Loading ...
Loading ...
Loading ...
ENGLISH
9
releasing the trigger of the Wireless Tool Control™
equipped tool or the button on theremote.
7
8
9
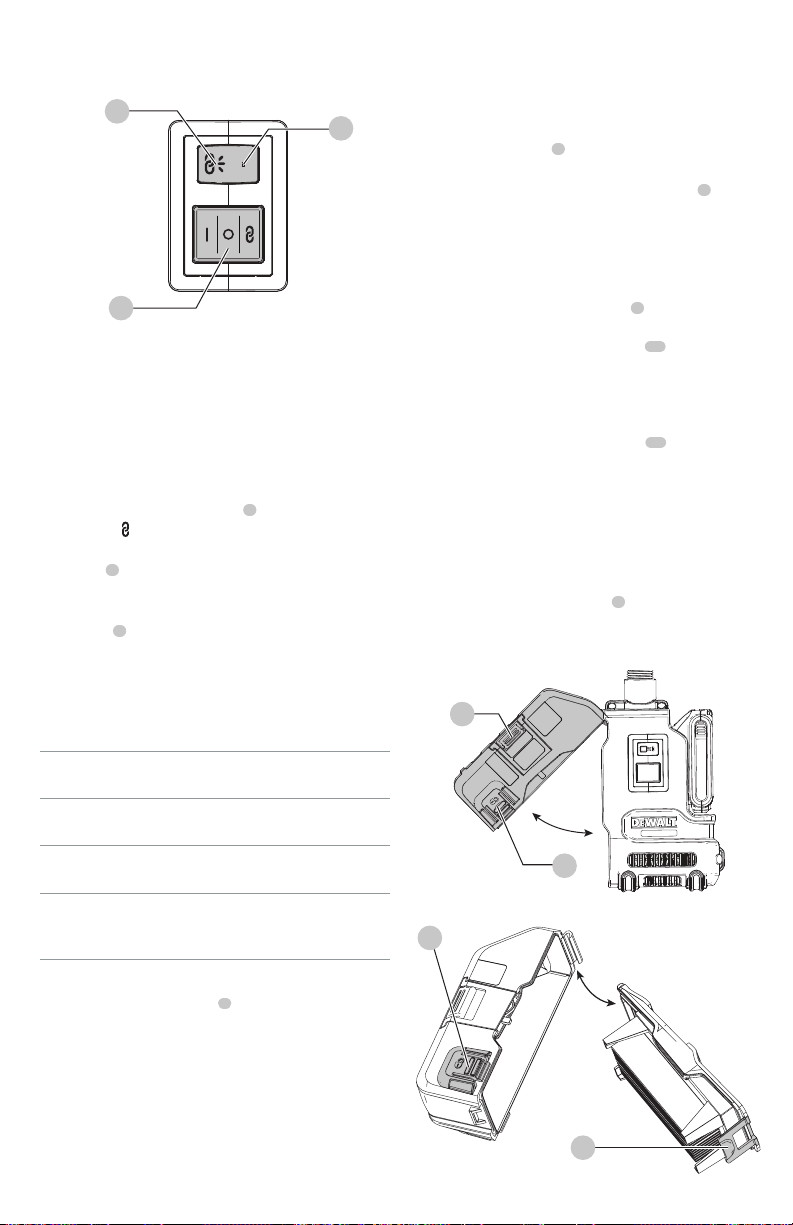
Fig. G
Pairing the Dust Extractor with a Tool using
Wireless Tool Control™ Mode (Fig. G)
CAUTION: When the dust extractor is being controlled
with the remote or paired power tool it may start or
stop withoutwarning.
To Pair with a DEWALT Remote or
Wireless Tool Control™ Tool
1. Press the three position switch
7
to the Wireless Tool
Control™ (
)position.
2. Press and hold the Wireless Tool Control™ pairing
button
8
on the DWH161 and pull the trigger on the
Wireless Tool Control™ equipped tool or press the
button on the remote at the sametime.
3. The LED
9
will be steadily illuminated to indicate a
successfulpairing.
NOTE: Only one transmitter can be paired to the
DWH161 at a time. If the unit is already paired the
previous transmitter will beoverridden.
Wireless Tool Control™ Troubleshooting
LED Light
Pattern
Pairing Button System Status
Slow flash Not pressed Wireless Tool Control™
not paired
Fast flash Pressed Pairing Mode, Waiting for
signal from tool
Solid Not pressed Wireless Tool Control™
paired, Waiting for
command from tool
Filter Cleaning Mechanism (Fig. A)
The filter cleaning mechanism
5
is a feature that uses
the motor in the dust extractor to force air through the
HEPA filter. Refer to Emptying the Dust Collection Box for
instructions on properuse.
Emptying the Dust Collection Box
(Fig. A, H, I)
WARNING: ALWAYS use eye protection. All
users and bystanders must wear eye protection that
conforms to ANSI Z87.1 / CAN CSAZ94.3.
WARNING: ALWAYS use proper NIOSH/OSHA/
MSHA respiratory protection when performing
thisprocedure.
CAUTION: Do not clean with water or compressedair.
The dust collection box
3
should be emptied as soon as the
performance has noticeably decreased or isfull.
1. Press the dust collection box release buttons
4
and pull the dust collection box away from the dust
extraction system. Once the catch mechanism is clear
of the dust extraction system the upper joint will
also release allowing the dust collection box to be
removedcompletely.
2. To empty the dust collection box
3
position it over a
suitable container to catch the dust contained within
it. Lift up the assembly release latch
17
to open the
dust collection box, separating the canister from the lid.
Gently tapping the dust collection box will encourage
any dust trapped within the filter to also be removed.
Once the filter lid and canister are empty reattach them,
ensuring the assembly release latch
17
is securely
fastened. Refer to FigureH.
3. To reattach the dust collection box to the dust
extraction system first insert the rounded profile of
the upper joint into the recess on the dust extraction
system. Pivot the dust collection box down so that the
release buttons click back into place. Refer to FigureIH
4. With the dust collection box properly installed, depress
the filter cleaning mechanism
5
and squeeze trigger
on tool or the button on the remote. Allow the system
to run for 5 seconds and release trigger. This should be
done after every emptying of the dust collectionbox.
Fig. H
5
4
4
17
Fig. I
Loading ...
Loading ...
Loading ...