Loading ...
Loading ...
Loading ...

6 7
ENGLISH
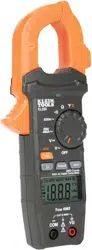
FEATURE DETAILS
NOTE: There are no user-serviceable parts inside meter.
1.
2000 count LCD display
8.
"MAX" (Maximum) button
2.
Function selector switch
9.
Data Hold button
3.
Clamp
10.
Clamp trigger
4.
"COM" jack
11.
Arrow markings
5.
"VΩ" jack
12.
"SEL/NCV" button
6.
Backlight button
13.
NCV Light
7.
"RANGE" button
14.
NCV Sensing Antenna
1
6
2
9
3
10
14
5
8
7
4
11
12
13
FUNCTION BUTTONS
ON/OFF
To power ON the meter, rotate the Function Selector switch
2
from
the OFF setting to any measurement setting. To power OFF the meter,
rotate the Function Selector switch
2
to the OFF setting. The Auto-
Power Off icon
will be visible in the display. By default, the meter
will automatically power OFF after 10 minutes of inactivity.
If the meter
automatically powers-OFF while in a measurement setting, press any
button to power the meter ON, or rotate Function Selector
2
switch
to OFF, then power ON the meter.
To deactivate Auto-Power OFF
functionality press and hold the "SEL/NCV" button
12
before powering
ON from the OFF setting. When Auto-Power OFF is deactivated, the
Auto-Power Off icon
will not be visible in the display.
SEL / NCV BUTTON (FOR NCV TESTING)
Press and hold the SEL/NCV button
12
to enter Non-contact Voltage
Testing (NCV) mode to test for presence of AC voltage.
The NCV
icon and "EF" will be present on the display. Approach the conductor
under test leading with the sensing antenna
14
. In the presence of
AC voltage, the red NCV light
13
will illuminate and audible signals
(beeps) will sound.
Release the "SEL/NCV" button to exit NCV testing
mode.
NOTE: Only voltages of 40V AC or greater will be detected.
BACKLIGHT
Press Backlight button symbol
6
to turn ON or OFF the backlight.
The backlight does not automatically power OFF.
RANGE
The meter defaults to auto-ranging mode
. This mode
automatically determines the most appropriate measurement range
for the testing that is being conducted.
To manually force the meter to
measure in a different range, use the
"RANGE"
button
7
.
1. Press the "RANGE" button
7
to manually select measurement
range (
is deactivated on the LCD). Repeatedly press the
"RANGE" button
7
to cycle through the available ranges,
stopping once the desired range is reached.
2. To return to auto-ranging mode, press and hold the "RANGE"
button
7
for more than two seconds ( is reactivated).
MAX
When the "MAX" button
8
is pressed, the meter keeps track of the
Maximum value as the meter continues to take samples.
1. When measuring, press "MAX" button
8
to display the
maximum value. If a new maximum occurs, the display
updates with that new value.
2. Press "MAX" button
8
again to return to normal measuring mode.
DATA HOLD
Press the Data Hold button
9
to hold the current measurement on
the display. Press again to return to live measuring mode.
Loading ...
Loading ...
Loading ...