
EN
FR
PG.37
WARNING
Do not try to light this appliance without
reading the “LIGHTING” instrucons secon of
this manual.
Do not store or use gasoline or other
ammable liquids or vapors in the vicinity of
this or any other appliance. An L.P. cylinder
not connected for use must not be stored in
the vicinity of this or any other appliance.
If the informaon in these instrucons is
not followed exactly, a re or explosion may
result, causing property damage, personal
injury or death.
DANGER
IF YOU SMELL GAS:
• Shut o gas to the appliance.
• Exnguish any open ame.
• Open lid.
• If odor connues, keep away from the
appliance and immediately call your gas
supplier or re department.
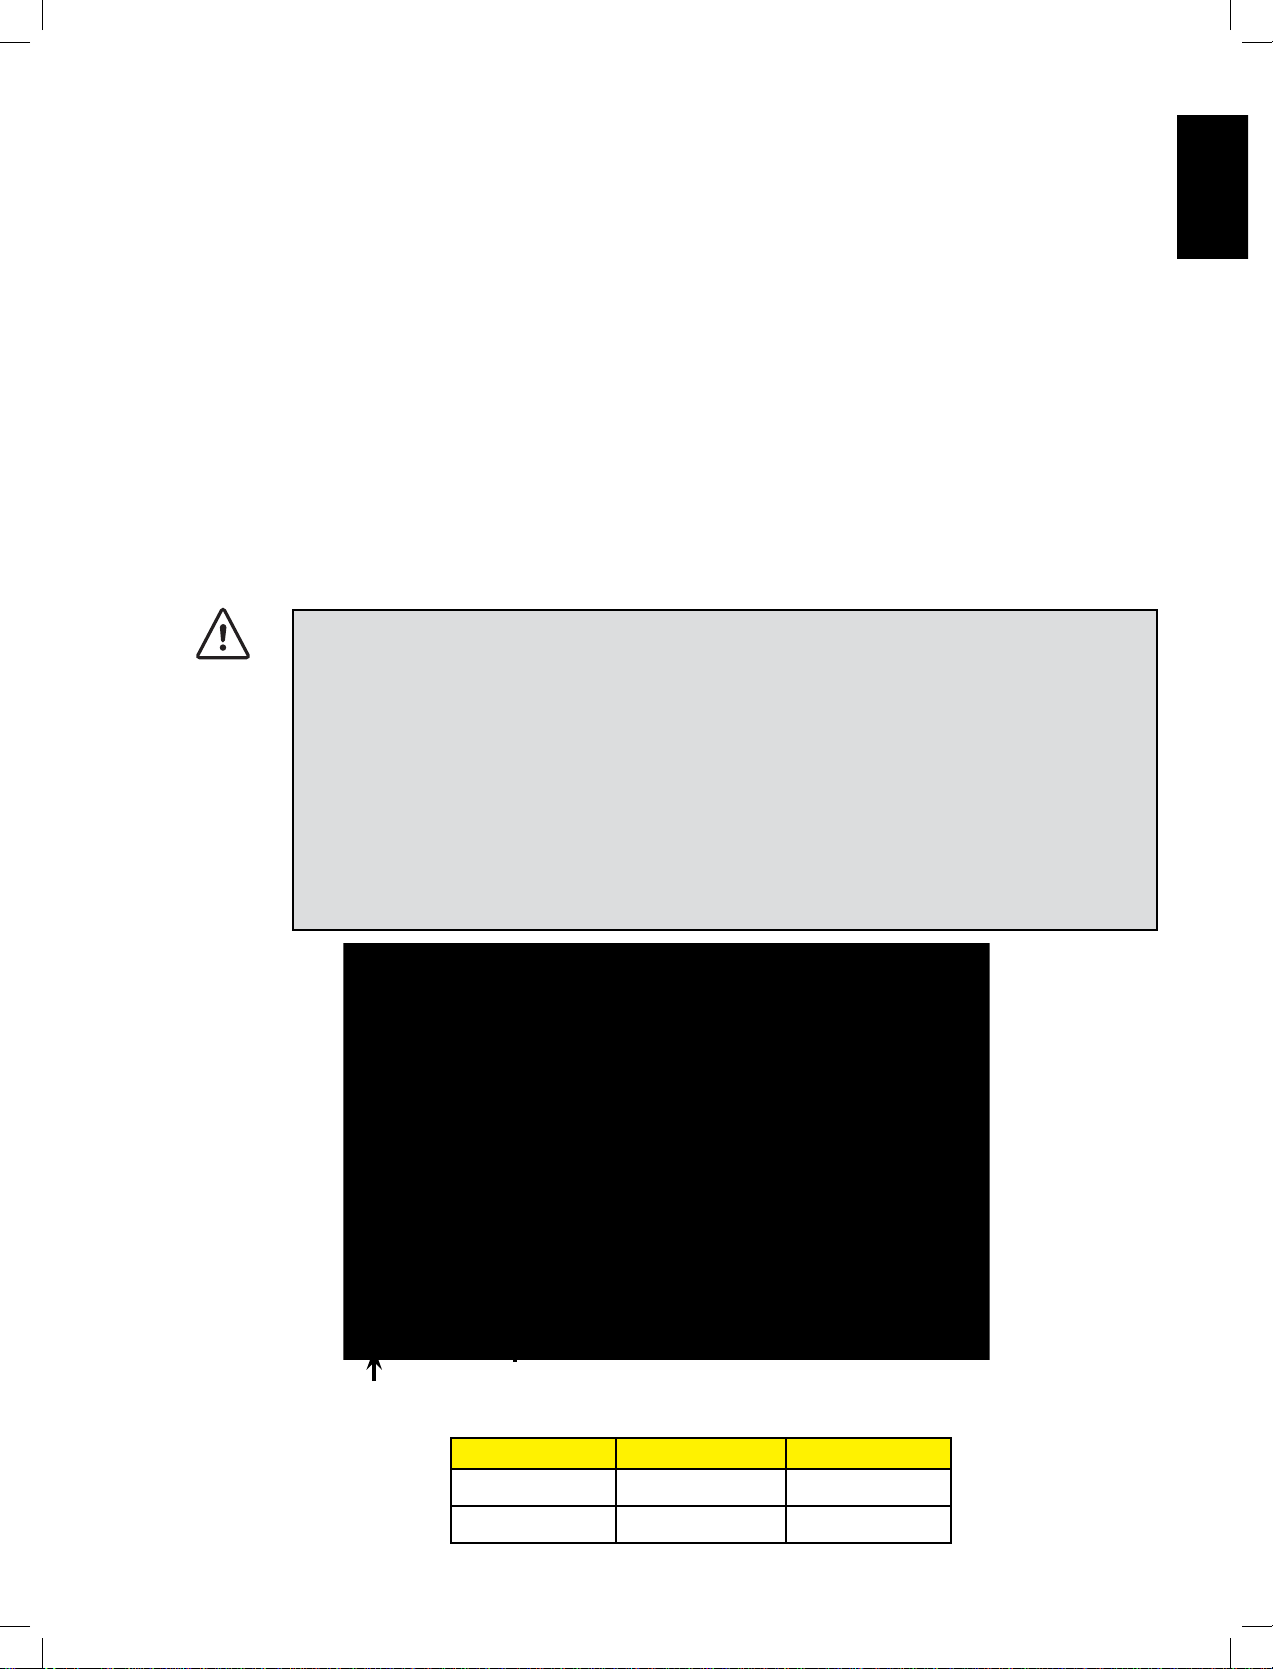
APPLY SERIAL NUMBER LABEL FROM CARTON
Serial No.
XXXXXX000000
MODEL NO.
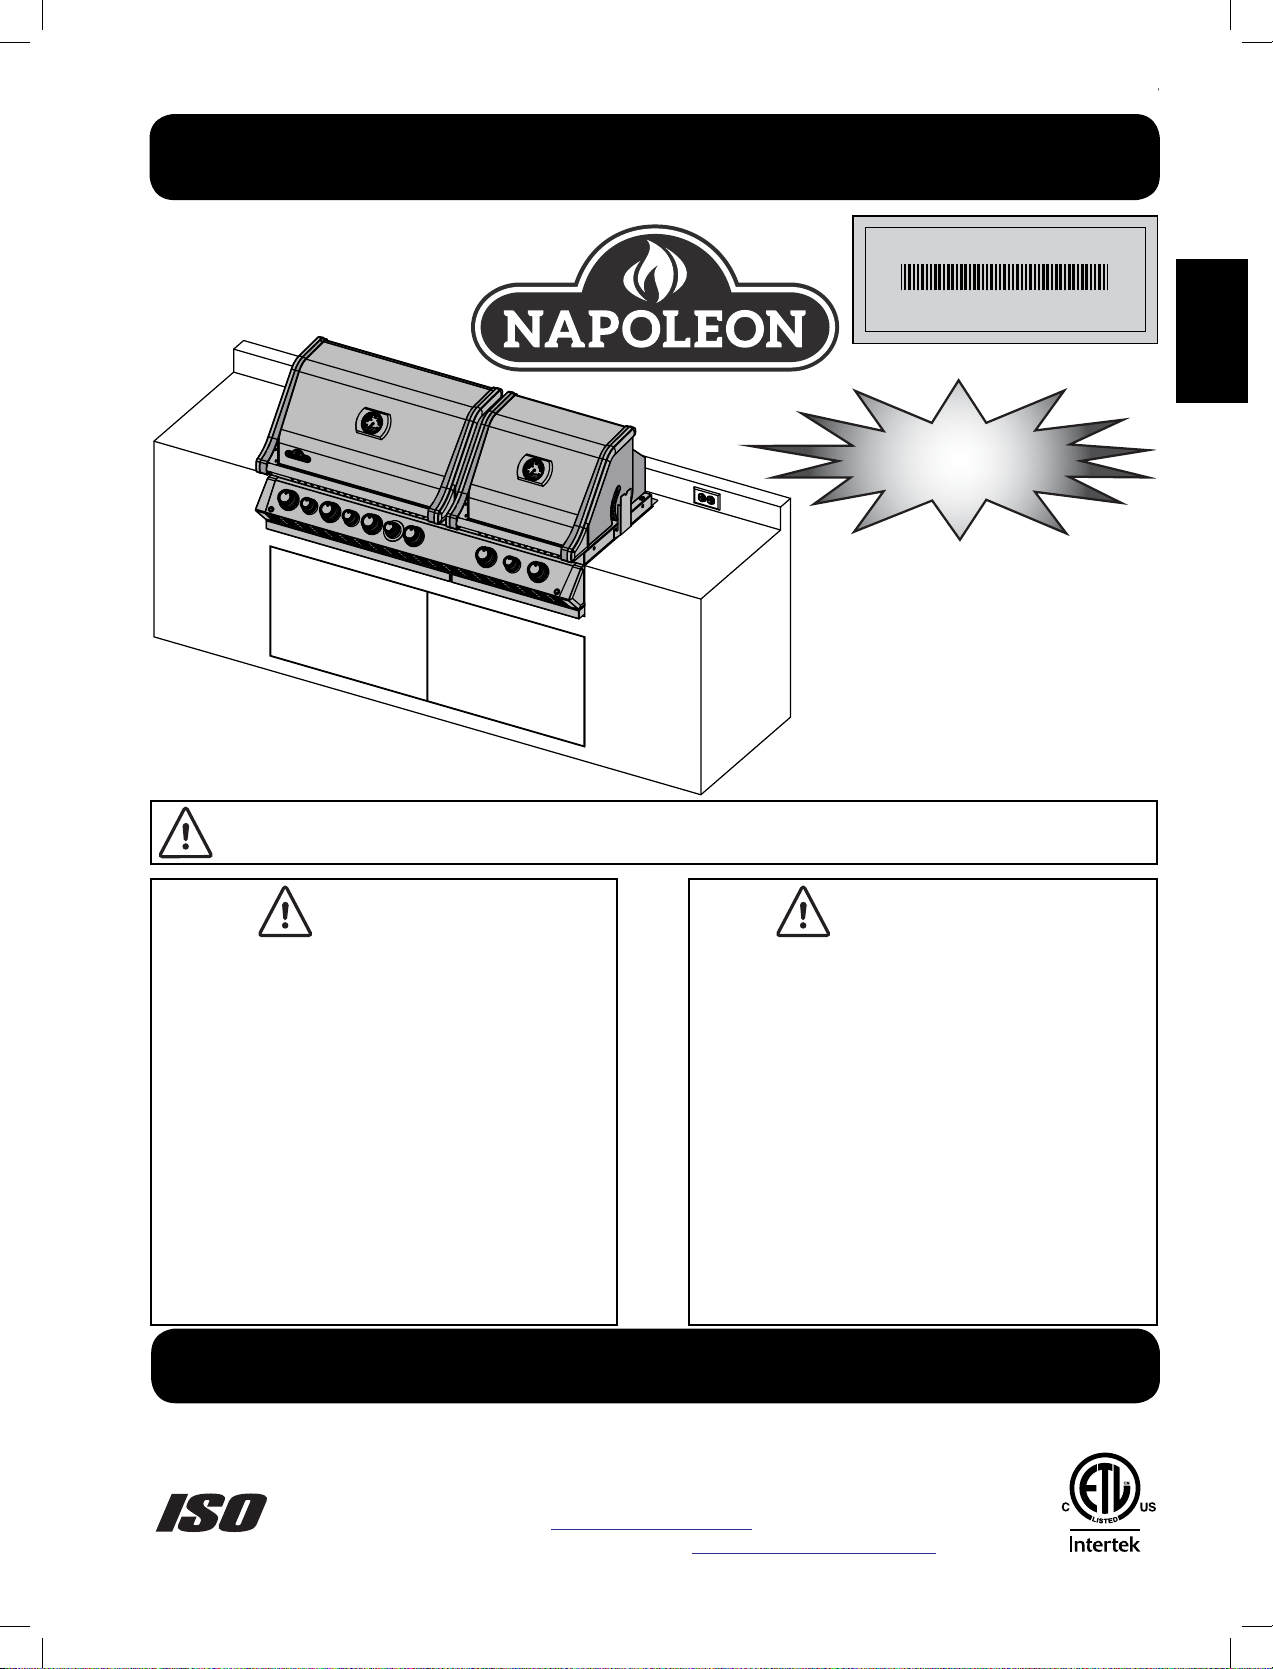
BIPRO 825
This gas grill must be used only outdoors in a well-venlated space and must not be used inside a
building, garage, screened-in porch, gazebo or any other enclosed area.
WARNING! CABINET FRAME, CABINET AND COUNTER TOP MUST BE MADE FROM NON-COMBUSTIBLE MATERIAL.
DO NOT DISCARD
N415-0410 APR 25.16
Noce to Installer: Leave these instrucons with the grill owner for future reference.
Adults and especially children should be alerted to the hazards of high surface temperatures.
Young children should be supervised near the gas grill.
Quality System Cerfied To
9001-2008
Napoleon Group of Companies
214 Bayview Dr., Barrie, Ontario, Canada L4N 4Y8
Phone: 1-705-726-4278 Fax: (705)-727-4282
www.napoleongrills.com
grills@napoleonproducts.com
www.napoleongrills.com
2
EN
All NAPOLEON gas grills are manufactured under the strict Standard of the world recognized ISO 9001-2008
NAPOLEON products are designed with superior components and materials, and are assembled by trained
and shipping to ensure that you, the customer, receive the quality product you expect from NAPOLEON.
Quality System Cerfied To
9001-2008
Napoleon Gas Grill President’s Limited Lifeme Warranty
NAPOLEON warrants that components in your new NAPOLEON product will be free from defects in material and
Stainless steel tube burners 10 years
plus5
Stainless steel sear plates 5 years
plus5
plus5
All other parts 2 years
plus5
indicates a period of extended warranty coverage whereby the replacement part will be made available to the
by this warranty.
Condions and Limitaons
NAPOLEON warrants its products against manufacturing defects to the original purchaser only, provided that
codes.
of the gas grill.
indirect damages.
respect to the sale of this product.
Any damages to the gas grill due to weather damage, hail, rough handling, damaging chemicals or cleaners will not
be the responsibility of NAPOLEON.
warranty claims from NAPOLEON.
claim.
www.napoleongrills.com
3
EN
WARNING! Failure to follow these instrucons could result in property damage, personal injury or
death. Read and follow all warnings and instrucons in this manual prior to operang grill.
Safe Operang Pracces
building, garage, screened-in porch, gazebo or any other enclosed area.
grill.
out of reach of children. Disconnected cylinders must not be stored in a building, garage or any other
enclosed area. Natural gas units must be disconnected from the supply when being stored indoors.
Inspect the fuel supply hose before each use. If there is evidence of excessive abrasion or wear or the
by the grill manufacturer.
and the built-in side burner BISB245.
grill to cool completely before covering.
Adults and especially children should be alerted to the hazards of high surface temperatures. Young
children should be supervised near the gas grill.
Do not light burners with lid closed.
Keep any electrical supply cord and fuel supply hose away from any heated surfaces.
must be towards the front of the gas grill (if applicable).
Do not use a pressure washer to clean any part of the unit.
www.napoleongrills.com
4
EN
General Informaon
CSA 1.6b
and
ANSI
b
California proposion 65
Propane Cylinder Specicaons
WARNING! If these instrucons are not followed exactly, a re causing death or serious injury
may occur.
WARNING! Do not store a spare propane cylinder on the shelf beneath the barbecue.
or serious injury may occur.
NOTE! Propane regulator hose not included.
Gas Hook-Up Instrucons
WARNING! This grill is designed for non-combusble enclosures only, and must be installed and
serviced by a qualied installer to local codes.
WARNING! Cabinet frame, cabinet, and counter top must be made from non-combusble
material.
WARNING! As indicated on the rang plate, this gas grill is designed to operate with gas supply
pressures of 11” WC for Propane and 7” WC for Natural Gas. For installaons where the gas supply
pressure exceeds these requirements, a regulator must be installed upstream of the grill’s components.
If the gas supply pressure is lower than these requirements, the unit will be under-red and will not
reach the maximum temperatures. Ensure that the supply line size complies with local and/or naonal
installaon codes.
BUILT IN PROPANE GAS HOOK-UP
the manifold. Connect the other end of the connector to the gas piping. Ensure that the connector does
www.napoleongrills.com
5
EN
CYLINDER SIZE OPENING A AREA OPENING B AREA
20in
2
2
) 10in
2
(65cm
2
)
2
(195cm
2
) 15in
2
(100cm
2
)
5” (127mm)
MAXIMUM
1” (25.4mm)
MAXIMUM
OPENING
A
OPENING
B
2” (51mm)
MINIMUM
PARTITION TO ISOLATE
CYLINDER FROM GRILL
NON LOCKING DOOR
34” (864mm)
RECOMMENDED
5” (127mm)
MAXIMUM
connect the unit except to connect the cylinder regulator to the piping system. It must be connected with
-
used to enclose the gas grill. A propane cylinder can not be stored below the gas grill.
BUILT IN CYLINDER ENCLOSURES: Built in cylinder enclosures which completely enclose the cylinder must
have both of the following:
Every opening must be large enough to permit the entrance of a 1/8 in (3.2 mm) rod.
WARNING!
use of tools.
enclosure and the ground.
enclosure.
www.napoleongrills.com
6
EN
Electrical Precauons
WARNING! Failure to follow these instrucons could result in property damage, personal injury or
death.
Do not let the cord hang over the edge of a table or touch hot surfaces.
the outlet.
Never remove the grounding plug or use with an adapter of 2 prongs.
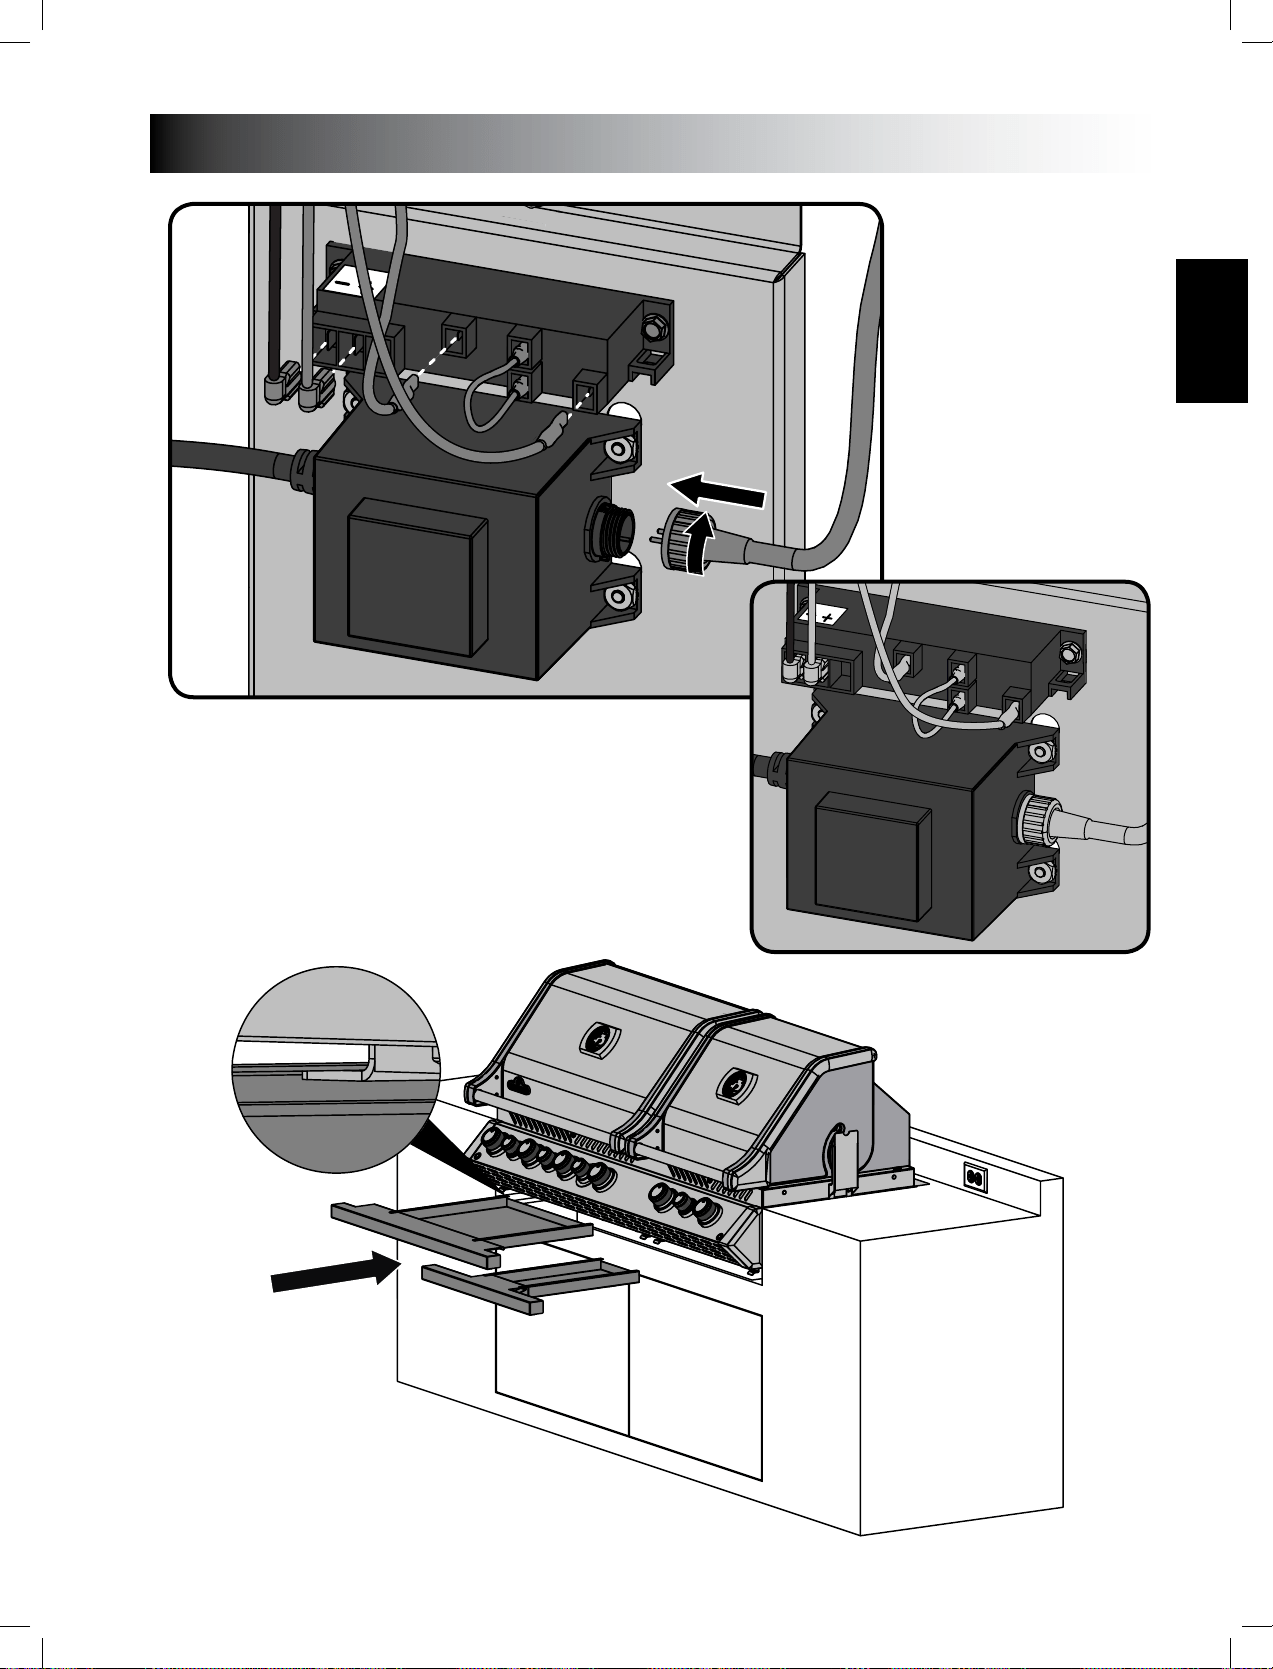
BUILT IN NATURAL GAS HOOK-UP
Connect the other end of the connector to the gas piping. Ensure that the connector does not pass
WARNING! Built in units are supplied with a drip pan which holds only a minimal amount of
grease. To prevent grease res, the pan must be cleaned aer each use.
WARNING! Access must be provided to the inside of the enclosure to make gas connecons.
DANGER! Read all instrucons carefully before operang the grill. Failure to follow these
instrucons exactly could result in a re causing serious injury or death. The enre installaon must be
leak tested before operang the grill.
www.napoleongrills.com
7
EN
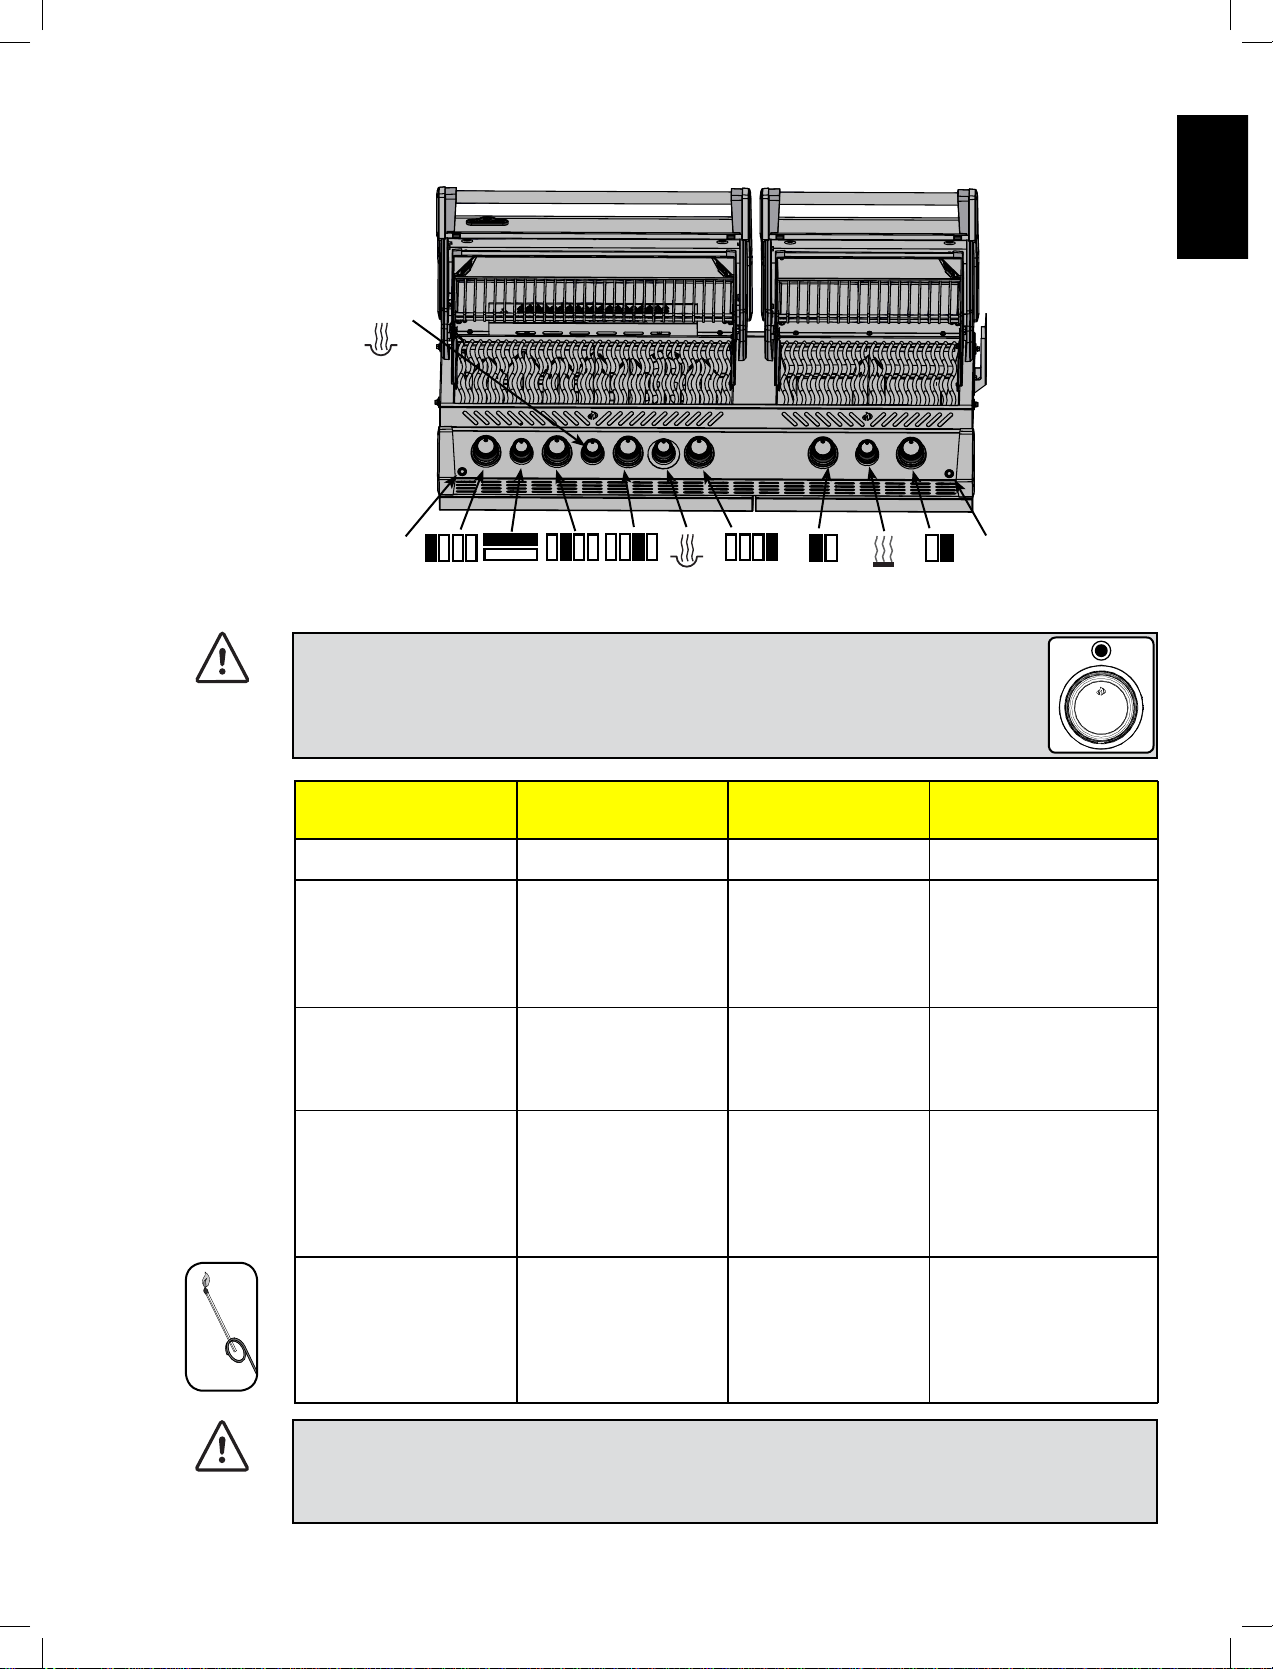
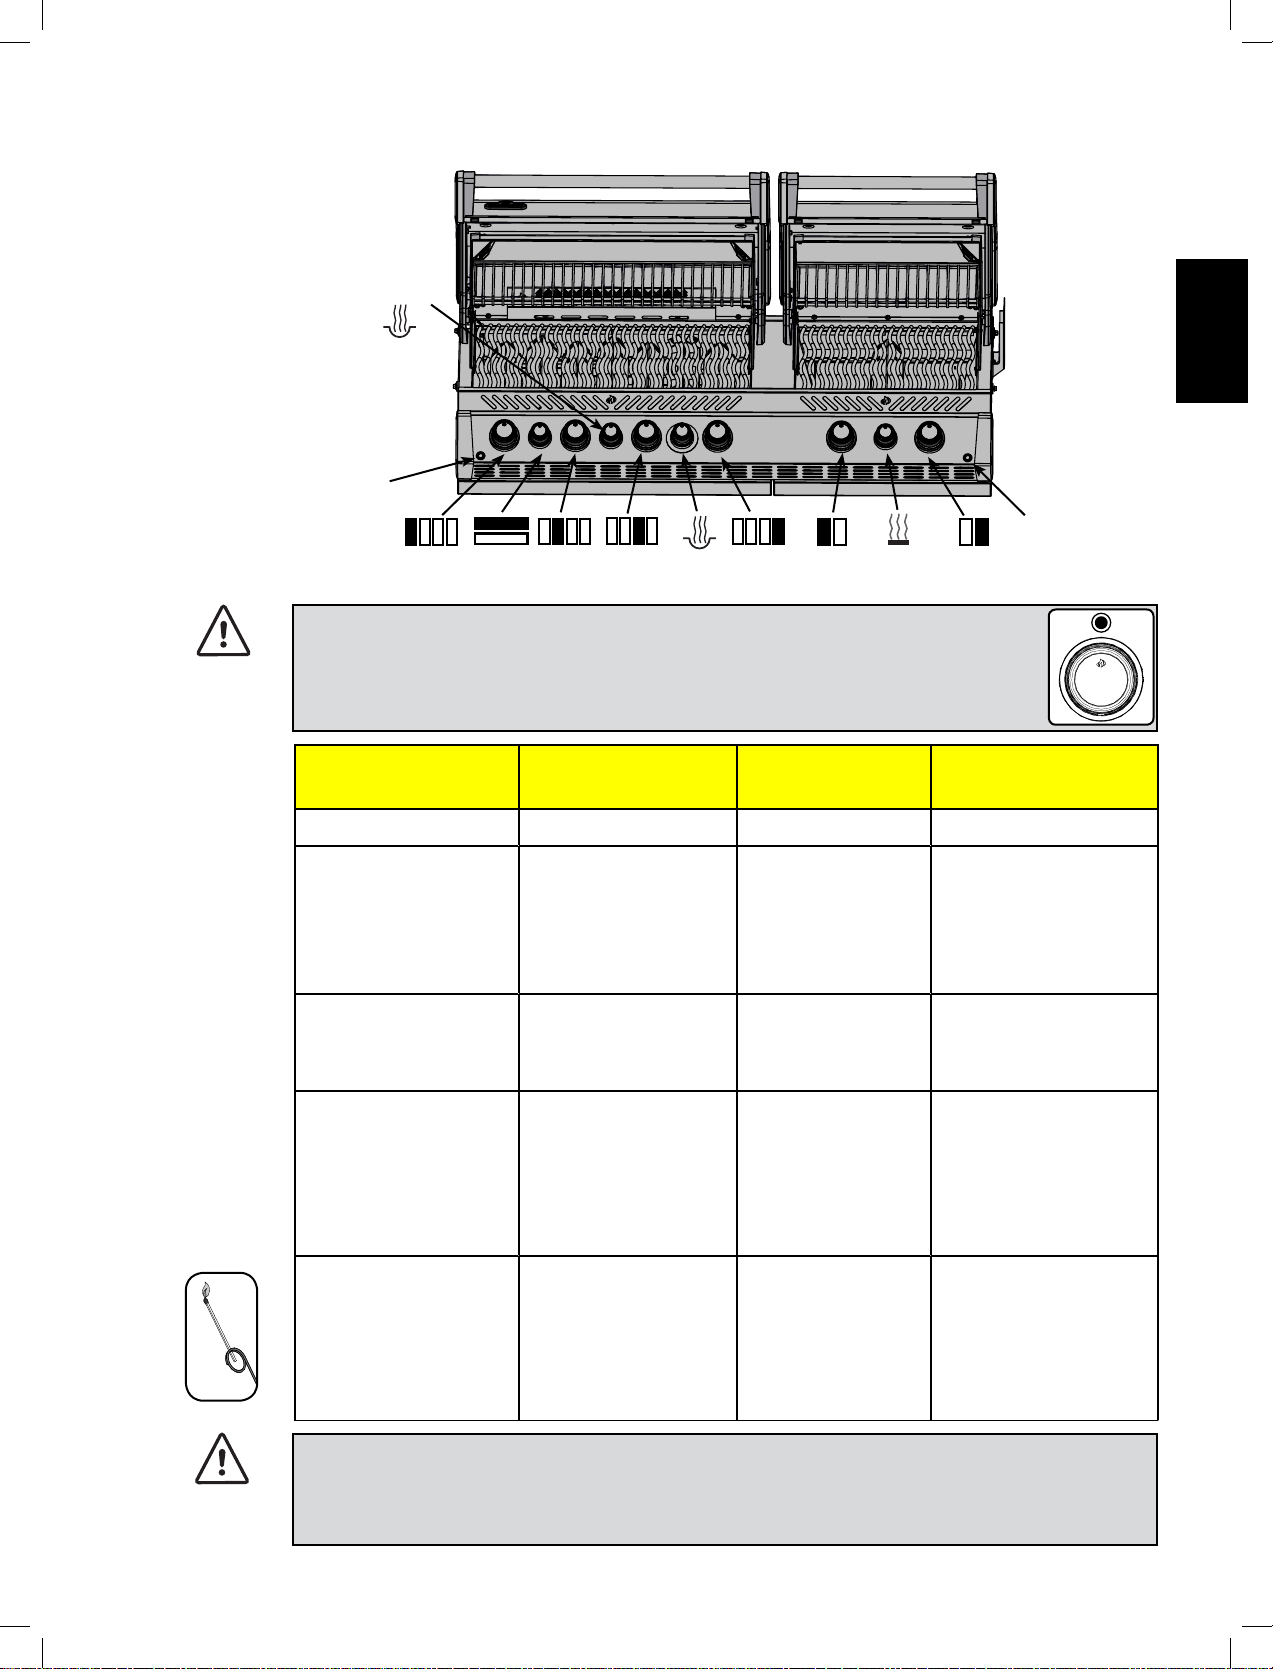
Lighng Instrucons
O Posion
WARNING! Open lid
WARNING! Ensure all burner controls are in the o posion. Slowly turn on the
gas supply valve.
Main Burner
Lighng
Smoker Burner
Lighng
Rear Burner Lighng
(if equipped)
Side Burner Lighng
(if equipped)
1. Open grill lid. 1. Open grill lid. 1. Open grill lid. 1. Open burner cover.
2. Push and turn any main
lights and then release.
2. Push and turn the side
then immediately turn the
light with a match.
burner control to the high
lights, or light with a match.
4. If the pilot and burner will
not ignite within 5 seconds,
minutes for any excess gas to
dissipate. Either repeat steps
4. If the burner will not
ignite within 5 seconds,
minutes for any excess gas to
dissipate. Repeat step 2.
4. Push and hold the
by match.
4. If the burner will not ignite
within 5 seconds, turn the
for any excess gas to dissipate.
Repeat step 2.
match, clip the match into the
the lit match down through
the grill and sear plate while
turning the corresponding
burner valve to high.
5. If the burner will not
ignite within 5 seconds,
minutes for any excess gas
WARNING! The propane cylinder is equipped with an excess ow device. Unless all burners are
turned o prior to turning the cylinder on, only small ames and low heat will be achievable.
WARNING! Do not use rear burner while operang main burner.
Le
Centre
Tube
Burner
Right
Centre
Tube
Burner
Le
Infra
Red
Burner
Right
Infra
Red
Burner
Igniter
Le
Tube
Burner
Rear
Burner
Right
Tube
Burner
Light
Smoker Burner
Smoker
Tray
Warming
Burner
www.napoleongrills.com
8
EN
Cooking Instrucons
Inial Lighng
does not occur again. Simply run the main burners on high for approximately one-half hour.
gas grill. In extreme circumstances when consistent high winds come from directly behind the unit, heat
the possibility of improper heat build up.
NOTE! Napoleon is not responsible for: over ring, blow outs caused by environmental condions
such as strong winds, or inadequate venlaon.
1 2
3
www.napoleongrills.com
9
EN
Main Burner Use
Rear Burner Use (If Equipped)
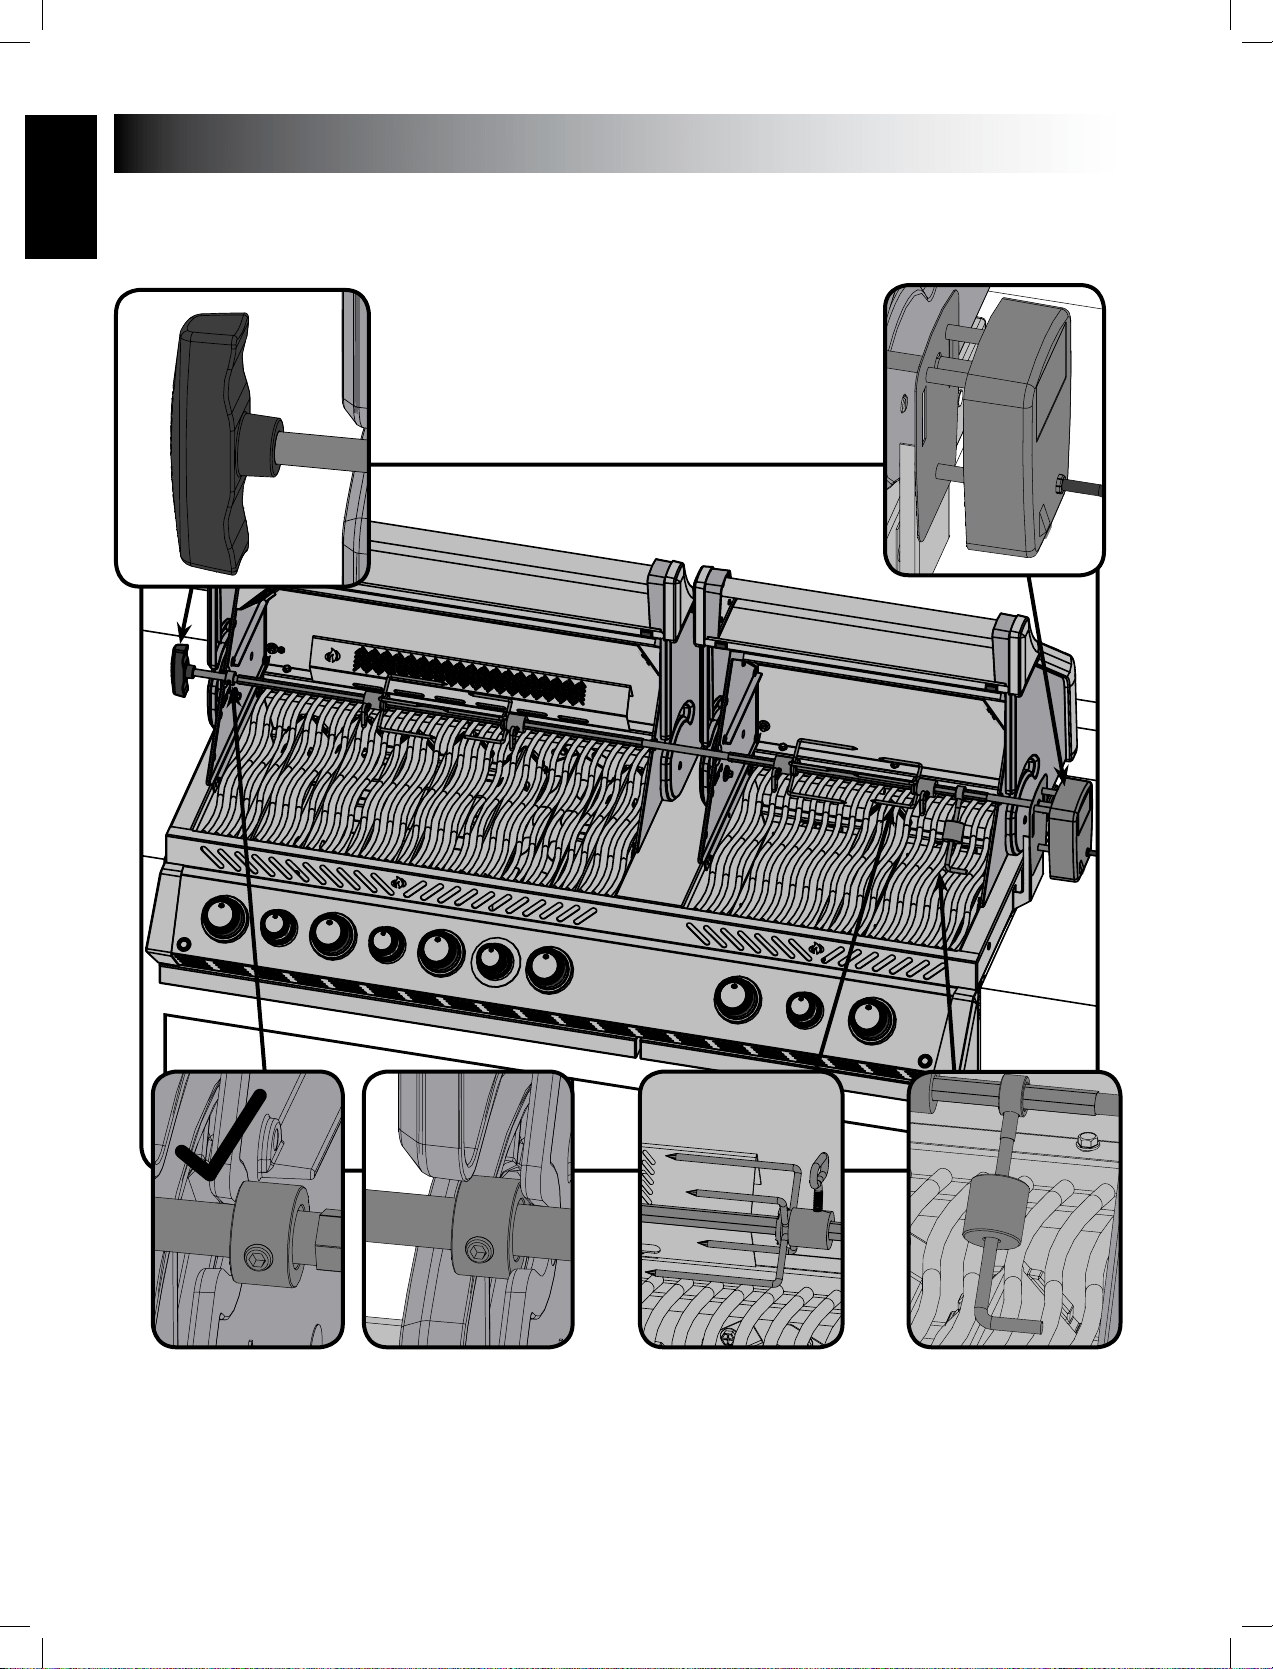
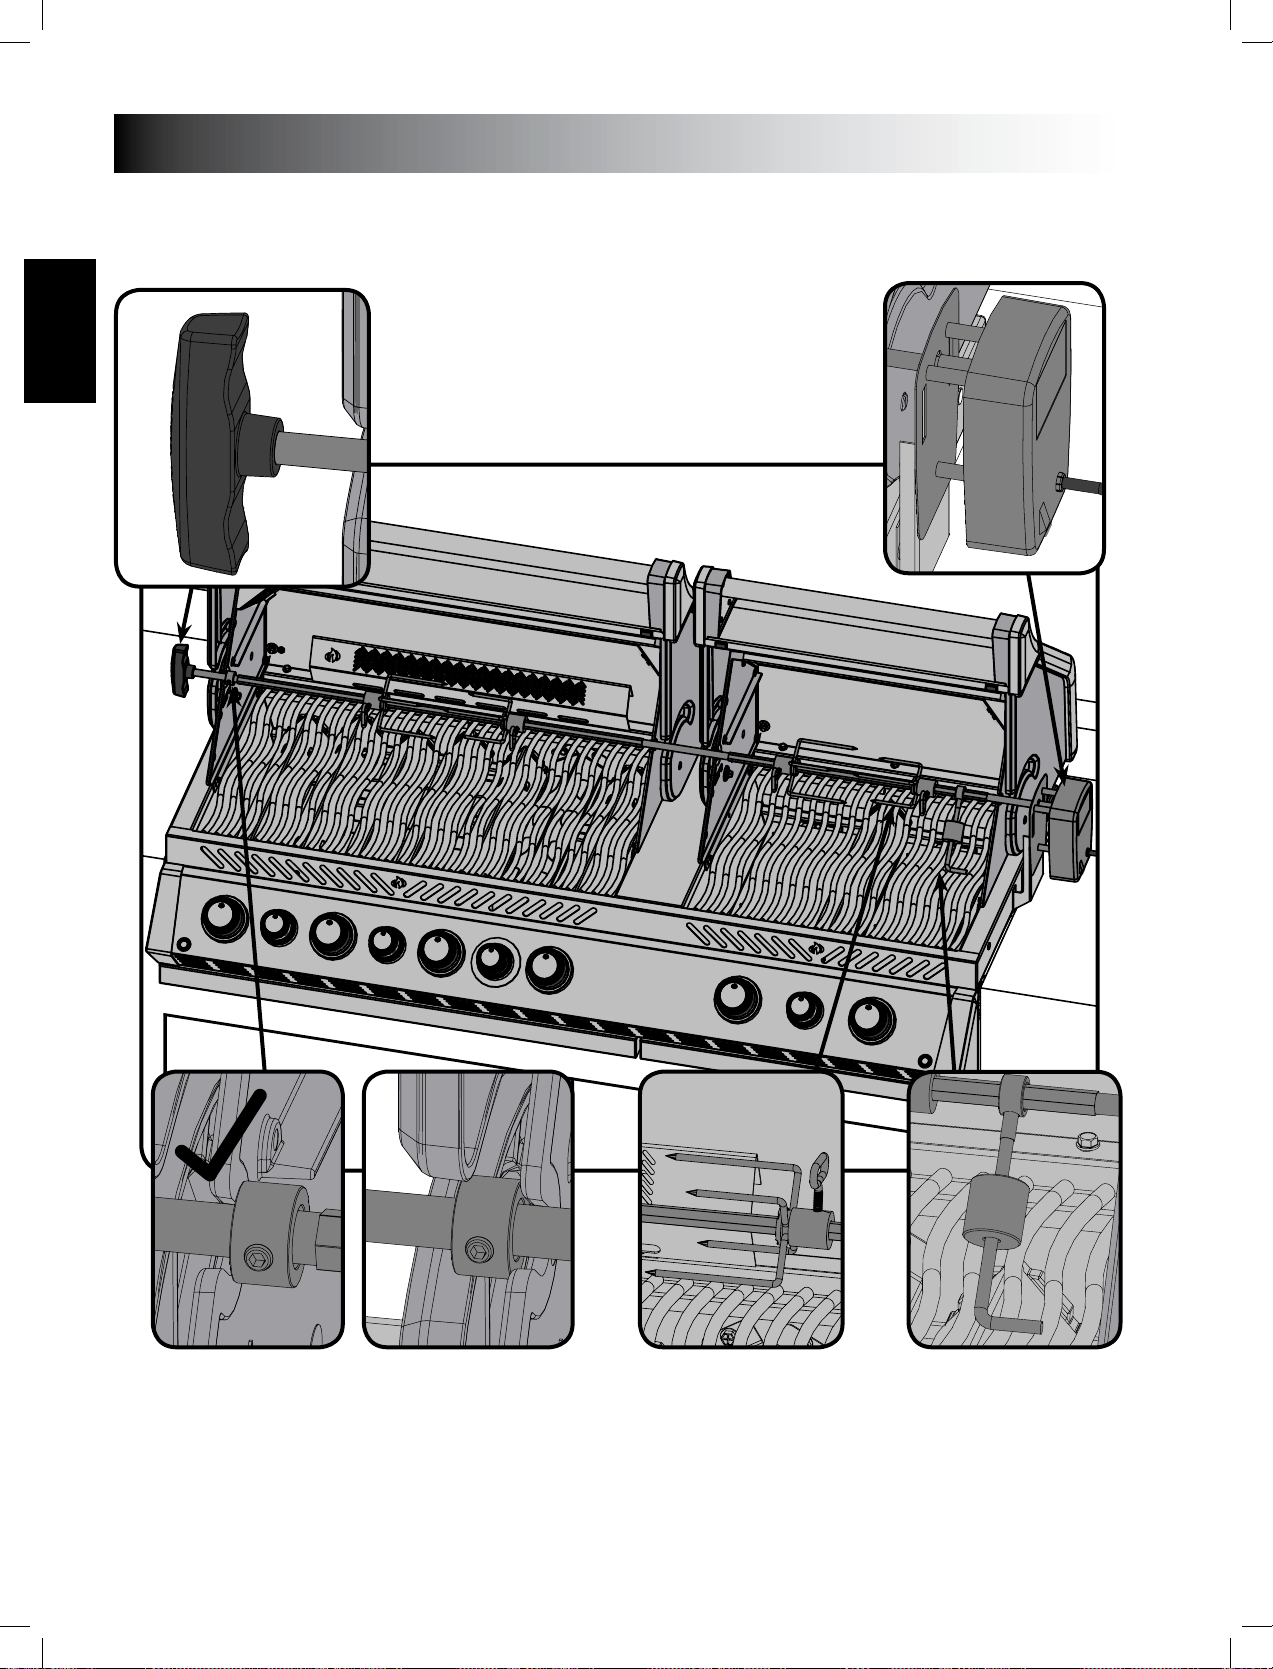
the counterbalance arm and weight so the arm is facing up. Slide the counterweight in or out to balance
foods. Keep the lid closed for best results. Your roasts and fowl will brown perfectly on the outside and
WARNING! Barbecue sauce and salt can be corrosive and will cause rapid deterioraon of the gas
grill components unless cleaned regularly. When nished cooking disassemble rosserie components,
wash thoroughly with warm soapy water and store indoors.
Direct Cooking
Indirect Cooking
Smoker Burner
heat as required.
Infrared Main Burner Use (If Equipped)
over infrared burners on high, medium, or low, turning food frequently, or place food over unlit burners,
CAUTION! Due to the intense heat the infrared burners provide, food le unaended over burners
will burn quickly. Keep the lid open when cooking with the infrared burners set to high. The intense
heat ensures adequate searing temperatures even with the lid open. This also allows observaon of the
food to prevent burning.

www.napoleongrills.com
10
EN
Infrared Heat
of the heat in the beam fell into the spectral region just beyond the red end of the spectrum, where no
visible light existed.
Most materials readily absorb infrared energy in a wide range of wavelengths, causing an
travel through the vacuum of space, through the atmosphere, and penetrate
allowing us to feel warmth.
familiar
the same type of infrared heat to the food as charcoal, without its hassle
or mess. Infrared burners also pro
vide a more consistently heated area that is far easier to regulate than
www.napoleongrills.com
11
EN
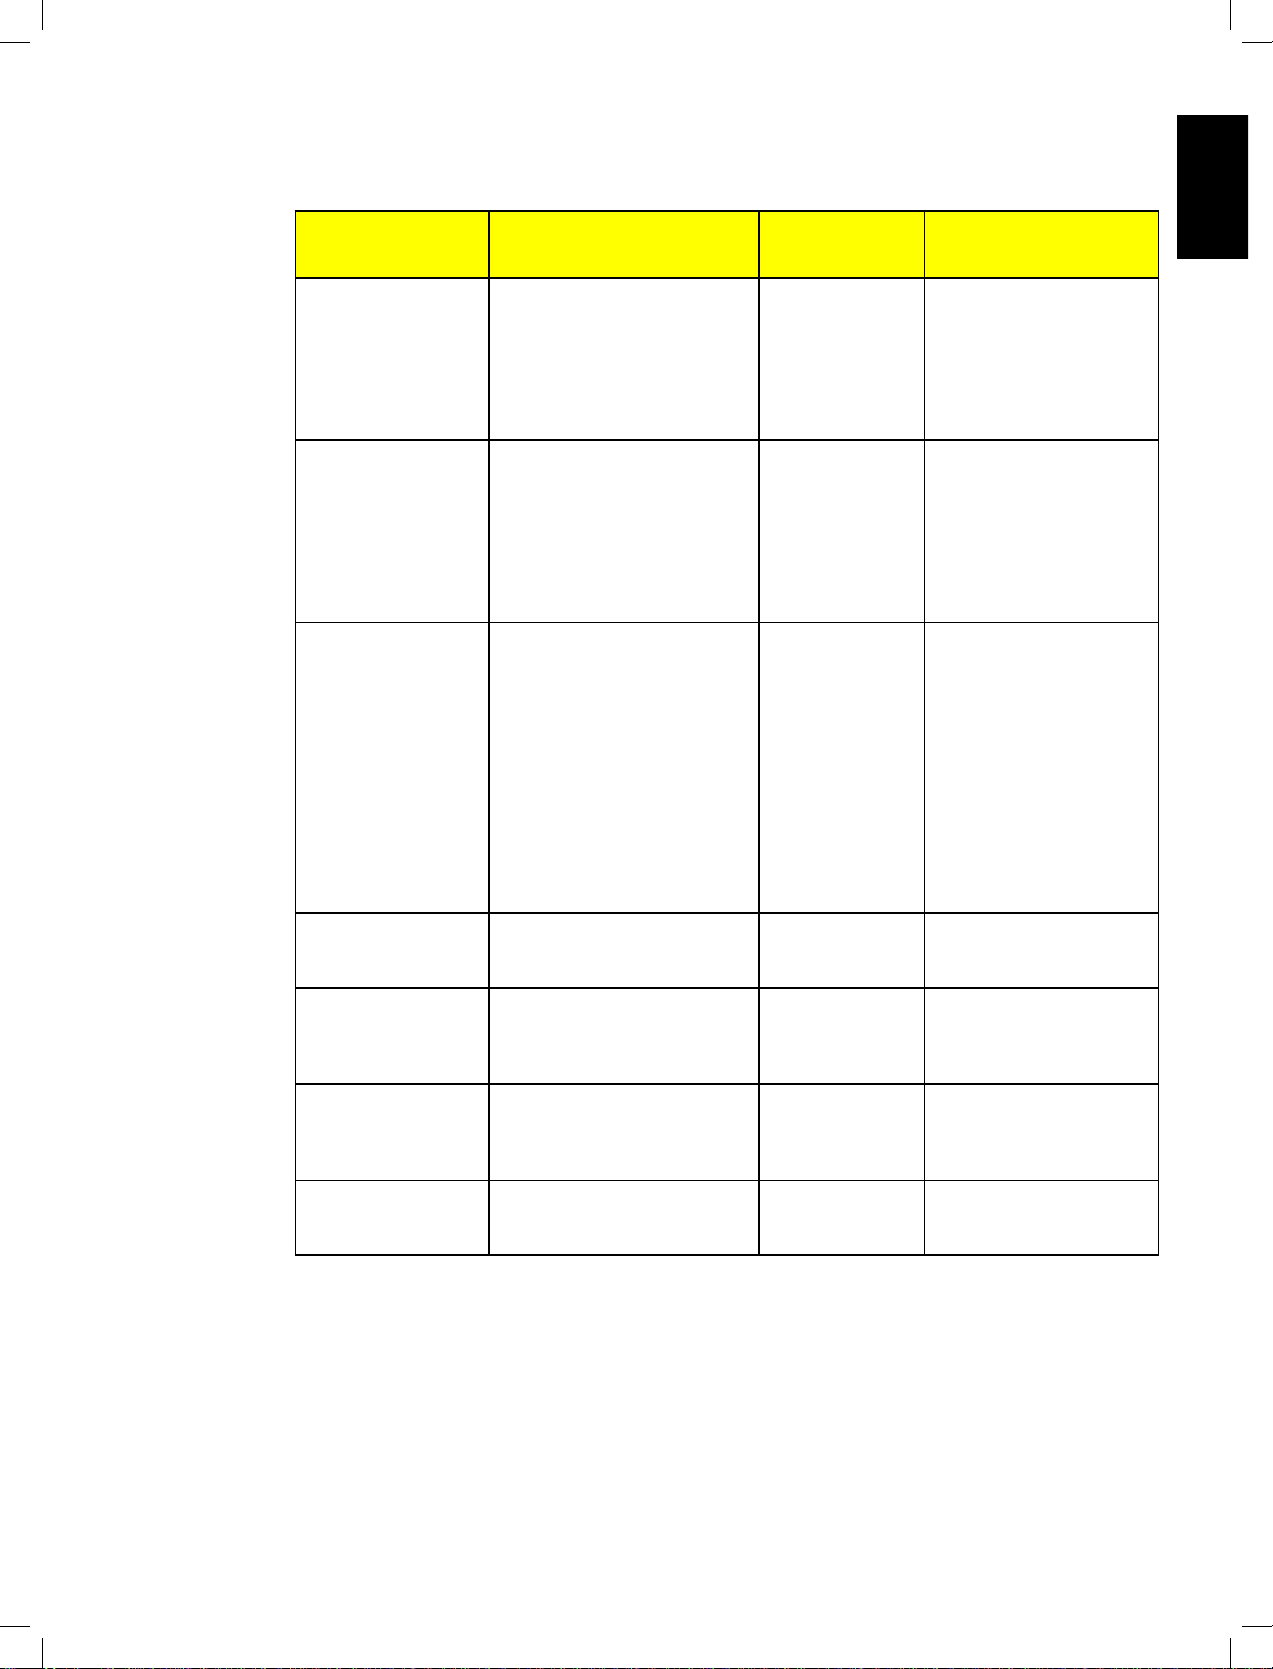
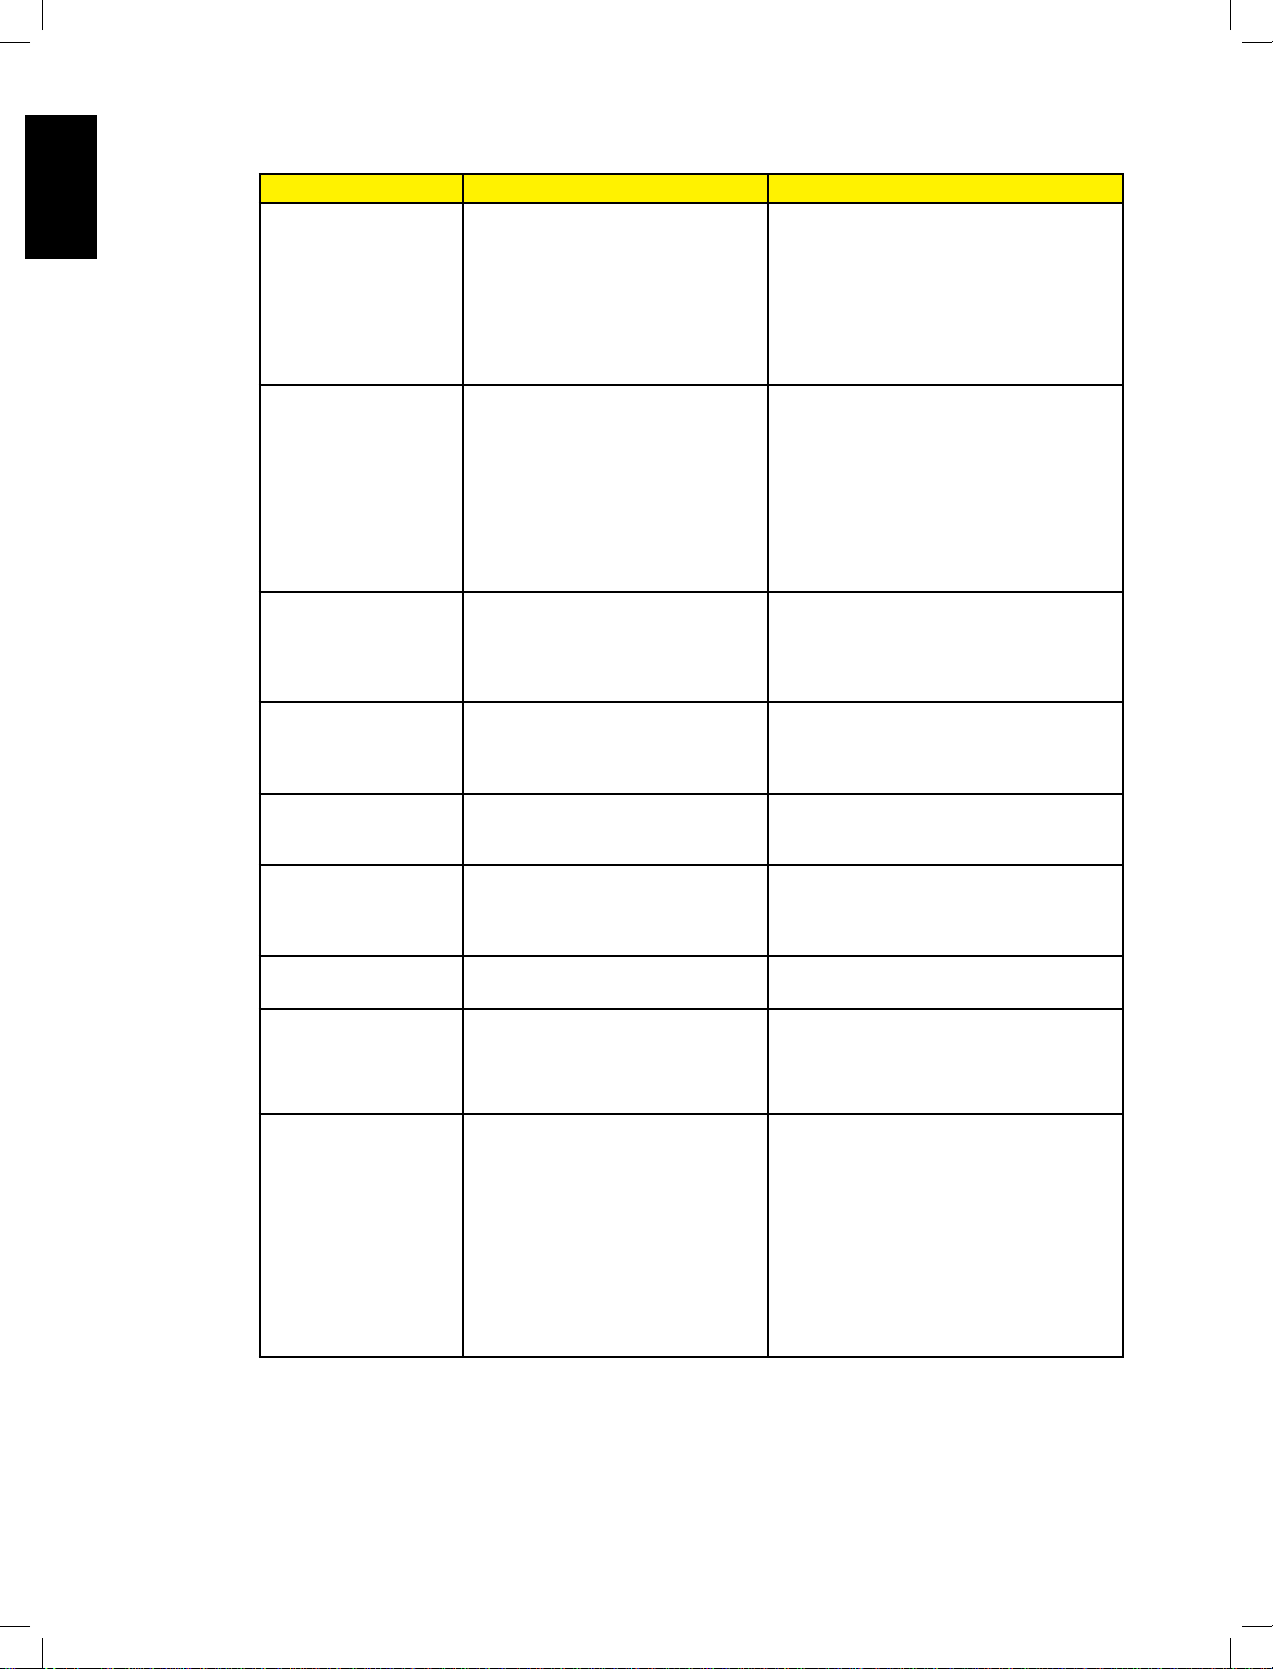
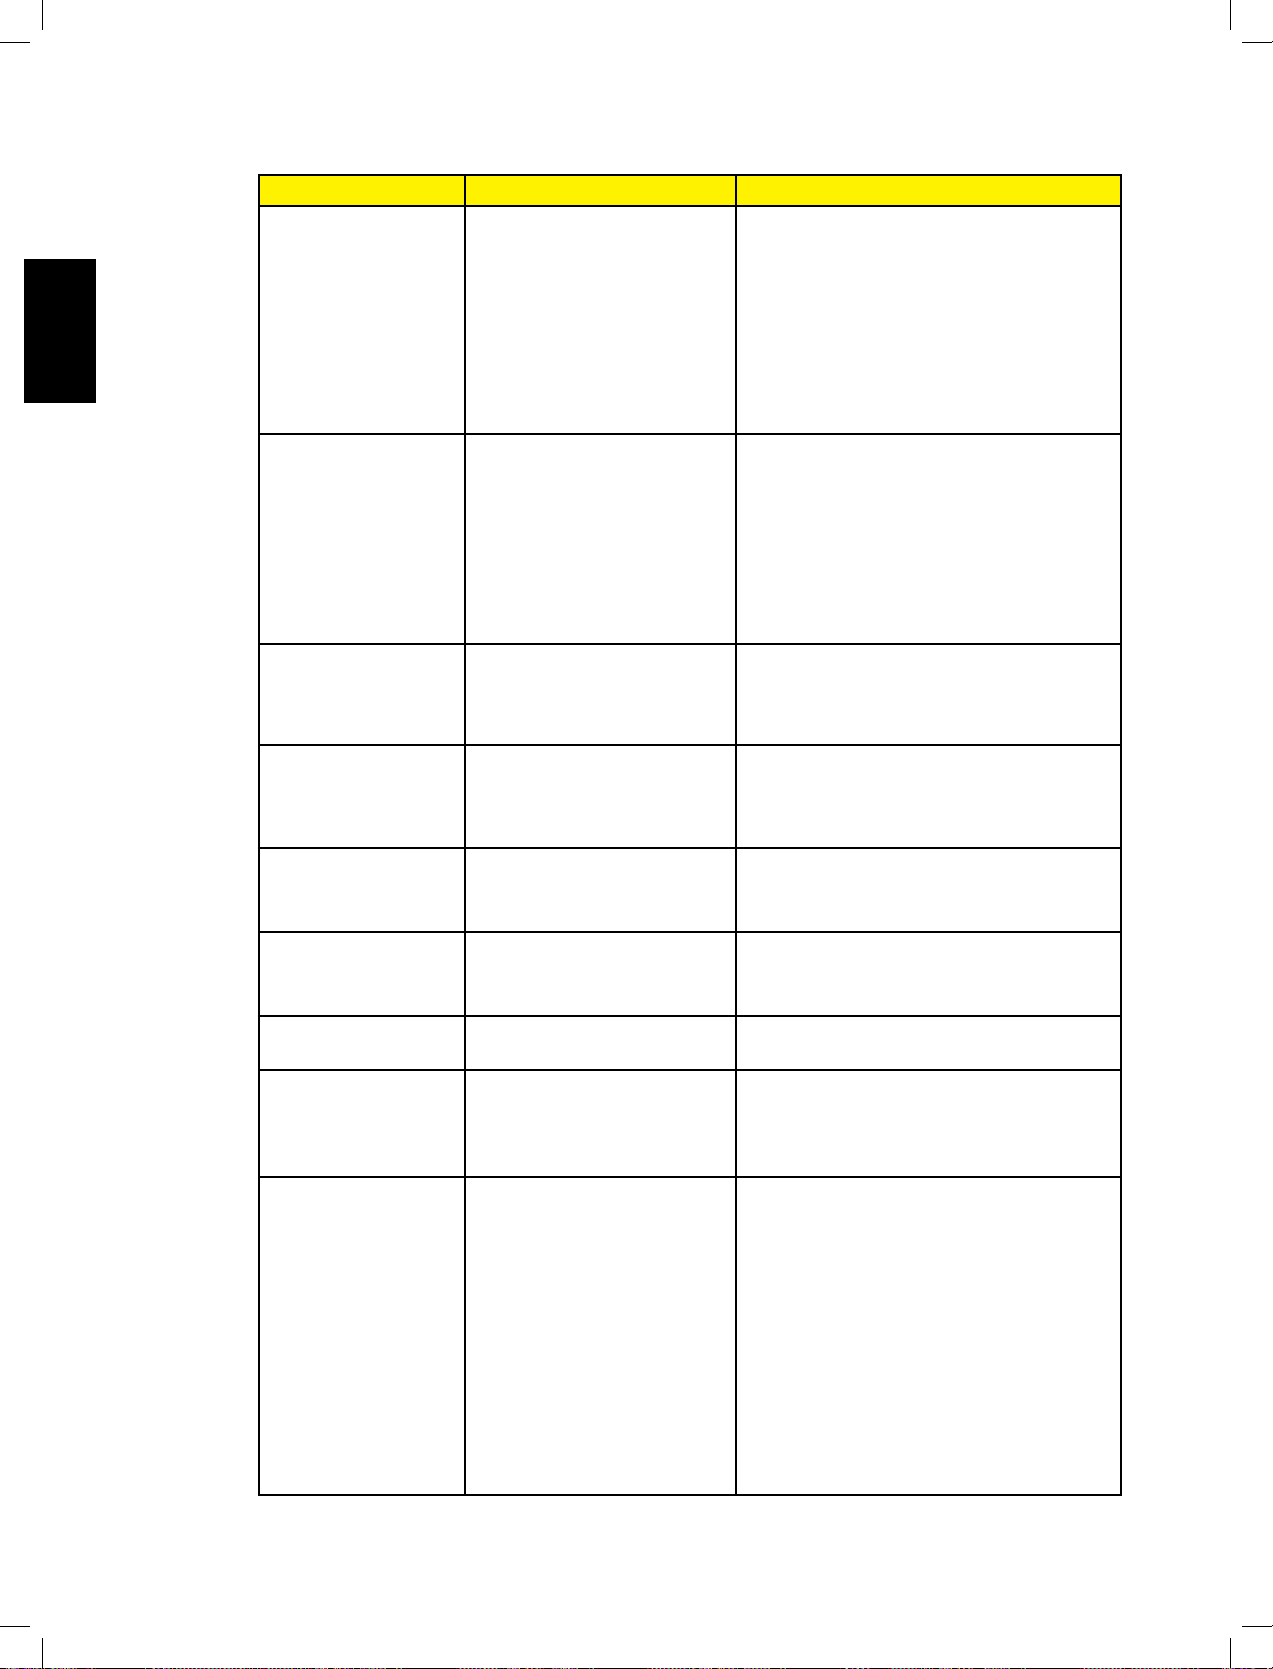
Infrared Grilling Chart
Food Control Seng Cooking Time Helpful Suggesons
4 min. – Rare
6 min. – Medium
a natural tenderizer while
and juicy.
4 min. – Rare
5 min. – Medium
Preparing hamburgers to
order is made easier by
20-25 min.
thigh and the leg from the
woodchips to your Napoleon
accessory.
Medium 6 min. per side
for more tender results.
Spare ribs
20 min. per side
Choose ribs that are lean
easily pulls away from the
bone.
Lamb chops
15 min. per side
chops for more tender
results.
Medium - Low 4-6 min. Select the larger size
lengthwise before grilling.
www.napoleongrills.com
12
EN
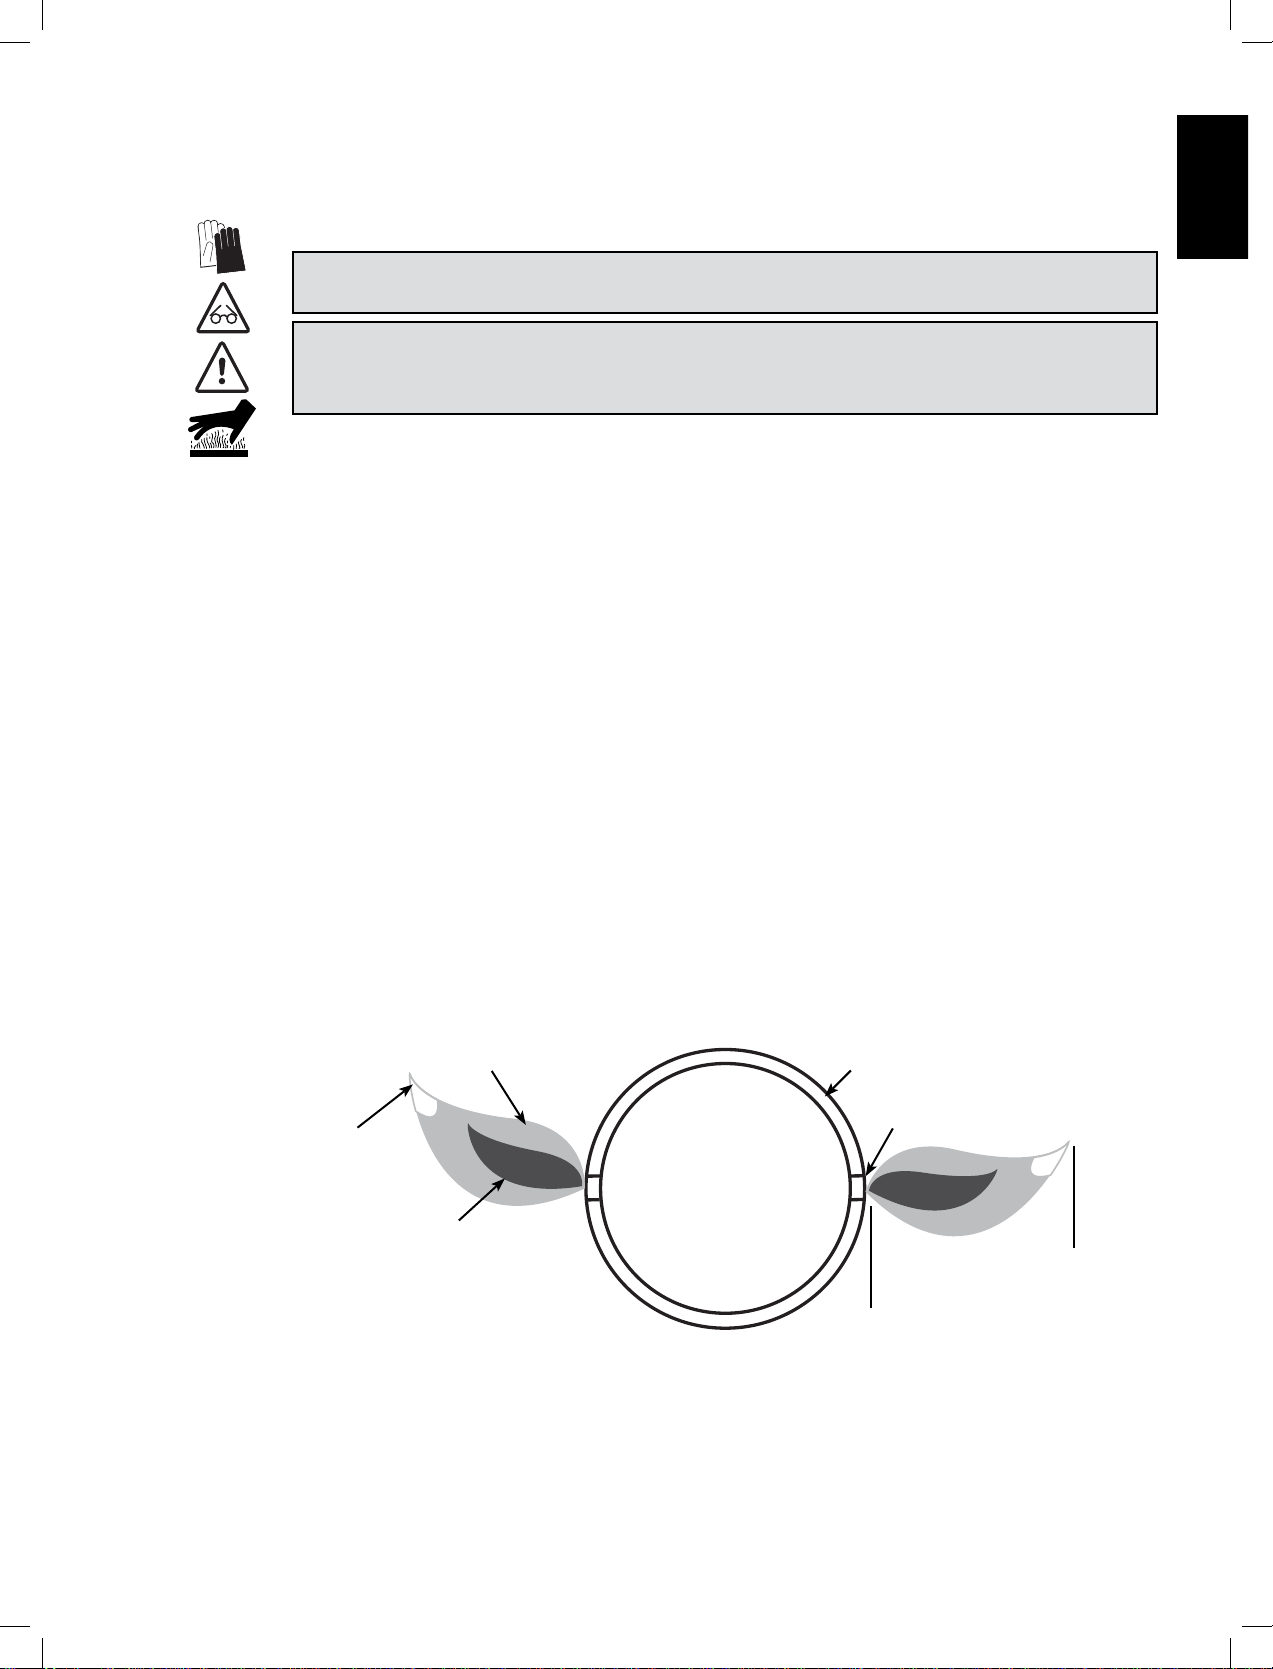
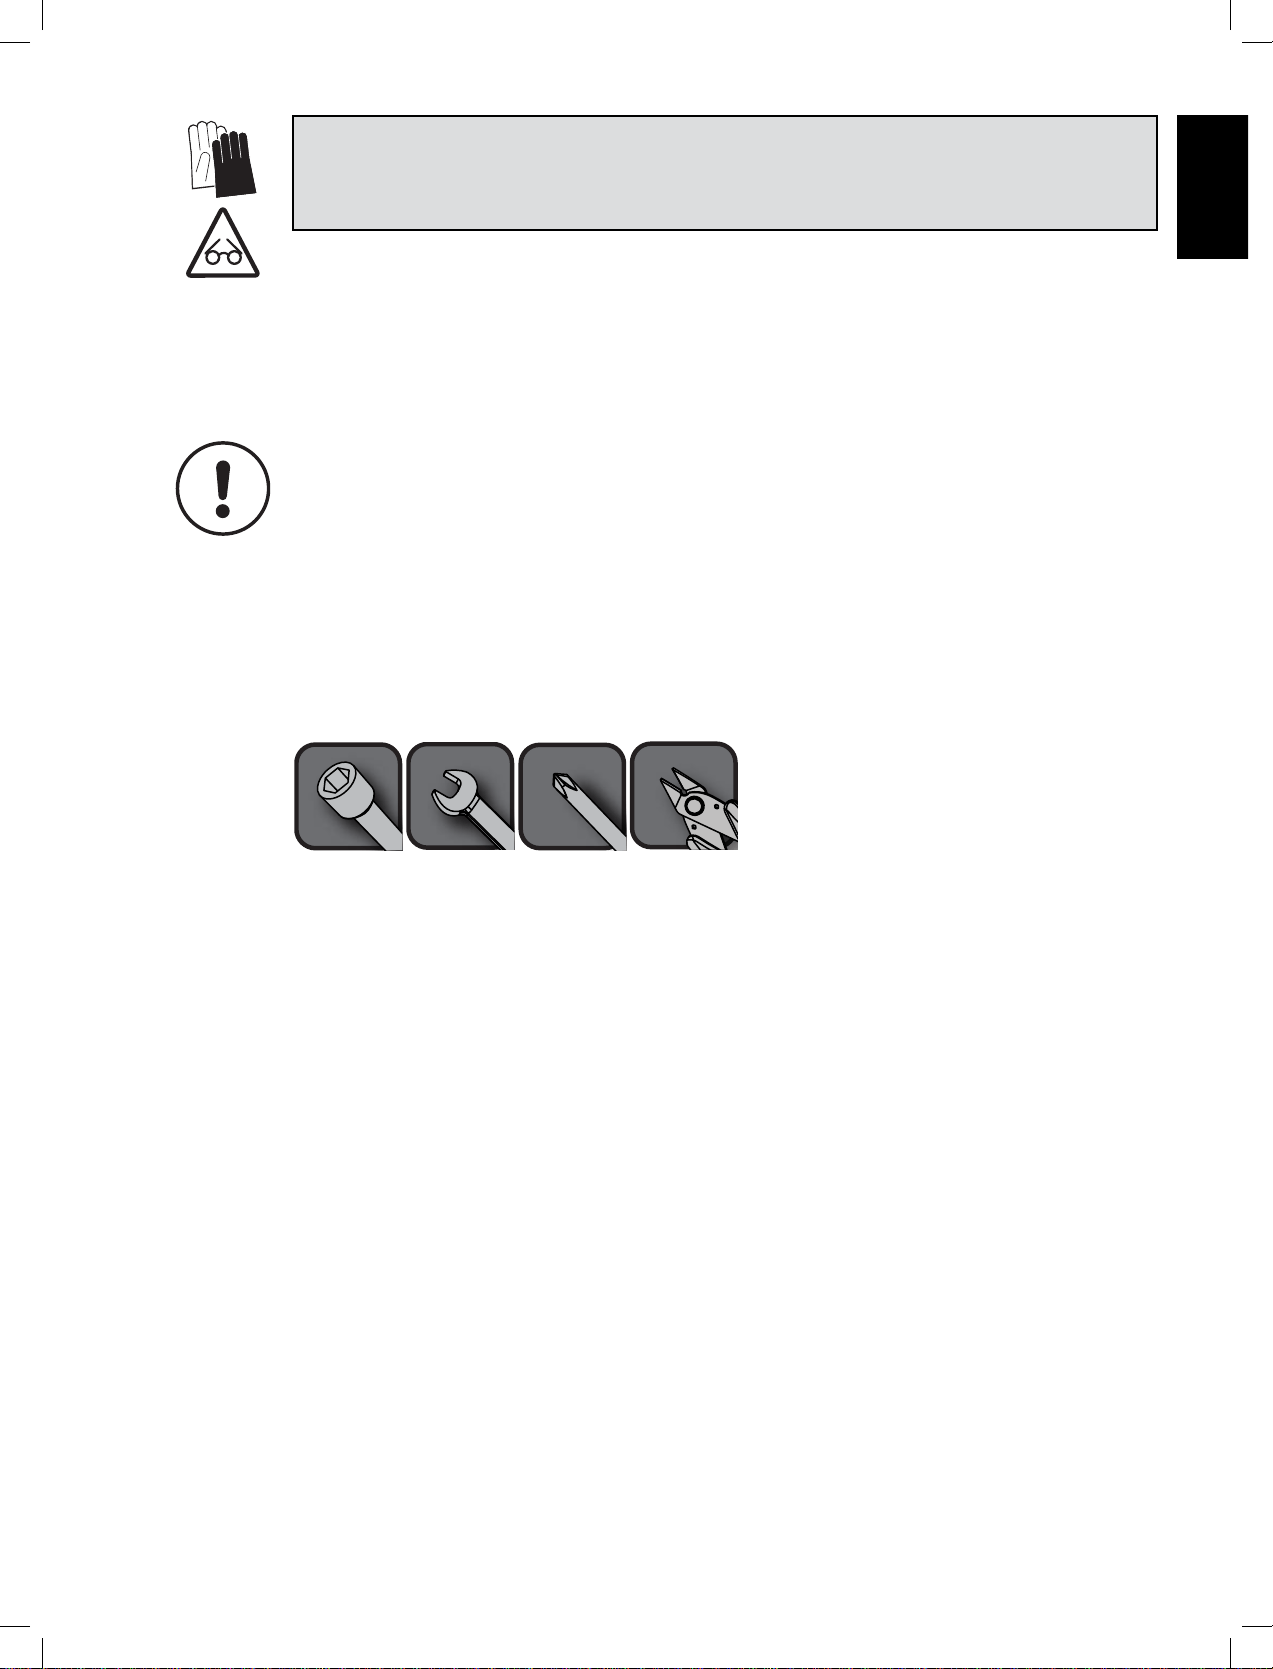
WARNING! Always wear protecve gloves and safety glasses when servicing your grill.
WARNING! To avoid the possibility of burns, maintenance should be done only when the grill is
cool. Avoid unprotected contact with hot surfaces. Ensure all burners are turned o. Clean grill in an
area where cleaning soluons will not harm decks, lawns, or paos. Do not use oven cleaner to clean
any part of this gas grill. Do not use a self-cleaning oven to clean cooking grids or any other parts of
the gas grill. Barbecue sauce and salt can be corrosive and will cause rapid deterioraon of the gas grill
components unless cleaned regularly.
Cleaning Instrucons
Note
coastal areas and other harsh environments, such as the warm, highly humid atmosphere around pools
Grids And Warming Rack
surface.
Control Panel
cleaner available from your Napoleon dealer. Never apply abrasive cleaners on any stainless surfaces,
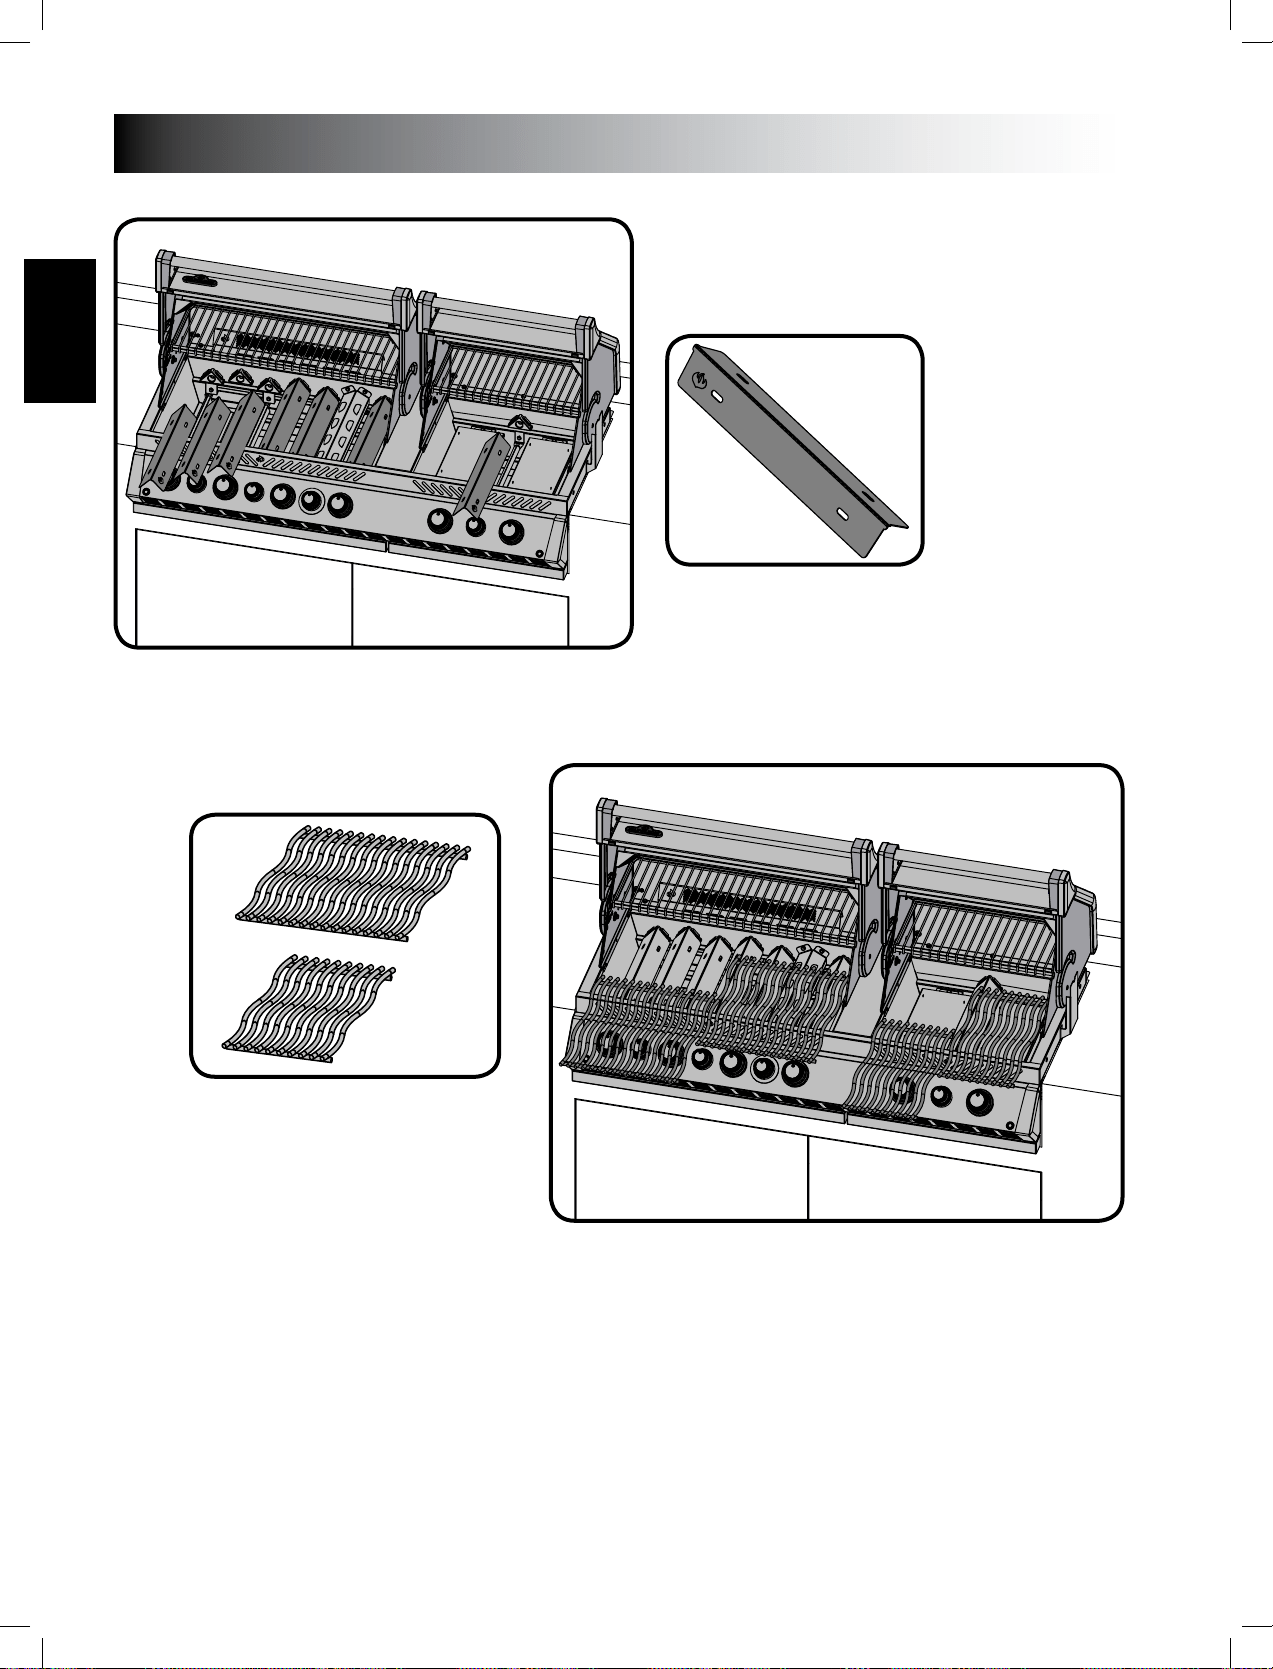
Cleaning Inside The Gas Grill
wire brush to remove the ash. Remove the sear plates and brush debris from the burners with the brass
wire brush. Sweep all debris from inside the gas grill into the drip pan.
WARNING! Built in units are supplied with a drip pan which holds only a minimal amount of
grease. To prevent grease res, the pan must be cleaned aer each use.
Drip Pan
pan, slide the drip pan free of the grill. Never line the drip pan with aluminum foil, sand or any other
Cleaning The Outer Grill Surface: Do not use abrasive cleaners or steel wool on any painted, porcelain or
stain
your Napoleon Grill dealer.
Lights
small amount of degreaser may be used. Do not use abrasive cleaners as this may scratch or damage the
lens.
www.napoleongrills.com
13
EN
WARNING! Always wear protecve gloves and safety glasses when cleaning your grill.
WARNING! Turn o the gas at the source and disconnect the unit before servicing. To avoid the
possibility of burns, maintenance should be done only when the grill is cool. A leak test must be
performed annually and whenever any component of the gas train is replaced or gas smell is present.
Maintenance Instrucons
Light Blue
Burner
Burner Port
Approximately
Combuson Air Adjustment
light blue and occasionally yellow.
Adjusng the air shuer:
are:
Main Tube Burner Rear Tube Burner Propane Full Open
Smoker Burner Warming Burner
*Infra-Red burners have no air adjustment.
installed.

www.napoleongrills.com
14
EN
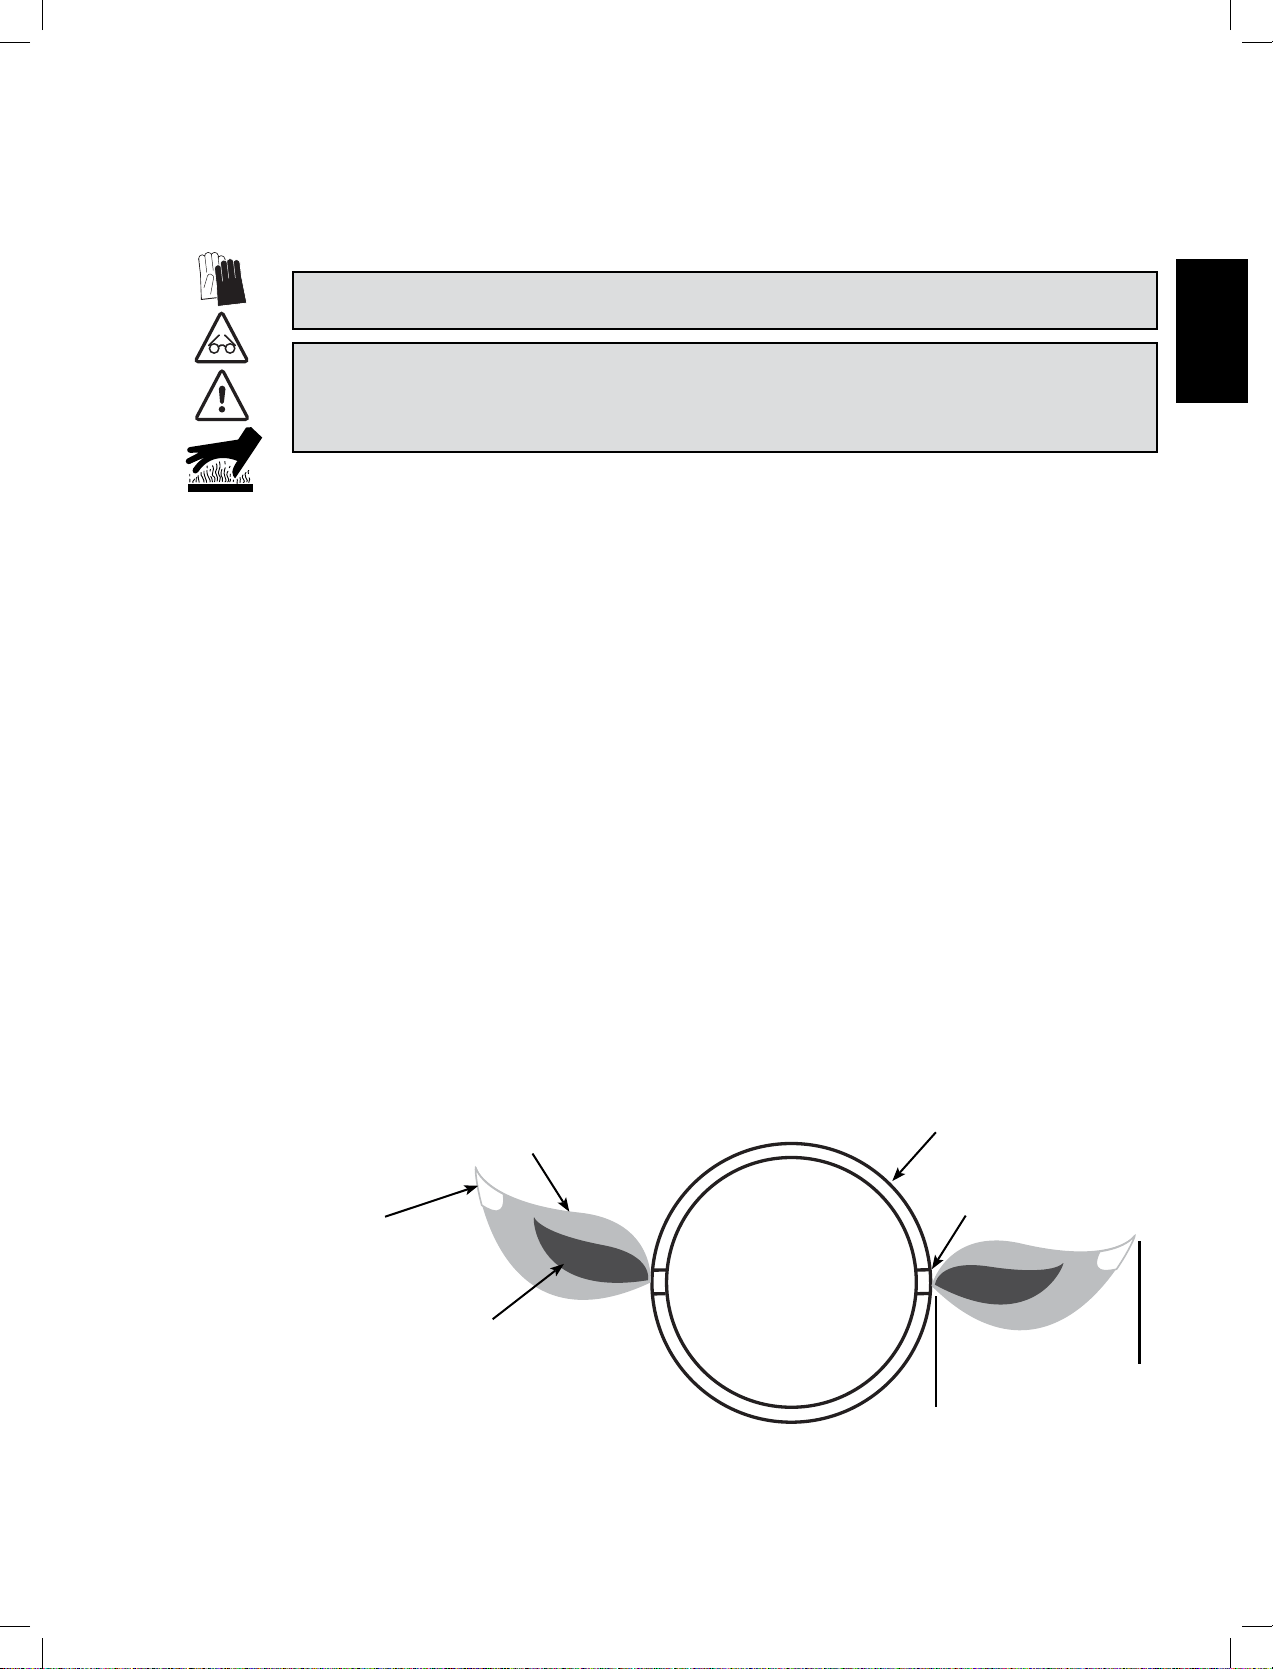
Burner
CAUTION! Beware of Spiders.
Reinstallaon
WARNING! Regulator Hose (when applicable): Check for abrasions’, melng, cuts, and cracks in the
hose. If any of these condions exist, do not use the gas grill. Have the part replaced by your Napoleon
Gas Grill dealer or qualied gas installer.
WARNING! When reinstalling the burner aer cleaning it is very
important that the valve/orice enters the burner tube before lighng your
gas grill. If the valve is not inside the burner tube a re or explosion could
occur.
Aluminum Casngs
surface to
remove any residue and paint with high temperature barbecue paint. Protect surrounding
WARNING! Always wear protecve gloves when changing the halogen bulb in the internal lights
of your grill.
Lights
remove the lens from the housing, remove the Philips screw securing the housing in place. Snap the lens
Do not touch the halogen bulb with your bare hands.
The oil from your ngerps will reduce the life of the bulb.
1
2
3
www.napoleongrills.com
15
EN
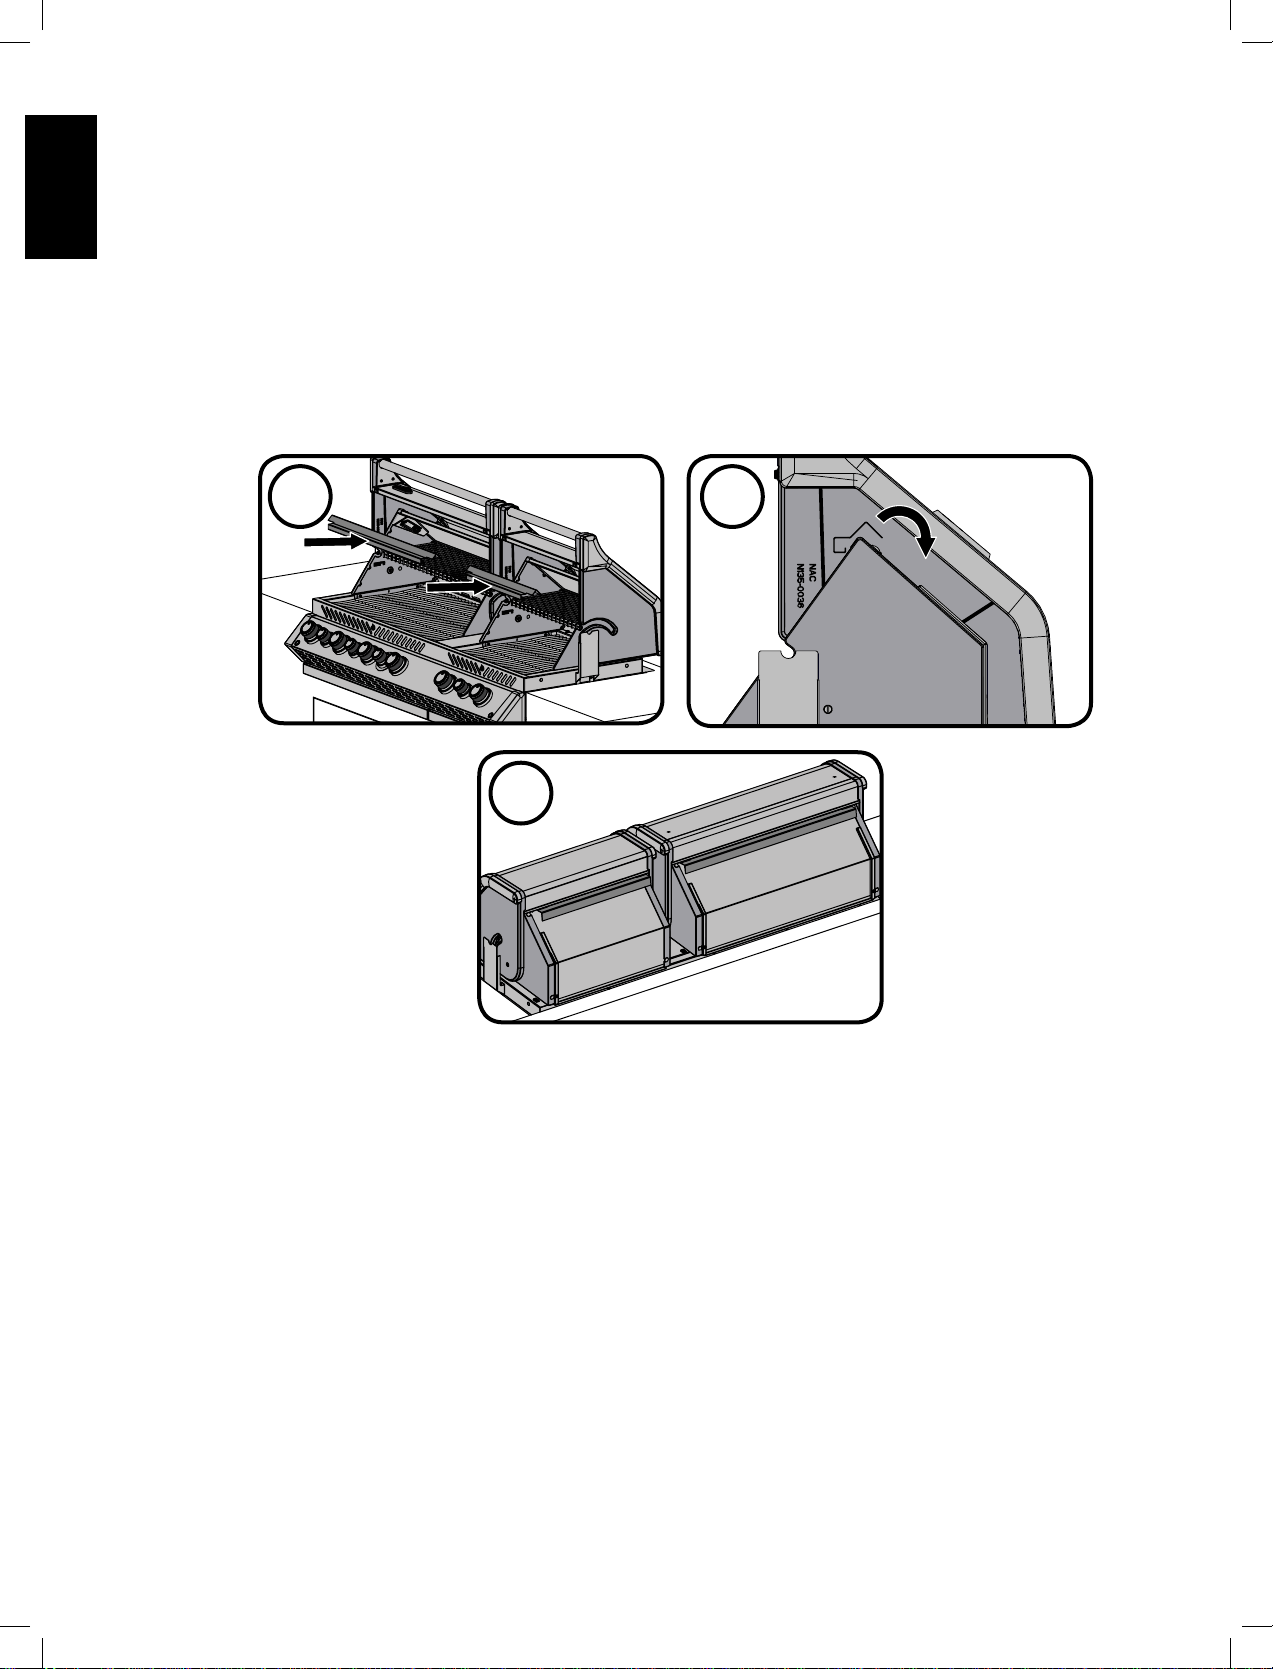
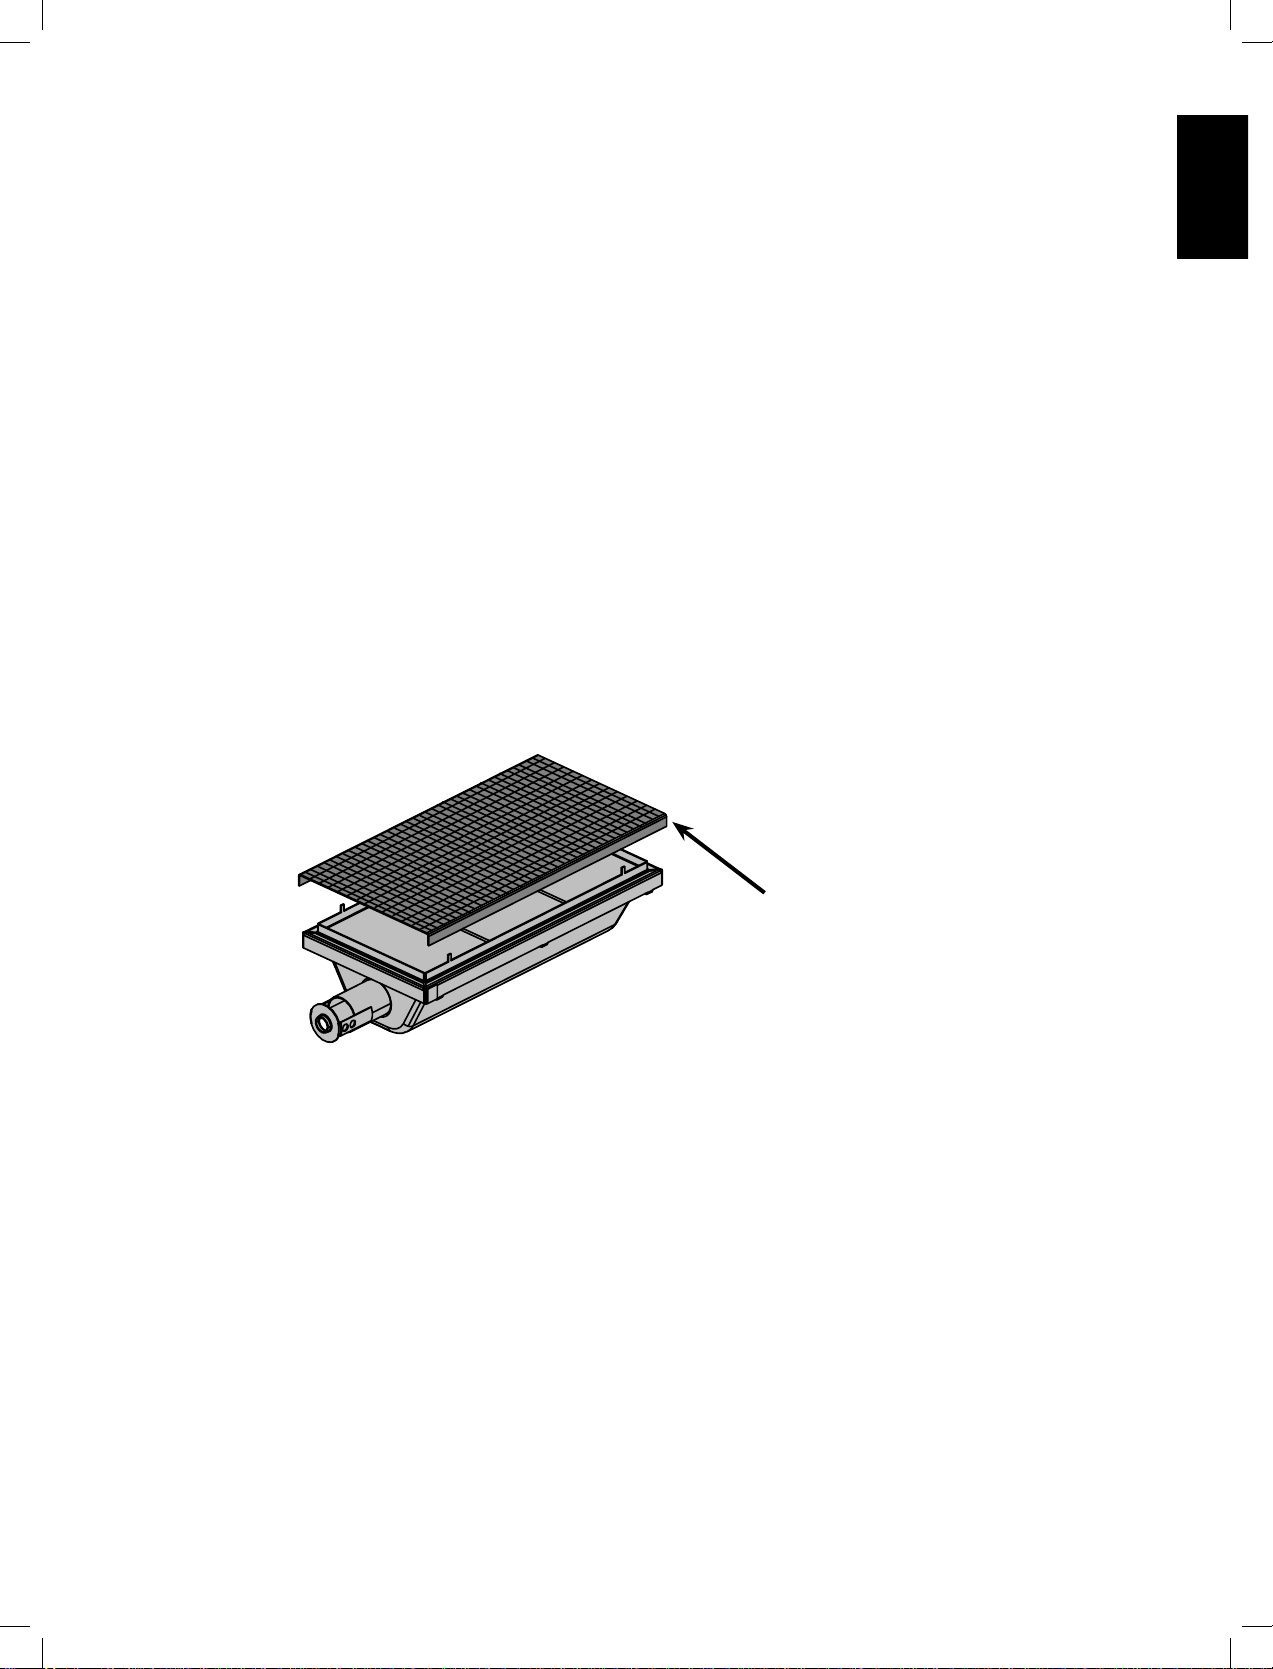
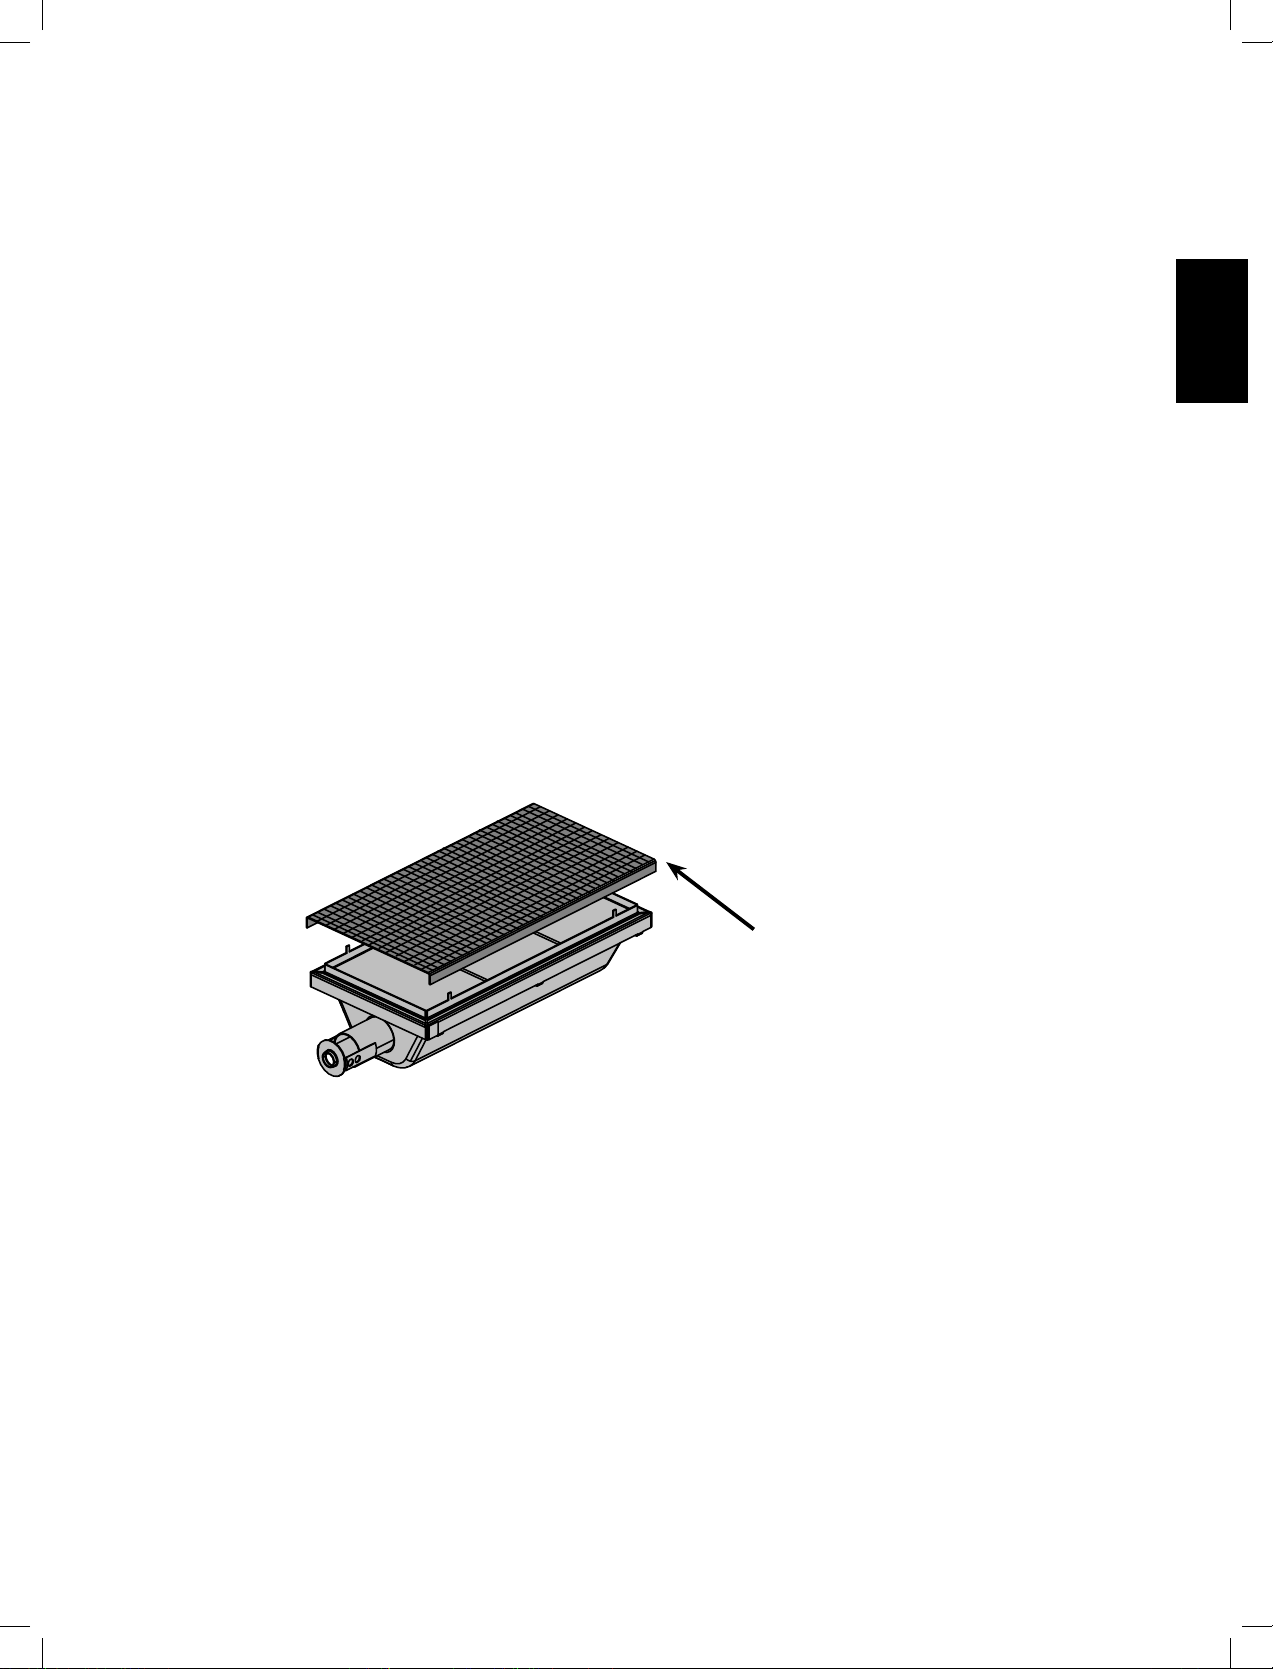
Protecon Of Infrared Burners:
them. Damage caused by failure to follow these steps is not covered by your grill warranty.
thoroughly.
way to escape the grill. If the hot air is not allowed to escape, the burners can become deprived of oxygen
REPLACEMENT SCREEN N565-0002
www.napoleongrills.com
16
EN
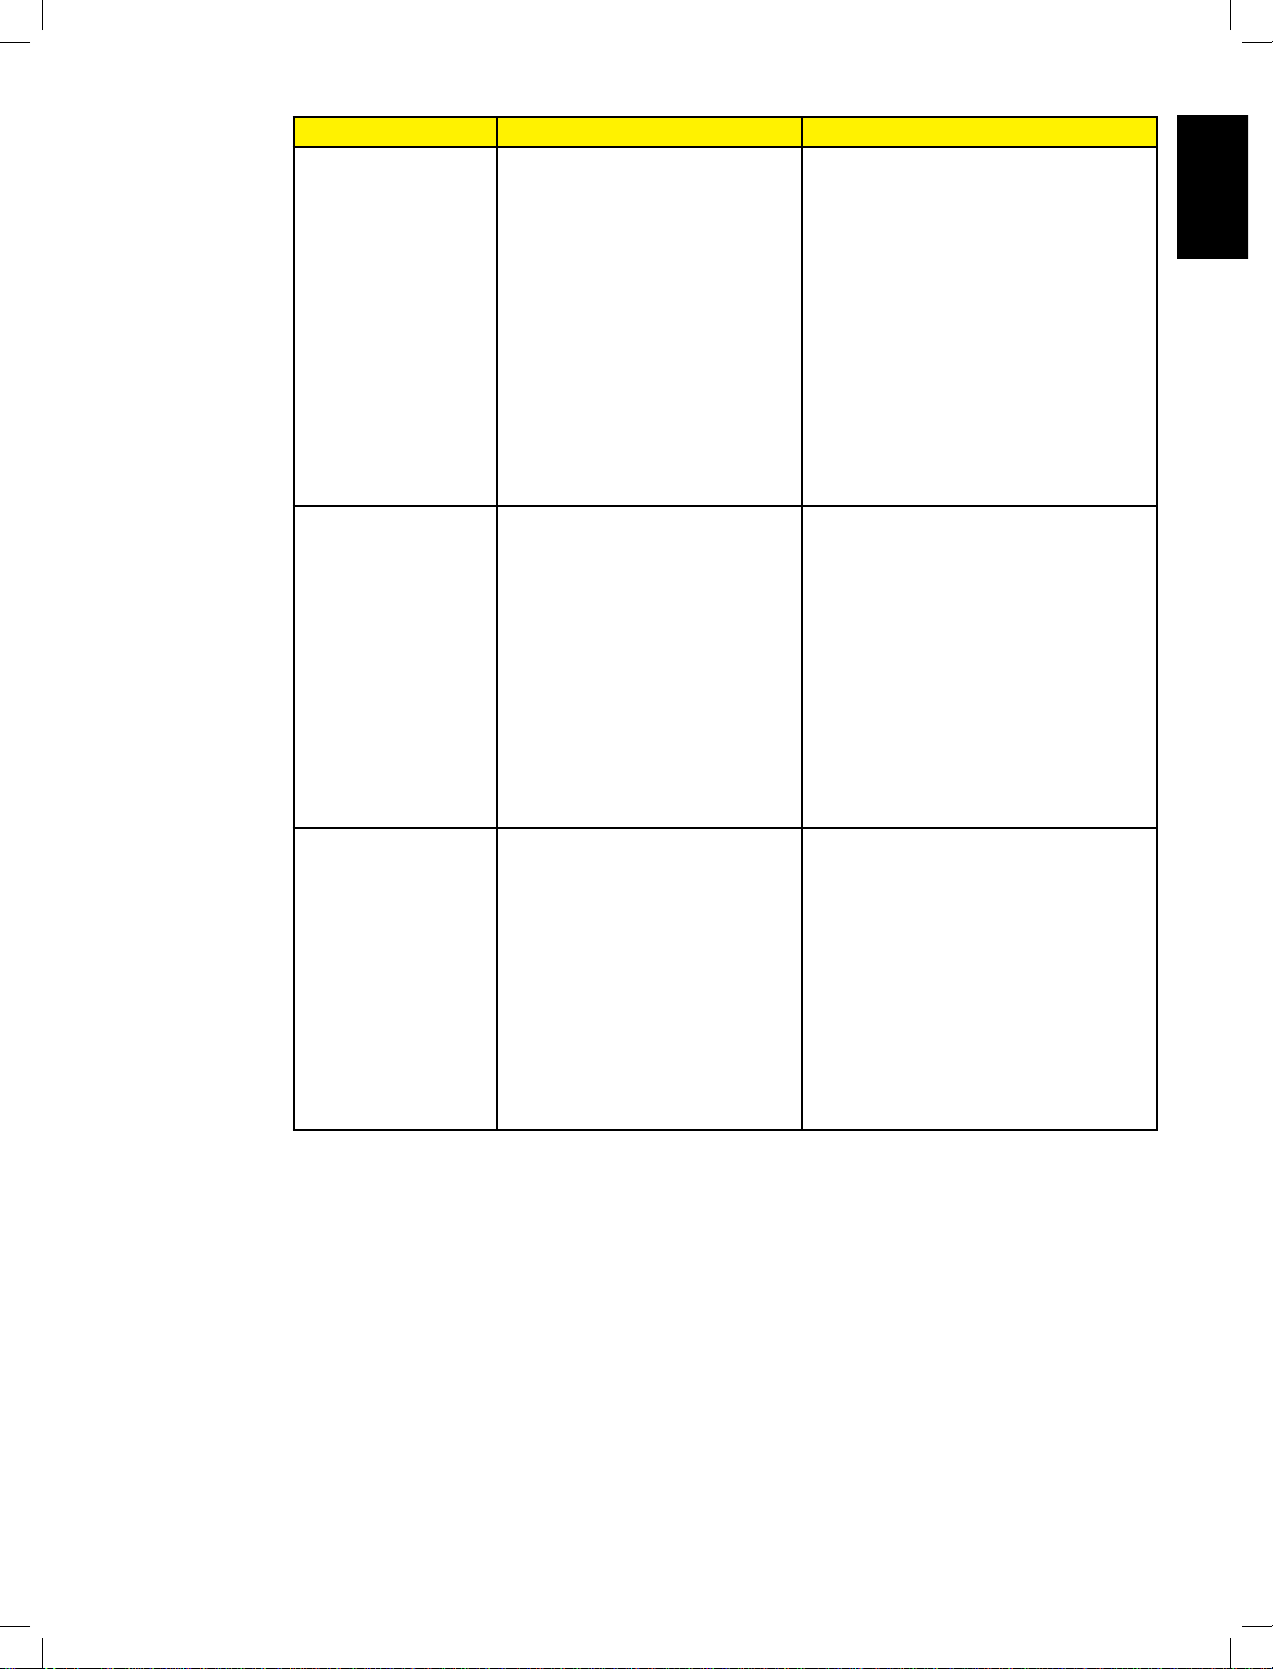
Troubleshoong
Problem Possible Causes Soluon
valve turned to high.
For natural gas - undersized supply line.
Preheat grill with both main burners on high for 10
to 15 minutes.
heat.
Sear plates installed incorrectly.
Excessive grease and ash build on sear
plates and in drip pan.
Ensure sear plates are installed with the holes
Preheat grill with both main burners on high for 10
to 15 minutes.
Clean sear plates and drip pan regularly. Do not
line pan with aluminum foil. Refer to cleaning
Burners burn with yellow
smell of gas.
Possible spider web or other debris, or
installer.)
burner, accompanied by the
smell of gas, and possibly
Main burner will not light
with the igniter, but will light
with a match.
Normal occurrence on hot days.
regulators will not be replaced.
Burners will not cross light
each other.
Clean or replace as required.
peeling inside lid or hood.
Grease build-up on inside surfaces.
Supply hose is pinched.
Clean out venturi tube.
www.napoleongrills.com
17
EN
Problem Possible Causes Soluon
Infrared burner (if equipped)
type sound and grows dim.)
drippings and build-up. Ports are clogged.
Burner overheated due to inadequate
by griddle or pan.)
or a weld failure in the burner housing.
minutes. Relight burner and burn on high for at
evenly glowing red.
relight.
Allow burner to cool and inspect very closely
authorized Napoleon dealer to order a replacement
burner assembly.
Contact your authorized Napoleon dealer for
assembly.
Blown Fuse.
Faulty transformer.
corroded or loose.
Faulty igniter.
Dirty or corroded electrodes.
Plug transformer cord into power box.
Replace fuse located on outlet line of transformer.
Replace if required.
Replace igniter – located under electrical cover.
Clean or replace as required.
Oven and control panel
Blown fuse.
Faulty transformer.
corroded or loose.
Bulbs blown (oven lights only).
Plug transformer cord into power box.
Replace fuse located on outlet line of transformer.
Replace if required.

www.napoleongrills.com
18
EN
KEEP YOUR RECEIPT AS PROOF OF PURCHASE TO VALIDATE YOUR WARRANTY.
Ordering Replacement Parts
Warranty Informaon
MODEL:
DATE OF PURCHASE:
SERIAL NUMBER:
(Record informaon here for easy reference)
Before contacng the Customer Soluons Department, check the Napoleon Grills Website for more extensive
cleaning, maintenance, troubleshoong and parts replacement instrucons at www.napoleongrills.com.
Contact the factory directly for replacement parts and warranty claims. Our Customer Soluons Department is
available between 9 AM and 5 PM (Eastern Standard Time) at 1-866-820-8686, fax at 1-705-727-4282 or e-mail
[email protected]. To process a claim, we must be provided with the following informaon:
1. Model and serial number of the unit.
2. Part number and descripon.
3. A concise descripon of the problem (‘broken’ is not sucient).
4. Proof of purchase (photocopy of the invoice).
In some cases the Customer Soluons Representave could request to have the parts returned to the factory
for inspecon before providing replacement parts. These parts must be shipped prepaid to the aenon of the
Customer Soluons Department with the following informaon enclosed:
1. Model and serial number of the unit.
2. A concise descripon of the problem (‘broken’ is not sucient).
3. Proof of purchase (photocopy of the invoice).
4. Return Authorizaon Number - provided by the Customer Soluons Representave.
Before contacng Customer Soluons Representave, please note that the following items are not covered by
the warranty:
• Costs for transportaon, brokerage or export dues.
• Labour costs for removal and reinstallaon.
• Costs for service calls to diagnose problems.
• Discoloraon of stainless steel parts.
• Part failure due to lack of cleaning and maintenance, or use of improper cleaners (oven cleaner
or other harsh chemicals).
www.napoleongrills.com
19
EN
Geng Started
1. Remove all cart panels, hardware, and grill head from the carton. Raise lid and remove any
components packed inside. Use the parts list to ensure all necessary parts are included.
2.
Assemble the grill where it is to be used, lay down cardboard or a towel to protect parts from being
lost or damaged while assembling.
4. Most stainless steel parts are supplied with a protective plastic coating that must be removed
prior to using the grill.
The protective coating has been removed from some of the parts
during
the manufacturing process and may have left behind a residue that can be perceived as
scratches or blemishes. To remove the residue, vigorously wipe the stainless steel in the same
direction as the grain
5.
6.
If you have any quesons about assembly or grill operaon or if there are damaged or missing parts
please call our Customer Soluons Department at 1-866-820-8686 between 9 AM and 5 PM (Eastern
Standard Time).
CAUTION! During unpacking and assembly we recommended you wear work gloves and safety
glasses for your protecon. Although we make every eort to make the assembly process as problem
free and safe as possible, it is characterisc of fabricated steel parts that the edges and corners might
be sharp and could cause cuts if handled incorrectly.
TOOLS REQUIRED FOR ASSEMBLY (tools not included)
3/8" (10mm)
www.napoleongrills.com
20
EN
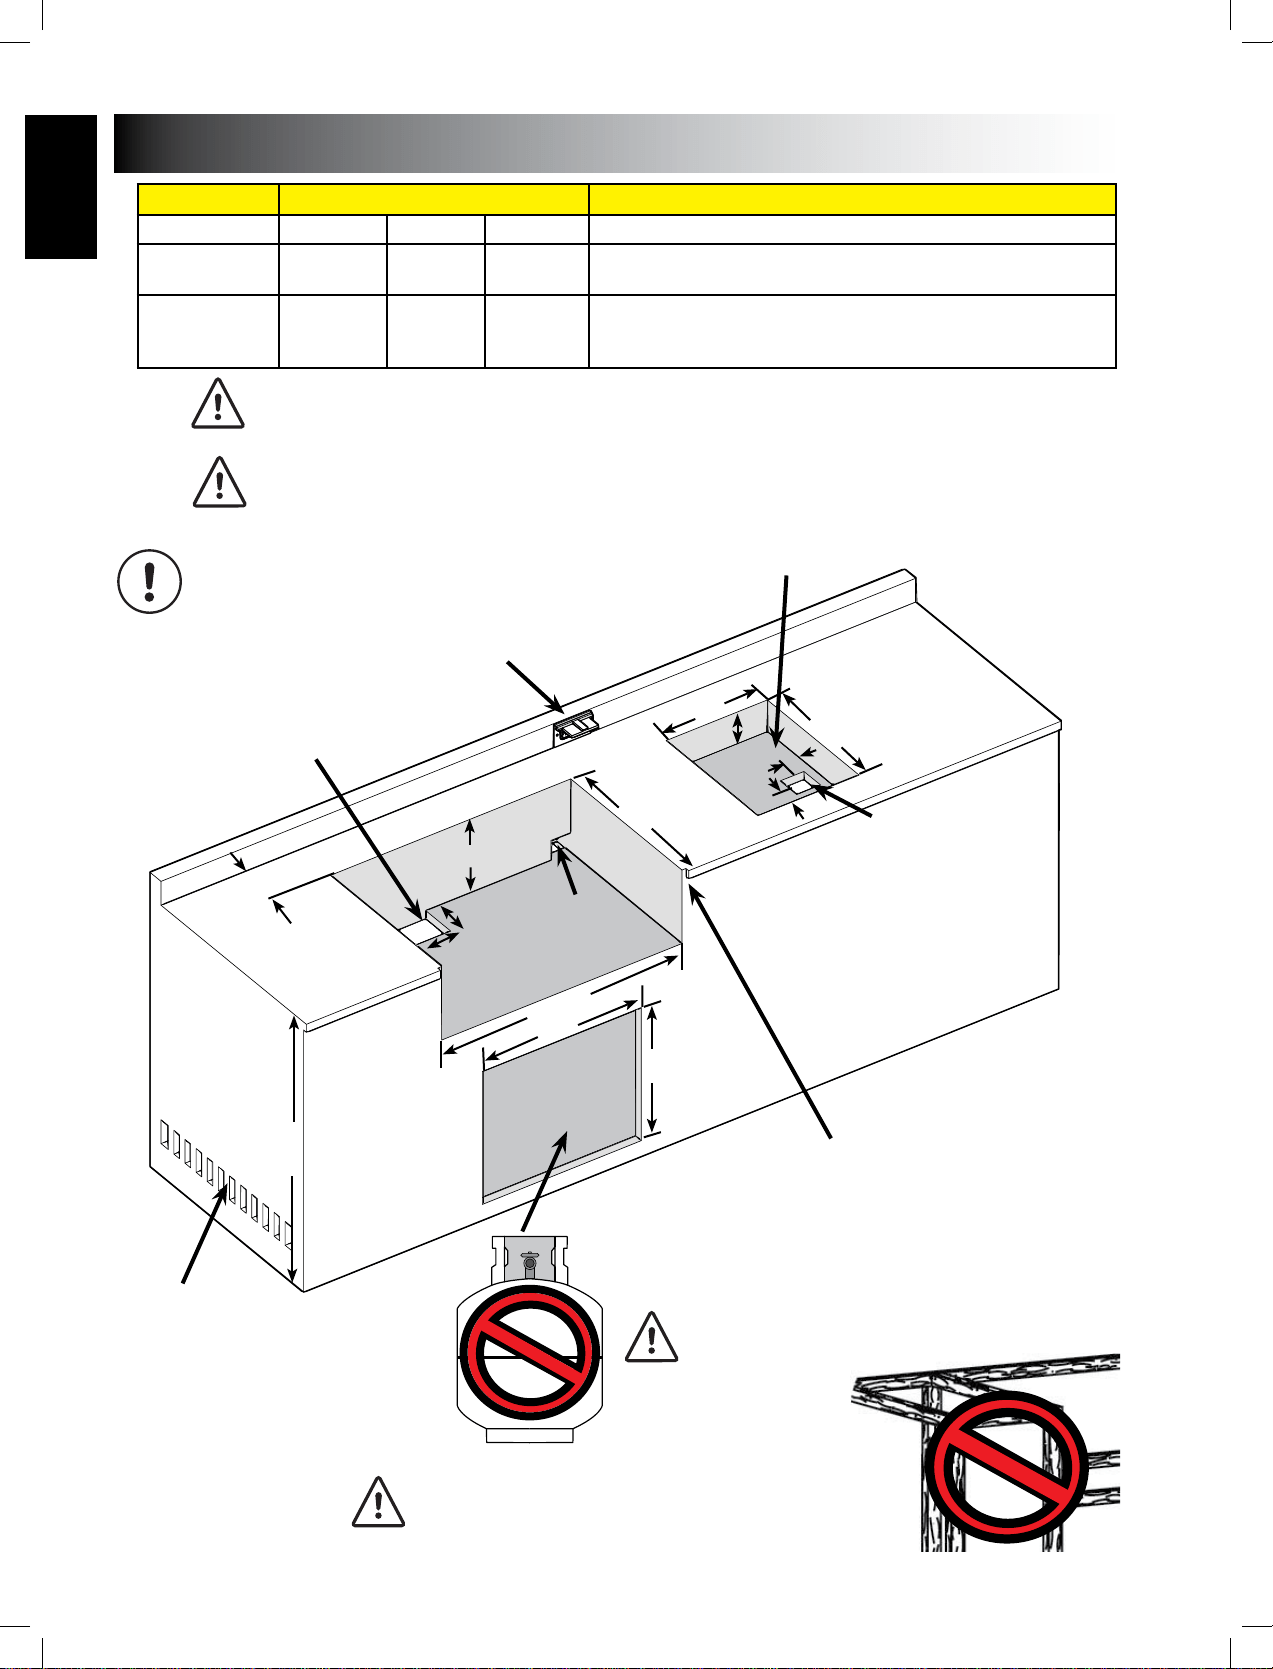
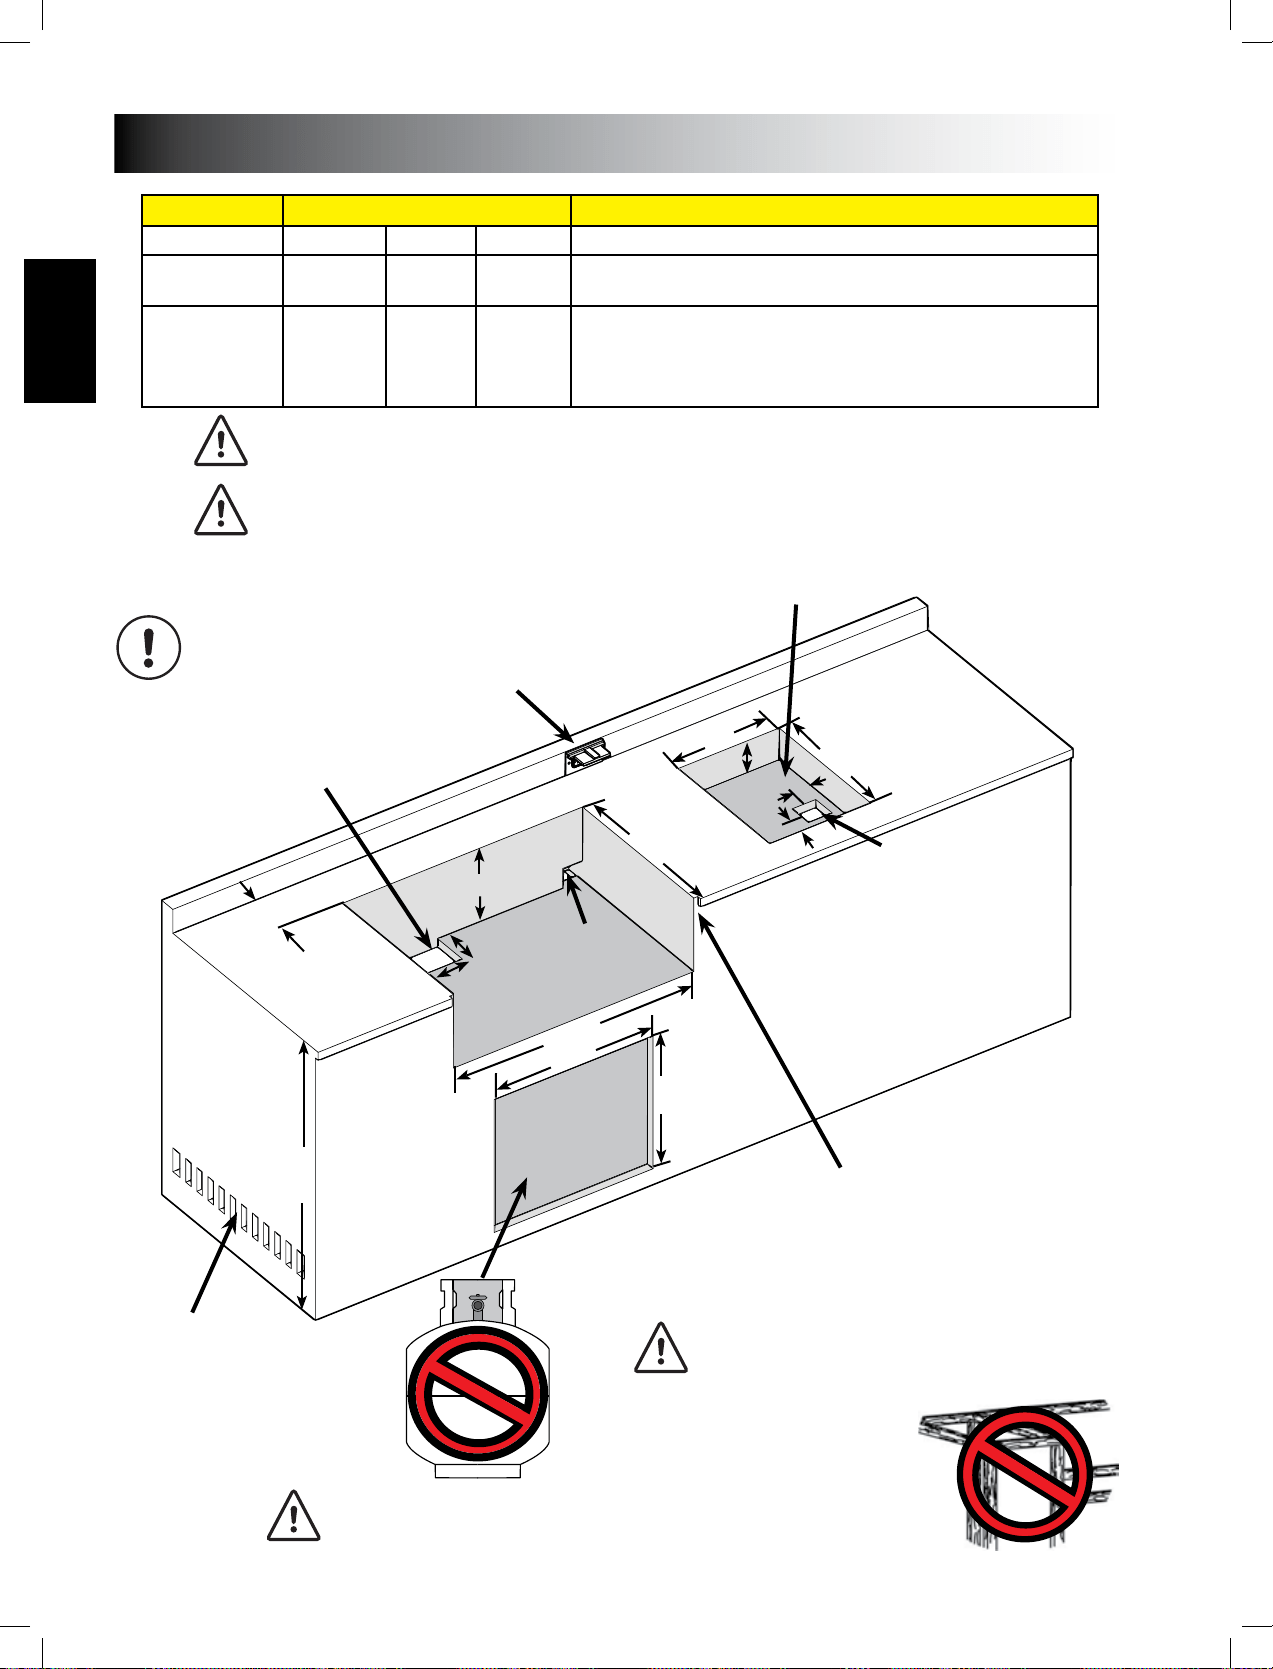
MODEL OPENING DIMENSIONS NOTES
D
BIPRO825
524mm
225mm
419mm
114mm
BUILT-IN UNIT OPENING DIMENSIONS
W
W
H
H
D
W
H
D
1¾”
(44mm)
BUILT-IN SIDEBURNER
GAS INLET OPENING
NON-COMBUSTIBLE MATERIAL
OUTDOOR GFI ELECTRICAL OUTLET
REC
OMMENDED - LOCATE ON SAME SIDE
OF GRILL AS ROTISSERIE BRACKET.
GAS INLET OPENING
Note: Accessory frames
overlap opening by 1 ¾”
on all 4 sides.
34” (864mm)
RECOMMENDED
5” (127mm)
1¾”
(44mm)
4”minimum
(102mm)
10”minimum
(254mm)
ELECTRICAL BOX OPENING
IF THE COUNTER TOP IS OVERHANGING THE EDGE OF
THE ENCLOSURE THE CORNERS MUST BE NOTCHED
A MINIMUM OF 1 3/16" (30 mm) TO ACCOMODATE
THE CONTROL PANEL END CAPS.
WARNING! A propane tank can not be
stored below the gas grill.
MINIMUM 10 SQ IN OF
VENTILATION REQUIRED
ON EACH END OF CABINET
WARNING! This grill is designed for Non-combusble enclosures only, and must be installed and
serviced by a qualied installer to local codes.
WARNING! Use only non-combusble materials (cered to ASTM E-136) such as steel studs,
cement board, ceramic le, marble, paint etc. When adding nishing materials to the appliance.
Do not use wood or drywall.
WARNING! CABINET FRAME, CABINET AND COUNTER
TOP MUST BE MADE FROM NON-COMBUSTIBLE MATERIAL.
www.napoleongrills.com
21
EN
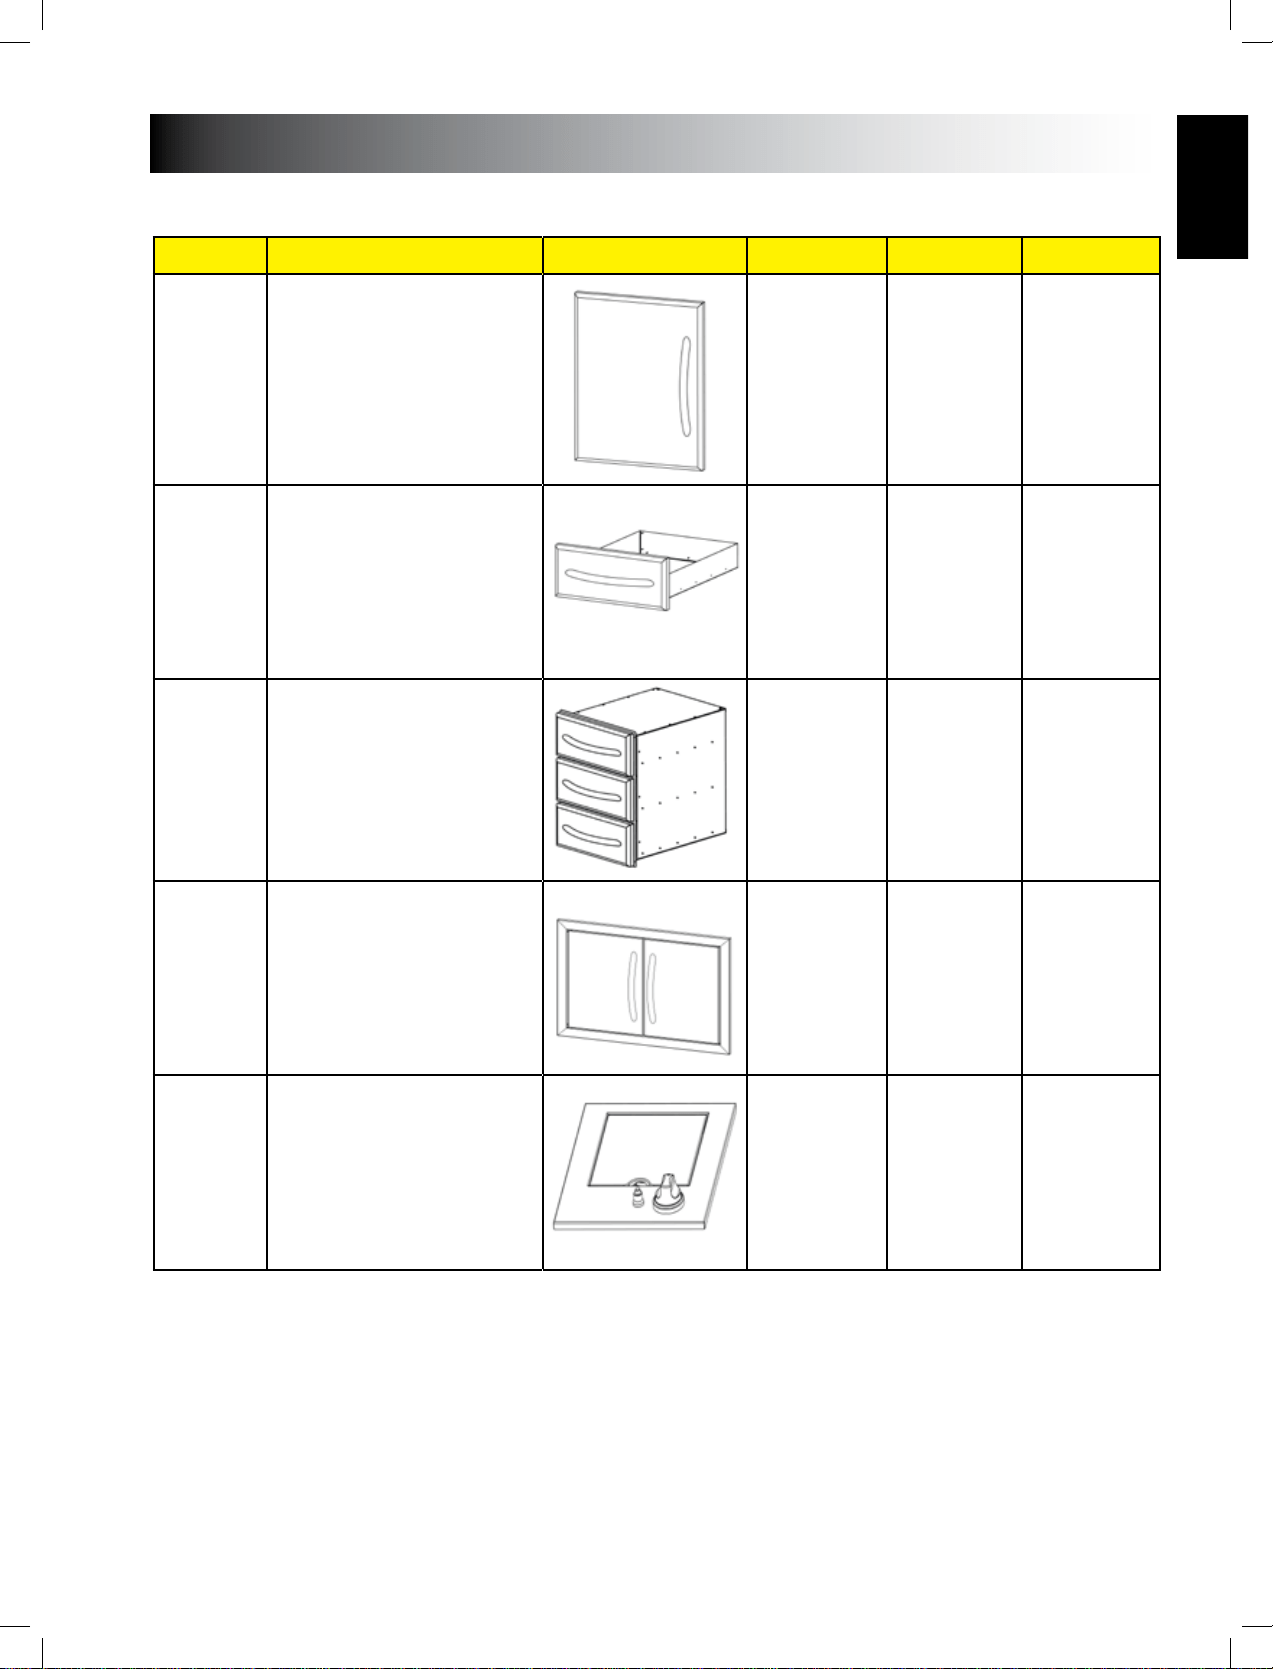
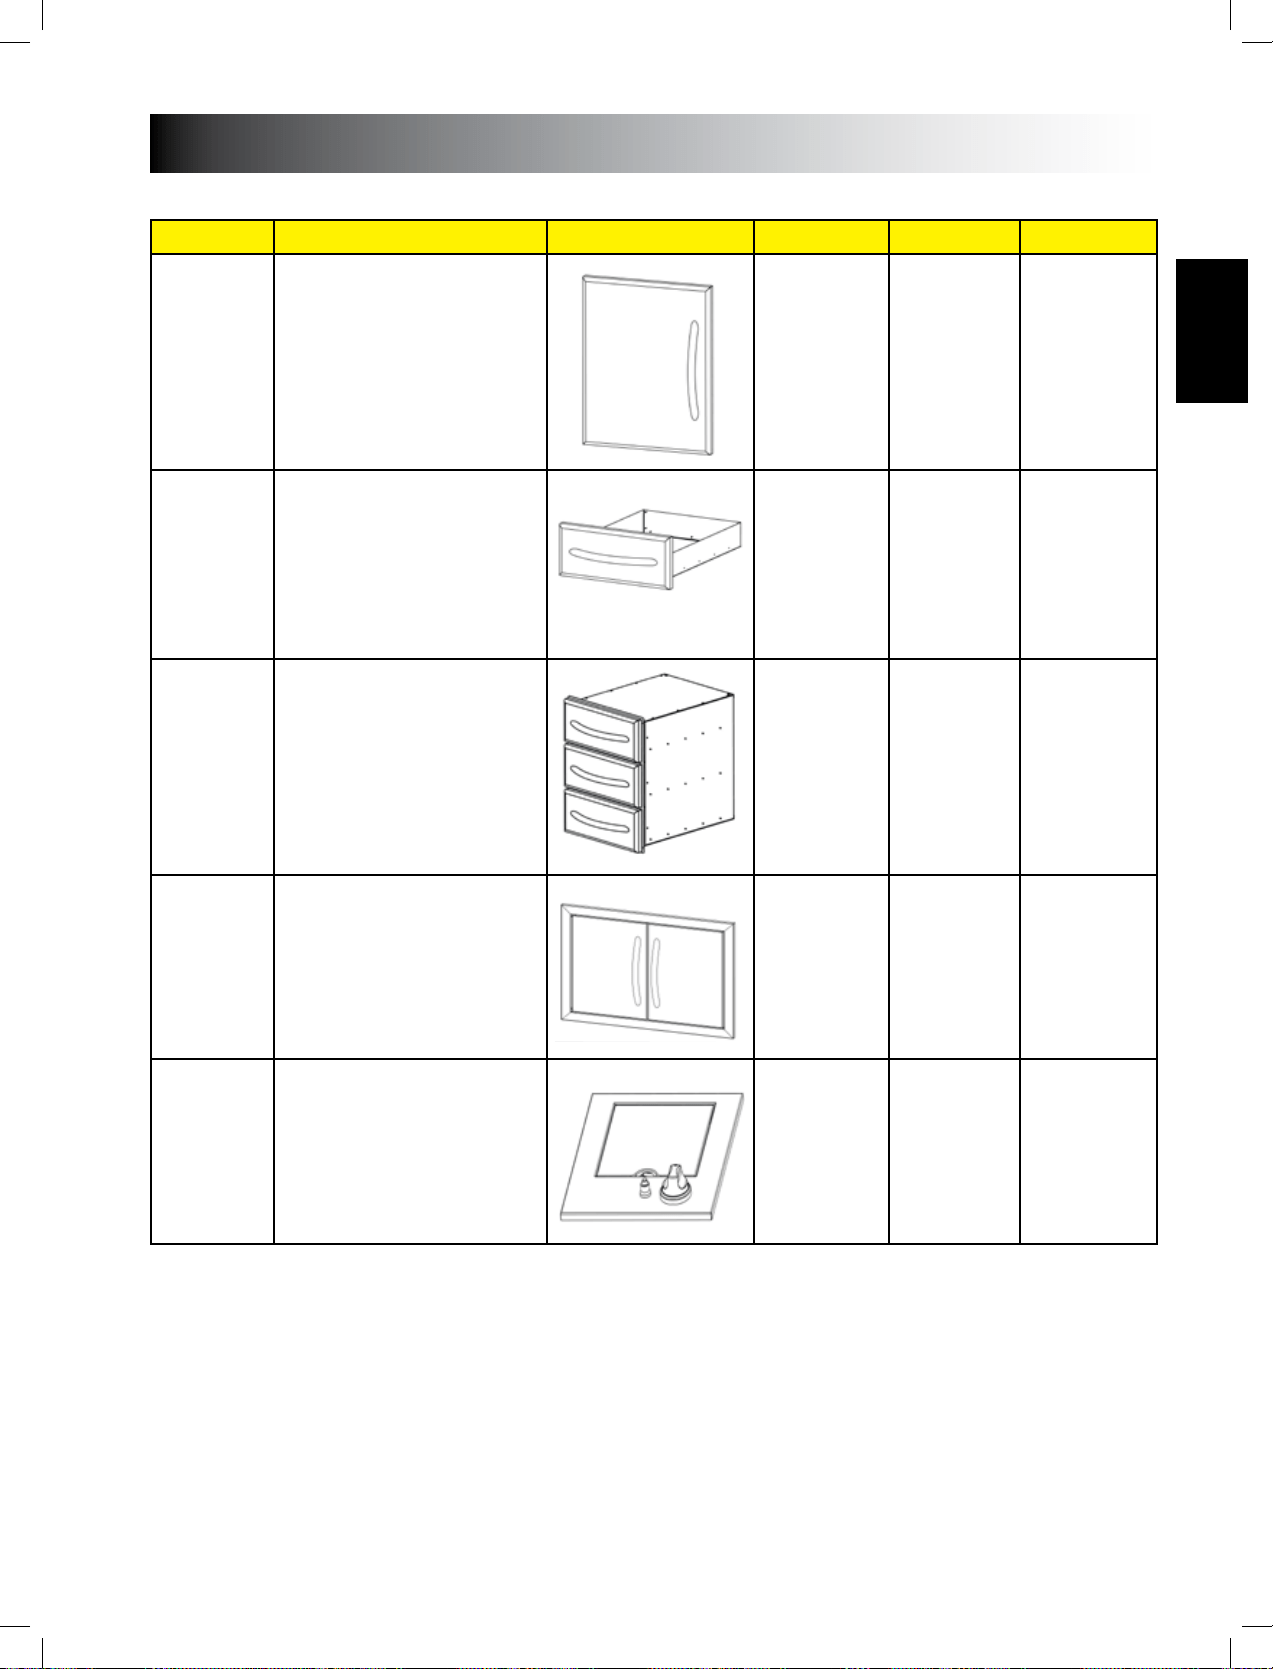
BUILT-IN ACCESSORY OPENING DIMENSIONS
Opening Dimensions
Part # Descripon Picture W H D
PF Style Stainless Steel Door
PF Style Stainless Steel Single
Drawer
Drawer
Double Door Small
Double Door Large
* Frames Protrude From Face Of
Cabinet By
¾”
Side Burner Propane
Side Burner Natural
minimum

www.napoleongrills.com
22
EN
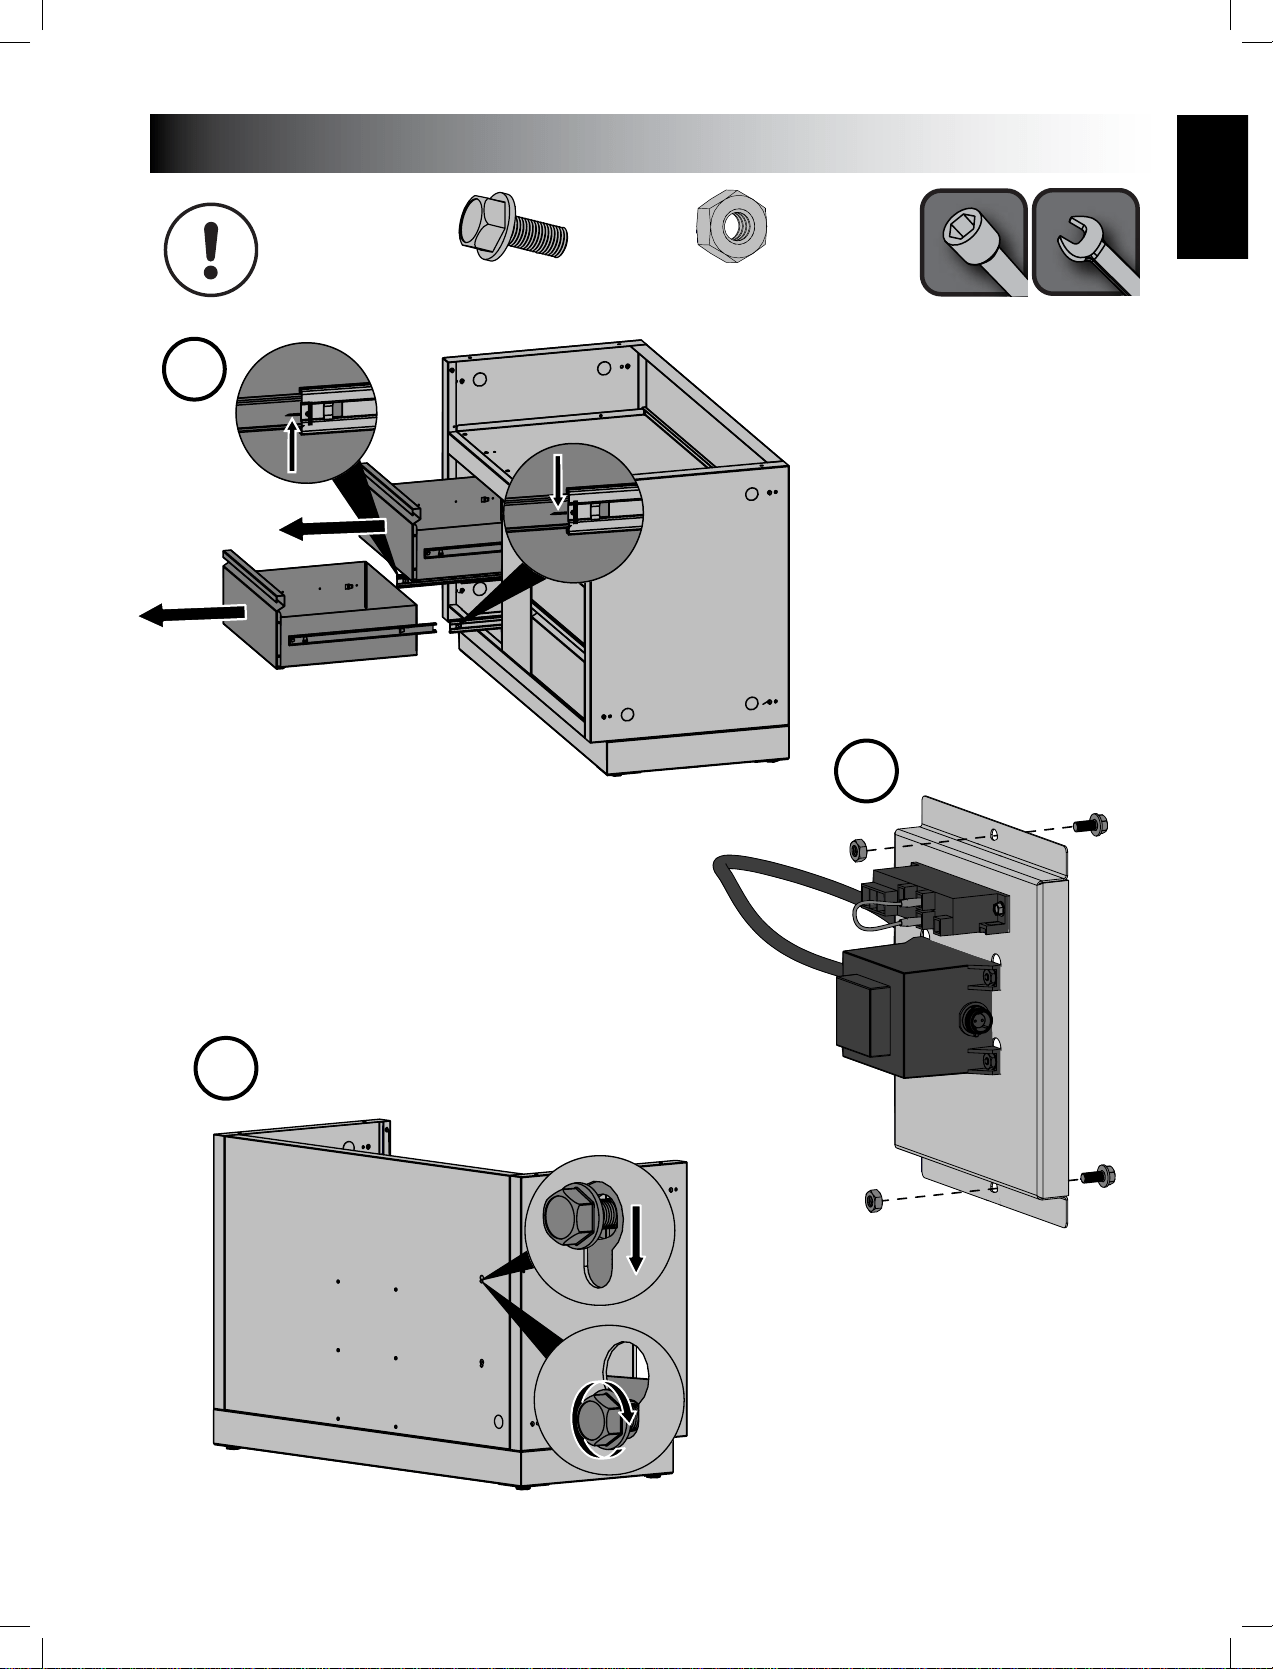
BI ACCESSORY DRAWER INSTRUCTIONS
BI ACCESSORY DOOR INSTRUCTIONS
ensure that the front of the enclosure is plumb.
4. Once the enclosure is level and square, fasten into place. (Fasteners not included).
b. For the PF style stainless steel door, the door needs to be removed by loosening the center philips screw on the hinge
www.napoleongrills.com
23
EN
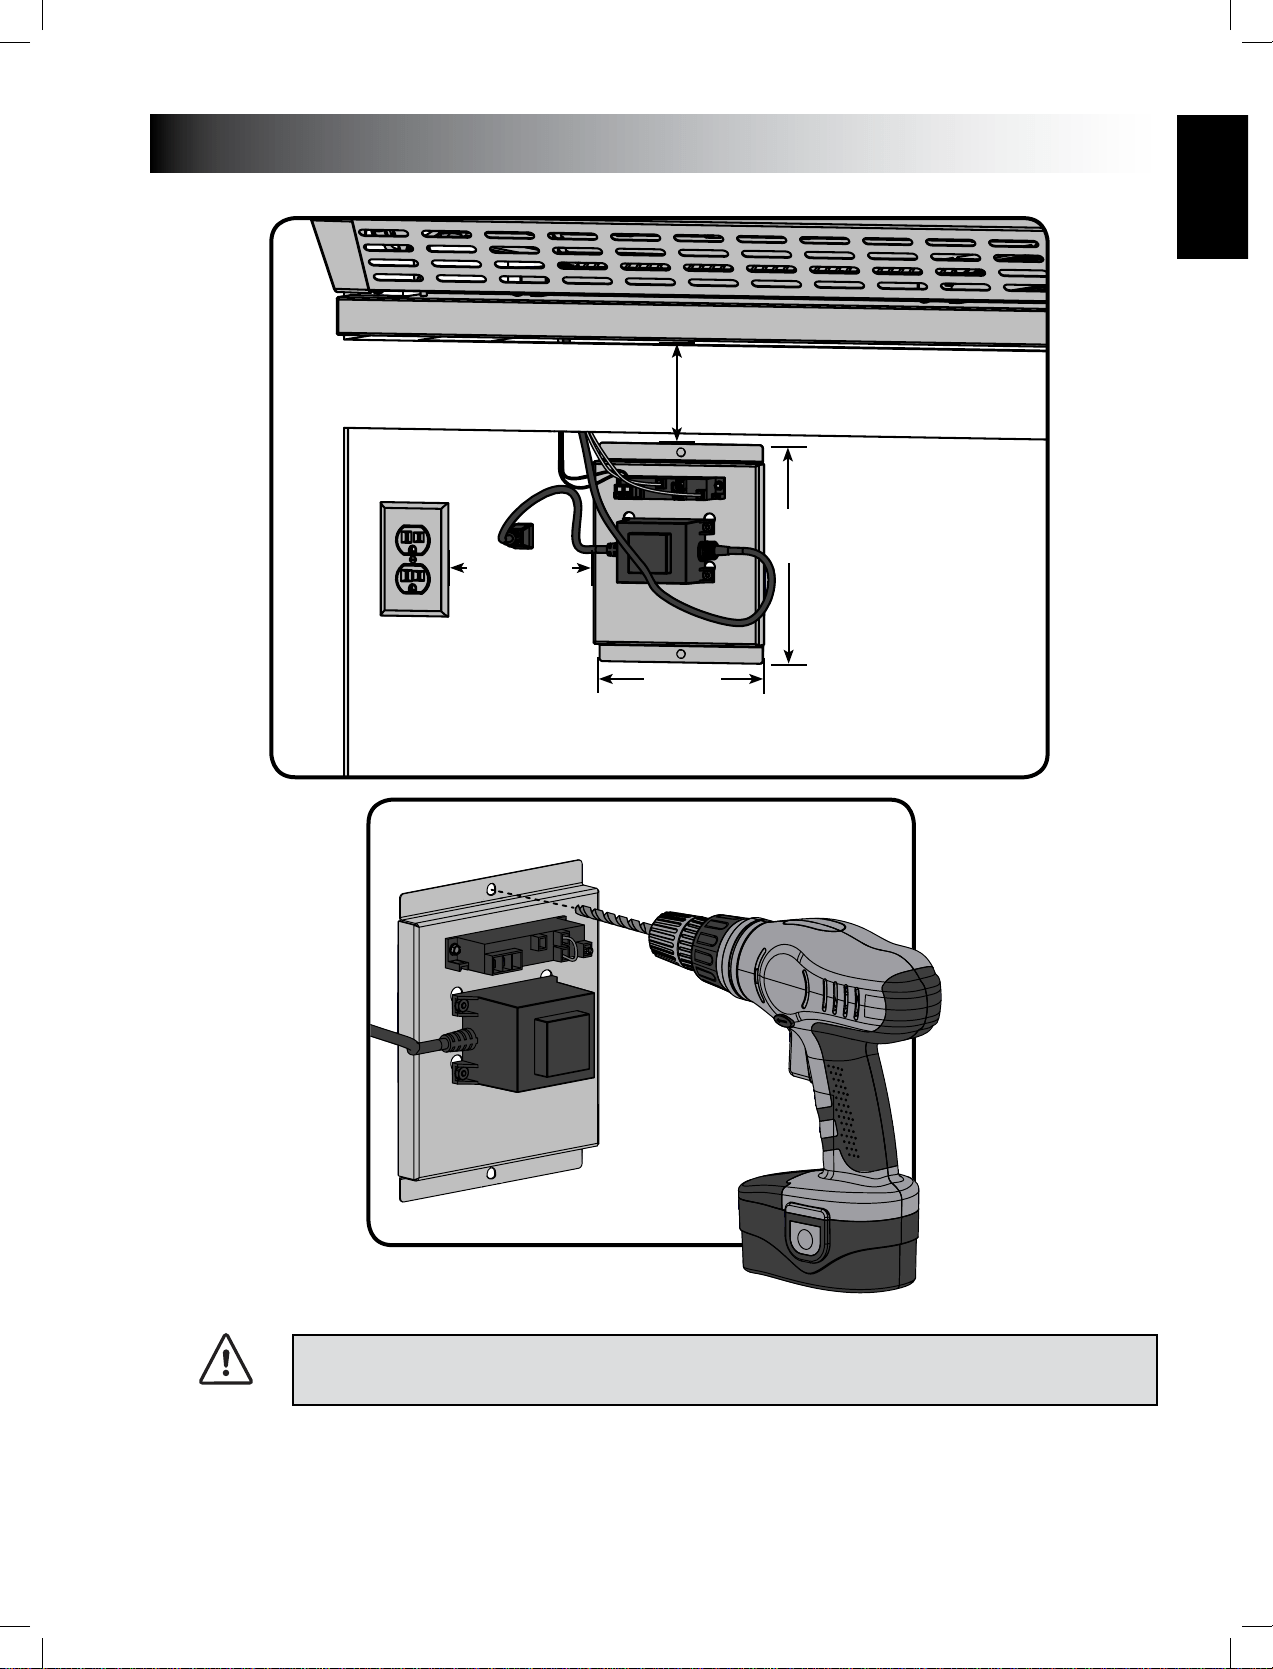
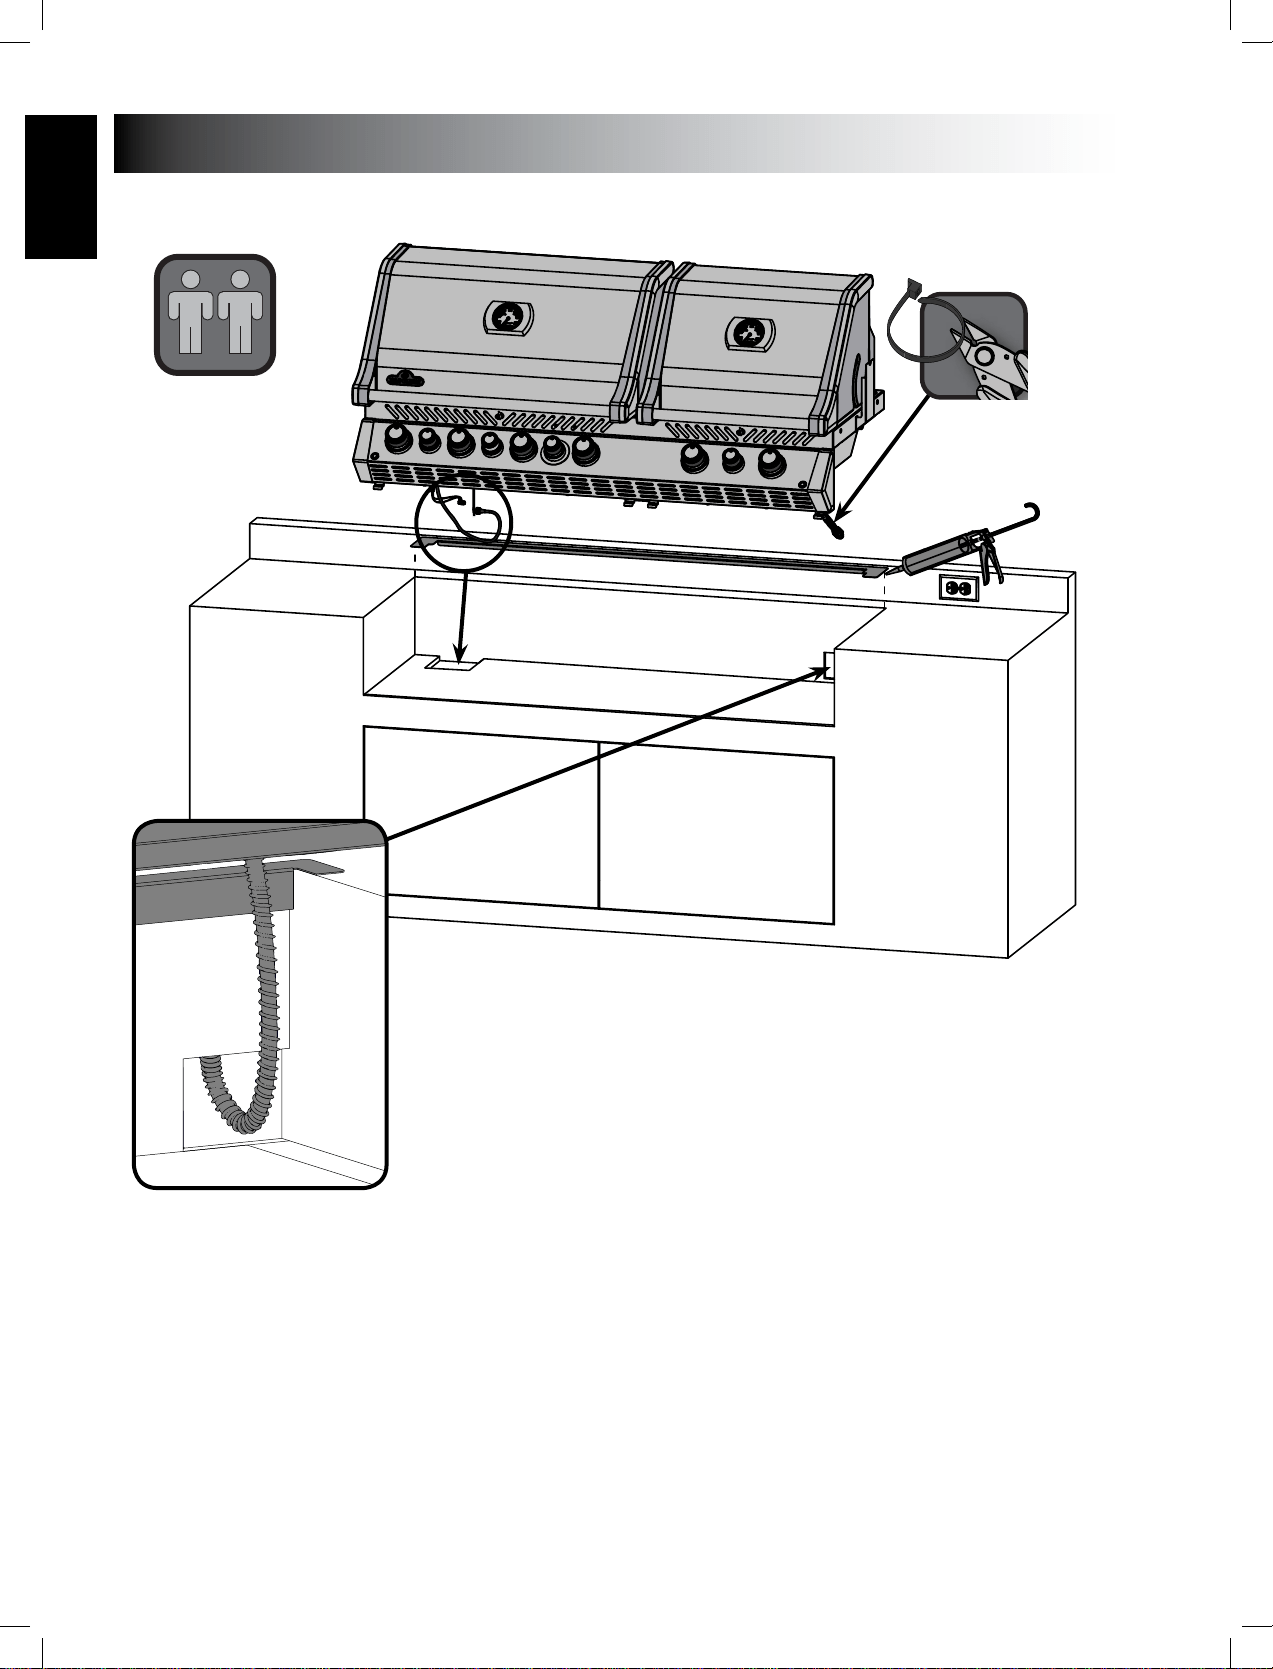
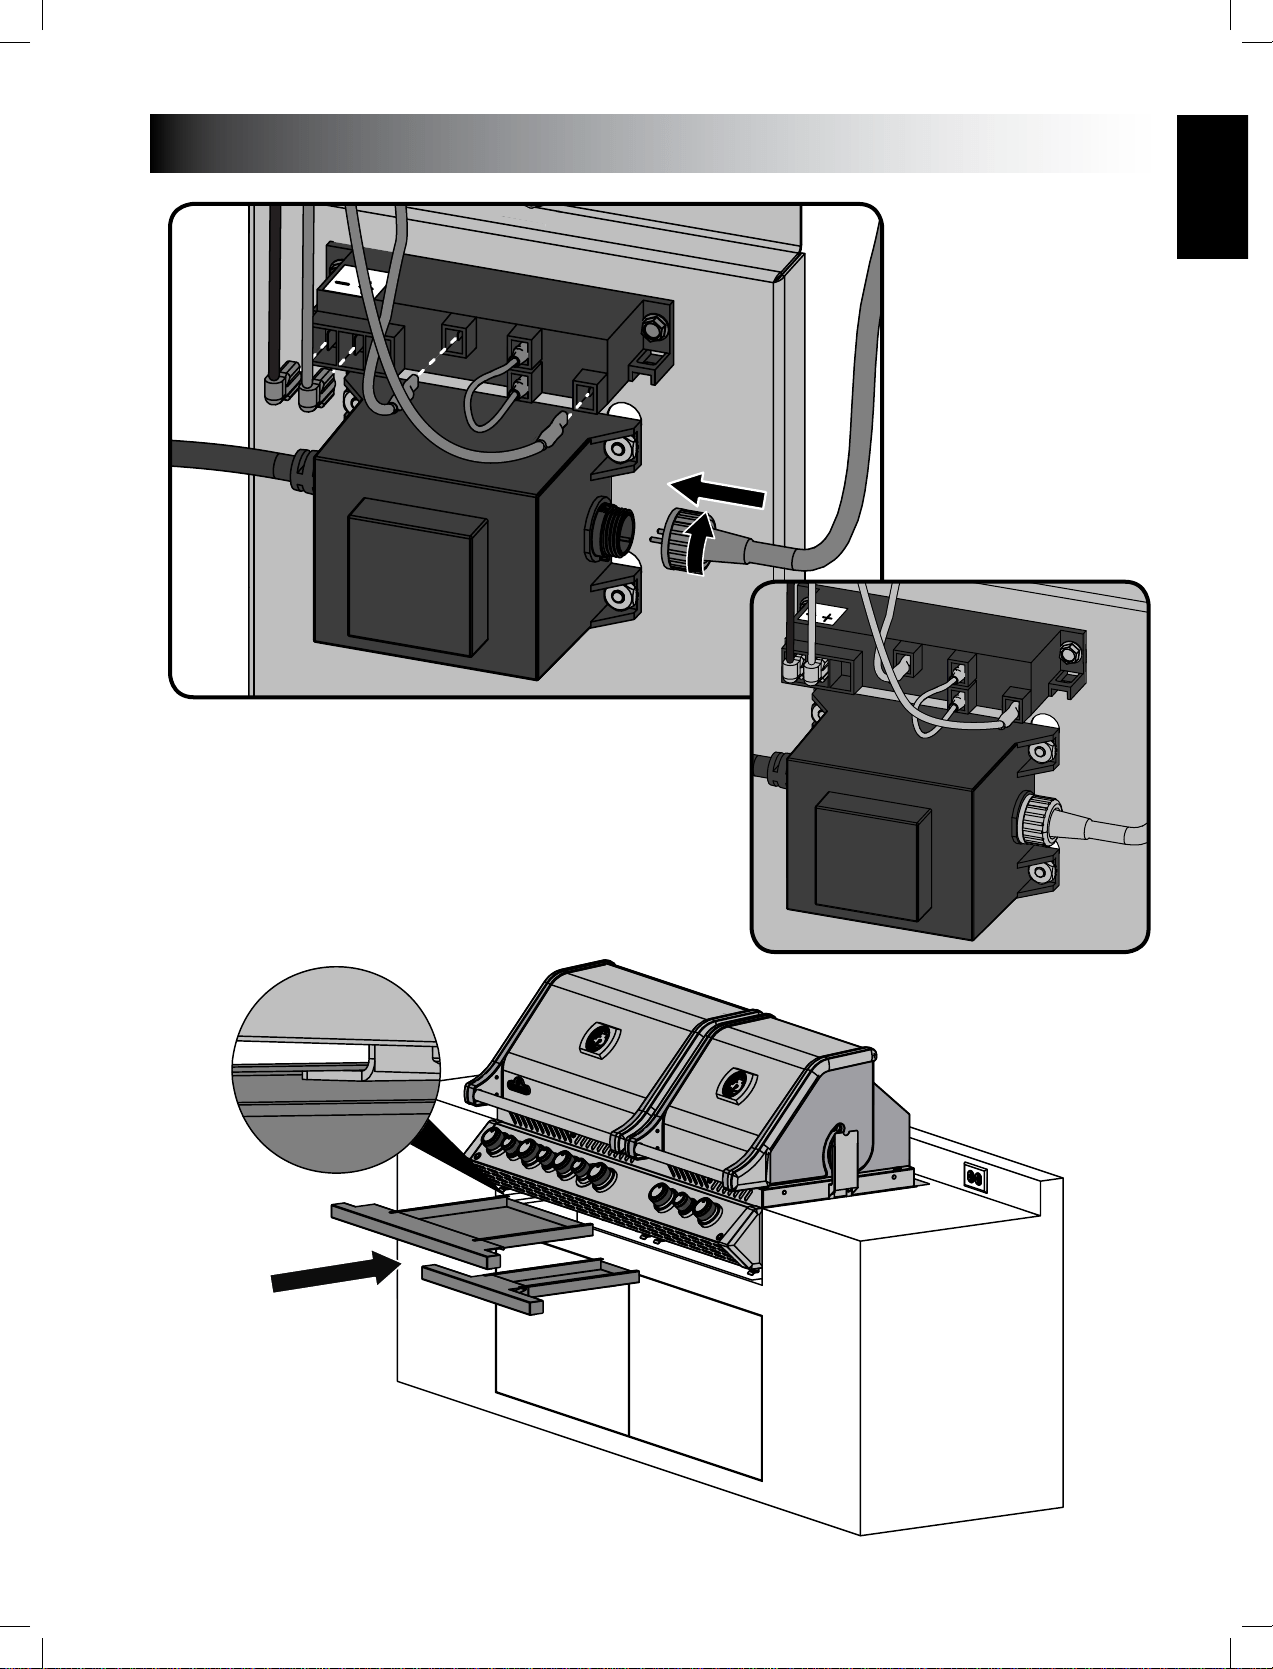
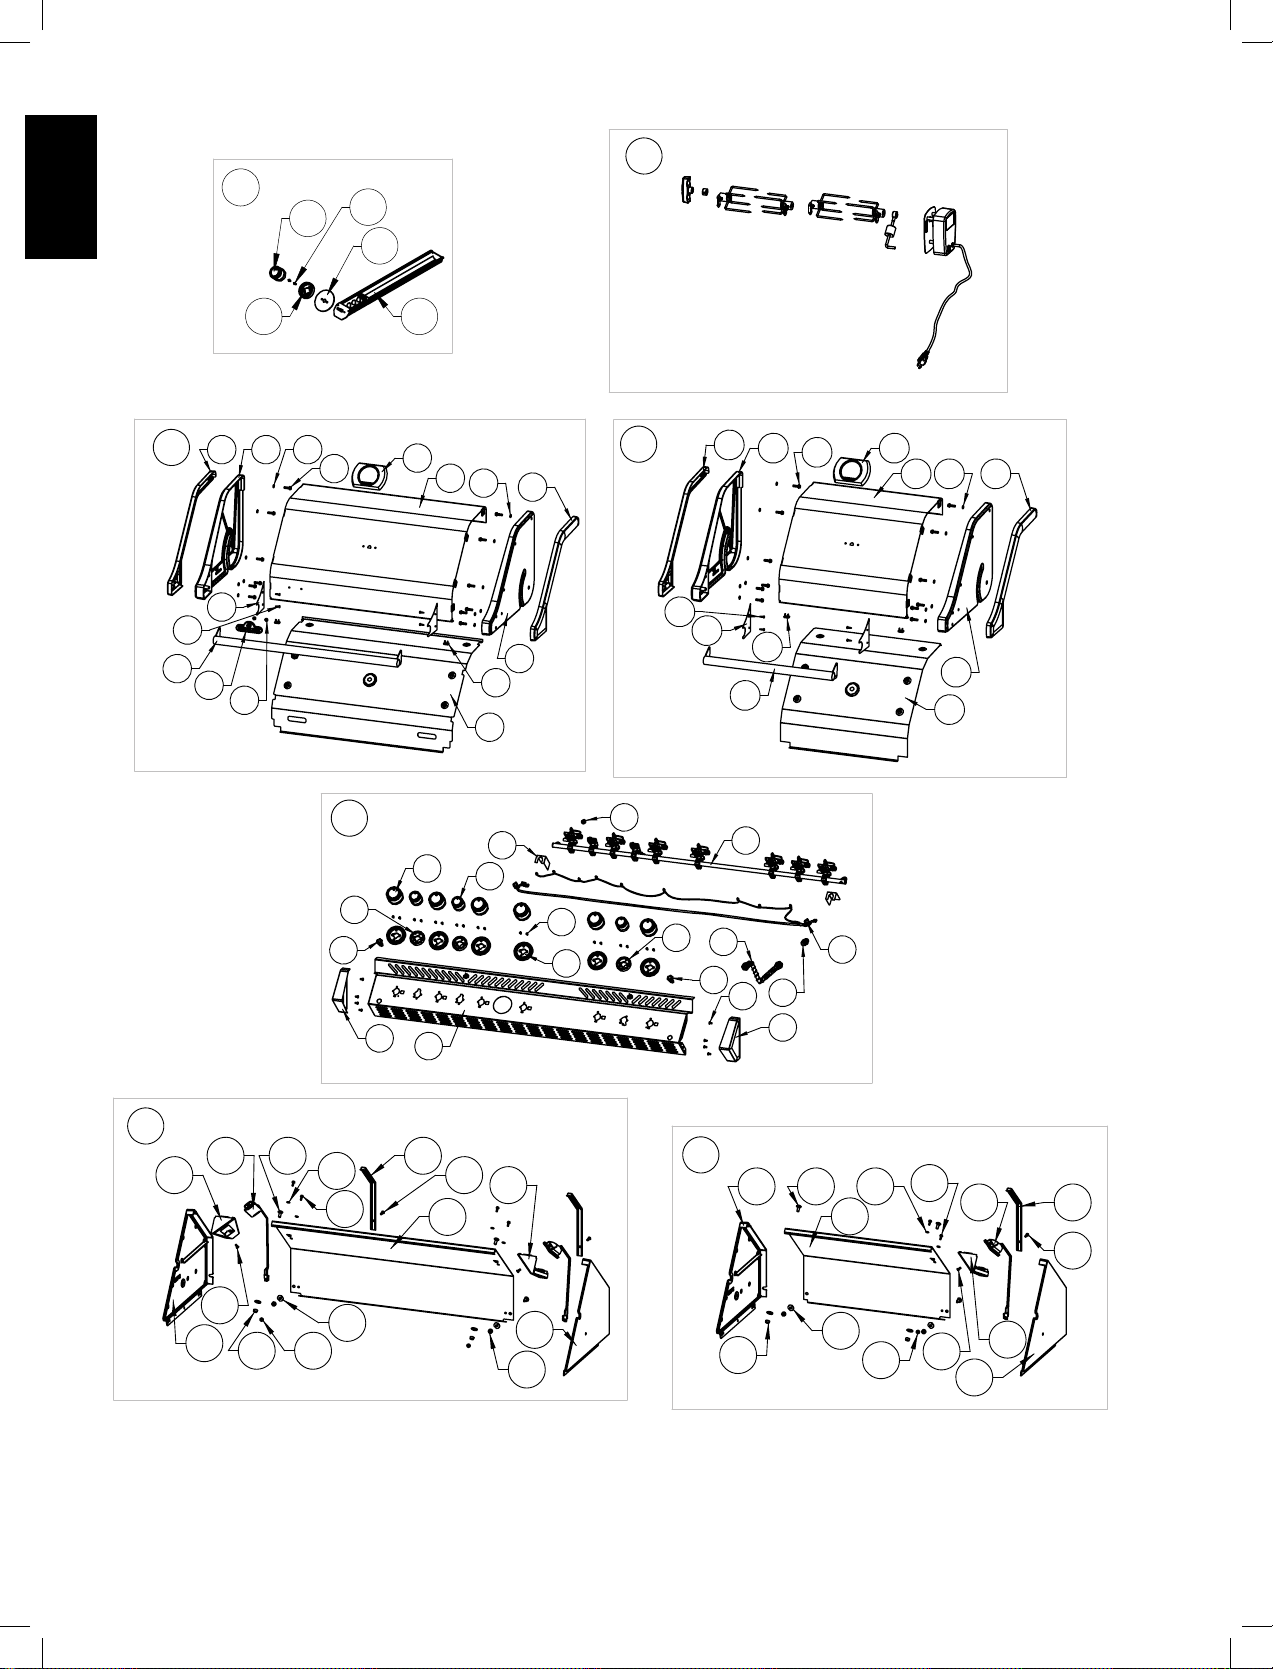
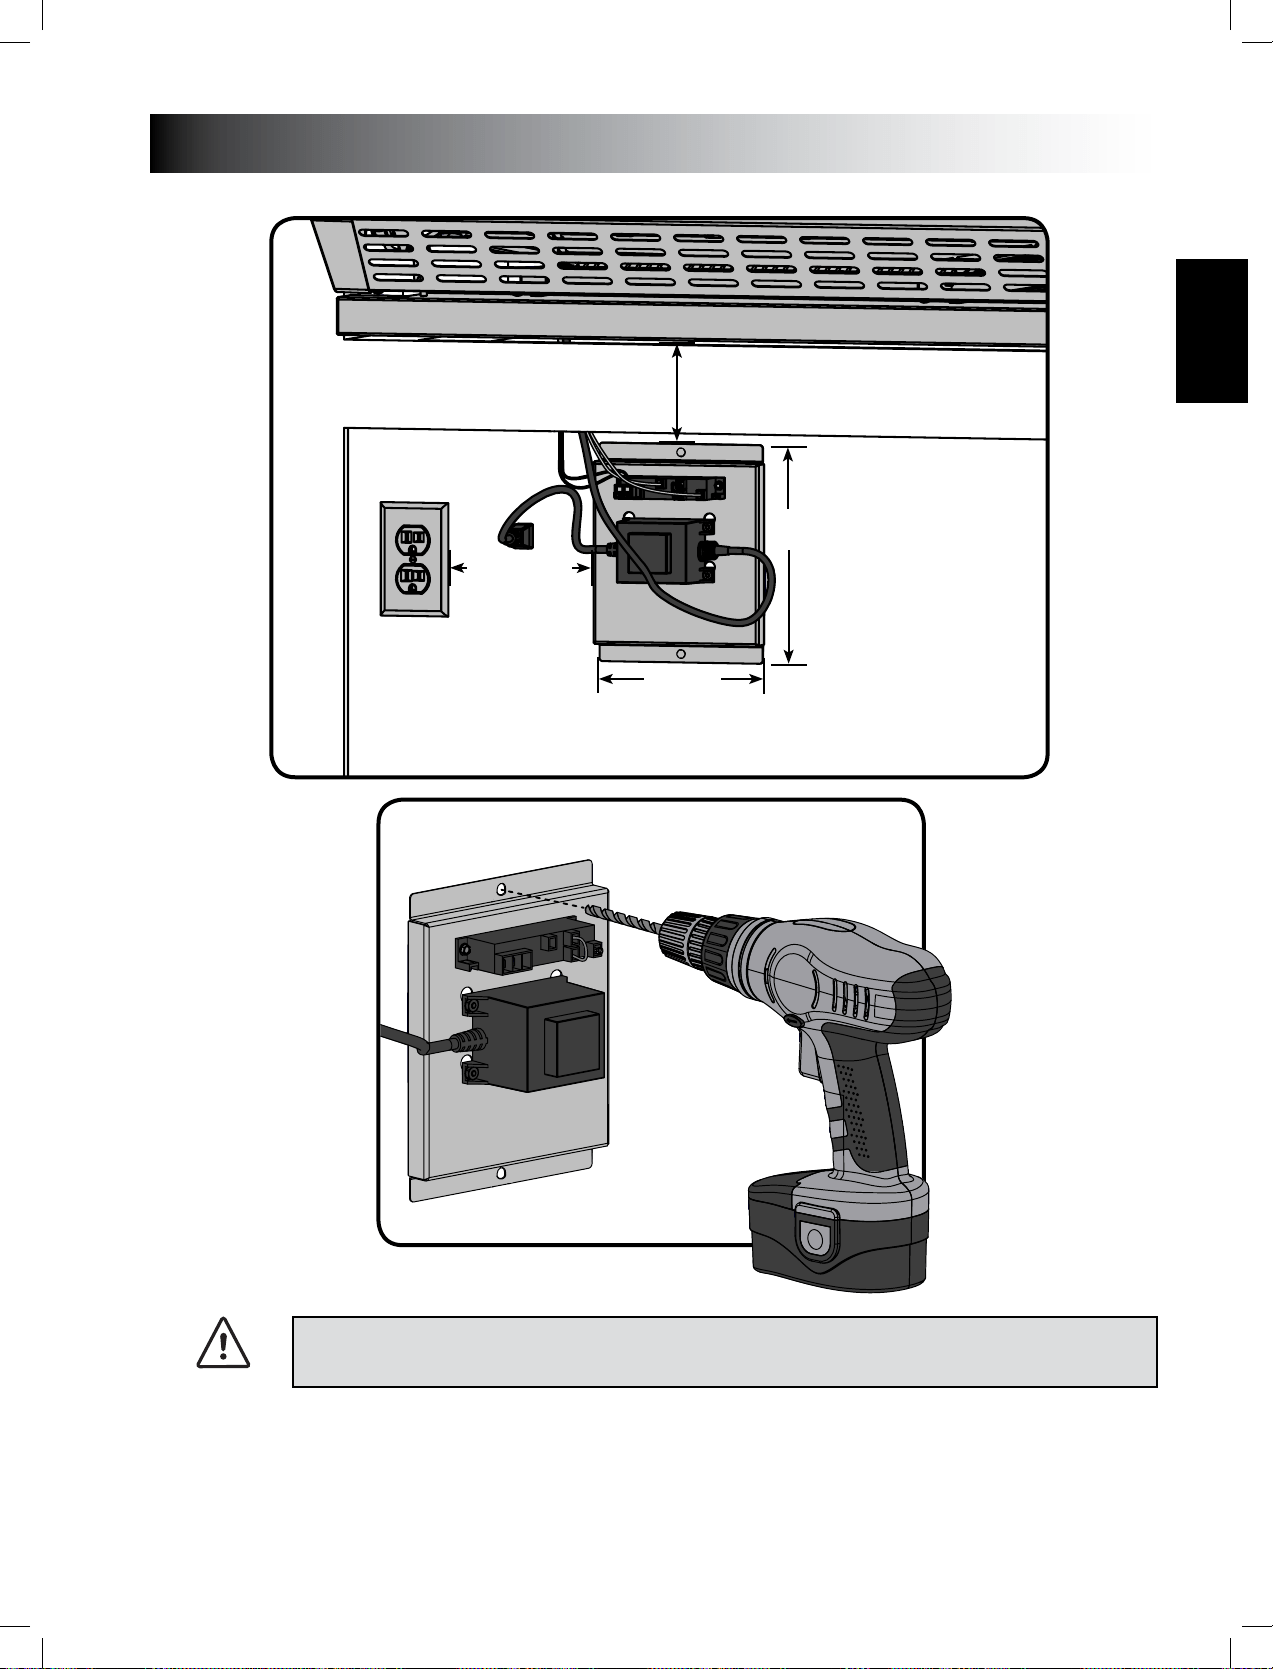
BIPRO825 BUILT-IN INSTRUCTIONS
4” (102mm) minimum, boom of the
grill to top of the electrical panel.
10” (254mm)
maximum
7”
(178mm)
9⅝”
(244mm)
LOCATED INSIDE CABINET
GFI Outlet
WARNING! Failure to follow these instrucons could result in property damage, personal injury or
death.
Plug the power supply into a Ground Fault Interrupter (GFI) protected circuit. Never remove the the
grounding plug or use with an adapter of 2 prongs.

www.napoleongrills.com
24
EN
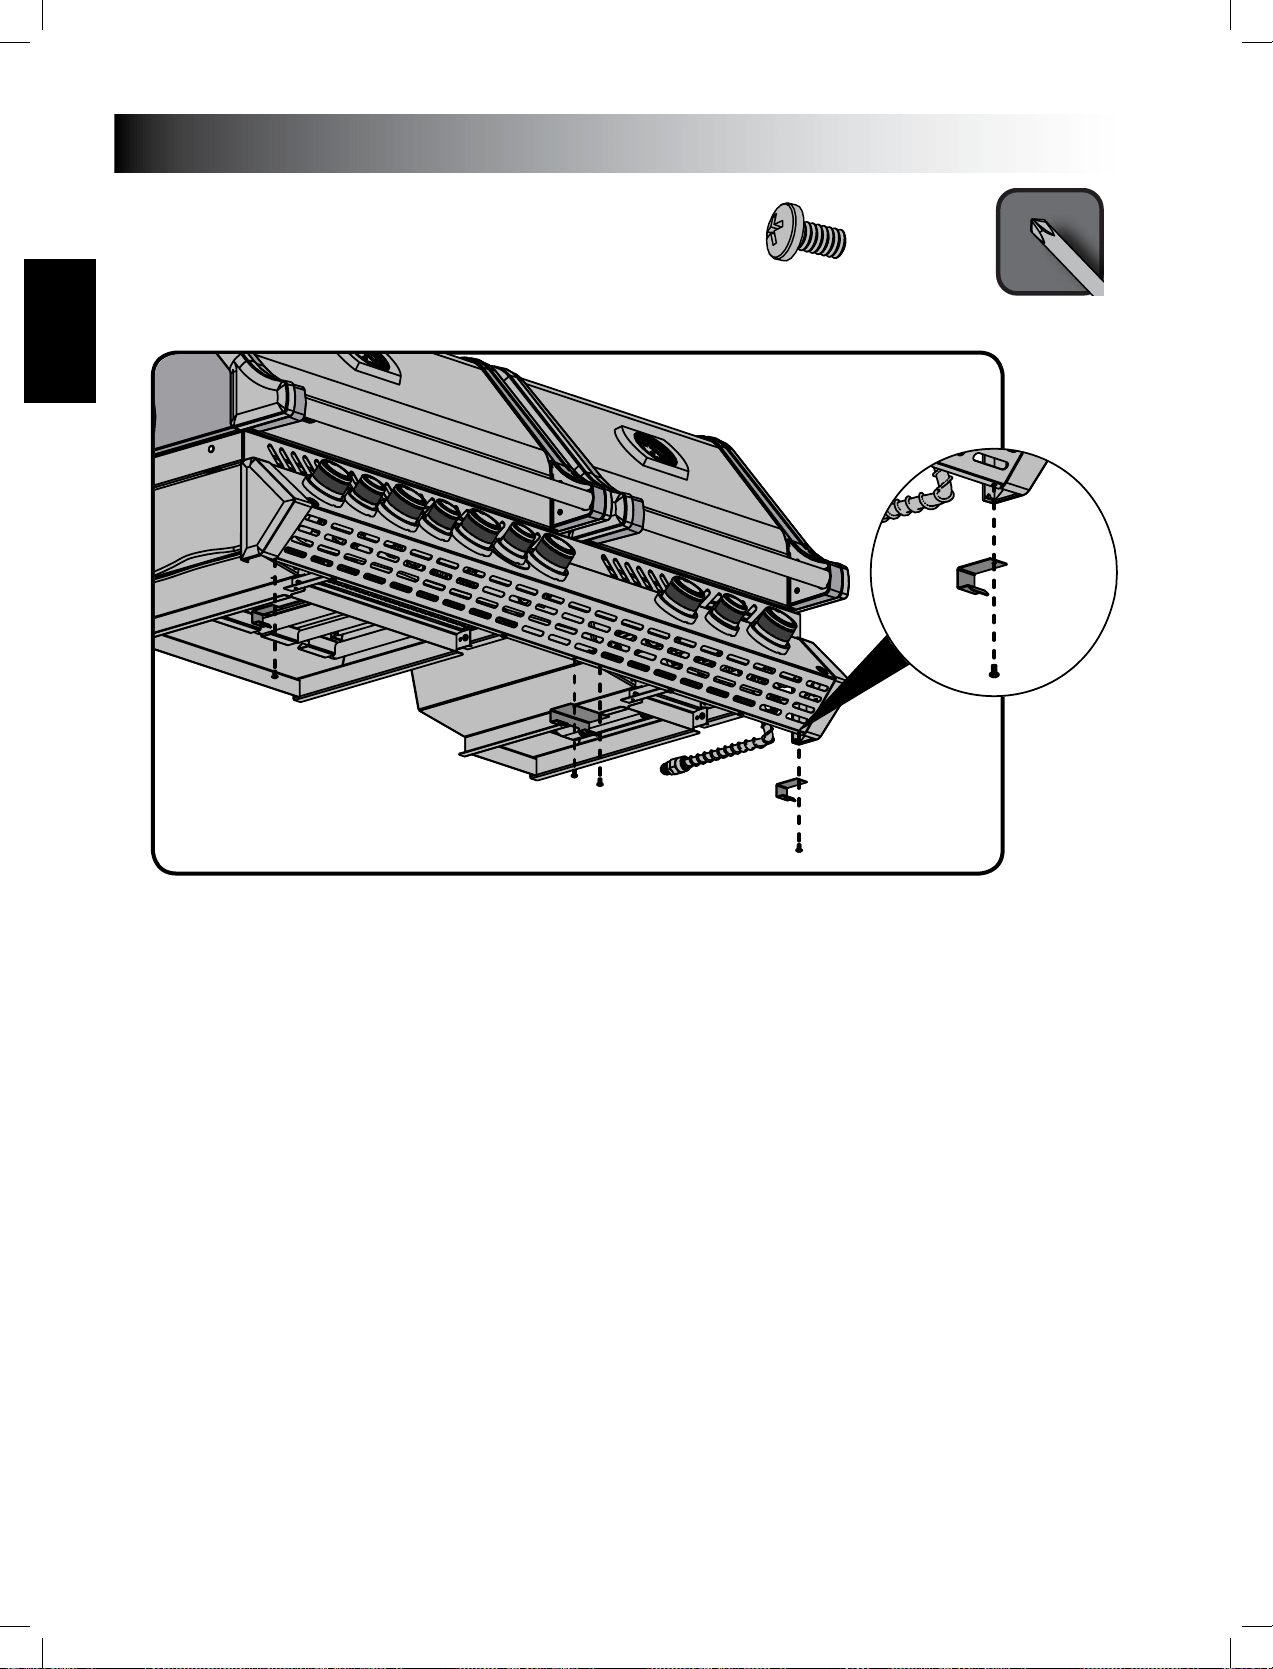
N570-0042 (10-24 X 3/8")
x4
www.napoleongrills.com
25
EN
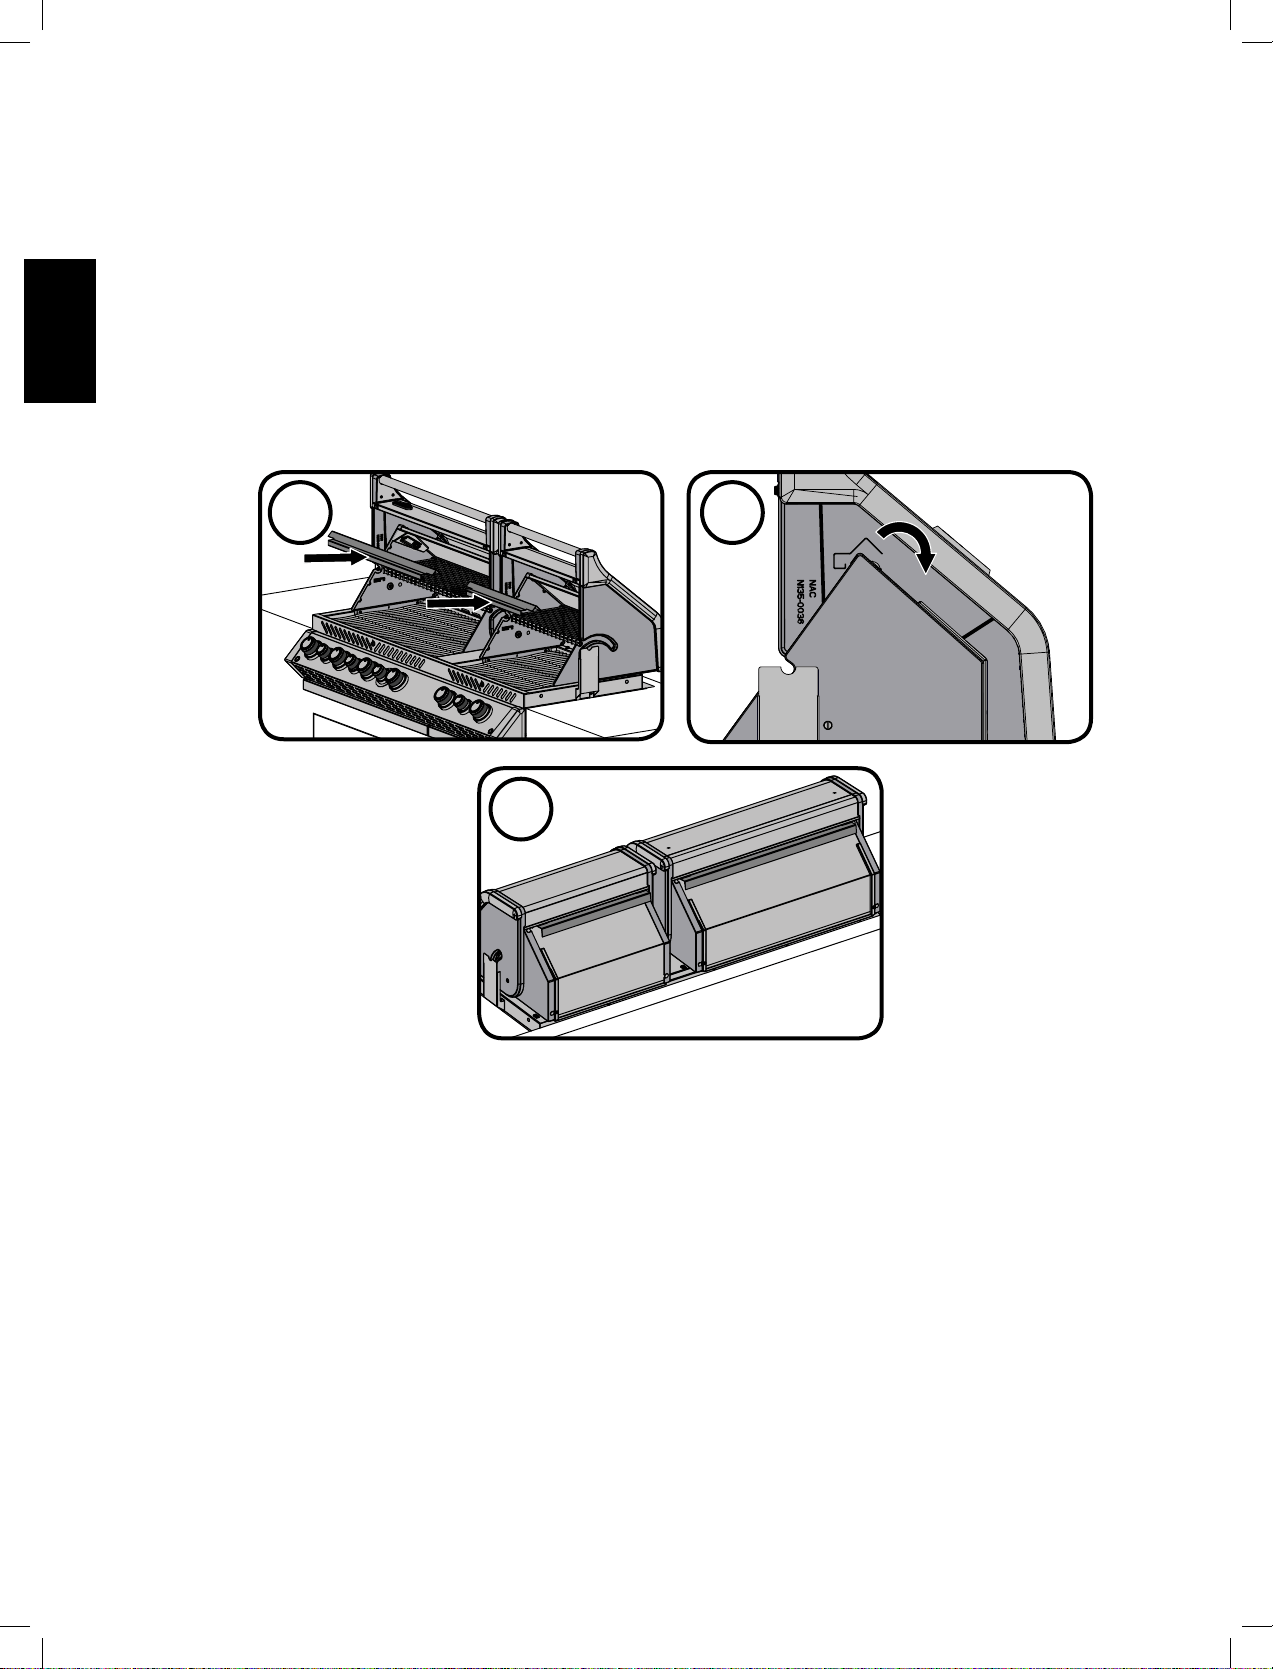
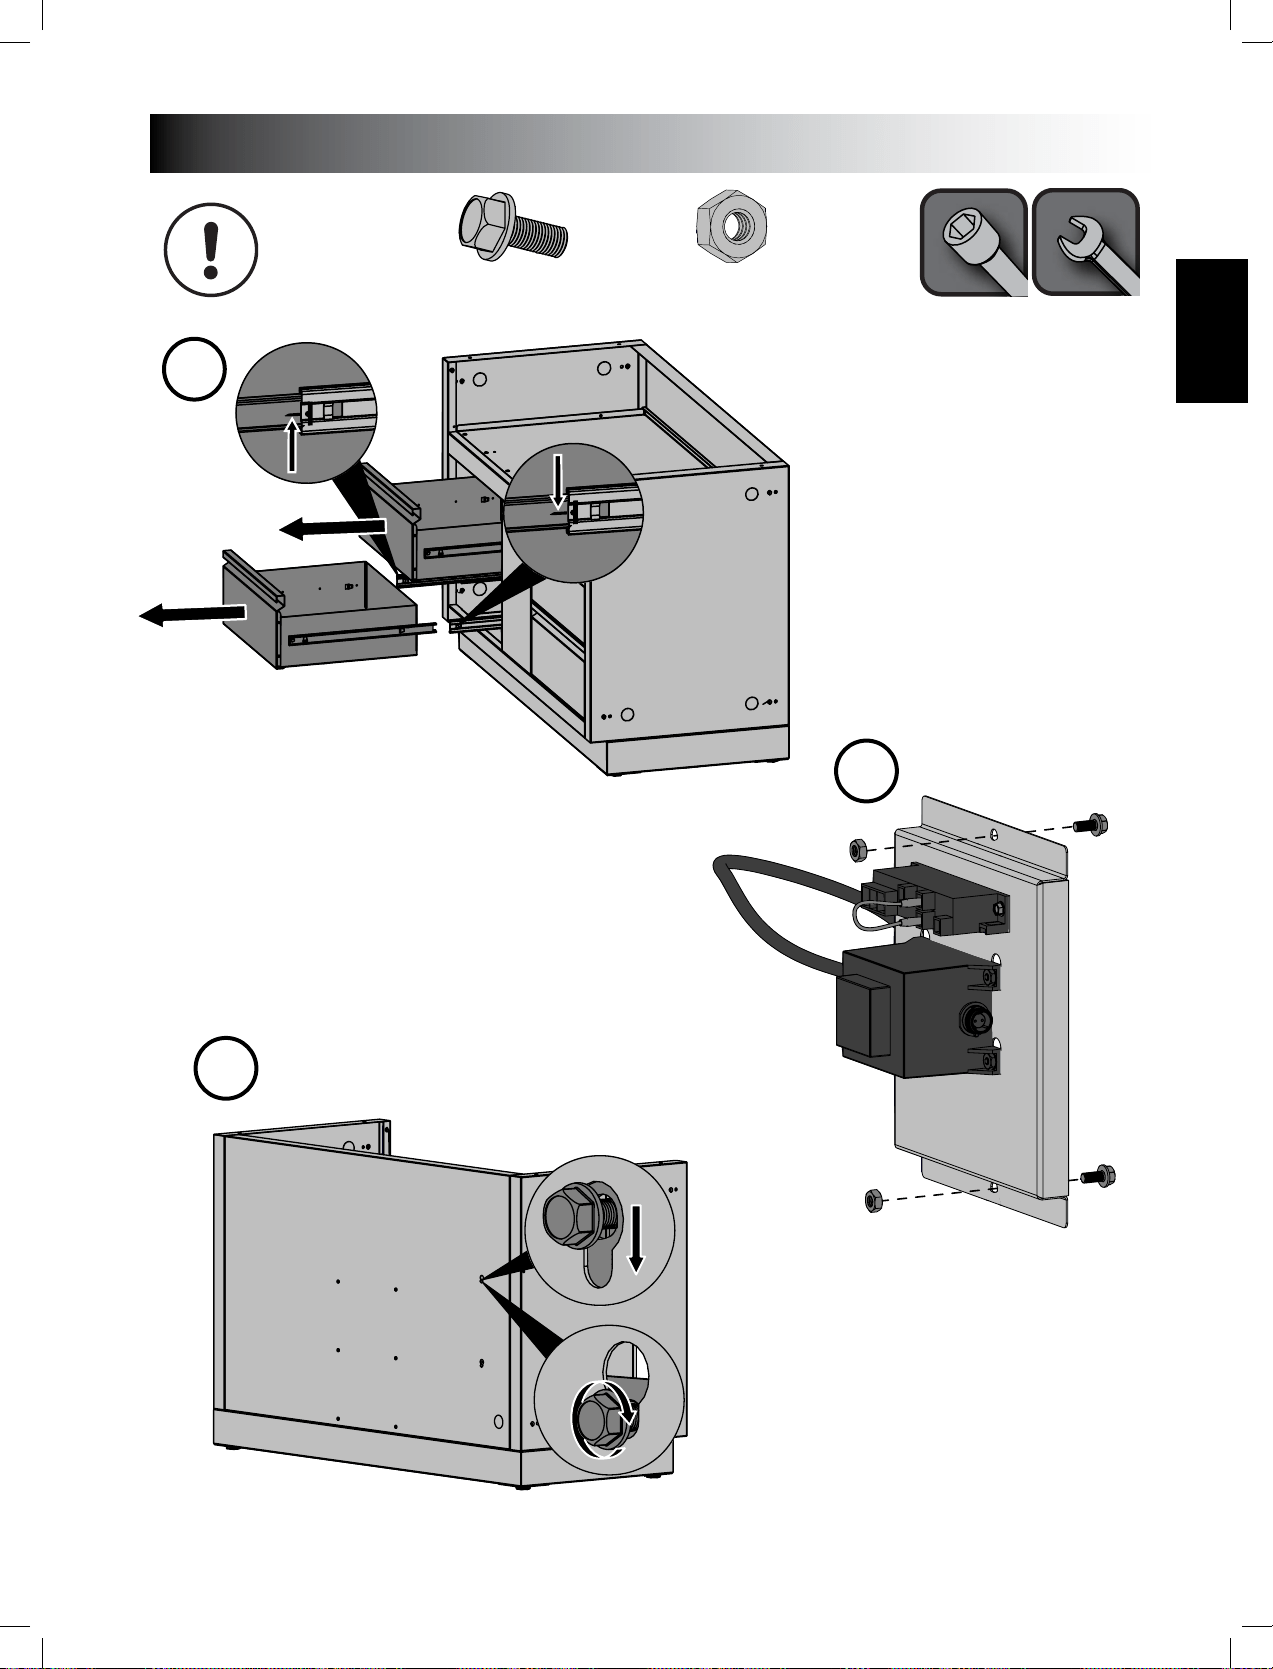
N570-0038 (1/4”-20 X 1/2”)
x2
N450-0008 (1/4”-20)
x2
IM-UGC825
1
2
3
www.napoleongrills.com
26
EN
APPLY A DAB OF SILICONE
TO EACH FLANGE TO
SECURE IN PLACE.
www.napoleongrills.com
27
EN
www.napoleongrills.com
28
EN
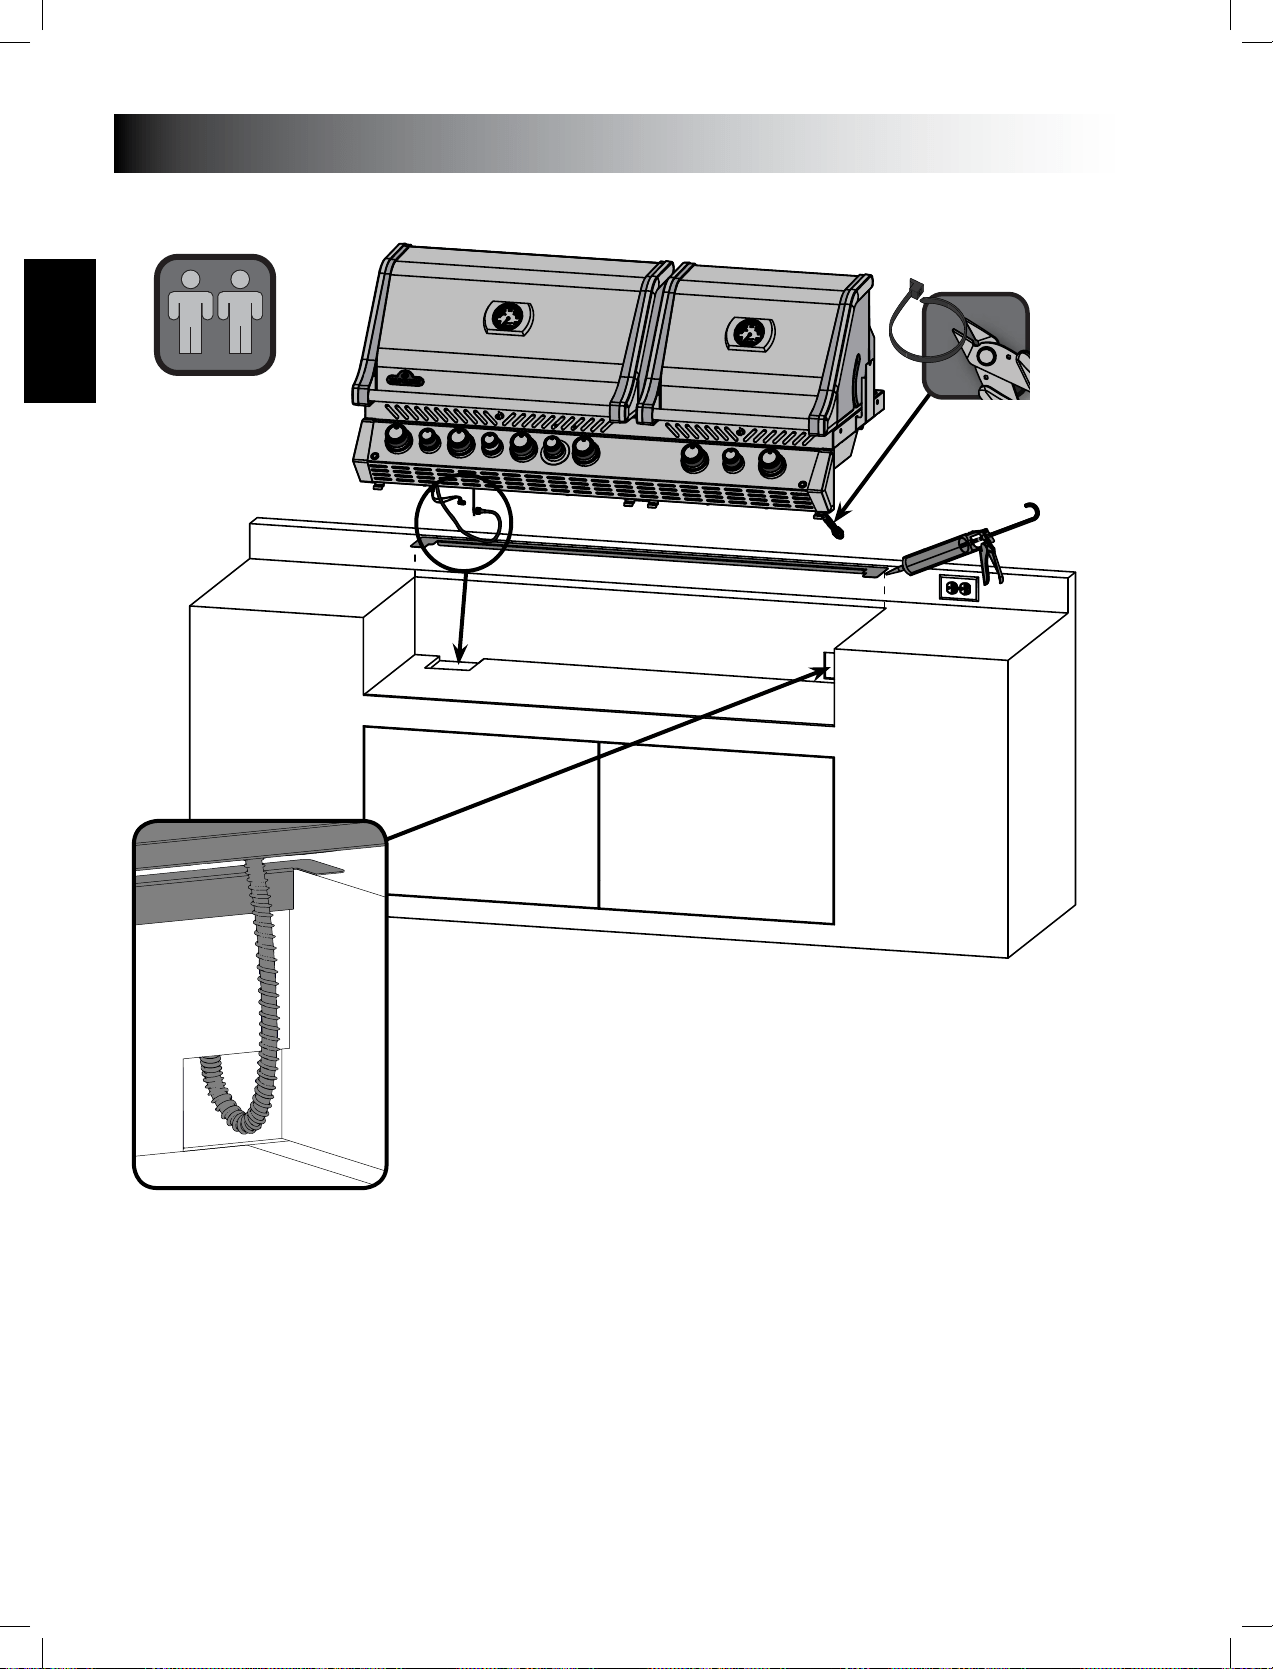
x2
x2
www.napoleongrills.com
29
EN
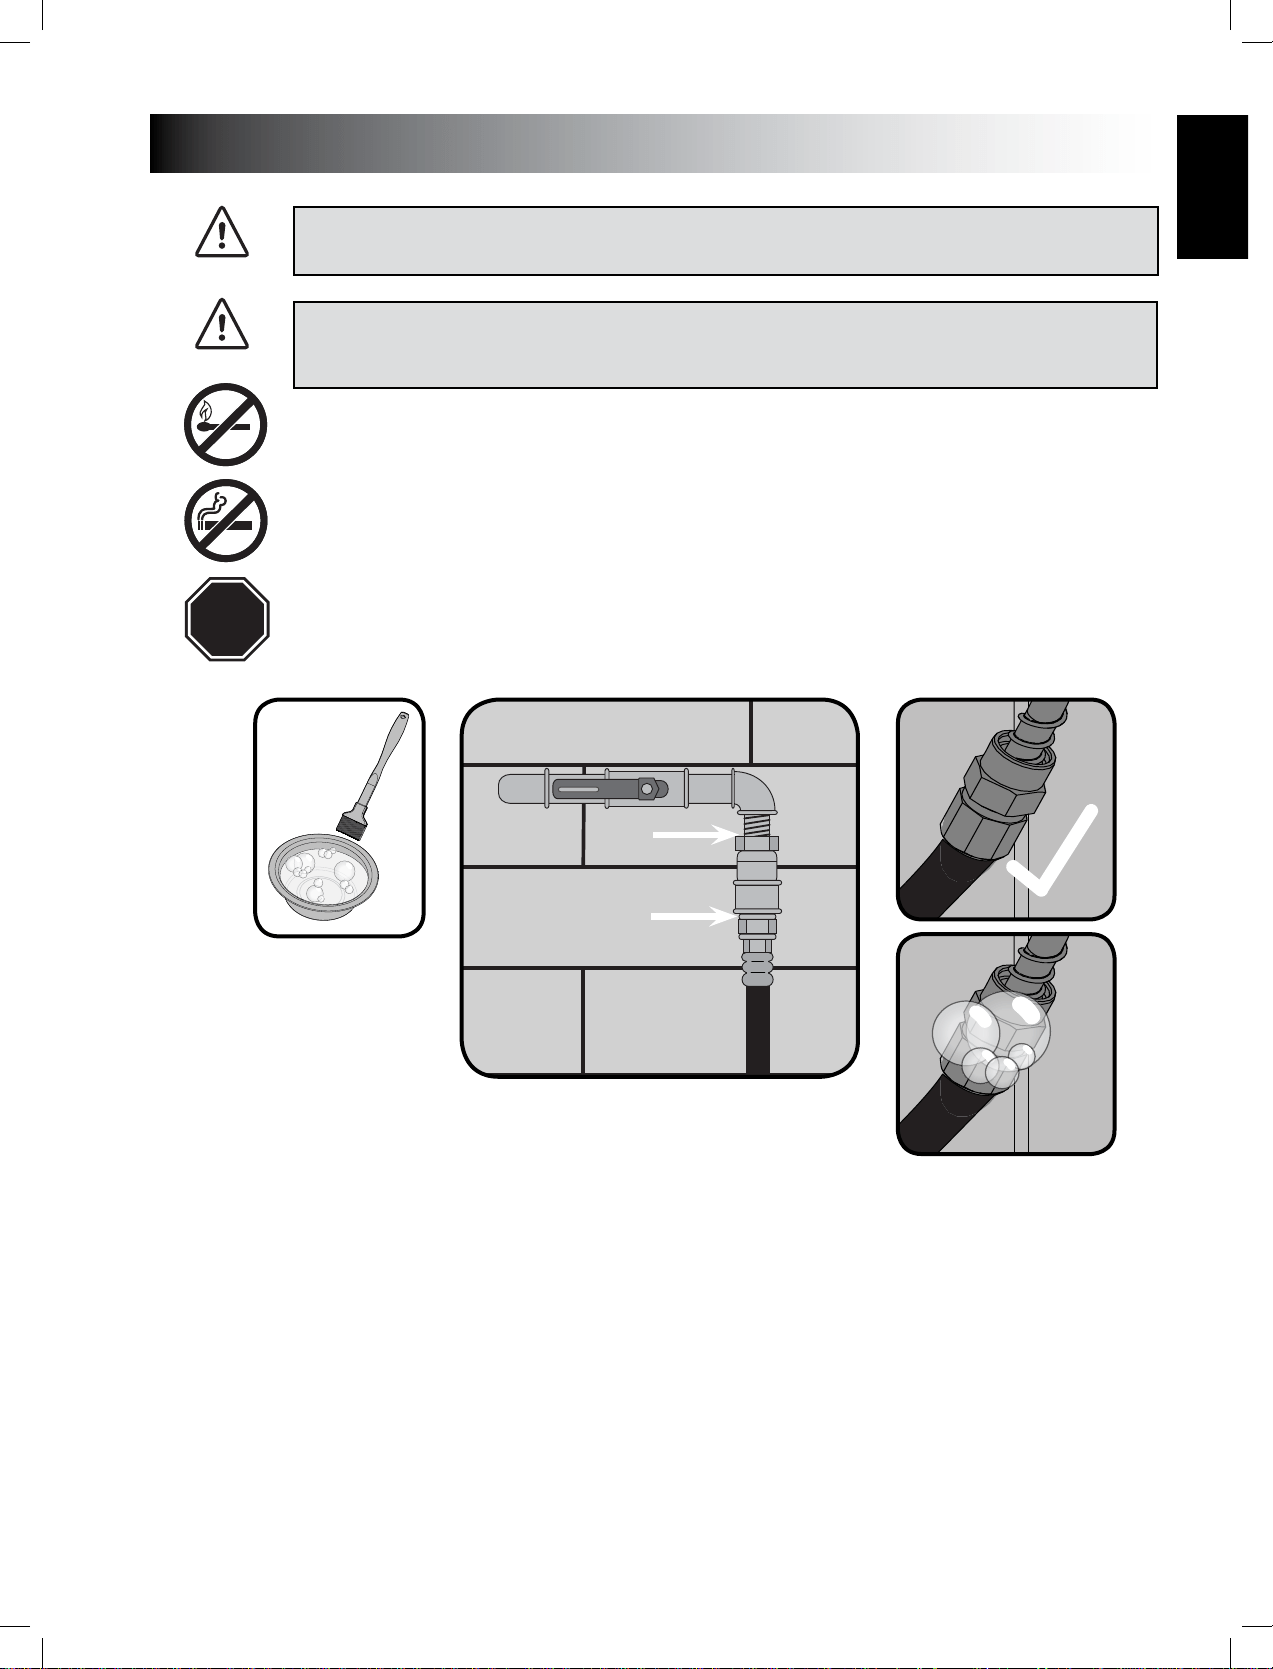
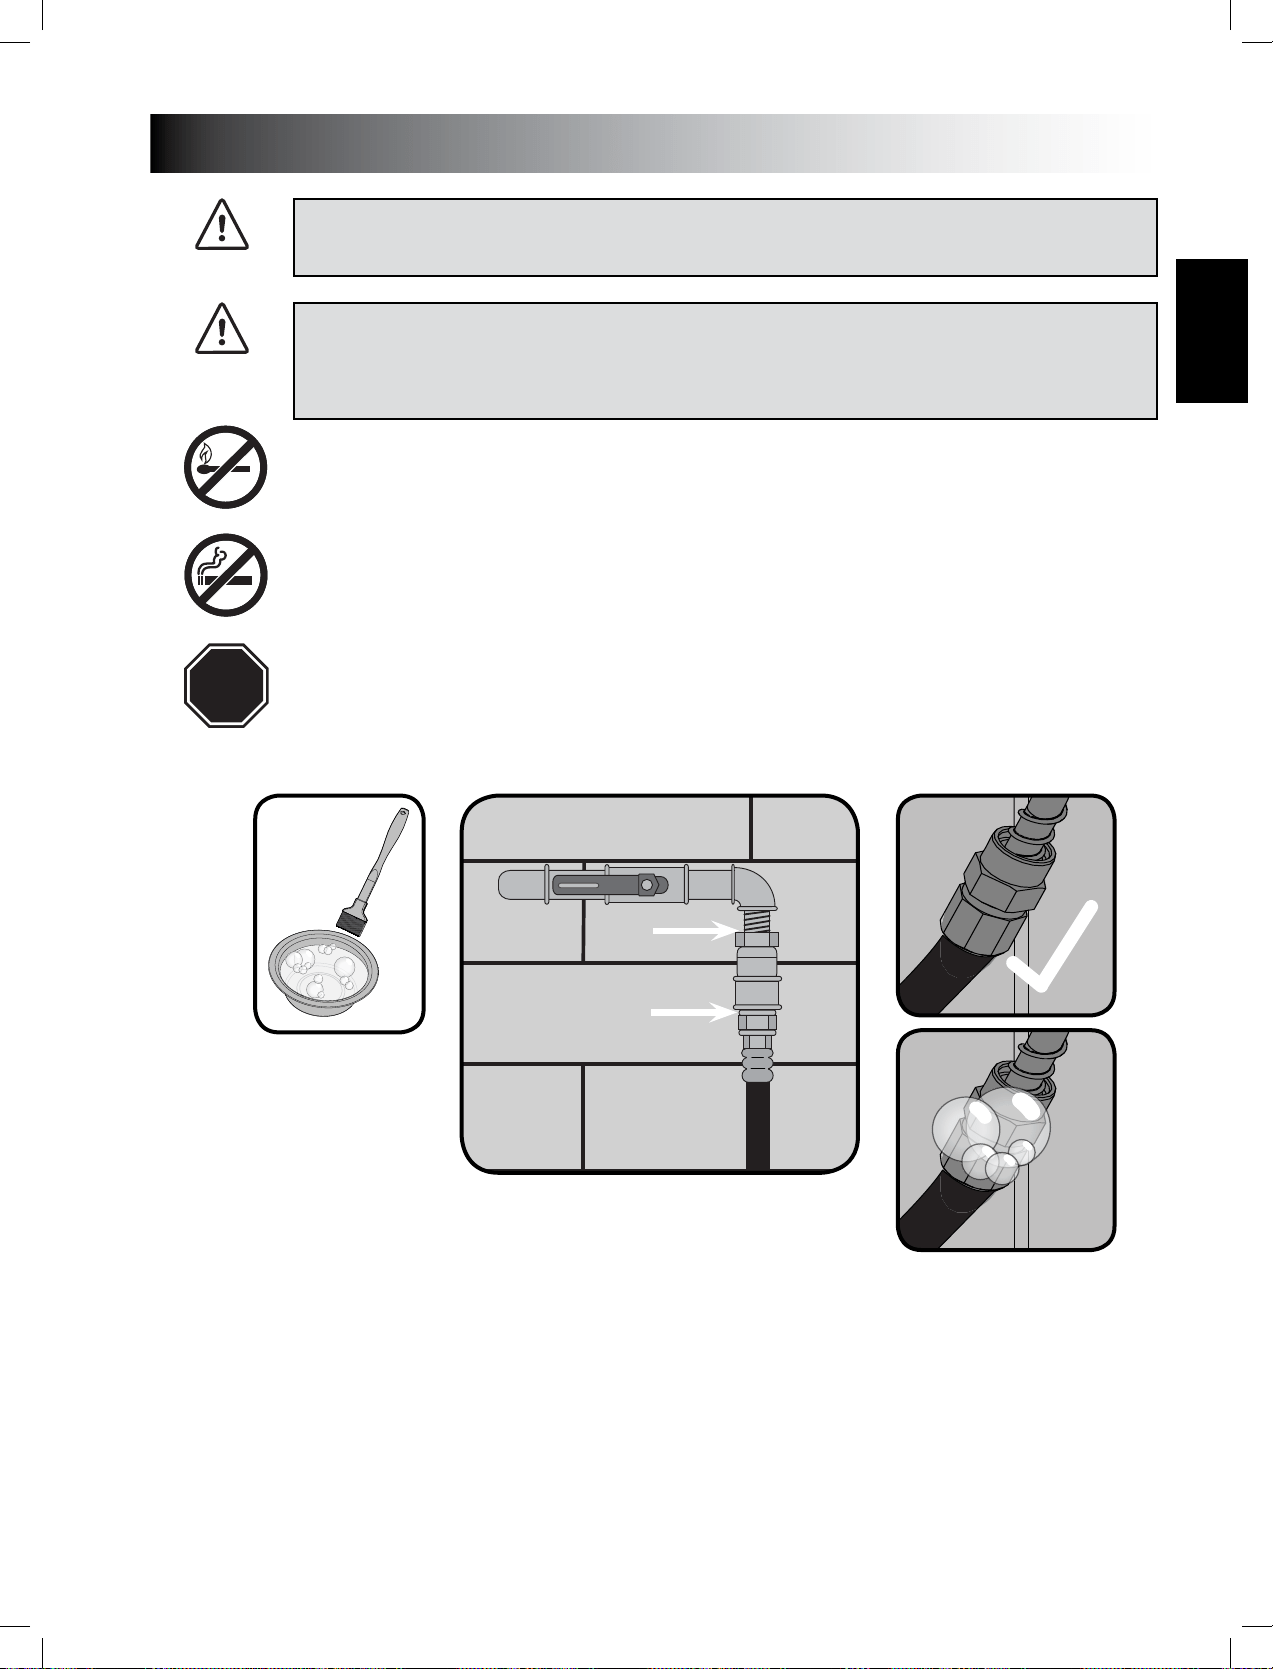
Leak Tesng Instrucons
WARNING! A leak test must be performed annually and each me a cylinder is hooked up or if a
part of the gas system is replaced.
WARNING! Never use an open ame to check for gas leaks. Be certain no sparks or open ames
are in the area while you check for leaks. Sparks or open ames will result in a re or explosion,
damage to property, serious bodily injury, or death.
Leak tesng
hose, manifolds and valves.
gas installer.
immediately shut o the gas supply, disconnect it, and have the grill
STOP
X
www.napoleongrills.com
30
EN
Rosserie Kit Assembly Instrucon
Ensure stop bushing is ghtened on the
inside of hood casng.
X
www.napoleongrills.com
31
EN
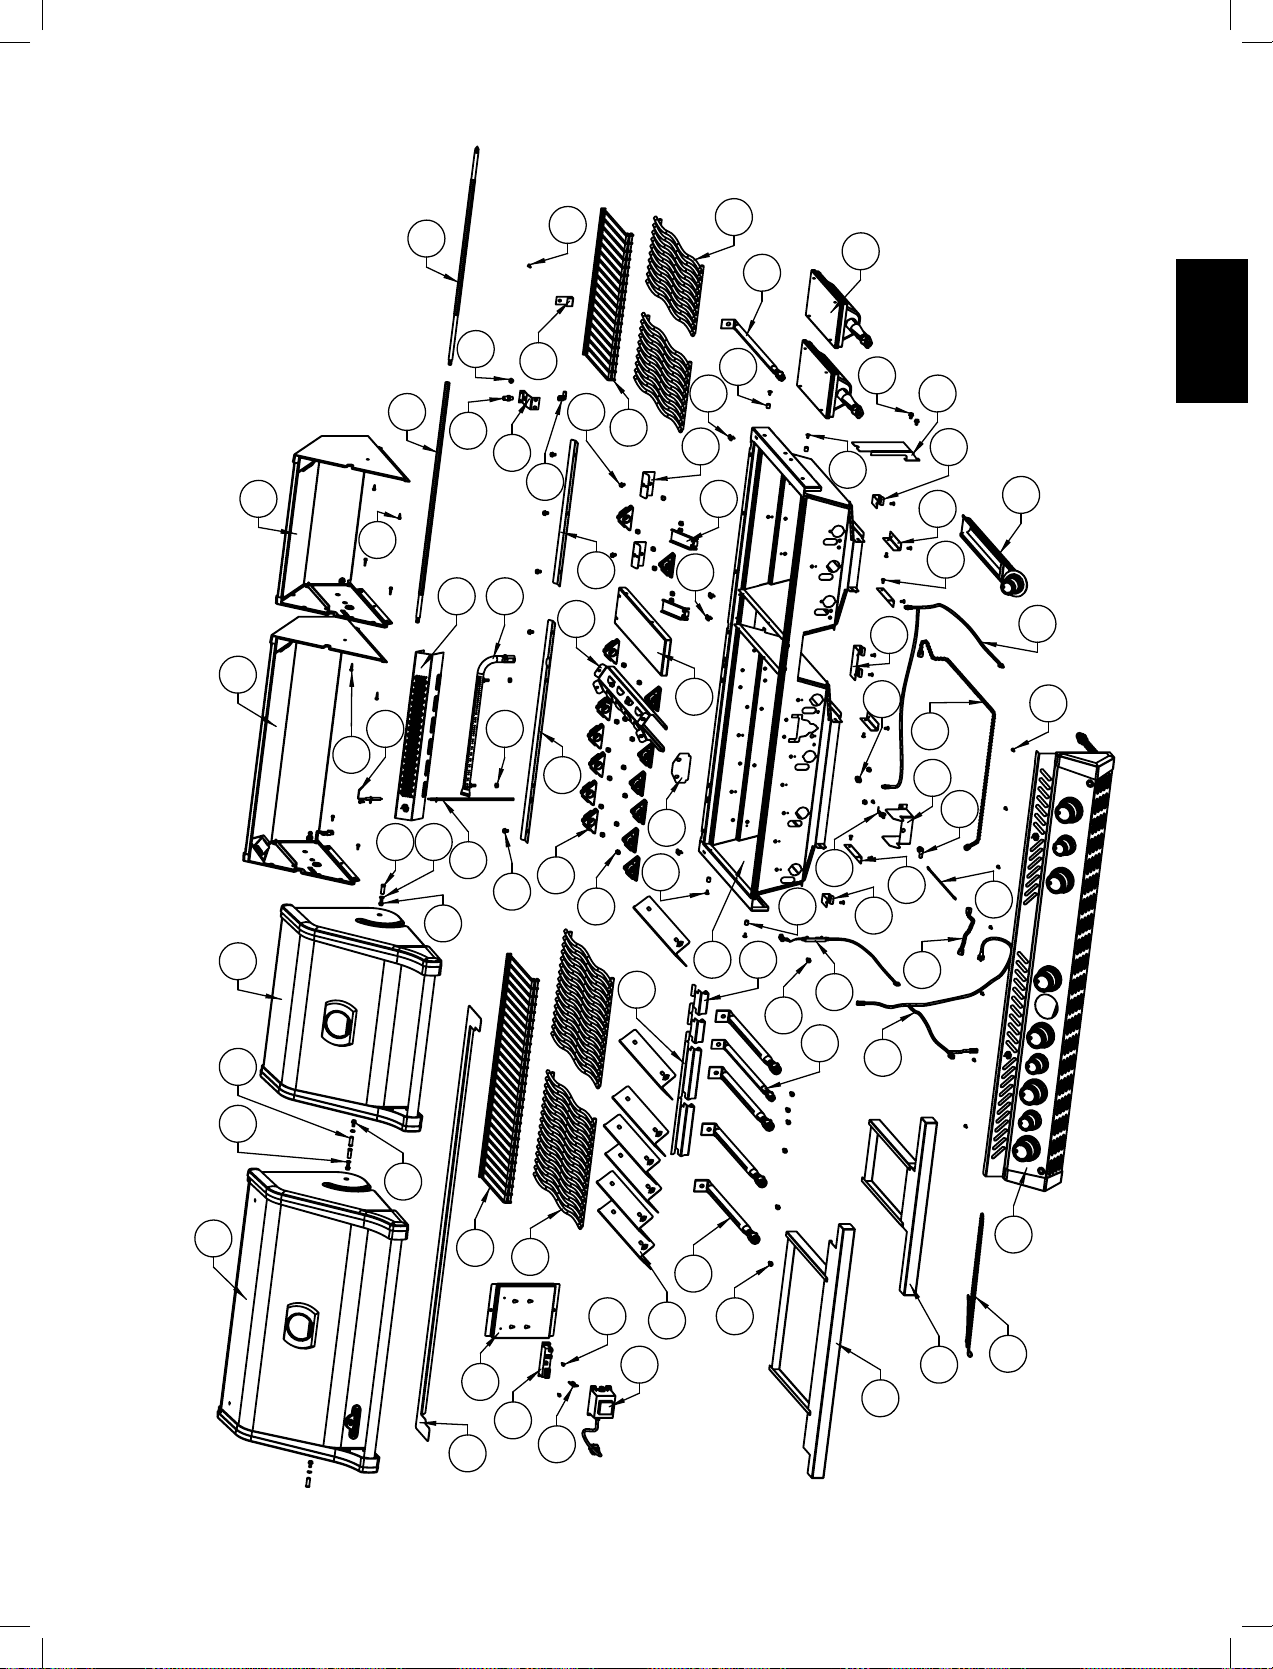
1
2
2
3
4
5
6
7
8
9
10
11
12
13
14
16
17
18
19
20
15
20
21
22
22
40
41
43
44
4546
48
49
50
51
58
58
58
63
64
65
58
4
68
70
70
71
71
72
72
73
74
75
76
77
78
80
84
82
83
85
86
87
88
89
90
91
92
93
94
93
95
96
95
96
9
113
114
115
116
118
117
15
47
22
97
www.napoleongrills.com
32
EN
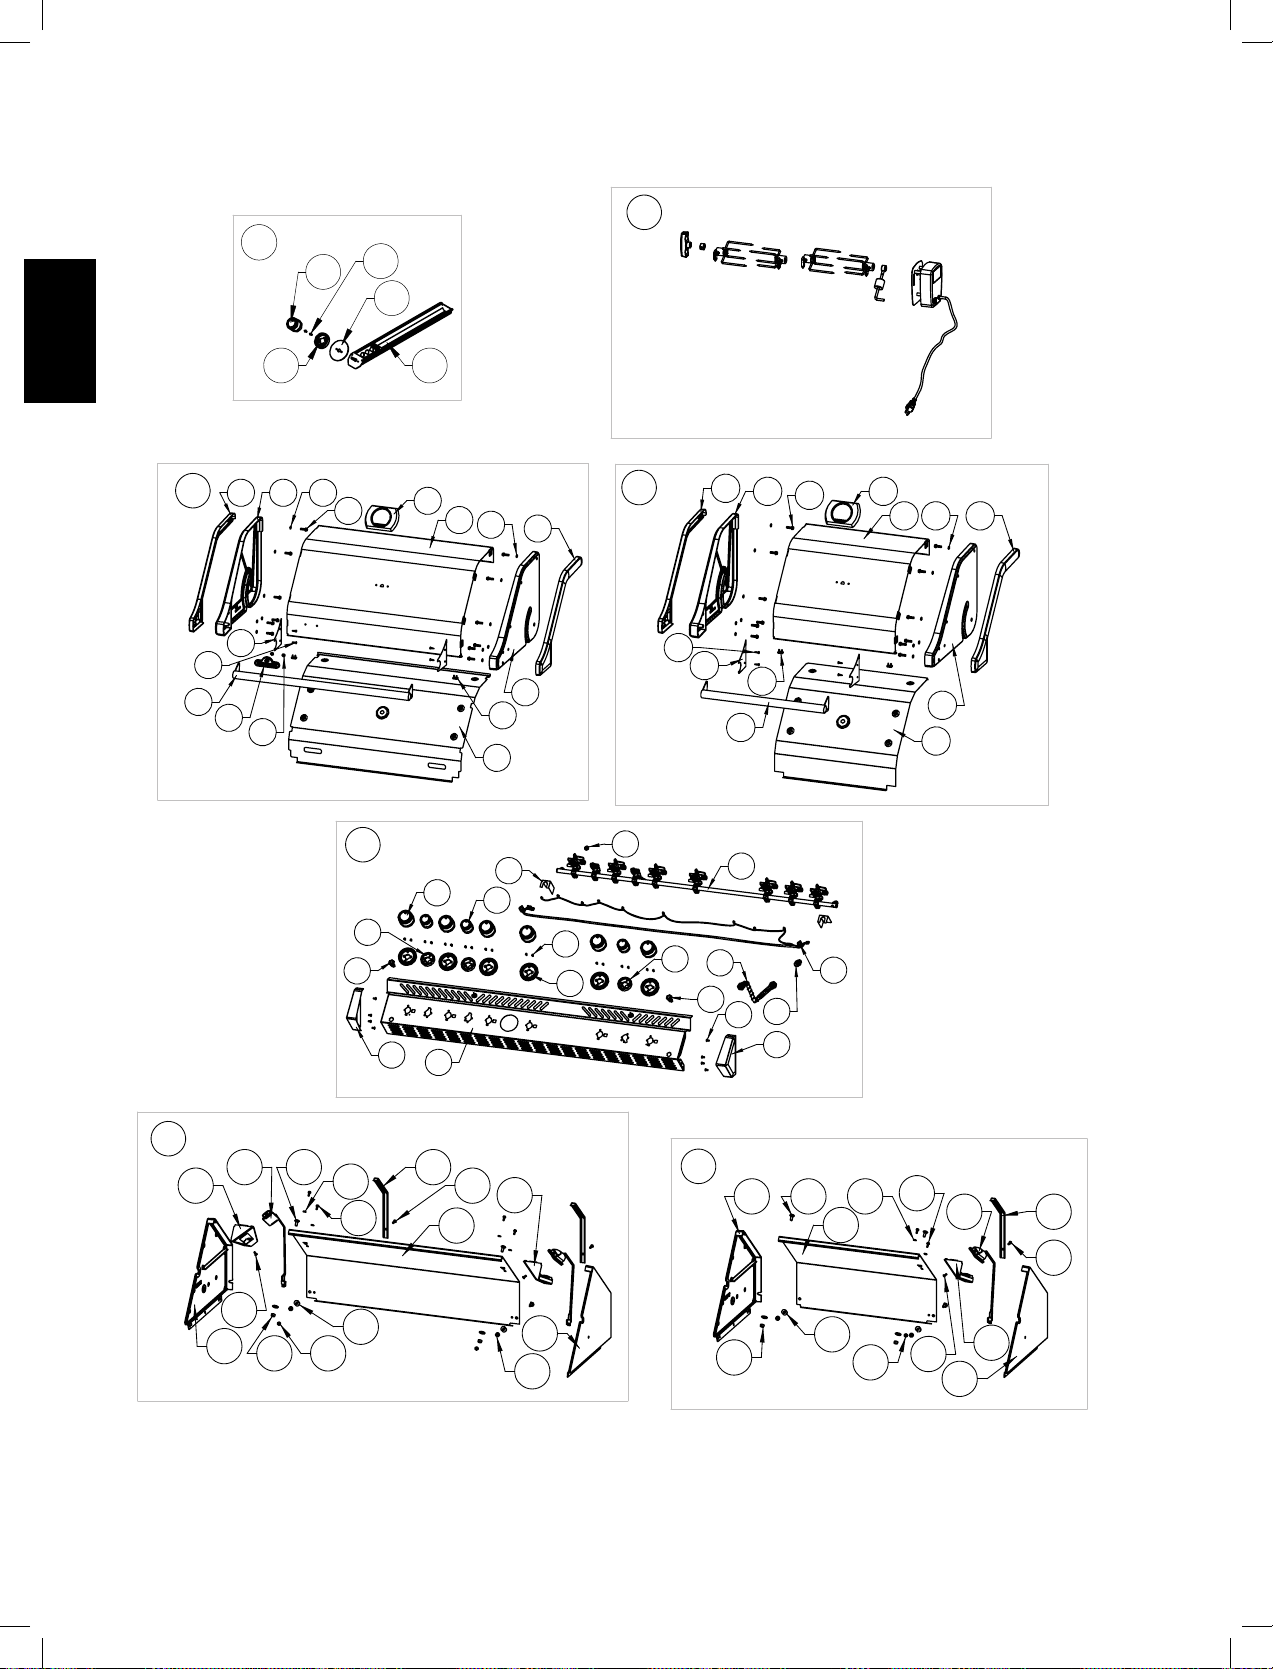
79
68
9
70
70
9899
100
101
102
104
103
105
106
107
108
112
82
68
9
70
98
99
100
101
109
110
111
112
108
107
83
23
24
25
26
27
28
29
30
31
32
33
34
35
36
37
38
39
21
86
42
46
46
52
53
54
56
57
59
60
61
62
66
67
69
81
87
42
46
52
53
55
56
57
60
61
62
66
67
69
81
88
51
119
120
42
121 122
www.napoleongrills.com
33
EN
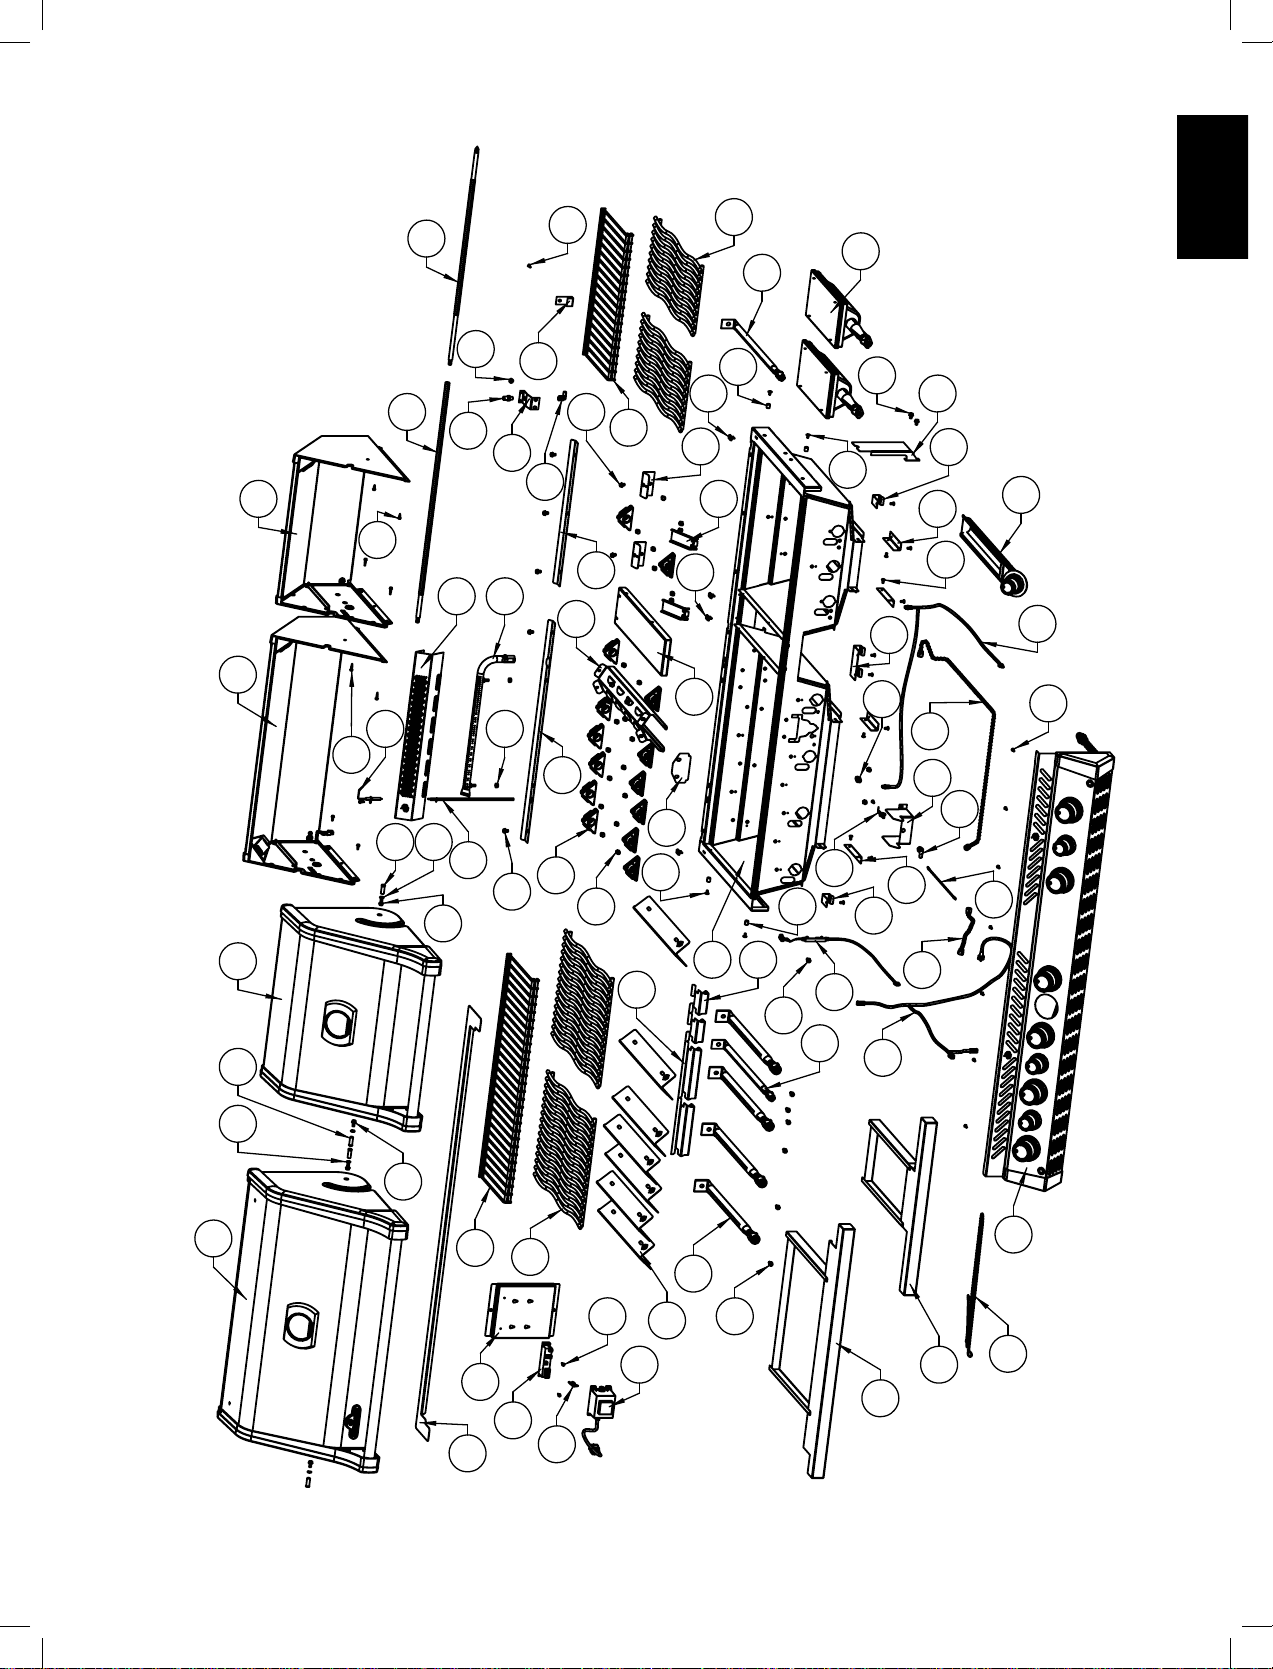
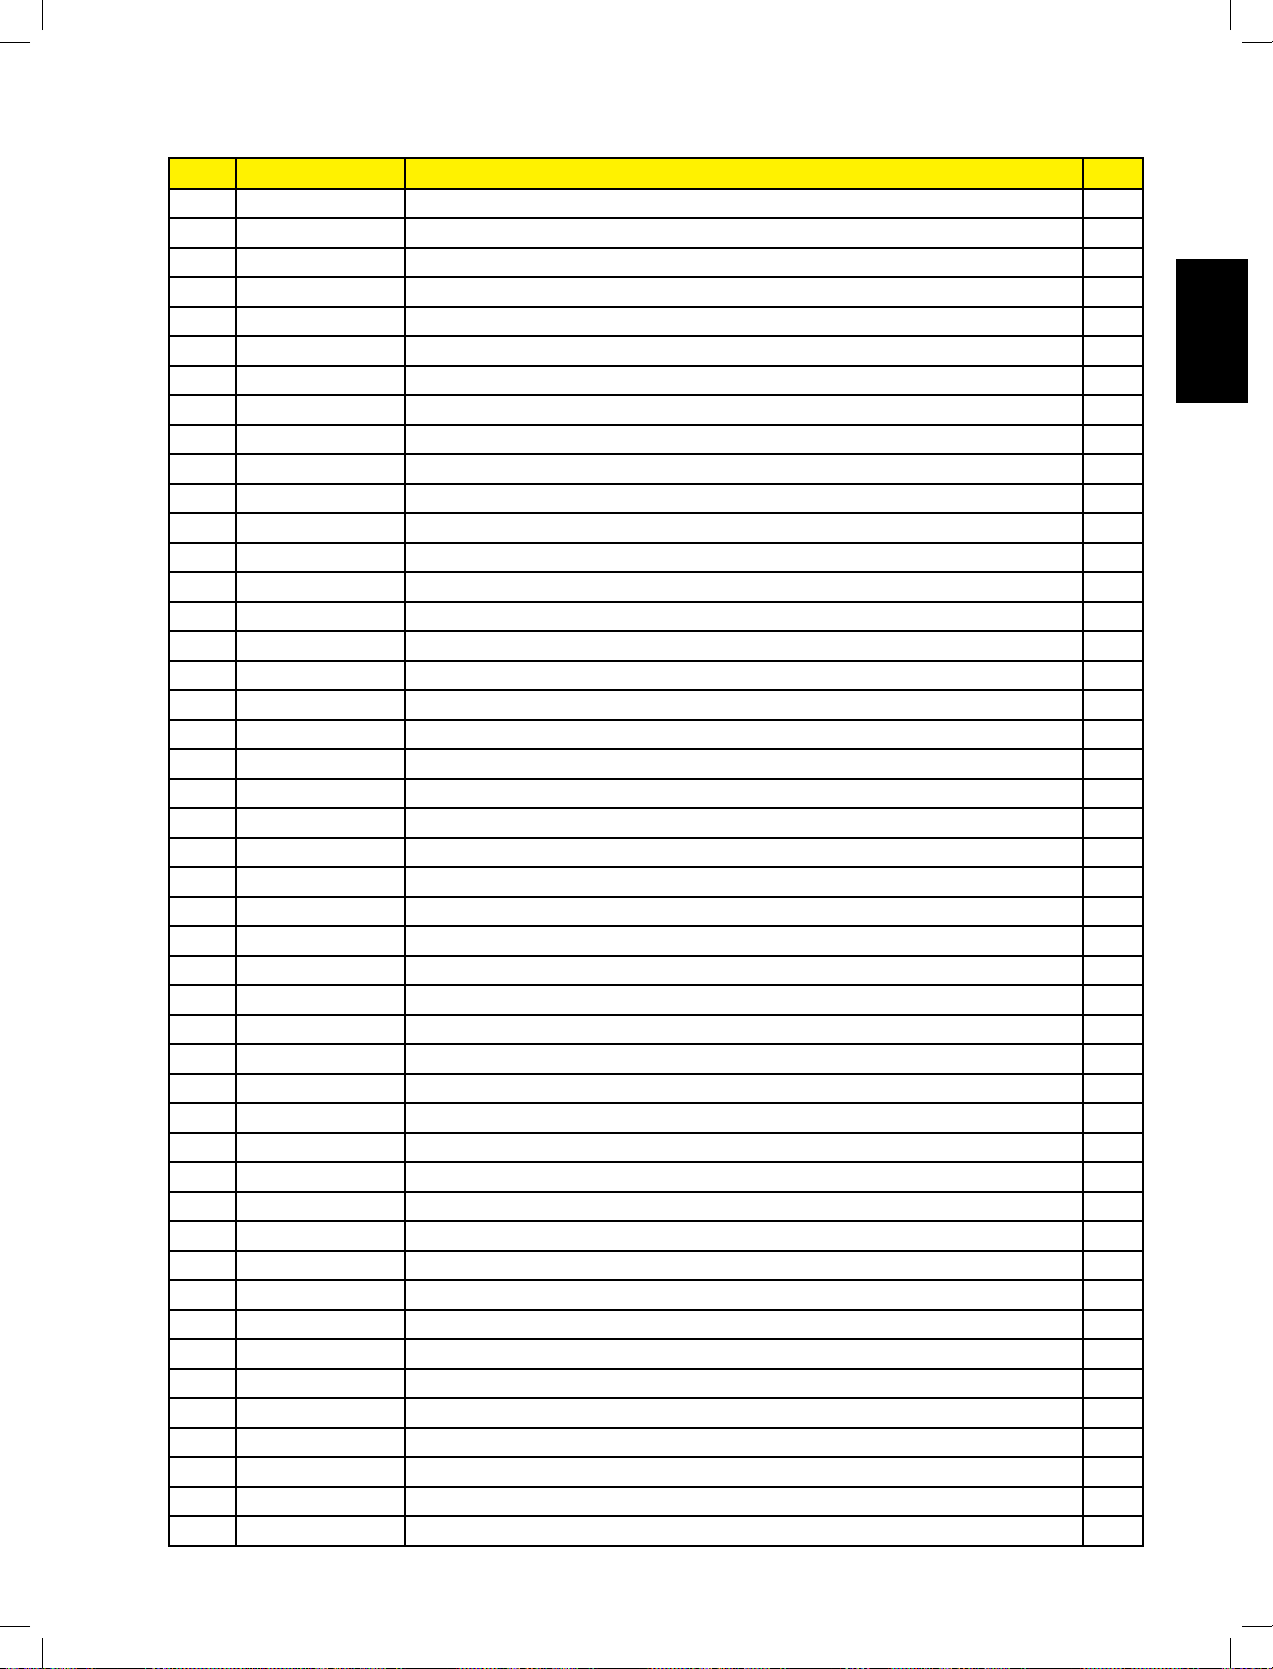
Parts List
ITEM PART # DESCRIPTION 825
1 N010-0814 x
2 x
N100-0048 x
4 N100-0049 x
5 x
6 x
7 x
8 N200-0106 x
9 x
10 x
11 x
12 N450-0025 x
x
14 N455-0055 p
n
15 N255-0058 x
16 x
17 N720-0056 x
18 N455-0016 p
N455-0002 n
19 x
20 x
21 N570-0042 x
22 N570-0008 x
x
24 N570-0078 x
25 N010-0794 p
N010-0795 n
26 N720-0070 x
27 N255-0024 x
28 N120-0024 x
29 N120-0025 x
N660-0006 x
N660-0005 x
N585-0098 x
N120-0028 x
x
N010-0882 x
x
N010-0911 x
x
x
40 N585-0101 x
41 N750-0040 x
42 N570-0022 x
x
www.napoleongrills.com
34
EN
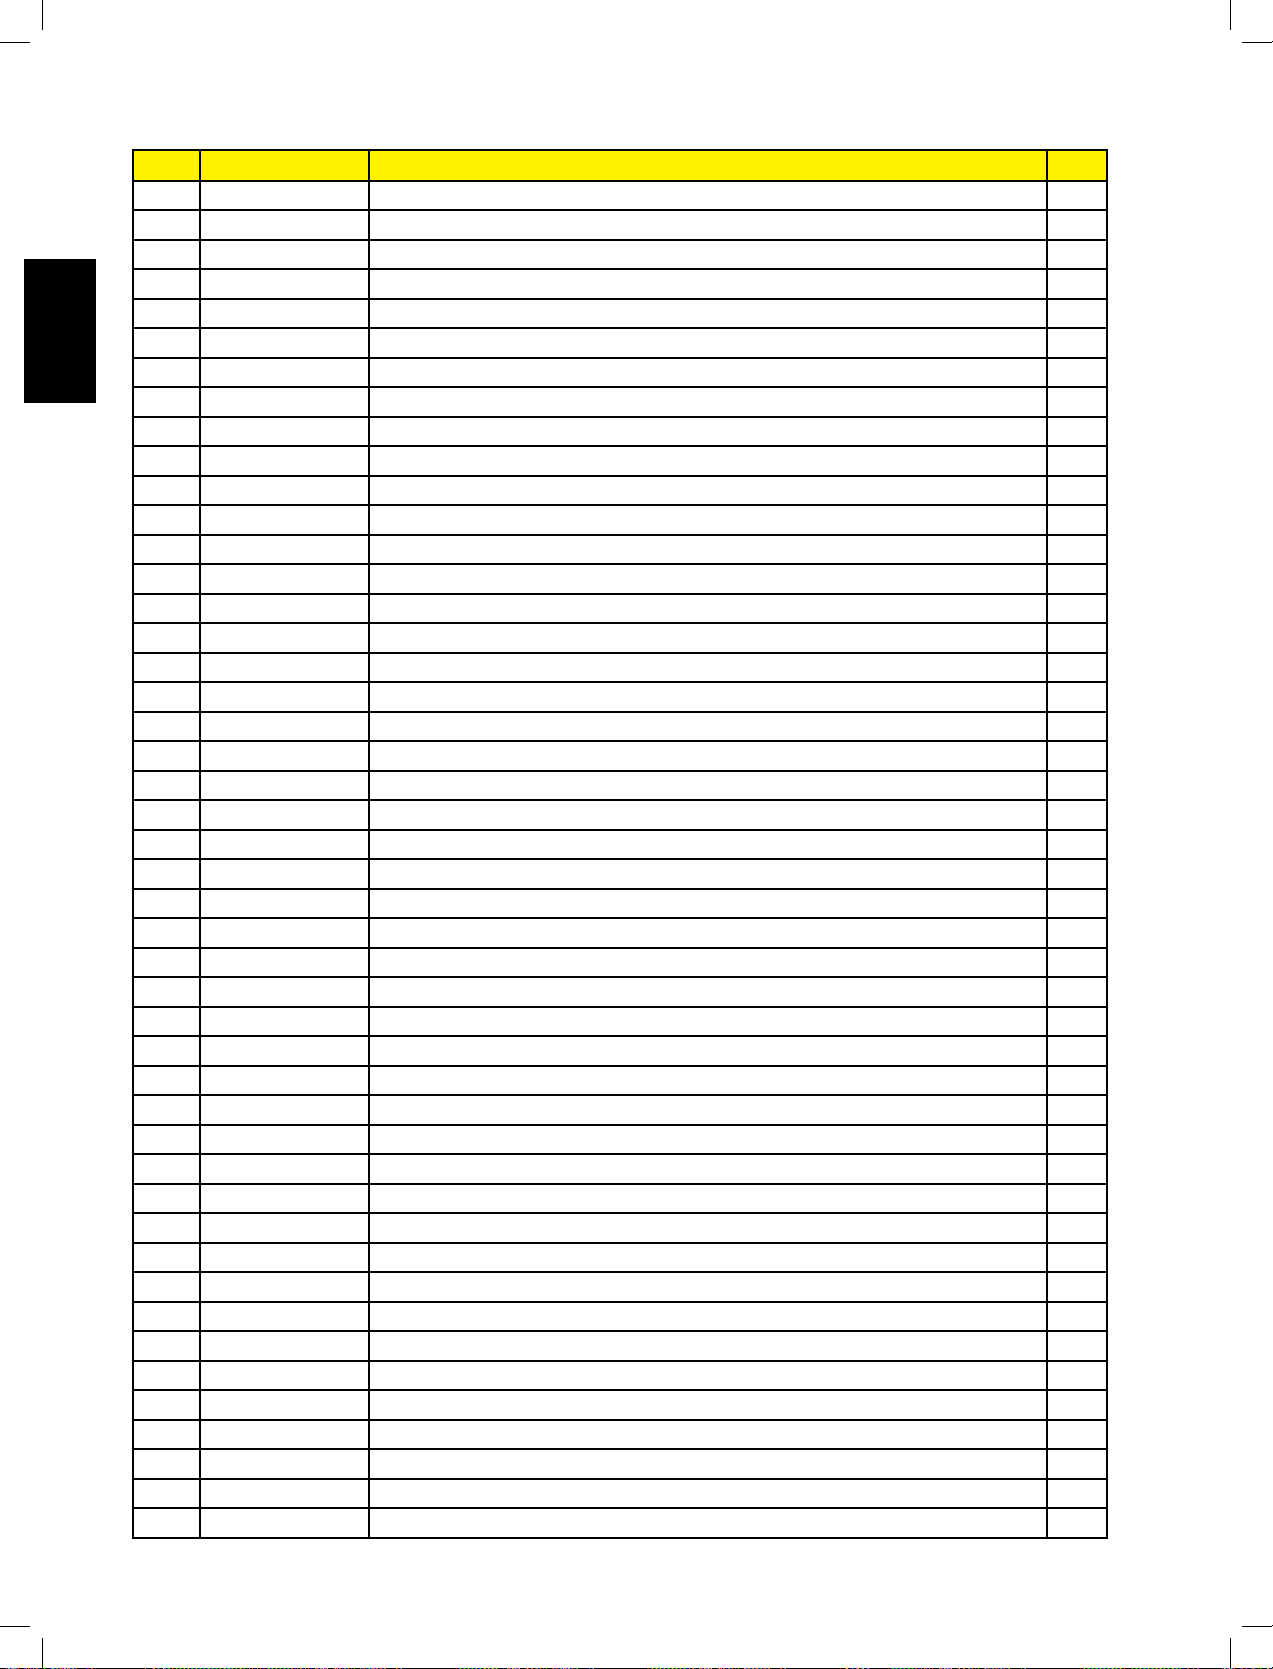
Parts List
ITEM PART # DESCRIPTION 825
44 x
45 N100-0045 x
46 N450-0006 x
47 x
48 x
49 x
50 x
51 N010-0800-SER x
52 x
x
54 x
55 x
56 N570-0012 x
57 x
58 x
59 x
60 x
61 N402-0017 x
ac
62 N450-0009 x
x
64 x
65 x
66 N200-0110 x
67 N570-0112 x
68 x
69 N570-0020 x
70 x
71 N570-0015 x
72 N570-0024 x
N010-0827 x
74 N010-0828 x
75 x
76 N010-0498 x
77 N715-0098 x
78 N215-0014 x
79 x
80 N555-0085 x
81 x
82 N010-0811-SS x
N010-0810-SS x
84 N555-0086 x
85 x
86 p
n
87 N010-0916 x
www.napoleongrills.com
35
EN
Parts List
ITEM PART # DESCRIPTION 825
88 N010-0917 x
89 N010-0886 x
90 N750-0044 x
91 x
92 x
x
94 x
95 N570-0101 x
96 x
97 x
98 x
99 N715-0091 x
100 x
101 N715-0092 x
102 x
N585-0110 x
104 x
105 N450-0044 x
106 x
107 x
108 N685-0004C x
109 N010-0812 x
110 x
111 N585-0095 x
112 N570-0087 x
x
114 x
115 x
116 N707-0012 x
117 N555-0025 x
118 N715-0100 x
119 x
120 N051-0010 x
121 N051-0012 x
122 N010-0800 x
N215-0016 ac
N215-0017 ac
68827 ac
56018 ac
56040 ac
ac
p - propane units only n - natural gas units only
x - standard ac - accessory
www.napoleongrills.com
36
EN
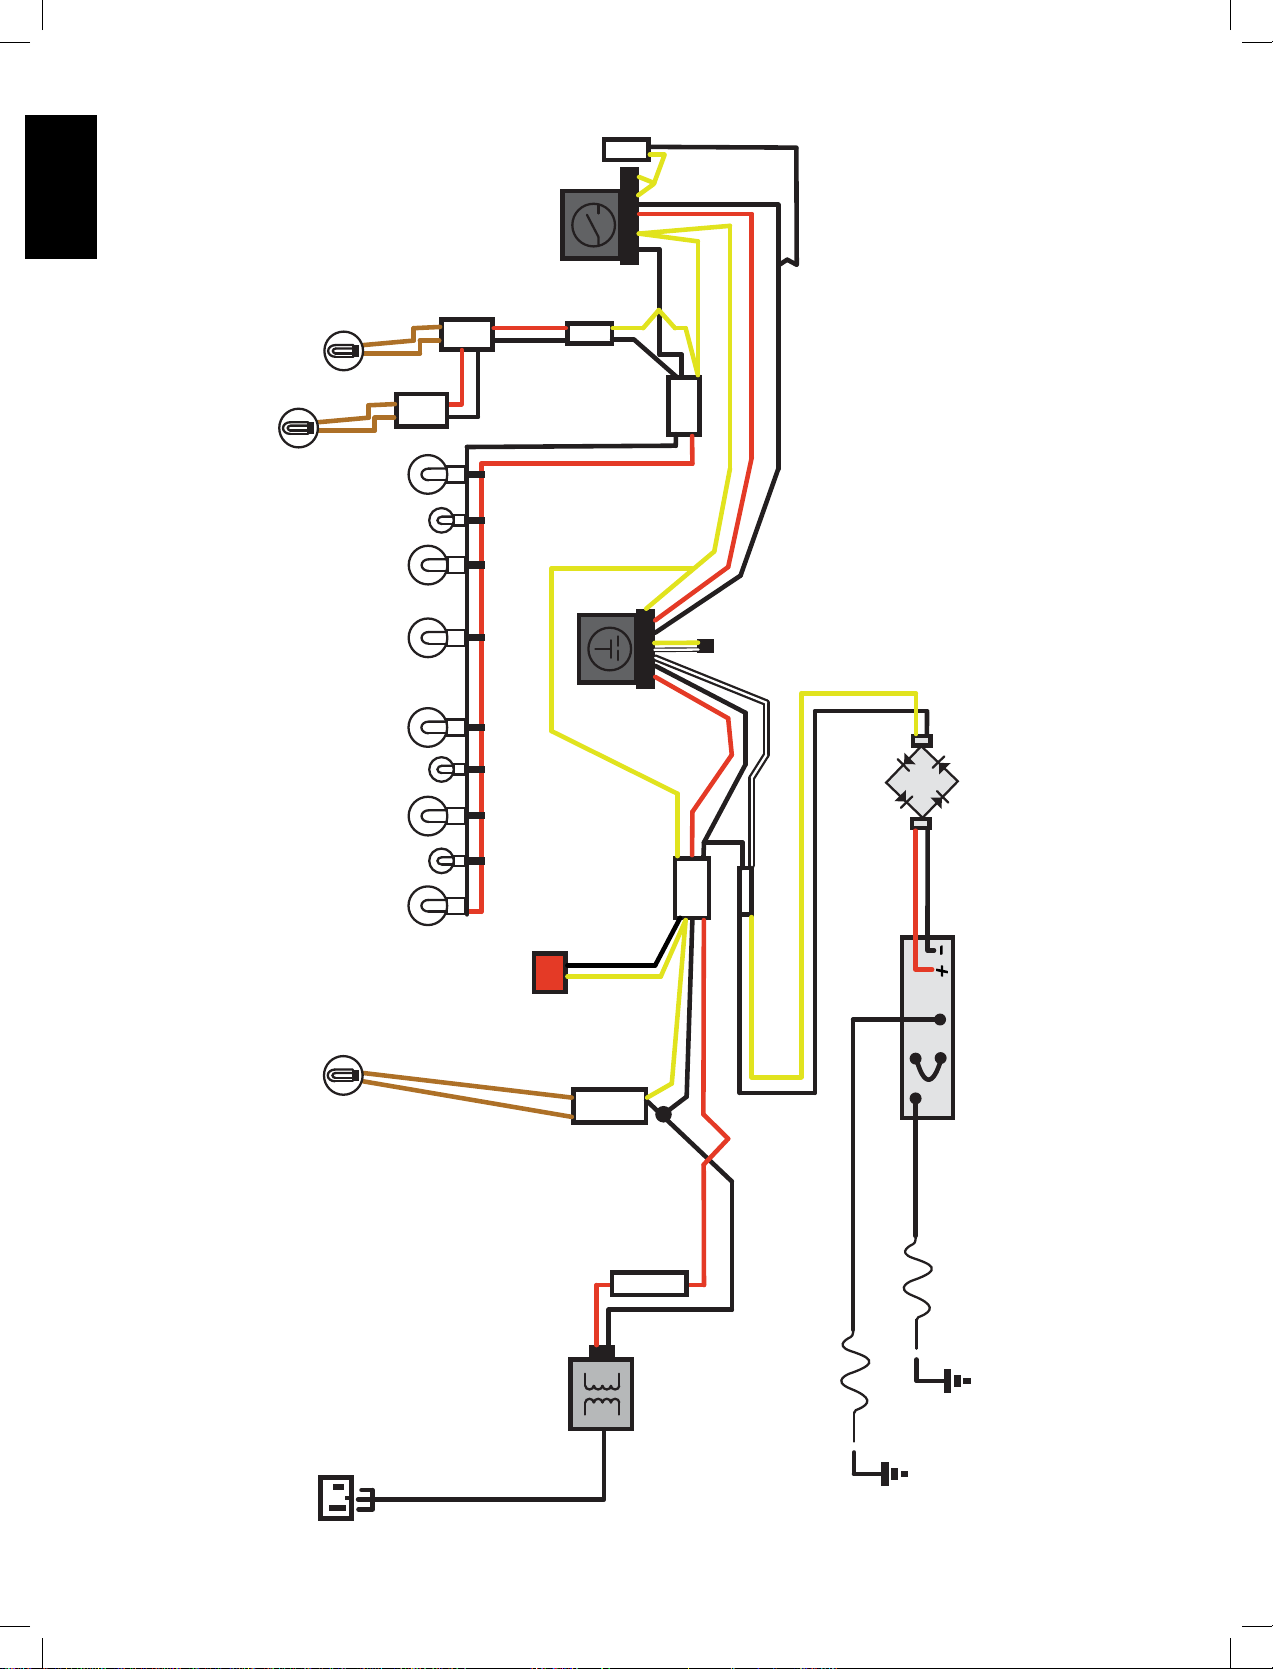
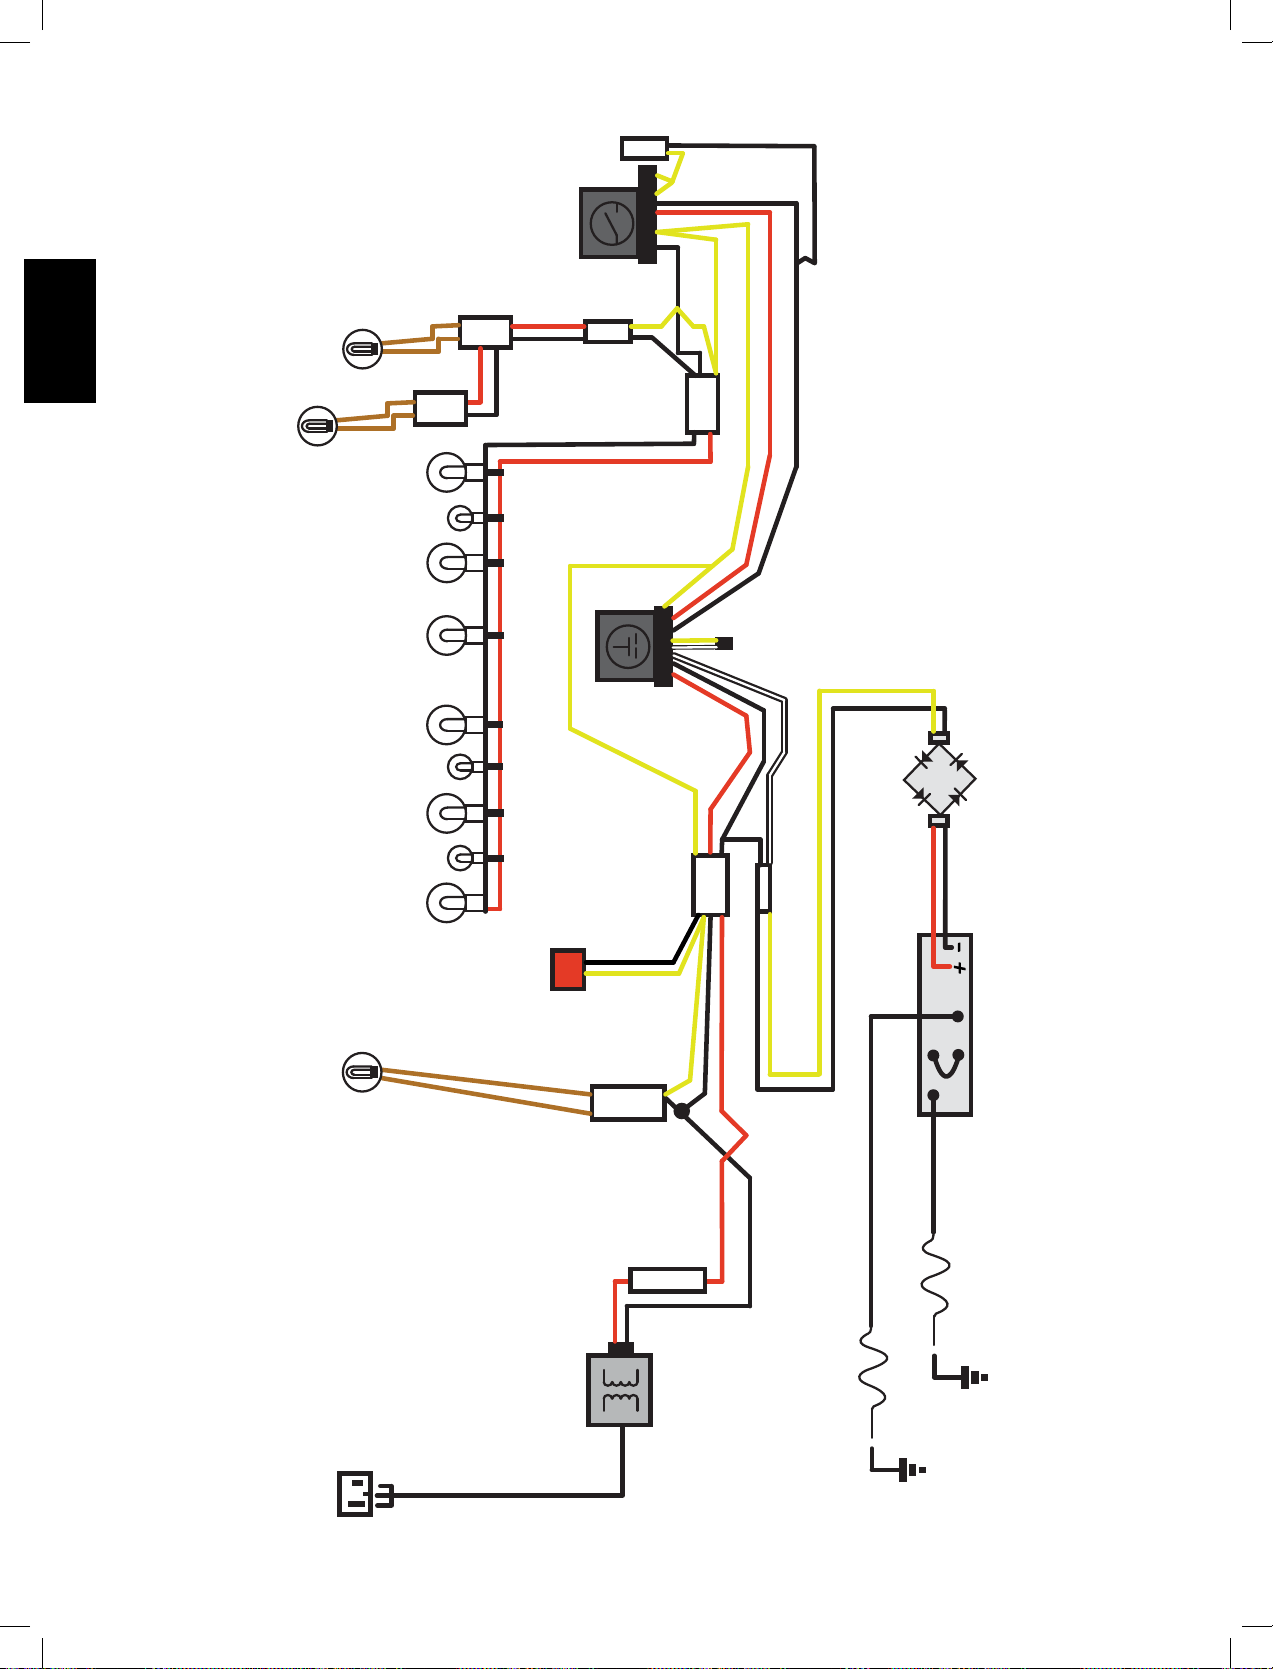
12V AC
C20
C2
C3
C4
C10 C11 C12
C13
C14 C15
C16
C17
C6
12V AC
1.5V DC
C1
GFI Outlet
EXTENSION CORD
TRANSFORMER 120V AC
LIGHT SWITCH
LED CONTROL PANEL LIGHTS
REAR BURNER ELECTRODE
IGNITER MODUAL
IGNITER SWITCH
ELECTRICAL CIRCUIT DIAGRAM (BIPRO825 MODEL)
FUSE 4A SLOW BLOW
LEFT HALOGEN LID LIGHT
FUSE HOLDER
RECTIFIER
RIGHT HALOGEN LID LIGHT
SMOKER ELECTRODE
CENTER HALOGEN LID LIGHT
C18
C7
JUMP WIRE
C8
C9
www.napoleongrills.com
37
FR
APPOSEZ LÉTIQUETTE DU NUMERO DE SERIE DU CARTON
N
O
de série
XXXXXX000000
N
O
DE MODÈLE
Ce gril doit être ulisé uniquement à l’extérieur, dans un endroit bien aéré et ne doit jamais être ulisé à
l’intérieur d’un bâment, d’un garage, un gazebo, une véranda avec paramousque, ou de tout autre endroit
fermé.
DANGER
SI VOUS DÉTECTEZ UNE ODEUR DE GAZ :
• Fermez l’alimentaon en gaz à
l’appareil.
• Éteignez toute amme nue.
• Ouvrez le couvercle.
• Si l’odeur persiste, éloignez-vous de
l’appareil et appelez immédiatement
votre fournisseur de gaz ou le service des
incendies.
AVERTISSEMENT! LA CHARPENTE DU CABINET, LE CABINET ET LE COMPTOIR DOIVENT ÊTRE FAITS
DE MATÉRIAUX INCOMBUSTIBLES.
Note à l’installateur : Laissez ces instrucons au propriétaire du gril pour consultaon ultérieure.
Les adultes et parculièrement les enfants doivent être sensibilisés aux risques que représentent les
surfaces exposées à des températures élevées. Surveillez les jeunes enfants lorsqu’ils sont près du gril.
AVERTISSEMENT
Ne tentez pas d’allumer cet appareil
avant d’avoir lu la secon “INSTRUCTIONS
D’ALLUMAGE” de ce manuel.
Pour votre sécurité n’entreposez pas et
n’ulisez pas d’essence ou autres liquides
et vapeurs inammables à proximité de cet
ou tout autre appareil. Une bonbonne de
propane de propane non branchée ne devrait
pas être entreposée à proximité de cet ou de
tout autre appareil. Si ces instrucons ne sont
pas suivies à la lere, un feu ou une explosion
pourraient s’ensuivre, causant des dommages
à la propriété, des blessures corporelles ou
des pertes de vie.
BIPRO 825
N415-0410 APR 25.16
NE PAS JETER
Système de qualité cerfiè
9001-2008
Napoleon Group of Companies
214 Bayview Dr., Barrie, Ontario, Canada L4N 4Y8
Phone: 1-705-726-4278 Fax: (705)-727-4282
www.napoleongrills.com
grills@napoleonproducts.com
www.napoleongrills.com
38
FR
Système de qualité cerfiè
9001-2008
mondialement reconnues ISO 9001-2008.
Garane à Vie Limitée du Président des grils à gaz Napoléon
plus5
plus5
plus5
plus5
Condions et limitaons
suivantes :
vente de ce produit.
www.napoleongrills.com
39
FR
AVERTISSEMENT! Si ces instrucons ne sont pas suivies, des dommages matériels, des blessures
corporelles ou des pertes de vie pourraient s’ensuivre. Lisez et respectez tous les averssements et les
instrucons de ce manuel avant de faire fonconner le gril.
Praques Sécuritaires D’ulisaon
le gril.
www.napoleongrills.com
40
FR
Informaon Générale
CSA 1.6b-2012 et
AINSI
Proposion 65 de la californie
Spécicaons Pour La Bonbonne De Propane
AVERTISSEMENT! Si ces instrucons ne sont pas suivies à la lere, un incendie pourrait
s’ensuivre, causant des blessures graves ou la mort.
AVERTISSEMENT! Ne rangez pas de cylindre de propane de rechange sur la tablee sous le gril.
soupape du cylindre.
NOTE! Propane régulateur tuyau pas inclus.
Instrucons De Branchement Du Gaz
AVERTISSEMENT! Ce gril est conçu pour des cabinets incombusbles seulement et doit être
installé et entretenu par un installateur qualié selon les codes locaux.
AVERTISSEMENT! La charpente du cabinet, le cabinet et le comptoir doivent être faits de
matériaux incombusbles.
AVERTISSEMENT! Comme il est indiqué sur la plaque d’homologaon, ce gril à gaz est conçu
pour fonconner à des pressions d’alimentaon en gaz de 11 po de colonne d’eau pour le propane et
de 7 po de colonne d’eau pour le gaz naturel. Pour les installaons où la pression d’alimentaon en gaz
est supérieure à celles exigées, un régulateur de pression doit être installé en amont des composantes
du gril. Si la pression d’alimentaon en gaz est inférieure à celles exigées, l’unité sera sous-alimentée
et sera incapable d’aeindre des températures maximales. Assurez-vous que la grosseur de la conduite
d’alimentaon est conforme aux codes d’installaon locaux ou naonaux.
BRANCHEMENT DU PROPANE AU GRIL ENCASTRÉ
www.napoleongrills.com
41
FR
5” (127mm)
MAXIMUM
OUVERTURE
A
OUVERTURE
B
5” (127 mm)
MAXIMUM
1” (25,4 mm)
MAXIMUM
34” (864 mm)
RECOMMANDÉS
2” (51 mm)
MINIMUM
LA PARTITION DOIT ISOLER
LE CYLINDRE DU GRIL
PORTE NON VERROUILLABLE
GRANDEUR DU CYLINDRE OUVERTURE A OUVERTURE B
20 po) 10 po (65 cm)
(195 cm) 15 po (100 cm)
ENCEINTE DU CYLINDRE POUR GRIL ENCASTRÉ :
Chaque ouverture doit être susamment large pour permere d’y introduire une ge de 1/8 po (3,2
mm).
AVERTISSEMENT!
gril.
cylindre et le sol.
www.napoleongrills.com
42
FR
Précauons électriques
AVERTISSEMENT! Omere de suivre ces instrucons peut entraîner des dommages matériels,
des blessures corporelles ou des pertes de vie.
broches.
BRANCHEMENT DU GRIL ENCASTRÉ AU GAZ NATUREL
AVERTISSEMENT! Les grils encastrés sont munis d’un plateau d’égouement qui ne peut
contenir qu’une pete quanté de graisse. An d’éviter les feux de graisse, le plateau doit être neoyé
après chaque ulisaon.
AVERTISSEMENT! Vous devez prévoir un accès dans le cabinet pour permere gaz connecon.
DANGER! Lisez aenvement toutes les instrucons avant de faire fonconner le gril. Si ces
instrucons ne sont pas suivies à la lere, un incendie pourrait s’ensuivre, causant des blessures
graves ou la mort. L’installaon complète doit être vériée pour des fuites avant de faire fonconner
l’appareil.
www.napoleongrills.com
43
FR
Instrucon D’allumage
AVERTISSEMENT! Ouvrez le couvercle
AVERTISSEMENT! Fermez tous les boutons de contrôle des brûleurs, ouvrez la
soupape d’alimentaon en gaz lentement.
Allumage du brûleur
principal
Allumage brûleur de
fumaison
Allumage du brûleur
arrière
(si équipé)
Allumage du brûleur
latéral.
(si équipé)
1. Ouvrez le couvercle. 1. Ouvrez le couvercle. 1. Ouvrez le couvercle. 1. Ouvrez le couvercle du
2. Enfoncez et tournez
2. Appuyez et tournez le
2. Enlevez la grille-
2. Appuyez et trournez le
maximum.
secondes, tournez le bouton
pas en moins de 5 secondes,
surplus de gaz de se dissiper.
4. Appuyez et gardez
allumez avec une
allumette.
pas en moins de 5 secondes,
dessous des plaques de
pas en moins de 5
secondes, tournez le
au surplus de gaz de
AVERTISSEMENT! La bonbonne est équipée d’un disposif de contrôle d’écoulement du gaz.
À moins que tous les boutons des brûleurs soient fermés avant d’ouvrir la bonbonne, seules de petes
ammes seront obtenues.
AVERTISSEMENT! N’ulisez jamais le brûleur arrière avec le brûleur principal.
Fermez
Brûleur de
fumaison
Bouton
d’allumeur
Brûleur
de gauche
Bruleur
d’arriere
Brûleur
de
droite
Brûleur
de droite
centre
Brûleur
de gauche
centre
Lumières
Brûleur
de gauche
Infrarouge
Brûleur
de droite
Infrarouge
Fumaison
plateau
Brûleur
chauage
www.napoleongrills.com
44
FR
Éclairage inial
Instrucons D’opéraon
NOTE! Napoléon ne sera pas responsable d’une surchaue ou d’une exncon causée par des
condions environnementales telles que des vents forts ou une venlaon inadéquate.
1 2
3
www.napoleongrills.com
45
FR
Ulisaon Du Brûleur Principal
Cuisson Directe
Cuisson Indirecte
Ulisaon Du Brûleur Arrière
pour
AVERTISSEMENT! La sauce BBQ et le sel sont corrosifs et causeront une détérioraon rapide
des composantes de votre gril à gaz à moins de les neoyer régulièrement. Une fois la cuisson
terminée, démontez les composantes de la rôssoire, lavez-les bien à l’eau chaude savonneuse et
rangez-les à l’intérieur.
Ulisaon Du Brûleur Infrarouge De Cuve (si équipé)
AVERTISSEMENT ! Dû à la chaleur intense produite pour le brûleur infrarouge, les aliments qui
sont laissés sur les brûleurs sans surveillance brûleront rapidement. Gardez le couvercle ouvert lorsque
vous faites fonconner le brûleur infrarouge à “high”. La chaleur intense vous assure des températures
adéquates de rayonnement même lorsque le couvercle est ouvert. Ceci vous permera de surveiller les
aliments an de prévenir qu’ils brûlent.

www.napoleongrills.com
46
FR
Brûleur de fumaison
Chaleur Infrarouge

www.napoleongrills.com
47
FR
Tableau de cuisson à l’infrarouge
Aliment Réglage Des Contrôles Temps De Cuisson Conseils Praques
4 min - Saignant
8 min - Bien cuit
Lorsque vous choisissez votre
viande, demandez une viande
la viande agira comme un
la cuisson et gardera la viande
plus juteuse.
4 min - Saignant
6 min - Bien cuit
Pour terminer la cuisson
de vos hambourgeois tous
vous conseillons de varier
Pour ajouter une saveur
ajoutez des copeaux de bois
Morceaux de poulet
20-25 min
sur la grille de cuisson. Ceci
rapidement. Pour ajouter une
poulet, ajoutez des copeaux
de faire cuire. Choisissez
viande plus tendre.
minutes
ensuite réglage à “low” pour
terminer la cuisson
tournez souvent
charnues et maigres. Grillez
minutes
ensuite réglage à “medium”
pour terminer la cuisson
de faire cuire. Choisissez
pour obtenir une viande plus
tendre.
Saucisses 4-6 min Choisissez des saucisses plus
grosses. Faites une entaille
dans la peau, sur la longueur
de la saucisse avant de faire
griller.
www.napoleongrills.com
48
FR
Neoyage De L’extérieur Du Gril
vous procurer
Lumières
Neoyage
Note
Les Grilles De Cuisson Et La Grille-Réchaud
Neoyage Du Panneau De Contrôle
gents
Neoyage De L’intérieur Du Gril
AVERTISSEMENT! Les grils encastrés sont munis d’un plateau d’égouement qui ne peut
contenir qu’une pete quanté de graisse. An d’éviter les feux de graisse, le plateau doit être neoyé
après chaque ulisaon.
Tiroir d'égouement
AVERTISSEMENT! Portez toujours des gants protecteurs et des lunees de sécurité lorsque
vous l'entreen votre gril.
AVERTISSEMENT! Assurez-vous que les brûleurs sont éteints avant de neoyer. Éviter tout
contact avec les surfaces chaudes. Neoyez votre gril dans un endroit où les produits de neoyage
n’endommageront pas votre pao, terrain ou terrasse. N’ulisez pas de produit de neoyage
à fourneau pour neoyer votre gril. La sauce BBQ et le sel sont très corrosifs et causeront une
détérioraon très rapide de votre gril à moins que vous ne fassiez un neoyage régulier.
www.napoleongrills.com
49
FR
Instrucons D’entreen
AVERTISSEMENT! Portez toujours des gants protecteurs et des lunees de sécurité lorsque
vous neoyez votre gril.
AVERTISSEMENT! Fermez le gaz à la source et débranchez l’appareil avant l’entreen.
L’entreen devrait être eectué seulement lorsque le gril est froid pour éviter toutes possibilités de
brûlure. Un test de détecon de fuites devrait être eectué annuellement ou à chaque fois qu’une
composante de gaz est remplacée.
Bleu
Pointe Jaune
Environ
Ajustement De L’air De Combuson (ceci doit être eectué par un installateur qualié)
la suie.
Pour ajuster le volet d’air:
ajustements normaux sont:
Brûleur tube principal Brûleur tube arrière Propane ouvert au complet
Brûleur de fumaison Brûleur de chauage

www.napoleongrills.com
50
FR
Brûleur Tube
ATTENTION! Aux Araignées
L
AVERTISSEMENT! Lors de la réinstallaon du brûleur après le
neoyage, il est très important que la soupape / l’orice entre dans le
brûleur avant que vous allumiez votre gril à gaz. Si la soupape n’est pas à
l’intérieur du brûleur, un feu ou une explosion pourrait survenir.
AVERTISSEMENT! Boyau (si applicable): Vériez l’usure, coupures, craquelures ou s’il est fondu.
Si vous découvrez une de ces défectuosités, n’ulisez pas votre gril. Faites remplacer la pièce par votre
détaillant NAPOLEON ou par un installateur qualié.
Moulages En Aluminium:
AVERTISSEMENT! Portez toujours des gants protecteurs lorsque vous remplacez l’ampoule
halogène des lumières internes de votre gril.
Lumières
1
2
3
www.napoleongrills.com
51
FR
Protecon Du Brûleur Infrarouge:
Écrans de rechange N565-0002
www.napoleongrills.com
52
FR
Guide De Dépannage
Problème Causes possibles Soluons
Pour le gaz naturel - tuyau
Pour les deux sortes de gaz - mauvais
de gaz.
doux.
pas les uns aux autres.
croix.
surfaces internes.
trop basse.
Manque de gaz.

www.napoleongrills.com
53
FR
Problème Causes possibles Soluons
subitement un bruit qui
souder et qui diminue en
surface de cuisson recouverte par des
plaques de cuisson ou des plateaux).
laissez-le refroidir pendant au moins deux minutes puis
rechange.
Les bornes sur le commutateur ou
transformateur.
Les bornes sur le commutateur ou
du couvercle seulement).
transformateur.

www.napoleongrills.com
54
FR
GARDEZ VOTRE REÇU COMME PREUVE D’ACHAT POUR VALIDER VOTRE
Commande De Pièces De Rechange
Informaon Sur La Garane
MODÈLE:
DATE D’ACHAT:
NUMÉRO DE SÉRIE:
(Inscrivez l’informaon ici pour y avoir accès facilement.)
Avant de contacter le département du service aux consommateurs, consultez le site Web de Napoleon
Grills pour obtenir plus d’instrucons sur le neoyage, l’entreen, le dépannage et le remplacement des
pièces à www.napoleongrills.com. Contactez le fabricant directement pour obtenir des pièces de rechange
et faire des réclamaons au tre de la garane. Le département du service aux consommateurs est à votre
disposion entre 9 h et 17 h (heure normale de l’Est) au 1-866-820-8686, par télécopieur au 705-727-4282
ou e-mail [email protected]. Pour qu’une réclamaon soit traitée, l’informaon suivante est
nécessaire :
1. Modèle et numéro de série de l’appareil.
2. Numéro de la pièce et descripon.
3. Descripon concise du problème (« brisé » n’est pas susant).
4. Preuve d’achat (copie de la facture).
Dans certains cas, le département du service aux consommateurs peut demander de retourner la pièce
pour des ns d’inspecon avant de fournir une pièce de rechange. Les pièces doivent être expédiées port
payé à l’aenon du département du service aux consommateurs avec l’informaon suivante :
1. Modèle et numéro de série de l’appareil.
2. Descripon concise du problème (« brisé » n’est pas susant).
3. Preuve d’achat (copie de la facture).
4. Numéro d’autorisaon de retour - fourni par le représentant du département du service aux
consommateurs.
Avant de contacter le service aux consommateurs, veuillez prendre note que les items suivants ne sont pas
couverts par la garane :
• coûts de transport, de courtage et frais d’exportaon;
• coûts de main-d’oeuvre pour l’enlèvement et l’installaon de la pièce;
• coûts des appels de service pour diagnosquer le problème;
• décoloraon des pièces en acier inoxydable;
• bris des pièces causé par un manque d’entreen et de neoyage, ou par l’ulisaon de
neoyants inappropriés (neoyant à fourneau ou autres produits chimiques agressifs).
www.napoleongrills.com
55
FR
ATTENTION! Lors du déballage et de l’assemblage, nous vous conseillons de porter des gants
de travail et des lunees de sécurité pour votre protecon. Malgré tous nos eorts pour assurer que
l’assemblage soit aussi sécuritaire et sans problème que possible, il se peut que les bords et les coins
des pièces usinées en acier soient coupants et qu’ils causent des coupures si les pièces ne sont pas
manipulées correctement.
Pour Commencer
1. Rerez tous les panneaux, le matériel et le gril du carton d’emballage. Soulevez le couvercle et
enlevez les composants qui se trouvent à l’intérieur. Servez-vous de la liste de pièces pour vous
assurer que toutes les pièces nécessaires sont incluses.
2.
4. La plupart des pièces en acier inoxydable possèdent un revêtement de plasque protecteur qui
doit être enlevé avant d’uliser le gril. Le revêtement de protecon a déjà été reré de certaines
pièces lors du processus de fabricaon, ce qui a pu laisser un résidu pouvant être perçu comme des
égragnures ou des marques. Pour enlever ce résidu, froez l’acier inoxydable vigoureusement
dans le sens du grain.
5.
6.
Si vous avez des quesons à propos de l’assemblage ou du fonconnement du gril, ou si des pièces sont
manquantes ou endommagées, veuillez appeler notre département du Service aux Consommateurs au
1-866-820-8686 entre 9 h et 17 h (heure normale de l’Est).
OUTILS REQUIS POUR L’ASSEMBLAGE (ouls non inclus)
3/8" (10mm)
www.napoleongrills.com
56
FR
DIMENSIONS D’OUVERTURE POUR LES GRILS ENCASTRÉS
MODÈLE DIMENSIONS DE L’OUVERTURE NOTES
L P
BIPRO825
524mm
225mm
BRÛLEUR
LATÉRAL
419mm
114mm
MINIMUM DE 10 PO²
DE VENTILATION EST
NÉCESSAIRE À CHAQUE
EXTRÉMITÉ DU CABINET
L
L
H
H
P
L
H
P
1¾”
(44mm)
5” (127mm)
1¾”
(44mm)
4”minimum
(102mm)
10”minimum
(254mm)
OUVERTURE DU BOÎTIER ÉLECTRIQUE
PRISE EXTÉRIEURE AVEC INTERRUPTEUR
DE DÉFAUT À LA TERRE RECOMMANDÉE
- LOCATE DU MÊME CÔTÉ DE LA GRILLE
COMME SUPPORT RÔTISSOIRE.
NOTE: LE CADRE DES
ACCESSOIRES CHEVAUCHE
L’OUVERTURE DE 1 3/4” SUR LES
QUATRE CÔTÉS.
OUVERTURE POUR LA
CONDUITE DE GAZ
OUVERTURE POUR LA
CONDUITE DE GAZ
MATÉRIAU INCOMBUSTIBLE
SI LE COMPTOIR SURPLOMBE LE BORD DU
CABINET, LES COINS DOIVENT ÊTRE ENTAILLÉS
UN MINIMUM DE 1 3/16" (30 mm) POUR
PERMETTRE L'INSERTION DES EMBOUTS DU
PANNEAU DE COMMANDE.
34” (864mm)
RECOMMANDÉ
AVERTISSEMENT! Un réservoir de propane
ne peut pas être rangé sous le gril.
BRÛLEUR LATÉRAL ENCASTRÉ
AVERTISSEMENT! Ce gril conçu pour des cabinets incombusbles seulement et doit être
installe et entretenu par un installateur qualié selon les codes locaux.
AVERTISSEMENT! Lorsque vous ajoutez des matériaux de nion à l’appareil, n’ulisez que des
matériaux incombusbles (cerés à la norme ASTM E-136) tels que des montants d’acier, un panneau
de ciment, des carreaux de céramique, du marbre, de la peinture, etc. N’ulisez pas de bois ni de
cloison sèche.
AVERTISSEMENT! LA CHARPENTE DU CABINET, LE CABINET ET LE
COMPTOIR DOIVENT ÊTRE FAITS DE MATÉRIAUX INCOMBUSTIBLES.
www.napoleongrills.com
57
FR
DIMENSIONS D’OUVERTURE
N° DE PIÈCE DESCRIPTION ILLUSTRATION L H P
* CADRES DÉPASSENT DE VISAGE DE
CABINET PAR ¾"
minimum
DIMENSIONS D’OUVERTURE POUR LES ACCESSOIRES

www.napoleongrills.com
58
FR
INSTRUCTIONS D’INSTALLATION DES TIROIRS
INSTRUCTIONS D’INSTALLATION DES PORTES
portes.
le bas.
www.napoleongrills.com
59
FR
INSTRUCTIONS POUR LE GRIL ENCASTRÉ BIPRO825
AVERTISSEMENT! Omere de suivre ces instrucons peut entraîner des dommages matériels,
des blessures corporelles ou des pertes de vie.
10” (254mm)
maximum
7”
(178mm)
9⅝”
(244mm)
SITUÉ À L'INTÉRIEUR DU CABINET
4” (102mm) minimum, à parr du bas de gril et au
dessus de la boîte électronique.
Prise DDFT
www.napoleongrills.com
60
FR
N570-0042 (10-24 X 3/8")
x4
www.napoleongrills.com
61
FR
N570-0038 (1/4”-20 X 1/2”)
x2
N450-0008 (1/4”-20)
x2
IM-UGC825
1
2
3
www.napoleongrills.com
62
FR
APPLIQUER UN PEU DE
SILICONE À CHAQUE
AILETTE POUR FIXER EN
PLACE.
www.napoleongrills.com
63
FR
www.napoleongrills.com
64
FR
x2
x2
www.napoleongrills.com
65
FR
TEST DE DÉTECTION DE FUITES
AVERTISSEMENT! Il doit être fait avant la première ulisaon, annuellement et à chaque fois
qu’une pièce du système de gaz est remplacée ou réparée
AVERTISSEMENT! N’ulisez pas une amme nue pour vérier pour des fuites de gaz. Assurez-
vous qu’il n’y ait aucune éncelle ni amme nue à proximité de l’endroit à vérier. Les éncelles ou les
ammes nues provoqueront un feu ou une explosion, causant des dommages matériels, des blessures
graves ou des pertes de vie.
Test De Fuites
le tuyau et ses raccords.
fermez l’alimentaon de gaz à la bonbonne, enlevez-la et faites
5 - Fermez la soupape de la bonbonne.
ARRÊTEZ
X
www.napoleongrills.com
66
FR
Instrucons D’assemblage De L’ensemble De Rôssoire
Assurez-vous que la bague d’arrêt soit
serrée à l’intérieur de la hoe.
X
www.napoleongrills.com
67
FR
1
2
2
3
4
5
6
7
8
9
10
11
12
13
14
16
17
18
19
20
15
20
21
22
22
40
41
43
44
4546
48
49
50
51
58
58
58
63
64
65
58
4
68
70
70
71
71
72
72
73
74
75
76
77
78
80
84
82
83
85
86
87
88
89
90
91
92
93
94
93
95
96
95
96
9
113
114
115
116
118
117
15
47
22
97
www.napoleongrills.com
68
FR
79
68
9
70
70
9899
100
101
102
104
103
105
106
107
108
112
82
68
9
70
98
99
100
101
109
110
111
112
108
107
83
23
24
25
26
27
28
29
30
31
32
33
34
35
36
37
38
39
21
86
42
46
46
52
53
54
56
57
59
60
61
62
66
67
69
81
87
42
46
52
53
55
56
57
60
61
62
66
67
69
81
88
51
119
120
42
121 122
www.napoleongrills.com
69
FR
Liste Des Pièces
ITEM PART # DESCRIPTION 825
1 N010-0814 x
2 x
N100-0048 x
4 N100-0049 x
5 x
6 x
7 x
8 N200-0106 x
9 x
10 x
11 x
12 N450-0025 x
x
14 N455-0055 p
n
15 N255-0058 x
16 x
17 N720-0056 x
18 N455-0016 p
N455-0002 n
19 x
20 x
21 N570-0042 x
22 N570-0008 x
x
24 N570-0078 x
25 N010-0794 p
N010-0795 n
26 N720-0070 x
27 N255-0024 x
28 N120-0024 x
29 N120-0025 x
N660-0006 x
N660-0005 x
N585-0098 x
N120-0028 x
x
N010-0882 x
x
N010-0911 x
x
x
40 N585-0101 x
41 N750-0040 x
42 N570-0022 x
x
www.napoleongrills.com
70
FR
Liste Des Pièces
ITEM PART # DESCRIPTION 825
44 x
45 N100-0045 x
46 N450-0006 x
47 x
48 x
49 x
50 x
51 N010-0800-SER x
52 x
x
54 x
55 x
56 N570-0012 x
57 x
58 x
59 x
60 x
61 N402-0017 x
ac
62 N450-0009 x
x
64 x
65 x
66 N200-0110 x
67 N570-0112 x
68 x
69 N570-0020 x
70 x
71 N570-0015 x
72 N570-0024 x
N010-0827 x
74 N010-0828 x
75 x
76 N010-0498 x
77 N715-0098 x
78 N215-0014 x
79 x
80 N555-0085 x
81 x
82 N010-0811-SS x
N010-0810-SS x
84 N555-0086 x
85 x
86 p
n
87 N010-0916 x

www.napoleongrills.com
71
FR
Liste Des Pièces
ITEM PART # DESCRIPTION 825
88 N010-0917 x
89 N010-0886 x
90 N750-0044 x
91 x
92 x
x
94 x
95 N570-0101 x
96 x
97 x
98 x
99 N715-0091 x
100 x
101 N715-0092 x
102 x
N585-0110 x
104 x
105 N450-0044 x
106 x
107 x
108 N685-0004C x
109 N010-0812 x
110 x
111 N585-0095 x
112 N570-0087 x
x
114 x
115 x
116 N707-0012 x
117 N555-0025 x
118 N715-0100 x
119 x
120 N051-0010 x
121 N051-0012 x
122 N010-0800 x
N215-0016 ac
N215-0017 ac
68827 ac
56018 ac
56040 ac
ac
p - propane seulement n - gaz naturel seulement
x - compris ac - accessoires
www.napoleongrills.com
72
FR
12V AC
C20
C2
C3
C4
C10 C11 C12
C13
C14 C15
C16
C17
C7
C6
C8
12V AC
1.5V DC
C1
Prise DDFT
LECTRIQUE
TRANSFORMATEUR 120V AC
LUMIÈRES POUSSOIR
DE LUMIERE
LUMIÈRES L.E.D. DU PANNEAU DE CONROLE
ÈLECTRODE DU BRÛLEUR ARRIÈRE
MUDULE D’ALLUMAGE
BOUTON POUSSOIR D’ALLUMEUR
SCHÈMA DU CIRCUIT ELECTRONIQUE (BIMODÈLE PRO825)
FUSIBLE 4 AMPÈRES TEMPORISER
LUMIÈRE HALOGÈNES GAUCHE
PORTE FUSIBLE
RECTIFIER
LUMIÈRES HALOGÈNE DROITE
ÈLECTRODE DU BRÛLEUR FUMAISON
RALLONGE
C9
LUMIÈRES HALOGÈNE CENTRE
C18
FIL DE PONTAGE

www.napoleongrills.com
73
FR
Notes

www.napoleongrills.com
74
FR
Notes

www.napoleongrills.com
75
FR
Notes

N415-0410
Napoleon products are protected
by one or more U.S. and Canadian
and/or foreign patents or patents
pending.
Les produits de Napoléon sont
protégés par notre brevet
d’invenon dans les pays États
Units, Canada et internaonal.