WasteCycler User Manual
UF006-E
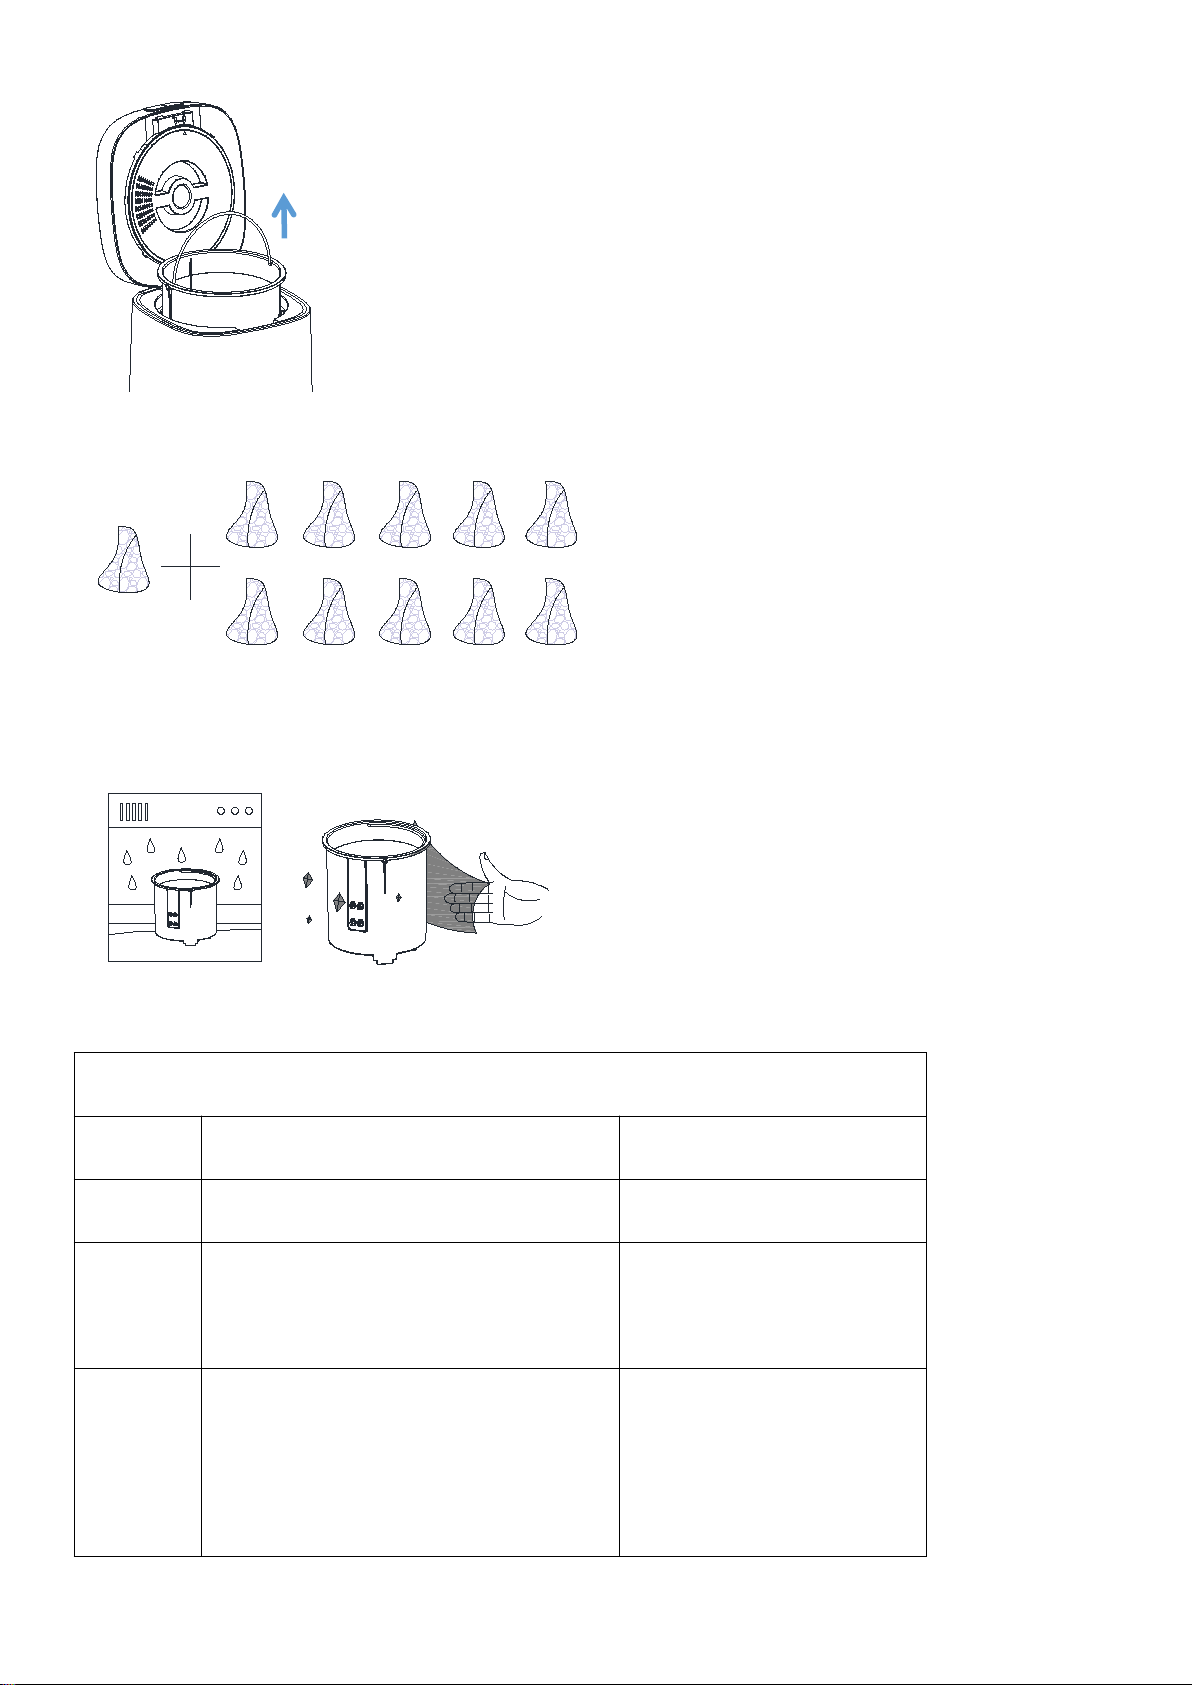
Replacing The Carbon Filter
Know Your WasteCycler
Product Specifications
WasteCycler Modes
Quick Start Guide
Regular Use Guidance
Let's Start A Simple Cycle
Troubleshooting
How To Make Perfect Compost
Cleaning And Maintenance
What Can I Put in WasteCycler
Frequently Asked Questions
Safety Instructions
Notices For Cord
Warranty
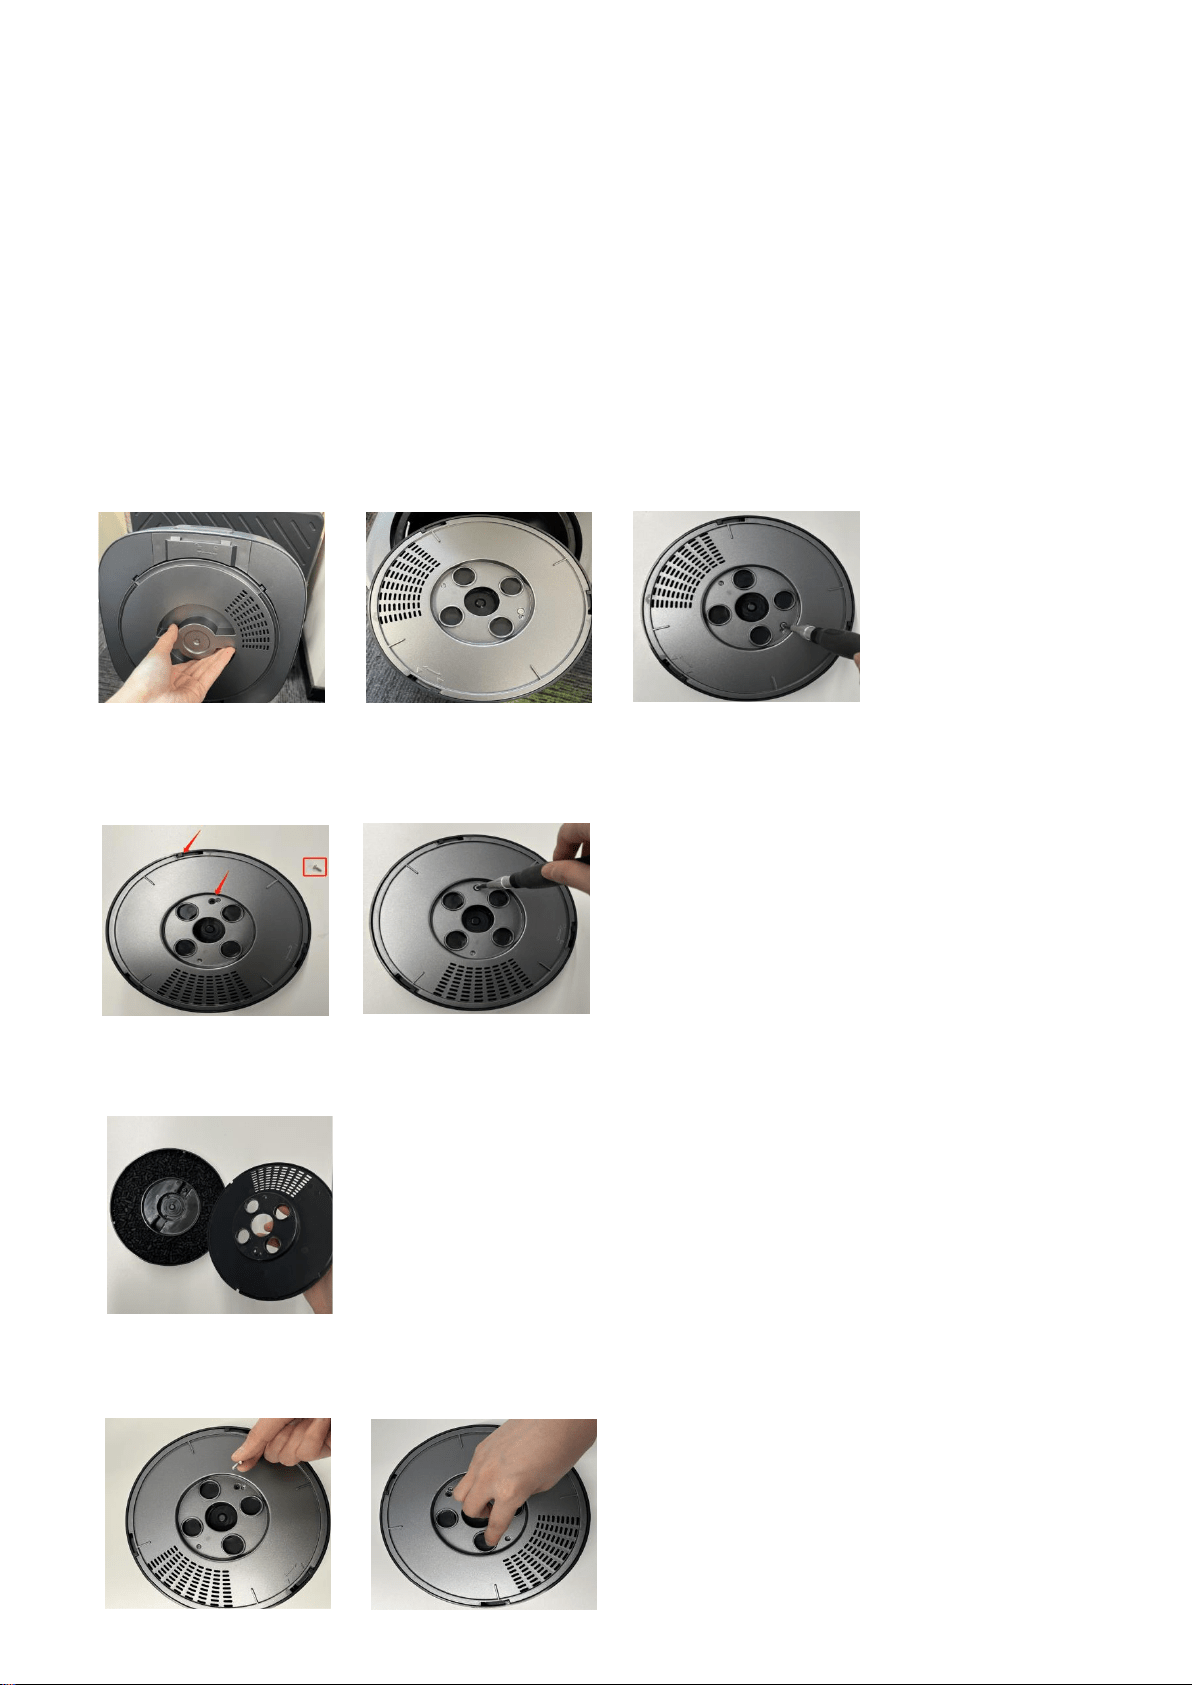
Replacing The Carbon Filter Box’s Carbon Granule
The E05 error occurs when you have accumulated more than 1000 hours of usage. But it does not affect
normal use for the time being. After replacing the activated carbon filter box, long press the "Mode"
button for 10s to cancel the E05 error.The carbon granule can be purchased at Frossvt Amazon Store.
In order to achieve better deodorization effect and according to the frequency of use in each family,
we recommend that you replace the activated Carbon Filter Box’s Carbon Granule every 6
months
.
1. Follow the direction indicated by the arrow on the carbon box, rotate and take out the carbon box
2. On the reverse side of the carbon box, unscrew and rotate to unscrew the small lid
3. pour out the old carbon particles, put on the new carbon particles
4.Reverse the screw port and reinstall everything

Safety Instructions
1.Please read this manual and follow the directions before using the WasteCycler for the first time.
2.Children or persons with disabilities should be used under supervision.
3.Do not allow to be used as a toy.
4.Please make sure that the voltage of your socket matches the WasteCycler before use.
5.Ensure that WasteCycler sits on a flat surface when in operation. To allow proper air flow,make sure
to place it at least 6 inches away from all walls and in a well-ventilated space.
6.Do not put the power cord and the plug into water or any other liquids to prevent electric shock.
7.Do not let the electric cord hang over the side of a counter or table or touch hot surfaces.
8.Keep the WasteCycler out of direct sunlight and away from any appliances which produce heat like
ovens and hotplates.
9.To prevent burns - please do not open the cover or touch the surface of the machine while the machine
is working.
10.If trying to clear a jam, do not use your hands or fingers, and always ensure that WasteCycler is
turned off and unplugged.
11.Do not immerse the entire machine directly in water or other liquids, except that the bucket can
be washed in water
12.When cleaning, unplug and wipe the outside with a soft dry cloth. Do not wipe the exterior of the
machine with strong acid or strong alkaline cleaners to avoid corrosion or discoloration of the
exterior.
13.Always unplug the unit when not in use or before cleaning. When adding/removing parts (such as filters)
also ensure the unit is unplugged.
14.When WasteCycler is not in use, always away from dirty environment and ensure the lid remains closed
to prevent items from falling into it.
15.Activated carbon must use columnar activated carbon with a diameter of 4mm or more. If activated
carbon below 4mm is used, the activated carbon may enter the fan and cause damage to the fan or machine
failure.
16.Do not use WasteCycler for anything other than its intended use and do not alter or adapt it in
anyway.
17.Do not use any attachments not recommended or sold by as these could damage the machine. Damage
caused by the use of accessories other than the original we will affect warranty service.
18.If the machine is malfunctioning or damaged, please contact the our mail box.
3Notices For Cord
A.A short power-supply cord is provided to reduce the risks resulting from becoming entangled in or
tripping over a longer cord.
B.Extension cords are available and may be used if care is exercised in their use.
C.If an extension cord is used:
1.The rated voltage of the extension cord shall be the same as the rated voltage of the appliance;
2.The extension cord should be a grounding type 3-wire cord;
3.The longer cord should be arranged so that it will not drape over the counter top or tabletop where
it can be tripped over, snagged, or pulled on unintentionally (especially by children).
To avoid entrapment hazard. Do not touch the grinding blades when it is moving. Do not press the main
button when the bucket is empty. Do not remove the bucket and touch the motor coupler when it is moving.
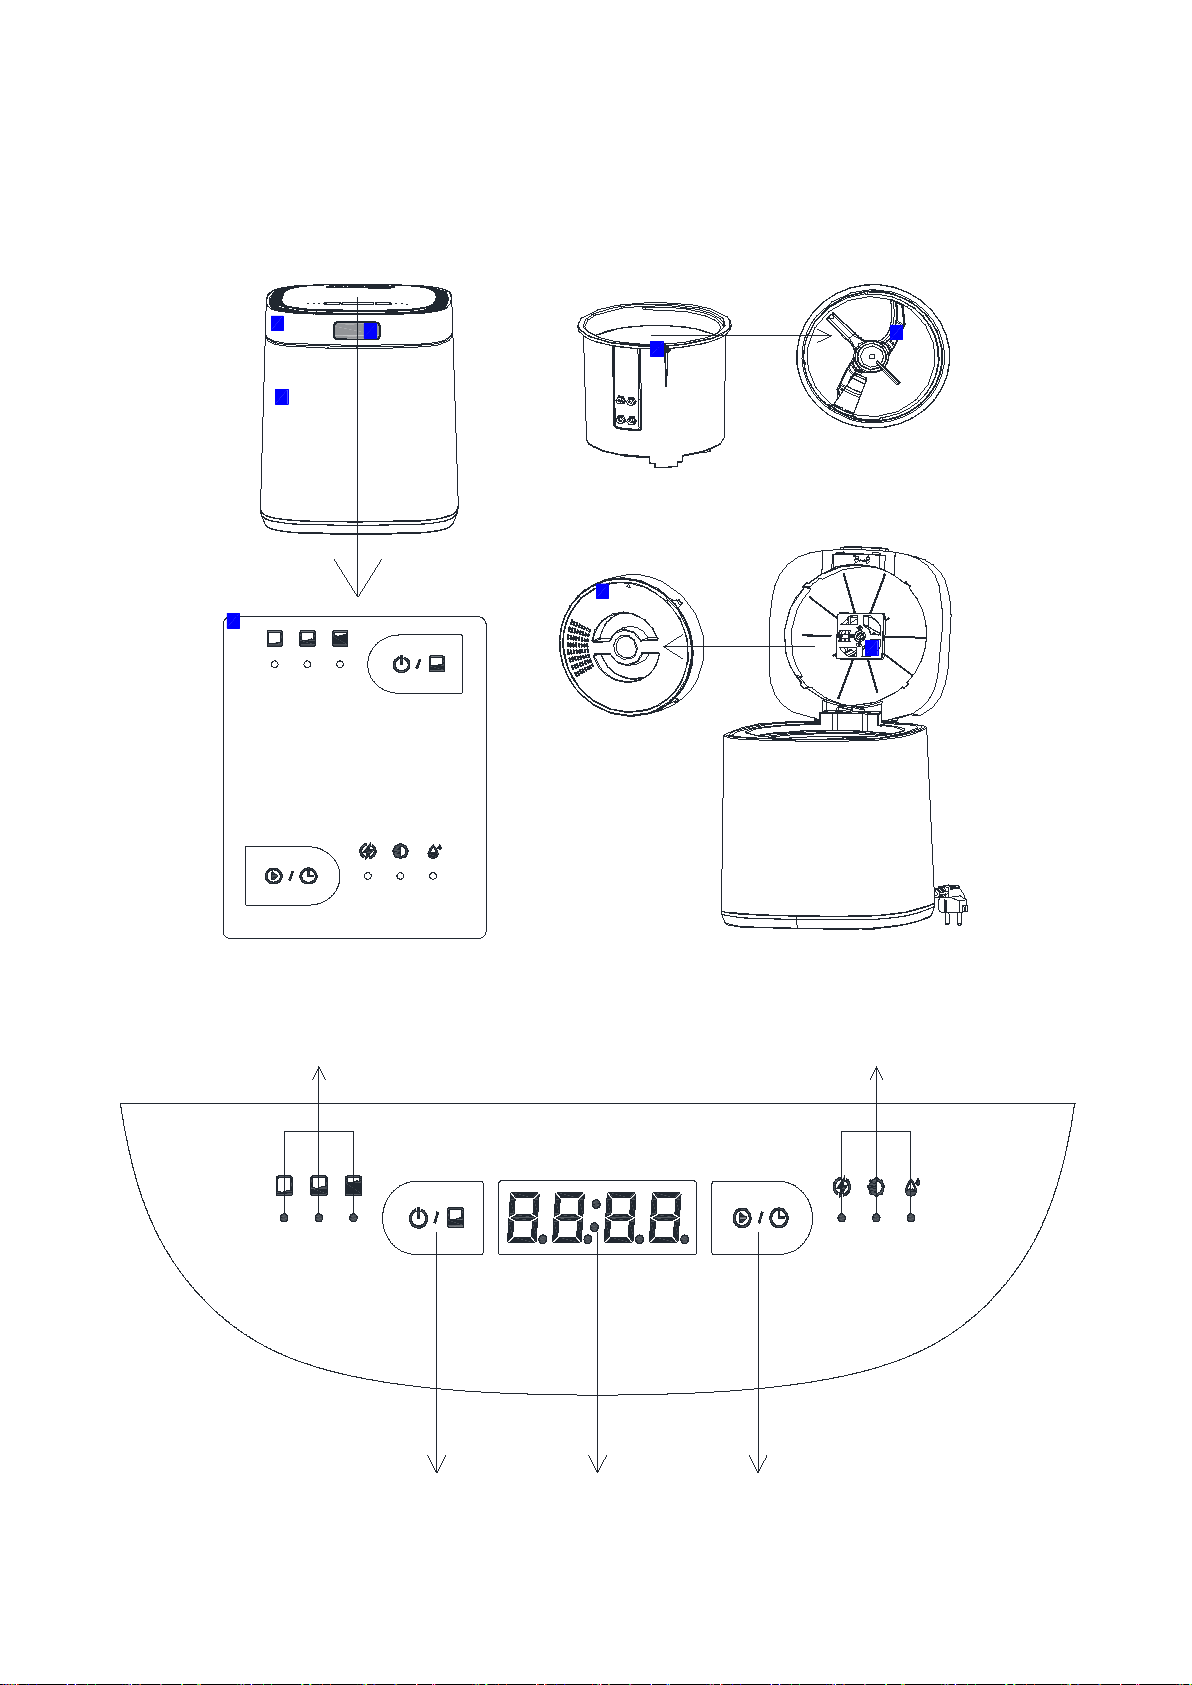
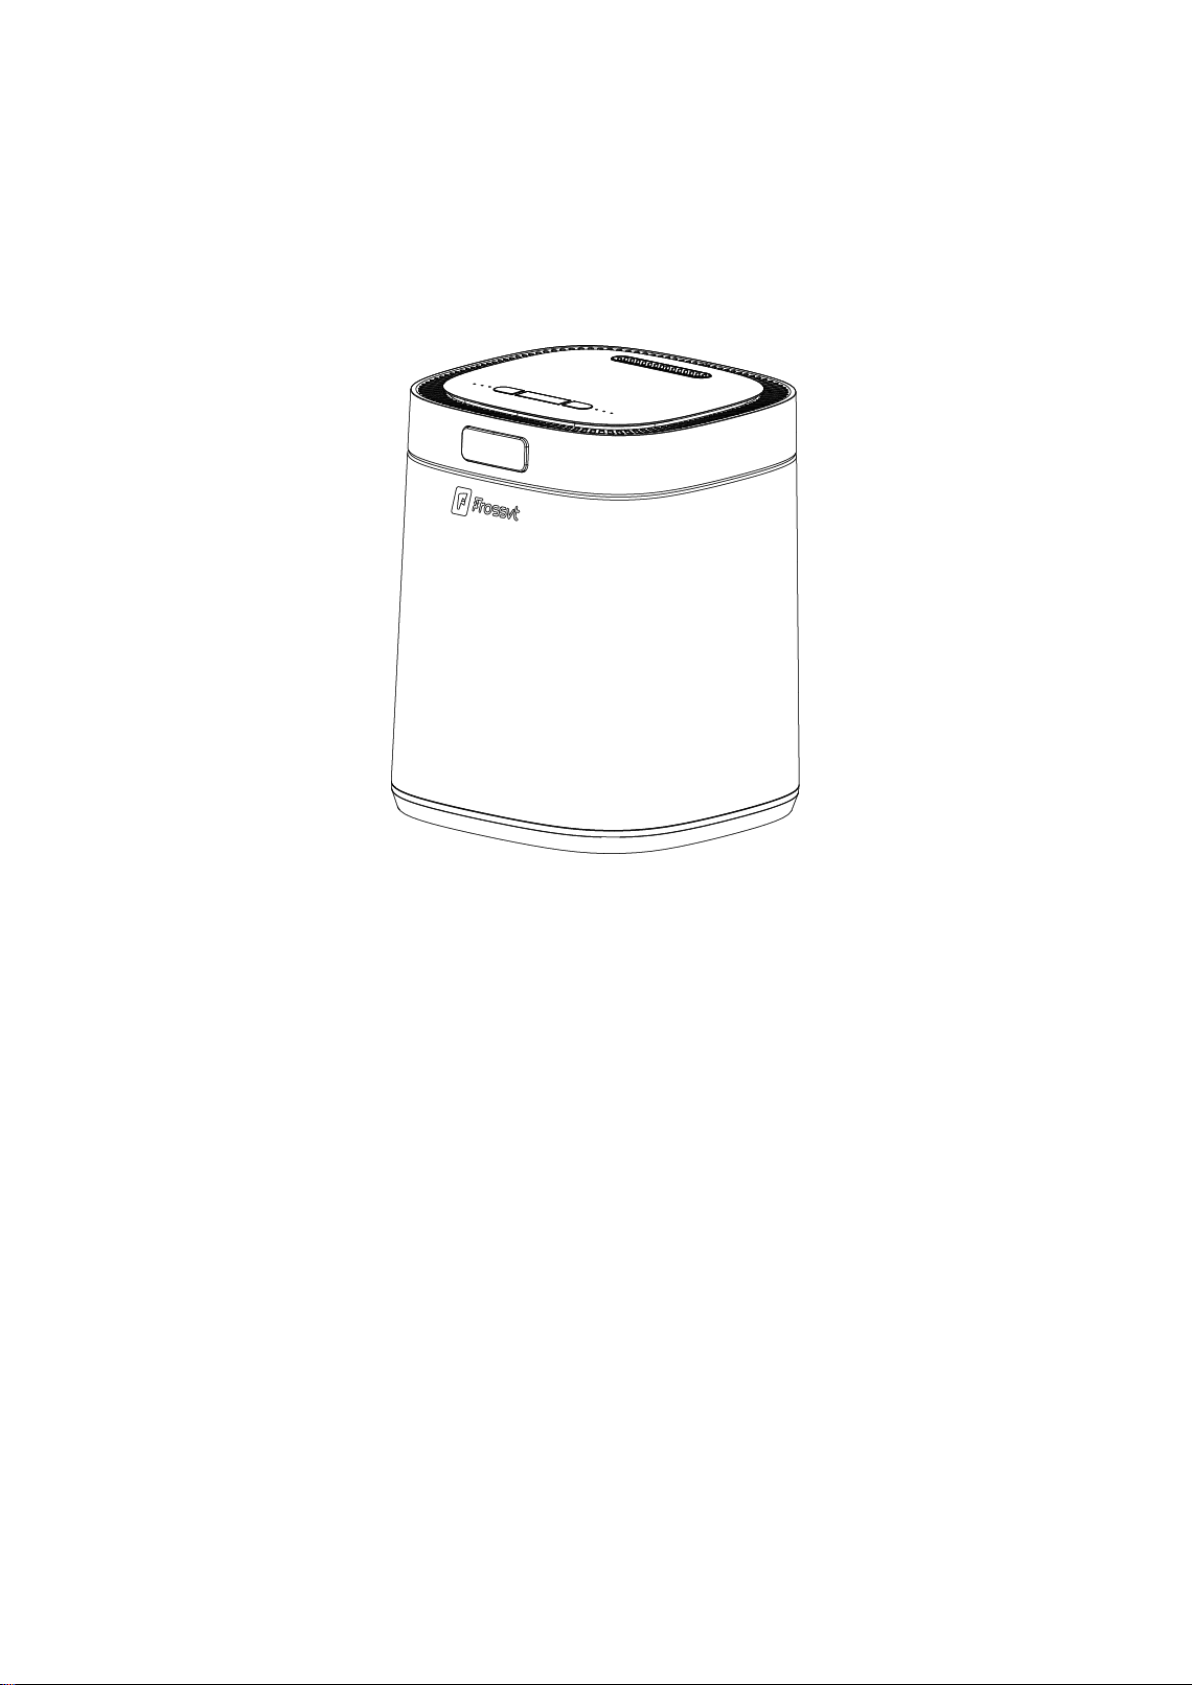
4Know Your WasteCycler
1.Cover 2.Main Housing Body 3.Open Button 4.Aluminum Bucket
5. Agitators in the Bucket 6.Control Panel 7. Activated Carbon Box 8. Built-in Fan
Volume
Mode
Low
Medium
Large
Quick
Standard
Ferment
1
3
2
4
5
6
7
8
9.Volume Indicator Light 10. Mode Indicator Light
Volume
Mode
Low
Medium
Large
Quick
Standard
Ferment
11.Power On/Off Button Volume Button 12.Time Remaining 13.Start/Pause Button Mode Button

Product Specifications
Series
WasteCycler UF006-E
Programs
Electric Kitchen Waste Composter
Volume
Low(about 300g)/Medium(about 500g)/Large
(about 700g)
Mode
Quick/Standard/Ferment
Waste Volume Reduction
80%-90%
Rated voltage
120VAC 60Hz
Rated current
4.2A
Rated power
500W
Dimensions (out of box)
9.96*9.96*12.4 inch (25.3*25.3*31.5 cm)
Package Size
12.6*12.6*14.7(32.0*32.0*36.5 cm)
Weight (out of box)
13.22lb(6kg)
Capacity
2.5L
Processing Time
Quick:
Low-2.5 hours, Medium-4 hours, Large-5 hours
Standard:
Low-4 hours, Medium-5 hours, Large-6hours
Ferment:
Low-12 hours, Medium-16 hours, Large-20 hours
Safety regulation &
Certification
Comply with relevant ETL and CETL
certification requirements
WasteCycler Modes
The WasteCycler has only two buttons - the "Volume" button and the "Mode" button, but you can choose
from 9 combinations to choose the processing method that suits you best.
For the “Volume” button, you could short press to choose Low, Medium and Large;
For the “Mode” button, you could short press to choose Quick, Standard and Ferment.
Quick Mode:
This mode is suitable for most odorprone kitchen food waste (do not put in degradable bioplastics).
This is the best mode for you if you just want to get rid of most of the odors and food waste in your
kitchen with low energy consumption.
Quick Mode utilizes 120°C heat sterilization to produce the final product which is dry, shredded and
pest free pre-composted material.
You can collect it at any time and add water and EM spawn for faster composting at your spare time.

Standard Mode:
In addition to food waste, this Mode can also put in all degradable bioplastic products, including
degradable plastic bags, degradable mobile phone cases, degradable coffee capsules, etc.
For more items, you can refer to the List of "What can I put in WasteCycler". This mode also can generate
environmentally friendly precompost materials, allowing bioplastics to return to nature.
Ferment Mode:
This mode accelerates the production of ready-to-use fertilizers through intelligent programming that
simulates the proper ratio and temperature required for natural fermentation.
You only need to put in green and brown materials with a reasonable carbon to nitrogen ratio (Perfect
Ratio : 4:1 brown waste to green waste) to produce fertilizer. If you want to ferment faster, you can
put in the extra purchased EM inoculum.
WasteCycler helps different types of microorganisms to multiply to the greatest extent via the
intelligent program of grinding-heating-keepingcooling, thereby decomposing the organic matter in the
garbage and turning it into fertilizer.
The fertilizer state produced in fermentation mode is half wet and half dry debris, which is very
conducive to the continuous decomposition of organic matter by microorganism.
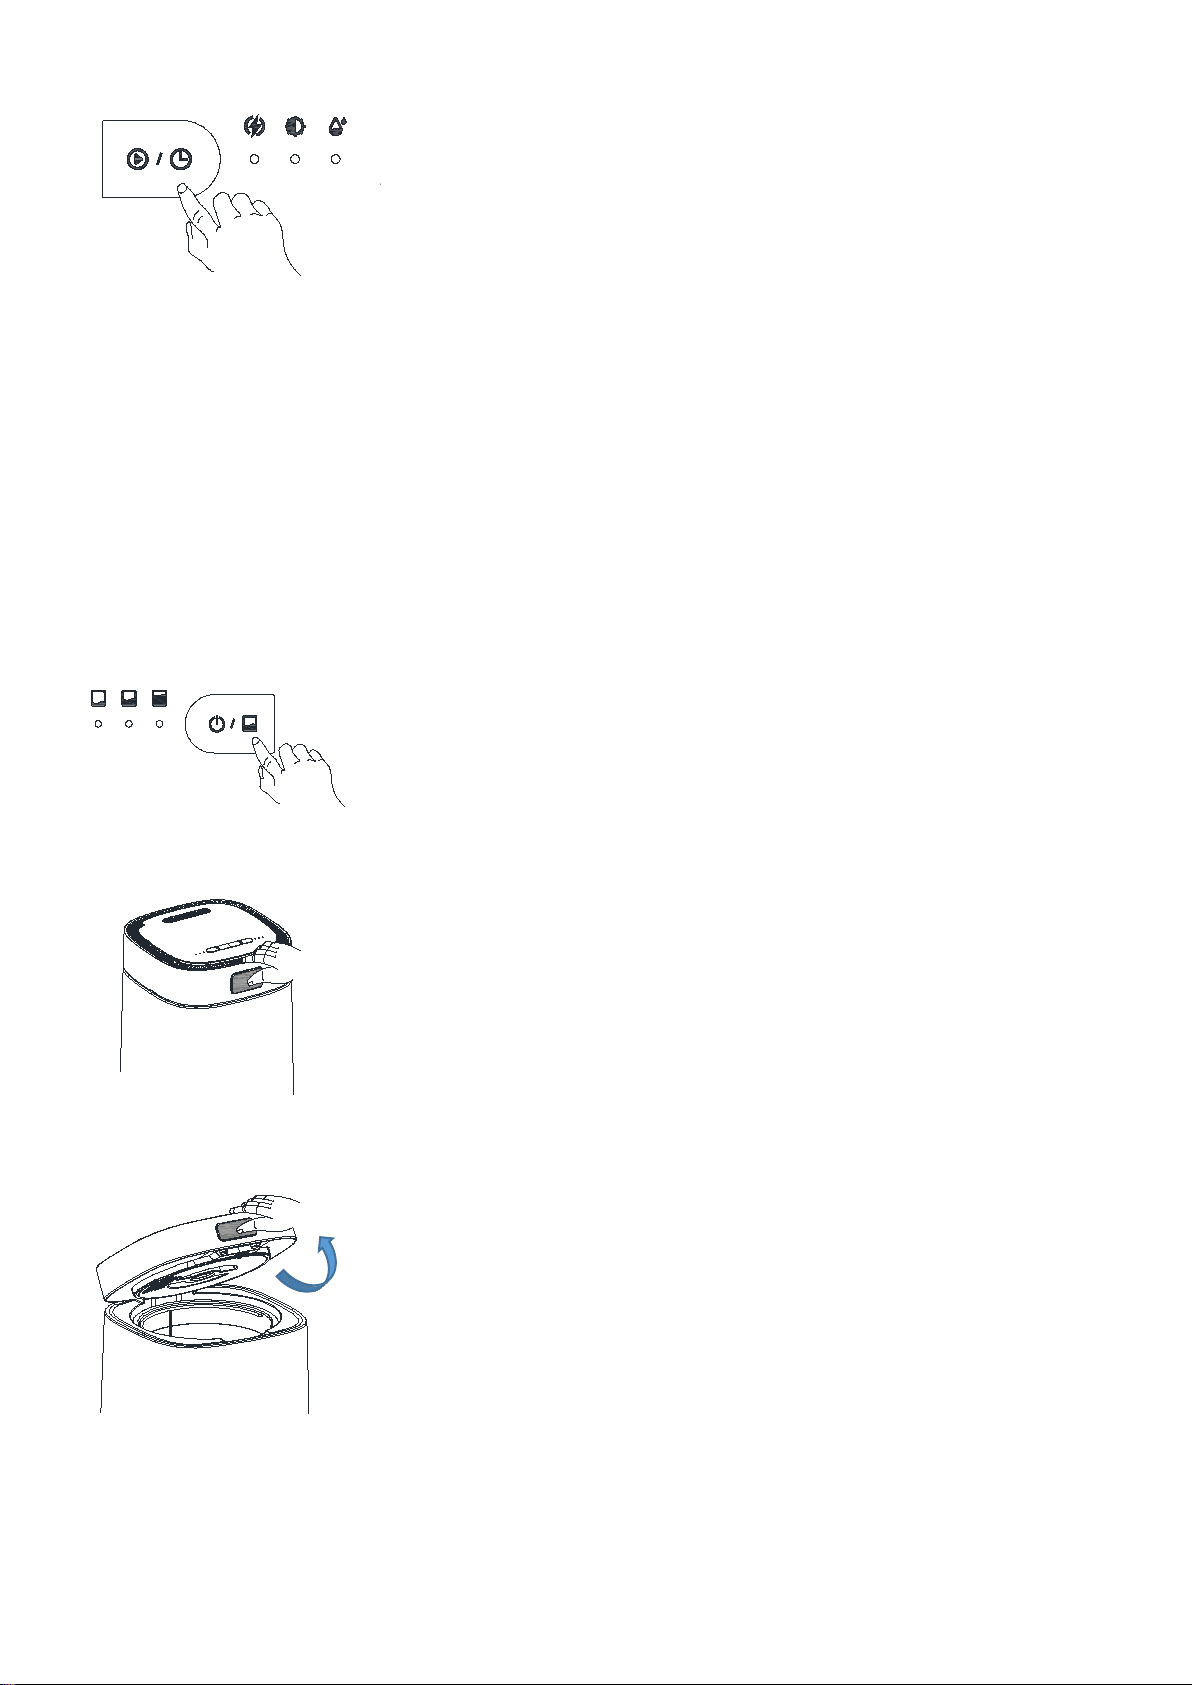
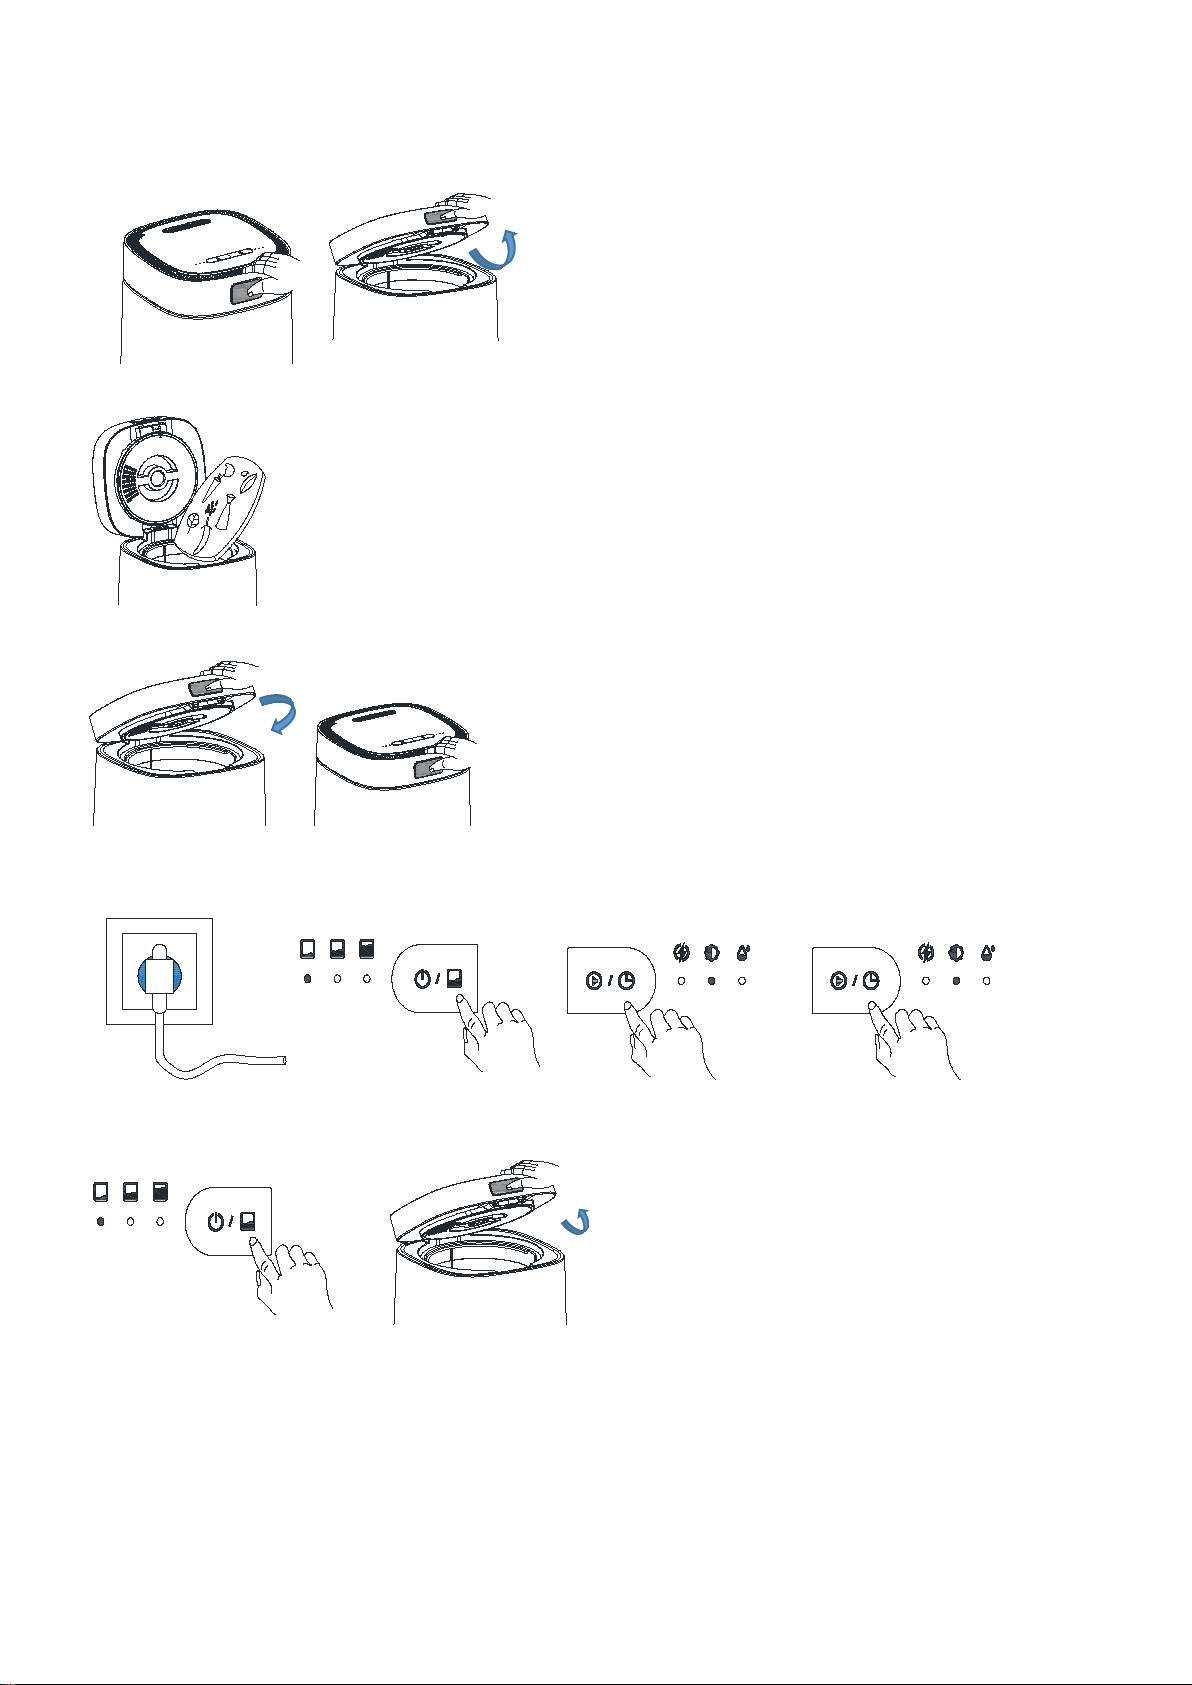
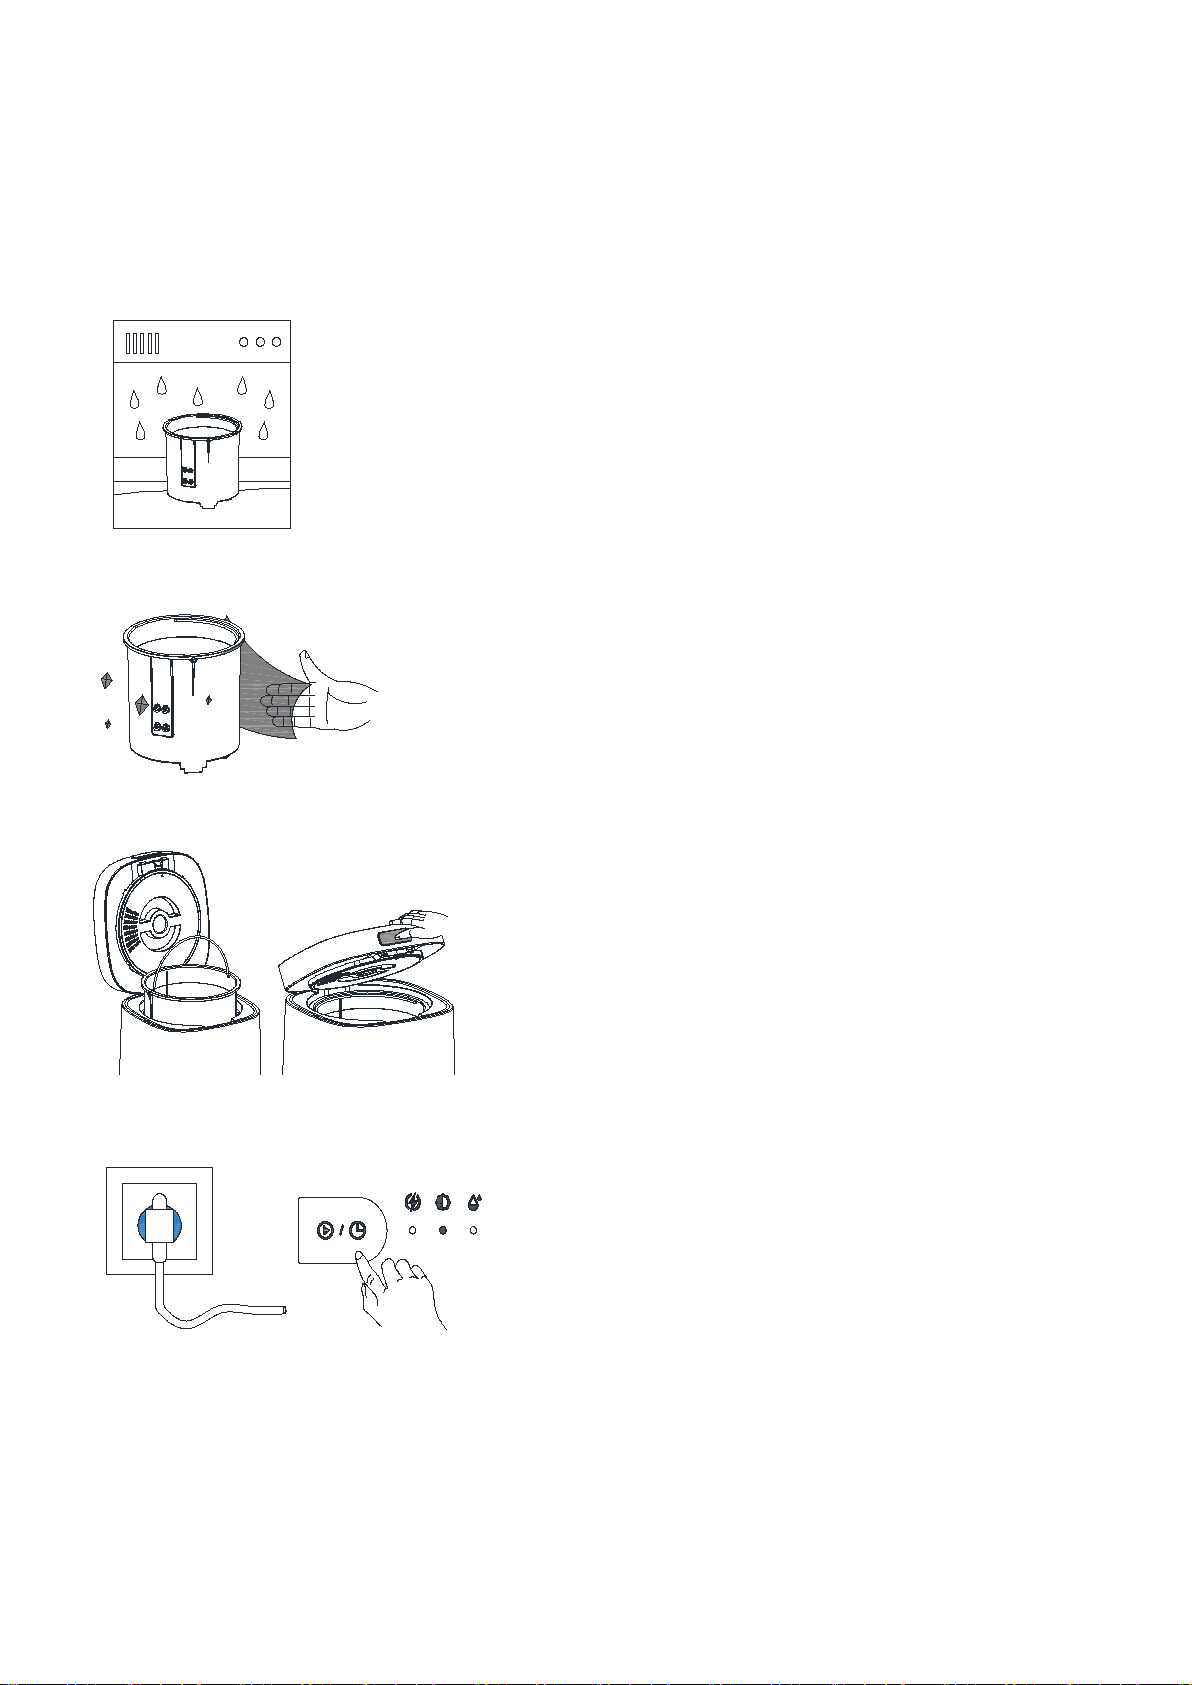
Quick Start Guide
Before use
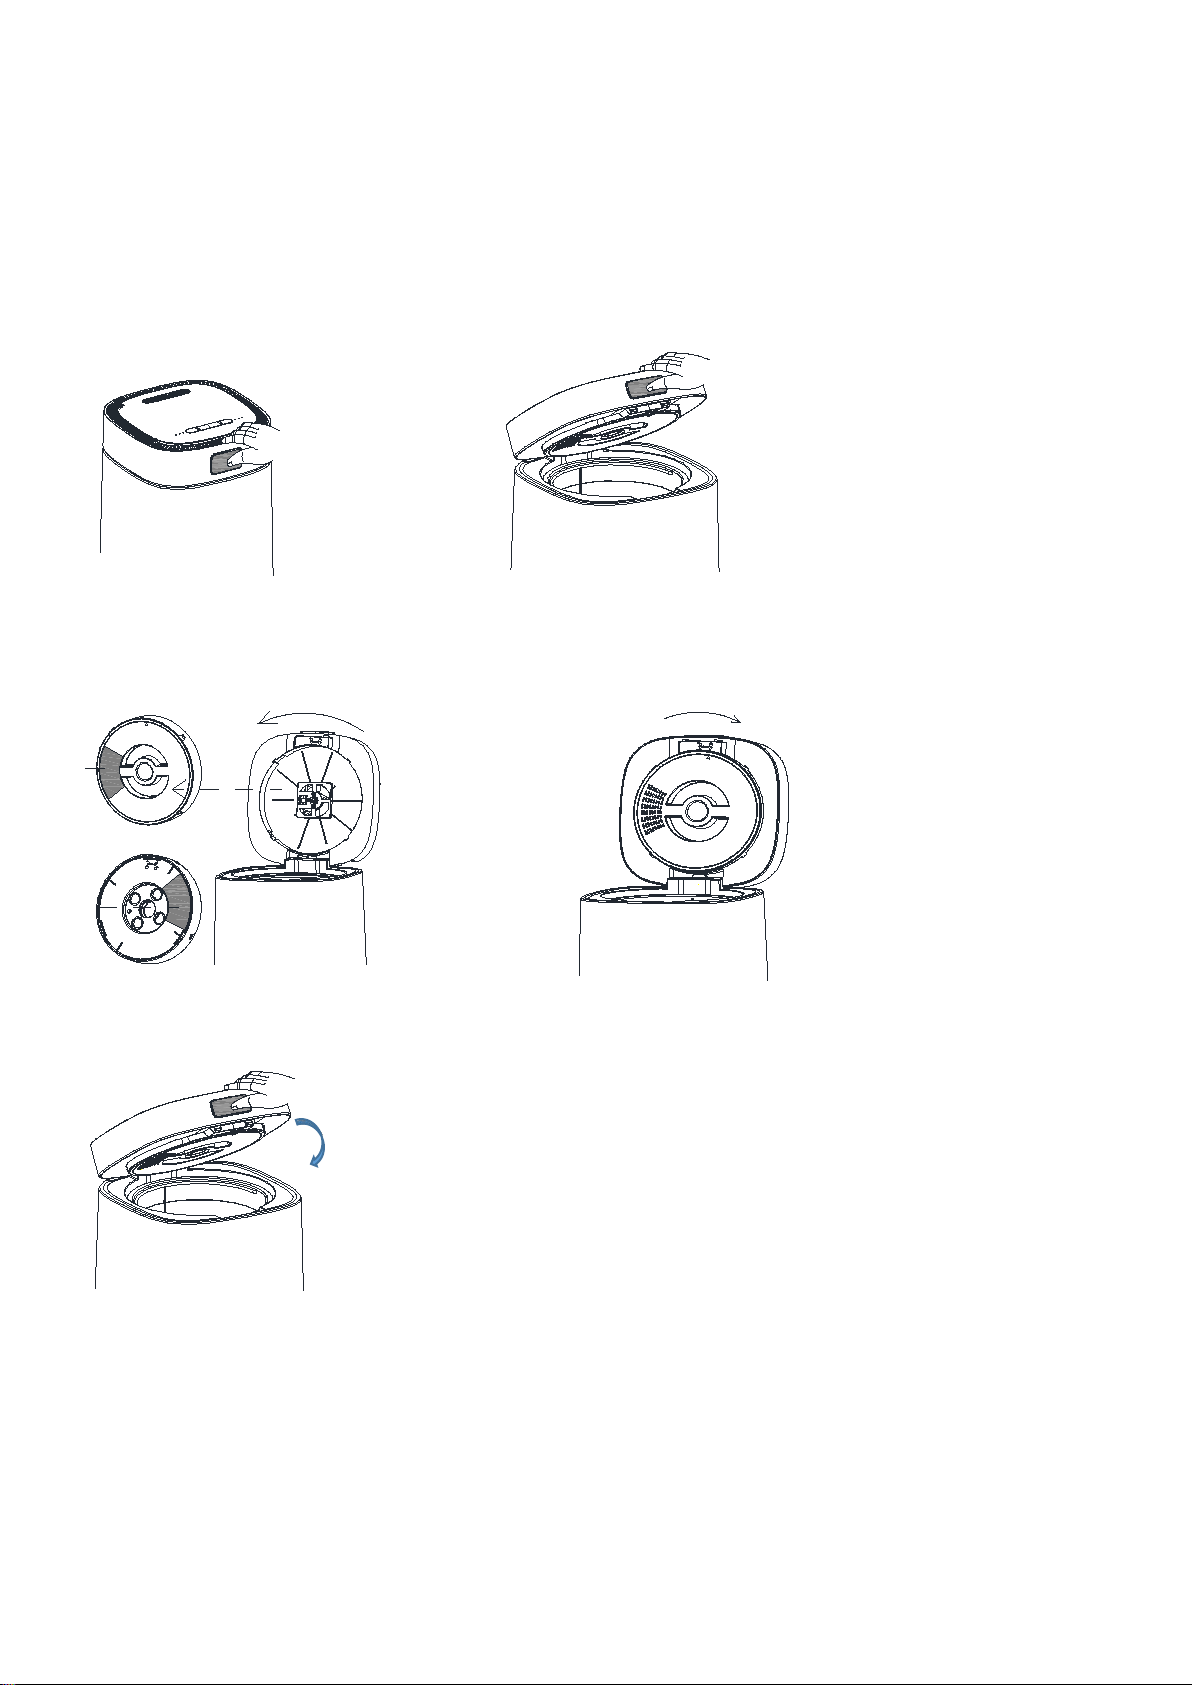
1. Place the machine on a level 2. Open the lid upwards.
Surface,then press the cover button.
3.Rotate counterclockwise to remove the carbon 4.Install the carbon box as shown in the figure.
and tear off the front and back sticker
front
black
Tear off
the front
sticker
Tear off
the back
sticker
Rotate counterclockwise
Clockwise rotation
5.Close the lid down
Note: The two stickers on the front and back of the carbon box must be removed
before it can be used
.
In-Use
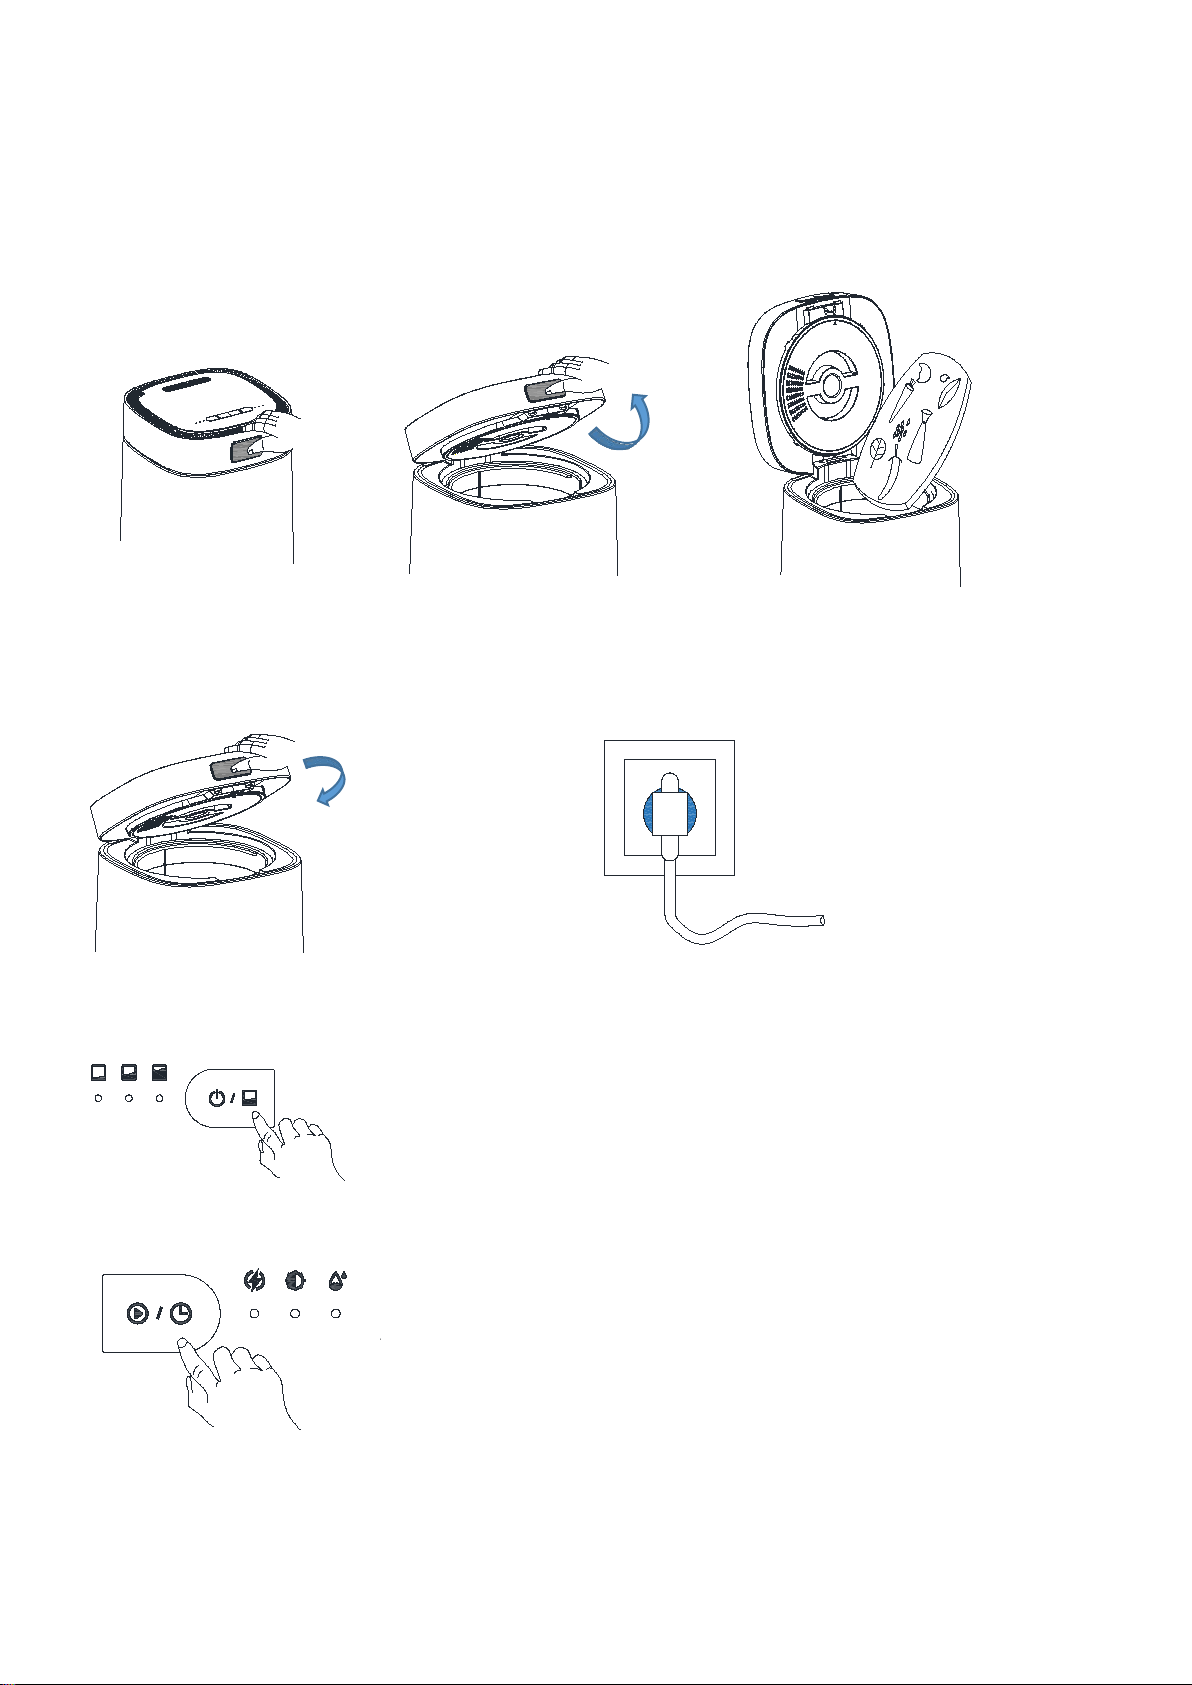
1.Press the cover button. 2. Open the lid upwards. 3.Pour the food waste into the bucket.
4.Close the lid down 5.Plug in the power.
6. Short Press the “Volume” button to choose the volume.
Volume
Low
Medium
Large
7. Short Press the “Mode” button to choose the mode.
Mode
Quick
Standard
Ferment
8. Long Press the “Mode” button for 1.5s to start the machine.
Mode
Quick
Standard
Ferment
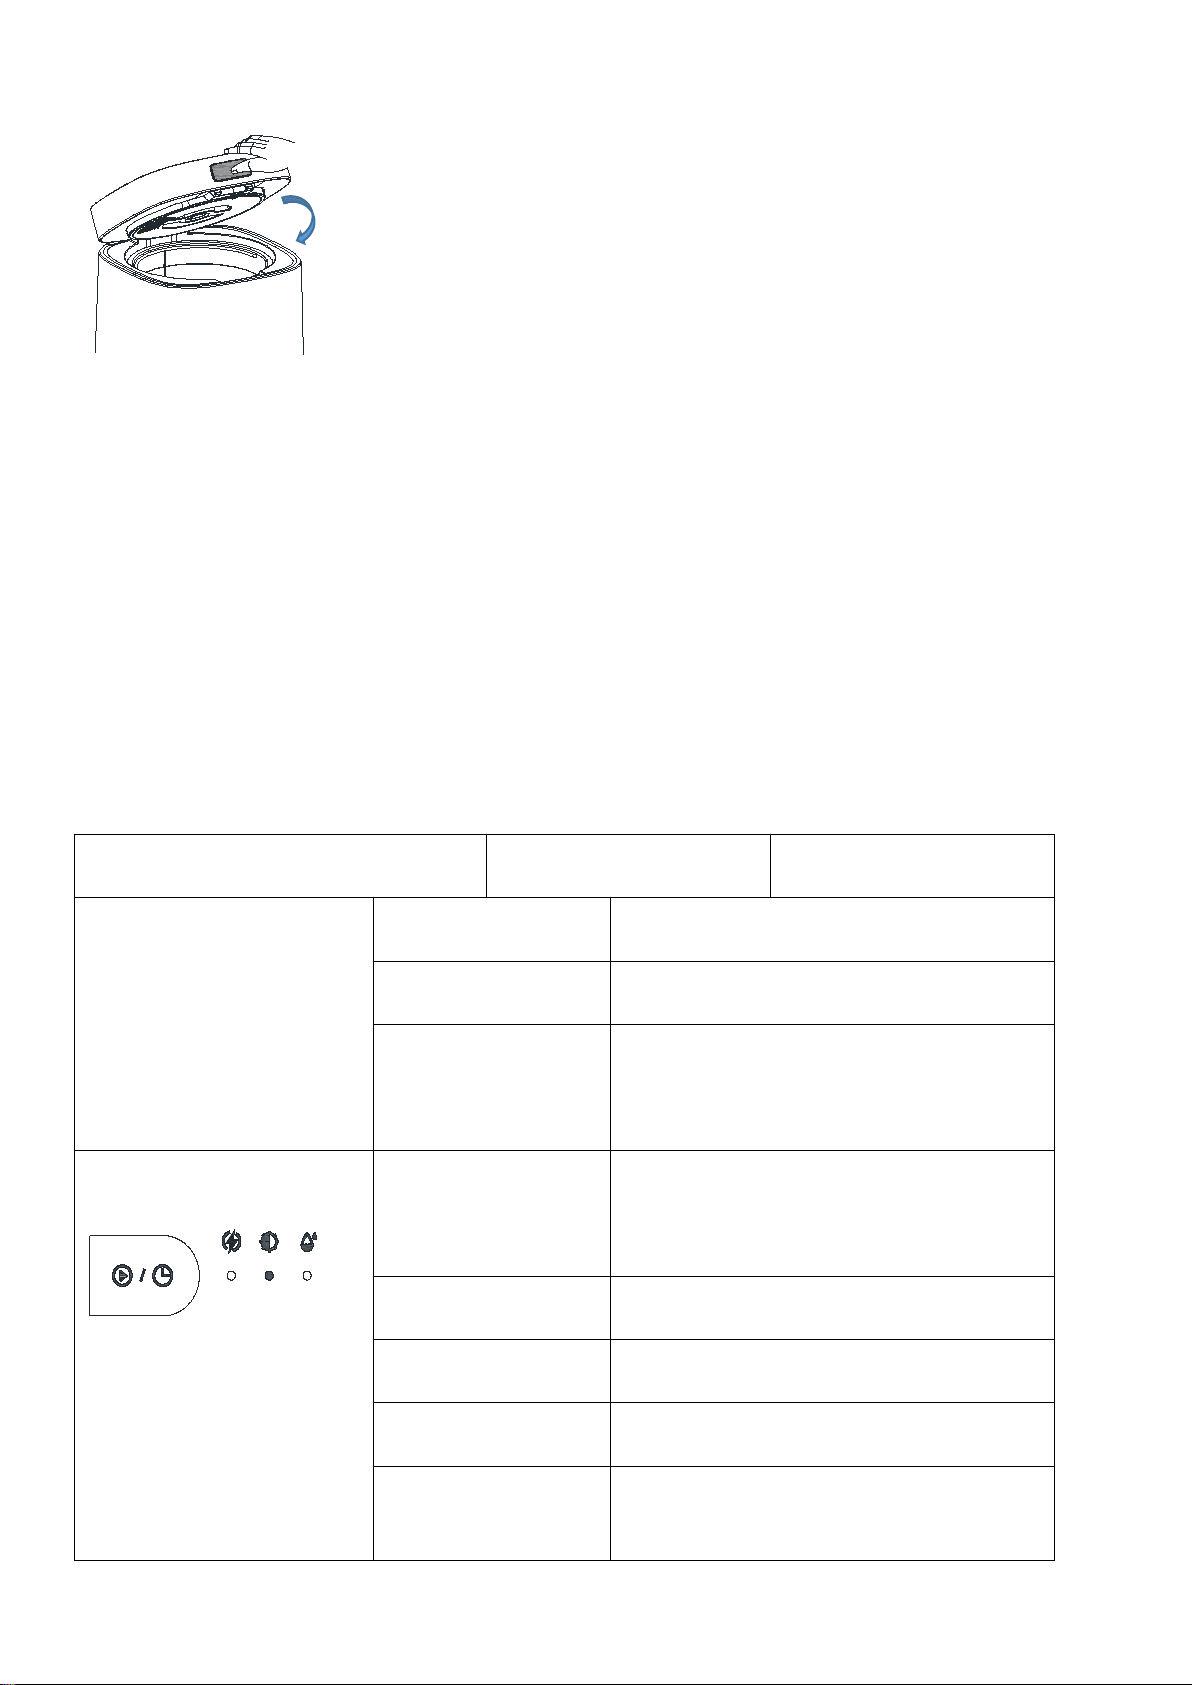
Notice:
1. Try not to open the Lid during operation. Otherwise, the machine needs to re-time
when restarting. Press the "Mode” button to pause if you do need to open the Lid.
2. If the machine displays E01, Just close the cover again
3. 3. If the cover is opened halfway, the condensed water on the cover will flow to the machine body
and then to the desktop or floor, so it is not necessary to open the cover halfway.
After Use
1. Long Press the “Volume” button for 1.5s to power off.And pull the plug.
Volume
Low
Medium
Large
2. Press the cover button.
3. Open the lid upwards.
4. Lift the bucket vertically to the machine.
*1.5s
*1.5s
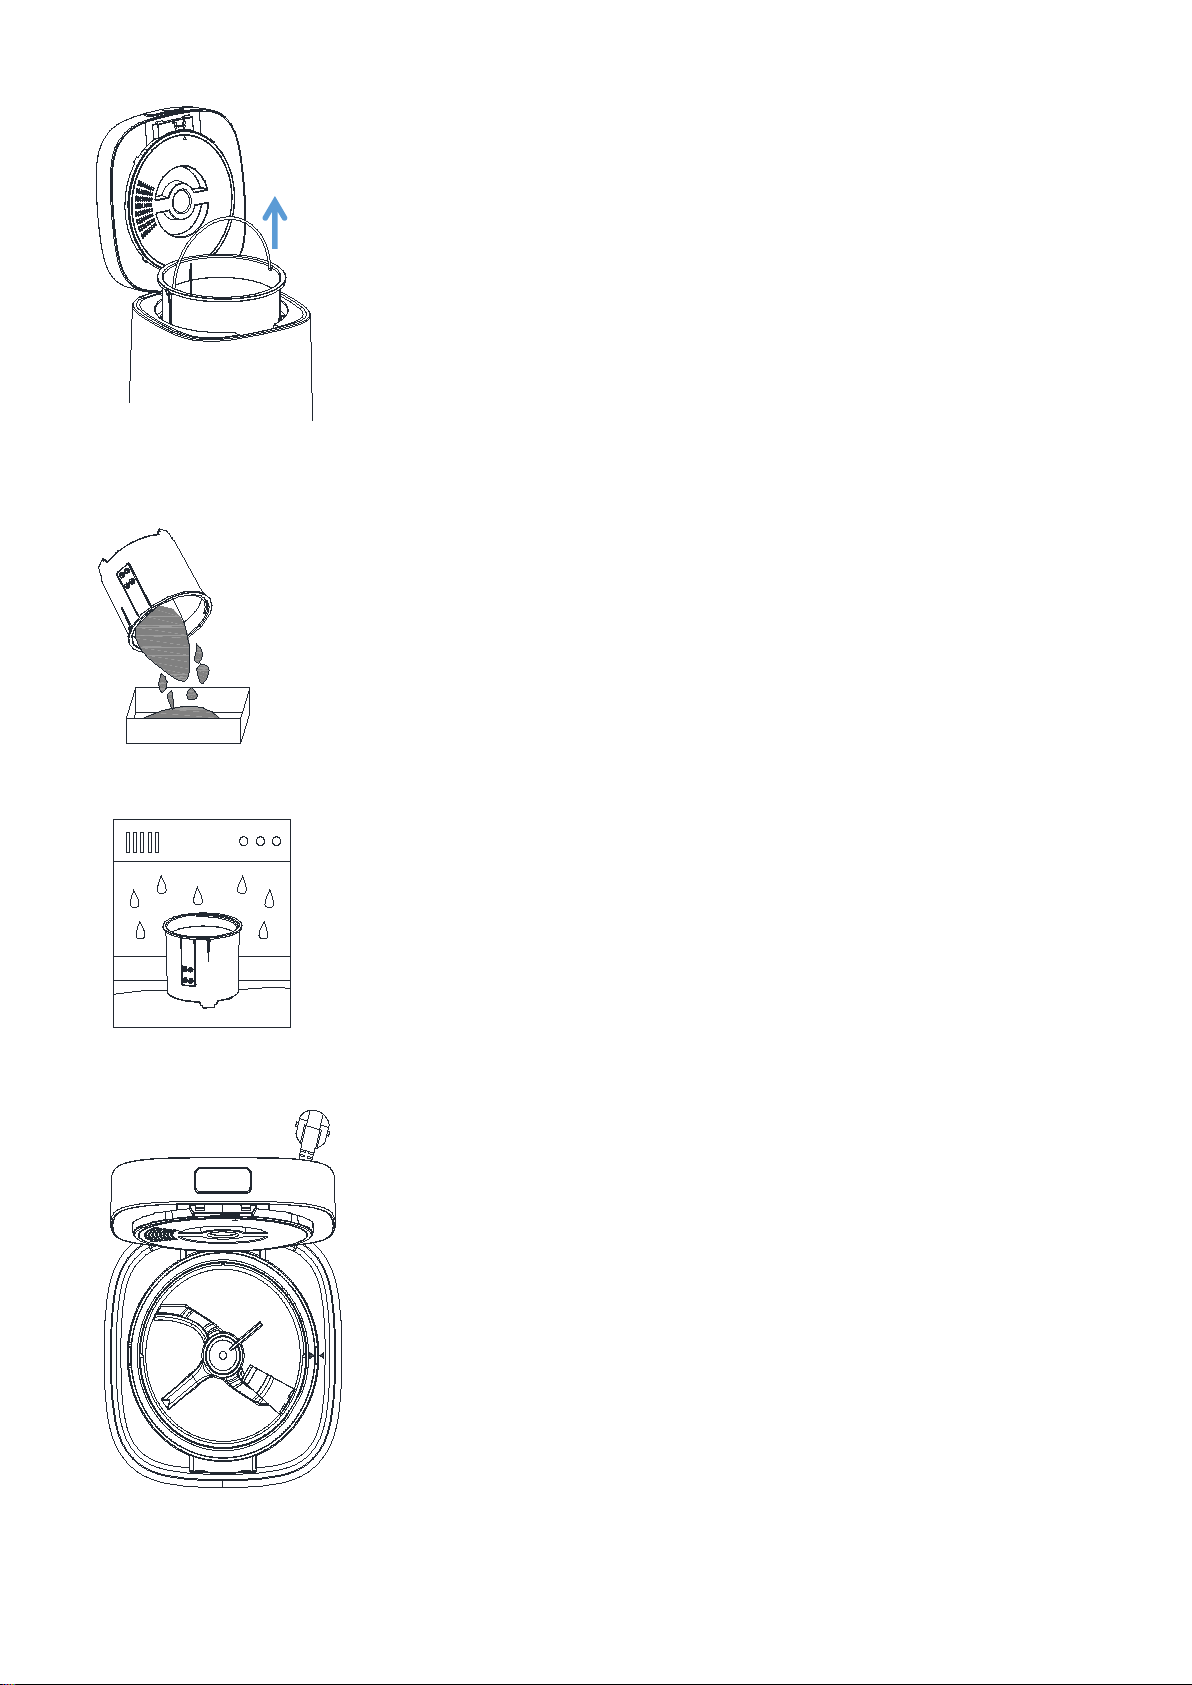
5. Pour the processed garbage in the bucket into the storage box.
6. Wash the bucket with water or put it directly in the dishwasher.
7. Aligning the mark placement buckets
8. Close the lid down.
Notice:
1. When putting the bucket into the machine as shown in the Step 7, turn it left and right slightly
and push it to the bottom with a small force to ensure that it is completely stuck in the correct position
after aligning the “▲” label.
2. After the machine is finished, the barrel is still hot. If you want to clean it immediately, please
wrap the handle of the barrel with a wet cloth to avoid scalding.
Regular Use Guidance
Button
Machine Status
Action
Volume
Low
Medium
Large
Standby Mode
Long Press the "Volume" button for 1.5s to
enter "Power-on Mode".
Power on Mode
Long Press the "Volume" button for 1.5s to
enter "Standby Mode".
Power on Mode
Short Press the "Volume" button for 0.5s to
choose Volume , and change the desired
Volume with each click.
(Low → Medium → Large)
Mode
Quick
Standard
Ferment
Power on Mode
Short Press the "Mode" button for 0.5s to
choose Mode , and change the desired Mode
with each click.
( Quick → Standard → Ferment )
Power on Mode
Long Press the "Mode" button for 1.5s to run
the machine.
Running
Short Press the "Mode" button for 0.5s to
Pause/Continue.
Power on Mode
Quick and short press the "Mode" button 3
times continuously to "Drying Mode".
E05 is displayed on
the screen and
flashes.
Long Press 10s to cancel the“activated
charcoal filter replacement prompt”.
Let's Start A Simple Cycle
1. Press the cover button and open the lip.
2. Cut a small amount (about 300 G) of waste into small pieces and pour into the bucket of the WasteCycle
3. Close the lid down.
4. Plug in the power, short press the "Volume" button to select the "Low volume"; short press the
"Mode" button to select the "Quick Mode"; long press the "Mode" button for 1.5s to start running.
Volume
Low
Medium
Large
Mode
Quick
Standard
Ferment
Mode
Quick
Standard
Ferment
5. You need wait for the machine program to run automatically to end,Press and hold the "Volume" button
for 1.5s to shut down and pull the plug, then open the lid
Volume
Low
Medium
Large
6. You need to lift out the bucketvertically to the machine.
Note: When the machine is just finished, it is still in a high temperature state. Please wait for
a while or lift the bucket with a wet cloth to prevent scalding.
*1.5s
*1.5s
7.Mix the resulting fertilizer with soil in a ratio of 1:10 and add to your garden plants.
8.Wash the bucket in the sink or in the dishwasher. If foreign objects fall into the machine, it needs
to be cleaned up, and then wipe the outside of the machine and the cover with a dry rag. Finally, put
the dried inner cylinder back into the machine and close the lid.
Troubleshooting
Flash and Sound Explanation
Problem
Reason
Method
E01
The lid is not closed properly
Put the lid on
E02
The mixing knife in the bucket is stuck
by hard objects or long fibers.
Pull out the plug, lift the
bucket and clean the hard
objects or long fibers in the
bucket, and then start again.
E03
The fan is damaged or stuck
by foreign objects.
Pull out the plug, remove the
carbon box and observe
whether the fan is stuck by
foreign matters. If it is,
remove it. If not, contact
the customer service.

E04
The barrel is not in place, resulting in
the barrel not being heated
After putting the bucket in
place, press it down with
your hand. If it still
doesn't work, please contact
customer service.
E05
You have accumulated more than 1000
hours of usage. But it does not affect
normal
use for the time being. For the sake of
keeping the filtering effect, it is
recommended to click on our official
website to purchase and replace the
activated carbon filter box.
After replacing the
activated
carbon filter box, long press
the "Mode" button for 10s to
cancel the E05 error.
Machine Performance
Smoke From
Waste
Added prohibited rubbish, such as thin
paper, hay or ordinary cotton. The hay
its ignition point and emits
smoke.
Unplug and open the lid.
After the bucket cools, pick
out the ones that don't fit.
Motor
Stops
Turning
And Emits
Smoke
Check for large hard bones,
metal or glasses that are on
the prohibited list.
Unplug and open the lid. After
the bucket cools, pick out the
ones that don't fit.
All
Indicator
Light
OFF
not plugged in / inappropriate
voltage / machine failure
Check whether the plug is
inserted and whether the
power supply voltage is
suitable. If it is judged
that the machine is faulty,
contact the customer
service.
How To Make Perfect Compost
1. Get to Know Your Greens and Browns
There are two main ingredients in any successful compost pile: carbon-rich ingredients and
nitrogen-rich ingredients.
Brown Material (high carbon content)
Fall leaves, Pine needles, Twigs, chipped tree branches/bark, Straw or hay, Sawdust,
Corn stalks, Paper ( newspaper, writing/printing paper, paper plates, napkins, and
coffee filters), Dryer lint, Cotton fabric, Corrugated cardboard (without
waxy/slick coatings), etc
Green Material (high nitrogen content)
Grass clippings, Coffee grounds/tea bags, Vegetable and fruit scraps, Trimmings from
perennial and annual plants, Annual weeds that haven't set seed, Eggshells, Animal
manures (cow, horse, sheep, chicken, rabbit, but not dog or cat manure), Seaweed,

etc
2.Striking the Right Carbon-Nitrogen Balance
The magic of composting lies in the interaction between carbon compounds (brown) and nitrogen compounds
(green). The perfect ratio of carbon to nitrogen in compost is close to 25:1 to 30:1, at the right
wet and dry level.
3.Get the Feel of Your Pile
A. If you are a home gardening enthusiast, you only need to put the daily kitchen waste into the compost
according to the volume of brown material: green material about 1:3. You can also purchase commonly
used microbial composting agents to use with them.
B. If you are a professional compost maker, you can browse relevant gardening books and websites to
obtain the carbon and nitrogen content of various materials, and use professional calculation methods
to control the results.
When the ratio is lower than ideal (too much nitrogen), the pile will be slimy and stinky; simply add
more brown materials.
When the ratio is higher than ideal (too much carbon), the pile will be dry; simply add more green
materials.
In general, carbon-rich materials should form the bulk of the pile. A good rule of
thumb is that each time you add a batch of nitrogen-rich ingredients, add roughly 4 times that amount
in carbon-rich ingredients (in volume, not weight).
What can WasteCycler's fermentation mode do for composting?
1.The intelligent low-temperature fermentation function of the WasteCycler makes the organic matter
to go through three different temperature stages, allowing microorganisms suitable for reproduction
at different temperatures to grow while killing the eggs of diseased insects.
2.Maintain the optimum humidity of 60% of the compost, which is most suitable for the rapid reproduction
of microorganisms.
3.Proper oxygen can inhibit the reproduction of anaerobic bacteria and produce foul gas.
4.Turn the compost pile frequently to distribute the microorganisms evenly throughout the compost
pile.ingredients (in volume, not weight).
Cleaning And Maintenance
For regular use, you could put the bucket directly into the dishwasher, or if you want to clean it
by hands, you just need to use the liquid detergent to do, just like our daily dishwashing.
If you do not use the WasteCycler for more than 1 month, here are the cleaning and maintenance
suggestions:
1. Rinse the bucket clean.
2. Dry the inner and outer surfaces and bottom of the bucket with a towel.
3. Put the bucket into the machine.then close the lid.
4. Plug in the power and press the “Mode” button three time continuously to enter the Drying Mode
for 30mins.
Mode
Quick
Standard
Ferment
*3 times
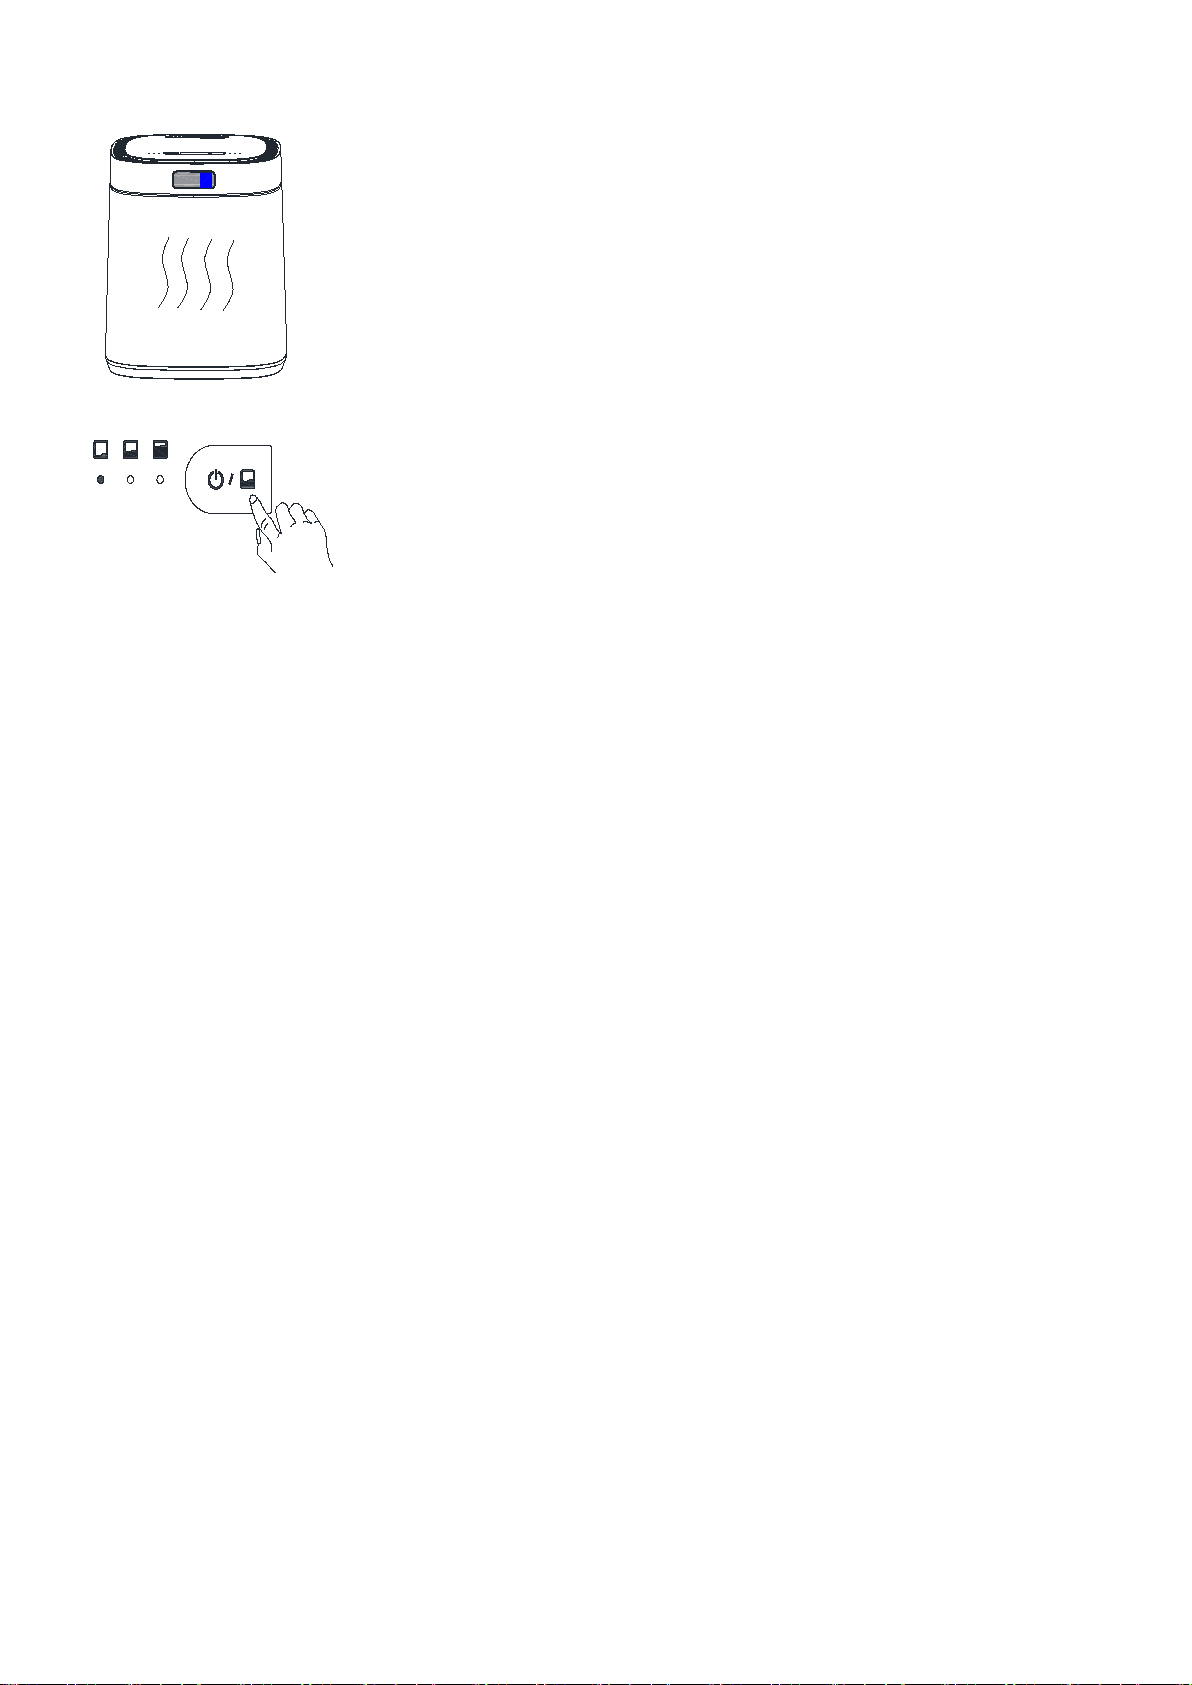
5. After 30 minutes, drying is complete and returns to standby mode.
3
6. Long Press the “Volume” button for 1.5s to power off and pull the plug.
Volume
Low
Medium
Large
*1.5s

What Can I Put in WasteCycler
For all modes, you can put in a wide variety of food waste. Some hard and
non-decomposable special waste cannot be put into the WasteCycler in order to avoid
damaging the machine. See below for what can and can not be put in WasteCycler:
ALWAYS
Fruit and vegetable scraps:
Peel (watermelon, orange, tangerine, banana, etc), Scrap (carrots,
broccoli, peas, hummus, etc).
Food leftovers:
Grains (bread, cereal, oatmeal, rice, pasta, pancakes, etc), cartilage
heads and shells (fish, eggs, shrimp, meat scraps, etc), dairy products
(cheese, yogurt, etc) .
Biodegradable biomaterials:
Tea and coffee (paper filters, coffee grounds, tea bags, etc), paper
items (napkins, cardboard, tissue paper, etc), degradable materials
(degradable plastic bag, degradable mobile phone case, etc).
Potted plants and leaves:
Houseplants, flowers Yard trimmings flowers, leaves, straw, pine
needles, etc.
Starches:
Bread, pasta, rice. potatoes, cereals, oats and other grains.
LIMITED
Soft peels or fifibrous waste:
corn husk, pineapple head, pistachio shells, apples, etc.
With oil and sauce:
Compostable paper towels, napkins and tissues, paper food packaging.
Sticky foods:
Honey, maple syrup, jams, nut butters, etc.
Need to be chopped:
Plain paper documents, envelopes, paper packing box, etc.
NEVER
Special kitchen waste:
Hard bones (chicken, beef, pork, lamb, etc), greasy foods (cooking oils,
pastes, etc), fruit pits (avocados, peaches, apricots, nectarines,
mango, etc), walnut shells (toxic to plants, etc).
Articles for daily use:
Soaps, shampoo and conditioner bars, lined bags (chip, cookie, pet
food), soiled diapers, baby wipes, tampon, pet feces, cigarettes,
metal, general plastics, glass, foil wrap, alcohol, styrofoam, etc.
Please contact us if you are not sure if a certain food can be put in.

Frequently Asked Questions
1.Why don't the blades of the machine turn all the time?
This is completely normal. Through hundreds of thousands of tests, the laboratory has finally designed
and determined the intelligent program of heating-grinding-holding-cooling. By programming separate
or intersecting heating and grinding jobs at different stages of operation, we can save enormous amounts
of electricity.
2.Should I add the extra purchased EM bacteria? At what stage should we add into it?
The composition of EM bacteria is some dormant beneficial microorganisms, which can help the
fermentation process to proceed faster. Since the kitchen and garden waste you compost itself contains
many microorganisms, when your added material achieves the perfect carbon-nitrogen ratio, EM bacteria
can be omitted. However, since the daily garbage generated by each household is not fixed, we still
recommend that you add EM bacteria before using the fermentation model which will greatly speeds up
the efficiency and success of composting.
3.How can I know if the fertilizer is too dry or too wet?
This is the original intention of our design of WasteCycler - a visual waste composter. Due to the
different types, weights and moisture content of kitchen waste generated by each household, it is
difficult for us to set a consistent program to achieve everyone's expectations for the dry and wet
state of fertilizers. You can stop the machine at any time when you observe that the fertilizer has
reached the desired chip and dry moisture.
4.How do I apply WasteCycler's fertilizer to my garden plants?
We recommend that you mix fertilizer to soil at a ratio of 1:10, then bury it under the plant, and
water it appropriately.
5.Can WasteCycler sit with unprocessed waste for a few days while I fifilll it? Will that smell?
We only recommend leaving it for a day, especially in hot weather, as it can grow bacteria and develop
odors if left untreated. When the WasteCycler is not running, the filter odor control is not activated,
so you may smell it.
Disclaimer
Main prohibited measures:
1.Misunderstand and misuse of the manual.
2.Use this product for purposes other than the specified purpose.
3.Modification of the machine by consumers other than authorized retailers or technicians.
This device complies with Part 15 of the FCC Rules. Operation is subject to the following
two conditions:
1.This device may not cause harmful interference;
2.This device must accept any interference received, including interference that may cause undesired
operation.
Please note that changes or modifications of this product is not expressly approved by the party
responsible for compliance could void the user's authority to operate the equipment.

NOTE:
This equipment has been tested and found to comply with the limits fora Class B digital device, pursuant
to Part 15 of the FCC Rules. These limits are designed to provide reasonable protection against harmful
interference in a residential installation. This equipment generates, uses and can radiate radio
frequency energy and, if not installed and used in accordance with the instructions, may cause harmful
interference to radio communications. However, there is no guarantee that interference will not occur
in a particular installation. If this equipment does cause harmful interference to radio or television
reception, which can be determined by turning the equipment off and on, the user is encouraged to try
to correct the
interference by one or more of the fallowing measures:
*Reorient or relocate the receiving antenna.
*Increase the separation between the equipment and receiver.
*Connect the equipment into an outlet on a circuit different from that to which the receiver is
connected.
*Consult the dealer or an experienced radio/TV technician for help.
Customer Service: frossvt@dg-sunrise.com

These appliances are built to the very highest of standards.
There are no user serviceable parts. Follow these steps if the unit fails to operate:
1.Check the instructions have been followed correctly.
2.Check that the mains supply is functional.
3.If the appliance will still not operate, please contact us:
Customer Service: frossvt@dg-sunrise.com
Every Frossvt product comes with 1-Year Worry-free Warranty.
Manufacture: FROSSVT Brands Inc
Customer Service: frossvt@dg-sunrise.com