Loading ...
Loading ...
Loading ...

65
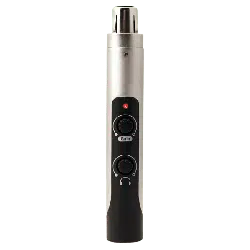
Connecting the Mic Mate™ Pro to your computer:
The MXL
®
Mic Mate
™
Pro will operate with both USB 2.0 (high speed USB) and USB 1.1 data buses. We
recommend you connect your microphone directly to the computer’s USB port as opposed to using a USB
hub. USB hubs have been known to interfere with the performance of various USB devices.
PLEASE NOTE: Audio and video recording can be very taxing to a computer’s resources. For this reason,
you should close any and all running applications that are non-essential. Please take the following steps to
get connected:
1. If open, close your audio recording application. You will open it after the Mic Mate
™
Pro is connected
and operational.
2. Connect the corresponding ends of the supplied USB cable to the Mic Mate
™
Pro and the computer’s
USB port.
3. The red LED on top of the Mic Mate
™
Pro will illuminate indicating it is receiving power from the computer.
4. Connect your microphone of choice* directly to the XLR connector on the Mic Mate
™
Pro or use an XLR
microphone cable to facilitate placement farther away from the computer.
*Please note that 48V phantom power is on all of the time and can potentially harm some ribbon
microphones. If you are unsure of how phantom power affects your microphone, please consult with your
microphone manufacturer prior to use.
Initial setup with Windows XP:
1. To select the Mic Mate
™
Pro microphone as the default audio device, go to the Start Menu and select
Control Panel.
2. Select Sounds and Audio Devices.
3. Click on the Audio tab and select USB Audio Codec as the default device for Sound playback and
Sound Recording.
Setup
4. To adjust the output volume from the computer, click on the Volume button under Sound playback.
5. The master volume output can be changed by moving the Speaker fader up or down. You can adjust this
volume in conjunction with the headphone volume knob on the Mic Mate
™
Pro to create the perfect monitor
mix between music playback and the direct signal from your microphone.
* You will notice the volume control under sound recording is grayed out. This is because the input gain
control is found on the Mic Mate
™
Pro.
Your Windows XP computer is now set up to use the Mic Mate
™
Pro USB interface with most recording
applications. Some applications will require additional settings be changed within the program. Please see your
recording software manual for proper setup.
Initial setup with Windows Vista:
1. To select the Mic Mate
™
Pro as the default audio device, go to the Start Menu and select Control Panel.
2. Double click the Sound icon.
3. Select the Playback tab. Highlight the speaker icon labeled as USB Audio Device and click the Set Default
button. To make further adjustments to the playback volume and settings, double-click on the speaker icon
labeled USB Audio Device.
4. To adjust the volume from the computer, click on the tab labeled Levels. The master volume output can
be changed by moving the Speaker fader left or right. You can adjust this volume in conjunction with the
headphone volume knob on the Mic Mate
™
Pro to create the perfect monitor mix between music playback
and the direct signal from your microphone.
5. To change the sample rate and bit depth, click on the tab labeled Advanced. From the drop down menu you
can change the sample rate and bit-depth for audio playback. When you are nished making changes, click the
OK button. Please note that you should verify these settings match the settings in your recording application.
6. To set the Mic Mate
™
Pro as the default audio input, select the Recording tab back in the Sound window.
Loading ...
Loading ...
Loading ...