Read this booklet thoroughly before using this coffee machine for the quick use.
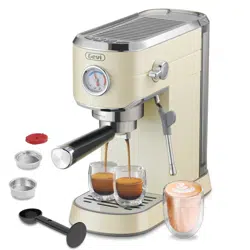
2-in-1 Smart
Espresso Coffee Machine
Brewer | Frother
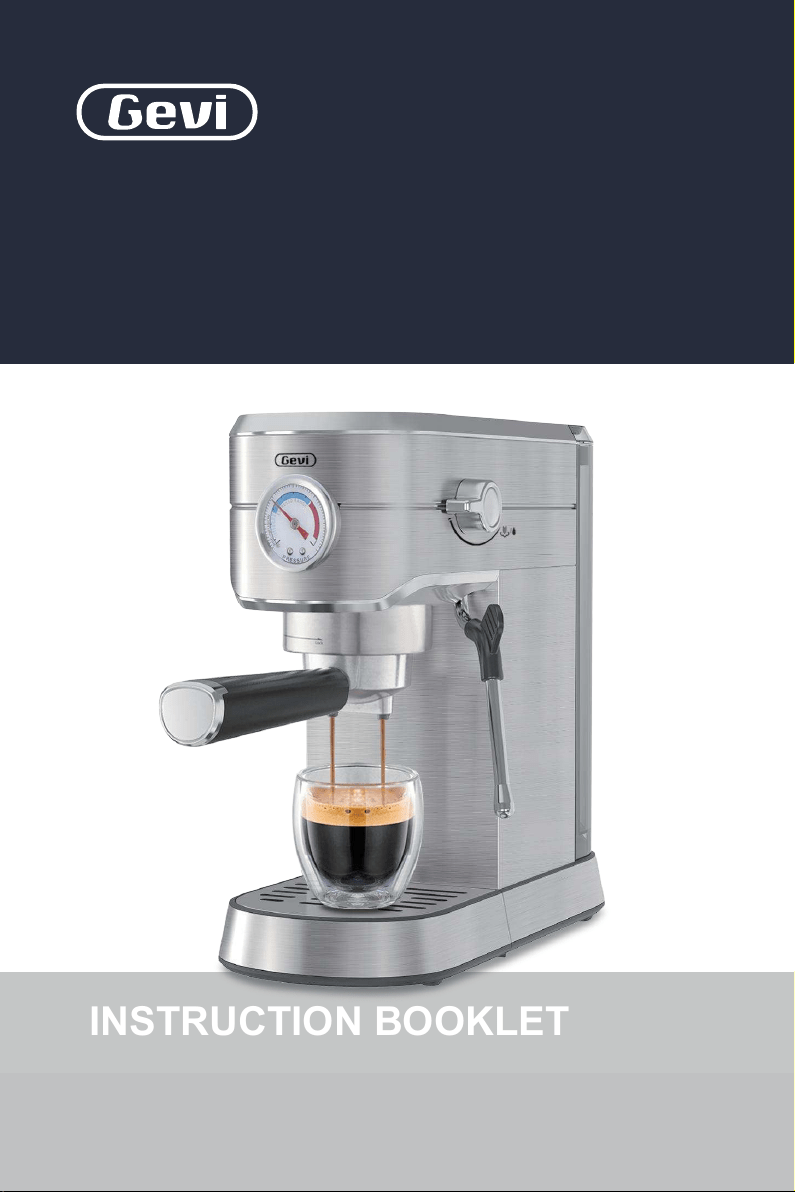
GECME418E-U
INSTRUCTION BOOKLET
Please read all the owner’s instruction booklet before use.

1. Important Safeguards
2. Know Your Machine
3. More Details
4. Before First Use
5. Espresso Making Guide
6. Milk Frothing Guide
7. Hot Water Guide
8. Other Functions
8.1 Automatic Sleep Mode Guide
8.2 Water Shortage Guide
8.3 High-temperature Alarm Guide
8.4 Button Sound Setting Guide
8.5 Pre-infusion Function
8.6 Descaling Warning Guide
9. Cleaning & Maintenance
10. Troubleshooting
11. Warranty
12. Coffees To Try
Table of Contents
. . . . . . . . . . . . . . . . . . . . . . . . . . . . . . . . . . . . . . . . . 01
. . . . . . . . . . . . . . . . . . . . . . . . . . . . . . . . . . . . . . . . . . . . . . . 28
. . . . . . . . . . . . . . . . . . . . . . . . . . . . . . . . . . . . . 31
. . . . . . . . . . . . . . . . . . . . . . . . . . . . . . . . . . . . . . . . . . . 05
. . . . . . . . . . . . . . . . . . . . . . . . . . . . . . . . . . . . . . . . . . . . . . . . . . . 07
. . . . . . . . . . . . . . . . . . . . . . . . . . . . . . . . . . . . . . . . . . . . . . . 09
. . . . . . . . . . . . . . . . . . . . . . . . . . . . . . . . . . . . . . . . 29
. . . . . . . . . . . . . . . . . . . . . . . . . . . . . . . . . . . . . . . . . 23
. . . . . . . . . . . . . . . . . . . . . . . . . . . . . . . . . . . . . . . . 31
. . . . . . . . . . . . . . . . . . . . . . . . . . . . . . . . . 29
. . . . . . . . . . . . . . . . . . . . . . . . . . . . . . . 30
. . . . . . . . . . . . . . . . . . . . . . . . . . . . . . . . . . 30
. . . . . . . . . . . . . . . . . . . . . . . . . . . . . . . . . . . . . . . 31
. . . . . . . . . . . . . . . . . . . . . . . . . . . . . . . . . . . . . . . . . . . . . . . . 54
. . . . . . . . . . . . . . . . . . . . . . . . . . . . . . . . . . . . . . . . . . . . . . . . . . . . . 52
. . . . . . . . . . . . . . . . . . . . . . . . . . . . . . . . . . . . . . . . . . . . . 44
. . . . . . . . . . . . . . . . . . . . . . . . . . . . . . . . . . . . . . . . . . . . . . . 29
. . . . . . . . . . . . . . . . . . . . . . . . . . . . . . . . . . . . . . . . 11

21
1. Important Safeguards1. Important Safeguards
When using electrical machines, basic safety precautions should
always be followed to reduce the risk of fire, electric shock, and/
or injury to persons including the following:
1. Read all instructions before using this machine.
2. Do not touch hot surfaces. Use handles or knobs.
3. Do not leave the machine unattended when in use.
4. Never use the espresso machine without water in the water tank.
5. To protect against electric shock, do not place or immerse cord,
plugs, or machine in water or other liquid.
6. Before using, check the output voltage of the wall outlet should
be correspond to the rated voltage marked on the machine’s
rating plate.
7. This machine is not intended for use by children or by persons
with reduced physical, sensory, or mental capabilities, or lack of
experience and knowledge. Close supervision is necessary when
any machine is used near children. Children should be supervised
to ensure that they do not play with the machine. Keep the machine
and its cord out of reach of children.
8. Unplug from outlet when either the machine or display clock (if
provided) is not in use, and before cleaning. Allow to cool before
putting on or taking off parts, and before cleaning the machine.
9.
Do not operate any machine with a damaged cord or plug or after
the machine malfunctions, or has been damaged in any manner.
Do not attempt to replace or splice a damaged cord. Return machine
to an Authorized Service Center for examination, repair or adjustment.
10.
The use of an accessory not recommended by the machine
manufacturer for use with this machine may result in fire, electric
shock or injury to persons.
11. Do not use outdoors or for commercial purposes.
12. Do not let cord hang over edge of table or counter, or touch hot
surfaces.
13. Do not place on or near a hot gas or electric burner, or in a heated
oven.
14. Be careful not to get burned by the steam.
15. Do not touch the hot surface of the steam wand and filter holder
when boiling directly. Use handle or knobs.
16. Relieve pressure through steam wand before removing portafilter.
17. Always attach plug to machine first, then plug cord into the wall
outlet (for machines with detachable cords). To disconnect, turn
any control to the off position, then remove plug from wall outlet.
18. To eliminate a choking hazard for young children, remove and
safely discard the protective cover fitted to the power plug of the
espresso machine.
19. Do not use machine for other than intended use. Misuse can cause
injuries.
20. Never remove the portafilter during the brewing operation as the
machine is under pressure.
WARNING
Always properly engage the Group Head to the locking mechanism.
Failure to do so may disengage the Group Head during the brew cycle
and cause injuries.
43
21. Models intended to be used with sealed capsules: Only use
capsules intended for this machine. If the capsule does not fit,
do not force the capsule into the machine.
22. Models with coffee grinders: Check hopper for presence of foreign
objects before using.
23. Household Use Only.
For machines with service panels:
1. Place the machine on a hard, flat, level surface to avoid interruption
of airflow underneath the espresso maker.
2. Do not operate the machine with an empty water tank.
A short power-supply cord (or detachable power-supply cord) may
be provided to reduce risks resulting from becoming entangled in or
tripping over a longer cord. Longer detachable power- supply cords
or extension cords are available and may be used if care is exercised
in their use. If a long detachable power-supply cord or extension cord
is used:
1. Important Safeguards1. Important Safeguards
WARNING
TO REDUCE THE RISK OF FIRE OR ELECTRIC SHOCK, DO NOT REMOVE
THIS COVER. NO USER‒SERVICEABLE PARTS INSIDE. REPAIR SHOULD
BE DONE BY AUTHORIZED SERVICE PERSONNEL ONLY.
NOTE
For electronic instruction manual, please contact Gevi support team.
North American models with grounded plugs:
POWER CORD INSTRUCTIONS:
PRODUCT NOTICES
This machine has a polarized plug, (one blade is
wider than the other). As a safety feature to reduce
the risk of electrical shock, this plug is intended to fit in a polarized outlet only
one way. If the plug does not fit fully in the outlet, reverse the plug. If it still does
not fit, contact a qualified electrician. Do not attempt to defeat this safety feature
or modify the plug in any way. If the plug fits loosely into the AC outlet or if the
AC outlet feels warm do not use that outlet.
POLARIZED PLUG
a. The marked electrical rating of the detachable power-supply cord
or extension cord should be at least as great as the electrical rating
of the machine;
b. If the machine is of the grounded type, the extension cord should
be a grounding type 3-wire cord;
c. The longer cord should be arranged so that it will not drape over
the counter top or table top where it can be pulled on by children
or tripped over unintentionally.
Do not pull, twist or otherwise abuse the power cord.

65
Model: GECME418E-U
2. Know Your Machine2. Know Your Machine
Double/long
Cup Button
- Pours 2 shot of espresso then automatically stops.
- Customize espresso by setting range 50-130mL.
ON/OFF Button
The ON/OFF LIGHT will illuminate & pulse to
indicate it is warming up. The ON/OFF LIGHT is
fixedly lighted when ready.
Single/short
Cup Button
- Pours 1 shot of espresso then automatically stops.
- Customize espresso by setting range 25-60mL.
Cup Warming Plate
Preheat cups and glasses which helps retain
the essential characteristics of true espresso;
aromaand a rich, sweet taste.
Group Head
For easy positioning of the portafilter.
Pressure Gauge
Monitors espresso extraction pressure and allows
you to make espress to better suit your taste.
51mm Single
Cup Filter
51mm Double
Cup Filter
Spoon & Tamper
Clean the
Steam Wand
Clean
the Filters
Cleaning Pin
Steam Button
Steam Button is fixedly lighted when warming up
to steam temperature and ready to use.
Push back the tank cover & fill with cold water, or
remove the Water tank by opening the cover.
Steam/water Knob
Turn“ ”to select steam and hot water.
Portafilter
The size for a more even water flow & improved
extraction taste.
Ball joint movement with silicone cover, allows
movement of the Steam Wand to desired position
without burning fingers.
Removable Drip
Tray
Includes a water level indicator that floats through
the grill to indicate the tray is full and requires
emptying.
❶
❽
❾
❿
⓬
⓭
❷
⓫
❸
⓮
Electrical parameters: 120V~ 60Hz 1350W
❺❹❻❼
Tank Handle
Removable Water
Tank
Steam Wand
Steam Wand Cover
Removable for easy cleaning.
❶
❸
❹
❺
❻
❼
❽
❷
DescriptionSpecificationRe.
❾
❿
⓫
⓬
⓭
⓮
Lifting upwards using the Handle located inside
when remove the Water tank.
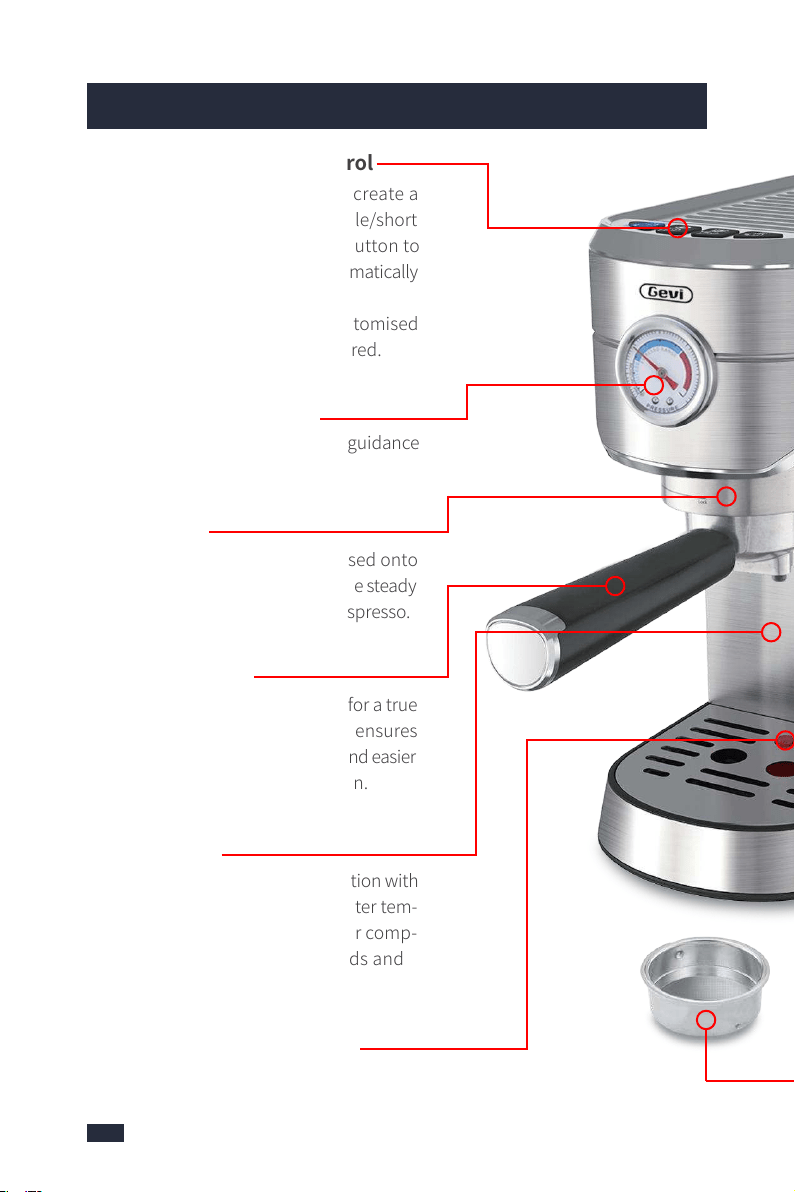
Auto Shot Volumetric Control
- Auto Shot is the easiest way to create a
great espresso. Just press the Single/short
cup button or Double/long cup button to
pour right amount, then it will automatically
stop.
- All Extraction Buttons can be customised
to deliver the shot volumes preferred.
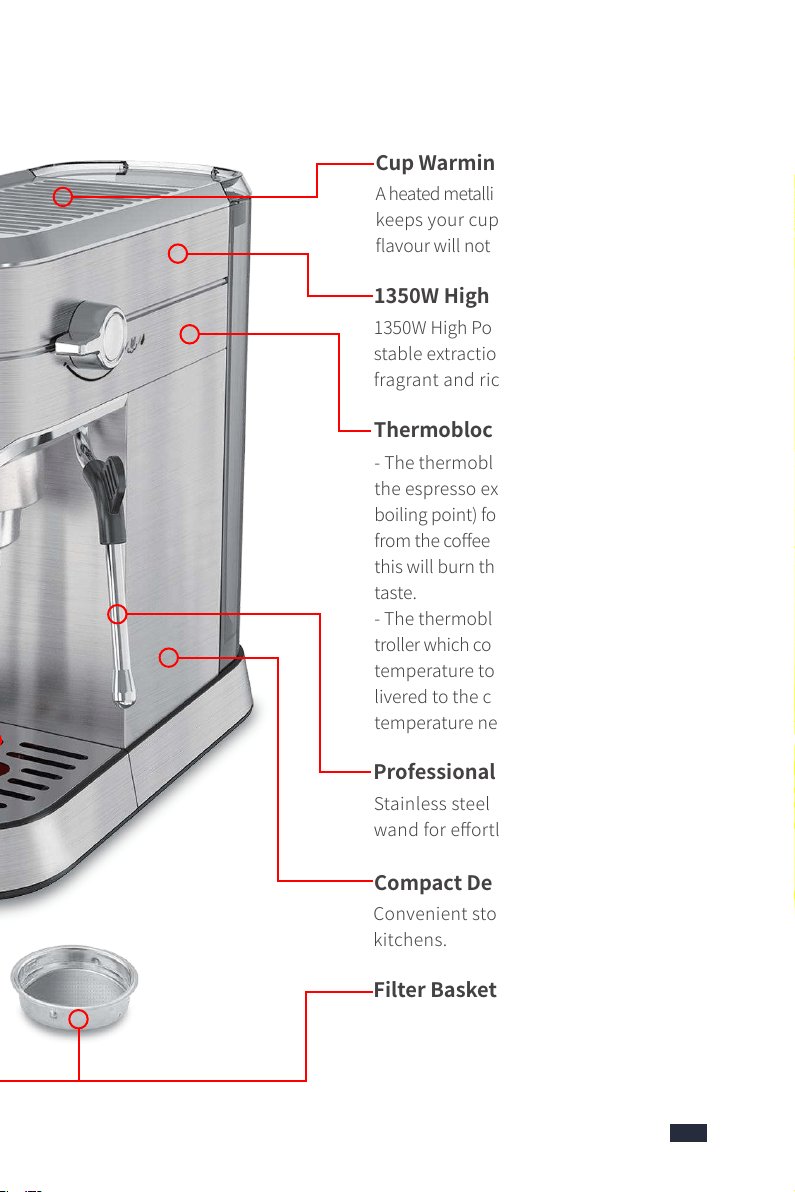
Cup Warming Plate
A heated metallic plate on top of the machine
keeps your cups warm, so that the coffee
flavour will not be influenced by cold parts.
1350W High Power
1350W High Power can provide a fast and
stable extraction, making espresso more
fragrant and richer in crema.
Professional Style Steam Wand
Stainless steel 360° swivel-action Steam
wand for effortless milk frothing.
Compact Design
Convenient storage, suitable for home
kitchens.
Filter Baskets
The filter baskets allow a more consistent
grind compaction, resulting in a better tasty
coffee. Used espresso pucks can be easily
emptied.
Thermoblock Fast Heating System
- The thermoblock heats the water so that
the espresso extracts at 198°F (just below
boiling point) for optimum extraction of oils
from the coffee grinds. Temperatures above
this will burn the grinds resulting in a bitter
taste.
- The thermoblock is fitted with a PID con-
troller which continually monitors the water
temperature to ensure water is always de-
livered to the coffee powder at the precise
temperature needed.
Built-in Pressure Gauge
The built-in pressure gauge offers guidance
in extraction.
Pre-Infusion
Small amounts of water are released onto
the tamped coffee grinds prior to the steady
flow of waterfor a richer flavored espresso.
2-in-1 Portafilter
The Portafilter holds coffee grinds for a true
cafe tasting coffee. Its perfect size ensures
the grinds are more evenly spread and easier
to fill for imporved flavor extraction.
20 BAR Pump
The thermoblock works in conjunction with
the pump to deliver the correct water tem-
perature at the correct pressure for comp-
lete extraction of oils, coffee solids and
aroma.
A Buoy Inside The Drip Tray
Remind you the water is full. It's detachable
for easy cleaning.
87
3. More Details
Auto Shot Volumetric Control
- Auto Shot is the easiest way to create a
great espresso. Just press the Single/short
cup button or Double/long cup button to
pour right amount, then it will automatically
stop.
- All Extraction Buttons can be customised
to deliver the shot volumes preferred.
Cup Warming Plate
A heated metallic plate on top of the machine
keeps your cups warm, so that the coffee
flavour will not be influenced by cold parts.
1350W High Power
1350W High Power can provide a fast and
stable extraction, making espresso more
fragrant and richer in crema.
Professional Style Steam Wand
Stainless steel 360° swivel-action Steam
wand for effortless milk frothing.
Compact Design
Convenient storage, suitable for home
kitchens.
Filter Baskets
The filter baskets allow a more consistent
grind compaction, resulting in a better tasty
coffee. Used espresso pucks can be easily
emptied.
Thermoblock Fast Heating System
- The thermoblock heats the water so that
the espresso extracts at 198°F (just below
boiling point) for optimum extraction of oils
from the coffee grinds. Temperatures above
this will burn the grinds resulting in a bitter
taste.
- The thermoblock is fitted with a PID con-
troller which continually monitors the water
temperature to ensure water is always de-
livered to the coffee powder at the precise
temperature needed.
Built-in Pressure Gauge
The built-in pressure gauge offers guidance
in extraction.
Pre-Infusion
Small amounts of water are released onto
the tamped coffee grinds prior to the steady
flow of waterfor a richer flavored espresso.
2-in-1 Portafilter
The Portafilter holds coffee grinds for a true
cafe tasting coffee. Its perfect size ensures
the grinds are more evenly spread and easier
to fill for imporved flavor extraction.
20 BAR Pump
The thermoblock works in conjunction with
the pump to deliver the correct water tem-
perature at the correct pressure for comp-
lete extraction of oils, coffee solids and
aroma.
A Buoy Inside The Drip Tray
Remind you the water is full. It's detachable
for easy cleaning.
87
3. More Details

109
4. Before First Use4. Before First Use
Ensure all packaging has been removed.
Ensure the espresso machine is always positioned onto a dry, stable, flat
horizontal counter top.
Step 1 - Please make sure that the rubber plug of the
water outlet of the water tank is removed.
Step 2 - Extract the tank by pulling it upwards.
Step 4
Step 3
affect the coffee effect.
Step 4 - Set up the water tank vertically and align the buckles
to the hole on the back of the machine, and then press it
down to be parallel to the top of the machine.
Step 1 - The steam/water knob is in a horizontal position (off-position).
Step 2 - Insert the Power Plug into a 120V AC power outlet & switch the power
on.
Step 3 - Press the ON/OFF button to turn on the
machine.
- The ON/OFF button will illuminate & pulse to
indicate the machine is heating up.
- When the 4 buttons are solid on, the machine is in the
READY state for all features.
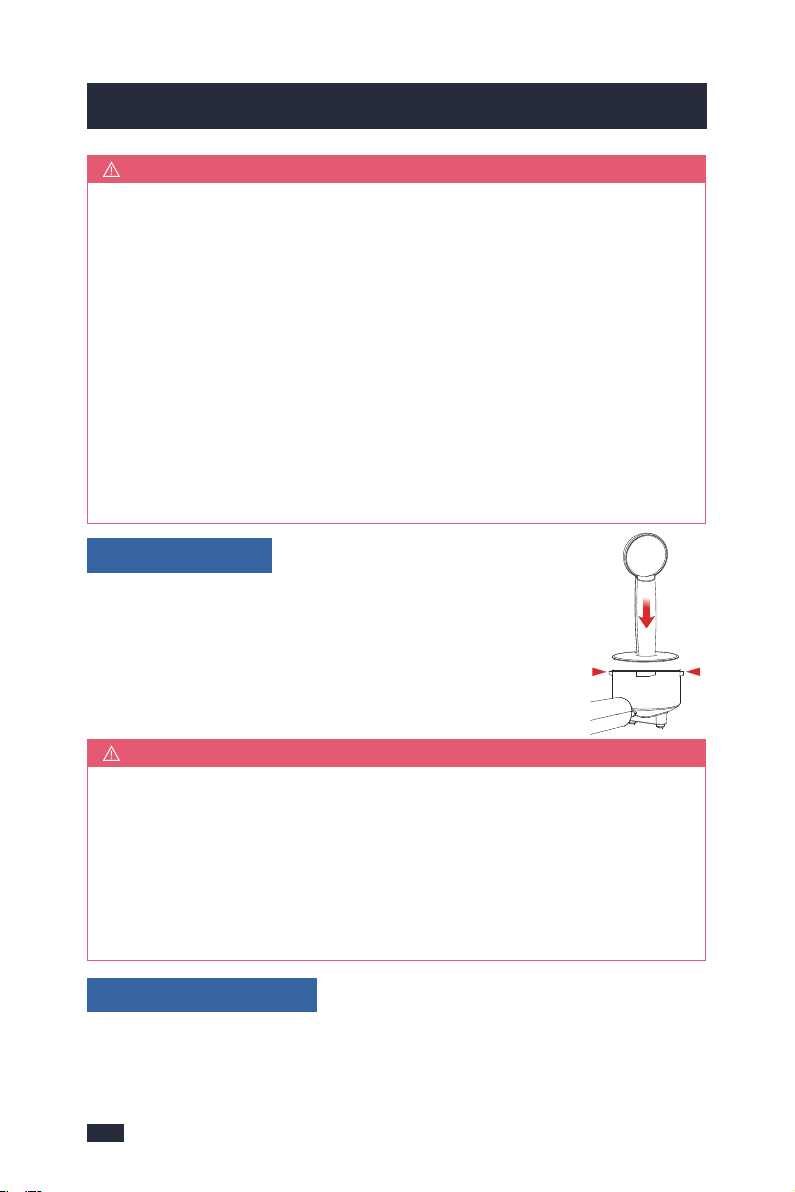
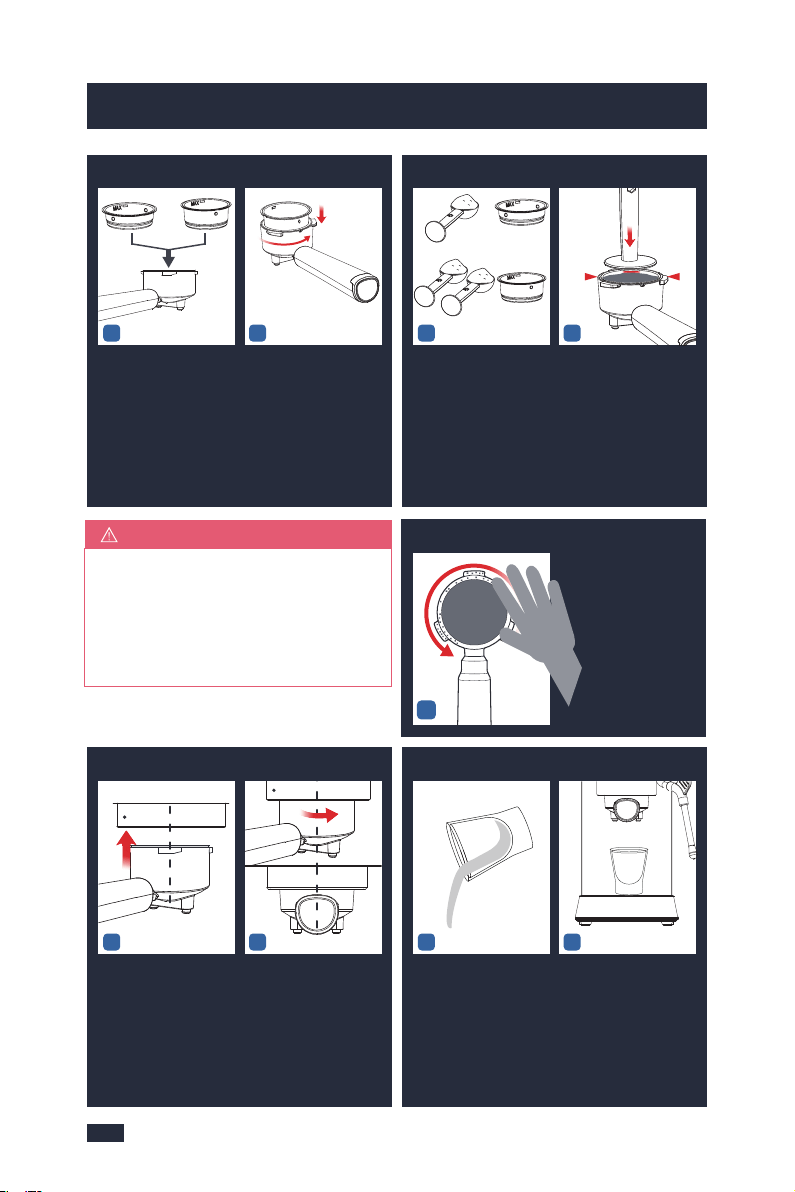
Step 1 - Align the marking dot on the filter with the
portafilter's groove, and then install the filter to the
portafilter, twist and fix the filter.
Step 2 - Hold the machine with one hand and the
portafilter with the other hand.
Step 3 - Place the portafilter underneath the group head
so that the handle is aligned with the INSERT position.
Insert the portafilter into the group head and rotate the
handle towards the center until resistance is felt.
Wash the parts listed below in warm water:
- Stainless Steel Single Cup Filter - Portafilter
- Stainless Steel Double Cup Filter - Drip Tray
- Removable Water Tank - Spoon & Tamper
Rinse & allow thorough air drying.
Do not clean or soak the portafilter in any descaling solution, otherwise,
it would be damaged.
NOTE
Turning the Portafilter to the centre position might be tight for the first
few uses.
NOTE
More simply, the water tank can also be filled without
being extracted by pouring the water directly from a jug.
NOTE
This priming step must be completed prior to first use.
IMPORTANT
4.1 Remove Packaging
4.2 Position Machine
4.3 Wash & Dry Parts
4.4 Prime the Machine
• Fill Water Tank
• Power
• Insert Portafilter
CENTRE
1.ALIGN
& INSERT
CENTRE
INSERT
2.TURN
Step 3 - Open the lid and fill enough pure water(recommended) in advance
but not exceed the MAX line of the water tank, and do not add too little water,
otherwise when the water runs out the water pump will make a loud noise and
Step 1

109
4. Before First Use4. Before First Use
Ensure all packaging has been removed.
Ensure the espresso machine is always positioned onto a dry, stable, flat
horizontal counter top.
Step 1 - Please make sure that the rubber plug of the
water outlet of the water tank is removed.
Step 2 - Extract the tank by pulling it upwards.
Step 4
Step 3
affect the coffee effect.
Step 4 - Set up the water tank vertically and align the buckles
to the hole on the back of the machine, and then press it
down to be parallel to the top of the machine.
Step 1 - The steam/water knob is in a horizontal position (off-position).
Step 2 - Insert the Power Plug into a 120V AC power outlet & switch the power
on.
Step 3 - Press the ON/OFF button to turn on the
machine.
- The ON/OFF button will illuminate & pulse to
indicate the machine is heating up.
- When the 4 buttons are solid on, the machine is in the
READY state for all features.
Step 1 - Align the marking dot on the filter with the
portafilter's groove, and then install the filter to the
portafilter, twist and fix the filter.
Step 2 - Hold the machine with one hand and the
portafilter with the other hand.
Step 3 - Place the portafilter underneath the group head
so that the handle is aligned with the INSERT position.
Insert the portafilter into the group head and rotate the
handle towards the center until resistance is felt.
Wash the parts listed below in warm water:
- Stainless Steel Single Cup Filter - Portafilter
- Stainless Steel Double Cup Filter - Drip Tray
- Removable Water Tank - Spoon & Tamper
Rinse & allow thorough air drying.
Do not clean or soak the portafilter in any descaling solution, otherwise,
it would be damaged.
NOTE
Turning the Portafilter to the centre position might be tight for the first
few uses.
NOTE
More simply, the water tank can also be filled without
being extracted by pouring the water directly from a jug.
NOTE
This priming step must be completed prior to first use.
IMPORTANT
4.1 Remove Packaging
4.2 Position Machine
4.3 Wash & Dry Parts
4.4 Prime the Machine
• Fill Water Tank
• Power
• Insert Portafilter
CENTRE
1.ALIGN
& INSERT
CENTRE
INSERT
2.TURN
Step 3 - Open the lid and fill enough pure water(recommended) in advance
but not exceed the MAX line of the water tank, and do not add too little water,
otherwise when the water runs out the water pump will make a loud noise and
Step 1
12
4. Before First Use
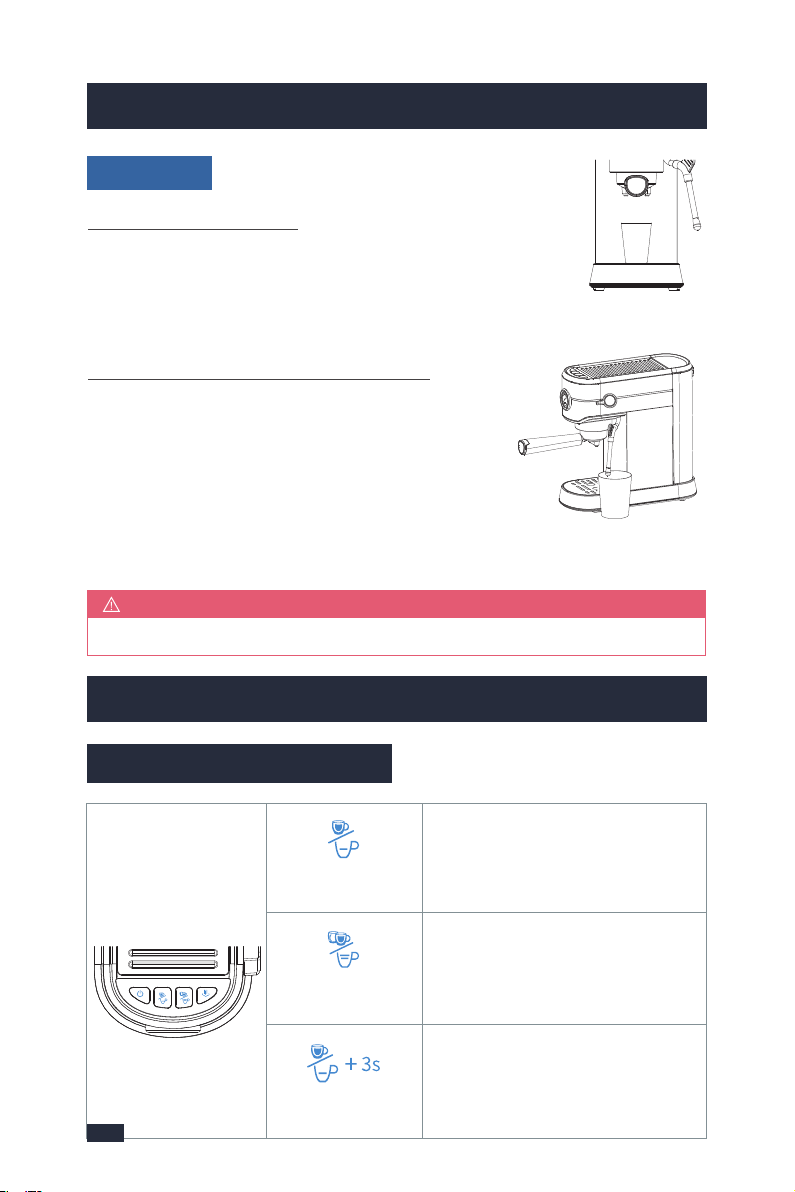
5. Espresso Making Guide
Step 1
Step 1
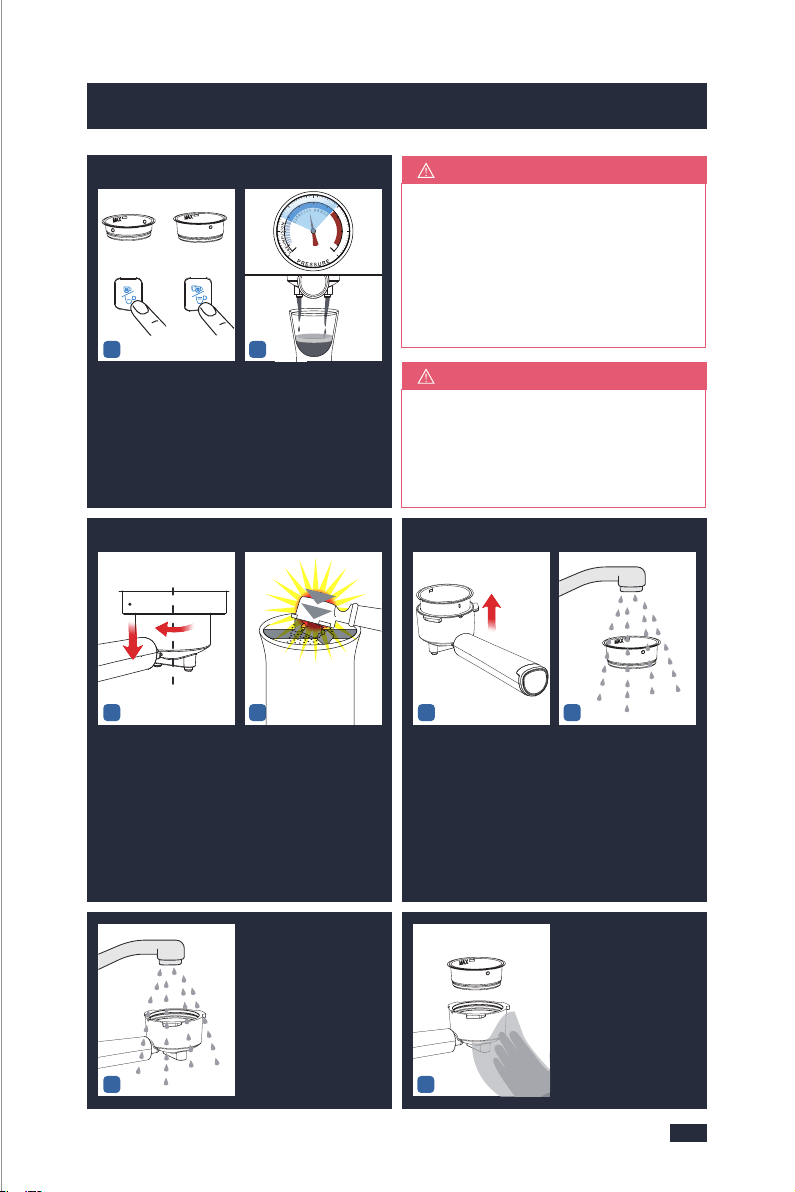
Step 1 - Put a container under the Group Head.
Step 2 - Press the Double/long cup button, and water should
start flowing from the Group Head. Allow some water to run
through until the machine stops. The machine will return to the READY state.
Step 1 - Position the Steam Wand over the Drip Tray,
or place a container with a minimum capacity of
100mL under the Forth Nozzle.
Step 2 - Turn the Steam/Water knob to the Steam/Water
icon. Allow water to run through for 20 seconds.
Step 3 - Return the Steam/Water Knob to off-position, and the machine will
return to the READY state.
If there is no water flowing out, please refer to Troubleshooting, page 45.
NOTE
• Cleaning
1 - All of the flavor comes from the beans, choose different kinds of roasts and
beans according to the type of coffee you make.
2 - For making espresso, medium- or dark-roasted coffee beans are well-suited.
If you use light-roasted coffee beans, the final coffee will be lighter in both its
color and flavor.
3 - Fresh, quality coffee beans will give you the best possible extraction. Bad
beans will not only affect your grinding results but also ruin your final coffee.
There are many types of beans on the market. To ensure best grinding results,
high quality beans are recommended.
4 - Old coffee beans, no matter what the grind setting is, will have a fast extraction
and will produce an under extracted tasting espresso.
5 - Buy coffee grinds well-suited for espresso if you don’t want grinding. When using
pre-ground bagged grinds, try to dose in half the grinds then tamp & repeat again.
5.2 Tips for Making the Perfect Espresso
1 - Coffee Beans/Grinds
Clean the Group Head
Clean the Steam Wand/Froth Nozzle
5. Espresso Making Guide
5.1 Brief Introduction
Double/long
cup button
Manual Shot
Volume
1-Press the Double/long cup button
to start brewing then the machine
will automatically stop.
2-Customize espresso volume by
setting range 50-130mL.
Press and hold the Single cup button
3 seconds to start brewing, and
then press the Single cup button
again to stop the brewing when the
desired shot volume is reached.
1-Press the Single/short cup button
to start brewing then the machine
will automatically stop.
2-Customize espresso volume by
setting range 25-60mL.
Single/short
cup button
single cup
double cup
The grind size will affect the rate of water flow through the coffee in the filter basket
and the flavor of the espresso. To make good espresso, a fine grind is a must. Co-
arse coffee grinds can make the extraction too fast and lead to an under extraction.
But also note don’t use too fine grinds to avoid water blockage or overflow from
the portafilter. After tamping, make sure wipe away any excess coffee grinds on
the edges of the portafilter before installing it to the machine.
2 - Grind Size
Add a proper amount of coffee grinds to
the portafilter, thedose of the single cup is
around 7 grams, and the double cup
is around 14 grams but not past the MAX line.
3 - Grind Dose
around 14g
around 7g
11

12
4. Before First Use
5. Espresso Making Guide
Step 1
Step 1
Step 1 - Put a container under the Group Head.
Step 2 - Press the Double/long cup button, and water should
start flowing from the Group Head. Allow some water to run
through until the machine stops. The machine will return to the READY state.
Step 1 - Position the Steam Wand over the Drip Tray,
or place a container with a minimum capacity of
100mL under the Forth Nozzle.
Step 2 - Turn the Steam/Water knob to the Steam/Water
icon. Allow water to run through for 20 seconds.
Step 3 - Return the Steam/Water Knob to off-position, and the machine will
return to the READY state.
If there is no water flowing out, please refer to Troubleshooting, page 45.
NOTE
• Cleaning
1 - All of the flavor comes from the beans, choose different kinds of roasts and
beans according to the type of coffee you make.
2 - For making espresso, medium- or dark-roasted coffee beans are well-suited.
If you use light-roasted coffee beans, the final coffee will be lighter in both its
color and flavor.
3 - Fresh, quality coffee beans will give you the best possible extraction. Bad
beans will not only affect your grinding results but also ruin your final coffee.
There are many types of beans on the market. To ensure best grinding results,
high quality beans are recommended.
4 - Old coffee beans, no matter what the grind setting is, will have a fast extraction
and will produce an under extracted tasting espresso.
5 - Buy coffee grinds well-suited for espresso if you don’t want grinding. When using
pre-ground bagged grinds, try to dose in half the grinds then tamp & repeat again.
5.2 Tips for Making the Perfect Espresso
1 - Coffee Beans/Grinds
Clean the Group Head
Clean the Steam Wand/Froth Nozzle
5. Espresso Making Guide
5.1 Brief Introduction
Double/long
cup button
Manual Shot
Volume
1-Press the Double/long cup button
to start brewing then the machine
will automatically stop.
2-Customize espresso volume by
setting range 50-130mL.
Press and hold the Single cup button
3 seconds to start brewing, and
then press the Single cup button
again to stop the brewing when the
desired shot volume is reached.
1-Press the Single/short cup button
to start brewing then the machine
will automatically stop.
2-Customize espresso volume by
setting range 25-60mL.
Single/short
cup button
single cup
double cup
The grind size will affect the rate of water flow through the coffee in the filter basket
and the flavor of the espresso. To make good espresso, a fine grind is a must. Co-
arse coffee grinds can make the extraction too fast and lead to an under extraction.
But also note don’t use too fine grinds to avoid water blockage or overflow from
the portafilter. After tamping, make sure wipe away any excess coffee grinds on
the edges of the portafilter before installing it to the machine.
2 - Grind Size
Add a proper amount of coffee grinds to
the portafilter, thedose of the single cup is
around 7 grams, and the double cup
is around 14 grams but not past the MAX line.
3 - Grind Dose
around 14g
around 7g
11
1413
5. Espresso Making Guide5. Espresso Making Guide
1-Isolating changes to grind size & tamping force will assist in producing
a consistent taste every time.
2-After tamping make sure wipe away any excess coffee grinds on the
edges of the portafilter before installing it to the machine.
3-If the coffee grinds exceed the MAX line after being tamped, you can
continue to tamp. If the grinds are too firm to tamp down, take some
grinds out and then re-tamp.
NOTE
Before brewing, make sure the knob is in a horizontal position (off-position) and
the temperature is suitable, at this point, the blue lights of the ON/OFF Button, Single/
short Cup Button, Double/long Cup Button, and Steam Button will be solid on.
5 - Water Temperature
1-A spoon of flat coffee grinds is approximately equal to 7g. Collect the
coffee grinds with the spoon and shake it gently to make the surface flat,
the amount of coffee grinds is around 7g. One spoon coffee grinds (7g)
can make one cup of top-grade coffee, while two spoons (14g) are two
cups of top-grade coffee.
2-Use the Single-cup Filter when brewing a single cup and the Double-
cup Filter when brewing two cups or a stronger single cup or mug.
3-You may need to experiment with how much coffee is put into the filter
or how long your grinder needs to run to achieve the correct dose.
4-Tap the portafilter several times to distribute the coffee grinds evenly in
the filter basket.
5-It is normal for the correct dose of coffee grinds to appear overfilled in
the filter before tamping.
NOTE
Tamp the coffee grinds firmly with pressure around 10-15kg
but not too hard to avoid water blockage or overflow from the
portafilter. After tamping, make sure wipe away any excess
coffee grinds on the edges of the portafilter before installing
it to the machine.
4 - Tamping Force
The machine is just turned on and in the process of pre-heating, the 4 buttons
start to blink blue light slowly, so it has not reached a suitable temperature for
brewing coffee. Before brewing coffee, make sure the pre-heating process has
finished, at this moment, the blue lights of the ON/OFF Button, Single/short Cup
Button, Double/long Cup Button, and Steam Button will be solid on.
Take note of the below 2 cases of misoperation:
CASE 1 - Low Temperature
The suitable temperature for brewing coffee is around 92 degrees Celsius(198
degrees Fahrenheit). If you accidentally press the Steam button or immediately
brew coffee after steaming, the temperature will be too high, and it is not suitable
for brewing coffee.
CASE 2 - High Temperature
What to do ?
If you accidentally press the Steam button, reset the Steam button to its initial
state and wait until the temperature cools down to an appropriate temperature
for coffee, and at this point, the ON/OFF Button, Single/short Cup Button, Double/
long Cup Button, and Steam Button will be solid on, then press the coffee button(
Single/short Cup Button or Double/long Cup Button) for brewing. Here 2 ways for
cooling down the machine:
a - Wait for the machine to lower down to a suitable temperature, but this will take
some time.
b - Turning the knob to the hot water icon will pump cold water into the boiler,
which will help cool the machine. Wait until the white light of the Steam button
turns off, the blue lights of the ON/OFF Button, Single/short Cup Button, and Double/
long Cup Button are solid on, then turn the knob back to the horizontal position (off-
position). Now, the machine is ready for brewing coffee.
If the machine just finished steaming, do not brew coffee immediately. Make sure
the steam/water knob is in a horizontal position (off-position), reset the Steam
button to turn off the steam function, and the blue light of the Steam button is
solid on, you can follow the above for cooling down the machine till to the suitable
temperature and then brew coffee, otherwise, the machine will release high-
temperature water from the group head and cause the coffee to be burnt.

1615
5. Espresso Making Guide5. Espresso Making Guide
1-Due to pre-infusion time, the espresso will not start to flow immediately.
2-As a guide, the espresso will start to flow after 4‒7 seconds (infusion time)
and should be the consistency of dripping honey.
3-If the espresso starts to flow after less than 3 seconds you have either
under dosed the filter, the grind is too coarse and/or the tamping force is
too light. This is an UNDER-EXTRACTED shot.
4-If the espresso starts to drip but doesn’t flow after 8 seconds, then you
have either over dosed the filter, the grind is too fine and/or the tamping
force is too heavy. This is an OVER-EXTRACTED shot.
5-A great espresso is about achieving the perfect balance between sweet-
ness, acidity and bitterness. The flavor of your coffee will depend on many
factors, such as the type of coffee beans, degree of roast, freshness, coarseness
or fineness of the grind, dose of coffee grinds, and tamping force.
6-Experiment by adjusting these factors just one at a time to achieve the
taste of your preference, see ‘Extraction Guide’, page 16.
TIPS
If for 2 shots with 1 cup, it is recommended that the capacity of the cup is about
100ML. While for 2 shots with 2 cups or 1 shot with 1 cup, it is recommended
that each cup is about 50ML. The cups without pre-heating or too large will
make the temperature of the espresso drop quickly, resulting in a poor flavor.
6 - Cups
The Single-shot Mode & Double-shot Mode use duration to control espresso
volume. The duration times are preset, but can be reprogrammed (We suggest
pre-setting the volumes of your shot modes, about 40mL per cup is recomme-
nded. For more details, refer to ‘Re-programming Shot Volume’, page 21)
7 - Shot Volume
1-The amount of espresso extracted in the cup will vary depending on your
grind size and grind dose settings.
2-If you want to end brewing in Single-shot Mode/Double-shot Mode,
press the corresponding button to stop brewing.
NOTE
Press either the Single/short cup button or the Double/long cup button to
extract espresso at the preset volume. The extraction will start using the low-
pressure pre-infusion. The machine will stop after the preset volume has been
extracted.
Single/short cup Mode & Double/long cup Mode
Manually control low-pressure pre-infusion time and shot volume without re-
programming the preset shot volume.
Step 1 - Press and hold the Single cup button 3 seconds, the single cup
button will blink white light slowly. The extraction process will enter low
pressure pre-infusion.
Step 2 - Press the Single cup button again when the desired volume of espresso
has been extracted.
Manual Shot Volume
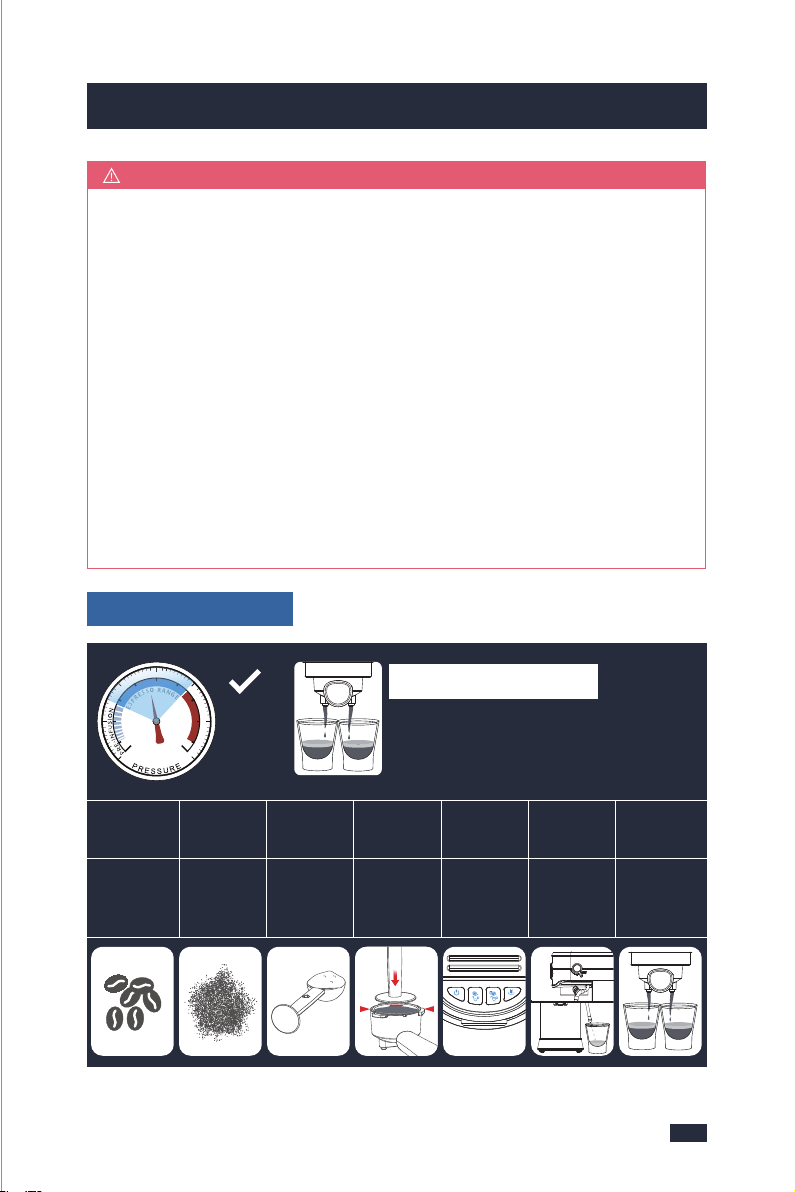
8 - Extraction Guide
• Flow slow like warm honey
• Crema is golden brown with a fine mousse texture
• Espresso is dark brown
Roast
Degree
Grind
Size
Grind
Dose
Tamping
Force
Water
Temp
Cups
Shot
Volume
Medium or
Dark Roasts
A Fine
Grind
Around 14
Grams
(Double Cup)
Pressure
Around 10-
15kg
Lights are
fully illuminated
blue.
Pre-heated
and Suitable
Size
Around
40mL
Per Cup
CORRECT EXTRACTION
Within
Espresso
Range
MAX
10-
15kg
1615
5. Espresso Making Guide5. Espresso Making Guide
1-Due to pre-infusion time, the espresso will not start to flow immediately.
2-As a guide, the espresso will start to flow after 4‒7 seconds (infusion time)
and should be the consistency of dripping honey.
3-If the espresso starts to flow after less than 3 seconds you have either
under dosed the filter, the grind is too coarse and/or the tamping force is
too light. This is an UNDER-EXTRACTED shot.
4-If the espresso starts to drip but doesn’t flow after 8 seconds, then you
have either over dosed the filter, the grind is too fine and/or the tamping
force is too heavy. This is an OVER-EXTRACTED shot.
5-A great espresso is about achieving the perfect balance between sweet-
ness, acidity and bitterness. The flavor of your coffee will depend on many
factors, such as the type of coffee beans, degree of roast, freshness, coarseness
or fineness of the grind, dose of coffee grinds, and tamping force.
6-Experiment by adjusting these factors just one at a time to achieve the
taste of your preference, see ‘Extraction Guide’, page 16.
TIPS
If for 2 shots with 1 cup, it is recommended that the capacity of the cup is about
100ML. While for 2 shots with 2 cups or 1 shot with 1 cup, it is recommended
that each cup is about 50ML. The cups without pre-heating or too large will
make the temperature of the espresso drop quickly, resulting in a poor flavor.
6 - Cups
The Single-shot Mode & Double-shot Mode use duration to control espresso
volume. The duration times are preset, but can be reprogrammed (We suggest
pre-setting the volumes of your shot modes, about 40mL per cup is recomme-
nded. For more details, refer to ‘Re-programming Shot Volume’, page 21)
7 - Shot Volume
1-The amount of espresso extracted in the cup will vary depending on your
grind size and grind dose settings.
2-If you want to end brewing in Single-shot Mode/Double-shot Mode,
press the corresponding button to stop brewing.
NOTE
Press either the Single/short cup button or the Double/long cup button to
extract espresso at the preset volume. The extraction will start using the low-
pressure pre-infusion. The machine will stop after the preset volume has been
extracted.
Single/short cup Mode & Double/long cup Mode
Manually control low-pressure pre-infusion time and shot volume without re-
programming the preset shot volume.
Step 1 - Press and hold the Single cup button 3 seconds, the single cup
button will blink white light slowly. The extraction process will enter low
pressure pre-infusion.
Step 2 - Press the Single cup button again when the desired volume of espresso
has been extracted.
Manual Shot Volume
8 - Extraction Guide
• Flow slow like warm honey
• Crema is golden brown with a fine mousse texture
• Espresso is dark brown
Roast
Degree
Grind
Size
Grind
Dose
Tamping
Force
Water
Temp
Cups
Shot
Volume
Medium or
Dark Roasts
A Fine
Grind
Around 14
Grams
(Double Cup)
Pressure
Around 10-
15kg
Lights are
fully illuminated
blue.
Pre-heated
and Suitable
Size
Around
40mL
Per Cup
CORRECT EXTRACTION
Within
Espresso
Range
MAX
10-
15kg
1817
5. Espresso Making Guide5. Espresso Making Guide
Ensure coffee beans or pre-ground grinds are fresh,as old coffee beans no
matter the Grind Setting will have a low flavor and bad taste.
NOTE
NOTE
When the water tank is pulled up, the water will flow out from the outlet
at the bottom of the water tank, as it is a movable part. If you have pulled
up several times and have not wipe the water immediately, it will accumulate
more and more and run to the bottom of the machine, maybe will leave the
table full of water. It's not leaking.
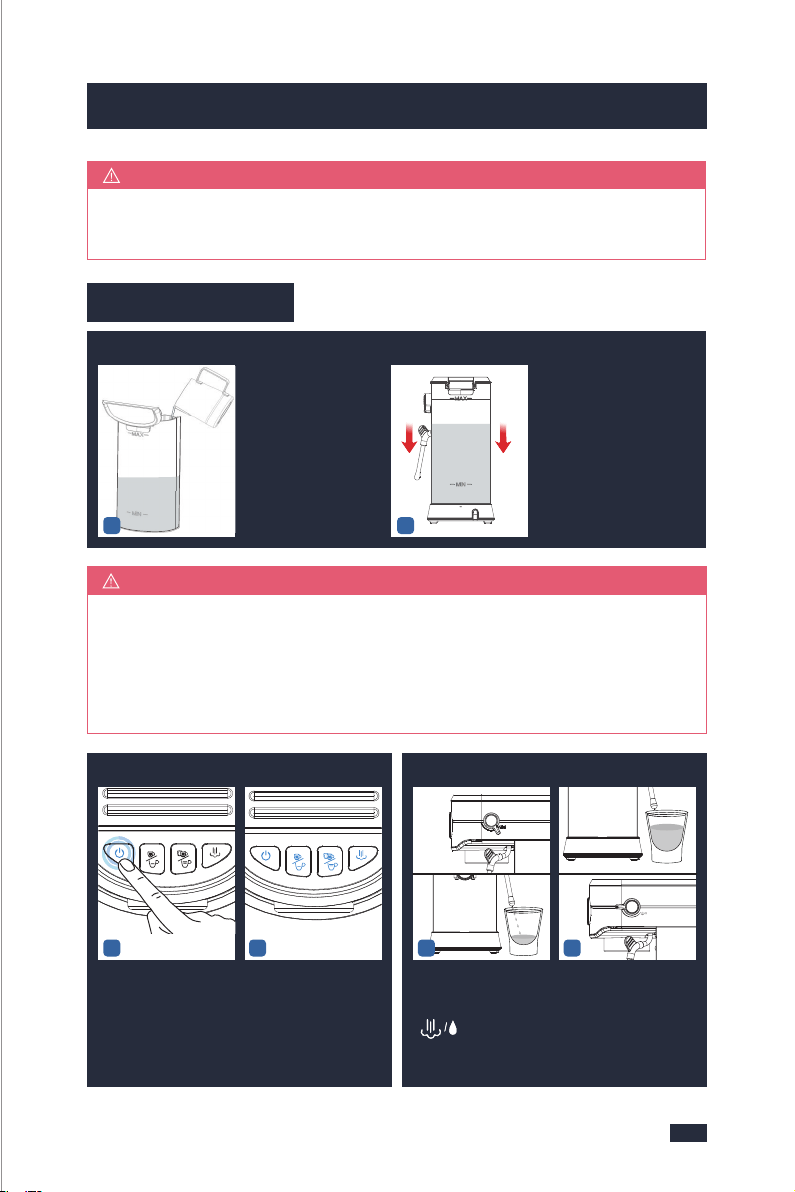
2 - Start Up
12
3 - Warm Cup-by Hot Water
12
1-2 Min Heat UpREADY
Insert the Power Plug.
Press the ON/OFF button
to turn the machine on,
the Power button will
illuminate & pulse to
indicate it's heating up.
LIGHTS all fully illumi-
nated = Espresso
Machine is ready for use.
Place a cup on counter
top and position Steam
Wand. Turn the knob to
" ".
5.3 Operation
Extract the tank by
pulling it upwards.Fill
the water tank with
clean and fresh water
(Do not exceed the
MAX line).
Set up the water tank
vertically and align the
buckles to the hole on
the back of the machine,
and then press it down
to be parallel to the top
of the machine.
1 - Check Water
12
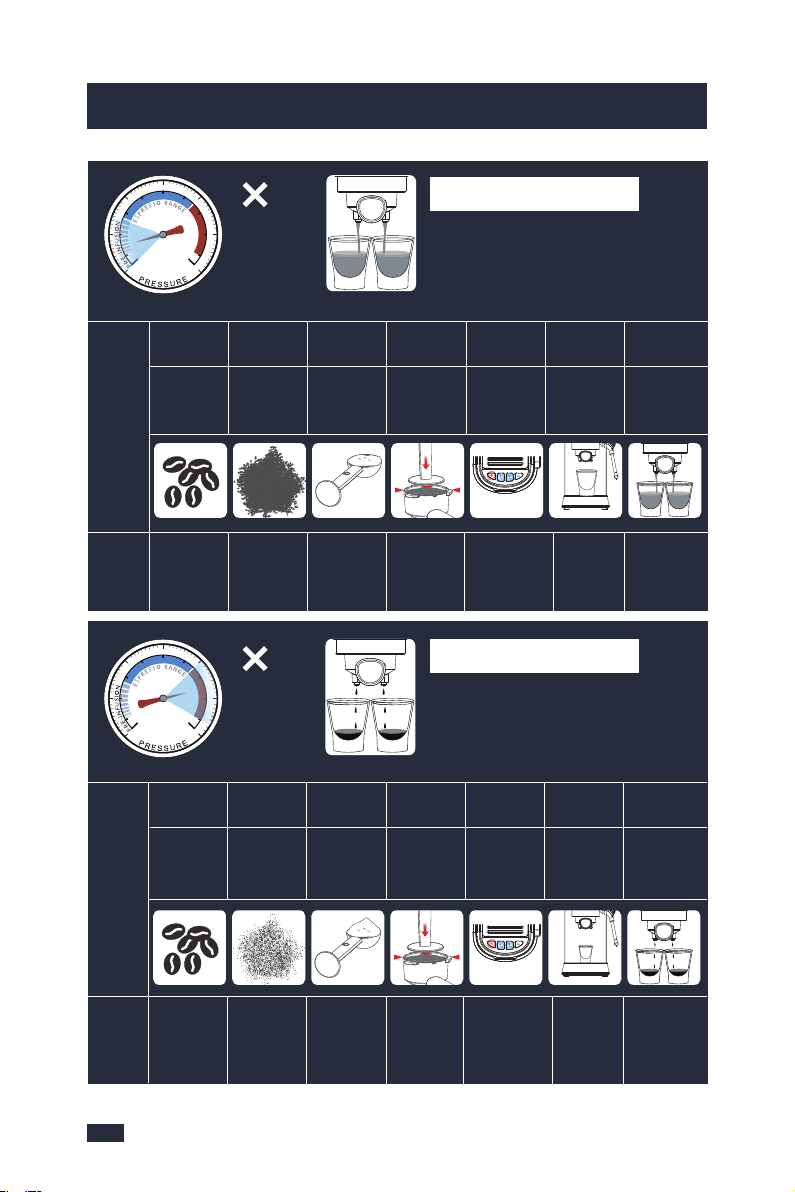
Watery Extraction
• Flow fast like water
• Crema is thin and pale
• Espresso is pale brown
• Tastes bitter/sharp, weak and watery
• Flow drips or not at all
• Crema is dark and spotty
• Espresso is very dark brown
• Tastes bitter and burnt
Over Extraction
Under
Espresso
Range
Over
Espresso
Range
Roast
Degree
Possible
Causes
What
to Do
Grind
Size
Grind
Dose
Tamping
Force
Water
Temp
Cups
Shot
Volume
Use Light
or too Dark
Roasts.
Medium or
Dark Roasts
Adjust to a
Finer
Grind Size.
Add More
Ground
Coffee.
Increase
Tamping
Force.
Cool the ma-
chine until
lights are fully
illuminated blue.
Brew
Less
Coffee.
Too
Coarse
Too
Little
Too
Light
Too High
Temp
Without
Preheating
and not
suitable size
Too
Much
MAX
<10kg
Preheat and
Change to a
Smaller Cup.
Roast
Degree
Grind
Size
Grind
Dose
Tamping
Force
Water
Temp
Cups
Shot
Volume
Use Light
or too Dark
Roasts.
Too
Fine
Too
Much
Too
Heavy
Too High
Temp
Without
Preheating
and not
suitable size
Too
Little
Possible
Causes
Medium or
Dark Roasts
Adjust to a
Coarser Grind
Size
Add Less
Ground
Coffee.
Reduce
Tamping
Force.
Brew
More
Coffee.
MAX
>15kg
What
to Do
Preheat and
Change to a
Bigger Cup.
Cool the ma-
chine until
lights are fully
illuminated blue.
Half fill the cup with
hot water to preheat
the cup. Return the
knob to horizontal
position (off-position).
1817
5. Espresso Making Guide5. Espresso Making Guide
Ensure coffee beans or pre-ground grinds are fresh,as old coffee beans no
matter the Grind Setting will have a low flavor and bad taste.
NOTE
NOTE
When the water tank is pulled up, the water will flow out from the outlet
at the bottom of the water tank, as it is a movable part. If you have pulled
up several times and have not wipe the water immediately, it will accumulate
more and more and run to the bottom of the machine, maybe will leave the
table full of water. It's not leaking.
2 - Start Up
12
3 - Warm Cup-by Hot Water
12
1-2 Min Heat UpREADY
Insert the Power Plug.
Press the ON/OFF button
to turn the machine on,
the Power button will
illuminate & pulse to
indicate it's heating up.
LIGHTS all fully illumi-
nated = Espresso
Machine is ready for use.
Place a cup on counter
top and position Steam
Wand. Turn the knob to
" ".
5.3 Operation
Extract the tank by
pulling it upwards.Fill
the water tank with
clean and fresh water
(Do not exceed the
MAX line).
Set up the water tank
vertically and align the
buckles to the hole on
the back of the machine,
and then press it down
to be parallel to the top
of the machine.
1 - Check Water
12
Watery Extraction
• Flow fast like water
• Crema is thin and pale
• Espresso is pale brown
• Tastes bitter/sharp, weak and watery
• Flow drips or not at all
• Crema is dark and spotty
• Espresso is very dark brown
• Tastes bitter and burnt
Over Extraction
Under
Espresso
Range
Over
Espresso
Range
Roast
Degree
Possible
Causes
What
to Do
Grind
Size
Grind
Dose
Tamping
Force
Water
Temp
Cups
Shot
Volume
Use Light
or too Dark
Roasts.
Medium or
Dark Roasts
Adjust to a
Finer
Grind Size.
Add More
Ground
Coffee.
Increase
Tamping
Force.
Cool the ma-
chine until
lights are fully
illuminated blue.
Brew
Less
Coffee.
Too
Coarse
Too
Little
Too
Light
Too High
Temp
Without
Preheating
and not
suitable size
Too
Much
MAX
<10kg
Preheat and
Change to a
Smaller Cup.
Roast
Degree
Grind
Size
Grind
Dose
Tamping
Force
Water
Temp
Cups
Shot
Volume
Use Light
or too Dark
Roasts.
Too
Fine
Too
Much
Too
Heavy
Too High
Temp
Without
Preheating
and not
suitable size
Too
Little
Possible
Causes
Medium or
Dark Roasts
Adjust to a
Coarser Grind
Size
Add Less
Ground
Coffee.
Reduce
Tamping
Force.
Brew
More
Coffee.
MAX
>15kg
What
to Do
Preheat and
Change to a
Bigger Cup.
Cool the ma-
chine until
lights are fully
illuminated blue.
Half fill the cup with
hot water to preheat
the cup. Return the
knob to horizontal
position (off-position).
2019
5. Espresso Making Guide5. Espresso Making Guide
CENTRE
INSERT
CENTRE
CENTRE
1212
If the coffee grinds exceed the MAX
line after being tamped, you can
continue to tamp. If the grinds are
too firm to tamp down, take some
grinds out and then re-tamp.
NOTE
Wipe away any excess
grinds to clear the
edges of the portafilter.
6 - Wipe Excess Grinds
1
7 - Insert Portafilter
Place the portafilter
underneath the group
head so that the handle
is aligned with the
INSERT position.
Insert the portafilter
into the group head
and rotate the handle
towards the center until
resistance is felt.
8 - Position Cup
Empty the cup.Position the cup on
the drip tray, under the
portafilter. Remove
the drip tray cover if
the cup is too tall.
Because of high pressure,the water
will fully penetrate into the coffee
grinds,it takes time for water to pass
through and flow out from the coffee
grinds. So it is normal that the excess
coffee will drip off.
TIPS
12
9 - Espresso Extraction
Single
cup
Double
cup
OR
Press either the Single/
short cup button or the
Double/long cup button.
Extraction begins and
will automatically stop.
The crema of the coffee
is golden brown with a
fine mousse texture.
(Around 40mL per cup
is recommended.)
When the machine starts to work,
there will be some noise from the
machine as it is pumping water
under high pressure.
NOTE
34
Align the marking dot
on the Filter Basket
with the groove on
the portafilter and
remove it from the
portafilter.
Rinse the front and
back of the filter basket
under the faucet, and
finally rinse the inner
holes and the outer
holes with water.
INSERT
CENTRE
12
10 - Remove & Wash
To avoid coffee grinds in
the portafilter splashing
and collapsing, and acc-
ompanied by a "bang"
sound, wait 20 seconds
to let the machine relieve
the pressure then twist the
portafilter out of the ma-
chine clockwise.
Discard the coffee puck
in the portafilter.
5
Rinse the inner and
outer holes of the
portafilter with clean
water,and be warned
that do not wash the
portafilter with any
descaler.
6
Use a clean cloth to
wipe the filter and
portafilter dry.
OR
ONE SHOTTWO SHOT
4 - Select Filter Baskets
1212
Place a filter into the
portafilter.
Select either
the Single-cup filter,or
the Double-cup filter.
Align the marking dot on
the filter with the porta-
filter's groove, and then
install the filter to the
portafilter, twist and fix
the filter.
5 - Dose & Tamp
Single
cup
Double
cup
Dose the filter with
coffee grinds.
•
One spoon of fine grinds
for the Single cup filter.
•
Two spoons of fine grinds
for the Double cup filter.
Evenly tamp(press) the
grinds to level indicated.
MAX
Press the ON/OFF button within 15 seconds. The machine will make one
beep and be back to ready state without saving the new settings.
NOTE
5.4 Re-programming Shot Volume
Re-programming Single-shot Volume Mode
To begin re-programming, press & hold the Single/short cup button and Double/
long cup button for 3 seconds to enter the user-defined mode.The Single/short
cup button and Double/long cup button will flash to indicate the machine is
in re-programming mode.
12
Wait for the heating of
the machine to comp-
lete, that is, the blue
lights of the ON/OFF
Button, Single/short
Cup Button, Double/
long Cup Button, and
Steam Button are solid
on.
Press the Single/short
Cup Button to dispense
water once to clean the
coffee grounds around
the Group Head.
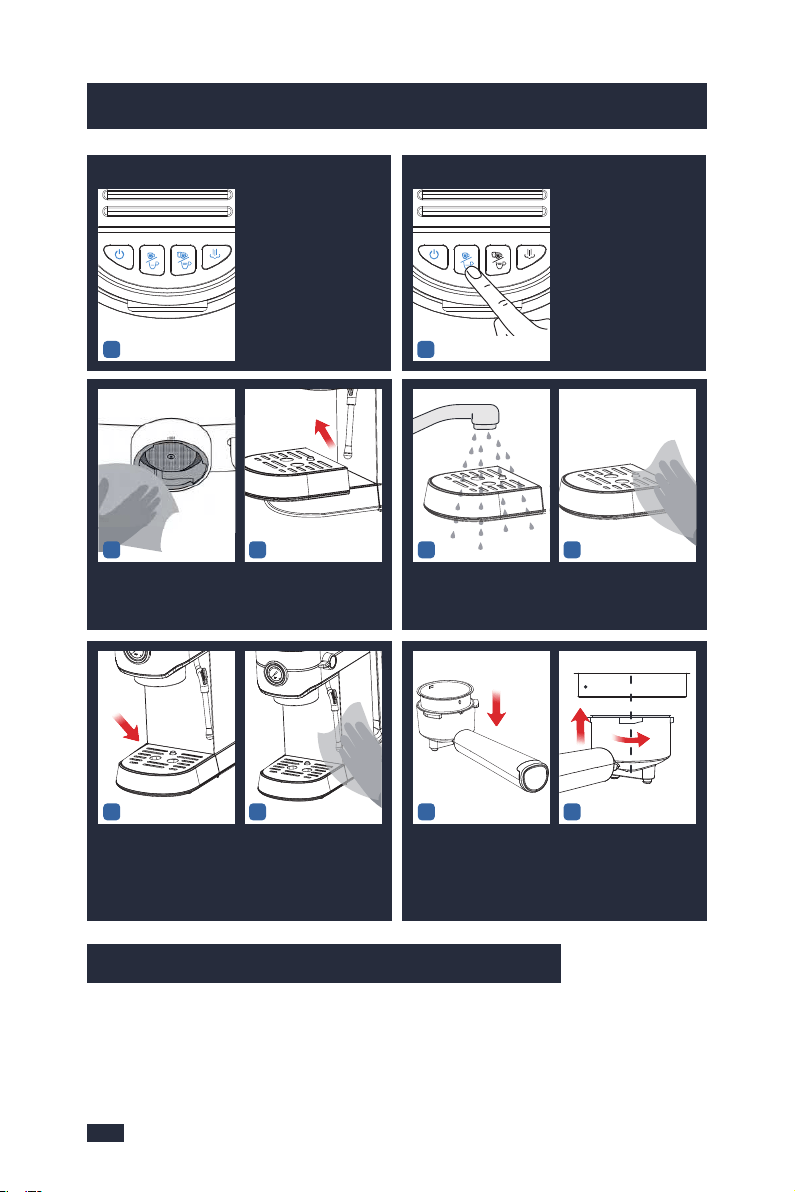
11 - After Each Use
2221
5. Espresso Making Guide5. Espresso Making Guide
56
78
Put it back.
Wipe down the machine
with a clean cloth.
Use a clean cloth to wipe
the coffee grounds left
on the Group Head.
Remove the drip tray
and pour away the
water.
Rinse the drip tray and
its cover with clean
water.
Wipe the drip tray with
a clean cloth.
12
Press Single/short cup
button once, the
espresso will start to
pour.
When you reach your
desired 1 shot volume,
press the Single/short
cup button again, the
espresso pour will stop.
(Shot Volume Range:
25-60mL)
34
Press the Steam button
within 15 seconds, the
ON/OFF button indicator
will flash blue light for 3
times and the machine
will have 3 beeps.
The new ONE CUP esp-
resso shot volume has
been saved and the
machine will return to
the READY state.
Re-programming Double-shot Volume Mode
12
Press Double/long cup
button once, the
espresso will start to
pour.
When you reach your
desired 2 shot volume,
press the Double/long
cup button. The espre-
sso pour will stop.(Shot
Volume Range: 50-130
mL)
34
Press the Steam button
within 15 seconds, the
ON/OFF button indicator
will flash blue light for 3
times and the machine
will have 3 beeps.
The new TWO CUP
espresso shot volume
has been saved and the
machine will return to
the READY state.
910
Align the marking dot
on the filter with the
groove on the portafilter
and put it back to the
portafilter.
Put the portafilter back
to the machine for next
use.
CENTRE
INSERT
43
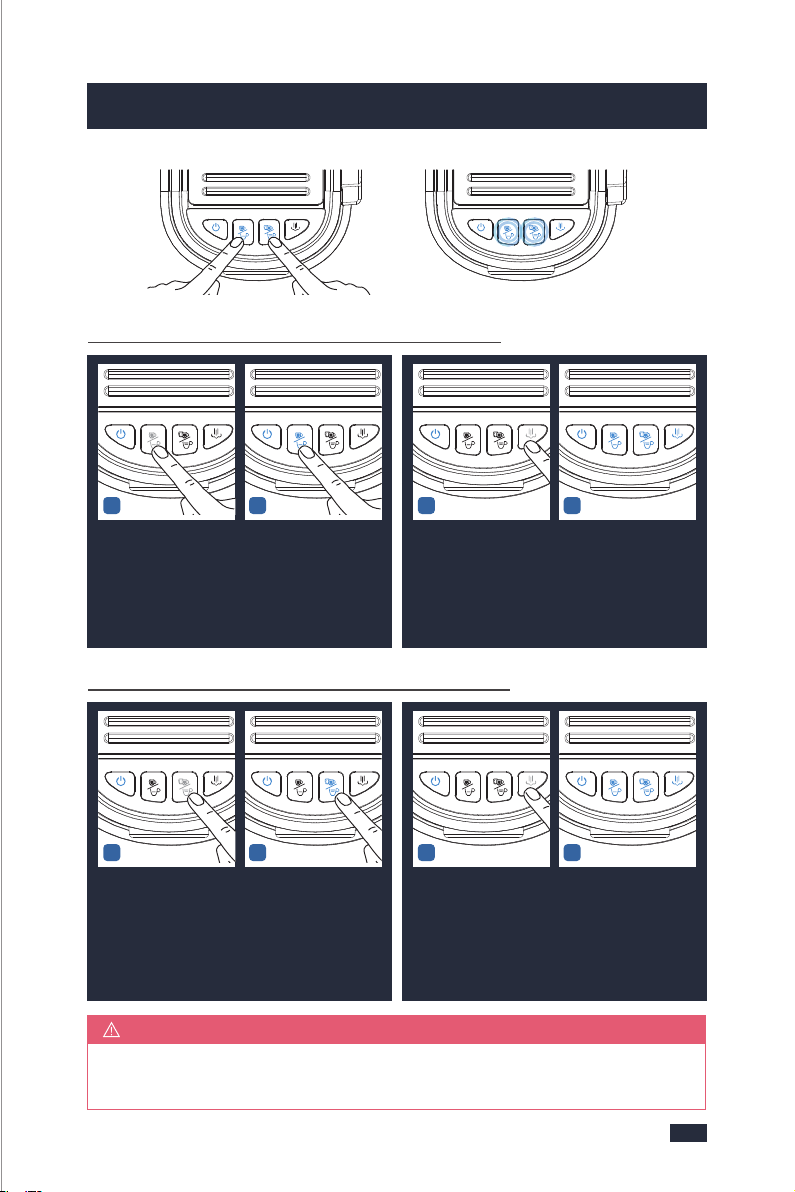
Press the ON/OFF button within 15 seconds. The machine will make one
beep and be back to ready state without saving the new settings.
NOTE
5.4 Re-programming Shot Volume
Re-programming Single-shot Volume Mode
To begin re-programming, press & hold the Single/short cup button and Double/
long cup button for 3 seconds to enter the user-defined mode.The Single/short
cup button and Double/long cup button will flash to indicate the machine is
in re-programming mode.
12
Wait for the heating of
the machine to comp-
lete, that is, the blue
lights of the ON/OFF
Button, Single/short
Cup Button, Double/
long Cup Button, and
Steam Button are solid
on.
Press the Single/short
Cup Button to dispense
water once to clean the
coffee grounds around
the Group Head.
11 - After Each Use
2221
5. Espresso Making Guide5. Espresso Making Guide
56
78
Put it back.
Wipe down the machine
with a clean cloth.
Use a clean cloth to wipe
the coffee grounds left
on the Group Head.
Remove the drip tray
and pour away the
water.
Rinse the drip tray and
its cover with clean
water.
Wipe the drip tray with
a clean cloth.
12
Press Single/short cup
button once, the
espresso will start to
pour.
When you reach your
desired 1 shot volume,
press the Single/short
cup button again, the
espresso pour will stop.
(Shot Volume Range:
25-60mL)
34
Press the Steam button
within 15 seconds, the
ON/OFF button indicator
will flash blue light for 3
times and the machine
will have 3 beeps.
The new ONE CUP esp-
resso shot volume has
been saved and the
machine will return to
the READY state.
Re-programming Double-shot Volume Mode
12
Press Double/long cup
button once, the
espresso will start to
pour.
When you reach your
desired 2 shot volume,
press the Double/long
cup button. The espre-
sso pour will stop.(Shot
Volume Range: 50-130
mL)
34
Press the Steam button
within 15 seconds, the
ON/OFF button indicator
will flash blue light for 3
times and the machine
will have 3 beeps.
The new TWO CUP
espresso shot volume
has been saved and the
machine will return to
the READY state.
910
Align the marking dot
on the filter with the
groove on the portafilter
and put it back to the
portafilter.
Put the portafilter back
to the machine for next
use.
CENTRE
INSERT
43

Milk frothing is the steaming of milk.
Key Elements of Frothed Milk
The steam only heats the milk. The milk also needs to be aerated (add air) to
create the micro-foam, and needs to be blended well together. Milk that has
been frothed correctly has been heated to between 140-149°F, and has a thick,
rich micro-foam with a silky sheen. It’s all about the temperature, positioning
of the Steam Wand and when you move the Milk foam cup.
Frothing makes a smooth hissing
sound.
NOTE
6.1 Brief Introduction
Resetting Default Volumes
2423
5. Espresso Making Guide6. Milk Frothing Guide
6. Milk Frothing Guide
Resetting Default Single-shot ModeResetting Default Double-shot Mode
12
To reset the machine to
the default single shot
volumes, hold and press
together the ON/OFF
button and Single/short
cup button for 3 seconds
and the machine will
have 3 beeps.
Then the default settings
of brewing espresso will
be restored and the
machine will be back to
ready state.
12
To reset the machine to
the default double shot
volumes, hold and press
together the ON/OFF
button and Double/long
cup button for 3 seconds
and the machine will
have 3 beeps.
Then the default settings
of brewing espresso will
be restored and the
machine will be back to
ready state.
Restore All Default Settings Guide
1
To reset the machine to
all default shot volumes,
hold and press together
the ON/OFF button,
Single/short cup button
and Double/long cup
button for 3 seconds
and the machine will
have 3 beeps.
Then the default settings
of brewing espresso will
be restored and the
machine will be back to
ready state.
2
PRESS & HOLD
TOGETHER 3 SEC
PRESS & HOLD
TOGETHER 3 SEC
PRESS & HOLD
TOGETHER 3 SEC
Step 3-The Froth Nozzle is at 3 o'clock,
and the milk is just soaked to the 2mm
position of the Froth Nozzle.
Step 4-The position of the left hand
is fixed, and the right hand turns the
Steam/water Knob to the steam icon
to start frothing the milk.
6.2 Tips for Milk Frothing
Make sure to make milk foam according to the following 6
requirements:
1 - Milk variety
Use whole milk instead of skim milk,
as skim milk is not suitable for frothing.
2 - Milk temperature
Use fresh whole milk at 38 - 46℉ (3-8℃).
3 - Milk volume
Use about 100mL of milk.
4 - Milk foam cup
Use a 300-350mL stainless steel milk
foam cup.
5 - Water temperature
Press the Steam Button when prehe-
ating before steam foaming and wait
for the white light of the Steam Button
to illuminate solid and it no longer
flashes, which indicates that the
heating is completed.
6 - Use the correct method to
froth milk
Step 1-Turn the Steam/water Knob to
the steam icon, and release some
steam out from the steam wand
before performing milk frothing.
Step 2-Hold the position below the
tip of the milk foam cup and the
bottom of the milk foam cup with
your left hand, and hold the handle
of the milk foam cup with your right
hand. Arms at 12 o'clock.
Step 5-Check that the milk is swirling.
Step 6-As the milk level rises, lower
the milk foam cup to keep the froth
nozzle below the surface.
Step 7-When the desired micro-foam
is reached, submerge the steam wand
halfway.
Step 8-Milk frothing is complete when
the base of the milk foam cup is too
hot to touch for 3 seconds.
Step 9-Turn the Steam/water Knob
to the standby position;
Step 10-Use the black Steam Wand
handle on the Steam Wand to move
the position of the Steam Wand, so
as to avoid scalding due to the high
temperature of the Steam Wand;
Step 11- Remove the milk foam cup
from the Steam Wand.
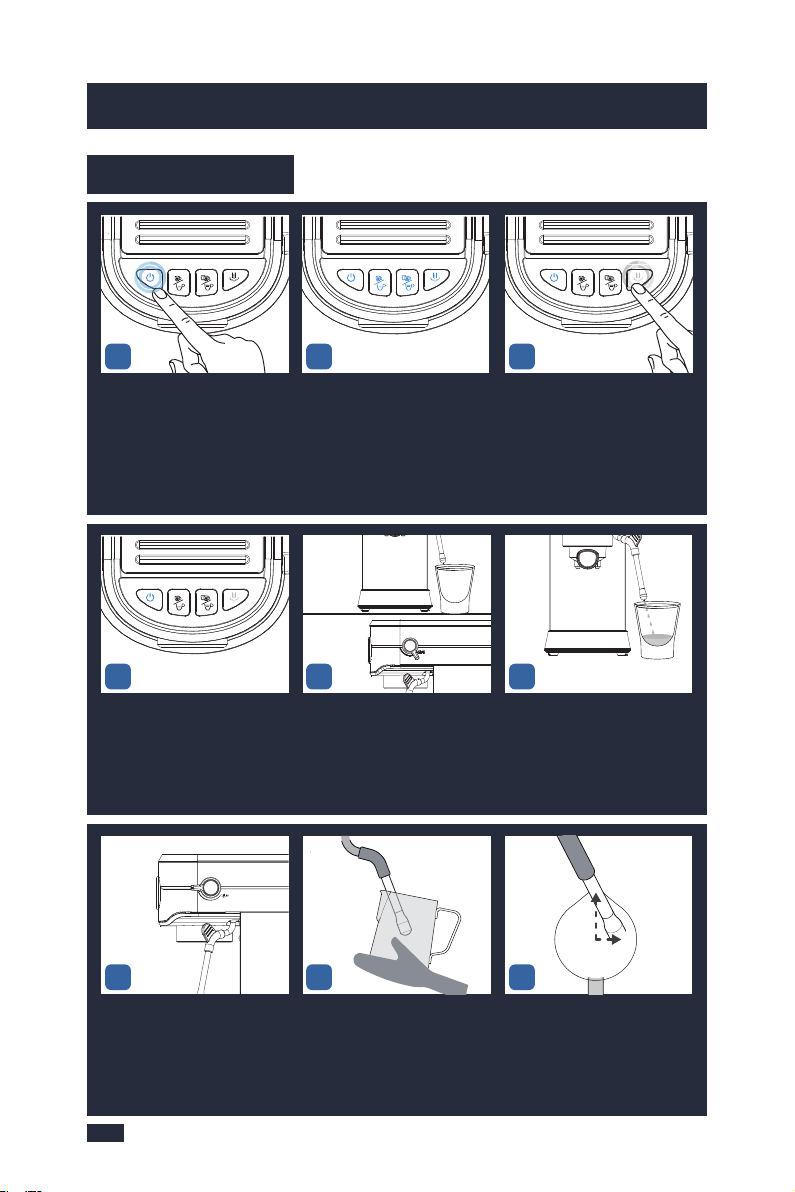
If use steam function
for more than 5
minutes, the ON/OFF
button blink red light
quickly, and the steam
button blink white light
quickly. Thus, reset
steam/water knob to
horizontal position(
off-position) to stop it.
NOTE
2625
6. Milk Frothing Guide
6. Milk Frothing Guide
6.3 Operation
The steam button keeps white
light fixed. It means the heating
for steam is finished.
Turn the Steam/water Knob
to the steam icon.
Release some steam out from
the steam wand before
performing milk frothing.
Press the steam button and
start to blink white light slowly.
All buttons are solid on =
Espresso Machine is ready
to use.
Press the steam button and
start to blink white light slowly.
Pause steam by returning
knob to horizontal position
(off-position).
Hold the position below the tip
of the milk foam cup and the
bottom of the milk foam cup
with your left hand, and hold
the handle of the milk foam
cup with your right hand.
The steam wand arm is at 12
o'clock. The froth nozzle is at 3
o'clock. The milk is just soaked
to the 2mm position of the Froth
Nozzle.
123
46
789
5
12 O CLOCK
,
3 O CLOCK
,
As the milk level rises, lower
the milk foam cup to keep the
froth nozzle below the surface.
When the desired micro-foam
is reached, submerge the steam
wand halfway.
Milk frothing is complete when
the base of the milk foam cup
is too hot to touch for 3 seconds.
Turn the Steam/water Knob to
the standby position.
The position of the left hand is
fixed, and the right hand turns
the Steam/water Knob to the
steam icon to start frothing the
milk.
Frothing makes a smooth
hissing sound.
Check that the milk is swirling.
- Press the steam button and
finish to blink white.
- Now Return to the READY
state.
Use the black Steam Wand
handle on the Steam Wand to
move the steam wand from the
milk foam cup.
101112
15
1617
1413
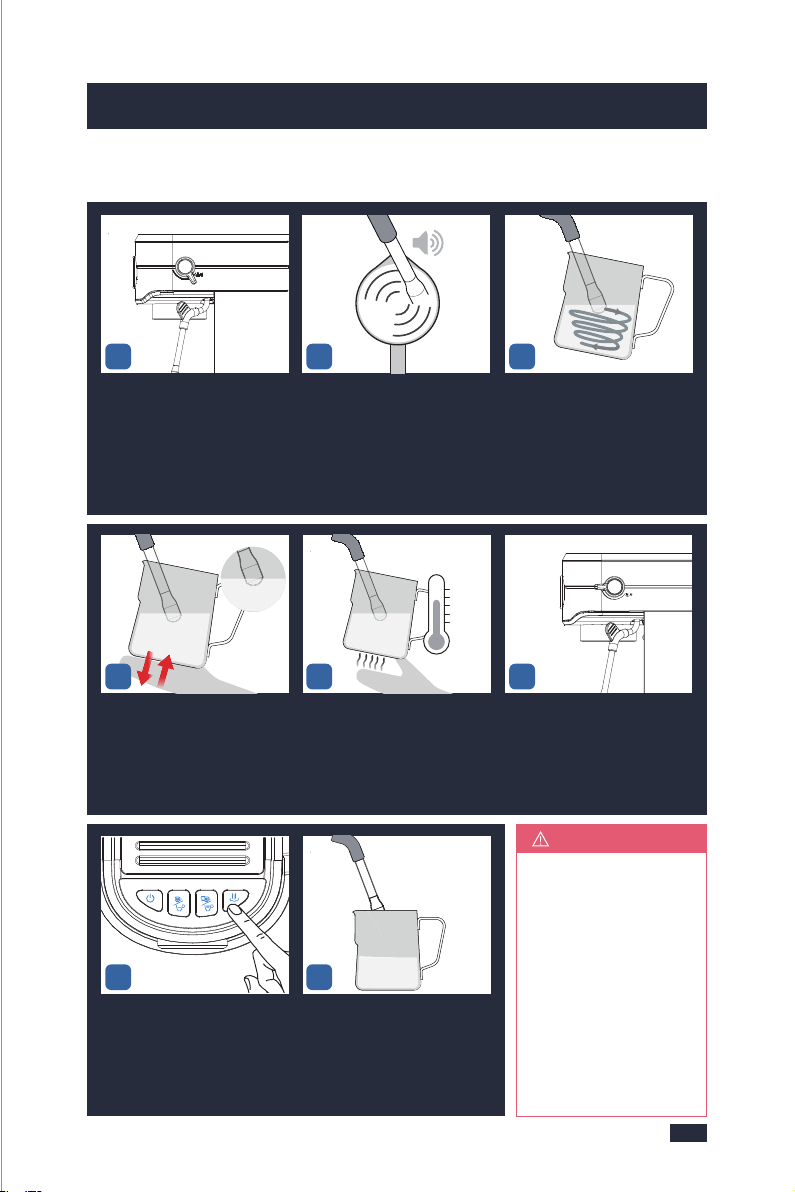

This function is designed for making long black coffee, hot drinks such as tea,
instant soups, and for warming cups prior to making espresso, but it will
automatically stop working after 5min.
Extract the tank by
pulling it upwards.
Fill the water tank
with clean and fresh
water(Do not exceed
the MAX line).
Set up the water tank
vertically and align the
buckles to the hole on
the back of the machine,
and then press it down
to be parallel to the top
of the machine.
1 - Check Water
2
Press the ON/OFF
button to turn the
machine on, the Power
button will illuminate
& pulse to indicate it
is heating up.
LIGHTS all fully
illuminate = Espresso
Machine is ready to use.
2 - Start Up
12
1-2 Min Heat UpREADY
3 - Hot Water
12
Place a cup on the co-
unter top and position
the steam wand. Turn
the knob to " "
icon to start releasing
hot water.
Hot water will pour from
the steam wand and
can be used for making
Americanos and pre-
heating cups.
3
To stop the hot water,
return the knob to the
horizontal position
(off-position).
7.1 Brief Introduction
7.2 Operation
2827
6. Milk Frothing Guide
7. Hot Water Guide
After the milk foam cup base is too hot to touch for 3 sec, the milk frothing
is finished. If you need more milk froth, you can continue to froth or stop
according to your needs.
TIPS
The steam wand should be cleaned after each use to make sure its best
performance, please do as directed by the following steps:
6.4 Cleaning after Each Use
Release steam for 60 seconds
to flush away the milk stains in
the froth nozzle.
Turn the Steam/water Knob to
the standby position.
Use a damp cloth to wipe off
the milk stains on the outside
of the steam wand and the froth
nozzle.
Press the steam button and it
starts to blink white light
slowly.
The steam button keeps white
light fixed. It means the heating
for steaming is finished.
Turn the Steam/water Knob to
the steam icon.
123
465
1
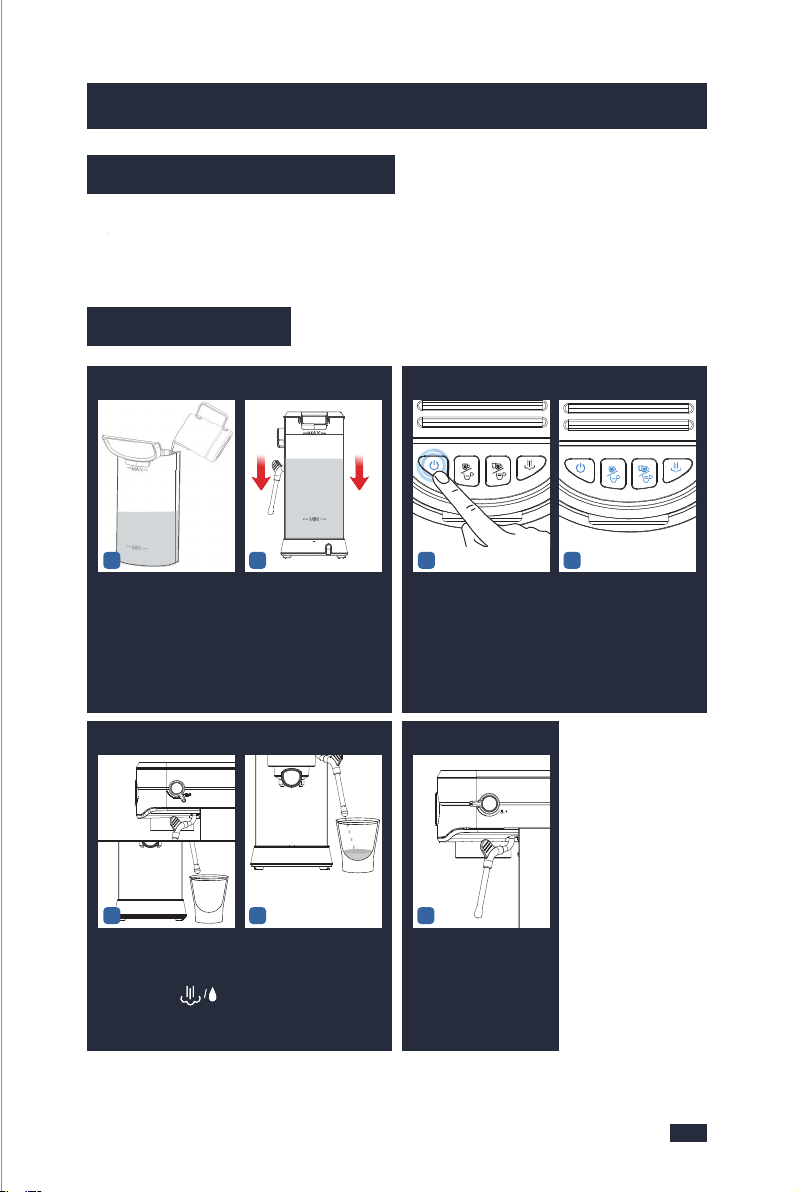
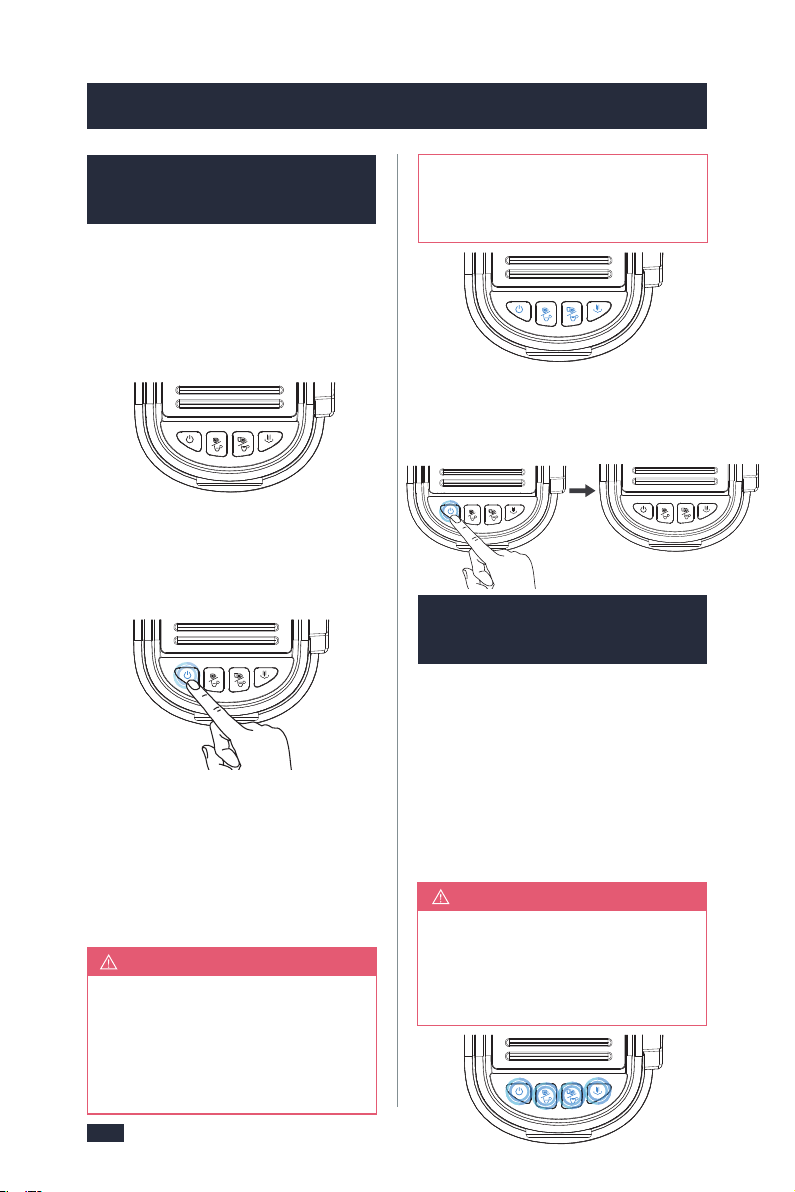
3029
8. Other Functions
8.1 Automatic Sleep
Mode Guide
If the machine is not in use for 5m-
in after milk frothing, it will also
enter the sleep mode. Press the
ON/OFF button and the button will
flash. The temperature is still high
NOTE
at this point, if you want to cont-
inue brewing coffee, refer to "8.3
High-temperature Alarm Guide".
- If there is no any operation after 5
minutes, the machine will beep for a
while and all button’s light will be
turned off and the machine will pass
to sleep mode.
8. Other Functions
- To reactivate the machine, press the
ON/OFF button, and the ON/OFF bu-
tton starts to blink blue light slowly,
other buttons don't light up.
- When the machine has reached the
correct temperature, the ON/OFF
button light will stop flashing and all
button lights on the control panel will
illuminate, the machine is at the
READY state.
- Long press the ON/OFF button for 2
seconds, the machine will be switc-
hed off.
Step 1 - Place a cup
under the froth
nozzle.
Step 2 - Turn the Steam/water knob to
the steam“ ” position to release
water out for making the machine co-
ol down.
- Wait the 4 buttons are solid on, the
machine will return to the READY state.
Step 3 - Turn the Steam/water Knob to
the standby position. Now, the mac-
hine is ready for brewing coffee.
8.2 Water Shortage
Guide
- During the brew, if the water tank is
out of water, the machine’s 4 butto-
ns(ON/OFF button, single cup button,
double cup button, steam button) will
blink blue light simultaneously and
the machine will automatically stop
brewing.
NOTE
After 30 seconds without any op-
eration, the blue light of the ON/-
OFF button is solid on, and the lig-
hts of other buttons are off.
Cool the Machine for Making
Espresso
8.4 Button Sound
Setting Guide
Step 1 - Press any button to return the
machine to the READY state. Then refill
the water tank with clean water imm-
ediately.
8.3 High-temperature
Alarm Guide
Step 2 - Remove the portafilter and
clear the coffee puck, and don't brew
thecoffee puck again.
Step 3 - Put a cup under the steam wand.
Turn the steam /water knob and brew
some water to refill the inner boiler. After
that, the machine is ready for use again.
NOTE
Due to the water shortage in the
portafilter, the machine will have
high temperature and high pressure,
so we recommend you operate by
following the steps below:
If you accidentally press the steam bu-
tton or immediately brew coffee after
steaming, the temperature will be too
high, and it is not suitable for brewing
coffee, there will be a high-temperature
alarm by pressing the Single cup button
or Double cup button, at this point,
the Single cup button and Double cup
button are blinking blue light quickly,
at the same time the ON/OFF button is
blinking red light quickly.
A beep is emitted to confirm each bu-
tton press. These button sounds can
be switched off. The beeps emitted
after the brewing, warming processes,
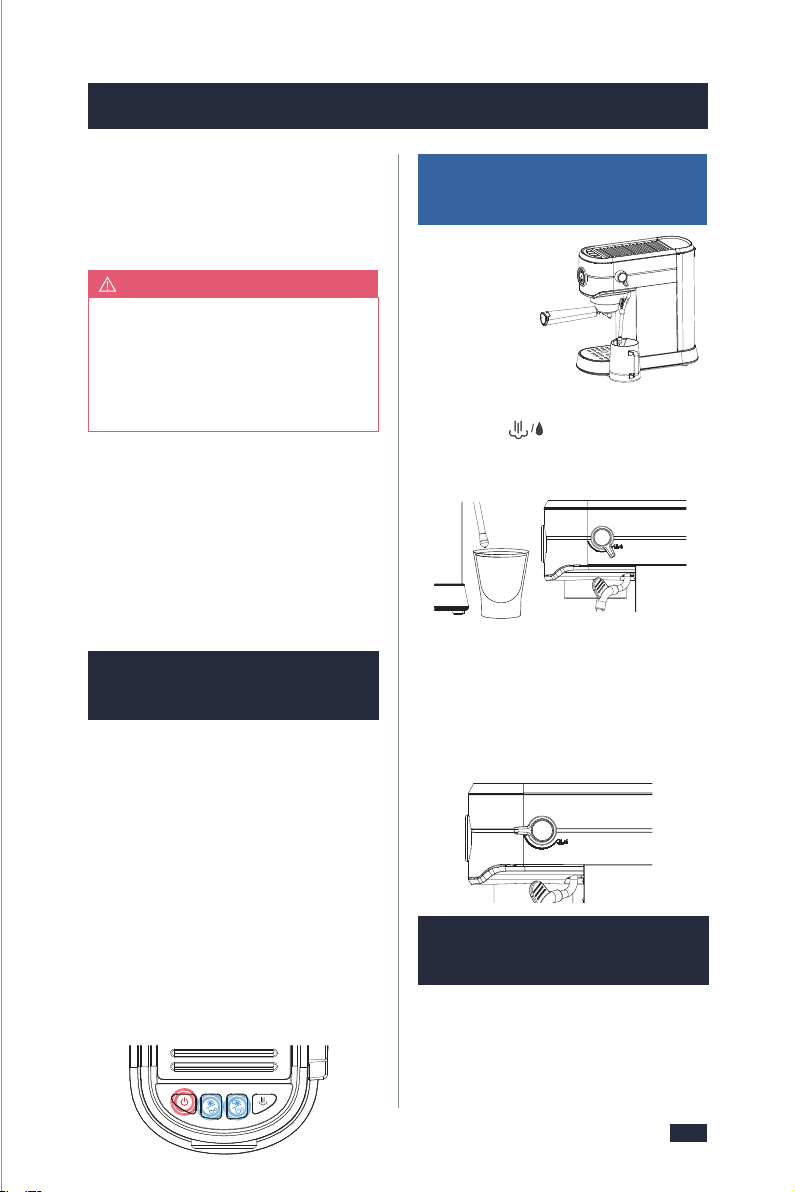

9.1 Cleaning & Main-
tenance - Brewer
or descaling warning cannot be
disabled.
Simultaneously press & hold the Sin-
gle/short Cup Button and Steam Bu-
tton for 3 seconds to access the button
sound setting, then the 4 button lights
keep illuminating blue steadily.
2 functions with independent water
pipes, hence each time either brewing
coffee or frothing milk will be considered
as one count of use.
2 - We suggest descaling the machine
when the machine reaches a certain
count of use. The number “100”mentioned
below is the total count of use that includes
both coffee brewing and milk frothing.
The descaling warning will be shown
when the machine has cumulatively
worked for 100 cycles. At that moment,
the power button and steam button will
flash blue and beep simultaneously for
about 10 seconds. The descaling cycle
can be exited at any point by pressing
any button. But the descaling warning
will be shown every 10 cycles after
canceling the descaling warning as the
machine hasn’t finished the descaling
yet. To finish descaling, refer to
"9. Cleaning & Maintenance", page 31.
Applies low water pressure at the start
of the extraction to gently expand
grinds for an even extraction for a
richer flavored espresso.
8.5 Pre-infusion
Function
8.6 Descaling
Warning Guide
3231
The lack of maintenance of the ma-
chine would not only affect your coffee
taste but also lower the performance
or even shorten the lifespan of your
machine. To make sure your machine
operates efficiently, it is necessary to
descale the machine periodically. We
recommend descaling your espresso
1 - Please make sure that the rubber
plug of the water outlet of the water
1 - If the water runs out midway, refill
the water tank. To ensure the best fla-
vor of the coffee, discard the used coff-
ee grinds, and restart brewing with
fresh coffee grinds.
2 - Do not remove the portafilter when
it is in use to avoid scalding.
3 - If the portafilter is not installed in
place during brewing, press the Sin-
gle/short Cup Button or Double/long
Cup Button to stop the brewing, and
then wait for 20 seconds before det-
aching the portafilter.
Descaling warning will be shown
when the machine has cumulatively
worked for 100 cycles. At that moment,
the power button and steam button
light are blue and blink and beep sim-
ultaneously about 10 seconds.
Make sure to clean the ground coffee
from the group head after each use,
as some older coffee grinds may be
sitting inside your machine and will
affect the quality of your next batch.
8. Other Functions
9. Cleaning & Maintenance
9. Cleaning & Maintenance
Before Use
In Use
After Use
Descaling Solution
The Descaling Cycle can be exited at
any point by pressing any button. But
descaling warning will be shown every
10 cycles after cancel the descaling
warning as the machine hasn’t
finished the descaling yet.
You have 3 options:
a. One espresso machine descaling
tablet.(Espresso Machine Cleaning Ta-
blets are available for purchase online
or through major retailers.) or
b. Liquid descaler. or
c. White vinegar & warm water.
You can also use powder descalers or
others to clean your machine as you
like. For specific cleaning methods,
please refer to the instructions prov-
ided by your descaler provider.
After Each Brew
After 100 Uses or Descaling
Warning Shows Up
For operation guide, refer to page 21,
steps “11. After Each Use” in section-
“5.3 Operation”.
tank is removed;
2 - It is recommended to use pure water;
3 - Please fill enough water in advance
but not exceed the MAX line of the
water tank, and do not add too little
water, otherwise when the water runs
out the water pump will make a loud
noise and affect the coffee effect;
4 - Ensure that coffee is made according
to the 7 requirements,refer to "-5.2
Tips for Making the Perfect Espresso",
page 12.
machine every 2 week or 100 cycles,
although this period will depend on the
hardness of water and frequency of use.
1 - In daily use, limescale gradually
builds up inside the machine’s water
pipes and heaters where water flows
through. This machine can brew coffee
or froth milk independently and these
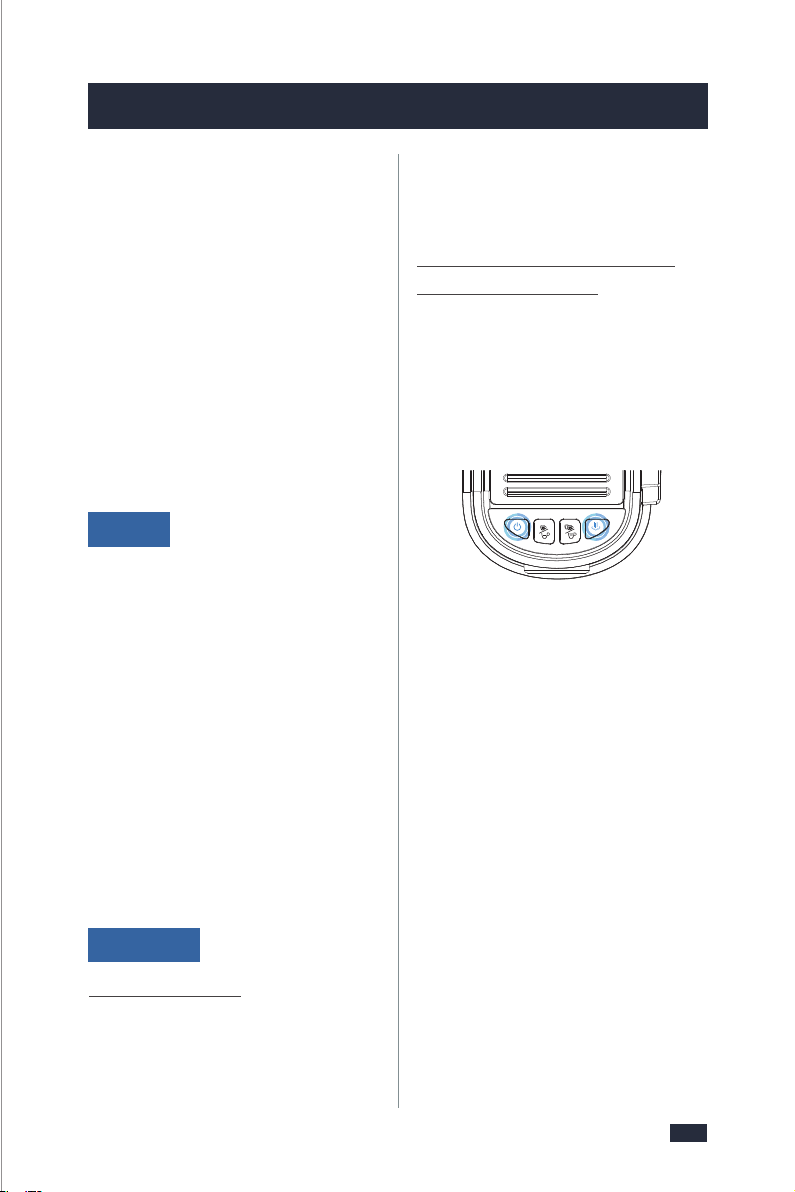
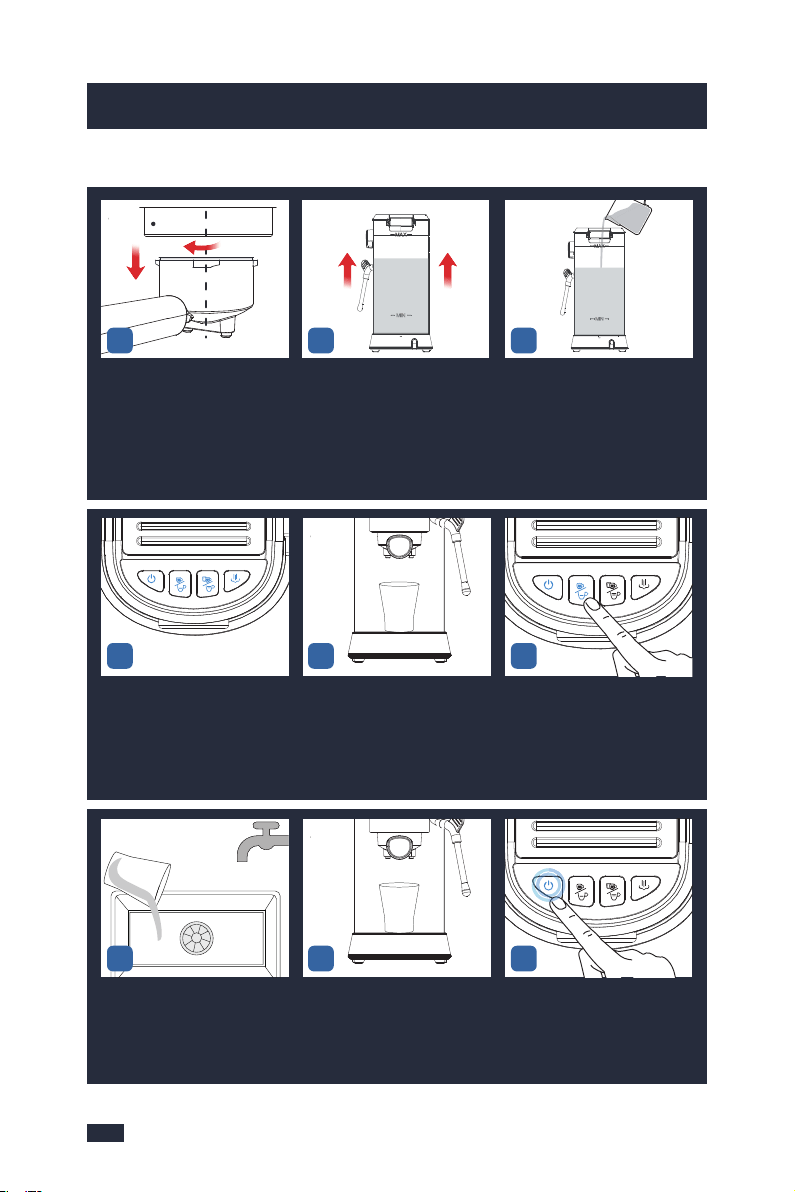
3433
9. Cleaning & Maintenance
9. Cleaning & Maintenance
Wait for the heating of the ma-
chine to complete, that is, the
blue lights of the ON/OFF
Button, Single/short Cup Button,
Double/long Cup Button, and
Steam Button are solid on.
Put a container under the Gr-
oup Head.
Press the Single/short Cup
Button to dispense some
discaling solution.
Wait 20 seconds to let the mac-
hine relieve the pressure then
twist the portafilter out of the
machine clockwise to avoid co-
ffee grinds in the portafilter spl-
ashing and collapsing, and acc-
ompanied by a "bang" sound.
Pour out the remaining water
in the water tank.
Fill the water tank with water to
the MAX marking that is 1000mL,
and then add 25 grams of the
descaling agent into the water
tank, then mix them evenly.
Descaling Cycle
Empty the container.Put the container back under the
Group Head. Let the descaling
solution soaks the limescale
inside the machine for 5 hours.
After 5 hours, press the ON/OFF
button to turn the machine on,
the Power button will illuminate
and pulse to indicate it's heating
up.
1.TURN
2.REMOVE
CENTRE
INSERT
123
456
789
Make sure all the buttons are so-
lid on(the machine has been pr-
eheated).
Long press the Single/short
cup button, Double/long cup
button, and Steam button
simultaneously for 3 seconds
to clean the machine with the
descaling solution.
Wait until running out all the de-
scaling solution in the tank and
take out the container, pour
away the descaling solution.
Remove the drip tray and pour
away the descaling solution.
Repeat step 11-13 for several ti-
mes with clean water until there
is no descaler smell.
Use a clean cloth to wipe off the
coffee grinds and water stains left
on the Group Head.
Remove the drip tray from the
machine and empty it.
Rinse the drip tray and the drip
tray cover with clean water.
Wipe the drip tray with a cloth a-
nd install it back
Repeat
Step 11-13
for 2-3 times
with clean water
PLEAS E EMPTY TR AY
UNSCREW
INSERT
INSERT
LOCK
101112
1415
1718
13
16
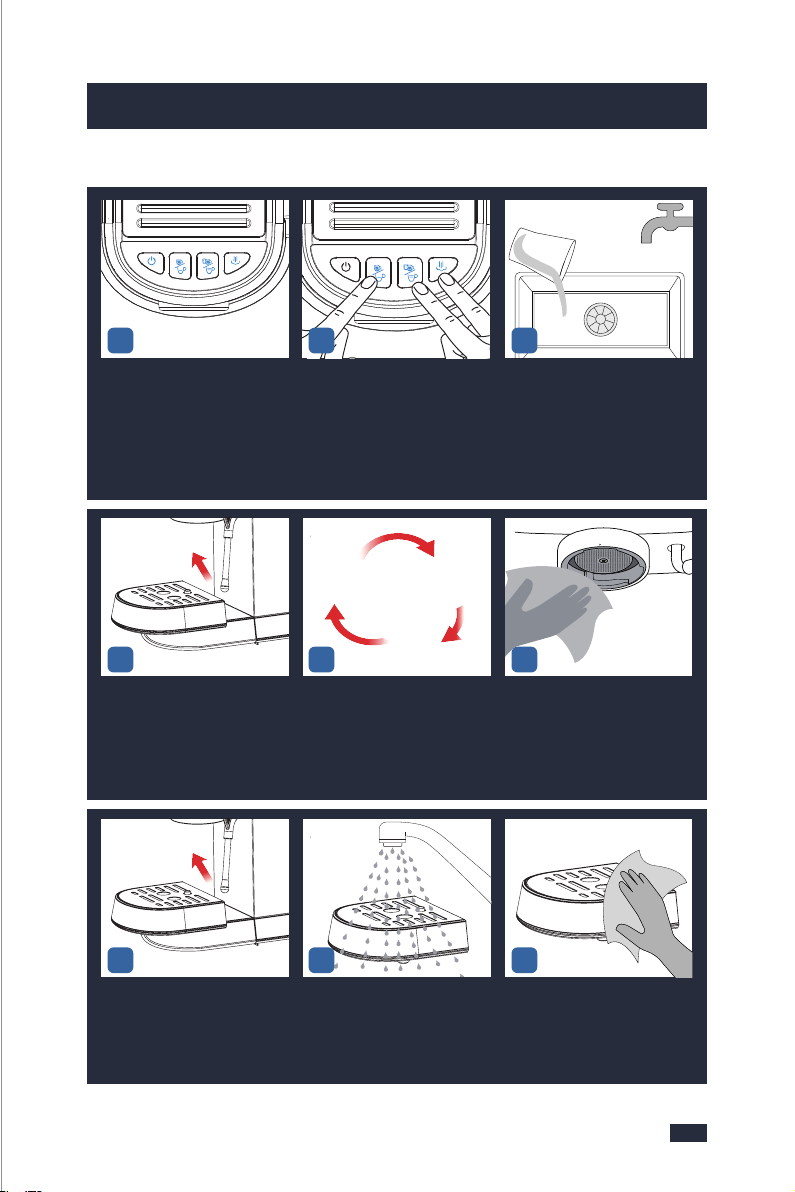

3635
9.2 Descaling & Mai-
ntenance - Frother
Before Use
In Use
After Use
1 - Please make sure that the rubber
plug of the water outlet of the water
tank is removed;
2 - It is recommended to use pure
water;
3 - Please prepare enough water in
advance but not exceed the MAX line
of the water tank, and do not add
too little water, otherwise the water
pump will make a loud noise and
affect the coffee effect.
4 - Make sure to make milk foam acc-
ording to the 6 requirements, refer to
"6.2 Tips for Milk Frothing", page 24.
1 - Use the correct method to froth milk,
refer to "6.3 Operation" of "6. Milk
Frothing Guide", page 25.
2 - If you stop frothing milk midway,
restart with fresh milk and don’t use
the frothed milk.
3 - During milk frothing, if the water is
running out, the machine will suddenly
make louder noises, check if there is
enough water, and add water timely.
Make sure to clean the steam wand
after each use to keep its best perfo-
rmance. For operation guide, refer to
page 27,“ 6.4 Cleaning after Each Use”.
9.Cleaning & Maintenance
9.Cleaning & Maintenance
If 5 hours are not long enough in step 8, let the descaling solution soak
the limescale inside the machine for 3 days instead. Other steps are the
same.
NOTE
The steam function will become weaker after a period of use, not as strong as
before. To make sure your frother operates efficiently, it is necessary to descale
the frother periodically. We recommend descaling your frother every 2 weeks
or 100 cycles.
Detach the frother nozzle with a
damp cloth, and then put it in
the container.
Place that container with the
frother nozzle under the steam
wand.
Insert the power plug into a 120V
AC power outlet & switch the
power on.
Turn off and unplug the machine
from the power outlet.
Use the provided cleaning pins
to cl ear the Froth Nozzle, insert
and pull out for about 30-50 times.
(After the Steam Wand cools
down)
Fill the water tank with water to
the MAX marking that is 1000mL,
and then add 25 grams of the
descaling agent into the water
tank, then mix them evenly.
PLEASE EMPTY TR AY
UNSCREW
INSERT
INSERT
I
N
S
E
R
T
PLEA SE EMPTY TRAY
STEAM
INSERT
Use a cloth to
wipe the
machine clean.
19
123
456
After Each Froth
After 100 Uses or Descaling Warning Shows Up
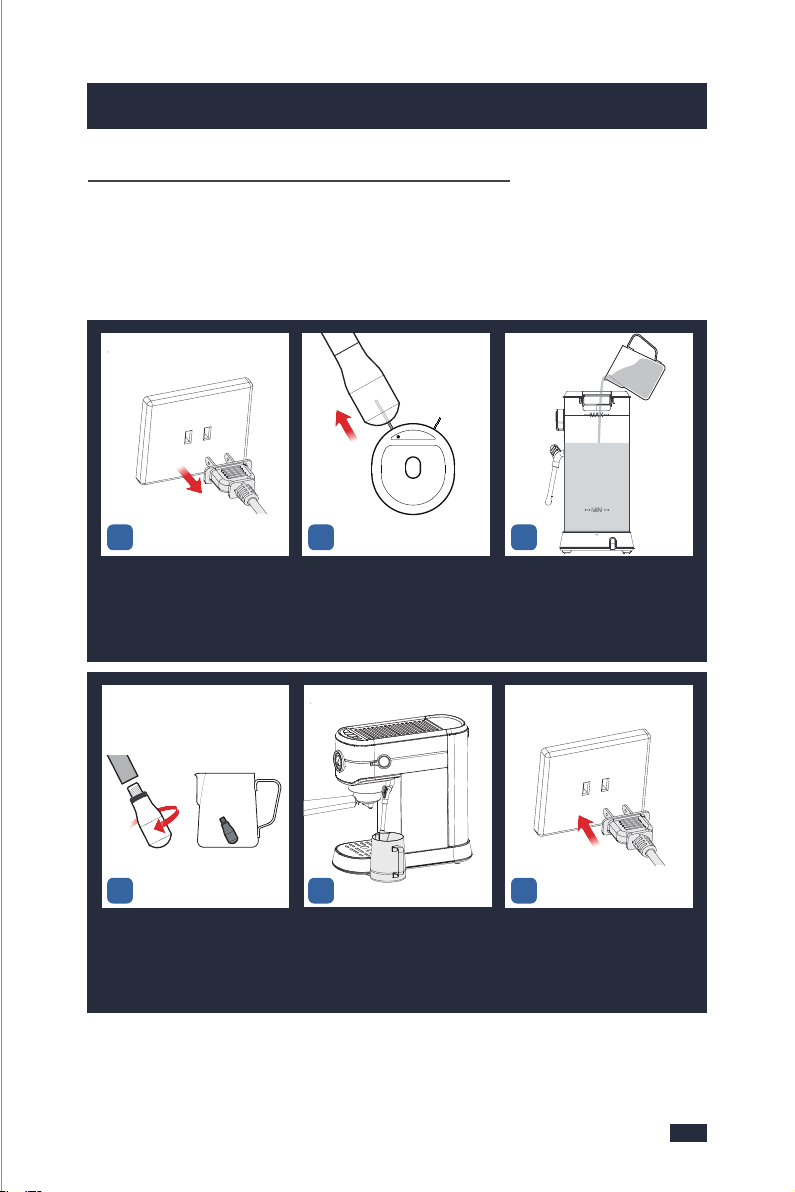
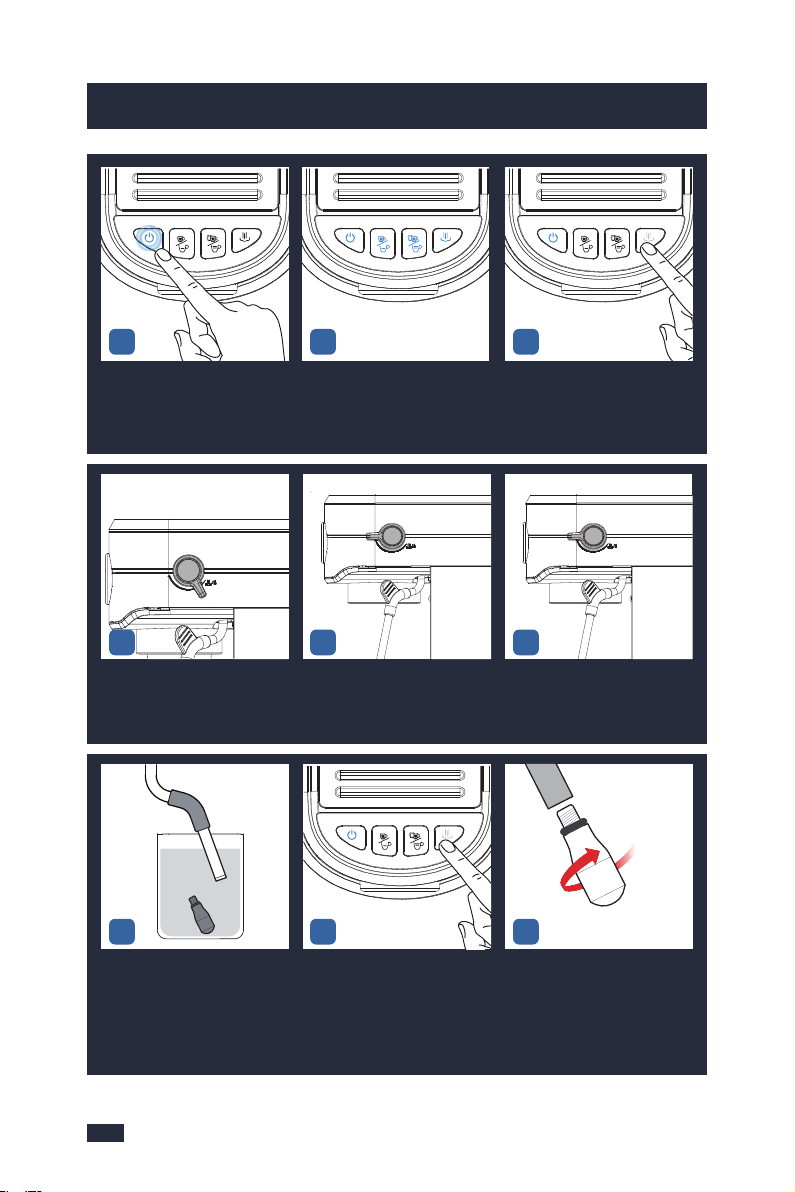
3837
9. Cleaning & Maintenance
9. Cleaning & Maintenance
Press the ON/OFF button to turn
the machine on, the Power but-
ton will illuminate and pulse to
indicate it's heating up.
Make sure all the buttons are so-
lid on(the machine has been pr-
eheated).
Press the Steam Button and wait
for the heating of the machine to
complete, that is, the white light
of the Steam Button is solid on.
Turn the knob to the steam
icon to release steam around
3 mins.
Turn the Steam/water Knob to
the standby position.
Let the machine stand for 5 hours
to make sure the limescale is in
better contact with the descaling
solution and totally dissolved.
789
101112
Take out the container, pour
away the descaling solution.
Place the container under the
steam wand.
Take out the water tank and fill
it with clean water but not exc-
eed the MAX marking, and inst-
all it onto the machine.
161718
Press the Steam Button and wait for
the heating of the machine to com-
plete, that is, the white light of
the Steam Button is solid on.
Turn knob to " " and
release steam until all of the
water flows out.
Repeat step 16-20 for 2-3 times
to ensure that the descaling so-
lution has been removed.
Turn the Steam/water Knob to
the standby position.
Soak the nozzle and steam wand
for 5 hours to make sure the
limescale is in better contact with
the descaling solution and totally
dissolved.
After 5 hours, turn on the machine,
press the steam icon, wait for the
machine to finish heating, and
then turn the knob to the steam
icon to release all of the descaling
solutions.
Take the frother nozzle out from
the container, and attach it back
to the steam wand.
Wipe the outside of the Steam
Wand and the Froth Nozzle with
a damp cloth to clean the milk
stains.
2223
192021
Repeat
Step 16-20
for 2-3 times
with clean water
SCREW
131415
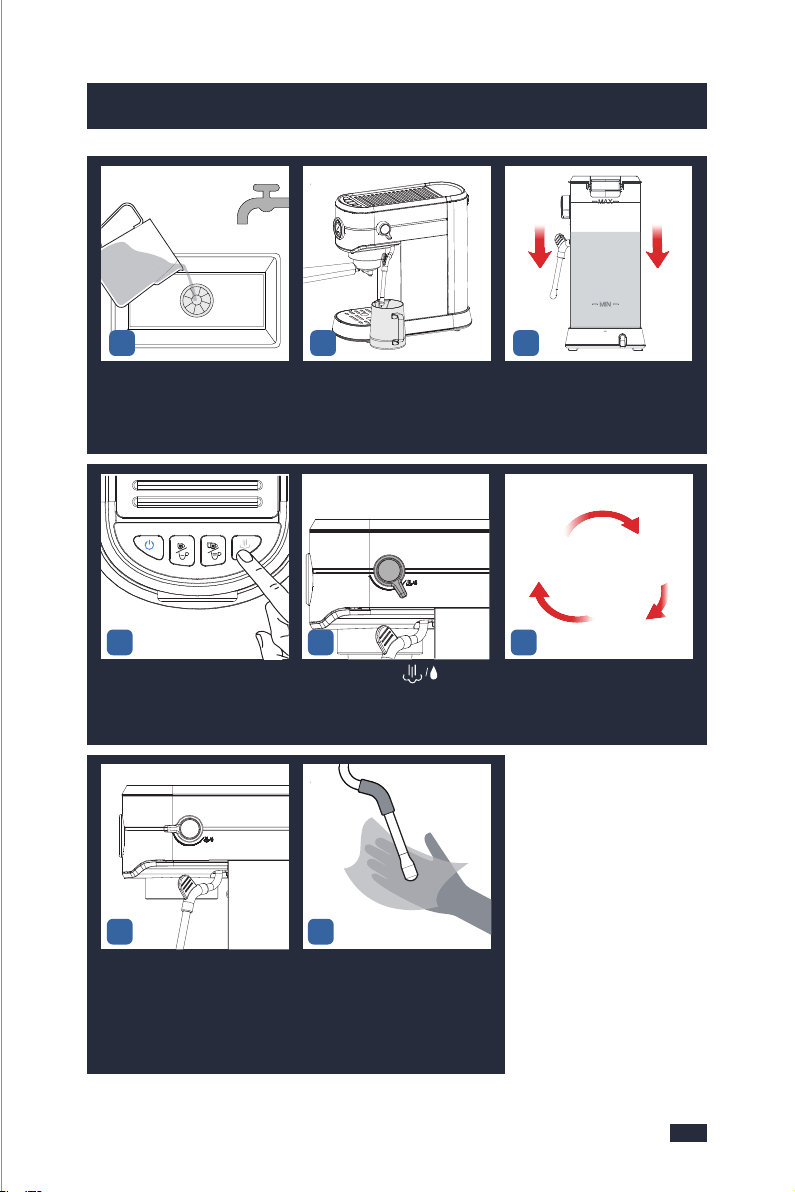
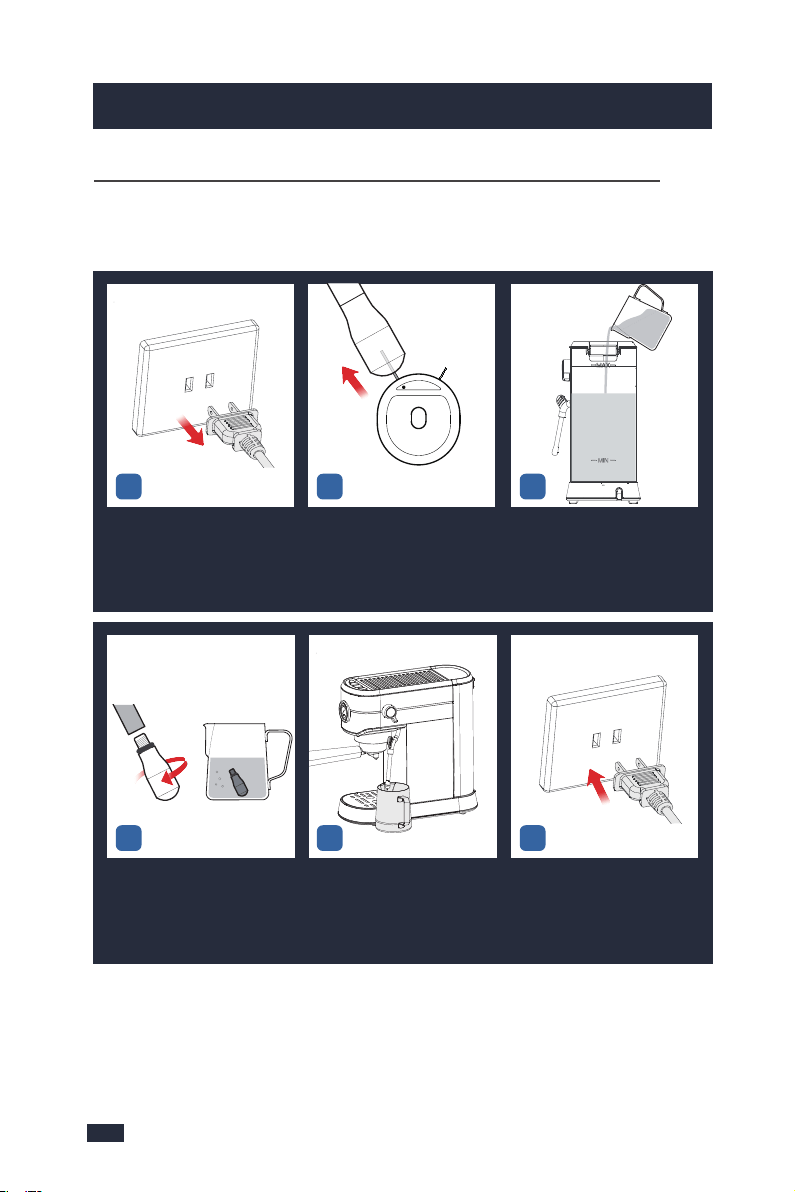
Whenever the steam output of the frother is less than usual, stop using it and
clean the frother by following the instructions as follows.
9.Cleaning & Maintenance
4039
9.Cleaning & Maintenance
Detach the frother nozzle with a
damp cloth, and then put it in
the container.
Place that container with the
frother nozzle under the steam
wand.
Insert the power plug into a 120V
AC power outlet & switch the
power on.
Turn off and unplug the machine
from the power outlet.
Use the provided cleaning pins
to cl ear the Froth Nozzle, insert
and pull out for about 30-50 tim-
es. (After the Steam Wand cools
down)
Prepare 800mL of water in a co-
ntainer and add 30 grams of de-
scaler. Mix them evenly. Fill the
water tank with the descaling
solution.
PLEA SE EMPTY TRAY
STEAM
INSERT
123
456
Press the ON/OFF button to turn
the machine on, the Power but-
ton will illuminate and pulse to
indicate it's heating up.
Make sure all the buttons are
solid on(the machine has
been preheated).
Press the Steam Button and wait
for the heating of the machine to
complete, that is, the white light
of the Steam Button is solid on.
After 3 days, Press the ON/OFF
button to turn the machine on,
the Power button will illuminate
and pulse to indicate it's
heating up.
Make sure all the buttons are so-
lid on(the machine has been
preheated).
Press the Steam Button and wait
for the heating of the machine
to complete, that is, the white
light of the Steam Button is
solid on.
Turn the Steam/water Knob to
the steam icon to release steam
around 3 mins.
Turn the Steam/water Knob to
the standby position, and let the
descaling solution soaks the
inside for 3 days.
Soak the Froth Nozzle and Steam
Wand in the container with
descaling solution for 3 days.
789
101112
131415
UNSCREW
I
N
S
E
R
T
Whenever the Steam Output of the Machine is Less Than Usual
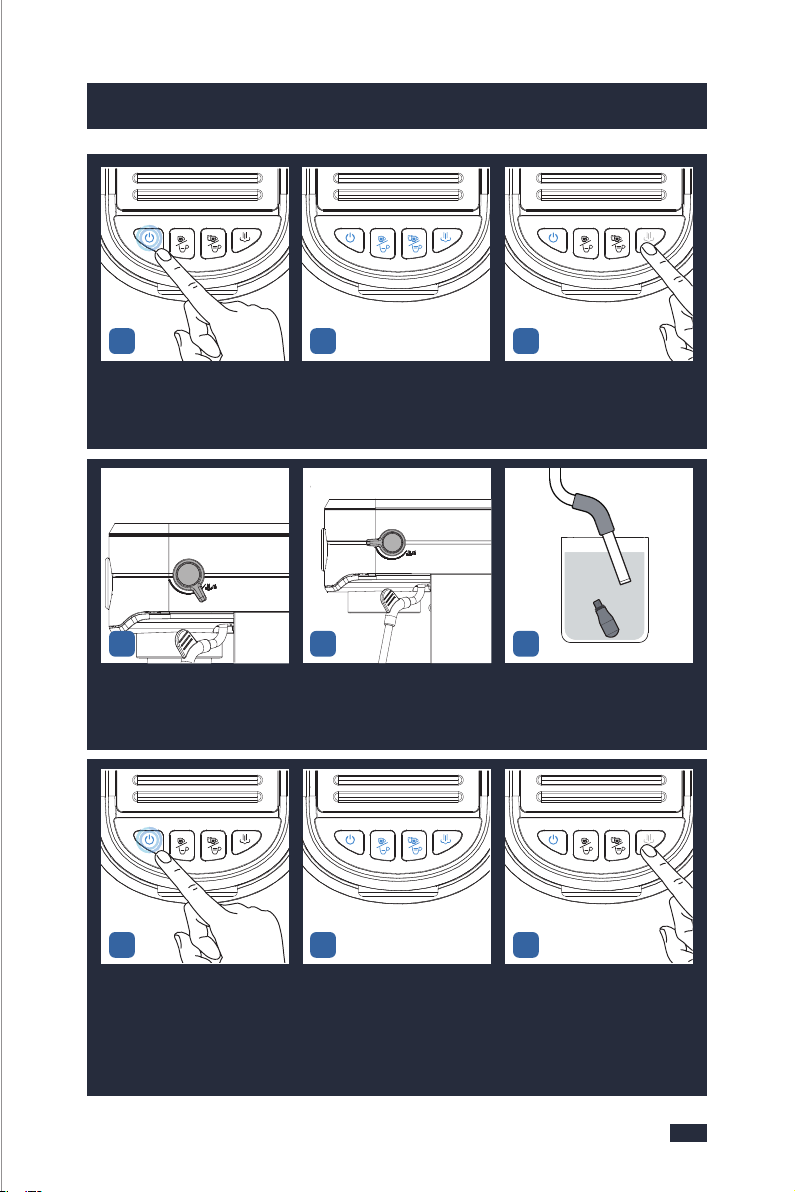

4241
9. Cleaning & Maintenance9. Cleaning & Maintenance
Wipe the outside of the Steam
Wand and the Froth Nozzle
with a damp cloth to clean the
milk stains.
9.3 Deep Cleaning - Accessories
Soak the filter in the remaining
descaling solution for 60 minu-
tes.
After 60 minutes, use a brush to
brush the inner surface, inner
and outer holes of the filter;
Pour away the descaling solut-
ion in the container.
Discard the used coffee puck in
the portafilter.
Align the marking dot on the
filter with the groove on the
portafilter and remove it from
the portafilter.
Rinse the front and back of the
filter under the faucet, and fin-
ally rinse the inner holes and the
outer holes with water.
123
456
Turn the Steam/water Knob to
the steam icon to release steam
until the water in the water tank
runs out.
Turn the Steam/water Knob to
the standby position.
Take the frother nozzle out from
the container and attach it back
to the steam wand.
SCREW
Take out the container, pour aw-
ay the descaling solution and pl-
ace it under the steam wand.
Take out the water tank and fill
it with clean water but not ex-
ceed the MAX marking, and in-
stall it onto the machine.
Press the Steam Button and wait
for the heating of the machine to
complete, that is, the white light
of the Steam Button is solid on.
Turn knob to " " and
release steam until all of the
water flows out.
Repeat step 19-22 for 2-3 times
to ensure that the descaling sol-
ution has been removed.
Turn the Steam/water Knob to
the standby position.
161718
25
192021
222324
Repeat
Step 19-22
for 2-3 times
with clean water
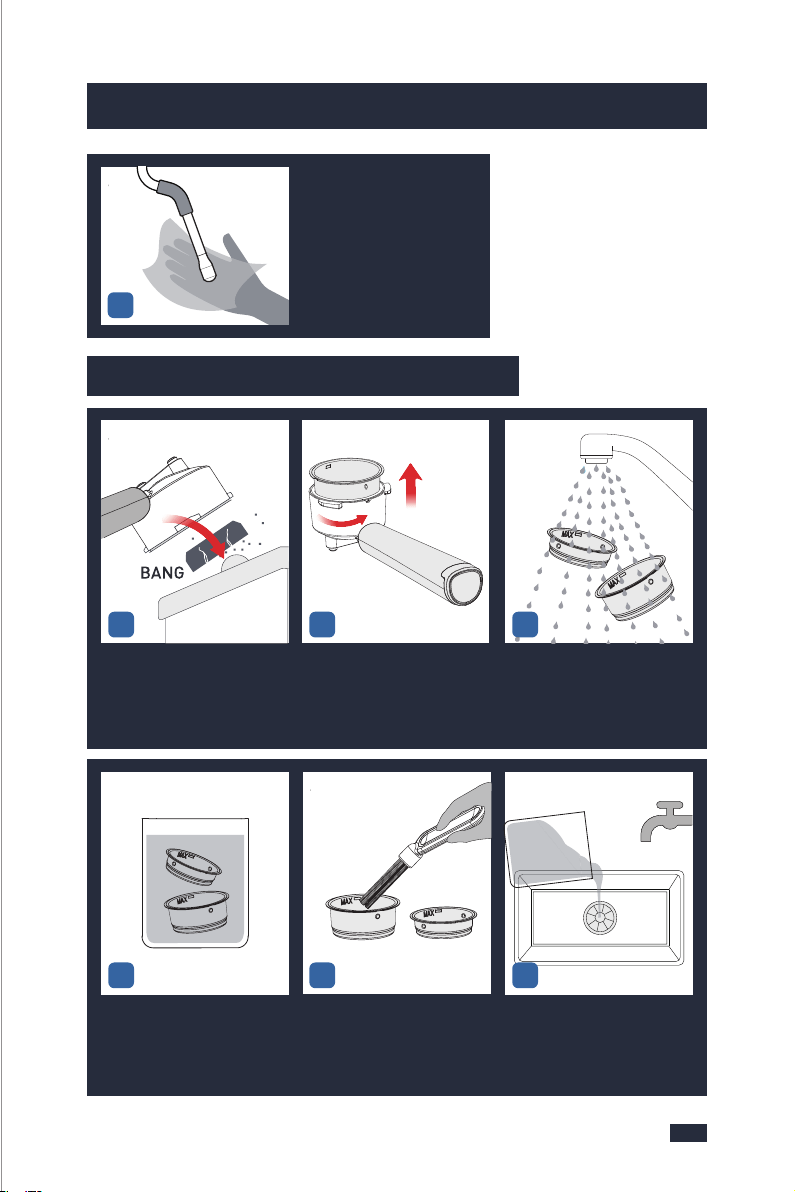
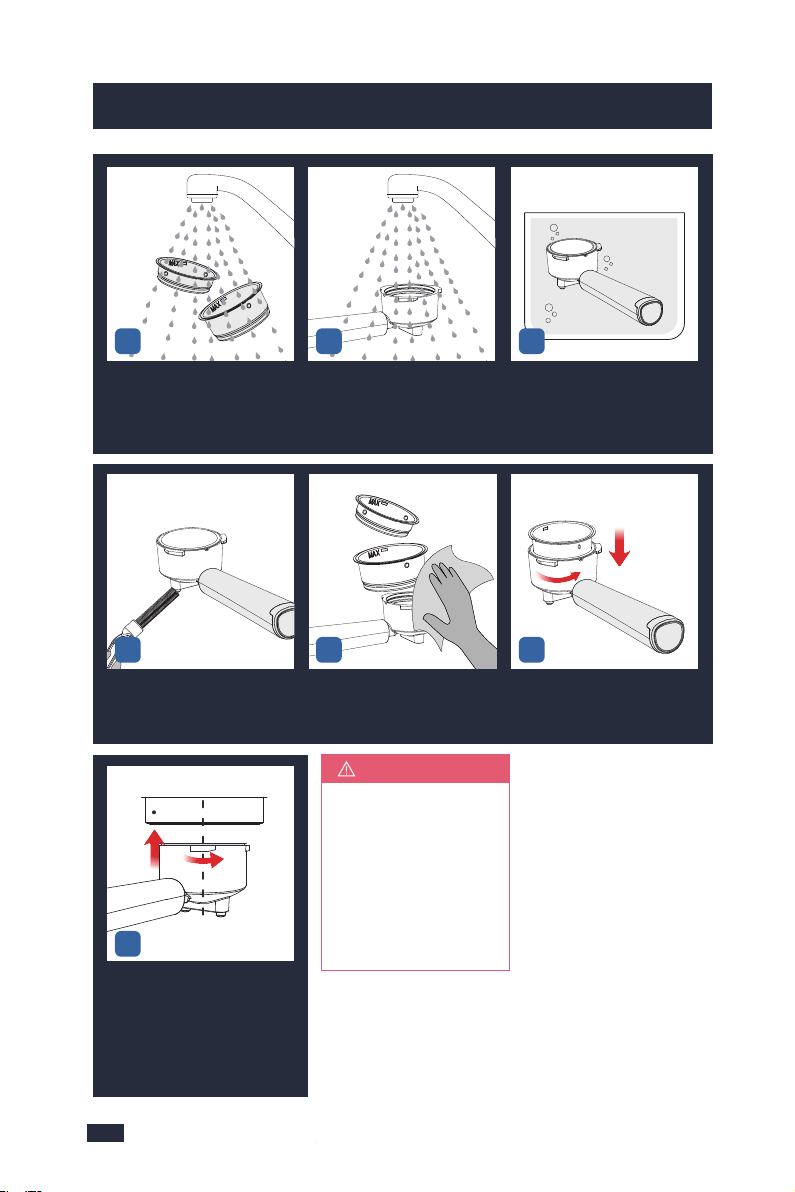
10.1 Troubleshooting Guide - Brewer
4443
9. Cleaning & Maintenance
Rinse the filter with clean water.Rinse the inner and outer holes
of the portafilter with clean
water, and be warned that do
not wash the portafilter with
any descaler.
Soak the portafilter in hot water
for 10 minutes(do not clean or
soak the portafilter in any desc-
aling solution).
Put the portafilter back to the m-
achine for next use.
If 60 minutes are
notlong enough in
step 4, let the desc-
aling solution soak
the limescale for 3
days instead. Other
steps are the same.
NOTE
789
Brush the 2 water outlets of the
portafilter with a brush.
Use a clean cloth to wipe off the
water on the filter and portafil-
ter.
Align the marking dot on the filter
with the groove on the portafilter
and put it back to the portafilter.
101112
CENTRE
INSERT
2.TURN
1.ALIGN
& INSERT
13
10. Troubleshooting
The pressure ga-
uge doesn't work
the first use.
All of the four bu-
ttons blink blue
light at the same
time (Water sho-
rtage alarm).
The pressure ga-
uge doesn't work
after a period
of use.
The limescale clogged the
pressure gauge.
Inappropriate methods are
used to make coffee, either
too less, too coarse of the
coffee grinds, or too less
tamping force.
Weak coffee
Change to medium- or dark-roasted
coffee beans and if you use light-roa-
sted coffee beans, the final coffee will
be lighter in both its color and flavor.
A deep descaling is needed for your
machine, refer to the "Descaling
Cycle " section of "9.1 Cleaning &
Maintenance - Brewer" on page 32.
1. Add more coffee grinds to the
portafilter and tamp.
2. Change to a finer grind.
3. Tamp the coffee grinds with more
force(around 10-15kg of pressure).
Inappropriate coffee beans
are used.
Change to a finer grind.Coffee grinds are too coarse.
Add more coffee grinds to the portafi-
lter and tamp to the MAX line.
Coffee grinds are too few.
Tamp the coffee grinds with more
force(around 10-15kg of pressure).
Tamping force is not enough.
Before brewing, make sure that the
pre-heating process finishes. At this
point, the 4 buttons would be solid on.
Water temperature has not be
reached.
Around 40mL per cup is recommended.Shot voume is inappropriate.
Inappropriate methods are
used to make coffee, either too
less, too coarse of the coffee
grinds, or too less tamping
force.
1. Add more coffee grinds to the
portafilter and tamp.
2. Change to a finer grind.
3. Tamp the coffee grinds with more
force(around 10-15kg of pressure).
ProblemPossible CauseWhat To Do
Fill water into the water tank but not
past the MAX line.
Not enough water in the water
tank.
Remove the rubber plug found at the
base of the water tank.
The rubber plug of the water
outlet of the water tank has not
been removed.

4645
10. Troubleshooting10. Troubleshooting
Coffee grinds are too
many.
Coffee grinds are too
fine.
Reduce the coffee grinds in the portafilter.
Use a coarser grind.
All of the four
buttons blink
blue light at the
same time (W-
ater shortage
alarm).
Method 1:
1- Plug the machine into a power outlet, press
the ON/OFF button to turn on the machine, and
wait for it to heat up.
2- When the 4 buttons are solid on, the machine
is in the READY state for all features. Turn knob
to Steam/Water icon and let the machine run
for 60 minutes. If there is water coming out of
the froth nozzle, it means the machine can work.
Method 2:
1- Fill the water tank with clean water, plug the
machine into a power outlet, press the ON/OFF
button, and wait for the machine to heat up.
2- When the 4 buttons are solid on, Press and
hold the Single/short cup button 3 seconds to
start flow out, and then press the Single/short
cup button again to stop when about 150-200
mL of water comes out, turn off the machine.
3- let the water soaks the inside for 1 day.
Please note that the water in the water tank
does not need to be poured out.
4- After 1 day, turn on the machine and release
steam to see if there is any water or steam
coming out.
5- If there is a small amount of water or steam
coming out, please continue to pour water and
release steam repeatedly until the machine is
back to normal.
Water shortage in the
water pump causes the
water pump to stick.
ProblemPossible CauseWhat To Do
Foreign objects and/or
limescale buildup
cause water blockage.
A deep descaling is needed for your machine,
refer to the "Descaling Cycle " section of "9.1 Cle-
aning & Maintenance - Brewer" on page 33.
Low pressure
when brewing.
Too high press-
ure when
brewing.
Tamping force is too much.
Tamp the coffee grinds with less force(
around 10-15kg of pressure).
The Group Head may be
blocked.
A deep descaling is needed for your mach-
ine, refer to "Descaling Cycle " section of "9.1
Cleaning & Maintenance - Brewer" on page
33.
The filter may be blocked.
The portafilter may be
blocked.
A deep cleaning is needed for your access-
ories, refer to "9.3. Deep Cleaning - Access-
ories " on page 42.
Inappropriate coffee beans
are used.
Change to medium- or dark-roasted coffee
beans.
Coffee grinds are too
coarse.
Change to a finer grind.
Coffee grinds are too few.
Add more coffee grinds to the portafilter and
tamp to the MAX line.
Tamping force is not
enough.
Tamp the coffee grinds with more force
(around 10-15kg of pressure).
Coffee grinds are too fine.Change to a coarser grind.
Coffee grinds are too many.Reduce the coffee grinds in the portafilter.
Tamping Force is too
much.
Tamp the coffee grinds with less force
(around 10-15kg of pressure).
ProblemPossible CauseWhat To Do
The coffee puck
is watery.
Coffee grinds are too few.
Add more coffee grinds to the portafilter and
tamp to the MAX line, 7g for the Single cup
filter and 14g for the Double cup filter.
Coffee grinds are too fine,
water can't pass through
and stays on the surface.
Change to a coarser grind.
Tamp the coffee grinds wi-
th too much force, water
can't pass through and st-
ays on the surface.
Tamp the coffee grinds with less force(aro-
und 10-15kg of pressure).
No coffee pours
out from the
portafilter.
No coffee pours
out from the
portafilter.

4847
10. Troubleshooting10. Troubleshooting
The coffee puck
is watery.
Coffee leaking
from the side of
the portafilter.
Coffee pours out
in drips
Detach the portafilter less
than 20s after brewing, pr-
essure and water can't be
released in the portafilter.
After brewing, wait 20 seconds to let the
machine relieve the pressure then twist
the portafilter out of the machine clockwise.
Water temp is too high for
brewing.
Release the hot water out after milk frothi-
ng, and let the machine cool down before
brewing coffee.
The filter clogged by
coffee grinds.
Clean the filter after each use, refer to "9.3
Deep Cleaning Accessories", page 42.
Coffee grinds are too many.
Coffee grinds are too fine.
Reduce the coffee grinds in the portafilter
and tamp the grinds to the MAX line, 7g for
the Single cup filter and 14g for the Double
cup filter.
Change to a coarser grind that is well-suited
for espresso.
Portafilter is not installed
correctly, or has not been
tightened sufficiently.
Re-install the portafilter correctly.
Coffee grinds are too many.Reduce the coffee grinds in the portafilter.
Grinds are too fine.
Change to a coarser grind.
Tamping Force is too
much.
Tamp the coffee grinds with less force(aro-
und 10-15kg of pressure).
ProblemPossible CauseWhat To Do
The Group Head may be
blocked.
A deep descaling is needed for your mach-
ine, refer to "Descaling Cycle " section of "9.1
Cleaning & Maintenance - Brewer" on page
33.
The filter may be blocked.
A deep cleaning is needed for your access-
ories, refer to "9.3. Deep Cleaning - Access-
ories " on page 42.
Limescale buildup in the
machine.
A deep descaling is needed for your mach-
ine, refer to "Descaling Cycle " section of "9.1
Cleaning & Maintenance - Brewer" on page
33.
The ON/OFF button bli-
nk red light, and Single
/short cup button and
Double/long cup button
blink blue light and un-
able to brew coffee (high
-temperature alarm).
The ON/OFF button and
steam button blink blue
light and beep simulta-
neously for 10 seconds.
Water leaks from the
bottom of the machine.
Making coffee immediately
after frothing the milk, as the
temperature for milk frothing
is higher than making espr-
esso, the machine will send
the high-temp alarm and not
allow for brewing coffee.
Need to clean and descale.
Turn the knob to the steam/hot
water icon and wait for the ma-
chine to continue to emit steam
until the icon returns to blue.
A deep descaling is needed for
your machine, refer to"Descaling
Cycle " section of "9.1 Cleaning &
Maintenance - Brewer" on page 33.
Too much water in the drip
tray.
Clean the drip tray.
When the water tank is pull-
ed up after use, it is normal
that there will be water left
on the desk.
The sealing ring of the water
inlet hole is deformed.
The connection between
the transfer switch pipe
and the seal ring is not
good.
The water pipe and the
screw is loosened.
It is not leaking as the outlet of the
water tank is a movable part.
Please contact with the authori-
zed service facility for repairing.
Step 1: Remove the top cover
and the bottom cover.
Step 2: Put the machine on the
side of the sink to check.
Step 3: Turn on the machine, use
the coffee function to pump the
water, and check whether the
leakage is from the connecting
pipe of the transfer switch, if so,
turn off the machine and remove
the connecting pipe and the sea-
ling ring inside to reassemble well
and check whether the problem
is solved. If not, turn off the mac-
hine and proceed to step 4.
Step 4: Check whether the water
pipe is loose, and then check
whether the screw is tightened.
If the screw is loose, please re-
tighten the screw.
Step 5: Install the top cover and
the bottom cover.
ProblemPossible CauseWhat To Do

Water leaks from the
bottom of the machine.
Water leaks from the
steam wand when it
brews coffee.
The coffee machine
cannot work.
The power cord is not plug-
ged well.
Plug the power cord into a wall
outlet correctly, if the machine st-
ill does not work, please contact
with the authorized service faci-
lity for repairing.
The Single cup and Do-
uble cup buttons flash
alternately and the ma-
chine sends an alarm by
beeping.
NTC disconnect or short
circuit.
Please contact with the authoriz-
ed service facility for repairing.
Coffee machine malfunctions.
The gasket of the Knob
adapter shaft was deformed
due to the accumulated scale.
Please contact with the authoriz-
ed service facility for repairing.
Step 1: A deep descaling is
needed for your machine, refer
to the "Whenever the Steam
Output of the Machine is Less
Than Usual " section of "9.2
Descaling & Maintenance -
Frother" on page 39.If the
problem persists,try the step 2.
Step 2: Tighten the knob
clockwise, tightening the knob
will effectively prevent the steam
tube from leaking when making
coffee. Then please brew the
coffee once to check if the
steam tube still leaks.
ProblemPossible CauseWhat To Do
5049
10.2 Troubleshooting Guide - Frother
No steam from
the Steam
Wand.
A deep descaling is needed for your machine,
refer to "After 100 Uses or Descaling Warning
Shows Up " section of "9.2 Descaling &
Maintenance - Frother" on page 36.
A deep descaling is needed for your machine,
refer to "After 100 Uses or Descaling Warning
Shows Up "section of "9.2 Descaling &
Maintenance - Frother" on page 36.
The steam wand tip is
blocked.
No water in the water
tank.
Add water to the water tank.
Method 1:
1- Plug the machine into a power outlet, press
the ON/OFF button to turn on the machine, and
wait for it to heat up.
2- When the 4 buttons are solid on, the machine
is in the READY state for all features. Turn knob
to Steam/Water icon and let the machine run for
60 minutes. If there is water coming out of the
froth nozzle, it means the machine can work.
Method 2:
1- Fill the water tank with clean water, plug the
machine into a power outlet, press the ON/OFF
button, and wait for the machine to heat up.
2- When the 4 buttons are solid on, Press and
hold the Single/short cup button 3 seconds to
start flow out, and then press the Single/short
cup button again to stop when about 150-200
mL of water comes out, turn off the machine.
3- let the water soaks the inside for 1 day. Ple-
ase note that the water in the water tank does
not need to be poured out.
4- After 1 day, turn on the machine and release
steam to see if there is any water or steam comi-
ng out.
5- If there is a small amount of water or steam
coming out, please continue to pour water and
release steam repeatedly until the machine is
back to normal.
Water shortage in the
water pump causes the
water pump to stick.
Weak steam.
Milk scum clogging the
steam wand.
ProblemPossible CauseWhat To Do
10. Troubleshooting
10. Troubleshooting

Water leaks from the
bottom of the machine.
Water leaks from the
steam wand when it
brews coffee.
The coffee machine
cannot work.
The power cord is not plug-
ged well.
Plug the power cord into a wall
outlet correctly, if the machine st-
ill does not work, please contact
with the authorized service faci-
lity for repairing.
The Single cup and Do-
uble cup buttons flash
alternately and the ma-
chine sends an alarm by
beeping.
NTC disconnect or short
circuit.
Please contact with the authoriz-
ed service facility for repairing.
Coffee machine malfunctions.
The gasket of the Knob
adapter shaft was deformed
due to the accumulated scale.
Please contact with the authoriz-
ed service facility for repairing.
Step 1: A deep descaling is
needed for your machine, refer
to the "Whenever the Steam
Output of the Machine is Less
Than Usual " section of "9.2
Descaling & Maintenance -
Frother" on page 39.If the
problem persists,try the step 2.
Step 2: Tighten the knob
clockwise, tightening the knob
will effectively prevent the steam
tube from leaking when making
coffee. Then please brew the
coffee once to check if the
steam tube still leaks.
ProblemPossible CauseWhat To Do
5049
10.2 Troubleshooting Guide - Frother
No steam from
the Steam
Wand.
A deep descaling is needed for your machine,
refer to "After 100 Uses or Descaling Warning
Shows Up " section of "9.2 Descaling &
Maintenance - Frother" on page 36.
A deep descaling is needed for your machine,
refer to "After 100 Uses or Descaling Warning
Shows Up "section of "9.2 Descaling &
Maintenance - Frother" on page 36.
The steam wand tip is
blocked.
No water in the water
tank.
Add water to the water tank.
Method 1:
1- Plug the machine into a power outlet, press
the ON/OFF button to turn on the machine, and
wait for it to heat up.
2- When the 4 buttons are solid on, the machine
is in the READY state for all features. Turn knob
to Steam/Water icon and let the machine run for
60 minutes. If there is water coming out of the
froth nozzle, it means the machine can work.
Method 2:
1- Fill the water tank with clean water, plug the
machine into a power outlet, press the ON/OFF
button, and wait for the machine to heat up.
2- When the 4 buttons are solid on, Press and
hold the Single/short cup button 3 seconds to
start flow out, and then press the Single/short
cup button again to stop when about 150-200
mL of water comes out, turn off the machine.
3- let the water soaks the inside for 1 day. Ple-
ase note that the water in the water tank does
not need to be poured out.
4- After 1 day, turn on the machine and release
steam to see if there is any water or steam comi-
ng out.
5- If there is a small amount of water or steam
coming out, please continue to pour water and
release steam repeatedly until the machine is
back to normal.
Water shortage in the
water pump causes the
water pump to stick.
Weak steam.
Milk scum clogging the
steam wand.
ProblemPossible CauseWhat To Do
10. Troubleshooting
10. Troubleshooting

Poor milk foam.
The ON/OFF button
blinks red light, and
the Single/short cup
button and Double/
long cup button blink
blue light (high-temp
alarm).
Skim milk used.
Use whole milk instead of skim
milk, as skim milk is not suitab-
le for frothing.
Milk is hot and not fresh.Use fresh whole milk at 3-8℃.
Too much milk used.Use about 100mL of milk.
Inappropriate milk foam cup
used.
Use a 300-350mL stainless steel
milk foam cup.
The preheating process for ste-
am has not finished.
Press the Steam Button when all
buttons are solid on, then it sta-
rts to blink white light slowly. Wh-
en the steam button keeps the
white light solid, it means the he-
ating for steam is finished.
Wrong method used to froth
milk.
Use the correct method to froth
milk, refer to "6.3 Operation
" section of "6. Milk Frothing
Guide" on page 25.
Brew coffee immediately after m-
aking steam, the temperature
inside the machine is too high.
Manual cooling: refer to "8.3 Hig-
h-temperature Alarm Guide " se-
ction of "8. Other Functions" on
page 30.
The ON/OFF button
blinks red light and
the steam button
blinks white light
quickly.
Use steam function for more
than 5 minutes.
Use hot water function for more
than 5 minutes
Reset steam/water knob to off-
position.
ProblemPossible CauseWhat To Do
10. Troubleshooting
5251
11. Warranty
In order to make a claim under our warranty, you must have the original proof
of purchasing documentation for the product, including but not limited to Order
Number and QR Code, and present it when requested. This guarantee is valid
for the original retail purchaser from the date of initial retail purchase and is
not transferable.
Upon receipt of your claim, Gevi will seek to resolve your difficulties. Should
your product develop any defect within 12 months of purchase because of
faulty materials or workmanship, we will repair or replace this product or any
component of the product, at our discretion. Replacement will be made with
a refurbished product or component. Refurbished parts may be used to repair
the product.
Our replacement or repair warranty only applies where a defect arises as a
result of faulty material or workm anship during the warranty period. Your
warranty does not cover misuse or negligent handling (including damage caused
by failing to use the product in accordance with this instruction booklet),
accidental damage, normal wear and tear, or lack of maintenance. Do Not
attempt to repair or adjust any electrical or mechanical functions on this product.
Doing so will void this guarantee.
Your warranty does not:
cover freight or any other costs incurred in making a claim, consumable items,
accessories that by their nature and limited lifespan require periodic renewal
(such as filters and seals) or any consequential loss or damage; or
This Gevi product is covered by a 12-month
replacement or repair warranty after the order
is issued under normal use, and we will provide
customer service to answer technical questions
even after 12 months.
cover damage caused by:
- power surges, power dips, voltage supply problems, or use of the product on
incorrect voltage;
*
*

11. Warranty
- servicing or modification of the product other than by Gevi or an authorized
Gevi service center;
- use of the product with other accessories, attachments, product supplies,
parts or devices that do not confirm to Gevi specifications; or
- exposure of the product to abnormally corrosive condition.
extend beyond 3 months if the product is used in commercial, industrial,
educational or rental applications.
If your warranty claim is not accepted, we will inform you and if requested to
do so by you, repair the product provided you pay the usual charges for such
repair. You will also be responsible for all freight and other costs.
*
For any questions relating to Gevi branded products(coffee machines, grinders,
milk frothers, toasters, air fryers and related accessories), please contact us thr-
ough information below:
Web: https://www.gevilife.com
E-mail: [email protected]om
Phone: 855-9922-888
FB: https://bit.ly/3qIgP5S
YT: https://bit.ly/3fxrFqq
Gevi headquarters
Web: www.gevi-tech.com
E-mail: service@gevi-tech.com
CONTACT INFORMATION
53
54
Espresso is a concentrated, full bodied coffee with a stable
layer of crema on top. An espresso is the foundation of all
cafe coffee.
• Espresso glass (3 oz).
• Single or double shot of espresso (1-2 oz).
Espresso (Short Black)
A ristretto is an extremely short espresso, distinguished by
its intense flavor, aftertaste and its thin crema on top.
• Espresso cup (1 oz).
• Half a single shot of espresso (0.5 oz).
Ristretto
A standard espresso with hot water added. The hot water
is added first so that the crema is maintained.
• Cup (6 oz).
• Hot Water (to preference).
•Single or double shot of espresso (1-2 oz).
Long Black (Americano)
Con Panna, Italian for "with cream", made up of an espresso
topped with lightly whipped cream. It can also be dusted
with cinnamon or chocolate.
• Cup (6 oz).
• Single or double shot of espresso (1-2 oz).
• Lightly whipped cream - dusted cinnamon.
Con Panna
Macchiato, Italian for ,'to stain or mark'. Traditionally served
as a standard espresso with a dash of cold or frothed milk
& a small dollop of foam into the middle of the crema.
• Espresso glass (3 oz).
• Single or double shot of espresso (1-2 oz).
• Dash of cold or frothed milk & small dollop of foam.
Macchiato
12. Coffees To Try

11. Warranty
- servicing or modification of the product other than by Gevi or an authorized
Gevi service center;
- use of the product with other accessories, attachments, product supplies,
parts or devices that do not confirm to Gevi specifications; or
- exposure of the product to abnormally corrosive condition.
extend beyond 3 months if the product is used in commercial, industrial,
educational or rental applications.
If your warranty claim is not accepted, we will inform you and if requested to
do so by you, repair the product provided you pay the usual charges for such
repair. You will also be responsible for all freight and other costs.
*
For any questions relating to Gevi branded products(coffee machines, grinders,
milk frothers, toasters, air fryers and related accessories), please contact us thr-
ough information below:
Web: https://www.gevilife.com
E-mail: gevi-home@gevi-home.com
Phone: 855-9922-888
FB: https://bit.ly/3qIgP5S
YT: https://bit.ly/3fxrFqq
Gevi headquarters
Web: www.gevi-tech.com
E-mail: service@gevi-tech.com
CONTACT INFORMATION
53
54
Espresso is a concentrated, full bodied coffee with a stable
layer of crema on top. An espresso is the foundation of all
cafe coffee.
• Espresso glass (3 oz).
• Single or double shot of espresso (1-2 oz).
Espresso (Short Black)
A ristretto is an extremely short espresso, distinguished by
its intense flavor, aftertaste and its thin crema on top.
• Espresso cup (1 oz).
• Half a single shot of espresso (0.5 oz).
Ristretto
A standard espresso with hot water added. The hot water
is added first so that the crema is maintained.
• Cup (6 oz).
• Hot Water (to preference).
•Single or double shot of espresso (1-2 oz).
Long Black (Americano)
Con Panna, Italian for "with cream", made up of an espresso
topped with lightly whipped cream. It can also be dusted
with cinnamon or chocolate.
• Cup (6 oz).
• Single or double shot of espresso (1-2 oz).
• Lightly whipped cream - dusted cinnamon.
Con Panna
Macchiato, Italian for ,'to stain or mark'. Traditionally served
as a standard espresso with a dash of cold or frothed milk
& a small dollop of foam into the middle of the crema.
• Espresso glass (3 oz).
• Single or double shot of espresso (1-2 oz).
• Dash of cold or frothed milk & small dollop of foam.
Macchiato
12. Coffees To Try

55
12. Coffees To Try
An espresso with frothed milk & a thin layer of foam milk on
top. The wider cup will create the slim layer of foam, the
signature of the flat white.
• Wide cup (6 oz).
• Single or double shot of espresso (1-2 oz).
• Frothed milk & foam.
Flat White
An espresso with frothed milk & a finger width layer of foam
milk on top. The narrower cup will create the thicker layer
of foam.
• Glass or Cup (7 oz).
• Single or double shot of espresso (1-2 oz).
• Frothed milk & foam.
Latte
An espresso with 1/3 steamed frothed milk, topped with
1/3 creamy foam & a dusting of chocolate.
• Cup (6-8 oz).
• Single or double shot of espresso (1-2 oz).
• 1/3 frothed milk, 1/3 foam - dusted with chocolate.
Cappuccino
Made in a similar way to a cappuccino but with the addition
of chocolate. Simply stir the chocolate into the espresso
prior to adding the steamed milk & foam.
• Cup or tall glass (6-8 oz).
• Single or double shot of espresso (1-2 oz).
• Chocolate Syrup (to preference).
• 1/3 Frothed milk, 1/3 foam.
Mocha
Steamed frothed milk with a layer of foamed milk.
It can also be dusted with chocolate.
• Small cup (3 oz).
• No shot of espresso.
• Frothed milk & foam - dusted with chocolate.
Babyccino

Read this booklet thoroughly before using this coffee machine for the quick use.
2-in-1 Smart
Espresso Coffee Machine
Brewer | Frother
GECME418E-U
INSTRUCTION BOOKLET
Please read all the owner’s instruction booklet before use.