Loading ...
Loading ...
Loading ...
5 6
ninjakitchen.co.uk
ninjakitchen.co.uk
BAKE, DEHYDRATE, WARM
1 Install the Accessory Frame in the bottom of
the oven.
2
Turn the left-hand dial to select BAKE,
DEHYDRATE or WARM.
3
If you plan to use the WOODFIRE FLAVOUR,
pull the smoke box open and use the pellet
scoop to fill the smoke box to the top with
Ninja Woodfire Pellets. DO NOT overflow
the smoke box. Then press the WOODFIRE
FLAVOUR button.
4 Press the TEMP button, then use the right-
hand dial to set the temp. Press the TIME
button, then use the right-hand dial to set
the time.
5 Press START/STOP to begin preheating.
Estimated preheat time is 5 to 25 minutes
depending on set temperature. If using
Woodfire Flavour, the pellets will
go through an ignition cycle (IGN), then the
oven will begin preheating (PRE).
6
While oven is preheating, start prepping
ingredients.
7
When the oven is preheated, ADD FOOD,
PRS START will appear on the display.
8 Use oven gloves to pull out the frame and
place pan with ingredients onto frame.
9 Press START/STOP to begin cooking. The
timer will begin counting down.
10
When cook time is complete, the oven will
beep and DONE will display.
11
Use oven gloves to remove food from the
oven. Let it rest, then serve.
USING THE COOKING FUNCTIONS
NOTE: There is no preheat time for the WARM
and DEHYDRATE functions.
NOTE: The WOODFIRE FLAVOUR button
cannot be used with BAKE.
SMOKER
1
Install the Accessory Frame in the bottom of
the oven, then place the Pro-Heat Tray on top
of it. Place the Roast Rack in the pan (optional).
2
Turn the left-hand dial to select SMOKER.
3
Place ingredients on the Roast Rack or
Pro-Heat Tray.
4 Pull the smoke box open and use the pellet
scoop to fill the smoke box to the top with
Ninja Woodfire Pellets. DO NOT overflow the
smoke box.
5 Press the TEMP button, then use the right-
hand dial to set the temp. Press the TIME
button, then use the right-hand dial to set
the time.
6
Press START/STOP to begin cooking. There is
no preheat time for the Smoker function. The
pellets will go through an ignition cycle (IGN)
for 3–4 minutes, then the oven will begin
cooking and the timer will begin counting
down.
7
When cook time is complete, the oven will
beep and DONE will appear on the display.
8
Use oven gloves to remove food from the
oven. Let it rest, then serve.
NOTE: Woodfire Technology will not ignite if
Pellets are not filled to the top of the smoke
box
GETTING TO KNOW THE CONTROL PANEL
FUNCTIONS
Turn the left-hand dial to select the desired
function or to turn o the oven.
WARM: Keep meals warm and ready to eat after
cooking.
DEHYDRATE: Gently remove moisture for snacks
like jerky and dried fruit.
SMOKER: Low and slow cooking to tenderize
large cuts of meat.
BAKE: Create baked goods with crispy crusts and
fluy centres.
TOP HEAT: Quickly melt toppings or create
beautifully browned exteriors
GOURMET ROAST: Start high and finish low for a
crisp outside and juicy inside.
MAX ROAST: Get charred, crispy, caramelized
results a traditional oven can’t create.
PIZZA: Make your favourite pizza styles at home
from fresh to frozen
Artisan – Artisan-style pizzas have char on the
outside of the thin, crispy crust and are piled
high with fresh mozzarella cheese.
Thin – A thinner crust supports a smattering
of thinly sliced ingredients that cook quickly.
Pan – A thicker crust and use of a deep-style
pan means you can pile on your ingredients
since it bakes longer than a thin crust.
New York Style – Thinner crust with lots of
low-moisture mozzarella cheese piled on top.
The cheese extends close to the edge of the
dough, leaving about an inch exposed to
handle the slice while eating.
Calzone – For best results, follow the
instructions on the box.
Custom – Use your favourite style crust and
add your favourite ingredients to create your
own custom pizza.
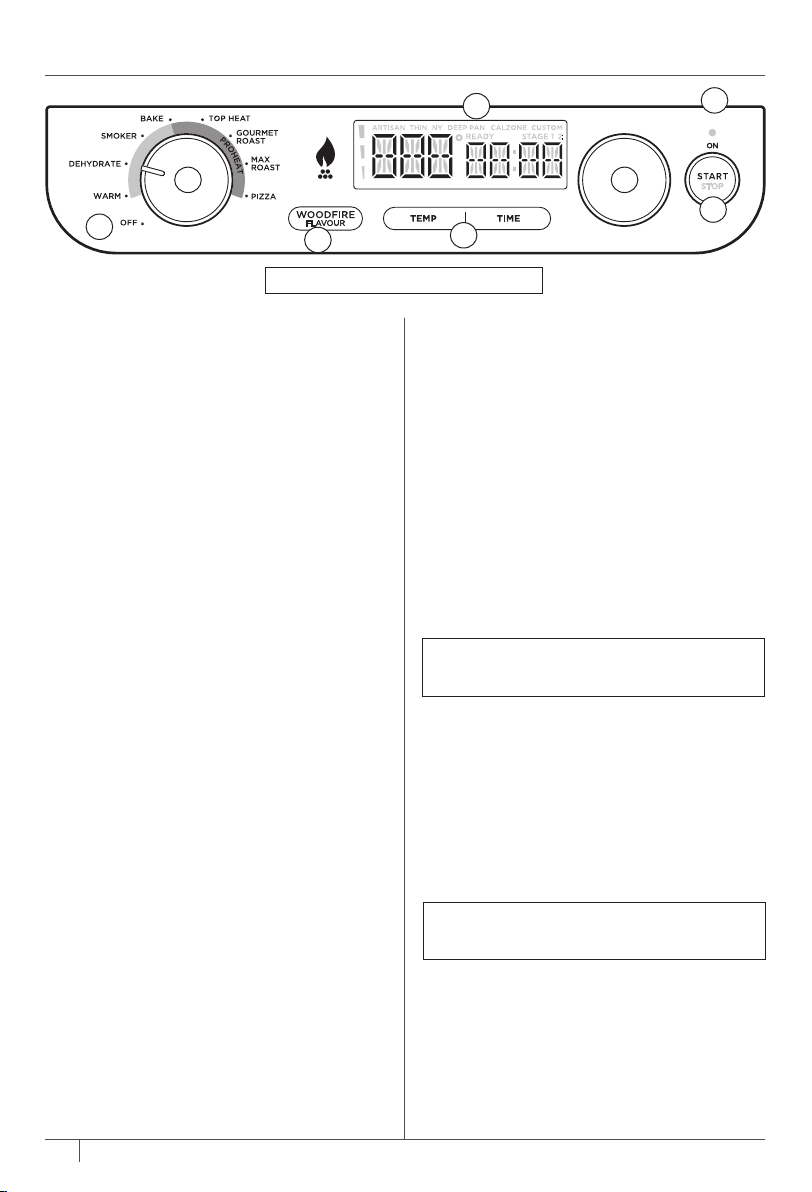
OPERATING BUTTONS/DIALS/INDICATOR
LIGHTS
1. OFF:
When unit is not in use, ensure dial is in
the OFF position.
2. LEFT-HAND DIAL:
Use this dial to select
desired cook function.
3. TEMP/TIME BUTTONS: Press the
TEMP button,
then use the right-hand dial to select desired
temperature. Press the TIME button, then use
the right-hand dial to select desired time.
4. RIGHT-HAND
DIAL: Use this dial along with
the TEMP and TIME buttons to adjust the
temperature and time and to choose pizza
type.
5.
START/STOP BUTTON:
Press START/STOP
button to start or stop the current cook
function.
6.
READY: When cooking multiple pizzas, the
READY indicator will illuminate, indicating
the Pizza Stone is at temperature
to
cook the
next Pizza.
7.
ON: If the oven is on and not set to the OFF
position, this light will illuminate, indicating the
oven is still on and hot. When the oven is not in
use, turn the left-hand dial to OFF.
8.
WOODFIRE FLAVOUR: Press to add Woodfire
Flavour to food. (Cannot be used for WARM).
7
5
6
3
8
42
1
NOTE:
Functions may vary by model.
NOTE:
While not recommended, preheating
can be skipped by pressing and holding the
right-hand dial for 4 seconds.
NOTE: Woodfire Technology will not ignite if
Pellets are not filled to the top of the smoke
box
Loading ...
Loading ...
Loading ...