
Register your
new device on
MyBosch now and
get free benefits:
bosch-home.com/
welcome
BGN22128GB
[en]
Instruction manual 6
[zh]
ֵ⭞䃠᱄
20

2
en
Safety information ......................................................................................................4
Your vacuum cleaner ...................................................................................................6
Replacement parts and accessories ..........................................................................7
Before using for the first time ....................................................................................8
Initial use ....................................................................................................................8
Vacuuming .................................................................................................................10
After using the appliance .........................................................................................11
Using the dust bag ....................................................................................................11
Using the dust container ..........................................................................................12
Malfunctions .............................................................................................................15
Filter care ..................................................................................................................15
Care ...........................................................................................................................16
Customer Service .....................................................................................................17
Disposal information ................................................................................................18
Conditions of guarantee ...........................................................................................18
3
zh
安全信息 .....................................................................................................................19
您的真空吸尘器 ...........................................................................................................20
替换部件和专用附件 .....................................................................................................21
首次使用前 ..................................................................................................................23
初次使用 .....................................................................................................................23
真空吸尘 .....................................................................................................................25
使用电器后 ..................................................................................................................26
使用集尘袋 ..................................................................................................................26
使用集尘容器 ...............................................................................................................27
故障 ............................................................................................................................30
过滤器保养 ..................................................................................................................30
保养 ............................................................................................................................31
客戶服務 .....................................................................................................................32
棄置資訊 .....................................................................................................................33

4
Please keep this instruction manual. When passing the
vacuum cleaner on to a third party, please also pass
on this instruction manual.
Intended use
This appliance is intended for domestic use only. This
appliance is intended for use up to a maximum height
of 2000 metres above sea level.
Only use this vacuum cleaner in accordance with the
instructions in this instruction manual.
In order to prevent injuries and damage, the vacuum
cleaner must not be used for:
Vacuum-cleaning persons or animals
Vacuuming up:
− hazardous, sharp-edged, hot or glowing substances.
− damp or liquid substances.
− highly flammable or explosive substances and gases.
− ash, soot from tiled stoves and central heating sys-
tems.
− toner dust from printers and copiers.
Spare parts, accessories, dust bags
Our original spare parts, original (special) accessories
and original dust bags are designed to work with the
features and requirements of our vacuum cleaners. We
therefore recommend that you only use our original spa-
re parts, original (special) accessories and original dust
bags. This will ensure that your vacuum cleaner has a
long service life and that the quality of its cleaning per-
formance will remain consistently high throughout.
!
Please note
Using unsuitable or inferior-quality spare parts,
(special) accessories and dust bags can damage
your vacuum cleaner. Damage caused by the use of
such products is not covered by our guarantee.
Safety information
This vacuum cleaner complies with the re-
cognised rules of technology and the rele-
vant safety regulations.
The appliance may be used by children
over the age of 8 years and by persons
with reduced physical, sensory or mental
capacity or by persons with a lack of ex-
perience or knowledge if they are super-
vised or have been instructed on the safe
use of the appliance and the have under-
stood the potential dangers of using the
appliance.
Children must never play with the appli-
ance.
Cleaning and user maintenance must ne-
ver be carried out by children without su-
pervision.
Plastic bags and films must be kept out
of the reach of children before disposal.
>= Risk of suffocation.
Proper use
Only connect and use the vacuum cleaner in ac-
cordance with the specifications on the rating plate.
Never vacuum without the dust bag or dust container,
motor protection or exhaust filter.
>= This may damage the vacuum cleaner.
Always keep the vacuum cleaner away from your head
when using nozzles and tubes.
>= This could cause injury!
When vacuuming stairs, the appliance must always be
positioned below the user.
Do not use the power cord or the hose to carry or
transport the vacuum cleaner.
For safety reasons, if this appliance's mains power
cable becomes damaged, it must be replaced by the
manufacturer, their after-sales service department or
a similarlyqualified person.
If using the appliance for longer than 30 minutes, pull
out the power cord completely.
When disconnecting the appliance from the mains,
pull on the plug itself to remove it; do not pull on the
power cord.
Do not pull the power cord over sharp edges or allow
it to become trapped.
When the cable is being automatically rewound, en-
sure that the mains plug is not thrown towards per-
sons, body parts, animals or objects.
>= Use the mains plug to guide the power cord.
Pull out the mains plug before carrying out any work
on the vacuum cleaner.
Do not operate the vacuum cleaner if it is damaged.
Unplug the appliance from the mains if a fault is de-
tected.
For safety reasons, only authorised after-sales service
personnel are permitted to carry out repairs and fit
replacement parts to the vacuum cleaner.
Protect the vacuum cleaner from the weather, moistu-
re and sources of heat.
Do not pour flammable substances or substances con-
taining alcohol onto the filters (dust bag, motor pro-
tection filter, exhaust filter, etc.).
The vacuum cleaner is not suitable for use on con-
struction sites.
>= Vacuuming up building rubble could damage the
appliance.
When not in use, switch off the appliance and pull out
the mains plug.
At the end of its life, the appliance should immediately
be rendered unusable, then disposed of in an appro-
priate manner.
Safety information

5
!
Please note
The mains socket must be protected by at least a
16 amp circuit breaker.
If a circuit breaker is tripped when you switch on
the vacuum cleaner, this may be because other
electrical appliances which have a high current
draw are connected to the same power circuit.
To prevent the circuit breaker from tripping, select
the lowest power setting before switching the
appliance on, and increase the power only once it is
running.
Safety information

6
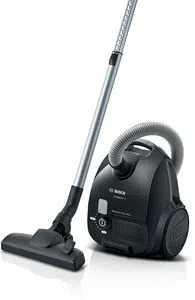
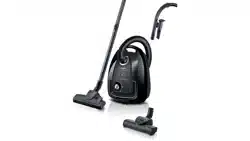
Your vacuum cleaner
1 Adjustable fl oor tool*
2 Hard-fl oor tool*
3 Telescopic tube*
4 Sliding switch*
5 Handle*
6 Flexible hose
7 Upholstery nozzle
8 Crevice nozzle
9 Parking aid
10 Power cord
11 Exhaust fi lter
12 On/Off button with electronic suction regulator*
13 Dust container* for using the vacuum cleaner without
dust bags or an alternative dust bag*
14 Dust bag
15 Motor protection fi lter, washable
16 Dust bag compartment lid
17 Carrying handles
18 Storage aid (on the underside of the appliance)
19 Dust bag change indicator*
20 Exhaust grille
1
3
5
6
1817
16
19 20
2
9
10
15
4
14
7
8
12
13
11
7
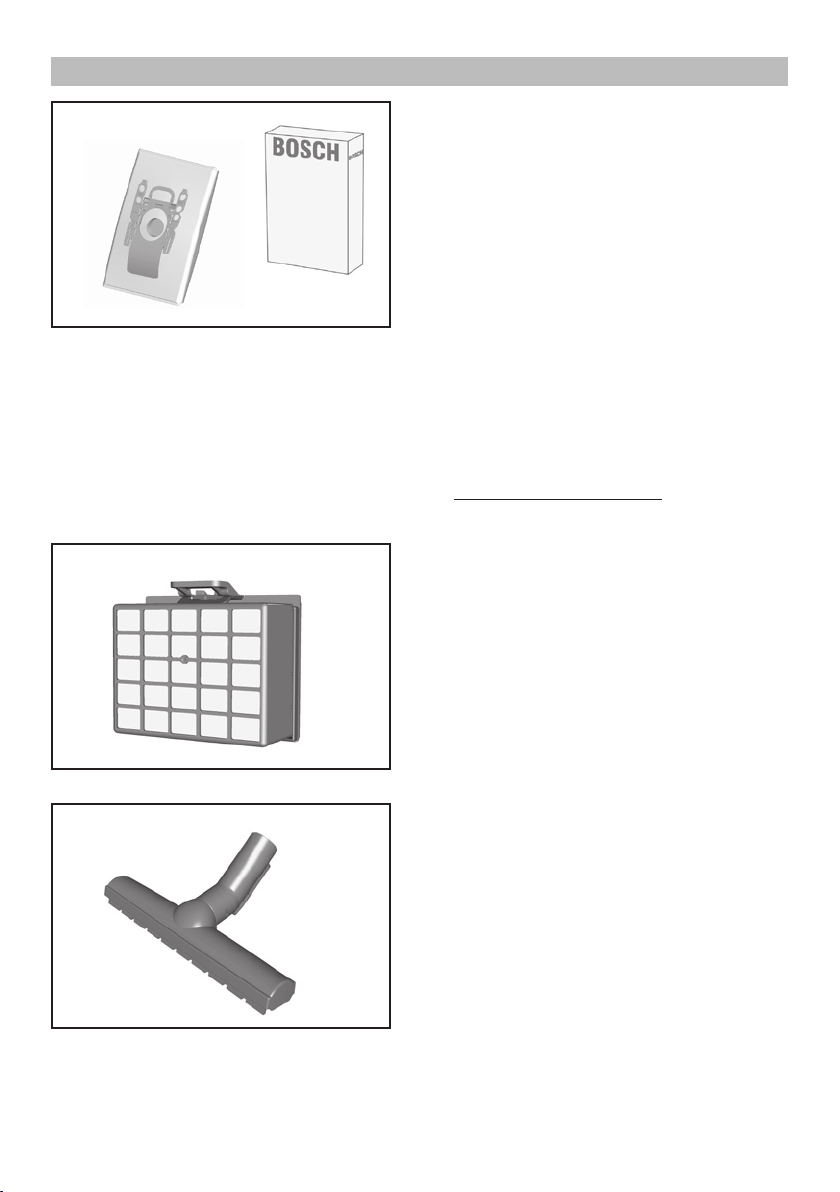
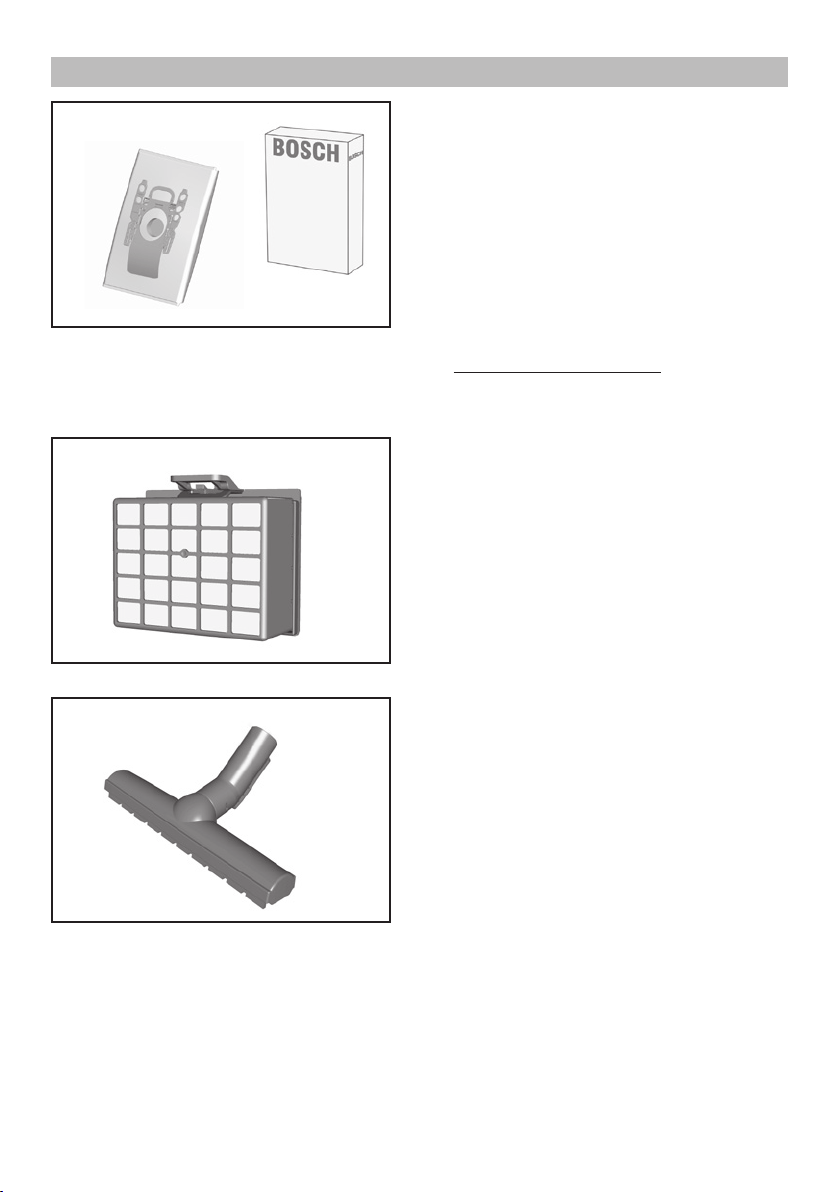
Replacement parts and accessories
A
C
B
A Replacement filter package
To get the most out of your appliance, we recom-
mend using Typ G ALL genuine replacement bags.
Contents:
- 4 dust bags with fasteners
!
PLEASE NOTE
We therefore recommend that you only use our origi-
nal dust bags.
Your appliance is a highly efficient vacuum cleaner
that achieves excellent cleaning results when used
with high-quality dust bags. Only by using high-
quality dust bags (such as Bosch original dust bags)
can you ensure that your vacuum cleaner is working
at the energy efficiency class, dust pick-up rate and
dust retention capacity listed on its EU energy label.
The use of inferior-quality dust bags (e.g. paper
bags) can have a negative effect on the service life
and performance of your appliance. Using unsuitable
or inferior-quality dust bags can also damage your
vacuum cleaner. Such damage is not covered by our
guarantee.
You can find more information about this at
www.bosch-home.com/dust-bag. You can order our
original vacuum cleaner bags here.
B (H)EPA filter BBZ156HF
Additional filter for cleaner exhaust air.
Recommended for allergy sufferers. Replace once a
year.
C Hard-floor tool BBZ123HD
For vacuuming hard floors
(parquet, tiles, terracotta, etc.)
8
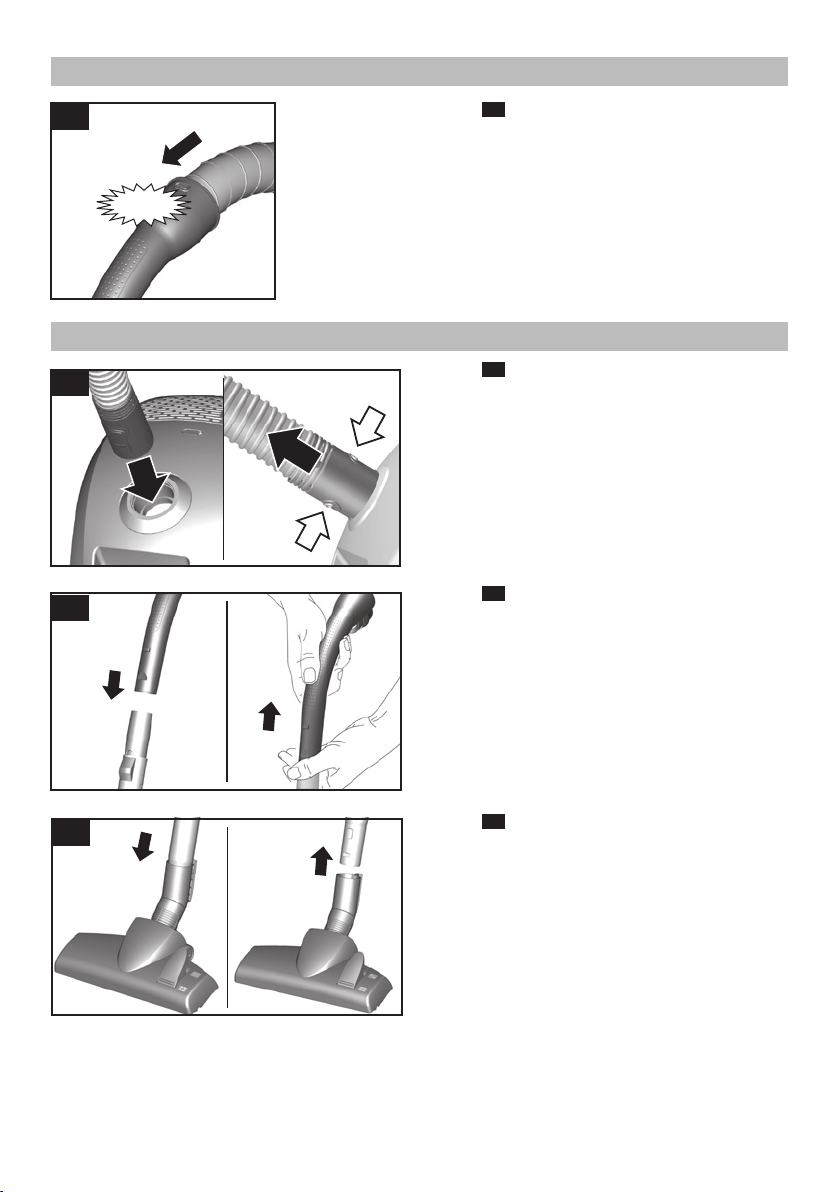
Figure
1
Push the handle onto the flexible hose and lock it
in place.
Figure
2
a) Push the flexible hose connecting piece into the air
intake opening in the lid until it locks in place.
b) To remove the flexible hose, press the two locking
catches together and pull out the hose.
Figure
3
Push the handle into the suction/telescopic tube.
To remove it, turn the handle slightly and pull it out
of the tube.
Figure
4
Push the suction/telescopic tube into the connec-
ting piece of the floor tool.
To release the connection, turn the tube slightly
and pull it out of the floor tool.
1
Click!
2
1
2
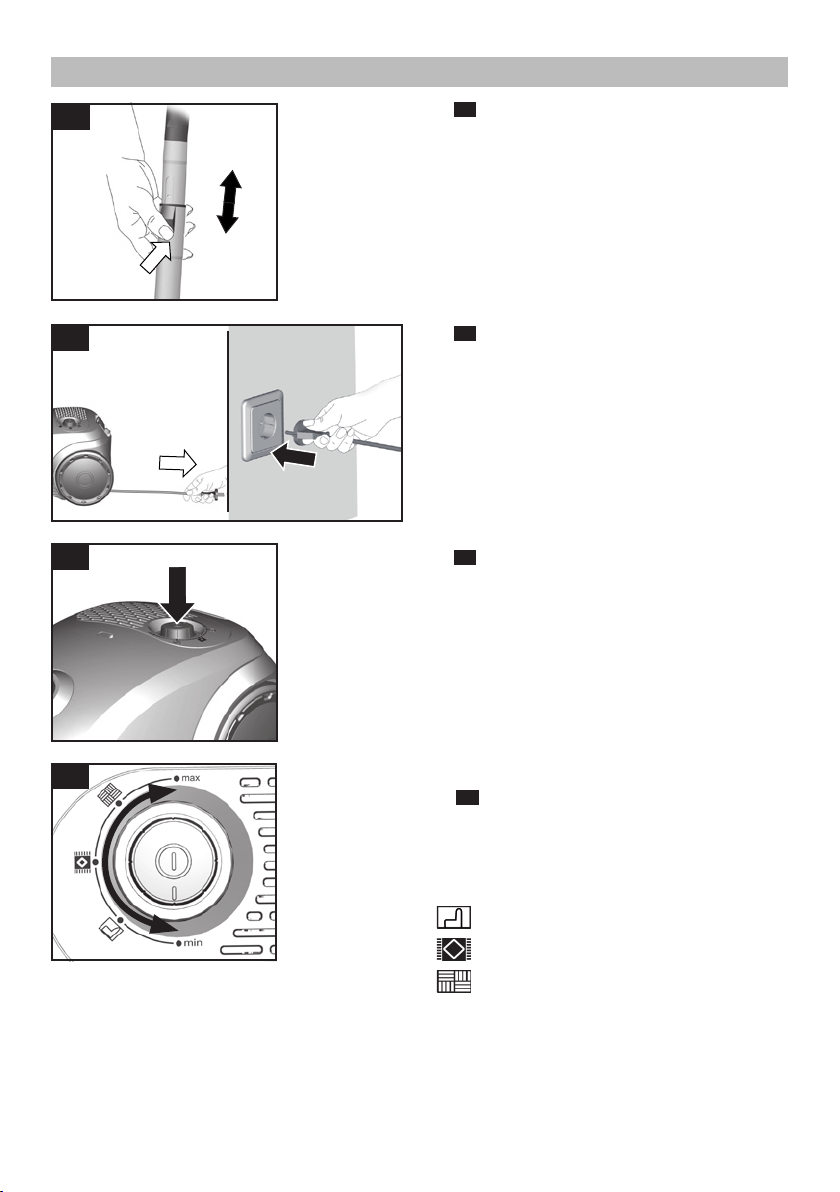
Before using for the first time
1
Initial use
4
3
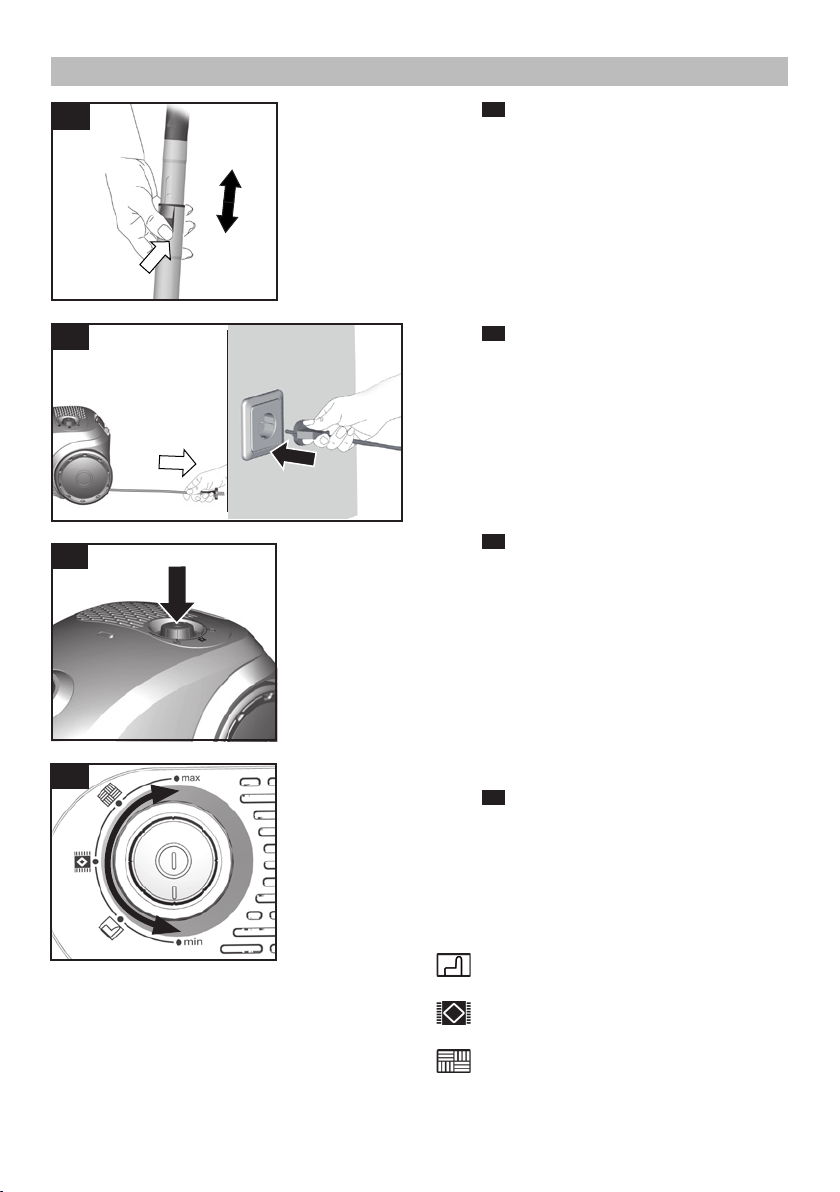
9
Figure
5
Unlock the telescopic tube by moving the sliding
switch in the direction of the arrow and adjust it to
the desired length.
Figure
6
Holding the power cord by the plug, pull it out to
the required length and insert the plug into the
mains socket.
Figure
7
To switch the vacuum cleaner on or off, press the
On/Off button in the direction of the arrow.
Controlling the suction level
Figure
8
Set the suction level by turning the On/Off button in
the direction of the arrow.
The suction level can be infinitely adjusted to the level
required by turning the control knob in the direction
of the arrow.
min - For vacuuming curtains and delicate textiles
- For vacuuming upholstered furniture and
cushions
- For vacuuming delicate rugs und for daily
vacuuming of lightly soiled floors
- For vacuuming durable floor coverings
max - For vacuuming hard floors and heavily soiled
rugs and carpets
Initial use
1
5
2
6
8
7
10
Figure
9
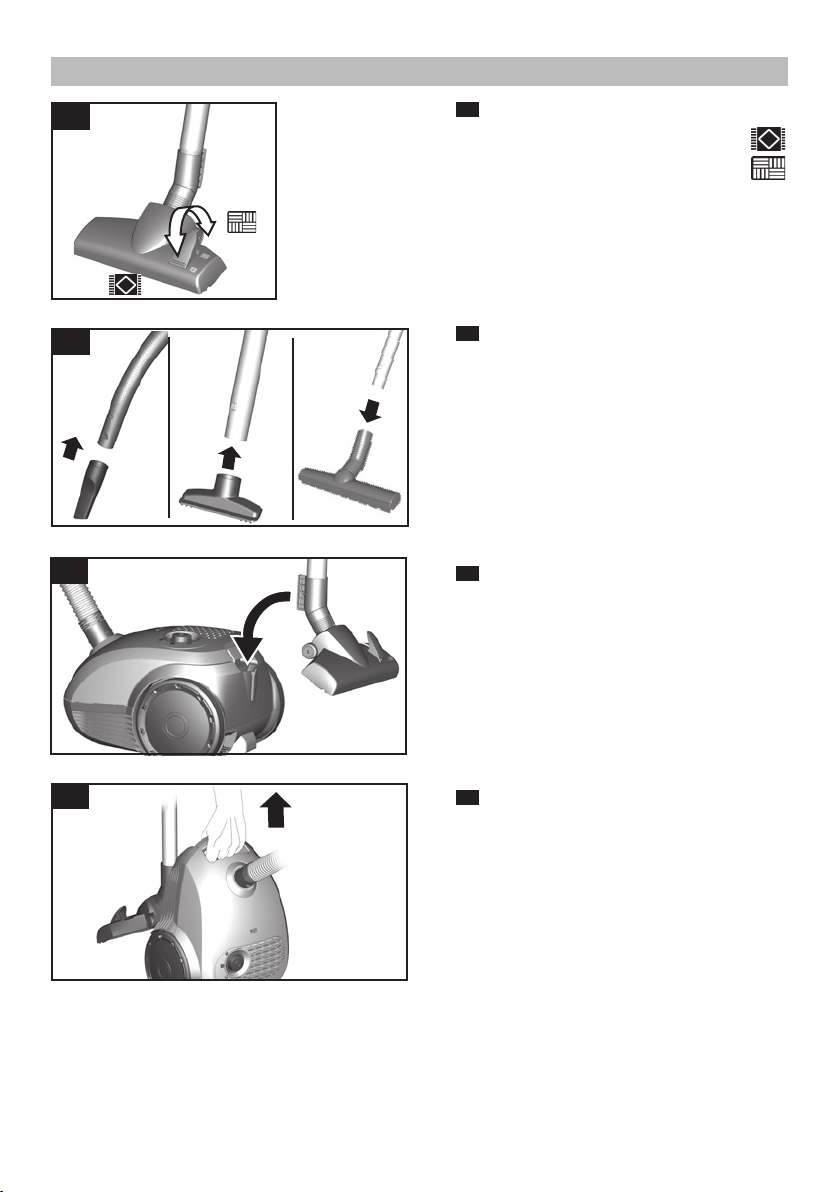
Adjusting the floor tool:
Rugs and carpets
=>
Hard floors
=>
Please note:
Floor tools are subject to a certain amount of wear,
depending on the type of hard floors you have (e.g.
rough, rustic tiles). You must therefore check the
underside of the floor tool at regular intervals.
Worn undersides of floor tools may have sharp
edges that can damage delicate hard floors, such
as parquet or linoleum. The manufacturer does not
accept any responsibility for damage caused by
worn floor tools.
Figure
10*
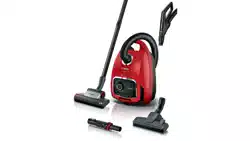
Vacuuming with accessories
Attach the nozzles to the suction pipe or handle as
required:
a) Crevice nozzle for vacuuming crevices and corners,
etc.
b) Upholstery nozzle for vacuuming upholstered furni-
ture, curtains, etc.
c) Hard-floor tool
For vacuuming hard floor coverings (tiles, parquet,
etc.)
Figure
11
You can use the parking aid on the side of the appli-
ance if you wish to stop vacuuming for a short time.
After switching off the appliance, slide the hook
on the floor tool into the recess on the side of the
appliance.
Figure
12
When vacuuming on stairs for example, the appliance
can also be carried by the handle.
Vacuuming
9
11
12
10*
a
b
c

11
Figure
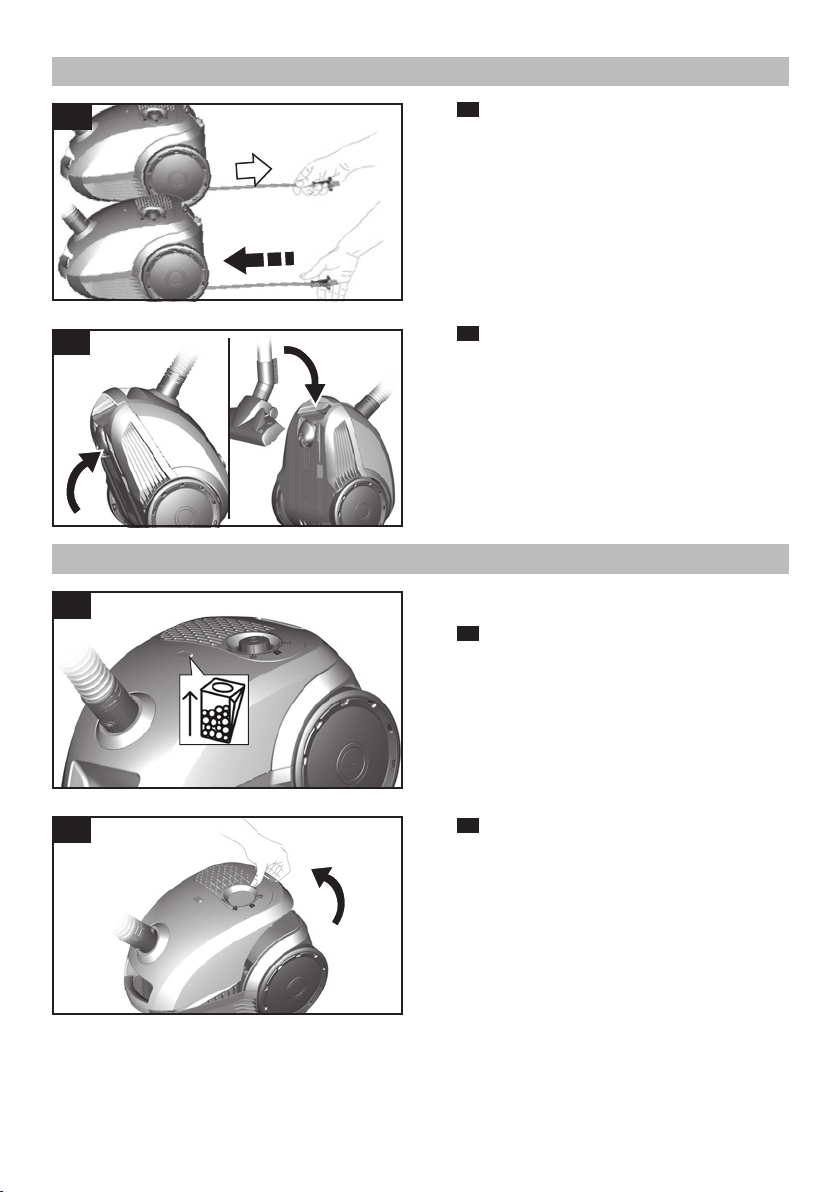
13
Pull out the mains plug.
Briefly pull on the power cord and then release it
(the power cord retracts automatically).
Figure
14
To store/transport the appliance, you can use the
storage aid on the underside of the appliance.
Stand the appliance up on its end. Slide the hook on
the floor tool into the recess on the underside of the
appliance.
You have purchased a floor vacuum cleaner which can
vacuum up any type of dry dirt using the dust contai-
ner or dust bag.
We recommend that you use:
− The dust bag principally for everyday household
cleaning.
− The dust container for DIY-related cleaning in parti-
cular, e.g. to vacuum up wood shavings, etc.
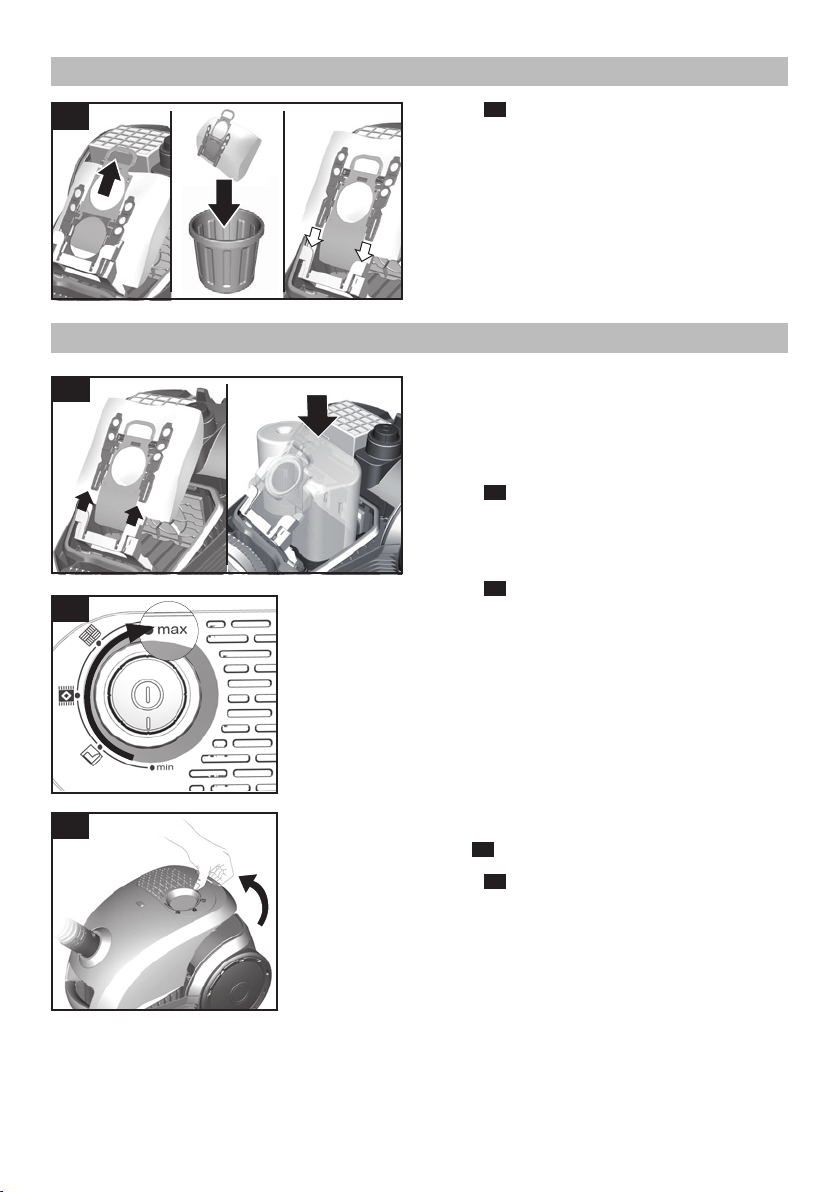
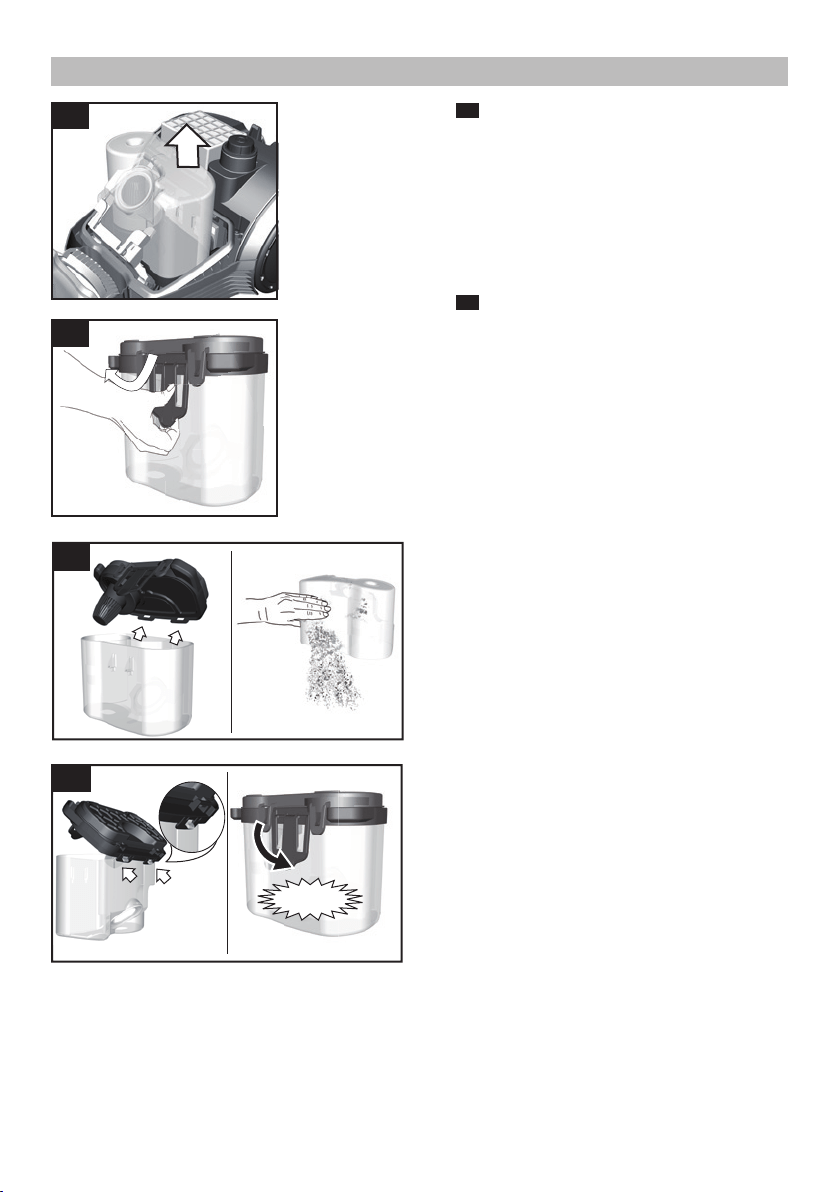
Replacing the dust bag
Figure
15*
If the dust bag change indicator in the lid is filled
completely when the floor tool is lifted from the
floor with the highest suction level selected, the
dust bag must be changed, even though it may not
yet be full. Even if the dust bag is not full, it may
still need changing, due to the type of dust which
has been vacuumed.
First check that the nozzle, suction pipe and flexib-
le hose are not blocked, as this would also lead to
the dust bag change indicator being triggered.
Figure
16
Unlock the lid by releasing the locking lever in the
direction of the arrow.
After using the appliance
14
13
1
2
15*
16
Using the dust bag
12
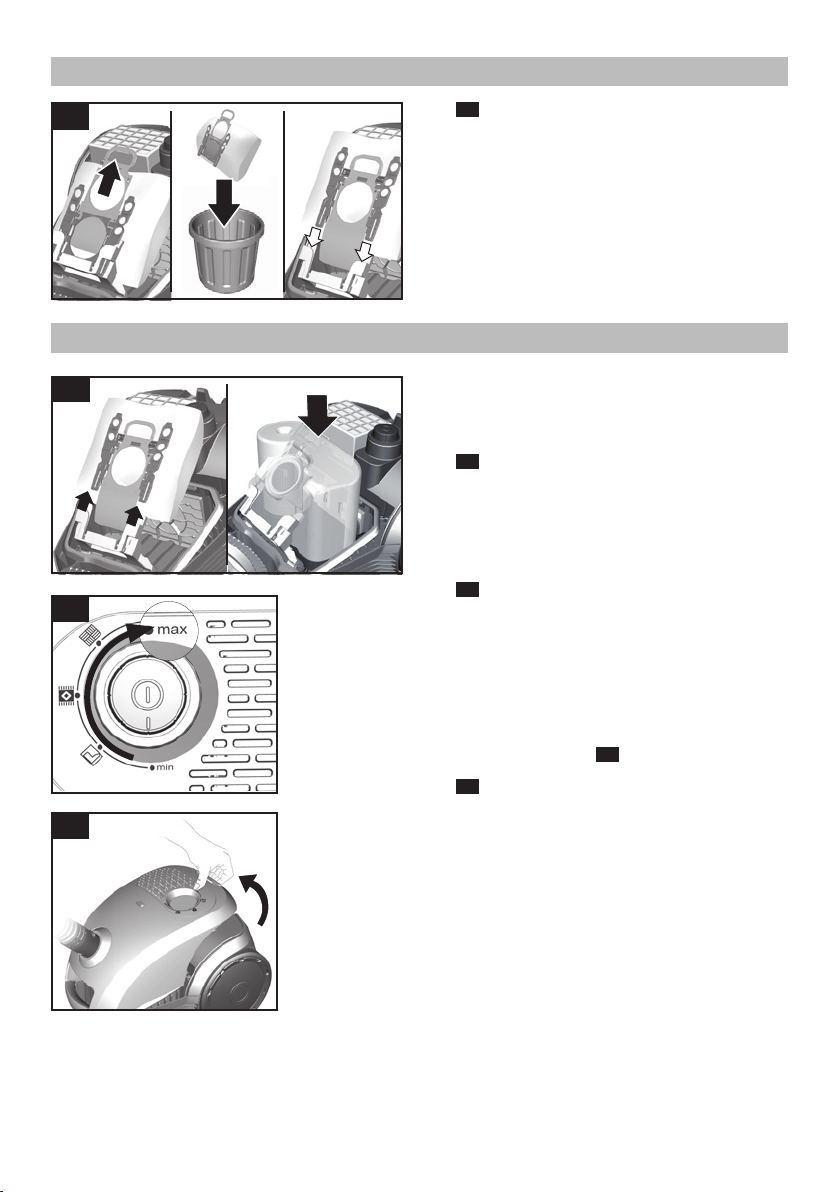
Figure
17
a) Close the dust bag by pulling on the locking tab and
then remove it.
b) Insert a new dust bag by pushing it fully into the
holder.
!
Please note: The lid will only close if a dust bag
has been inserted.
If necessary, a dust container can be used in place of
a dust bag.
!
Please note: The dust bag change indicator only
works in conjunction with a dust bag.
Figure
18
Open the dust bag compartment lid.
Remove the dust bag and insert the dust container.
Close the appliance lid.
Figure
19
Set the power setting to maximum for best results
when vacuuming.
We recommend that you reduce the setting only when
vacuuming very delicate materials.
Emptying the dust container
To achieve the best possible vacuuming results, the
dust container should be emptied after every use or, at
the latest, when dust at one point in the dust container
has reached the max mark.
When emptying the dust container, always check how
dirty the foam filter at the bottom of the container is.
If visibly dirty, clean the filter as described from
figure
24
onwards.
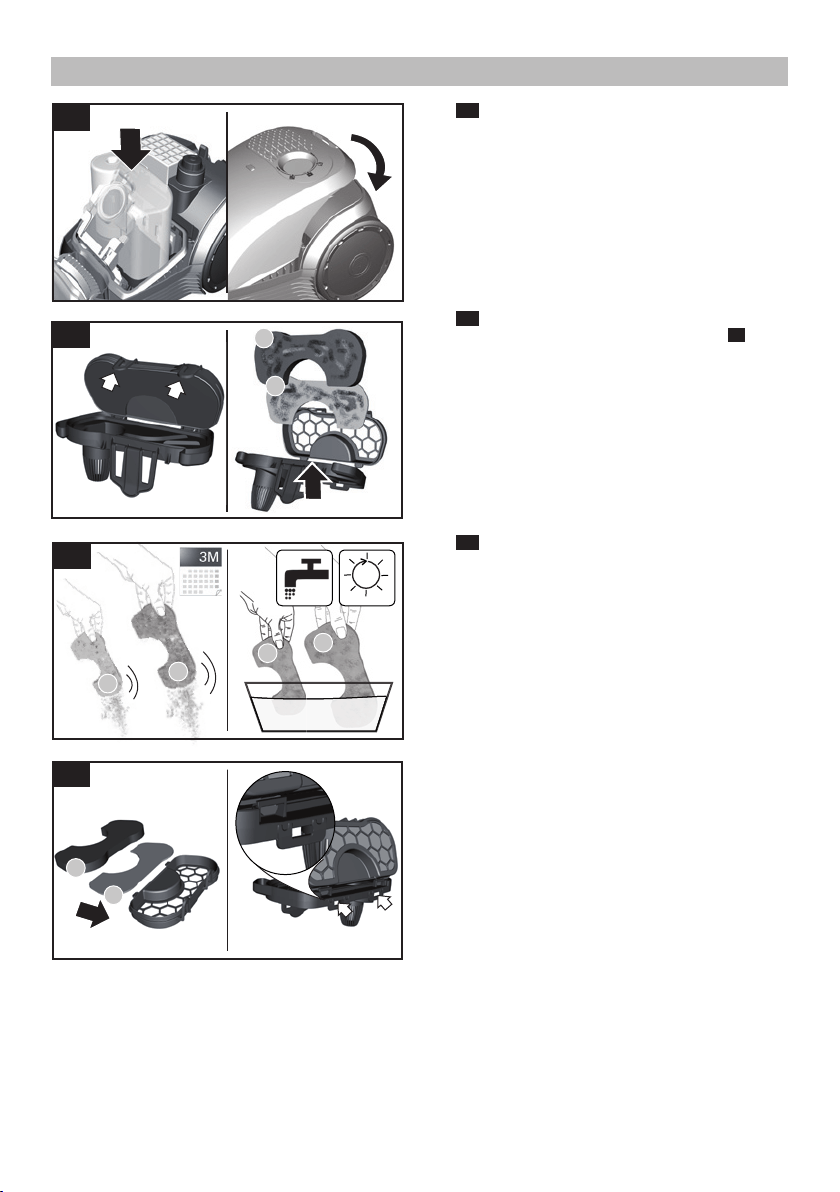
Figure
20
Unlock the dust compartment lid by moving the lo-
cking lever in the direction of the arrow.
19
20
17
18
Using the dust bag
Using the dust container
13
Figure
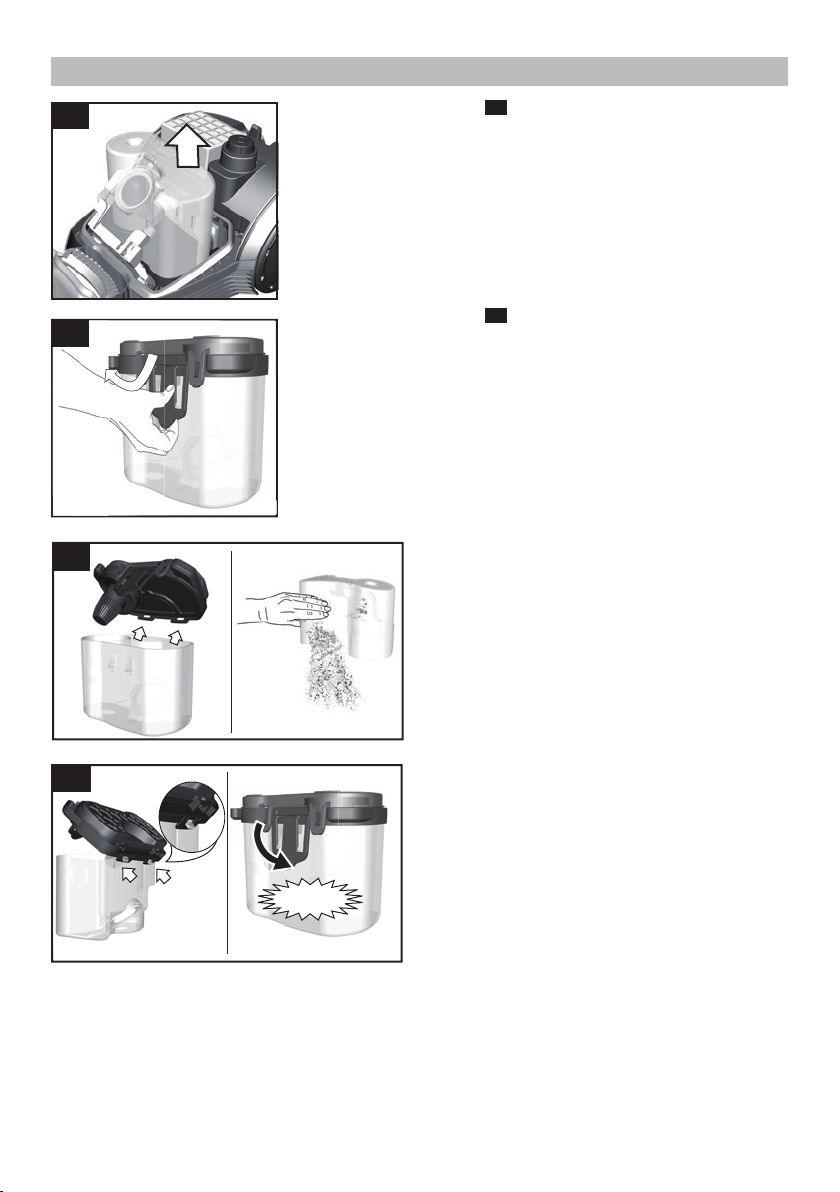
21
Remove the dust container from the appliance.
Figure
22
Unlock the snap lock in the base fl ap by moving it in
the direction of the arrow.
Take the base fl ap out of the container and lay it to
one side.
Empty the container.
Latch the base fl ap into the container and close it.
21
22
22
22
Using the dust container
Click!

14
23
25
24h
Drying
a
b
a
b
Figure
23
Place the dust container back in the appliance and
close the dust compartment lid.
!
Please note: The inside of the dust container
may become scratched with use and start to look
opaque. This does not, however, affect the perfor-
mance of the vacuum cleaner in any way, i.e. it will
continue to function as norm al.
Cleaning the foam fi lter and fi lter fl eece in the dust
container
How often?
After any malfunctions, i.e. after clearing a blockage
If the fi lter is visibly dirty
At least every 3 months
Figure
24
Unlock the snap lock in the base fl ap by moving it in
the direction of the arrow.
Figure
22
Remove the base fl ap.
Unlock the two snap locks in the base plate by mo-
ving them in the direction of the arrow.
Remove both fi lters (a + b) from the base plate.
Figure
25
Wash both fi lters (a + b) and leave them to dry for at
least 24 hours.
After cleaning them, place both fi lters in the base
plate.
Close the base plate and push in the locking tab until
you hear it click into place.
Latch the base fl ap into the container and close it.
!
Please note: Always fi t the fi lters in the correct or-
der. The foam fi lter (b) must be on top of the fi lter
fl eece (a).
Using the dust container
25
a
b
24
a
b
15
26
24h
Drying
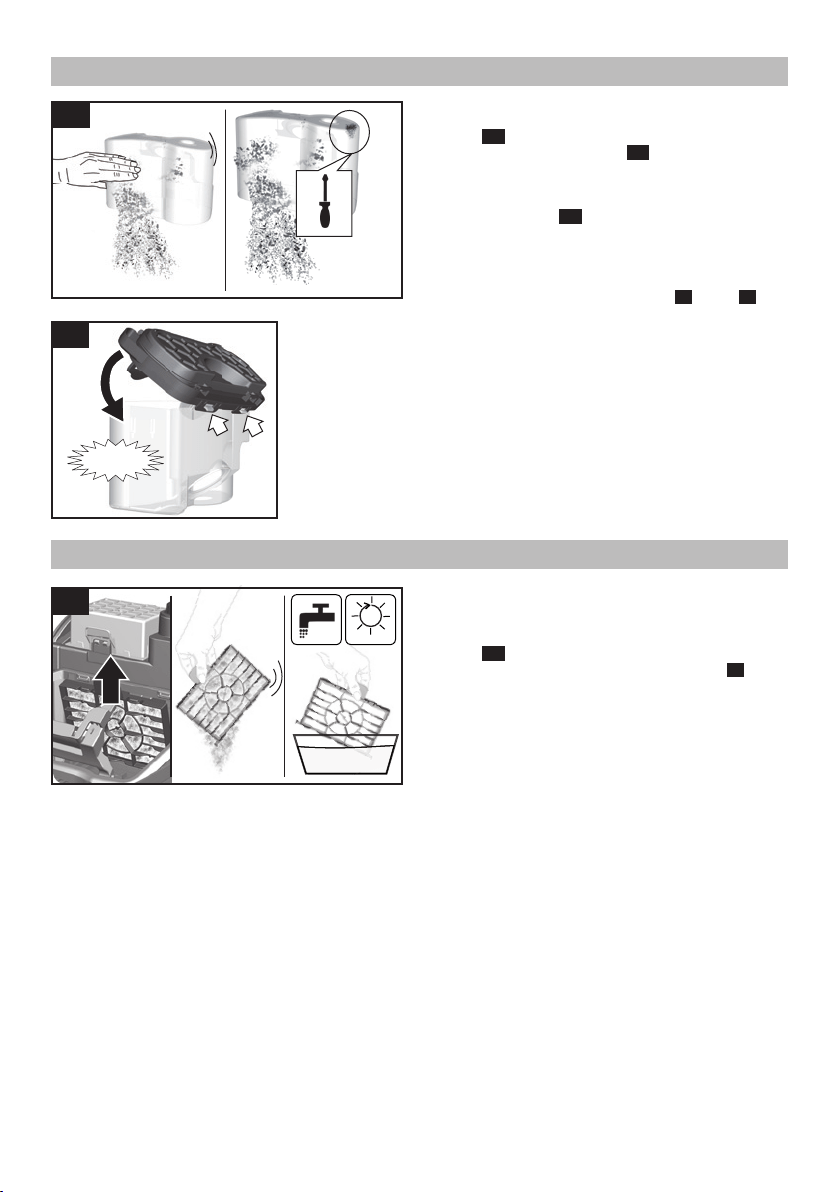
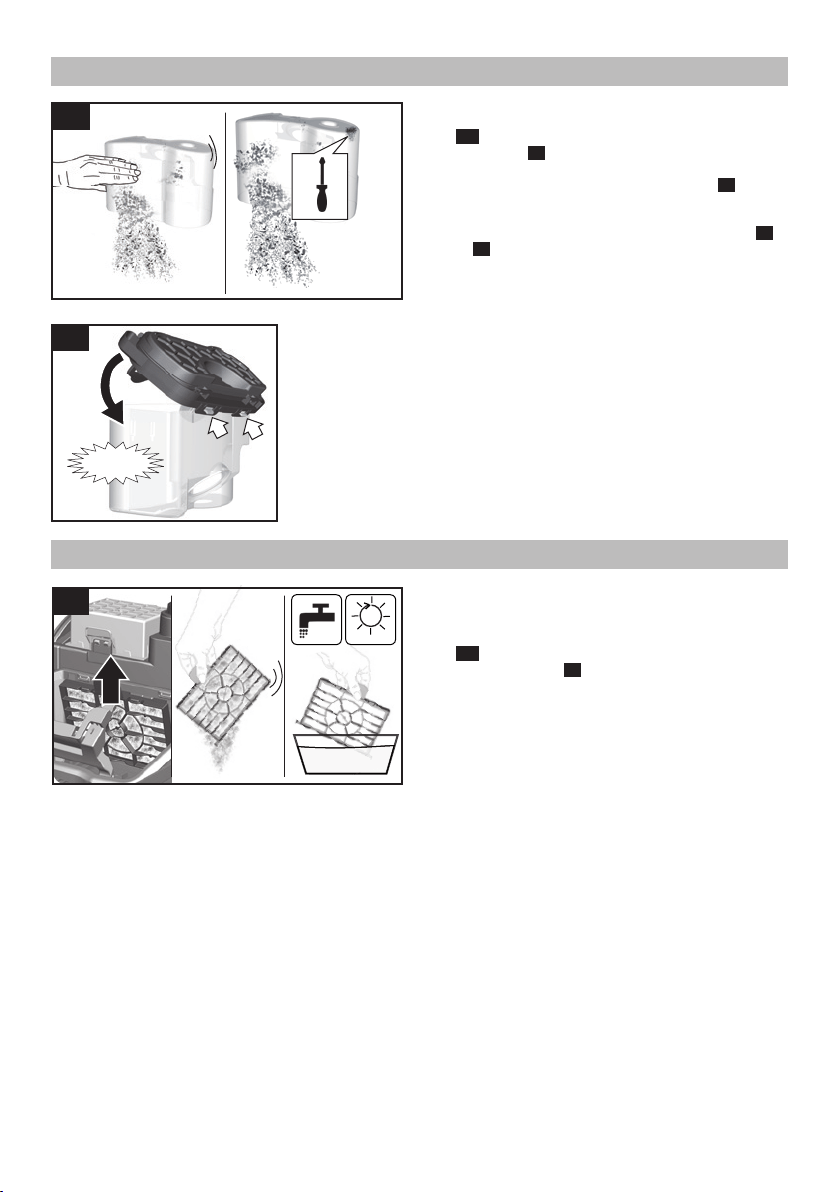
Removing a blockage in the dust container
Figure
26
Empty the container. Figure
20
Loosen the blockage, e.g. with a screwdriver, and
tap or suck it out.
If sucking out, a dust bag must be inserted in the
appliance.
Figure
18
Fit the container cover, fold up the carrying handle
and lock it in place on the cover.
!
Note: After any malfunctions, you must clean the
fi lters on the dust container (
fi gure
24
+ fi gure
25
).
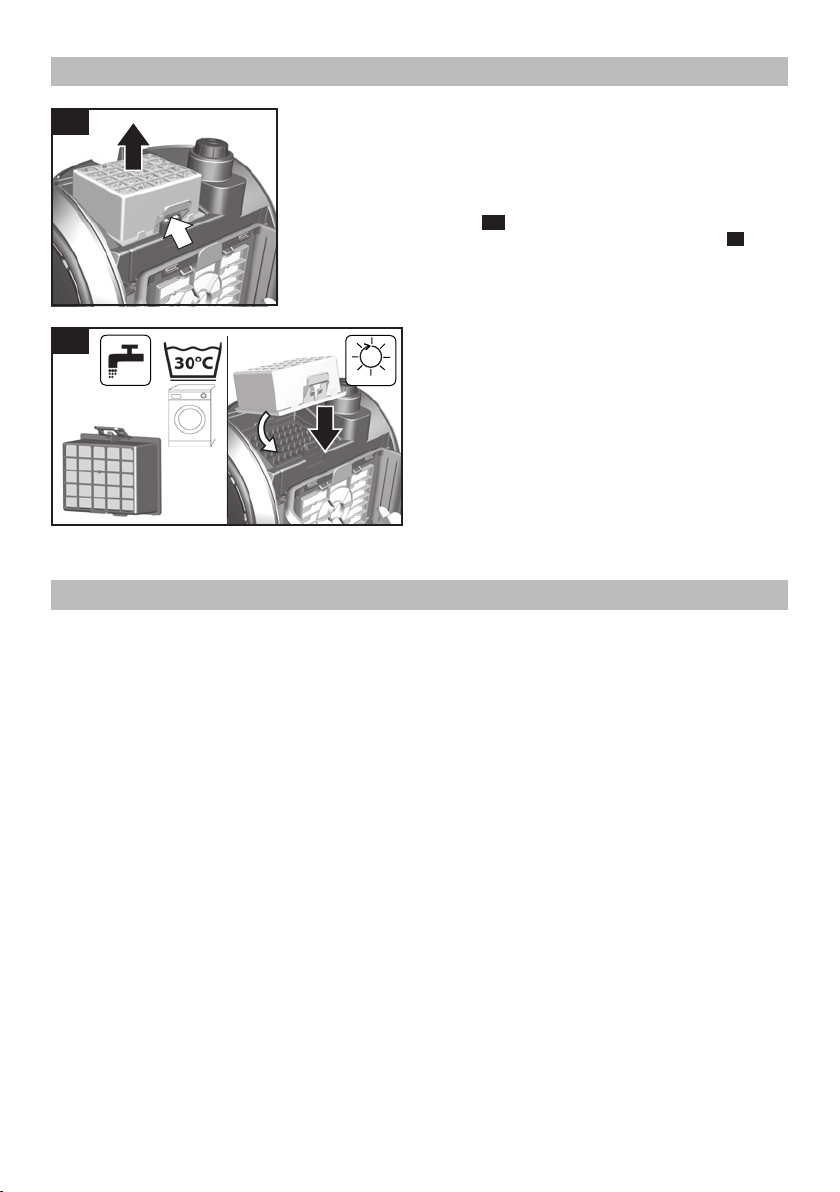
Cleaning the motor protection fi lter
The motor protection fi lter should be cleaned regular-
ly by tapping out the dirt and rinsing.
Figure
27
Open the dust bag compartment lid. Figure
20
Remove the motor protection fi lter in the direction
of the arrow.
Clean the motor protection fi lter by tapping out
the dirt.
If it is very dirty, the motor protection fi lter should
be rinsed.
Then allow the fi lter to dry for at least 24 hours.
After cleaning, insert the motor protection fi lter
into the appliance and close the dust bag compart-
ment lid.
Malfunctions
27
Filter care
26
Click!
2
1
1
16
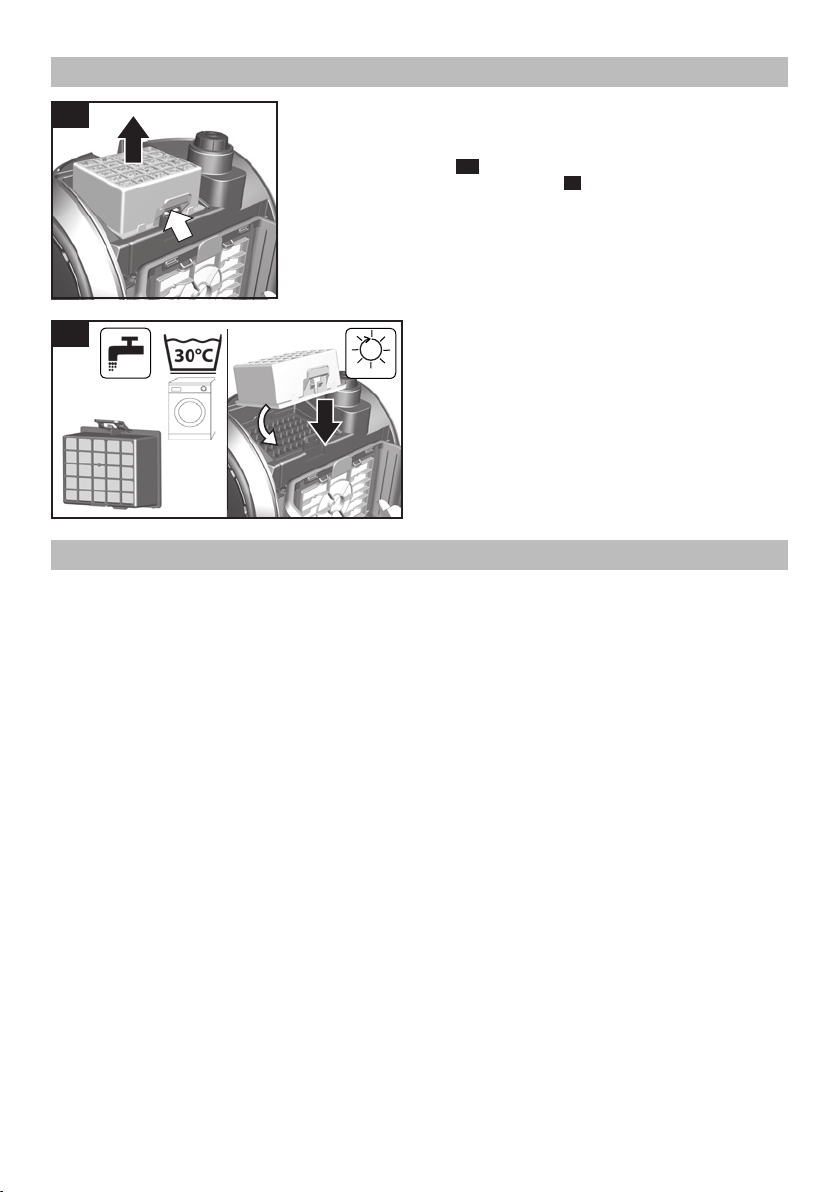
Cleaning the washable HEPA filter
To ensure that the vacuum cleaner is working at its
optimum power level, the exhaust filter should be
rinsed out after one year. The filtering action of the
filter remains intact, even if the filter surface becomes
discoloured.
Figure
28*
Open the dust bag compartment lid. Figure
20
Unlock the HEPA filter by moving the locking lever
in the direction of the arrow and remove the filter
from the appliance.
When doing so, first slide the rear part of the filter
into the intended recess and then push it into the
front, over the locking lever until it audibly locks in
place.
Tap out the filter unit and rinse it under running
water.
Alternatively, the unit can be cleaned in a washing
machine at max. 30°C using a gentle programm and
the lowest spin speed.
TIP: To protect other laundry items, put the filter
unit into a laundry bag.
Once the HEPA filter has dried completely (at least
24 hours), insert it back into the appliance.
After vacuuming fine dust particles, clean the motor
protection filter and, if necessary, the HEPA filter.
Filter care
28*
1
2
28*
24h
Drying
Care
Always switch off the vacuum cleaner and disconnect the power cord from the mains before cleaning the vacuum
cleaner. The vacuum cleaner and plastic accessories can be cleaned with a commercial plastic cleaner.
!
Do not use a scourer, glass-cleaning agent or multi-purpose cleaning products. Never immerse the vacuum
cleaner in water.
The dust compartment can, if necessary, be cleaned with a second vacuum cleaner or simply wiped with a dry
cloth or dusting brush.
Subject to technical modifications.

17
GB Great Britain
BSH Home Appliances Ltd.
Grand Union House
Old Wolverton Road
Wolverton
Milton Keynes MK12 5PT
To arrange an engineer visit, to order spare parts and
accessories or for product advice please visit:
www.bosch-home.co.uk
or call
Tel.: 0344 892 8979*
* Calls are charged at the basic rate, please check with
your telephone service provider for exact charges.
HK Hong Kong,
香港
BSH Home Appliances Limited
Unit 1 & 2, 3rd Floor
North Block, Skyway House
3 Sham Mong Road
Tai Kok Tsui, Kowloon
Hong Kong
Tel.: 2626 9655 (HK)
Toll free 0800 863 (Macao)
Fax: 2565 6681
mailto:[email protected]
www.bosch-home.com.hk
SG Singapore,
新加坡
BSH Home Appliances Pte. Ltd.
Block 4012, Ang Mo Kio Avenue 10
#01-01 Techplace 1
Singapore 569628
Tel.: 6751 5000*
Fax: 6751 5005
mailto:[email protected]
www.bosch-home.com.sg
* Mo-Fr: 8.30am to 7.00pm, Sa: 8.30am to 5.30pm
(exclude public holidays)
Customer service
18
Disposal information
Packaging
The packaging is designed to protect the vacuum cleaner from being damaged during transportation. It is made
of environmentally friendly materials and can therefore be recycled.
Dispose of packaging that is no longer required at an appropriate recycling point.
Old appliances
Old appliances still contain many valuable materials. Therefore, please take appliances that have reached the
end of their service to your retailer or recycling centre so that they can be recycled. For current disposal me-
thods, please enquire at a retailer or your local council.
Disposal of filters and dust bags
Filters and dust bags are manufactured from environmentally friendly materials. Provided they do not contain
substances that are not permitted in household waste, you can dispose of them with your normal household
waste.
This appliance is labelled in accordance with European
Directive 2012/19/EU concerning used electrical and
electronic appliances (waste electrical and electronic
equipment - WEEE). The guideline determines the
framework for the return and recycling of used applian-
ces as applicable throughout the EU.
For this appliance the guarantee conditions as set out by our representatives in the country of
sale apply. Details regarding same may be obtained from the dealer from whom the appliance
was purchased. For claims under guarantee the sales receipt must be produced.
Conditions of guarantee

19
䈭ؓᆎླᵢ䈪᱄ᢁ߂ԛ༽䴶㾷ᰬḛⵁȾྸሼⵕグಞ䖢㔏ㅢп
ᯯθ䈭ࣗᗻᰬ䖢Ӛᵢ䈪᱄ᢁ߂Ⱦ
ѱ㾷⭞䙊
ᵢₕۻ䲆᯲⿷Ӱᇬᓣ䶔ᾣ⫦ູѣֵ⭞Ⱦᵢₕ䚟൞⎭ᤊ
ᴶ儎ޢተԛсֵ⭞Ⱦ
ۻד➝ֵ⭞䃠᱄ᴮрⲺ⽰ֵ⭞ᵢຫಞȾ
Ѱ䱨↘՚ᇩૂᦕඅθಞуᗍ⭞ӄԛс⭞䙊φ
ⵕグ⌷Ӱᡌࣞ⢟
ⵕグφ
− ধ䲟Ƚቌ䭆Ƚ⚲✣Ⲻ⢟䍞Ⱦ
− ▤⒵ᡌ⏨։⢟䍞Ⱦ
− ᱉⟹Ƚ᱉⠼⢟䍞ૂ≊։Ⱦ
− ᶛ㠠ӄ⚿⚬ૂ䳼ѣב㌱㔕Ⲻ⟹✝⚦✢ᡌ➚✕⚦Ⱦ
− ᢉদᵰૂགྷদᵰⲺໞ㊿Ⱦ
䴬༽ԬȽ䱺ԬȽ䳼㻁
ᡇԢⲺ㻻䴬༽ԬȽ㻻щ⭞䱺Ԭૂ㻻䳼㻁ṯᦤᡇԢⲺⵕ
グಞӝⲺࣕ㜳ૂ㾷≸щ䰞䇴䇗Ⱦഖ↚ᡇԢᔰ䇤ᛞӻֵ⭞ᡇԢ
Ⲻ㻻䴬༽ԬȽ㻻 щ⭞䱺Ԭૂ㻻䳼㻁Ⱦ䘏ሼ⺤ؓᛞⲺⵕ
グಞֵ⭞ስળ䮵Ƚ⌷ᙝ㜳どᇐ儎᭾Ⱦ
!
䈭⌞ᝅ
ֵ⭞у䘸Ⲻᡌ䍞քࣙⲺ䴬༽ԬȽщ⭞䱺Ԭૂ䳼㻁
㜳ᦕඅᛞⲺⵕグಞȾഖֵ⭞↚㊱ӝ㙂ሲ㠪Ⲻᦕඅу
൞ᡇԢⲺؓؤ㤹പȾ
ᆿޞؗᚥ
ᵢⵕグಞㅜޢ䇚Ⲻᢶᵥ㿺㤹ૂީⲺᆿ
ޞ⌋㿺Ⱦ
ԛрݵㄛԛ䓡։Ƚᇎᡌ㋴⾔ᴿ㕰䲭
ⲺӰᡌ㕰҅㔅僂ૂ⸛䇼ⲺӰθᗻ亱൞ᴿ
Ӱⴇᡌ൞ᗍࡦ⭫ಞֵ⭞ᆿޞሲᒬҼ䀙
ީধ䲟ⲺᶗԬсθᯯֵ⭞ᵢ⭫ಞȾ
⾷↘ݵㄛ⧟㙃ᵢ⭫ಞȾ
⾷↘ݵㄛ൞ᰖӰⴇⲺ߫сሯᵢ⭫ಞ䘑㺂
⌷ૂؓޱᬃ֒Ⱦ
ᓕᔹࢃⲺງᯏ㻁ૂງᯏ㟒ᗻ亱᭴൞ݵㄛᰖ⌋
䀜Ⲻ൦ᯯȾ
>= トᚥধ䲟Ⱦ
↙⺤ֵ⭞
䈭ӻṯᦤ䬣⢂рⲺ㿺Ṳ䘔ૂֵ⭞ᵢⵕグಞȾ
࠽൞⋗ᴿ䳼㻁ᡌ䳼ᇯಞȽ⭫ᵰؓᣚᡌᧈ࠰䗽┚ಞⲺ
߫с䘑㺂ⵕグᬃ֒Ⱦ
>= 䘏㜳ᦕඅⵕグಞȾ
ֵ⭞౪ૂⵕグ㇗Ⲻᰬُࣗᗻֵⵕグಞ䘒⿱ᛞⲺཪ
䜞Ⱦ
>= ࡏ㜳䙖ᡆӰ䓡՚ᇩέ
ᖉሯᾲụ䘑㺂ⵕグᰬθಞⲺփ㖤ᗻ亱քӄֵ⭞
㘻Ⱦ
࠽䙐䗽ᢥ⭫Ⓠ㓵ᡌ䖥㇗ᶛ〱ࣞⵕグಞȾ
ᆿޞؗᚥ
࠰ӄᆿޞ㘹㲇θྸᵢ⭫ಞⲺ⭫Ⓠ㓵ᦕඅθᗻ亱⭧䙖
Ƚ䙖ᵃࣗ䜞䰞ᡌޭᴿ㊱ղ䍺䍞ⲺӰᴪᦘ⭫Ⓠ
㓵Ⱦ
ྸֵ⭞⭫ಞⲺᰬ䰪䎻䗽࠼䫕θ䈭ᇂޞᤊ࠰⭫Ⓠ㓵Ⱦ
ᖉѰ⭫ಞ࠽ᯣ⭫Ⓠᰬθ䈭ᤊᦿ⭫Ⓠᨈཪᵢ䓡θу㾷ᢥ⭫
Ⓠ㓵Ⱦ
у㾷ֵ⭫Ⓠ㓵䀜䭆⢟ᡌ㘻㕖㔋൞ж䎭Ⱦ
ྸ⭫㓵㠠ࣞ㕖㔋θ䈭⺤ؓ⭫ⓆᨈཪуሯӰȽӰ։䜞
փȽࣞ⢟ᡌ⢟։Ⱦ
>= 䈭ֵ⭞⭫Ⓠᨈཪᕋሲ⭫Ⓠ㓵Ⱦ
൞ሯⵕグಞ䘑㺂Աᬃ֒ࢃ䈭ᤊ࠰⭫ⓆᨈཪȾ
ྸⵕグಞᦕඅθ䈭ᬃ֒ȾྸỶ⎁ࡦ᭻䳒θ䈭ᤊ
ᦿಞ⭫ⓆᨈཪȾ
࠰ӄᆿޞ㘹㲇θӻݷ䇮㔅䗽ᦾᵹⲺᵃࣗӰሯⵕグ
ಞ䘑㺂㔪ؤȽᆿ㻻ૂᴪᦘᬃ֒Ⱦ
䱨↘ⵕグಞ䚣ཟ≊Ƚ▤⒵ૂ✣ⓆᖧଃȾ
࠽൞䗽┚㻻㖤 䳼㻁Ƚ⭫ᵰؓᣚ䗽┚ಞȽᧈ࠰䗽┚
ಞθㅿㅿр⌲⍈⟹⢟䍞ᡌ䞈㋴⢟䍞Ⱦ
ⵕグಞу䘸⭞ӄᔰㆇᐛ൦Ⱦ
>= ྸሼެ⭞ӄᔰㆇ⬜θ㜳䙖ᡆಞᦕඅȾ
ᖉуֵ⭞ಞᰬθ䈭ީᯣ⭫Ⓠᒬᤊ࠰⭫ⓆᨈཪȾ
ྸ⭫ಞስળ㓾㔉θᓊڒ↘ֵ⭞θ❬ԛᚦᖉᯯᕅᓕ
ᔹȾ
!
䈭⌞ᝅ
⭫Ⓠᨈᓝᗻ亱䙐䗽㠩ቇᆿฯⲺᯣ䐥ಞ䘑㺂ؓᣚȾ
ྸ൞ᛞᔶⵕグಞ⭫Ⓠᰬθᯣ䐥ಞ䐩䰮θࡏ㜳ᱥഖѰᴿ
ެᆹᴪ儎⭫⍷⎾㙍Ⲻ⭫ಞ䘔ࡦҼж⭫䐥рȾ
Ѱ䱨↘ᯣ䐥ಞ䐩䰮θ䈭ݾ䘿ᴶքࣕ⦽䇴㖤θ❬߃ᔶ⭫ಞ⭫
Ⓠθᖻ⭫ಞ䘆㺂䎭ᶛ߃໔ࣖࣕ⦽Ⱦ
ᓕᔹ༺㖤ؗᚥ
㻻
㻻Ⲻ䇴䇗࣑≸䱨↘ⵕグಞ൞䘆䗉䗽ぁѣ䚣ࡦᦕඅȾ㻻
⭧⧥ؓᶆᯏᡆθഖ↚ഔ᭬⭞Ⱦ䈭ሼу߃䴶㾷Ⲻᓕᔹ㻻
䘷㠩ᚦᖉⲺഔ᭬⛯Ⱦ
ᰝ⭫ಞ
ᰝ⭫ಞԃ❬ᖾཐᴿԭٲⲺᶆᯏȾഖ↚θ䈭ሼᐨስળ㓾㔉Ⲻ
⭫ಞ䘷㠩ᛞⲺ㔅䬶༺ᡌഔ᭬ѣᗹθԛഔ᭬߃⭞Ⱦީӄ⧦㺂
ᓕᔹ༺㖤ᯯ⌋θ䈭䈘㔅䬶ᡌᛞᖉ൦Ⲻ㇗⨼ᯯȾ
䗽┚ಞૂ䳼㻁Ⲻᓕᔹ༺㖤
䗽┚ಞૂ䳼㻁ൽ⭧⧥ؓᶆᯏ֒㙂ᡆȾ㾷ᆹԢууݷ
䇮֒Ѱ⭕⍱ඹ൴Ⲻ⢟䍞θቧԛሼᆹԢфᲤ䙐⭕⍱ඹ൴ж䎭ᓕ
ᔹȾ

20
ᛞⲺⵕグಞ
䈹㢸Ⲻᢈ
⺢䍞൦䶘ᢈ
ծ㕟㇗
┇ࣞᔶީ
ᢁ
⍱ࣞ䖥㇗
7 室內吸嘴
8 尖頭吸嘴
䖻ࣟㄏ㻻㖤
⭫Ⓠ㓵
ᧈ࠰䗽┚ಞ
ᑜ⭫ࣞ䈹㢸ಞⲺᔶީ䫤
ԙᴵ䳼㻁Ⲻ䳼ᇯಞᡌ㘻ᴵᦘ⭞Ⲻ䳼㻁
䳼㻁
⍍Ⲻ⭫ᵰؓᣚ䗽┚ಞ
䳼㻁㡧ⴌ
ᩢ䘆ᢁ
ᆎ۞䖻ࣟ㻻㖤൞⭫ಞᓋ䜞
䳼㻁ᴪᦘ⽰ಞ
ᧈ࠰Ṳḻ
1
3
5
6
1817
16
19 20
2
9
10
15
4
14
7
8
12
13
11
21
ᴵᦘ䜞Ԭૂщ⭞䱺Ԭ
A
C
B
A ᴵᦘ䗽┚ྍ㻻
ѰֵᛞⲺ⭫ಞᥛᴶཝࣕ⭞θᡇԢᔰ䇤ֵ⭞Typ G ALL ޞྍ
ᴵᦘྍ㻻Ⱦ
φ
- 4 ѠᑜᢄⲺ䳼㻁
䈭⌞ᝅ
ഖ↚ᡇԢᔰ䇤ᛞӻֵ⭞ᡇԢⲺ㻻䳼㻁Ⱦ
ᛞⲺ儎᭾ⵕグಞ䞃儎䍞䳼㻁ሼᇔ⧦࠰㢨Ⲻ⌷᭾
Ⱦᴿֵ⭞儎䍞䳼㻁 ׁྸঐь㻻䳼㻁 ᢃ㜳⺤ؓ
ᛞⲺⵕグಞԛ⭫ಞрⲺ⅝ⴕ㜳᭾ḽㆴࡍ࠰Ⲻ㜳᭾ㅿ㓝Ƚ䳼
⦽ૂ䳼ᇯ䠅䘑㺂ᐛ֒Ⱦ
ֵ⭞ࣙ䍞䳼㻁ྸ㓮㻁㜳ሯ⭫ಞֵ⭞ስળૂᙝ㜳䙖ᡆ䍕
䶘ᖧଃȾֵ⭞у䘸Ⲻᡌ䍞քࣙⲺ䳼㻁䘎㜳ᦕඅᛞⲺⵕ
グಞȾ↚㊱ᦕඅу൞ᡇԢⲺؓؤ㤹പȾ
ᛞ൞ԛс㖇ㄏḛⵁᴪཐީؗᚥφ
www.bosch-home.com/dust-bag ᛞ൞↚䇘䍣ᡇԢⲺ
㻻ⵕグಞ䳼㻁Ⱦ
B (H)EPA 䗽┚ಞ BBZ156HF
⭞ӄಞᧈ࠰ᓕ≊Ⲻ仓ཌ䗽┚ಞȾ
᧞㦆᱉䗽ᮅӰ㗚ֵ⭞Ⱦ∅ᒪᴪᦘж⅗Ⱦ
C ⺢䍞൦䶘ᢈ BBZ123HD
⭞ӄ⺢䍞൦䶘Ⲻ
ྸ䮬ᵞ൦ᶵȽ⬭⹌Ƚ䎚䲬ㅿȾ

22
1
Click!
2
1
2
俌⅗ֵ⭞ࢃ
1
ࡓ⅗ֵ⭞
4
3
ഴ
1
ሼᢁ᧞㠩⍱ࣞ䖥㇗θ䬷↘ࡦփȾ
ഴ
2
a) ሼ⍱ࣞ䖥㇗䘔Ԭ᧞ޛⴌᆆⲺ䘑≊θ㠩䬷↘ࡦփȾ
b) 㤛㾷с⍱ࣞ䖥㇗θ䈭ᰬুњѠ䬷ᢙθ❬࠰䖥㇗Ⱦ
ഴ
3
ሼᢁ᧞ޛ㇗ծ㕟㇗Ⱦ
㤛㾷ሼެсθ䈭䖱䖱ᰁ䖢ᢁθ❬ሼެ࠰㇗ծ㕟
㇗Ⱦ
ഴ
4
ሼ㇗ծ㕟㇗᧞ޛᢈⲺ䘔ԬȾ
㤛㾷⎾䘔θ䈭䖱䖱ᰁ䖢㇗ծ㕟㇗θ❬ሼެ࠰
ᢈȾ
23
ࡓ⅗ֵ⭞
1
5
2
6
8
7
ഴ
5
➝㇣ཪᯯ〱ࣞ┇ࣞᔶީθֵծ㕟㇗䀙䬷θ❬ሼެ䈹㢸㠩
ᡶ䴶Ⲻ䮵ᓜȾ
ഴ
6
ᤵօ⭫Ⓠ㓵Ⲻᨈཪθཌ⭫Ⓠ㓵θ㠩ᡶ䴶䮵ᓜθ❬ሼᨈ
ཪᨈޛ⭫ⓆᨈᓝȾ
ഴ
7
㤛㾷ᔶᡌީᯣⵕグಞθ䈭➝㇣ཪᯯুᔶީ
䫤Ⱦ
≪ᒩ
ഴ
8
➝㇣ཪᯯᰁ䖢ᔶީ䫤䇴㖤≪ᒩȾ
➝㇣ཪᯯᰁ䖢ᰁ䫤ṯᦤ䴶㾷ᰖ䲆൦䈹㢸≪ᒩȾ
最小 - 適合清理窗簾和精緻布料
- 適合清理傢俱和坐墊
- 適合清理精緻地墊,以及日常輕微骯髒的地板
- 適合清理抗磨的地板覆蓋物
最大 - 適合清理硬質地板和非常骯髒的地墊或坐墊
24
ഴ
9
䈹㢸ᢈφ
൦∥
!
⺢䍞൦䶘
!
䈭⌞ᝅφ
ᢈ㜳ཕᢵжᇐぁᓜⲺ⼞ᦕθޭ։ߩӄ⺢䍞൦䶘Ⲻ㊱ශ
ྸ㋍㌏Ⲻ⬭⹌Ⱦഖ↚ᛞᗻ亱ᇐᵕỶḛᢈⲺᓋ䜞Ⱦ
⼞ᦕⲺᢈᓋ䜞㜳ᴿቌ䭆䗯㕎θ㜳Րᦕඅ㋴㓼㜼ᕧⲺ⺢
䍞൦䶘θྸ൦∥ૂ⋯∗Ⱦ⭧ӄᢈ⼞ᦕ㙂䙖ᡆⲺᦕඅθ䙖
Ᾰу䍕䍙Ⱦ
ഴ
10*
ᑜ䱺Ԭ䘑㺂
➝㾷≸ᣀ౪䘔㠩㇗ᡌᢁφ
a) ⭞ӄ⌷㕓䳏ૂ䀈㩳ㅿⲺ㕓䳏౪Ⱦ
b) ⭞ӄ⌷ᑜᓝྍⲺᇬޭȽネᑎㅿⲺᓝྍ౪Ⱦ
c) ⺢䍞൦䶘ᢈ
⭞ӄ⌷⺢䍞൦䶘ᶆᯏྸ⬭⹌ૂ䮬ᵞ൦ᶵㅿȾ
ഴ
11
ྸᛞ䴶㾷Ჸڒθֵ ⭞ಞם䶘Ⲻ 䖻ࣟㄏ㻻㖤Ⱦ
ީᯣ⭫ಞθሼᢈрⲺ䫟ᆆ┇ޛಞם䶘Ⲻ″Ⱦ
ഴ
12
ׁྸ൞ᾲụр䘑㺂ⵕグᰬθҕ䙐䗽ᢁ〱ࣞಞȾ
* דශ㙂ᇐ
ⵕグ
9
11
12
a
b
c
10*
25
ഴ
13
ᤊс⭫ⓆᨈᓝȾ
䖱䖱ࣞ⭫Ⓠ㓵θ❬ᶴᔶ⭫Ⓠ㓵Ր㠠᭬ࣞഔȾ
ഴ
14
㤛㾷ᆎ۞䘆䗉⭫ಞθֵ⭞⭫ಞᓋ䜞Ⲻ䖻ࣟᆎ۞㻻㖤Ⱦ
ᣀ⭫ಞ䎭ᶛȾሼᢈрⲺ䫟ᆆ┇ޛಞᓋ䜞Ⲻ″Ⱦ
ᛞ䍣ҦⲺᱥ൦䶘ⵕグಞθᆹԛ䙐䗽䳼ᇯಞᡌ䳼㻁᭬
Ա㊱ශⲺᒨ⠛⚦Ⱦ
ᡇԢᔰ䇤ᛞφ
− ᰛᑮᇬᓣ⌷ѱ㾷ֵ⭞䳼㻁Ⱦ
− ',<ީⲺ⌷⢯ࡡᱥ⌷ᵞኇㅿֵ⭞䳼ᇯಞȾ
ᴪᦘ䳼㻁
ഴ
15*
ᖉ䘿Ҽᴶ儎≪ᒩሼᢈԄ൦䶘ᣢ䎭ᰬθྸⴌᆆрⲺ
䳼㻁ᴪᦘ⽰ಞᇂޞݻ┗θ䛙Ѿθ䳼㻁㜳䘎⋗ᴿ㻻
┗θҕᗻ亱ᴪᦘ䳼㻁Ⱦ⭧ӄ䙐䗽ⵕグޛⲺ⚦㊱ශужθ
䳼㻁⋗ᴿ㻻┗θҕ㜳䴶㾷ᴪᦘȾ
俌ݾỶḛ౪Ƚ㇗ૂ⍱ࣞ䖥㇗ᱥດθྸᴿດࡏ㜳䀜
䳼㻁ᴪᦘ⽰ಞȾ
ഴ
16
➝㇣ཪᯯ䠀᭴䬷↘ᵼθԛ䀙䬷ⴌᆆȾ
ֵ⭞⭫ಞ
14
13
1
2
15*
16
ֵ⭞䳼㻁
26
ഴ
17
a) ࣞ䬷⡽ԛީ䰣䳼㻁θ❬сȾ
b) ᨈޛжѠ᯦Ⲻ䳼㻁θሼެᇂޞ᧞ޛ᭥ᓝȾ
!
䈭⌞ᝅφᴿᖉᨈޛ䳼㻁θⴌᆆᢃՐީ䰣Ⱦ
ྸᴿᗻ㾷θֵ⭞䳼ᇯಞԙᴵ䳼 㻁Ⱦ
!
䈭⌞ᝅφᴿֵ⭞䳼㻁ᰬθ䳼㻁ᴪᦘ⽰ಞᢃ䎭֒⭞Ⱦ
ഴ
18
ᢉᔶ䳼㻁㡧ⴌȾ
с䳼㻁θᨈޛ䳼ᇯಞȾ
ީ䰣⭫ಞⴌȾ
ഴ
19
ᬃ֒ᰬθ䈭ሼࣕ⦽䇴㖤Ѱᴶཝٲθԛᇔ⧦ᴶ֩᭾Ⱦ
ᡇԢᔰ䇤ᛞӻ൞⌷䶔ᑮ㋴㓼㜼ᕧⲺᶆᯏᰬᢃ䲃ք䇴㖤ٲȾ
グⴈ
ѰҼؓᤷᴶ֩᭾θ∅⅗㔉ᶕθᓊグⴈȾᡌ㘻㠩ቇ
൞⚦䗴ࡦᴶཝḽ䇦ᰬグȾ
グⴈᰬθࣗᗻỶḛⴈᓋ䜞Ⲻ⌗⋡䗽┚ಞⲺ㝅⊗ぁᓜȾ
ྸᴿ᱄ᱴ㝅⊗θ䈭➝Ԅ
ഴ
24
ᔶခⲺ䈪᱄⌷䗽┚ಞȾ
ഴ
20
➝㇣ཪᯯ〱ࣞ䬷↘ᵼθԛᢉᔶ䳼ⴌȾ
19
20
17
ֵ⭞䳼㻁
ֵ⭞䳼ᇯಞ
18
ഴ
21
Ԅ⭫ಞрсⴈȾ
ഴ
22
➝㇣ཪᯯ〱ࣞᓋᓝᥗᶵѣⲺগ䬷θሼެᢉᔶȾ
ሼᓋᓝᥗᶵԄⴈѣ࠰ᒬ᭴൞ж䗯Ⱦ
グⴈȾ
ሼᓋᓝᥗᶵ䬷ޛⴈθ❬ީ䰣Ⱦ
ֵ⭞䳼ᇯಞ
21
22
22
22
Click!
ഴ
23
ሼⴈ᭴ഔ⭫ಞᒬީ䰣䳼ⴌȾ
䈭⌞ᝅφ䳅ֵ⭞Ⲻ໔ཐθⴈⲺ䜞㜳࠰⧦ࡤⰋθᔶခᗍ
␗у䙅᱄Ⱦ❬㙂θ䘏ѓ∡уᖧଃⵕグಞⲺԱᙝ㜳θᆹሼ
㔝㔣ྸᖶᑮжṭᐛ֒Ⱦ
⌷ⴈѣⲺ⌗⋡䗽┚ಞૂ㔈∑䗽┚ಞ
⌷仇⦽ᱥཐቇϋ
Ա᭻䳒ҁθ䲚ດ⢟
ྸ䗽┚ಞᴿ᱄ᱴ㝅⊗
㠩ቇ∅пѠᴾж⅗
ഴ
24
➝㇣ཪᯯ〱ࣞᓋᓝᥗᶵѣⲺগ䬷θሼެᢉᔶȾഴ
22
࠰ᓋᓝᥗᶵȾ
➝㇣ཪᯯ〱ࣞᓋᶵѣⲺњѠগ䬷θሼެᢉᔶȾ
ԄᓋᶵсњѠ䗽┚ಞDEȾ
ഴ
25
⍍њѠ䗽┚ಞDEθᲴᒨ㠩ቇቅᰬȾ
⌷θሼњѠ䗽┚ಞ䠃᯦᭴ഔᓋᶵȾ
ީ䰣ᓋᶵθ❬᧞ޛ䬷⡽θ㠩ࡦެćଈĈж༦ࡦփȾ
ሼᓋᓝᥗᶵ䬷ޛⴈθ❬ީ䰣Ⱦ
!
䈭⌞ᝅφࣗᗻ➝↙⺤Ⲻ亰ᓅᆿ㻻䗽┚ಞȾ
⌗⋡䗽┚ಞEᗻ亱փӄ㔈∑䗽┚ಞDⲺрᯯȾ
ֵ⭞䳼ᇯಞ
23
25
24h
Drying
a
b
a
b
a
b
24
25
a
b
29
䲚ⴈѣⲺດ⢟Ⱦ
ഴ
26
グⴈȾഴ
22
⯅ᶴດ⢟ׁྸֵ⭞㷰ѓ࠶θ❬ሼެᮨ࠰ᶛᡌ࠰ᶛȾ
ྸ࠰ດ⢟θ䈭൞⭫ಞѣ᭴㖤жѠ䳼㻁Ⱦ
ഴ
18
ሼᓋ䜞ᥗᶵ䬷ޛⴈθ❬ީ䰣Ⱦ
!
䈭⌞ᝅφԱ᭻䳒ҁθࣗᗻ⌷ⴈѣⲺ䗽┚ಞ ഴ
25
ഴ
26
Ⱦ
⌷⭫ᵰؓᣚ䗽┚ಞ
ᓊᇐᵕ⌷⭫ᵰؓᣚ䗽┚ಞθޭ։ᯯ⌋ᱥᣀ㝅⊗ᮨ࠰ᶛθ❬ߨ
⍍Ⱦ
ഴ
27
ᢉᔶ䳼㻁㡧ⴌȾഴ
20
➝㇣ཪᯯс⭫ᵰؓᣚ䗽┚ಞȾ
⌷⭫ᵰؓᣚ䗽┚ಞθޭ։ᯯ⌋ᱥᣀ㝅⊗ᮨ࠰ᶛȾ
ྸ⭫ᵰؓᣚ䗽┚ಞћ䠃㝅⊗θࡏᓊߨ⍍Ⱦ
❬ֵ䗽┚ಞᲴᒨ㠩ቇቅᰬȾ
⌷θሼ⭫ᵰؓᣚ䗽┚ಞᨈޛ⭫ಞθ❬ީ䰣䳼㻁㡧ⴌȾ
24h
Drying
᭻䳒
27
䗽┚ಞؓޱ
26
26
Click!
2
1
1
30
䗽┚ಞؓޱ
28*
1
2
28*
24h
Drying
ؓޱ
൞⌷ⵕグಞࢃθࣗᗻީᯣⵕグಞⲺ⭫Ⓠᒬሼ⭫Ⓠ㓵ᤊᦿȾֵ⭞⭞ງᯏ⌷ࡸ⌷ⵕグಞૂງᯏ䱺ԬȾ
!
࠽ֵ⭞䲚ෘࡸȽ⧱⪹⌷ࡸᡌཐ⭞䙊⌷ࡸȾ࠽ሼⵕグಞ⎮ޛ≪ѣȾ
ྸᴿᗻ㾷θֵ⭞жѠⵕグಞ⌷䳼㡧θᡌ㘻ቧ⭞ᒨᐹᡌ䲚⌷Ⱦ
ᴿ㜳䘑㺂ᢶᵥᴪȾ
⌷⍍Ⲻ+(3$䗽┚ಞ
Ѱ⺤ؓⵕグಞԛᴶ֩ࣕ⦽≪ᒩ䘆䖢θᧈ࠰䗽┚ಞֵ⭞жᒪᓊ
⍍Ⱦֵ䗽┚ಞ㺞䶘㽠㢨θެ䗽┚ࣕ㜳ҕѓ∡уᖧଃȾ
ഴ
28*
ᢉᔶ䳼㻁㡧ⴌȾഴ
20
➝㇣ཪᯯ〱ࣞ䬷↘ᵼθԛ䀙䬷+(3$䗽┚ಞθ❬Ԅ⭫ಞ
࠰䗽┚ಞȾ
൞↚ᬃ֒ᵕ䰪θ俌ݾሼ䗽┚ಞⲺ䜞┇ޛⴤḽ″θ❬ሼެ᧞
ޛࢃ䜞θ䎻䗽䬷↘ᵼθ㠩ࡦ䬷↘ࡦփⲺ༦丩Ⱦ
ᮨ࠰䗽┚ಞⲺ㝅⊗θ❬൞⍷≪сߨ⍍Ⱦ
ᡌ㘻θҕ⭞⍍ 㺙ᵰ⍍ 䗽┚㻻 㖤θᴶ儎≪e&θֵ⭞ૂ
ぁᓅૂᴶք䖢䙕Ⱦ
ᨆ⽰φѰؓᣚެᆹ⍍⢟θ䈭ᣀ䗽┚㻻㖤᭴ޛ⍍ؓᣚ㻁Ⱦ
ᖻ+(3$䗽┚ಞᖱᓋᒨ⠛㠩ቇቅᰬθሼެᨈഔ⭫
ಞȾ
⌷ᗤ㓼㋈θ⌷⭫ᵰؓᣚ䗽┚ಞθᗻ㾷ᰬࡏ⌷+(3$䗽
┚ಞȾ
31
ᇘᡬᵃ
GB Great Britain
BSH Home Appliances Ltd.
Grand Union House
Old Wolverton Road
Wolverton
Milton Keynes MK12 5PT
To arrange an engineer visit, to order spare parts and
accessories or for product advice please visit:
www.bosch-home.co.uk
or call
Tel.: 0344 892 8979*
* Calls are charged at the basic rate, please check with
your telephone service provider for exact charges.
HK Hong Kong,
香港
BSH Home Appliances Limited
Unit 1 & 2, 3rd Floor
North Block, Skyway House
3 Sham Mong Road
Tai Kok Tsui, Kowloon
Hong Kong
Tel.: 2626 9655 (HK)
Toll free 0800 863 (Macao)
Fax: 2565 6681
mailto:[email protected]
www.bosch-home.com.hk
SG Singapore,
新加坡
BSH Home Appliances Pte. Ltd.
Block 4012, Ang Mo Kio Avenue 10
#01-01 Techplace 1
Singapore 569628
Tel.: 6751 5000*
Fax: 6751 5005
mailto:[email protected]
www.bosch-home.com.sg
* Mo-Fr: 8.30am to 7.00pm, Sa: 8.30am to 5.30pm
(exclude public holidays)
32
包裝
產品包裝旨在保護吸塵機於運輸過程中不受損壞,以環保材料製成,因此可被循環再造,不再需要找專門的回收點棄置。
舊電器
舊電器裡仍有很多可用的物料。因此,請將無法使用的電器送交零售商或回收中心,讓它們可循環電造。有關目前的棄置方法,請聯絡
零售商或當地有關政府部門。
棄置濾網及塵袋
濾網及塵袋以環保材料製造。除了含 有不能以 家 居 廢 物 棄 置 的物 質外 ,濾網及塵袋均可當作一般家居廢物處理。
此吸塵機受歐盟2012/19/EU有關舊電器及電子產品(廢棄電
器和電子設備– WEEE)指引監管,該指引確立了適用於整個
歐盟的舊電器回收和再造的規章制度。
Ỻ㖤䋽䁀
33

34

35

36
Robert Bosch Hausgeräte GmbH
Carl-Wery-Straße 34
81739 München
GERMANY
www.bosch-home.com
Register your new device on MyBosch now and profit directly from:
-*#$&&#%&$%"$+"'$##!
-$$!&+*&!%"!"#&"!%
-%"'!&%"$%%"$%%#$#$&%
-& !'!##!&&!
-%+%%&""%" ##!%$(
Free and easy registration – also on mobile phones:
)))"%" " )"
Expert advice for your Bosch home appliances, need help with problems
or a repair from Bosch experts.
Find out everything about the many ways Bosch can support you:
)))"%" " %$(
"!&&&""'!&$%$%&!&&&%$($&"$+
!+"'"$'+!
"%" ##!
""!"$#
"'.,!&$
8001138783
990314