この印刷物は再生紙を使用しております。
フィリップ ス
ボディーグ ルーマ ー
BG7025/15
品番
Bodygroom
©2019 Philips Japan, Ltd.
4222.002.9078.1
(
04/19
)
①
必ずお守りください
②
各部の名称
③
充電の仕方
④
基本的な使い方
⑤
トリミングの仕方
⑥
ボディーシェービングの仕方
⑦
ボディーシェービング のコツ
⑧
お手入れ方法
⑨
製品を廃棄するとき
⑩
故障かな
?
と思ったら
⑪
保証とアフターサービス
⑫
仕様
⑬
無料修理規定
Guidance in English
目 次
フィリップ ス
ボディーグルーマーをお買い上げいただき、まこと
にありがとうございます。長い間ご愛用いただくために、ご使用前に
この取扱説明書をよくお読みのうえ、正しくお使いください。また、
お読みになった後は、お使いになる方がいつでも見られるところに
必ず保管してください。
●商品のご確認
商品をご確認ください。
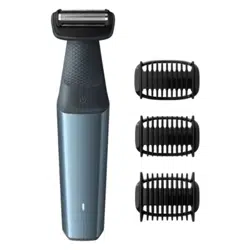
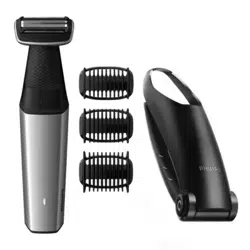
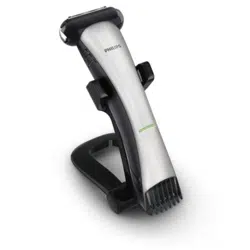
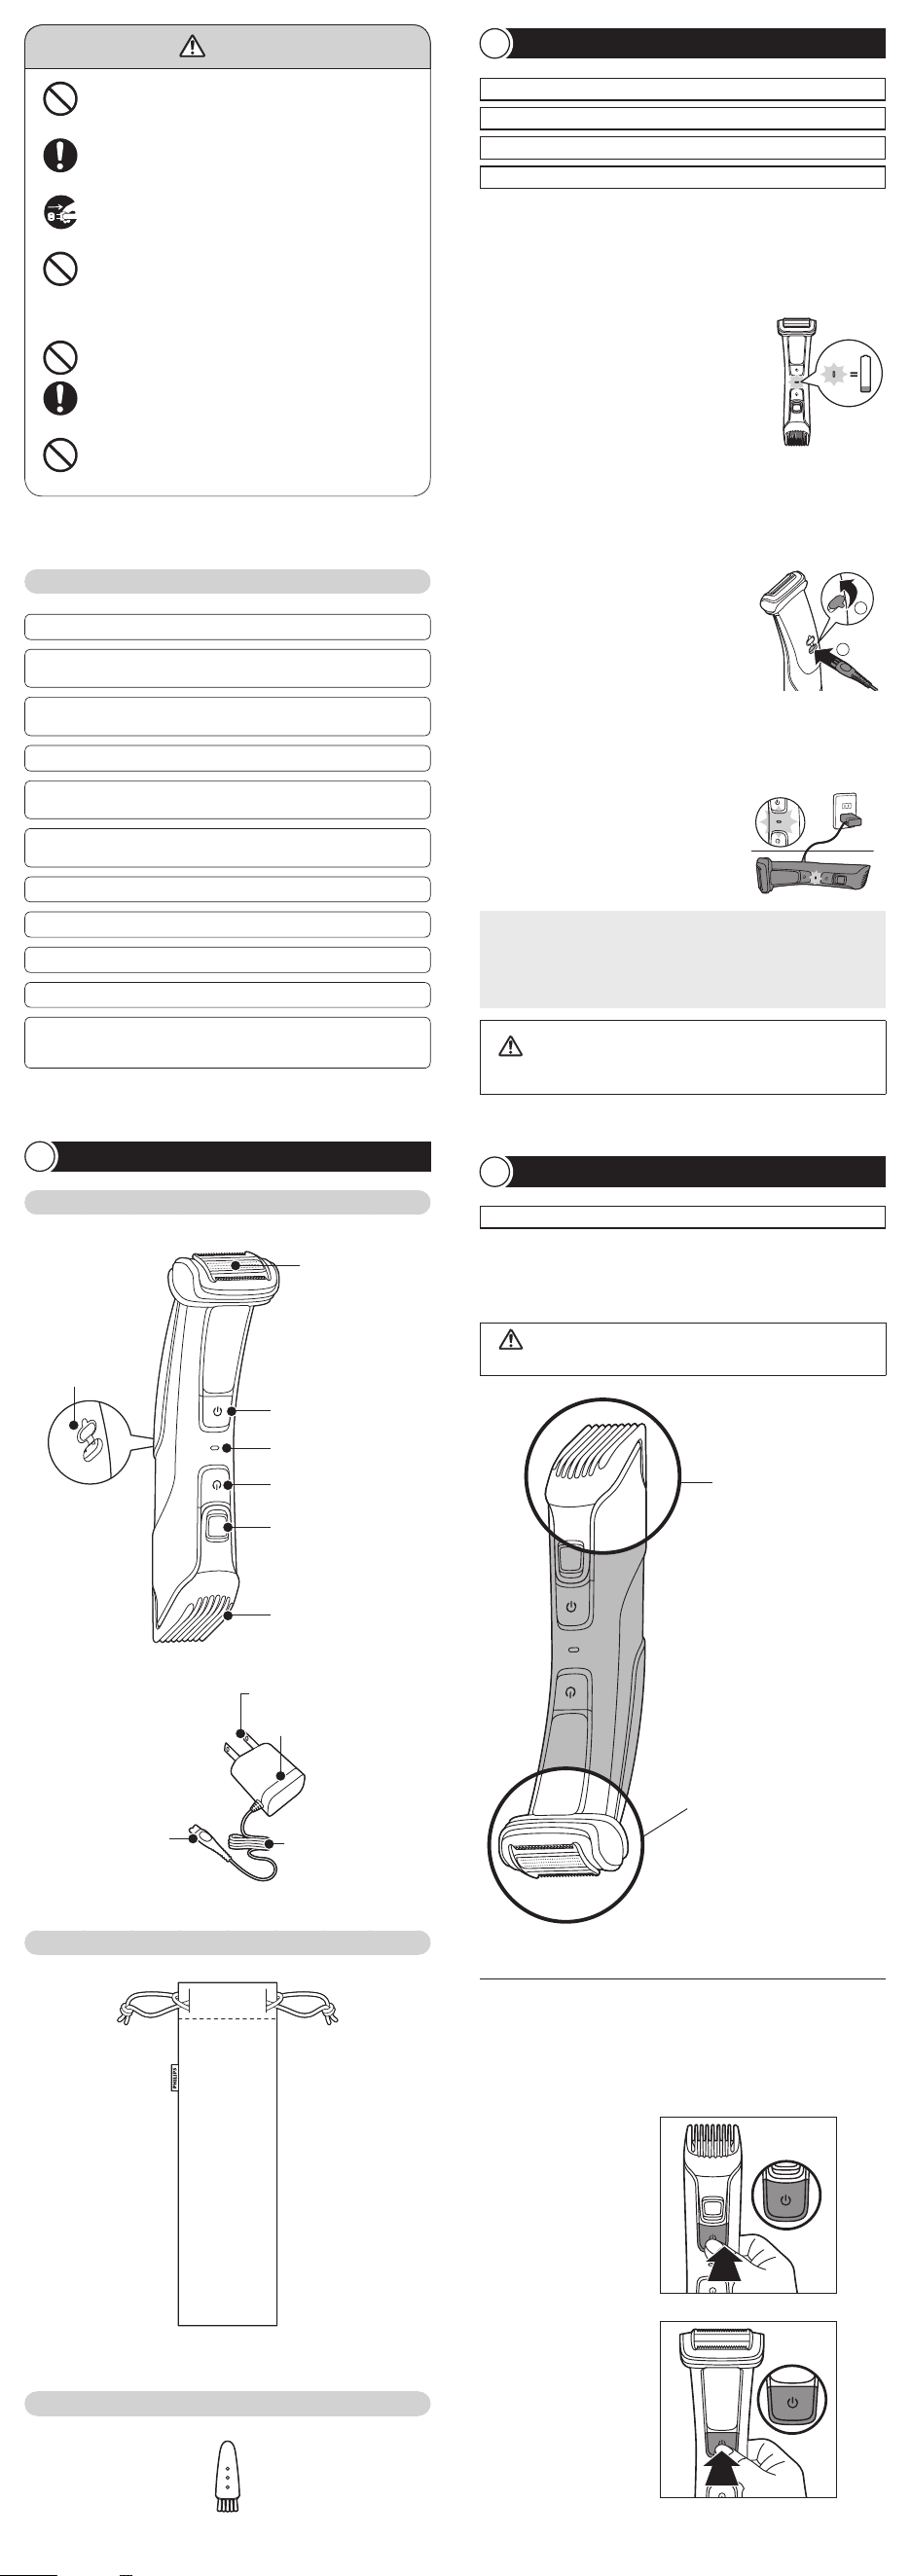
本体
必ずお守りください
1
●ここに示した注意事項は、安全に関する重要な内容ですので、必
ず守ってください。
●誤った取扱いをしたときに想定される内容を「警告」と「注意」とに
区分けしています。
安 全 上 の ご 注 意
○絵表示の例
記号は、してはいけない「禁止」を示します。図の中や近くに具体的
な禁止内容(左図の場合は分解禁止)を示します。
記号は、必ずしていただく「強制」を示します。図の中や近くに具
体的な強制内容(左図の場合は電源プラグをコンセントから抜く
こ と )を 示 し ま す 。
○絵表示について
記号は、「警告、注意」を示します。
図の中や近くに具体的な注意内容を示します。
人が傷害を負う可能性及び物的損害の発生が想定され
る内容。
注意
人が死亡または重傷を負う可能性が想定される内容。
警告
注 意
●
本製品は、人の首から下のムダ毛を処理するためのもので
す。ヒゲを剃ったり頭髪を刈るなど、それ以外の目的で使用し
ないでください 。
●
充電アダプタの電源プラグを抜くときは、電源コード部を持
たずに必ず先端の充電アダプタ部を持って引き抜いてくださ
い。感電やショートして発火することがあります。
●
充電時以外は、充電アダプタをコンセントから抜いてくださ
い。ケガややけど、絶縁劣化による感電・漏電・火災の原因
となります。
●
充電アダプタは付属の専用アダプタを使用してください。ま
た付属の専用アダプタで他の商品を充電しないでください。
ショート、異常発熱による発火の原因になります。破損、故
障した場合は、事故を避けるために必ずフィリップス社製の
同型充電アダプタをお求めください。
●
刃は強く押さえないでください。破損して皮膚を傷つけるこ
とがあります 。
●
刃やコームなどの部品が破損または故障した場合は、本製品
を使用しないでください。ケガの原因になります。交換の際
には必ずフィリップス社製の同型部品とお取り替えください。
●
電源コネクタ受部にピンやごみを付着させないでください。
感電・ショート・発火の原因になります。
10.
本体は防水加工をしておりますが、水や液体の中に浸けないでください。
11.
プラグ式消臭・芳香剤を使用しているコンセントあるいはその近くのコンセ
ントに充電アダプタを接続しないでください。充電アダプタを傷める原因と
なりま す 。
3 .
刃 は 、薄 く 仕 上 げ て あ り ま す の で 、刃 部 を 強 く 押 さ え た り 、硬 い も の に 当
てないよう、ていねいに扱ってください。
5 .
切れ味が衰えてきたり、刃やコームなどの部品が破損した場合は、使用
せず必ず新しい同型部品と交換してください。
6 .
直射日光の当たる場所には保管しないでください。夏場、車の中に放置し
ないでください。
7 .
乳幼児の手の届かないところに保管してください。
8 .
本 製 品 は 、使 用 の 都 度 、掃 除 を し て く だ さ い 。
9 .
衛生上、他の人とは共有しないでください。
使 用 上 の ご 注 意
1 .
60
℃以上の熱湯で洗浄しないでください。
2 .
本製品の使用、充電、保管は室温
5
℃〜
35
℃の環境下で行ってください
(尚、低温や高温で充電すると、充電池の寿命が短くなります)。
4 .
刃の清掃やコームの着脱は必ず電源を
OFF
にしてから行ってください 。
CERTIFICATE OF PURCHASE
この保証書は、「無料修理規定」記載内容で無料修理を行うことをお約束するもの
です。お買い上げの日から下記期間中に故障が発生した場合は、製品と保証書を
ご 用 意 い た だ き 、フィリップ ス サ ポ ート セ ン タ ー に お 問 い 合 わ せ く だ さ い 。お 客 様
にご記入いただいた個人情報(保証書の控え)は、株式会社フィリップス・ジャパン
のホームページ
http://www.philips.co.jp/
に 掲 載 さ れ て い る「 お 客 様 の
個人情報の取り扱いについての当社の方針」に基づき適切に管理いたします。
★
保証書は再発行しませんので、大切に保管してください。
★
ご販売店様へ
この保証書はお客様へのアフターサービスの実施と責任を明
確にするものです。贈答品、記念品の場合も含めて必ず記入捺印してお客
様に お 渡しくだ さ い 。
品名ボディーグルーマー
品番
BG7025/15
保証期間お買い上げ日より
2
年
対象部分
本体、充電アダプタ(刃、コーム、クリーニングブラシ、ポーチを除く)
お買い上げ日
年 月 日
お客様
ご住所
〒
ご芳名
電話番号
★販売店
販売店名・住所・電話番号
フィリップ ス
ボディーグルーマー
保証書
充電できない
▶充電アダプタの電源コードが断線していませんか?
新しい充電アダプタをお買い求めください。
▶充電アダプタの電源プラグ部はコンセントにきちんと差し込ま
れていますか?
充電アダプタの電源プラグ部をコンセントにきちんと差し込んでください。
▶本体の電源コネクタ受部に充電アダプタの電源コネクタ部がき
ちんと差し込まれていますか?
本体の電源コネクタ受部に充電アダプタの電源コネクタ部をきちんと差し込んで
ください 。
異常な音がする
▶刃に傷が付いていませんか?
▶刃が正しくセットされていますか?
▶刃の掃除はしていますか?
以上の点検により、正常な状態に戻らない場合は、
フィリップスサポートセンターにお問い合わせください。
故 障 か な?と 思 った ら
10
故障かな?と思ったら、お調べください。
充電しても使用時間が極端に短い
▶刃の掃除はしていますか?
▶本製品が完全に止まるまで作動させてからもう一度約
1
時間充電
してください。
▶それでも改善されないときは、充電池の寿命です。
だんだん切れ味が悪くなった
▶刃が損傷または摩耗していませんか?
刃の寿命は約
1
年が目安ですが使用時間・回数により異なります。
破損または摩耗しているときは、刃を交換してください。
電源ボタンを押しても作動しない
▶本体に充電アダプタが接続されていませんか?
充電アダプタを外してください。
▶刃の掃除はしていますか?
▶充電はされていますか?
約
1
時間、充電をしてください。
▶刃と本体が正しくセットされていますか?
お買い上げのお客様へ
初めてご使用になる際は、ご使用前に充電してください。
無料修理規定
13
1.
取扱説明書、本体貼付ラベル等の注意書に従った正常な使用状態で
保証期間内に故障した場合には、無料修理します。
2.
保証期間内に故障して無料修理をお受けになる場合には、フィリップ
スサポートセンターにお問い合わせください。
3.
ご贈答品の修理に関するご相談は、フィリップスサポートセンターに
お問い合わせください。
4.
保証期間内でも次の場合には有料修理になります。
○
1
使用上の誤り及び不当な修理や改造による故障及び損傷。
○
2
お買い上げ後の輸送、移動、落下等による故障及び損傷。
○
3
火災、地震、水害、落雷、その他の天災地変、公害や異常電圧による故障及び損傷。
○
4
一般家庭以外(例えば、業務用の長時間使用)に使用された場合の故障及び損傷。
○
5
保証書の提示がない場合。
○
6
保証書にお買い上げ年月日、お客様名、販売店名の記入のない場合、或は字句を書
き換えられた場合。
※保証書は、本書に明示した条件のもとにおいて無料修理をお約束す
るものです。従って保証書を発行している者(保証責任者)、及びそれ
以外の事業者に対するお客様の法律上の権利を制限するものではあ
りません。
保証期間経過後の修理についてご不明の場合は、フィリップスサポート
センターにお問い合わせください。
※保証期間経過後の修理・補修用性能部品の保有期間について詳しく
は取扱説明書の保証とアフターサービスの項目をご覧ください。
※お客様にご記入いただいた個人情報(保証書の控え)は保証期間内
のサービス活動及びその後の安全点検活動のために利用させてい
ただく場合がございます。ご了承ください。また個人情報は、株式会社
フィリップス・ジャパンのホームページ
http://www.philips.co.jp/
に掲載されている「お客様の個人情報の取り扱いについての当社の
方針」に基づき適切に管理いたします。
〈無料修理規定〉
保証とアフターサービス
11
保証書と修理サービスについて(必ずお読みください。)
保証期間 お買い上げ日から
2
年間
対象部分
本体、充電アダプタ(刃、コーム、クリーニングブラシ、ポーチを除く)
【補修用性能部品の保有期間】
●
補修用性能部品の保有期間は製造打ち切り後
6
年です。
●
性能部品とは、その製品の機能を維持するために必要な部品です。
【ご不明な点や修理に関するご相談は】
●
修理に関するご相談ならびにご不明な点は、フィリップスサポートセンターに
お問い合わせください。
【修理を依頼されるときは】
●
修理をご依頼される前に、この取扱説明書をよくお読みいただき、再度点検く
ださい。尚、異常のあるときはご使用を中止し、フィリップスサポートセンター
にお問い合わせください。
【保証期間中は】
●
製品と保証書をご用意いただき、フィリップスサポートセンターにお問い合わ
せください。保証書の記載内容により無料修理いたします。
【保証期間が過ぎているときは】
●
修理によって商品の機能が維持できる場合は、補修用性能部品の保有期間内
であれば、ご希望により有料で修理させていただきます。
【
海外での本製品の保証及びアフターサービスについて
】
●
本製品の保証は海外においても有効です。(同シリーズ製品の取り扱いがある
国に限ります)
●
日本国以外のフィリップスサービス部門においても保証期間内及び保証期間
の経過後のアフターサービスを受けることができますが、この場合多少日数
を要 することもあります。
●
海外にてアフターサービスを受けられる場合は、現地のフィリップスサービス
部門にお問い合わせください。尚、お困りの点がございましたら下記までご連
絡くださ い 。
Philips Consumer Lifestyle Service Department P.O.Box 20100 9200 CA DRACHTEN
The Netherlands Fax:+31 51 259 2785
【お客様の個人情報のお取り扱いについて】
●
お受けしましたお客様の個人情報は、株式会社フィリップス・ジャパンのホーム
ページ
http://www.philips.co.jp/
に掲載されている「お客様の個人情報
の取り扱いについての当社の方針」に基づき適切に管理いたします。
〈保証書・表面左側に付属〉
●
保証書は、必ず「お買い上げ日・販売店名」等の記入をお確かめのうえ、販売店か
ら受け取っていただき内容をよくお読みのあと大切に保管してください。
お買い上げ日
年 月 日
お買い上げ店名
TEL.
(
)
便利メモ
このような症状の時は、故障や事故防止のため、電源を
OFF
に し 、充 電 ア ダ プ タ を
コンセントから外して、必ずフィリップスサポートセンターにお問い合わせください。
ご使用の時、このような症状はありませんか?
●
本体にさわると時々電気を感じる。
●こげくさい 臭 い がする。
●
電源コ ード部を動 かすと通 電したり、しなかったりする。
●
その他の異常、故障がある。
仕様
12
品 番
BG7025/15
電 源 方 式 充電式(専用充電アダプタ使用)
充電アダプタ品番
HQ8505
消 費 電 力
9W
(
AC100V
充電時)
定 格 電 圧
AC100-240V
(
50/60Hz
)
本 体 質 量 約
202g
(コーム含まず)
充 電 時 間 約
1
時間
替 刃 品 番
TT2000
※改良の為、仕様を予告なく変更することがあります。
株式会社
フィリップ ス・ジャ パ ン
〒
108-8507
東京都港区港南
2-13-37
フィリップ ス ビ ル
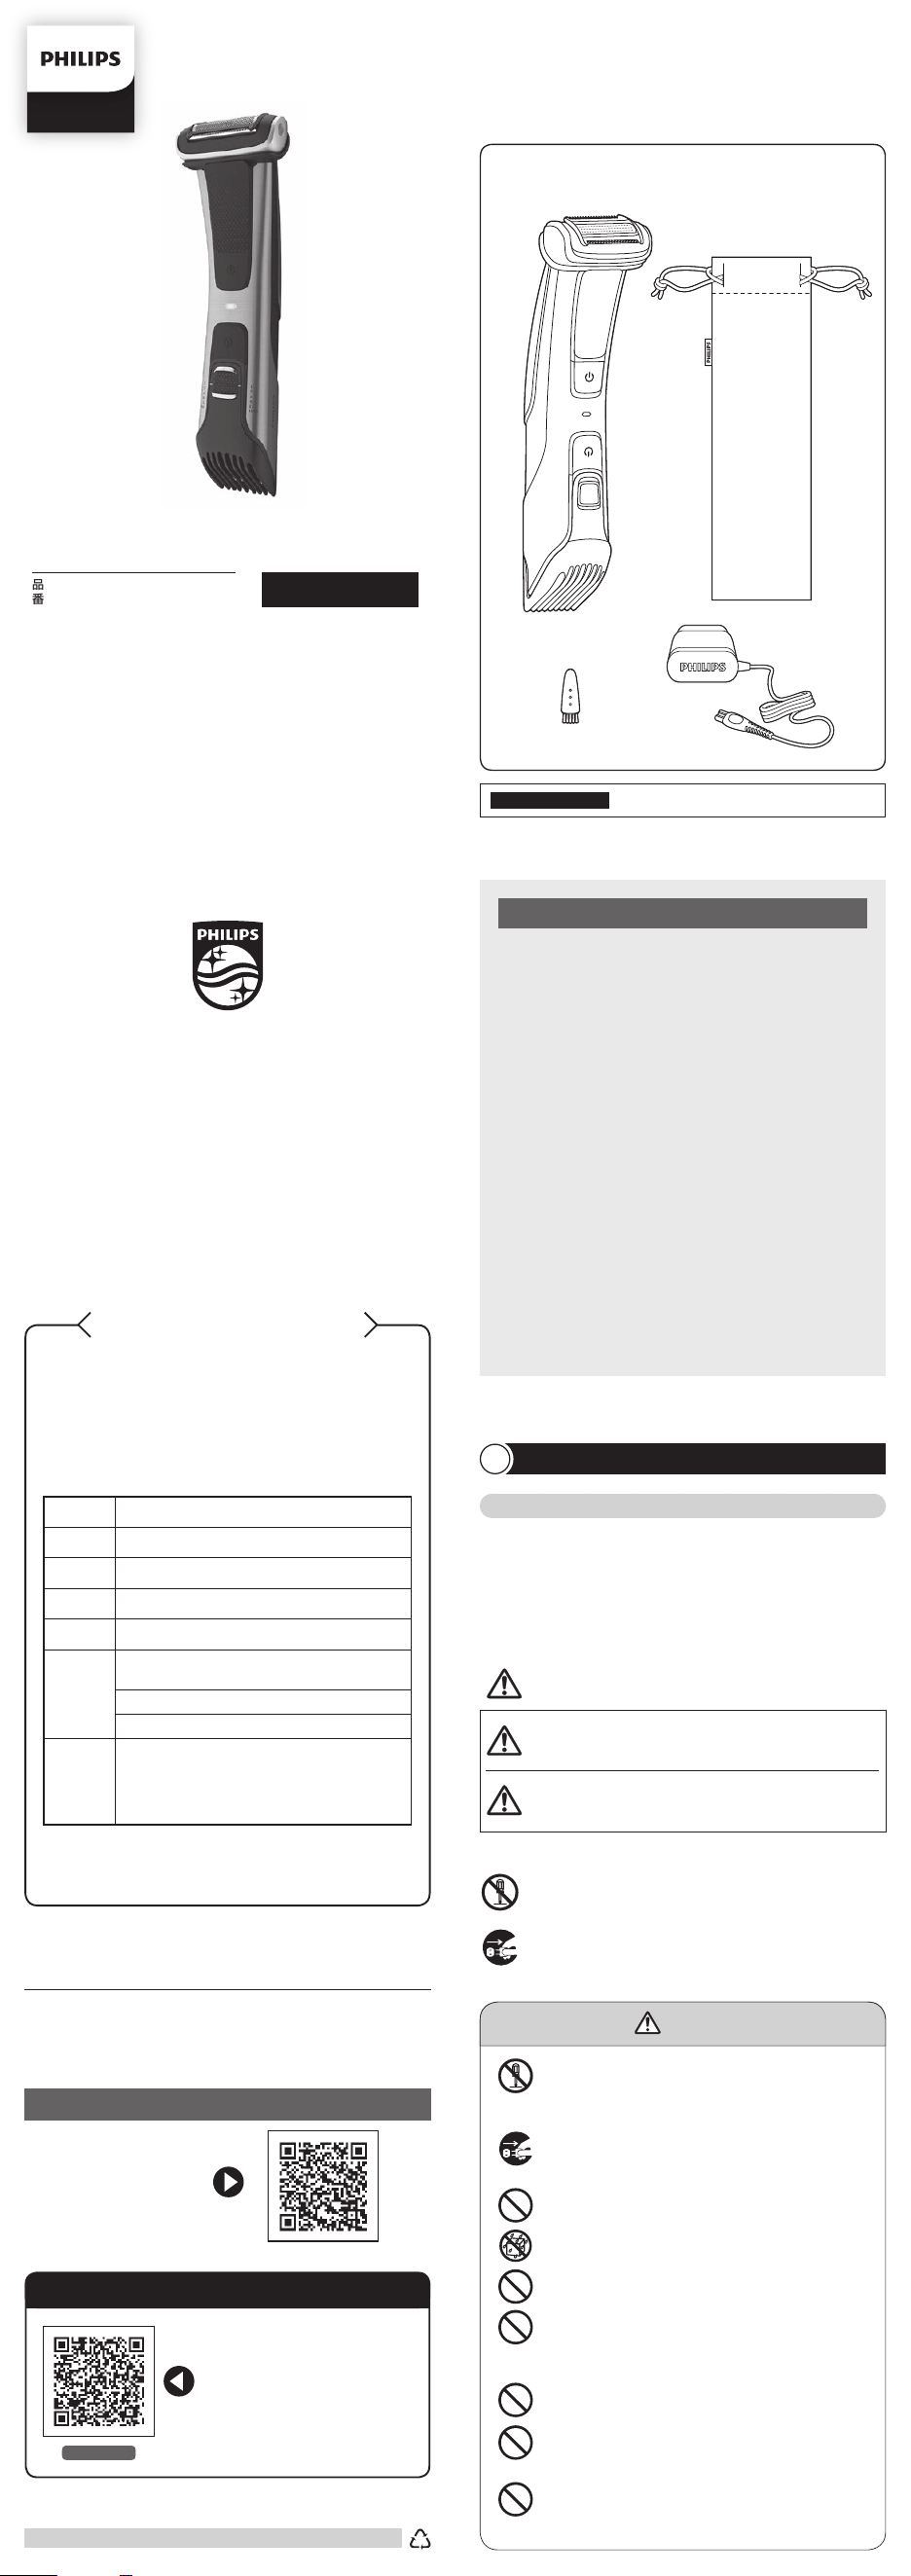
充電アダプタ
クリー ニングブラシ
ポーチ
本体
●
本体ならびに充電アダプタは改造しないでください。また、
分 解したり修 理 をしな い でくだ さ い 。 火 災 、 感 電 、ケガ の 原
因となります。修理はフィリップスサポートセンターにお問い
合わせくだ さい 。
●
お手入れの際は必ず充電アダプタの電源プラグをコンセント
から抜いてください。 また、濡れた手で抜き差ししないでく
ださい。感電やケガをすることがあります。
●
充電アダプタが傷んだり、コンセントの差込みが緩いときは
使用しないでください。感電・ショート・発火の原因になります。
●
充電アダプタを水につけたり、水をかけたりしないでくださ
い。故障や、ショート・感電の原因になります。
●
本体を水洗いする場合は、必ずコンセントから電源プラグを
抜いてください。
●
充電アダプタを傷付けたり、電源コードを無理に曲げたり、
引っ張ったり、ねじったり、たばねたり、 重い 物を載 せ たり、
挟み込んだり、加工したりしないでください。電源コードが
破損し、火災・感電の原因となります。
●
乳幼児の手の届くところに本製品を置かないでください。
●
充電アダプタには変圧器が内蔵されています。充電アダプ
タを切り離して別のプラグに接続するのは危険ですのでおや
めください。
●
自分で意思表示ができない人(幼児を含む)に使用させな
いでください。また、お体の不自由な人だけでは使用しな
いでください 。
警 告
※
充電完了後、約
30
分経過すると充電表示ラ
ンプが消えます。
4
充電中は、充電表示ランプが白色に
ゆっくりと点滅します。充電が完了し
たら、充電表示ランプが白色に点灯し
ます。
ポイント
●充電中、テレビ等に雑音が入る場合、別のコンセントで充電してください。
●充電・ご使用中は本体・充電アダプタが多少熱くなりますが、異常ではあ
りません。
●充電池の寿命は使用・保管などの状態により異なります。
注意
●専用の充電アダプタ以外での充電はしないでください。
●長期間使用しない場合は、充電池が過放電や液漏れして使えなくなる
ことがあります。
3
〜4カ月に一度は充電してください。
●本製品はコンセントに差したまま使用はできません。
充電の仕方
3
初めてお使いになるときや、長い間ご使用にならなかったときは、ご使用前に充電してく
ださい。充電時間は約
1
時間です。海外(
100
〜
240V
)でのご使用も可能です。ただし、
コンセントの形状や電圧など現地で充分お確かめのうえご使用ください。
※本製品はリチウムイオン電池を使用しているため、ご使用の都度充電をしても充電池
の寿命には影響ありません。
お客様による充電池の交換はできません。
浴室で充電をしないでください。
この商品は通常約
1
時間充電です。
満充電で約
80
分使用できます。
1
充電表示ランプがオレンジ色に点滅し
たら、充電が少なくなっていますので、
本製品を充電する必要があります。
2
充電する際には、電源を必ず
OFF
にし
てください 。
※
ON
の状態では充電できません。
3
本体裏側の充電コネクタ受部カバー
を外し(①)、充電アダプタの電源コネ
クタ部を、本体の電源コネクタ受部に
差し込み(②)、充電アダプタの電源
プラグ部をコンセントに差し込みます。
2
1
トリミングの際は必ずコームを付けてご使用ください。コームを装着せずにカットすると、
刃が触れた部分の体毛が短くカットされますのでご注意ください。
トリミングの仕方
5
3
トリミング部電源を
ON
にしま す 。
1
トリミング部 が 上に、シェービング 部 が 下 にくるようにして ボディー
グルーマーを持ちます。
1
2
2
長さ調整ボタン①を押して、②コームを
お好みの長さ位置までスライドさせます。
コームを使用した場合の仕上がりの
長さは下の表の通りです。
長さ調整目盛
1 2 3 4 5
仕上がりの長さ
3mm 5mm 7mm 9mm 1 1mm
ポ イ ント
●使い始めは、コームを
7mm
に設定し、トリミングすることをおすすめします。
●
カットの仕上がりが均一になるように、コームの平らな部分を常に皮膚に密着
させ 、強く押しつけ ず 、す べらすように動 かしてくださ い 。
●
体毛は部位によって毛の向きが異なります。毛の向きに合わせて、カットする
方向(上下・左右)を変えてみてください。
●皮膚や体毛は、乾いている方がよりスムーズにトリミングできます。
4
体 毛 の 流 れに逆らうようにしてボディー
グルーマーの網刃を皮膚に強く押し
つけず、すべらすように動かします。コ ー ム
の先端は、ボディーグルーマーを動かす
方向に向けてください。
※皮膚に強く押しつけないでください。
破損または故障の原因となります。
ボディーシェービングする際は、ボディーグルーマーの網刃を皮膚に強く押し
つけないでください。
ボディーシェービングの仕方
6
注意
シェービング部をご使用になる前に、刃の損傷や消耗がないか必ず確認し
てください。ケガの原因になりますので、シェービング部や刃に損傷や消
耗がある場合は、シェービング部を使わないでください。刃に損傷が見ら
れる場合は、必ず新しい刃にお取り替えいただき安全にご使用ください。
ポ イ ント
●空いている方の手を使って皮膚を伸ばし、毛がまっすぐに立つようにします。
●刃が皮膚にぴったり触れるようにしてください。
●
デリケートな部分を初めて剃る際には、ボディーグルーマーをゆっくり動かし
て様子をみてください。肌が慣れるまでに、少し時間がかかります。
●
体毛の長さが
10mm
以上ある場合には、先にトリミングをしておくとボディー
シェービングがしやすくなります。
3
手で皮膚を伸ばしながら、ボディーグルーマーを軽く押さえたまま体
毛 の 流 れに逆らうようにして 動 かします。
※皮膚に強く押しつけないでください。破損または故障の原因となります。
2
シェービング部電源を
ON
にしま す 。
1
シェービング部 が 上 に、トリミング部 が 下 にくるようにしてボディー
グルーマーを持ちます。
2
刃の中央部に親指を当てて刃を矢印
の方向に押して、開きます。
1
長さ調整ボタンを押しながら(①)
コームをスライドさせ、本体から取り
外します(②)。
1
2
3
付属のクリーニングブラシで刃と
本体を掃除し、ぬるま湯または水で
洗い流します。
4
刃と本体を充分に乾燥させた後、カチッと音がするまで刃を本体に押
し込み、元の状態に戻します。また、コームを長さ調整ボタンを押しな
がら(①)、装着します(②)。
1
2
製品を廃棄するとき
9
注意
●製品を廃棄するとき以外は、絶対に本体を分解しないでください。
●本体内部の金具は鋭いので、ご注意ください。
●分解する際は、必ず電源を
OFF
にしてください。
リチウムイオン電池のリサイクルについて
本製品はリチウムイオン電池を使用していま
す。リチウムイオン電池はリサイクル可能な貴
重な資源です。ご使用済みの製品の廃棄に際し
ては、リチウムイオン電池を取り出し、各自治体の処理方法に従い、リサイ
クル協力店にお持ちください。
Li-ion
※お客様による充電池の修理交換はできません。
充電池の取り外し方
8
最後に電子基盤と充電池を繋げる留め金を切り離し、充電池を取り
外します。
●電源を
ON
にして、完 全に動作しなくなるまで充電 池を放 電させてから、
行ってください 。
※充電池を取り外した後は、通電しないでください。
※ショートしないように充電池の端子をテープで覆ってください。
1
トリマーの刃を親指で押し上げて
開き、プラスドライバーを使ってトリ
ミング部の上部内側にある
2
つのネジ
を外します。
2
マイナスドライバーを本体カバーの内側と金属プレートの間にこじ
入れすき間を作り、モーターユニットを引き抜きます。
4
シェービングヘッドを引き抜き、プラスドライバーを使ってシェー
ビング部の上部内側にある
2
つのネジを外します。
5
本体裏側のカバーを外し、プラスドライバーを使って内側にある2つの
ネジを外します。
3
マイナスドライバーをシェービングヘッドと本体の接合部へこじ入れ
ます。
6
マイナスドライバーを使って背面カバーのツメを外し、内部ユニット
を取り出します。
7
プラスドライバーを使って内部ユニットにある
4
つ の ネ ジ を 外 し 、内
部の充電器ユニットと内部ユニット本体の間にマイナスドライバーを
こじ入れ、充電器ユニットを取り外します。
●
ボディーグルーマーは、首から下の体毛(腕、足、ワキ、胸など)の長さを整
えたり、ボ ディーシェービング することができます 。
●
本製品は、濡れている状態でも乾いている状態でもお使いいただけます。
注意
ヒゲを剃ったり頭髪を刈るなど、本来の目的以外で使用しないでください。
基本的な使い方
4
製品本体に充電アダプタを差したまま使用はできません。
※使用後は電源を
OFF
にし、ご使用のたびに掃除をしてください。
電源の
ON/OFF
動作していない状態で電源ボタンを
1
回押すと
ON
、も う
1
回押すと
OFF
になります 。
トリミング部
電源ボタン
シェービング 部
電源ボタン
トリミングする時
体毛の長さを整える時は
トリミング部を使用します。
トリミング部
シェービング部
ボディーシェービングする時
体毛を残さずボディーシェービ
ングしたい時はシェービング部
を使用します
。
特によく使う、腕、ワキ、足をきれいに整える方法です。
ボディー シェービングのコツ
7
1
腕
体の外側から内側に向かってボ
ディー シェービングします。
3
足
体毛の流れに逆らうように、足首
の 方 か ら 、ひ ざ に 向 か っ て ボ
ディー シェービングします 。
2
ワキ
腕を上げて、皮膚をなるべく伸ば
した状態でボディーシェービング
します。ボディーシェービングす
る方向を上下、左右に変えながら
念 入りに剃っていきます 。
注意
●圧縮空気、研磨パッド、研磨洗浄剤、ペトロールやアセトンなどの刺激
性の強い液体は絶対に使わないでください。
●本製品に潤滑剤を使う必要はありません。
●充電アダプタは絶対に濡らさないでください。
●本体は水洗いできますが、水中に浸けないでください。
お手入れ方法
8
※本製品はご使用のたびに掃除をしてください。
刃の 取り替え
トリミング部の刃やシェービング部の網刃が破損・磨耗した場合は、フィ
リップスサポートセンターにお問い合わせいただき、同型部品をご注文
ください 。
1
掃除をする前に、電源が
OFF
になっていることを 確かめてく
ださい。
2
ボディーグルーマー本体を水で洗い流します。
トリミング部のお手入れ
注意
●刃、網刃は非常に壊れやすいので、取扱いには充分ご注意ください。
●刃、網刃が損傷している場合には、すぐに交換してください。
●網刃の寿命は約
1
年が目安ですが、使用時間、回数により異なります。
2
取り外した網刃をぬるま湯または水で
洗い流します。網刃を傷つけるおそれ
があるため、クリーニングブラシを使っ
て掃除しないでください。
3
シェービング部をぬるま湯または水
で洗い流します。
4
網刃と本体を充分に乾燥させた後、カ
チッと音がするまで刃を本体に押し込
み、元の状態に戻します。
1
網刃を本体から取り外します。刃の上
下を持って引っ張ると簡単に外れま
す。
シェービング部のお手入れ
本体
/
充電アダプタ
クリーニングブラシ
ポーチ
各部の名称
2
1
8
15
17
9
16
2
11
3
4
5
6
7
14
13
19
18
12
10
電源コード部
充電アダプタ部
電源プラグ部
電源コネクタ部
シェービング部電源ボタン
トリミング部電源ボタン
長さ調整ボタン
充電表示ランプ
電源コネクタ受部
コーム
網刃
取扱説明書
フィリップスでは、製品をより快適に
ご使用いただくために
製品登録をおすすめしております。
MyPhilips
では製品の保証書や
購入証明書の写真も保管でき、
万が一購入証明書を紛失された場合
にも安心です。
http://www.philips.co.jp/myphilips-about
URL
MyPhilips
登録のご案内
製品の使用方法や修理に関するお問い合わせ
★
受付時間:
9
:
00
〜
18
:
00
(年末年始除く)
0120
(
944
)
859
フィリップ ス サ ポ ート セ ン タ ー
Web
からの
お問い合わせ
この印刷物は再生紙を使用しております。
フィリップ ス
ボディーグ ルーマー
BG7025/15
品番
Bodygroom
©2019 Philips Japan, Ltd.
4222.002.9078.1
(
04/19
)
①
必ずお守りください
②
各部の名称
③
充電の仕方
④
基本的な使い方
⑤
トリミングの仕方
⑥
ボディーシェービングの仕方
⑦
ボディー シェービング のコツ
⑧
お手入れ方法
⑨
製品を廃棄するとき
⑩
故障かな
?
と思ったら
⑪
保証とアフターサービス
⑫
仕様
⑬
無料修理規定
Guidance in English
目 次
フィリップ ス
ボディーグルーマーをお買い上げいただき、まこと
にありがとうございます。長い間ご愛用いただくために、ご使用前に
この取扱説明書をよくお読みのうえ、正しくお使いください。また、
お読みになった後は、お使いになる方がいつでも見られるところに
必ず保管してください。
●商品のご確認
商品をご確認ください。
本体
必ずお守りください
1
●ここに示した注意事項は、安全に関する重要な内容ですので、必
ず守ってください。
●誤った取扱いをしたときに想定される内容を「警告」と「注意」とに
区分けしています。
安 全 上 の ご 注 意
○絵表示の例
記号は、してはいけない「禁止」を示します。図の中や近くに具体的
な禁止内容(左図の場合は分解禁止)を示します。
記号は、必ずしていただく「強制」を示します。図の中や近くに具
体的な強制内容(左図の場合は電源プラグをコンセントから抜く
こ と )を 示 し ま す 。
○絵表示について
記号は、「警告、注意」を示します。
図の中や近くに具体的な注意内容を示します。
人が傷害を負う可能性及び物的損害の発生が想定され
る内容。
注意
人が死亡または重傷を負う可能性が想定される内容。
警告
注 意
●
本製品は、人の首から下のムダ毛を処理するためのもので
す。ヒゲを剃ったり頭髪を刈るなど、それ以外の目的で使用し
ないでください 。
●
充電アダプタの電源プラグを抜くときは、電源コード部を持
たずに必ず先端の充電アダプタ部を持って引き抜いてくださ
い。感電やショートして発火することがあります。
●
充電時以外は、充電アダプタをコンセントから抜いてくださ
い。ケガややけど、絶縁劣化による感電・漏電・火災の原因
となります。
●
充電アダプタは付属の専用アダプタを使用してください。ま
た付属の専用アダプタで他の商品を充電しないでください。
ショート、異常発熱による発火の原因になります。破損、故
障した場合は、事故を避けるために必ずフィリップス社製の
同型充電アダプタをお求めください。
●
刃は強く押さえないでください。破損して皮膚を傷つけるこ
とがあります 。
●
刃やコームなどの部品が破損または故障した場合は、本製品
を使用しないでください。ケガの原因になります。交換の際
には必ずフィリップス社製の同型部品とお取り替えください。
●
電源コネクタ受部にピンやごみを付着させないでください。
感電・ショート・発火の原因になります。
10.
本体は防水加工をしておりますが、水や液体の中に浸けないでください。
11.
プラグ式消臭・芳香剤を使用しているコンセントあるいはその近くのコンセ
ントに充電アダプタを接続しないでください。充電アダプタを傷める原因と
なりま す 。
3 .
刃 は 、薄 く 仕 上 げ て あ り ま す の で 、刃 部 を 強 く 押 さ え た り 、硬 い も の に 当
てないよう、ていねいに扱ってください。
5 .
切れ味が衰えてきたり、刃やコームなどの部品が破損した場合は、使用
せず必ず新しい同型部品と交換してください。
6 .
直射日光の当たる場所には保管しないでください。夏場、車の中に放置し
ないでください。
7 .
乳幼児の手の届かないところに保管してください。
8 .
本 製 品 は 、使 用 の 都 度 、掃 除 を し て く だ さ い 。
9 .
衛生上、他の人とは共有しないでください。
使 用 上 の ご 注 意
1 .
60
℃以上の熱湯で洗浄しないでください。
2 .
本製品の使用、充電、保管は室温
5
℃〜
35
℃の環境下で行ってください
(尚、低温や高温で充電すると、充電池の寿命が短くなります)。
4 .
刃の清掃やコームの着脱は必ず電源を
OFF
にしてから行ってください 。
CERTIFICATE OF PURCHASE
この保証書は、「無料修理規定」記載内容で無料修理を行うことをお約束するもの
です。お買い上げの日から下記期間中に故障が発生した場合は、製品と保証書を
ご 用 意 い た だ き 、フィリップ ス サ ポ ート セ ン タ ー に お 問 い 合 わ せ く だ さ い 。お 客 様
にご記入いただいた個人情報(保証書の控え)は、株式会社フィリップス・ジャパン
のホームページ
http://www.philips.co.jp/
に 掲 載 さ れ て い る「 お 客 様 の
個人情報の取り扱いについての当社の方針」に基づき適切に管理いたします。
★
保証書は再発行しませんので、大切に保管してください。
★
ご販売店様へ
この保証書はお客様へのアフターサービスの実施と責任を明
確にするものです。贈答品、記念品の場合も含めて必ず記入捺印してお客
様に お 渡しくだ さ い 。
品名ボディーグルーマー
品番
BG7025/15
保証期間お買い上げ日より
2
年
対象部分
本体、充電アダプタ(刃、コーム、クリーニングブラシ、ポーチを除く)
お買い上げ日
年 月 日
お客様
ご住所
〒
ご芳名
電話番号
★販売店
販売店名・住所・電話番号
フィリップ ス
ボディーグルーマー
保証書
充電できない
▶充電アダプタの電源コードが断線していませんか?
新しい充電アダプタをお買い求めください。
▶充電アダプタの電源プラグ部はコンセントにきちんと差し込ま
れていますか?
充電アダプタの電源プラグ部をコンセントにきちんと差し込んでください。
▶本体の電源コネクタ受部に充電アダプタの電源コネクタ部がき
ちんと差し込まれていますか?
本体の電源コネクタ受部に充電アダプタの電源コネクタ部をきちんと差し込んで
ください 。
異常な音がする
▶刃に傷が付いていませんか?
▶刃が正しくセットされていますか?
▶刃の掃除はしていますか?
以上の点検により、正常な状態に戻らない場合は、
フィリップスサポートセンターにお問い合わせください。
故 障 か な?と 思 った ら
10
故障かな?と思ったら、お調べください。
充電しても使用時間が極端に短い
▶刃の掃除はしていますか?
▶本製品が完全に止まるまで作動させてからもう一度約
1
時間充電
してください。
▶それでも改善されないときは、充電池の寿命です。
だんだん切れ味が悪くなった
▶刃が損傷または摩耗していませんか?
刃の寿命は約
1
年が目安ですが使用時間・回数により異なります。
破損または摩耗しているときは、刃を交換してください。
電源ボタンを押しても作動しない
▶本体に充電アダプタが接続されていませんか?
充電アダプタを外してください。
▶刃の掃除はしていますか?
▶充電はされていますか?
約
1
時間、充電をしてください。
▶刃と本体が正しくセットされていますか?
お買い上げのお客様へ
初めてご使用になる際は、ご使用前に充電してください。
無料修理規定
13
1.
取扱説明書、本体貼付ラベル等の注意書に従った正常な使用状態で
保証期間内に故障した場合には、無料修理します。
2.
保証期間内に故障して無料修理をお受けになる場合には、フィリップ
スサポートセンターにお問い合わせください。
3.
ご贈答品の修理に関するご相談は、フィリップスサポートセンターに
お問い合わせください。
4.
保証期間内でも次の場合には有料修理になります。
○
1
使用上の誤り及び不当な修理や改造による故障及び損傷。
○
2
お買い上げ後の輸送、移動、落下等による故障及び損傷。
○
3
火災、地震、水害、落雷、その他の天災地変、公害や異常電圧による故障及び損傷。
○
4
一般家庭以外(例えば、業務用の長時間使用)に使用された場合の故障及び損傷。
○
5
保証書の提示がない場合。
○
6
保証書にお買い上げ年月日、お客様名、販売店名の記入のない場合、或は字句を書
き換えられた場合。
※保証書は、本書に明示した条件のもとにおいて無料修理をお約束す
るものです。従って保証書を発行している者(保証責任者)、及びそれ
以外の事業者に対するお客様の法律上の権利を制限するものではあ
りません。
保証期間経過後の修理についてご不明の場合は、フィリップスサポート
センターにお問い合わせください。
※保証期間経過後の修理・補修用性能部品の保有期間について詳しく
は取扱説明書の保証とアフターサービスの項目をご覧ください。
※お客様にご記入いただいた個人情報(保証書の控え)は保証期間内
のサービス活動及びその後の安全点検活動のために利用させてい
ただく場合がございます。ご了承ください。また個人情報は、株式会社
フィリップス・ジャパンのホームページ
http://www.philips.co.jp/
に掲載されている「お客様の個人情報の取り扱いについての当社の
方針」に基づき適切に管理いたします。
〈無料修理規定〉
保証とアフターサービス
11
保証書と修理サービスについて(必ずお読みください。)
保証期間 お買い上げ日から
2
年間
対象部分
本体、充電アダプタ(刃、コーム、クリーニングブラシ、ポーチを除く)
【補修用性能部品の保有期間】
●
補修用性能部品の保有期間は製造打ち切り後
6
年です。
●
性能部品とは、その製品の機能を維持するために必要な部品です。
【ご不明な点や修理に関するご相談は】
●
修理に関するご相談ならびにご不明な点は、フィリップスサポートセンターに
お問い合わせください。
【修理を依頼されるときは】
●
修理をご依頼される前に、この取扱説明書をよくお読みいただき、再度点検く
ださい。尚、異常のあるときはご使用を中止し、フィリップスサポートセンター
にお問い合わせください。
【保証期間中は】
●
製品と保証書をご用意いただき、フィリップスサポートセンターにお問い合わ
せください。保証書の記載内容により無料修理いたします。
【保証期間が過ぎているときは】
●
修理によって商品の機能が維持できる場合は、補修用性能部品の保有期間内
であれば、ご希望により有料で修理させていただきます。
【
海外での本製品の保証及びアフターサービスについて
】
●
本製品の保証は海外においても有効です。(同シリーズ製品の取り扱いがある
国に限ります)
●
日本国以外のフィリップスサービス部門においても保証期間内及び保証期間
の経過後のアフターサービスを受けることができますが、この場合多少日数
を要 することもあります。
●
海外にてアフターサービスを受けられる場合は、現地のフィリップスサービス
部門にお問い合わせください。尚、お困りの点がございましたら下記までご連
絡くださ い 。
Philips Consumer Lifestyle Service Department P.O.Box 20100 9200 CA DRACHTEN
The Netherlands Fax:+31 51 259 2785
【お客様の個人情報のお取り扱いについて】
●
お受けしましたお客様の個人情報は、株式会社フィリップス・ジャパンのホーム
ページ
http://www.philips.co.jp/
に掲載されている「お客様の個人情報
の取り扱いについての当社の方針」に基づき適切に管理いたします。
〈保証書・表面左側に付属〉
●
保証書は、必ず「お買い上げ日・販売店名」等の記入をお確かめのうえ、販売店か
ら受け取っていただき内容をよくお読みのあと大切に保管してください。
お買い上げ日
年 月 日
お買い上げ店名
TEL.
(
)
便利メモ
このような症状の時は、故障や事故防止のため、電源を
OFF
に し 、充 電 ア ダ プ タ を
コンセントから外して、必ずフィリップスサポートセンターにお問い合わせください。
ご使用の時、このような症状はありませんか?
●
本体にさわると時々電気を感じる。
●こげくさい 臭 い がする。
●
電源コ ード部を動 かすと通 電したり、しなかったりする。
●
その他の異常、故障がある。
仕様
12
品 番
BG7025/15
電 源 方 式 充電式(専用充電アダプタ使用)
充電アダプタ品番
HQ8505
消 費 電 力
9W
(
AC100V
充電時)
定 格 電 圧
AC100-240V
(
50/60Hz
)
本 体 質 量 約
202g
(コーム含まず)
充 電 時 間 約
1
時間
替 刃 品 番
TT2000
※改良の為、仕様を予告なく変更することがあります。
株式会社
フィリップ ス・ジャ パ ン
〒
108-8507
東京都港区港南
2-13-37
フィリップ ス ビ ル
充電アダプタ
クリー ニングブラシ
ポーチ
本体
●
本体ならびに充電アダプタは改造しないでください。また、
分 解したり修 理 をしな い でくだ さ い 。 火 災 、 感 電 、ケガ の 原
因となります。修理はフィリップスサポートセンターにお問い
合わせくだ さい 。
●
お手入れの際は必ず充電アダプタの電源プラグをコンセント
から抜いてください。 また、濡れた手で抜き差ししないでく
ださい。感電やケガをすることがあります。
●
充電アダプタが傷んだり、コンセントの差込みが緩いときは
使用しないでください。感電・ショート・発火の原因になります。
●
充電アダプタを水につけたり、水をかけたりしないでくださ
い。故障や、ショート・感電の原因になります。
●
本体を水洗いする場合は、必ずコンセントから電源プラグを
抜いてください。
●
充電アダプタを傷付けたり、電源コードを無理に曲げたり、
引っ張ったり、ねじったり、たばねたり、 重い 物を載 せ たり、
挟み込んだり、加工したりしないでください。電源コードが
破損し、火災・感電の原因となります。
●
乳幼児の手の届くところに本製品を置かないでください。
●
充電アダプタには変圧器が内蔵されています。充電アダプ
タを切り離して別のプラグに接続するのは危険ですのでおや
めください。
●
自分で意思表示ができない人(幼児を含む)に使用させな
いでください。また、お体の不自由な人だけでは使用しな
いでください 。
警 告
※
充電完了後、約
30
分経過すると充電表示ラ
ンプが消えます。
4
充電中は、充電表示ランプが白色に
ゆっくりと点滅します。充電が完了し
たら、充電表示ランプが白色に点灯し
ます。
ポイント
●充電中、テレビ等に雑音が入る場合、別のコンセントで充電してください。
●充電・ご使用中は本体・充電アダプタが多少熱くなりますが、異常ではあ
りません。
●充電池の寿命は使用・保管などの状態により異なります。
注意
●専用の充電アダプタ以外での充電はしないでください。
●長期間使用しない場合は、充電池が過放電や液漏れして使えなくなる
ことがあります。
3
〜4カ月に一度は充電してください。
●本製品はコンセントに差したまま使用はできません。
充電の仕方
3
初めてお使いになるときや、長い間ご使用にならなかったときは、ご使用前に充電してく
ださい。充電時間は約
1
時間です。海外(
100
〜
240V
)でのご使用も可能です。ただし、
コンセントの形状や電圧など現地で充分お確かめのうえご使用ください。
※本製品はリチウムイオン電池を使用しているため、ご使用の都度充電をしても充電池
の寿命には影響ありません。
お客様による充電池の交換はできません。
浴室で充電をしないでください。
この商品は通常約
1
時間充電です。
満充電で約
80
分使用できます。
1
充電表示ランプがオレンジ色に点滅し
たら、充電が少なくなっていますので、
本製品を充電する必要があります。
2
充電する際には、電源を必ず
OFF
にし
てください 。
※
ON
の状態では充電できません。
3
本体裏側の充電コネクタ受部カバー
を外し(①)、充電アダプタの電源コネ
クタ部を、本体の電源コネクタ受部に
差し込み(②)、充電アダプタの電源
プラグ部をコンセントに差し込みます。
2
1
トリミングの際は必ずコームを付けてご使用ください。コームを装着せずにカットすると、
刃が触れた部分の体毛が短くカットされますのでご注意ください。
トリミングの仕方
5
3
トリミング部電源を
ON
にしま す 。
1
トリミング部 が 上に、シェービング 部 が 下 にくるようにして ボディー
グルーマーを持ちます。
1
2
2
長さ調整ボタン①を押して、②コームを
お好みの長さ位置までスライドさせます。
コームを使用した場合の仕上がりの
長さは下の表の通りです。
長さ調整目盛
1 2 3 4 5
仕上がりの長さ
3mm 5mm 7mm 9mm 1 1mm
ポ イ ント
●使い始めは、コームを
7mm
に設定し、トリミングすることをおすすめします。
●
カットの仕上がりが均一になるように、コームの平らな部分を常に皮膚に密着
させ 、強く押しつけ ず 、す べらすように動 かしてくださ い 。
●
体毛は部位によって毛の向きが異なります。毛の向きに合わせて、カットする
方向(上下・左右)を変えてみてください。
●皮膚や体毛は、乾いている方がよりスムーズにトリミングできます。
4
体 毛 の 流 れに逆らうようにしてボディー
グルーマーの網刃を皮膚に強く押し
つけず、すべらすように動かします。コ ー ム
の先端は、ボディーグルーマーを動かす
方向に向けてください。
※皮膚に強く押しつけないでください。
破損または故障の原因となります。
ボディーシェービングする際は、ボディーグルーマーの網刃を皮膚に強く押し
つけないでください。
ボディーシェービングの仕方
6
注意
シェービング部をご使用になる前に、刃の損傷や消耗がないか必ず確認し
てください。ケガの原因になりますので、シェービング部や刃に損傷や消
耗がある場合は、シェービング部を使わないでください。刃に損傷が見ら
れる場合は、必ず新しい刃にお取り替えいただき安全にご使用ください。
ポ イ ント
●空いている方の手を使って皮膚を伸ばし、毛がまっすぐに立つようにします。
●刃が皮膚にぴったり触れるようにしてください。
●
デリケートな部分を初めて剃る際には、ボディーグルーマーをゆっくり動かし
て様子をみてください。肌が慣れるまでに、少し時間がかかります。
●
体毛の長さが
10mm
以上ある場合には、先にトリミングをしておくとボディー
シェービングがしやすくなります。
3
手で皮膚を伸ばしながら、ボディーグルーマーを軽く押さえたまま体
毛 の 流 れに逆らうようにして 動 かします。
※皮膚に強く押しつけないでください。破損または故障の原因となります。
2
シェービング部電源を
ON
にしま す 。
1
シェービング部 が 上 に、トリミング部 が 下 にくるようにしてボディー
グルーマーを持ちます。
2
刃の中央部に親指を当てて刃を矢印
の方向に押して、開きます。
1
長さ調整ボタンを押しながら(①)
コームをスライドさせ、本体から取り
外します(②)。
1
2
3
付属のクリーニングブラシで刃と
本体を掃除し、ぬるま湯または水で
洗い流します。
4
刃と本体を充分に乾燥させた後、カチッと音がするまで刃を本体に押
し込み、元の状態に戻します。また、コームを長さ調整ボタンを押しな
がら(①)、装着します(②)。
1
2
製品を廃棄するとき
9
注意
●製品を廃棄するとき以外は、絶対に本体を分解しないでください。
●本体内部の金具は鋭いので、ご注意ください。
●分解する際は、必ず電源を
OFF
にしてください。
リチウムイオン電池のリサイクルについて
本製品はリチウムイオン電池を使用していま
す。リチウムイオン電池はリサイクル可能な貴
重な資源です。ご使用済みの製品の廃棄に際し
ては、リチウムイオン電池を取り出し、各自治体の処理方法に従い、リサイ
クル協力店にお持ちください。
Li-ion
※お客様による充電池の修理交換はできません。
充電池の取り外し方
8
最後に電子基盤と充電池を繋げる留め金を切り離し、充電池を取り
外します。
●電源を
ON
にして、完 全に動作しなくなるまで充電 池を放 電させてから、
行ってください 。
※充電池を取り外した後は、通電しないでください。
※ショートしないように充電池の端子をテープで覆ってください。
1
トリマーの刃を親指で押し上げて
開き、プラスドライバーを使ってトリ
ミング部の上部内側にある
2
つのネジ
を外します。
2
マイナスドライバーを本体カバーの内側と金属プレートの間にこじ
入れすき間を作り、モーターユニットを引き抜きます。
4
シェービングヘッドを引き抜き、プラスドライバーを使ってシェー
ビング部の上部内側にある
2
つのネジを外します。
5
本体裏側のカバーを外し、プラスドライバーを使って内側にある2つの
ネジを外します。
3
マイナスドライバーをシェービングヘッドと本体の接合部へこじ入れ
ます。
6
マイナスドライバーを使って背面カバーのツメを外し、内部ユニット
を取り出します。
7
プラスドライバーを使って内部ユニットにある
4
つ の ネ ジ を 外 し 、内
部の充電器ユニットと内部ユニット本体の間にマイナスドライバーを
こじ入れ、充電器ユニットを取り外します。
●
ボディーグルーマーは、首から下の体毛(腕、足、ワキ、胸など)の長さを整
えたり、ボ ディーシェービング することができます 。
●
本製品は、濡れている状態でも乾いている状態でもお使いいただけます。
注意
ヒゲを剃ったり頭髪を刈るなど、本来の目的以外で使用しないでください。
基本的な使い方
4
製品本体に充電アダプタを差したまま使用はできません。
※使用後は電源を
OFF
にし、ご使用のたびに掃除をしてください。
電源の
ON/OFF
動作していない状態で電源ボタンを
1
回押すと
ON
、も う
1
回押すと
OFF
になります 。
トリミング部
電源ボタン
シェービング 部
電源ボタン
トリミングする時
体毛の長さを整える時は
トリミング部を使用します。
トリミング部
シェービング部
ボディーシェービングする時
体毛を残さずボディーシェービ
ングしたい時はシェービング部
を使用します
。
特によく使う、腕、ワキ、足をきれいに整える方法です。
ボディー シェービングのコツ
7
1
腕
体の外側から内側に向かってボ
ディー シェービングします。
3
足
体毛の流れに逆らうように、足首
の 方 か ら 、ひ ざ に 向 か っ て ボ
ディー シェービングします 。
2
ワキ
腕を上げて、皮膚をなるべく伸ば
した状態でボディーシェービング
します。ボディーシェービングす
る方向を上下、左右に変えながら
念 入りに剃っていきます 。
注意
●圧縮空気、研磨パッド、研磨洗浄剤、ペトロールやアセトンなどの刺激
性の強い液体は絶対に使わないでください。
●本製品に潤滑剤を使う必要はありません。
●充電アダプタは絶対に濡らさないでください。
●本体は水洗いできますが、水中に浸けないでください。
お手入れ方法
8
※本製品はご使用のたびに掃除をしてください。
刃の 取り替え
トリミング部の刃やシェービング部の網刃が破損・磨耗した場合は、フィ
リップスサポートセンターにお問い合わせいただき、同型部品をご注文
ください 。
1
掃除をする前に、電源が
OFF
になっていることを 確かめてく
ださい。
2
ボディーグルーマー本体を水で洗い流します。
トリミング部のお手入れ
注意
●刃、網刃は非常に壊れやすいので、取扱いには充分ご注意ください。
●刃、網刃が損傷している場合には、すぐに交換してください。
●網刃の寿命は約
1
年が目安ですが、使用時間、回数により異なります。
2
取り外した網刃をぬるま湯または水で
洗い流します。網刃を傷つけるおそれ
があるため、クリーニングブラシを使っ
て掃除しないでください。
3
シェービング部をぬるま湯または水
で洗い流します。
4
網刃と本体を充分に乾燥させた後、カ
チッと音がするまで刃を本体に押し込
み、元の状態に戻します。
1
網刃を本体から取り外します。刃の上
下を持って引っ張ると簡単に外れま
す。
シェービング部のお手入れ
本体
/
充電アダプタ
クリーニングブラシ
ポーチ
各部の名称
2
1
8
15
17
9
16
2
11
3
4
5
6
7
14
13
19
18
12
10
電源コード部
充電アダプタ部
電源プラグ部
電源コネクタ部
シェービング部電源ボタン
トリミング部電源ボタン
長さ調整ボタン
充電表示ランプ
電源コネクタ受部
コーム
網刃
取扱説明書
フィリップスでは、製品をより快適に
ご使用いただくために
製品登録をおすすめしております。
MyPhilips
では製品の保証書や
購入証明書の写真も保管でき、
万が一購入証明書を紛失された場合
にも安心です。
http://www.philips.co.jp/myphilips-about
URL
MyPhilips
登録のご案内
製品の使用方法や修理に関するお問い合わせ
★
受付時間:
9
:
00
〜
18
:
00
(年末年始除く)
0120
(
944
)
859
フィリップ ス サ ポ ート セ ン タ ー
Web
からの
お問い合わせ
1
2
2
1
2
1
1
2
BG7025/15
ENGLISH
Introduction
Congratulations on your purchase and welcome
to Philips! To fully benet from the support that
Philips oers, register your product at
www.philips.com/welcome.
General description (Fig. 1)
1 Shaver head
2 Shaver head on/o button
3 Battery status indicator
4 Trimmer head on/of button
5 Length selector
6 Trimming comb
7 Small plug inlet
8 Power plug
9 Small plug
10 Brush
11 Pouch
Important safety information
Read this important information carefully before
you use the appliance and its accessories and
save it for future reference. The accessories
supplied may vary for dierent products.
Danger
- Keep the supply unit dry.
Warning
- To charge the battery, only use the detachable
supply unit (HQ8505) provided with the
appliance.
- The supply unit contains a transformer. Do
not cut o the supply unit to replace it with
another plug, as this causes a hazardous
situation.
- This appliance can be used by children
aged from 8 years and above and persons
with reduced physical, sensory or mental
capabilities or lack of experience and
knowledge if they have been given
supervision or instruction concerning use of
the appliance in a safe way and understand
the hazards involved. Children shall not
play with the appliance. Cleaning and user
maintenance shall not be made by children
without supervision.
- Always unplug the appliance before you clean
it under the tap.
- Always check the appliance before you use
it. Do not use the appliance if it is damaged,
as this may cause injury. Always replace a
damaged part with one of the original type.
- Do not open the appliance to replace the
rechargeable battery.
- This appliance contains batteries that are non-
replaceable.
Caution
- Never immerse the charging stand in water
and do not rinse it under the tap.
- Do not use the supply unit in or near wall
sockets that contain an electric air freshener to
prevent irreparable damage to the supply unit.
- Only use this appliance for its intended
purpose as shown in the user manual.
- For hygienic reasons, the appliance should
only be used by one person.
- Never use water hotter than 60°C to rinse the
appliance.
- Never use compressed air, scouring pads,
abrasive cleaning agents or aggressive
liquids such as petrol or acetone to clean the
appliance.
Electromagnetic elds (EMF)
This Philips appliance complies with all
applicable standards and regulations regarding
exposure to electromagnetic elds.
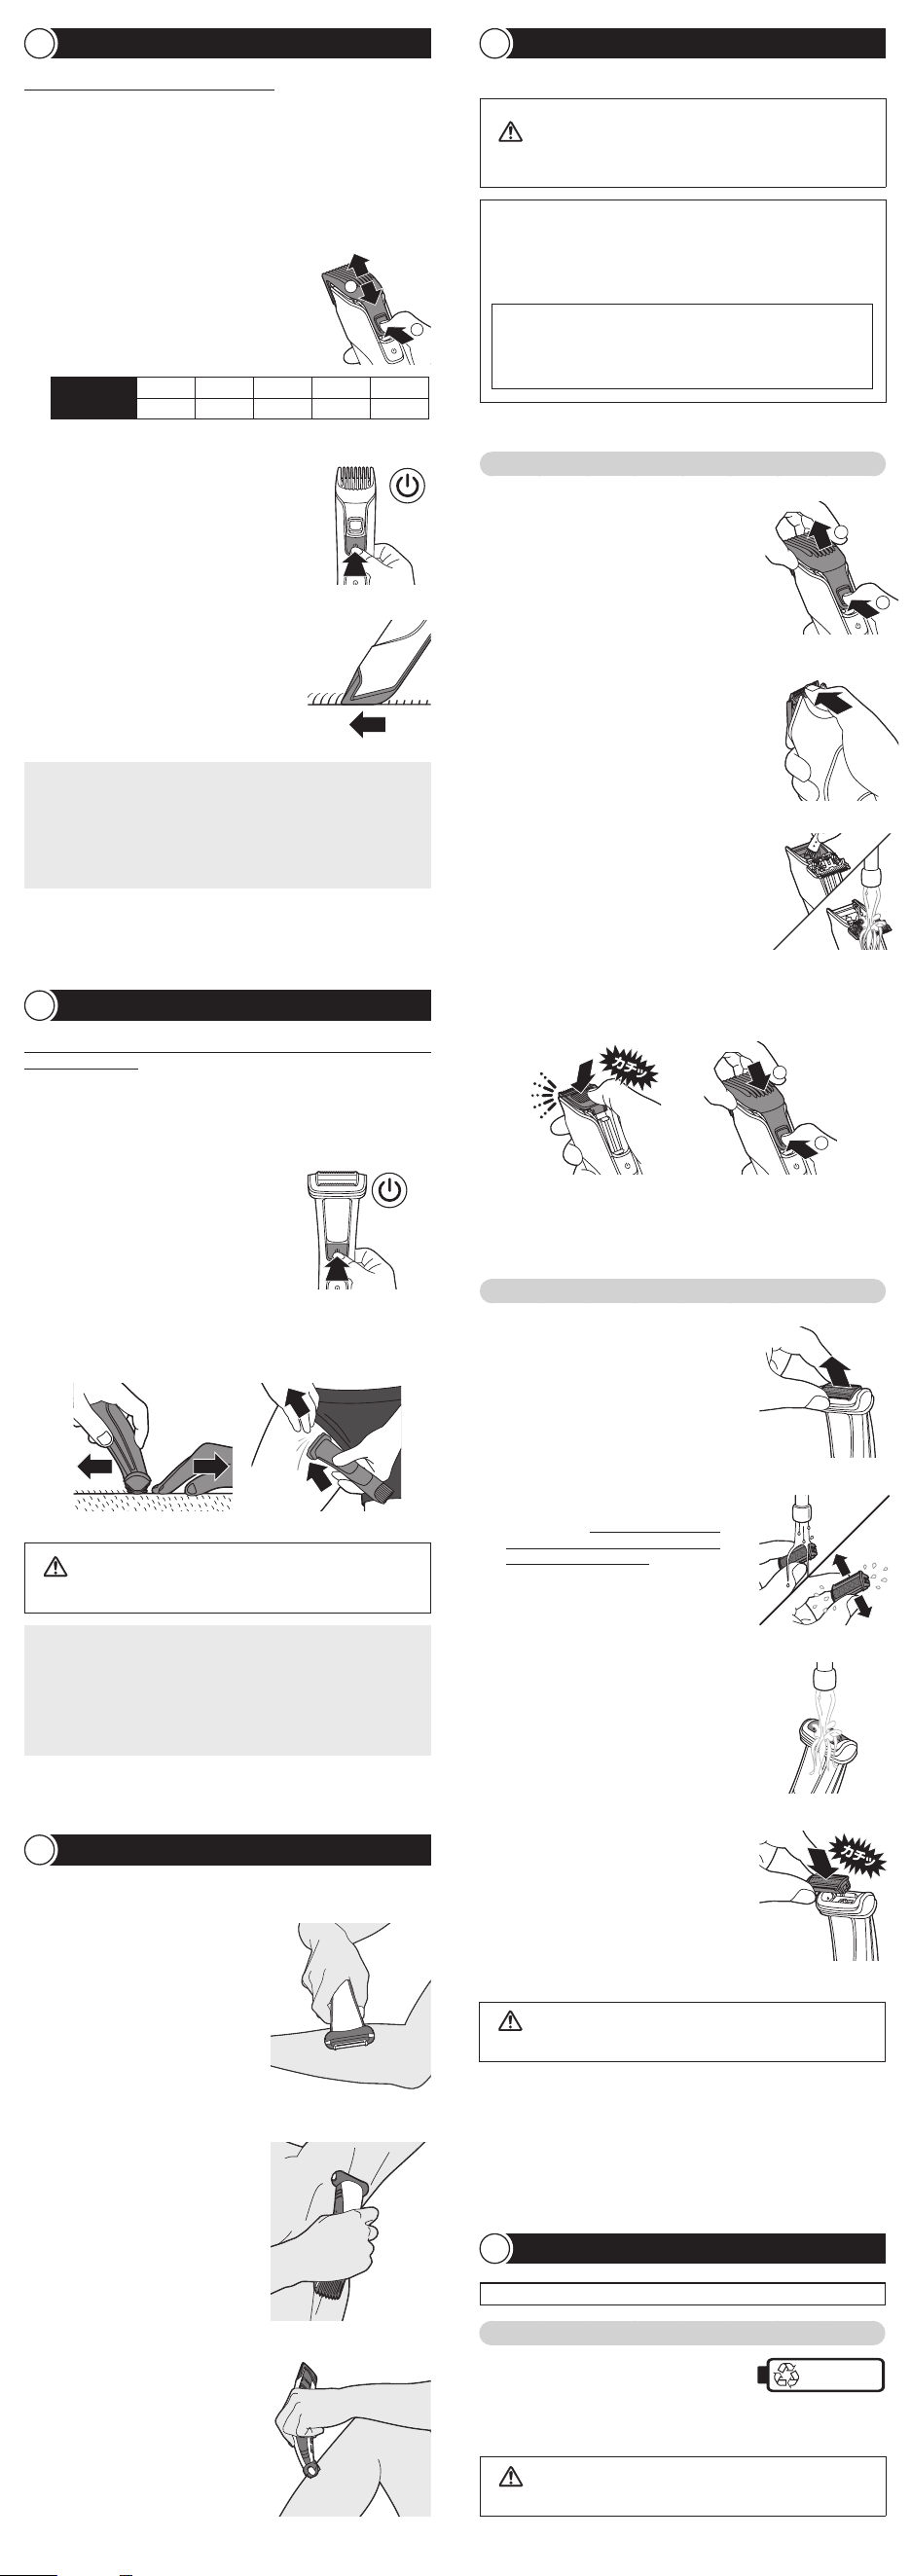
General
- This appliance is waterproof (Fig. 2). It is
suitable for use in the bath or shower and for
cleaning under the tap. For safety reasons, the
appliance can therefore only be used without
cord.
- The supply unit is suitable for mains voltages
ranging from 100 to 240 volts.
- The supply unit transforms 100-240 volts to a
safe low voltage of less than 24 volts.
Charging
Charging takes approx. 1 hour. Charge the
appliance before you use it for the rst time and
when the display ashes orange to indicate that
the battery is almost empty.
- Charging, recharging or using the appliance
at temperatures below 5°C or higher
than 35°C adversely aects the lifespan of the
battery.
- If the appliance is subjected to a major change
in temperature, pressure or humidity, let the
product stand for 30 minutes before use.
1 Make sure the appliance is switched o.
2 Raise the inlet cover (1). Insert the small plug
into the appliance (2) (Fig. 3) and put the
power plug in any 120V-240 AC wall socket.
3 After charging, remove the power plug from
the wall socket and pull the small plug out
of the appliance. Put the inlet cover back in
place.
Battery status indications
- When the battery is almost empty, the battery
status indicator ashes orange (Fig. 4).
- When the product is charging, the battery
status indicator ashes white (Fig. 5).
- When the battery is fully charged, the battery
status indicator lights up white continuously.
Note: After approx. 30 minutes, the battery status
indicator goes out automatically.
Operating time
When the appliance is fully charged it has a
cordless operating time of up to 80 minutes.
Using the appliance
You can use the appliance wet or dry to shave
or trim hair on all parts of the body below the
neckline.
Always check the appliance and all accessories
before you use it. Do not use the appliance
or any accessory if it is damaged, as this may
cause injury. Always replace a damaged part
with one of the original type.
- Use this appliance for its intended household
use as described in this manual.
- For hygienic reasons, the appliance should
only be used by one person.
- Trimming is easier when the skin and hair are
dry
Note: This appliance is waterproof (Fig. 2). It is
suitable for use in the bath or shower and for
cleaning under the tap. For safety reasons, this
appliance can therefore only be used without
cord (Fig. 6).
Trimming
Do not use the trimmer head on sensitive
areas without the guard attachment.
- If you are trimming for the rst time, be careful.
Do not move the appliance too fast. Make
smooth and gentle movements.
- When you trim for the rst time, use trimming
setting 7mm (9/32 in.) to familiarize yourself
with the appliance.
- Since all hairs do not grow in the same
direction, you may want to try dierent
trimming directions(i.e. upwards, downwards,
or across). Practice is best for optimum results.
- Always make smooth and gentle movements
and be sure the surface of the guard always
stays in contact with your skin.
- For trimming, make sure hair is clean and dry
as wet hair tends to stick to the body and
when trimming sensitive areas, always use the
trimming comb attachment.
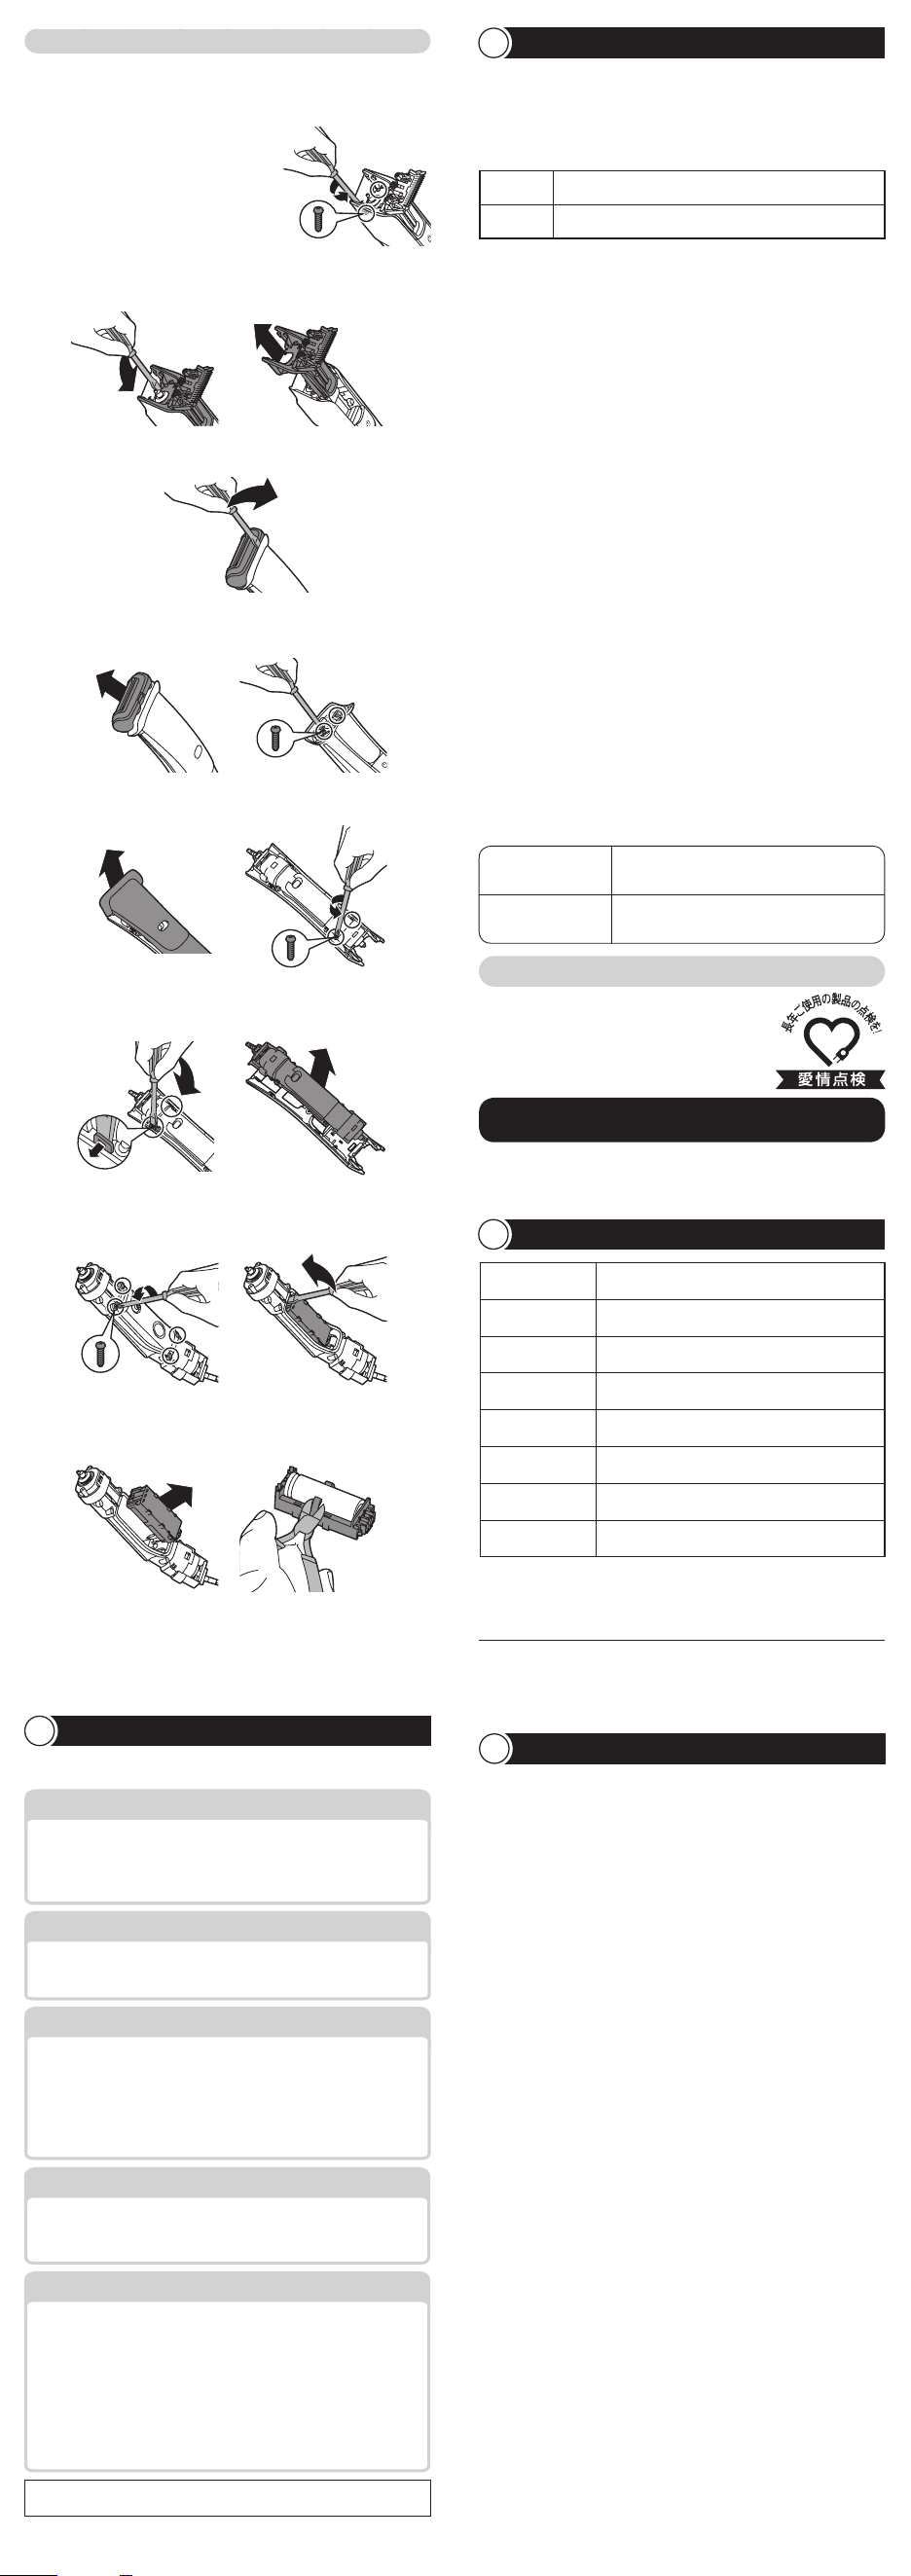
Trimming
1 Press the length selector (1) and then slide it
up or down to select the desired hair length
setting (2) (Fig. 7).
2 Press the trimmer head on/o button to turn
on the appliance (Fig. 8).
3 Trim against the direction of hair growth for
optimal performance (Fig. 9).
Note: Make sure that the at part of the trimming
guard is always fully in contact with the skin.
4 Turn o and clean the appliance after each
use.
Shaving
Do not use the shaver head to shave or trim hair
on face or head.
- When shaving sensitive areas for the rst time,
you may feel some discomfort, irritation or
reddening of the skin. This is normal as your
skin needs time to adjust to shaving.
- If your hair is longer than 10 mm (13/32in.),
trim hair to a length of 3mm (1/8in.) rst for
optimum shaving results.
- For dry use, be certain that your skin is clean
and dry before using the shaver head.
Shaving
Inspect shaving foil of the shaver head
before each use. Replace the foil element
when the foil is damaged (Fig. 10).
1 Press the shaver head on/o button to turn on
the appliance (Fig. 11).
2 Stretch your skin taut with your free hand (Fig.
12), (Fig. 13). Gently press the shaver head to
skin and move it slowly and smoothly against
the direction of hair growth (Fig. 14),.
- Do not press too hard. Too much pressure can
distort the foil and cause skin irritation.
- Make sure the shaver head is always in full
contact with your skin.
- The shaver is bi-directional, which means that
you can shave by moving the appliance up
and down. Shave against the direction of hair
growth for optimal performance.
3 Switch o and clean the appliance after each
use.
Cleaning
Never use scouring pads, abrasive cleaning
agents or aggressive liquids such as petrol or
acetone to clean the appliance.
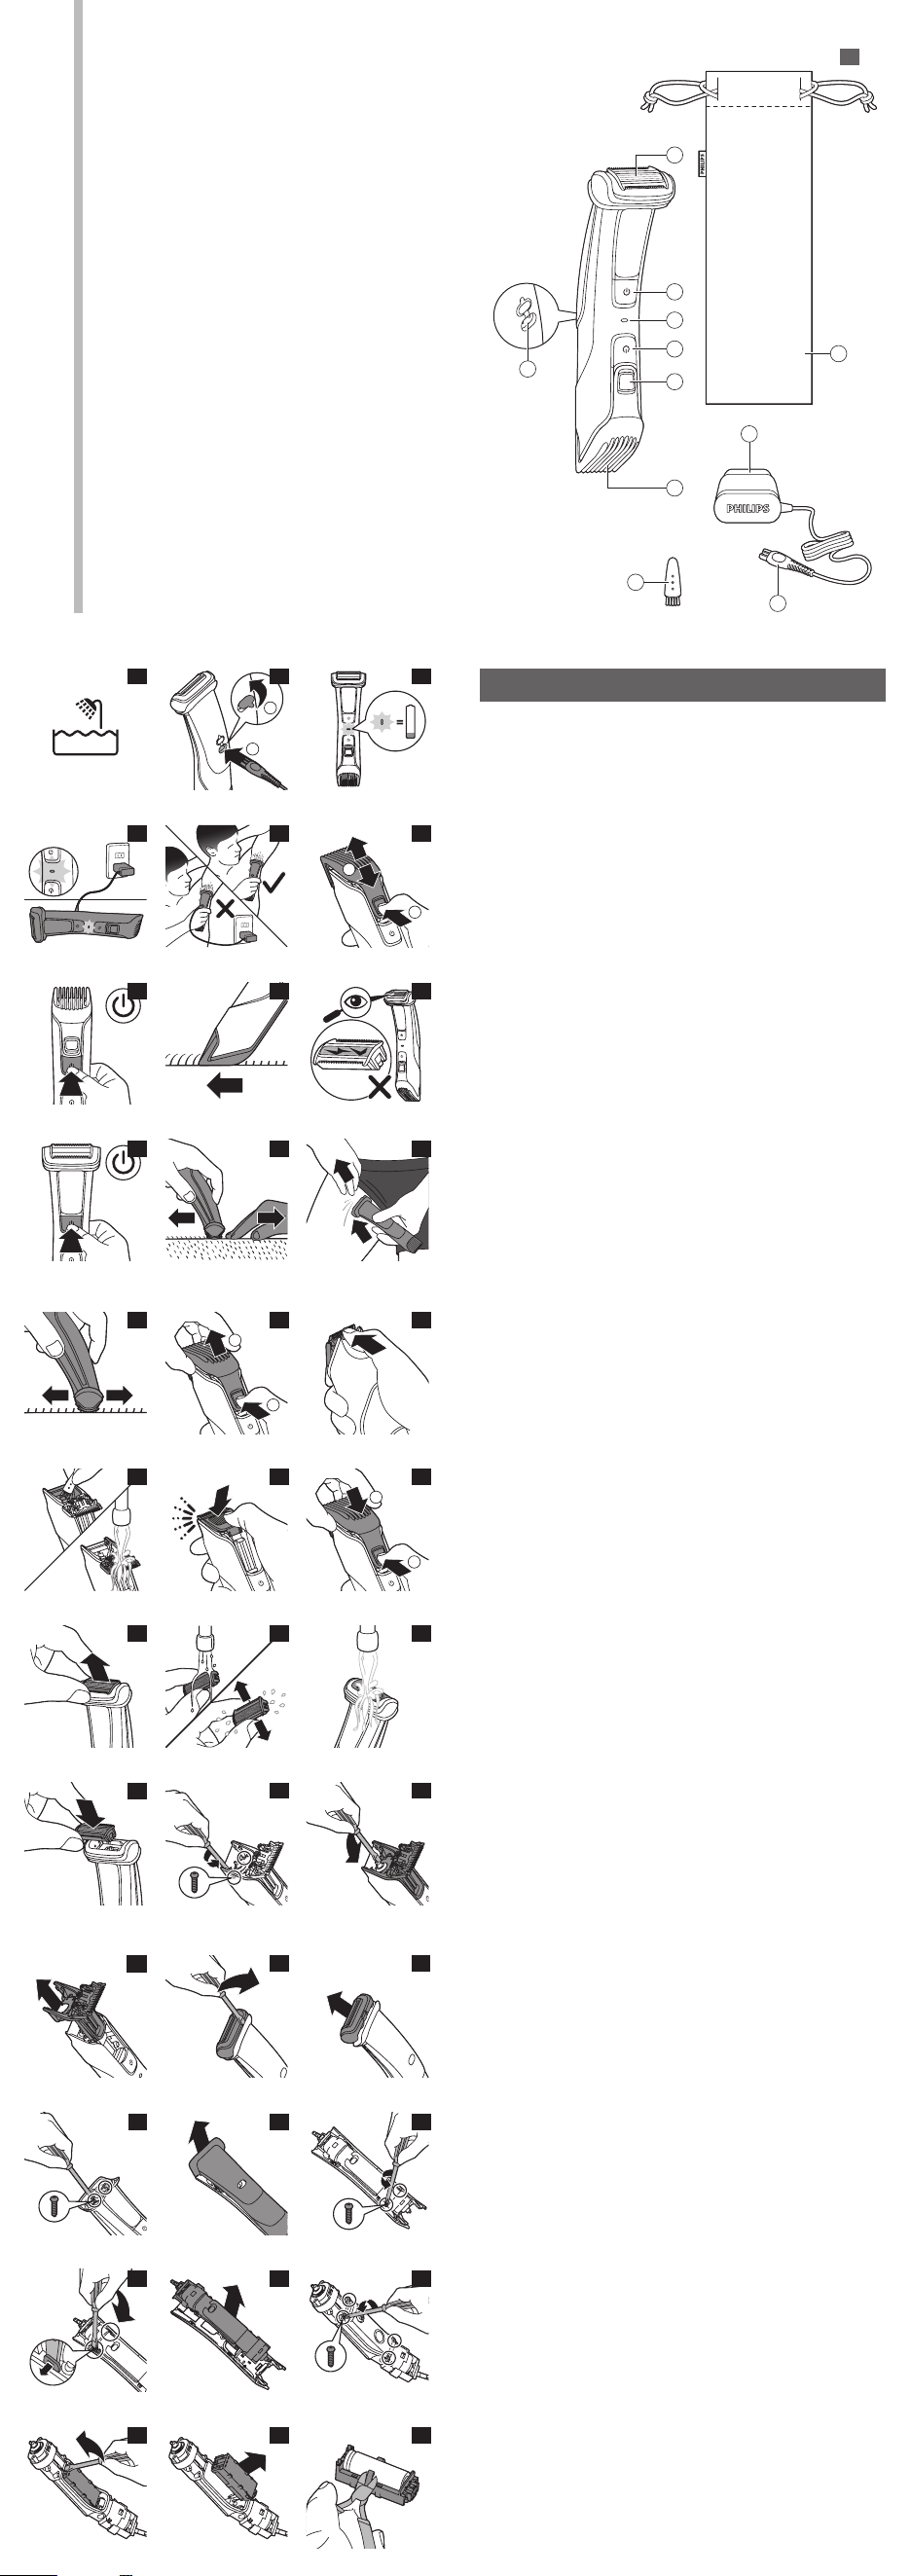
Cleaning the trimmer
1 Turn o the trimmer head (Fig. 8).
2 Remove the comb by pressing the length
selector (1) and sliding it upwards (2) (Fig. 15).
Rinse the comb with water.
3 Open the cutting element by pressing the
cutting element upwards with your thumb (Fig.
16).
4 Clean the hair chamber with the brush and
rinse it under the tap (Fig. 17).
5 Shake o excess water. Allow the appliance to
air dry completely.
- Never dry the trimmer head with a towel or
tissue, as this may cause damage.
6 Close the trimming unit. You will hear a 'click'
(Fig. 18).
7 Reattach the trimming comb (1) and press the
length selector button to lock it in the right
position (2) (Fig. 19).
Cleaning the shaver head
1 Turn o the appliance (Fig. 11).
2 Pull the shaving foil unit out of the shaver
head (Fig. 20).
- Hold the shaving foil unit by the plastic
housing only.
3 Rinse the shaving foil unit with luke warm
running tap water. Shake o excess water (Fig.
21).
4 Allow the shaving foil head to air dry
completely.
- Never dry trimmer or shaving foil head with
a towel, brush or tissue, as this may cause
damage.
5 Rinse the hair chamber under luke warm
running tap water to remove any residual
debris (Fig. 22).
6 Reattach the shaving foil unit by snapping it
back onto the shaver head. You will hear a
click (Fig. 23).
Storage
- Be sure the appliance is turned o. Remove
cord from wall socket and the product before
storing it in a safe, dry location where it will
not be crushed, banged, or subject to damage.
- Do not wrap cord around the appliance when
storing.
- Store cord in a safe location where it will not
be cut or damaged.
- Do not place or store the appliance where it
can fall or be pulled into a tub or sink, water or
other liquid while plugged in.
Accessories
Replacement parts may be purchased on our
website www.philips.com/store. For maximum
product performance, replace shaving foil head
once a year.
- Model TT2000 Philips Replacement Shaving
Foil Head.
Replacement
For maximum shaving performance, we advise
you to replace the shaving foil unit every year
(TT2000). If the shaving foil unit is worn or
damaged, do not use the appliance and replace
immediately. Always replace the shaving foil unit
with original Philips shaving foil unit Accessories.
1 Switch o the appliance and disconnect it from
the wall outlet.
2 Remove the shaving foil unit by pulling it o the
shaving head (Fig. 20).
Note: Handle the shaving foil unit with care, as it
can be damaged.
3 Place the new shaving foil unit on the appliance
by snapping it into place (Fig. 23). You will hear
a click.
Recycling
- Follow your country’s rules for the separate
collection of electrical and electronic products
and rechargeable batteries. Correct disposal
helps prevent negative consequences for the
environment and human health.
Removing the rechargeable
battery BG7025
Only remove the rechargeable battery
when you discard the product. Before
you remove the battery, make sure that
the product is disconnected from the wall
socket and that the battery is completely
empty.
Take any necessary safety precautions
when you handle tools to open the
product and when you dispose of the
rechargeable battery.
1 Open the trimmer cutting element by pressing
the cutting element upwards with your thumb
(Fig. 16).
2 Use a crosshead screwdriver to unscrew the
two screws under the cutting element (Fig. 24)
3 Place a at head screwdriver between the
outer shell and inner body. Twist to create
a gap between the outer shell and the
innerbody (Fig. 25)
4 Pull the inner part with the cutting element out
of the handle (Fig. 26).
5 Place a athead screwdriver between the
shaving unit and the outer shell. Twist to
unlock the shaving unit from the handle (Fig.
27).
6 Remove the shaving unit (Fig. 28).
7 Use a crosshead screwdriver to unscrew the
two screws under the shaving unit (Fig. 29).
8 Pull the backpanel from the body (Fig. 30)
9 Unscrew the screws on the backside of the
handle with a crosshead screwdriver (Fig. 31)
10 Place a athead screwdriver between the
hooks and the aps. Bend the aps away from
the hooks (Fig. 32).
11 Remove the inner body (Fig. 33)
12 Unscrew the screws on the inner body with a
crosshead screwdriver. Remove the innerbody
cover (Fig. 34).
13 Place a athead screwdriver between the
battery compartment and the innerbody
(Fig. 35). Twist the screwdriver to remove the
battery compartment (Fig. 36).
14 To remove the battery, use a cutter to remove
the holders that keep the battery in place
(Fig. 37).
Warranty and support
If you need information or support, please
visit www.philips.com/support or read the
international warranty leaet.
Warranty restrictions
Cutting units are not covered by the terms of the
international warranty because they are subject
to wear.
1
2
4
3
5
7
6
8
10
9
11
13
12
14
16
15
17
29
19
31
18
30
20
32
22
34
21
33
26
28
27
23
35
25
24
36
37
2
3
4
5
10
6
1
7
11
8
9

1
2
2
1
2
1
1
2
BG7025/15
ENGLISH
Introduction
Congratulations on your purchase and welcome
to Philips! To fully benet from the support that
Philips oers, register your product at
www.philips.com/welcome.
General description (Fig. 1)
1 Shaver head
2 Shaver head on/o button
3 Battery status indicator
4 Trimmer head on/of button
5 Length selector
6 Trimming comb
7 Small plug inlet
8 Power plug
9 Small plug
10 Brush
11 Pouch
Important safety information
Read this important information carefully before
you use the appliance and its accessories and
save it for future reference. The accessories
supplied may vary for dierent products.
Danger
- Keep the supply unit dry.
Warning
- To charge the battery, only use the detachable
supply unit (HQ8505) provided with the
appliance.
- The supply unit contains a transformer. Do
not cut o the supply unit to replace it with
another plug, as this causes a hazardous
situation.
- This appliance can be used by children
aged from 8 years and above and persons
with reduced physical, sensory or mental
capabilities or lack of experience and
knowledge if they have been given
supervision or instruction concerning use of
the appliance in a safe way and understand
the hazards involved. Children shall not
play with the appliance. Cleaning and user
maintenance shall not be made by children
without supervision.
- Always unplug the appliance before you clean
it under the tap.
- Always check the appliance before you use
it. Do not use the appliance if it is damaged,
as this may cause injury. Always replace a
damaged part with one of the original type.
- Do not open the appliance to replace the
rechargeable battery.
- This appliance contains batteries that are non-
replaceable.
Caution
- Never immerse the charging stand in water
and do not rinse it under the tap.
- Do not use the supply unit in or near wall
sockets that contain an electric air freshener to
prevent irreparable damage to the supply unit.
- Only use this appliance for its intended
purpose as shown in the user manual.
- For hygienic reasons, the appliance should
only be used by one person.
- Never use water hotter than 60°C to rinse the
appliance.
- Never use compressed air, scouring pads,
abrasive cleaning agents or aggressive
liquids such as petrol or acetone to clean the
appliance.
Electromagnetic elds (EMF)
This Philips appliance complies with all
applicable standards and regulations regarding
exposure to electromagnetic elds.
General
- This appliance is waterproof (Fig. 2). It is
suitable for use in the bath or shower and for
cleaning under the tap. For safety reasons, the
appliance can therefore only be used without
cord.
- The supply unit is suitable for mains voltages
ranging from 100 to 240 volts.
- The supply unit transforms 100-240 volts to a
safe low voltage of less than 24 volts.
Charging
Charging takes approx. 1 hour. Charge the
appliance before you use it for the rst time and
when the display ashes orange to indicate that
the battery is almost empty.
- Charging, recharging or using the appliance
at temperatures below 5°C or higher
than 35°C adversely aects the lifespan of the
battery.
- If the appliance is subjected to a major change
in temperature, pressure or humidity, let the
product stand for 30 minutes before use.
1 Make sure the appliance is switched o.
2 Raise the inlet cover (1). Insert the small plug
into the appliance (2) (Fig. 3) and put the
power plug in any 120V-240 AC wall socket.
3 After charging, remove the power plug from
the wall socket and pull the small plug out
of the appliance. Put the inlet cover back in
place.
Battery status indications
- When the battery is almost empty, the battery
status indicator ashes orange (Fig. 4).
- When the product is charging, the battery
status indicator ashes white (Fig. 5).
- When the battery is fully charged, the battery
status indicator lights up white continuously.
Note: After approx. 30 minutes, the battery status
indicator goes out automatically.
Operating time
When the appliance is fully charged it has a
cordless operating time of up to 80 minutes.
Using the appliance
You can use the appliance wet or dry to shave
or trim hair on all parts of the body below the
neckline.
Always check the appliance and all accessories
before you use it. Do not use the appliance
or any accessory if it is damaged, as this may
cause injury. Always replace a damaged part
with one of the original type.
- Use this appliance for its intended household
use as described in this manual.
- For hygienic reasons, the appliance should
only be used by one person.
- Trimming is easier when the skin and hair are
dry
Note: This appliance is waterproof (Fig. 2). It is
suitable for use in the bath or shower and for
cleaning under the tap. For safety reasons, this
appliance can therefore only be used without
cord (Fig. 6).
Trimming
Do not use the trimmer head on sensitive
areas without the guard attachment.
- If you are trimming for the rst time, be careful.
Do not move the appliance too fast. Make
smooth and gentle movements.
- When you trim for the rst time, use trimming
setting 7mm (9/32 in.) to familiarize yourself
with the appliance.
- Since all hairs do not grow in the same
direction, you may want to try dierent
trimming directions(i.e. upwards, downwards,
or across). Practice is best for optimum results.
- Always make smooth and gentle movements
and be sure the surface of the guard always
stays in contact with your skin.
- For trimming, make sure hair is clean and dry
as wet hair tends to stick to the body and
when trimming sensitive areas, always use the
trimming comb attachment.
Trimming
1 Press the length selector (1) and then slide it
up or down to select the desired hair length
setting (2) (Fig. 7).
2 Press the trimmer head on/o button to turn
on the appliance (Fig. 8).
3 Trim against the direction of hair growth for
optimal performance (Fig. 9).
Note: Make sure that the at part of the trimming
guard is always fully in contact with the skin.
4 Turn o and clean the appliance after each
use.
Shaving
Do not use the shaver head to shave or trim hair
on face or head.
- When shaving sensitive areas for the rst time,
you may feel some discomfort, irritation or
reddening of the skin. This is normal as your
skin needs time to adjust to shaving.
- If your hair is longer than 10 mm (13/32in.),
trim hair to a length of 3mm (1/8in.) rst for
optimum shaving results.
- For dry use, be certain that your skin is clean
and dry before using the shaver head.
Shaving
Inspect shaving foil of the shaver head
before each use. Replace the foil element
when the foil is damaged (Fig. 10).
1 Press the shaver head on/o button to turn on
the appliance (Fig. 11).
2 Stretch your skin taut with your free hand (Fig.
12), (Fig. 13). Gently press the shaver head to
skin and move it slowly and smoothly against
the direction of hair growth (Fig. 14),.
- Do not press too hard. Too much pressure can
distort the foil and cause skin irritation.
- Make sure the shaver head is always in full
contact with your skin.
- The shaver is bi-directional, which means that
you can shave by moving the appliance up
and down. Shave against the direction of hair
growth for optimal performance.
3 Switch o and clean the appliance after each
use.
Cleaning
Never use scouring pads, abrasive cleaning
agents or aggressive liquids such as petrol or
acetone to clean the appliance.
Cleaning the trimmer
1 Turn o the trimmer head (Fig. 8).
2 Remove the comb by pressing the length
selector (1) and sliding it upwards (2) (Fig. 15).
Rinse the comb with water.
3 Open the cutting element by pressing the
cutting element upwards with your thumb (Fig.
16).
4 Clean the hair chamber with the brush and
rinse it under the tap (Fig. 17).
5 Shake o excess water. Allow the appliance to
air dry completely.
- Never dry the trimmer head with a towel or
tissue, as this may cause damage.
6 Close the trimming unit. You will hear a 'click'
(Fig. 18).
7 Reattach the trimming comb (1) and press the
length selector button to lock it in the right
position (2) (Fig. 19).
Cleaning the shaver head
1 Turn o the appliance (Fig. 11).
2 Pull the shaving foil unit out of the shaver
head (Fig. 20).
- Hold the shaving foil unit by the plastic
housing only.
3 Rinse the shaving foil unit with luke warm
running tap water. Shake o excess water (Fig.
21).
4 Allow the shaving foil head to air dry
completely.
- Never dry trimmer or shaving foil head with
a towel, brush or tissue, as this may cause
damage.
5 Rinse the hair chamber under luke warm
running tap water to remove any residual
debris (Fig. 22).
6 Reattach the shaving foil unit by snapping it
back onto the shaver head. You will hear a
click (Fig. 23).
Storage
- Be sure the appliance is turned o. Remove
cord from wall socket and the product before
storing it in a safe, dry location where it will
not be crushed, banged, or subject to damage.
- Do not wrap cord around the appliance when
storing.
- Store cord in a safe location where it will not
be cut or damaged.
- Do not place or store the appliance where it
can fall or be pulled into a tub or sink, water or
other liquid while plugged in.
Accessories
Replacement parts may be purchased on our
website www.philips.com/store. For maximum
product performance, replace shaving foil head
once a year.
- Model TT2000 Philips Replacement Shaving
Foil Head.
Replacement
For maximum shaving performance, we advise
you to replace the shaving foil unit every year
(TT2000). If the shaving foil unit is worn or
damaged, do not use the appliance and replace
immediately. Always replace the shaving foil unit
with original Philips shaving foil unit Accessories.
1 Switch o the appliance and disconnect it from
the wall outlet.
2 Remove the shaving foil unit by pulling it o the
shaving head (Fig. 20).
Note: Handle the shaving foil unit with care, as it
can be damaged.
3 Place the new shaving foil unit on the appliance
by snapping it into place (Fig. 23). You will hear
a click.
Recycling
- Follow your country’s rules for the separate
collection of electrical and electronic products
and rechargeable batteries. Correct disposal
helps prevent negative consequences for the
environment and human health.
Removing the rechargeable
battery BG7025
Only remove the rechargeable battery
when you discard the product. Before
you remove the battery, make sure that
the product is disconnected from the wall
socket and that the battery is completely
empty.
Take any necessary safety precautions
when you handle tools to open the
product and when you dispose of the
rechargeable battery.
1 Open the trimmer cutting element by pressing
the cutting element upwards with your thumb
(Fig. 16).
2 Use a crosshead screwdriver to unscrew the
two screws under the cutting element (Fig. 24)
3 Place a at head screwdriver between the
outer shell and inner body. Twist to create
a gap between the outer shell and the
innerbody (Fig. 25)
4 Pull the inner part with the cutting element out
of the handle (Fig. 26).
5 Place a athead screwdriver between the
shaving unit and the outer shell. Twist to
unlock the shaving unit from the handle (Fig.
27).
6 Remove the shaving unit (Fig. 28).
7 Use a crosshead screwdriver to unscrew the
two screws under the shaving unit (Fig. 29).
8 Pull the backpanel from the body (Fig. 30)
9 Unscrew the screws on the backside of the
handle with a crosshead screwdriver (Fig. 31)
10 Place a athead screwdriver between the
hooks and the aps. Bend the aps away from
the hooks (Fig. 32).
11 Remove the inner body (Fig. 33)
12 Unscrew the screws on the inner body with a
crosshead screwdriver. Remove the innerbody
cover (Fig. 34).
13 Place a athead screwdriver between the
battery compartment and the innerbody
(Fig. 35). Twist the screwdriver to remove the
battery compartment (Fig. 36).
14 To remove the battery, use a cutter to remove
the holders that keep the battery in place
(Fig. 37).
Warranty and support
If you need information or support, please
visit www.philips.com/support or read the
international warranty leaet.
Warranty restrictions
Cutting units are not covered by the terms of the
international warranty because they are subject
to wear.
1
2
4
3
5
7
6
8
10
9
11
13
12
14
16
15
17
29
19
31
18
30
20
32
22
34
21
33
26
28
27
23
35
25
24
36
37
2
3
4
5
10
6
1
7
11
8
9