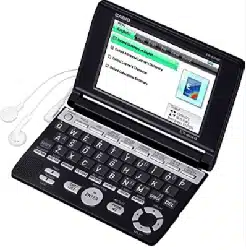

EW-B100C
User’s Guide
E
Using a Dictionary
Multiple Dictionary Search
Useful Dictionary Functions
Using the Calculator
Using the Practical
English Usage
Using the Oxford Learner’s
Wordfi nder Dictionary
Important!
Be sure to keep all user documentation handy for future reference.
(This mark applies in EU countries only.)
This product includes FontAvenue
®
font(s) licenced by NEC
Corporation.
FontAvenue is a registered trademark of NEC Corporation.
Other company and product names used in this manual and in the
contents of this product may be trademarks or registered trademarks
of others.
•
•
Manufacturer:
CASIO COMPUTER CO., LTD.
6-2, Hon-machi 1-chome, Shibuya-ku, Tokyo 151-8543, Japan
Responsible within the European Union:
CASIO EUROPE GmbH
Casio-Platz 1, 22848 Norderstedt, Germany

1
Unpacking
As you unpack your electronic dictionary, check to make sure that
the following item is included with it.
One AA-size alkaline battery
Other accessories also may be included.
Battery
Use only a battery included in the recommended battery list (page
77). Do not use a battery that is not included in the list. Battery
characteristics and a battery that does not match the specifi cations of
the electronic dictionary may result in abnormal operation or failure to
achieve the specifi ed operation between battery charges.
Your electronic dictionary does not come with a rechargeable battery
or a battery charger. If you want to use a rechargeable battery and
a battery charger, it is up to you to purchase them from a retailer,
wholesaler, or other source.
The charge of the original battery that comes with this electronic
dictionary is consumed somewhat as the product spends time in
transit, storage, etc. Because of this, the original battery may not
provide the full amount of operation noted in the specifi cations (page
79).
•
•
•
•
Before Getting StartedBefore Getting Started
2
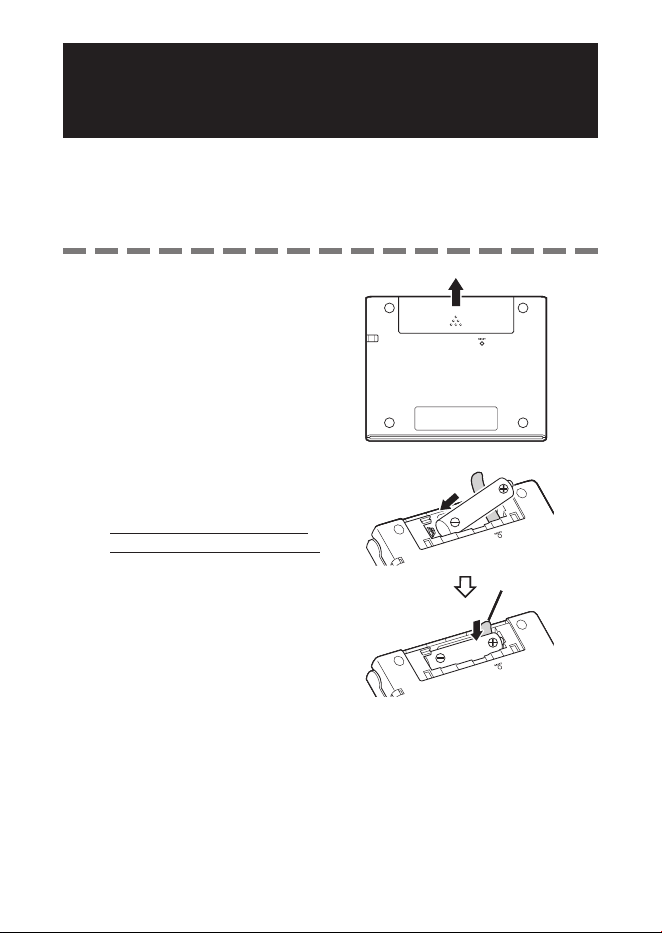
Loading the Battery for the
First Time
Before using your electronic dictionary for the fi rst time, be sure
to perform the following steps to load the LR6 or AA-size alkaline
battery that comes with it.
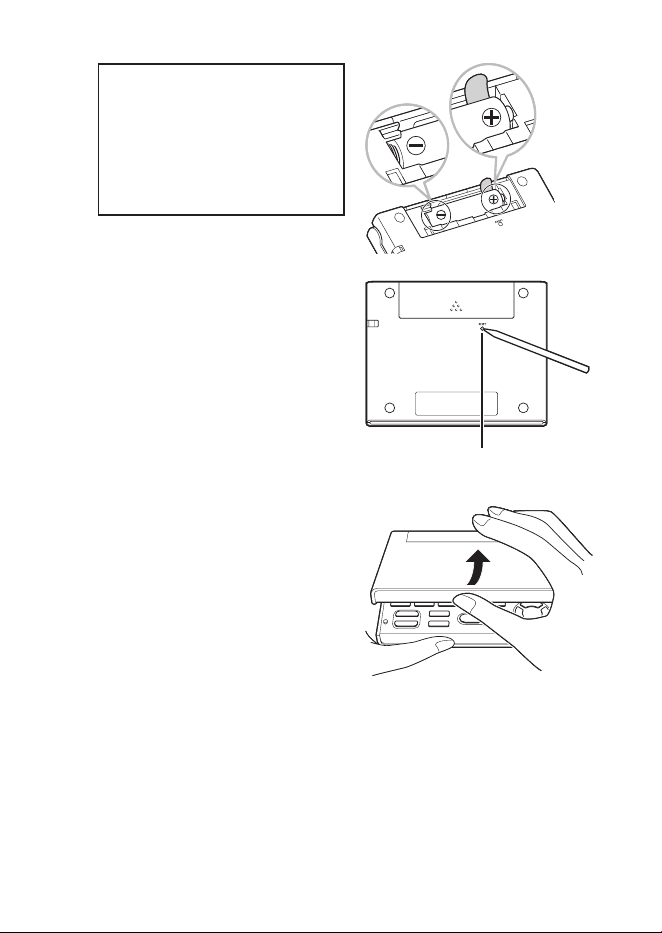
1
While pressing at the point on
the battery cover indicated in
the illustration, slide the cover
in the direction indicated by the
arrow and remove it.
2
Load the battery, and then
replace the battery cover.
While pressing the (–) end of
the battery against the spring,
lower the (+) end into the battery
compartment making sure the
ribbon is passing under the
battery.
•
RibbonRibbon
3
Correct Installation
Spring is not protruding from the
side.
Ribbon is extended and is not
folded under the battery.
Battery poles (+ and – ends) are
facing correctly.
•
•
•
3
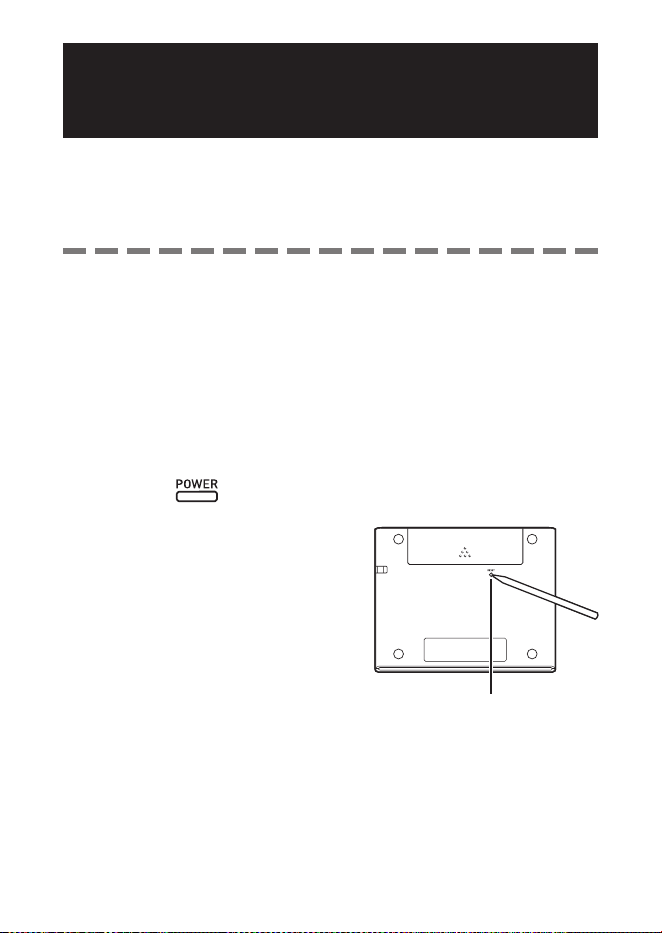
Use a ballpoint pen or some
similar pointed object to press
the RESET button on the back
of your electronic dictionary.
When pressing the RESET button,
do not use a toothpick, lead
pencil, or any other object whose
tip can break off easily. Doing
so can damage your electronic
dictionary.
4
Open the cover of your
electronic dictionary as shown
in the illustration.
This will cause the Battery Setting
screen to appear.
•
•
RESET buttonRESET button
4
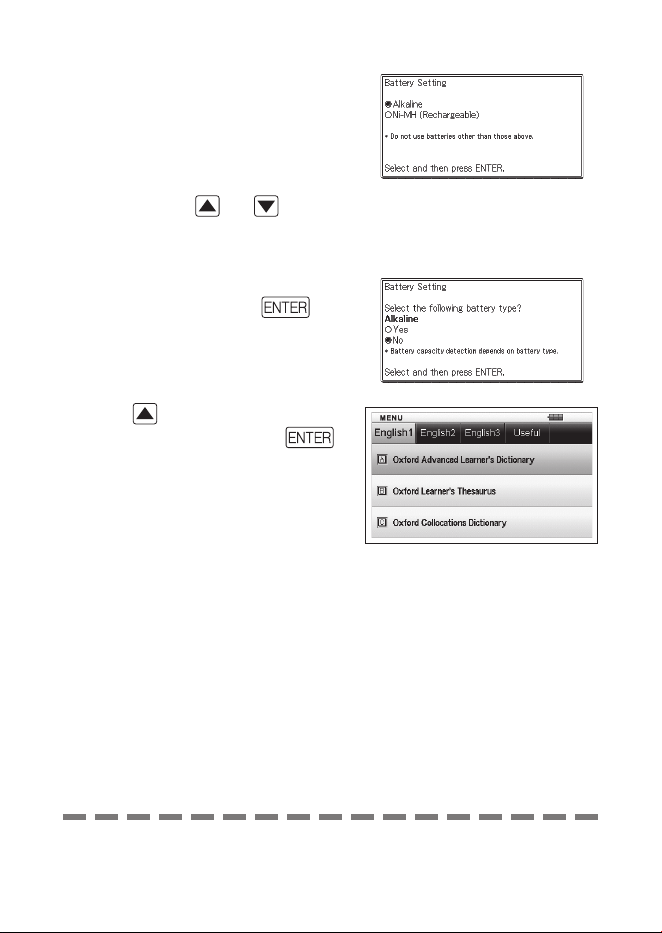
5
Check to make sure that
“
●
Alkaline” is selected as the
battery type.
If you are using a commercially
available rechargeable battery
in place of the original alkaline
battery, use
and to
move the cursor (●) to “Ni-MH
(Rechargeable)”.
6
After the battery setting is the
way you want, press .
This will display a confi rmation
screen.
7
Use to move the cursor (
●
)
to “Yes” and then press .
This will display the MENU screen.
•
•
•
You can also confi gure display brightness and other electronic
dictionary settings (page 67).
•
5
Display Brightness and
Battery Life
You can adjust the brightness of your electronic dictionary to one of
fi ve levels.
The initial factory default setting is 3.
The brightness of the display will automatically dim to level 1 if you do
not perform any operation for about 30 seconds (under initial default
settings). Performing an operation will cause display brightness to return
to its normal level.
You can adjust screen brightness and the time it takes until screen
illumination turns off. See “Illumination Duration Setting” and “Brightness
Setting” (page 68).
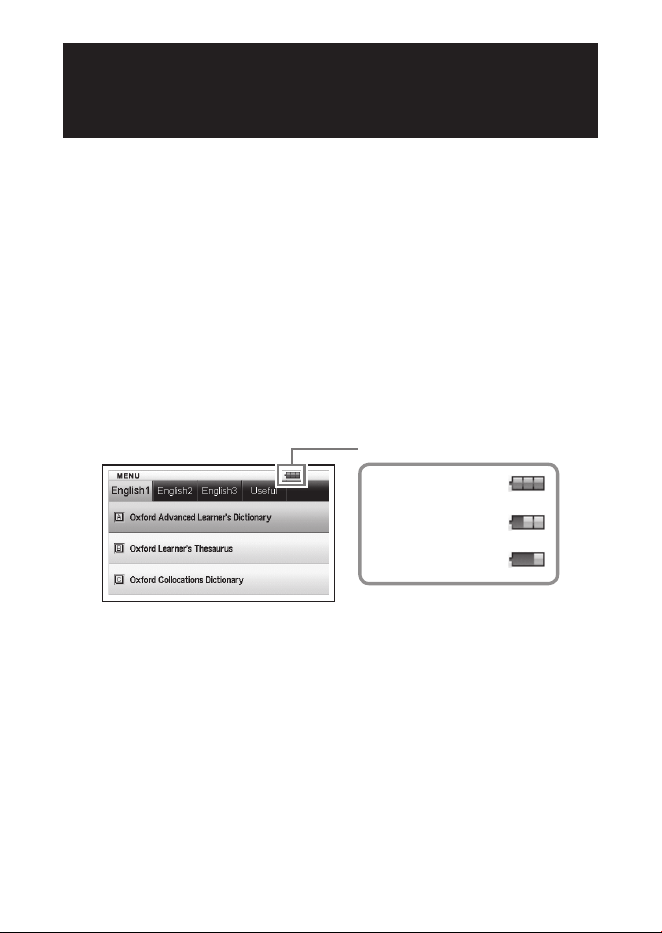
An icon in the upper right corner of the MENU screen shows the current
battery level.
Battery level icon
Battery Level 3
Battery Level 2
Battery Level 1
Power will turn off and the screen will go blank when the battery level
reaches 0.
At battery level 1, the electronic dictionary may not operate normally,
may suddenly turn off, or may exhibit other abnormal operation.
Replace the battery as soon as possible when battery level 1 is
indicated.
•
•
•
•
6
Battery Life
Prolonged use of a bright display setting, and keeping the display
illuminated for long periods, can shorten battery life.
When battery power is low, your electronic dictionary may suddenly
turn off or display the Battery Setting screen, without displaying the
low battery message fi rst.
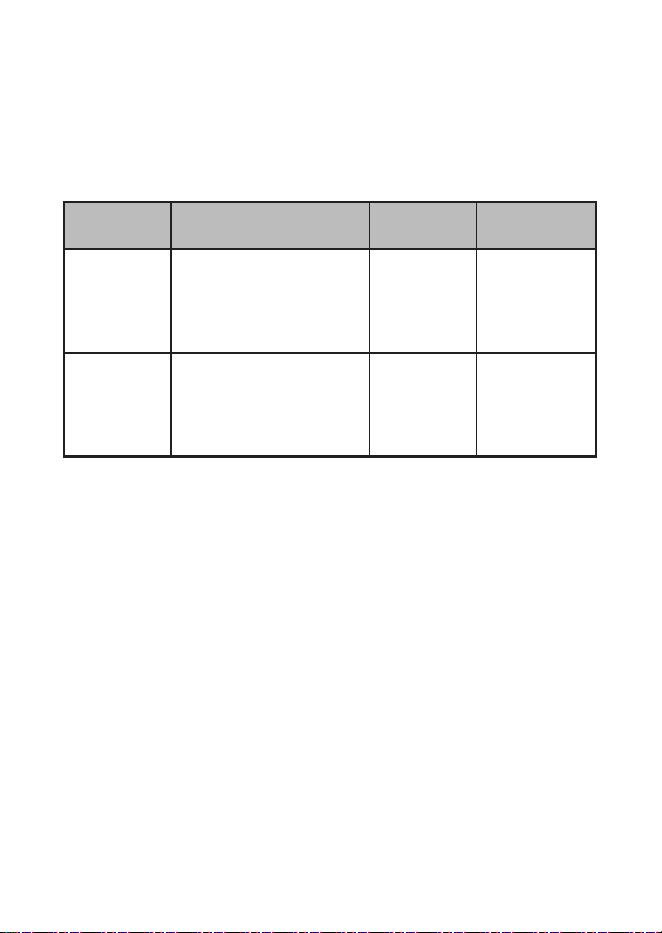
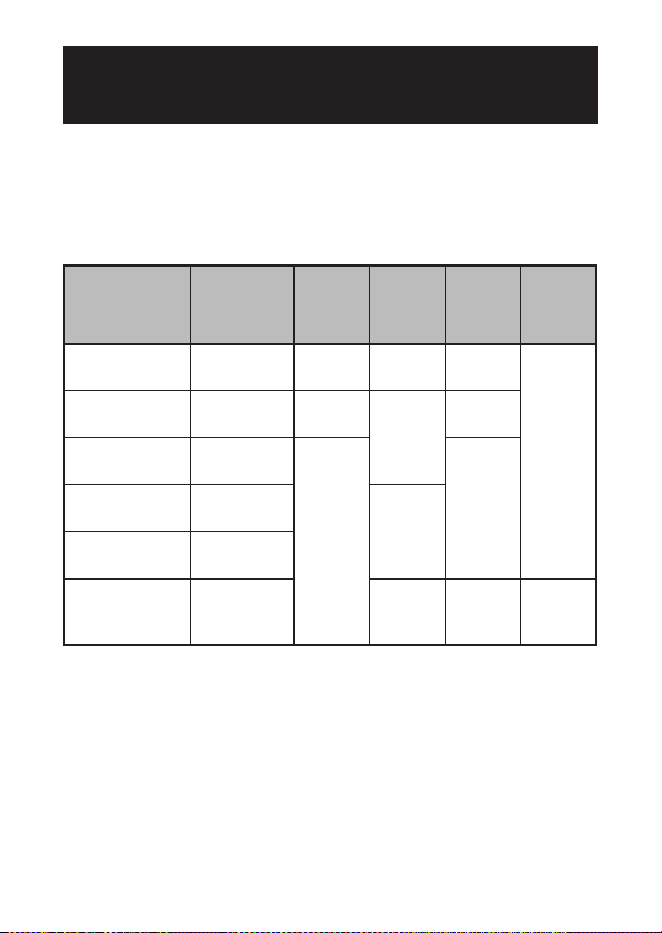
Battery Operating Conditions
Display
Brightness
Approximate
Battery Life
*2
Alkaline
battery
Repeated 5 minutes of
input and search, 55
minutes of English-English
dictionary screen display
each hour
*1
50 hours
Rechargeable
nickel-metal
hydride
battery
Repeated 5 minutes of
input and search, 55
minutes of English-English
dictionary screen display
each hour
*1
40 hours
*3
*1
Display brightness level 3, display dimmed after 30 seconds.
*2
New alkaline battery or new, fully charged rechargeable battery at an
ambient temperature of 25°C.
Battery life values are approximate and are intended for reference only.
*3
Reference value based on a SANYO eneloop rechargeable battery.
•
•

7
Contents
Before Getting Started 1
Unpacking ............................................................................... 1
Battery ..................................................................................... 1
Loading the Battery for the First Time ................................ 2
Display Brightness and Battery Life .................................... 5
Introduction 11
Important Precautions ........................................................ 11
Names of Parts ..................................................................... 14
Opening the Cover of the Electronic Dictionary ................14
Screen Formats ......................................................................15
Turning Power On and Off ................................................... 16
Basic Operation 17
Basic Operation .................................................................... 17
Selecting a Mode ...................................................................17
Selecting a Headword or Screen Item .................................19
Scrolling Between Screens .................................................. 20
Back-stepping to a Previous Operation.............................. 20
Viewing a List Screen ........................................................... 20
Looking Up Another Term .................................................... 20
Using the Dictionary Guide................................................. 21

8
Inputting Characters 23
Inputting Alphabetic Characters ....................................... 23
Inputting Numbers ............................................................... 24
Correcting an Input Error .................................................... 25
Using a Dictionary 26
Dictionaries and Functions ................................................. 26
Looking Up a Headword ...................................................... 27
Looking Up Details About a Term
(Phrases, Examples, Comments) ................................ 29
Looking Up Phrases ............................................................. 29
Looking Up Examples and Comments ............................... 30
Looking Up a Term when You are Unsure of Its Spelling
... 31
Spell Checking and Searching for an Original Form
(Spell Check/Original Form Search) ........................... 33
Looking Up Phrases (Phrase Search) ............................... 34
Looking Up Examples (Example Search) .......................... 35
Viewing Writing Tutor .......................................................... 36
Looking Up a Keyword (Keyword Search) ........................ 37
Searching for Quasi-synonyms by Category ................... 38
Searching for Common Word Pairs (Collocation Search)
... 39
Using the Oxford Learner’s Wordfi nder Dictionary
40
Looking Up a Keyword (Keyword Search) ........................ 40
Looking Up Related Terms (Related Term Search) ......... 41
Looking Up Examples (Example Search) .......................... 42
Performing a Topic Search ................................................. 42

9
Using the Practical English Usage 43
Looking Up a Keyword (Keyword Search) ........................ 43
Performing a Topic Search ................................................. 44
Performing an Item Number Search ................................. 45
Performing a Search of “130 Common Mistakes” ........... 45
Multiple Dictionary Search 46
Multiple Dictionary Search ................................................. 46
Searching for the Same Term in Multiple Dictionaries
(Headword Search) ........................................................ 47
Searching the Examples and Phrases of Multiple
Dictionaries (Example and Phrase Search) ............... 48
Specifying the Dictionary Display Sequence for
Lists of Hits ..................................................................... 49
Useful Dictionary Functions 50
Performing Re-lookup of a Recently Searched for
Term (History Search) ................................................... 50
Deleting History Memory Entries ........................................ 51
Looking Up a Term Used within a Defi nition or
Comment Screen (Jump Search) ................................ 53
Changing the Size of Screen Characters (Zoom) ............ 55
Vocabulary List ..................................................................... 56
Saving a Headword to a Vocabulary List ............................ 56
Unhighlighting Text ............................................................... 58
Viewing, Selecting, and Deleting a Saved Headword........ 59
Confi guring Vocabulary List Display Settings .................... 61
Changing the Name of a Vocabulary List ........................... 62

10
Using the Calculator 63
Using the Calculator ............................................................ 63
Basic Arithmetic Calculations ............................................. 64
Constant Calculations .......................................................... 64
Memory Calculations ........................................................... 65
Correcting Key Operation Errors ......................................... 65
Error (“E”) Display ................................................................. 66
Confi guring Electronic Dictionary Settings 67
Changing Settings ............................................................... 67
Copyrights 69
Co py rig ht ............................................................................... 6 9
Reference 72
Screen Messages ................................................................. 72
Troubleshooting ................................................................... 73
Resetting the Electronic Dictionary .................................. 74
Clearing Memory Data ......................................................... 75
Replacing the Battery .......................................................... 76
Specifi cations ....................................................................... 79
■
General Guide ......................................................................... 87

11
Important Precautions
Note the following important precautions whenever using your
electronic dictionary.
Never expose your electronic dictionary to fi re. Doing so can cause the
battery to explode, creating the risk of fi re and personal injury.
Avoid temperature extremes. Do not locate your electronic dictionary
in direct sunlight, near a window, near a heater, etc.
Under very low temperatures, display response may slow down or
fail entirely. This condition is temporary and operation should resume
under normal temperatures.
Avoid areas subject to excessive moisture, dirt, and dust.
Never subject your electronic dictionary to strong impact, bending, or
twisting, do not carry it in the pocket of your trousers, and do not keep
it together with hard objects inside of a bag or briefcase.
Never place heavy objects on the electronic dictionary. Doing so can
cause the object to fall off and create the chance of personal injury.
Never try to take your electronic dictionary apart.
Never use a pen, pencil, or other sharp object to press keys.
To clean the exterior, wipe your electronic dictionary with a soft cloth
dampened in a weak solution of a mild neutral detergent and water.
Be sure to wring out any excess moisture from the cloth before wiping.
Never use benzene, thinners, or any other volatile agent for cleaning.
Doing so can remove the fi gures printed on the case or otherwise
damage the fi nish of the case.
Should the electronic dictionary ever start emitting smoke, strange
odor, or heat, or start exhibiting other strange behavior, stop using
it. Continued use creates the risk of fi re and electric shock. Take the
following steps immediately.
1 Turn off power.
2 Contact your original retailer or authorized CASIO service centre.
Before assuming malfunction, be sure to check this manual for
possible remedies, and check to make sure your problem is not due to
low battery power or operational errors.
•
•
•
•
•
•
•
•
•
•
•
IntroductionIntroduction

12
Keep the electronic dictionary away from your chest (breast pocket,
etc.) if you are wearing a pacemaker or other medical device.
Magnetism from the electronic dictionary can affect a pacemaker or
other device. If you feel any abnormality, immediately move away from
the electronic dictionary and contact your physician.
Never carry the electronic dictionary along with a magnetic card
(credit card, cash card, prepaid card, etc.) The electronic dictionary
uses components that generate a magnetic fi eld, which can make a
magnetic card unusable.
LCD
Never apply strong pressure to the LCD screen or subject it to strong
impact. Doing so can cause the glass to crack.
Should the LCD glass ever break, avoid touching the liquid that may
leak from the LCD. Contact with LCD liquid can cause skin irritation.
Should you accidentally get liquid leaking from the LCD in your mouth,
immediately rinse your mouth and contact your physician.
Should liquid leaking from the LCD get into your eyes or onto your
skin, immediately rinse for at least 15 minutes and then contact your
physician.
Due to limitations of the LCD used in this electronic dictionary, graphic
images may not appear as they do on your computer display in terms
of colour, etc.
Some display pixels may not light or may remain lit.
The liquid crystal panel used for the display is a product of very
high accuracy technology. The effective pixel rate of the display
is 99.99%, which means that no more than 0.01% of the pixels
do not light or remain lit at all times. This is normal and does not
indicate malfunction.
•
•
•
•
•
•
•
13
Location
Never use your electronic dictionary in a hospital, in an aircraft, or in
any other location where operation of mobile telephones is controlled
or restricted.
Avoid using your electronic dictionary in areas where electrostatic
charge is generated.
CASIO COMPUTER CO., LTD. assumes no responsibility for any
loss or claims by third parties arising out of the use of this product.
The contents of this manual are subject to change without notice.
No part of this manual may be reproduced in any form without the
express written consent of the manufacturer.
The screen shots and product illustrations shown in this manual
may be different from those of the actual product. For the sake of
simplicity, some keys and icons are not shown in the examples of
this manual.
Example:
➜
•
•
•
•
•
•
14
Names of Parts
LCD
POWER key
(page 16)
Keyboard (page 87)
RESET button
(pages 3 and 74)
Battery Cover
(pages 2 and 78)
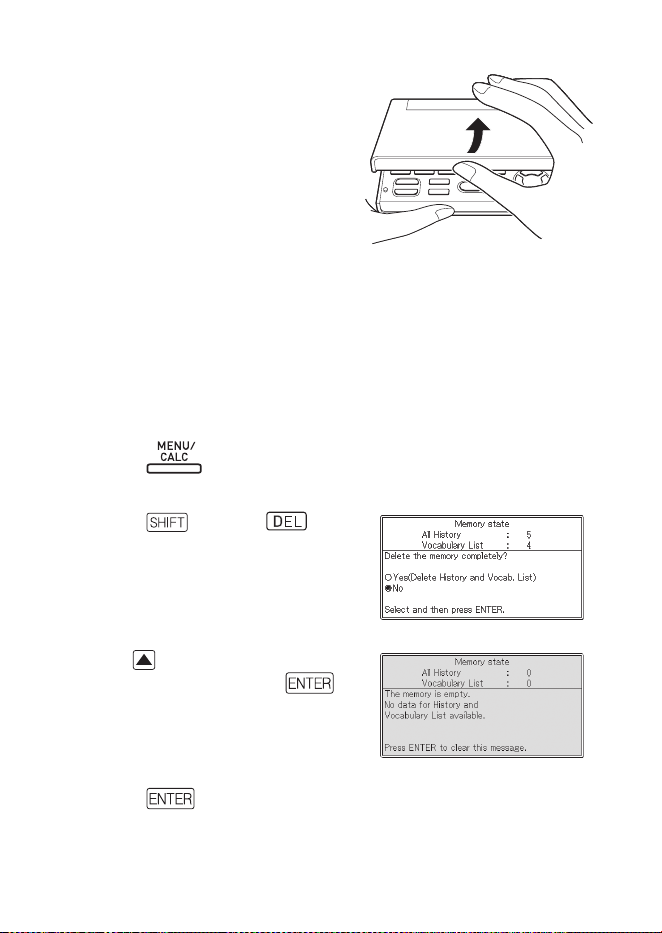
Opening the Cover of the Electronic Dictionary
Open the cover of your electronic
dictionary as shown in the
illustration.
15
Screen Formats
Quick Search
With Quick Search, the list of
hits continually updates as you
input each character.
You can turn off Quick Search,
if you want. When Quick Search
is off, the hit list does not appear
until you press
(page 67).
Preview Screen
On the list of hits produced
by a search, you can display
a preview screen that shows
part of the defi nition of the
highlighted headword.
Example/Comment Preview Screen
When you look up examples
or comments by pressing
the
key, part of the
highlighted example or
comment will be shown in the
lower pane on the display.
■
•
■
■
16
Turning Power On and Off
Power turns on automatically whenever you open the electronic
dictionary’s cover, and shuts off automatically when you close it.
You also can turn power on and off by pressing the key.
Power also turns on when you press a Mode key. Turning on power
displays the keyword input screen (initial screen) of the selected
dictionary/mode. Pressing displays the MENU screen.
Mode key
You can turn off power regardless of what screen is currently on the
display.
Never turn off power while the electronic dictionary is changing from
one screen to another.
•
•
•
•
An Auto Power Off function guards against wasting battery power by
turning off the electronic dictionary if you do not perform any operation for
a preset amount of time. See page 67 for information about specifying the
Auto Power Off time.
A Resume feature automatically saves screen information and data
whenever power is turned off. Pressing the
key to turn power back
on again restores the screen that was on the display when power was last
turned off.
•
•
17
Basic Operation
Selecting a Mode
You can select a mode either by performing the applicable mode key
operation or by using the MENU screen.
To select a mode using a mode key
Each press of a mode key displays the initial screen of the dictionary
marked above it. If a key is marked with two dictionary names, each
press of the key toggles between them.
To display the initial screen of the second dictionary marked above a
mode key, press and then the mode key.
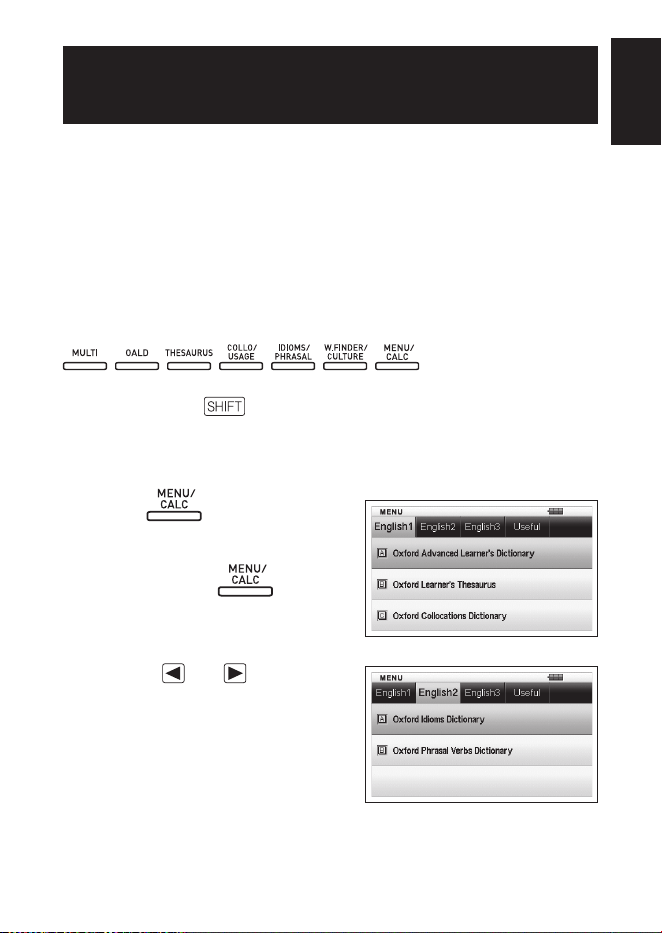
To select a mode using the MENU screen
You can use this procedure to select any mode.
1
Press .
This displays the MENU screen.
If the Calculator mode screen
appears, press
again.
2
Use the and cursor keys
to move the highlighting to
the tab of the category for the
dictionary/mode you want to
select.
■
•
■
•
•
Basic OperationBasic Operation

18
3
Use the and cursor keys to move the highlighting to the
mode you want to select.
4
Press .
This displays the initial screen of the dictionary/mode you selected.
The dictionaries/modes are divided into the categories listed below.
English1
Oxford Advanced Learner's Dictionary (English-English dictionary)
Oxford Learner's Thesaurus
Oxford Collocations Dictionary
English2
Oxford Idioms Dictionary
Oxford Phrasal Verbs Dictionary
English3
Oxford Learner's Wordfi nder Dictionary (English usage dictionary)
Practical English Usage
Oxford Guide to British and American Culture
Useful
Multi-Dictionary Search
Calculator
Vocabulary List
•
•
•
•
•
19
Selecting a Headword or Screen Item
To select a headword or screen item by highlighting it
or moving the cursor (
●
) to it
1
Use the arrow keys to move the
highlighting to a headword, or
to select the screen item you
want.
On some screens, you need
to move a cursor (●) instead of
highlighting to the item you want
to select.
2
Press .
All of the examples in this manual use this method for headword and
screen item selection.
To select a headword or screen item by pressing a
character key
Press the character key for the
letter to the left of the headword
or screen item you want to
select.
■
•
•
■
20
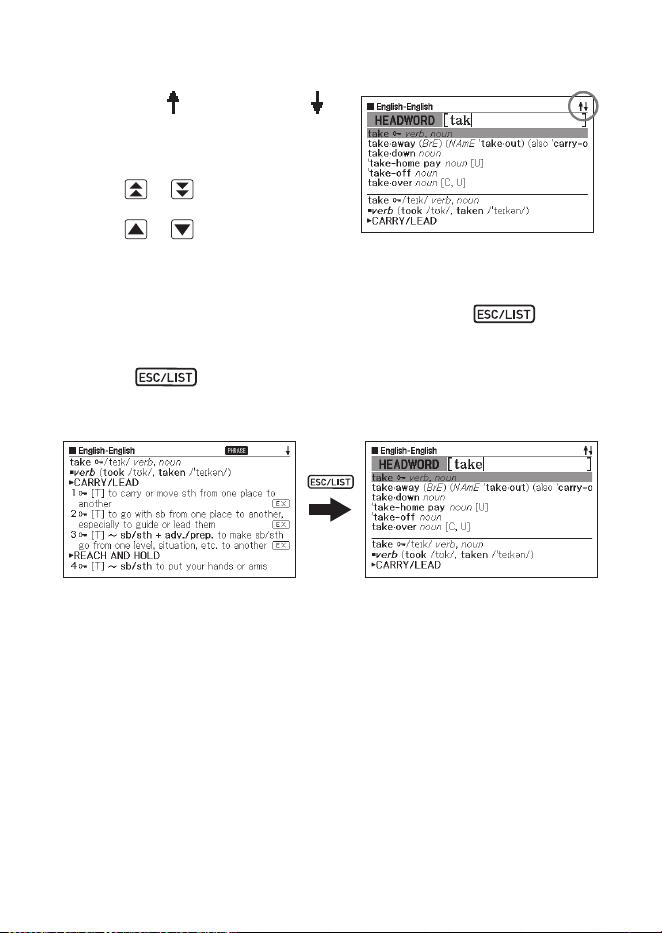
Scrolling Between Screens
An up arrow ( ) or down arrow ( ) in
the upper right corner of the display
indicates that more screen content
is available above or below.
Press or to scroll from one
screen to the next (page scroll).
Press
or to scroll line-by-line.
Back-stepping to a Previous Operation
If you make a mistake while operating your electronic dictionary, you
can back-step to the previous operation by pressing .
Viewing a List Screen
Pressing while a defi nition screen is on the display will
switch to the list view of terms, which includes the term whose
defi nition you were viewing.
Looking Up Another Term
After viewing the defi nition of a term, you can look up another term
by using the keyboard to input it.
The fi rst character you input returns you to the keyword input screen
(initial dictionary screen), where you can input the term you want to
fi n d .
•
•
•
21
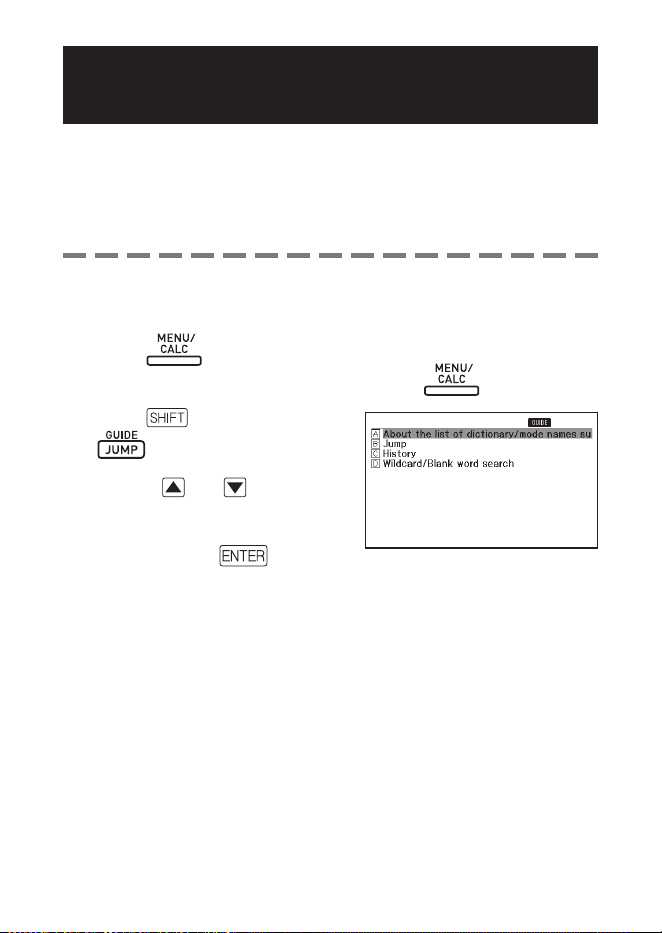
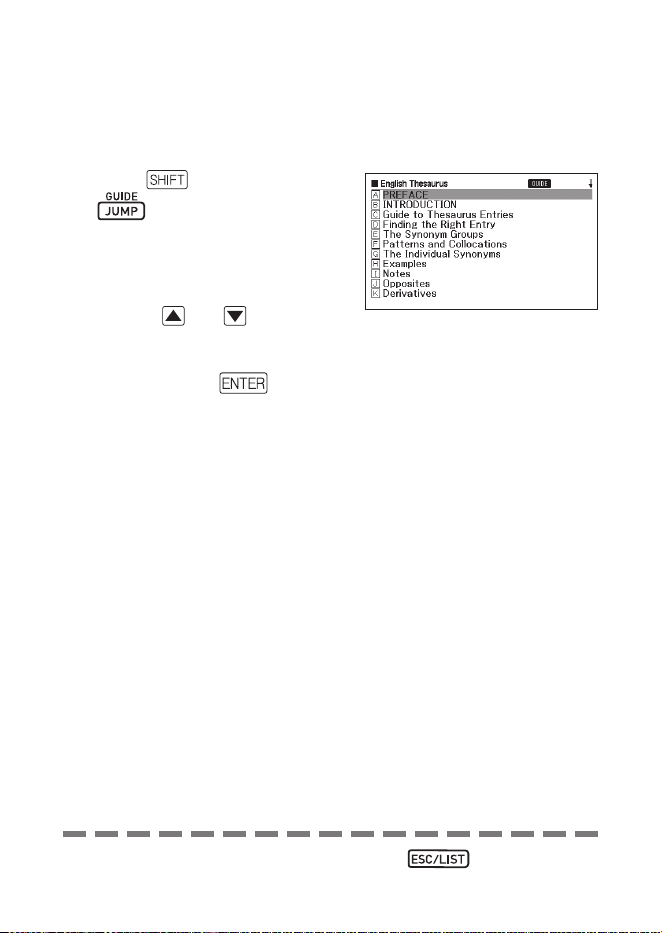
Using the Dictionary Guide
Dictionary guide information shows the dictionaries/modes that
support specifi c types of searches and other functions.
It also provides explanations (conventions, how to use, etc.) for each
dictionary/mode.
To view dictionaries/modes that support specifi c types
of searches and other functions
1
Press to display the MENU screen.
If the Calculator mode screen appears, press again.
2
Press , and then press
.
3
Use the and cursor keys
to move the highlighting to the
guide item you want to view,
and then press .
■
•
22
To view an explanation about a dictionary/mode
1
Select one of the dictionaries/modes.
This will display the initial screen of the selected dictionary/mode.
2
Press , and then press
.
This function is not supported
by certain modes, such as the
calculator, etc.
3
Use the and cursor keys
to move the highlighting to the
guide item you want to view,
and then press .
■
•
•
To close the guide information screen, press .
•
23
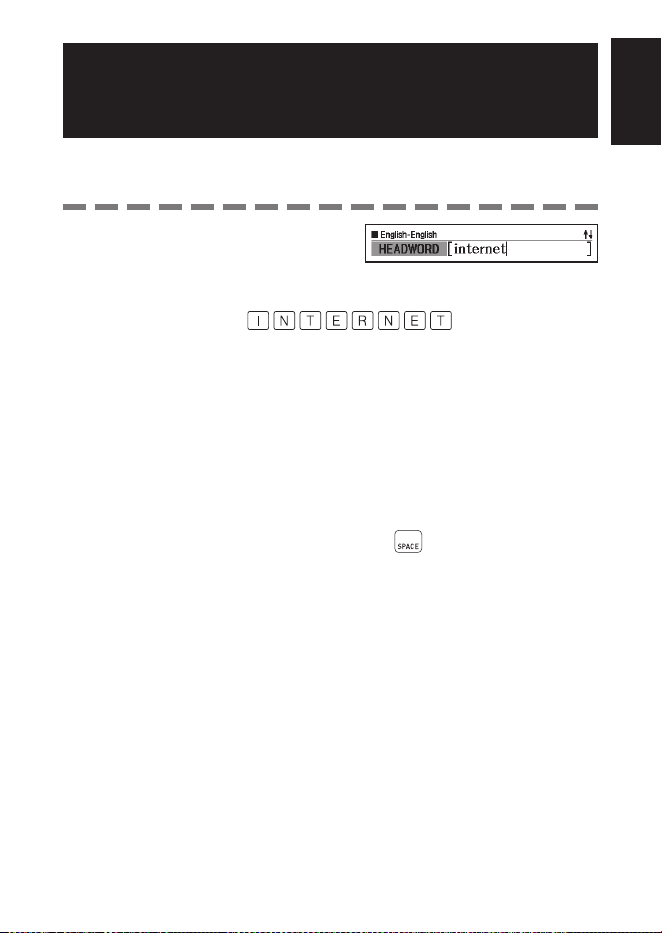
Inputting Alphabetic
Characters
Use the keyboard to input alphabetic characters.
Example: To input the word
“internet”
Press the keyboard keys to input the
term.
In this example, press: .
Alphabetic Character Input Rules
Note that all alphabetic characters are input in lower case, regardless
of their normal capitalization.
Input hyphenated terms as single words, without a hyphen. To look up
“heaven-sent”, for example, input “heavensent”.
If an ampersand is part of the word or phrase you are inputting for an
English Headword Search, replace the ampersand with the word “and”.
To input “A & E”, for example, input “aande”.
When inputting multiple words (Phrase Search, Example Search, etc.),
separate them with a space (entered using
).
You can input up to 30 characters. With Phrase Search and Example
Search, a blank space is counted as a character.
•
•
•
•
•
•
Inputting CharactersInputting Characters
24
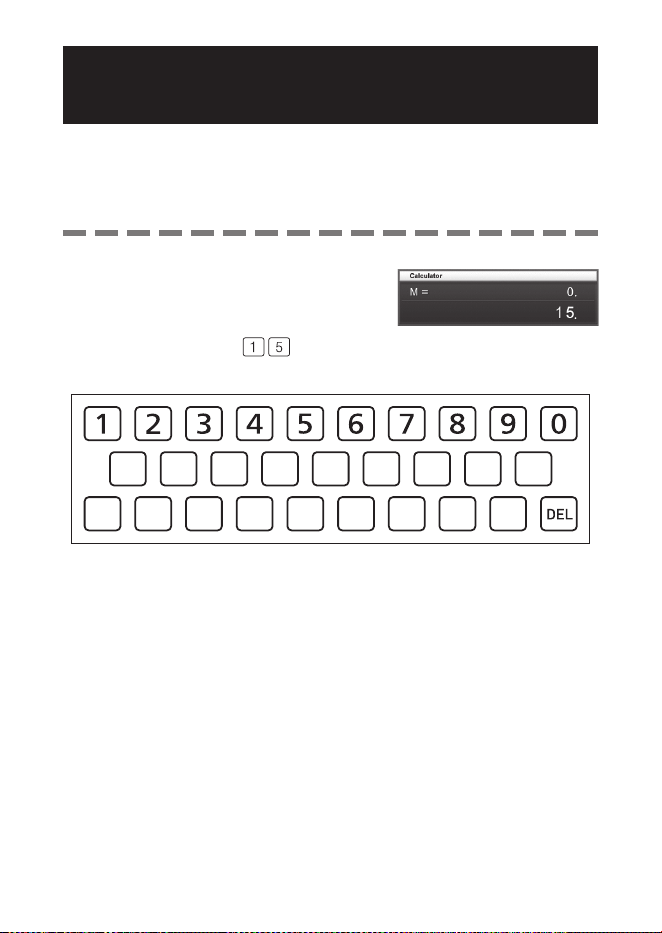
Inputting Numbers
You can input numbers when editing a Vocabulary List name and
on the calculator screen. Entering the Calculator mode automatically
changes the keyboard to a number input keyboard.
Example: To input 15
While the calculator screen is on the
display, press the keyboard keys to
input numbers.
In this example: press .
Keys Used for Number
•
Calculator screenCalculator screen
25
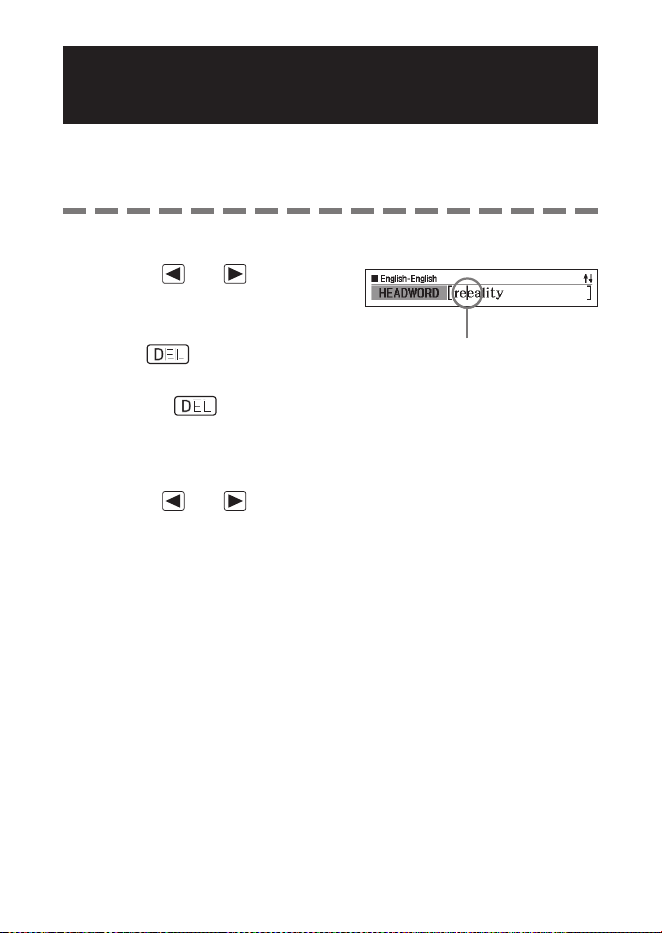
Correcting an Input Error
You can use any of the following methods to correct input errors and
to modify input.
To delete a character
1
Use the and cursor keys
to move the cursor to the left of
character you want to delete.
2
Press .
This deletes the character to the right of the current cursor position.
Pressing
while the cursor is located to the right of the last input
character deletes the character to the left of the cursor.
To insert a character
1
Use the and cursor keys to move the cursor to the
location where you want to insert the character.
2
Input the character.
This inserts the character at the current cursor position.
■
•
•
■
•
CursorCursor
26
Dictionaries and Functions
The following shows the dictionaries included in your electronic
dictionary and where you need to go for more information when you
want to perform a specifi c type of look-up.
Basic operations are almost the same in all dictionaries. Any
differences are noted in the explanations for each particular dictionary.
Dictionary/
Thesaurus
Type Of
Look-up
Looking
Up a
Headword
Checking
Spelling
and Original
Forms
Looking
Up
Phrases
Looking
Up
Examples
English-
English
*1
Defi nition of
English term
Page 27 Page 33 Page 34
Page 35
English
thesaurus
*2
English
synonyms
—
—
—
English
Collocations
*3
Defi nition of
English term
Page 27
Page 34
English idioms Defi nition of
English term
Page 33
English phrasal
verbs
Defi nition of
English term
British and
American
Culture
Defi nition of
English term — — —
*1
The English-English dictionary can be used to fi nd out how to write
text for reports, resumes, letters, e-mail and other types of documents
(Writing Tutor). (page 36)
*2
The English thesaurus supports lookup by keyword and category.
(pages 37 and 38)
*3
You can use the English Collocations Dictionary to look up common
word combinations (collocations). (page 39)
•
27
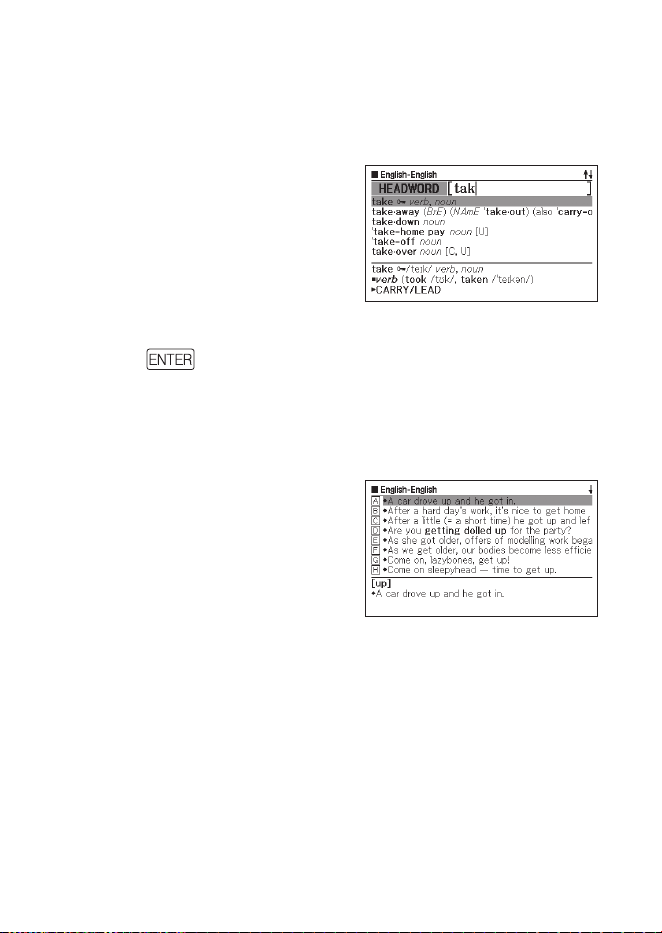
Looking Up a Headword
The following explanation and screen shots are based on the English-
English dictionary.
1
Select the dictionary you want
to use (page 17).
Check to make sure that
“HEADWORD” is highlighted.
2
Input the term you want to look
up.
This example looks up “fish”. A list
of hits continually updates as you
input each letter of the term.
•
Using a DictionaryUsing a Dictionary
28
3
Use , , , and to
move the highlighting to the
term (headword) you want to
select, and then press .
This displays the result of the look-
up.
•
You also can search for a term even if you are unsure of its correct
spelling (page 31).
If you see a , , or icon on the screen, it means that
additional information is available. Refer to the sections noted below
for more information.
Icon Additional Information Page
Viewing phrase data for a headword Page 29
Viewing the comment for a word with the
icon
Page 30
Viewing the example for a word with the
icon
Red text indicates that there is
related information within the same
dictionary. To view the related
information, press , use ,
, , and to select the red
text, and then press .
•
•
•
29
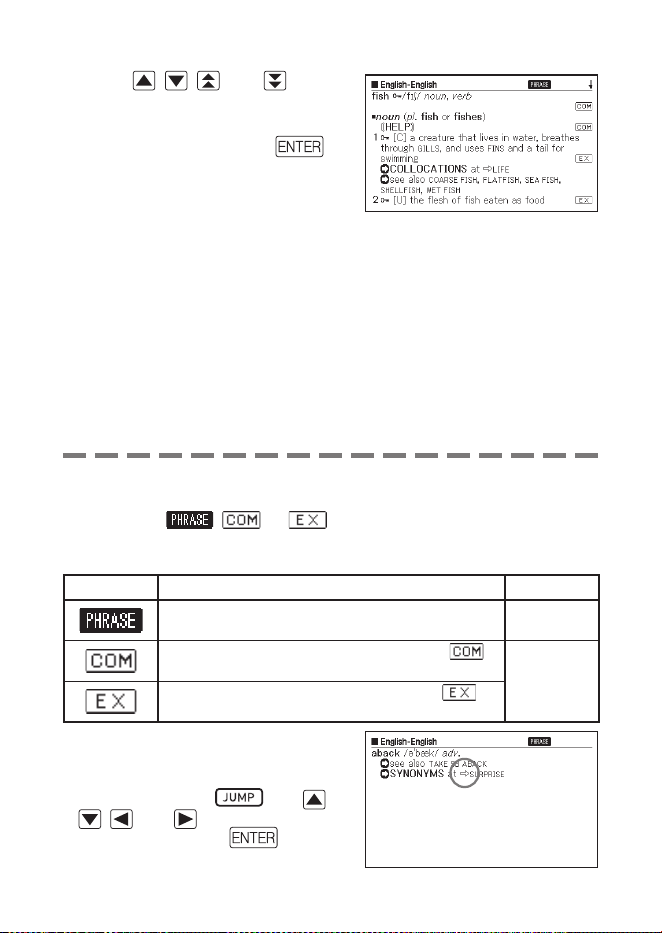
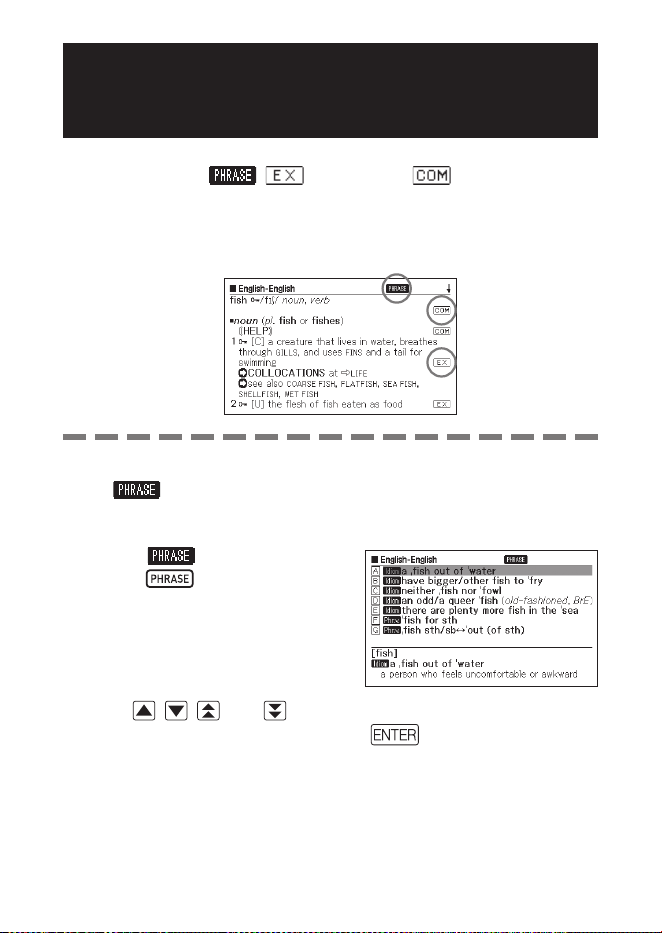
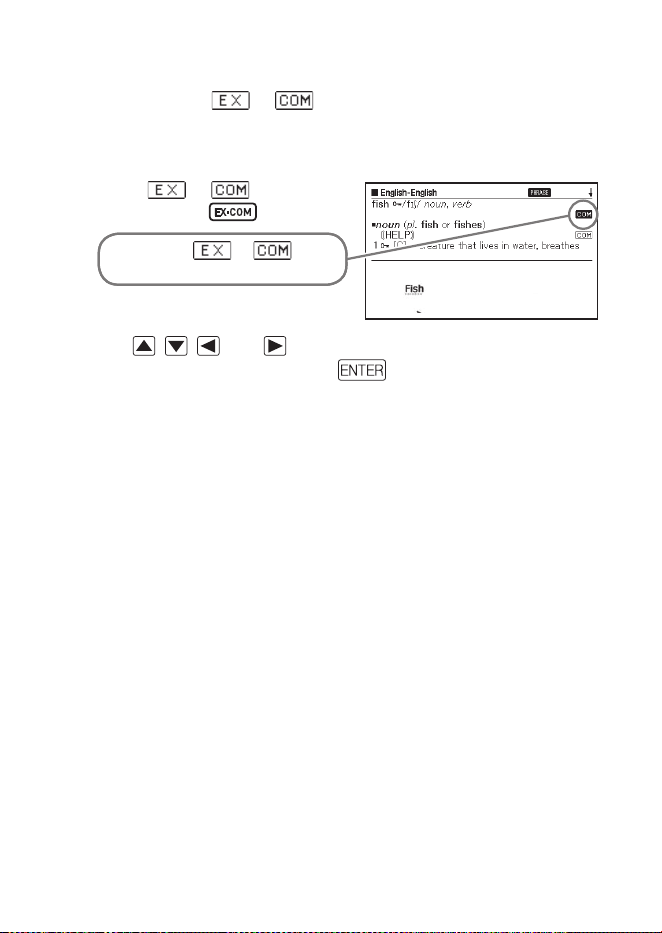
Looking Up Details About a Term
(Phrases, Examples, Comments)
If you see the icon , (example), or (comment or
fi gure) on the screen, it means that there is additional information
available.
The following explanation and screen shots are based on the English-
English dictionary.
Looking Up Phrases
When is on the screen, you can lookup phrases that contain
the term you looked up.
1
When is on the screen,
press .
This displays a list of hits.
2
Use , , , and to move the highlighting to the phrase
you want to select, and then press .
This displays the meaning of the phrases.
•
•
•
30
Looking Up Examples and Comments
Whenever you see or on the display, it means that there
is example or comment information available for the term you are
viewing.
1
When or is on the
display, press .
This causes or to
become highlighted.
2
Use , , , and to move the highlighting to the icon you
want to select, and then press
.
This displays the applicable example, comment, or fi gure.•
31
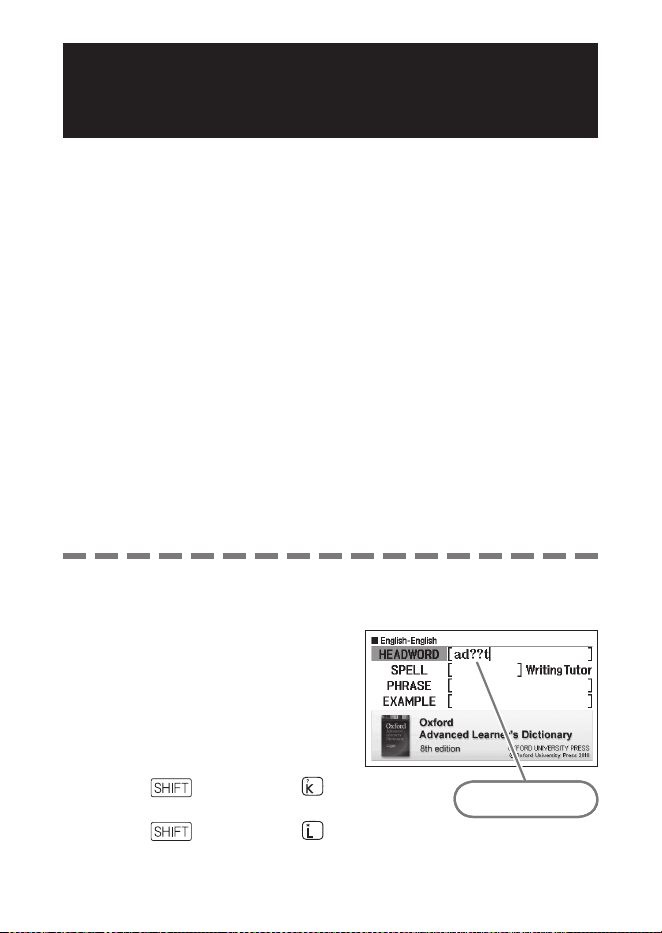
Looking Up a Term when You
are Unsure of Its Spelling
When you are unsure of specifi c characters
You can input the wildcard character (?) in place of characters when
you know how many letters a term contains but are unsure of what
specifi c characters are used.
Letters you are unsure about: ad_ _t
➝
ad??t
When you are unsure about the number of characters
Use the blank word character (
✽
) to fi nd a term when you are unsure
about how many characters there are in a certain part of it.
Part you are unsure about: ad_... _t
➝
ad
✽
t
Use the wild card (?) or blank word character (
✽
) to perform a
Headword Search.
The following explanation and screen shots are based on the English-
English dictionary.
You can use Dictionary Guide Information (page 21) to view the names
of the dictionaries/modes that support this function.
1
Display the initial screen of the dictionary (page 17).
2
Input the keyword, substituting
the wildcard character (?) or
blank word character (
✽
) for
parts where you are unsure of
the spelling.
Inputting the wildcard
character (?)
Press , and then press .
Inputting the blank word character (
✽
)
Press , and then press .
■
■
•
•
•
•
•
Input “?” here.Input “?” here.

32
3
Press .
This displays a list of hits that
resemble the keyword you input.
4
Use , , , and to move the highlighting to the term
you want to select, and then press .
This displays the defi nition of the term.
•
•
You can input up to 29 wildcard characters (?) in a single keyword.
A search cannot be performed in the following cases.
When the keyword contains more than one blank word character (
✽
).
When the keyword contains both a wildcard character (?) and a blank
word character (
✽
).
If you know only the fi rst few characters of the term you want to fi nd,
just input the characters you know and search. This will produce a list
of hits.
You also can input a wildcard character or blank word character by
pressing . On the window that appears, use and to
select the character you want, and then press
. To close the
window without inputting anything, press
.
•
•
•
•
•
•
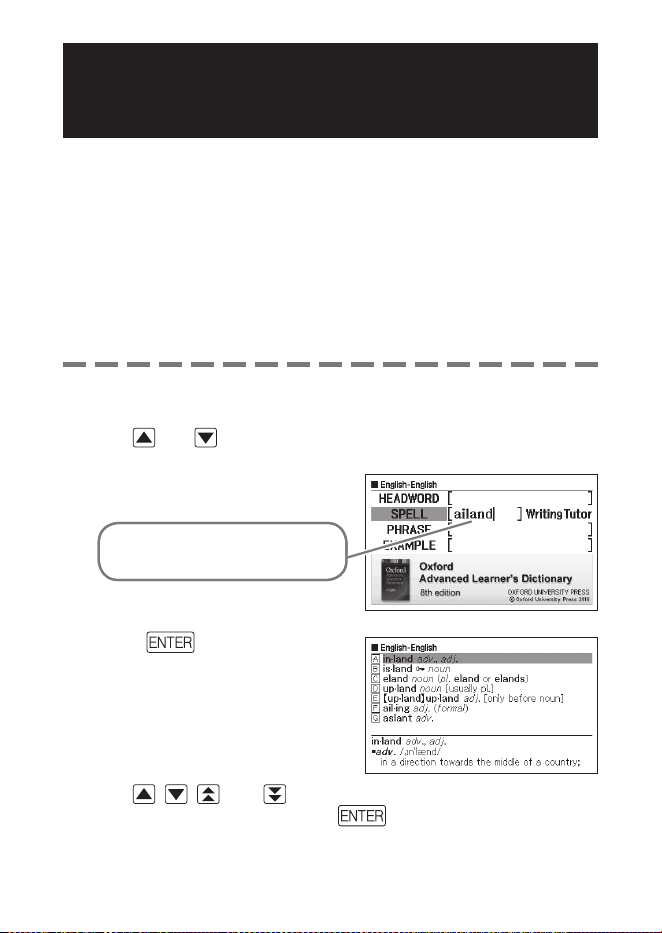
33
Spell Checking and Searching for an Original
Form (Spell Check/Original Form Search)
The following explanation and screen shots are based on the English-
English dictionary.
In addition to fi nding terms whose spelling resembles the term you
input, the electronic dictionary also will display candidates of what
it thinks is the original (unmodifi ed) form of the word you input. This
does not necessarily mean that the candidates are the correct original
(unmodifi ed) form of the word. Original (unmodifi ed) form candidates
will not be displayed if you input a modifi ed form of a term that is not a
headword.
1
Select the dictionary you want to use (page 17).
2
Use and to highlight “SPELL”.
3
Input the term you want to spell
check.
This example checks the spelling
of “ailand” (for “island”).
4
Press .
This displays a list of possible
spellings.
5
Use , , , and to move the highlighting to the term you
want to select, and then press
.
This displays the defi nition of the term.
•
•
•
•
34
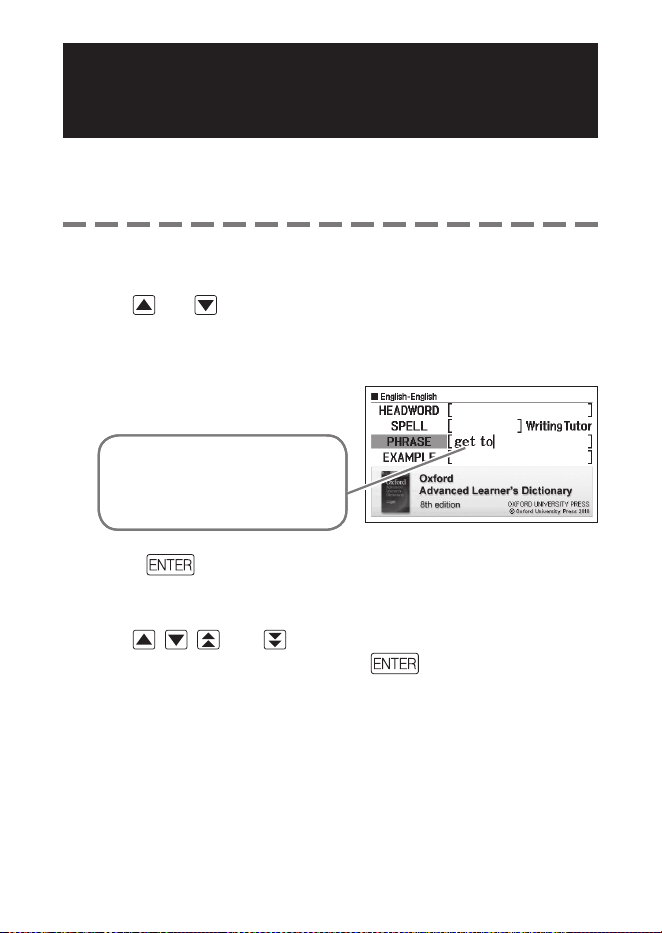
Looking Up Phrases
(Phrase Search)
The following explanation and screen shots are based on the English-
English dictionary.
1
Select the dictionary you want to use (page 17).
2
Use and to highlight “PHRASE”.
In the English idioms dictionary, highlight “IDIOM”. In the English
phrasal verbs dictionary, highlight “PHRASAL VERB”.
3
Input the words that should be
included in the phrases.
When inputting multiple words,
separate them with a space.
To input “get” and “to” in this
example, input “get to”.
4
Press .
This displays a list of hits.
5
Use , , , and to move the highlighting to the phrase
you want to select, and then press
.
This displays the meaning of the phrase.
The English idioms dictionary displays the meanings of idioms, and the
English phrasal verbs dictionary shows the meanings of phrasal verbs.
•
•
•
•
•
35
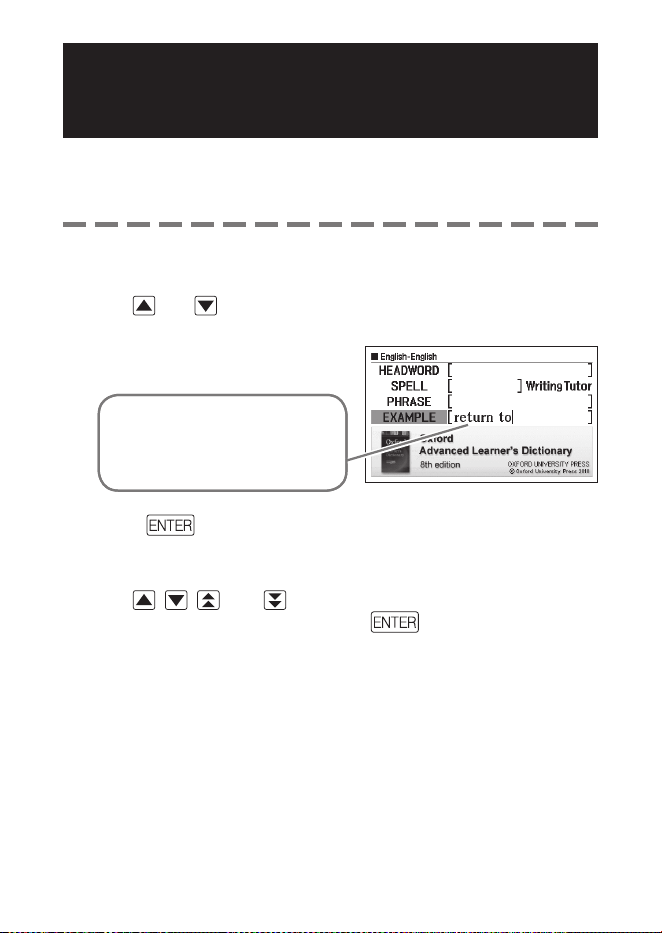
Looking Up Examples
(Example Search)
The following explanation and screen shots are based on the English-
English dictionary.
1
Select the dictionary you want to use (page 17).
2
Use and to highlight “EXAMPLE”.
3
Input the words that should be
included in the examples.
When inputting multiple words,
separate them with a space.
To input “return” and “to” in this
example, input “return to”.
4
Press .
This displays a list of hits.
5
Use , , , and to move the highlighting to the example
you want to select, and then press .
This displays the meaning of the example.
•
•
•
36
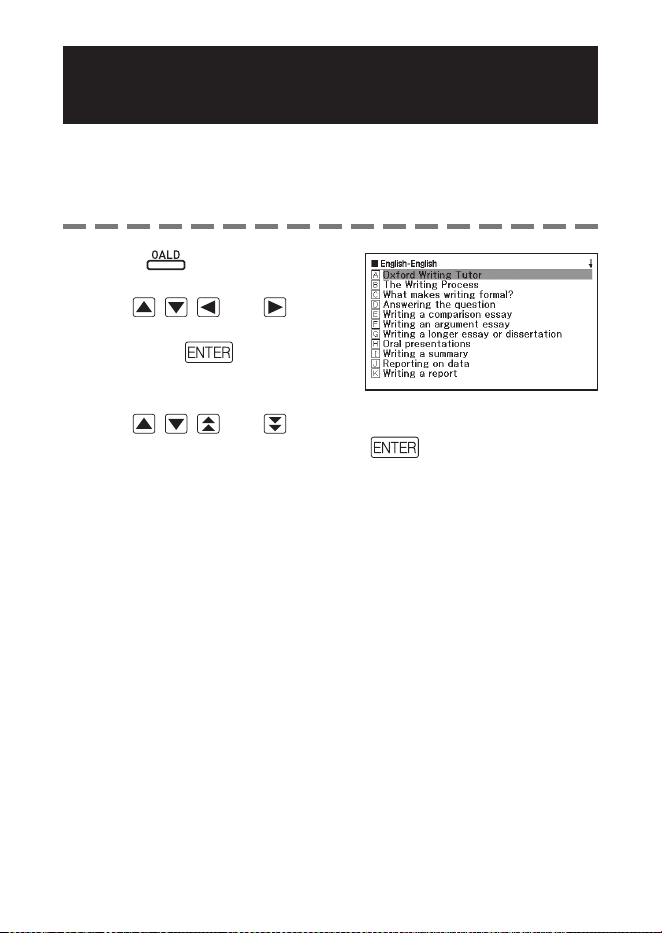
Viewing Writing Tutor
Writing Tutor can be used to fi nd out how to write text for reports,
resumes, letters, e-mail and other types of documents. Writing Tutor
uses the English-English dictionary.
1
Press .
2
Use , , , and to
highlight “Writing Tutor”, and
then press .
This displays a list of topics.
3
Use , , , and to move the highlighting to the topic
you want to select, and then press .
Repeat the above steps as many times as necessary to view the
explanations you want to look up.
•
•
•
37
Looking Up a Keyword
(Keyword Search)
Keyword Search uses the English thesaurus.
1
Press .
Check to make sure that
“KEYWORD” is highlighted.
2
Input the English term you want
to look up.
This example looks up “act”. A list
of hits continually updates as you
input each letter of the term.
3
Use , , , and to move the highlighting to the English
term (keyword) you want to select, and then press .
This displays terms and expressions that are related to the keyword
you specifi ed.
•
•
38
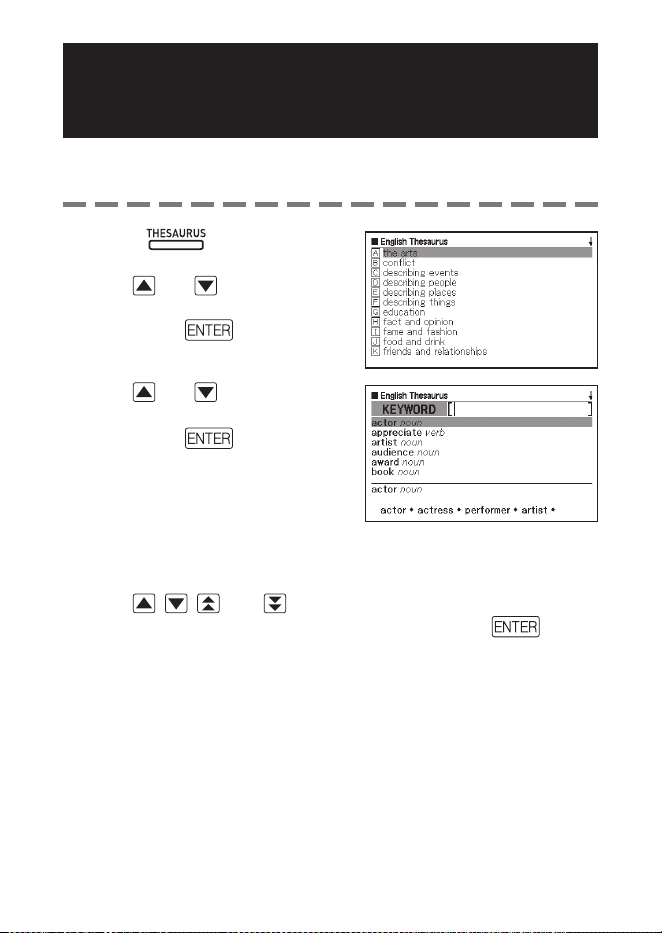
Searching for Quasi-
synonyms by Category
Category Search uses the English thesaurus.
1
Press
.
2
Use and to highlight
“CATEGORY SEARCH”, and
then press .
3
Use and to select a
quasi-synonym category and
then press
.
4
Input the English term you want to look up.
5
Use , , , and to move the highlighting to the English
term (keyword) you want to select, and then press
.
This displays terms and expressions that are related to the keyword
you specifi ed.
•
•
39
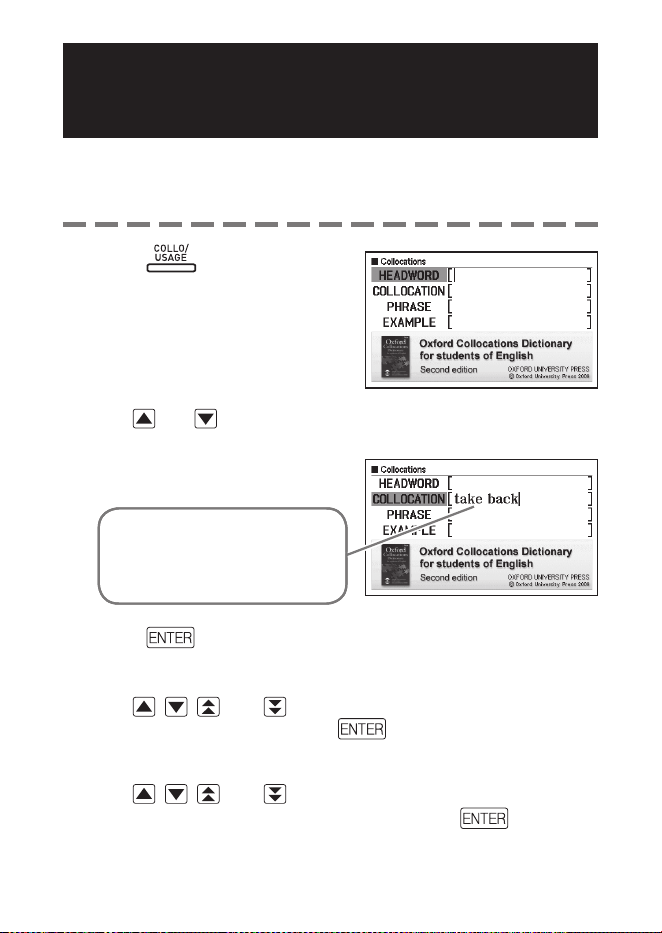
Searching for Common Word Pairs
(Collocation Search)
Collocation Search is performed using the English Collocations
Dictionary.
1
Press .
2
Use and to highlight “COLLOCATION”.
3
Input the term you want to
search.
When inputting multiple words,
separate them with a space.
To input “take” and “back” in this
example, input “take back”.
4
Press .
This displays a list of hits.
5
Use , , , and to move the highlighting to the item you
want to select, and then press
.
This displays a list of hits.
6
Use , , , and to move the highlighting to the
collocation you want to select, and then press .
This displays the collocations for the term.
•
•
•
•
40
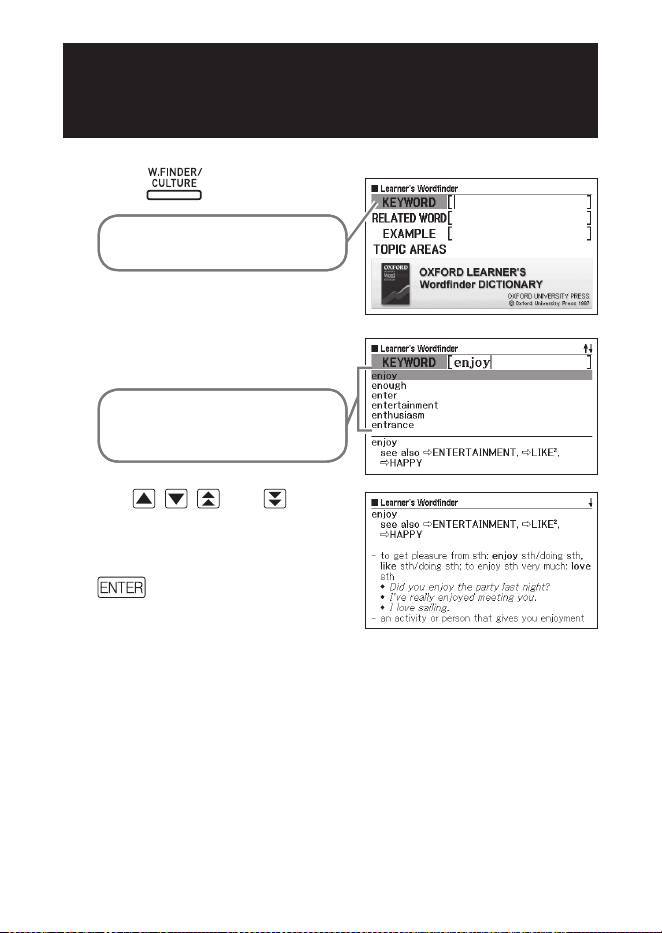
Looking Up a Keyword
(Keyword Search)
1
Press .
Check to make sure that
“KEYWORD” is highlighted.
2
Input the English term you want
to look up.
This example looks up “enjoy”. A
list of hits continually updates as
you input each letter of the term.
3
Use , , , and to
move the highlighting to the
English term (keyword) you
want to select, and then press
.
This displays terms and
expressions that are related to the
keyword you specifi ed.
•
41
Looking Up Related Terms
(Related Term Search)
1
Press .
2
Use and to highlight “RELATED WORD”.
3
Input the English term you want to look up.
4
Press .
This displays a list of related terms.
5
Use , , , and to move the highlighting to the English
related term you want to select, and then press .
This displays an explanation of the related term.
•
•
Using the Oxford Learner’s Wordfi nder Dictionary Using the Oxford Learner’s Wordfi nder Dictionary

42
Looking Up Examples
(Example Search)
1
Press .
2
Use and to highlight “EXAMPLE”.
3
Perform steps 3 through 5 under “Looking Up Examples
(Example Search)” in “Using a Dictionary” (page 35) to search
for examples.
Performing a Topic Search
1
Press .
2
Use and to highlight “TOPIC AREAS”, and then press
.
This displays a list of topics.
3
Use , , , and to move the highlighting to the topic
you want to select, and then press .
This displays a list of terms related to the topic.
•
•
43
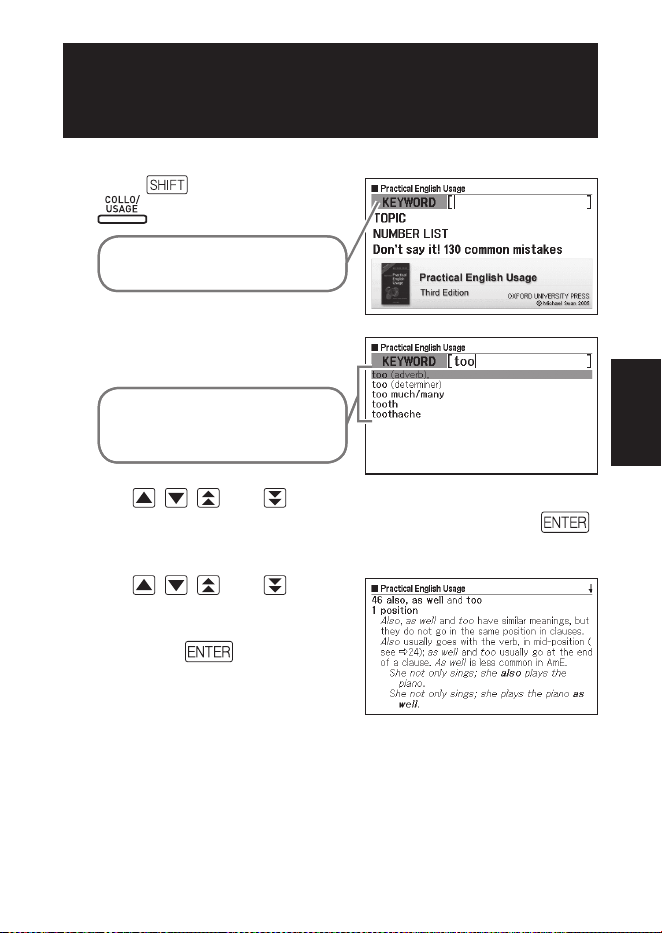
Looking Up a Keyword
(Keyword Search)
1
Press , and then press
.
Check to make sure that
“KEYWORD” is highlighted.
2
Input the English expression
you want to look up.
This example looks up “too”. A list
of hits continually updates as you
input each letter of the term.
3
Use , , , and to move the highlighting to the English
expression (keyword) you want to select, and then press .
Here we selected “too (adverb)”.
4
Use , , , and to
move the highlighting to the
item you want to select, and
then press .
Repeat the above step as many
times as required in order to
display an explanation of the
English expression.
•
•
Using the Practical English UsageUsing the Practical English Usage
44
Performing a Topic Search
1
Press , and then press .
2
Use and to highlight
“TOPIC”, and then press
.
This displays a list of topics.
3
Use , , , and to move the highlighting to the topic list
you want to select, and then press .
4
Use , , , and to move the highlighting to the item you
want to select, and then press .
Repeat the above step as many times as required in order to display an
explanation of the English expression.
•
•
45
Performing an Item
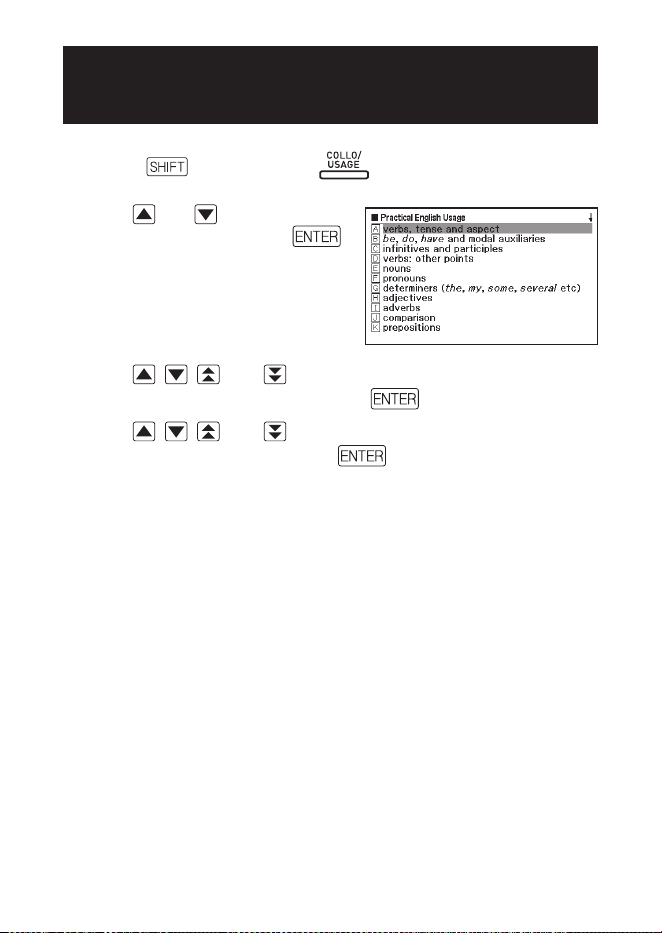
Number Search
1
Press , and then press .
2
Use and to highlight “NUMBER LIST”, and then press
.
3
Use , , , and to move the highlighting to the item
number list you want to select, and then press .
4
Use , , , and to move the highlighting to the item you
want to select, and then press
.
Repeat the above step as many times as required in order to display an
explanation of the English expression.
Performing a Search of
“130 Common Mistakes”
1
Press , and then press .
2
Use and to highlight “Don’t say it! 130 common
mistakes”, and then press
.
3
Use and to move the highlighting to the mistake type list
you want to select, and then press
.
This displays example mistakes.
•
•
46
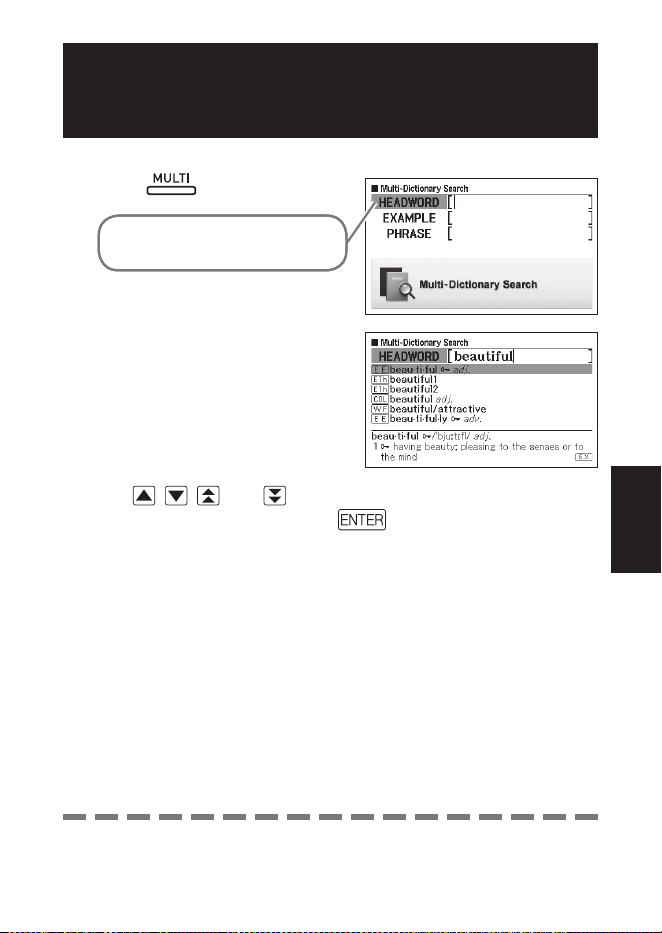
Multiple Dictionary Search
You can enter a term and search dictionaries/modes for the term
itself, or examples or phrases that use the term.
The maximum number of characters and other input restrictions are in
accordance with same rules that apply for alphabetic character input
(page 23).
Perform the operation below to view the dictionaries/modes that are
supported for Multiple Dictionary Search.
1 Press
.
2 Press
, and then press .
To close the screen that appears, press
.
•
•
•
47
Searching for the Same Term in Multiple
Dictionaries (Headword Search)
1
Press .
Check to make sure that
“HEADWORD” is highlighted.
2
Input the term you want to
search for.
A list of hits continually updates as
you input each letter of the term.
3
Use , , , and to move the highlighting to the term you
want to select, and then press .
•
Multiple Dictionary SearchMultiple Dictionary Search
Note that the input term for Headword Search cannot include the
wildcard character (?), blank word character (
✽
), or a space.
•
48
Searching the Examples and Phrases of Multiple
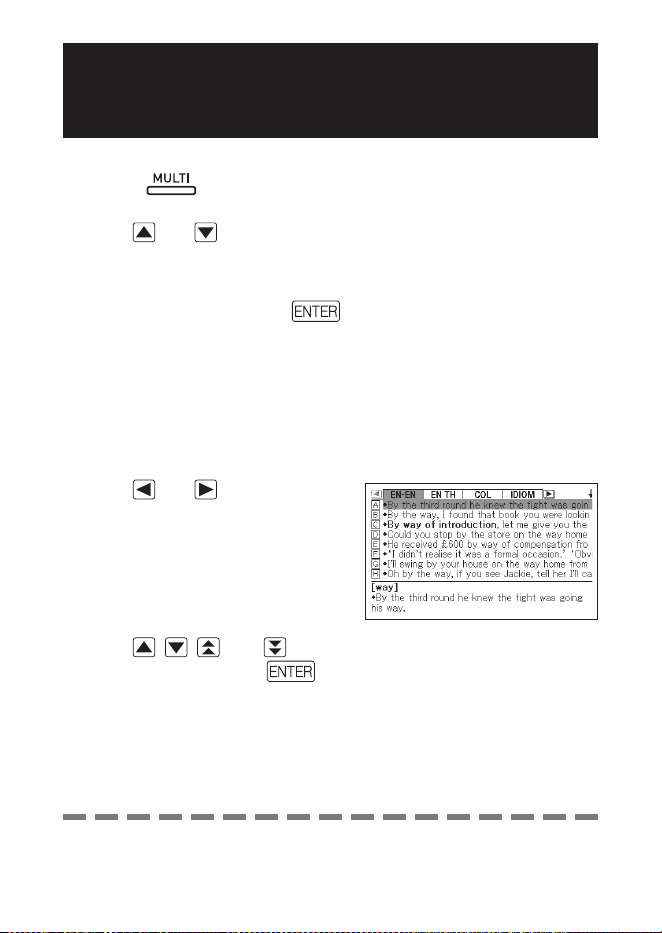
Dictionaries (Example and Phrase Search)
1
Press .
2
Use and to highlight “EXAMPLE” for Example Search or
“PHRASE” for Phrase Search.
3
Input the words that should be included in the examples or
phrases, and then press .
Here we will use Example Search to search for the examples that
contain “by the way”.
When inputting multiple words, separate them with a space.
This displays a list found by the search.
You can use the procedure on page 49 to specify the dictionary priority
sequence for the list of hits.
4
Use and to select the
dictionary you want.
5
Use , , , and to highlight the example or phrase you
want, and then press .
•
•
•
•
Note that the input words for Example or Phrase Search cannot
include the wildcard character (?) or blank word character (
✽
).
•
49
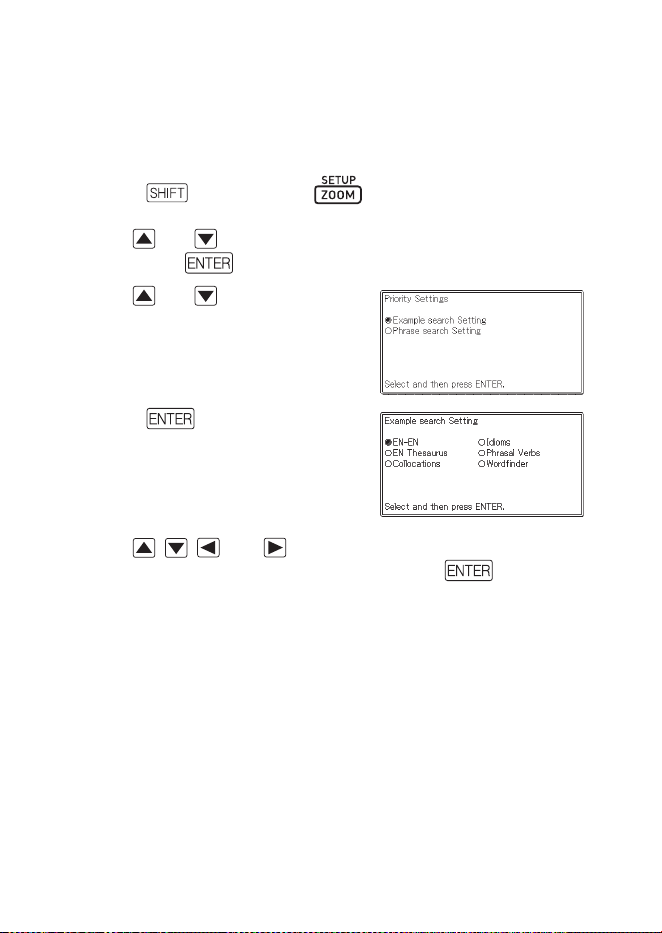
Specifying the Dictionary Display Sequence for
Lists of Hits
Use the procedure below to specify what order dictionaries should
appear when displaying a list of hits for a Multiple Dictionary Search.
1
Press and then press .
2
Use and to move the cursor (
●
) to “Priority Settings” and
then press .
3
Use and to move the
cursor (
●
) to the item you want
to change.
4
Press .
5
Use , , , and to move the cursor (
●
) to the dictionary
that should be given priority, and then press
.
50
Performing Re-lookup of a Recently
Searched for Term (History Search)
Each time you look up a term, it is stored in history memory. You
can view the current content of the history memory for a specifi c
dictionary, or for all dictionaries.
When you want to perform re-lookup of a term that you recently
searched for, simply display the history list and select the term (History
Search).
History memory can contain up to 1,000 terms at one time. When
you perform a search operation that causes this maximum limit to be
exceeded, the new entry causes the oldest entry in history memory to
be deleted automatically.
You can use Dictionary Guide Information (page 21) to view the names
of dictionaries/modes that support this function.
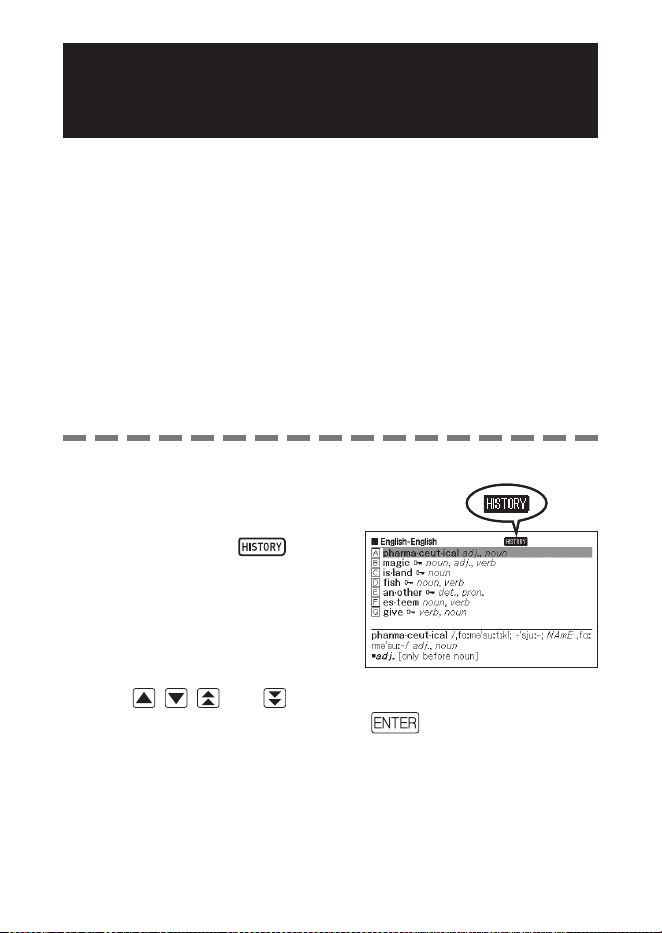
To perform a History Search for a specifi c dictionary
1
While the dictionary whose
history you want to search is on
the display, press .
2
Use , , , and to move the highlighting to the term you
want to re-look up, and then press
.
This displays the defi nition of the term you selected.
•
•
■
•
51
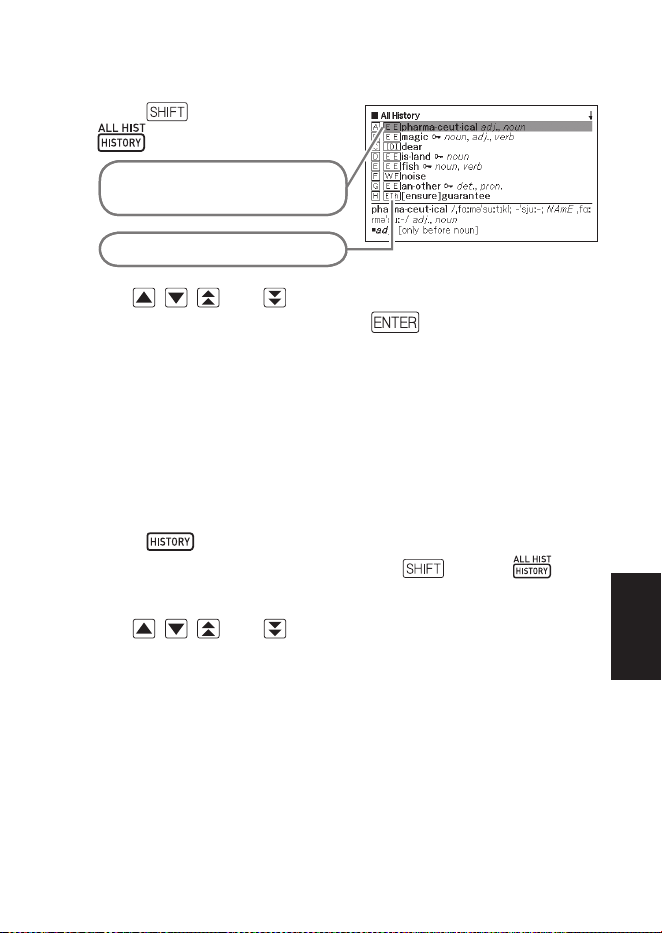
To perform a History Search for all dictionaries
1
Press , and then press
.
The last term you searched for is
highlighted on the list.
Indicates the dictionary type.
2
Use , , , and to move the highlighting to the term you
want to re-look up, and then press .
This displays the defi nition of the term you selected.
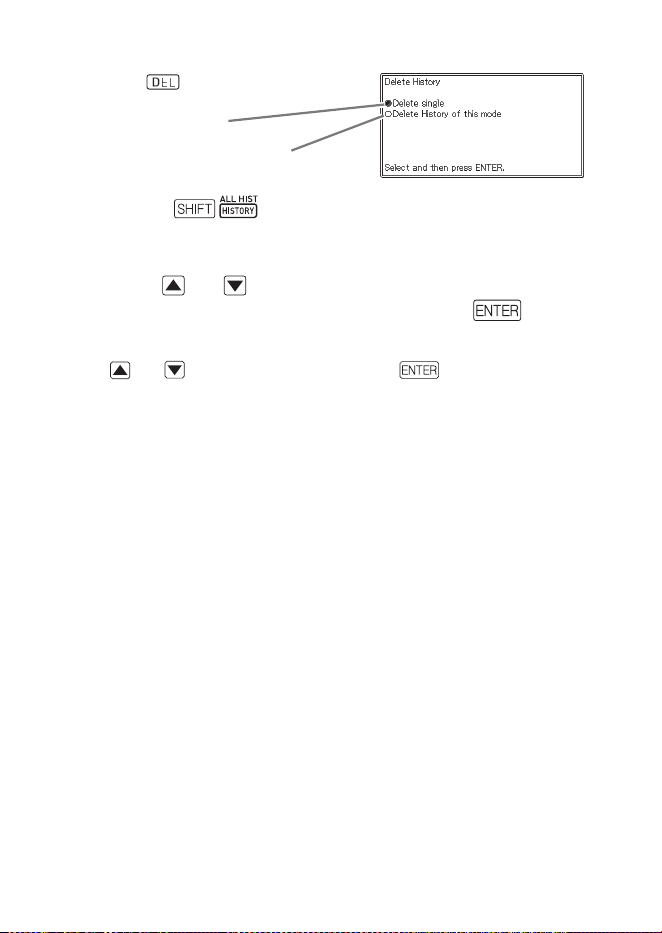
Deleting History Memory Entries
You can use any one of the following three procedures to delete
history memory entries.
Delete one entry only
Delete all the entries for a specifi c dictionary
Delete all history memory content
1
Press .
If you want to delete all history data, press and then in
step 1.
2
Use , , , and to move the highlighting to the history
entry you want to delete.
■
•
•
•
•
•
Useful Dictionary FunctionsUseful Dictionary Functions
52
3
Press .
One entry delete
Dictionary-specific delete
Pressing
in step 1 will display the history memory for
all dictionaries. In this case, the screen that appears will show the
message “Delete History of all modes”.
4
Use the and cursor keys to move the cursor (
●
) to the
delete type you want to perform and then press .
A confi rmation message will appear if you select “Delete History of this
mode” or “Delete History of all modes” in the above step. To delete, use
and to select “Yes” and then press .
•
•
53
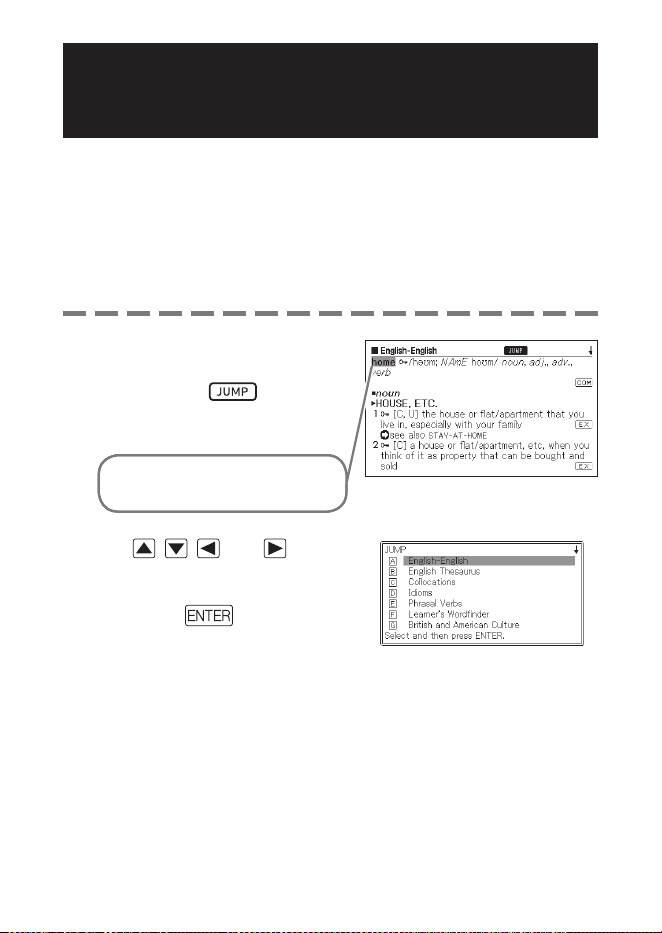
Looking Up a Term Used within a Defi nition
or Comment Screen (Jump Search)
Use the following procedure when you want to use a term that
appears within a defi nition or comment as the keyword for another
search. You also can search for examples and phrases that use the
term.
You can use Dictionary Guide Information (page 21) to view the
dictionaries/modes that can be searched using this function.
1
While a defi nition screen or
comment screen is on the
display, press .
Jump Search is not supported
while a table or fi gure is displayed.
This highlights the first term that
can be selected for Jump Search.
2
Use , , , and to
move the highlighting to the
term you want to look up, and
then press .
Here we selected “live”.
•
•
•
54
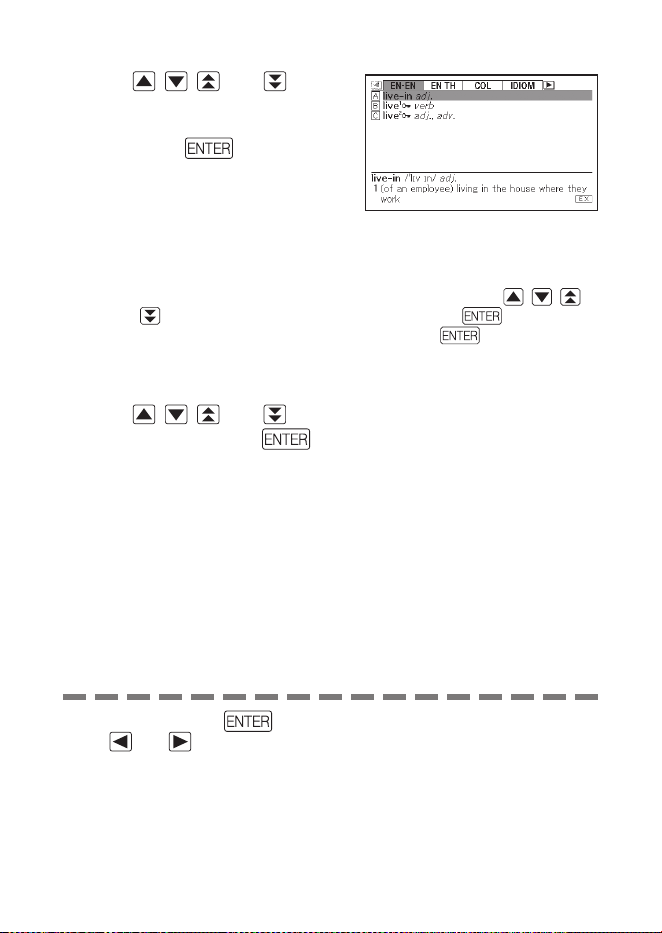
3
Use , , , and to
move the highlighting to the
dictionary you want to use, and
then press .
This displays a list of terms that
completely match or are similar to
the one you selected.
When the highlighted term is a plural form (like “dishes”), a comparative
form (like “bigger”), or any other form that is produced by adding a suffi x to
the original term, the search will look for the original term (“dish”, “big”, etc.)
To search for examples that use the highlighted term, use , , ,
and
to select “Example Search”, and then press . To search for
phrases, select “Phrase Search” and then press
. This will display
a list of examples or phrases that use the selected term or a term that is
close to the selected term.
4
Use , , , and to move the highlighting to the term you
want and then press .
•
•
•
Even after pressing to display a term list (in step 3), you can still
use and to select the dictionary you want to use as the Jump
Search destination.
You also can perform another Jump Search from a defi nition or
comment screen that you arrived at from a previous Jump Search.
Performing the Jump Search operation on red text will display the
term’s data screen. You do not need to specify a Jump Search
destination in this case.
•
•
•
55
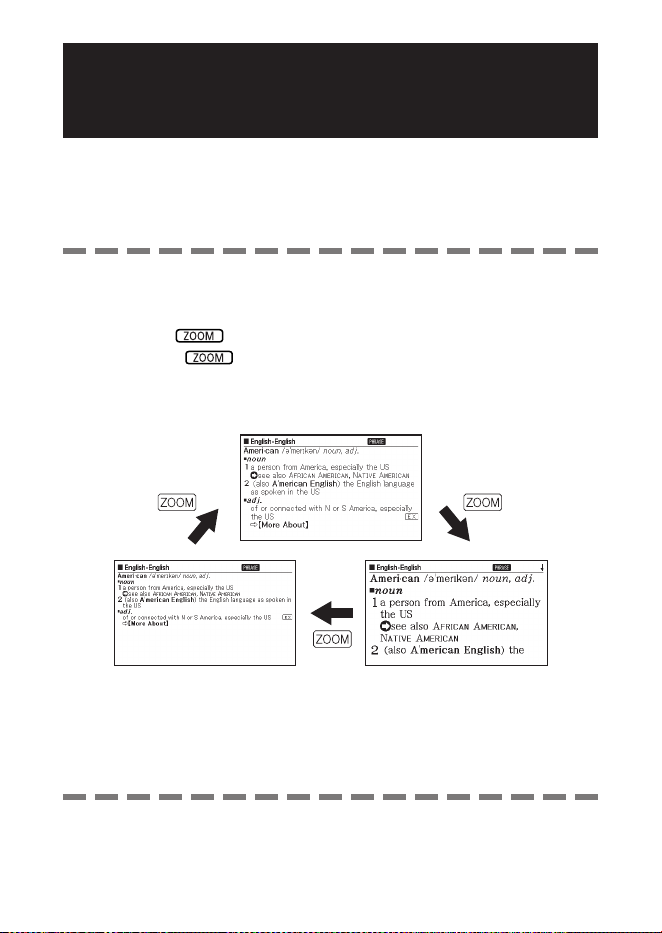
Changing the Size of
Screen Characters (Zoom)
You can perform a zoom operation to change the character size of
on-screen text while a list screen, defi nition screen, or comment
screen is on the display.
To change the screen character size
While a list screen, defi nition screen or comment screen is on the
display, press .
Each press of cycles through the character sizes in the
sequence 16 dots
➝
24 dots
➝
12 dots
➝
16 dots, etc.
The following shows an example of how zoom affects the defi nition
screen.
■
•
•
The screen character size selected here is applied for the defi nition,
comment, and list screens.
Zoom is not supported while a table or fi gure is displayed.
•
•
56
Vocabulary List
Vocabulary List lets you save headwords you want to remember. A
marker feature lets you highlight words with one of three colours.
You can even hide highlighted words, if you like.
You can create up to ten different Vocabulary Lists, and each list can
contain up to 150 headwords.
You can save terms, examples, or phrases as headwords.
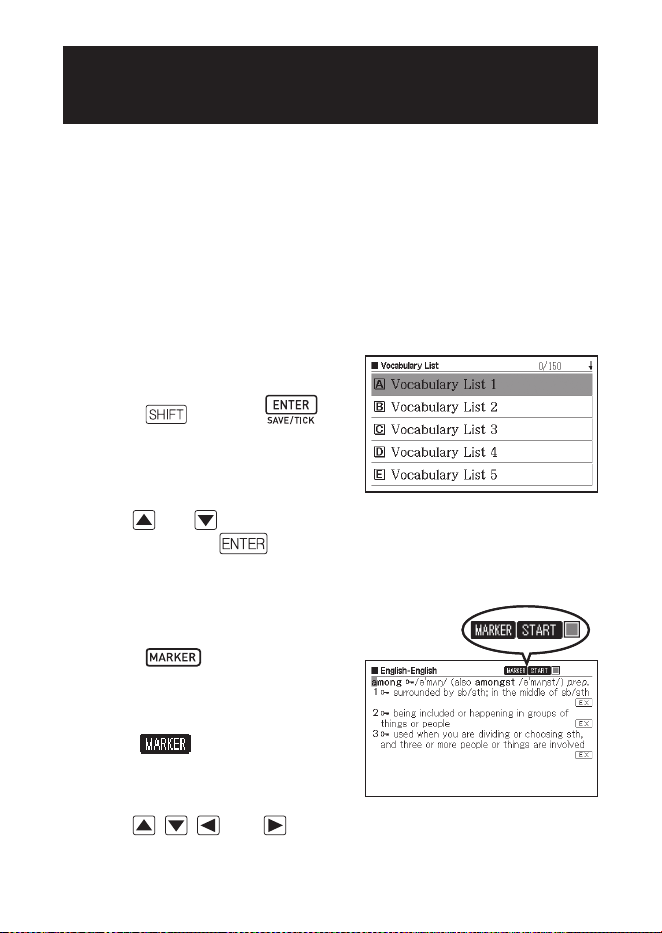
Saving a Headword to a Vocabulary List
To register a headword without highlighting text
1
On the screen that contains the
headword you want to save,
press and then .
This displays a Vocabulary List
index.
2
Use and to select the Vocabulary List you want to save
and then press
.
To highlight text and register a headword
1
On the screen that contains the
headword you want to save,
press .
A green cursor (■) will be
displayed at the highlighting start
point.
The
will be displayed while
you are using the marker feature.
2
Use , , , and to move the cursor to the highlighting
start point.
•
•
■
•
■
•
•
57
To change the marker colour, press . Each press of
cycles through the marker colours in the following sequence: Pink
→
Yellow
→
Blue
→
Pink, etc.
3
Press .
This registers the start point and
changes the cursor to the highlight
colour.
4
Use , , , and
to move the cursor to the
highlighting end point.
Text is highlighted as the cursor
passes over it.
5
After highlighting all the text you
want, press
.
This applies the highlighting and
causes the cursor to change to
green (indicating it is ready to
select another start point).
If you want to highlight more text,
repeat steps 2 through 5.
You can highlight up to 10 locations on a single headword screen.
To remove highlighting, perform steps 2 through 5 of the procedure
under “Unhighlighting Text” (page 58).
6
Press and then .
This displays a Vocabulary
List index.
7
Use and to select the Vocabulary List you want to save
and then press
.
•
•
•
•
•
•
•
58
Unhighlighting Text
1
On the headword screen that
contains the text you want to
unhighlight, press .
For information about displaying
the headword screen that contains
the text you want to unhighlight,
see the procedure under “Viewing,
Selecting, and Deleting a Saved
Headword” (page 59).
A green cursor (
■) will appear on the display.
2
Press .
3
Use the and to move the
cursor (
●
) to the delete type you
want to perform and then press
.
If you selected “Delete all in this
data”, the highlighting will be
deleted. Next, advance to step 6.
If you selected “Specify the
highlighting to delete”, go to step 4.
4
Use , , , and to move the green cursor to the
highlighted text you want to unhighlight.
This will cause the highlighted text to change to green highlighting.
5
Press .
This will delete the highlighting and
display the green cursor again. If
you want to unhighlight more text,
repeat steps 2 through 5.
6
Press and then .
This displays a Vocabulary List
index.
7
Use and to select the Vocabulary List you want to save
and then press .
•
•
•
•
•
•
•
59
Viewing, Selecting, and Deleting a Saved Headword
1
Press .
This displays a menu of
Vocabulary Lists.
You also can display the menu
of Vocabulary Lists by selecting
“Vocabulary List” on the MENU
screen. (page 17)
2
Use and to select “View
Vocabulary List” and then press
.
This displays a Vocabulary List
index.
3
Use and to select the Vocabulary List you want to view
and then press .
This displays a saved headword index screen.
Marker colour
Tick
Dictionary name
Headword
Sequential number of currently selected
headwords/Total number of headwords
registered in current Vocabulary List
•
•
•
•
Number of entries/CapacityNumber of entries/Capacity
60
The following operations are supported from the saved headword
index screen.
Function Operation
Viewing a headword
screen
Select the headword you want to view and then
press
.
If you used the procedure under “Confi guring
Vocabulary List Display Settings” (page 61) to
hide highlighted headwords, pressing
will toggle between hide and show.
You also can change the highlighting colour
and location, if you want. Perform the
operation from the beginning of "Saving a
Headword to a Vocabulary List" (page 56).
Also note that if you selected a Vocabulary
List that is different from the one you last
selected when saving, the saved headword
(including edited content) will be moved to the
selected Vocabulary List.
•
•
Ticking or unticking a
saved headword
1. Select the headword you want to tick or
untick.
2. Press
and then press .
Deleting a single
headword
1. Select the headword you want to delete and
then press
.
2. On the delete method selection screen that
appears, select “Delete the selected data (1)”
and then press
.
Deleting only headwords
with ticks from the
displayed Vocabulary List
1. Press
.
2. Select “Delete the entries with ticks” and
then press
.
3. Select “Yes” and then press
.
Deleting all headwords
from the displayed
Vocabulary List
1. Press
.
2. Select “Delete the data of the displayed list”
and then press .
3. Select “Yes” and then press
.
Deleting all headwords
from all Vocabulary Lists
1. Press
.
2. Select “Delete all data in Vocabulary List”
and then press
.
3. Select “Yes” and then press
.
61
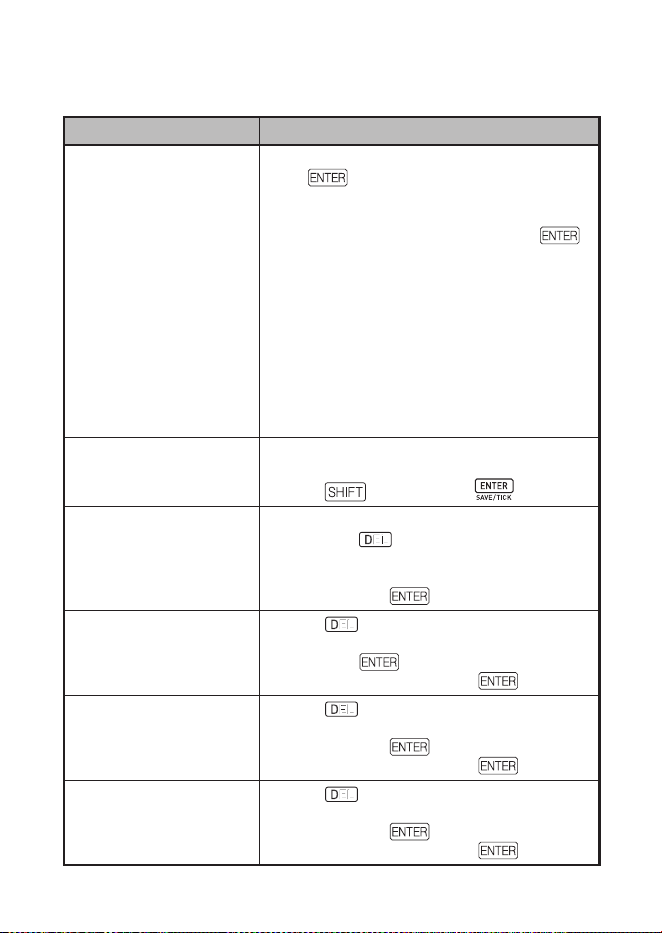
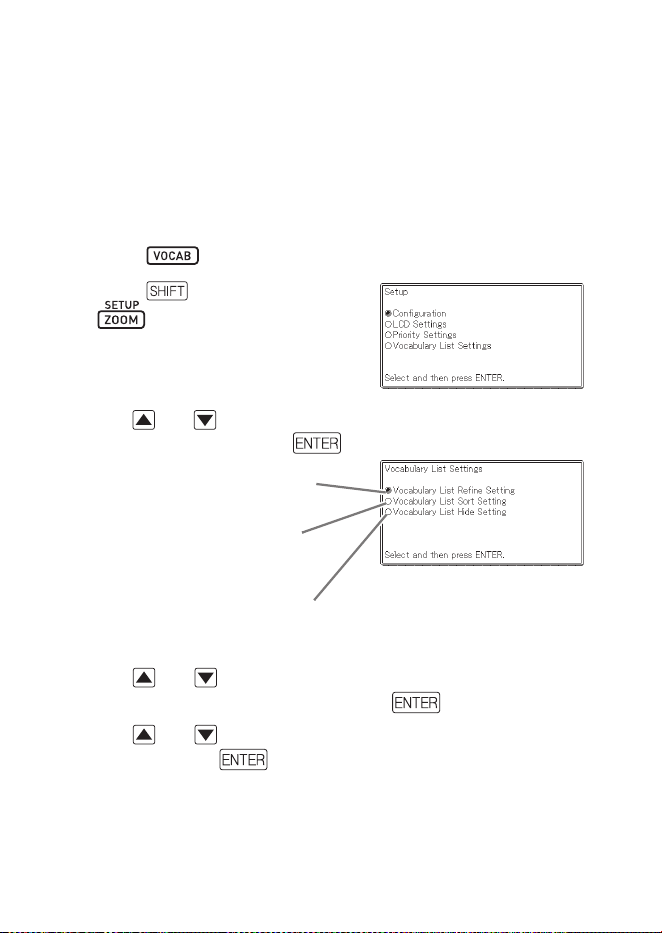
Confi guring Vocabulary List Display Settings
You can confi gure settings that control what appears on the screen
when you view a Vocabulary List. You can use these settings to hide
words that are highlighted with a specifi c colour, or to sort the list
according to whether words are ticked or unticked. This helps to
make your study and practice more effi cient.
1
Press .
2
Press , and then press
.
This will display the “Setup”
screen.
3
Use and to move the cursor (
●
) to “Vocabulary List
Settings” and then press .
Displays only headwords that
satisfy conditions.
Displays headwords sorted
according to specified
conditions.
Hides highlighted headwords
according to specified
conditions.
4
Use and to move the cursor (
●
) to the type of condition
you want to confi gure and then press .
5
Use and to move the cursor (
●
) to the condition you want
and then press
.
•
62
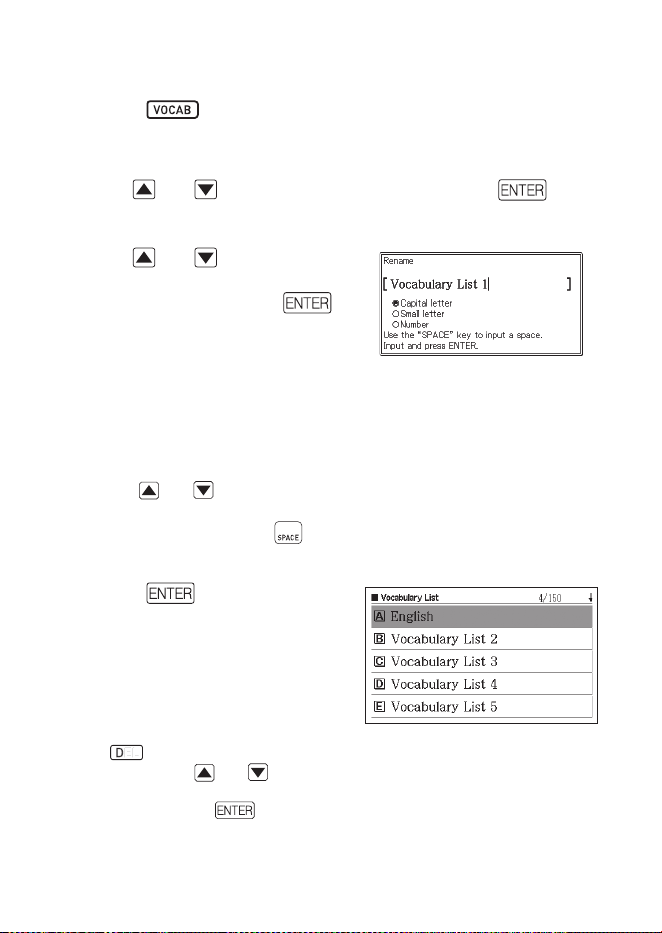
Changing the Name of a Vocabulary List
1
Press .
You also can display the menu of Vocabulary Lists by selecting
“Vocabulary List” on the MENU screen. (page 17)
2
Use and to select “Rename” and then press .
This displays a Vocabulary List index.
3
Use and to select the
Vocabulary List you want to
rename and then press .
This displays a screen showing
the selected Vocabulary List’s
current name.
4
. Delete the current name and then input a new name.
You can input alphabetic characters (upper case, lower case),
numbers, and spaces.
To input upper case characters, lower case characters, and numbers,
use
and to move the cursor (
●
) to the type of character you
want to input.
To input a space, press
.
You can input up to 25 characters.
5
Press .
You can change a Vocabulary
List name back to its initial factory
default (Vocabulary List 1 through
10), if you want. In step 3 of the
above procedure, select the
Vocabulary List whose name you
want to initialize and then press
. This will display the “Rename”
screen. Use and to select
the initialization option you want
and then press
.
•
•
•
•
•
•
•
•
B
63
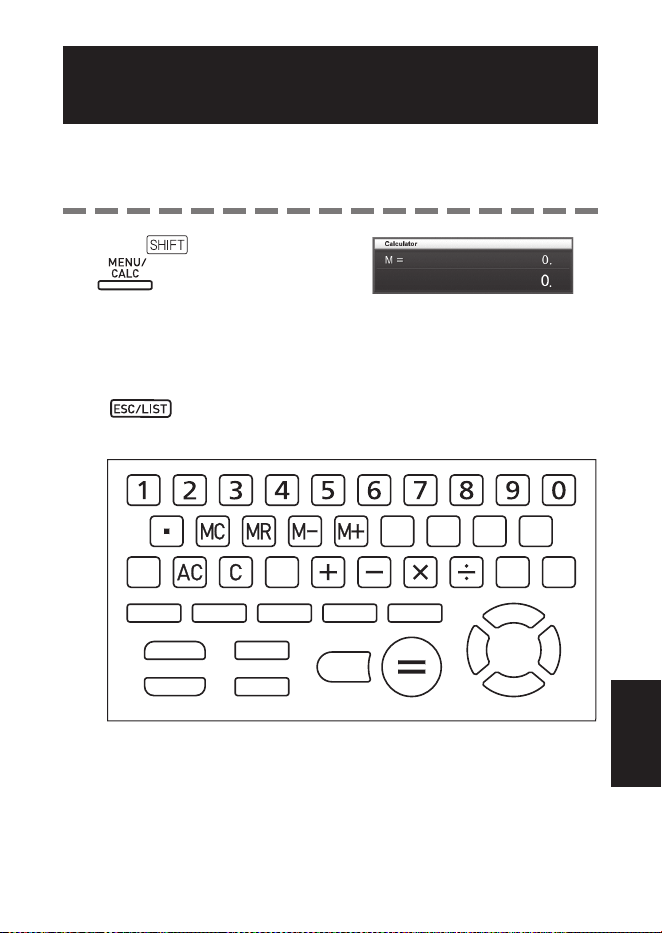
Using the Calculator
The calculator can perform addition, subtraction, multiplication and
division, as well as constant and memory calculations.
1
Press , and then press
.
This displays the calculator
screen.
2
Perform the operations described on the next page.
After the calculation is complete, exit the calculator screen by pressing
.
Calculator keyboard
•
•
Using the CalculatorUsing the Calculator
64
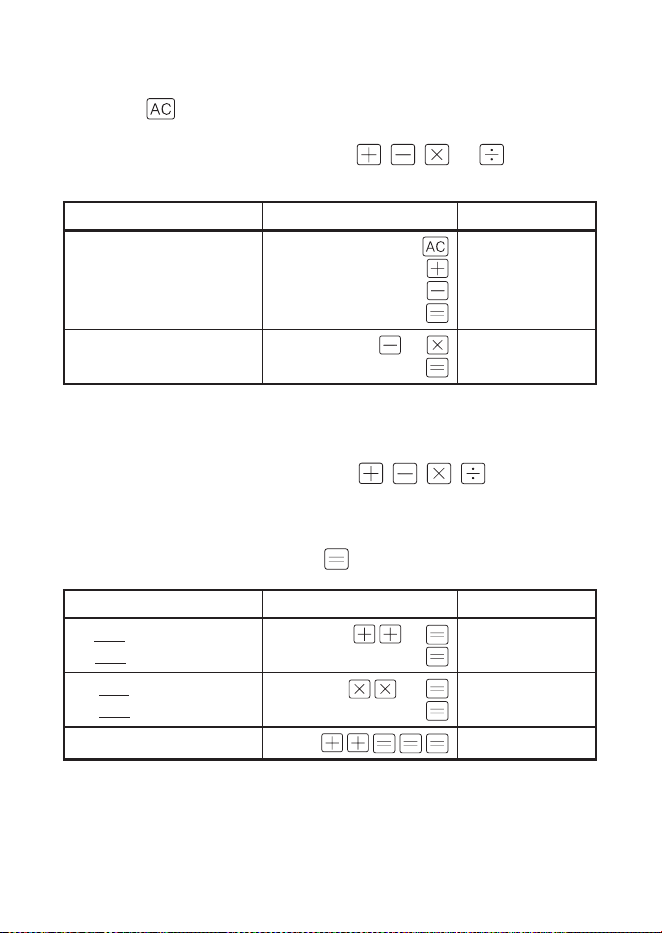
Basic Arithmetic Calculations
1
Press to clear the calculator before starting.
2
In the following examples, press , , , or to input the
corresponding arithmetic operator.
Example Key Operation Display
53 + 123 – 63 = 113
53
123
63
0.
53.
176.
113.
963 × (23 – 56) = – 31779
23
56
963
– 33.
– 31’779.
Constant Calculations
1
After inputting the value you want to use as the constant, press
the key of an arithmetic operator ( , , , ) twice.
This registers the constant and arithmetic operator, and displays the “K”
indicator.
2
Now input a value and press to perform the operation.
Example Key Operation Display
12 + 23 = 35
45 + 23 = 68
23
12
45
K 35.+
K 68.+
2.3 × 12 = 27.6
4.5 × 12 = 54
12
2.3
4.5
K 27.6×
K 54.×
17 + 17 + 17 + 17 = 68
17
K 68.+
•
65
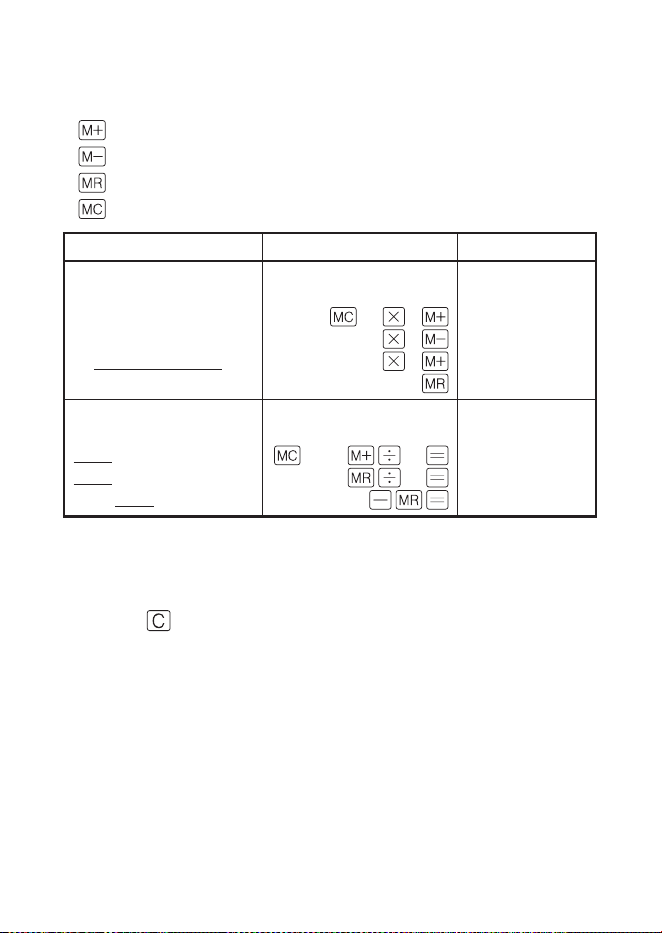
Memory Calculations
You can use the following keys to perform memory calculations.
: Adds a value to independent memory.
: Subtracts a value from independent memory.
: Displays the value currently in independent memory.
: Clears independent memory content.
Example Key Operation Display
To totalize calculation
results
80 × 9 = 720
– ) 50 × 6 = 300
20 × 3 = 60
(Total) 480
•
80 9
50 6
20 3
M = 720. 720.
M = 420. 300.
M = 480. 60.
M = 480. 480.
To perform calculations
with a common value
193.2 ÷ 23 = 8.4
193.2 ÷ 28 = 6.9
123 – 193.2 = – 70.2
•
193.2 23
28
123
M = 193.2 8.4
M = 193.2 6.9
M = 193.2 –70.2
Correcting Key Operation Errors
To correct a value input error
1
Press .
This clears the input value and displays “0.”
2
Re-input the value.
•
•
•
•
■
•
66
To correct an arithmetic operator ( , , , ) input
error
Simply input the correct operator.
To clear the calculator
Press .
This clears everything except for independent memory.
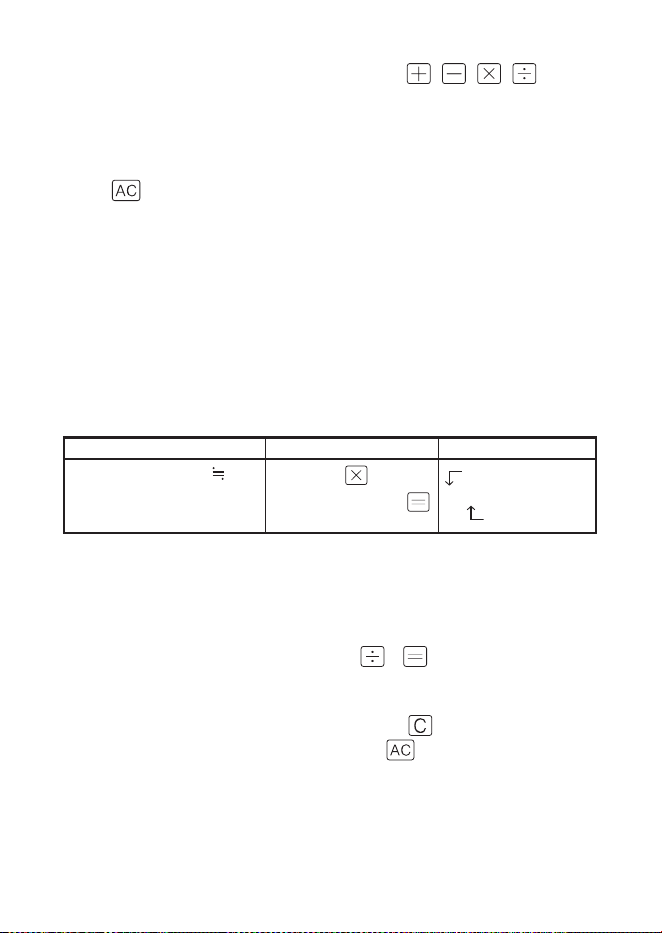
Error (“E”) Display
Any of the following causes an error to occur, which is indicated by “E”
appearing on the display.
Causes
When the integer part of an intermediate or fi nal result exceeds
12 digits
When this type of error occurs, the value shown on the display is an
approximation with the decimal point to the right of the trillion digit.
Example Key Operation Display
1234567 × 7418529
9158671091940
1234567
7418 52 9
Error indicator
E
9.15867109194
Trillion digit
When the integer part of the value stored in independent
memory exceeds 12 digits
This causes “0.” to appear on the display. Note, however that
independent memory retains the value it contained before the
operation that caused the overfl ow.
When division by zero (example: 6
0 ) is attempted
To clear an Error
After the error indicator (“E”) appears, press if you want to
continue with the previous calculation, or
to start a new
calculation.
■
•
■
•
•
•
■
67
Changing Settings
You can confi gure various settings to tailor operation of your
electronic dictionary to your needs. The settings that can be
confi gured are described below.
Initial default settings are shown underlined and in bold.
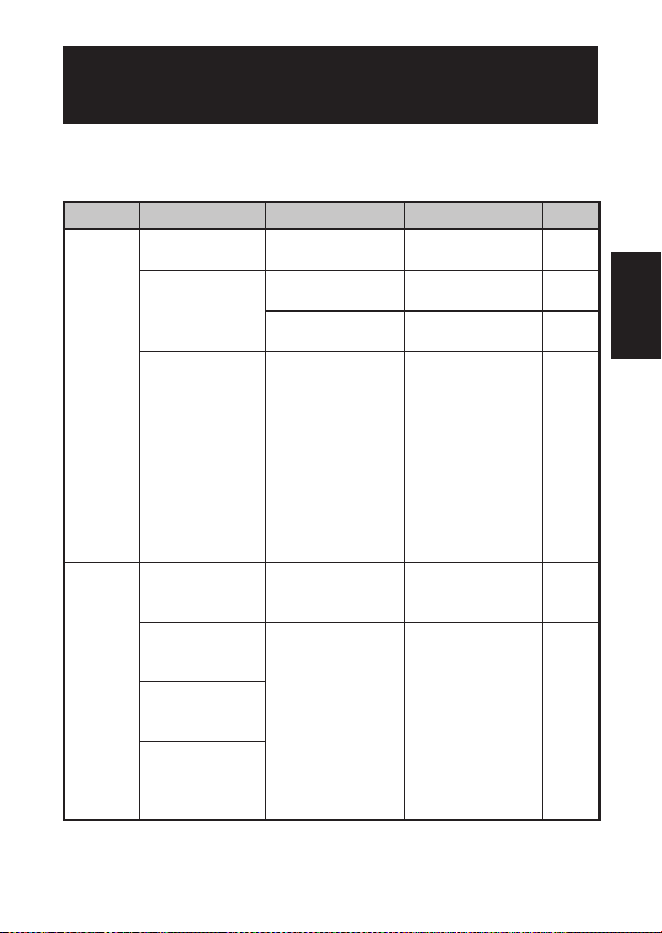
Confi guration
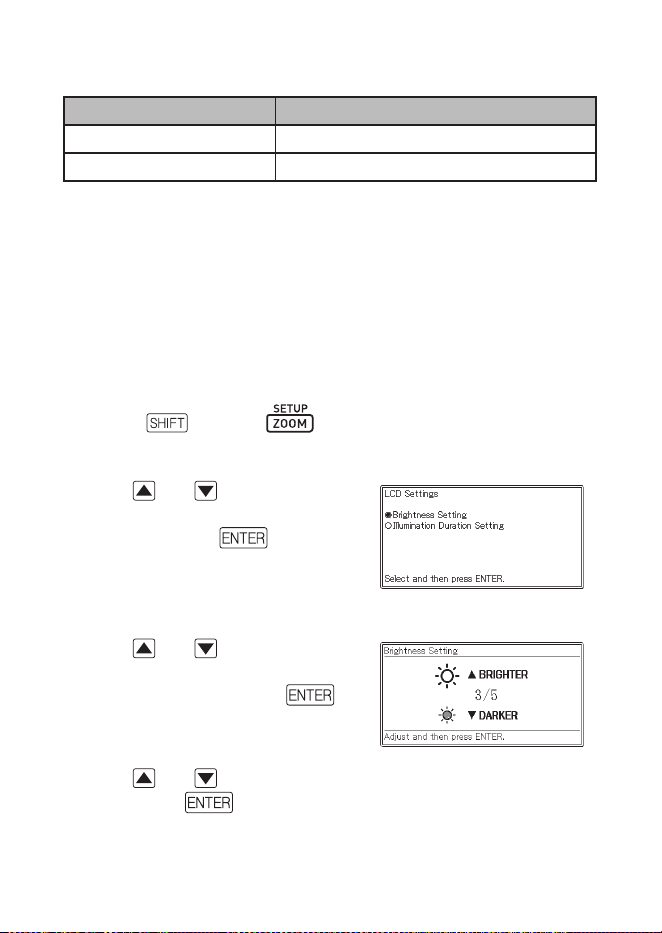
Item Settings Description
Key Tone ON Tone sounds when keys are
pressed.
OFF No tone sounds.
Auto Power Off
3 Min/6 Min/10 Min/
15 Min/30 Min/
45 Min/60 Min/90 Min
Trigger time until Auto Power
Off
Quick Search ON Search with Quick Search
(page 15)
OFF Hits do not appear as
characters are entered. Press
to display hit list.
Battery Setting Alkaline Using an AA-size alkaline
battery.
Ni-MH
*
(Rechargeable)
Using an AA-size rechargeable
battery.
*
Ni-MH: Nickel-metal hydride battery
•
■
Confi guring Electronic Dictionary SettingsConfi guring Electronic Dictionary Settings
68
LCD Settings
Item Description
Brightness Setting Display brightness adjustment (below)
Illumination Duration Setting Illumination duration (30 Sec, 1 Min, 3 Min)
“Priority Settings” (page 49), “Vocabulary List Settings” (page 61)
Changing Settings
To change settings, start from the initial screen of any one of the
dictionaries. Starting from another type of screen may restrict the
settings you can confi gure.
Example: To set display brightness
1
Display the initial screen of any one of the dictionaries.
2
Press and then .
This will display the “Setup” screen.
3
Use and to move the
cursor (
●
) to “LCD Settings”
and then press .
4
Use and to move the
cursor (
●
) to “Brightness
Setting” and then press .
5
Use and to select the brightness setting you want and
then press .
■
•
■
•

69
Copyright
Copyright Notice
The contents of this electronic dictionary were compiled with
the cooperation and permission of the copyright holders of the
dictionaries listed below.
You are not allowed to reproduce or copy the contents of this
electronic dictionary either in part or in their entirety without
permission.
Except for your own personal use, you are not allowed to use the
contents of this electronic dictionary for any other purpose without
the permission of CASIO and the original copyright holders.
Other Precautions
The display data of this electronic dictionary was compiled under the
supervision of the original dictionary publishers. However, displayed
data may differ from the data as presented in the printed version of
each source dictionary.
Certain information contained in this electronic dictionary may be
outdated due to ongoing current events, etc.
The dictionaries contained in your electronic dictionary are digital
renditions based upon the print versions of dictionaries published by
each applicable publishing company.
CASIO COMPUTER CO., LTD. assumes no liability for any losses
suffered due to errors, omissions, or improper usage contained in the
dictionary data.
Except for some dictionaries, the following are not included:
photographs, illustrations, tables, sub-articles, and appendices.
■
■
•
•
•
CopyrightsCopyrights

70
Oxford Advanced Learner’s Dictionary, 8th edition
<Oxford University Press>
About 184,500 words, phrases and meanings
About 800 illustrations
© Oxford University Press 2010
Oxford Learner’s Thesaurus
<Oxford University Press>
Over 17,000 synonyms and opposites from written and spoken
English
© Oxford University Press 2008
Oxford Collocations Dictionary for students of English
<Oxford University Press>
Collocations for 9,000 nouns, verbs and adjectives, 250,000 word
combinations
© Oxford University Press 2009
Oxford Idioms Dictionary for Learners of English
<Oxford University Press>
More than 10,000 idioms
50 illustrations
© Oxford University Press 2001 and 2006
Oxford Phrasal Verbs Dictionary for learners of English
<Oxford University Press>
Over 6,000 common British and American phrasal verbs
© Oxford University Press 2001 and 2007

71
Oxford Learner’s Wordfinder Dictionary
<Oxford University Press>
About 630 keywords (about 31,000 related words)
470 illustrations
© Oxford University Press 1997
Practical English Usage
<Oxford University Press>
©Michael Swan 2005
Oxford Guide to British and American Culture
<Oxford University Press>
About 9000 entries
About 30 images
© Oxford University Press 2005

72
Screen Messages
The following explains why certain messages appear on the display,
and the actions you need to take in response.
Other messages remain on the display for a short while, and then
disappear. Such messages are not included in this table.
Message Cause and Remedy
Error code 01
Error code 02
The electronic dictionary was subjected to
electrostatic charge or strong impact. Contact
your nearest CASIO service centre.
•
73
Troubleshooting
When any of the following problems occurs, take the specifi ed
action.
Symptom Cause Action
Page
Power
Supply
Cannot turn on
power.
Low battery
power
Replace the
battery.
77
Power turns off
when I do not
perform any
operation.
Auto Power Off Turn power back
on.
16
Low battery
power
Replace the
battery.
77
When using a
rechargeable
nickel-metal
hydride battery,
actual battery
operation
between
charges is
shorter than
that noted in the
specifi cations.
“Alkaline” is
selected as the
battery type.
Change the
battery type
setting to “Ni-MH
(Rechargeable)”.
67
Display
Auto Power Off
does not work.
Auto Power Off
trigger time is too
long.
Check Auto Power
Off settings. 67
The display
suddenly goes
blank.
Low battery
power
Replace the
battery.
77
Screen does
not light up or
fl i c k e r s .
The Battery
Setting screen
suddenly
appears.
ReferenceReference
74
Resetting the Electronic
Dictionary
Strong electrostatic charge can cause abnormal electronic
dictionary operation or lockup. If this happens, you need to reset
your electronic diction ary.
Caution!
Note the following very important information about the reset
operation.
Be sure to turn off power before performing the reset operation.
Resetting without turning off power can cause history data and
settings to be deleted.
When pressing the RESET button, do not use a toothpick, lead pencil,
or any other object whose tip can break off easily. Doing so can
damage your electronic dictionary.
1
Press the key to turn off power.
2
Use a ballpoint pen or some
similar pointed object to press
the RESET button on the back
of your electronic dictionary.
•
•
RESET buttonRESET button
75
3
Open the cover of your
electronic dictionary as shown
in the illustration.
This will cause the Battery Setting
screen to appear.
4
Follow the instructions that
appear on the display to
confi gure the battery setting.
For details, see the steps starting from step 5 under “Loading the
Battery for the First Time”. (page 4)
Clearing Memory Data
You can use the procedure below to delete all data from the
Vocabulary List and HISTORY memory.
Note that a delete operation cannot be undone. Once deleted, data
cannot be recovered.
1
Press .
This will display the MENU screen.
2
Press and then .
This will display a confi rmation
screen.
3
Use to move the cursor (
●
)
to “Yes” and then press .
This will delete the data and cause
the numbers for all the stored data
item values on the confi rmation
screen to revert to zero.
4
Press .
This will return to the MENU screen.
•
•
•
•
•
•

76
Replacing the Battery
Replace the battery as soon as possible after the message “The
battery is low.” appears on the display.
You should replace the battery at least once a year, even if this
message does not appear.
A nickel-metal hydride battery (rechargeable battery)
in particular can deteriorate when left in the electronic
dictionary when you are not using it for long periods. Remove
the rechargeable battery as soon as possible.
Make sure you turn off power before replacing the battery.
Changing the battery while power is on can cause history data,
settings, and other information to be deleted.
Always replace the battery with a new AA-size alkaline battery or a fully
charged AA-size nickel-metal hydride battery (rechargeable battery).
Using a battery other than those specifi ed can greatly shorten battery
life and cause abnormal operation.
When changing to a rechargeable battery, be sure to change the
battery type setting to “Ni-MH (Rechargeable)”.
Battery Precautions
Using a battery incorrectly can cause it to burst or leak, possibly
damaging the interior of the unit. Note the following precautions:
Be sure that the positive (+) and negative (–) ends of the battery are
facing in the correct directions.
Do not expose batteries to direct
heat, let them become shorted, or
try to take them apart.
Never leave a dead battery in the battery
compartment.
Remove the battery if you do not plan to use
your electronic dictionary for a long time.
Never try to recharge the battery that comes
with your electronic dictionary.
•
•
•
•
•
•
•
•

77
Should a battery leak, clean out the battery compartment immediately,
taking care to avoid letting battery fl uid come into direct contact with
your skin.
Should battery fl uid ever get into your eyes, take the following steps
immediately. Failure to do so can result in loss of eyesight.
1. Rinse your eyes with clean water, without rubbing them.
2. Contact a physician immediately.
Battery
Use only the specifi ed battery charger for the battery you are using to
charge it.
There is no way to recharge a battery without removing it from the
electronic dictionary.
Before using a rechargeable battery or its special charger unit, be sure
to read and follow the instructions and precautions that come with
them.
Recommended Battery
AA-size alkaline battery: LR6 (AM3)
AA-size nickel-metal hydride battery: SANYO eneloop
Keep batteries out of the reach of small children. If swallowed,
consult a physician immediately.
Never dispose of used batteries with general household
refuse. Be sure to take batteries to a appropriate collection
site or specifi ed waste disposal facility.
Replacing the Battery
1
Prepare a new AA-size alkaline battery
or a fully charged
AA-size rechargeable battery.
2
Press the key to turn off power.
•
•
•
•
•
•
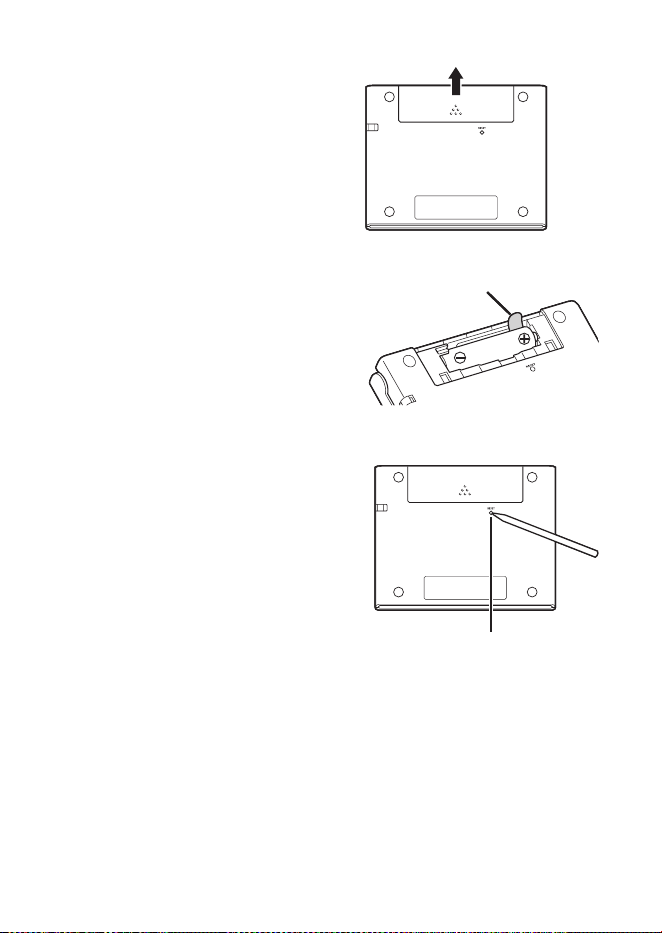
78
3
While pressing at the point on
the battery cover as shown in
the illustration, slide the cover
in the direction indicated by the
arrow and remove it.
4
Remove the old battery and
load a new one.
Pull up on a ribbon to remove a
battery.
Load the battery so the ribbon
runs underneath it.
5
Replace the battery cover.
6
Use a ballpoint pen or some
similar pointed object to press
the RESET button on the back
of your electronic dictionary.
When pressing the RESET button,
do not use a toothpick, lead
pencil, or any other object whose
tip can break off easily. Doing
so can damage your electronic
dictionary.
7
Open the cover of your electronic dictionary.
This will cause the Battery Setting screen to appear.
8
Follow the instructions that appear on the display to confi gure
the battery setting.
For details, see the steps starting from step 5 under “Loading the
Battery for the First Time”. (page 4)
•
•
•
•
•
RibbonRibbon
RESET buttonRESET button
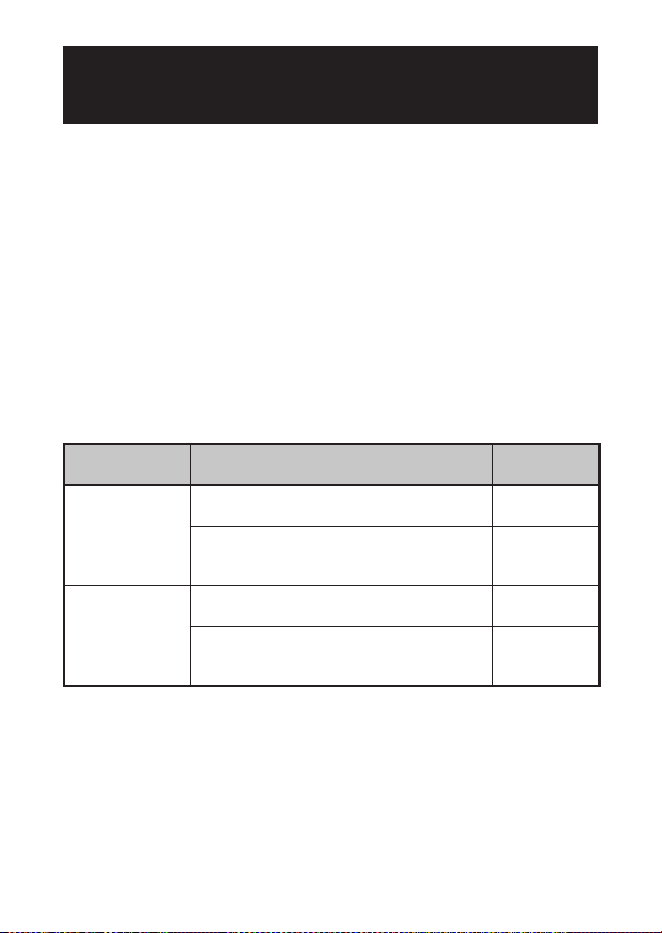
79
Specifi cations
Content: See “Copyrights” (page 69) for information about dictionaries.
Calculator: 12 digits; arithmetic calculations; arithmetic constant
calculations; independent memory calculations; mixed calculations
Decimal point: Full fl oating
Constant display of memory content
Display: 384 × 216-dot TFT colour LCD
Power Consumption: 0.35 W
Power Requirements: One AA-size alkaline battery (LR6) or one AA-
size nickel-metal hydride battery (rechargeable battery)
Approximate Battery Life
Based on a new alkaline battery or new, fully charged nickel-metal
hydride battery (rechargeable battery), at an ambient operating
temperature of 25°C.
Battery Operating Conditions
Approximate
Battery Life
*2
One AA-size
alkaline battery
(LR6)
Continuous display of English-English
dictionary screen
*1
100 hours
Repeated 5 minutes of input and search,
55 minutes of English-English dictionary
screen display each hour
*1
50 hours
One AA-size
rechargeable
nickel-metal
hydride battery
Continuous display of English-English
dictionary screen
*1
80 hours
*3
Repeated 5 minutes of input and search,
55 minutes of English-English dictionary
screen display each hour
*1
40 hours
*3
*1
Display brightness level 3, display dimmed after 30 seconds.
*2
Battery life values are approximate and are intended for reference only.
Battery life is affected by operating conditions, battery type, operating
environment, types of operations performed (display illumination
brightness setting, display illumination duration setting), etc.
*3
Reference value based on a SANYO eneloop rechargeable battery.
•
•
•
•
•
•
•
•

80
Auto Power Off: Selectable trigger time of approximately 3, 6, 10, 15,
30, 45, 60, or 90 minutes
Resume Function: Current screen and data are saved when power is
turned off.
Operating Temperature: 0°C to 40°C
Dimensions: 108.5 (W) x 87.0 (D) x 17.2 (H) mm (at thinnest point when
cover is closed); H is 17.7 mm at thickest point.
Approximate Weight: 175g (including battery)
•
•
•
•
•

81
MEMO

82
MEMO

83
MEMO

84
MEMO

85
MEMO

86
MEMO
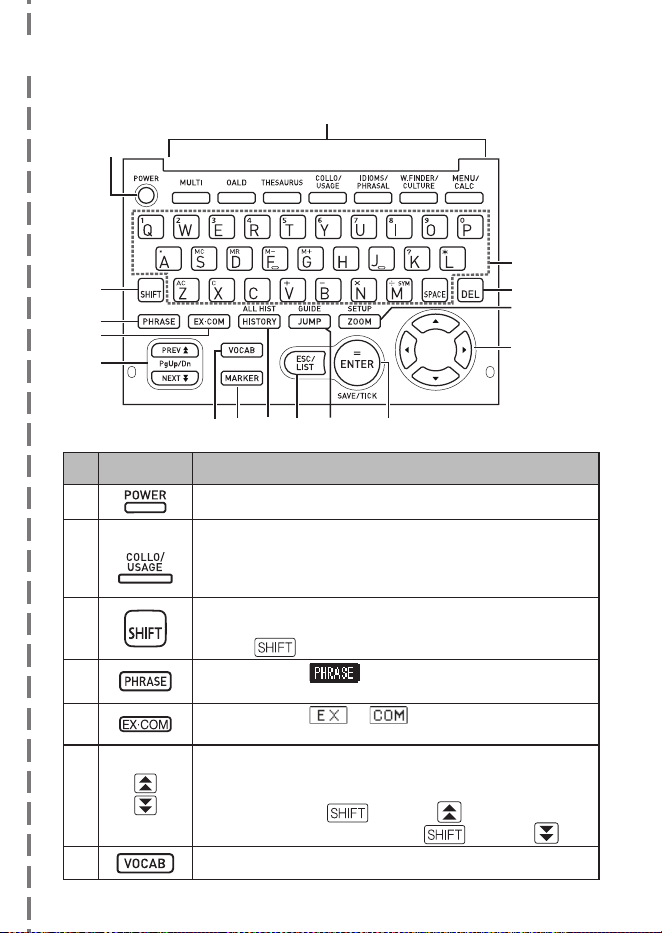
87
General Guide
ę
ũ
Ć
Character keys
Mode key
Key Role of the key
Turns power on and off. (page 16)
Example:
Each press of a mode key displays the initial screen of the
dictionary marked above it. If a key is marked with two
dictionary names, each press of the key toggles between
them. (page 17)
Press to input certain characters (?,
✽
), to access guide
information, etc. (pages 21 and 31)
Press
and release it, and then press the next key.•
Press when the icon is on a dictionary screen to
look up phrases. (page 29)
Press when the or icon is on a dictionary
screen to look up examples or comments. (page 30)
Use these keys to scroll the screen content up and down.
(page 20)
To jump to the defi nition of the term before the one you
are viewing, press
and then . To jump to the
defi nition of the next term, press and then .
Press this key to use the Vocabulary List. (page 59)
■
✂
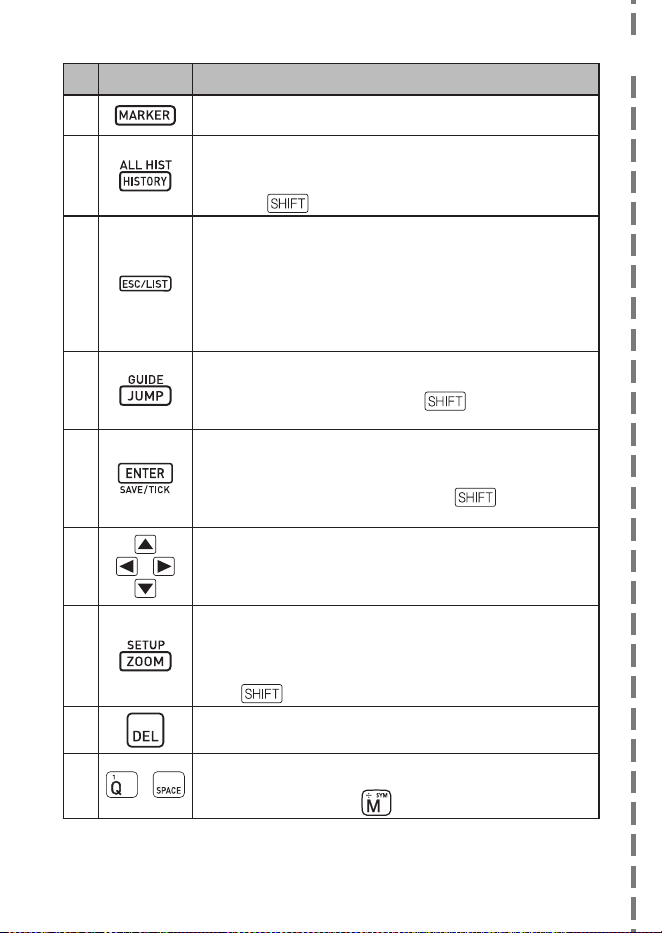
88
Key Role of the key
Press this key to highlight text on a defi nition screen with
a marker. (page 56)
Press this key to re-lookup a term that you recently
searched for. (page 50)
To search all dictionaries for a term you previously looked
up, press
and then this key. (page 51)
Press this key to back-step to the previous operation.
(page 20)
Pressing this key while a defi nition screen is on the
display switches to the list view of terms, which includes
the term whose defi nition you were viewing. (page 20)
Pressing this key while a dictionary’s initial screen is on
the display will return to the MENU screen. (page 17)
Press this key to look up a term on the currently displayed
defi nition screen or comment screen. (page 53)
To view guide information, press and then this key.
(page 21)
Press this key to register characters you input or
selections you made on the display. (page 18)
To add an entry to the Vocabulary List or to put a tick
next to a Vocabulary List term, press
and then this
key. (pages 57 and 60)
a
Use these keys to move the selection highlighting or to move
the cursor up, down, left, or right. (page 19)
If the defi nition is too large to fi t on the screen, the screen
will scroll line by line as required when you press this key.
k
Press this key while a list screen, defi nition screen or
comment screen is on the display to change the text size.
(page 55)
To change the settings of your electronic dictionary,
press
and then this key. (page 67)
#
Press this key to delete a character. (page 25)
m
~
Use these keys to input characters and values. (pages 23
and 24)
For details about the
key, see page 32.•
✂

MO1111-B Printed in China
CASIO COMPUTER CO., LTD.
6-2, Hon-machi 1-chome
Shibuya-ku, Tokyo 151-8543, Japan