
User Manual
Portable Air Conditioner
Before using your TOSOT Portable Air Conditioner
please read this user manual in its entirety.
MO DEL NUMBERS
5,000 BTU-GPC05AK-A3NNA1C 6,000 BTU-GPC06AK-A3NNA1C

Welcome to the TOSOT Direct Family!
We’re extremely happy to welcome you as a new member of our family! Please
read the tips below before using your product for the first time.
1. The portable air conditioner is a heavy object, which needs two or more people
to lift and install. Failure to do so could result in injury or other accidents.
2. Allow the unit to sit upright for at least 3-4 hours before powering on. Shipping
carriers may set the unit on its side, which causes the refrigerant to pool in
certain areas. Standing the unit upright for 3-4 hours allows the refrigerant to
move freely within the coils.
3. Some parts with sharp edges may cause injury, so gloves are highly recommended
for unpacking and installing.
4. Run the unit continuously for 24 hours after letting the unit stand upright for 3-4
hours. This allows the unit to work out any “kinks” that may have resulted during
shipping from our factory to your doorstep.
5. For a quick start video guide of installation, please contact Customer Support.
6. If you have any problems with your product, please send us an email before
submitting a return request, as there might be a simple solution for your issue.
Tips for First-Time Use

Table of Contents
Safety and Instructions
Installation and Setup
Electrical Safety Warning
Parts Description
Operation
Control Panel
Remote Control
Combination Buttons
Replacing the Batteries
Installation
Tools Required
Parts List
Installing Your AC
Installing the Exhaust Hose
Removing Collected Water
Installing the Power Cord Hooks
Cleaning and Maintenance
Troubleshooting
Malfunction Codes
Warranty&Customer Support
01
01
02
05
06
06
08
10
11
11
11
12
13
18
19
21
22
24
25
26
-------------------------------------------
-------------------------------------------
---------------------------------------
-----------------------------------------------------
--------------------------------------------------
-------------------------------------------
-----------------------------------------
----------------------------------------------------
----------------------------------------------------------
------------------------------------------------
------------------------------------
-------------------------------------
-----------------------------
---------------------------------------
----------------------------------------------------
-------------------------------------------------
------------------------------------
---------------------------------------------------
------------------------------------------------------------
-----------------------------------------------------------

Safety and Instructions
01
Installation and Setup
Please read all instructions before use and save this user manual for future
reference. A digital version can be obtained from Customer Support.
Your safety and the safety of others are very important to us. We have provided
many important safety messages throughout this manual and on the appliance
itself. Always read and follow all posted safety messages.
To reduce the risk of fire, electric shock, injury, or death to persons using or near
this appliance, please follow some basic safety precautions. These precautions
include, but are not limited to, the following:
● This appliance is not intended for use by any persons (including children) with
reduced or restricted physical, mental, or sensory capabilities, or lack of
experience and knowledge, unless under the direct supervision of a person
responsible for their safety.
● Please keep plastic bags and sheets out of the reach of children as they might
be mistakenly used for play. Packaging materials can become airtight chambers
and may pose a risk of suffocation if not disposed of properly.
● When installing or moving the appliance, be careful not to pinch, crush, or
damage the power cord.
● Never attempt to operate this appliance if it visibly damaged, malfunctioning,
disassembled or has missing or broken parts. This includes exposed wiring on
a damaged cord or electrical plugin. All repairs and servicing must be performed
by qualified service personnel. Use only authorized TOSOT factory OEM parts.
● Keep the product away from fire. Do not store or use flammable gases or
materials near the appliance.
● Do not use heating equipment near the appliance.
● In the event of a gas leak (propane gas, LP gas, etc.) do not operate this or any
other appliance. Open a window or door to ventilate the area immediately.

02
● Only use the appliance in an upright position. Make sure the angle of inclination
<10°. Always place the appliance on a stable, flat, level surface to prevent the
air conditioner from overturning.
Electrical Safety Warning
● If the power cable is damaged, it must be replaced by the manufacturer or an
authorized technical service center in order to avoid all risk.
● Do not damage, alter, excessively bend, twist, pull or heat the power cord.
● Do not cover the power cord with a rug or carpeting.
● Do not rest hot or heavy objects on the appliance and power cord.
● Always plug into a fixed 115V AC ground outlet.
● Never plug or unplug the appliance with wet hands.
● Push the power plug all the way into the wall outlet so that it will not loose.
● Always grip the plug firmly and pull straight out from the outlet when taking it out.
● Never unplug the appliance by pulling on the power cord.
● Never use the appliance if the outlet is damaged or loose.
● This product should be plugged directly into a power outlet. Power outlets should
be properly rated, protected, and sized in order to avoid electrical overload.
● Do not cut or remove the third (ground) prong from the power cord.
● Always unplug the unit from the outlet before cleaning or maintenance operations.
● Your air conditioner must be used in a properly grounded wall receptacle. If the
wall receptacle you intend to use is not adequately grounded or not protected by
a time-delay fuse or circuit breaker, have a qualified electrician install the proper
wall power receptacle before using this appliance.
● Be sure that the air conditioner is properly grounded. To minimize shock and fire
hazards, proper grounding is important. The power cord is equipped with a three-
prong grounding plug for protection against shock hazards.
● Do not run the air conditioner without the plastic shell in place. This could result
in mechanical damage within the air conditioner.
03
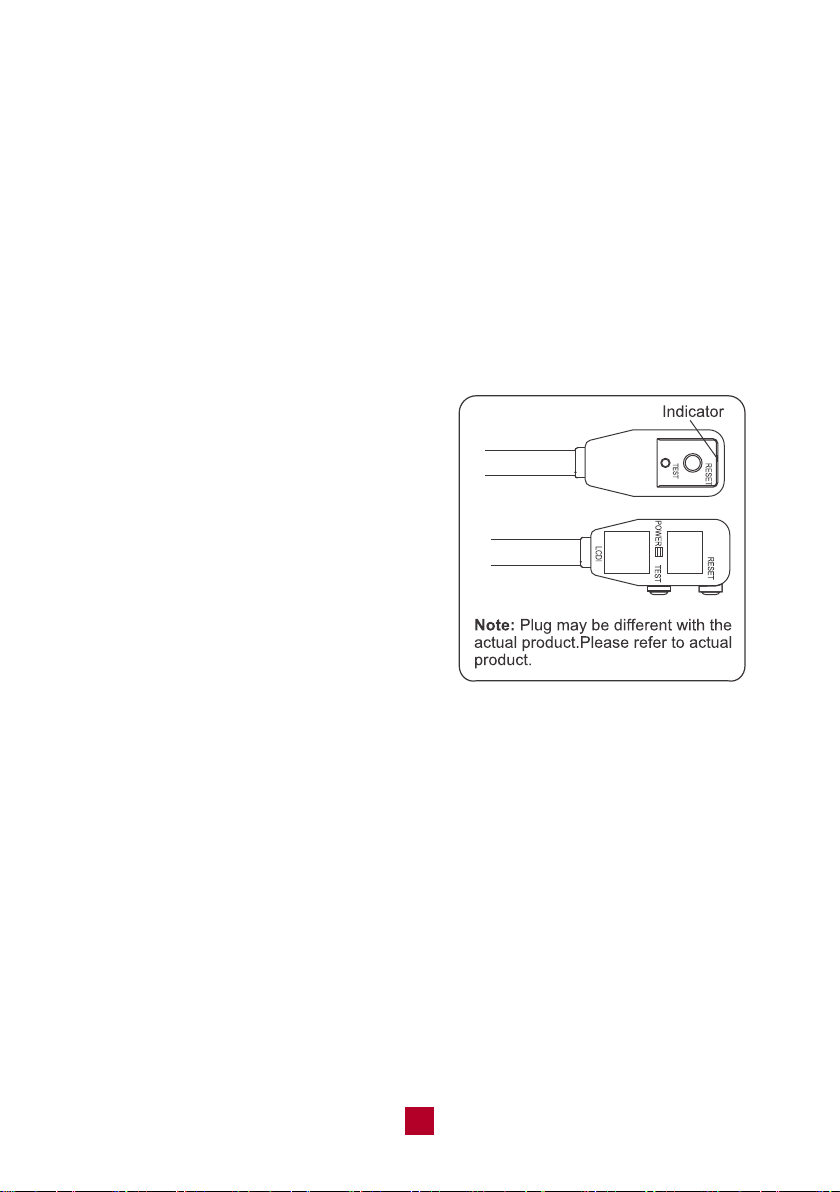
LCDI Power Plug (Leakage Current Detection and Interruption)
The power cord used with this air conditioner contains a current detection device
designed to reduce the risk of fire. In the event that the power supply cord is
damaged, it cannot be repaired. The power supply cord must be replaced with a
replacement cord received from the manufacturer by a trained service technician.
Always finish the test of LCDI plug before use:
Follow 4 steps on the LCDI plug case, if the TEST button does not cause the circuit
breaker trip or the RESET button will not stay engaged, unplug the air conditioner
immediately and contact Customer Support.
1. Plug in the air conditioner.
2. The power supply cord will have two
buttons on the plug head. If you press
the TEST button you should notice a
clicking noise as the RESET button
pops out.
3. Press the RESET button again, and
you will notice a clicking noise as the
button engages.
4. The power supply cord is now supplying
electricity to the unit.
● Do not use the LCDI plug to turn the unit on or off
● Always make sure the RESET button is pushed in for correct operation
● The power supply must be replaced if it fails to reset when either the TEST
button is pushed, or it cannot be reset. Please contact us for more information.
Recommended Operating Environment
● The recommended operating temperature range is 61°F -95°F (16°C-35°C).
● The appliance is for indoor use only.
● The appliance must be positioned so that the plug is easily accessible.
● This air conditioner is intended for residential use, not for commercial or industrial
purposes.
04
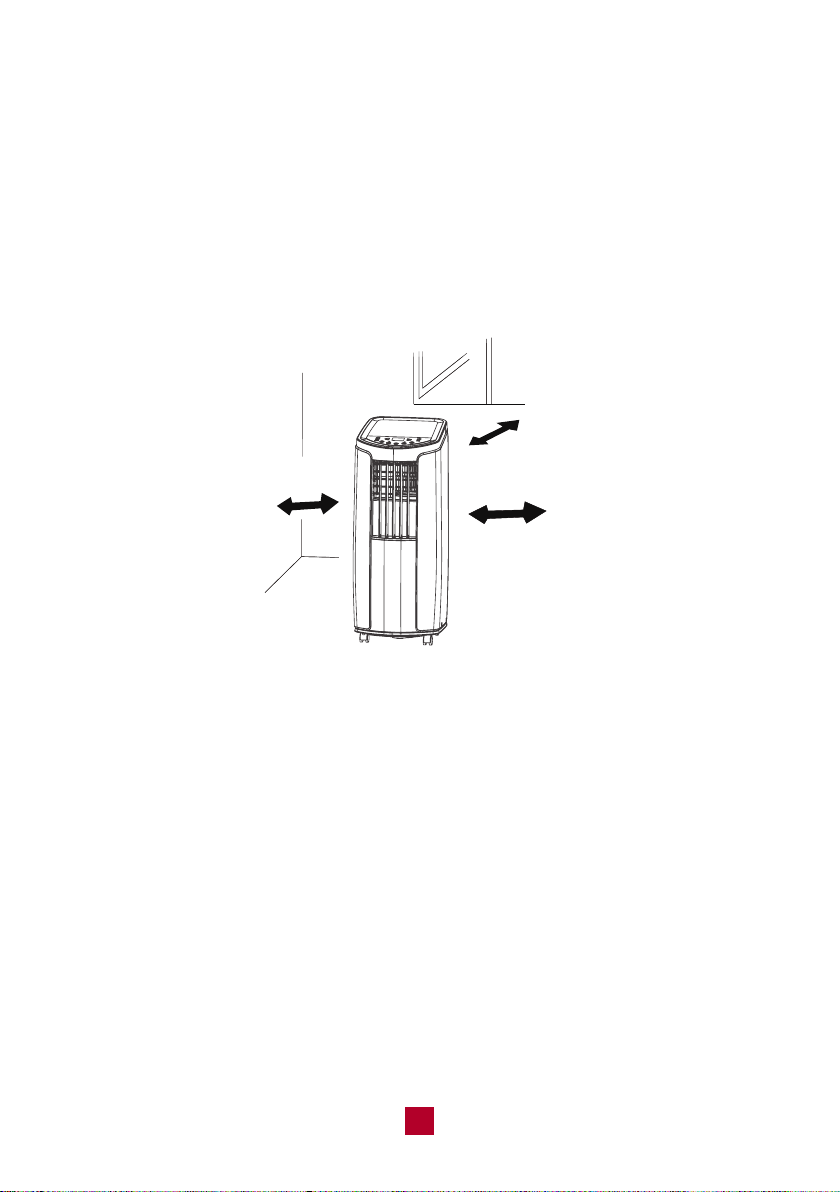
● Open space around the air conditioner should be at least 12 inches (30cm) to
ensure airflow.
● Please keep the air inlet and air outlet clean and free from obstacles.
● During operation, close doors and windows to improve the cooling effect in the
room.
● Please put the air conditioner on smooth and flat ground to avoid noise and
vibration.
● Avoid direct sunlight exposure.
61cm(24
”
)
30cm(12
”
)
30cm(12
”
)
Note: The following locations or conditions may cause malfunction or damage to
your air conditioner. Avoid running the air conditioner under the following conditions:
● Near strong heat sources, vapors, flammable or explosive gas, or volatile objects
spread in the air.
● Around any high-frequency devices (such as welding machines or medical
equipment.)
● Any place with oil or oil fumes in the air.
● Any place with a high concentration of sulfurated gas.

05
Parts Description
1
2
3
4
5
7
8
9
10
This picture is only for reference. Please refer to the actual product
for the appearance.
6
1
8 7 6
9
10
5
1
2
3
4
Remote Control
Control Panel
Vertical Airflow Louver
Horizontal Airflow Louver
Caster Wheels
Air Intake
Joint
Exhaust Hose
Rear Clip
Power Cord
Power Cord Hooks

06
Operation
Control Panel
4
1
2
3
4
5
6
2 3 5 6
1
+/- Button
Fan Button
Sleep Button
Notes:
● After powering the air conditioner on, the air conditioner will emit a single beeping
sound after powering on. After that, you can operate the air conditioner by using
the control panel or remote.
● The air conditioner will emit a beep after pressing each button on the control panel.
● The dual-8 nixie tube on the control panel will display the set temperature when
incooling mode, but won’t display anything in other modes. The dual-8 nixie tube
won’t display anything while the air conditioner is powered off.
ON/OFF Button
Timer Button
Mode Button
07
+/- Button
● Pressing this button will allow you to change the temperature setting.
● After pressing the timer button, the +/- buttons will adjust the timer setting from
0.5-24 hours in 0.5-hour increments. After the 10-hour mark, the +/- button will
adjust the timer setting in 1-hour increments. It will take 5 seconds for the timer
settings to be confirmed by the machine.
Note: This button is not valid under dry and fan model.
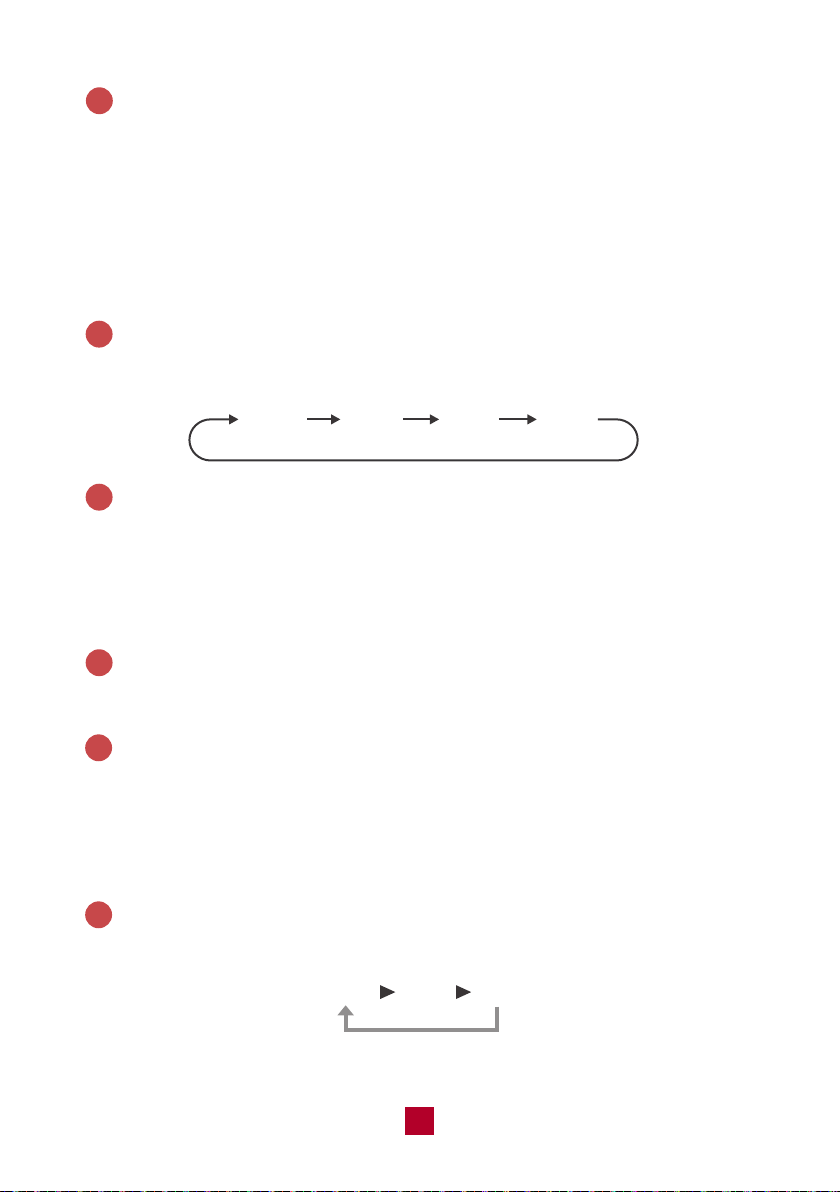
Fan Button
Pressing this button will cycle the fan speed through one of 4 fan modes, as shown
below:
Sleep Button
Press this button to enter the sleep operation mode. Sleep mode is not available
for Fan mode and Dry mode. When in sleep mode, the AC temperature will
automatically increase by 2°F for the first hour and 4°F for the second hour and
then will keep running with this temperature.
ON/OFF Button
Press to power the air conditioner ON or OFF.
Timer Button
When the unit is running, press this button to schedule when the unit will power
off by using the +/- button to adjust the length of time before powering off. When
the unit is not running, press this button to schedule when the unit will power on
by using the +/- button to adjust the length of time before powering on.
Mode Button
Pressing this button will cycle through the following modes, as shown below:
AUTO LOW MED HIGH
1
2
3
4
5
6
COOL DRY FAN

08
Remote Control
1
1
2
2
3
4
3
4
5
5
6
6
7
7
This is a universal remote control for a variety of models. If your model does not
have a function listed on the remote control, there will be no changes in the
operation of your unit. The max range of the remote control is 25 feet with no
obstacles or interference from other devices, such as wireless phones or
fluorescent lamps.
The air conditioner will emit a beep sound if the signal from the remote has been
received successfully.
ON/OFF button
MODE button
+/- button
FAN button
X-FAN button
SLEEP button
TIMER button
On/Off
Signal Sending
X-Fan
Sleep Mode
Child Lock Mode
Speed Setting
Time SettingTemperature Setting
Fan Mode
Dry Mode
Cool Mode
X-

09
ON/OFF Button
Press to power the air conditioner ON or OFF.
Mode Button
Press this button to cycle through the following modes. A corresponding logo
indicator on the left side of the remote will be shown.
a. Cool mode: standard cooling mode. The set temperature and fan speed can
both be adjusted.
b. Dry mode: the unit will run on low speed for dehumidification. The fan speed
cannot be adjusted.
c. Fan Only mode: the air conditioner will not produce cool air, only blow air from
the outside. The fan speed can be adjusted.
+/- Button
● Pressing the “+” or “-” button will increase/decrease the set temperature by 1°F.
Holding the button for 2 seconds will cause the temperature to change rapidly.
Release the button once your desired temperature is reached.
● After pressing the Timer button, each press of the +/- button will increase/
decrease the time by 0.5 hours. Holding the button for 2 seconds will cause the
timer to change rapidly. Release the button once your desired time setting has
been reached.
Fan Button
Press this button to cycle through the Auto mode and 3 fan speeds (Low, Medium,
High). Under auto fan speed, the air conditioner will automatically adjust the fan
speed according to ambient temperature.
1
2
3
4
5
Auto
Speed 1 Speed 2
Speed 3
X-Fan Button
Press this button to toggle the X-Fan mode on when the unit is in operation. When
you turn the machine off you will find the fan is running at a low speed. Press the
X-Fan button again to cancel. The X-Fan mode helps dry residual water inside the
exhaust hose.

10
Combination Buttons
Light Function
Press and hold the “+” and “FAN” buttons simultaneously for 3 seconds to turn the
lights on the air conditioner on or off. The default setting after being powered on is
for the lights to be on.
Child Lock Function
Press the “+” and “-” buttons simultaneously to enter the child lock function. While
in this mode, the remote control will display a LOCK symbol and will not send any
signal to the air conditioner.
Change Between °F and °C
With the remote powered off, press the Mode and “-“ buttons simultaneously to
switch between Fahrenheit and Celsius displays.
Sleep Button
Press this button to enter the sleep operation mode. While in sleep mode, you
can only use the Cool modes. When in sleep mode, the AC temperature will
automatically increase by 2°F for first hour and 4°F for second hour and then
will keep running with this temperature.
Timer Button
Press this button to activate the timer button. Use the +/- buttons to adjust the
length of the timer before the unit powers off. The time setting range is 0.5-24
hours, in 0.5-hour increments. Press the timer button a second time to confirm
the timer setting. If the characters on the display are blinking, you must press
the Timer button again to confirm the timer setting. If you have confirmed a time
setting, you can press this button again to cancel the timer mode.
6
7
11
Installation
Tools Required
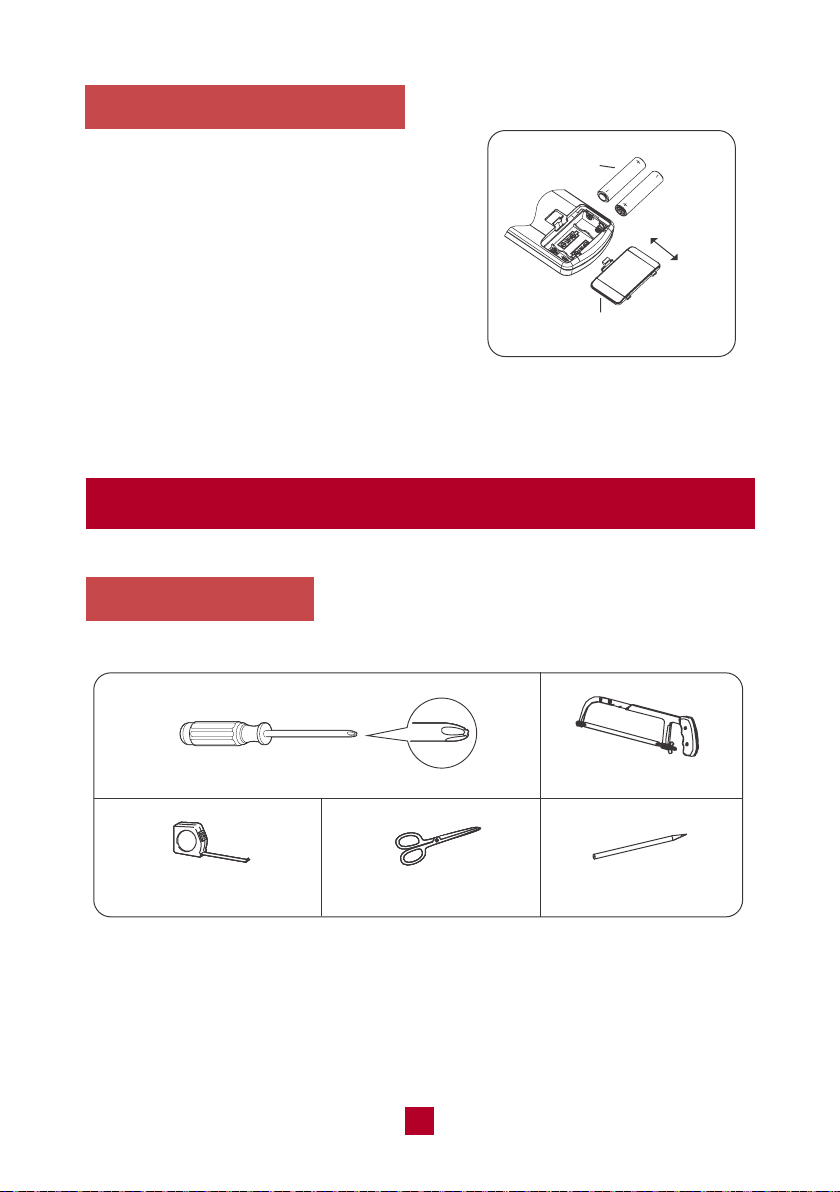
Replacing the Batteries
1. Press the back side of the remote control
battery cover and slide out following the
engraved arrow.
2. Replace with two new AAA(1.5V) batteries
(not included) of the same make and model.
Make sure the polarities (+ & -) are aligned
correctly.
3. Reinstall the battery cover box.
reinstall
remove
battery
cover of battery box
Phillips head screwdriver
Tape measure Scissors
Saw
Pencil
12
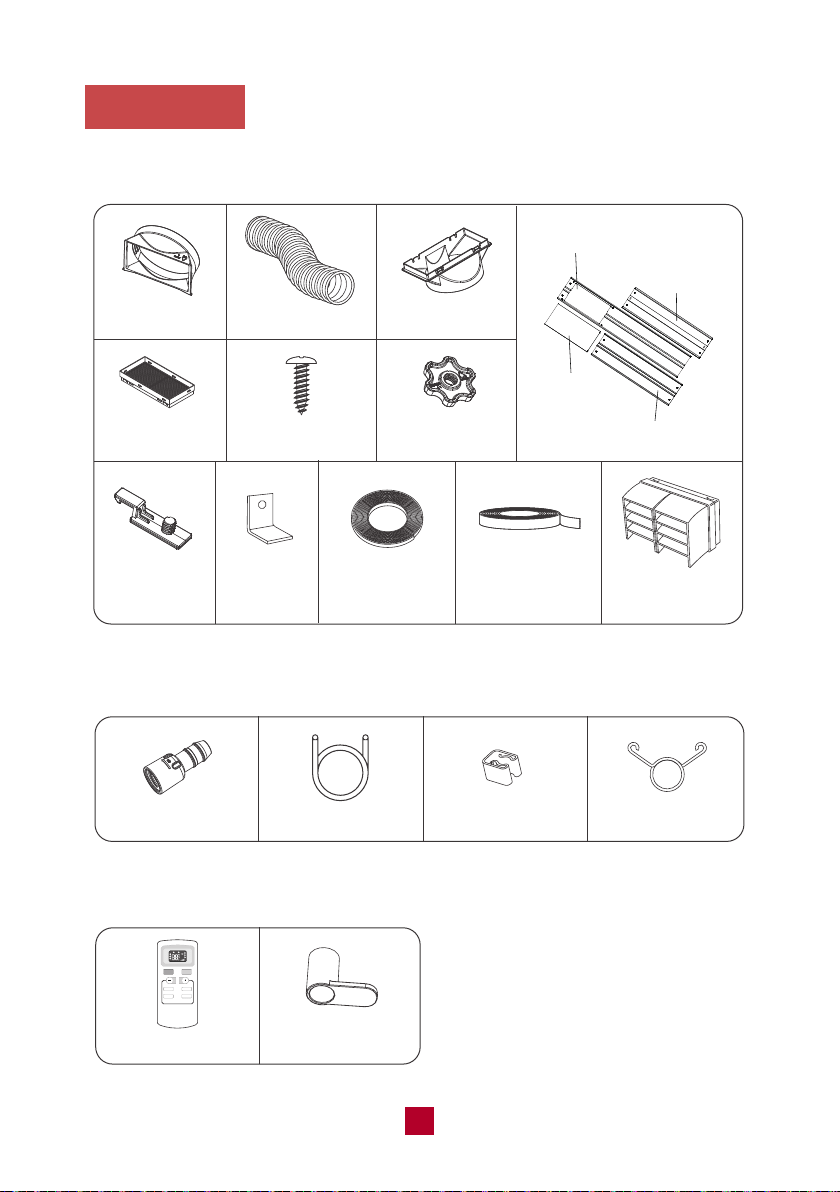
Parts List
Exhaust HoseJoint Rear Clip
Insect Guard Screw x 4pcs
Mounting Plate
x 2pcs
Drain Hose Adapter
Drain Hose
Spring Clip
Drain Pipe Clip
Accessory kit for window installation
FAN
ON/OFF MODE
SLEEP
TIMER
LOCK
X-FAN
SLEEP
X-FAN
SPEED
T-ON
T-OFF
H
AU
OPER
TO
FAN
DR
COO
Y
L
Window panel
Extension panel
Exhaust
cover
Adjustment
panel
Fixed Clip
x 2pcs
Bracket
Foam Seal A
(non adhesive)
Foam Seal B
(adhesive type)
Rain Guard
x 2pcs
Accessory kit for installing the drain hose
Remote Control
Power Cord Hook
x2pcs
Others

13
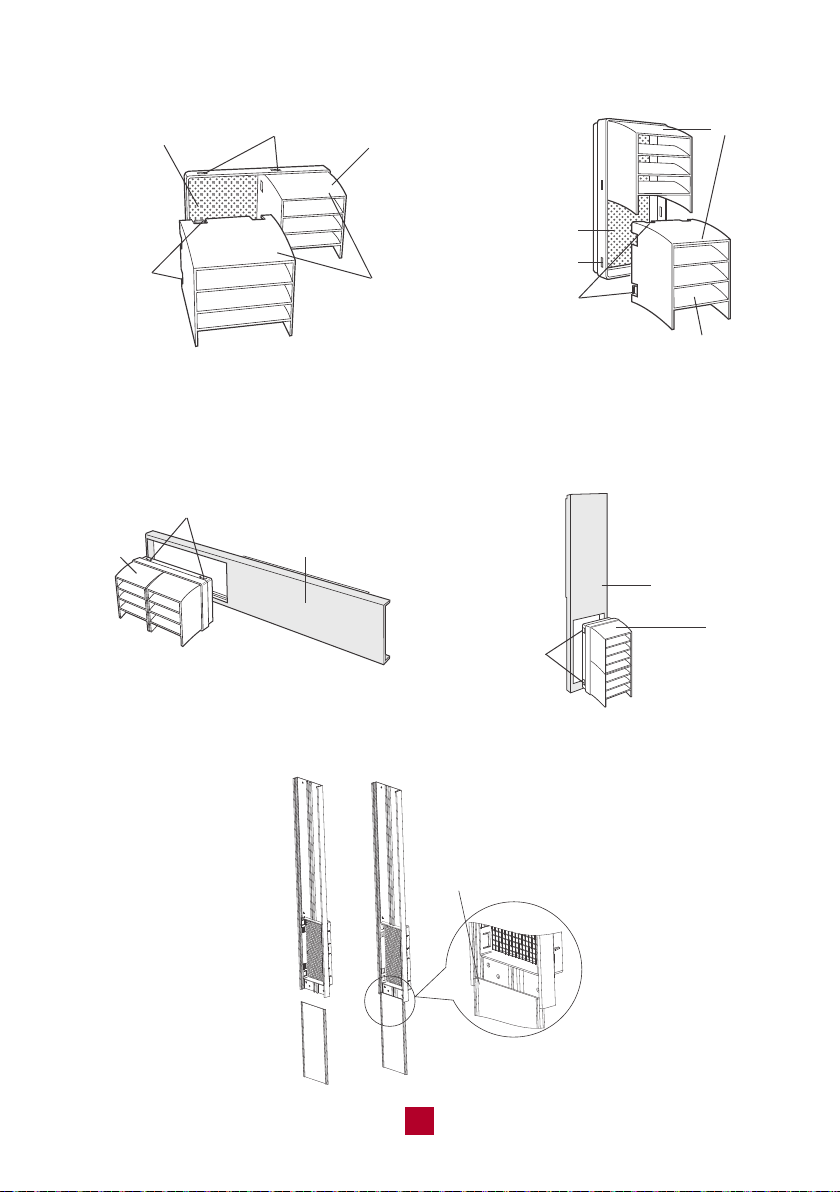
Installing Your AC
Here are the detailed instructions for installing the window panel into sliding sash
or hung windows. For certain windows, such as a casement window, you will need
to improvise several steps of the installation as each specific window will be different.
1. Cut the Foam seal B (adhesive type) to the proper length and attach it to your
horizontal (or vertical) sliding window.
Foam seal B
(adhesive type)
Foam seal B
(adhesive type)
2. Attach the insect guard to the back side of the window panel. Push in to ensure
that it fits securely. If you do not want to install the rain guard, skip to Step 4 below.
3. Optional: Install the rain guard over the insect guard to prevent rainwater from
leaking into the exhaust hose.
a. Insert the three projections on each rain guard into the holes in the insect guard.
Side “A” should be at the top, as indicated in the diagram below.
14
Hole
Projection
Insect guard net
Rain guard
"A"
Hole
Projec-
tion
Insect guard net
Rain guard
"A"
Double-hung sash window Sliding sash window
b. Insert the insect guard firmly to ensure that the four projections fit into the holes
of the window panel. Make sure that Side A is on the top.
Double-hung sash window Sliding sash window
Projection
"A"
Window panel
Window panel
Projection
"A"
4. Slide the Exhaust Cover into the grooves of the Window Panel.
Insert the first groove

1
1
2
2
3
3
Window width
Max 62inch / Min 9.1inch
Window width
Max 62inch
Min 9.1inch
Window panel (cut if necessary)
Adjustment panel
Extension panel
Exhaust cover
1
2
3
4
28.3inch
18.3inch
18.3inch
10inch
5inch
5inch
4.8inch
4.8inch
You can slide the exhaust cover to
cover the hole of the window panel
when the exhaust hose is removed.
15
5.Installing the Window Panel(s)
This window installation kit comes with 3 panels to adjust to your exact window size.
You may not need to use all three panels. To begin, please refer to the guide below:
● If your window is less than 28 inches long you only need the window panel. You
may need to saw off part of the window panel if your window is smaller than the
window panel length.
● If your window is 28 to 46 inches long, you will need the window and adjustment
panel. You will not need the extension panel.
● If your window is 46 to 62 inches long, you will need all three panels.
● Last, if your window is longer than 62 inches, you will need all three panels and
then need to improvise to fill the remaining gap.
Hung Window
Sliding Slash Window
16
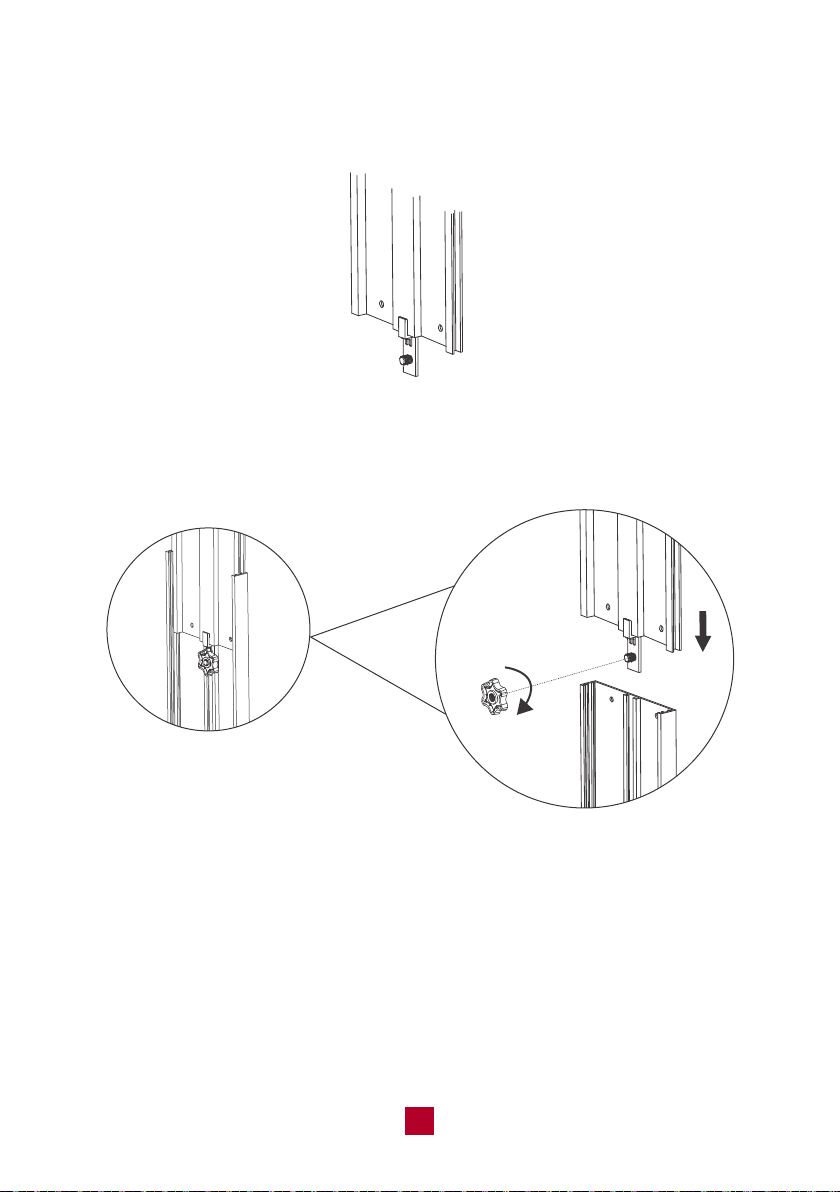
a. Find the adjustment panel (with two grooves on each end), and a Fixed Clip
and Mounting Plate.
b. Insert the fixed clip into the groove of the adjustment panel.
c. Slide the fixed clip into the groove of the window panel and slide the fixed clip
until there is no gap between the two panels.
d. Screw the mounting plate into the fixed clip to secure the panels together once
it is at the length of your window.
mounting plate
fixed clip
e. If needed, follow the above steps to connect the other side of the adjustment
panel to the extension panel. The total length of the panels will reach 62 inches.
If your window is longer than 62 inches, you will need to improvise to fill in the gap.
17
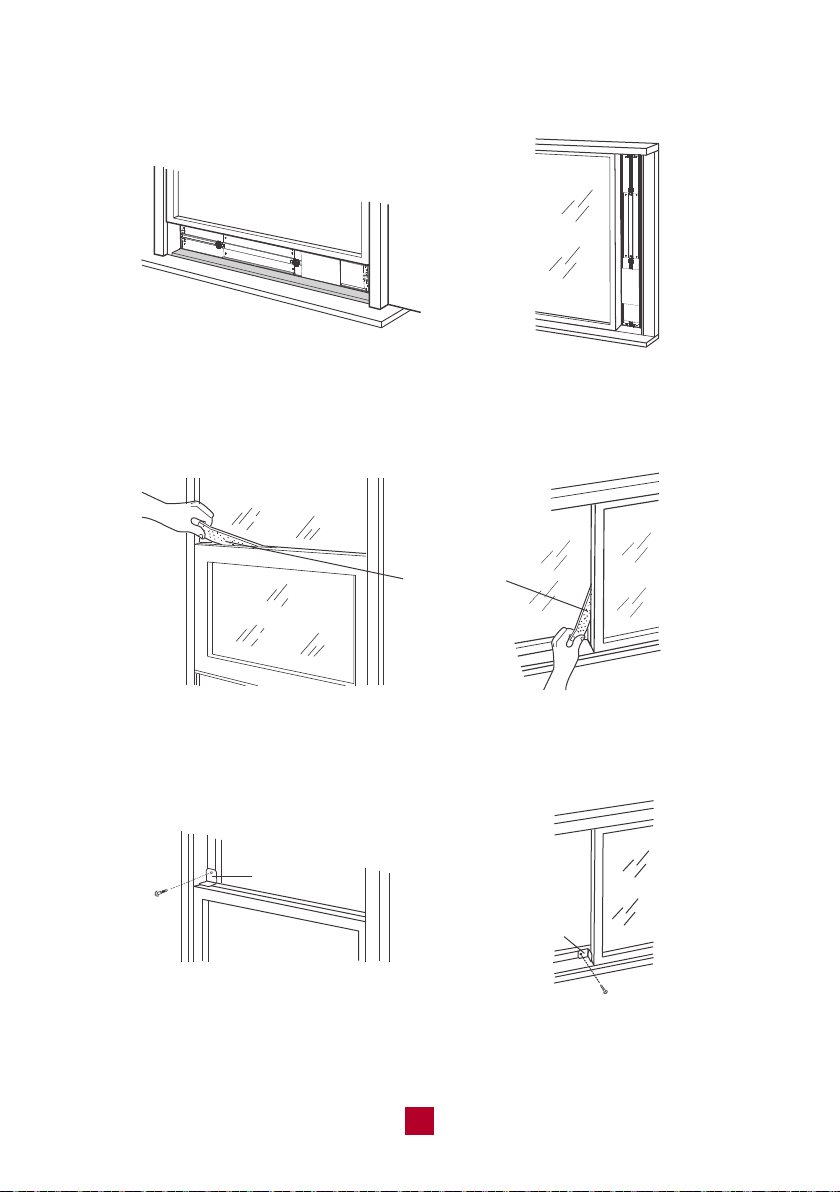
6. Insert the window panel into the window sill and close the window securely
against the Window panel.
7. Stuff Foam Seal A (non adhesive) between the glass and the window to prevent
air and insects from getting into the room.
8. Optional: Attach a bracket to the window frame with a screw to prevent any gaps
from opening up.
Foam Seal A
Bracket
Bracket
18
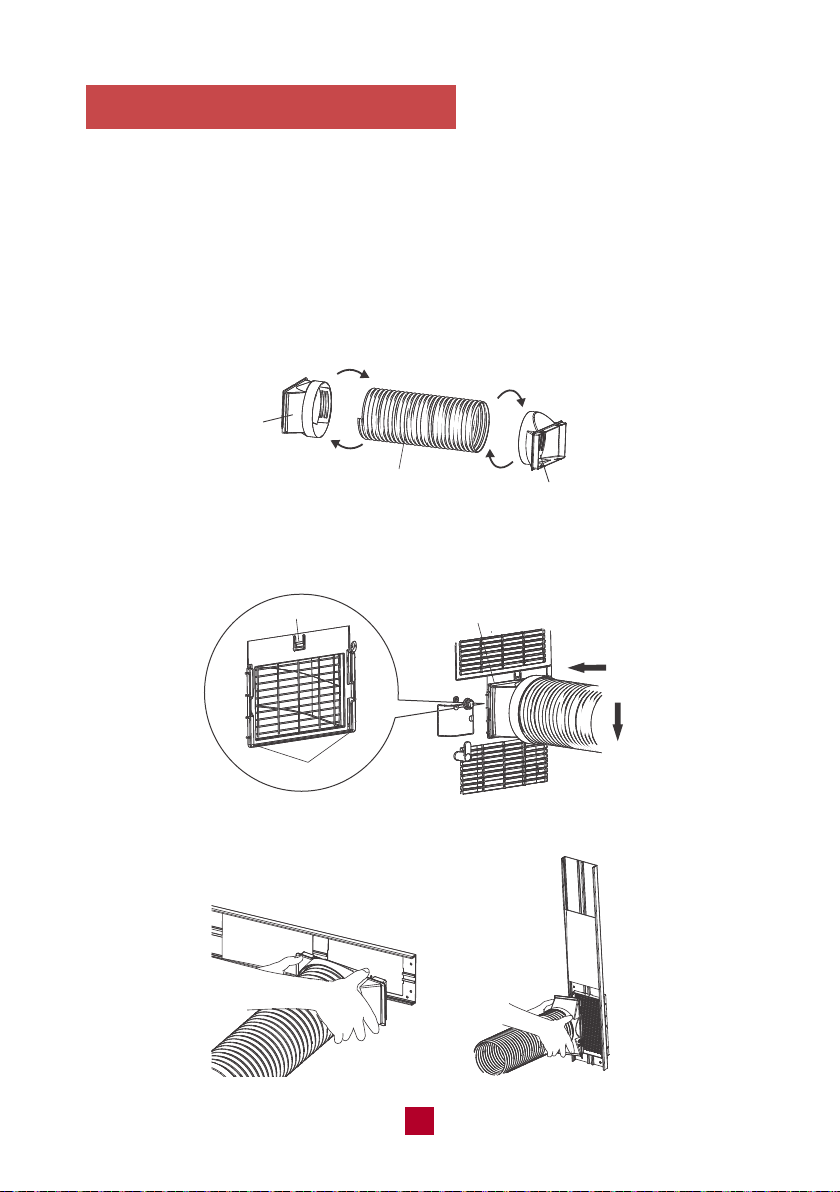
Installing the Exhaust Hose
Please note that the exhaust hose is REQUIRED to use for this portable air
conditioner. This TOSOT portable air conditioner (like all air conditioners) must
produce heat as a byproduct of producing cool air. If you don’t connect the exhaust
hose your unit will exhaust this hot air into the room you are trying to cool. That
won’t work very well.
1) Twist the Joint and Rear Clip clockwise onto the exhaust hose.
Clockwise
Rear clip
Exhaust hose
Clockwise
Joint
2) Insert the Joint into the groove on the back of the unit and extend the exhaust hose.
groove
clasp
the side with "TOP" is upwards
3) Attach the Rear clip to the window panel.
19
Removing Collected Water
TOSOT portable air conditioner comes with an auto-evaporation system. The unit
automatically evaporates the condensation. There is no need to empty the water
except in humid conditions.
Manual Drainage
The internal pan can hold about 0.5L of water. When it is filled with water, an alarm
will beep 8 times and the display panel will show an H8 malfunction code to remind
you to drain the water. For manual drainage, you will need to:
1) Move the unit to a suitable place for discharging water. Please keep the unit
horizontal so water does not spill.
2) Remove the rubber plug from the drainage port and the collected water will drain.
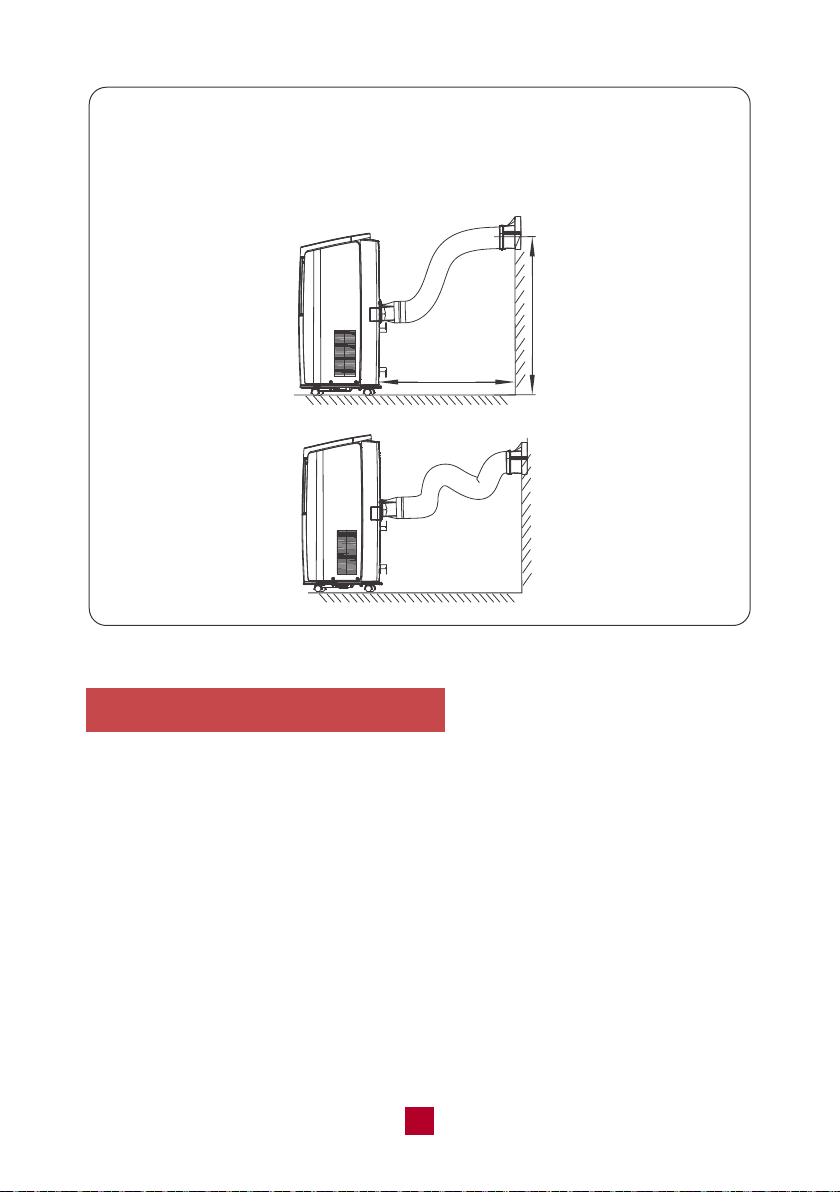
Tips:
In order to improve the cooling efficiency of your air conditioner, the
exhaust hose should be as short and direct as possible. Our suggested
configuration is shown below.
correct under 51 inches
about 24 inches
wrong

20
drainage port
drainage port
drainage
pipe clip
screw
3) Plug back the rubber plug to the port. The unit will resume operation in 3 minutes.
Note: You can also insert a drain hose (included) to the port to aid drainage.
Here, you will need to insert the hose to the port first before operation and
secure it with a pipe clip. Then, attach it to the drainage pipe clip at the back
of the machine. When draining, remove the hose from the clip and water will
flow from the pipe.
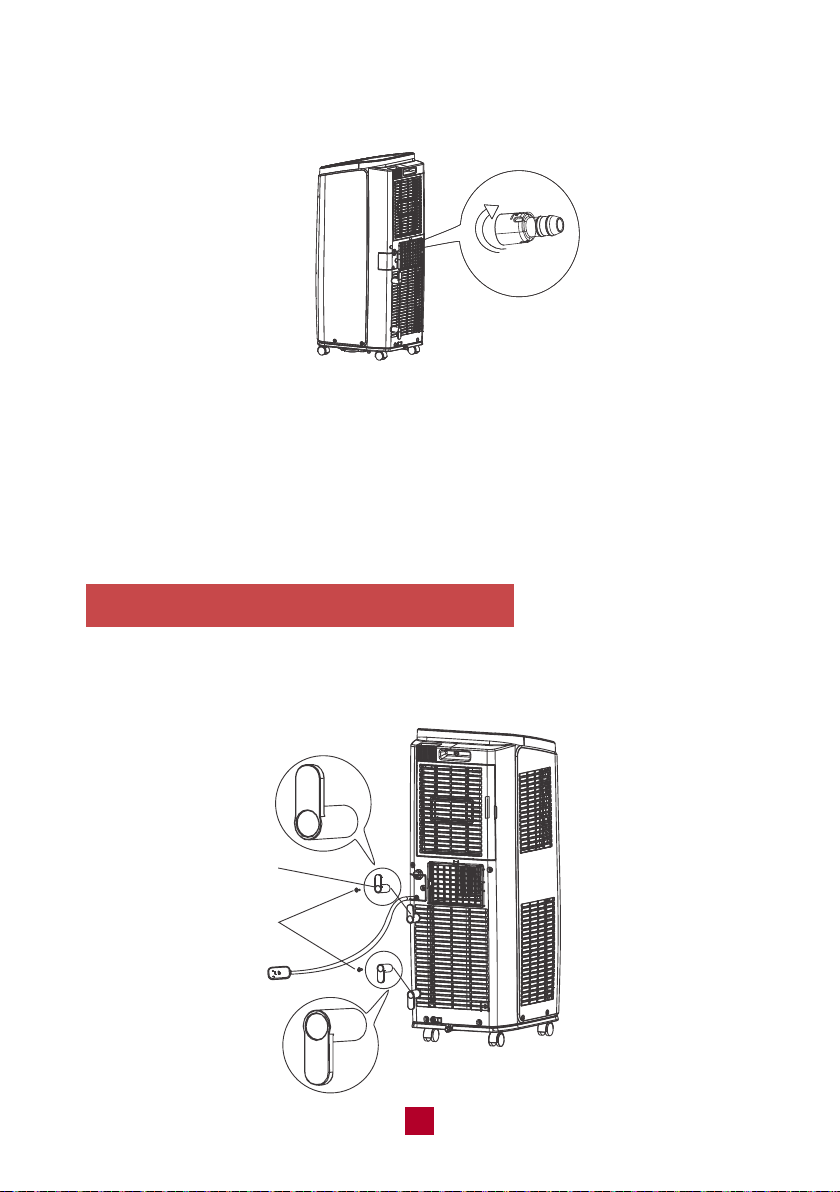
Continuous Drainage
Water can be drained into a floor drain by attaching a drain hose (included) to the
continuous drain port.
1. Remove the continuous drain cap by turning it counter-clockwise.
21
Installing the Power Cord Hooks
Attach the two power cord hooks on the back of the unit using the included screws
and wrap the power cord around the power cord hooks when not in use.
2. Screw the drain hose adapter into the spout by twisting clockwise and attach the
drain hose to the drain adapter.
Note: When using the continuous drainage option make sure that the air
conditioner is located on a flat, level surface and that the drain hose is directed
downwards and clear of any obstructions. Placing the air conditioner on an uneven
surface may result in the chassis filling with water until the H8 malfunction code is
displayed. If this occurs, manually empty the water in the chassis then recheck the
air conditioner location and hose connection.
Direction of wire hook is upward
Direction of wire hook is downward
Screw
Wire hook
22
Cleaning and Maintenance
To avoid electric shock, turn off the air conditioner and disconnect from power
before cleaning. Do not wash or douse the air conditioner with water. Never use
abrasive or flammable solvents to clean the air conditioner.
Cleaning the outer case
Wipe with a soft cloth soaked in warm water and a mild detergent, if needed.
Cleaning the exhaust hose
Remove the exhaust hose from the air conditioner and clean with a soft cloth
soaked in warm water. Let dry completely before reinstalling.
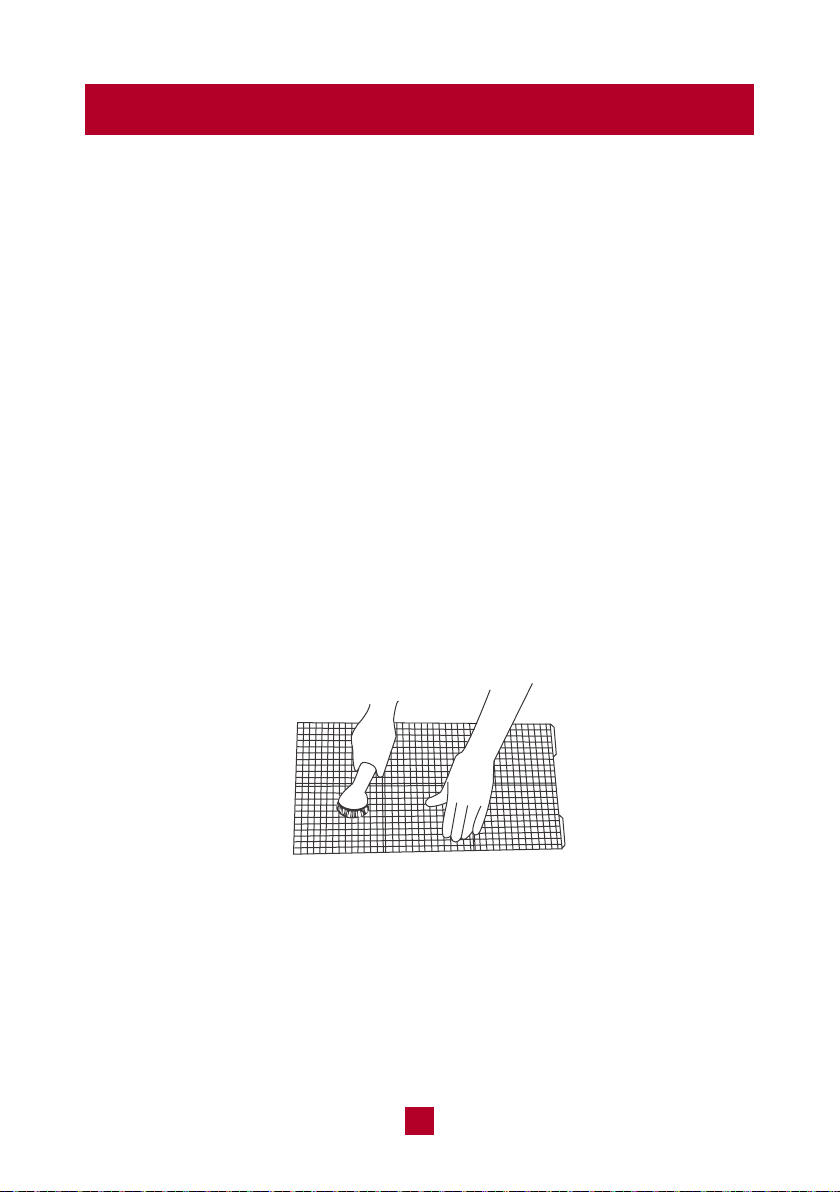
Cleaning the filter
1. Remove the filter
Locate the filter and remove it from the air conditioner. You may need to move
the filter around to loosen.
2. Clean the filter
After removing, use the dust attachment of your vacuum to suck up any dirt or
warm water mixed with a mild detergent. A soft bristle brush may help remove
some of the dirt, if needed.
3. Reinstall the filter
After the filter has dried completely, reinstall back into the air conditioner.
Notes: ● Clean the filter at least every three months.
● Do not touch the metal fins in the air conditioner after removing the filter
as they may cause personal injury.
● Do not attempt to dry the filter with a hairdryer or other heating elements
as this may deform or ignite the filter.
● Do not operate the air conditioner if the air filter is missing.

23
Maintenance Checklists
Pre-Season Maintenance Checklist
● Check the power cord for any cuts or exposed wiring
● Check the ground prong is still on your power plug
● Clean the air filter
● Check whether the hose adapters and exhaust hose are installed tightly and free
of damage
Post-Season Maintenance Checklist
● Disconnect unit from the power outlet
● Clean air filter and exterior case
● Drain any accumulated water from the air conditioner
● Wrap the air conditioner in plastic to prevent the accumulation of dust
Long-Term Storage Checklist
● Disconnect unit from the power outlet
● Clean air filter and exterior case
● Wrap and/or cover the unit to prevent the accumulation of dust within the unit

24
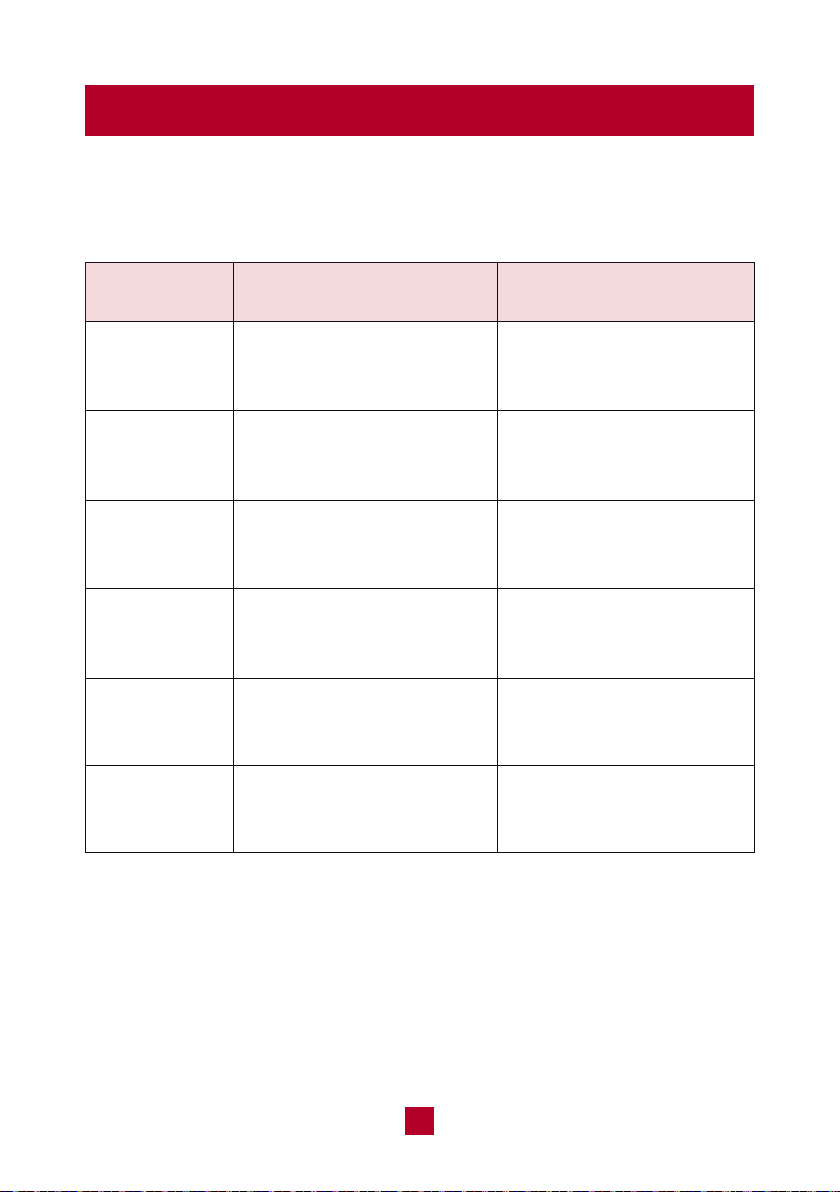
Troubleshooting
Check whether the air
outlet or inlet is blocked
Check if the evaporator
is defrosting
Is the unit in auto mode?
Your desired temperature
exceeds the AC range
Check if the source of the
odor is somewhere in the
room
Has the unit just been
turned on or off?
Has the unit just been
turned on or off?
Remove the obstacles
blocking the air outlets
and inlets
After defrosting is finished,
the AC will resume operation
Temp cannot be adjusted in
auto mode
Temp set range is 61-86°F
Remove the source of the
odor and clean the filter
The flowing water sound is
the refrigerant inside the
air conditioner, which is
completely normal
Changing temperature can
cause the panel to shrink
or expand, causing friction
No air is blowing
from the air
conditioner
Set temperature
cannot be adjusted
Air blowing from
the air conditioner
has a weird smell
Abnormal sound
during operation,
such as water
flowing
Abnormal sound
during operation,
such as a rapid
“pop-pop” sound
Issue Troubleshooting Solution
What is 3-Minute Compressor Protection?
All TOSOT Air Conditioners have a 3-Minute Compressor Protection feature to help extend
the lifespan of your unit. You may notice this happening when the unit is not blowing cold air
or you can’t hear the sound of the compressor. Below are some situations where the 3-Minute
Protection Mode will be activated:
A. Your unit just experienced a power outage. The compressor will restart again after 3 minutes.
B. After you switch from the fan or dry mode to the cooling mode, there is a 3-minute delay
before the compressor starts up.
C. If the unit is powered on, then powered off, then powered on again within a 3-minute period,
there will be a 3-minute delay before the compressor starts again.
D. If the ambient room temperature is lower than the set temperature on your control panel,
the compressor will power off for 3 minutes and restart once the ambient room temperature
rises above the set temperature again.
25
Malfunction Codes
If you experience any of the below malfunction codes, remove the unit from power
for a few minutes. Plug the unit back in to determine if the malfunction code is still
present.
Chassis is full of water
Refrigerant lacking protection
Ambient temperature sensor
malfunction
Evaporator temperature
sensor malfunction
Exhaust hose temperature
sensor
Compressor overload
protection
Chassis is full of water, pour
it out and see if symptoms
persist
Compressor stops operation
but the fan continues to
operate
Compressor stops operation
but the fan continues to
operate
Compressor stops operation
but the fan continues to
operate
Compressor stops operation
but the fan continues to
operate
Compressor stops operation
but the fan continues to
operate
H8
F0
F1
F2
F4
H3
Malfunction
Code on Unit
Malfunction Name Symptoms
If you notice or experience any of the following conditions, please turn off the air
conditioner, disconnect from power, discontinue use, and contact support immediately.
● The power cord is overheating or otherwise damaged
● Abnormal sound during operation
● A strange odor is emitted from the unit
● Excessive water leakage the unit
Do not attempt to repair or retrofit the air conditioner by yourself. All repairs must
be performed by qualified individuals.
26
Warranty & Customer Support
Warranty Information
1. 1-Year warranty:
TOSOT Portable Air Conditioner comes with a 1-year warranty from the date
of purchase.
This warranty covers manufacturing and material defects. Please visit
https://tosotdirect.com/warranty for more details.
2. Additional 6-Month warranty extension:
You can get a 6-month warranty extension by registering your new product
at www.tosotdirect.com/extend.
Customer Support
Questions? We are here to help
+1 702-514-1603
www.tosotdirect.com
Share your experience
@tosotdirect