DVI
O
27
'uctions
2
Please read through these operating instructions so you will know how to operate your model properly. After you
have finished reading the instructions, put them away in a safe place for future reference.
• This player is not suitable for commercial use.
IMPORTANT
A
TbellghtnlFEflashwithenowheadsymbel,within
=nequi_eral thangin,isintendedtoalerttbeusa
to tbethe_enceofurdnsuletod"da_enuJSVOhebe"
within the product'senclosure that may be of
suftlelent mugnitJ_etocor_tltuteariskofsh_ctrin
shockto ber_
CAUTION:
TO PREVENTTHE RISKOF ELECTRICSHOCK,
DO NOT REMOVE COVER (OR BACK). NO
USER*SERVICEABLEPARTS INSIDE, REFER
SERVICING TO QUALIFtED SERVICE
PERSONNEL
]_e e_brnatinnpointwithinanequlbtemltd_gin
is intendedth inert the user to the m of
impc_aet obemtingendn_inten=nce(se_ining)
instmcbensin the Klerotu(eaccornbenylng the
shpim.
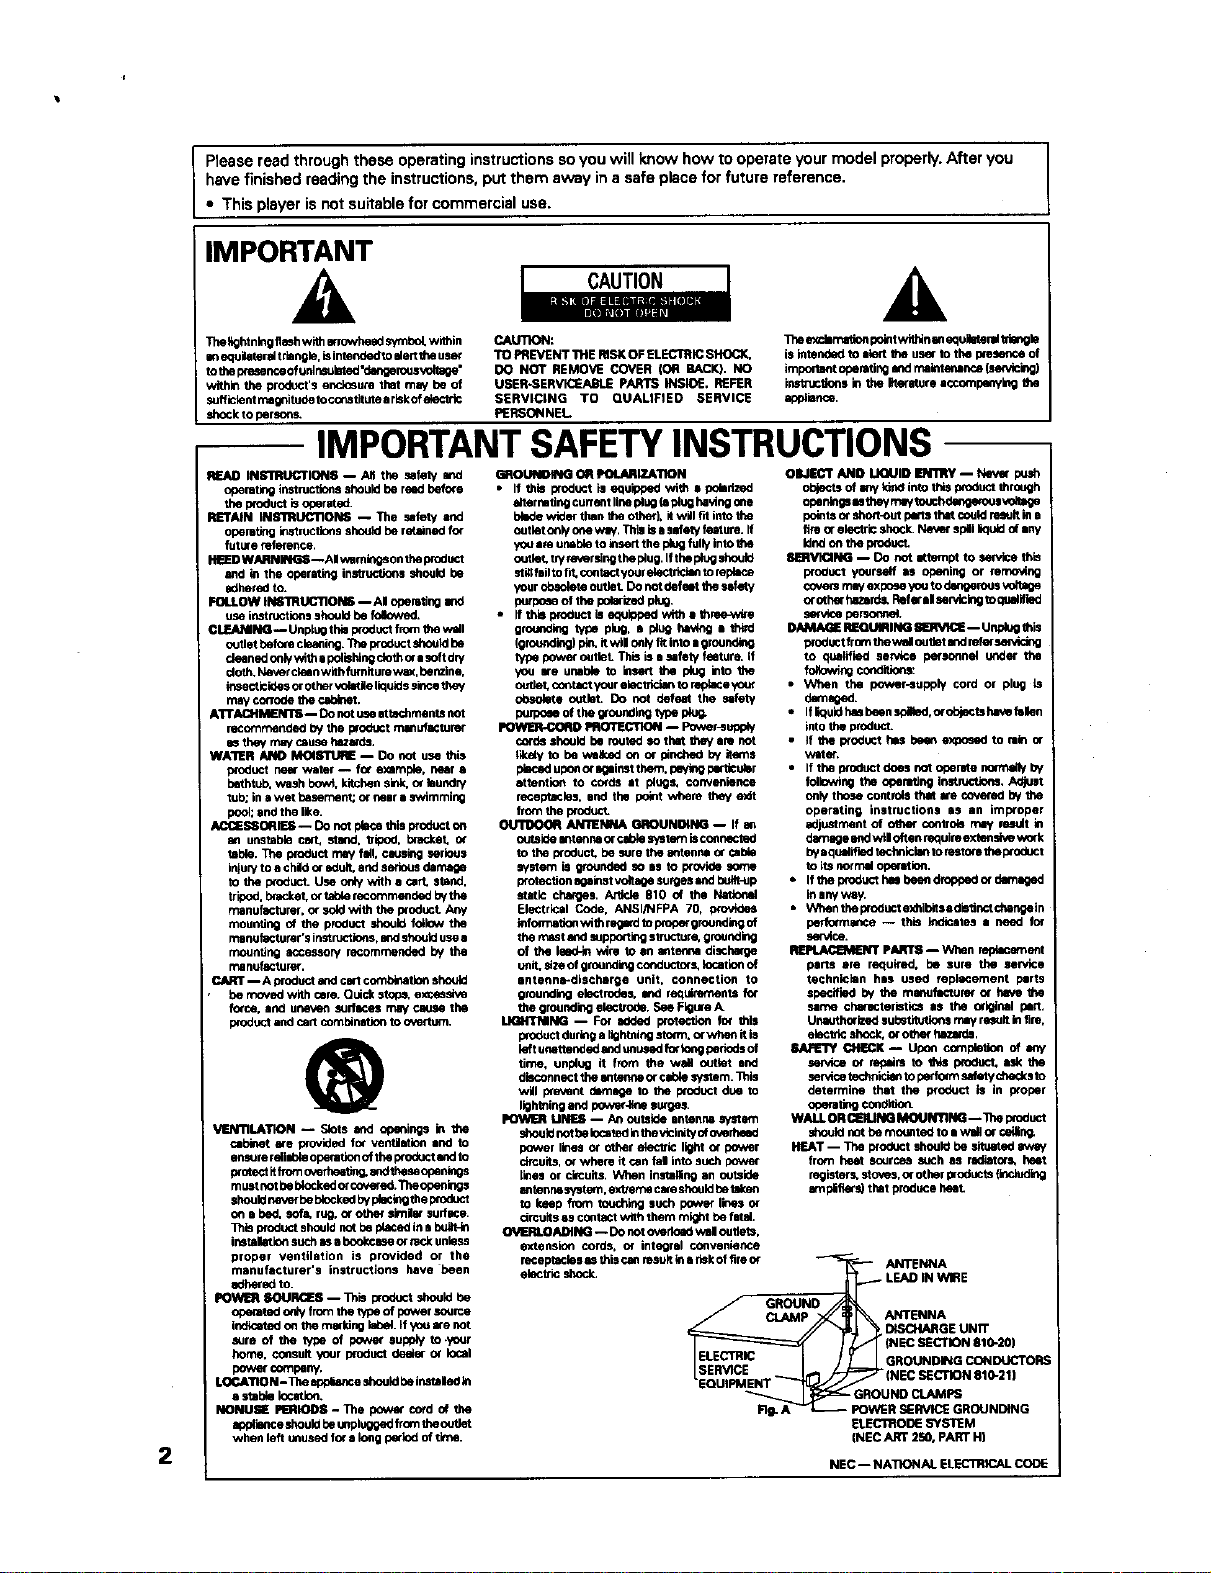
IMPORTANT SAFETY INSTRUCTIONS
READ INSTRUCTIONS -- All the safety m_d
opembeg instructionsshouldbe reedbefo¢e
tbe productisoderated.
RETAIN INmUCTIONS -- The safety and
operatingit_tmctinns shouldbe re_aleedfor
future fthefeRce.
_ WARNING&--AI v_mingson_e thoduct
and in the operatinginstructkxtsshould be
0dberbeto.
r.ou.ow IN$'IRUCTIONS --AI obemtingand
use instructions should be _.
CLEANING-- UnpLugthisproduct fromthe wall
outletbeforecleaning.Theproductshou_ be
cleanedoofywithi poll•hiesclothorasoft dry
cloth.Neverclelnwithfumiturewa0(.ben=the.
lesecticibesor ofherv_atle liqu_sinncethay
may conobetbecshleet.
ATTACHMENll -- Donotm ettachmer.tsnot
recommendedby the I_O_JCtrmmufacturer
asthay maycauseW.
WAILER ANO MOISTURE -- Do not use thin
thoduct nearv_ter -- for example, near a
bathtub,wash bowl.kitchensink.or inunthy
tub; inawet hasemen_ ornear• swimming
pool;and the like.
ACCESSORIES-- Donot placethis product on
an unstable ca_ stand, tripod, bracket,or
table. The productmay fall.causing serious
injuryto a childc( adult,endseriousbemin;e
to tbe p_oduct.Usoonly with e cart. stand.
tripod,bracket,c_tat_ recommendedbythe
manufacturer,o¢soldwith the ixoducL Any
moundngof the productshouldfollow the
manufacturer'sinstructions._ sbeuld usee
mountingaccessory recommendedby the
m8 oufactuRK.
CART -- Aprnduct _d cwt c_tlen should
be movedwithcare.Quick stops, excessive
force, and unarm _4Jrfmcesmay c_msethe
productenclcan combinshontooverturn.
®
_.NTILATION -- Slots end of)eningsin the
cabinet we providedfor veofishon •od to
en_m reltshleoperetic_lof theproductandto
WolectItfromovert_ti_ andtheaeopenlegs
mustnotbe bleckodo(covefed.Tbeopenings
sbeuldnev_ be bleckbebypledngtheproduct
on e bed.sofs. rug. or othersirnhr surfuce.
Thle thoduct shouldnot he placod le e bullt_in
instckatlensuchas abookcaseorrockunless
proper ventilation is provided or the
manufacturer's instructions have been
odhered to.
_ SOURCE• -- _3_leprbeuctslmuldbe
obemtbeo_y fromthetybeof power=oume
i_ o_ them=ldng isbel. Lfyou arenot
sure of the type of power supplyto +your
home. consult yourproductbe_er Or local
bewe_ compen'_
LOCATION- _e odpinmceshouldbein._mlledin
• =tshle incatlo_.
NONU_ PERIODS- The power cordof the
shphanceshouinbeunplnggedIromtheoutlet
when left unusedfor• long p_ind of tinge.
OROUtilOING OR POLARIZA'nON
• If this productis equipped with • be_dzed
intermdng currentlineplug (_plughe'_ng one
Id_bew_derthan tbeother). Itwiltth intothe
outletoofyone way.ThisisaNthty thmure. If
you•re ur_ble to insertthe pCugfullyintothe
outfur, tryaver •in9tbeplug.IftheI=_Jg=_ld
stiMinlto_ collect youreisofrlckmtoreplica
yourobsofuteoutlet Donotbefwt thes=futy
p_lx_e of tbe posited pkg.
• If this p,_oductis eq_Jibeedwnh o thme-wtre
Orou_ ty_ plu_. a plug _ mth_
(grounding)_ itwtl onlyfit into• gmuoding
type powe{outlet This isa safety feature,if
you we unable to insert _e plug into the
oultet,co_tlct youreisctrickm to repinceyour
obsolete outint. Do nm defeat the =efuty
be_<_e of the groundingtyodpieS.
POWER-_D PROTECTION-- Fower-supp_
o_be shouldbe muted sothat they am not
_ik_lyto be wakbe _ _ plncbed by items
ubenot Iglinst tbem,paylagpI_itcther
attention to cords at plugs, convenience
receptacins, and the point where they exit
fromtbe ixbeuct
ANI_NNA eROUNBN_ -- If
out•lee antennaOrcablesystemiscoummled
to the I_oduct be surethe antenna er _ald_
system is gmundbeso as to provide some
protectionIg_inst voltagesurges andbeltt_p
static charges. Article 810 of the
Ein_trlcal Code. ANSI/NFPA 70, provides
lethm',etinnwithregardto pmpe;grouodingof
themastandsupporting structure, grounding
of the leggin wire to an intanna di_h_ge
unit.sizeof grouodiFEco_ductm=,locationof
antenn_discharge unit, connection to
groundingeisctrobes_md requbemeofsfor
the groundingelectrode. See FIgmeA.
IJ_NTNIN_ -- For _dod i:_tectinn fm this
productduringaltDhtuingstom_,o(when it is
leftunottended _d unu_d thr lensbedods of
time, unplug it from the wall o_tlet end
disconnectthean_ orcabfu•,/stem.]_ls
will p_mmnthamlge to the i_oductdue to
Ik_htningand po_,e_4_esurges.
POWER UNES -- An outsideantenr_ system
shouldnotbefucatedinthevicinityofovethwd
power lines Or Otherelectdc light or power
circuits,o_where it canfal into auchpowe_
li_es or circuits.When lt,_tallleg an outside
antennaaystem,e_ careshouldbel_en
to heap from touchingsuch bewer lines O_
drcultsas contactwiththem mightbe fldaL
O'v_EJRlt.OAJ_NO-- DOnoto_rlebe w_l oubet_.
extension cords, or integral convenier_e
receplecinsas this canresultinariskof fireor
electricshock.
OBJECT AND _ID IENTRY-- Nev_ bash
objec_ of iny ldod itho this productthrough
pointsOrshort-outberle thatcouldresultin e
fireor electricshock.Ne_ shllt liquinof •ny
lendonthe_
_ --DO _ _ to_e ttiis
m_od_ yourselfms openingor m_
_ exbese,youto_s _
orothe_hazards,Rthe_d seP_cb'Kitothmntied
_uct(mm th_ oubet_ _
to qu_lHled se_ce i_onnel under the
_ng c_ition_
• When the power_upply cord or ping is
• if_uldi_ been_,o(_tabe_ fulfun
inththeproduct
• If the product hl_Sbe_ e)_o_ed to rain o€
_uf.
• If tbe thbeuct doesnot opemth nom'_inlyby
followingthe oberatingthstru_Jo_, Adjust
onlythosec_$ _ arecow(be by
operatinsinstructions*) an imm_oper
adjustmentof_ centr_ _ _t in
bemage m_lw_loftenmqutieextenetvev,_xk
byaq_ technicisntomsto_th_t
toi_no_ _inn.
• if t_ p_u_t it= be_ d_be_ or darn_od
• _11enthe_oduct eshibltsadistlectchengeln
be_io_nmce-- this_ates • need for
_ce.
PARTS --V_l_n_ent
parts ere required, be sure the service
technicianhas used repi_ement m_rts
shecifind by 0m manufactureror _
same cf_M_ctemticsas the ork(_l__.
Unauthoritedsubstituben$ mayr_mlt inthe,
elec_ shoch,or_ _.
_ _K _ Upen com_ _ _
sen4o__idan to_ _s to
determine that the product is in Wober
_ ¢ondi_t
WALLOR CL=IUNOMOUNT1NO-- Theproduct
sbe_Idnotbe moumodto i W_l o__ng.
HEAT --Tbe l_Oduct_M be _ _
from _ eour_ such es _or_ le_t
rngister_sto_os,orother_Is (_
em_llers)thatproducebeet
_ ANTENNA
LSAD IN WIRE
GROUND
DISCHARGEUNiT
(NEC SECTION 810-=0)
GROUNDING CONDUCTORS
(NEC SECTION810-21)
_ ;ROUND CLAMPS
noWI.=R SERVICEGR_NI_NG
Et [ffrlRO_ aY_I'E M
[NEC ART 2_. PARTH)
NEC -- NATIONAL ELEC31_AL CODE

CONGRATULATIONS ON YOUR PURCHASE OF
THIS RNE PIONEER PRODUCT.
Pioneer is on the leading edge of DVD research for
consumer products and this unit incorporates the latest
technological developments.
We are sure you will be fully satisfied with the DVD
player.
Thank you for your support.
WARNINg:TO PREVENTFIREOR SHOCKHAZARD,DO
NOT EXPOSETHIS APPUANCETO RAINOR
MOISTURE.
IMPORTANT NOTICE
[For U.S. end Canadian models]
The serial number for this equipment is located on the
rear panel. Please write this serial number on your
enclosed warranty card and keep it in a secure area. This
isfor your security.
CAUTION:This product satisfies FCC regulations when
shielded cables and connectors are used to connect
the unit to other equipment. To prevent
electromagnetic interference with e_ectric appliances
such as radios and televisions, use shielded cables
end connectors for connections.
This equipment has been tested and found to comply
with the Emits for a Class B digital device, pursuant to
Part 15 of the FCC Rules. These limits are designed
to provide reasonable protection against harmful
interference in a residential installation. This
equipment generates, uses, and can radiate radio
frequency energy and, if not installed and used in
accordance with the instructions, may cause harmful
interference to radio communications. However,
there is no guarantee that interference will not occur
in a particular installadon, if this equipment does
cause harmful interference to radio or television
reception, which can be determined by turning the
equipment off and on, the user is encouraged to try
to correct the interference by one or more of the
following measures:
- Reorient or relocate the receiving antenna.
- Increase the separation between the equipment an_
receiver.
- Connect the equipment into an outlet on a circuit
different from that to which the receiver is
connected.
- Consultthe dealeroran experiencedradlo/rv
technicianfor help.
CAUTION
• Use of controlsor adjustmentsor performanceof
proceduresotherthanthose specifiedhereinmay
resultinhazardousradiationexposure.
• The useofopticalinstrumentswith this product
will increaseeye hazard.
[ForCanadian model]
ThisClassBdigitalapparatuscomplieswith Canadian
ICES-O03
[Pour le modele canadiee]
Cet appereilnum_riquede laclaseaB eat conformeii
ianormeNMB-O03duCanada.
[Forcanadian model[
CAUTION:TO PREVENTELECTRICSHOCK,DO NOT
USETHIS (POLARIZED)PLUGWITH AN EXTENSION
CORD, RECEPTACLEOR OTHEROUTLETUNLESSTHE
BLADESCAN BE FULLYINSERTEDTO PREVENT
BLADEEXPOSURE.
ATTENTION:POURPREVENIRLESCHOCS
ELECTRIQUESNE PASUTILISERCETTEFICHE
POLARISEEAVECUN PROLONGATEUR,UNE PRISE
DE COURANTOU UNEAUTRESORTIEDE COURANT.
SAUFSI LEaLAMES PEUVENTETREINSEREESA
FONDSANS EN LAISSERAUCUNE PARTIEA
DECOUVERT.
This product incorporates copyright protection
technology that is protected by method claims of
certain U.S. patents and other intellectual property
rights owned by Macrovision Corporation and other
rights owners. Use of this copyright protection
technology must be authorized by Macrovision
Corporation, and is intended for home and other
limited viewing uses only unless otherwise
authorized by Macrovision Corporation. Reverse
engineering or disassembly isprohibited.
Information to User
Alterationor modificationscarriedout without
appropriateauthorizationmay invalidatethe user's
rightto operatethe equipment.
3
I/
4
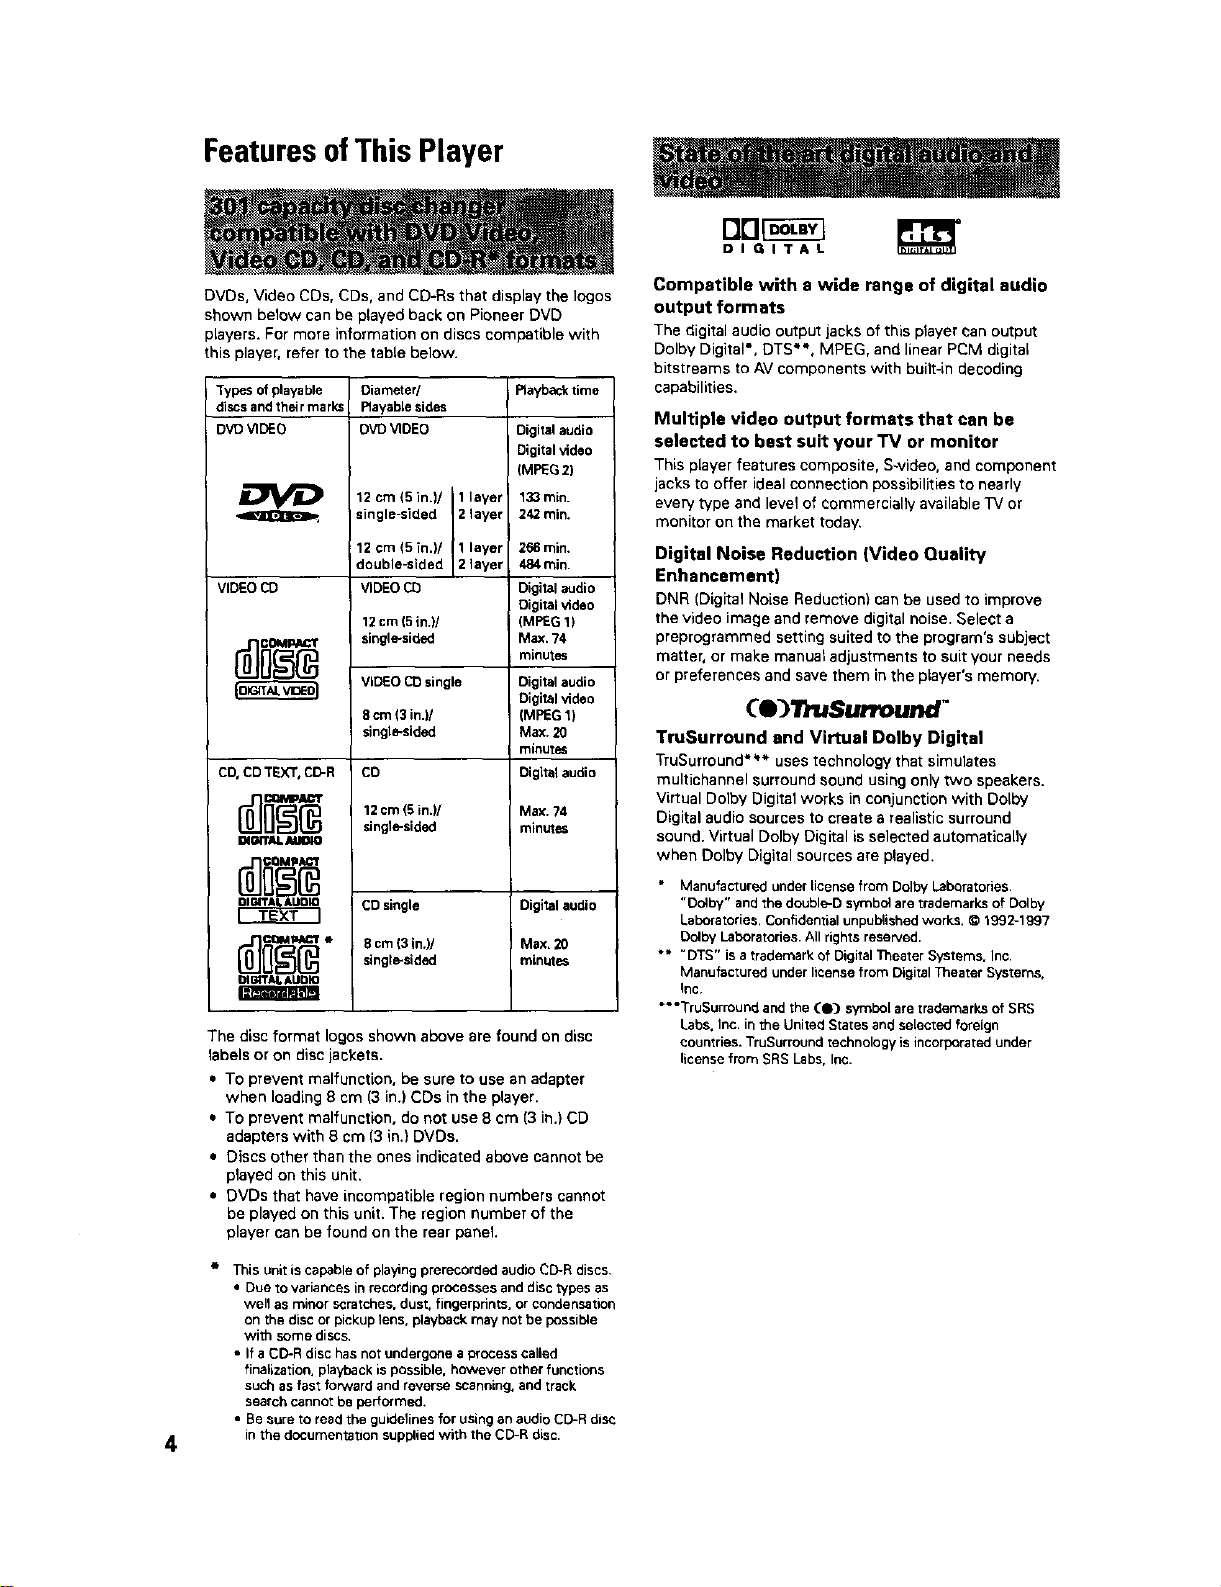
FeaturesofThis Player
DVDs, Video CDs, CDs, and CD-Rs that display the Iogos
shown below can be played back on Pioneer DVD
players. For more information on discs compatible with
this player, refer to the table below.
Types of playable
discs and their marks
DVD VIDEO
o
VIDEO CD
CD,CDTEXT,CD-R
DI_'rAL AUIIIO
Diameter/
Rayable sides
DVO VIDEO
12 cm (5 in.)/ 1 layer
single-sided 2 layer
12 cm (5 in.)/ 1 layer
double-slded 2 layer
VIDEO CD
12 cm (5 in.)/
single-sidnd
VIDEO CD single
8 crn (3 in.)/
singl_sided
CD
12 cm (g in.)/
sing16-sided
CD single
g cm(3in.)/
single-sided
Playback time
Digital audio
Digital video
(MPEG 2)
133 rain.
242 min.
266 min.
484 rain.
Digital audio
Digital video
(MPEG 1)
Max. 74
minutes
Digital audio
Digital video
(MPEG 1)
Max. 20
minutes
Digitalaudio
Max. 74
minutes
Digital audio
Max, 20
minutes
The disc format Iogos shown above are found on disc
labels or on disc jackets.
• To prevent malfunction, be sure to use an adapter
when loading 8 cm (3 in.) CDs in the player.
• To prevent malfunction, do not use 8 cm (3 in.) CD
adapters with 8 cm (3 in.) DVDs.
• Discs other than the ones indicated above cannot be
played on this unit.
• DVDs that have incompatible region numbers cannot
be played on this unit. The region number of the
player can be found on the rear panel.
Tbls unit is capable of playing prerecorded audio CD-R discs,
• Due to variances in recording processes and disc typos as
well as minor scratches, dust, fingerprints, or condensation
on the disc or pickup lens, playback may not be possible
with some discs,
• If a CD-R disc has not undergone a process called
finalization, playback is possible, however other functions
such as fast forward and reverse SCanning, and track
search cannot be performed.
• Be sure to read the guidelines for using an audio CD-R disc
in the documentation supplied with the CD-R disc.
DIGITAL
Compatible with a wide range of digital audio
output formats
The digital audio output jacks of this player can output
Dolby Digital*, DTS**. MPEG, and linear PCM digital
bitstrearns to AV components with built-in decoding
capabilities.
Multiple video output formats that can be
selected to best suit your TV or monitor
This player features composite, S-video, and component
jacks to offer ideal connection possibilities to nearly
every type and level of commercially available TV or
monitor on the market today.
Digital Noise Reduction (Video Quality
Enhancement)
DNR (Digital Noise Reduction) can be used to improve
the video image and remove digital noise. Select a
preprogrammsd setting suited to the program's subject
matter, or make manual adjustments to suit your needs
or preferences and save them in the player's memory.
Ce 3l uSurround"
TruSurround and Virtual Dolby Digital
TruSurround*** uses technology that simulates
multichannel surround sound using only two speakers.
Virtual Dolby Digital works in conjunction with Dolby
Digital audio sources to create a realistic surround
sound. Virtual Dolby Digital is selected automatically
when Dolby Digital sources are played.
• Manufactured under license from Dolby Laboratories.
"Dolby" and the double-D symbol are trademarks of Dolby
Laboratories. Confidential unpublished works. © 1992-1997
Dolby Laboratories. All rights reserved.
** "DTS" is a trademark of Digital Theater Systems. Inc,
Manufactured under license from Digital Theater Systems.
Inc.
** "TruSurround and the (0) symbol are trademarks of SRS
Labs. Inc. in the United States and selected foreign
countries. TruSurround technology is incorporated under
license from SRS Labs, Inc.
It has never been easier to manage 300 discs than with
this player's on-screen graphical control screens. Using
the player's Sub Setup screen, you can input titles and
artists for the discs loaded in the player, sort them
according to number, disc type, title, or artist, organize
them into groups, and keep the information updated
even ifyou physically reorganize the discs (page 30).
Organize all of the discs in
the rack by inputting disc
titles and artist names for
easy search and reference.
I DVO S_ MdJ_
2_:_,Ir3_mm,_+_d S.Ewa
3VC_ DIn_ Cd. VI_OUt
sco I.kul Rr_l
_W_emr_a_ I_mE_
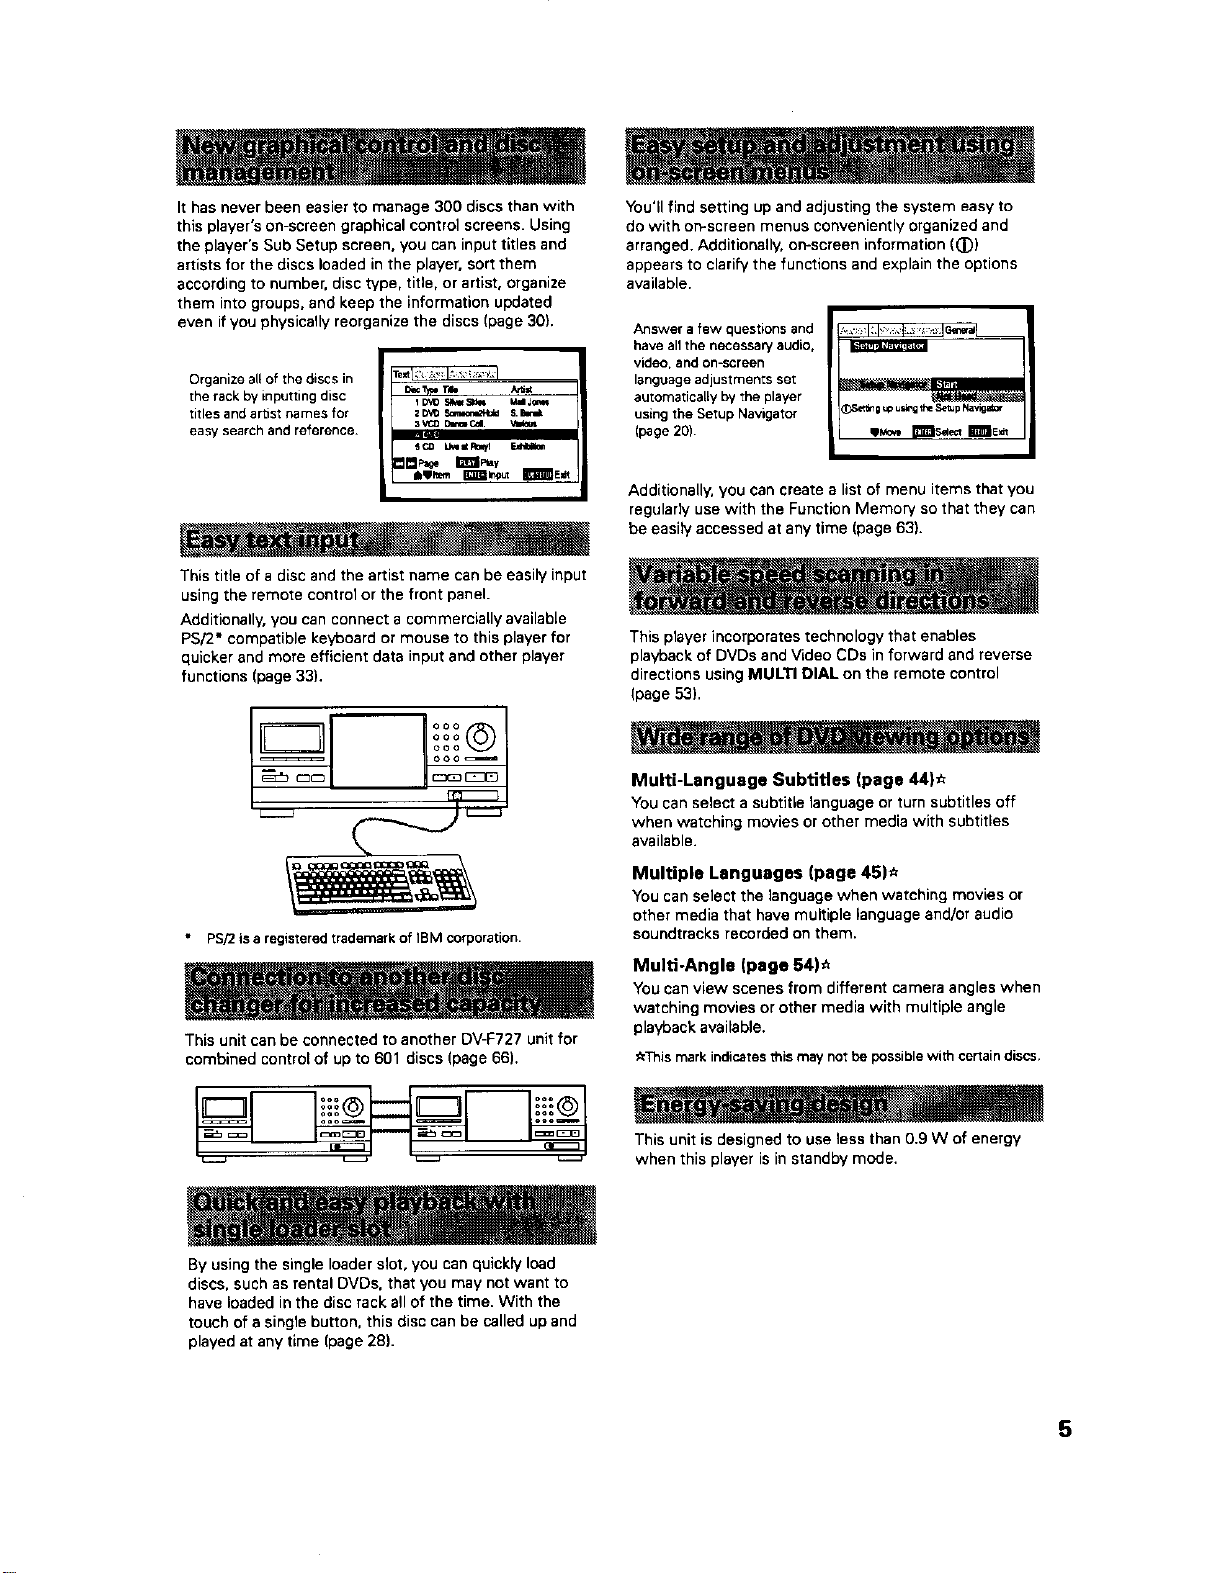
This title of a disc and the artist name can be easily input
using the remote control or the front panel.
Additionally, you can connect a commercially available
PS/2* compatible keyboard or mouse to this player for
quicker and more efficient data input and other player
functions (page 33).
PS/2isa registeredtrademark of IBM corporation.
This unit can be connected to another DV-F727 unit for
combined control of up to 601 discs (page 66).
By using the single loader slot, you can quickly load
discs, such as rental DVDs. that you may not want to
have loaded in the disc rack all of the time. With the
touch of a single button, this disc can be called up and
played at any time (page 28).
You'll find setting up and adjusting the system easy to
do with on-screen menus conveniently organized and
arranged. Additionally, on-screen information (_))
appears to elari5/the functions and explain the options
available.
Answer a few questions and
have an the necessa W audio,
video, and on-screen
language adjustments set
automatically by the player
using the Setup Navigator
(page 20).
_Set_ 0 up u_g the Setup Navig_or
Additionally, you can create a list of menu items that you
regularly use with the Function Memory so that they can
be easily accessed at any time (page 63).
This player incorporates technology that enables
playback of DVDs and VLdeo CDs in forward and reverse
directions using MULTI DIAL on the remote control
(page 53).
Multi-Language Subtitles (page 44}_
You can select a subtitle language or turn subtitles off
when watching movies or other media with subtitles
available.
Multiple Languages (page 45)_
You can select the language when watching movies or
other media that have multiple language and/or audio
soundtracks recorded on them.
Multi-Angle (page 54)_
You can view scenes from different camera angles when
watching movies or other media with multiple angle
playback available.
_This mark indicates this may nor be possible with certain discs.
This unit is designed to use less than 0.9 W of energy
when this player is in standby mode.
5
Differences in Disc
Composition
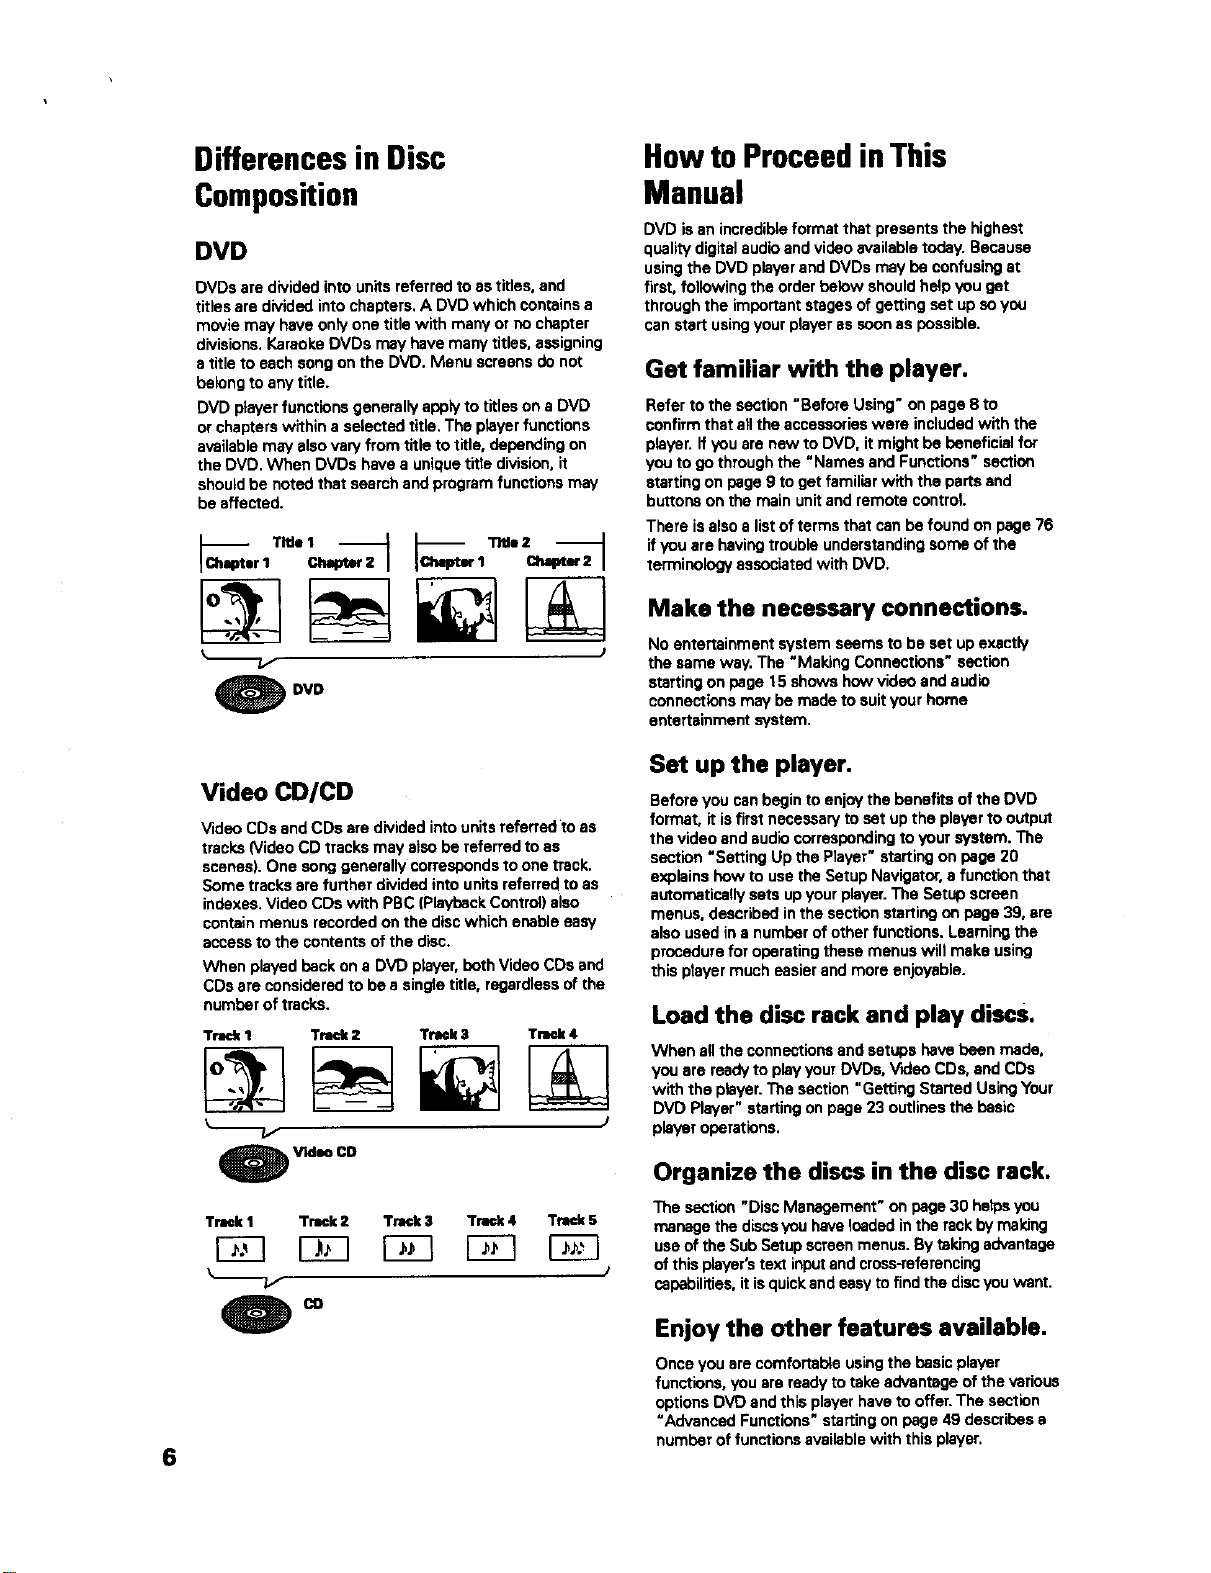
DVD
DVDs are divided into units referred to as titles, and
titles are divided into chapters. A DVD which contains a
movie may have only one title with many or no chapter
divisions. Karaoke DVDs may have many titles, assigning
s title to each song on the DVD. Menu screens do not
beleng to any title.
DVD player functions generally apply to titles on a DVD
or chapters within a selected title. The player functions
available may also vary from title to title, depending on
the DVD. When DVDs have a unique title dMsion, it
should be noted that search and program functions may
be affected.
I 1
O DVD
HowtoProceedinThis
Manual
DVD isan incredibleformat thatpresentsthe highest
qualitydigitalaudioandvideoavailabletoday.Because
usingthe DVD playerandDVDs maybe confusingst
first, following theorderbelow shouldhelpyouget
throughthe importantstagesofgettingset upsoyou
canstart usingyourplayeras soonas possible.
Get familiar with the player.
Refer to the section "Before Using" on page 8 to
confirm that all the accessories were included with the
player, if you are new to DVD, it might be beneficial for
you to go through the "Names and Functions" section
starting on page 9 to get familiar with the parts and
buttons on the main unit and remote control.
There is also a list of terms that can be found on page 76
if you are having trouble understanding soma of the
terminology associated with DVD.
Make the necessary connections.
No entertainment system seams to be set up exactly
the same way. The "Making Connections" section
starting on page 15 shows how video and audio
connections may be made to suit your home
entertainment s/stem.
6
Video CD/CD
Video CDs and CDs are divided into units referred to as
tracks (Video CD tracks may also be referred to as
scenes). One song generally corresponds to one track.
Some tracks are further divided into units referred to as
indexes. Video CDs with PBC (Playback Control) also
contain menus recorded on the disc which enable easy
access to the contents of the disc.
When played back on a DVD player, beth Video CDs and
CDs are considered to be s single title, regardless of the
number of tracks.
Track 1 Track 2 Track 3 Track 4
O Video CD
Track I Track2 Track 3 Track 4 Track 5
Set up the player.
Before you can begin to enjoy the benefits of the DVD
format, it isfirst necessary to sot up the player to output
the video and audio corresponding to your system. The
section "Setting Up the Player" staring on page 20
explains hew to use the Setup Navigator, a function that
automatically sets up your player. The Setup screen
menus, described in the section starting on page 39, are
also used in a number of other functions. Learning the
procedure for operating these menus will make using
this prayer much easier and more enjoyable.
Load the disc rack and play discs.
When all the connections and setups have been made,
you are ready to play your DVDs. V_leo CDs, and CDs
with the player. The section "Getting Started Using Your
DVD Player" starting on page 23 outlines the basic
player operations.
Organize the discs in the disc rack.
The section "Disc Management" on page 30 hetpeyou
manage the discs you have leaded in the rack by making
use of the Sub Setup screen menus. By taking advantage
of this player's text input and cross-referencing
capabilities, it is quick and easy to find the disc you want.
Enjoy the other features available.
Once you are comfortable using the basic player
functions, you are ready to take advantage of the various
options DVD and this player have to offer. The section
"Advanced Functions" starting on page 49 describes s
number of functions available with this player.

Table of Contents
Before Using ........................................ 8
Checking Accessories ..................................... 8
Prepadng the Remote Control ......................... 8
Names and Functions ......................... 9
Front Panel ...................................................... 9
Display Window ............................................. 10
Remote Control ............................................. 12
Rear Panel ..................................................... 14
Making Connections ......................... 15
Connecting Your DVD Player ......................... 15
Audio Connections ........................................ 17
Video Connections ......................................... 18
CD-Deck Synchro Connections ..................... 19
System Control Connections ......................... 19
Setting Up the Player ....................... 20
Using the Setup Navigator ............................. 20
Getting Started Using Your DVD
Player .................................................. 23
Loading DVDs, Video CDs and CDs
into the Player .......................................... 23
Playing DVDs, Video CDs and CDs ........... _... 24
Chapter (Track)Skip Forward/Skip Back ........ 27
Forward and Reverse Scanning ..................... 27
Playing a Disc That Is Not Loaded in the Rack
(Singte Loader Play).................................. 28
Stopping Playback and Switching Power Off .. 29
Disc Management ............................. 30
Registering Information and Inputting Text
for Discs Newly Loaded in the Player ...._30
Keeping the Disc Order and Information
Updated ................................................... 31
Inputting and Changing Text Information ......31
Selecting a Disc On-Screen ........................... 35
Searching for a Disc, ntle, Chapter, Track, or
Location on a Disc .................................... 35
Creating and Selecting Custom Files ............. 37
Adjusting Audio and Video
Settings .............................................. 39
Using the Setup Screen Menus .................... 39
Changing to the Setup Screen "Expert"
Menu Mode ............................................. 40
Setting the Digital Audio Output To Be
Compatible with Your AV Component ...... 41
Turning the Digital Output On and Off ........... 42
Adjusting the OSD (On-Screen Display) ........ 42
Setting the TV Screen Size ............................ 43
Setting the Language Options ......... 44
Selecting a Subtitle Language
(Multi-Language Subtitles) ....................... 44
Changing the Audio Language
(M ulti-Language Function) ....................... 45
Setting Language and Subtitle Preferences
in the Setup Screen Menus ..................... 46
Advanced Functions ......................... 49
Getting Surround Sound from
Stereo Speakers ....................................... 49
Adjusting the Dynamic Range of the
Audio Soundtrack ..................................... 49
Adjusting the Video Quality
(Digital Noise Reduction) .......................... 50
Still Frame/Slow Play/Frame
Advance Playback .................................... 52
Scanning in Forward and Reverse
Directions at Different Speeds ................. 53
Viewing from a Desired Camera Angle
(Multi-Angle) ............................................. 54
Repeat Play .................................................... 55
Random Play .................................................. 56
Playbackin a Desired Order (Program Play) .... 57
To make an ongoing program of your favorite
titles, chapters and tracks (Best play) ...... 59
Reviewing Previously Played Discs
(Previous Scan) ........................................ 60
Previewing Discs in the Current Play Mode
(Hi-Lite Scan) ............................................ 60
Continuing Playback from a Specified
Location (Last Memory) ........................... 61
Memorizing Settings for Often Viewed
DVDs (Condition Memory) ....................... 62
Memorizing Regularly Used Menu Settings
(Function Memow) ................................... 63
Viewing Disc Information .............................. 64
Connecting to Another Player for Control
of 601 Discs ............................................. 66
Utilizing the Audio-video Output of
Another AV Component ........................... 68
Selecting External Input ................................. 68
Setting the Parental Lock Level ..................... 69
Turning the Screen Saver On and Off ............ 70
Changing the Background Color
of the Screen ............................................ 70
Additional Information ..................... 71
Disc Care ....................................................... 71
For Proper and Long Use of This Unit ........... 72
Language Code List ....................................... 73
Troubleshooting ............................................. 74
Resetting the Player to System Settings ....... 75
Terms ............................................................. 76
Specifications ................................................ 78
7
Preparingthe RemoteControl
Inserting batteries into the remote
control
CheckingAccessories
Please confirm that the following were received with the
ptayer.
Audio cord
Video cord
Master-Slave control cord
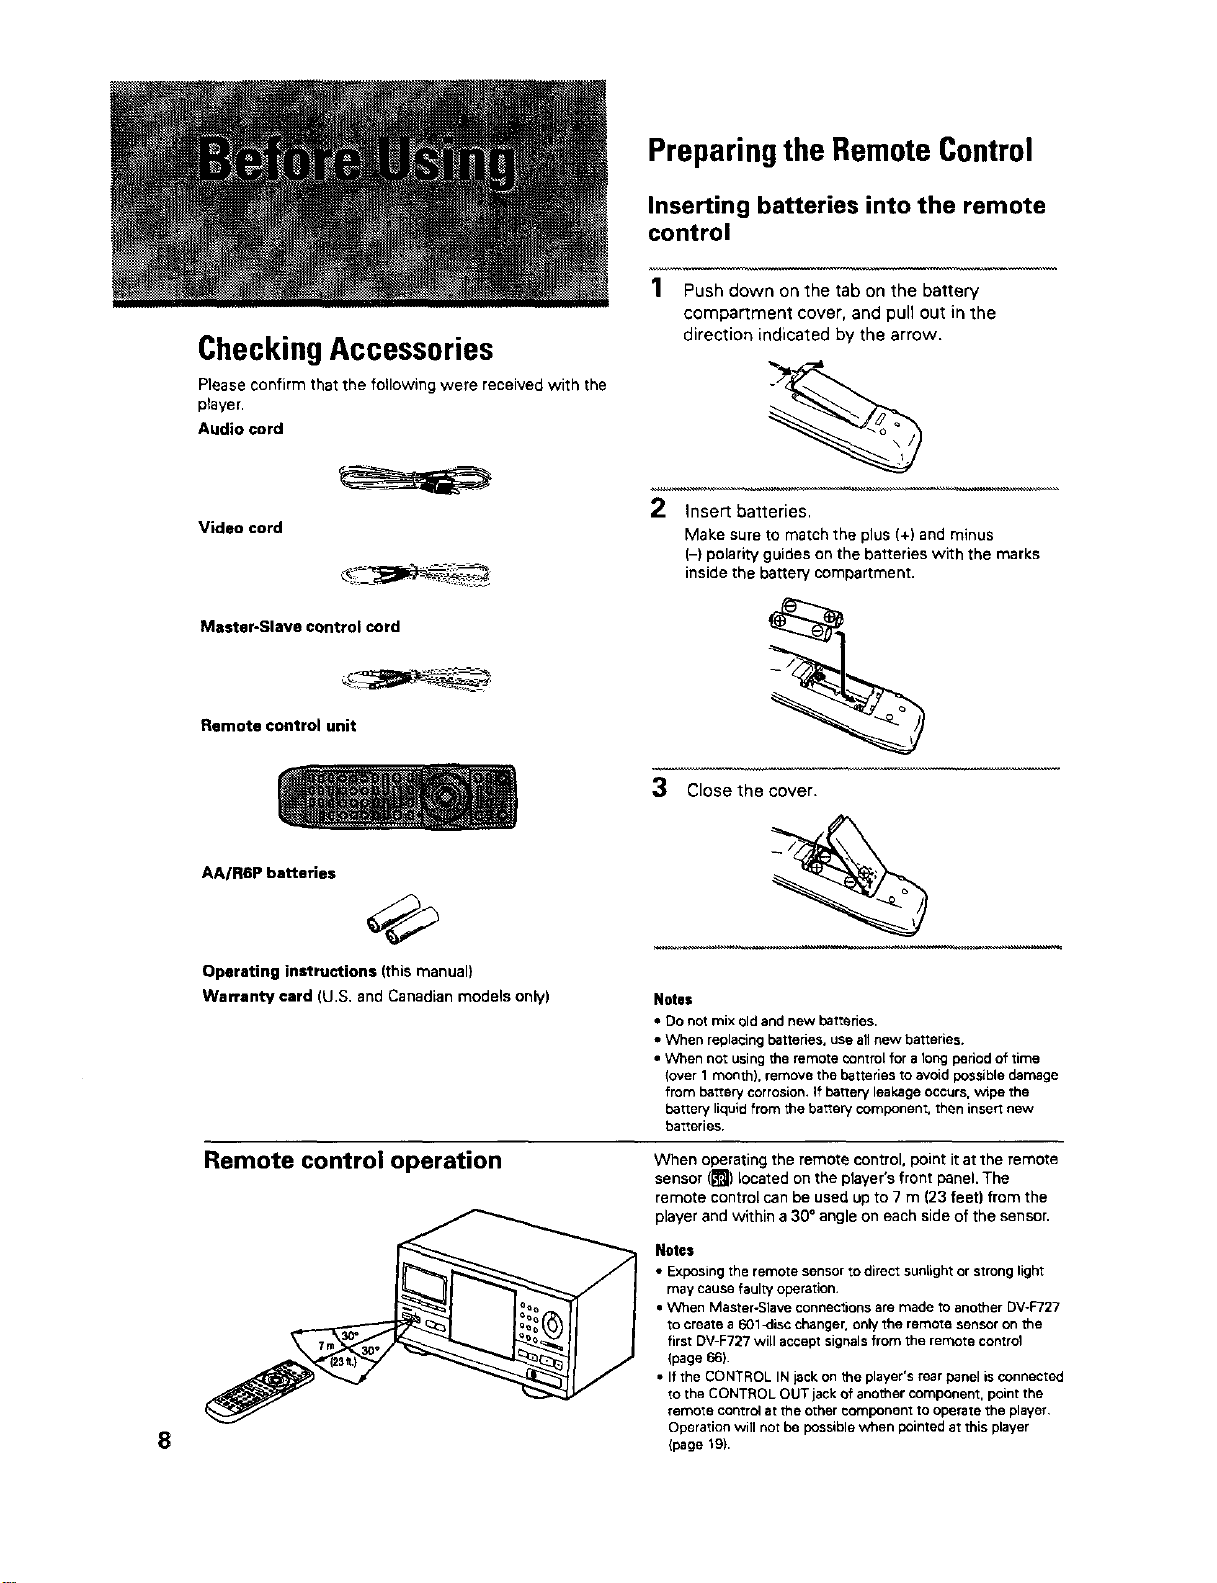
1 Push down on the tab on the battery
compartment cover, and pull out in the
direction indicated by the arrow.
2 insert batteries.
Make sure to match the plus (+) and minus
(-) polarity guides on the batteries with the marks
inside the battery compartment.
Remote control unit
3 Close the cover.
8
AA/R6P batteries
Operating instructions (this manual)
Warranty card (U,S, and Canadian models only) Notes
• Do not mix old and new batteries.
• When replacing battedes, use all new batteries.
• When nor using the remote _ontrol for a long period of time
(over 1 month), remove the batteries to avoid possible damage
from battery corrosion, If batten/leakage occurs, wipe the
batten/liquid from the battery component, then insert new
batteries,
Remote control operation
When operating the remote control, point itat the remote
sensor ([]) located on the player's front panel. The
remote control can be used up to 7 m (23 feet) from the
player and within a 30° angle on each side of the sensor.
Notes
• Exposing the remote sensor to direct sunlight or strong light
may cause fault,/operation.
• When Master-Slave connections are made to another DV-F727
to create a 601_isc changer, only the remote sensor on the
first DV-F727 will accept signals from the remote control
(page 66).
• If the CONTROL IN jack on the player's rear panel is connected
to the CONTROL OUT jack of another component, point the
remote control at the other component to operate the player,
Operation will not be possible when pointed at this player
(page 19).
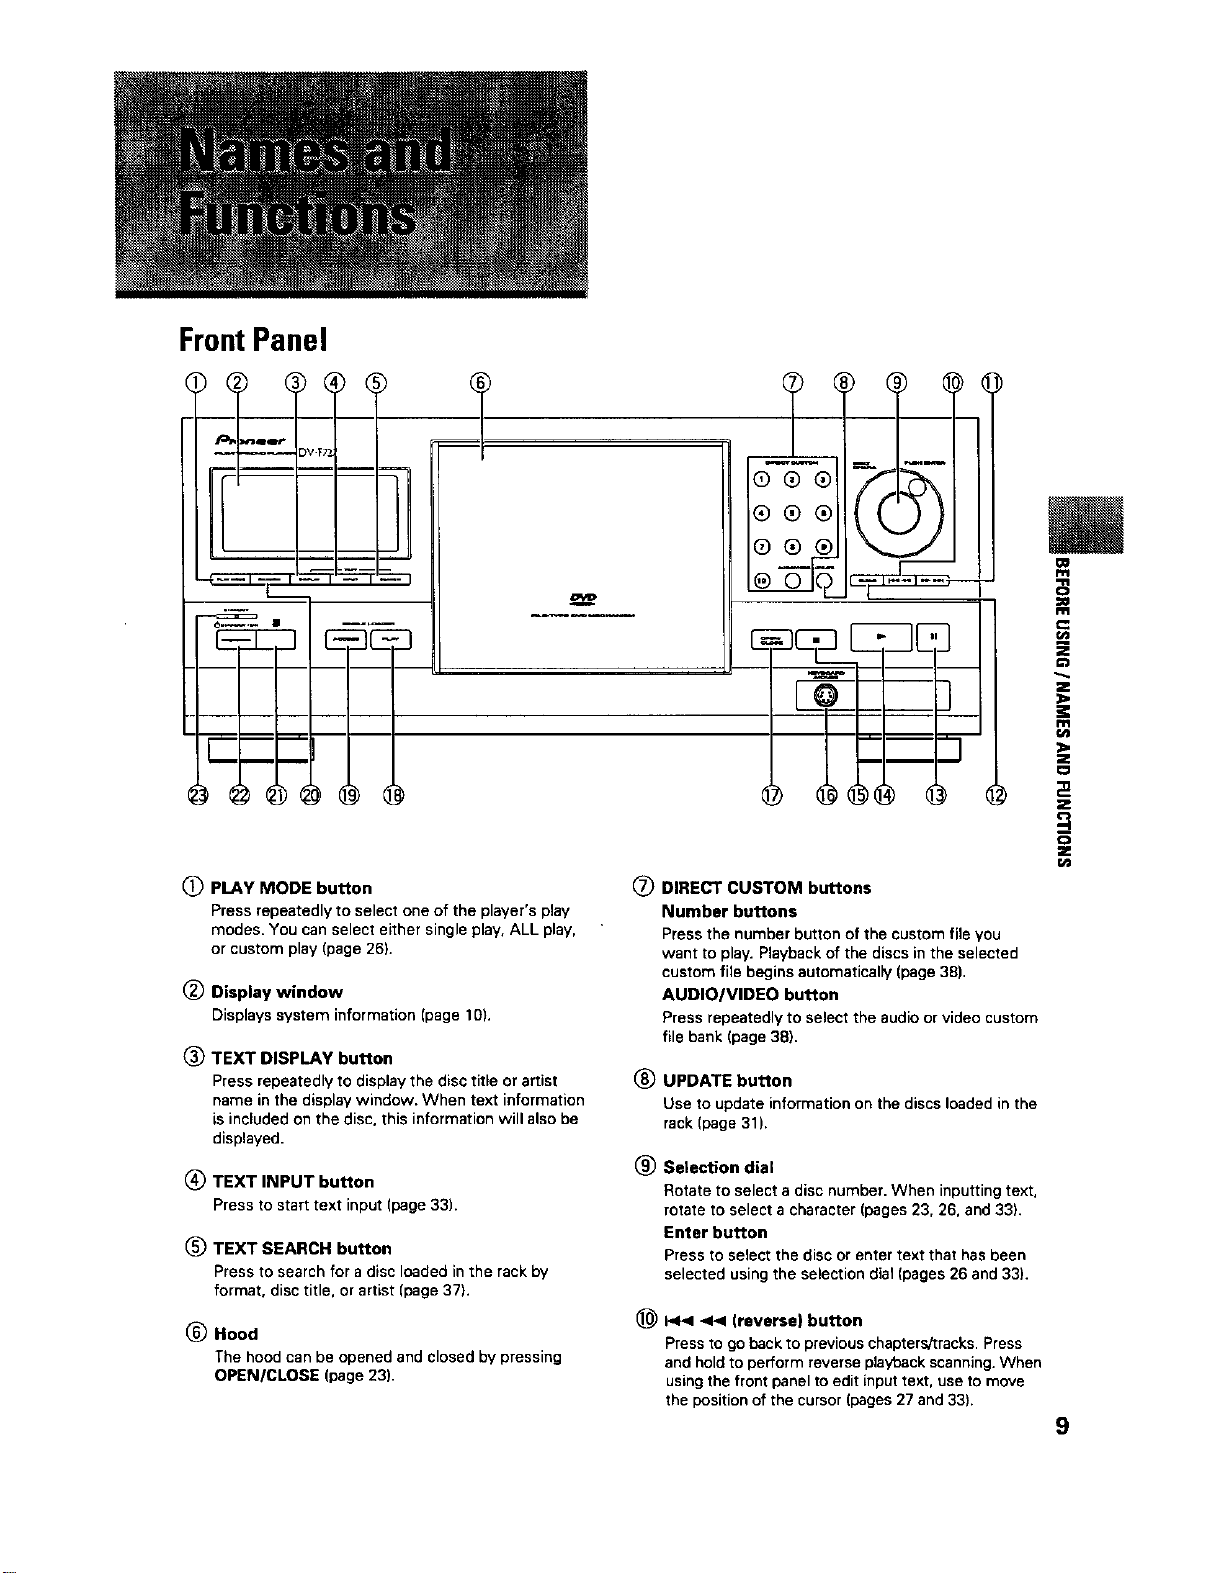
FrontPanel
(_) PLAY MODE button
Press repeatedly to select one of the player's play
modes. You can select either single play, ALL play,
or custom play (page 26).
(_) Display window
Displayssysteminformation(page10).
TEXT DISPLAY button
Press repeatedly to display the disc title or artist
name in the display window. When text information
is included on the disc, this information will also be
displayed.
(_) TEXT INPUT button
Press to start text input(page33).
(_ TEXT SEARCH button
Press to search for a disc loaded in the rack by
format, disc title, or artist (page 371.
(_ Hood
The hood can be opened and closed by pressing
OPEN/CLOSE (page 23).
(_ DIRECT CUSTOM buttons
Number buttons
Press the number button of the custom fila you
want to play. Playback of the discs in the selected
custom file begins automatically (page 38),
AUDIO/VIDEO button
Press repeatedly to select the audio or video custom
file bank (page 381,
_) UPDATE button
Use to update information on the discs loaded in the
rack (page 31).
® Selection dial
Rotate to select a disc number. When inputting text,
rotate to select a character (pages 23, 26, and 33).
Enter button
Press to select the disc or enter text that has been
selected using the selection dial (pages 26 and 33).
<< (reverse) button
Press to go back to previous chapters/tracks. Press
and hold to perform reverse playback scanning. When
usingthe front panel to edit input text, use to move
the position of the cursor (pages 27 and 33).
;£
9
_) _ _ (forward) button
Press to advance to chapters/tracks. Press and hold
to perform fast-forward scanning. When usingthe
frontpanel to edit inputtext, useto move the pa_tion of
the cursor (pages 27 and 33).
CLEAR button
Useto cance]repeatendrandomplayback,edit
programs,andcleartext entries(pages33, 55, 56, 58,
and62).
(_. (pause) button
Press during playback to pause. Press again to
continue playback (page 52).
_) _- (play) button
Pressto start discplayback(pages24 and 29).
(_ • (stop) button
Pressto stopplayback(page29).
(_ KEYBOARD/MOUSE connection jack
A PSi2compatiblekeyboardor mousecanbe
connectedtothisjackforeasyentryandeditingof
text information(pages33and34).
(_ OPENICLOSE button
Pressto open andclosethe hood(pages23 and24).
(_ SINGLE LOADER PLAY button
Press to play the disc loaded in the single loader slot.
This button can be used at any time, even if another
disc is being played (page 28).
(_ SINGLE LOADER ACCESS button
Pressto havethe hoodopenandthe singleloader
slotbroughttothe frontposition(page28).
_) RANDOM button
Pressto startrandom playback(page56).
_) Remote sensor
Point the remote control toward the remote sensor
to operate the player (page 8).
(_ STANDBY/ON button
Press to switch the player on or to put in standby
(pages 20, 23, 29, and 75L
1_ STANDBY indicator
Indicates that the player is in standby, using e
minimum amount of power to maintain system
settings,
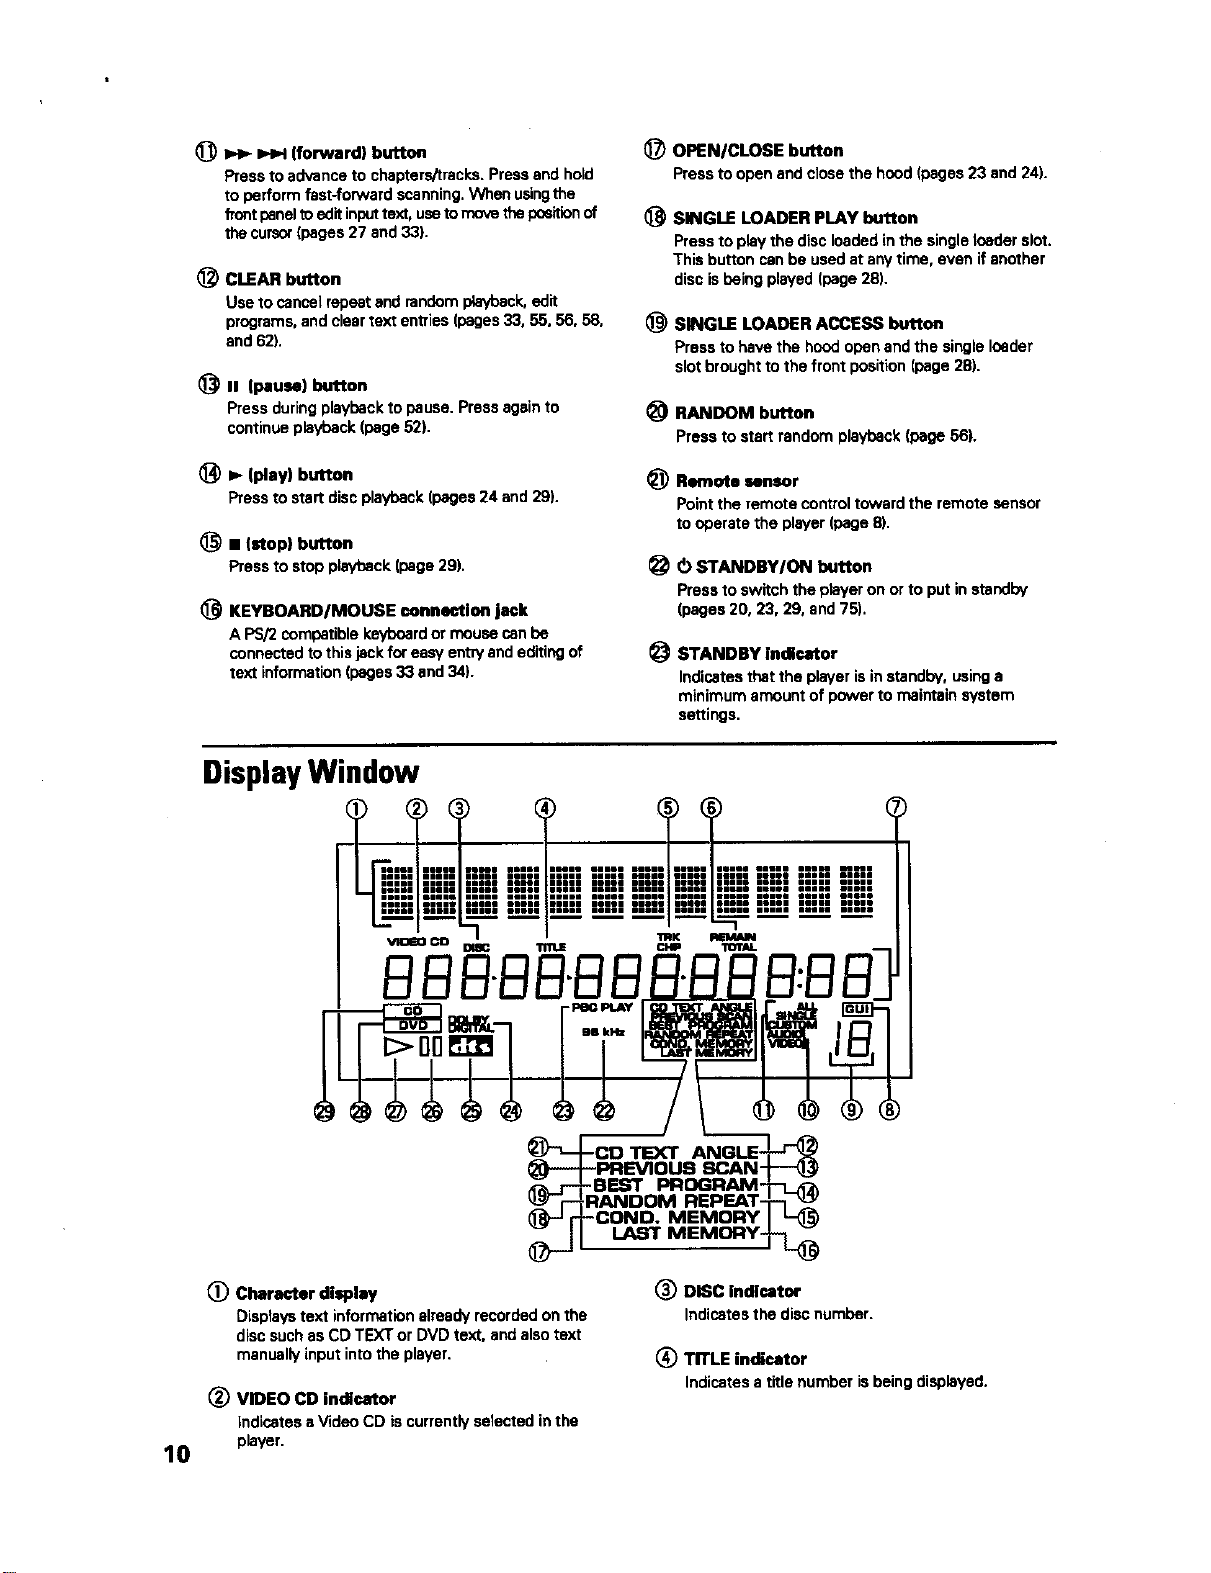
DisplayWindow
LA51
10
(_ Character display
Displaystext informationalreadyrecordedonthe
discsuchas COTEXTor DVDtext. andalsotext
manually inputintothe player.
(_ VIDEO CD indicator
Indicates aVideo CD is currently selected in the
player.
(_ DISC Indicator
Indicatesthe discnumber.
(_ TITLE indicator
Indicatesa titlenumberisbeingdisplayed.
(_) TRK and CliP indicators
Indicates a chapter or track number is being
displayed,
(_) REMAIN and TOTAL Indicators
REMAIN indicates the remaining playback time of a
title or chapter/track is being dLeplayed.TOTAL
indicates the disc in the player is stopped and
DISPLAY has been pressed (page 65).
(_) Counter display
Displays title and chapter/track numbers, playback
time, etc.
(_) GUI Indicator
Indicatesanon-screenmenu operationisbeing
performed,
Custom file indicator
Indicatesthe numberofthe currentlyselected
customaudioorvideofile (pages26 and38).
(_ AUDIO and VIDEO indicators
Duringcustomplay,indicatewhether the current
customfileisan audio(CD)orvideo (DVDorV'ideo
CD) customfile(pages26 and38).
1_) ALL, SINGLE, and CUSTOM indicators
Indicatesthe currentplaymode (page26).
ANGLE indicator
indicates Multi-Angle playback is in progress
(page 54).
SCAN indicator
IndicatesaHi-Litescan isbeingperformed[page
60).
PROGRAM indicator
Indicatesprogramplaybackisbeingperformed(page
57).
REPEAT indicator
Indicatesrepeatplaybackis being performed (page
55).
LAST MEMORY indicator
Indicates the Last Memory location is registered in
memory for the DVD currently playing (page 61).
COND. MEMORY indicator
Indicates Condition Memory settings are memorized
for the DVD currently playing (page 62),
RANDOM indicator
Indicates randomplaybackisbeingperformed(page
56).
BEST indicator
IndicatesBest playisbeingperformed(page59).
PREVIOUS SCAN indicator
IndicatesPreviousscanisbeing performed (page
60).
(_) CD TEXT indicator
Indicates the CD is recorded with CD TEXT
information. When a DVD recorded with text is
encountered, only the TEXT indicator lights.
96 kHz indicator
Indicates the DVD currently playing contains an
audio signei with a sempiing frequency of 96 kHz.
PBC PLAY indicator
Indicates PBC (pisVoack control) playback of s Video
CD.
_) DOLBY DIGITAL indicator
IndicatesDolbyDigitalaudioplayback.
DTS Indicator
IndicatesDTSaudioplayback.
00(pause) indicator
indicatesplaybackispaused.
_>(play) indicator
Indicatesa discisplaying.
DVD indicator
IndicatesaDVD iscurrentlyselectedinthe player.
CD indicator
Indicatess CD iscurrentlyselacted inthe player.
i
ca
m,
w
11
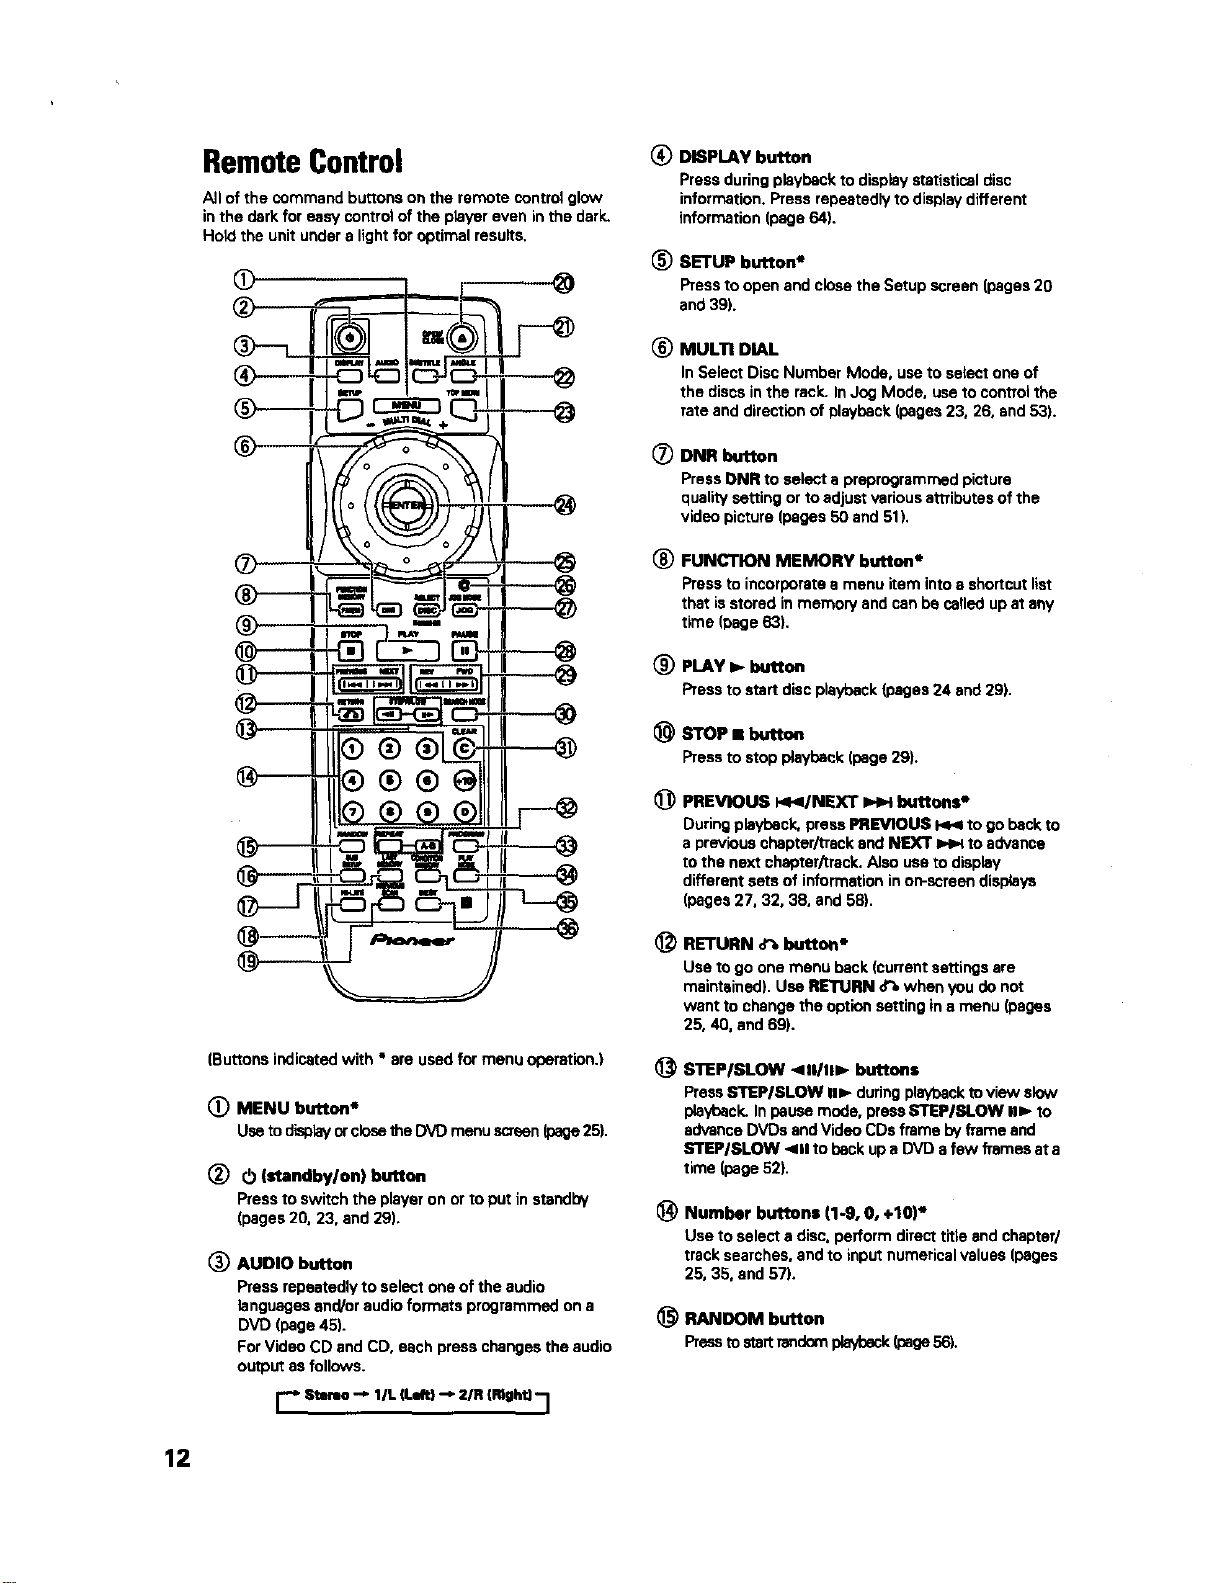
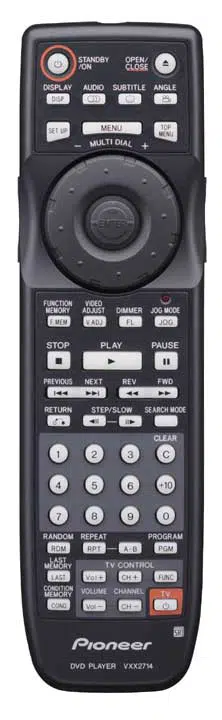
RemoteControl
All of the command buttons on the remote control glow
in the dark for easy control of the player even inthe dark,
Hold the unit under a light for optimal results.
®
(Buttons indicated with * are used for menu operation.)
O
®
®
MENU button*
UseTOdisplayorcloeatheDVDmenuscrean(dage25).
0 (standby/on) button
Pressto switchthe playeron orto put in standby
(pages20. 23, and29).
AUDIO button
Press repeatedly to select one of the audio
languages and/or audio formats programmed on a
DVD (page 45).
For Video CD and CO, each press changes the audio
output as follows.
r-. Sterea-,,, t/L (Ldtl -=,2/R (lUght)--j
(_ DISPLAY button
Press during playback to display statistical disc
information. Press repeatedly to display different
information (page 64).
(_) SETUP button*
Press to open and close the Setup screen (pages 20
and 39).
®
MULTI DIAL
In Select Disc Number Mode, use to select one of
the discs in the rack. In Jog Mode, use to control the
rate and direction of playback (pages 23, 26, and 53).
® DNR button
Press DNR to select a preprogrammed picture
quality setting or to adjust various attributes of the
video picture (pages 50 and 51).
® FUNCTION MEMORY button*
Pressto incorporates menu item intoashortcutlist
that isstoredinmemory andcanbe cafledupat any
time (page63).
® PLAY I_ button
Pressto startdiscplayback(pages24 and29).
S'roP II button
Press to stop playback (page 29).
_) PREVIOUS _I4/NEXT HH buttons*
During playback, press PREVIOUS _ to 9o back to
a previous chaptor/_tTackend NID('r 1_4 to advance
to the next chapter/_rack. Also use to display
different sets of information in on-scraen displays
(pages 27, 32, 38, and 58).
_) RETURN o% button*
Use to go one menu back (current settings are
maintained). Use RETURN o%when you do not
want to change the option setting in a menu (pages
25, 40, and 69).
(_ S'nEP/SLOW <11/111_ buttons
Press STEPISLOW II1_ during playback to view slow
playback. In pause mode, pressSTEPISLOW #a, to
advance DVDs and Video CDs frame by frame and
STEPISLOW <111to back up a DVD afew fTamea at a
time (page 52).
_) Number buttons (1-9, 0, +10)*
Usetoselecta disc.performdirecttitle andchapter/
tracksearches,andto inputnumericalvalues(pages
25, 35, and 57).
(_ RANDOM button
Preeatostattrandomplayback(page56).
12
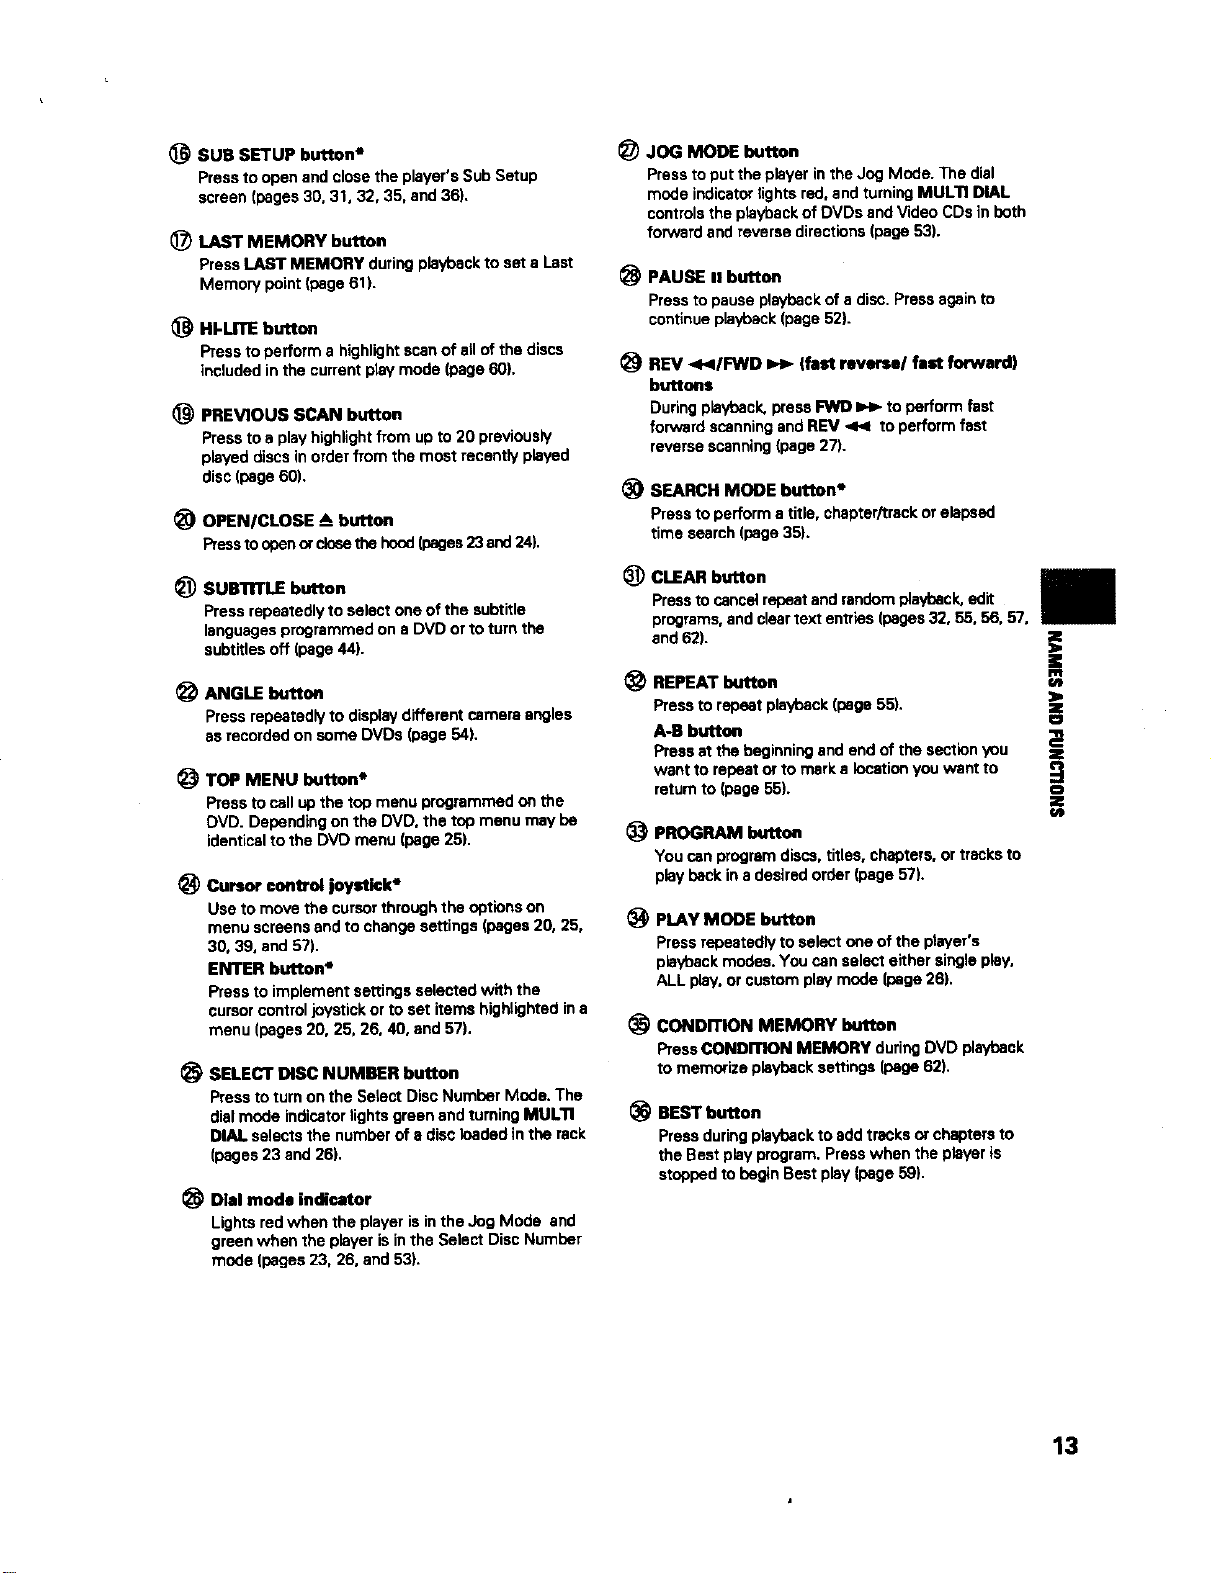
(_ SUB SETUP button*
Pressto openand closethe player'sSubSetup
screen(pages30, 31, 32, 35. and36).
(_) LAST MEMORY button
Press LAST MEMORY during playback to set a Last
Memory point (page 61).
(_ HI-UTE button
Press to perform a highlight scan of all of the discs
included in the current play mode (page 60).
PREVIOUS SCAN button
Press to a play highlight from up to 20 previously
played discs in order from the most recently played
disc (page 60).
_) OPENICLOSE A button
Presstoobenorclosethehood(pages23and24).
_) JOG MODE button
Press to put the player in the Jog Mode. The dial
mode indicator lights red, and turning MULTI DIAL
controls the playback of DVDs and Video CDs in both
forward and reverse directions (page 53).
PAUSE II button
Press to pause playback of a disc. Press again to
continue playback (page 52).
REV 4</FWD _ (fast reverse/fast forward)
buttons
Duringplayback,pressFWD _ toperformfast
forwardscanningandREV <4 toperformfast
reversescanning(page27).
_) SEARCH MODE button*
Press to perform a title, chapter,_rack or elapsed
time search (page 35).
_) CLEAR button
_) SUB'nrTLE button
Press repeatedly to select one of the subtitle Press to cancel repeat and random playback, edit
languages programmed on a DVD or to turn the programs, and clear text envies (pages 32, 55, 56, 57,
subtitles off (page 44). and 62). E
(_ ANGLE button (_ REPEAT button
Press repeatedly to display different camera angles Press to repeat playback (page 55).
as recorded on some DVDs (page 54). A-B button
Press at the beginning and end of the section you
TOP MENU button* want to repeat or to mark s location you want to
return to (page 55). o
Press to call up the top menu programmed on the
DVD. Depending on the DVD, the top menu may be
identical to the DVD menu (page 25).
Cursor control joystick*
Usetomovethe cursorthroughthe optionson
menuscreensand tochangesettings(pages20, 25,
30, 39, and 57).
ENTER button*
Pressto implementsettingsselectedwith the
cursorcontroljoystickor toset itemshighlightedina
menu (pages20, 25, 26, 40, and 57).
SELECT DISC NUMBER button
Pressto turnonthe SelectDiscNumberMode. The
dialmode indicatorlightsgreenand turningMULl1
DIALselectsthe numberofa discloadedinthe rack
(pages23 and26).
Dial mode indicator
Lightsredwhen the player isinthe JogMode and
greenwhen the player isinthe SelectDiscNumber
mode (pages23. 26, and53).
PROGRAM
You canprogramdiscs,titles, chapters,ortracksto
playbackin adesiredorder(page57).
=E
Gt
(_ PLAY MODE button
Press repeatedly to select one of the player's
playback modes. You can select either single play,
ALL play, or custom play mode (page 26),
CONDITION MEMORY button
PressCONDITION MEMORY duringDVDplayback
to memorizeplaybacksettings(page62).
® BESTbutton
Pressduringplaybackto add tracksor chaptersto
the Bestplayprogram. Presswhen theplayer is
stoppedtobeginBest play(page59).
13
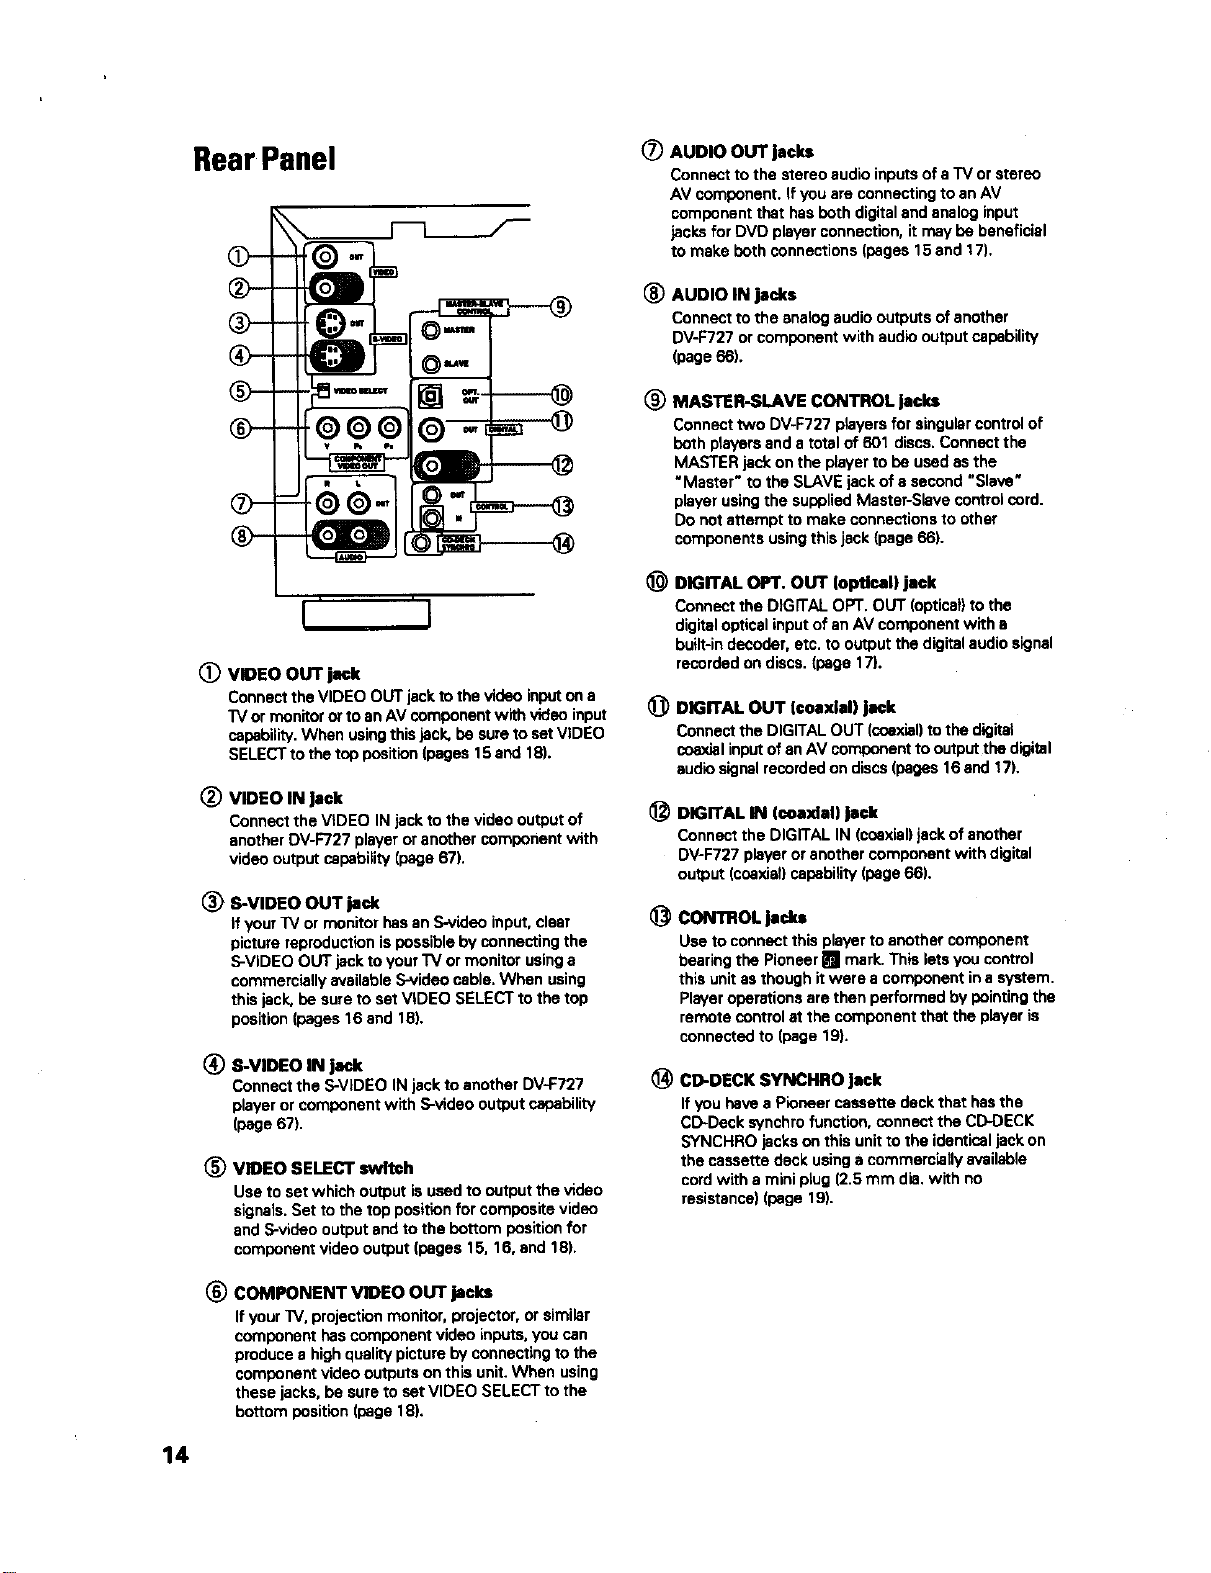
RearPanel
O-
J' '1
(_) VIDEO OUT jack
ConnecttheVIDEO OUTjacktothevideoinputona
"IVormonitororto anAV componentwith videoinput
capability.When usingthisjack,be suretosetVIDEO
SELECTto thetop position(pages15and 18).
VIDEO IN Jack
Connectthe VIDEO IN jacktothe videooutputof
anotherDV-F727playeroranothercomponentwith
video outputcapability [page67).
(_ S-VIDEO OUT jack
If your TV or monitor has an S-video input, clear
picture reproduction is possible by connecting the
S-VIDEO OUT jack to your'IV or monitor using a
commercially available S-video cable. When using
this jack, be sure to set VIDEO SELECT to the top
position (pages 16 and 16).
® S-VIDEO IN jack
Connect the S-VIDEO IN jack to another DV-F727
player or component with S-video output capability
(page 67).
VIDEO SELECT switch
Use to set which output is used to output the video
signais. Set to the top position for composite video
and S-video output and to the bottom position for
component video output (pages 15, 16, end 18).
(_ AUDIO OUT jacks
Connect to the stereo audio inputs of a "iV or stereo
AV component, if you are connecting to an AV
component that has both digital and analog input
jacks for DVD player connection, it may be beneficial
to make beth connections (pages 15 and 17).
(_ AUDIO IN jacks
Connecttothe analogaudiooutputsofanother
DV-F727orcomponentwith audiooutputcapability
(page66).
(_) MAS'nER-SLAVE CONTROL jacks
Connect two DV-F727 players for singular control of
both players and a total of 601 discs. Connect the
MASTER jack on the player to be used as the
"Master" to the SLAVE jack of s second "Slave"
player using the supplied Master-Slave control cord.
Do net attempt to make connections to other
components using this jack (page 66).
DIGITAL OPT, OUT loptloal) jack
Connect the D(GITAL OPT. OUT (optical) to the
digital optical input of an AV component with a
built-in decoder, etc. to output the digital audio signal
recorded on discs. (page 17).
DIGITAL OUT [coaxial) jack
Connect the DIGITAL OUT (coaxial) to the digital
coaxial input of an AV component to output the digital
audio signal recorded on discs (pages 16 and 17).
_) DIGITAL IN (coaxial) Jack
Connect the DIGITAL IN (coaxial) jack of another
DV-F727 player or another component with digital
output (coaxial) capability (page 66)+
CONTROLjad_
Use to connect this player to another component
bearing the Pioneer _ mark. This lets you control
this unit as though it were a component in a system.
Player operations are then performed by pointing the
remote control st the component that the player is
connected to (page 19).
@CD-DECK SYNCHRO Jack
If you have a Pioneer cassette deck that has the
CD-Dack svnchro function, connect the CD-DECK
SYNCHRO jacks on this unit to the identical jack on
the cassette deck usinga commercially available
cord with a mini ptug (2.5 mm die. with no
resistance) (page 19).
(_ COMPONENT VIDEO OUT jacks
If your "W,projection monitor, projector, or similar
component has component video inputs, you can
produce a high quality picture by connecting to the
component video outputs on thla unit. When using
these jacks, be sure to set VIDEO SELECT to the
bottom position (page 18).
14
ConnectingYourDVDPlayer
Unlike any other audiovisual media format, DVD offers a
wide array of audio and video output options which
allows playback to be enjoyed in any number of system
configurations from a standard TV with stereo audio
input to a home theater system with a projection
monitor and full surround sound capabilities.
Connecting two DV-F727 players?
If you have chosen to purchase two DV-F727 players for
combined control of up to 601 discs, make connections
to the player to be used as the Master player following
the procedures in this section. When connections are
complete, refer to page 66 for a description of how to
connect the Slave player.
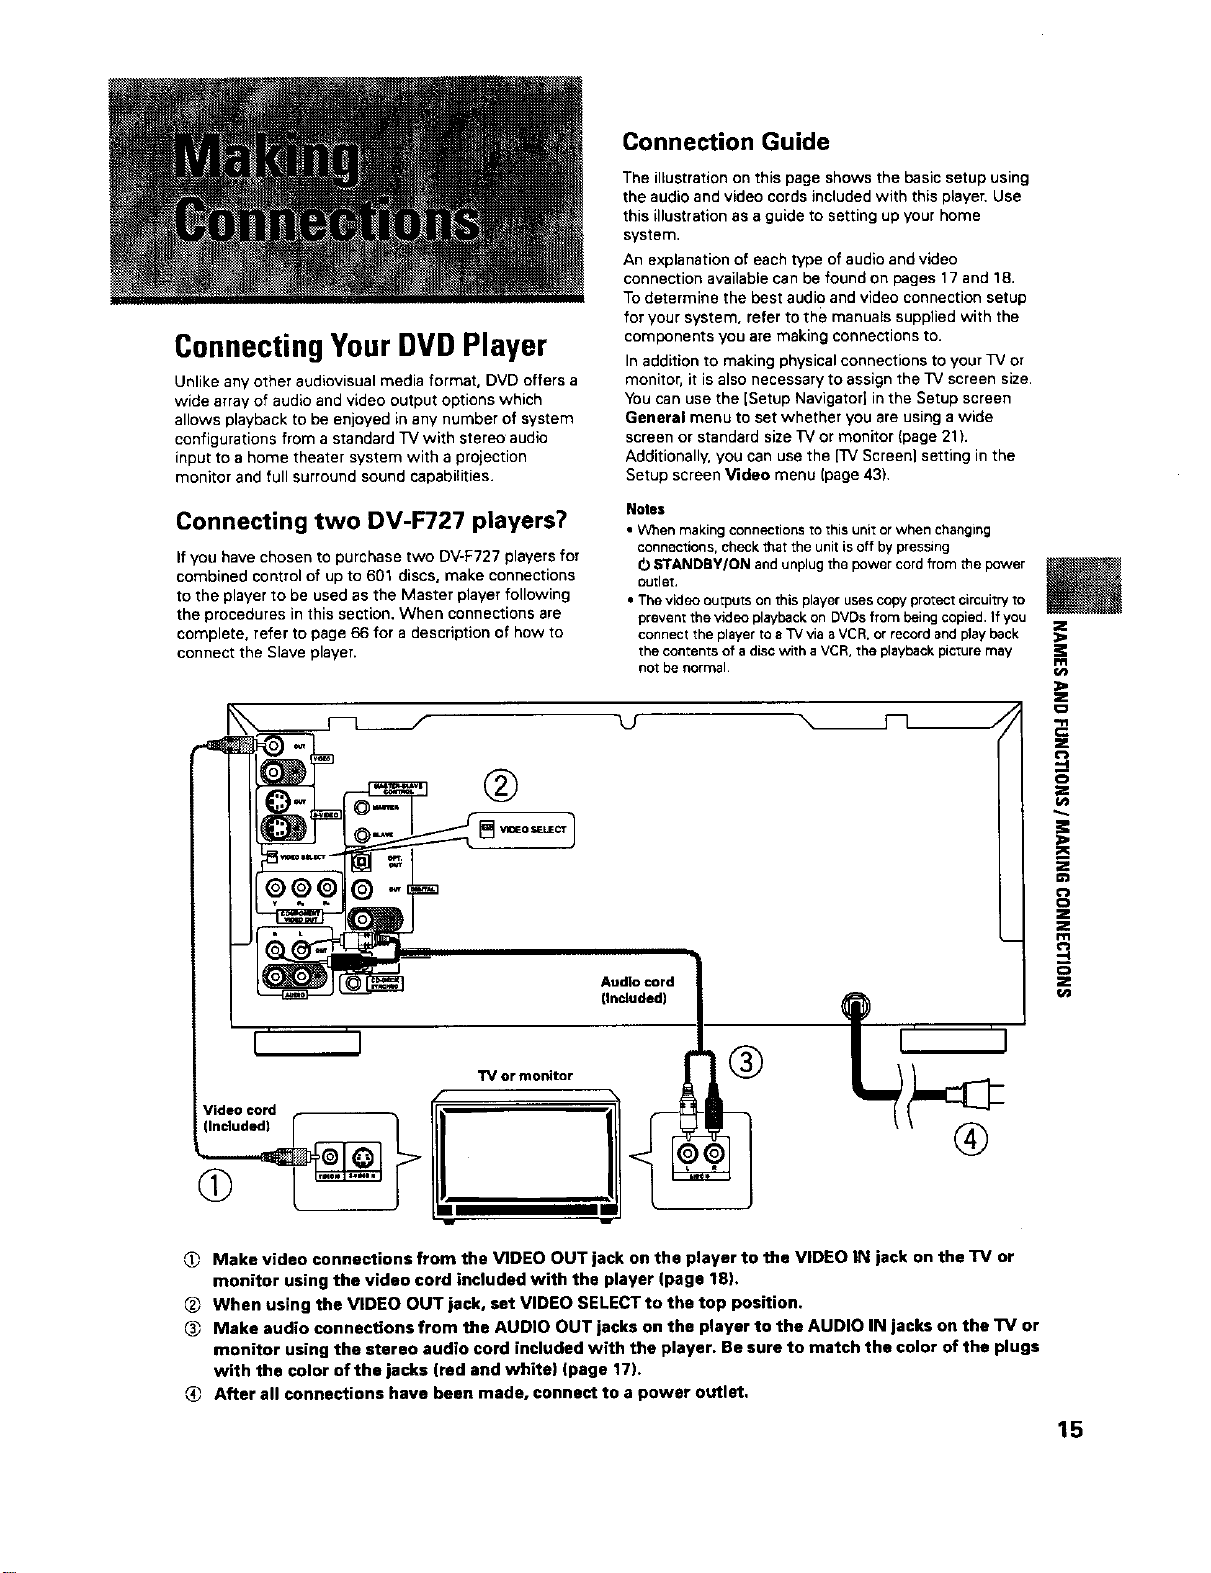
Connection Guide
The illustration on this page shows the basic setup using
the audio and video cords included with this player. Use
this illustration as a guide to setting up your home
system.
An explanation of each type of audio and video
connection available can be found on pages 17 and 18.
To determine the best audio and video connection setup
for your system, refer to the manuals supplied with the
components you are making connections to.
In addition to making physical connections to your TV or
monitor, it is also necessary to assign the TV screen size,
You can use the (Setup NavigatorJ in the Setup screen
General menu to set whether you are using a wide
screen or standard size TV or monitor (page 21).
Additionally, you can use the _ Screeni setting in the
Setup screen Video menu (page 43).
Notes
• When making connections to this unit or when changing
connections, check that the unit is off by pressang
O STANDBY/ON and unplug the power cord from the power
outlet,
• The video outputs on this player uses copy protect circuitry to
prevent the video playback on DVDs from being copied. If you
connect the player to a TV via a VCR, or record and I_ay back
the contents of a disc with a VCR, the playback picture may
not be normal
©@
Audio cord
(Included)
m
==
.=
'-4
z
¢n
TV or monitor
Video cord
(9
®
Make video connections from the VIDEO OUT jack on the player to the VIDEO IN jack on the TV or
monitor using the video cord included with the player (page 18),
When using the VIDEO OUT jack, set VIDEO SELECT to the top position.
Make audio connections from the AUDIO OUT jacks on the player to the AUDIO IN jacks on the TV or
monitor using the stereo audio cord included with the player. Be sure to match the color of the plugs
with the color of the jacks (red and white) (page 17),
After all connections have been made, connect to a power outlet,
15
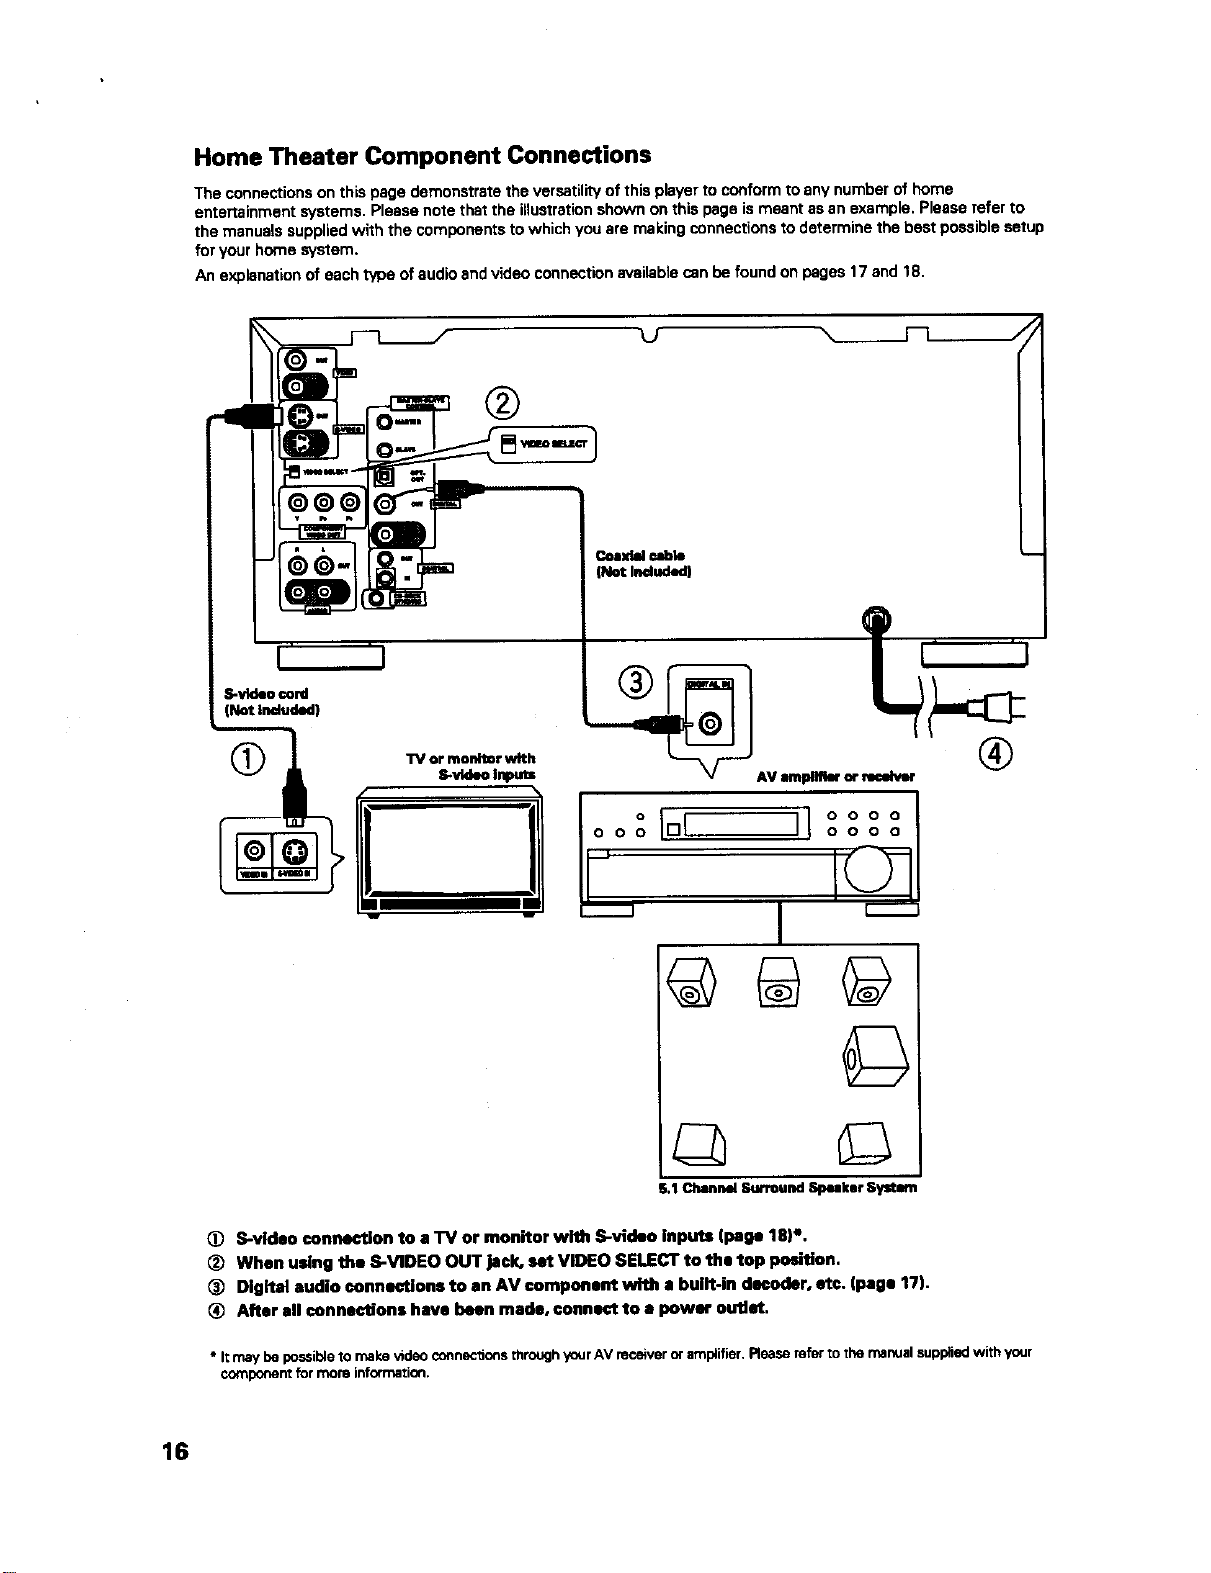
Home Theater Component Connections
The connections on this page demonstrate the versatility of this player to conform to any number of home
entertainment systems. Please note that the illustration shown on this page is meant as an example. Please refer to
the manuals supplied with the components to which you are making connections to determine the best possible setup
for your home system.
An explanation of each type of audio and video connection available can be found on pages 17 and 18.
@@@
S-vkl*o cord
®
®
®
@
©
S.1Channel Surround Speaker System
(_ S-vld•o connection to a TV or monitor with S-video inputs (page 18)%
(_ When using the S-VIDEO OUT jack, set VIDEO SELECT to th• top position.
Digital •udio connection• to •n AV compon•nt with • built-in decoder, etc. (page 17).
After all connections have been made, connect to • power outlet.
• It may be possible to make _deo connections through your AV receiver or amplifier, Rease refo_ to the manual supplied with your
component for more information.
16
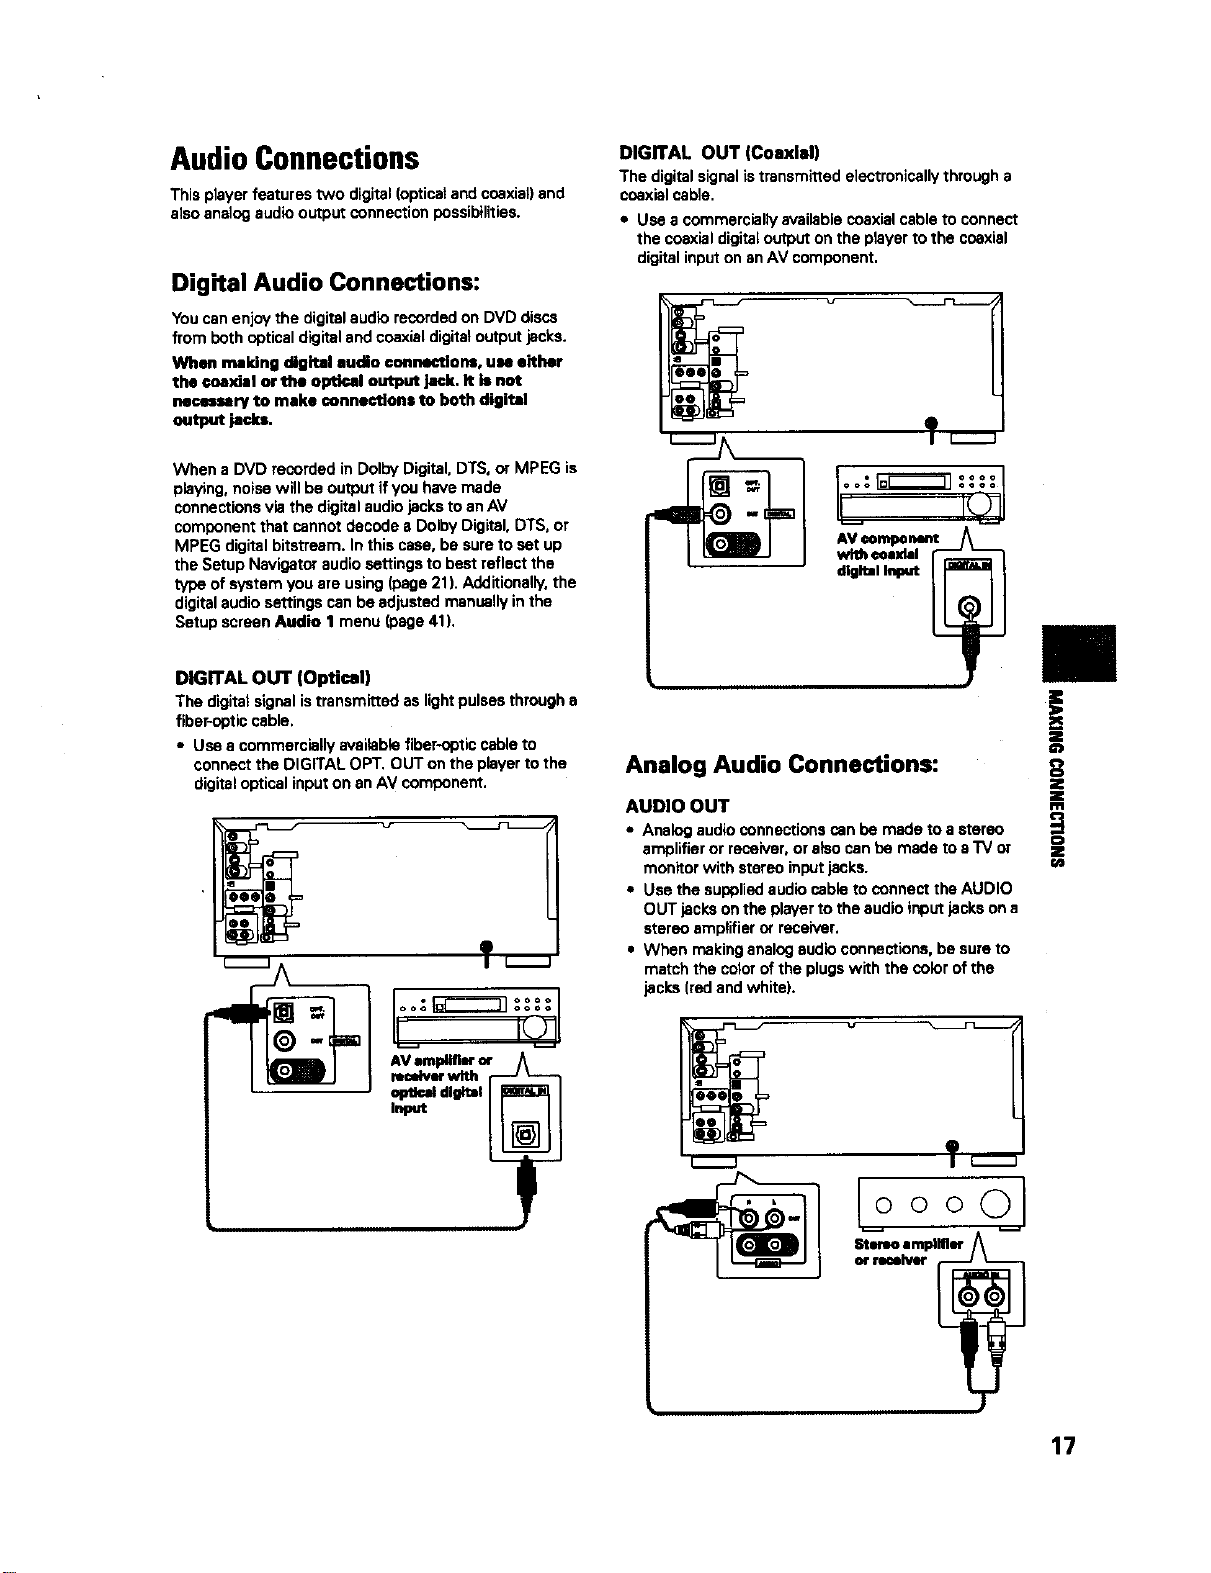
Audio Connections
This player features two digital (opticst and coaxial) and
also analog audio output connection possibilities.
Digital Audio Connections:
You can enjoy the digital audio recorded on DVD discs
from both optical digital and coaxial digital output jacks.
When making digital audio connectiorm, use either
the coaxial or the optical output jack. It is not
necmmary to make oannections to both digital
output jack_
When a DVD recorded in Dolly Digital, DTS, or MPEG is
playing, noise will be output if you have made
connections via the digital audio jacks to an AV
component that cannot decode s Doily Digital, DTS, or
MPEG digital bitatream. In this case, be sure to set up
the Setup Navigator audio settings to best reflect the
type of system you are using (page 21). Additionally, the
digital audio settings can be adjusted manually in the
Setup screen Audio I menu (page 41).
DIGITAL OUT (Optical)
The digitalsignalistransmittedas lightpulsesthrougha
fiber-opticcable.
• Use a commerciallyavailablefiber-opticcableto
connectthe DIGITALOPT. OUTonthe playertothe
digitalopticalinputon anAV component.
v
ooa_
AV ampllflm"or ,
DIGITAL OUT (Coaxial)
The digital signal is transmitted electronically through a
coaxial cable.
• Use a commercially available coaxial cable to connect
the coaxial digital output on the player to the coaxial
digital input on an AV component.
AV eompenent
t
Analog Audio Connections:
AUDIO OUT
• Analog audio connections can be made to a stereo
amplifier or receiver, or also can be made to e "IV or
monitor with stereo input jacks.
• Use the suopliad audio cable to connect the AUDIO
OUT jacks on the player to the audio input jacks on a
stereo amplifier or receiver.
• When making analog audio connections, be sure to
match the color of the plugs with the color of the
jacks (red and white).
ooO
Stereo amplifier A
or ruelver
€:)
Z
w
17

VideoConnections
Thisplayerfeatures S-video,composite,andcomponent
videooutputpossibilities. Checkthe manualsupplied
withyourIV or monitor todeterminethe bestpossible
connectionforyoursystem.
Inadditionto makingphysicalconnectionstoyourIV or
monitor, it isalsonecessarytoassignthe IV screensize.
Youcanuse the ]SetupNavigator]inthe Setupscreen
General toset whetheryouare usinga wide screenor
standardsizeTV or monitor (page21).Additionally,you
canusethe [/V Screen]settinginthe Setupscreen
Video menu (page43).
VIDEO OUT
• Make composite video connections to a standard IV
or monitor with a video input jack.
• Use the supplied video cable to connect the VIDEO
OUT jack on the p_ayerto the video input on the IV or
monitor.
• Be sure to match the color of the plug with the color
of the jack (yellow).
• When makingvideo connections,make sure to setVIDEO
SELECTon the rear panelof the playerto the top position
to assigncomposite video output.
S-VIDEO OUT
• Make S-video connections to a 1'4 or monitor with
S-video input to produce a high quality video image.
• Use a commercially available S-video cable to connect
the S-VIDEO OUT jsck on the player to an S-video
input on the IV or monitor.
• When making S-video connections, make sure to set
VIDEO SELECT on the rear panel of the player to the
top position to assign S-video output,
"_ or m_tor
COMPONENT VIDEO OUT
• Make component video connections to a IV, projection
monitor, or projector with component inputsfor an
exceptional video image that best portrays the high
quality digital video recorded on DVDs.
• Use a commercially available component video cable
or 3 video cords to connect the COMPONENT VIDEO
OUT jacks on the player to the component jacks on
the monitor.
• When making component video connections, make
sure to set VIDEO SELECT on the rear panel of the
player to the bottom po6ition to assign component
video ou_ut.
"IV,projection monitor,
18 or projector
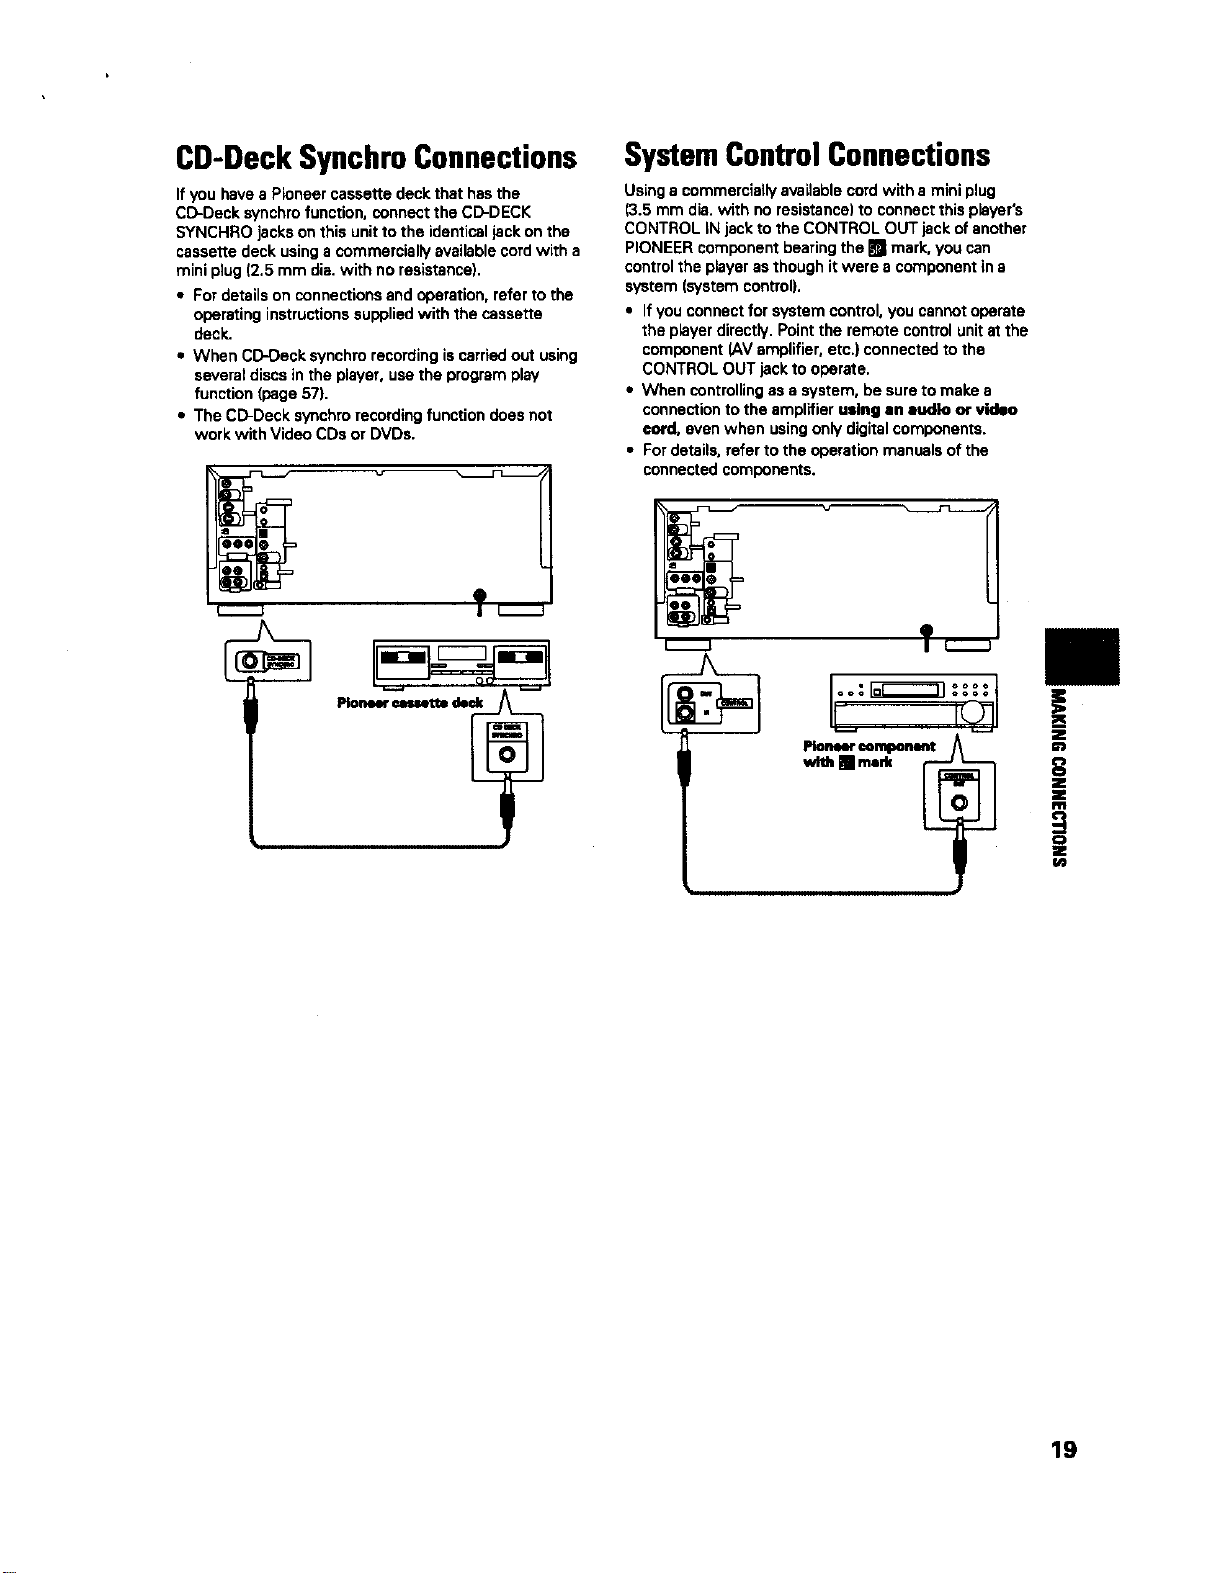
CD-DeckSynchroConnections
If you have a P_oneer cassette deck that has the
CD-Deck synchro function, connect the CD-DECK
SYNCHRO jacks on this unit to the identical jack on the
cassette deck using a commercially available cord with a
mini plug (2.5 mm dis. with no resistance).
• For details on connections and operation, refer to the
operating instructions supplied with the cassette
deck.
• When CD-Oeck aynchm recording is carried out using
several discs in the player, use the program play
function (page 57).
• The CD-Deck synchro recording function does not
work with Video CDs or DVDs.
m_
T
SystemControlConnections
Using a commercially available cord with a mini plug
(3.5 mm dis. with no resistance) to connect this player's
CONTROL iN jack to the CONTROL OUT jack of another
PIONEER component bearing the ml mark, you can
control the player as though it were a component in s
system (system control).
• If you connect for system control, you cannot operate
the p_ayer directly. Point the remote control unit at the
component (AV amplifier, etc.) connected to the
CONTROL OUT jack to operate.
• When controlling as a system, be sure to make s
connection to the amplifier u=lng an audio or video
cord, even when using only digital components.
• For details, refer to the operation manuals of the
connected components.
L_J
T
Pioneereeml_mmt
wW,IIm.rk _
!
_8
!
0
Z
19
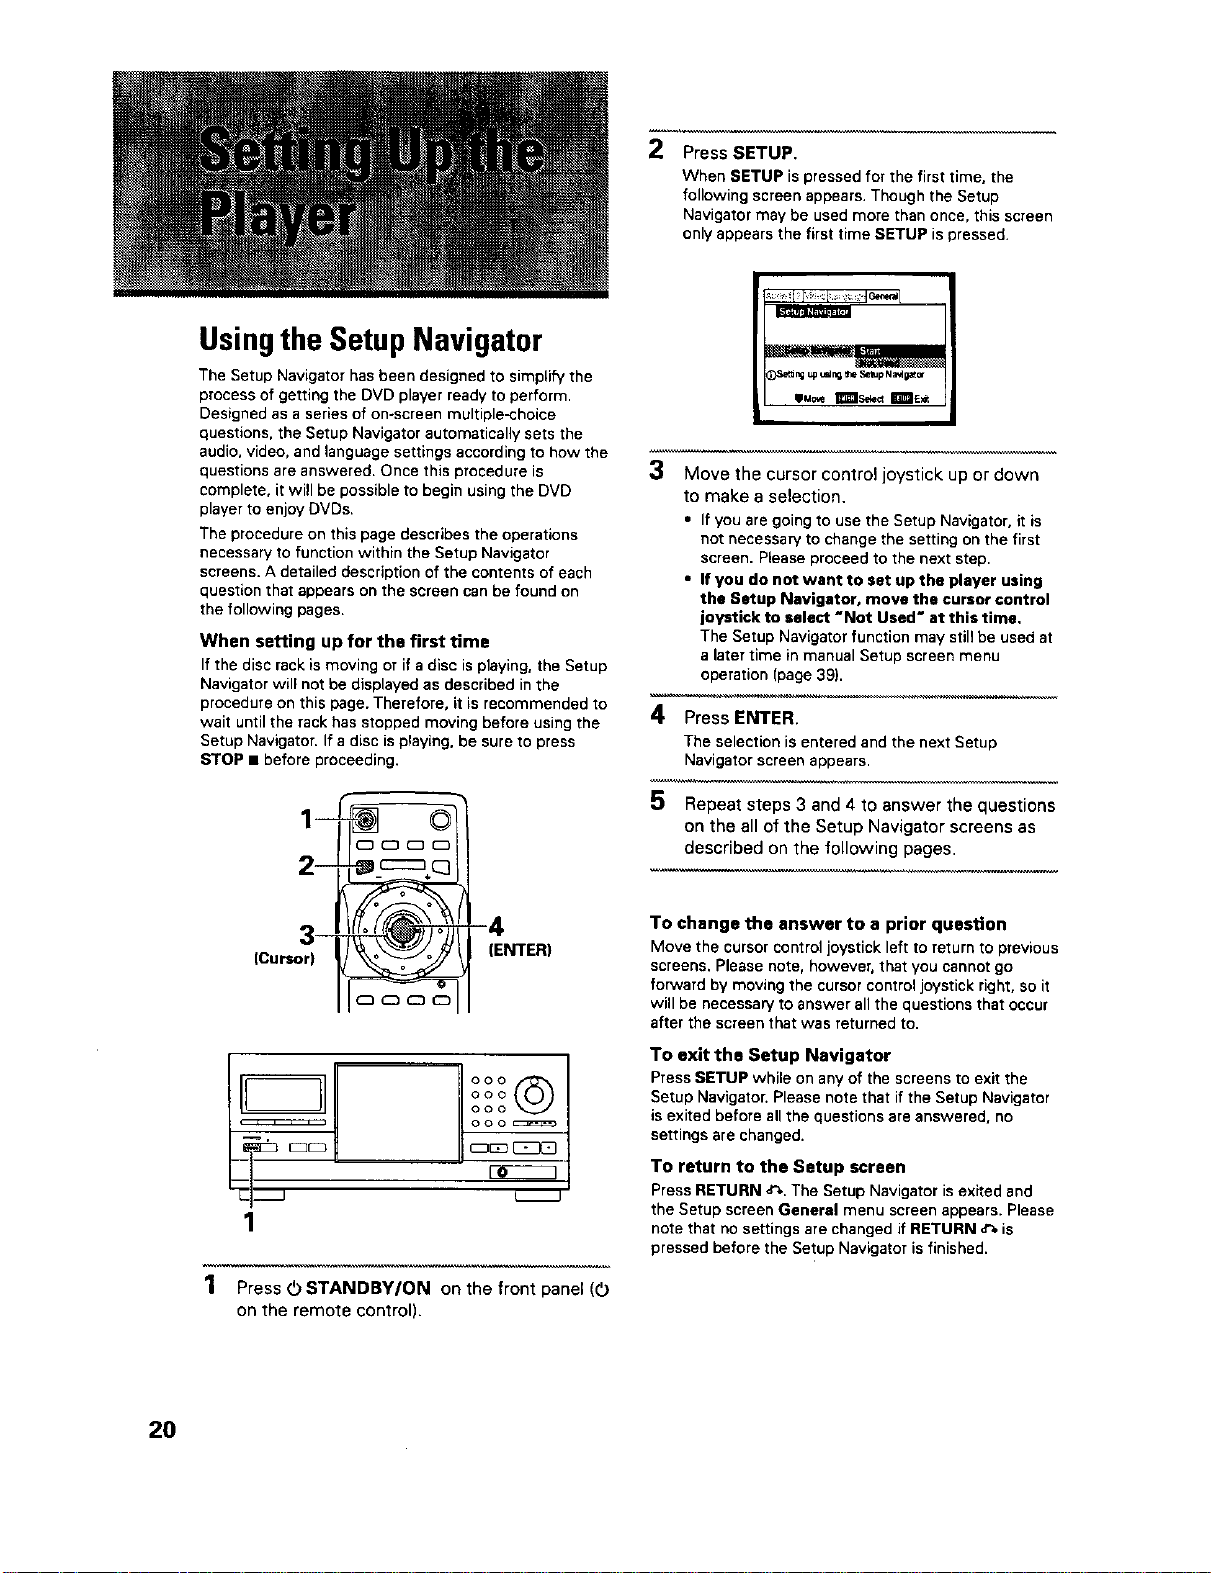
2
Press SETUP.
When SETUP is pressed for the first time, the
following screen appears. Though the Setup
Navigator may be used more than once, this screen
only appears the first time SETUP is pressed.
Usingthe Setup Navigator
The Setup Navigator has been designed to simplify the
process of getting the DVD player ready to perform.
Designed as a series of on-screen multiple-choice
questions, the Setup Navigator automatically sets the
audio, video, and language settings according to how the
questions are answered. Once this procedure is
complete, it will be possible to begin using the DVD
player to enjoy DVDs.
The procedure on this page describes the operations
necessary to function within the Setup Navigator
screens. A detailed description of the contents of each
question that appears on the screen can be found on
the following pages.
When setting up for the first time
If the disc rack is moving or if a disc is playing, the Setup
Navigator will not be displayed as described in the
procedure on this page. Therefore, it is recommended to
wait until the rack has stopped moving before using the
Setup Navigator. If a disc is playing, be sure to press
STOP • before proceeding.
)Setd ag up t_ n_ _%eSel_p N a_g_
3
Move the cursor control joystick up or down
to make a selection.
• If you are going to use the Setup Navigator, it is
not necessary to change the setting on the first
screen. Please proceed to the next step.
• If you do not want to set up the player using
the Setup Navigator, move the cursor control
joystick to select "Not Used" at this time.
The Setup Navigator function may still be used at
a later time in manual Setup screen menu
operation (page 39).
4 Press ENTER.
The selection is entered and the next Setup
Navigator screen appears.
1 _-'-_ _ 5 Repeatsteps3and4toanswerthequestions
on the all of the Setup Navigator screens as
c_ _ described on the following pages.
4 TO change the answer to a prior question
(Cursor)_ NTER) Move the cursor control joystick left to return to previous
screens. Please note, however, that you cannot go
forward by moving the cursor control joystick right, so it
will be necessary to answer all the questions that occur
after the screen that was returned to.
U.......2
1
To exit the Setup Navigator
Press SETUP while on any of the screens to exit the
Setup Navigator. Please note that if the Setup Navigator
is exited before all the questions are answered, no
settings are changed.
To return to the Setup screen
Press RETURN _'.. The Setup Navigator is exited and
the Setup screen General menu screen appears. Please
note that no settings are changed if RETURN ,P- is
pressed before the Setup Navigator is finished.
1 Press 0 STANDBYION on the front panel (0
on the remote control).
2O
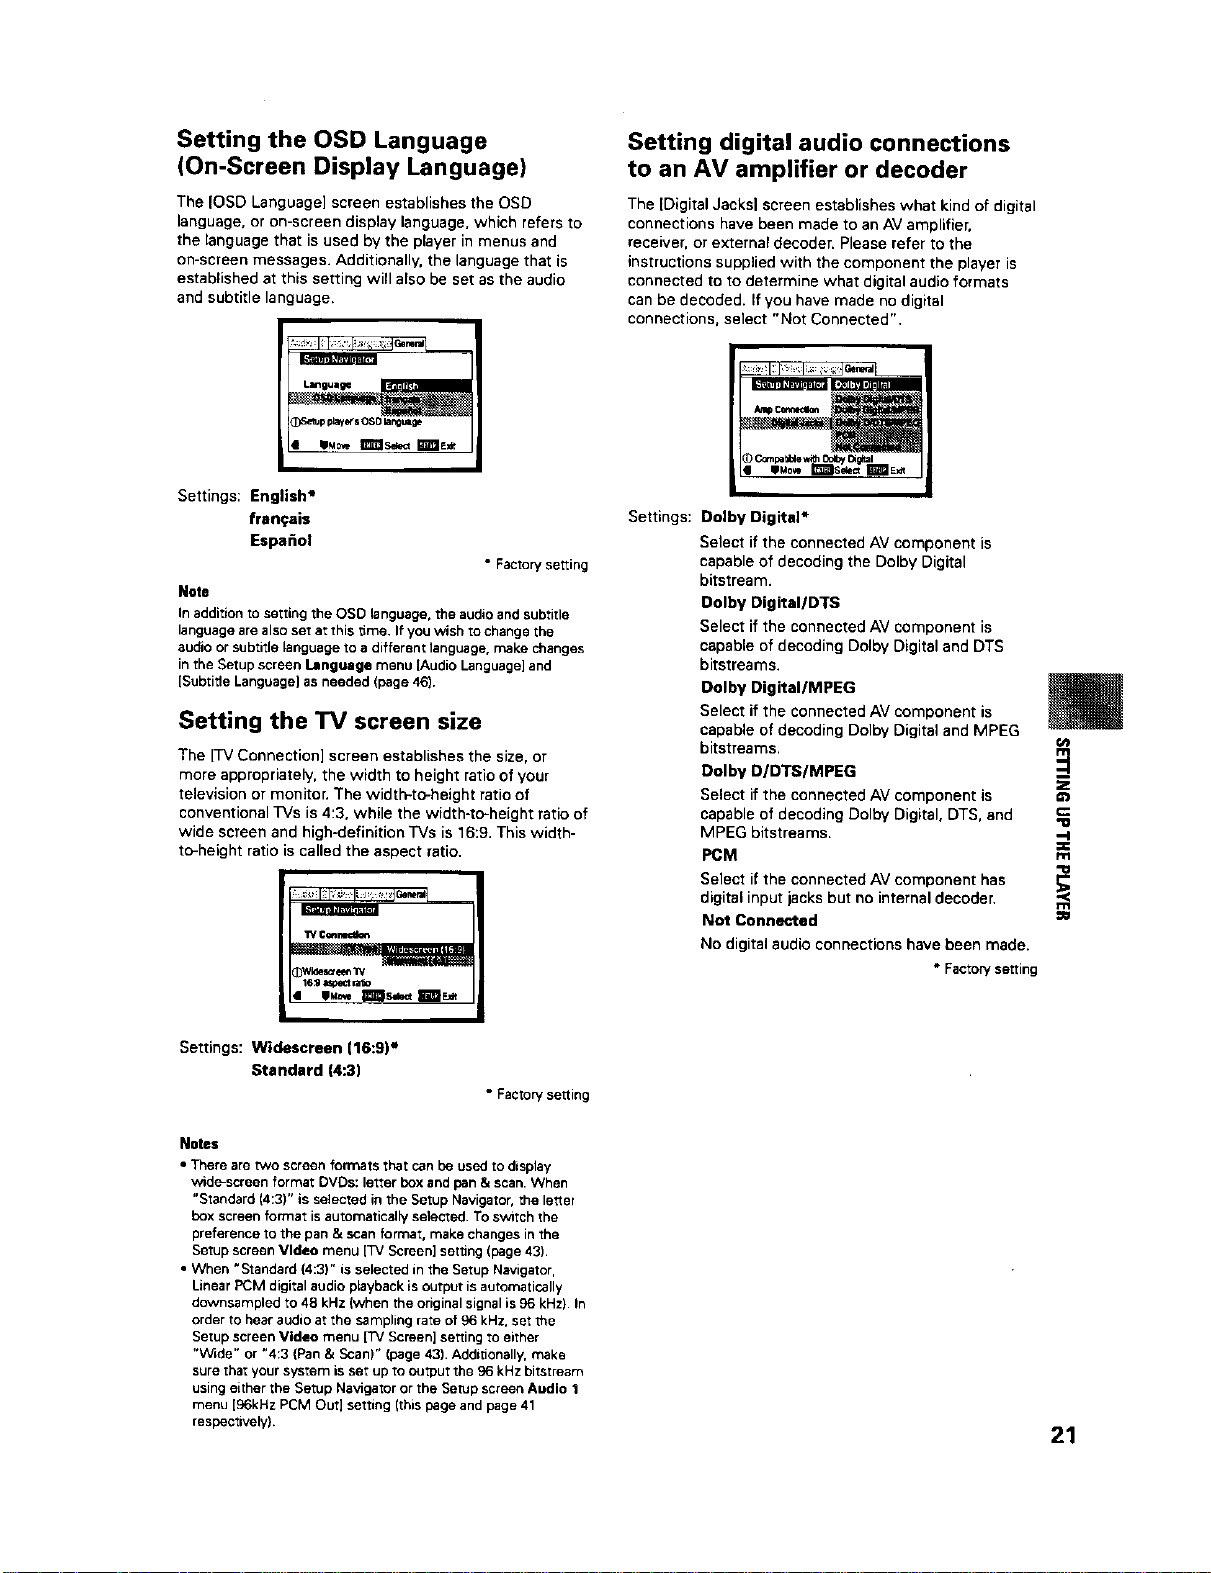
Setting the OSD Language
(On-Screen Display Language)
The IOSD Language] screen establishes the OSD
language, or on-screen display language, which refers to
the language that is used by the player in menus and
on-screen messages. Additionally. the language that is
established at this setting will also be set as the audio
and subtitle language.
Seep players OS0 la_;e
Settings: English*
fran_:ais
Espa_ol
• Factory setting
Note
In addition to setting the OSD language, the audio and subtitle
language are also set at this time. If you wish to change the
audio or subtitle language to a different language, make changes
in the Setup screen language menu )Audio Language] and
[Subtitle Language) as needed (page 46),
Setting the TV screen size
The [TV Connection] screen establishes the size, or
more appropriately, the width to height ratio of your
television or monitor. The width-to-height ratio of
conventional TVs is 4:3, while the width-to-height ratio of
wide screen and high-definition TVs is 16:9. This width-
to-height ratio is called the aspect ratio.
"IVConnec_n
_Wlde_ree_ W
16_9_n_o
Setting digital audio connections
to an AV amplifier or decoder
The ]Digital Jacksl screen establishes what kind of digital
connections have been made to an AV amplifier,
receiver, or external decoder. Please refer to the
instructions supplied with the component the player is
connected to to determine what digital audio formats
can be decoded. If you have made no digital
connections, select "Not Connected".
Settings: Dolby Digital*
Select if the connected AV component is
capable of decoding the Dolby Digital
bitstream.
Dolby Digital/DTS
Select if the connected AV component is
capable of decoding Dolby Digital and DTS
bitstreams.
Dolby DigitaI/MPEG
Select if the connected AV component is
capable of decoding Dolby Digital and MPEG
bitstreams.
Dolby D/DTS/MPEG
Select if the connected AV component is
capable of decoding Dolby Digital. DTS, and
MPEG bitstreams.
PCM
Select if the connected AV component has
digital input jacks but no internal decoder.
Not Connected
No digital audio connections have been made.
• Factory setting
D
Z
G1
"O
,-I
:=€
rfl
f.fl
Settings: Widescreen {16:9P
Standard (4:3)
• Factory setting
Notes
• There are two screen formats that can be used to display
wide-screen format DVDs: letter box and pan & scan. When
"Standard (4:3)" is selected in the Setup Navigator, the let_el
box screen format is automatically selected. To svatch the
preference to the pan & scan format, make changes in the
Setup screen Video menu [TV Screen] setting (page 43).
• When "Standard (4:3)" is selected in the Setup Navigator,
Linear PCM digital audio playback is output is automatically
downsampled to 48 kHz (when the original signal is 96 kHz) In
order to hear audio at the sampling rate of 96 kHz. set the
Setup screen Video menu ITV Screen] setting to either
"W_de" or "4:3 (Pan & Scan)" (page 43). Additionally. make
sure that your system is set up to output the 96 kHz bhatream
using either the Setup Navigator or the Setup screen Audio 1
menu [96kHz PCM Out] setting ]this page and page 41
respectively).
21
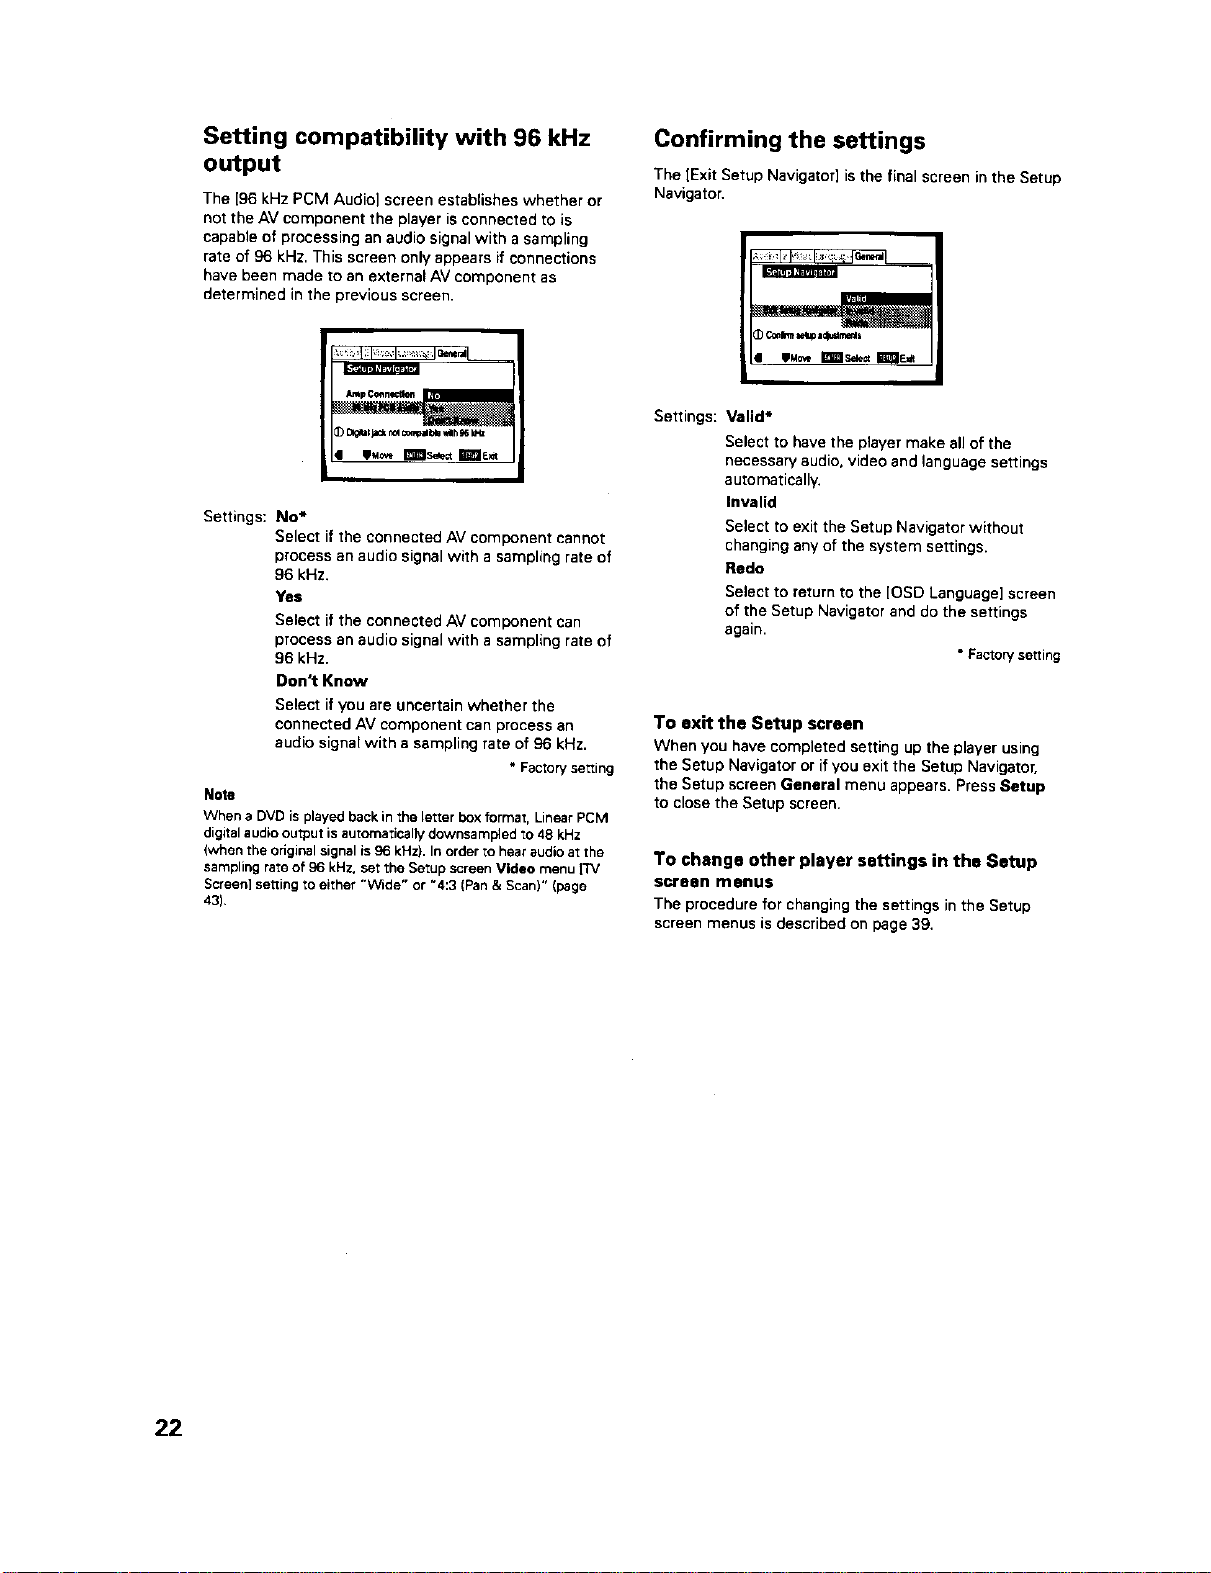
Setting compatibility with 96 kHz
output
The [96 kHz PCM Audio] screen estabSshes whether or
not the AV component the player is connected to is
capable of processing an audio signal with a sampling
rate of 96 kHz. This screen only appears if connections
have been made to an external AV component as
determined in the previous screen.
Confirming the settings
The [Exit Setup Navigator] is the final screen in the Setup
Navigator.
_ _'_'_L
/
• ilaove I_1_ls_e= It"_lE_
Settings:
No _
Select if the connected AV component cannot
process an audio signal with a sampling rate of
96 kHz.
Yes
Selectifthe connected AV componentcan
process an audio signal with a samplingrate of
96 kHz.
Don_ Know
Select if you are uncertain whether the
connected AV component can process an
audio signal with a sampling rate of 96 kHz.
• Factoryselling
Note
When a DVD is played back in the letter box format, Linear PCM
digital audio output is automatically downsa mpled to 48 kHz
(when the original signal is 96 kHz). In order to hear audio at the
sampling rate of 96 kHz, set the Setup screen Video menu ['i'V
Screen] setting to either "Wtde" or "4:3 (Pan & Scan)" (page
43).
Settings: Valid*
Select to have the player make all of the
necessary audio, video and language settings
automatically.
Invalid
Select to exit the Setup Navigator without
changing any of the system settings.
Redo
Select to return to the [OSD Language] screen
of the Setup Navigator and do the settings
again.
• Facton/setting
To exit the Setup screen
When you have completed setting up the player using
the Setup Navigator or if you exit the Setup Navigator,
the Setup screen General menu appears. Press Setup
to close the Setup screen.
To change other player settings in the Setup
screen menus
The procedure for changing the settingsin the Setup
screen menus is describedon page39.
22

LoadingDVDs,Video CDsand
CDsintothe Player-DVD/VideoCO/CD
You can load as many as 300 discs into the rack. Disc
positions in the rack are numbered clockwise from 1 to
300 starting after the single loader slot. The procedure
on this page describes how to load discs starting from
the number 1 position. However, the same procedure
can be followed when you want to change or add more
discs at a different time.
3
Load discs in the rack,
• The number I position is immediately to the left
of the single loader slot.
• Load discs with the label side facing to the right.
(When loading double-sided DVDs, load the disc
in the rack with the label denoting the contents
you want to view facing the right.)
• Do not place more than one disc in the same rack
position as that may damage the disc and cause
the player to malfunction.
,/Label slde
ooo
/
4 Press SELECT DISC NUMBER (the dial mode
indicator lights green) and then turn MULTI
DIAL to rotate the rack to the next position.
When using the front panel, turn the selection
dial clockwise to rotate the rack to the next
disc position.
• The rack rotates the amount that either MULTI
"Dial mode DIAL or the selection dial is turned, u_
indicator !
C3 • Turning the MULTI DIAL or the selection dial --
[] r=q [] 4 direction.
C3 eg-_3 CZ) 5
OOO
000
1 2,6
1 Press 0(0;
panel).
Press OPEI_
front panel).
,,(
counterclockwise rotates the rack in the opposite
Press O (0 STANDBY/ON on the front
Press OPEN/CLOSE &--(OPEN/CLOSE on the
Repeat steps 3 and 4 to continue loading
discs in the rack.
6 When you have finished loading discs into the
rack, press OPEN/CLOSE _. (OPEN/CLOSE
on the front panel).
The hood slides closed andthe rack makesa single
revolution while the player determines where discs
havebeen loaded inthe rack.
The disc rack hood slides open. m
=O
°°°Oooo .o,.
O OO Never force the hoodopenor closed,Doingsomay causepart
O OO _ damageorplayermalfunction.
23
To load a 3 Inch (8 cm) CD
3 inch (8 cm) discs cannot be inserted as they are. Be
sure to attach all3 inch (6 cm) CDs to a commercially
available disc adapter before loading them in the player.
• Do not load an adapter into the rack without a CD
attached. Doing so may cause the player to
malfunction.
• 3 inch (8 cm) DVDs cannot be used with this player.
To prevent malfunction, do not use 8 cm (3 in.) CD
adaptem with 8 cm (3 in.) DVDs.
To remove discs from the rack
1 Press OPEN/CLOSE A (OPEN/CLOSE on the front
panel) to open the hood.
2 Select the disc that you want to remove using one of
the methods outlined in step 4 of the procedure
"Loading DVDs, Video CDs and CDs into the Player"
on the previous page.
3 Remove the disc from the rack.
4 Press OPENICLOSE _ (OPEN/ClOSE on the front
panel) to close the hood when you are finished.
_k WARNING
Do not put your hand ur any other object Inside the
rack, as this may result In personal injury cndlor pert
damage.
PlayingDVDs,VideoCDsand
CDs-ovD/VideoCO/CO
Beforeyou can startto enjoythe digitalaudioandvideo
on DVDs,be surethatyou haveeitherperformed the
SetupNavigatorproccdLiredescribedin the previous
sectionormadethe necessarysettingsinthe Setup
screenmenusasoutlinedinthe sectionstartingonpage
39 to setupthe playerto correspondto your home
system.Havingmadethesesettings,youare now ready
tostart usingthe playerto enjoyDVDs,VideoCDs,and
CDs.
Make surethatyou havealreadyioededthe rackas
describedinthe sectionstartingonthe previouspage.
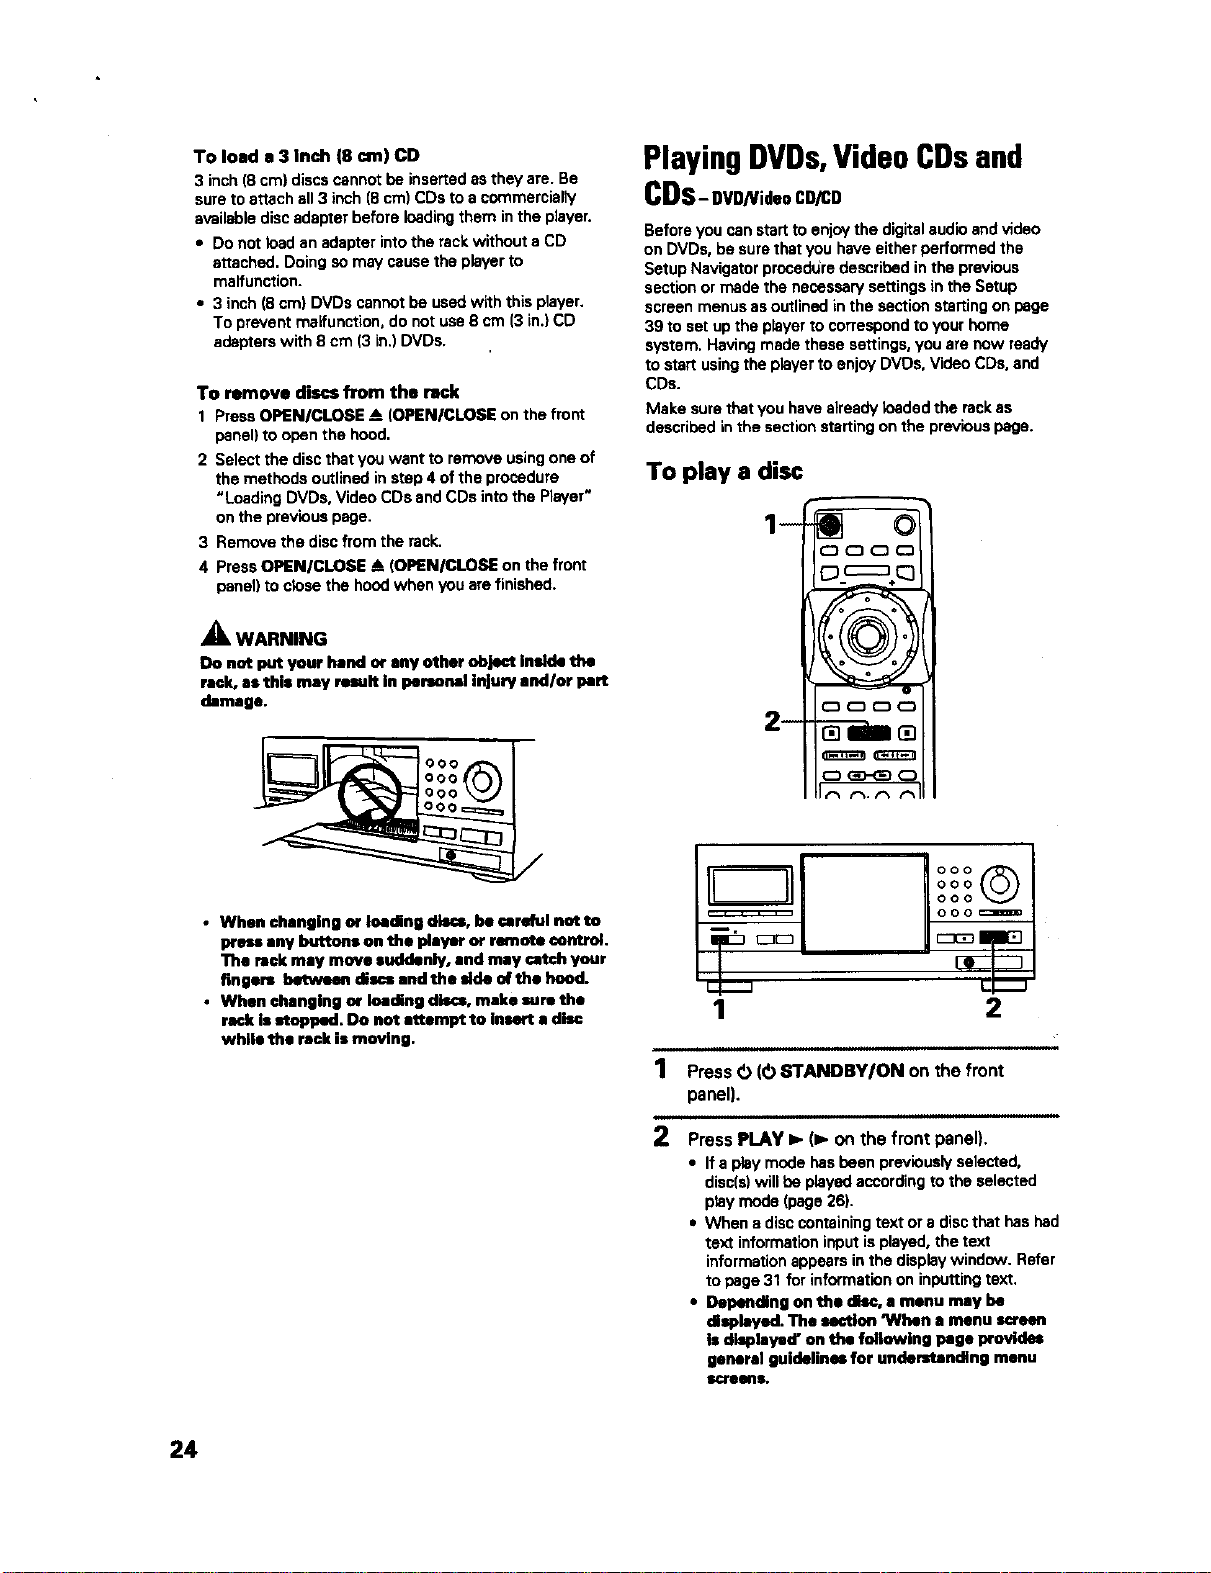
To play a disc
• When changing ur Inadinll discs, be carefol not to
press any buttons on the player or remote control.
The rack may move suddenly, and may catch your
fingers between discs and the side of the hood.
• When changing or loading discs, make sure the
rack is stopped. Do not attempt to insert a disc
while the rack is moving.
1
2
oooQ
000
ooo
ooo_
z--n
L
1 2
i illl illl ii
Press O (O STANDBYION on the front
panel).
Press PLAY ib (1_ on the front panel).
• If a play mode has been previously solected,
disc(s) will be played according to the selected
play mode (page 26).
• When a disc containing text or a disc that has had
text information ir_outis played, the text
information appears in the display window. Refer
to page 31 for information on inputting text.
• Depending on the disc, € menu may be
displayed. The section 'When a menu screen
is displayed" on the following page provides
general guidelines for understanding menu
$¢fesuc.
24
Notes
• Noise is output if you make digital audio connections to a
receiver c# amplifier that does nor have a built-in decoder.
Check that the digital audio output format selected in the
Audio I menu corresponds to the audio components you have
made connections to (page 41),
• The _/screerl size is factory Set to presen_ the wide screen
format (16:9 aspect ratio). If you have a standard TV screen
(4:3 aspect ratio), this setting can be changed to match your TV
screen size in the Video menu (page 43),
When an operation is prohibited
There are times when you are using the player and attempt to
perform an operation, but for some reason it cannot be
performed, When this occurs, one of the two following icons
appears on "_hescreen.
_= Theoperationisprohibitedbytheplayer.
The operation ls prohibited by the programming on
the disc.
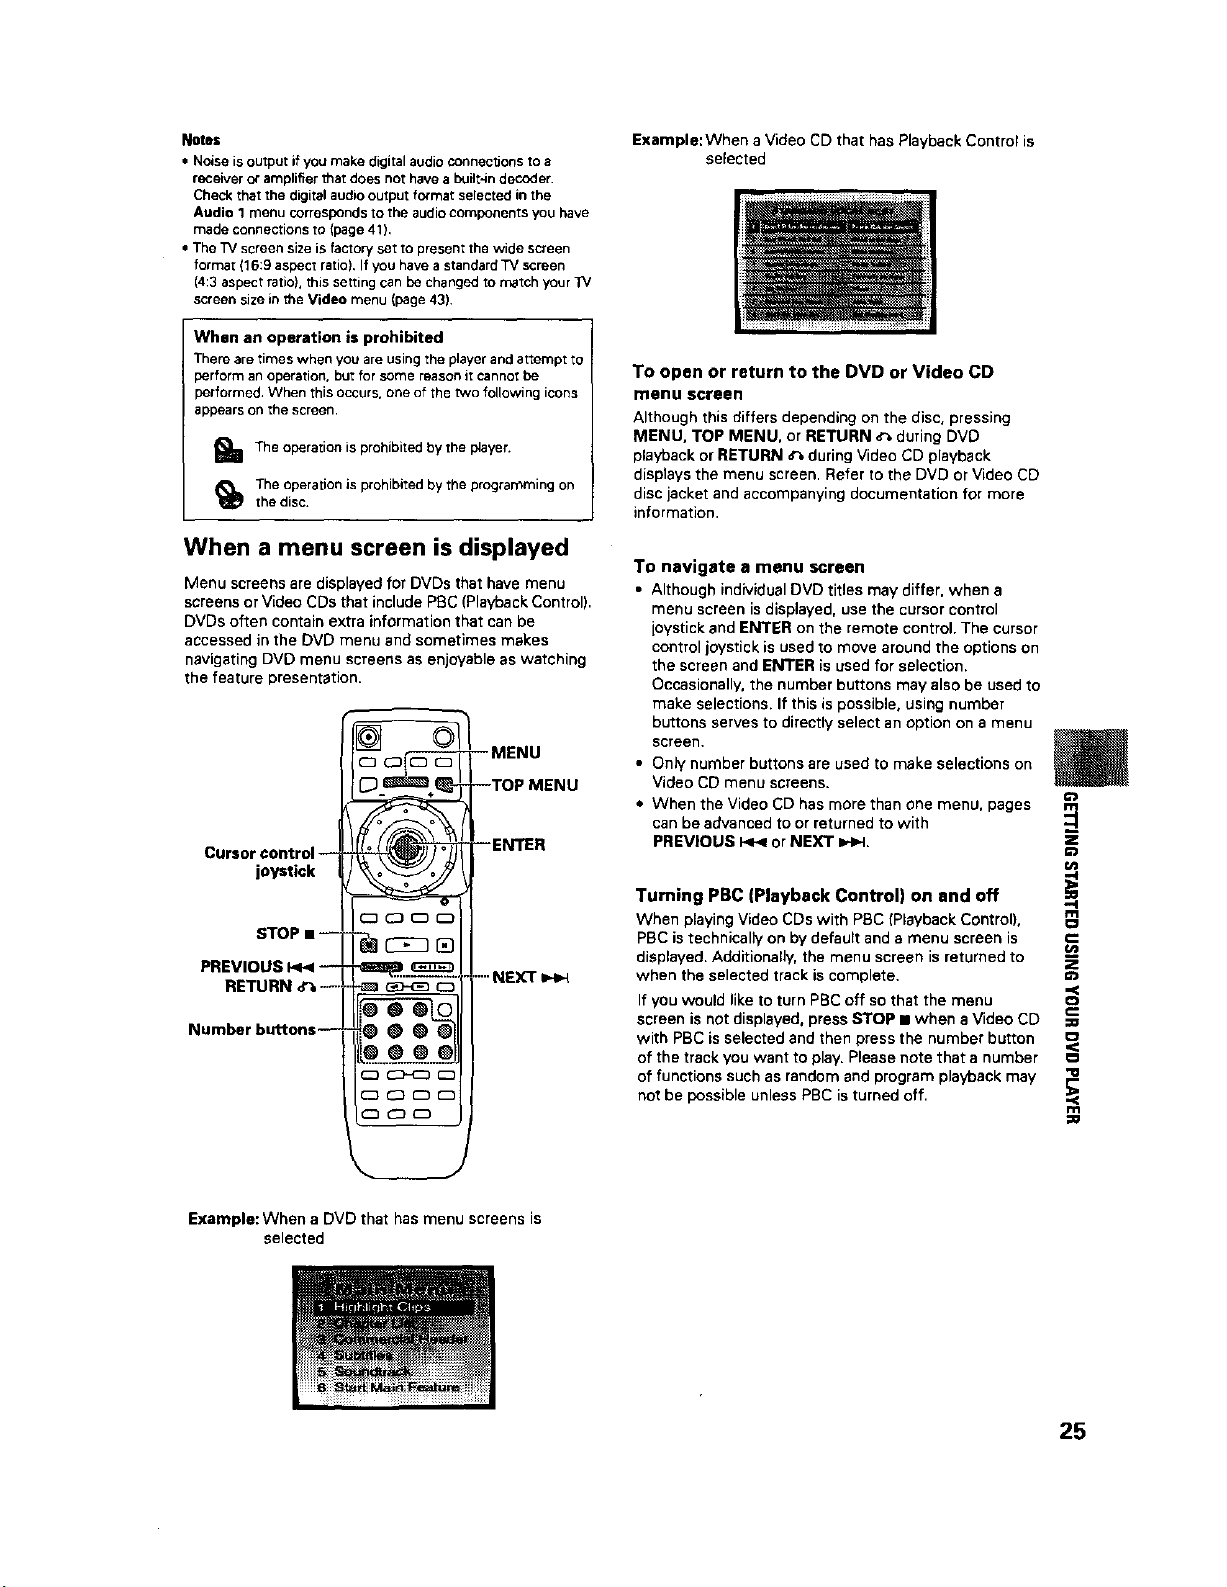
When a menu screen is displayed
Menu screens are displayed for DVDs that have menu
screens or Video CDs that include PBC (Playback Control).
DVDs often contain extra information that can be
accessed in the DVD menu and sometimes makes
navigating DVD menu screens as enjoyable as watching
the feature presentation.
D i
Cursor control --
joystick
C_ Cz) _ D
STOP I1-_-_ - _ _ []
PREVIOUS h_< --1-
Number butRons ---_ 0 0 0
--MENU
--TOP MENU
--ENTER
....NEXT
Example: When a DVD that has menu screens is
selected
Example: When a Video CD that has Playback Control is
selected
To open or return to the DVD or Video CD
rnenu screen
Although this differs depending on the disc, pressing
MENU, TOP MENU, or RETURN o_ during DVD
playback or RETURN _ during Video CD playback
displays the menu screen. Refer to the DVD or Video CD
disc jacket and accompanying documentation for more
information.
To navigate a menu screen
• Although individual DVD titles may differ, when a
menu screen is displayed, use the cursor control
joystick and ENTER on the remote control. The cursor
control joystick is used to move around the options on
the screen and ENTER is used for selection.
Occasionally, the number buttons may also be used to
make selections. If this is possible, using number
buttons serves to directly select an option on a menu
screen.
• Only number buttons are used to make selections on
Video CD menu screens.
• When the Video CD has more than one menu, pages
can be advanced to or returned to with
PREVIOUS _ or NEXT z_,.l.
Turning PBC (Playback Control) on and off
When playing Video CDs with PBC (Playback Control),
PBC is technically on by default and a menu screen is
displayed. Additionally, the menu screen is returned to
when the selected track is complete.
If you would like to turn PBC off so that the menu
screen is not displayed, press STOP • when a Video CD
with PBC is selected and then press the number button
of the track you want to play. Please note that a number
of functions such as random and program playback may
not be possible unless PBC is turned off.
==
!
€:
.=
==
'IV
E
rfl
::g
25

Selecting a disc in the disc rack Selecting a play mode
"Dial mode
indicator
1 2
000_
000
OOoO=._
u,,,,,,,,= , , ,,,,
1 PressSELECTDISC NUMBER (thedialmode
indicator lights green) and then rum MULTI
DIAL to select a disc number.
When using the front panel, turn the selection
dial to select a disc number.
• The discnumbersincreasewhen MULTI DIAL or
theselectiondialisturnedclockwise,and
decrease when MULTI DIALor the selectiondial
isturnedcounterclockwise
2 Press ENTER.
When using the front panel, press the enter
buT[onin the center of the selection dial.
• The discrackrotatesto positicmofthe selected
disc,andplaybackof the discstarts.
Note
Youcanalsoselectadiscon-screenusingthe SubSetupscreen
Text menu(page35).
r_ CZ3 _
0000
0000
oooo
C3 CD-(ZI _
a (:DO J --PLAY
(_ ,--_ _ MODE
PLAY MODE
Press PLAY MODE repeatedly to select one of
the play modes:
ALL : All discs of the same format as the currently
selected disc ere played back in the order
they appear in the rack.
SINGLE : One disc is played. Piaybeck stops after the
disc has been played.
CUSTOM: Only discs in the custom file are played back.
The playmode changeseachtime PLAY MODE is
pressedas follows.
While disc playback isstopped:
During disc playback:
[ ,-_u.
-- SINGLE 4
• The ALL,SINGLE.CUSTOM AUDIO, orCUSTOM
VIDEO indicatorsappearinthe displaywindowto
indicate the currentplay mode.
• ALLpbyendsafterafullrevolutionoftherackhasbeen
madefromthepositionofthecurrentlyselecteddisc.
• CUSTOMAUDIO andCUSTOM VIDEOcannotbe
selecteduntilcustomfiles havebeen created.
26
To mDm and select one of 1he custom play modes
Refer to the section 'Creating and Selecting Custom
Files' on page 37.
Nutea
• If PLAYMODE is pressed duringIxngram play,the Ixngramis
erased.
• The playmode isstoredin mernorywhen the playeristumed
off. andis established when the player isturnedonagain.
• If noplaymodeis selected,the defaultplaymodeisALL play.
• Thesingleplaymode isautornedcaliysetwhen _hediscinthe
singleloaderslotis beingplayed(page28).
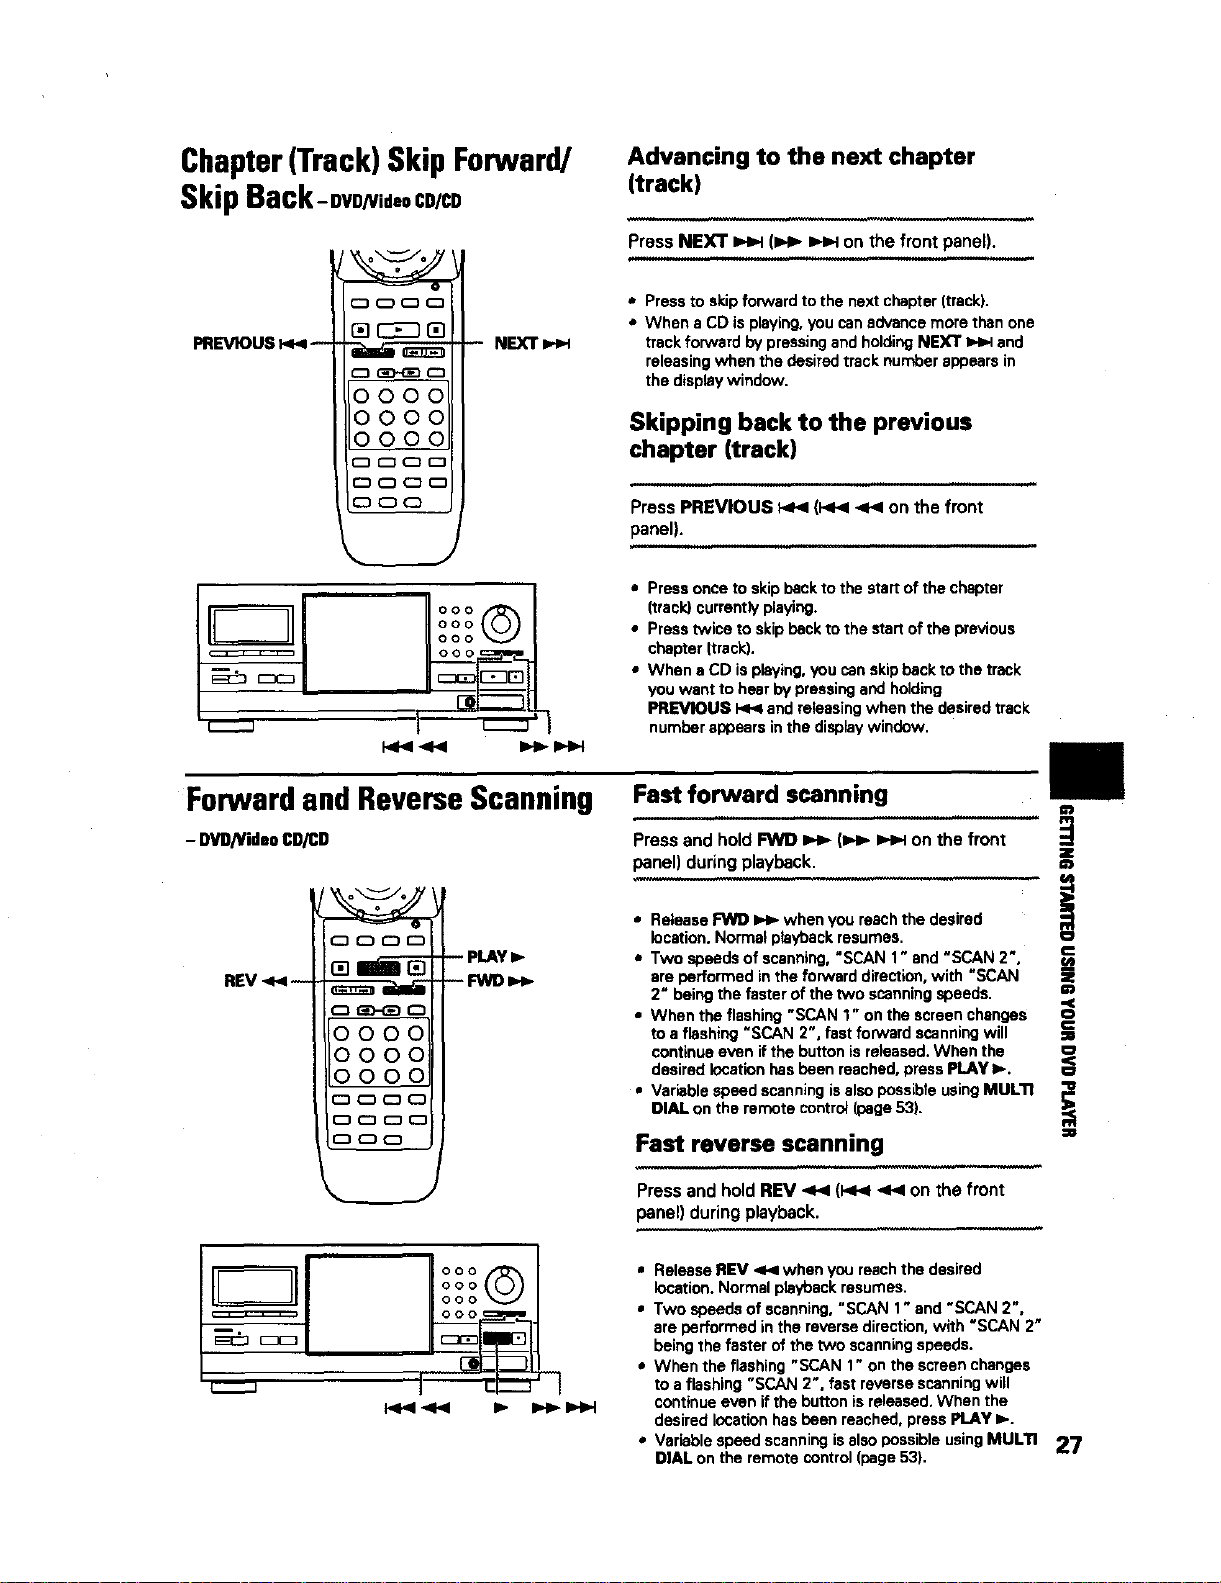
Chapter(Track) Skip Forward/
Skip Back-ovo/via,oCD/CD
PREVIOUS t<4 NEXT
Advancing to the next chapter
(track)
Press NEXT _ (I,.t__H on the front panel).
,.,Hnnnl ,,,,,..i
,, Press to skip forward to the next chapter (track).
• When a CD is playing, you can advance more than one
track forward by pressing and holding NEXT _ and
releasing when the desired track number appears in
the display window.
Skipping back to the previous
chapter (track)
,,,,, ,,,,,,,,
Press PREVIOUS P_l (:<1< <_1 on the front
panel).
i i
• Press once to skip back to the start of the chapter
(track) currently playing.
• Press twice to skip back to the start of the previous
chapter {track).
• When a CD is playing, you can skip back to the track
you want to hear by pressing and holding
PREVIOUS I<1<1and releasing when the desired track
number appears in the display window.
Forwardand ReverseScanning
- DVD/VideoCD/CD
C:3 0 C3 r-'_
REV <<--
o_r-1
0000
ooo o
C3 CD CD CD
CD (_ _ CD
CD CD CD
Fast forward scanning
"lml i
Press and hold FWD _ (I,,t_ IH_ on the front
panel) during playback.
=t
• Rolesse FWl) _ when you reach the desired
location. Norma! playback resumes, o_
-- PLAY l- • Two speeds of scanning, "SCAN 1" and "SCAN 2 ", u_
-- FWD _ are performed in the forward direction, with "SCAN mz
2" being the faster of the two scanning speeds.
• When the flashing "SCAN 1" on the screen changes o<
to a flashing "SCAN 2", fast forward scanning will _-_
continue even if the button is recessed.When the
desired location has been reached, press PLAY l,-.
• Variable speed scanning isalso possible using MULTI ;_
DIAL on the remote control (page 53).
Fast reverse scanning =
,,,, ,,
Press and holdREV _< (I,4<1_ on thefront
panel) duringplayback.
°°°@1
ooo
• Release REV <<1 when you reach the desired
location. Normal playback resumes.
• Two speeds of scanning, "SCAN 1" and "SCAN 2".
ere performed in the reverse direction, with "SCAN 2"
being the faster of the two scanning speeds.
• When the flashing "SCAN 1" on the screen changes
to a flashing "SCAN 2". fast reverse scanning will
continue even if the button is released. When the
desired location has been reached, press PLAY I,-.
* Variable speed scanning is also possible using MULTI 27
DIAL on the remote control (page 53).
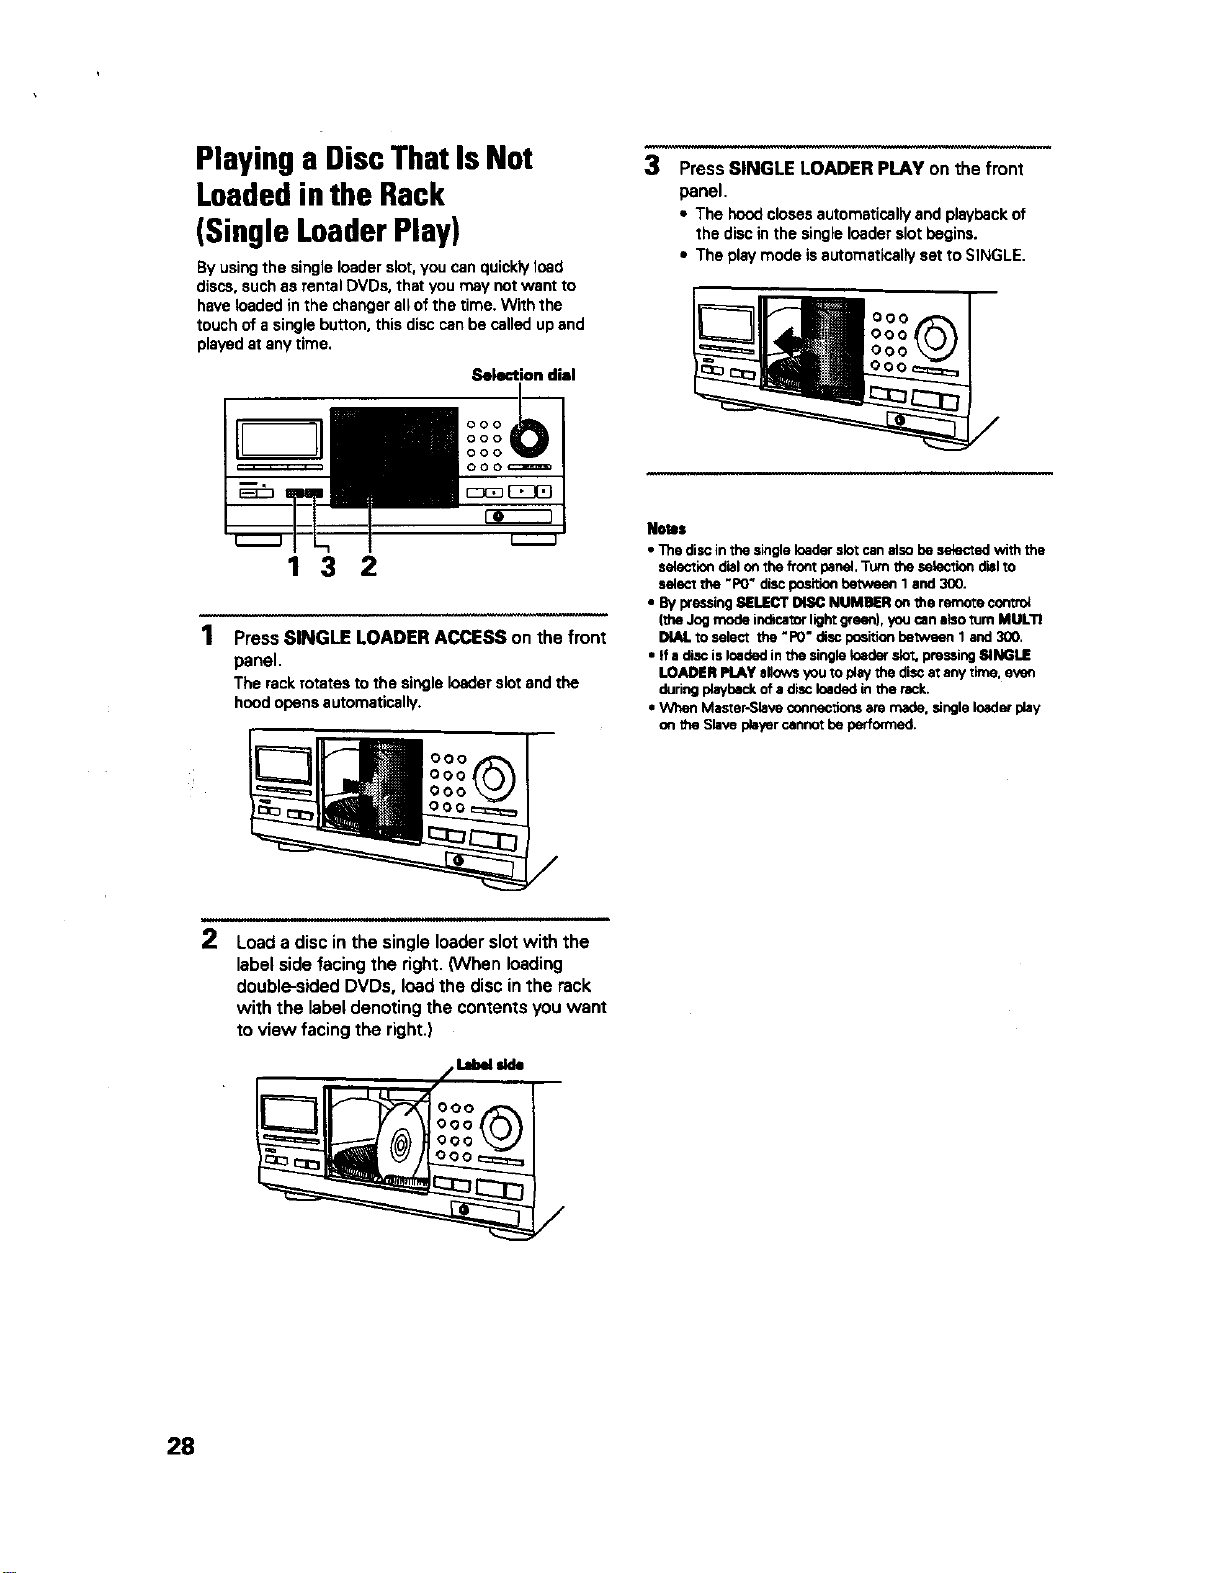
Playing a DiscThat Is Not
Loadedinthe Rack
(Single LoaderPlay)
By using the single loader slot, you can quickly load
discs, such as rental DVDs, that you may not want to
have loaded in the changer all of the time. With the
touch of a single button, this disc can be called up and
played at any time.
Selection dial
ooo )
ooo
ooo
ooo_
_cn_
t-----J
132
2
Press SINGLE LOADER ACCESS on the front
panel.
The rackrotatestothe singleloaderslotandthe
hoodopensautomatically.
Load a disc in the single loader slot with the
label side facing the right. (When loading
double-sided DVDs, load the disc in the rack
with the label denoting the contents you want
to view facing the right.)
3
Press SINGLE LOADER PLAY on the front
panel.
• The hoodclosesautomaticsllyandplaybackof
the discinthe singleloaderslotbegins.
• The playmodeisautomatloal_yset toSINGLE.
Notls
• The discinthe singleloaderslotcanalsobe selectedwiththe
selectiondialon the frontpanel.Turntheselectlendlelto
selectthe "PO"discposillent_en 1and 300.
• Bypressing8ELECT _ NUMBERonthe remotecontro_
(theJogmodeindicatorlig_ green),youcanalsoturnMULTI
DIAL to select the "P0" discpositionbetween 1and300.
• if a discisloadedinthe singleloaderslot, pressingSINGLE
LOADER PLAYaflowsyouto pleythe discat anytime. evert
duringplay_ck of a disck_ded inthe rack.
• When Master-SlaveconnecIlensare made, singleloaderplay
on the Slaveplayercannotbe performed.
28
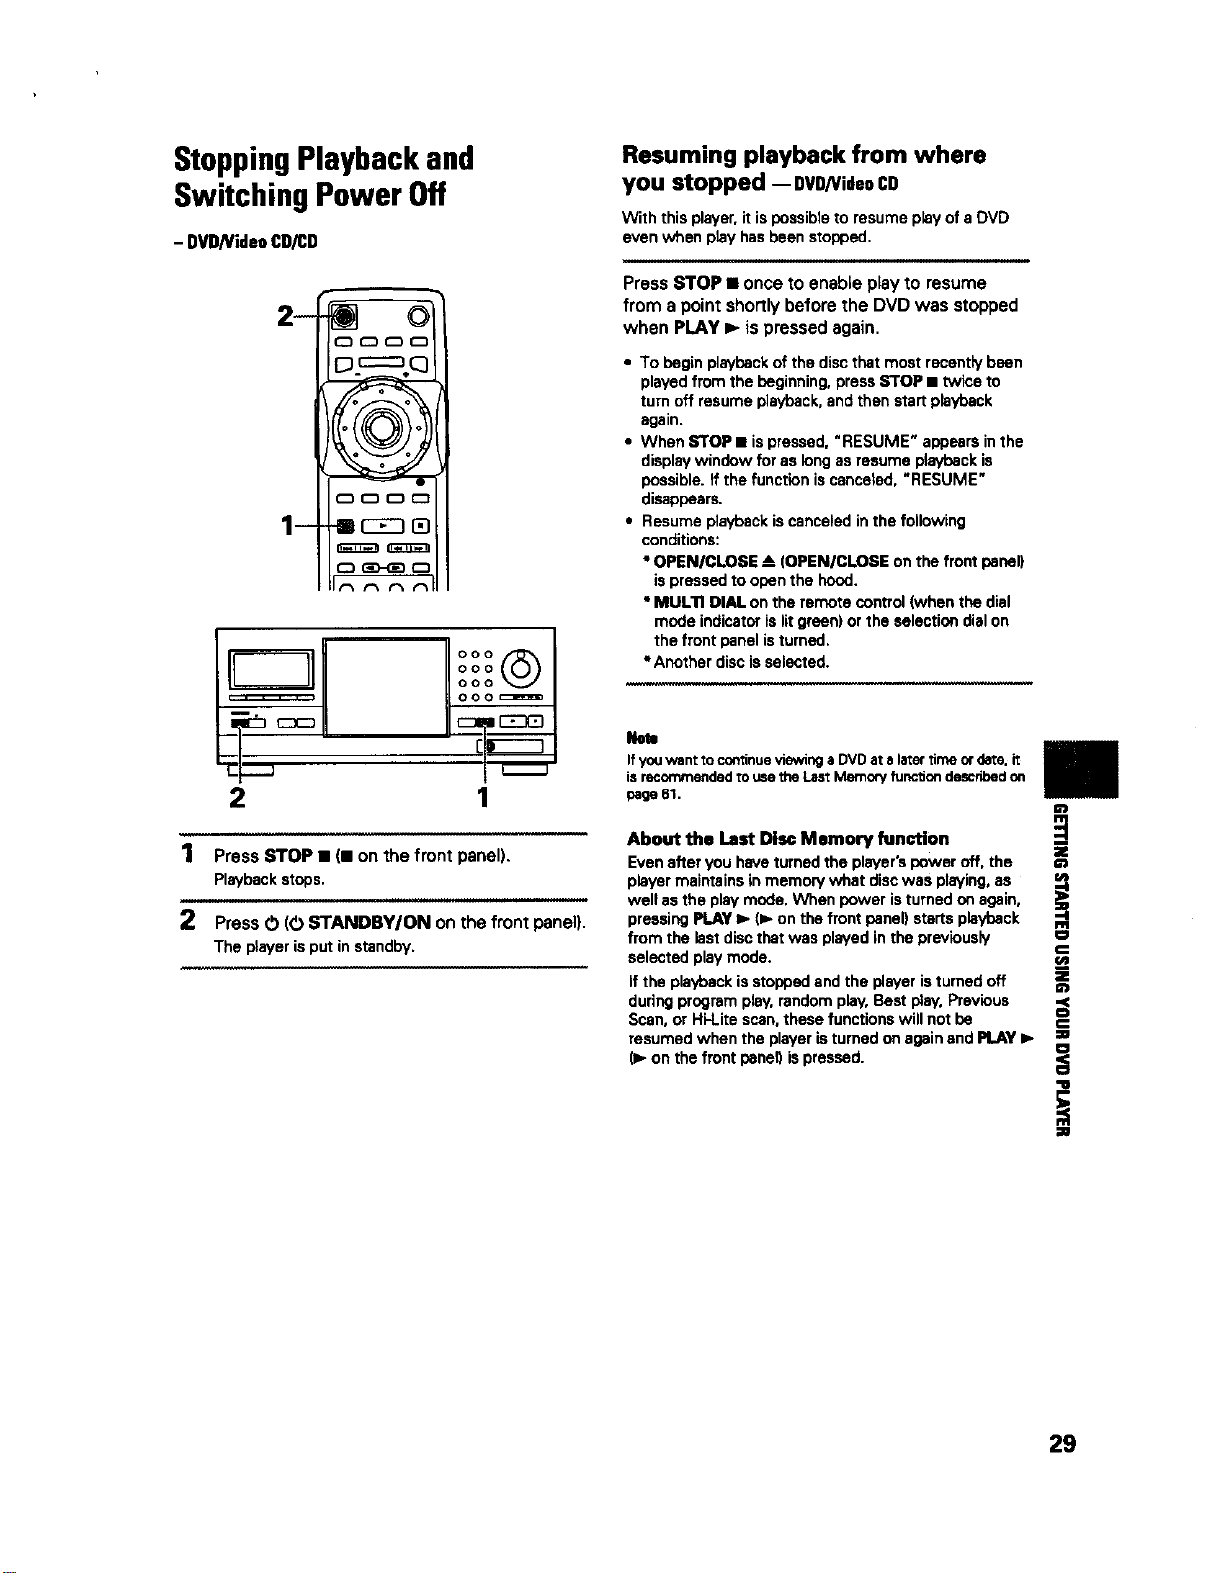
StoppingPlayback and
Switching Power Off
- DVD/VideoCD/CD
Resuming playback from where
you stopped -- DVD/VideoCD
With this player, it is possible to resume play of s DVD
even when play has been stopped,
2- _ 0
1- i rn
PressSTOP• onceto enableplayto resume
from a pointshortlybeforethe DVD was stopped
when PLAY I_ ispressedagain.
• To begin playback of the disc that most recently been
played from the beginning, press STOP • twice to
turn off resume playback, and then start playback
again.
• When STOP • is pressed, "RESUME" appears in the
display window for as long as resume playback is
possible. _fthe function is canceled, "RESUME"
disappears.
• Resume playback iscancaled inthe following
conditions:
• OPEN/CLOSE --&.(OPENICLOSE on the front panel)
is pressed to open the hood.
• MUL'n DIAL on the remote control (when the dial
mode indicator is lit green) or the selection dial on
the front panel is turned,
*Another disc is selected.
If youwant tocontinueviewinga DVDat alater timeor date,it
isrecommendedto usethe LastMemoryfunctiondescribedon
1 page 61.
About the Last Disc Memory function
1 PressSTOP• (11on the frontpanel). Even after you have turned the player's power off, the
Playback stops, player maintains in memory what disc was playing, as
well as the play mode, When power is turned on again,
2 Press O (O STANDBY/ON on the front panel), pressing PLAY _. (1_on the front panel) starts playback
The player is put in standby, from the last disc that was played in the previously
selected play mode.
if the playback is stopped and the player isturned off
during program play, random play, Best play, Previous
Scan, or Hi-Lite scan, these functions will not be
resumed when the player is turned on again and PLAY I_
(1_on the front panel) is pressed.
29
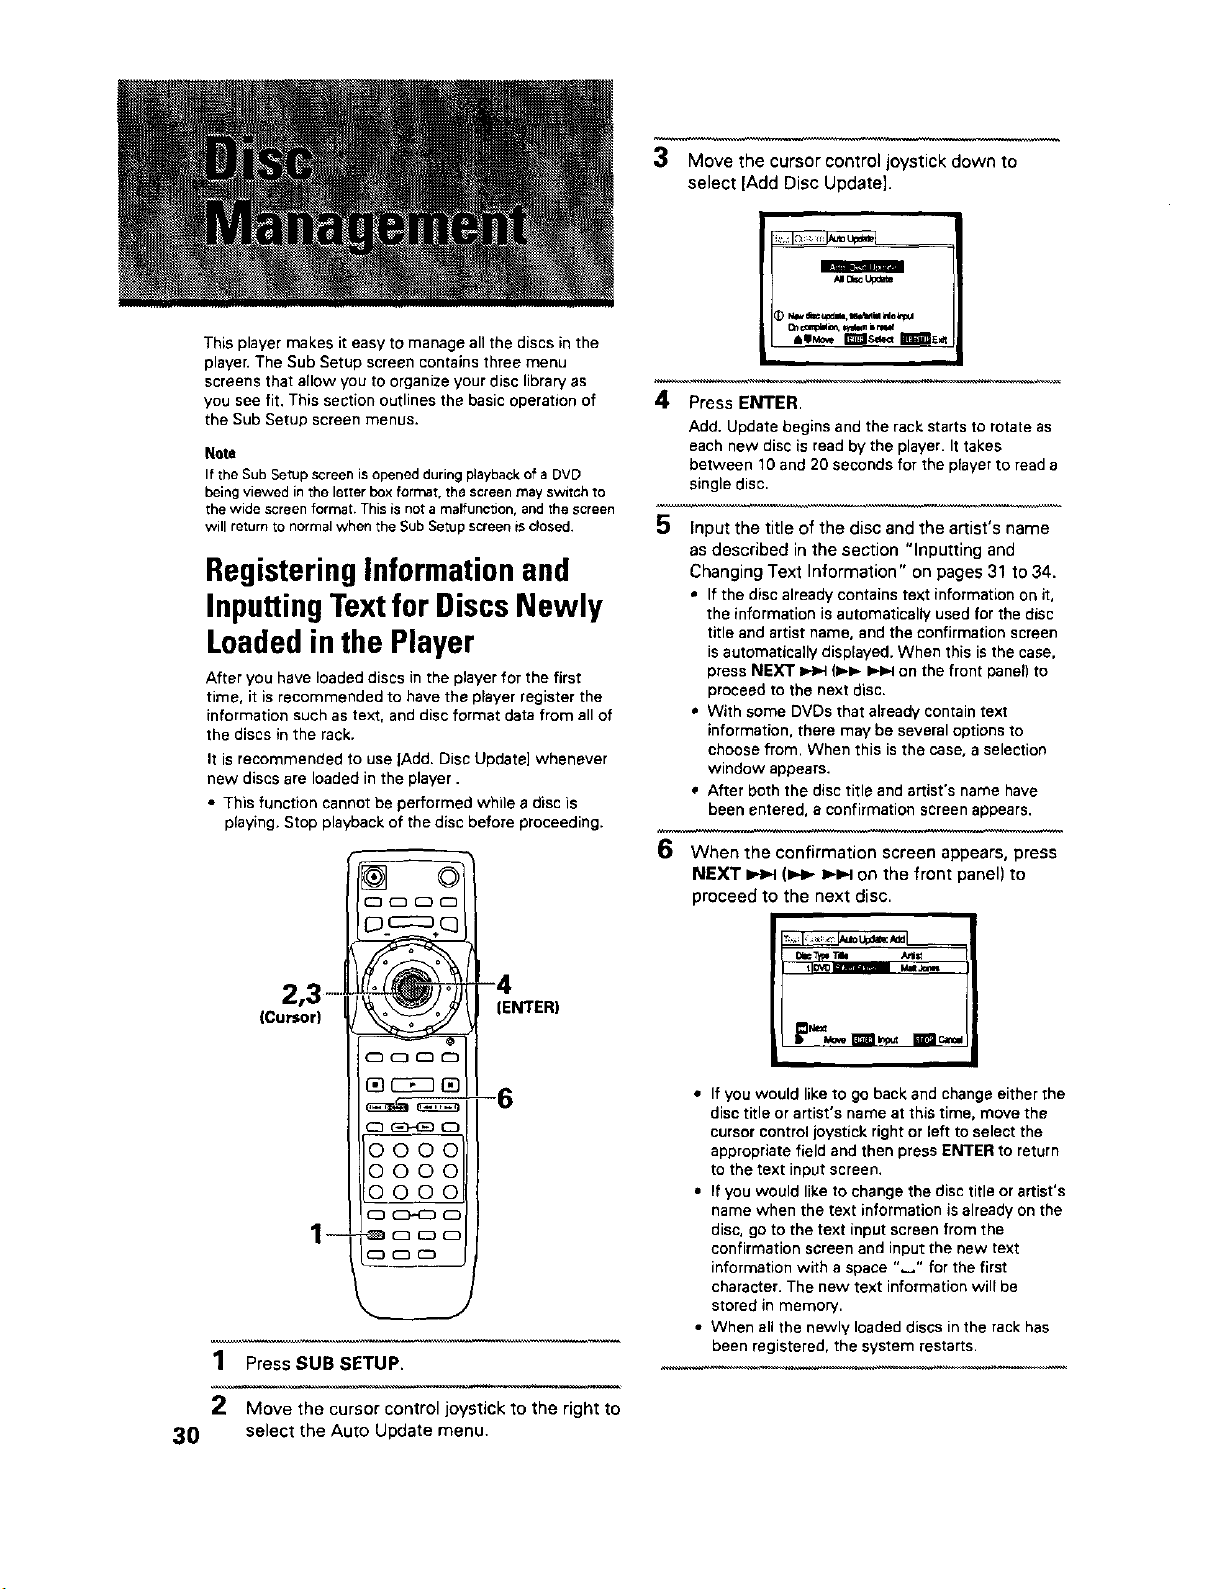
3 Move the cursor control joystick down to
select [Add Disc Update].
This player makes it easy to manage all the discs in the
player. The Sub Setup screen contains three menu
screens that allow you to organize your disc library as
you see fit, This section outlines the basic operation of
the Sub Setup screen menus.
Note
If the Sub Setup screen is opened during playback of a DVD
being viewed in the letter box format, the screen may svatch to
the wide screen format. This is not a malfunction, and the screen
will return re normal when the Sub Setup screen is closed.
RegisteringInformationand
InputtingTextfor DiscsNewly
Loadedinthe Player
After you have loaded discs in the player for the first
time, it is recommended to have the player register the
information such as text, and disc format data from all of
the discs in the rack.
It is recommended to use IAdd. Disc Update] whenever
new discs are loaded in the player.
• This function cannot be performed while a disc is
playing. Stop playback of the disc before proceeding.
p3 .....
(Cursor)
--
©
(ENTER)
3O
1 Press SUB SETUP.
2 Move the cursor control joystick to the right to
select the Auto Update menu.
4 Press ENTER.
Add. Update begins and the rack starts to rotate as
each new disc is read by the player. It takes
between 10 and 20 seconds for the player to read a
single disc.
5 Input the title of the disc and the artist's name
as described in the section "Inputting and
Changing Text Information" on pages 31 to 34.
• If the disc already contains text information on it,
the information is automatically used for the disc
title and artist name, and the confirmation screen
is automatically displayed. When this is the case,
press NEXT _=4 (_=,- _-_ on the front paner) to
proceed to the next disc.
• With some DVDs that already contain text
information, there may be several options to
choose from. When this is the case, a selection
window appears.
• After both the disc title and artist's name have
been entered, a confirmation screen appears.
6 When the confirmation screen appears, press
NEXT _ (I.._- I_1.-Ion the front panel) to
proceed to the next disc.
_ Tie _llt
• If you would like to go back and change either the
disc title or artist's name at this time, move the
cursor control joystick right or left to select the
appropriate field and then press ENTER to return
to the text input screen.
• If you would like to change the disc title or artist's
name when the text information is already on the
disc, go to the text input screen from the
confirmation screen and input the new text
information with a space "_" for the first
character. The new text information wilFbe
stored in memory.
• When all the newly loaded discs in the rack has
been registered, the system restarts.
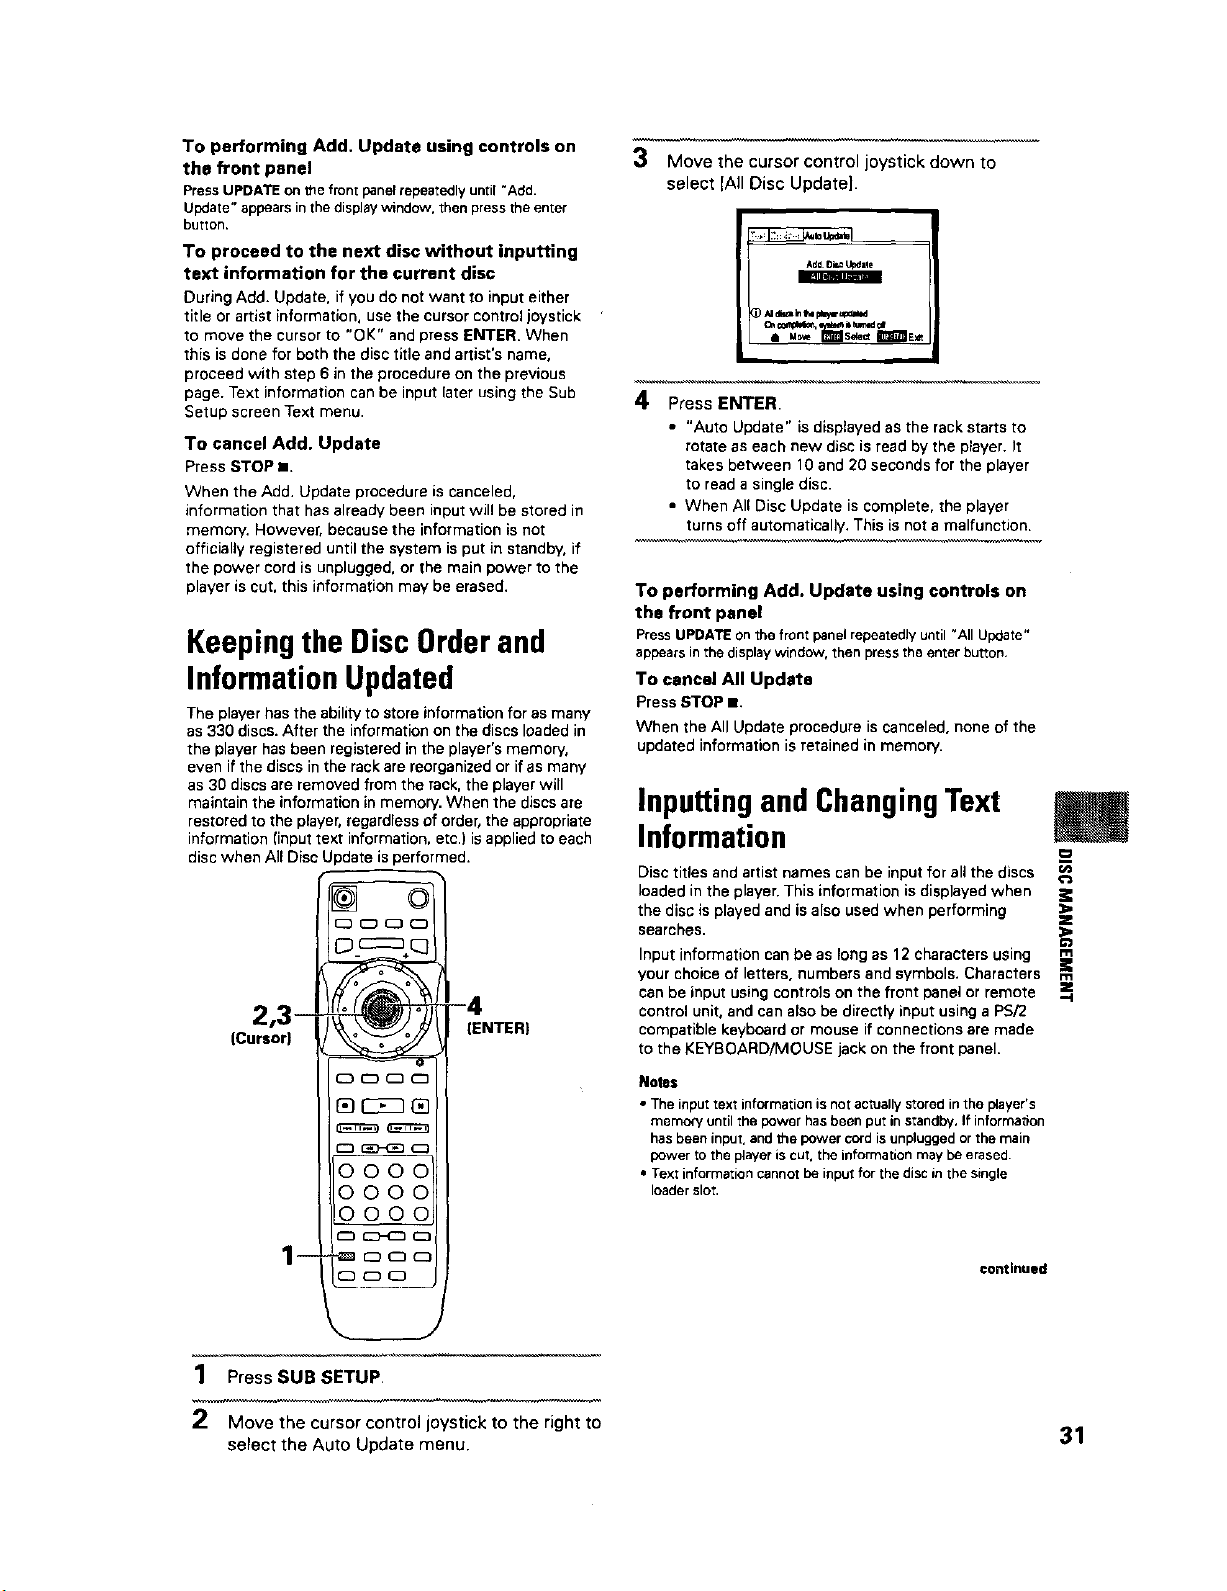
ToperformingAdd,Updateusingcontrolson
the front panel
PressUPDATE on the frontpanelrepeatedly until"Add.
Update"appears in the displaywindow, thenpressthe enter
burton.
To proceed to the next disc without inputting
text information for the current disc
During Add. Update, if you do not want to input either
title or artist information, use the cursor control joystick
to move the cursor to "OK" and press ENTER. When
this isdone for both the disc title and artist's name,
proceed with step 6 in the procedure on the previous
page. Text information can be input later using the Sub
Setup screen Text menu.
To cancel Add. Update
PressSTOPI
When the Add. Update procedure is canceled,
information that has already been input will be stored in
memory. However, because the information is not
officially registered until the system is put in standby, if
the power cord is unplugged, or the main power to the
player is cut, this information may be erased.
Keepingthe DiscOrder and
Information Updated
The player has the abiliw to store information for as many
as 330 discs. After the information on the discs loaded in
the player has been registered in the player's memory,
even if the discs in the rack are reorganized or if as many
as 30 discs are removed from the rack, the player will
maintain the information in memory. When the discs are
restored to the player, regardless of order, the appropriate
information (input text information, etc.) is applied to each
disc when All Disc Update is performed.
2,3--
(Cursor}
--
0000
0000
0000
I0000
-4
IENTER)
3
Move the cursor control joystick down to
select JAil Disc Update].
4
O_¢otaplllc_ illtm_d _f
l
Press ENTER.
• "Auto Update" is displayed as the rack starts to
rotate as each new disc is read by the player. It
takes between 10 and 20 seconds for the player
to read a single disc.
• When All Disc Update is complete, the player
turns off automatically. This is not a malfunction.
To performing Add. Update using controls on
the front panel
PressUPDATEonthe frontpanelrepeatedlyuntil"All Update*'
appears in the displaywindow, then pressthe enter button.
To cancel All Update
PressSTOPm.
When the All Update procedure is canceled, none of the
updated information is retained in memory.
Inputtingand ChangingText
Information
Disc titles and artist names can be input for all the discs
loaded in the player. This information is displayed when
the disc is played and is also used when performing
searches.
Input information can be as long as 12 characters using
your choice of letters, numbers and symbols. Characters
can be input using controls on the front panel or remote
control unit, and can also be directly input using a PS/2
compatible keyboard or mouse if connections are made
to the KEYBOARD/MOUSE jack on the front panel.
Notes
• The input text information is not actually stored in the I_ayer's
memory until the power has been put in standby, If inforrnadon
has been input, and the power cord is unplugged or the main
power to the player iscut. the information may be erased
• Text information cannot be input for the disc in the single
loader slot.
continued
m
_0
U_
z
m
m
z
-4
1 Press SUB SETUP,
2 Move the cursor control joystick to the right to
select the Auto Update menu. 31
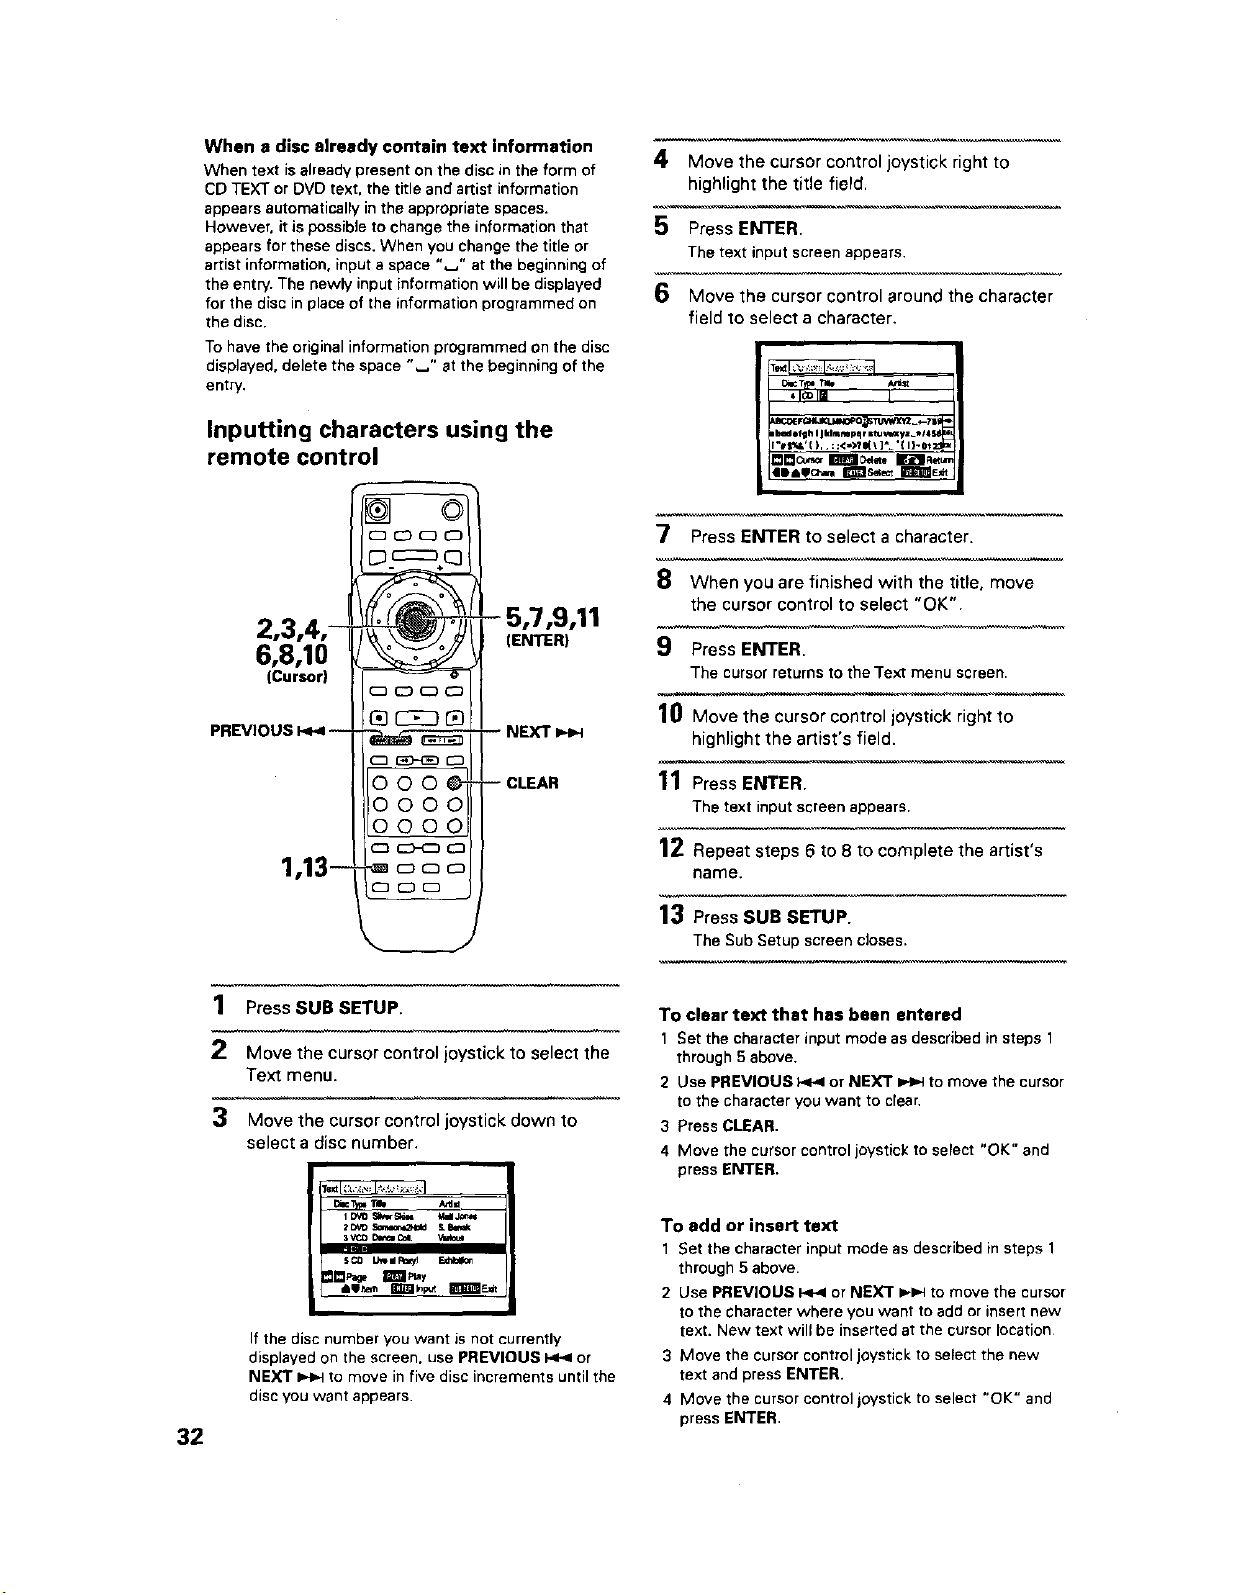
When a disc already contain text information
When text is already present on the disc in the form of
CD TEXT or DVD text. the title and artist information
appears automatically in the appropriate spaces.
However, it is possible to change the information that
appears for these discs. When you change the title or
artist information, input a space ",_" at the beginning of
the entry. The newly input information will be displayed
for the disc in place of the information programmed on
the disc.
To have the original information programmed on the disc
displayed, delete the space "J' st the beginning of the
entry.
Inputting characters using the
remote control
2,3,4,-
6,8,10
(Cursor)
PREVIOUS F<4--
1,13--
000 _"
0000
oooo__
C3_
- 5,7,9,11
(ENTER)
-- NEXT
-- CLEAR
4 Move the cursor control joystick right to
highlight the title field.
5 Press ENTER.
The text input screen appears.
6 Move the cursor control around the character
field to select a character.
_TtFm _ A,_=
'1_1| I
t_efgh I Jklm_pqr =tu_yz_*14
7 Press ENTER to select a character.
When you are finished with the title, move
the cursor control to select "OK".
_)- Press ENTER.
The cursorreturnstothe Text menu screen.
10 Move the cursor control joystick right to
highlight the artist's field.
11 Press ENTER.
The text input screen appears.
12 Repeat steps 6 to 8 to complete the artist's
name.
13 Press SUB SETUP.
The Sub Setup screencloses.
32
1 Press SUB SETUP.
2 Move the cursor control joystick to select the
Text menu.
3 Move the cursor control joystick down to
select a disc number.
5_ LJ_ st f_/5
If the disc number you want is not currently
displayed on the screen, use PREVIOUS _ or
NEXT _ to move in five disc increments until the
disc you want appears.
To clear text that has been entered
1 Set the character input mode as described in steps 1
through 5 above.
2 Use PREVIOUS P<4 or NEXT _ to move the cursor
to the character you want to clear.
3 Press CLEAR.
4 Move the cursor control joystick to select "OK" and
press ENTER.
To add or insert text
1 Set the character input mode as described in steps 1
through 5 above,
2 Use PREVIOUS I<_ or NEXT _*_ to move the cursor
to the character where you want to add or insert new
text. New text will be inserted at the cursor location
3 Move the cursor control joystick to select the new
text and press ENTER.
4 Move the cursor control joystick to select "OK" and
press ENTER.
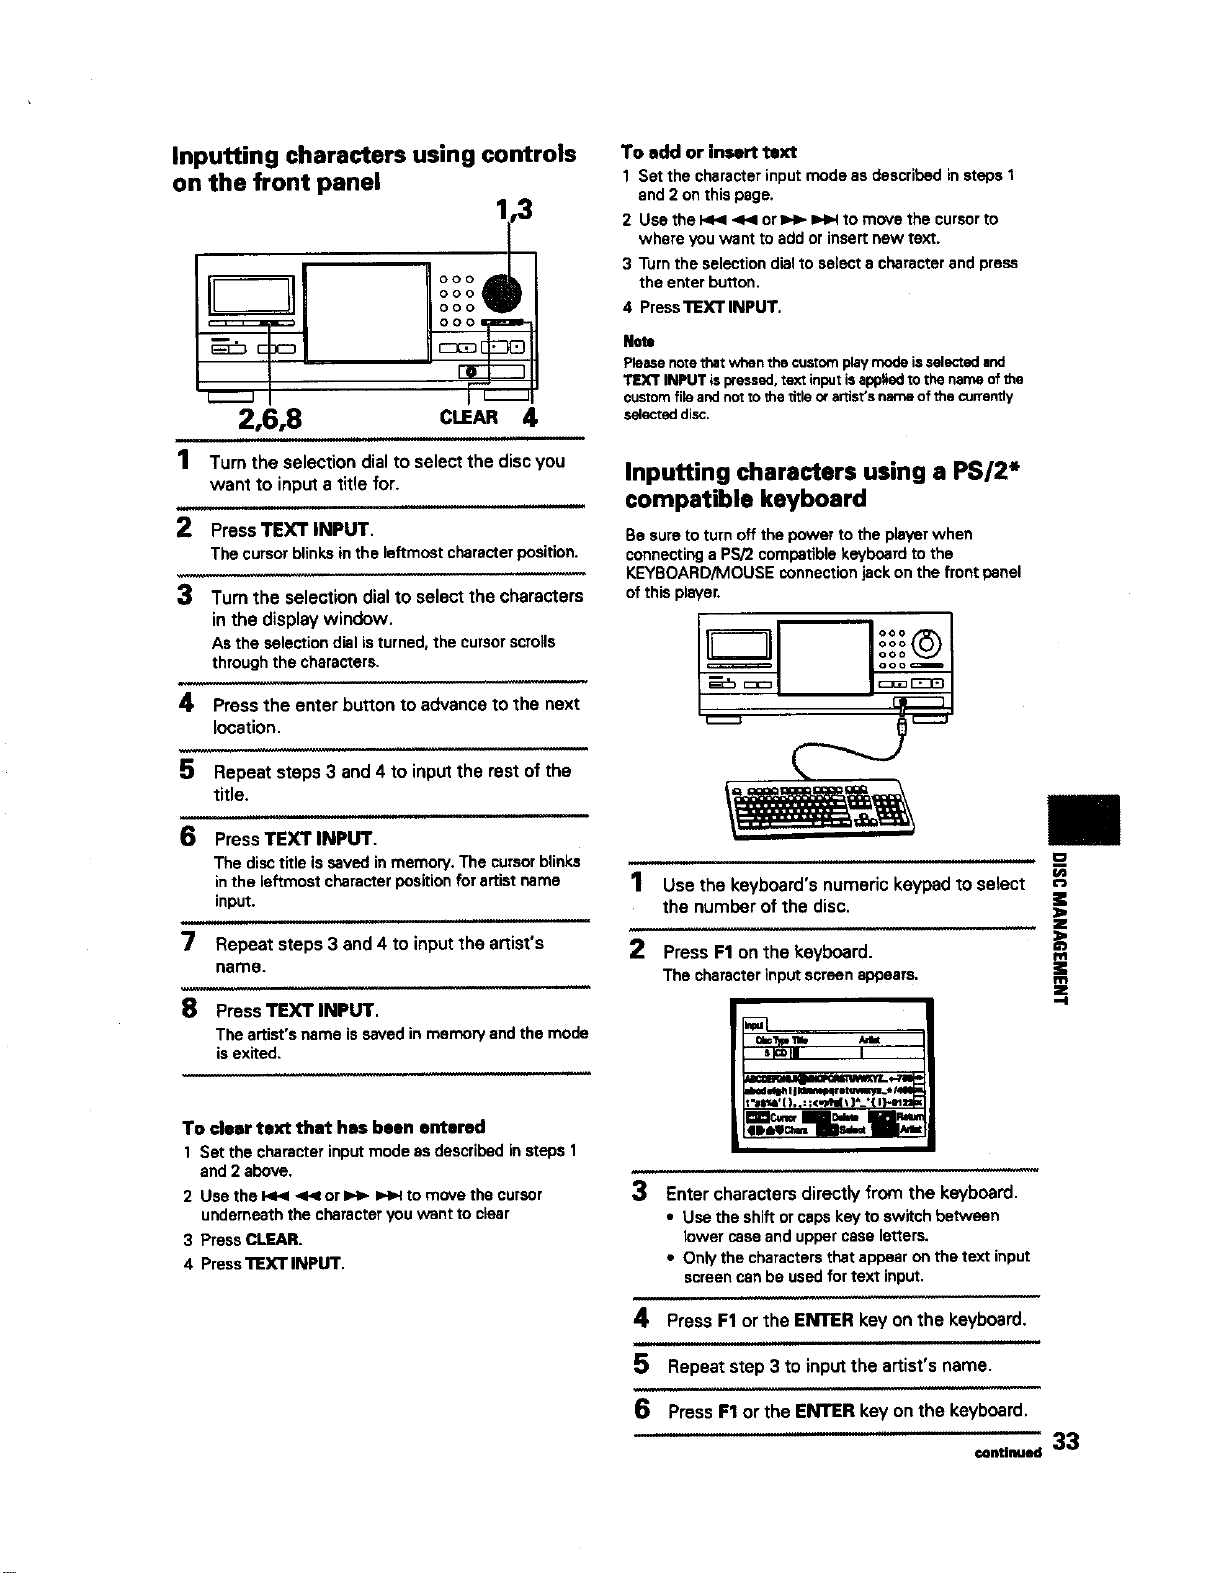
Inputting characters using controls
on the front panel
1,3
000
000
000
o o o _=_-
rir_
F--
2,6,8 CLEAR4
1 Turn the selection dial to select the disc you
want to input a title for.
2 Press TEXT INPUT.
The cursor blinks in the leftmost character position.
3 Turn the selection dial to select the characters
in the display window.
As the selection dial isturned, the cursor scro}ls
through the characters,
4 Press the enter button to advance to the next
location,
5 Repeat steps 3 and 4 to input the rest of the
title.
6 Press TEXT INPUT.
The disc title is saved in memory. The cursor blinks
in the leftmost character position for artist name
input.
i llll
7 Repeat steps 3 and 4 to input the artist's
name.
To add or insert text
1 Set the character input mode as described in steps 1
and 2 on this page.
2 Use the _ _ or _ _ to move the cursor to
where you want to add or insert new text.
3 Turn the selection dial to select a character and press
the enter button,
4 Press'nExT INPUT.
Note
Pleasenotethatwhen the customplaymodeisselectedand
TEXT INPUT ispressed,textinputisappliedto the name of the
customfile andnotto the title ora_ist's name of the currently
selecteddisc,
Inputting characters using a PS/2*
compatible keyboard
Be sure to turn off the power to the player when
connecting a PS/2 compatible keyboard to the
KEYBOARD/MOUSE connection jack on the front panel
of this player.
8 Press TEXT INPUT.
The artist's name is saved in memory and the mode
is exited.
To clear text that has been entered
1 Set the character input mode as described in steps 1
and 2 above.
2 Use the _ ,<_ or IH_ ee,4 to move the cursor
underneath the character you want to clser
3 Press CLEAR.
4 Press'nEXT INPUT.
1 use the keyboard's numeric keypad to select
the number of the disc.
2 Press F1 on the keyboard.
The character input screen appears.
=,=vp_, _=t
s_lI I
I, I
3 Enter characters directly from the keyboard.
• Use the shift or caps key to switch between
lower case and upper case letters.
• Only the characters that appear on the text input
screen can be used for text input.
_.R
t/)
i
m
=E
m
z
.=1
4 Press F1 or the ENTER key on the keyboard.
ii ii
5 Repeat step 3 to input the artist's name.
6 Press F1 or the ENTER key on the keyboard.
=.tl.=._ 33
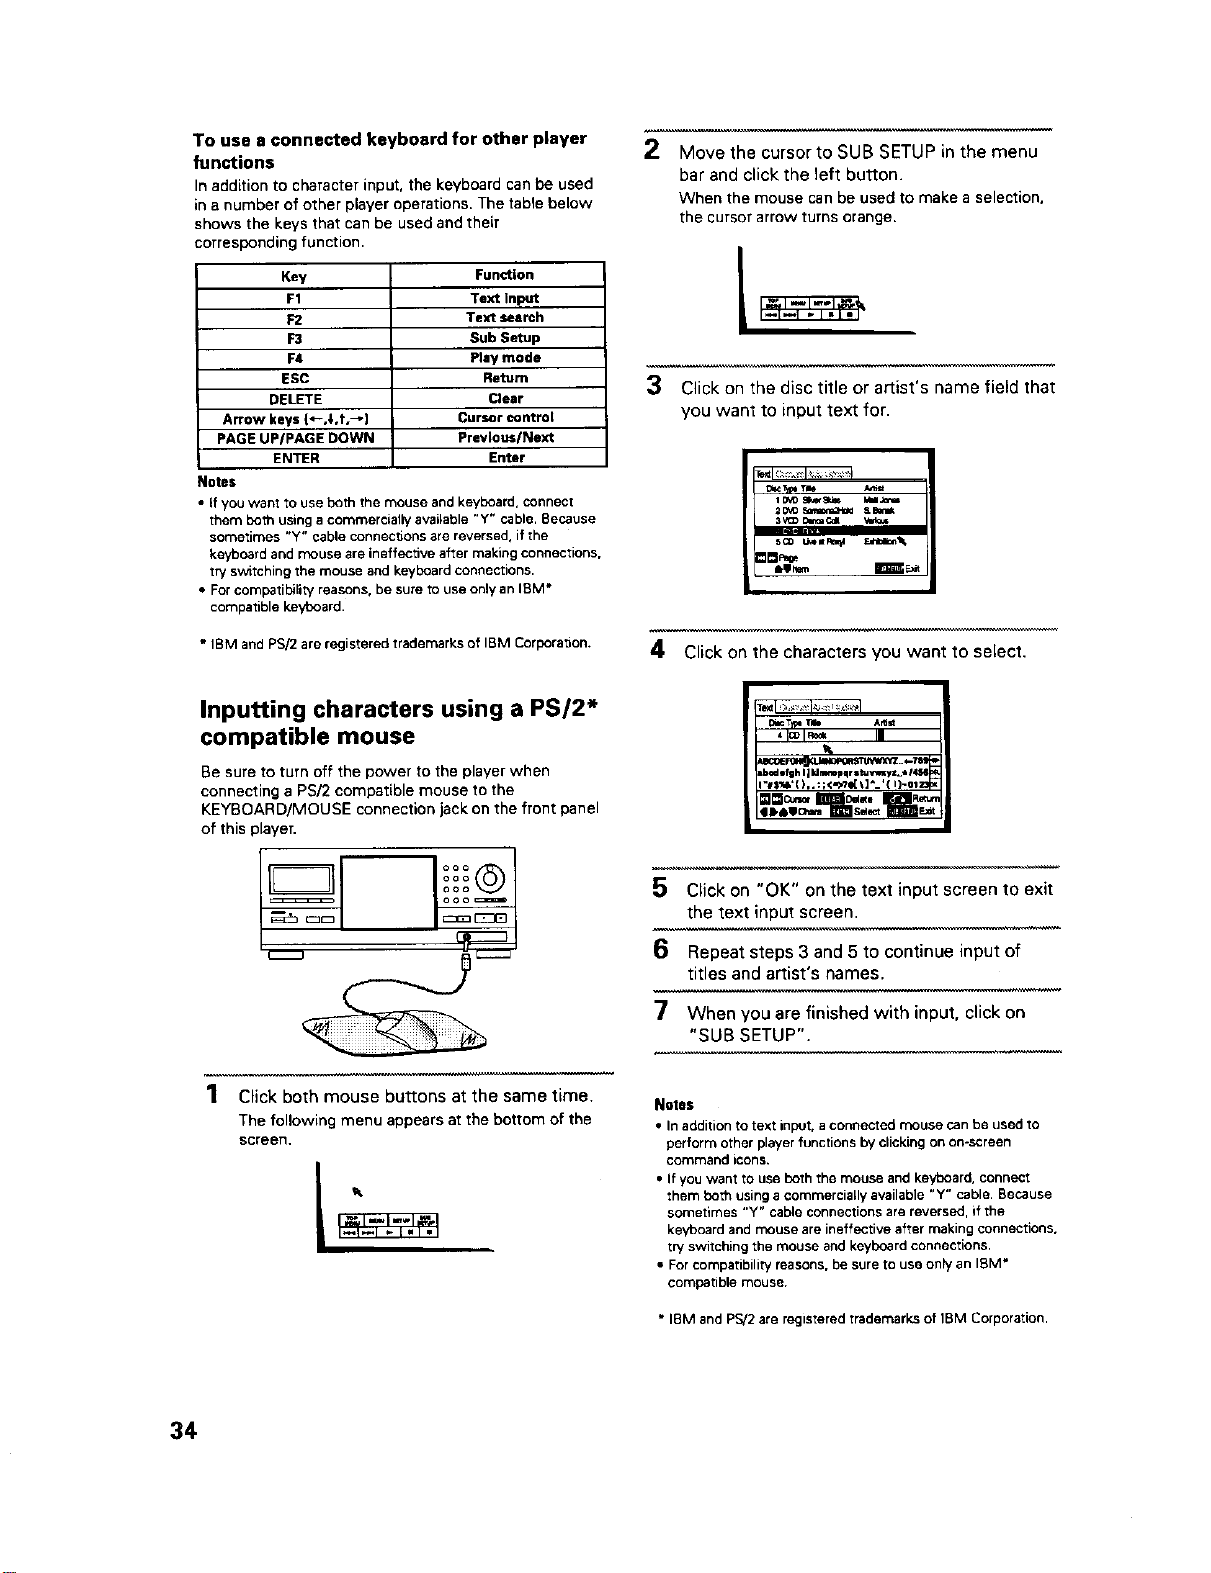
To use a connected keyboard for other player
functions
In addition to character input, the keyboard can be used
in a number of other player operations. The table below
shows the keys that can be used and their
corresponding function.
Key
F1
F2
F3
F4
ESC
DELETE
Arrow keys {*-,$,t,--]
PAGE UPIPAGE DOWN
ENTER
Notes
Function
Text Input
Text search
Sub Setup
Play mode
Return
Clear
Cursor control
Previous/Next
Enter
• if you want to use both the mouse and keyboard, connect
them both using a commercially available "Y" cable. Because
sometimes "Y" cable connections are reversed, if the
keyboard and mouse are ineffective after making connections,
try switching the mouse and keyboard connections.
• For compatibility reasons, be sure to use only an IBM •
compabble keyboard.
• IBM and PSi2 are registered trademarks of IBM Corporation.
2
Move the cursor to SUB SETUP in the menu
bar and click the left button.
When the mouse can be used to makea selection,
the cursor arrow turns orange.
3 Click on the disc title or artist's name field that
you want to input text for.
_Tzpel_e
i D_ 8r_er_ IJ_i
2_ sa'_at_ Sblk
4 Click on the characters you want to select,
Inputting characters using a PS/2*
compatible mouse
Be sure to turn off the power to the player when
connecting a PSi2 compatible mouse to the
KEYBOARD/MOUSE connection jack on the front panel
of this player.
1 Click both mouse buttons at the same time.
The following menu appears at the bottom of the
screen.
_ Tma A_d_
4 _IRo* Imm
Lbad•fuh I1_]wrmpqr •_Y, uyz_•/r4_6
"#$_,'[ ),. :;<->'tel_]*_'{ 1)-ol_
5 Click on "OK" on the text input screen to exit
the text input screen.
6 Repeat steps 3 and 5 to continue input of
titles and artist's names.
7 When you are finished with input, click on
"SUB SETUP".
Notes
• In addition to text input, a connected mouse can be used to
perform other player functions by clicking on on-screen
CoN3mand icons.
• If you want to use both the mouse and keyboard, connect
them both using a commercially available "Y" cable, Because
sonlebma_ "Y" cable connectiorl$ ar_ r_versed, if the
keyboard and mouse are ineffective after making connections,
try switching the mouse and keyboard connections.
• For compatibility reasons, be sure to use only an I_M •
eompatl ble mouse.
• IBM and PS!2 are registered trademarks of IBM Corporation.
34
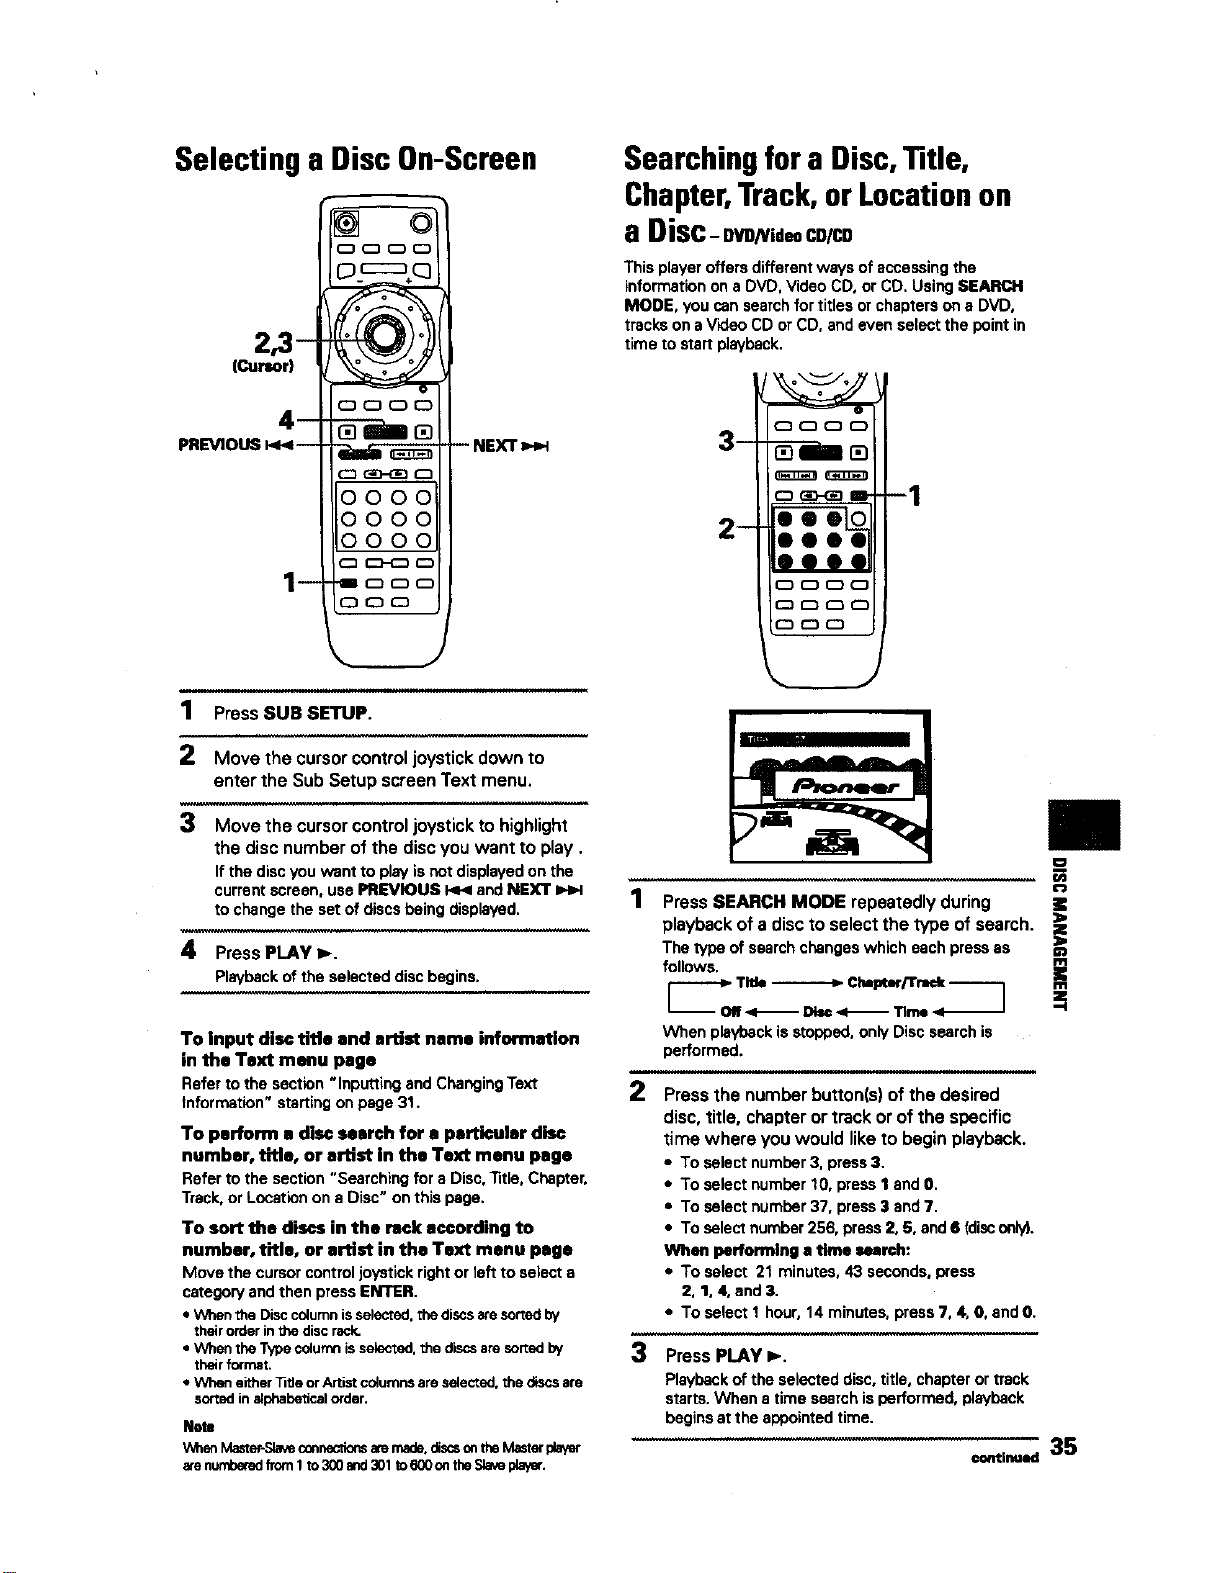
Selecting a Disc On-Screen
1 Press SUBSETUP.
Move the cursor control joystick down to
enter the Sub Setup screen Text menu.
3 Move the cursor control joystick to highlight
the disc number of the disc you want to play.
If the discyou want to playisnot displayedon the
currentscreen,usePREVIOUS _ andNEXT _ 1
tochangethe setofdiscsbeingdisplayed.
Press PLAY I,-.
Playbackofthe selecteddiscbegins.
To Input disc title and artist name information
in the Text menu page
Referto the section"Inputtingand ChangingText
information"startingonpage31.
To perform a disc search for • particular disc
number, title, or artist in the Text menu page
Referto the section"Searching fora Disc,Tide,Chapter,
Track,or Locationon a Disc"on thispage.
To sort the discs in the rack according to
number, title, or artist in the Text menu page
Move the cursor control joystick right or 1offto select a
category and then press ENTER.
• When the Disccolumnisselected,the discsaresortedby
their orderinthe discrack.
• When the Type columnis selected,the dLscsare sortedby
theirformat.
• When either_tie orArtist columnsare selected,the discsare
sortedinalphabeticalorder.
Note
WbenMaster-Slaveconnectionsatemade.discsontheMasterplayer
a_enumberedfrom1Io3(]0and301to6(X}ontheSlavepla_er.
Searchingfor a Disc,Title,
Chapter,Track, or Locationon
a Disc-ovo_zd.co/co
Thisplayeroffersdifferentwaysof accessingthe
informationon aDVD,VideoCD,or CD.UsingSEARCH
MODE, youcansearchfortitlesorchapterson aDVD,
trackson aV'_eo CDor CD,andeven selectthe pointin
timeto startplayback.
2
O O O (:_
3- _---im _
C_ (3D-GOD m 1
2-
eeee
00_0
ODO0
OO0
Press SEARCH MODE repeatedly during
playback of a disc to select the type of search.
i
ofsearchchangeswh heachpreeaas
When playback is stopped, only Disc search is
performed.
Press the number button(s) of the desired
disc, title, chapter or track or of the specific
time where you would like to begin playback.
• To select number 3, press 3.
• To select number 10, press I and O.
• To select number 37, press 3 and 7.
• To select number 256, press 2, 6, and 6 (disconly),
When performing a time search:
• To select 21 minutes, 43 seconds, press
2, 1, 4, and 3.
• To select I hour, 14 minutes, press 7, 4, O, and O.
3 Press PLAY _.
Playbackof the selecteddisc.title, chapterortrack
starts.When a time searchisperformed,playback
beginsat the appointedtime.
continued
35
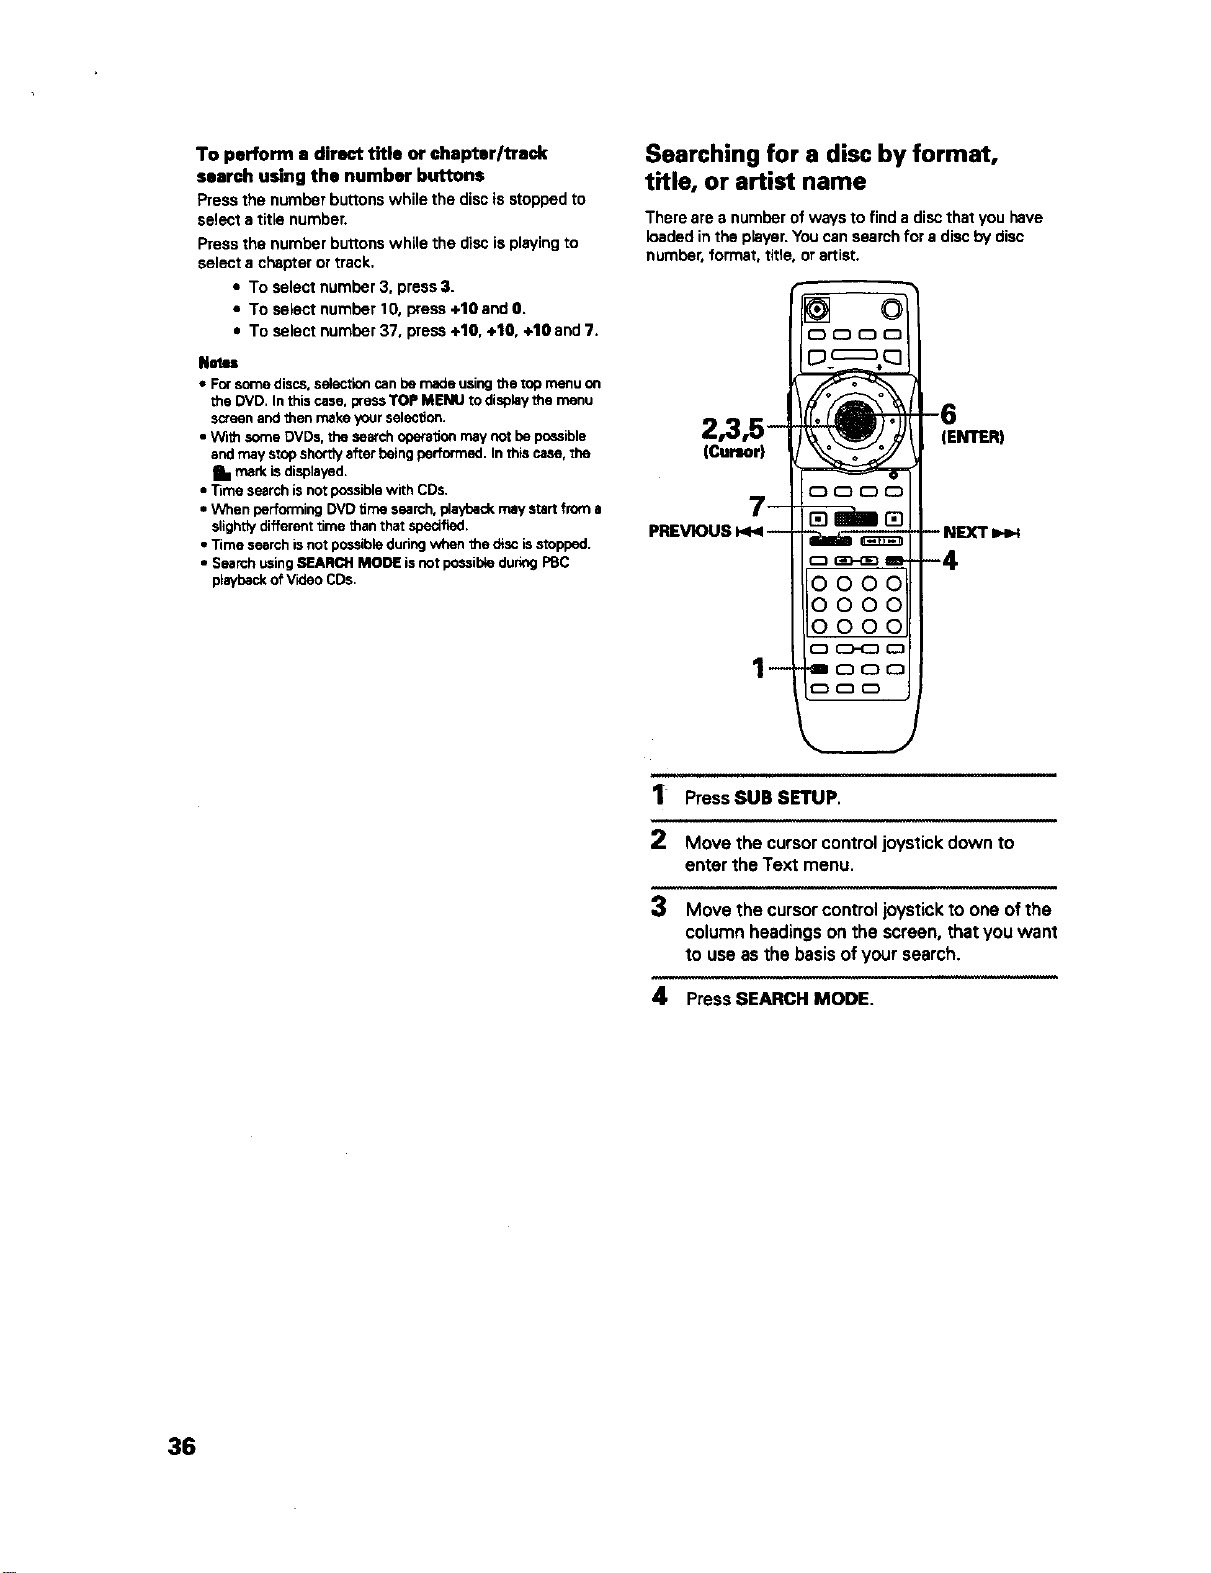
To perform a direct title or chapter/track
search using the number buttons
Press the number buttons while the disc is stopped to
select a tibe number.
Press the number buttons while the disc is playing to
select a chapter or track,
• To select number 3, press 3.
• To select number 10, press +10 and 0.
= To select number 37, press +10, +10, +10 and 7.
NMu
• For some discs, Selection can be made using the top menu on
the DVD. In this case, press TOP MENU to display the menu
screen and t_en make your selection.
• W_th some DVDs, the search operation may not be possible
and may srop shortty after being performed. In this case, the
Ill mark is displayed.
• T_me search is nor possible with CDs.
• When performing DVD time search, playback may start from a
slightty different rime _han that specified.
• Time search is not possible during when 1he disc is stopped.
• Search using SEARCH MODE is not possible during PBC
playback ofVideo CDs.
Searching for a disc by format,
title, or artist name
There are a number of ways to find a disc that you have
loaded in the player. You can search for a disc by disc
number, format, title, or artist.
2,3,5 -
(Cur=or)
_
PREVIOUS k_--
--
oooo
(ENTER)
ill i i
1 PressSUB SETUP.
2 Move the cursor control joystick down to
enter the Text menu.
3 Move the cursor control joystick to one of the
column headings on the screen, that you want
to use as the basis of your search.
4 Press SEARCH MODE.
36
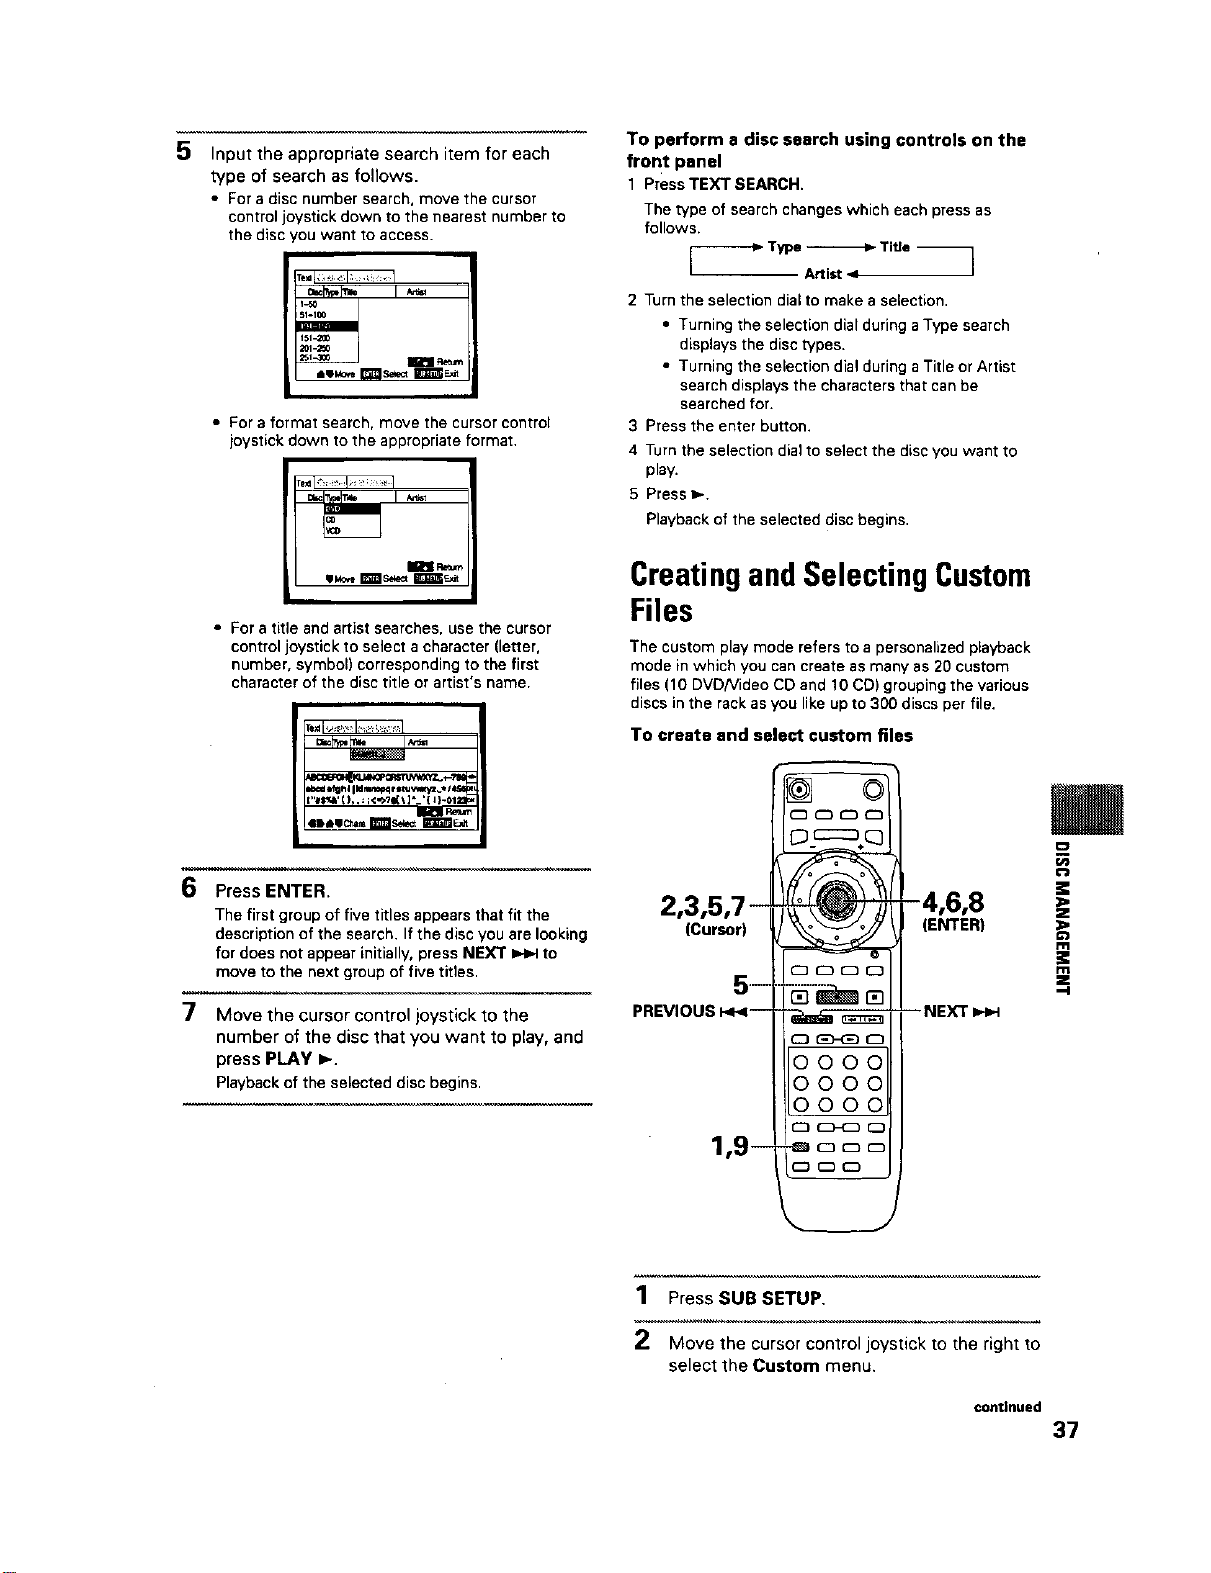
5
6
7
Input the appropriate search item for each
_pe of search as follows.
• For a disc number search, move the cursor
control joystick down to the nearest number to
the disc lou want to access.
51.100
• For a format search, move the cursor control
joystick down to the appropriate format.
m Retum
I
• For a title and artist searches, use the cursor
control joystick to select a character (letter,
number, symbol) corresponding to the first
character of the disc title or artist's name.
sl,.=., m _,=_'_
Press ENTER.
The first group of five titles appears that fit the
description of the search. If the disc you ere looking
for does not appear initially, press NEXT =_=.4to
move to the next group of five titles.
Move the cursor control joystick to the
number of the disc that you want to play, and
press PLAY b-.
Playbackof the selected disc begins.
To perform a disc search using controls on the
front panel
1 PressTEXT SEARCH.
The type of search changes which each press as
follows.
Type _ Tiee --
2 Turn the selection dial to make a selection.
• Turning the selection dial during a Type search
displays the disc types.
• Turning the selection dial during a Title or Artist
search displays the characters that can be
searched for.
3 Press the enter button.
4 Turn the selection dial to select the disc you want to
play.
5 Press I_.
Playback of the selected disc begins.
CreatingandSelecting Custom
Files
The custom play mode refers to a personalized playback
mode in which you can create as many as 20 custom
files (10 DVDNideo CD and 10 CD) grouping the various
discs in the rack as you like up to 300 discs per file.
To create and select custom files
2,3,5,7--
iCursor)
._=
PREVIOUS I,_<--
1,9--
D F:z_÷(3
_ "_'-- NEXT I,,-_-I
0000
0000
0000
C)_CD
m
z
k-J
m
:e
m
z
,-I
1 Press SUB SETUP,
2 Move the cursor control joystick to the right to
select the Custom menu.
continued
37
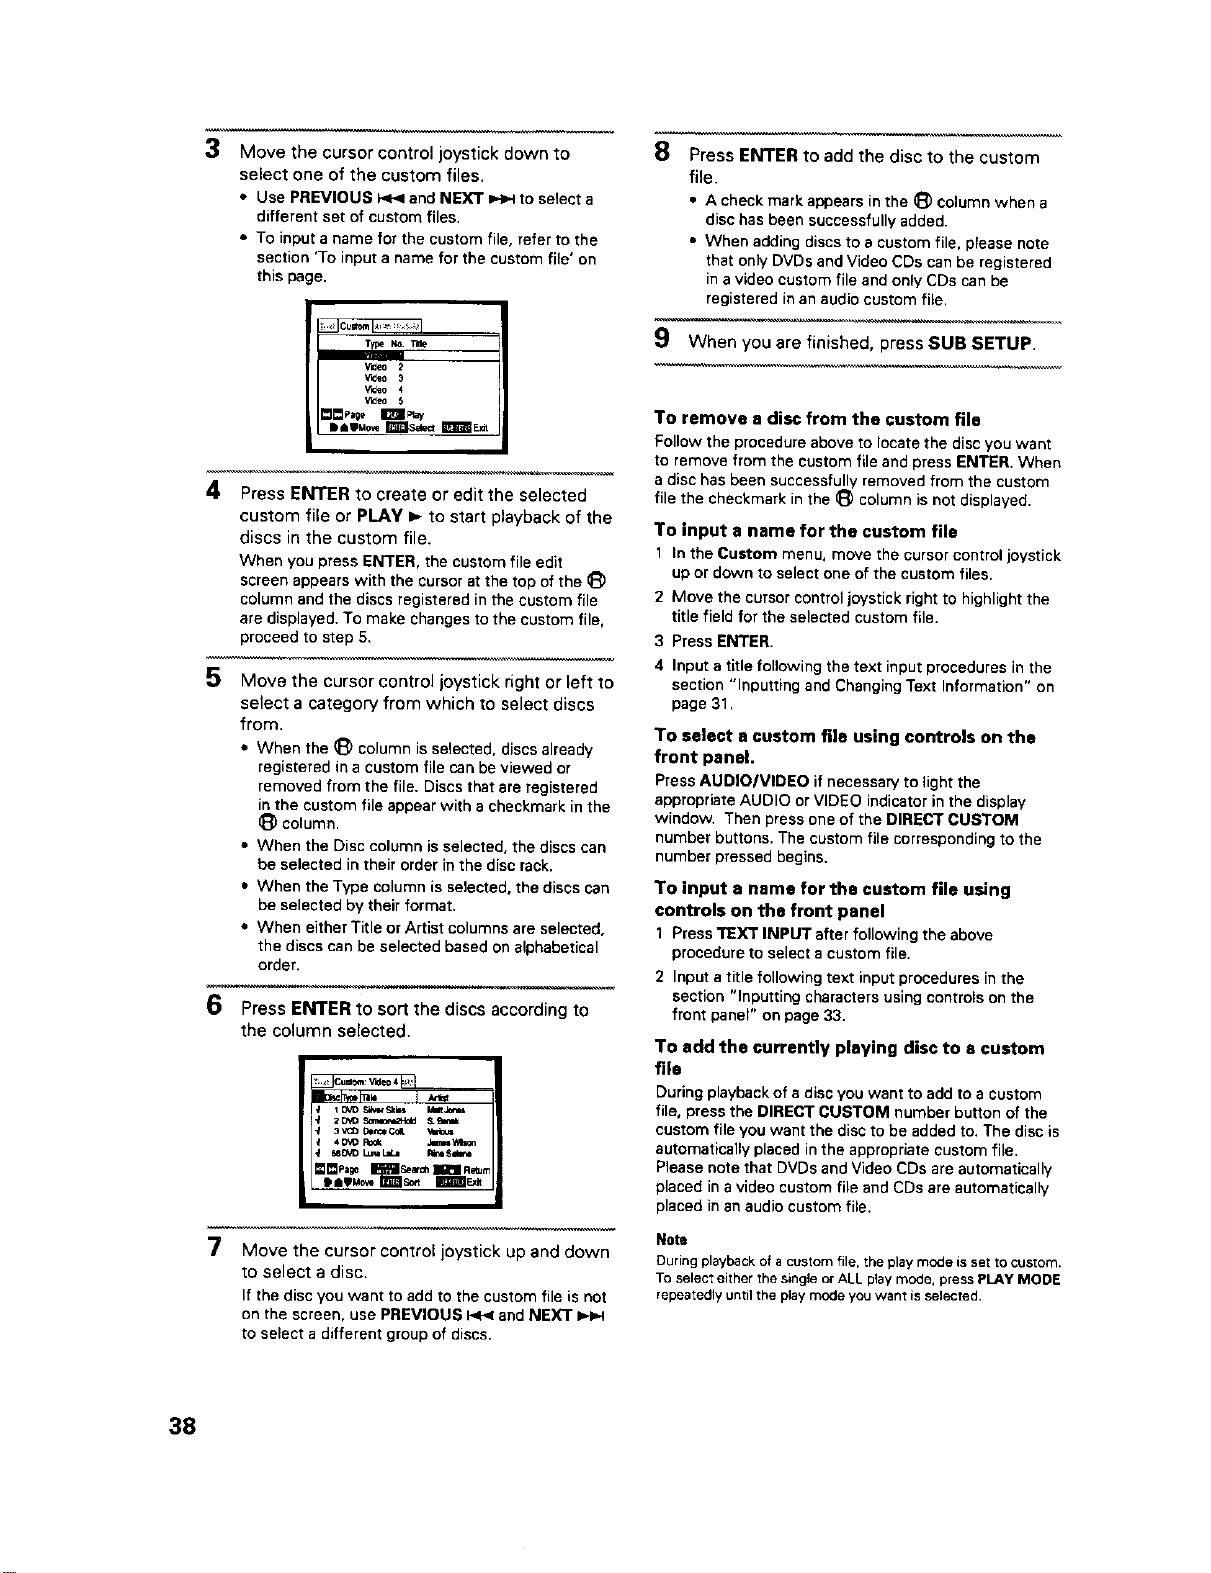
3
4
5
6
7
Move the cursor control joystick down to
select one of the custom files.
• Use PREVIOUS _ and NEXT _ to select a
different set of custom files.
• To input a name for the custom file, refer to the
section 'To input a name for the custom file' on
this page.
Type N_
Video 2
_f_eo 3
_f_eo 4
Vl_eO 5
ail=WMo_r#tttlse_=aml_E_
Press ENTER to create or edit the selected
custom file or PLAY _.- to start playback of the
discs in the custom file.
When you press ENTER, the custom file edit
screen appears with the cursor at the top of the _)
column and the discs registered in the custom file
ere displayed. To make changes to the custom file,
proceed to step 5.
Move the cursor control joystick right or left to
select a category from which to select discs
from.
• When the (_ column is selected, discs already
registered in a custom file can be viewed or
removed from the file, Discs that are registered
in the custom file appear with a checkmark in the
_) column.
• When the Disc column is selected, the discs can
be selected in their order in the disc rack.
• When the Type column is selected, the discs can
be selected by their format.
• When either Title or Artist columns are selected,
the discs can be selected based on alphabetical
order.
Press ENTER to sort the discs according to
the column selected.
i UqD £1t,l_ S_i_ l/it Joe_
2o_o _amo_Hdd &b,tm
4_ Rook ,liTm=YAt0n
680VD LU_ LaL= Rk_S_
I_Pa_ _ _ Ae_m
Move the cursor control joystick up and down
to select a disc.
If the disc you want to add to the custom file is not
on the screen, use PREVIOUS _ and NEXT
to select a different group of discs.
8 Press ENTER to add the disc to the custom
file.
• A check mark appears in the _) column when a
disc has been successfully added.
• When adding discs to a custom file, please note
that only DVDs and Video CDs can be registered
in a video custom file and only CDs can be
registered in an audio custom file.
9 When you are finished, press SUB SETUP.
To remove e disc from the custom file
Follow the procedure above to locate the disc you want
to remove from the custom file and press ENTER. When
a disc has been successfully removed from the custom
file the checkmark in the _) column is not displayed.
To input a name for the custom file
1 _ntheCustom menu, movethe cursor control joystick
up or down to select one of the custom files.
2 Move the cursor control joystick right to highlight the
title field for the selected custom file.
3 Press ENTER.
4 Input a title following the text input procedures in the
section "Inputting and Changing Text Information" on
page 31.
To select a custom file using controls on the
front panel.
Press AUDIO/VIDEO if necessary to light the
appropriate AUDIO or VIDEO indicator in the display
window, Then press one of the DIRECT CUSTOM
number buttons, The custom file corresponding to the
number pressed begins.
To input a name for the custom file using
controls on the front panel
1 Press TEXT INPUT after following the above
procedure to select a custom file,
2 Input a title following text input procedures in the
section "Inputting characters using controls on the
front panel" on page 33,
To add the currently playing disc to • custom
file
During playback of a disc you want to add to a custom
file, press the DIRECT CUSTOM number button of the
custom file you want the disc to be added to, The disc is
automatically placed in the appropriate custom file.
Please note that DVDs and Video CDs are automatically
placed in a video custom file and CDs are automatically
placed in an audio custom file.
Note
During playback of a custom file, the play mode is set to custom.
To select either the single or ALL play mode, press PLAY MODE
repeatedly until the play mode you want is selected.
38
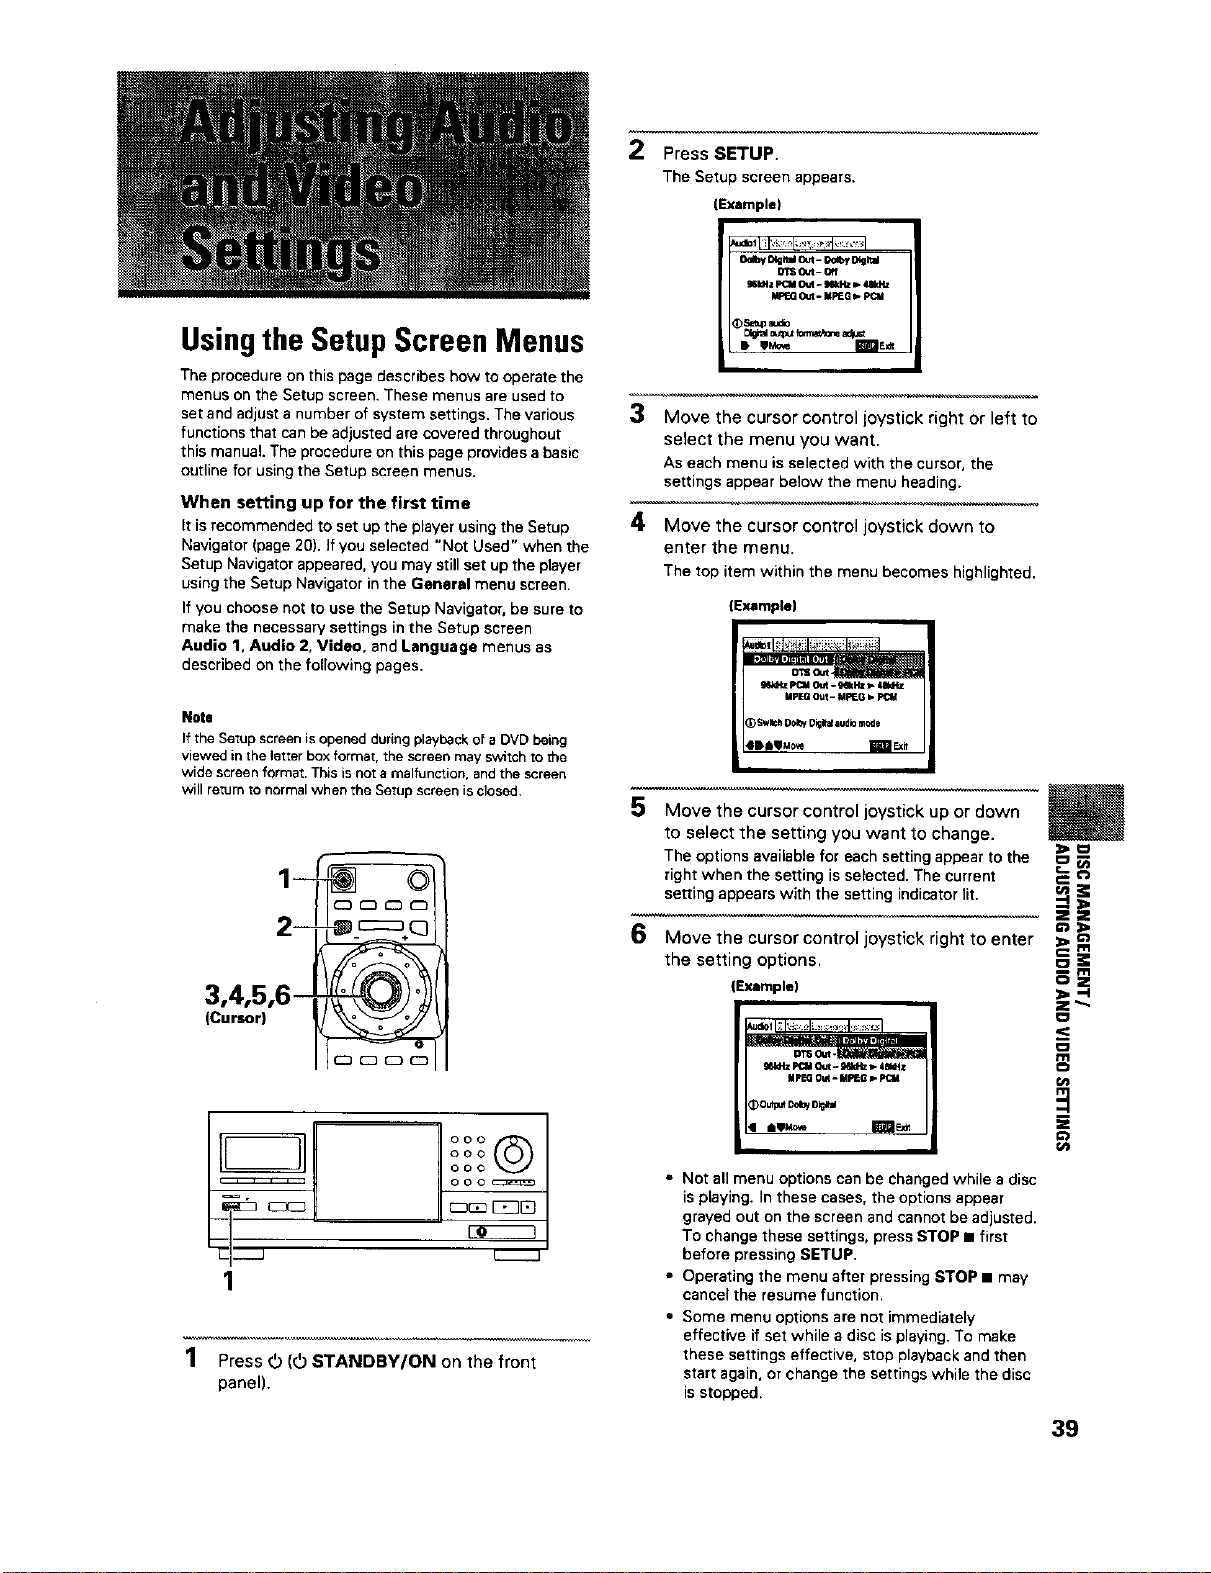
Usingthe Setup Screen Menus
The procedure on this page describes how to operate the
menus on the Setup screen. These menus are used to
set and adjust a number of system settings. The various
functions that can be adjusted are covered throughout
this manual. The procedure on this page provides a basic
outline for using the Setup screen menus.
When setting up for the first time
It is recommended to set up the player using the Setup
Navigator (page 20). If you selected "Not Used" when the
Setup Navigator appeared, you may still set up the player
using the Setup Navigator in the General menu screen.
If you choose not to use the Setup Navigator, be sure to
make the necessary settings in the Setup screen
Audio 1. Audio 2, Video, and Language menus as
described on the following pages.
2
3
4
Press SETUP.
The Setup screen appears.
{Example)
O'tSOut- Off
S41CtZF_tl O_. I_Hz _ 41kHz
k'PEG(_t - MPIEGI_PCU
Move the cursor control joystick right or left to
select the menu you want.
As each menu is selected with the cursor,the
settings appear below the menu heading.
Move the cursor control joystick down to
enter the menu.
The top item within the menu becomes highlighted.
{Example)
Note
If the Setup screen is opened during playback of a DVD being
viewed in the letter box format, the screen may switch to the
wide screen format. This isnot a malfunction, and the screen
will re;urn to normal when The Setup screen is closed.
(Cursor)
M--J
1
l
°°°©t
ooo
ooo
ooo cz_
EJ_ C_IB
I
1 Press _ (_ STANDBY/ON on the front
panel).
5 Move the cursor control joystick up or down _
to select the setting you want to change.
The options available for each setting appear to the I_
right when the setting is selected. The current
setting appears with the setting indicator lit.
2Z
96Mtz _:M Q_t- _ _-4aldtz
MpEG Out. MP_G _
6 theM°VesettingthecurSOroptions.COntroljoystick right to enter --i i
(Example) _ --I
t_
o
s aeM_ I_
D
Z
Cn
• Not all menu options can be changed while a disc
is playing. In these cases, the options appear
grayed out on the screen and cannot be adjusted.
To change these settings, press STOP • first
before pressing SETUP.
• Operating the menu after pressing STOP • may
cancel the resume function.
• Some menu options are not immediately
effective if set while a disc isplaying. To make
these settings effective, stop playback and then
start again, or change the settings while the disc
isstopped.
39
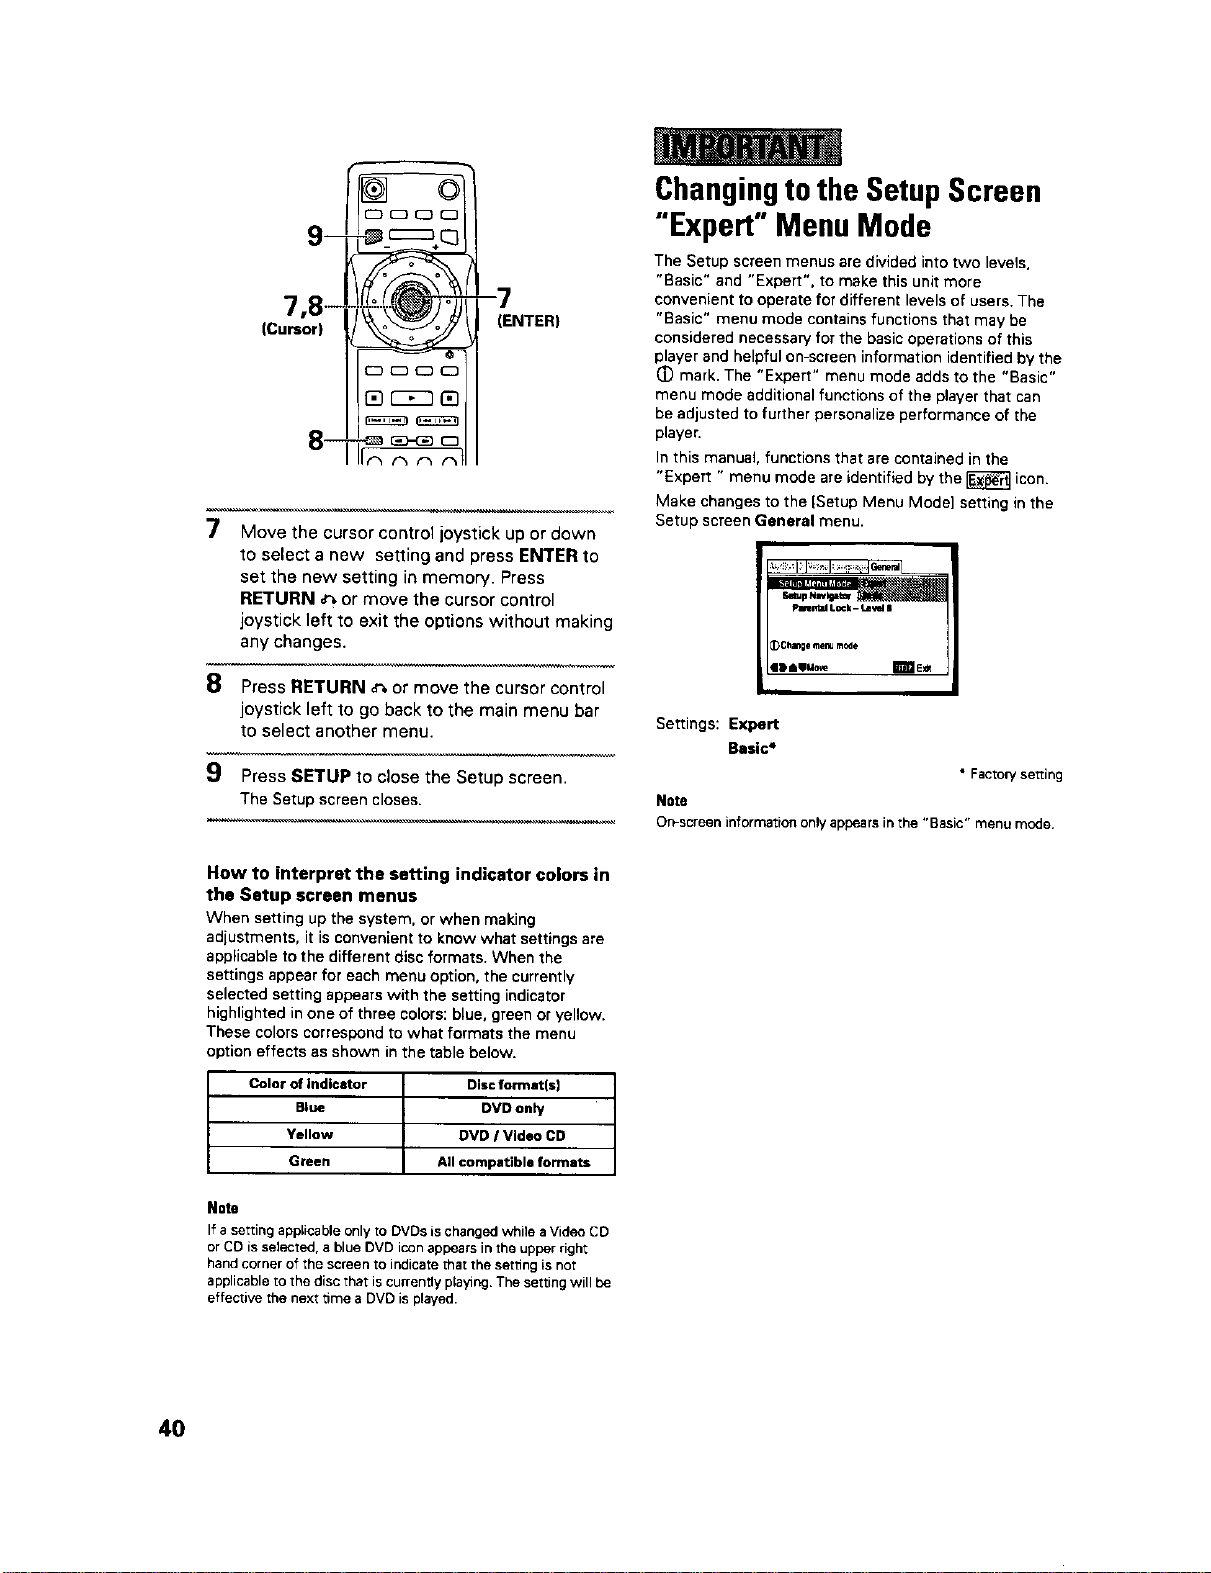
(Cursor)
_
(£3000
-7
(ENTER)
7 Move the cursor control joystick up or down
to select a new setting and press ENTER to
set the new setting in memory. Press
RETURN _ or move the cursor control
joystick left to exit the options without making
any changes.
8 Press RETURN _ or move the cursor control
joystick left to go back to the main menu bar
to select another menu.
9 Press SETUP to close the Setup screen.
The Setup screencloses.
Changingtothe SetupScreen
"Expert" Menu Mode
The Setup screen menus are divided into two levels,
"Basic" and "Expert", to make this unit more
convenient to operate for different levels of users. The
"Basic" menu mode contains functions that may be
considered necessary for the basic operations of this
player and helpful on-screen information identified by the
(D mark. The "Expert" menu mode adds to the "Basic"
menu mode additional functions of the player that can
be adjusted to further personalize performance of the
player.
In this manual, functions that are contained in the
"Expert " menu mode are identified by the _ icon.
Make changes to the {Setup Menu Mode] setting in the
Setup screen General menu.
Plmmml Lock - Level i
_C;lange menura_e
ID aaMo;'e E_rfJE_
Settings: Expert
Basic*
• Facrowse_ting
Note
On-screen information onlyappearsinthe "Basic" menu mode.
How to interpret the setting indicator colors in
the Setup screen menus
When setting up the system, or when making
adjustments, it is convenient to know what settings are
applicable to the different disc formats. When the
settings appear for each menu option, the currently
selected setting appears with the setting indicator
highlighted in one of three colors: blue, green or yellow.
These colors correspond to what formats the menu
option effects as shown in the table below.
Color of indicator Disc format(s]
Blue DVD only
Yellow DVD I Video CD
Green All compatible formats
Note
If a setting applicable only to DVDs is changed while a Video CD
or CO is selected, a blue DVD icon appears in the upper right
hand corner of the screen to indicate that the setting is not
applicable to the disc that iscurrently playing. The setting will be
effective the next time a DVD is played.
40
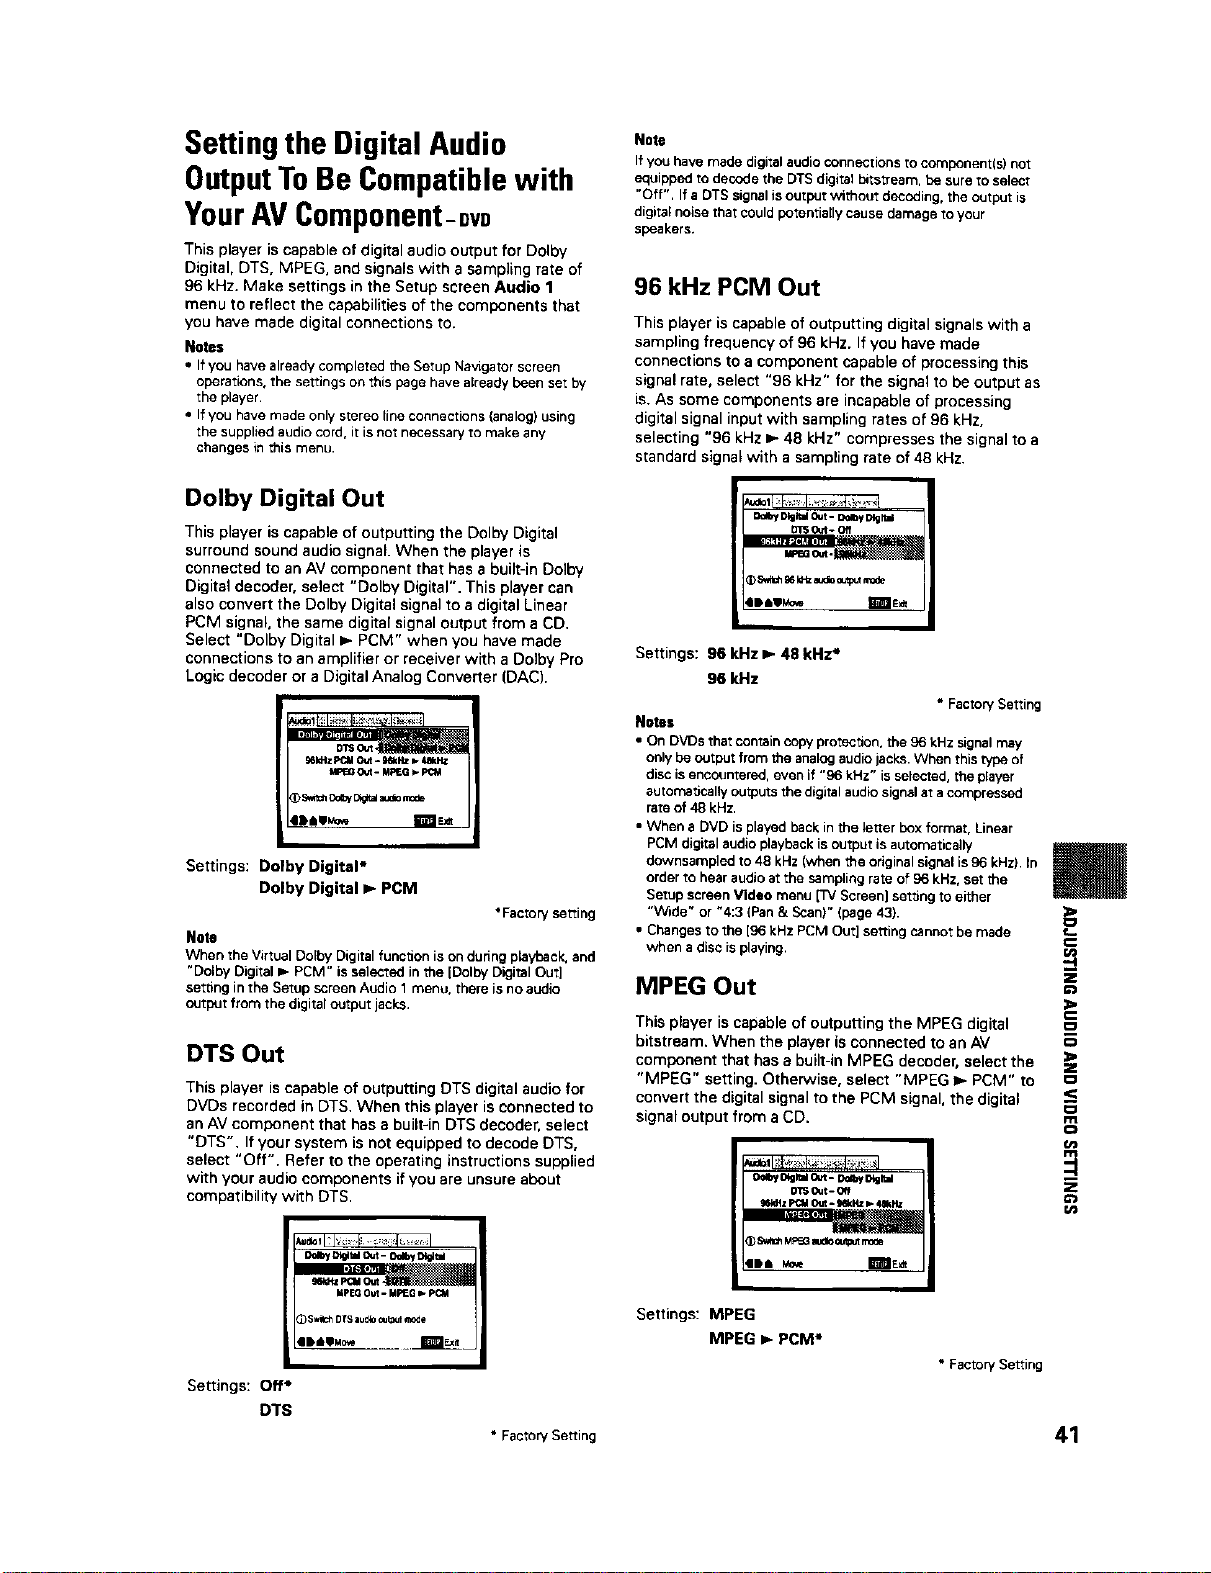
Settingthe Digital Audio
OutputTo Be Compatiblewith
YourAVComponent-orb
This player is capable of digital audio output for Dolby
Digital, DTS, MPEG, and signals with a sampling rate of
96 kHz. Make settings in the Setup screen Audio 1
menu to reflect the capabilities of the components that
you have made digital connections to.
Notes
• If you havealready completed the Setup Navigatorscreen
operations, the settings on this pagehave a_readybeenset by
the player.
• If you have madeonly stereo line connections (analog)using
the supplied audio cord, it is net necessary to make any
changes in this menu.
Dolby Digital Out
This player is capable of outputting the Dolby Digital
surround sound audio signal. When the player is
connected to an AV component that has a built-in Dolby
Digital decoder, select "Dolby Digital". This player can
also convert the Dolby Digital signal to a digital Linear
PCM signal, the same digital signal output from a CD.
Select "Dolby Digital _- PCM" when you have made
connections to an amplifier or receiver with a Doiby Pro
Logic decoder or a Digital Analog Converter (DAC).
gdl_lz_ Out- _skHz_ 4akl4z
_ 5_m11od_ 3g_lauaiomode
411)4111uo_ Imls_
Settings: Dolby Digital*
Dolby Digital I,- PDM
*Factory setting
Note
When the Virtual DoEby Digital func_on is on dudng playback, and
"Dolby Digital _- PCM" is selected in the [Dolby Digital Out]
sett;ng in the Setup screen Audio 1 menu, there is no audio
output from the digital output jacks.
DTS Out
This player is capable of outputting DTS digital audio for
DVDs recorded in DTS. When this player is connected to
an AV component that has a built-in DTS decoder, select
"DTS". If your system is not equipped to decode DTS,
select "Off". Refer to the operating instructions supplied
with your audio components if you are unsure about
compatibility with DTS.
14pEQOut. MPEG I_ p_M
,SwabDTSaudloout,J1mote
Note
If you have made digital audio connections to component(s) not
equipped to decode the DTS digital b_tstream, be sure to select
"Off". If a DTS signal is output without decoding, the output is
digital noise that could potentially cause damage to your
speakers.
96 kHz PCM Out
This player is capable of outputting digital signals with a
sampling frequency of 96 kHz. If you have made
connections to a component capable of processing this
signal rate, select "96 kHz" for the signal to be output as
is. As some components are incapable of processing
digital signal input with sampling rates of 96 kHz,
selecting "96 kHz IP-48 kHz" compresses the signal to a
standard signal with a sampling rate of 48 kHz.
g_ Dlg_zzlOut- De_y DIgl'_
13TSOut- Off
Settings: 96 kHz 41-48 kHz*
96 kHz
• Factory Setting
Notes
• On DVDs that contain copy protection, the 96 kHz signal may
only be output from the analog audio jacks. When this type of
disc is encountered, even if "96 kHz" is selected, the player
autornadcally outputs the digital audio signal at a compressed
rate of 48 kHz.
• When a DVD isplayed back in the letter box format, Linear
PCM digital audio playback is output is automatically
downsampled to 48 kHz (when the original signal is 96 kHz). In
order to hear audio at the sampling rate of 96 kHz, set the
Setup screen Video menu [TV Screen) setdng to either
"Wide" or "4:3 (Pan & Scan)" (page 43).
• Changes to the [96 kHz PCM Out] setting cannot be made
when a disc is playing.
MPEG Out
This player is capable of outputling the MPEG digital
bitstream. When the player is connected to an AV
component that has a built-in MPEG decoder, select the
"MPEG" setting. Otherwise, select "MPEG 1_ PCM" to
convert the digital signal to the PCM signal, the digital
signal output from a CD.
o'rs out-off
(_ Sw_h MP_G m_o Outer mote
4111 woe I_fllE_
Settings: MPEG
MPEG I,_PCM*
• Factory Setting
m
E
€
z
_<
m
o
Settings: Off*
DTS
• FactorySetting 41
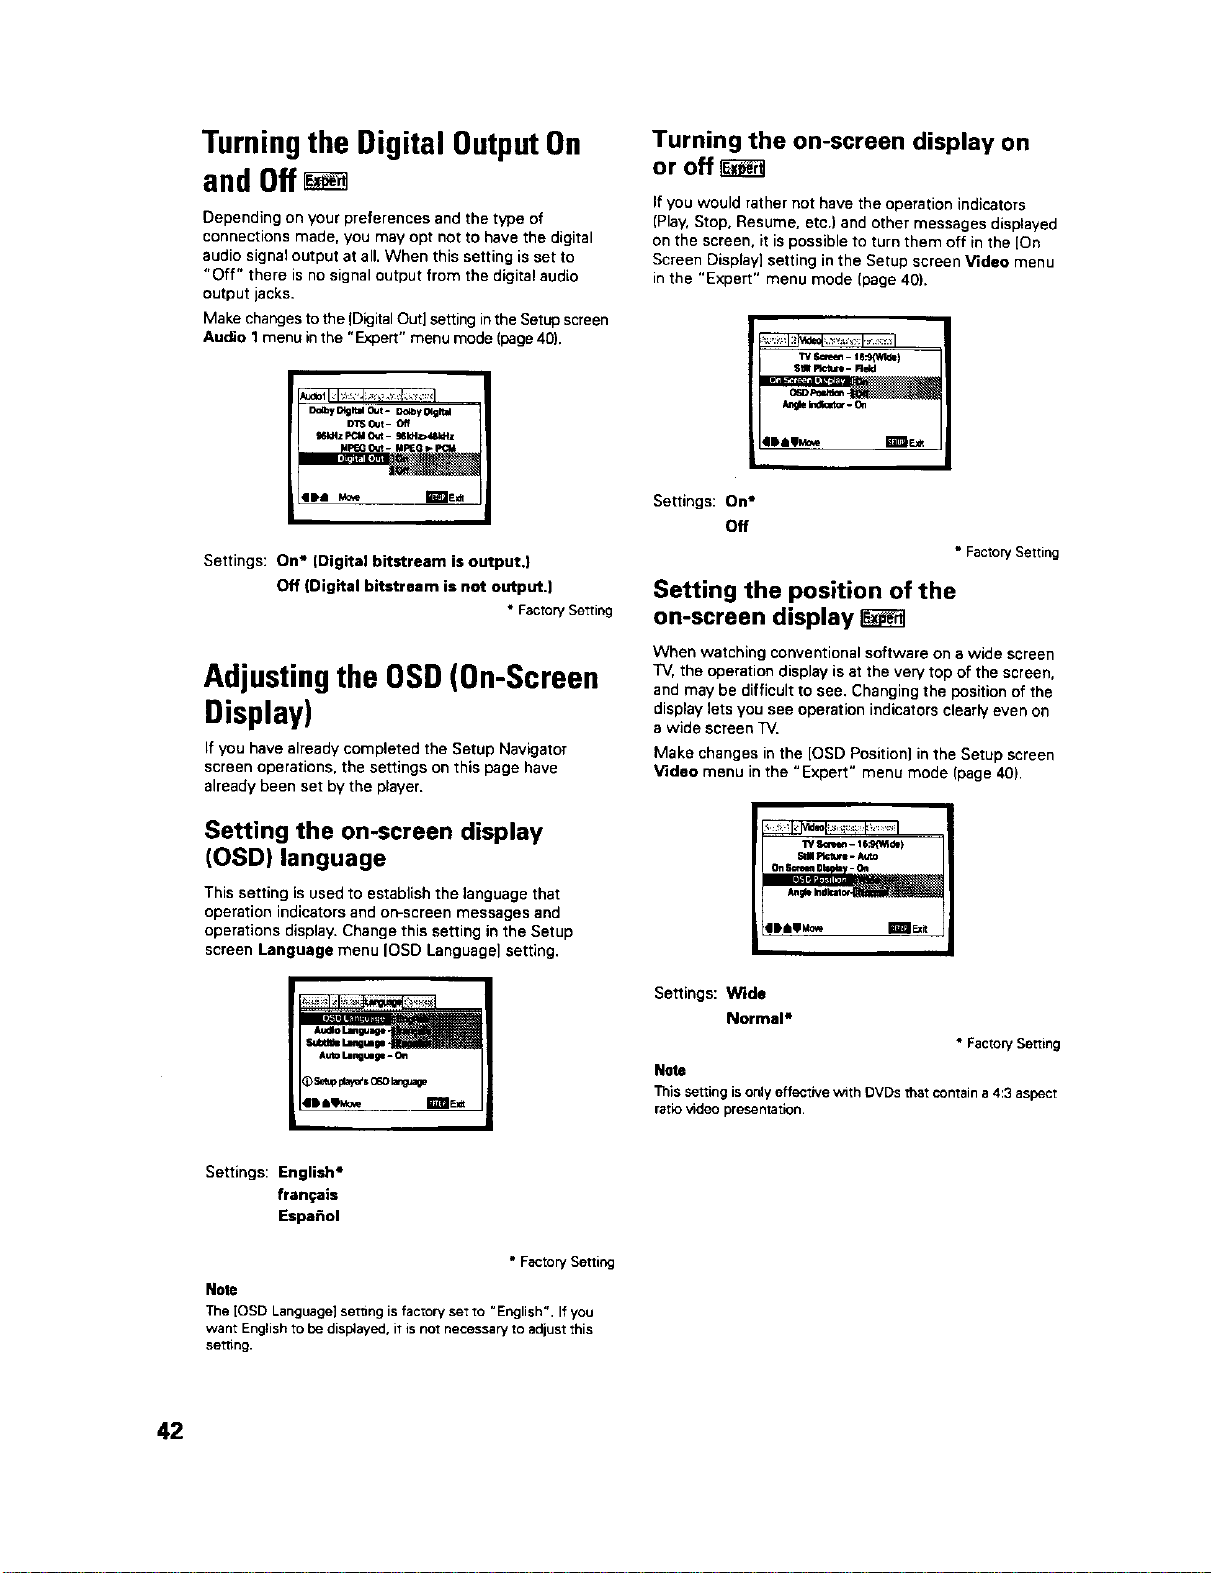
TurningtheDigitalOutputOn
andOff
Depending on your preferences and the type of
connections made, you may opt not to have the digital
audio signal output at all. When this setting is set to
"Off" there is no signal output from the digital audio
output jacks,
Make changes to the ]Digital Out] setting inthe Setup screen
Audio 1 menu in the "Expert" menu mode (page 40).
D_y Otgr,zl cut- D_q_yI_gr,d
DTS _t - Off
g6kHz _ Out - _Mt_48Id_z
eDa_ T_E_
Settings: On* ]Digital bitstream is output.|
Off (Digital bitstream is not output.]
• FactorySetting
Adjustingthe OSD(On-Screen
Display)
If you have already completed the Setup Navigator
screen operations, the settings on this page have
already been set by the player.
Setting the on-screen display
(OSD) language
This setting is used to establish the language that
operation indicators and on-screen messages and
operations display. Change this setting in the Setup
screen Language menu IOSD Language] setting,
Turning the on-screen display on
or offr_
If you would rather not have the operation indicators
]Play, Stop, Resume, etc.) and other messages displayed
on the screen, it is possible to turn them off in the [On
Screen Display] setting in the Setup screen Video menu
in the "Expert" menu mode (page 40).
W s¢_m - I e:s_/id=)
Sgll Ptcttn - Field
4Daa_e i_
I
Settings: On*
Off
• Factory Setting
Setting the position of the
on-screen display
When watching conventional software on a wide screen
TV, the operation display is at the very top of the screen,
and may be difficult to see. Changing the position of the
display lets you see operation indicators clearly even on
a wide screen TV.
Make changes in the [OSD Positionl in the Setup screen
Video menu in the "Expert" menu mode (page 40).
"i3/_ - 16;_Mdw)
WII Pletu_ -/u,t=
|aaaMo_ 1€_1E_
Settings: Wide
Normal*
• FactorySetting
Note
This settingis only effective w_thOVDs that containa 4:3aspect
ratiovideo presentation.
Settings: English*
fran_:ais
Espa_ol
• Factory Setting
Note
The [OSD Language] set_ng is factory set to "English". If you
want English to be disl_ayed, it is not necessary to adjust this
setting.
42
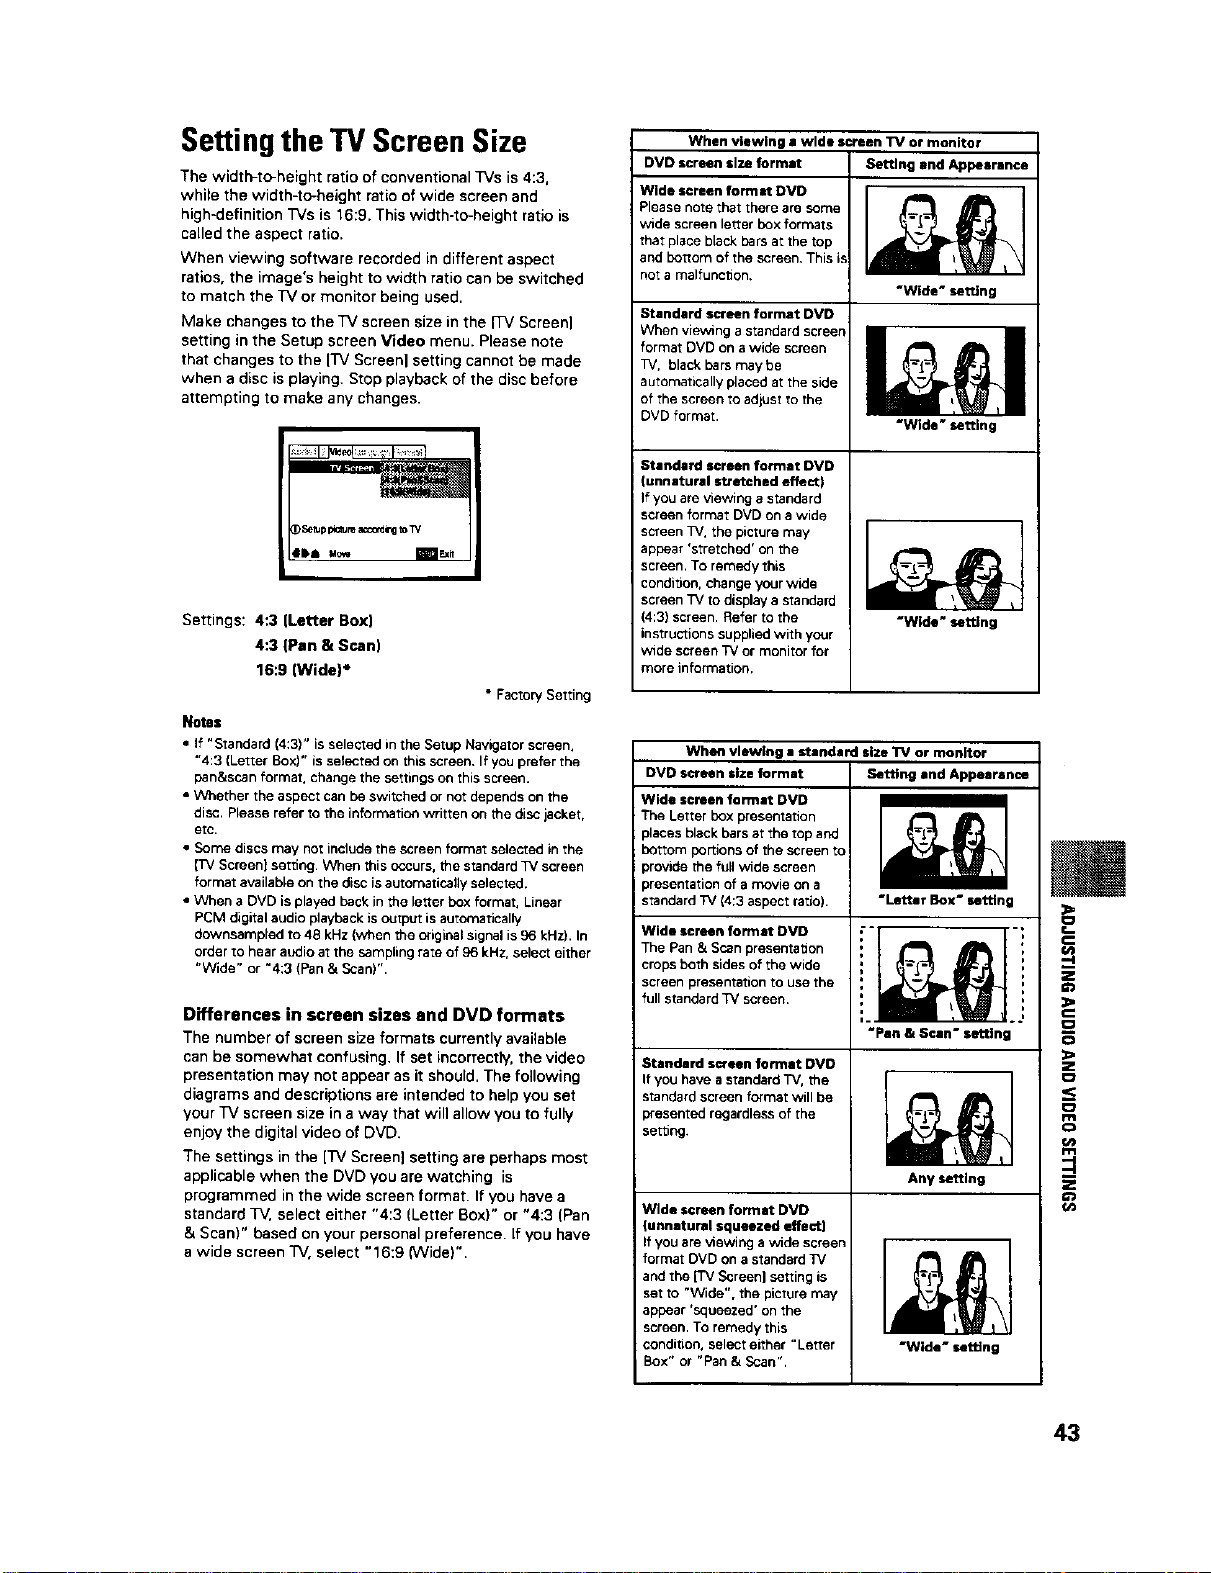
Settingthe TV Screen Size
The width-to-height ratio of conventional TVs is 4:3,
while the width-to-height ratio of wide screen and
high-definition TVs is 16:9. This width-to-height ratio is
called the aspect ratio.
When viewing software recorded in different aspect
ratios, the image's height to width ratio can be switched
to match the TV or monitor being used.
Make changes to the TV screen size in the FFVScreen]
setting in the Setup screen Video menu. Please note
that changes to the rfv Screenl setting cannot be made
when a disc is playing. Stop playback of the disc before
attempting to make any changes.
D_emppictureac_d_gtoTV
Iga uc_,e I_it
Settings: 4:3 [Letter Box)
4:3 (Pan & Scan)
16:9 (Wide)*
• Factory Setting
Notes
• if "Standard (4:3)" is selected in the Setup Navigator screen,
"4:3 (Letter Box)" is selected on this screen. If you prefer the
pan&scan format, change the settings on this screen.
• Whether the aspect can be switched or not depends on the
disc. Please refer to the information written on the disc jacket,
etc.
• Some discs may not inclede the screen format selected in the
[TV Screen] setting. When this occurs, the standard 3%'screen
format available on the disc is automaboally selected.
• When a DVD is played back in the letter box format, Linear
PCM digital audio playback is output is automatically
downsampled to 48 kHz (when the original signal is 96 kHz). In
order to hear audio at the sampling rate of 96 kHz, select either
"Wide" or "4:3 (Pan & Scan)".
Differences in screen sizes and DVD formats
The number of screen size formats currently available
can be somewhat confusing. If set incorrectly, the video
presentation may not appear as it should, The following
diagrams and descriptions are intended to help you set
your TV screen size in a way that will allow you to fully
enjoy the digital video of DVD.
The settings in the [TV Screen] setting are perhaps most
applicable when the DVD you are watching is
programmed in the wide screen format If you have a
standard TV, select either "4:3 (Letter Box)" or "4:3 (Pan
& Scan)" based on your personal preference If you have
a wide screen TV, select "16:9 (VVide)".
When viewing a wide screen TV or monitor
DVD screen size format Setting end Appearance
Wide screen format DVD
Please note that there at6 some
wide screen letter box formats
that place black bars at the top
and bottom of the screen, This is
not a malfunction,
Standard screen format DVD
When viewing a standard screen
format DVD on a wide screen
TV. black bars maybe
automatically placed at the side
of the screen to adjust to the
DVD format.
Standard screen format DVD
unnatural stretched effect)
}f you are viewing a standard
screen format DVD on a wide
screen TV The picture may
appear 'stretched' on the
screen. To remedy this
condidon, change your wide
screen TV to display a standard
(4:3) screen. Refer to the
instructions supplied with your
wide screen TV or monitor for
more information,
"Wide" setting
"Wide" setting
"Wide" setting
When viewing a standard size TV or monitor
DVD screen size format
Wide screen format DVD
The Letter box presentation
; places black bars at the top and
; bottom portions of the screen to
provide the full wide screen
presentation of a movie on a
standard TV (4:3 aspect ratio).
Wide screen format DVD
The Pan & Scan presentation
crops both sides of the wide
screen presentation to use the
full standard _/screen.
Standard screen format DVD
If you have a standard TV, the
standard screen format will be
)resented regardless of the
setting.
Wide screen format DVD
(unnatural squeezed effect)
If you are viewing a wide screen
format DVD on a standard 3%'
and the [TV Screen) setting is
set to "Wide". the picture may
appear 'squeezed' on the
screen. To remedy this
condition, select either "Letter
Box" or "Pan & Scan".
Setting and Appearance
=Letter Box" setting
0 -,
0 t
t ) t
g I
' I 1
:.. _3.:
"Pan & Scan" setting
Any _tln g
=Wide = setting
m
!-
(n
43
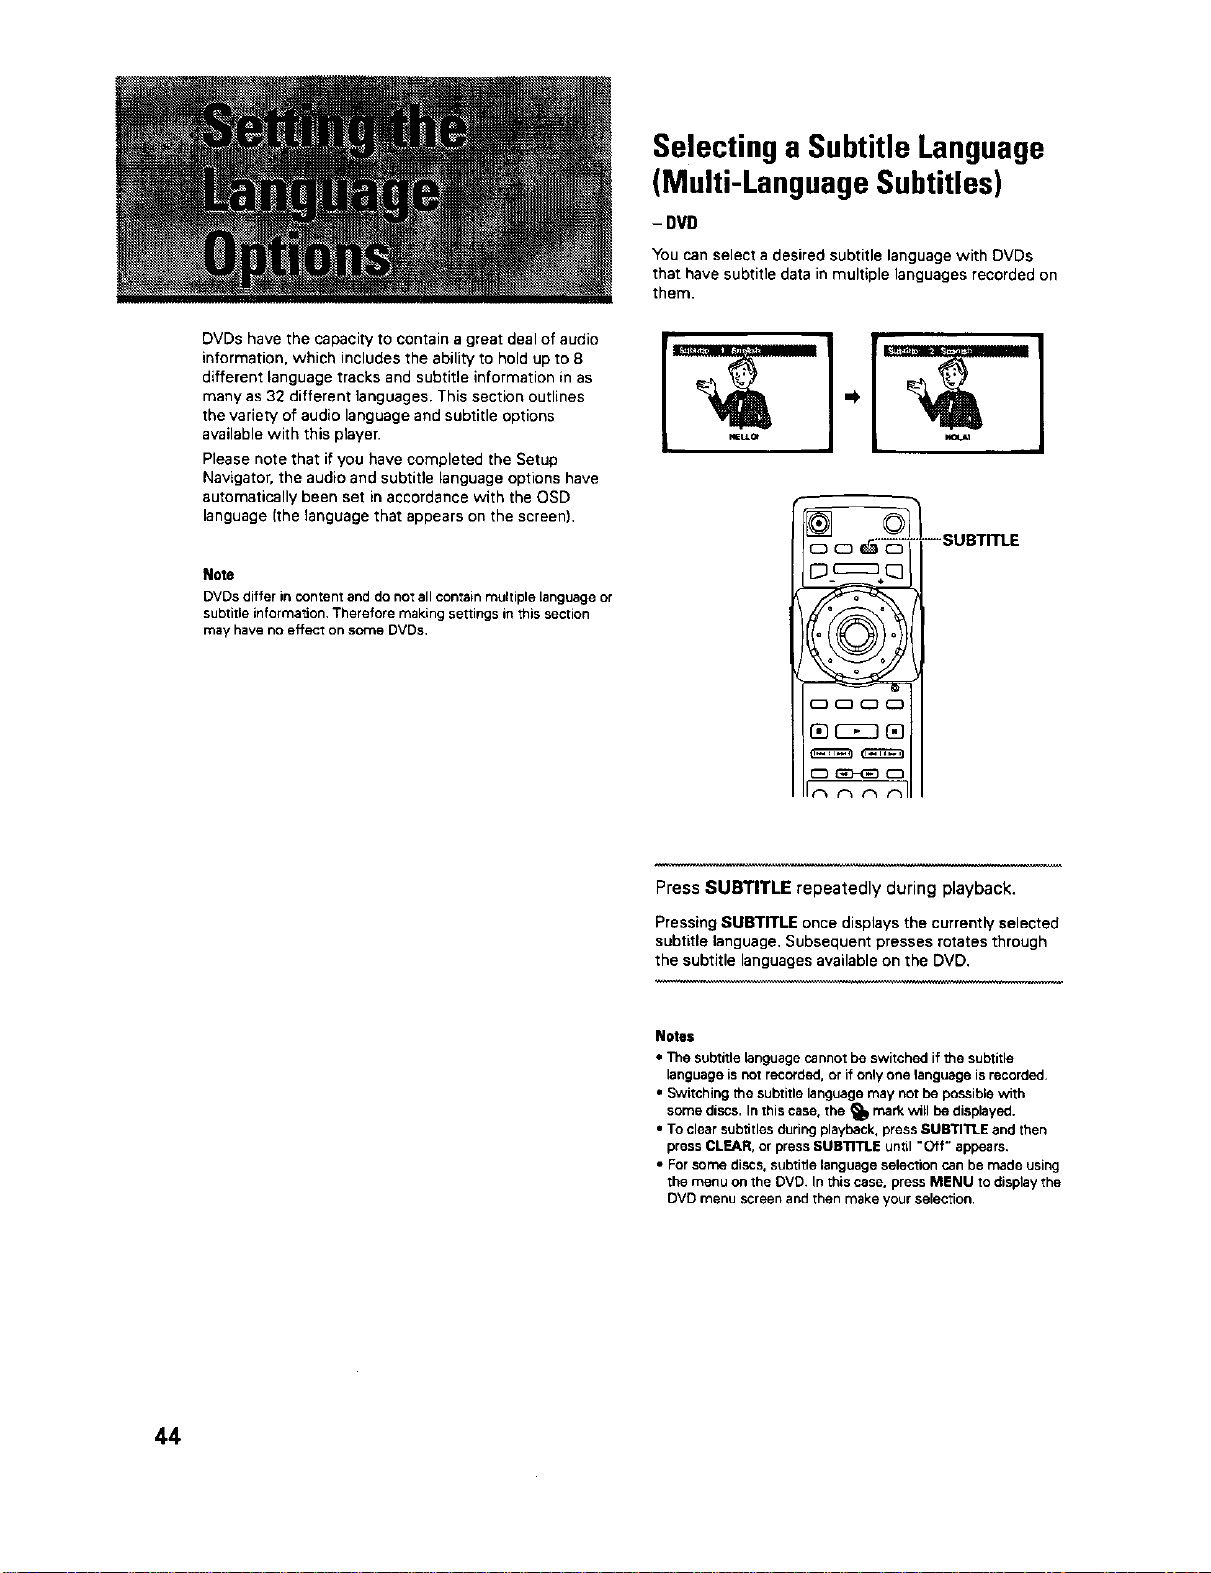
Selecting a Subtitle Language
(Multi-Language Subtitles)
- DVD
You can select a desired subtitle language with DVDs
that have subtitle data in multiple languages recorded on
them.
DVDs have the capacity to contain a great deal of audio
information, which includes the ability to hold up to 8
different language tracks and subtitle information in as
many as 32 different languages. This section outlines
the variety of audio language and subtitle options
available with this player.
Please note that if you have completed the Setup
Navigator, the audio and subtitle language options have
automatically been set in accordance with the OSD
language (the language that appears on the screen),
Note
DVDs differ in content and do not all contain multiple language or
subtitle information, Therefore making settings in this section
may have no effect on some DVDs,
L .¢_1
Press SUBTITLE repeatedly during playback.
Pressing SUBTITLE once displays the currently selected
subtitle language. Subsequent presses rotates through
the subtitle languages available on the DVD,
Notes
• The subtitle _nguage cannot be switched if the subtitle
language is not recorded, or if only one language is recorded,
• Switching the subtitle language may not be possible with
some discs. In this case, the _ mark will be displayed.
• To clear subtitles during playback, press SUB'rI'n_E and then
press CLEAR, or press SUB'nTLE until "Off" appears,
• For some discs, subtitle language selection can be made using
the menu on the DVD. In this case. press MENU to display the
DVD menu screen and then make your selection,
44
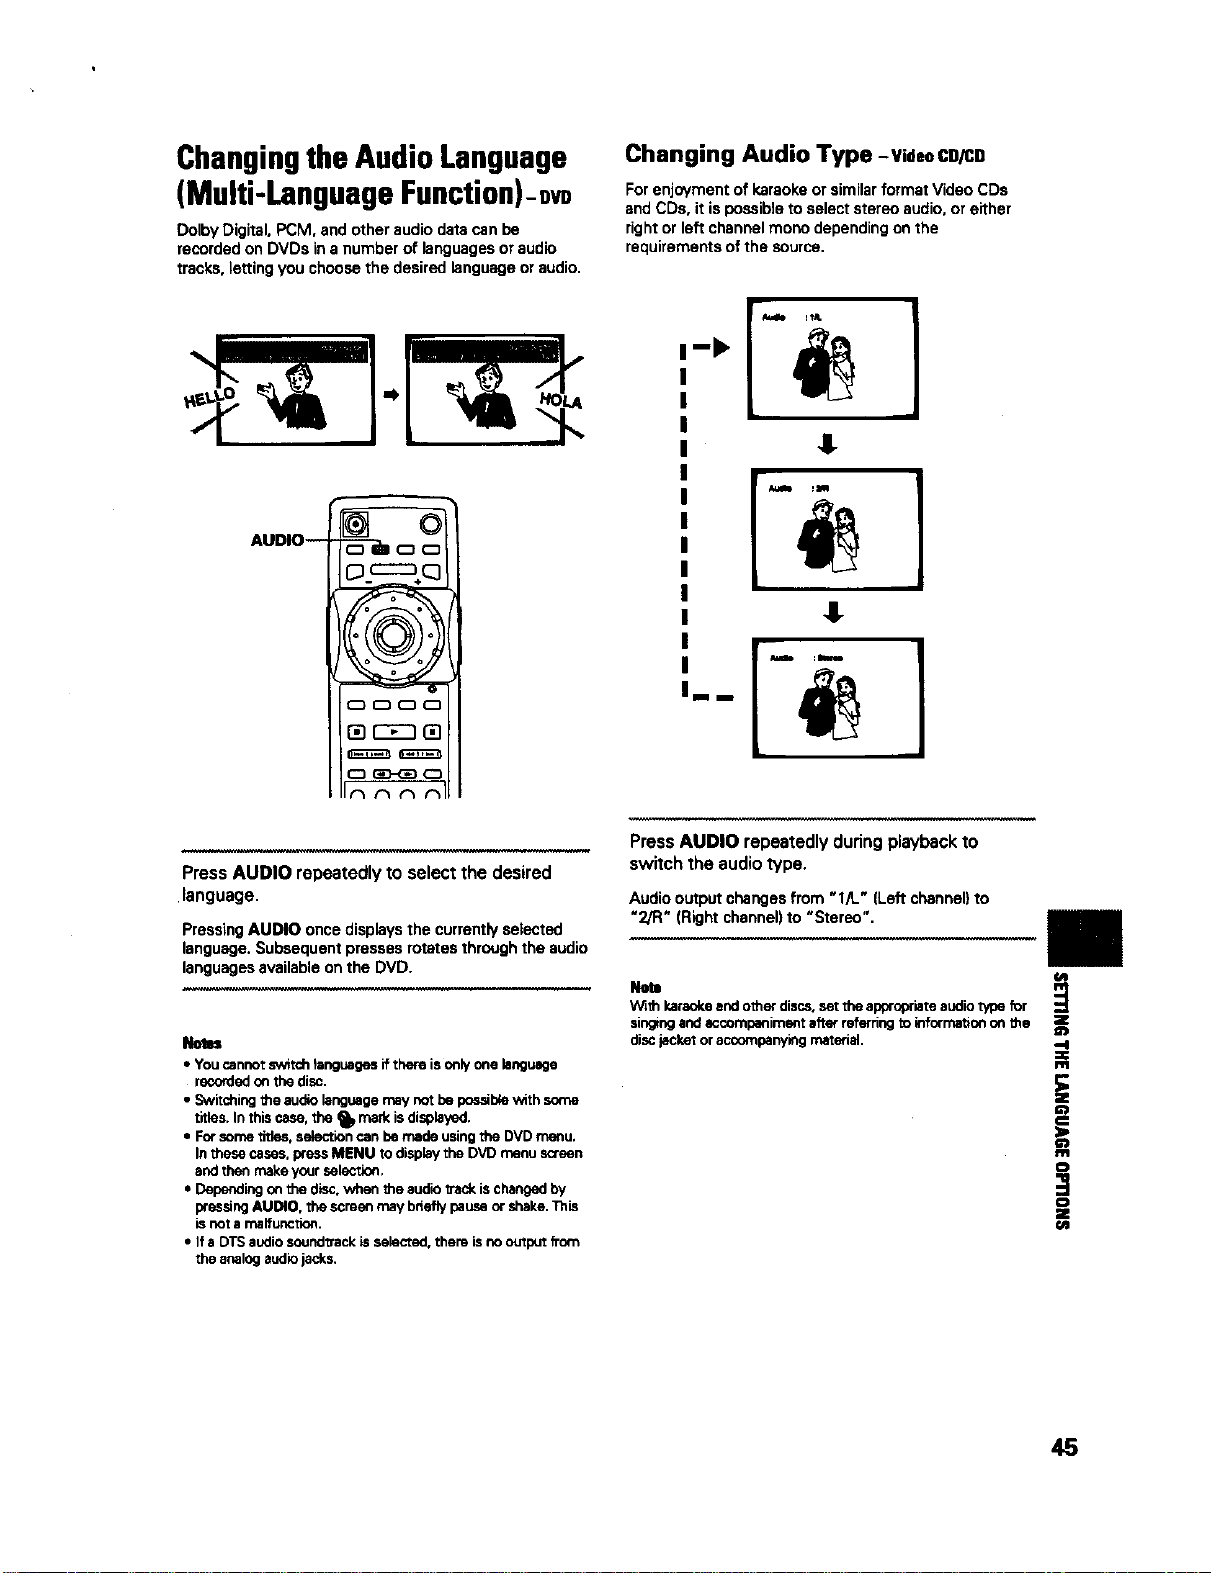
ChangingtheAudioLanguage
(Multi-LanguageFunction)-.vo
DolbyDigital,PCM, andotheraudiodatacanbe
recordedonDVDs ina numberof languagesoraudio
tracks,lettingyou choosethe desiredlanguageor audio.
Changing Audio Type -VideoCD/CD
For enjoyment of karaoke or similar format Video CDs
and CDs, it is possible to select stereo audio, or either
right or left channel mono depending on the
requirements of the SOurce.
]
I
AUDIO--
Press AUDIO repeatedly to select the desired
language.
Pressing AUDIO once displays the currently selected
language. Subsequent presses rotates through the audio
languages available on the DVD.
k
• Youcannotswitchtanguagesif thereis onlyone language
recordedon the disc.
• Switchingthe audiolanguagemaynotbe possiblewith some
titles.In this case, the _IP mad<isdisplayed.
• Forsometitles,selectioncan bemade usingthe DVDmenu.
In thesecases,pressMENU to displaythe DVDmenuscreen
andthen makeyoursele_ion,
• Dependingonthe disc.when the audiotrackischangedby
pressing AUDIO, thescreen maybrieflypauseor shake.This
is not a malfunction.
• If a DTSaudiosound_ackis selected,them isnooutputfTom
the analog audiojacks.
Press AUDIO repeatedly during playback to
switch the audio type.
Audiooutputchangesfrom "l/L" [Left channel)to
"2/R" (Rightchannel)to "Stereo".
Netl
W;th karaokeand otherdiscs,setthe appropriateaudio type for
singing andaccompanimentafterreferringto inforrnaOonon the
discjackeroraccompanyingmaterial,
i
o
Z
(R
45

Setting Languageand Subtitle
Preferences inthe Setup
Screen Menus
The Setup screen Language menu contains a number of
settings related to the audio and subtitle language
preferences.
Please note that changes to the settings in the
Language menu in this section cannot be made when a
disc is playing. Stop playback of the disc before
attempting to make any changes.
Selecting an audio language
preference
The audio language that you normally listen to can be
selected from the various audio languages on a DVD.
Even when the audio language is changed during
playback by pressing AUDIO, the language selected at
this setting will be selected as the default when the DVD
is changed.
Make changes to the [Audio Language] setting in the
Setup screen Language menu.
Selecting a subtitle language
preference
The subtitle language that you will normally display can
be selected from the subtitles programmed on a disc.
Even when the subtitle language is changed during
playback by pressing SUBTFrLE, the language selected
at this setting will be selected when the disc is changed.
Make changes to the [Subtitle Languagel setting in the
Setup screen Language menu.
Settings: English*
French
Spanish
Other (For details on how to select
other languages, see 'When "Other"
is selected' on the following page.)
*Factory setting
Settings: English*
French
Spanish
Other (For details on how to select
other languages, see 'When "Other"
is selected' on the following page,)
*Factory setting
46
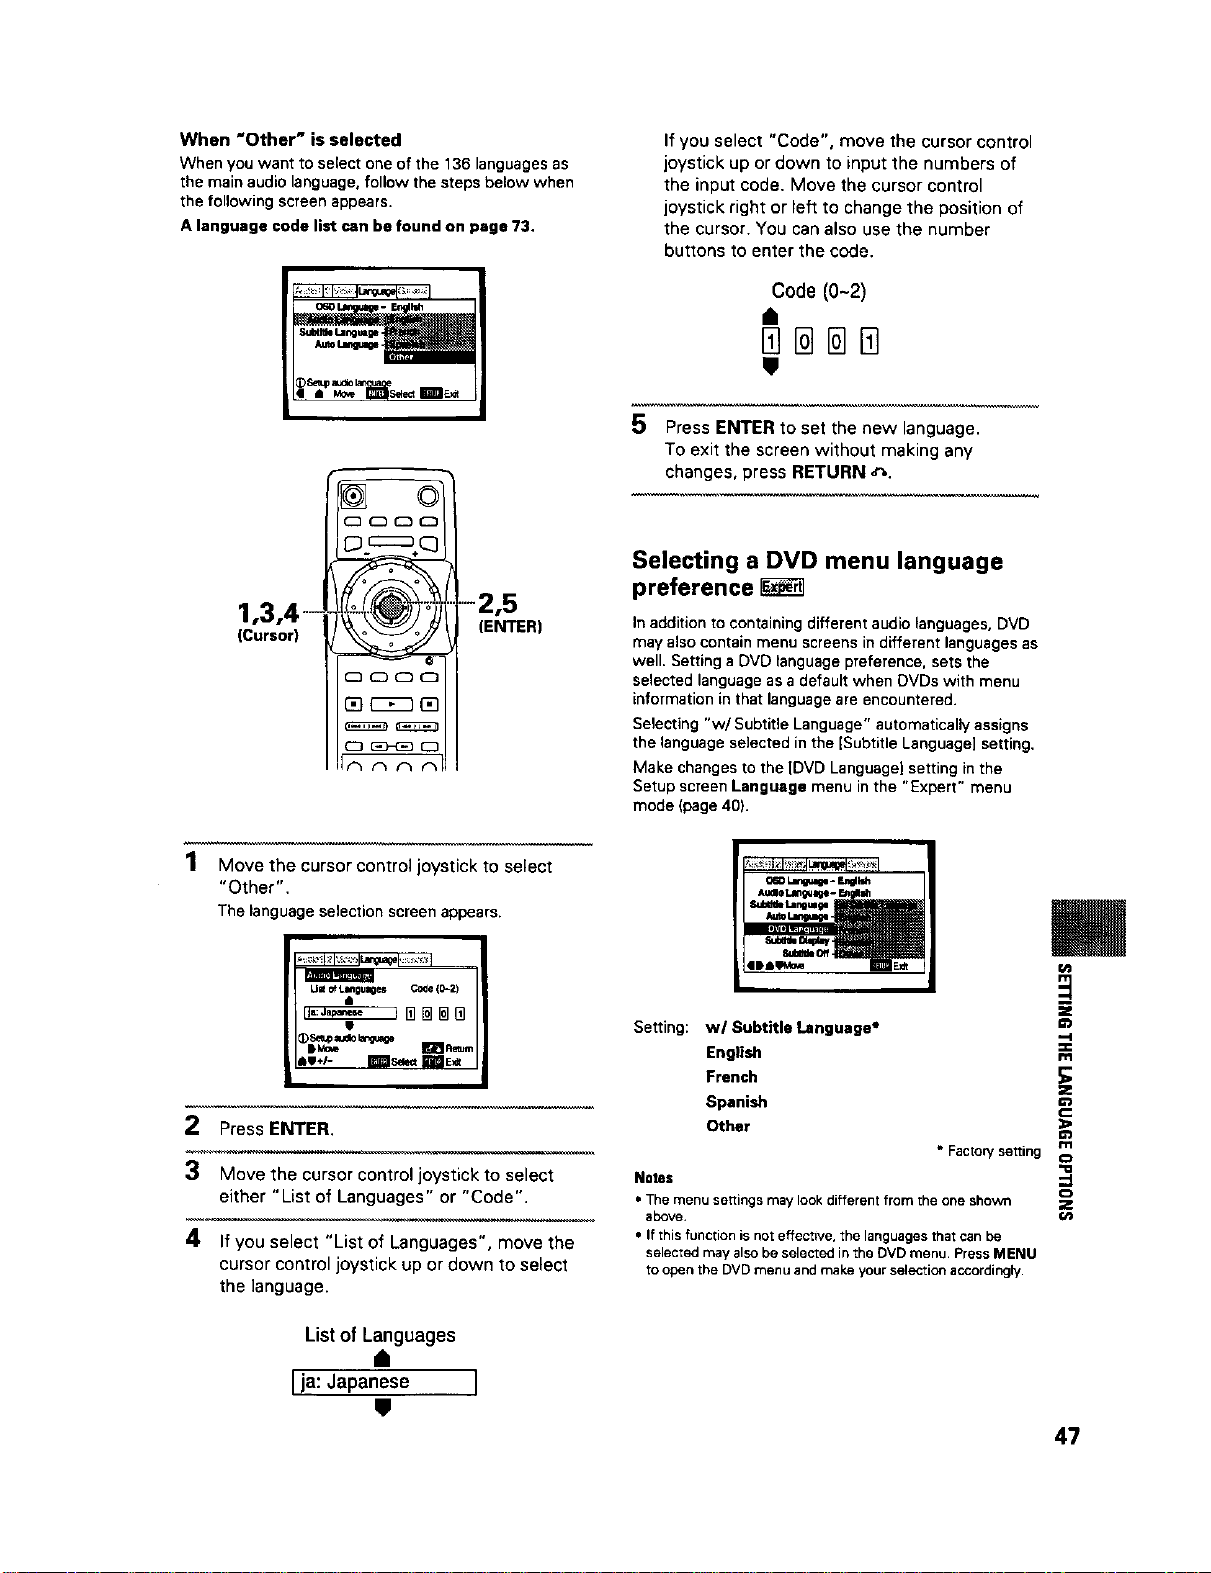
When "Other" is selected
When you want to select one of the 136 languages as
the main audio language, follow the steps below when
the following screen appears.
A language code list can be found on page 73,
1,3,4--
(Cursor)
F
(:3000
D cz_÷q
®
"-2,5
(ENTER)
1 Move the cursor control joystick to select
"Other".
The language selection screen appears.
m
Um ofLlmgu_es C0_e{1_2)
t
2 Press ENTER.
3 Move the cursor control joystick to select
either "List of Languages" or "Code".
4 If you select "List of Languages", move the
cursor control joystick up or down to select
the language.
Listof Languages
I ja:Japanese ]
If you select "Code", move the cursor control
joystick up or down to input the numbers of
the input code. Move the cursor control
joystick right or left to change the position of
the cursor. You can also use the number
buttons to enter the code.
Code (0-2)
5 Press ENTER to set the new language.
To exit the screen without making any
changes, press RETURN _",.
Selecting a DVD menu language
preference
In addition to containing different audio languages. DVD
may also contain menu screens in different languages as
well. Setting a DVD language preference, sets the
selected language as a default when DVDs with menu
information in that language are encountered.
Selecting "w/ Subtitle Language" automatically assigns
the language selected in the [Subtitle Language] setting.
Make changes to the [DVD Languagel setting in the
Setup screen Language menu in the "Expert" menu
mode (page 40).
Setting: w/Subtitle Language*
English
French
Spanish
Other
Notes
• Facto=,/setting
• The menu settings may look different from the one shown
above.
• If this function is not effectwe, the languages that can be
selected may also be selected in the OVD menu. Press MENU
to open the DVD menu and make your selection accordingly.
m
Z
--I
=€
m
z
m
',m
Z
t_
47

Setting Auto Language to control
subtitle and audio language based
on program content
When the Auto Language function is used, foreign
movies are shown with the original audio soundtrack and
subtitles in the language selected in the [Subtitle
Language] menu option. Domestic films are shown with
the original audio soundtrack and no subtitles.
Make changes to the [Auto Languagel setting in the
Setup screen Language menu.
&udloLmng_zge- r_n_
Dplay dlalog,e,etc_i_0dgi_aHanneed_9uaGe
|De M0_ I_lt
Settings: On*
Off
• Factory se=ing
Note
The Auto Languagefunction operatesonlywhen thisfunction is
set to '*On", andthe languageset for the [AudioLanguage]and
[SubtitleLanguage]settingsisthe same.
Selecting subtitles, assist subtitles
or no subtitles I_
Use this function to turn the subtitles on or off. Also,
some DVDs provide assist subtitles that give additional
explanations of scenes in addition to the standard
subtitles for viewers who are hard of hearing. Select
"Assist Subtitle" to display these subtitles on DVDs
where this function is offered.
Make changes to the [Subtitle Display[ setting in the
Setup screen Language menu in the "Expert" menu
mode (page 40).
Selecting the language of forced
subtitles
Even when the subtitles are turned off, some DVDs will
nevertheless display them on the screen. This setting
allows you to select the language of the subtitles to be
displayed with this type of DVD.
Select "With Audio" to display the subtitles in the same
language as the currently selected audio language.
Select "Selected Subtitle" to display the subtitles in the
language set in the [Subtitle Language] setting.
Make changes to the [Subtitle Off] setting in the Setup
screen Language menu in the "Expert" menu mode
(page 40),
o_ Lm,4Wap- snav_h
A_dlo Language -tn_4sh
SUD_e Laquqe - Sponlsh
AutoLar4we_ - On
DVOLan_tqe - En is_
1'
Settings: With Audio
Selected Subtitle*
• Factory setting
Settings: On*
Off
Assist Subtitle
* Factory setting
Noto$
• If there is no subtitle information recorded on the DVD, no
subtitles are displayed even if this function is set to '*On",
• This setting serves as a default as whether or nor to display
subtitles. Even if this option is set to "Off". subtitles can be
displayed by pressing SUBTITLE. Sirniledy. if this option is set
to "On". the subtitles can be turned off by pressing SUBTITLE
and then CLEAR,
48
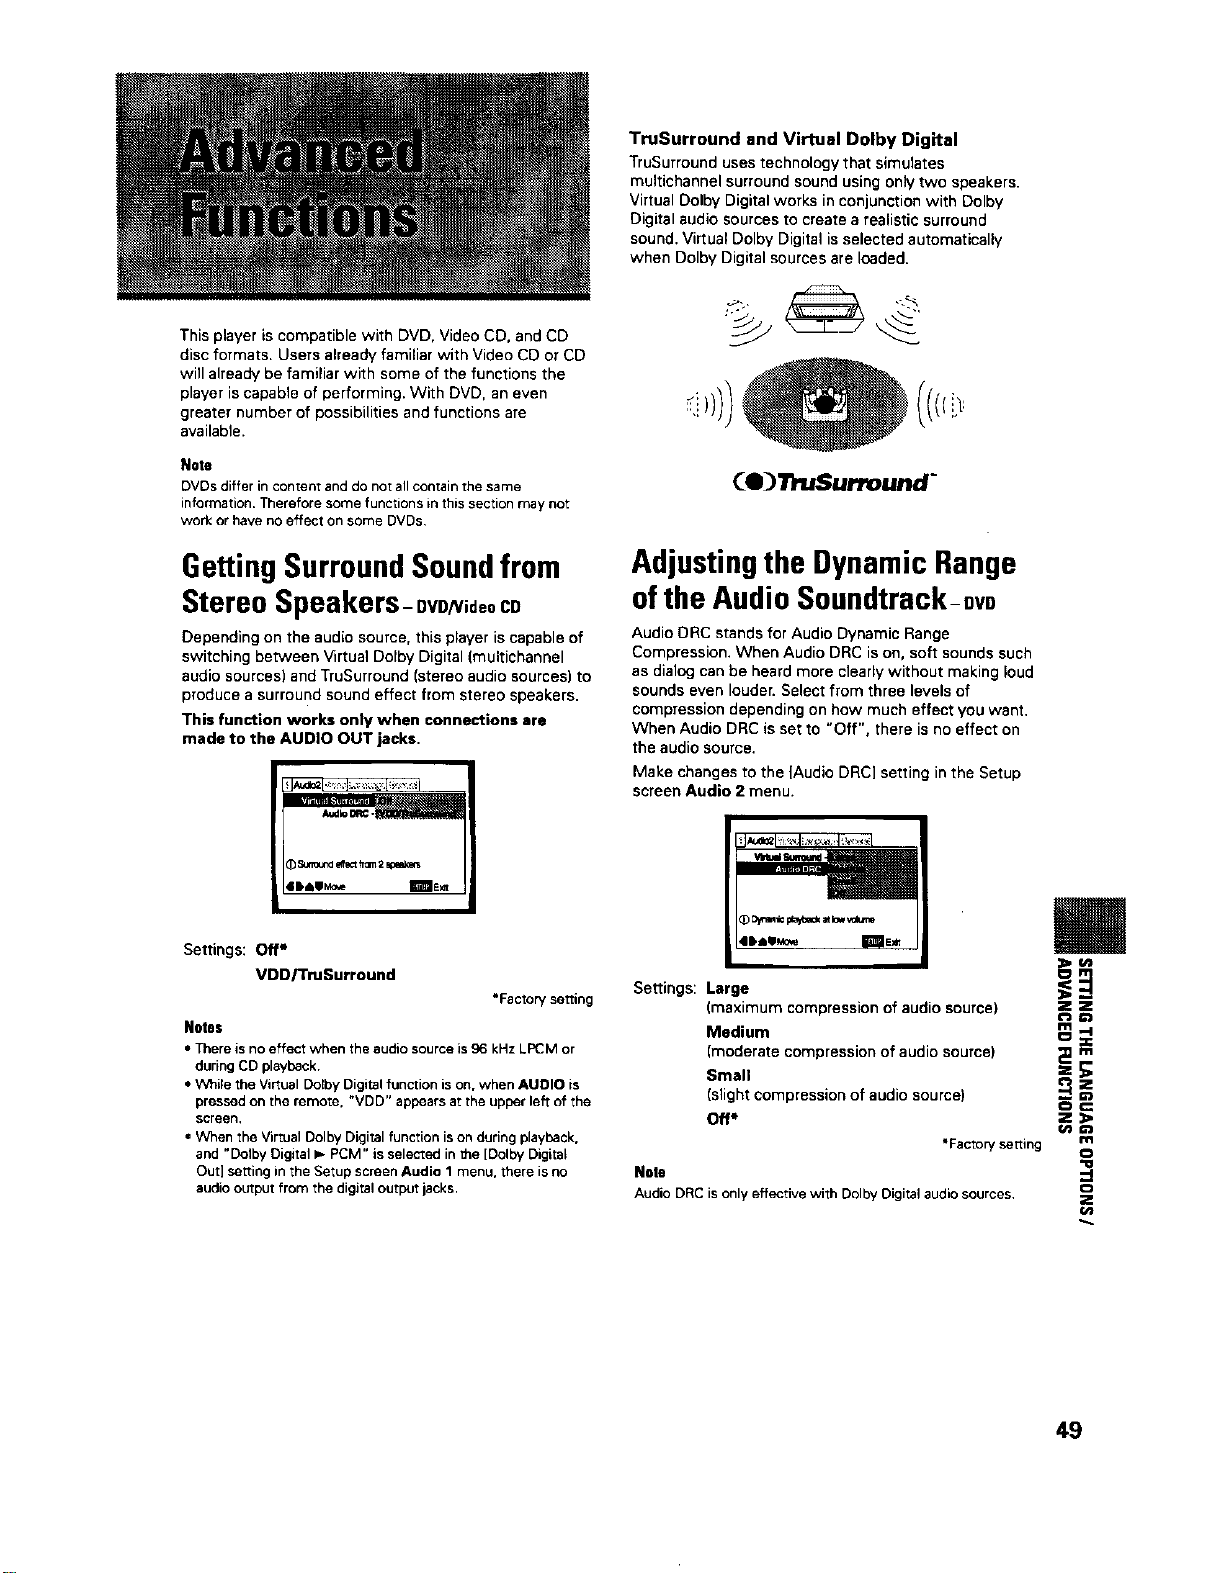
This player iscompatible with DVD, Video CD, and CD
disc formats. Users already familiar with Video CD or CD
will already be familiar with some of the functions the
player is capable of performing. With DVD, an even
greater number of possibilities and functions are
available.
Note
DVDs differ in content and do not all contain the same
information. Therefore some functions in this section may not
work or have no effect on some DVDs,
GettingSurroundSoundfrom
StereoSpeakers- gVD/Video CD
Depending on the audio source, this player is capable of
switching between Virtual Dolby Digital (muitichannel
audio sources) and TruSurround [stereo audio sources) to
produce a surround sound effect from stereo speakers.
This function works only when connections are
made to the AUDIO OUT jacks.
_ S_und erecth_ 2e_ak_m
Settings: Off*
VDD/TmSurround
*Factory setting
Notes
• There is no effect when the audio source is 96 kHz LPCM or
during CD playback.
• While the Virtual Derby Digital function is on. when AUDIO is
pressed on the remote. "VDD" appears at the upper left of the
screen.
, When the Virtual Dolby Digital function is on during playback.
and "Dolby Digital I,- PCM" is selected in the [Dolby Digital
Out] setting in the Setup screen Audio 1 menu. there is no
audio output from the digital output jacks.
TruSurround and Virtual Dolby Digital
TruSurround uses technology that simulates
multichannel surround sound using only two speakers.
Virtual Dolby Digital works in conjunction with Dolby
Digital audio sources to create a realistic surround
sound. Virtual Dolby Digital is selected automatically
when Dolby Digital sources are loaded.
(e) TruSurround"
Adjustingthe Dynamic Range
ofthe AudioSoundtrack-DvD
Audio DRC stands for Audio Dynamic Range
Compression. When Audio DRC is on, soft sounds such
as dialog can be heard more clearly without making loud
sounds even louder. Select from three levels of
compression depending on how much effect you want.
When Audio DRC is set to "Off", there is no effect on
the audio source.
Make changes to the )Audio DRC] setting in the Setup
screen Audio 2 menu.
Settings: Large _
(maximum compression of audio source) _
Medium _
[moderate compression of audio source) _ E
Small
(slight compression of audio source) ---
oc
Off* Z :_
Cno
*Factorysetting m
Note
AudioDRCis onlyeffective with DolbyDigitalaudio sources, _,
(#"j
49
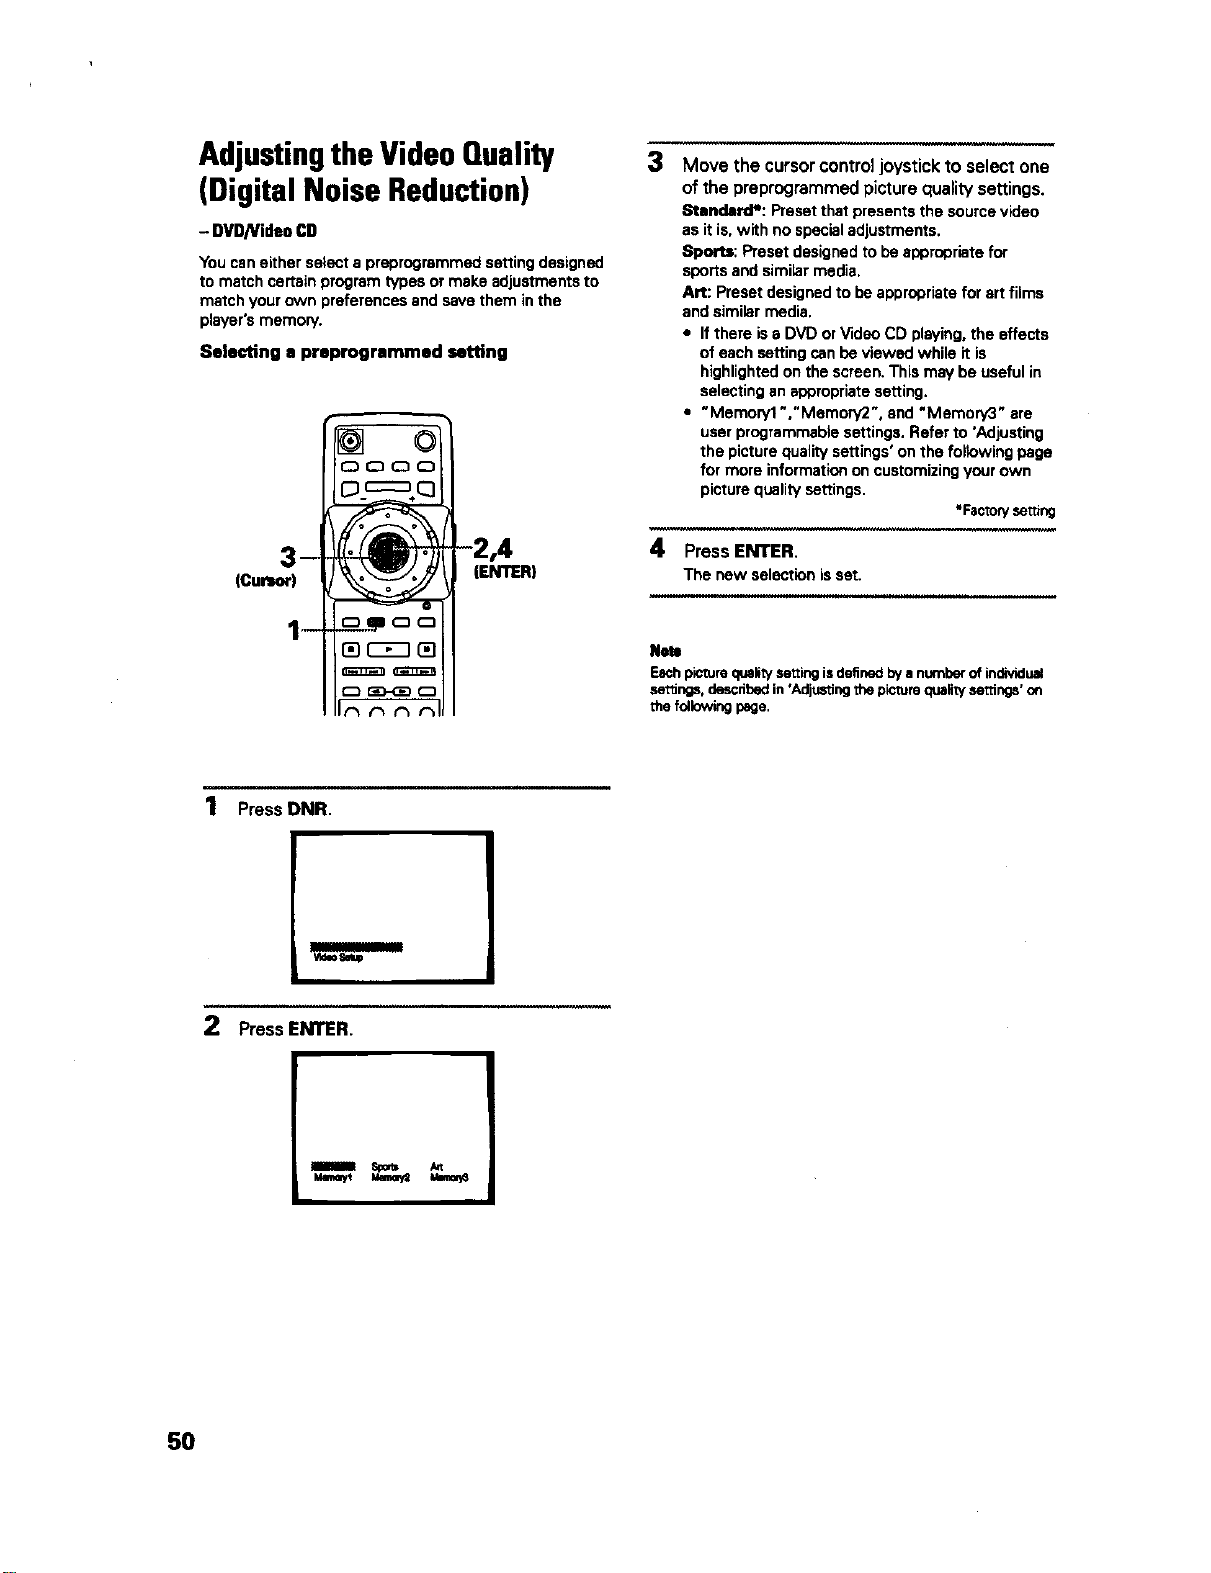
AdjustingtheVideoQuality
(DigitalNoiseReduction)
- DVD/VideoCD
Youcaneitherselecta preprogrammedsettingdesigned
to matchcertainprogramtypesor makeadjustmentsto
matchyourown preferencesand savethem inthe
player'smemory.
Selecting a preprogrammed setting
(Cursor)
iENTER)
3
Move the cursor control joystick to select one
of the preprograrnrned picture quality settings.
Standard*: Preset that presents the source video
as it is, with no special adjustments.
Sports: Preset designed to be appropriate for
sports and similar media.
Art: Preset designed to be appropriate for art films
and similar media.
• If there is a DVD or Video CD playing, the effects
of each setting can be viewed while it is
highlighted on the screen, This may be useful in
selecting an appropriate setting.
• "Memoryl","Memory2", and "Memory3" are
user programmable settings. Refer to *Adjusting
the picture quality settings' on the following page
for more information on customizing your own
picture quality settings,
• FactoW se_ng
4 Press ENTER.
The new selectionisset.
Note
Eachpicture quaNtysettingisdefinedbyanumber of individual
se_ngs, describedin'Adjustingthe picture qualitysettings' on
the followingpage,
1 Press DNR.
2 Press ENTER.
ilium sr_m
umnyt _
50
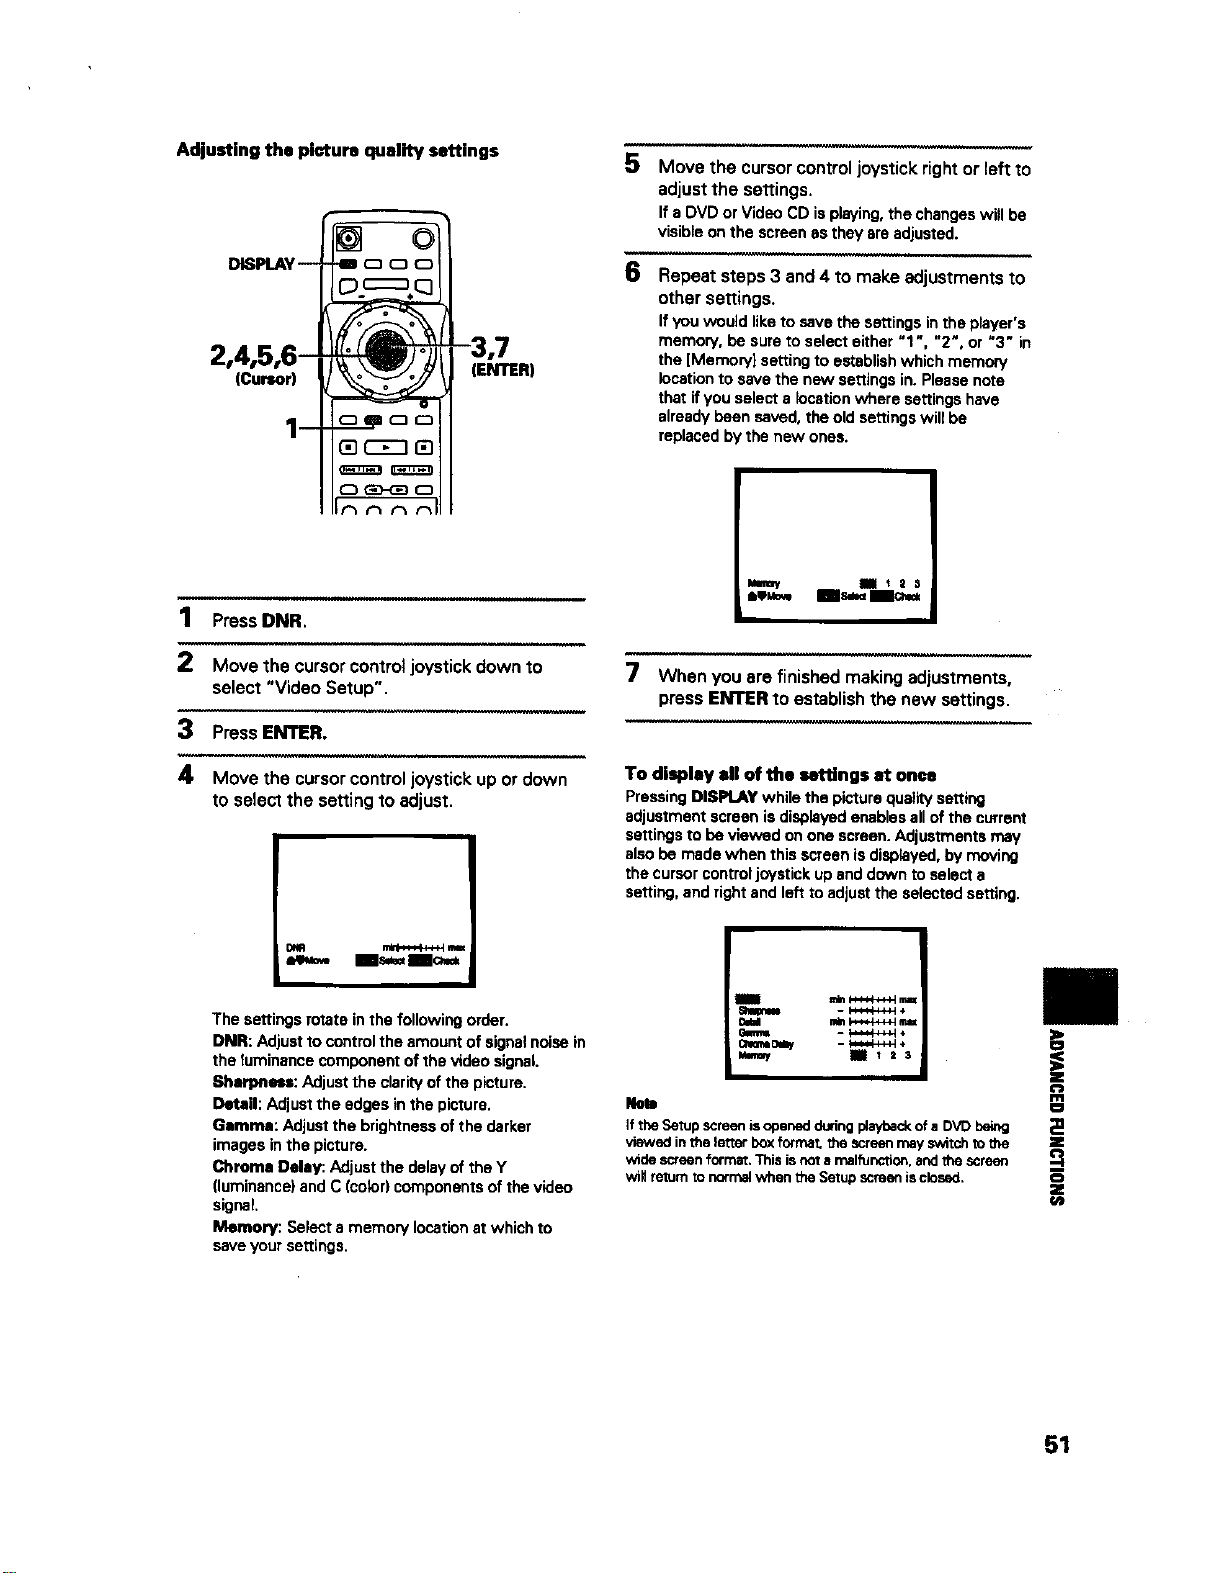
Adjusting the picture quality settings
DISPLAY--
2,4,5,6-
(Cursor)
i
®
_oo
-3,7
(ENTER)
1 Press DNR.
2 Move the cursor control joystick down to
select "Video Setup".
3 Press ENTER.
4 Move the cursor control joystick up or down
to select the setting to adjust.
Is== Ic_*
The settings rotate in the following order.
DNR: Adjust to control the amount of signal noise in
the tuminance component of the video signal.
Sherpnen: Adjust the clarity of the picture.
Detail: Adjust the edges in the picture.
Gamma: Adjust the brightness of the darker
images inthe picture.
Chrome Delay: Adjust the delay of the Y
(luminance) and C (color) components of the video
signal.
Memory: Select a memory location at which to
save your settings.
5
6
Move the cursor control joystick right or left to
adjust the settings.
If aDVD orVideoCD isplaying,the changeswill be
visibleonthe screenasthey areadjusted.
Repeat steps 3 and 4 to make adjustments to
other settings.
If you would like to save the settings in the player's
memory, be sure to select either "1 ", "2", or "3" in
the [Memory} setting to establish which memory
location to save the new settings in. Please note
that if you select a location where settings have
already been saved, the old settings will be
replaced by the new ones.
Ii3S
7 Whenyouare finishedmakingadjustments,
pressENTERto establishthe new settings.
To display ell of the settings at once
Pressing DISPLAY while the picture quatity setting
adjustment screen is displayed enables all of the current
settings to be viewed on one screen. Adjustments may
also be made when this screen is displayed, by moving
the cursor control joystick up end down to select a
setting, and right and left to adjust the selected setting.
IslI/inii _i
Note
If the Setup screenisopenedduringplaybackof a DVD being
viewed inthe letter box formal I1_ screenmayswitchtothe
wide screenformat.Thisisnota malfunction,andthe screen
will returnto n_rcal when the Setupscreenisclosed.
m
i
o
ep
51
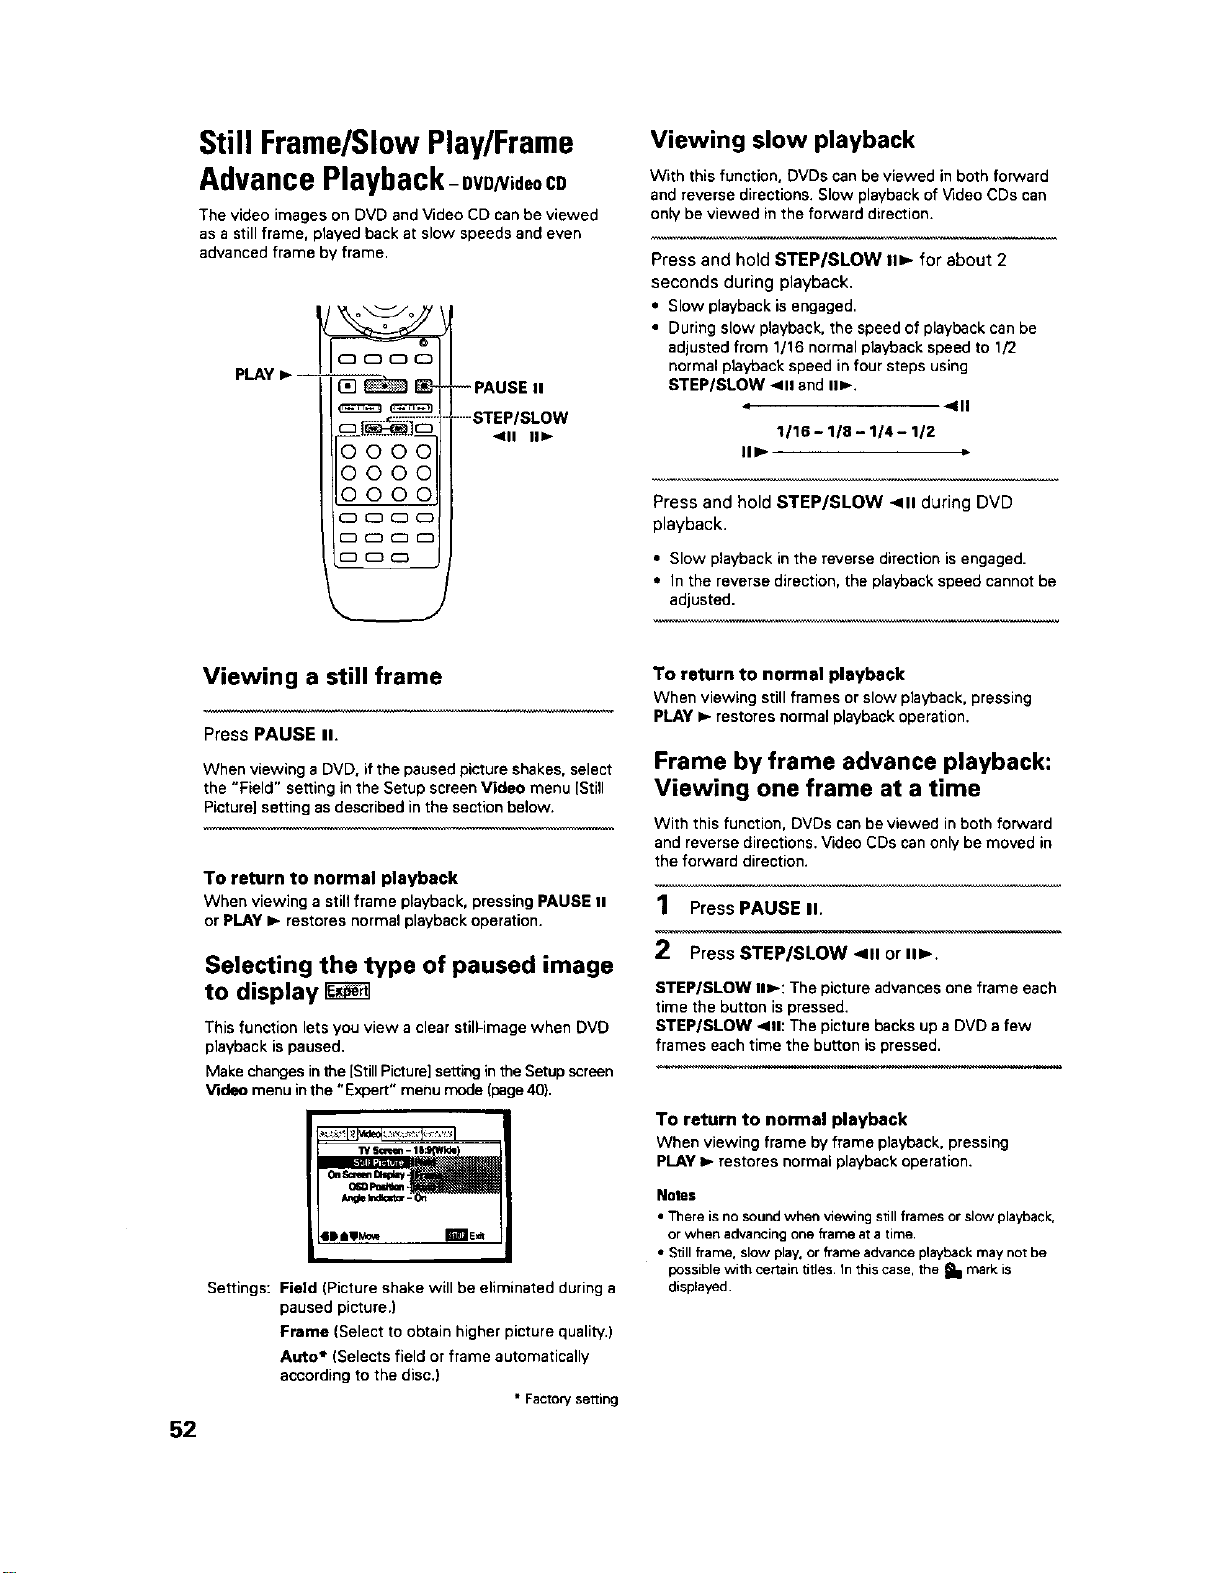
Still Frame/Slow Play/Frame
Advance Playback-ovD =daoCD
The video images on DVD and Video CD can be viewed
as a still frame, played back at slow speeds and even
advanced frame by frame.
PLAY =,-
0000
0000
oooo
Viewing slow playback
With this function, DVDs can be viewed in both forward
and reverse directions. Slow playback of Video CDs can
only be viewed in the forward direction.
Press and hold STEP/SLOW II1_ for about 2
seconds during playback.
• Slow playback is engaged.
• During slow playback, the speed of playback can be
adjusted from 1/16 normal playback speed to 1/2
normal playback speed in four steps using
STEP/SLOW 411 and II1_.
4 qlll
1116-118-1/4--1/2
IlIP.
Press and hold STEP/SLOW <111during DVD
playback.
• Slow playback in the reverse direction is engaged.
• In the reverse direction, the playback speed cannot be
adjusted.
52
Viewing a still frame
Press PAUSE II.
When viewing a DVD, if the paused picture shakes, select
the "Field" setting in the Setup screen Video menu [Still
Picture] setting as described in the section below.
To return to normal playback
When viewing a still frame playback, pressing PAUSE II
or PLAY I_ restores normal playback operation.
Selecting the type of paused image
to display
This function lets you view a clear still-image when DVD
playback is paused,
Make changes inthe [StillPicture] setting inthe Setup screen
Video menu inthe "E>qoert" menu mode (page 40).
W S¢_en - 1| Ida
Oo S=_m Bmay
0_0 Pod_a -
leeo_o_ zfale,_
Settings: Field (Picture shake will be eliminated during a
paused picture.)
Frame (Select to obtain higher picture quality.)
Auto* (Selects field or frame automatically
according to the disc.)
• Factory setting
To return to normal playback
When viewing still frames or slow playback, pressing
PLAY _- restores normal playback operation.
Frame by frame advance playback:
Viewing one frame at a time
With this function, DVDs can be viewed in both forward
and reverse directions. Video CDs can only be moved in
the forward direction.
1 Press PAUSE II.
2 Press STEP/SLOW <11 or IIl_.
STEP/SLOW ii1_: The picture advances one frame each
time the button is pressed.
STEP/SLOW -411:The picture backs up a DVD a few
frames each time the button ispressed.
To return to normal playback
When viewing frame by frame playback, pressing
PLAY _,- restores normal playback operation.
Notes
• There is no sound when viewing still frames or slow playback,
or when advancing one frame at a time.
• Still frame, slow play, or frame advance playback may not be
possible with certain titles. In this case, the _l mark is
displayed.
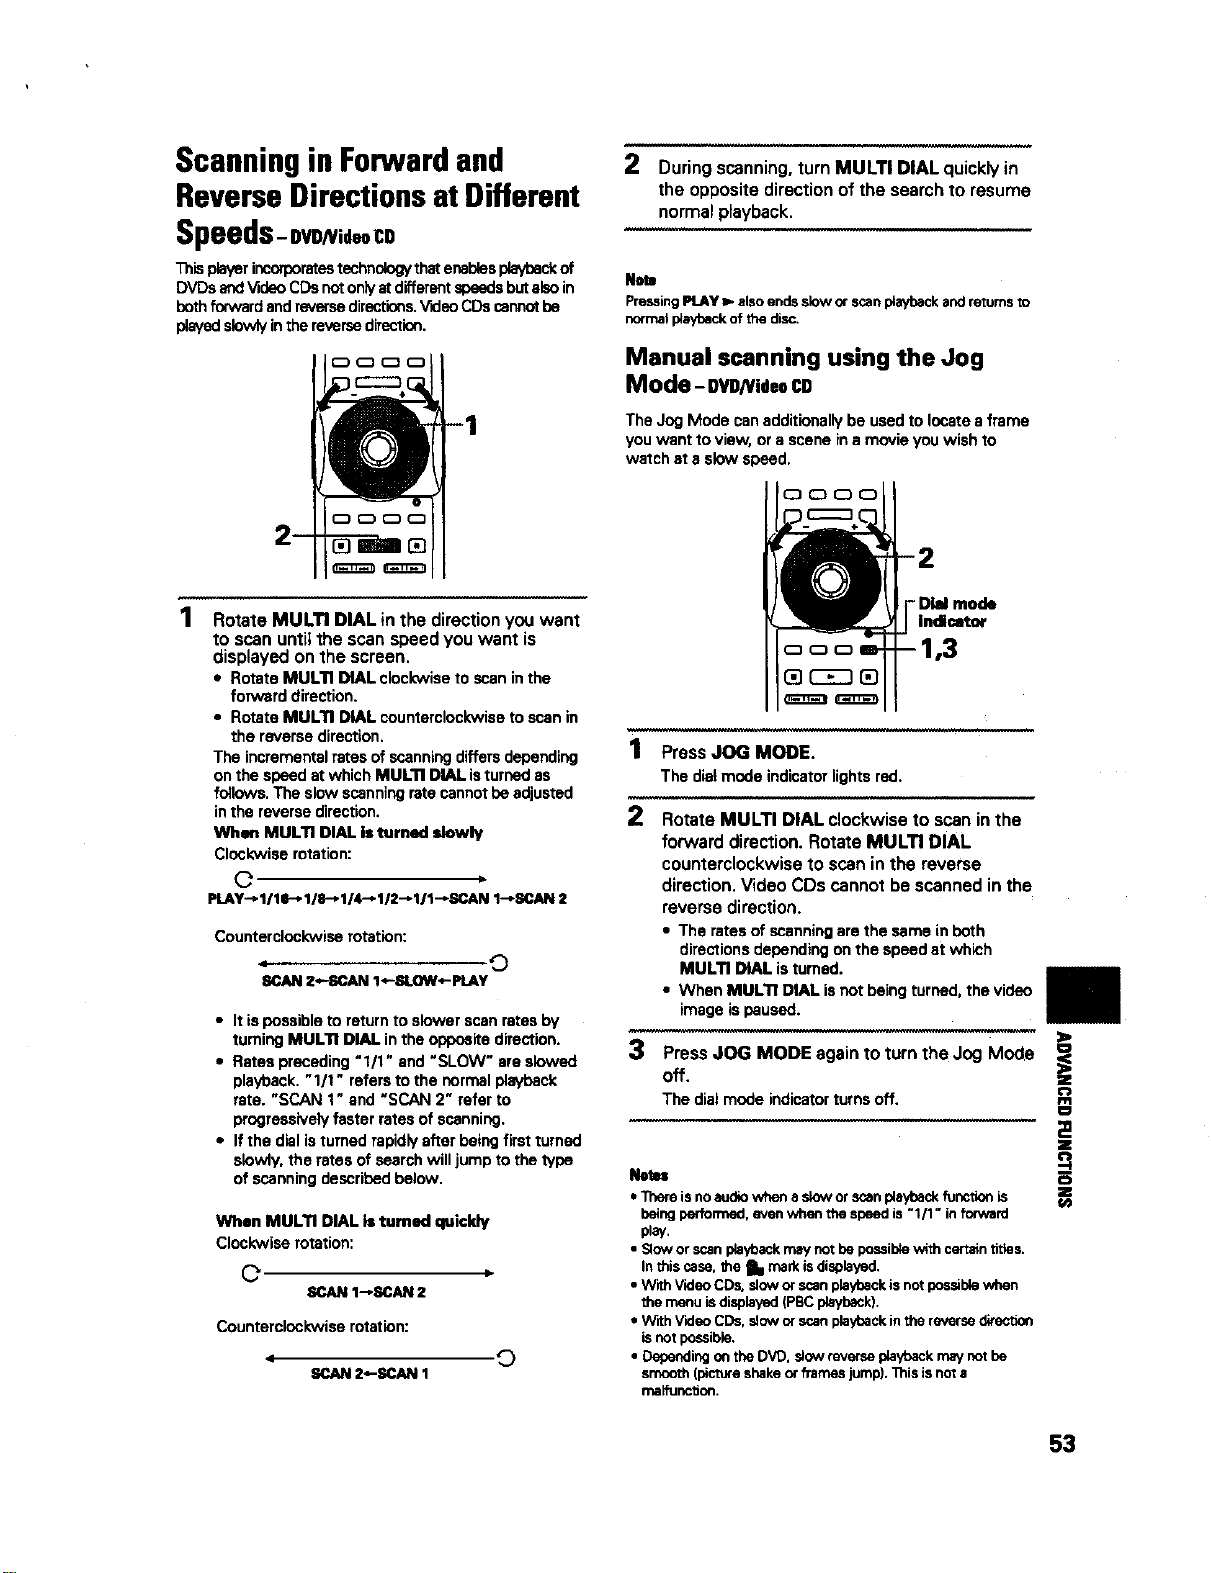
Scanning in Forwardand
ReverseDirectionsat Different
Speeds-owNid.CO
This player incorporatestechnology thatenables playt_ck of
DVDs esd Video CDs not on]'/at different speeds butabo in
beth forward and reverse directions.VEleo CDs cannot be
playedslowly inthe reverse direction.
Rotate MULTI DIAL in the direction you want
to scan until the scan speed you want is
displayed on the screen.
• Rotate MULTI DIAL clockwise to scan in the
forward direction.
• Rotate MULTI DIAL counterclockwise to scan in
the reverse direction.
The incremental rates of scanning differs depending
on the speed at which MULTI DIAL isturned as
follows. The slow scanning rate cannot be adjusted
in the reverse direction.
When MULTI DIAL Is turned slowly
Clockwise rotation:
O
PLAY-_I/lg-_ 1/8-_ 1/4-* 112"_111"_SCAN1-pSCAN 2
Counterclockwise rotation:
iCAN Z--SCAN I*-SLOW4-PLAY "_
• It is possible to return to slower scan rates by
turning MULTI DIAL in the opposite direction.
• Rates preceding "1/1" and "SLOW" are slowed
playback. "1/1" refers to the normal playback
rate. "SCAN 1" and "SCAN 2" refer to
progressively faster rates of scanning.
• If the dial isturned rapidly after being first turned
slowly, the rates of search will jump to the type
of scanning described below.
When MULTI DIAL is turned quickly
Clockwise rotation:
O
SCAN t_C;AN 2
Counterclockwise rotation:
JI
2*-SCAN 1
©
2 During scanning, turn MULTI DIAL quickly in
the opposite direction of the search to resume
normal playback.
Note
PressingPLAY_ alsoendsslow orscanplaybackand retumsto
normalplaybackof the disc.
Manual scanning using the Jog
Mode - gVD/1/ideoCD
The Jog Mode can additionally be used to locate a frame
you want to view, or a scene in a movie you wish to
watch at s slow speed.
oooo
1 Press JOG MODE.
The dialmodeindicatorlightsred,
2 Rotate MULTI DIAL clockwise to scan in the
forward direction. Rotate MULTI DIAL
counterclockwise to scan in the reverse
direction. Video CDs cannot be scanned in the
reverse direction.
• The rates of scanningare the same inboth
directionsdependingonthe speedat which
MULTI DIAL isturned.
• When MULTI DIAL isnot beingturned,the video
imageispaused.
3 PressJOG MODE againto turntheJog Mode
Off.
€
The dial mode indicator turns off.
Nets=
• Thereisnoaudiowhen aslow orscanplaybackfunctionis
beingperfomned,evenwhenthe speed is"1/1" inforward
play.
• Sloworscanplaybackmaynot bepossiblewithcmzaintitles.
Inthis case, the _11mark isdisplayed.
• With_leo CDs. sloworscanplaybackisnotpossiblewhen
the menu isdisplayed(PBCplayback).
• With VideoCDs,slowor scanplaybackinthe reversedirection
isnotpossible.
• Dependingonthe DVD, slow reverseplaybackmaynotbe
smooth(pictureshakeorframes jump),l_is isnora
rnalfunctJon.
I
O
Z
f/)
53

Viewing from a Desired
CameraAngle (Multi-Angle)
- DVD
You can select a camera angle when viewing DVDs with
the multi-angle option.
To check whether or not a disc is recorded with
angles:
The jacket of discs that are recorded with angles wiU be marked
with [_:t, When locations on discs that are recorded with angles
are played back. the _ indicator can be displayed,
To cancel the angle mark, set [Angle Indicator] to "Off" in the
Setup screen Video menu described in the section below.
Turning the angle indicator on and
off
When a picture recorded in different angles is played
back, t=_3is displayed on the screen. This setting lets
you see clearly whether the playback picture is recorded
in multiple angles or not.
Turn the angle indicator on or off in the [Angle Indicator]
setting in the Setup screen Video menu in the "Expert"
menu mode (page 40).
StllRctu_- R_d
LIDe _ IIJE_
0 _l (_ 0
......ANGLE
Settings: On* (_3 is displayed)
Off (Not displayed)
* Factory setting
Note
Even when the [Angle Indicator[ setdng is set to "Off", the
ANGLE indicator in the display panel of the player lights dunng
multi-angle playback. Therefore, it is possible to know when the
multi-angle function can be used without having to display the
icon on the screen.
Press ANGLE during playback.
The camera angle changes each time you press the
button.
Notea
• You can use the Muhi-Angle function only with discs featuring
recordings of images shot from different camera angles.
• During Multi-Angle playback, the ANGLE indicator in the
display lights.
• For some discs, selection can be made using the DVD menu.
In this case, wess MENU to display the DVD menu screen and
then make your selection.
54

Repeat Play-oVD/VideaCD/CD
You can repeat an entire title, chapter or track, or just a
part.
STOP •-
REPEAT--
/im--_
0000
0000
0000
-- PLAY I_.
--CLEAR
--A-B
Repeat play of a chapter/track
Press REPEAT once during playback of the
chapter or track you want to repeat.
Repeat play of a title/disc
Press REPEAT twice during playback of the title
you want to repeat.
To cancel repeat play
PressSTOP II. PressCLEARifyou want to cancel
repeatplaybackandcontinuenormalplayback.
Repeat play of a specified section
i,,,,,,,,,,. ,,
Press A-B at the beginning and end of the section
you want to repeat.
* When A-B is pressed a second time, the disc returns
to the Iocatbn where A-B was pressed first end plays
the selected section repeatedly.
• You can only perform A-B repeat within the same
title, chapter, or track.
To cancel A-B repeat play
Press CLEAR. Playback continues, but the repeat
function is canceled.
Return to a specified location on a
disc
1 Press A-B at the desired location.
,..H....m.
2 When you want to return to the specified
location, press PLAY I_.
• With DVDs. the title continues playing until the end,
and then playback starts once more from the
beginning of that title.
• With CDs and Video CDs, repeat play differs according
to the current play mode. In single play mode, only the
currem disc is repeated. In ALL play mode. allof the
Video CDs and CDs in the rack are played and then
repeated in the same order. In custom play mode, all
of the Video CDs and CDs in the current custom file
are played and then repeated.
To repeat a program
PressREPEATonceduringprogramplaybackto repeat
the program.
To repeat Best Play
Press REPEAT once during Best Play to repeat the Best
Play program.
To repeat random play
Press REPEAT once during any of the random playback
modes. When random playback is repeated, the tracks
will be played in a different random order.
To clear the specified location
Press CLEAR to cancel repeat play or to dear the
specified location that was set using A-B.
Notes
• With some DVDdiscs,there maybetimes when repeat
playbackisrot possible,Inthesecases,the a. markwill
appearon the screen.
• With_/_leoCDs.repeatplayisnot pos_blewhen the menuis
displayed(PBCplayback).Toperformrepeatplay,start
playbackwithout displayinga menuby pressingthe track
numbertobe repeatedwhen the discisstopped,andthen
pressREPEAT.
!
o
J
g
cs
Z
55
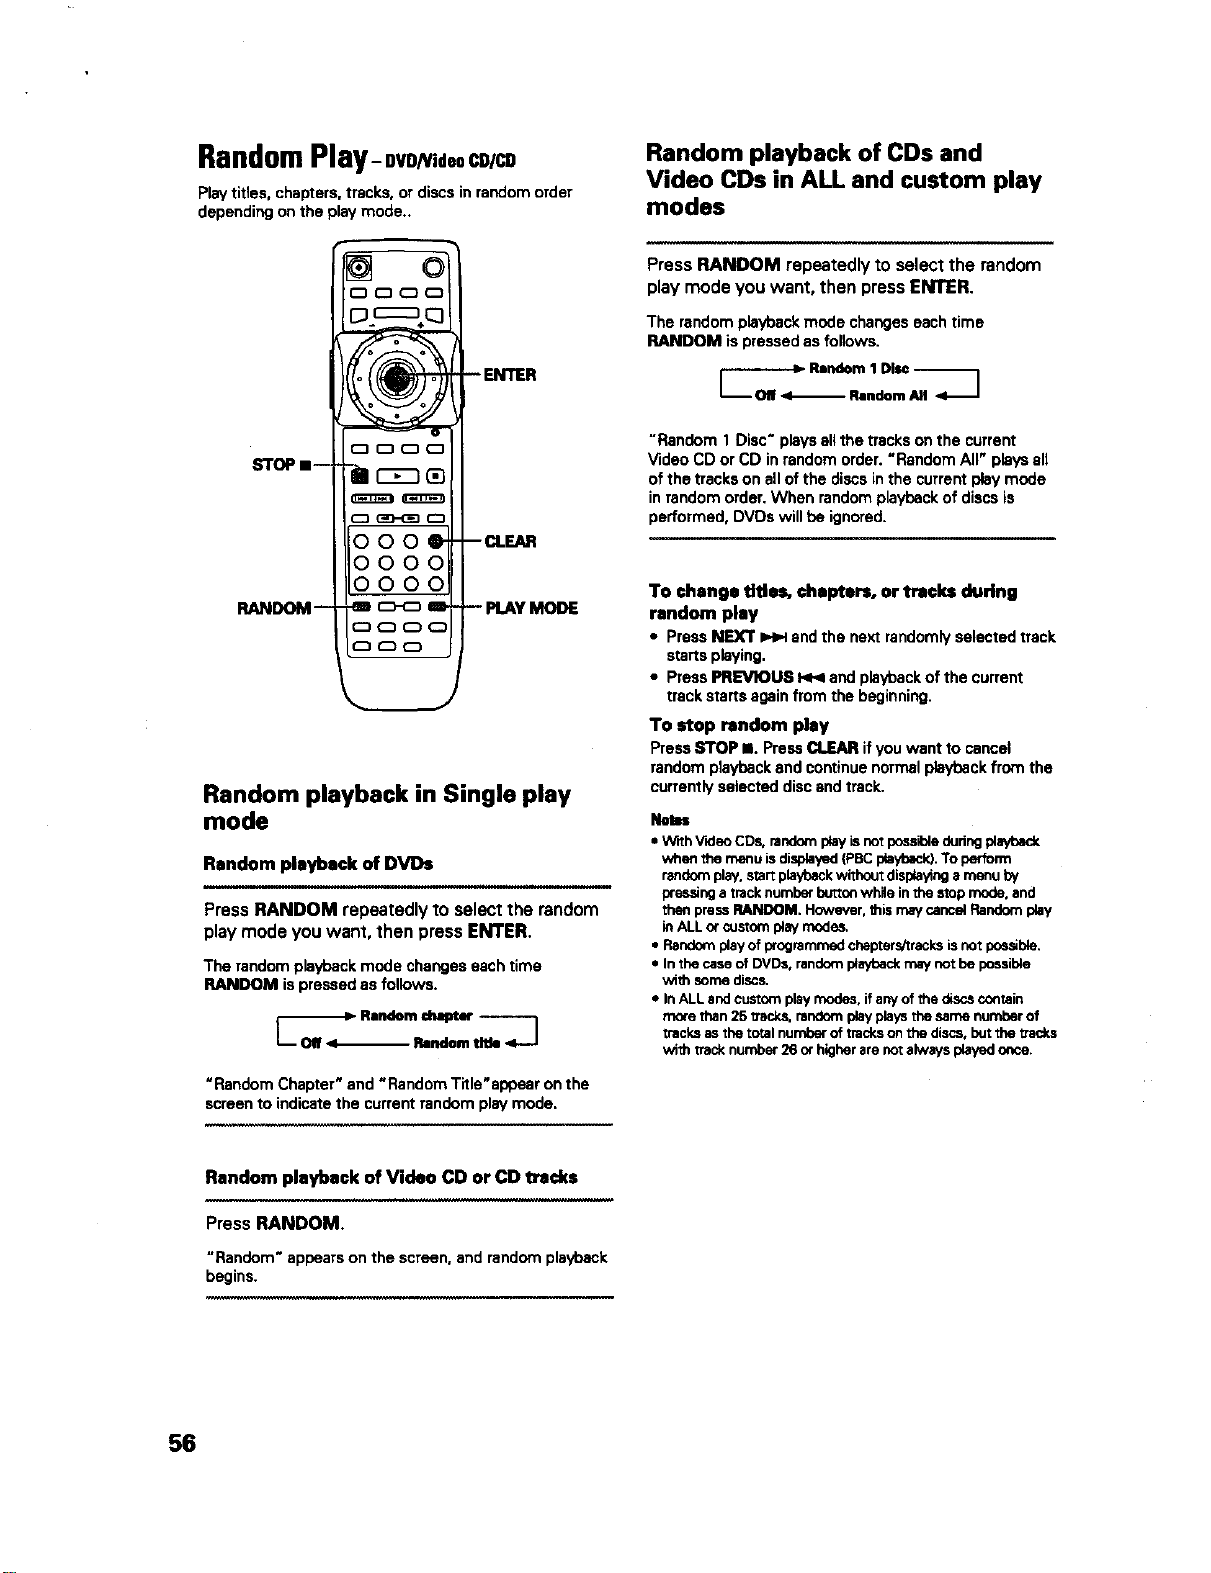
RandomPlay- DVDNideoCD/C9
Play titles, chapters, tracks, or discs in random order
depending on the play mode..
Random playback in Single play
mode
Random playback of DVi)s
, ,,=,, , , =,
Press RANDOM repeatedly to select the random
play mode you want, then press ENTER.
The random playback mode changes each time
RANDOM is pressed as follows.
_----_1 Random chapter ]
Random tltJe
"RandomChapter"and "RandomTitle'appear onthe
screento indicatethe currentrandomplaymode.
Random playback of Video CD or CD tracks
Press RANDOM.
"Random"appearson the screen,andrandomplayback
begins.
Random playback of CDs and
Video CDs in ALL and custom play
modes
Press RANDOM repeatedly to select the random
play mode you want, then press ENTER.
The random playback mode changes each time
RANDOM is pressed as follows.
"Random 1 Disc" plays eli the tracks on the current
Video CD or CD in random order. "Random All" plays all
of the tracks on all of the discs in the current play mode
in random order. When random playback of discs is
performed, DVDs will be ignored.
To change titles, chapters, or tracks during
random play
• PressNEXT _ endthe nextrandomlyselectedtrack
startsplaying.
• PressPREVIOUS _ endplaybackofthe current
trackstartsagainfromthe beginning.
To stop random play
Press STOP II. Press CLEAR if you want to cancel
random playback end continue normal playback from the
currently selected disc and track.
NetR
• With VKleOCDs,randomplayis notpo_sibleduringplayback
when the menu isdisplayed(Pec playback).To perform
randomplay,start pisVoackwithoutdisplayinga menu by
pressinga tracknumberbuttonwhile in thestopmode,and
then pressRANDOM. However,thismaycancs_Randomplay
inALLor customplaymodes,
• Random playof programmedchapters!tracksisnotpes_ble.
• In thecaseof DVDs,randomplaybackmaynot he possible
with somediscs.
• In ALLandcustomplaymodes, ifanyof the discscontain
morethan25 txack_randomplayplaysthe samenumberof
tracksasthetotalnumberof tracksonthe discs,burthe ITac_s
with tracknumber26or higherare noralwaysplayedonce.
56
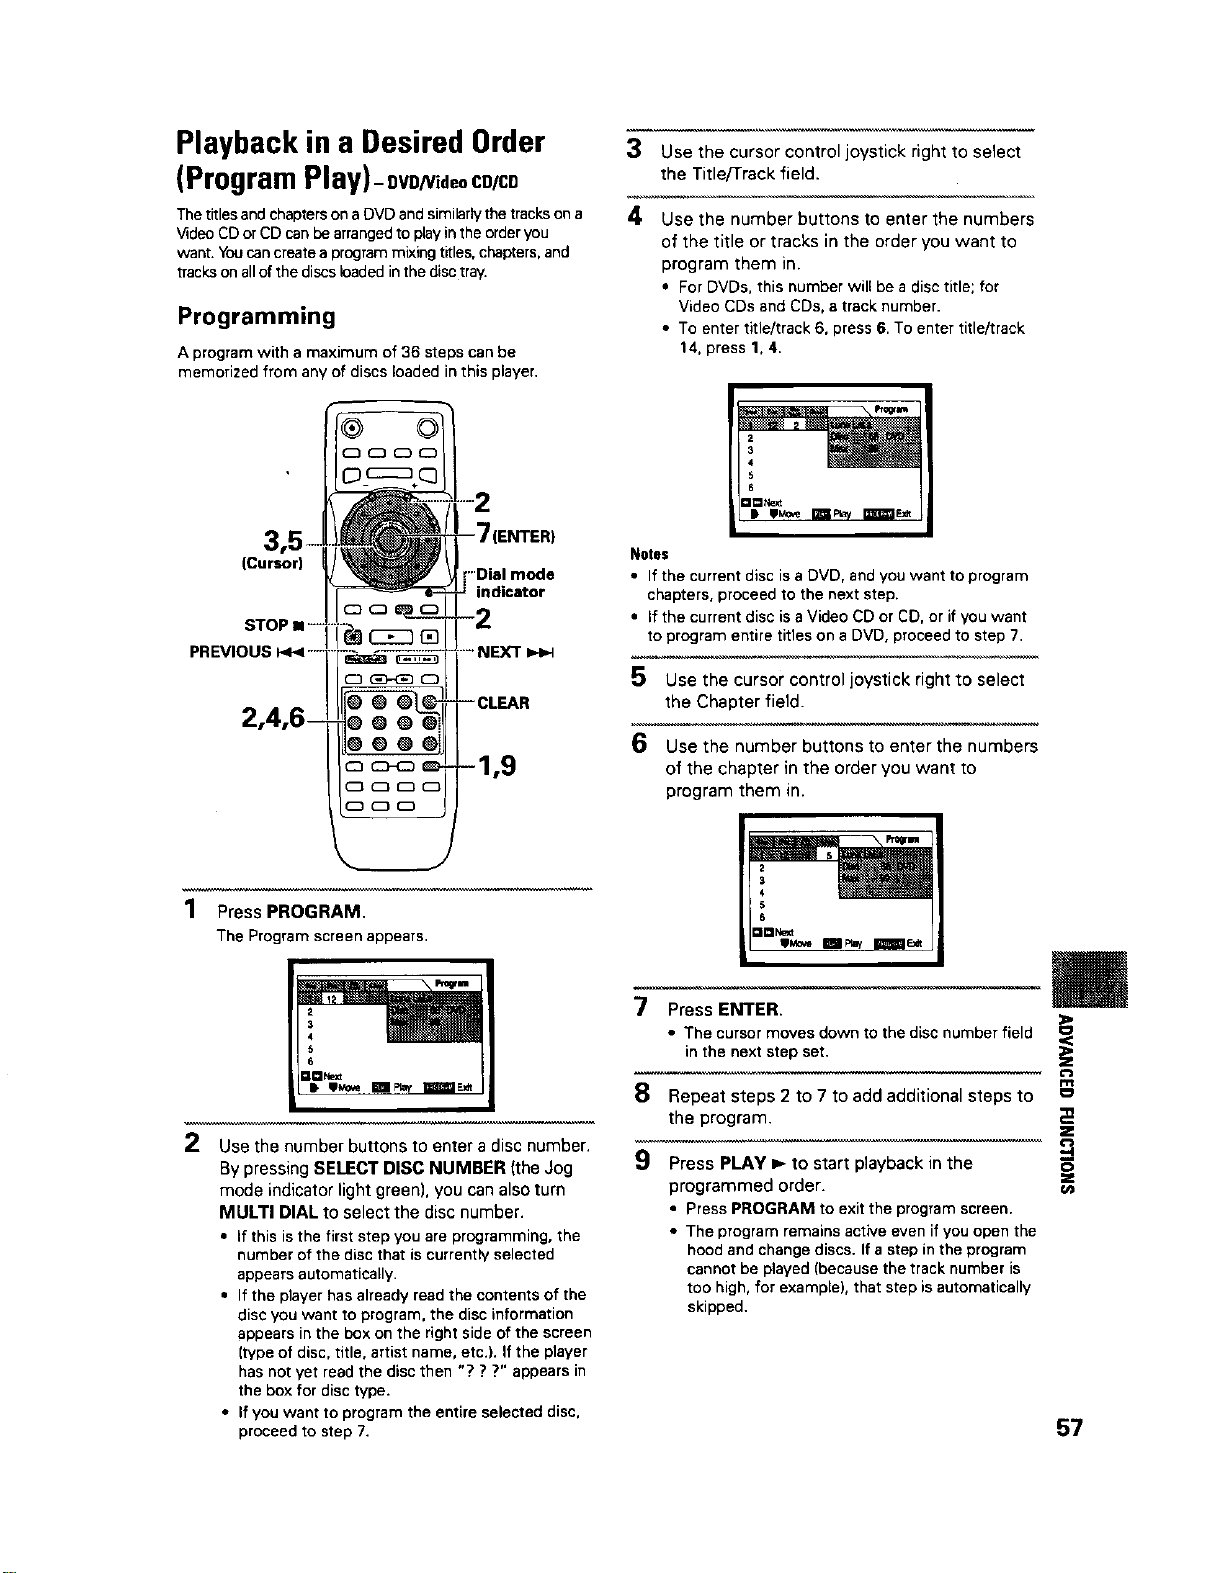
Playback in a Desired Order
(Program Play)- DVD/Videoco/co
The titles and chapters on a DVD and similarly the tracks on a
Video CD or CD can be arranged to play in the order you
want. You cancreate a program mixing titles, chapters, and
tracks on all of the discs leaded in the disc tray.
Programming
A program with a maximum of 36 steps can be
memorized from any of discs loaded in this player.
3 Use the cursor control joystick right to select
the Title/Track field.
4 Use the number buttons to enter the numbers
of the title or tracks in the order you want to
program them in.
• For DVDs, this number will bea disc title; for
Video CDsand CDs, atrack number.
• To entertitle/track 6, press 6.To enter title/track
14, press 1, 4.
(Cursor)
STOP • -
PREVIOUS _ .....
•"Dial mode
indicator
....NEXT
-- CLEAR
Notes
• If the current disc is a DVD, and you want to program
chapters, proceed to the next step.
• If the current disc is a Video CD or CD, or if you want
to program entire titles on a DVD, proceed to step 7.
5 Use the cursor control joystick right to select
the Chapter field.
6 Use the number buttons to enter the numbers
of the chapter in the order you want to
program them in.
1 Press PROGRAM,
The Program screen appears,
w
7 Press ENTER.
• The cursor moves down to the disc number field
in the next step set.
m
8 Repeat steps 2 to 7 to add additional steps to
the program. ;_
2 Use the number buttons to enter a disc number.
O
Z
By pressing SELECT DISC NUMBER (the Jog
mode indicator light green), you can also turn
MULTI DIAL to select the disc number.
• If this is the first step you are programming, the
number of the disc that is currently selected
appears automatically.
• If the player has already read the contents of the
disc you want to program, the disc information
appears in the box on the right side of the screen
(type of disc, title, artist name, etc.). If the player
has not yet read the disc then "? ? ?" appears in
the box for disc type.
• If you want to program the entire selected disc,
proceed to step 7.
9 Press PLAY ib- to start playback in the
programmed order.
• Press PROGRAM to exit the program screen.
• The program remains active even if you open the
hood and change discs. If a step in the program
cannot be played (because the track number is
too high, for example), that step is automatically
skipped.
57

To confirm the contents of a program
1 PressPROGRAM.
2 Use PREVIOUS _ orNEXT =,4Hbuttonsto jumpto
the next/previouspageof sixsteps (1<.<1/1_1on the
frontpanelcannotbeusedto performthisoperation).
3 PressPROGRAM to exitthe programscreen.
To change the contents of a program
1 PressPROGRAM.
2 Jump to the page of steps with the contents you want
to change using the _ buttons _ on the
front panel cannot be used to perform this operation).
3 Move the cursor control joystick up or down to select
the step you want to change.
4 Move the cursor control joystick right or left to select
the appropriate field.
5 Press the number button(s) of the number you want
to change.
6 Press PROGRAM to exit the program screen.
Nnll
• If achapterisprogrammedfor a discthat hasnorye_heen
readbythe player('???" isdisplayed),anda CDorVideoCD is
laterdetected inthatdiscposition,the chapterprogram
informationla cleared.Additionally,ifthere isnodiscinthe
selecteddiscp_itJon, or ifthe programmedchapternumberis
largerthanthe numberof chaptersinthe seisctedtitle, the
chapterprograminformationiserased.
• DuringDVD playback,whena chapter_hatcannotbe playedas
hart ofprogramplaybackisenoountered._11ol-_ is
displayed, andthe program automaticallyproceedsto the next
chapter.
• ProgrammingisnorpossibleduringPBCplaybackof Video
CDs.To program VideoCDs,atop ptaybackbeforeattempting
to makea program,
• Dudngprogrammedplayback,if therackisrotatedto playa
DVD.an astedskmayhe displayedinthe upperdght_ of
the screen. This isto indicatethat _heraisinformationon the
discthat mustbe playedfirst(Rrst PlayPGC).Dependiogon
the disc.the astedsk maybrinkcontinuouslyduringplaybackof
chaptersthatwere norprogrammed andthendisappearshanty
before playbackof the desiredlocationonthe disc.
To add to a program
Adda new Disc,Trtle/TrackorChapterat the endof the
programby followingthe stepsinthe section
'Programming"onthe previous page.
To repast the €ontsnts of a program
Duringprogram playback,pressREPEAT.The entire
programwill be repeated.
To delete a step in a program
1 Press PROGRAM.
2 Jump to the page with the contents you want to
delete using the I<vqilblH buttons (I<<IilH_ on the
front panel cannot be used to perform this operation).
3 Move the cursor control joystick up or down to select
the step you want to delets.
4 Press CLEAR.
5 Press PROGRAM to exit the program screen.
To clear the entire program
PressingCLEARwhen the discissteppedwitlclearall
program data.
To stop program play
PressSTOP m.
58
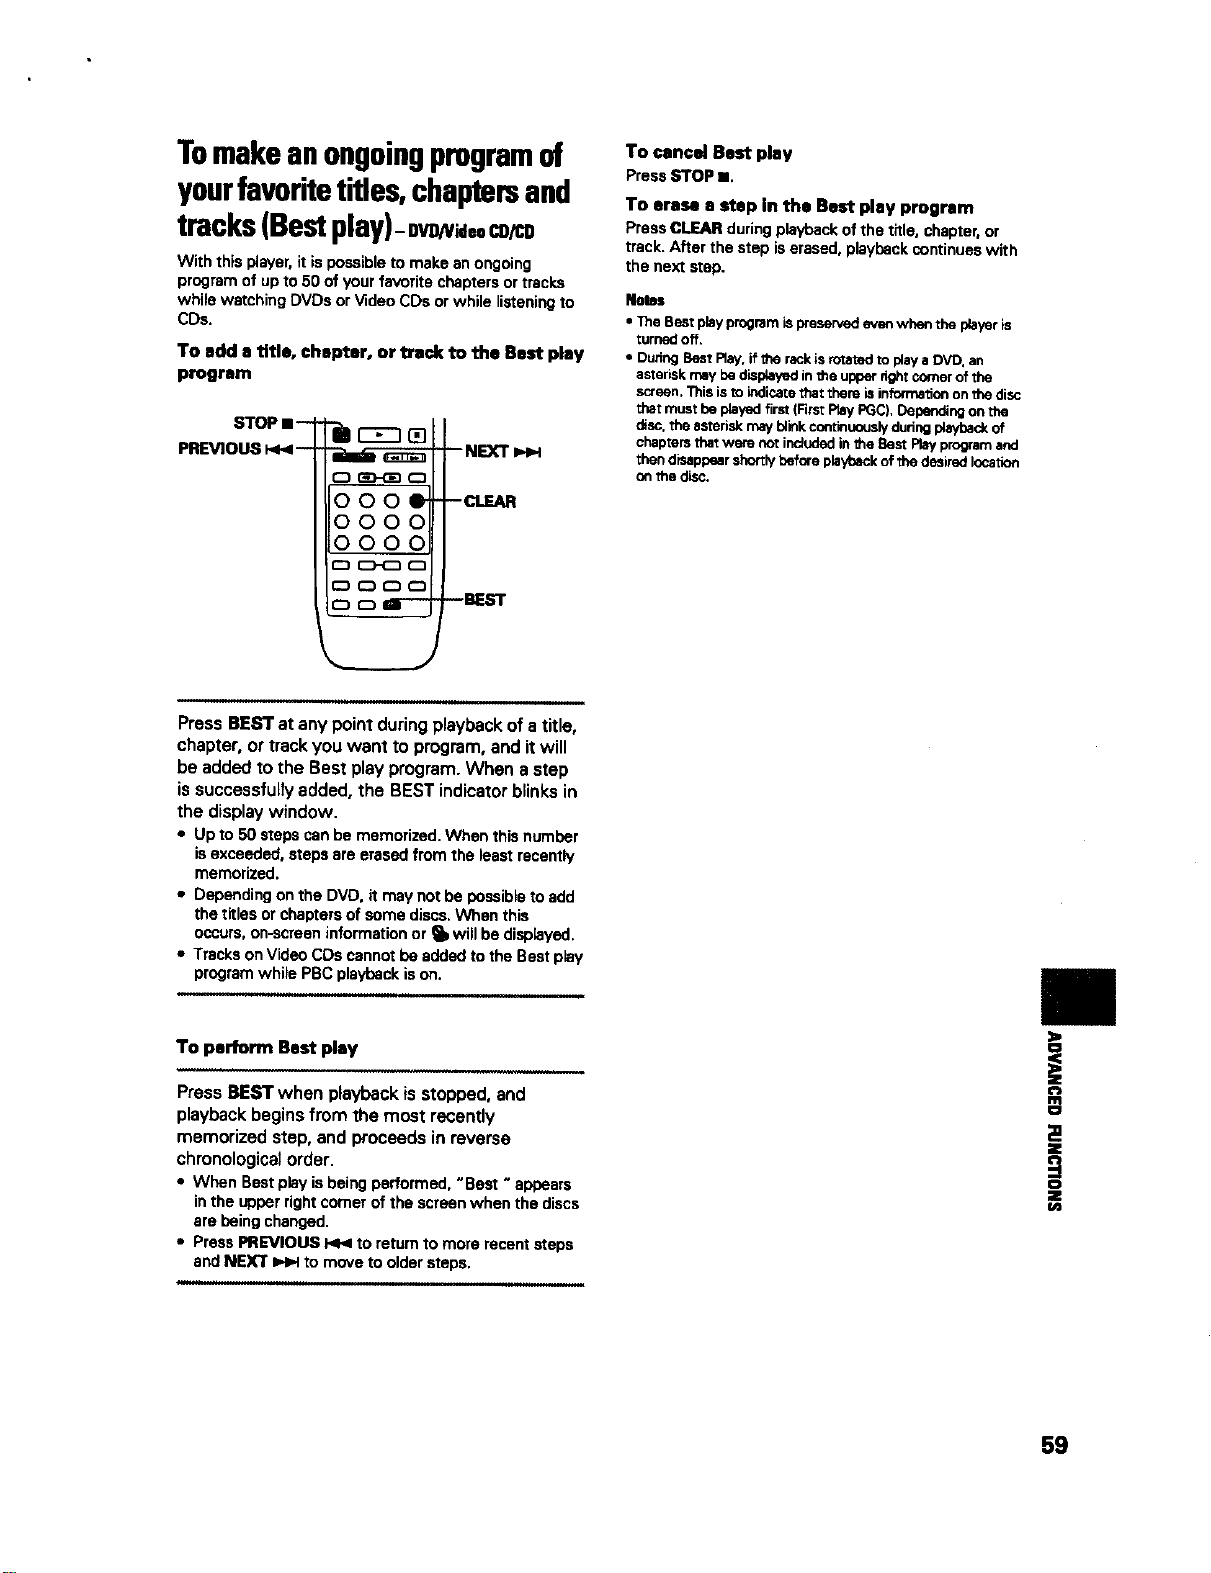
Tomakeanongoingprogramof
yourfavoritetitles,chaptersand
tracks(Bestplay)-0v v ,ocon
With this player, it is possible to make an ongoing
program of up to 50 of your favorite chapters or tracks
while watching DVDs or Video CDs or while listening to
CDs.
To add a title, chapter, or track to the Best play
program
STOP I--
PREVIOUS _ --
r'_ GD-GD r"l
0000
0000
0000
CD CD CD _
CD C3 aI---
--NEXT
--CLEAR
--BEST
Press BEST at any point during playback of a title,
chapter, or track you want to program, and it will
be added to the Best play program. When a step
is successfully added, the BEST indicator blinks in
the display window.
• Upto 50 stepscanbe memorized. When thisnumber
isexceeded,stepsare erasedfromthe leastrecently
memorized.
• Dependingonthe DVD, itmay notbe possibleto add
the titlesorchaptersof somediscs.When this
occurs,on-screeninformationor _ will be displayed.
• TracksonVideoCDs cannotbe addedtothe Bestplay
programwhile PBCplaybackison.
To perform Best play
Press BEST when playback is stopped, and
playback begins from the most recently
memorized step, and proceeds in reverse
chronological order.
• When Bestplayisbeingperformed,"Best "appears
inthe upperrightcomerof the screenwhen the discs
are beingchanged.
• PressPREVIOUS _ to returnto more recentsteps
andNEXT ZHzHto movetooldersteps.
To cancel Best play
PressSTOP m.
To erase a step in the Best play program
PressCLEAR duringplaybackofthe title,chapter,or
track. After the step iserased,playbackcontinueswith
the nextstep.
Notes
• The Bestplayprogramispresenaedevenwhenthe playeris
turned off,
• DuringBestRay, ifthe rackis rotatedto playa DVD. an
asterisknay be displayedin£haupperdghtcornerofthe
screen.This isto indicatethat thereis informationon the disc
tha_rrv_ beplayedf_-st_FirstP_¥ _), Oeperdng o_ the
disc,the asteriskmayblinkcontinuouslyduringplayt_d_of
chaptersthatwere notincludedin_le BestPlayprogramand
thendis_lppearshortly beforeplayt_lckof the desiredlocation
onthe disc,
i
D
Z
59
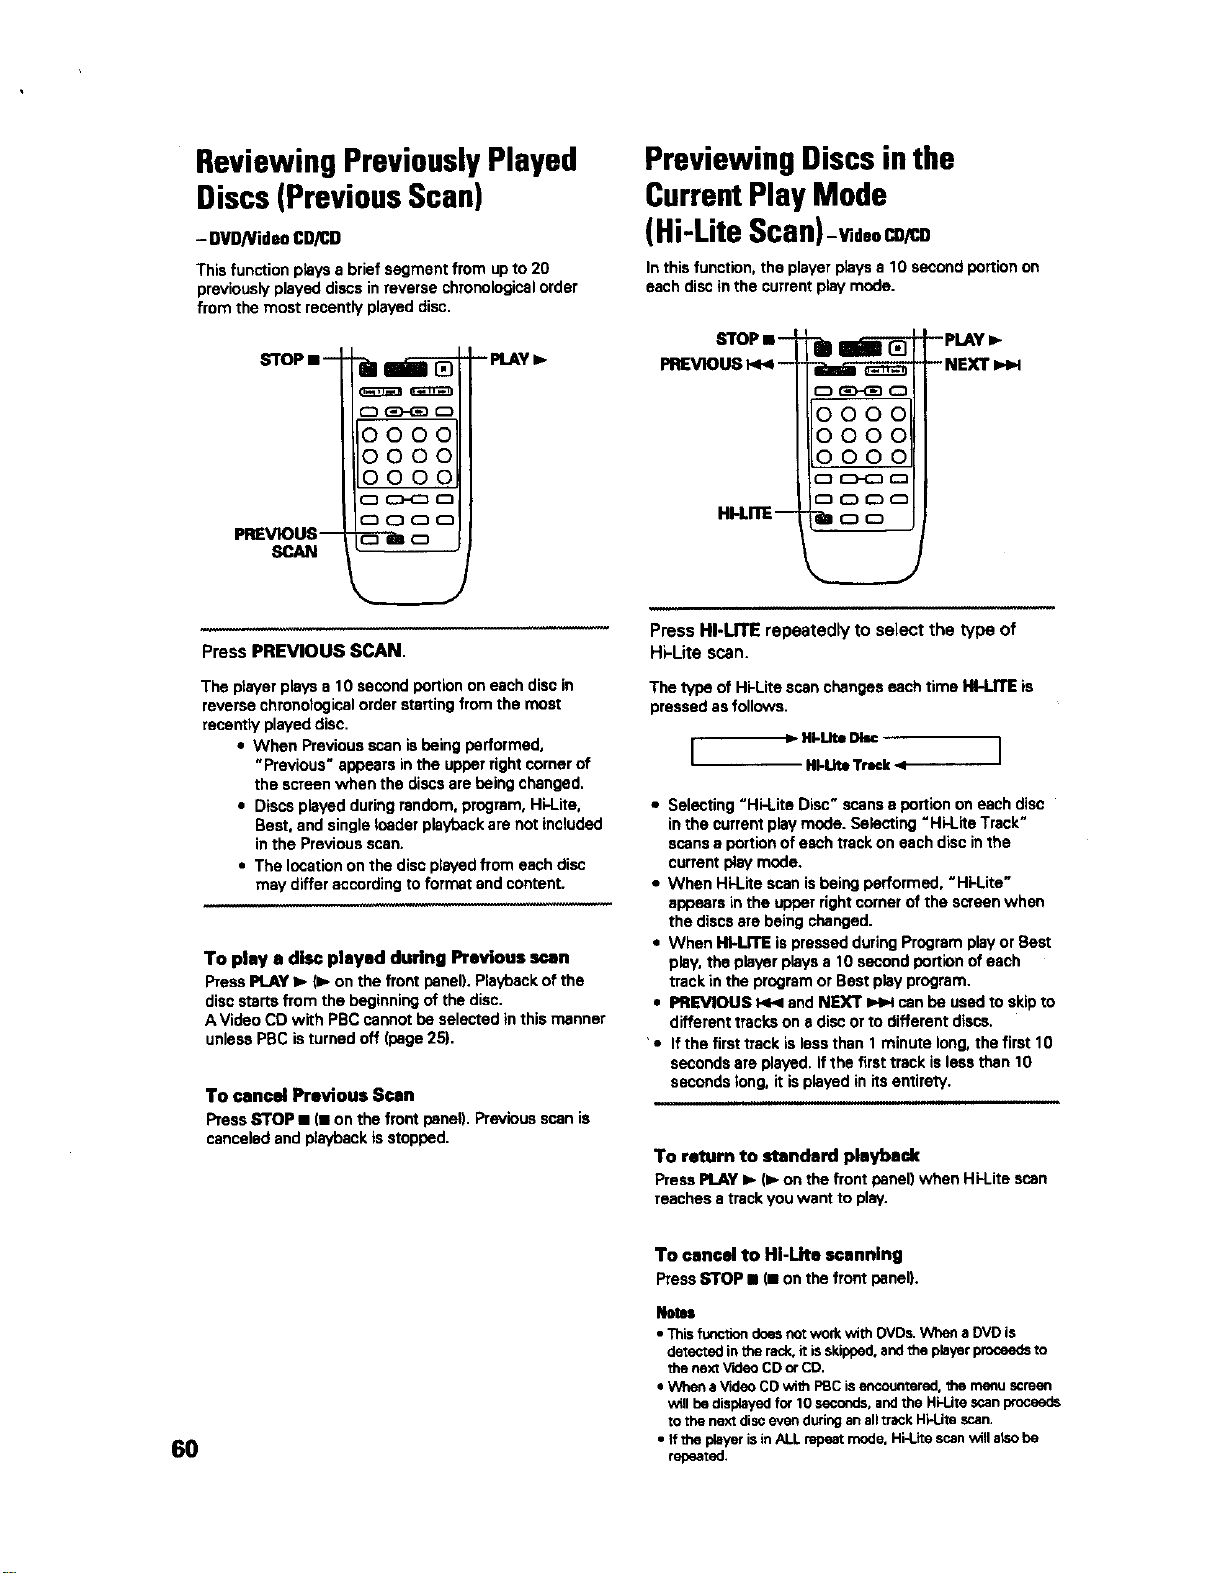
ReviewingPreviouslyPlayed
Discs(PreviousScan)
- DVD/VideoCD/CD
This function plays a brief segment from up to 20
previously played discs in reverse chronological order
from the most recently played disc.
STOPs _
PREVIOUS--
SCAN
o GD_ _
0000
0000
0000
CD_
r-1(X_(D (D
--P_AY_
PressPREVIOUSSCAN.
The player plays a 10 second portion on each disc in
reverse chronological order starting from the most
recently played disc.
• When Previous scan isbeing performed,
"Previous" appears in the upper right corner of
the screen when the discs are being changed.
• Discs played during random, program, Hi-Lite,
Best, and single leader playback are not included
in the Previous scan.
• The location on the disc played from each disc
may differ according to format and content.
To play a disc played during Previous scan
Press PLAY I_ _. on the front panel). Playback of the
disc starts from the beginning of the disc.
A Video CD with PBC cannot be selected in this manner
unless PBC is turned off (page 25).
To cancel Previous Scan
PressSTOP • (monthe frontpanel).Previous scanis
canceledandplaybackisstopped.
Previewing Discsinthe
CurrentPlay Mode
(Hi-Lite Scan)-wd.=r.o
In this function, the player plays a 10 second portion on
each disc in the current play mode.
STOP • -
PREVIOUS_ -
HI-UTE m
Ilmi-
DG£_O
000_
000
0000
CD C>_D _
CD CD ID _
"_OO
-- PLAY
--NEXT _
Press HI-UTE repeatedly to select the type of
Hi-Lite scan.
The type ofHi-Litescanchangeseachtime Itf-LITE is
pressedasfollows.
[ _- Hl-UteDk.= ]
HI-UtoTrack-4-
• Selecting "Hi-Lite Disc" scans a portion on each disc
in the current play mode. Selecting =Hi-Lite Track"
scans a portion of each track on each disc in the
current play mode.
• When Hi-Lite scan isbeing performed, "HkLite"
appears in the upper right corner of the screen when
the discs are being changed.
• When HI-MTE is pressed during Program play or Best
play, the player plays a 10 second portion of each
track in the program or Best play program.
• PREVIOUS _ and NEXT _ can be used to skip to
different tracks on a disc or to different discs.
' • If the first track isless than 1 minute long, the first 10
seconds are played, if the first track is less than 10
seconds long, it is played in its entirety.
To return to standard playback
Press PLAY I_ (l_ on the front panel) when HkLite scan
reaches a track you want to play.
6O
To cancel to HI-Lite scanning
PressSTOP • (• onthe frontpanel).
Nelea
• Thisfunction doesnorworkwith DVDs.When a DVD is
detectedinthe rack,it isskipped,and the playerproceedsto
the next V'K_eOCD orCO.
• When aV'_leoCDwith PBCisencountered,the menuscreen
will bedisplayedfor 10 seconds,andthe Hi-Lirascanproceeds
to the nextdisc_Nenduringan alltrackHi-Litescan.
• If theplayerisinALL repeatmode, Hi-Litescanwillalsobe
repeated.

ContinuingPlayback froma
Specified Location(Last
Memory)-ovo
The LastMemoryfunctionisconvenientwhenyou want
tocontinueviewinga discfromthe pointwhere you
were watchingbefore.Unlikethe resumefunction, the
LastMemoryfunction iseffectiveeven ifthe DVD is
removedfrom the player.
Memorizing a Last Memory
location to return to later
_m
1 Press LAST MEMORY during play.
The LAST MEMORY indicator lights on the player.
2 Press STOP • to stop playback, or 0 to put
the power in standby.
Once memorized, the memorized point will be
recalled even if the power is put in standby, or if the
disc is ejected. Points on up to 5 discs can be
memorized, and those points are recalled the next
time any of the discs are played back.
Resuming playback from where
LAST MEMORY was pressed
STOP •--
_
0000
0000
oooo
_wJ
1 Play a disc that has a Last Memory point
memorized and then press STOP • to stop
playback.
2 Press LAST MEMORY.
The discbeginsplaybackat the memorizedpoint,
• Last Memorymode may notfunctionforsome
DVDs,
• tfyou registermorethanfiveOVDs.detailsof the
latestdiscarememorized,while detailsofthe
leastrecentdisc(thediscyou registeredfirst)is
erased.
• Evenwithsdiscyou havememorizedwithLast
Memory,playbackbeginsatthestartofthedisc
ifyou pressPLAY =,-.
• This functionisonlyfor playbackof DVDs.
To clear the Last Memory location
Call up the Last Memory location by pressing LAST
MEMORY. Then press CLEAR while "Last Memory" is
still being displayed on the screen.
The LAST MEMORY indicator disappears from the
display window.
m
o
Z
(R
61
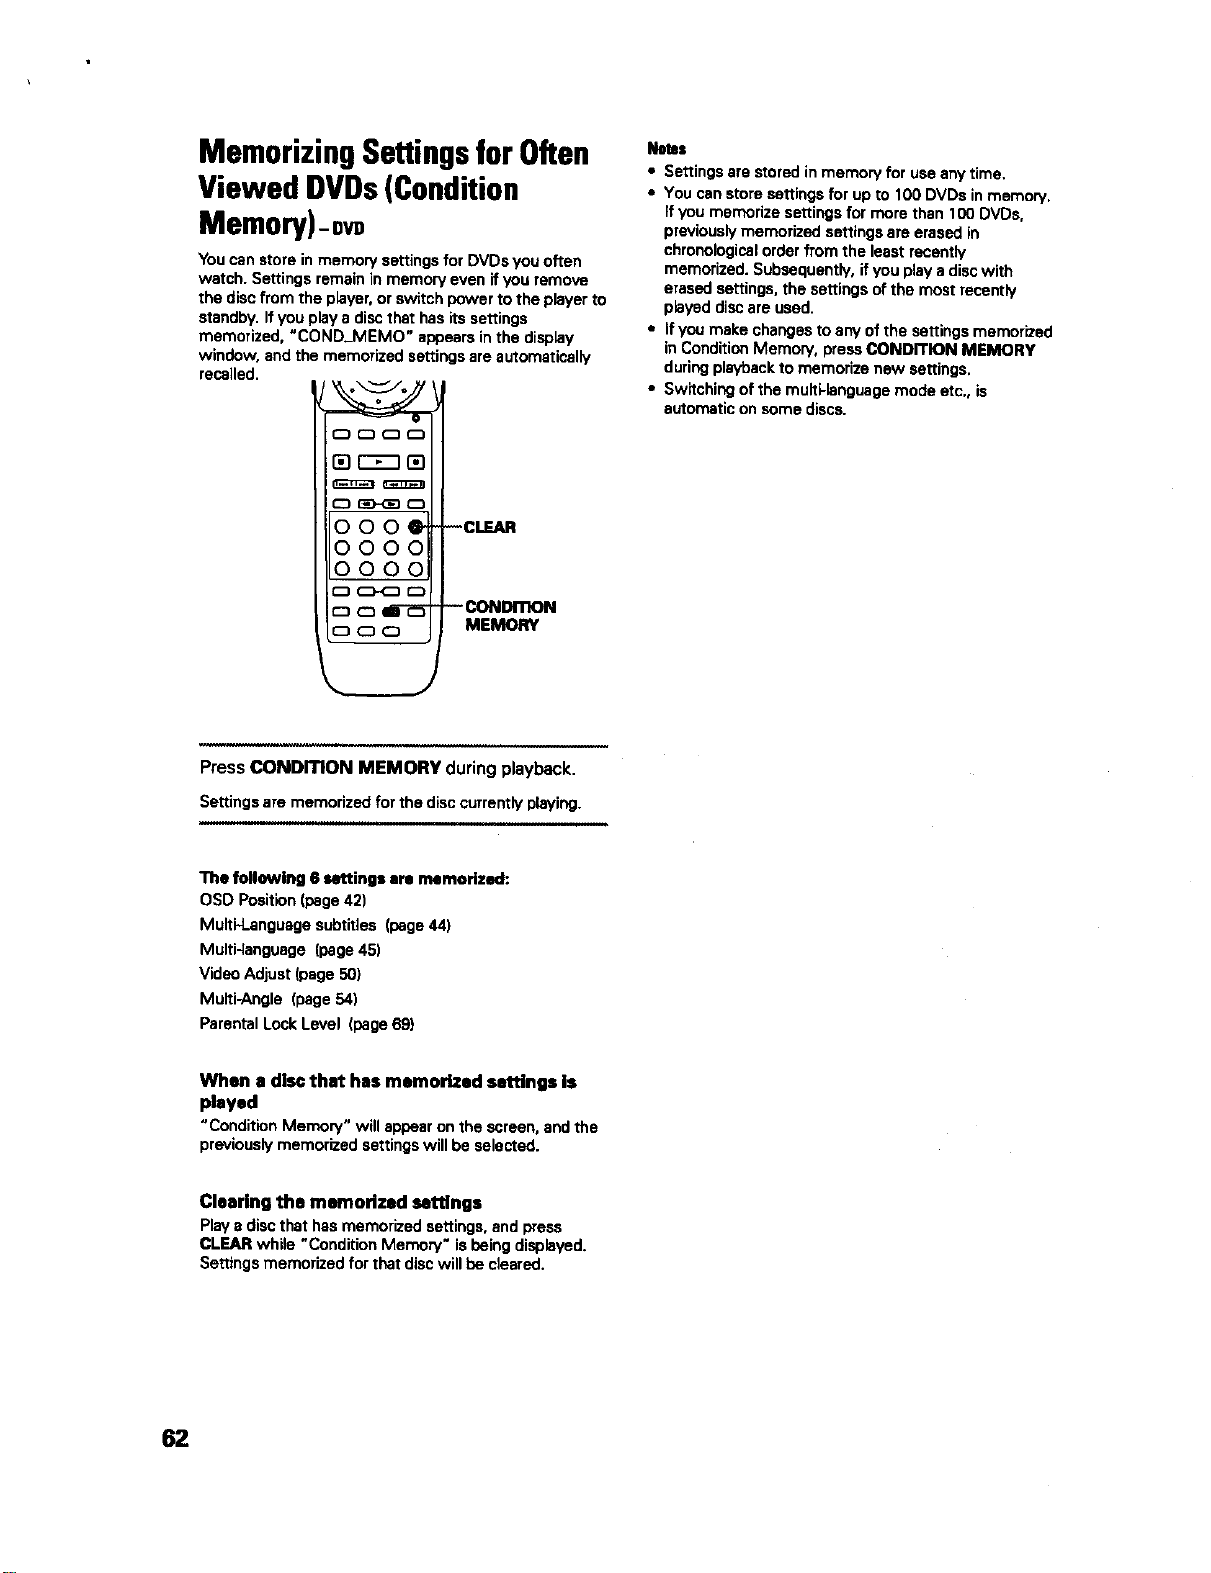
Memorizing Settingsfor Often
Viewed DVDs(Condition
Memory)-ow
You can store in memory settings for DVDs you often
watch. Settings remain in memory even if you remove
the disc from the player, or switch power to the player to
standby. If you play a disc that has its settings
memorized, "COND_MEMO" appears in the display
window, and the memorized settings are automatically
recalled.
i_1rrn _
O_D
000_
ooo
0000
_CD
CJ C3 IE-d_
CD C3 (:D
-- CONDmON
MEMORY
Notoa
• Settings ate stored inmemoW for use any time.
• You can store settings for up to 100 DVDs in memory.
If you memorize settings for more than 100 DVDs,
previously memorized settings are erased in
chronoiogical order from the least recentty
memorized. Subsequently, if you play a disc with
erased settings, the settings of the roost recently
played disc are used.
• If you make changes to any of the settings memorized
in Condition Memory, press CONDITION MEMORY
during playback to memorize new settings.
• Switching of the multi-language mode etc., is
automatic on some discs.
PressCONDmON MEMORY duringplayback.
Settings are memorized for the disc currently playing.
The following 6 settings am memorized:
OSO Position (page 421
Multi*Language subtitles (page 44)
Multi-4seguage (page 45)
Video Adjust (page 50)
Multi-Angle (page 54)
Parental Lock Level (page 69)
When a disc that has memorized settings Is
played
"ConditionMemory" willappearon the screen,andthe
previouslymeroorized settingswillbe selected.
Clearing the memorized settings
Play e disc that has memorized settings, and press
CLEAR while "Condition Memory" is being displayed.
Settings memorized for that disc will be cleared.
62

Memorizing RegularlyUsed
Menu Settings(Function
Memory)-ovgNideoco/=
You can create a shortcut menu that contains settings
that you frequently change and call up this menu
whenever you need to change one of the stored
settings. Settings remain in memory even if the player is
turned off.
Creating the Function Memory item list
Calling up the Function Memory item list
ICursor)
--
oooo
_ooo
OO {5E£]OD
o C3D-QE]0
000_
-2,3
IENTERI
-- CLEAR
Press FUNCTION MEMORY.
The FunctionMemoryitem listappearsoa the
screen.
Move the cursor control joystick to select the
item you want to adjust and press ENTER.
The Setup screenopens,andthe cursorismoved
tothe appropriatemenuandmenu item as selected
inthe FunctionMemory item list.
3 Move the cursor control joystick to make
setting adjustments, then press ENTER.
The settingischanged.Formore informationon
makingadjustmentsin the Setupscreenmenus,
referto the section"Usingthe Setup Screen
Menus" onpage39.
4 Press SETUP to close the Setup screen.
1 Press SETUP to display the Setup screen.
2 Move the cursor control joystick to select the
menu and then the menu item you want to
add to the Function Memory,
3 Press FUNCTION MEMORY.
If "FM" appears next to the menu item, the item
has been successfully added to the Function
Memory,
illl
4 Repeatsteps2 and3 toaddas manyas 5
items to the Function Memory.
When 5 items have already been stored. "FM"
does not appear next to the item when FUNCTION
MEMORY is pressed.
5 Press SETUP to close the Setup screen.
To clear an Item from the FUNCTION MEMORY
1 Press SETUP to open the Setup soreen_
2 Move the cursor control joystick to the menu and
menu item marked with "FM".
3 PressFUNC'nON MEMORY toclearthe itemfrom
the FunctionMemory.If "FM" disappears,the item
hasbeen cleared.
4 Press SETUP to close the Setup screen.
Rate
Items thatcannotbechangedwhenthe discisp_ayingcannotbe
addedto FunctionMemory ifthe disciscurrentlyplaying.When
these itemsare selected,on-screeninformationor I. willbe
displayed.
i
O
Z
€/J
63
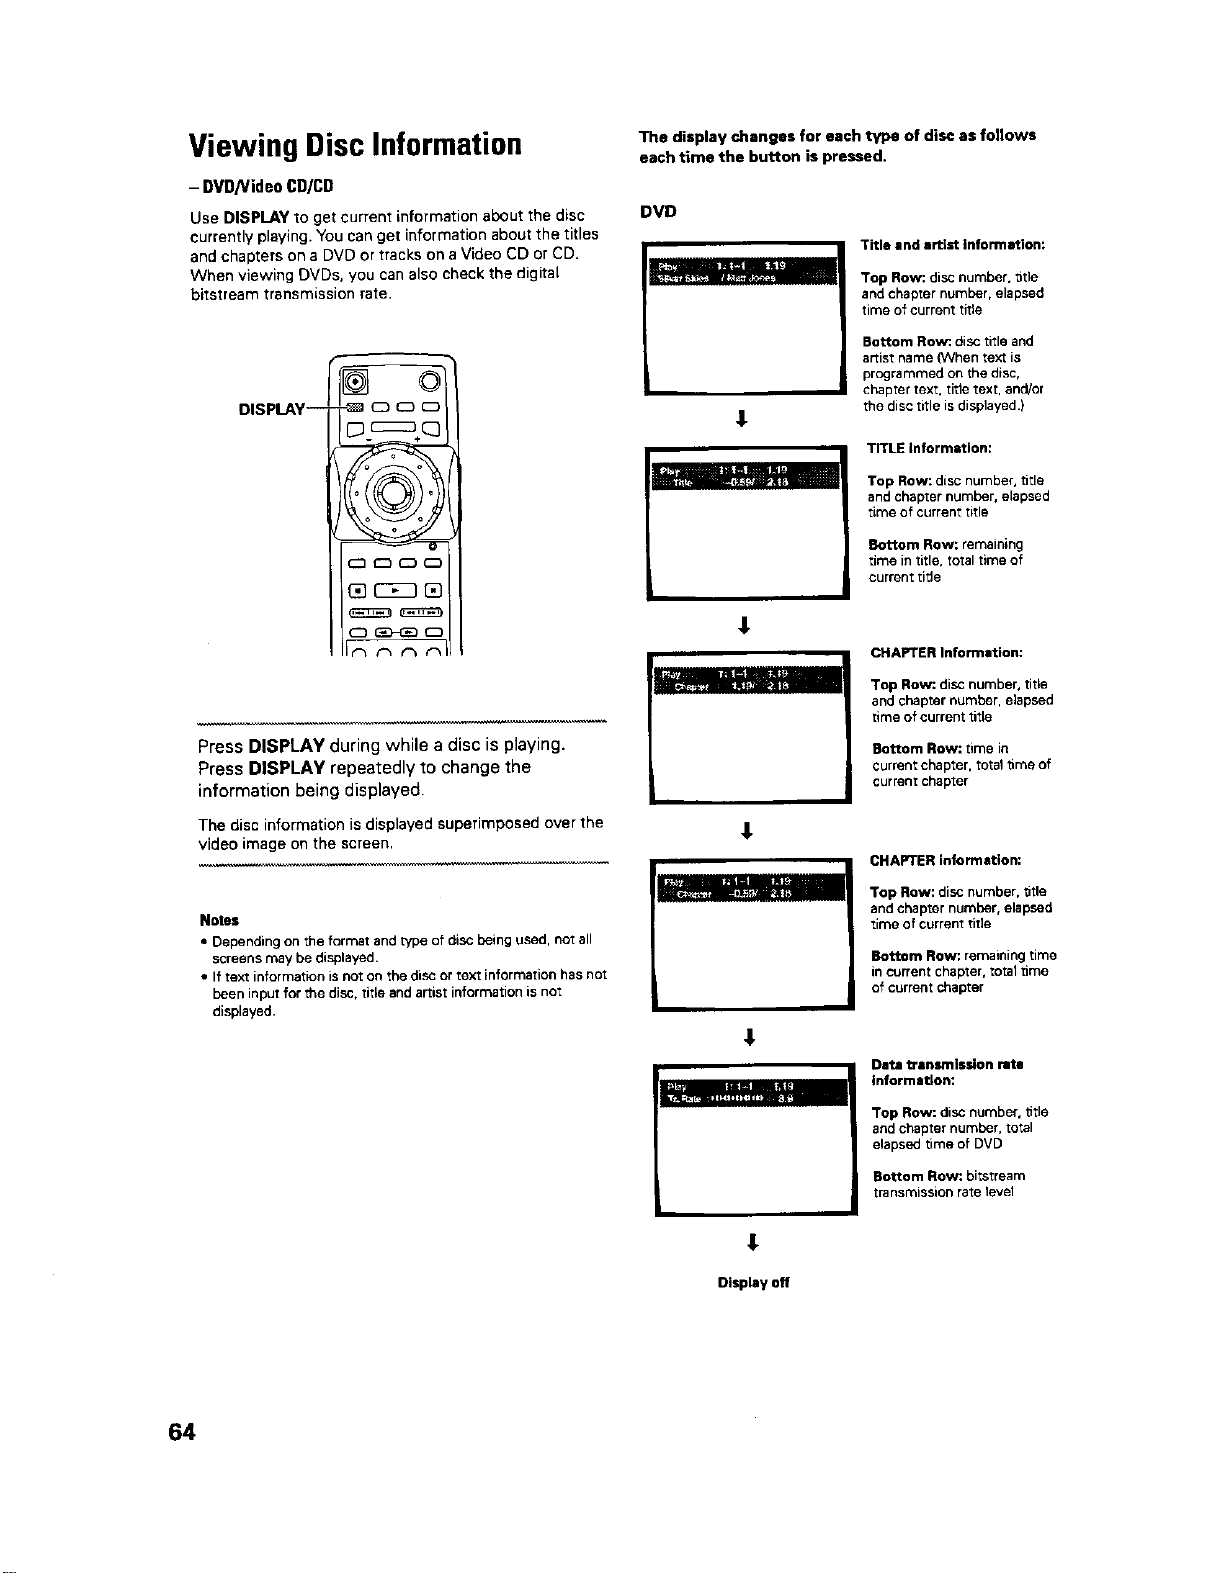
Viewing Disc Information _. display changes for each type of disc as follows
each time the button is pressed.
- DVD/VideoCD/CD
Use DISPLAY to get current information about the disc
currently playing. You can get information about the titles
and chapters on a DVD or tracks on a Video CD or CD.
When viewing DVDs, you can also check the digital
bitstream transmission rate.
J E_
DISPLAY-- -_ (_ _
Press DISPLAY during while a disc is playing.
Press DISPLAY repeatedly to change the
information being displayed.
The disc information is displayed superimposed over the
video image on the screen.
_mn_l
Notes
• Depending on the format and type of disc being used, not all
screens may be displayed,
• If text information is not on the disc or text information has not
been input for the disc, title and artist information is not
displayed.
DVD
Title and artist information:
Top Row: disc number, title
and chapter number, elapsed
time of current title
Bottom Row:, disc title and
artist name (When text is
programmed on the disc,
chapter text, title text, and/el
the disc title is displayed .)
TITLE Informstlon:
Top Row: disc number, title
and chapter number, elapsed
time of current title
Bottom Row: remaining
time in title, total time of
current title
CHAPTER Intormstior_
Top Row:. disc number, title
and chapter number, elapsed
time of current title
Bottom Row: time in
current chapter, total time of
current chapter
CHAPTER information:
Top Row: disc number, title
and chapter number, elapsed
time of current title
Bottom Row:. remaining time
in current chapter, total brae
of current chapter
Data transmission rate
information:
Top Row: disc number, title
and chapter number, total
elapsed time of DVD
Bottom Row:. bitatream
transmission rate level
Display off
64
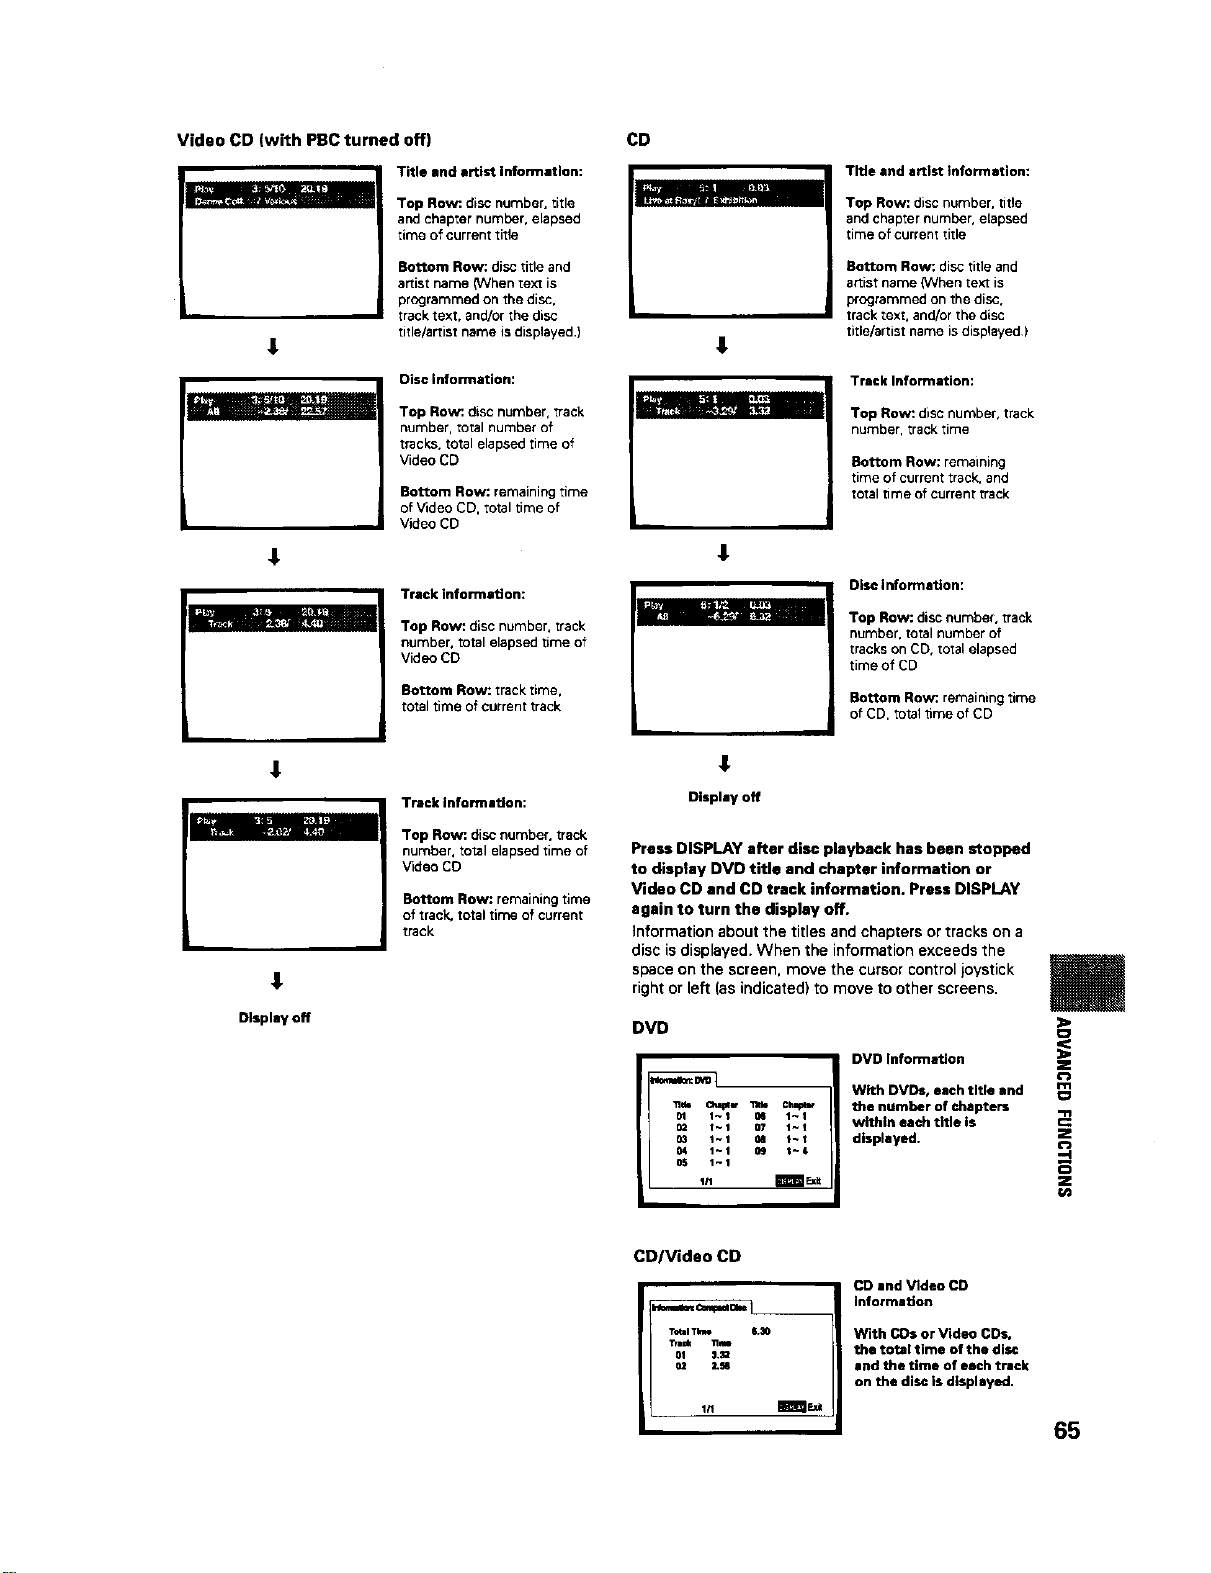
Video CD (with PBCturned off) CD
l
Title and artist information:
Top Row: disc number, dtle
and chapter number, elapsed
time of current title
Bottom Row: disc title and
artist name (When text is
programmed on the disc,
track text, and/or the disc
title/artist name is displayed,)
Disc information:
am bl_I - i
I _]
Top Row: disc number, track
number, total number of
tracks, total elapsed time of
Video CD
Bottom Row: remaining time
of Video CD, total time of
Video CD
Track information:
Top Row: disc number, track
number, total elapsed time of
Video CD
Bottom Row:. track rime,
total time of current track
L
1
€
Title and artist information:
Top Row: disc number, title
and chapter number, elapsed
time of current title
Bottom Row: disc title and
artist name (When text is
programmed on the disc,
track text, and/or the disc
tide/artist name is displayed)
Tracklntormation:
Top Row:. disc number, track
number, track time
Bottom Row: remaining
time of current track, and
total time of current track
Disc Information:
Top Row: disc number, track
number, total number of
tracks on CD, total elapsed
time of CD
Bottom Row:.remainingtime
of CD,_otallime of CD
1
1
Display off
Tracklnformaflon:
Top Row:. disc number, track
number, total elapsed rime of
Video CD
Bottom Row: remaining time
of track, total time of current
track
1
Display off
Press DISPLAY after disc playback has been stopped
to display DVD title and chapter information or
Video CD and CD track information. Press DISPLAY
again to turn the display off.
Information about the titles and chapters or tracks on a
disc is displayed. When the information exceeds the
space on the screen, move the cursor control joystick
right or left (as indicated) to move to other screens.
DVD
';1tie Cha_w _ Chmp_
01 l~t _4 1-1
O_ f-1 07 1~1
03 1-1 08 |-I
04 1~1 Og I~t
05 1-1
t/1 m_ll
DVD Information
With DVDs, each title and
the number of chapters
within each title is
displayed.
Z
m
O
Z
-4
Z
_n
CD/Video CD
.=.,= c=_.==.[
T_al Time 6.30
'rradz 11m
OI 3._2
O2 2.M
CD and Video CD
information
With CDs or Video CDs,
the total time of the disc
and the time of each track
on the disc is displayed.
65
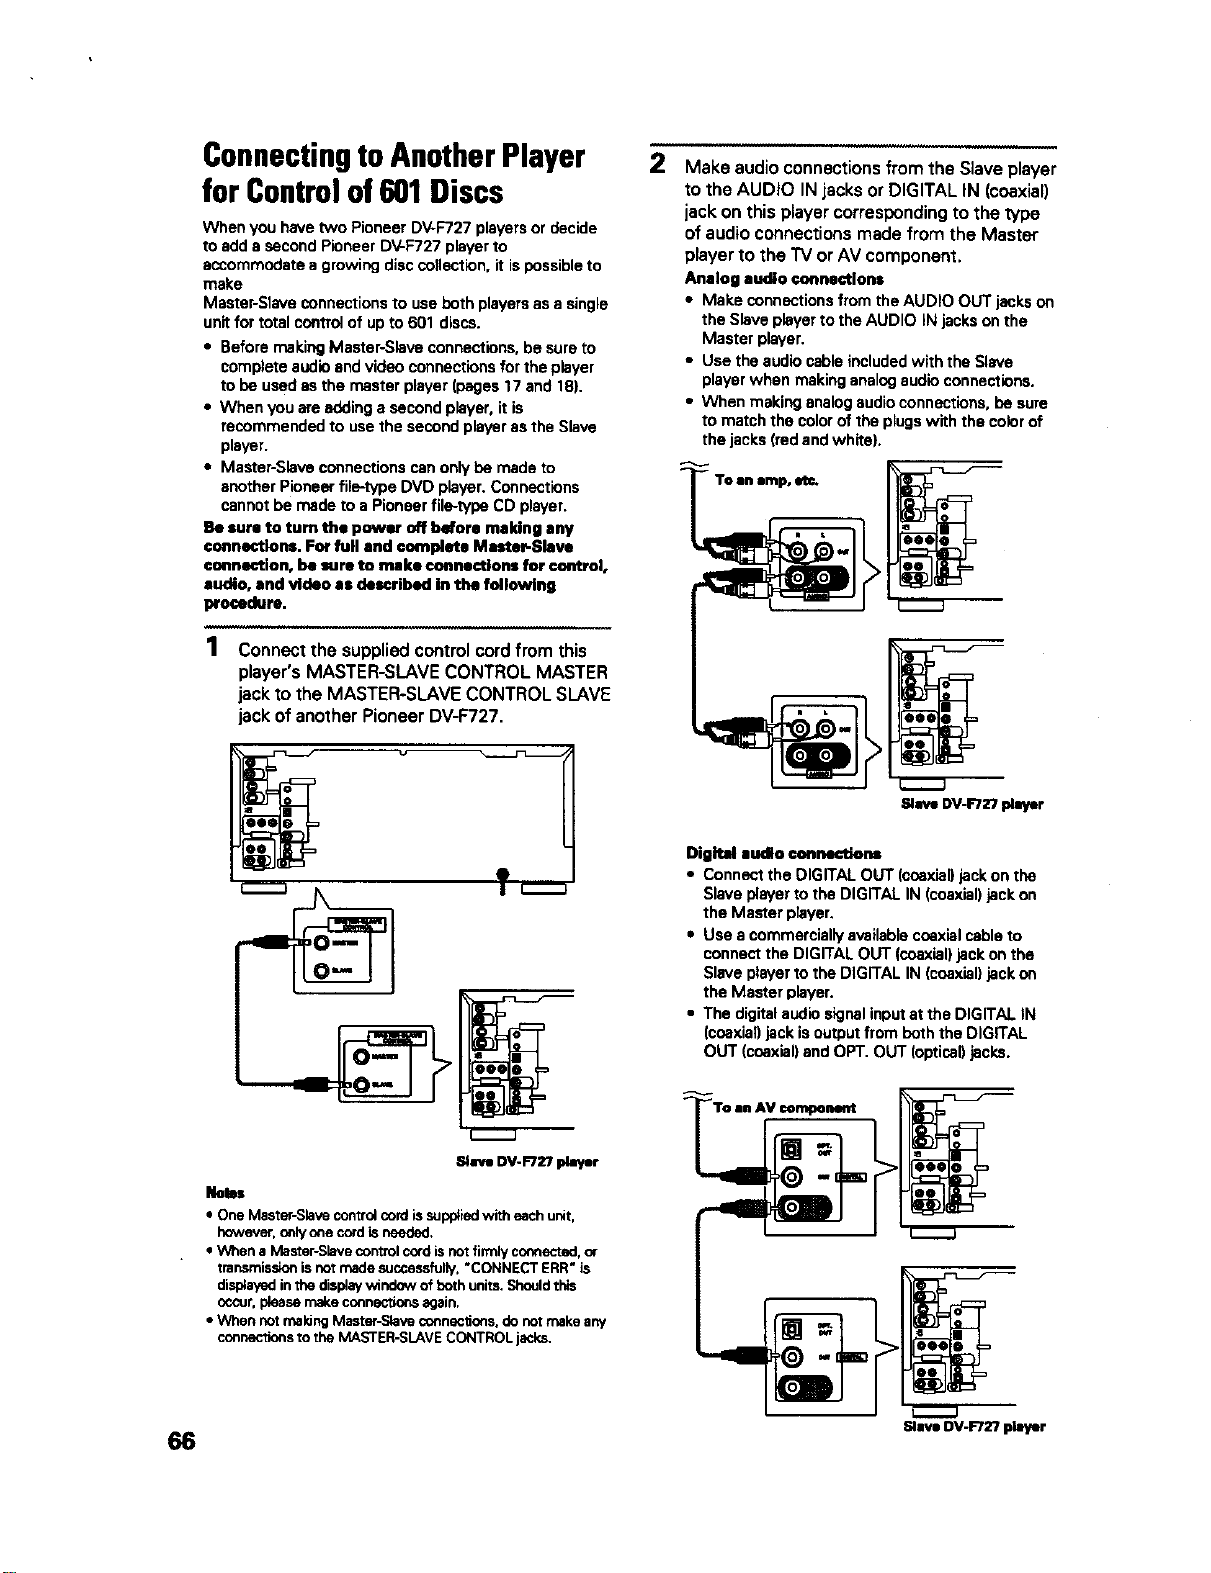
66
ConnectingtoAnotherPlayer
for Controlof601Discs
When you have two Pioneer DV-F727 players or decide
to add a second Pioneer DV-F727 player to
accommodate a growing disc collection, it is possible to
make
Master-Stave connections to use both players as a single
unit for total control of up to 601 discs.
• Before making Master-Slave connections, be sure to
complete audio end video connections for the player
to be used as the master player (pages 17 and 18).
• When you are adding a second player, it is
recommended to use the second player as the Slave
player.
• Master-Slave connections nan only be made to
another Pioneer fiio-type DVD player. Connections
cannot be made to a Pioneer file-type CD player.
Be sure to turn the power off bdore making any
connections. For full and complete Mnster-Slave
connection, be sure to make connections for control,
audio, and video as described in the following
procedure.
1
Connect the supplied control cord from this
player's MASTER-SLAVE CONTROL MASTER
jack to the MASTER-SLAVE CONTROL SLAVE
jack of another Pioneer DV-F727.
Slave DV-F727 player
_n48s
• One Master-Slave control cord is supplied with each unit,
however, only one cord is needed.
• Wrnen a Master-Slave control cord is not firmly connected, or
transr issLonis not made successfully, "CONNECT ERR" is
displayed in the display window of both units. Should this
cccur, please make connec_ons again,
• When not making Master-Slave connections, do nor make any
connections to the MASTER-SLAVE CONTROL jacks,
2
Make audio connections from the Slave player
to the AUDIO IN jacks or DIGITAL IN (coaxial)
jack on this player corresponding to the type
of audio connections made from the Master
player to the TV or AV component.
Analog audio co_nsctlons
• Make connections from the AUDIO OUT jacks on
the Slave player to the AUDIO iN jacks on the
Master player.
• Use the audio cable included with the Slave
player when making analog audio connections,
• When making analog audio connections, be sure
to match the color of the plugs with the color of
the jacks (rod and white),
Slave DV-F727 player
Digital audio connections
• Connect the DIGITAL OUT (coaxial) jack on the
Slave player to the DIGITAL IN (coaxial) jack on
the Master player.
• Use a commercially available coaxial cable to
connect the DIGITAL OUT (coaxial) jack on the
Slave player to the DIGITAL IN (coaxial) jack on
the Master player.
• The digital audio signal input at the DIGITAL IN
(coaxial) jack is output from both the DIGITAL
OUT (coaxial) and OPT. OUT (optical) jacks.
Slave DV-F727 player
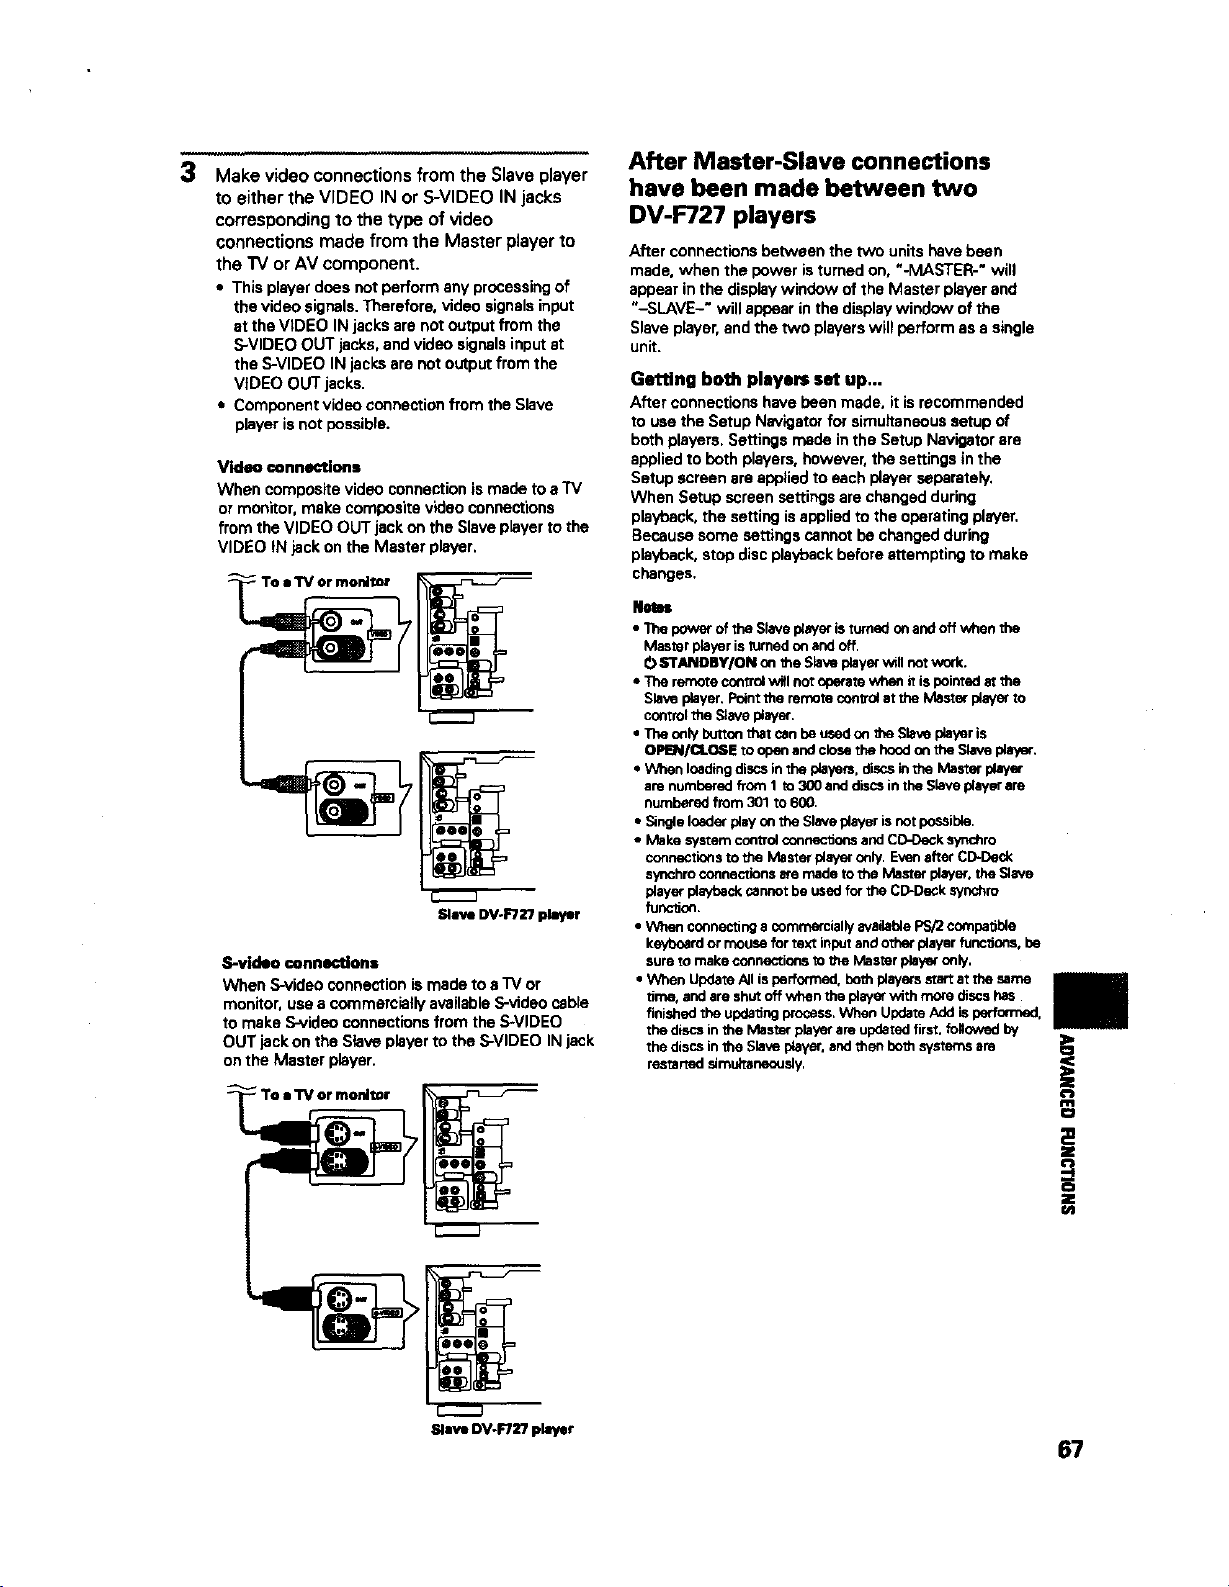
3
Make video connections from the Slave player
to either the VIDEO IN or S-VIDEO IN jacks
corresponding to the type of video
connections made from the Master player to
the "IV or AV component.
• This playerdoesnotperformanyprocessingof
the videosignals.Therefore,videosignalsinput
at the VIDEO IN jacksare notou_ut from the
S-VIDEOOUT jacks,andvideosignalsinputst
the S-VIDEOINjacksarenot outputfrom the
VIDEOOUT jacks.
• Componentvideoconnectionfrom the Slave
playerisnotpossible.
Video connections
When compositevideoconnectionismade toa TV
ormonitor,makecompositevideoconnections
fromtheVIDEO OUTjack onthe Slaveplayertothe
VIDEO IN jack onthe Masterpb./er.
Slave DV÷FT_r/player
S-video connections
When S-video connection is made to a "rv or
monitor, use a commercially available S-video cable
to make S-video connections from the S-VIDEO
OUT jack on the Slave player to the S-VIDEO IN jack
on the Master player.
Slave DV-F72? player
After Master-Slave connections
have been made between two
DV-F727 players
After connections between the two units have been
made, when the power isturned on, "-MASTER-" will
appear in the display window of the Master player and
"-SLAVE-" will appear in the display window of the
Slave player, and the two players will perform as a single
unit.
Getting both players set up,..
After connections have been made, it is recommended
to use the Setup Navigator for simuitancous setup of
both players. Settings made in the Setup Navigator are
applied to both players, however, the settings in the
Setup screen are applied to each player separately,
When Setup screen settings are changed during
playback, the setting isapplied to the operating player.
Because some settings cannot be changed during
playback, stop disc playback before attempting to make
changes.
Nets=
• 11_epower of the Slavapl_'er isturnadonend offwhen the
Master playeris _rned onand off.
0 STANDBY/ON on the Slaveplayerwtilnotwork.
• The remote controlwitl notoperatev_nenit ispointedat the
Slaveplayer.Pointthe remotecontrolatthe Master playerto
controltheS_avaplayer.
• The only buttonthat canbe usedon the Slaveplayeris
OPEN/CLOSE to openandclosethe hoodon the Slaveplayer,
• When loadingdiscsinthe players,discsinthe Master player
are numberedfromI to 300 anddiscsin theSlaveplayerare
numbered from 301to 600.
• SingleloaderplayOnthe Slaveplayer isnotpossible.
• Make systemcomrolconnectionsandCD-Decksynchro
connectionsto the Master playeronly. Evenafter CD-Dack
synchro connectionsare madeto the Master player, theSlave
player playbackcannotbe usedforthe CD-Decksynchro
fonc_on.
• When connectinga commerciallyavailablePS/2compatible
keyboardormouse fortext inputandotherplayer functions, be
sureto makeconnectionstothe Master playeronly,
• When UpdateAllisperformed,bo_ players startat the same
time. andare shutoff whenthe playerwith morediscshas
finished the updatingWocess,When UpdateAddis perfomled.
the discsinthe Master playerare updatedfirst,followedby
the discsinthe Slaveplayer,and then beth systemsare
restartedsimu_ne_Jsly,
g
0
Z
€/D
67
UtilizingtheAudio-VideoOutput
ofAnotherAVComponent
Selecting External Input
When a component is connected to the video or audio
input jacks on this unit as described on pages 17 and 18.
it is possible to select the input from that unit. By doing
this, you can combine the audio of the connected
component with the video of this player or the video of
the connected component with the audio of this player,
or you can even select both the audio and video input
from the connected component(s).
Make selections in the Setup screen General menu
[External Input] setting in the "Expert" menu mode
(page 40).
The input jacks on this player can be used for external
audio and/or video input from a separate component.
Additionally, when these kind of connections are made,
it is possible to mix and match the audio and video
inputs as you like.
Make audio and!or video connections to the input jacks
on this unit as described in the previous section 'Master-
Slave Connections'.
• Select the audio or video input from the component(s)
connected to the input jacks on this unit in the Setup
screen Genera) menu [External Input] setting in the
"Expert" menu mode (pages 40 and this page).
• When Master-Slave connections are made to a
second Pioneer DV-F727 player, it is not possible to
make connections to a separate component even if
some jacks are not being used by the Slave player.
Notes
• It is not possible to select two aud_ or _o _d_ sources at
the same _me.
• If a _d_ signal is being input from an e)_er_lly connected
component and SETUP is pressed on the remote, the *_d_
signal of the player will appear while the Setup screen is open.
This is not a malfunction.
• When external input connections are made, do nor make any
connections to the MASTER-SLAVE CONTROL jacks.
Settings: Off*
Audio
Selects the audio output from the connected
component.
Video
Selects the video output from the connected
component.
Audio and Video
Selects both the audio video output from the
connected component.
• Factorysetting
Notes
• It is not possible to combine wvo video or two audio sources.
• When "Audio and Video" is selected, there is no output from
this unit.
• When Master-Slave connection is made, this setting cannot be
selected.
• The output of the connected component(s) is not input when
the power of the player is turned off.
• If a video signal is being input from an externally connected
component and SETUP is pressed on the remote, the video
signal of this unit will appear while the Setup screen is open.
This is not a rnalfuection.
68
Settingthe Parental LockLevel 2
This player lets you set the Parental Lock if the DVD has
a parental lock level recorded on it. With Parental Lock
capable discs, you can block access to material you feel
is inappropriate for your children. Refer to the DVD disc
jacket and the accompanying documentation to see if a
particular disc contains a parental lock level.
Make changes to the [Parental Lock] setting in the Setup
screen General menu. Please note that changes to the
Parental Lock level cannot be made when a disc is
playing. Stop playback of the disc before attempting to
make any changes.
MceuM_ - h_
_1SE4up_ewir_ reslri_ic_s
Settings: Level Change (For information, refer to
'Setting the Parental Lock level' on this page.)
Password Change (For information, refer to
'Changing the password' on the following
page.)
When a DVD with a set Parental Lock level is
played
Playback cannot be started until the password has been
correctly input by moving the cursor control joystick or
the number buttons, and ENTER has been pressed.
Entering the password
When you select either "Level Change" or "Password
Change ", it is necessary to enter the password (4-digit
code number). Use the following steps at any time you
are asked to enter or confirm your password.
1
Move the cursor control joystick up or down
or the number buttons to select a number
between 0 and 9.
You can also use the number buttons to enter the
numbers directly. When entering your password for
the first time, or changing it, you will be asked to
reenter your password. When using the number
buttons to confirm the password, the numbers
appear as asterisks, and the cursor advances
automatically to the next position.
ElElElEl
e
eMo_
aa+l - 1_!1 Re_Jm a_lm Exif
Move the cursor control joystick right or left to
move the cursor to a different position in the
password.
When all four numbers of the password have been
entered, "ENTER" appearson the screen.
Mo_
3 Press ENTER to set the password.
The password is entered.
Note
Be sure not to forge_ your password. If you should forget it,
reset the system, and enter a new password. To reset the
system, see 'Rese=ing the Player to System Settings' (page 75).
Please note that this procedure resets the system, and clears all
saved settings, not just the password,
Setting the Parental Lock level
ParentalLock level information shouldbe printed on the DVD
disc jacket or accompanying documentation ifit isfeatured.
Generally speaking, level 8 offers no restriction on viewing
and level 1provides the strictestviewing restrictions.
L",_I 1 2 3 4 _] 6 r B
Ir_ p*s_m
eeMo_ m_s_ IBle,e
m
1 Select "Level Change" in the iParental Lock]
setting and press ENTER.
F
The screen changes to the password input screen. If
you have not yet set a password, you will be asked
to do so at this time. To enter the password, refer to
'Entering the password' on this page.
Move the cursor control joystick right or left to
adjust the Parental Lock level.
The lock icons appear "unlocked" up to the
selected level to indicate that access is available.
3
Press ENTER to set the new level.
The new Parental Lock level is set and the screen
returns to the General menu screen. To go back to
the General menu screen without making any
changes, press RETURN o_
Note
Condi_on Memo W function can be used to save the Parental
Lock level. Therefore. Parental Lod( levels can be set f_" individual
discsaccording to their content rather _an aset level for all DVDs,
69
Changing the password
Change your password whenever you feel it is
necessary. However. if you forget your existing
password, you cannot enter this screen to change it.
Selup MgtsuMode. Basic
2
Select "Password Change" in the ]Parental
Lock] setting and press ENTER.
The screen changes to the password input screen
as shown in the section 'Entering the password' on
the previous page.
Enter your current password.
To enter the password, refer to 'Entering the
password' on the previous page.
If you have not yet set a password, you cannot
select this setting. Establish a password by
selecting "Level Change" first.
3 Move the cursor control joystick or the
number buttons to enter the new password.
4 When the new password has been entered,
press ENTER.
The new password is set and the screen returns to
the General menu screen. To go back to the
General menu screenwithout making anychanges,
press RETURN _,.
Turningthe Screen Saver On
and Off
As a protective function against residual images on the "iV
screen or monitor, a phenomenon referred to as "screen
burn", the screen saver appears when the same screen
has been displayed for a length of time.
Make changes to the IScreen Saver] settingin the Setup
screen General menu in the "E_oert" menu mode (page 40).
E_-_l Illmu ilode - Ex?erl
Sllup Nwlgl_
p=_lll L_k - Lev=lO
Edemli I_put- OI
41ee_o,_ IfflmE,_
Changingthe Background
Colorofthe Screen
You can select a blue or black background to appear
when the player is in the stop mode.
Make changes to the {Background Colod setting in the
Setup screen General menu in the "Expert" menu
mode (page 40).
Piwisbil Lock- Le_s48
S¢l,_,lll Sll',_i - 1311
Settings: Black
Blue*
Other
*Factory se_ing
When "Other" is selected
This player gives you the option of creating your own
background color by adjusting the red, green and blue
levels.
lIM_ ri_R_m
lit-/* Ililllls_= ll'_
1 Move the cursor control joystick up or down
to select a color bar.
The selectedcolorbarbecomeshighlighted.
2 Move the cursor control joystick right or left to
adjust the level of the color.
As the colorbar isadjusted,the squareonthe right
sideof the screenindicateshowthe currentmix of
the threecolorsappears.
3 Repeat steps 1 and 2 until you have achieved
a color that you like.
4 Press ENTER to set the color as the
background color.
Settings: On
Off*
*Factor'/setting
7O
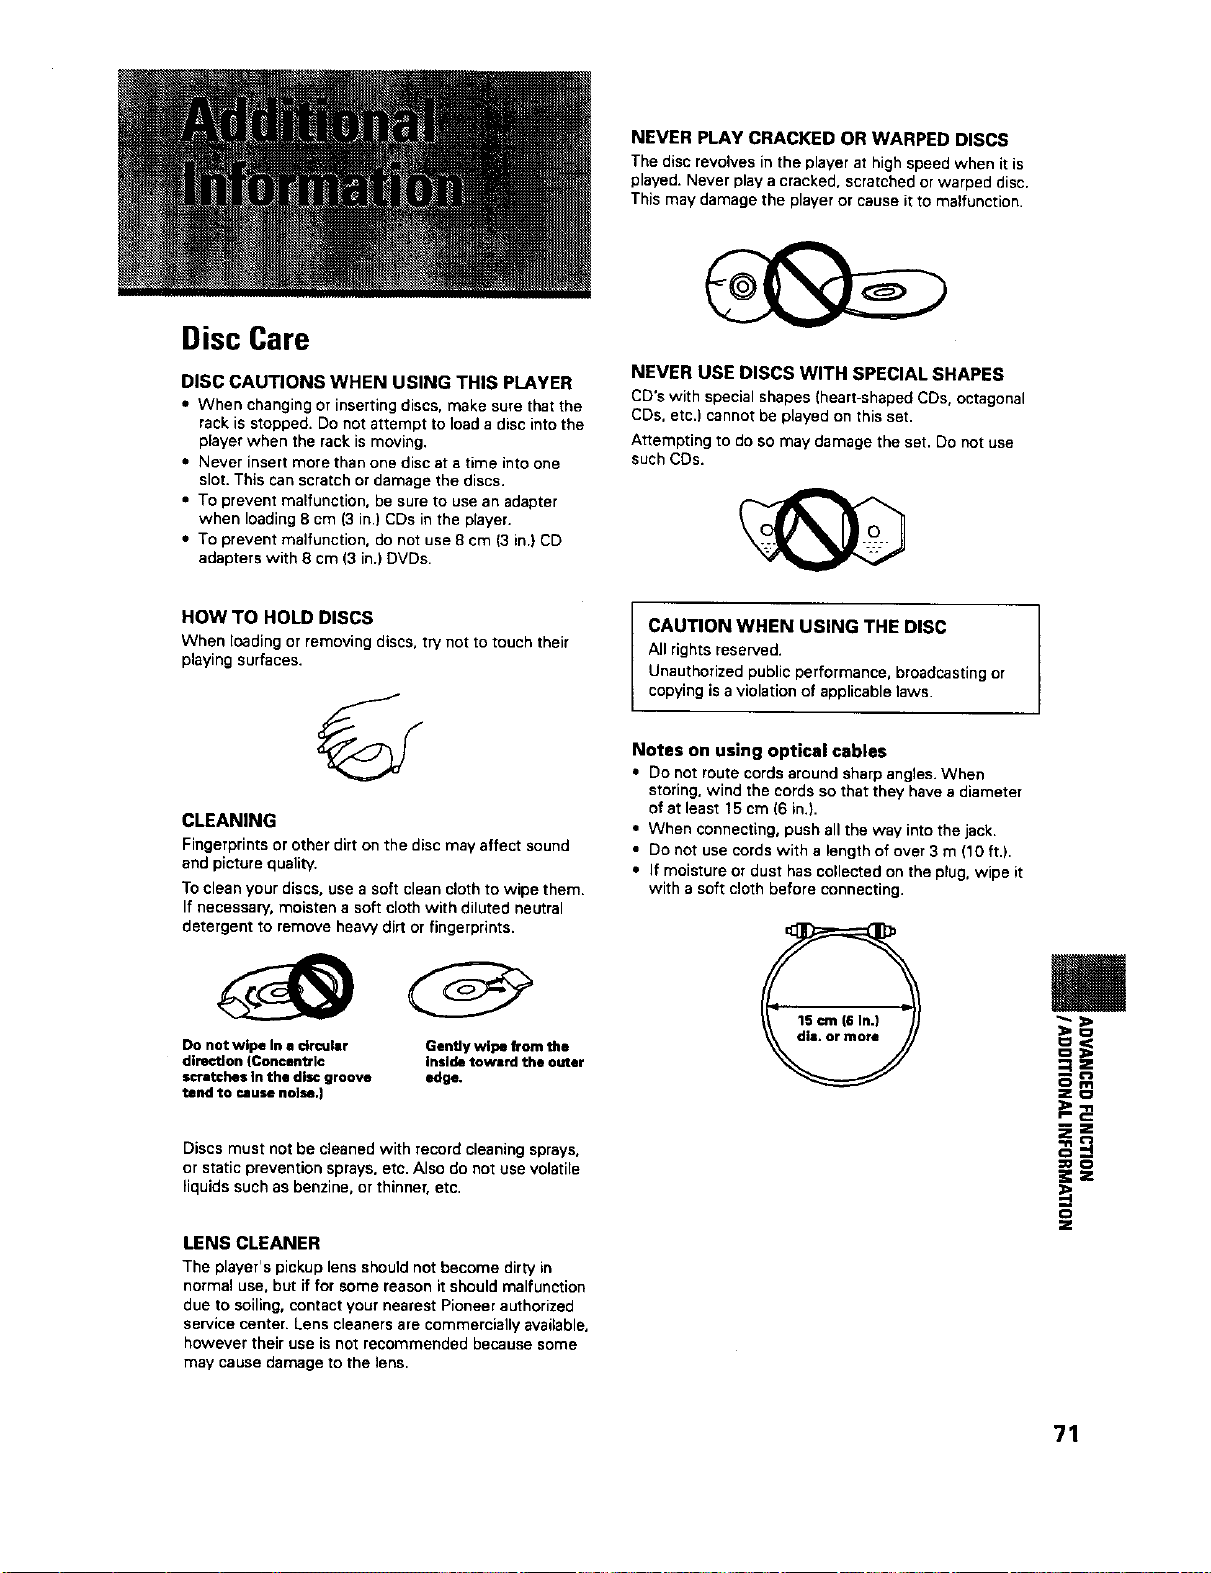
Disc Care
DISC CAUTIONS WHEN USING THIS PLAYER
• When changing or inserting discs, make sure that the
rack is stopped. Do not attempt to load a disc into the
player when the rack is moving.
• Never insert more than one disc at a time into one
slot. This can scratch or damage the discs.
• To prevent malfunction, be sure to use an adapter
when loading 8 cm (3 in.) CDs in the player.
• To prevent malfunction, do not use 8 cm (3 in.) CD
adapters with 8 cm (3 in.) DVDs.
NEVER PLAY CRACKED OR WARPED DISCS
The disc revolves in the player at high speed when it is
played. Never play a cracked, scratched or warped disc.
This may damage the player or cause it to malfunction.
NEVER USE DISCS WITH SPECIAL SHAPES
CD's with special shapes (heart-shaped CDs, octagonal
CDs. etc.) cannot be played on this set.
Attempting to do so may damage the set. Do not use
such CDs.
HOW TO HOLD DISCS
When loading or removing discs, try not to touch their
playing surfaces.
©
CLEANING
Fingerprints or other dirt on the disc may affect sound
and picture quality.
To clean your discs, use a soft clean cloth to wipe them.
If necessary, moisten a soft cloth with diluted neutral
detergent to remove heaw dirt or fingerprints.
Do not wipe In a drcular
direction (Concentric
scratches In the disc groove
tend to cause nolse,)
Gently wipe from the
Inside toward the outer
edge.
Discs must not be cleaned with record cleaning sprays,
or static prevention sprays, etc. Also do not use volatile
liquids such as benzine, or thinner, etc.
LENS CLEANER
The player's pickup lens should not become dirty in
normal use. but if for some reason it should malfunction
due to soiling, contact your nearest Pioneer authorized
service center. Lens cleaners are commercially available,
however their use is not recommended because some
may cause damage to the lens.
CAUTION WHEN USING THE DISC
All rights reserved.
Unauthorized public performance, broadcasting or
copying is a violation of applicable laws.
Notes on using optical cables
• Do not route cords around sharp angles. When
storing, wind the cords so that they have a diameter
of at least 15 cm (6 in,),
• When connecting, push allthe way into the jack.
• Do not use cords with a length of over 3 m (10 ft,),
• If moisture or dust has collected on the plug. wipe it
with a soft cloth before connecting,
i
€_m
ZO
P'C:
Ez
;£
71
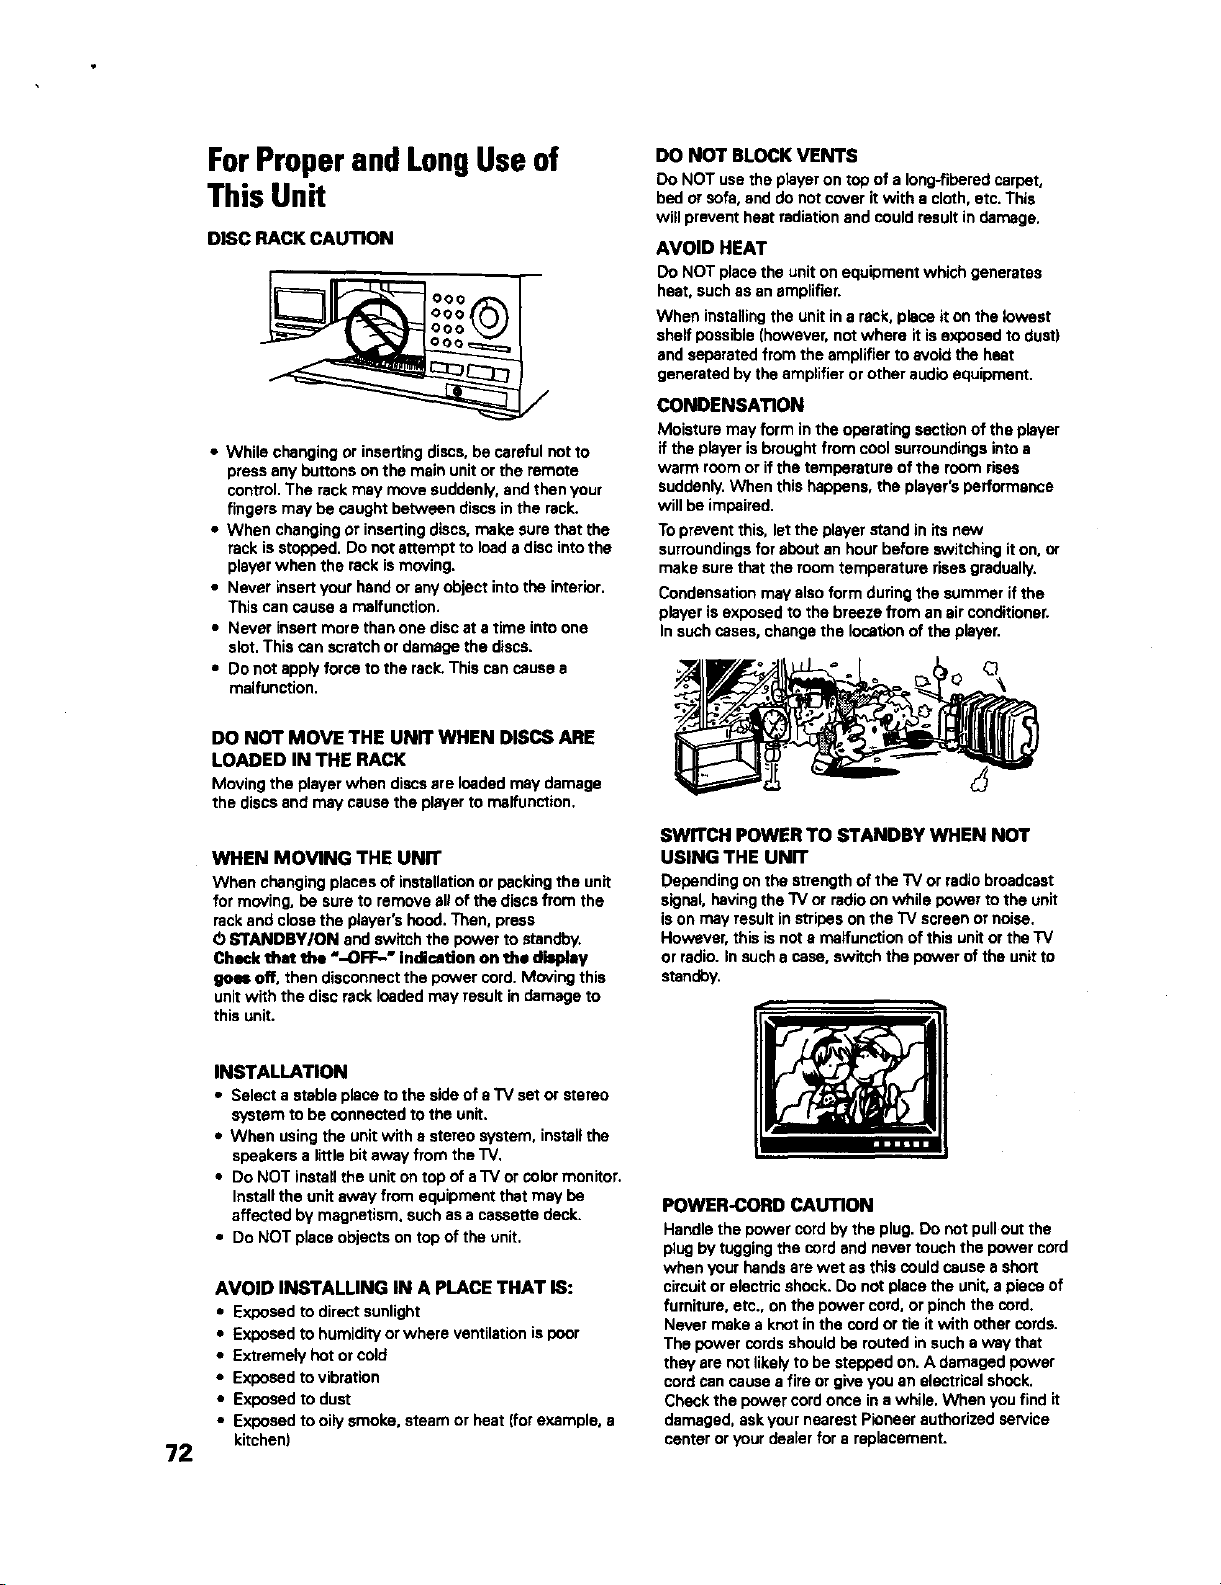
72
ForProper and LongUse of
This Unit
DISC RACK CAUTION
• While changing or inserting discs, be careful not to
press any buttons on the main unit or the remote
control. The rack may move suddenly, and then your
fingers may be caught between discs in the rack.
• When changing or inserting discs, make sure that the
rack is stopped. Do not attempt to load a disc into the
player when the rack is moving.
• Never insert your hand or any object into the interior.
This can cause a malfunction.
• Never insert more than one disc at a time into one
slot. This can scratch or damage the discs.
• Do not apply force to the rack. This can cause a
malfunction.
DO NOT MOVE THE UNIT WHEN DISCS ARE
LOADED IN THE RACK
Movingthe playerwhen discsare loadedmay damage
the discsand may causethe playerto malfunction.
WHEN MOVING THE UNIT
When changing places of installation or packing the unit
for moving, he sure to remove ell of the discs from the
rack and close the player's hood. Then, press
O STANDBY/ON and switch the power to standby.
Check that the "-OFF--" indication on the display
goes off, then disconnect the power cord. Moving this
unit with the disc rack loaded may result in damage to
this unit.
INSTALLATION
• Select a stable place to the side of a "IV set or stereo
system to be connected to the unit.
• When using the unit with a stereo system, install the
speakers a little bit away from the "IV.
• Do NOT install the unit on top of a "iV or color monitor.
Install the unit away from equipment that may be
affected by magnetism, such as a cassette deck.
• Do NOT place objects on top of the unit.
AVOID INSTALLING IN A PLACE THAT IS:
• Exposed to direct sunlight
• Exposed to humidity or where ventilation ispoor
• Extremely hot or cold
• Exposed tovibration
• Exposed to dust
• Exposed to oily smoke, steam or heat [for example, a
kitchen)
DO NOT BLOCK VENTS
Do NOT usethe playeron top ofa Iong-fiperedcarpet,
bed orsofa,and donotcover itwith a cloth,etc.This
witlpreventheatradiationandcould resultin damage.
AVOID HEAT
Do NOT place the unit on equipment which generates
heat, such as an amplifier.
When installing the unit in a rack, place it on the lowest
shelf possible [however, not where it is exposed to dust)
and separated from the amplifier to avoid the heat
generated by the amplifier or other audio equipment.
CONDENSATION
Moisture may form in the operating section of the player
if the pPayeris brought from cool surroundings into a
warm room or if the temperature of the room rises
suddenly. When this happens, the player's performance
will be impaired.
To prevent this, let the player stand in its new
surroundings for about an hour before switching it on, or
make sure that the room temperature rises gradually.
Condensation may also form during the summer if the
p!ayer is exposed to the breeze from an air conditioner.
In such cases, change the location of the player.
SWITCH POWER TO STANDBY WHEN NOT
USING THE UNIT
Depending on the strength of the TV or radio broadcast
signal, having the TV or radio on while power to the unit
is on may result in stripes on the TV screen or noise.
However, this isnot a malfunction of this unit or the "iV
or radio. In such a case, switch the power of the unit to
standby.
POWER-CORD CAUTION
Handle the power cord by the plug. Do not pull out the
plug by tugging the cord and never touch the power cord
when your hands are wet as this could cause a short
circuit or electric shock. Do not place the unit, a piece of
furniture, etc., on the power cord, or pinch the cord.
Never make a knot in the cord or tie it with other cords.
The power cords should be routed in such a way that
they are not likely to be stepped on. A damaged power
cord can cause a fire or give you an electrical shock.
Check the power cord once in a while. When you find it
damaged, askyour nearest Pioneer authorized service
center or your desler for a replacement.
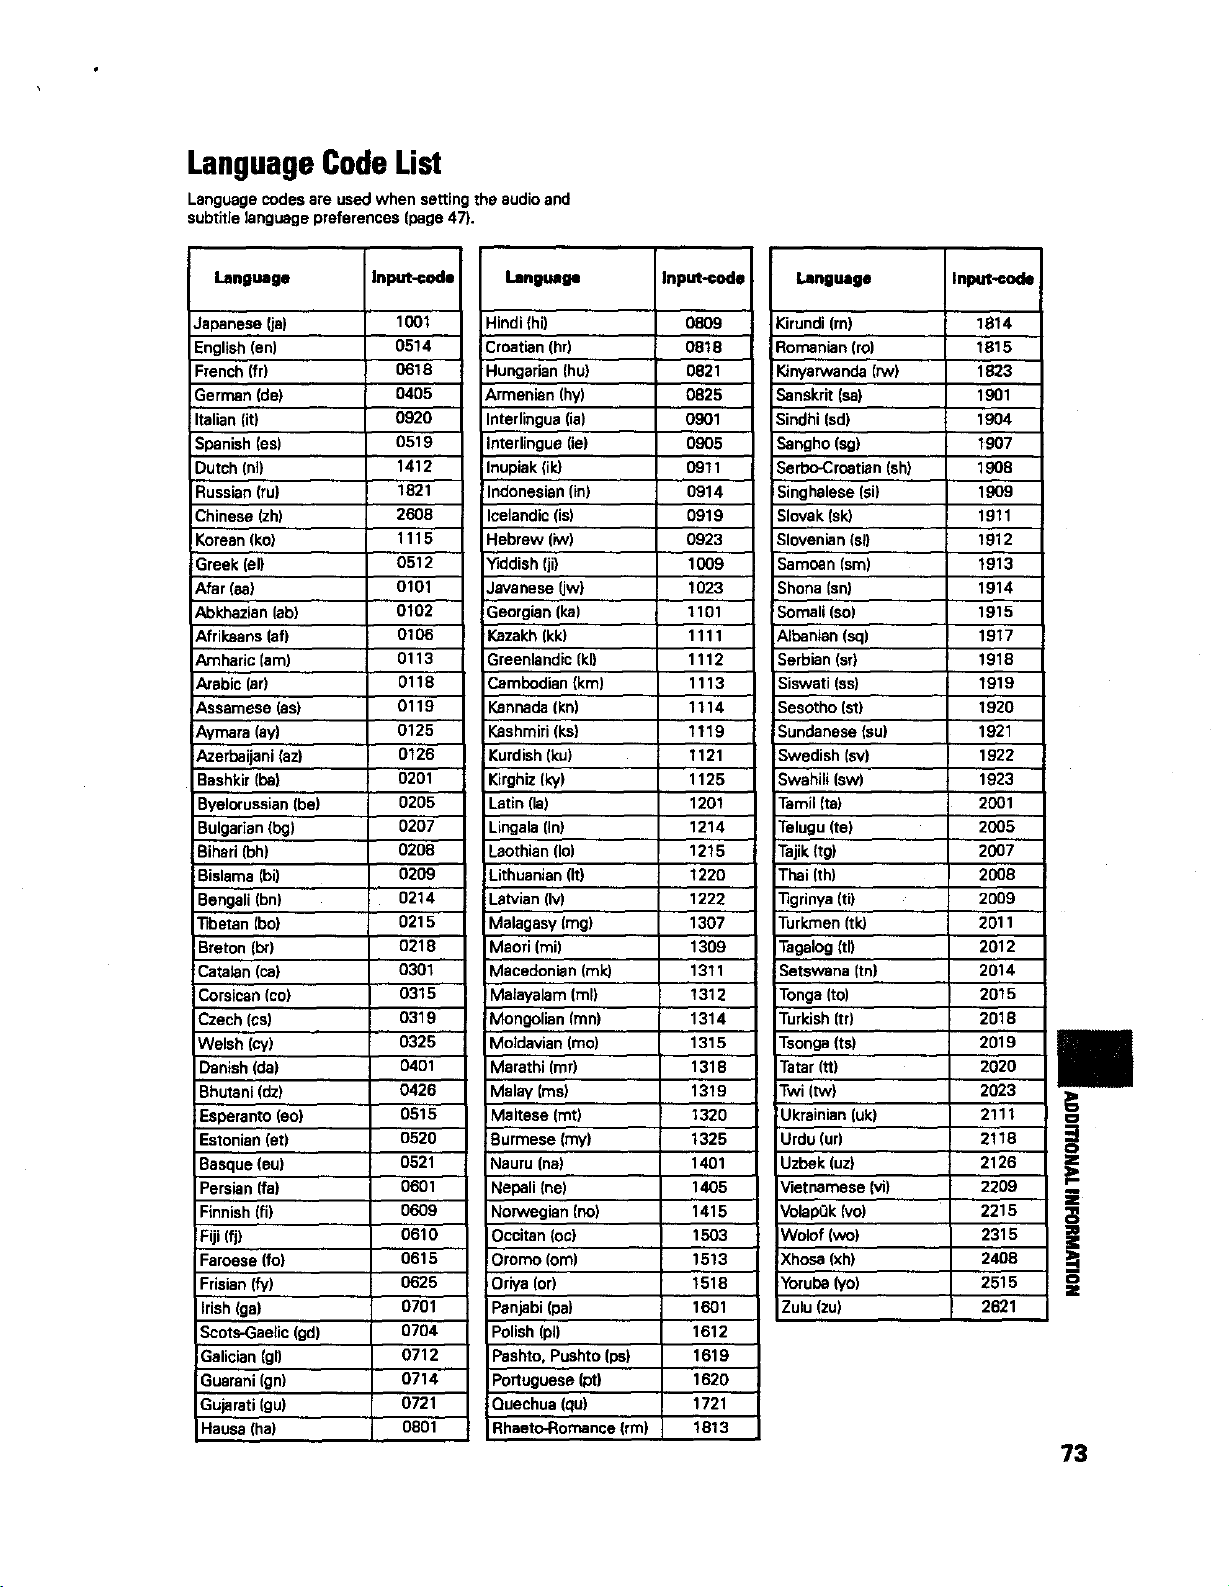
LanguageCode
Language codes are used when setting the audio and
subtitle language preferences (page 47).
LangUage
Japanese (ja)
English (an)
French (fr)
German de)
Italian (it)
Spanish (as)
Dutch (n])
Russian (ru)
Chinese (zh)
Korean (ko)
Greek (el)
Afar (aa)
Abkhazlan (ab)
Afrikaans (af)
Amharic (am)
Arabic (ar)
Assamese (as)
Aymara (ay)
Azerbaijani (az)
Bashkir (be)
Byelorussian (be)
Bulgarian (bg)
Bibari (bh)
Bislama (bi)
Bengali (bn)
T=betan (bo)
Breton (br)
Catalan (ca)
Corsican (co)
Czech (cs)
Welsh (cy)
Danish (pa)
Bhutani (dz)
Esperanto (eo)
Estonian (et)
Basque (eu)
Persian (fa)
Finnish (fi)
Fiji (fj)
Faroese (fo)
Frislan (fy)
Irish (ga)
5cots-Gselic (gd)
Dalician {gl)
Guarani (gn)
Gujarati (gu)
Hausa (ha)
Input-€ode
1001
0514
0618
0405
0920
0519
1412
1821
2608
1115
0512
0101
0102
0106
0113
0118
0119
0125
0126
0201
0205
0207
0208
0206
0214
0215
0218
0301
0315
0319
O325
0401
0426
0515
0520
0521
0601
0609
0610
0615
0625
0701
0704
0712
0714
0721
0801
language Input-code
Language Inpm-€ode
Hindi (hi)
Croatian (hr)
Hungarian (hu)
Armenian (hy)
Interlingua (ia)
Interlingue (ie)
Inupiak (lid
Indonesian (in)
Icelandic (is)
Hebrew (iw)
Yiddish (ji)
Javanese (jw)
Georgian (ka)
Kazakh (kk)
Greenlandic (kl)
Cambodian (km)
Kannada (kn)
Kashmiri (ks)
Kurdish (ku)
Kitghiz (ky)
Latin (la)
Lingala (In}
Laothlan (Io)
Lithuanian (It)
Latvian (Iv)
Malagaay [mg)
Maori (mi)
Macedonian (mid
Malayalam (ml)
Mongolian (ran)
Moldavian (mo)
Marathi (mr)
Malay (ms)
Maltese (mt)
Burmese (my)
Nauru (ha)
Nepali {he)
NonNeglan (no)
Ocoitan (oc)
Oromo (ore)
Oriya (or)
Penjabi (pa)
Polish (pl)
Pashto, Pushto (ps)
Portuguese (pt)
Quechua (qu)
Rhaeto-Romance (rm)
O809
0818
0821
0825
0901
0905
0911
0914
0919
0923
1009
1023
1101
1111
1112
1113
1114
1119
1121
1125
1201
1214
1215
1220
1222
1307
1309
1311
1312
1314
1315
1318
1319
1320
1325
1401
1405
1415
1603
1513
1518
1601
1612
1619
1620
1721
1813
Kirundi (rn)
Romanlan (ro)
!Kinyarwanda (rw)
Sanskrit (sa)
Sindhi (sd)
Sangho (sg)
Serbo-Croatlan (sh)
Singhalese (si)
Slovak (sid
51ovenlan (sl)
Samoan {sm)
Shone {sn)
Somali (so)
Albanian (sq)
Serbian (st)
Siswati (ss)
Sesotho (st)
Sundanese {su)
Swedish (sv)
Swahili (sw)
Tamil (re)
Telugu (te)
Tajik (tg)
Thai (th)
"figrinya (ti)
Turkmen (rid
Tagalog {tl)
Setswana itn)
Tonga (to)
Turkish (tr)
Tsonga (ts)
Tatar (tt)
Twi (tw)
Ukrainian (uk)
Urdu (ur)
Uzbek (uz)
Vietnamese (vi)
VolapQk (vo)
Wolof (wo)
Xhosa (xh)
Yoruba (yo)
Zulu (zu)
1814
1815
1823
1901
1904
1907
1908
1909
1911
1912
t913
1914
1915
1917
1918
1919
1920
1921
1922
1923
2001
2OO5
2007
2OO8
2009
2011
2012
2014
2015
2018
2019
2020
2023
2111
2118
2126
2209
2215
2315
2408
2515
2621
=3
i
o
z
73
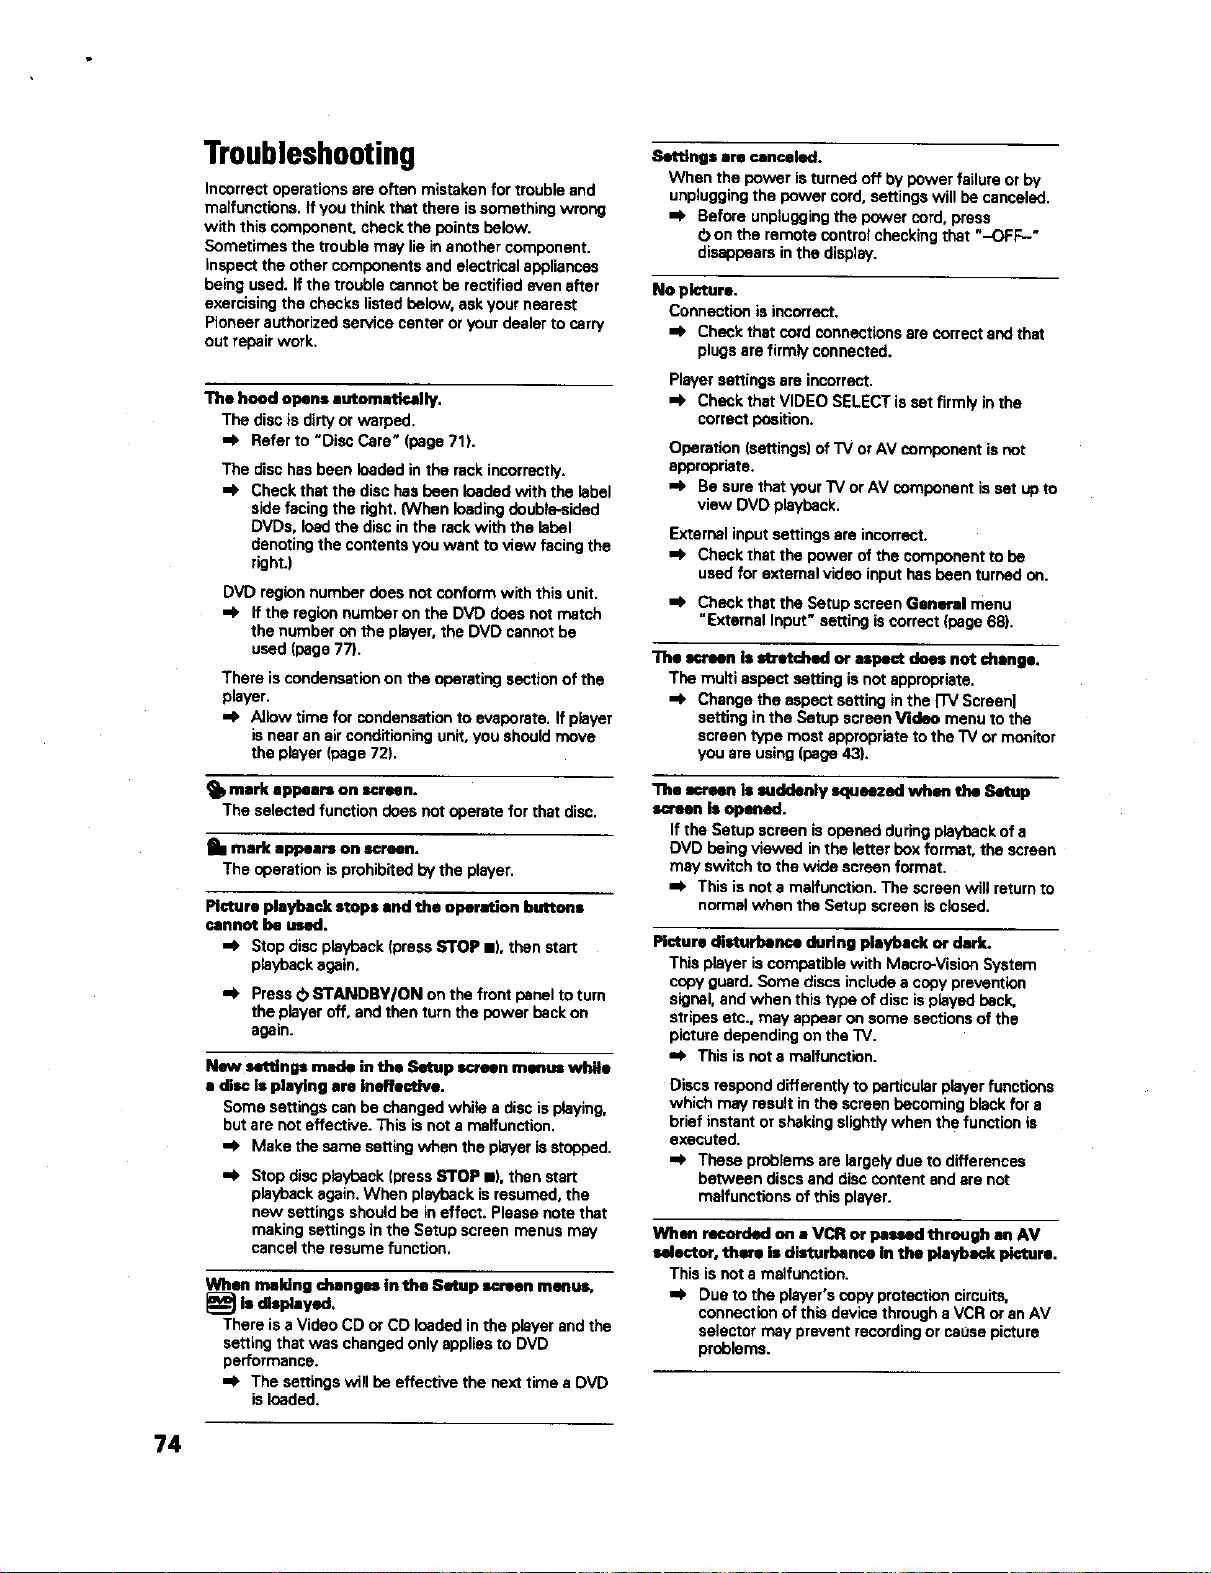
Troubleshooting
Incorrect operations are often mistaken for trouble and
malfunctions, if you think that there is something wrong
with this component, check the points below.
Sometimes the trouble may lie in another component.
inspect the other components and electrical appliances
being used. If the trouble cannot be rectified even after
exercising the checks listed below, ask your nearest
Pioneer authorized service center or your dealer to carry
out repair work.
The hood opens autornatioally.
The disc is dirty or warped.
=k Refer to "Disc Care" (page 71).
The disc has been loaded in the rack incorrectly.
=_ Check that the disc has been loaded with the label
side facing the right. {When loading double-sided
DVDs, load the disc in the rack with the label
denoting the contents you want to view facing the
right.)
DVD region number does not conform with this unit.
=_ If the region number on the DVD does not match
the number on the player, the DVD cannot be
used (page 77).
There is condensation on the operating section of the
player.
AJiowtime for condensation to evaporate. If player
isnear an air conditioning unit, you should move
the player (page 72).
_l) mark appears on screen.
The selected function does not operate for that disc.
mark appears on screen.
The operation isprohibited by the player.
Picture playback stops and the operation buttons
cannot be used.
Stop disc playback (press STOP II), then start
playback again.
=,_ Press O STANDBY/ON on the front panel to turn
the player off, and then turn the power beck on
again.
New settings made in the Setup ec4_en menus while
a disc Is playing are Ineffective.
Some settings can be changed while a disc is playing,
but are not effective. This is not a malfunction.
=i_ Make the same setting when the player is stopped.
Je Stop disc playback ]press STOP II), then start
playback again. When playback isresumed, the
new settings should be ineffect. Please note that
making settings in the Setup screen menus may
cancel the resume function.
When making changesin the Setup screenmenus,
Ischplayed.
There is a Video CD or CO loaded in the player and the
setting that was changed only applies to DVD
performance.
=i_ The settings will be effective the next time a DVD
isloaded.
Sottlngs are canceled.
Whenthe power isturnedoff bypowerfailureorby
unpluggingthe power cord,settingswill be canceled.
=k Beforeunpluggiegthe powercord, press
O on the remotecontrolcheckingthat "-OFF-"
disappearsinthe display.
No picture.
Connectionisincorrect.
=_ Checkthatcord connections are correctandthat
plugsarefirmlyconnected.
Player settings are incorrect.
=_ Check thst VIDEO SELECT is set firmly in the
correct position.
Operation (settings) of TV or AV component is not
appropriate.
=e Be sure thst your TV or AV component is set ub to
view DVD playback.
External input settings are incorrect.
=_ Check that the power of the component to be
used for external video input has been turned on.
=_ Check that the Setup screen General menu
"External Input" setting is correct (page 68).
The =oreen is stretched or aspect does not change.
The multi aspect setting is not appropriate.
=i_ Change the aspect setting in the I'rV Screen]
setting in the Setup screen Video menu to the
screen type most appropriate to the TV or monitor
you are using (page 43).
The _caen is suddenly squeezed when the Setup
==seen is opened.
If the Setup screen is opened during playback of a
DVD being viewed in the letter box format, the screen
may switch to the wide screen format.
=F This is not a malfunction. The screen will return to
normal when the Setup screen is closed.
Picture disturbance during playback or dark.
This player is compatible with Mscrc_Vision System
copy guard. Some discs include a copy prevention
signal, and when this type of disc is played back,
stripes etc., may appear on some sections of the
picture depending on the "IV.
=e This is not a malfunction.
Discs respond differently to particular player functions
which may result in the screen becoming black for a
brief instant or shaking slightly when the function is
executed.
=e These problems are largely due to differences
between discs and disc content and are not
malfunctions of this player.
When recorded on a VCR or passed through an AV
selector, thin is disturbance in the playback picture.
This is not a malfunction.
=e Due to the player's copy protection circuits,
connection of this device through a VCR or an AV
selector may prevent recording or cause picture
problems.
74
Remote control operation is not possible,
The rear panel control input jack on the player is being
used.
,_ Point the remote control at the component that
the player is connected to (page 19).
The remote control is too far from the player, or the
angle with the remote sensor is too wide.
=_ Be sure to operate the remote from a location
within its operating range (page 9).
The batteriesare exhausted.
•e Replacethe exhaustedbatteries with eli new
batteries (page8).
Audio is not output or is distorted.
The Setup screen Audio I menu (96 kHz PCM Outl
setting is set to "96 kHz'.
q On DVDs that contain copy protection, it may not
be possible to play back the audio at 96 kHz.
When this type of disc is encountered, even if "96
kHz" is selected, the player automatically outputs
the digital audio output at a compressed rate of 48
kHz. This is not a malfunction.
-I, The"4:3(LetterB_.)"screensettingisselected.
Evenif"96kHz"isselected,theplayerautomatically
downsamplastheaudiotoa compressedrateof 48
kHz.ThlaBnota maifunction.
,_ Besureto makeanalogaudioconnectionsaswell
asdigitalconnections(page17).
The disc is dirty.
,,_ Refer to "Disc Care" (page71).
The connection plugs are not inserted fully into the
terminals or are not connected.
,=_ Check that all connection plugs are firmly inserted.
The connection plug or terminal is dirty.
Check that the plugs end terminals are wiped
clean of dirt. etc.
Audio cable connection iswrong.
=!_ Check to make sure that the audio cables aro
connected correctly [page 17).
Connection is made to the stereo amplifier's PHONO
input terminal.
,=b Change connection to any input terminal except
PHONO.
The pause mode is engaged.
,=_ Press PLAY !z,-or PAUSE II to exit the pause
mode.
Stereo amplifier operation is incorrect.
,,_ Check input (CD, AUX, etc.) selector to determine
if if is selected for DVD playback.
External input settings are incorrect.
,_ Check that the power of the component to be
used for external audio input has been turned on.
=F Check that the Setup screen General menu
"External Input" setting iscorrect [page 68).
The DTS audio soundtreck on a DVD has been
selected.
-_ There is no audio output from the analog jacks
during DTS audio playback. Select another
soundtreck.
Noticeable difference in DVD and CD volume.
DVDs and CDs use different recording methods.
,O This is not a malfunction.
"ntere is no video endlor audio output from a SLAVE
DV-F727 or other component connected to the input
Jacks on this unit.
Connections are incorrect.
=e Check that connections are made firmly from the
output jacks on the other component to the IN
jacks on this unit (pages 66 end 67).
Menu settings are incorrect
=_ Check that the Setup ecreen Othor menu
[External input] setting is set approprietely (page
68).
The SLAVE DV-F727 does not operate when
€onnentad
Connections are incorrect.
,_ Check that the control cable is connected to the
MASTER jack on this unit and the SLAVE jack on
the connected DV-F727 (page 66).
,_ When connections ere not made correctly or
transmission cannot be performed between the
Master and Slave player, "CONNECT ERR" is
displayed in the display window. If this message
is displayed, connect the cord correctly (page 66).
Caution
Static electricity or other external influence may cause
malfunctioning of this unit. In this case, unplugging
the power cord and then re-plugging it in will usually
reset the unit for proper operation. If this dons not
correct the problem, please consult your nearest
Pioneer service center.
ResettingthePlayerto System
Settings
To reset the pleyer, press and hold • (stop) on the front
panel when pressing O STANDBY/ON on the front
panel to turn the unit from standby to on.
All input text data, program memory, saved settings
from functions such as Function Memory end
Condition Memory are cleared, end ell Setup sermm
menus are returned to factory settings.
!
J
=m
Z
75
Terms
Aspect ratio
Aspect ratio refers to the length to height ratio of TV
screens. The ratio of a standard TV is4:3, while the ratio
of s high-definition or wide TV is 16:9. The latter allows
you to enjoy a picture with a wider perspective.
CD TEXT
CDTEXT isa systemin whichtext information isstored
ona CD. CD TEXTcanbe usedto displaythe disc'stitle,
the artist'scame, andtracktitlesas well asother
information.Additionally,thisplayerusesthe COTEXT
alreadyonthe CDwhen the discsare updatedinthe
player.
Chapter number
Chapternumbersarethe numbersassignedto sections
ofe titleonthe disc,similarto chaptersina book.If the
discincludeschapternumbers,you canlocatethe
sectionyou want very quicklyusingsearchandother
functions.
Component (colordifference) video output
The color signal of the "iV is divided into the luminance
(Y) signal and the color (Peand Pn)signals and then
output. In this way mutual interference of each signal is
avoided. On a TV with component input jacks, these
signals are synthesized to produce the picture.
Condition memory
"Condition" refers to the various mode settings, etc. On
this player, various conditions, such as those set during
playback, can be memorized. This function allows you to
p_aybeck the same disc at any time without having to
redo your preferred settings.
Digital bitsUeem
The bitatrssmdoesnotreferto the audiosignal,but
rathertothe digitaldatathat, onceconverted,becomes
the audiosignal.The playeroutputsdigitalbitstrsemsvia
the digitalopticalordigitalcoaxialoutput.Ifthe
bitstrssmcannotbe decodedby the connectedAV
amplifieretc., digitalnoiseisproduced.Digitalbitstrsem
formats compatiblewith differententertainment
systemscanbe selectedinthe SetupscreenAudio 1
menu.
Digital output (Coaxlel)
Output of the digital audio signal is transmitted
electronically using a coaxial cable. Because the signal
being transmitted is digital, connection must be made to
the coaxial digital input of another component. Noise will
be output if connected to the analog audio inputs as the
digital signal cannot be decoded.
Digital output (Optical)
Norrnalh/, audio is converted to an electric signal and
transmitted through an electric wire from the player to
the amplifier, etc. Changing this signal m a digital signa_
and transmitting it through an fiber-optic cable is called
optical digital output. Similarly, optical digital input
receives digital signals from external units such as an AV
amplifier or receiver.
DNR (Digital Noise Reduction)
Digital noise reduction, in reference to video picture
quality, refers to the detection and removal of digital
artifacts, or errant video data, which appear as specks on
the screen, When the digital noise reduction function of
this player ison, some of this data can be detected and
kept from appearing on the screen,
Dolby Digital
Using a maximum of 5.1 channels of audiO, this high
quality surround system (Surround Digital) is used in
many of the finer movie theaters around the world.
nnrw---1
OlelTAL
In order to enjoy Dolby Digital discs, this unit's digital
output jack (either coaxial or optical) must be connected
to the digital input jack of an AVamplifier or Dolby Digital
decoder to enjoy the sound of Dolby Digital soundtrecks.
DTS
DTSstandsforDigitalTheaterSystem.DTSisa
surroundsystemdifferentfrom DolbyDigitalthathas
becomee popularsurroundsoundformatfor movies.
Em
In order to enjoy the benefits of DTS encoded discs, the
digital output jack (either coaxial or optical) of this player
needs to be connected to an AV amplifier or receiver or
to a DTS decoder to be able to enjoy the surround sound
of DTS audio. DTS audio is not output from the analog
audio outputs.
Dynamic range
Dynamicrangerefersto the differencebetween the
maximumandminimumlevelsof the audiosoundtreck
as measured indecibels(dB).
Compressingthe dynamicrangeraisesthe minimum
signalleveland lowersthe maximumsignallevel.This
allowsyouto hearvoicesandotherlow levelaudio
signalsclearlywhile loweringstrongaudiosignalslike
the soundof explosions.
Function Memory
Function Memory lets you make s shortcut list of up to
five regularly used settings from the Setup screen page.
By selecting a function from the Function Memory
window, the appropriate Setup screen menu and
function are automatically opened.
76
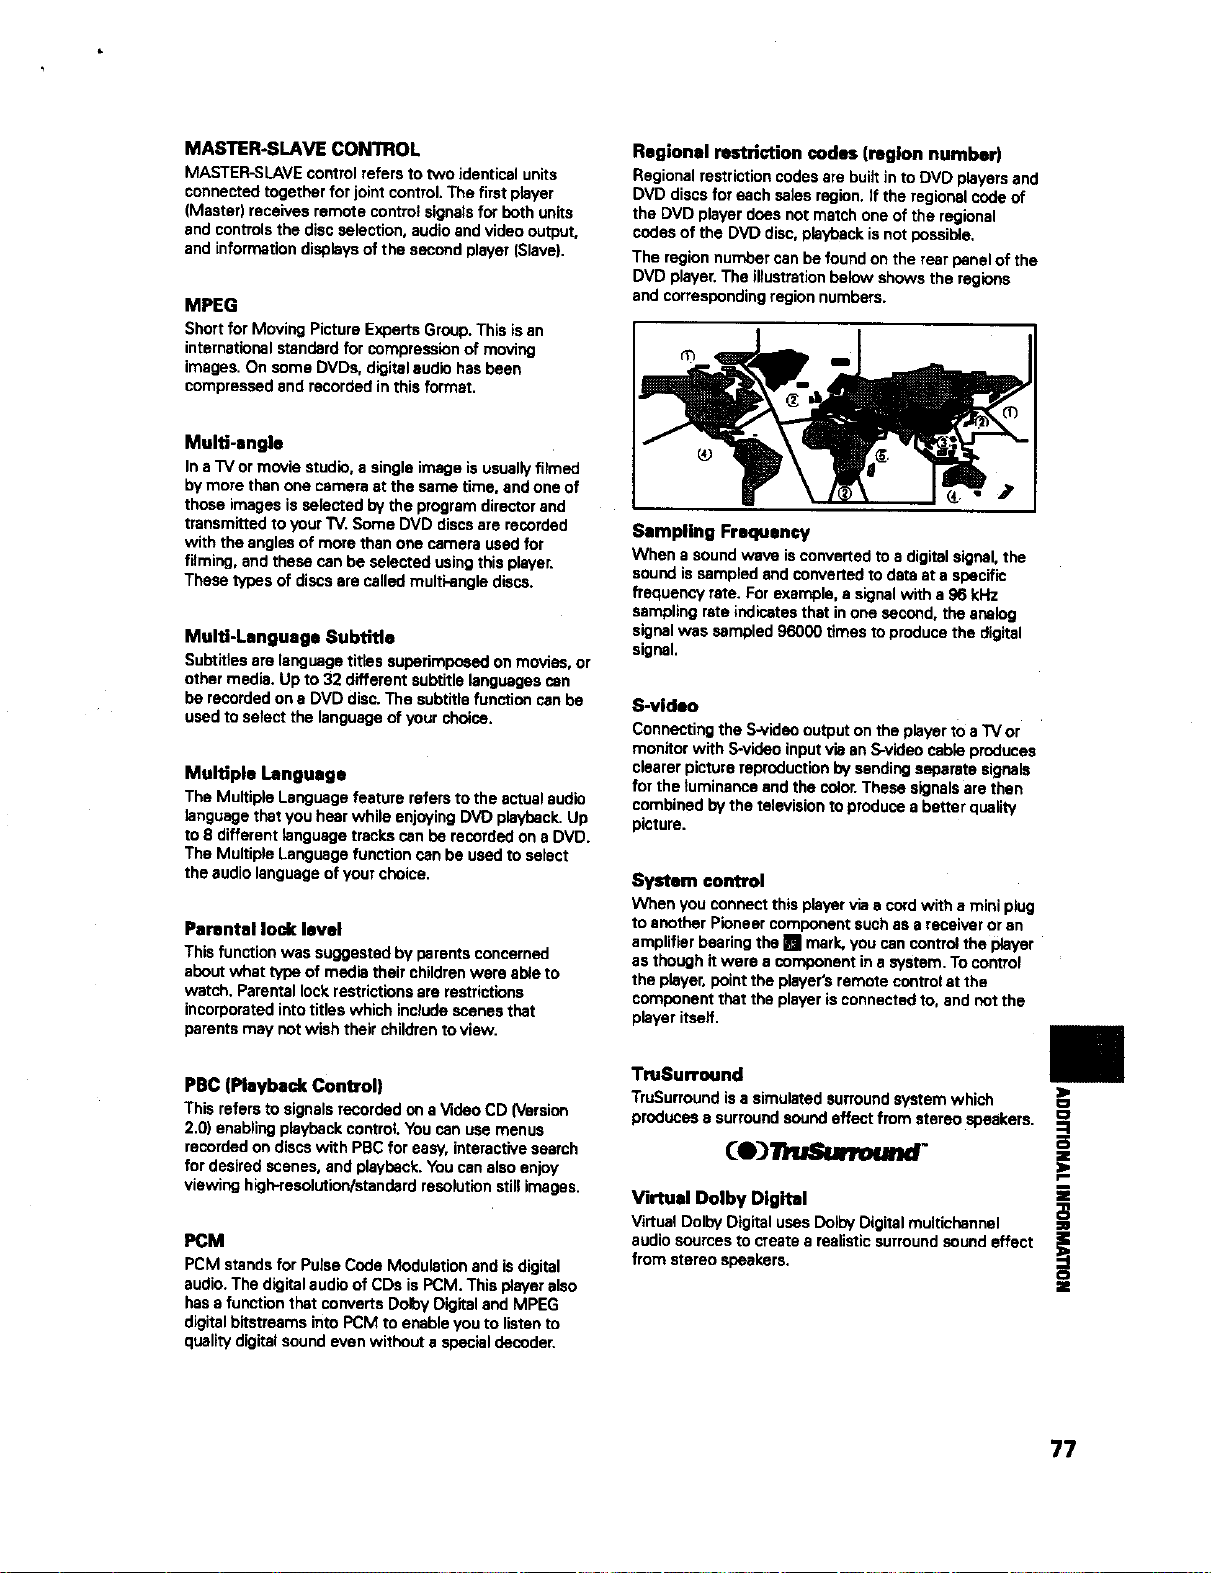
MASTER-SLAVE CON1ROL
MASTER-SLAVEcontrolrefersto two identicalunits
connectedtogetherfor jointcontrol.The first player
(Master)receivesremote controlsignalsfor both units
andcontrolsthe discselection,audioandvideooutput,
and informationdisplaysof the secondplayer(Slave).
MPEG
Shortfor MovingPictureE_oertsGroup.Thisisan
internationalstandardfor compressionof moving
images.On some DVDs,digitalaudiohasbeen
compressedand recordedinthis format.
Multi-angle
In a TV or movie studio, a single image is usually filmed
by more than one camera at the same time, and one of
those images is selected by the program director and
transmitted to your TV. Some DVD discs are recorded
with the angles of more than one camera used for
filming, and these can be selected using this player.
These types of discs are called multi-angle discs.
Multi-Language Subtitle
Subtitles are language titles superimposed on movies, or
other media. Up to 32 different subtitle languages can
be recorded on a DVD disc. The subtitle function can be
used to select the language of your choice.
Multiple Language
The Multiple Language feature refers to the actual audio
language that you hear while enjoying DVD playback. Up
to 8 different language tracks can be recorded on a DVD.
The Multiple Language function can be used to select
the audio language of your choice.
Pamntel lock level
Thisfunctionwas suggestedbyparentsconcerned
aboutwhat typeof media theirchildrenwere ableto
watch.Parentallockrestrictionsare restrictions
incorporatedintotitleswhichinbludescenesthat
parentsmay notwishtheir childrentoview.
PBC (Playback Control)
Thisreferstosignalsrecordedon aVideoCD(Version
2.0) enablingplaybackcontrol.Youcan usemenus
recordedondiscs with PBCforeasy,interactivesearch
fordesiredscenes,and playback.Youcanalsoenjoy
viewing high-resolution/standardresolutionstillimages.
PCM
PCM standsfor PulseCodeModulationand isdigital
audio.The digitalaudioof CDs isPCM.This playeralso
hase functionthatconvertsDolbyDigitaland MPEG
digitalbltstreamsintoPCM toenableyouto listento
qualitydigitalsoundevenwithoutaspecialdecoder.
Regional restriction codes (region number)
Regionalrestrictioncodesarebuiltin to DVD playersand
DVD discsfor each salesregion.If the regionalcedeof
the DVD playerdoessot matchone ofthe regional
codesof the DVD disc,playbackisnot possible.
The regionnumbercanbe foundon the rearpanelof the
DVD player.The illustrationbelowshowsthe regions
andcorrespondingregionnumbers.
Sampling Frequency
When a sound wave isconverted to a digital signal, the
sound is sampled and converted to data at a specific
frequency rate. For example, a signal with a 96 kHz
sampling rate indicates that in one second, the analog
signal was sampled 96000 times to produce the digital
signal.
S-video
Connecting the S-video output on the p!ayer to a _ or
monitor with S-video input via an S-video cable produces
clearer picture reproduction by sending separate signals
for the luminance and the color.These signals are then
combined by the television to produce a better quality
picture.
Systom control
When you connect this player via a cord with a mini plug
to another Pioneer component such as a receiver or an
amplifier bearing the [] mark, you can control the player
as though it were a component in a system. To control
the player, point the player's remote control at the
component that the player is connected to, and not the
player itself.
TmSurround
TruSurround isa simulated surround system which
produces e surround sound effect from stereo speakers.
Virtual Dolby Digital
VirtualDolbyDigitalusesDoibyDigitalmultichannel
audiosourcesto createa realisticsurroundsound effect
from stereospeakers.
.=
|
:O
o
z
77
Specifications
General
System .......................... File-typeDVD systemand Compact
DLscdigitalaudiosystem
Power requirements ............................. AC 120 V, 60 Hz
Power consumption ................................................ 21 W
Power consumption in standby mode .... less than 0,9 W
Weight ..................................................... 7,7 kg (17 Ibs,)
Dimensions ................... 420 (W) x 434 (D) x 193 (H) mm
(16 e/is(W) x 171/_s(D) x 7 s/a(H) in.)
(Not including protruding cables, etc.)
Operating temperature ... +5°C to +35=(:: (+36°F to +S6°F)
Operating humidity .......... 5% to 85% (no condensation)
S-vid_ input/output
Y (luminance) * Output level ........................ 1 Vp-p (75 Q)
C (color) - Output level ........................ 286 mVp-p (75 Q)
Jacks .......................................................... S-VIDEO jack
Video input/output
Output level ................................................ 1 Vp-p (75 Q)
Jacks ................................................................. RCA jack
Component video output
(Y. P,. P,)
Output level ......................................... Y: 1.0 Vp-p (75 _)
Pe, P.: 0.7 Vp-p (75 _)
Jacks ................................................................. RCA jack
Digital output
Optical digital output ........................... Optical digital jack
Coaxial digital input]output ................................ RCA jack
Control Ks
Controlinput/output.................Monauralminijack(3.5e)
MASTER-SLAVE.......................... Stereominijack (3.5e)
Other jacks
CD-DECK SYNCHRO jack ....................... Minijack (2,5 e)
KEYBOARD/MOUSE jack ....... 6-pin DIN connection jack
AaceNoriem
Remote control unit ....................................................... 1
AA (R6P) dw ce_|bakeries ............................................. 2
Audio cord ...................................................................... 1
Video cord ...................................................................... I
Master-Slave control cord .............................................. 1
Operating Instructions .................................. this manual
Warranty Card .............. (U.5. and Canadian models only)
l_e speclfic_mnsanddesignof1hisproductaresubjectto
changewithoutno_ce,due to irnprovenmnt.
Audio |nput/outp[_
Output leve_
During audio output ............. 200 mVrms (1 kHz, -20 dB)
Number of channels ....................................................... 2
Jacks ................................................................. RCA jack
Digital audio sharacterlstJna
Frequencyresponse..... 4 Hzto44 kHz(DVDfs:96 kHz)
S/N ratio .............................................. more than115 dB
Dynamicrange.................................... morethan102 dB
Total harmonicdistortion.................................... 0.002%
Wow andflutter ............................Limitofmeasurement
(,0.001% W. PEAK)or lower
78
Selecting fine audio equipment such as the unit you've just
purchased is only the start of your musical enjoyment, Now
it's time m consider how you can maximize the fun and
excitement your equipment offers. This manufacturer and
the Electronic Iedustri_-_ Association" sConmme_ Elecevnies
Group want you to get the most out of your equipment by
pinying it ata safe level. One that lets the sound come through
loud and clear without annoying blaring or distortlon-and,
most impo_anfly, without affecting your sensitive heating.
Sound canbe deceiving. Over time your hearing"comfort
level" adap_ to higher volumes of sound. So what sounds
"normal" can actually be loud andha_qnfultoyour hearing.
Guasd against this by setting your equipment ata safe level
BEFOREyour hearing adapts.
To eslablish a safe level:
• Startyour volume control ata low setting.
• Slowlyincv'_.asethesouudtmtilyou c_mhenritcomfurtably
andclearly, andwithout distortion.
Once you have established n enmfortable sound level:
• Set the dlal and leave it there.
Taking aminutem do thisnow willhelptopreventhearing
damageorloss inthe future.After all, we wantyou listening
for a lifetime.
We Want You Listening For A
Lifetime
Used wisely, your new sound equipment will provide a
li_time of fun and enjoyment. Since hearing damage from
loud noise is often undetectabte tmtil it is too late, this
manufacturer and the Eleettonic Indusl_-ies Association's
Coummet Electmdics Group recommend you avoid pmlougud
exposure to excessive noise. This llst of sound levels is
included fo_ your protection.
Deeibd
30 Quiet lii_'az'y, sol_ whispers
40 Living morn, refrigerate€, bedroom away from traffic
50 Light traffic, normal conversation, quiet office
60 Air conditioner at 20 feet, sewing machine
70 Vactmm cleaner, hair dryer, noisy sestauraut
80 Average city trafftc, garbage disposals, aletm clock
at two feet.
THE FOLLOWING NOISES CAN BE
DANGEROUS UNDER CONSTANT EXPOSURE
90 Subway, motmvycle, truck traffic,lawn mower
H30 Garbage u_ck, chain saw, lmeumatic drill
120 Reck band cencext in front of speakers, thuudet_ap
140 Gunshot blast, jet plane
180 Rocket launching pad
I_mmafio. €otw_sy of the Deafness Research Fvendatiou.
79
For U.S. and Canadian models only
Should this product require service in the U.S.A. and you wish to locate the nearest Pioneer Authorized
Independent Service Company, or if you wish to purchase replacement parts, operating instructions, service
manuals, or accessories, please call the number shown below,
a00-421-1404
Please do not ship your product to Pioneer without first calling the Customer ServiceDepartment at
the above listed number for assistance.
PIONEER ELECTRONICS SERVICE, INC.
CUSTOMER SERVICE DEPARTMENT
P.O. BOX 1760, LONG BEACH,
CA 90801-1760, U.S.A,
For warranty information please see the Limited Warranty sheet included w}th your product.
Pub#shed by 1o_,neerCort_orm_lon.
Copyright • 19911Pioneer CmporaUon.
All tights reeerved.
PIONEER CORPORATION _1, Meguro 1-Chorea, Meguro-ku, Tokyo 153-8654, Japan
PIONEER ELECTRONICS [USA] INC. P.O. BOX 1540, Long Beach,California S0e01-1540,U.S._.
PIONEER ELE_ICS OF CANADA, INC. 300 Allstate Parkway,Markham, Ontario L3ROP2, Canada
PIONEER ELECTRONIC [EUROPE] N.V. Haven 1087, Keetberglasn 1,9120 Melsela, Belgium TEL: 03/570.05.11
PIONEER ELECTRONICS AUSTRALIA PTY. LTD. 178-184BoundaryRoad, Braeslde,Victoria 3195, Australia,TEL: 039686*6300
PIONEER ELECTRONICS DEMEXICO S.A. DEC.V, SanLorenzoNum 1009 3erpiso Desp.302Col. DelValle,Mexico D.F.C.P.03100
TEL: 5-888-52-S0
<99J00WFOGOO> Printed In Japan <VRB1237-A>
80