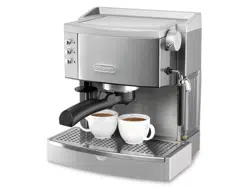
EC685
COFFEE MAKER
Instruction for use

2
EN
6
3
C3
C2
C4
A1
A2
A3
A5
A6
A4
B2
B1
B4 B6
A7
A8
A9
A10
C1
C5
A11
B3 B5 B7
C6*
A15
A13
A14
A12
4
1
4 5 6
7 8 9
12
10 11
2 3
2
1
12
5
13
17 18
2120
15
16
5°C
max 1/3
14
19
22
HOT MILK
23 24

6
1. FUNDAMENTAL SAFETY WARNINGS
• The appliance is not intended for use by persons (including children) with reduced
physical, sensory or mental capabilities, or lack of experience and knowledge, unless
they have been given supervision or instruction concerning use of the appliance by a
person responsible for their safety.
• Children should be supervised to ensure that they do not play with the appliance.
• Cleaning and user maintenance shall not be made by children without supervision.
• Never clean by immersing the appliance in water.
• This is an household appliance only. It is not intended to be used in: sta kitchen
areas in shops, oces and other working environments; farm houses; by clients in
hotels, motels and other residential type environments; bed and breakfast type
environments.
• If the plug or cord is damaged, it must be replaced by Customer Services only to avoid
all risk.
FOR EUROPEAN MARKETS ONLY:
• This appliance can be used by children aged from 8 years and above if they have been
given supervision or instruction concerning use of the appliance in a safe way and
understand the hazards involved. Cleaning and user maintenance shall not be made
by children unless they are older than 8 and supervised. Keep the appliance and power
cord away from children under eight years of age.
• The appliance can be used by persons with reduced physical, sensory or mental capa-
bilities or lack of experience and knowledge if they are supervised or have been given
instruction concerning use of the appliance in a safe way and if they understand the
hazards involved.
• Children shall not play with the appliance.
• Always unplug the appliance when left unattended and before assembly, taking apart
or cleaning.
Surfaces marked with this symbol become hot during use (the symbol is present in
certain models only).
7
2. SAFETY WARNINGS
Danger! Failure to observe the warning may result in life
threatening injury by electric shock.
This is an electrical appliance and may cause electrical shocks.
You should therefore follow these safety warnings:
• Never touch the appliance with damp hands or feet.
• Never touch the plug with damp hands.
• Make sure the socket used is freely accessible at all times,
enabling the appliance to be unplugged when necessary.
• Unplug directly from the plug only. Never pull the cord as
you could damage it.
• To disconnect the appliance completely you must unplug it
from the mains socket.
• If the appliance is faulty, do not attempt to repair.
Turn it o, unplug from the mains socket and contact Cus-
tomer Services.
• Before cleaning the appliance, turn it o, unplug from the
mains socket and allow to cool.
Important: Failure to observe the warning could result in
injury or damage to the appliance.
Keep all packaging (plastic bags, polystyrene foam) away from
children.
Danger of burns! Failure to observe the warning could
result in scalds or burns.
This appliance produces hot water and steam may form while
it is in operation.
Avoid contact with splashes of water or hot steam.
2.1 Designated use and restrictions
This appliance is designed and made to prepare coee or hot
water and to heat milk using steam.
Use drinking water only to ll the tank as described in the In-
struction for Use.
Never use the hot water/steam spout (A12) with beverages
other than milk.
Any other use is considered improper and thus dangerous. The
manufacturer is not liable for damage deriving from improper
use of the appliance.
2.2 Instruction for Use
Read this Instruction for Use carefully before using the appli-
ance. Failure to follow this Instruction for Use may result in
burns or damage to the appliance.
The manufacturer is not liable for damage deriving from failure
to respect this Instruction for Use.
Please note:
Keep this Instruction for Use. If the appliance is passed to other
persons, they must also be provided with this Instruction for
Use.
2.3 Checking the appliance
After removing the packaging, make sure the product is com-
plete and undamaged and that all accessories are present. Do
not use the appliance if it is visibly damaged. Contact De’Longhi
Customer Services.
3. DISPOSING OF THE APPLIANCE
The appliance must not be disposed of with house-
hold waste, but taken to an authorised waste separa-
tion and recycling centre.
4. TECHNICAL DATA
Mains voltage: ........................................ 220-240V~50/60Hz
Absorbed power: ......................................................... 1350 W
Pressure: ....................................................................... 15 bar
Water tank capacity: ............................................................1 l
Size LxHxD..........................................149x305x330 (414)mm
Weight ......................................................................... 4.04 kg
This appliance conforms to EC Regulation 1935/2004
on materials and articles intended to come into con-
tact with food.
None of the components or accessories is dish-
washer safe.
8
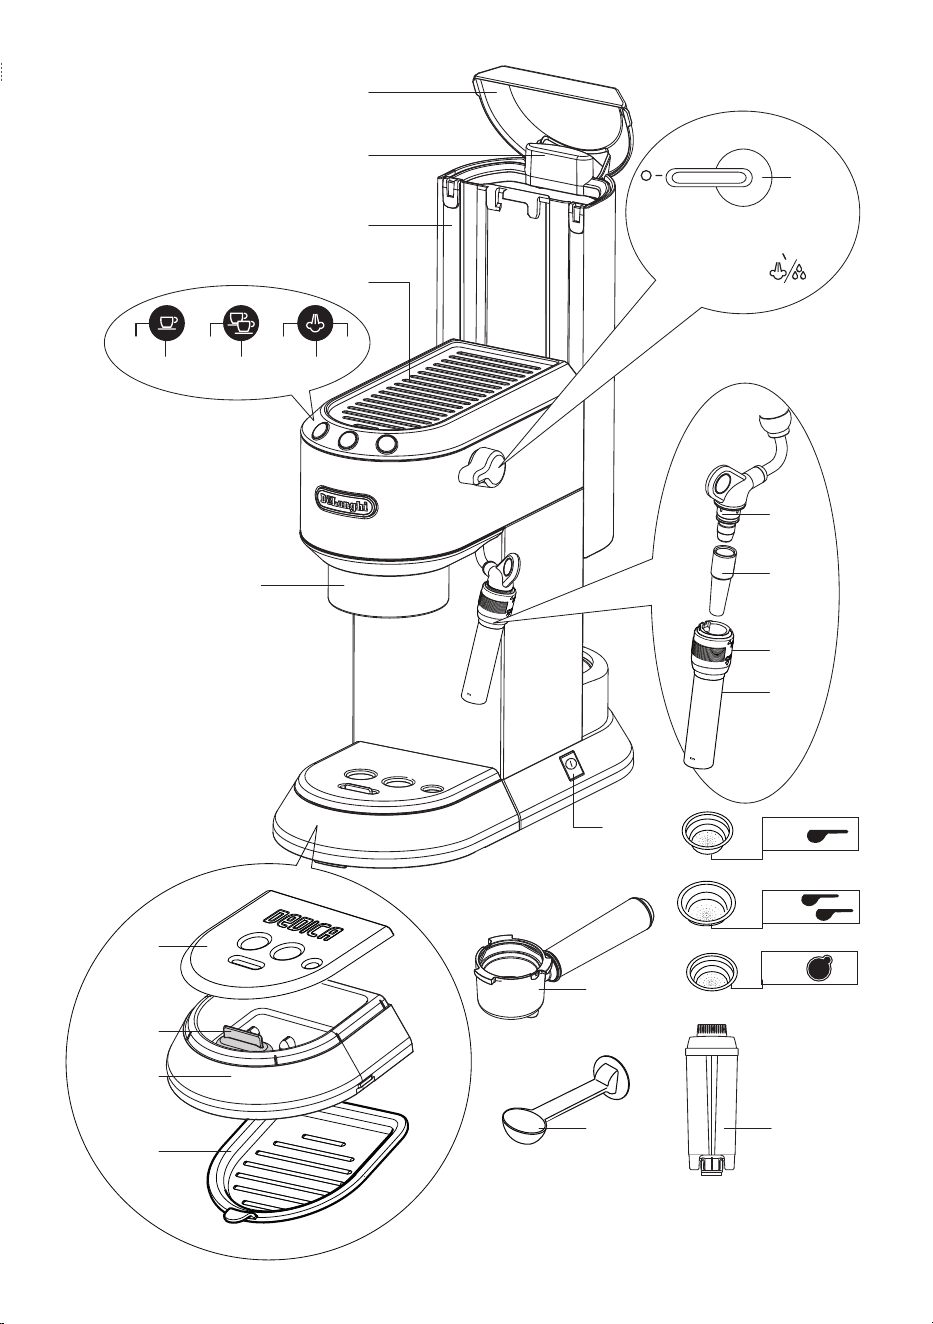
5. DESCRIPTION (page 3)
The terminology below will be used repeatedly on the following
pages.
5.1 Description of the appliance
A1. Water tank lid
A2. Tank extraction handle
A3. Water tank
A4. Cup warmer
A5. Boiler outlet
A6. ON/OFF switch
A7. Cup tray
A8. Drip tray full indicator
A9. Drip tray
A10. Mugs or glasses tray
A11. Steam dial
A12. Hot water/steam spout
A13. Hot water/steam connection nozzle
A14. Cappuccino maker selection ring
A15. Hot water/steam connection tube
5.2 Description control panel
B1. One cup button
B2. ON light on button (white)
B3. Two cups button
B4. ON light on button (white)
B5. Steam button
B6. ON light on button (white)
B7. Descale light (orange)
5.3 Description of the accessories
C1. Filter holder
C2. 1 cup lter ( symbol under lter)
C3. 2 cup lter ( symbol under lter)
C4. Pod lter ( symbol under lter)
C5. Measure/presser
C6. Water softener lter (*not included, can be purchased
from authorised Customer Services)
6. INSTALLING THE APPLIANCE
Important!
When you install the appliance, you should respect the follow-
ing safety warnings:
• Water penetrating the coee maker could cause damage.
Do not place the appliance near taps or sinks.
• The appliance could be damaged if the water it contains
freezes.
Do not install the appliance in a room where the tempera-
ture could drop below freezing point.
• Arrange the cord in such a way that it cannot be damaged
by sharp edges or contact with hot surfaces (e.g. electric
hot plates).
• The appliance gives o heat. After positioning the appli-
ance on the worktop, leave a space of at least 3 cm be-
tween the surfaces of the appliance and the side and rear
walls and at least 15 cm above the machine.
• Clean all the removable parts with tap water.
6.1 Connecting the appliance
Danger!
Check that the mains power supply voltage corresponds to that
indicated on the rating plate on the bottom of the appliance.
Connect the appliance to an eciently earthed and correctly
installed socket with a minimum current rating of 10A only. If
the power socket does not match the plug on the appliance,
have the socket replaced with a suitable type by a qualied
professional.
7. FILLING THE WATER TANK
Please note:
Before rst use, wash all the accessories and water tank with
warm water.
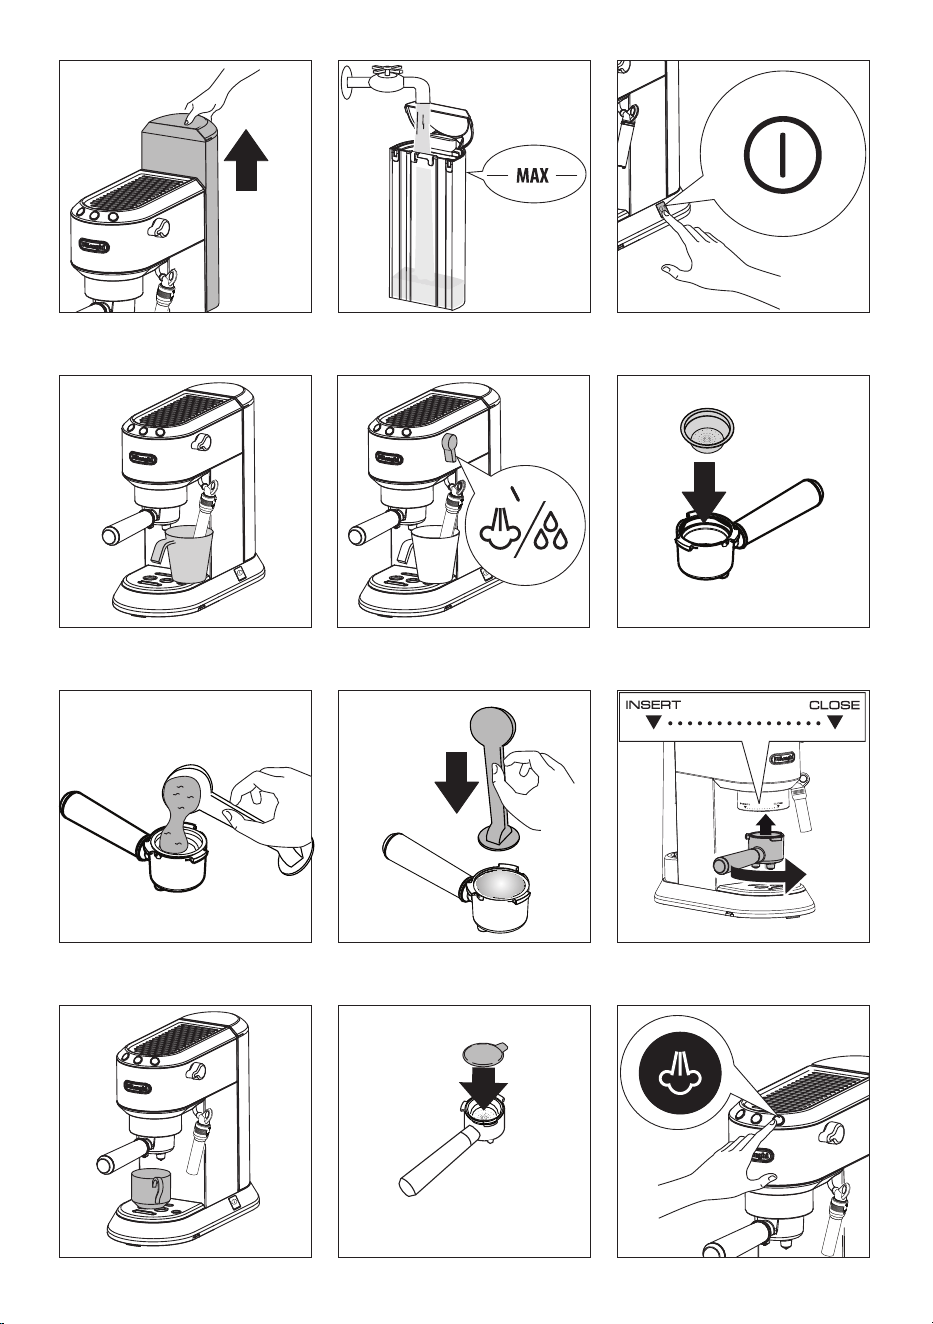
1. Extract the tank by pulling it upwards (g. 1).
2. Open the lid and ll the tank with fresh clean water, taking
care not to exceed the MAX level (g. 2). Put the tank back
in the appliance, pressing lightly to open the valves located
on the bottom of the tank.
3. More simply, the tank can also be lled without removing
it, pouring the water directly from a jug.
Important:
Never operate the appliance without water in the tank or with-
out the tank.
Please note:
It is normal for there to be water in the space under the tank.
This should therefore be dried regularly with a clean sponge.
8. FIRST USE
At rst use, rince the internal circuit as follows:
1. Turn the appliance on by pressing the ON/OFF switch (g.
3). The appliance performs a self-diagnosis cycle, indicated
by sequential ashing of the three buttons.
2. The and lights ash to indicate the appliance
is heating up. When the lights stop ashing and remain on
steadily, the appliance is ready for operating the rinse.
3. Attach the lter holder to the appliance (g. 9).
9
4. Place a container with a minimum capacity of 500 ml
under the boiler outlet (A5) (g. 4) and press the
button. Repeat this operation 5 times.
5. Empty the container and put it under the hot water/steam
spout (A12) (g. 4).
6. Turn the hot water/steam dial to the position (g.
5) and deliver to empty the water tank (A3); then turn the
knob to the ○ position.
9. PROGRAMMING THE SETTINGS MENU
To access the menu, make sure the appliance is ready for use,
then press and hold the button for 10 seconds until the
three buttons ash in sequence:
The appliance is now in programming mode.
Set the coee maker as you wish, then exit the settings menu by
waiting for 15 seconds.
Please note:
If no selections are made for 15 seconds, the appliance automat-
ically exits programming and is ready for use again.
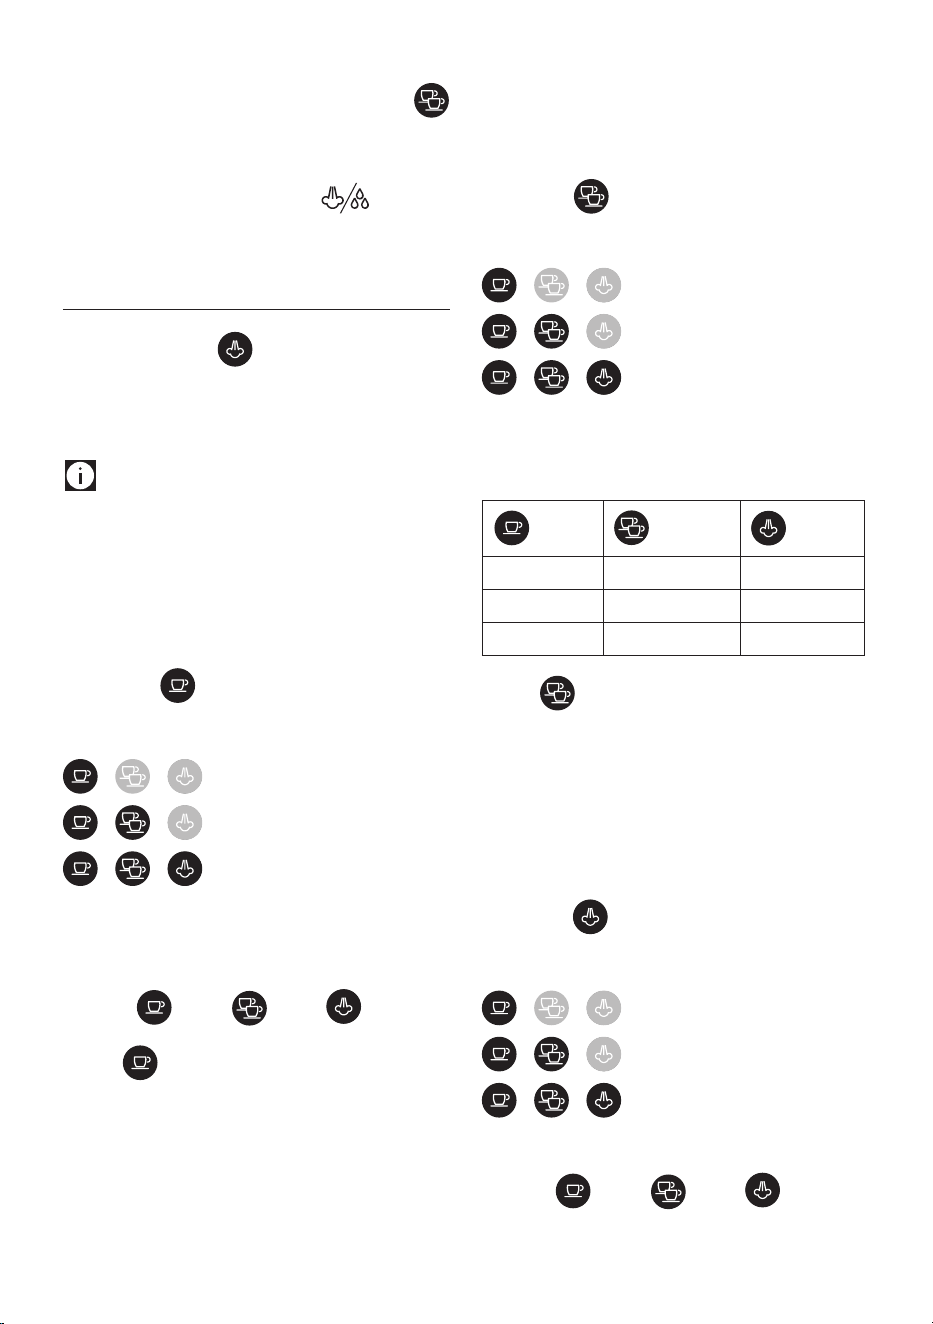
9.1 Setting coee temperature
To modify the temperature of the water used to make the coee,
proceed as follows:
1. Access the settings menu;
2. Press the button to enter the coee temperature
selection mode. The lights corresponding to the current
selection come on:
low
medium
high
3. The lights start ashing in sequence;
4. Press the button corresponding to the required
temperature:
low medium high
5. The button ashes to indicate that the selection has
been saved.
The appliance exits the menu and is ready for use.
9.2 Setting water hardness
The light (B7) indicating that the coee maker needs descaling
comes on after a period of operation established according to
water hardness.
The appliance can also be programmed according to the hard-
ness of the mains water in the various regions so that descaling
needs to be performed more or less frequently.
Proceed as follows:
1. Access the settings menu;
2. Press the button to enter the water hardness selec-
tion mode. The lights corresponding to the current selec-
tion come on:
soft
medium
hard
3. The lights start ashing in sequence;
4. Press the button corresponding to the water hardness in
your area:
soft water
medium
water
hard water
<10°dH 10°dH - 20°dH >20°dH
<18°fH 18°fH - 36°fH >36°fH
<180mg/l CaCo
3
180-360mg/l CaCo
3
>360mg/l CaCo
3
- The button ashes to indicate that the selection has
been saved.
The appliance exits the menu and is ready for use.
9.3 Adjusting auto-o (stand-by)
To save energy, an auto-o function turns the appliance o
when not used for a long period. To turn it back on again, press
any button on the control panel.
1. Access the settings menu;
2. Press the button to enter the auto-o time selection
mode. The lights corresponding to the current selection
come on:
9 min
30 min
3 hours
3. The lights start ashing in sequence;
4. Press the button corresponding to the required time:
9 min 30 min 3 hours
10
5. The button ashes to indicate that the selection has
been saved.
The appliance exits the menu and is ready for use.
9.4 Default values (reset)
This resets all menu settings and programmed quantities back
to the default values.
To reset the default values, proceed as follows:
1. Position the steam spout over the drip tray;
2. Access the settings menu;
3. Turn the steam dial to the position;
4. Press the button. The three lights ash simulta-
neously to conrm that the original settings have been
restored.
5. The and lights ash to indicate that the
steam dial must be closed again (○symbol).
When the steam dial has been closed, the appliance is ready for
use.
10. HOW TO MAKE ESPRESSO COFFEE
10.1 Tips for a hotter coee
For hotter espresso coee, you should:
• You are recommended to warm the cups before making
coee by rinsing them with a little hot water.
• Attach the lter holder to the appliance with the lter in
place but without adding coee. Using the same cup
as will later be used to make the coee, press the 1 cup
button and deliver hot water into the cup to heat it.
• Raise the coee temperature in the settings menu.
• Rest the cups you will be using on the cup warmer (A4)
which becomes hot during operation.
10.2 How to prepare espresso coee using pre-
ground coee
1. Place the ground coee lter (C2 or C3) in the lter holder
(g. 6). To make one coee, use the lter with the
symbol on the bottom, to make two coees, use the lter
with the symbol on the bottom.
2. To make just one coee, place one level measure of pre-
ground coee (about 7 g) in the lter (g. 7). To make two
coees, place two loosely lled measures (about 7+7 g) of
pre-ground coee in the lter. Fill the lter a little at a time
to prevent the pre-ground coee from overowing.
Important:
For correct operation, before lling with pre-ground coee,
make sure there are no coee residues left in the lter from the
last time you made coee.
3. Distribute the pre-ground coee evenly and press lightly
with the presser (g. 8).
Correct pressing of the pre-ground coee is essential to
obtain a good espresso. If you press too rmly, the coee
will be delivered slowly and will be strong. If you press
too lightly, the coee will be delivered quickly and will be
weak.
4. Remove any excess coee from the rim of the lter holder
and attach the lter holder to the appliance. To attach cor-
rectly, align the lter holder handle with the INSERT sym-
bol (g. 9), attach the lter holder and rotate the handle
towards the right until aligned with the CLOSE symbol.
5. Place the cup or cups under the lter holder spouts (g.
10).
6. Make sure the lights corresponding to the coee buttons
are on, then press the or coee button. The
appliance proceeds to make the coee and delivery is in-
terrupted automatically.
7. To remove the lter holder, turn the handle from right to
left.
Danger of burns!
To avoid splashes, never remove the lter holder while the
appliance is delivering coee. Always wait for a few seconds
after delivery.
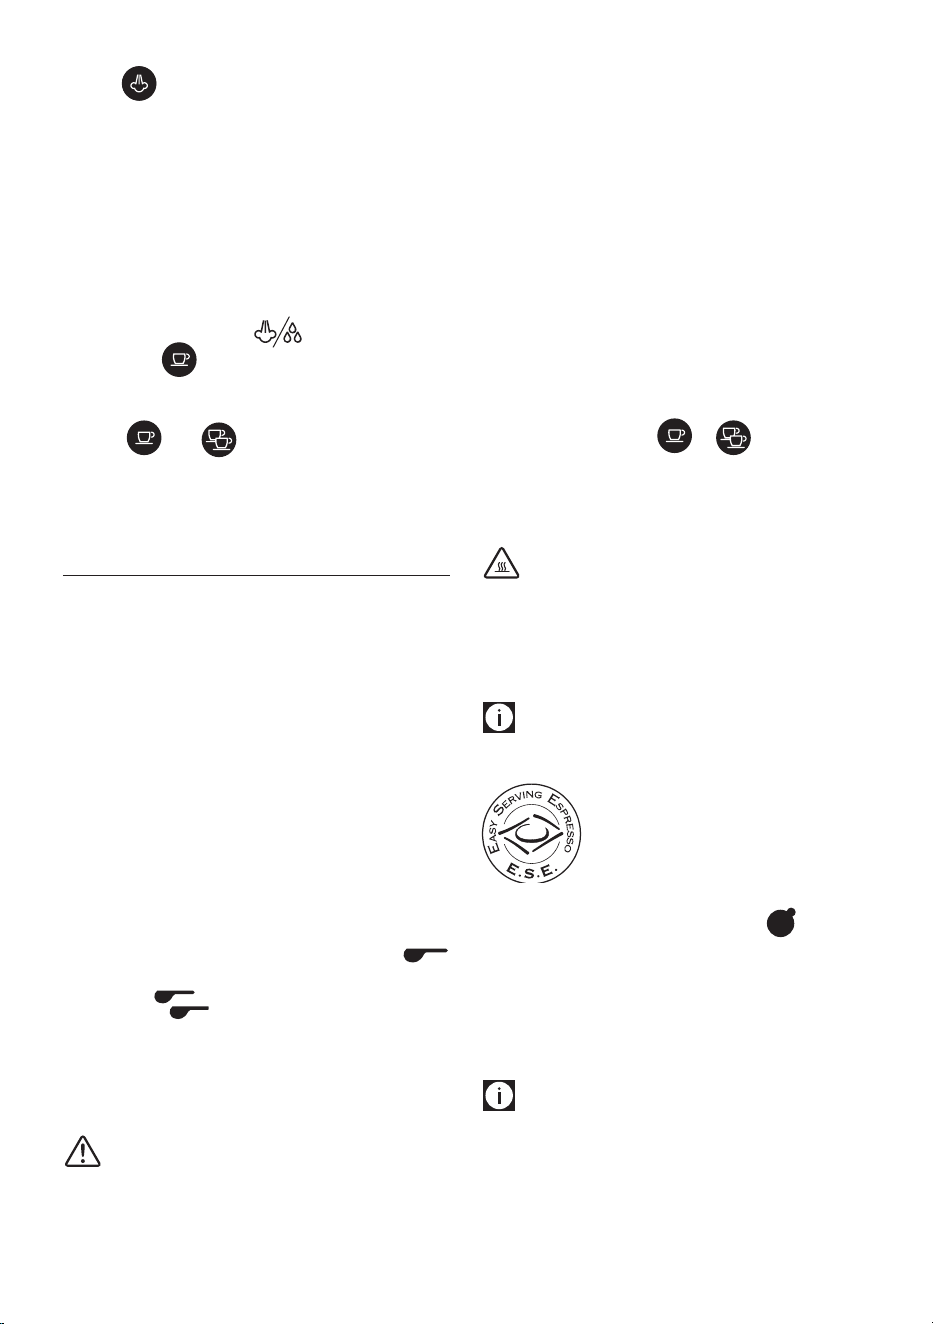
10.3 How to make espresso coee using pods
Please note:
Use pods conforming to the ESE standard, indicated on the pack
by the following symbol.
The ESE standard is a system accepted by lead-
ing pod producers and enables espresso coee
to be prepared simply and cleanly.
1. Place the lter for coee pods (with the symbol on
the bottom) in the lter holder.
2. Insert the pod, centring it as far as possible on the lter
(g. 11). Always follow the instructions on the pod pack to
position the pod on the lter correctly.
Proceed as described in points 4 to 6 in the previous section.
Please note:
• While the appliance is making coee, delivery can be in-
terrupted at any moment by pressing the coee button
pressed previously.
• At the end of delivery (within 3 seconds), to increase the
amount of coee in the cup, press and hold the coee but-
11
ton pressed previously. Delivery is automatically interrupt-
ed after a few seconds.
• To remove the lter holder, turn the handle from right to
left.
Danger of burns!
To avoid splashes, never remove the lter holder while the
appliance is delivering coee. Always wait for a few seconds
after delivery.
10.4 Programming the quantities of coee in
the cup
The appliance is set by default to automatically deliver standard
quantities. To change these quantities, proceed as follows:
1.
Place one or two cups under the lter holder spouts.
2. Press and hold the button you want to programme (
or ). The coee maker starts delivering coee and
the other coee button ashes to indicate that the appli-
ance is in programming mode.
3. Once the required quantity of coee has been delivered
into the cup, release the button. Delivery stops and the
light ashes to indicate that the quantity has been saved
correctly.
4. When the two coee lights come on steadily, the appliance
is ready for use.
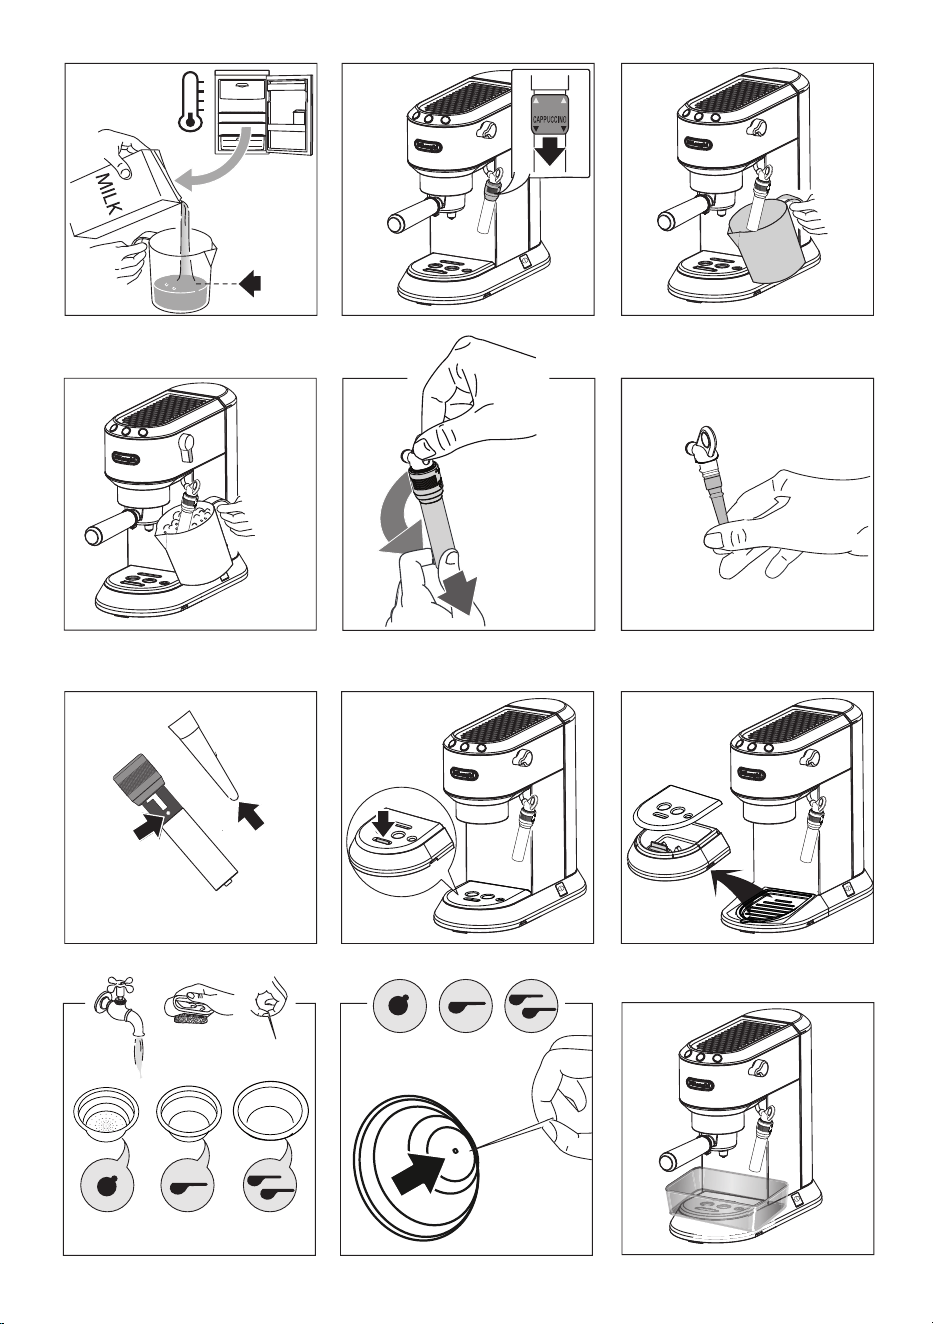
11. HOW TO MAKE CAPPUCCINO
1. Prepare the espresso coees as described in the previous
sections, using suciently large cups. To use tall glasses,
remove the drip tray and stand the glasses on the glasses
tray (A10);
2. Press the button (g. 12). The light ashes;
3. In the meantime, ll a recipient with about 100 grams of
milk for each cappuccino to be prepared. For a denser more
even froth, you must use skimmed or partially skimmed
milk at refrigerator temperature (about 5°C). In choosing
the size of the recipient, bear in mind that the milk doubles
or triples in volume (g. 13).
4. Make sure the cappuccino maker selection ring (A14) is in
the "CAPPUCCINO" position (g. 14);
5. Wait for the light corresponding to the button to
come on steadily, indicating that the boiler has reached
the ideal temperature to produce steam.
6. Position an empty container under the cappuccino maker
and open the dial for a few seconds to eliminate any air left
in the circuit. Close the dial again.
7. Place the recipient containing the milk under the cappucci-
no maker.
8. Immerse the cappuccino maker in the milk container.
Never immerse the black ring (g. 15). Turn the dial to the
position. Steam is delivered from the cappuccino
maker, giving the milk a creamy frothy appearance (g.
16). To obtain a creamier froth, immerse the cappuccino
maker in the milk and rotate the container with slow up-
ward movements.
9. When the required temperature (the ideal is 60°C) and
froth density is reached, interrupt steam delivery by turn-
ing the steam dial clockwise.
10. Pour the frothed milk into the cups containing the espresso
coee prepared previously. The cappuccino is ready. Sweet-
en to taste and if desired, sprinkle the froth with a little
cocoa powder.
Please note:
• to prepare more than one cappuccino, rst make all the
coees then at the end prepare the frothed milk for all the
cappuccinos;
• to exit the steam function, press any button. The
and lights ash to indicate that the temperature is
too high to make coee (see section "Cooling the boiler”).
You should not deliver steam for more than
60 seconds.
12. MAKING HOT MILK
To make hot milk without froth, proceed as described in the
above section, making sure the cappuccino maker selection
ring (A14) is positioned upwards in the "HOT MILK" position.
13. CLEANING THE CAPPUCCINO MAKER
AFTER
USE
Important:
For hygiene reasons, the cappuccino maker should always be
cleaned after use.
Proceed as follows:
1. Turn the steam dial to deliver a little steam for a few sec-
onds (points 2, 5 and 6 of the previous section). This caus-
es the cappuccino maker to discharge any milk left inside.
Press the ON/OFF button to turn the appliance o.
2. Wait a few minutes for the cappuccino maker to cool down.
With one hand, hold the cappuccino maker tube rmly,
with the other, release the cappuccino maker by turning it
clockwise, then pull o downwards (g. 17).
3. Remove the rubber steam connection nozzle from the
spout by pulling it downwards (g. 18).
4. Push the ring upwards and make sure the two holes shown
by the arrows in g. 19 are not blocked. If necessary, clean
with a pin;
12
5. Replace the nozzle, move the ring downwards and put the
cappuccino maker back on the connection nozzle, turning
it and pushing it upwards until it is attached.
14. COOLING THE BOILER
To make coee again immediately after frothing milk, the boil-
er must rst be cooled or the coee will be burnt. Proceed as
follows:
• place a container under the cappuccino maker;
• open the steam dial to deliver hot water and cool the
boiler;
• hot water delivery is interrupted automatically when the
boiler is cool. When the pump stops operating and no more
water is delivered, close the steam dial.
The coee maker is now ready for use.
15. HOT WATER
1. Press the ON/OFF button (g. 3) to turn the appliance on.
Wait for the coee lights to come on steadily.
2. Place a recipient under the cappuccino maker.
3. Turn the dial to the position. Hot water is delivered
from the cappuccino maker.
4. To stop hot water delivery, close the dial and press any
button.
You should not deliver hot water for more
than 60 seconds.
16. CLEANING
16.1 Cleaning the machine
The following parts of the machine must be cleaned regularly:
- drip tray (A9)
- the coee lters (C2, C3 and C4);
- the boiler outlet (A5);
- water tank (A3);
- the cappuccino maker (A15) as described in section "”13.
Cleaning the cappuccino maker after use”;
Important!
• Do not use solvents, abrasive detergents or alcohol to clean
the coee machine.
• Do not use metal objects to remove encrustations or coee
deposits as they could scratch metal or plastic surfaces.
•
If the appliance is not used for more than one week, before
using it again, we strongly recommend you perform a rinse
cycle as described in section ”8. rst use”.
Danger!
• While cleaning, never immerse the coee maker in water.
It is an electrical appliance.
• Before cleaning the outside of the appliance, turn it o,
unplug from the mains socket and allow to cool.
16.2 Cleaning the drip tray
Important!
The drip tray is tted with a level indicator (red) showing the
level of water it contains (g. 20). Before the indicator protrudes
from the cup tray, the drip tray must be emptied and cleaned
otherwise the water may overow the edge and damage the
appliance, the surface it rests on or the surrounding area.
1. Remove the drip tray (g. 21).
2. Remove the cup tray (A7), empty the water and clean the
drip tray with a cloth, then reassemble the drip tray. Ex-
tract the mugs or glasses tray (A10), clean with water, dry
and put back in the machine;
3. Put the drip tray back in place.
16.3 Cleaning the coee lters
Clean the coee lters regularly:
1. Rinse the lters under running water (g. 22);
2. Make sure the holes are not blocked. If necessary, clean
with a pin (gs. 22 and 23).
16.4 Cleaning the boiler outlet
After every 200 coees, rinse the boiler outlet by delivering
about 0.5 l of water from the boiler outlet (press the coee but-
ton without using ground coee).
16.5 Other cleaning operations
1. Do not use solvents or abrasive detergents to clean the cof-
fee maker. Use a soft damp cloth only.
2. Clean the lter holder cup.
16.6 Cleaning the water tank
1.
Clean the water tank regularly (about once a month) and
whenever you replace the water softener lter (C6, *if pro-
vided) with a damp cloth and a little mild washing up liquid;
2. Remove the lter (*if present) and rinse with running
water;
3. Put the lter (*if provided) back in the appliance, ll the
tank with fresh water and replace the tank;
4. (Models with water softener lter only) Deliver about 100
ml of water.
Danger!
While cleaning, never immerse the coee maker in water. It is
an electrical appliance.
13
16.7 Descale
Descale the appliance when the orange light on the but-
ton comes on.
Important!
• Before use, read the instructions and the labelling on the
descaler pack.
• You should use De'Longhi descaler only. Using unsuitable
descaler and/or performing descaling incorrectly may re-
sult in faults not covered by the manufacturer's guarantee.
Proceed as follows:
1. (IF PRESENT, REMOVE THE WATER SOFTENER FILTER). Fill
the tank with the descaler solution, obtained by diluting
the descaler provided with water (ll the water tank up to
the MAX level).
2. Press the ON/OFF button.
3. Make sure the lter holder is not attached and position a
recipient under the hot water spout and boiler outlet (A5)
(g. 24).
4. Wait for the and lights to come on steadily,
indicating that the appliance is ready for use.
5. Press and hold the button for 10 seconds until the
three buttons ash in sequence.
6. Turn the steam dial to the position.
7. Press the button to start descaling.
8. The descale programme starts and the descaler liquid
comes out of the water spout. The descale programme
removes limescale deposits from inside the appliance by
automatically performing a series of rinses and pausesuntil
the tank is completely empty.
Please note:
During descaling, to clean the boiler outlet, close the steam dial
from time to time to deliver small quantities of descaler from
the boiler outlet.
9. The appliance stops operation and the orange
light continues to ash, indicating that descaling is still
underway.
10. The appliance is now ready for rinsing through with clean
water. Extract the water tank, empty, rinse under running
water, ll with fresh water up to the MAX level and put
back in the appliance (If used, insert the water softener
lter).
11. Empty the container used to collect the descaler solution
and replace it empty under the hot water spout.
12. Make sure the steam dial is in the position, then
press the button to start rinsing.
Please note:
During rinsing, to clean the boiler outlet, close the steam dial
from time to time to deliver small quantities of water from the
boiler outlet.
13. When the water tank is empty, the orange light goes out
and descaling is complete.
14. Make sure the steam dial is in the closed position (○
symbol).
The appliance is ready for use.
Please note!
• If the descaling cycle is not completed correctly (e.g. no
electricity) we recommend repeating the cycle;
• If the water tank has not been lled to the MAX level, at the
end of descaling, the appliance requests a further rinse to
guarantee that the descaler solution has been completely
eliminated from the machine's internal circuits.
Repair of damage to the coee maker caused by limescale is not
covered by the guarantee unless descaling is performed regular-
ly as described above.
14
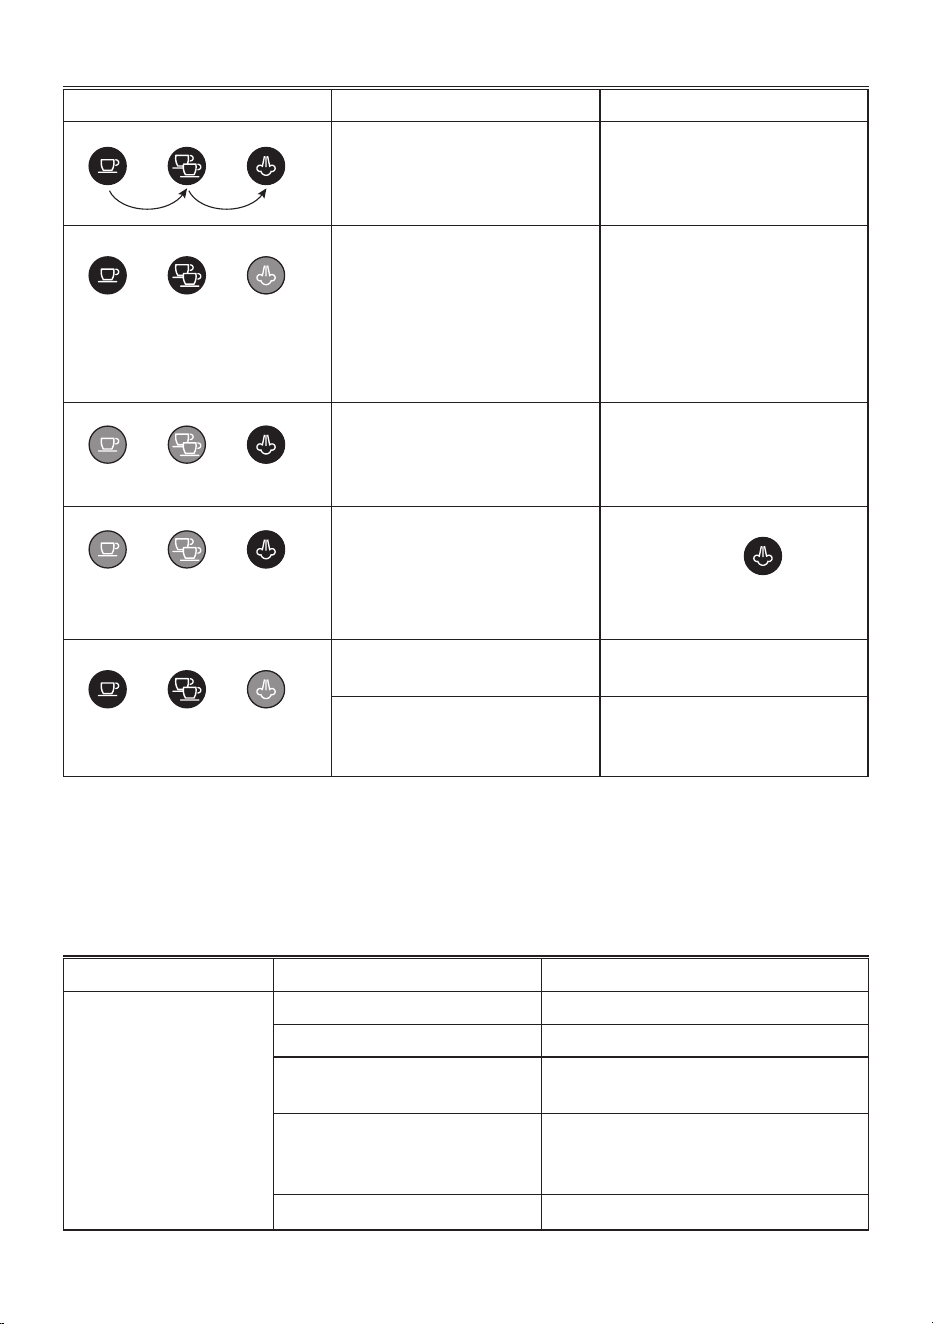
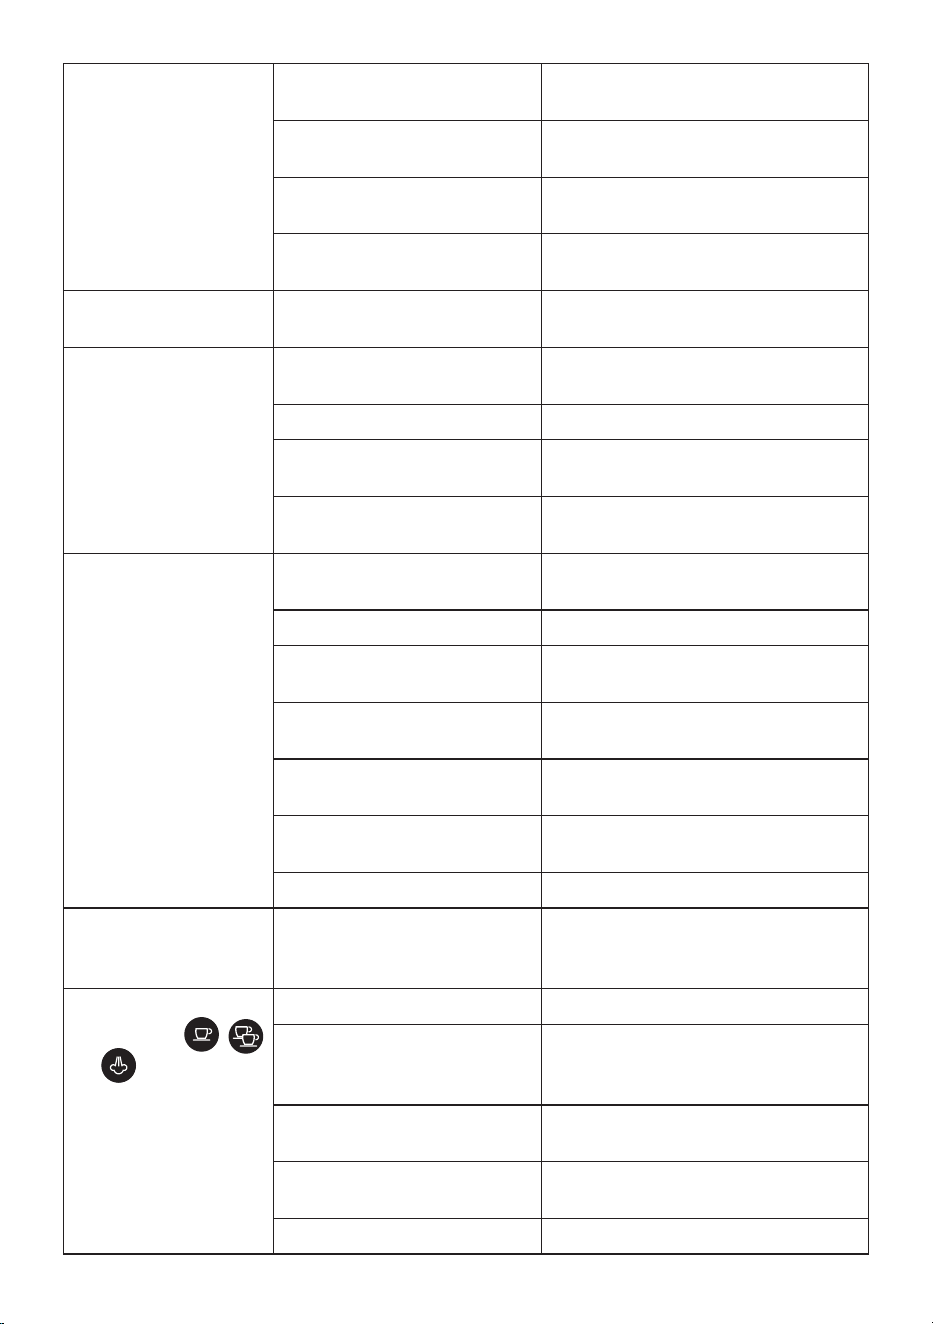
17. EXPLANATION OF LIGHTS
Lights Operation Explanation of lights
The ON/OFF button is turned on The appliance performs a self-diagnosis
cycle, indicated by sequential ashing of
the lights
When the appliance is turned on Flashing lights: the appliance is heating
up to make coee
Lights on steadily: the appliance is ready
to make coee
The lights ash rapidly: the tank is empty
or the appliance will not make coee. See
the section “7. Filling the water tank”
The steam function is required Flashing light: the appliance is heating
up to deliver steam
Light on steadily: the appliance is ready
to deliver steam
orange
ashing
The appliance needs descaling Descale the appliance, the operation is
complete when the light goes
o.
Steam dial open Flashing lights: close the steam dial
High boiler temperature Flashing lights: Cool as described in sec-
tion “14. Cooling the boiler”
18. TROUBLESHOOTING
Problem Cause Solution
No espresso coee is delivered No water in the tank Fill the tank
The holes in the lter holder are blocked Clean the lter holder spout holes
The lter is blocked Clean as described in section “16.3 Cleaning the
coee lters”
The tank has been inserted incorrectly
and the valves on the bottom are not
open
Press the tank down lightly to open the valves on
the bottom
Limescale in the water circuit Descale as described in section “16.7 Descale”
15
The espresso coee drips from
the edges of the lter holder
rather than the holes
The lter holder has been inserted incor-
rectly or is dirty
Attach the lter holder correctly and rotate rmly
as far as it will go
The espresso boiler gasket has lost elas-
ticity or is dirty
Have the espresso boiler gasket replaced by Cus-
tomer Services
The holes in the lter holder spouts are
blocked
Clean the lter holder spout holes
The lter is blocked Clean as described in section “16.3 Cleaning the
coee lters”
The lter holder cannot be at-
tached to the appliance
Too much coee has been placed in the
lter
Use the measure supplied and make sure you are
using the correct lter for the type of preparation
The coee froth is too light (de-
livered from the spout too fast)
The pre-ground coee is not pressed
down rmly enough
Press the pre-ground coee more rmly
There is not enough pre-ground coee Increase the quantity of pre-ground coee
The pre-ground coee is too coarse Use only pre-ground coee for espresso coee
makers
The wrong type of pre-ground coee is
being used
Change the type of pre-ground coee
The coee froth is too dark
(delivered from the spout too
slowly)
The pre-ground coee is pressed down
too rmly
Press the coee down less rmly
There is not enough pre-ground coee Reduce the quantity of pre-ground coee
The espresso boiler outlet is blocked Clean as described in section “16.4 Cleaning the
boiler outlet”
The lter is blocked Clean as described in section “16.3 Cleaning the
coee lters”
The pre-ground coee is too ne Use only pre-ground coee for espresso coee
makers
The pre-ground coee is too ne or damp Use pre-ground coee for espresso coee makers
only and make sure it is not too damp
Limescale in the water circuit Descale as described in section “16.7 Descale”
After delivering coee, the lter
remains attached to the boiler
outlet
Insert the lter holder again, deliver coee, then
remove the lter holder
The appliance will not make
any drink and the ,
and lights ash for a few
seconds
No water in the tank Fill the tank with water
The tank has been inserted incorrectly
and the valves on the bottom are not
open
Press the tank down lightly to open the valves on
the bottom
The espresso boiler outlet is blocked Clean as described in section “16.4 Cleaning the
boiler outlet”
The lter is blocked Clean as described in section “16.3 Cleaning the
coee lters”
Limescale in the water circuit Descale as described in section “16.7 Descale”
16
19. ELECTRICAL CONNECTION (UK ONLY)
Before using this appliance ensure that the voltage indicated on the product corresponds with the main voltage in your home, if you
are in any doubt about your supply contact your local electricity company.
The exible mains lead is supplied connected to a B.S. 1363 fused plug having a fuse of 13 amp capacity.
Should this plug not t the socket outlets in your home, it should be cut o and replaced with a suitable plug, following the procedure
outlined below.
Note: Such a plug cannot be used for any other appliance and should therefore be properly disposed of and not left where children
might nd it and plug it into a supply socket - with the obvious consequent danger.
Please note: We recommend the use of good quality plugs and wall sockets that can be switched o when the machine is not in use.
IMPORTANT: The wires in the mains lead tted to this appliance are coloured in accordance with the following code:
GREEN AND YELLOW EARTH
BLUE NEUTRAL
BROWN LIVE
As the colours of the wires in the mains lead of this appliance may not correspond with the coloured markings identifying the terminals
in your plug, proceed as follows:
- The wire which is coloured green and yellow must be connected to the terminal in the plug which is marked with the letter E or
by the earth symbol or coloured green or green and yellow.
- The wire which is coloured blue must be connected to the terminal which is marked with the letter N or coloured black.
- The wire which is coloured brown must be connected to the terminal which is marked with the letter L or coloured red.
When wiring the plug, ensure that all strands of wire are securely retained in each terminal. Do not forget to tighten the mains lead
clamp on the plug. If your electricity supply point has only two pin socket outlets, or if you are in doubt, consult a qualied electrician.
Should the mains lead ever require replacement, it is essential that this operation be carried out by a qualied electrician and should
only be replaced with a exible cord of the same size.
After replacement of a fuse in the plug, the fuse cover must be retted. If the fuse cover is lost, the plug must not be used until a
replacement cover is obtained. The colour of the correct replacement fuse cover is that of the coloured insert in the base of the fuse
recess or elsewhere on the plug. Always state this colour when ordering a replacement fuse cover.
Only 13amp replacement fuses which are asta approved to B.S. 1362 should be tted.
This appliance conforms to the Norms EN 55014 regarding the suppression of radio interference.
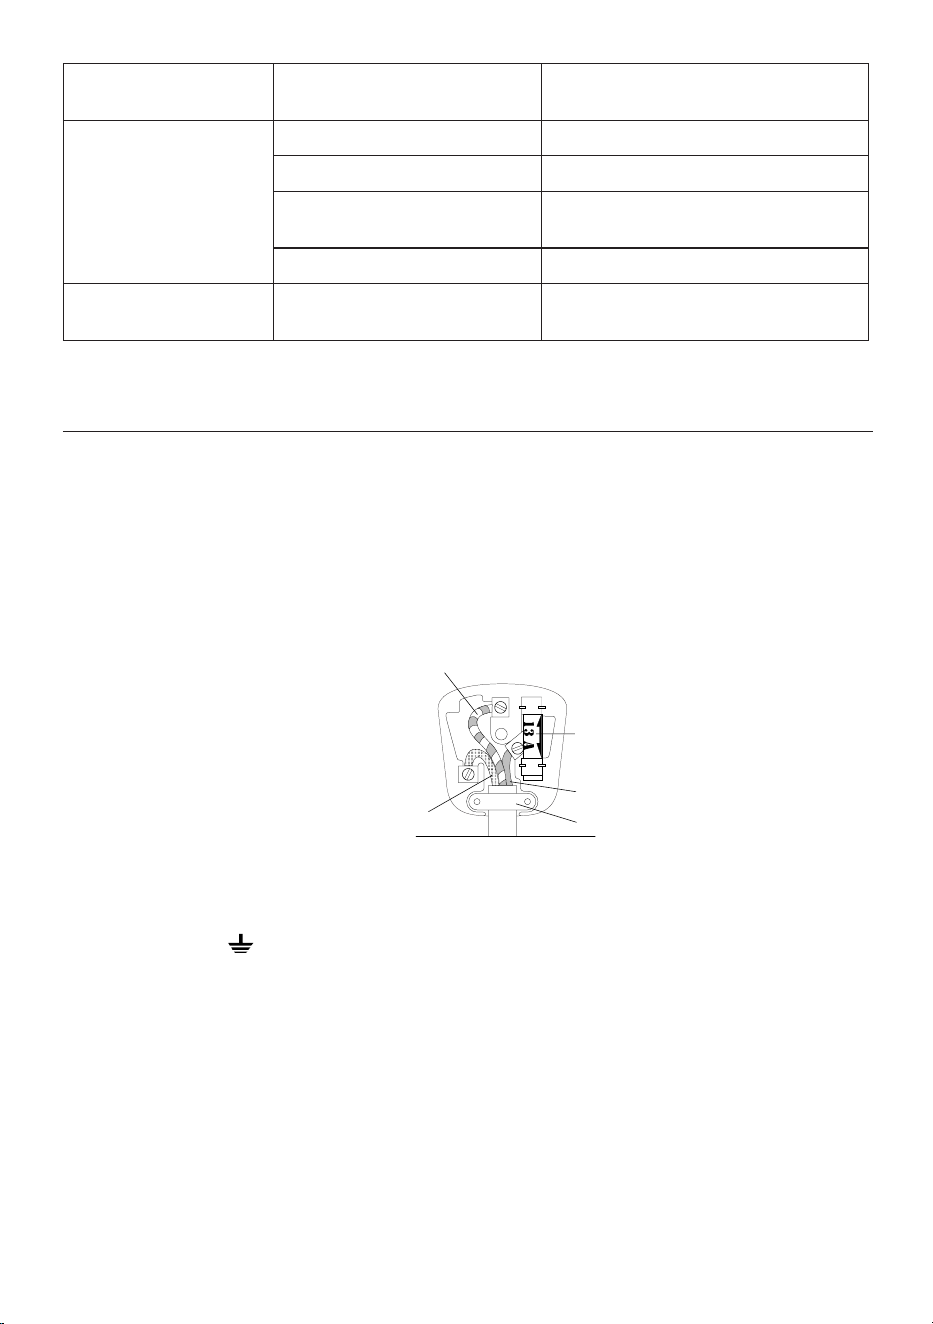
Warning - this appliance must be earthed
Green and Yellow to Earth
13 amp Fuse
Brown to live
Cord Clamp
Blue to
neutral
The appliance does not func-
tion and all the lights ash
Disconnect the appliance immediately and contact
authorised Customer Services.
No milk froth is formed when
making cappuccino
The ring is in the “HOT MILK” position Push the ring into the “CAPPUCCINO” position.
Milk not cold enough Always use milk at refrigerator temperature
Cappuccino maker dirty Clean as described in section “13. Cleaning the
cappuccino maker after use”
Limescale in the water circuit Descale as described in section “16.7 Descale”
At the end of descaling, the ap-
pliance requests a further rinse
During the rinse cycle, the water tank has
not been lled to the MAX level
Repeat the rinse cycle from point 10 of the section
"Explanation of lights" “16.7 Descale”

De’Longhi Appliances via Seitz, 47 31100 Treviso Italia www.delonghi.com
5713233481 /12.16