
l Warning !Important
Safety Instructions
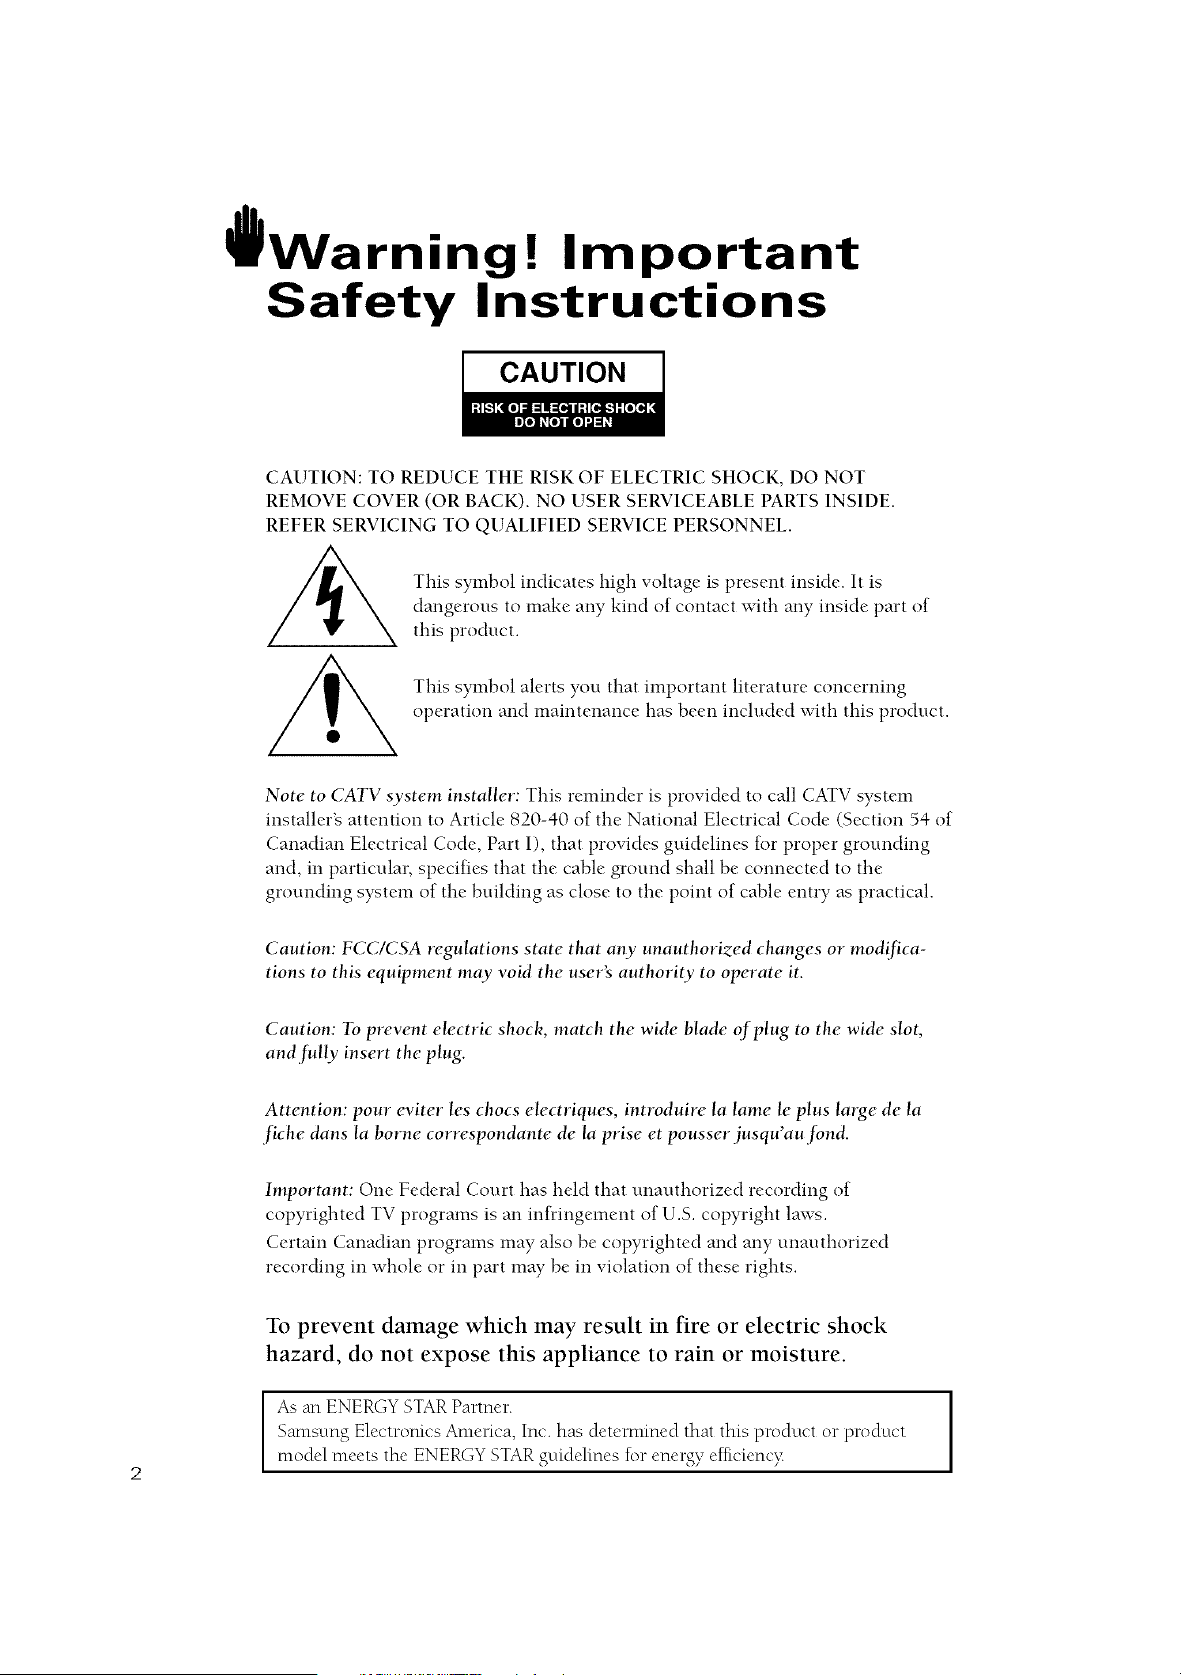
CAUTION
CAUTION: TO REDUCE THE RISK OF ELECTRIC SHOCK, DO NOT
REMOVE COVER (OR BACK). NO USER SERVICEABLE PARTS INSIDE.
REFER SERVICING TO QUALIFIED SERVICE PERSONNEL.
This symbol indicates high voltage is present inside. It is
dangerous to make any kind of contact with any inside part of
this product.
This symbol alerts you that important literature concerning
operation and maintenance has been included with this product.
Note to CATV system installer: This reminder is provided to call CATV system
installer_s attention to Article 820-40 of the National Electrical Code (Section 54 of
Canadian Electrical Code, Part I), that provides guidelines ti)r proper grounding
and, in particular, specifies that the cable ground shall be connected to the
grounding system of the building as close to the point of cable entry as practical.
Caution: FCC/CSA regulations state that any unauthorized changes or mod!fica-
tions to this equipment may void the user's authority to operate it.
Caution: To prevent electric shock, match the wide blade (_f plug to the wide slot,
and fully insert the plug.
Attention: pour eviter les chocs electriques, introduire la lame le plus large de la
fiche dans la borne correspondante de la prise et pousser jusqu'au fond.
Important: One Federal Court has held that unauthorized recording of
copyrighted TV programs is an infringement of U.S. copyright laws.
Certain Canadian programs may also be copyrighted and any unauthorized
recording in whole or in part may be in violation of these rights.
To prevent damage which may result in fire or electric shock
hazard, do not expose this appliance to rain or moisture.
As an ENERGY STAR Partner. I
Sanlsnng Electronics Amenca, Inc. has detemlined that this product or product
model meets the ENERGY STAR guidelines for energ)_ ellicienc_
Thank You for Choosing Samsung
Thank you for choosing SamsungT Your new Samsung TV receiver represents the latest in
television technology: It has easy-to-use, on-screen menus and closed-captioning capabilities,
making this TV one of the best products in its class This product will provide convement,
dependable service and eNoyment for years to come
Important Safety Information
_To reduce the risk of fire, electrical shock, and other it\juries, keep these satety precautions in
mind _•hen installing, using, and maintaining _•our machine
• Read all safety and operating instructions before operating the TV receiver
• Retain the safety and operating instructions for future reference
• Heed all warnings on the TV receiver and in the operating instructions
• Follow all operating instructions.
•Unplug the TV receiver from the wall outlet before cleaning, Use a damp cloth, Do not use
liquid or aerosol cleaners.
•Never add any attachments and/or equipment without approval of the manufacturer. Such
additions may cause risk of fire, electric shock, or other personal ir\}ur?:
• Do not use the TV receiver where contact with or immersion in water is a possibility; such as
near bath tubs, sinks, washing machines, sv4mming pools, etc.
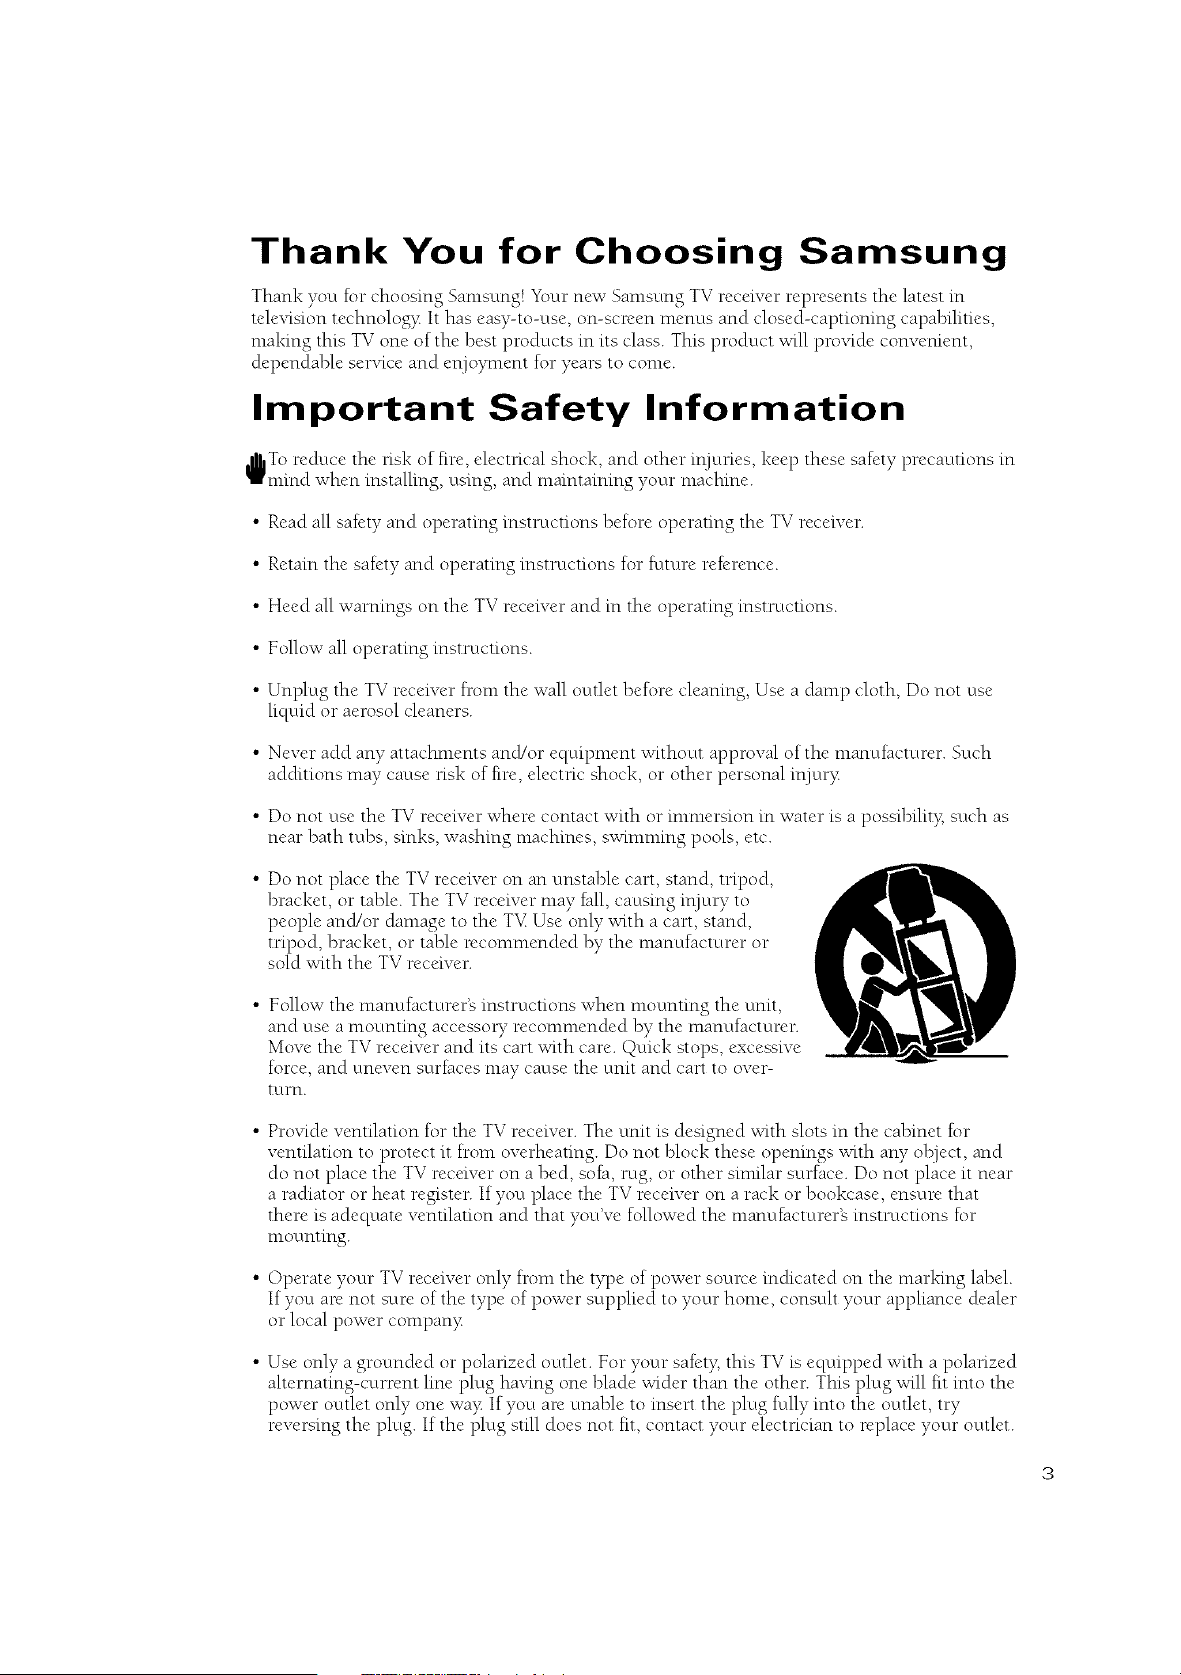
• Do not place the TV receiver on an unstable cart, stand, tripod,
bracket, or table. The TV receiver may fall, causing ir\iury to
people and/or damage to the T'v_Use only with a cart, stand,
tripod, bracket, or table recommended by the manufacturer or
sold with the TV receiver
• Follow the manufacturer's instructions when mounting the unit,
and use a mounting accesso Urecommended by the manufacturer.
Move the TV receiver and its cart with care. Quick stops, excessive
force, and uneven surfaces may cause the unit and cart to over-
turn.
• Provide ventilation for the TV receiver. The unit is designed with slots in the cabinet for
ventilation to protect it from overheating. Do not block these openings with any olz}ect, and
do not place the TV receiver on a bed, sofa, rug, or other similar surface. Do not place it near
a radiator or heat register. If you place the TV receiver on a rack or bookcase, ensure that
there is adequate ventilation and that you've followed the manufacturer's instructions for
mounting.
• Operate your TV receiver only from the type of power source indicated on the marking label.
If you are not sure of the type of power supplied to your home, consuh your appliance dealer
or local power company:
• Use only a grounded or polarized octtlet. For your safety; this TV is equipped with a polarized
ahernating-current line plug having one blade wider than the other. This plug will fit into the
power outlet only one vva?:If you are unable to insert the plug fully into the outlet, try
reversing the plug. If the plug still does not fit, contact your electrician to replace your outlet.
•Protect the power cord. Power supply cords should be routed so that they will not be walked
on or pinched by items placed on or against them. Pay particular attention to cord placement
at plugs, convenience receptacles, and at the point where they exit from the unit.
• Unplug the TV receiver from the wall octtlet and disconnect the antenna or cable system dur-
ing a lightning stoml or when left unattended and unused for long penods of time. This will
prevent damage to the unit due to lightmng and powe>line surges.
• An outside antenna system should not be placed in the vicimty of over*head power lines or
other electric light or power circuits or where it can fall into such power lines or circuits.
Avoid overhead power lines: When installing an omside antenna system, be extremely careful
to keep from touching the power lines or circuits. Contact with such lines might be fatal.
• Do not overload the wall outlet or extension cords. Overloading can resuh in fire or electric
shock.
•Do not insert foreign ol_jects through opemngs in the unit, as they nmy touch dangerous
voltages or cause danmge. Never spill liquid of any kind on the TV receiver.
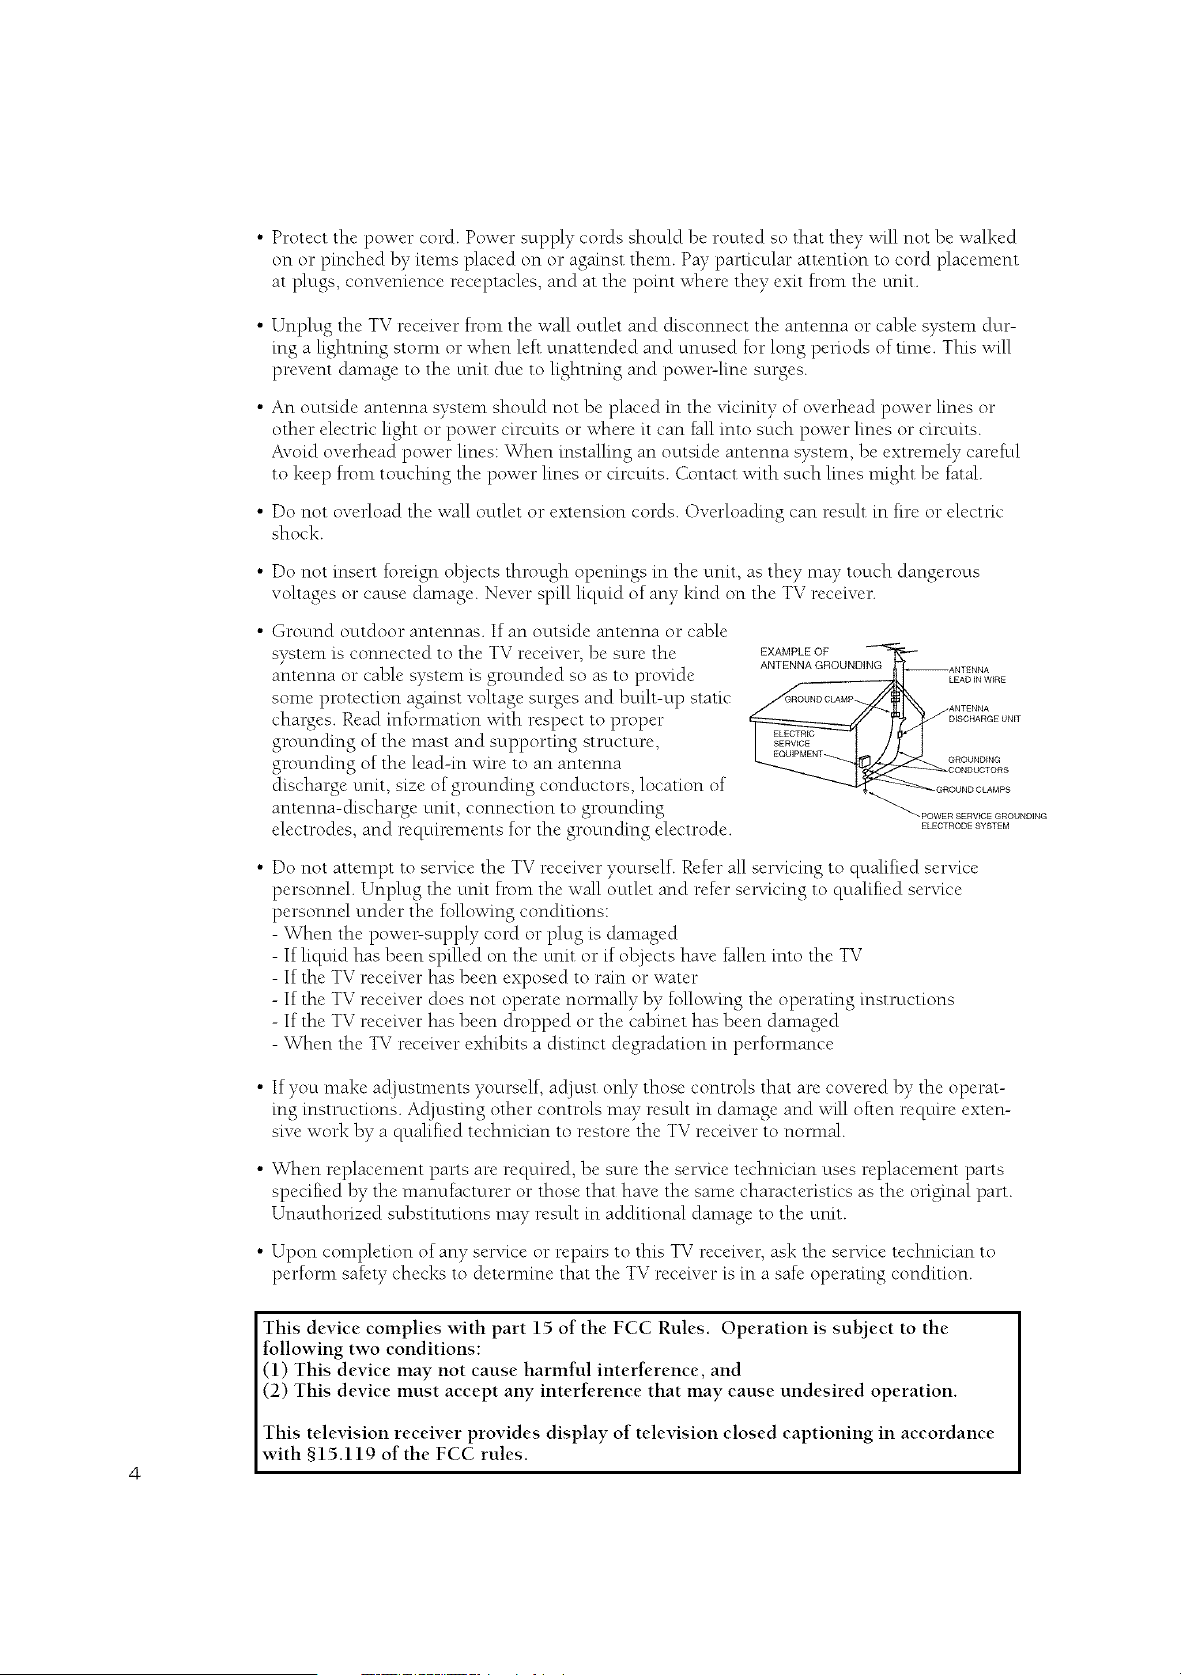
• Ground outdoor antennas. If an outside antenna or cable
system is connected to the TV receiver, be sure the
antenna or cable system is grounded so as to provide
some protection against voltage sut*gesand bmh-up static
charges. Read infommtion with respect to proper
grotm&ng of the nmst and supporting structure,
groun&ng of the lead-in wire to an antenna
discharge unit, size of groun&ng conductors, location of
antenna-discharge unit, connection to grounding
electrodes, and requirements for the groun&ng electrode.
EXAMPLE OF
ANTENNA GROUNDING
• Do not attempt to sel%ce the TV receiver yourself. Refer all servicing to qualified service
personnel. Unplug the unit from the wall octtlet and refer ser,_king to qualified servke
personnel under the following conditions:
- When the powe>supply cord or plug is dan*aged
- If liquid has been spilled on the unit or if Ol#lectshave fallen into the TV
- If the TV receiver has been exposed to rain or water
- If the TV receiver does not operate nornmlly by following the operating instructions
- If the TV receiver has been dropped or the cabinet has been danmged
- When the TV receiver exhibits a distinct degradation in perfommnce
•If you nmke acljustments yourself, acljust only those controls that are covered by the operat-
ing instructions. Acljusting other controls nmy resuh in danmge and will often require exten-
sive work by a qualified technician to restore the TV receiver to nommfi
• When replacement parts are required, be sure the service technician uses replacement parts
specified by the manufacturer or those that have the same characteristics as the onginal part.
Unauthonzed substitutions nmy resuh in additional danmge to the unit.
• Upon completion of any service or repairs to this TV receiver, ask the ser,<ice technician to
perform safety checks to detemfine that the TV receiver is in a safe operating condition.
This device complies with part 15 of the FCC Rules. Operation is subject to the
following two conditions:
(1) This device may not cause harmful interference, and
(2) This device must accept any interference that may cause undesired operation.
This television receiver provides display of television closed captioning in accordance
with §15.119 of the FCC rules.
4
1) Read these instructions.
2) Keep these instructions.
3) Heed all warnings.
4) Follow all instructions.
--_ OUBLE INSULATED - When senTicmguse only identical replacement parts.
5) Do not use this apparatus near water.
6) Clean only with dry cloth.
7) Do not block any ventilation openings, Install in accordance with the manufacturer's
instructions.
s)
9)
Do not install near any heat sources such as radiators, heat registers, or other apparatus
(including amplifiers) that produce heat.
Do not defeat the safety purpose of the polarized or groun&ng-type plug. A polarized
plug has two blades with one wider than the other. A grounding type plug has two blades
and a third groun&ng prong. The wide blade or the third prong are proqded for your
safet}_If the proqded plug does not fit into your octtlet, consuh an electrician for replace-
ment of the obsolete outlet.
10) Protect the power cord Iron* being from being walked on or pinched particularly at plugs,
convenience receptacles, and the point where they exit from the apparatus.
11) Only use attachments/accessories specified by the manufacturer.
12) Use only with cart, stand, tripod, bracket, or table specified by the manufacturer, or sold
with the apparatus. When a used, caution when moving the cart/apparatus combination to
avoid ir\juUfrom tip-over.
13) Unplug this apparatus. When a cart is used, use caution when moving the cart/apparatus
combination to avoid ir\ju Ufrom tip-over.
14) Refer all servicing to qualified service personnel. Ser,_icing is required when the apparatus
has been damaged in aW wa> such as powe>supply cord or plug is dan*aged, liquid has
been spilled or ol_jects have fallen into the apparatus, the apparatus has been exposed to
rain or moisture, does not operate normall> or has been dropped.
CONTENTS ]
Chapter 1: Your New TV ................. 8
List of Features ........................................... 8
Fam[lmrizmg Yl)urself with The TV ............................ 9
Front Pand Buttons ................................. 9
Side Panel Jacks. .................................. 10
Rear Pand Jacks .................................. 11
Remote Contrd ................................... 12
Chapter 2: Installation ................. 15
Cormectmg VHF and UHF Antcmlas .......................... 15
Antcrmas with 300-ohm Flat Twin Leads ................ 15
Antcrmas with 7%ohm Round Leads .................. 16
Separate VHF and UHF Antermas ..................... 16
Cormectmg Cable TV ..................................... 16
Cable without a Cable Box .......................... 16
Cormectmg to a Cable Box that I2escmmbles
All Chamlels ..................................... 17
Comlecting to a Cable Box that I2escmmbles
Some Channels ................................... 17
Cormectmg a VCR ........................................ 18
(2mnectmg an S-VHS VCR .......................... 20
Cormectmg a Second VCR 1{)Record from the TV......... 21
(2mnectmg a DVD Player .................................. 21
Connecting a Camcorder ................................... 22
Installing Batteries m the Remote Contrd ...................... 23
Chapter 3: Operation .................. 24
Turning the TV On and Off ................................. 24
Plug & Play Feature ....................................... 24
Viewing the Menus and On4creen Displays .................... 26
Viewing the Menus ................................ 26
Viewing the Display ............................... 26
Selecting a Menu Language ................................. 27
Memorizing the Channels .................................. 28
Selecting the Video Signal-source ..................... 28
Storing Channels m Memory (Autonmtic Method) ........ 29
Adding and Erasing Chamlels (Manual Method) .......... 30
Changing Charmels ....................................... 31
Using the (karmel Buttons .......................... 31
Directly Accessing Channels ......................... 31
Using the PRE-CH Button m select the Previous Channel... 31
A@tsting the M)lurne ..................................... 31
Using Mute ...................................... 31
Labeling the Chamlels ..................................... 32
Setting the Clock ......................................... 33
Customizing the Picture ................................... 34
Using Automatic Picture Settings ............................. 35
Customizing the Sound .................................... 36
Using Automatic Sound Settings ............................. 37
Setting The O_gOf[ Melody ................................. 38
Viewing a VCR or Can,corder Tape ........................... 39
CONTENTS ]
Chapter 4: Special Features ............. 40
Customizing Your Remote Control ........................... 40
Setting Up Ybur Remote Control to Operate Ybur
VCR or DVD ..................................... 40
Setting Up Ybur Remote Control to Operate Ybur Cable Box . . . 42
Fine Tuning Channels ..................................... 43
Changing the Screen Size .................................. 44
Digital Noise Reduction .................................... 45
Tilt ................................................... 46
Using the Surf Feature ..................................... 47
Setting the On/Off Tinier ................................... 48
Setting the Sleep Timer .................................... 49
Sound Features .......................................... 50
Choosing a Muhi-Channel Sound (MTS) Soundtrack ...... 50
Extra Sound Settings
(Turbo Sound, Surround or Auto _blume) .............. 51
Viewing Closed Captions ................................... 52
Using the _uCNp ........................................ 53
Setting Up Your Personal ID Number (PIN) ............. 53
How to Enable/Disable the _uChip .................... 54
How to Set up Restrictions Using the '%V guidelines _'. ..... 54
How to Set up Restrictions Using the MPAA Ratings:
G, PG, PG-13, R, NC-17, X .......................... 56
How to Reset the TV after the _uChip
Blocks a Channel ('_Emergency Escapd') ................ 57
Chapter 5: Troubleshooting ............. 58
Identifying Problems ...................................... 58
Appendix ............................ 59
Cleaning and Maintaining Your TV ........................... 59
Using Yl)ur TV in Another Countly ........................... 59
Specifications ........................................... 59
Your NEW TV
List of Features
"g2)ul_TV was designed with tile latest technology This TV is a high-i)erfi)rmance unit that
includes tile following special features:
• Easy-to-use remote control
•Easy-to-use Oil-screen [llenLt s vste[ll
•Automatic timer to tutti1 the TV on and off
• Ac[]ustable picture and sound settings that can be stored m the TVs memo 0
• Automatic channel tuning fi)r up to 181 channels
• A special filter to reduce or eliminate reception problems
• Fine tuning control for the sharpest picture possible
• Built-in, dual channel speakers
• A special sleep tinter
Your NEW TV I
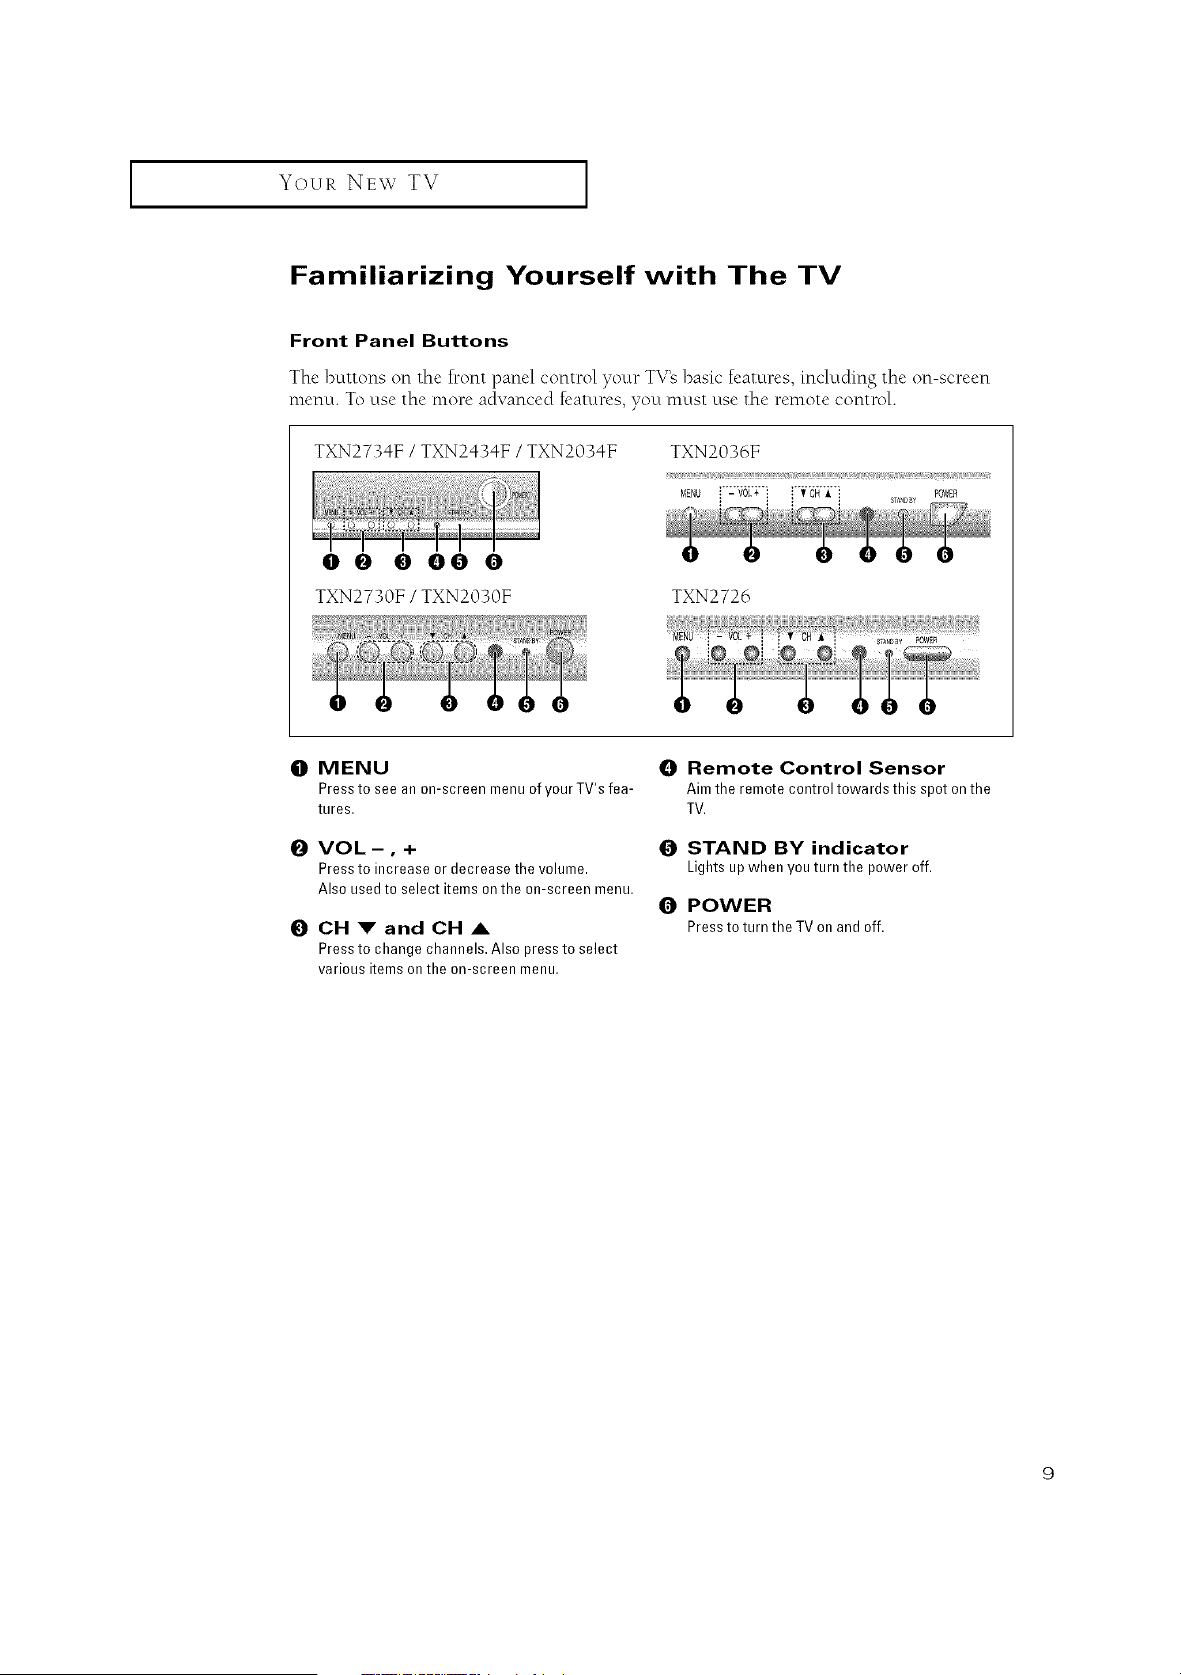
Familiarizing Yourself with The TV
Front Panel Buttons
The buttons on the h_ont panel control yore _ TV's basic features, including the on-screen
menu. To use file more advanced features, you must use the remote control.
TXN2734F /TXN24341 = /TXN2034F TXN2036F
00 OOO0
TXN2730F /TXN2030F TXN2726
0MENU
Press to see an on-screen menu of yourTV's fea-
tures,
OVOL-, +
Press to increase or decrease the volume.
Also used to select items on the on-screen menu.
0CH 1" and CH &
Press to change channels. Also press to select
various items on the on-screen menu,
ORemote Control Sensor
Aim the remote control towards this spot on the
TV,
0STAND BY indicator
Lightsupwhen youturn the poweroff.
0POWER
Pressto turntheTVon andoff.
Your NEW TV ]
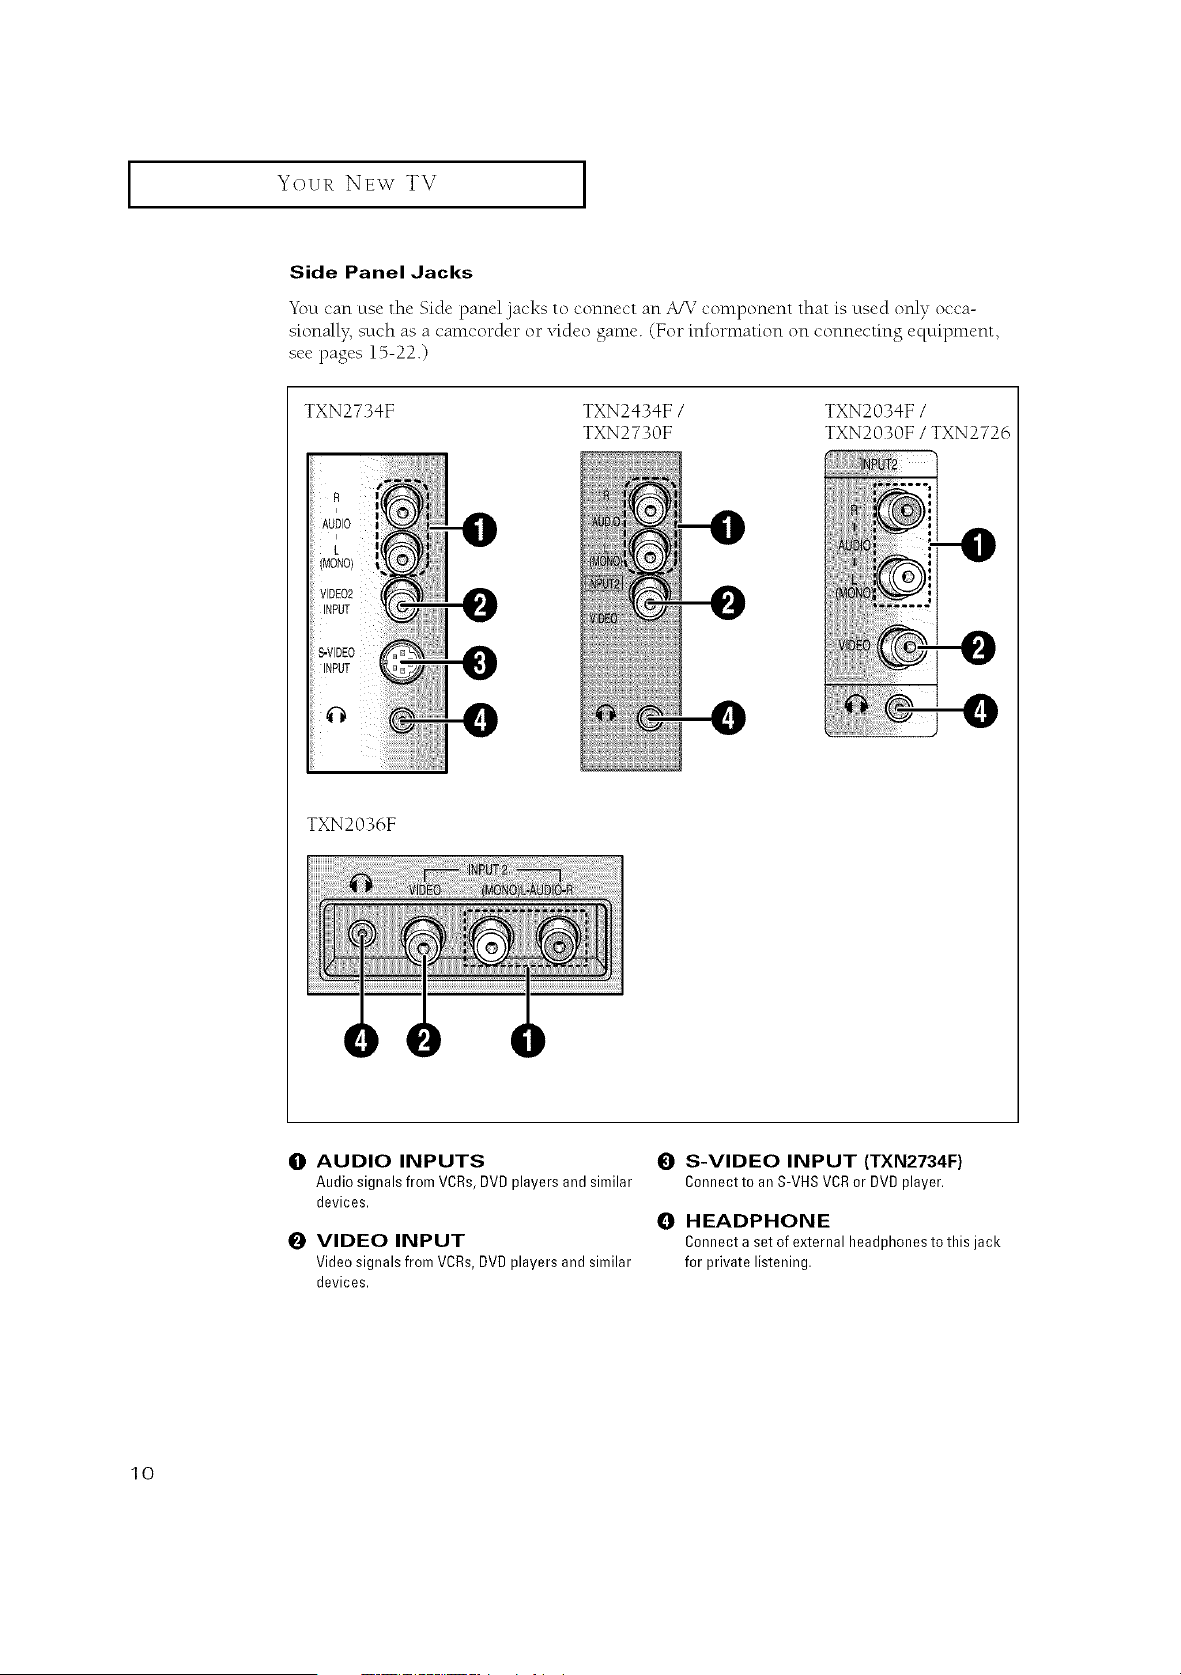
Side Panel Jacks
Yl)u can use the Side panel lacks to connect an A/V component that is used only occa-
sk)nall_ such as a camcorder or v_deo game. (For reformation on connecting equipment,
see pages 15-22.)
TXN2734F TXN2434F /
TXN2730F
TXN2034F/
TXN2030F/TXN2726
-0
--0
-0
TXN2036F
OAUDIO INPUTS
Audio signals from VCRs,DVD players and similar
devices.
OVIDEO INPUT
Video signals from VCRs, DVD players and similar
devices.
0 S-VIDEO INPUT (TXN2734F)
Connectto anS-VHSVCRor DVDplayer.
OHEADPHONE
Connect a set of external headphones to this jack
for private listening.
lO
Your NEW TV ]
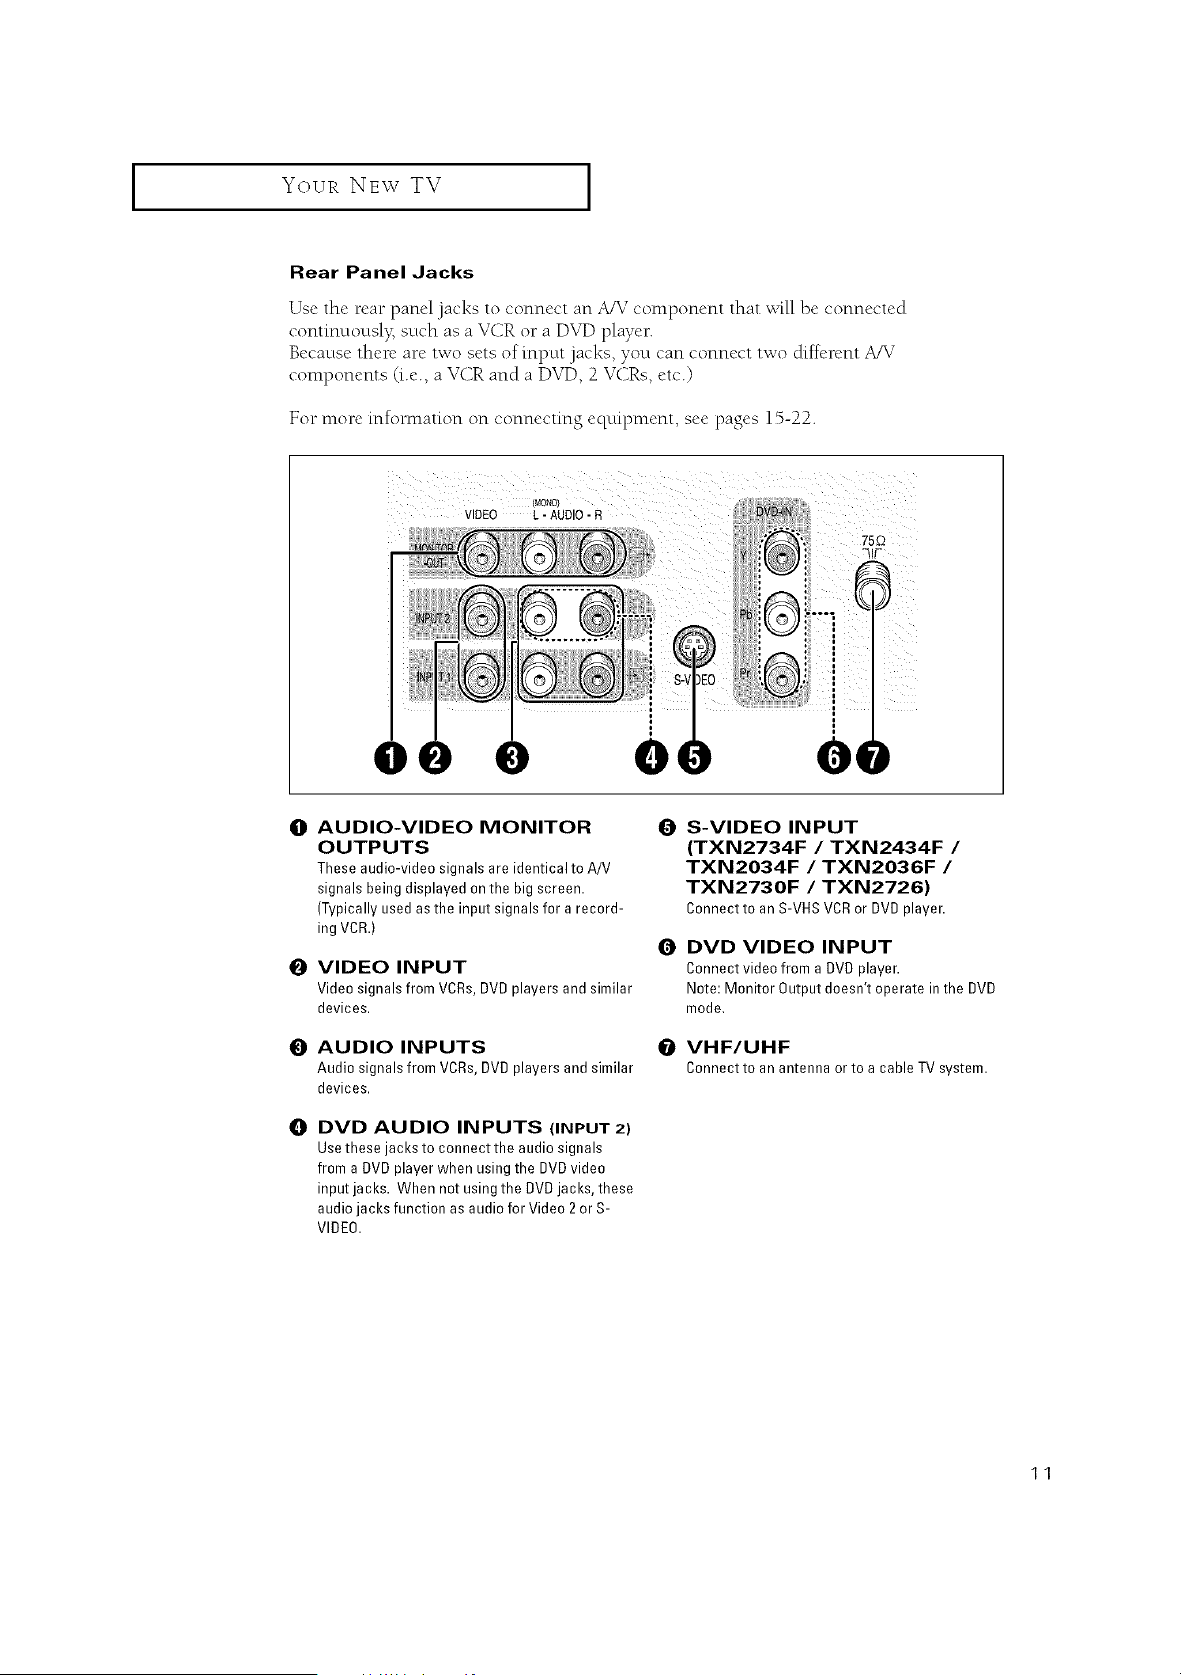
Rear Panel Jacks
Use the rear panel jacks to connect an A/V component that will be connected
continuously, such as a VCR or a DVD player.
Because there are two sets of input jacks, you can connect two &ffcrent A/V
components (i.e., a VCR and a DVD, 2 VCRs, etc.)
For more information on connecting equipment, see pages 15-22.
MONOI
VIDEO L - AUDIO -
II
O
O
O
O
AUDIO-VIDEO MONITOR
OUTPUTS
These audio-video signals are identical to A/V
signals being displayed on the big screen.
(Typically used as the input signals for a record-
ing VCR.)
VIDEO INPUT
Video signals from VCRs,DVD players and similar
devices.
AUDIO INPUTS
Audio signals from VCRs,DVD players and similar
devices.
DVD AUDIO INPUTS (INPUT 2)
Use these jacks to connect the audio signals
from a DVD player when using the EIVDvideo
input jacks. When not using the DVD jacks, these
audio jacks function as audio for Video 2 or S-
VIDEO.
Q
O
O
S-VIDEO INPUT
(TXN2734F /TXN2434F /
TXN2034F /TXN2036F /
TXN2730F /TXN2726)
Connectto an S-VHSVCRor DVDplayer.
DVD VIDEO INPUT
Connect video from a DUD player.
Note: Monitor Output doesn't operate in the DVD
mode,
VHF/UHF
Connectto an antennaor to a cableTVsystem.
11
Your NEW TV ]
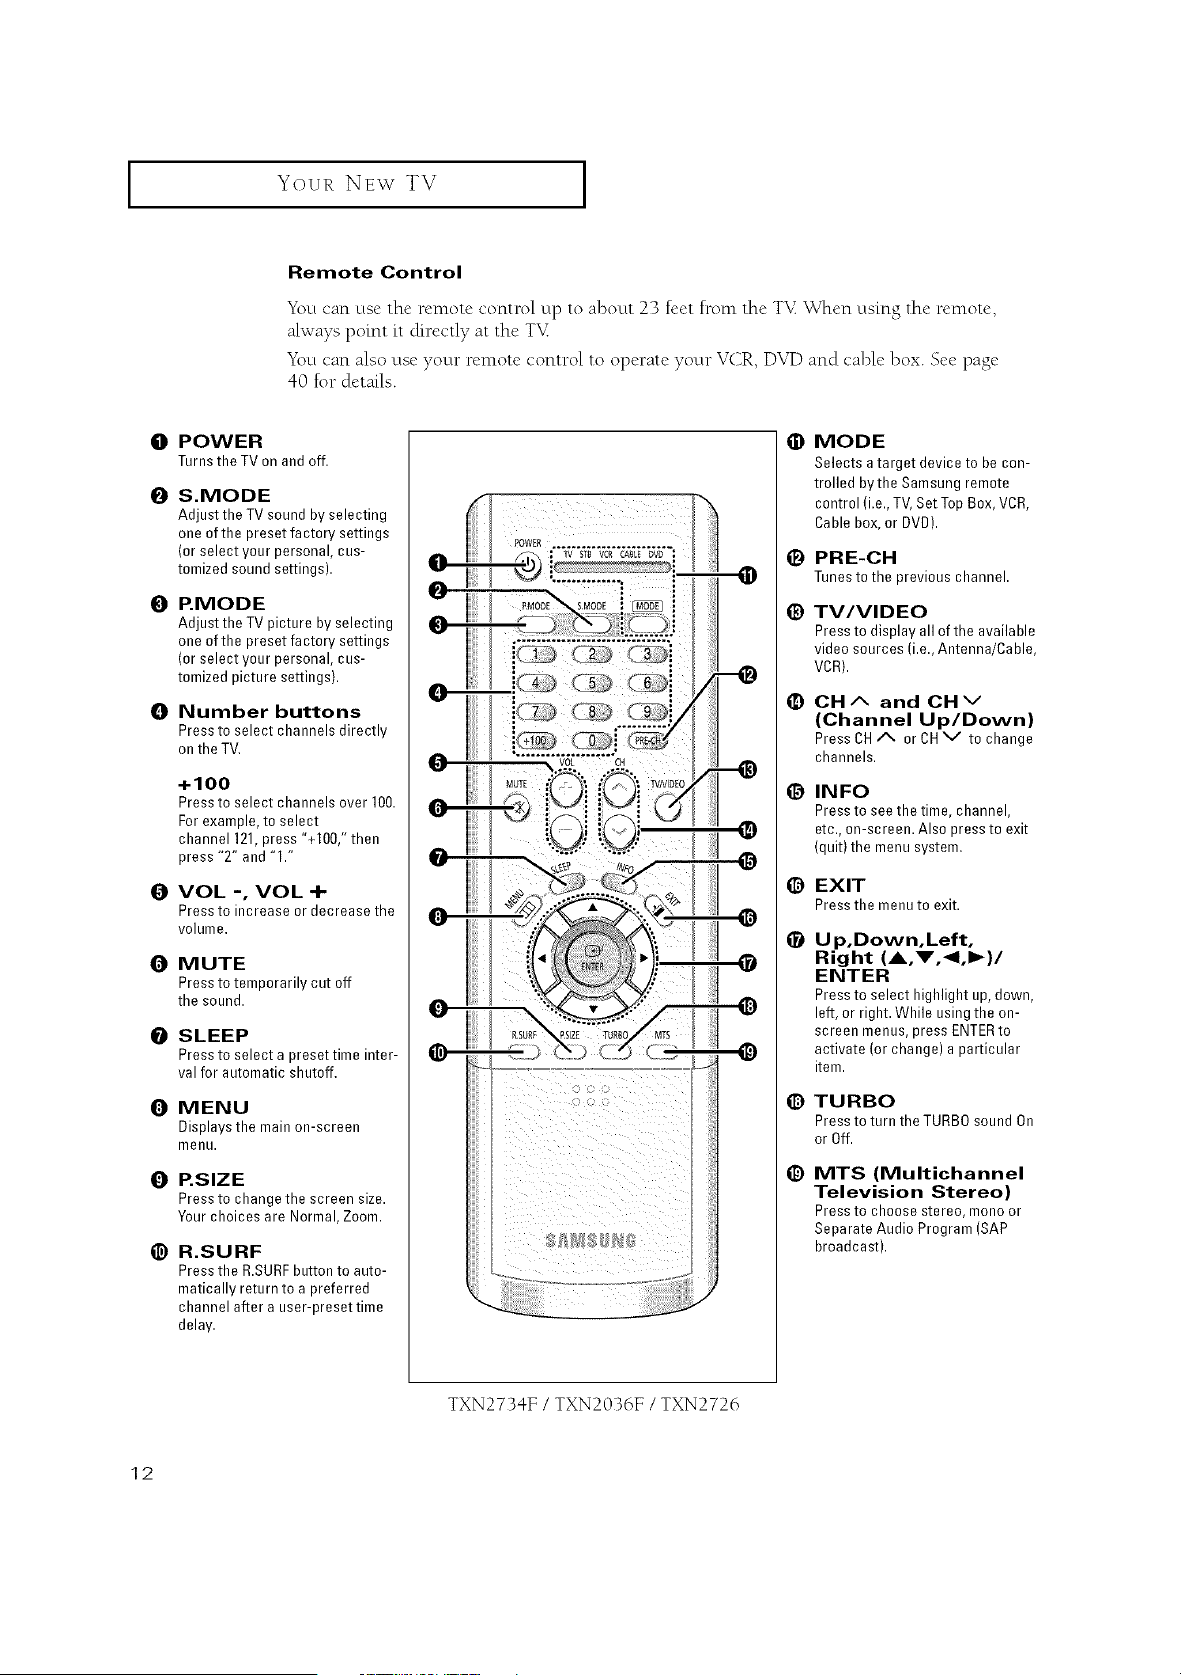
Remote Control
Yl)u can use the remote control up to about 23 feet from the TT_When using the remote,
always point it directly at tile TT_
You ('an also use yo_Jrremote control to operate your VCR, DVD and cable box. See page
40 for details.
O POWER
Turnsthe TVonandoff.
OS.MODE
Adjust the TV sound by selecting
one of the preset fa ctory settings
(or select your personal, cus-
tomized sound settings).
O P.MODE
Adjust the TV picture by selecting
one of the preset factory settings
(or select your personal, cus-
tomized picture settings).
O Number buttons
Press to select channels directly
on the TV.
+100
Press to select channels over 100.
For example, to select
channel 121,press "+100," then
press "2" and "1."
OVOL -, VOL -I-
Press to increase or decrease the
volume.
O MUTE
Press to temporarily cut off
the sound.
OSLEEP
Press to select a preset time inter-
val for automatic shutoff.
O MENU
Displays the main on-screen
menu.
O P.SIZE
Press to change the screen size.
Your choices are Normal, Zoom.
_) R.SURF
Press the R.SURFbutton to auto-
matically return to a preferred
channel after a user-preset time
delay.
6}
e
e
@
O
MODE
Selects a target device to be con-
trolled bythe Samsung remote
control (i.e., TV,Set Top Box, VCR,
Cable box, or DVD).
PRE-CH
Tunesto the previouschannel.
TV/VIDEO
Pressto displayall of the available
videosources(i.e.,Antenna/Cable,
VCR).
OH Aand OH v
(Channel Up/Down)
PressCHA or CHV to change
channels.
INFO
Press to see the time, channel,
etc., on-screen. Also press to exit
(quit) the menu system.
EXIT
Pressthe menuto exit.
Up,Down,Left,
Right (A,V,<I,I_)/
ENTER
Press to select highlight up, down,
left, or right. While using the on-
screen menus, press ENTERto
activate (or change) a particular
item.
TURBO
Press to turn the TURBOsound On
or Off.
MTS (Multichannel
Television Stereo)
Press to choose stereo, mono or
Separate Audio Program (SAP
broadcast).
TXN2734F /TXN2036F /TXN2726
12
Your NEw TV ]
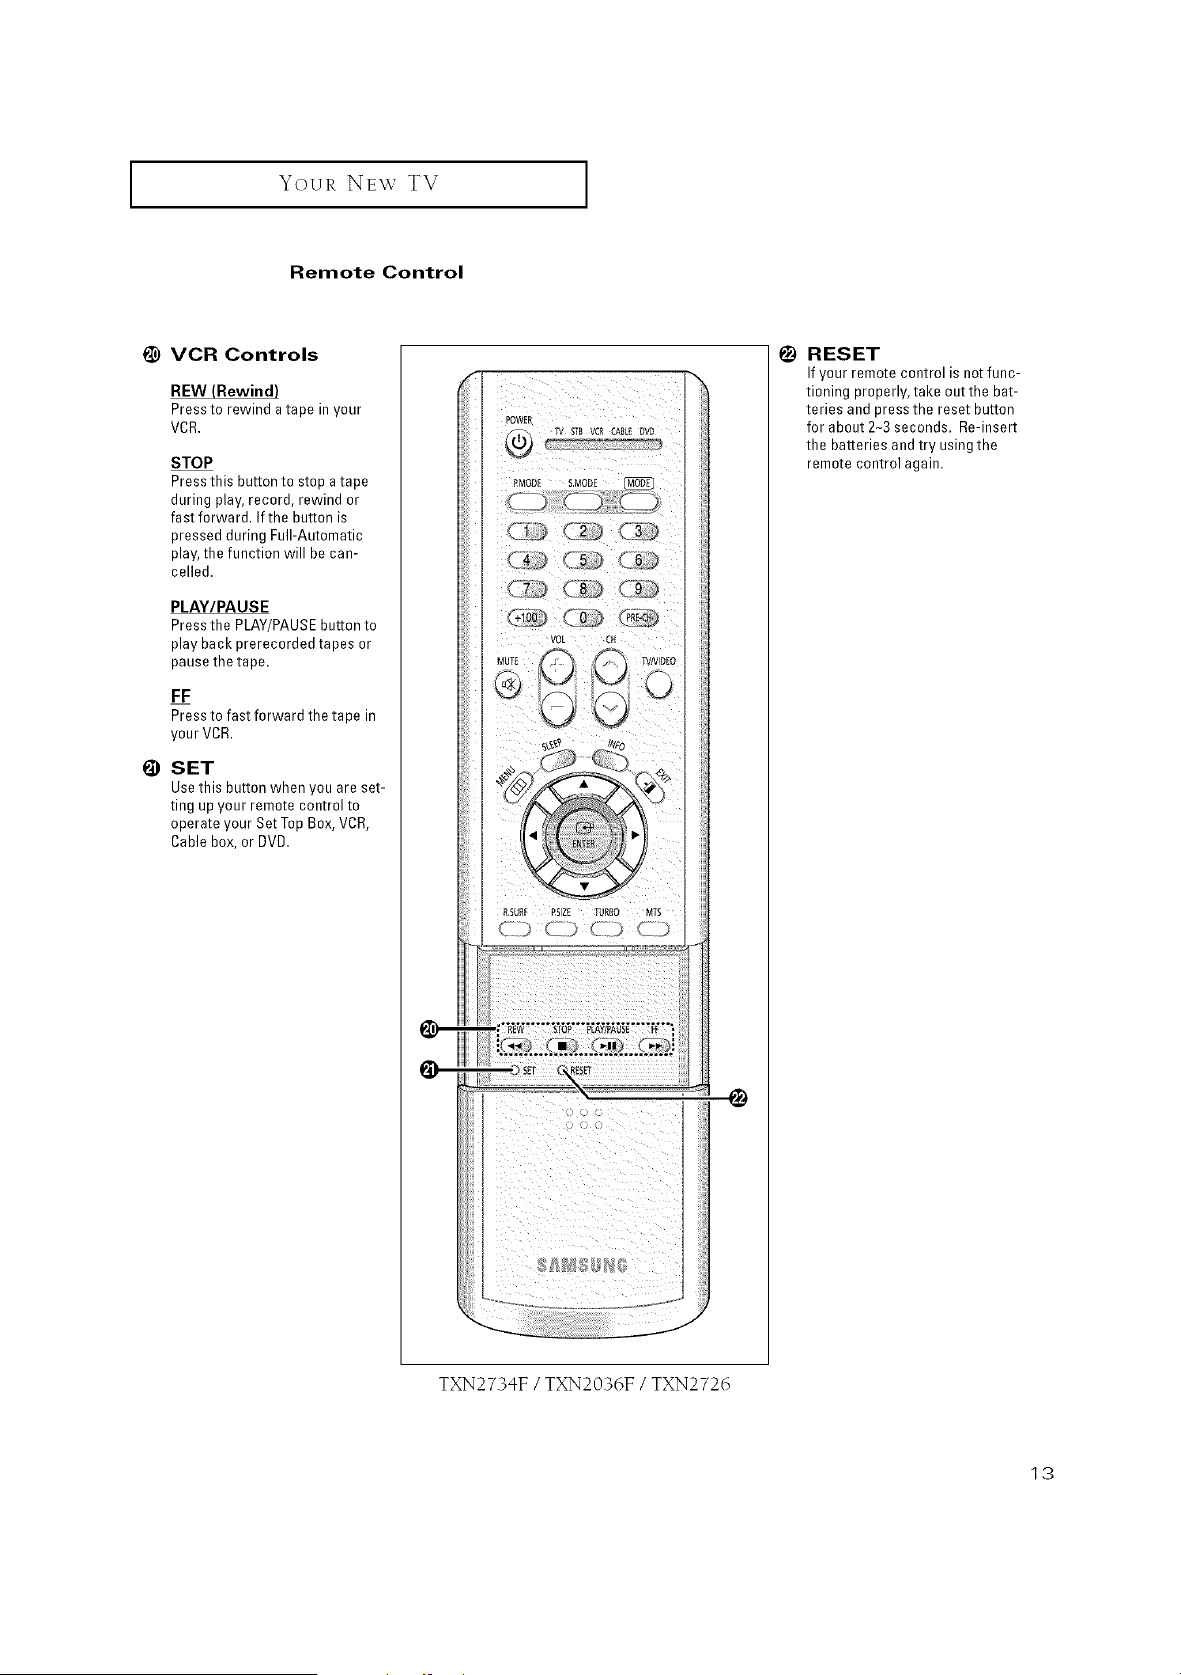
Remote Control
1_) VCR Controls
REW (Rewind)
Press to rewind a tape in your
VCR,
STOP
Press this button to stop a tape
during play, record, rewind or
fast forward. If the button is
pressed during Full-Automatic
play, the function will be can-
celled,
PLAY/PAUSE
Press the PLAY/PAUSEbutton to
play back prerecorded tapes or
pause the tape.
FF
Press to fast forward the tape in
your VCR.
I_ SET
Usethis button when you are set-
ting up your remote control to
operate your Set Top Box, VCR,
Cable box, or OVO.
VOL :CP{
@
TXN2734F /TXN2036F /TXN2726
!_) RESET
If your remote control is not func-
tioning properl%take out the bat-
teries and press the reset button
for about 2-3 seconds. Re-insert
the batteries and try using the
remote control again,
13
Your NEW TV [
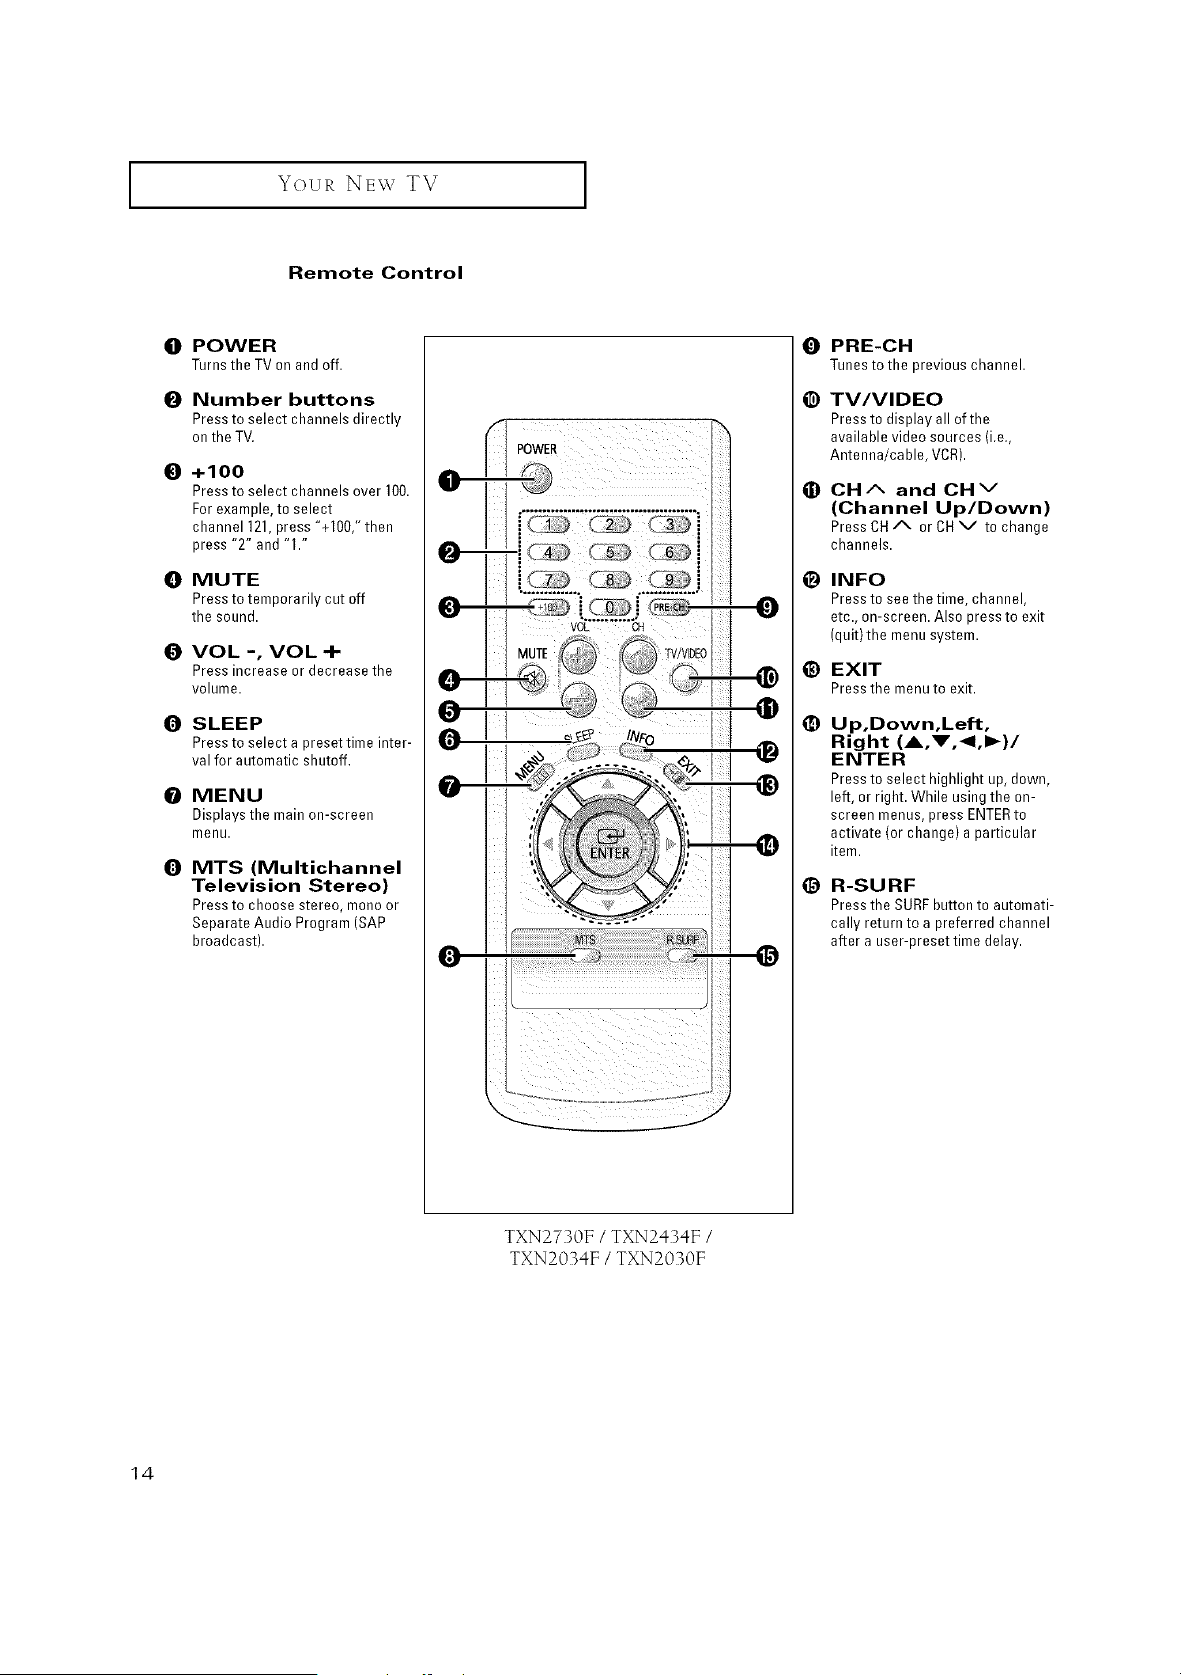
Remote Control
O
e
e
O
O
O
O
O
POWER
Turnsthe TVon andoff.
Number buttons
Press to select channels directly
on the TV.
+100
Press to select channels over 100.
For example, to select
channel 121,press "+100," then
press "2" and "1."
MUTE
Press to temporarily cut off
the sound.
VOL -, VOL -I-
Press increase or decrease the
volume.
SLEEP
Press to select a preset time inter-
val for automatic shutoff.
MENU
Displays the main on-screen
menu.
MTS (Multichannel
Television Stereo)
Press to choose stereo, mono or
Separate Audio Program (SAP
broadcast).
POWER
0
@
e
e
e
@
PRE-CH
Tunesto the previouschannel.
TV/VIDEO
Press to display all of the
available video sources (i.e.,
Antenna/cable, VCR).
OH Aand OH v
(Channel Up/Down)
PressCHA or CHV to change
channels.
INFO
Pressto see the time, channel,
etc., on-screen. Also press to exit
(quit)the menu system.
EXIT
Pressthe menuto exit.
Up,Down,Left,
Right (A,_',<I,I_)/
ENTER
Press to select highlight up, down,
left, or right. While using the on-
screen menus, press ENTERto
activate (or change) a particular
item.
R-SURF
Pressthe SURFbutton to automati-
cally return to a preferred channel
after a user-preset time delay.
TXN2730F /TXN2434F /
TXN2034F /TXN2030F
14
INSTALLATION
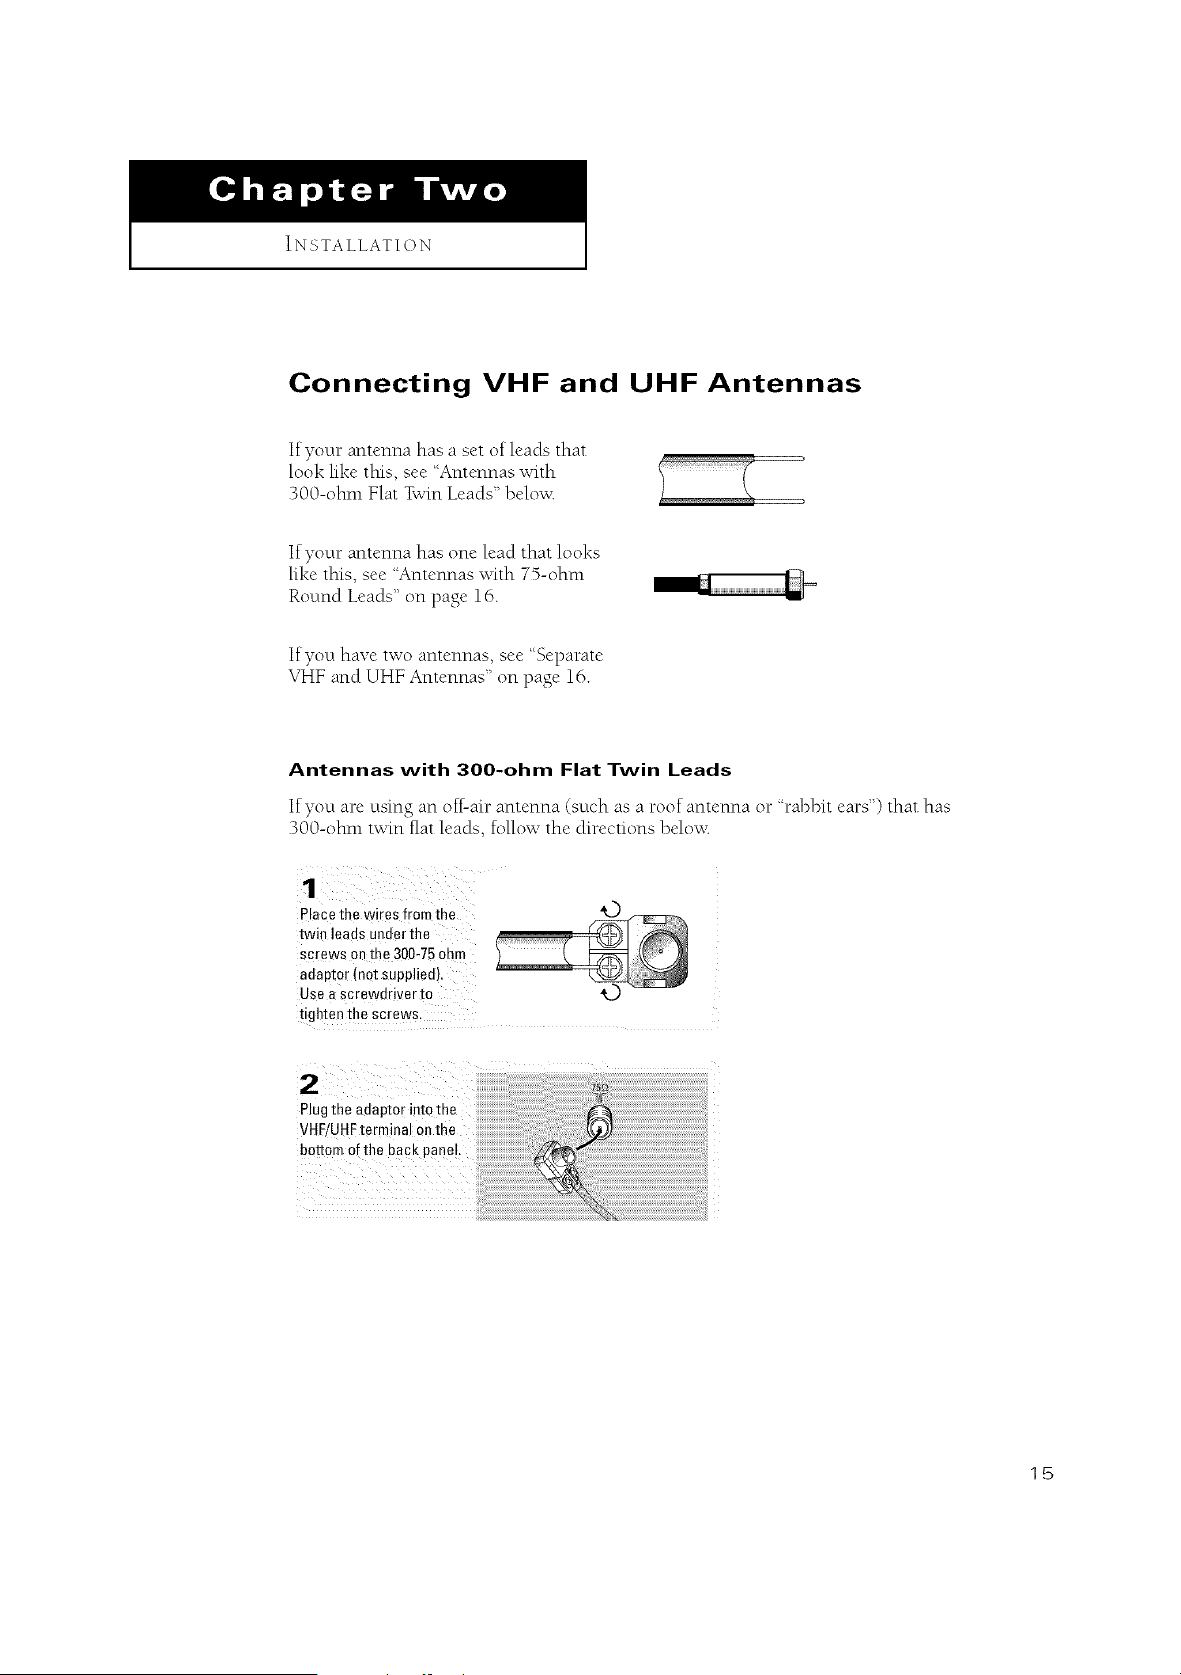
Connecting VHF and UHF Antennas
If your antenna has a set of leads that
look like this, see "Antennas with
300-ohm Flat Twin Leads" beh)w_
If your antenna has one lead that looks
like this, see "Antennas with 7%ohm
Round Leads" on page 16.
If you have two antennas, see "Separate
VHF and UHF Antennas" on page 16.
Antennas with 300-ohm Flat Twin Leads
If you are using an off-air antenna (such as a roof antenna or 'h*abbit ears") that has
300-ohm twin fiat leads, follow the directions below<
Place the wires from the
twin leads under the
screws o_ me 300-75 of --
aeaptor (not supplied]
Use a screwdriver m
dgh[en the screws.
2,,,, .................................................................
Plug the adaptor into the
VHF/UHFterminal an the
bot_i_ i! ih e b ac! iane,!
15

IINSTALLATION I
Antennas with 75-ohm Round Leads
Plug the antenna lead into
the VHF/UHF
terminal on the bottom of
the back pane!.
Separate VHF and UHF Antennas
If you have two separate antennas for your TV (one VHF and one UHF), you must
combine the two antenna signals before connecting the antennas to the T'v_This
procedure requires an optional combine>adaptor (available at most electronics shops).
Connect both antenna
leads to the combiner.
2
Plug the combine
VHF/UHFterminal oathe
bottom ofthe rear panel
Connecting Cable TV
r • 7
To connect to a cable T'v s}stem, follow the instructions below.
Cable without aCable Box
plug the incoming cable
into the VHF!UHFantenna
terminal on back of the TV,
Because this TV is cable-read?;
you do not need a cable box to view
unscrambled cable channels.
16
I INSTALLATION I
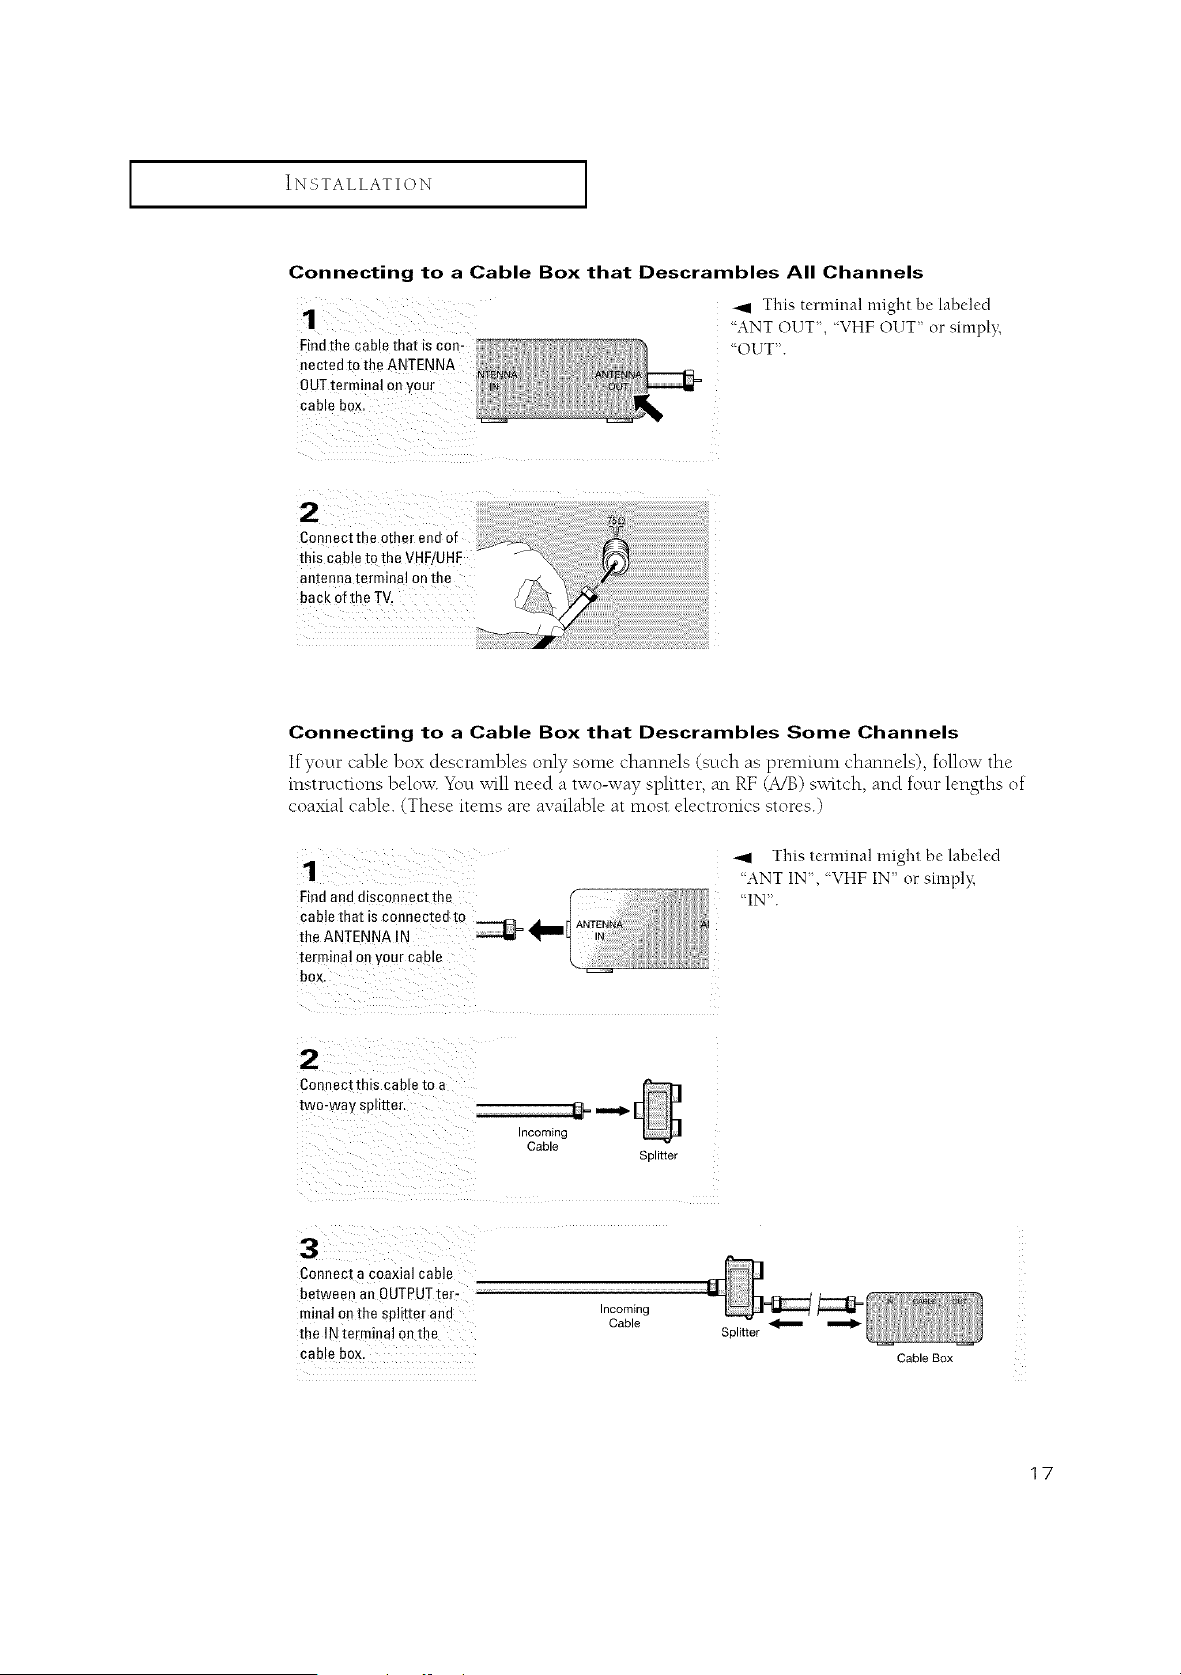
Connecting to a Cable Box that Descrambles All Channels
Findthe cable that is con-
nected to the ANTENNA
OUTterminal
cable box.
_I This terminal might be labeled
'ANT OUT,"VHFOUT orsimpl};
"OUT".
Connectthe other end of
this cable to the VHF/UHF
antenna terminal on the
back of the TV.
Connecting to a Cable Box that Descrambles Some Channels
If your cable box descrambles only some channels (_uch as premium channels), tollow the
instructions below. You will need a two-way splitter, an RF (A/B) switch, and tour lengths of
coaxial cable. (These items are available at most electromcs stores.)
1
Findand disconnec[ me
cable that is connectea m
the ANTENNA IN
[erminal on your cab,e
box.
This terminal might be labeled
'ANT IN, "VHF IN" or simpl}_
"IN".
Connec[th_s cable to a
two-way splitter,
3
ncoming
Cable
Splitter
Connect a coaxial cable
between an OUTPUTte,-
minal on the splitter ann Incoming
Cable _
the IN terminal on the Splitter
cab e box. CableBox
17
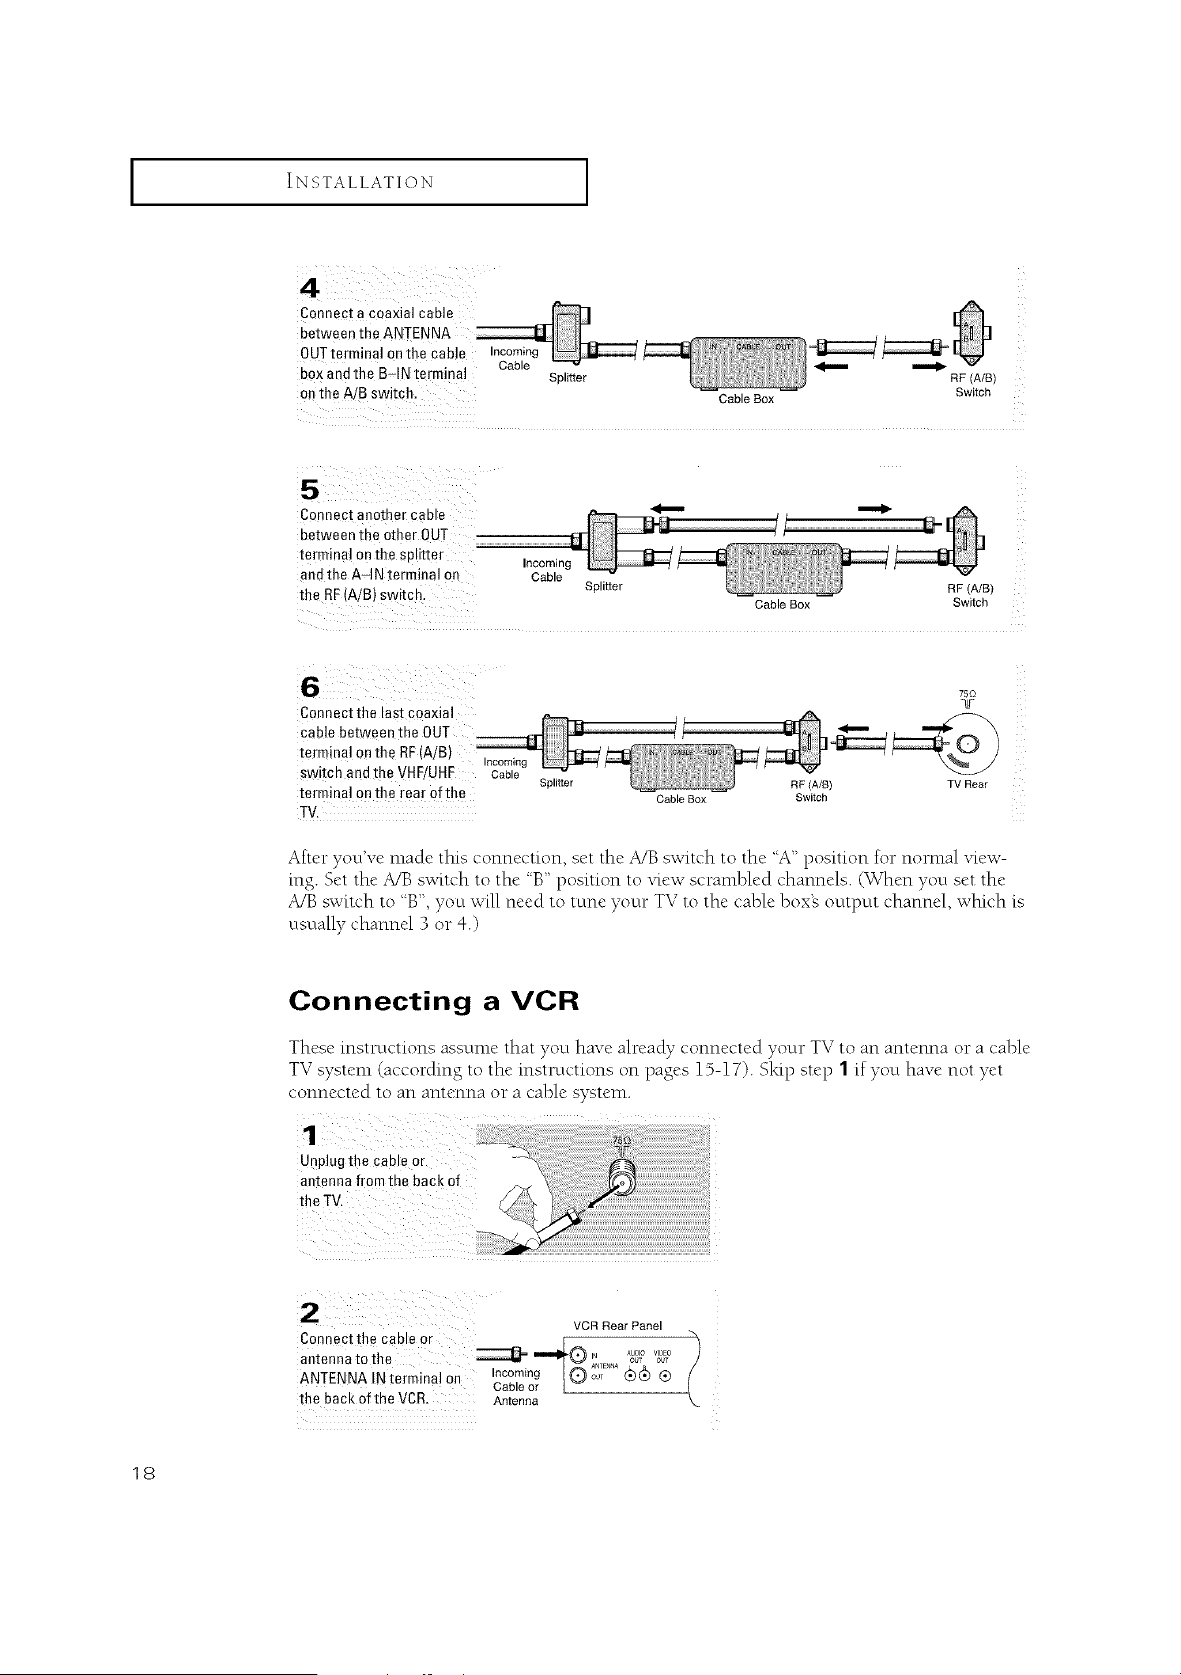
INSTALLATION
Connect a coaxial cane
between the ANTENNA
OUT terminal on the cable Incoming
box and the B_IN terminal Cable Splitter _ ""_ RF (A/B)
on the A/B switch, Cable Box Switch
Connect another cable
between the other OUT
terminal on the splitter
and the AqN terminal on
the RF(A/B) switch,
Incoming
Cable
Splitter
Cable Box
RF (A/B)
Switch
75Q
Connect the last coaxial qlr
cable between the 0UT ]
terminal on the RF(A/B)
Incoming
switch and the VHF/UHF Cable Splitter RF (A/B) TV Rear
terminal on the rear of the Cable Box Switch
TV,
After you've made tills connection, set the A/B switch to the "A" position for nomlal view-
rag. Set the A/B switch to the "B" position to view scrambled channels. (When you set the
A/B switch to "B", you will need to tune your TV to the cable boxes output channel, which is
usually channel 3 or 4.)
Connecting a VCR
These instructions assume that you have already connected vour TV to an antenna or a cable
TV system (according to the instructions on pages 15-17). Sidp step 1 if you have not yet
connected to an antenna or a cable system.
Unplugthe cableor
antennafromthe backof
VCR Rear Panel
Connect the cable or _ "_
antenna to the _ _@ _NTNNA_ VI_)_U_
Incoming OOT
ANTENNA IN termina! On Cablenr9 [O (_(_ ®
the back of the VCR, Antenna
18

iINSTALLATION i
VCR Rear Panel TV Rear Panel
A coaxial cable is usually included with a VCE. (If not, check your local electronics
Store).
VCR Rear Panel
Connect a set Qfaudio I _ /
cables betweenthe ................................................_ _;,_A _,g_,o_,o_?
AUBIO OUt jacks Onthe _°° _ ®
L
ovcL°T' Audio Cable
TV Rear Panel
i
VCR Rear Panel TV Rear Panel
• 7 •
Follow the instructions in '%iewmga VCR (DrCamcorder Tape" to view your VCR tape.
Note: This.fig_re shows the 5tandaM co*mecto',':jackpanel. The act_al coqfig_ration.fi,r yo_r
TV m_Lvbe d{_'rent.
19
I INSTALLATION I
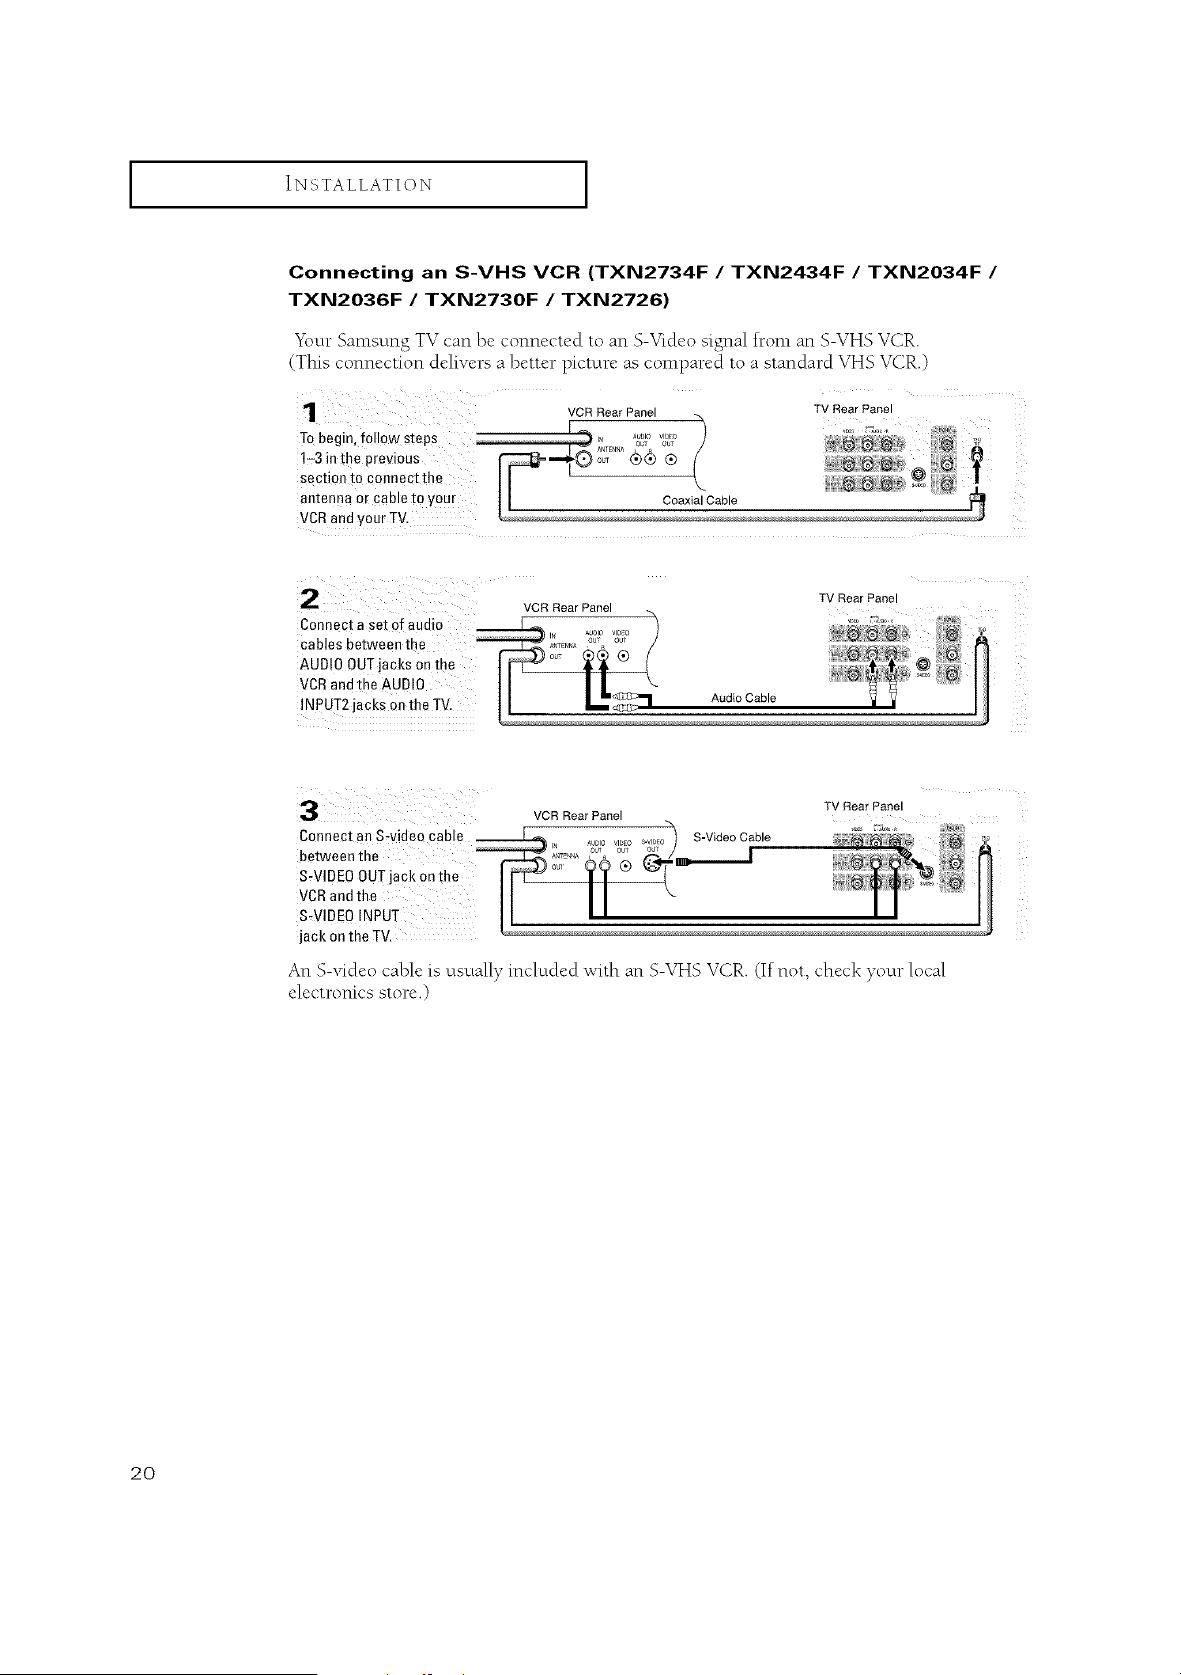
Connecting an S-VHS VCR (TXN2734F /TXN2434F /TXN2034F /
TXN2036F /TXN2730F /TXN2726)
"gbur Samsung TV can be connected to an S-Video signal tram an S-VHS VCR
(This connection delivers a better picture as compared to a standard VHS VCR.)
TV Rear Panel
VCR Rear Panel
Connect a set of audio _ / , ,,_%, r
cables between the _ _-.... _ / ._ _,=.
AUD OOUT acksonthe _ _(_ (* H
\ _' N "_ r@
VCR andthe AUDIO /I/. ....................H
!NPUT2jacks on the TV.
ConnecI an Swidea cable
betweenthe
S-VIDEO OUTJackon the
VCRandthe
S.VIDEO INPUT
jack on the TV.
VCR Rear Panel
S-Video Cable
TV Rear Panel
An S-video cable is usually included with an S-VHS VCR (If not, check your local
electronics store.)
2O
iINSTALLATION i
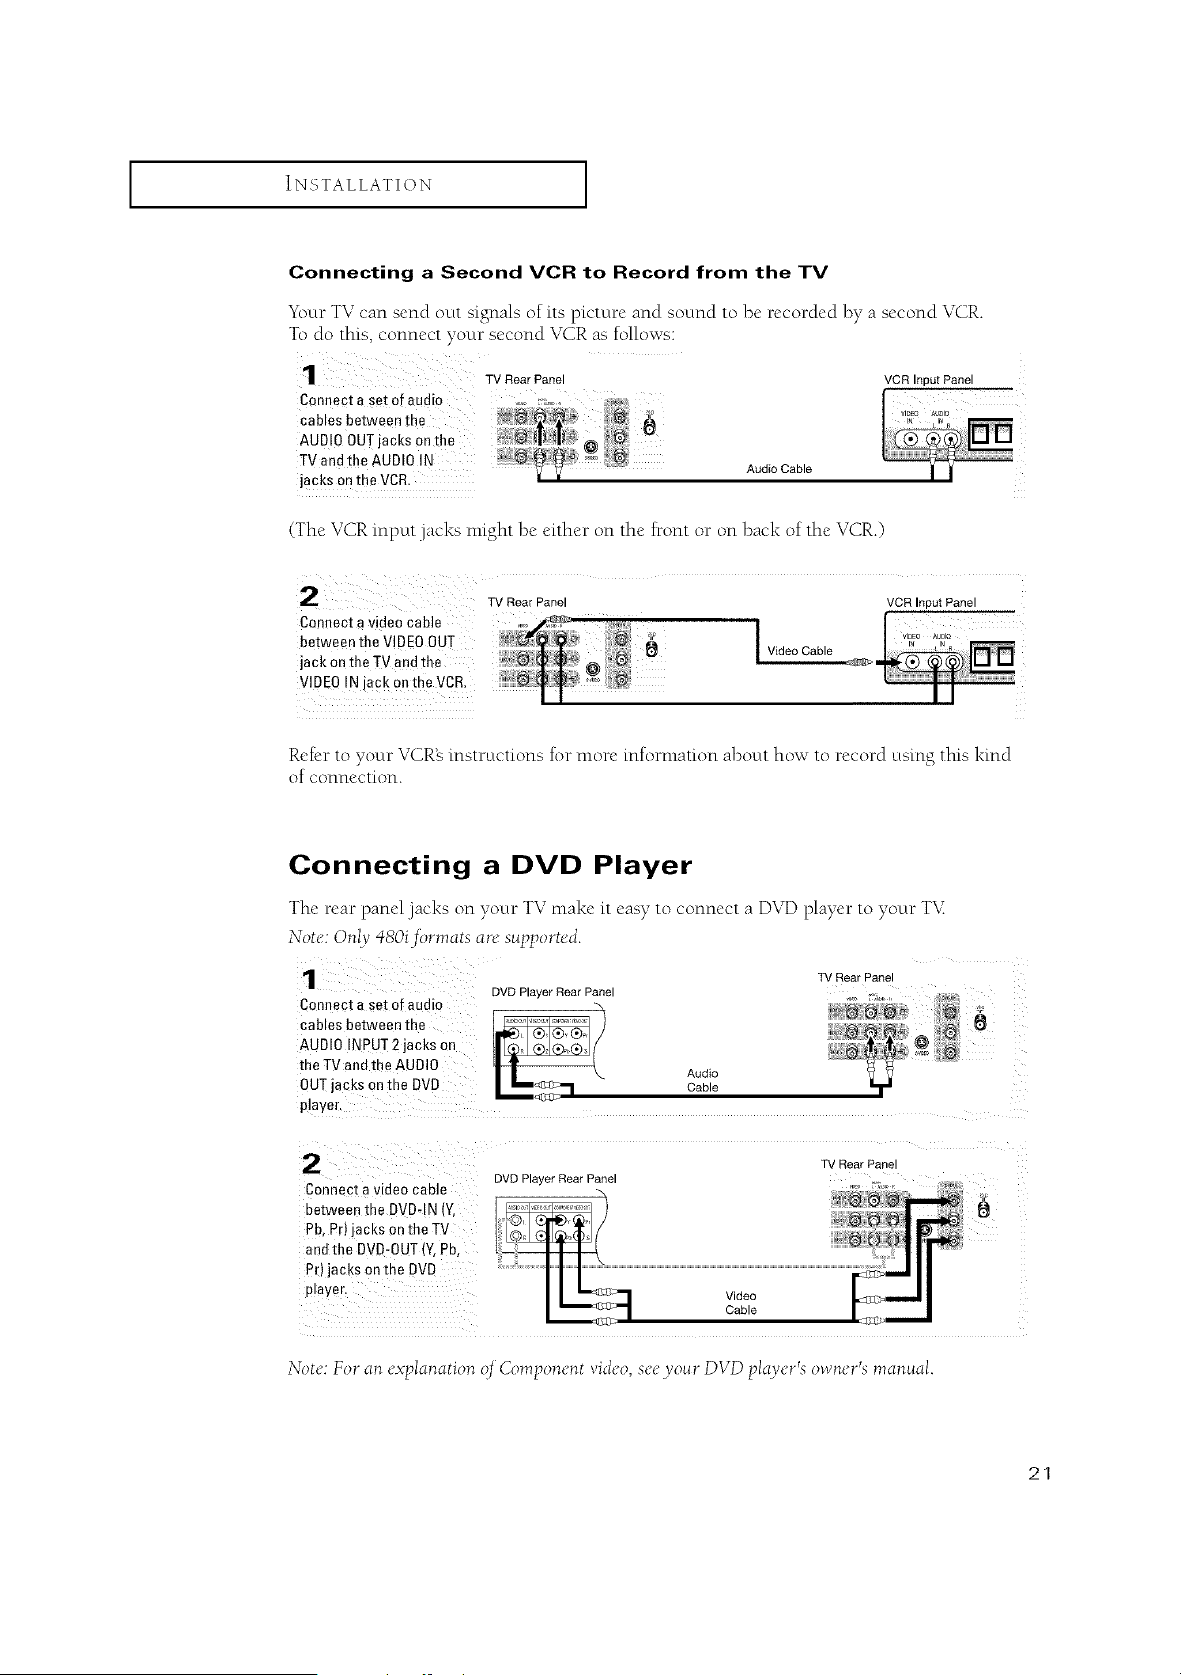
Connecting a Second VCR to Record from the TV
"YburTV can send out signals of its picture and sound to be recorded by a second VCR.
To do this, connect your second VCR as follows:
1 TVRoorPaoo, VCR,opo,Paoe,
Connect a set of audio ,o_o,_....
cables between the
AUDIO OUTjacks on the
TVandthe AUDIO IN AudioCable
jacks oa the VCR.
(The VCR input jacks nfight be either on the front or on back of the VCR.)
2TvRoa . oo,
Connect a video cable
between the VIDEOOUT
jack on the TV and the
VIDEO IN Jack0nthe VCR.
Video Cable
VCR Input Panel
_m
Refer to your VCR_s instructions for more information about how to record using this kind
of connection.
Connecting a DVD Player
The rear panel jacks on your TV make it easy to connect a DVD player to your TV.
Note: Only q8Oi _3rmats are s_pported.
TV Rear Panel
DVD Player Rear Panel
Connect a set of audio ..... r;..... _,,_
cables between the ;_;_
AUDIO INPUT 2 jacks on
the TV and tne AUDIO Audio
OUTjacks on the DVD Cable
Nayer.
Connect a video cable
eerween the DVD-IN (Y.
Pb, Pr) jacks on the TV
and the DVI3-OUT(Y, Pb,
Pr) jacks on the DV£,
player.
DVD Player Rear Pane
Video
Cable
TV Rear Panel
,T) .
N( te. For an explanation q_ Component Pideo, see you r DVD player's owrter's manual.
21
I INSTALLATION I
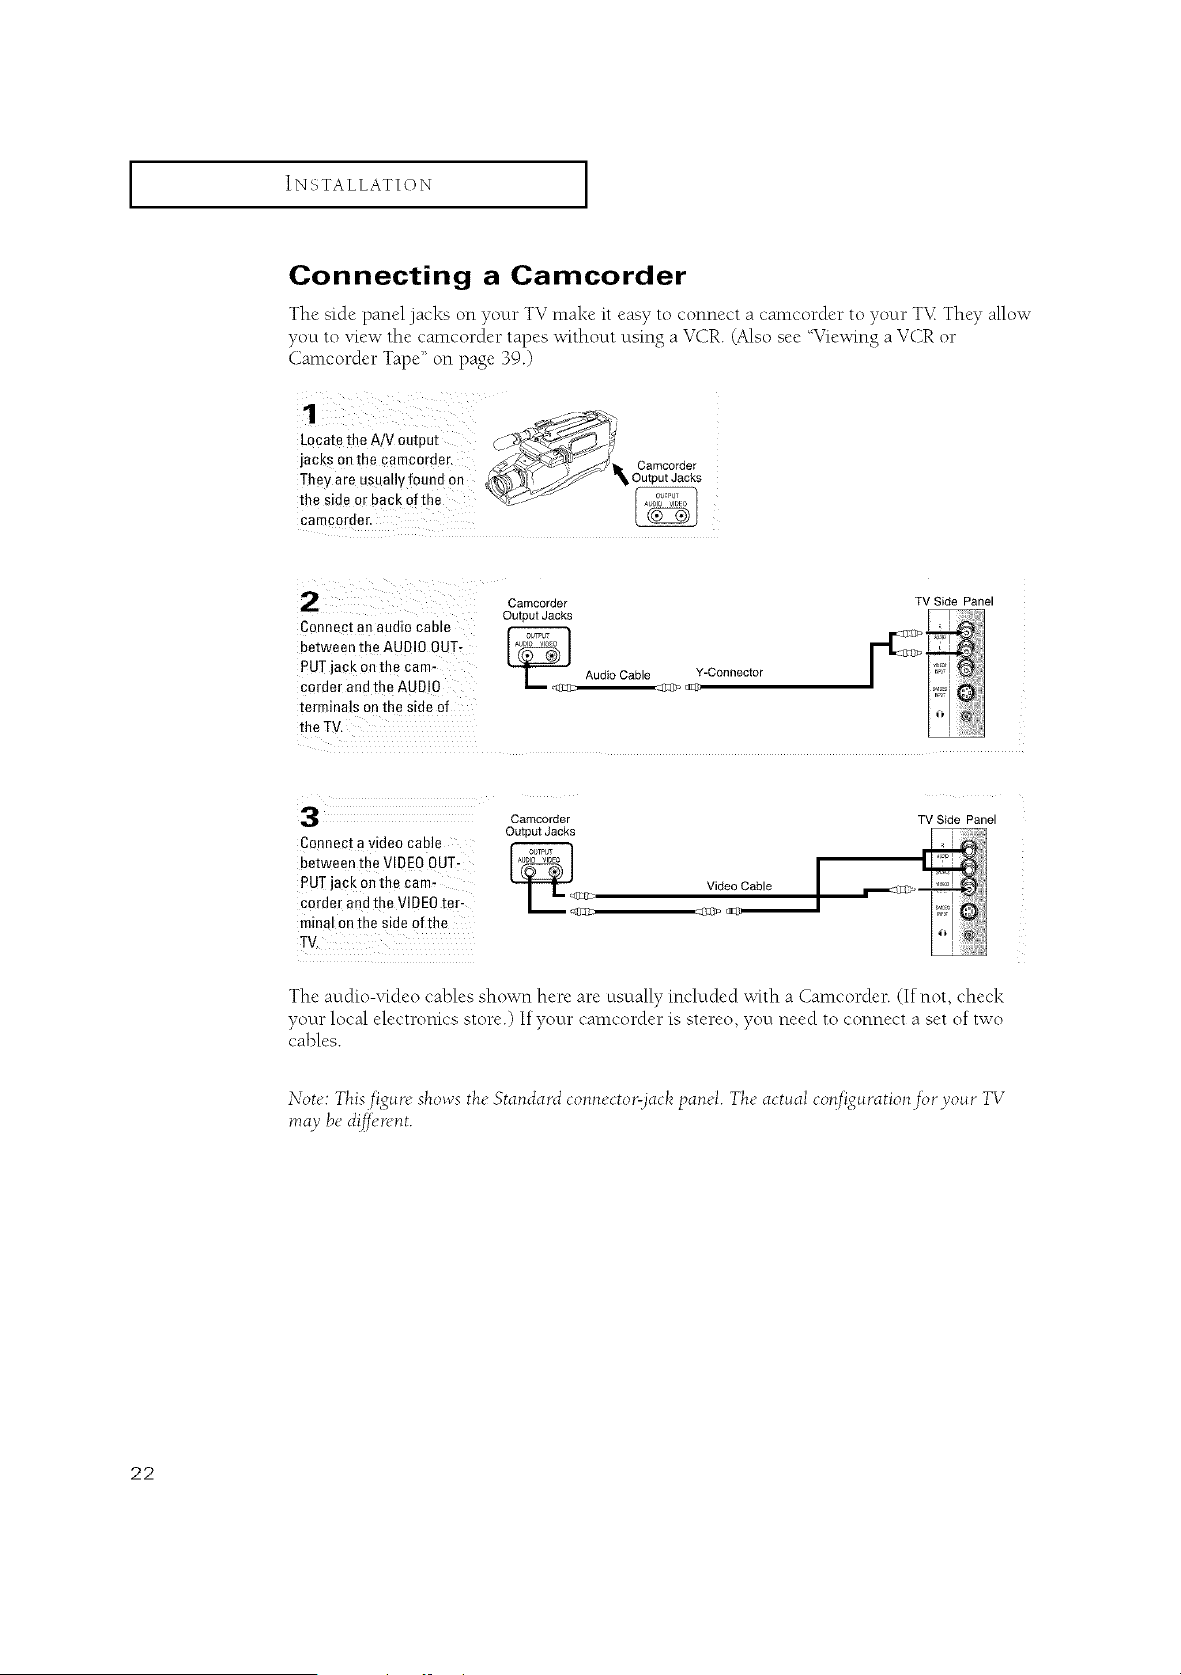
Connecting a Camcorder
The side panel jacks on your TV make it easy to connect a camcorder to your T'v_ They allow
you to view the camcorder tapes without using a VCR (Also see Wiewing a VCR or
Camcorder Tape" on page 39.)
¸1¸¸¸¸¸¸ /---¸ _.-.
Locate the A/V Output &.
jacks on the camc°rder, _, /Camcorder
Theyare Usuallyfouad On _S_OutputJacks
the Side or back Ofthe _ .....
2Camcorder
Output Jacks
Connect an audio cable
between the AUDIO OUT-
PUT jack on the cam- AudioCable
corder and the AUDIO
terminals on the side of
Y-Connector
TV Side Panel
3
Connect a video cable
between the VIDEO OUT-
PUT Jackonthe cam,
corder and the VIDEOter-
minal onthe side oftbe
TV,
Cemcorder
Output Jacks
_2 Video Cable
%9> _:D
TV Side Panel
The audio-video cables shown here are usually included with a Camcorder. (If not, check
your local electronics store.) If your camcorder is stere{), you need to connect a set of two
cables.
Note: This.fig_re shows the Standard co*mecto'qjackpanel. The act_al cor!fi_g_'cation.fi,'cyo_'c TV
may be d{[_>n'nt.
22
I INSTALLATION I
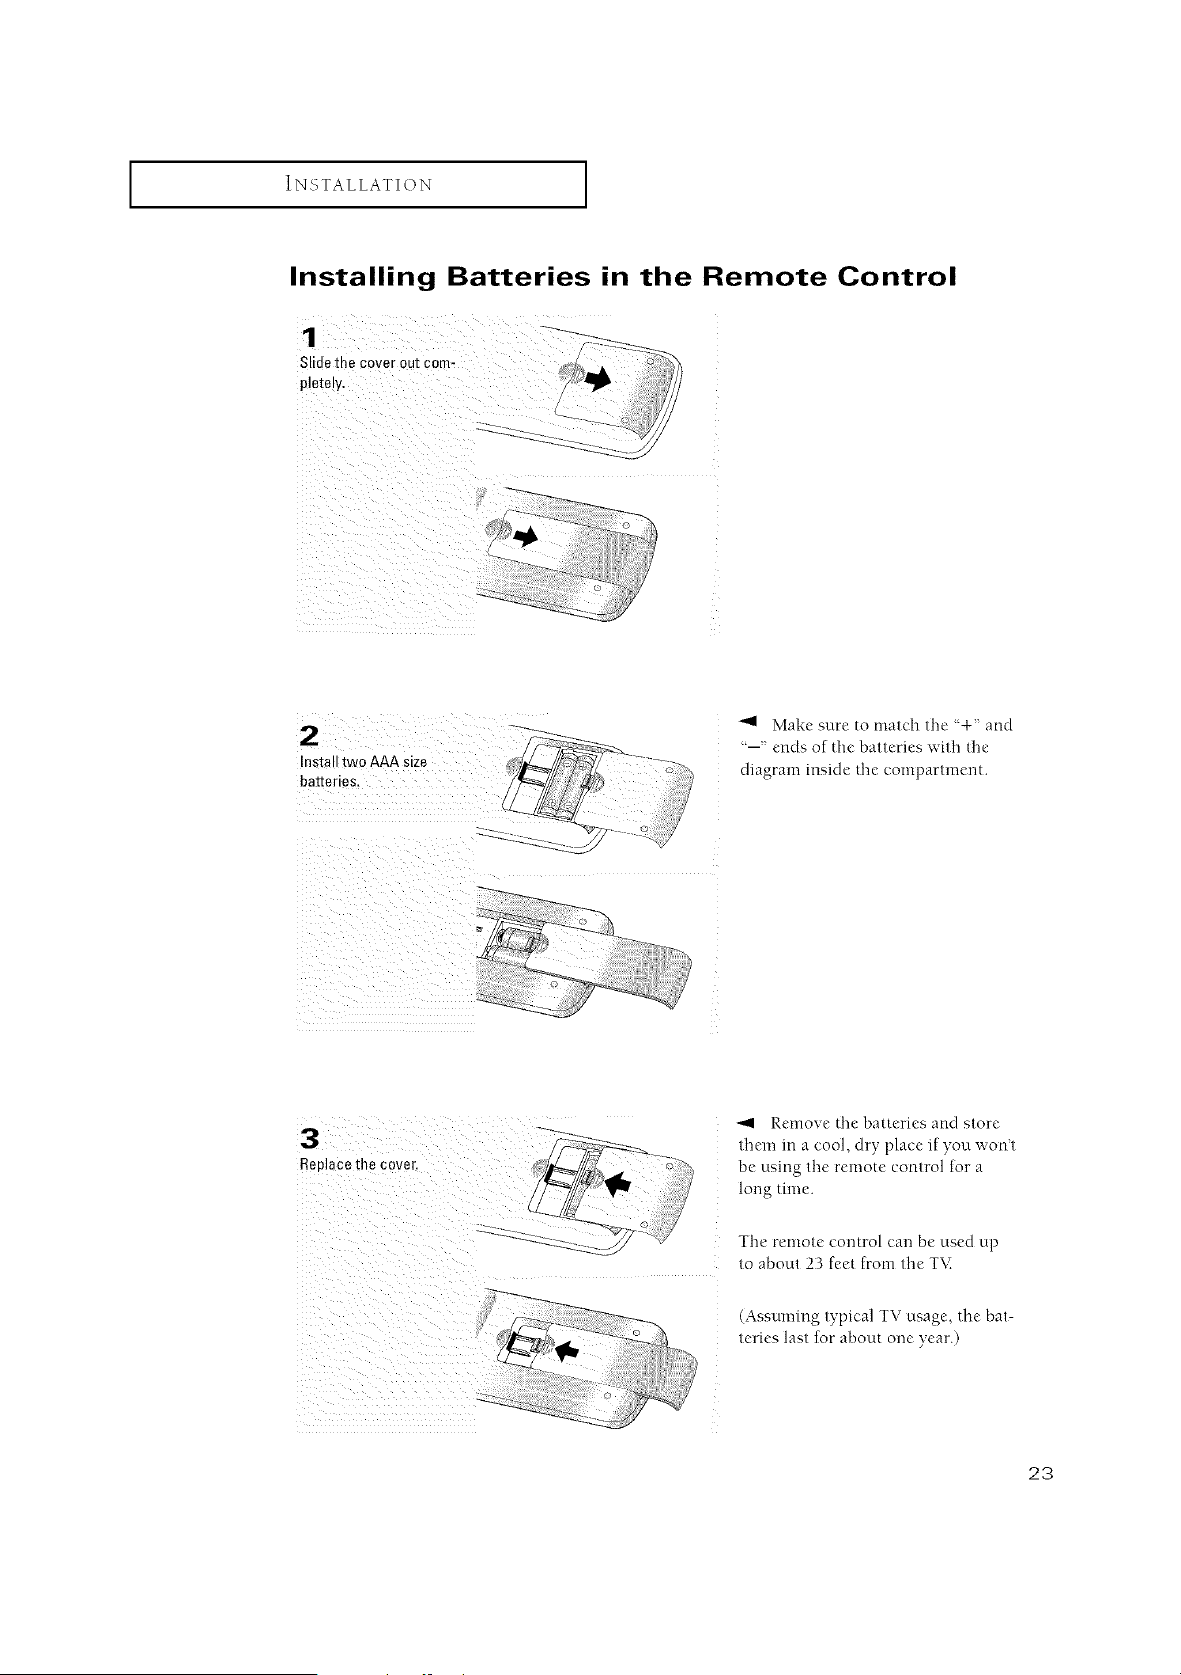
Installing Batteries in the Remote Control
¸:¸¸¸¸¸¸¸/¸;¸¸¸¸¸;7/¸;i !?iiiii i
,_i_)_!iii_i_i__(i(i!i_!_!i__i___i_i;_I
Make sure to match the '+ and
"--'ends of the batteries with the
diagram reside the compartment.
Replace the cover.
Remove the batteries and store
them in a cool, dry place if you wont
be using the remote control for a
long time.
The remote control can be used up
to about 23 feet from the T\.:
(Assuming typical TV usage, the bat-
teries last for about one year.)
23
OPERATION
Turning the TV On and Off
Press the POWERbutton on the remote control.
_bu can also use the POWER button on tl_c front panel.
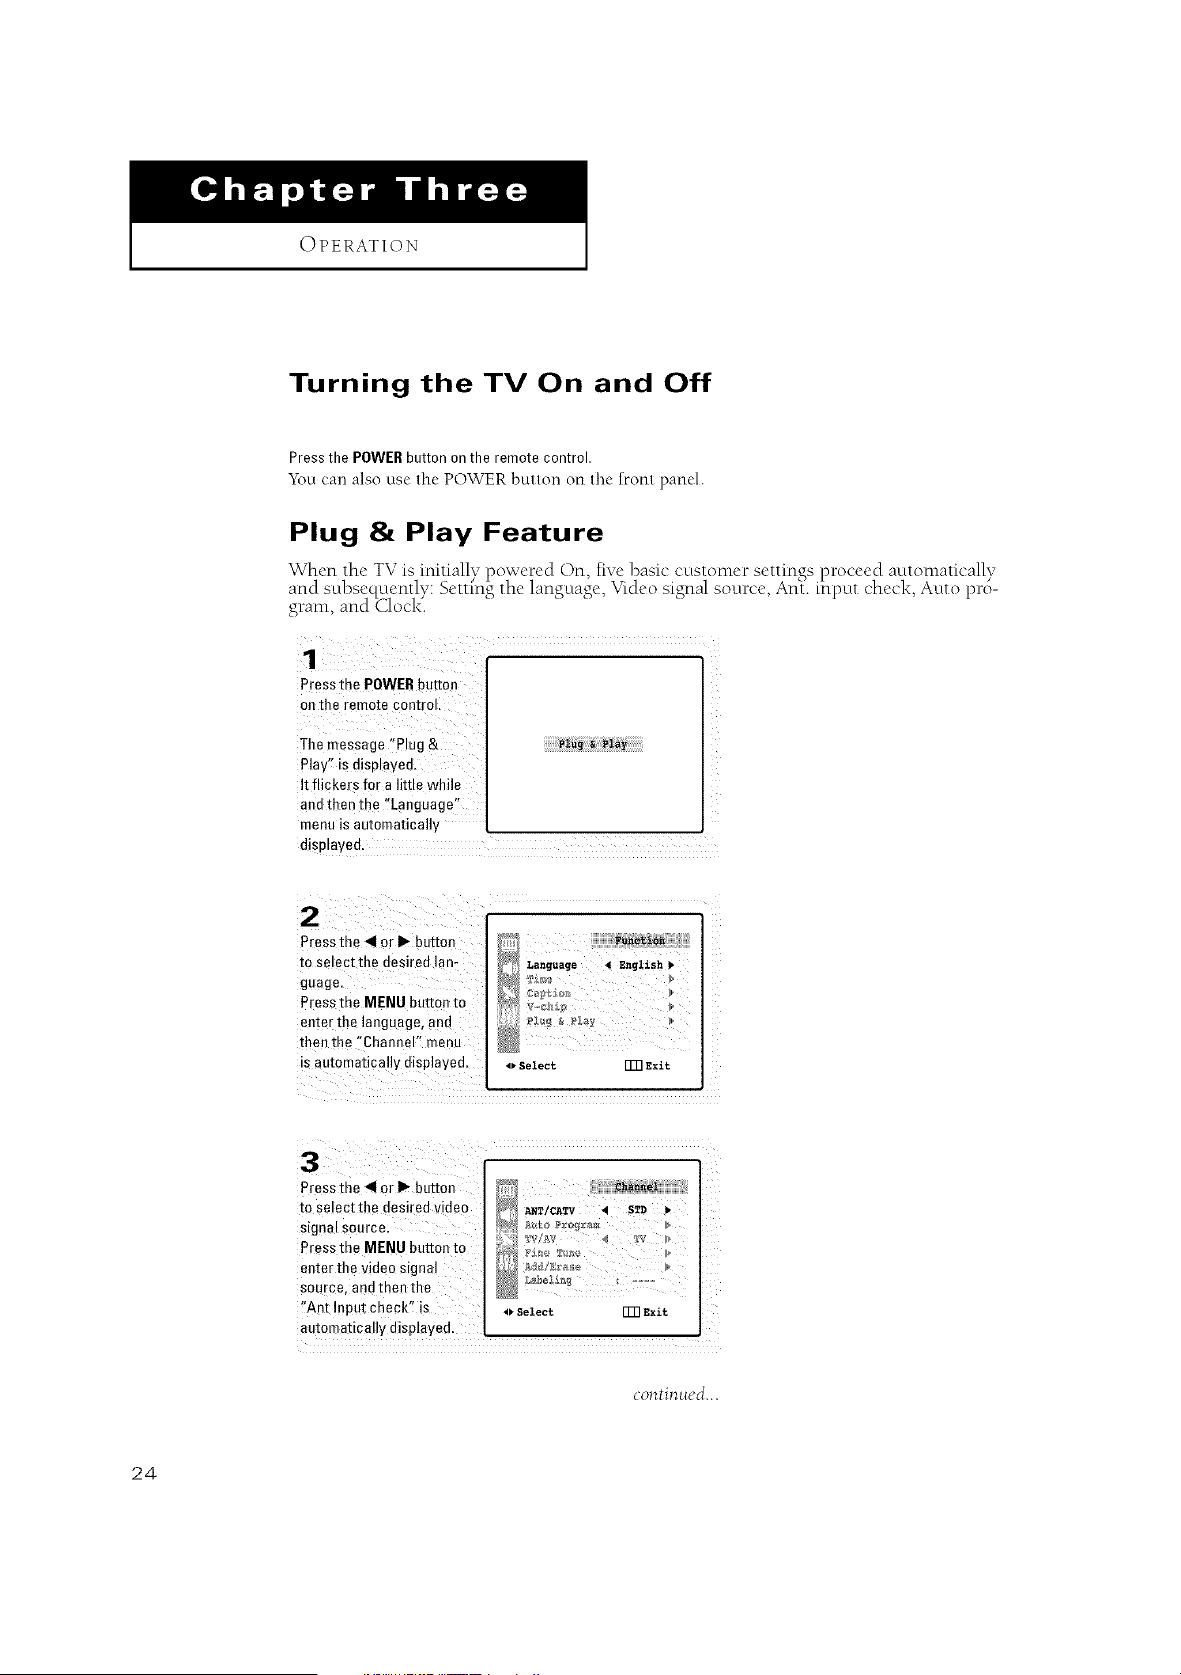
Plug &Play Feature
When the TV is initially i)owered On, five basic customer settings i)roceed automatically
/• p . c • J
and subsequently: Setting the language, T*deo s*gnal souKe, Ant. input check, Auto pro-
gram, and Clock.
1
Press the POWERbutton
on the remote control,
The message i!PIug &
Play'_ is displayed,
It flickers for a little while
and then the %anguage"
menu is automatically
displayed.
Press the .411or I_ button
to select the desired lan-
guage.
Press the MENU button to
enter the language, and
then the "Channel'! menu
is automatically displayed, 4_select rm E,it
pressthe _1 or I_ button
tO se[ect the desire d video
signal source.
Pressthe MENU button to
enter the video signa!
source, and then the
"An* lnput check" is
automa'dca!!ydisplayed,
_)Select [_ Exit
i
continued...
24
I OPERATION I
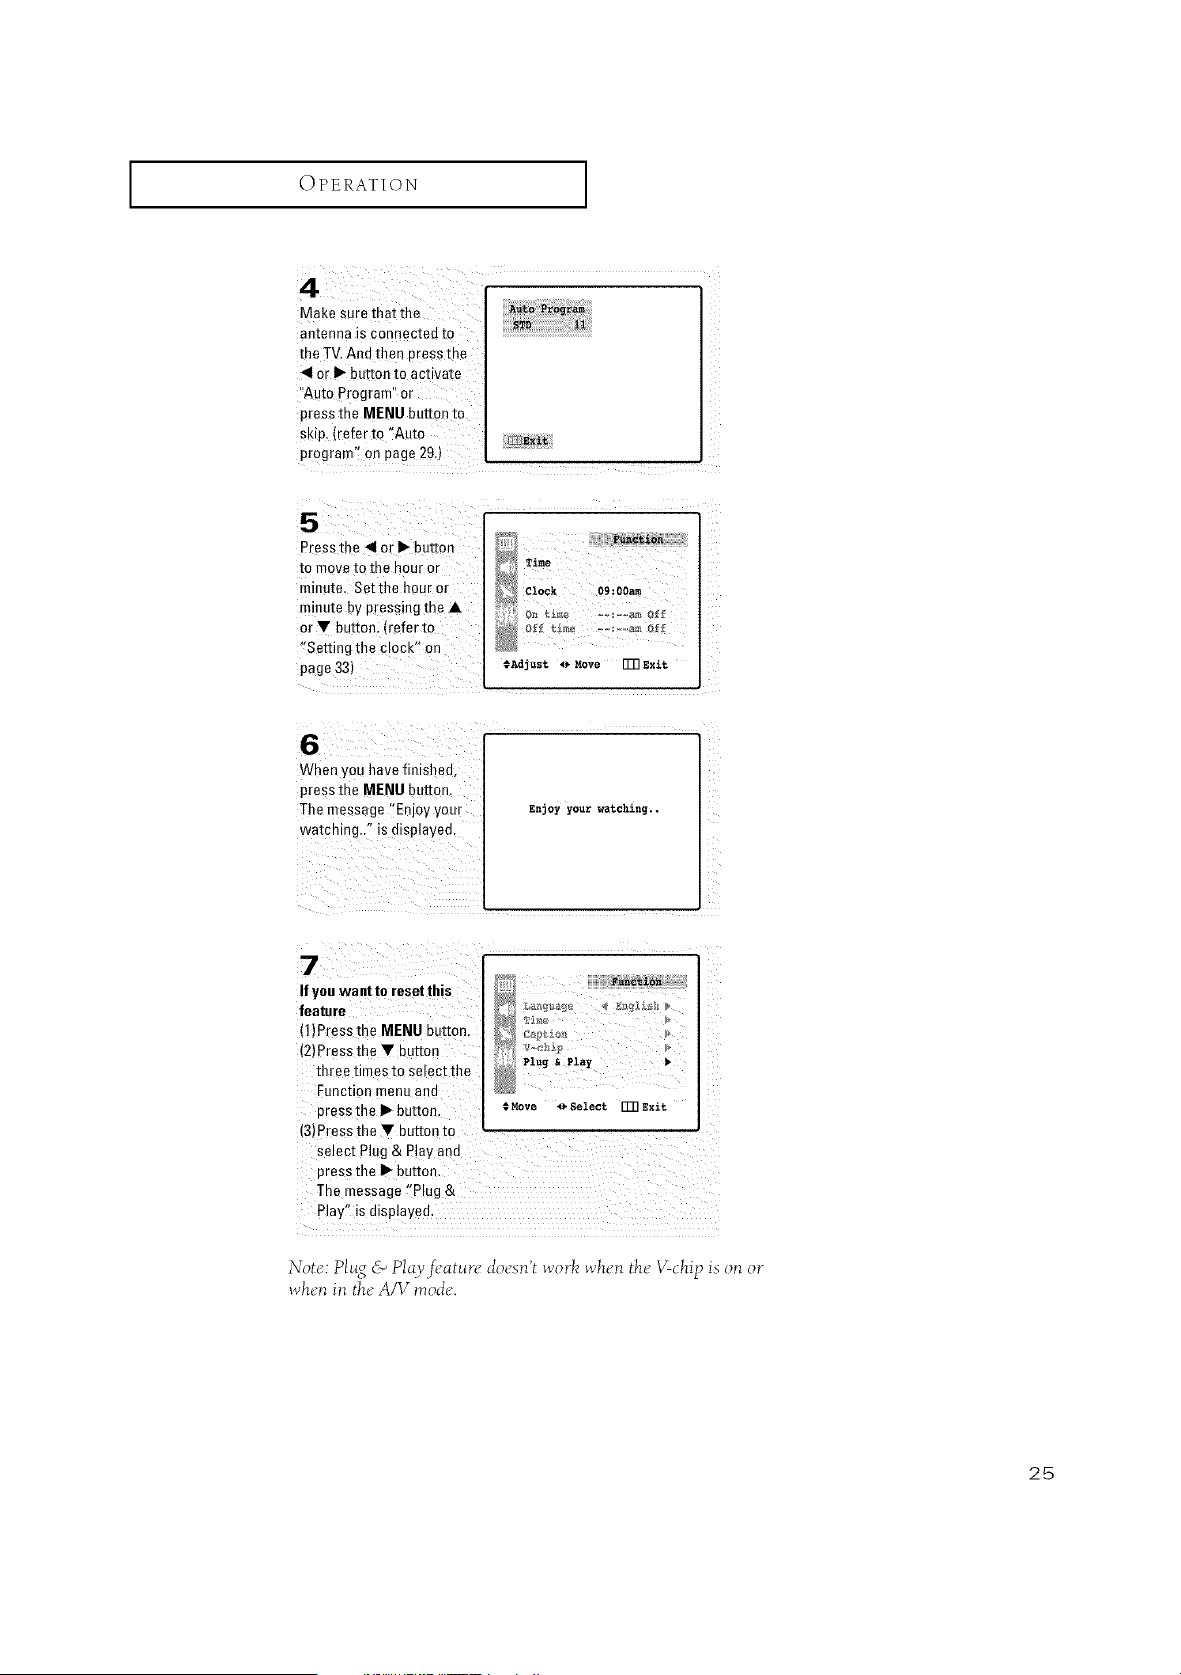
4
Make sure mat the
antenna is connected to
the TV. And then press me
<1or I_ button to activate
Auto Program or
pressthe MENU button to
SKip,(refer to "Auto
program" on page 29.)
[Z_Exi%
Press the <1or I_ button
to move to me nour or
minute. Setthe haL" or
minute by pressing the •
or• button. (refer to
"Setting the clock" on
page 33)
Function
Time
Clock O9:OOam I
¢Adjust _ Move FFRExit
6
When you have finishea,
press the MENU button.
The message "Enjoy your
watching.." is displayed.
Enjoy yourwatching..
7
Ifyou want to reset this
feature
{1)Press the MENU button.
(2)Press me • button
three times to select the
Function menu aea
aress the I_ button.
(3)Press the • button to
select Plug & Play and
Dressthe I1_buEon.
The message "Plug &
Play" is displayea.
r
Plug &Play
:Move _Select TR Exit
Not_':Plsg & Play.fi'atun" do_'sn'twork _vh_.llthe"V-chip is oil or
whell ill theAIV n_ode.
25
I OPERATION I
Viewing the Menus and On-Screen Displays
Viewing the Menus
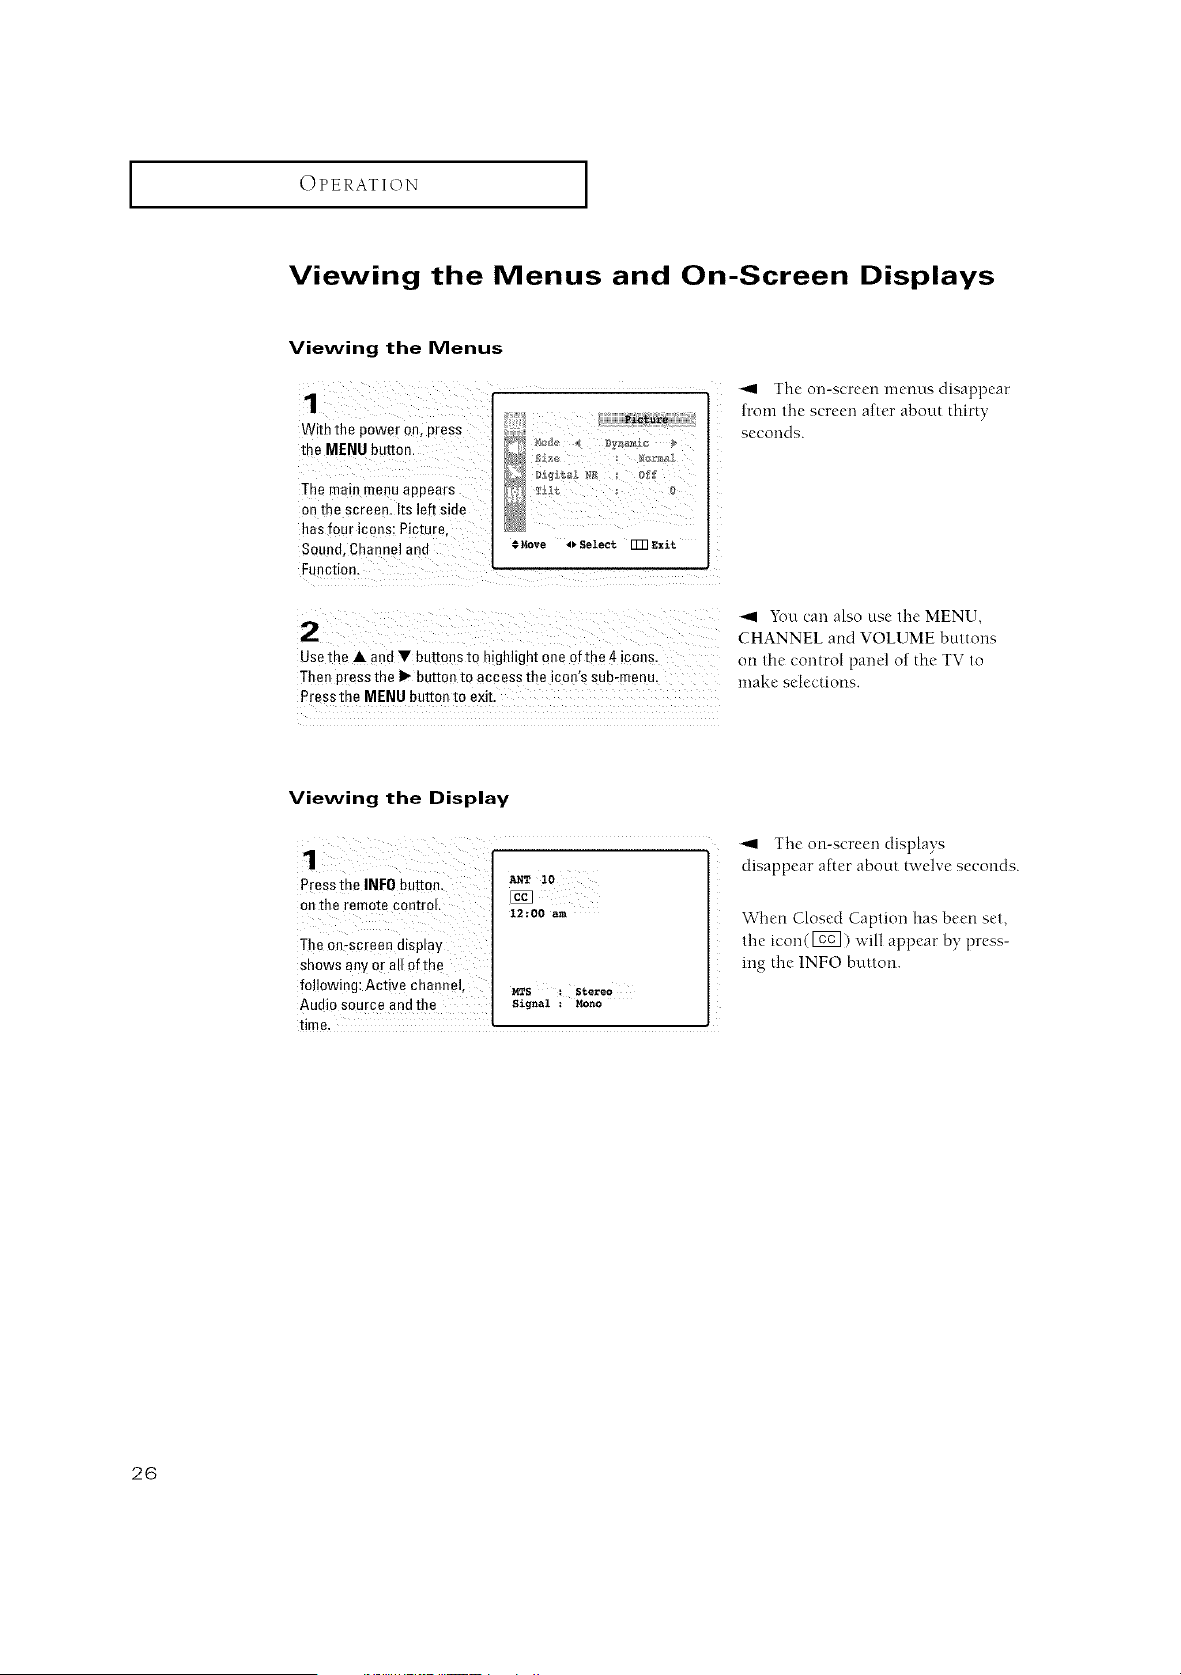
With the power on, press
the MENU but[on
The ma n menu aooears
on the screen. Its left side
has four icons: Picture.
Souea, Channel ana
Ft nction.
P1_re
€Move oSelect qqqExit
2
Usethe • and • buttons to highhght one of the 4icons.
Then Dressthe I_ button to access the icon's sub-menu.
Press the MENU button to exit.
_1 The on-screen menus disappear
from the screen after about thirty
seconds.
_I You can also use the MENU,
CHANNEL and VOLUME buttons
on the control pand of the TV to
make selections.
Viewing the Display
1
Pressthe INFObutton, _,_T 10
on the remote control,
12:00am
The on:screen display
shows any or all of the
following: Active channel, _s : Stereo
Audio source and the signal :Mono
time.
-_1 The on-screen displays
disappear after about twelve seconds.
When Closed Caption has been set,
the icon(FE_]) ,,,,ill appear by press-
ing the 1NFO bLttton.
26
I OPERATION I
Selecting a Menu Language
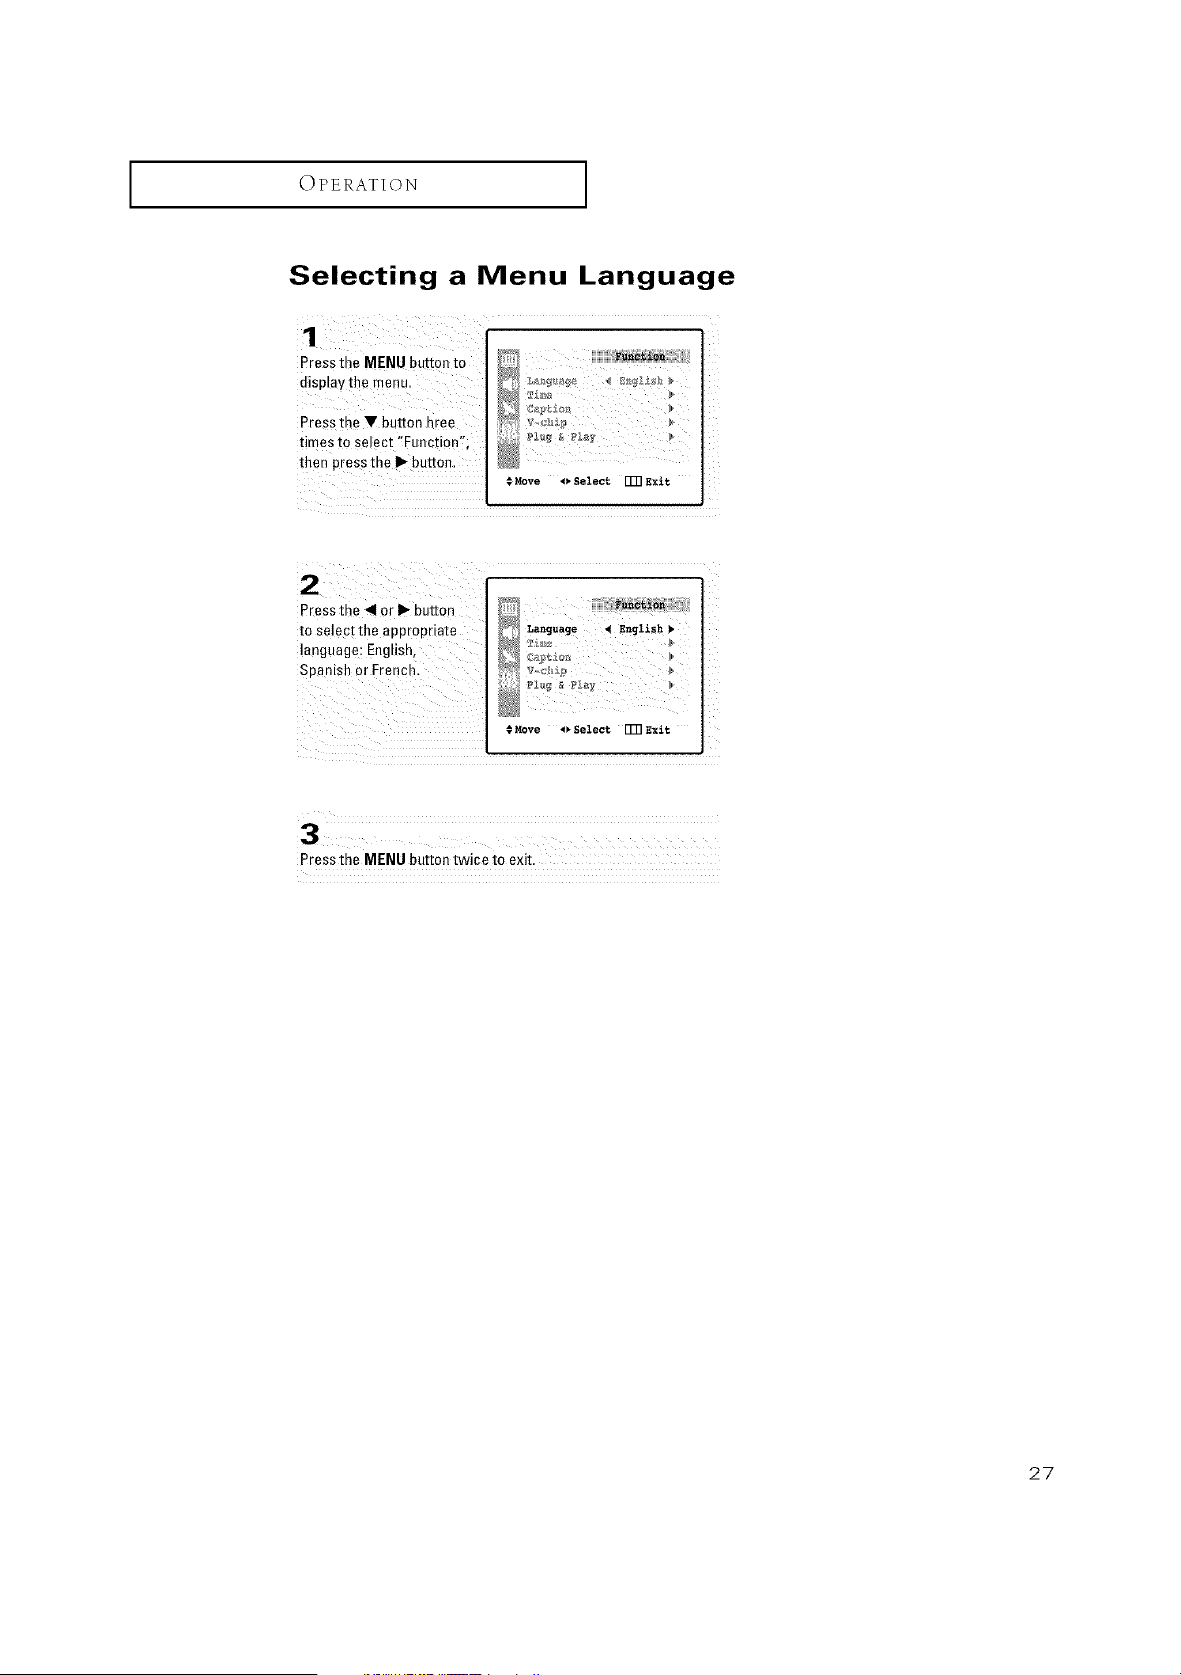
Press the MENU button to
displaythe menu.
Pressthe V button hree
times to select 'Function%
then press the II_button,
# Move '_"Select I_ Exit
T*Move _Select Um Exit
Press the MENU button twice to exit.
27
I OPERATION I
Memorizing the Channels
Yi>urTV can n_emodze and store all of the available channels for both "off-air" (antenna)
and cable channels. Alter the available channels are memorized, use the CH A and
CH v buttons to scan through the channels. This eliminates the need to change
channels by entet-ing the channel digits. There are three steps for n*en*odzing c}lannels:
selecting a broadcast source, memorizing the channels (automatic) and adding and
deleting channels (manual).
Selecting the Video Signal-source
Before your television can begin nlemodzin_ the available channels, you must specify
the type of signal source that_is connected to the TV (i.e., an antenna or a cable system).
1
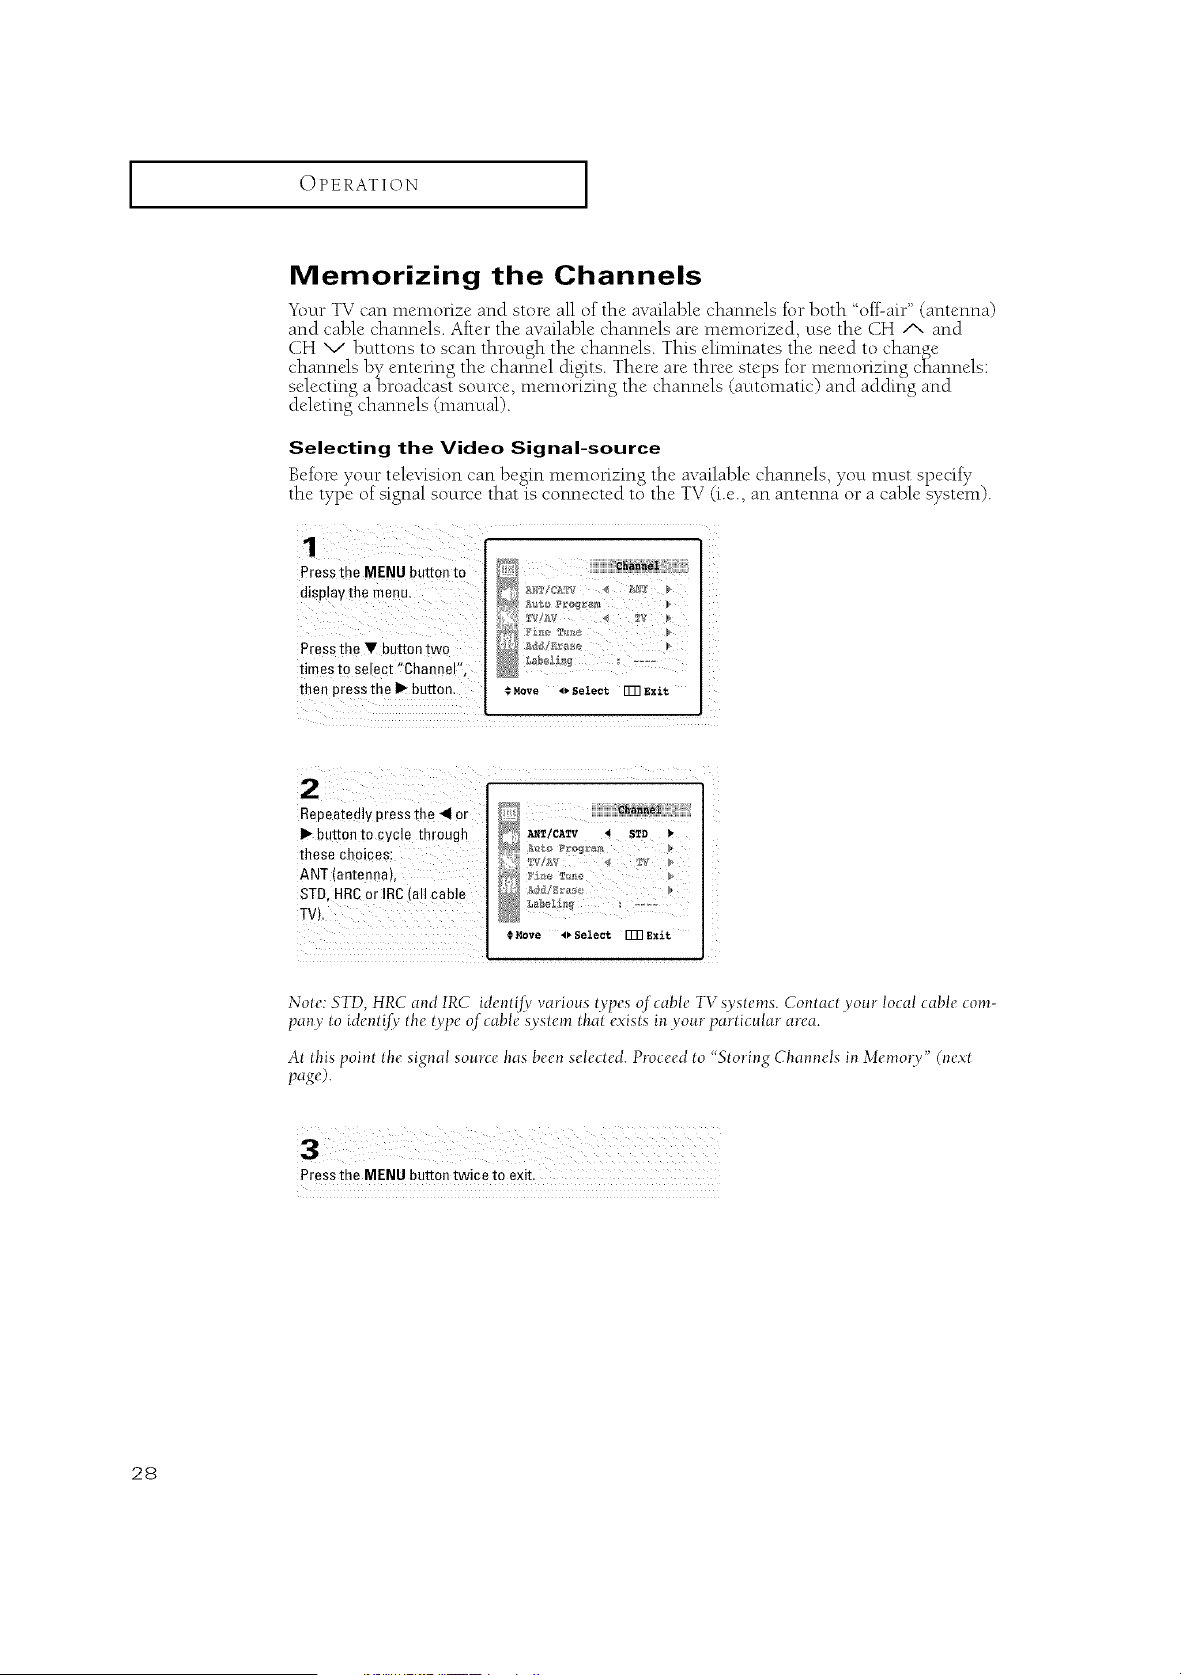
Pressthe MENU button to
display the menu,
i
Pressthe V button two
times to select !'Channel'_,
then pressthe I)- button, #Move _v Select rFR Exit
!¸77777777777777¸¸
Repeatedly press the _ or
I_ button to cycle through
these Choices:
ANT (anten£a),
STD, HRCor IRC (all cable
TV),
D....?,7!,,77,7,7= =,,,_,_,,_,7!=!,,,!?=,,7,
_9_ A_/CATV _STD
•_,Move 4)Select FURExit
Note:5TD, HRC and IRC ide)_Zifvvario_lstypesof cable TV sysZcms.Contact yore loca!cableconr-
pan.yto identifv tbe type of cable system that e.xists i, y our parti__,lar atea.
At Ufispoint the signal source has l)cen selected. Proceed to "5lori)_g Cham_els in Memot v" (nc.×t
pa,_O.
Press the MENU button twice to exit.
28
I OPERATION I
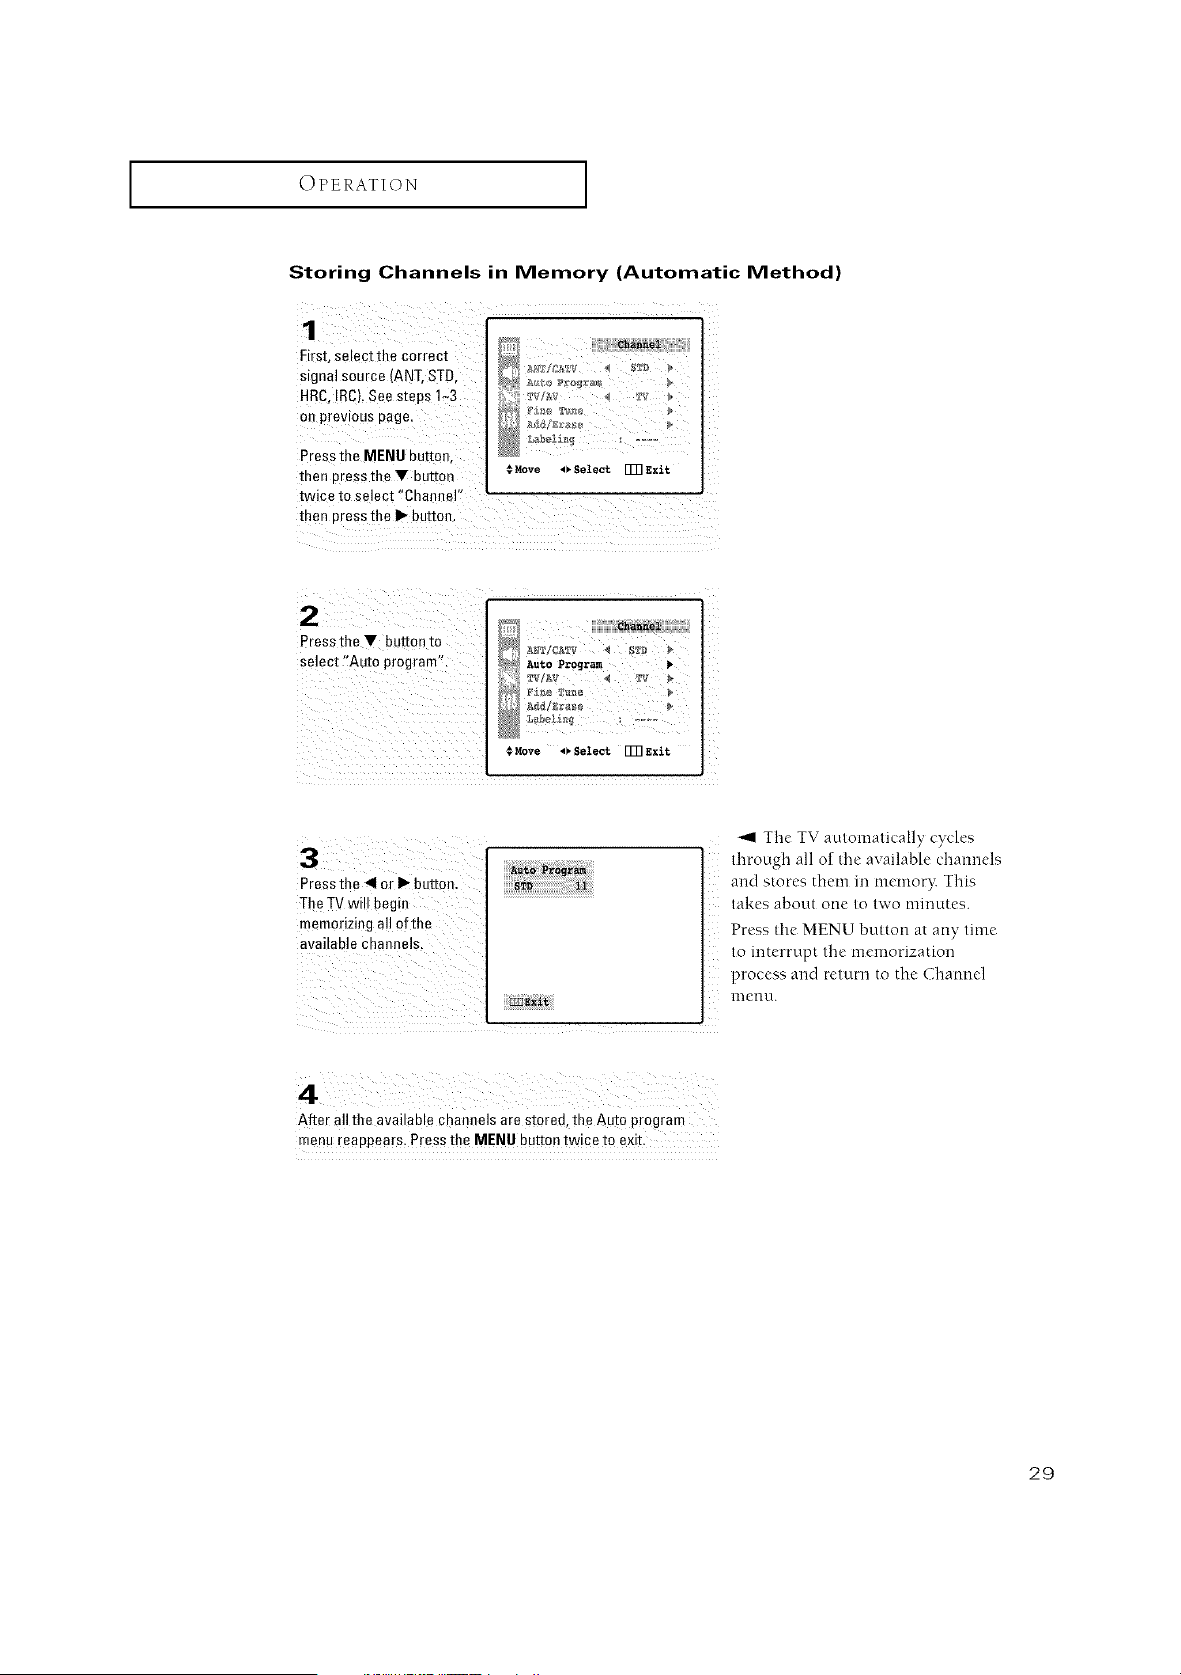
Storing Channels in Memory (Automatic Method)
First select the correct
Signa! source (ANT,STD,
HRC, IRC), See Steps 1<3
On previous page,
Pressthe MENU button,
then pressthe _!' button
D
#Move _ Select _ Exit
twice to select "ChanneF
then press the II" button,
Pressthe V button to
select "Auto program":
€ Move 4V $eleet FFR Exi{;
Press the 41or i_ button,
The TV wi!! begin
memorizing a!l ofthe
available channels,
_I The TV autonmtically cycles
through all o] the ava]lab[{, {.'hai]l]els
and stores them in memoo: This
takes about one to two minutes.
Pr{'ss the MENU button at any time
to interrupt the memorization
process and return to the Channel
menu.
After all the available channels are stored, the Auto program
menu reappears, Press the MENU button twice to exit,
29

OPERATION I
Adding and Erasing Channels (Manual Method)
Pressthe MENU button.
Pressthe • button twice
ro select "Channel",then
press the I_ button,
# Move .I_ Select [m Exit
2
Presstne • or• button
to select "Add/Erase",
Press the I_ button, Iv ¢
AddlSrase •
_el_
€ Move I_ Select r]3] Exit
_
m
cha_ne,_ou_ontaddedore_osed. _
.o.°.°l°ot s.t
i
Press the • or Ybutton
tO Select '!Sel:ect,,
Press the _11or II_ button
to select "Ad:ded" or
Channel i A_ 11 '
€Move i_Select [I]]Exit
Press the MENU button
three times to exit. :
3O
OPERATION ]
Changing Channels
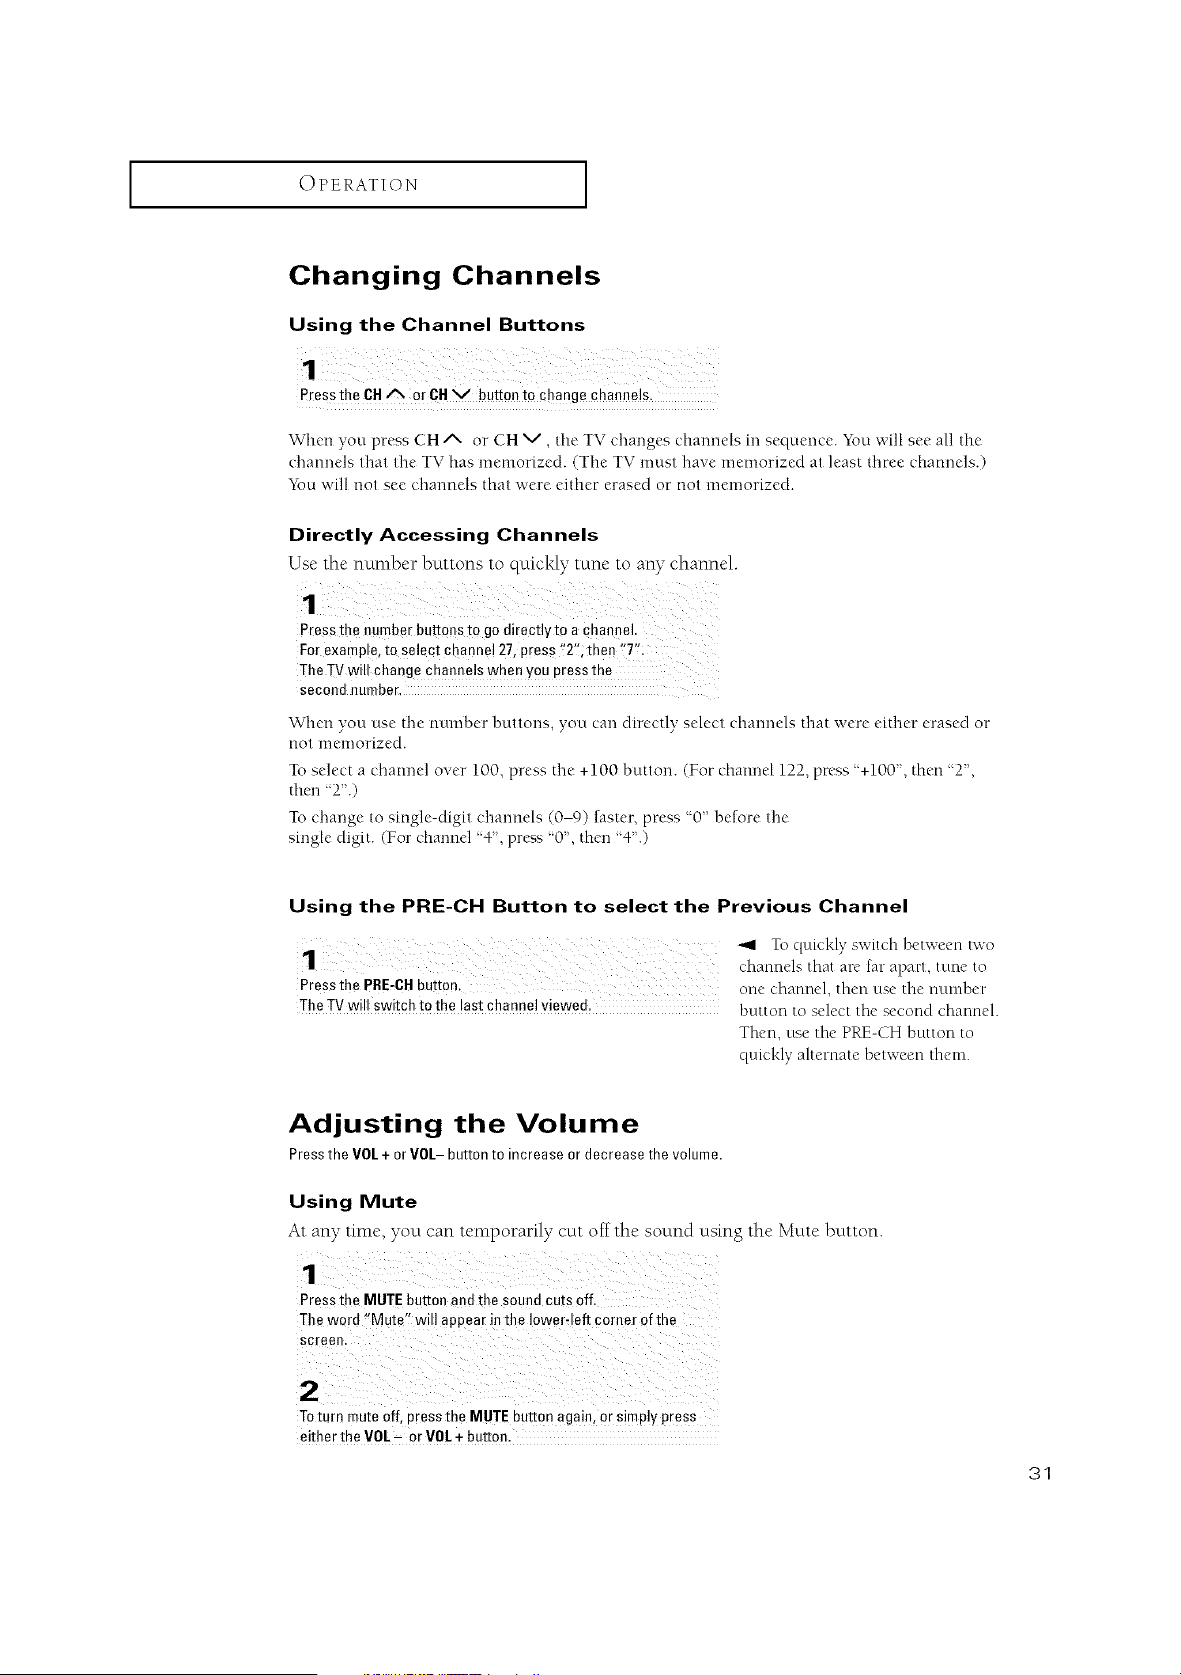
Using the Channel Buttons
1
PresstheCH,,% or CHVbuttonto changechanne!s,
When you press CH Aor CH V, the TV changes channels in sequence. You will see all the
channels that the TV has memorized. (The TV must have memorized at least three channels.)
You will not see channels that were either erased or not memorized.
Directly Accessing Channels
Use the number buttons to quickly tune to any channel.
Press the number buttons to go ditecflyto a channel
For example, to select channe! 27, press '!2'_1thee '7';
The TV will change channels when you press the
second number,
When you use the number buttons, you cart directly select channels that were either erased or
not menaorized.
To select a channel over 100. press the +100 button. (For dlannel 122, press '+100", then "2",
thm-t'_2".)
To change to single-digit charmels (0-0) faster, press '0" before the
single digit. (For charred "4", press "0", then "4.)
Using the PRE-CH Button to select the Previous Channel
1T ,q, ckl>sw ,chbe,ween,,,'o
channels that are fat-apart, tune to
Pressthe PRDCHbutton, one channel, then use the number
The TVwillswitch to the last channel viewed, button to select the second channel.
Then, use lhe PRE-CH button to
quickl} allernale ber,veen them.
Adjusting the Volume
PresstheVOL+ or VOL- buttonto increaseor decreasethe volume.
Using Mute
At any tin*e, you can temporarily cut off the sound using the Mute button.
Press the MUTE button and the sound cuts off.
The word "Mate, will appear inthe Iower_left corner of the
Screen.
Toturn mute Off, press the MUTE button again,or simply PreSs
either the VOL= or VOL+ button.
31
OPERATION [
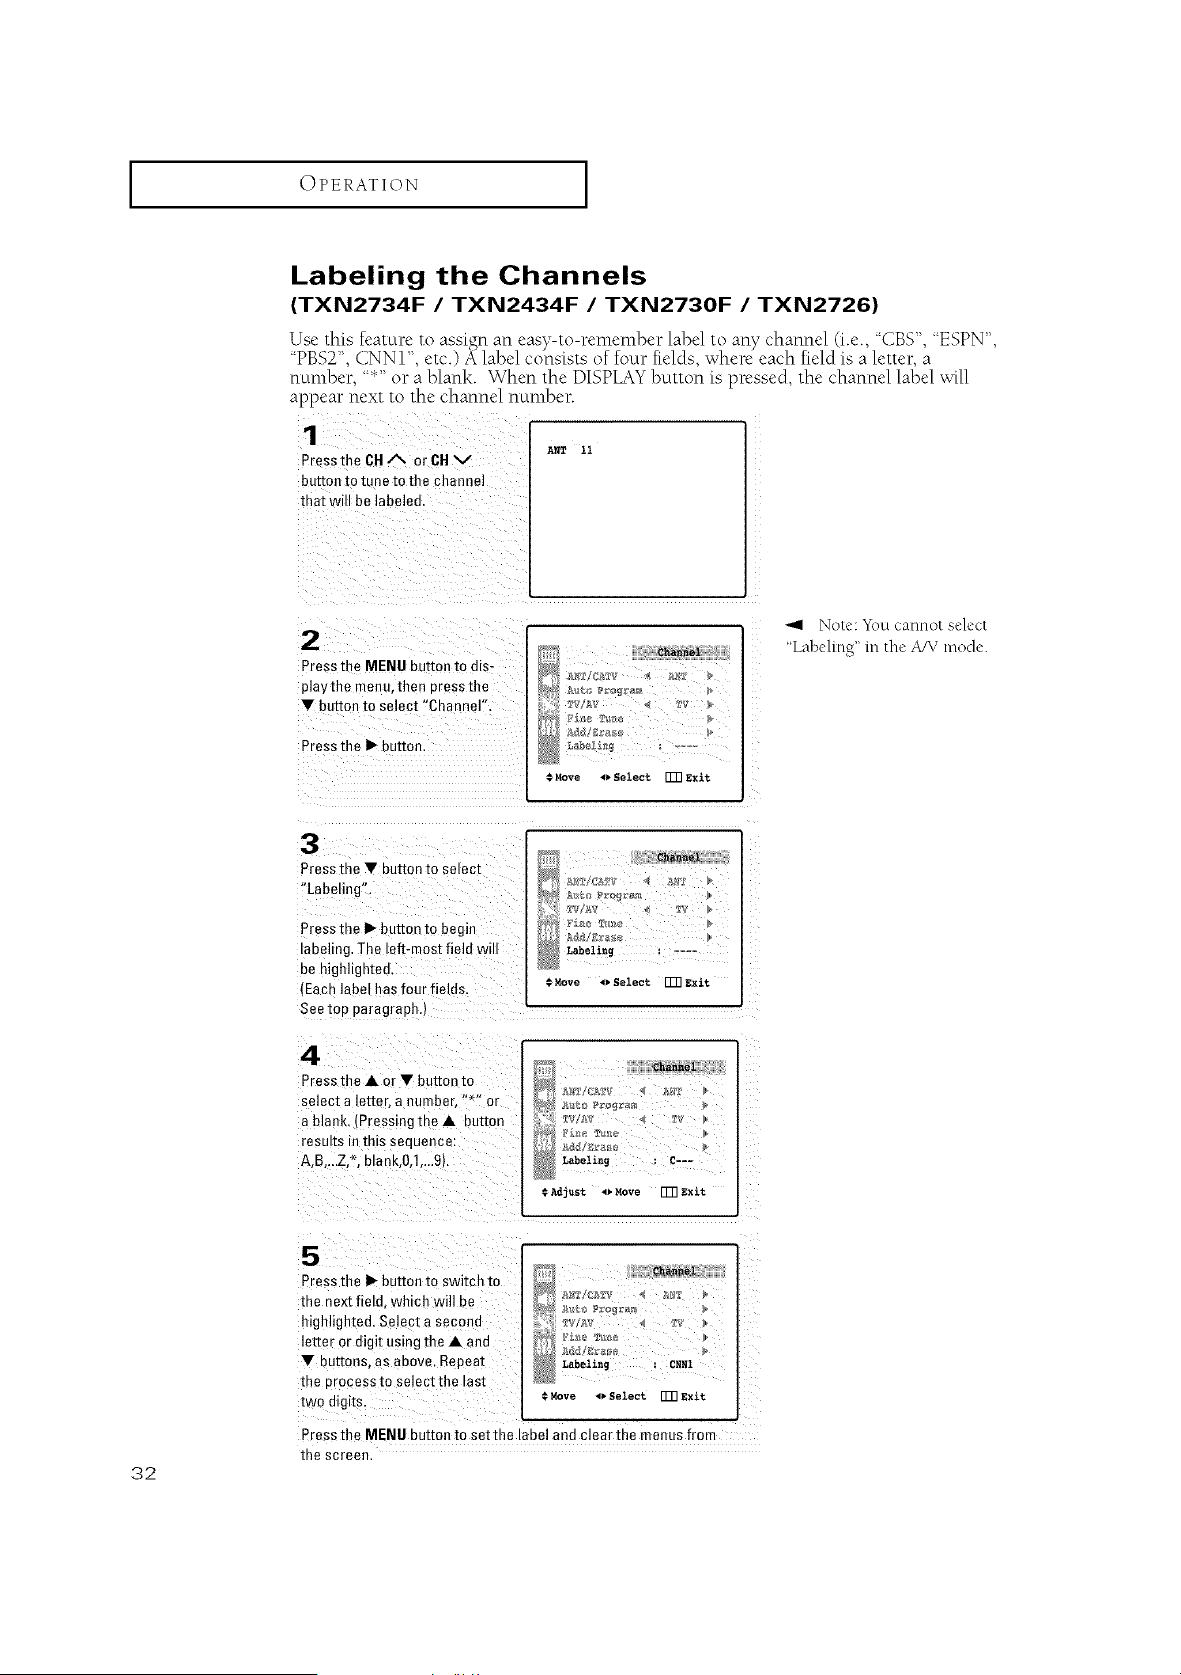
Labeling the Channels
(TXN2734F /TXN2434F /TXN2730F /TXN2726)
Use this feature to assign an easy-to-remember label to any channel (i.e., "CBS", "ESPN",
"PBS2", CNNI", etc.) A label consists of four fields, where each field is a letter, a
number, "*" or a blank. When the DISPLAY button is pressed, the channel label _x411
appear next to the channel number.
Pressthe CH ,'% or CH v
button to tune to the channel
that will be labeled,
AN_ 11
Press the MENU button to dis-
play the menu, then uress the
'IF button to select "Channel",
Press the I_ auEon.
Move _ Select [Ill Exit
Nole: _\_Ltcannot select
"Labeling" m the A!V mode.
3
Press the • outran to selecl
"Labelir g".
Press the I_-button to begin
labeling. The left-most field will
be highli£ ltea
(Each label has four fields.
Seetop paragraph.)
4
Press the • or • button to
select a letter, a number, "" or
a blank, Pressing the • button
results In IRIS sec Jence:
A,B,...Z, _, blank,O,l,...9s
_ann_
Label£ng : ....
_Move _ Select Vmgxit
eha_ae_
Labeling : C---
¢A_j_St 4_Move [_EXit
5
Press the I_ buEon to switch to
the next field, whmh will be
highlighted. Select a seconc
letter or digit us ng the • and
'IF bu[mns, as above. Repeat
me orocessto select the last
two alglIs.
_hamaei
Labelin_ _ _NNI
© Move ,,. _e_t rgR exit.
Press the MENU button to set the label and clear the menus from
the screen.
32
OPERATION I
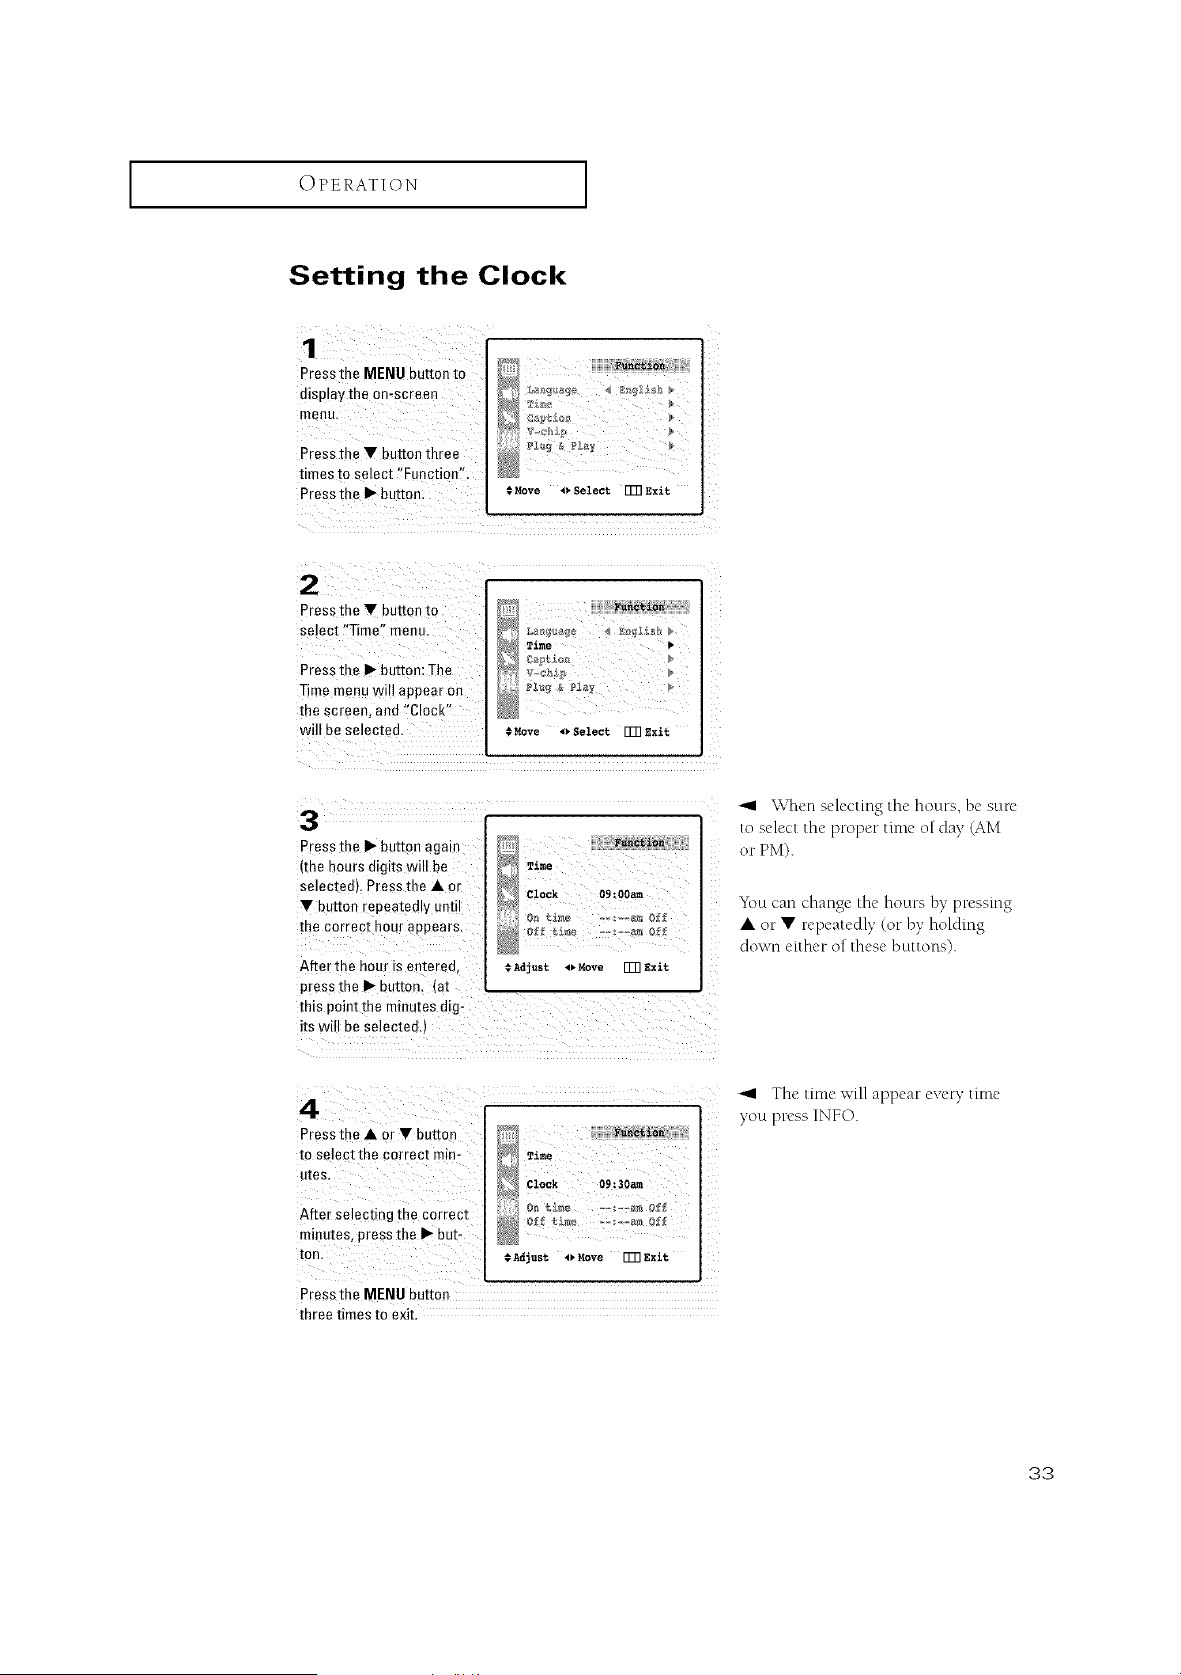
Setting the Clock
Pressthe MENU button to
display the on-screer_
menu,
Press the V button three i
times to select '!Function,.
Press the _ button:
Z
iL
€Move _ Select [_] Exit
Press the V button to
select !fTime_'menu.
Press the I1_button: The
Time menuw appear on
the screen, and ,Clock'!
will be se ected.
>
Time )
Move 4_, Select. [Z]] exit
Press the I1_button again
(the hours digits will be
Selected). Press the &or
Y button [epeated!y Until
the correct hour appears.
After the hour is entered, #k_just _ Move [T]]Exit
pressthe _ button. {at
this point the minutes digL
its will be selected.)
\\/hen selecting the hours, be sure
to select the proper time of day (AM
or PM).
"f\)u can change the hours by pressing
• or • repeatedly (or by holding
down eilhe r o [these b ult o ns).
4: ;i ¸
Pressthe ,&or v buo _ :
_;J_; ..........
to select the correct min- _ 'n=e
utes. _ CZOC_ O_=30a_
After selecting the correct e_ _._,_ ==_r_a_ e_
minutes, press the I_ but-
CA_just 4)Move FFR Exit
PresstheMENU button
three times to exit.
_1 The time will appear every time
you press INFO.
33
I OPERATION I
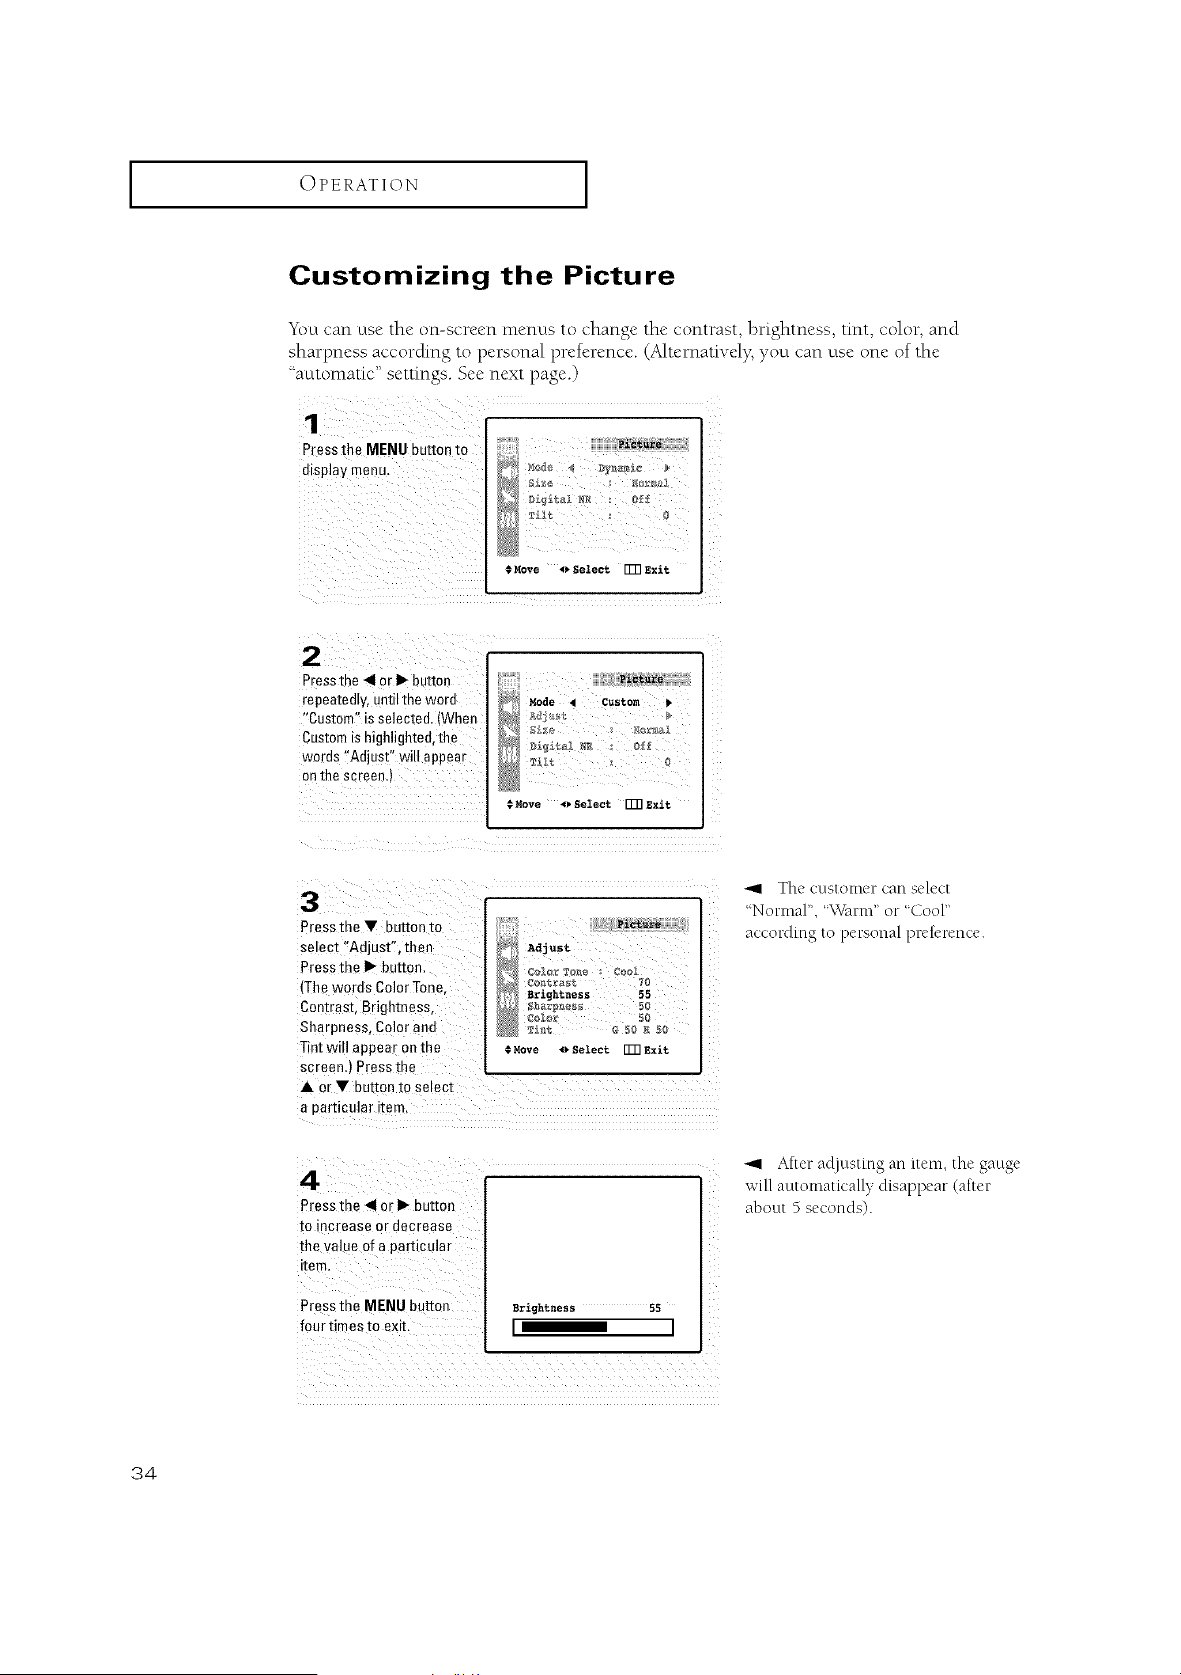
Customizing the Picture
You can use the on-screen menus to change the contrast, brightness, tint, color, and
sharpness according to personal preference. (Alternativd> yo_.tcan use one of the
'_automatic" settings. See next page.)
3ressthe _IENUbuttonto
display menu.
'21Jr
Move _Select rgR Sxit
3ressthe _1or I_ button
repeatedly, until the word
"Custom" is selectee. [Wher
Customis highlighted,the
words "Adjust" wilt appear
on the sc "eenJ
Picture
Mode 4Custom
$Move 4_Select FFRExit
appear on the .*Rove _ Select ITR Exit
Tint will
screen.) Press the
A 0r v button to select
a particular item,
Pressthe 41o[ I_ button
to increase or decrease
the value of a particular
item,
Press the MENU b_tton erightness 5S
I_I
/
/ii i_iii!_!_!_!_!_!_!_!_!_!_!_!_!_!_!_!_!_!_!_!_!_!_!_!_!_!_!_!_I
The cLlslonler call select
"Normal", '\VarnC or 'Cool"
according to personal prelerence.
After adiusting an item, the gauge
will automatically disappear taller
about 5 seconds).
34
I OPERATION I
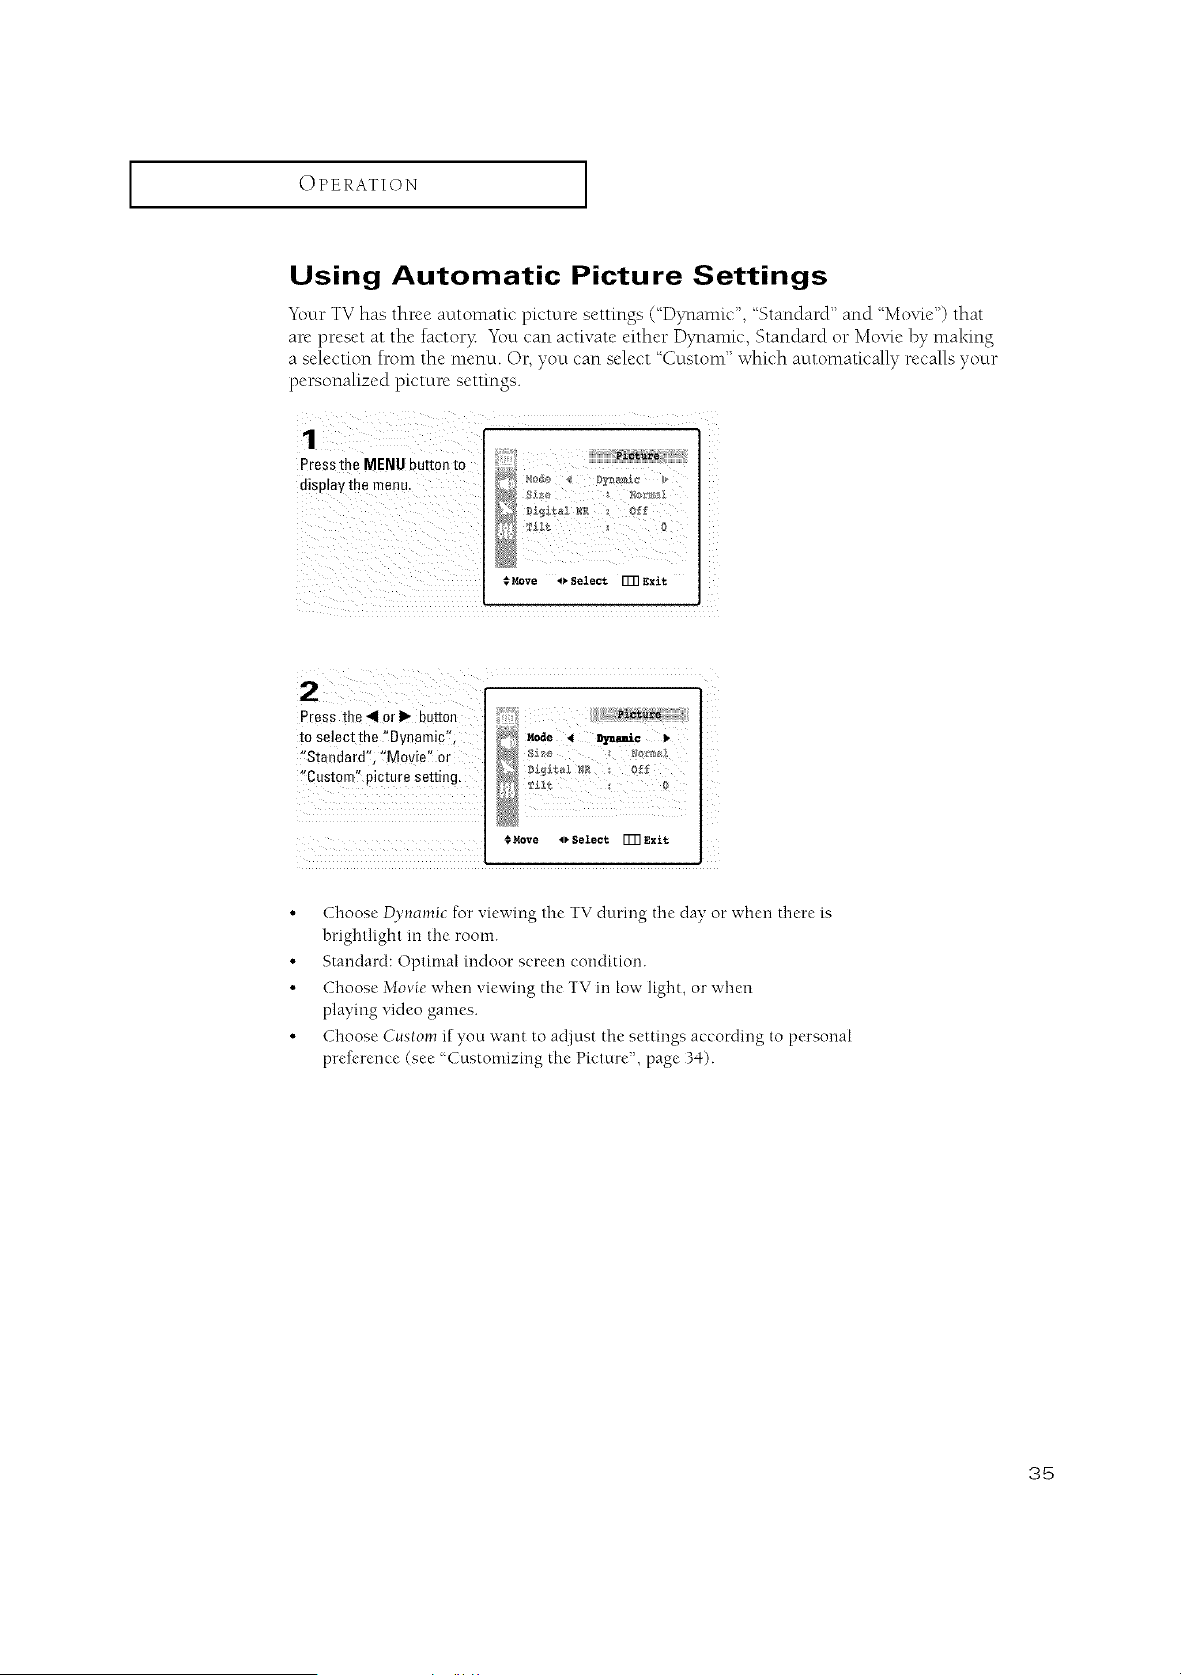
Using Automatic Picture Settings
"gi)urTV has three automatic picture settings (':Dynamic", "Standard" and "Movie") that
are preset at the factor?_ "Yi)ucan activate either Dynamic, Standard or Movie by making
a selection Iron* the menu. Or, you can select "Custom" which automatically recalls your
personalized picture settings.
Press the MENU button to
disolay me menu.
;Pi_£Rre
D_ital _R _ Ofl
.*Move 0 Select [_ Exit
12¸
Press the4 orP" button
to select the "Dynamic% _;ii : _!_ax_[
'Standard'; :!Movie"or
,,c.Jp,oteroeett,oO.
¢Move I_Select []77Exit
• Choose D>mamic for viewing the TV during the clay or when there is
brightlight in the room.
• Standard: Optimal indoor screen condition.
• Choose Movie when viewir_g the TV m low light, or when
playing video games.
• Choose Custom if you want to ac0ust the settings according to personal
prefl'rence (see "Customizing the Picture", page 3q).
35
OPERATION [
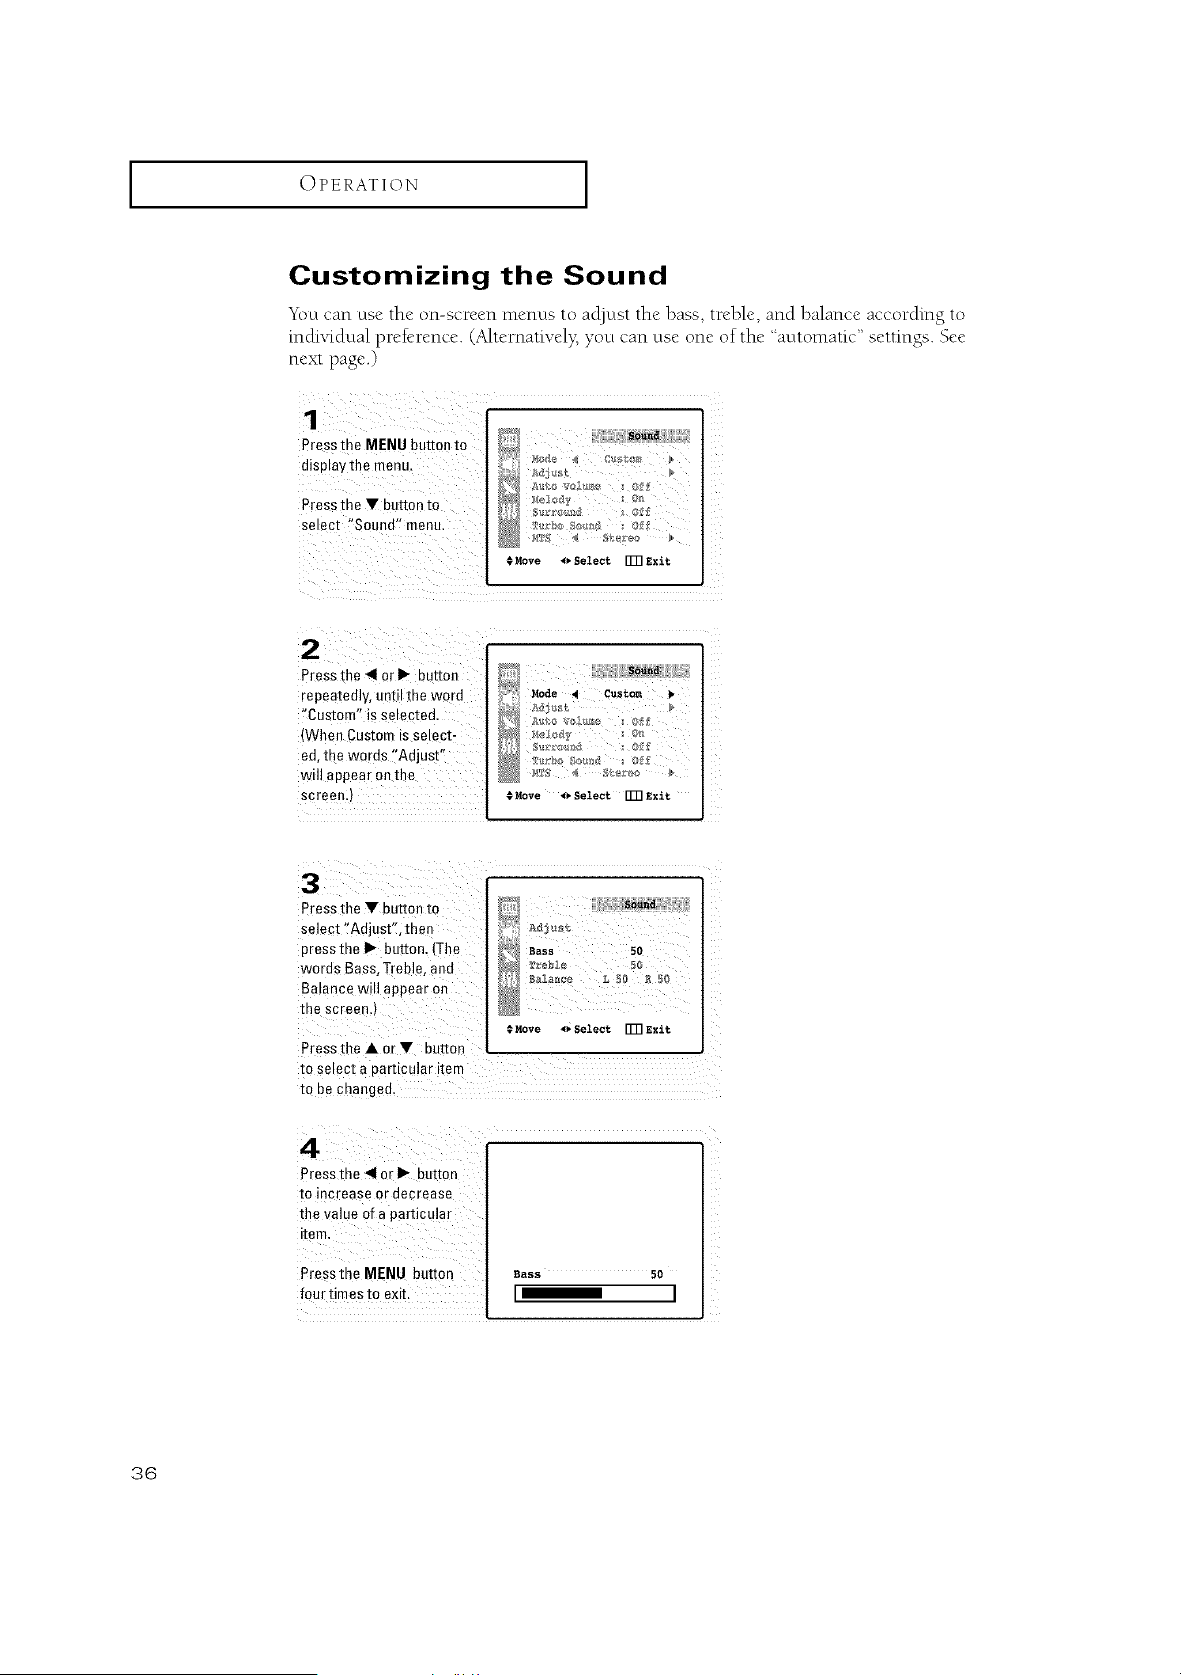
Customizing the Sound
Ybu can use the on-screen menus to acljnst the bass, treble, and balance according to
indixqdual prek-rence. (Alternativel}_ you can use one of the "automatic" settings. See
next page.)
Press the MENU button to
display the menu.
Press the • buuon to
select "Sound" menu
SOuRR
." _love <> Select FFR Exit
Press the 4 or I_ button
repeatedly, unto me wore
"Custom" is selected.
(When Custom is selec>
ed, the words "Adjust"
will appear on the
screen.)
S_M_a
Mode •Custom
Rove _ Select FFR Exit
Press the • button to
Select :fAdjust':, then
pressthe I1_button_(!he
words Bass, Treble, and
Balance will appear on
the screen,)
Adjus_
_a,,, So
1
€Move l_. Select [T]l Exit
Press the • or • button
tO select a particular item
to be Changed,
Press the "11or I_- button
to increase or decrease
the value of a particular
Pressthe MENU button :Bass so
four times to exit, I_ I
36
I OPERATION I
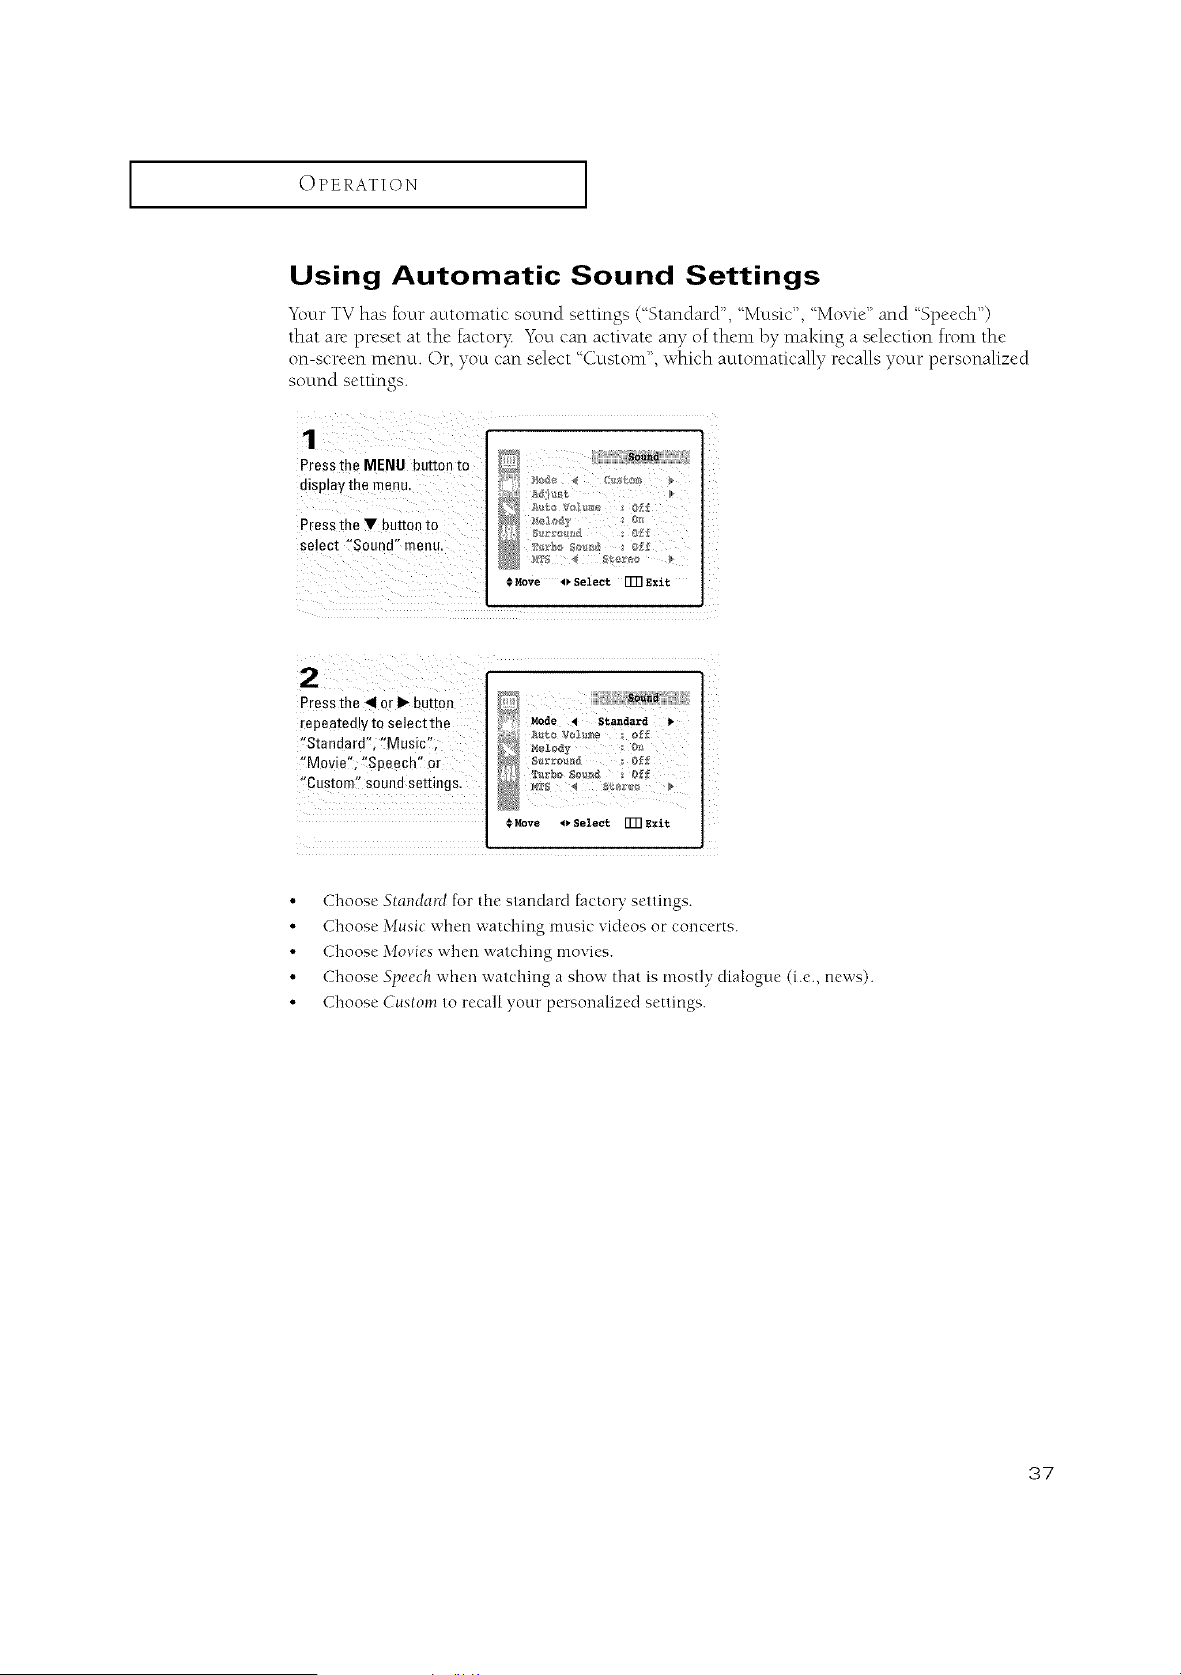
Using Automatic Sound Settings
"T2)urTV has four automatic sound settings (%tandard", "Music", "Movie" and "Speech")
that are preset at the factor?_ You carl activate any of then* by making a selection front the
on-screen menu. Or, you can select _&.tstom", which automatically recalls your personalized
sound settings.
Pressthe MENU button to
display me menu.
Press the • button to
select "Sound" menu,
_}uIlS,
191o_ 4<;_
Move _ Select IT[] exit
Press the _1or I_ button
repeated!v to Select th e
'!Standard' '!Music"
!!Movie% _!Speech, Or
"Custom? sound settings,
#Move 4_ Select [T]Iexit
• Choose Standard for the standard factory settings.
•Choose Music when watching music videos or concerts.
• Choose Movies when watching movies.
• Choose Speech when watching a show that is mostly dialogue (i.e., news).
• Choose Custom to recall your personalized settings.
37
OPERATION [
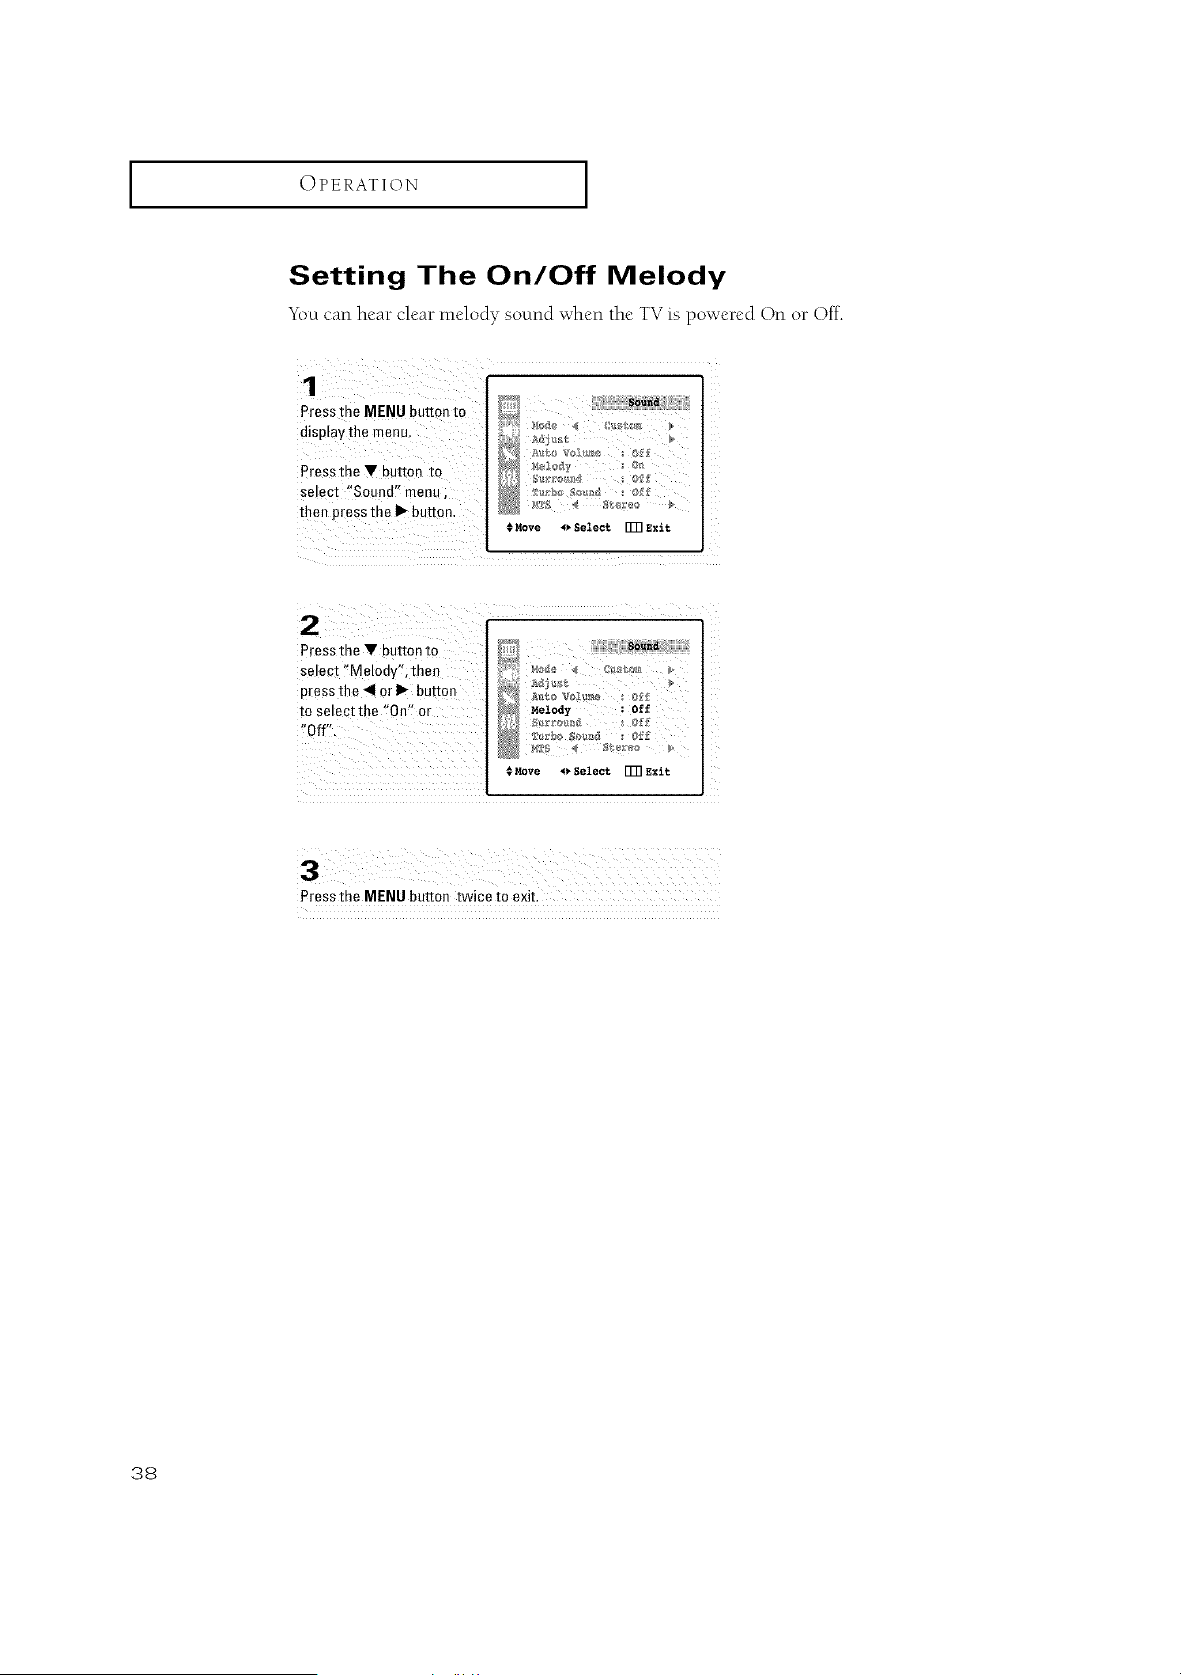
Setting The On/Off Melody
Ybu can hear cleat*melody sound when tile TV is powered On or Off.
Pressthe MENU button to
display the menu,
Pressthe • button to
select "Sound' _menu ;
then pressthe )_ button.
Press the MENU button twice to exit.
38
I OPERATION I
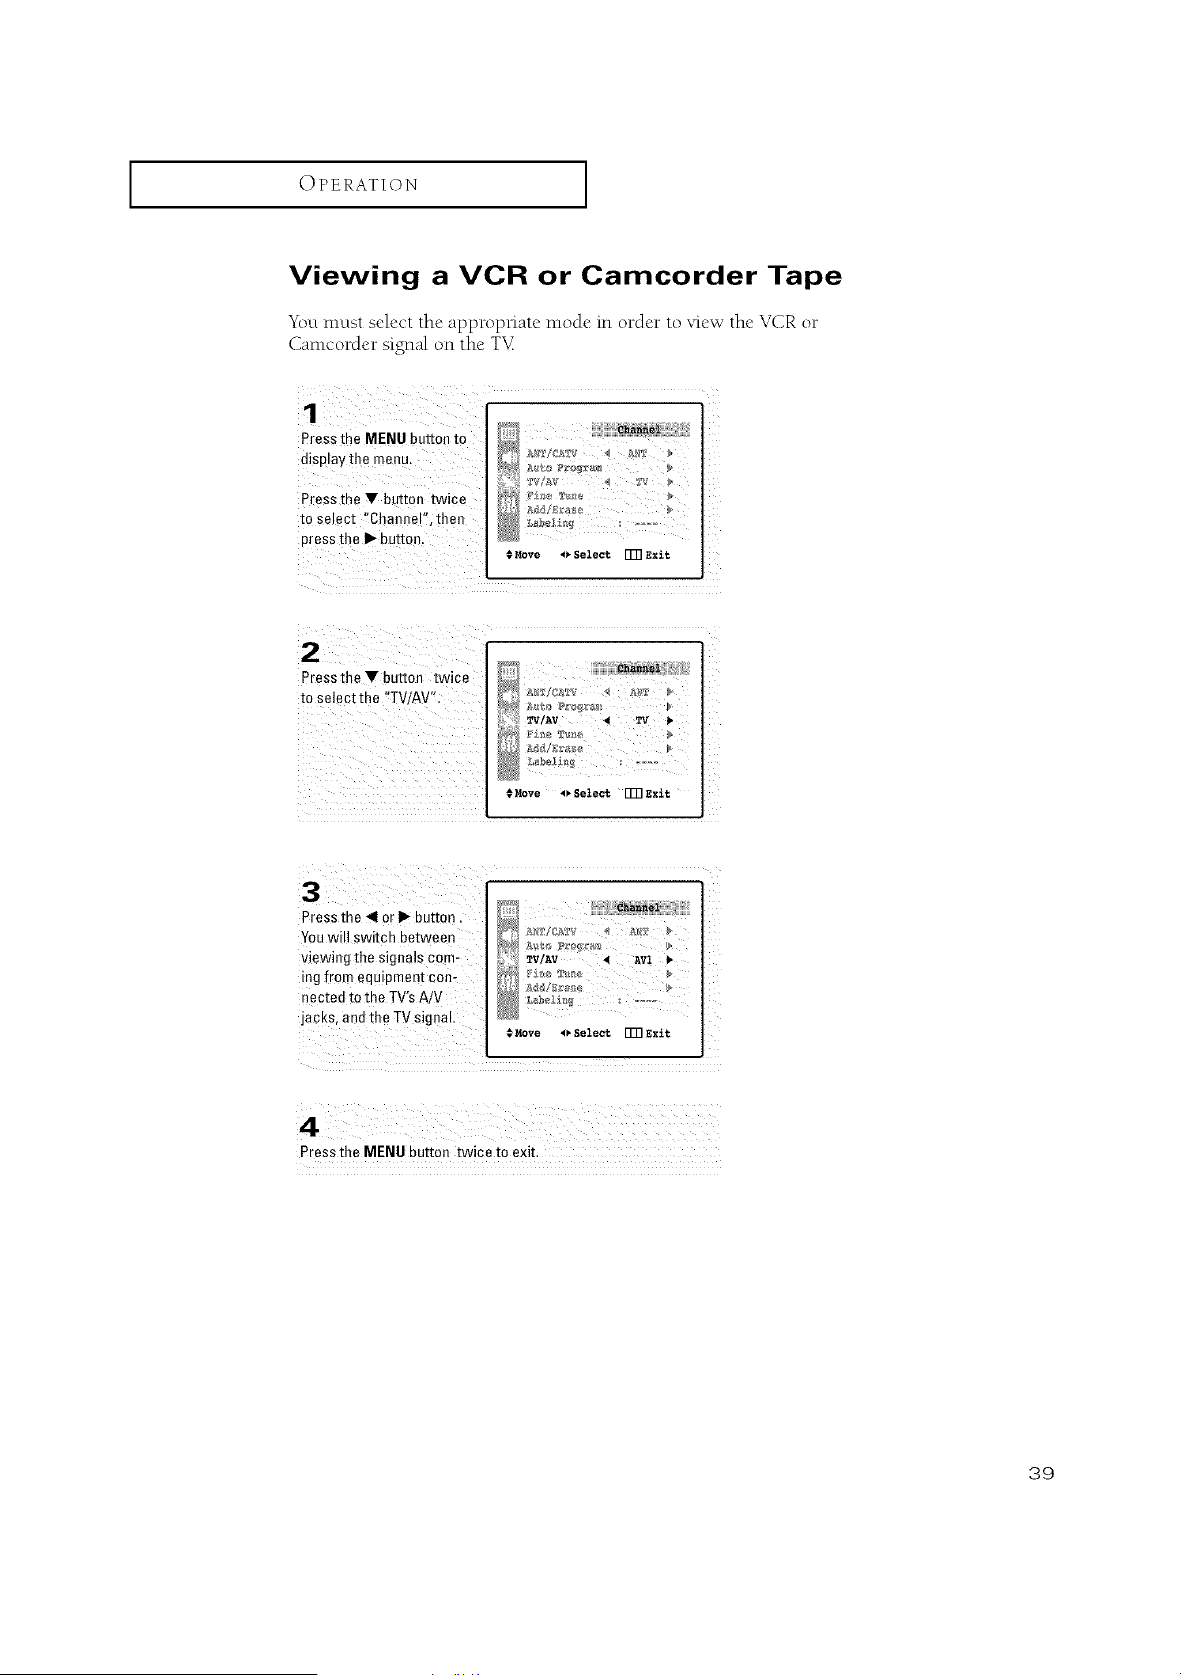
Viewing a VCR or Camcorder Tape
"Y\)umust select the appropnate mode in order to view the V(2R or
Can*corder signal on the T\L
Press the MENU button to
display the menu,
Pressthe V button twice
to select "Channel";then
Press the I1_butten_
/
i I
€Move 4, Select IT[] Exit
£
:_ zv/Av _w
#Move _Select I_RExit
Press the MENU button twice to exit.
39
SPECIAL FEATURES
Customizing Your Remote Control
(TXN2734F /TXN2036F /TXN2726)
Your TV comes equipped with a "umversaF' remote control. In addition to
controlling the T'v_the universal remote can also operate a VCR, DVD and a cable box
(even if your VCR, DVD and cable box are made by manufacturers other than San*sung).
Not_':The"t'_-raot_-co*itrolmight not b_"compatibD with all DVD play_.rs, VCRs, alid CabD bo.ws.
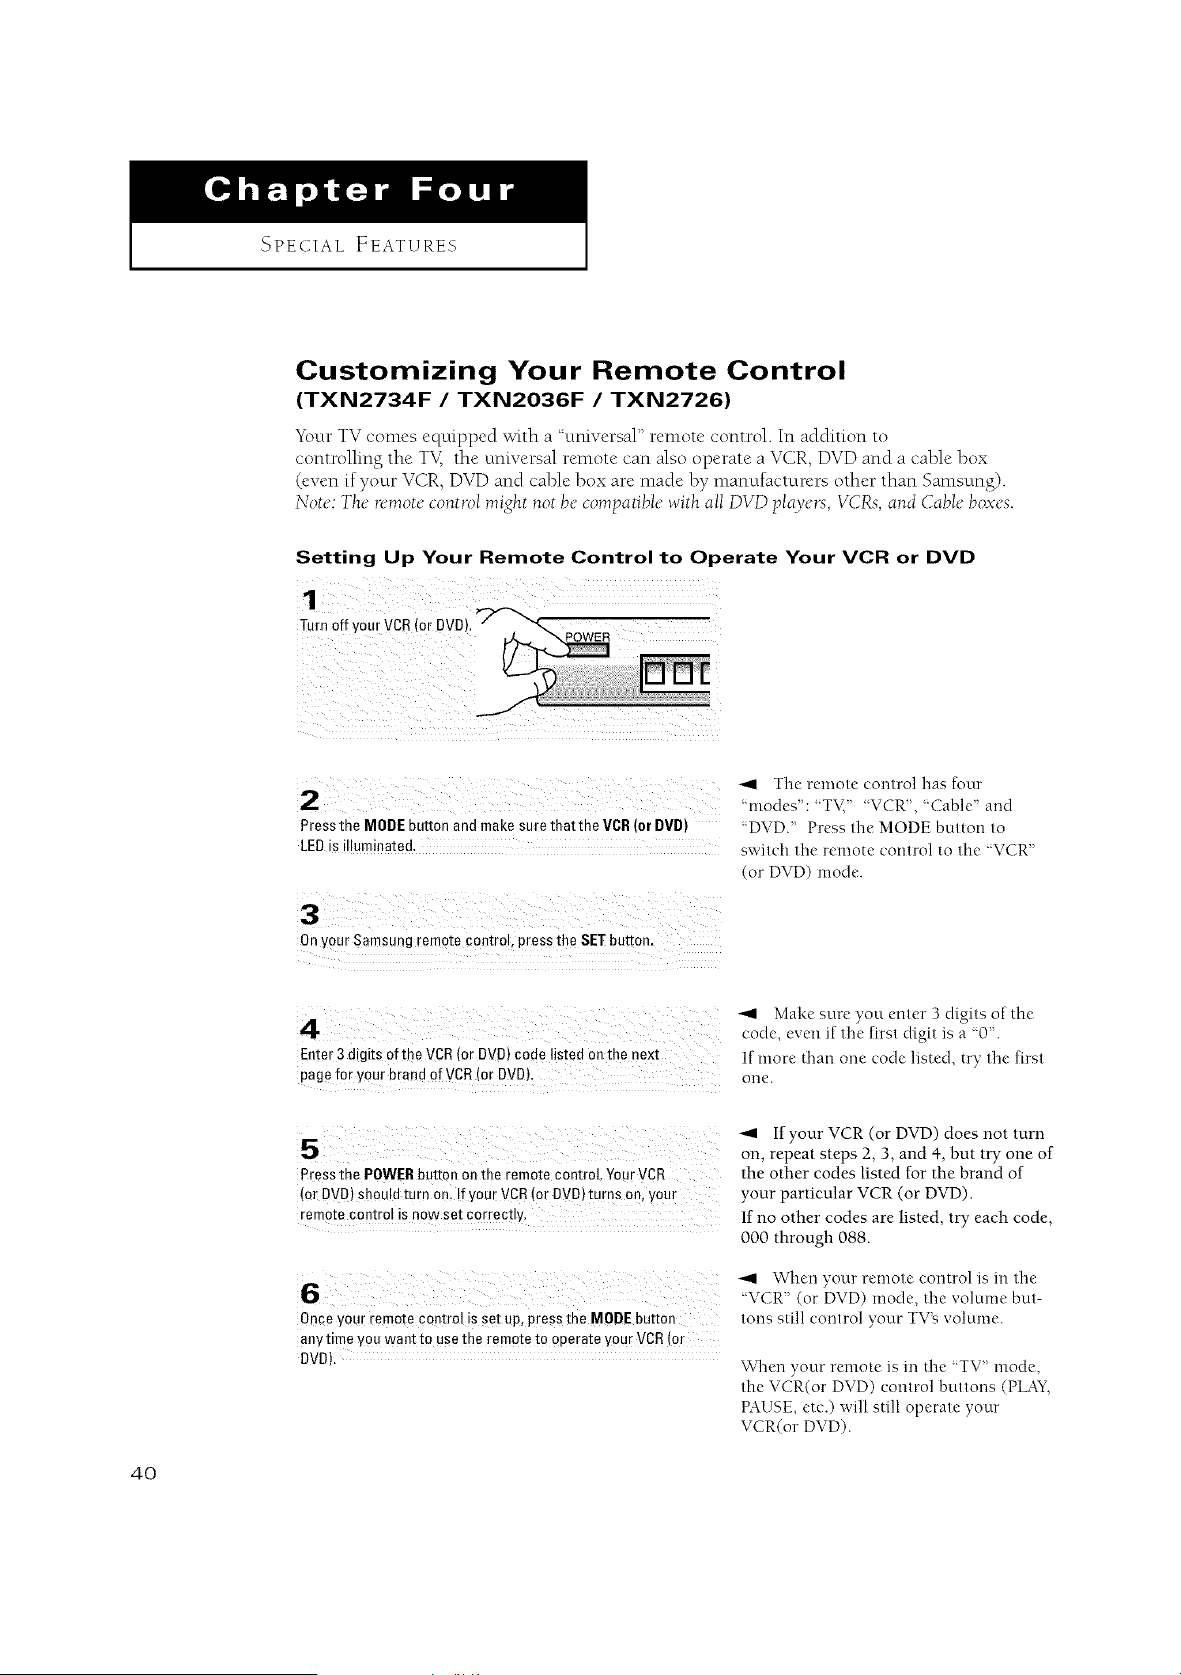
Setting Up Your Remote Control to Operate Your VCR or DVD
1
T.r"i_fyourVCRtorDVDt_row_R
2
Pressthe MODEbuttonandmakesurethatthe VCR(orDVD)
LEDisilluminated,
-'4 The remote control has four
'modes": 'T_{ "VCR'. "Cable' and
DVD." Press the MODE button to
switch the remote control to the "VCR"
(or DVD) mode.
Onyour Samsung remote control, press the SETbutton.
Enter 3 digits ofthe VCR (or DVD) code listedon the next
page for your brand of VCR (or DVD).
-'q Make sure you enter 3 digits of the
code, even if the first digit is a "0'.
If more than one code listed, try the first
one.
5" , your <orD, D)does,,otfur,,
on, repeat steps 2, 3, and 4, but try one of
Press the POWERbutton on the remote control,YourVCR the other codes listed for the brand of
{0rDVD)Shouldturn on, !fyou_VCR{orDVD)turnson, your your particular VCR (or DVD).
rem0tecontrol is nowset c0rrectly. If no other codes are listed, try each code,
000 through 088.
6
Once yourremotecontrolis set up,pressthe MODEbutton
anytime YOUwantto usethe remoteto operateyourVCR(0r
DVD),
"11 \Vhen your remote control is in the
7 7 7
_\ CR" (or D\, D) mode, the "_olume but-
tons still control your TV_ volume.
Wllen your remote is m the TV" mode,
the VCR(or DVD) control buttons (PLAY,
PAUSE, etc.) will still operate your
VCR(or DVD).
4O

I SPECIAL FEATURES I
VCR Codes
Samsung
LG(Goldsforl
Daewoo
DO0
001
002
003
004
0O5
006
007 Daewoo, LG(Goldstar}
008 Daewoo
009 Curtis Mathes, Dimensia,
General Electric, PROSCAN,
RCA
011 Bell & Howell, Fisher, JC Penney,
JCL, Kenwood, Marantz, NEC,
Quartz, Radio Shack, Realistic,
Sanyo, Sears,Tandy
014 Hitachi, JC Penney, Pentax,
Pioneer, RCA, Sears, Toshba
015 Admiral, Optlmus, Radio Shack,
Realistic, Sharp
016 Candle, Cff zen, Craig,
Curtis Mathes, General Electric,
Go Video, JC Penney,MTC,
Multitech, RCA, Samsung,
Totevision
017 Canon, Curtis Mathes,
Emerson, General Electric,
InstantReplay,JC Penney,
JCL, Magnavox, Marantz,
Panasonic, Philco, Phillps,
Quasar, Radio Shack, Realistic,
RCA, Sylvan a, Technics, Teknika
018
019
021
022
O23
024
025
026
027
028
029
030
031
032
035
Candle, Citizen, Emerson,
LG(GoldstarI, Radio Shack,
Realistic, Sears, Toshiko,Teknka, 037
Tolevision 038
Broksonic, Emerson
Cmlg, Fisher, Radio Shack, 039
Realistic, Sanyo, Sears
Audio Dynamics, Candle, Citizen, 040
Daewoo, Emerson,Samsung, 041
Scott,Toshibc_
Colortyme, Curtis Mathes, DB, 042
LGJGoldstar),Harmon Kardon, 043
JC Penney, JCL, Kenwood, 044
Marantz, NEC
Aiwa, Curts Mathes, Dynatech, 045
Emerson,Funai, Hitachi, Lloyd, 046
LXI,MTC, Multtech, Radio Shack, 047
Realistic, S gnature, Sylvania, 048
Symphonic, Tandy, Teac, Teknika 050
Audio Dynamics, DB, JC Penney, 051
JCL, Kenwood, Marantz, NEC, 052
Pioneer,Sansui
Akai, Shintom, Sony 053
Fisher,Sears 054
Fisher,Radio Shack, Realistic,
Sears,Toshiba 055
Emerson
Tek_ika
Akai, Samsung 056
Akai, Emerson 057
Shintom,Sony 058
036 Eledrohome, Emerson,
Radio Shack, Realistic, Sharp
RCA
Magnavox, Marantz, Philco,
Philips, Sylvania
JC Penney,JCL, Kenwood,
Marantz, NEC, Tatung,Teac
Logik, Multitech, Shintom
General Eledfie, Multiteeh,
Samsung
Pioneer
Emerson
Hitachi, JC Penney,Pentax, RCA,
Sears
Hitachi
RCA
Sony
Sharp
Emerson, Scott
Emerson, Samsung
Fisher, Rado Shack, Realistic,
Sears
Portland, Quasar
Candle, Citizen, Daewoo,
Portland, Sharp
Candle, Citizen, Curtis Mathes,
[G(Goldstar), JCL, Kenwood,
Marantz, NEC, Peniex Research+
Emerson
Fisher, Sears, Toshiba
Emerson, Sco_t,Toshiba
059 P anent
060 JC Penney
061 Candle, Cilizen, Portland
062 Canon, Curtis Mathes,
General Electric,JC Penney,
Magnavox, Panasonic, Philco,
Radio Shack, Realistic, Sylvania
063 RCA
064 Shintom
065 Magnavox, Philco, Sylvania
066 Emerson
067 Fisher
069 LGIGoldstar)
070 Marantz, NEC
071 Emerson
073 Curtis Mathes, NEC
074 Emerson
076 Curtis Mathes, Emerson,TMK
077 Emerson, Scott
078 RCA, Teac
079 Emerson
082 KLH
084 Panasonic
085 Daewoo
086 Panasonic
088 Admiral
DVD Codes
_ amsung
LG(Goldstar)
Toshiba JVC
Sony
Sharp Panasonic
Phlhps
PROSCAN, RCA
Curtis Mathes
41
I SPECIAL FEATURES I
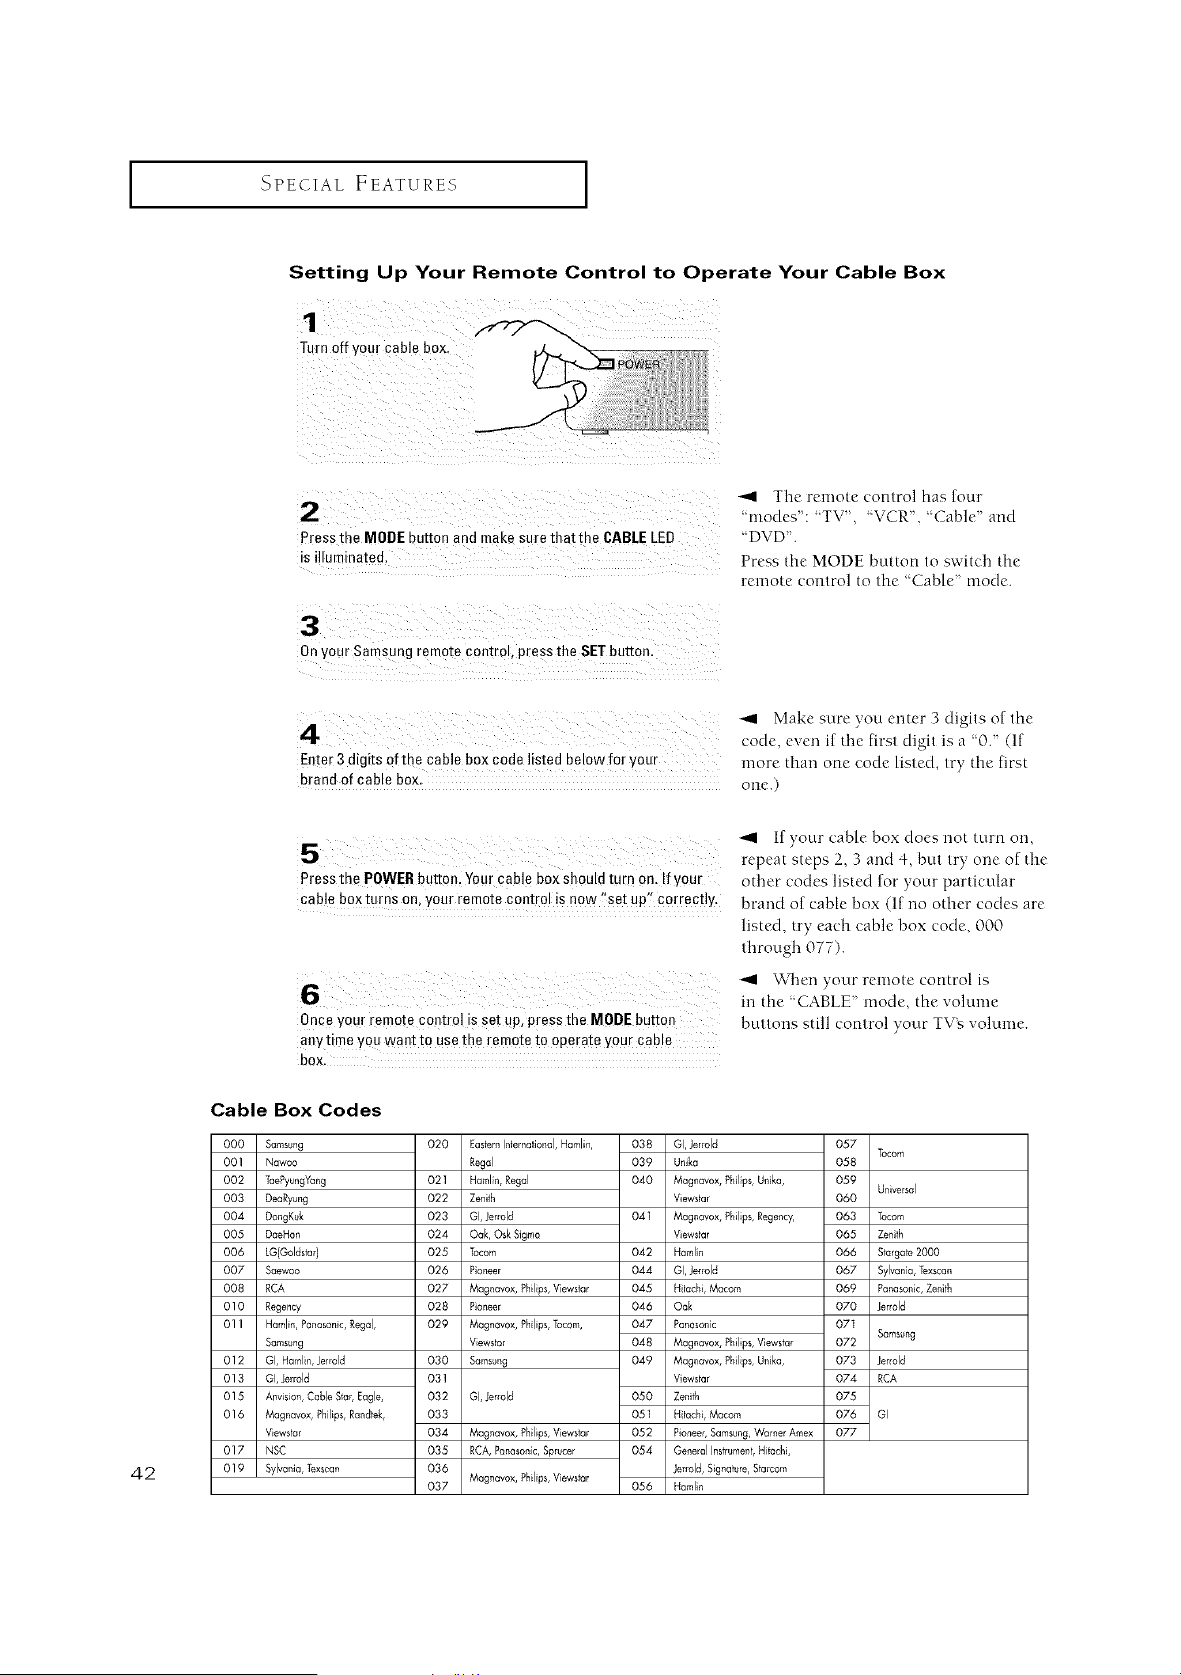
Setting Up Your Remote Control to Operate Your Cable Box
1
Turn off your cable box
2
Press the MODE button and make sure that the CABLELED
s i]lumma[ea.
3
Onyour Samsung remo[e controb press the SETbutton.
The remote control has four
'modes": 'TV', 'VCR,"Cable and
'DVD.
Press the MODE button to switch the
remote control to the "Cable tootle.
42
4
Enter 3 digits of the cane box code listed below for yam
brand of cable box.
Make sure you enter 3 digits of the
code, even if the first digit is a "0. (If
more than one code listed, try the first
one.)
If your cable box does not turn orl,
repeat steps 2, 3 and 4, but try one of the
Press the POWERbutton. Yourcable box should turn 0n. IfyOUr other codes listed for },our particular
cable b0xturns on, your remote control iSnow %et upl_correctly, brand of cable box (If no other codes are
listed, try each cable box code, 000
through 077).
6
Once yout remote contro! is set up, press the MODE button
anytime You want to usethe remote to operate your cable
bOX,
_1 When your remote control is
in the "CABLE" mode, the volume
buttons still control your TVN volume.
J
Cable Box Codes
000 Samsung 020 Ea#ernMernafional, Hamlin, 038 GI, Jerrold
001 Nawoo Regal 039 Unika
002 TaePyuegYang 021 Hamln, Regal 040 Magnavox, Philps, Unika,
003 DeaRyung 022 Zeniih Viewstar
004 DongKuk 023 GI, Jerrold 041 Magnavox, Philps, Regency,
005 DaeHan 024 Oak, Osk Sigma Viewstar
006 LG{Goldsfar) 025 Tocom 042 Hamlin
007 Saewoo 026 Pioneer 044 Ol, Jerrold
008 RCA 027 Megrmvox, Philips,Vewslar 045 H lachi, Macom
010 Regency 028 Pioneer 046 Oak
01 IHamlin,Panasanic,Regal, 029 Magnavax, Philips,Tocom, 047 Panasonic
Samsung Viewstar 048 Magnavox, Philps, Viewstar
012 GI, Haml, Jerrold 030 Samsung 049 Magnavox, Philps, Unika,
013 GI, Jerrold 031 Viewstar
O15 Any son, Cable Sar, Eagle, 032 GI, Jerrold 050 Zenith
016 Megnavox, PhJlips,Randtek, 033 051 H lachi, Macorn
Viewslar 034 Magnavox, Philips,Vewstar 052 Pioneer,Samsung,Warner Amex
017 NSC 035 RCA,Panasonlc,Sprucer 054 General Insfrumeni,Hitachi,
019 Sylvania, Texsca,, 036 Jerrdd, Signature,Starcom
037 Magnavox, Philips,Vewstar 056 Hamlin
057
Tocom
O58
059
Universal
060
063 Tocom
065 Zeith
066 Stargate2000
067 Sylvania, Texscan
069 Panasonic,Zenith
070 }errold
07I
072 Sams_ng
073 Jerrold
074 RCA
075
076 GI
077
I SPECIAL FEATURES I
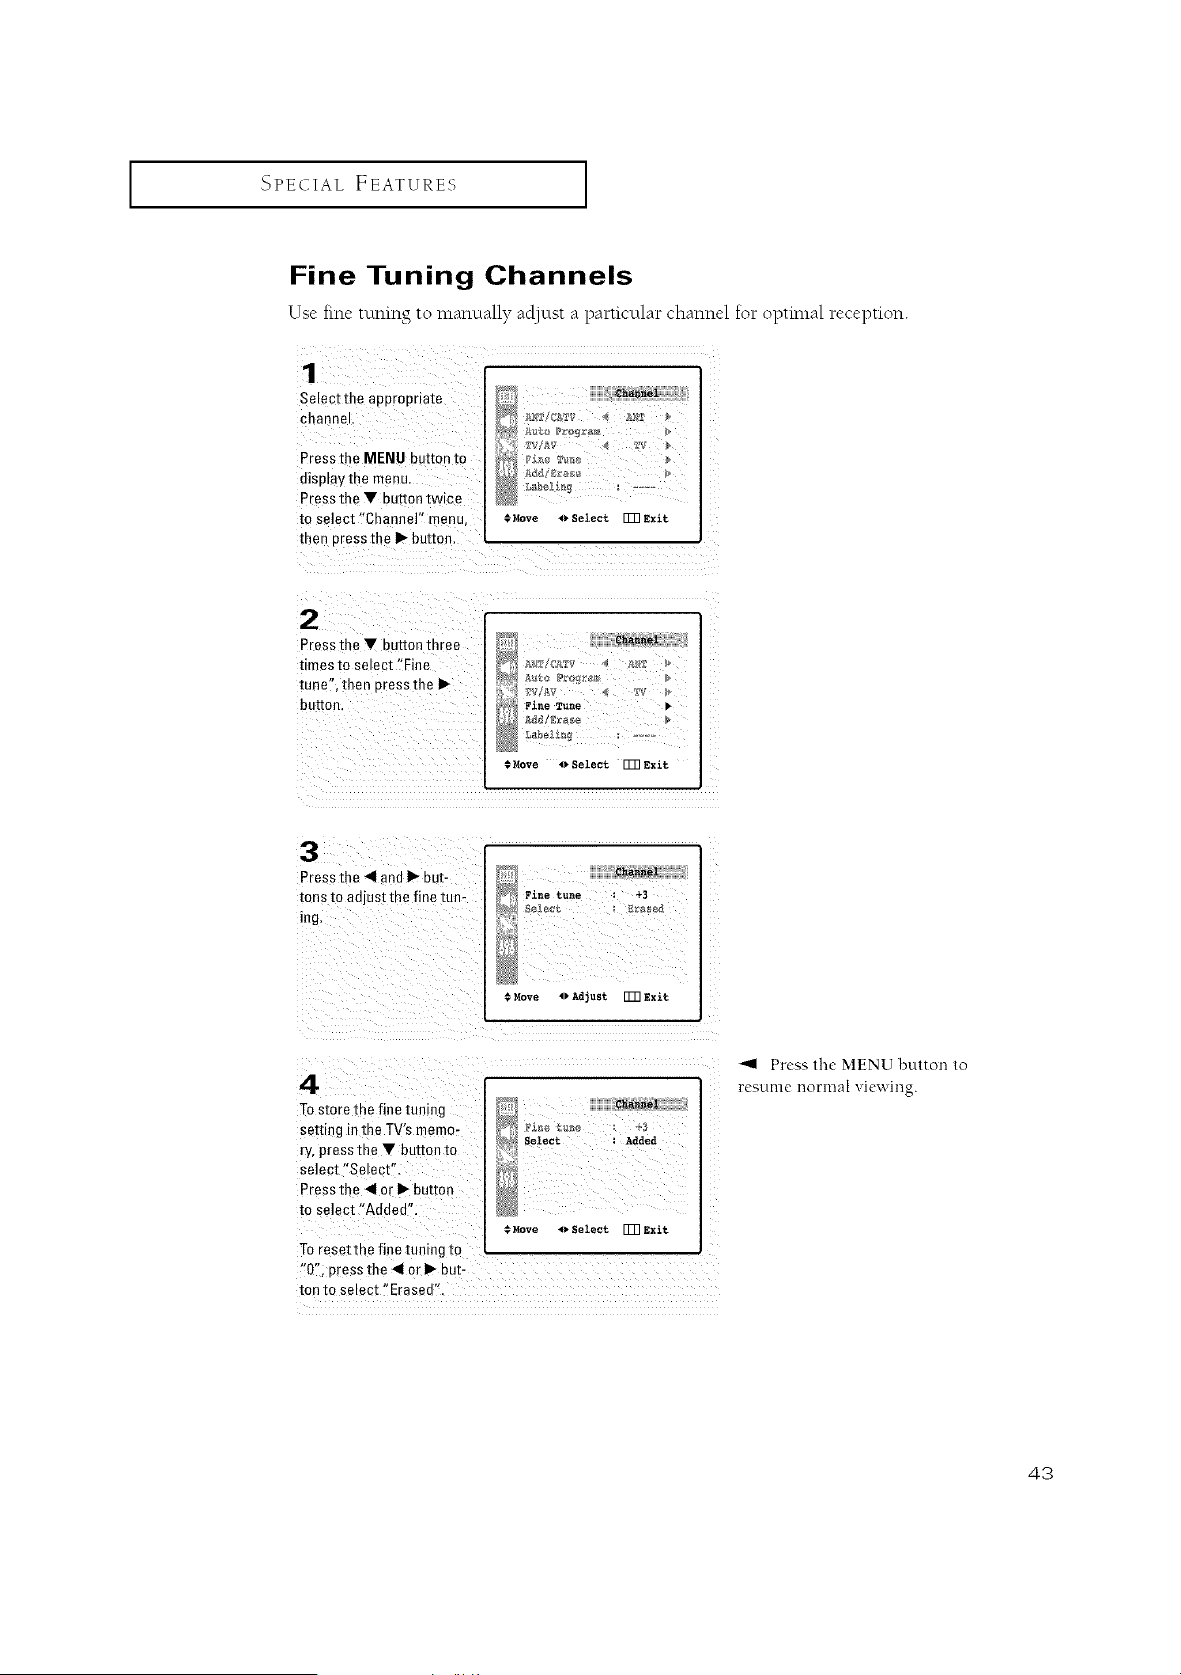
Fine Tuning Channels
Use free tuning to manually acljust a particular channel for optimal reception.
Selectthe appropriat e
channel.
Pressthe MENU button to
display the menu.
Press the • button twice
tO select'ChaneeF menu, ;Move _)Select _Exit
then pressthe I_ button.
Press the Y button three
times to select 'iFine
tune,, then press the
button.
#Move ()Select [T_Exit
3
Pressthe _11and I_ but-
runs to adjust the fine tun-
ing.
Pine tune : +3
Move 4)Adjust FmExit
4
Tostore the fine tuning
setting in the TV's memo-
ry, press the • button to
selec[ "Semcr"
Press the 41or I_ button
to select "Added",
To resettne fine tuning to
"0", press the 41or I_ Put-
[on to semcr "Erased".
_h_l
Selec_ : Added
Move 4) Select _3 Exit
_1 Press the MENU button to
restmle l-lOrlllal viewing.
43
[SPECIAL FEATURE8
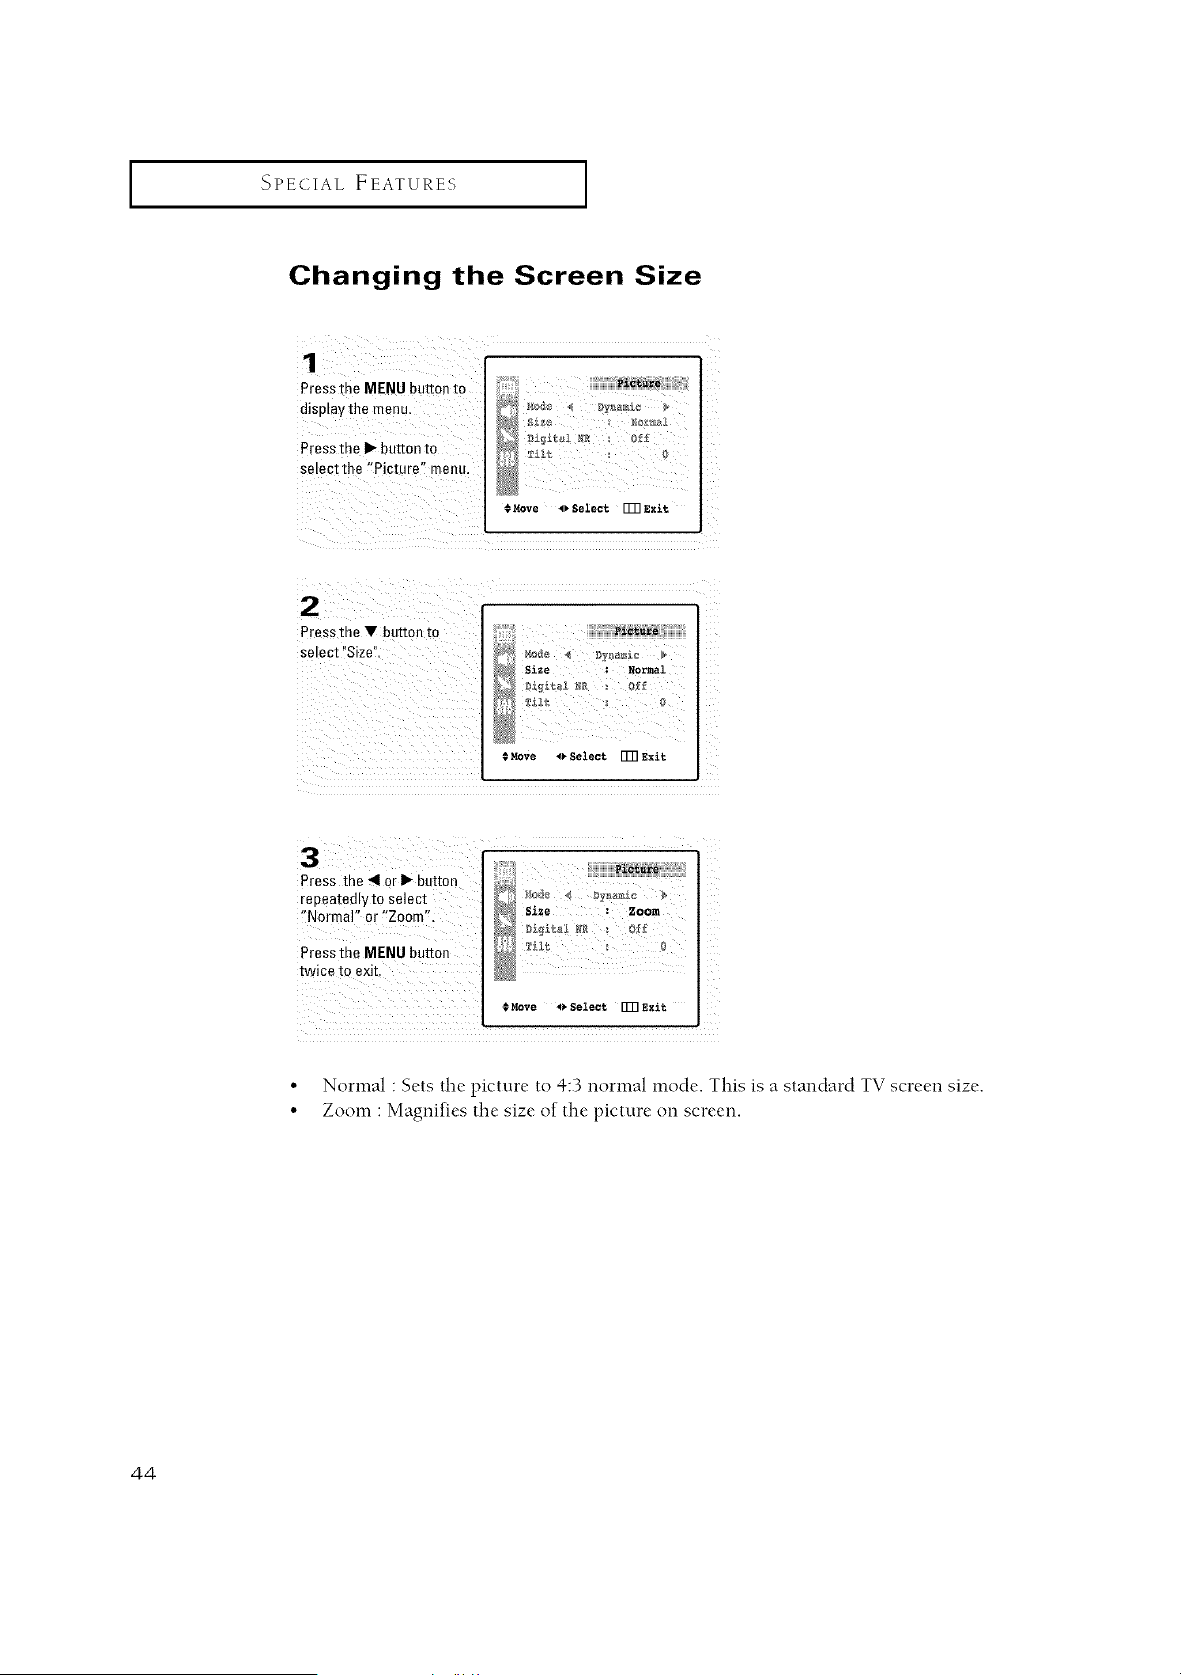
Changing the Screen Size
1
Presstne MENU button to
display the _renu,
Press me I_ button to
setect the "Picture" menu.
)
@,v,ove _select []_ e_i._
2
Pressthe _ button to
select Size". SlIe :Normal
€ Move _ select [I]]E_it
Press the 4 or_ button _#_ _o_ 4 _;Y_z_
repeatedly [o select _ Size _zoom
"Normal" or "Zoom", _£_i,t_ _ _ o_ _
Press the MENU buttou 1
twice to exit.
€MOVe _ eelecl_ _3 _xit
L
•Normal : Sets the picture to 4:3 normal mode. This is a standard TV screen size,
• Zoom : Magnifies the size of the picture on screen.
44
I SPECIAL FEATURES I
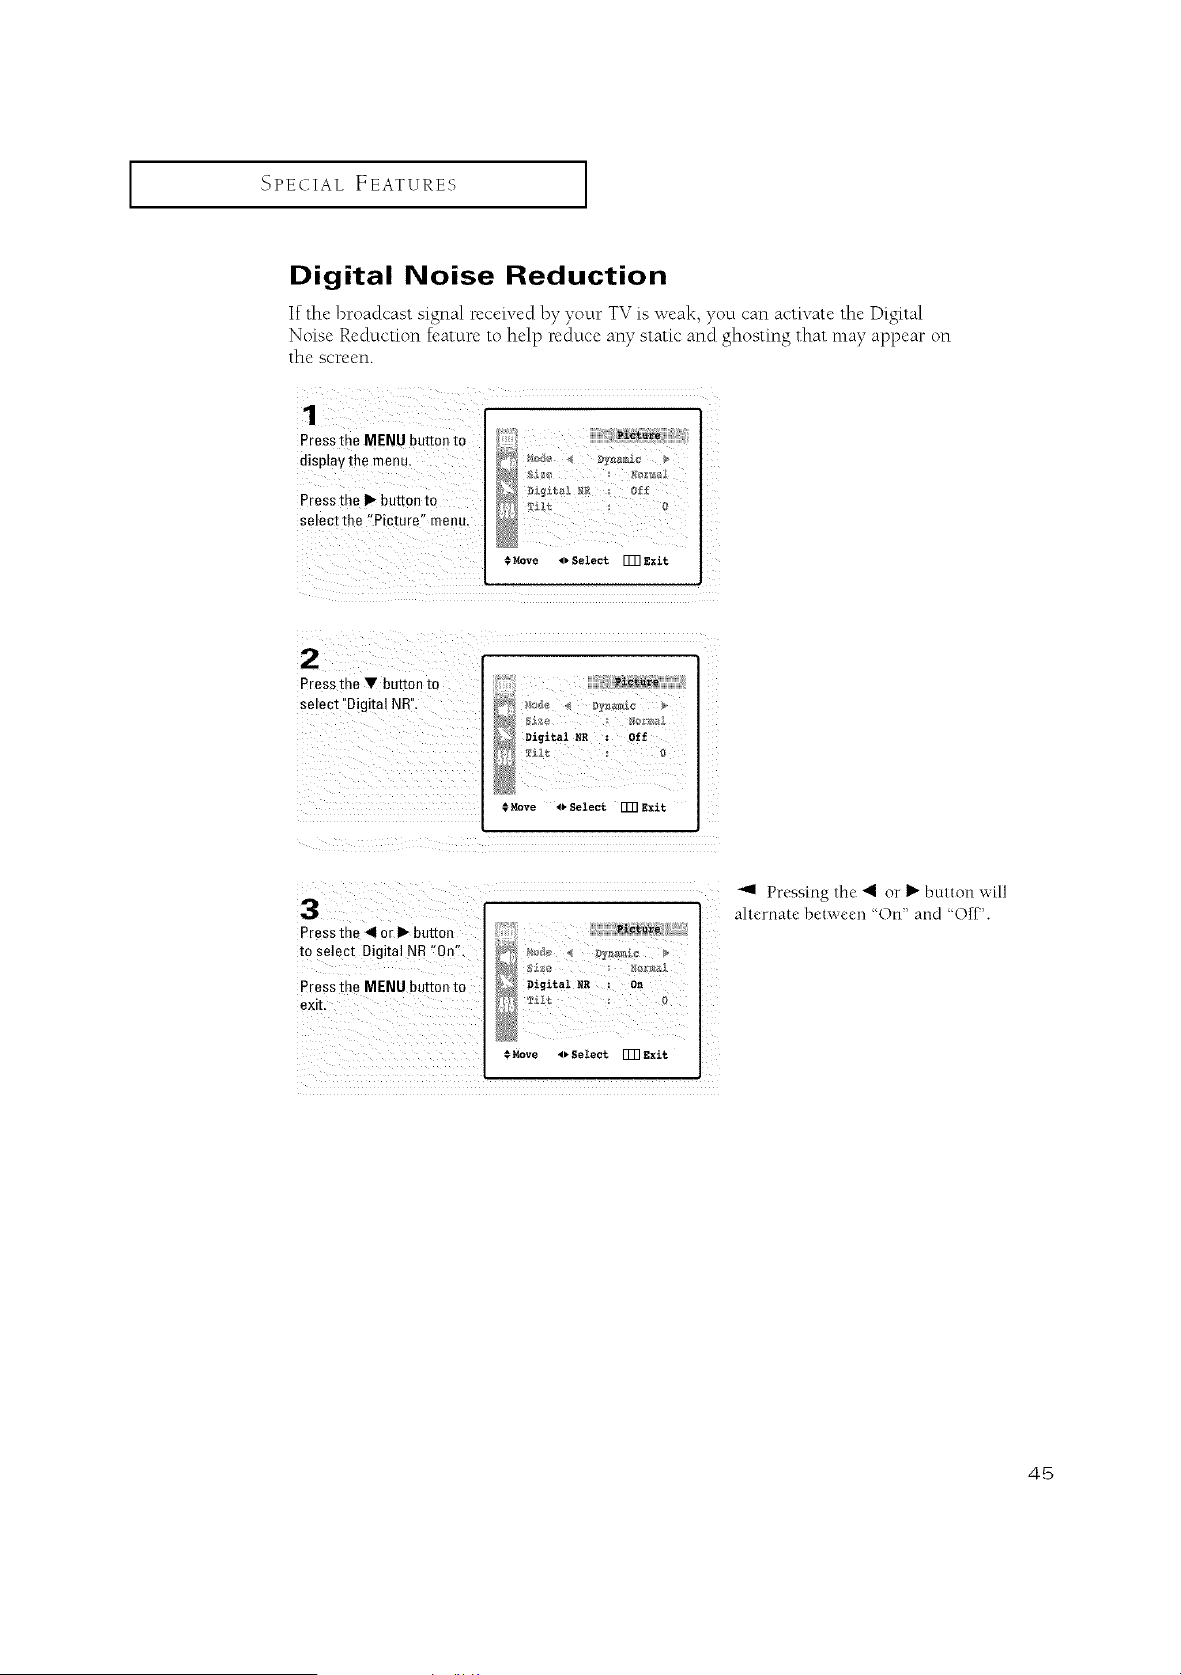
Digital Noise Reduction
If the broadcast signal received by yo_.trTV is weal<, yo_.tcan activate the Digital
Noise Reduction feature to help red uce any static and ghosting that may appear on
the screen.
1
Pressthe MENU button to
Press the I_ button to _{ _&_ 0
select the !{Picture " nlenu,
#Move _ Select []_ Exit
Press me V button to
select "Digital NR".
9_et_re
_o_ namlc
Dzgital _ : Off
#Move _Select []]]exit
3
Pressthe_llorll_buRon
to select Digital NR "On"
Press me MENU button to
eXE,
Digital NS : On
Tilt
© Move o Select []_ Exi%
Pressing the _1 or I1_button will
ahernate between "On" and 'Off".
45
I SPECIAL FEATURES I
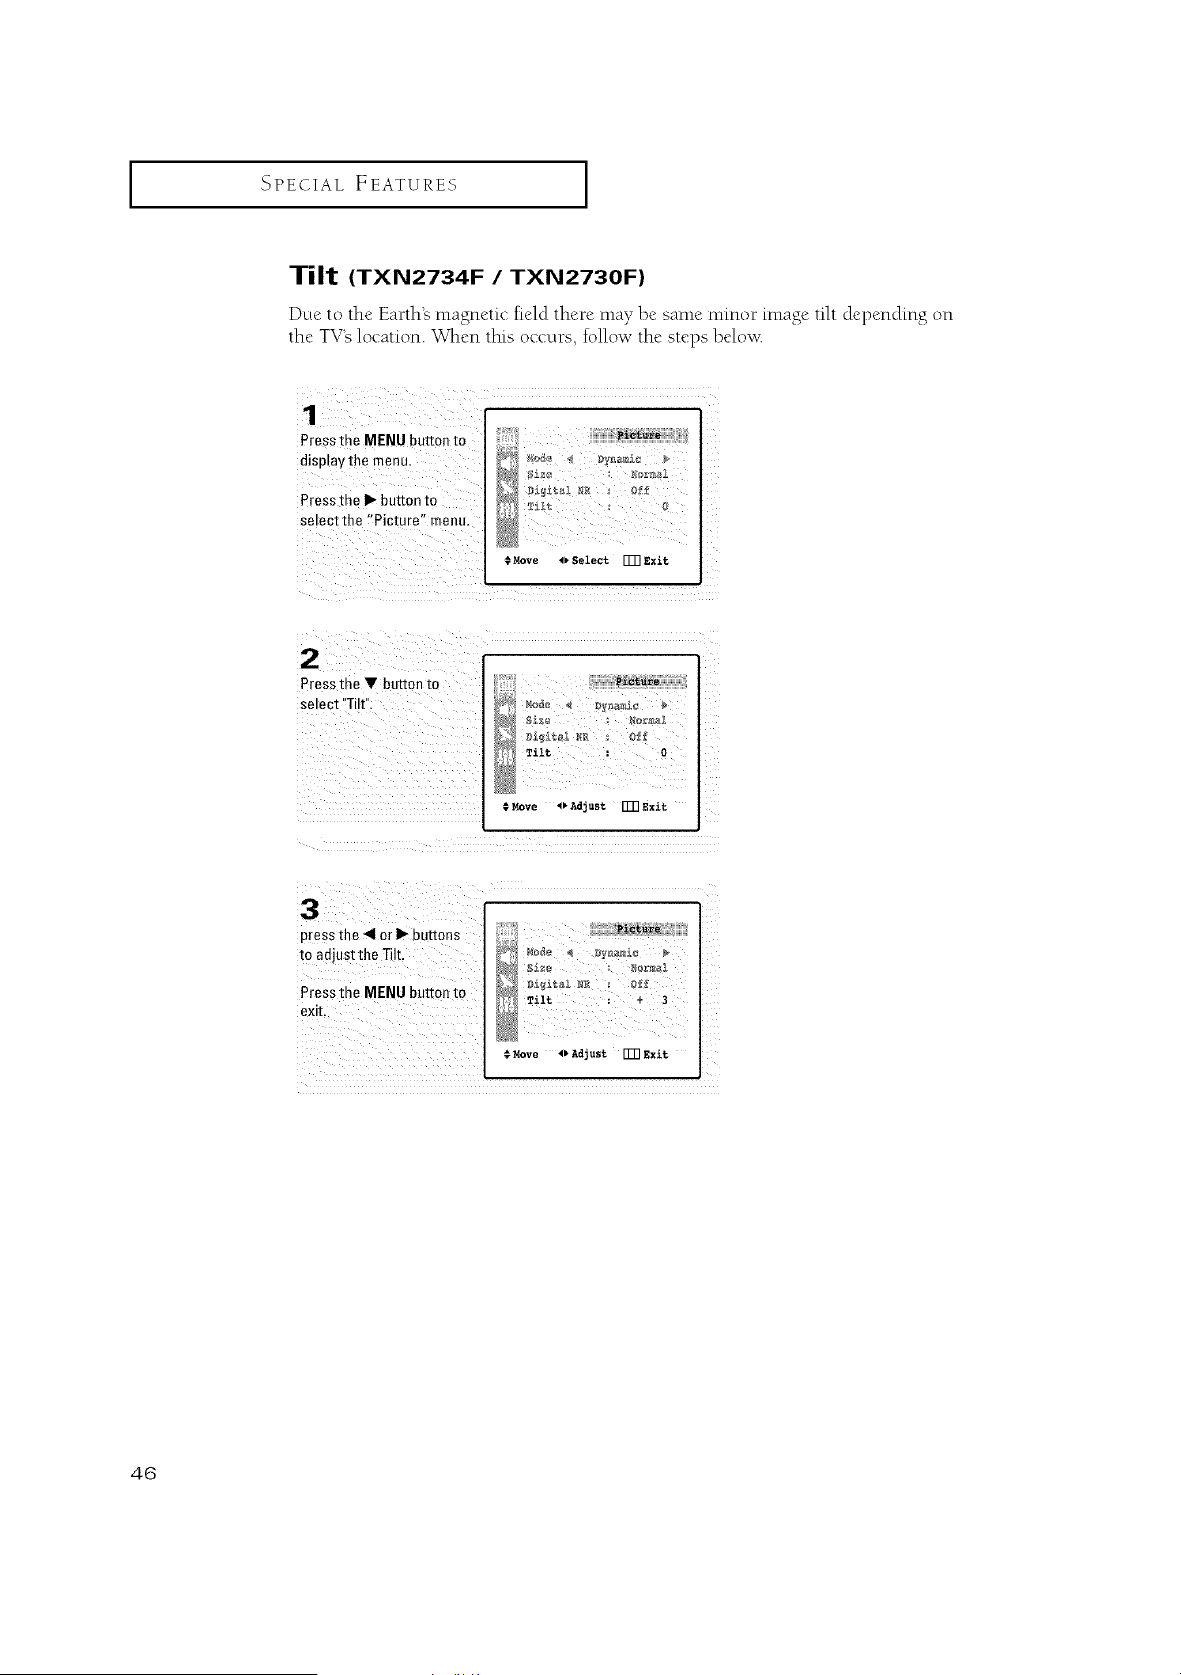
Tilt (TXN2734F /TXN2730F)
Due to the Earth's magnetic field there may be same nfinor image tilt depending on
the TVg location. When this occurs, follow the steps belov_c
il ¸ // i
Pressthe MENU button to
display the menu,
Pressthe I_ button to
select the f'Picture" menu,
€ Move _, Select [TR Exit
Press the V button to
semct "Tilt",
_i_t_re
Tilt : a
Move _vAd3ust _ Exit
3
press the 41or I1_buttons
m adjust the Tilt.
Press the MENU button m
exit
Pi_re
_l_e Ro_a{
Tilt : + 3
@Move _ Adjust rT_Exlt
46
SPECIAL FEATURES ]
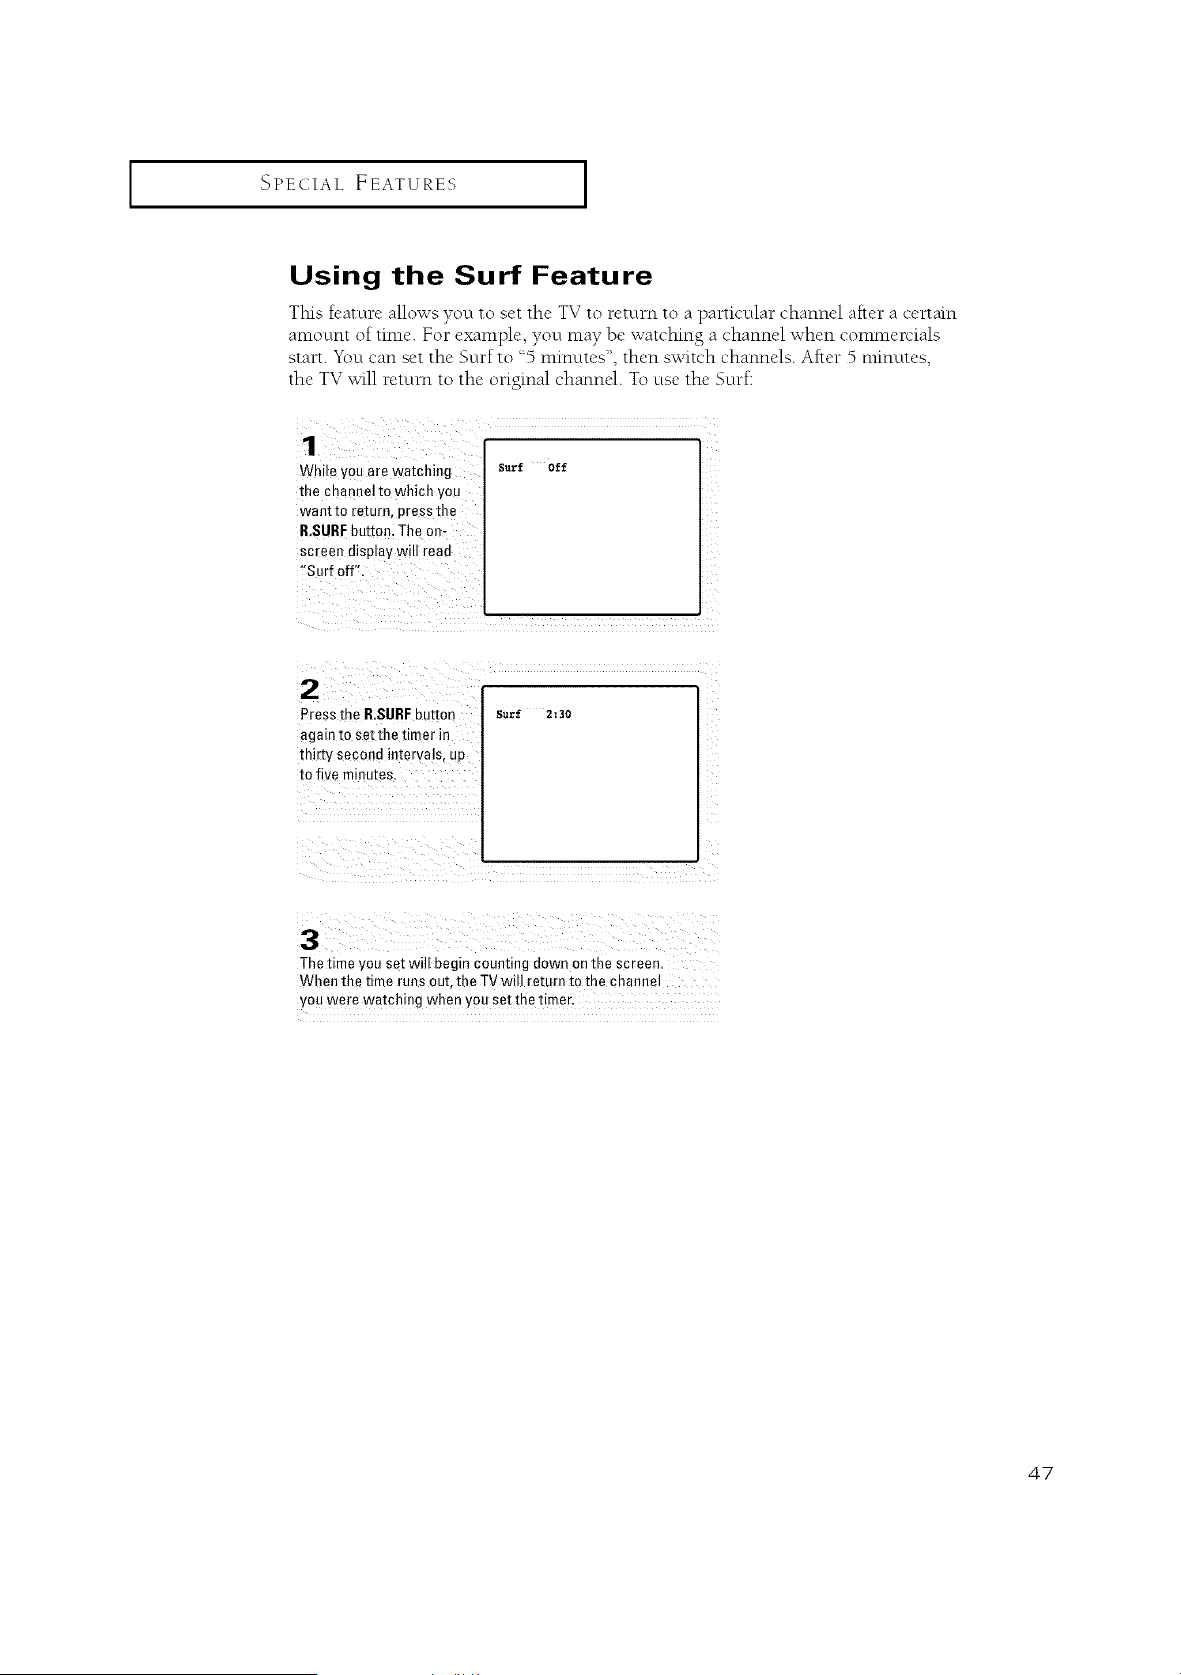
Using the Surf Feature
Thb feature allows you to set the TV to return to a particular channel after a certain
amount of time. For example, you may be watching a channel when commerdals
start. You can set the Surf to "5 minutes", then switch channels. After 5 minutes,
the TV will return to the original channel. To use the Surf:
While you are watching
the channel tO which you
want to returB, press the
&SURF button; The on-
screen display will read
!'Surf off".
Press the R.SURFbutton
again to s_t the timer in
thirty second intervals, up
to five minutes.
Surf 2=30
ii i iii i
The time you sat will begin counting down on the screen.
When the time runs out, the TV will return to the channel
You were watching when YOUset the timer.
47
ISPECIAL FEATURES I
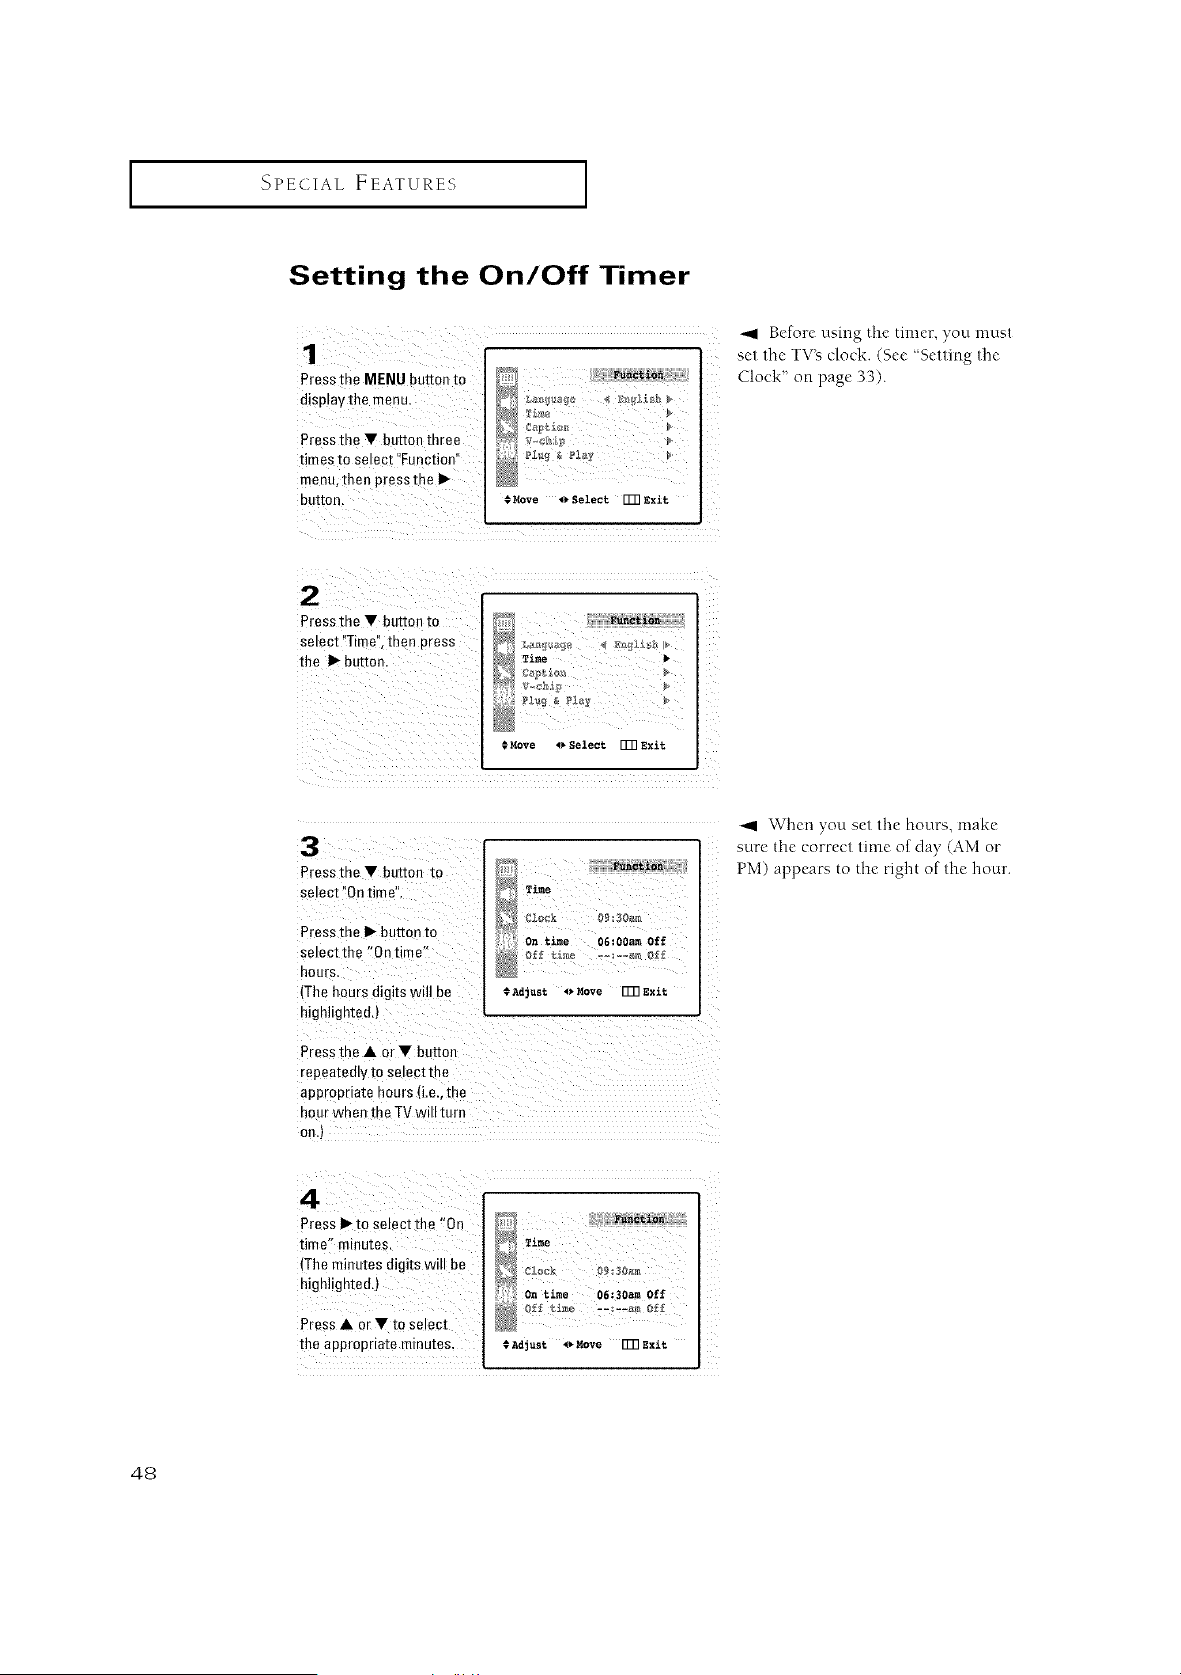
Setting the On/Off Timer
_.9 Before using the timer, you must
set the TV_ clock. (See '%etting rite
Clock _' on page 33).
Pressthe • button to
Select '_Time'i,then press
the • button.
.*Move _ Select[[]]Exit
3
Pressthe • butzon lo
semct "Ontime'
Press me • button to
select the "On tim e"
BOUTS.
(The hours digits will 3e
highlighted.)
Press the • or • button
repeatedly to select the
appropriate hours (i.e.,the
hOUrwhen the TVwttt Turn
on./
£ene_ion
Time
C_ock 89:30_
On ti_t_ 06;OOamOff
ef_ time -am of_
#Adjust o Move _Exit
_1 When you set tlte hours, make
sure the correct time of Clay (AM or
PM) appears to the right of the ltour.
4
Press • m smect the "On
time" minutes.
(Theminutes digits wtll be
highligmee4
Press • or • to select
the appropriate minutes.
Function
Time
On time 06:30am Off
#Adjust _*Move _3]Exit
48
ISPECIAL FEATURES
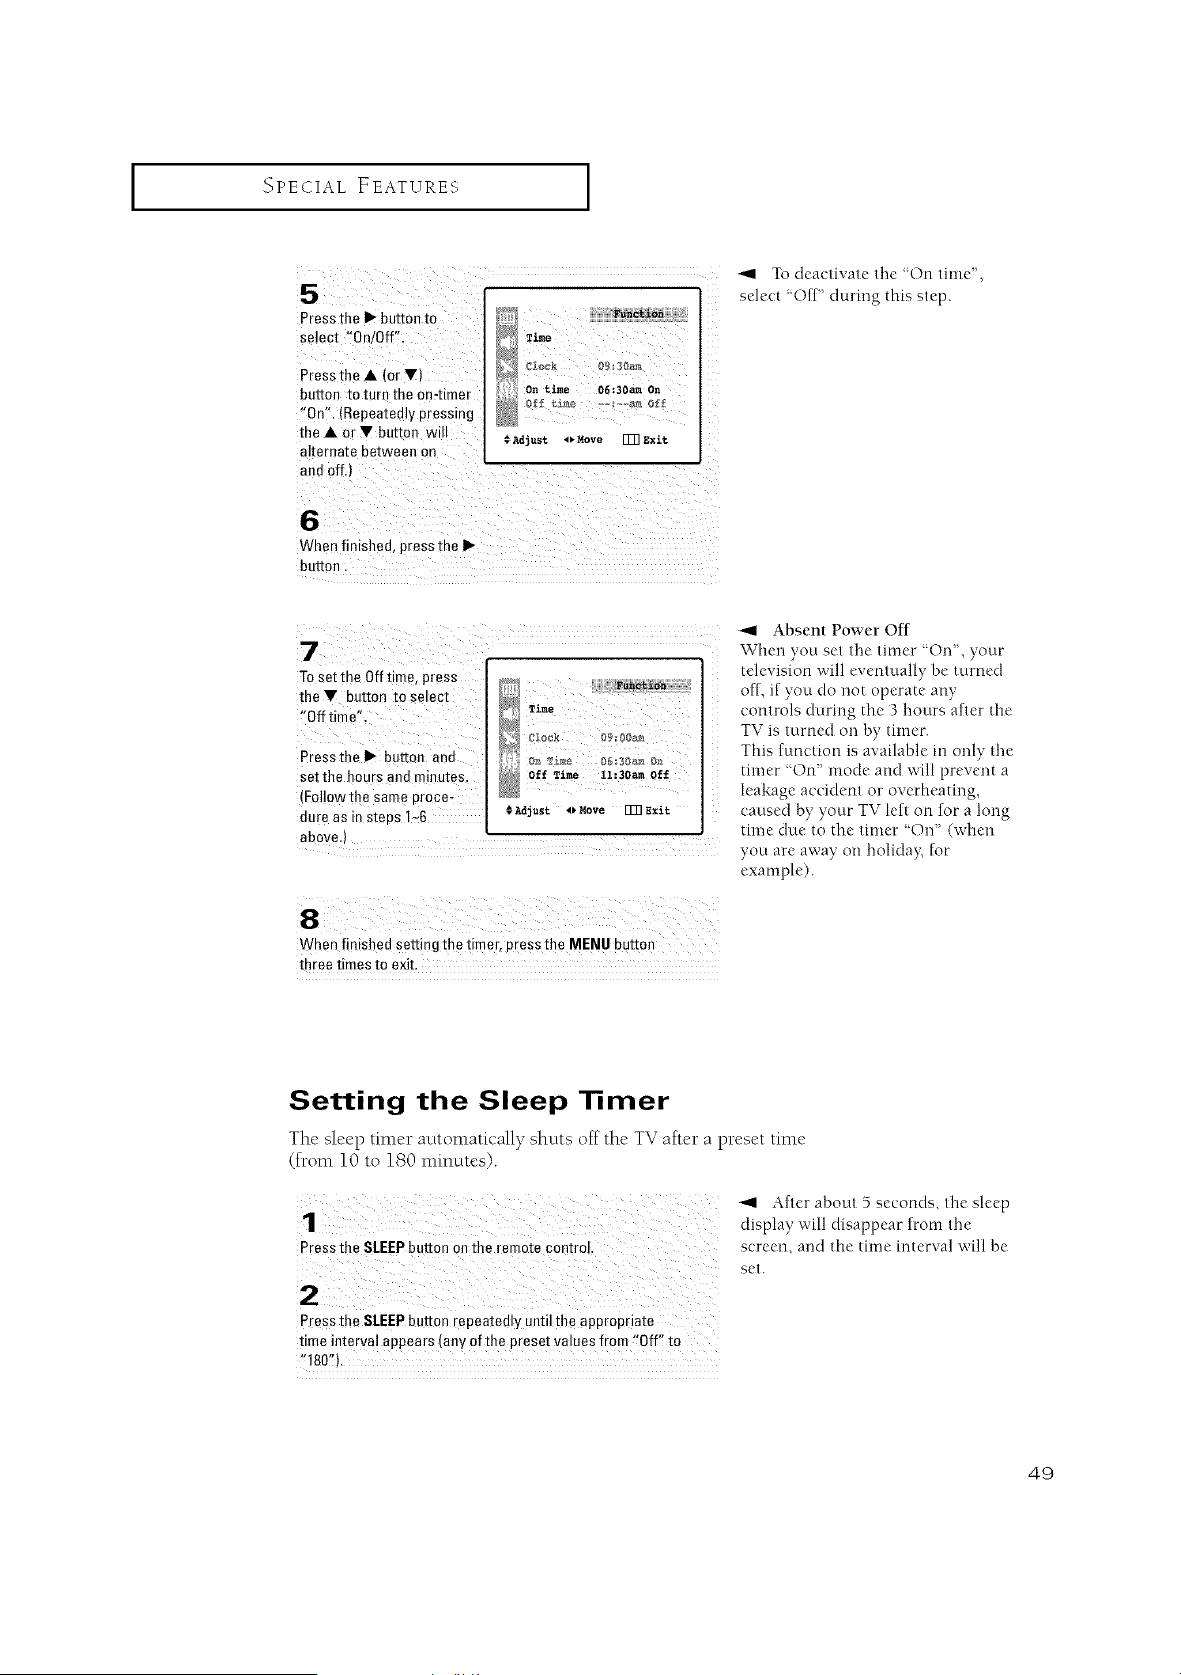
Press the Ib-button to
select ,On/Off".
Pressthe A (orV)
button to ture the on,timer
!'On:_,(Repeatedly Pressing
theA erY button will
altereate between on
and Off.) '
-.9 TO deactivate tile "On time",
select 'Off" during this step.
When finished, press the Ib-
button.
To set the Off time, press
the Ybutton to select
Presstbe I1_button and
setthe hours and minutes,
(Follow the same proce,
dure as in steps 1,_6 @Adjust4_Move FR Exit
above.)
_1 Absent Power Off
When you set the timer 'On", your
television will eventually be turned
of[, if you do not operate any
controls during the 3 hours after the
TV is turned on by timer.
This function is available in only the
timer "On" mode and will prevent a
leakage accident or overheating,
caused by your TV left on for a long
time clue to the timer OrF' (when
you are away on holiday, for
example).
When finished setting the time r,p[ess the MENU button
three times to exit.
Setting the Sleep Timer
The sleep timer automatically shuts off the IV after a preset time
(from 10 to 180 nfinutes).
"display.,ft,. bout,,,,,ldisapp,. e o, ds.f omthesl,'eptbe
Press the SLEEPbutton on the remote control, screen, and the time interval will be
set.
Press the SLEEPbutton repeatedly until the appropriate
time interval appears (any ofthe preset values from !'Off'! to
"180,).
49

I SPECIAL FEATURES I
Sound Features
Choosing a Multi-Channel Sound (MTS) Soundtrack
Depending on the particular program being broadcast, yo_.tcan listen to stereo, mono or
a Separate A!.tdio Program. (SAP audio is usually a foreign-language translation.
Sometimes SAP has unrelated infom*ation like news or weather.)
Pressthe MENU button
tO displavthe menu_
PresstheV button to
Select the '_Sound' menu,
then press the II_buttoal Z
€ Rove _ Select IT[]Exit
Pressthe V button six _{
times tO Select !'MTS:'I _#_' 4 cu,_,_,_ >
MTS 4 Stereo J_
Rove 4_ Select rm Exit
Press the 41or I1_button
to select '!Mono'; "SAP!_
or "Stereo",
Pressthe MENU button
twice to exit. MTS _ Mo_o
#Move _ Select Fm gxit
The text at the bottom of the
lnenu tells you if the incoming
audio is stereo, SAP or mono.
•Choose Stereo [()r channels that are broadcasting in stereo.
•Choose Motto for channels that are broadcasting in mono, or if you are
having difficulty receiving a stereo signal.
• Choose .SAPto listen to the Separate Audio Program, which is usually a
tbreign-language translation.
You can also change the MTS setting by pressing the "MTS" button on the remote
control. (When you change channels, MTS is set to "Stere()" automaticall}q
To listen in "SAP" or "Mono", change the MTS setting.)
5O
SPECIAL FEATURES ]
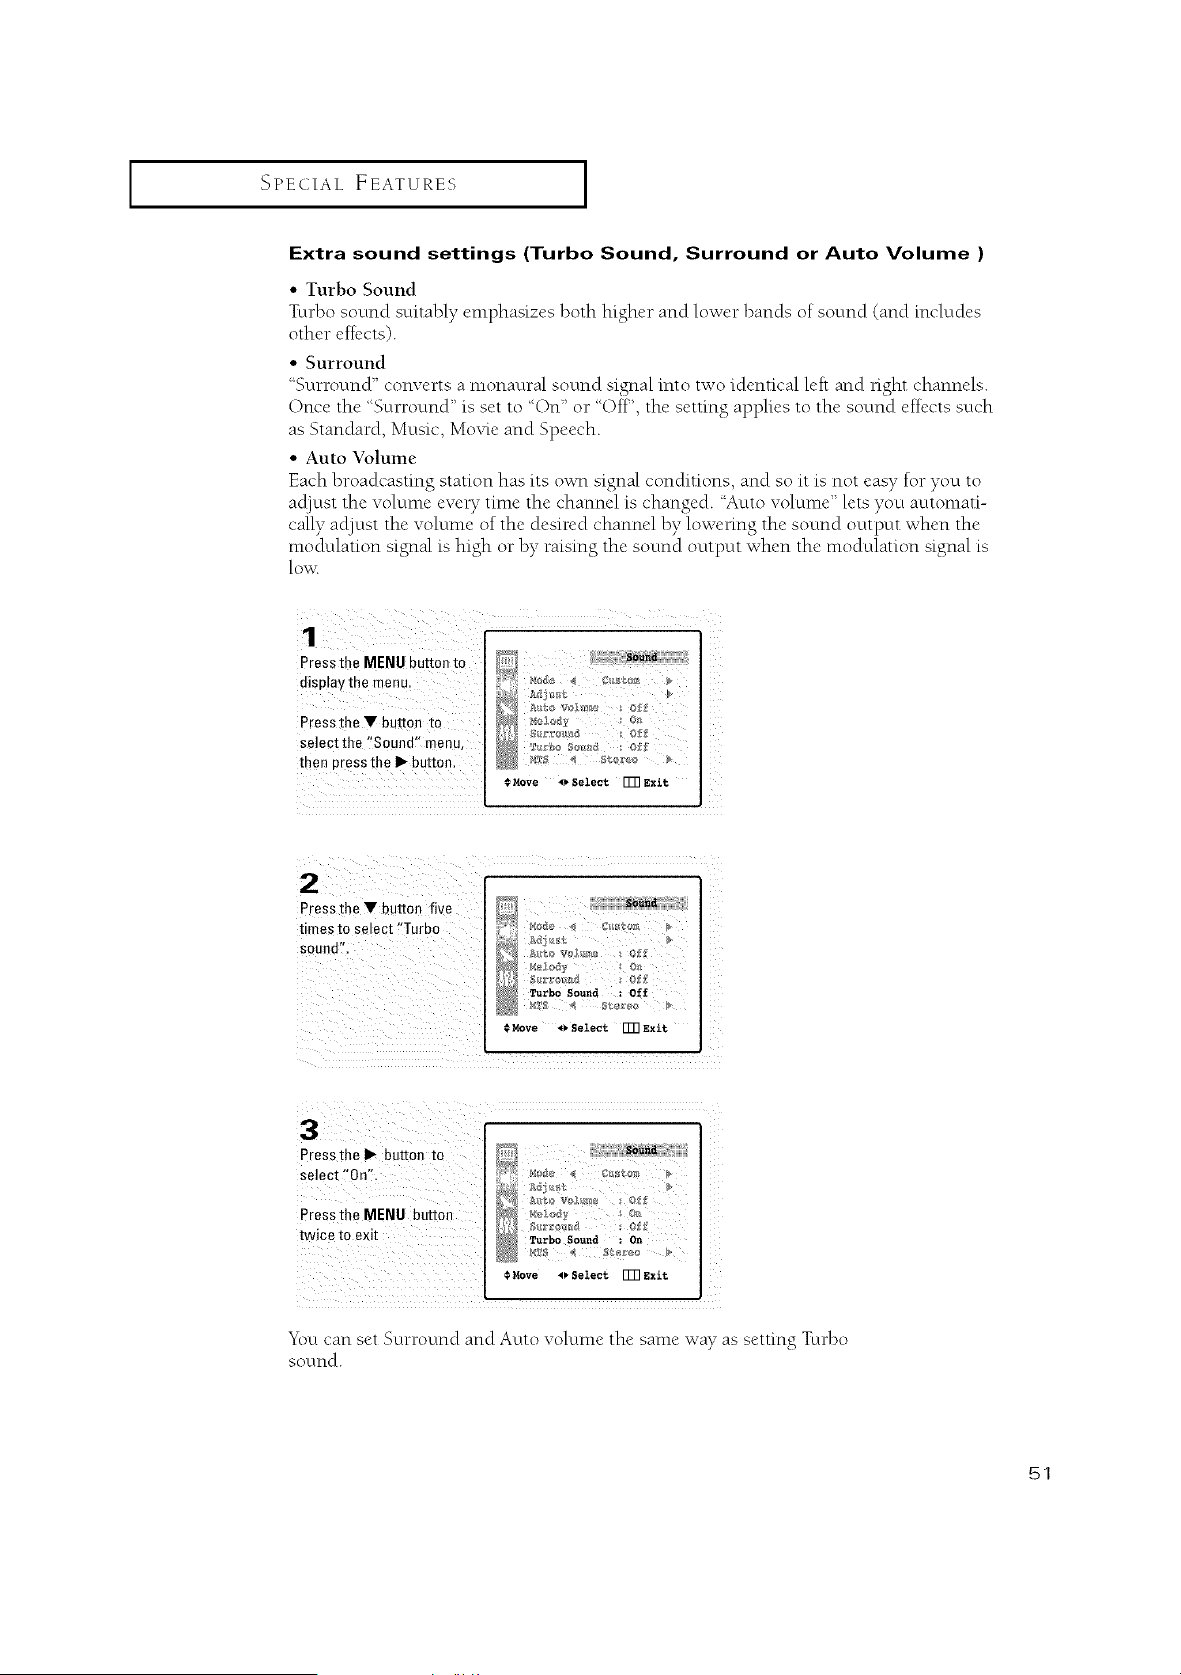
Extra sound settings (Turbo Sound, Surround or Auto Volume )
• Turbo Sound
Turbo sound suitably emphasizes both higher and lower bands of sound (and includes
other effects).
• Surround
%urround" converts a monaural sound signal into two identical left and right channels.
Once the '_Surround" is set to '_On" or '_Off",the setting applies to the sound effects such
as Standard, Music, Movie and Speech.
• Auto Volume
Each broadcasting station has its own signal conditions, and so it is not easy for you to
aclinst the volume eveUtime the channel is changed. '_Autovolume" lets you automati-
cally acl]nst the volume of the desired channel by lowering the sound output when the
modulation signal is high or by raising tire sound octtput when the modulation signal is
low.
# Move _* Select 1_ Exit
Pressthe Ybutton five
times to select !'Turbo
Move _Select _ Exit
i_!_i__ii_iii)ii_I_ii_ii_iii_i_7 _i_
¸3¸¸¸¸¸¸¸L
Pressthelb- button to
Select ,On';,
Pressthe MENU button
twice to exit
€Rove _Select _gxit
Youcan set Surround and Auto volume the same way as setting Turbo
SOLlnd.
51
SPECIALFEATURES I
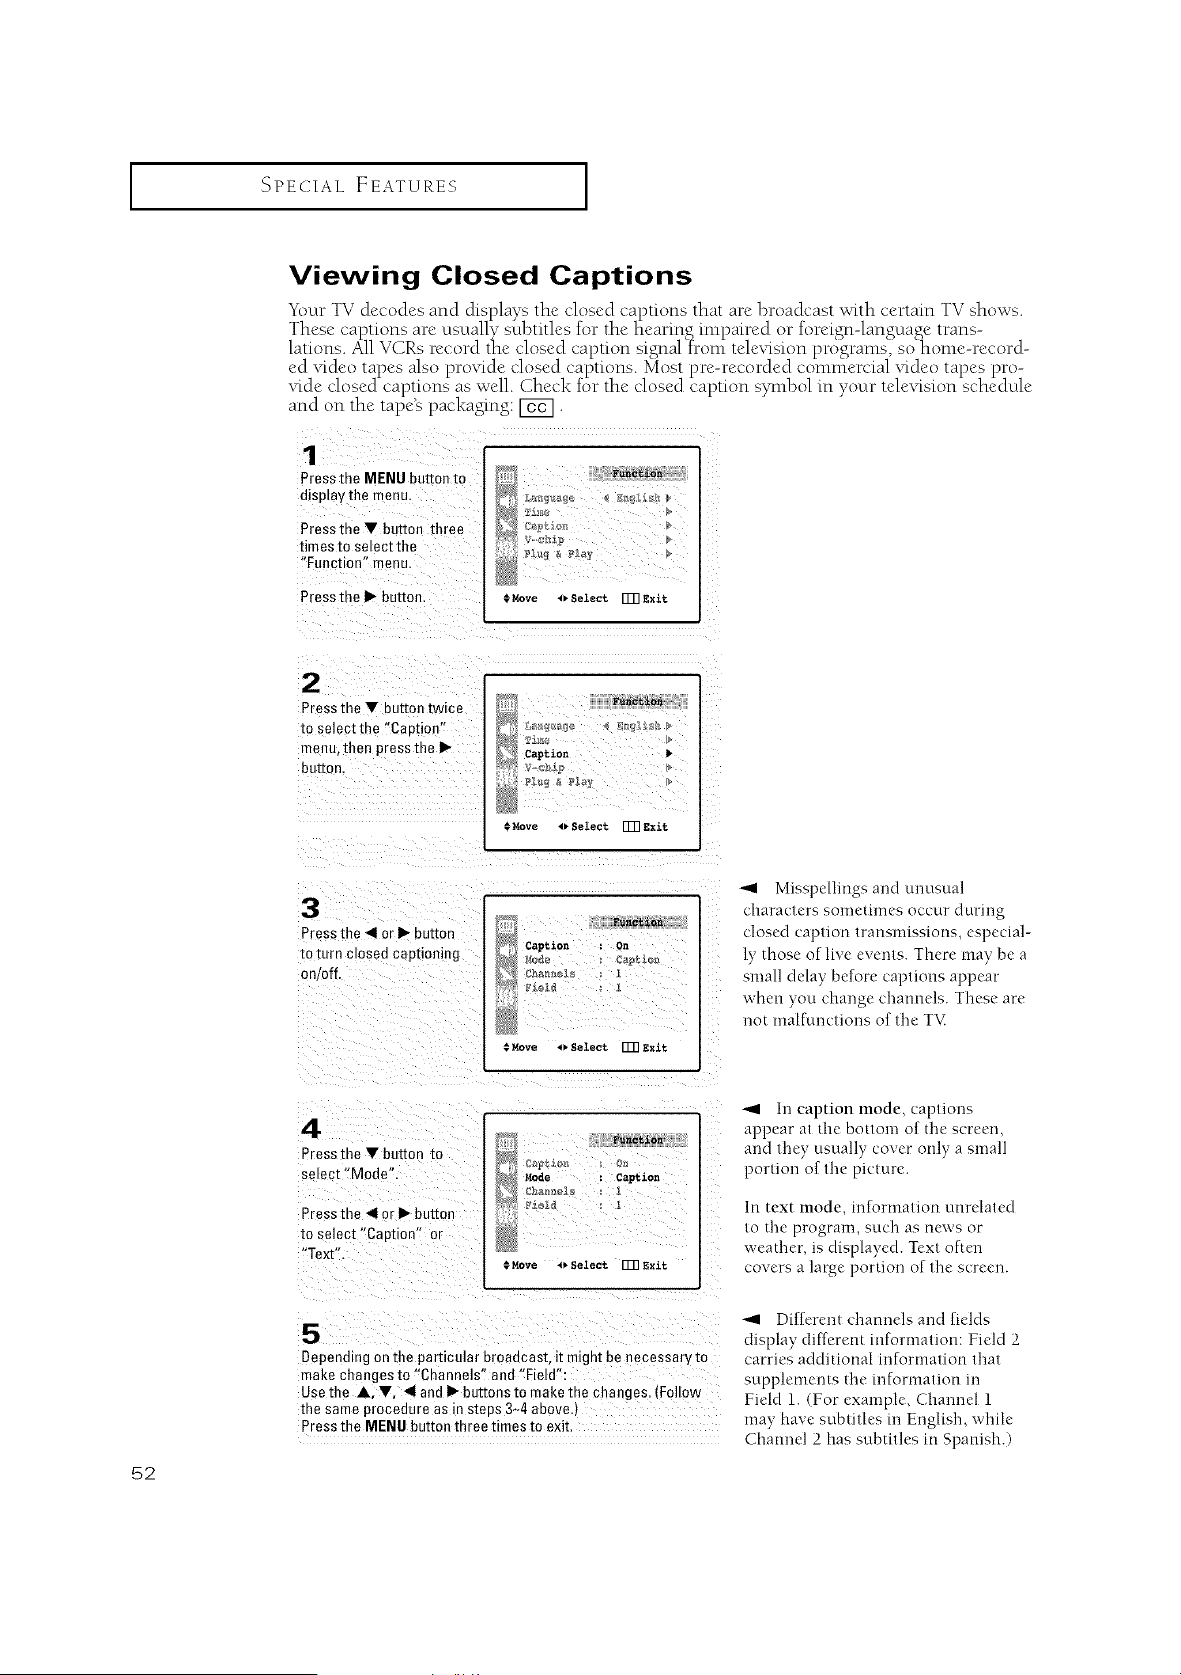
Viewing Closed Captions
_(bur TV decodes and displays the closed captions that are broadcast with certain TV shows.
These cal)tions are usually subtitles for the hearin< iml)aired or forei<n-lan<uage trans-
lations. All VCRs record the closed caption signal ]'ron_ tele,dsion pro'grams7 so' home-record-
ed _ddeo tapes also pro_dde dosed captions. Most pre-recorded commercial _ddeo tapes pro-
vide dosed captions as well. Check for the closed caption symbol in your television schedule
and on the tape's packaging: [_.
1
Pressthe MENUbuttonto
display the menu
Pressthe • button three
times to select the
"Function" menu
Press the I_ button. .* Move 4_ Select [_ Exit
2
Pressthe • buttontwice
to selectthe "Caotioe"
menu,then pressthe •
button.
_c_ion
Captio_
= Move _ Select rUN exit
3
Press the _1or • our[on
m turn closed captioning
on/off.
Caption : On
#Move OSelect FUn exit
-,9 Misspellings and unusual
characters sometimes occur during
closed caption transmissions, especial-
ly those of live events. There may be a
small delay before captions appear
when you change channels. These are
not nmlfunctiorls of the T\_
52
4
Press the • button [o
semct "Mode"
Press the _IIor • button
to select "Caption" or
"Text"
Fu_t £on
Mode : Caption
#Move *_Select FUnexit
5
Dependingon the particularbroaacast,it m_ghtbe necessarym
makechangesto "Channels"and"Field":
Usethe A, •, 41andI_ buttonsto makethe changes..Follow
thesameproceaureas in steas3~4above.]
Pressthe MENUbuttonthreetimesto exit.
-._ In caption mode, captions
appear at the bottom of the screen,
and they usually cover only a small
portion of the picture.
In text mode, in[ormation unrelated
to the program, such as news or
weather, is displayed. Text often
covers a large portion of the screen.
-'_ Different channels and fields
display dif[crent reformation: Field 2
carries additional reformation that
supplements d-_ereformation m
Field 1. (For example. Channel 1
may have subtitles m English, while
Channel 2 has subtitles in Spanish.)

SPECIAL FEATURES ]
Using the V-Chip
The V-Chip feature automatically locks out progranmfing that is deemed inappropriate for
children. The user must first enter a PIN (personal ID number) before any of the V-Chip
restrictions can be set up or changed.
Setting Up Your Personal ID Number (PIN)
1
Pressthe MENU button to
I
t
displaythe menu. L_ _ _ _ _
PresstheV button three t_ o
timesto selectthe _;g _ _;L_
" unction'menu@
Press the ii_ button" ©M0ve Select [TRtxit
Press the • button three
[_mesto select the "V-
chip" menu.
Press the I_ button.
Ftnct_on
Enter pin
Enter pin : ....
The "Enter pin" screen will appear. Enter your 4-digit PIN
number, Note: The defau t PIN _umber for a new TV set is
"0-0-0-0."
3
After entering a valid PIN
numoer.the "V-chip"
screen will appear
Press the • button three
times and highlight
"Change pin"
eha_ge pin
•
While me "Change pin"
field is selected, press the
I_ button. The Change pin
screen w appear.
Choose any 4-digits for
your PIN and enter mem.
Function
Change p£n
Enter new pin : ....
tonfi_ new pin
Confirm new pin : ....
As soon as the 4 digits are entered, the "Confirm new pin"
screen appears. Re-enter the same 4 digits. When the Confirm
screen disaooears, your PIN has been memorized.
Press the MENU button three times to exit.
-,_ Note: If you forget the PIN,
press the remote-control keys m the
following sequence, which resets the
pin to 0-0-0-0:
POWER OFF "+ MUTE "+ 1 "+ 8
2 "+ POWER ON.
53
I SPECIAL FEATURES I
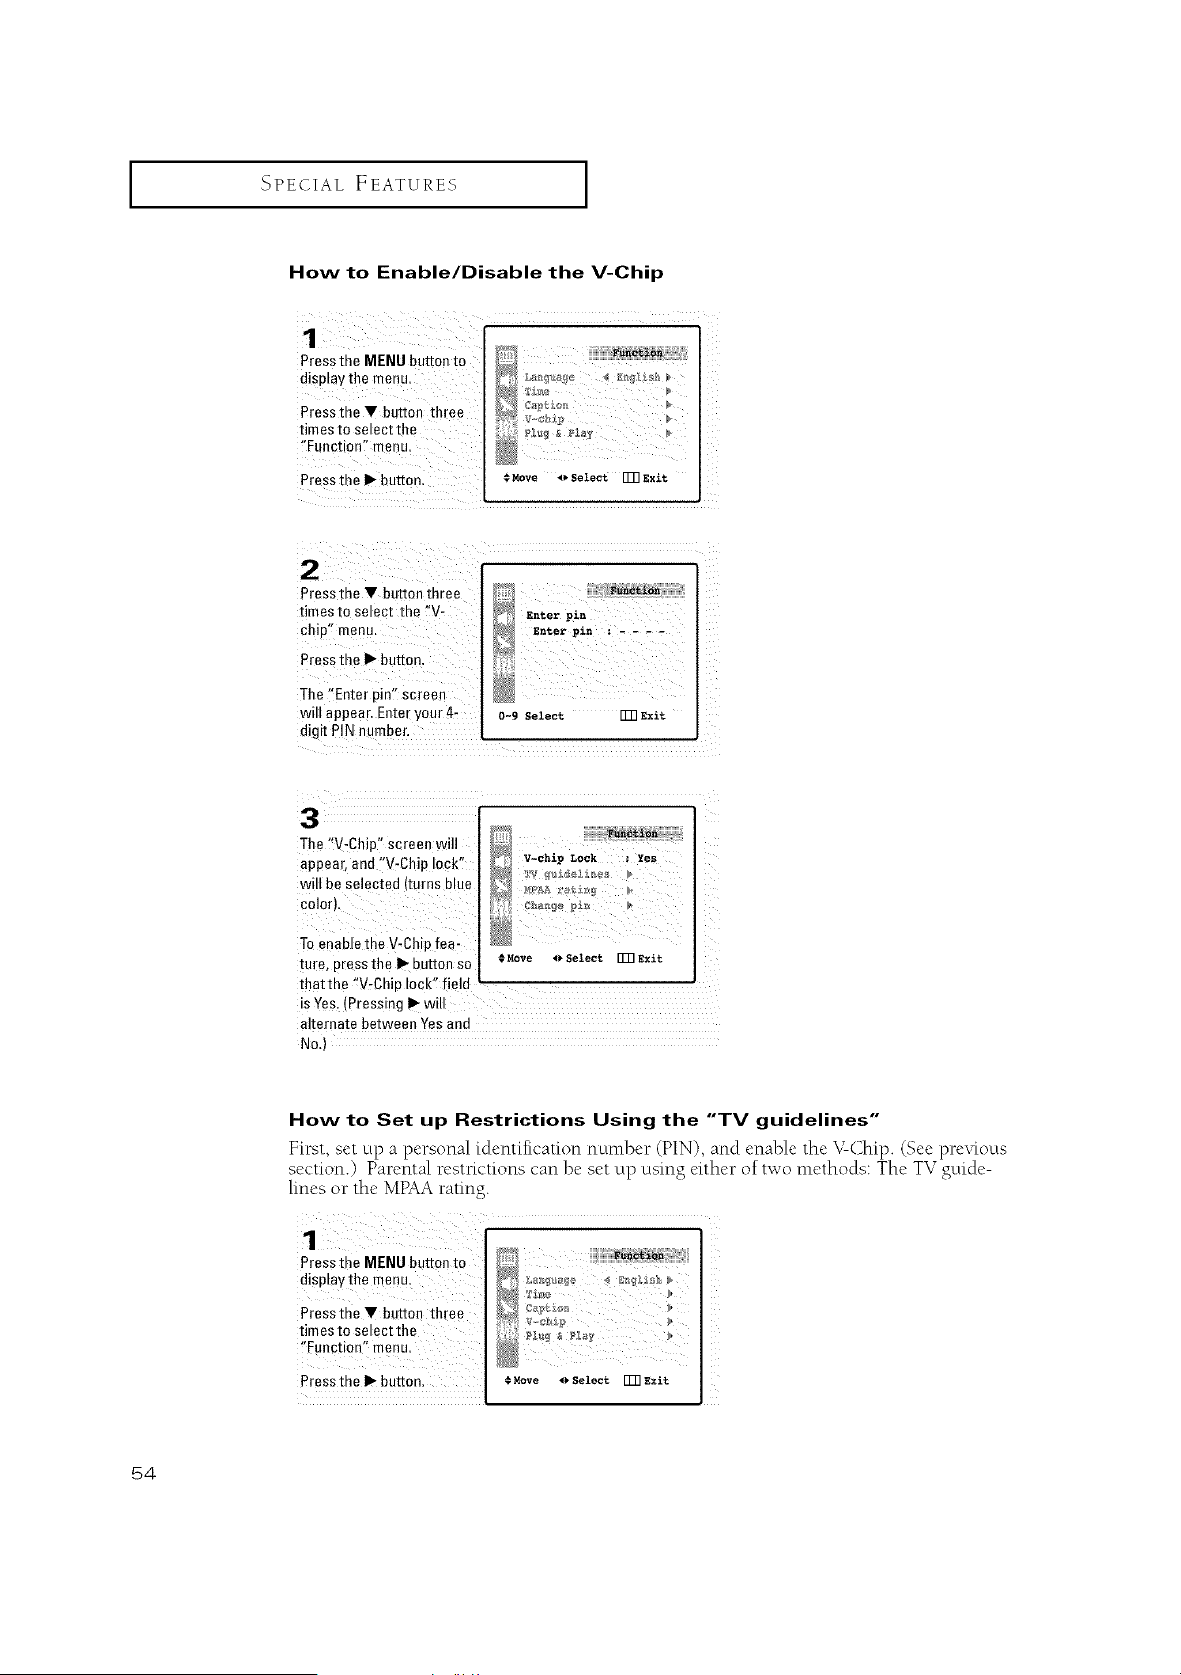
How to Enable/Disable the V-Chip
Pressthe MENU button to
disp!aythe menu_
Pressthe V button three
timesto select the
"Function"menu:
Press the I_ button € MOVe ,_ Select FFRExit
Press the V button three
timesto select the !!V-
Chip" menu.
Press the I_ button.
]'he !'Enter pin!! screen
will appear. Enter your 4:
digit PIN number.
D
Enterpin _- - ,
0-9Select rm exit
3
The '!V:Chip" screen will
appear, and "V-Chip lock,
will be selected (turns blue
To enable the V-Chip fea-
ture, press the I_-button so
'_:_i _i _ _ii • _
_V-chlp Lock : Yes
@
*. Move t_ Select [133exit
that the '!V-Chip lock" field
is Yes: (Pressing _" will
alternate between Yes and
No.)
How to Set up Restrictions Using the "TV guidelines"
First, set up a personal [dentifk'ation number (PIN), and enable the V-Chip. (See previous
section.) Parental restt-ictions can be set up using either of two methods: The TV gttide-
lines or the MPAA rating.
Press the MENU button to
d splay the menu.
Pressthe V button three
times to select the
!'Function" menu.
Press the I1_button. €Move oSelect r]_ Exit
54
I SPECIAL FEATURES I
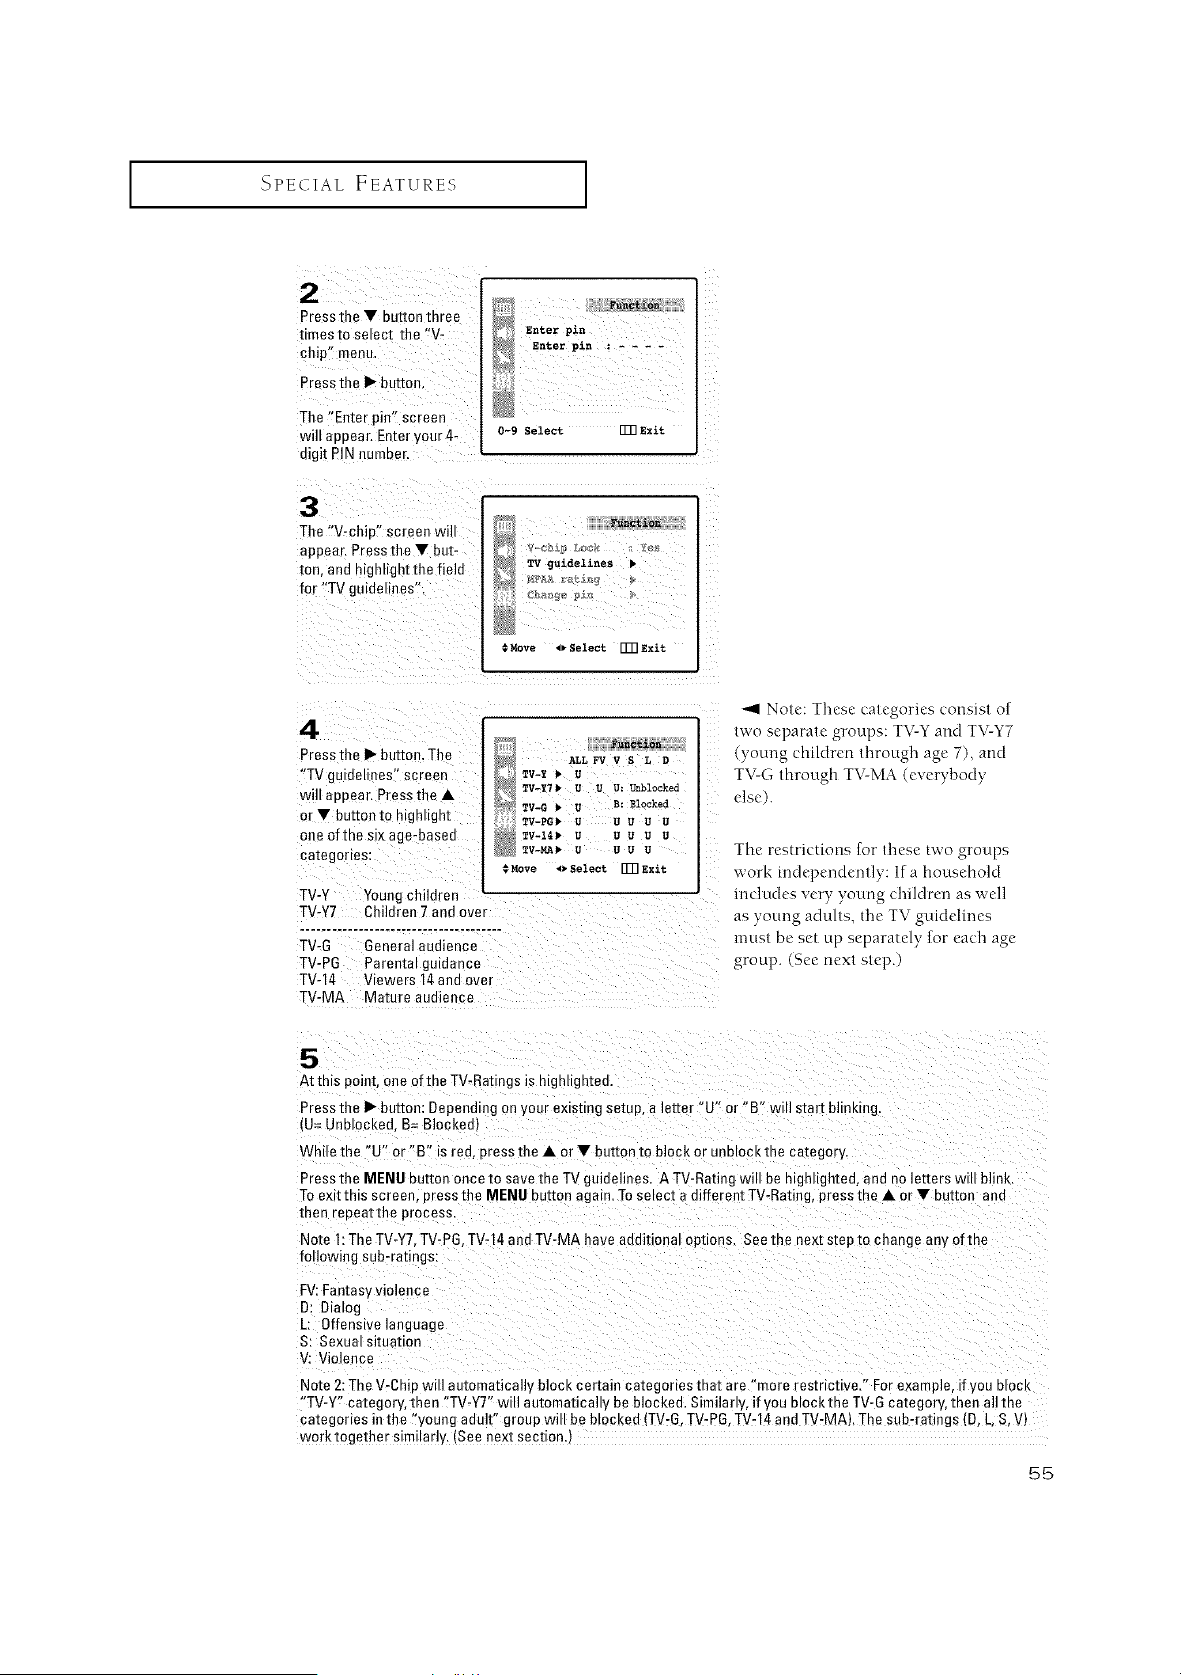
2
Pressthe V button three
umes to select the "V-
chip" menu.
Press the I_ button.
The "Enter pie" screen
will auoear. Enter your 4-
digit PIN numner.
3
The "V-chin" screen will
appear. Press the V but-
ton. and mgnught the field
for "TV guidelines".
enter pin
Enter pin : ....
0-9 Select FFRExi%
_unctioa
TVguiaelines •
€Move _ Select FFR exit
4
Press the I_ bottoe. ]'he
"TV guidelines" screen
wil/appear. Press the •
or • buttonto highlight
one of the six age-basea
ca[ego/lOS:
_unc&io_
ALLFV V S L D
TV-_ _ U
TV_¥7 _UU U: Unblocked
TV-G • U B: Blocked
TV=PG_ a u uu u
TV-I_ a U U B U
TV_MA_ UUU B
Move ,_ Select _] exit
TV-Y Youngchildren
TV-Y7 C_ Idren 7 and over
......................................
TV-O General audience
TV-PO Parental guidance
TV-14 Viewers 14 aea ovm
TV-MA Mature audience
Nolo: These ca/egorics consisl o[
two separate groups: TV-Y and TV-Y7
young children dlrough age 7). and
TV-G lhrough TV-MA (everybody
else).
The restrictions for/hose two groups
work mdependcnlly: If a household
includes very young children as well
as young adul/s, tile TV guidelines
muel bc set Lipscpara[ct_ for each age
group. See next slop.)
At this point, one of the TV-Ratings is highligntee.
Press the I_ button: Bepeadirg on your existing setup, a letter "U" or "B" will start blinking.
,U= Unblocked B= Blocked)
Wh e the "U" or "B" is red, press the • or • button to block or ur 3lOCKme category.
Press the MENU button once to save the TV guidelines. A TV-Ratieg will be highlighted, and no letters will blink
To ex [mls screen, press the MENU buEeq again. To semct a different TV-Ratieg, press the • or • button and
men reoeatthe process.
Note 1:The TV-Y7,TV-P8, TV-14 andTV-MA have additioea op[mns. See me next s[ep to change any of the
following sub-ratings:
FV:Fan[asy violence
D: Dialog
L: Offensive language
S: Sexua/situation
V: Violence
Note 2:The V-Chin wi automatically block certain categories that are "more restrictive." For example, if you mock
"TV-Y" category, then "TV-Y7" will automatically be blocked. Similar y, if you blockthe TV-G category, then all the
ca[egories inthe "young auult" group will be blocked (TV-G. TV-PG.TV-14 and TV-MA). The sub-ratings (B, L, S,V)
worktogether similarly. ISee next sectionj
55
I SPECIAL FEATURES I
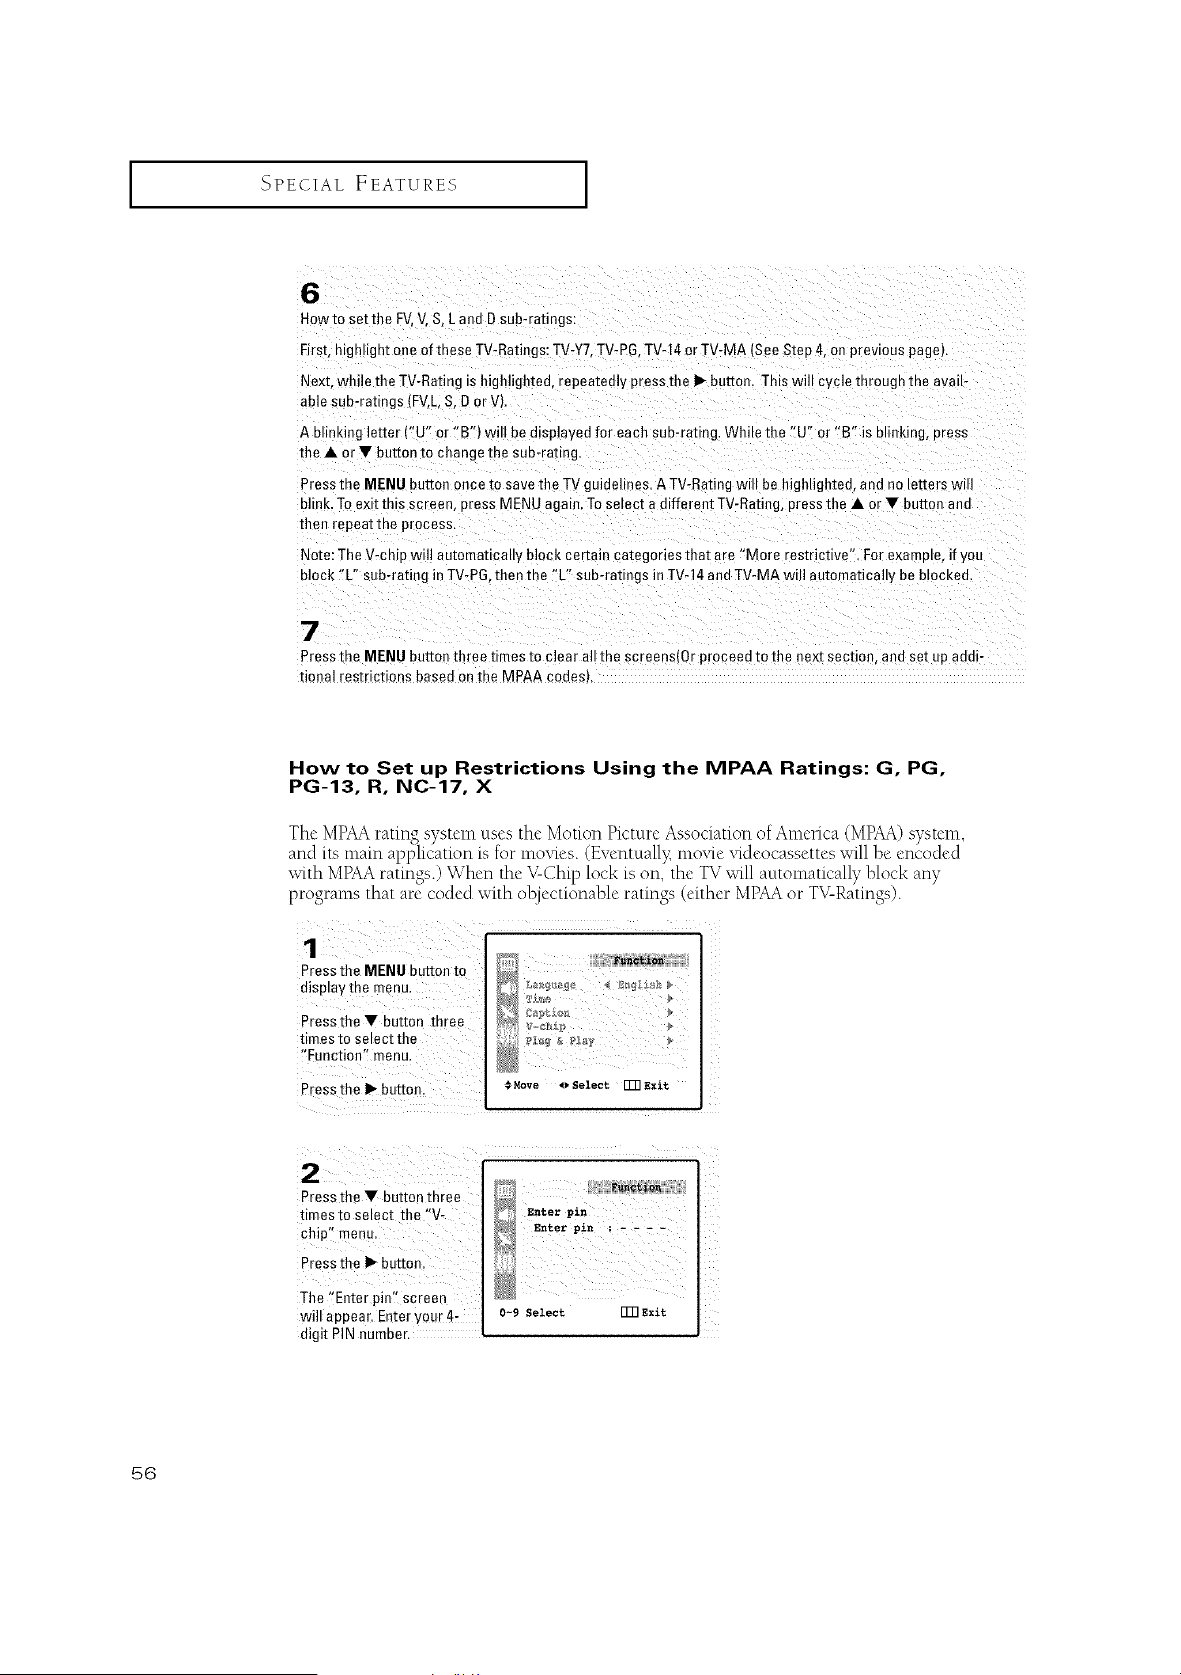
6
Howto setthe FV,V. S, L and D sub-ratings:
First, h ghlight one of these TV-Ratiegs: TV-Y7,TV-PG.TV-14 or TV-MA (See Step 4, o- prevtous page)•
Next, while the TV-Rating s highlighted, repeatedly press the I_ button. This will cycle tnrougn me ava u-
able sub-ratings (FV,L, S, D orV).
A blinking letter ("U" or "B') will be displayed for each sub-rating. While the "U" or "B" is blinking, press
the • or 'IF button to change me suo-ratmg.
Press the MENU button once to save the TV guidelines• A TV-Rating will be highlighted, and no letters wtll
blink. Toexit tl" s screen, DressMENU again• Toselect a different TV-Rating, press the • or • button and
then repeat me process•
Note: The V-chip wtll automatmally block certain categories that are "More restrictive". For examole, if you
block "L" sub-rating in TV-PG,then the %" sub-ratings in TV-14 and TV-MA wi Iautomaticall,, be blocked.
7
Press the MENU buttor three rimes to clear all the screens(0r proceed to the next section, ann set up aec -
tioeal restrictions based on the MPAA codes_.
How to Set up Restrictions Using the MPAA Ratings: G, PG,
PG-13, R, NC-17, X
The MPAArating system uses the Motion Picture Association of America (MPAA)system,
and its main application is for moxqes. (Eventuall}_moxqe xqdeocassettes will be encoded
V '
with MPAAratings.) When the -Chip lock is on, the TV will automatically block any
programs that are coded with ol_jectionable ratings (either MPAAor TV-Ratings).
2¸¸¸¸¸¸¸¸(¸¸¸¸¸¸¸¸¸/(
Pressthe • button three _
• 4 F'_ Enterpin
tlmesto select the V, _ Enterpin ]
_Enterpin • - - --
chip '_ menu. _ Enter pin ;.... ]
Press the I_ button.
will appear, Enter your 4: o-9 SeZeet ITRExlt
digit PIN number,
56
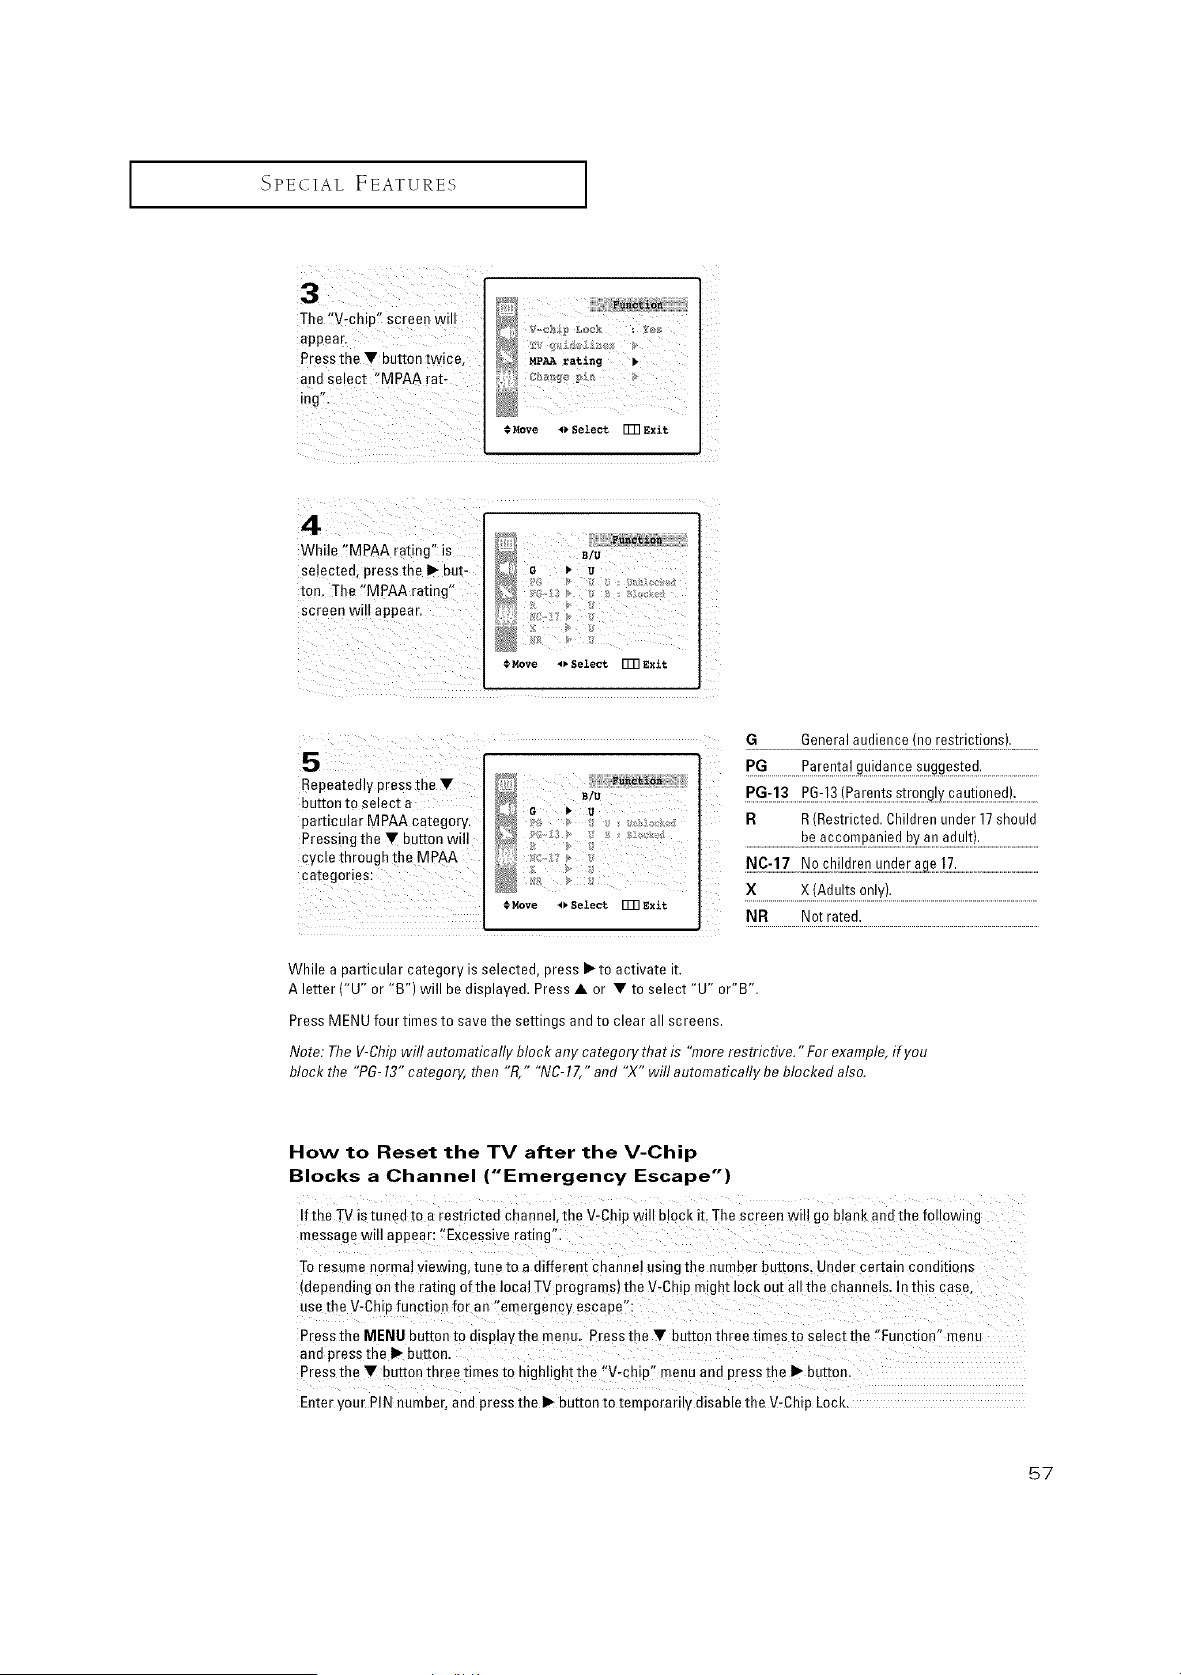
SPECIAL FEATURES [
]'he !_Vrcb!p" screen wi!!
appear.
Press the • button twice,
and Select "MPAA iat-
ing":
*.Move _ Select FFRexit
While '!MPAA rating'! is
selected, press the I_ but-
ton, ]he ,MpAA rating,
screen will appeal.
B_u 7 ).......
_ G _ a ¸¸¸
Rove 4_SelectFmExit
5 PGG......................Parental guidance suggested. .............
Bepeated!y press the,
button to select a
particular MPAA Category.
Pressing the Y button will
cycle through the MPAA
categories:
>C > / /2 }ag ge
P2: _ F ); aZ*:;k*;d
R )
g > ,
l_Rove I_SelectFm Exit
PG-13 PG-13(Parentsstrongly cautioned).
R R (Restricted. Children under 17should
............................_e...a..__.£._._a._.!e._!.._v.._.n.._._!.q!.t!:..............................
NC-17 Nochildrenunderac 17.
X X (Adults only).
NR Not rated.
While a particular category is selected, press I_to activate it.
A letter ("U" or "B") will be displayed. Press • or • to select "U" or"B".
Press MENU four times to save the settings and to clear all screens.
Note: The V-Chipwill automatically block any category that is "more restrictive." For example, if you
block the "PG- 13"category, then "R," "NC- 17," and "X" will automatically be blocked also.
How to Beset the TV after the V-Chip
Blocks a Channel ("Emergency Escape")
Ifthe TV is tuned to a restricted channel, the V-Chip will block it. The screen wil! go blank and the following
message will appear: t'Excessive rating"i
To resume normal viewing, tune to a diffe[ent channel using the number buttons. Under certain conditions
depending Onthe rating of the local TV programs)the V_Chip might lock out all the channels. In this case,
usethe V-Chipfunction for an temetgenw escape":
Press the MENU button tOdisplay the menu. Press the • button three times to select the/'Eunctien" menu
and press the I1_-button.
Press the •button three times to highlight the "V-chipl _menu and press the I_ button.
Enter your PIN number, and press the II_button to temporarily disable the V-Chip Lock.
57
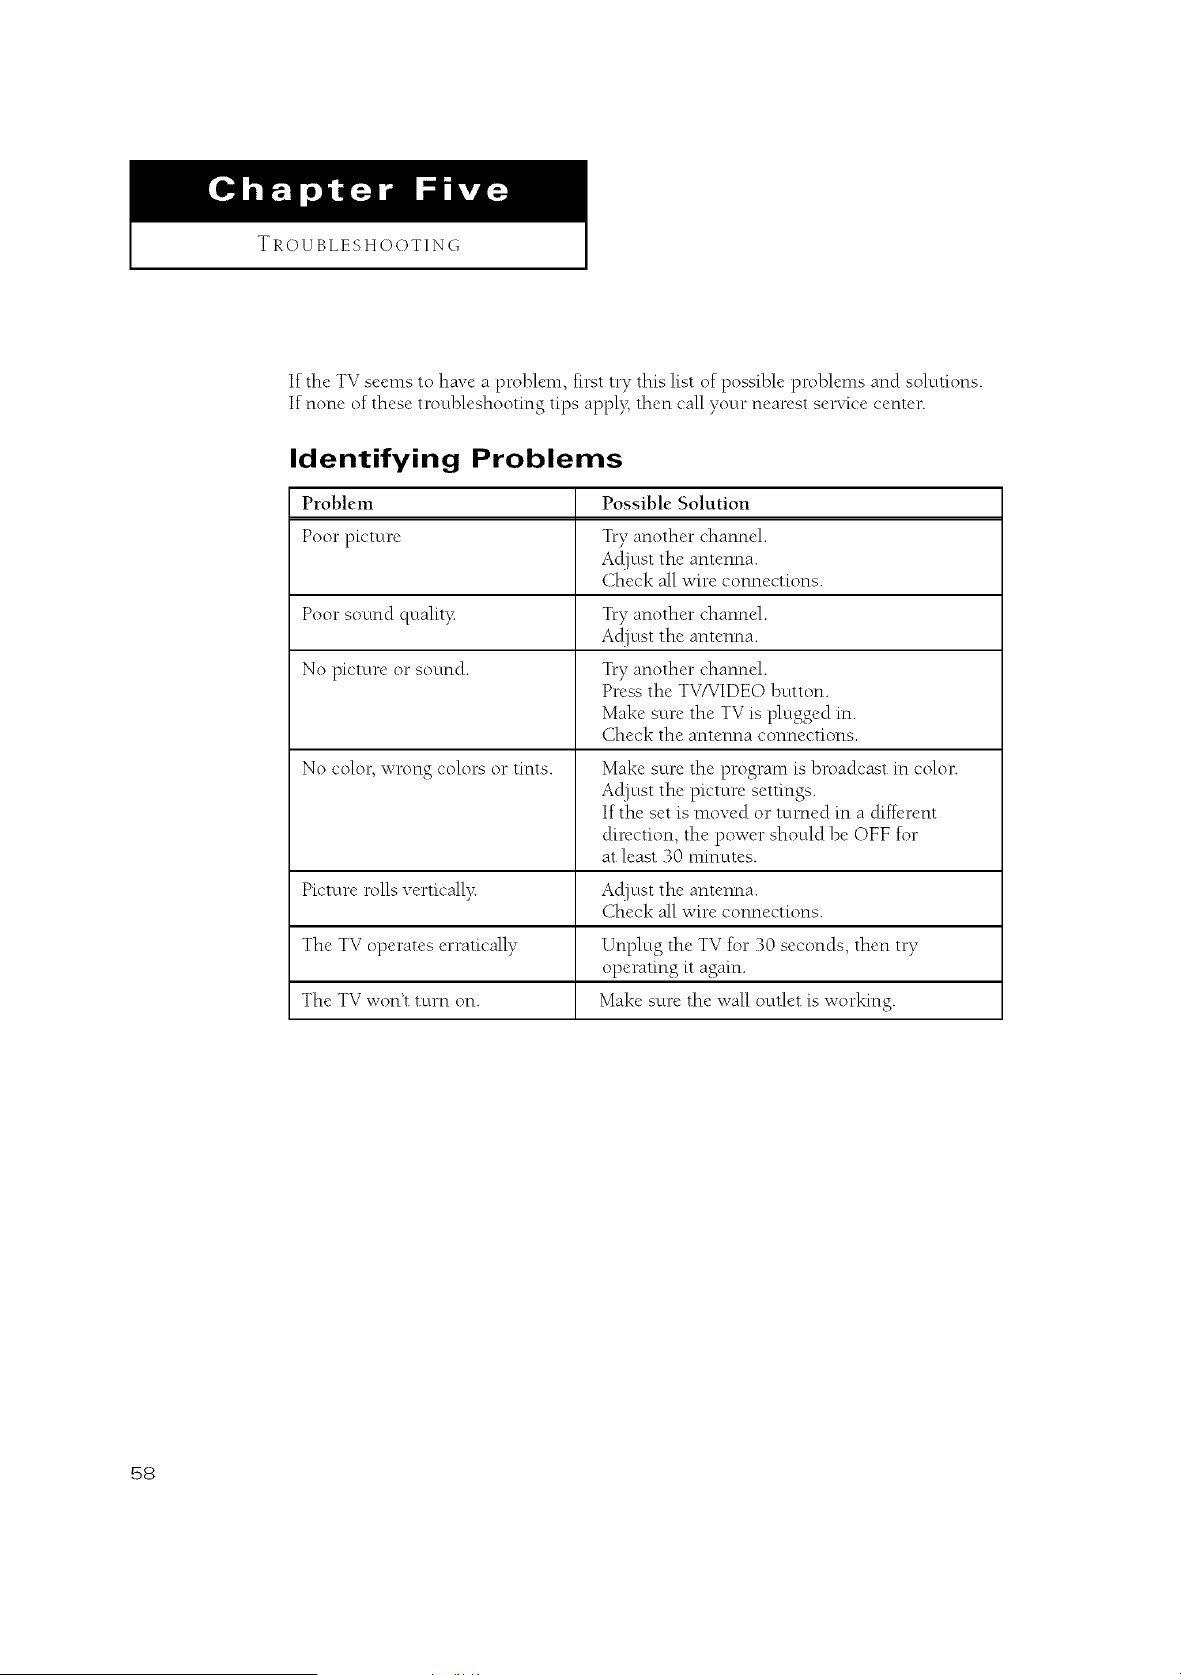
TROUBLESHOOTING
If the TV seemsto have a problem, first try this list of possible problems and solutions.
If none of these troubleshooting tips appl> then call your nearest ser,Tice center.
Identifying Problems
Problem Possible Solution
Poor picture Try another channel.
At[just the antenna.
Check all wire connections.
Poor sound quality TtT another channel.
Acljust the antenna.
No picture or sound. TiT another channel.
Press the TV/VIDEO button.
Make sure the TV is plugged in.
Check the antenna connections.
No color, wrong colors or tints. Make sure the program is broadcast in color.
Acljust the picture settings.
If the set is moved or turned in a &ffcrent
direction, the power should be OFF for
at least 30 ruinutes.
Picture rolls verticall> Acljust the antenna.
Check all wire connections.
The TV operates erratically Unplug the TV for 30 seconds, then try
operating it again.
The TV won't t urn on. Make sure the wall outlet is working.
68
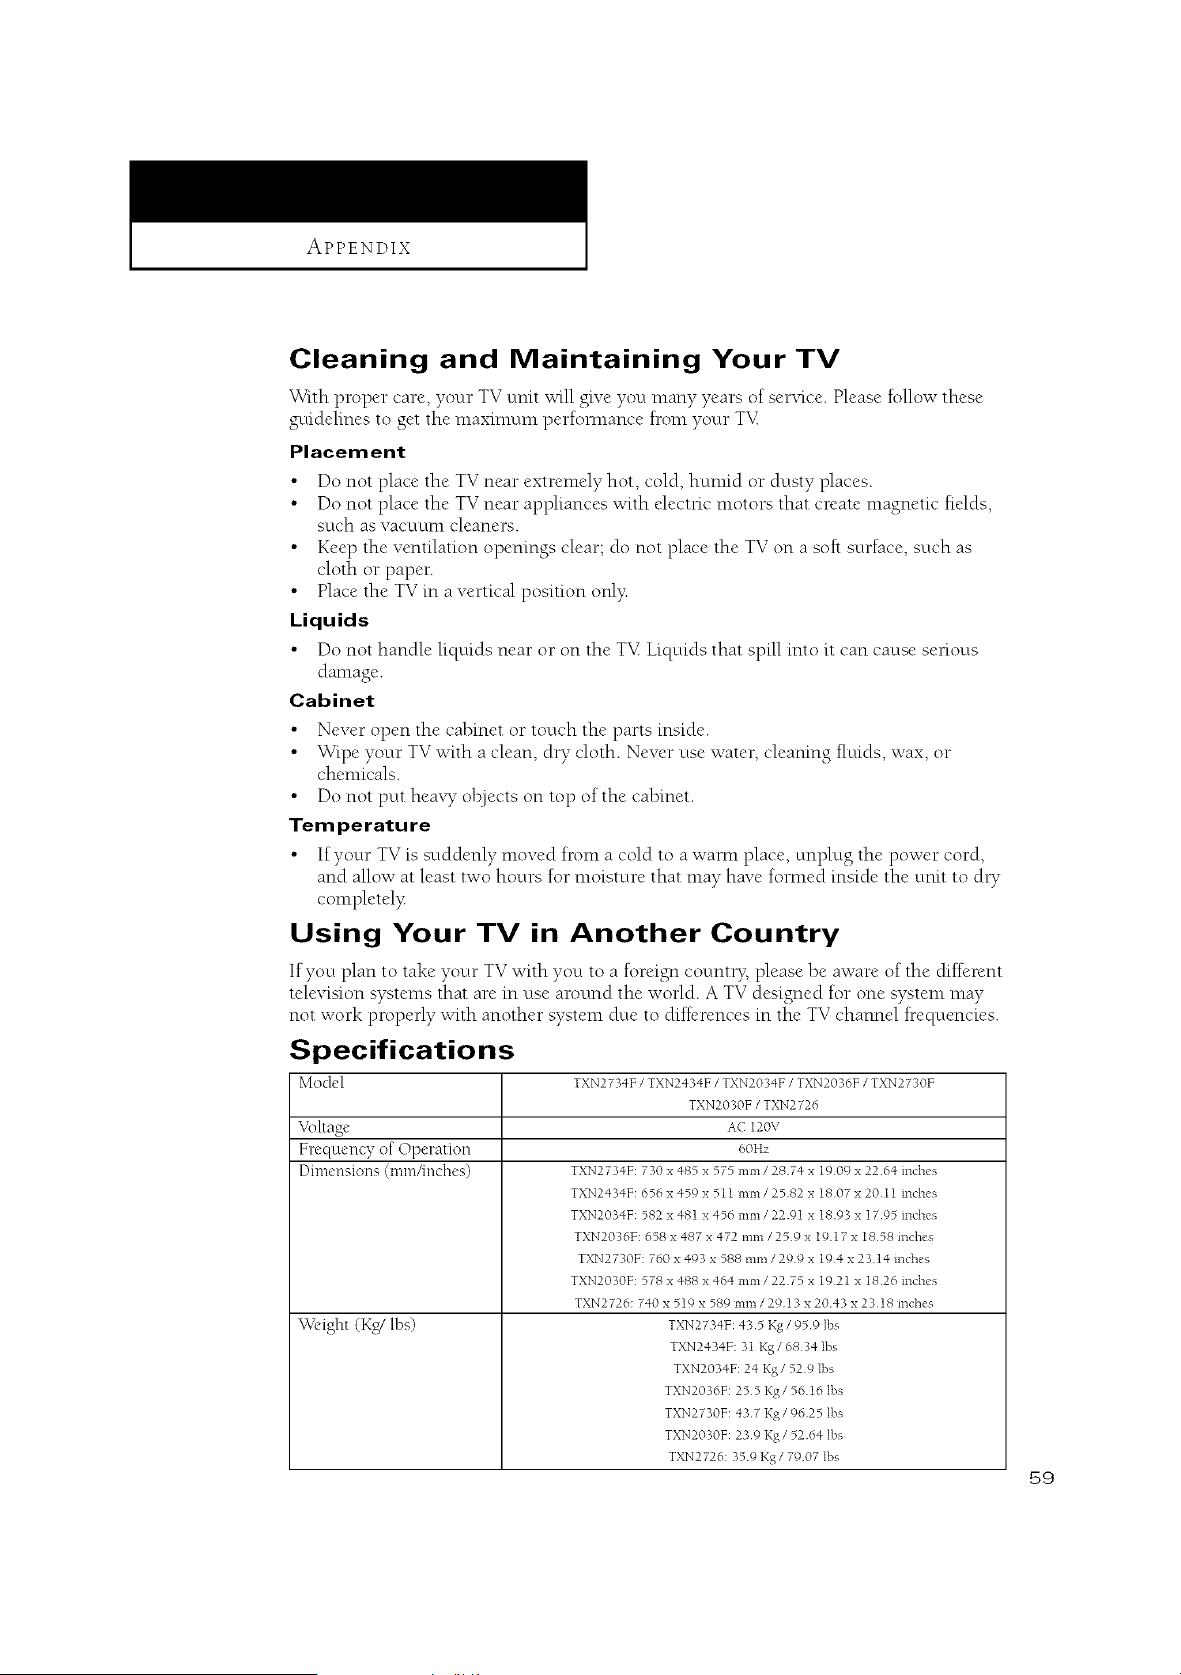
APPENDIX
Cleaning and Maintaining Your TV
With proper care yo_u _ TV unit will give you many years of service Please follow these
guidelines to get the maximum perfomlance from your TX£
Placement
•Do not place the TV near extremely hot, cold humid or dusty places
• Do not place the TV near appliances with electnc motors that create magnetic fields
such as vacuum cleaners
• Keep the ventilation openings clear; do not place the TV on a soft surface, such as
cloth or paper
• Place the TV in a vertical position oN?_
Liquids
• Do not handle liquids near or on the TX£ Liquids that spill into it can cause senous
damage
Cabinet
•Never open the cabinet or touch the parts inside
• Wipe vour TV with a clean dry cloth Never use water, cleamng tluids, wax, or
chemicals
• Do not putt heaxT o]R]ects on top of the cabinet
Temperature
• If your TV is suddenly moved from a cold to a waml place, unplug the power cord,
and allow at least two hours fi)r moisture that may have fi)mled inside the umt to dl T
completel?:
Using Your TV in Another Country
If you plan to take your TV with you to a foreign courm); please be aware of the different
television systems that are in use around the world. A TV designed for one system may
not work properly with another system due to differences in the TV channel frequencies.
Specifications
Model TXN2734F /TXN2434F /TXN2034F /TXN2036F /TXN2730F
TXN2030F /TXN2726
Vollage A( 120V
Frequency of Operation 60Hz
Dimensions (l_lPfl/Jtlches) TXN2734F: 730 x 485 x 575 mm/ 2874 x 1909 x 22 64 inches
TXN2434F: 656 x 459 x 511 mm/ 2582 x 1807 x 20I 1 inches
TXN2034F: 582 x 481 x 456 mm/ 22 91 x 1893 x 1795 inches
TXN2036F: 658 x 487 x 472 rnm /259 x 19 17 x 1858 inches
TXN2730F: 760 x 493 x 588 mm/ 299 x 194 x 23 14 inches
TXN2030F: 578 x 488 x 464 mm /22 75 x 1921 x 1826 inches
TXN2726:740 x 519 x 589 mm /2913 x 2043 x 2318 inches
\V{'ight (K,g/lbs) TXN2734F:435 Kg/95 9 ]bs
TXN2434F: 31 Kg /6834 lbs
TXN2034F: 24 Kg/529 lbs
TXN2036F: 255 Kg/5616 ]bs
TXN2730F: 437 Kg/9625 ]bs
TXN2030F: 239 Kg/5264 ]bs
TXN2726:359 Kg /7907 lbs
$9