©
2021 Nikon Corporation
SB1L01(11)
7MMA7611-01
En
• Read this document thoroughly before using the product.
• To ensure proper use of the product, be sure to read “For Your Safety” (page 5).
• After reading this document, keep it readily accessible for future reference.
Reference Guide
NIKKOR Z 100-400mm f/4.5-5.6 VR S

Table of Contents
Introduction. . . . . . . . . . . . . . . . . . . . . . . . . . . . . . . . . . . . . . . . . . . . . . . . . . . . . 4
Befor
e You Begin. . . . . . . . . . . . . . . . . . . . . . . . . . . . . . . . . . . . . . . . . . . . . . . . . . . . . . 4
For Your Safety. . . . . . . . . . . . . . . . . . . . . . . . . . . . . . . . . . . . . . . . . . . . . . . . . . . . . . . . 5
Using the Lens. . . . . . . . . . . . . . . . . . . . . . . . . . . . . . . . . . . . . . . . . . . . . . . . . . . . 8
Parts of the Lens: Names and Functions. . . . . . . . . . . . . . . . . . . . . . . . . . . . . . . . . . 8
Attachment and Removal. . . . . . . . . . . . . . . . . . . . . . . . . . . . . . . . . . . . . . . . . . . . . . 20
The Lens Info Panel. . . . . . . . . . . . . . . . . . . . . . . . . . . . . . . . . . . . . . . . . . . . . . . . . . . 23
Panel Options. . . . . . . . . . . . . . . . . . . . . . . . . . . . . . . . . . . . . . . . . . . . . . . . . . . . . . . . 25
Attaching and Removing the Lens Hood. . . . . . . . . . . . . . . . . . . . . . . . . . . . . . . . . 27
Using the Tripod Collar. . . . . . . . . . . . . . . . . . . . . . . . . . . . . . . . . . . . . . . . . . . . . . . . 29
Vibration Reduction (VR). . . . . . . . . . . . . . . . . . . . . . . . . . . . . . . . . . . . . . . . . . . . . . . 32
Precautions for Use. . . . . . . . . . . . . . . . . . . . . . . . . . . . . . . . . . . . . . . . . . . . . . . . . . . 33
Lens Maintenance. . . . . . . . . . . . . . . . . . . . . . . . . . . . . . . . . . . . . . . . . . . . . . . . . . . . 34
Technical Notes. . . . . . . . . . . . . . . . . . . . . . . . . . . . . . . . . . . . . . . . . . . . . . . . . . 35
Cameras with AF-Assist Illuminators. . . . . . . . . . . . . . . . . . . . . . . . . . . . . . . . . . . . . 35
Using the Lens on Cameras with a Built-in Flash. . . . . . . . . . . . . . . . . . . . . . . . . . 36
Accessories. . . . . . . . . . . . . . . . . . . . . . . . . . . . . . . . . . . . . . . . . . . . . . . . . . . . . . . . . . 37
Specifications. . . . . . . . . . . . . . . . . . . . . . . . . . . . . . . . . . . . . . . . . . . . . . . . . . . . . . . . 39
Table of Contents
2


Introduction
Before You Begin
Befor
e using this product, please read these instructions carefully. You will also
need to consult the documentation provided with the camera.
• This lens is intended exclusively for use with mirrorless cameras featuring a
Nikon Z mount.
• Update the camera fir
mware to the latest version. With earlier versions, the
camera may fail to detect the lens correctly and some features may not be
available. The latest version of the camera firmware can be downloaded from
the Nikon Download Center at the URL below.
https://downloadcenter.nikonimglib.com/
No reproduction in any for
m of this document, in whole or in part (except for
brief quotation in critical articles or reviews), may be made without written
authorization from NIKON CORPORATION.
4
Before You Begin
For Your Safety
To prev
ent damage to property or injury to yourself or to others, read “For Your
Safety” in its entirety before using this product.
After reading these safety instructions, keep them readily accessible for future
reference.
WARNING: Failure to observe the precautions marked with this icon
could result in death or sev
ere injury.
CAUTION: Failure to observe the precautions marked with this icon
could result in injur
y or property damage.
WARNING
Do not disassemble or modify this product. Do not touch internal parts
that become exposed as the result of a fall or other accident.
F
ailure to observe these precautions could result in electric shock or other
injury.
Should you notice any abnormalities such as the product producing
smoke, heat, or unusual odors, immediately disconnect the camera power
source.
Continued operation could result in fire, burns or other injury.
5
For Your Safety

WARNING
Keep dry. Do not handle with wet hands.
Failure t
o observe these precautions could result in fire or electric shock.
Do not use this product in the presence of flammable dust or gas such as
propane, gasoline or aerosols.
Failure to observe this precaution could result in explosion or fire.
Do not directly view the sun or other bright light source through the lens.
Failure to observe this precaution could result in visual impairment.
Keep this product out of reach of children.
Failure to observe this precaution could result in injury or product malfunction.
In addition, note that small parts constitute a choking hazard.
Should a child
swallow any part of this product, seek immediate medical attention.
Do not handle with bare hands in locations exposed to extremely high or
low temperatures.
F
ailure to observe this precaution could result in burns or frostbite.
For Your Safety
6

CAUTION
Do not leave the lens pointed at the sun or other strong light sources.
Light focused by the lens could cause fire or damage to pr
oduct’s internal
parts. When shooting backlit subjects, keep the sun well out of the frame.
Sunlight focused into the camera when the sun is close to the frame could
cause fire.
Do not leave the product where it will be exposed to extremely high
temperatures, for an extended period such as in an enclosed automobile
or in direct sunlight.
Failure to observe this precaution could result in fire or product malfunction.
Do not transport cameras or lenses with tripods or similar accessories
attached.
Failure to observe this precaution could result in injury or product malfunction.
For Your Safety
7
Using the Lens
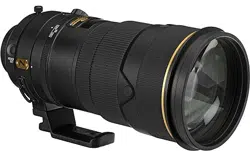
Parts o
f the Lens: Names and Functions
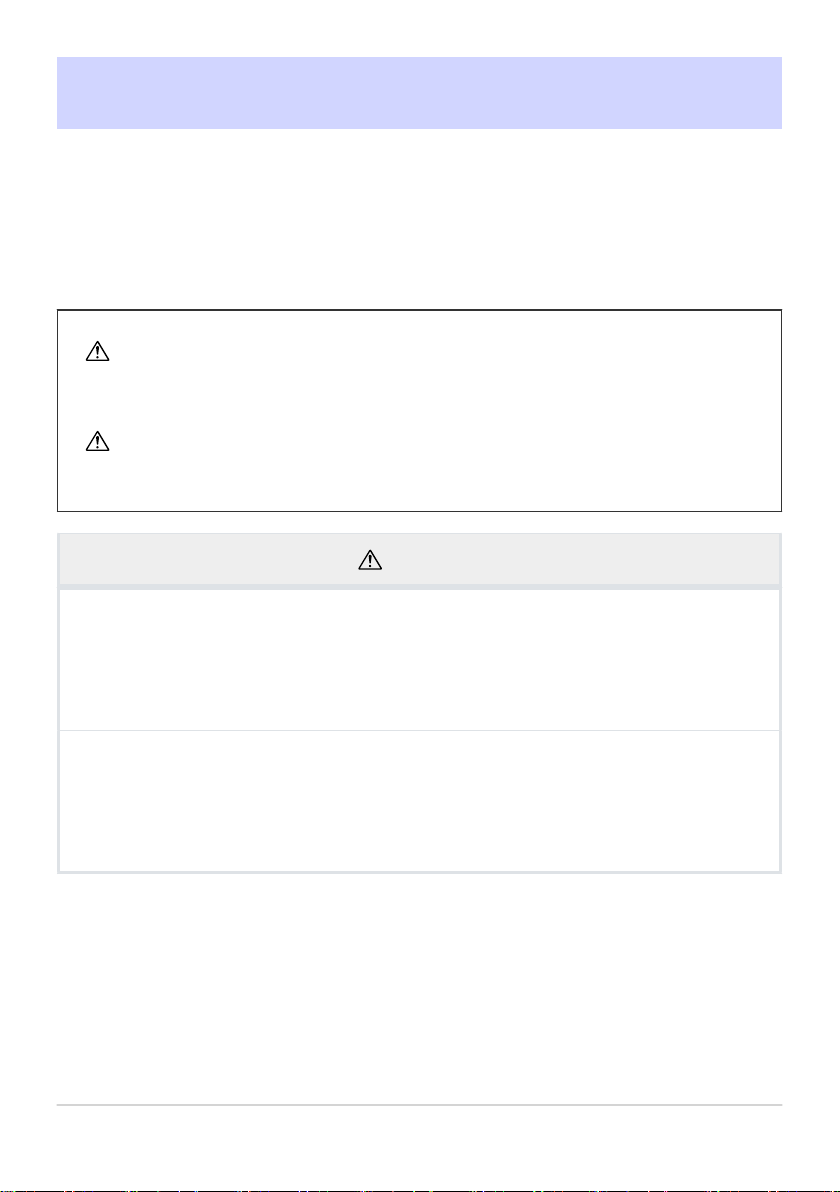
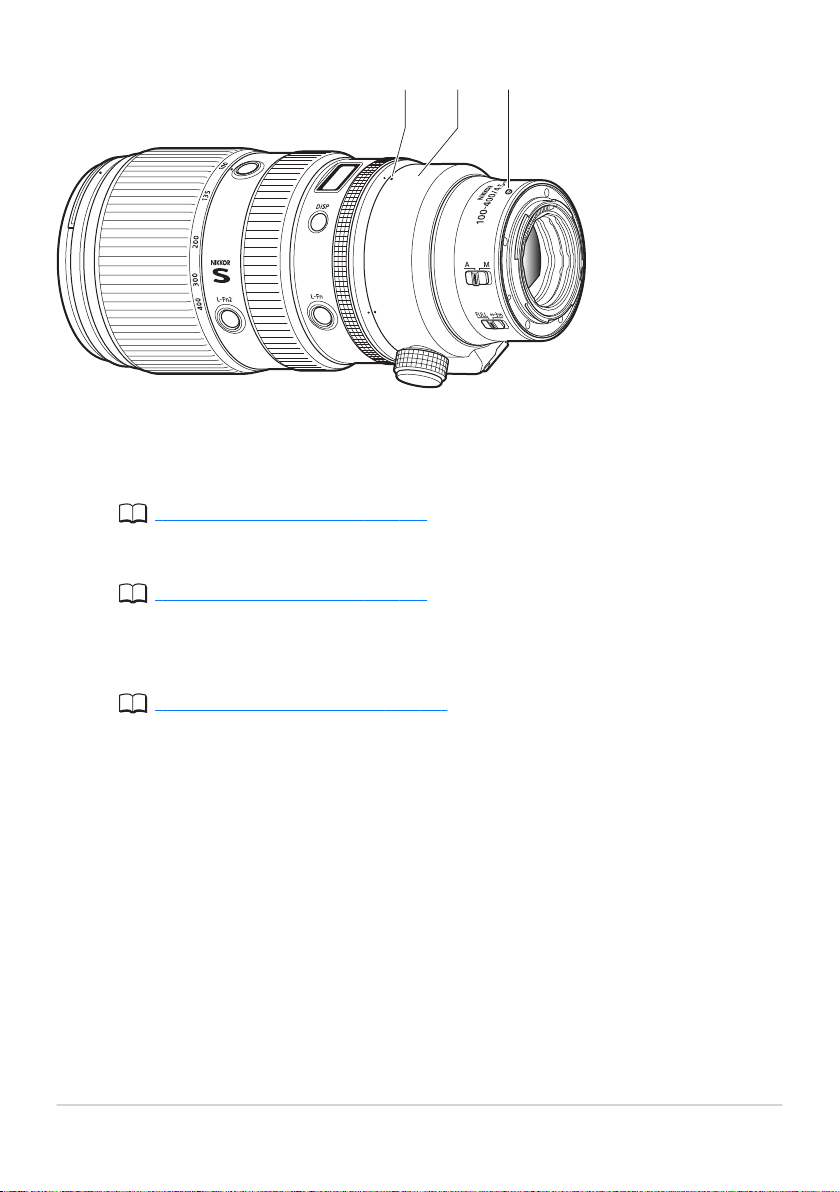
The parts of the lens are listed below.
1 2 3
Lens hood mounting mark
Use when attaching the lens hood.
“Attaching and Removing the Lens Hood” (p.27)
Zoom ring
Rotat
e the ring to zoom in or out.
Focal length scale
Determine the approximate focal length when zooming the lens in or out.
8
Parts of the Lens: Names and Functions
1
2
3
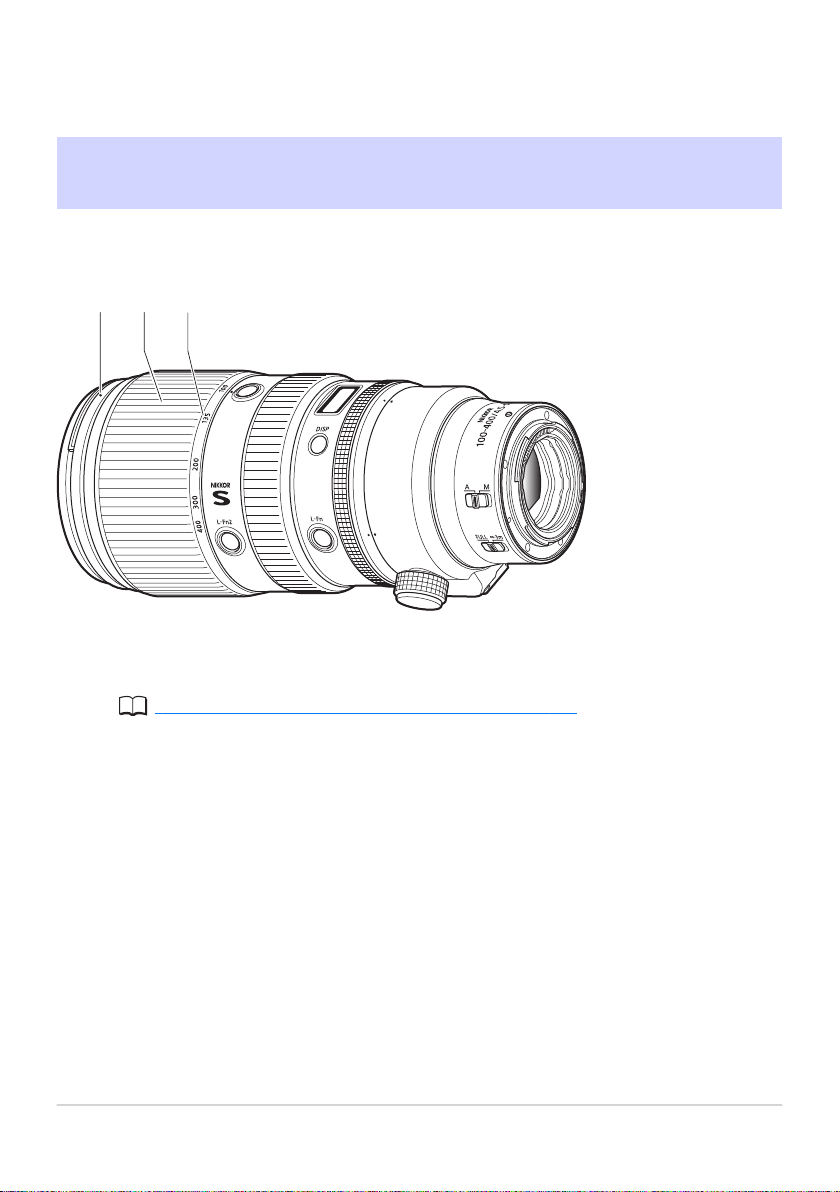
5 64
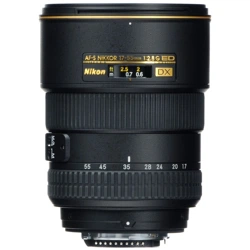
Focal length mark
Determine the appr
oximate focal length when zooming the lens in or out.
Focus ring
Use for manual focus.
• When focusing using autofocus, you can adjust focus manually by
rotating the ring while the shutter-release button is pressed halfway;
after focusing, press the shutter-release button the rest of the way down
to shoot.
Display button (DISP)
Save settings or choose the information shown in the lens info panel.
“The Lens Info Panel” (p.23), “Panel Options” (p.25)
Parts of the Lens: Names and Functions
9
4
5
6
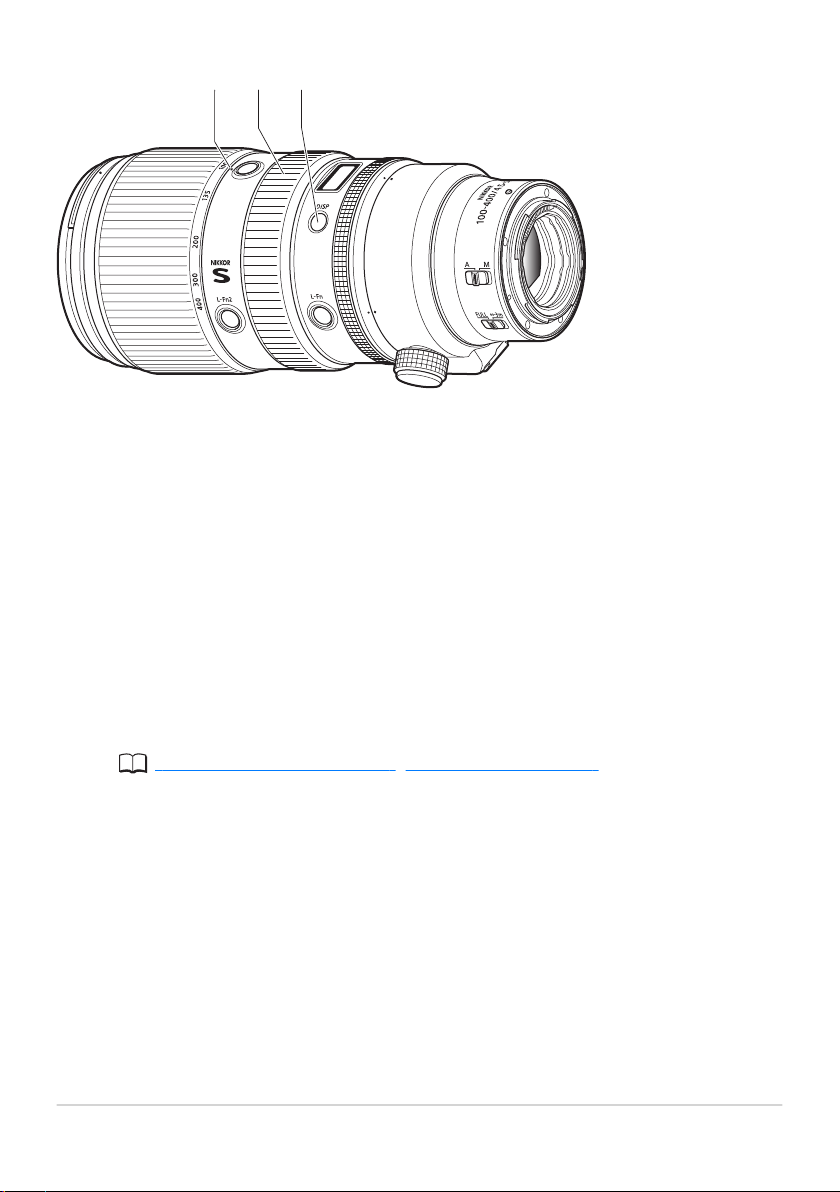
97 8
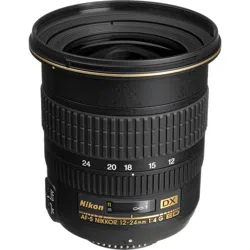
Lens info panel
View focus distance, depth of field, and other information.
“The Lens Info Panel” (p.23), “Panel Options” (p.25)
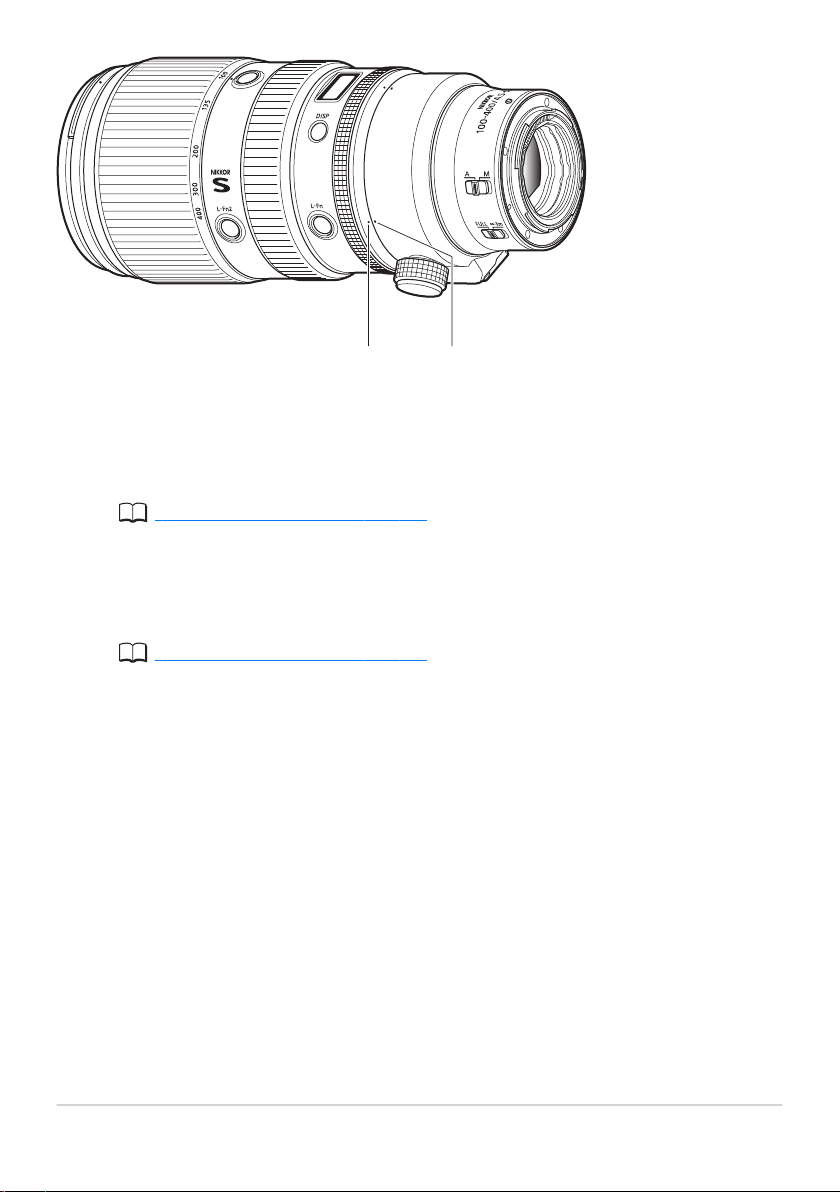
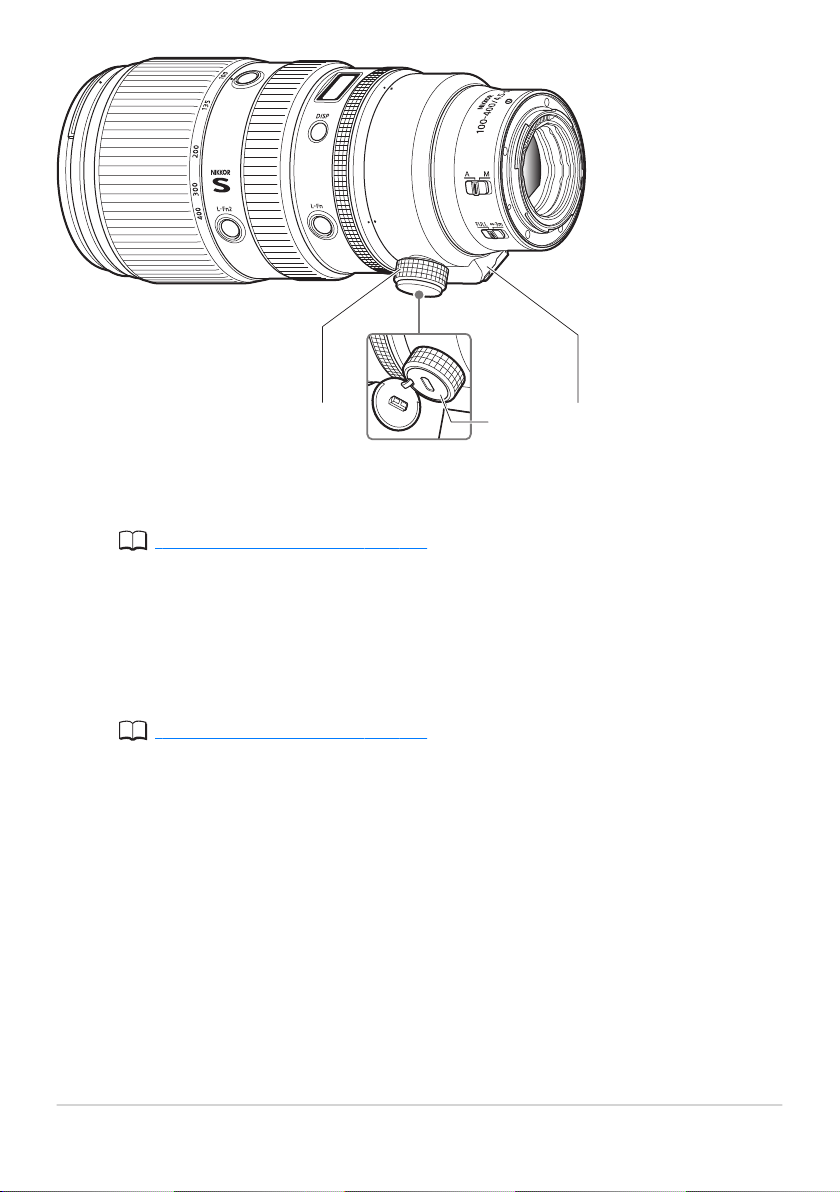
Control ring
R
otate to adjust a setting such as [Aperture] or [Exposure compensation]
assigned using the camera. For more information, see the description of
[Custom control assignment], [Custom controls], or [Custom controls
(shooting)] in the documentation provided with the camera.
Lens rotation index
Use when rotating the camera to shoot in landscape (“wide”) or portrait
(“tall”) orientation.
“Using the Tripod Collar” (p.29)
Parts of the Lens: Names and Functions
10
7
8
9
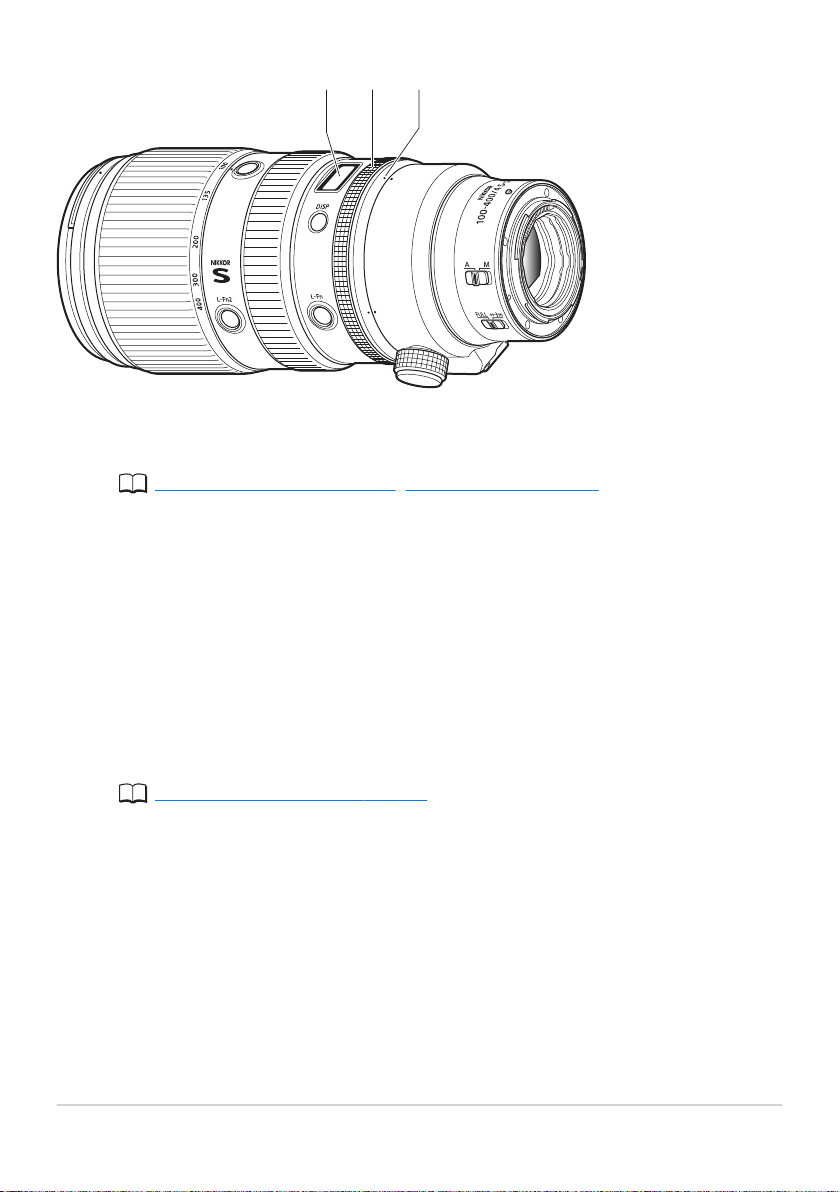
10 11 12
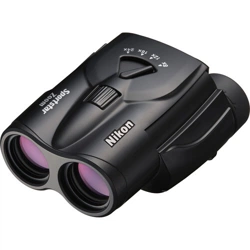
Tripod collar ring rotation index
Use when rotating the camera to shoot in landscape (“wide”) or por
trait
(“tall”) orientation.
“Using the Tripod Collar” (p.29)
Tripod collar r
ing
“Using the Tripod Collar” (p.29)
Lens mounting mark
Use when mounting the lens on the camera.
“Attachment and Removal” (p.20)
Parts of the Lens: Names and Functions
11
10
11
12
13 14
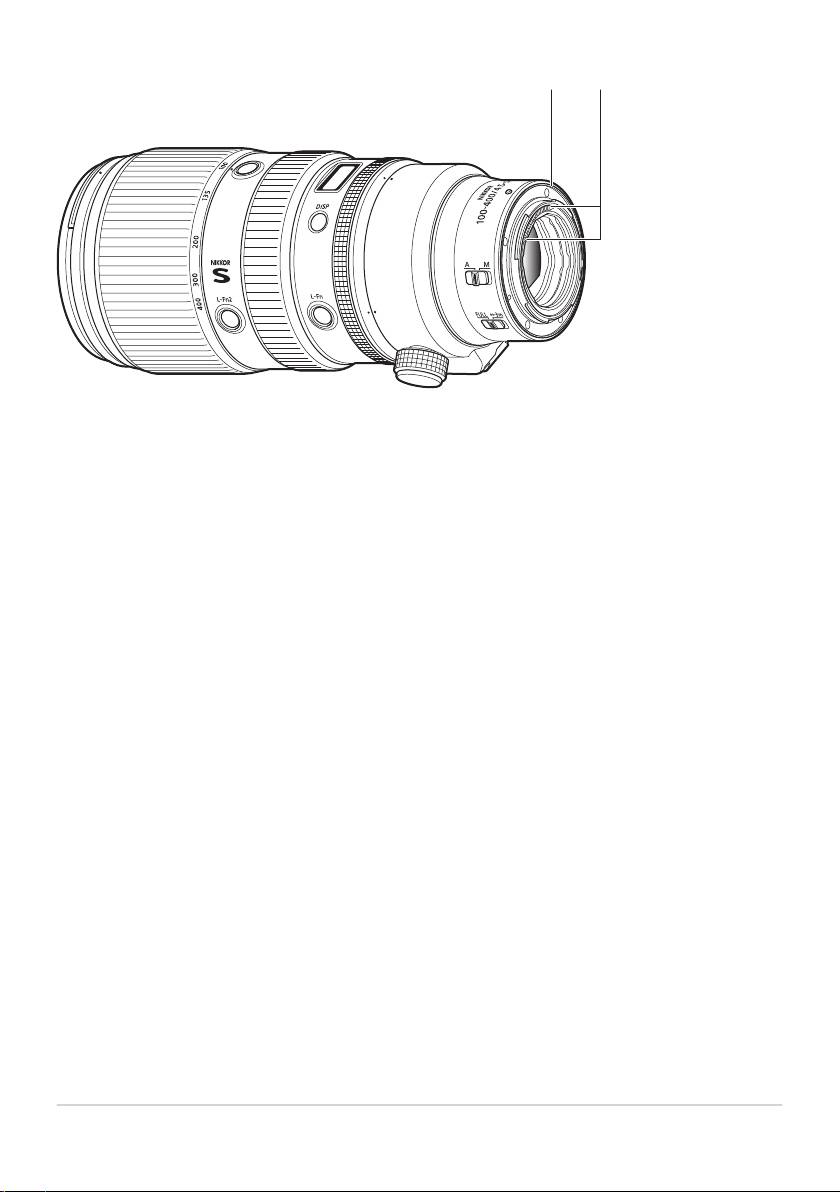
Rubber lens-mount gasket
Helps prevent the ingr
ess of water droplets or dust along the surfaces
where the lens and camera meet when the lens is mounted on the
camera.
*
There is no guarantee that the gasket is completely proof against the
ingress of water droplets or dust in all circumstances.
CPU contacts
Used to transfer data to and from the camera.
Parts of the Lens: Names and Functions
12
13
*
14
16
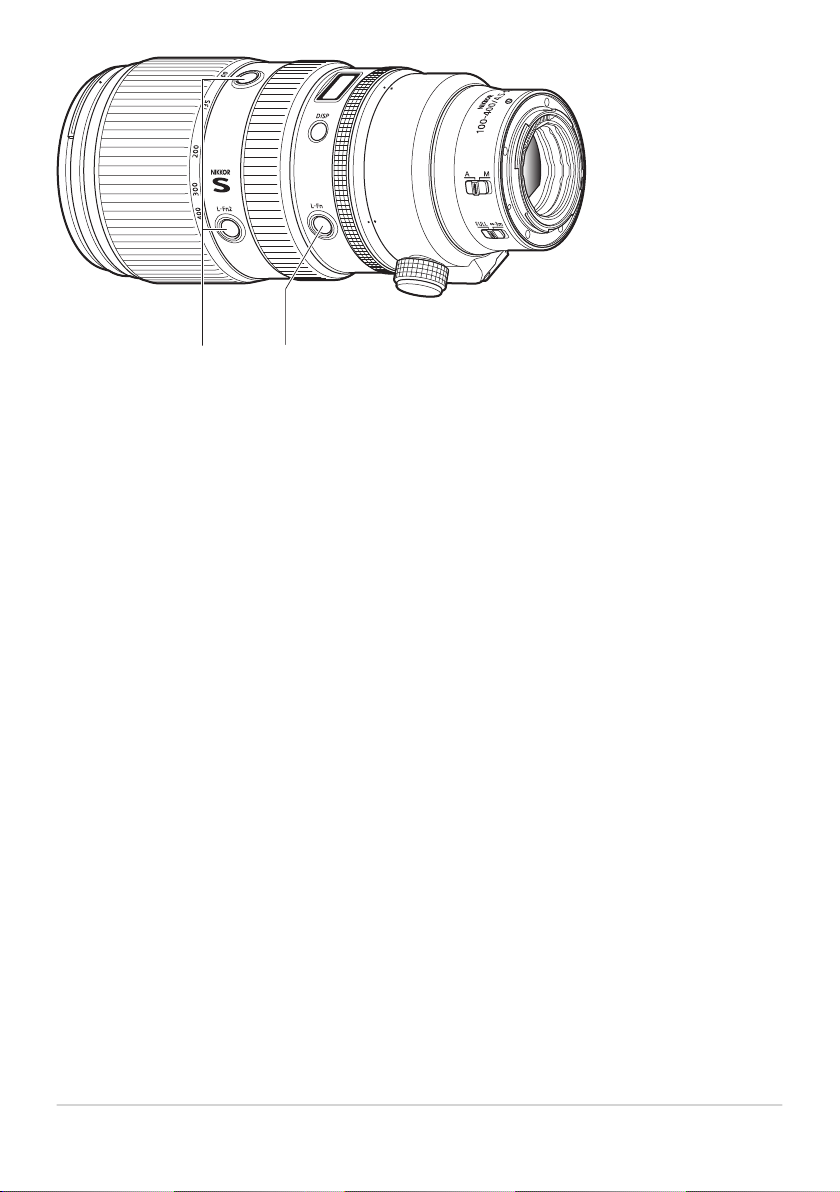
15
L-Fn2 button (×4)
Press to per
form a function assigned using the camera. For more
information, see the description of [Custom control assignment],
[Custom controls], or [Custom controls (shooting)] in the documentation
provided with the camera.
L-Fn button
Press to perform a function assigned using the camera. For more
information, see the description of [Custom control assignment],
[Custom controls], or [Custom controls (shooting)] in the documentation
provided with the camera.
Parts of the Lens: Names and Functions
13
15
16
1817
Lens rotation index (90°)
Use when rotating the camera to shoot in landscape (“wide”) or por
trait
(“tall”) orientation.
“Using the Tripod Collar” (p.29)
Tripod collar r
ing rotation index (90°)
Use when rotating the camera to shoot in landscape (“wide”) or portrait
(“tall”) orientation.
“Using the Tripod Collar” (p.29)
Parts of the Lens: Names and Functions
14
17
18
2119 20
Tripod collar ring attachment screw
Fix the tripod collar ring in place.
“Using the Tripod Collar” (p.29)
Security slot (for anti-theft cable)
A
ttach a third-party anti-theft cable. For more information, see the
documentation provided with the cable.
Tripod collar mounting foot
“Using the Tripod Collar” (p.29)
Parts of the Lens: Names and Functions
15
19
20
21
22 23
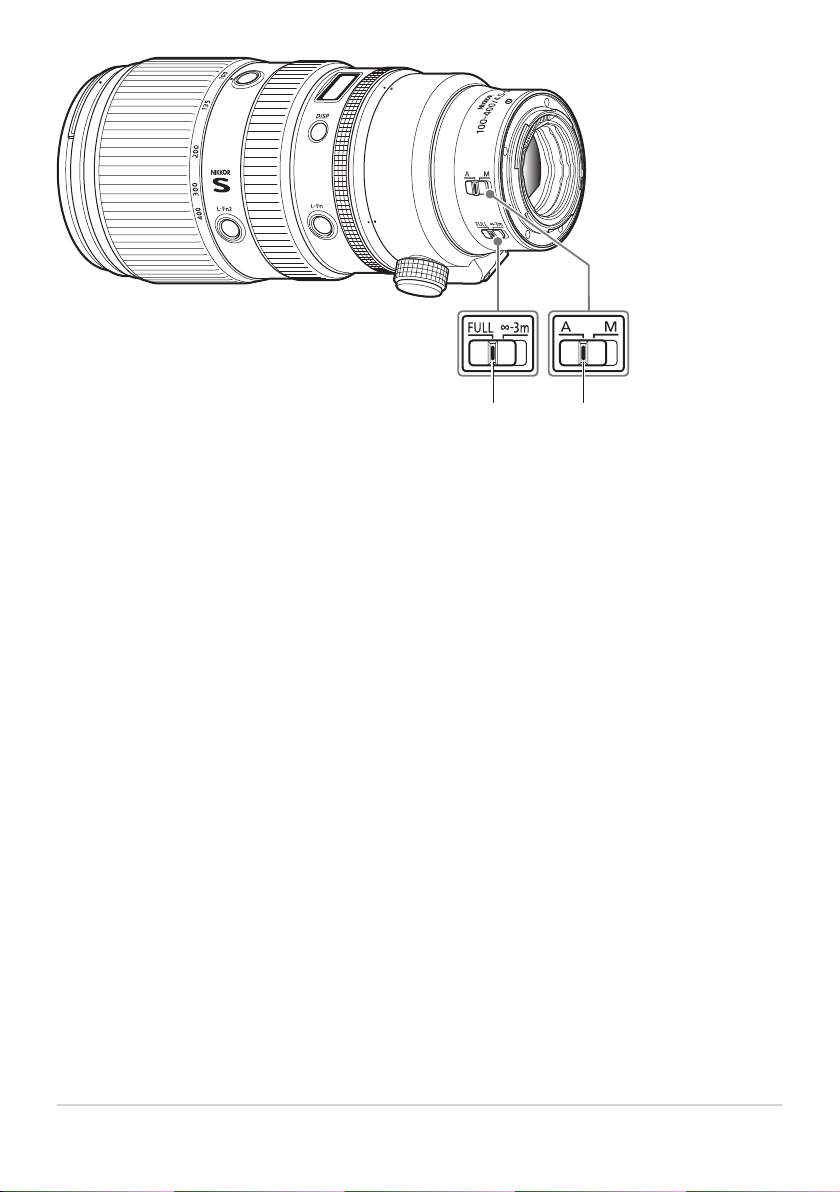
Focus limit switch
Choose the autofocus range.
• FULL: Choose t
o focus on subjects at any distance between 0.75 m
(2.46 ft) and ∞.
• ∞ – 3 m: Focus is limited to distances of 3 m (9.85 ft) and more. Select
this option for faster focusing if your subject will always be at distance of
at least 3 m (9.85 ft).
Focus-mode switch
Choose a focus mode.
• A: Autofocus
• M: Manual focus
Note that regardless of the setting chosen, focus must be adjusted
manually when manual focus mode is selected using camera controls.
Parts of the Lens: Names and Functions
16
22
23
24 25 26 27
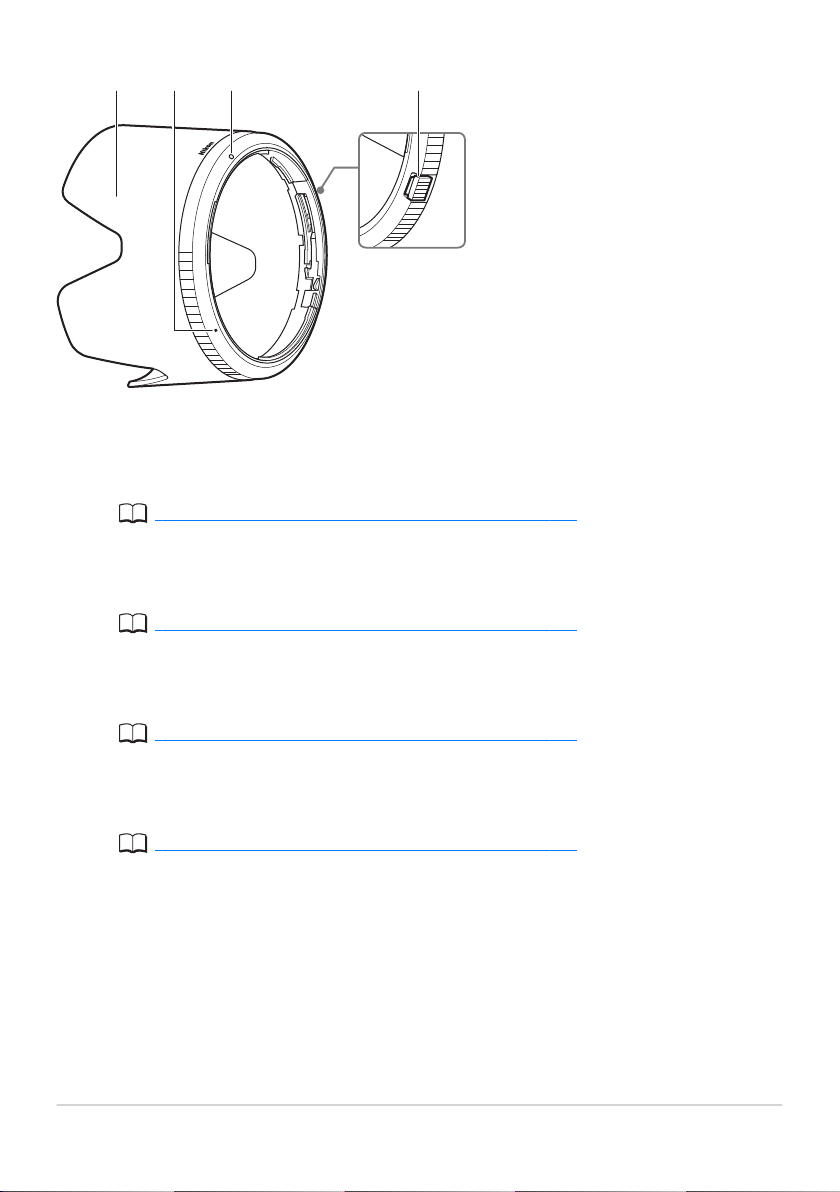
Lens hood
Lens hoods block stray light that would otherwise cause flar
e or ghosting.
They also serve to protect the lens.
“Attaching and Removing the Lens Hood” (p.27)
Lens hood alignment mark
Use when attaching the lens hood.
“Attaching and Removing the Lens Hood” (p.27)
Lens hood lock mark
Use when attaching the lens hood.
“Attaching and Removing the Lens Hood” (p.27)
Lens hood lock release button
Use when r
emoving the lens hood.
“Attaching and Removing the Lens Hood” (p.27)
Parts of the Lens: Names and Functions
17
24
25
26
27
28 29 30
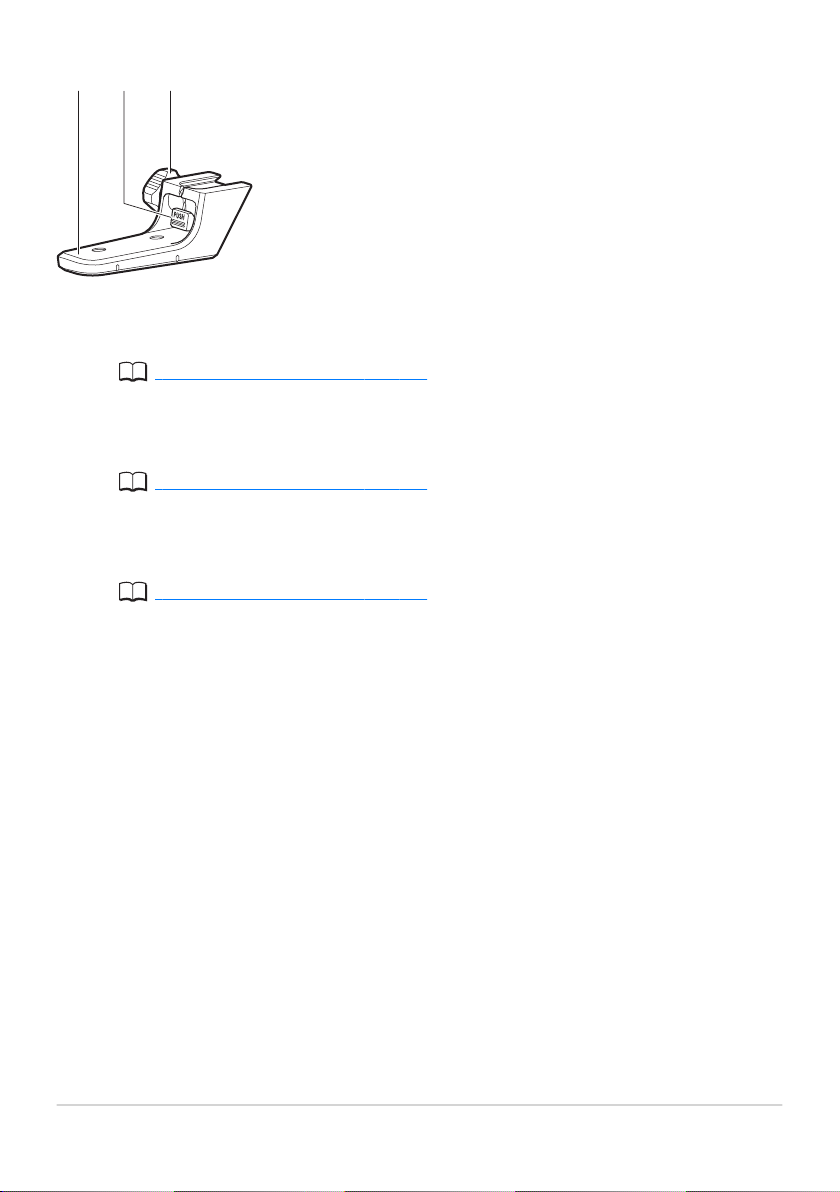
Tripod collar
Use when attaching a tripod to the camera on which the lens is mounted.
“Using the Tripod Collar” (p.29)
Tripod collar lock r
elease
Use when removing the tripod collar from the tripod collar mounting foot.
“Using the Tripod Collar” (p.29)
Tripod collar lock scr
ew
Secure the tripod collar after attaching it to the tripod collar mounting foot.
“Using the Tripod Collar” (p.29)
Parts of the Lens: Names and Functions
18
28
29
30
31
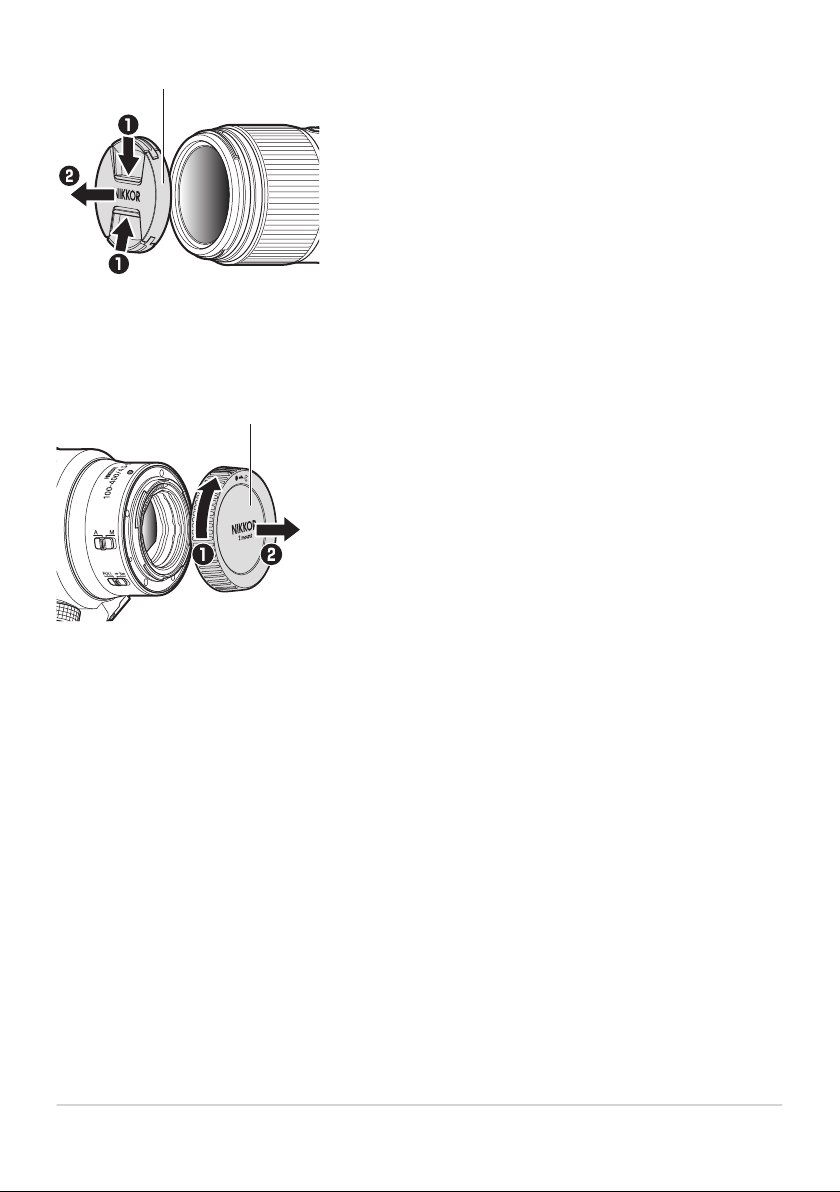
Lens cap (front cap)
32
Lens cap (rear cap)
Parts of the Lens: Names and Functions
19
31
32
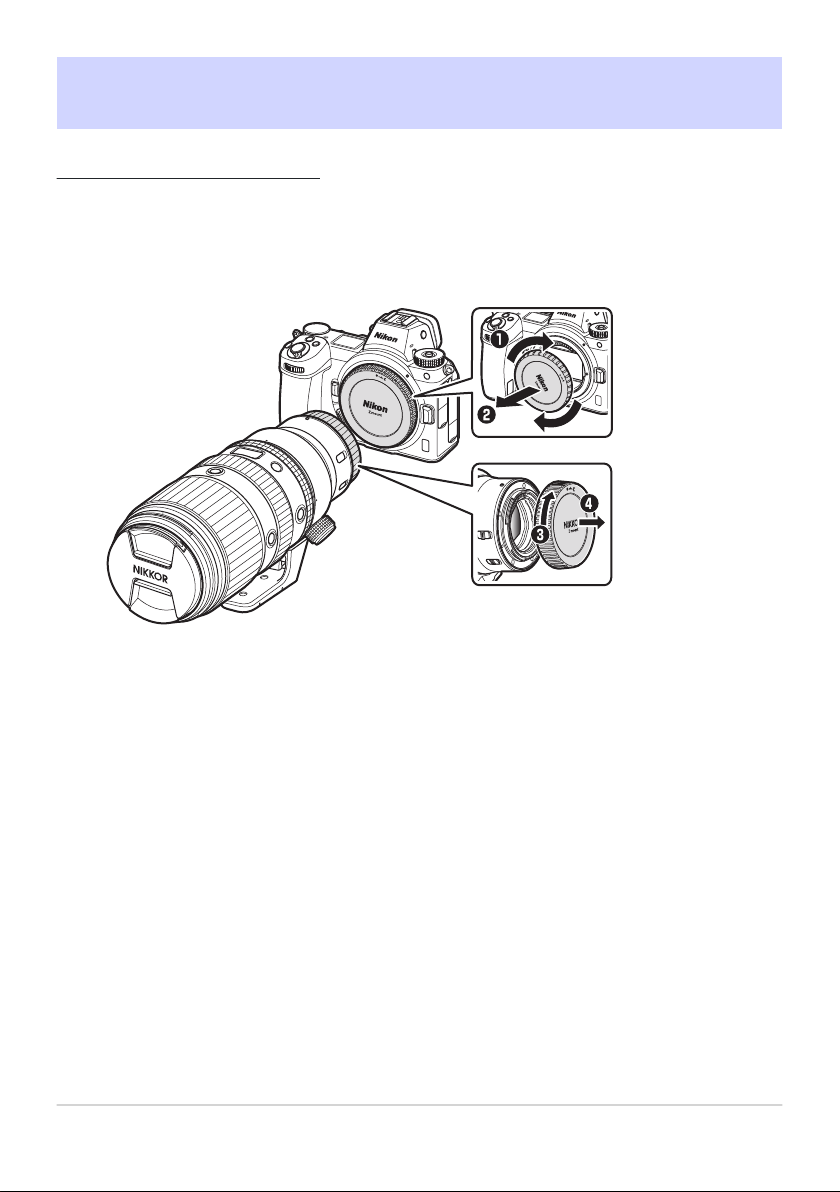
Attachment and Removal
Attaching the Lens
Turn the camera o
ff, remove the body cap, and detach
the rear lens cap.
20
Attachment and Removal
1.
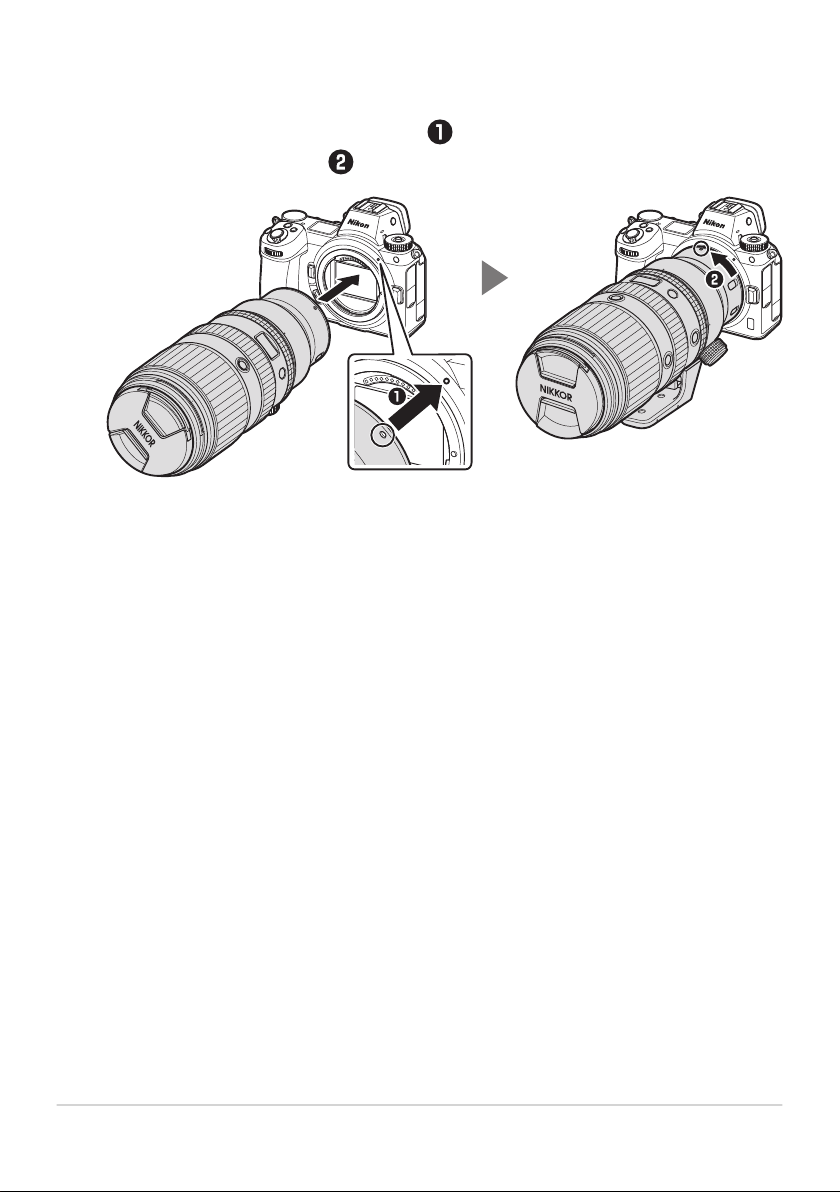
Position the lens on the camera body, keeping the
mounting mark on the lens aligned with the mounting
mark on the camera body ( ), and then rotate the lens
counterclockwise ( ) until it clicks into place.
Attachment and Removal
21
2.
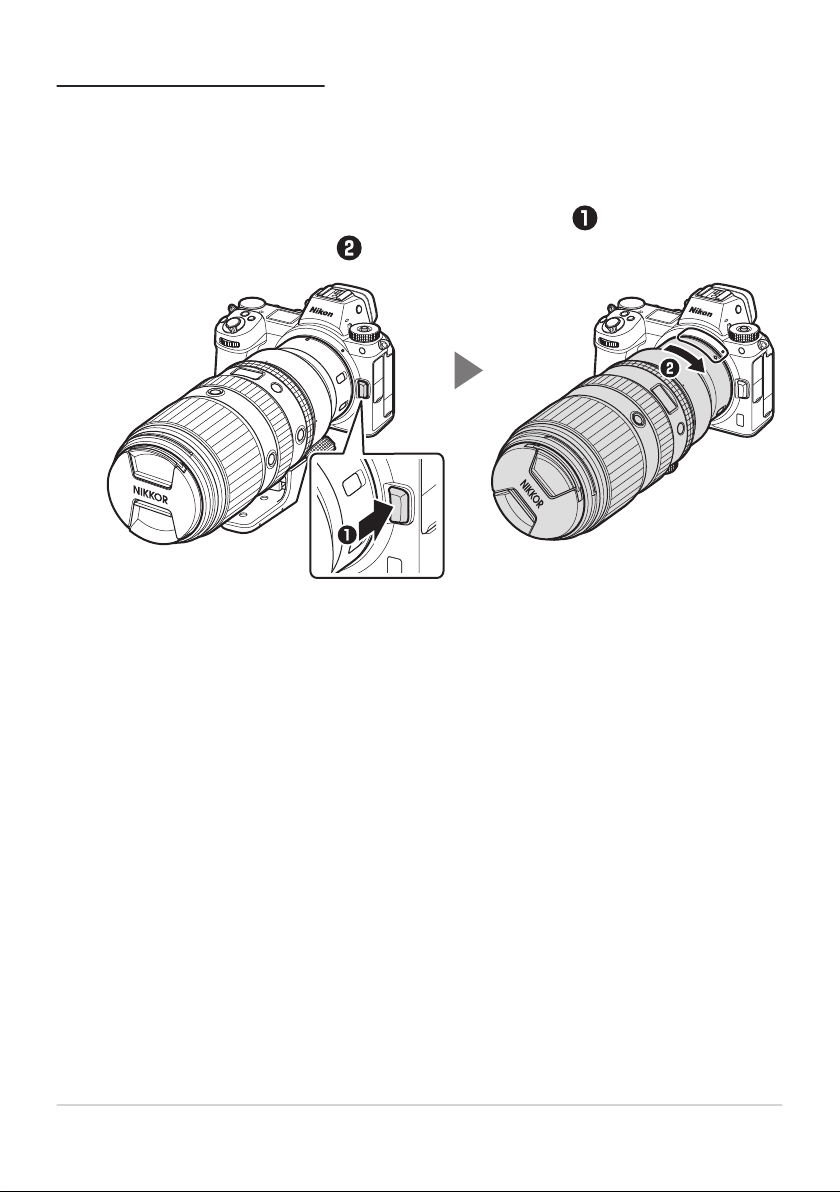
Removing the Lens
Turn the camera o
ff.
Press and hold the lens release button (
) while turning
the lens clockwise ( ).
Attachment and Removal
22
1.
2.
The Lens Info Panel
The lens Info panel lights when the lens is attached to a camera and the camera is
on.
•
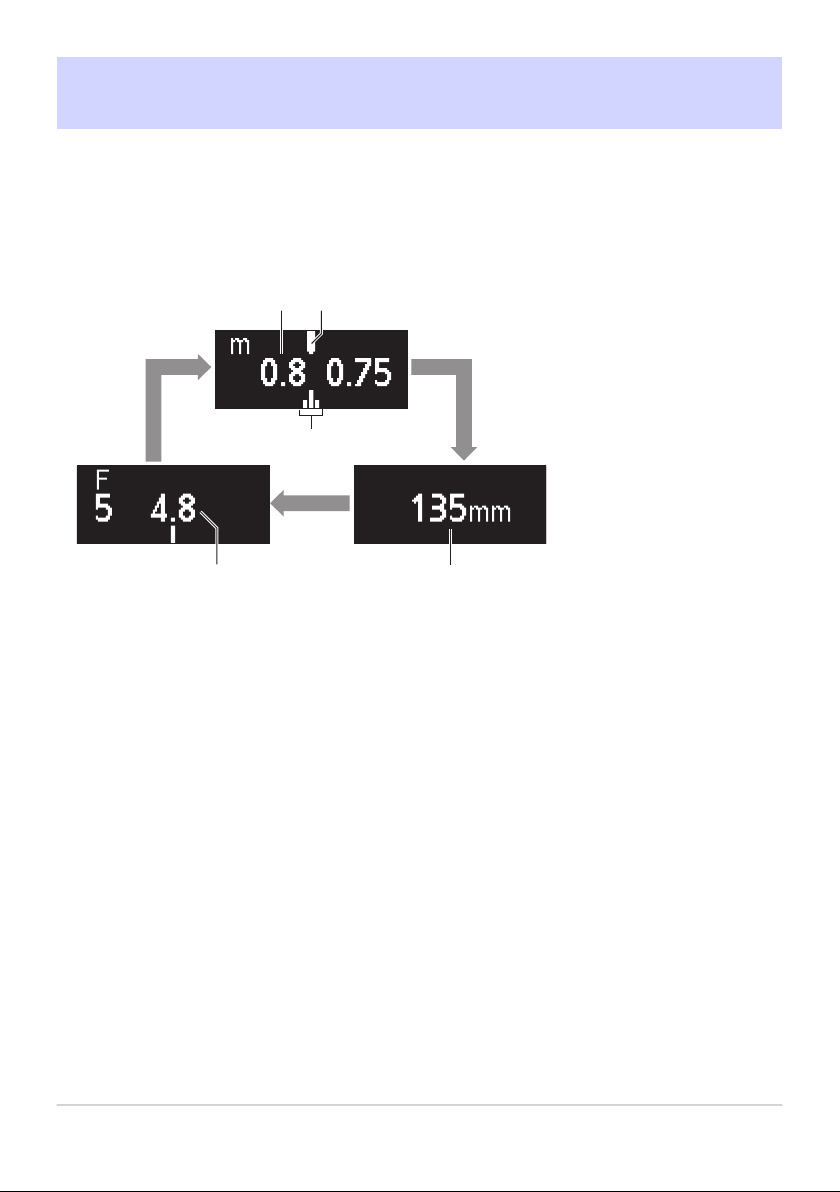
Press the lens display button to cycle the display as shown:
1
3
5
4
2
Focus distance
Minimum focus distance index
1
Depth o
f field
2
Focal length
Aperture
3
Shows the approximate minimum focus distance at the current focal length.
The minimum focus distance varies with the zoom position.
Depth of field is displayed when the camera is in mode A or M.
23
The Lens Info Panel
1
2
3
4
5
1
2

Aperture is displayed only when the camera is in mode A or M. The display for
other modes is shown in the illustration.
• The panel turns off automatically when the camera standby timer expires or if
no lens operations are perfor
med for about 10 seconds. Press the display
button to reactivate the display.
The Lens Info Panel
The focus distance, depth of field, and other information display
ed in the lens
Info panel are approximations only.
The Lens Info Panel
24
3
Panel Options
Follow the steps below to choose the units for focus distance fr
om meters (m) or
feet (ft) or adjust the brightness of the lens Info panel.
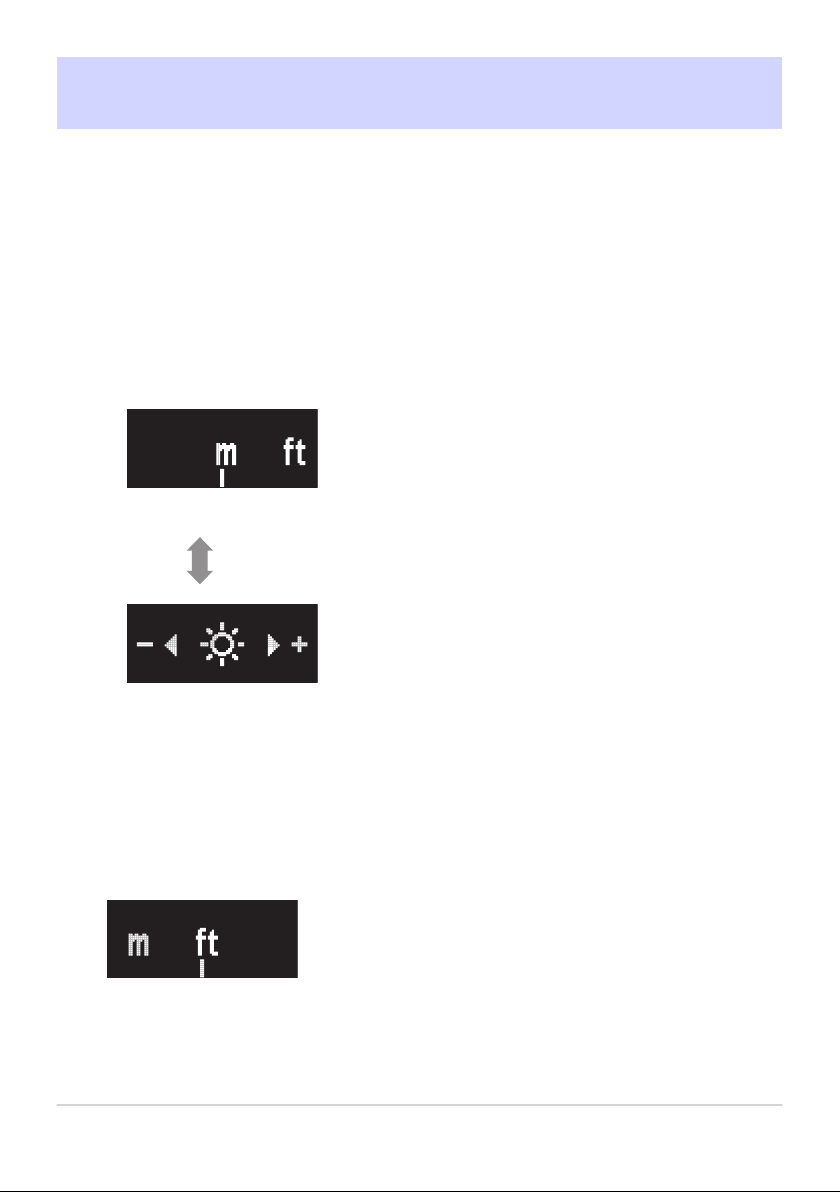
Press and hold the display button to view settings.
• Unit or brightness selection options will be displayed. The currently
selected item will flash.
•
Press the display button to toggle between displays.
Units
Brightness
Choose a setting using the lens contr
ol r
ing.
Units
R
otate the control ring to choose from meters (m) or feet (ft).
25
Panel Options
1.
2.
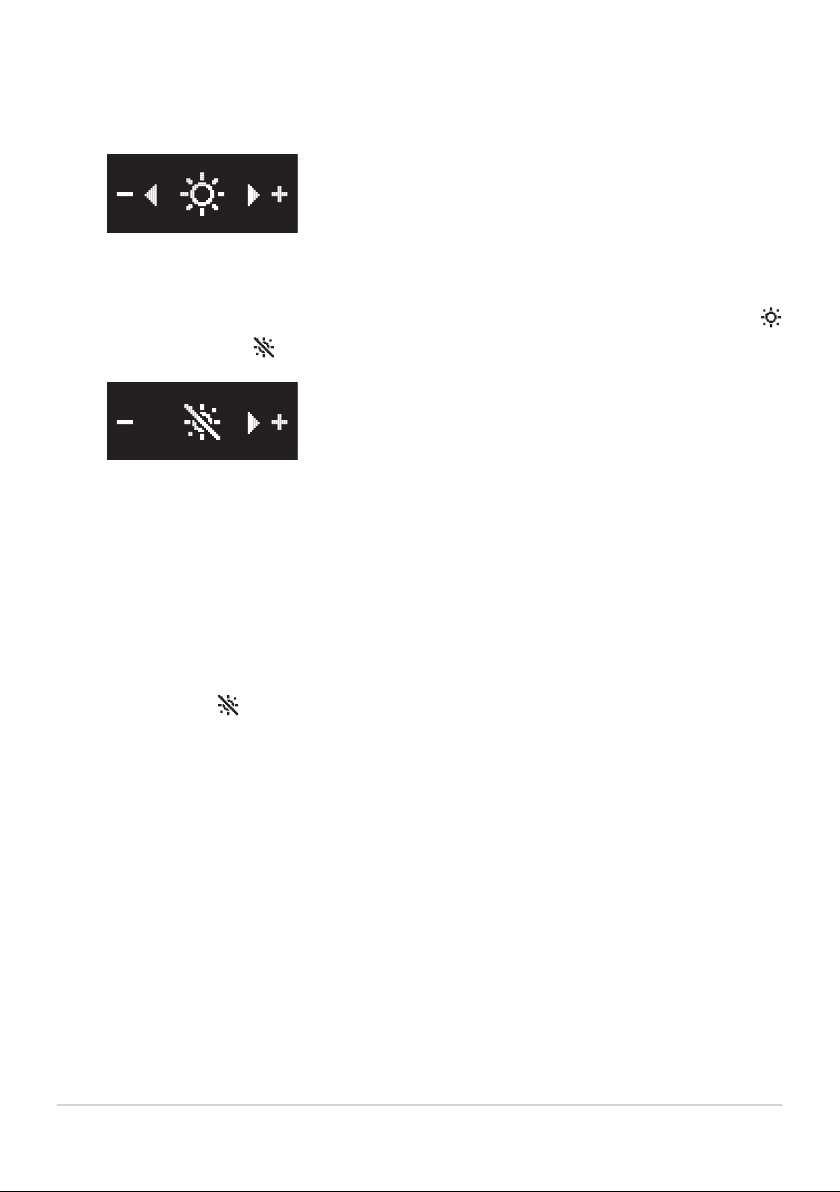
Brightness
Rotate the contr
ol ring in the “+” (brighter) or “−” (darker) direction.
Choose from 6 levels of brightness.
To turn the lens info p
anel off, rotate the ring in the “−” direction until the
icon changes to .
• Press the display button to save changes and toggle the display.
• If no operations are performed using lens controls for about 5 seconds,
p
anel options will clear fr
om the display
. Any changes will be lost.
Press and hold the display button to return to the lens
information display.
• Choosing
for brightness turns the lens info panel off. To turn the
display on again, pr
ess and hold the display butt
on.
P
anel Options
26
3.
Attaching and Removing the Lens Hood
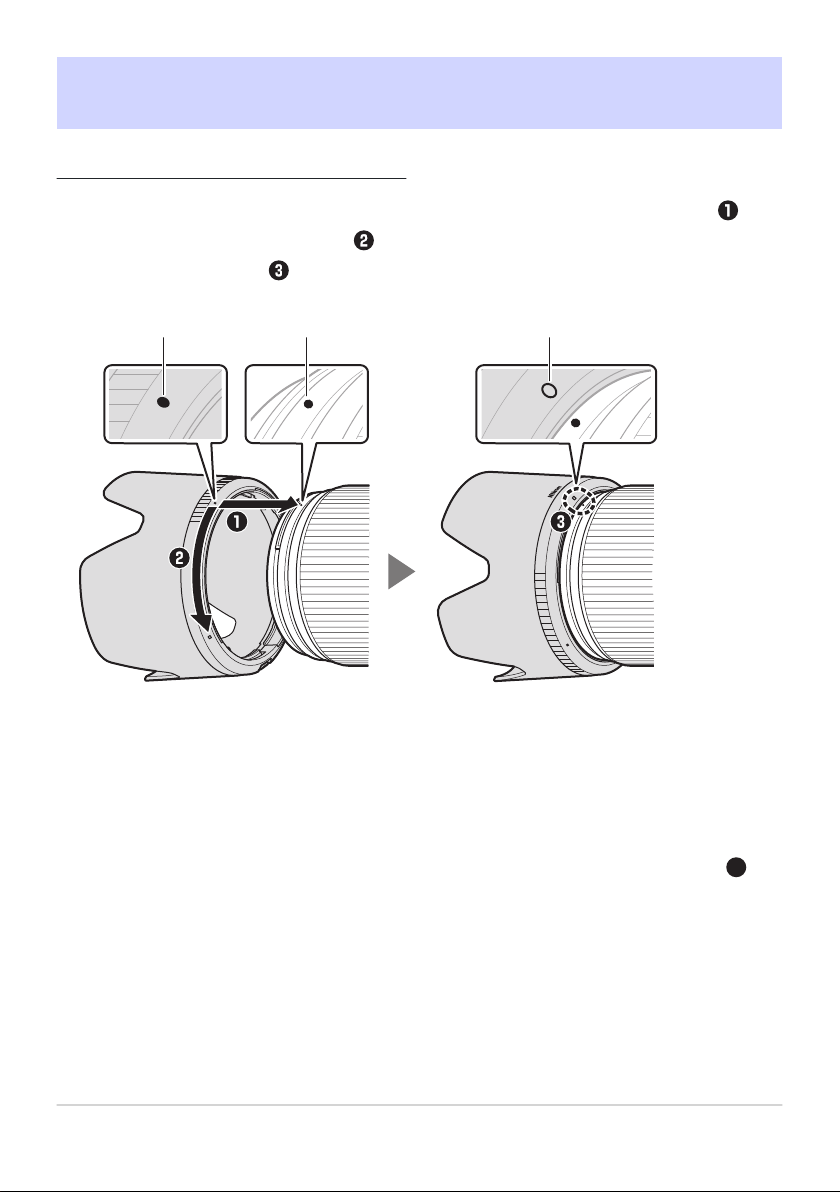
Attaching the Lens Hood
• Align the lens hood mounting mark with the lens hood alignment mark ( )
and then rotate the lens hood ( ) until the mounting mark is aligned with the
lens hood lock mark ( ).
1 2 3
Lens hood alignment mark
Lens hood mounting mark
Lens hood lock mark
•
Gripping the front too tightly makes the lens hood difficult to attach or remove.
When rotating the lens hood, hold it near the lens hood alignment mark (
).
27
Attaching and Removing the Lens Hood
1
2
3

• The lens hood can be reversed and mounted on the lens when not in use.
Removing the Lens Hood
• Keeping the lens hood lock release button pressed (
), rotate the lens hood in
the dir
ection shown (
) and remove it from the lens ( ).
1
Lens hood lock release button
• The same procedure can be used when the lens hood is reversed.
Attaching and Removing the Lens Hood
28
1
Using the Tripod Collar
Attach tripods to the tripod collar
, not to the camera.
Be sure to securely tighten the tripod collar lock screw. Failure to observe this
precaution may result in the lens unexpectedly separating from the tripod,
causing injury.
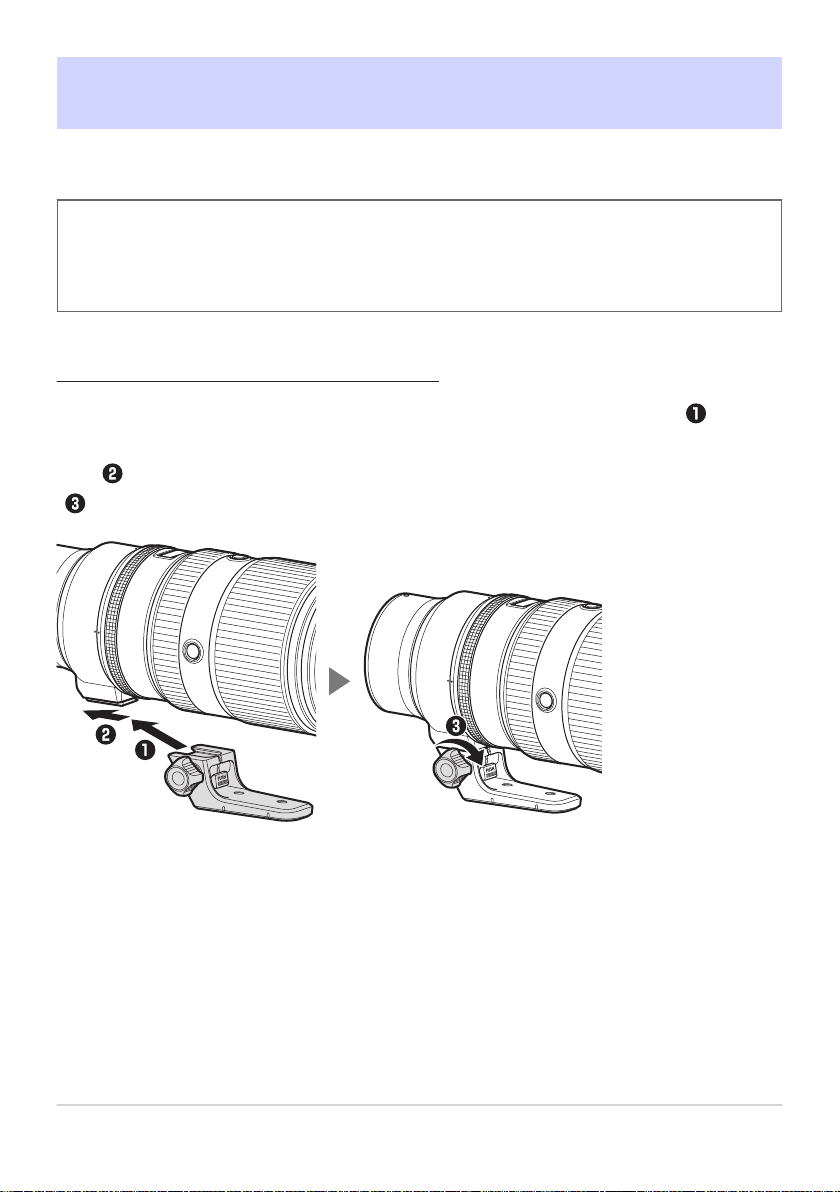
Attaching the Tripod Collar
Align the slot on the tripod collar with the tripod collar mounting foot ( ) and
then slide the collar onto the foot, not stopping until the foot is at the b
ack of the
slot (
). Fully tighten the tripod collar lock screw once the collar is in position
( ).
29
Using the Tripod Collar
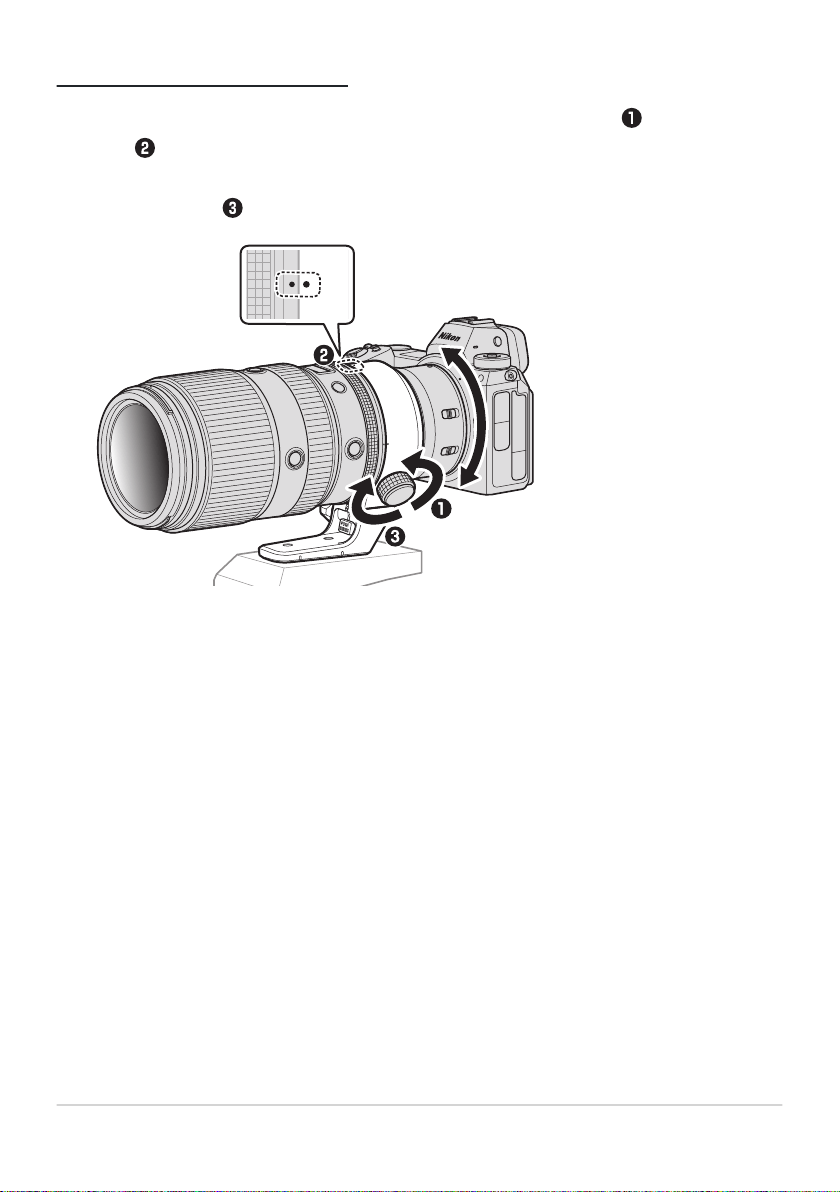
Rotating the Camera
After slightly loosening the tripod collar ring attachment scr
ew (
), rotate the
camera ( ) to align the lens rotation index with the tripod collar ring rotation
index that matches the desired orientation (landscape or por
trait) and then
tighten the screw (
).
Using the Tripod Collar
30
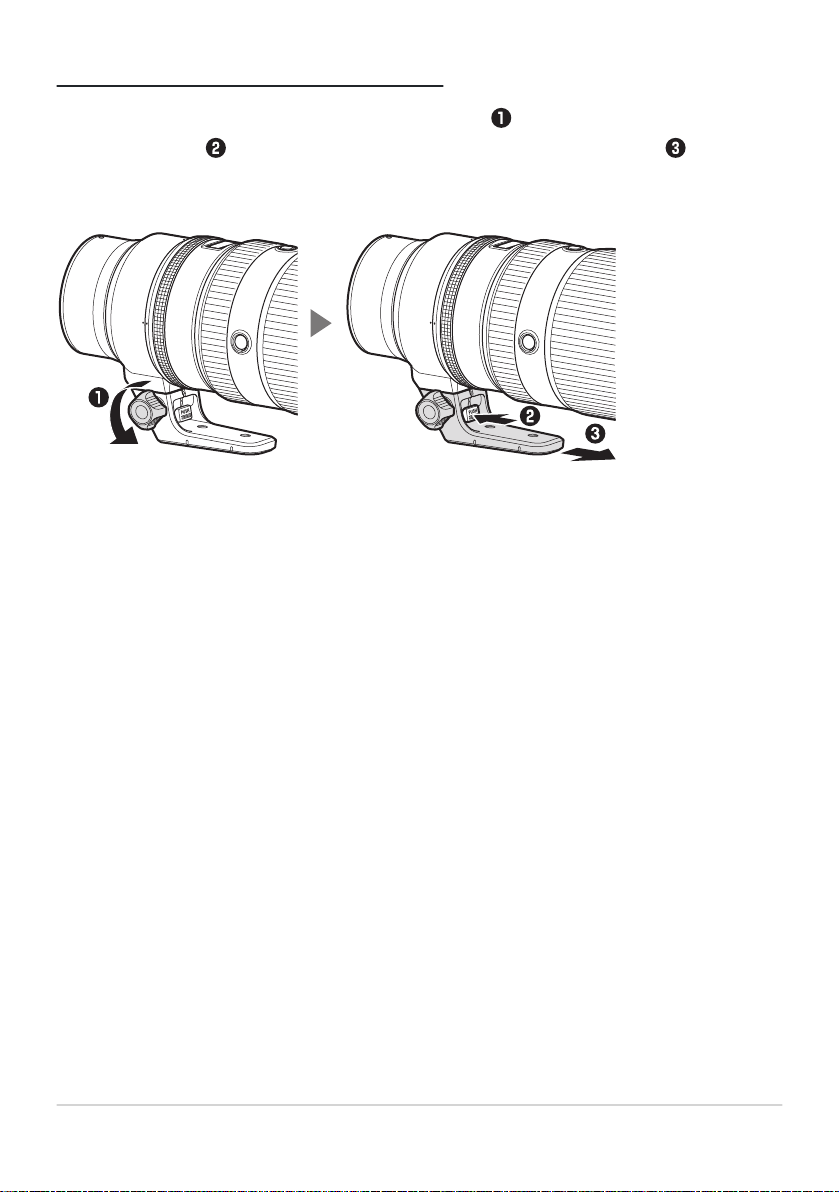
Removing the Tripod Collar
After fully loosening the tripod collar lock scr
ew (
), keep the tripod collar lock
release pressed ( ) while sliding the collar from the mounting foot ( ).
Using the Tripod Collar
31

Vibration Reduction (VR)
The lens supports vibration reduction. Vibration r
eduction settings can be
adjusted from the camera. See the documentation provided with the camera for
details.
Vibration reduction allows shutter speeds slower than would otherwise be the
case, expanding the range of shutter speeds available.
Vibration Reduction
• Due to the design of the vibration reduction system, the lens may rattle when
shaken. This does not indicate a malfunction.
•
To reduce blur caused by tripod shake, select [Normal] or [Sport] for the on-
camera vibration reduction option when the camera is mounted on a tripod.
Note, however, that depending on the type of tripod and shooting
conditions, there may be cases in which [Off] is the preferred option.
• [Normal] or [Sport] is recommended when the camera is mounted on a
monopod.
32
Vibration Reduction (VR)

Precautions for Use
• Be sure to support the lens when holding the camera. Failure to observe this
precaution could damage the camera lens mount.
• Do not pick up or hold the lens or camera using only the lens caps or lens
hood.
• Keep the CPU contacts clean.
•
Should the rubber lens-mount gasket be damaged, cease use immediately and
take the lens to a Nikon-authorized service center for repair.
• Reattach the lens caps when the lens is not in use.
• Do not leave the lens in humid locations or in locations in which it may be
exposed to moisture. Rusting of the internal mechanism can cause irreparable
damage.
• Do not leave the lens next to open flames or in other extremely hot locations.
Extreme heat could damage or warp the lens.
• Taking the lens from a warm to a cold environment or vice versa may cause
damaging condensation inside and outside the lens. Place the lens in a sealed
bag or plastic case before taking it across a temperature boundary. The lens can
be taken from the bag or case once it has had time to adjust to the new
temperature.
• We recommend that you place the lens in its case to protect it from scratches
during transport.
• Nikon will not be held liable in the event that the lens is stolen or damaged
while a third-party anti-theft cable is attached to the security slot.
33
Precautions for Use

Lens Maintenance
• Removing dust is normally sufficient to clean the glass surfaces of the lens.
• When cleaning the fluorine-coated front lens element:
Smudges, fingerprints, and other oily stains can be removed using a so
ft,
clean cotton cloth or third-party lens cleaning tissue; clean from the center
outwards using a circular motion.
To remove stubborn stains, wipe gently using a soft cloth lightly dampened
with a small amount of distilled water, ethanol, or third-party lens cleaner.
Drop-shaped marks may form on fluorine-coated surfaces, which are highly
water- and oil-repellent. Such marks can be removed with a dry cloth.
• When cleaning the rear lens element, which is not fluorine-coated:
Smudges, fingerprints, and other oily stains can be removed using a soft,
clean cotton cloth or third-party lens cleaning tissue lightly dampened with a
small amount of ethanol or third-party lens cleaner; clean from the center
outwards in a circular motion. Be sure to clean evenly and thoroughly without
leaving smears.
• Never use organic solvents such as paint thinner or benzene to clean the lens.
• Neutral Color (NC) filters (available separately) and the like can be used to
protect the front lens element.
• Do not store the lens in direct sunlight or with naphtha or camphor moth balls.
If the lens will not be used for an extended period, store it in a cool, dry location
to prevent mold and rust.
34
Lens Maintenance
-
-
-
-

Technical Notes
Cameras with AF-Assist Illuminators
The lens or lens hood may block the light fr
om the camera AF-assist illuminator.
• For the information on using the lens with cameras that have built-in AF-assist
illuminators, visit the sit
e below.
https://downloadcenter.nikonimglib.com/
35
Cameras with AF-Assist Illuminators

Using the Lens on Cameras with a Built-in
Flash
Shadows will be visible in photos where light fr
om the built-in flash is obscured by
the lens or lens hood. Remove the lens hood before shooting. Note, however, that
depending on the distance to the subject, and in the case of zoom lenses also on
the lens focal length, shadows may appear even when the lens hood is removed.
• For the information on focal lengths and subject distances at which shadows
will not appear in photos taken with a built
-in flash, visit the site below.
https://downloadcenter.nikonimglib.com/
36
Using the Lens on Cameras with a Built-in Flash

Accessories
Supplied Accessories
• LC-77B Lens Cap (front cap)
• LF-N1 Lens Cap (rear cap)
• HB-103 Lens Hood
• CL-C3 Lens Case
Using the Lens Case
• The case is intended to protect the lens from scratches, not from falls or
other physical shocks.
• The case is not water resistant.
• The material used in the case may fade, bleed, stretch, shrink, or change
color when rubbed or wet.
• Remov
e dust with a soft brush.
• Water and stains can be removed from the surface with a soft, dry cloth. Do
not use alcohol, benzene, thinner, or other volatile chemicals.
• Do not store in locations exposed to direct sunlight or to high temperatures
or humidity.
• Do not use the case to clean the monitor or lens elements.
• Be careful that the lens does not fall from the case during transport.
Material: Polyester
37
Accessories

Other Compatible Accessories
• 77 mm filters
• Z TELECONVERTER TC-1.4×/TC-2.0×
Filters
• Use only one filter at a time.
• Remove the lens hood before attaching filters. You will also need to remove
the lens hood before rotating cir
cular polarizing filters.
Teleconverters
Depending on the subject, ambient lighting conditions, and the focus point
selected, the camera may be unable to focus using aut
ofocus or the focus
indicator for electronic rangefinding may flicker while a teleconverter is
attached.
Accessories
38

Specifications
Mount Nikon Z mount
Focal length 100 – 400 mm
Maximum aperture f/4.5 – 5.6
Lens construction
25 elements in 20 groups (including 6 ED elements, 2
super-ED elements, elements with Nano Crystal and
ARNEO co
ats, and a fluorine-coated front lens
element)
Angle of view
FX format: 24°20′ – 6°10′
DX format: 16° – 4°
Focal length scale Graduated in millimeters (100, 135, 200, 300, 400)
Focusing system Internal focusing system
Vibration reduction Lens shift using voice coil motors (VCMs)
Minimum focus
distance (measured
from focal plane)
• 100 mm zoom position: 0.75 m (2.46 ft)
• 135 mm zoom position: 0.78 m (2.56 ft)
• 200 mm zoom position: 0.8 m (2.63 ft)
• 300 mm zoom position: 0.87 m (2.86 ft)
• 400 mm zoom position: 0.98 m (3.22 ft)
Maximum
reproduction ratio
0.38×
Diaphragm blades 9 (rounded diaphragm opening)
39
Specifications

Aperture range
• 100 mm zoom position: f/4.5 – 32
• 400 mm zoom position: f/5.6 – 40
The value displayed at minimum aper
ture may vary
with the exposure increment selected on the camera.
Focus limit switch Two positions: FULL (∞ – 0.75 m) and ∞ – 3 m
Filter-attachment size 77 mm (P = 0.75 mm)
Dimensions
(maximum
diameter × distance
to end of lens from
camera lens mount
flange)
Approx. 98 mm × 222 mm (3.9 in. × 8.8 in.)
Weight (with tripod
collar)
Approx. 1435 g (3 lb 2.7 oz)
Weight (without
tripod collar)
Approx. 1355 g (2 lb 15.8 oz)
Nikon reserves the right to change the appearance, specifications, and
performance of this product at any time and without prior notice.
Specifications
40
*

Notices
Notices for Customers in the U.S.A.
This device complies with part 15 o
f the FCC Rules. Operation is subject to the
following two conditions: (1) this device may not cause harmful interference, and
(2) this device must accept any interference received, including interference that
may cause undesired operation.
Federal Communications Commission (FCC) Radio
Frequency Interference Statement
This equipment has been tested and found to comply with the limits for a Class B
digital device, pursuant to Part 15 of the FCC rules. These limits are designed to
provide reasonable protection against harmful interference in a residential
installation. This equipment generates, uses, and can radiate radio frequency
energy and, if not installed and used in accordance with the instructions, may
cause harmful interference to radio communications. However, there is no
guarantee that interference will not occur in a particular installation. If this
equipment does cause harmful interference to radio or television reception, which
can be determined by turning the equipment off and on, the user is encouraged
to try to correct the interference by one or more of the following measures:
• Reorient or relocate the receiving antenna.
• Increase the separation between the equipment and receiver.
• Connect the equipment into an outlet on a circuit different from that to which
the receiver is connected.
• Consult the dealer or an experienced radio/television technician for help.
41
Notices

This symbol indicates that electrical and electronic
equipment is to be collected sep
arately.
CAUTIONS
●Modifications
The FCC r
equires the user to be notified that any changes or modifications made
to this device that are not expressly approved by Nikon Corporation may void the
user’s authority to operate the equipment.
Nikon Inc., 1300 Walt Whitman Road, Melville, New York 11747-3064, U.S.A.
Tel.: 631-547-4200
Notices for Customers in Canada
CAN ICES-3 B / NMB-3 B
Notices for Customers in Europe
The following apply only to users in Eur
opean countries:
• This product is designated for separate collection at an appropriate collection
point. Do not dispose of as household waste.
• Separate collection and recycling helps conserve natural resources and prevent
negative consequences for human health and the environment that might result
from incorrect disposal.
• For more information, contact the retailer or the local authorities in charge of
waste management.
Notices
42