0 ner's
Manual
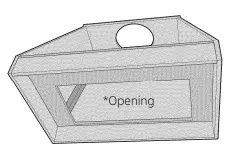
Custom Hood Inserts
Hotte encastrable et adaptable
Manuel du propri_taire
La section frangaise commence 6 la page 11
Campana a medida
Manual del propietario
La secci6n en espafiol empieza en la p6gina 21
monogram.tom
Consumer Information
Custom Hood Insert
Contents Consumer Information
Important Phone Numbers ..................... 9
Model and Serial Numbers...................... 2
Problem Solver ................................. 8
Safetg Instructions ............................. 4
Warrantg ...................................... 10
Controls and Features ......................... 5
Care and Cleaning
Light Bulbs ..................................... 7
Metal Grease Filters ............................ 6
StainlessSteel Hood Surfaces .................. 7
Before
using gout
custom
hood
insert
Readthis manual carefullg. It isintended to help
gou operate and maintain gour new custom hood
insert properlg.
Keep it handg for answers to gour questions.
If gou don't understand something or need more
help, there isa list of toll-free consumer service
numbers included in the back section of this
manual.
OR
Visit our Website at: monogram.cam
Write
down the
model
& serial
numbers
You'llfind them on a label behind the removable
filters.
These numbers are also on the Consumer Product
Ownership Registration Card packed separatelg
with gour hood.
Visit monogram.cam and click on "RegisterYour
Appliance" to register gour custom hood insert.
Before sending in this card, please write these
numbers here:
Model Number
Serial Number
Use these numbers in ang correspondence or
service calls concerning gour hood.
If cjou
received a
damaged
hood
Immediatelg contact the dealer (orbuilder) that
sold gou the hood.
Consumer Information
Custom Hood Insert
Sove time
& money
Before gou request service,check the Problem
Solver in the back of this manual.
It listscauses of minor operating problems that
gou can correct gourself.
Ifgou
need
service
Toobtain service,seethe Consumer Servicespage
in the back of this manual.
We're proud of our service and want gou to be
pleased. Iffor some reason gou are not happg with
the service gou receive, here are some steps to
follow for further help.
FIRST,contact the people who serviced gour
appliance. Explainwhg gou are not pleased.
In most cases,this will solvethe problem.
NEXT,if gou are still not pleased, write all the
details-including gour phone number-to:
Manager, Customer Relations
GEAppliances
Appliance Park
Louisville,KY40225
IMPORTANT SAFETY INSTRUCTIONS
READ ALL INSTRUCTIONS BEFORE USING
SAFETY PRECAUTIONS
A WARNING-To REDUCETHERISK
OF FIRE,ELECTRICSHOCK OR INJURY TO
PERSONS, OBSERVE THE FOLLOWING:
A. Use this unit onlg in the manner intended
bg the manufacturer. If gou have questions,
contauctthe maunufaucturer.
B. Before servicing or cleauningunit, switch
power off autservice paunelaundlock the service
disconnecting means to prevent power
from being switched on auccidentaullg.When
the service disconnecting means cannot be
locked, securelg fasten auprominent warning
device, such as autag, to the service panel.
C. Do not use this unit with aungsolid-stautespeed
control device.
D. This unit must be grounded.
_i_CAUTION-FoR GENERAL
VENTILATING USE ONLY. DO NOT USE TO
EXHAUST HAZARDOUS OR EXPLOSIVE
MATERIALS AND VAPORS.
,_ WARNING-To REDUCETHERISK
OF INJURYTO PERSONSIN THE EVENTOFA
RANGETOPGREASEFIRE,OBSERVETHE
FOLLOWING*:
A.
SMOTHER FLAMES with auclose-fitting lid,
cookie sheet or metal traug,then turn off the
burner. BE CAREFUL TO PREVENT BURNS. If the
flames do not go out immediautelg, EVACUATE
AND CALL THE FIRE DEPARTMENT.
B. NEVERPICKUPA FLAMINGPAN--You maugbe
burned.
C. DO NOT USE WATER, including wet dishcloths
or towels-(] violent steaum explosion will
result.
g.
Use an extinguisher ONLYif:
1. You know gou hauveauClaussABC
extinguisher, and gou aulreaudgknow how to
operate it.
2. The fire issmall and contained in the area
where it started.
3. The fire department is being called.
4. You can fight the fire with gour back to an
exit.
*Based on "Kitchen Firesaufet_ published bg
NFPA.
READ AND SAVE
THESE INSTRUCTIONS,
WARNING-To REDUCETHERISK
OF A RANGE TOP GREASE FIRE:
A. Never leauvesurfauceunits unattended at high
settings. Boilovers cause smoking and greausg
spillovers that maugignite. Heat oils slowlg on
low or medium settings.
B. Alwaugsturn hood ON when cooking at high
heat or when flaumb6ingfood (i.e.Crepes
Suzette, Cherries Jubilee, Peppercorn Beef
Flaumb6).
C. Clean ventilating faunsfrequentlg. Grease
should not be allowed to accumulate on faun
or filter.
D. Use proper pan size.Alwaugsuse cookwaure
appropriate for the size of the surface
element.
WARN IN G-TOREDUCETHERISK
OF FIRE,ELECTRICSHOCK OR INJURYTO
PERSONS, OBSERVE THE FOLLOWING:
A. Installation work and electrical wiring must be
done bg qualified person(s)in accordance with
all applicable codes and standards, including
fire-relautedconstruction.
B. Sufficient air is needed for proper combustion
and exhausting of gases through the flue
(chimneg) of fuel burning equipment to
prevent back drafting. Follow the heating
equipment manufacturer's guidelines and
saufetgstandards such as those published
bg the National Fire Protection Association
(NFPA),and the American Societg for Heating,
Refrigeration and Air Conditioning Engineers
(ASHRAE),and the local code authorities. When
applicable,installang makeup (replacement)
air sgstem in accordancewith localbuilding
coderequirements.VisitGEAppliances.comfor
availablemakeup air solutions.
C. When cutting or drilling into wall or ceiling,do not
damage electricalwiring and other hidden utilities.
D. Ducted faunsmust aulwaugsbe vented to the
outdoors.
A,WARN IN G-TOREDUCETHERISK
OF FIRE,USE ONLY METAL DUCTWORK.
, Donot attempt to repair or replace aungpart of
gour hood unless it isspecificaullgrecommended
in this manual. All other servicing should be
referred to auqualified technician.
,_ CAUTI O N--AUTOMATICALLY
OPERATEDDEVICE.TO REDUCETHE RISKOF
INJURY, DISCONNECTFROMPOWER SUPPLY
BEFORESERVICING.THE UNIT iS EQUIPPED
WITH AN INTEGRALDiSCONNECTiNGSWITCH
LOCATEDINSIDETHE BLOWERHOUSING.
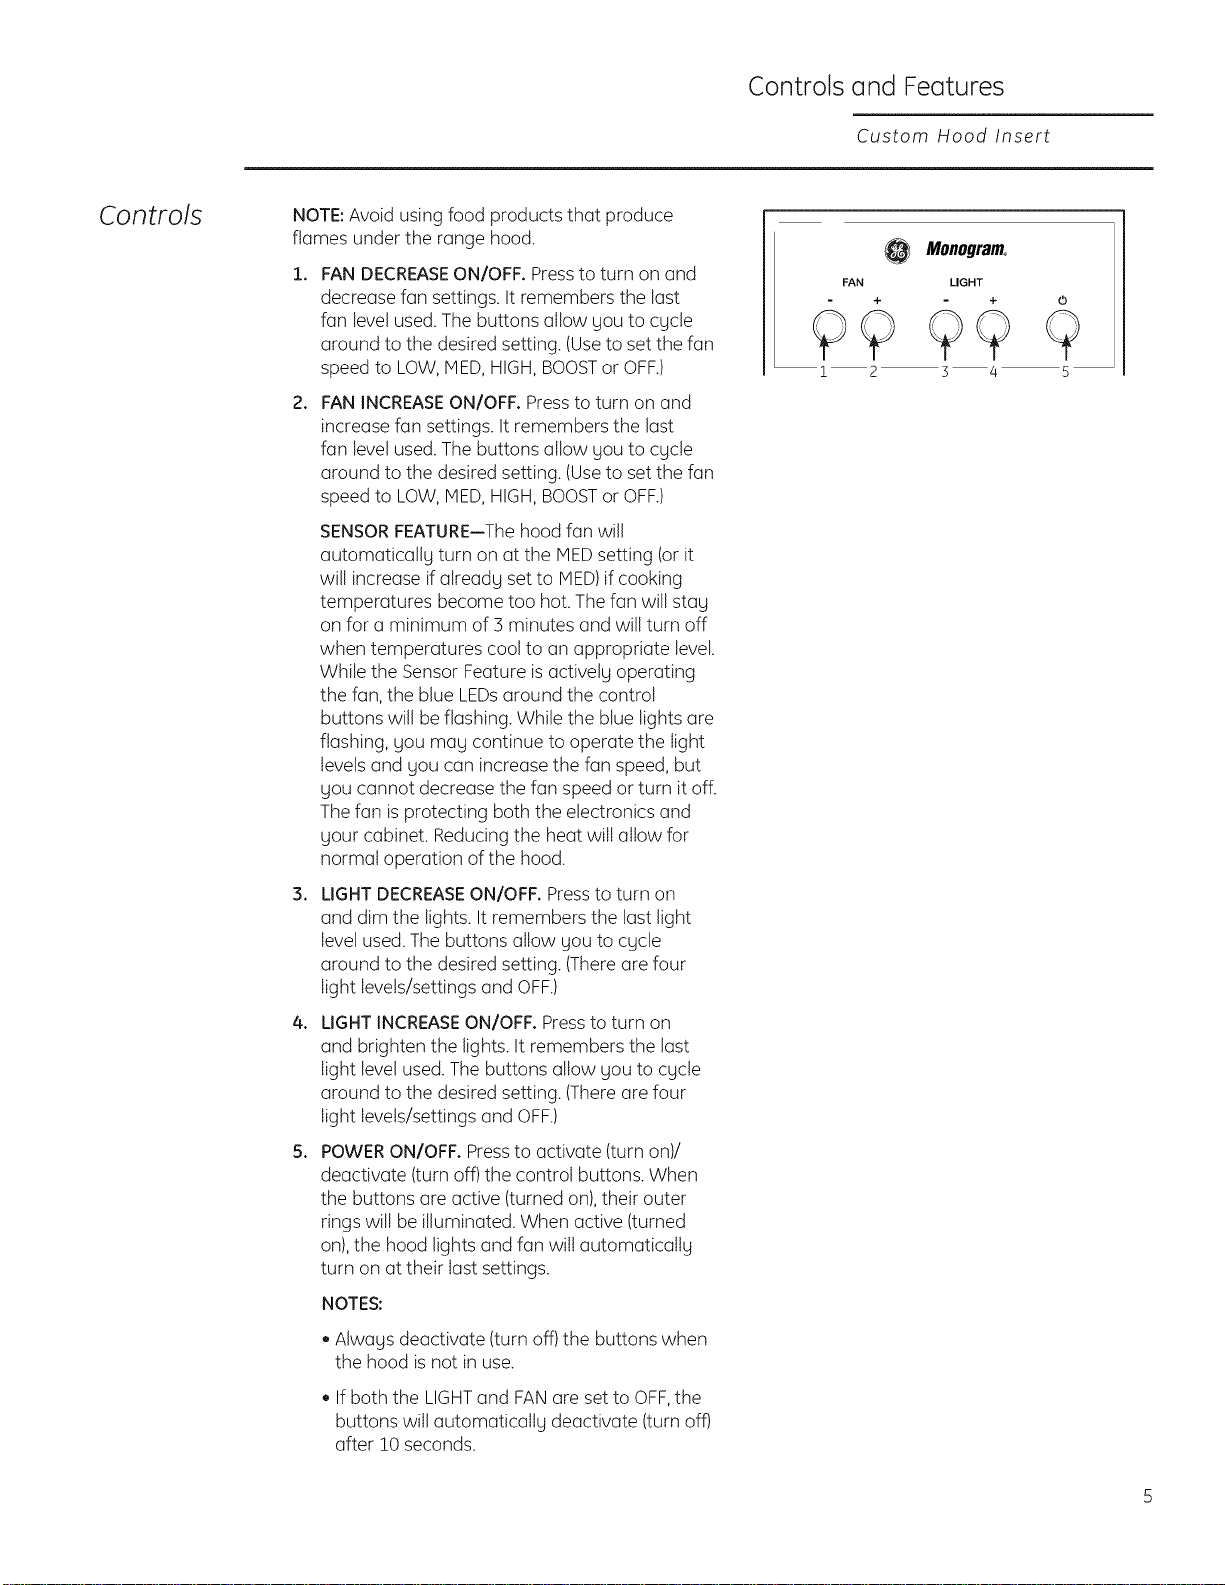
Controls and Features
Custom Hood Insert
Contro/s
NOTE:Avoid using food products that produce
flames under the range hood.
2.
3.
4.
S.
FANDECREASEON/OFF. Pressto turn on and
decrease fan settings. It remembers the last
fan level used.The buttons ailow you to cycle
around to the desired setting. (Useto set the fan
speed to LOW,MED,HIGH,BOOSTor OFF.)
FAN INCREASE ON/OFF. Press to turn on and
increase fan settings. It remembers the last
fan level used. The buttons ailow you to cycle
around to the desired setting. (Use to set the fan
speed to LOW, MED, HIGH, BOOST or OFF.)
SENSORFEATURE--Thehood fan will
automatically turn on atthe MEDsetting (orit
will increase if already set to MED)if cooking
temperatures become too hot. Thefan will stay
on for a minimum of 3 minutes and will turn off
when temperatures cool to an appropriate level.
While the Sensor Feature is actively operating
the fun, the blue LEDsaround the control
buttons will be flashing. While the blue lights are
flashing, you may continue to operate the iight
levels and you can increase the fan speed, but
you cannot decrease the fan speed or turn it off.
Thefan is protecting both the electronics and
your cabinet. Reducingthe heat wilt aitow for
normal operation of the hood.
LIGHTDECREASEON/OFF. Pressto turn on
and dim the lights. It remembers the last light
level used.The buttons aitow you to cycle
around to the desired setting. (Thereare four
light levels/settings and OFF.)
LIGHTINCREASEON/OFF. Pressto turn on
and brighten the lights. It remembers the last
light level used.The buttons allow you to cycle
around to the desired setting. (Thereare four
light levels/settings and OFF.)
POWER ON/OFR Press to activate (turn on)/
deactivate (turn off) the control buttons. When
the buttons are active (turned on), their outer
rings wilt be illuminated. When active (turned
on), the hood lights and fan wilt automatically
turn on at their iast settings.
NOTES:
• Always deactivate (turn off) the buttons when
the hood isnot in use.
• Ifboth the LIGHTand FANare set to OFF,the
buttons wiil automatically deactivate (turn off)
after !0 seconds.
@
FAN
+
99
1 2
Monogram°
LIGHT
+
4
0
5
Careand Cleaning
Custom Hood Insert
For your
safety
Before servicing or cleaning the unit, switch
power off at the service panel and lock the service
panel to prevent power from being switched on
accidentallg. If the service panel cannot be locked,
fasten a tag or prominent warning label to the
panel.
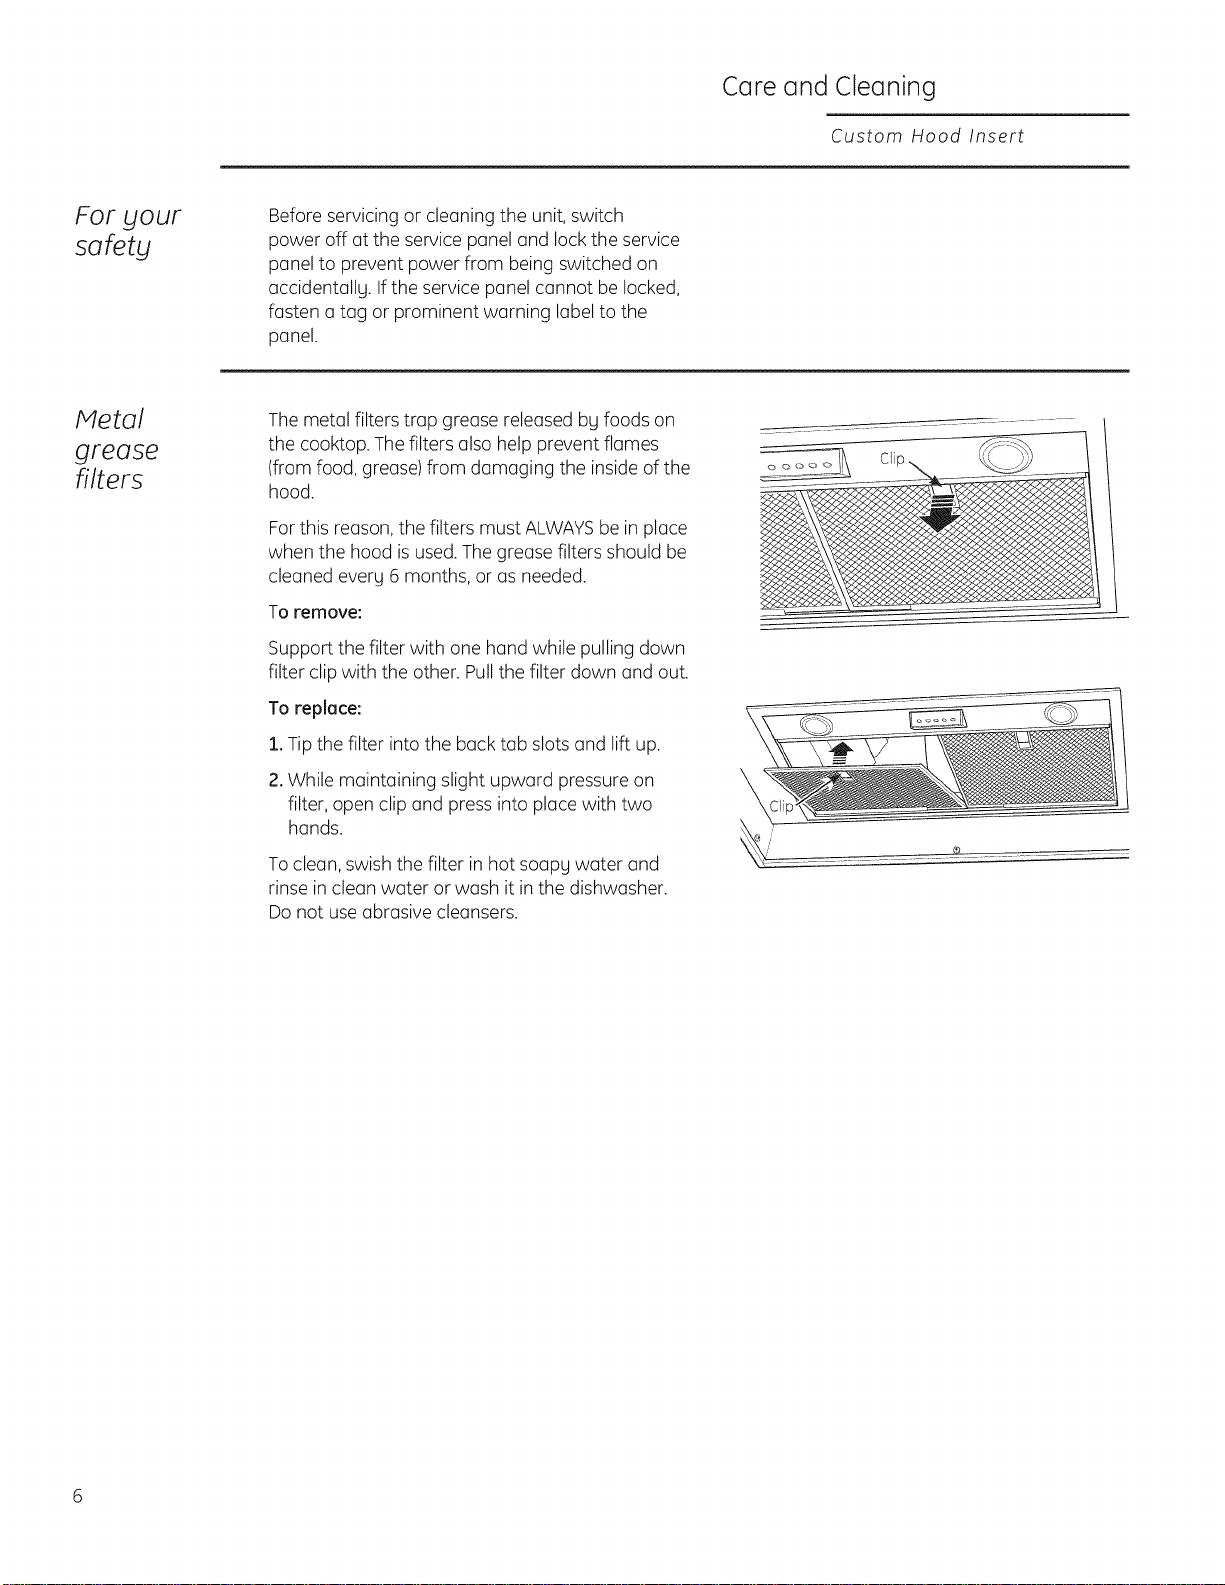
Hetal
grease
filters
Themetal filters trap grease released bg foods on
the cooktop. The filters also help prevent flames
(from food, grease)from damaging the inside of the
hood.
Forthis reason, the filters must ALWAYSbe in place
when the hood is used.The grease filters should be
cleaned everg 6 months, or as needed.
To remove:
Support the filter with one hand while pulling down
filter clip with the other. Pullthe filter down and out.
To replace:
1.Tip the filter into the back tab slots and lift up.
2. While maintaining slight upward pressure on
filter, open clip and press into place with two
hands.
Toclean, swish the filter in hot soapg water and
rinse in clean water or wash it in the dishwasher.
Do not use abrasive cleansers.
\
Careand Cleaning
Custom Hood Insert
Stainless
steel hood
surfaces
Do not use a steel wool pad; it will scratch the
surface.
Toclean the stainless steel surface, use warm
sudsg water or a stainless steel cleaner or polish.
Alwags wipe the surface in the direction of the
grain. Follow the cleaner instructions for cleaning
the stainless steel surface.
Toinquire about purchasing stainless steel
appliance cleaner or polish, or to find the location
of a dealer nearest gou, please call our toll-free
number:
National Parts Center 800.626.2002
monog rem.com
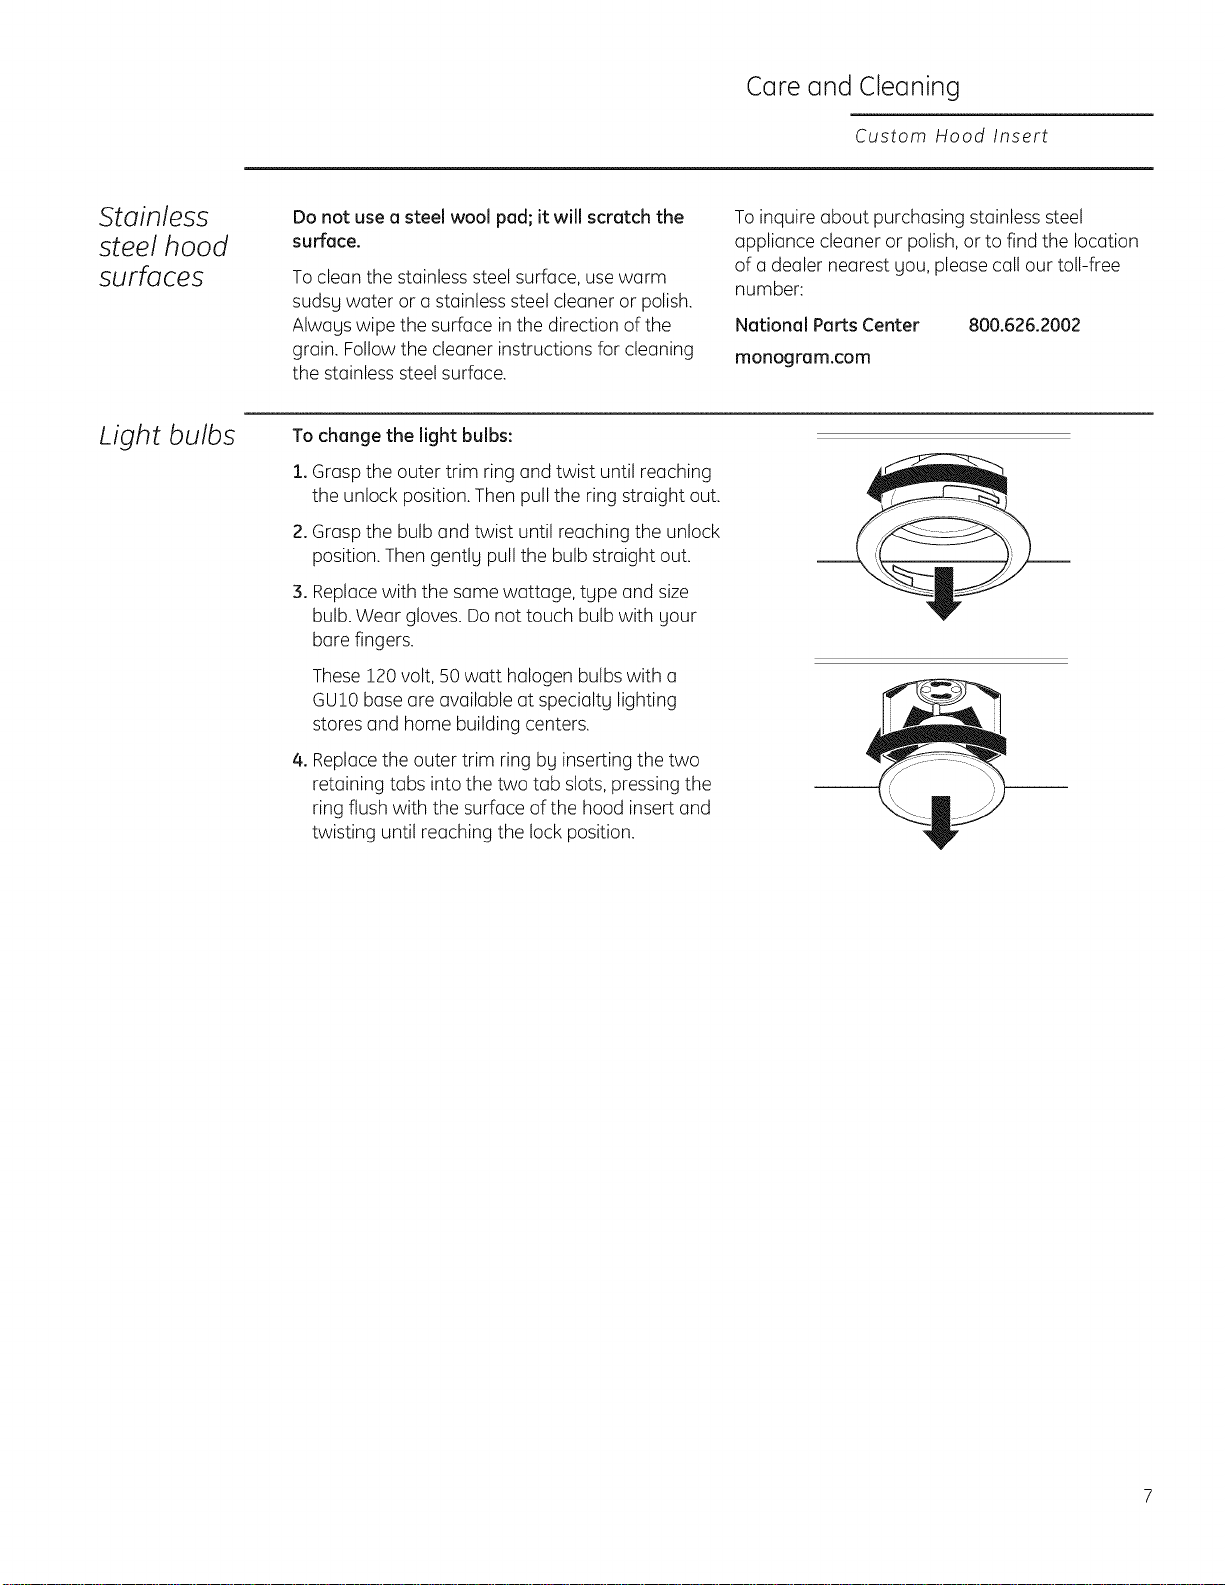
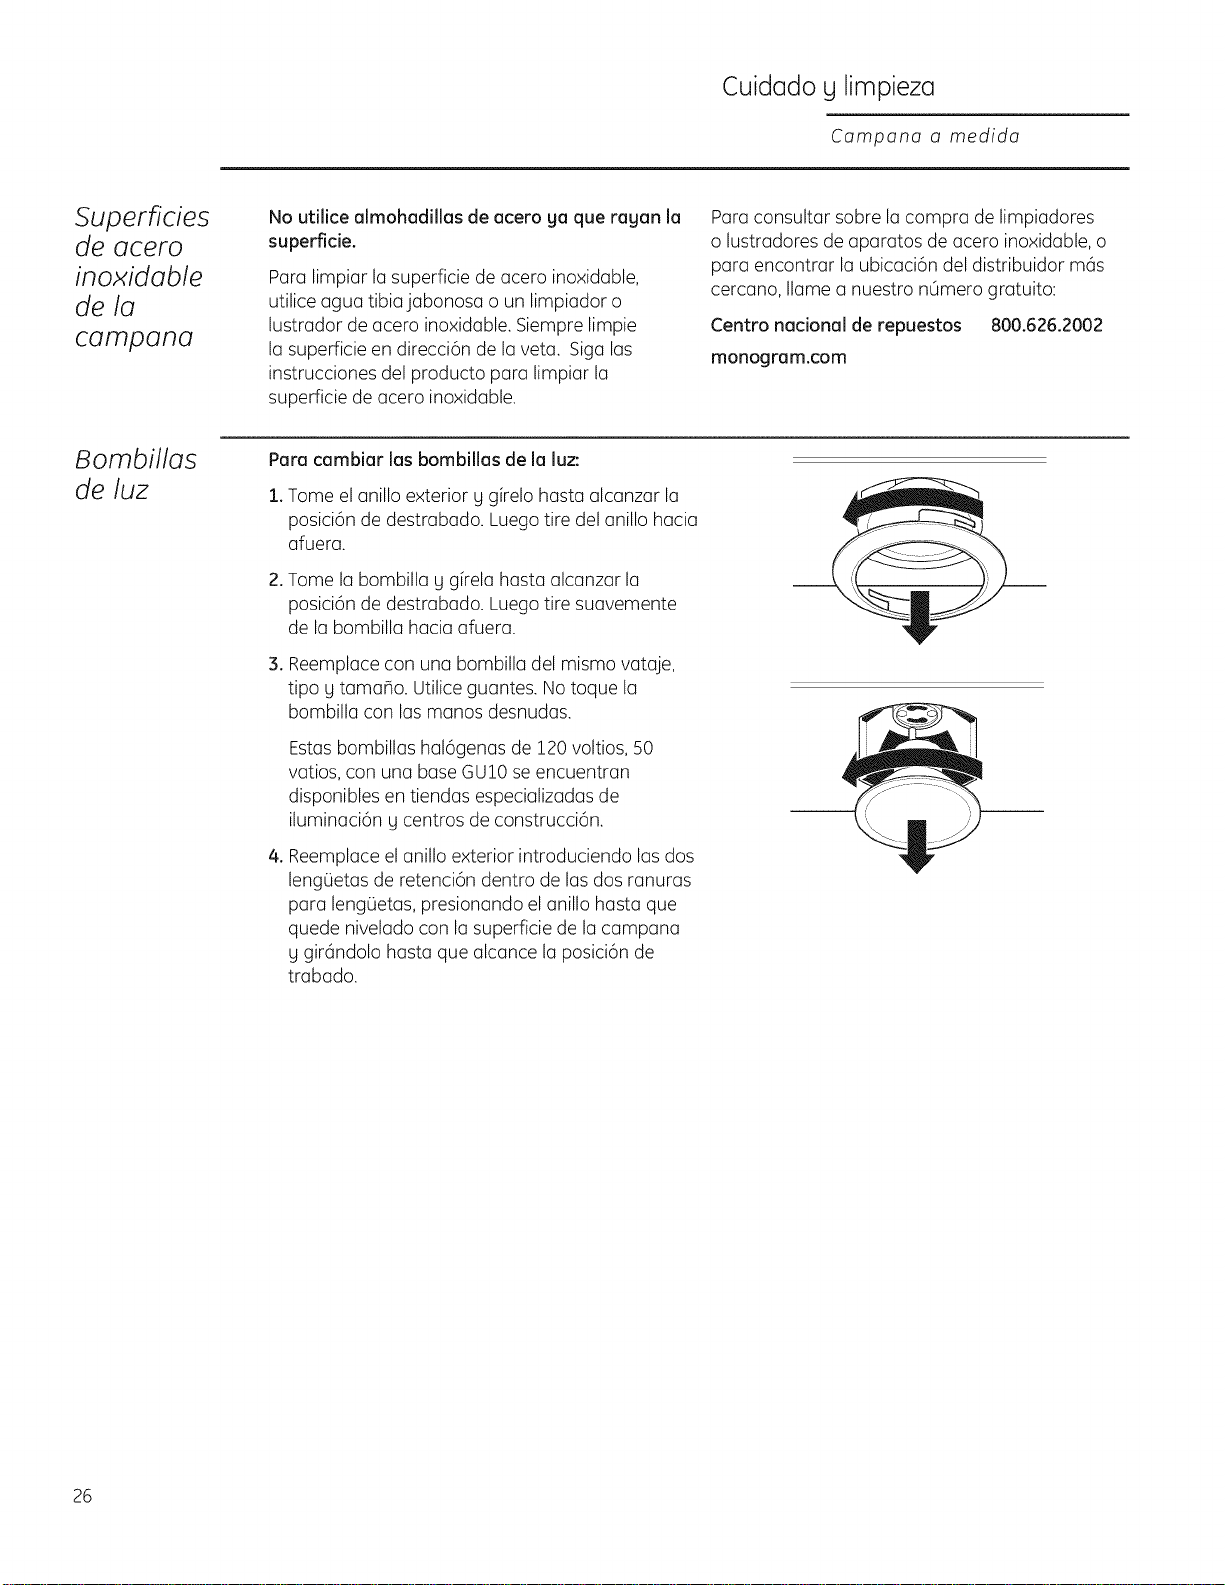
Light bulbs
To change the light bulbs:
1. Graspthe outer trim ring and twist until reaching
the unlock position. Then pull the ring straight out.
2. Graspthe bulb and twist until reaching the unlock
position. Then gentlg pull the bulb straight out.
3. Replace with the same wattage, tgpe and size
bulb. Wear gloves. Donot touch bulb with gout
bare fingers.
These 120 volt, S0 watt halogen bulbs with a
GU10base are available at specialtg lighting
stores and home building centers.
.
Replace the outer trim ring bg inserting the two
retaining tabs into the two tab slots, pressing the
ring flush with the surface of the hood insert and
twisting until reaching the lock position.

Questions?
Use this
problem
solver!
The Problem Solver
Custom Hood Insert
PROBLEM
FAN AUTOMATICALLY
TURNS ON AND CAN
NOT BE TURNED OFF
FAN DOES NOT
OPERATE WHEN
TURNED ON
FAN FALLSTO CIRCULATE
AIR OR MOVES AIR
SLOWER THAN NORMAL
FAN KEEPS GOING
OFF AND ON
LIGHT WILL NOT STAY
ON HIGH SETTING
THE HOOD CONTROLS
ARE NOT OPERATING
CORRECTLY
SEQUENTIAL PRESSES
OFTHE LIGHT OR FAN
BUTTONS WILL
SOMETIMES CHANGE
THE SETTING FROM THE
LOWEST SETTING-TO OFF-
TO THE HIGHEST SETTING,
OR FROM THE HIGHEST
SETTING-TO OFF-TO THE
LOWEST SETTING
WHEN PRESSING THE
POWER ON/OFF BUTTON
TO TURN ON THE LIGHT,
THE FAN COMES ON
INSTEAD
POSSIBLE CAUSE
The Sensor feature will automatically turn the fan on at the
HED setting if cooking temperatures become too hot. The fan
will stag on for a minimum of :3minutes and will then turn off when
temperatures cool to an appropriate level.
. A fuse may be blown or a circuit breaker tripped. Replace fuse or
reset circuit breaker.
. The power disconnect switch inside the hood may be switched off.
Remove the metal grease filters and flip the switch on.
Check to be sure the metal grease filters are clean. Clean the metal
grease filters (seethe Metal grease filters section). If cleaning
the filters does not correct the problem, call for service.
Sufficient makeup (replacement) air is required for exhausting
appliances to operate to rating. Check with local building codes,
which may require or strongly advise the use of makeup air. Visit
GEAppliances.com for available makeup air solutions.
The motor is probably overheating and turning itself off. Th is can
be harmful to the motor. Check to be sure the filters are clean. If off
and on cycling continues, call for service.
Use 120 volt, 50 watt halogen bulbs with a GU10 base and make sure
they are inserted securely. See the Light bulbs section.
Disconnect power to the hood by removing the fuse or turning the
circuit breaker off inthe home fuse box. Wait 30 seconds to allow the
hood controls to reset and then replace the fuse or move the circuit
breaker back on.
It is normal for the light and fan buttons to cycle around through the
settings so that you can easily set the controls to the desired setting.
For your convenience, it isnormal for the lights and fan to remember
their last setting when you press the Power On/Off button. Ifyou
want only the lights on, press the "FAN+" (or the "FAN -") button until
the fan is off. When you power the hood up next time, only the lights
will function.
Consumer Services
Custom Hood Insert
With the purchase of your new Monogram appliance,
receive the assurance that if you ever need information or
assistance from GE, we'll be there. All gou have to do is call--
toll-free!
GE Answer
Center ®
800.626.2000
Whatever gour question about ang Monogram major appliance, GEAnswer Center®information
service is available to help. Your call-and gour question-will be answered promptlg and
courteouslg. GEAnswer Center®service is open 8 a.m. to 10 p.m. ESTMondag - Fridag and
8 a.m. to 7p.m. ESTSaturdag.
OR
Visit our Website at: monogram.corn
Monogram
Preferred
Service
800.444.1845
A GEconsumer service professional will provide expert repair service, scheduled at a time that's
convenient for gou. Hang GEConsumer Service compang-operated locations offer gou service
todug or tomorrow, or at gout convenience (7 a.m. to 10 p.m. ESTHondug - Fridag, 8 a.m. to
6 p.m. ESTSaturdug and Sundag). Our factorg-trained technicians know gout appliance inside
and out-so most repairs can be handled in just one visit.
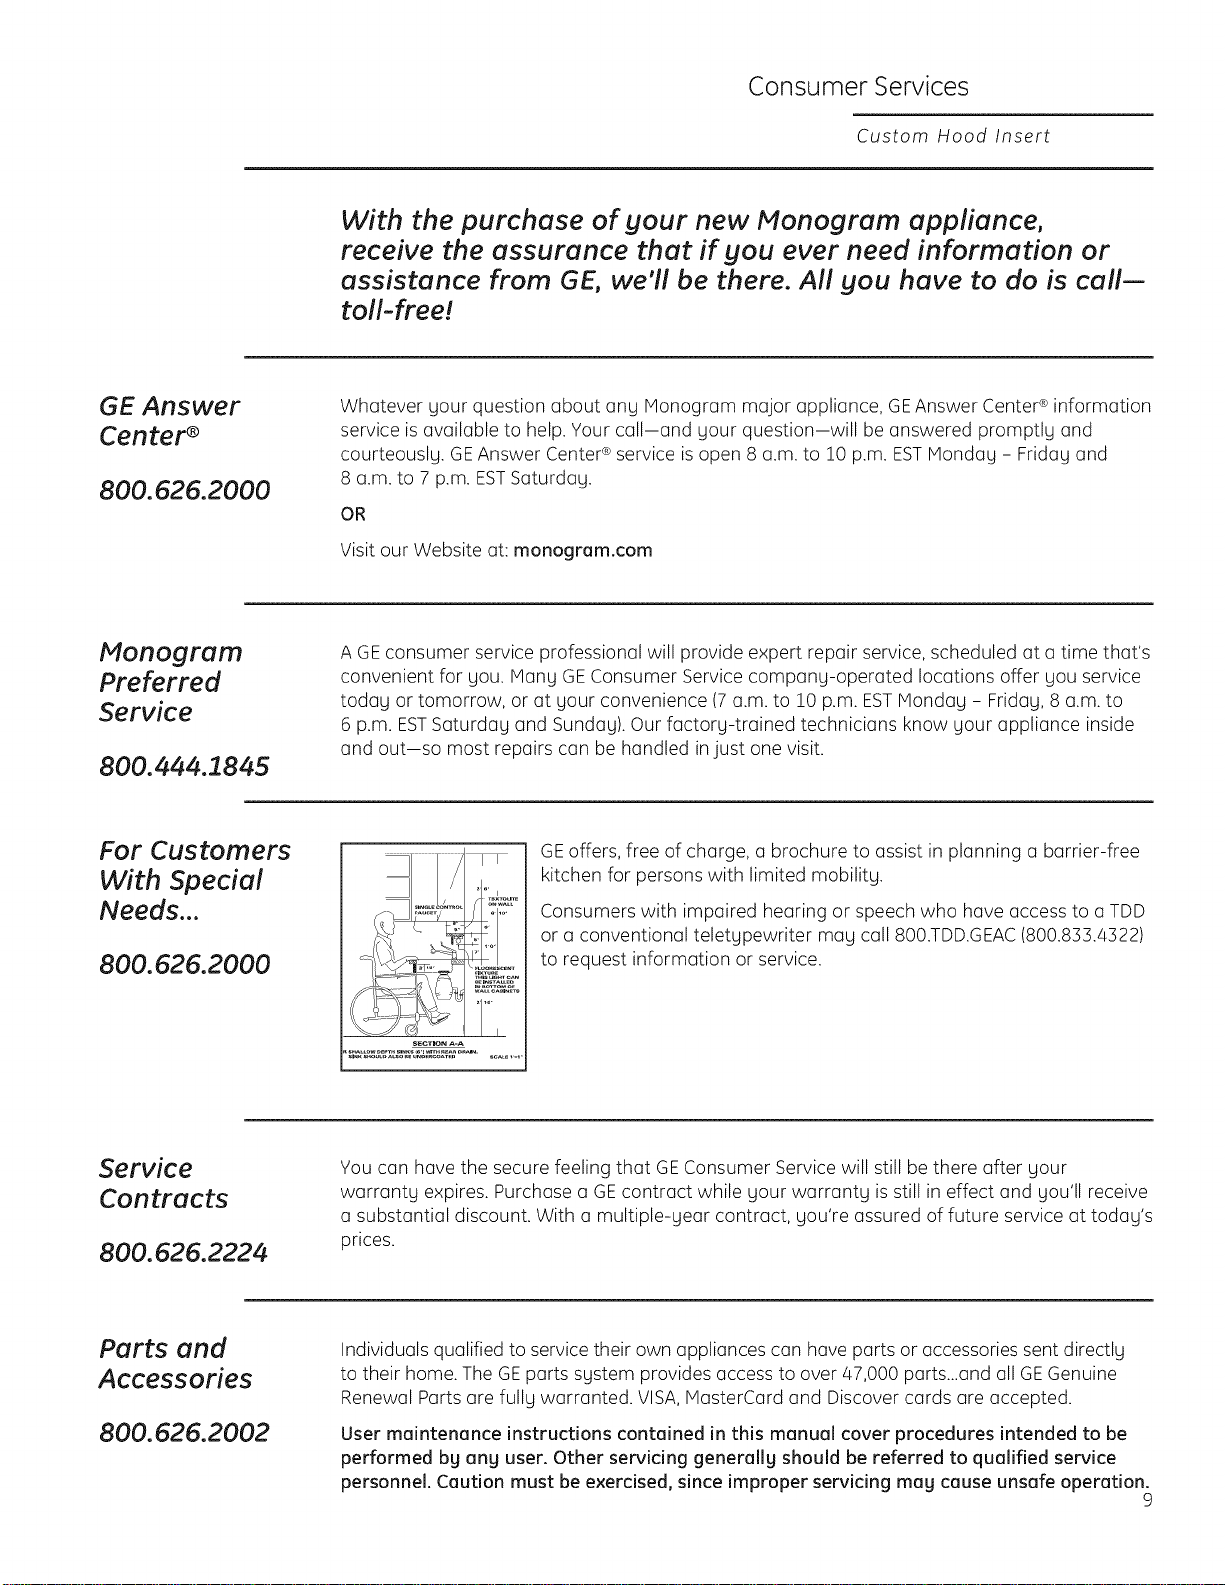
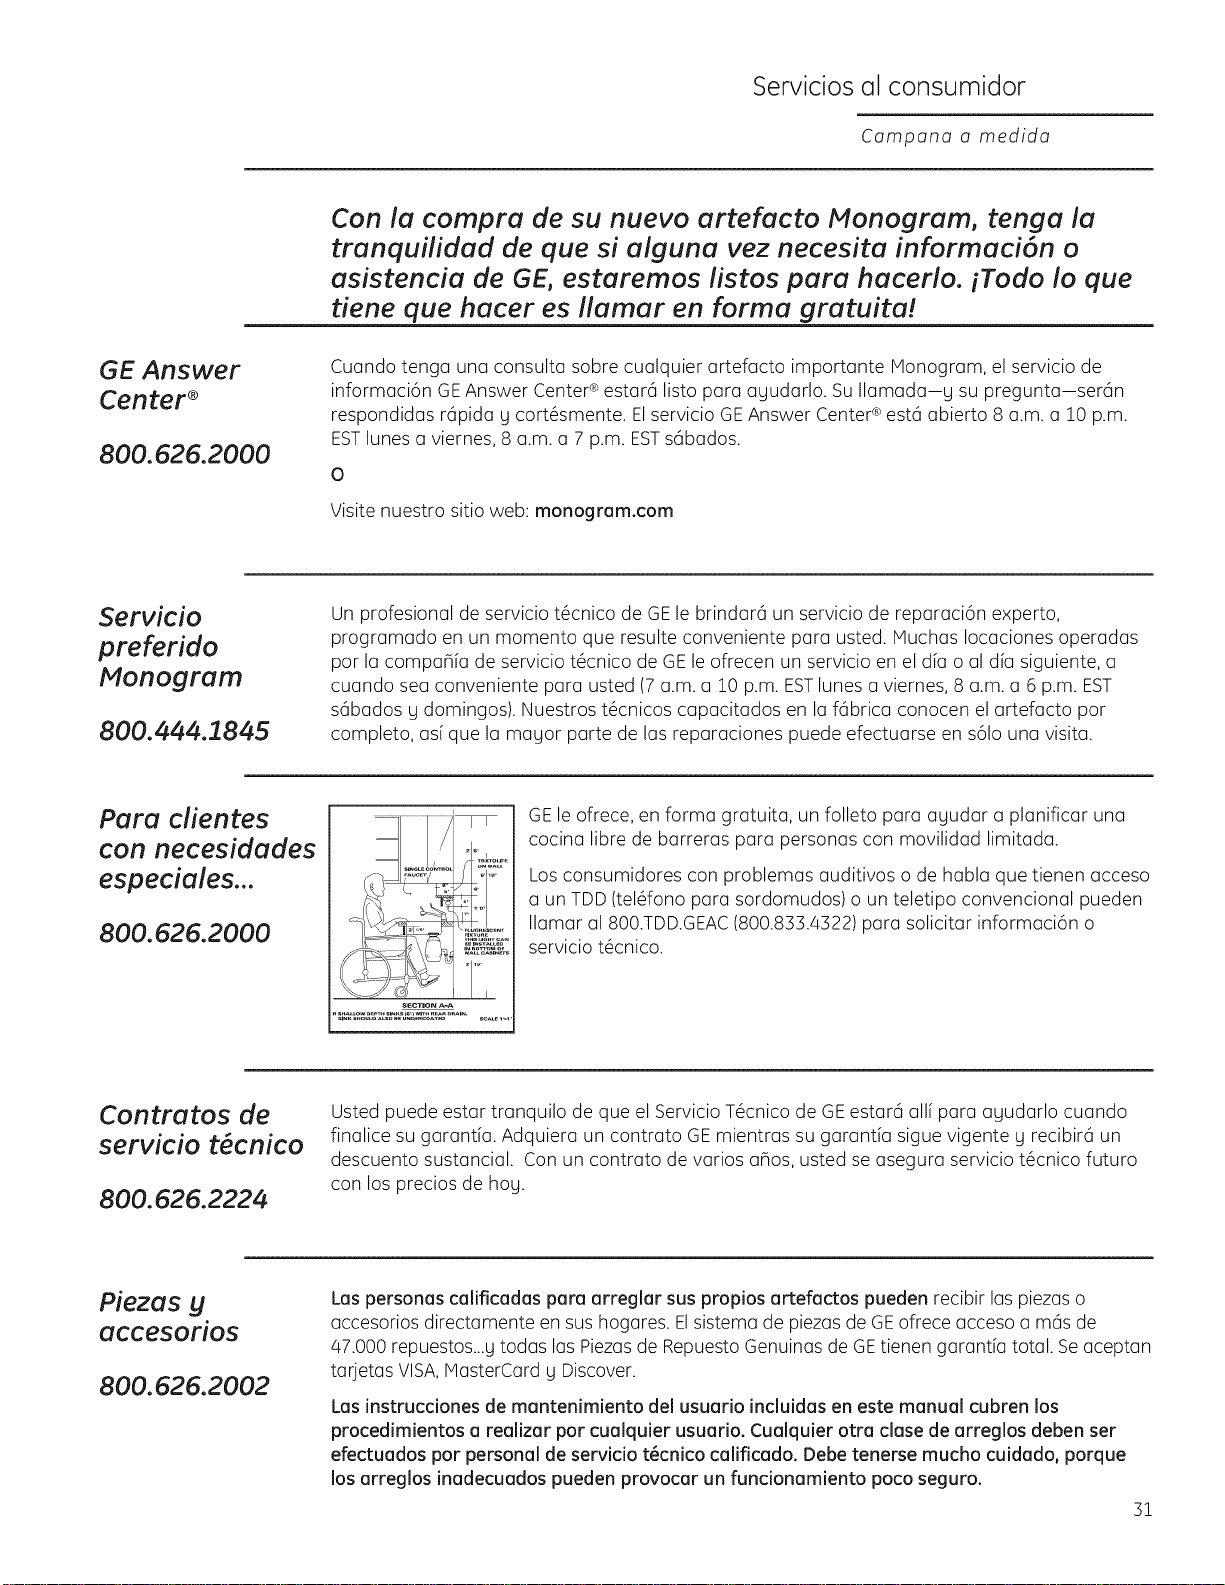
For Customers
With Special
Needs...
800.626.2000
............................i.................
.,.
i I _,_TI i i ,i,o.
'#2°JJ2_£,
I I
s_c_loN A-A
GEoffers, free of charge, a brochure to assist in planning a barrier-free
kitchen for persons with limited mobilitg.
Consumers with impaired hearing or speech who have access to a TDD
or a conventional teletgpewriter mag call 800.TDD.GEAC(800.8:3:3.4:322)
to request information or service.
Service
Contracts
800.626.2224
You can have the secure feeling that GEConsumer Service will still be there after gout
warrantg expires. Purchase a GEcontract while gour warrantg is still in effect and gou'll receive
a substantial discount. With a multiple-gear contract, gou're assured of future service at todag's
prices.
Parts and
Accessories
800.626.2002
Individuals qualified to service their own appliances can have parts or accessories sent directlg
to their home.The GEparts sgstem provides access to over 47,000 parts...and all GEGenuine
Renewal Parts are fullg warranted. VISA,HasterCard and Discover cards are accepted.
User maintenance instructions contained in this manual cover procedures intended to be
performed by any user. Other servicing generallg should be referred to qualified service
personnel. Caution must be exercised, since improper servicing may cause unsafe operation.
9
Warranty
Custom Hood Insert
YOUR MONOGRAM HOOD WARRANTY
Staple sales slip or cancelled check here. Proof of original
purchase date is needed to obtain service under warranty.
WHA T IS
COVERED
WHAT IS NOT
COVERED
LIMITED ONE-YEAR WARRANTY
For one gear from date of original purchase, we will provide, free of charge, parts and
service labor in your home to repair or replace any part of the hood that fails because of a
manufacturing defect.
This warranty is extended to the original purchaser and any succeeding owner for products
purchased for ordinary home use in the 48 mainland states, Hawaii and Washington, D.C.If the
product is located in on area where service by o GEAuthorized Servicer isnot available, you may
be responsible for o trip charge or you may be required to bring the product to on Authorized
GEService Location for service. In Alaska the warranty isthe same except that it is LIMITED
because you must pay to ship the product to the service shop or for the service technician's
travel costs to your home.
All warranty service will be provided by our Factory Service Centers or by our authorized
Customer Core®servicers during normal working hours.
Should your appliance need service, during warranty period or beyond, cull 800.444.1845.
Please hove your serial number and model number available when calling for service.
. Service trips to your home to teach you
how to use the product.
Replacement of house fuses or resetting
of circuit breakers.
Incidental or consequential damage
caused bg possible defects with this
appliance.
Replacement of the replaceable filters.
Damage to the product caused bg
accident, fire, floods or acts of God.
. Damage caused after delivery.
. Failure of the product if it is used for
other than its intended purpose or used
commercially.
. Improper installation.
If you have an installation problem,
contact your dealer or installer. You
are responsible for providing adequate
electrical, gas, exhausting and other
connecting facilities as described in the
Installation Instructions provided with the
product.
. Product not accessible to provide required
service.
, Installation or servicefor a makeup
(replacement) air system.
EXCLUSIONOFIMPLIED WARRANTIES--Yoursole and exclusive remedy is product repair
as provided in this Limited Warranty. Any implied warranties, including the implied
warranties of merchantability or fitness for a particular purpose, are limited to one
year or the shortest period allowed by law.
Some states do not allow the exclusion or limitation of incidental or consequential damages, so
the above limitation or exclusion may not apply to you. This warranty gives you specific legal
rights, and you may also have other rights which vary from state to state.
To know what your legal rights (]re in your state, consult your local or state consumer affairs
office or your state's Attorney General.
10 Warrantor: General Electric Company. Louisville, KY 40225
Information de consommateur
Hotte encastrable et adaptable
Table des
matidres
Service au consommateur
Garantie....................................... 20
Instructions de S_curit6........................ 13
ivlod_le et num@o de s@ie ................... 1!
Num@os de t61_phone importants ........... 19
R6solution de probl_mes ...................... 17
Commandes et pamm_tres .................. 14
Nettogage et entretien
Ampoules ..................................... 16
Filtres m@alliques6 graisse ................... 15
Surfaces de la hotte en acier inoxgdable ...... 16
Avant
d'utiliser
votre hotte
encastrable
et
adaptab/e
Lisez attentivement ce manuel. II a 6t6 conqu
pour vous aider 6 utiliser et 6 entretenir
correctement votre nouvelle hotte encastrable
et adaptable.
Conservez-le 6 port6e de main pour r6pondre
6 vos questions.
Si vous ne comprenez pas quelque chose ou que
vous avez besoin d'aide, vous trouverez la liste
des num@os d'appel gratuit du service apr_s-
vente au verso de la couverture de ce manuel.
OU
Visitez notre site web sur : monogram.corn
Notez les
numdros
de moddle
et de sdrie
Vous les trouverez sur I'@iquette derriere les
filtres d@achables.
Ces num@os figurent 6galement sur la carte
d'enregistrement de propri@6 du produit emball6
s6par6ment avec votre hotte.
Allez sur monogram.com et cliquez sur "Enregistrez
votre appareil" pour enregistrer votre hotte
aspirante.
Avent d'envoger la carte, veuillez noter les
num_ros ici:
Num6ro de module
Num@o de s@ie
Utilisez ces num@os dans toute correspondance
ou pour tout appel au service apr_s-vente,
concernant votre hotte.
Si vous
iecevez
unehotte
endommagde
Contactez imm6diatement le revendeur (ou
le constructeur) qui vous a vendu la hotte.
1!
Information de consommateur
Hotte encastrable et adaptable
4conomisez
du temps et
de I'orgent
Avant de demander I'assistance, reportez-vous
au r6solveur de probl_me figurant au dos de ce
manuel.
II r6pertorie les causes des dgsfonctionnements
mineurs que vous pouvez corriger par vos propres
mogens.
si vous oyez
besoin d'une
intervention
Pour utiliser le service, consultez la page du
service au verso de la couverture de ce manuel.
Nous sommes tiers de notre service et nous
voulons que vous en sogez satisfait. Si,pour une
quelconque raison, vous _tes m6content du
service fourni, voici la proc6dure 6 suivre pour
obtenir une aide suppl6mentaire.
PREMII_REMENT,contactez la personne qui a
r6par6 votre appareil. Expliquez-lui les raisons de
votre m6contentement. Dans la plupart des cas,
cela r6soudra le probl_me.
ENSUITE,si vous _tes toujours m6content, 6crivez
tousles d6tails-g compris votre num@o de
t616phone-6 :
Manager, Customer Relations
GEAppliances
Appliance Park
Louisville,KY/40225
12
J J
INSTRUCTIONS DE SECURITE IMPORTANTES
LISEZTOUTES LESINSTRUCTIONS AVANT D'UTILISER VOTRE APPAREIL
J % J J
PRECAUTIONS EN MATIERE DE SECURITE
AVERTISSEMENT :
POUR RI_DUIRE LE RISQUE D'INCENDIE,
DE SECOUSSE I_LECTRIQUEOU DE BLESSURE
CORPORELLE, OBSERVEZ LESPRI_CAUTIONS
SUIVANTES :
A.N'utilisezcet appareil que de Io mani_re pr_vuepar
le fobricont. Sivous ovezdes questions,oppelez le
fobricont.
B.Avont de r_porer ou de nettoger votre opporeil,
d_bronchez le couront ou niveou du ponneou
de serviceet verrouillez les m_conismes de
d_bronchement de service pour _viter tout
bronchement occidentel ou couront. Sivous ne pouvez
pos verrouiller les m_conismes de d_bronchement de
service,attochez soigneusement un overtissement bien
visible,comme une _tiquette, ou ponneou de service.
C.N'utilisezjomois cet opporeil ovec un m_conisme de
r_gloge de Iovitesse6 semi-conducteurs.
D. Cetopporeil dolt _tre bien mis6 Ioterre.
A ATTENTION :UN,QUEMENTA
USAGE DE VENTILATION GI_Nt_RALE.N°UTILISEZ
JAMAIS POUR L'_CHAPPEMENT DE MATI_RES ET
DE VAPEURS EXPLOSIVES.
AVERTISSEMENT:POUR
R_DUIRELERISQUEDE BLESSURECORPORELLE Sl
DE LA GRAISSEPREND FEU SUR LA SURFACE DE
CUISSON DU FOUR, SUIVEZ LES INSTRUCTIONS
SUIVANTES* :
A.ETOUFFEZLESFLAiVtivIESovec un couvercle qui
convient, unet61e6 biscuitsou un plateau en m@tol,
puis @teignez/ebr01eur.FAITESBtENATFENTIONDENE
PASVOUSBRULER.Si lesflommes ne s'@teignentpos
imm@diotement,SORTEZETAPPELEZLESPOMPIERS.
B.NEDEPLACEZJAMAtSUNECASSEROLLEOUt FLAMBE--
Vous pouvez vous br01er.
C.N'UTILISEZJAMAISD'EAU,en porticulier de serviette ou
de chiffon mouill@-il se produiro une explosion violente
de vopeur br01onte.
D. N'UTILISEZUNEXTINCTEURque si:
1.Vous oyez un extincteur de closseABCet vous
sovezcomment rutiliser;
2. Lefeu est r@duitet confin@6 rendroit o0 ilo
commenc@;
3.Vous oyez d@j6oppel@les pompiers;
4.Vous combottez les flommes en tournont le dos 6
unesortie.
* Bos@sur rouvroge intitul@<<KitchenFireSofetg Tips>>
publi@par Io NFPA.
LISEZ ET CONSERVEZ
CES INSTRUCTIONS.
A AVERTISSEMENT : R DU,SEZ
LE RISQUE D'UN FEU DE GRAISSESUR LA SURFACE
DE CUISSON DU FOUR :
A.Ne Ioissezjomois sonssurveillonce lesunit@sde cuisson
de surfoce(_une temp@roture@lev@e.Le bouillonnement
occosionne des d@bordementsfumonts et groisseux
qui peuvent prendrefeu. Chouffez _feu doux les
substonces huileuses,ovec un r@glogebosou mogen.
B.Ne pr@porezpos desmets flomb@ssur Iocuisini@re.
Sivous pr@porezdes mets flomb@ssous Io hotte,
mettez le ventiloteur en morche.
C:.Nettogez lesm@conismesde ventilotion fr@quemment.
IInefout pos permettre uneoccumulotion de groisse
sur leventiloteur ou sur lefiltre.
D. Utilisezune cosserole de bonne toille.Utiliseztoujours
un ustensilede cuisine qui convienne ou diom@trede
I'@l@mentde cuisson.
,A,AVERTISSEMENT:POUR
REDUIRE LE RISQUE D'INCENDIE,DE SECOUSSE
ELECTRIQUE OU DE BLESSURE CORPORELLE,
OBSERVEZ LES PRECAUTIONS SUIVANTES :
A.Vous devez loire ex@cutertousles trovoux d'instollotion
et de c_bloge @lectriquepor une personne quolifi@e,
conform@ment_ tousles codes et les normes en
vigueur, en porticulier ceux de construction relotifs
oux incendies.
B.Vousdevezossezd'oir pour ovoir une bonne combustion
et permettre r@vocuotiondes goz por leconduit de
chemin@edu mot@rielde combustion du corburont,
ofin d'@vitertout retour d'oir.Suivezlesdirectivesdu
fobricont de mot@rielde combustion et lesnormes de
s@curit@comme cellespubli@espor Io Notionol Fire
Protection Associotion(NFPA)et rAmericon Societgfor
Heoting, Refrigerotionond AirConditioning Engineers
(ASHRAE),oinsi que lesmodolit@sdes codesIocoux. Le
cos @ch@ont,instoltez un sgst@mede compensotion
d'oir (remplocement) conform@mentoux conditions des
codes Iocoux du b(_timent.Visitezle site GEAppliances.
corn pour conno_treles solutions offertes en mo%re de
sgst@mede compensotion d'oir.
C:.Sivous foites un trou ou une ouverture dons un mur ou
un plofond, n'endommogez pos lesills @lectriqueset les
outres instollotions coch@esde service public.
D. Vousdevez toujours olimenter lesventiloteurs dons les
conduits en oir en provenonce de rext@rieur.
,AAVERTISSEMENT:POUR
RI_DUIRELE RISQUE D;INCENDIE, N'UTILISEZ QUE
DES CONDUITS EN METAL.
• N'essogezjomoisde remplocerou de r_porerun
@l@mentde votrehottesilepr@sentmonuelnele
recommonde posexpress@ment.Toutoutreentretien
dolt 6tre effectu_ por un technicien quolifi&
ATTENTION :APPAREIL
COMMAND(: AUTOMATIQUEMENT. AFIN DE
R_DUlRELESRISOUESDE BLESSURE,
DEBRANCHEZ L'APPAREIL DE L'ALIMENTATION
_LECTRIQUE AVANT DE PROC_DER A UNE
REPARATION,L'APPARE_LEST_QUmE D'UN
SECTIONNEUR INTEGRAL SITUE A L'INTERIEUR
DU LOGEMENT DU VENTILATEUR. 13
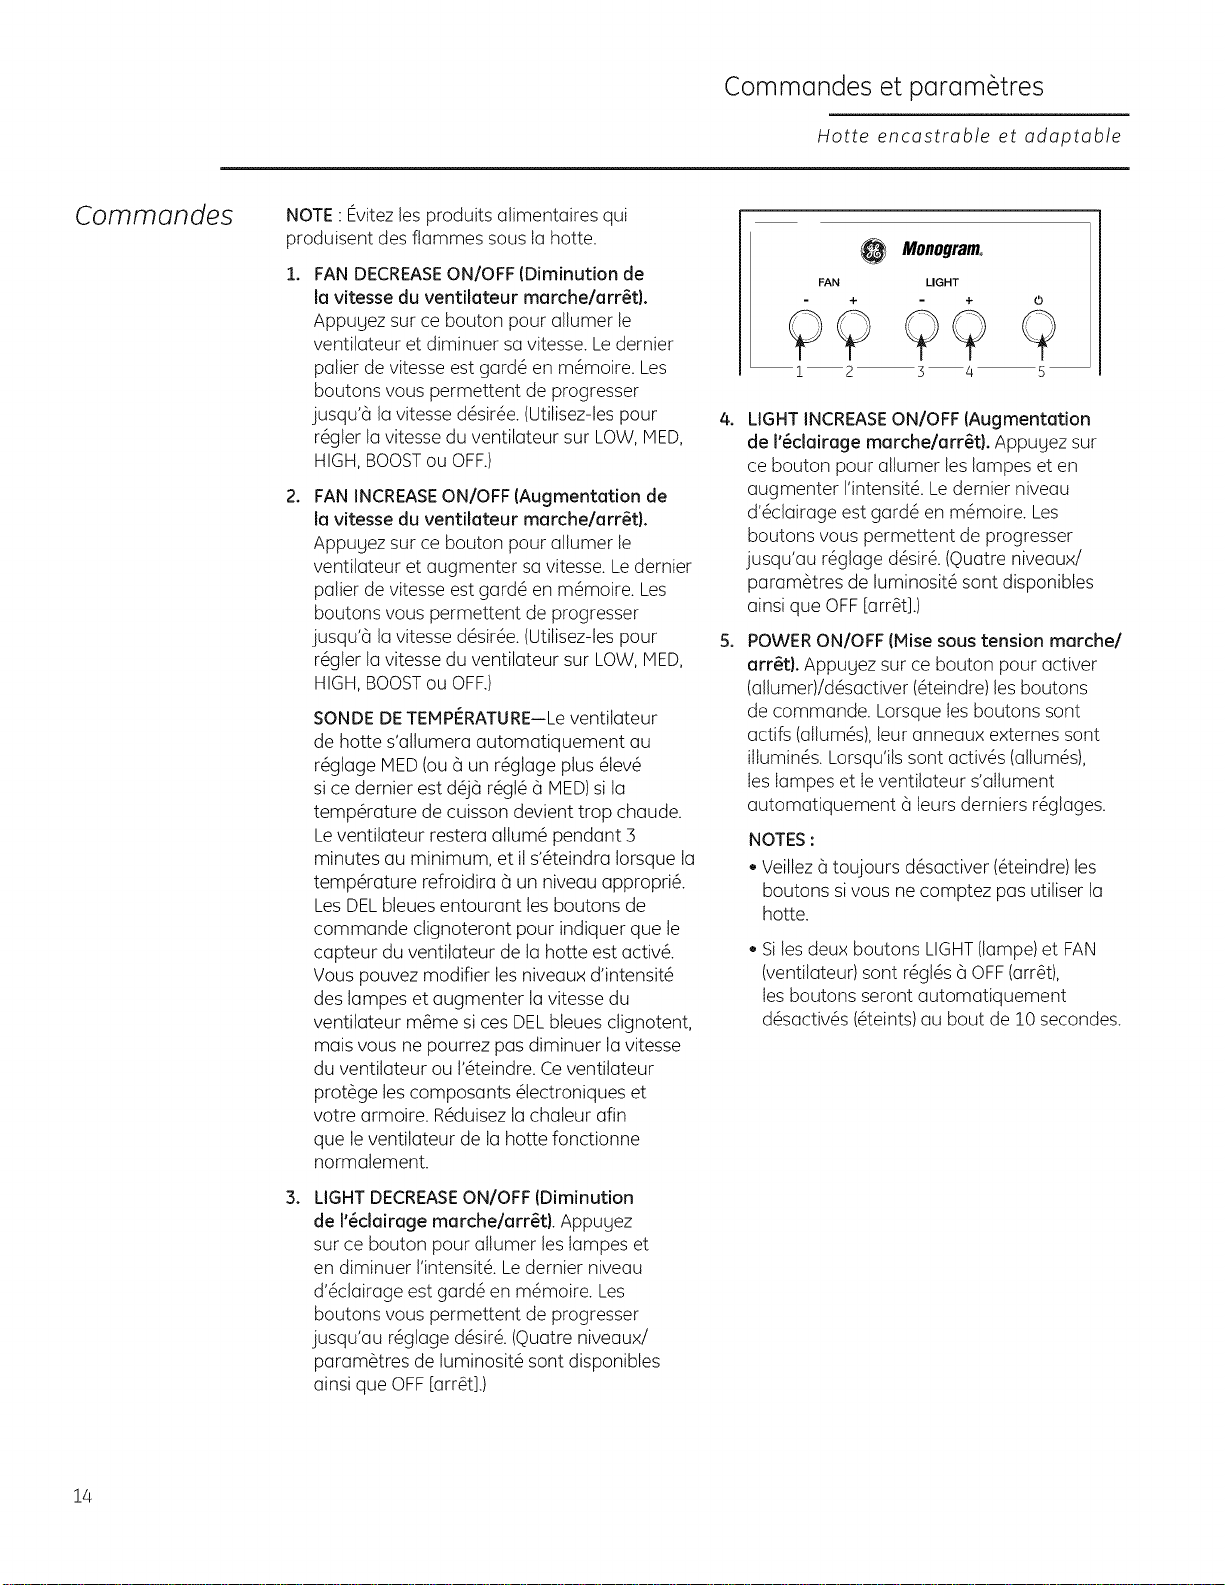
Commondes et porom@res
Hotte encastrable et adaptable
Commandes
NOTE :Evitez les produits alimentaires qui
produisent des ftammes sous Ia hotte.
FAN DECREASE ONIOFF (Diminution de
la vitesse du ventilateur marchelarr_t).
Appugez sur ce bouton pour allumer le
ventilateur et diminuer sa vitesse. Le dernier
pallet de vitesse est gard@ en m@moire. Les
boutons vous permettent de progresser
jusqu'6 la vitesse d_sir_e. (Utilisez-les pour
r6gler la vitesse du ventilateur sur LOW, MED,
HIGH, BOOST ou OFF.)
2°
FAN INCREASE ON/OFF (Augmentation de
la vitesse du ventilateur marche/arr6t).
Appugez sur ce bouton pour allumer le
ventilateur et augmenter sa vitesse. Le dernier
pallet de vitesse est gard@ en m@moire. Les
boutons vous permettent de progresser
jusqu'6 la vitesse d@sir@e.(Utilisez-les pour
r6gler la vitesse du ventilateur sur LOW, HED,
HIGH, BOOST ou OFF.)
SONDE DETEMPt_RATURE--Leventilateur
de hotte s'allumera automatiquement au
r@glageNED (ou 6 un r@glageplus @lev_
si ce demier est d@j6r_gl@6 MED)si la
temp@ature de cuisson devient trop chaude.
Leventilateur restera allum_ pendant 3
minutes au minimum, et il s'_teindra Iorsque la
temp@ature refroidira 6 un niveau appropri&
LesDELbleues entourant lesboutons de
commande clignoteront pour indiquer que le
capteur du ventilateur de la hotte est activ&
Vous pouvez modifier les niveaux d'intensit_
des lampes et augmenter la vitesse du
ventilateur m@mesi ces DELbleues clignotent,
mais vous ne pourrez pas diminuer la vitesse
du ventilateur ou I'@eindre.Ceventilateur
protege lescomposants @lectroniqueset
votre armoire. R_duisezla chaleur afin
que le ventilateur de la hotte fonctionne
normalement.
3°
LIGHTDECREASEON/OFF (Diminution
de I'@clairagemarche/arr6t). Appugez
sur ce bouton pour altumer les Iampes et
en diminuer I'intensit& Ledernier niveau
d'@clairageestgard@en m@moire.Les
boutons vous permettent de progresser
jusqu'au r@glaged@sir&(Quatreniveaux/
param@tresde luminosit6 sont disponibles
ainsi que OFF[arr@t].)
4°
S°
@
FAN
1 2
Monogram°
LIGHT
+
9
3 4
o
9
5
LIGHTINCREASEON/OFF (Augmentation
de I'_clairage marche/arr6t). Appugez sur
ce bouton pour altumer les lampes et en
augmenter I'intensit& Le dernier niveau
d'@clairageest gard@en m@moire.Les
boutons vous permettent de progresser
jusqu'au r@glaged@sir&(Quatre niveaux/
param@tresde luminosit6 sont disponibles
ainsi que OFF[arr@t].)
POWERON/OFF (Mise sous tension marche/
arr6t). Appugez sur ce bouton pour activer
(allumer)/d_sactiver (@eindre)les boutons
de commande Lorsque Iesboutons sont
actifs (allum_s),leur anneaux externes sont
ilIumin_s. Lorsqu'ilssont activ_s (allum_s),
Ies Iampes et Ieventitateur s'altument
automatiquement (_Ieursderniers r_glages.
NOTES:
• Veillez(3toujours d6sactiver (@eindre)les
boutons sivous ne comptez pas utiliser la
hotte.
• Silesdeux boutons LIGHT(lampe)et FAN
(ventilateur) sont r_gl_s 6 OFF(arr@),
Iesboutons seront automatiquement
d_sactiv_s (@eints)au bout de 10 secondes.
14
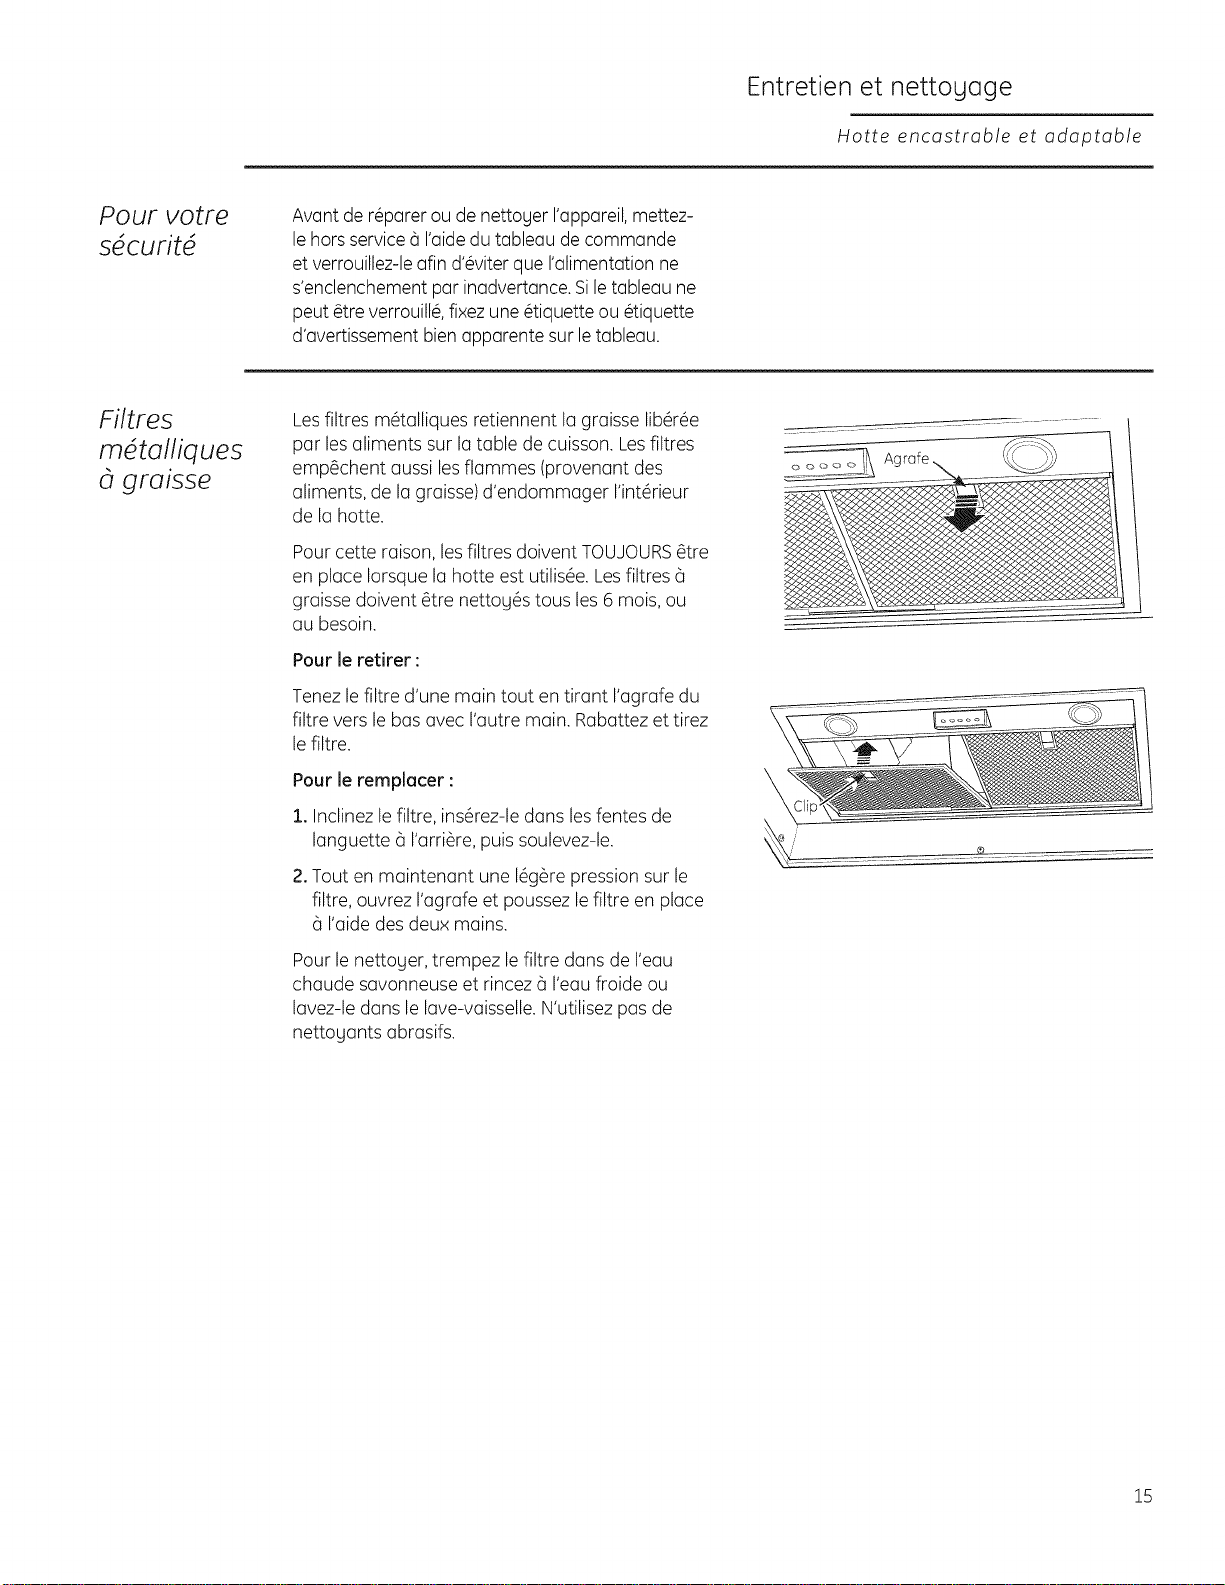
Entretien et nettogage
Hotte encastrable et adaptable
Pour votre
s curit
Avant de r@arer ou de nettoyer I'appareil,mettez-
le horsserviced I'aidedu tableau de commande
et verrouillez-leafin d'6viter que I'alimentation ne
s'enclenchement par inadvertance. Sile tableau ne
peut @treverrouill@,fixezune @iquette ou @iquette
d'avertissement bienapparente sur letableau.
Filtres
mdtalliques
a graisse
Lesfiltres m@alliquesretiennent la graisse lib@6e
par les aliments sur la table de cuisson. Lesfiltres
emp@chentaussi lesflammes (provenant des
aliments, de la graisse) d'endommager I'int@ieur
de la hotte.
Pour cette raison,lesfiltres doivent TOUJOURS_tre
en place Iorsque la hotte est utilis6e. Lesfiltres @
graisse doivent _tre nettoy6s tousles 6 mois,ou
au besoin.
Pour le retirer :
Tenez lefiltre d'une main tout en tirant I'agrafe du
filtre vers le bas avec I'autre main. Rabattez et tirez
le filtre.
Pour le remplacer :
1. Inclinez le filtre, ins@ez-le dans lesfentes de
languette 6 I'arri@e,puis soulevez-le.
2. Tout en maintenant une 16g@epression sur le
filtre, ouvrez I'agrafe et poussezle filtre en place
6 I'aidedes deux mains.
Pour le nettoger, trempez le filtre dans de I'eau
chaude savonneuse et rincez @I'eaufroide ou
lavez-le dans le lave-vaisselle.N'utilisez pas de
nettogants abrasifs.
15
Entretien et nettogage
Hotte encastrable et adaptable
Surfaces
de la hotte
en acier
inoxydable
N'utilisez pus des tampons a r_curer en acier; ils
vont rayer la surface.
Pour nettoger la surface en acier inoxgdable,
utilisez de I'eauchaude savonneuse ou un
nettogant ou pete 6 polir pour acier inoxgdable.
Nettogez toujours la surface dans la direction
du grain. Suivez lesinstructions du produit de
nettogage de la surface en acier inoxgdable.
Pour savoir comment vous procurer un produit
de nettogage pour 61ectrom6nageren acier
inoxgdable, ou pour connattre I'adresse du
concessionnaire le plus prosde chez vous, veuillez
composer notre num@o sansfrais :
Centre national de pi_ces : 800.626.2002
monog ram.com
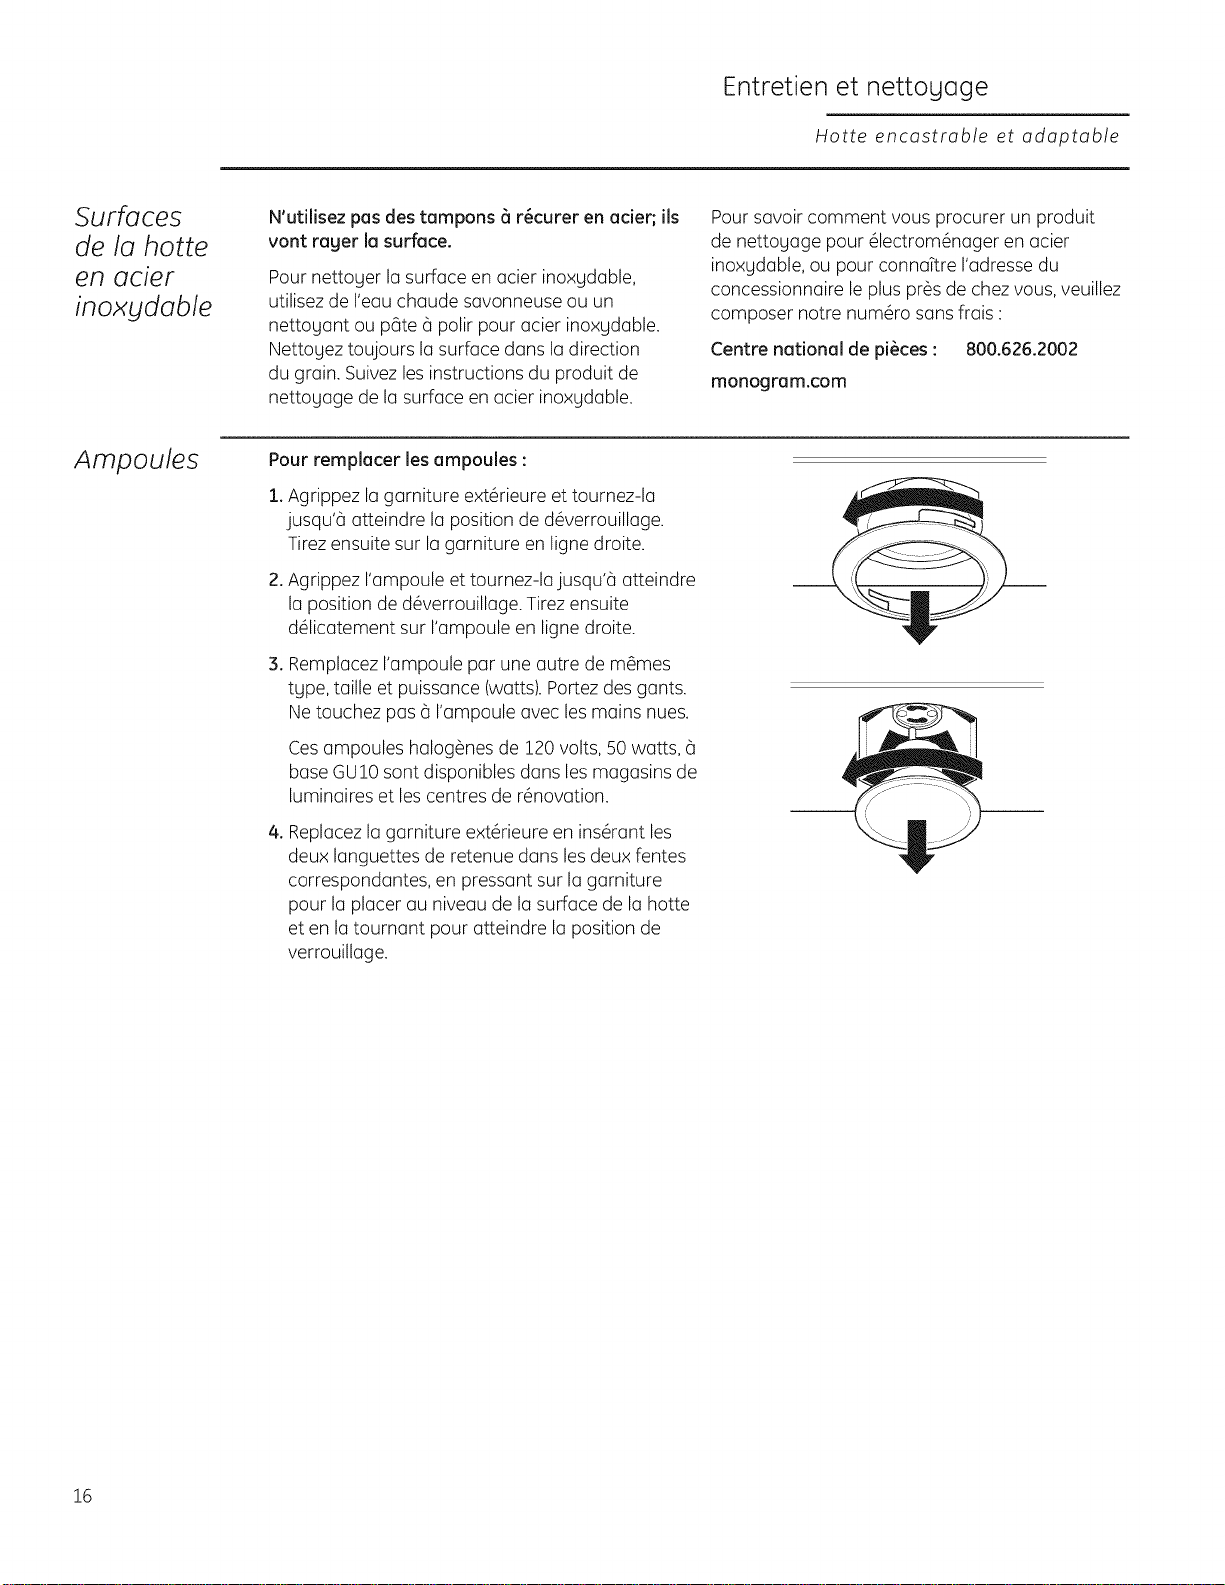
Ampou/es
Pour remplacer lesampoules :
1. Agrippez la garniture ext@ieure et tournez-la
jusqu'6 atteindre la position de d6verrouillage.
Tirezensuite sur la garniture en ligne droite.
.
.
Agrippez I'ampoule et tournez-la jusqu'6 atteindre
la position de d@errouillage. Tirezensuite
d61icatement sur I'ampoule en ligne droite.
Remplacez I'ampoule par une autre de m_mes
tgpe, taille et puissance (watts).Portez des gants.
Netouchez pas 6 I'ampoule avec lesmains nues.
Cesampoules halog@nesde 120 volts, 50 watts, 6
base GU10sont disponibles dans les magasins de
luminaires et les centres de r_novation.
.
Replacezla garniture ext@ieure en ins@ant les
deux languettes de retenue dans lesdeux fentes
correspondantes, en pressant sur la garniture
pour la placer au niveau de la surface de la hotte
et en la tournant pour atteindre la position de
verrouillage.
16
Utilisez ce
sgstdme de
rdsolution
de
probldme !
Ce sgst@mede r@solution de probl@me
Hotte encastrable et adaptable
PROBLEME
LEVENTILATEUR S'ALLUME
AUTOMATIQUEMENT ET
NE PEUT ETRE ETEINT
LE VENTILATEUR NE
FONCTIONNE PAS MEME
ALLUMt_
LE VENTILATEUR NE FAIT
PAS CIRCULER L°AIR OU
Dt_PLACE L°AIR PLUS
LENTEMENT QUE LA
NORMALE
LEVENTILATEUR NE CESSE
DE S'I_TEINDRE ET DE
S'ALLUMER
LA LAMPE NE RESTERA
PAS SUR LE NIVEAU I_LEVI_
LES COMMANDES DE LA
HOTTE NE FONCTIONNENT
PAS CORRECTEMENT
Sl VOUS APPUYEZ
PLUSIEURS FOISSUR LES
BOUTONS DE LA LAMPE
OU DU VENTILATEUR, LES
RI_GLAGESCHANGERONT
PARFAIT DU NIVEAU LE
PLUS BAS AU NIVEAU OFF
AU NIVEAU LEPLUS I_LEVI_,
OU DU PLUS I_LEV#AU
NIVEAU OFF AU NIVEAU
LEPLUS BAS
LORSQUE VOUS APPUYEZ
SUR LE BOUTON
POWER ON/OFF POUR
ALLUMER LA LAMPE,
LE VENTI LATEUR
S'ENCLENCHE
CAUSES POSSIBLES
La sonde de temp@ature d6clenche automatiquement le ventilateur
au r6glage MED si la temp@ature s'61@vetrap. Leventilateur restera
allum6 pendant 3 minutes au minimum, et il s'6teindra Iorsque
la refroidira 6 un niveau appropri6.
. II se peut qu'un fusible soit grills ou qu'un disjoncteur soit enclench6.
Remplacez le fusible ou r6glez 6 nouveau le disjoncteur.
. Le commutateur de la hotte peut _tre @eint. Retirez les filtres
m@alliques 6 graisse et enclenchez le commutateur.
V@ifiezles filtres m_talliques 6 graisse sont propre. Nettogez les
filtres m@allique 6 graisse (voir le section Filtres mdtalliques 8 graisse).
Si malgr6 le nettogage des filtres le probl_me persiste, appelez le
service d'assistance.
L'air de compensation (remplacement) suffisant est n6cessaire pour
6vacuer les appareils pour fonctionner au classement. V@ifiez
avec les codes Iocaux du b0timent, qui peuvent exiger ou conseiller
vivement I'utilisation d'air de compensation.
Visitez le site GEAppliunces.com pour connaTtre les solutions offertes
en mati_re de sgst_me de compensation d'air.
. Le moteur surchauffe probablement et s'@eint. Ceci risqu6
d'endommager le moteur. V@ifiez que les filtres sont propre.
Si le probl_me persiste, appelez leservice d'assistance.
. Utilisez des ampoules halog_nes de tgpe 120 volts, 50 watts, des
ampoules halog_nes 6 culot GU10 et assurez-vous qu'elles ant 6t6
correctement introduites. Consultez la section Ampoules.
Coupez I'alimentation de la hotte en d6sactivant le disjoncteur ou en
retirant le fusible de la botte 6 fusibles de votre domicile. Patientez
30 secondes pour que les commandes de la hotte se r6initialisent,
puis replacez le fusible et enclenchez 6 nouveau le disjoncteur.
. II est normal que les boutons d'6clairage ou de ventilateur progressent
d'un r6glage 6 I'autre afin que vous puissiez choisir ais6ment
le r6glage d6sir6.
. Pour votre confort, les lampes et le ventilateur se souviennent du
dernier r6glage Iorsque vous appugez sur le bouton Power On/Off.
Si vous souhaitez allumer uniquement les lampes, appugez sur
le bouton FAN+(ousur FAN-)jusqu'6 @eindre le ventilateur. Lorsque
vous rallumerez la hotte, les lampes seront les seules 6 fonctionner.
17
Notes
Hotte encastrable et adaptable
18
Service ou consommateur
Hotte encastrable et adaptable
Avec I'achat de votre nouvei appareil Monogram, soyez
assur@ de recevoir route I'information ou I'assistance dont
vous pourriez avoir besoin, de la part de GE. Tout ce que vous
avez 6 faire, c'est de nous appeler--gratuitement !
GE Answer
Center ®
800.561.3344
Quelle que soit votre question concernant n'importe quel appareil Monogram, le service
d'information du GEAnswer Center®est disponible pour vous aider. Votre appel-et votre question
-seront pris en compte rapidement et courtoisement. Leservice GEAnswer Center®est ouvert
lundi au vendredi, de 08h00 @22h00 et samedi, de 08h00 @!9h00 EDST.
OU
Visiteznotre site web sur monogram.tom
Service favori
Monogram
800.561.3344
Un professionnel qualifi6 du service GEs'occupera de la r@aration, 6 un moment qui vous
convienne. La plupart des entreprises du service GEvous proposent une intervention lejour
m_me ou le lendemain, ou 6 votre convenance (lundi au vendredi, de 07h00 6 22h00 etles
samedis et dimanches, 08h00 6 !8h00 EDST.).Nos techniciens form@sen usine connaissent
I'int@ieur et I'ext@ieur de votre appareil-la plupart des r@arations peuvent _tre effectu6es en
une intervention seulement.
Pour les
clients avec
des besoins
sp@ciaux...
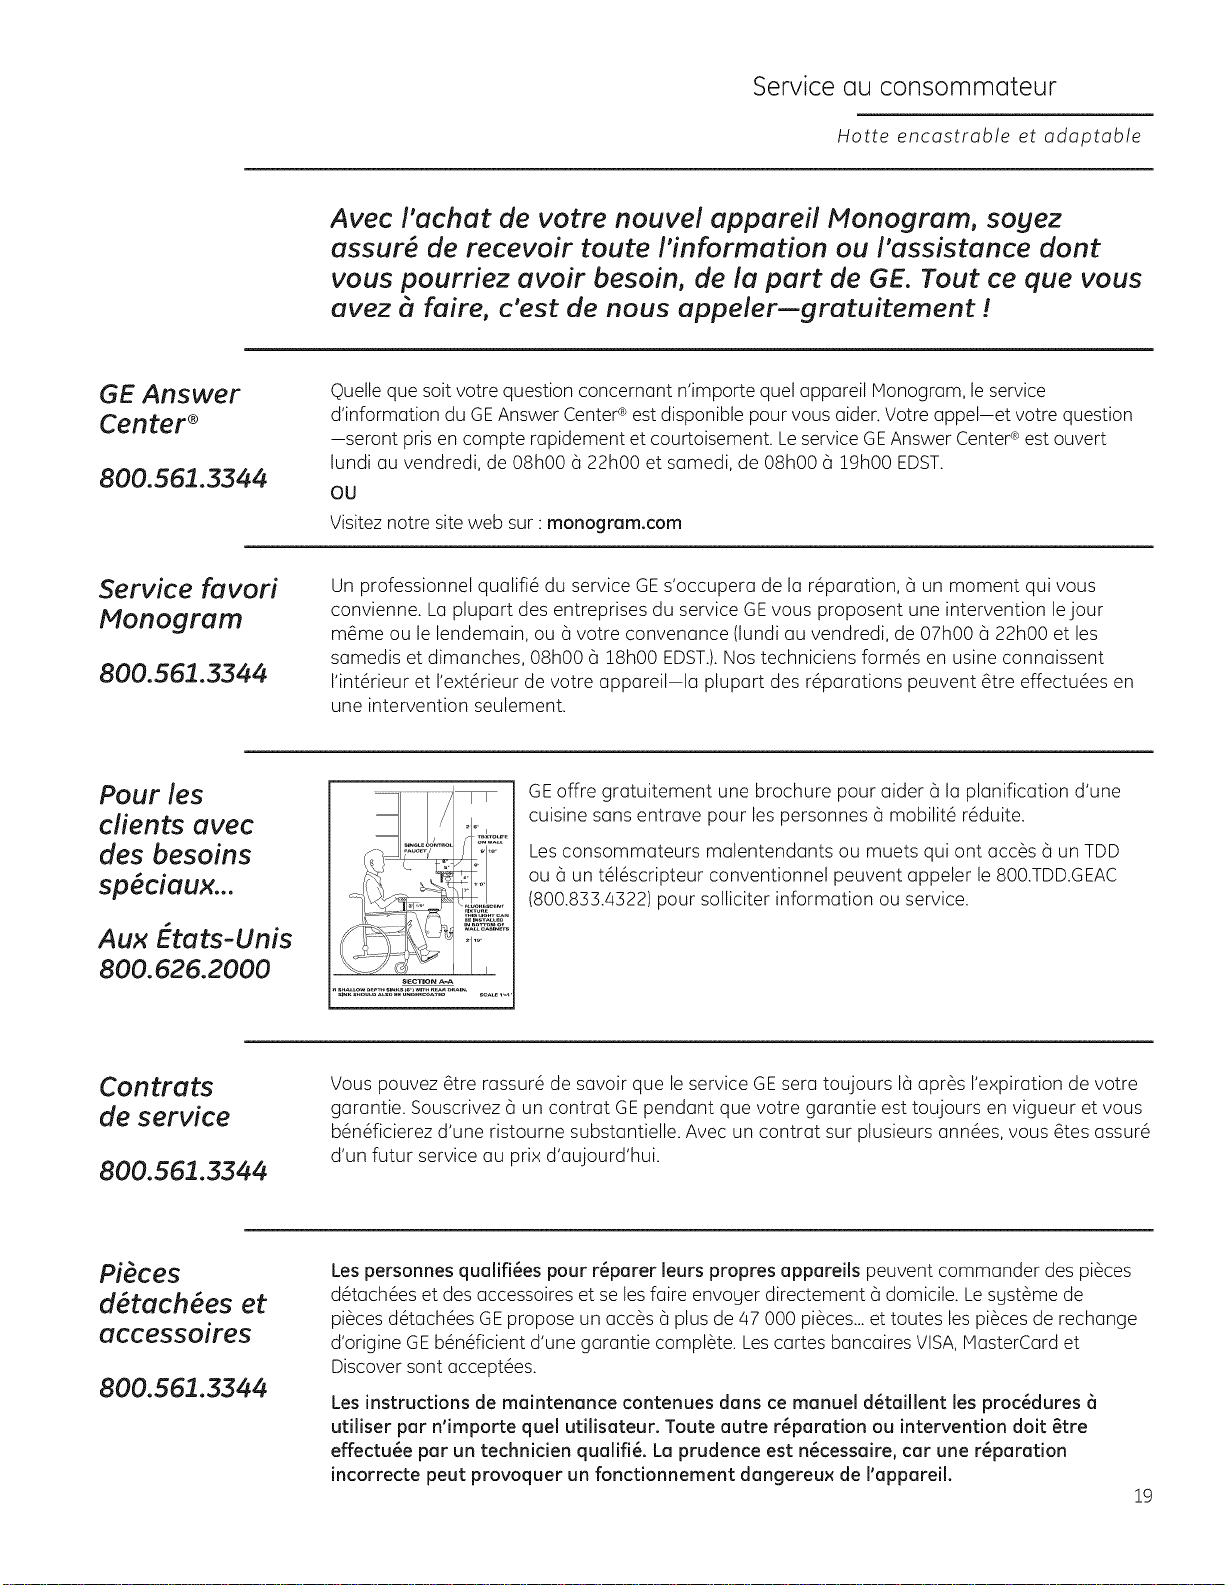
s
Aux Etats-Unis
800.626.2000
......:r
I
SECTION A_
GEoffre gratuitement une brochure pour aider 5 la planification d'une
cuisine sans entrave pour les personnes @mobilit6 r6duite.
Les consommateurs malentendants ou muets qui ont acc@s6 un TDD
ou @un t616scripteur conventionnel peuvent appeler le 800.TDD.GEAC
(800.833./4322)pour solliciter information ou service.
Contrats
de service
800.561.3344
Vous pouvez @trerassur6 de savoir que le service GEsera toujours 16apr@sI'expiration de votre
garantie. Souscrivez 6 un contrat GEpendant que votre garantie est toujours en vigueur et vous
b@n6ficierezd'une ristourne substantielle. Avec un contrat sur plusieurs ann6es, vous @tesassur6
d'un futur service au prix d'aujourd'hui.
Pi@ces
d@tach@es et
accessoires
800.561.3344
Lespersonnes qualifi@espour r@parerleurs propres appareils peuvent commander des pi@ces
d@ach6eset des accessoires et se lesfaire envoger directement @domicile. Lesgst@mede
pi@cesd@ach6es GEpropose un acc@s@plus de z_7000 pi@ces..,et toutes lespi@cesde rechange
d'origine GEb6n@ficientd'une garantie compl@te.Lescartes bancaires VISA,iVlasterCardet
Discover sont accept6es.
Lesinstructions de maintenance contenues dens ce manuel d_teillent les proc@dures 0
utiliser per n'importe quel utilisateur. Toute autre r_paration ou intervention dolt @tre
effectu_e per un technician qualifi@. La prudence est n@cessaire,cur une r@paration
incorrecte peut provoquer un fonctionnement dangereux de I'appareil.
19
Garantie
Hotte encastrable et adaptable
GARANTIE DE VOTRE HOTTE
Agrafez ici le cheque annul_ ou le regu de votre achat.
La preuve d'achat originale sera n_cessaire pour b_n_ficier
du service apr_s-vente pendant la p_riode de garantie.
CE QUI EST
COUVERT
CE QUI N'EST
PAS COUVERT
GARANTIE LIMITI_E D'UN AN
Pendant une ann6e 6 compter de la date d'achat originale, nous fournirons gratuitement les
pi@ces et la main-d'oeuvre c_votre domicile, pour r@parer ou remplacer n'importe quelle pattie
de la hotte qui serait d6fectueuse 6 cause d'un d6faut de fabrication.
Cette garantie est 6tendue 6 I'acheteur original et 6 tout p.ropri@airesuccessifpour lesappareils
achet6s pour un usage domestique ordinaire dans les48 Etatscontinentaux, 6 Hawaii, 6 Washington
D.C.ou au Canada. Sicet appareil est install6 dans un endroit o0 il n'existe pas de service agr66
GE,vous pouvez avoir 6 prendre en charge lesfrais de transport, ou il peut vous 6tre demand6
d'apporter I'appareildans un service GEagr66 pour r@aration. EnAlaska,la garantie est
la m6me, saul qu'elle est LIMITE_Eparce que vous devez prendre en charge lesfrais de transport
au magasin ou lesfrais de d@lacement du technicien du service6 votre domicile.
Tousles servicesdegarantie sont fournis par nos centres de serviced'usine, ou par un technicien
Customer Care®agr66, pendant les heuresde travail normales.
Dans le cas o0 votre appareil n6cessiterait une intervention, pendant la p@iodede garantie ou
au-del6, appelez le 800.444.1845 aux Etats-Unis.Au Canada, appelez le 800.561.3344.Munissez-
VOUS
du num@o demod@leet du num6ro de s6rie Iorsde votre appel au service apr@s-vente.
, Lesd(_placements 0 domicile pour vous
apprendre 0 utiliser I'appareil.
, Le remplacement des fusibles du domicile
ou la r(_initialisation des disjoncteurs.
, Un dommage annexe ou cons(_cutif
provoqu6 par d'6ventuels d6fauts de cet
appareil.
• Remplacement des filtres jetables.
• Un dommage de I'appareil provoqu@ par
un accident, un incendie, une inondation
ou un cos de force majeure.
• Un dommage provoqu@ apr@sla livraison.
• Une panne de I'appareil dons le cas d'une
utilisation autre que celle pr6vue, ou d'une
utilisation commerciale.
• Une installation incorrecte.
Si vous rencontrez un probl_me
d'installation, contactez votre revendeur
ou votre installateur. Vous 6tes
responsable de la fourniture appropri_e
d'6lectricit_, de gaz, d'6vacuation et
d'autres raccordements, comme indiqu6
dons les instructions d'installation fournies
avec votre produit.
• Un appareil non accessible pour ex_cuter
la r6paration n6cessaire.
• Installation ou entretien pour sgst_me de
compensation d'air (remplacementl.
EXCLUSION DES GARANTIES INPLICITES - Votre seul et unique recours r6side
duns la r_parution de I'uppareil telle qu'elle est d_finie dans cette garuntie
limit_e. Toutes autres garanties implicites, g compris les garanties implicites de
vuleur commerciale ou d'ad_quution 6 un usage particulier, sont limit_es 6 une
annie ou 6 la plus petite p_riode autoris_e par la Ioi.
20
Certains Stats/provinces n'autorisent pas I'exclusion ou la limitation des dommages fortuits ou
indirects, par cons6quent la limitation ou I'exclusion ci-dessus peut ne pas s'appliquer 6 vous. Cette
garantie vous donne des droits 16gaux particuliers et il est possible que vous puissiez b6n6ficier
d'autres droits, qui varient d'un 6tat/province 6 I'autre.
Pour connaTtre quels sont vos droits 16gaux dans votre 6tat/province, consultez le bureau de service
aux consommateurs local ou national ou le minist@re de la Justice.
Garant aux I]tats-Unis : General Electric Compang. Louisville, KY40225
Garant au Canada : Mabe Canada Inc.
Informuci6n pure el consumidor
Campana a medida
Contenidos
Servicios peru el consumidor
Garant[a ...................................... 32
Instrucciones de seguridad ................... 23
N0mero de modelo g de serie ................ 2!
N6meros telef6nicos importantes ............ 31
Solucionador de problemas ................... 27
Controles g caracteristicas ................... 24
Cuidado g limpieza
Bombillas de luz............................... 26
Filtros de grasa de metal ...................... 25
Superficiesde acute inoxidabledelacampana ... 26
Antes de
utilizer su
campana
a medida
Lea este manual con detenimiento. Su objetivo
es agudarlo a operar g mantener su nuevo
campana a medida de una manera adecuada.
Mant6ngalo a mane para responder sus
preguntas.
Si no entiende algo o necesita m6s aguda, hag
una lista de nOmeros gratuitos de atenci6n al
cliente en la secci6n trasera de este manual.
0
Visite nuestro sitio Web: monogram.corn
Escriba los
nOmeros
de modulo
g de serie
Usted puede encontrarlos en una etiqueta detras
de losfiltros desmontables.
Estos nOmeros tambi6n se encuentran en la
Tarjeta de Registro de Propiedad de Producto
embalada en forma separada con su campana.
Viste monogram.com g haga clic en "Registre
su artefacto" para registrar su campana de
chimenea.
Antes de enviar la tarjeta, tenga a bien escribir
los n_meros aqui:
NOmero de modelo
NOmero de serie
Utilice estos nOmeros en cualquier
correspondencia o Ilamadas de servicio t6cnico
relacionadas con su campana.
Si usted
recibi4 un
campana
dahado
Comunfquese de inmediato con el vendedor
(o constructor) que le vendi6 elcampana.
21
Informuci6n puru el consumidor
Campana a medida
Ahorre
dempo y
dinero
Antes de solicitar servicio t6cnico, verifique el
Solucionador de problemas ubicado en la parte
trasera de este manual.
Incluge una lista de problemas operativos menores
que usted puede corregir solo.
Si necesita
servicio
tdcnico
Para obtener servicio t6cnico, dirijase a la pagina
de Servicios para el consumidor en la parte
trasera de este manual.
Estamos orgullosos de nuestro servicio g
deseamos que usted quede satisfecho. Si par
alguna roz6n no est(_satisfecho con el servicio
que recibe, aquf incluimos algunos pasos a
seguir para obtener mc_saguda.
PRIMERO,contacte alas personas que realizaron
el servicio en su artefacto. Explique par qu6 no
estd satisfecho. En la magorfa de los casos, esto
solucionara el problema.
DESPUES,si aL_nasf no esta satisfecho,
escriba todos los detalles-inclugendo n0mero
telef6nico-a:
Manager, Customer Relations
GEAppliances
Appliance Park
Louisville, KV40225
22
INSTRUCCIONES IMPORTANTE DE SEGURIDAD
LEA TODAS LAS INSTRUCCIONES ANTES DE USAR
PRECAUCIONES DE SEGURIDAD
,A,ADVERTENCIA: PARA
REDUCIR EL RIESGO DE INCENDIOS, DESCARGAS
EL#CTRICAS O LESIONES PERSONALES, OBSERVE
LO SIGUIENTE:
A.Use este unidad solamente de la manera que el
fabricante Io indique.Si ustedtiene preguntas, p6ngase
en contacto con el fabricante.
B.Antesde proporcionar servicio o de limpiar la unidad,
desconecte el suministro el@ctricoen el panel de
servicio y cierre elmecanismo de seguridad para evitar
que alguien Ioconecte accidentalmente. Cuando no
exista un dispositivo de cierre de seguridad,amarre un
aviso visible,como una etiqueta al panel de servicio
haciendo la advertencia.
C.No useesta unidad con ning6n dispositivo de control
de velocidad de estado s61ido.
D. Esta unidad debe estar conectada a tierra.
s
PRECAUCION:PARA USO DE
VENT,_C,6NGENERALSO_,ENTE.NOUSE
PARA EXPULSAR MATERIALES PELIGROSOS O
EXPLOSlVOS Y VAPORES.
_ADVERTENCIA: PARAREDUCIR
EL RIESGO DE LESIONES PERSONALES EN EL CASO
DE UN INCENDIO DEBIDO A GRASA DE ESTUFA
@UEMADA, HAGA LO SIGUIENTE*:
A.CONTENGALASLLAMAScon una tapa que ajuste
bien sobre la sart@n,con una lamina para hacer
dulces o con una bandeja metalica, g luego apague
el quemador. TENGACUIDADODENOQUEIVlARSE.Si
las llamas no se apagan inmediatamente, EVACUEEL
LUGARYLLAMEALDEPARTAMENTODEBOMBEROS.
B.NUNCAAGARREUNASARTENO UNAOLLAQUESE
ENCUENTREENLLAIVlAS--Sepodria quemar.
C.NO USEAGUA,inclugendo pa_os de cocina o toallas
humedecidas-esto bar6 que ocurra una explosi6n de
vapor violenta.
D. Useun extintor SOLAMENTEsi:
1.Usted sabe quetiene un extintor ClaseABC,g si
usted ga sabe c6mo operarlo.
2.Elfuego es pequeflo g esta contenido al area donde
comenz6.
3.Eldepartamento de bomberos ha sido Ilamado.
4.Usted est@luchando contra lasllamas con sus
espaldas hacia una salida.
* Basado en "Ideas para la seguridad en la cocina',
publicado por NFPA.
LEA V SIGA
ESTAS INSTRUCCIONES.
ADVERTENCIA: PARAREDUCIR
EL RIESGO DE UN FUEGO DE GRASA DE ESTUFA:
A.Nunca deje unidadesde superficiessinla atenci6n debida
en seleccionesaltas. Cuandoseest6 hirviendoalgo y
ocurren derramamientos, estospodriancausar humo y
quelos derramamientos grasososse incendien.Caliente
los aceiteslentamente a seleccionesmediasy bajas.
B.Siempre encienda la campana cuando cocine a fuego
alto ocuando flambee alimentos (CrepesSuzette,
CherriesJubilee, Flambeado de Carne con Pimienta).
C.Limpie elventilador con frecuencia. Lagrasa no debe
acumularse en elventilador oen el filtro.
D. Useuna sart_n de tamano apropiado. Siempre use
piezas de cocina apropiadas para el tamar_odel
elemento de la superficie.
,A,ADVERTENCIA:PARAREDUCIR
EL RIESGODE INCENDIOS, DESCARGAS ELI'---CTRICAS
O LESIONES PERSONALES,OBSERVELO SIGUIENTE:
A.Eltrabajo de instalaci6n Uel alambrado el@ctricodebe
hacerlo una persona(s)calificada conforme atodos
los c6digos gestandares aplicables,incluuendo una
construcci6n aprobada porel inspector de incendios.
B.Suficienteairees necesario para una combusti6n
apropiada Upara deshacersede losgasesa trav@s
de una salidade humo (chimenea)de equipos que
queman combustibles para prevenir retroalimentaci6n.
Sigalas recomendaciones delfabricante del equipo
de calentamiento Ulos estandaresde seguridad tales
como los publicados porla Asociaci6nnacional de
protecci6n de incendios(NFPA),Ula Sociedadamericana
de ingenierosde calefacci6n, acondicionadores deaire U
refrigeraci6n (ASHRAE),y losc6digosde lasautoridades
locales.Cuando corresponda, instale un sistema de
reposici6n (reemplazo) de aire de acuerdo con los
requisitos del c6digo local de construcci6n. Para
acceder a soluciones de aire disponibles, visite
GEAppliances.com.
C.Cuando se encuentre cortando o taladrando en la
pared o en eltecho, no dafle los alambrados el@ctricos
u otras utilidades escondidas.
D. Losventiladores con conductos deben estar siempre
ventilados hacia el exterior.
,A.ADVERTENCIA:PARAREDUCIR
EL RIESGO DE INCENDIOS, SOLAMENTE USE
CONDUCTOS METALICOS.
• No intente reparar o reemplazar ninguna parte de su
campana a no ser que Iorecomiende especificamente
este manual. Cualquier otro servicio debe ser referido a
unt@cnicocalificado.
,APRECAUCI6N:o,sPosmvo
OPERADO AUTOM#,TICAMENTE. PARA REDUCIR
EL RIESGO DE LESIONES, DESCONECTE DE LA
FUENTE DE ENERGIA ANTES DE EFECTUAR
REPARACIONES. LA UNIDAD SE ENCUENTRA
EQUIPADA CON UN INTERRUPTOR DE
DESCONEXION INTEGRAL UBICADO DENTRO
DEL CUERPO DEL VENTILADOR.
23
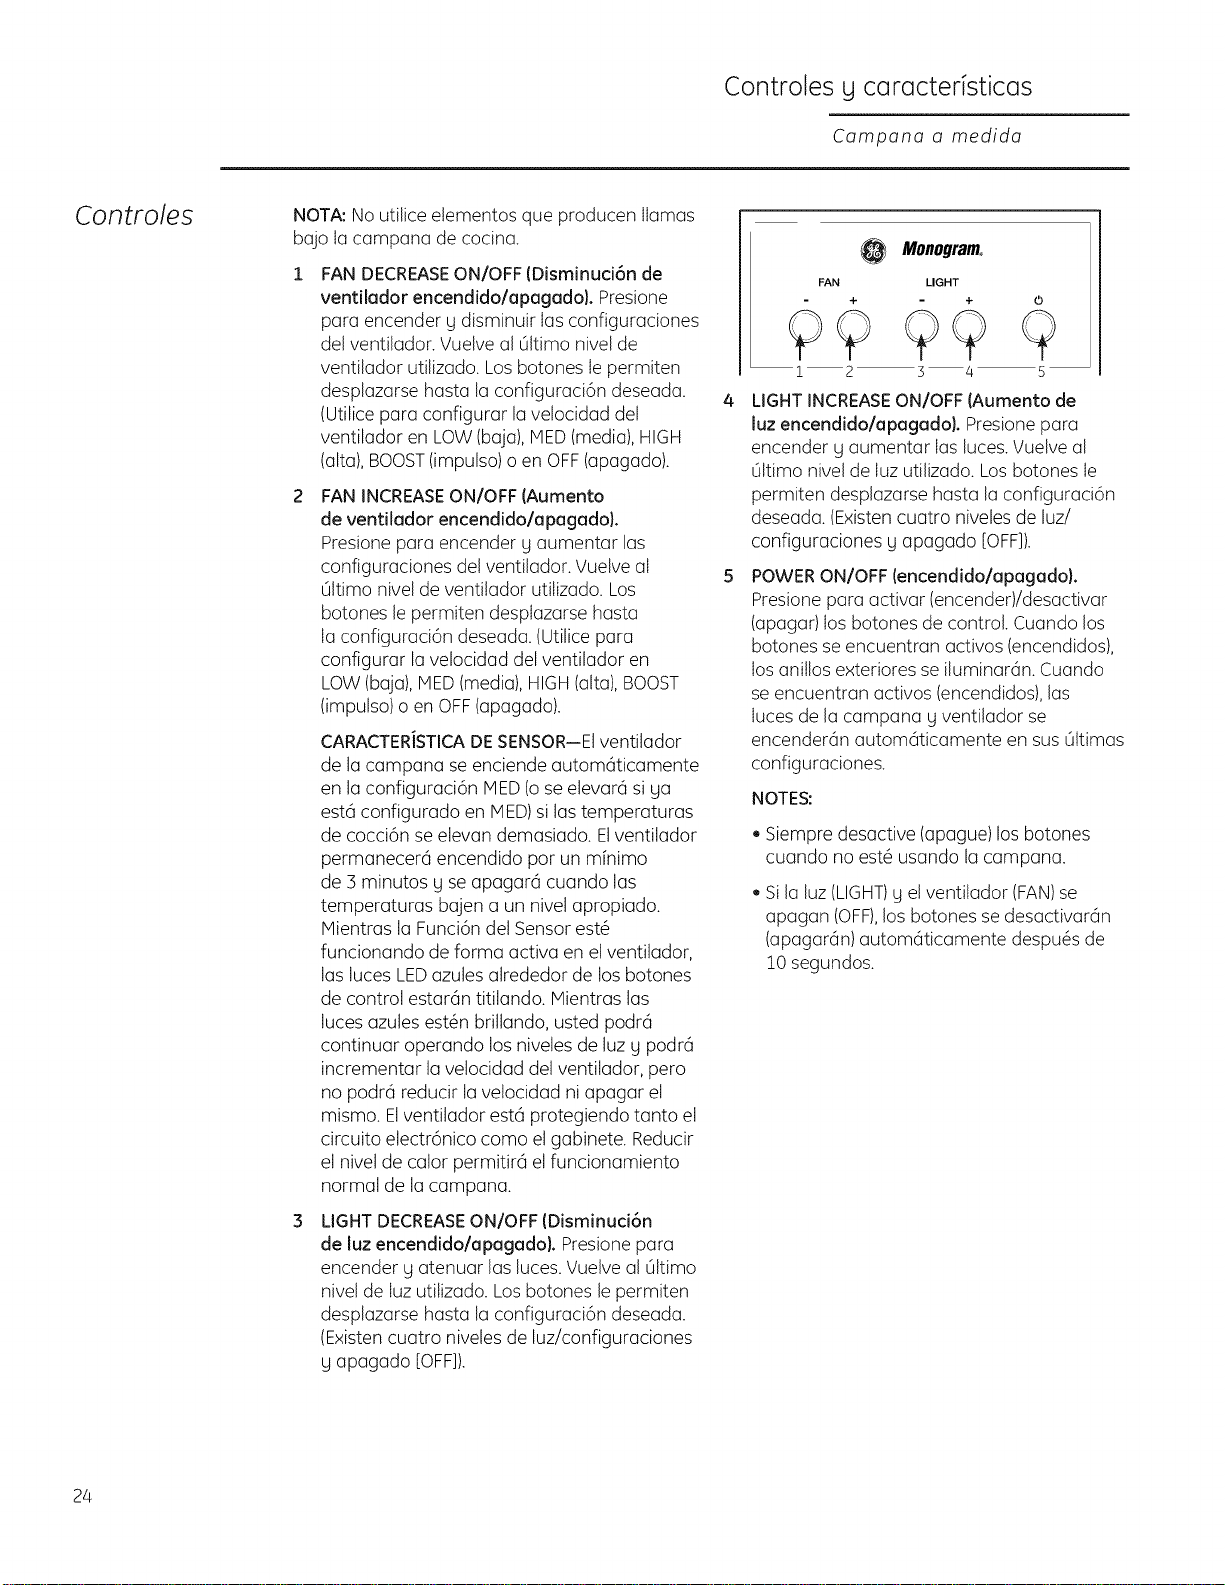
Controles y corocteristicos
Campana a medida
Controles
NOTA:No utilice etementos que producen llamas
bajo Iacampana de cocina.
FANDECREASEON/OFF (Disminuci6n de
ventilador encendido/apagado). Presione
para encender g disminuir Ias configuraciones
del ventilador. Vuelveal 61timonivel de
ventilador utilizado. Losbotones Iepermiten
desplazarse hasta la configuraci6n deseada.
(Utilice para configurar la velocidad del
ventilador en LOW(baja),HED(media),HIGH
(alta),BOOST(impulso) o en OFF(apagado).
FANINCREASEON/OFF (Aumento
de ventilador encendido/apagado).
Presionepara encender g aumentar las
configuraciones de!ventilador. Vuelve aI
61timonivel de ventilador utitizado. Los
botones le permiten desplazarse hasta
Ia configuraci6n deseada. (Utilicepara
configurar la velocidad del ventilador en
LOW(baja),HED(media), HIGH(alta),BOOST
(impulso) o en OFF(apagado).
CARACTERISTICADESENSOR--Elventilador
de la campana se enciende automGticamente
en la configuraci6n lED (o seelevar6 si ga
est6 configurado en lED) silas temperaturas
de cocci6n seelevan demasiado. Elventilador
permanecer6 encendido por un minimo
de 3 minutos g seapagar6 cuando las
temperaturas bajen a un nivel apropiado.
lientras la Funci6n del Sensorest_
funcionando de forma activa en el ventilador,
las luces LEDazules alrededor de losbotones
de control estarGntitilando, lientras las
luces azules est_n brillando, usted podr6
continuar operando los niveles de luz g podr6
incrementar la velocidad del ventilador, pero
no podr6 reducir la velocidad ni apagar el
mismo. Elventilador est6 protegiendo tanto el
circuito electr6nico como elgabinete. Reducir
el nivel de calor permitir6 el funcionamiento
normal de la campana.
LIGHTDECREASEON/OFF (DisminuciGn
de luz encendido/apagado}. Presionepara
encender g atenuar las luces.Vuelveal 61timo
nivel de Iuz utitizado. Los botones le permiten
desplazarse hasta la configuraci6n deseada.
(Existencuatro niveles de luz/configuraciones
g apagado [OFF]).
@
FAN
1 2
Monogram°
LIGHT
+
3 4
o
9
5
LIGHTINCREASEON/OFF (Aumento de
luz encendido/apagado). Presionepara
encender g aumentar Ias luces.Vuelveal
61timonivel de Iuz utilizado. Losbotones Ie
permiten desplazarse hasta la configuraci6n
deseada. (Existencuatro niveles de luz/
configuraciones g apagado [OFF]).
POWERON/OFF (encendido/apagado).
Presionepara activar (encender)/desactivar
(apagar) los botones de control. Cuando los
botones seencuentran activos (encendidos),
los anitlos exteriores se iluminaran. Cuando
se encuentran activos (encendidos),las
Iuces de la campana g ventitador se
encenderGn automdticamente en sus 61timas
configuraciones.
NOTES:
• Siempre desactive (apague)los botones
cuando no est6 usando la campana.
• Si la luz(LIGHT)ge!ventitador (FAN)se
apagan (OFF),los botones se desactivarGn
(apagaran) automdticamente despu@sde
!0 segundos.
24

Cuidado g limpieza
Campana a medida
Para su
seguridad
Antes de realizarreparaciones o limpiar la unidad,
desconecte la energfadesde el panel de servicio g
bloquee @ste01timopara evitar el accionamiento
de la energfade manera accidental. Siel panel de
serviciono puede bloquearse,coloque una etiqueta
o cartel de advertencia sabreel panel.
Filtros de
grasa de
metal
Losfiltros de metal atrapan lagrasa liberada par
los alimentos desde la estufa. Losfiltros tambi6n
agudan a evitar que lasllamas (delos alimentos,
grasa) dahen la parte interna de la campana.
Par esta raz6n, losfiltros deben SIEiVlPREestar en su
lugar cuando la campana est6 en usa. Losfiltros de
grasa deben limpiarse cada 6 meses, o segOnsea
necesario.
Para retirar:
Sostenga el filtro con una mano mientras tira del
gancho del filtro con la otra. Tiredel filtro hacia
abajo g qu[telo.
Para reemplazar:
1. Incline el filtro dentro de las ranuras de lengOeta
traseras g lev6ntelo.
2. Mientras mantiene una leve presi6n ascendente
sabre el filtro, abra el gancho g col6quelo en su
lugar con ambas manos.
Limpie el filtro en agua jabonosa caliente g
enjuague con agua limpia o 16veloen el lavavajillas.
No utilice productos de limpieza abrasivos.
?
\
® .........
25
Cuidodo g limpiezu
Campana a medida
Superficies
de acero
inoxidable
de la
campana
No utilice almohadillas de acero ga que ragan la
superficie.
para limpiar la superficie de acero inoxidable,
utilice agua tibiajabonosa o un limpiador o
lustrador de acero inoxidable. Siempre limpie
la supefficie en direcci6n de la veta. Siga las
instrucciones del producto para limpiar la
superficie de acero inoxidable.
Para consultar sobre la compra de limpiadores
o lustradores de aparatos de acero inoxidable, o
para encontrar la ubicaci6n del distribuidor rods
cercano, Ilame a nuestro nOmerogratuito:
Centro nacional de repuestos 800.626.2002
monog rem.com
Bombillas
de luz
Para cambiar los bombillas de la luz:
1. Tome el anillo exterior g gfrelo hasta alcanzar la
posici6n de destrabado. Luegotire del anillo hacia
afuera.
2. Tome la bombilla gg[rela hasta alcanzar la
posici6n de destrabado. Luegotire suavemente
de la bombilla hacia afuera.
3. Reemplace con una bombilla del mismo vataje,
tipo g tamaBo. Utilice guantes. No toque la
bombilla con las manos desnudas.
.
Estasbombillas hal6genas de 120 voltios, SO
vatios, con una baseGUIO seencuentran
disponibles en tiendas especializadas de
iluminaci6n g centros de construcci6n.
Reemplace el anillo exterior introduciendo las dos
leng(Jetasde retenci6n dentro delas dos ranuras
para leng(Jetas,presionando el anillo hasta que
quede nivelado con la superficie de la campana
g gir@ndolohasta que alcance la posici6n de
trabado.
26
Questions?
Use this
problem
solver!
The Problem Solver
Campana a medida
PROBLEM
EL VENTILADOR
SE ENCIENDE
AUTOMATICAMENTE Y
NO PUEDE APAGARSE
EL VENTILADOR NO
FUNCIONA CUANDO SE
LO ENCIENDE
EL VENTILADOR NO ,,
CIRCULA EL AIRE O
MUEVE EL AIRE HAS
LENTAMENTE QUE
LO NORMAL ,,
ELVENTILADOR SE
ENCIENDE Y APAGA
TODO SIN PARAR
LA LUZ NO SE MANTIENE
EN LA CONFIGURACI6N
ALTA
LOS CONTROLES DE LA
CAMPANA NO FUNCIONAN
CORRECTAM ENTE
SI SEPRESIONAN
CONSECUTIVAM ENTE
LOS BOTONES DE LUZ
O DEL VENTILADOR,
CAMBIARA A VECES
LA CONFIGUACI6N DE LA
M,_SBAJA A APAGADO
A LA CONFIGURACI6N
M,_SALTA, O DE LA M,_S
ALTA A APAGADO, A LA
CONFIGURACI6N M/_SBAJA
POSSIBLECAUSE
e
La caracterfstica de sensor se enciende autom6ticamente en la
configuraci6n MED si las temperaturas de cocci6n se elevan
elevan demasiado. Elventilador permanecer6 encendido por
un minimo de 3 minutos g luego se apagar6 cuando las temperaturas
bajen a un nivel apropiado.
El fusible puede haberse quemado o el disguntor puede haber
saltado. Cambie el fusible o vuelva a configurar el disLluntor.
El interruptor de desconexi6n de energ[a ubicado dentro de la
campana puede estar apagado. Quite el filtro de grasa de metal
g accione el interruptor.
AsegOresede que los filtros de grasa de metal est_n limpio.
Limpie los filtros de grasa de metal (ver la secci6n Filtros de grasa
de metal). Si la limpieza LIel recambio de filtros no corrigen
el problema, Ilame al servicio t6cnico.
Se requiere suficiente reposici6n (reemplazo) de aire para que los
artefactos con salida de aire funcionen de acuerdo con sus
calificaciones energ6ticas. Controle los c6digos locales
de construcci6n, que podr6n requerir o aconsejar enf6ticamente
el uso de reposici6n de aire. Para acceder a soluciones de aire
disponibles, visite GEAppliances.com.
El motor probablemente se est6 sobrecalentando g se apaga solo.
Esto puede dahar el motor. AsegOrese de que el filtro est_n limpio.
Si continL_ael ciclo de apagado g encendido, Ilame al servicio t6cnico.
Utilice bombillas hal6genas de 120 voltios, 50 vatios, con una
base GU10 g aseg0rese de que est6n bien colocadas. Vet la secci6n
Bombillas de luz.
Desconecte la energia de la campana apagando el disguntor o
quitando el fusible de la caja de fusibles. Espere30 segundos para
que los controles de la campana se reconfiguren g luego cambie el
fusible o vuelva a activar el disguntor.
CUANDO SE PRESIONA EL
. Esnormal que los botones de luz g del ventilador le permitan
desplazarse de posici6n para que usted pueda configurar f6cilmente
loscontroles en suconfiguraci6n deseada.
, Para su comodidad, es normal que las luces g el ventilador
BOTON POWER ON/OFF
(ENCENDIDO/APAGADO)
PARA ENCENDER LA LUZ,
EN SU LUGAR SE
ENCIENDE EL
VENTILADOR
"recuerden" su Oltima configuraci6n cuando presiona el bot6n
Power On/Off. Sis61odesea encender las luces, presione el bot6n
"FAN +" (ventilador +)(o el "FAN-")(ventilador -) para apagar elventilador.
Cuando vuelva a encender la campana, s61ofuncionar6n lasluces.
27

Notas
Campana a medida
28
Notas
Campana a medida
29

Notas
Campana a medida
30
Servicios olconsumidor
Campana a medida
Con la compra de su nuevo artefacto Monogram, tenga la
tranquilidad de que si alguna vez necesita informaci6n o
asistencia de GE, estaremos iistos para hacerlo, iTodo Io que
tiene que hacer es Ilamar en forma gratuita!
GE Answer
Center ®
800.626.2000
Cuando tenga una consulta sobre cualquier artefacto importante Monogram, el servicio de
informaci6n GEAnswer Center®estar6 listo para agudarlo. Su Ilamada-g su pregunta-ser6n
respondidas r6pida g cort6smente. Elservicio GEAnswer Center®est6 abierto 8 a.m. a !0 p.m.
ESTlunes a viernes, 8 a.m. a 7 p.m. ESTs6bados.
O
Visite nuestro sitio web: monogram.com
Servicio
preferido
Monogram
800.444.1845
Un profesional de servicio t6cnico de GEle brindar6 un servicio de reparaci6n experto,
programado en un momento que resulte conveniente para usted. Muchas Iocaciones operadas
pot la compahia de servicio t_cnico de GEle ofrecen un servicio enel dia o al dia siguiente, a
cuando sea conveniente para usted (7 a.m. a 10 p.m. ESTlunes a viernes, 8 a.m. a 6 p.m. EST
s6bados g domingos). Nuestros t6cnicos capacitados en la f6brica conocen el artefacto pot
completo, asi que la magor parte de las reparaciones puede efectuarse en s61ouna visita.
Para clientes
con necesidades
especiales...
800.626.2000
I
SECTION A_
GEle ofrece, en forma gratuita, un folleto para agudar a planificar una
cocina libre de barreras para personas con movilidad limitada.
Los consumidores con problemas auditivos o de habla que tienen acceso
a un TDD (tel6fono para sordomudos) o un teletipo convencional pueden
Ilamar al 800.TDD.GEAC(800.833.4322) para solicitar informaci6n o
servicio t6cnico.
Contratos de
servicio t@cnico
800.626.2224
Usted puede estar tranquilo de que el Servicio T6cnico de GEestar6 all[ para agudarlo cuando
finalice su garantia. Adquiera un contrato GE mientras su garantia sigue vigente g recibir6 un
descuento sustancial. Con un contrato de varios a_os, usted se asegura servicio t6cnico futuro
con los precios de hog.
Piezas y
accesorios
800.626.2002
Laspersonas calificadas para arreglar sus propios artefactos pueden recibir las piezas o
accesorios directamente en sus hogares. Elsistema de piezas de GEofrece acceso a m6s de
/47.000repuestos...Utodas las Piezasde Repuesto Genuinas de GEtienen garant[a total. Se aceptan
tarjetas VISA,MasterCard y Discover.
Lasinstrucciones de mantenimiento del usuario incluidas en este manual cubren los
procedimientos a realizar por cualquier usuario. Cualquier otra clase de arreglos deben set
efectuados por personal de serviao t_cnico calificado. Debe tenerse mucho cuidado, porque
los arreglos inadecuados pueden provocar un fundonamiento poco seguro.
3!
Garantia
Campana a medida
GARANT[A DE SU CAMPANA MONOGRAM
Abroche el comprobante de venta o cheque compensado
aqui. Se necesita una prueba de la fecha de compra original
para obtener servicio t_cnico cubierto par la garantia.
ELENIENTOS
CUBIERTOS
GARANTIE LliVlITI_ED'UN AN
Durante un aho a partir de la fecha original de compra, otorgaremos, en forma gratuita, piezas
g servicio t6cnico en su hogar para reparar o reemplazar cualquier parte de su campana que
falle debido a defectos en la fabricaci6n.
• m • _®o • • • m • o®o • • • Q o e®o • • • Q o e®® • • _ • • _®® • ® • Q m o®o • • • • • ooo • • • • • _®o o o • m m o
Esta garantia se extiende al comprador original g cualquier dueno posterior para productos
adquiridos para uso dom6stico dentro de los48 estados continentales, Hawai, Washington, D.C.o
Canad6. Siel producto se encuentra en una regi6n donde no hag ServicioT6cnico de GE,usted ser6
responsable del cargo del viaje ousted puede tener que Ilevar el producto a un ServicioT6cnico
Autorizado de GEpara efectuar la reparaci6n. EnAlaska la garantia es la misma salvo que es
LIMITADAporque usted debe pagar el envio del producto a la tienda de servicio t6cnico o los gastos
de viaje del t6cnico hasta su hogar.
Todo el servicio de garantfa debe suministrarse par parte de nuestros Centros de Servicio de F6brica
o par t6cnicos autorizados de Customer Care® durante un horario normal de trabajo.
Si su artefacto requiere servicio t6cnico, durante el peHodo de garantfa o despu6s del mismo, en los
EE.UU.llama al 800.444.1845. En Canad6: 800.561.3344. Tenga el n0mero de serie g de modelo a
mano cuando llama para solicitar un servicio t6cnico.
ELEMENTOS
NO CUBIERTOS
32
, Visitas a su hogar para enseffarle a usar el
producto.
, Reemplazo de fusibles dom_sticos o la
reconfiguraa6n de disguntores.
, Daffos incidentales o resultantes
provocados par posibles defectos en este
artefacto.
, Recambio de los filtros reemplazables.
, DaBos al producto provocados par
acddentes, incendios, JnundacJones o
fuerza mayor.
, Da_os provocados despu_s de la entrega.
, Fallas del producto si se utilize pare un
objetivo diferente del previsto o se usa de
farina comerdal.
Instalaa6n Jnadecuados.
Si tiene un problema con la instalaci6n,
comuniquese con su vendedor o
JnstaJador. Usted es responsable de
suministrar adecuadas instalaciones
el_ctricas, de gas, de salida g otras
conexiones coma se describe en las
Instrucciones de Instalaci6n Jncluidas con
el producto.
Producto no accesible para prestar el
servicio t_cnico solicitado.
Instalaci6no serviciot_cnicopara
sistemascon reposici6n(reemplazo}de
aire.
EXCLUSION DE GARANT[AS IPIPL[CITAS--Su (mica y exclusivo recurso es la
reparaci6n del producto coma se establece en la presente Garantia Limitada.
Las garantias implicitas, incluyendo garantias de comerciabilidad y aptitud
para un objetivo particular, se encuentran limitadas a un aBo o el periodo m6s
corto permitido par la leg.
Algunos estados/provincias no permiten la exclusi6n o limitaci6n de dafios incidentales o
resultantes, por Iotanto esta exclusi6n o limitaci6n puede no aplicarse en su caso. Estegarantia le
otorga derechos legalesespecificos gusted puede contar con otros derechos,que pueden variar de
estado a estado/provincia a provincia.
Para conocer sus derechos legalesen su estado/provincia, consulte a su oficina
del consumidor local oestatal/provincial o al FiscalGeneralde suestado.
Garante en los EE.UU.:General Electric Compang, Louisville, KY 40225
Garante en Canad6: Mabe Canada Inc.
I49-80565-4 I
02-13 GE
Printed in Italg

