

zh
2
目录
安全性
...............................................3
一般注意事项 ....................................3
使用范围 ...........................................3
用户群的限制 ....................................3
安全使用 ...........................................3
防止材料损坏
...................................5
光敏传感器和部件 .............................5
法律声明 ...........................................5
正确使用
...........................................5
环境保护和节约
.................................5
了解机器
...........................................6
电器 ..................................................6
状态 LED...........................................7
触摸显示屏........................................7
功能 ..................................................9
通知消息 ...........................................9
符号 ................................................10
首次使用前
......................................10
供货范围 .........................................10
电器拆包和使用准备........................11
执行初始设置 ..................................11
操作基本知识
..................................11
开启电器 .........................................11
在待机模式下唤醒电器 ....................11
使用电器 .........................................11
向洗衣机发送洗涤程序 ....................12
电器充电 .........................................13
将电器返回到待机模式 ....................13
重启电器 .........................................13
关断电器 .........................................13
校准电器 .........................................13
软件更新
.........................................14
自动安装软件更新 ...........................14
基本设置
.........................................15
基本设置概览 ..................................15
更改基本设置 ..................................16
清洁和保养
......................................16
清洁电器 .........................................16
处理故障
.........................................17
功能故障 .........................................17
温度问题 .........................................19
效果问题 .........................................19
运输、储存和废弃处理
....................21
设置电器 .........................................21
搬运电器 .........................................21
处置 ................................................21
数据保护
.........................................21
售后服务
.........................................21
型号 ................................................21
开放源代码许可信息........................22
技术规格
.........................................22

安全性 zh
3
安全性
请注意有关安全的信息以确保机器使用上的安全。
一般注意事项
可在此查看有关本说明书的一般信息。
¡ 请仔细阅读本说明书。唯有如此才能安全有效使用本机器。
¡ 本说明书适用于本机器的用户。
¡ 请注意安全注意事项和警告注意事项。
¡ 请妥善保管说明书及产品资料以备日后查阅或提供给下一位使用
者。
¡ 拆开包装后请检查本机器。出现运输损坏时请勿连接本机器。
使用范围
为了能够安全并正确地使用本机器,请注意使用范围的注意事项。
本机器之用途应符合以下要件:
¡ 按照本说明书之规定。
¡ 仅限私人家庭和居家环境的室内区域。
¡ 本机器最高可在海拔 4000米以下使用。
用户群的限制
避免孩童或容易发生危险情况的人士受到危害。
凡年满 8 岁的孩童,身体、感官或智力有缺陷的人士以及缺乏相关经
验和知识的人士,应在负责安全使用机器人员的监督或指导下,了解
使用机器可能带来的危险后,方能使用本机器。
严禁孩童将本机器用于嬉戏。
孩童除非在监督下,否则不得进行清洁及用户维护的工作。
请让 3 岁以下的孩童和家中宠物远离机器。
安全使用
使用本机器时,请注意这些安全注意事项。
警告
‒
窒息危险
!
¡ 孩童有可能用包装材料将头部套住或将自己缠住而造成窒息。
▶
请让孩童远离包装材料。

zh 安全性
4
▶
切勿让孩童用包装材料玩耍。
¡ 孩童可能会吸入或吞食小型而造成窒息。
▶
请让孩童远离小型部件。
▶
切勿让孩童用小型部件玩耍。
警告
‒
电击危险
!
湿气渗入会导致电击危险。
▶
切勿让设备暴露在过热或潮湿的环境中。

防止材料损坏 zh
5
防止材料损坏
请遵循这些说明,以免损坏材料和电
器。
光敏传感器和部件
设备上安装的光学传感器和其他精密部
件非常敏感。
请小心操作。
避免在设备上施加外力。
¡ 避免设备遭受任何剧烈冲击或掉落。
¡ 请勿踩踏设备。
法律声明
如不遵守下列安全说明,材料如有损
坏,BSH 概不负责。
¡ 本电器目前只支持可洗衣物。
¡ 本电器只能分析由一种或两种纤维构
成的衣物。
¡ 本电器支持处理大于底部玻璃 (直径
1.5 cm) 的污渍。
¡ 衣物分析的准确性可能受到颜色图案
不均匀、水分或特殊类型深色染色的
影响。
¡ 织物厚度偏小可能影响衣物和污渍分
析的准确性。
正确使用
请遵守下列安全说明,以免造成人身伤
害和财产损失。
¡ 只能使用随电器配套提供的充电线充
电。
¡ 只能按照铭牌上的规定连接和操作充
电线。
¡ 只能在室内存放电器及为其充电。
¡ 为了充分利用电池容量,电器应在室
温下存放和运行。
¡ 请勿将电器置于低于 0 °C 或高于
40 °C 的温度环境中。
¡ 切勿使用已损坏的充电线。请使用原
装充电线进行更换。
¡ 将充电线从电源上拔下时,要拉拔电
源插头,不要拉扯电源线。
¡ 不要将充电线从锋利的边缘上拉过或
者让充电线缠住。
¡ 不要使用损坏的电器。
¡ 如果发生故障,请关闭电器,并将其
从充电线和电源上断开。
¡ 出于安全考虑,仅允许经过授权的售
后服务人员对电器进行维修、安装和
更换操作。
¡ 在下列情况下,您必须立即停用电器
并联系售后服务人员:
– 如果液体进入电器内部。
– 如果电器掉落并损坏。
¡ 防止电器受外部天气条件、湿度和热
源影响。
环境保护和节约
通过以节约资源的方式使用机器并正确
处理可重复使用的材料来保护环境。

了解机器 zh
7
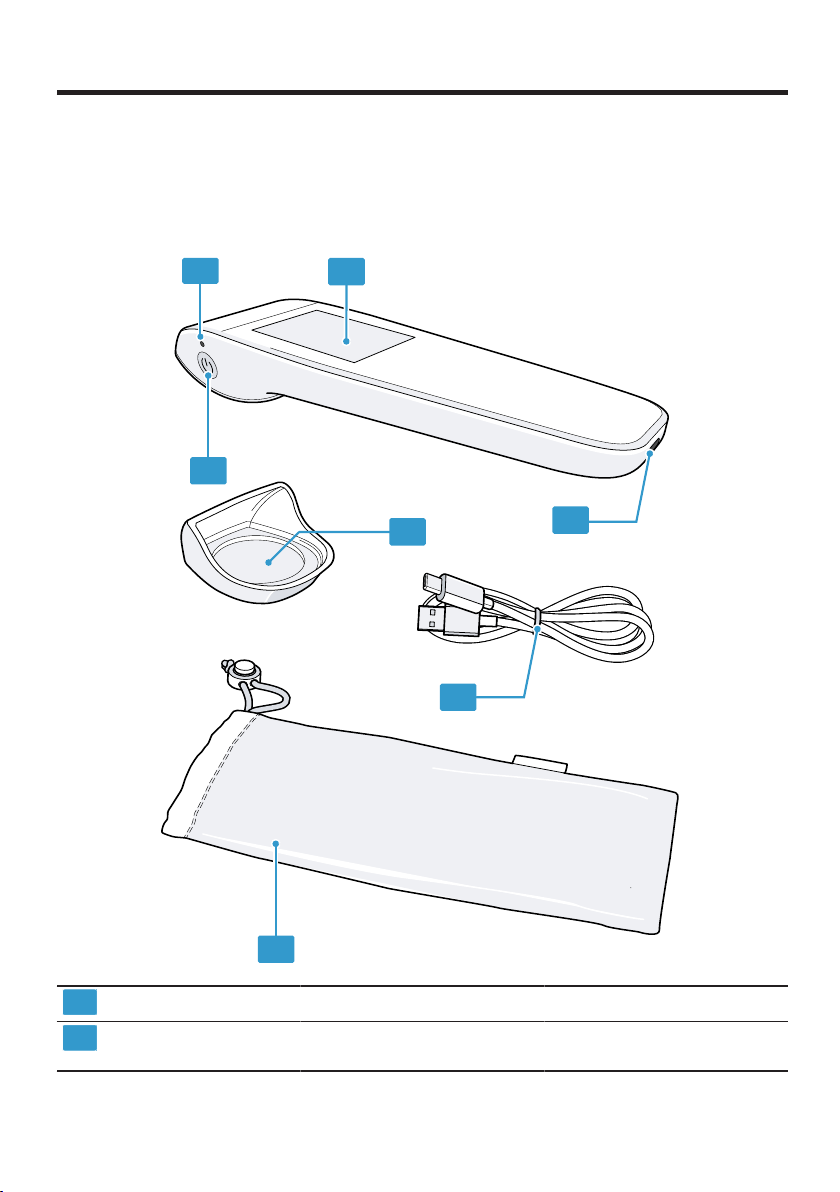
4
电源按键 ¡ →"
开启电器
",
页码
11
¡ →"
关断电器
",
页码
13
¡ →"
在待机模式下唤醒电
器
",
页码
11
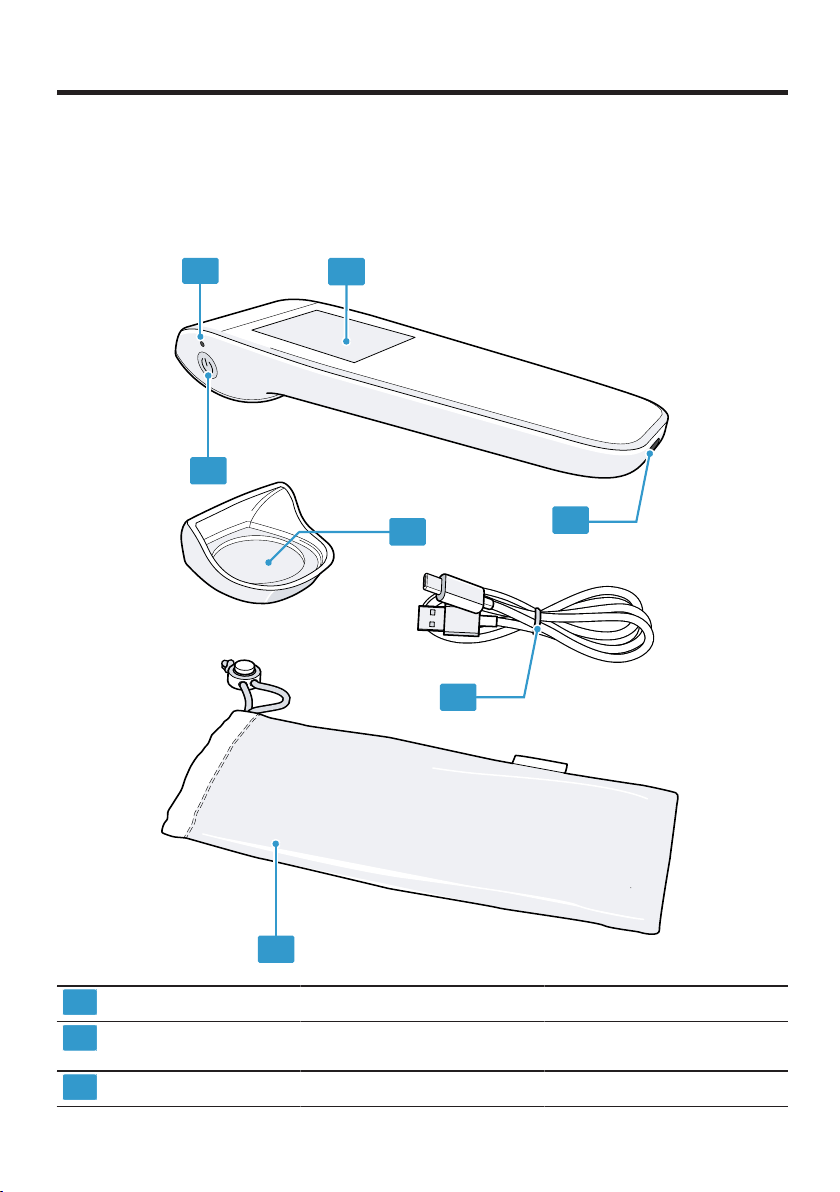
5
充电线 ¡ →"
电器充电
",
页码
13
6
罩盖 ¡ →"
校准电器
",
页码
13
7
存储袋 ¡ →"
设置电器
",
页码
21
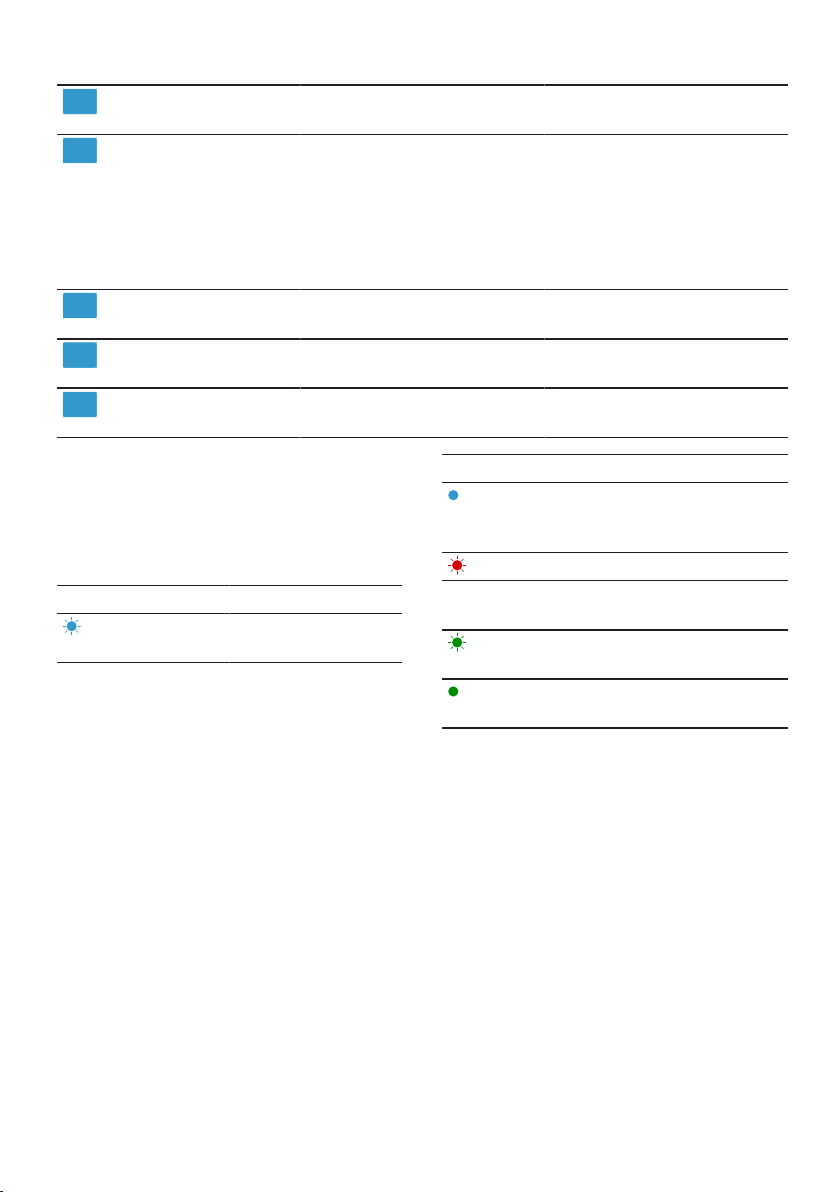
状态
LED
状态 LED 将向您提供电器的操作状态
和充电状态信息。
LED
显示屏 说明
蓝牙处于可发现模
式。
LED
显示屏 说明
电器已与微信应用
程序完成配对。
电池电量耗尽。
电池正在充电。
电器处于待机模
式。
电池充满。
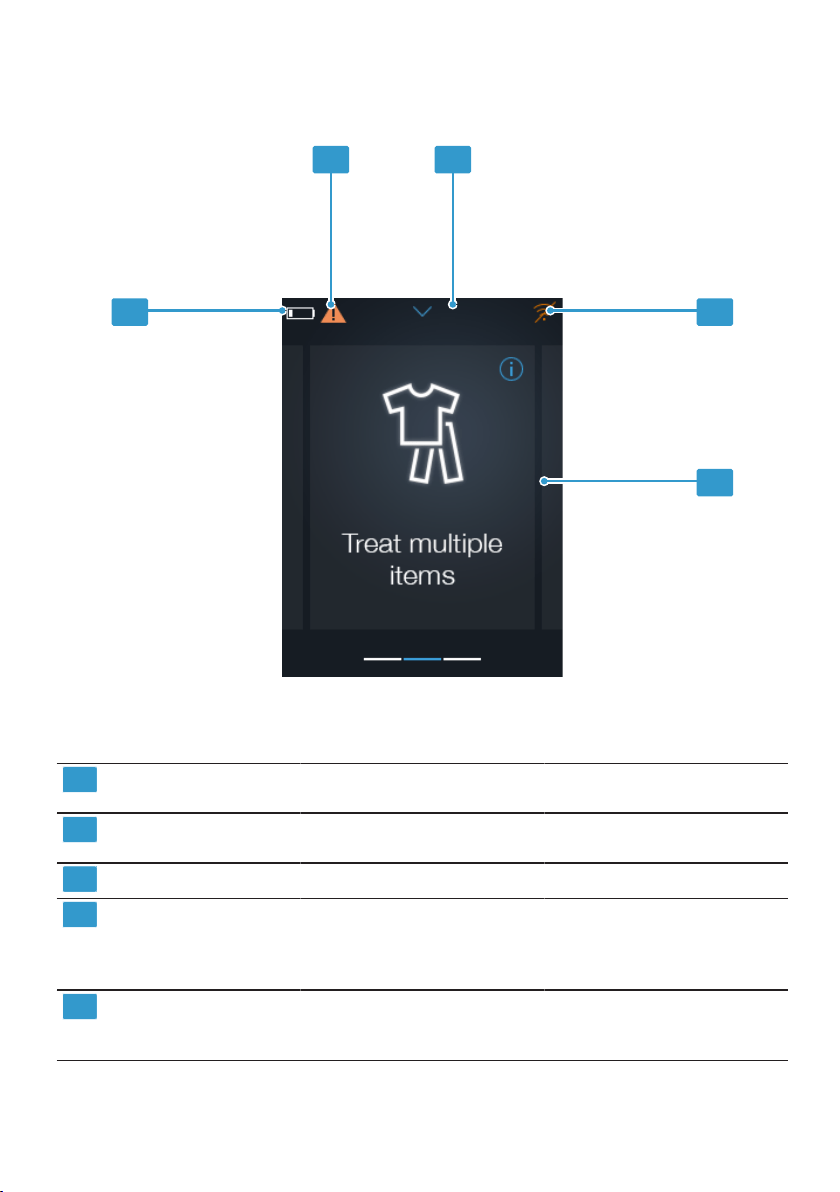
触摸显示屏
您可在此找到触摸显示屏各个区域的概述。您可使用触摸显示屏控制电器,并了解
其操作状态的信息。
如要操作,请按下触摸显示屏或使用水平或垂直滑动。
了解机器 zh
9
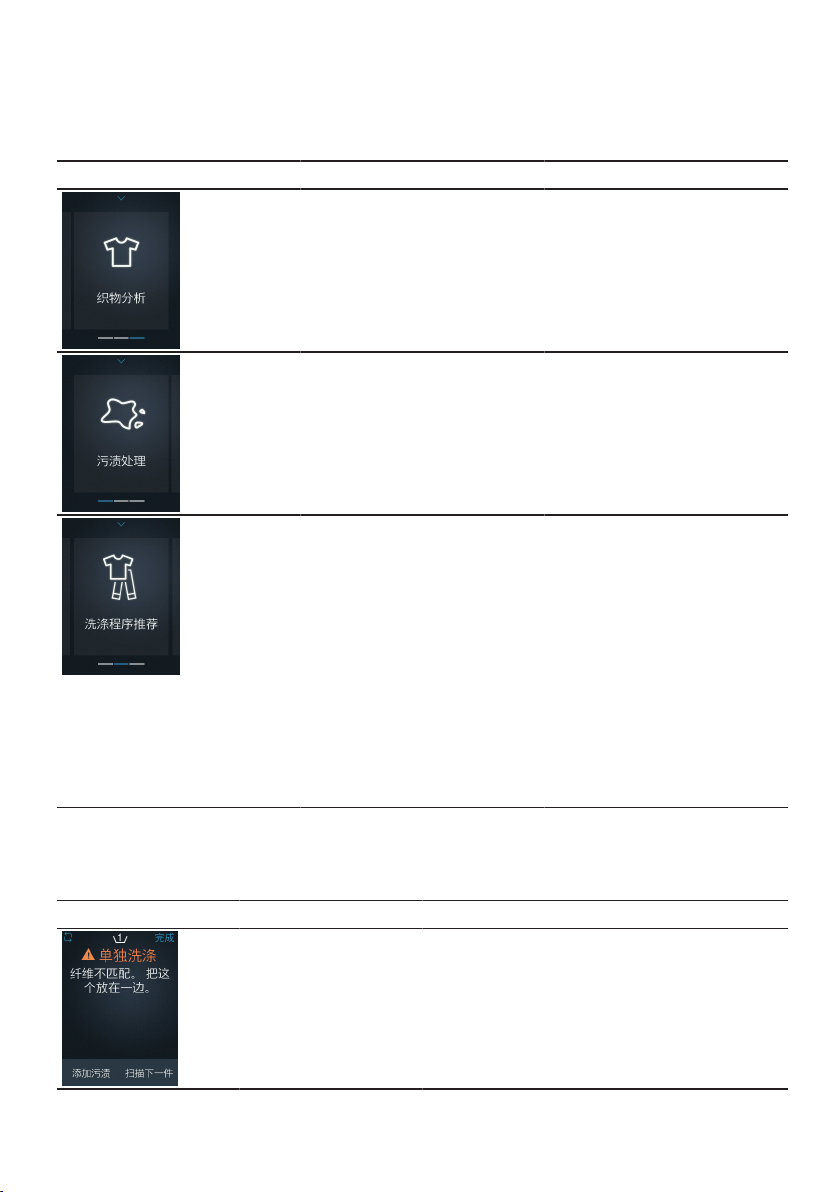
功能
可在此查看电器主菜单中的各种功能概览。功能取决于电器的软件版本。
功能 功能范围 用途
¡ 扫描和分析衣物。
→"
使用快速织物分析
",
页
码
12
分析单件衣物,以提供其
成分信息。
¡ 扫描和分析衣物。
¡ 扫描和分析污渍。
¡ 去污说明
→"
使用清除污渍
",
页
码
12
对有污渍的衣物进行分
析,以提供去污信息。
¡ 扫描和分析衣物。
¡ 扫描和分析污渍。
¡ 去污说明
¡ 将衣物添加至洗衣任
务。
¡ 将衣物排除在洗衣任务
之外。
¡ 关于推荐洗涤程序的信
息
→"
使用处理多件衣物
",
页
码
12
→"
向洗衣机发送洗涤程
序
",
页码
12
扫描几件有污渍和无污渍
的衣物,创建一个洗衣任
务。为整个洗衣任务提供
最佳的洗涤程序建议。
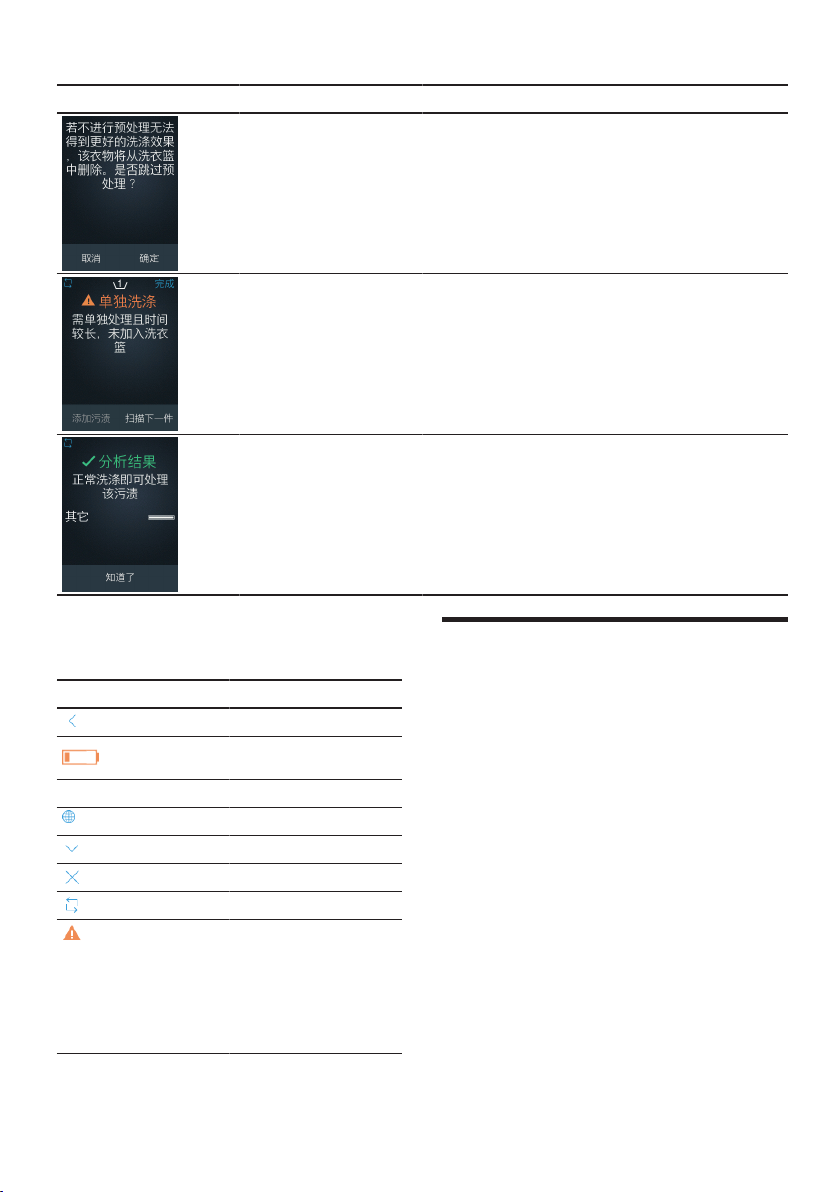
通知消息
可在此找到电器上各种通知消息的概览。
通知消息 功能 说明 建议
→"
使用处理多件衣
物
",
页码
12
所扫描衣物的洗涤
建议与当前洗衣任
务的洗涤建议不匹
配。
为了避免损坏衣
物,取得最佳洗涤
效果,请不要在当
前洗衣任务中清洗
该物品。
zh 首次使用前
10
通知消息 功能 说明 建议
→"
使用处理多件衣
物
",
页码
12
建议的去污程序已
被跳过。
为达到最佳的洗涤
效果,在将衣物加
入洗衣任务之前,
请先去除污渍。
→"
使用处理多件衣
物
",
页码
12
所需的去污过程是
一个耗时的过程。
取出有污渍的衣
物,继续准备洗衣
任务。
→"
使用清除污渍
",
页码
12
→"
使用处理多件衣
物
",
页码
12
→"
使用清除污渍
",
页码
12
污渍不需要任何特
殊的预处理。
该衣物可直接在洗
衣机中清洗。
符号
此处提供电器上的符号概览。
符号 说明
返回
电池电量耗尽
电池正在充电
语言
显示状态栏
关闭选项
重复扫描
错误消息
电器发生错误。
→"
通知消息
",
页
码
9
→"
手动校准电器
",
页码
13
首次使用前
准备将本机器投入使用。
供货范围
拆开包装后,请检查所有部件是否在运
输过程中发生损坏,供货是否完整。
如有任何投诉意见,请联系出售该电器
的经销商或我们的售后服务部。
随本品配套提供:
¡ X-Spect
¡ 罩盖
¡ 充电线
¡ 存储袋
¡ 快速入门指南
¡ 产品保修卡
操作基本知识 zh
11
电器拆包和使用准备
准备将本机器投入使用。
小心
!
使用不当会导致危险
▶
只能使用随电器配套提供的充电线充
电。
▶
请勿在低于 0 °C 或高于 40 °C 的
温度下为电器充电。
1. 从电器上拆下所有包装材料和保护套
管。
2. 检查电器有无肉眼可见的损坏。
3.
如果 闪烁,请为电器充电。
→"
电器充电
",
页码
13
4.
执行初始设置 →
页码
11。
执行初始设置
在首次开启或复位到出厂设置后,必须
将电器与微信配对小程序及洗衣机配
对。
前提条件
¡ 可访问 WiFi 家庭网络 (Wi-Fi
1
)。
¡ 已拥有 HomeConnect 帐户。
¡ 洗衣机已连接到您的
HomeConnect 关联帐户。
▶
注意事项:
您可在我们的
HomeConnect 网站找到关于该应
用程序的信息:www.home-
connect.com。
将电器与 HomeConnect 帐户及洗
衣机相关联。
→"
自动配对电器
",
页码
11
微信配对小程序和电器将引导您完成
配对的各个步骤。
自动配对电器
1.
开启电器 →
页码
11。
a 触摸显示屏显示欢迎屏幕。然后显示
二维码。
2. 使用微信应用程序扫描二维码。
3. 按照微信配对小程序中的说明进行操
作。
a 电器连接微信配对小程序。
a 电器连接 HomeConnect 帐户。然
后显示确认消息。
4. 按下“完成设置”。
a 将显示主菜单。
a 电器准备就绪。
操作基本知识
您可以在此了解操作机器的基本知识。
开启电器
▶
按下并按住 按键 3 秒。
a 触摸显示屏显示欢迎屏幕,然后显示
主菜单。
在待机模式下唤醒电器
前提条件:
电器处于待机模式。
→"
状态
LED",
页码
7
▶
按下 按键。
使用电器
1. 通过滑动浏览到主菜单并选择功能。
– →"
使用快速织物分析
",
页码
12
– →"
使用清除污渍
",
页码
12
– →"
使用处理多件衣物
",
页码
12
2. 扫描织物或污渍。
注意事项
为了提高检测和建议的准确性,请注意
以下提示:
¡ 只能扫描干的污渍。如果扫描潮湿
的织物或污渍,可能会弄脏镜头,
此时需要用一块布清洁。
¡ 将电器紧紧压在衣服或污渍上,保
持不动,直到显示屏显示“正在扫
描”。
¡ 如果衣物上有彩色图案,请扫描颜
色最深的地方。
1
无线网络是 Wi-Fi Alliance 的注册品牌。

zh 操作基本知识
12
¡ 如果衣物由多种面料构成,请扫描
多处。
¡ 将电器镜头对准污渍中心,以提高
检测精度。
a 电器分析织物和 / 或污渍。
3. 检查分析结果。
4. 按照建议处理污渍,或 向洗衣机发
送建议的洗涤程序 →
页码
12。
使用快速织物分析
1. 在主菜单中,选择快速织物分析功
能。
a 触摸显示屏显示“握住扫描仪紧贴织
物开始扫描”。
2. 将传感器紧贴织物。
3. 按下“立即扫描”。
a 电器扫描并分析织物。
a 触摸显示屏将显示织物的成分。
4. 要扫描另一件衣物,触摸“重新扫
描”。
5. 如要关闭快速织物分析,触摸“关
闭”。
a 将显示主菜单。
使用清除污渍
1. 在主菜单中,选择“清洁污渍”功能。
a 触摸显示屏显示“握住扫描仪紧贴污
渍开始扫描”。
2. 将传感器紧贴污渍并按下“立即扫
描”。
a 电器将扫描污渍。触摸显示屏随后将
显示“握住扫描仪紧贴织物开始扫
描”。
3. 将传感器紧贴织物并按下“立即扫
描”。
a 电器将扫描织物并分析污渍。触摸显
示屏随后将显示一条确认消息及污渍
的成分。如果不需要预处理,触摸显
示屏将显示“普通脏污”。
4. 触摸“开始处理”。
a 电器运行去污指导步骤。
5. 按照指导步骤去除污渍。
使用处理多件衣物
1. 在主菜单中,选择“处理多件衣物”功
能。
a 触摸显示屏显示“握住扫描仪紧贴织
物开始扫描”。
2. 将传感器紧贴织物并按下“立即扫
描”。
如要在已扫描的织物中添加污渍,请
按下“添加污渍”。然后扫描污渍,并
按照去污说明进行操作,或按下“跳
过”跳过去污步骤。
a 触摸显示屏显示“该项目已被添加到
洗涤任务中”。
3. 按下“扫描更多”。
4. 重复此过程。
如果扫描的织物不适合洗衣量或必须
去除污渍,触摸显示屏将显示一条通
知消息。
→"
通知消息
",
页码
9
5. 按下“完成”确认洗衣量。
a 电器对扫描织物进行分析。
6. 选择织物类型,然后按下“下一步”。
如果无需选择任何织物类型,按
下“跳过”按钮。
7.
按下向洗衣机发送洗涤程序 →
页
码
12或按下“关闭”结束过程。
a 将显示主菜单。
向洗衣机发送洗涤程序
前提条件:
电器将显示推荐的洗涤程
序。
→"
使用处理多件衣物
",
页码
12
1. 检查建议的洗涤程序。
使用垂直滑动手势浏览显示屏。
2. 按下“发送到洗衣机”。
a 洗涤程序已发送到洗衣机,但未手动
启动。随后将显示确认发送的消息。
3. 按下“关闭”。
a 将显示主菜单。
4. 要启动洗涤程序,按下洗衣机上的启
动按键。

操作基本知识 zh
13
电器充电
请使用随附的充电线给电器充电。
1. 将充电线连接到 USB 端口。
2. 将充电线连接到电器充电插座。
a 状态 LED 亮起红色。
a 当电器关断时,触摸显示屏显示电池
充电状态。开启时,它显示状态栏。
a 当电池充满电时,状态 LED 亮起绿
色。
3. 从电器上拔下充电线。
4. 从 USB 端口上拔下充电线。
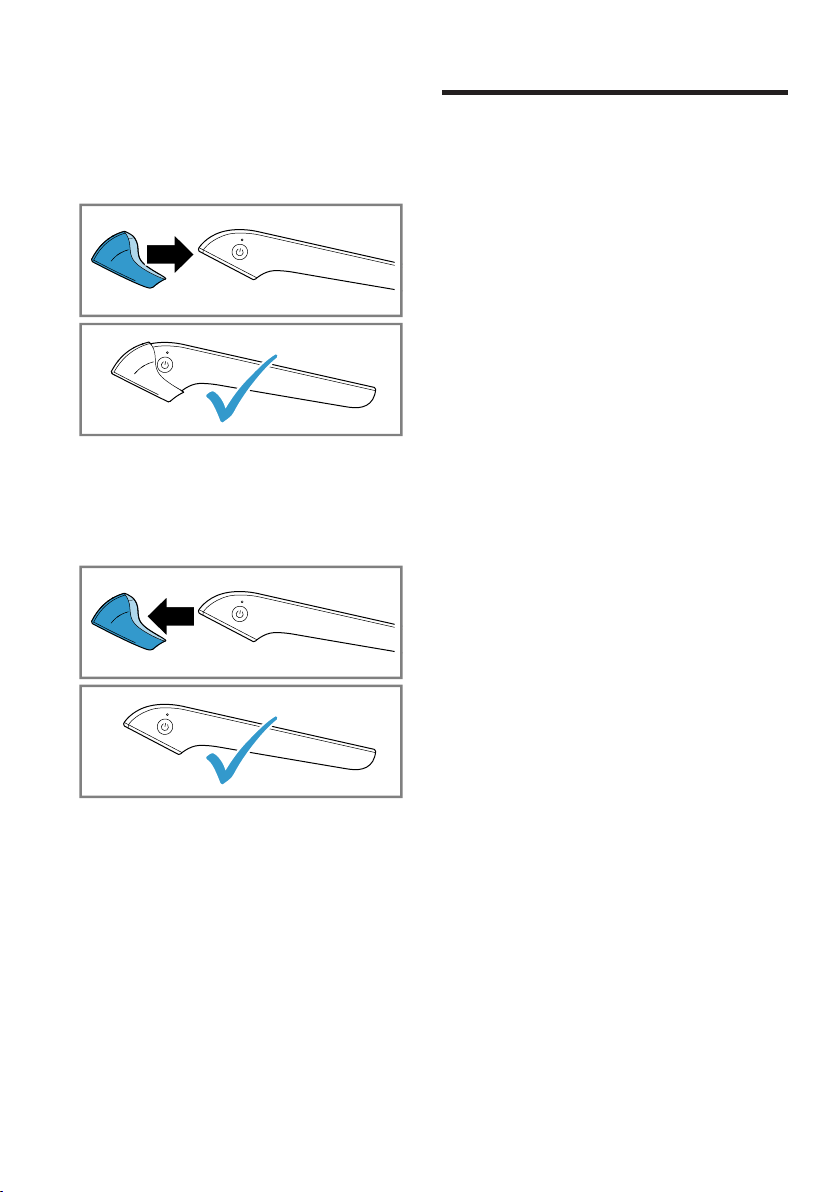
将电器返回到待机模式
▶
按下 按键。
a 状态 LED 闪烁绿色。
重启电器
▶
按下 按键大约 7秒钟。
a 电器重新启动。
关断电器
1.
按下并按住 按键 3 秒。
a 触摸显示屏将显示“是否要关断设
备?”。
2. 触摸“是”。
a 电器关断。
校准电器
电器会定期提醒您进行校准。
此时可以立即或稍后校准电器。
注意事项:
稍后校准电器会影响检测精
度。
→"
自动校准电器
",
页码
13
→"
手动校准电器
",
页码
13
自动校准电器
注意事项:
按下“跳过”按钮,跳过校
准。状态栏显示 。
前提条件:
触摸显示屏显示“X-Spect
传感器需要校准。在启动校准前,请盖
上电器罩盖。”
1. 将罩盖盖在传感器上。
2. 按下“启动”。
a 将显示校准画面。随后触摸显示屏将
显示“校准已完成。现在已可拆下罩
盖。”
3. 拆下罩盖。
4. 按下“确定”。
a 将显示主菜单。
a 电器准备就绪。
手动校准电器
1. 向下拉,打开主菜单中的状态栏。
zh 软件更新
14
2. 按下状态栏。
a 将打开“设置”菜单。如果之前没有跳
过校准,请手动打开“设置”中的“校
准”菜单项。
3. 将罩盖盖在传感器上。
4. 按下“开始校准”。
a 将显示校准画面。随后触摸显示屏将
显示“校准已完成。现在已可拆下罩
盖。”
5. 拆下罩盖。
6. 按下“确定”。
a 将显示主菜单。
软件更新
软件更新将进一步优化电器并添加新功
能。
自动安装软件更新
启动时,电器会搜索是否有新的软件更
新。
前提条件:
触摸显示屏将显示“有新的
软件更新。是否要更新?”
▶
按下“更新”。
如果电池电量低于 75%,触摸显示
屏将显示“请将设备连接到充电器”。
连接充电器。
→"
电器充电
",
页码
13
a 将开始安装软件更新,随后电器将重
启。

基本设置 zh
15
基本设置
您可以视您的需求设置机器。
基本设置概览
您可以在此查看基本设置和出厂设置一览。基本设置取决于机器的设备。
基本设置 选项 描述
WiFi 添加 WiFi 网络
删除 WiFi 网络
添加新的 WiFi 网络。
→"
添加
WiFi
网络
",
页
码
16
删除已保存的 WiFi 网络。
→"
删除
WiFi
网络
",
页
码
16
添加洗衣机 无可用选项。 通过微信应用程序扫描二
维码,将一台新洗衣机连
接至电器。洗衣机必须与
家居互联应用程序配对。
校准 无可用选项。 手动校准电器 →
页码
13。
语言 参见电器上的选项。 设置语言。
待机 ¡ 30 秒
¡ 1分钟
¡ 2 分钟
¡ 3 分钟
¡ 5 分钟
电器切换至待机模式的等
待时间。
→"
设置待机时间
",
页
码
16
自动关断 ¡ 5 分钟
¡ 10 分钟
¡ 15 分钟
¡ 20 分钟
¡ 30 分钟
电器自动关断的等待时
间。
→"
设置自动关断
",
页
码
16
查看 T&C 无可用选项。 扫描二维码,查看电器的
条款和条件。
复位 无可用选项。 将更改后的设置恢复为出
厂设置。
→"
复位电器
",
页码
16
首次使用时必须配置设
置。
→"
执行初始设置
",
页码
11
设备信息 无可用选项。 显示电器信息。

zh 清洁和保养
16
更改基本设置
1. 在主菜单中向下拉,打开状态栏。
a 状态栏显示设置。
2. 在状态栏中下拉设置。
a 将打开“设置”菜单。
3. 按下所需的菜单项,更改设置。
使用垂直滑动动作浏览菜单。
4. 按下退出菜单项。
5. 按下关闭设置。
设置待机时间
您可定义切换到待机模式的等待时间。
1. 打开“设置”。
2. 按下 “待机”。
3. 按下所需的时间段。
a 新的时间已被保存。
4.
按下 退出菜单项。
5.
按下 关闭设置。
设置自动关断
您可定义电器自动关断的等待时间。
1. 打开“设置”。
2. 按下“自动关断”。
3. 按下所需的时间段。
a 新的时间已被保存。
4.
按下 退出菜单项。
5.
按下 关闭设置。
复位电器
您可将电器复位到出厂设置。
1. 打开“设置”。
2. 按下“复位”。
a 触摸显示屏将显示“复位操作将恢复
出厂设置。所有配置都将丢失。”
3. 按下“复位”。
a 触摸显示屏显示“是否确定要复位设
备?”。
4. 按下“是”。
a 电器重新启动。
5.
执行初始配置 →
页码
11。
添加
WiFi
网络
您可在电器上存储多达 10 个 WiFi 网
络。
1. 打开“设置”。
2. 按下 WiFi。
3. 按下“添加 WiFi”。
a 触摸显示屏将显示一个二维码。
4. 使用微信应用程序扫描二维码。
5. 按照移动设备上微信配对小程序中的
说明进行操作。
删除
WiFi
网络
1. 打开“设置”。
2. 按下 WiFi。
3. 按下 WiFi 网络旁边的回收站符号。
a 触摸显示屏显示“是否确定删除
[‘WiFi 名称’] WiFi 连接?”。
4. 按下“是”。
a WiFi 网络已被删除。
清洁和保养
为了让机器长时间保持功能顺畅,请仔
细进行清洁和保养。
清洁电器
请按照规定清洁电器。这可确保不会因
清洁不当或清洁产品不合适而损坏电器
的不同零件和表面。
▶
请按照清洁说明进行操作。
零件 清洁说明
电器镜头 使用湿软毛巾 (超
细纤维) 进行清洁
镜头盖 吹干净校准材料
上的灰尘。
处理故障 zh
17
处理故障
机器上发生的小故障,大多能自行解决。联系客户服务之前,请先运用处理故障信
息尝试自行解决。此举可避免不必要的支出。
警告
受伤危险
!
维修不当可能发生危险。
▶
仅限合格的专业人员才能对本机器进行维修。
▶
若本机器故障,请致电客户服务。
功能故障
故障 原因 故障排除
出错,请检查 WiFi 连
接。
设备上未配置可用的
WiFi 连接。
▶
检查您的路由器是否可用。
▶
在设备上配置一个新的 WiFi
网络。
→"
添加
WiFi
网络
",
页码
16
无法连接到我们的云
端,请检查您的互联网
连接或稍后重试。
当前的 WiFi 网络不具备
可用的互联网连接。
▶
检查您的路由器是否可用。
当前处于维修停机时
间,X-Spect 云端不可
用。
▶
请稍后重试。
云端出错,请稍后再
试。
当前处于维修停机时
间,X-Spect 云端不可
用。
▶
请稍后重试。
需要校准。请盖上镜头
盖并按下“启动”。
为了提高检测和建议的
准确性,应不时校准设
备。
▶
→"
自动校准电器
",
页码
13
出错,请确保已安装镜
头盖。
在校准期间,设备未在
传感器上检测到镜头
盖。
▶
在设备上盖上镜头盖。
注意事项:
在显示屏显示“正
在校准”期间,请勿拆下镜头
盖。
校准失败。请稍后重
试。
设备校准数据未被保存
到 X-Spect 云端。
▶
请稍后重试。
发送程序失败。请确保
电器已连接到互联网。
电器未连接到互联网。
▶
请检查电器的互联网连接。
详细信息请参见电器用户手
册。如果问题继续存在,请
联系客户服务。
发送程序失败。请不要
手动控制家电。
X-Spect 正在向电器发送
程序。
▶
在 X-Spect 设备成功将程序传
送到电器之前,请勿手动控
制您的电器。
zh 处理故障
18
故障 原因 故障排除
发送程序失败。另一个
程序目前正在进行中。
电器上有程序正在运
行。
▶
停止电器上正在运行的程
序。
▶
等待程序完成,然后重试。
设备注册失败,请重启
设备以重复设置。
在设备设置过程中出
错。
1. →"
重启电器
",
页码
13
2. →"
执行初始设置
",
页码
11
3. 如果问题继续存在,请联系
客户服务 →
页码
21。
该设备未注册,请联系
客户服务。
在设备设置过程中出
错。
▶
联系客户服务 →
页码
21。
服务器无法验证设备身
份。请重新设置您的设
备。
设备权限被取消。服务
器无法识别您的设备。
1. 复位设备。 →
页码
16
2. 设置设备。 →
页码
11
有新的条款和条件可
用。请在家居互联应用
程序中接受该条款和条
件,然后重试。
必须接受新的条款和条
件。
▶
接受家居互联应用程序中的
新条款和条件。
已达到配额限制,请稍
后再试。
您的设备在一天内向我
们的云端发出请求过
多。为改善云端性能,
您的设备将被暂时禁用
24 小时。
▶
请稍后重试。
检测到充电电流过低,
请更换适配器。
例如,如果适配器故障
或充电线无法充电,设
备会检测到慢速充电速
度。
1. 尝试使用不同的 CCC 认证适
配器或充电线。
2. 如果问题继续存在,请联系
客户服务 →
页码
21。
未找到充电器。如果问
题继续存在,请联系客
户服务。
设备无法检测到充电器
给电池充电。如果适配
器故障或充电线无法充
电,将会出现这种情
况。
1. 尝试使用不同的 CCC 认证适
配器或充电线。
2. 如果问题继续存在,请联系
客户服务 →
页码
21。
未找到传感器。如果问
题继续存在,请联系客
户服务。
设备无法检测到传感
器。
1. 重新启动设备。 →
页码
13
2. 如果在重新启动设备后仍然
存在问题,请联系客户服务
→
页码
21。
未找到温度传感器。如
果问题继续存在,请联
系客户服务。
设备无法检测到传感
器。
1. 重新启动设备。 →
页码
13
2. 如果在重新启动设备后仍然
存在问题,请联系客户服务
→
页码
21。
处理故障 zh
19
故障 原因 故障排除
未找到触感传感器。如
果问题继续存在,请联
系客户服务。
设备无法检测到传感
器。
1. 重新启动设备。 →
页码
13
2. 如果在重新启动设备后仍然
存在问题,请联系客户服务
→
页码
21。
未找到测量传感器。如
果问题继续存在,请联
系客户服务。
设备无法检测到传感
器。
1. 重新启动设备。 →
页码
13
2. 如果在重新启动设备后仍然
存在问题,请联系客户服务
→
页码
21。
未找到触摸面板。如果
问题继续存在,请联系
客户服务。
设备无法检测到显示
屏。
1. 重新启动设备。 →
页码
13
2. 如果在重新启动设备后仍然
存在问题,请联系客户服务
→
页码
21。
未找到 WiFi / BT。如果
问题继续存在,请联系
客户服务。
设备无法检测到 WiFi 适
配器。
1. 重新启动设备。 →
页码
13
2. 如果在重新启动设备后仍然
存在问题,请联系客户服务
→
页码
21。
温度问题
故障 原因 故障排除
检测到高温。如果问题
继续存在,请联系客户
服务。
在操作过程中,设备检
测到温度过高。为避免
电池发生意外,设备将
自动关闭。
1. 为防止损坏,请勿将电池暴
露在 60 °C 或以上的高温环境
中。
2. 如果在正常工作环境中也存
在问题,请联系客户服务
→
页码
21。
设备温度过低,已禁止
充电。如果问题继续存
在,请联系客户服务。
在操作过程中,设备检
测到温度过低。为延长
电池使用寿命,设备将
自动停止充电。
1. 为提高充电效率,不要将电
池暴露在低温环境下。
2. 如果在正常工作环境中也存
在问题,请联系客户服务
→
页码
21。
效果问题
故障 原因 故障排除
出错,请确保扫描的是
织物。
在扫描过程中,设备无
法检测到有衣物接触传
感器。
▶
将设备紧紧压在衣服上,保
持不动,直到显示屏显示“正
在扫描”。
出错,请确保扫描的是
污渍。
在扫描过程中,设备无
法检测到有污渍接触传
感器。
▶
将设备紧紧压在污渍上,保
持不动,直到显示屏显示“正
在扫描”。

zh 处理故障
20
故障 原因 故障排除
无法将该织物纤维装入
洗衣篮。请将该衣物放
置一旁。
设备检测到该织物纤维
无法与之前放入洗衣篮
中的纤维一起洗涤,例
如,试图将纯棉和丝绸
衣物一起洗涤。
1. 为避免损坏织物,请将衣物
放置一旁,不要将其放入洗
衣机的这个洗衣篮中。
2. 将其与其它类似衣物单独清
洗。

运输、储存和废弃处理 zh
21
运输、储存和废弃处理
您将在此将了解如何准备运输和储存机
器。此外,您也可以了解如何处理旧机
器。
设置电器
请妥善存放电器,避免损坏。
注意事项:
将电器放在干燥的地方,防
止高温和外部影响。
当不使用电器时,务必要将电器套入所
提供的存储袋中存储。
1.
关断电器。 →
页码
13
2. 将电器套入存储袋中。
搬运电器
设备中的锂离子电池须符合危险品法规
的有关规定。电池可由用户通过陆运运
输,无需其他任何要求。
如果由第三方处理 (例如空运或货运),
则必须满足关于包装和标识的特殊要
求。在这种情况下,在准备发货时必须
咨询危险品专家。
处置
以环保的方式处置包装材料,可让有价
值的材料得以重新利用。
请以负责任的方式回收设备、电池、附
件和包装材料。
不要将设备和电池
当作家庭垃圾处
置。
集成式电池只能由专业人员拆除并废
弃。
旧电器
该电器包含可充电锂离子电池。因此,
电器只能由获得授权的售后服务商或经
销商处理。
数据保护
请参见数据保护信息。
当电器首次通过有互联网连接的家庭网络
进行注册时,电器会把以下类别的数据传
输到家居互联服务器 (初始注册):
¡ 唯一电器识别信息 (包含电器代码和
已经安装的 WiFi 通信模块的 MAC
地址)。
¡ Wi-Fi 通信模块的安全证书 (为了确
保安全的数据连接)。
¡ 电器的当前软件和硬件版本。
¡ 之前进行的任何复位出厂设置的操
作。
初始注册为您正常使用家居互联各功能
做好准备,且仅当初次使用这些功能时
才需要进行初始注册。
注意事项:
确保家居互联功能仅可与家
居互联应用程序同时使用。可以通过家
居互联应用程序获得有关数据保护的信
息。
售后服务
如果您有任何疑问或无法自行排除故
障,请联系我们的售后服务部门。
我们会不断寻找适当的解决方案,避免
维修人员不必要的登门造访。
在联系售后服务部门时,需要提供设备
的型号 (E 编号)。
您可通过下列电话号码联系售后服务部
门:
CN 400 885 5888
型号
型号 (E 编号) 可在铭牌上和设备设置
中找到。
铭牌位于包装内侧。
E 编号也可从“设置”的“设备信息”菜单
项中找到。
→"
基本设置概览
",
页码
15
记下设备的详细信息和售后服务电话号
码,以便能够快速找到它们。

zh 技术规格
22
开放源代码许可信息
本设备所使用的软件中包含由版权所有
者许可的免费或开源软件。
您可以通过以下方式获取这些软件的许
可证信息,微信配对程序或设备菜
单:“设置 -> 系统信息 -> 开放源代码
许可二维码”。
您也可以将查看需求发送至
[email protected] 或写信至以下
地址BSH Hausgeräte GmbH GmbH,
Carl-Wery-Str.34, D-81739 München,
Germany,并注明“OSSREQUEST“。
您需承担因此产生的费用。我们将在您
购买产品的三年之内或在可获得产品支
持和配件的期限内提供此项服务。
技术规格
您可以在此处查看机器的数据和纪录。
型号 XA1504A5HW
电池容量 内置 1000 mAh 锂
离子充电电池
系统电源
(正常状态)
3.7V / 250mA
显示屏 2.0 英寸 240x320
LED 背光双触摸显
示屏,采用 IPS 技
术和全 RGB
处理器 1.0 GHz 处理器
存储器 2 Gb NAND 闪存
WiFi 802.11a/b/g/n/ac
2.4 Ghz,不支持
5.0 Ghz
蓝牙 4.1
长度 16.30cm
宽度 5.09cm
最低/最高高度 3.10cm / 6.14cm
重量 221g
工作温度 5°C ~ 50°C
储存温度 -20°C ~ 30°C
相对湿度 45% ~ 85%
规范和认证 ¡ SRRC
¡ BQB
¡ RoHS
¡ UN38.3
¡ GB 31241-2014
¡ GB4943.1
¡ GB9254、CISPR
32、CISPR 35
¡ GB/T
17618-2015

en
23
Table of contents
Safety.............................................24
General information........................24
Intended use...................................24
Restriction on user group...............24
Safe use .........................................25
Preventing material damage .......26
Sensitive optical sensors and
components....................................26
Legal disclaimer .............................26
Proper use .....................................26
Environmental protection and
saving energy................................27
Familiarising yourself with
your appliance...............................28
Appliance .......................................28
Status LED......................................29
Touch display .................................29
Functions ........................................31
Notification messages....................32
Symbols..........................................32
Before using for the first time ......33
Scope of delivery............................33
Unpacking and preparing the
appliance for use............................33
Performing the initial setup ............33
Basic operation .............................34
Switching on the appliance ............34
Waking up the appliance from
standby mode ................................34
Using the appliance .......................34
Sending a washing program to
the washing machine .....................35
Charging the appliance..................36
Returning the appliance to
standby mode ................................36
Restarting the appliance ................36
Switching off the appliance ............36
Calibrating the appliance ...............36
Software update ............................37
Installing the software update
automatically ..................................37
Basic settings................................38
Overview of the basic settings .......38
Changing the basic settings ..........39
Cleaning and servicing.................40
Cleaning the appliance ..................40
Troubleshooting............................41
Malfunctions ...................................41
Temperature problem.....................43
Problem with results.......................44
Transportation, storage and
disposal .........................................45
Storing the appliance .....................45
Transporting the appliance ............45
Disposal..........................................45
Data protection..............................45
After-sales service ........................46
Model number ................................46
Information regarding Free and
Open Source Software ...................46
Technical specifications...............46

en Safety
24
Safety
Please read the safety information to ensure that you use the ap-
pliance safely.
General information
You can find general information about this instruction manual
here.
¡ Read this instruction manual carefully. Only this ensures you will
use the appliance safely and efficiently.
¡ This manual is intended for the user of the appliance.
¡ Follow the safety instructions and warnings.
¡ Keep the instruction manual and the product information safe
for future reference or for the next owner.
¡ Check the appliance after unpacking it. Do not connect the ap-
pliance if it has been damaged in transit.
Intended use
Please read the information on intended use to ensure you use
the appliance correctly and safely.
Only use this appliance:
¡ As specified in this instruction manual.
¡ In private households and in enclosed spaces in a domestic en-
vironment.
¡ Up to an altitude of max. 4000m above sea level.
Restriction on user group
Avoid risks to children and vulnerable persons.
This appliance may be used by children aged 8 or over and by
people who have reduced physical, sensory or mental abilities or
inadequate experience and/or knowledge, provided that they are
supervised or have been instructed on how to use the appliance
safely and have understood the resulting dangers.
Do not let children play with the appliance.

Safety en
25
Cleaning and user maintenance must not be performed by chil-
dren unless they are being supervised.
Keep children under the age of 3 years and pets away from the
appliance.
Safe use
Follow these safety instructions when using the appliance.
WARNING‒Risk of suffocation!
¡ Children may put packaging material over their heads or wrap
themselves up in it and suffocate.
▶
Keep packaging material away from children.
▶
Do not let children play with packaging material.
¡ Children may breathe in or swallow small parts, causing them
to suffocate.
▶
Keep small parts away from children.
▶
Do not let children play with small parts.
WARNING‒Risk of electric shock!
Penetrating moisture may cause an electric shock.
▶
Never expose the device to intense heat or humidity.

en Preventing material damage
26
Preventing material dam-
age
Follow these instructions to avoid ma-
terial damage and damage to the ap-
pliance.
Sensitive optical sensors and
components
Very sensitive optical sensors and
other delicate components are in-
stalled in your device.
Take care that you handle it carefully.
Avoid applying any external forces to
the device.
¡ Avoid any violent shocks to the
device or dropping it.
¡ Do not step on the device.
Legal disclaimer
BSH accepts no responsibility or liab-
ility for material damage due to non-
compliance with the following safety
instructions.
¡ This appliance supports only wash-
able garments at the moment.
¡ This appliance can analyze gar-
ments that consist of one or two
fibers only.
¡ This appliance supports stains that
are larger than the bottom glass
(1.5 cm diameter).
¡ Garment analysis accuracy may be
affected by inhomogeneous color
patterns, moisture, or special types
of dark dyeing.
¡ Garment and stain analysis accur-
acy may be affected by small tex-
tile thickness.
Proper use
Observe the following safety instruc-
tions in order to avoid personal injury
and damage to property.
¡ Only charge the appliance using
the charging cable included.
¡ Only connect and operate the
charging cable as specified on the
rating plate.
¡ Only store and charge the appli-
ance indoors.
¡ To make best use of the battery
capacity, the appliance should be
stored and operated at room tem-
perature.
¡ Do not expose the appliance to
temperatures below 0 °C or above
40 °C.
¡ Do not use the charging cable if it
is damaged. Replace it with an ori-
ginal charging cable.
¡ When disconnecting the charging
cable from the mains, pull the plug
itself to remove it – do not pull on
the power cord.
¡ Do not pull the charging cable
over sharp edges or allow it to be-
come trapped.
¡ Do not use a damaged appliance.
¡ In the event of a fault, switch off
the appliance and disconnect it
from the charging cable and the
mains.
¡ For safety reasons, only authorised
after-sales service personnel are
permitted to carry out repairs and
fit replacement parts to the appli-
ance.
¡ In the following cases, you must
stop using the appliance immedi-
ately and contact the after-sales
service:
– If liquid has entered the inside of
the appliance.
– If the appliance has been
dropped and damaged.

Environmental protection and saving energy en
27
¡ Protect the appliance from outside
weather conditions, humidity and
sources of heat.
Environmental protection
and saving energy
Help protect the environment by us-
ing your appliance in a way that con-
serves resources and by disposing of
reusable materials properly.
Familiarising yourself with your appliance en
29
3
Charging socket ¡ →"Charging the appliance",
Page36
4
Power button ¡ →"Switching on the appli-
ance", Page34
¡ →"Switching off the appli-
ance", Page36
¡ →"Waking up the appliance
from standby mode",
Page34
5
Charging cable ¡ →"Charging the appliance",
Page36
6
Cover cap ¡ →"Calibrating the appli-
ance", Page36
7
Storage pouch ¡ →"Storing the appliance",
Page45
Status LED
The status LED will provide you with
information about the operating
status and charging status of your
appliance.
LED display Explanation
Bluetooth is in discov-
erable mode.
LED display Explanation
The appliance is
paired with the
WeChat app.
The battery is empty.
The battery is char-
ging.
The appliance is in
standby mode.
The battery is fully
charged.
Touch display
Here, you can find an overview of the various areas of the touch display. Use
the touch display to control your appliance and obtain information about its op-
erating status.
For operating, press the touch display or use a horizontal or vertical swipe ges-
ture.
en Familiarising yourself with your appliance
30
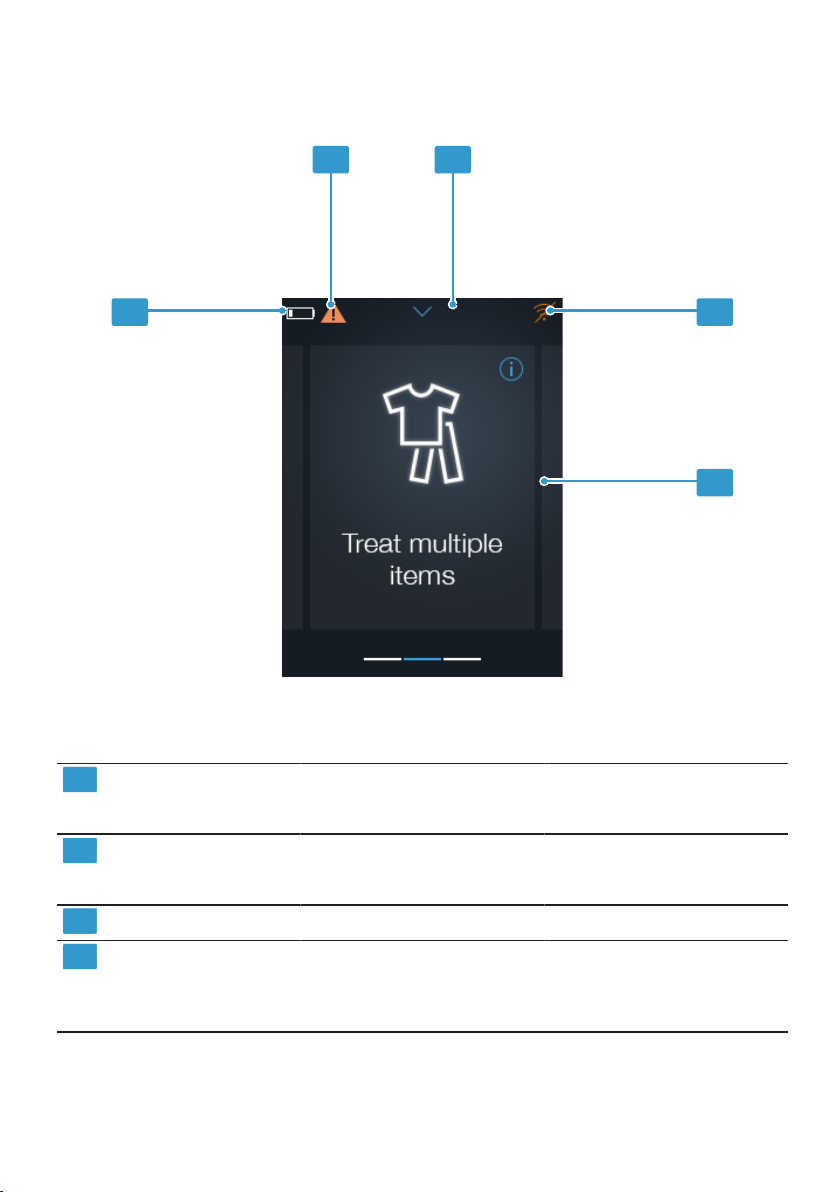
1
2 3
4
5
1
Battery charging status →"Status LED", Page29
→"Charging the appliance",
Page36
2
Note →"Calibrating the appliance",
Page36
→"Software update", Page37
3
Status bar
4
Status of the WiFi
1
network →"Adding a WiFi network",
Page39
→"Deleting a WiFi network",
Page40
1
Wi-Fi is a registered trademark of the Wi-Fi Alliance.

Familiarising yourself with your appliance en
31
5
Function
Menu item
Functions or menu items are
displayed in this area of the
touch display.
→"Functions", Page31
1
Wi-Fi is a registered trademark of the Wi-Fi Alliance.
Functions
Here, you can find an overview of the various functions of your appliance in the
main menu. The functions depend on the software version of your appliance.
Function Range of functions Use
¡ Scan and analyse fabrics.
→"Using Quick fabric analysis",
Page34
Analyses individual fabrics to
provide information about their
composition.
¡ Scan and analyse fabrics.
¡ Scan and analyse stains.
¡ Instructions for stain removal
→"Using Clean a stain",
Page35
Analyses a fabric with a stain to
provide information about stain
removal.
¡ Scan and analyse fabrics.
¡ Scan and analyse stains.
¡ Instructions for stain removal
¡ To add fabrics to a wash
load.
¡ To exclude items from a
wash load.
¡ Information on the recom-
mended washing program
→"Using Treat multiple items",
Page35
→"Sending a washing program
to the washing machine",
Page35
Scans several fabrics with and
without stains in order to create
a load. Provides the optimal
washing program recommenda-
tion for the entire load.
en Familiarising yourself with your appliance
32
Notification messages
Here, you can find an overview of the various notification messages on your ap-
pliance.
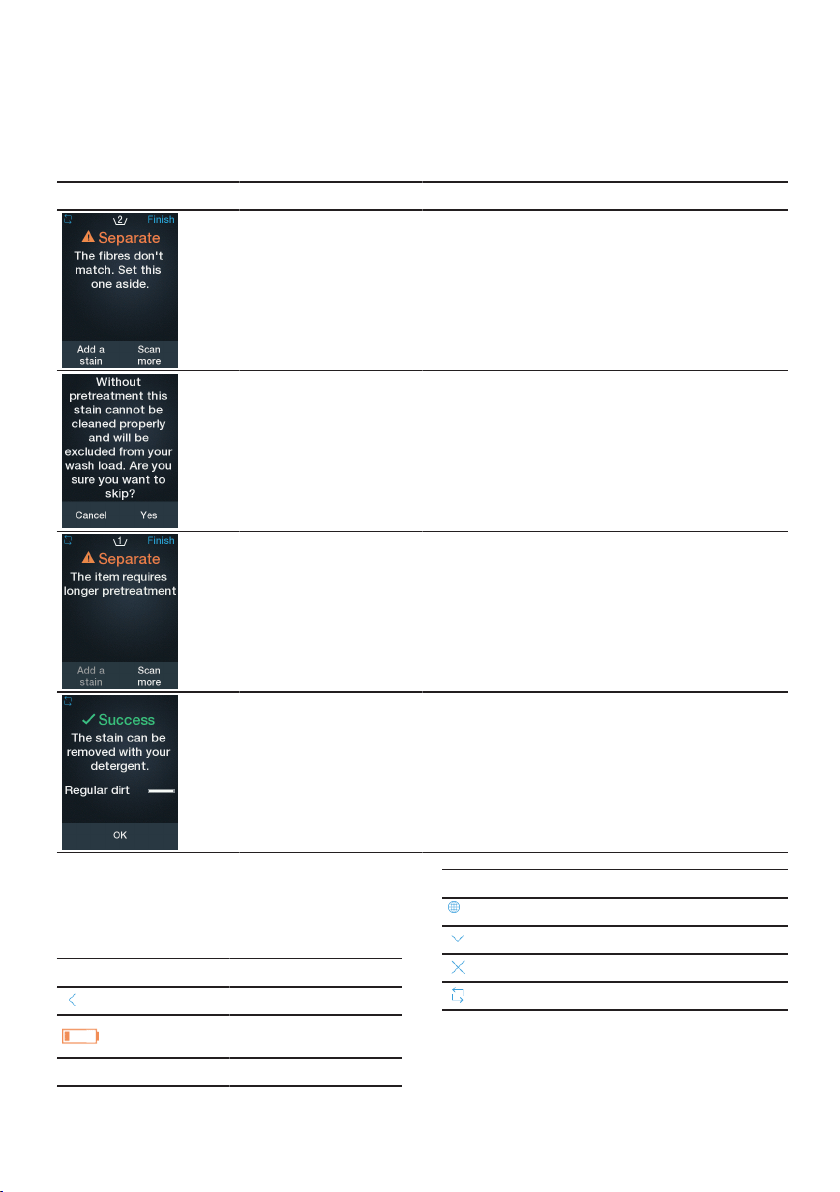
Notification message Function Explanation Recommendation
→"Using Treat mul-
tiple items", Page35
The washing recom-
mendation for the
scanned fabric does
not match the washing
recommendation for
the existing wash load.
In order to avoid dam-
aging the fabric and
produce optimum
washing results, do not
wash the item in the
current load.
→"Using Treat mul-
tiple items", Page35
The recommended
stain removal was
skipped.
To achieve optimum
washing results, re-
move the stain before
you place the fabric in
the wash load.
→"Using Treat mul-
tiple items", Page35
The required stain re-
moval is a time-con-
suming process.
Continue preparing
your wash load without
stained item.
→"Using Clean a
stain", Page35
→"Using Treat mul-
tiple items", Page35
→"Using Clean a
stain", Page35
The stain does not re-
quire any special pre-
treatment.
The item can be dir-
ectly washed in the
washing machine.
Symbols
Here you can find an overview of the
symbols on your appliance.
Symbol Explanation
Back
Battery empty
Battery charging
Symbol Explanation
Language
Display status bar
Close options
Repeat scan

Before using for the first time en
33
Symbol Explanation
Error message
An error has occurred
on the appliance.
→"Notification mes-
sages", Page32
→"Calibrating the ap-
pliance manually",
Page37
Before using for the
first time
Prepare the appliance for use.
Scope of delivery
After unpacking all parts, check for
any damage in transit and complete-
ness of the delivery.
If you have any complaints, contact
the dealer from whom you purchased
the appliance or our after-sales ser-
vice.
The following are included with the
appliance:
¡ X-Spect
¡ Cover cap
¡ Charging cable
¡ Storage pouch
¡ Quick start guide
¡ Warranty card
Unpacking and preparing the
appliance for use
Prepare the appliance for use.
CAUTION
!
Hazard due to incorrect use
▶
Only charge the appliance using
the charging cable included.
▶
Do not charge the appliance at
temperatures below 0 °C or above
40 °C.
1. Remove all the packaging material
and protective sleeves from the
appliance.
2. Check the appliance for visible
damage.
3.
If is blinking, charge the appli-
ance.
→"Charging the appliance",
Page36
4. Perform the initial setup
→Page33.
Performing the initial setup
When switching on for the first time
or after resetting to factory settings,
you must pair the appliance with the
companion app and your washing
machine.
Requirements
¡ You have access to a WiFi home
network (Wi-Fi
1
).
¡ You now have a HomeCon-
nectaccount.
¡ Your washing machine is connec-
ted to your HomeConnectaccount
connected.
▶
Note:You can find information
about the app on our HomeCon-
nect website: www.home-con-
nect.com.
Couple the appliance with the
HomeConnectaccount and your
washing machine.
→"Automatically pairing the appli-
ance", Page34
The companion app and the appli-
ance guide you through the indi-
vidual steps of the pairing.
1
Wi-Fi is a registered trademark of the Wi-Fi Alliance.

en Basic operation
34
Automatically pairing the appliance
1. Switch on the appliance
→Page34.
a The touch display shows the wel-
come screen. A QR code then ap-
pears.
2. Scan the QR code with the
WeChat app.
3. Follow the instructions in the com-
panion app.
a The appliance connects to the
companion app.
a The appliance connects to your
HomeConnect account. A confirm-
ation then appears.
4. Press Finish setup.
a The main menu appears.
a The appliance is now ready for
use.
Basic operation
You can find out everything you need
to know about operating your appli-
ance here.
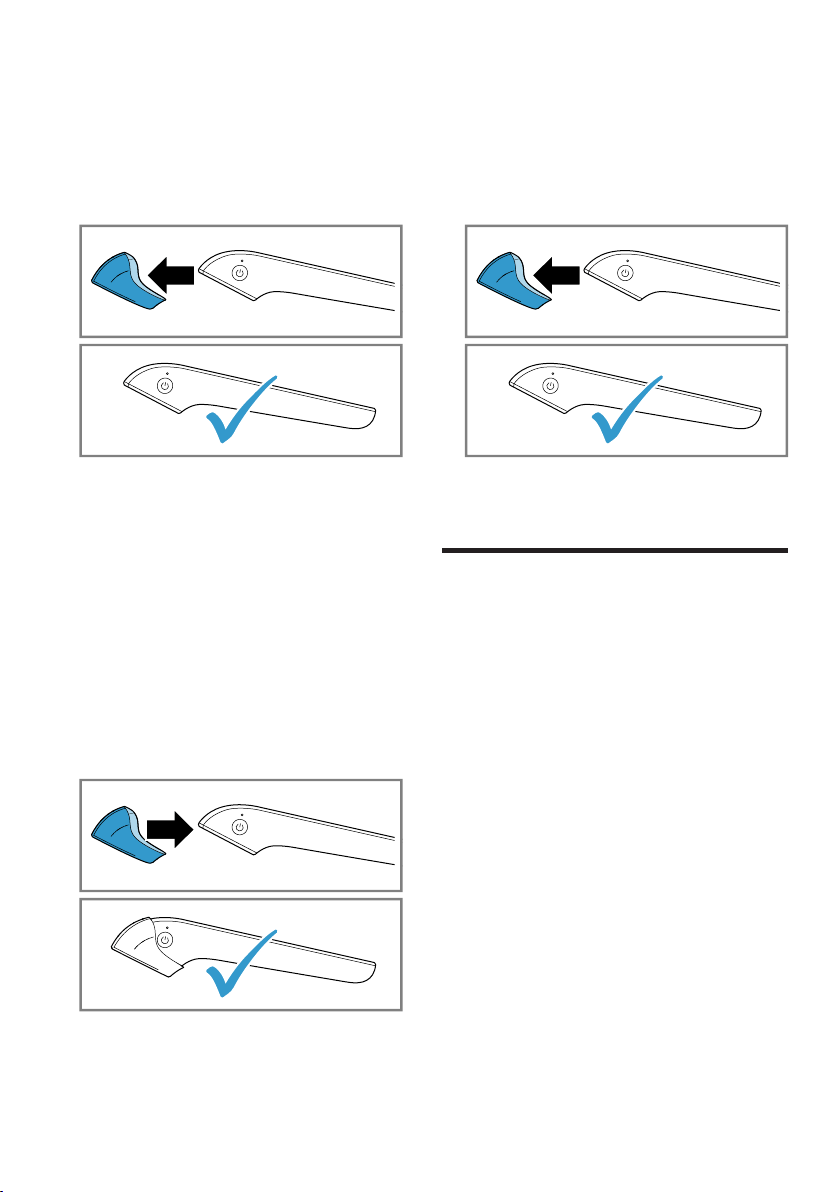
Switching on the appliance
▶
Press and hold the button for
3seconds.
a The touch display shows the wel-
come screen and then the main
menu.
Waking up the appliance from
standby mode
Requirement:The appliance is in
standby mode.
→"Status LED", Page29
▶
Press the button.
Using the appliance
1. Navigate to the main menu by
swiping and selecting a function.
– →"Using Quick fabric analysis",
Page34
– →"Using Clean a stain",
Page35
– →"Using Treat multiple items",
Page35
2. Scan a fabric or stain.
Note
To improve detection and
recommendation accuracy, note the
following:
¡ Only scan dry stains. If you scan
wet or damp fabrics or stains,
the lens will get dirty and you
needs to clean it with a piece of
cloth.
¡ Firmly press the appliance on
the garment or stain without
movement as long as the dis-
play shows “Scanning”.
¡ If the garment has a colorful pat-
tern, scan the darkest spot.
¡ If the garment consists of sev-
eral fabrics, scan at multiple
spots.
¡ Position your appliance lens on
the center of the stain to im-
prove detection accuracy.
a The appliance analyses the fabric
and/or the stain.
3. Check the results of the analysis.
4. Treat the stain as recommended or
send the recommended washing
program to the washing machine
→Page35.
Using Quick fabric analysis
1. In the main menu, select the Quick
fabric analysis function.
a The touch display shows "Hold the
scanner tight against the fabric
and scan."
2. Hold the sensor to the fabric.
3. Press Scan now.
a The appliance scans and analyses
the fabric.

Basic operation en
35
a The touch display shows the com-
position of the fabric.
4. To scan another item, touch Res-
can.
5. To close the quick fabric analysis,
touch Close.
a The main menu appears.
Using Clean a stain
1. In the main menu, select the Clean
a stain function.
a The touch display shows "Hold the
scanner tight against the stain and
scan."
2. Hold the sensor to the stain and
press Scan now.
a The appliance scans the stain.
Then the touch display shows
"Hold the scanner tight against the
fabric and scan."
3. Hold the sensor to the fabric and
press Scan now.
a The appliance scans the fabric and
analyzes the stain. The touch dis-
play then shows a confirmation
and the composition of the stain. If
no pretreatment is required, the
touch display shows "Regular dirt".
4. Touch Start treatment.
a The appliance runs through the
guide steps for stain removal.
5. Remove the stain by following the
guide step by step.
Using Treat multiple items
1. In the main menu, select the Treat
multiple items function.
a The touch display shows "Hold the
scanner tight against the fabric
and scan."
2. Hold the sensor to the fabric and
press Scan now.
To add a stain to the scanned fab-
ric, press Add stain. Then scan the
stain and follow the instructions for
stain removal or press Skip to skip
stain removal.
a The touch display shows "The item
was added to your wash load."
3. Press Scan more.
4. Repeat the process.
If the scanned fabric for the current
wash load is not suitable or stains
have to be removed, the touch dis-
play shows a notification message.
→"Notification messages",
Page32
5. Press Finish to confirm the wash
load.
a The appliance analyses the
scanned fabrics.
6. Select the type of fabric and press
Next.
If no type of fabric is to be selec-
ted, press Skip.
7. Press Send washing program to
the washing machine →Page35
or press Close to end the process.
a The main menu appears.
Sending a washing program
to the washing machine
Requirement:The appliance displays
the recommended washing program.
→"Using Treat multiple items",
Page35
1. Check the recommended washing
program.
Navigate through the display using
a vertical swipe gesture.
2. Press Send to washer.
a The washing program is sent to
the washing machine but not start-
ing manually. A sending confirma-
tion is then displayed.
3. Press Close.
a The main menu appears.
en Basic operation
36
4. To start the washing program,
press the start button on the wash-
ing machine.
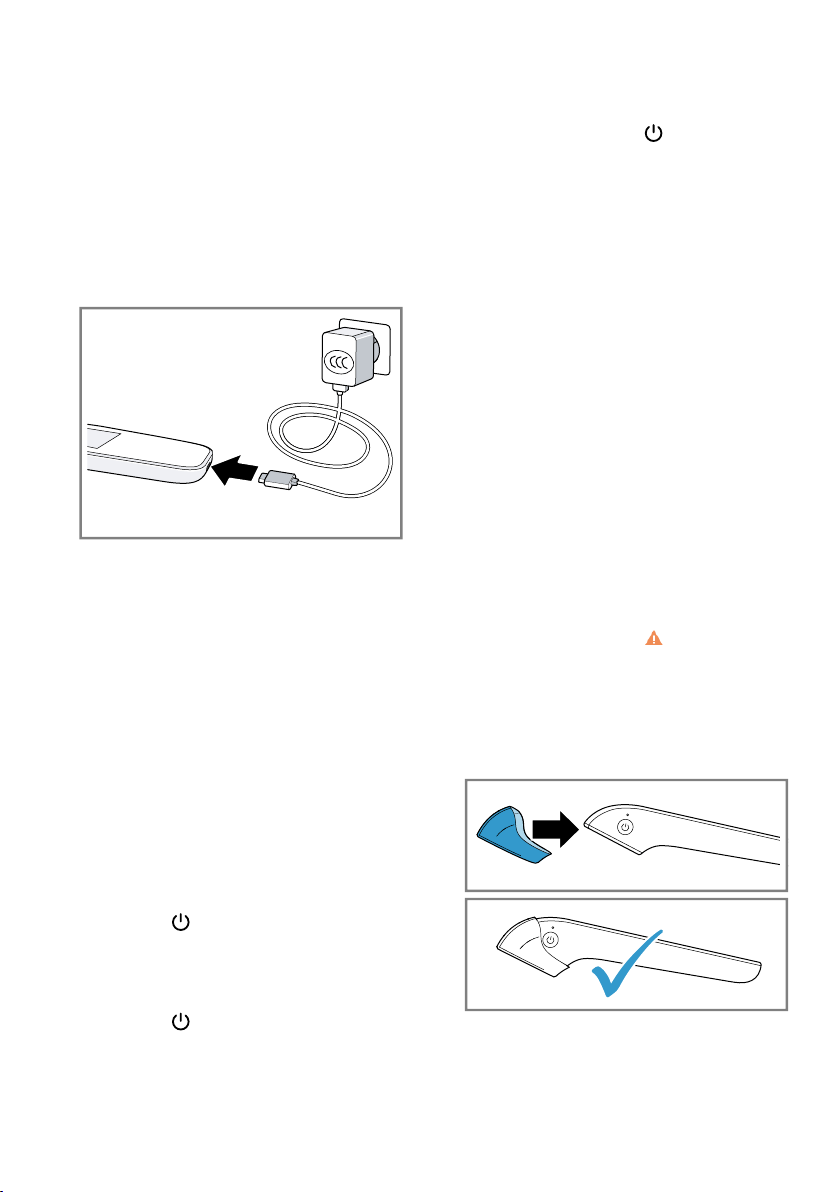
Charging the appliance
Use the supplied charging cable to
charge the appliance.
1. Connect the charging cable to a
USB port.
2. Connect the charging cable to the
appliance charging socket.
a The status LED lights up red.
a When it is switched off, the touch
display shows the battery charging
status. When it is switched on, it
shows the status bar.
a Once the battery is fully charged,
the status LED lights up green.
3. Disconnect the charging cable
from the appliance.
4. Disconnect the charging cable
from the USB port.
Returning the appliance to
standby mode
▶
Press the button.
a The status LED flashes green.
Restarting the appliance
▶
Press the button for 7 seconds.
a The appliance restarts.
Switching off the appliance
1.
Press and hold the button for
3seconds.
a The touch display shows "Do you
want to switch off the device?".
2. Touch Yes.
a The appliance switches off.
Calibrating the appliance
The appliance prompts you to calib-
rate at regular intervals.
You can calibrate the appliance im-
mediately or later.
Note:Calibrating the appliance later
will affect the detection accuracy.
→"Calibrating the appliance automat-
ically", Page36
→"Calibrating the appliance manu-
ally", Page37
Calibrating the appliance
automatically
Note:Press Skip to skip calibration.
The status bar shows .
Requirement:The touch display
shows "X-Spect sensor need calibra-
tion. Before starting, place the cover
cap on the appliance."
1. Place the cover cap on the sensor.
Software update en
37
2. Press Start.
a The calibration screen appears.
Then the touch display shows "Cal-
ibration complete. You can now re-
move the cover cap."
3. Remove the cover cap.
4. Press OK.
a The main menu appears.
a The appliance is now ready for
use.
Calibrating the appliance manually
1. Pull downwards to open the status
bar in the main menu.
2. Press in the status bar.
a The Settings menu opens. If calib-
ration was not skipped previously,
open the Calibration menu item in
the Settings manually.
3. Place the cover cap on the sensor.
4. Press Start calibration.
a The calibration screen appears.
Then the touch display shows "Cal-
ibration complete. You can remove
the cover cap."
5. Remove the cover cap.
6. Press OK.
a The main menu appears.
Software update
Software updates will further optimise
your appliance and add new func-
tions.
Installing the software update
automatically
On start up, the appliance searches
for new software updates.
Requirement:The touch display
shows "New software update is avail-
able. Do you want to update?"
▶
Press Update.
If the battery level is less than
75%, the touch display shows
"Connect your device to the char-
ger." Connect the charger.
→"Charging the appliance",
Page36
a The software update will be in-
stalled and the appliance restarts.
en Basic settings
38
Basic settings
You can configure the appliance to meet your needs.
Overview of the basic settings
Here you can find an overview of the basic settings and factory settings. The
basic settings depend on the features of your appliance.
Basic setting Options Description
WiFi Add WiFi network
Delete WiFi network
Adds a new WiFi network.
→"Adding a WiFi network",
Page39
Deletes a saved WiFi network.
→"Deleting a WiFi network",
Page40
Add washer No options available. To connect a new washing ma-
chine to the appliance by scan-
ning a QR code with WeChat
app. The washing machine
must already be paired with the
Home Connect app.
Calibration No options available. Calibrating the appliance manu-
ally →Page37.
Language See options on the appliance. Setting the language.
Standby ¡ 30seconds
¡ 1 minute
¡ 2 minutes
¡ 3 minutes
¡ 5 minutes
Time until the appliance
switches to standby mode.
→"Setting the standby time",
Page39
Auto switch off ¡ 5 minutes
¡ 10 minutes
¡ 15 minutes
¡ 20 minutes
¡ 30 minutes
Time until the appliance
switches off automatically.
→"Setting Auto switch off",
Page39
View T&C No options available. To view the terms and condi-
tions of the appliance by scan-
ning a QR code.

Basic settings en
39
Basic setting Options Description
Reset No options available. Restores changed settings to
the factory settings.
→"Resetting appliance",
Page39
The settings for initial use must
be configured.
→"Performing the initial setup",
Page33
Device info No options available. Displays the appliance informa-
tion.
Changing the basic settings
1. Pull downwards in the main menu
to open the status bar.
a The status bar shows Settings.
2. Pull down Settings in the status
bar.
a The Settings menu opens.
3. Press the required menu item and
change the setting.
Navigate through the menu using
vertical swipe gestures.
4. Press to exit the menu item.
5. Press to close the Settings.
Setting the standby time
You can define the time period after
which the appliance switches to
standby mode.
1. Open Settings.
2. Press Standby.
3. Press the time period you require.
a The new time has been saved.
4.
Press to exit the menu item.
5.
Press to close the Settings.
Setting Auto switch off
You can define the period of time
after which the appliance automatic-
ally switches itself off.
1. Open Settings.
2. Press Auto switch off.
3. Press the time period you require.
a The new time has been saved.
4.
Press to exit the menu item.
5.
Press to close the Settings.
Resetting appliance
You can reset your appliance to the
factory settings.
1. Open Settings.
2. Press Reset.
a The touch display shows "Reset
will restore the factory settings. All
configurations will be lost."
3. Press Reset.
a The touch display shows "Are you
sure you want to reset the
device?".
4. Press Yes.
a The appliance restarts.
5. Perform the initial configuration
→Page33.
Adding a WiFi network
You can store up to 10 WiFi net-
works on your appliance.
1. Open Settings.
2. Press WiFi .
3. Press Add WiFi.
a The touch display shows a QR
code.
4. Scan the QR code with the
WeChat app.

en Cleaning and servicing
40
5. Follow the instructions in the com-
panion app on your mobile appli-
ance.
Deleting a WiFi network
1. Open Settings.
2. Press WiFi .
3. Press the recycle bin symbol next
to the WiFi network.
a The touch display shows "Are you
sure you want to delete ["WiFi
name"] WiFi connection?".
4. Press Yes.
a The WiFi network has been de-
leted.
Cleaning and servicing
To keep your appliance working effi-
ciently for a long time, it is important
to clean and maintain it carefully.
Cleaning the appliance
Clean the appliance as specified.
This will ensure that the different
parts and surfaces of the appliance
are not damaged by incorrect clean-
ing or unsuitable cleaning products.
▶
Follow the cleaning instructions.
Part Cleaning instruc-
tions
Appliance lens Clean with a moist
soft towel (mi-
crofiber)
Calibration cap Blow dust away from
the calibration ma-
terial.
Troubleshooting en
41
Troubleshooting
You can rectify minor faults on your appliance yourself. Read the troubleshoot-
ing information before contacting Customer Service. This will avoid unneces-
sary costs.
WARNING
Risk of injury!
Improper repairs are dangerous.
▶
Repairs to the appliance should only be carried out by trained specialist
staff.
▶
If the appliance is defective, call Customer Service.
Malfunctions
Errors Cause Troubleshooting
Something went wrong,
please check your WiFi con-
nection.
No active WiFi connection is
configured on your device.
▶
Check your router availability.
▶
Configure a new WiFi network on
your device.
→"Adding a WiFi network",
Page39
Our cloud cannot be
reached, please check your
internet connection or try
again later.
The active WiFi network
does not have a working in-
ternet connection.
▶
Check your router availability.
The X-Spect cloud is unavail-
able due to some mainten-
ance downtime.
▶
Try again later.
Something went wrong on
our cloud, please try again
later.
The X-Spect cloud is unavail-
able due to some mainten-
ance downtime.
▶
Try again later.
Calibration is required.
Please attach the cap and
press start.
To improve detection and re-
commendation accuracy,
the device should be calib-
rated from time to time.
▶
→"Calibrating the appliance auto-
matically", Page36
Something went wrong,
please make sure the calib-
ration cap is attached.
The device could not detect
a calibration cap attached to
its sensors while calibrating.
▶
Attach the calibration cap to the
device.
Note:Do not remove the calibra-
tion cap as long as the display
shows “Calibrating”.
Calibration has failed. Please
try again later.
The device calibration data
was not saved on the X-
Spect cloud.
▶
Try again later.

en Troubleshooting
42
Errors Cause Troubleshooting
Sending program has failed.
Please make sure your appli-
ance is connected to the in-
ternet.
The appliance is not connec-
ted to the internet.
▶
Check the internet connection of
your appliance.
For details, refer to the user manual
of your appliance. If problem per-
sists, please contact customer ser-
vice.
Sending program has failed.
Please do not manually con-
trol your Home Appliance.
X-Spect device is sending
the program to the appli-
ance.
▶
Do not manually control your appli-
ance by hand until the X-Spect
device has transmitted the program
to the appliance successfully.
Sending program has failed.
Another program is currently
in progress.
A program is running on
your appliance.
▶
Stop the running program on the
appliance.
▶
Wait until the program is finished
and try again.
Device registration has
failed, please reboot the
device to repeat setup.
Something went wrong dur-
ing the device setup pro-
cess.
1. →"Restarting the appliance",
Page36
2. →"Performing the initial setup",
Page33
3. If problem persists, contact the cus-
tomer service →Page46.
This device is not registered,
please contact customer
service.
Something went wrong dur-
ing the device setup pro-
cess.
▶
Contact the customer service
→Page46.
The server cannot verify
your device identity. Please
set up your device again.
The device permissions
were revoke. The server can
not identify your device.
1. Reset the device. →Page39
2. Set up the device. →Page33
New terms & conditions are
available. Please accept
them in the Home Connect
app and try again.
New Terms and Conditions
must be accepted.
▶
Accept the new Terms and Condi-
tions in your Home Connect app.
You reached your quota
limit, please try again later.
Your device has sent too
many requests to our cloud
in one day. To improve the
cloud performance, your
device is temporarily dis-
abled for 24 hours.
▶
Try again later.
Low charging current detec-
ted, please replace your ad-
apter.
The device detected a slow
charging rate, for example, if
the adapter is faulty or the
cable is not working.
1. Try a different CCC safety-certified
adapter or cable.
2. If problem persists, contact the cus-
tomer service →Page46.
Troubleshooting en
43
Errors Cause Troubleshooting
Charger not found. If prob-
lem persists, please contact
customer service.
The device could not detect
a charger to recharge the
battery. This can happen if
the adapter is faulty or the
cable is not working.
1. Try a different CCC safety-certified
adapter or cable.
2. If problem persists, contact the cus-
tomer service →Page46.
Sensor not found. If problem
persists, please contact cus-
tomer service.
The device could not detect
its sensors.
1. Restart the device. →Page36
2. If problem persists after restarting
the device, contact the customer
service →Page46.
Temperature sensor not
found. If problem persists,
please contact customer
service.
The device could not detect
its sensors.
1. Restart the device. →Page36
2. If problem persists after restarting
the device, contact the customer
service →Page46.
Haptic sensor not found. If
problem persists, please
contact customer service.
The device could not detect
its sensors.
1. Restart the device. →Page36
2. If problem persists after restarting
the device, contact the customer
service →Page46.
Gauge sensor not found. If
problem persists, please
contact customer service.
The device could not detect
its sensors.
1. Restart the device. →Page36
2. If problem persists after restarting
the device, contact the customer
service →Page46.
Touch panel not found. If
problem persists, please
contact customer service.
The device could not detect
its display.
1. Restart the device. →Page36
2. If problem persists after restarting
the device, contact the customer
service →Page46.
WiFi/BT not found. If prob-
lem persists, please contact
customer service.
The device could not detect
its WiFi adapter.
1. Restart the device. →Page36
2. If problem persists after restarting
the device, contact the customer
service →Page46.
Temperature problem
Errors Cause Troubleshooting
High temperature detected.
If problem persists, please
contact customer service.
The device detected a high
temperature during its oper-
ation. To avoid battery acci-
dents, the device will auto-
matically shutdown.
1. To prevent damage, don't expose
your battery to high temperatures
of 60 °C or above.
2. If problem persists in normal work-
ing environments, contact the cus-
tomer service →Page46.

en Troubleshooting
44
Errors Cause Troubleshooting
Charging is disabled be-
cause of low device temper-
ature. If problem persists,
please contact customer
service.
The device detected a low
temperature during its oper-
ation. To improve battery
lifetime, the device will auto-
matically stop charging.
1. To improve charging efficiency,
don't expose your battery to low
temperatures.
2. If problem persists in normal work-
ing environments, contact the cus-
tomer service →Page46.
Problem with results
Errors Cause Troubleshooting
Something went wrong,
please make sure you scan
a textile.
The device could not detect
a garment touching its
sensors while scanning.
▶
Firmly press the device on the gar-
ment without movement as long as
the display shows “Scanning”.
Something went wrong,
please make sure you scan
a stain.
The device could not detect
a stain touching its sensors
while scanning.
▶
Firmly press the device on the stain
without movement as long as the
display shows “Scanning”.
This textile fibers don’t fit
into your basket. Please set
this item aside.
The device detected textile
fibers that cannot be
washed with previously ad-
ded fibers in your basket, for
example, if you try to wash
Cotton and Silk together.
1. To avoid textile damage, set the
item aside and do not put it with
this basket in your washing ma-
chine.
2. Wash the item separately with other
similar items.
Transportation, storage and disposal en
45
Transportation, storage
and disposal
You can find out here how to prepare
your appliance for transportation and
storage. You will also find out how to
dispose of old appliances.
Storing the appliance
Store your appliance properly so that
there is no risk of damage to the ap-
pliance.
Note:Store the appliance in a dry
place and protect it from high tem-
peratures and external influences.
Always keep your appliance in the
supplied storage pouch when it is not
being used.
1. Switch off the appliance.
→Page36
2. Place the appliance in the storage
pouch.
Transporting the appliance
The lithium-ion batteries in the device
are subject to the requirements of
dangerous goods legislation. The
batteries can be transported by the
user by road without any further re-
quirements.
In the event that they are shipped by
a third party (e.g. transported by air
or freight carrier), special require-
ments regarding packaging and iden-
tification must be met. In this case, a
dangerous goods expert must be
consulted when preparing the goods
for dispatch.
Disposal
If they are disposed of in an environ-
mentally responsible manner, valu-
able materials can be reused.
The device, battery, accessories and
packaging should be recycled in an
environmentally responsible manner.
Do not dispose of the
device and the battery
in the household rub-
bish.
Integrated batteries may only be re-
moved by specialist personnel for the
purpose of disposal.
Old Appliance
This appliance contains rechargeable
lithium-ion batteries. The appliance
must therefore only be disposed of
by an authorised after-sales service
or dealer.
Data protection
Please see the information on data
protection.
The first time your appliance is
registered on a home network
connected to the Internet, your
appliance will transmit the following
types of data to the Home Connect
server (initial registration):
¡ Unique appliance identification
(consisting of appliance codes as
well as the MAC address of the Wi-
Fi communication module in-
stalled).
¡ Security certificate of the Wi-Fi
communication module (to ensure
secure data connection).
¡ The current software and hardware
version of your appliance.
¡ Status of any previous reset to
factory settings.

en After-sales service
46
This initial registration prepares the
Home Connect functions for use and
is only required when you want to
use the Home Connect functions for
the first time.
Note:Please note that the Home
Connect functions can only be util-
ised with the Home Connect app. In-
formation on data protection can be
called up in the Home Connect app.
After-sales service
If you have any queries or are unable
to rectify errors on the device your-
self, contact our after-sales service.
We will always find the right solution
in order to avoid any unnecessary
visits by our customer service techni-
cian.
When contacting the after-sales ser-
vice, you will need the model number
(E-Nr.) of your device.
You can contact the after-sales ser-
vice using the following telephone
number:
CN 400 885 5888
Model number
The model number (E-Nr.) can be
found on the rating plate and in your
device settings.
The rating plate is situated on the un-
derside of the packaging.
You will also find the E-Nr. under the
Device info menu item in the Set-
tings.
→"Overview of the basic settings",
Page38
Making a note of your device details
and the after-sales telephone number
will enable you to find them again
quickly.
Information regarding Free
and Open Source Software
This product includes software com-
ponents that are licensed by the
copyright holders as free software or
open source software.
You can access the license informa-
tion via your WeChat MiniApp or via
the device: "Settings > Device info >
QRCode on the third page". You can
also send a request to oss-
[email protected] or to BSH Haus-
geräte GmbH GmbH, Carl-Wery-
Str.34, D-81739 München, Germany.
The source code will be made avail-
able to you on request.
To file a request, please email to
or send a written request to
BSH Hausgeräte GmbH GmbH
Carl-Wery-Str.34
D-81739 München
Reference „OSSREQUEST“
The cost of performing your request
will be charged to you. This offer is
valid three years from the date of pur-
chase or at least as long as we offer
support and spare parts for the
product.
Technical specifications
Facts and figures for your appliance
can be found here.
Model XA1504A5HW
Battery capacity Built-in 1000 mAh
lithium-ion re-
chargeable battery
System power
(normal status)
3.7V / 250mA

Technical specifications en
47
Display 2.0-inch 240x320
LED backlight dual-
touch display with IPS
technology and full
RGB
Processor 1.0 GHz processor
Memory 2 Gb NAND Flash
WiFi 802.11a/b/g/n/ac
2.4 Ghz, 5.0 Ghz not
supported
Bluetooth 4.1
Length 16.30cm
Width 5.09cm
Height min. / max. 3.10cm / 6.14cm
Weight 221g
Operating temperat-
ure
5°C ~ 50°C
Storage temperature -20°C ~ 30°C
Relative humidity 45% ~ 85%
Regulatory and Certi-
fications
¡ SRRC
¡ BQB
¡ RoHS
¡ UN38.3
¡ GB 31241-2014
¡ GB4943.1
¡ GB9254, CISPR
32, CISPR 35
¡ GB/T
17618-2015

感谢您购买博世家电!
立即在MyBosch上为您的电器注册,便可直接获得如下福利:
• 专家级电器使用提示与技巧
• 保修延长选项
• 附件和备件折扣
• 易于获得数字手册和所有电器数据
• 便于享受博世家电服务
注册免费而简单 – 同样针对移动电话:
www.bosch-home.com/welcome
需要帮助吗?
可以从此处获取。
针对博世家电的专家级建议,
需要博世专家帮助解决问题或维修。
了解博世支持您的各种方式:
www.bosch-home.com/service
*8001149383*
8001149383 (990819)
zh, en