INSTRUCTION MANUAL
Please read this manual carefully before using, and keep it for future reference.
9KG/6KG
FRONT LOAD
WASHER/DRYER COMBO
SC-9060AU9FLC


General Safety 4
Product Overview 9
Getting Started 12
Levelling the appliance 13
Connecting the water inlet hose 14
Connecting the Drain Hose 15
Instructions 17
Operations 21
Cleaning and Maintenance 22
FAQs 25
Specifications 26
Customer Helpline 28
CONTENTS
4
Read this manual thoroughly before you start using the Front Load Washing
Machine. The safety precautions instructions reduces the risk of fire, electric
shock and injury when correctly complied to. Please follow all instructions and
take notice of all warnings.
ELECTRICAL SAFETY
• Voltage: Plug the appliance to a 220-240V, 50Hz, properly earthed power
outlet, it must be in good working order.
• Power connection: Do not use an adaptor or an extension cord.
Plug the power plug directly into a separate power point that cannot be accidentally
turned o, and that is easily accessible so you can switch it o if needed.
• Power cord: Do not kink or damage the power supply cord. Make sure it is behind
the appliance so no one can step on or place anything on the power supply cord or
against it. A damaged power plug may overheat and cause a fire.
• Damaged cord: Do not use a cord that shows cracks or damage. Any damage
to the cord may cause a short circuit, fire and/or electric shock.
Contact our support centre on 1300 296 699 for advice
• Disconnection: Never pull the power cord to unplug appliance.
Grip the plug and pull straight out from the power point.
• Electrical work: If the installation of this appliance requires any electrical work,
make sure it is carried out by an electrician.
If the supply cord is damaged, it must be replaced by the manufacturer, its service agent
or similarly qualified persons in order to avoid a hazard.
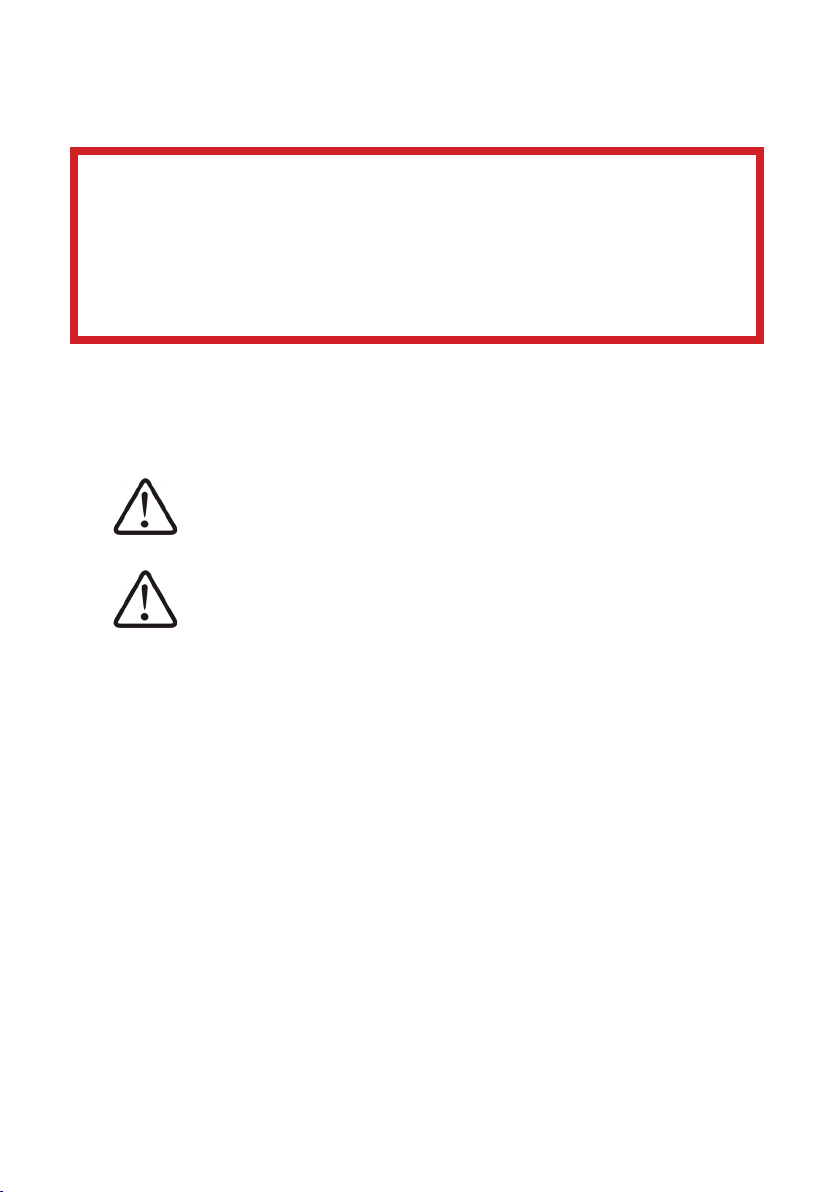
Pay close attention to messages that follow this safety alert symbol or the words DANGER,
WARNING or CAUTION. These words will be used to alert you of potential hazards that and
injure you and others. Following these instruction will tell you how to reduce the chance of
injury and the possible dangers if
instructions aren’t followed.
This symbol indicates when there is a serious risk of
injury if you do not pay attention to the warnings.
WARNING
CAUTION
This symbol indicates when to be careful to
avoid a serious risk of injury to oneself or
damage to property.
IMPORTANT INFORMATION
GENERAL SAFETY

5
To reduce risk of fire, electric shock or injury, always follow these basic precautions and
accident prevention measures when using this appliance, including the below:
NOTE: This appliance should be installed by an authorised technician else warranty
will be void.
INSTALLATION
• The product is heavy, be careful when moving it. To avoid back or other
injury, have 2 people lift or mechanical aid when installing.
• When unboxing, thoroughly inspect the appliance carefully for any
damage. If there is any damage, do not install the appliance. Contact our
support centre on 1300 296 699 for advice.
• While installing the appliance make sure that the power cord is not bent
or flattened.
• Make sure to remove all packaging materials such as foams and tapes
before installing the appliance.
• Make sure if the machine is to be placed on carpet that the ventilation openings
in the base are not obstructed
• Install the washing machine on a flat level and stable ground.
• If not wall mounted, be sure that the appliance is not placed on any soft
materials such as plastics or foams.
• Do not install appliance in a tight fitted cabinet.
• Do not install appliance near other heat sources such as radiators, heaters or
direct sunlight.
• Install appliance on a flat level and stable ground.
WARNING
• Make sure that transport packaging is removed from the rear of the dryer. Do not
overload the washer/dryer with too many clothes.
• Exhaust air must not be discharged into a flue which is used for exhausting
fumes from appliances burning gas or other fuels.
• Appliance must not be installed behind a lockable door, a sliding door or a door
with a hinge on the opposite side to that of the tumble dryer, in such a way that
a full opening of the tumble dryer door is restricted.
GENERAL SAFETY INSTRUCTIONS (Cont.)

6
GENERAL SAFETY INSTRUCTIONS (Cont.)
USAGE CONDITIONS AND RESTRICTIONS
• Supervision over children is to ensure that they do not play with the
appliance. Never allow them to use, play with or crawl inside the appliance.
Cleaning and maintenance must not be done by children.
• This appliance is not to be used by persons (including children) with reduced
physical, sensory or mental capabilities, or lack of experience and knowledge,
unless they are being supervised or been given instructions on how to use of the
appliance in a safe way and understand the hazards with using this
appliance incorrectly.
• Only for indoor domestic use only. It is not to be used for industrial or
commercial use.
• Do not use this product for anything other than its intended purpose, and only
use it as described in this manual. Do not attempt to alter or modify
this appliance.
• In the process of a hot wash, the door window can become hot. Make sure not to
touch it or that no children or pets come into contact with the door window.
• Ensure that emptying all pockets of every item to make sure that there is no
hard, sharp objects such as coins, safety pins, bra wires, nails or screws can cause
damage to the appliance and has a chance to block the pump.
• Damage or malfunction caused from foreign objects is not covered by your
warranty to the appliance.
• Do not operate this appliance outdoors.
• Incorrect use can result in property damage, injury or death. We assume no
liability for misuse of the appliance or noncompliance with these instructions.
• Maximum load of dry clothes is 6.0kg for Drying / 9.0kg for Washing.
• Do not block any ventilation openings. Ensure that vents are not covered
by anything.
• Do not use this product for anything other than its intended purpose, and only
use it as described in this manual. Do not attempt to alter or modify
this appliance.
• Only load items that are suitable for the clothes dryer.
• Do not place any open source flames on the dryer such as candles, etc..
• The door/window will be hot after a long cycle, be sure not to touch the window
and to keep children away from the appliance.
• WARNING: Never stop a tumble dryer before the end of the cycle unless all
items are quickly removed and spread out so that the heat is dissipated.

7
GENERAL SAFETY INSTRUCTIONS (Cont.)
CLEANING AND MAINTENANCE
• Before cleaning or maintenance, always unplug the appliance from the power socket.
Make sure you pull by the plug, not the cord as this can damage the power cord and
cause a hazard.
• Only the filter requires regular cleaning, everything else is non user-serviceable
parts. Do not try to repair, disassemble or modify the appliance.
• Check and clean the lint filter on a regular basis. Wipe the glass and seal after
each wash to remove lint and stains. If lint builds up it can cause leaks.
Remove any coins, buttons and other objects from the seal after each wash.
• Service: Never try to repair, modify or replace any part of the appliance, unless
this manual says you can do so. All other servicing is to be done by a qualified
technician, or contact our support centre on 1300 296 699 for advice.
• The only part that can be changed is the filter, other than this nothing else in the
dryer contains user serviceable parts. Do not open, disasseble or try to repair the
appliance yourself. Only have this appliance serviced by a qualified technician.
• Incorrect use can result in property damage, injury or death. We assume no
liability for misuse of the appliance or noncompliance with these instructions.
CAUTION
ITEMS BELOW ARE NOT SUITABLE FOR DRYING. IT CAN CAUSE FIRE IN
THE APPLIANCE OR EXTENSIVE DAMAGE. DO NOT PLACE FOLLOWING
IN THE APPLIANCE
• Items containing rubber or foam like rubber or any other similar
textured materials.
• Items that are spotted or soaked with cooking oil or any other flammable items.
These other items include kerosene, stain removers, dry-cleaning solvents,
alcohol, petrol, turpentine, waxes, hair care products, wax removers.
• Washing the items vigoursly beforehand in hot water with extra detergent will
reduce, but not completely eliminate the hazard.
• Undergarments that contain metal reinforcements (such as underwire bras).
Plastic articles such shower caps and waterproof bibs.
• Rubber-backed articles, clothes with foam rubber pads, pillows, galoshes and
rubber coated tennis shoes.
• Fabric softeners or similar products unless recommended by product
manufacturer for use in a clothes dryer.

8
This symbol alerts you to take care as oil-aected items can
ignite, especially when exposed to heat, such as in a clothes
dryer. The items become warm, causing an oxidation reaction
in the oil. Oxidation causes heat. If the heat cannot escape, the
items can become hot enough to catch fire. Piling,
stacking or storing oil-aected items can prevent heat
from escaping and so it will create a fire hazard.
GENERAL SAFETY INSTRUCTIONS (Cont.)
CAUTION
• Do not use the tumble dryer if industrial chemicals have been used for cleaning.
• Do not dry unwashed items in the dryer.
• Do not allow lint to accumulate around the tumble dryer. Clean the Lint Trap and
filter after every use.
• Enough ventilation has to be provided to avoid the backflow of gases into the room
from appliances burning other fuels including open fires.
• Remove all objects from pockets such as lighters and matches.
• If it is unavoidable that fabrics that contain vegetable or cooking oil or have been
contaminated by hair care products be placed in a tumble dryer they should first be
washed in hot water with extra detergent - this will reduce, but not eliminate,
the hazard.

9
GENERAL SAFETY INSTRUCTIONS (Cont.)
Items that have been soiled with substances such as cooking oil, acetone, alcohol,
petrol, kerosene, spot removers, turpentine, waxes and wax removers should be washed
in hot water with an extra amount of detergent before being dried in the tumble dryer.
• Items such as foam rubber (latex foam), shower caps, waterproof textiles, rubber
backed articles and clothes or pillows fitted with foam rubber pads should not be dried
in the tumble dryer.
• Fabric softeners, or similar products, should be used as specified by the fabric
softener instructions.
• The final part of a tumble dryer cycle occurs without heat (cool down cycle) to ensure
that the items are left at a temperature that ensures that the items will not be damaged.
• Remove all objects from pockets such as lighters and matches.
• Oil-aected items can ignite spontaneously, especially when exposed to heat sources
such as in a tumble dryer. The items become warm, causing an oxidation reaction in
the oil. Oxidation creates heat. If the heat cannot escape, the items can become hot
enough to catch fire. Piling, stacking or storing oil-aected items can prevent heat from
escaping and so create a fire hazard.
• If it is unavoidable that fabrics that contain vegetable or cooking oil or have
been contaminated by hair care products be placed in a tumble dryer they should first
be washed in hot water with extra detergent - this will reduce, but not eliminate, the
hazard.
WARNING: Never stop a tumble dryer before the end of the drying cycle unless all
items are quickly removed and spread out so that the heat is dissipated.
10
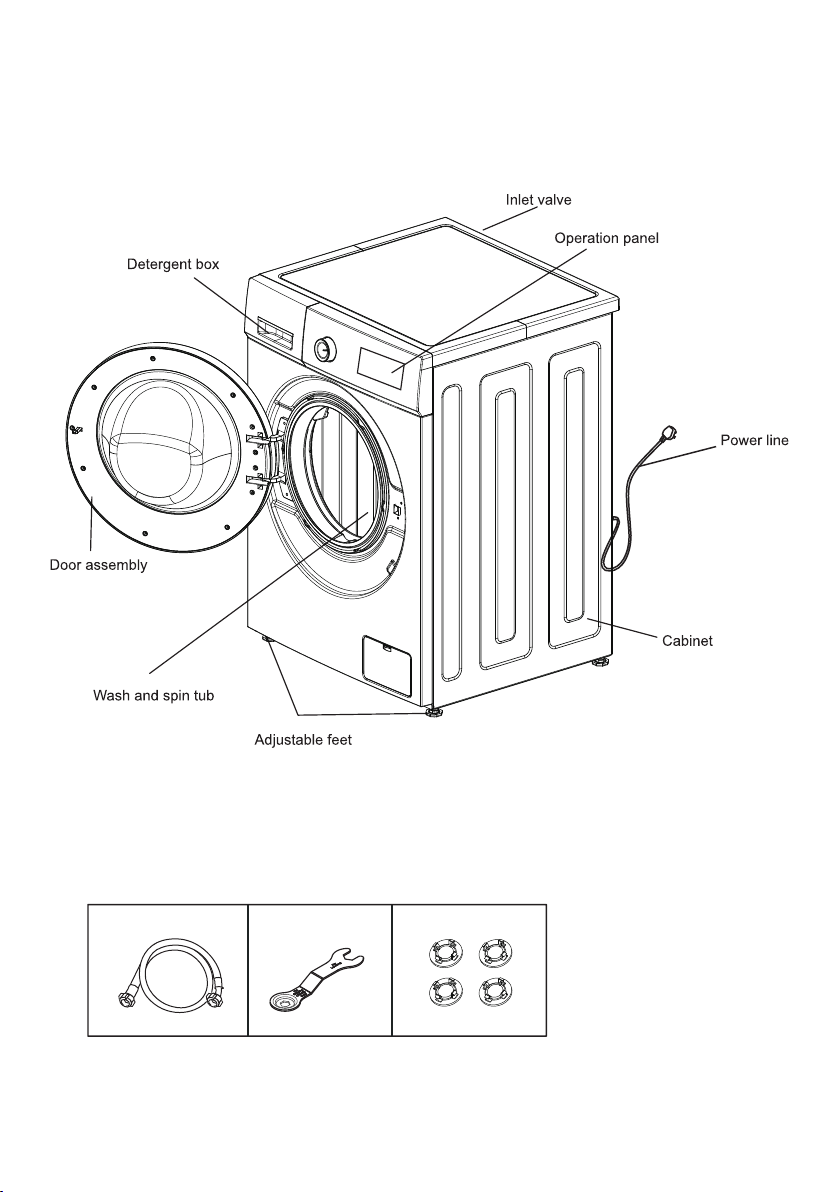
PRODUCT OVERVIEW
Accessories
Transport Hole
Plug
Supply Hose
Cold Water
Wrench

11
PRODUCT OVERVIEW (Cont.)
CONTROL PANEL
1. On/Off button: Product is switched on or off
2. Dry button: Press the button to change from “Intelligent Drting”, “Timing 120 minutes”,
“Timing 60 minutes”. “Timing 30 minutes” and “Cancel”.
3. Temp. Button: Select water temperature according to the variety and contarmination
degree. Different procedure water temperature rage, some no choice.
4. Speed button: Select the speed according to the capacity and variety of cloths.
Different procedure, different speed select range, but the speed of drum clearance no
choice.
5. Start/Pause button: Press it to start or pause.
6. Child-Lock Button: Press Temp. + Speed for more than 3 seconds to ON/OFF Child-
Lock function. Press it to guard against child operating. Child-Lock operating, other
buttons unavaiable except ON/OFF.
7. Pre Delay Button: Press Dry + Temp. For more than 3 seconds to start the pre delay
function. When the pre delay time is displayed, press Dry + Temp. button for 3 seconds
to adjust the pre delay time. Delay time refers to the period from appoint to end.
8. Display screen: To display the remaining time or pre delay time. Remaining time
gradually reduce in accordance with the washing. During the process of washing, if
there is a abnormal phenomenon, the screen will display the error code accordingly. If
the remaining time is different with the real time, the program will adjust according to
the real situation. It is not an error.
9. Program button: Select program according to variety and contamination of cloths. The
programs can be selected according to requirements.
• Dry - Low-temp.Drying - Air Wash - Duvet - Down Jacket - Eliminate Mite - Cotton -
Quick 15’ - Wool - Rinse+Spin - Spin - Tub Clean.
3
6

12
OPERATIONS
Drying hints
• Clothes could be dried after spinning
• To ensure quality dry the textiles,please classify them according to their kinds and the
drying temperature.
• Synthetic should be set the proper drying time .
• If you want to iron the clothes after drying,please put them for a while.
Clothes not suitable for drying
• Particularly delicate items such as synthetic curtains,woolen and silk, clothes with metal
inserts, nylon stockings, bulky clothes,s uch as anoraks, bed covers, quilts, sleeping
bags and duvets must not be dried.
• Clothes padded with foam-rubber or materials similar to foam-rubber must not be
machine dried.
• Fabrics containing residues of setting lotions or hair sprays, nail solvents or similar
solutions must not be machine dried in order to avoid the formation of harmful vapors
13
Before installing your appliance, read all safety instructions in this manual,
especially the sections on electrical safety and installation.
GETTING STARTED
UNPACKING
• When unpacking the appliance, be sure to keep all the packaging materials until
you have made sure your new appliance is undamaged and in good working
order. Plastic can be a suffocation hazard for babies and young children,
make sure the materials are out of their reach.
TRANSPORTATION
• CAUTION: VERY HEAVY! Be sure to team lift the appliance with someone or
mechanical aid is required when moving the appliance. Keep the appliance
upright as possible when moving the appliance.
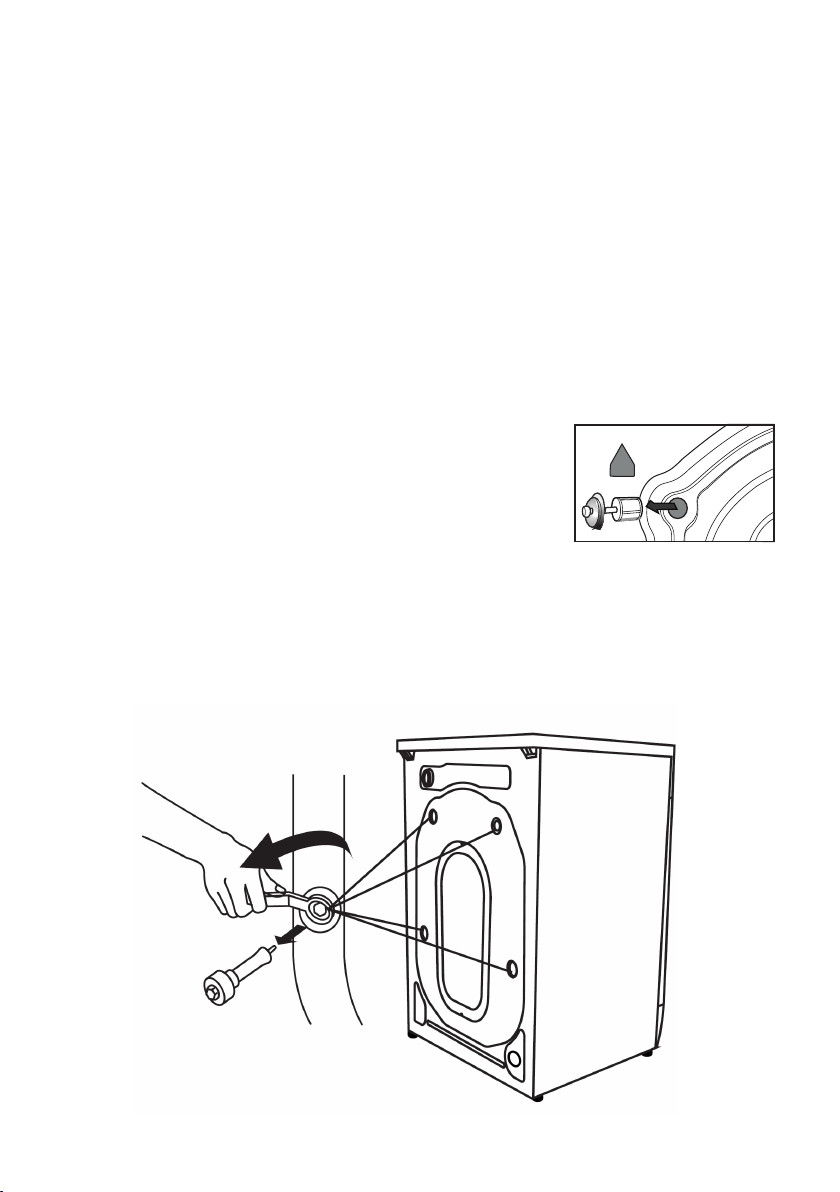
REMOVE TRANSPORT BOLTS
• IMPORTANT! Make sure before you install the appliance,
you must remove the transit bolts from the back of the
appliance and cover the holes with the hole covers
provided. A spanner is required to remove the bolts.
NOTE: Keep the transit bolts for future needs if you are going to move the
appliance again to another location. The bolts hold the drum in place during
transportation but MUST be removed before use so the drum can move during a wash.
Leaving the bolts in can result in strong shock, noise and malfunction.
14
GETTING STARTED (Cont.)
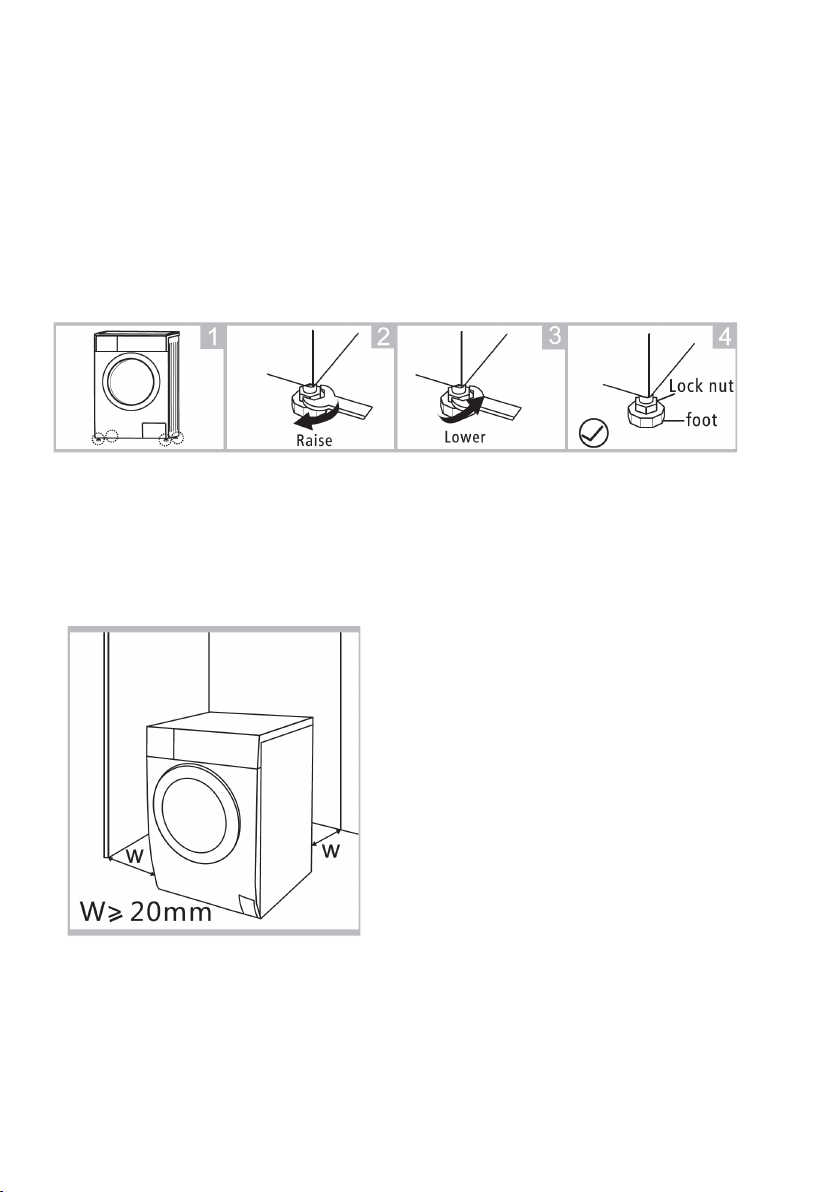
LEVELLING THE APPLIANCE
IMPORTANT! Make sure to level the appliance carefully with a spirit level to ensure the most
accurate levelling of the appliance. This is a must if your floor in unbalanced to level the
washing machine.
• Make sure to position the appliance on a level and stable ground. If the floor is uneven
you can adjust the feet by twisting foot then with a spanner you twist the lock nut to the top
to lock it in place.
• By placing a spirit level on top of the appliance you can check correctly to aid you in
adjusting the feet levelling nuts to adjust the appliance to be completely level.
INSTALLATION AREA
IMPORTANT! When installing the appliance the spacing on the side and behind the
appliance must not be less the 20mm to allow proper ventillation.
Note: Make sure to avoid direct sunlight onto the appliance.
15
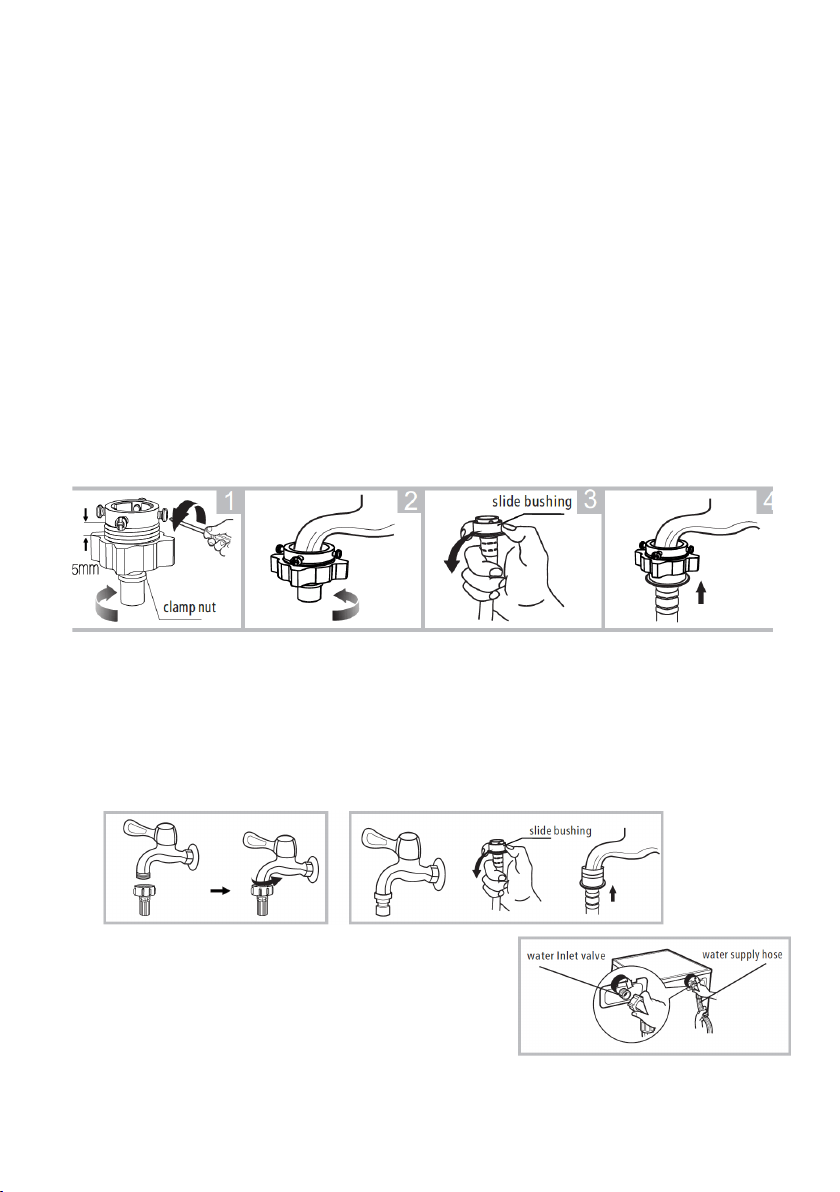
CONNECT THE INLET PIPE
Connect the inlet pipe as indicated in the figure. There are 2 ways to connect the inlet pipe.
INSTALL INLET PIPE
1. Connect the elbow to tap and fasten it clockwise.
2. Connect the other end of inlet pipe to the inlet valve at the backside of washing
machine and fasten the pipe tightly clockwise.
Notes: If there is any leakage with hose after connecting, then repeat the steps to connect
inlet pipe. The most common type of tap shall be used to supply water. If the tap is square
or too big, then the tap should be changed to a standard one.
CONNECTION BETWEEN SCREW TAP AND INLET HOSE.
1. Tap with threads and inlet hose
2. Special tap for washing machine
3. Connect the other end of inlet pipe to the inlet
valve at the backside of product and fasten the pipe
tightly clockwise.
GETTING STARTED (Cont.)
CONNECTING THE WATER INLET HOSE
IMPORTANT! To prevent leakage or water damage please follow the below instructions. Do
not kink, crush, modify or sever the water inlet hose.
Minimum Inlet Water Pressure: 0.05MPa/Maximum Inlet Water Pressure: 1MPa
Be sure to only use new hose sets when connecting the washing machine. Do not re-use old
hoses.
16
GETTING STARTED (Cont.)
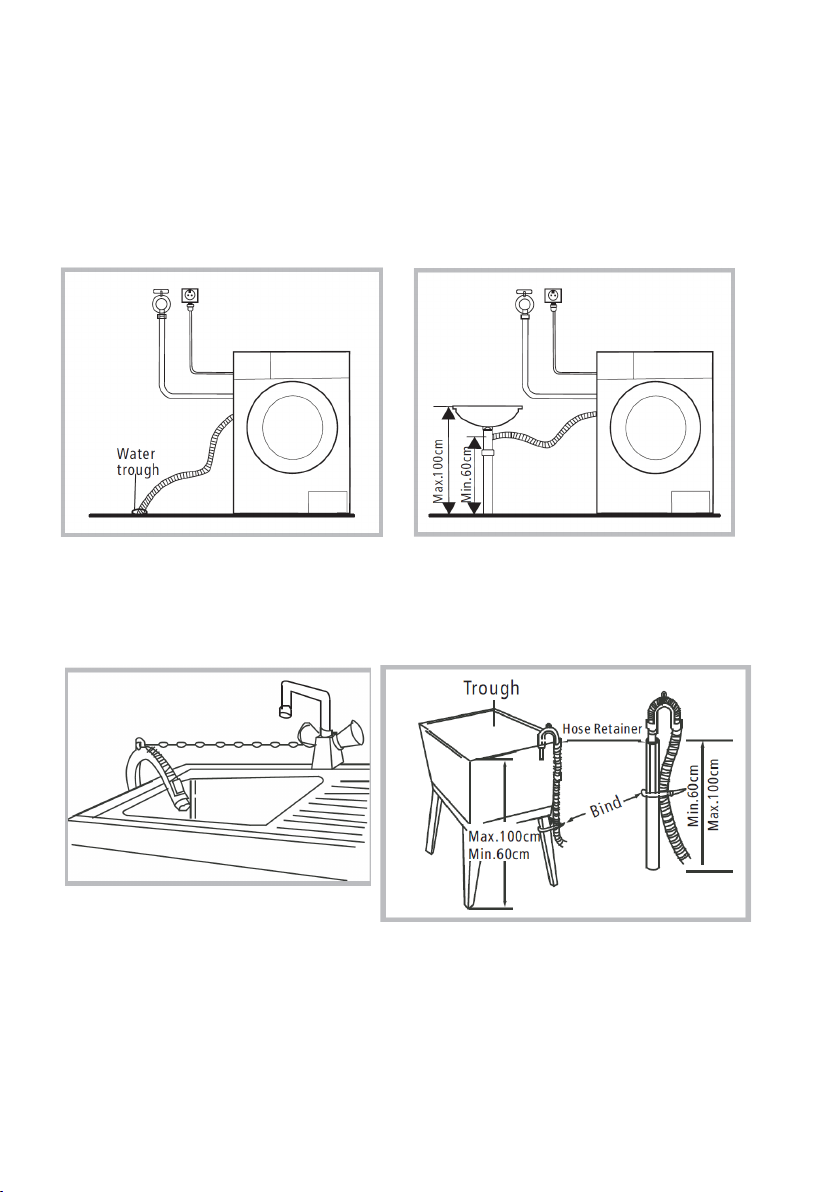
CONNECTING THE DRAIN HOSE
Do not kink or protract the drain hose. Position the drain hose correctly otherwise
damage will result in water leakage.
There are two ways to place the end of drain hose:
1. Put it through the water trough. 2. Connect it to the branch drain pipe.
When installing the drain hose into the laundry sink, make sure it is properly fitted with rope
to hold it in place. If the hose is too long, do not try to push the end were it comes from the
appliance in to shorten length, this can damage it.
WARNING
• Make sure that the hose is not higher then 120cm above the ground, otherwise appliance
will not drain the water well.
• Never lay down the drain hose otherwise water will pour out.
• Make sure the hose has no kinks so it can drain properly.

17
GETTING STARTED (Cont.)
Electrical connection
• As the maximum current through the unit is 10A when you are using its heating
function, please make sure the power supply system (current, power voltage and wire)
at your home can meet the normal loading requirements of the electrical appliances.
• Please connect the power to a socket which is correctly installed and properly earthed.
• Make sure the power voltage at your place is same to that in the machine’s rating label.
• Power plug must match the socket and cabinet must be properly and effectively
earthed.
• Do not use multi-purpose plug or socket as extension cord.
• Do not connect and pull out plug with wet hand.
• When connecting and pulling out the plug, hold the plug tightly and then pull it out.
Do not pull power cord forcibly.
If power cord is damaged or has any sign of being broken, special power cord must be
selected or purchased from its manufacturer or service center for replacement.
WARNING
• This machine must be earthed properly. If there is any short circuit, earthing can reduce
the danger of electrical shock. This machine is equipped with power cord, which
includes plug, earthing wire at earthing terminal.
• Washing machine shall be operated in a circuit separate from other electrical
appliances. Otherwise, power protector may be tripped or fuse may be burned out.
18
BEFORE FIRST USE
• Before any first wash make sure everything is installed correctly. Make sure to
do one wash with no items inside to clean out the tube before your first
loaded wash.
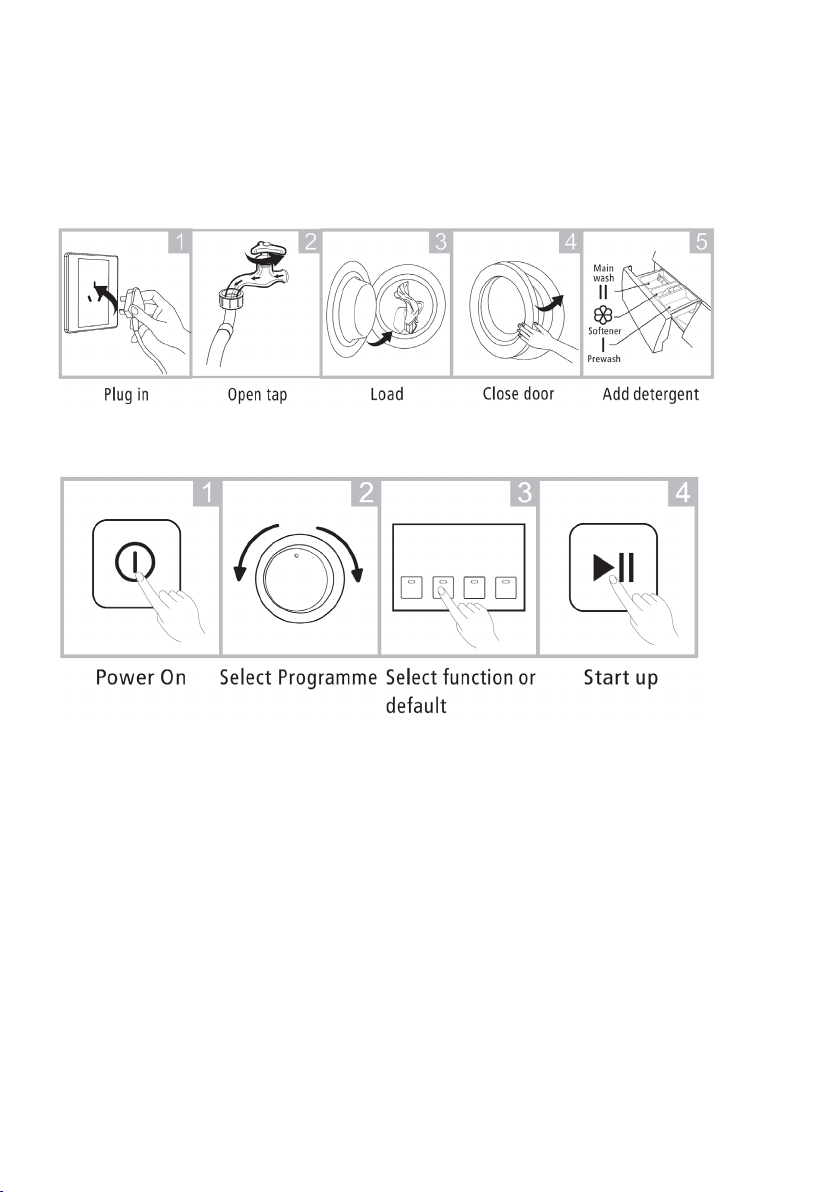
After the above steps have been completed, In a few simple steps shown below
you can select the type of wash you want and get started.
INSTRUCTIONS
19
INSTRUCTIONS (Cont.)
• As for the agglomerated or ropy detergent or additive, before they are poured the
detergent box, it is suggested to use some water for dilution to prevent inlet of detergent
box from being blocked and overflowing while filling water.
• Please choose suitable type of detergent for the various washing temperature to get the
best washing performance with less water and energy consumption.
• Make sure that the appliance is in a correct working temperature (0-40˚C). If the
appliance is used under 0˚C the inlet valve and draining system may be damaged.
• Make sure that all labels are checked on items if they can be washed.
• Use non-foaming or less-foaming detergents which are more suitable for washing
machines to wash correctly.
• Maximum mass of dry clothes for drying is 6.0kg
Maximum mass of dry clothes for washing is 9.0kg
WARNING
• Never use the washing machine to wash a single item at any given time, if you need to
urgently wash an item, we suggest placing a few clothing items in there.
• Make sure that all labels are checked on items if they can be washed.
• Use non-foaming or less-foaming detergents which are more suitable for washing
machines to wash correctly.

20
WASH CARE SYMBOLS
When choosing a wash program, check for any labels on your clothes and follow the
instructions. below are some commonly used symbols.
INSTRUCTIONS (Cont.)
DETERGENT DISPENSER
Only use low-subsiding detergents and clothing care preparations that are for use in a front
load washing machine.
21
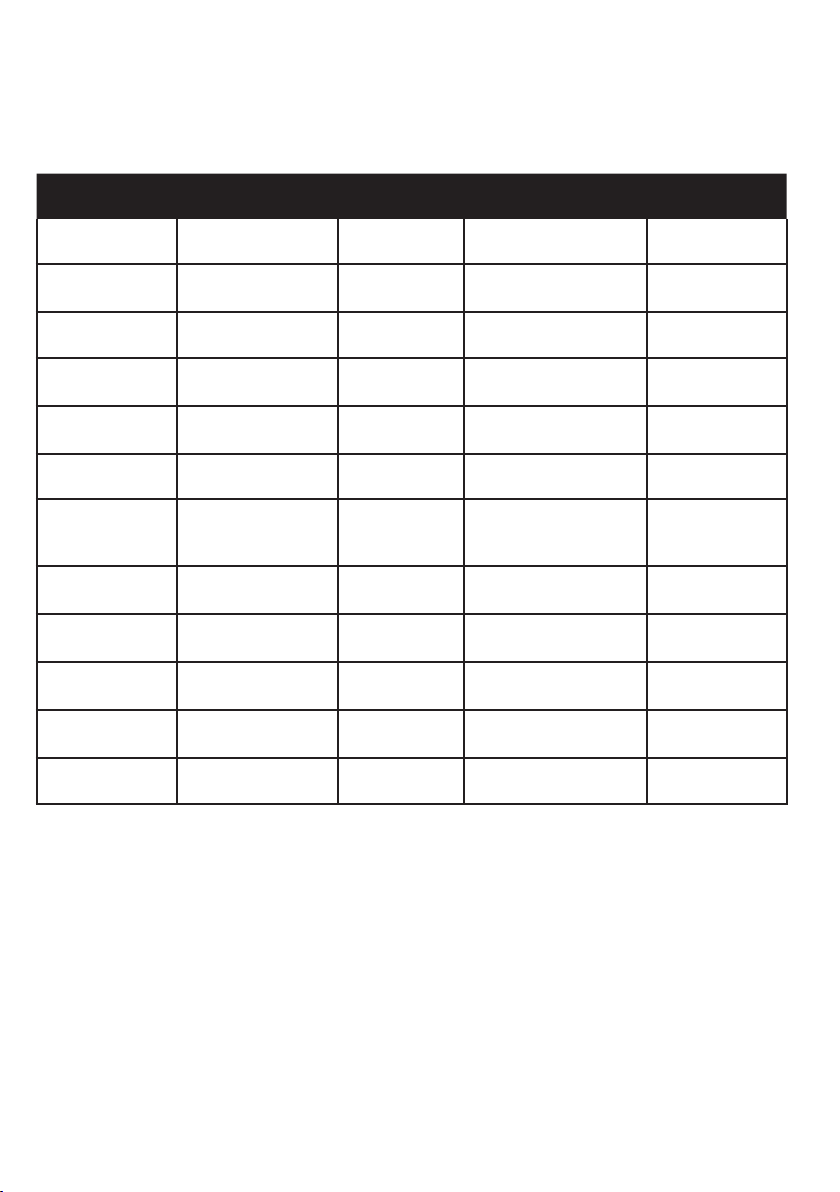
WASHING PROGRAMS TABLE
INSTRUCTIONS (Cont.)
Program Temperature(°C) Rinse(times) Revolution(rpm) Time(min)
Dry / / 1000(1400) 2:35
Low-temp
Drying
/ / 1400 2:45
Air Wash / / / 0:30
Duvet
40°C
(cold water,30°C)
2
800
(0,600,1000,1400)
1:12
Down Jacket
40°C
(cold water,30°C)
2 800(0,600) 1:08
Eliminate Mite 60°C 2 800(0,600,1000) 1:59
Cotton
40°C
(cold water,
30°C,60°C,96°C)
2
800
(0,600,1000,1400)
1:05
Quick 15'
cold water
(30°C, 40°C)
1 800(0,600) 0:15
Wool
cold water
(30°C, 40°C)
2 600(0,800) 0:43
Rinse+Spin cold water 1
800
(0,600,1000,1400)
0:16
Spin cold water /
800
(0,600,1000,1400)
0:10
Tub Clean 60°C 2 800 1:15
22
OPERATIONS
PROGRAMS
Select the desired programs according to the clothes that are being washed.
PROGRAMS
Cotton For Washing general cotton fabrics
Quick 15’
it is used to wash a small amount of clothes and light polluted
clothes.
Wool For machine washable wool fabrics.
Rinse + Spin Suitable for separate rinsing and dehydration of clothing
Spin For spinning clothes only
Tub clean For simple cleaning of inner cylinder, please do not put clothes.
Delicate Washing gauze, silk underclothes
Down Jacket Suitable for machine washable down clothing.
Duvet
For the machine-washable mark, like bedding, bed sheets,
curtains, etc.
Air Wash
For cleaning and deodrorizing cotton, linen and chemical fiber
clothes
low- temp. Drying
Suitable for low-temperature druing of cotton, linen and
chemical fiber clothes.
Dry It can dry cotton, linen and synthetic clothes
23
CLEANING AND MAINTENANCE
WARNING:
• Before starting maintenance, ensure that the appliance is unplugged and
close the tap.
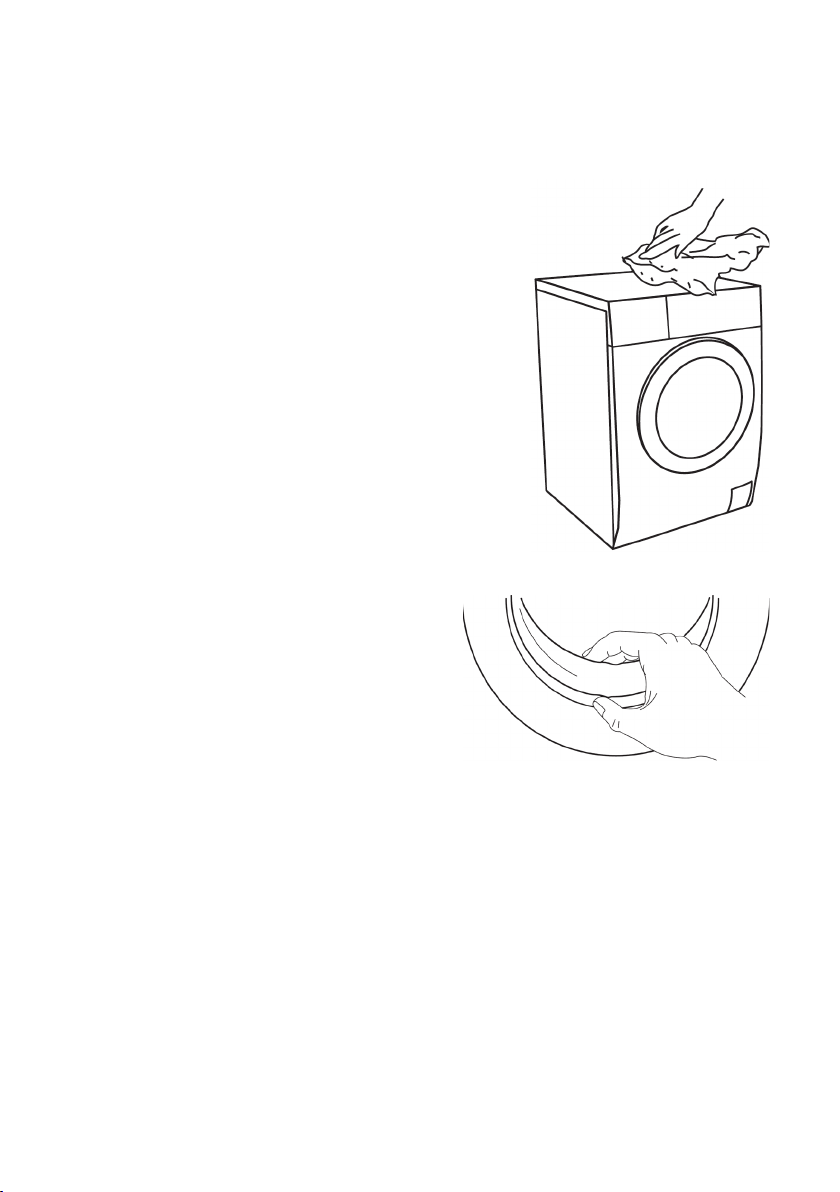
CLEANING THE CABINET
Proper maintenance on the washing machine can
extend its working life.
The surface can be cleaned with diluted
non-abrasive neutral detergents when necessary. If
there is any water overflow, use a wet cloth to wipe
it off immediately. Make sure no sharp items are
used to clean the appliance.
CLEANING THE DOOR SEAL AND GLASS
Wipe the glass and seal after each wash to
remove lint and stains. If lint builds up it can
eventually cause leaks. Remove any coins,
buttons or other objects from the seal (if
any) after each wash.
24
CLEANING AND MAINTENANCE (Cont.)
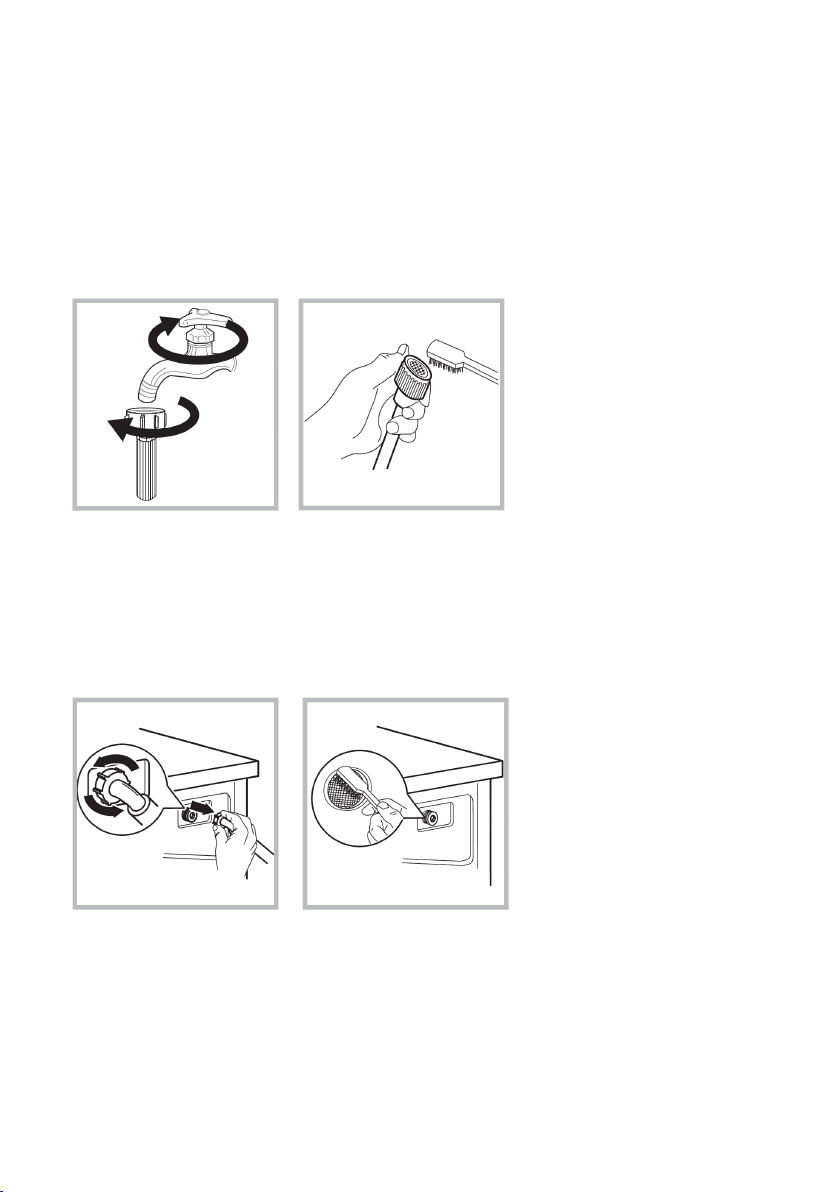
CLEANING THE INLET FILTER
Washing the filter in the tap
1. Close the tap
2. Remove the water supply hose from the tap
3. Clean the filter
4. Reconnect the water supply hose
Washing the filter in the washing machine
1. Screw off the inlet pipe from the back of appliance
2. Pull out the filter with long nose pliers and reinstall after being washed
3. Use the brush to clean the filter
4. Reconnect the inlet pipe and turn on the tap
25
CLEANING AND MAINTENANCE (Cont.)
CLEANING THE DRAIN PUMP FILTER
1 Be careful of the hot water.
2 Allow the detergent solution to cool down.
3 Drain pump filter can filter the yarns and small foreign matters from the washing.
4 Clean the filter periodically to ensure the washing machine operates normally.
CAUTION
• Make sure that the valve cap and drain hose are reinstalled properly. Cap plates should
be inserted aligning to hole plates otherwise water may leak.
• When the appliance is in use and depending on the program selected there can be hot
water in the pump. Never remove the pump cover during a wash cycle, always wait until
the appliance has finished the cycle and is empty. When replacing the cover ensure it is
tightly secured.
1.After the power is
disconnected, open the
filter cover.
2.Turn the filter down as
shown with the figure and
take out sundries matters.
3.Reinstall each part back
after sundries matters are
removed.
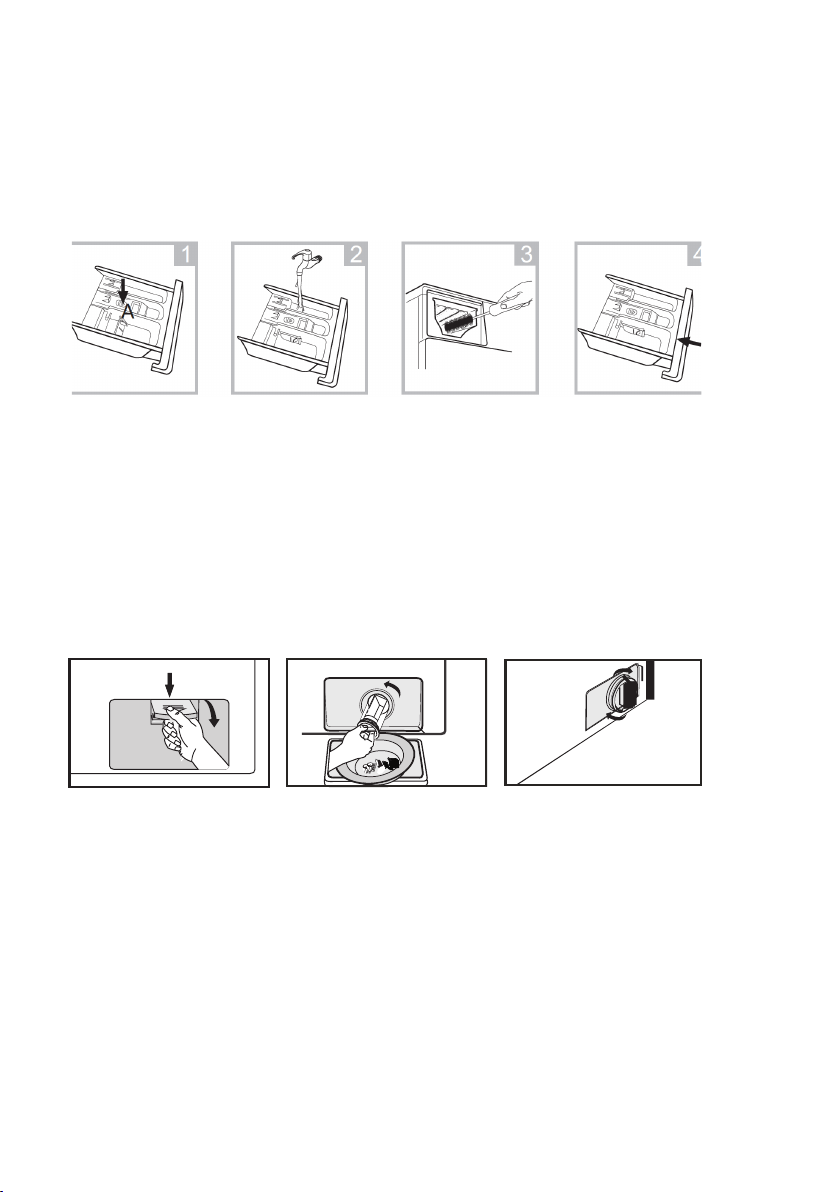
CLEANING THE DETERGENT DISPENSER
1. Press down the arrow location on softener cover inside the dispenser drawer.
2. Lift the clip up and take out softener cover and wash all grooves with water.
3. Restore the softener cover and push the drawer into position.
Pull out the dispenser
drawer with press the A
Note: Do not use alcohol,solvents or chemical products to clean the machine.
Clean the dispenser
drawer under water
Clean inside the recess
with an old toothbrush
Insert the dispenser
drawer
26
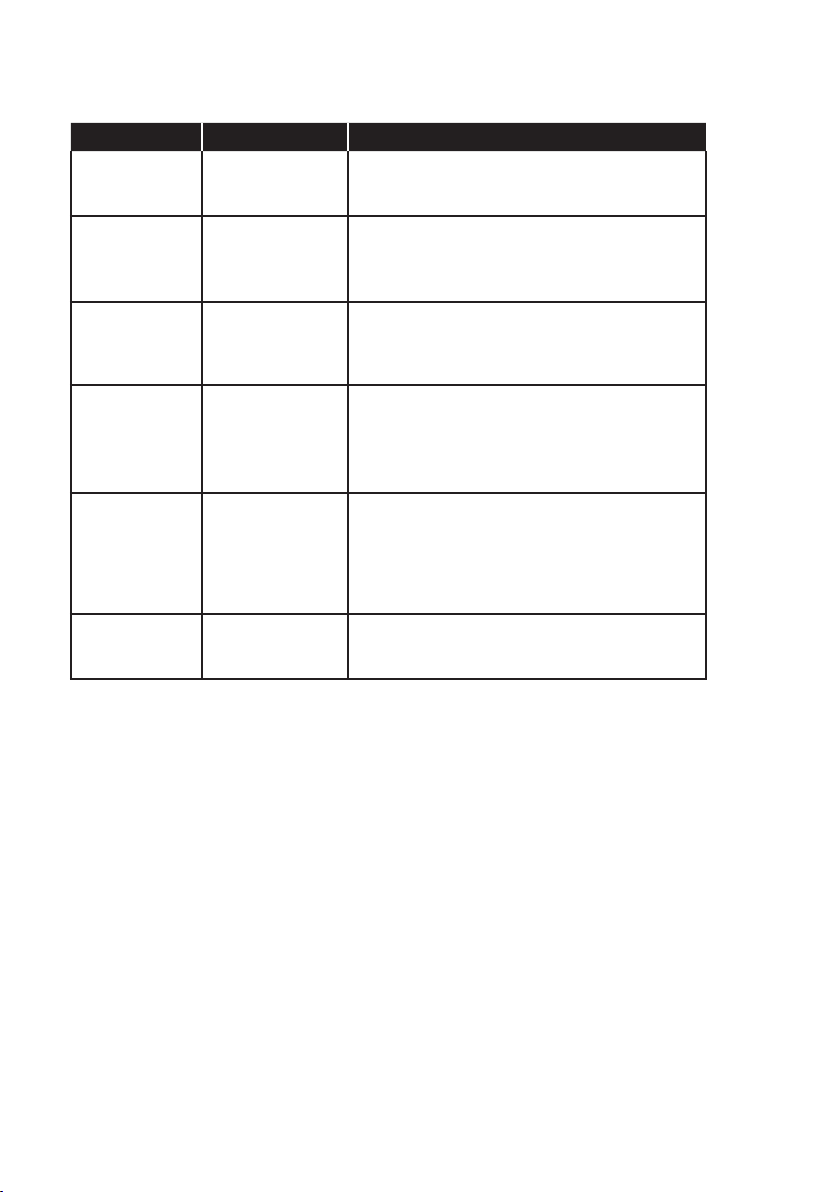
FAQs
Problem Possible Cause Solution
Washing
machine is not
starting
Door is not
closed properly
Restart after the door is closed, check if the
clothes are stuck
Door can’t be
opened
Washer’s
safety protection
is active
Disconnect the power and restart
the appliance
Water Leakage
The connection
between inlet
pipe or outlet
hose is not tight
check and fasten water pipes.
Clean up outlet hose.
Detergent
residues are in
the dispenser
detergent might
be dampened
Clean and wipe the detergent dispenser
Indicator or
display isn’t
working
Disconnect the
power, PC
board or harness
may have a
connection
problem.
Check if the power is on and the power plug
is connected correctly.
Abnormal
Noise
Check if the Transport bolts at the back of
the appliance have been removed.
Check it’s installed on a level and solid floor.
27
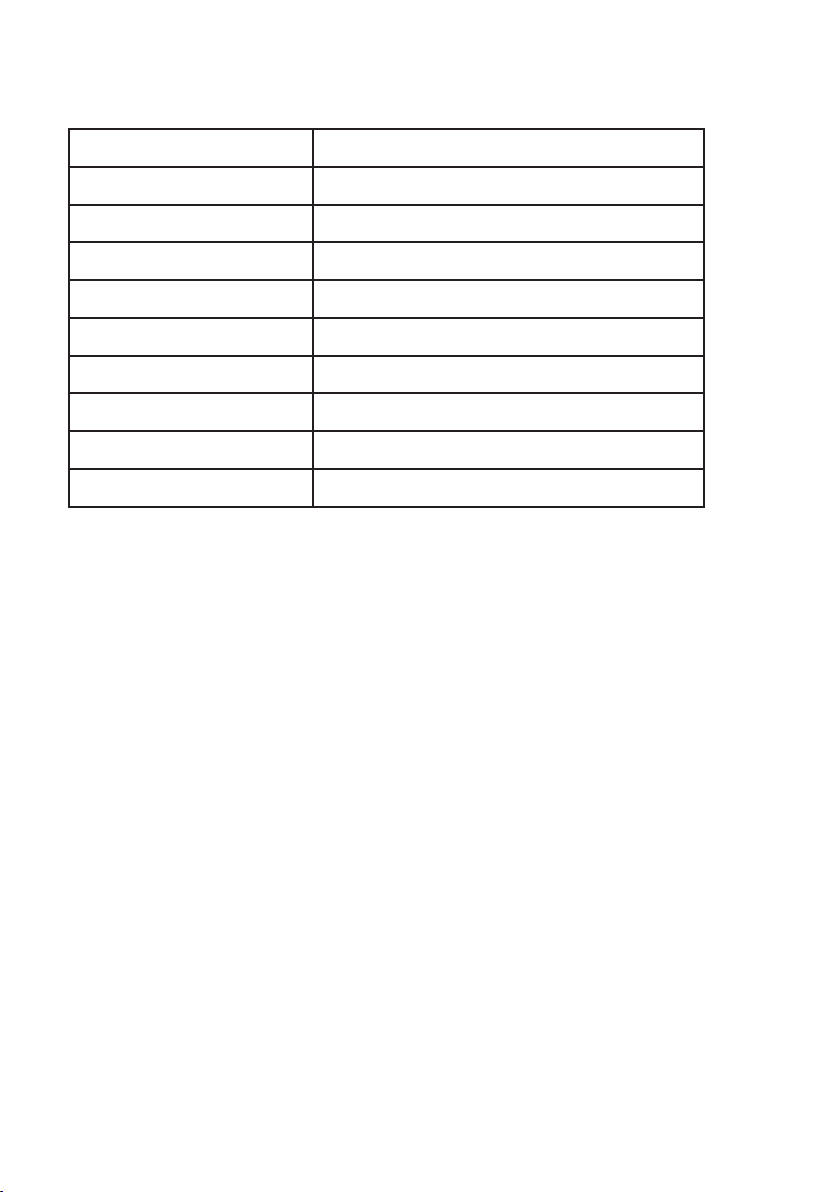
SPECIFICATIONS
Power Supply 220-240V~50Hz
Standard Water Pressure 0.05MPa~1MPa
Washing Capacity 9 KG
Drying Capacity 6 KG
Rated Power 1950W
Drying Power 1650W
Max. Current 10A
Max Spin Speed 1400 RPM
Dimensions 595 (w) x 600 (d) x 850 (h) mm
Weight: Net: 58 kg / Gross: 63 kg


CUSTOMER HELPLINE:
info@ayonz.com
DISTRIBUTED BY:
Ayonz Pty Ltd