Loading ...
Loading ...

1
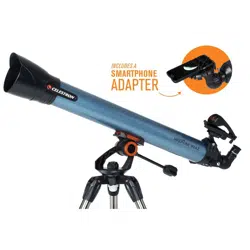
1. Telescope Tube
2. StarPointer Pro Finderscope
3. 20 mm Eyepiece
4. Erect Image Diagonal
5. Focus Knob
6. Focus Micrometer
7. Panning Handle/Altitude Clutch Knob
8. Tripod
9. Accessory Tray Lock Knob
10. Folding Accessory Tray
11. Lens Cap/Smartphone Adapter
12. Tube Mounting Bolt
13. Altazimuth Mount
14. Removable Flashlight
15. Accessory Tray Tension Knob
16. 10 mm Eyepiece
SOLAR WARNING
Never look directly at the Sun with the naked eye or with a telescope unless you have the proper solar filter. Permanent and irreversible eye damage may result.
Never use your telescope to project an image of the Sun onto any surface. Internal heat build-up can damage the telescope and any accessories attached to it.
Never use an eyepiece solar fi lter or a Herschel wedge. Internal heat build-up inside the telescope can cause these devices to crack or break, allowing unfi ltered sunlight to pass through to the eye.
Do not leave the telescope unsupervised, especially when children or adults unfamiliar with the correct operating procedures of your telescope are present.
We recommend saving your telescope box so it can be used to store the telescope when it is not in use. Unpack the box carefully
as some parts are small. Use the parts list below to verify that all parts and accessories are present.
PARTS LIST
WHAT’S IN THE BOX
ASSEMBLING YOUR TELESCOPE
THE MOUNT
The Inspire mount and tripod come fully assembled, so setting it
up is easy.
1. Remove the tripod and mount from the box.
2. Loosen the hand knobs at the bottom of each leg and extend
the inner section of the leg to the desired length. Tighten the
knobs to secure the legs, being careful not to over tighten.
3. Stand the tripod upright and pull the tripod legs apart until the
folding accessory tray snaps into place.
4. Line up the tabs on the spring-loaded accessory tray locking
knob with the notches in the accessory tray and press
downward. Turn the locking knob clockwise about 20 degrees
to fully lock the tray in place.
5. Turn the accessory tray tension knob clockwise until it stops.
Do not over tighten.
NOTE: When closing the tripod at the end of the observing session, be sure to fi rst loosen the tension
knob all the way, then loosen the locking knob by turning it counterclockwise until the spring
pops the locking knob upward. Grab the knob and lift upward and the tripod will fold up.
5
2
3
4
13
14
16
1
8
15
6
7
9
10
11
12
Tension Knob
Locking Knob
Loading ...
Loading ...
Loading ...