User manual
Audio/Video
SRP9348D/27
v3 11/18
2
Introduction ............................................................. 2
Setup ......................................................................... 3
Button Functions ....................................................4
Programming Your Remote ...................................6
Direct Code Entry ..............................................6
Auto Code Search .............................................. 7
Controlling Combo Devices .............................9
Using Your Remote ............................................... 10
Primary Audio Control .................................... 10
Code Identication ........................................... 11
Reset to Factory Settings ................................ 11
Troubleshooting .....................................................12
Warranty ..................................................................13
FCC Statement ...................................................... 14
Congratulations on your purchase of this Philips
branded Universal Remote Control. This remote
is capable of operating thousands of audio/
video devices including TVs, Blu-ray™/DVD
players, streaming media players, sound bars,
cable receivers and more!
Table of Contents
Read instructions or watch easy-to-
follow video. Scan QR code or visit
byjasco.com/urccodes
READ IT
OR WATCH IT

3
Your universal remote requires two (2) AAA
batteries (not included). Alkaline batteries are
recommended.
Battery Installation
1. On the back of the remote, pull down on
the textured surface and slide battery cover
downward to remove.
2. Match the (+) and (-) marks on the batteries
to the (+) and (-) marks inside the battery
compartment, then insert two (2) AAA
batteries. Be sure to use fresh batteries.
3. Position battery cover slightly below opening
and push upward to lock into place.
NOTE: If your remote stops operating properly,
replace the batteries with new ones.
Battery Precautions
• Do not mix old and new batteries.
• Do not mix alkaline, standard (carbon-
zinc), or rechargeable (Ni-Cd, Ni-MH, etc.)
batteries.
• Always remove old, weak or worn-out
batteries promptly and recycle or dispose of
them in accordance with local and national
regulations.
Battery Saver
Your remote automatically turns o if the
buttons are depressed more than 8 seconds.
This will save your batteries should your remote
get stuck in a place where the buttons remain
depressed (e.g., between the sofa cushions).
Code Saver
You have up to 10 minutes to change the
batteries in your remote without losing the
codes you have programmed.
Setup
4
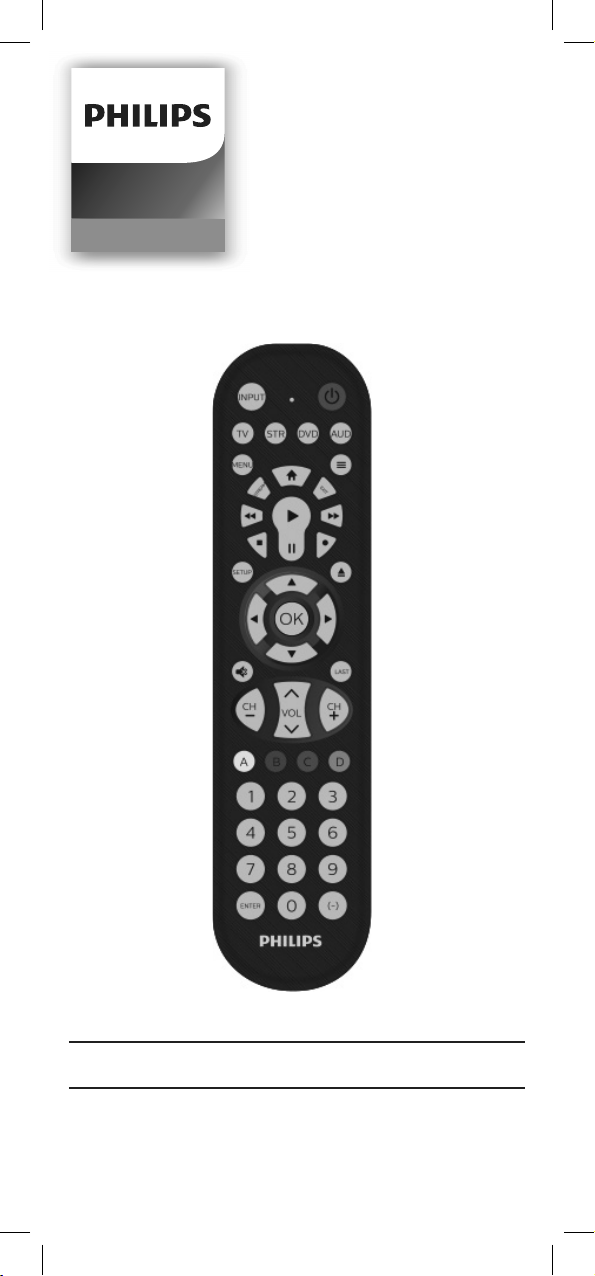
Button Functions
7
11
13
14
17
19
20
21
18
16
3
4
1
88
9 9
11
2
6
5
15
10
12

5
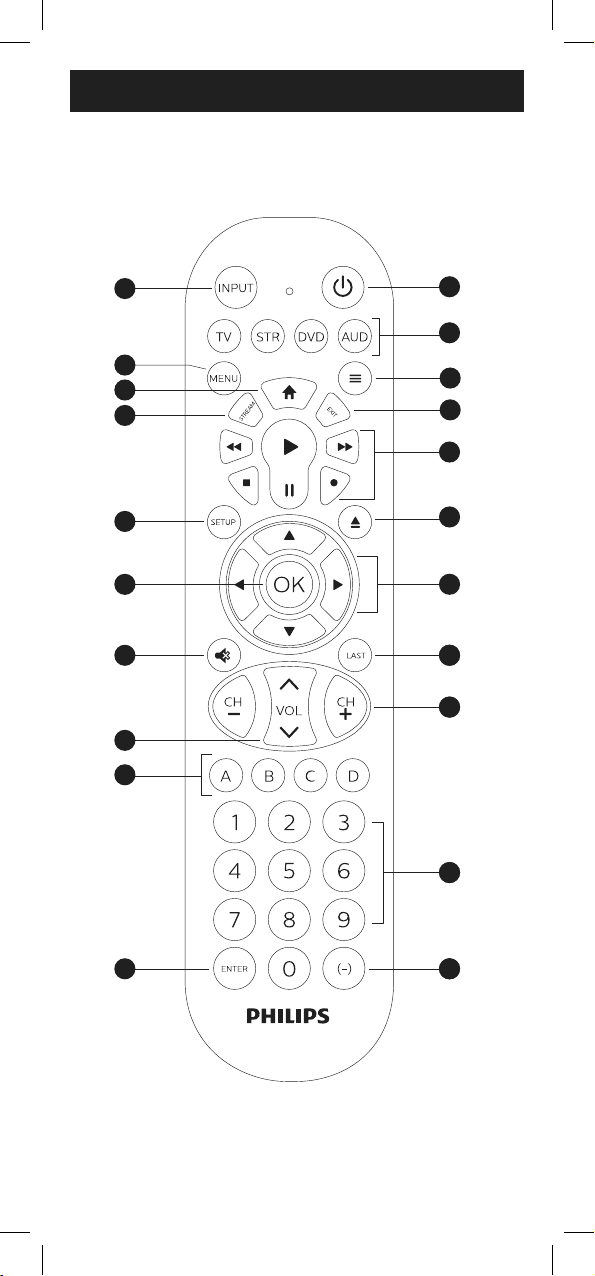
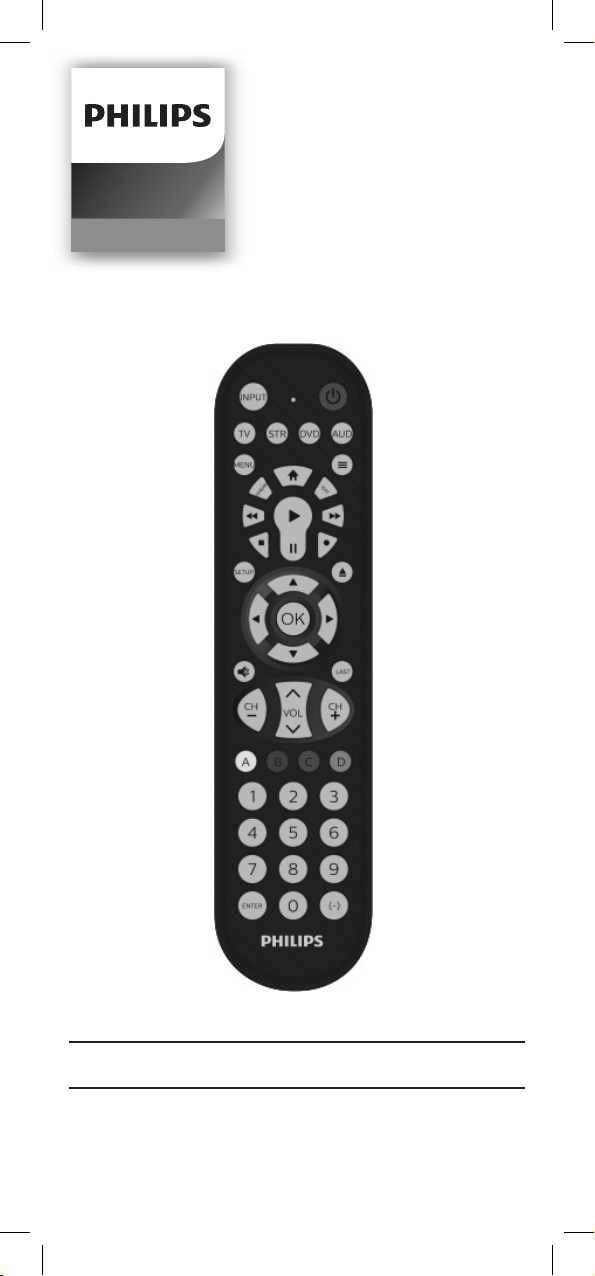
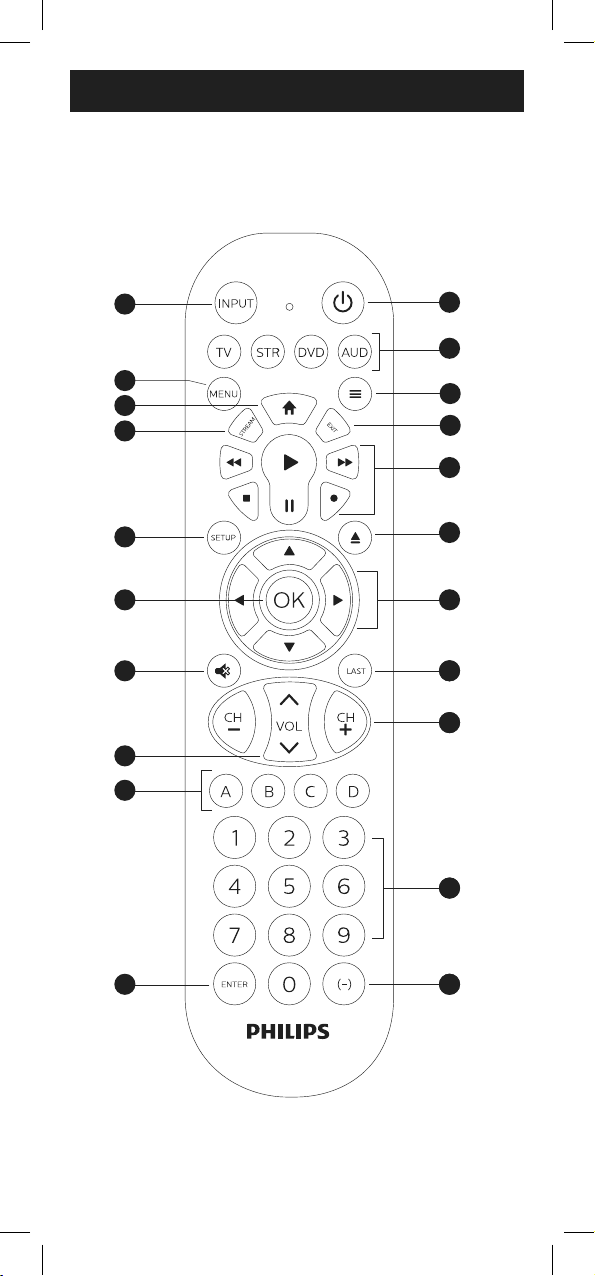
Button Functions
1. Power - Turns devices ON/OFF
2. TV, STR, DVD, AUD - Selects the device
to control
3. Info/Options - Displays on-screen show/
content information
4. Exit - Exit on-screen menus
5. Record, play, stop, rewind, fast forward,
pause
6. DVD/
™
open/close - open/close a player, or
List features on cable/satellite receivers
7. Up/down/left/right menu navigation
8. Last channel - Returns to the previously
selected channel
9. Channel up/down
10. Numbers - Enter numbers for direct channel
selection
11. Dash (-) - Use to select digital channels,
e.g., 4.1
12. Enter key (Some devices require enter to be
pressed after channel selection)
13. ABCD - Access additional features for DVRs,
cable and satellite receivers
14. Volume up/down
15. Mute - Mutes sound
16. Ok - Selects menu items for the controlled
device
17. Setup - Used to program the remote
18. Streaming App Hotkey - Access top apps
like Netix
®
, Amazon
®
Prime, Hulu
®
and more
19. Home/Guide - Easily access features on
today’s streaming devices, or Guide on
cable/satellite receivers
20. Menu - Displays the on-screen menu
21. Input - Selects video inputs
6
Programming Your Remote
Your remote is designed to control multiple
audio/video devices. To use, you will need to
program the remote for your devices. There are
two dierent methods you can use to program
the remote, Direct Code Entry or Auto
Code Search.
• The Direct Code Entry method is the
recommended method as it is the simplest
and quickest method in most cases.
• The Auto Code Search method searches
through all the codes in the remote to nd a
code for your device.
NOTE: This remote comes preprogrammed for
Roku
®
boxes and Samsung TVs. Press TV for
Samsung TVs and STR for Roku boxes.
Direct Code Entry (Recommended)
1. Locate the Code List included
with your remote. Find the section
for the type of device you wish to
control, (for example TV, STR, DVD,
AUD). Locate the brand of your
device and circle all the remote
codes for the brand.
2. Press and hold down the SETUP
button on the remote until the red
light on the remote control turns
on. Release the SETUP button. The
red light will remain on.
NOTE: The red light will either be a
small light at the top of the remote or
the power ON/OFF button.
3. Press and release the device
button on the remote for the type
of device you wish to control,
(for example TV, STR, DVD, AUD).
The red light will blink once and
remain on.
NOTE: Any of the device buttons
on the remote can be programmed
to control any of your devices. For
example, you can use the aux device
button on the remote to control a
Satellite Receiver, Digital Converter
7
Programming Your Remote
Box, Streaming Media Player or any
device category in the Code List.
4. Use the number buttons on the
remote to enter the rst 4-digit
remote code you circled in the
Code List in Step 1. The red light
will turn o after entering the
fourth digit.
5. Point the remote at the device.
Test the buttons on the remote
to see if the device responds as
you would expect. If the buttons
do not operate the device, return
to Step 2 above and use the next
code that you circled for that
device.
6. Repeat steps 1 – 5 for each
device you wish to control.
Programming Notes
• Some codes may operate only a few
functions of your device. There may be
another code in the Code List that controls
more functions. Test other codes in the
Code List for more functionality.
• If you do not nd a remote code that works
your device or there are no codes in the
Code List for your device, use the Auto
Code Search method in the next section to
program your remote.
• For combination devices such as a TV/DVD
combo or TV/VCR combo, you may have to
enter a code for each device.
• Write down the remote codes used to
program the remote for future reference.
Auto Code Search
The Auto Code Search is a process where you
can search through all the codes stored in
the remote to nd a code for your device. It is
recommended that you read through all the
steps below to familiarize yourself with the
Auto Code Search before starting the process.
8
Programming Your Remote
1. Manually turn on the device you
wish to control.
NOTE: The Auto Code Search process
cannot be used for devices without
power ON/OFF capability. Use the
Direct Code Entry method in these
cases.
2. Press and hold down the SETUP
button on the remote until the red
light on the remote control turns on.
Release the SETUP button. The red
light will remain on.
NOTE: The red light will either be a
small light at the top of the remote or
the power ON/OFF button.
3. Press and release the device button
on the remote for the type of device
you wish to control, (for example TV,
DVD, STRM, AUX). The red light will
blink once and remain on.
4. With the remote pointed at the
device, press and release the
POWER button on the remote. The
remote will send 10 dierent codes
to the device. The red light will blink
once for each code and remain on
after sending the 10 codes.
Did the device turn o?
• If YES, go to Step 5.
• If NO, repeat Step 4 to test the
next 10 codes.
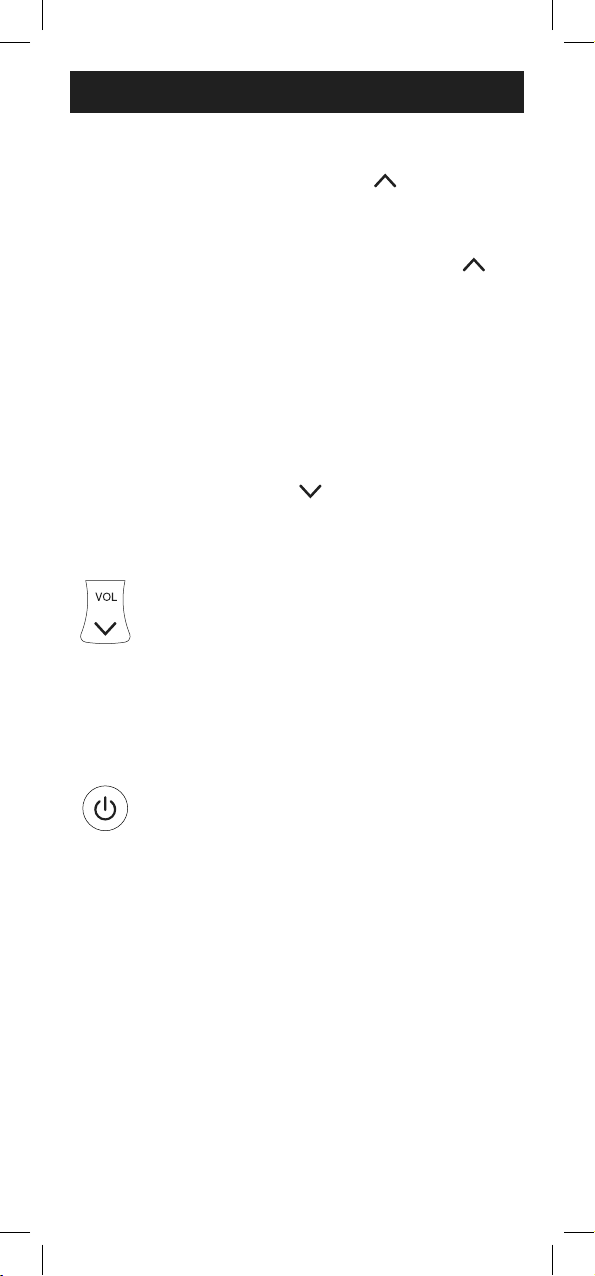
5. Manually turn the device back on.
6. With the remote pointed at the
device, press and release the
VOL
button. The remote will
re-send the rst code of the 10
codes from Step 4. The red light will
blink once and remain on.
Did the device turn o?
• If YES, you have found a code for
the device. Press and release the
same device button you pressed
in Step 3. This will store the code
in the remote. Go to Step 7.
9
Programming Your Remote
• If NO, continue to press and
release the VOL
button until
the device turns o to test the
other 9 codes from Step 4. Be
sure to wait approximately
3 seconds after each VOL
button press to allow the device
time to respond to the code.
When the device turns o, you
have found a code for your
device. Press and release the
same device button pressed in
Step 3. This will store the code
in the remote. Go to Step 7.
NOTE:
• The
VOL button can be used to
go backwards through each batch
of 10 codes.
• The red indicator light will ash 2
times after testing the rst or last
code in each batch of 10.
7. Use the remote to turn the device
back on. Test the buttons on
the remote to see if the device
responds as you would expect.
If the buttons do not operate the
device, return to Step 2 and repeat
this process to search for a better
code to operate the device.
8. Repeat this process for each
device you wish to control.
Controlling Combo Devices
Some combo devices (e.g. TV/VCR, TV/DVD,
DVD/VCR, etc.) will require you to set up two
dierent device buttons to control both parts
of the combo device. For example, if you have
a TV/DVD combo, you may need to set up one
code under the TV button to control the TV
and a separate code under the DVD button to
control the DVD.
10
Using Your Remote
Primary Audio Control
The Primary Audio Control feature allows you to
select a single device that the volume buttons
always control. For example, the remote can be
in TV mode while the volume buttons control
the volume on your audio receiver or sound bar
instead of your TV.
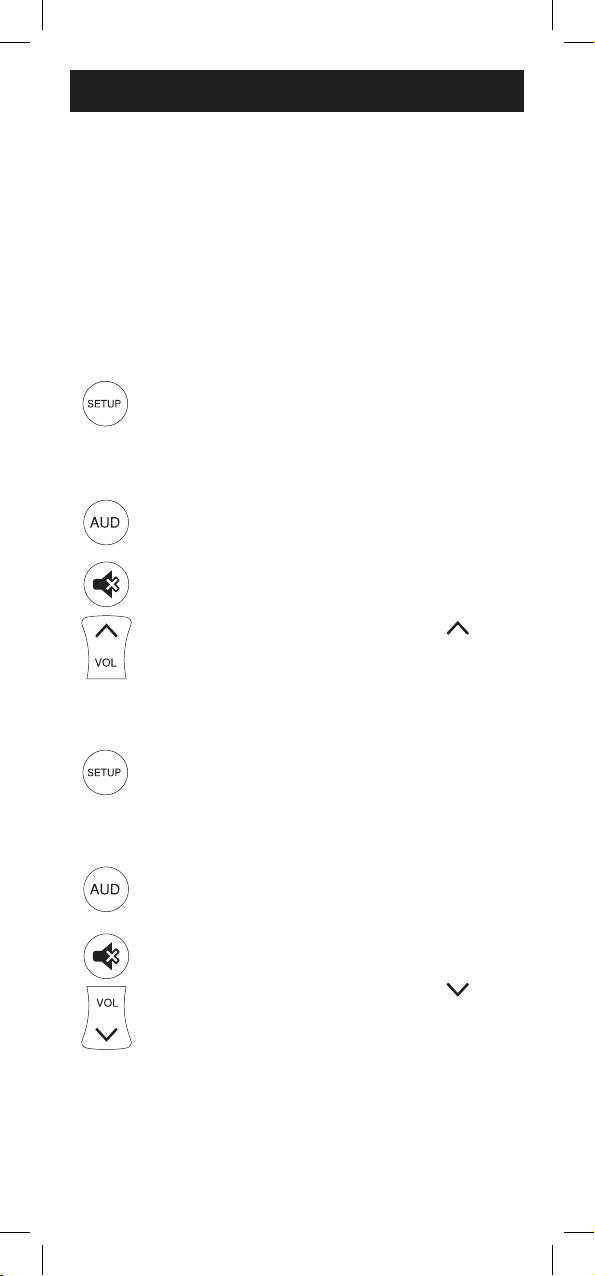
Enabling the Primary Audio Control
1. Press and hold down the SETUP
button on the remote until the red
light on the remote control turns
on. Release the SETUP button.
The red light will remain on.
2. Press and release the device
button (TV, AUD, etc.) on the
remote for the device you wish
to control the volume.
3. Press and release the
MUTE button.
4. Press and release the VOL
button. The red light will blink
twice and turn o.
Disabling the Primary Audio Control
1. Press and hold down the SETUP
button on the remote until the red
light on the remote control turns
on. Release the SETUP button.
The red light will remain on.
2. Press and release the device
button (TV, AUD, etc.) programmed
to control the Master Volume
Feature.
3. Press and release the
MUTE button.
4. Press and release the VOL
button. The red light will blink
twice and turn o.

11
Using Your Remote
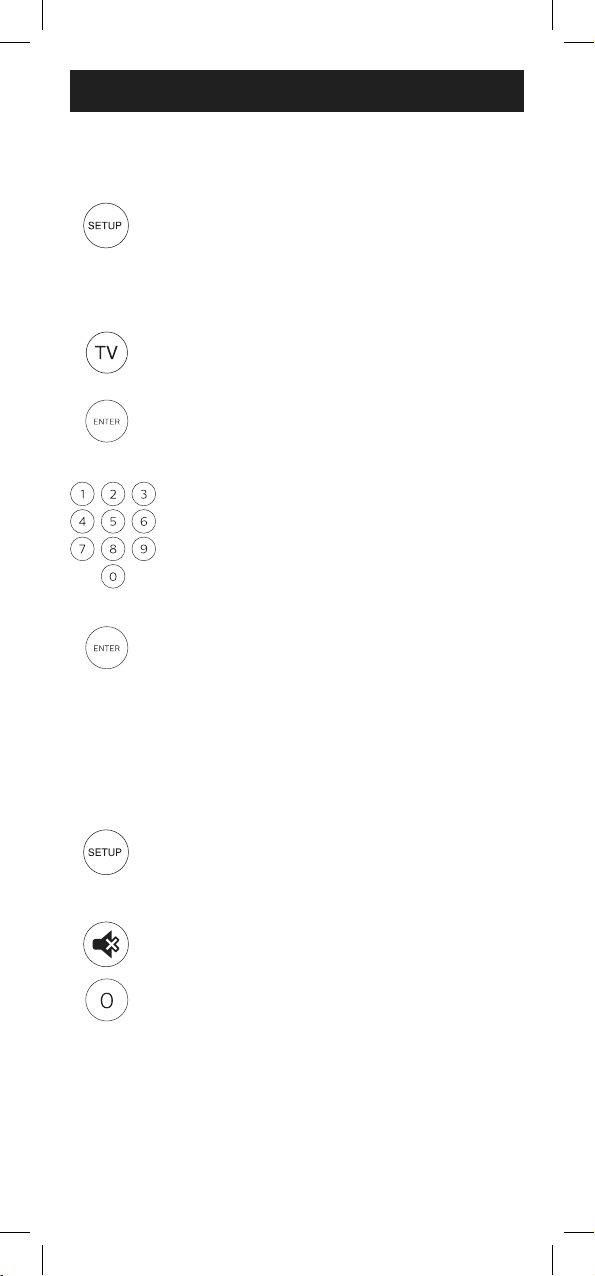
1. Press and hold down the SETUP
button on the remote until the
red light on the remote control
turns on. Release the SETUP
button. The red light will
remain on.
2. Press and release the desired
device button (TV, DVD, STRM,
AUD) you would like the code for.
3. Press and release the
ENTER button.
4. Press and release the #1 button.
Count the number of times the
remote light ashes. This is the
number corresponding to the
rst digit of the code. Repeat the
process by pressing the #2, #3
and #4 buttons for the remaining
digits.
5. Press and release the ENTER
button to exit this mode.
Code Identication
Reset to Factory
Settings
1. Press and hold down the SETUP
button on the remote until the
red light on the remote control
turns on. Release the SETUP button.
The red light will remain on.
2. Press and release the
MUTE button.
3. Press and release the number #0
button. The red indicator light will
ash twice.

12
Remote does not operate your device.
• Make sure the batteries are fresh and
installed correctly.
• Aim the remote directly at your device, and
make sure that there are no obstructions
between the remote and device.
• Make sure you select the appropriate device
on the remote you wish to control; TV for TV
and CBL for cable box.
• Try programming the remote with a dierent
code. See Direct Code Entry section.
• Remote may not be compatible with your
device.
Remote does not operate some features of
your device.
• Sometimes a particular code might operate
a few features but not all. Try programming
the remote with a dierent code from the
Code list. See Direct Code Entry section.
• Remote may not be able to operate all
features of your device or button names
may be dierent than that of your original
remotes.
Troubleshooting

13
90-Day Limited Warranty
Jasco Products Company warrants this product
to be free from manufacturing defects for a
period of 90 days from the original date of
consumer purchase. This warranty is limited
to the repair or replacement of this product
only and does not extend to consequential or
incidental damage to other products that may
be used with this unit. This warranty is in lieu of
all other warranties express or implied. Some
states do not allow limitations on how long an
implied warranty lasts or permit the exclusion
or limitation of incidental or consequential
damages, so the above limitations may not
apply to you. This warranty gives you specic
rights, and you may also have other rights which
vary from state to state. If unit should prove
defective within the warranty period, return
prepaid with dated proof of purchase to:
Jasco Products Company
10 E. Memorial Rd.,
Oklahoma City, OK 73114, USA
MADE IN CHINA
Philips and the Philips Shield Emblem are registered
trademarks of Koninklijke Philips N.V. and are used under
license. This product has been manufactured by and is
sold under the responsibility of Jasco Products Company,
and Jasco Products Company LLC, 10 E. Memorial Rd,
Oklahoma City, OK 73114 is the warrantor in relation to
this product.
This product comes with a 90-day limited warranty.
Visit www.philips.com/support for warranty details.
Questions? Contact our US-based Consumer Care at
1-844-816-0320 between 7AM - 8PM CST.

14
This device complies with Part 15 of the FCC
rules. Operation is subject to the following
two conditions:
(1) this device may not cause harmful
interference, and (2) this device must
accept any interference received, including
interference that may cause undesired
operation.
FCC NOTE: The manufacturer is not
responsible for any radio or TV interference
caused by unauthorized modications to this
equipment. Such modications could void the
user’s authority to operate the equipment.
NOTE: This equipment has been tested and
found to comply with the limits for a Class B
digital device, pursuant to Part 15 of the FCC
Rules. These limits are designed to provide
reasonable protection against harmful
interference in a residential installation.
This equipment generates, uses and can
radiate radio frequency energy and, if not
installed and used in accordance with the
instructions may cause harmful interference
to radio communications. However, there
is no guarantee that interference will not
occur in a particular installation. If this
equipment does cause harmful interference
to radio or television reception, which can
be determined by turning the equipment
o and on, the user is encouraged to try to
correct the interference by one or more of the
following measures:
• Reorient or relocate the receiving
antenna.
• Increase the separation between
the equipment and receiver.
• Connect the equipment into an outlet on
a circuit dierent from that to which the
receiver is connected.
• Consult the dealer or an experienced
radio/TV technician for help.
ICES-3(B)/NMB-3(B).
FCC Statement
15

16
17
Manual de usuario
Audio/Video
SRP9348D/27

18
Introducción ........................................................... 18
Conguración ......................................................... 19
Funciones de los botones ...................................20
Programación del control remoto ...................... 22
Entrada directa de códigos ............................22
Búsqueda automática de códigos ................24
Control de dispositivos integrados ..............26
Uso del control remoto ........................................ 27
Control del audio principal ............................ 27
Identicación de códigos ...............................28
Restablecimiento de la conguración
de fábrica ..........................................................28
Resolución de problemas ....................................29
Garantía ..................................................................30
Declaración de la Comisión Federal
de Comunicaciones (FCC) ....................................31
Felicitaciones por haber comprado este control
remoto universal marca Philips. Este control
remoto puede operar miles de dispositivos de
audio/video, como TV, reproductores de DVD/
Blu-ray
™
, reproductores de multimedia en línea,
barras de sonido, receptores de cable, etc.
Tabla de contenido
Para obtener ayuda
con su control remoto:
byjasco.com/urccodes

19
El control remoto universal usa dos (2) pilas
AAA (no incluidas). Se recomienda usar pilas
alcalinas.
Instalación de las pilas
1. En la parte posterior del control remoto,
presione hacia abajo sobre la supercie
texturada y deslice la tapa de las pilas para
quitarla.
2. Inserte dos (2) pilas AAA de modo tal que
las marcas (+) y (-) de las pilas coincidan
con las marcas (+) y (-) en el interior del
compartimento. Asegúrese de usar pilas
nuevas.
3. Coloque la tapa de las pilas levemente por
debajo de la abertura y presione hacia arriba
hasta que quede trabada.
NOTA: Si el control remoto deja de funcionar
normalmente, coloque pilas nuevas.
Precauciones respecto de las pilas
• No utilice pilas usadas y nuevas al
mismo tiempo.
• NO combine el uso de pilas alcalinas
comunes (de tipo carbono-cinc) o
recargables (Ni-Cd, Ni-MH, etc.)
• Siempre quite las pilas gastadas o agotadas
de inmediato y recíclelas o elimínelas de
conformidad con las normas locales y
nacionales.
Ahorrador de pilas
El control remoto se apaga automáticamente si
los botones permanecen presionados por más
de ocho (8) segundos. De esta forma evitará
que se consuma la energía de las pilas si el
control queda atascado en algún lugar con los
botones presionados (p. ej., entre los cojines
del sofá).
Protector de códigos
Tiene hasta 10 minutos para cambiar las pilas
del control remoto sin perder los códigos que
haya programado.
Conguración
20
7
11
13
14
17
19
20
21
18
16
3
4
1
88
9 9
11
2
6
5
15
10
12
Funciones de los botones

21
Funciones de los botones
1. Power (Encendido) - enciende/apaga
(on/o) los dispositivos
2. TV, STR, DVD, AUD - selecciona el dispositivo
que desea controlar
3. Info/Options (Información/Opciones) -
muestra información del show/contenido
en pantalla
4. Exit (Salir) - le permite salir de los menús
en pantalla
5. Record (grabar), play (reproducir), stop
(detener), rewind (rebobinar), fast forward
(avanzar), pause (pausa)
6. DVD/Blu-ray
™
open/close (abrir/cerrar DVD/
Blu-ray
™
) - abre o cierra un reproductor, o
enumera las características de los receptores
de cable/satélite
7. Up (arriba)/Down (abajo)/Left (izquierda)/
Right (derecha) - botones de navegación
del menú
8. Last Channel (último canal) - permite volver
al canal previamente seleccionado
9. Channel Up/Down (subir/bajar canal)
10. Numbers (números) - permiten ingresar
números para seleccionar el canal en
forma directa
11. Dash (-) (raya) - Se usa para seleccionar los
canales digitales, p. ej., 4.1
12. Enter - en algunos dispositivos se deberá
presionar enter una vez seleccionado el
canal deseado
13. ABCD - acceder a las funciones adicionales de
DVR, receptores de cable y satélite
14. Volume Up/Down (subir/bajar volumen)
15. Mute (silenciar) - desactiva el sonido
16. OK (aceptar) - selecciona opciones del menú
para el dispositivo controlado
17. Setup (Conguración) - usa para programar
el control remoto
18. Streaming App Hotkey (Tecla de acceso rápido
para aplicaciones de transmisión de contenido
web) - Acceda a las principales aplicaciones
como Netix
®
, Amazon
®
Prime, Hulu
®
y más¡
19. Home/Guide (inicio/guía) - acceso fácil a las
funciones de dispositivos de transmisión en
línea o a las guías de los receptores de
cable/satélite
20. Menu (menú) - muestra el menú en pantalla
21. Input (entrada) - selecciona las entradas
de video

22
Programación del control remoto
El control remoto está diseñado para controlar
varios dispositivos de audio/video. Para
usarlo, deberá programarlo para controlar los
dispositivos. Existen dos formas de programar
el control remoto: Entrada directa de códigos o
Búsqueda automática de códigos.
• La Entrada directa de códigos es el método
recomendado ya que en la mayoría de los
casos es el más sencillo y el más rápido.
• El método Búsqueda automática de códigos
busca por todos los códigos en el control
remoto para encontrar un código para el
dispositivo.
NOTA: Este control remoto está programada
para las cajas Roku
®
y los televisores Samsung.
Presione TV para los televisores Samsung y STR
para las cajas Roku.
Entrada directa de códigos (recomendado)
1. Busque la Lista de códigos
incluida con el control remoto.
Encuentre la sección para el tipo
de dispositivo que desea controlar
(por ejemplo, TV, STR, DVD, AUD).
Ubique la marca de su dispositivo
y marque los códigos remotos
correspondientes.
2. Presione y mantenga presionado el
botón SETUP (conguración) hasta
que la luz roja del control remoto
se encienda. Suelte el botón
SETUP (conguración). La luz roja
permanecerá encendida.
NOTA: La luz roja será una luz
pequeña ubicada en la parte superior
del control remoto o el botón de
encendido/apagado.
3. Presione y suelte el botón del
dispositivo en el control remoto
del dispositivo que desea controlar
(por ejemplo, TV, STR, DVD, AUD).
La luz roja parpadeará una vez y
permanecerá encendida.
NOTA: Cualquiera de los botones
de dispositivo en el control
23
Programación del control remoto
remoto puede ser programado
para controlar cualquiera de los
dispositivos. Por ejemplo, puede
usar el botón auxiliar del control
remoto para controlar un receptor
de satélite, decodicador digital,
reproductor multimedia en línea o
cualquier categoría de dispositivos
que aparezca en la lista de códigos.
4. Use los botones de números del
control remoto para introducir
el primer código remoto de 4
dígitos que marcó en la Lista de
códigos en el Paso 1. La luz roja se
apagará después de introducir el
cuarto dígito.
5. Apunte el control remoto
hacia el dispositivo. Pruebe
los botones en el control para
ver si el dispositivo responde
como debería. Si los botones no
accionan el dispositivo, vuelva al
Paso 2 y use el siguiente código
que marcó para dicho dispositivo.
6. Repita estos pasos para cada dispositivo
que desee controlar.
Notas de programación
• Es posible que algunos códigos solo
ejecuten algunas funciones del dispositivo.
Es probable que haya otro código en la
Lista de códigos que ejecute más funciones.
Pruebe otros códigos de la Lista de códigos
para obtener más funcionalidades.
• Si no encuentra un código que funcione con
su dispositivo o en la Lista de códigos no
aparecen códigos para el dispositivo, use el
método Búsqueda automática de códigos
en la siguiente sección para programar el
control remoto.
• En el caso de dispositivos combinados, como
combinación TV/DVD o TV/ VCR, quizá deba
ingresar un código para cada dispositivo.
• Escriba los códigos que sirven para
programar el dispositivo para consultas
futuras.

24
Programación del control remoto
1. Encienda manualmente el
dispositivo que desea controlar.
NOTA: El proceso Búsqueda
automática de códigos no se puede
usar para dispositivos sin la capacidad
de encendido/apagado. En estos
casos, use el método Entrada directa
de códigos.
2. Presione y mantenga presionado
el botón SETUP (conguración)
hasta que la luz roja del control
remoto se encienda. Suelte el botón
SETUP (conguración). La luz roja
permanecerá encendida.
NOTA: La luz roja será una luz
pequeña ubicada en la parte superior
del control remoto o el botón de
encendido/apagado.
3. Presione y suelte el botón del
dispositivo en el control remoto
del dispositivo que desea controlar
(por ejemplo, TV, STR, DVD, AUD).
La luz roja parpadeará una vez y
permanecerá encendida.
4. Apunte el control remoto hacia
el dispositivo y presione y suelte
el botón POWER en el control. El
control enviará 10 códigos diferentes
al dispositivo. La luz roja parpadeará
una vez para cada código y
permanecerá encendida después de
enviar los 10 códigos.
¿Se apagó el dispositivo?
• Si la respuesta es Armativa,
proceda al Paso 5.
Búsqueda automática de códigos
La Búsqueda automática de códigos es un
proceso mediante el cual puede buscar por
todos los códigos almacenados en el control
remoto para encontrar un código para el
dispositivo. Se recomienda que lea todos los
pasos a continuación para familiarizarse con
la Búsqueda automática de códigos antes de
comenzar el proceso.
25
Programación del control remoto
• Si la respuesta es Negativa, repita
el Paso 4 para probar los 10
códigos siguientes.
5. Vuelva a encender manualmente el
dispositivo.
6. Apunte el control remoto hacia el
dispositivo y presione y suelte el
botón VOL
. El control remoto
volverá a enviar el primero de los
10 códigos del Paso 4. La luz roja
parpadeará una vez y permanecerá
encendida.
¿Se apagó el dispositivo?
• Si la respuesta es Armativa,
signica que ha encontrado
un código para el dispositivo.
Presione y suelte el mismo botón
de dispositivo que oprimió en el
Paso 3. Esta acción almacenará
el código en el control remoto.
Proceda al Paso 7.
• Si la respuesta es Negativa, siga
oprimiendo y soltando el botón
VOL
hasta que se apague el
dispositivo para probar los otros
9 códigos del Paso 4. Asegúrese
de esperar aproximadamente tres
(3) segundos después de cada
presión del botón VOL
para
que el dispositivo tenga tiempo
de responder al código. Cuando
se apague el dispositivo, signica
que ha encontrado un código.
Presione y suelte el mismo botón
que oprimió en el Paso 3. Esta
acción almacenará el código en el
control remoto. Proceda al Paso 7.
NOTA:
• El botón VOL se puede usar
para retroceder por cada conjunto
de 10 códigos.
• La luz roja parpadeará dos veces
después de probar el primero o el
último código de cada conjunto
de 10.

26
7. Use el control remoto para volver a
encender el dispositivo. Pruebe los
botones en el control para ver si el
dispositivo responde como debería.
Si los botones no accionan el
dispositivo, vuelva al Paso 2 y repita
este proceso para buscar un código
que sea mejor.
8. Repita este proceso para cada
dispositivo que desee controlar.
Control de dispositivos integrados
En algunos dispositivos integrados (p. ej., TV/
VCR, TV/DVD, DVD/VCR, etc.) deberá programar
dos botones diferentes para controlar ambas
partes del dispositivo. Por ejemplo, si tiene un
TV/DVD integrados, es probable que tenga que
programar un código en el botón de TV para
controlar la parte del TV Y un código separado
en el botón de DVD para controlar la parte
del DVD.
Programación del control remoto
27
Uso del control remoto
Control del audio principal
La característica de control del audio principal
le permite seleccionar un solo dispositivo
que siempre es controlado por los botones
de volumen. Por ej., el control remoto puede
estar en el modo de televisor mientras que los
botones de volumen controlan el volumen del
receptor de audio o la barra de sonido en lugar
del televisor.
Habilitar el control del audio principal
1. Presione y mantenga presionado
el botón SETUP (conguración)
hasta que la luz roja del control
remoto se encienda. Suelte el
botón SETUP (conguración). La
luz roja permanecerá encendida.
2. En el control remoto, presione y
suelte el botón (TV, AUD, etc.) que
corresponda al tipo de dispositivo
para el que desea controlar el
volumen.
3. Presione y suelte el botón MUTE
(silenciar).
4. Presione y suelte el botón
VOL
. La luz roja parpadeará dos
veces y se apagará.
Deshabilitar el control del
audio principal
1. Presione y mantenga presionado
el botón SETUP (conguración)
hasta que la luz roja del control
remoto se encienda. Suelte el
botón SETUP (conguración). La
luz roja permanecerá encendida.
2. Presione y suelte el botón del
dispositivo (TV, AUD, etc.) que se
haya programado para controlar la
función de volumen maestro.
3. Presione y suelte el botón MUTE
(silenciar).
4. Presione y suelte el botón
VOL
. La luz roja parpadeará dos
veces y se apagará.
28
Uso del control remoto
1. Presione y mantenga presionado
el botón SETUP (conguración)
hasta que la luz roja del control
remoto se encienda. Suelte el
botón SETUP (conguración). La
luz roja permanecerá encendida.
2. Presione y suelte el botón
correspondiente al dispositivo
(TV, DVD, STRM, AUD) para el que
desee obtener el código.
3. Presione y suelte el botón
ENTER.
4. Presione y suelte botón “1”.
Cuente la cantidad de veces
que la luz del control remoto
parpadea. Este el número
correspondiente al primer dígito
del código. Repita el proceso
presionando los botones “2”, “3”
y “4” para los dígitos restantes.
5. Presione y suelte el botón ENTER
para salir de este modo.button to
exit this mode.
Identicación de códigos
Restablecimiento de la conguración
de fábrica
1. Presione y mantenga presionado
el botón SETUP (conguración)
hasta que la luz roja del control
remoto se encienda. Suelte el botón
SETUP (conguración). La luz roja
permanecerá encendida.
2. Presione y suelte el botón MUTE
(silenciar).
3. Presione y suelte el botón #0. La
luz indicadora roja parpadeará dos
veces.

29
El control remoto no funciona con
su dispositivo.
• Asegúrese de que las pilas sean nuevas y
estén bien colocadas.
• Apunte a su dispositivo directamente con el
control remoto y asegúrese de que no haya
ninguna obstrucción entre el control remoto
y el dispositivo.
• Asegúrese de seleccionar en el control
remoto el dispositivo correcto que desea
controlar, por ejemplo: TV para el televisor y
CBL para el receptor de cable.
• Intente programar el control remoto usando
un código distinto. Consulte la sección
Entrada directa de códigos.
• Es posible que el control remoto no sea
compatible con su dispositivo.
Algunas funciones de su dispositivo no
funciona con el control remoto.
• A veces un código puede servir para algunas
funciones del dispositivo, pero no todas.
Intente programar el control remoto con
un código distinto de la lista de códigos.
Consulte la sección Entrada directa de
códigos.
• Es posible que el control remoto no sirva
para todas las funciones de su dispositivo o
bien que algunos nombres de los botones
sean diferentes de los del control remoto
original.
Resolución de problemas

30
Garantía limitada de 90 días
Este documento garantiza que este producto
está libre de defectos de fabricación durante un
período de noventa (90) días desde la fecha de
compra original del consumidor. Esta garantía
está limitada a la reparación o el reemplazo
de este producto solamente y no cubre los
daños consecuentes o incidentales a otros
productos que puedan usarse con esta unidad.
Esta garantía prevalecerá sobre cualquier otra
garantía expresa o implícita. Algunos estados no
permiten la aplicación de limitaciones respecto
de la duración de una garantía implícita o no
permiten la exclusión o limitación de la cláusula
sobre daños incidentales o consecuentes, por
lo que las limitaciones mencionadas pueden
no aplicarse en su caso. Esta garantía le otorga
derechos especícos y es posible que tenga
otros derechos que pueden variar según el
estado en el que vive.
HECHO EN CHINA
Philips y el emblema de escudo Philips son marcas regis-
tradas de Koninklijke Philips N.V. y se usan bajo licencia.
Este producto ha sido fabricado y se comercializa bajo
responsabilidad de Jasco Products Company y Jasco
Products Company LLC, 10 E. Memorial Rd, Oklahoma City,
OK 73114, es el garante en relación a este producto.
Este producto tiene una garantía de 90 días.
Visite www.philips.com/support para conocer los
detalles de la garantía.
¿Tiene preguntas? Comuníquese al 1-844-816-0320 entre
las 7:00 a. m. y las 8:00 p. m. CST (hora central estándar).

31
Este dispositivo cumple con el apartado 15 de
la normativa de la FCC. El funcionamiento está
sujeto a las dos condiciones siguientes:
(1) este dispositivo no causa interferencia
negativa y (2) este dispositivo debe aceptar
las interferencias recibidas, incluidas
las interferencias que puedan causar un
funcionamiento no deseado.
NOTA DE LA FCC: El fabricante no se hace
responsable de ninguna interferencia de
radio o TV ocasionada por modicaciones no
autorizadas efectuadas a este aparato.
Dichas modicaciones podrían anular la
autoridad del usuario para utilizar este aparato.
NOTA: Este aparato ha sido probado y cumple
con los límites para aparatos digitales de
Clase B, de conformidad con el apartado
15 de la normativa de la FCC. Estos límites
están diseñados para proveer protección
razonable contra interferencias perjudiciales en
instalaciones residenciales. Este aparato genera,
usa y puede irradiar energía de radiofrecuencias
y, si no se instala y usa según las instrucciones,
puede provocar interferencia perjudicial a las
radiocomunicaciones. No obstante, no hay
garantías de que no ocurrirá interferencia en
una instalación en particular. Si este aparato
provoca interferencia perjudicial a la recepción
de radio o televisión, lo que puede determinarse
encendiendo y apagándolo, se recomienda que
el usuario intente corregir la interferencia por
medio de la implementación de una o más de las
siguientes medidas:
• Cambiar la orientación o el lugar de la
antena receptora.
• Incrementar la separación entre el aparato
y el receptor.
• Conectar el aparato a un tomacorriente de
un circuito diferente del circuito al que el
receptor está conectado.
• Consultar al distribuidor o a un técnico
con experiencia en radio/televisión para
solicitar ayuda.
ICES-3(B)/NMB-3(B).
Declaración de la FCC