
I
www.x431.com +86 755 8455 7891
LAUNCH
PAD VII
User Manual
Copyright Information
Copyright © 2021 LAUNCH TECH CO., LTD. All rights reserved. No part of this publication may be
reproduced, stored in a retrieval system, or transmitted in any form or by any means, electronic, mechanical,
photocopying, recording or otherwise, without the prior written permission of LAUNCH. The information
contained herein is designed only for the use of this unit. LAUNCH is not responsible for any use of this
information as applied to other units.
losses, costs, or expenses incurred by purchaser or third parties as a result of: Accident, misuse, or abuse
of this unit, or unauthorized modifications, repairs, or alterations to this unit, or failure to strictly comply
with LAUNCH operating and maintenance instructions. LAUNCH shall not be liable for any damages or
problems arising from the use of any options or any consumable products other than those designated as
Original LAUNCH Products or LAUNCH Approved Products by LAUNCH.
LAUNCH owns the complete intellectual property rights for the software used by this product. For any
reverse engineering or cracking actions against the software, LAUNCH will block the use of this product and
reserve the right to pursue their legal liabilities.
the time of printing.
LAUNCH reserves the right to make changes at any time without notice. While information of this manual
has been carefully checked for accuracy, no guarantee is given for the completeness and correctness of
not be liable for any direct, special, incidental, indirect damages or any economic consequential damages
Trademark Information
All other LAUNCH trademarks, service marks, domain names, logos, and company names referred to in
this manual are either trademarks, registered trademarks, service marks, domain names, logos, company
trademarks, service marks, domain names, logos and company names are not registered, LAUNCH claims
other rights associated with unregistered trademarks, service marks, domain names, logos, and company
names. Other products or company names referred to in this manual may be trademarks of their respective
owners. You may not use any trademark, service mark, domain name, logo, or company name of LAUNCH
or any third party without permission from the owner of the applicable trademark, service mark, domain
name, logo, or company name. You may contact LAUNCH by visiting the website at www.cnlaunch.com, or
Longgang, Shenzhen, Guangdong, P.R.China, to request written permission to use Materials on this manual
for purposes or for all other questions relating to this manual.

II
www.x431.com +86 755 8455 7891
LAUNCH
PAD VII
User Manual
IMPORTANT SAFETY INFORMATION
DANGER
When an engine is operating, keep the service area well-ventilated or attach a building exhaust removal
system to the engine exhaust system. Engines produce various poisonous compounds (hydrocarbon,
personal injury.
WARNING
Read all safety warnings and instructions.
*Note: Failure to follow the warnings and instructions may result in electric shock, re and/or serious injury.
1. Always perform automotive testing in a safe environment.
2. Do not connect or disconnect any test equipment while the ignition is on or the engine is running.
3. DO NOT attempt to operate the tool while driving the vehicle. Have second personal operate the
tool. Any distraction may cause an accident.
4.
5. NEVER smoke or allow a spark or flame in vicinity of battery or engine. Do not operate the tool in
6.
7.
8. Put blocks in front of the drive wheels and never leave the vehicle unattended while testing.
9. Use extreme caution when working around the ignition coil, distributor cap, ignition wires and spark
plugs. These components create hazardous voltage when the engine is running.
10. To avoid damaging the tool or generating false data, please make sure the vehicle battery is fully
11.
automotive batteries should be avoided. Keep the ignition sources away from the battery at all times.
12. Keep the tool dry, clean, free from oil, water or grease. Use a mild detergent on a clean cloth to clear the
outside of the equipment when necessary.
13. Keep clothing, hair, hands, tools, test equipment, etc. away from all moving or hot engine parts.
14. Store the tool and accessories in a locked area out of the reach of children.
15. Do not use the tool while standing in water.
16. Do not expose the tool or power adapter to rain or wet conditions. Water entering the tool or power
adapter increases the risk of electric shock.
III
www.x431.com +86 755 8455 7891
LAUNCH
PAD VII
User Manual
Using This Manual
This manual contains device usage instructions.
Some illustrations shown in this manual may contain modules and optional equipment that are not included
in your system.
Conventions
The following conventions are used.
Bold Text
Example:
Tap OK.
Notes and Important Messages
Notes
A NOTE provides helpful information such as additional explanations, tips, and comments.
Example:
Note: In general, vehicle idencaon numbers are standardized - all contain 17 characters. VIN characters may
be capital leers A through Z and numbers 1 through 0; however, the leers I, O and Q are never used in order to
avoid mistakes of misreading. No signs or spaces are allowed in the VIN.
Warning
indicates a hazardous situation which, if not avoided, could result in minor or moderate injury to
the operator or to bystanders.
Example:
Warning: Retrieving and using DTCs for troubleshooting vehicle operation is only one part of an overall
diagnosc strategy. Never replace a part based only on the DTC denion. Each DTC has a set of tesng procedures,
instrucons and ow charts that must be followed to conrm the locaon of the problem. This informaon can be
found in the vehicle’s service manual.
Danger
DANGER indicates an imminently or potentially hazardous situation which, if not avoided, could result in
death or serious injury to the operator or to bystanders.
Example:
Danger: If you must drive the vehicle in order to perform a troubleshoong procedure, always have a second
person help you. Trying to drive and operate the diagnosc tool at the same me is dangerous, and could cause a
serious trac accident.
Hyperlink
Hyperlinks, or links, that take you to other related articles, procedures, and illustrations are available in
website link or an email address link.
Illustrations
tested. Observe the menu titles and on-screen instructions to make correct option selection.

IV
www.x431.com +86 755 8455 7891
LAUNCH
PAD VII
User Manual
Table of Contents
1 Introduction .................................................................................................................................................1
...........................................................................................................................................1
1.2 Accessory Checklist...................................................................................................................................2
2 Components & Controls ............................................................................................................................4
2.1 Display Tablet ............................................................................................................................................4
2.2 SmartLink C Device ...................................................................................................................................6
............................................................................................................................7
3 Preparations................................................................................................................................................8
3.1 Charging the Tablet ...................................................................................................................................8
..........................................................................................................................................8
....................................................................................................................8
3.4 Wi-Fi Setup ................................................................................................................................................9
.................................................................................................................................... 10
3.6 Change System Language ..................................................................................................................... 10
3.7 Set Standby Time ................................................................................................................................... 10
4 Initial Use...................................................................................................................................................11
4.1 Register & Download Diagnostic Software .............................................................................................. 11
4.2 Job Menu ................................................................................................................................................ 13
4.3 Connections............................................................................................................................................ 14
4.3.1 Preparation .......................................................................................................................................... 14
4.3.2 DLC Location ....................................................................................................................................... 14
4.3.3 Vehicle Connection .............................................................................................................................. 15
4.4 Communication Setup ............................................................................................................................ 15
5 Start Diagnostics ..................................................................................................................................... 17
................................................................................................................................ 17
5.2 Local Diagnose ....................................................................................................................................... 20
5.2.1 Main Menu ..................................................................................................................................... 20
..................................................................................................................................... 21
5.2.3 Manual Selection ........................................................................................................................... 22
5.3 Diagnostic History................................................................................................................................... 31
5.4 Feedback ................................................................................................................................................ 32
6 Maintenance Reset .................................................................................................................................. 33
6.1 Oil Reset Service .................................................................................................................................... 33
.............................................................................................................. 34
6.3 Steering Angle Calibration ...................................................................................................................... 34
.......................................................................................................................................... 34
6.5 Tire Pressure Monitor System Reset ...................................................................................................... 34
6.6 Gear Learning......................................................................................................................................... 34
......................................................................................................................................... 34
....................................................................................................................................... 35
....................................................................................................... 35

V
www.x431.com +86 755 8455 7891
LAUNCH
PAD VII
User Manual
....................................................................................... 35
6.11 Electronic Throttle Position Reset ........................................................................................................ 35
6.12 Gearbox Matching ................................................................................................................................ 35
....................................................................................... 36
............................................................................................................................. 36
6.15 Suspension Calibration ........................................................................................................................ 36
6.16 EGR Adaption ....................................................................................................................................... 36
6.17 Seats Calibration .................................................................................................................................. 36
6.18 Tyre Reset ............................................................................................................................................ 36
...................................................................................................................................... 36
................................................................................ 36
6.21 NOx Sensor Reset................................................................................................................................ 36
7 Software Update ...................................................................................................................................... 37
7.1 Update Diagnostic Software & APP ........................................................................................................ 37
7.2 Update Frequently Used Software ......................................................................................................... 37
7.3 Renew Subscription................................................................................................................................ 38
8 SmartLink Diag. ....................................................................................................................................... 39
............................................................................................................................................. 39
8.2 Perform SmartLink Remote Operation ................................................................................................... 41
8.2.1 Posting remote assistance request .............................................................................................. 41
8.2.2 Connections & operations ............................................................................................................ 42
9 TPMS......................................................................................................................................................... 45
9.1 Working Principle .................................................................................................................................... 45
9.2 Operation Flowchart ............................................................................................................................... 46
.................................................................................................................................. 47
......................................................................................................................................... 47
9.3.2 Unbinding ..................................................................................................................................... 48
10 ADAS ...................................................................................................................................................... 49
11 User Info ................................................................................................................................................. 51
11.1 My Report ............................................................................................................................................. 51
........................................................................................................................................................ 52
.......................................................................................................................................... 52
............................................................................................................. 52
11.5 Data Stream Sample ............................................................................................................................ 52
11.6 Vehicle Voltage ..................................................................................................................................... 52
11.7 My Order ............................................................................................................................................... 53
11.8 Subscription Renewal Card .................................................................................................................. 53
.................................................................................................................................................... 53
11.10 Change Password .............................................................................................................................. 53
11.11 Settings ............................................................................................................................................... 53
11.11.1 Units .......................................................................................................................................... 53
....................................................................................................................... 53
11.11.3 Printer Set ................................................................................................................................. 53

VI
www.x431.com +86 755 8455 7891
LAUNCH
PAD VII
User Manual
11.11.4 Clear Cache .............................................................................................................................. 55
11.11.5 About ......................................................................................................................................... 55
11.11.6 Diagnostic Software Auto Update ............................................................................................. 56
................................................................................................ 56
11.12 Diagnostic Software Clear .................................................................................................................. 56
12 Others ..................................................................................................................................................... 57
12.1 Remote Diagnose ................................................................................................................................. 57
.......................................................................................................................... 57
12.1.2 Add Friends ................................................................................................................................ 57
.............................................................................................................. 58
.......................................................................... 59
................................................................................ 61
12.2 Toolbox ................................................................................................................................................. 62
12.3 Tablet Setting ........................................................................................................................................ 62
12.4 Files ...................................................................................................................................................... 62
12.5 Wireless Upgrade ................................................................................................................................. 63
12.6 TeamViewer QS .................................................................................................................................... 64
12.7 Recording Master ................................................................................................................................. 64
................................................................................................................................................ 64
12.9 Camera ................................................................................................................................................. 64
12.10 Gallery ................................................................................................................................................ 65
12.11 Video Player ....................................................................................................................................... 65
12.12 E-Mail ................................................................................................................................................. 65
12.13 Calculator ........................................................................................................................................... 65
13 J2534 Reprogramming Using SmartLink C......................................................................................... 66
13.1 As a Local J2534 PassThru Device ...................................................................................................... 66
13.2 As a Remote J2534 PassThru Device .................................................................................................. 66
14 FAQ ......................................................................................................................................................... 68
............................................................................................................................ 68
14.2 About SmartLink Diag. .......................................................................................................................... 70
15 Glossary of Terms & Abbreviations .................................................................................................... 72

Safety & Accessory
Initial UseDiagnosticsFAQ & Appendix
Product Prole
1
www.x431.com +86 755 8455 7891
LAUNCH
PAD VII
User Manual
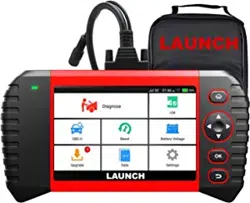
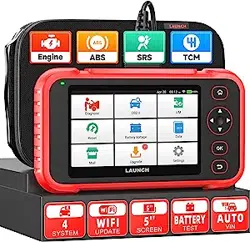
1 Introduction
1.1 Product Prole
This Android OS-based, tablet-style scanner incorporates the best possible coverage of OE-level
and is characterized by covering a wide range of vehicles, featuring powerful functions, and providing
precise test result.
resolution of 1920 x 1080 dots, it delivers quick and complete diagnostic functionalities which technicians
need to diagnose, research and repair vehicles in one solution.
• Intelligent Diagnose
eliminating guesswork and step-by-step manual menu selection.
• Local Diagnose
Follow the on-screen prompts to start diagnostic session step by step. Diagnosis functions include: Read
DTCs, Clear DTCs, Read Data Stream, Special Functions etc.
• Reset
Regeneration, Electronic Throttle Position Reset, Gearbox Matching, AFS (Adaptive Front-lighting
• SmartLink Diag.
can seek a trusted second opinion or additional expertise on various vehicle issues from remote master
• TPMS
Enables you to activate tire pressure information, program tire pressure sensor and perform the TPMS
kinds of various TPMS functions.
• One-click Update
Lets you update your diagnostic software online.
• Feedback
Enables you to submit the vehicle diagnostic software problems or app bugs to us for analysis and
troubleshooting.
• ADAS
• Mall
Enables you to subscribe some extra software or service functions that are not integrated in the tool
online.
• Vehicle Coverage
Checks which vehicle models are supported on this tool.
• Remote Diagnose
This module helps repair shops or mechanics to diagnose a remote vehicle, and launch instant

Safety & Accessory
Initial Use
Diagnostics
FAQ & Appendix
Product Prole
2
www.x431.com +86 755 8455 7891
LAUNCH
PAD VII
User Manual
• Diagnostic History
This function provides a quick access to the tested vehicles and users can choose to view the test report
or resume from the last operation, without starting from scratch.
• Add-on Modules
1.2 Accessory Checklist
this tool together.
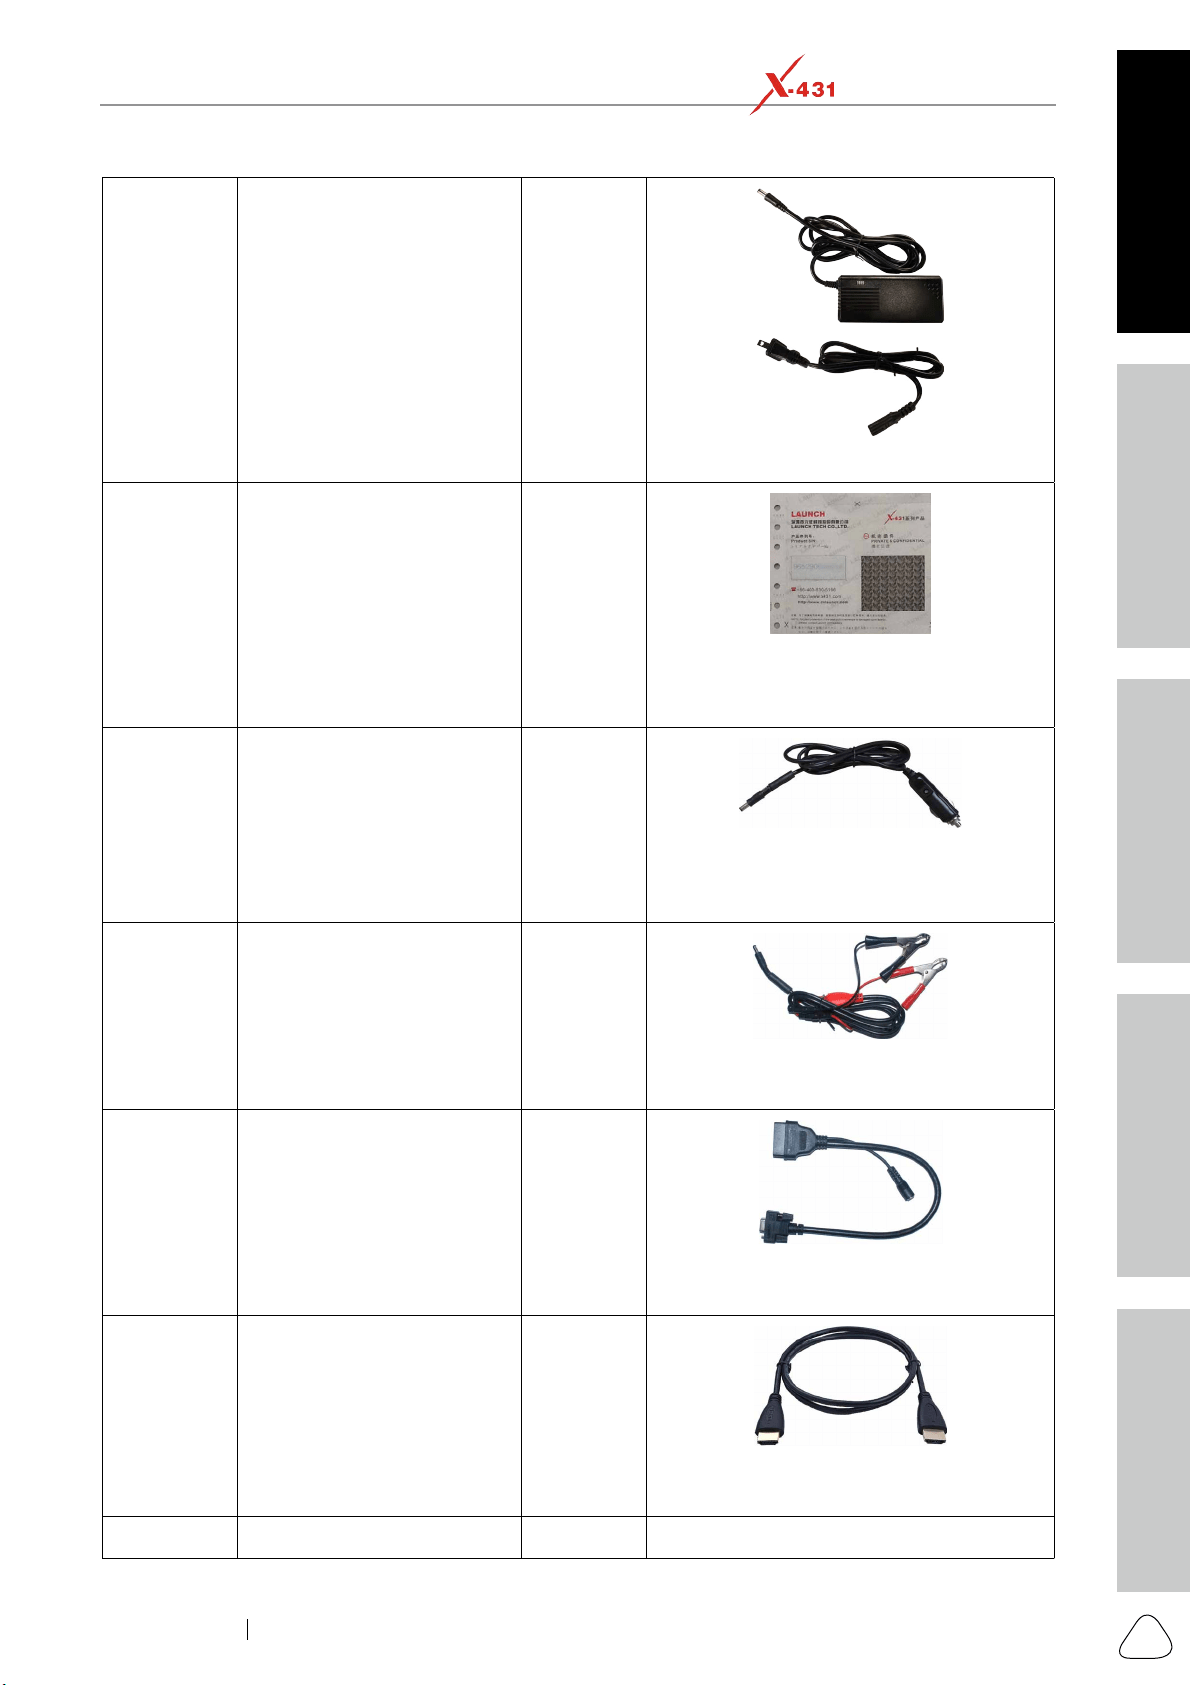
No. Name Qt. Picture & Notes
1 Display
Tablet 1
2 SmartLink C Device 1
3 Diagnostic Cable 1
(Connects the SmartLink C device to the
)
4 Data Cable (Type A- Type B) 1
(Connects the SmartLink C device to PC for
5 Data Cable (Type A- Type C)
(Connects the tablet to PC for data
6 Crossover Cable 1
(Connects the SmartLink C device to
the modem while performing SmartLink
Safety & Accessory
Initial UseDiagnosticsFAQ & Appendix
Product Prole
3
www.x431.com +86 755 8455 7891
LAUNCH
PAD VII
User Manual
7 Power Adapter 1
8 Password Envelope 1
Activation Code, which is required for your
9 Cigarette Lighter Cable 1
(To provide power to the non-16pin connector
through connection to the Cigarette Lighter
receptacle.)
10 Battery Clamps Cable 1
(To provide power to the non-16pin connector
through connection to the vehicle's battery.)
11 OBD I Adapter 1
(A adapter cable for connecting non-16 pin
12
Mini High Denition Media
Interface Cable
1
(To mirror the tablet screen onto an external
13 Non-16pin Connector Kit
Safety & Accessory
Initial Use
Diagnostics
FAQ & Appendix
Product Prole
4
www.x431.com +86 755 8455 7891
LAUNCH
PAD VII
User Manual
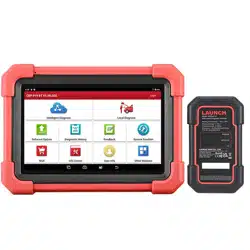
2 Components & Controls
There are two main components to the diagnostic system:
Display Tablet -- the central processor and monitor for the system (For details, please refer to Chapter
2.1 Display Tablet
The tablet acts as the central processing system, which is used to receive and analyze the live vehicle data
from the SmartLink C device and then output the test result.
Safety & Accessory
Initial UseDiagnosticsFAQ & Appendix
Product Prole
5
www.x431.com +86 755 8455 7891
LAUNCH
PAD VII
User Manual
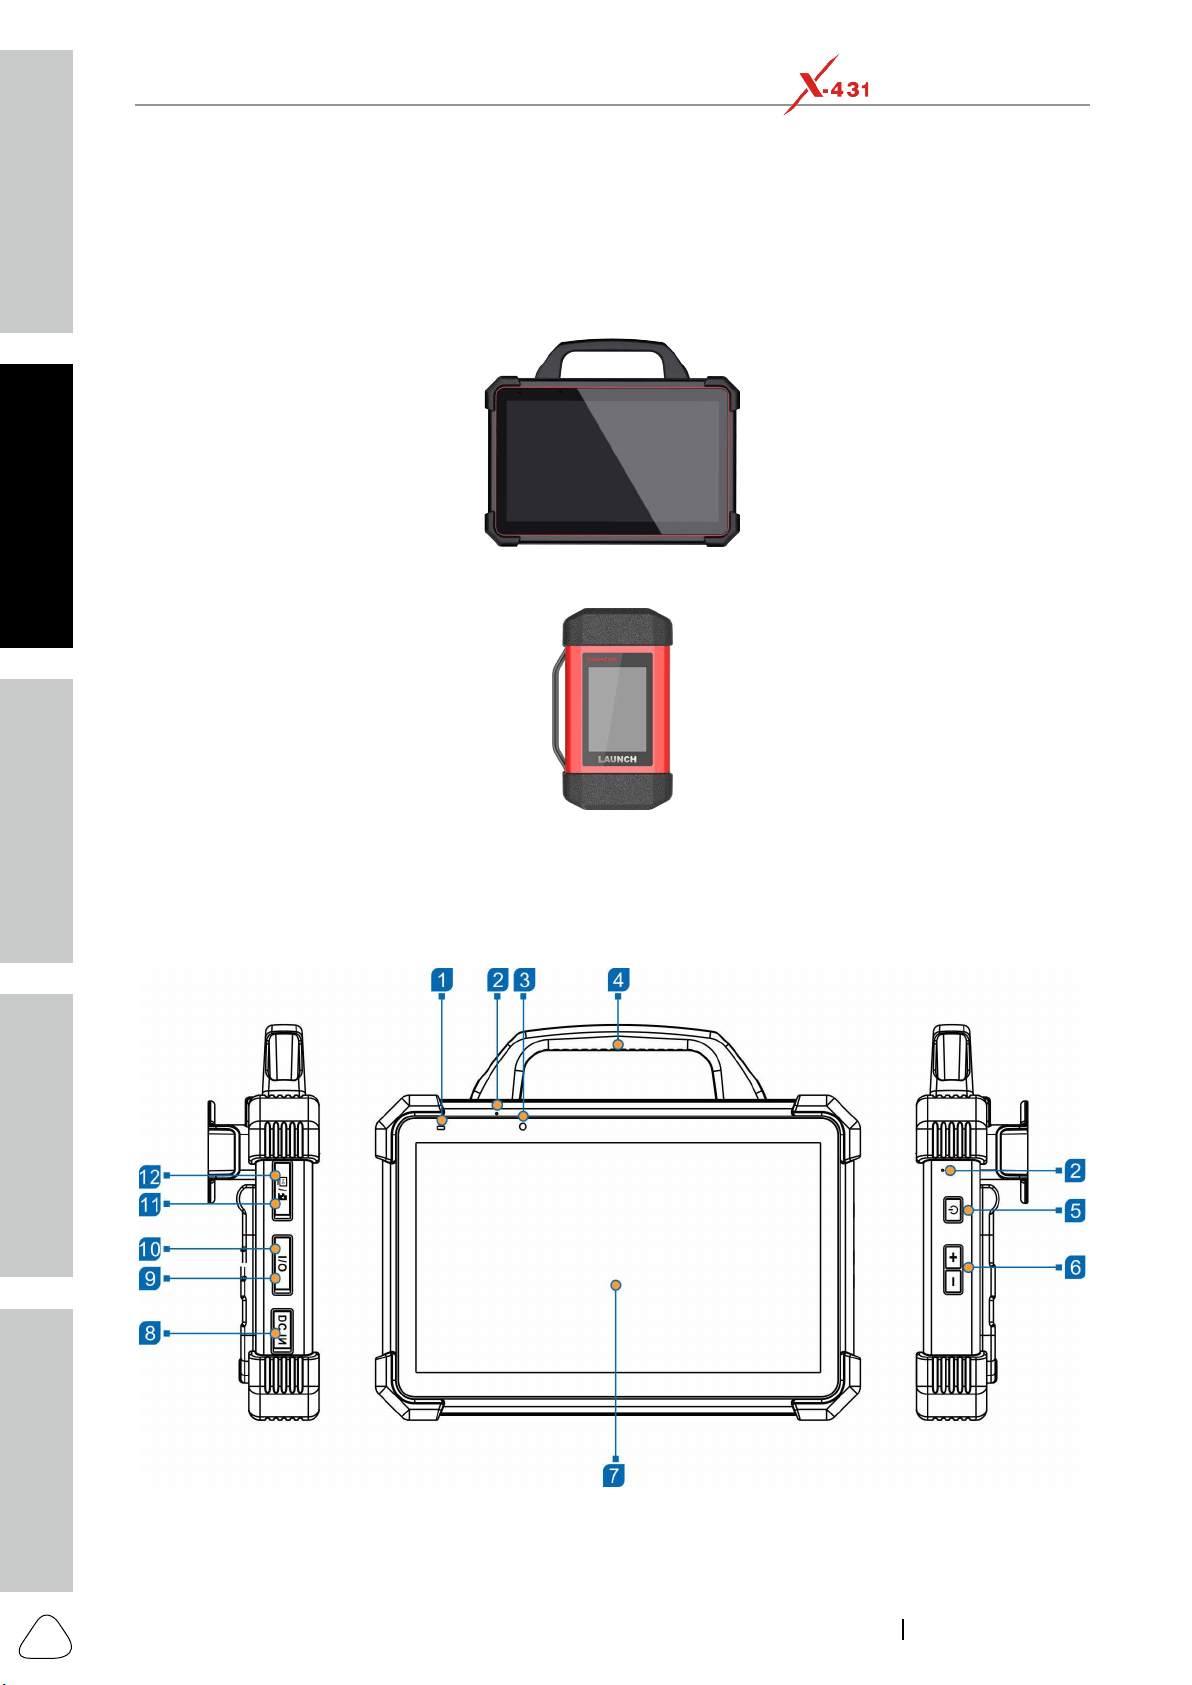
The following table formulates ports and indicators of display tablet:
No. Name & Descriptions
1
Charging indicator
2 Microphone
3 Front Camera
4 Handgrip
5
Power/Screen Lock Button --
screen with short press.
6
Volume Buttons -- To adjust the volume.
Note: Press and hold [POWER] and [VOL -] key to capture the current screenshot.
7 Display Screen
8 DC IN Port -- Connects the power adapter to charge the tablet.
9 Type-C Data Transmission Port -- Connects it to the PC for data exchange.
10
Type-A Port
11
Memory Card Slot -- Stores the memory card for storage expansion.
SIM Card Slot -- Disabled for this edition.
12
High Definition Multimedia Output Port -- Connects it to an external projector or
monitor with similar interface.
No. Name & Descriptions
13 Rear Camera
14 Camera Flash
Safety & Accessory
Initial Use
Diagnostics
FAQ & Appendix
Product Prole
6
www.x431.com +86 755 8455 7891
LAUNCH
PAD VII
User Manual
15 Audio Speaker
16
Adjustable Kickstand - Flip out it to any angle and work comfortable at your desk, or
hang it on automotive part.
2.2 SmartLink C Device
The SmartLink C device features powerful functions and it can be applied in the following situations:
1. When as a VCI (Vehicle Communication Interface) device, it needs to work in conjunction with the
Diagnose module of the tablet, which is used to obtain vehicle data, and then send it to the tablet for
2. When as a SmartLink C (Customer) dongle, it does not communicate with the tablet, but it needs
to work together with the SmartLink module of the tablet. The tablet is mainly used to issue remote
diagnostic requests, and the SmartLink C dongle is networked to receive and execute commands from
Note: For detailed operations, please refer to Chapter 8.
3. When as a local or remote J2534 PassThru device, it can be used in conjunction with the PC installed
with OEM diagnostic software.
Note: For detailed operations, please refer to Chapter 13.
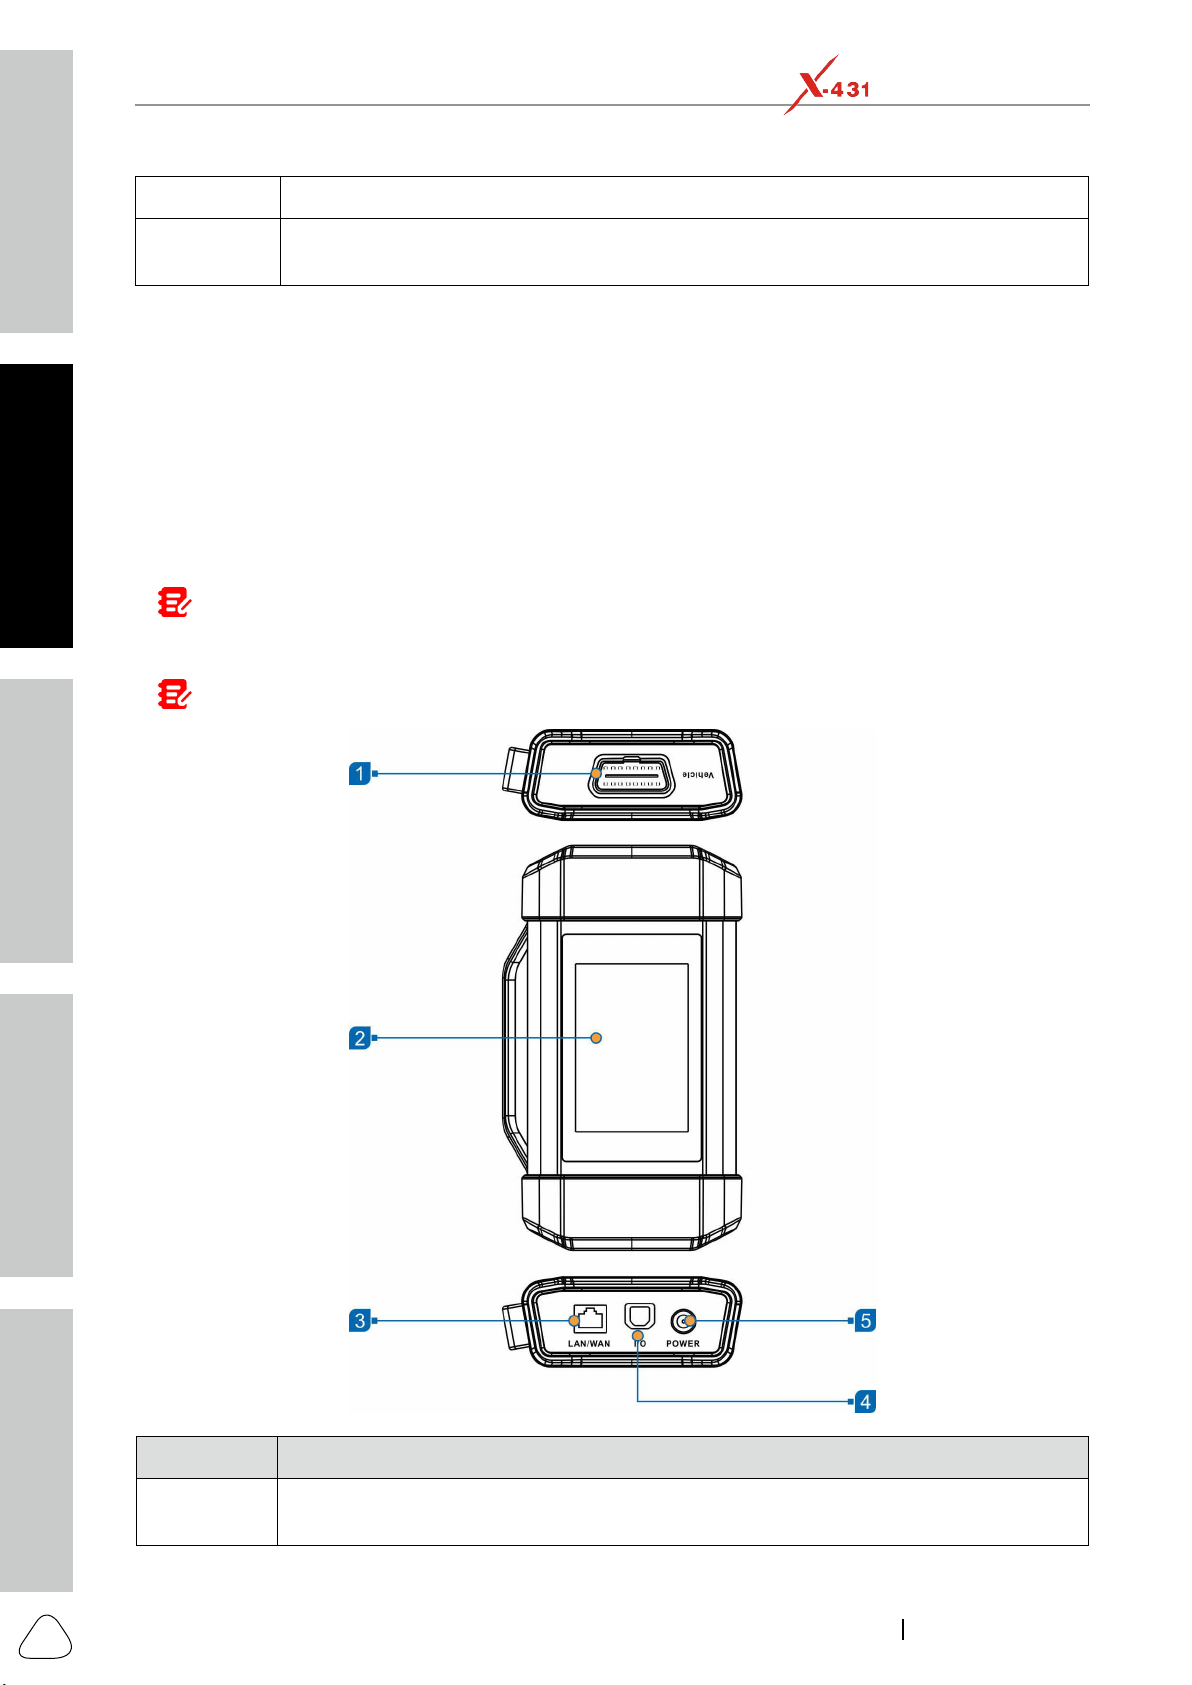
No. Name & Descriptions
1
OBD-16 Diagnostic Connector

Safety & Accessory
Initial UseDiagnosticsFAQ & Appendix
Product Prole
7
www.x431.com +86 755 8455 7891
LAUNCH
PAD VII
User Manual
2 Display Screen
3
LAN/WAN Port
cable.
4
Data I/O Port -- Connects the SmartLink C device to the PC via the data cable when as
a J2534 PassThru device.
5
DC-IN Port -- Currently disabled and for manufacturer use only.
Warning: The SmartLink C device obtains power through the vehicle's DLC, and it is
prohibited to connect to an external DC power supply. No responsibility can be assumed for
any damage or loss caused as a result of not strictly following the above method.
2.3 Technical Specications
A. Display Tablet
Item Description
Operating system Android 9
CPU Octa-core processor, 2GHz
Display
Memory
Hard disk
Connectivity
Camera
HDMI
Speaker Two 1.5W speakers
Microphone Two microphones
Operating Temperature -10
℃
~ 50
℃
(14 ~122
℉
Storage Temperature -20
℃
~ 70
℃
(-4 ~158
℉
B. SmartLink C Device
Item Description
Working voltage DC 9V ~ 36V
Size 204mm x 110mm x 45mm
Typical power consumption
Communication via
Operating Temperature -10
℃
~ 50
℃
(14 ~122
℉
Safety & Accessory
Initial Use
Diagnostics
FAQ & Appendix
Product Prole
8
www.x431.com +86 755 8455 7891
LAUNCH
PAD VII
User Manual
3 Preparations
3.1 Charging the Tablet
Warnings:
• Only use the included power adapter to recharge the tablet. Use of any other adapter will damage the tool. We
assume no responsibility for damage or loss resulng from using other similar adapters other than the specied
one.
• Always charge on a non-ammable surface in a well-venlated area.
1. To check the battery power level, press and hold the
Power button about 3 seconds to turn on the tablet.
2. Power level is indicated as a percentage in the
level drops below 10% while the tablet is on,
a Connect Charger
the screen.
port of the tablet, and the other end to the AC outlet.
2. The charging LED illuminates solid red and the
charging symbol
will appear on the screen.
3. Once it illuminates solid green, it indicates that
the battery is fully charged and the charging
complete symbol
replaces the charging sym-
bol. Disconnect the power adapter from the AC
outlet.
3.2 Power ON/OFF
Note: If it is the rst me you use the tablet or the tablet keeps idle for a long me, it could fail to be turned on.
It results from low baery. In this case, please recharge it for a while and try to turn it on.
1. Press and hold the POWER button for about 3 sec-
onds to turn on the tablet. The system starts initial-
izing and then enters the Home screen.
2. To turn the tablet off, press and hold the
POWER button until an option menu appears.
Tap Power O.
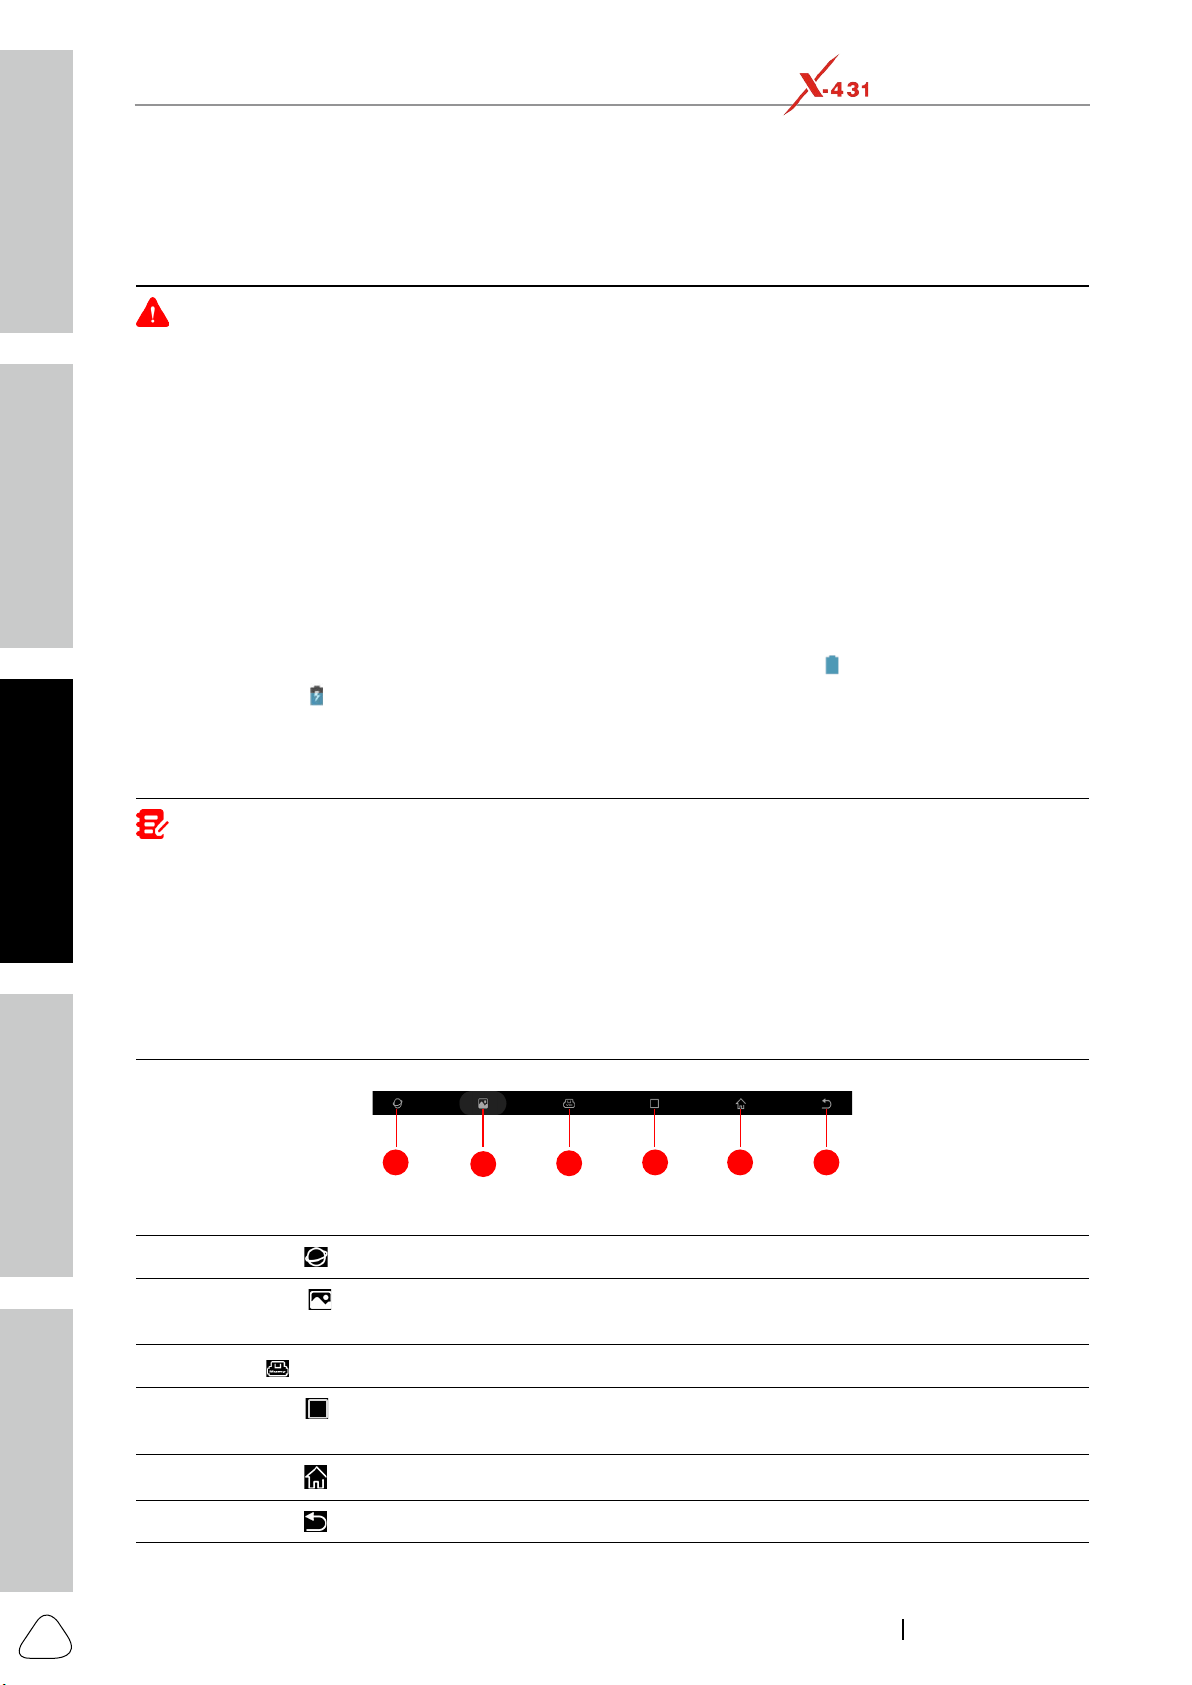
3.3 Locator & Navigation Buttons
1
2
3
4 5 6
On-screen keys and status bar are as follows:
1 Tap
2
Tap
to capture the current screen and all captured screenshots are stored in the
Screenshots folder.
3
: Shows whether the SmartLink C device is properly connected or not.
4
Tap
to display a list of applications that are currently running or recently used. To open
an application, tap it. To remove an application, swipe it upwards.
5 Tap
6 Tap
to return to the previous screen or exit the application.
Safety & Accessory
Initial UseDiagnosticsFAQ & Appendix
Product Prole
9
www.x431.com +86 755 8455 7891
LAUNCH
PAD VII
User Manual
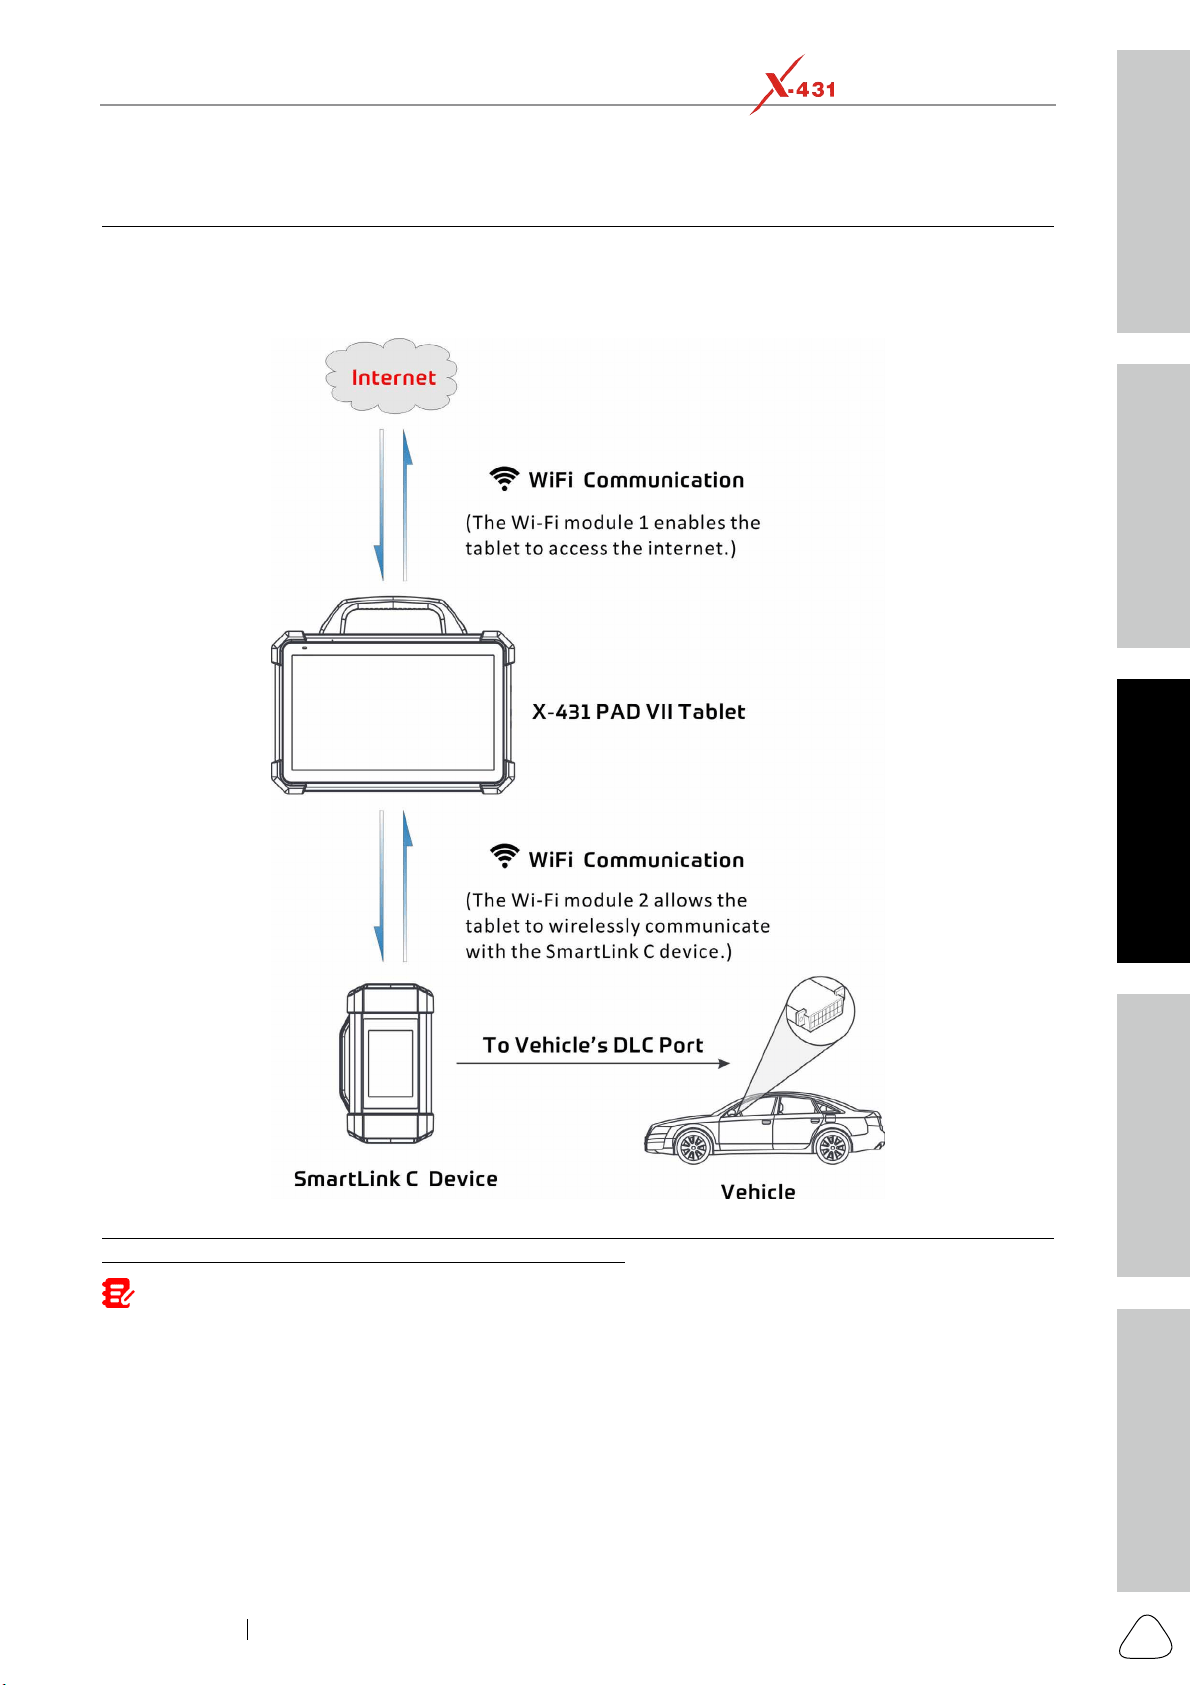
3.4 Wi-Fi Setup
The tablet has dual built-in Wi-Fi communication modules. One is used to communicate with the tablet, and
Note: Once WLAN is set as ON, the tablet will consume more power. While it keeps unused, please set it o to
save power. While WLAN is not in use, please turn it o to conserve baery power.
Connect to a WLAN Network
1. On the Home screen, tap Settings -> Network & in-
ternet -> Wi-Fi.
2. Slide the Wi-Fi switch to ON, the tablet starts search-
ing for available wireless LANs.
3. Select the desired WLAN network from the list.
-
nect directly. A password may be required for
secured networks.

Safety & Accessory
Initial Use
Diagnostics
FAQ & Appendix
Product Prole
10
www.x431.com +86 755 8455 7891
LAUNCH
PAD VII
User Manual
Disconnect from a WLAN Network
1. On the Home screen, tap Settings -> Network & in-
ternet -> Wi-Fi.
2. Tap the network with a Connected status,
then tap Forget.
3.5 Adjust Brightness
Note: Reducing the brightness of the screen is helpful to conserve the baery power.
1. On the home screen, tap Settings -> Display ->
Brightness level.
2. Drag the slider to adjust it.
3.6 Change System Language
The tool supports multiple system languages. To change the language of the tool, please do the following:
1. On the home screen, tap Settings -> System ->
Language & input -> Languages.
2. Tap Add a language, and then choose the desired
language from the list.
3. Tap and hold the desired language and drag it
to the top of the screen and then release it, the
system will change into the target language.
3.7 Set Standby Time
system enters sleep mode to save power.
1. On the home screen, tap Settings -> Display -> Ad-
vanced -> Sleep.
2. Choose the desired sleep time.
Safety & Accessory
Initial UseDiagnosticsFAQ & Appendix
Product Prole
11
www.x431.com +86 755 8455 7891
LAUNCH
PAD VII
User Manual
4 Initial Use
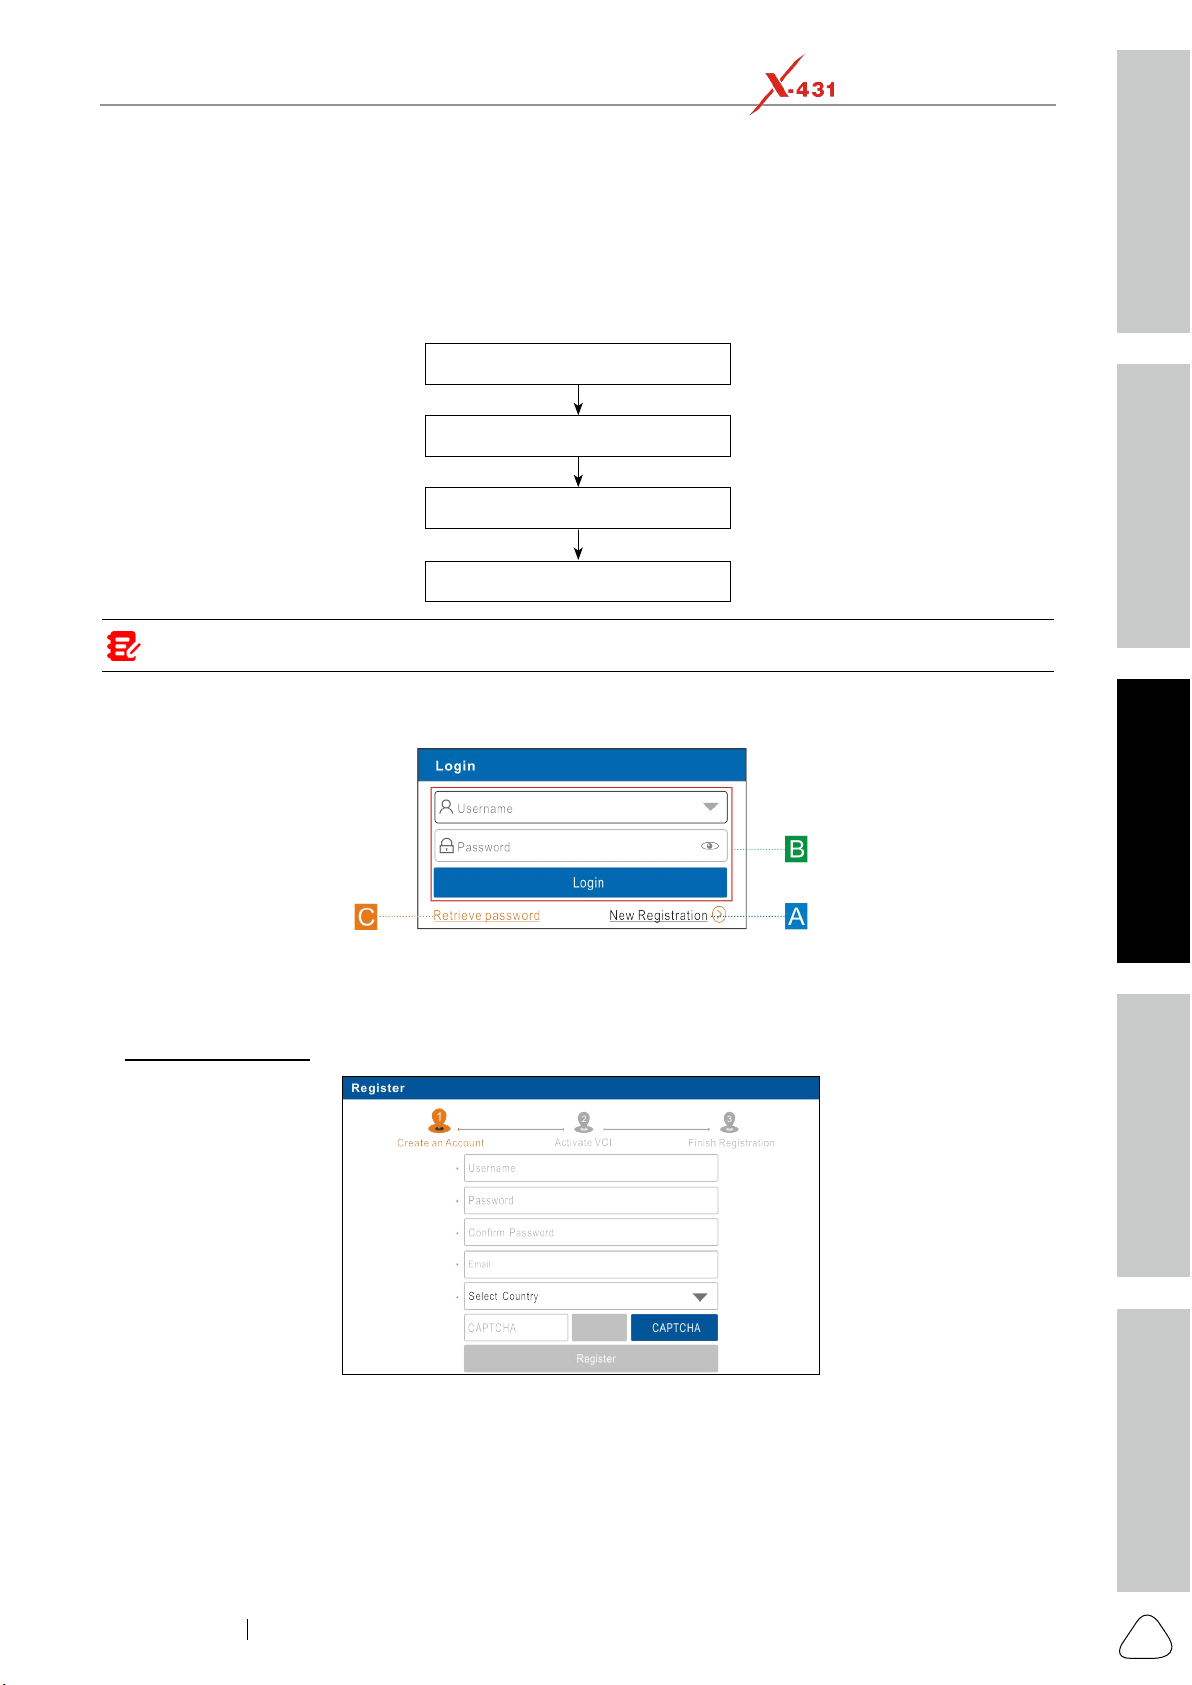
4.1 Register & Download Diagnostic Software
For new users, please follow the operation chart shown below to get started with this tool.
App Sign-up
Finish Registration
Download Software
Note: Before registering, please make sure that the tablet has a strong and stable Wi-Fi signal.
On the home screen, tap the application icon to launch it, and then tap Login on the upper right corner of
the screen. The following dialog box will pop up on the screen.
(If you are a new user, follow A to proceed.)
(If you have registered to be a member, go to B to login the system directly.)
(In case you forgot the login password, refer to C to reset a new password.)
A. , tap New Registration to enter registration page.
Register,
the following
screen
will appear:
Safety & Accessory
Initial Use
Diagnostics
FAQ & Appendix
Product Prole
12
www.x431.com +86 755 8455 7891
LAUNCH
PAD VII
User Manual
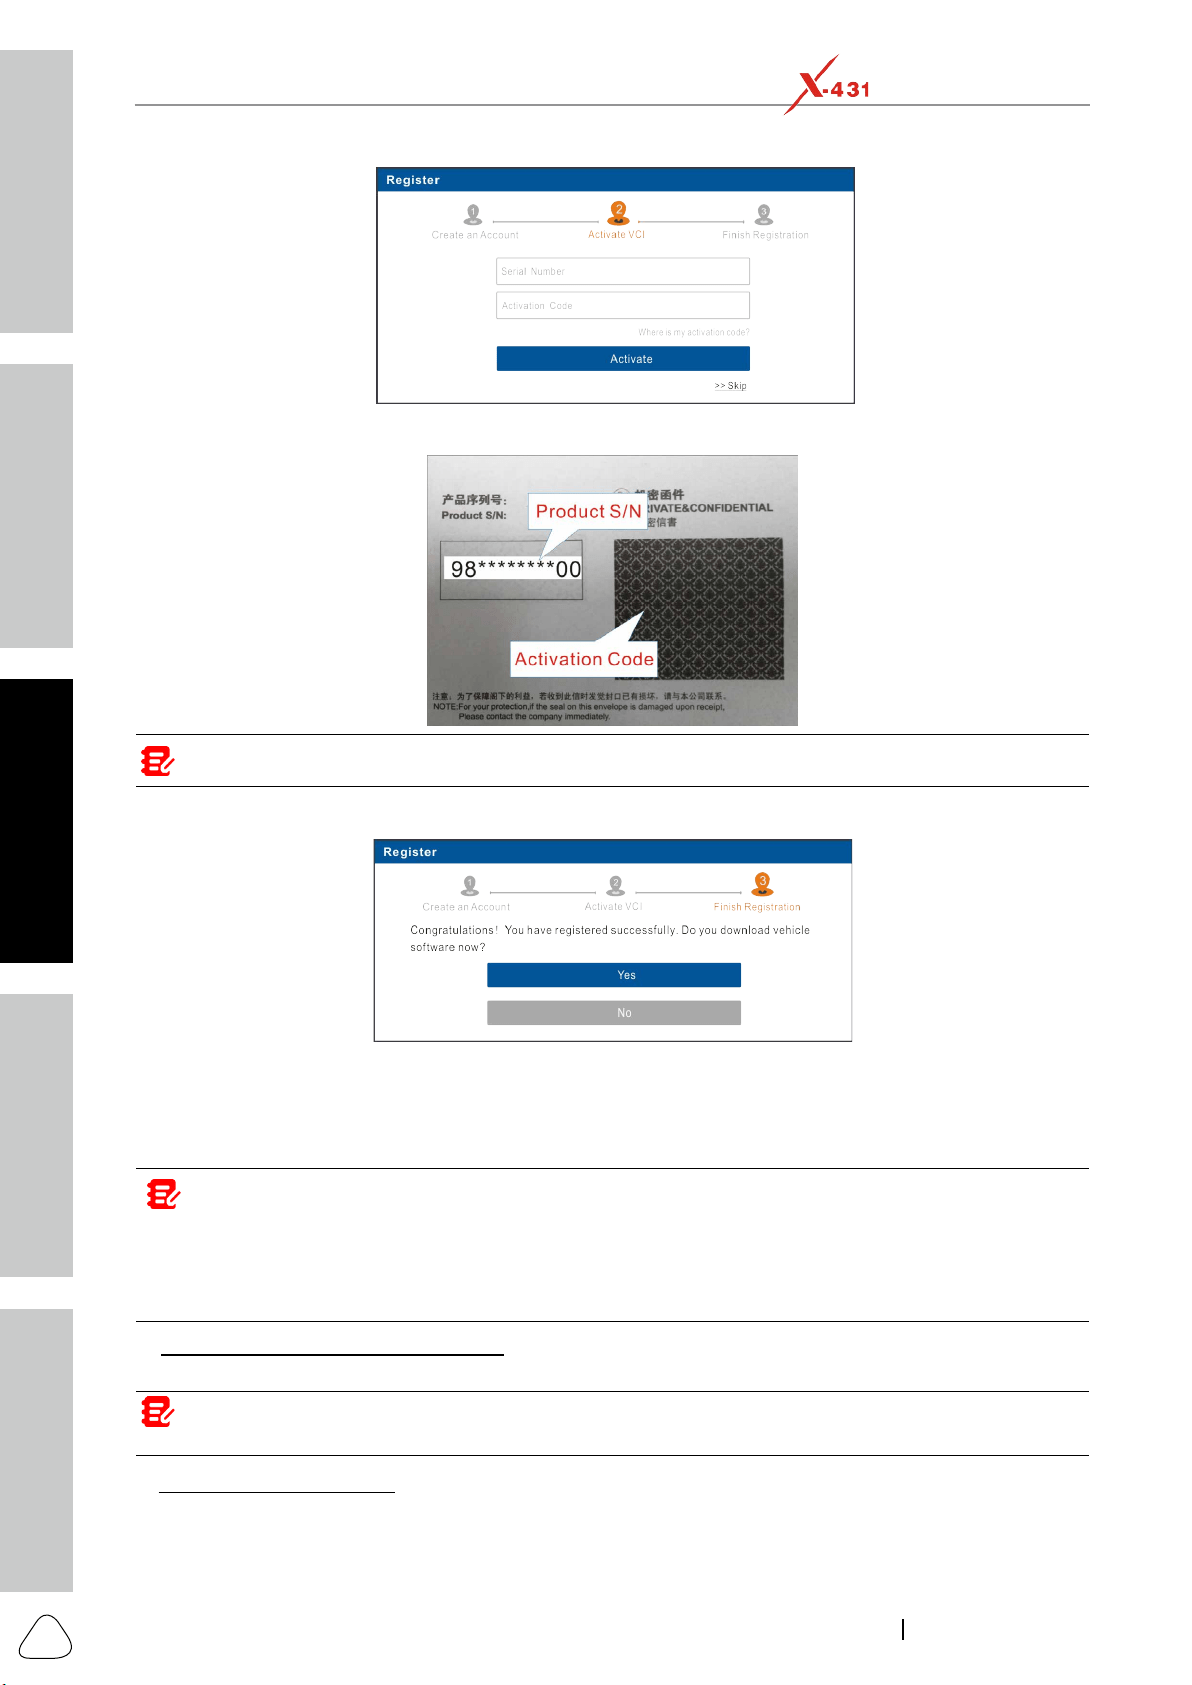
Note: To exit and acvate it later, tap Skip. In this case, you can acvate it by tapping User Info -> Acvate VCI.
Tap Activate
To download the diagnostic software, tap Yes to enter the download page. Tap No to download and install it
later.
On the download page, tap Update to start downloading. To pause downloading, tap Stop. To resume it,
tap Continue. Once download is complete, the system will install the software package automatically.
Notes:
• In process of download, please make sure the tablet has a strong Wi-Fi signal. It may take several minutes to
nish it, please be paent to wait.
• To use the AutoDetect (VINScan) funcon, you have to download the corresponding diagnosc soware and
AutoSearch le.
, input your name and password, and then tap Login to enter the
main menu screen directly.
Note: The tablet has an auto-save funcon. Once the username and password are correctly entered, the system
will automacally store it. Next me you login the system, you will not be asked to input the account manually.
C. , tap Retrieve password and then follow on-screen instructions to set a new
password.
Safety & Accessory
Initial UseDiagnosticsFAQ & Appendix
Product Prole
13
www.x431.com +86 755 8455 7891
LAUNCH
PAD VII
User Manual
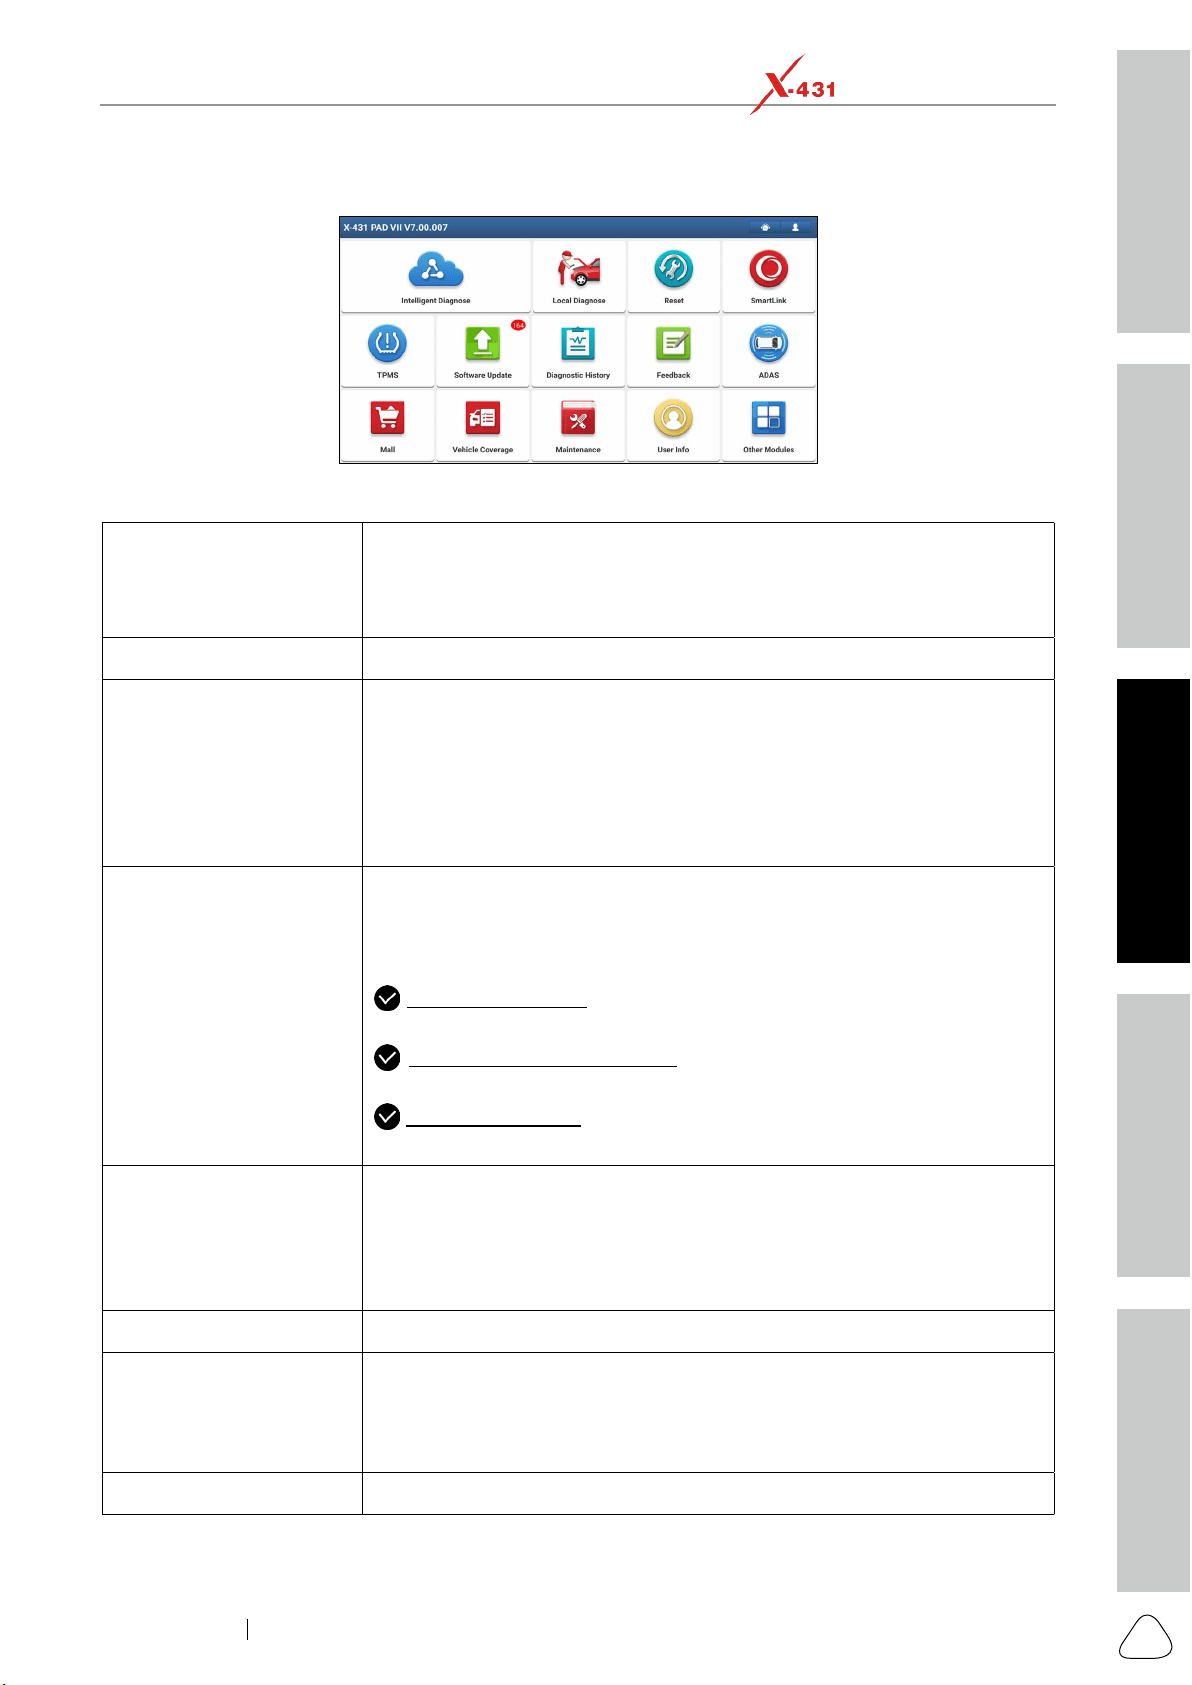
4.2 Job Menu
Intelligent Diagnose
This module allows you to obtain vehicle data from the cloud server to
can also check the historical repair records online through this module.
Local Diagnose To diagnose a vehicle manually.
Reset
To perform all kinds of common repair & maintenance items, including Oil
SmartLink
The SmartLink system is powerful remote diagnostics solution developed
by LAUNCH.
The system consists of SmartLink C dongle, SmartLink Service Platform
SmartLink C dongle: For technicians seeking technical assistance and
additional expertise on various vehicle issues.
SmartLink Service Platform: For SmartLink C posting assistance
: For service provider or master technician providing
technical assistance service.
TPMS
Configures this tool as a professional TPMS (Tire Pressure Monitoring
information, program tire pressure sensor and perform the TPMS relearning
(sold
Software Update To update vehicle diagnostic software and APK.
Diagnostic History
Generally once a vehicle diagnosis is performed, the tablet will record the
every details of diagnostic process. The History function provides a quick
access to the tested vehicles and users can resume from the last operation,
without starting from scratch.
Feedback To feed back the recent 20 diagnostic logs to us for issue analysis.
Safety & Accessory
Initial Use
Diagnostics
FAQ & Appendix
Product Prole
14
www.x431.com +86 755 8455 7891
LAUNCH
PAD VII
User Manual
ADAS
This function enables users to perform ADAS (Advanced Driver Assistance
function using the ADAS Activation Card.
Note: This funcon requires the diagnosc tool to work with the specic ADAS
calibraon tool(calibraon tools from other manufacturers will not be supported).
Mall
This module enables you to subscribe some extra software or service
functions that are not integrated in the diagnostic tool online.
Vehicle Coverage To check the vehicle models supported on the tablet.
Maintenance
Abundant maintenance data are available, which helps repair professionals
User Info
Other Modules
4.3 Connections
4.3.1 Preparation
Normal testing conditions
Turn on the vehicle power supply.
Vehicle battery voltage range should be 11-14V or 18-30V.
Throttle should be closed at its close position.
connector is required.
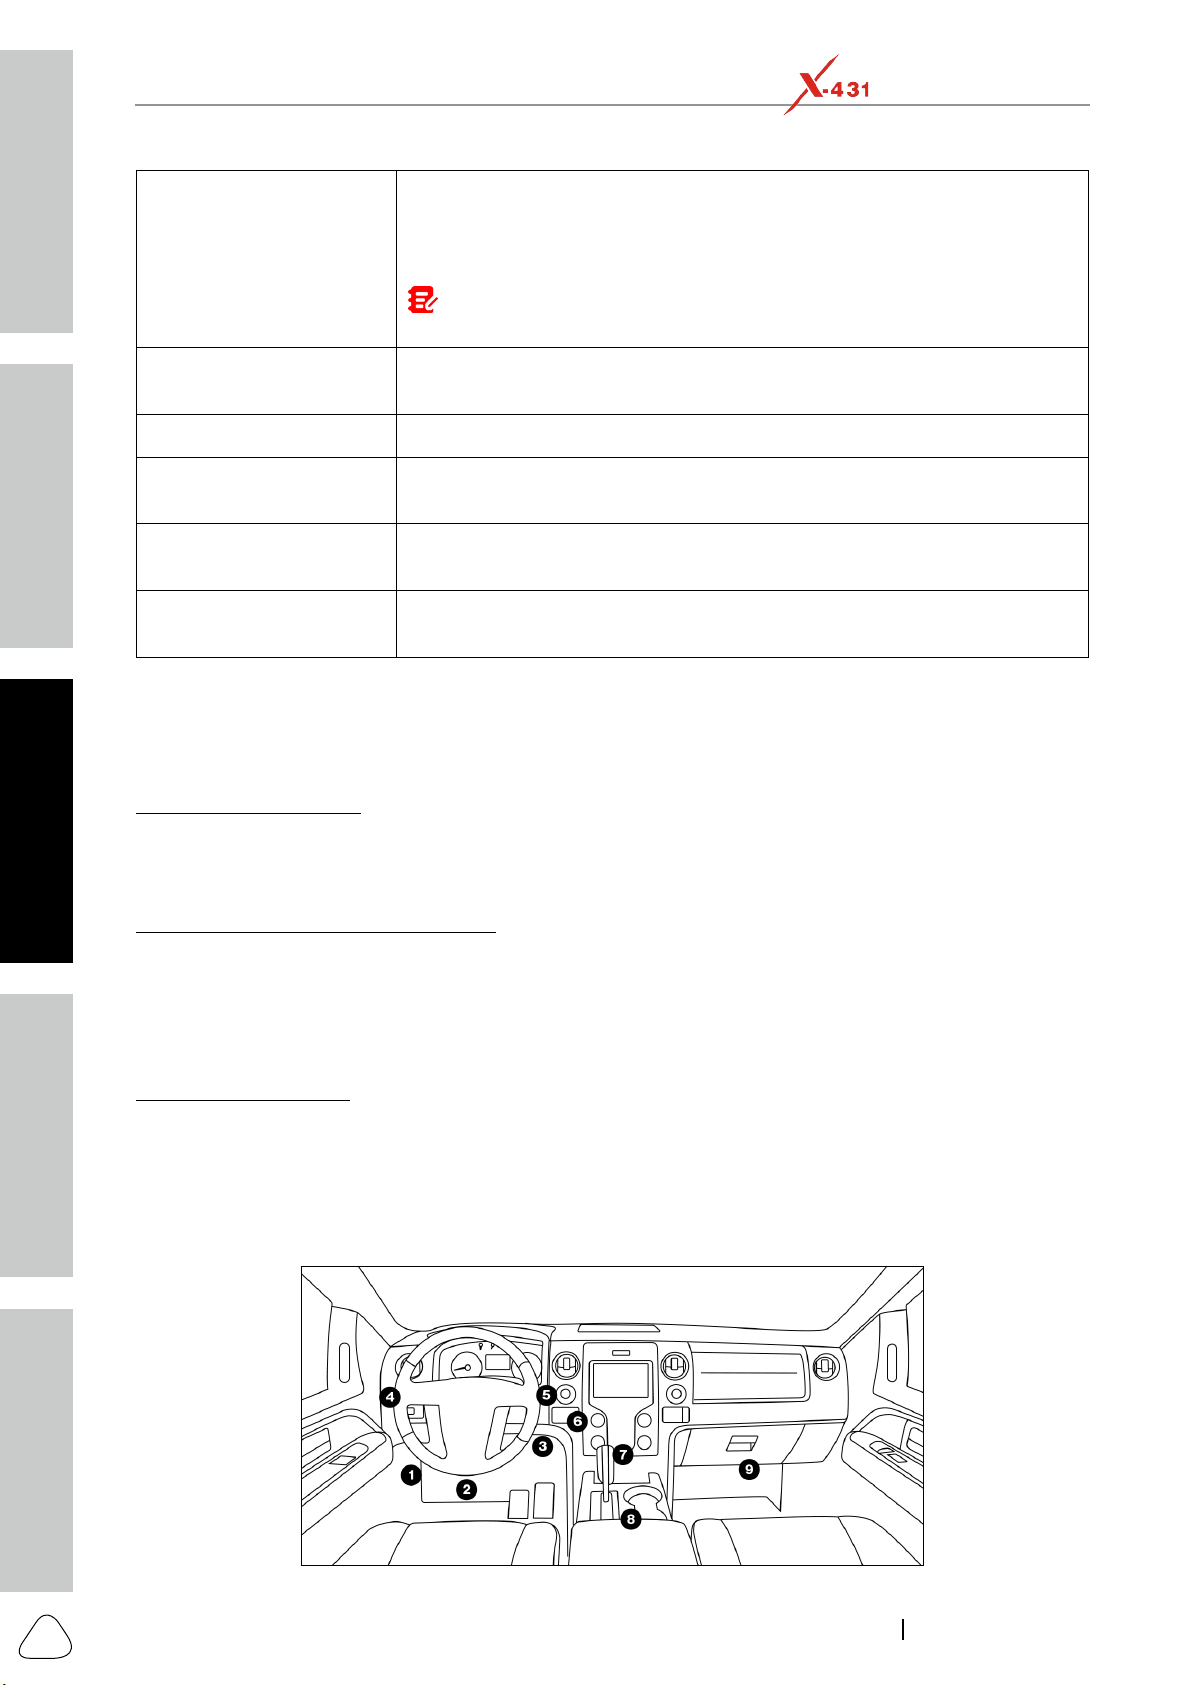
4.3.2 DLC Location
For Passenger Vehicles
location. For some Asian and European vehicles, the DLC is located behind the ashtray and the ashtray
for the location.
Safety & Accessory
Initial UseDiagnosticsFAQ & Appendix
Product Prole
15
www.x431.com +86 755 8455 7891
LAUNCH
PAD VII
User Manual
4.3.3 Vehicle Connection
through a standardized DLC.
connection, and in some cases supplies 12V power through the cigarette lighter receptacle or a
connection to the vehicle battery.
SmartLink C device To Vehicle's DLC port
, proceed as follows:
SmartLink C device
To Vehicle's DLC port
Non-16pin connector
Notes:
If the power supply on vehicle diagnosc socket is insucient or the power pin is damaged, you can get power via
either of the following ways:
A. Via Baery clamps cable (oponal): Connect one end of the baery clamps cable to the power jack of the OBD I
adapter box, and the other end to the vehicle’s baery.
SmartLink C device OBD II extension cable
To Vehicle's DLC port
To Cigarette lighter
receptacle
OBD I adapter
Non-16pin connector
Cigarette lighter cable
B. Via Cigaree lighter cable (oponal): Connect one end of the cigaree lighter cable to the power jack of the OBD
I adapter box, and the other end to the cigaree lighter receptacle.
SmartLink C device OBD II extension cable
To Vehicle's DLC port
To vehicle's battery
OBD I adapter
Non-16pin connector
Battery clamps cable
4.4 Communication Setup
There are 3 kinds of ways available for the tablet to communicate with the SmartLink C device: Wi-Fi,
After the sign-up is successfully completed, the Wi-Fi communication between the tablet and the SmartLink

Safety & Accessory
Initial Use
Diagnostics
FAQ & Appendix
Product Prole
16
www.x431.com +86 755 8455 7891
LAUNCH
PAD VII
User Manual
This method is not recommended.
SmartLink C device.
navigation button at the bottom
of the screen becomes highlighted indicating the communication is established.
Note: The USB connection provides the most stable and fastest communication. When all communication
methods are applied at the same me, the tablet will use the USB communicaon as the default priority.
Safety & Accessory
Initial UseDiagnosticsFAQ & Appendix
Product Prole
17
www.x431.com +86 755 8455 7891
LAUNCH
PAD VII
User Manual
5 Start Diagnostics
5.1 Intelligent Diagnose
Through simple Wi-Fi communication between the tablet and SmartLink C device, you can easily get
successfully identified, the system will retrieve it from the remote server and then guide you to vehicle
information page without the necessity of step-by-step manual menu selection.
The vehicle information page lists all historical diagnostic records of the vehicle, which lets the technician
function are also available on this page for reducing the roundabout time and increasing productivity.
Notes:
• Before using this funcon, please make sure the SmartLink C device is properly connected to the vehicle’s DLC.
For detailed connecon, see Chapter 4.3.3 Vehicle Connecon.
• A stable network connecon is required for this funcon.
Follow the steps below to proceed.
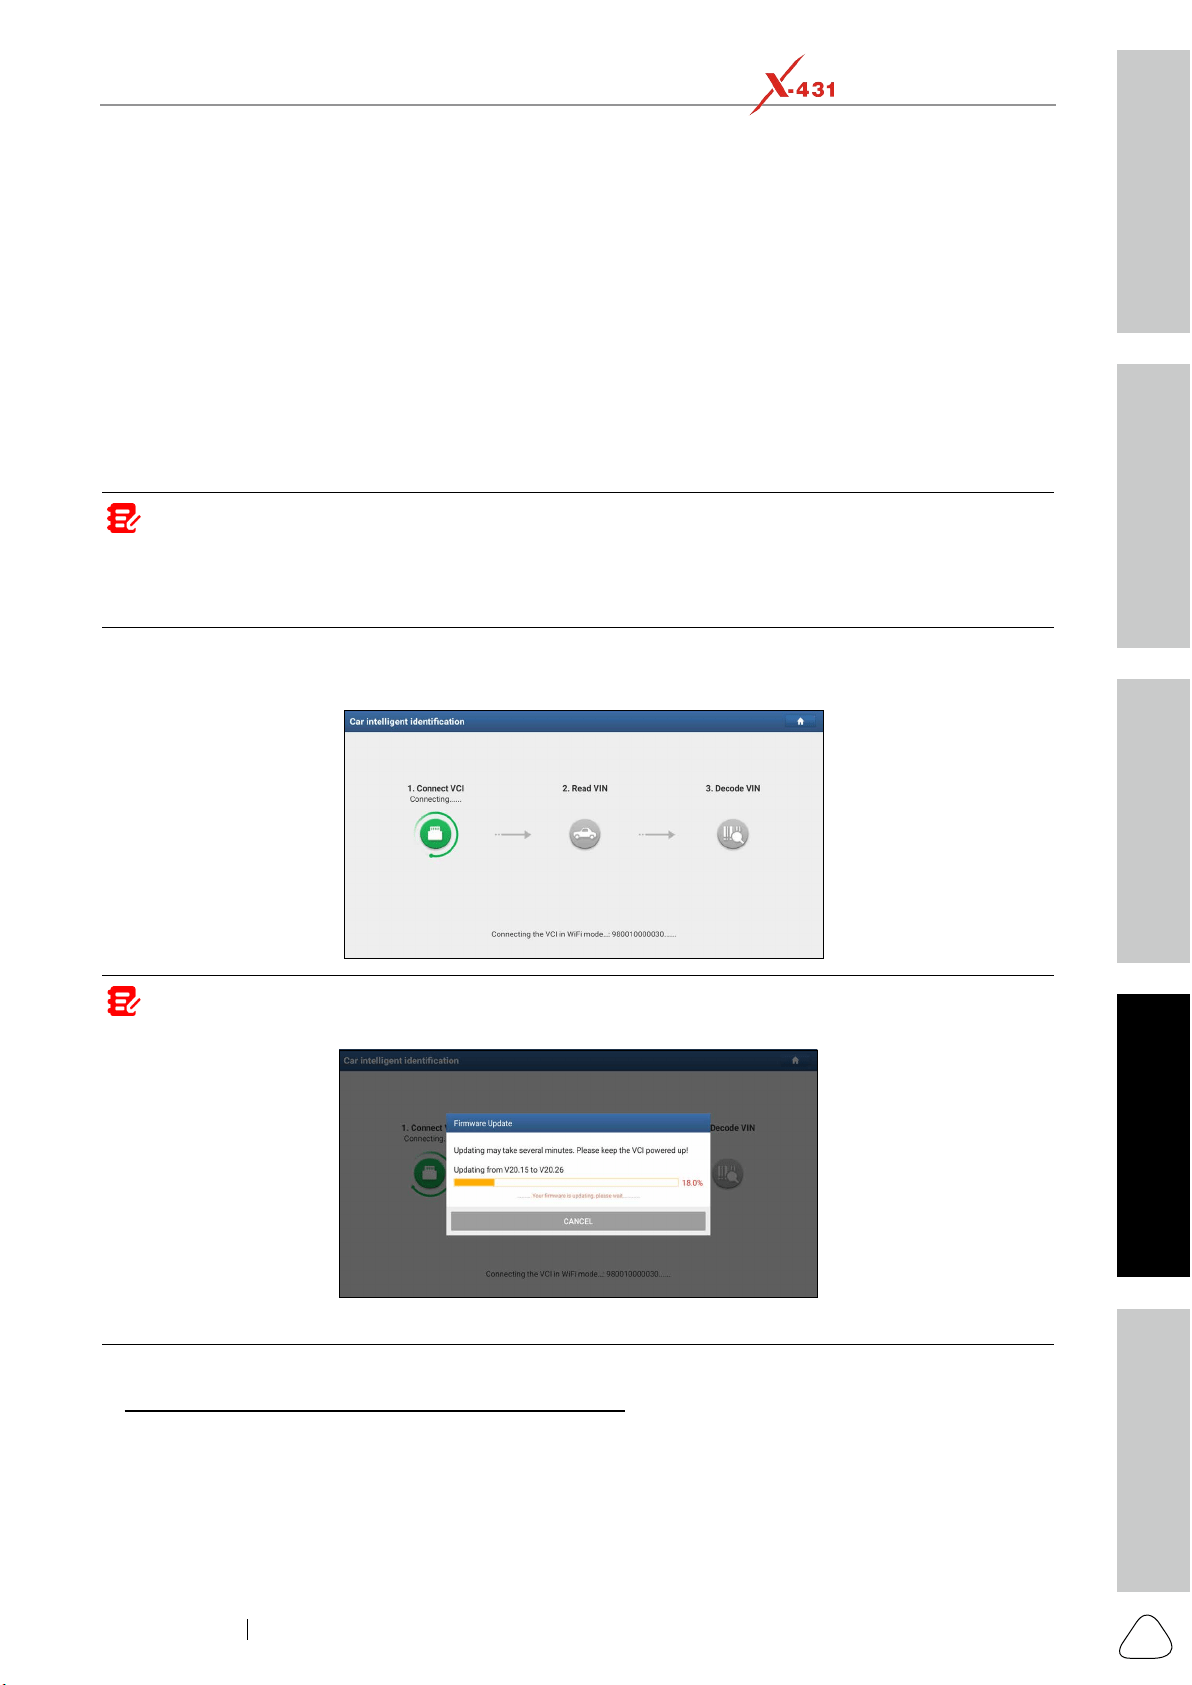
1. Tap Intelligent Diagnose on the Job Menu.
Note: If the system detects a newer firmware version, it will automatically update it and the following screen
will appear:
Aer the rmware update is nished, tap OK to start reading VIN.
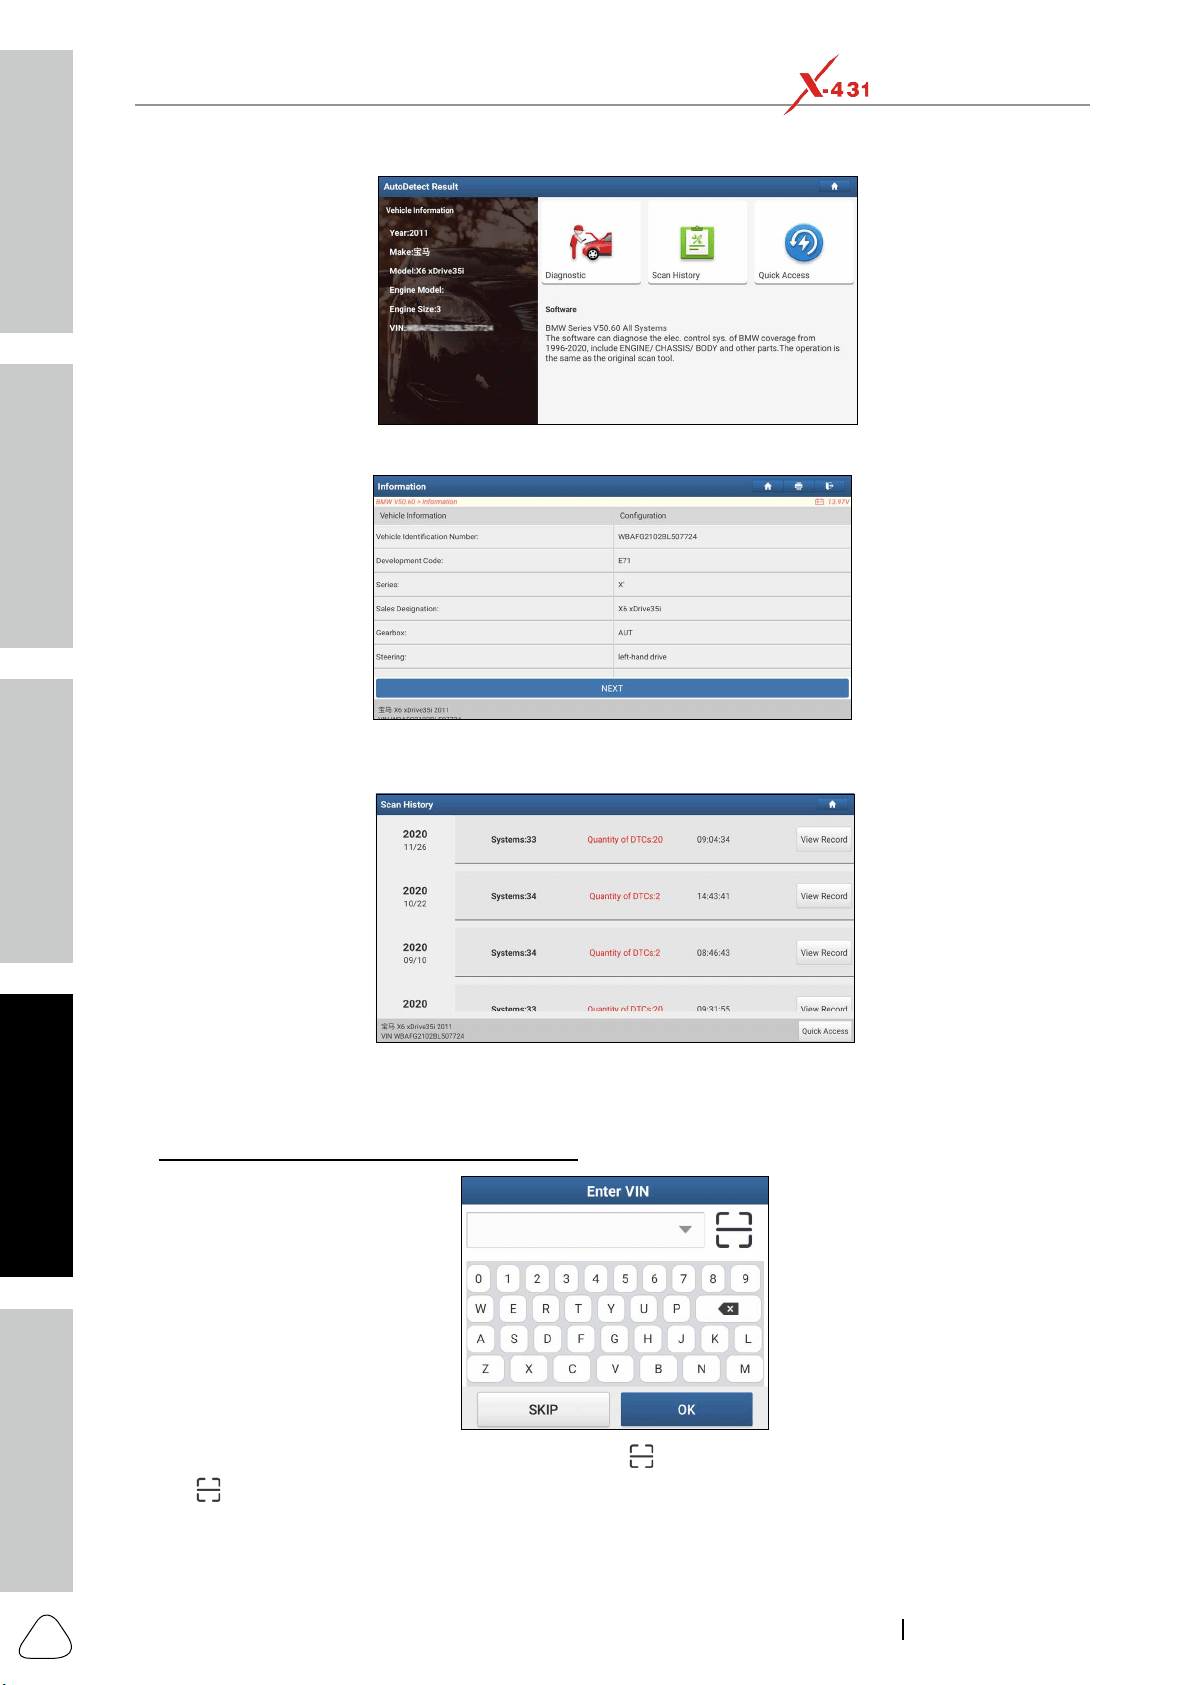
A. , the following screen will appear:
Safety & Accessory
Initial Use
Diagnostics
FAQ & Appendix
Product Prole
18
www.x431.com +86 755 8455 7891
LAUNCH
PAD VII
User Manual
Diagnostic to start a new diagnostic session.
Scan History
No Record.
View record to view the details of the current diagnostic report.
Quick access to directly go to the function selection screen. Choose
the desired one to start a new diagnostic session.
, the following dialog box will appear on the screen.
to scan it.
Safety & Accessory
Initial UseDiagnosticsFAQ & Appendix
Product Prole
19
www.x431.com +86 755 8455 7891
LAUNCH
PAD VII
User Manual
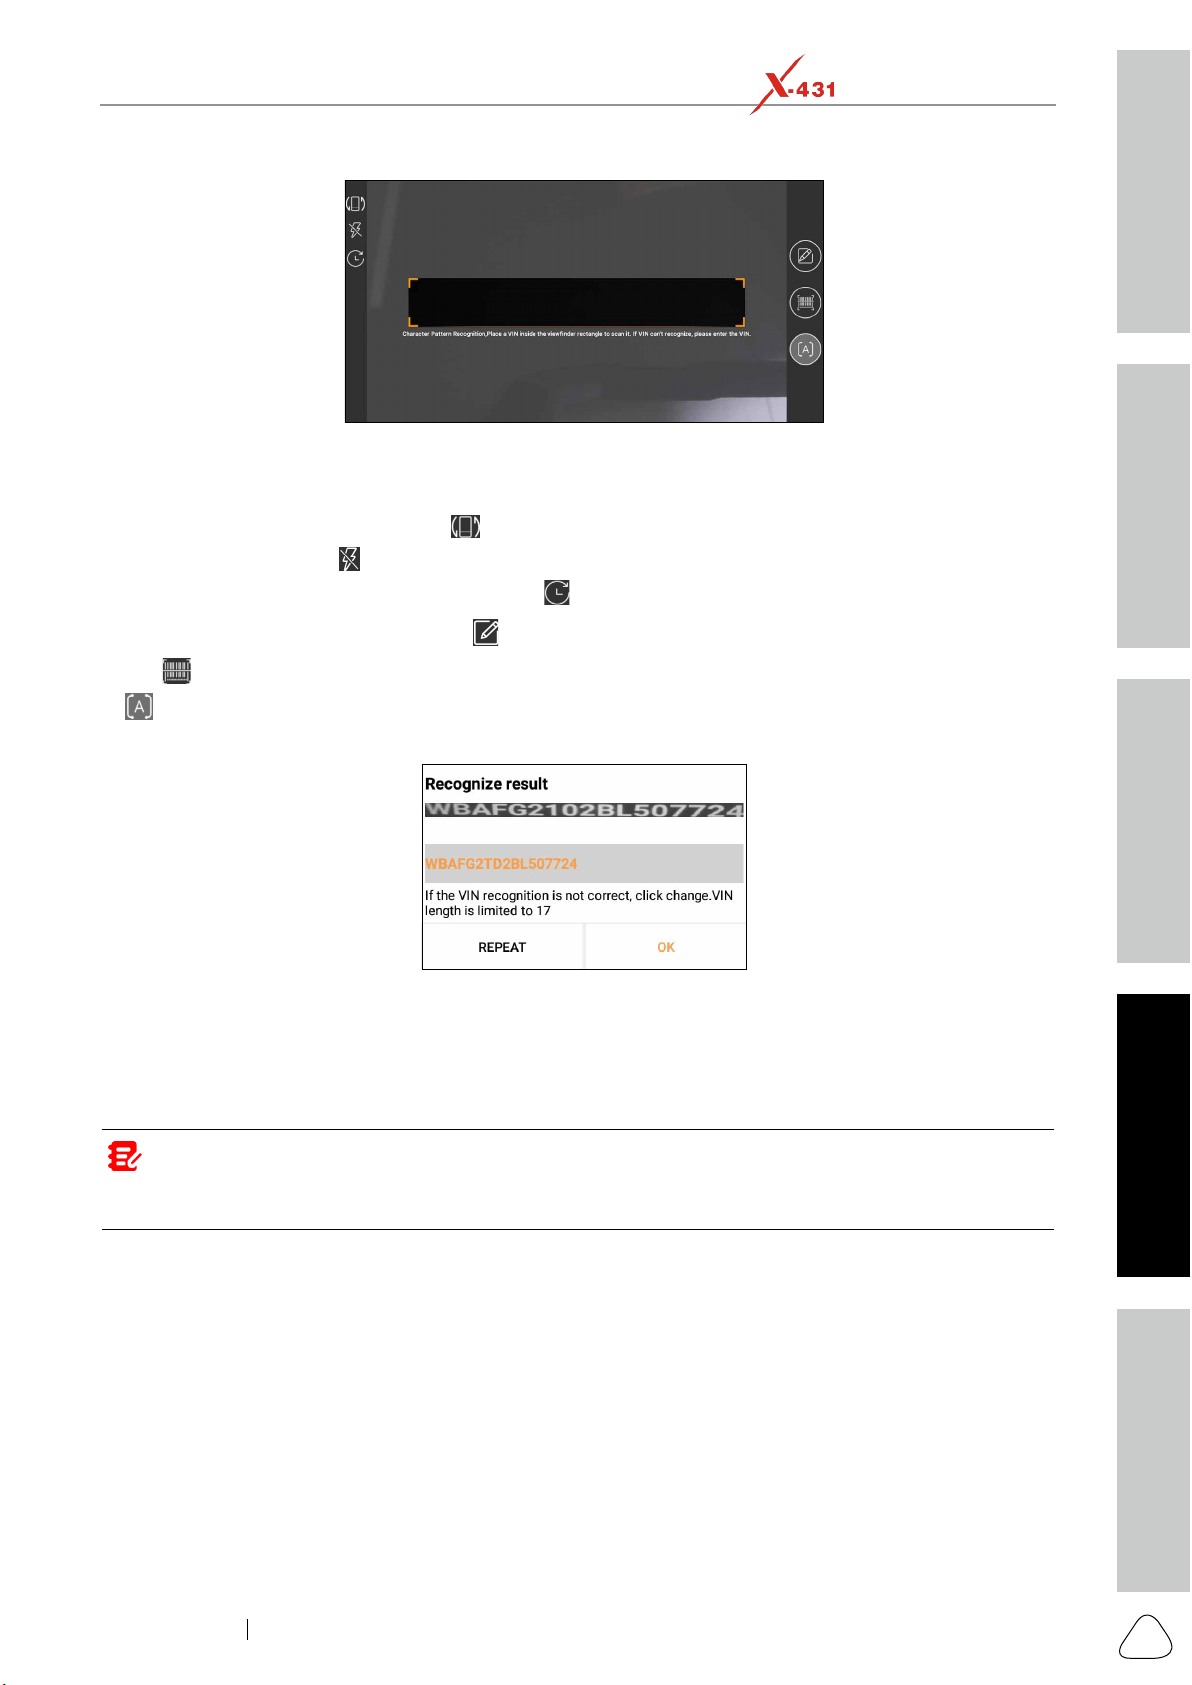
.
.
to choose it from the record list.
to enter it manually.
Tap
to switch the camera to barcode pattern recognition mode.
After scanning, the screen automatically displays the result.
OK
remote server, the system will enter the vehicle information screen.
REPEAT.
OK, the system will automatically identify the vehicle model and directly navigate
to the vehicle information page.
Note: In general, vehicle idencaon numbers are standardized - all contain 17 characters. VIN characters may
be capital leers A through Z and numbers 1 through 0; however, the leers I, O and Q are never used in order to
avoid mistakes of misreading. No signs or spaces are allowed in the VIN.
Safety & Accessory
Initial Use
Diagnostics
FAQ & Appendix
Product Prole
20
www.x431.com +86 755 8455 7891
LAUNCH
PAD VII
User Manual
5.2 Local Diagnose
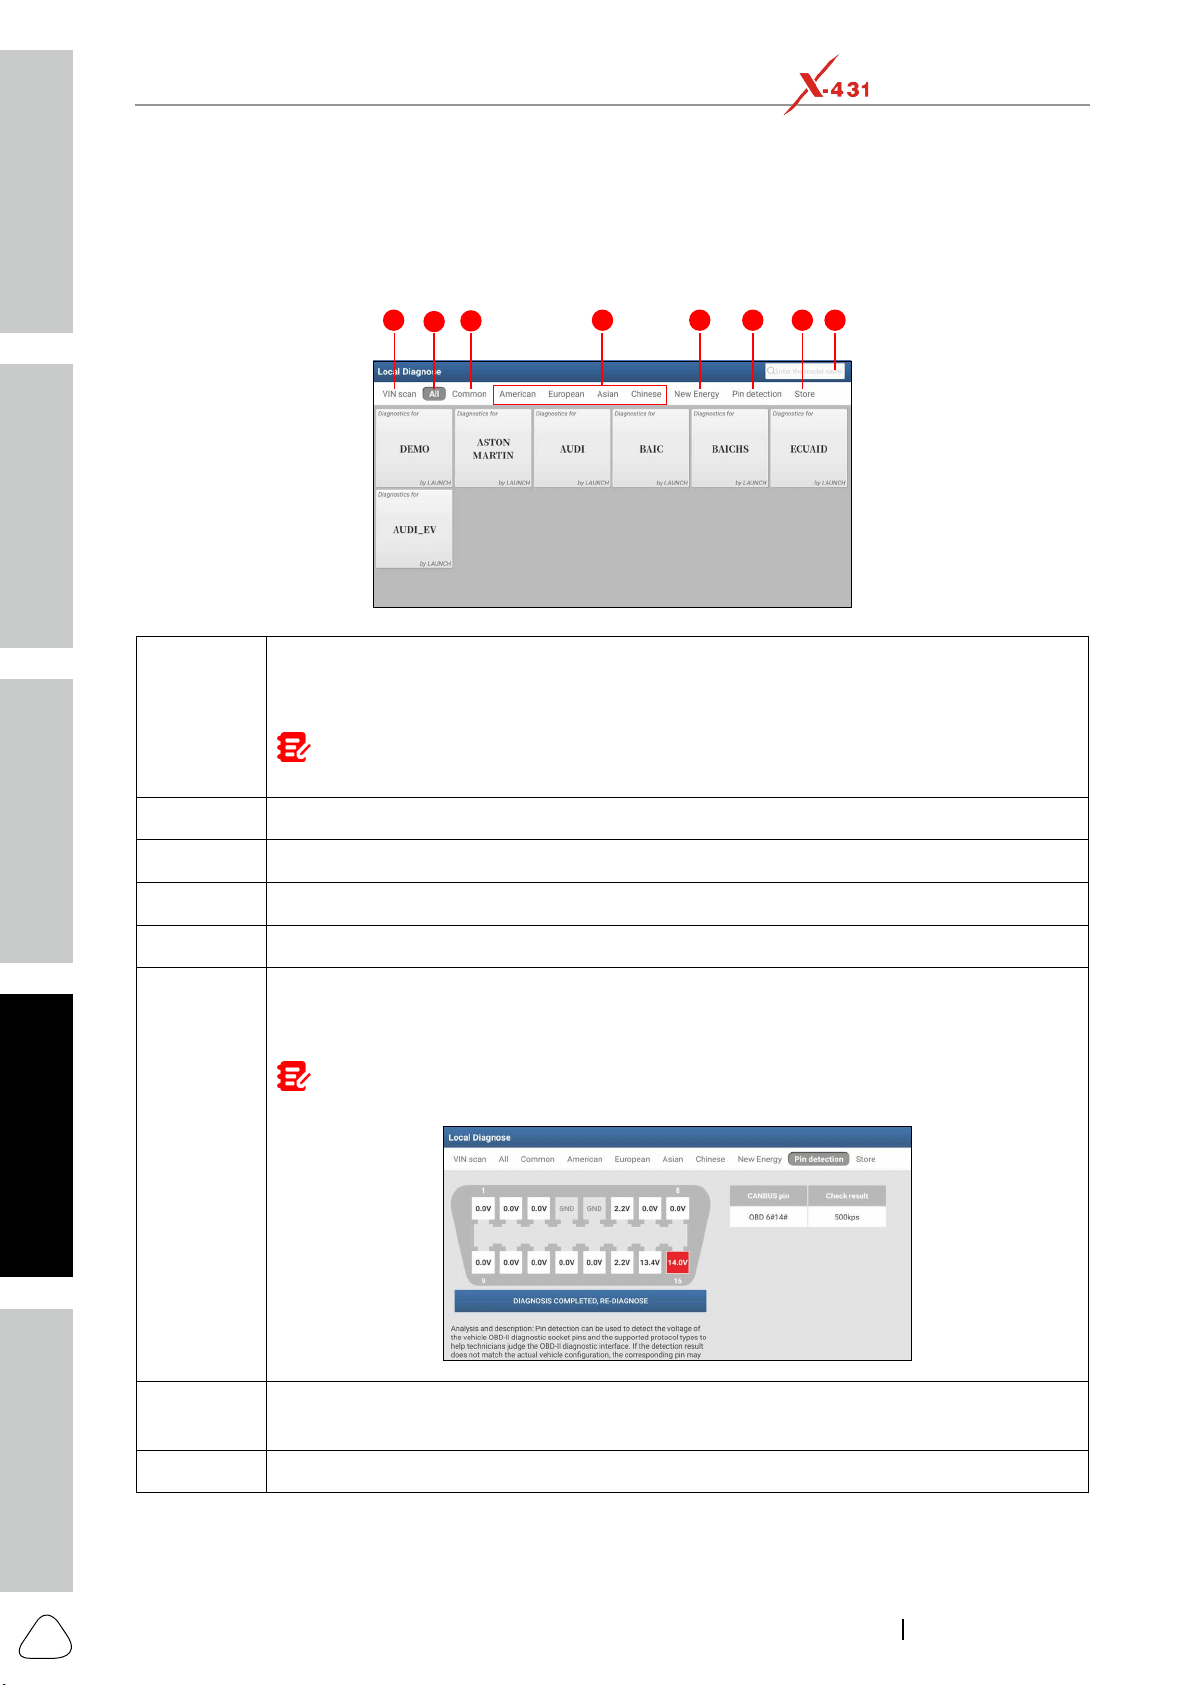
Tap Local Diagnose to enter the vehicle selection page.
5.2.1 Main Menu
1
2
3
4 5 6 7 8
1
commercial vehicles.
Note: Before using this function, the corresponding diagnostic software and Auto search file
need to be downloaded on your tool first while downloading the diagnostic software.
2 All Tab: Displays all the vehicle makes.
3 Common Tab: Displays all frequently-used vehicle makes.
4
5 New Energy: Displays all new energy vehicle makes.
6
Note: Before using this function, the SmartLink C device should be properly connected to the
vehicle's DLC port.
7
Store: Allows you to renew the subscription of diagnostic software and check the order
status.
8 Search bar: Enables you to quickly locate the desired vehicle make.
2 approaches are provided for you to access the vehicle diagnostic software.
Safety & Accessory
Initial UseDiagnosticsFAQ & Appendix
Product Prole
21
www.x431.com +86 755 8455 7891
LAUNCH
PAD VII
User Manual
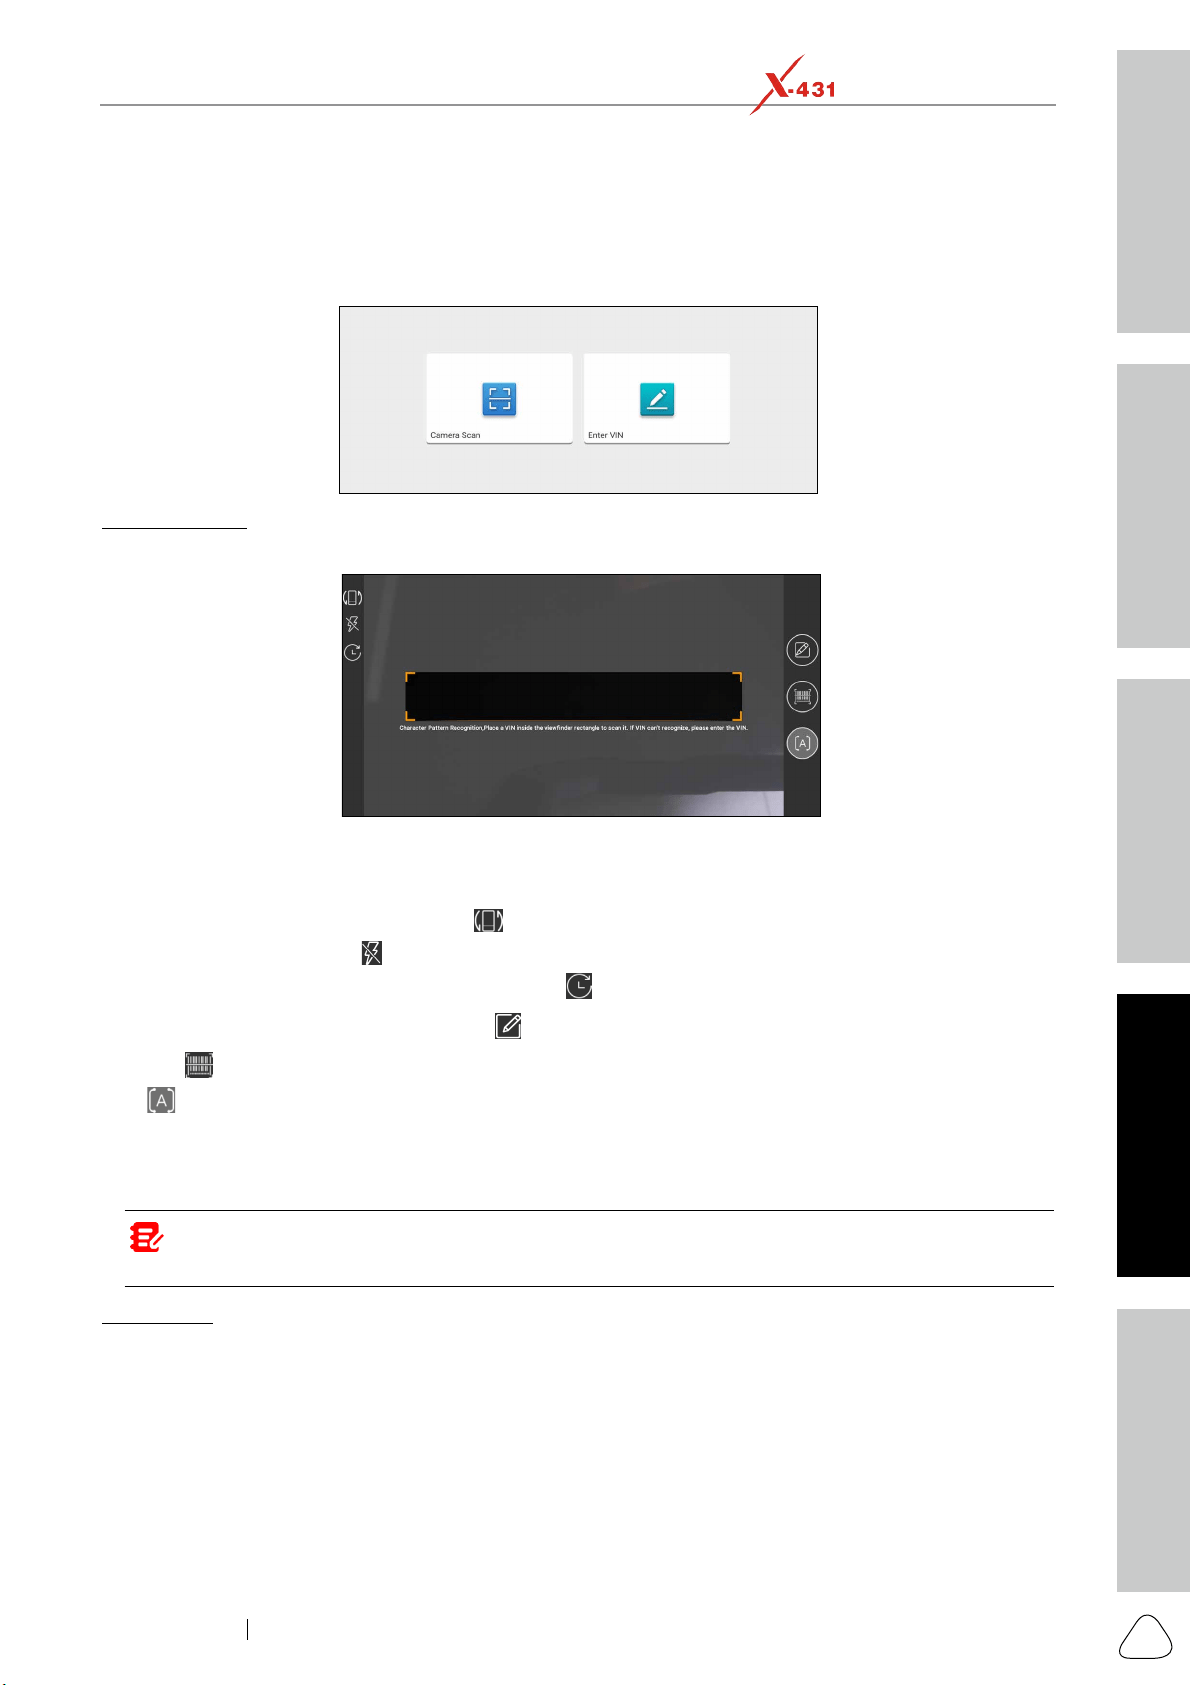
5.2.2 VINSCAN
This function enables you to access it more quickly.
Tap VIN scan, the screen displays as follows:
A. Camera Scan
Tap Camera Scan, the following screen will appear:
.
.
to choose it from the record list.
to enter it manually.
Tap
to switch the camera to barcode pattern recognition mode.
Once the test vehicle is successfully identified, the tablet will navigate to the function selection page
directly.
Tap the desired option to perform the corresponding function.
Note: Before using this function, the corresponding diagnostic software and Auto search file need to be
downloaded on your tool rst while downloading the diagnosc soware.
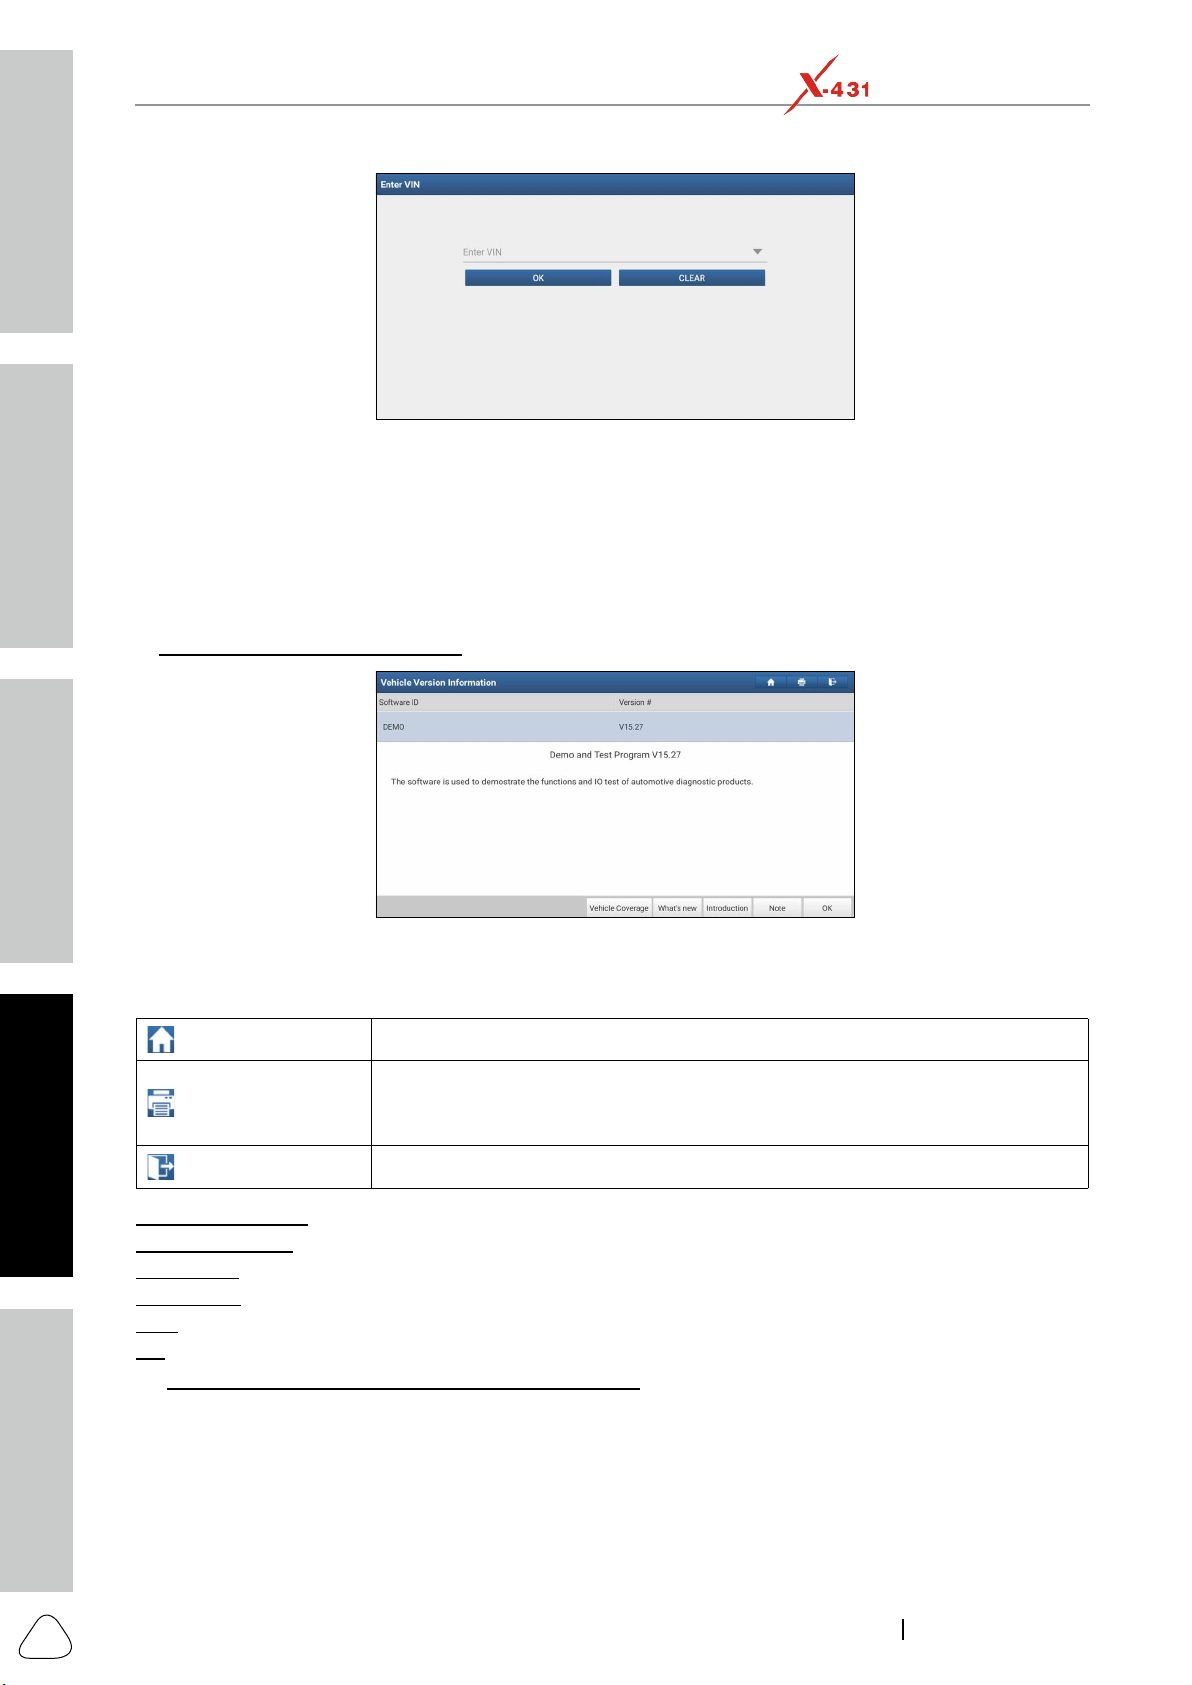
Tap Enter VIN, the following screen will appear:
Safety & Accessory
Initial Use
Diagnostics
FAQ & Appendix
Product Prole
22
www.x431.com +86 755 8455 7891
LAUNCH
PAD VII
User Manual
OK, the system will automatically identify the vehicle model and directly navigate
to the function selection page.
5.2.3 Manual Selection
Tap a corresponding diagnostic software logo, and then follow the on-screen instruction to access the
diagnostic software.
Take Demo as an example to demonstrate how to diagnose a vehicle.
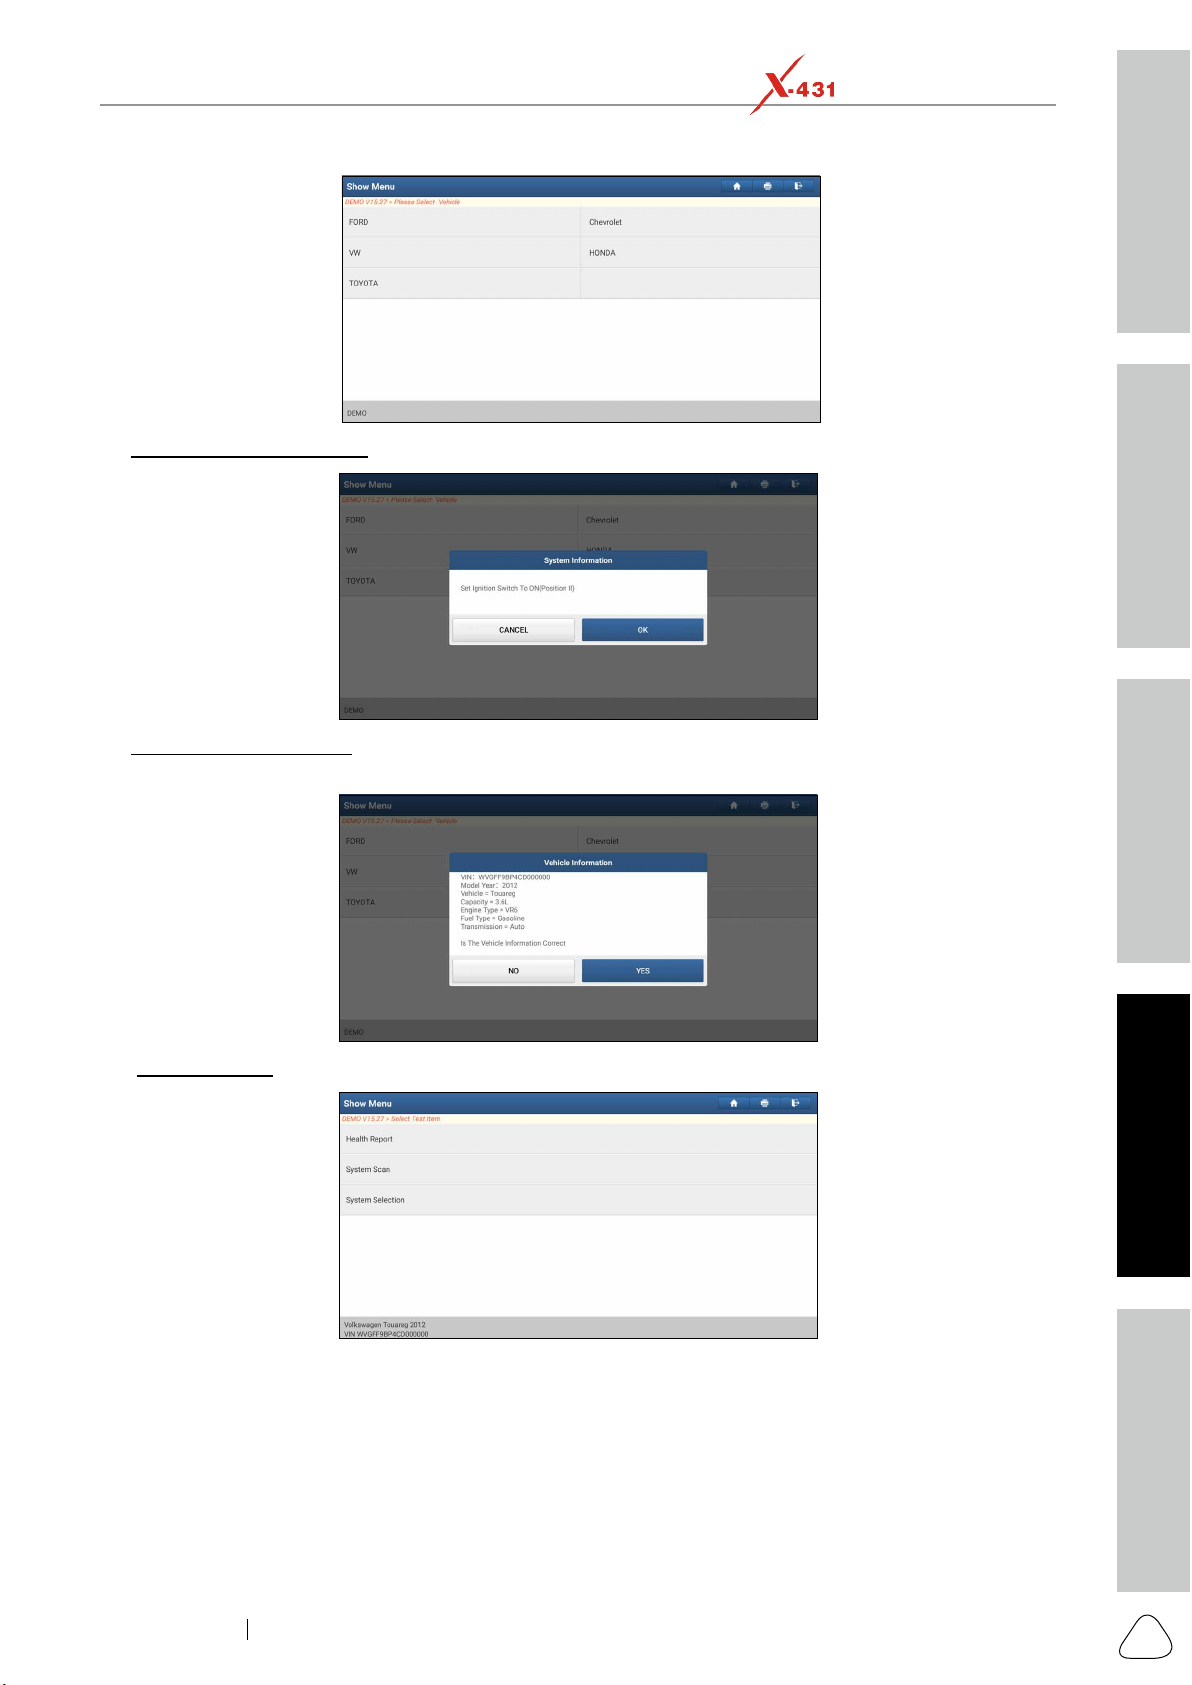
Select diagnostic software version: Tap DEMO to go to Step 2.
The diagnostics toolbar contains a number of buttons that allow you to print the displayed data or make
session. The table below provides a brief description for the operations of the diagnostics toolbar buttons:
Home Tap to navigate to the home screen.
Print
Touch to print the selected screenshots out via external printer. The printer
11.11.3 Printer Set.
Exit Session Tap to exit the current diagnostic session.
Vehicle Coverage: Tap to view the vehicle models that the current diagnostic software covers.
: Tap to view the optimized items and enhancements.
: Tap to check the software function list.
Note: Tap to read some precautions on using the current diagnostic software.
OK: Tap it to go to next step.
: Select the desired vehicle model. Here we take
Ford for example to demonstrate how to diagnose a vehicle.
Safety & Accessory
Initial UseDiagnosticsFAQ & Appendix
Product Prole
23
www.x431.com +86 755 8455 7891
LAUNCH
PAD VII
User Manual
Turn the ignition key to ON: Set the ignition switch to on.
Read vehicle information: After reading the vehicle information, double check if the vehicle information is
YES to continue.
Select test item: Select the desired test item to proceed.
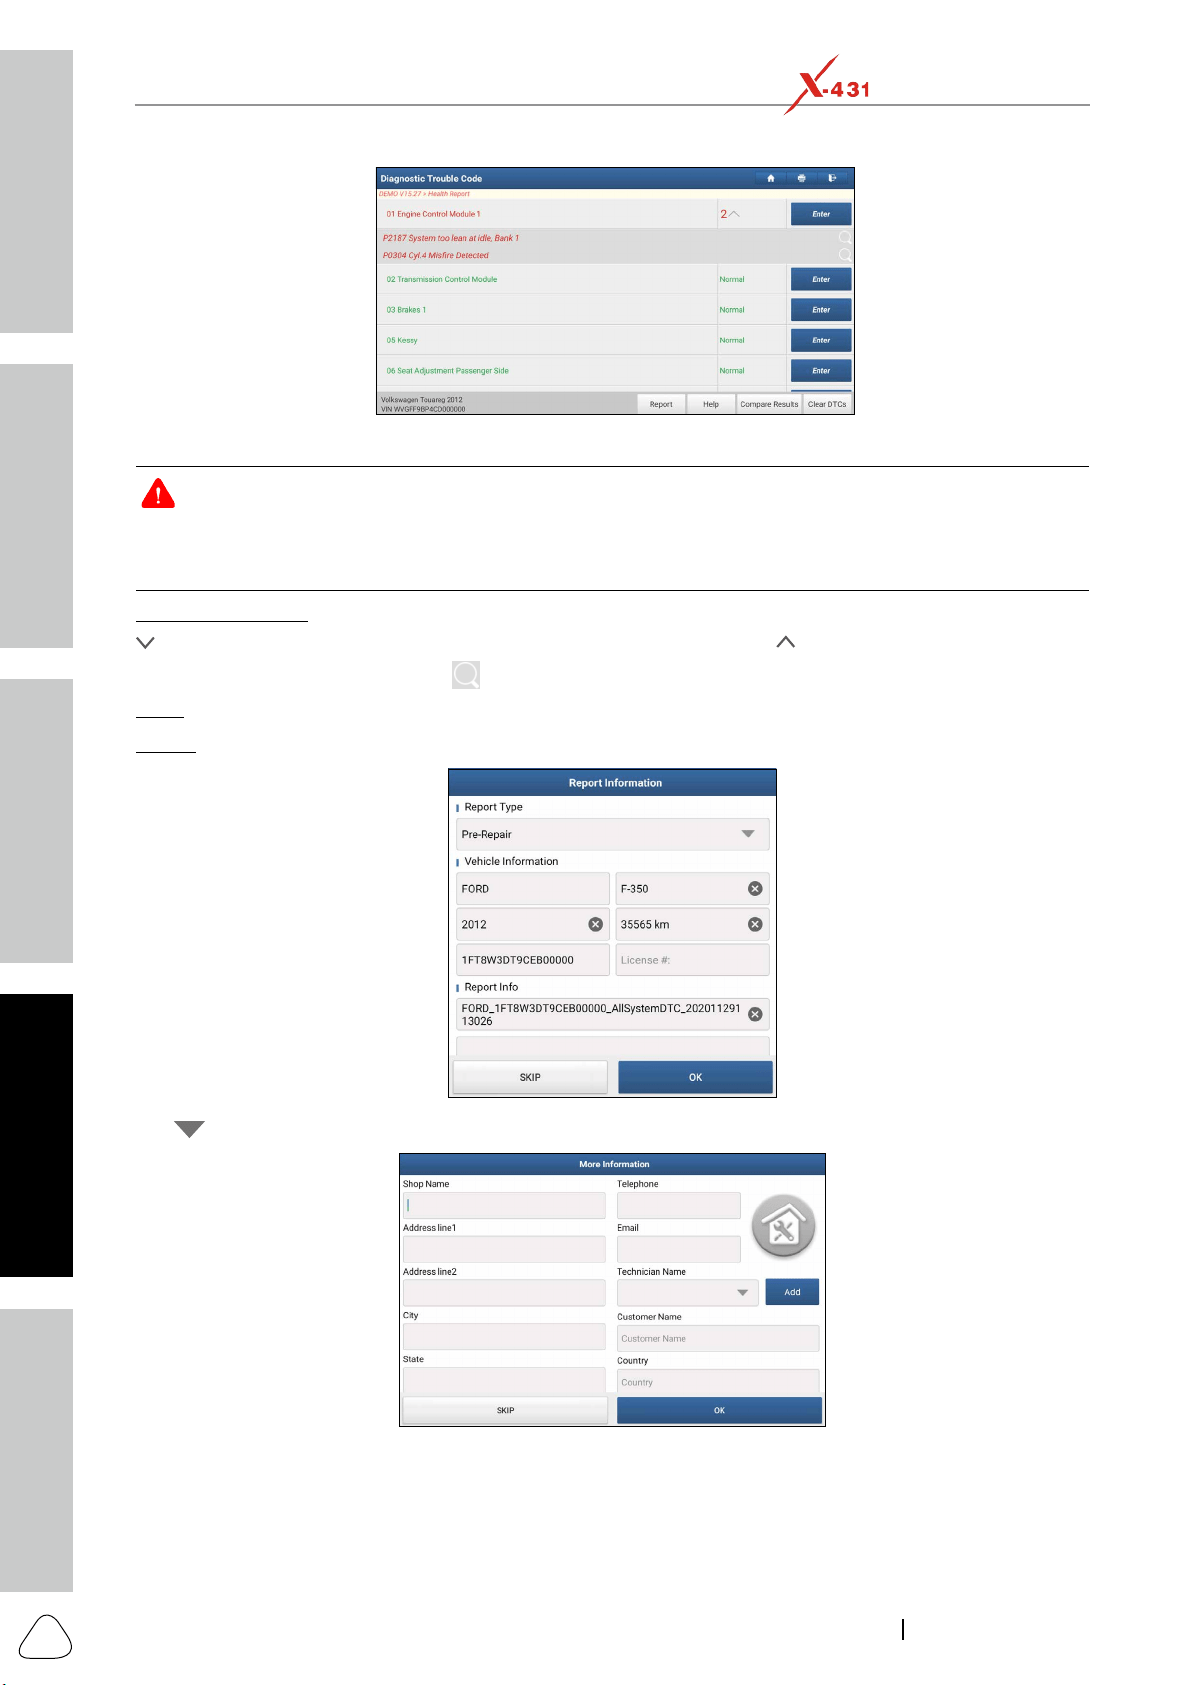
5.2.3.1 Health Report (Quick Test)
of the vehicle and generate a detailed report about vehicle health.
Tap Health Report on the test item selection screen, the system starts scanning the ECUs. Once the
scanning is complete, the following screen will appear:
Safety & Accessory
Initial Use
Diagnostics
FAQ & Appendix
Product Prole
24
www.x431.com +86 755 8455 7891
LAUNCH
PAD VII
User Manual
Warning: Diagnosc Trouble Codes or Fault Codes can be used to idenfy which engine systems or components
that are malfunctioning. Never replace a part based only on the DTC definition. Retrieving and using DTCs for
troubleshoong vehicle operaon is only one part of an overall diagnosc strategy. Follow tesng procedures (in
vehicle’s service manual), instrucons and owcharts to conrm the locaons of the problem.
: Tap to display the details of DTCs existing in the current system. Tap to hide it.
Highlight certain DTC item, and tap
to open the browser to retrieve it.
Enter: Tap to select other test functions.
Report: Tap to save the diagnostic result as a report.
Tap to select the report type from the option list and input the required information, and then tap OK.
Enter the technician and customer name and then tap OK to confirm and navigate to the report details
page. To ignore the workshop information, tap Skip to go to the report details page.
For workshop information, input it directly (alternatively you also can set it in User Info -> Settings -> Print
Information
the diagnostic report. All vehicle and workshop information will be appended as tags on the diagnostic
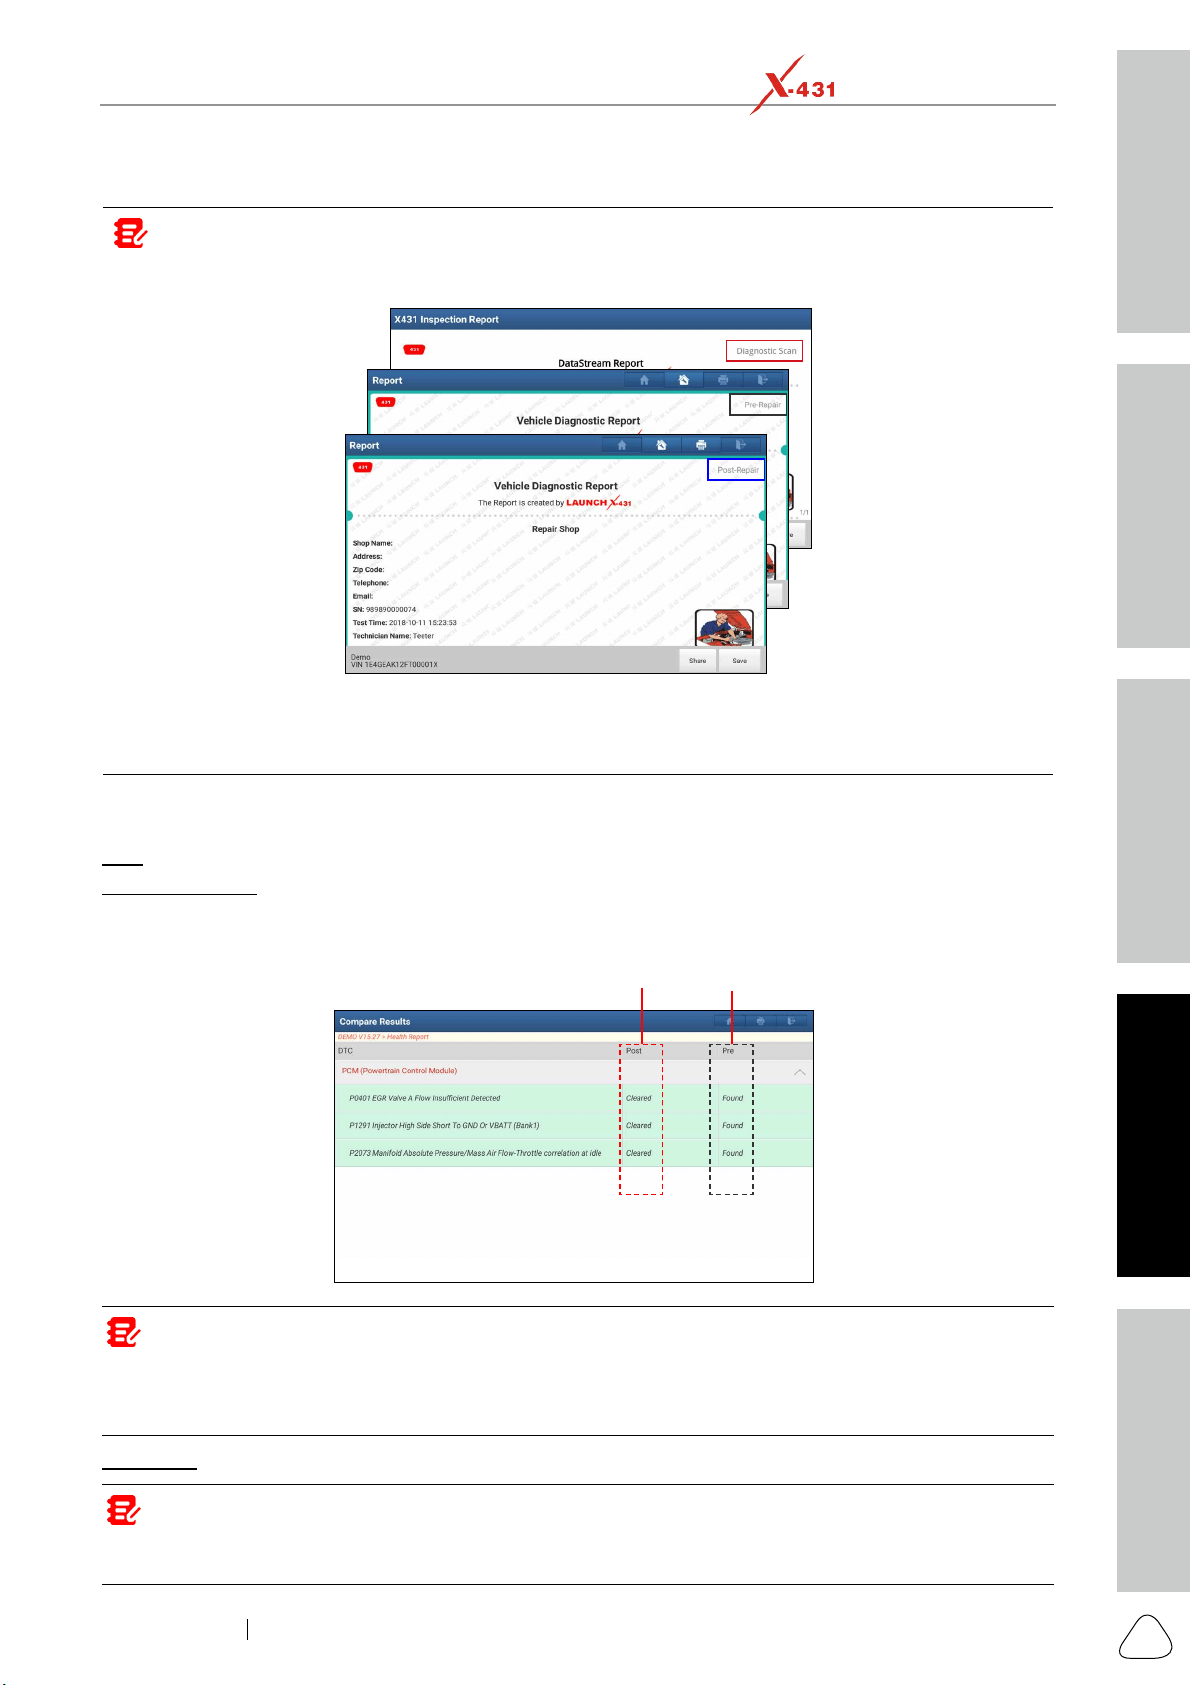
Safety & Accessory
Initial UseDiagnosticsFAQ & Appendix
Product Prole
25
www.x431.com +86 755 8455 7891
LAUNCH
PAD VII
User Manual
report.
Note: Diagnosc report is classied into three categories: Pre-Repair report, Post-Repair report and Diagnosc
Scan. No maer which type you saved the report as, the report type will be appended as a tag on the upper right
corner of the diagnosc report for easier idencaon.
To facilitate the comparison of the pre-repair and post-repair reports and get accurate test result, please make
sure you saved the right type of the diagnosc report.
To save the report as a common diagnosc report, select Diagnosc Scan.
On the report details page, tap Save to save it. All diagnostic reports can be accessed from User Info ->
My Reports -> Health Report.
Help: Tap to view the help information of the selected DTC item.
Compare Results
The DTC status
of post-repair
The DTC status
of pre-repair
Note: Before performing this funcon, please make sure that:
• You have saved a pre-repair report of the currently tested vehicle, and
• You have already made some repairs and service and cleared the DTCs aer the pre-repair reported is generated.
Otherwise, no dierences exist between the pre- and post- repair reports.
Clear DTC: Tap to clear the existing diagnostic trouble codes.
Note: Clearing DTCs does not x the problem(s) that caused the code(s) to be set. If proper repairs to correct
the problem that caused the code(s) to be set are not made, the code(s) will appear again and the check engine
light will illuminate as soon as the problem that cause the DTC to set manifests itself.
Safety & Accessory
Initial Use
Diagnostics
FAQ & Appendix
Product Prole
26
www.x431.com +86 755 8455 7891
LAUNCH
PAD VII
User Manual
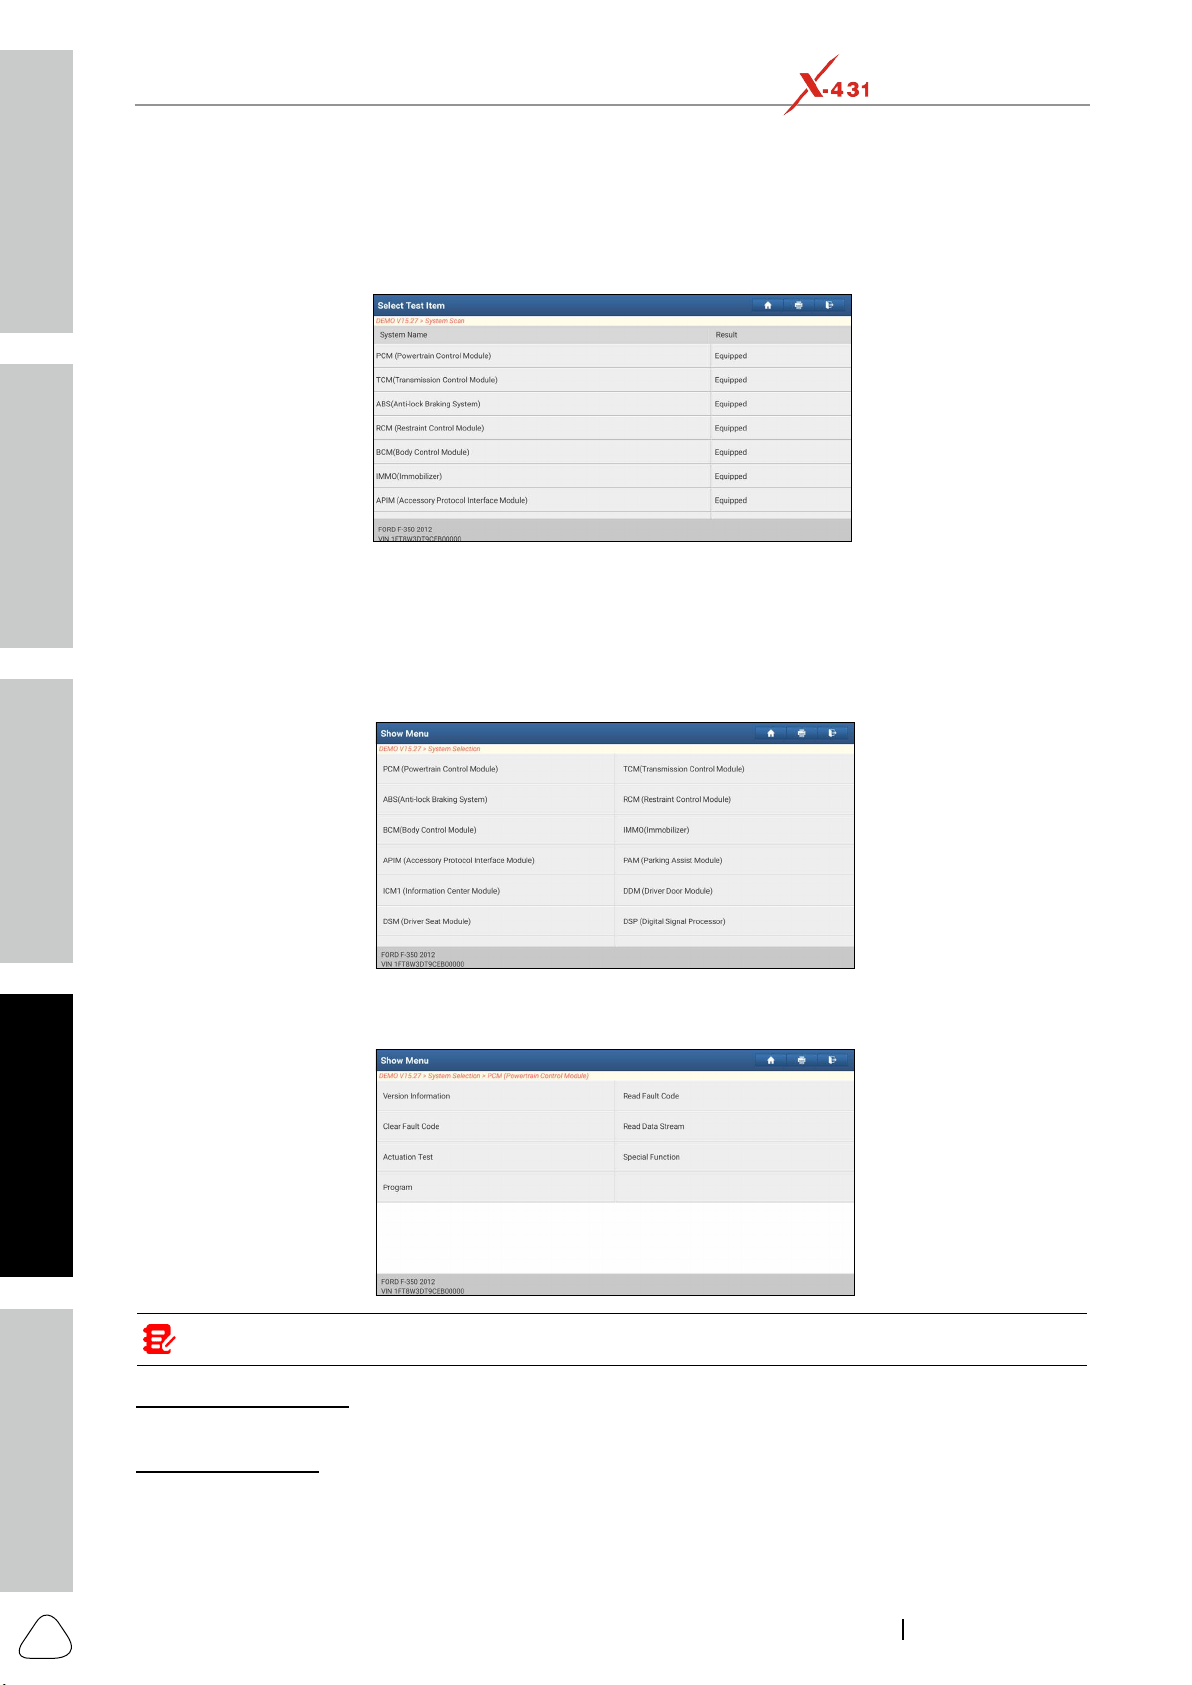
5.2.3.2 System Scan
This option allows you to quickly scan which systems are installed on the vehicle.
Tap System Scan on the test item selection screen, the system starts scanning the systems. Once the
scanning is complete, the screen will display the result.
Tap the desired system to advance to the test function selection page. For detailed operations on test
function, please refer to Chapter 5.2.3.3 System Selection.
5.2.3.3 System Selection
This option allows you manually select the test system and function step by step.
Tap System Selection on the test item selection screen, the following screen will appear:
Swipe the screen from the bottom to view the vehicle system on the next page.
Tap the desired system (take ECM
Note: Dierent vehicle has dierent diagnosc menus.
A. Version Information
B. Read Fault Code
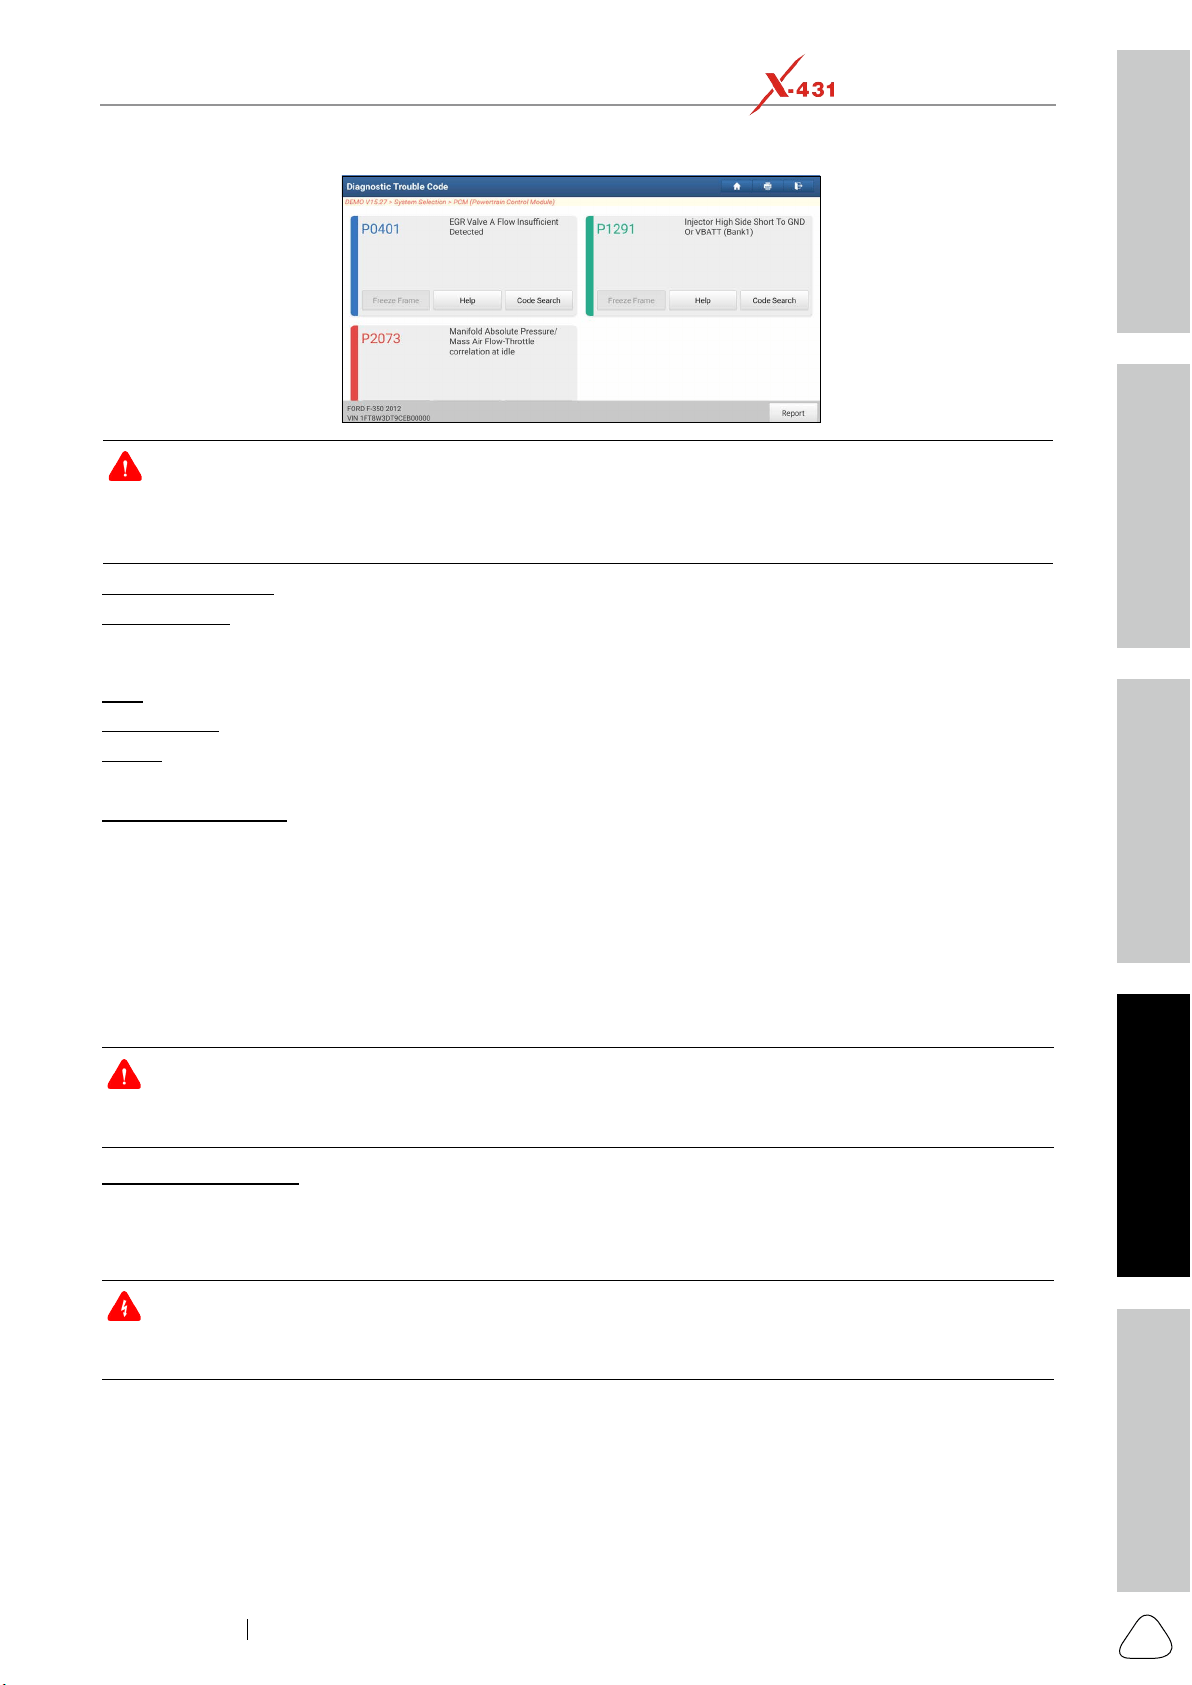
Tap Read Fault Code on the test function selection screen, the screen will display the diagnostic result.
Safety & Accessory
Initial UseDiagnosticsFAQ & Appendix
Product Prole
27
www.x431.com +86 755 8455 7891
LAUNCH
PAD VII
User Manual
Warning: Retrieving and using DTCs for troubleshooting vehicle operation is only one part of an overall
diagnosc strategy. Never replace a part based only on the DTC denion. Each DTC has a set of tesng procedures,
instrucons and ow charts that must be followed to conrm the locaon of the problem. This informaon can be
found in the vehicle’s service manual.
Freeze Frame: When an emission-related fault occurs, certain vehicle conditions are recorded by the on-
board computer. This information is referred to as freeze frame data. Freeze frame data includes a snapshot
of critical parameter values at the time the DTC is set.
Help: Tap to view the help information.
Code Search: Tap it to search for more information about the current DTC online.
Report: To save the current data in text format. All diagnostic reports can be accessed from User Info -> My
Reports -> Diagnostic Report.
C. Clear Fault Code
After reading the retrieved codes from the vehicle and certain repairs have been carried out, you can
engine light will illuminate as soon as the problem that cause the DTC to set manifests itself.
Tap Clear Fault Code on the test function selection screen, a confirmation dialog box pops up on the
screen. Tap Yes and the system will automatically delete the currently existing trouble code.
Note: Aer clearing, you should retrieve trouble codes once more or turn ignion on and retrieve codes again.
If there are sll some trouble codes in the system, please troubleshoot the code using a factory diagnosis guide,
then clear the code and recheck.
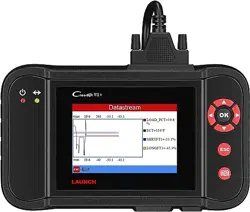
D. Read Data Stream
also be used to guide vehicle repair.
Danger: If you must drive the vehicle in order to perform a troubleshoong procedure, always have a second
person help you. Trying to drive and operate the diagnosc tool at the same me is dangerous, and could cause a
serious trac accident.
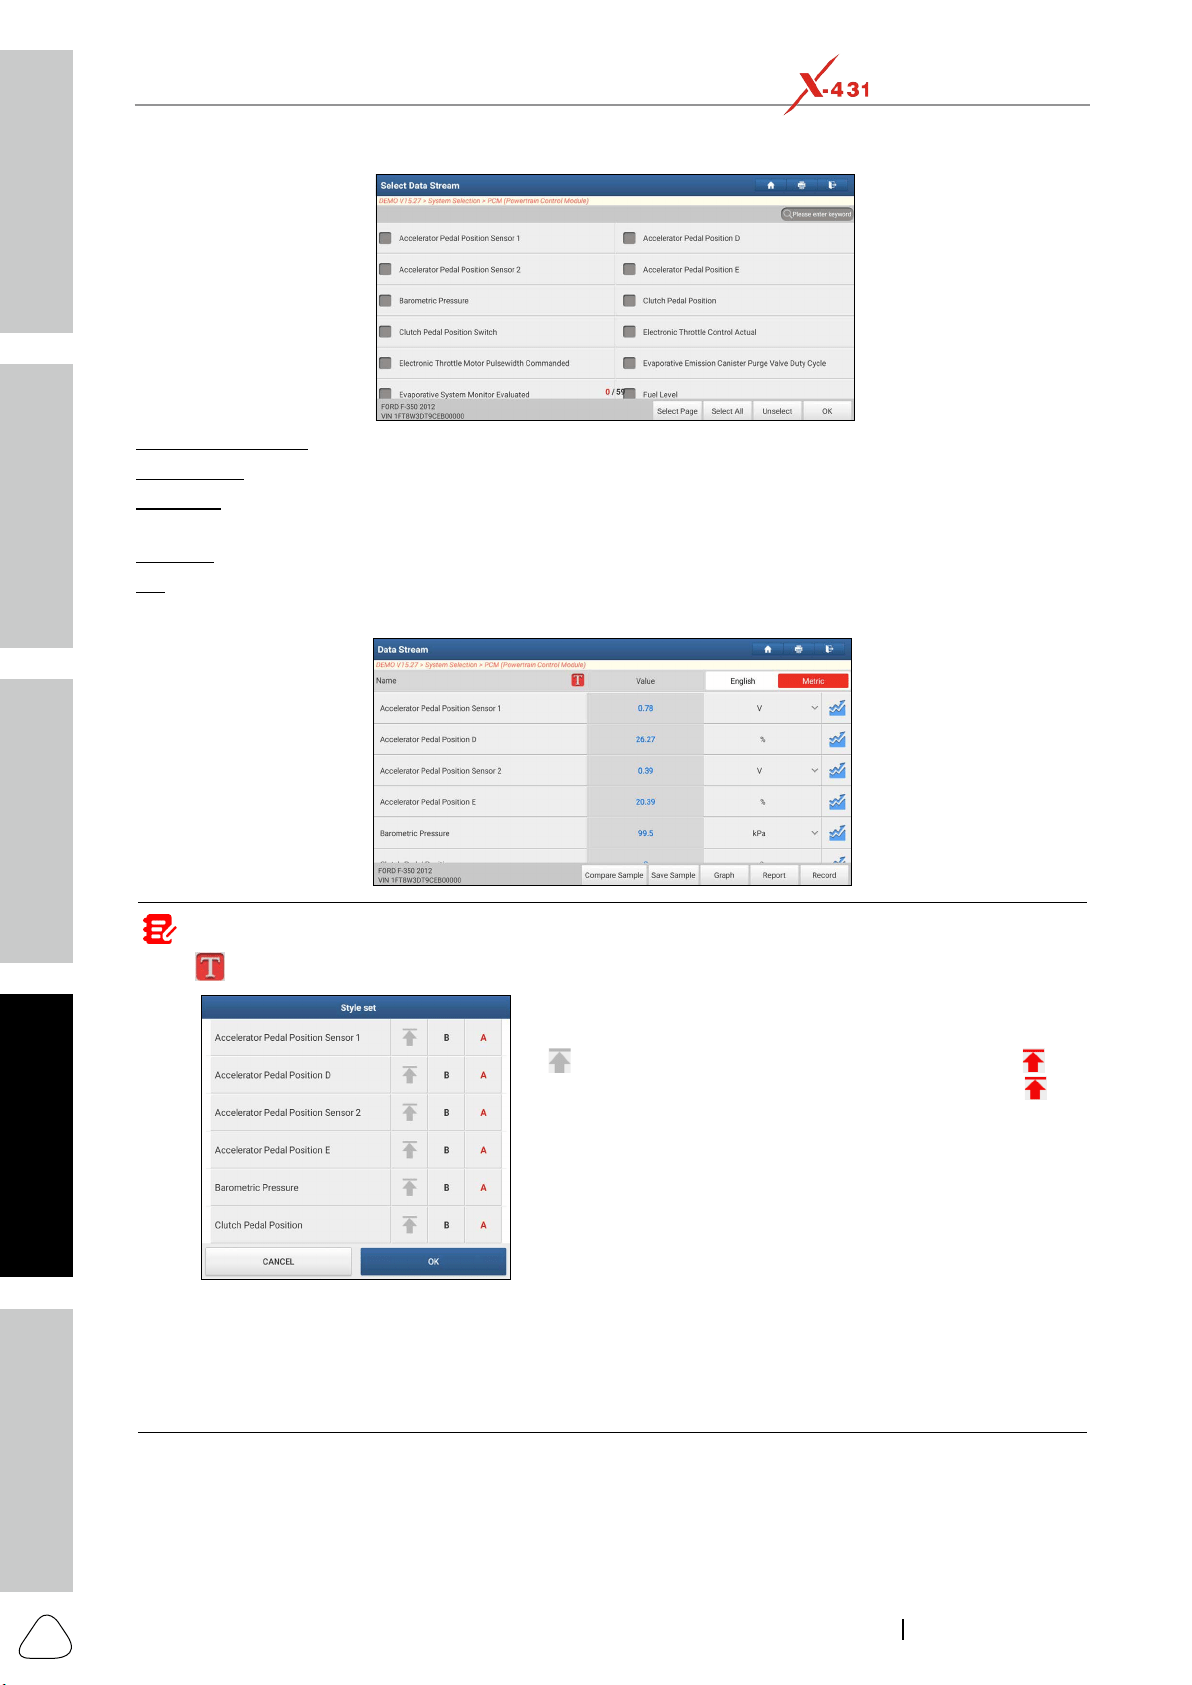
Tap Read Data Stream on the test function selection screen, the system will display data stream items.
Safety & Accessory
Initial Use
Diagnostics
FAQ & Appendix
Product Prole
28
www.x431.com +86 755 8455 7891
LAUNCH
PAD VII
User Manual
Select Page: Tap to select all items of the current page.
Select All: Tap to select all items. To select certain data stream item, just check the box before the item
name.
Unselect: Tap to deselect all data stream items.
OK
After selecting the desired items, tap OK to enter the data stream reading screen.
Notes:
1. Tap
, the following popup will appear.
Here the user can set different display style for each selected
item.
indicates sticky top. If it is tapped, it will change into . On
the data stream display screen, the data stream item with
will
be shown on the top of the selected data stream list. To remove
it from the top of the list, just tap it again.
B indicates this item will be displayed in Bold.
A indicates this item will be displayed in Red.
2. Tap English or Metric to switch the measurement unit.
3. If the value of the data stream item is out of the range of the standard (reference) value, the whole line will
display in red. If it complies with the reference value, it displays in blue (normal mode).
4. The indicator 1/X shown on the boom of the screen stands for the current page/total page number. Swipe the
screen from the right/le to advance/return to the next/previous page.
There are 3 types of display modes available for data viewing, allowing you to view various types of
parameters in the most suitable way.
Value – this is the default mode which displays the parameters in texts and shows in list format.
Graph – displays the parameters in waveform graphs.
Safety & Accessory
Initial UseDiagnosticsFAQ & Appendix
Product Prole
29
www.x431.com +86 755 8455 7891
LAUNCH
PAD VII
User Manual
: Tap it to view the waveform graph of the current data stream item.
Note: The waveform can be zoomed in or out via: Spread apart/pinch together.
To zoom in manually, place two ngers on the screen and then spread them apart. To zoom out, place two ngers
apart on the screen and then pinch them together.
the system will alarm.
Note: The real time (Live Data) vehicle operating information (values/status) that the on-board computer
supplies to the tool for each sensor, actuator, switch, etc. is called Parameter Idencaon Data (PID).
Graph: Tap to view the waveforms of the selected data stream items.
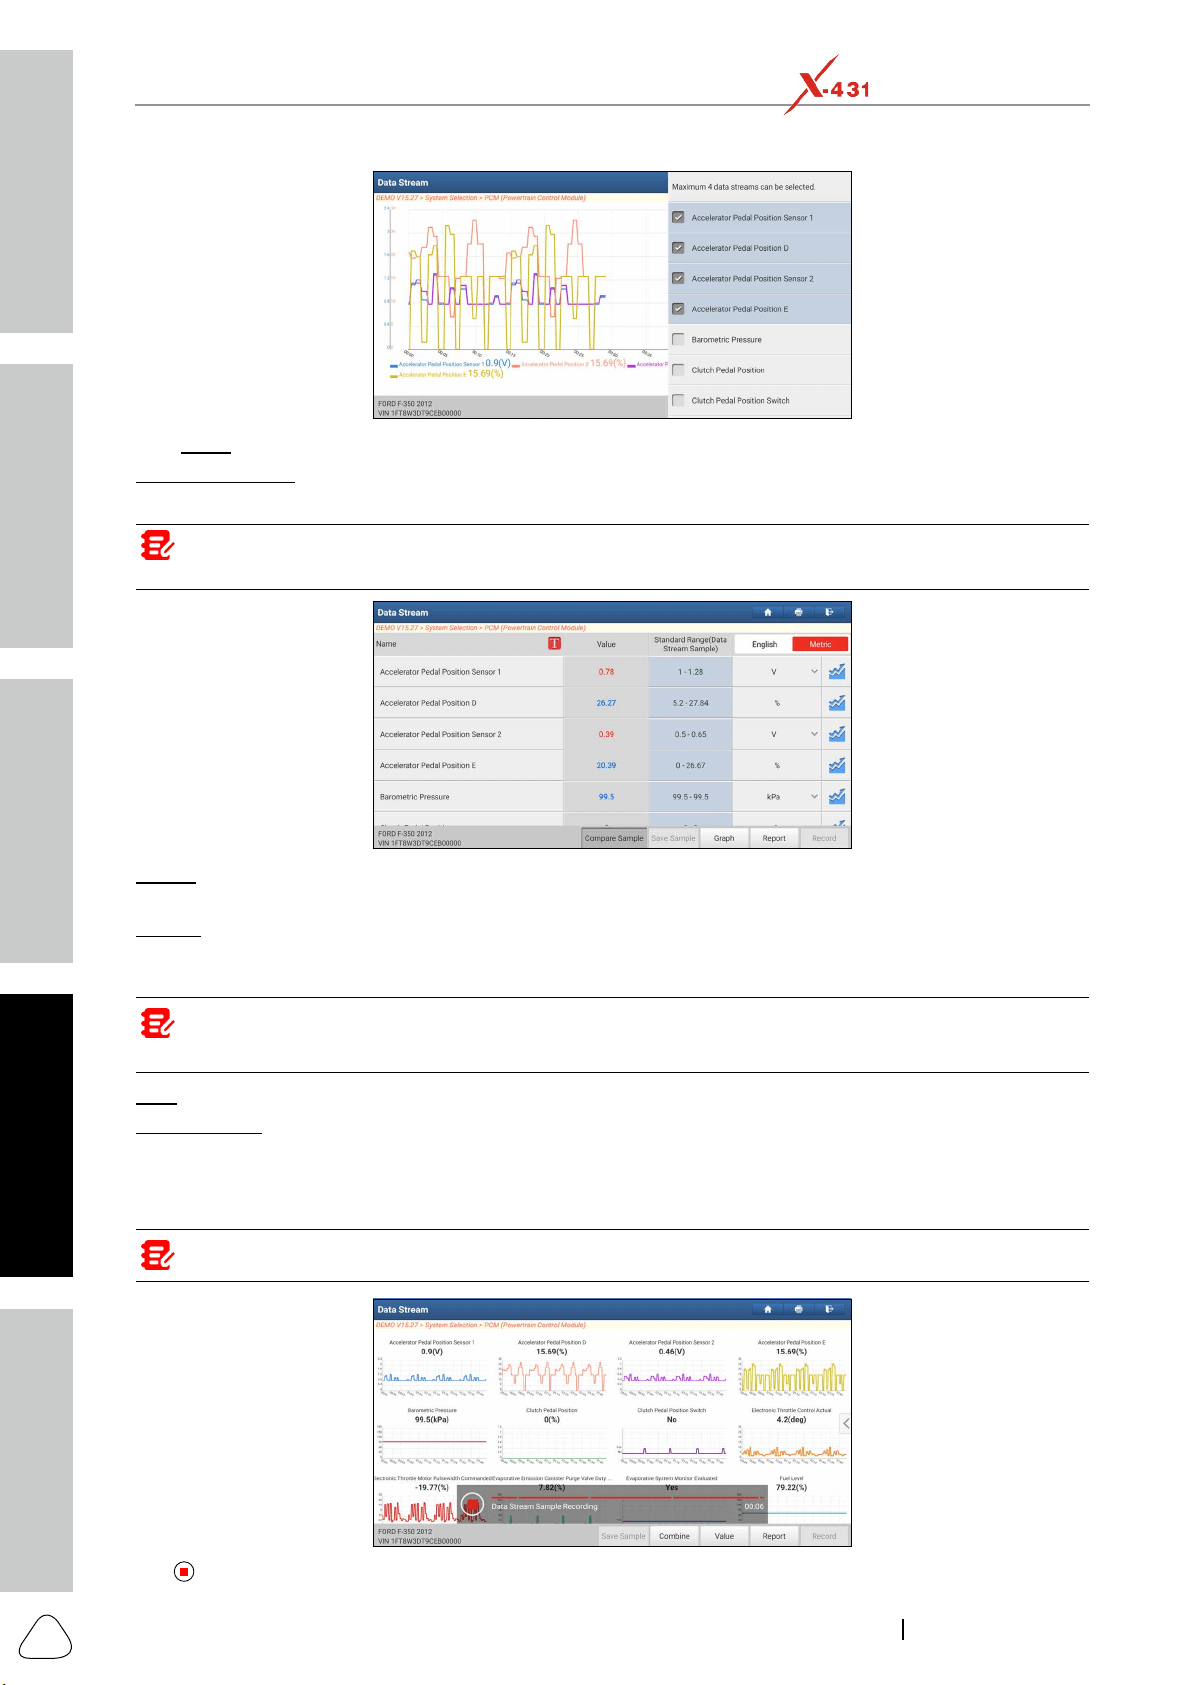
Combine: This option is mostly used in graph merge status for data comparison. Select (Maximum 4
waveforms corresponding to these items immediately.
Safety & Accessory
Initial Use
Diagnostics
FAQ & Appendix
Product Prole
30
www.x431.com +86 755 8455 7891
LAUNCH
PAD VII
User Manual
Value: Tap to display the parameters in texts.
Compare Sample
data stream sampling will be imported into the Standard Range
Note: Before executing this function, you have to sample the values of data stream items and save it as an
sample DS le.
Report: To save the current data as a diagnostic report. All diagnostic reports can be accessed from User
Info -> My Reports -> Health Report.
Record: Tap to start recording diagnostic data. Recorded live data can serve as valuable information to help
you in troubleshooting of vehicle problems. All diagnostic records can be replayed from User Info -> My
Reports -> Recorded Data.
Note: The saved le follows the naming rule: It begins with vehicle type, and then the product S/N and ends
with record starng me (To dierenate between les, please congure the accurate system me).
Help: Tap to view the help information.
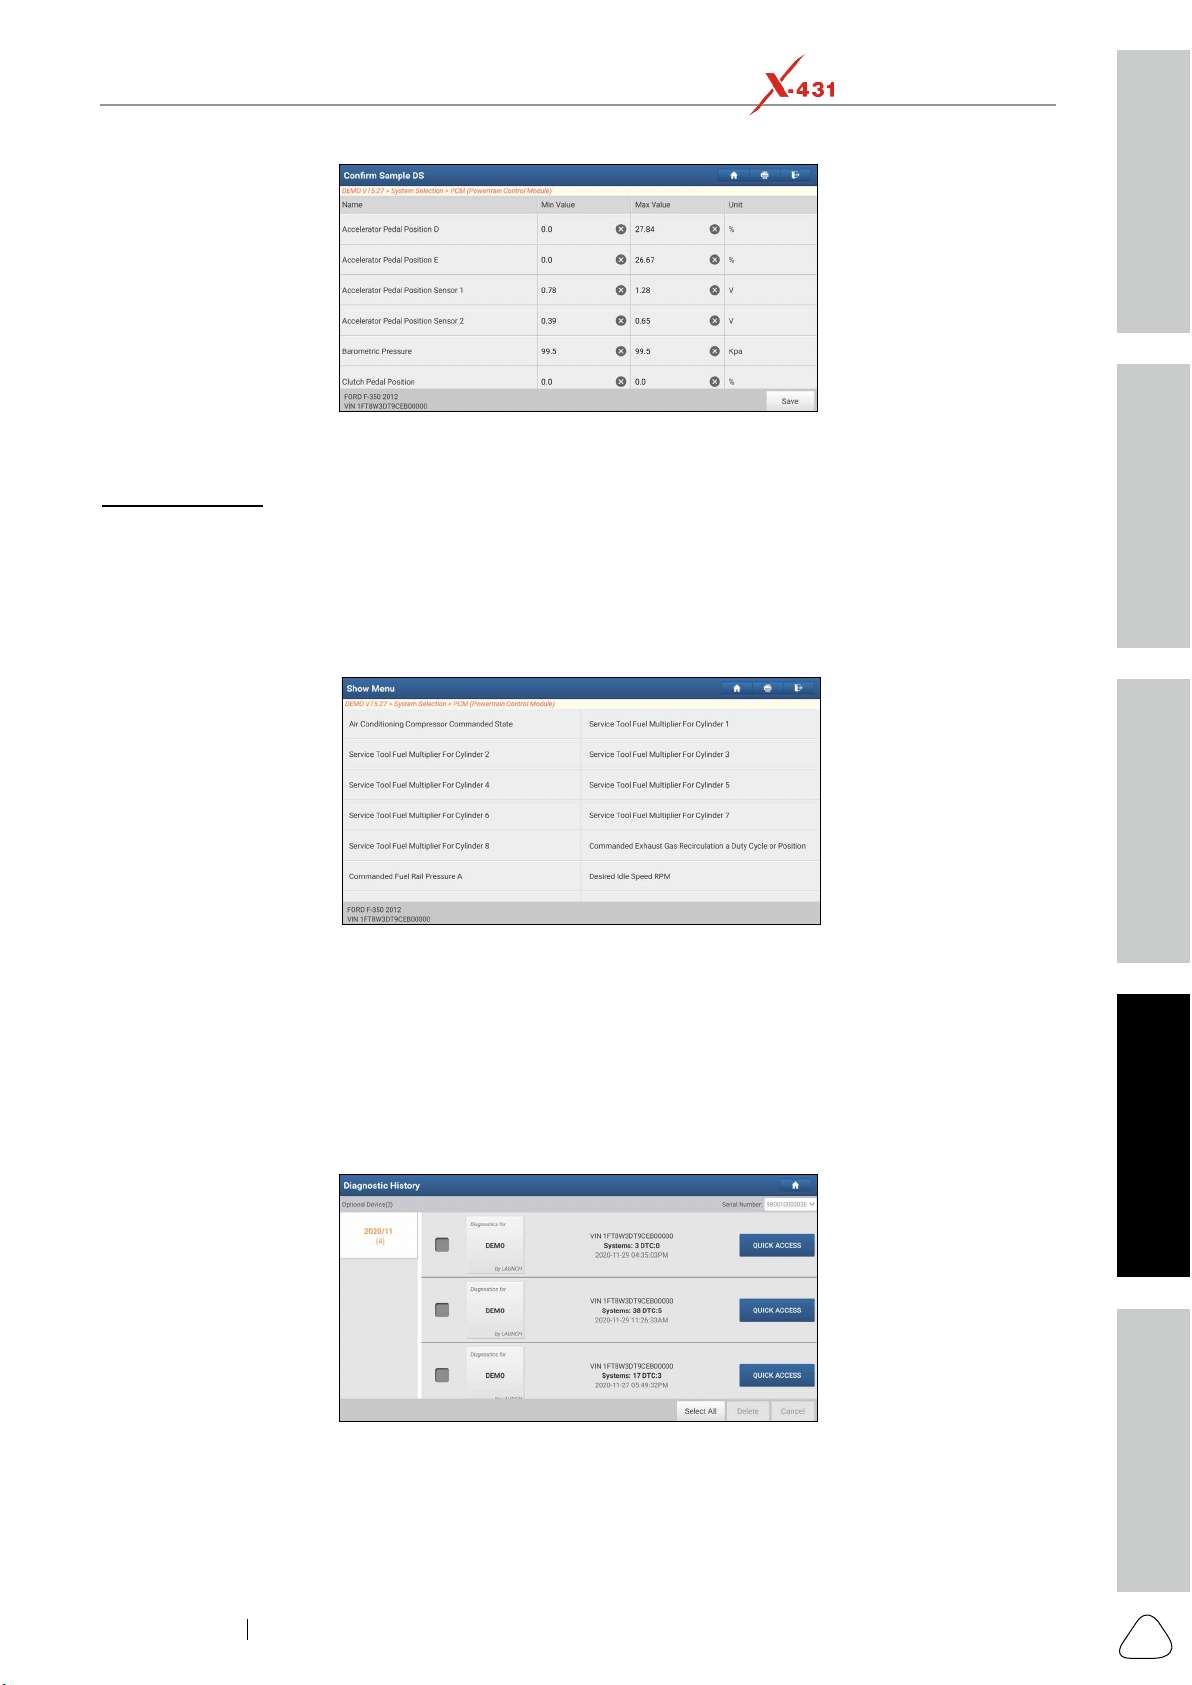
Save Sample: This item enables you to customize the standard range of live data stream items and
corresponding sample data to overwrite the current standard range.
Tap it to start recording the sample data, and the following screen will appear:
Note: Only the data stream items with measurement units will be recorded.
Tap
to stop recording and navigate to the data revision screen.
Safety & Accessory
Initial UseDiagnosticsFAQ & Appendix
Product Prole
31
www.x431.com +86 755 8455 7891
LAUNCH
PAD VII
User Manual
Save to save it as a sample DS
Data Stream SampleUser Info.
E. Actuation Test
This option is used to access vehicle-specific subsystem and component tests. Available test vary by
vehicle manufacturer, year, and model. During the actuation test, the tablet outputs commands to the ECU
in order to drive the actuators, and then determines the integrity of the system or parts by reading the ECU
data, or by monitoring the operation of the actuators, such as switching a injector between two operating
states.
Tap Actuation Test on the test function selection screen, the system will display as follows:
Simply follow the on-screen instructions and make appropriate selections to complete the test. Each time
when an operation is successfully executed, Completed displays.
5.3 Diagnostic History
Generally once a vehicle diagnosis is performed, the tablet will record the every details of diagnostic
process. The History function provides a quick access to the tested vehicles and users can resume from the
last operation, without starting from scratch.
Tap Diagnostic History, all diagnostic records will be listed on the screen in date sequence.
Delete. To delete all historical records, tap
Select All and then tap Delete.
Quick Access to directly navigate to the function selection page of last diagnostic operation. Choose
the desired option to proceed.

Safety & Accessory
Initial Use
Diagnostics
FAQ & Appendix
Product Prole
32
www.x431.com +86 755 8455 7891
LAUNCH
PAD VII
User Manual
5.4 Feedback
This item allows you to feedback your diagnostic problems to us for analysis and troubleshooting.
Tap Feedback, the following 3 options will be displayed on the left column of the screen.
A. Feedback
Tap a tested vehicle model to enter the feedback screen.
Choose File to open the target folder and choose the desired diagnostic logs.
email address. After inputting, tap Submit Result to send it to us.
Tap it to display all diagnostic feedback logs which have not been submitted successfully due to network
failure. Once the tablet gets a stable network signal, it will be uploaded to the remote server automatically.
Safety & Accessory
Initial UseDiagnosticsFAQ & Appendix
Product Prole
33
www.x431.com +86 755 8455 7891
LAUNCH
PAD VII
User Manual
6 Maintenance Reset
most commonly performed service functions contain:
Oil Reset Service
Steering Angle Calibration
Gear Learning
Electronic Throttle Position Reset
Gearbox Matching
Suspension Calibration
EGR Adaption
Seats Calibration
Tyre Reset
NOx Sensor Reset
There are two methods to reset service lamp: Manual reset or Auto reset. Auto reset follows the principle
follow the on-screen instructions to select appropriate execution options, enter correct data or values, and
perform necessary actions, the system will guide you through the complete performance for various service
operations.
Select “Reset”
Select the desired reset
item (e.g. oil lamp reset
etc.)
Select the car brand
Select the service mode
(The available mode varies
from vehicle to vehicle)
Follow the instructions
on the screen to operate
6.1 Oil Reset Service
This function allows you to perform reset for the engine oil life system, which calculates an optimal oil life
change interval depending on the vehicle driving conditions and climate.
This function can be performed in the following cases:

Safety & Accessory
Initial Use
Diagnostics
FAQ & Appendix
Product Prole
34
www.x431.com +86 755 8455 7891
LAUNCH
PAD VII
User Manual
2. After changing engine oil or electric appliances that monitor oil life, you need to reset the service lamp.
6.2 Electronic Parking Brake Reset
the on-board computer to replace the brake pad. After replacing the brake pad, you must reset the brake
pad. Otherwise, the car alarms.
2. Reset must be performed in the following cases:
6.3 Steering Angle Calibration
this position as reference, the ECU can calculate the accurate angle for left and right steering.
After replacing the steering angle position sensor, replacing steering mechanical parts (such as steering
body, you must reset the steering angle.
6.4 ABS Bleeding
This function allows you to perform various bi-directional tests to check the operating conditions of Anti-lock
6.5 Tire Pressure Monitor System Reset
TPMS replacement and sensor test.
2. Tire pressure resetting must be performed after maintenance is performed in the following cases: tire
pressure is too low, tire leaks, tire pressure monitoring device is replaced or installed, tire is replaced, tire
pressure sensor is damaged, and tire is replaced for the car with tire pressure monitoring function.
6.6 Gear Learning
The crankshaft position sensor learns crankshaft tooth machining tolerance and saves to the computer to
6.7 IMMO Service
ignition key or other device is present. Most new vehicles have an immobilizer as standard equipment. An
audible alarm alone.

Safety & Accessory
Initial UseDiagnosticsFAQ & Appendix
Product Prole
35
www.x431.com +86 755 8455 7891
LAUNCH
PAD VII
User Manual
in the ignition key and a device called a radio frequency reader in the steering column. When the key
is placed in the ignition, the transponder sends a signal with a unique identification code to the reader,
the computer disables the system, and the car will be unable to start until the correct key is placed in the
ignition.
To prevent the car being used by unauthorized keys, the anti-theft key matching function must be performed
use the car.
battery is replaced, anti-theft key matching must be performed.
6.8 Injector Coding
Write injector actual code or rewrite code in the ECU to the injector code of the corresponding cylinder so
as to more accurately control or correct cylinder injection quantity.
the cylinder can better identify injectors to accurately control fuel injection.
6.9 Battery Maintenance System Reset
This function enables you to perform a resetting operation on the monitoring unit of vehicle battery, in which
the original low battery fault information will be cleared and battery matching will be done.
detects false information, it will invalidate some electric auxiliary functions, such as automatic start & stop
function, sunroof without one-key trigger function, power window without automatic function.
sensor to detect battery power usage more accurately, which can avoid an error message displaying on
the instrument panel.
6.10 Diesel Particulate Filter (DPF) Regeneration
combustion oxidation mode (such as high temperature heating combustion, fuel additive or catalyst reduce
DPF regeneration may be performed in the following cases:
6.11 Electronic Throttle Position Reset
This function enables you to make initial settings to throttle actuators and returns the learned values stored
to adjust the amount of air intake.
6.12 Gearbox Matching
1. This function can complete the gearbox self-learning to improve gear shifting quality.

Safety & Accessory
Initial Use
Diagnostics
FAQ & Appendix
Product Prole
36
www.x431.com +86 755 8455 7891
LAUNCH
PAD VII
User Manual
automatically compensate according to the driving conditions so as to achieve more comfortable and
better shift quality.
6.13 AFS (Adaptive Front-lighting System) Reset
This feature is used to initialize the adaptive headlamp system. According to the ambient light intensity, the
adaptive headlamp system may decide whether to automatically turn on the headlamps, and timely adjust
the headlamp lighting angle while monitoring the vehicle speed and body posture.
6.14 Sunroof Initialization
temperature threshold outside the car etc.
6.15 Suspension Calibration
1. This function can adjust the height of the body.
2. When replacing the body height sensor in the air suspension system, or control module or when the
vehicle level is incorrect, you need to perform this function to adjust the body height sensor for level
calibration.
6.16 EGR Adaption
6.17 Seats Calibration
This function is applied to match the seats with memory function that are replaced and repaired.
6.18 Tyre Reset
6.19 Coolant Bleed
Use this function to activate the electronic water pump before venting the cooling system.
6.20 AdBlue Reset (Diesel Engine Exhaust Gas Filter)
6.21 NOx Sensor Reset
NOx fault is re-initialized and the NOx catalytic converter is replaced, it is necessary to reset the catalytic
converter learned value stored in the engine ECU.

Safety & Accessory
Initial UseDiagnosticsFAQ & Appendix
Product Prole
37
www.x431.com +86 755 8455 7891
LAUNCH
PAD VII
User Manual
7 Software Update
This module allows you to update the diagnostic App and frequently used software.
7.1 Update Diagnostic Software & APP
Go to Software Update on the Job Menu and tap the Downloaded tab.
The Available tab displays a list of software that can be updated. Under it, all software is categorized into
three kinds:
• Common software: mainly includes some common apps that are associated with the diagnostic app.
The software of this kind always stays at the top of the list, which can be deselected manually (excluding
• Frequently used vehicle software: refers to the diagnostic software that is frequently used, including
Common
software list.
• Other vehicle software
displayed following the Frequently used software list.
is selected by default. Tap Update to start downloading.
long period of time, only the frequently used software is selected. Tap Update to start downloading.
Other vehicle software that is rarely used will also be listed under the Available tab, but it is not selected
at default.
To download certain software that is not frequently used, check the box before the vehicle model. Tap
Update to start downloading.
7.2 Update Frequently Used Software
Software Update and tap the
Downloaded tab.
Tap Update to start downloading. Once download is finished, the software packages will be installed
automatically.
Safety & Accessory
Initial Use
Diagnostics
FAQ & Appendix
Product Prole
38
www.x431.com +86 755 8455 7891
LAUNCH
PAD VII
User Manual
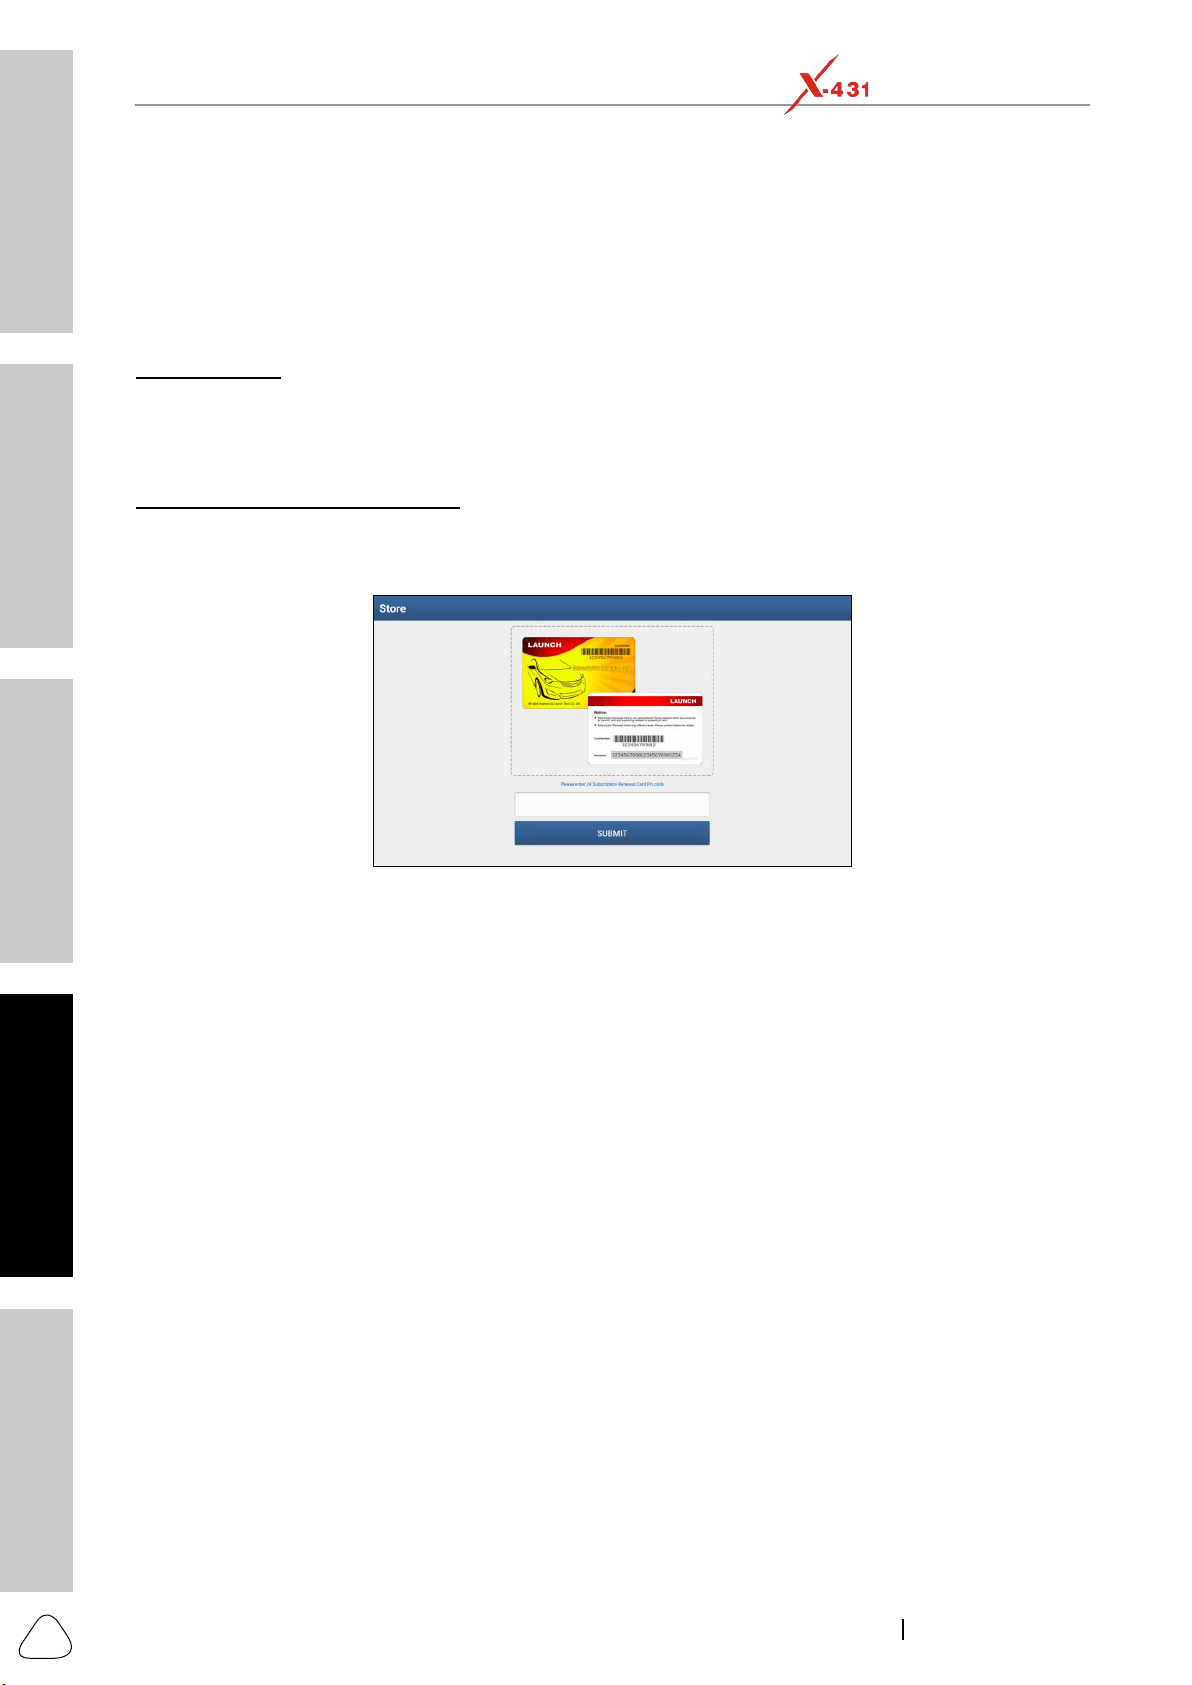
7.3 Renew Subscription
Renewal button will appear on the bottom of the update page.
Tap Renewal to navigate to the payment screen.
A. Using PayPal
1. Tap Renewal on the update page to navigate to the renewal type selection screen.
2. Select PayPal
3. After payment, go to update center to update the diagnostic software.
1. Tap Renewal to navigate to the renewal type selection screen.
2. Select Subscription Renewal Card.
Submit
4. Go to the update center to update the diagnostic software.
Safety & Accessory
Initial UseDiagnosticsFAQ & Appendix
Product Prole
39
www.x431.com +86 755 8455 7891
LAUNCH
PAD VII
User Manual
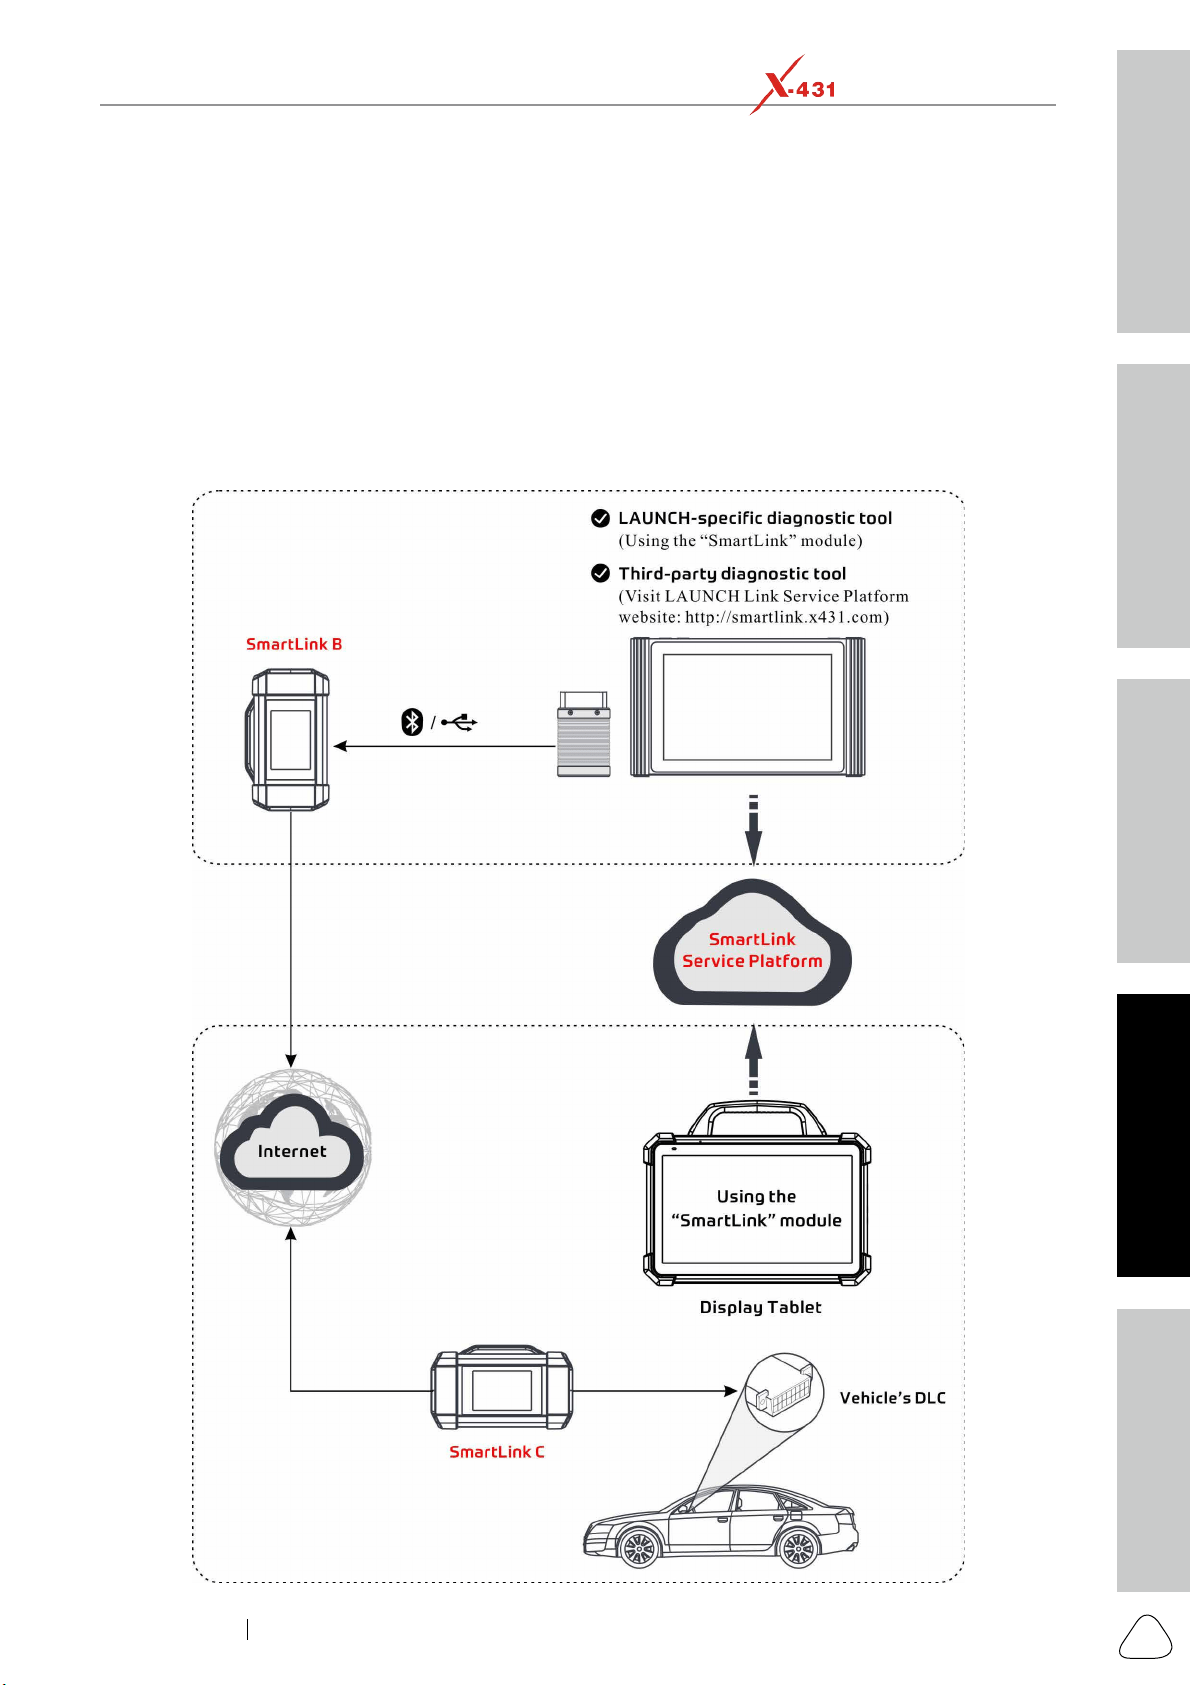
8 SmartLink Diag.
8.1 Introduction
SmartLink is a newly developed powerful service system dedicated to remote vehicle diagnosis and service.
touch vehicle problem, he can seek a trusted second opinion or additional expertise on various vehicle
assistance service.
Safety & Accessory
Initial Use
Diagnostics
FAQ & Appendix
Product Prole
40
www.x431.com +86 755 8455 7891
LAUNCH
PAD VII
User Manual
SmartLink Service Platform
two modules available on the link service platform: I’d like a remote assistance (for SmartLink C) and I
am a remote technician (for SmartLink B).
SmartLink C (Customer) - SmartLink Service Subscriber
SmartLink B (Business) - SmartLink Service Provider
module, tap SmartLink
accepts orders in the browser.
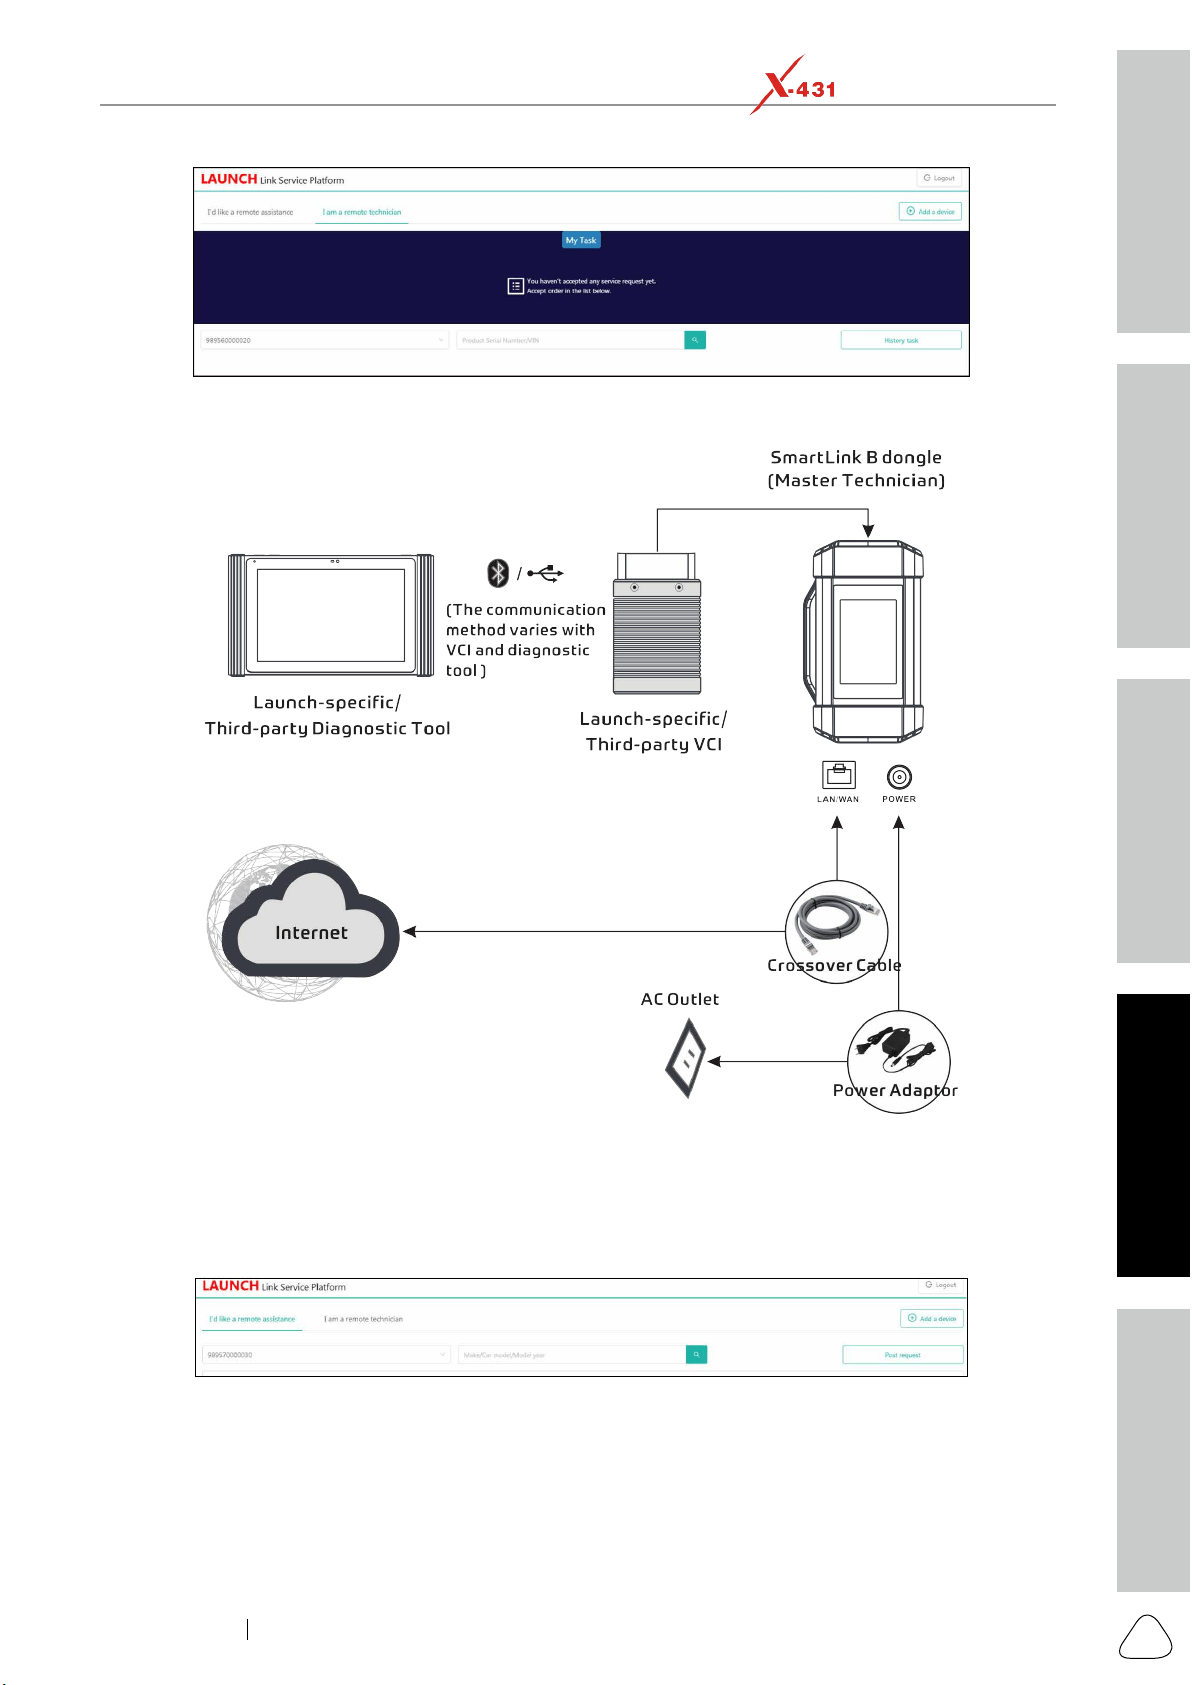
Safety & Accessory
Initial UseDiagnosticsFAQ & Appendix
Product Prole
41
www.x431.com +86 755 8455 7891
LAUNCH
PAD VII
User Manual
diagnosis of the vehicle connected to the SmartLink C dongle.
8.2 Perform SmartLink Remote Operation
8.2.1 Posting remote assistance request
1. Tap SmartLink on the Job menu of the tablet. The tablet automatically logs in the SmartLink system.
On-screen buttons:
Logout: Exits the current account from the system.
Add a device
Post request: Submits a new remote assistance order.
2. Tap the Post Request
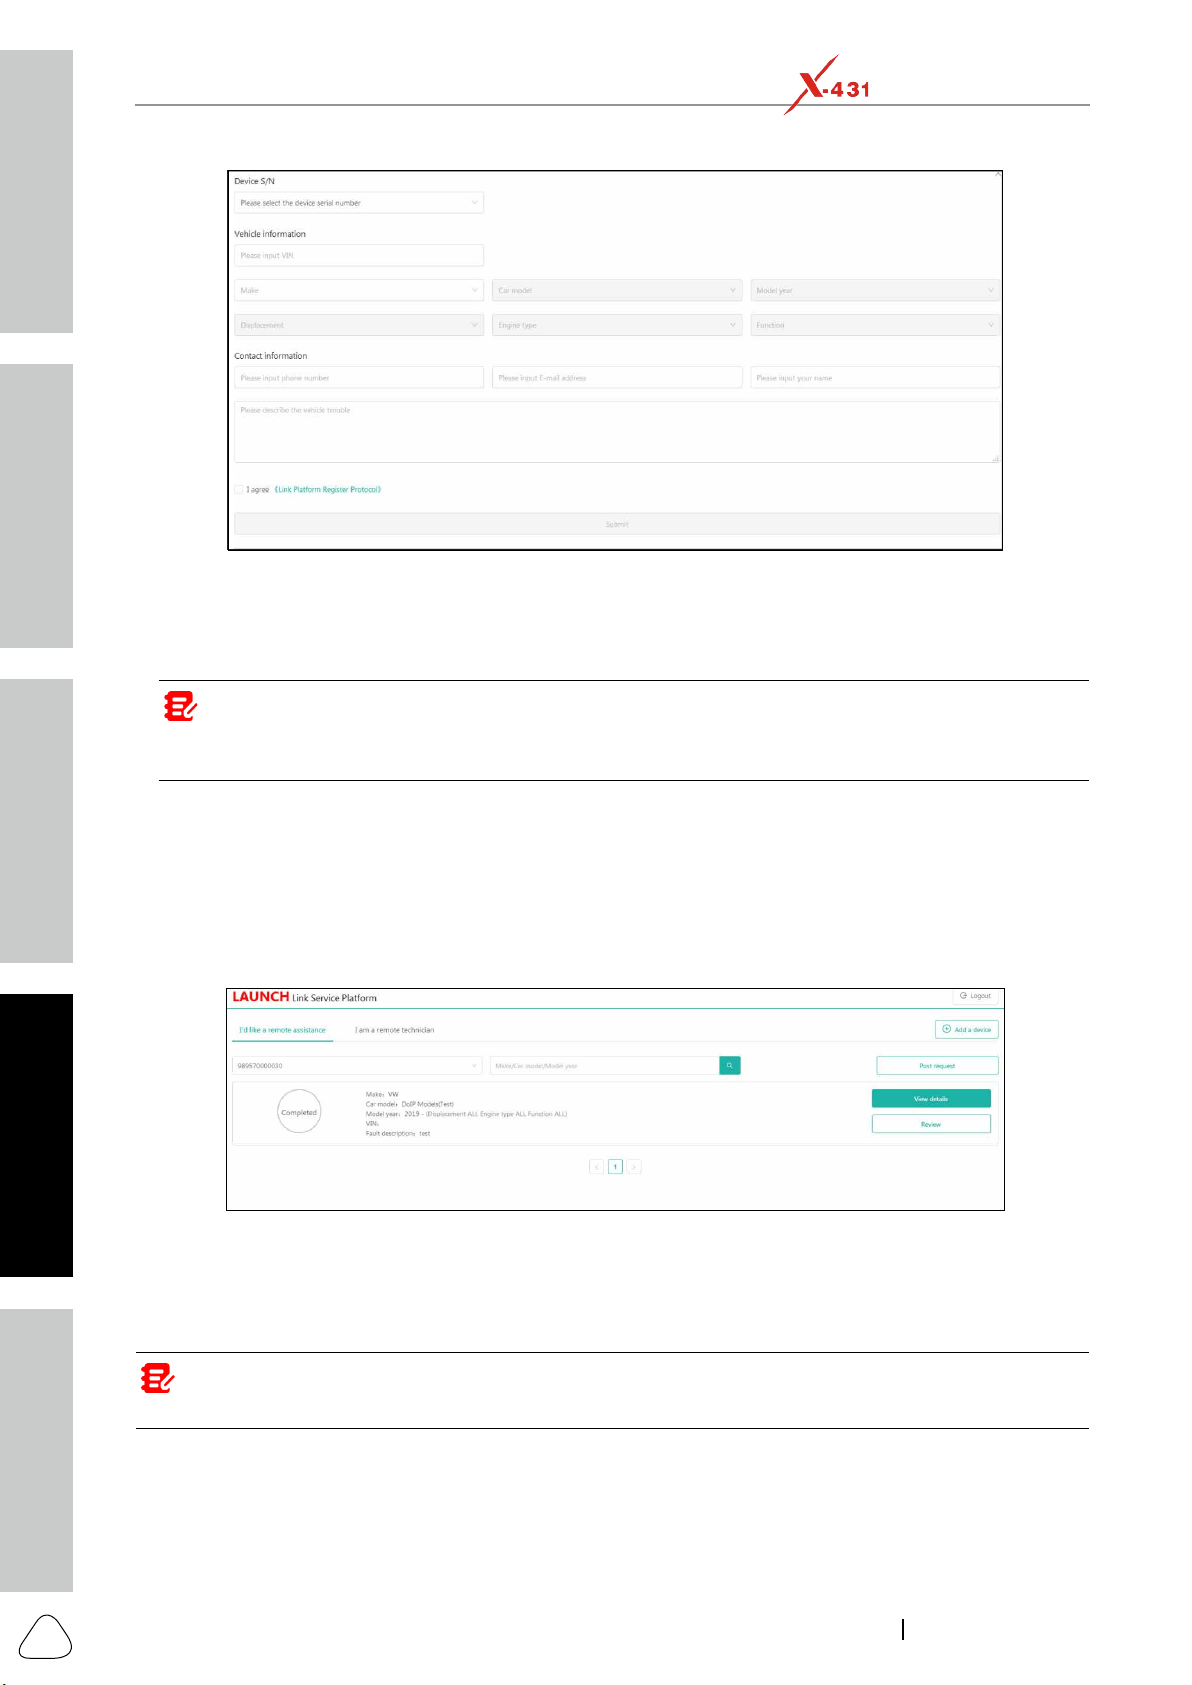
Safety & Accessory
Initial Use
Diagnostics
FAQ & Appendix
Product Prole
42
www.x431.com +86 755 8455 7891
LAUNCH
PAD VII
User Manual
Device S/N column, choose the desired SmartLink C Serial Number from the pull-down list if
several SmartLink C is bound to the current account.
Vehicle information
Model year, Displacement, Engine type and Function.
Note: In general, vehicle idencaon numbers are standardized - all contain 17 characters. VIN characters
may be capital leers A through Z and numbers 1 through 0; however, the leers I, O and Q are never used in
order to avoid mistakes of misreading. No signs or spaces are allowed in the VIN.
Contact information column, input the phone number, E-mail address and name so that you can
Problem Description input box, it is highly recommended to describe the vehicle failure as
the vehicle status.
Link Platform Register Protocol to read it carefully. After reading it, select the checkbox I agree.
Submit to create the order.
On-screen buttons:
View details: Double check if the order information is correct or not.
Review
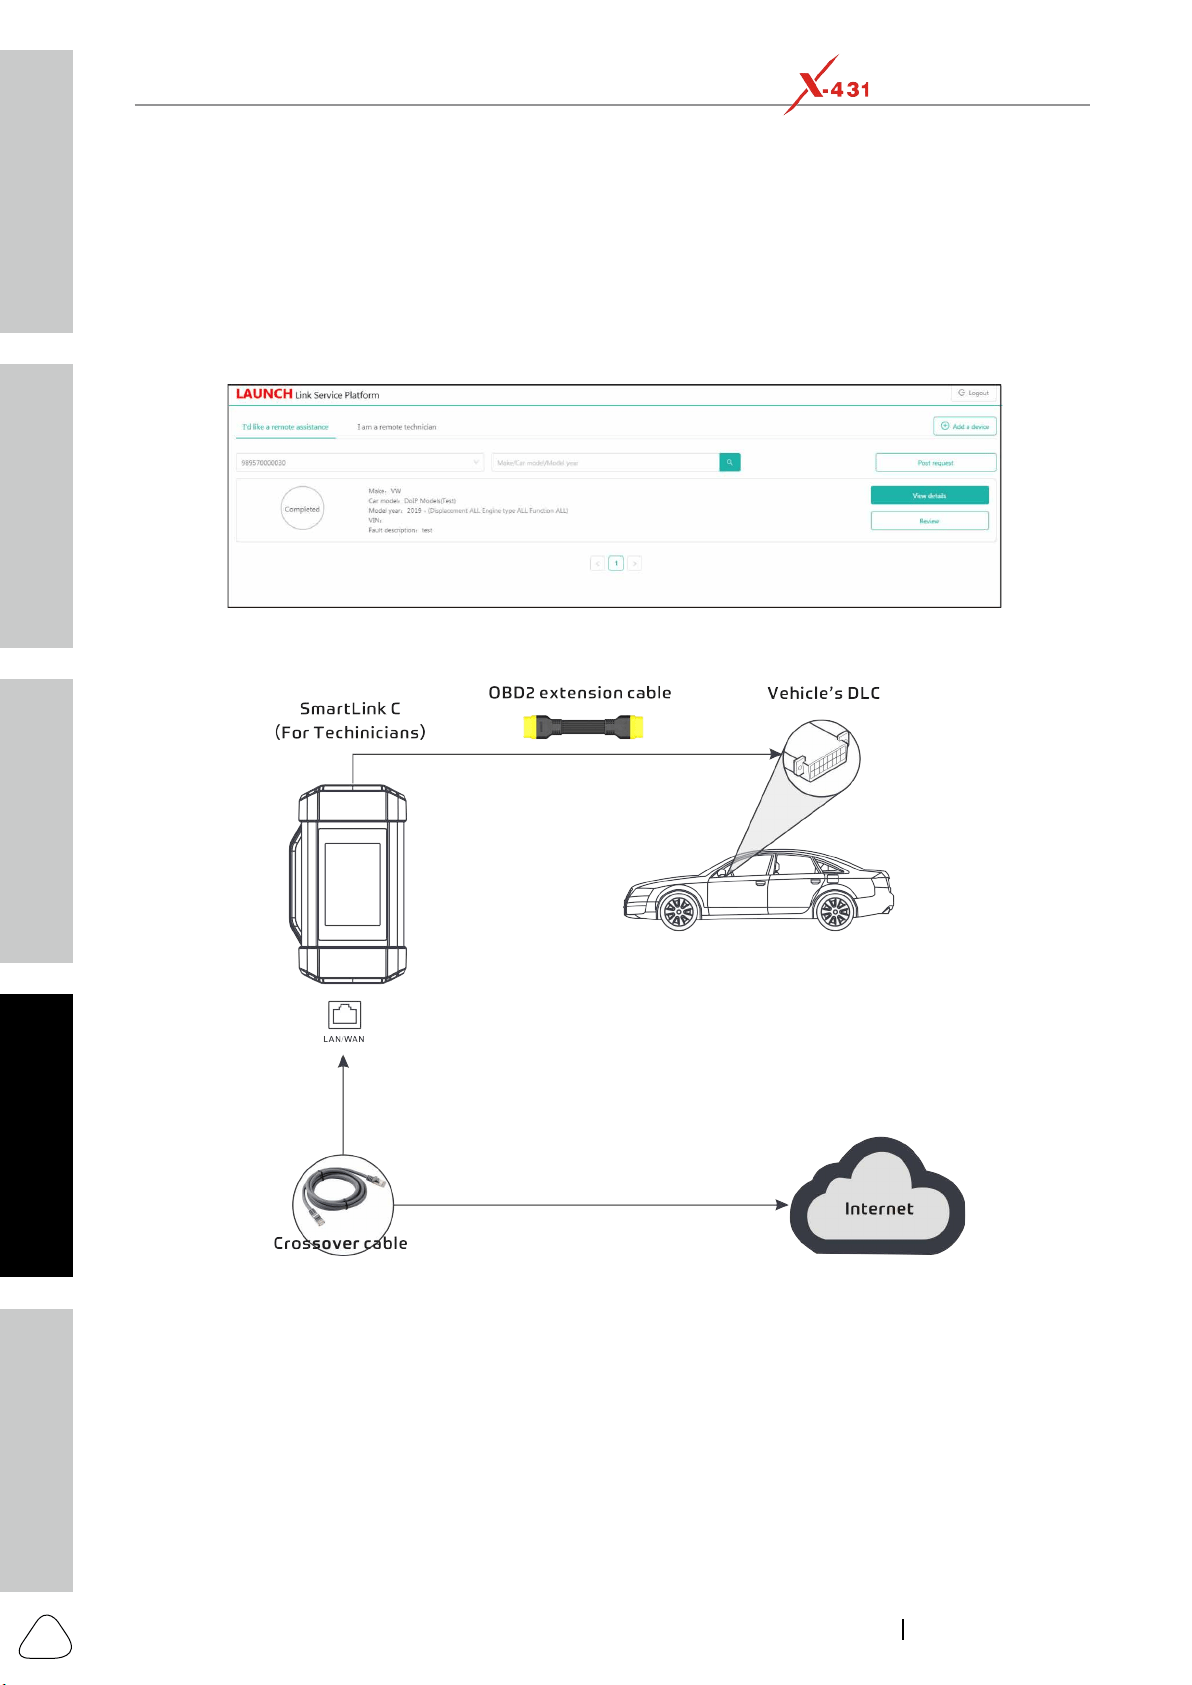
4. Next refer to Chapter 8.2.2 to make connections and start the diagnosis.
Note: The remote SmartLink operaon can only be performed aer the SmartLink C has submied the request,
and this request has been accepted by the remote SmartLink B.
8.2.2 Connections & operations
Follow the steps below to proceed:
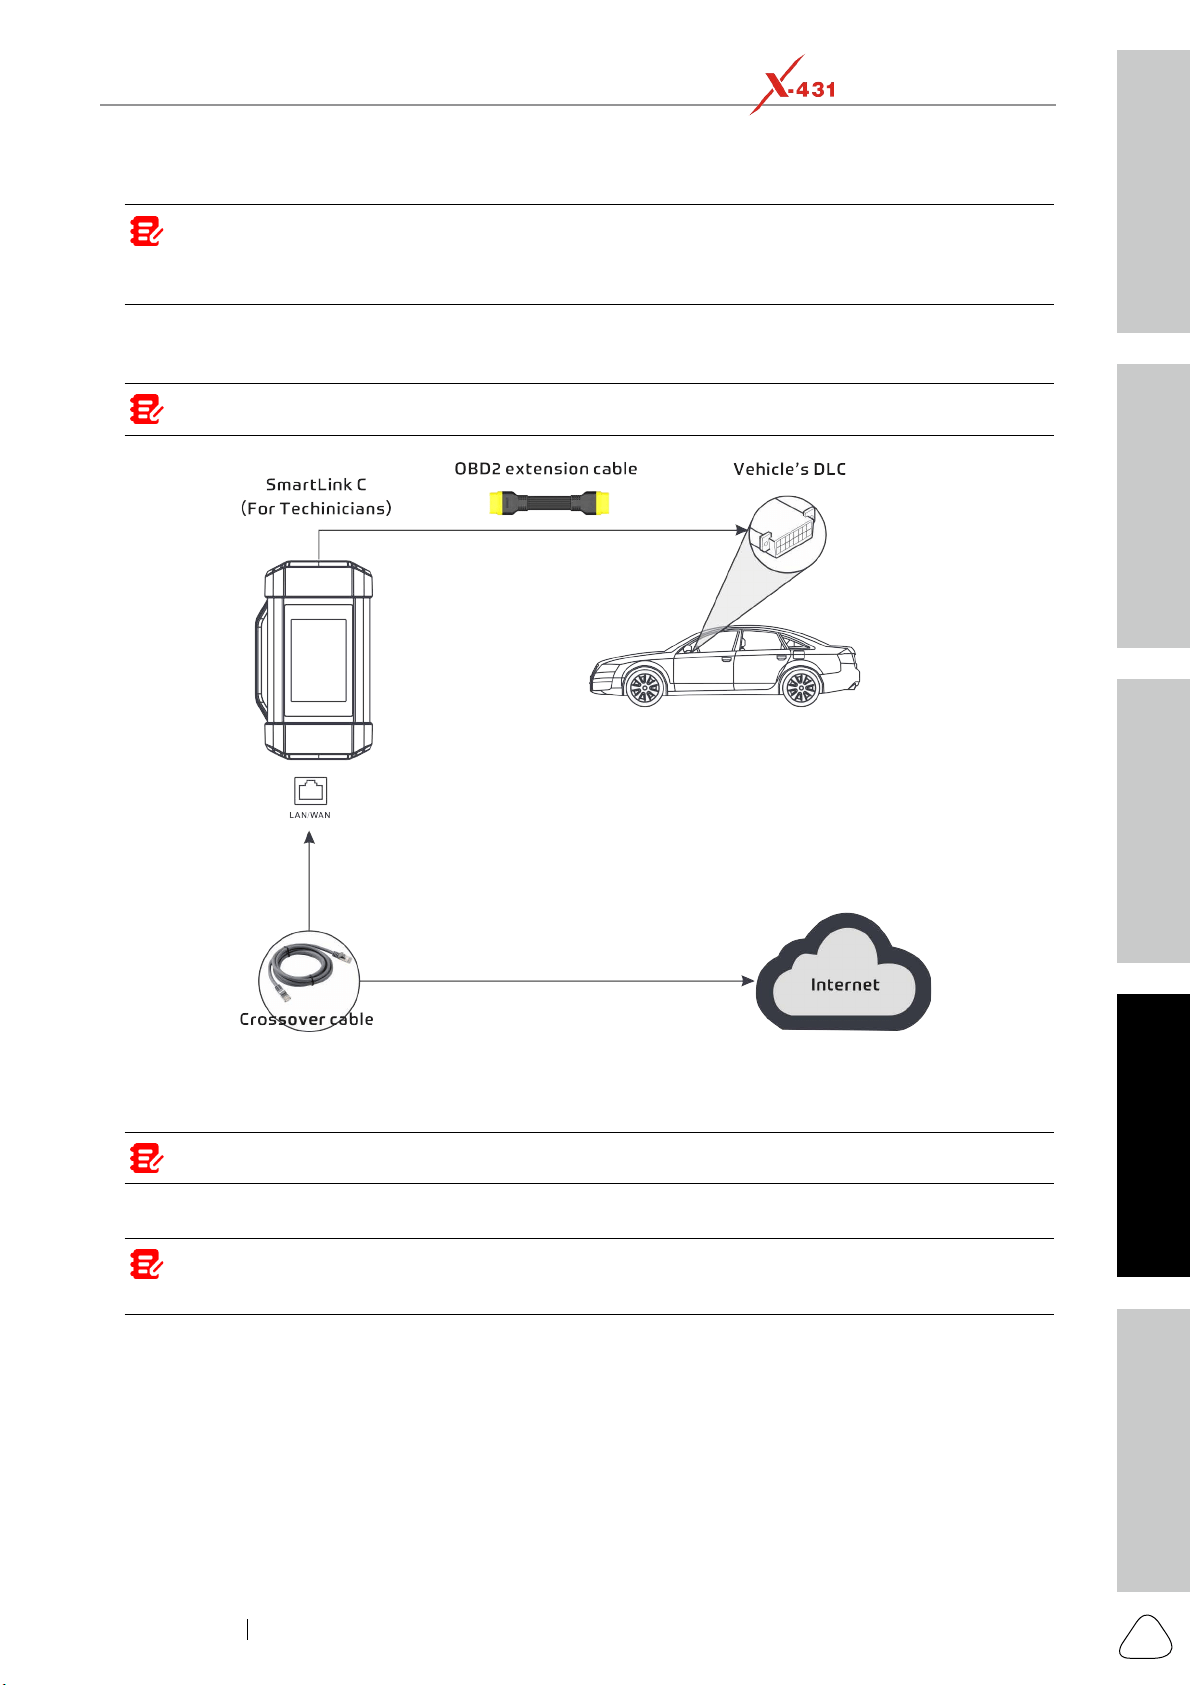
Safety & Accessory
Initial UseDiagnosticsFAQ & Appendix
Product Prole
43
www.x431.com +86 755 8455 7891
LAUNCH
PAD VII
User Manual
Note: During the SmartLink diagnosis, especially during remote online programming, it is recommended that
the vehicle baery is connected to a charging power source. Doing so can prevent the vehicle from running out
of power and failing to start due to long diagnosis me.
end into the LAN port of network modem.
Note: The network broadband of 100MB and above is required for this operaon.
4. After a successful network connection, the SmartLink C screen displays prompt information asking
whether to enter the super remote diagnostic mode. Tap Yes, the system will automatically read the
vehicle information and connect to the remote diagnosis server.
Note: One SmartLink C can only accept one remote diagnosc operaon at one me.
5. Turn on the vehicle ignition.
Note: Aer receiving the order, the SmartLink B master technician will accept the order and contact you via
phone or E-mail address.
message will be displayed on the SmartLink C screen.

Safety & Accessory
Initial Use
Diagnostics
FAQ & Appendix
Product Prole
44
www.x431.com +86 755 8455 7891
LAUNCH
PAD VII
User Manual
delay status. There are three states of network delay:
when the network delay is green. Otherwise, the communication with the vehicle may fail or the
incorrect system detection may occur.
disconnected.
Note: If the displayed network is poor, there may be too many people using the network in the LAN and
some users are downloading. It is recommended to use a stable network for remote diagnosis.
Notes:
• Please do not interrupt the vehicle or network connecon during a remote diagnosc process.
• Please make sure that the network delay is in green state when performing a remote online programing
process.
7. Unplug the crossover cable when a SmartLink operation is completed.
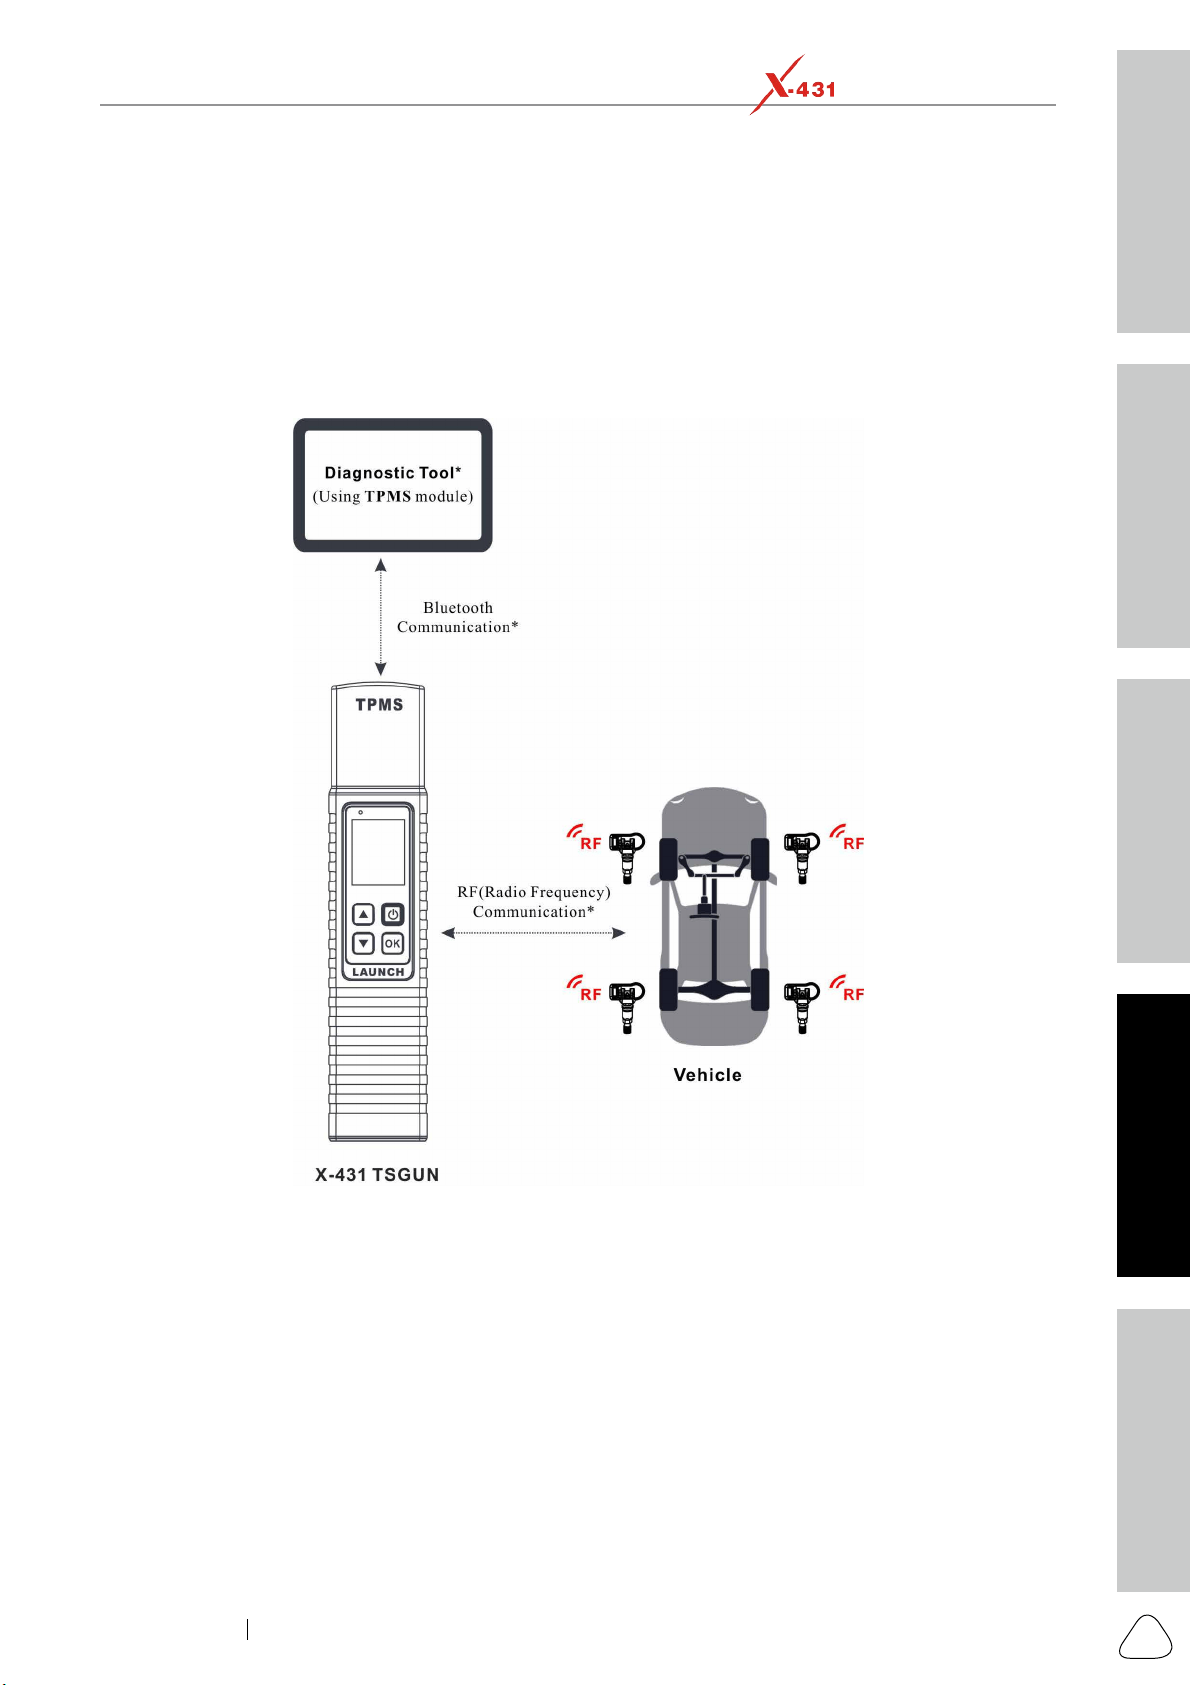
Safety & Accessory
Initial UseDiagnosticsFAQ & Appendix
Product Prole
45
www.x431.com +86 755 8455 7891
LAUNCH
PAD VII
User Manual
9 TPMS
9.1 Working Principle
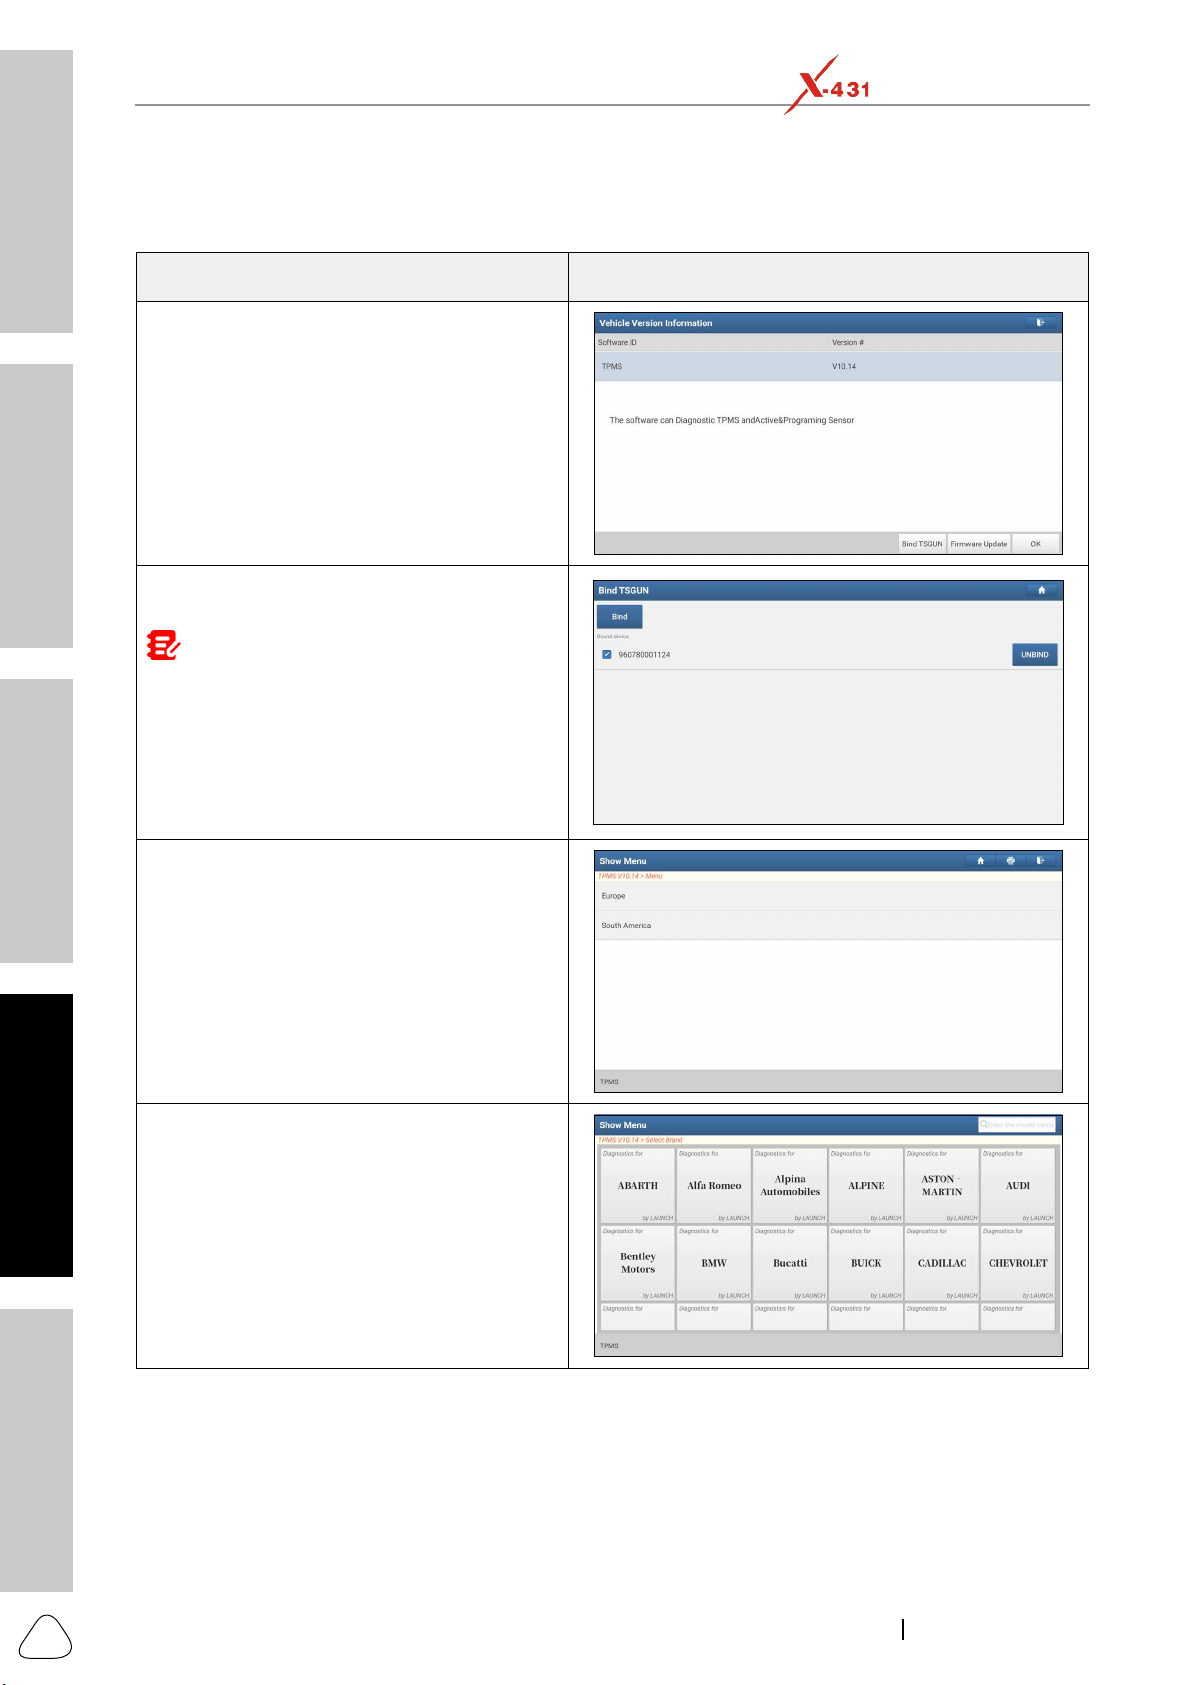
Safety & Accessory
Initial Use
Diagnostics
FAQ & Appendix
Product Prole
46
www.x431.com +86 755 8455 7891
LAUNCH
PAD VII
User Manual
9.2 Operation Flowchart
Mercedes-BENZ
Steps Corresponding Screenshots
Step 1 - Tap TPMS on the diagnostic tool
Step 2 - Select the desired X-431 TSGUN
Note
:
This step shall apply when multiple
X-431 TSGUN devices are bound to the diagnosc
tool. If only one X-431 TSGUN is bound to the
diagnostic tool, keep the device ON and tap OK
to ignore this step. If it is your rst me using the
X-431 TSGUN, please bind it before doing any
TPMS operaons. See Chapter 9.3 for more details
on binding/unbinding.
Step 3 - Select target region
Step 4 - Select vehicle manufacturer
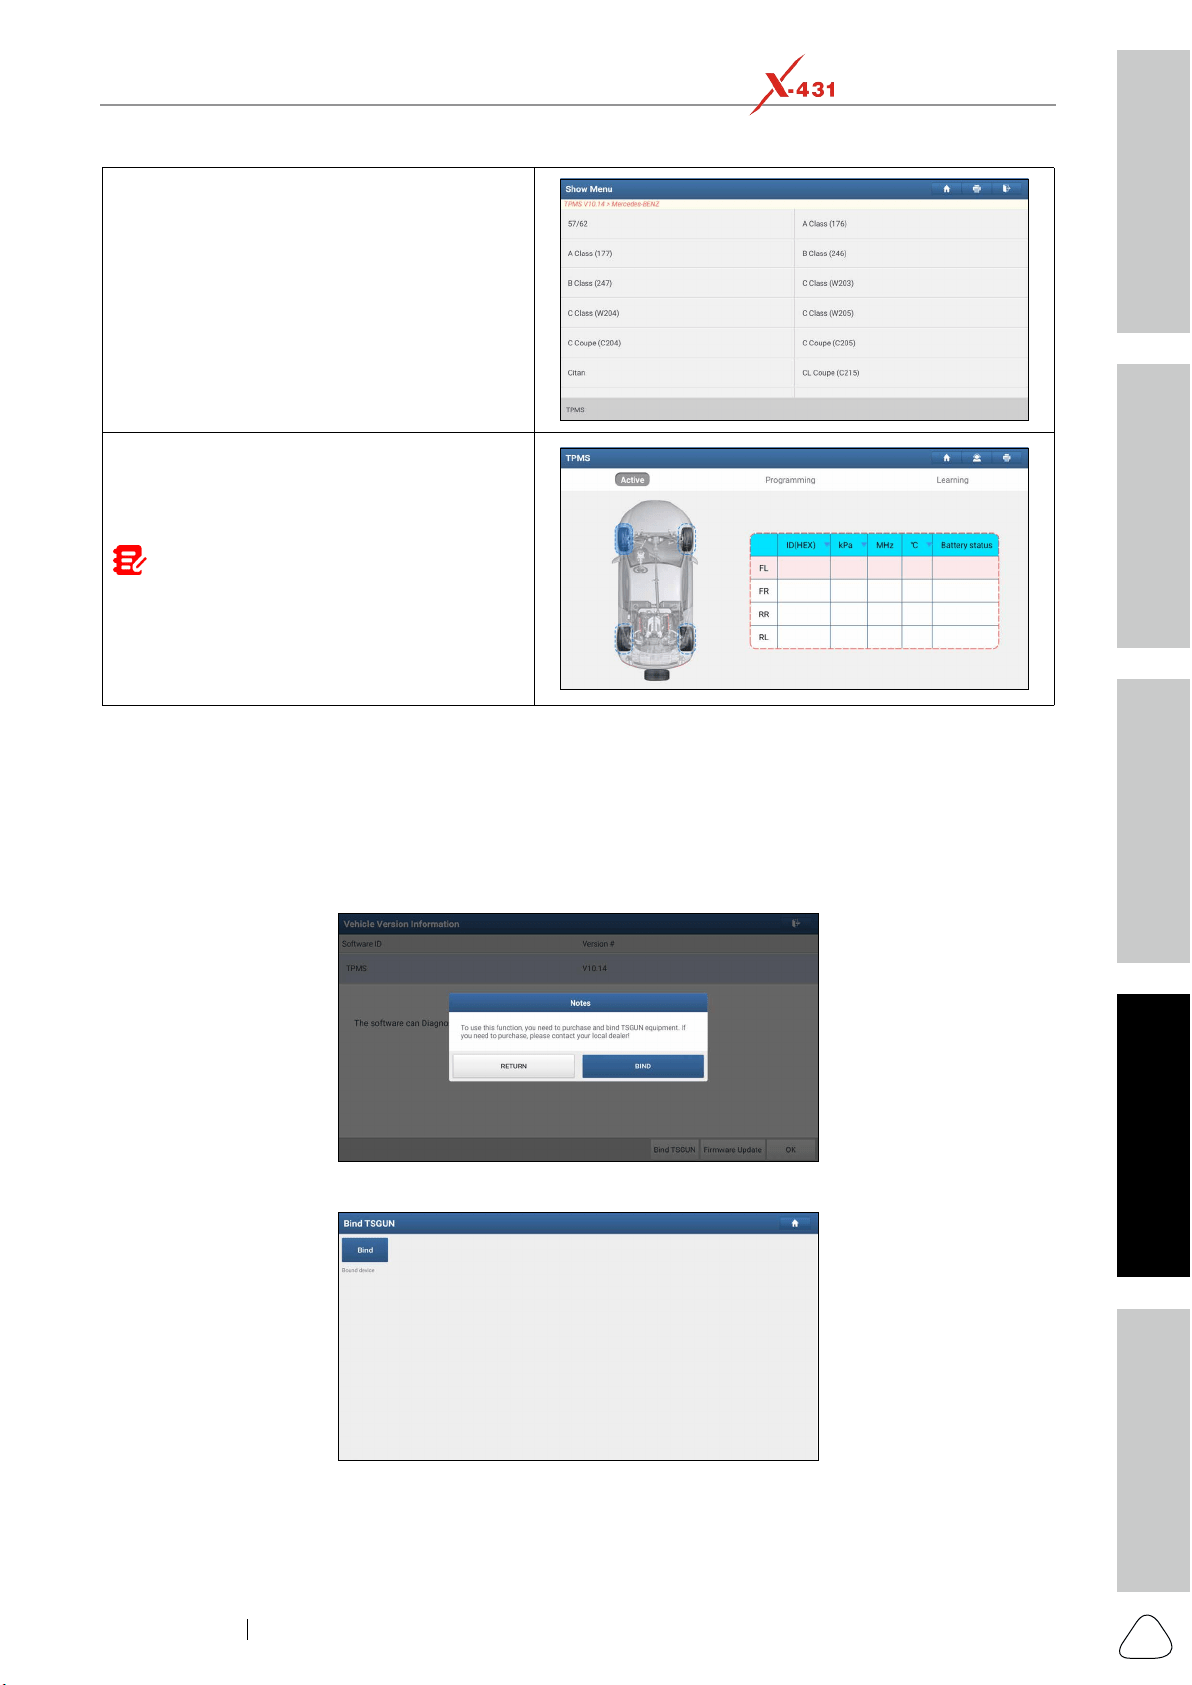
Safety & Accessory
Initial UseDiagnosticsFAQ & Appendix
Product Prole
47
www.x431.com +86 755 8455 7891
LAUNCH
PAD VII
User Manual
Step 5 - Select vehicle model and year
Step 6 - Select the TPMS function and follow
on-screen instructions to proceed. For more
details on TPMS functions, see the User Man-
ual of the X-431 TSGUN.
Note: For indirect TPMS vehicle, only the
Learning function is supported. For vehicle using
Direct TPMS, it generally includes: Activation,
Programming, Learning and Diagnosis. The
available TPMS functions may vary for different
vehicles being serviced.
9.3 Binding/Unbinding
9.3.1 Binding
For initial use, user needs to bind the X-431 TSGUN to the diagnostic tool.
1. Tap TPMS on the Job menu.
2. Tap Bind TSGUN to enter.
3. Tap Bind, the following screen will pop up.
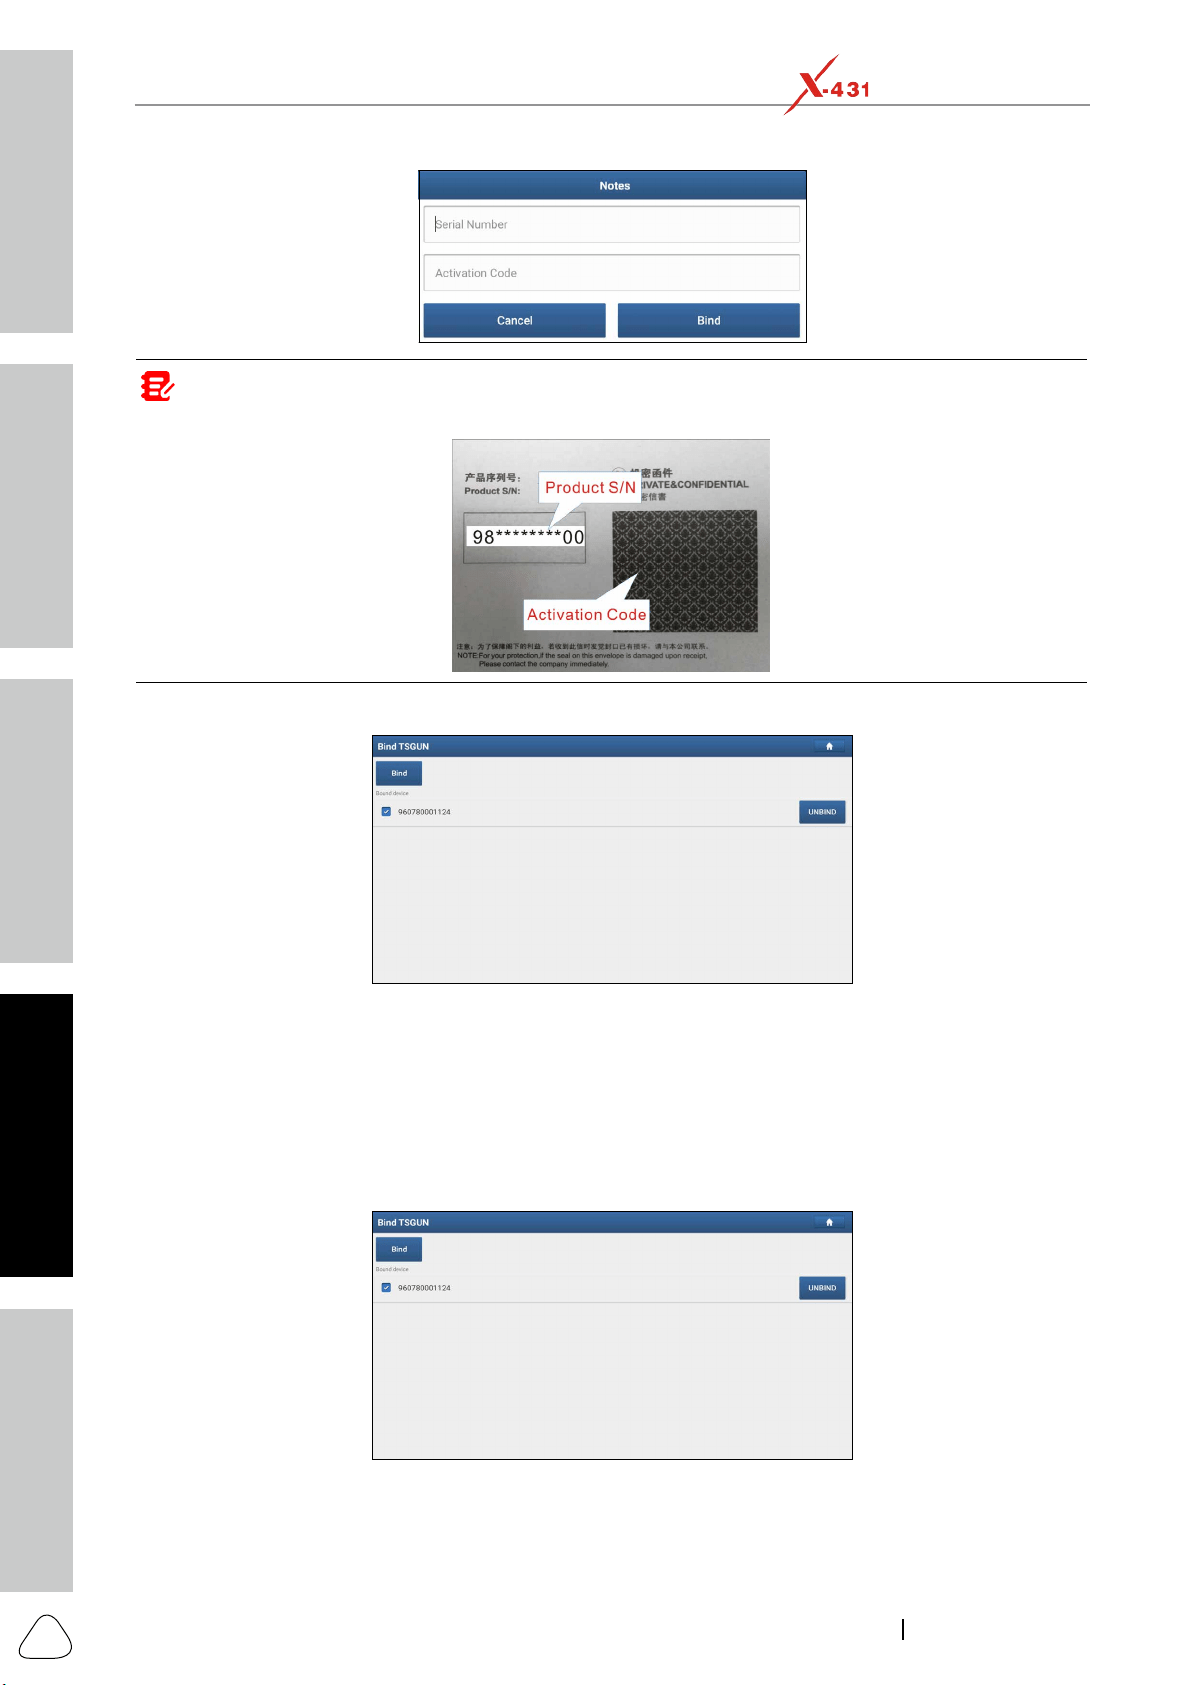
Safety & Accessory
Initial Use
Diagnostics
FAQ & Appendix
Product Prole
48
www.x431.com +86 755 8455 7891
LAUNCH
PAD VII
User Manual
Note: Serial Number is a 12-digit number starng with 90002 - you can nd it on the back of the tool/from the
password envelope. Acvaon Code is a 8-digit number stored in the password envelope included with the device.
4. Enter the required information. After inputting, tap Bind
Repeat steps 3~4 to bind multiple X-431 TSGUN devices to the tablet.
9.3.2 Unbinding
This function enables you to unbind the X-431 TSGUN and use it on other diagnostic tools.
Follow the steps below to proceed:
1. Tap TPMS on the Job menu.
2. Tap Bind TSGUN to enter.
3. Tap UNBIND, and then tap YES
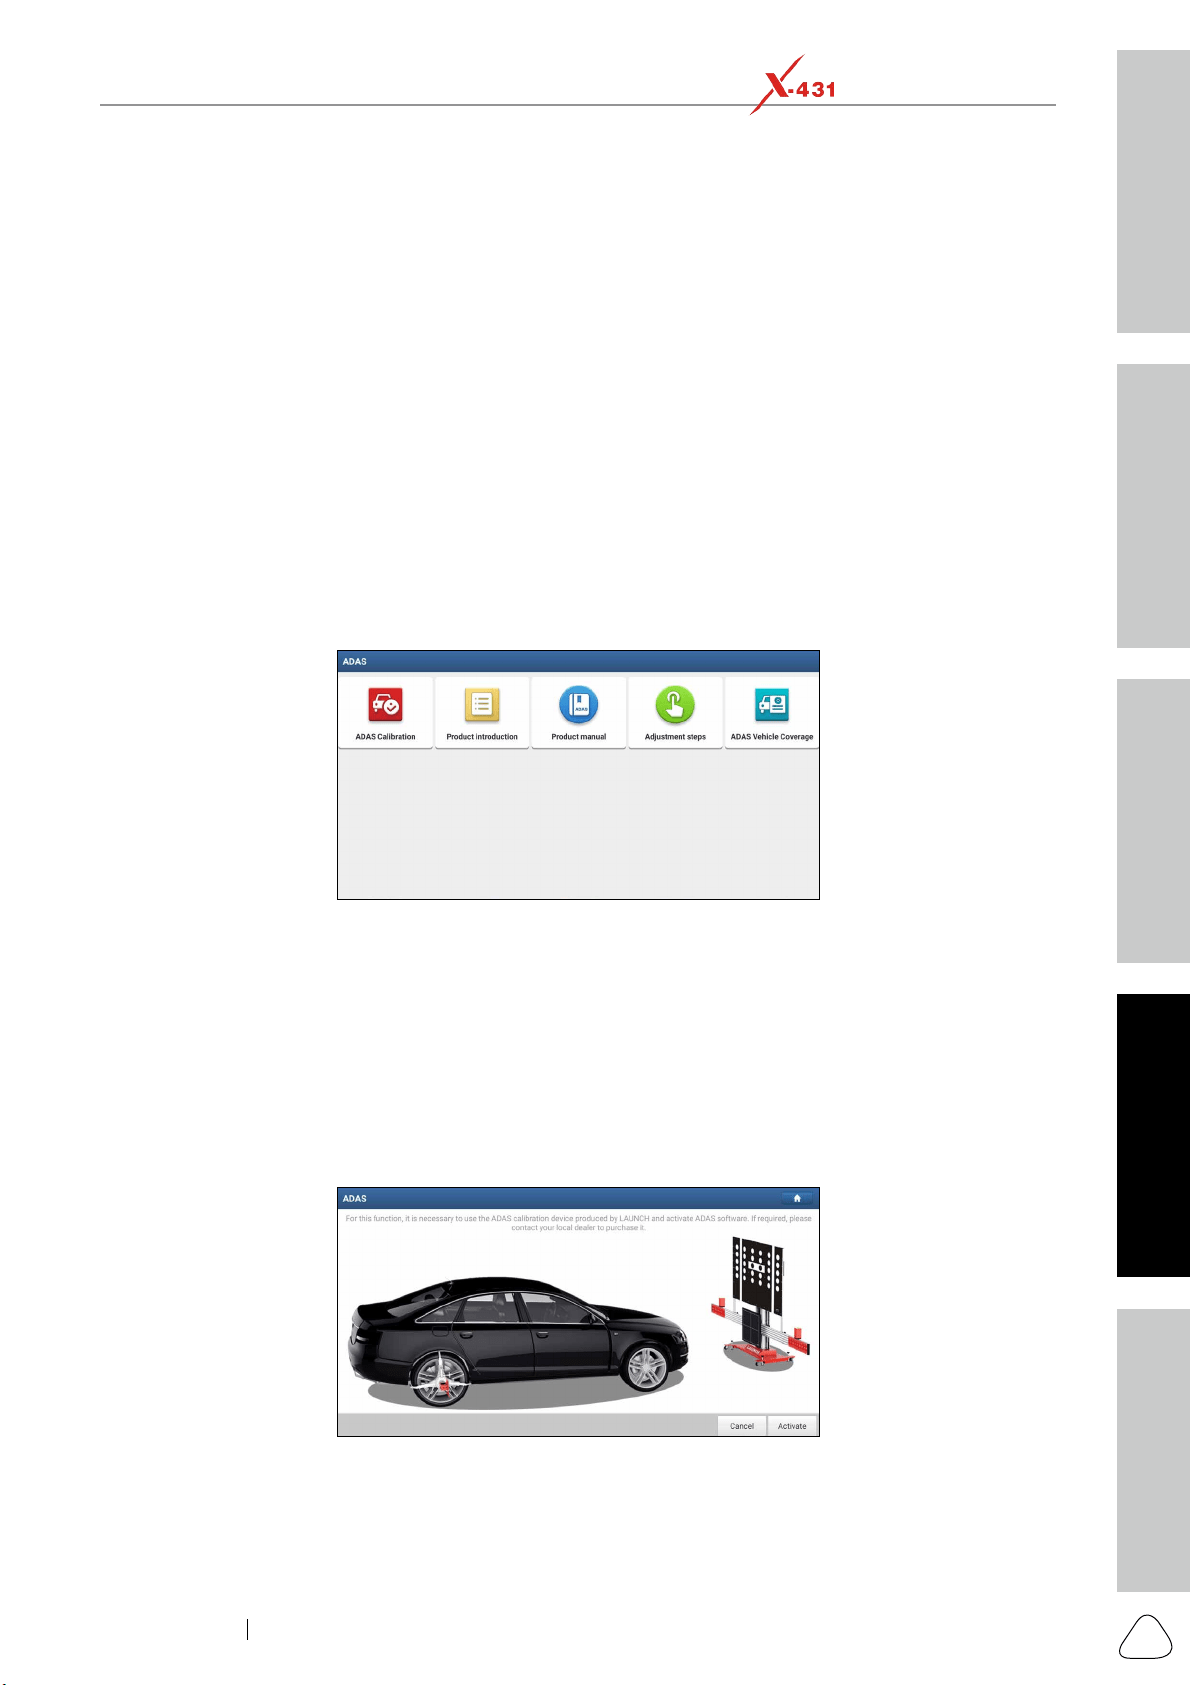
Safety & Accessory
Initial UseDiagnosticsFAQ & Appendix
Product Prole
49
www.x431.com +86 755 8455 7891
LAUNCH
PAD VII
User Manual
10 ADAS
calibration resulting from windscreen replacement or wheel alignment can cause the system to deliver
incorrect results or even fail completely, resulting in a serious accident or even a fatality.
The ADAS feature on this diagnostic tool is disabled by default and user needs to activate this feature with
tool to work with the ADAS calibration tool manufactured by LAUNCH (calibration tools from other
assistance systems, e.g. the front camera for the lane departure warning system, the radar sensor for the
Follow the steps below to activate it.
1. Tap ADAS on the Job Menu.
The following functions are included in this module:
ADAS Calibration: This option allows you to activate the ADAS function on this tool.
Product Introduction: A brief introduction of the ADAS calibration tool.
Product Manual: The user manual of the ADAS calibration tool is available for easy retrieval and
reference.
Adjustment Steps: The detailed adjustment steps on how to calibrate the ADAS calibration tool.
ADAS Vehicle Coverage: Checks all vehicle models that the ADAS calibration tool covers.
2. Tap ADAS Calibration.
3. Tap Activate to enter the ADAS activation screen.
4. Scratch or scrap the designated area on the Activation Card to reveal the password, and input the
24-digit password to activate it.

Safety & Accessory
Initial Use
Diagnostics
FAQ & Appendix
Product Prole
50
www.x431.com +86 755 8455 7891
LAUNCH
PAD VII
User Manual
5. Now the ADAS function becomes accessible and is ready for use.
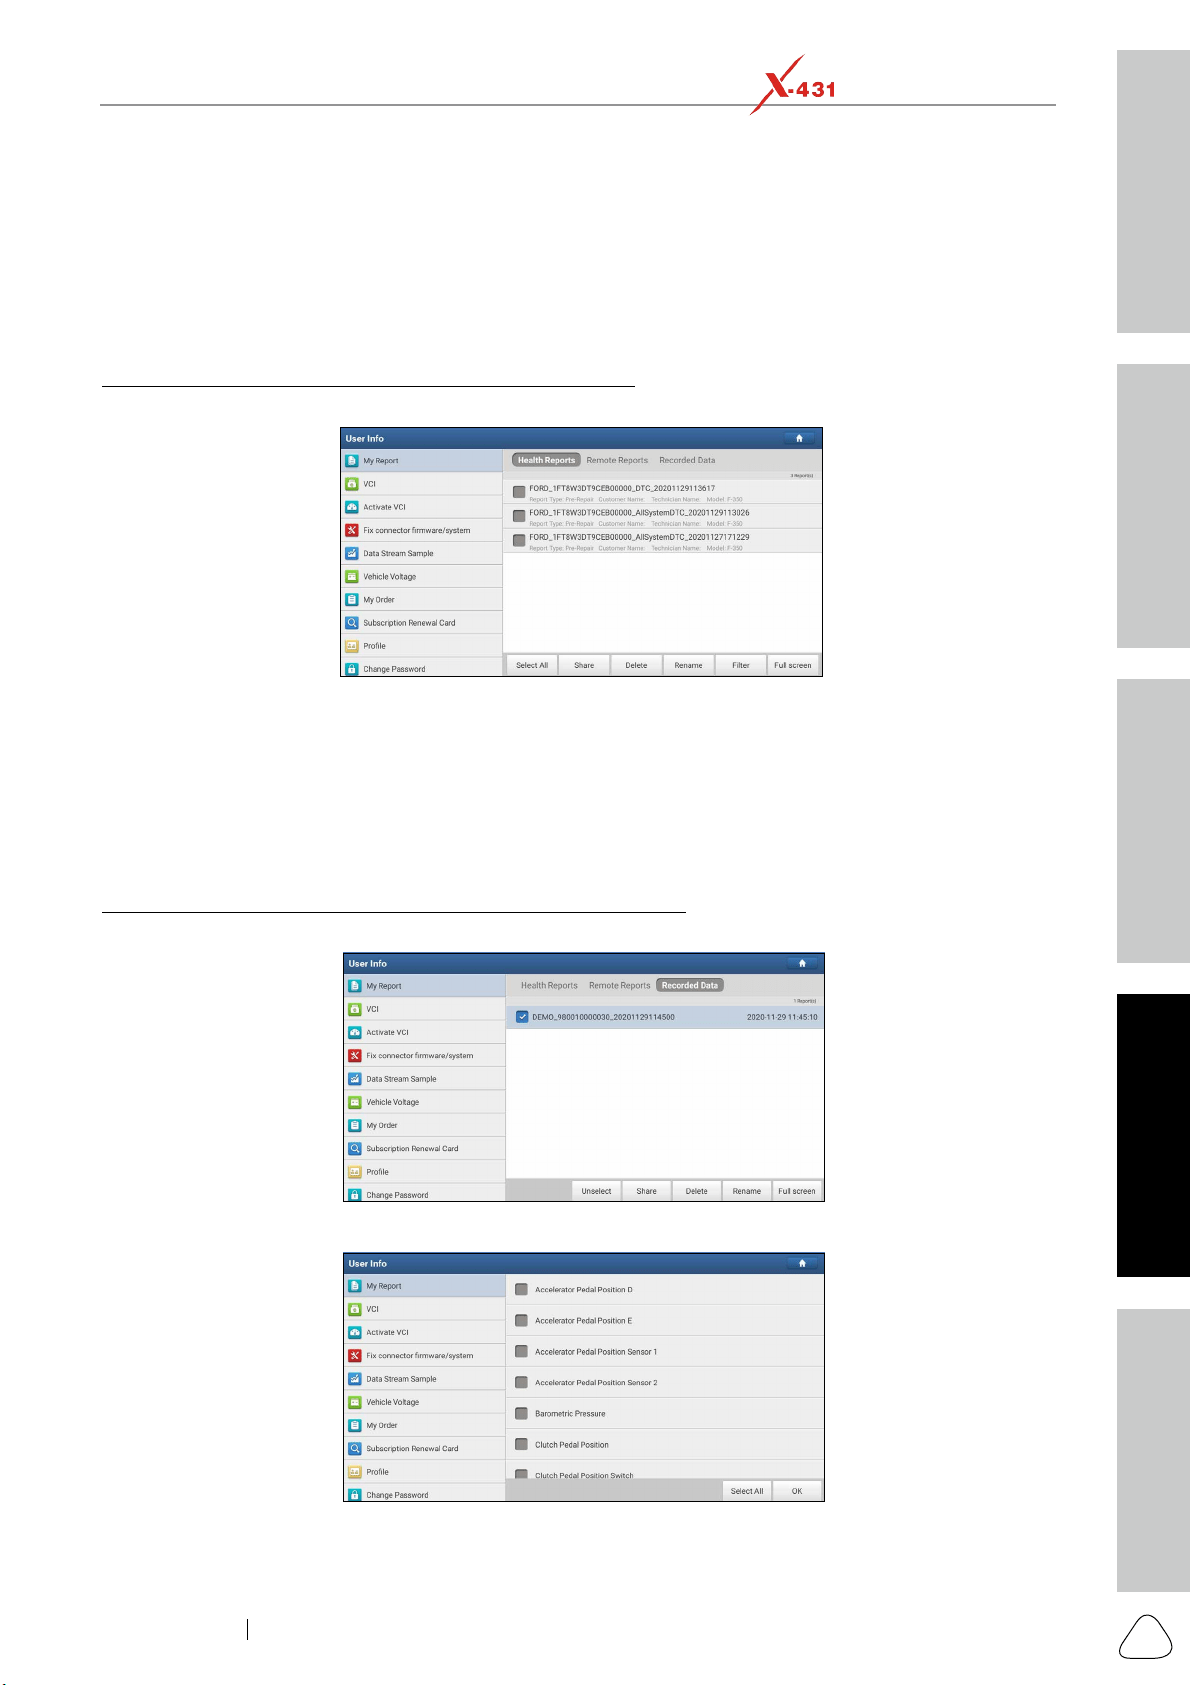
Safety & Accessory
Initial UseDiagnosticsFAQ & Appendix
Product Prole
51
www.x431.com +86 755 8455 7891
LAUNCH
PAD VII
User Manual
11 User Info
11.1 My Report
This option is used to view, delete or share the saved reports.
Tap My Report, there are total 3 options available.
Health Report
tab.
Select All. To deselect
all, tap Unselect.
Share.
Delete to delete it.
Rename.
Filter.
Exit full screen.
under the Recorded Data tab.
Tap the desired one to enter:
Select the desired data stream items and tap OK to jump to the playback page:
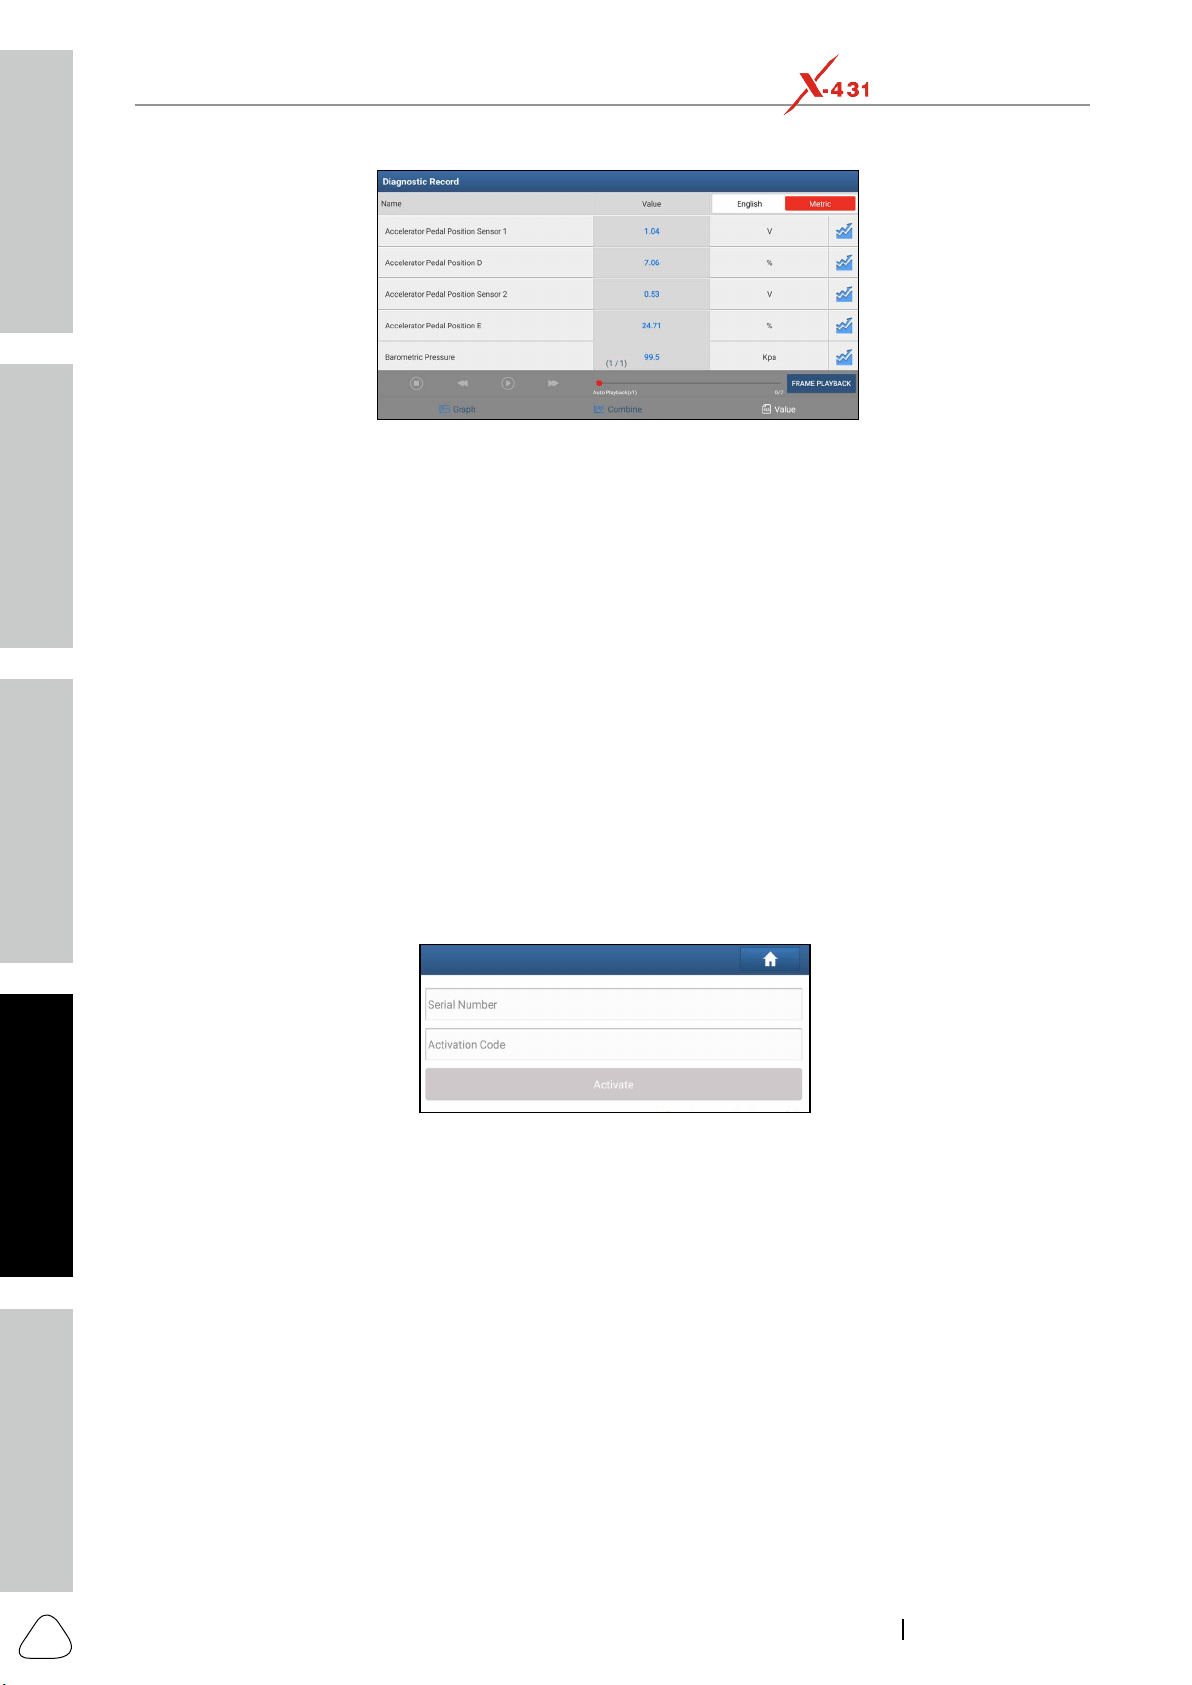
Safety & Accessory
Initial Use
Diagnostics
FAQ & Appendix
Product Prole
52
www.x431.com +86 755 8455 7891
LAUNCH
PAD VII
User Manual
Graph – displays the parameters in waveform graphs.
Value – this is the default mode which displays the parameters in texts and shows in list format.
Frame Playback – plays back the recorded data stream items frame by frame. Once it is in frame playback
mode, this button changes into Auto Playback.
Remote Diagnostic Report lists all diagnostic reports generated in process of remote diagnosis.
11.2 VCI
11.3 Activate VCI
product sign-up.
Activate to activate it.
For details on how to obtain Activation Code, tap the link below to get help.
11.4 Fix connector rmware/system
other interfaces.
11.5 Data Stream Sample
11.6 Vehicle Voltage
This item is used to detect the voltage of the currently tested vehicle when the SmartLink C device is
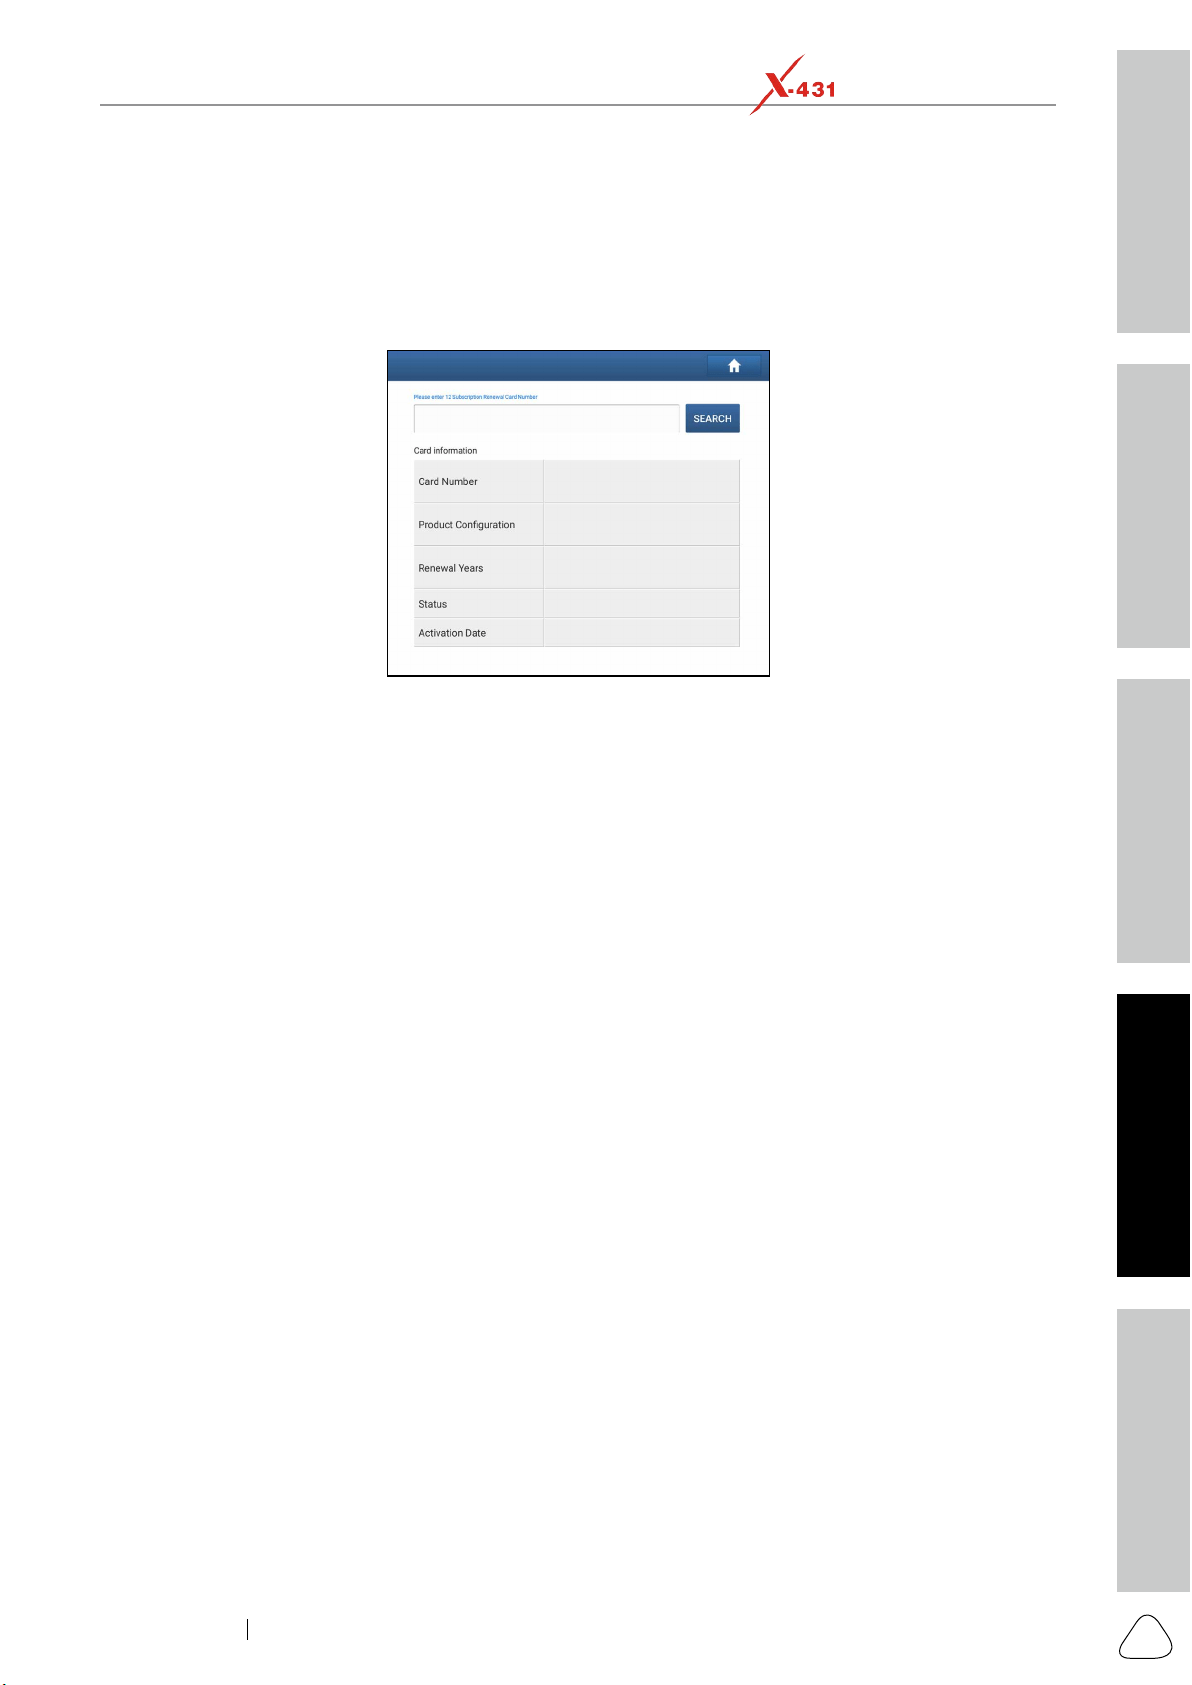
Safety & Accessory
Initial UseDiagnosticsFAQ & Appendix
Product Prole
53
www.x431.com +86 755 8455 7891
LAUNCH
PAD VII
User Manual
11.7 My Order
This item allows you to check the status of all your orders.
11.8 Subscription Renewal Card
This item is used to check the status of the subscription renewal card.
2. Tap Search to get the search result.
11.9 Prole
Tap the user image to change it.
Free Upgrade Period to check the due date of all diagnostic software.
11.10 Change Password
This item allows you to modify your login password.
11.11 Settings
11.11.1 Units
11.11.2 Shop Information
and License Plate.
After inputting, tap Save.
Once you saved the print information, it will be entered automatically in the Add Information box every
time you save the diagnostic report.
11.11.3 Printer Set
while performing printing operations.
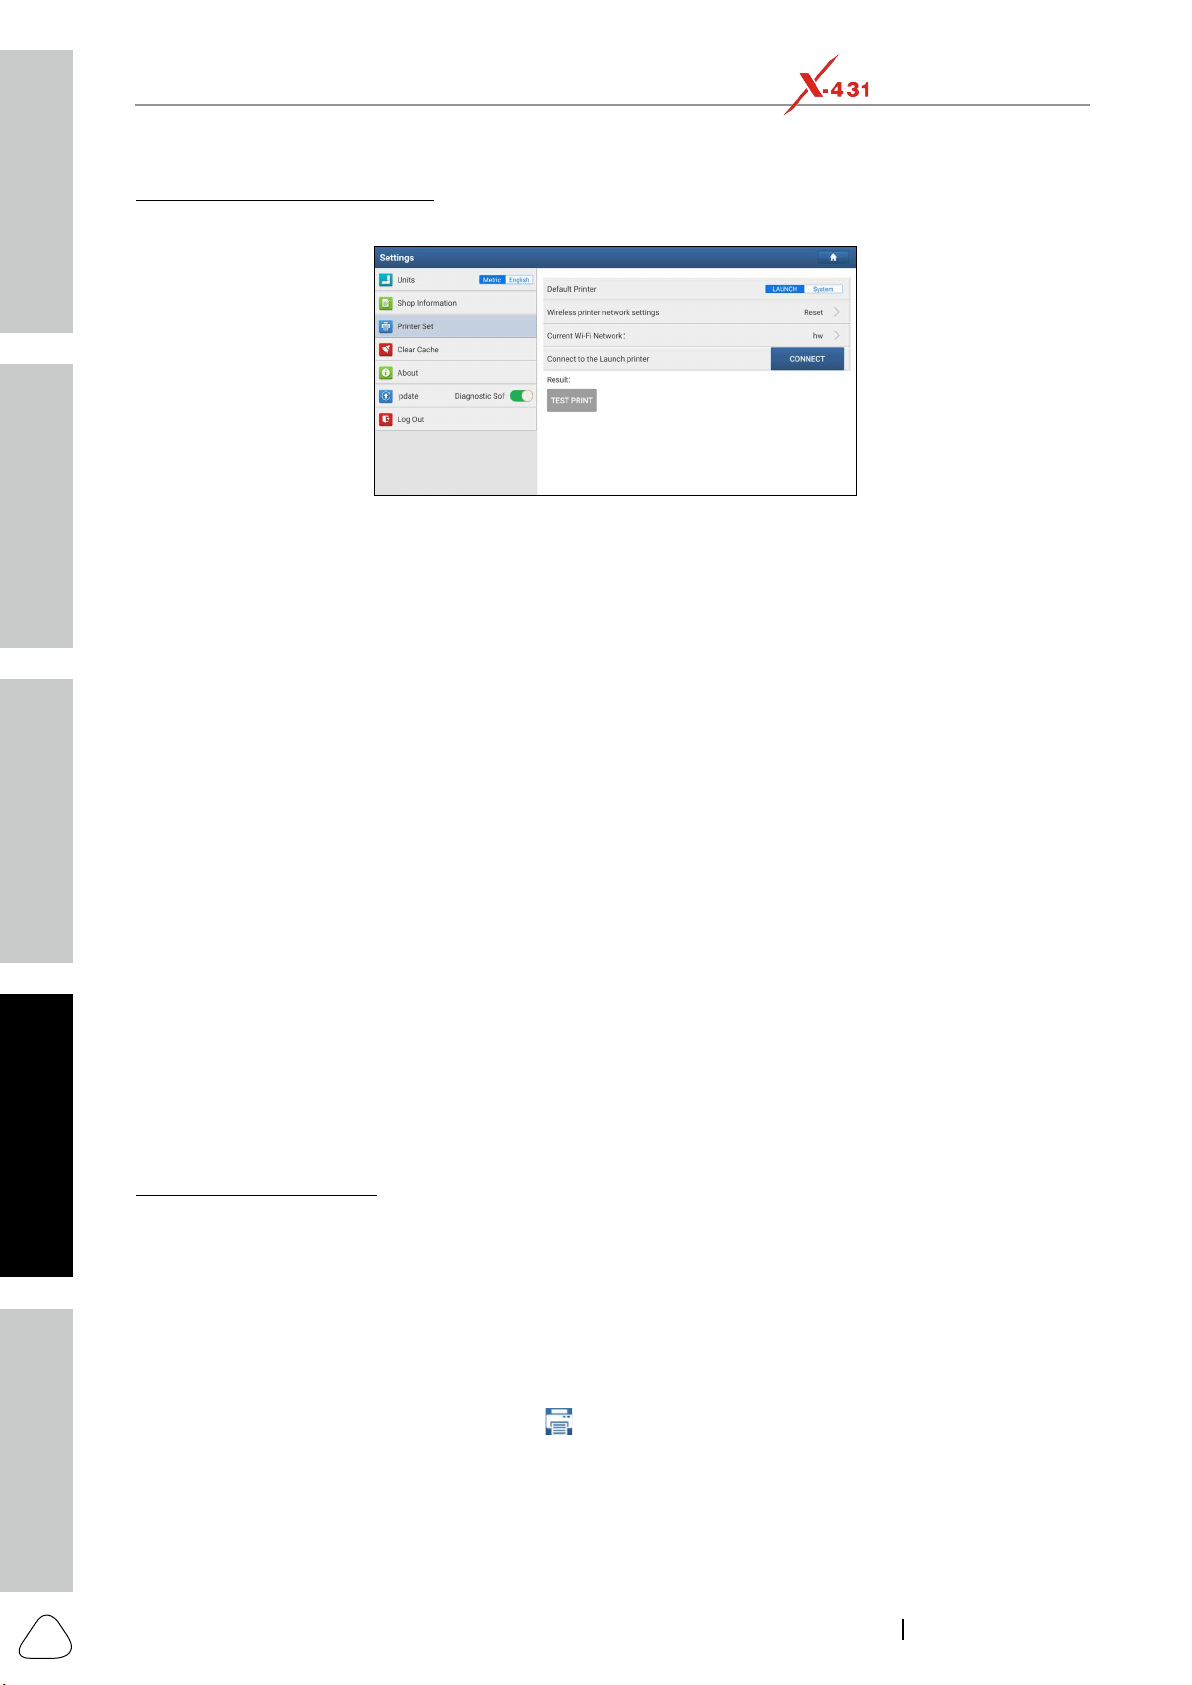
Safety & Accessory
Initial Use
Diagnostics
FAQ & Appendix
Product Prole
54
www.x431.com +86 755 8455 7891
LAUNCH
PAD VII
User Manual
A. For LAUNCH Wi-Fi mini printer, follow the steps below to connect the printer.
1. Tap Printer Set.
2. For initial use, you are suggested to reset the printer: Press and hold [MODE] & [FEED] for 8 seconds,
the following resetting command will be printed out:
ok
rebooting...
3. Tap Reset
Step 1: Connect the printer:
Tap Scan
Connect to enter Step 2.
Step 2: Join the Wi-Fi printer into LAN:
Tap Scan
Conrm.
4. Once the Wi-Fi network of the printer is connected and the printer is found, tap Printing test to test the
printing.
Now you can use the Wi-Fi printer to print!
check whether the current device and the printer are on the same LAN.
2. Tap Connect to Printer:
Test Print directly to test the printing.
Follow the steps below to proceed:
1. Set the default printer as System.
2. Go to Settings -> Network & Internet -> Wi-Fi
.
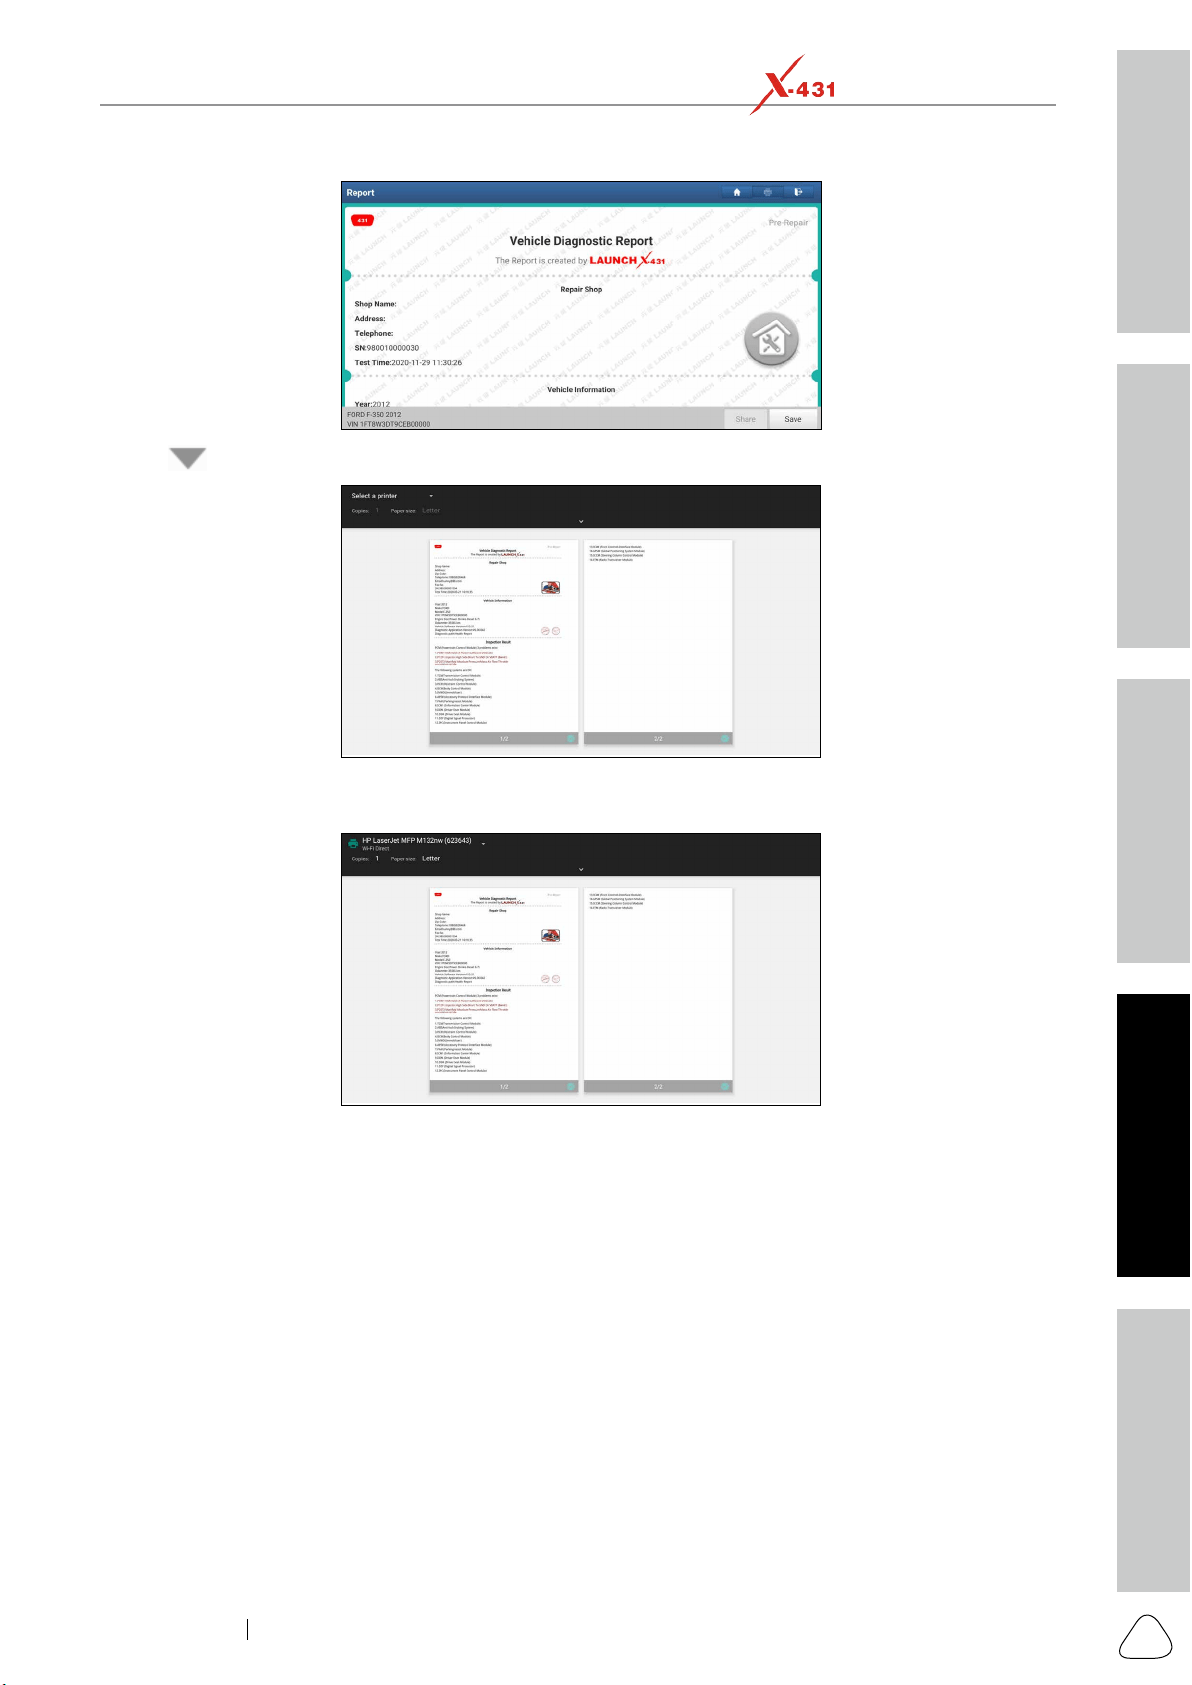
Safety & Accessory
Initial UseDiagnosticsFAQ & Appendix
Product Prole
55
www.x431.com +86 755 8455 7891
LAUNCH
PAD VII
User Manual
4. Tap next to Select a printer on the upper left corner of the screen.
5. Select All Printers -> Add printer and enable the installed printer service, the system starts searching
for all available Wi-Fi printers of the brand.
to get the default password.
7. Now the printer is ready for printing.
later printing.
11.11.4 Clear Cache
This item is used to clear the App cache.
Tap Clear Cache, a pop-up window will appear on the screen. Tap OK to clear cache and the system will
restart the App.
11.11.5 About
The software version information and disclaimer are included.
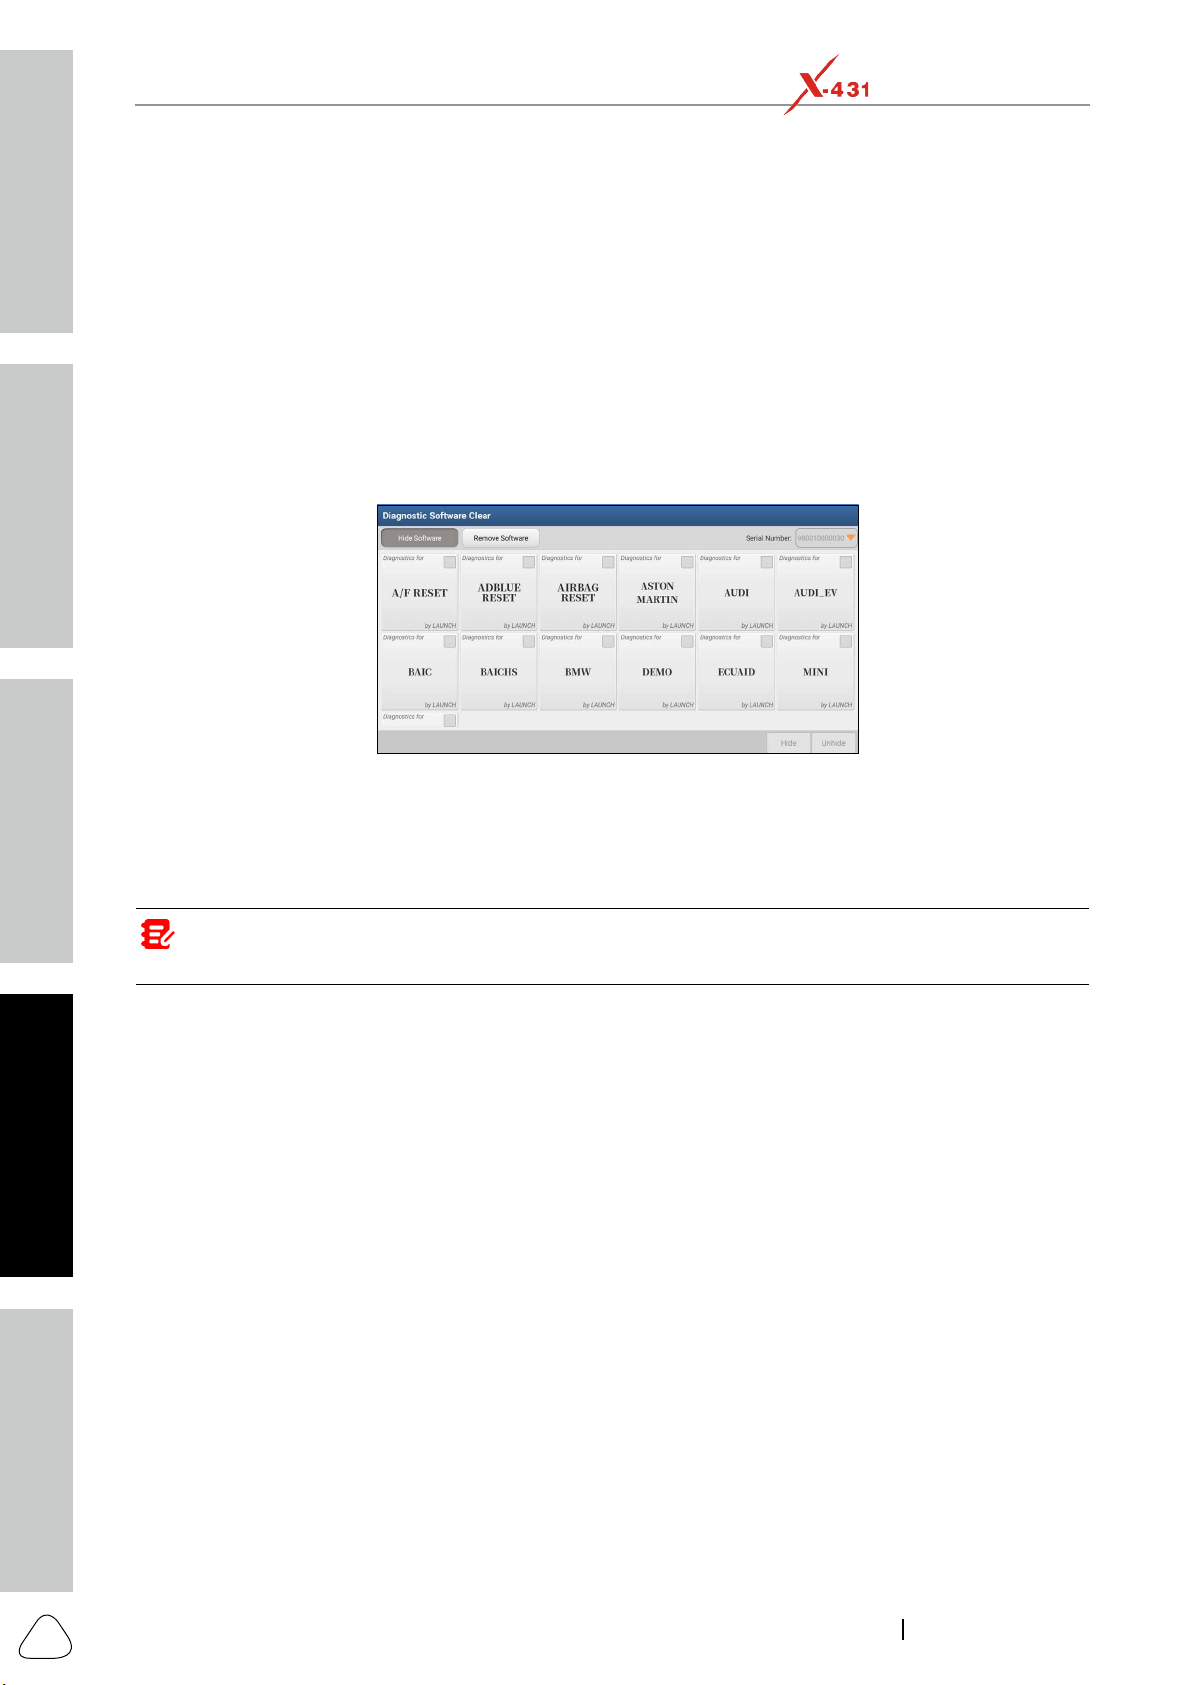
Safety & Accessory
Initial Use
Diagnostics
FAQ & Appendix
Product Prole
56
www.x431.com +86 755 8455 7891
LAUNCH
PAD VII
User Manual
11.11.6 Diagnostic Software Auto Update
This option is used to set whether automatic update function is ON.
11.11.7 Login/Exit from current account
Logout.
To login the system again, tap Login.
11.12 Diagnostic Software Clear
Tap Diagnostic Software Clear, the following screen will appear:
Under the Hide Software tab, select the desired software logo (a checkmark will show in the checkbox
Hide, it will become invisible. Tap Unhide to undo the hide
operation.
Under the Remove Software tab, select the desired software logo and tap Delete, it will disappear from the
screen.
Note: Removing soware may completely delete the soware from the tablet. If some soware is not used and
the tablet runs out of space, you can use this feature to remove it. To re-download it, go to Update -> Available.
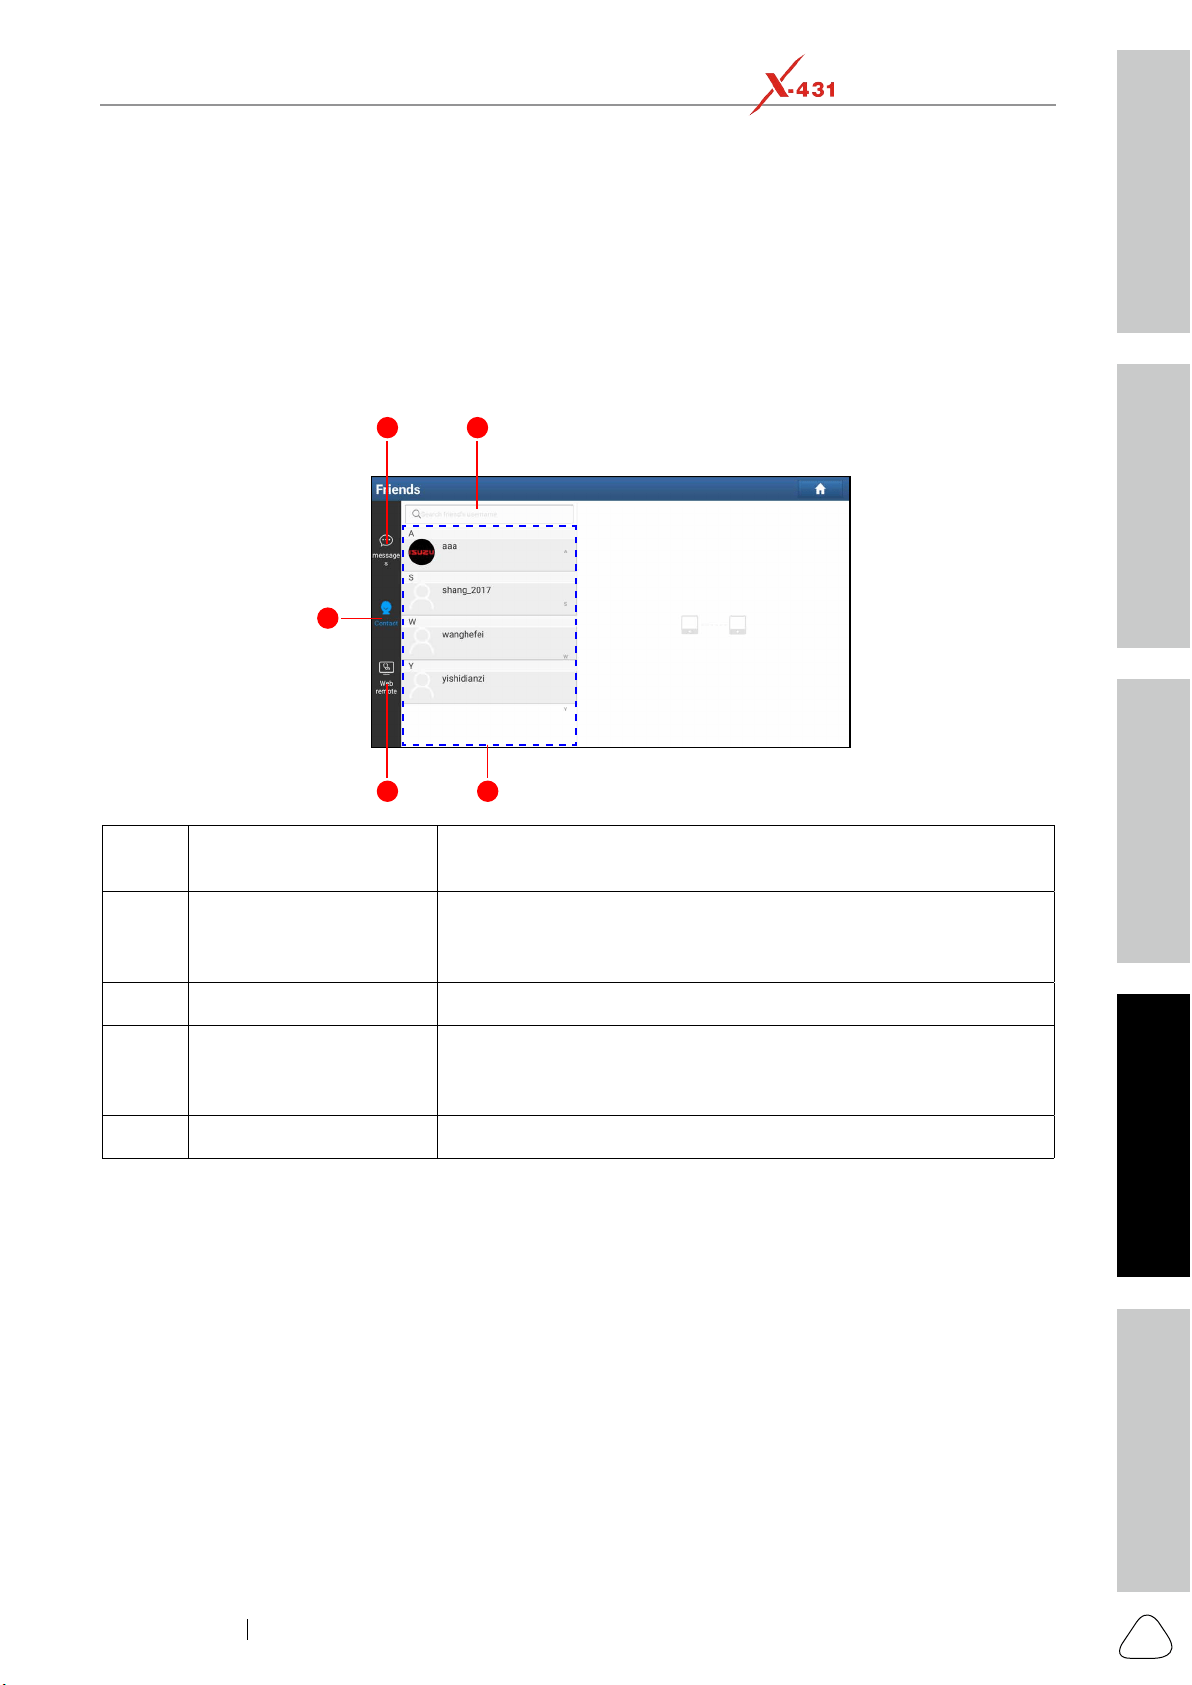
Safety & Accessory
Initial UseDiagnosticsFAQ & Appendix
Product Prole
57
www.x431.com +86 755 8455 7891
LAUNCH
PAD VII
User Manual
12 Others
12.1 Remote Diagnose
This option aims to help repair shops or technicians launch instant messaging and remote diagnosis,
12.1.1 Interface Layout
21
5
4 3
1 Message tab
Once an incoming message reaches, a red dot will appear on the
upper right corner of the tab.
2 Search bar
searching, and then tap the desired one to add it into your friend
list.
3 Friends List
4
Tap to slide the switch to ON, the tablet keeps online and becomes
5 Contacts tab Tap to enter the friend list.
12.1.2 Add Friends
Although the remote diagnostics can be performed normally even if the partner may be not your friend,
you are suggested to create a Contacts list for future experience exchange and communication among the
technician fellows.
Tap Contacts
Search button next to the search bar to start
following:
Workshop
Technician
golo users
Once the result matches the keyword, the following screen will appear:
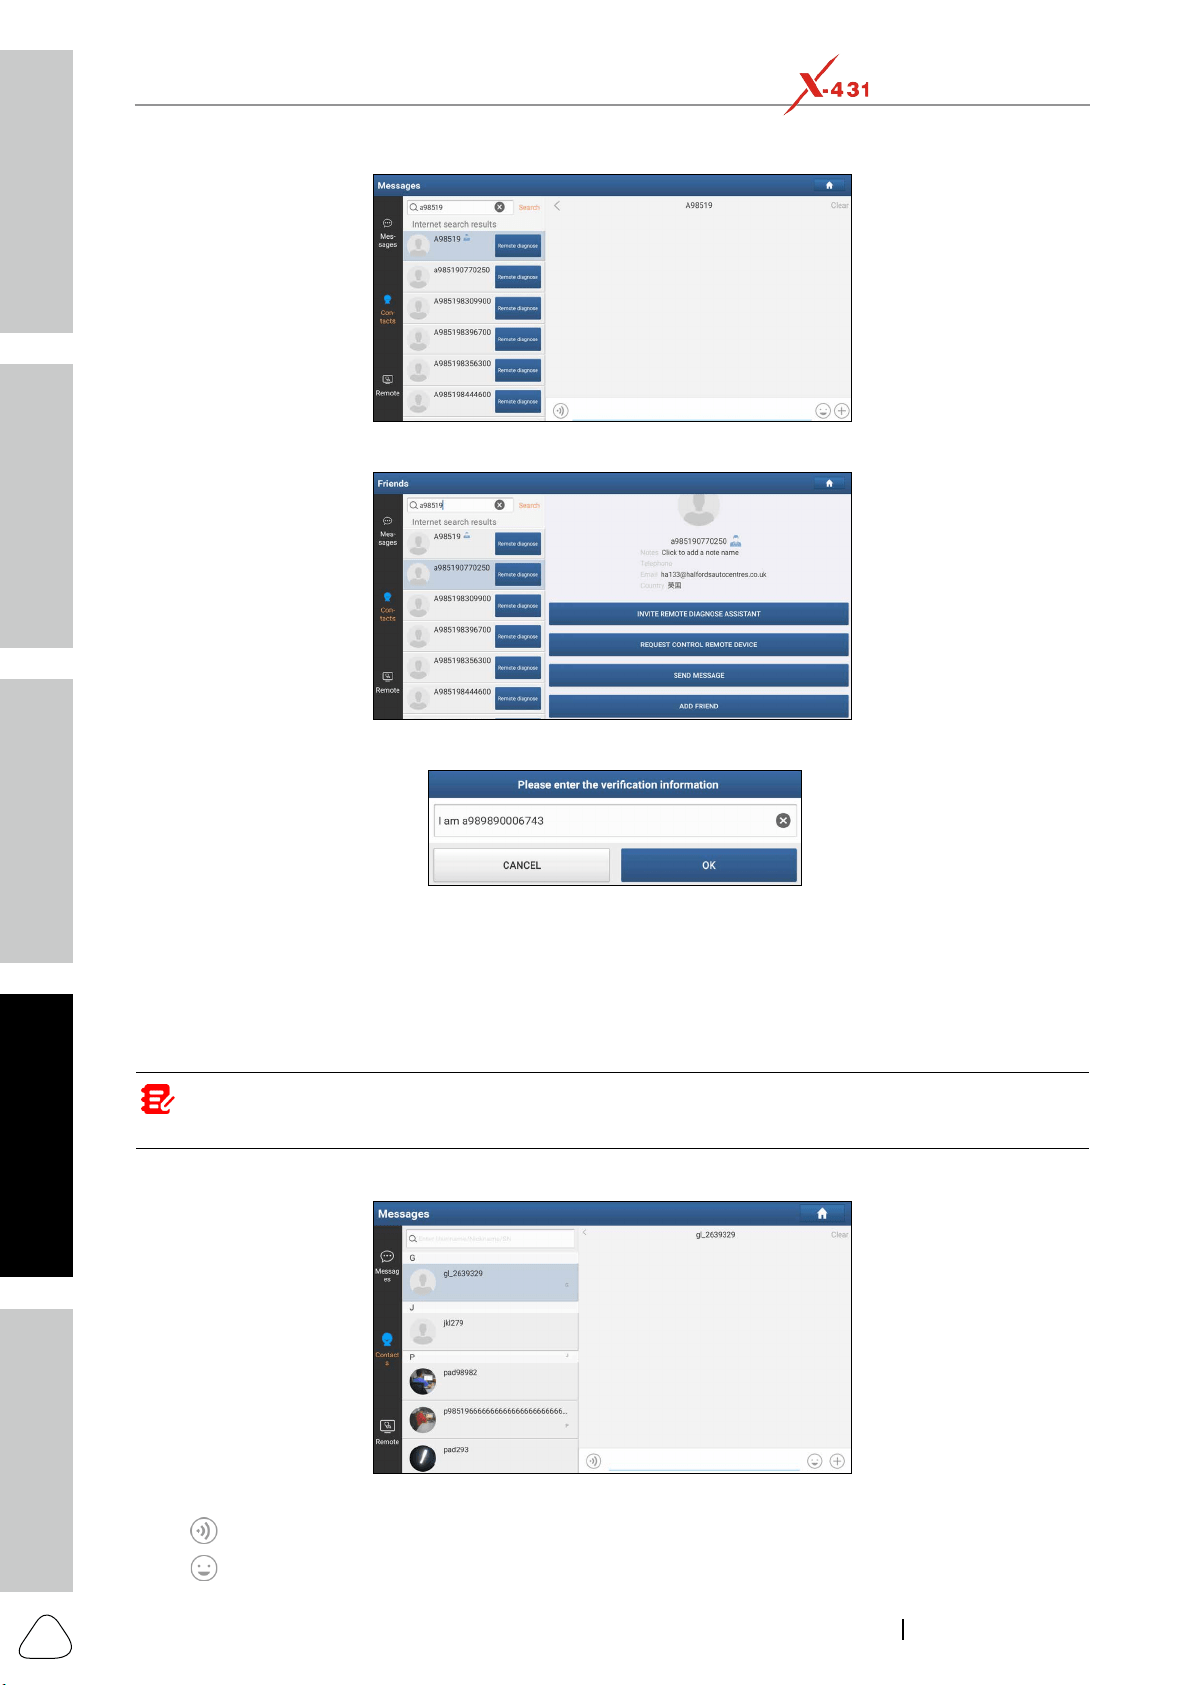
Safety & Accessory
Initial Use
Diagnostics
FAQ & Appendix
Product Prole
58
www.x431.com +86 755 8455 7891
LAUNCH
PAD VII
User Manual
Tap the user image, the following screen will appear.
Tap ADD FRIEND to send your request.
Once the partner receives the request, a beep will sound. Tap the Messages tab:
Contacts tab.
Agree
Ignore to ignore this request.
12.1.3 Start Instant Messaging
Note: The I/M (Instant Messaging) funcon is open to all users who had Launch’s diagnosc tool equipped with
this module.
Send to send it.
Tap
to send the voice message.
Tap
to send the emoj.
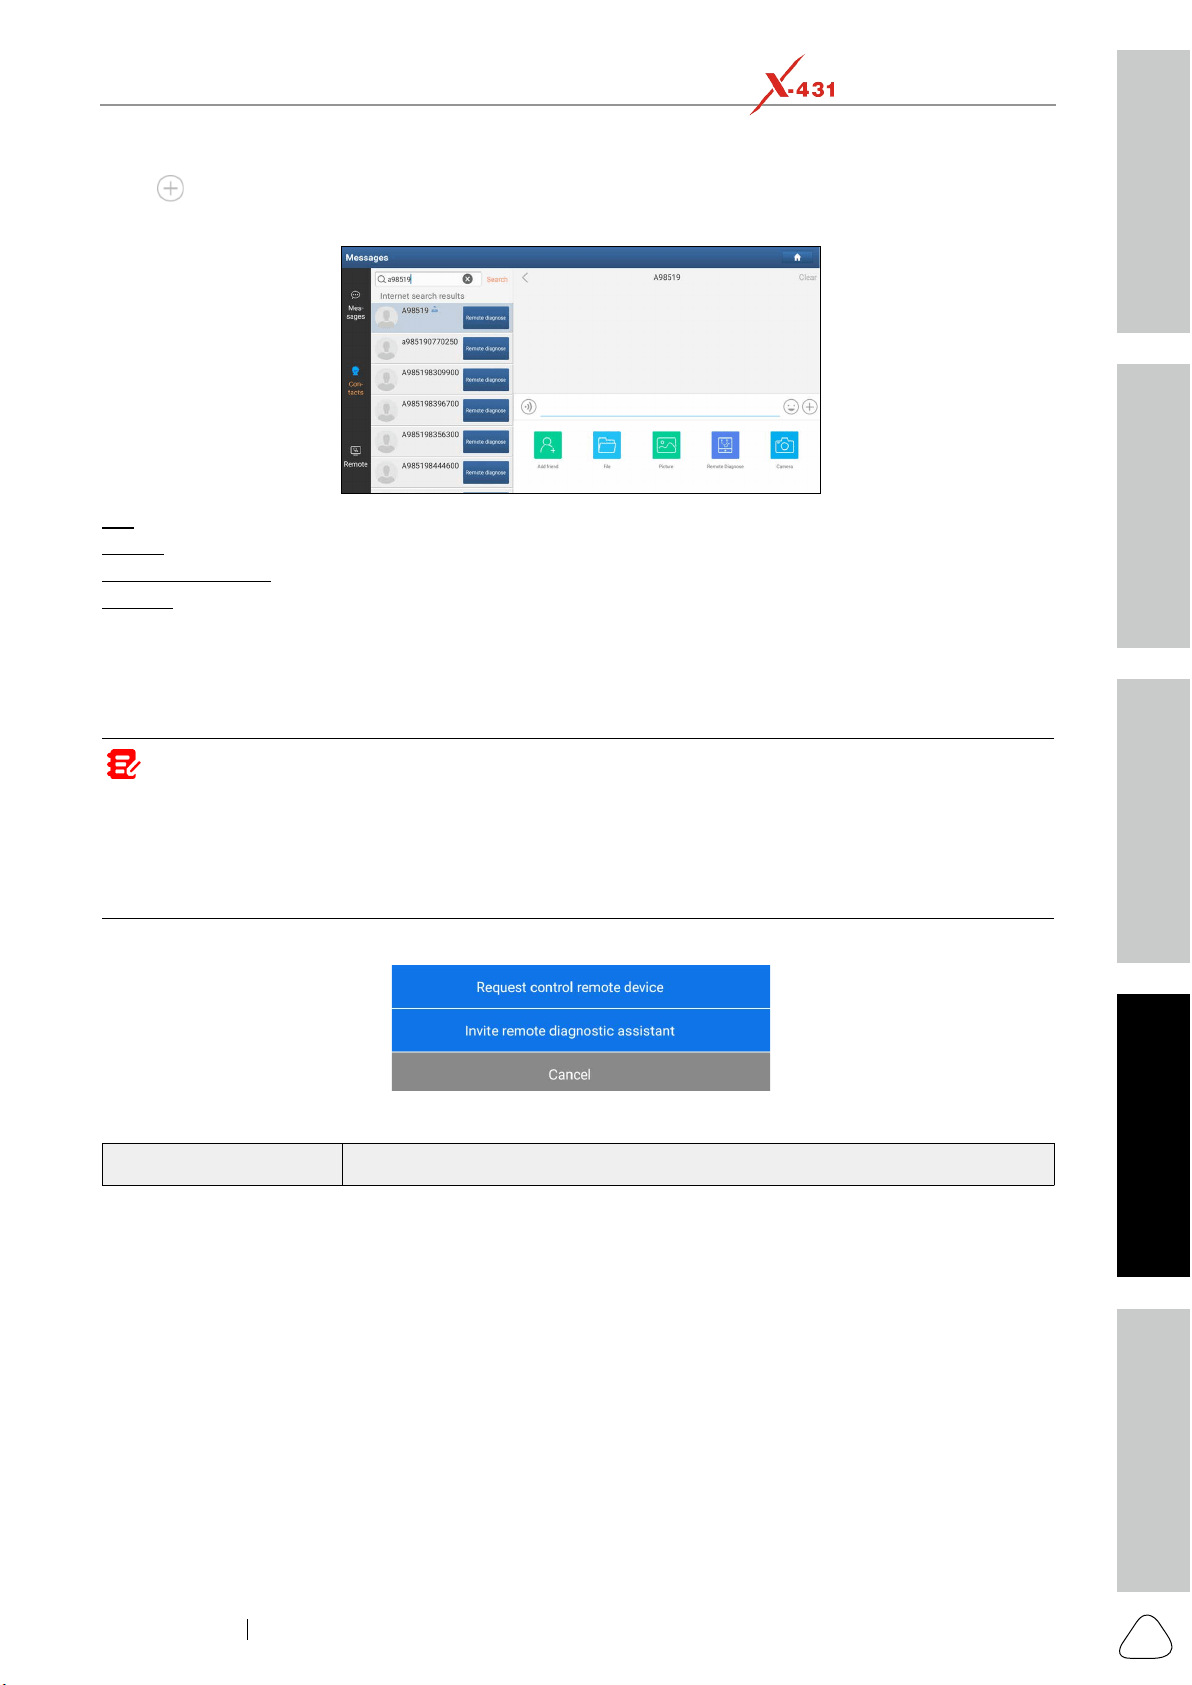
Safety & Accessory
Initial UseDiagnosticsFAQ & Appendix
Product Prole
59
www.x431.com +86 755 8455 7891
LAUNCH
PAD VII
User Manual
Tap to call out more function options.
Tap Clear
File
Picture: Choose screenshots or pictures to send.
Remote Diagnostic: To start a remote diagnostic session. For details, refer to Chapter 12.1.4.
Camera: Open camera to take pictures.
12.1.4 Launch Remote Diagnosis (Device-To-Device)
The tablet is allowed to initiate remote diagnosis with other diagnostic tools (including but not limited to the
Notes: Before performing this operation, please make sure the following no matter which side sends the
remote request:
• Turn on the vehicle power supply.
• Throle should be in a closed posion.
• The SmartLink C should be properly connected to the vehicle’s DLC and a successful communicaon between the
SmartLink C device and the tablet is required.
Tap Remote Diagnostic, the following pull-down menu will pop up on the screen:
Actions Results
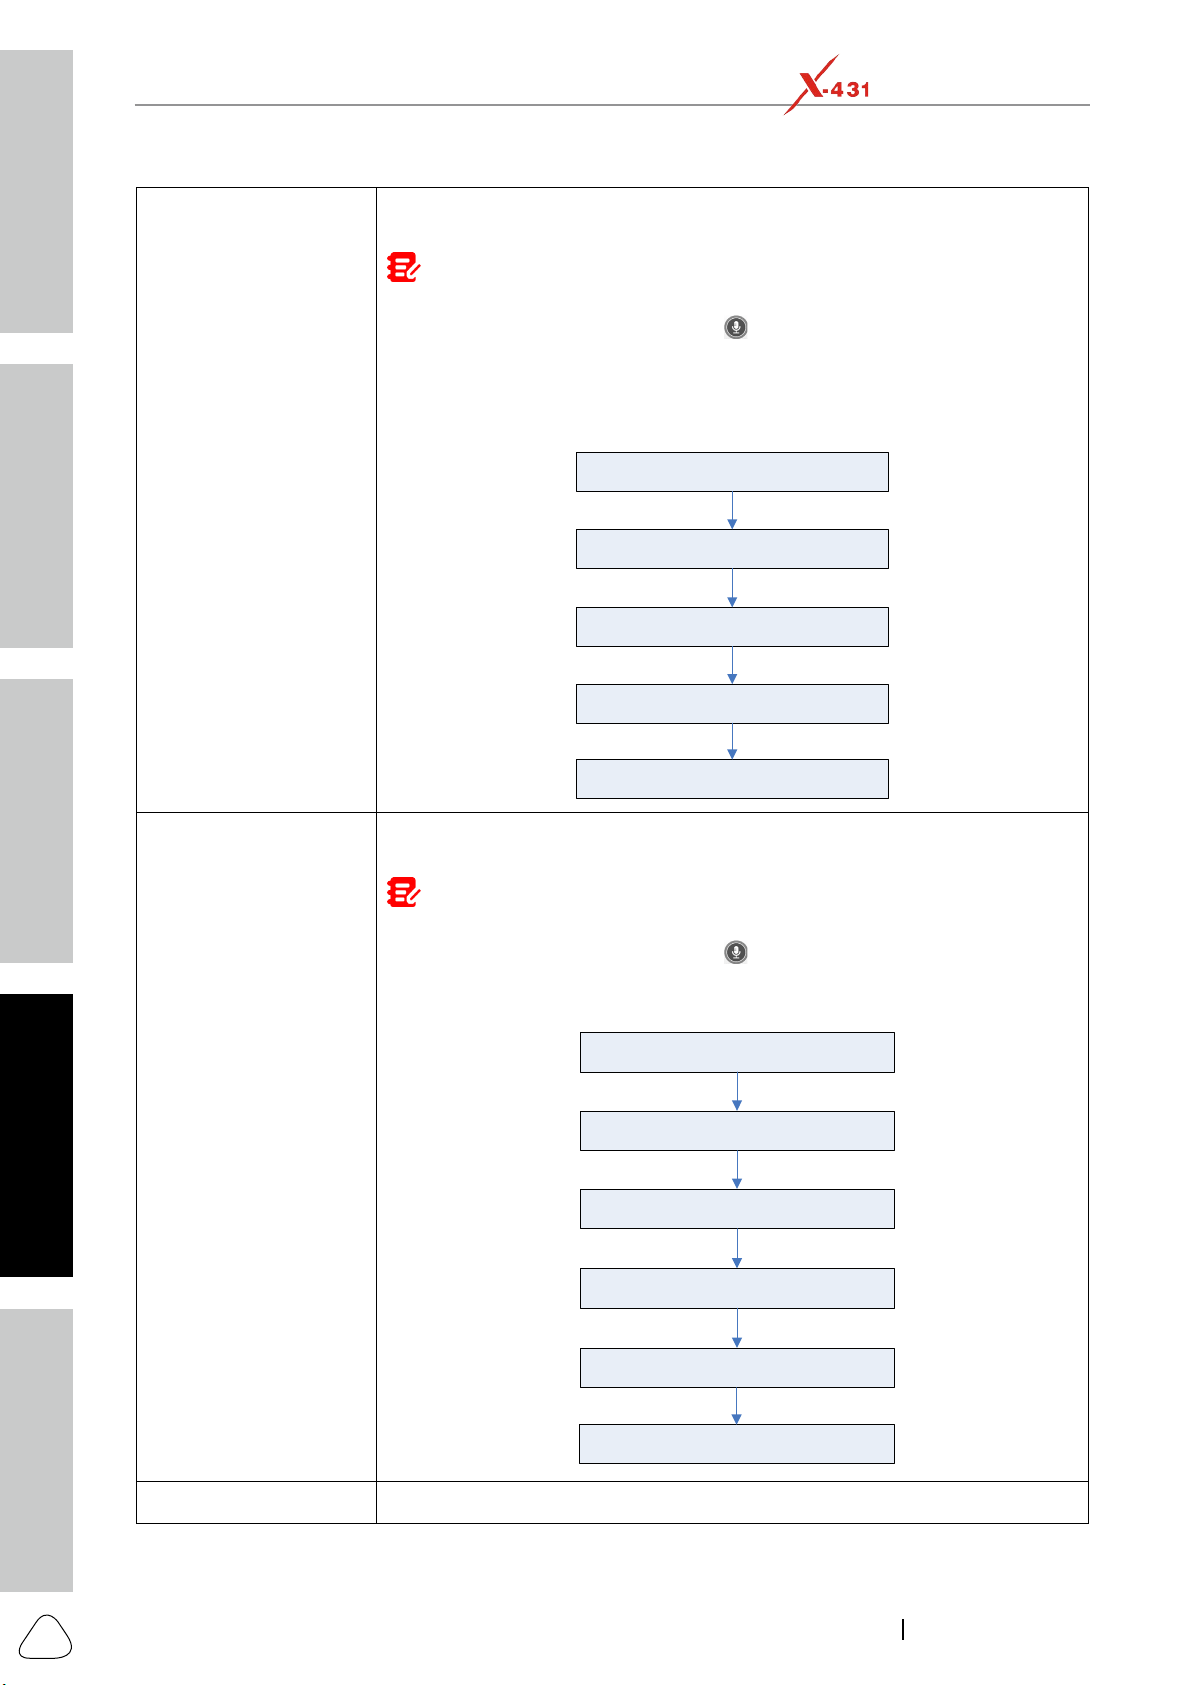
Safety & Accessory
Initial Use
Diagnostics
FAQ & Appendix
Product Prole
60
www.x431.com +86 755 8455 7891
LAUNCH
PAD VII
User Manual
Request control remote
device
vehicle.
Notes:
• Remote diagnosis has the same diagnosc steps as manual diagnosis.
• In process of remote diagnosis, tap the
buon to send a voice message.
• Once vehicle diagnosis is complete, a report will be created. Input your comments
on this report, and then tap Send Report to send it to the partner.
• If you have a local vehicle diagnosis in process, please exit it rst before starng
remote diagnosis.
Tap “Request control remote device”
Wait for partner’s confirmation
Start connecting after request confirmed
Start Diagnosis
Generate diagnostic report
assistant
remote control on your tool.
Notes:
• Remote diagnosis has the same diagnosc steps as manual diagnosis.
• In process of remote diagnosis, tap the
buon to send voice message.
• Once you received the report from the partner, tap View Report to view details. All
diagnosc reports are saved User Info -> My Report -> Remote Reports.
Tap “Invite remote diagnostic assistant”
Choose the desired diagnostic software
Wait for partner’s confirmation
Start connecting after request confirmed
Start Diagnosis
Generate diagnostic report
Cancel To cancel this operation.
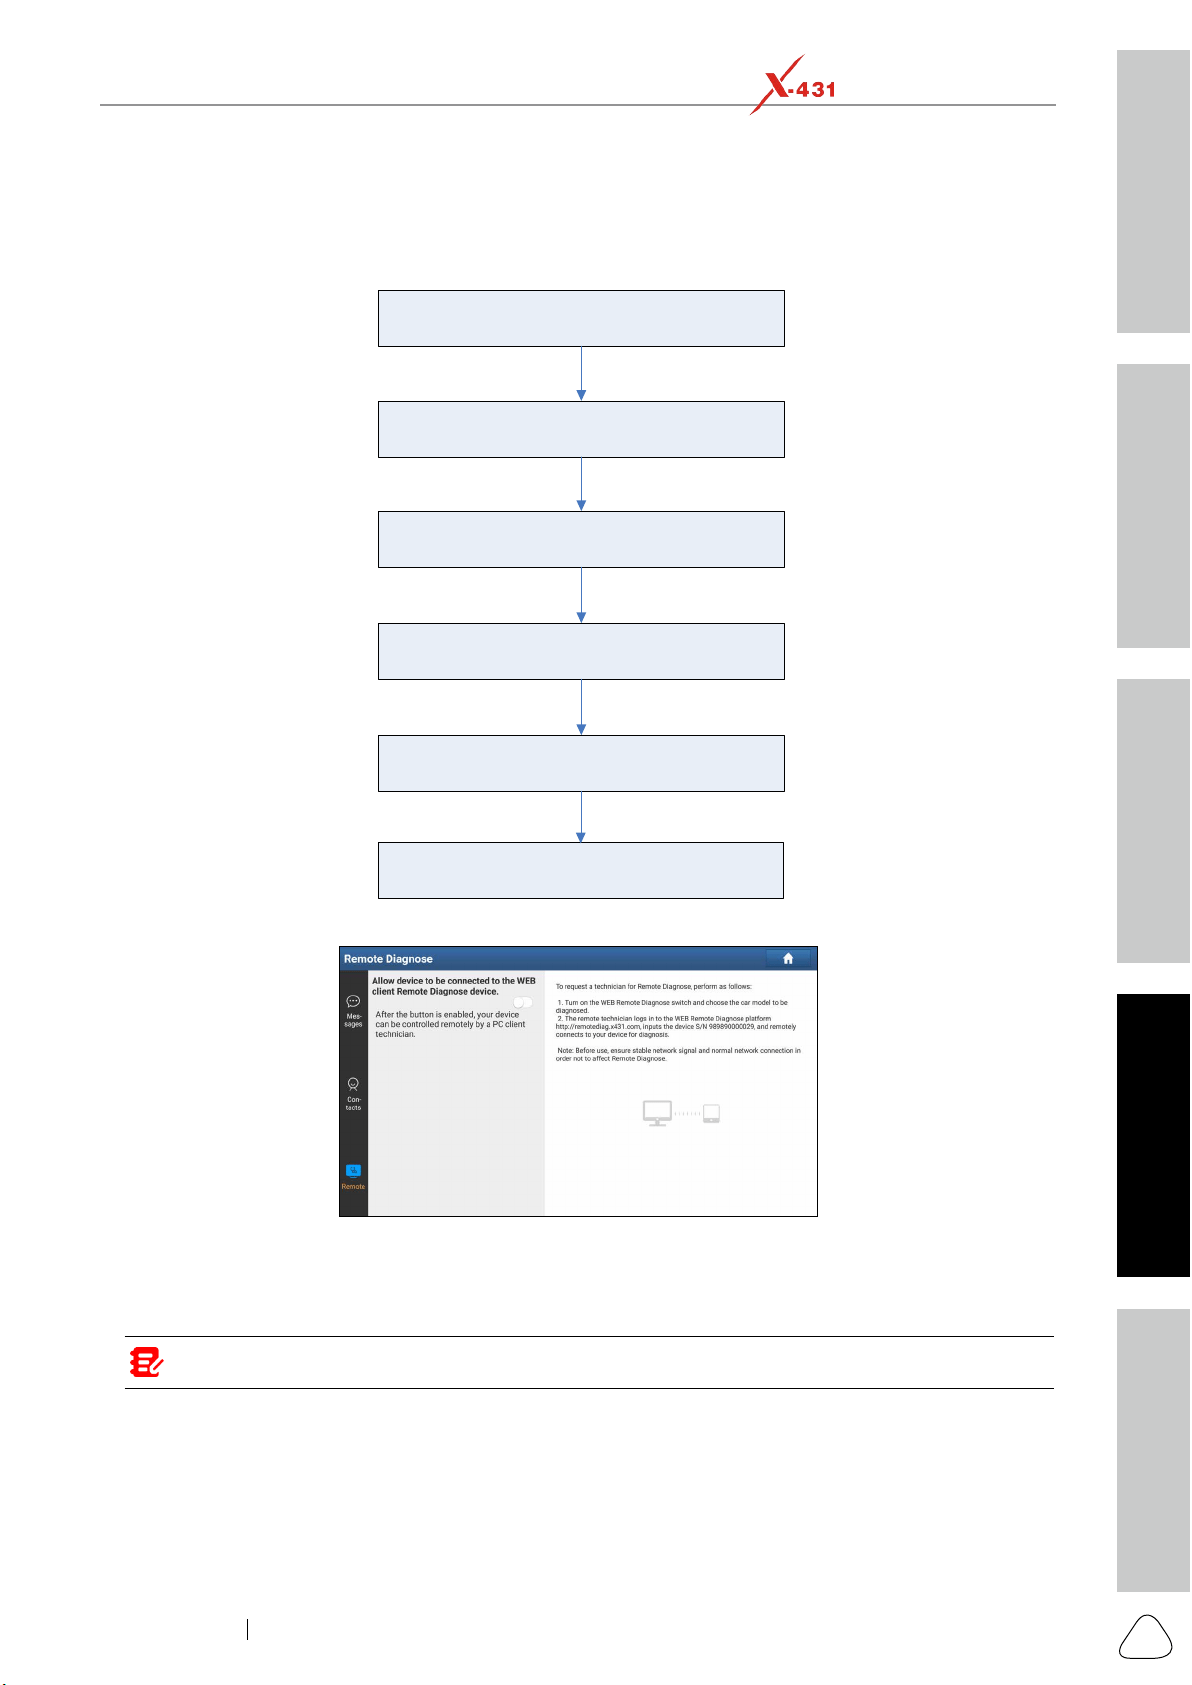
Safety & Accessory
Initial UseDiagnosticsFAQ & Appendix
Product Prole
61
www.x431.com +86 755 8455 7891
LAUNCH
PAD VII
User Manual
12.1.5 Launch Remote Diagnosis (Device-To-PC)
with the module, user also can ask for remote control from PC client technician.
Slide the switch to ON
Notify the partner of the remote diagnostic web link
Input the partner’s official account and password
Input the Serial Number of your handset
Start Diagnosis
Generate diagnostic report
Tap the Remote tab, the screen displays as follows:
1. Slide the switch Allow device to be connected to the WEB client remote diagnostic device to ON so
link, the PC displays as below:
Note: Before processing remote diagnosis, please make sure the tablet is properly connected to the vehicle.
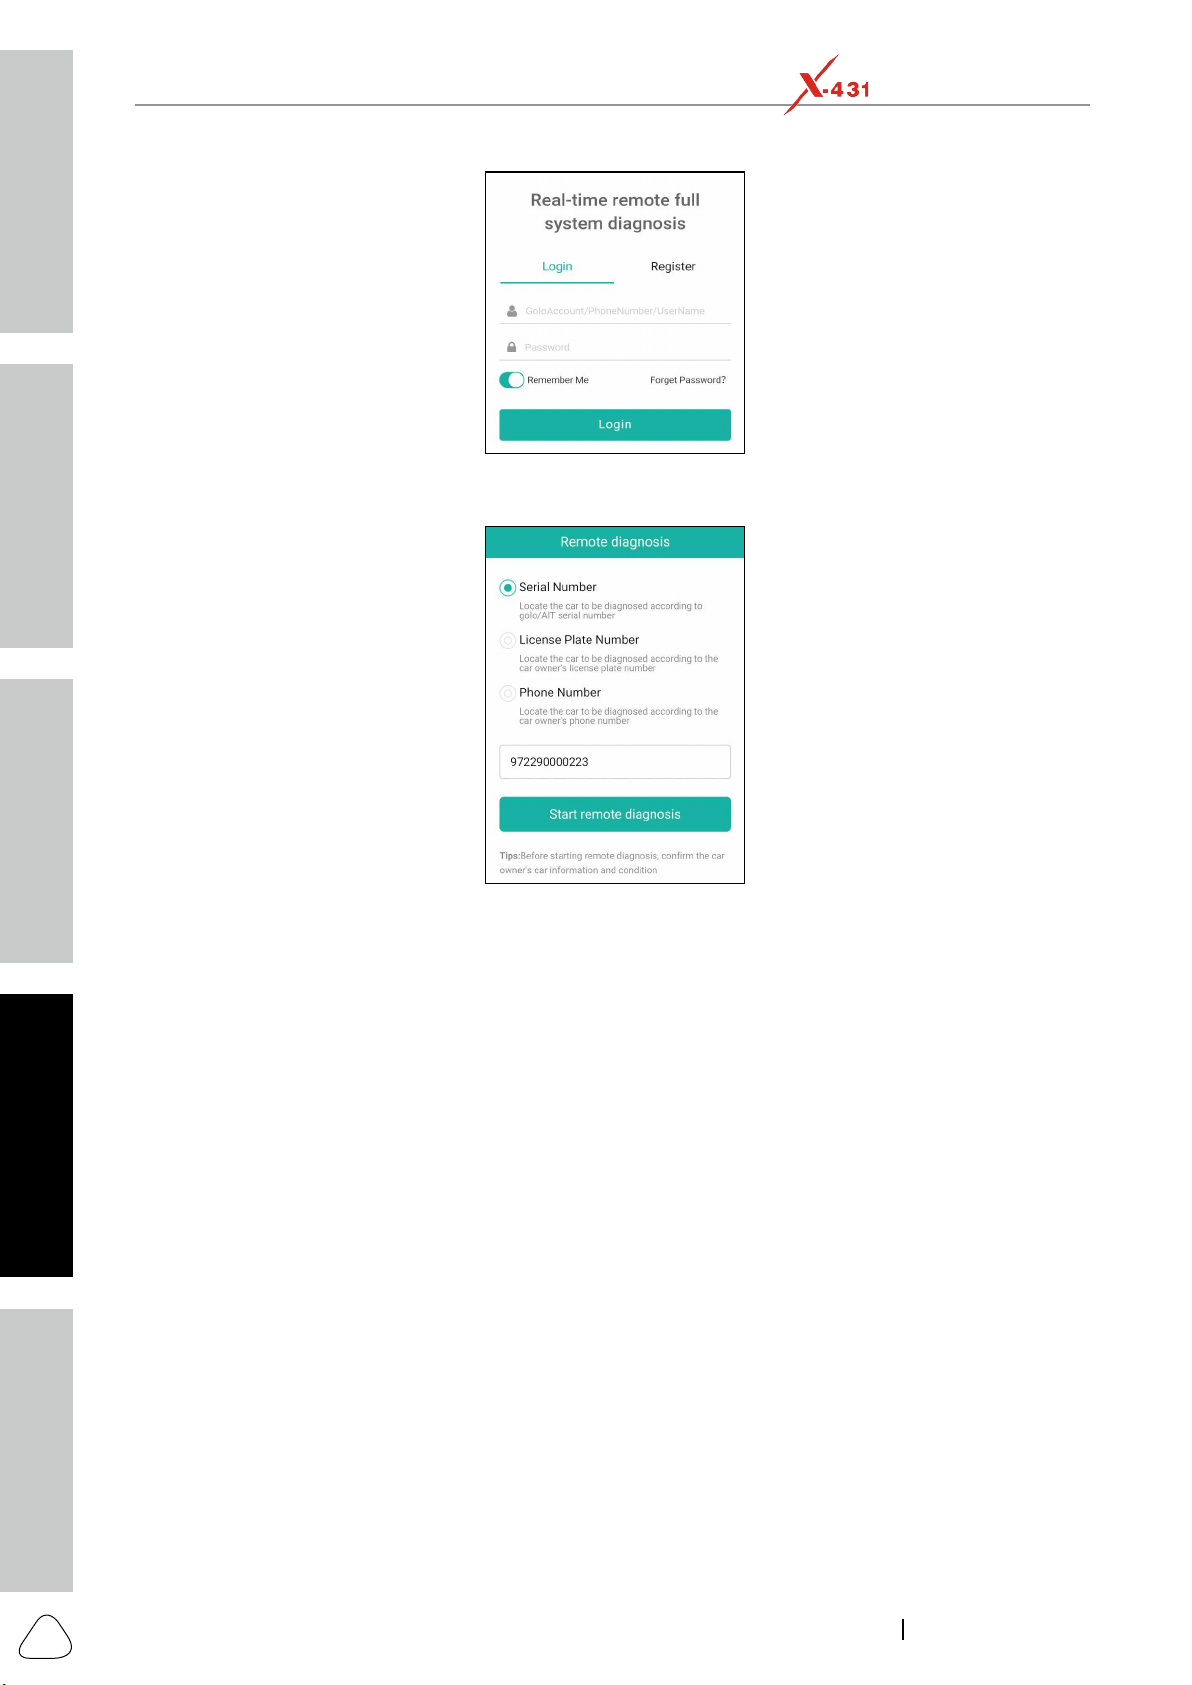
Safety & Accessory
Initial Use
Diagnostics
FAQ & Appendix
Product Prole
62
www.x431.com +86 755 8455 7891
LAUNCH
PAD VII
User Manual
Login to navigate
4. Tell the partner to check the box Serial number and enter the Serial Number provided by you, and then
tap Start remote diagnosis to control your device remotely.
The operations in remote diagnosis are same as those in Local Diagnose. Once the session is complete, a
remote diagnostic report will be automatically generated.
12.2 Toolbox
Tester and Videoscope.
Each module consists of two parts: hardware and app. These modules cannot work properly on the tablet,
the User Manual of each module.
12.3 Tablet Setting
tapping the Settings on the Android home screen.
12.4 Files
needing to connect it to a computer.
The app also features an application manager, task killer and download manager. Another excellent feature
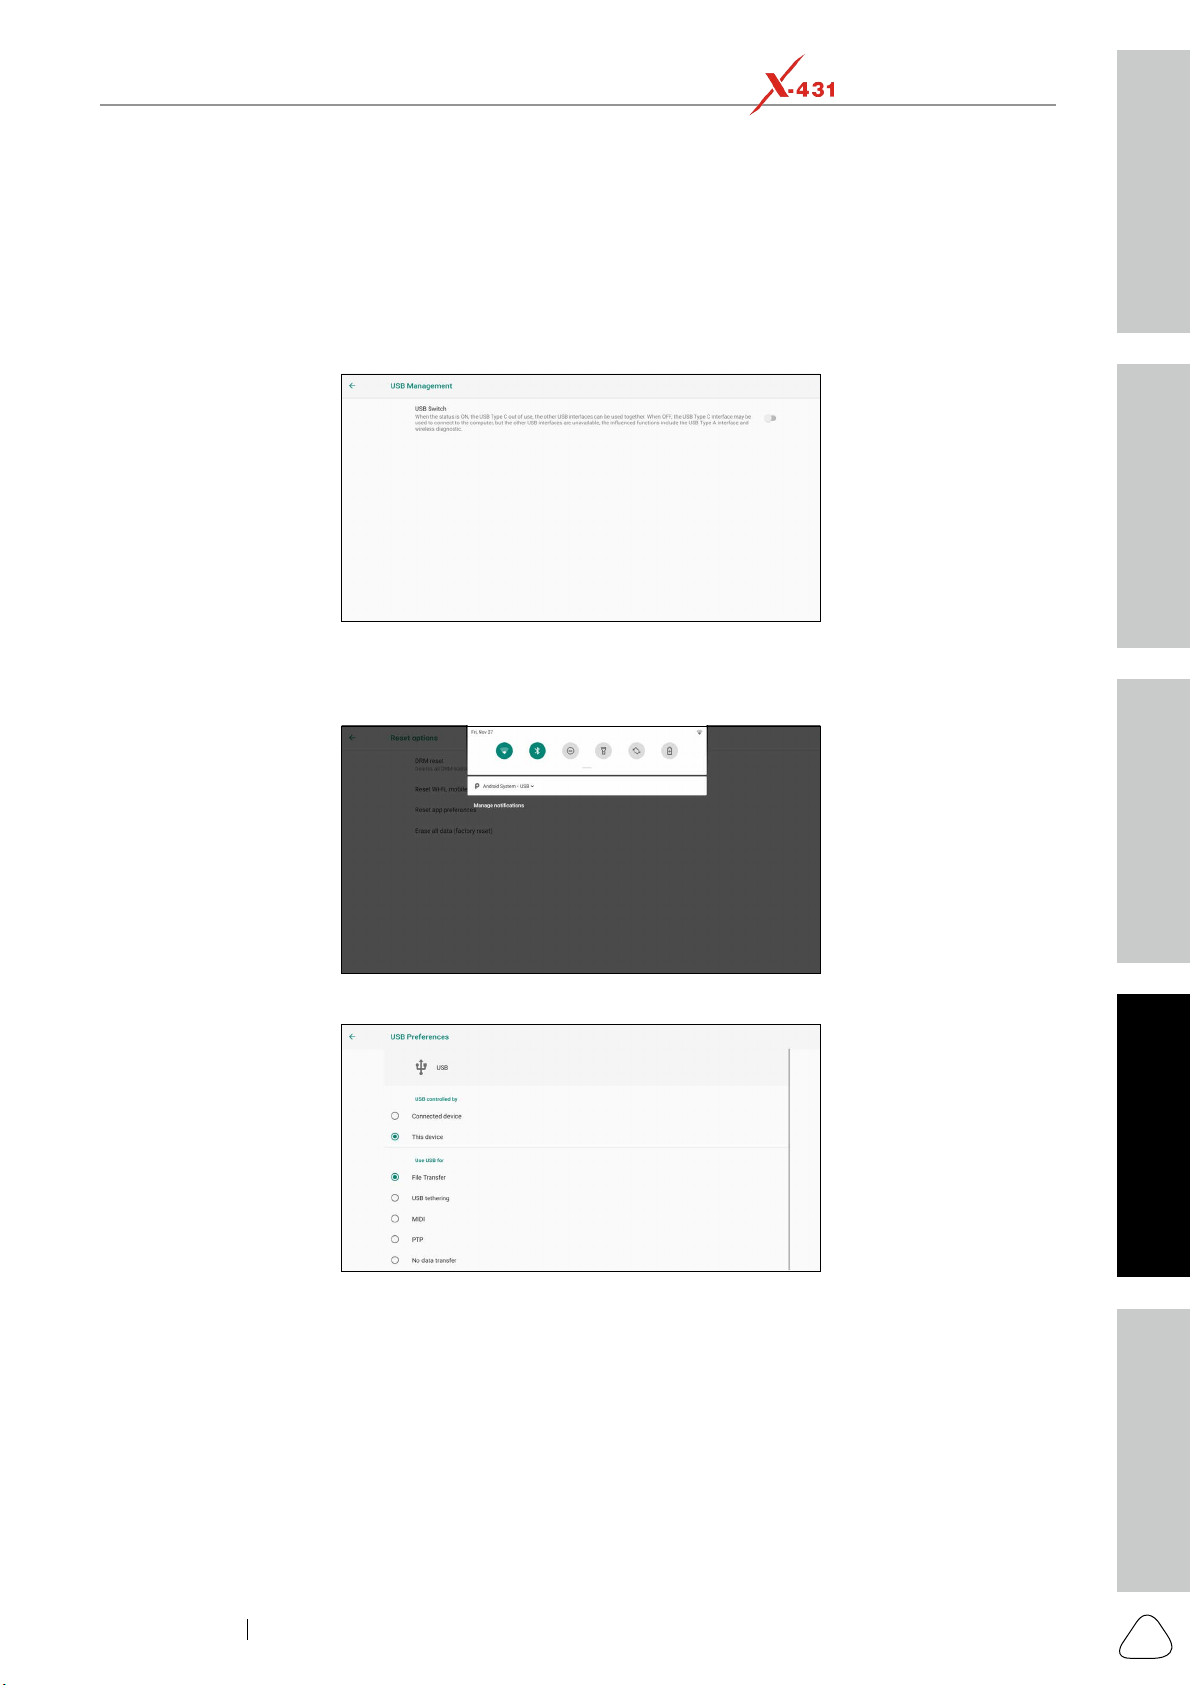
Safety & Accessory
Initial UseDiagnosticsFAQ & Appendix
Product Prole
63
www.x431.com +86 755 8455 7891
LAUNCH
PAD VII
User Manual
without using a separate app.
1. On the Home screen, go to SystemUSB Management
interface.
port of the PC.
3. Swipe the tablet screen from the top, a pull-down option list will appear on the screen.
4. Tap Android System, the following setting options will be displayed on the screen.
5. Select the checkbox File Transfer under the Use USB for tab.
12.5 Wireless Upgrade
an over-the-air update.

Safety & Accessory
Initial Use
Diagnostics
FAQ & Appendix
Product Prole
64
www.x431.com +86 755 8455 7891
LAUNCH
PAD VII
User Manual
Note: While performing OTA update, please make sure the tablet baery has at least 70% and DO NOT run any
other programs during the update.
1. On the Job menu, tap Other modules -> Built-in apps -> Wireless Upgrade.
2. Tap Check for updates. Once a newer version is found, follow the on-screen instructions to download
12.6 TeamViewer QS
This function enables you to receive remote support from technician fellows, colleagues or friends by
allowing them to control your tablet on their computer view TeamViewer software.
On the Job menu, tap Other modules -> Built-in apps -> TeamViewer QS. The following screen will
appear:
Note: In order to provide support and take control of your tablet remotely, you partner needs to install and run
the TeamViewer full version program in his computer, and have your TeamViewer ID. Visit hp://www.teamviewer.
com for details.
12.7 Recording Master
This module is a free and convenient application that allows you to take tablet screen video capture of high
quality, with or without sound.
12.8 Browser
12.9 Camera
This application allows you to take pictures or record videos with the device camera.

Safety & Accessory
Initial UseDiagnosticsFAQ & Appendix
Product Prole
65
www.x431.com +86 755 8455 7891
LAUNCH
PAD VII
User Manual
12.10 Gallery
12.11 Video Player
This video player is a media player said to be the best ever created since it supports all types of video
formats.
on respective sides, move out the video on the home screen, and can do much more.
12.12 E-Mail
12.13 Calculator
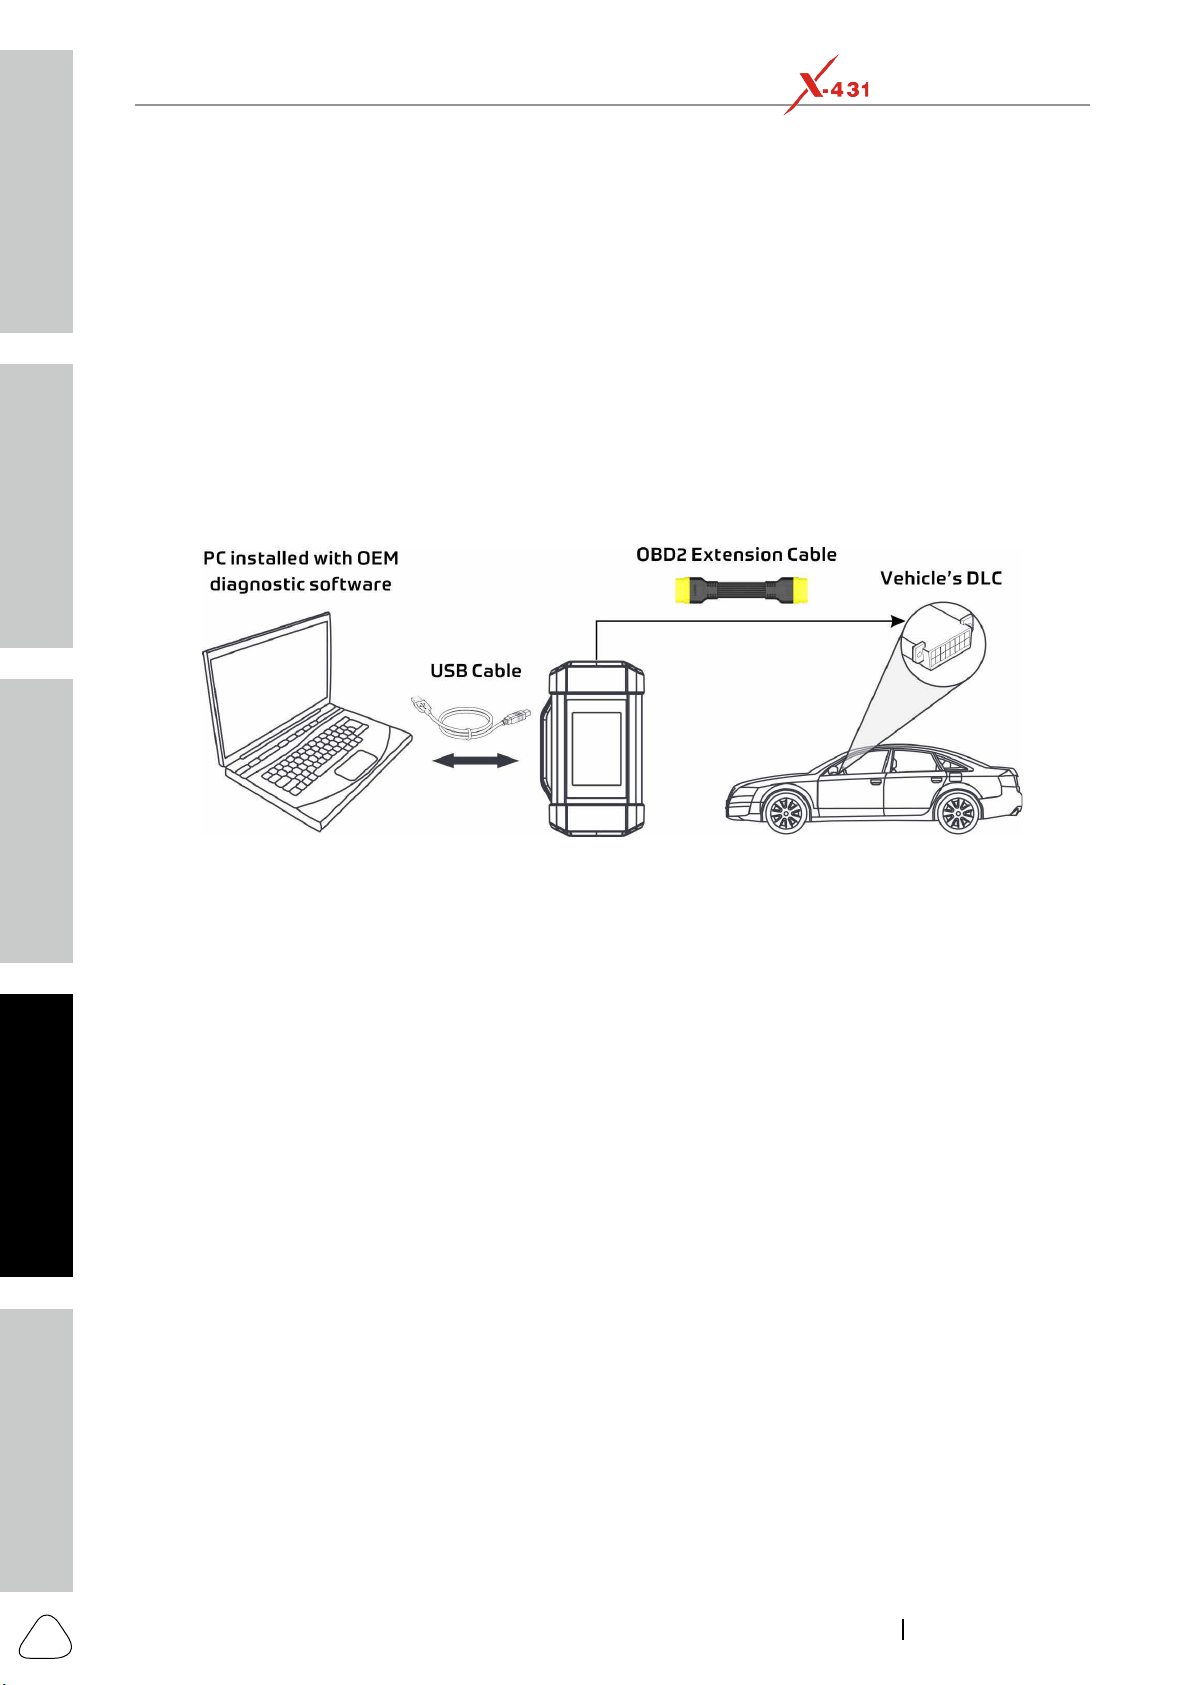
Safety & Accessory
Initial Use
Diagnostics
FAQ & Appendix
Product Prole
66
www.x431.com +86 755 8455 7891
LAUNCH
PAD VII
User Manual
13 J2534 Reprogramming Using SmartLink C
vehicles. As part of the 21st Century Tune-up, reprogramming is often the only solution for problems ranging
from drivability and loss of power to poor fuel economy and emissions related issues. SmartLink C makes
reprogramming.
13.1 As a Local J2534 PassThru Device
PassThru device, working together with the PC installed with the OEM diagnostic software to perform the
downloaded from www.cnlaunch.com.
13.2 As a Remote J2534 PassThru Device
C.
documentation can be downloaded from www.cnlaunch.com.
Ensure that the remote reprogramming operation is performed after the SmartLink C is connected to the
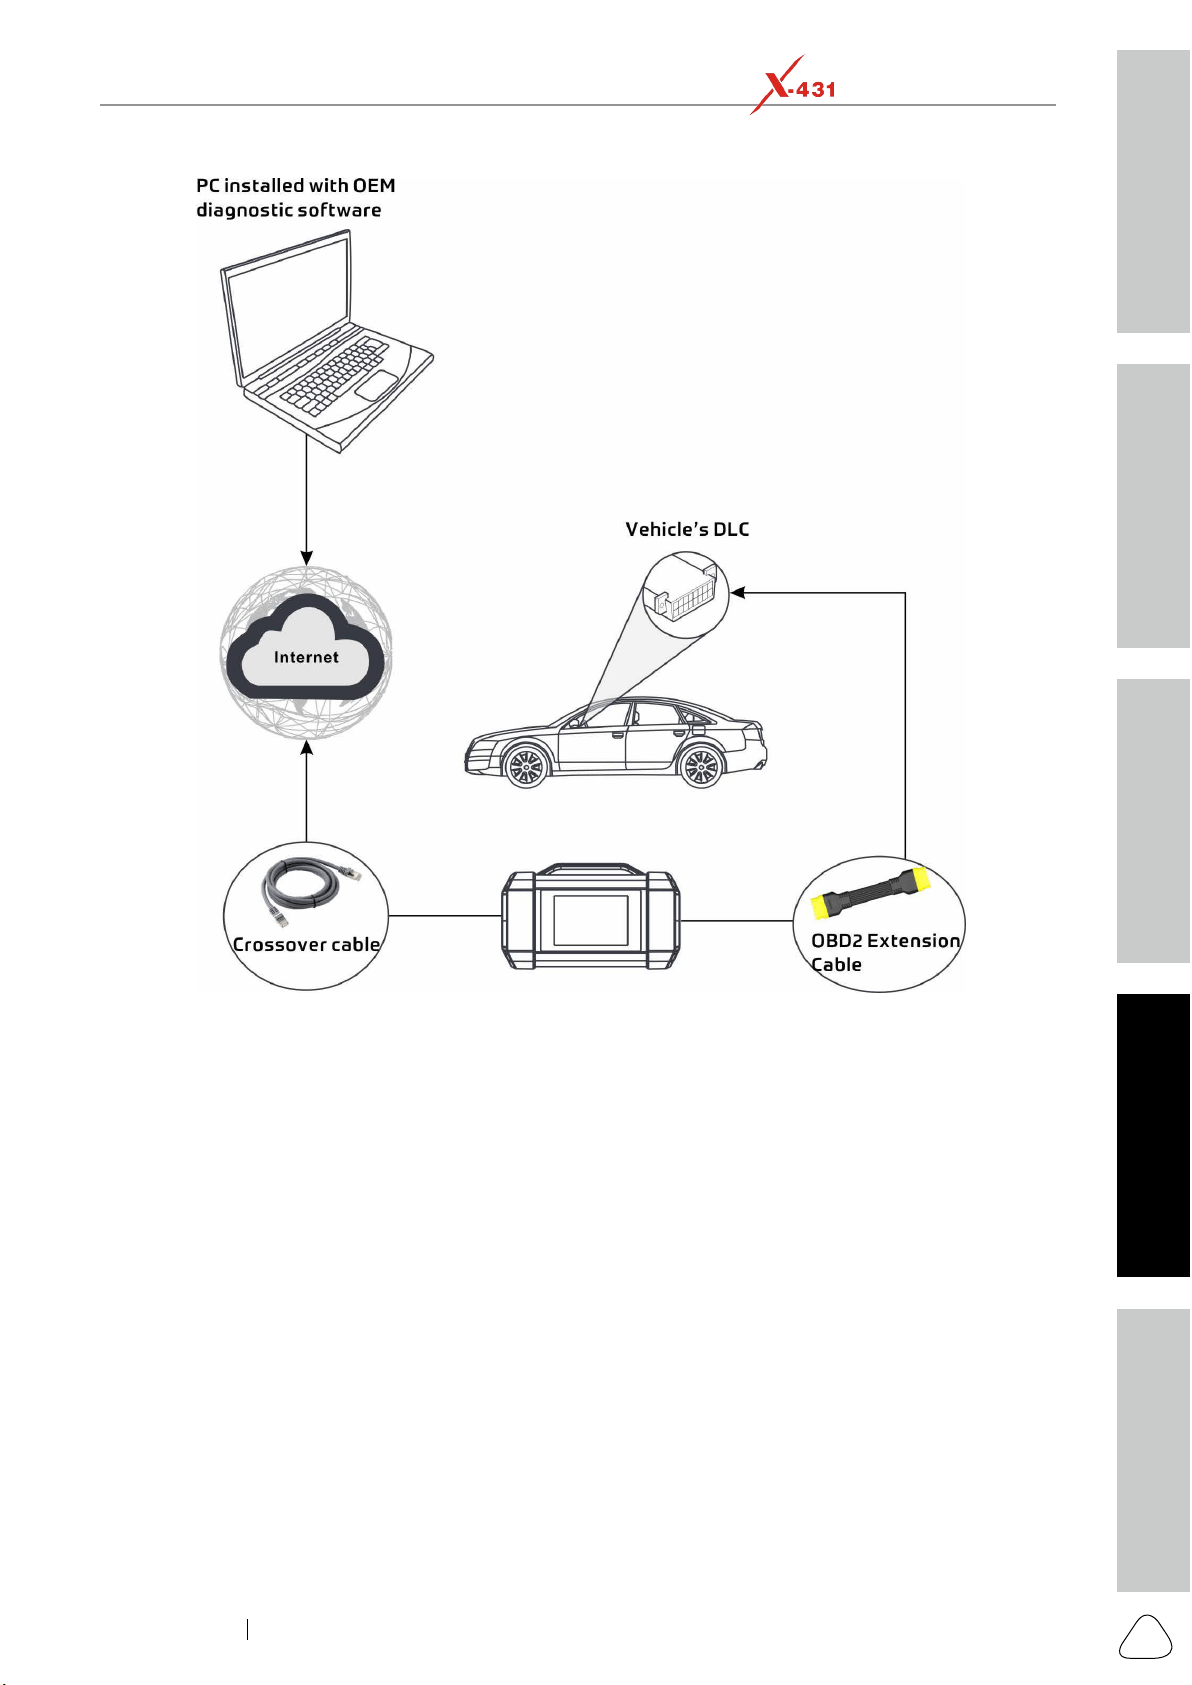
Safety & Accessory
Initial UseDiagnosticsFAQ & Appendix
Product Prole
67
www.x431.com +86 755 8455 7891
LAUNCH
PAD VII
User Manual

Safety & Accessory
Initial Use
Diagnostics
FAQ & Appendix
Product Prole
68
www.x431.com +86 755 8455 7891
LAUNCH
PAD VII
User Manual
14 FAQ
14.1 About X-431 PAD VII
1. How to save power?
Set a shorter standby time.
Decrease the brightness of the screen.
2. Communication error with vehicle ECU?
1. Whether the SmartLink C device is correctly connected.
2. Whether ignition switch is ON.
3. Failed to enter into vehicle ECU system?
1. Whether the vehicle is equipped with this system.
2. Whether the SmartLink C device is correctly connected.
3. Whether ignition switch is ON.
4. How to reset the tablet?
been backed up.
Do the following to reset the tablet:
1. Tap Settings -> System -> Reset options.
2. Tap Erase all data (factory reset).
3. Tap RESET TABLET.
4. Tap ERASE EVERYTHING to start resetting until the tool automatically reboots.
5. How to download the X-431 PAD VII App after resetting the tablet?
Note: Before registraon, please make sure the network is properly connected.
After the tablet has been successfully reset, follow the steps below to download the App:
2. Tap Login, input the username and password and tap Log In.
3. Make sure that the serial number is correct, tap APP application program and tap the Download icon to
start downloading.
4. After the download is complete, follow the on-screen instructions to install it.
5. After installation, use the existing username and password to login and go to update center to download
the diagnostic software.
6. What to do if the language of vehicle diagnostic software does not match the system language?
English is the default system language of the tool. After the system language is set to the preference
language, please go to the update center to download the vehicle diagnostic software of the corresponding
language.
language is under development.
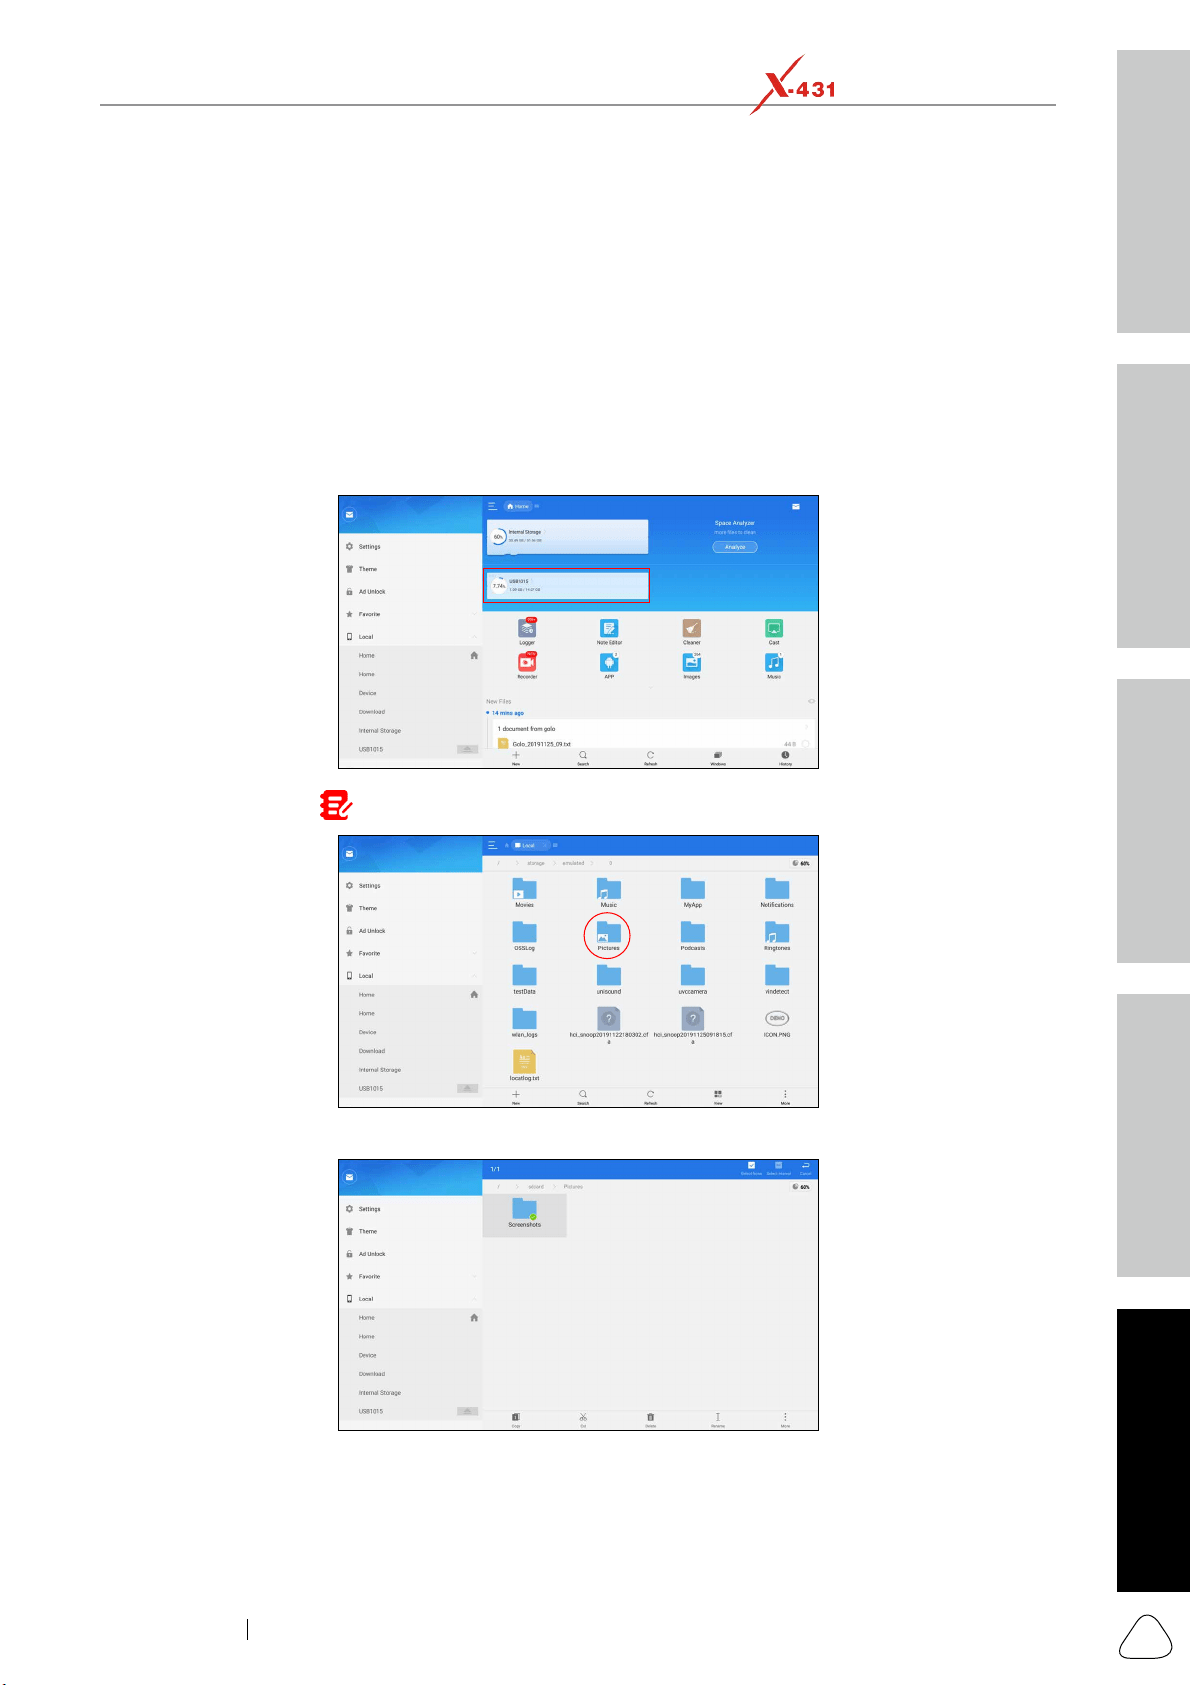
Safety & Accessory
Initial UseDiagnosticsFAQ & Appendix
Product Prole
69
www.x431.com +86 755 8455 7891
LAUNCH
PAD VII
User Manual
7. How to retrieve the login password?
Please follow below steps to proceed in case you forgot the login password:
1. Tap the application icon on the home screen to launch it.
2. Tap the Login button on the upper right corner of the screen.
3. Tap Retrieve password.
8. How to back up data?
1. Turn the tablet on.
4. Tap Internal Storage
(
Note: Take Pictures for example)
.
Screenshots folder, tap on it for a while, all available operation options will appear.
6. Tap Copy on the bottom of the screen, the folder is successfully copied.
Paste to start copying.
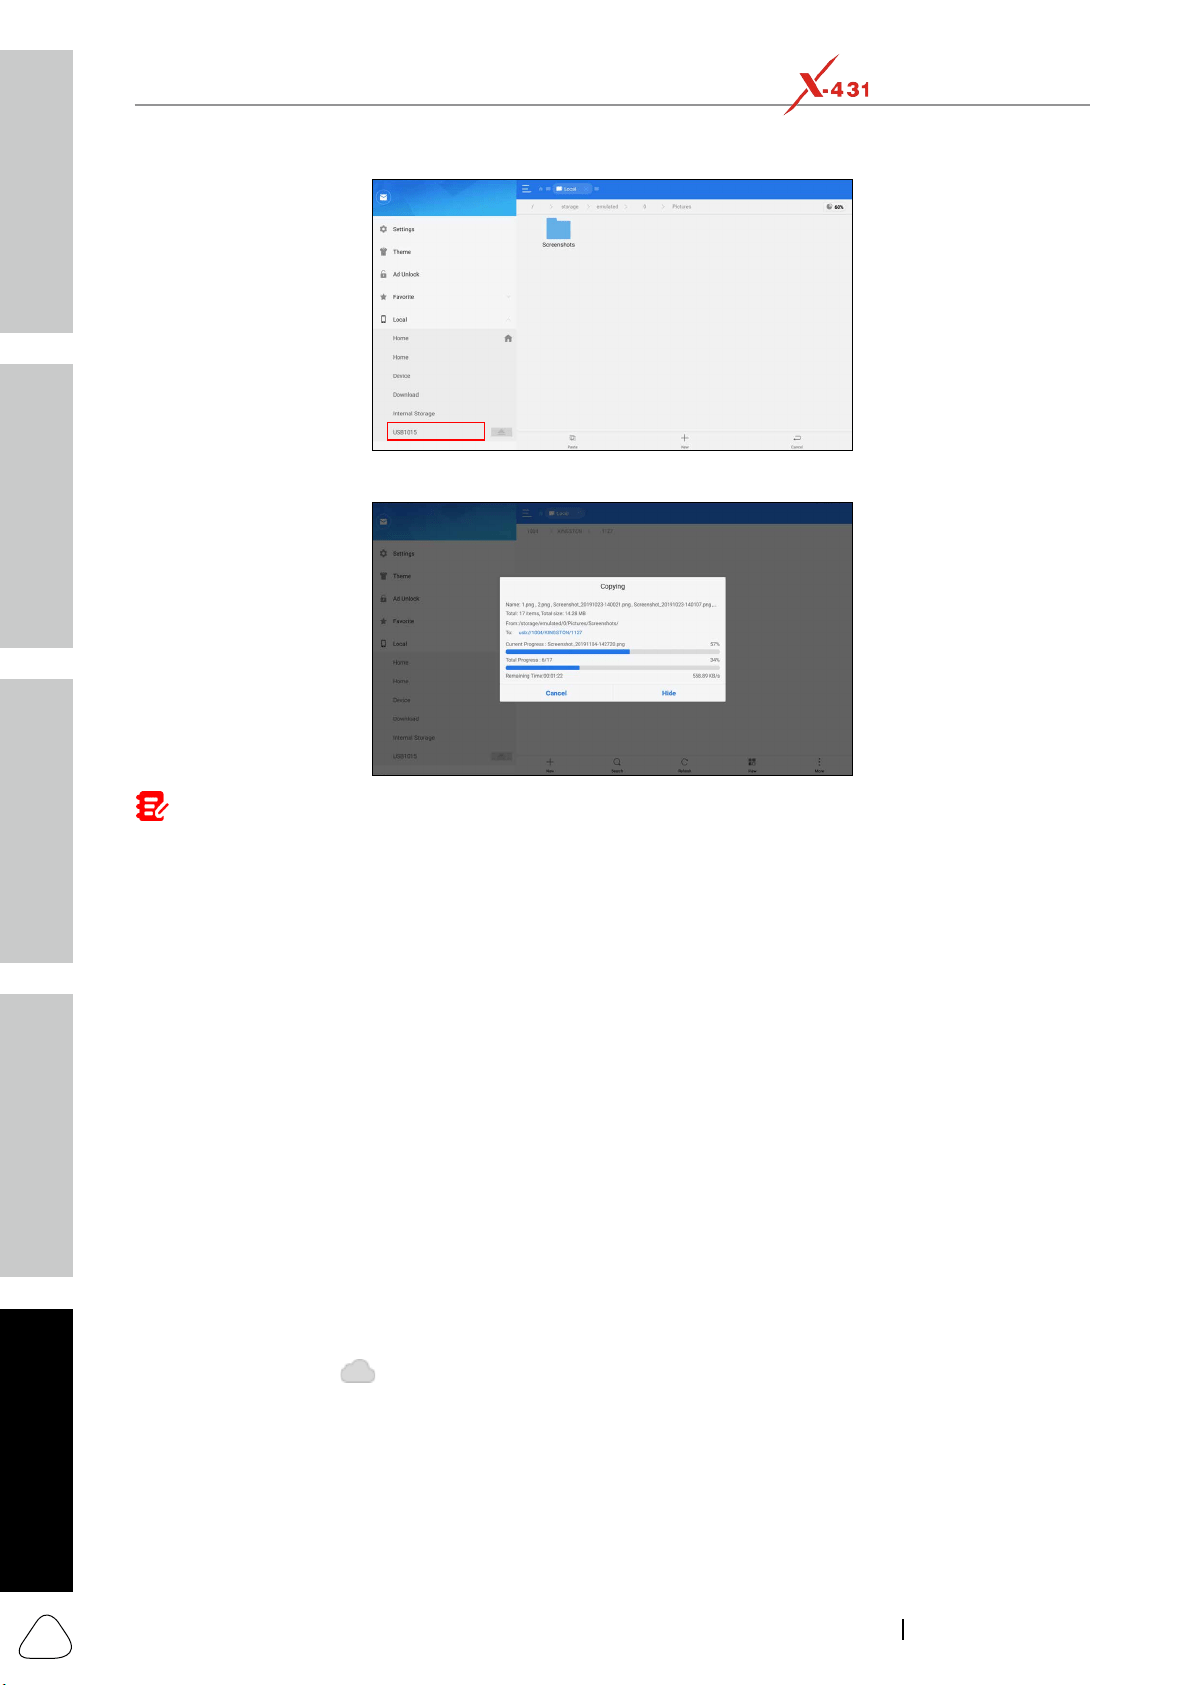
Safety & Accessory
Initial Use
Diagnostics
FAQ & Appendix
Product Prole
70
www.x431.com +86 755 8455 7891
LAUNCH
PAD VII
User Manual
8. After the total progress reaches to 100%, the backup is OK. Unplug the storage device from the tablet.
Note: Another method is available for picture backup. User also can go to Gallery to select the desired folder/
les and share it to the external storage device via ES Save to....
14.2 About SmartLink Diag.
1. What network condition is required for SmartLink Diag.?
2. What does the word “Delay” displayed on the SmartLink C screen mean?
delay status. There are three states of network delay:
when the network delay is green. Otherwise, the communication with the vehicle may fail or the incorrect
system detection may occur.
disconnected.
3. Why is the network connection so poor?
4. Why does the sign
appear on the upper right corner of the SmartLink C screen?
is recommended to use the networks directly installed by telecommunication operators where there is no
5. Some systems of some old vehicles cannot be tested.
K-Line communication protocol.

Safety & Accessory
Initial UseDiagnosticsFAQ & Appendix
Product Prole
71
www.x431.com +86 755 8455 7891
LAUNCH
PAD VII
User Manual
6. Is it necessary to re-ignite the car after the diagnostic system starts working?
7. Can I charge the SmartLink C device through an external DC power supply?
through an external DC power supply could result in system malfunction.
8. How to update SmartLink C system?
After the SmartLink C device is powered on and connected to the network, a message “Whether to upgrade
now?” will be displayed if a new system version is detected. Tap Yes to start updating, wait until the upgrade
is complete.

Safety & Accessory
Initial Use
Diagnostics
FAQ & Appendix
Product Prole
72
www.x431.com +86 755 8455 7891
LAUNCH
PAD VII
User Manual
15 Appendix - Glossary of Terms & Abbreviations
ABS
AC – Alternative Current
ADAS -- Advanced Driver Assistance Systems
AFS – Adaptive Front-lighting System
APP - Application
BT -
CAN – Controller Area Network
Communication Protocol
DC – Direct Current
DLC – Data Link Connector
The 16-cavity connector on the vehicle that allows communication between the computer system and the
diagnostic tool.
DPF – Diesel Particulate Filter
DTC – Diagnostic Trouble Code
Drive Cycle
to run and complete their diagnostic tests.
EGR - Exhaust Gas Recirculation
Freeze Frame Data
a fault code was recorded.
Generic Code
I/M
I/M Readiness
LCD – Liquid Crystal Display
LED – Light Emitting Diode
Manufacturer Specic Code
manufacturer.
MIL
OBD I
OBD II
OEM – Original Equipment Manufacturer
PCM – Powertrain Control Module
PID
TPMS – Tire Pressure Monitor System
VCI
WLAN – Wireless Local Area Network

Safety & Accessory
Initial UseDiagnosticsFAQ & Appendix
Product Prole
73
www.x431.com +86 755 8455 7891
LAUNCH
PAD VII
User Manual
Warranty
LAUNCH electronic product is warranted against defects in materials and workmanship for one year (12
This warranty does not cover any part that has been abused, altered, used for a purpose other than for
which it was intended, or used in a manner inconsistent with instructions regarding use. The exclusive
remedy for any automotive meter found to be defective is repair or replacement, and LAUNCH shall not be
liable for any consequential or incidental damages.
Final determination of defects shall be made by LAUNCH in accordance with procedures established by
LAUNCH. No agent, employee, or representative of LAUNCH has any authority to bind LAUNCH to any
Replaceable and optional parts can be ordered directly from your LAUNCH authorized tool supplier. Your
order should include the following information:
1. Quantity
2. Part number
3.
Customer Service
LAUNCH
TECH CO., LTD.:
Website: www.x431.com
www.cnlaunch.com
Email: [email protected]
Statement: LAUNCH reserves the rights to make any change to this manual without noce. We have tried our best to
make the descripons and illustraons in the manual as accurate as possible, and defects are inevitable, if you have
any queson, please contact local dealer or LAUNCH TECH. CO., LTD., LAUNCH does not bear any responsibility arising
from misunderstandings.