Loading ...
Loading ...
Loading ...
16 17
ninjakitchen.co.uk
ninjakitchen.co.uk
USING THE
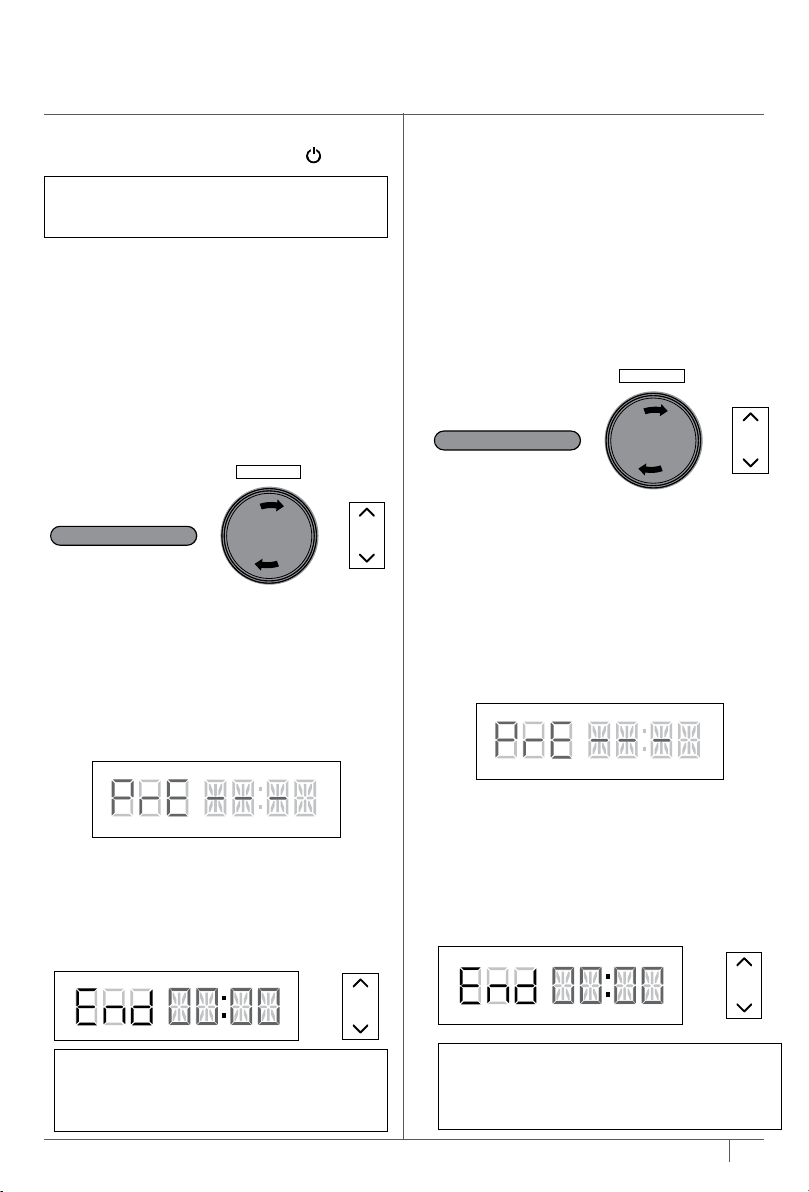
COMBI-STEAM MODE FUNCTIONS
Steam Air Fry
1 Place ingredients in the pot with
Cook & Crisp™ Basket or the reversible
rack. Ensure there is liquid in the pot to
create steam. Close the lid.
2 Move slider to COMBI-STEAM mode,
then use the dial to select STEAM AIR
FRY. The default temperature and time
settings will display. Use the up and
down arrows to the left of the display to
choose a temperature in 5°C increments
between 150°C and 240°C.
3 Use the up and down arrows to the right
of the display to adjust the cook time in
minute increments up to 1 hour.
4 Press START/STOP to begin cooking.
5 The display will show "PrE" and progress
bars indicating the unit is building
steam. The time to steam depends on
the amount of ingredients in the pot.
6 When the unit reaches the appropriate
steam level, the display will show the
set temperature and the timer will begin
counting down.
7 When cook time reaches zero, the
unit will beep and display "End" for
5 minutes.
To turn on the unit, plug the power cord
into a wall socket, then press the
button.
Steam Meals
1 Load ingredients according to recipe.
Ensure there is liquid in the pot to
create steam.
2 Move slider to COMBI-STEAM mode.
The function selection will default to STEAM
MEALS. The default temperature and time
settings will display. Use the up and down
arrows to the left of the display to choose
a temperature between in 5°C increments
between 150°C and 240°C.
3 Use the up and down arrows to the right
of the display to adjust the cook time in
minute increments up to 1 hour.
4 Press START/STOP to begin cooking.
5 The display will show "PrE" and a
progess bar indicating the unit is building
steam. The time to steam depends on
the amount of ingredients in the pot.
6 When the unit reaches the appropriate
steam level, the display will show the
set temperature and the timer will begin
counting down.
7 When cook time reaches zero, the unit
will beep and display "End" for 5 minutes.
5 Press START/STOP to begin cooking.
The unit will begin building pressure.
The display will show "PrE" and a
progress bar. The timer will begin
counting down when the unit is fully
pressurised.
6 When cook time reaches zero, the
unit will natural, quick or delayed release
pressure depending on your selection.
If you choose to manually release
pressure, turn the pressure release valve
to VENT position to release the steam.
7 The unit will beep, automatically switch
to KEEP WARM mode, and the timer will
begin counting up.
8 If using quick release or delay release the
unit will release pressure and then switch
to keep warm. If using natural release the
unit will switch to keep warm after the
cooking cycle has completed. The unit will
beep, automatically switch to KEEP WARM
mode, and the timer will begin begin
counting up.
9 When the unit displays "OPN Lid," it has
depressurised and you can move the slider
to the right to open the lid.
NOTE: After cooking is complete, you
may press KEEP WARM to turn the
KEEP WARM mode o. Or press the
START/STOP button.
NOTE: For details about the 3 ways to
automatically release pressure, see page 15.
NOTE: If running for 1 hour or less, the
clock will count down by minutes and
seconds. If running for more than 1 hour,
the clock will count down by minutes only.
NOTE: The position of the pressure
release valve does not matter. It can be
in the SEAL or VENT position.
NOTE: If your food requires more time
use the up arrows to the right of the
display to add additional time. The unit
will skip preheating.
NOTE: If your food requires more time
use the up arrows to the right of the
display to add additional time. The unit
will skip preheating.
NOTE: Time to pressure varies
depending on the selected pressure.
current temperatures of the cooking
pot and temperature/quantity of the
ingredients.
+
+
+
USING THE
PRESSURE COOKING FUNCTIONS - CONT
++
COMBI-STEAM
STEAM MEALS
++
COMBI-STEAM
STEAM AIR FRY
Loading ...
Loading ...
Loading ...