Loading ...
Loading ...
Loading ...
13
Figure 20
Figure 21
Figure 22
Please make sure the person performing this process has clean hands while handling or
servicing the inner parts of the filtration system.
1. To begin the flushing process, you will need to make sure the RO fresh water storage tank
valve, letter F in the above picture, is in the closed position. Note: Please make sure the RO
filter is not installed during the flushing process.
2. You will need to open three water valves: 1) open the inlet water supply fitting, letter A in the
above picture, and 2) the sink main water inlet valve and 3) the RO faucet.
3. You should start to hear water running through the RO system. Note: you may hear strange
noises and air passing through the RO system, this is normal.
4. Water will start to flow out from the RO faucet, slowly at first and then once pressure builds
the water will start to flow faster. Note: Make sure the RO faucet is pointed to sink basin,
water will start to flow through the filters.
5. Flush the unit for three-minutes until the water becomes clear. Note: The water will appear
cloudy and then will start to clear up. If after three-minutes the water is still cloudy, continue
running water.
6. When the water becomes clear, close the inlet water supply fitting, letter A in the above
picture. You will need to install the RO filter. Note: Before removing the RO cap, you will need a
bucket and towel to capture any water that may be in the RO filter housing. Please make sure
all water is removed from the RO filter housing.
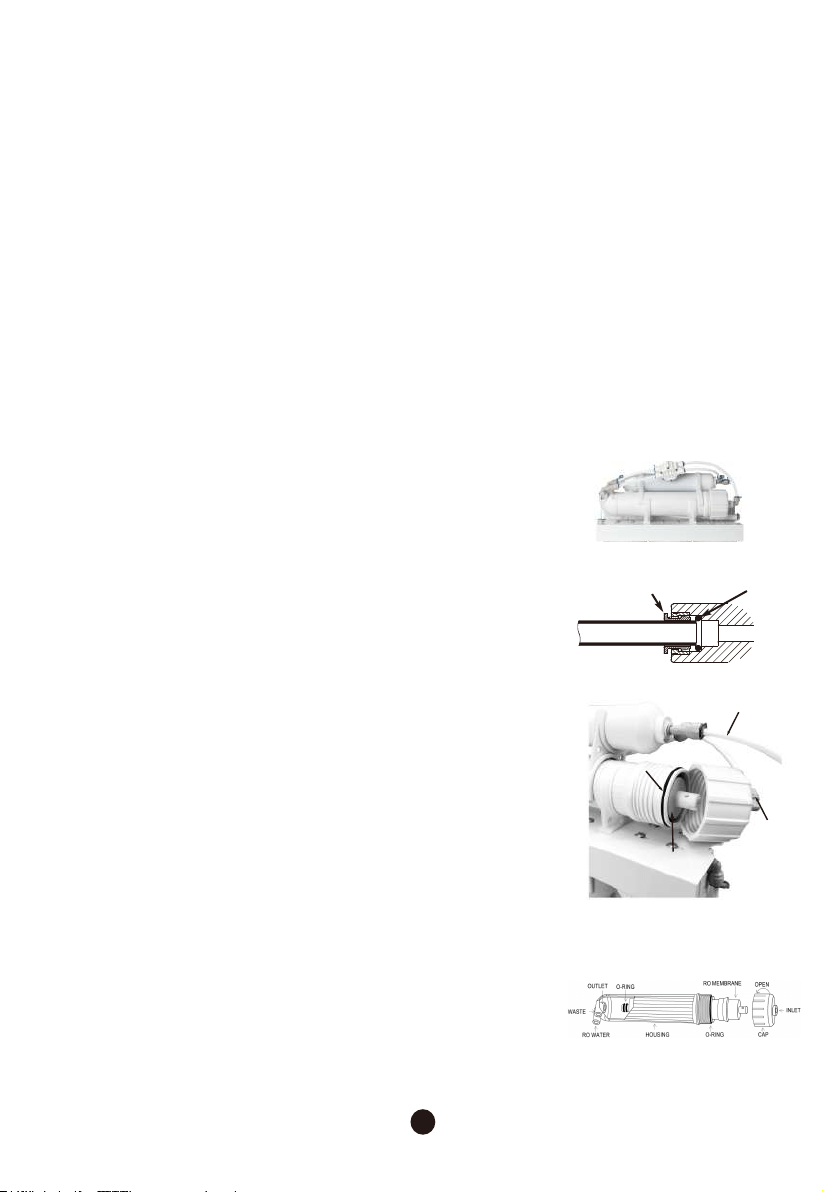
Tubing
Linlet
Cap
O-Ring
Housing
Membrane
HOW TO INSTALL THE RO FILTER
1. Locate the RO Filter by Referring to Figure 20.
2. To install the RO Filter, first remove the blue PE Tube Locking Clip
and white PE tube that is connected to the right side of the RO filter
housing.
• The white PE tube is inserted into a quick connect housing.
• To remove the white PE tube, remove the blue PE tube locking
clip, and press inward on the Collet (dark grey ring) that the PE
tube is inserted into.
• Gently pull out the white PE tube from the water connector. See
illustration to the right for details.
How to Connect and Disconnect the Tubes
3. Remove the filter housing cap by unscrewing counterclockwise.
Inspect the underside of the housing cap to make sure there is an
O-Ring installed. Inspect the filter housing to make sure there is an
O-Ring installed. See Figure 21.
4. NOTE: For your safety, the RO system is wet tested prior to
shipment, so you may notice some water drops are still inside
the filter housing.
5. Reference Figure 22, install the RO filter by inserting the "small
head" end of the membrane firmly into the housing. NOTE: one end
of the RO membrane has a thick-rubber gasket, this should be
inserted towards the filter-cap end.
6. Before twisting the housing cap back on, make sure the O-Ring is
seated at the end of the membrane housing, which is very important
to avoid leaking and damage to the O-Ring.
7. Place the membrane housing cap back and pre-tighten it with
hand, then tighten it with the housing wrench. Do not over tighten.
8. Reconnect the white PE tube to the quick connect fitting and
install the blue PE tube locking clip.
9. Please make sure the white PE tube is fully engaged into quick
connect fitting or water will leak from the fitting.
Collet
O-Ring
Flushing Stage 1 – 3 Filter, Steps
Loading ...
Loading ...
Loading ...