Loading ...
Loading ...
Loading ...
Rev.A 0523 CD12950ES2
IMPORTANT SAFETY INSTRUCTIONS
When using electrical appliances, these instructions and warnings should always be
followed to reduce the risk of fi re, electrical shock, injury to persons and hyperthermia:
TO REDUCE THE RISK OF FIRE, ELECTRICAL SHOCK OR PERSONAL INJURY, ALWAYS FOLLOW
THESE IMPORTANT SAFETY INSTRUCTIONS AND WARNINGS:
Plug heaters directly into a 120v wall outlet/receptacle only. Never use with an extension cord. Do not plug heater into any other cord connected
device, such as a power strip, surge protector, multiple outlet adapter, cord reel or outlet-type air freshener. The use of such devices may create a
fi re hazard. Do not plug multiple devices in the same outlet or on same circuit as heater.
Faulty wall outlet connections may cause the wall outlet to overheat. Be sure that heater plug fi ts tightly into outlet before each use. During use,
check to make certain the heater plug is not overheating. If necessary have a qualifi ed electrician check and/or replace the wall outlet. Do not use
this heater with any solid state speed control devices.
Make certain that the power source conforms to the electrical requirements of the heater.
Extreme caution is necessary when any heater is used by or near children or invalids. The heater should not be left operating unattended. Never
leave children unattended when the heater is on or plugged in.
This appliance has a polarized plug (one blade is wider than the other). To reduce the risk of electric shock, this plug is intended to fi t in a
polarized outlet only one way. If the plug does not fi t fully in the outlet, reverse the plug. If it still does not fi t, contact a qualifi ed electrician. Do not
attempt to defeat this safety feature.
Do not use the heater in areas where gasoline, paint, or fl ammable liquids are used or stored. Do not use heater in locations where fl ammable or
explosive chemicals are stored, or in wet atmospheres.
Do not operate any heater with a damaged cord or plug or after the heater malfunctions, or has been dropped or damaged in any manner. To
disconnect heater, turn the heater off then remove the plug from the outlet.
Always unplug heater when not in use. Unplug power cord before servicing or moving the heater.
Do not insert or allow fi ngers or foreign objects to enter any ventilation or exhaust opening as it may cause an electric shock, fi re, or damage the
heater. Do not block or tamper with the heater in any manner while it is in operation.
Do not block air intakes or exhaust in any manner. Do not place on soft surfaces, like a bed, where openings may become blocked. Do not
depend on the on/off switch as the sole means of disconnecting power when servicing or moving the heater. Always unplug the power cord.
Hyperthermia can result in death. Symptoms of hyperthermia include high body temperature, headache, nausea, vomiting, tiredness, dizziness,
fainting, and rapid pulse. If you begin to experience symptoms related to hyperthermia, turn off the heater and seek medical attention.
To avoid excessive room temperatures which can cause hyperthermia: DO NOT leave product running unattended in a confi ned space around
infants, or individuals with reducedphysical, sensory, or mental capabilities.
WARNING
• Always unplug heater when not in use. Unplug power cord before servicing or moving the heater.
• Do not insert or allow fi ngers or foreign objects to enter any ventilation or exhaust opening as it may cause an electric shock, fi re, or damage
the heater. Do not block or tamper with the heater in any manner while it is in operation.
• Do not block air intakes or exhaust in any manner. Do not place on soft surfaces, like a bed, where openings may become blocked. Do not
depend on the on/off switch as the sole means of disconnecting power when servicing or moving the heater. Always unplug the power cord.
• Always place the heater on a stable, fl at, level surface when operating, to avoid the chance of the heater overturning. Locate the power cord
so the heater or other objects are not resting on it. Do not run power cord under carpeting. Do not cover power cord with throw rugs, runners,
or similar coverings as this may cause cord to overheat. Arrange power cord away from room traffi c and where
it will not be tripped over.
• This heater is hot when in use. To avoid burns, do not let bare skin touch hot surfaces. Always use handle when moving this heater. Keep
combustible materials, such as furniture, pillows, bedding, papers, clothes and curtains at least 3 feet (0.9 M) from the front of the heater and
keep them at least 1 foot (0.3 M) from the sides and rear.
• This heater is not intended for use in wet or damp locations. This heater is not intended for use in bathrooms, laundry areas and similar
indoor locations. Never locate a heater where it may fall into a bathtub or other water container.
• Do not use heater outdoors.
• This heater is not suitable for use in agricultural facilities including areas where livestock, poultry or other animals are confi ned. Please refer
to national electric code (nec) article 547-7 (2008), or applicable state or local codes or standards relating to electrical requirements for
agricultural buildings. This heater does not meet the requirements of nec article 547-7 (2008).
• This heater is not suitable for use in hazardous locations. Please refer to national electric code (nec) article 500 or applicable state or local
codes or standards relating to electrical requirements for hazardous locations. This heater does not meet the requirements of
nec article 500 (2008).
• Remote controls for other appliances or electronic equipment can sometimes interfere with the operation of this heater. If this occurs, move
the heater to another location.
• Keep heater remote control unit away from chairs and your bed where it may be sat or laid upon and inadvertently turn on the heater.
CAUTION
REMOTE CONTROL:
• Install two “AAA” batteries (not included).
• Do not mix old and new batteries. Do not mix al ka line, stan dard (carbon-zinc)
or rechargeable (nickel-cad mi um) batteries.
• Do not dispose of batteries in fi re. Batteries may explode or leak.
• Always purchase the correct size and grade of battery most suitable
for the intended use.
• Replace all batteries of a set at the same time.
• Clean the battery contacts and also those of the device prior
to battery installation.
• Ensure the batteries are installed correctly with regards to polarity (+ and -).
• Remove batteries from equipment that is not to be used for an
extended period of time.
• Remove used batteries promptly.
Read all instructions before using this Heater. Save these instructions
Rev. A 0523 CD12950ES7
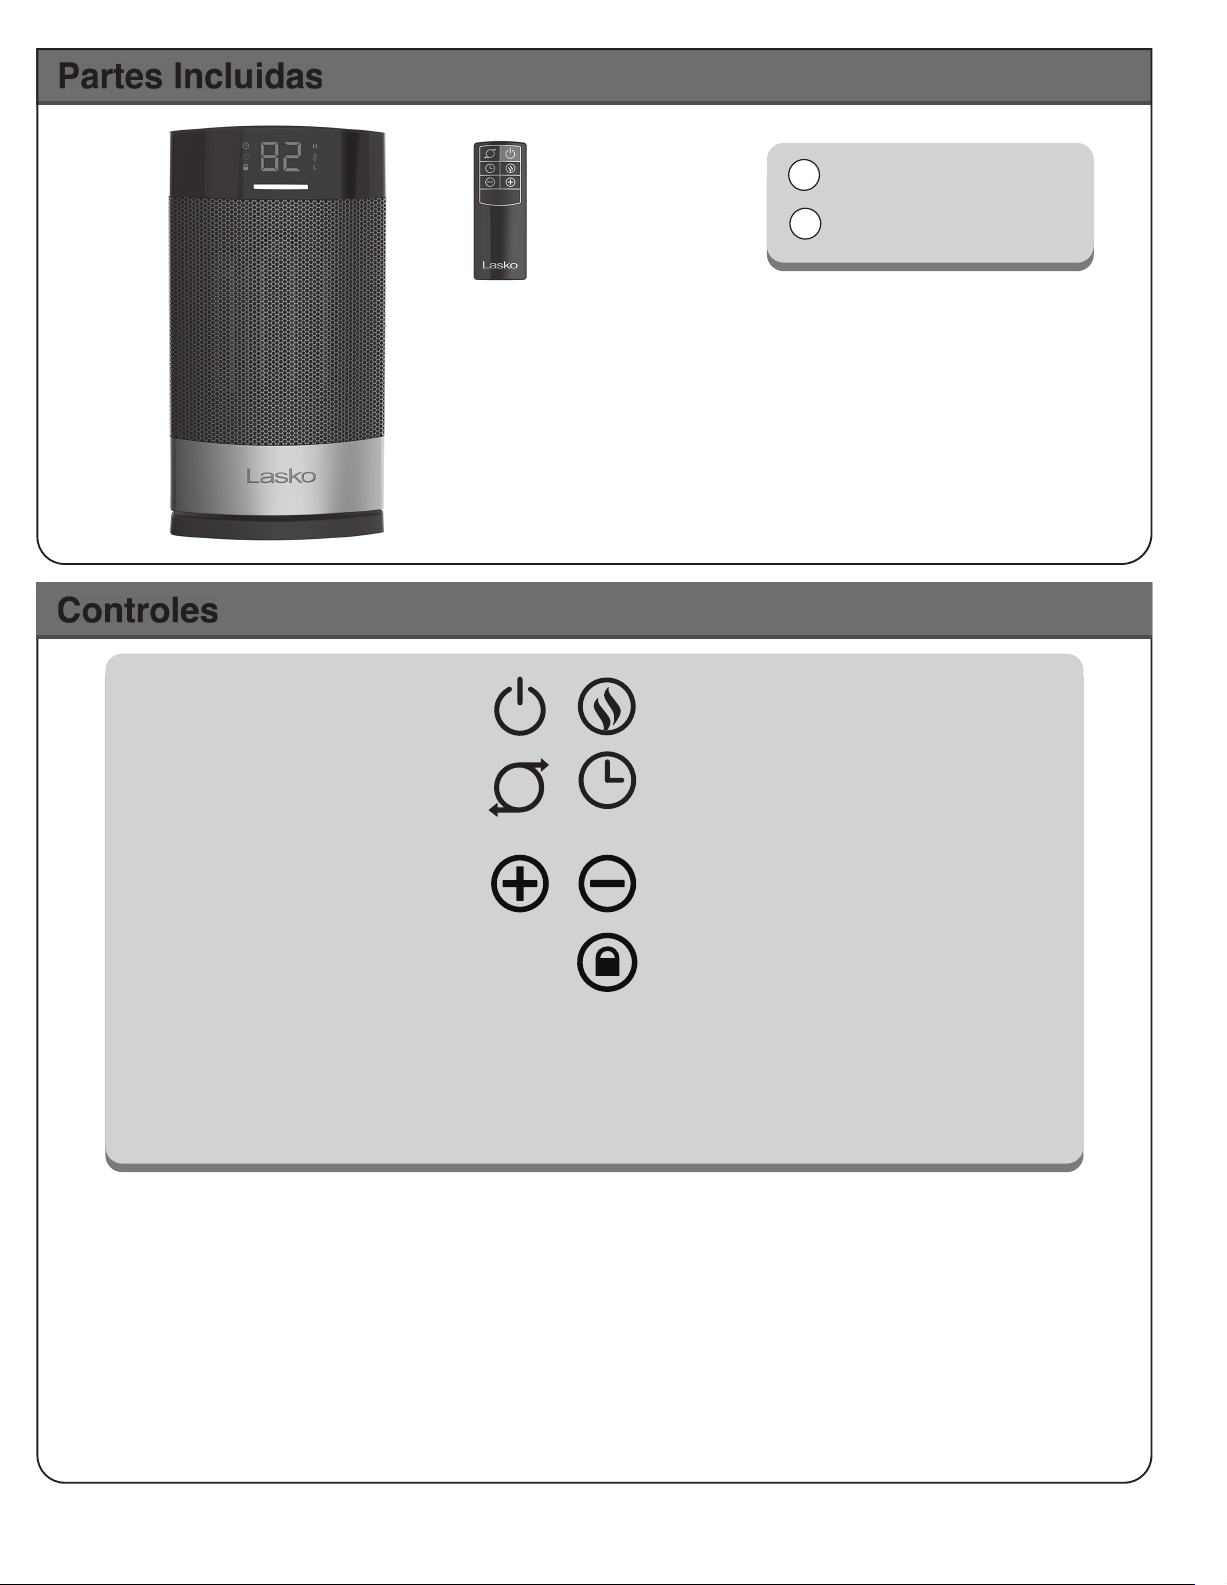
1 Cuerpo
1
Partes Incluidas
2
Control Automático de la Temperatura (-)*
Presione para Disminuir la temperatura ambiente
deseada.
Botón de temporizador
El temporizador se puede confi gurar hasta 12 horas. 0.5
- 12.0 horas en intervalos de 0.5 horas hasta 2 horas,
incrementos de 1 hora de 2 horas a 12 horas. Continúe
presionando el botón del temporizador para alcanzar la
confi guración de tiempo deseada.
Botón de Encendido
ENCENDIDO/APAGADO el Calefactor
presionando el Botón de Encendido.
Control Automático de la Temperatura (+)
*
Presione para Aumentar la temperatura
ambiente deseada.
Controles
BLOQUEO PARA NIÑOS (Activar):
Cuando se mantiene presionado el botón de bloqueo
para niños durante 3 segundos, todas las funciones del
calentador están desactivadas, excepto la Botón. Todas
las funciones que están activadas actualmente
Quédate. Los despagos mostrarán “CL”.
BLOQUEO DE NIÑOS (Desactivar):
Para desactivar el bloqueo para niños, pulse el botón
Bloqueo para niños 3 segundos. La función de bloqueo
para niños se desactivará. Desenchufar la unidad
también desactivará el niño Función de bloqueo.
2 Control Remoto
Botón de Modo de Calor
El calor se puede ajustar a H3 (alto), H2 (Med) o H1 (bajo)
El ventilador se puede ajustar a F2 (alto), F1 (bajo)
Botón de Oscilación de Base
Presione para Iniciar/Detener la función de
oscilación de la base.
*
CONTROL AUTOMÁTICO DE LA TEMPERATURA
La función de temperatura automática funciona en todos los modos de calor. No funciona en modos de ventilador.
1. Para ajustar la habitación a una temperatura específi ca, presione el botón Control de temperatura Plus o el botón Menos temperatura Conrol a la temperatura
deseada. La pantalla ahora refl ejará la temperatura establecida y la temperatura parpadeará. El calentador ahora está en modo de temperatura automática.
2. Cuando alcance la temperatura en la cual desea establecer la unidad, la temperatura fi jada titilará varias veces y luego la pantalla volverá a indicar la temperatura
actual y cambiará gradualmente a medida que cambia la temperatura de la habitación. NOTA: la pantalla de la temperatura no indica la temperatura del aire
caliente emitido por el calefactor.
3. Una vez que la temperatura de la habitación alcanza los 2 grados por encima de la temperatura fi jada, el Calefactor se apagará. Una vez que la temperatura
de la habitación alcanza 1 grado por debajo de la temperatura fi jada, el Calefactor se encenderá de nuevo y continuará con el ciclo de apagado y encendido
para mantener la temperatura fi jada.
4. Esta función se cancelará si se pulsa el botón Modo calor. El Calefcator ahora estará en calefacción “Alta”.
NOTA: Es normal que el “ventilador” del calefactor funcione durante aproximadamente 15 segundos después que el calefactor se haya apagado tras alcanzar la
temperatura fi jada. Oprima los botones botón más y botón menos al mismo tiempo para cambiar la pantalla a ° Celsius. Oprima los dos botones al mismo tiempo
nuevamente para cambiar la pantalla y volver a ° Fahrenheit.
PANTALLA DIGITAL CON ATENUACIÓN AUTOMÁTICA
Después de 10 segundos, las luces de la pantalla
se atenuarán automáticamente. Tocar cualquier
botón volverá a iluminar las luces al 100%.
Loading ...