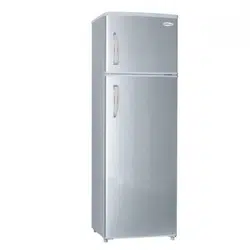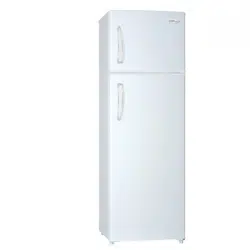
DE 2.4 cu.ft.
2.4 cu. ft.
PRF24500MW
PRF24600MS
PRF24500MW
PRF24600MS

1
Contents
1. SAFETY WARNINGS ............................................................................................... 2
2. INSTALLATION ......................................................................................................... 3
2.1 Location ................................................................................................................... 3
2.2 Reversing the Door Swing ............................................................................... 3
2.3 Door Space Requirements ............................................................................... 5
2.4 Leveling the Unit .................................................................................................. 5
2.5 Cleaning Before Use ........................................................................................... 5
2.6 Before Using Your Unit ...................................................................................... 5
2.7 Interior Accessories ............................................................................................ 5
3. PRODUCT OVERVIEW ............................................................................................ 6
4. OPERATION ............................................................................................................... 6
4.1 Adjusting the Temperature .............................................................................. 6
4.2 Noise Inside the Unit! ........................................................................................ 6
4.3 Tips for Keeping Food in the Unit .................................................................. 7
5. CLEANING .................................................................................................................. 7
5.1 Defrosting ............................................................................................................... 7
5.2 Cleaning the Interior and the Exterior of the Unit .................................. 7
5.3 Cleaning Tips ......................................................................................................... 7
6. MAINTENANCE ......................................................................................................... 8
6.1 Changing the Internal Light ............................................................................ 8
6.2 Care When Handling / Moving Your Unit .................................................... 8
6.3 Servicing ................................................................................................................. 8
6.4 Switching Of for Long Periods of Time ........................................................ 8
7. Trouble shooting ..................................................................................................... 8
7.1 Warm tips: ............................................................................................................. 9
8. TIPS FOR ENERGY SAVING ................................................................................. 9
9. DISPOSAL ................................................................................................................ 10

2
1. SAFETY WARNINGS
Caution: risk of fire
1) WARNING―Keep ventilation openings in the appliance enclosure or in
the built-in structure, clear of obstruction.
2) WARNING―Do not use mechanical devices or other means to
accelerate the defrosting process, other than those recommended by the
manufacturer.
3) WARNING―Do not damage the refrigerant circuit.
4) WARNING―Do not use electrical appliances inside the food storage
compartments of the appliance, unless they are of the type recommended
by the manufacturer.
5) WARNING―DANGER: Risk of child entrapment. Before you throw
away your old refrigerator or freezer;
•Take off the doors
•Leave the shelves in place so that children may not easily climb inside.
6) The appliance has to be unplugged after use and before carrying out user
maintenance on the appliance.
7) This appliance can be used by children aged from 8 years and above and
persons with reduced physical, sensory or mental capabilities or without
experience and knowledge if they have been given supervision or instruction
concerning use of the appliance in a safe way and understand the hazards
involved. Children shall not play with the appliance. Cleaning and user
maintenance shall not be made by children without supervision.
8) If the supply cord is damaged, it must be replaced by the manufacturer,
its service agent or similarly qualified persons in order to avoid a hazard.
9) Please discard the refrigerator according to local regulations for its use of
flammable gas and refrigerant.
10) Please follow local regulations regarding disposal of the appliance for its
flammable refrigerant and gas. Before you discard the appliance, please
take off the doors to prevent the possibility of children being trapped inside.
11) This appliance is intended to be used in household and similar
applications as
– Staff kitchen areas in shops, offices and other working environments;
– Farm houses and by clients in hotels, motels and other residential type
environments;
– Bed and breakfast type environments;
– Catering and similar non-retail applications.
12) Do not store explosive substances as aerosol cans with a flammable
propellant in this appliance.
3
IT IS HAZARDOUS FOR ANYONE OTHER THAN AUTHORISED
SERVICE PERSONNEL TO CARRY OUT SERVICING OR REPAIRS
WHICH INVOLVE THE REMOVAL OF COVERS.
TO AVOID THE RISK OF AN ELECTRICAL SHOCK DO NOT ATTEMPT
REPAIRS YOURSELF.
2. INSTALLATION
2.1 Location
When selecting a position for your unit, you should make sure the floor is flat
and firm, and the room is well ventilated with an average room temperature
of between 16
o
C and 38
o
C. Avoid locating your unit near a heat source, e.g.
cooker, boiler or radiator. Also avoid direct sunlight as it may increase the
electrical consumption. Extreme cold environment temperatures may also
cause the unit not to perform properly. This unit is not designed for use in a
garage or outdoor installation. Do not drape the unit with any covering.
When installing the unit, allow 40 cm (15.7 inch) of free space at both sides,
15 cm (5.9 inch) at the rear and 20 cm (7.9 inch) at the top of the unit. This
will allow cold air to circulate around the refrigerator and improve the
efficiency of the cooling process. The door can be opened to the right or the
left, depending on what better suits the location. Please ensure there is
adequate space for the door to fully open.
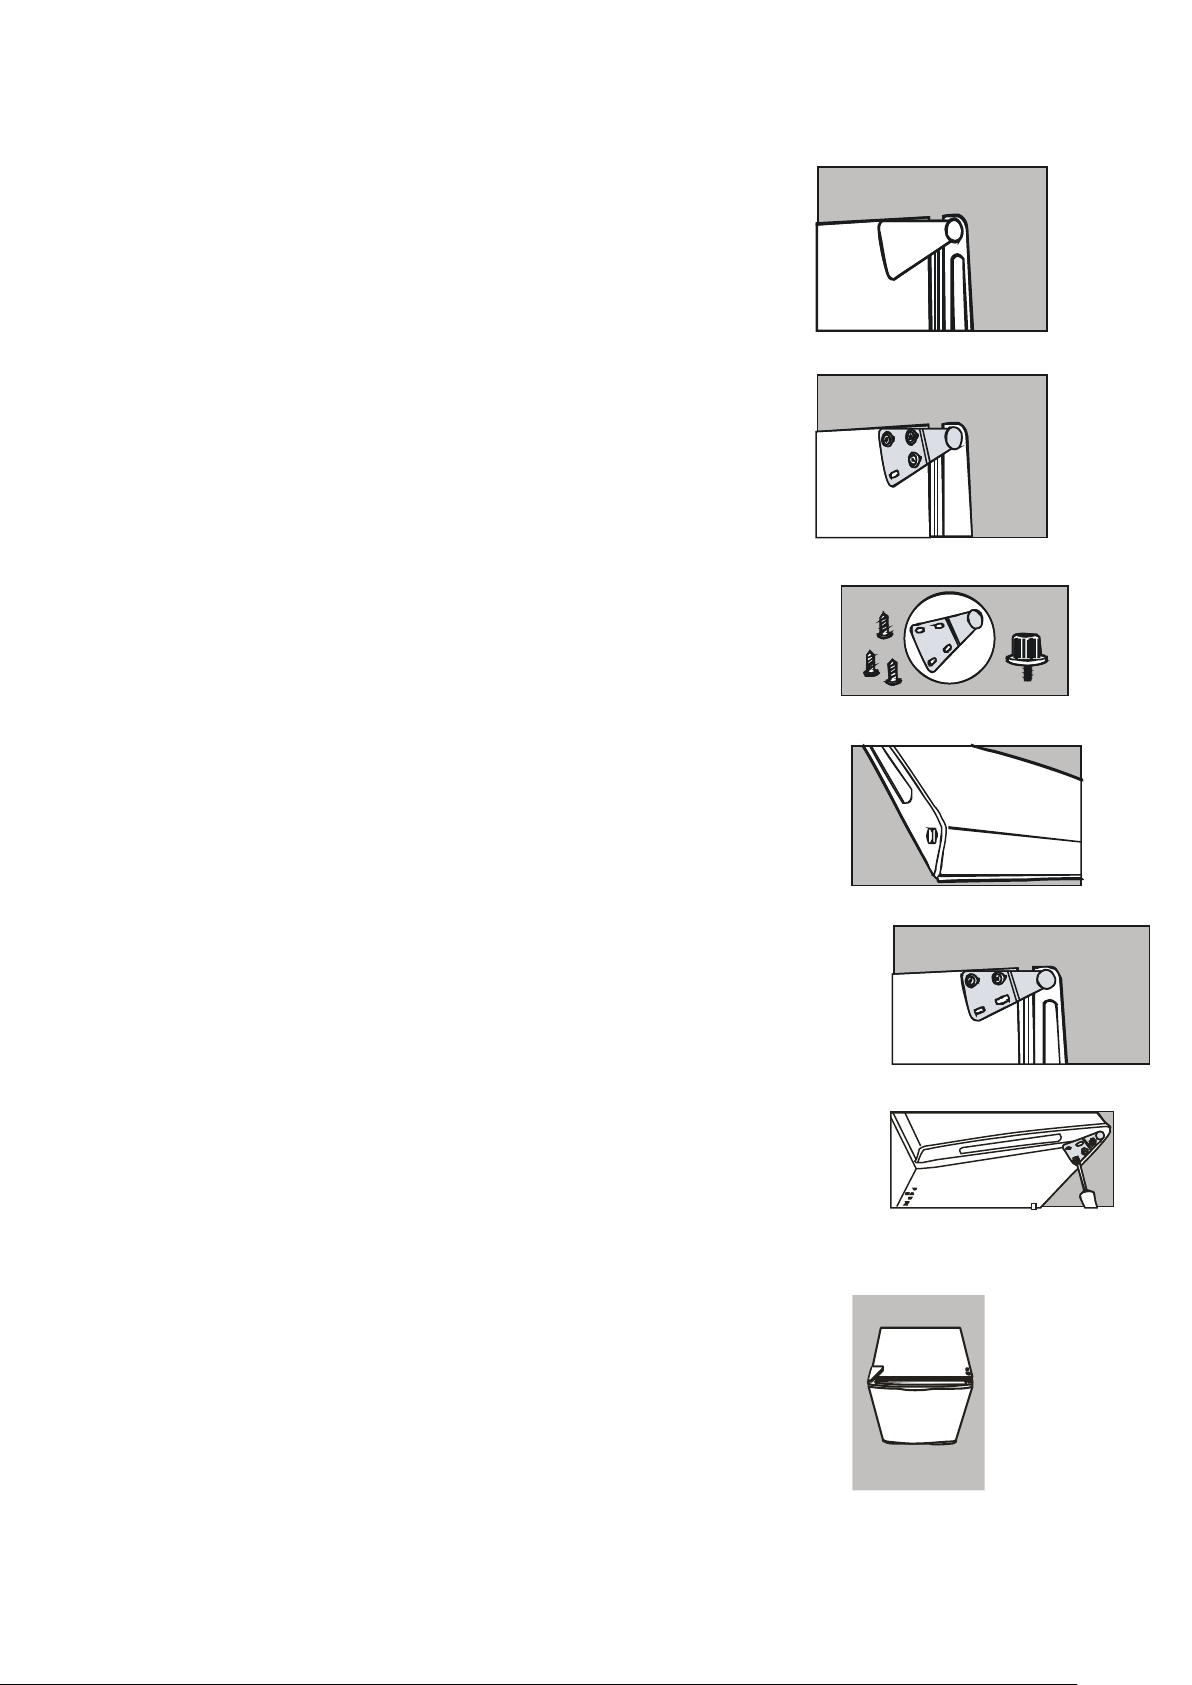
2.2 Reversing the Door Swing
Tools Required: Phillips style screwdriver / Flat bladed screwdriver /
Hexagonal spanner
◆ If you want to have the door swing reversed, we recommend that
you contact a qualified technician. You should only try to reverse the
door yourself if you believe that you are qualified to do so.
◆ Ensure the unit is unplugged and empty.
◆ Adjust the two leveling feet to their highest position.
◆ To take the door of it is necessary to tilt the unit backwards. You
should rest the unit on something solid so that it will not slip during
the door reversing process.
◆ All parts removed must be saved to do the reinstallation of the
door.
◆ Do not lay the unit flat as this may damage the coolant system.
◆ We recommend that 2 people handle the unit during assembly.
4
1) Remove the plastic covering from the top door hinge.
2) Unscrew the three screws from the bottom bracket.
Remove the foot from opposite side.
3) Place to one side.
4) Slide the appliance door down about 15cm and off the
top hinge pin and lift away from the appliance.
5) Remove the two screws from top bracket and replace
on the other side. You will need to first remove the plastic caps
from the other side.
6) Slide the appliance door back on to the Top hinge,
making sure it’s the right way up.
Screw the bottom hinge into place on the new side.
Replace the other foot on the other side. Replace the
plastic covering by clicking back into position on the
door hinge.
7) Check that the door is aligned horizontally and
vertically and that the seals are closed on all sides
before finally tightening the bottom hinge and
the leveling the feet as needed.
5
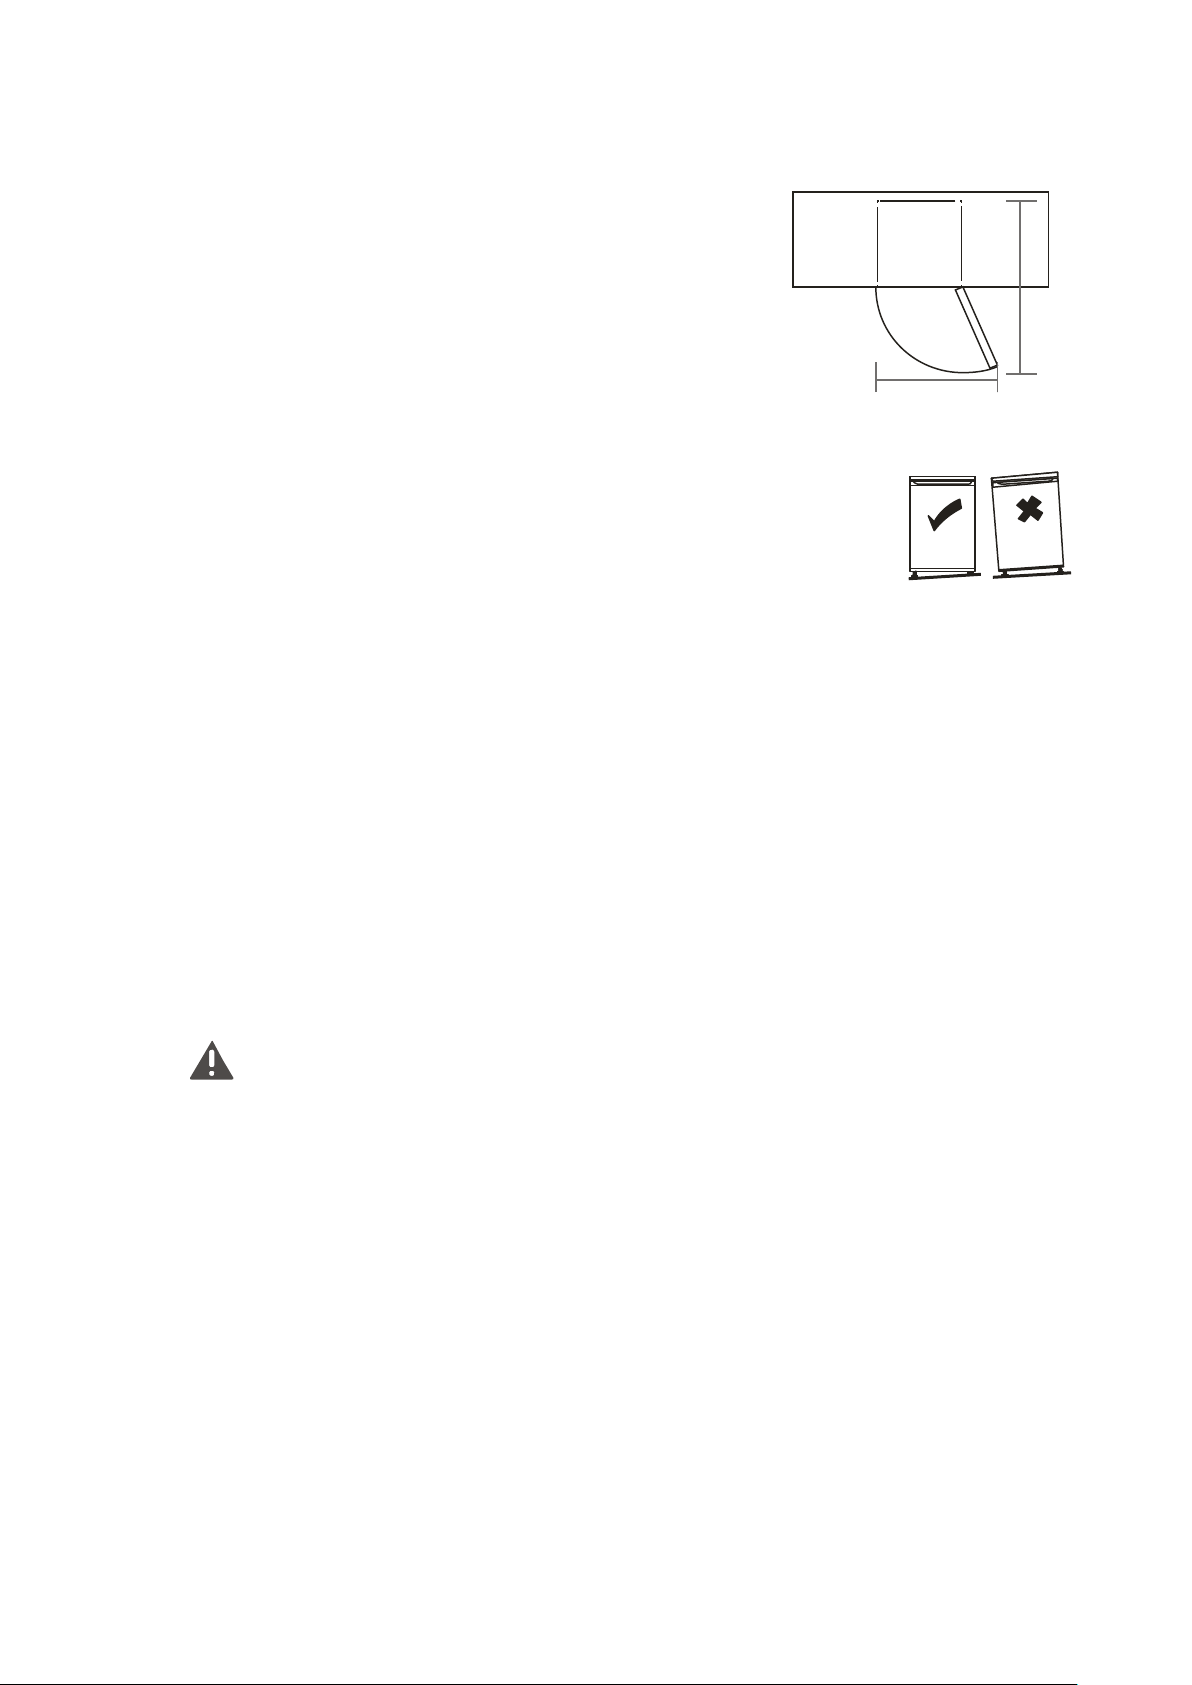
2.3 Door Space Requirements
The unit's door must be able to open fully as shown.
W×D≥880mm×800mm
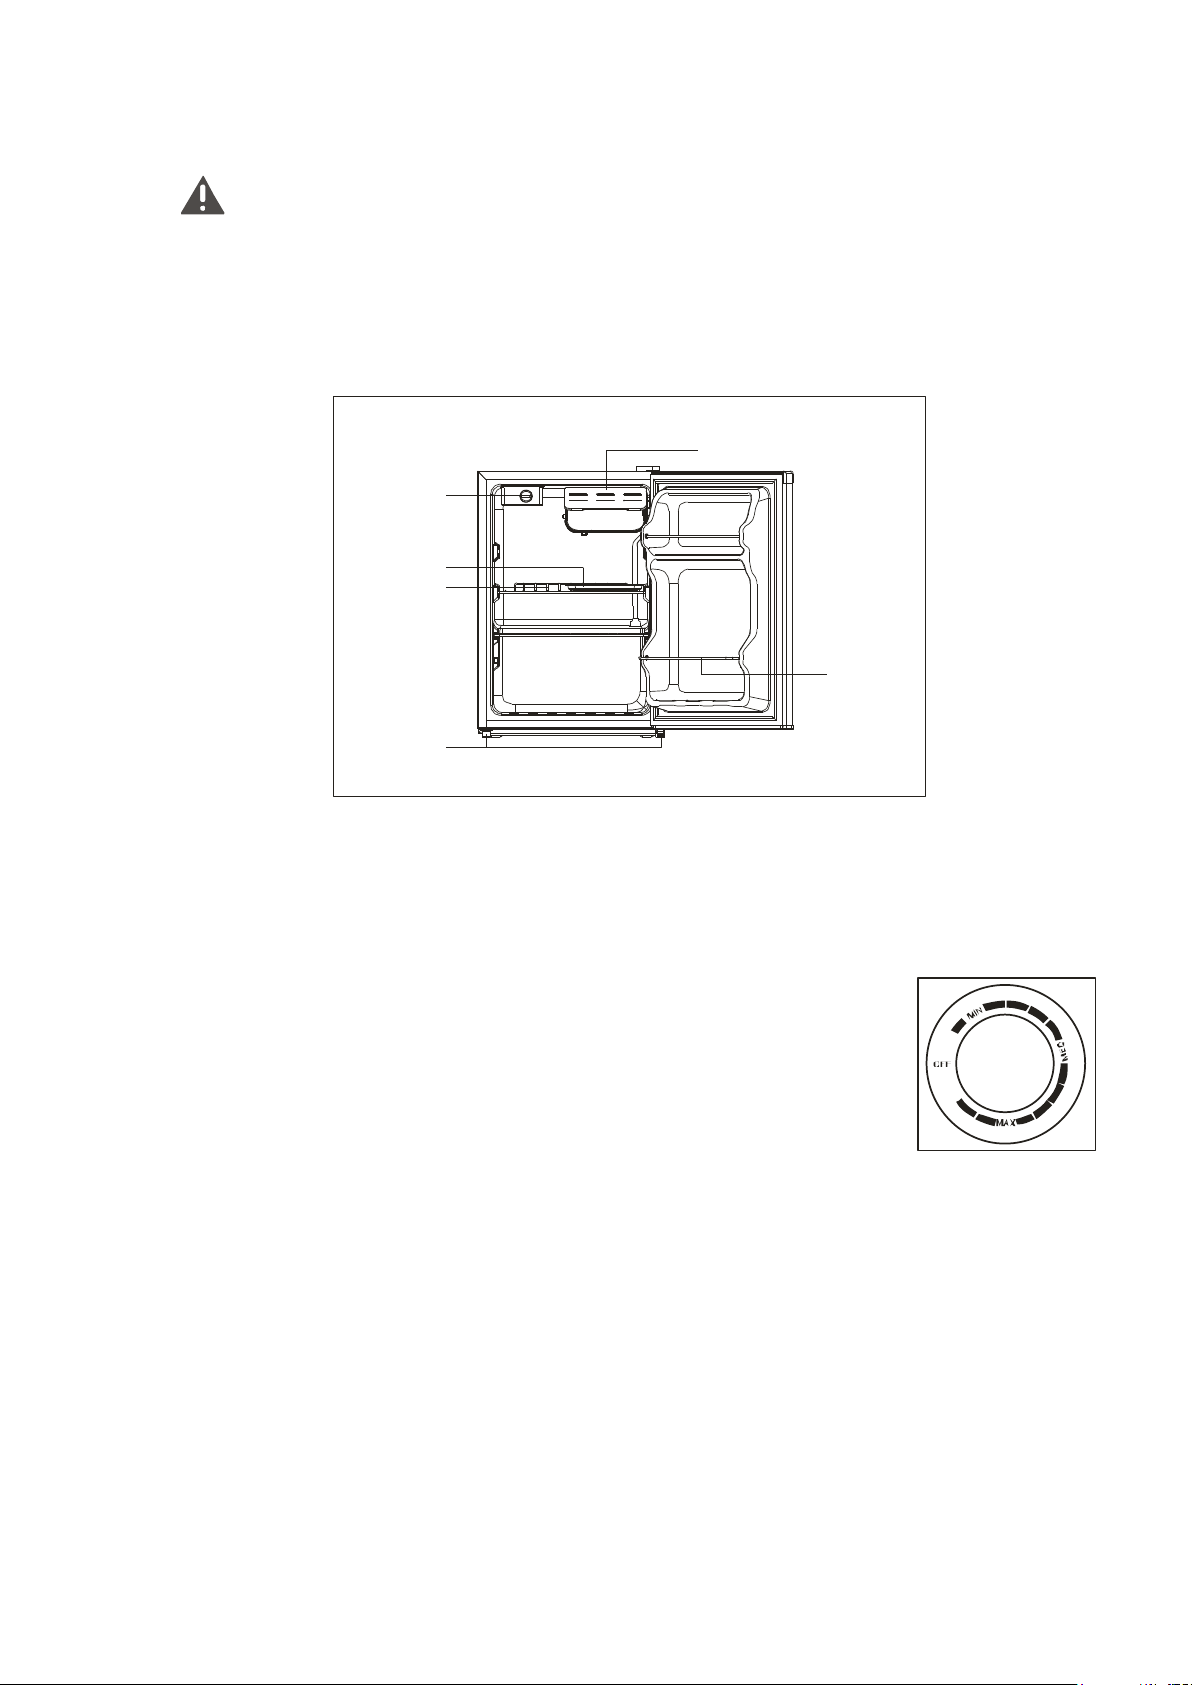
2.4 Leveling the Unit
To do this, adjust the two leveling feet at the front of the unit.
If the unit is not level, the door and magnetic seal alignments
will not be covered properly.
2.5 Cleaning Before Use
Wipe the inside of the unit with a mild solution of bicarbonate soda. Then
rinse with warm water using a soft sponge or cloth. Wash the shelves and
bins in warm soapy water and dry completely before replacing in the unit.
Clean the exterior of the unit with a damp cloth.
If you require more information refer to the Cleaning section.
2.6 Before Using Your Unit
Before placing any food in your unit, turn it on and wait 24 hour, to make
sure it is working properly and to allow it time to fall to the correct
temperature. Your unit should not be overfilled.
◆ Before Plugging in
You must check that you have a socket which is compatible with the
plug supplied with the unit.
◆ Before Turning On!
Do not turn on until two hours after moving the unit. The coolant
fluid needs time to settle.
2.7 Interior Accessories
Various glass or plastic storage shelves are included with your appliance -
different models have different combinations.
You should always slide one of the full size storage shelves into the lowest
set of guides, above the fruit and vegetable containers, and keep it in this
position. To do this, pull the storage shelf forward until it can be swiveled
upwards or downwards and removed.
W
D
6
Please do the same in reverse to insert the shelf at a different height.
In order to make the most of the volume of the fresh food storage
compartment and frozen-food storage compartment, the user can remove
one or more shelves, drawers, out of the appliance, according to your daily
use.
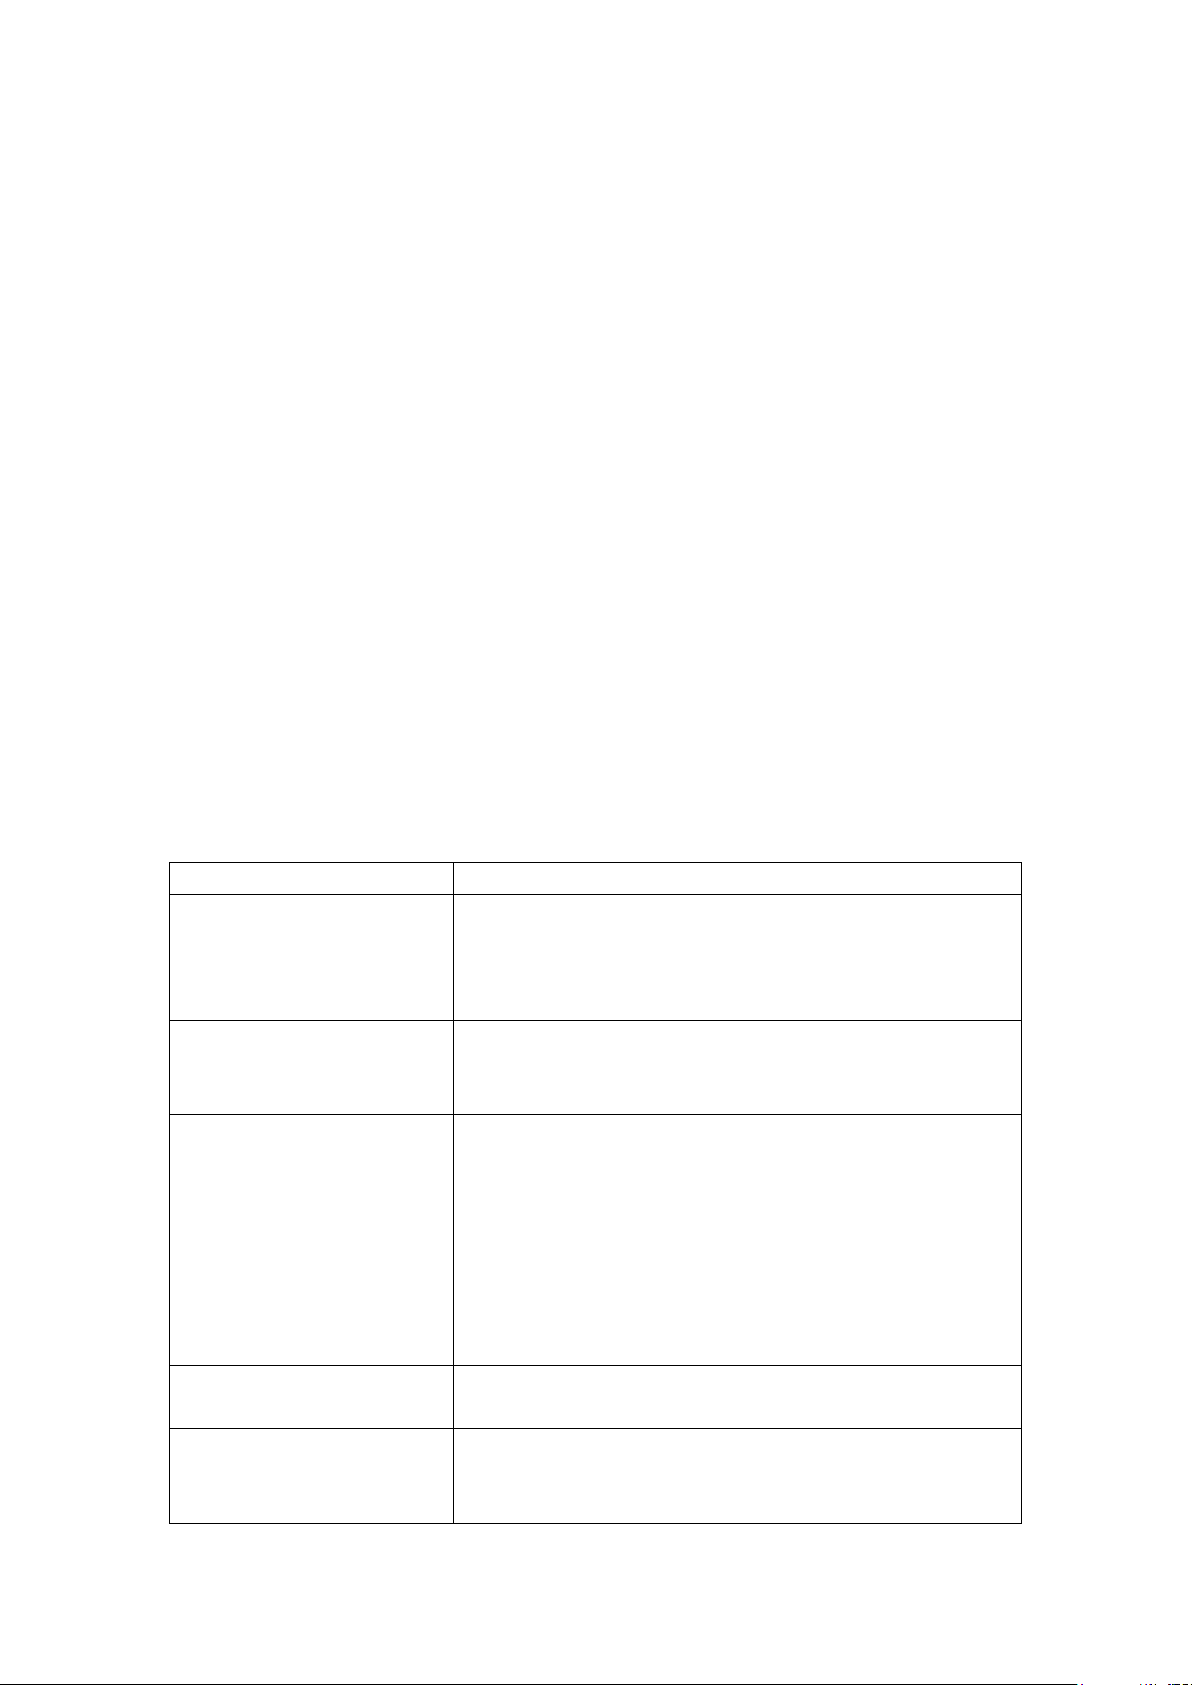
3. PRODUCT OVERVIEW
Small door
Pan drain ,
Steel wire shelf
Leveler leg,
Thermostat
Wire steel bar
*All images in this instructions manual are for information only; please refer
to your individual unit for details.
4. OPERATION
4.1 Adjusting the Temperature
◆ The temperature selector knob is located on the right hand side
wall of the refrigerator interior
Setting “Off”:Unit Off
Setting“Min”:Less Cool Temperature
Setting“Med”:Normal Operation (adequate for most situations)
Setting“Max”:Coolest Temperature
◆ For high environmental temperatures e.g. on hot summer days, it may be
necessary to set the thermostat to the Coolest setting (position “Max”). This
may cause the compressor to run continuously in order to maintain a low
temperature in the cabinet.
◆ The first time you install your refrigerator, set the thermostat knob at
“Med”. Give your refrigerator time to cool down completely before adding
food. It is the best to wait 24 hours before adding food. The thermostat knob
controls the temperature. When the thermostat control knob is set to OFF,
the refrigerator will not be running.
4.2 Noise Inside the Unit
You may notice that your unit makes some unusual noises. Most of these are

7
perfectly normal, but you should be aware of them! These noises are caused
by the circulation of the refrigerant liquid in the cooling system. It has
become more pronounced since the introduction of CFC free gases. This is
not a fault and will not affect the performance of your unit. This is the
compressor motor working, as it pumps the refrigerant around the system.
4.3 Tips for Keeping Food in the Unit
◆ Cooked meat/fish should always be stored on a shelf above raw
meat/fish to avoid bacterial transfer. Keep raw meat/fish in a container
large enough to collect their juices and cover it properly. Place the
container on the lowest shelf.
◆ Leave space around your food to allow air to circulate inside the unit.
Ensure all parts of the unit are kept cool.
◆ To prevent transfer of flavors and drying out, pack or cover the food
separately. Fruit and vegetables do not need to be wrapped.
◆ Always let pre-cooked food cool down before putting it in the unit. This
will help to keep the internal temperature of the unit.
◆ To prevent cold air escaping from the unit, try to limit the number of
times you open the door. We recommend that you only open the door
when you need to put food in or take food out.
5. CLEANING
5.1 Defrosting
Frost may accumulate on the inner rear surface of the appliance;
this will automatically defrost during the off cycle of the compressor.
Water is channeled via the drain hole to the collection tray above the
compressor where it will evaporate.
Please ensure the drain hole is checked and cleaned on a regular basis so
water can exit the storage compartment.
5.2 Cleaning the Interior and the Exterior of the Unit
◆ Remove all the shelves and bins. To remove the salad bins, first remove
the lower door shelf.
◆ Wipe the inside of the unit with a mild solution of bicarbonate soda and
then rinse with warm water using a soft sponge or cloth. Wipe completely
dry before replacing the shelves and bins.
◆ Use a damp cloth to clean the exterior, and then wipe with a standard
furniture cleaner. Make sure that the door is closed to avoid the cleaner
getting on the magnetic door seal or inside the unit.
◆ The grill of the condenser at the back of the unit and the adjacent
components can be vacuumed using a soft brush attachment.
5.3 Cleaning Tips
Condensation may appear on the outside of the unit. This may be due to a
change in room temperature. Wipe off any moisture residue. If the problem
continues, please contact a qualified technician for assistance.
8
6. MAINTENANCE
6.1 Changing the Internal Light
Lamp replacement must be done by professionals.
6.2 Care When Handling / Moving Your Unit
Hold the unit around its sides or base when moving it. Under no
circumstances should it be lifted by holding the edges of the top surface.
6.3 Servicing
The unit should be serviced by authorized and qualified personnel and only
genuine spare parts should be used. Under no circumstances should you
attempt to repair the unit yourself. Repairs carried out by inexperienced
persons may cause injury or serious malfunction. Contact a qualified
technician.
6.4 Switching Off for Long Periods of Time
When the unit is not going to be used for a long period of time, disconnect it
from the mains supply, empty all food and clean the appliance, leaving the
door ajar to prevent unpleasant smells.
7. Troubleshooting
The following simple issues can be handled by the user. Please call the
after-sale service department if the issues are not solved.
Problem
What to Check
Appliance does not
work
Whether the refrigerator is plugged and
connected to power;
Low voltage;
Power failure or tripping circuit
Odor
Smelly foods should be carefully wrapped;
Whether foods are spoiled;
Whether the interior has to be cleaned.
Long-term operation of
compressor
It is normal that the refrigerator compressor
operates for longer periods of time during the
summer when the environment temperature is
higher;
Do not put too much food in the refrigerator at one
time;
Do not put foods until they are cooled down;
Frequent opening of refrigerator door.
Light does not turn on
Whether the refrigerator is connected to power,
Whether the light bulb is damaged.
The refrigerator door
cannot be properly
closed
The freezer door is stuck by food packages;
Too much food;
Tilted refrigerator.

9
Loud noises
Whether the food is leveled, whether the
refrigerator is balanced;
Whether the refrigerator parts are properly
placed.
7.1 Warm tips:
◆ The refrigerator enclosure may release heat during operation especially
during the summer; this is caused by radiation of the condenser, and it is a
normal phenomenon.
◆ Condensation: condensation phenomenon will be detected on the exterior
surface and door seals of the refrigerator when the environmental humidity
is high; this is a normal phenomenon and the condensation can be wiped
away with a dry towel.
◆ Buzz: A buzz will be generated by the running compressor specially when
starting up or shutting down.
8. TIPS FOR ENERGY SAVING
Try not to open the door too often, especially when the weather is wet and
hot. Once you open the door, close it as soon as possible.
Every now and then check if the appliance is adequately ventilated
(adequate air circulation behind the appliance).
In normal temperature conditions, please arrange the thermostat at the
middle setting.
Before loading the appliance with packages of fresh food, make sure they
are cooled to environment temperature.
Ice and frost layer increase energy consumption, so clean the appliance as
soon as the layer is 3-5 mm thick.
The outer condenser and the rear wall should be always clean free of dust or
any impurities.
Always consider the instructions stated in the “Positioning and Energy
Saving Tips” sections; otherwise the energy consumption might be
substantially higher.
◆ The appliance should be located in the coolest area of the room, away
from heat producing appliances or heating ducts, and out of the direct
sunlight.
◆ Let hot foods cool to room temperature before placing them in the
appliance. Overloading the appliance forces the compressor to run longer.
Foods that freeze too slowly may lose quality or spoil.
◆ Be sure to wrap foods properly, and wipe containers dry before placing
them in the appliance. This cuts down on frost build-up inside the
appliance.
◆ Appliance storage bin should not be lined with aluminum foil, wax paper,
or paper toweling. Liners interfere with cold air circulation, making the
appliance less efficient.

10
◆ Organize and label foods to reduce door openings and extended
searches. Remove as many items as needed at one time, and close the
door as soon as possible.
9. DISPOSAL
Old units still have some residual value. An environmentally friendly method
of disposal will ensure that valuable raw materials can be recovered and
used again. The refrigerant used in your unit and insulation materials
require special disposal procedures. Ensure that none of the pipes on the
back of the unit are damaged prior to disposal. Up to date information
concerning options of disposing of your old unit and packaging from the new
one can be obtained from your local council office.
When disposing of an old unit, break off any old locks or latches and remove
the door as a safeguard.
Correct Disposal of this product
Correct Disposal of this product
This marking indicates that this product should not be disposed with
other household waste throughout the EU. To prevent possible harm
to the environment or human health from uncontrolled waste
disposal, recycle it responsibly to promote the sustainable reuse of
material resources. To return your used device, please use the return
and collection systems or contact the retailer where the product was
purchased. They can take this product for environmental safe
recycling.
For more information, please contact the local authority or the retailer where
you purchased the product.

11
Contenido
1. ADVERTENCIAS DE SEGURIDAD .................................................................... 12
2. INSTALACION ......................................................................................................... 13
2.1 Ubicación............................................................................................................... 13
2.2 Invirtiendo la Apertura de la Puerta........................................................... 13
2.3 Requerimientos de Espacio de la Puerta .................................................. 15
2.4 Nivelando la Unidad .......................................................................................... 15
2.5 Limpie antes de Usar ....................................................................................... 15
2.6 Antes de usar la Unidad .................................................................................. 15
2.7 Accesorios Interiores ........................................................................................ 16
3. VISTA GENERAL DEL PRODUCTO ................................................................... 16
4. OPERACION ............................................................................................................. 16
4.1 Ajustando la Temperatura ............................................................................. 16
4.2 Ruido en el interior de la unidad ................................................................. 17
4.3 Recomendaciones para conservar alimentos en la unidad ............... 17
5. LIMPIEZA .................................................................................................................. 18
5.1 Descongelando la escarcha ........................................................................... 18
5.2 Limpiando el Interior y el Exterior de la unidad .................................... 18
5.3 Recomendaciones de Limpieza .................................................................... 18
6. MANTENIMIENTO .................................................................................................. 18
6.1 Cambiando la bombilla interna .................................................................... 18
6.2 Cuidado al mover la unidad ........................................................................... 18
6.3 Servicio .................................................................................................................. 18
6.4 Apagando por periodos largos de tiempo ................................................ 18
7. Resolución de Problemas ................................................................................... 19
7.1 Recomendaciones de temperatura: ........................................................... 19
8. RECOMENDACIONES PARA EL AHORRO DE ENERGIA ........................... 20
9. ELIMINACION ......................................................................................................... 20

12
1. ADVERTENCIAS DE SEGURIDAD
Cuidado: riesgo de fuego
1) ADVERTENCIA― Mantenga las aberturas de ventilación del equipo
libres de obstrucción.
2) ADVERTENCIA― No utilice dispositivos mecánicos u otros medios
diferentes a los recomendados por el fabricante para acelerar el proceso de
descongelación.
3) ADVERTENCIA― Tenga cuidado de no dañar el circuito refrigerante.
4) ADVERTENCIA― No utilice aparatos eléctricos dentro de los
compartimientos de almacenamiento de alimentos del equipo a menos que
sean del tipo recomendado por el fabricante.
5) ADVERTENCIA― PELIGRO: Riesgo de quedar atrapados para los
niños. Antes de desechar su refrigerador;
• Retire las puertas
• Deje los estantes en su lugar para que los niños no puedan meterse
fácilmente.
6) El equipo tiene que ser desconectado después de su uso y antes de
realizar cualquier mantenimiento en el dispositivo.
7) Este aparato puede ser utilizado por niños mayores de 8 años y personas
con capacidades físicas, sensoriales o mentales reducidas o sin experiencia
y conocimiento si han tenido supervisión o instrucciones relativas al uso del
equipo de forma segura y entienden los riesgos involucrados. Los niños no
pueden jugar con el equipo. La limpieza y mantenimiento no debe ser
realizada por niños sin supervisión.
8) Si el cable de alimentación está dañado, debe ser reemplazado por el
fabricante, su representante de servicio técnico o personas similarmente
calificadas para evitar cualquier riesgo.
9) Por favor deseche el refrigerador según las regulaciones locales para
equipos que usan gas inflamable y refrigerante.
10) Siga las regulaciones locales sobre eliminación de equipos que usan
refrigerante y gas inflamable. Antes de desechar el aparato, por favor, retire
las puertas para evitar la posibilidad de que los niños queden atrapados.
11) Este aparato está diseñado para ser utilizado en ambientes domésticos
y similares como:
– Áreas de cocina en tiendas, oficinas y otros entornos laborales;
– Granjas y por clientes en hoteles, moteles y otros ambientes de tipo
residencial;
– Entornos de tipo bed and breakfast;
– Aplicaciones no comerciales de restauración y similares.
12) No almacene sustancias explosivas como latas de aerosol con un
propulsor inflamable en este aparato.

13
ES PELIGROSO REALIZAR MANTENIMIENTO O REPARACIONES
QUE IMPLICAN LA ELIMINACIÓN DE LAS TAPAS PARA
CUALQUIERA QUE NO SEA PERSONAL DE SERVICIO
AUTORIZADO.
NO INTENTE REPARAR USTED MISMO PARA EVITAR RIESGO DE
UN CHOQUE ELÉCTRICO.
2. INSTALACION
2.1 Ubicación
Cuando seleccione la ubicación para su unidad, debe asegurarse de que el
piso esté plano y firme y la habitación esté bien ventilada con una
temperatura promedio de entre 16
o
C y 38
o
C. Evite colocar la unidad cerca de
fuentes de calor como por ejemplo la cocina, caldera o radiador. También
evite la luz sol directa ya que es posible que esto aumente el consumo
eléctrico. Las temperaturas extremas de un ambiente frío también pueden
causar que la unidad no funcione correctamente. Esta unidad no está
diseñada para ser usada en un garaje o una instalación al aire libre. No cubra
la unidad con ningun revestimiento. Al instalar la unidad, deje 40 cm(15.7
inch) de espacio libre a cada lado, 15 cm(5.9 inch) en la parte trasera y 20
cm(7.9 inch) en la parte superior de la unidad. Esto permitirá que el aire frío
circule alrededor del refrigerador y mejorara la eficiencia del proceso de
enfriamiento. La puerta se puede abrir hacia la derecha o la izquierda,
dependiendo de lo que mejor adapte a su situación. Asegúrese de que haya
suficiente espacio para que la puerta abra completamente.
2.2 Invirtiendo la Apertura de la Puerta
Herramientas Requeridas: Destornillador tipo Phillips / Destornillador
plano / Llave hexagonal
◆ Si desea que la puerta del refrigerador abra hacia el otro lado, le
recomendamos que contacte un técnico calificado. Sólo invierta la puerta
usted mismo si usted cree que está calificado para hacerlo.
◆ Asegúrese de que la unidad esté desconectada y vacía.
◆ Ajuste las dos patas niveladoras en su posición más alta.
◆ Para invertir la puerta es necesario que incline el refrigerador hacia atrás.
La unidad debería descansar sobre algo sólido para que no resbale
durante el proceso de inversión de la puerta.

14
◆ Todas las piezas desmontadas deben guardarse para hacer la
reinstalación de la puerta.
◆ No coloque la unidad horizontalmente ya que esto podría dañar el sistema
de enfriamiento.
◆ Se recomienda que dos personas manipulen la unidad durante el
montaje.
1) Retire la cubierta de plástico de la bisagra superior
de la puerta.
2) Afloje los tres tornillos de la arandela inferior.
Quite el pie del lado opuesto.
3) Coloque a un lado.
4) Deslice la puerta hacia abajo unos 15cm y levante
el pasador de la bisagra superior lejos del aparato.
5) Retire los dos tornillos del soporte superior y vuelva a
colocarlos en el otro lado. Usted necesitará primero
retirar las tapas plásticas del otro lado.
6) Deslice la puerta en la bisagra superior del otro lado,
asegurándose de colocarla correctamente.
Atornille la bisagra inferior en su lugar en el lado nuevo.
Vuelva a colocar el otro pie en el otro lado. Vuelva a
colocar la cubierta plastica hasta que haga clic en su lugar
en la bisagra de la puerta.

15
7) Compruebe que la puerta esté alineada horizontalmente
y verticalmente y que los sellos están cerrados por todos
lados antes de finalmente apretar la bisagra inferior y
nivelar los pies como sea necesario.
2.3 Requerimientos de Espacio de la Puerta
La puerta de la unidad debe ser capaz de abrir
completamente como se muestra.
W×D≥880mm×800mm
2.4 Nivelando la Unidad
Para nivelar la unidad, ajuste las dos patas de nivelación
en la parte delantera de la unidad. Si la unidad no está
nivelada, la puerta y el sello magnético no estarán
alineadas y cubiertas correctamente.
2.5 Limpie antes de Usar
Limpie el interior de la unidad con una solución suave de bicarbonato. Luego
enjuague con agua tibia y una esponja suave o un paño. Lave los estantes y
contenedores con agua jabonosa tibia y seque completamente antes de
reemplazar en la unidad. Limpie el exterior de la unidad con un paño
húmedo. Si usted requiere más información, consulte la sección Limpieza.
2.6 Antes de usar la Unidad
Antes de colocar los alimentos en su unidad, enciendala y espere 24 horas,
para asegurarse de que está funcionando correctamente y para permitir que
llegue a la temperatura correcta. La unidad no debe ser sobrecargada de
alimentos.
◆ Antes de Enchufar
Usted debe verificar que usted tiene un enchufe compatible con el enchufe
W
D

16
suministrado con la unidad.
◆ Antes de Encender!
No encienda hasta dos horas después de mover la unidad. El líquido
refrigerante necesita tiempo para asentarse.
2.7 Accesorios Interiores
Su electrodomestico incluye varios estantes plasticos o de vidrio para
almacenamiento - diferentes modelos tienen diferentes combinaciones.
Deslice siempre uno de los estantes de almacenamiento de tamaño
completo en las guías mas bajas, directamente encima de la gaveta o
contenedor para frutas y verduras y manténgalo en
esta posición. Para
hacer esto, hale el estante de almacenamiento hacia adelante hasta que se
pueda girar hacia arriba o hacia abajo y sacarlo. Haga lo mismo en sentido
contrario para colocar el estante a una altura diferente.
Con el fin de aprovechar al máximo el volumen del compartimiento
de almacenamiento de alimentos frescos y el compartimiento de
almacenamiento de alimentos congelados, el usuario puede eliminar uno o
más estantes o cajones, del aparato, según su uso diario.
2. VISTA GENERAL DEL PRODUCTO
Puerta pequeña
Drenaje
Estante de
rejilla en acero
Nivelador, patas
Termostato
Barra de acero
* Todas las imágenes en este manual de instrucciones son a título
informativo; por favor, consulte a su unidad individual para más detalles.
4. OPERACION
4.1 Ajustando la Temperatura
◆ El selector de temperatura está situado en la pared lateral
derecha del interior del refrigerador

17
Posición “Off”:Unidad apagada
Posición “Min”:Temperatura menos fría
Posición “Med”: Operación Normal (adecuada a casi todas las ocasiones)
Posición “Max”:Temperatura mas fría
◆Para altas temperaturas ambientales, por ejemplo en días calurosos de
verano, puede ser necesario ajustar el termostato a la posición más fría
(posición "Max"). Esto puede causar que el compresor funcione
continuamente para mantener una temperatura baja en el interior del
gabinete.
◆ La primera vez que instala su refrigerador, ajuste la perilla del termostato
en "Med". Permita que el refrigerador enfríe completamente antes de
colocar alimentos. Se recomienda esperar 24 horas antes de colocar los
alimentos. El termostato controla la temperatura. Cuando la perilla del
termostato está colocada en posicion OFF, el refrigerador esta apagado.
4.2 Ruido en el interior de la unidad
Usted puede notar que su unidad hace unos ruidos extraños. La mayoría de
estos ruidos es perfectamente normal, pero usted debe estar consciente de
ellos. Estos ruidos son causados por la circulación del líquido refrigerante en
el sistema de enfriamiento. Esto se ha hecho más pronunciado desde la
introducción de gases libres de CFC. Esto no es una falla y no afectará el
rendimiento de su unidad. Este es el funcionamiento del motor del
compresor, que bombea el refrigerante en el sistema.
4.3 Recomendaciones para conservar alimentos en la unidad
◆ La carne/pescado cocidos siempre deben almacenarse en un estante por
encima de la carne/pescado crudos para evitar la transferencia de
bacterias. Guarde la carne/pescado crudos en un recipiente lo
suficientemente grande como para recoger sus jugos y cubralos
completamente. Coloque el recipiente en el estante más bajo.
◆ Deje espacio alrededor de la comida para permitir que el aire circule
dentro de la unidad. Asegúrese de que todas las partes de la unidad se
mantienen frescas.
◆ Para evitar la transferencia de sabores y que se sequen sus alimentos,
empaque o cubra los alimentos por separado. Las frutas y verduras no
necesitan ser envueltas.
◆ Siempre permita que los alimentos cocinados se enfrien bien antes de
colocarlos en la unidad. Esto ayudará a mantener la temperatura interna
de la unidad.
◆ Para evitar que el aire frío aire escape de la unidad, trate de limitar el
número de veces que se abre la puerta. Le recomendamos que sólo abra
la puerta cuando necesite colocar o retirar comida del refrigerador.

18
5. LIMPIEZA
5.1 Descongelando la escarcha
Se puede acumular escarcha en la superficie interna de la parte posterior del
aparato; Esta escarcha se descongela automáticamente durante el ciclo de
apagado del compresor.
El agua es canalizada a través del orificio de desagüe a la bandeja de
recogida sobre el compresor donde se evaporará.
Asegúrese de que el orificio de drenaje se revisa y se limpia regularmente
para evitar que el agua se acumule y llegue al compartimiento de
almacenaje.
5.2 Limpiando el Interior y el Exterior de la unidad
◆ Retire todos los estantes y recipientes. Para retirar los recipientes de
vegetales, primero retire el estante inferior de la puerta.
◆ Limpie el interior de la unidad con una solución suave de bicarbonato y
luego enjuague con agua tibia y una esponja o un paño suave. Seque
completamente antes de colocar los estantes y recipientes de nuevo.
◆ Utilice un paño húmedo para limpiar el exterior y luego limpie con un
limpiador estándar para muebles. Asegúrese de que la puerta esté
cerrada para evitar que el limpiador entre en el sello magnético de la
puerta o dentro de la unidad.
◆ La parrilla del condensador en la parte posterior de la unidad y los
componentes adyacentes pueden ser aspirados usando un cepillo suave.
5.3 Recomendaciones de Limpieza
Puede aparecer condensación en la parte exterior de la unidad. Esto puede
deberse a un cambio en la temperatura de la habitación. Limpie cualquier
residuo de humedad. Si el problema persiste, póngase en contacto con un
técnico calificado para asistencia.
6. MANTENIMIENTO
6.1 Cambiando la bombilla interna
El cambio de la lámpara debe ser realizado por un tecnico especializado.
6.2 Cuidado al mover la unidad
Sujete la unidad por los lados o en la base al moverla. Bajo ninguna
circunstancia la levante sujetandola por los bordes de la superficie superior.
6.3 Servicio
La unidad debe ser reparada por personal autorizado y calificado y deben
utilizarse sólo auténticas piezas de repuesto. Bajo ninguna circunstancia
debe usted intentar reparar la unidad usted mismo. Las reparaciones
realizadas por personas inexpertas pueden causar lesiones o desperfectos
graves. Póngase en contacto con un técnico calificado.
6.4 Apagando por periodos largos de tiempo
Cuando la unidad no vaya a ser utilizada durante un periodo largo de tiempo,
desconéctela de la red de alimentación electrica, retire todos los alimentos,

19
limpie el aparato y deje la puerta entreabierta para evitar olores
desagradables.
7. Resolución de Problemas
Los siguientes problemas simples pueden ser resueltos por el usuario. Por
favor llame al departamento de servicio post-venta si no se resuelven los
problemas.
Problema
Que verificar
Aparato no funciona
Si el refrigerador está enchufado y conectado a la
corriente eléctrica;
Baja corriente electrica;
Falla eléctrica o problema en el circuito.
Olor
Los alimentos malolientes se deben envolver
cuidadosamente;
Si los alimentos estan dañados;
Si se debe limpiar el interior del refrigerador.
El compresor funciona
por largo tiempo
Es normal que el compresor del refrigerador
funcione por períodos más largos de tiempo
durante el verano cuando la temperatura del
ambiente es superior;
No coloque demasiados alimentos en el
refrigerador al mismo tiempo;
No coloque los alimentos en el refrigerador hasta
que se enfrien a temperatura ambiente;
Si se abre la puerta del refrigerador muy
frecuentemente.
La luz no se enciende
Si el refrigerador está conectado a la
alimentación;
Si la bombilla está dañada.
No se puede cerrar bien
la puerta del
refrigerador
Si la puerta del congelador está atascada por
paquetes de alimentos;
Si hay demasiados alimentos;
Si el refrigerador esta inclinado.
Ruidos fuertes
Si los alimentos están nivelados;
Si el refrigerador está balanceado;
Si se colocaron correctamente las partes del
refrigerador.
7.1 Recomendaciones de temperatura:
◆ El cajon del refrigerador puede liberar calor durante la operación,
especialmente durante el verano; Esto es causado por la radiación del
condensador, y es un fenómeno normal.
◆ Condensación: puede aparecer condensación en la superficie exterior y en
los sellos de la puerta del refrigerador cuando la humedad ambiental es alta;

20
Este es un fenómeno normal y la condensación puede secarse con una toalla
seca.
◆ Zumbido: Un zumbido es generado por el compresor cuando esta
funcionando, especialmente al arrancar o apagarse.
8. RECOMENDACIONES PARA EL AHORRO DE ENERGIA
No abra la puerta demasiado a menudo, especialmente cuando el clima es
húmedo y caliente. Una vez que usted abra la puerta, cierrela tan pronto
como sea posible.
Verifique cada cierto tiempo si el aparato está adecuadamente ventilado (la
circulación de aire es la adecuada detrás del aparato).
En condiciones normales de temperatura, por favor coloque el termostato en
la posición media (MED).
Antes de cargar el aparato con paquetes de alimentos frescos, asegúrese de
que se encuentran a temperatura ambiente.
Una capa de hielo y escarcha aumenta el consumo de energía, así que limpie
el aparato tan pronto como la capa llegue a 3-5 mm de espesor.
El condensador externo y la pared posterior deben ser siempre limpios,
libres de polvo e impurezas.
Siempre tenga en cuenta las instrucciones contenidas en las secciones de
"Recomedaciones de posicionamiento y para ahorrar energía"; de lo
contrario el consumo de energía puede ser substancialmente mas alto.
◆ El equipo debe estar ubicado en la zona mas fria de la habitacion, lejos
del aparatos generadores de calor o conductos de calefacción y de la luz
directa del sol.
◆ Deje enfriar los alimentos calientes a temperatura ambiente antes de
colocarlos en el refrigerador. Sobrecargar el aparato puede forzar el
compresor a trabajar de más. Los alimentos que se congelan muy
lentamente pueden perder calidad o estropearse.
◆ Asegúrese de envolver los alimentos adecuadamente y seque los
envases antes de colocarlos en el aparato. Esto reduce la acumulación de
escarcha dentro del aparato.
◆ El compartimiento de almacenaje del aparato no debe ser forrado con
papel de aluminio, papel encerado o toallas de papel. Los forros interfieren
con la circulación de aire frío, afectando negativamente la eficiencia del
equipo.
◆ Organice y etiquete los alimentos para reducir el tiempo de apertura de la
puerta y evitar búsquedas extendidas. Saque todos los elementos que se
necesitan a la vez y cierre la puerta tan pronto como sea posible.
9. ELIMINACION
Las unidades viejas todavía tienen algún valor residual. Un método

21
ecológico de eliminación asegurará que valiosas materias primas puedan ser
recuperadas y reutilizadas. El refrigerante y los materiales aislamiento
usados en su unidad requieren procedimientos especiales de eliminación.
Asegúrese de que ninguno de los tubos en la parte posterior de la unidad
está dañado antes de la eliminación. Busque información actualizada sobre
las opciones para deshacerse de su unidad antigua y del material de
emapque de la nueva en la oficina del consejo local. Al deshacerse de una
unidad vieja, retire las cerraduras y la puerta para evitar accidentes.
Eliminación correcta de este producto
Correcta eliminación de este producto que esta marca indica que este
producto no debe desecharse con otros residuos domésticos en toda
la UE. Para evitar posibles daños al medio ambiente o la salud
humana eliminación incontrolada de residuos, recíclelo
correctamente para promover la reutilización sostenible de recursos
materiales. Para devolver el dispositivo usado, por favor utilice los
sistemas de recogida y devolución o póngase en contacto con el
distribuidor donde compró el producto. Ellos pueden llevarse este
producto para reciclaje seguro ambiental.
Para obtener más información, póngase en contacto con la autoridad local o
con el distribuidor donde adquirió el producto.