'S L
i i_ ¸
MODELS, LB8OOOER ,LW8OOOER
FOR YOUR RECORDS
Wr_e the m,od_ and _ria] nur_rs here:
Mode| #
_rial #
You can find them on a label on the side of each unit.
_aler's Name
Date Purc_sed
[] Stap,_eyou_ |eceipt to this pa_ i_°_the e_e_t you need
it to prove date of purcha_ or for waffan|y issue.
READ THIS MANUAL
_nside 'you wilJ fir_ many helipfui hints on how to use
and maintain your air coi_t_oi_r Ip,rof_r[y. Just a Ifflie
preventive care on your part can save you a great dea_
of tim and money over the lile of your air oo,nditioner,
You'H find many answers to common prob]e_ in the
cha_ of troub,lest_ling tips. if you review our chart ,of
Troub_esh_tJng Tips first, you may not need to calil
for _rv_e at al_
• Contact the a_hori_d _vice technician _or repair o_
_|nt_,an_ .ofth|s unit,
.,Contact the insta|_r for instal_tion of this unit.
•_e al_ cond|tio.ner is not in|enid for u_ by young
chi_ren or invalids w_hout su_rv_m
=Young children should be su_rvi_d to ensure that
t_y _ _ot p|ay with the _i_ conditioner,
•When t_ power cord is to. i_ replaY, replacement
wo_ sh_ll _ _rfot_ by _thorized petsonne_ on_
_ng only _nuir_, mp,la_ part_
•_ns_l_tion work mu_ _ perto_d in accordance with
•e Na|io_l El_ric C:o_ b,y qua|it,d _d _hori_
_onne_ o_|yo
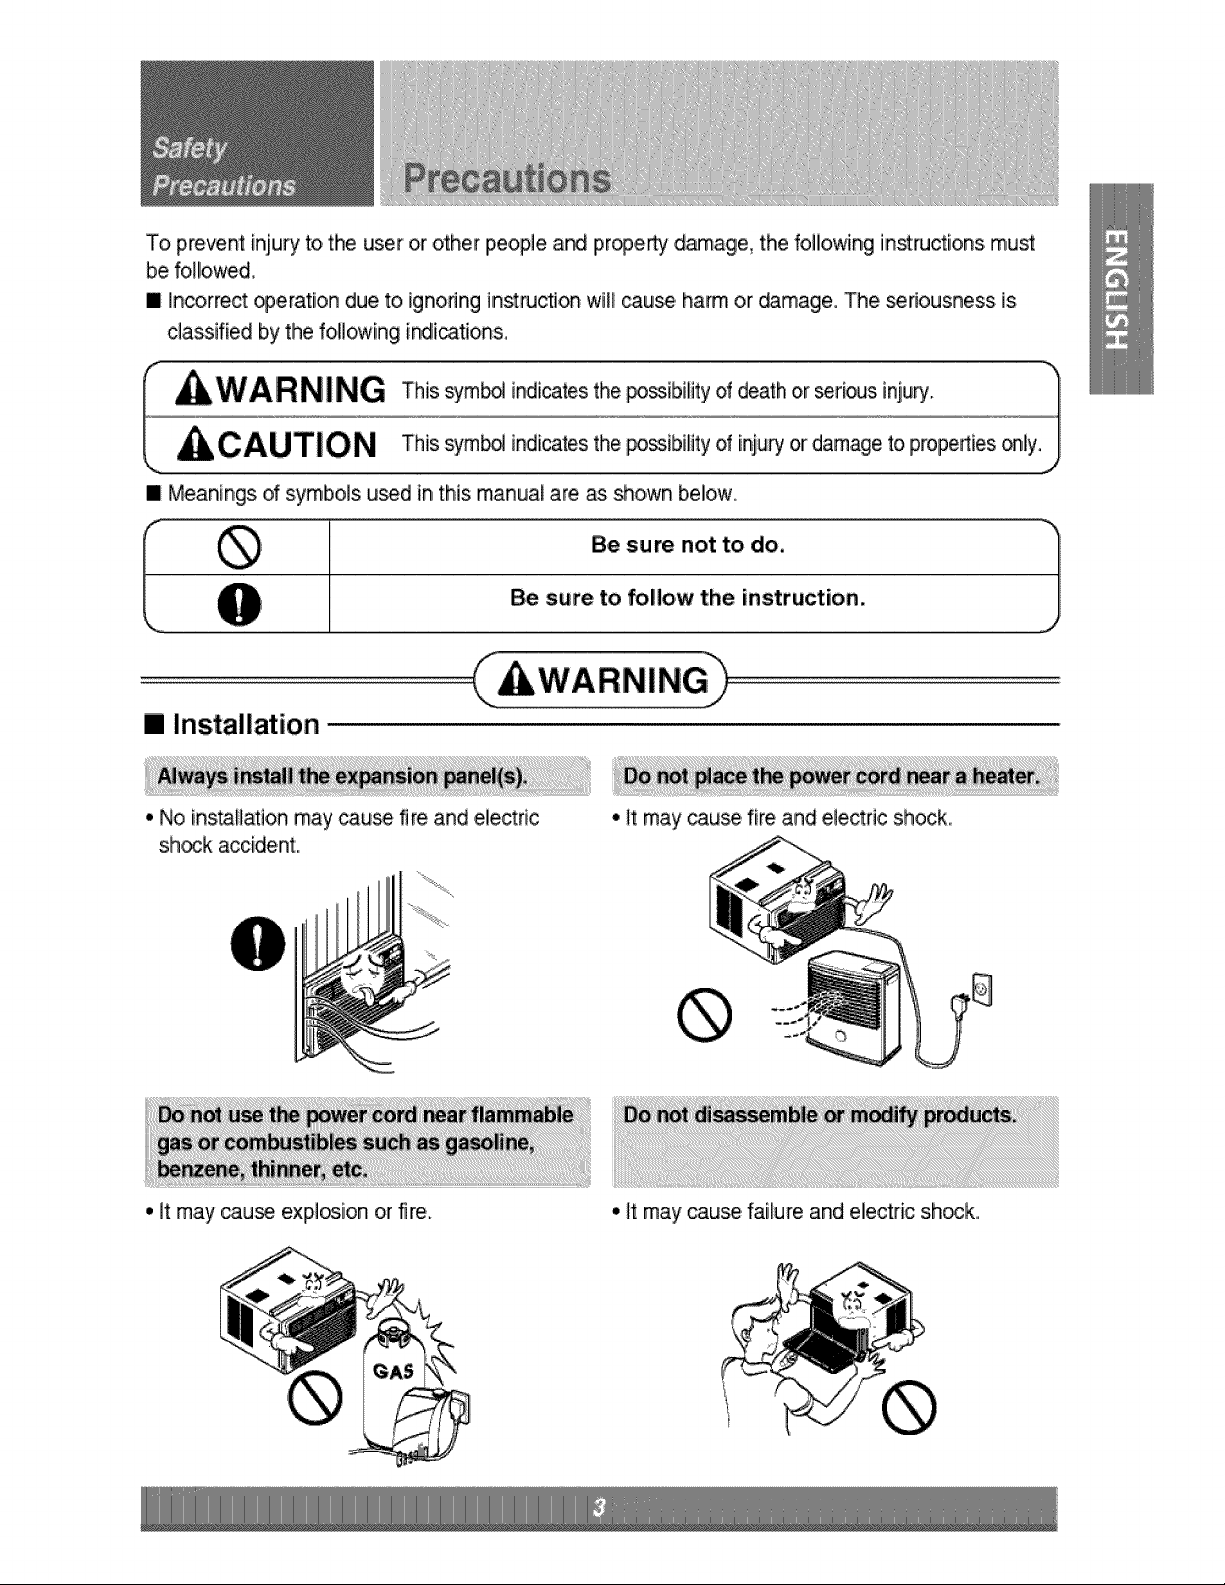
To prevent iniu _ to tihe user or other people ar_ pr_erty damage, the following inst_ctions, must
be fo,l!owe&
i incorrect c_,erati,on due to ignoring instruction wi_ cause harm or _mage. The senousness, is,
classified by the fo!lowing i_iications,
[] Meanings dsymbols u_d in this manual are, as shown below.
I ..o oot,ooo. rl!
Be sure to follow' the instruction.,
[] Installation
° No installation may cause fire and electric
sh_k accident:,
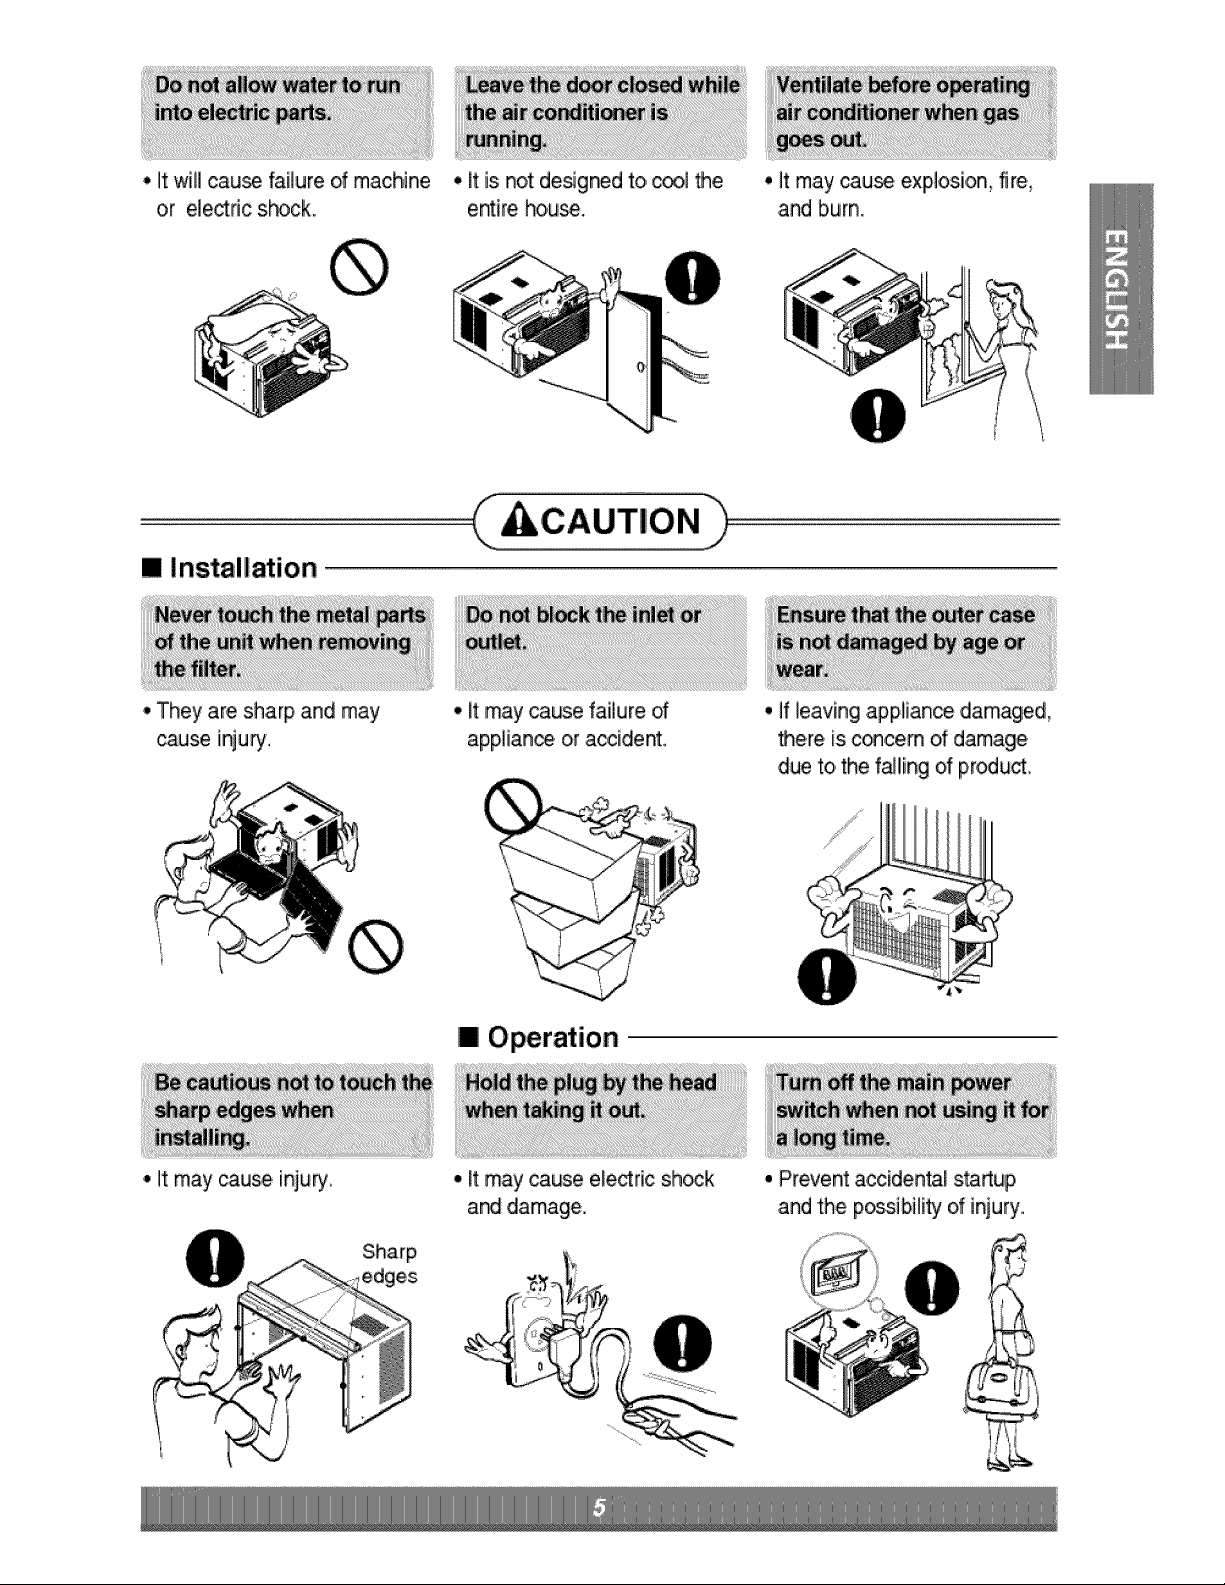
• _t may cau_ fire and electric shock
° It may _u_ expl_,ion or fire, • it may cau_, failure and electric s,h_k,.
mOperation
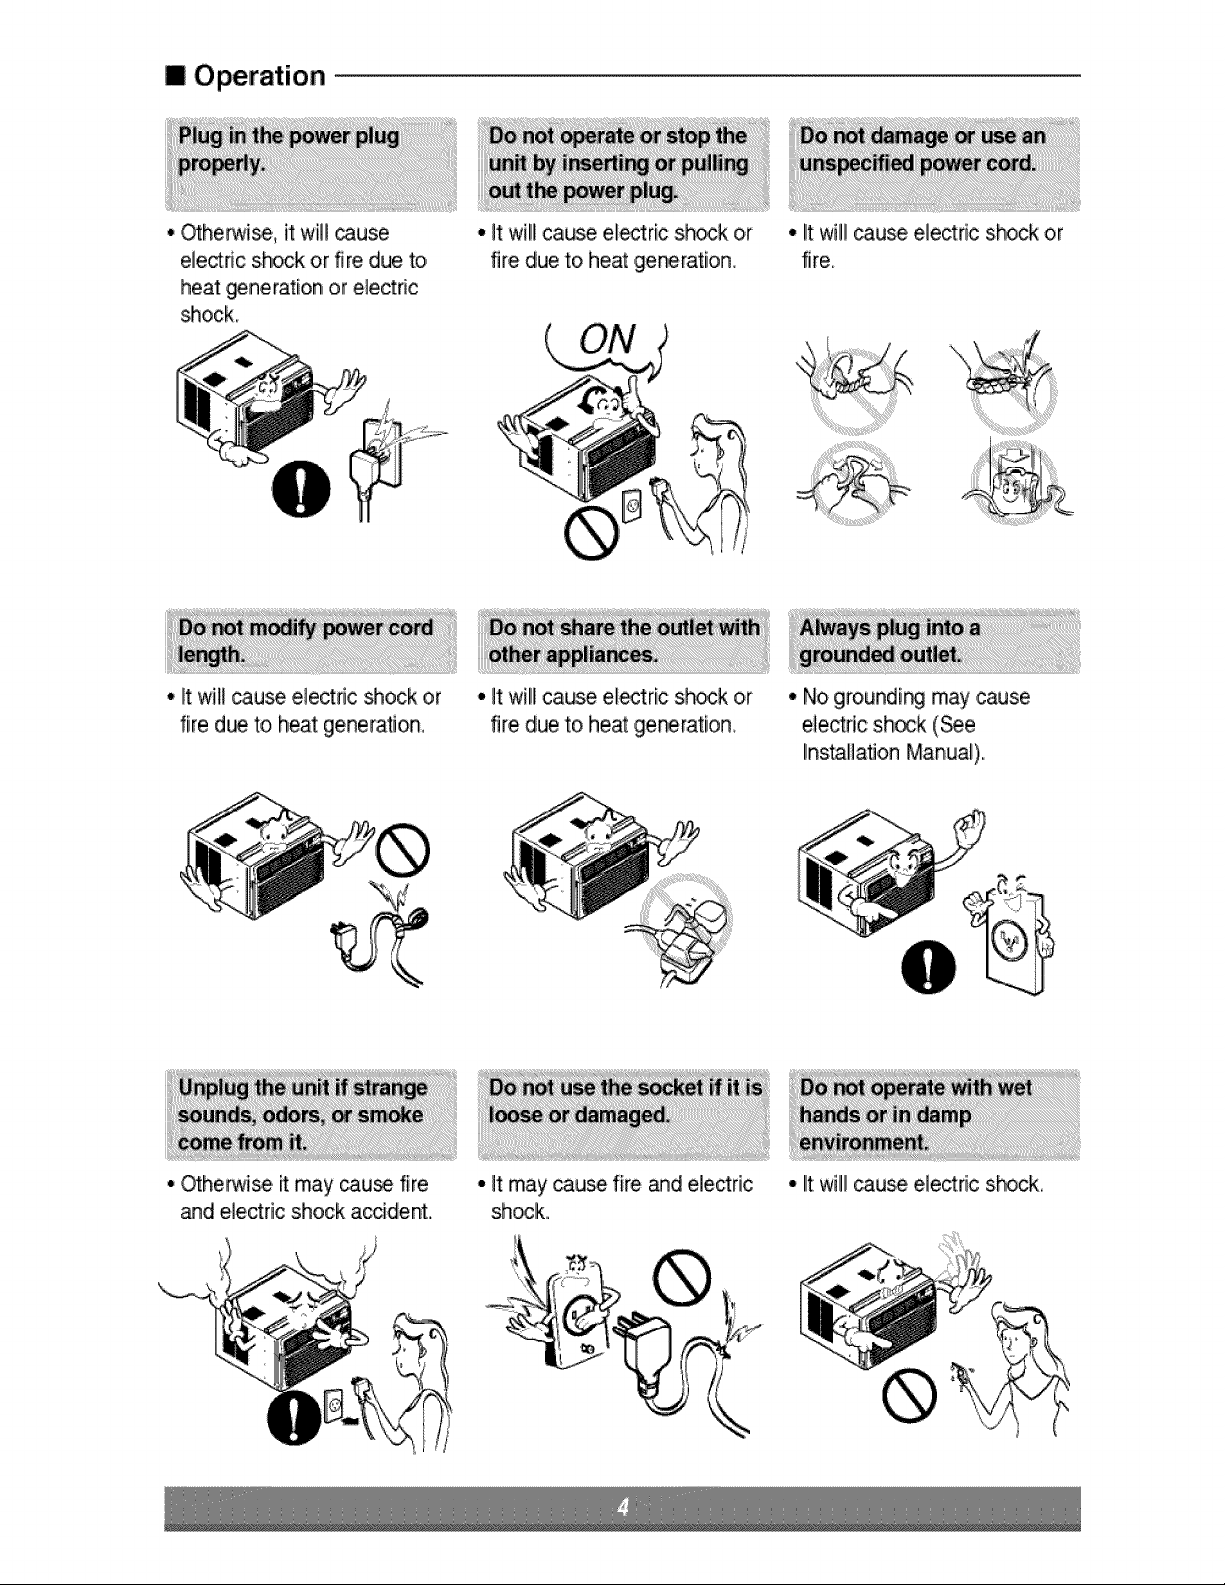
° _herwi_, it wi]] muse
ele_fic s.hock or fire due to,
heat _nerat[,on or electric
_ock
• It will cause electdc shock or
fire due to heat generation,
° Otherwise [t may cau_ fire
_d e]e_ric shock a_ident,.
• It wil!lcause citric shock or
fire due to heat ,germrat[on.
• It will cause e!_ric shock or
fire due to heat germrat[on,
° It may _u_ fire and ,electric
sheik..
° I!twill! cau_ electric shock or
fire.
° No ground[_ may cause
e]e_ric sh_k (_e
installation Manual).
° lit will cause electric s_ck,
• It will cau_ failure of machine
or elect_ficsP#ck.,
I Installation
• They are sharp ,andmay
cause iinju_.
• It may _use inju%
• It is not deigned to, _l Me
entire ho,u_.
i'i'iiiiiiiiii¸
_iiii,i_iillii ii!ii!ii!ii!ii!ii!ii_ii!iiiiiiiii!!_:
° it may cause failure of
applian_, or a_ident,,
i
>/
/
° It may cau_. explosi,on, fire,
.andburn.
• ff _eaving appliance damaged,
there is concern of damage
due to,the f_ling of product,
I Operation
Sharp
es
° it may cause ele_ric shock
a_ diamage.
° Prevent acciden_l sta_up
,andthe possibility of injury,.
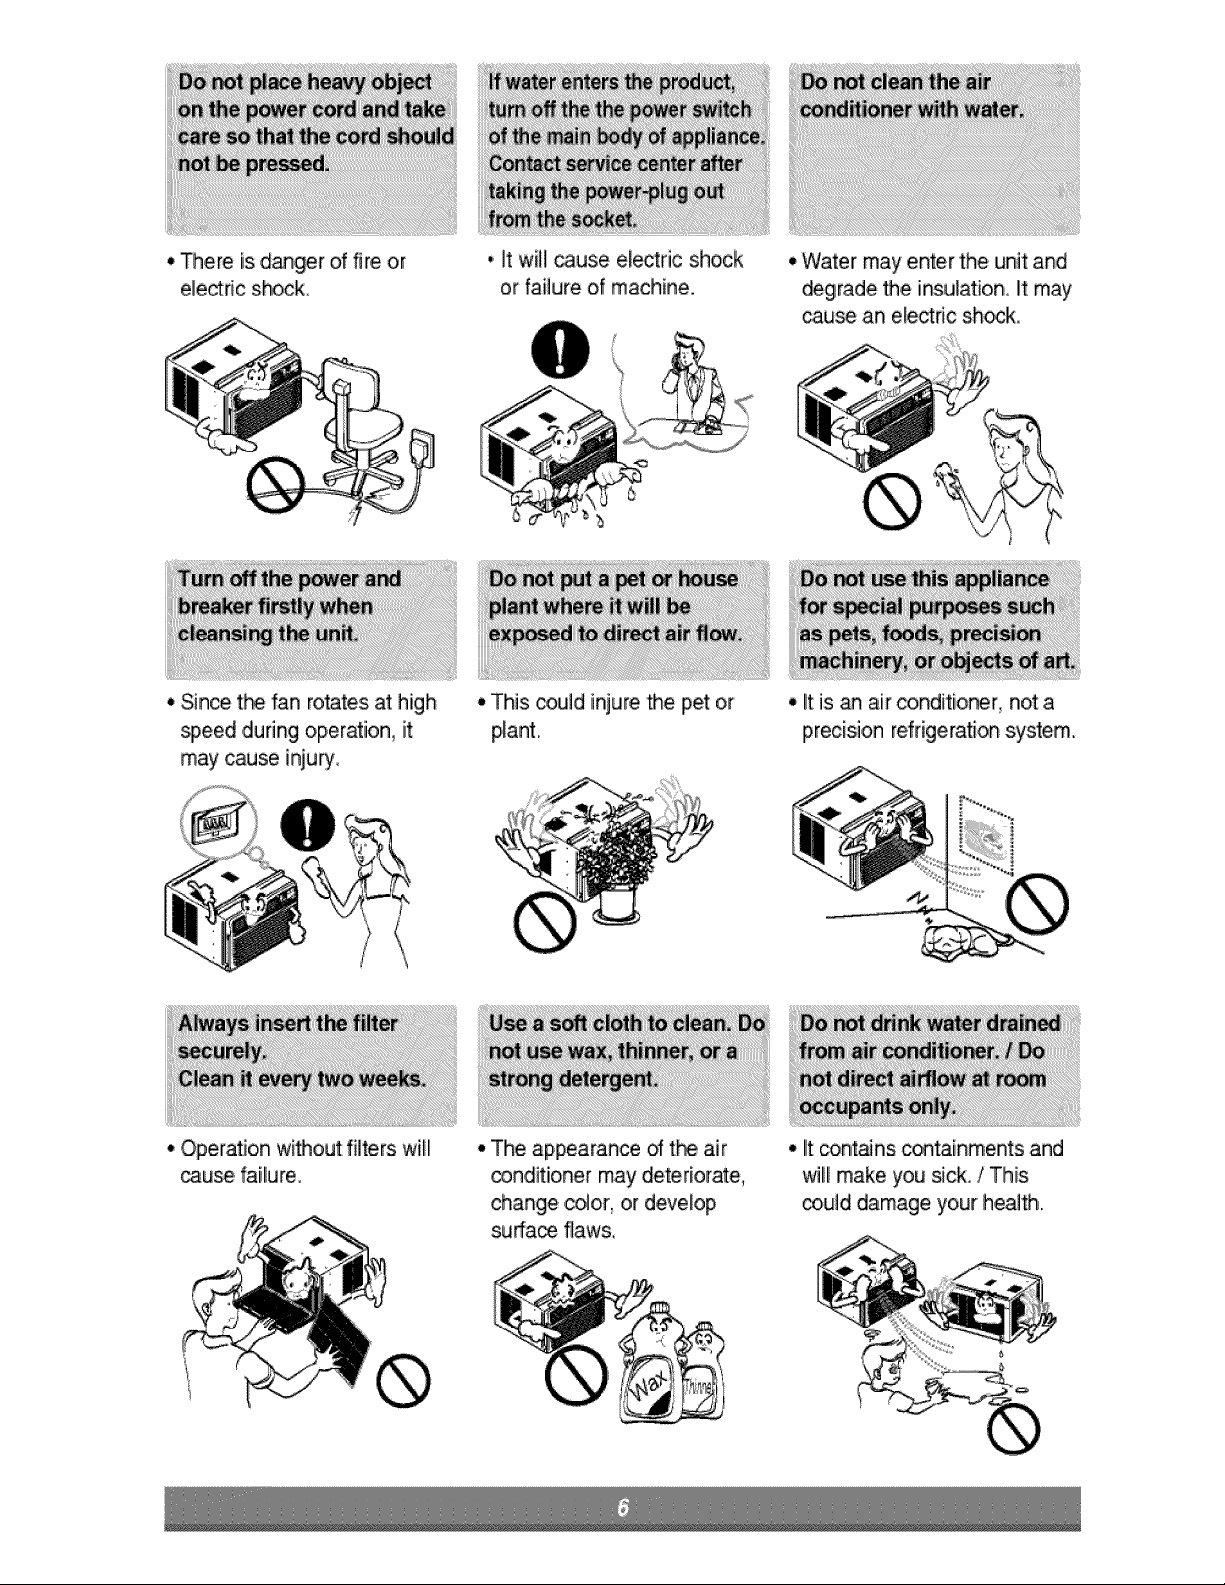
,_ere is d_ger of fire or
eleddc shock,
,, It will cause e_e_ric shock
or failure of machiae.
•Water may enter the unit and
degrade the insulation. _tmay
_u_ an e_e_ric shock
IN
• Sin_ tr_ fan rotates at high
_,eed during operation, it:
may cause injury_
........ _.............._ ....... .........
•Jtis _ _ir conditioner, not a
precision refrigeration system.
!ii_¸_!i _;::;; _;! ,;_ _;;_ _;;; _ _::_ '_ _ ! _ _ ;iiill¸¸
,, OperNion without filters wHII
_use failure_

_ C_ct an instalillati_ s_cialist for installation.
PI_ in the p_ser piug pretty.
_Do not share the same outlierwith other applianc_
_Do not we an extension _rd.
Do net staWstop operation _ _uggin_unpluggin,g the pow_ cad.
_ cord/_ug is ,_mag_, replace only with an authorized _rt.
Being ex_sed to direct _fflow for an exter_i_ _ri_ of time could _ hazardous 'to your health, IDono€
expose,occupant, _ts, or plan_ to di_t aiff!_ fo_" ext:end,_ _d_s of time,,
Due to the _ssibil_y of oxygen defic_ncy,, ventJlia_ethe room when usi_ t_ether with st_Jes or other
heating devices°
Do not:_e this air conditioner for non-specked Sl_Cial purpo_ (e,g, prese_ing precision de.vice,
food, pets_pla_s., .andart objects), Usage in such a manner _uld harm such pro_y,
Do not we water to cle.aninsMe the .airco_itioner, Exp_ure to water can des.troy_e insu_flon, leading
possible _ectric sh_k,
When cleaning the unit, fir_ make sure that the power and b_eaker are turned off. The fan rotates at a
ve_ high sp_ during o_ration. There is a p_siibili_ _ injury if t:l_ un_°s_w_ is accidentally
#iggered on while clleaning inner [pa_sof the unit.
F_ repair _d maintenance, con_ct your authorized _tvice dealer
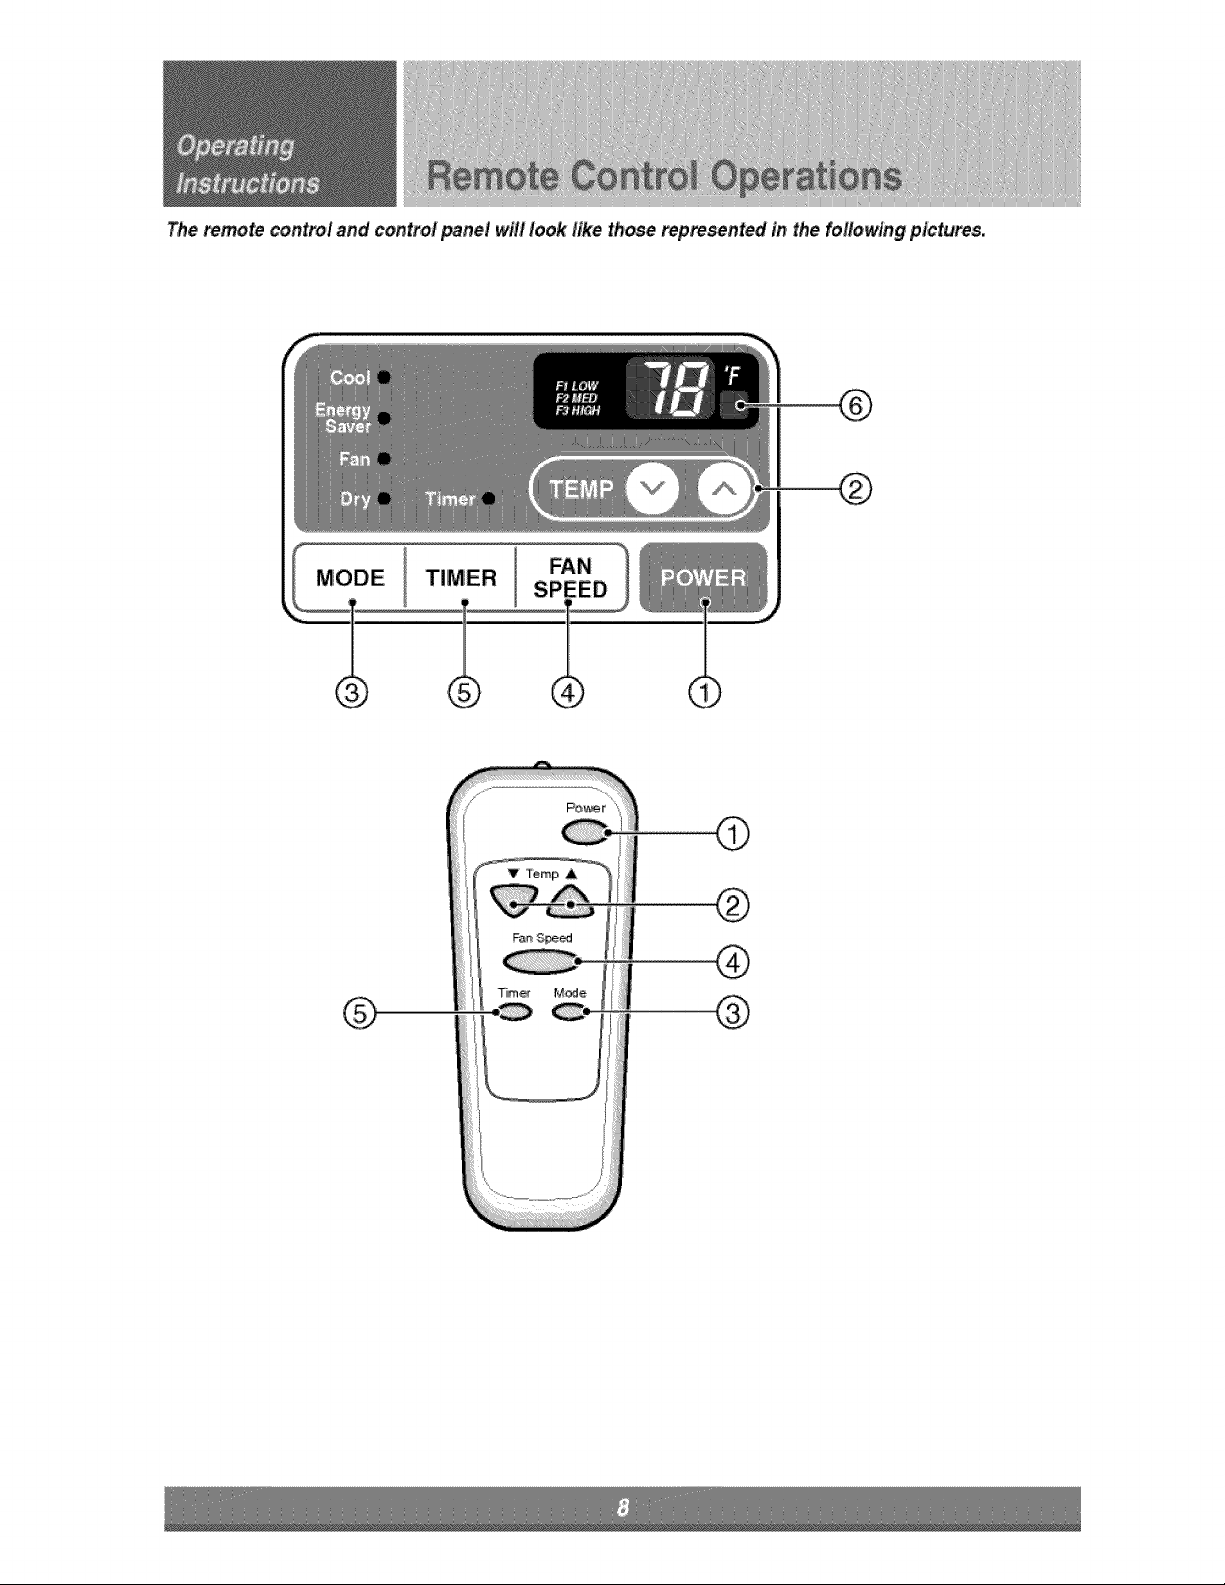
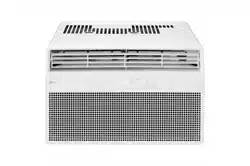
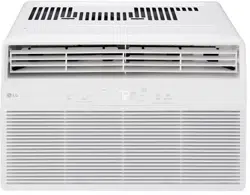
The _mote control and control _nel will look like those rep_sented in the following plctur"es.
®®
POWER
,O_ration s_rts when this button is pre_ a_ sto_ when you pll3_ssthe b_on again
TEMPERATURE CON_OL
The thermostat m_ors room temperature to maintain _e desir_ tem_ratureo
The rheostat: c_ be set be._een 60_"F~_°F (16'_C~_°C).
The unit t_es an average _ 30 minutes to adjust the r_m tem_rature by i_'F.
OPERATION MODE SELECTOR
Select coo,llingm_e to _o_ _e _im..
Sei_t energy _ver mode f_ energy saving o_r_bn.
Select _anmode fo.rb_.ic ventilating fan operation_
Sei_: dry mode for d_ o_ration
FAN SPEED SELECTOR
For inc_ea_ _wer whilec_l!i_, s_ect ahigher fan sp_.d_
3 ste_: High -) Lcw 4, M_
_ O_OFF T|MER
The timer _n _ _t to _tart and _top _e un_ in houdy i_rements, (up to 12 hours,),
REMOTE CON_OL SENSOR
Push ,o_ the cov_ on t_ back of tlhe remo_ co,ntro]with your _Ulmb
Pay attention to polarity a_ ir_serttwo new AA.Ai .5V batter,s.
'_ R_tLach the cm_er.
"_ not use rechargeable batlefes. Make sure that both batteries are new.
• In order to prevent _harge, remove the batteries fromthe remote control ff the air
conditioner is not going to.be used for an extended period of time
Ke_, _e remote control away from extm,melyhot or humid p¢aces,
To maintain optimal operation of _e remote control, the remote sensor should not be
exposed to direct sur_igh't.
°The remote co,ntro_can be mounted on a watl using the moun_ble holder.
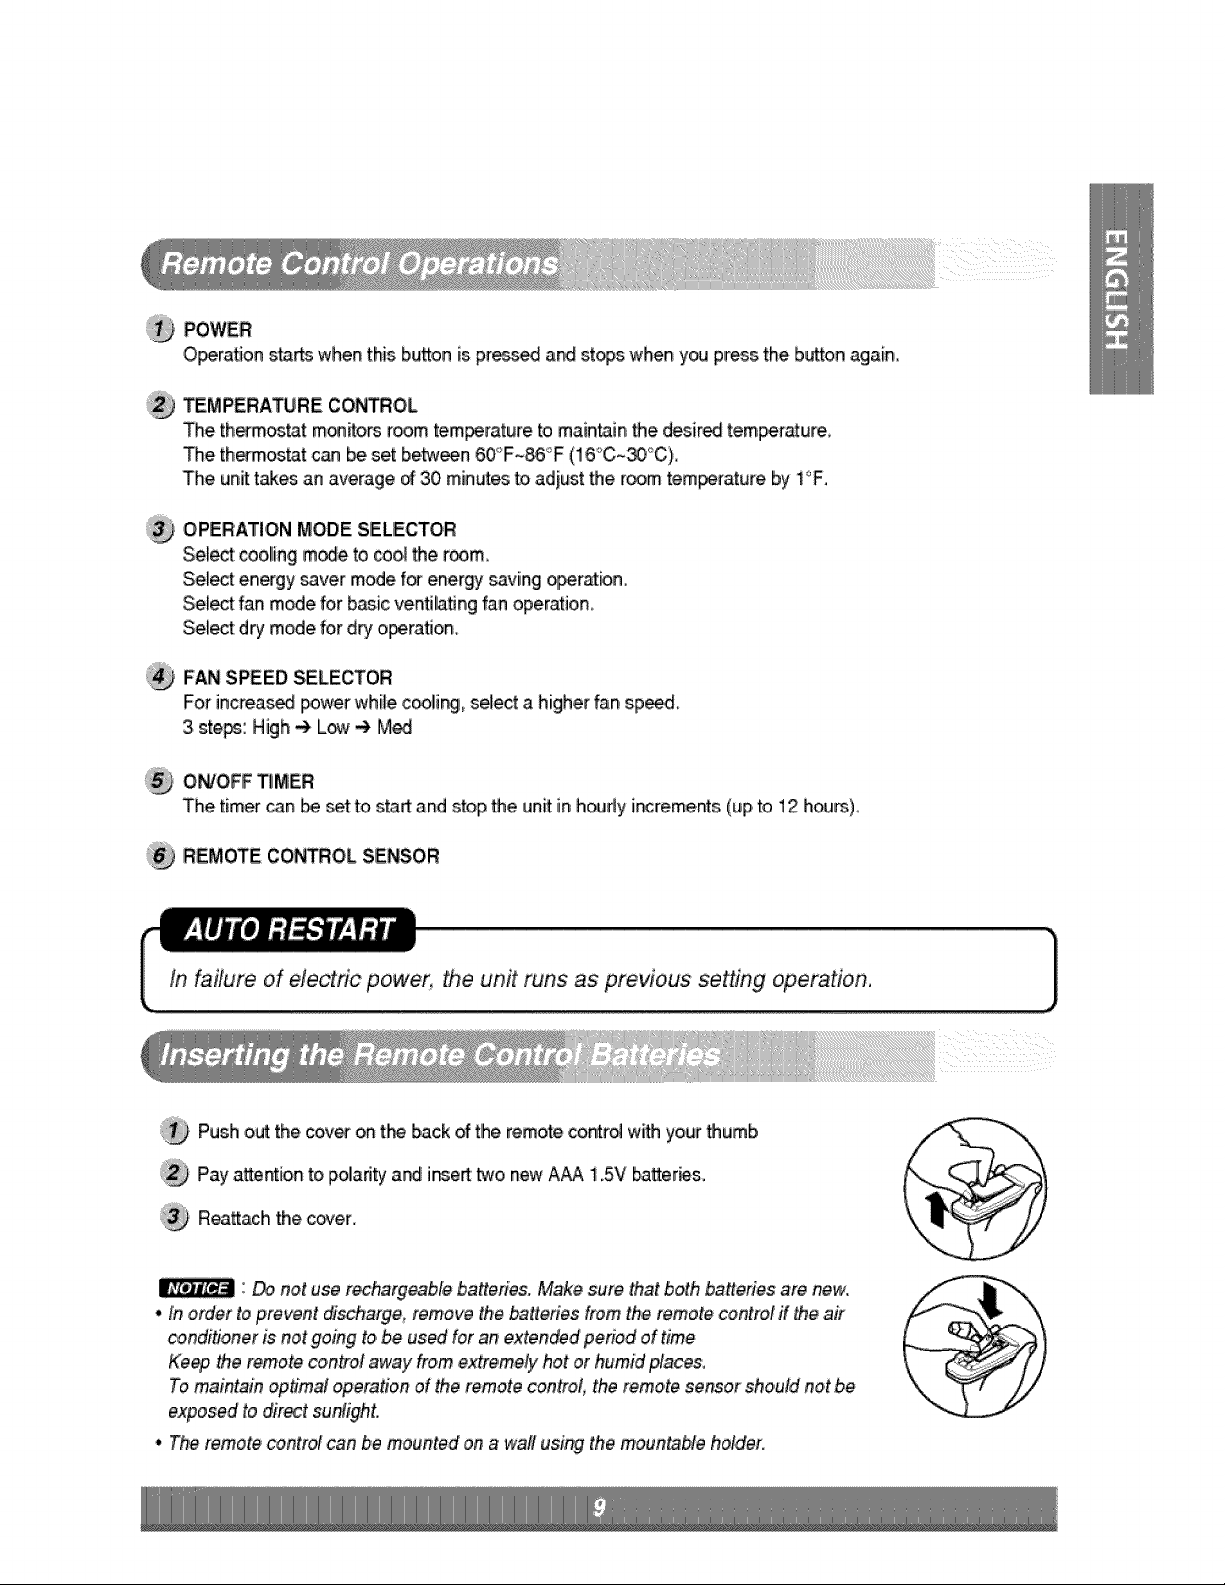
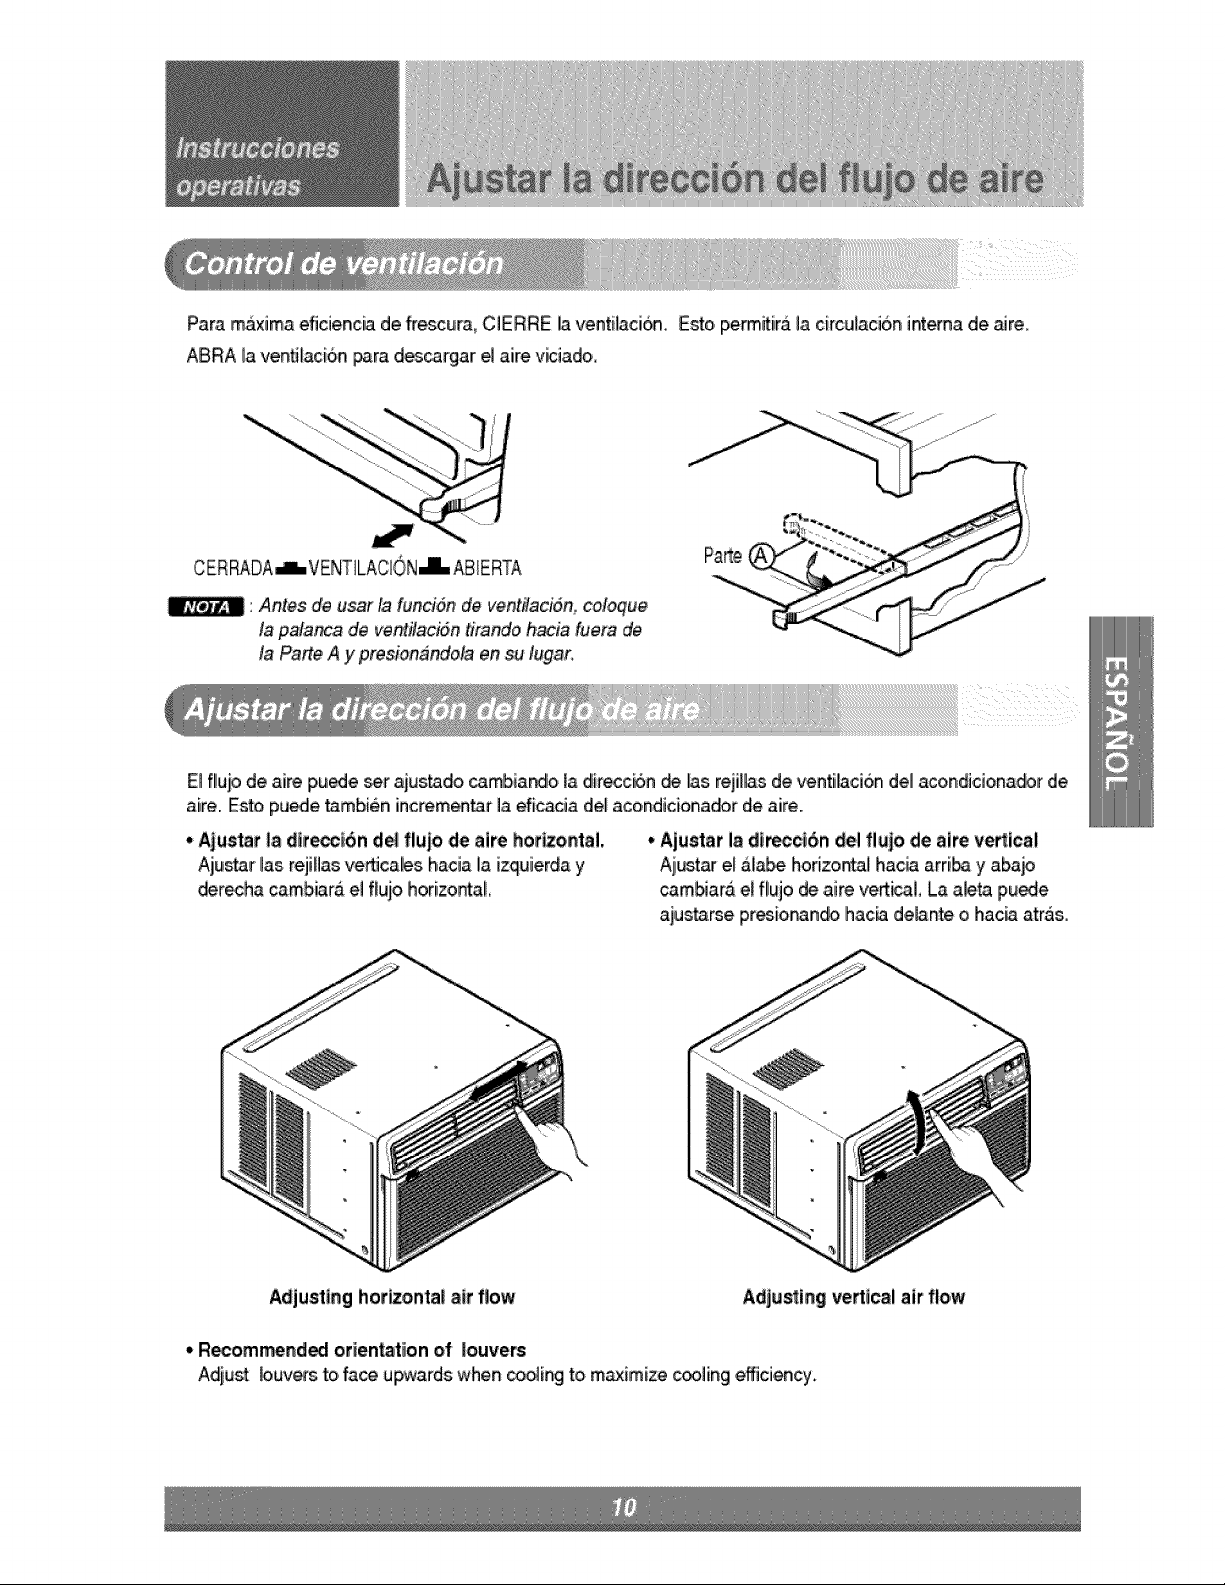
Formaximum_ling efficiency,CLOSEthev_t,,Thiswillallowinternalaircirculatio,n_
OPENtheventtodisch_gestale_r
CLOSE,L VENT.-LOPEN
Before using _e ventfla#on fea_'re, posifon
_e vent tever straight by pulling Pa_ A _'t
and snapping it into p,lace.
Aiff[_ _n be adjust_ by char_ing the diiirectionof the air conditiioneCs IIo_m_. This can also increase the
_o_ing eff_iency of the air cond_ion_.
•Adjusting Horizon_ll Air Flow Diction
Aejus_tJ_th_ v'erticallouvers I_ _d right will
change hori_on_[ aifflo,w,
•Adjusting Vetica| Air Flow Direction
Adjusting the h_zont_ vane up and d_m wiU
change ve_i_l airflow The vane _n _ adj_ted
by nudging the vane backward or forward,
Adjusting hotlzonta_air flow Adjuring 'vertical air flow
• Recomm=endl_ otien_tiion of louvers
Adiu_ louvers to,face upwards when _oling to m_imize _ling e_ciency.
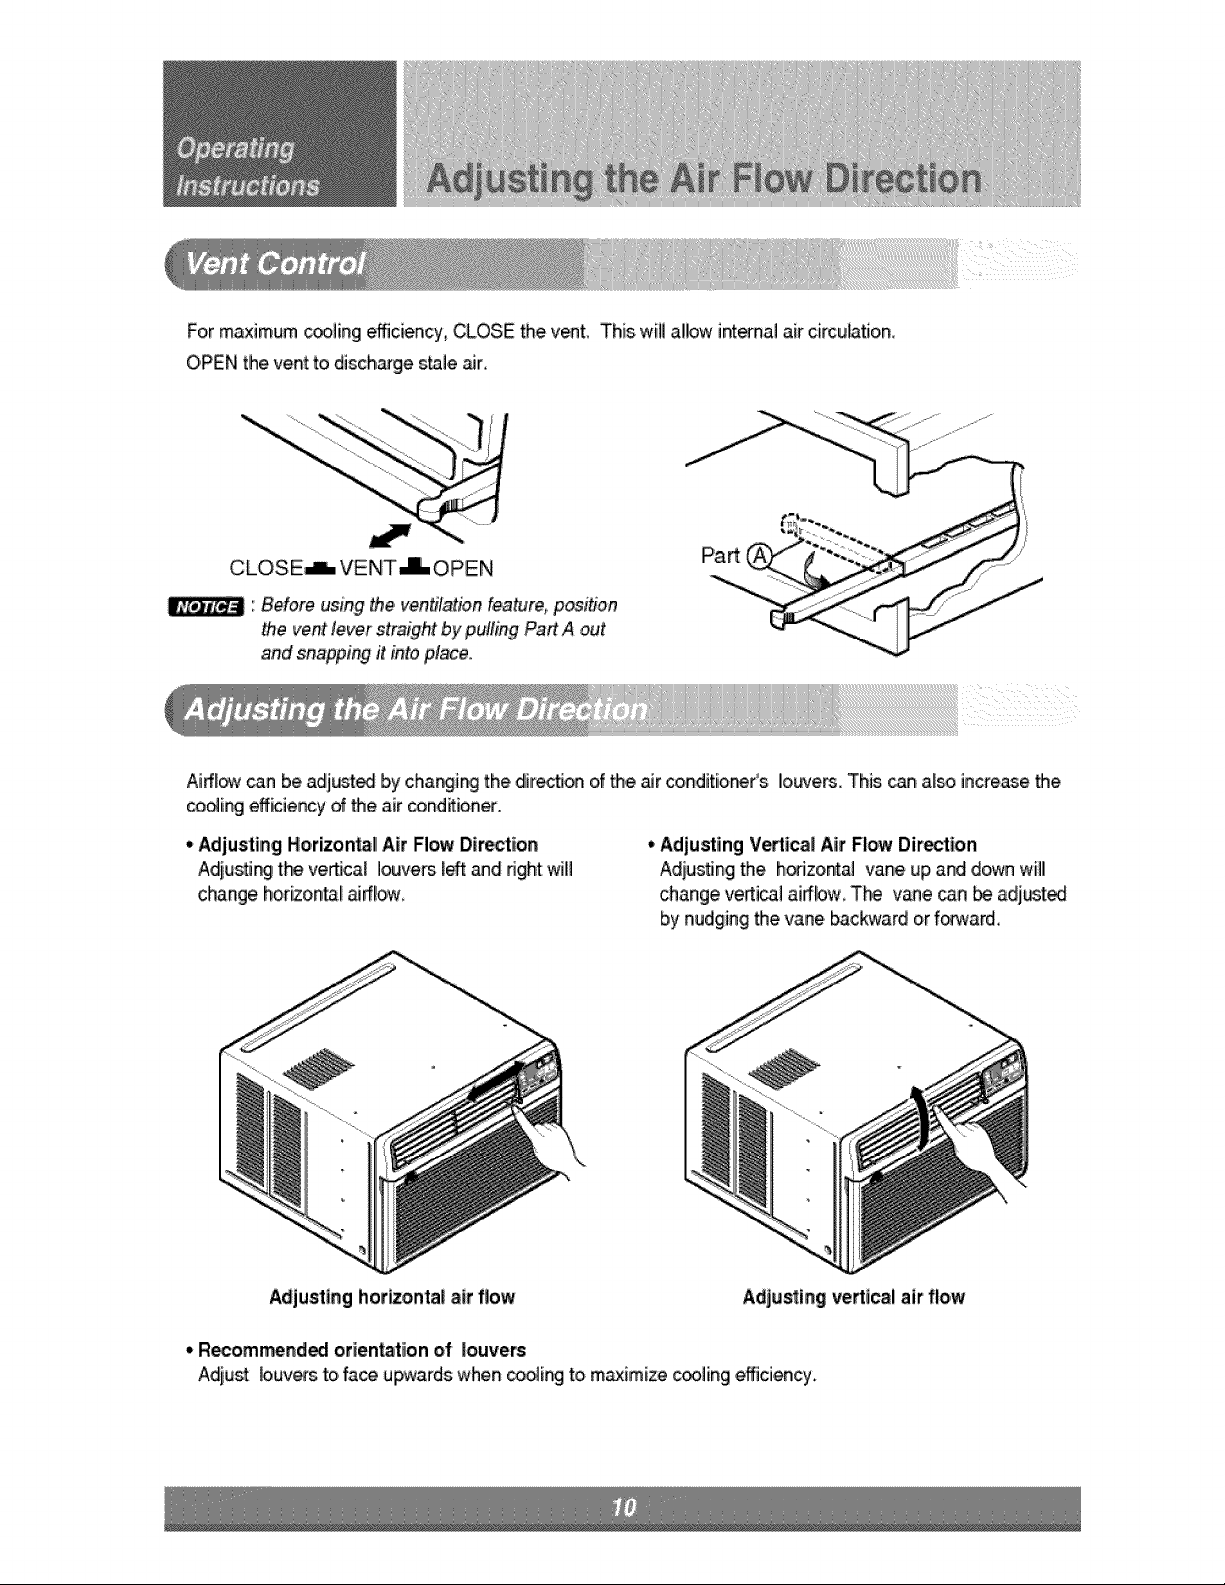
Turn t_ power of and unplugt_ po,wetplug_,_m c,_antngthe aircondmone_
The air f[ff,er_hind t_ iNet grille sL_,u_ _ checked a_ c_ean,ed _ [east on_ eve_ 2 w_ks (oras
nece_a_) to ma[n_in optimal peffoirm_ce _ the air _n_i_oner.
How to remove the air filter
The gri!]e may be o_ned fr_ _e top for easy
maint_ance after instail_bn.
Open the inlietgdlle by pu]Uingoff _e exposed d_r
on the t_ of the unit (b_ed on ins_lllati_).
PuI_the tab s]igbt!y to re_ase the filter, Pul_tl_ filler
inthe same direction as the opening.
Clean the filter with wa_, sc_3pyw_er. The w_er
should _ _ _°C (I_°F}.
Rinse off and gently shake off excess water fromthe
fi_. Let it dry before rep_aceng it.
The base _n may o,veffbw due to high humidly. To, drain _e excess
water, remove _e drain cap from _,e back _ the unit and _cure t_
When p,ress.[ngthe drainpipe intoplace, apply force in the.direction
away from _,e fins to avoid injuring yourse_.
CA_ON: Dis appliance should be ins_|_ in accordance with national wiring
r_ulations, The followlng information serves acts as aguide to help to explain product
feature;,
@
®
Y_ can cho_e be._n two meth_s below a,ccordli_ to your wi_o,w stool shape and preference.
*Fastenthe stopper using 2 screw _les, and I!ead
o_ the _wer cord through slit °A".
Power _rd
*Fasten the stopper using left scr_ holie,and route
properliyto lead the power cord o,_ through s,_it"B°.
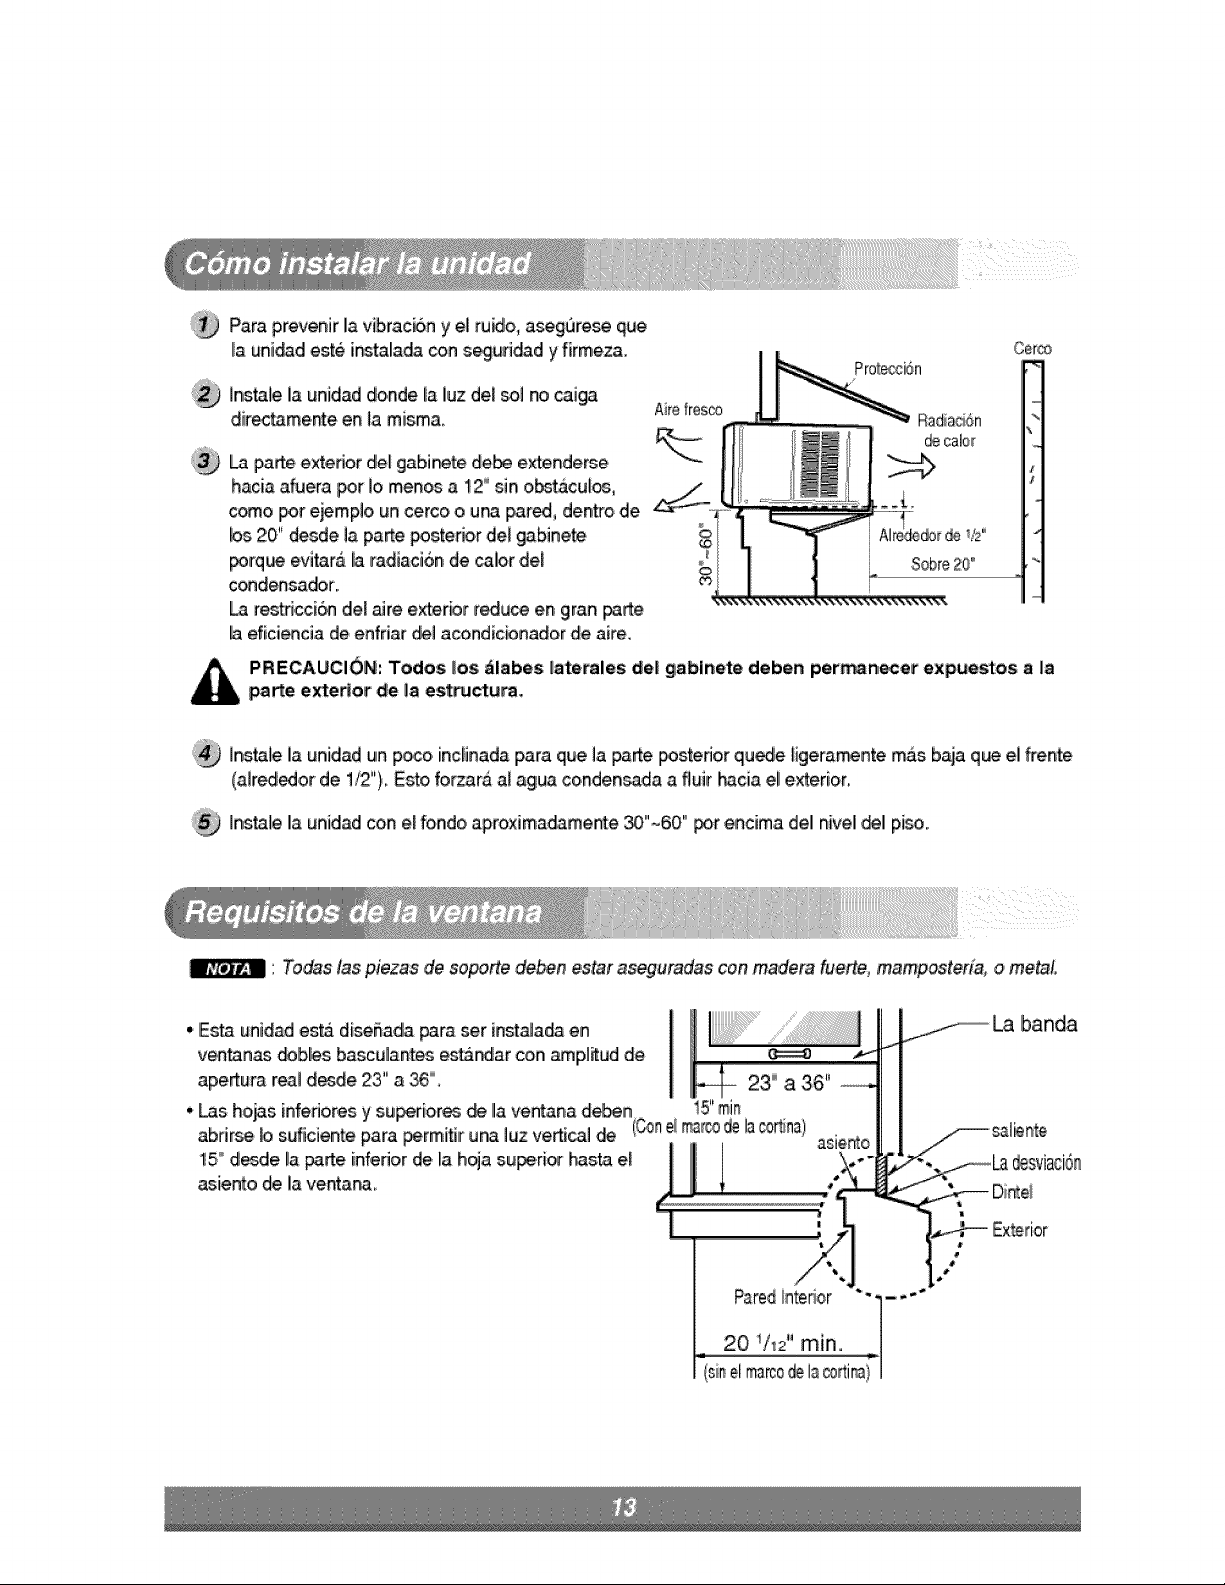
To prevent vibration a_ r_ise, make sure the unit
is [nst_l_ s_urely and firmly.
hstatl the unit where the sunlig_ d_s not shine
dkecUy o,nthe unit,
There should _ no _acl_, such as a fete and
wall, w_hin 20'_'from the back of the _n_
be_u_ it wil! prevent heat radiation of the
cond_ser,
Res_ictJ,onof outs_e air will greatfy reduce the
cooling effici_cy of the air conditbner.
Fence
CAIL_|ON; All side Iouvers ofthecabine_must remain expo_d totheoutsi_oifthe
structure.
In,s,ta_lthe unit a little slanted _ the _ck is slightly locaterthan t_ front (about 1/2°)_
This will force cond -e_ water toifl!o_vto the outs_e,,
InstaU the.unit w_h the i_o,m a_ut 30"~_ ° ab,_e the ft_r leve!
Ai! supporting parts should be s_u'md to firm wood, masons, oil meta!,
• This unit is desoned for ins'_llatio,n in standard _ub_e
hung win_ws with act_l o_nir_ wiOhs from 23"
to 36"
• The top and bosom window sash must open sufficiently
to alllowa clear vertica_opting _ 15" fr_ the _om
the upper sash to t_ widow stoo_
Y
23i_to 36,"_
15" mini.
NO.
4
5
6
7
8
9
10
11
NAME _ PARTS Q_
NUT
sc nEWL 'Z@o 6
SCREW_TYPEB 3
_,,,,,,,ooo__ ,,[,YPEC 5
FOAM-STRIP 1
UPPERGUIDE: 1
FOAM-PE 1
FRAMEGUIDE 2
12 . W!NDO_u'LOCKINGBRACKET i
13 FOAMPE 1
SCREWDRIVER(Phillips and Ra'tead), RULER_ KHIFE,_ HAMMER, PENC|L_ LEVEL
PREPARATION OF CHASSIS
Remove timescrews which fasten the canner at _th
sides ard at tLe _ck.
Slide the unit from the _b,[r_t by gripping the base pan
handle and ipu]ling fo_ard while _acing the cabinet,
Cut the wi_slowsash seat to the Foper leith.
P,ee]off fl_e backing and a_ch the F,o_-PE @to, the,
underside, of the 'window sa_l.
Remove timebacking from the top u_r guide Foam-PE
@a_ attach it to the _ttom of the U_er Guide ®,.
Attach tt_e,u_r guide onto the top of fl_e cabinet with 3
1
;_ ]_ert tk_ Frame Guides @ i_,o the bottom o,fthe
]r_ert tL-e Frame Curtain @ into the U_er Guide, @ and
Frame Guides @
Fasten the ,curtains to the unit with 4 T_e
A screws Q
(Type A) (
Openthe window Mark a line on center of the
window sto,oll,
Carefully place the cabinet on _e window stool and
alignthe center mark on the _om fror_ with the
center _inemarked in the window stool,
Pul! the bottom window sash down behind the Upper
Guide ® until it meets
_TE; Do not pall the window _sh down tighdy that' the
_v_nt of Frame Cu#ain 0is restrictS:
Window Sash
F_m=
Cabinet
Frame Cudain Q
Front Angle
stool
Fig. 1
Fig. 2
Loosely assemble the Sill Sup_ @ using the ps_s
in Fig,,3,
OUTDOOR
Nut_
Fig. 3
Select the position t_at:will place the Sil_Suppo_ (_
near the o_er most point on sill (See F g 4)
NOTE: B'eca'refu/ when yeu instal! thiecabinet (Fra_
,Guides@ are broken easity).
A_ach _e Sill Suppo_ Qto the cabinet:track hole in
_lation to the sellected#_sition using 2 Ty_ A
screws in each suppo_ (See Fig. 4)
Frame Guide
_NIDOOR
Screw(Ty_ A)@
\
/
/
Cabinet
DUTDOOR
Fig. 4
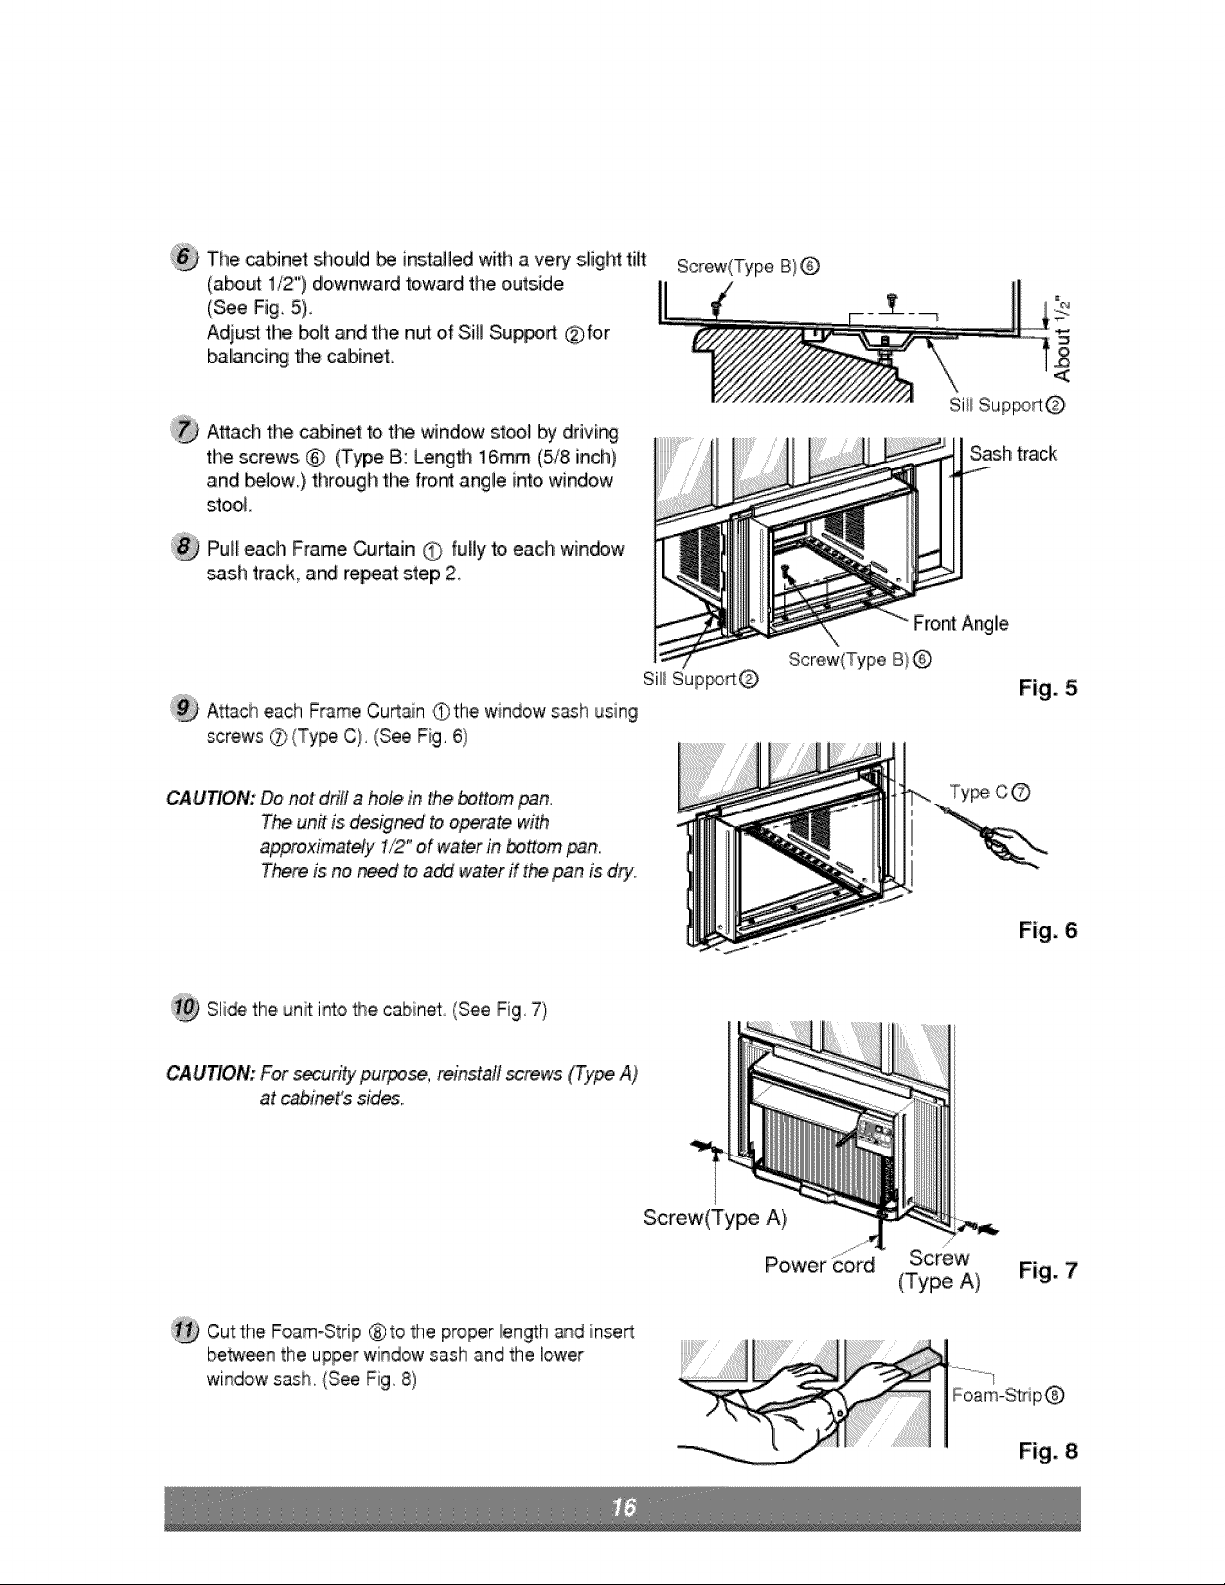
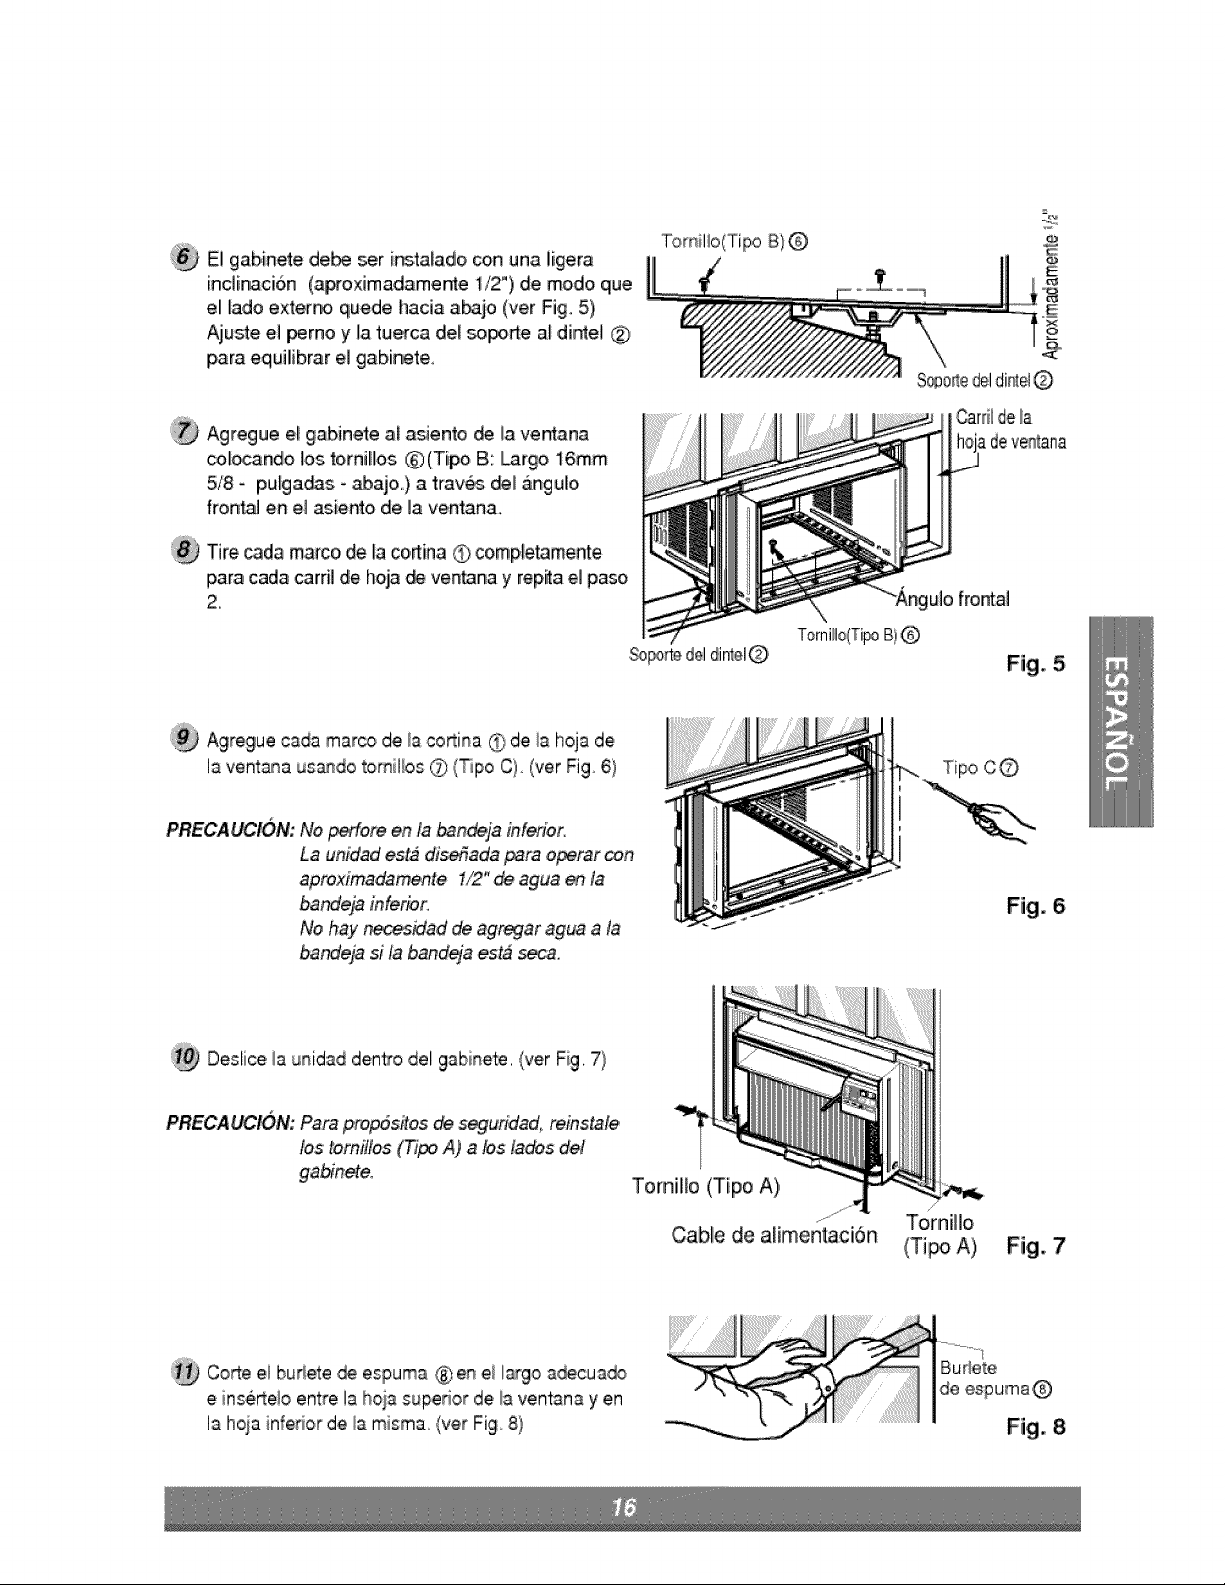
The cabinet should be installed with ave_ sl!ighttilt
(abo_ 1/2") downward toward the outside
(See Fig, 5},
Adju_ the bolt and the n_ of Sill Su_rt ®for
ballancir_ fl_e calbinel,
A_ach the cabinet to tl°_ window stool by drivir_9
the screws ® (Type B: Leng#_ 16ram (518 inch)
and _bw.) through the fron_angle into window
stool
Pul_each,Frame Curtain0 fullyto,each window
sash track and re_a,t step 2,
Attac[heach Frame CuRain (#the window sash using
screws O (Type C), (See Fig, 61)
Screw(Type B! @
Front Angle
Screw(Type B!@
Sill Sup_O
Sash track
Fig. 5
CA,UTION:Do no{ drill ahole in the _,#om _n,
The un# is desig_ to operate with
approximat#y I/2" oil water in _ttom pan,,
There is no _to a_ water ff the pan' is dry,
c©
Fig. 6
Sli_ the unffi_o _e cabinet (See Fig, 7)
CAUTION: ,Forsecurity purpose, reinstall _rews (Type A)'
at cabi_t's sides,,
Cutthe Foam-Strip @to the proper _engthand inseR
be_n the uppe wndow _a_h and the lower
window sash, (See Fig, 8)
Screw(Type A)
Power Cor'c Screw
(Type A) Fig. 7
Fig. 8
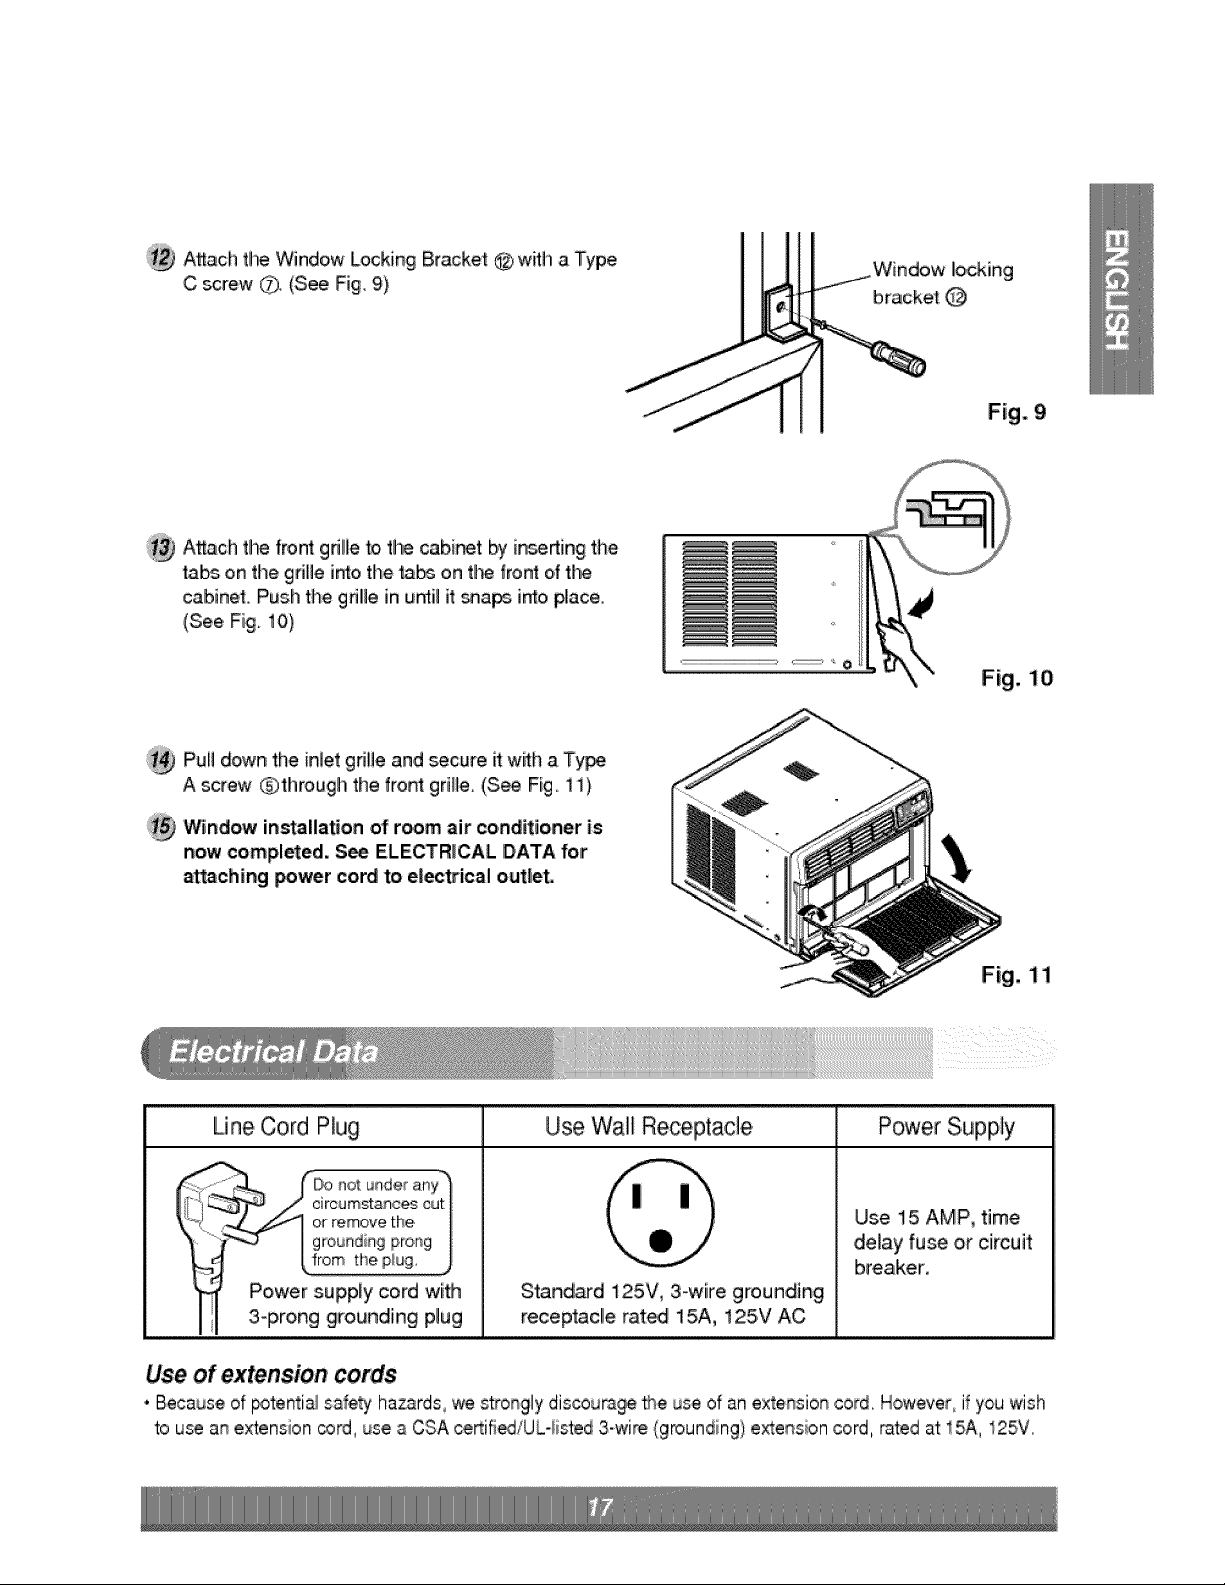
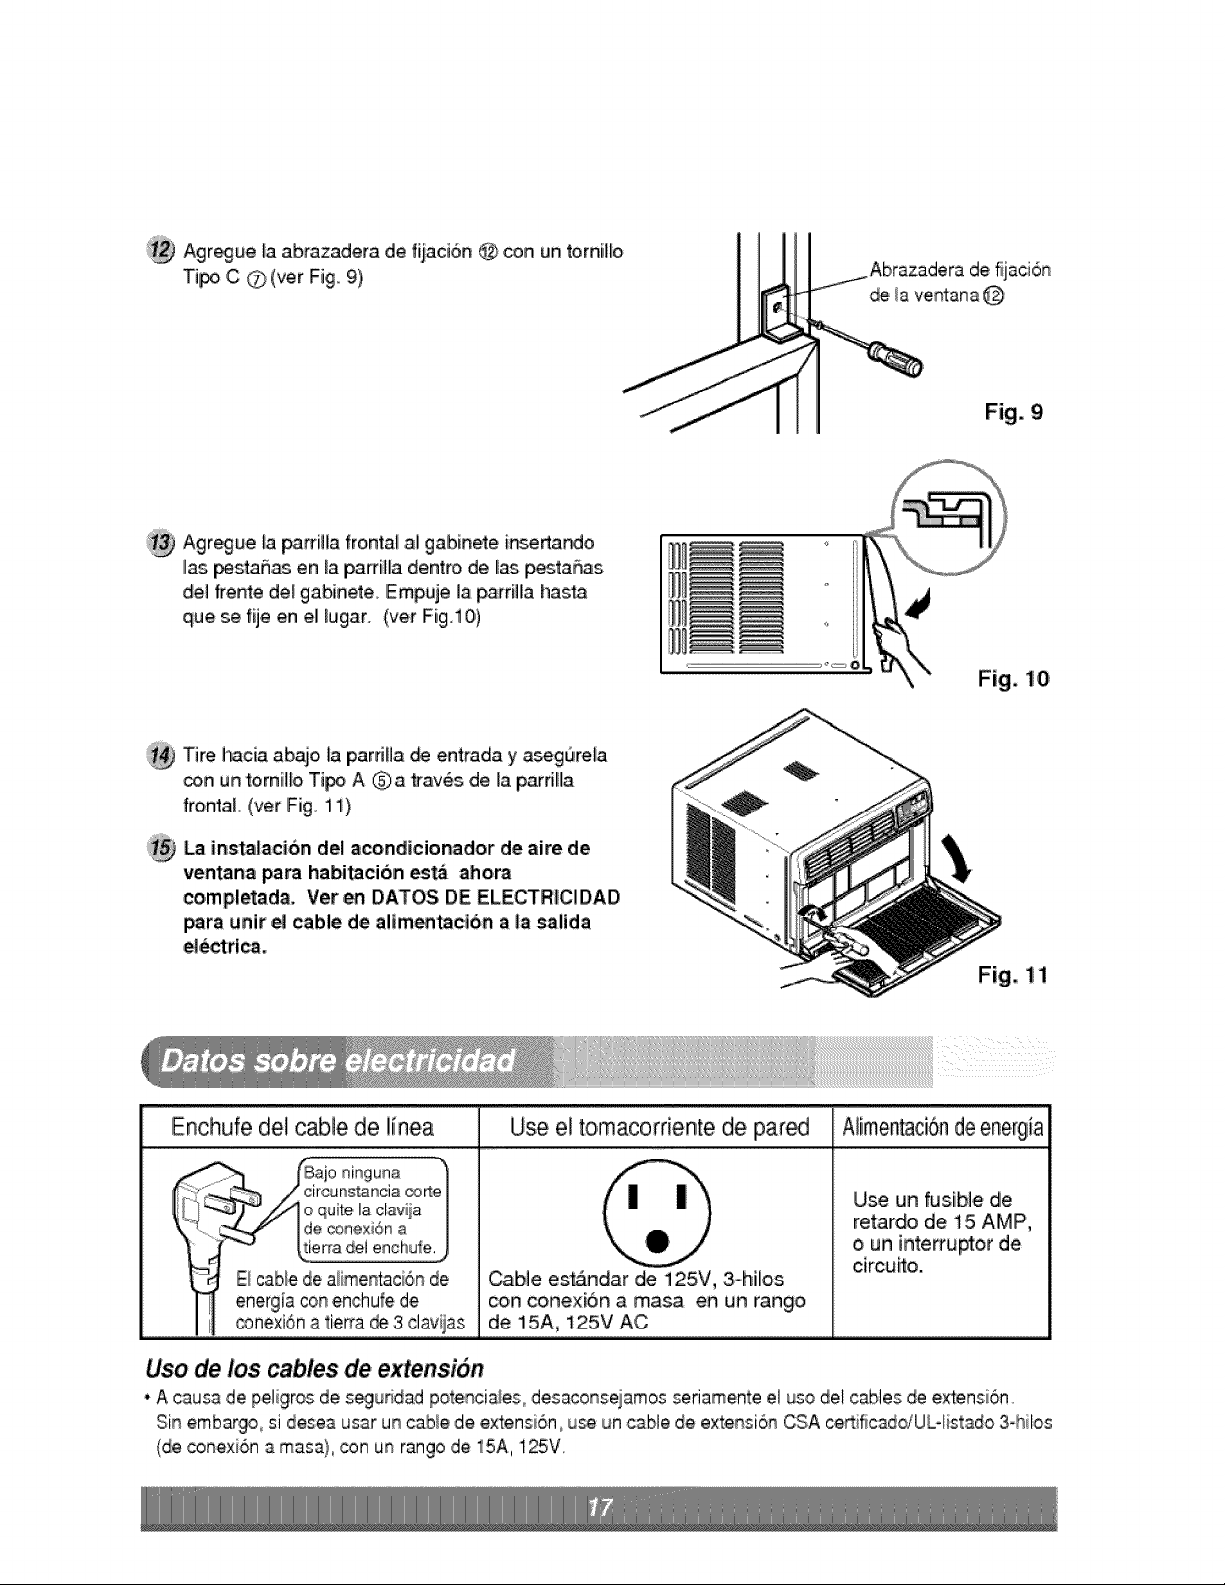
Attach the Window Locking Bracket _, with a Type
C screw _. (See Fig. 9) ___ indow locking
bracket: @
Fig_ 9
Attach the front grille to the cabir_t by inserting the
tab,s on the gdlle into the tabs on t_ fro_ of the
cabinet. Push the grillle in until it _a_ into pliace,.
(See, Fig. 10)
Fig. 10
Pul! down the inlet grille and _cure it with a Ty_
A screw _)through thie front grille. (S_ Fig_11)
'_ndow installa_on of r_m air conditioner is
now completed. S_ ELECTRICAL DATA for
a_ching _wer cord to e|ec_ical out|et.
Fig, ! 1
Use Wall Receptacle Power SupplyUne Cord Plug
/) circumstances cut
_--__'_""1 or remove the
I groundingpror_g
Power supply cord with
3oprong grounding plug
Standard 125V, 3-wiire grounding
rece_.acl!e rat_ 15A, 125,V AC
Use 1:5 AMP, time
delay fuse or circuit
breaker,
Use of extension cords
•Because of _tenti_ sa_.etyhazards_'we s_ongly discou_ge _e use of an extension co_d, H_ever_ i_you wish
to use alnextension cord, use a CSA certified/UL-iisted 3-wire(g_unding) e_ension cord, i_ted at 15A, 125V,
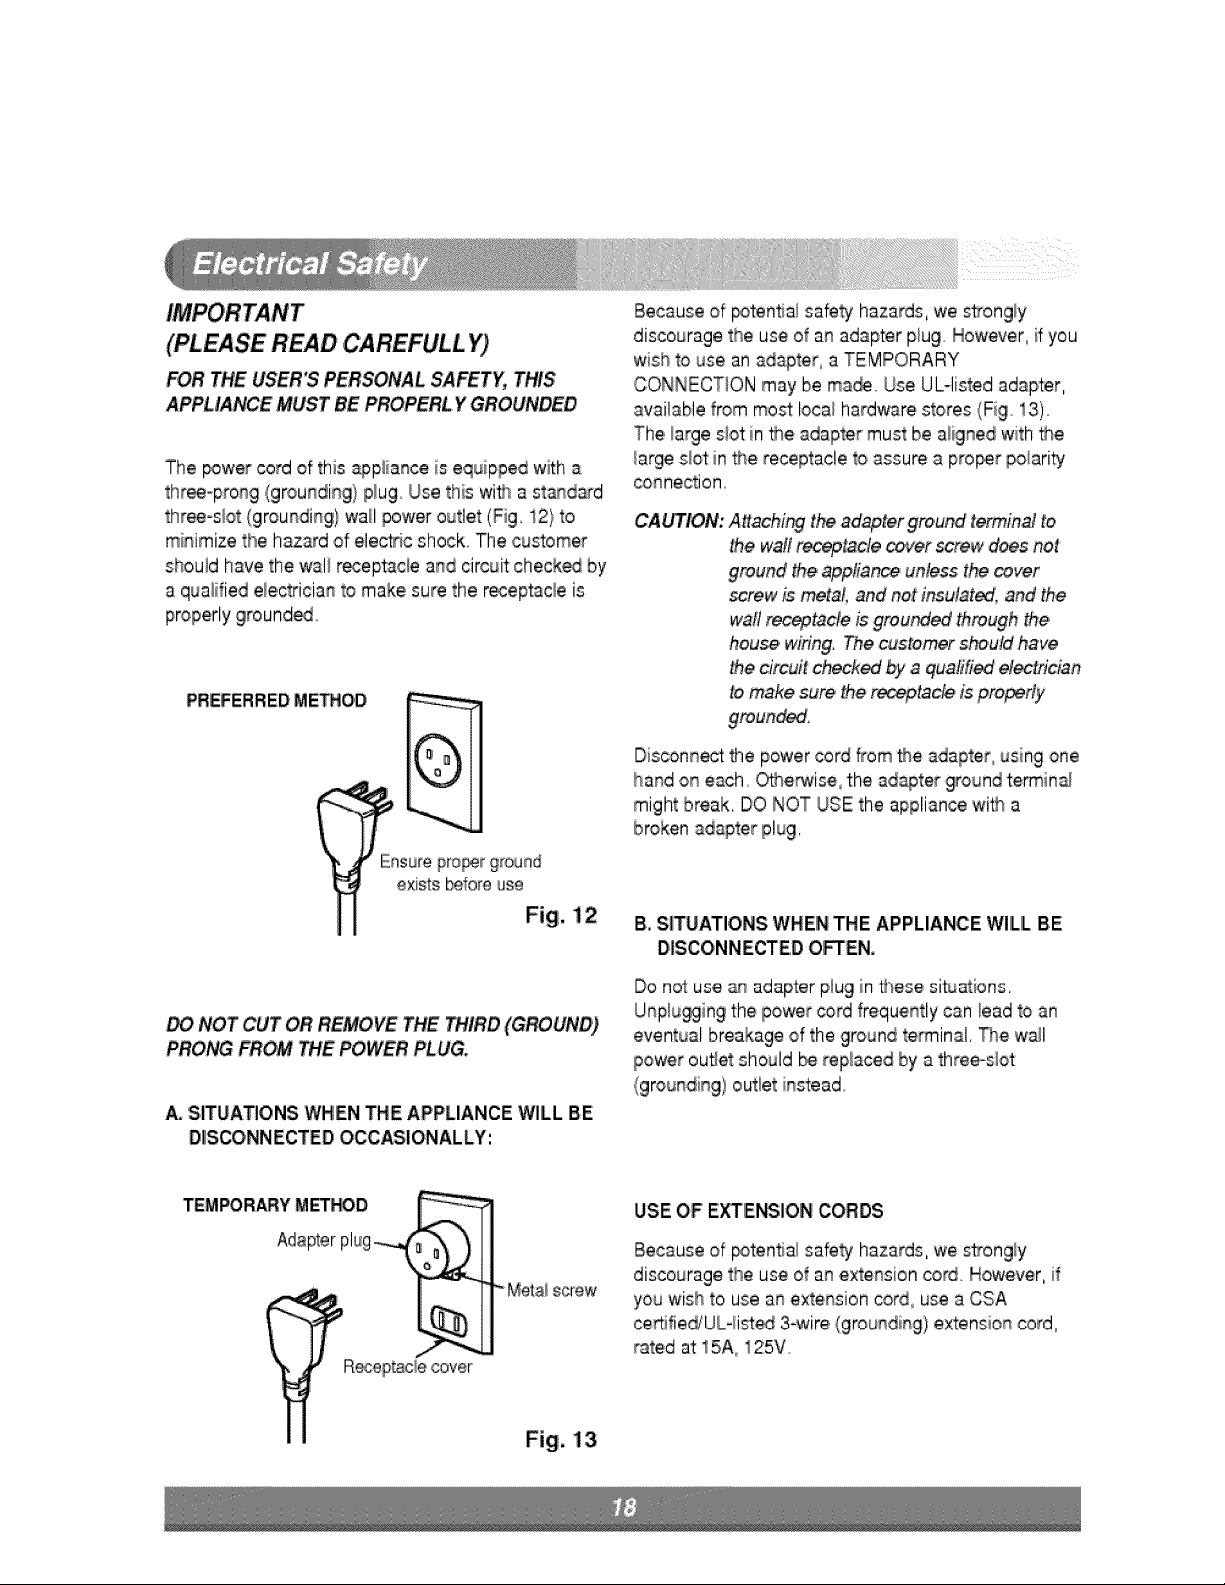
(PLEASE READ CAREFULL Y)
FOR THE USER3 PERSONAL SAFETY,,THIS
APPLIANCE MUST BE YGROUNDED
The _wer cord of this app#ance is eq_Jippedw_h
three-prong (grounding) p_ug Use this with a stand_d
three-s_,ot(grounding) wall power outlet (Fig 12} to
mi#imize the h_ard of eleot_c shock The customer
shouid have the wali receptacle and circuit che,ck_ by
a qualified electrician to make sure the receptacie is
properly ground_o
PREFERRED METNO,D
Because of _ten_al safety hazards, we strongly
discourage the use of an adapter plug However, if you
wish to use an adapter° a TEMPORARY
C:ONNECT_ONmay be ma_. Use UU.listed adapter,
available from mo_ local hardware stores (Fig. 13)
The iarge s_otin _e adapter must be aligned with the
large slot in #_ereceptacle to assure a proof po!arity
connection.
CAUTION: Attaching theadapter ground terminal _
the wa#receptacle cover screw does not
ground the applian_ unless the cover
screw is metal, and not insulatedl and the
waltrec_tacte is grou_ed Lhroughthe
house wiring. The custo_r st'_uld have
thecircuitcheckedby aqualified n
to make sure the receptacle _sproperly
Dis_nn_ the power cord from _e adapter using one
hand on each O_e_ise, the adapter ground terminal
might break, DO NOT USE the appliance with a
broken adapter plug.
existsbetereuse
Fig. i 2
NOT CUT OR REMOVE THE THIRD (GROUND)
PRONG FROM _E POWER PLUG
A. SITUATIONS WHEN THE APPLIANCE WILL BE
DIISCO,NNIECTEDOCCASIONALLY:
B, SITUATIONS WHEN THE APPLIANCE WILL BE
DISCONNECTED OFTEN,
Do not use sq adapter plu9 in #'_esesituations.
Unplugging thiepower cord frequently can lead to sn
eventual breakage of the ground terminal. _e wall
[powerouSet should _ replaced by a three-slot
,(grounding) outlet instead
TEMPORARYMETED
Adapterplug-_
Receptac_ecover
screw
Fig. 13
USE OF EXTENSION CORDS
Because of _tenf_al safe_ hazards, we strongly
discourage the use of an extension _rd However, if
you wish to use an extension cord, use a CSA
certifie_'UL4ist_ 3_wire (grounding) extension cord,
rated at 15A,, 125V
Before calh_ngfor service, please review the following list of common'problems and solutions.
The air ,conditioner is operating normally when:
• You hear a pinging noise. This is caus_ by water _ing Dcked up by the condenser on rainy days _ in highly
humid conditions. This feature is design_l to,help remove moisture in the _r and improve c_[in,g efficiency.
• You h_r the thermostat dick. This is caused by the c_pres_r cyc# st_ing and stopping.
° You s_ water ddppi_ from the rear dthe un&, Water may _ co!l!ectedin the _ pan in highly humid
conditior_ or on rainy days, This water ovedl_,ws and drip_ from the rear of the un_,
• You hear the fan _nning while the c_pres_r is silent, This is a normal operational feature,
The air conditioner may be operating abnormally when:
The air conditioner
d_s not operate
at aft
Air conditioner
does not coot
Ice appears on the
air conditioner.
• Make sure t_ p,liugis comp_tel[y plugged into,
the o_let
• Check the fuse!circu_ breaker box _d replace
the fuse or res_ the breaker
• _nthe event of a power f_[ure, set _e p_er
control!to OFF W_n the power is restored,
wait 3 minutes to,resta_ the air cond[itJonerto
prevent the compressor fr_ _ed_ding
•Make sure t_re are r# curtains, b,[in_,
furn_ure or other obstacles in front of t_ air
condi_oner
• Turn the kn_, to ahigher setting The highest
setting provid_ maximum c_ling
• Clieanthe fi_ter_ I_st _ery 2 weeks. Ref_ to
•e°Care and Maintenance"' _n (pl 1)
•emanual.
• After the _r conditio_r isturned _, you need
to give the air conditioner some time to c_l the
room.
• Ch_k for open fumase floor resiste_ and c_d
air returns.
•CLOSE _e air _nd_ion_ vent
• See ice appears o# the air ¢onditioner _[_
• Ice may block the air flow and obstruct the air
conditioner from pro_dy co_ing the room. S_
•efan at MED or HIGH while setting the
thereat at 1 or 2 un_l the ice melts,

PARA SUS ARCH!VOS
E_[iba aqu_ e_ irno_[o y _U_O i de _rie:
Modelo n_:
Ser_e n°:
Pu_ encontrar estos datos en _ etiqueta s_uada en
e[ lateral de ca_ unidad,
Nombre del dlstribu!dor:
F_ha _ compra:
m Adjunte su rec_bea esi_ p_gina con la ,grapa_a para
el momealo que le necesite para probalr la f_ha de su
adquisici6n o pa,ra!a va!id_ci6n _ !a 9aranl:fa
LEA ESTE MANUAL
En su intedor enco_tra_A muchos coaseios _tiles sobre ia
utiiizaci6n y mantenimien_o de su a_ndicionador de aite,
Unos p_os cuidados por su pa_e !e pueden ahon'ar mucho
Bem_ y dinero du_ante _av#a _ su acond_sior'_adorde sire,
En A talbla de co_ejes para _aso!uci6n rApida _ problem,s
encont:rarA muchas respuestas a los problemas m_s
habituates Si revisa primero nuestCa Tabl8 _ Con_s
para la so/uci6n rapida de problemas, _1 vez no necesite
Ilamar nun_ al se_' cio t6cnico,
PRECAUCION
•P6ng_ en con_cto con un |_cn_o _11servic_
autorizado p_ra =re_li_t la tep_mci6,n y_ntenim_nto
e_ unida_.
•P_n_se en cont_cto con un inst_l_r _ra realtor la
instalaci6n de esta uni_.
•C_an_ se vaiacamber el cab_ el_trico., el trabajo
reemp_m_nto _be set reaU_do uni_nte _r
_son_! autor_, utili_do las piezas de c_mbio
Para prevenir tanto lesiones _ usuario u otras Iper_nas como daSos materiales., es p,reciso seguir
estas instru_ior_&
m El manejo incorre_o debido a la instrucci6in igno,rada pue,d,ecarat lesi_s o daSo,s cuya
gray.lad esta cl!asifi_da en a}s siguientes indic,acione&
[] El significado de I_, simbo_os _ilizados en e_,e manua_ se indica a _ntinuaci_.
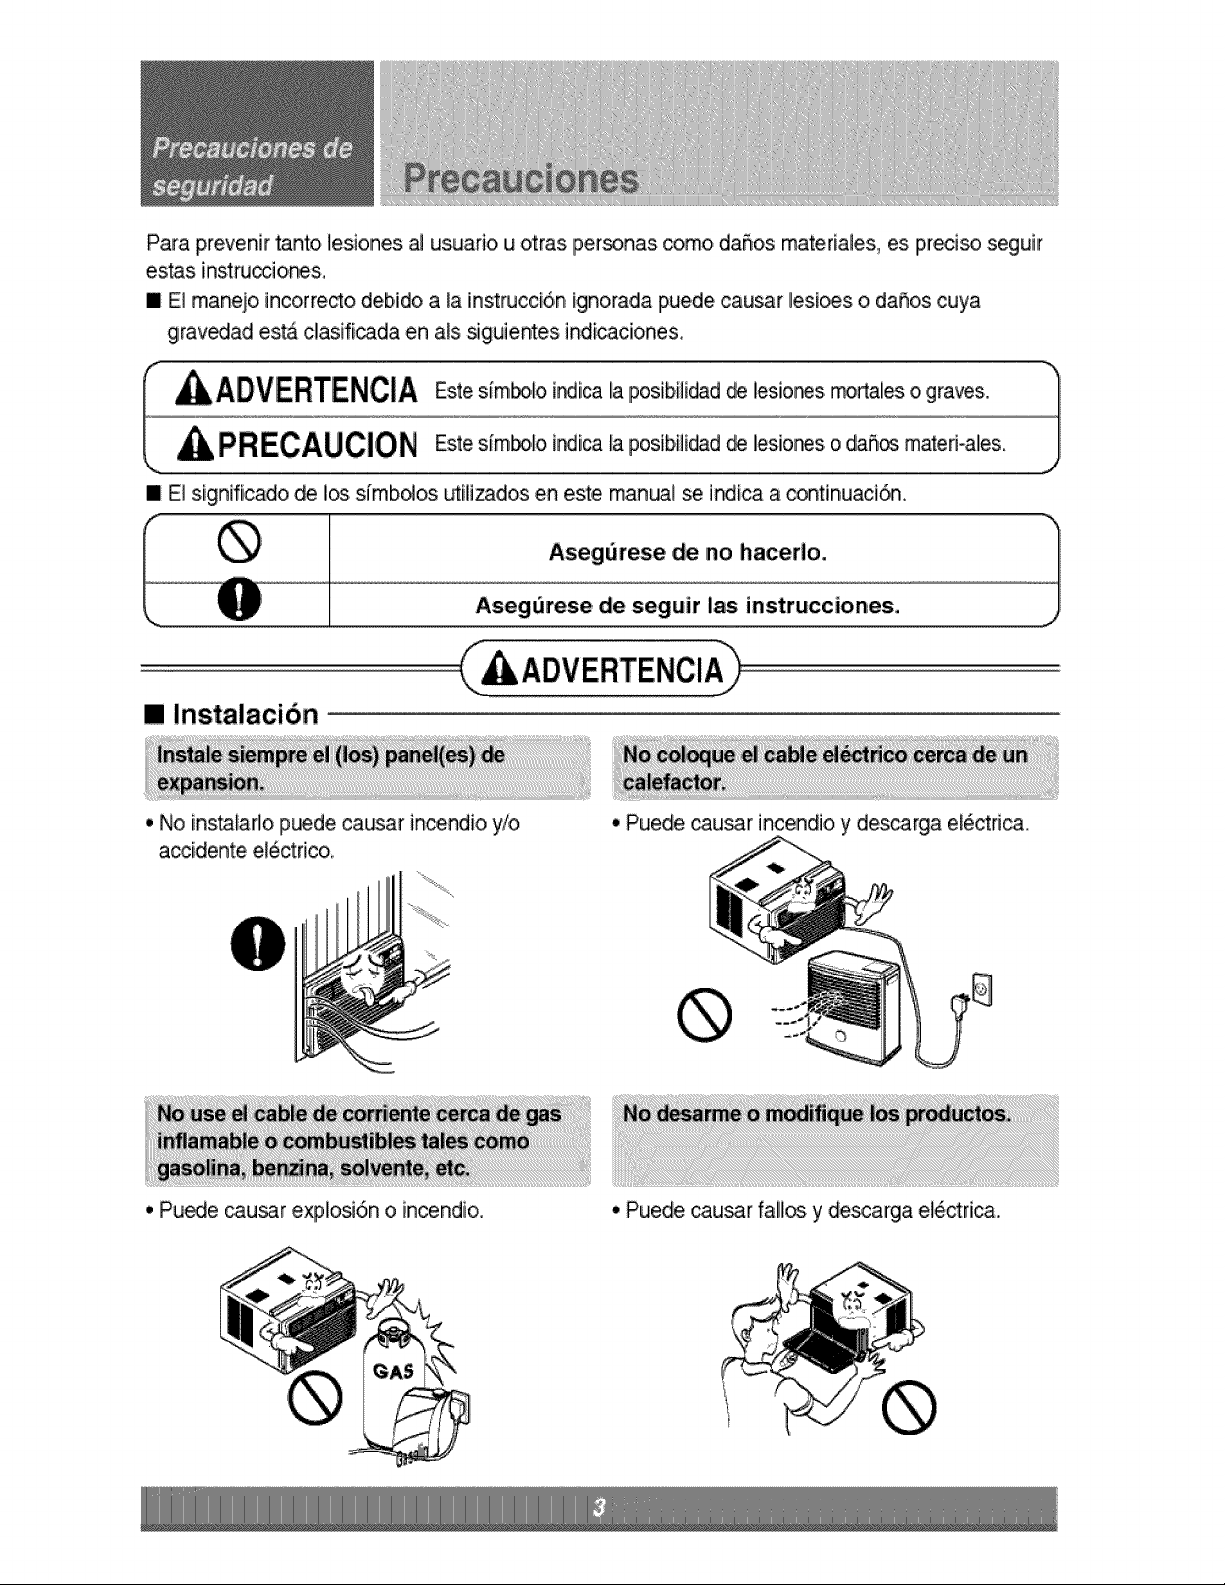
[] Instalacibn
., No ins_a[lo puede ca_a[ in_ndio yio • Puede _usar incen,dio y des_rga electric.
., Pu_e cau_r expl,osJ6n o in,cendio. • Puede cau_r fall_ y de_arga el6ctri,ca.
I Funcionamiento
•De otro, m@, causar,_
descarga el6ctfica o [r#endio
debido a la g,eneraci_ de
calor.
,, CausarA descarga el_,ctfica o
[nce_io, debido a la
generac[6n de calor.
• ,Cau_ra _scarga el6ctr[ca o
in_ndio debido a la
generaci6n de ca!or,
•En caso que n_, puede
•Cau_rgt _scarga e]6ctrica o
incendio.
• Causar& descarga ei_ctfica o
[nce_io, debido a la
generaci6n de calor,
".Si nOihay _nexi6n a masa,
puede pr_uc:[r una
descarga eU_ctri_. (Vea el
Manual de [nstalacil6n )
_us.ar in_ndio y accidente
de _rto circuito.
• Puede _u_r in_ndio y
a_idente elddri®.
•Puede causar diescar_
eli_ctdca..
° PuedecausarunafaHadel
motoro unade_rga
,el,6ctriica.
° Esta no estH dise#ado para
enffiar la ca_ entera.
° Puede cau_r explosi6n,
incendio, quemaduras.
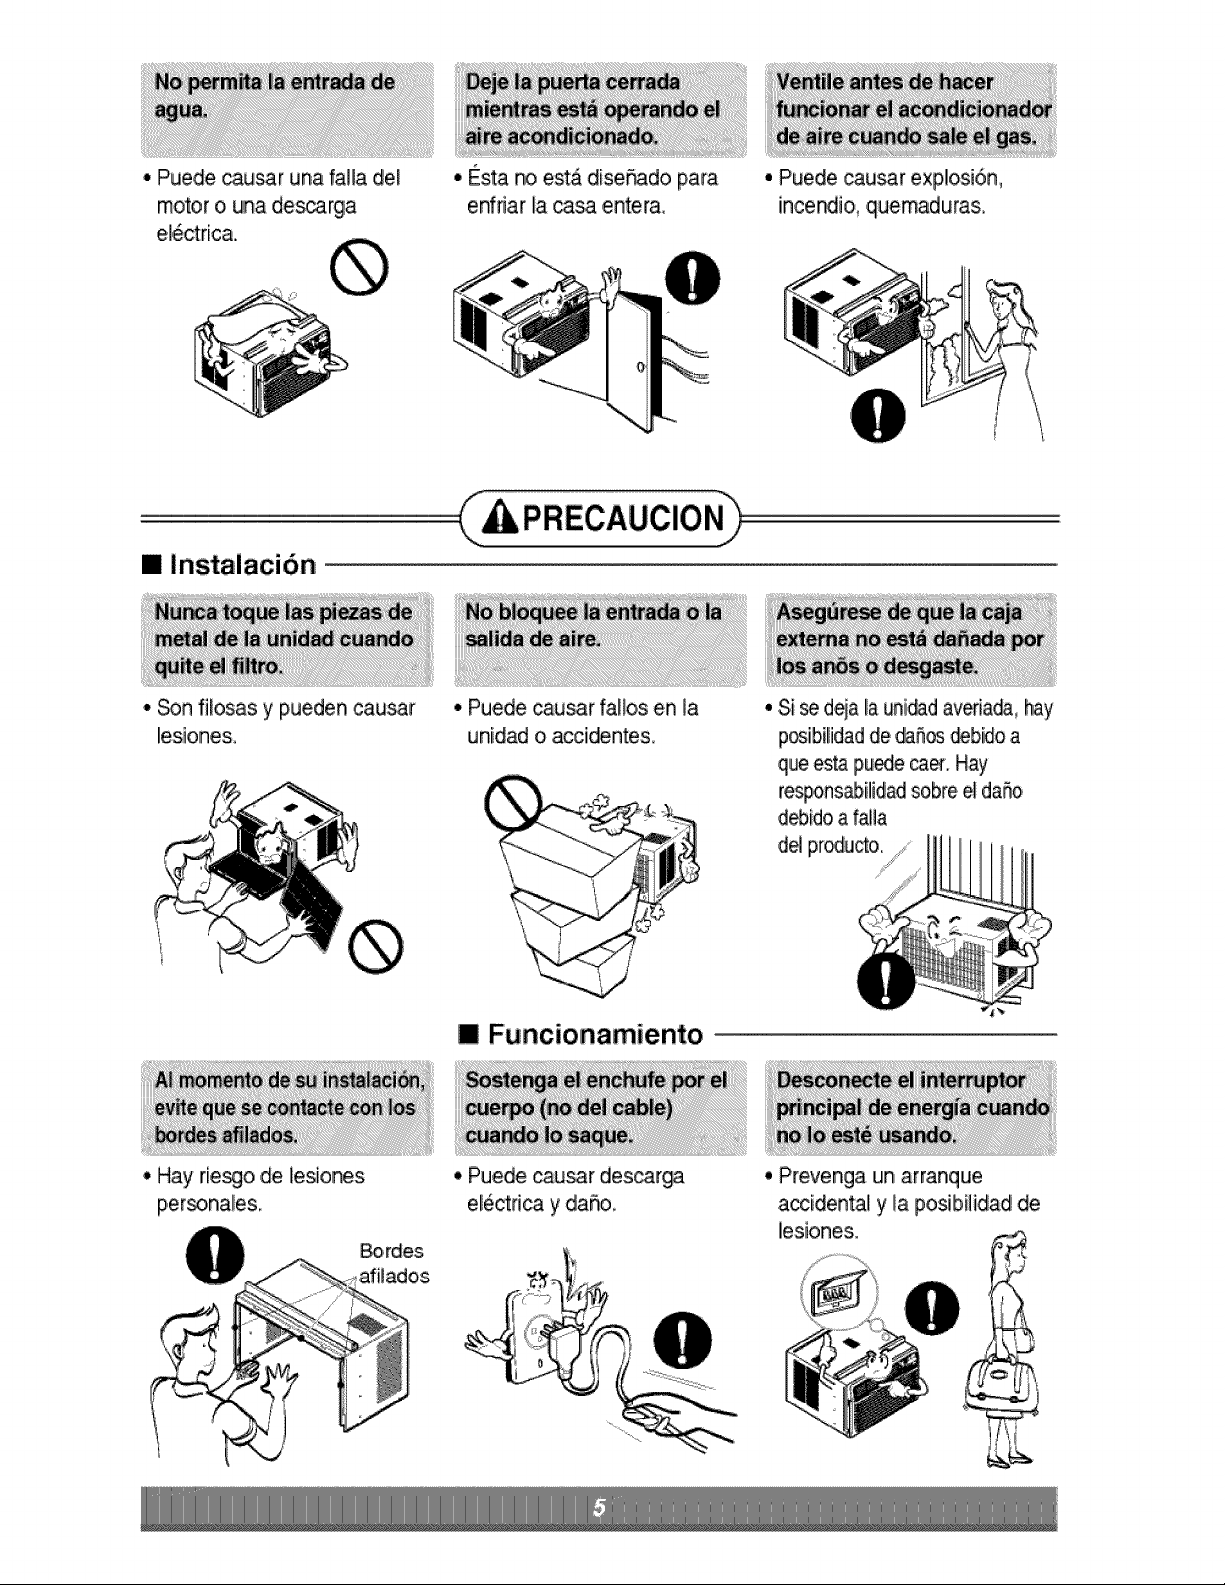
• Instalacibn
° _n filosas y pueden causia[
lesiones,
•Hay rie._o ,delesiones
p,ersonales.
° Puede causar faHos en la
unidad o accidentes,
2,
/
s
y
|Funcionamienito
'i Puede ,causar,des_r_
eU_ctri_ y diaffo
• Si se deja la uni_d averia_, hay
p_ibilidad de daS_ _bido a
que esta puede caer, Hay
respons_ilidad sobre el daSo
d_,ido a falila
d_ pr_ucto.
_,rdes
,afilados
• Prevenga un arranque
.a_idental y IlaposibHidad de
Iiesiones.
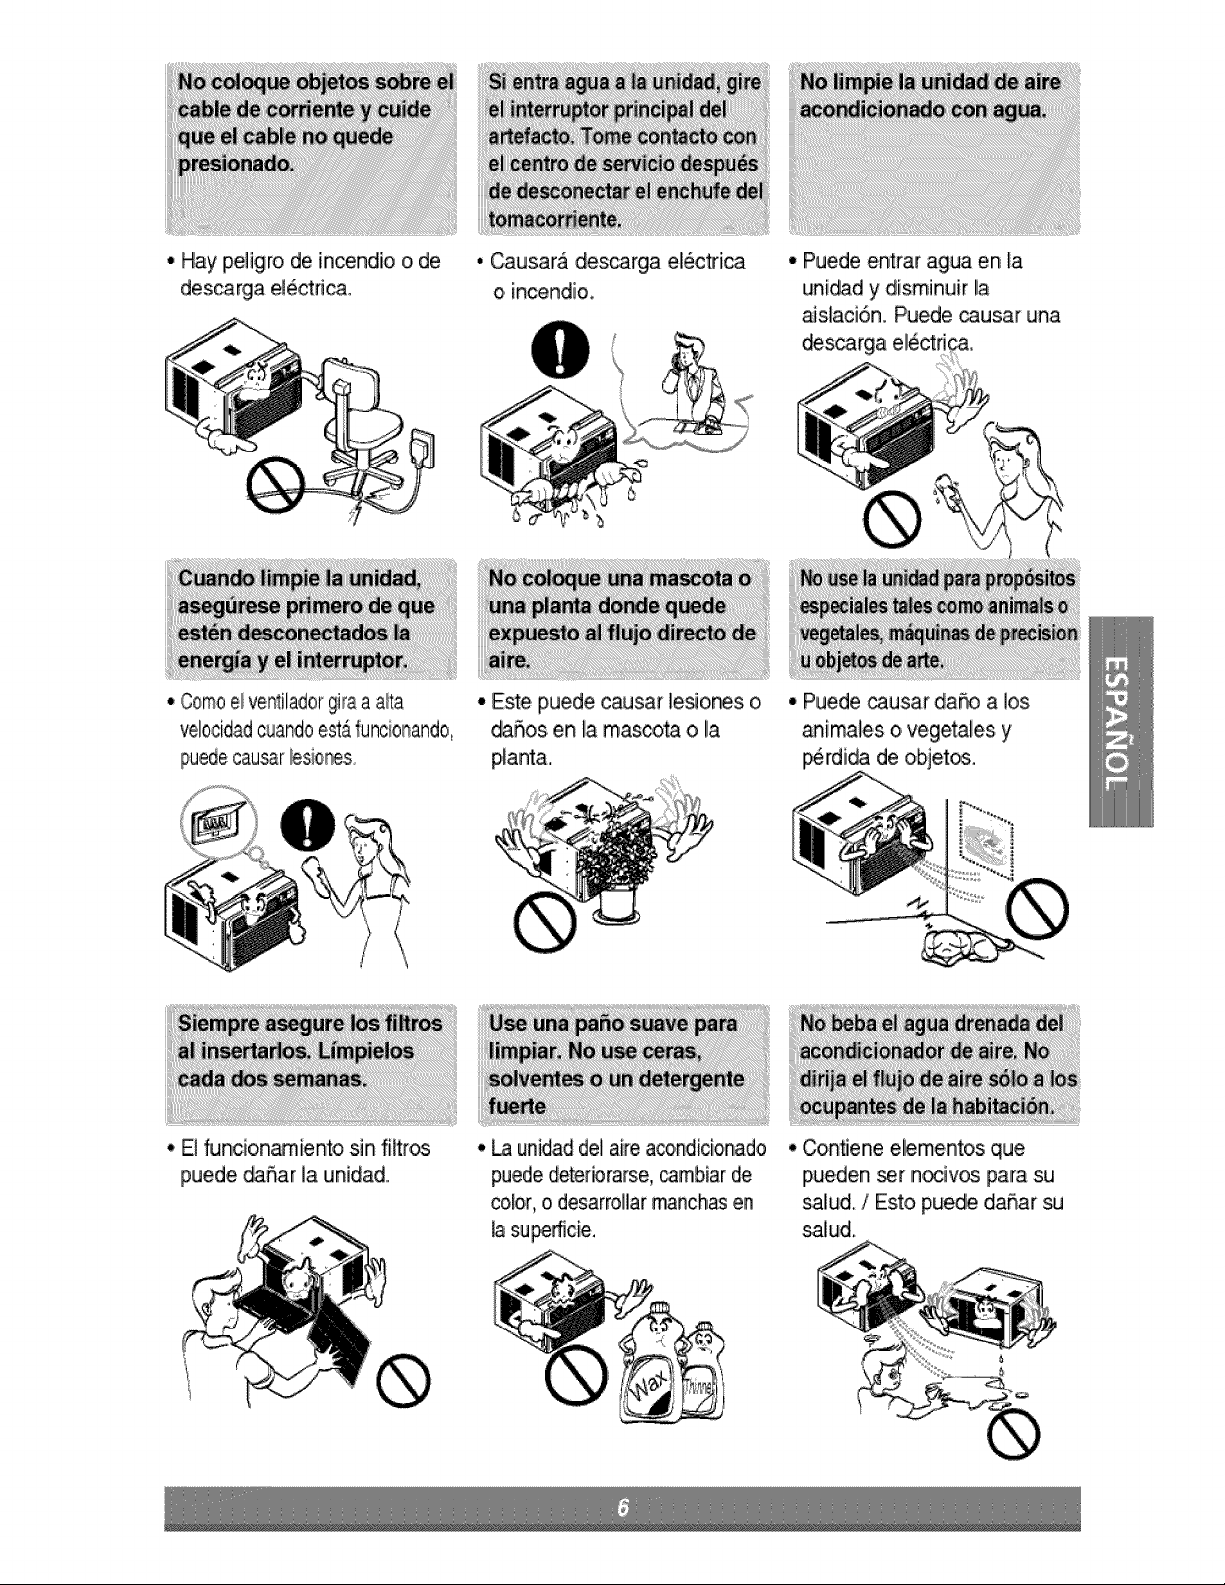
• Haypeligrodeincendioo de
desc_rgae_ctdcA
, Causarades_rga el6¢tri_
o incendioo
• Puedeemraraguaen la
unida.dy disminuirla
_slaci6n.Puede_usar una
descargae!_ctd(
• Oomoelventiladorgiraaa/ta
velocidadcuandoestAfuncionando,
pu,edecausallesior_.s.
• El fun,ciona_iento sin fi_ros
puede _Sar la unidad,.
• £ste puede causar le_o_s o
dafios en Uamascota o la
p,lanta.
• Puede causar da_,o a los
_imabs o vegetaFes y
p_lrdi,_ de objetos..
• La unidad dei aire aco,ndicionade
puede deterbrarse, _mbiar de
color, o desarrollar manchas en
h su_cie.
• Comiene elementos que
ipueden set nocivos palm sui
salud,/Esto puede daSar
Cc_ctat un es_Ja[ista para la instaJac_n..
C_oque e_enchufe c_rectamente.
_No compa_ la _[i_ con otro_ artefacto,s.
No _e un cable de extensi_.
_No arranqueld_enga _ funcionamiento enchufandoide_nchufando e_cable de corri_te e_ctrica.
Si cuerd_ta_Sn _ daSa, reempLa_ _o con una _rte auto_i_da..
_{_ Estar exp,_sto al flujo ditto de aire _r un peri_o _go de _em_ puede _nst_uir un ri_go _ra su
salud. No exponga alas _rsonas, m_co_s o p,[_s al f[uio diire_o_r perils largos de tiem_.
_, D_ido a la _ibilidad de una deficie,ncia de oxigeno, ve,rCd_la h,abib_cbn¢uland,o_i_i,cs,al mismo
tiem_ estufas u otros _ar_ _ ca_efacci6n.
No use este acondicionador de _re para pro_itos d_ermina_s no,es_cificados (p_ ei.: prewar
dis_sitivos de pr_isi_, _imentos, cachorros, plantas y _,i_ de arte),. Usarb de esta manera
£_de daff_ _les elementos.
No _e agua _ra limpiar adentro del acon_icio_dor. La exposici6n alagua pu_ destruir A aisAci6n
yesto a su ve,zprovo_r una descarga _ectri_,
Cuando [im#e la unidad, asegurese que la c_'ie_e y el interruptor esten d_con_d_.. El venfl_3dor
gira a muy alta vebcidad cua_o, es_ funcbnando. Existe _a_ibilMad de lesionarse si }a e_rgia
con_ acci_n_lmente cu_do este _impian_ las piezas interns de la uni_d.
Pare r,e_racbn y mantenimiento,, _n_,_e a su pr,ov_dor de._rvicio,,
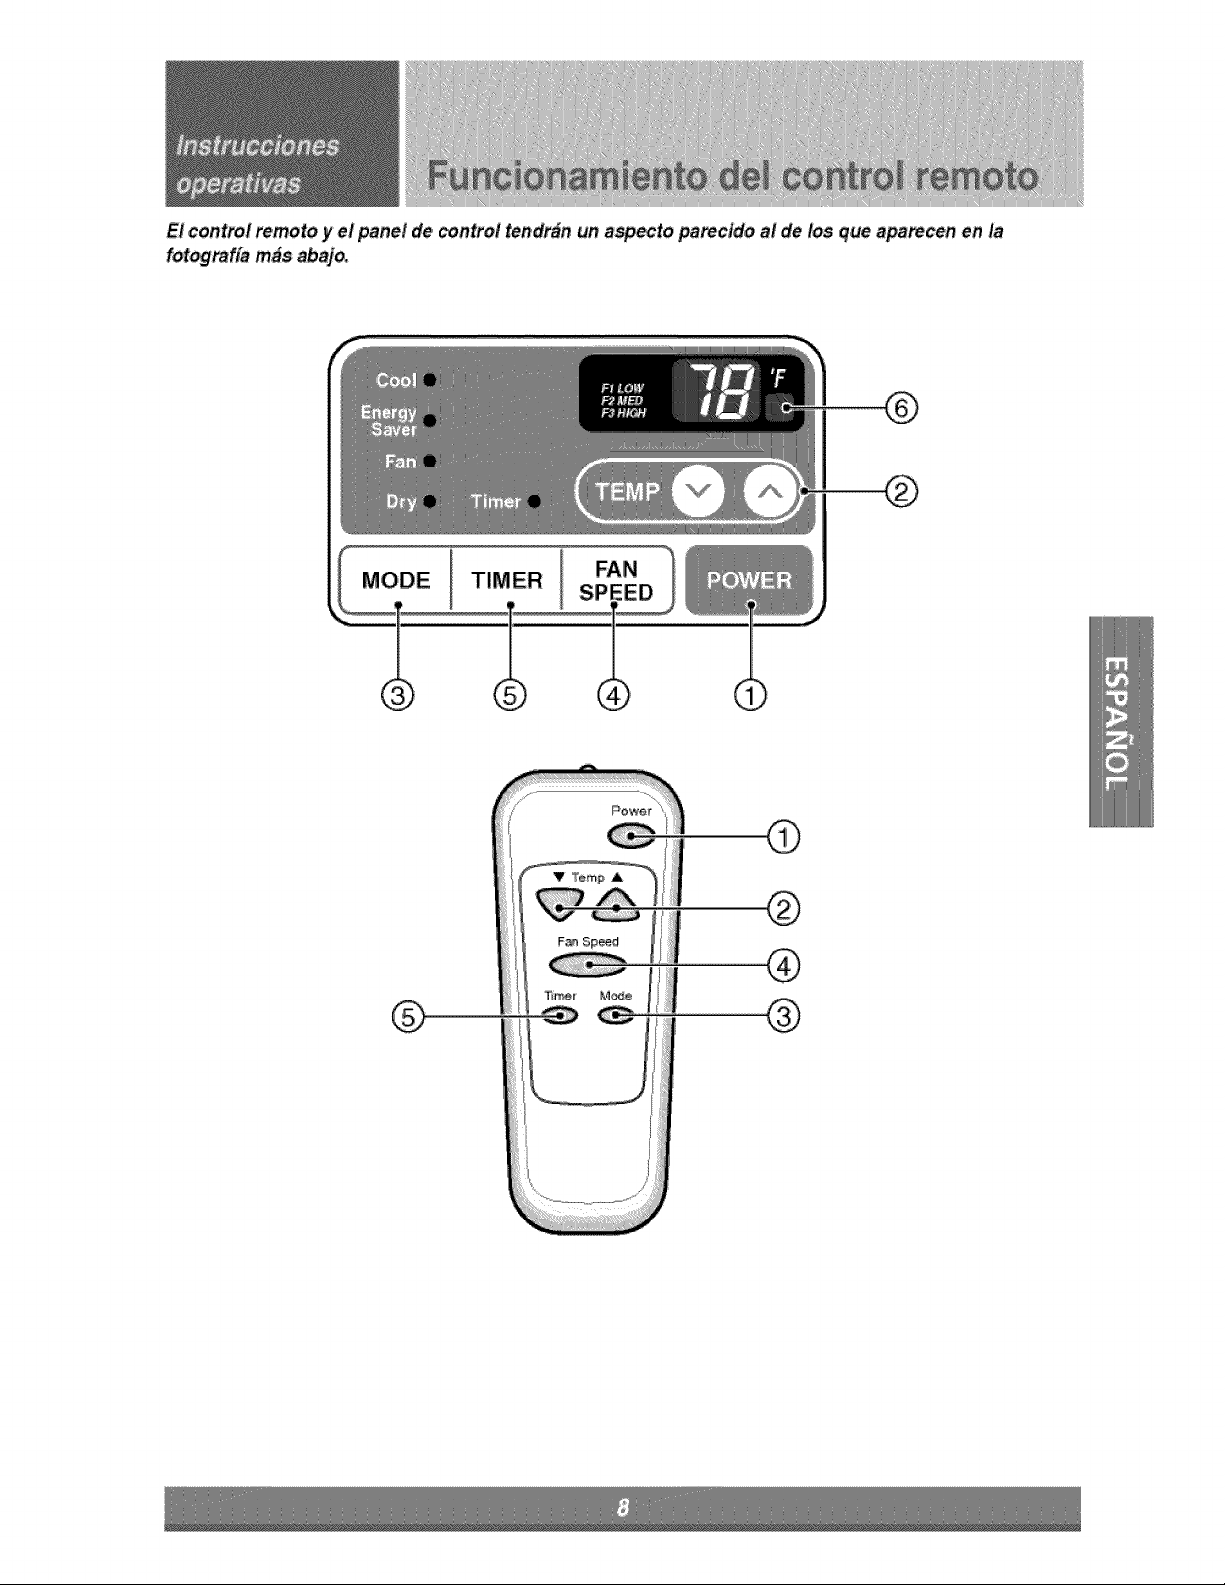
E/control mmoto y el pane! de, control tendr_n un aspecto pamcido, a/de los q,ueapamcen en la
fot_mfta m_s abajo_
®
_WER ,(encelndido)
E/funcion_i,ento _ iniciiacua_o se ipulsaesta_la y se de,one ¢uandose la gr_iona nu_amenteo
CO.'T LDE MPE.ATURA
E!termostatomoni_re,ala tem_ra#jra de la hab#_ci6aparsman.her latem_ratura de.ads
Eitermostat:opu_e ser coiocadoentre60"'F~86'>F(16_C_30'C)
L,_unidadtoms unpromediode _ minut_ pars aius_r iatemperaturade la h_,itaci6nen I':'F
FUNCIO,NAMIE_O OEL_ SELECTOR
Sele_ioneel modofre_o (co_) parsenffiaria _bi_ci6n,
Sele_ioneel re,odD,_ _orro de energiaparsel funci_amiento del ahorrode ene_g[a,
Sele_ioneel modoventilador(fan}_ra elfuncionamien_de_venti_ador.
Seleccioneel modos_o (d_) parse/ funcionamie_ose_,
_CT_ DEVELOCIDADDELVE_ILA_R (FANSPEED),
Parsaumenta__aca_c:_ad m_ntrasse refr_ca se_cione unama_r vel_i_d del ve_#ado_
3 Pasos:High(a_) --_L_ (baja}--,Med (m_ia)
C_t'_M_ O_'_O_ (E_ENOIO_APAGA_) Elcror_metropuedeser col_ado _ra iniciary detener_aunidad
en increm_t_ _r hora (has_ i2 hor_s).
SENSOR DEL COETROL RE_O
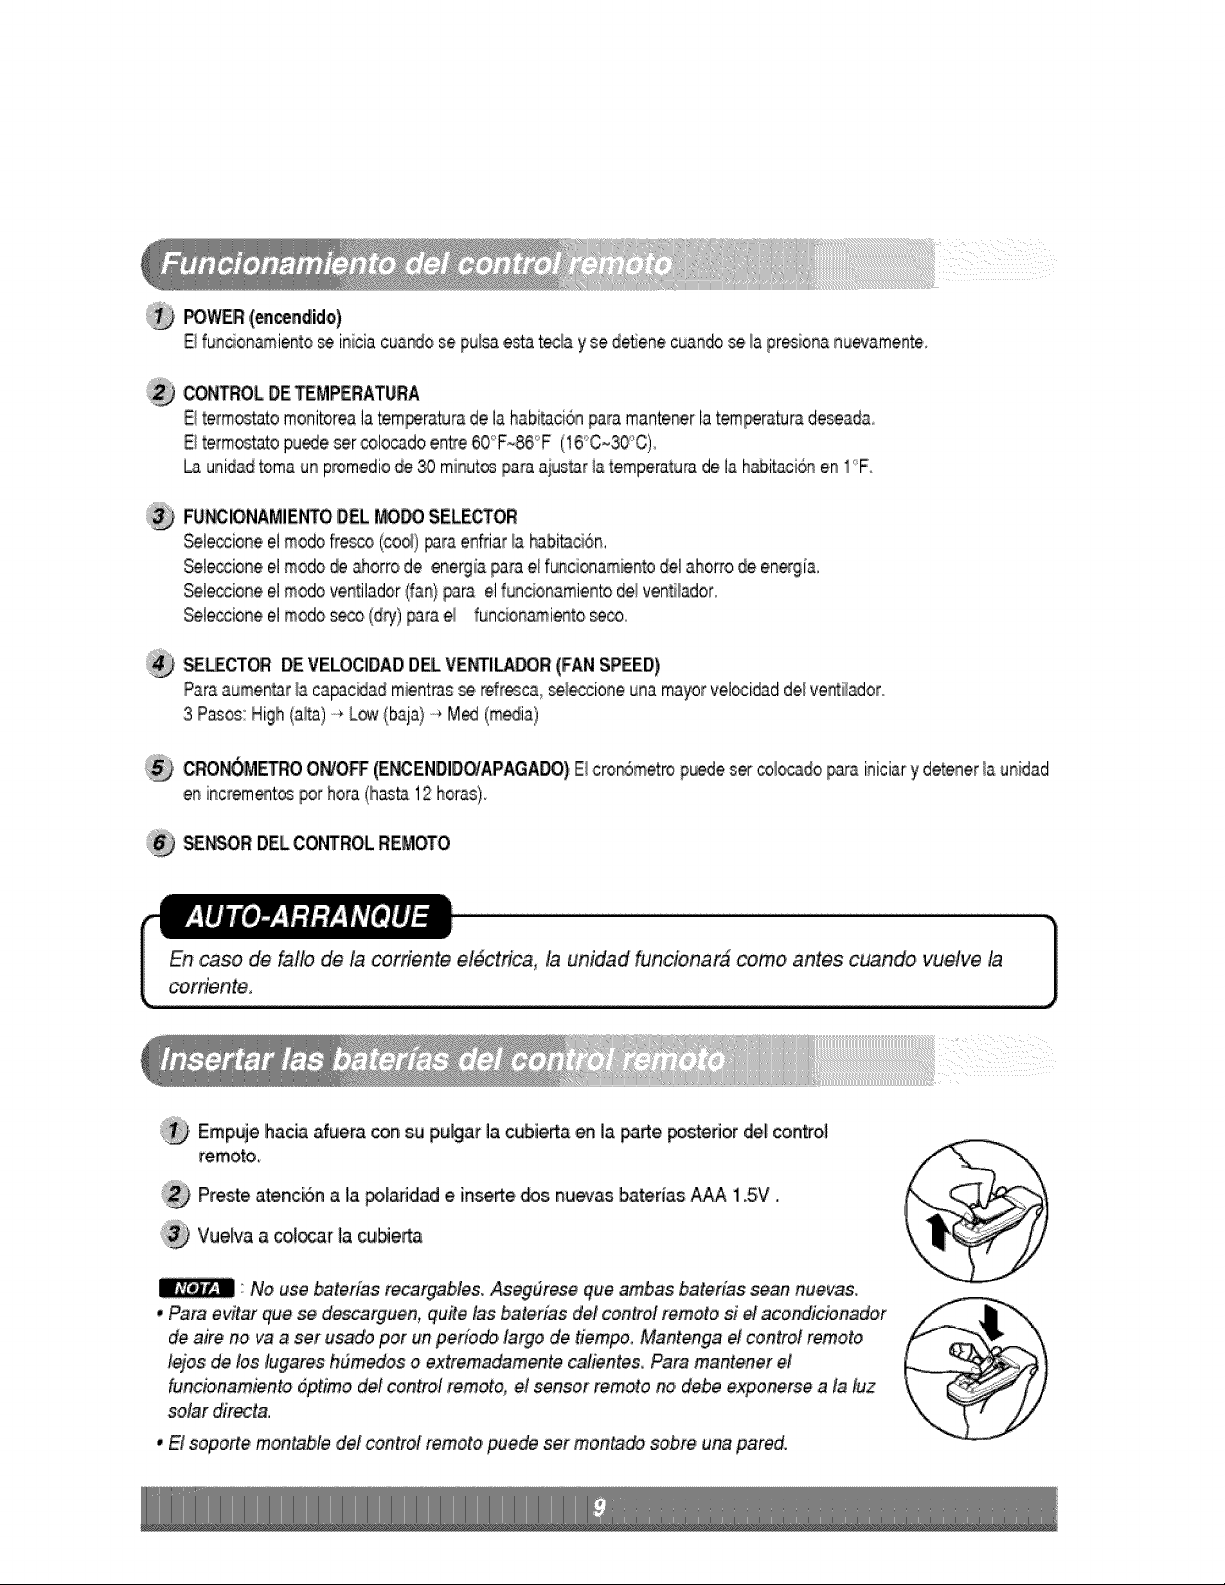
_' Empuje hacia afuera _n su p,ulgarla cubie_a ,onlia pQ_e _StetiO[ del control
remoto,
Preste atenci6n a la _f_idad e in_e _s nu,evasbaterias AAA i .5V,,
Vuelva a co,_ocar_acuNerta
:No use _'tefia'.s r_argables. Aseg,dr_e que ambas baterias scan nuevas.
•Papaevitar que se descargu_n, quite las baterias det control remoto si dacondicion_dor
de sire no 'vaa set usado p,orun period, largo de tiempo. Mantenga el control remoto
_os de los lugares hdmedos o extremadarnente calientes. Pars mantener e!
funcio,narnbnto dptimo de! control rernoto, el sensor rernoto _, debe exponerse a la luz
so_r direct&
• E! sop,oRemontable del control remoto,puede set mon_do sobre una pared.
Para m&xima eficiencia de fr_cura, ClERRE la ventiiaci6n. Esto.permitir& la circulaci6n intema de _re.
ABRA la ventJfaci6npara d_cargar eJaire v_i.ado,
CERP_,DA=m.VENTILACIONj- A,BIERTA
_ ' Antes de usaf ta funcidn' de 'ventilation,.caique
ta paiar,ca de vent_Ta'cbntira_o h,_ia fuera de
la Parte A y presionandola en su lugar.
El fl!u_ de aire puede _t aius_do _mbiardio la diirecci6n _ ks rejillas de ventiilaci6n de1acondiciona_r de
aire. IEs_[opu_e _mbien increment liaefi_cia del aco,ndiciona_r de aire.
* A|ustat la dlt_16n d_ flujo de aire hot_ontal.
Aiustar las rejiilas verticales haciala izquierda y
_recha ¢ambiar_ el flujo horizontal,,
•Ajus_ar la dl_6n del fluio de aire verlical
Ajust_ el &la_ horizontalihac_ arriba y abap
¢ambiar& e_flujo de aire ve_ical, La aleta pu_e
ajusta.rsepresio_ndo hacia de,ante o hack atr&s.
Adjusting hotlzonta_air flow Adjuring ve_lcal air flow
• R_ommendi_ otien_tiion of louvers
Adiu_ buyers to,face upwards when _oling to m_imize _ling e_ciency.

Descon_telae_rg(aydesenchulela u_dad antesde li_tat el _ondtc_na_t de aim.
Elfiltro de aire detr&s de la _rfil[a de entrada die_ _r _ntrolado y lim_ado po,rIo menos una vez cada d_
semanas (o cuando sea n_arb) _ra m_tener _ rendimi_to 6_mo ,delacond_ionado_ _ aire.
Como quitar el filtro de aire
La rejii_ p,ue_ set abie_ des_ _a_rte superior
_ra mant_im_nto f&cil desp_s de.la ins._laci6n,
Abra la r_iUa de entrada _rando de _apuerta
externa en _ pa/rtesu_dor de la unidad (basada
en ir__taiaci6n),..
i:_ Tire de Ilacu_ Jig_ram_ p_ra liar.at el fi_o.
Tire del fi_ro _ la misma direc,cio,nde la a_irtura.
Liimpiee] fiffro con agua _bia y ja_no_. El agua
de_ estat _t de_ioi _ los 40_C (104'_F),
Eniuagiuey sacuda suavememe _ ex:c_o ,deagua
de! fi_t:ro°D_e]o s_ar antes de c_ocar[o
nuevamente.
La b_d_a de base pu_e inundarse d_ido a un ex_o de
hum_ad° Para drenar el excese de agua, quite _a_pa de dtenaje
desde la p_e _terior de A unidad y asegure e! carlo de drenaje
Cu_do presione e_caffo de drenaje en su _ugat,ap_iquefuerza en
direccio,n _uesta alas a_e__as.,para ev_ar Ilesionarse.

PRECALIC|_N: Este dispositivo debe s_ instalado de acu_do con la notmas
nacionales de _b|e_o. II_ainformaci6n que figura a continuad6n constituye una guia
para exp|icar |as cara_erisUc_ _| producto.
@
®
®
Pue,dei e;sc_r ent_ I_ dosm_od_ abajod_critos de acuer_ a la forma de,I tabutetede su ventanay su prderencia,
• Aprete el o_urador usan_ 2 hoyos de t_illo, y
_que el cab_ el_tdco a traves de la ranura °A°
• Apr_e ,elobturado,r usando el hoyo u'zquierdode
tornillo,, y gire apro,piadlamente_ra sa_r el cable
electrio3 a traves de,_ ranura "B_
Paraprevenirlavibracbnye[ruMo,a_gure_ que
launii_desteir_tala_cons_un_d yfirmeza.
ins._e la unidad do.nde[a luz de_sol _ _iga
direc_me.nte en la misma.
Oer_
PRECAUCION: Todos los dlabes |aterales de| gabinete debe,n per_n_et expuest:os a la
_rt,e e_etior de la est_u_,
instale la unidad un peco inclinada para que la _e I_sterior qu_e ligera_nte m&s b_a q_ el ffente
(alfred,or de 1/2"), Esto,forzara al agua conden_da a fluir _cia el e.x!e.rior,
hs._le la unidad con el fondo,aproximadiame_e _"~60" _r encima dellnivel dellpi_.
_' To_s las piezas de so_,#e dean estar aseguradas con ma,dem fuerte, mampostena, o,meal
• IE_ unidad esfA di_ffada _ra ser inst_ada en
v_na:s _b[es bascu_a_tese-sta_ar con _pl_ud de _. _apertura tea! de,de 23" a _°, 23? a 36"
•_s hojas infenor,esy su_riores de Ilaven_na d_in 15"mi_
, (_
abrirse b s_ciente para permitiir una luizve_ical de e_rr_ar__ la_r_na)
i 5°desde,la pa_:einferior de _ahoja SUl_rio[ Pastael
_iento de Ilarental,.
I.._ La banda

I_ NOMBREDE LA PARTE C_t_ad
1 MARCODELA CORTINA 2
2 DINTELDESO_RTE 2
3 PERNO 2
4 TUERCA 2
5 TORNILLO(T_P,OA} 16
6 TORNILLO_T.IPOB}
oJLo
8
5
BURLETEDEESPUMA 1
_:_ SUPERIOR _
10 BURLETEDE ESPUMAoPE 1
11 GUiA DELMARCO 2
12 ABR_ADERAdeFIJACi0NA_ VENTAN,A 1
i3 BURLETEdeESPUMA-PE 1
14. CANOde ORENAJE 1
DEST,ORNILLA_R (Phi|ips yRatead), REGLA_ CL!,CHILLO,, MA_LLO_ _PIZ, NIVEL I
PREPARACI6N DEL CHASiS
,Qu_:eI!ostom[ll!os que unen el 9abinet:e a amNs _ados.y
a la _d.e _sterior.
D_lice la unidad des_ el 9abin_e asiendo la maniia de
la base de la _ndeja base mier_ras con la otra mano
_stie_ el 9abinete.
Corte el _llo de la P#ia de la ventana en la medida
adecuada Q,u_e el recubrim[ento del s_rte y _9ue e_
_Hete de E_uma-PE @ a la cara inferior de la hoja de
la ven_ana.
Qu_e el _po_e de la 9uia supedor del buHete de
Espuma PE (f_ y p6guela a la _rte inferior de la 9uia
superior @_
Fije ia guia superior a la parte superior _l 9a.binete con
3 tomillos tj_ A _3,
Ir_erte las guias del maroo @en la _rte infedor de_ (TI PO A)
i_erte e] m,arco de Ilacodina O en,la guiia superior (_ y
las guias del marco @.
:_ Fiie,las co,rt[nas a I,aun[&3d con 4 tomiHosti_ A _,

Abralave_tana,Marqueunalinesenelcentrodel
asientodeIsventsna,
Coloquecuidsdosamenteelgabinetesobree_asiento
delave_anaa_ineeiamsrcscentraldeiaparte
inferiorfrontalconlalineamarcadsenelcentrodel
asie_ode13ventana.
Tireiahoiainferiordelaventanadetrasdelagu[a
superior®hsstsque,seencuentren.
Gala
Asientode h ventana
Angulofronta_ Fig. 1
_TA: No #re hacia _ap ta heja de la ventana de un
mode,que impida el _virniente _l ma_ _fa
cortin,a0.
Arme _ modo flojo el soporte dei dintei @ usan®
las ps_es que se muestran en Fig 3,
Fig.2
AFUERA
Seleccione is posici6n en la que colocar& ei sopo_e
delldinte_@ cerca ,delpunto mas extemo del di_tel
(Vet Fig, 4)
_TA: Tenga c,uidadocuando ins,talael g_te #as
,gUfaS de marco$ @ _ mmpen fac'il,_te)
@ Agregue el soporte dei dinte_¢_ ai hueco _ ia guia
de_g_inete segOnla posici6n se_cionada usan®
2 torniHosti_ A en cada soporte (Ver Fig, 4)
AOENTRO
®
AFUERA
Fig,3
Fig,4
El ga,binete de_ set ir_taiado con una I!igera
indi_ci6n (ap_oxJmadamente 1/2°) de modo que
el lado exter_ quede hacia abajo (ver Fi£. 5}
Ajuste el perno y/la tuerca de[ _lpo_e a_,di_el
para equilibrar el gabinete.
'_ Agregue e_g,abin,etea[ asiento _ la ve_ana
,colocando los,'tomilllos ®(Tipo B: I_rgo i6mm
5/8 - pulga_s - _ajo,,) a trav_ _1 _ngulo,
frontal en el asie_o de la ve,ntan&
;:_ Tim cada marco,de la co,_ina 0 compbtamente
para cada carril de hoia _ ven_na y repita el paso
2.
Tomillo(Tripo B}Q
E
.E
S®o_,edeldimet
Car_ildeia
ven_na
gulo [rontal
Tornil[Io(Ti_B)
Fig., 5
':_ Agregue cada marco de _acoRina @de,Is hoja de
la vent_a us&qdo tomilbs O (Tipo C). (ver Fig 6) c®
PRECA,UCION:No perfore en la _ndeja inferior,
La' unidad' es_ di_ada _ra' operar con
monte _2" _ agua en la
ba_eja inferior.
No hay _agregar agua a la
ba_eja si la bandeja es_ _a.
Fig. 6
@ Des!ice la unidad dentro de! gabinet:e,(ver Fig, 7}
PR'ECA_ION: Para p,r_sitos _ segu_ad, reins_le
los tomilios (Tipo A) a _,s ta_,s de!
gabin'_e. Tomiili[o (Tipo A),
Cable de alimen_ci_n Tornillo
(Tipo A) Fig. 7
:@ CorSeei budete _ espuma ® en ei largo s,decus@
e inse_e!o entre la hoia superior de la ventana yen
la hoia inferior de la misma (vet Fig 8) Fig., 8
Agr_ue la abrazadeta de fiiaci6n @ con un temille
Ti_ C Q (vet Fig, 9), I t.iAbrazadera de fijaci6_:
___....__ la ventana _
Fig. 9
Agr_ue la pardlla frointal ,allgabinete i_rta_o
Ilas_staniss en la pardlla dentro de ins p_ta_s
de1_ente de_gabinete. IEmpuje la patrillia hasta
que se fije en el lugar. (ve_ Fig,lO,)
Fig. 10
Tire hacia abajo la pardlla _ entrada y asegure[a
con un tornil_o Ti_ A @,a traves de la parrillla
fro,ntal, (vet Fig 11)
La instalaci6n del acondicionador de aire de
ventana pata habitacion es_ ahora
completadao Vet _DATOS DE ELECTRICIDAD
para unit _ cable de alimentaclbn a la salida
,et,_tri_.
Fig. !l
Uso de los cables de extension
-A causa de peligros de s_ur_dad potencia_es_desaconseiamos seriamente el use del cables de extensi6n
Sin embargo, si desea usar un cable de extensi6n, use f_ncable de extensiSn CSA ce_ificadoiULdistado 3 hilos
{de cokqexi6na masa}, con un range de 15A, 125V.
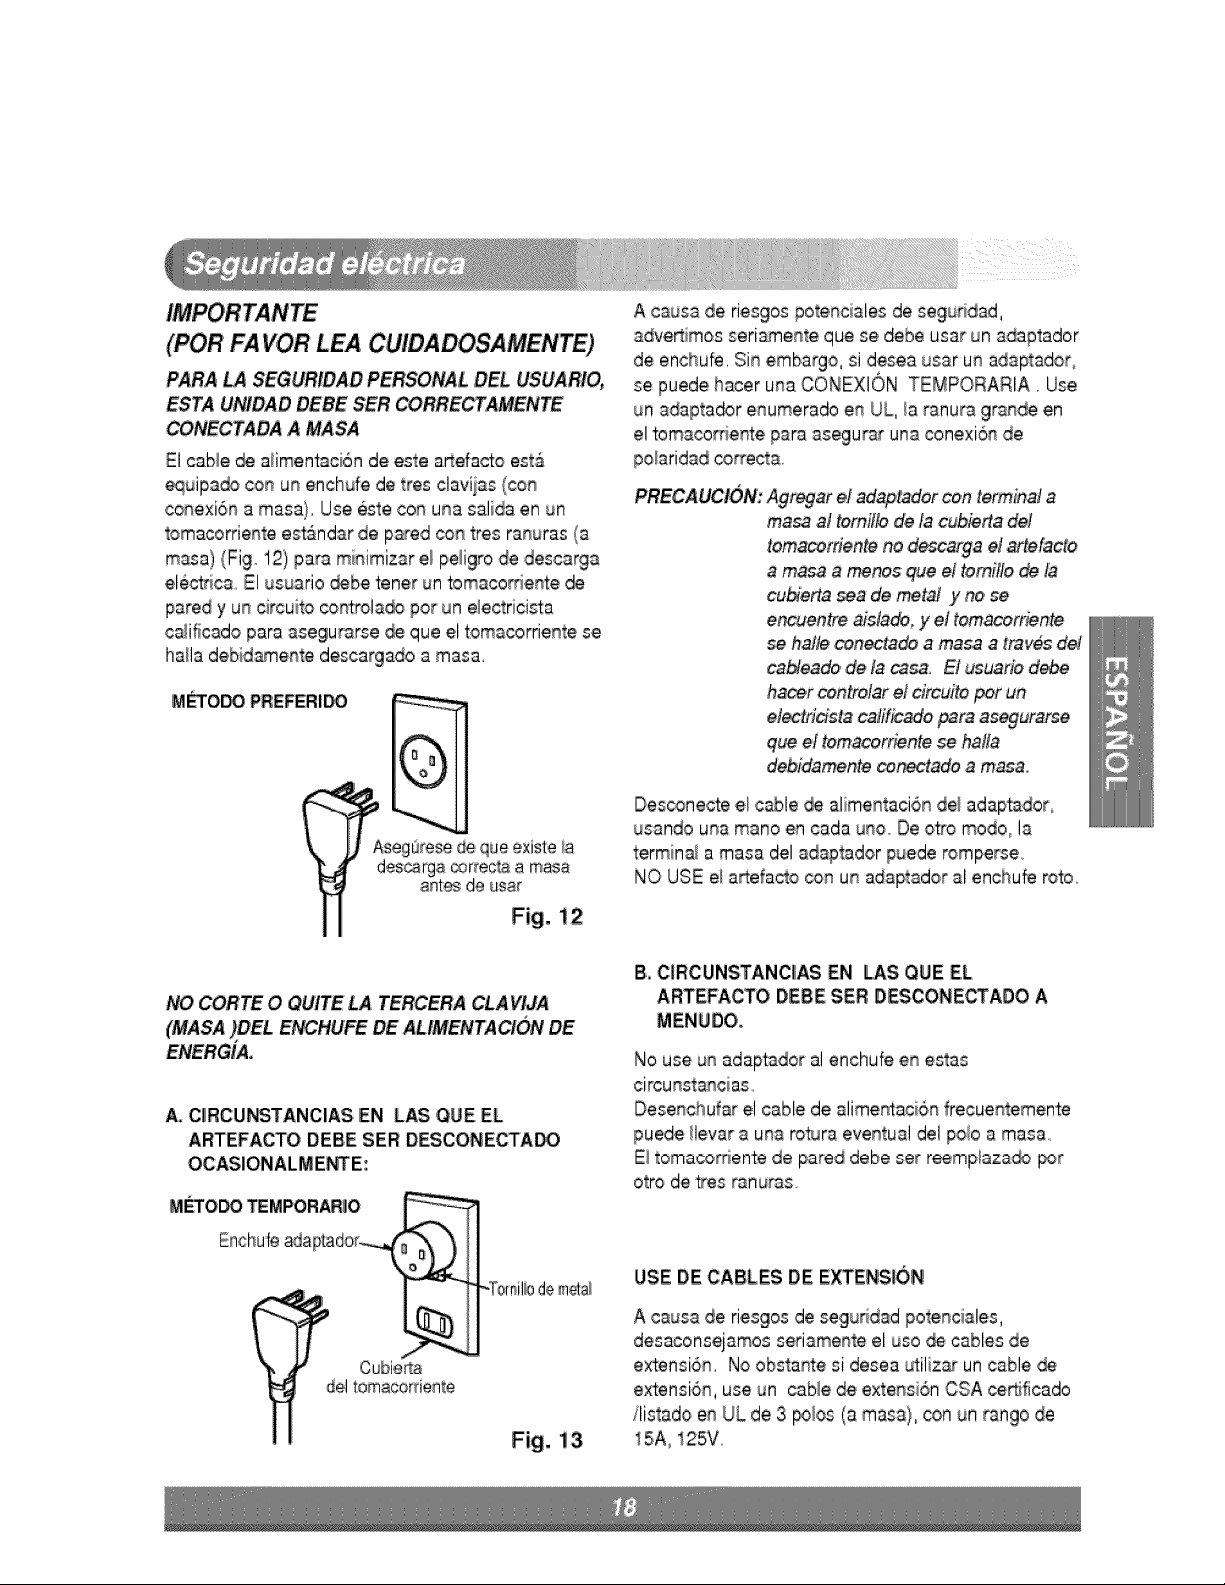
(POR FAVOR LEA CUIDADOSAMENTE)
PABA LA SEGURIDAD PERSONAL _EL USUARIO,
ESTA UNIDAD DEBE SER CORRECTAMENTE
CONECTADA A MASA
El cane de a_imentaci6nde este a_efacto esta
_uipa_ _n un enchufe de tres claviias (con
conexi6n a masa) Use este con una salida en un
tomacorriente est&ndar de pared con tres ranuras (a
masa) (Fig 12) para minimizar el peligro de descarga
electrica. El usuario debe tene,r un tomacomente de
pared y un circuito cont:rola_ pot un elec_ricista
caiificado para aseguFarse_ que el tomacorriente se
halla de,bidsmente descargado a masa,
A causa de riesgos potenciales de segu_dad,
advertimos seriamente que se debe usar un adaptador
de enchufe. Sin embargo, si desea _Jsarun adaptador_
se puede hacer una CONEXlON TEMPORARIA. Use
un adaptador ,enumeradoen UL, _aranura grande en
el tomacorfiente para asegurar una ,conexi6nde
PRECAUC_N': Ag_ar e,Iadaptador con terminal a
m_' al tomiilo de la cubierta de/
tomacerfiente no ef afrofacto
a masa a meres queet tomiiio de ta
cubierta sea de metal y _i sei
encuentre dsta_, y ei tomacorr_nte
halle conedade a _sa a trav_ d_
cablea_, de la casa. El usuario debe
hace_contrdar el drcuito per un
ta _ra as_urarse
que et tomacorriente se halJa
debidamente cenectado amas&
Des_necte el cable _ alime_taci6n del adaptadot
usando una mano en cada uno. De otto modo, Is
terminal a ma.sadel adaptador puede romperse
NO USE el a_efacto _n un adaptador al enchufe roto,
COR'TEO QUITE LA TERCERA CLAVIJA
(MASA )DEL ENCHU'_ DE ALIMENTA_(3N DE
A, C_R'CUNSTANClAS EN LAS ,QIJEEL
ARTEFACTO DEBE SER DES,CONECTA_
OCAS!ONALME_E;
IM_0_ _ MPO,RARIIO
E_lchufeadap'_do_(
d,e#l_a_
Fig, 13
B,iCIRCUNSTANCIIAS EN ILAS QUE E,L
ARTEFACTO DEBES,ER iDESCONECTAOOA
MENUDO.
No use un adaptador al enchufe en estas
circunstancias
Dese,_chufare! cable de alimentaci6n frecuentemen'te
puede !levar a una rotura eventual del IpO!oa masa.
Ei tomacomente de pared debe set reemp_aza_ p_r
otto de tres ranuras,
USE DiECABLES DE E_ENSI6N
A causa de ri,esgosde segiuddad potenciaies,
desaconsejamos seriamente el _so de cables de
extensi6n, No obsta#te si desea utiliz_ un cable
extensi6n, use un cane de extensi6n CSA ce_ficado
/listado en UL de 3 _l,os (a masa}, con un tango de
15A, 125Vo
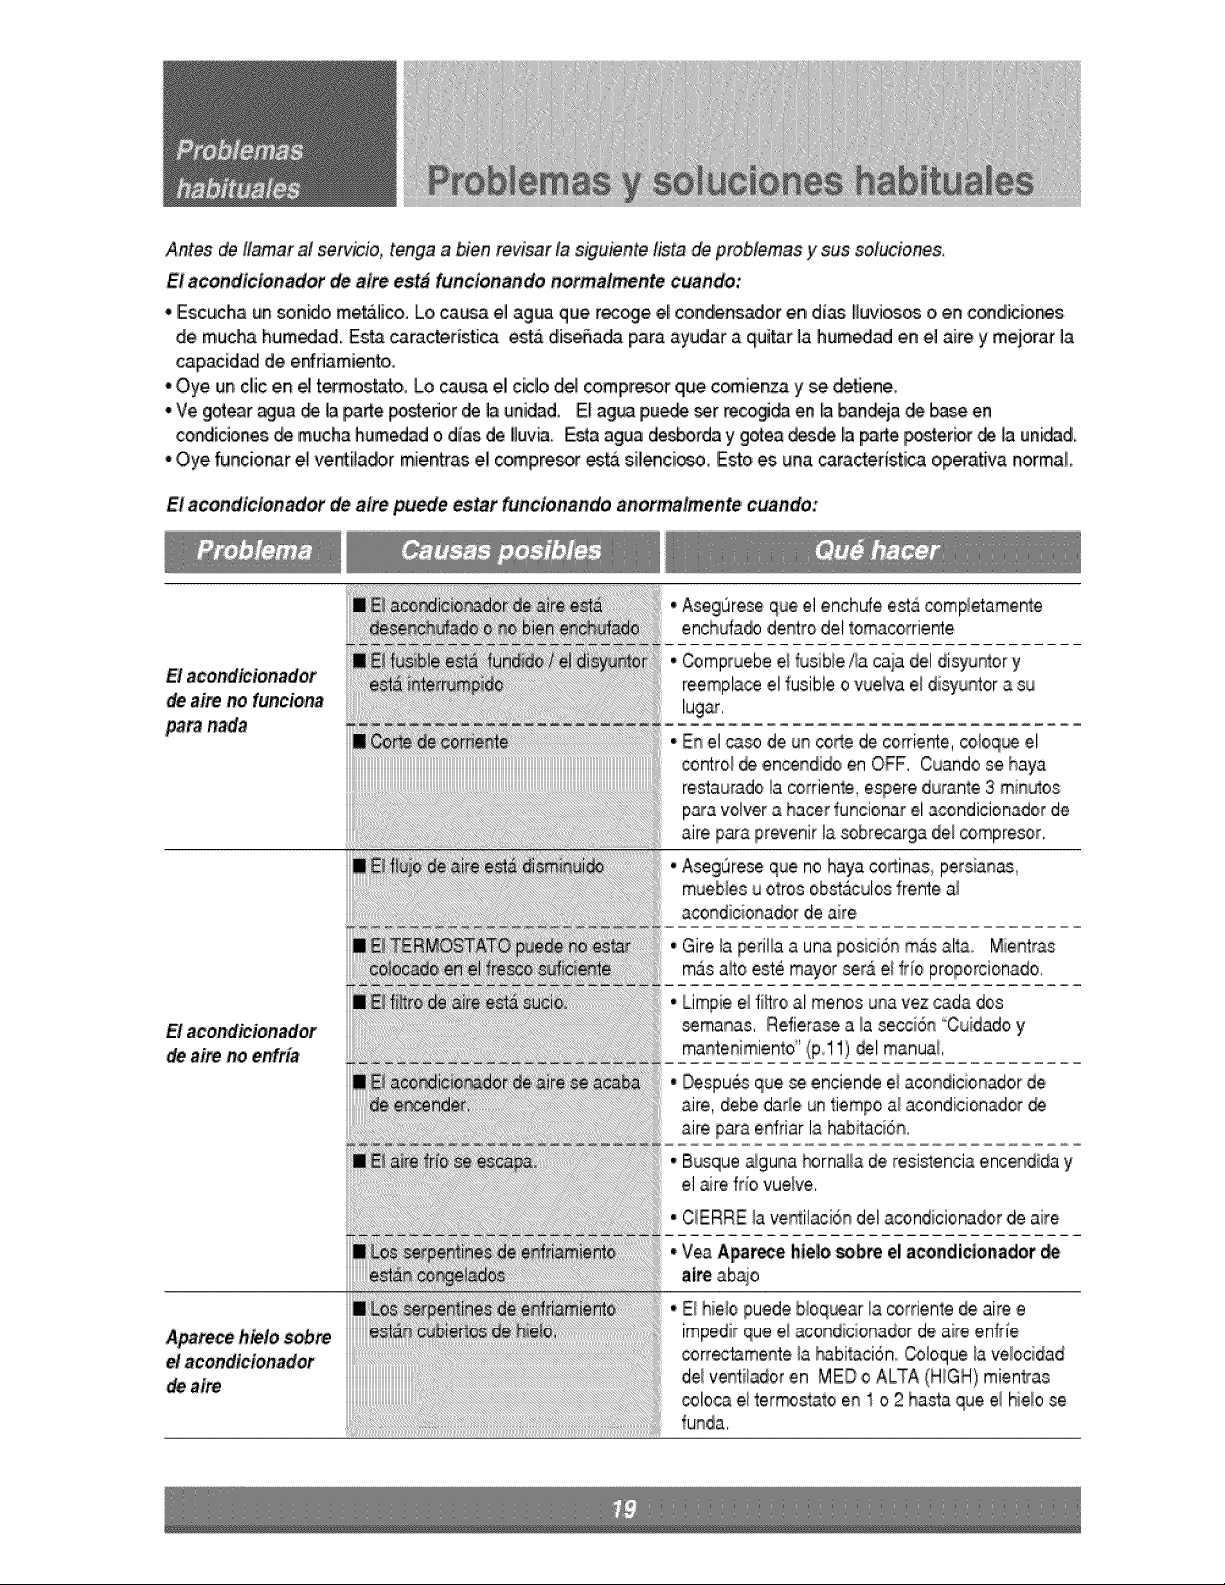
A_tes de Itamar al servicio, tenga a bien re,visar la siguiente tista _ problemas y sus solucio_&
El acondicionador ,deaire es_ fun¢iona_do normalmente ¢uando:
• Escucha un _n_o mef_:_lico.Locausa e] ag_ que rec_e el condlensadot en,dias Iluvi_ o,en condicior_s
de mucha humeda& Es_ caractedstica est& disefiada para ayudar a ,qui_r ]a humedad en e] aire y mejorar ]is
capacidad de e_damiento.
•Oye un clic en e_termostato, Lo _usa el!cic!o def _mpresor que c_ienza y se dleSene,
• Ve gotear _ua ,_ la _e _stedo,r de la unidad. E[ ag_ pu_ _r reco,_ en _ _n_a diebase en
co_iciones _ mucha humedad o dias de i[Itxv_ E_a agua de.erda y gores desde la parte po_erbr _ la uni_d
•Oye fu!ncio,rarel ventila_r mientras e! comp,re_r est& siler_ci_, iEstoes una caractedstica o,p_ativa normal,
El acon,dicionado¥,_ aim puede estar funcionando anormalmente cuando:
El acondicionador
de aim no funeiena
pars nada
El acondicionador
de aim noenfria
Aparece htetosobm
acondidonador
_atre
• AsegOreseque el enchde esta comp/etamenle
ench_ufa_dentrodel tomacorriente
• C_mpruebee_!_s ble4a caia del diswrtor y
reemplaceel fusibleo wJe_a el diwur_tora su
lu,gsr.
• E_ el case de u_ colic ,decorriente,co!oq_ el
control _ encendido en OFF. Cuandose hays
res4a_radola corrienle, esperedu_ante3 miin_4os
p_a volver_ hacer funcionar el acondicionadorde
sire _ara prevenir lasobr_arga de_compresor.
• AsegOreseq_e no haya co_inas persiar_as_
mueb_esuotros obsta.culosfre_e al
aco_dicio_adorde sire
• Gire ia perilla a una posici6n mb,s altao Mientras
masare este mayorser_ el fdo prope_cionado,
• Limpieel filtro al menos u_a vez cads dos
sema_as, Refiera_ a ia secciS_"C_idadoy
mantenimiento'(pl 1)@1manual
• _.spues q_e se enciende ei aco_dicio_adorde
sire, debedade untiempe al acondicienador
sire pars enfriar la habitaci6_.
• Busquea_gunab#rna[iade resi#encia encendiday
el _re fr_orue/re,
• CiERREIs ve_ilaci6h del acondicionadorde sire
E_hie/e puedebloq_ar la corrientede sire e
impedirque eliacondicionaderde sire enffie
correctamente_a_bi_ci6n,, Coloque_ave_ocidad
dei ventiiadoren MED o ALTA (HIGH)mientas
_loca el term,estAtee_ 1 o 2 basts que el hielo se
funds,
LG Electronics Inc. will repair or at its option replace, without charge, your product if it proves to be defective in
material or workmanship under normal use during the warranty period set forth below, effective from the date of
original consumer purchase of the product. This limited warranty is good only to the original purchaser of the product
and effective only when used in the United States including Alaska, Hawaii, and U.S. Territories.
WARRANTY PERIOD:
Labor: 2 Years from the Date of Purchase.
Parts: 2 Years from the Date of Purchase.
Compressor: 5Years from the Date of
Purchase.
HOW SERVICEIS HANDLED:
Call 1-877-714-7486 and choose the appropriate prompt. Please
have product type (Room Air Conditioner), model number, serial
number, and ZiP/postal code ready.
The warranted labor covers the cost of In-Home Service on all
parts including the compressor.
THIS WARRANTY IS IN LIEUOF ANY OTHER WARRANTIES,EXPRESSOR IMPLIED, INCLUDING WITHOUT LIMITATION, ANY
WARRANTY OF MERCHANTABILITYOR FITNESSFOR A PARTICULARPURPOSE.TO THE EXTENTANY IMPLIEDWARRANTY IS
REQUIREDBY LAW, IT IS LIMITED IN DURATIONTO THE EXPRESSWARRANTY PERIODABOVE. LG WILL NOT BE LIABLEFOR
ANY CONSEQUENTIAL,INDIRECT, OR INCIDENTALDAMAGES OF ANY KIND, INCLUDING LOSTREVENUESOR PROFITS,IN
CONNECTION WITH THE PRODUCT. SOME STATESDO NOT ALLOW LIMITATION ON HOW LONG AN IMPLIED WARRANTY
LASTSOR THE EXCLUSIONOF INCIDENTALOR CONSEQUENTIALDAMAGES, SO THE ABOVE LIMITATIONSOR EXCLUSIONS
MAY NOT APPLYTO YOU.
THIS LIMITED WARRANTY DOES NOT APPLY TO:
I.
2.
Service trips to your home to deliver, pick up, and/or install the product, instruct, or replace house fuses or
correct wiring, or correction of unauthorized repairs; and
Damages or operating problems that result from misuse, abuse, operation outside environmental
specifications or contrary to the requirements or precautions in the Operating Guide, accident, vermin,
fire, flood, improper installation, acts of God, unauthorized modification or alteration, incorrect electrical
current or voltage, or commercial use, or use for other than intended purpose.
3. Therefore, the cost of repair or replacement of such a defective product shall be borne by the consumer.
CUSTOMERINTER-ACTIVECENTERNUMBERS:
To Prove Warranty Coverage
To Obtain Nearest Authorized Service Center or Sales
Dealer, or to Obtain Product, Customer, or Service
Assistance
Retain your Sales Receipt to prove date of purchase.
A copy of your Sales Receipt must be submitted at
the time warranty service is provided.
Call 800-984-7469, 24 hrs a day, 7 days per week.
Press the appropriate option, and please
have your product type (AIR CONDITIONER),and
ZIP/postal code ready.
Patent No.: US 6, 412, 298
P/No.: 3828A20437E Printed in China