M90

FCC STATEMENT
1. This device complies with Part 15 of the FCC Rules. Operation is subject to the following
two conditions:
(1) This device may not cause harmful interference.
(2) This device must accept any interference received, including interference that may
cause undesired operation.
2. Changes or modifications not expressly approved by the party responsible for
compliance could void the user's authority to operate the equipment.
NOTE: This equipment has been tested and found to comply with the limits for a Class
B digital device, pursuant to Part 15 of the FCC Rules. These limits are designed to
provide reasonable protection against harmful interference in a residential installation.
This equipment generates uses and can radiate radio frequency energy and, if not
installed and used in accordance with the instructions, may cause harmful interference
to radio communications. However, there is no guarantee that interference will not occur
in a particular installation. If this equipment does cause harmful interference to radio
or television reception, which can be determined by turning the equipment off and on,
the user is encouraged to try to correct the interference by one or more of the following
measures:
Reorient or relocate the receiving antenna.
Increase the separation between the equipment and receiver.
Connect the equipment into an outlet on a circuit different from that to which the receiver is
connected.
Consult the dealer or an experienced radio/TV technician for help.
FCC STATEMENT

FCC STATEMENT
1. This device complies with Part 15 of the FCC Rules. Operation is subject to the following
two conditions:
(1) This device may not cause harmful interference.
(2) This device must accept any interference received, including interference that may
cause undesired operation.
2. Changes or modifications not expressly approved by the party responsible for
compliance could void the user's authority to operate the equipment.
NOTE: This equipment has been tested and found to comply with the limits for a Class
B digital device, pursuant to Part 15 of the FCC Rules. These limits are designed to
provide reasonable protection against harmful interference in a residential installation.
This equipment generates uses and can radiate radio frequency energy and, if not
installed and used in accordance with the instructions, may cause harmful interference
to radio communications. However, there is no guarantee that interference will not occur
in a particular installation. If this equipment does cause harmful interference to radio
or television reception, which can be determined by turning the equipment off and on,
the user is encouraged to try to correct the interference by one or more of the following
measures:
Reorient or relocate the receiving antenna.
Increase the separation between the equipment and receiver.
Connect the equipment into an outlet on a circuit different from that to which the receiver is
connected.
Consult the dealer or an experienced radio/TV technician for help.
FCC STATEMENT

1
5
7
8
8
8
8
8
8
9
10
11
11
11
11
12
12
13
13
13
14
15
21
21
21
22
24
Contents
Assembly Instruction
Panel Control
Setup
Basic Operation
Standby/On
AutoStandby4
Deactivate Auto standby Function
Adjusting Volume & Start Playing
Piano Pedals
Piano Reset
Playing Demo Songs
The Connector Box
Headphones
MIDI OUT
Line Out
Using USB MIDI/USB Audio
Aux In
Voice/Function
Function Mode
Resetting the Data Control Knob to Voice Select
Using the Voice Select Keys
Split Mode
Layer Mode
Twin
Erp On/O
Octave
Transpose
25
26
27
29
31
34
35
35
36
36
35
38
38
39
39
39
39
40
40
41
41
42
44
45
46
Master Tuning
Touch(F3,F#3,Ab3,Bb3)
Reverb
Chorus
Metronome
Song Recording
To Record a Track
Manually Select a Track to Record
Clearing a Single Track in the Song Recorder
Playing Back Your Song Recorder Tracks
To Stop Playback and Exit Song PlayMode
Learning Function
Selecting a song
Listening to the entire song
Practicing the right hand of the selected song
Practicing the left hand of the selected song
Turn o the Learning Mode
MIDI functions
Local On/O
Appendix
MIDI Implementation Chart
Defaults
Advanced Functions Keyboard Chart
Piano Reset in Detail
Specications
21
Assembly Instructions
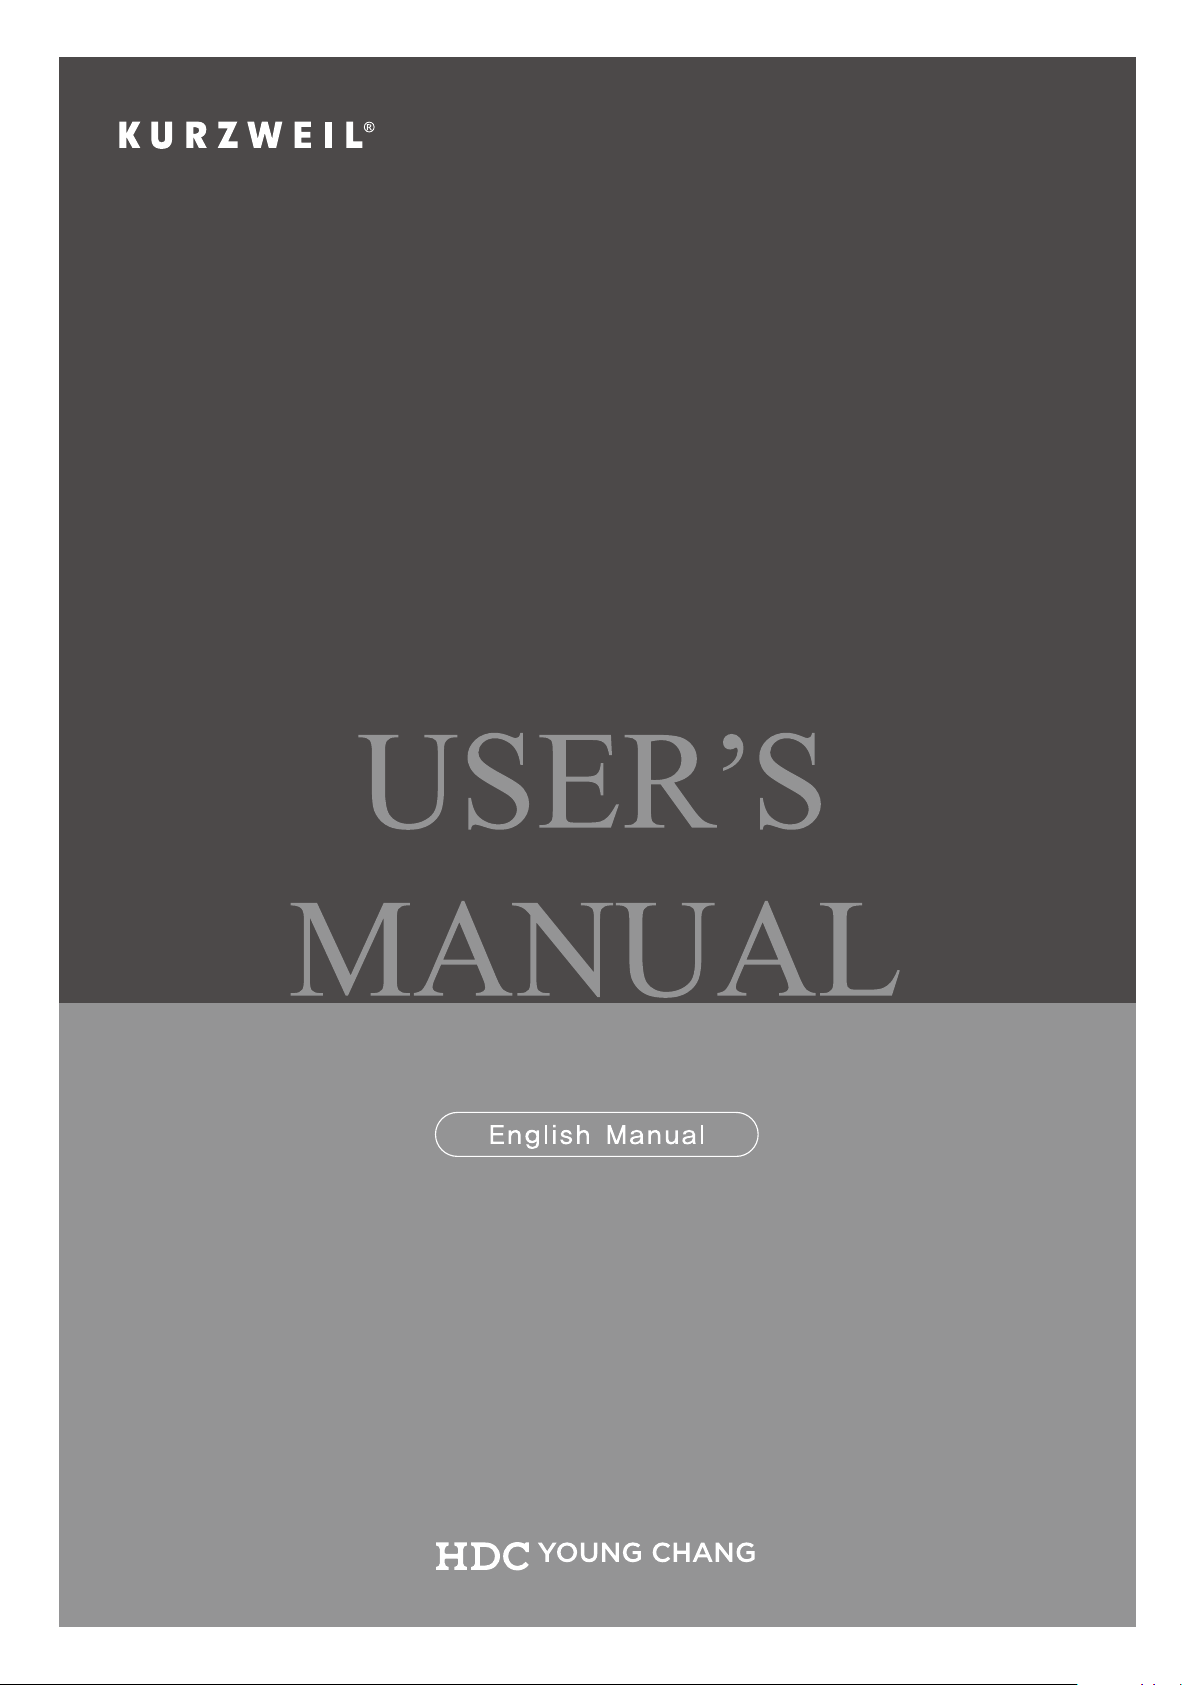
What's Included
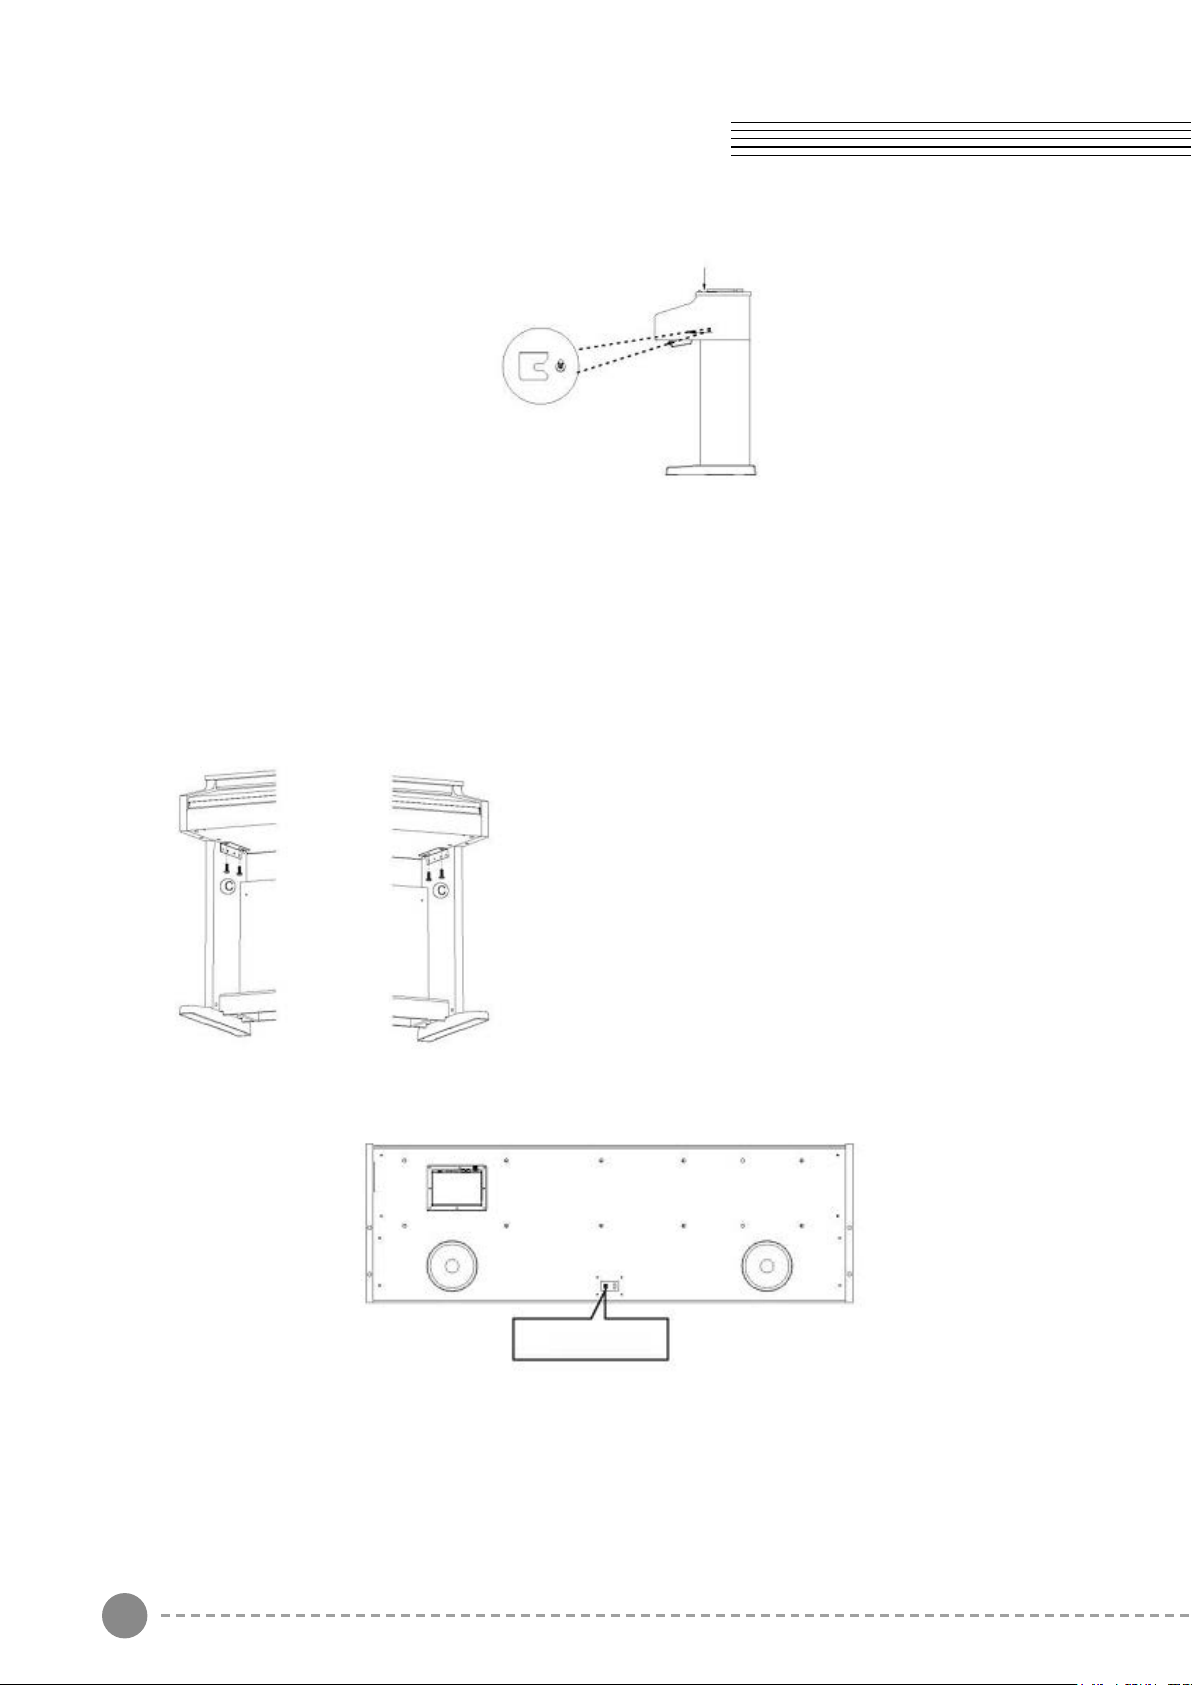
1. Assembling the Stand Legs
Place the four Cylindrical Nuts (A) into the holes in the Stand Legs, with the slot facing out.
Use a screw driver to align the threads in the nuts with the openings on the bottom of the
Stand Legs.
Cylindrical Nuts (A) x 4
Piano Body
Back Panel
Pedal Board
Legs (2)
Headphones
holde
Feet(2)
Foot Bolts (B) x 4 Piano
Body Bolts (C) x 4
Back Panel Bolts (D)x 2
Back Panel Bolts (E)x 3
Pedal Board Bolts (F) x 4
Headphone Bolts (G) x 4
Place the do wells in the feet into the appropriate holes in the bottom of the Stand Legs.
Make sure that the feet are facing away from the back panel bracket as shown below.
Threated two Foot Bolts(B) through the foot and into the cylindrical washers, rotating the
washer to align if needed. Firmly tighten and repeat for the other side.
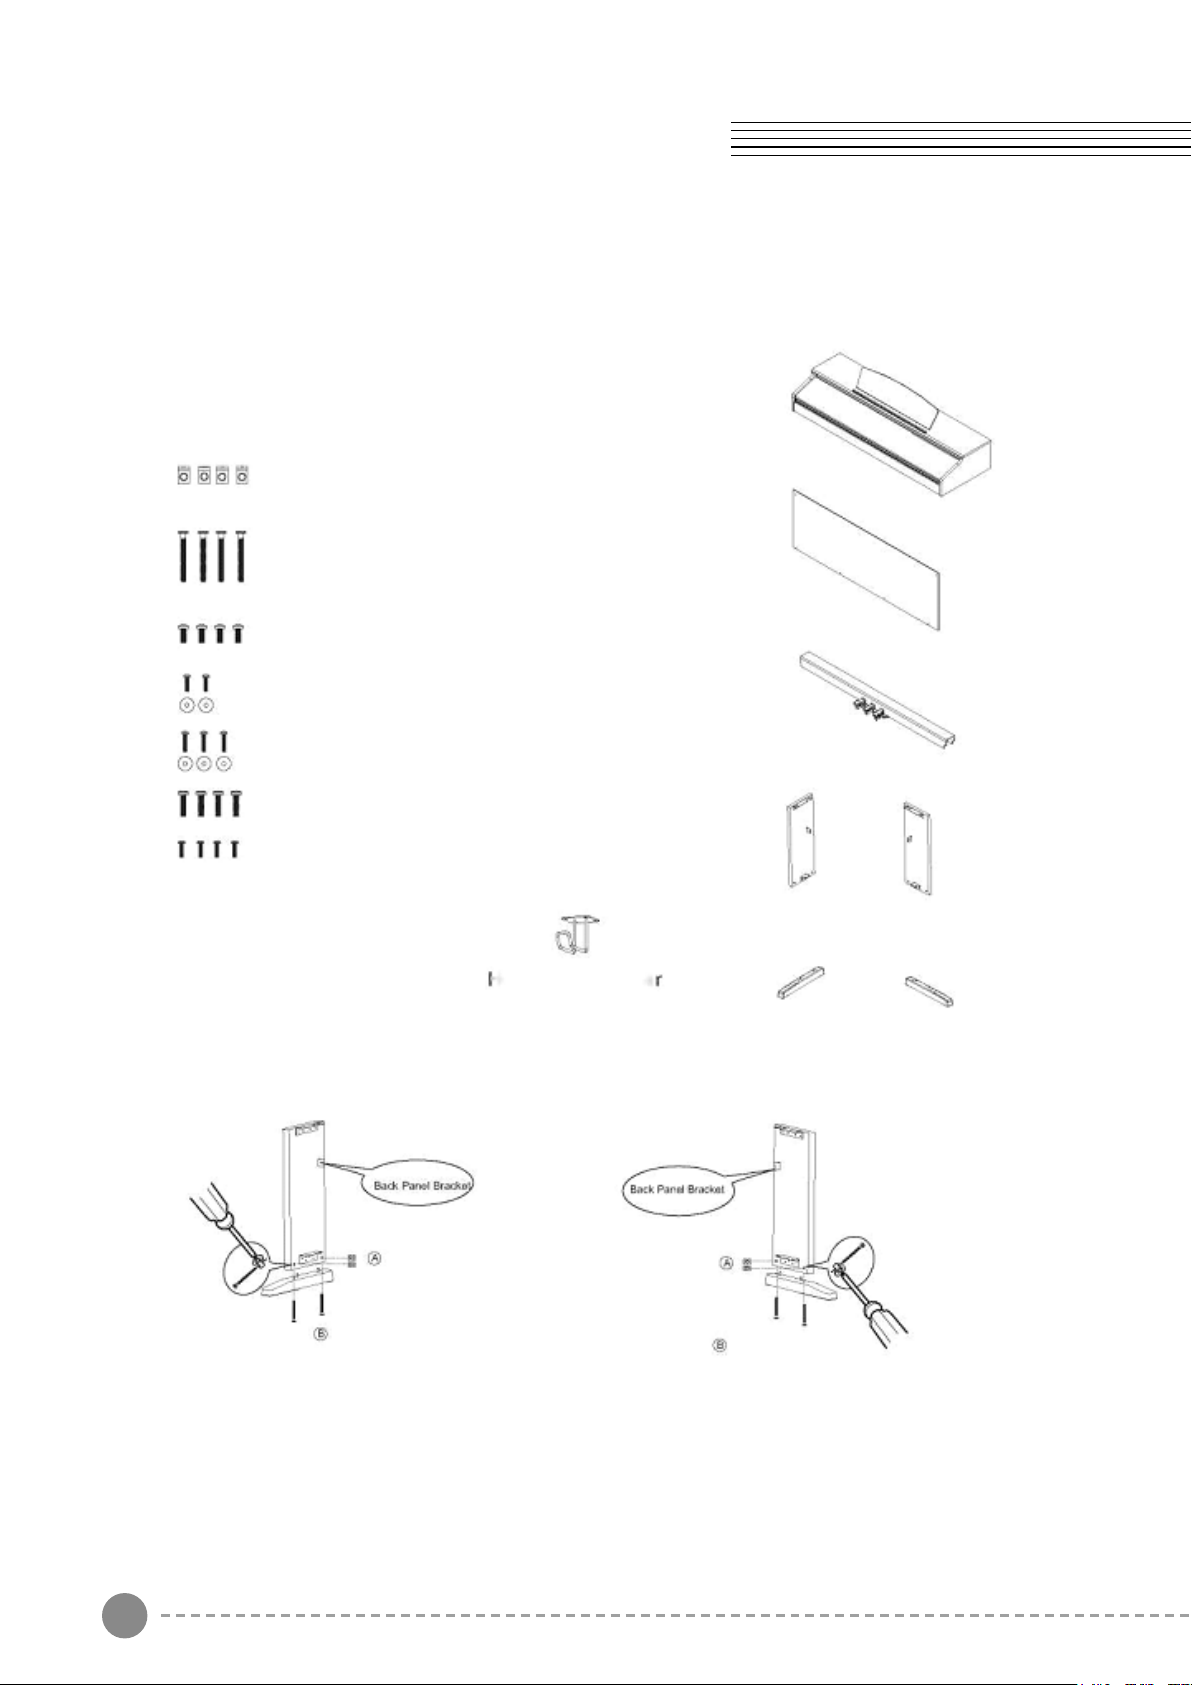
2. Attaching the Pedal Board
Starting with the right Stand Leg, align the holes in the Pedal Board with the holes in the
Pedal Board Bracket as shown. Make sure that the pedals are facing towards the front of
the Stand Legs.
Thread two Pedal Board Bolts (F) through the Pedal Board and into the bracket. Repeat
with the left Stand Leg and tighten all bolts fully.
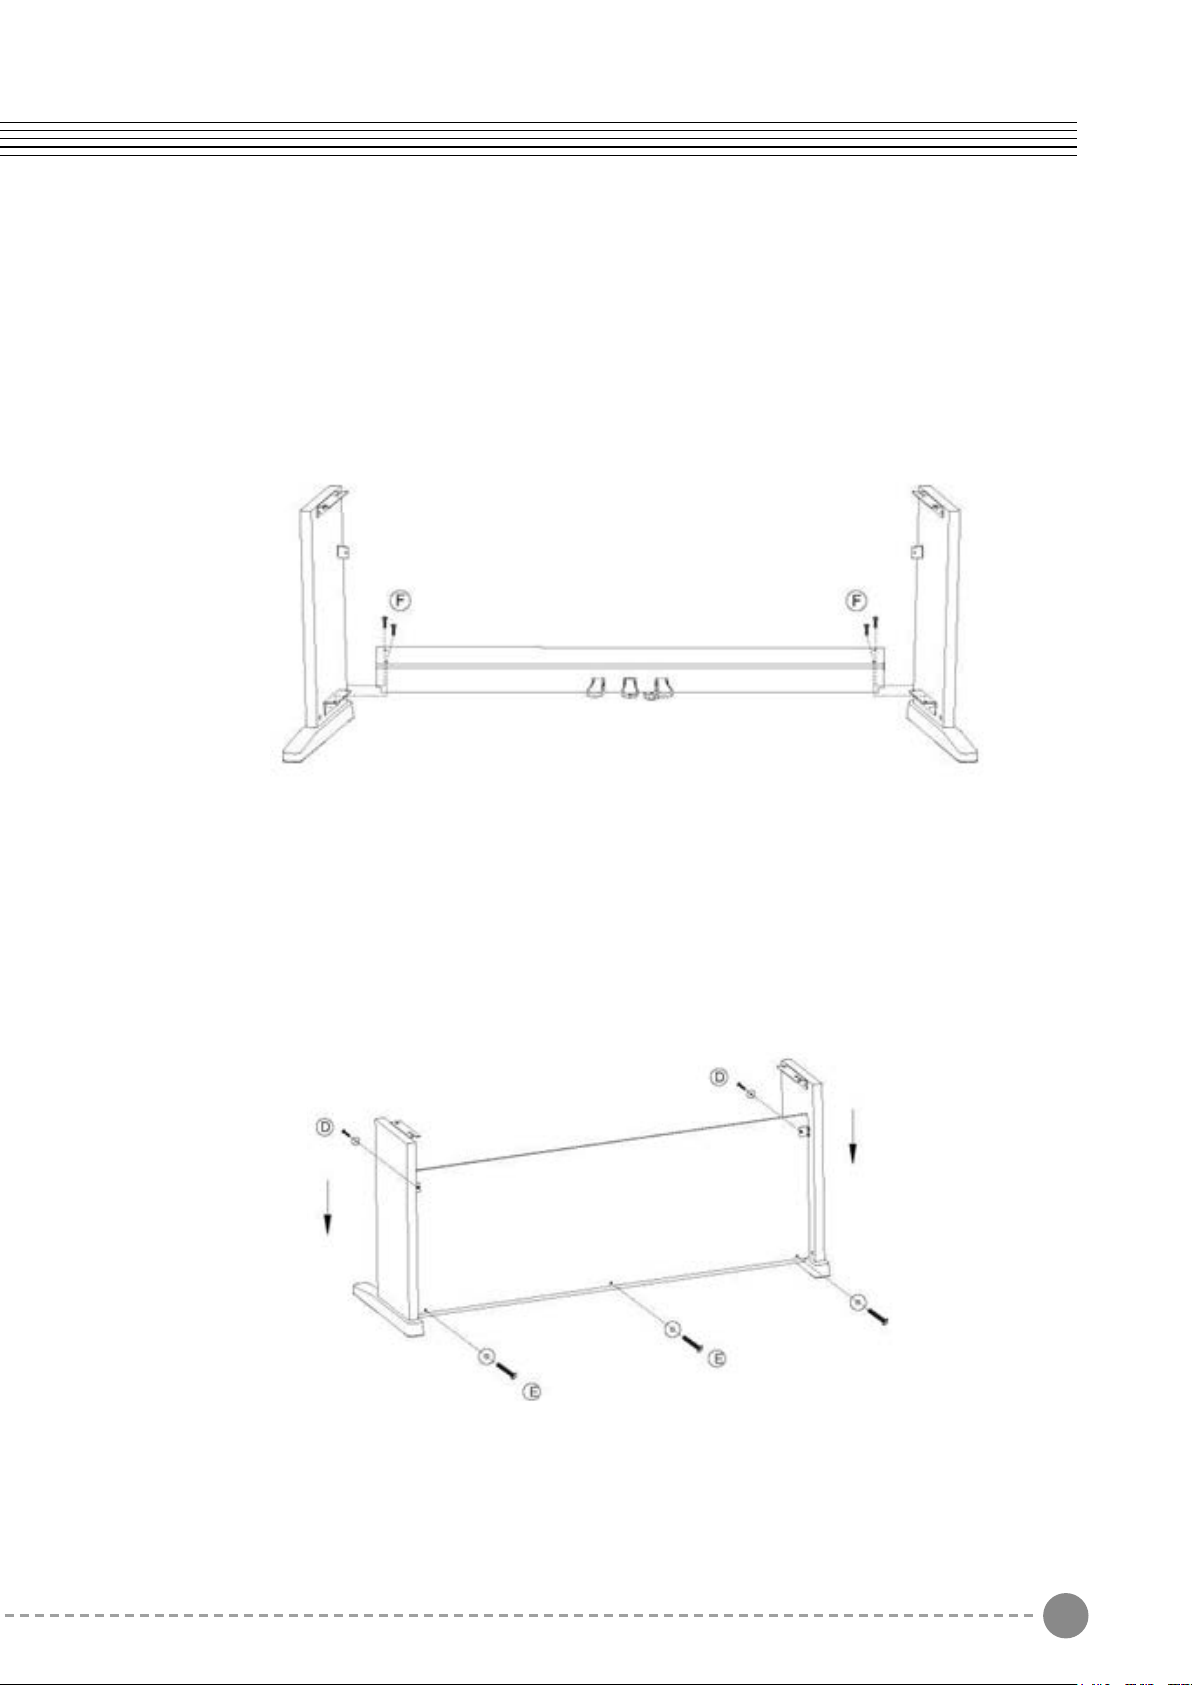
3. Attaching the Back Panel and Piano Body
Using two Back Panel Bolts (D) with washers, and three Back Panel Bolts (E) with
washers, attach the Back Panel to the stand. Please note that the pedal board is not
predrilled for the Back Panel Screws, and they must be driven in manually.
21
Assembly Instructions
What's Included
1. Assembling the Stand Legs
Place the four Cylindrical Nuts (A) into the holes in the Stand Legs, with the slot facing out.
Use a screw driver to align the threads in the nuts with the openings on the bottom of the
Stand Legs.
Cylindrical Nuts (A) x 4
Piano Body
Back Panel
Pedal Board
Legs (2)
Headphones
holde
Feet(2)
Foot Bolts (B) x 4 Piano
Body Bolts (C) x 4
Back Panel Bolts (D)x 2
Back Panel Bolts (E)x 3
Pedal Board Bolts (F) x 4
Headphone Bolts (G) x 4
Place the do wells in the feet into the appropriate holes in the bottom of the Stand Legs.
Make sure that the feet are facing away from the back panel bracket as shown below.
Threated two Foot Bolts(B) through the foot and into the cylindrical washers, rotating the
washer to align if needed. Firmly tighten and repeat for the other side.
2. Attaching the Pedal Board
Starting with the right Stand Leg, align the holes in the Pedal Board with the holes in the
Pedal Board Bracket as shown. Make sure that the pedals are facing towards the front of
the Stand Legs.
Thread two Pedal Board Bolts (F) through the Pedal Board and into the bracket. Repeat
with the left Stand Leg and tighten all bolts fully.
3. Attaching the Back Panel and Piano Body
Using two Back Panel Bolts (D) with washers, and three Back Panel Bolts (E) with
washers, attach the Back Panel to the stand. Please note that the pedal board is not
predrilled for the Back Panel Screws, and they must be driven in manually.
3 4
Assembly Instructions
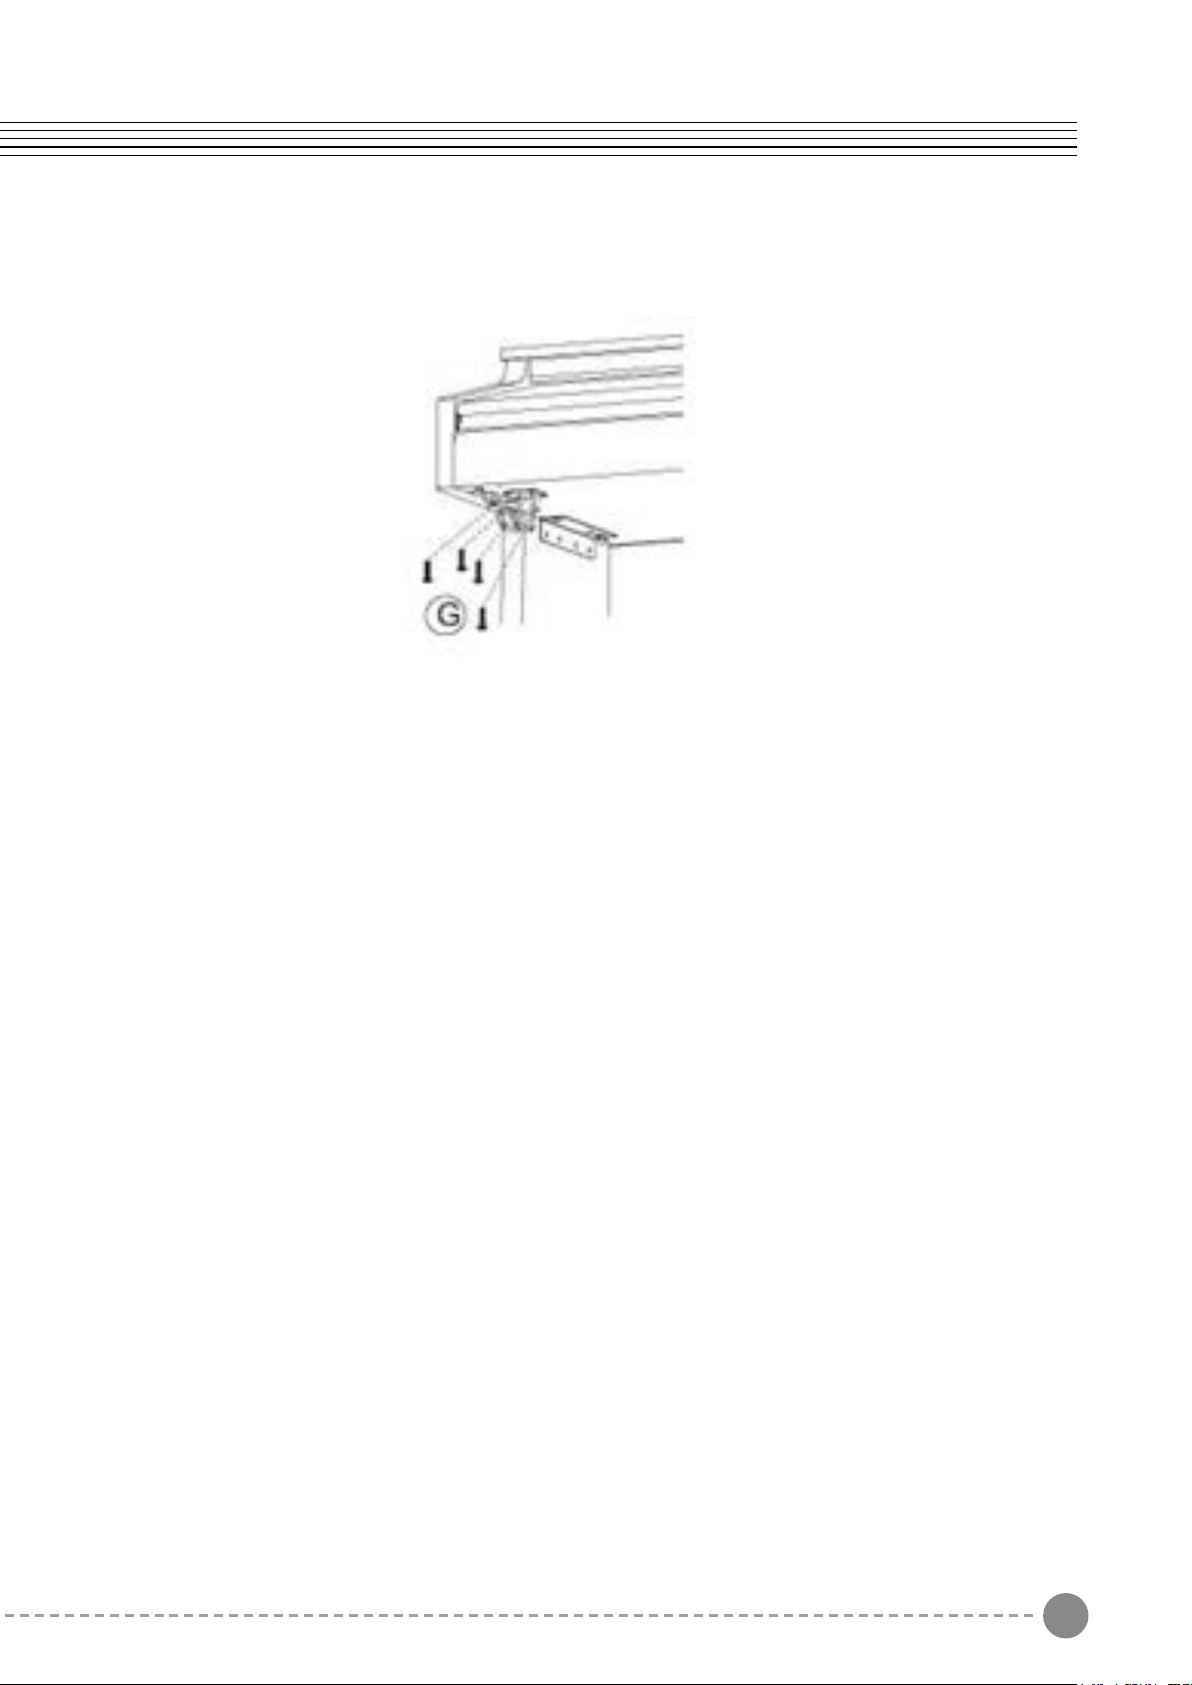
4. Installing the Headphone Holder
Headphone Holder Installation: Attach the headphone holder to the bottom left of the piano
with the four Headphone Bolts(G).
With help from another person, lift the piano onto the stand and slide forwards, pushing the
guide rods on the bottom of the piano into the slots on the Stand Legs, as shown below.
When lifting the piano onto its stand , be careful not to catch/trap hands or fingers.
4. Securing the Piano Body
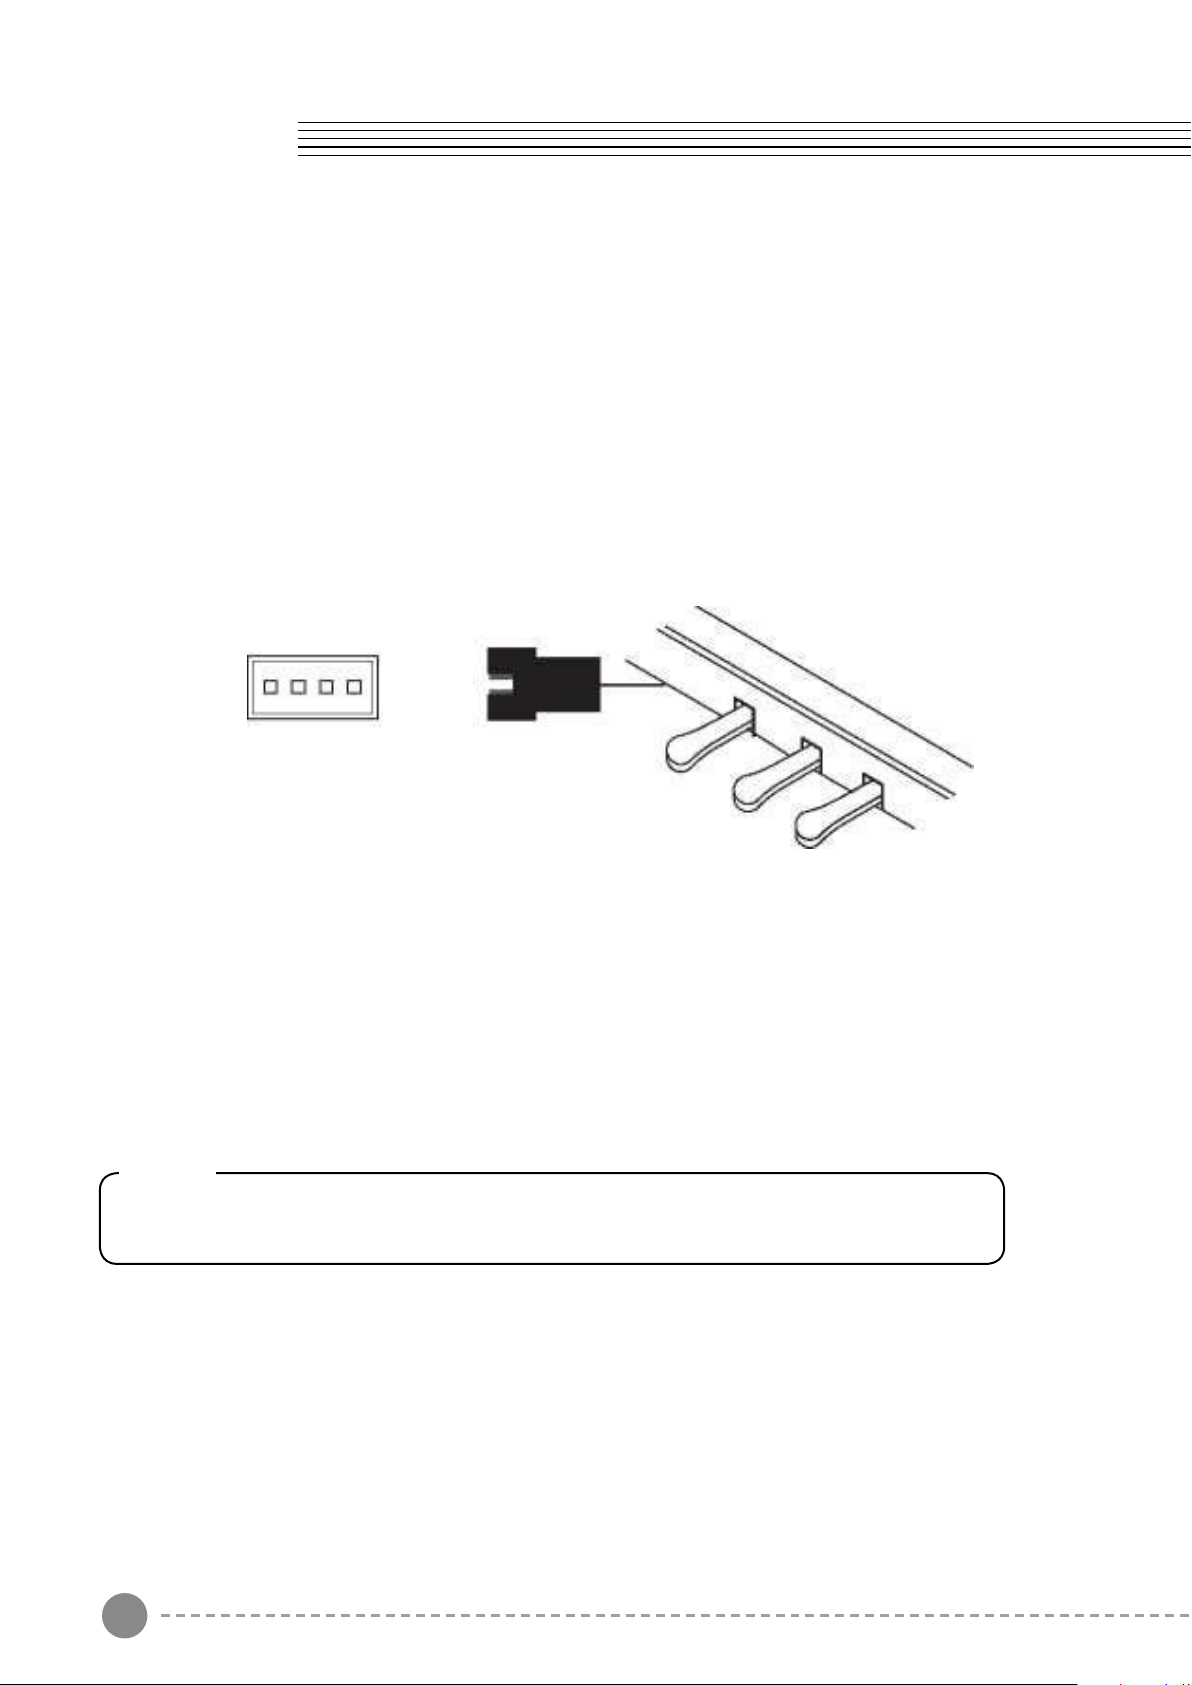
5. Connecting the Pedal Cable and Power Supply
Attach the DC Adaptor and Pedal Cable into their connectors on the bottom of the piano as
shown.
Lift onto stand
slide forward,
Finish attaching the piano to the stand by
using the two Piano Body Bolts (C) to attach
the bottom of the piano to its stand.
Power, Pedals
Bottom Rear of the Piano
3 4
Assembly Instructions
4. Installing the Headphone Holder
Headphone Holder Installation: Attach the headphone holder to the bottom left of the piano
with the four Headphone Bolts(G).
With help from another person, lift the piano onto the stand and slide forwards, pushing the
guide rods on the bottom of the piano into the slots on the Stand Legs, as shown below.
When lifting the piano onto its stand , be careful not to catch/trap hands or fingers.
4. Securing the Piano Body
5. Connecting the Pedal Cable and Power Supply
Attach the DC Adaptor and Pedal Cable into their connectors on the bottom of the piano as
shown.
Lift onto stand
slide forward,
Finish attaching the piano to the stand by
using the two Piano Body Bolts (C) to attach
the bottom of the piano to its stand.
Power, Pedals
Bottom Rear of the Piano
5 6
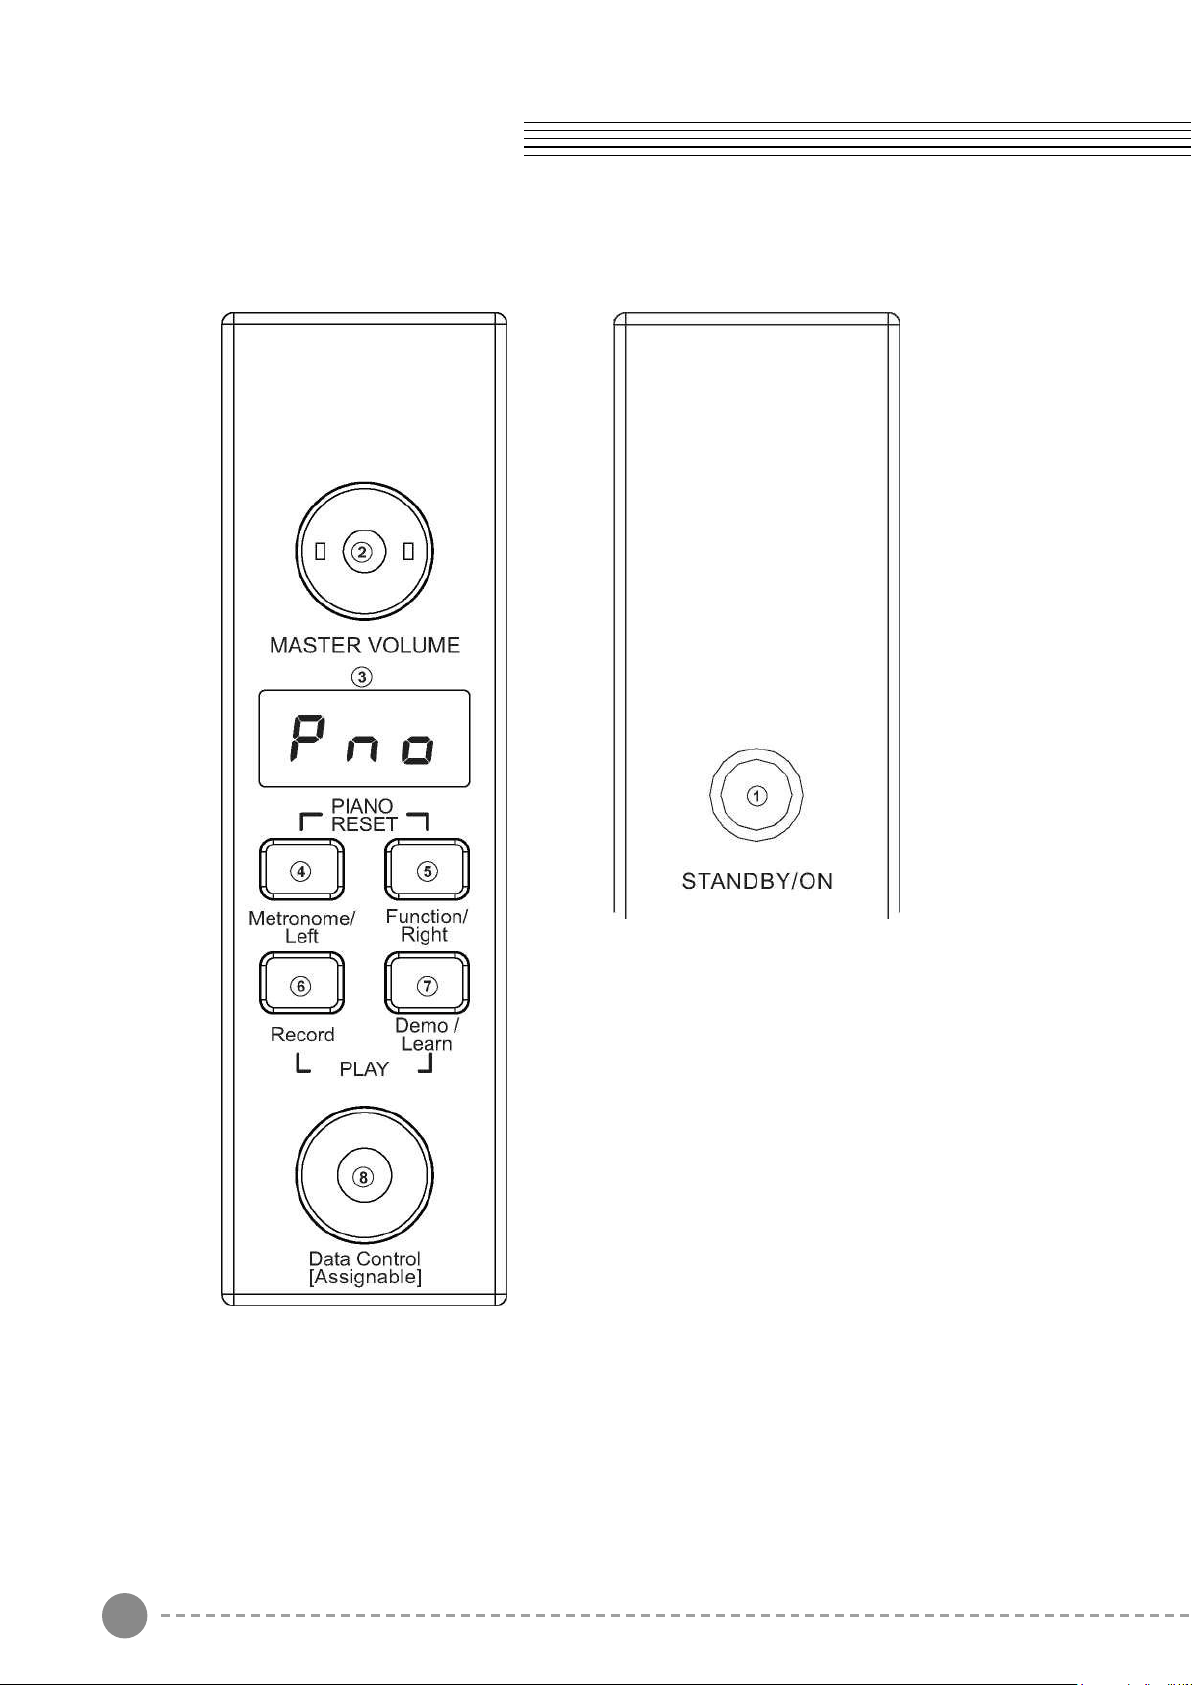
Panel Control
1. STANDBY/ON
2. MASTER VOLUME
3. LED DISPLAY
4. Metronome/Left Button
5. Function/Right Button
6. Record Button
7. Demo/Learn Button
8. Data Control Knob
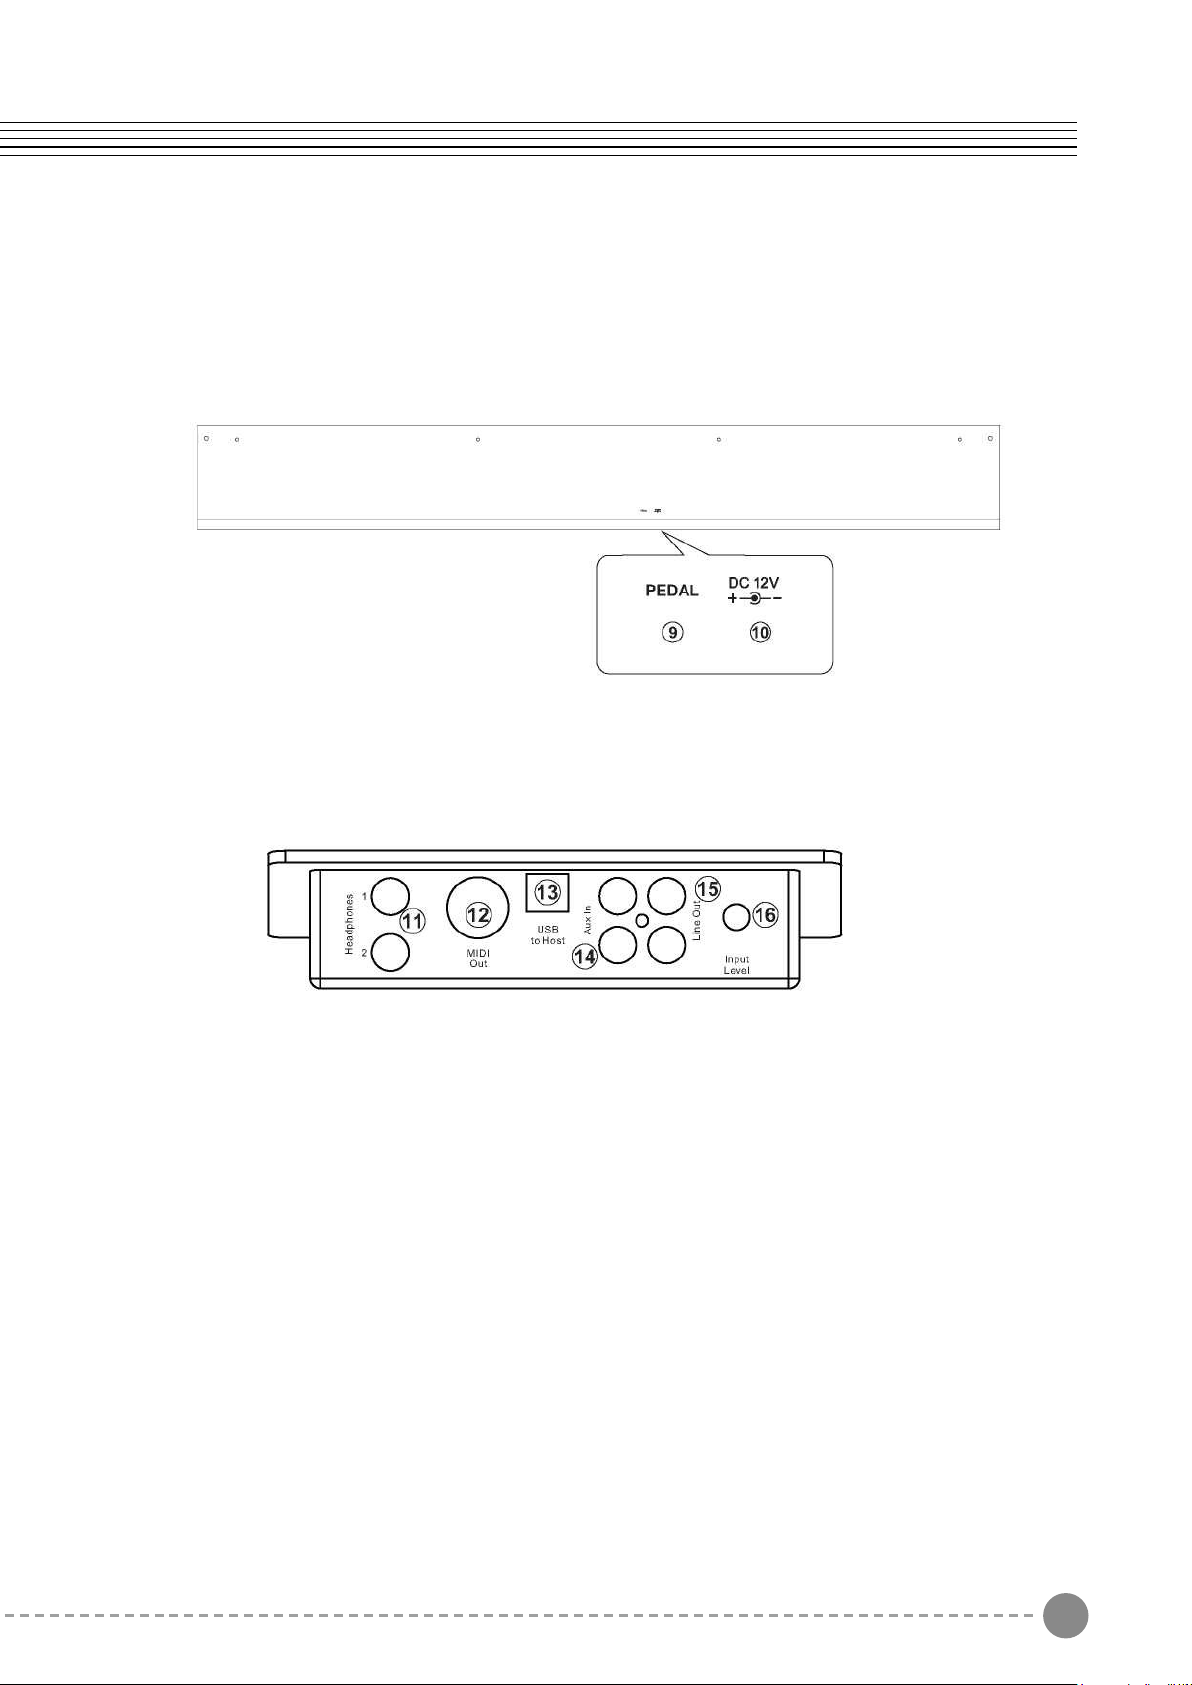
Rear Panel
9. Pedal Connector
10. DC 12V
Connections Panel
11. Headphones 1 / 2
12. MIDI Out
13. USB to Host Connector
14. Aux Line In
15. Line Out
16. Aux Input Level
5 6
Panel Control
1. STANDBY/ON
2. MASTER VOLUME
3. LED DISPLAY
4. Metronome/Left Button
5. Function/Right Button
6. Record Button
7. Demo/Learn Button
8. Data Control Knob
Rear Panel
9. Pedal Connector
10. DC 12V
Connections Panel
11. Headphones 1 / 2
12. MIDI Out
13. USB to Host Connector
14. Aux Line In
15. Line Out
16. Aux Input Level
7 8
Standby
Press the [STANDBY/ON] button to turn on the power and the LCD display will light.
Auto Standby
Your piano will switch o automatically in 30 minutes after no any operation on it. In this
case, press the [STANDBY/ON] button again to turn on the power.
Deactivate Auto Standby Function
Hold the rst white key and rst black key on
the left side of the keyboard at the same time
and then press the [STANDBY/ON] button to
deactivate the Auto Standby function.
Adjusting Volume & Start Playing
The speaker system in the piano is very powerful and can be overpowering in some rooms.
Adjust the [MASTER VOLUME] control to a 12 o'clock position as a safe starting point. You
can adjust the volume at any time even while you are playing.
Now play the keyboard. You should hear the rich tone of the default Grand Piano sound.
Piano Pedals
Just like a regular grand piano, your piano feature 3 foot pedals:
Damper Pedal (Right)
The damper pedal performs the same function as the damper
pedal on an actual acoustic piano, letting you sustain the sound
of the voices even after releasing your ngers from the keys.
Setup Basic Operation
You are no doubt eager to play your new piano instrument, but first please make sure you
have completed the following basic setup steps:
1) Follow the assembly instructions as outlined on page 46 in the appendix of this manual.
2) Once the piano is securely assembled, connect the plug of the foot pedal unit to the
pedal jack on the rear panel.
3) Plug the other end of the power cable into the power outlet.
Note
1. Ensure the piano is turned o when connecting and disconnecting the power.
2. Turn the volume knob to its minimum level before turning on the power.
9 10
Basic Operation
Sostenuto Pedal (Center)
The sostenuto pedal also allows you to sustain notes, but it works a little different from the
damper pedal. If you play a note or chord on the keyboard and press the sostenuto pedal
while the notes are held, those notes will be sustained as long as the pedal is held. All
subsequently played notes will not be sustained.
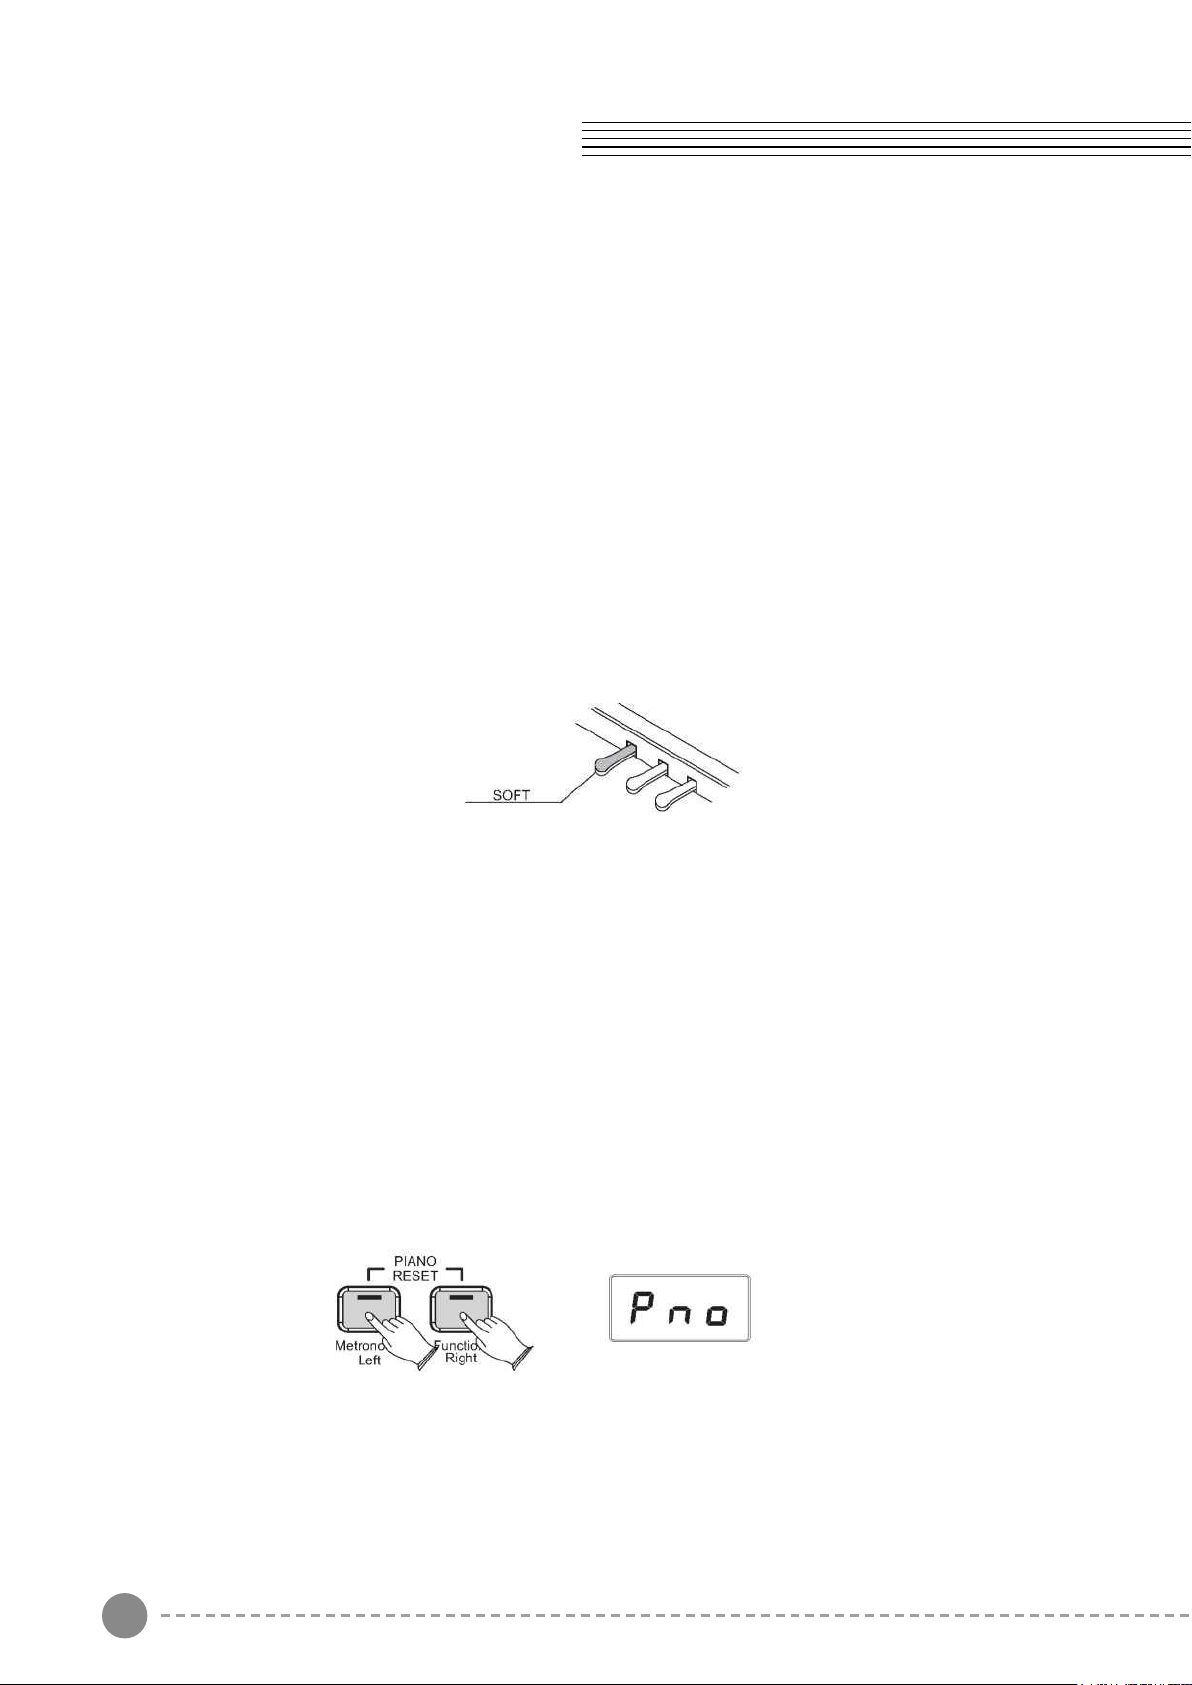
Soft Pedal (Left)
The soft pedal on an acoustic piano changes the character of the sound, making it softer
and quieter. The soft pedal on your piano does exactly the same.
Press the soft pedal when you need to play passages that require extreme pianissimo.
Piano Reset
The Piano Reset Function resets selected aspects of the piano voices back to their default
factory state. These elements are carefully selected to give you a quick and easy way
to restore back to being a simple Grand Piano once more, with the Data Control knob
assigned for selecting voices.
Press the [Metronome/Left] button and the [Function/Right] button at the same time. When
both buttons are pressed the display will immediately change to show:
Playing Demo Songs
There are 16 preset piano songs that you can play individually. Here's how you can select
and play the demo songs.
Listening to the Demo Song
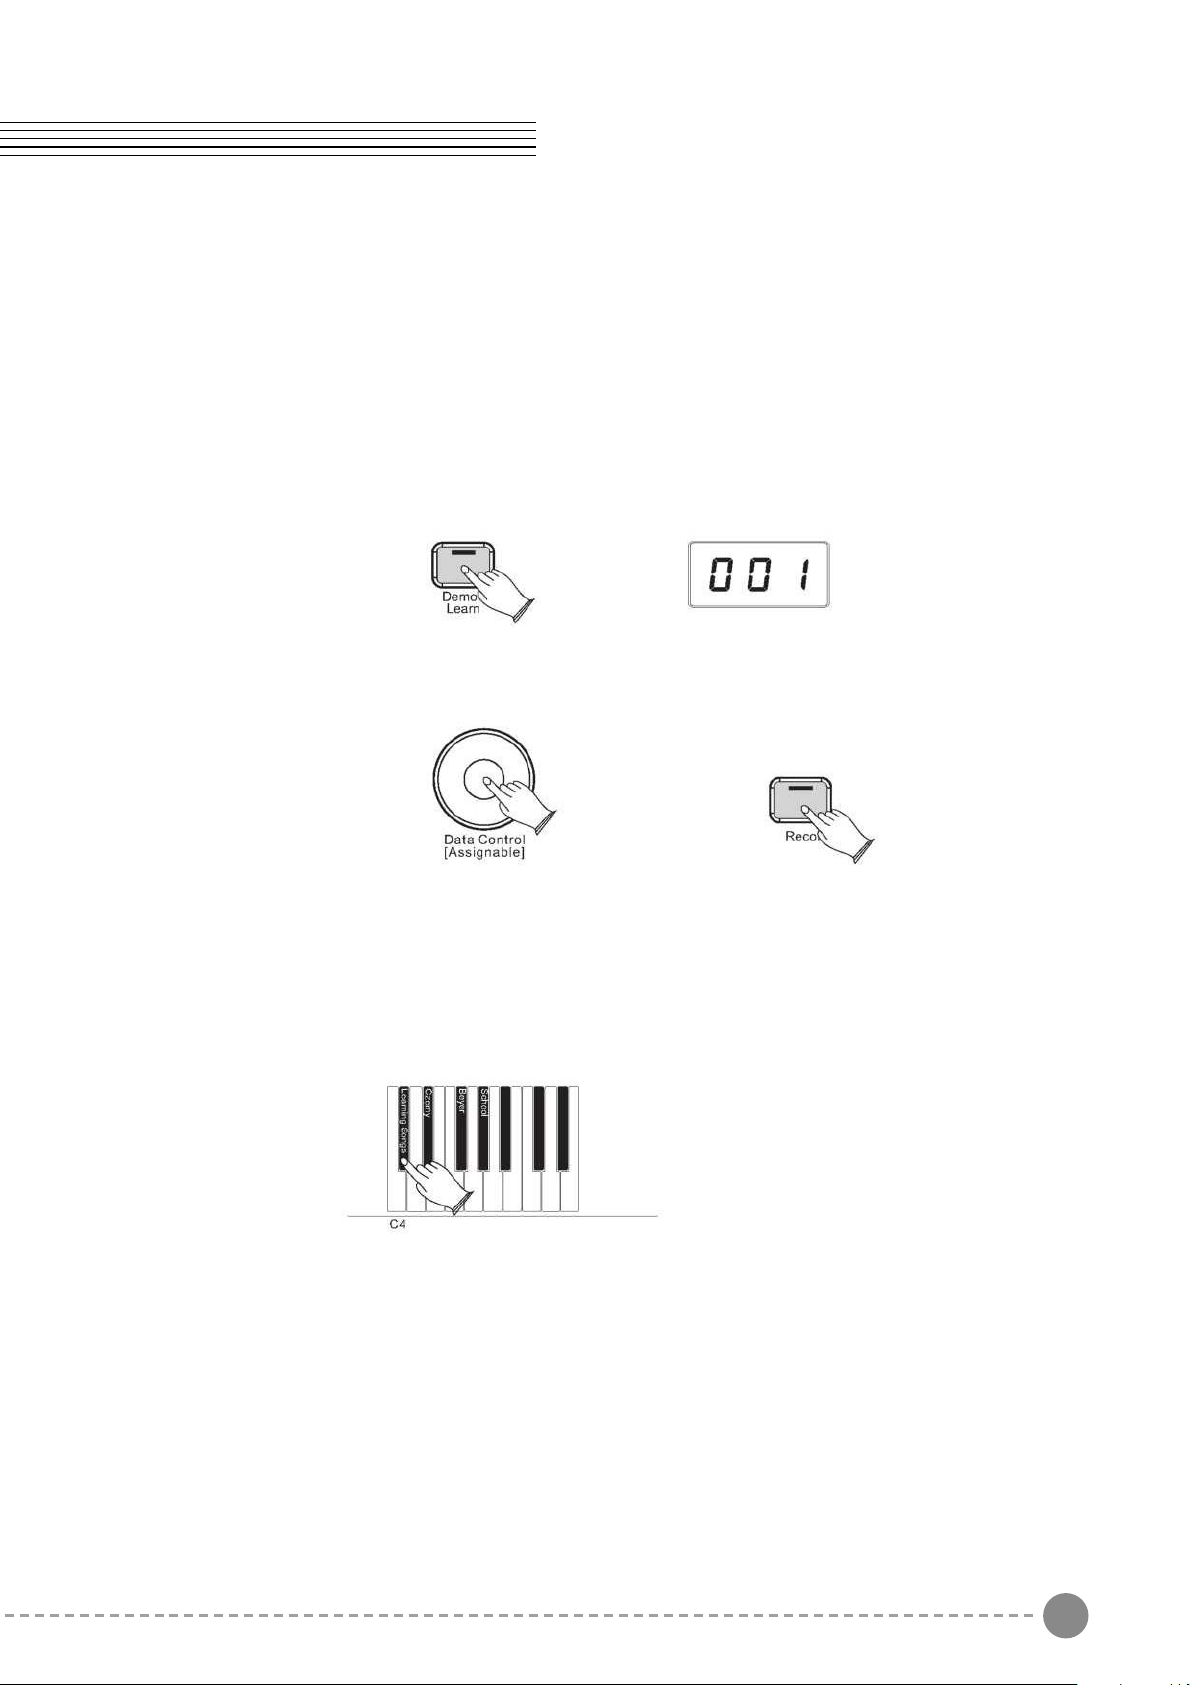
Press the [DEMO/LEARN] button to enter Demo Play Mode and the button will flash.
Press the button to hear Demo Song 1 .While the demo is playing, the [DEMO/LEARN]
button will flash , and the LED display will show:
[LEARN] button will flash , and the LED display will show:
If you allow playback to continue past the end of Demo Song 1,Demo Song 2 will begin
to play, and after that, each of the remaining demos will continue to play in sequence until
you press the [DEMO/LEARN] button. If the [DEMO/ LEARN] button is not pressed to stop
demo playback, after the end of the 16 demo songs, demo playback will continue from the
beginning of Demo Song 1 until the Song button is pressed.
Selecting the Demo Song
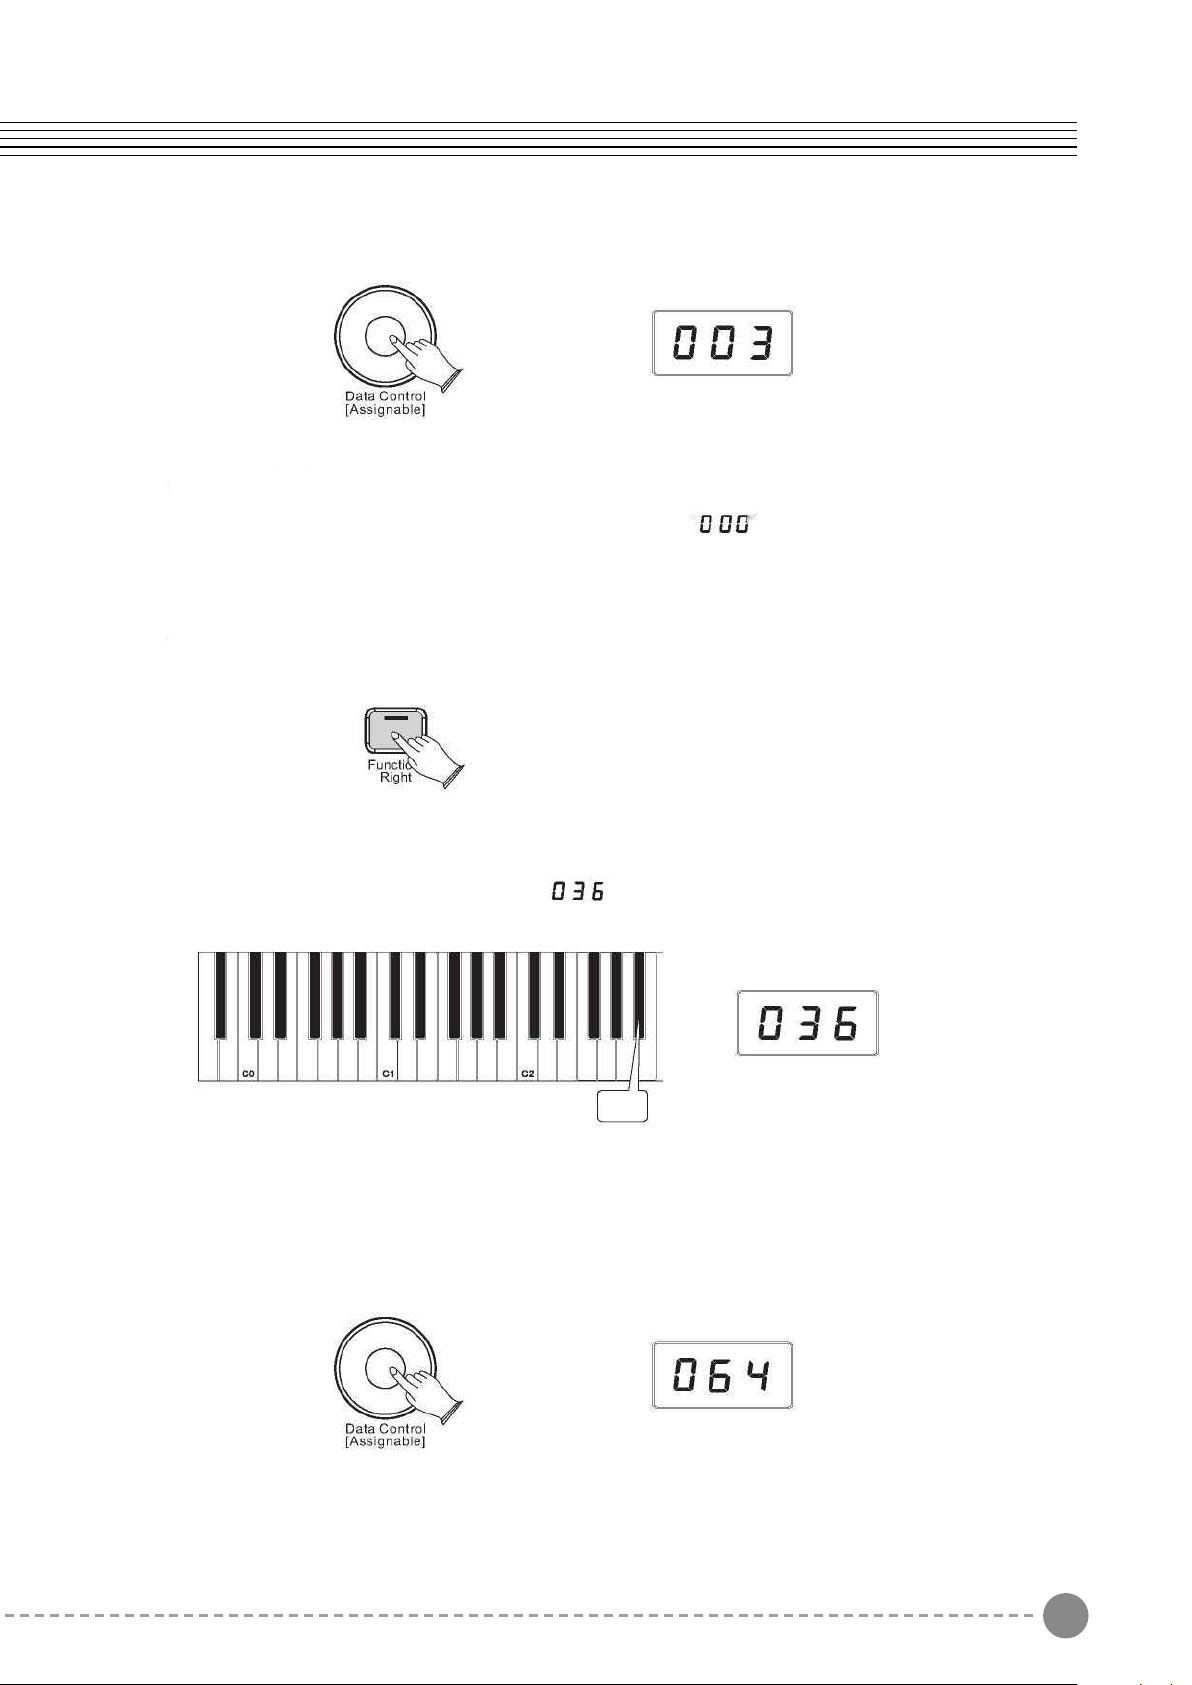
In Demo Song Palyback mode, you can turn the [Data Control] knob to the right until you
see the desired Demo Song number appear in the LED display
Stopping Playing
Press the [DEMO/LEARN] button again to stop playing.

9 10
Basic Operation
Sostenuto Pedal (Center)
The sostenuto pedal also allows you to sustain notes, but it works a little different from the
damper pedal. If you play a note or chord on the keyboard and press the sostenuto pedal
while the notes are held, those notes will be sustained as long as the pedal is held. All
subsequently played notes will not be sustained.
Soft Pedal (Left)
The soft pedal on an acoustic piano changes the character of the sound, making it softer
and quieter. The soft pedal on your piano does exactly the same.
Press the soft pedal when you need to play passages that require extreme pianissimo.
Piano Reset
The Piano Reset Function resets selected aspects of the piano voices back to their default
factory state. These elements are carefully selected to give you a quick and easy way
to restore back to being a simple Grand Piano once more, with the Data Control knob
assigned for selecting voices.
Press the [Metronome/Left] button and the [Function/Right] button at the same time. When
both buttons are pressed the display will immediately change to show:
Playing Demo Songs
There are 16 preset piano songs that you can play individually. Here's how you can select
and play the demo songs.
Listening to the Demo Song
Press the [DEMO/LEARN] button to enter Demo Play Mode and the button will flash.
Press the button to hear Demo Song 1 .While the demo is playing, the [DEMO/LEARN]
button will flash , and the LED display will show:
[LEARN] button will flash , and the LED display will show:
If you allow playback to continue past the end of Demo Song 1,Demo Song 2 will begin
to play, and after that, each of the remaining demos will continue to play in sequence until
you press the [DEMO/LEARN] button. If the [DEMO/ LEARN] button is not pressed to stop
demo playback, after the end of the 16 demo songs, demo playback will continue from the
beginning of Demo Song 1 until the Song button is pressed.
Selecting the Demo Song
In Demo Song Palyback mode, you can turn the [Data Control] knob to the right until you
see the desired Demo Song number appear in the LED display
Stopping Playing
Press the [DEMO/LEARN] button again to stop playing.
11 12
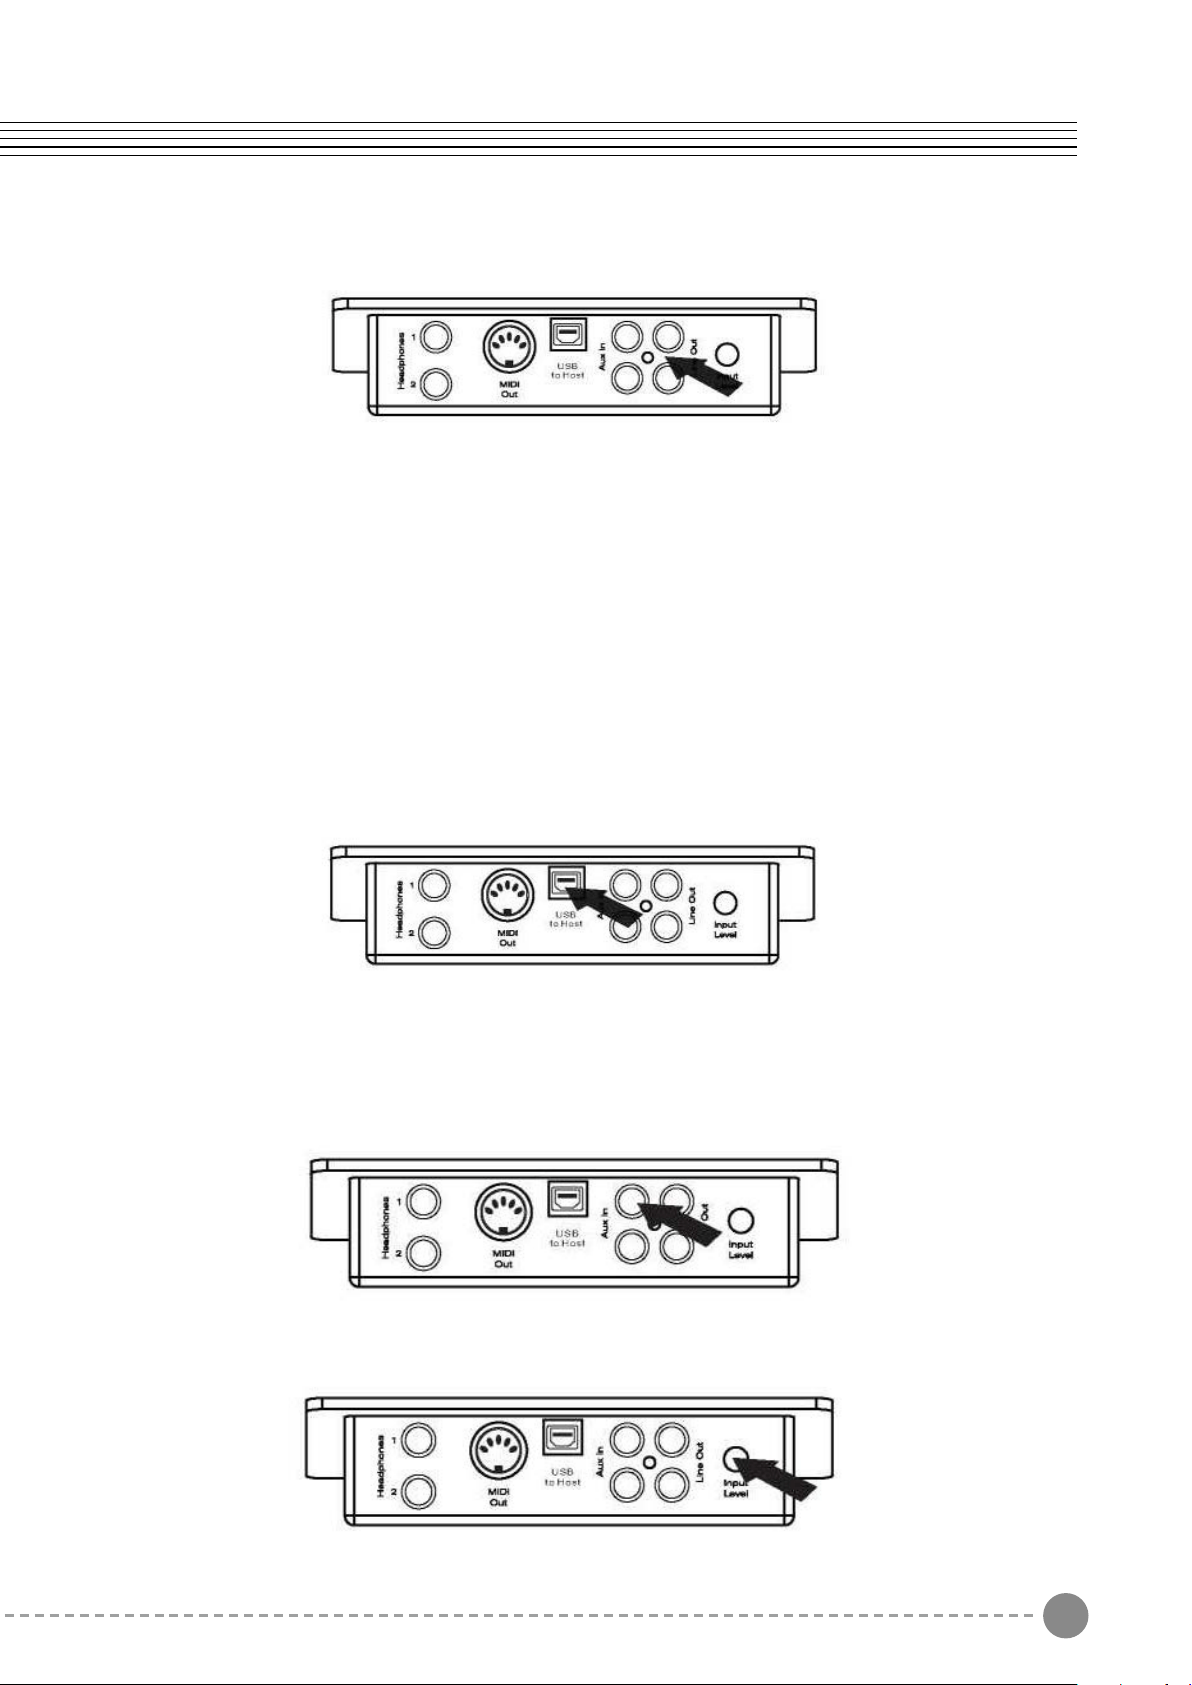
Using USB-MIDI/USB Audio
This product allows the transfer of MIDI information over USB to a computer.
As complicated this might sound, it's actually pretty straight forward. Because your piano is
USB Class Compliant, there is no need to install a driver to enable it to work with compute.
Simply just plug it in and the OS will do the rest. The piano will work with all standard MIDI
based computer software.
USB AUDIO interface is a digital audio interface. By USB cable, you can digitally transfer
intact audio signals of PC to this instrument, and enjoy it on this instrument or use it for
accompany when you play this instrument; likewise, you can transfer intact audio signals
of the instrument to PC to record and edit music.
Aux In
The Aux In stereo RCA connectors allow you to mix an external sound source (such as a
CD player, MP3 player or computer output) with the piano's internal sounds, for playback
through the piano's built-in speakers or headphone outputs.
The Aux In signal level can be adjusted using the Input Level knob.
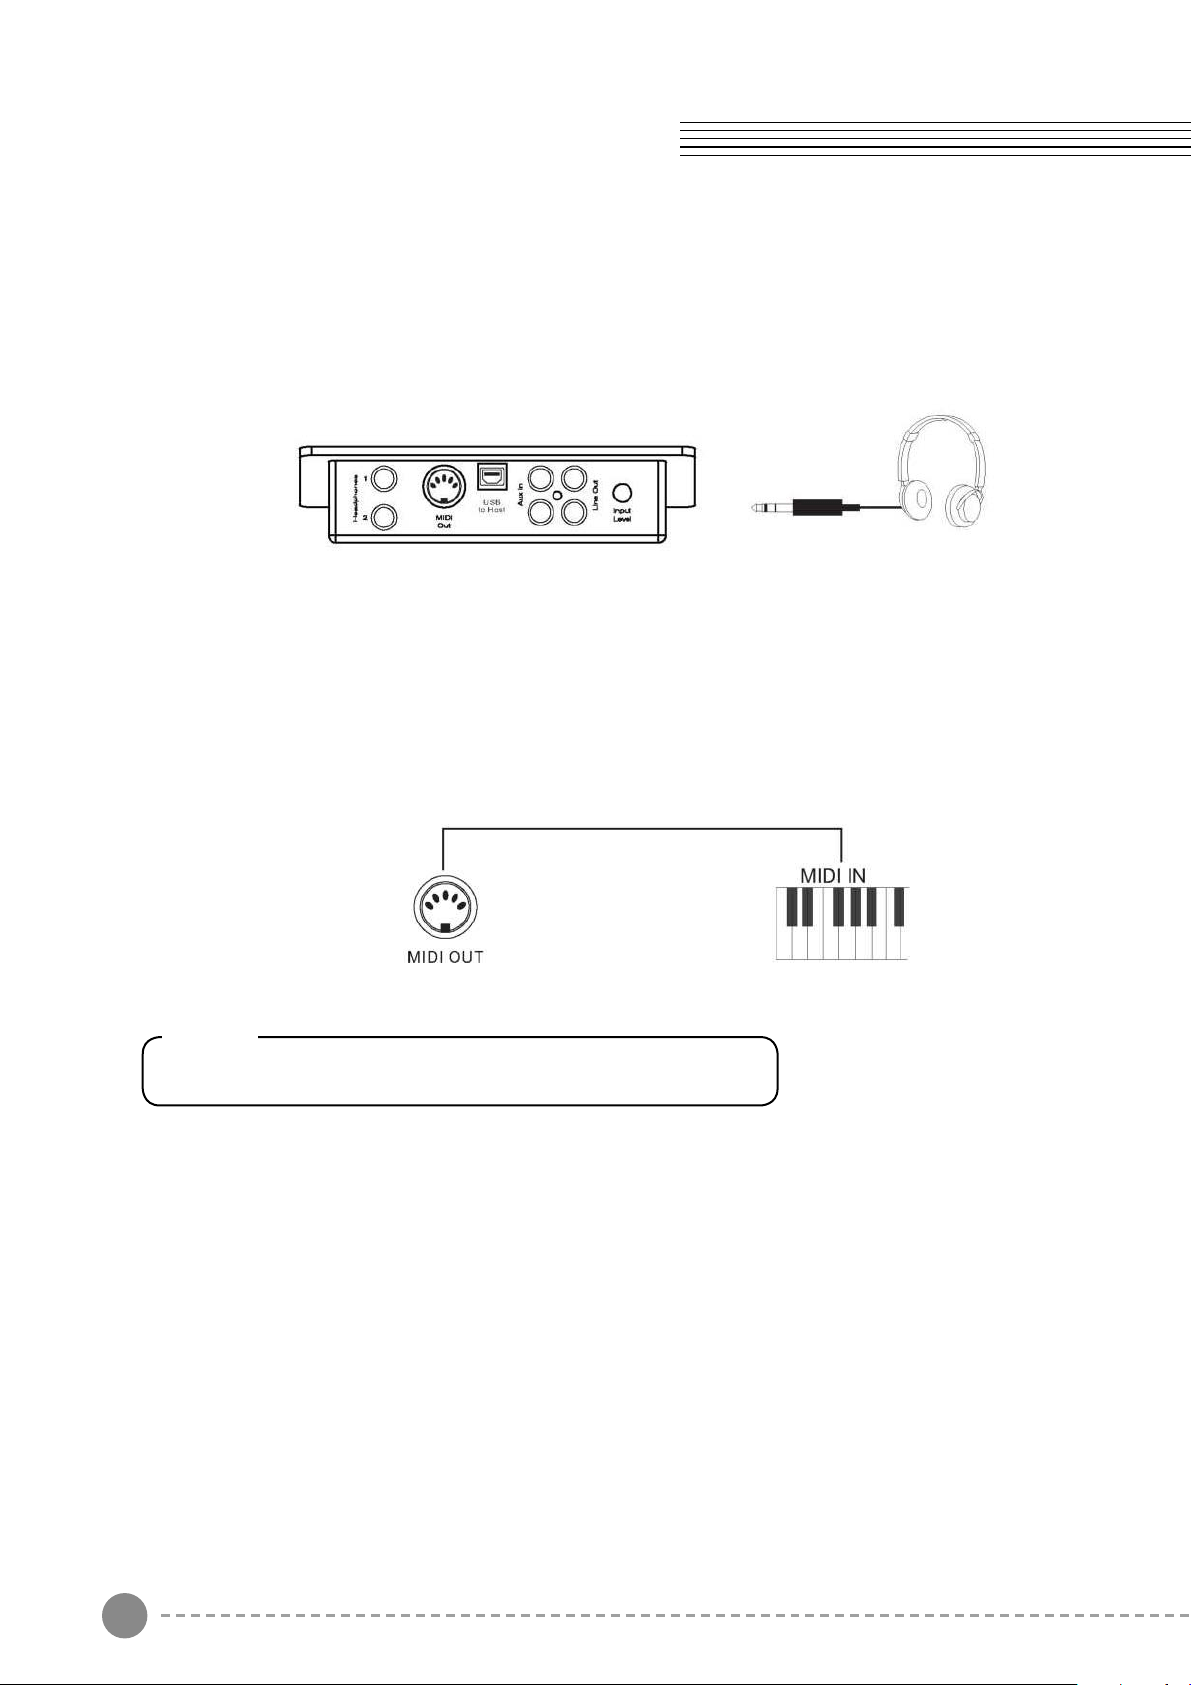
The Connector Box
Headphones
The piano is equipped with two sets of standard stereo headphone jacks to accommodate
private practice or late-night playing. The internal speaker system is automatically shut off
when a pair of headphones is plugged into the 1. Headphone jack.
MIDI OUT
MIDI (Musical Instrument Digital Interface) is a world-standard communication interface
which allows electronic musical instruments to communicate with each other, by sending
and receiving compatible note, program change and other types of MIDI data. You should
only plug the MIDI out in to another device featuring a MIDI input.
Line OUT
The piano's stereo RCA line output can be used to deliver the output of the piano to a
keyboard amplifier, stereo sound system, mixing console or tape recorder. The piano's
internal sound system will remain on unless headphones are plugged in to the 1.
Headphone jack.
Note
MIDI OUT Transmits MIDI data to another MIDI device.
11 12
Using USB-MIDI/USB Audio
This product allows the transfer of MIDI information over USB to a computer.
As complicated this might sound, it's actually pretty straight forward. Because your piano is
USB Class Compliant, there is no need to install a driver to enable it to work with compute.
Simply just plug it in and the OS will do the rest. The piano will work with all standard MIDI
based computer software.
USB AUDIO interface is a digital audio interface. By USB cable, you can digitally transfer
intact audio signals of PC to this instrument, and enjoy it on this instrument or use it for
accompany when you play this instrument; likewise, you can transfer intact audio signals
of the instrument to PC to record and edit music.
Aux In
The Aux In stereo RCA connectors allow you to mix an external sound source (such as a
CD player, MP3 player or computer output) with the piano's internal sounds, for playback
through the piano's built-in speakers or headphone outputs.
The Aux In signal level can be adjusted using the Input Level knob.
The Connector Box
Headphones
The piano is equipped with two sets of standard stereo headphone jacks to accommodate
private practice or late-night playing. The internal speaker system is automatically shut off
when a pair of headphones is plugged into the 1. Headphone jack.
MIDI OUT
MIDI (Musical Instrument Digital Interface) is a world-standard communication interface
which allows electronic musical instruments to communicate with each other, by sending
and receiving compatible note, program change and other types of MIDI data. You should
only plug the MIDI out in to another device featuring a MIDI input.
Line OUT
The piano's stereo RCA line output can be used to deliver the output of the piano to a
keyboard amplifier, stereo sound system, mixing console or tape recorder. The piano's
internal sound system will remain on unless headphones are plugged in to the 1.
Headphone jack.
Note
MIDI OUT Transmits MIDI data to another MIDI device.
13 14
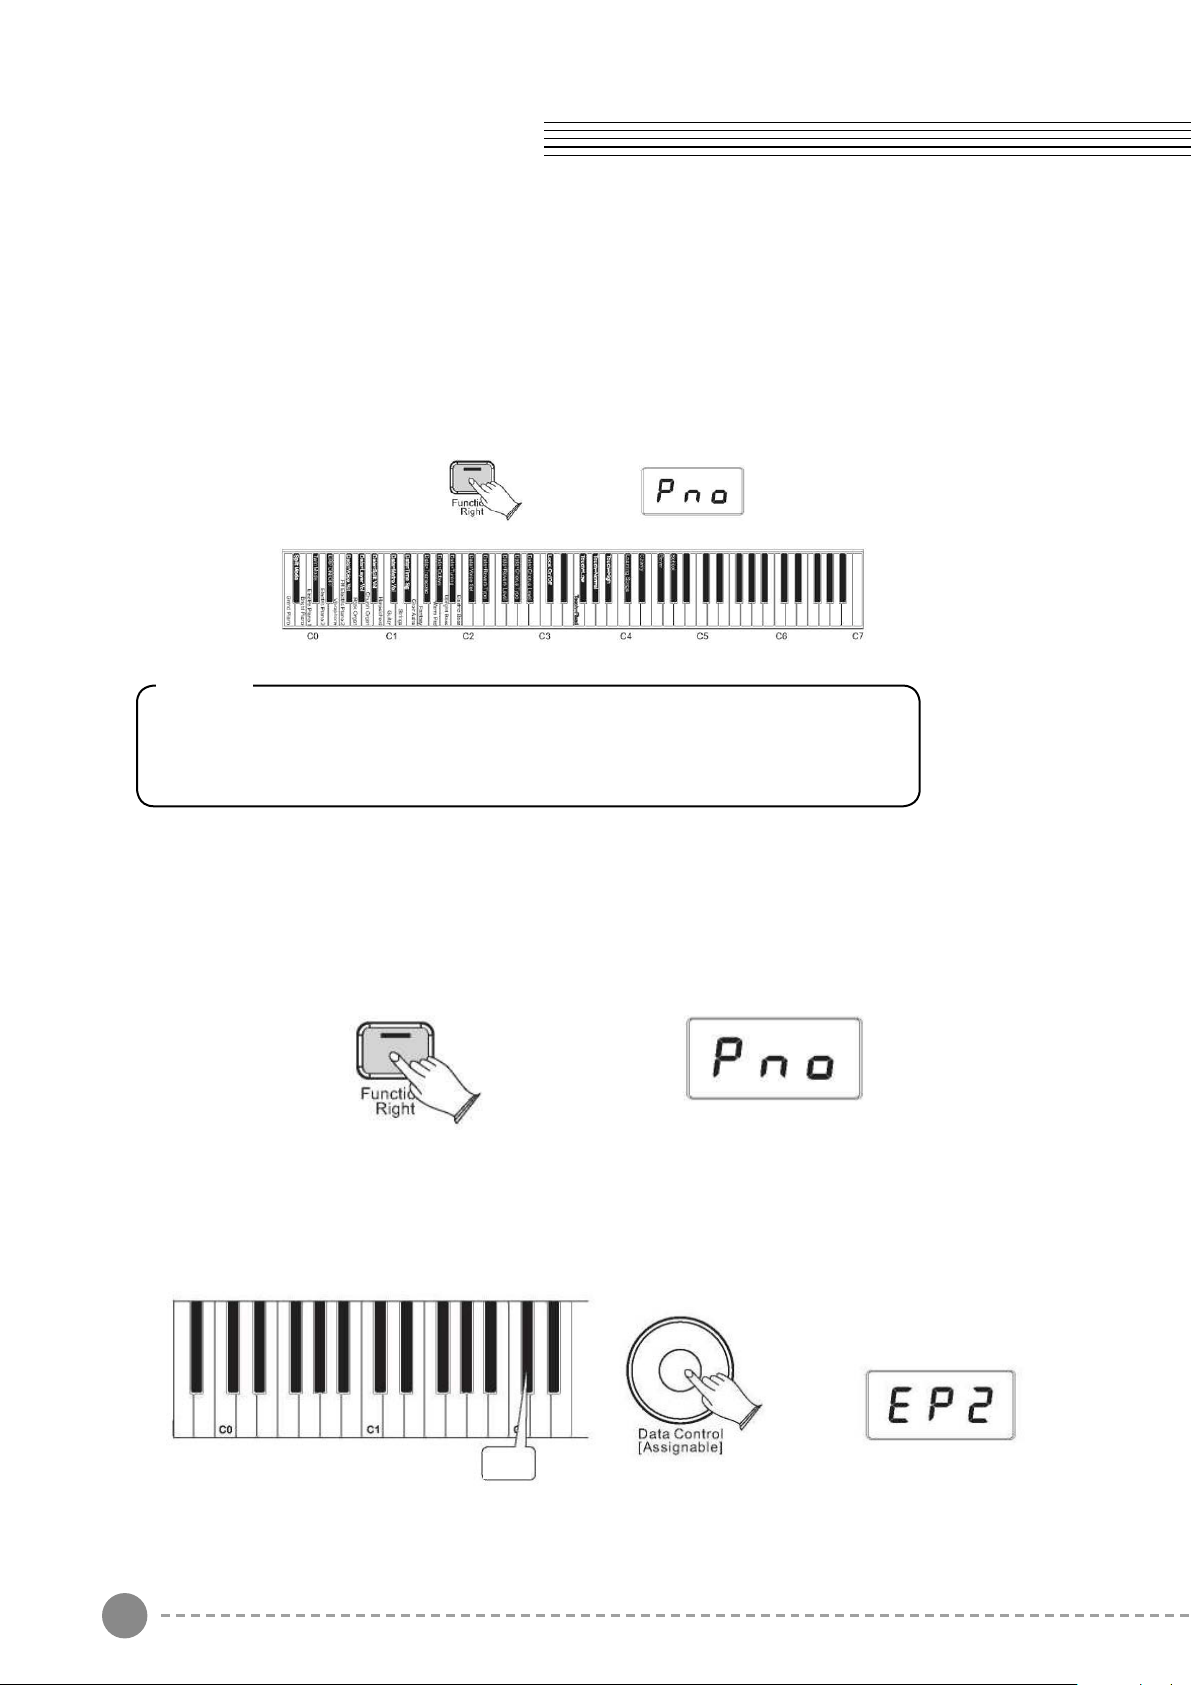
Function Mode
In Function Mode, the keys on the piano keyboard do not make any sound. Instead, the
keys are used for selecting and editing advanced functions. In most cases, an edit function
is selected using the keyboard, and the Data Control knob is used to increase or decrease
the value of the selected editing parameter. To enter Edit Mode, press the Voice/Function
button.
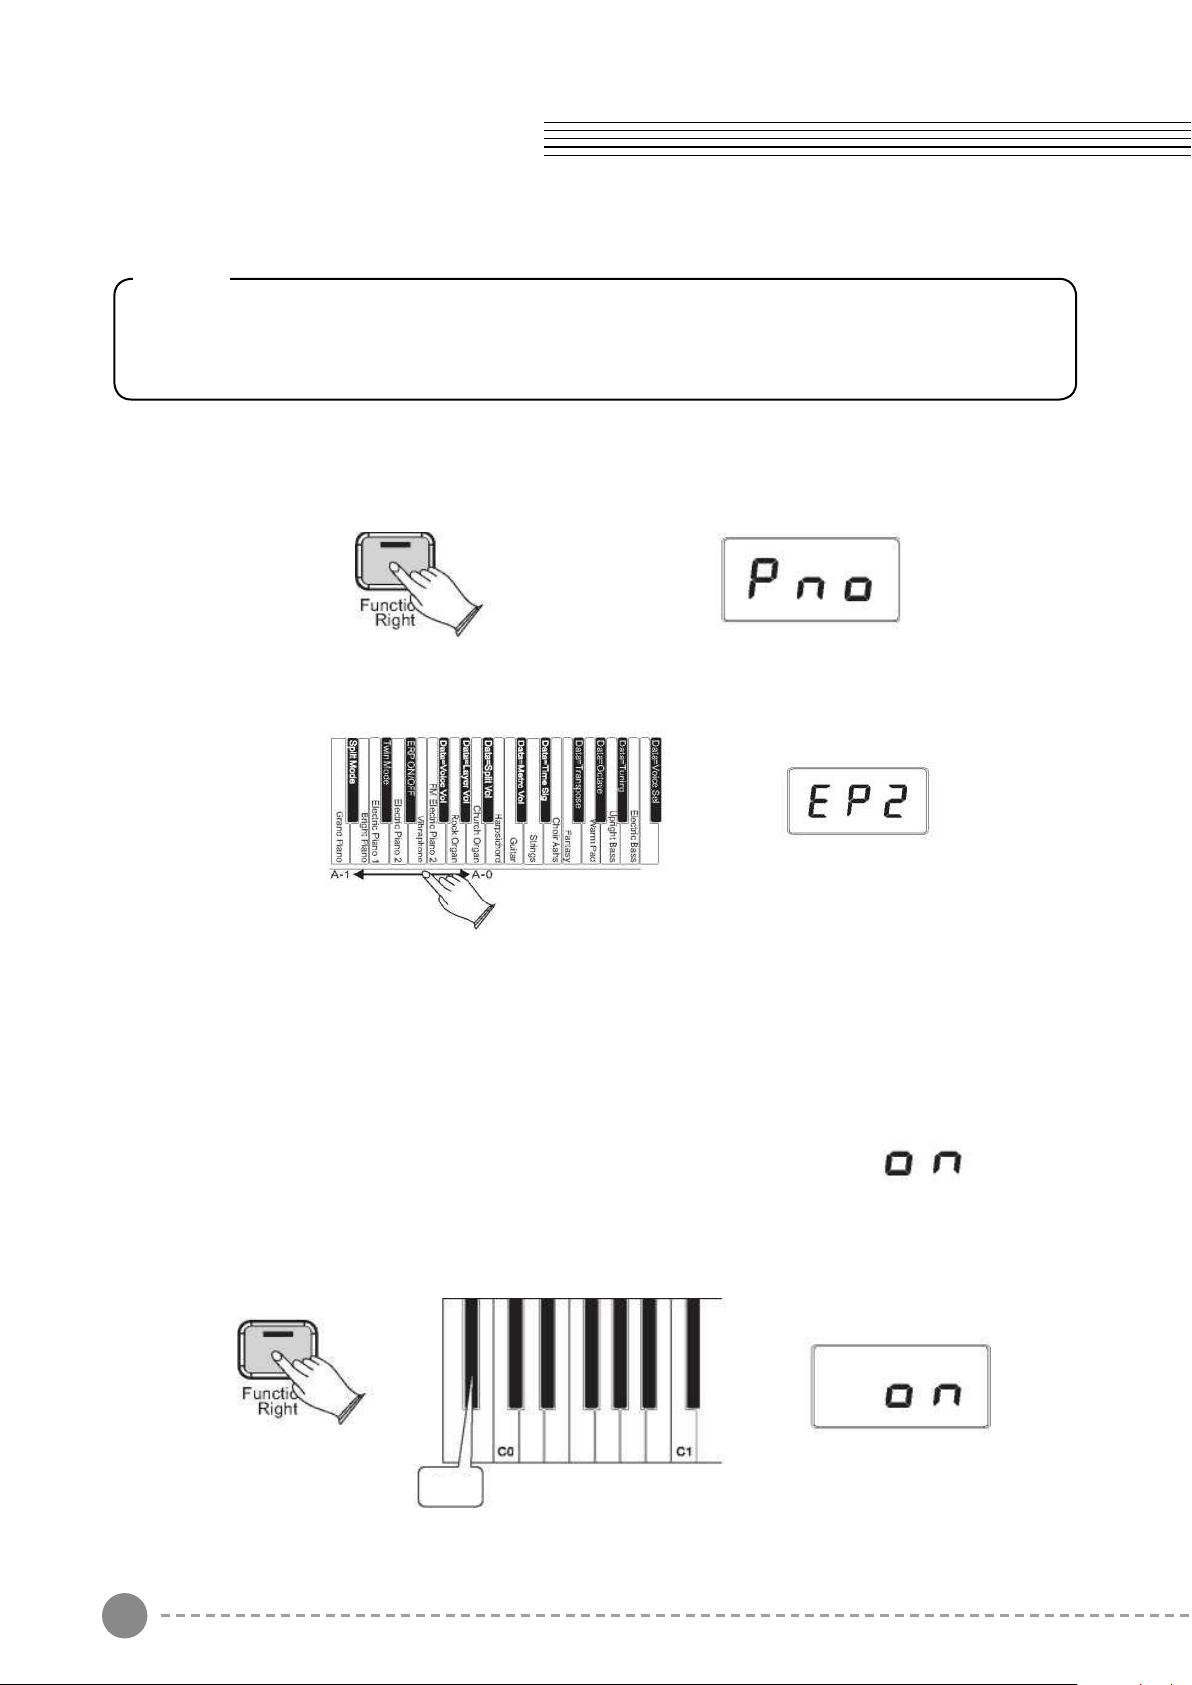
Resetting the Data Control Knob to Voice Select
Press the [Function/Right] button. It will light up.
Press the key C#2. The LED will then display the currently selected Voice. Now you can
use the Data Control knob to select the desired Voice.
Note
Regardless of how the Data Control knob is assigned, it's possible
to change voices by pressing and holding down the Voice/Function
button while selecting a voice using the Data Control knob.
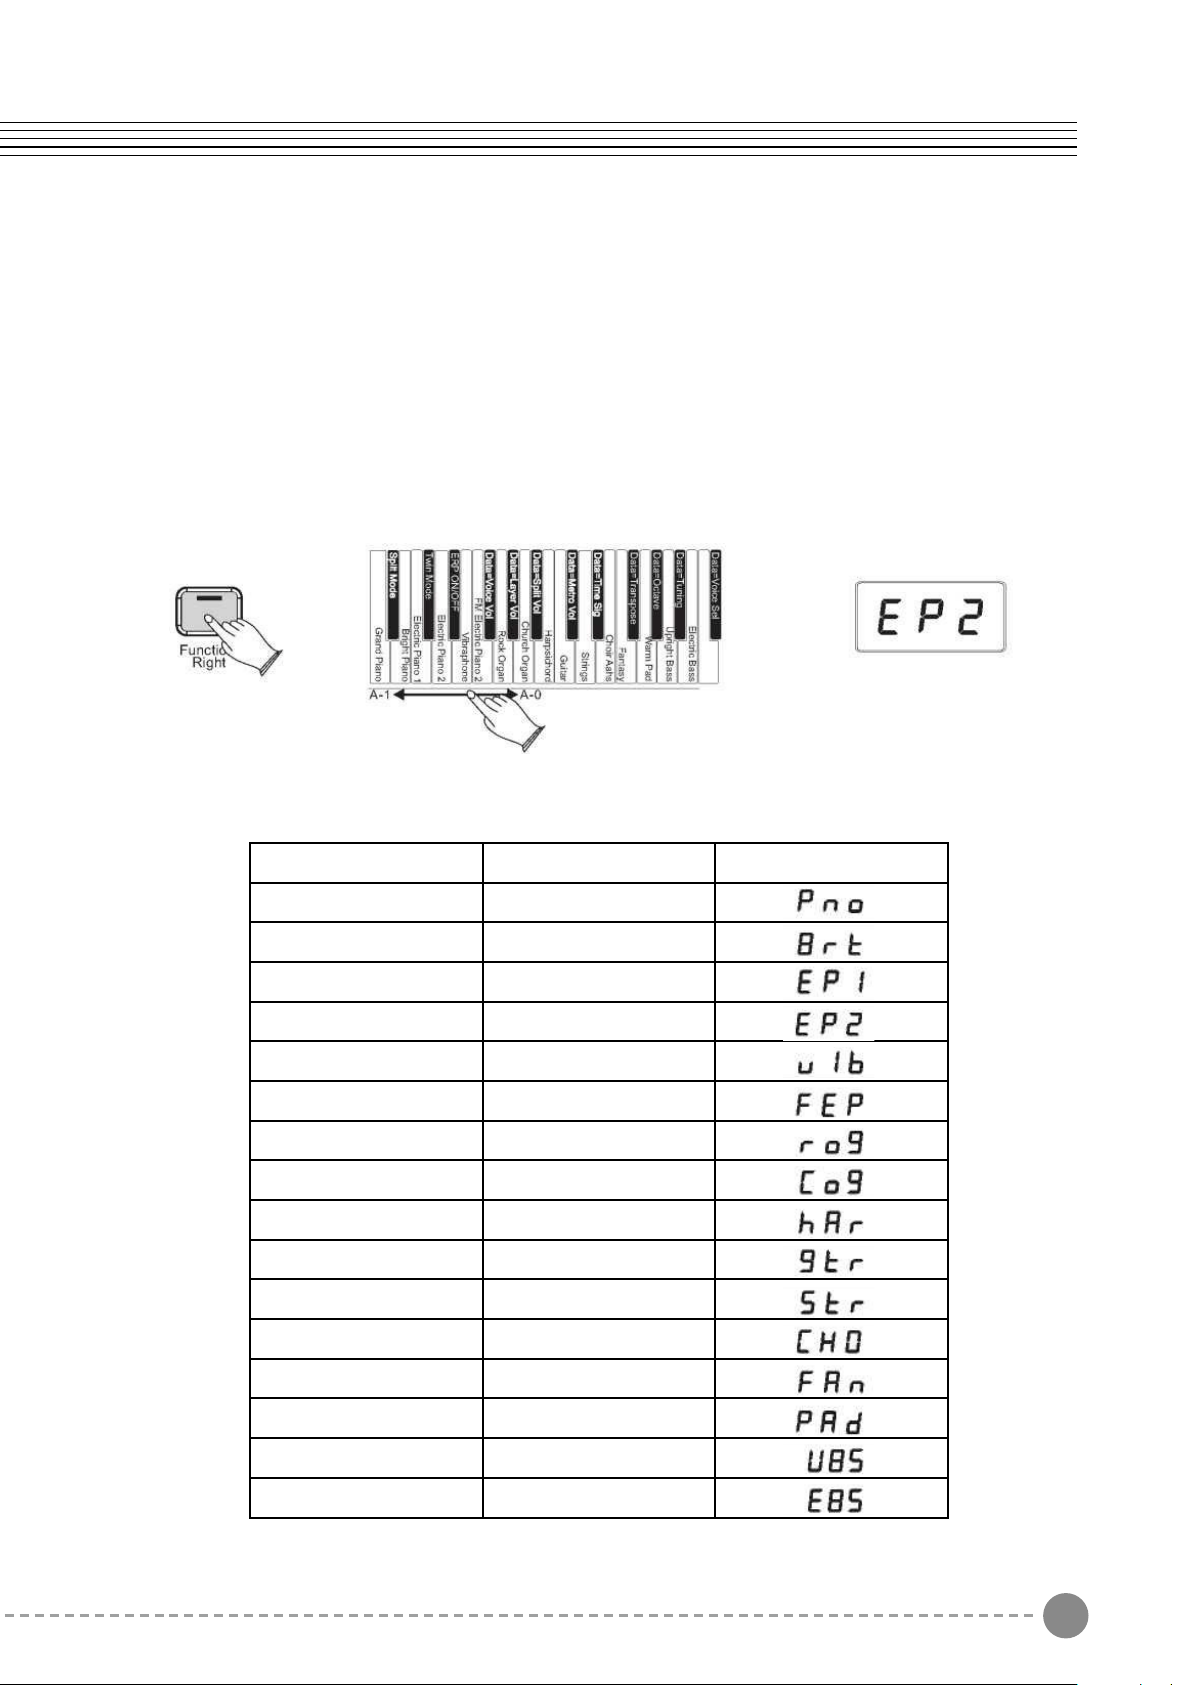
Using the Voice Select Keys
The Voice Select keys offer an alternative method of selecting voices.
To Select Different Voices Using Voice Select Keys:
Press the [Function/Right] button to enter Edit Mode. The LED in the [Function/Right]
button will light.
Press and release one of the Voice Select keys on the keyboard.
The LED display will change to show the newly selected voice according to the following
table:
Key Sound Name LED Display
A-1 Grand Piano
B-1 Bright Piano
C0 Electric Piano1
DO Electric Piano 2
EO Vibraphone FM
FO Electric Piano
GO Rock Organ
AO Church Organ
A-0 Harpsichord
B-O Guitar
C1 Strings
D1 Choir Aahs
E1 Fantansy
F1 WarmPad
G1 Upright Bass
A1 Electric Bass
Voice/Function
C#2
13 14
Function Mode
In Function Mode, the keys on the piano keyboard do not make any sound. Instead, the
keys are used for selecting and editing advanced functions. In most cases, an edit function
is selected using the keyboard, and the Data Control knob is used to increase or decrease
the value of the selected editing parameter. To enter Edit Mode, press the Voice/Function
button.
Resetting the Data Control Knob to Voice Select
Press the [Function/Right] button. It will light up.
Press the key C#2. The LED will then display the currently selected Voice. Now you can
use the Data Control knob to select the desired Voice.
Note
Regardless of how the Data Control knob is assigned, it's possible
to change voices by pressing and holding down the Voice/Function
button while selecting a voice using the Data Control knob.
Using the Voice Select Keys
The Voice Select keys offer an alternative method of selecting voices.
To Select Different Voices Using Voice Select Keys:
Press the [Function/Right] button to enter Edit Mode. The LED in the [Function/Right]
button will light.
Press and release one of the Voice Select keys on the keyboard.
The LED display will change to show the newly selected voice according to the following
table:
Key Sound Name LED Display
A-1 Grand Piano
B-1 Bright Piano
C0 Electric Piano1
DO Electric Piano 2
EO Vibraphone FM
FO Electric Piano
GO Rock Organ
AO Church Organ
A-0 Harpsichord
B-O Guitar
C1 Strings
D1 Choir Aahs
E1 Fantansy
F1 WarmPad
G1 Upright Bass
A1 Electric Bass
Voice/Function
C#2
15 16
Split Mode
In SPLIT mode, your keyboard will be split into two sections which means different voices
can be played with the left and right hands at the same time.
Use Split Mode
Press the [Function/Right] button to enter Edit Mode.
Press the Bb-1 key to enter Split Mode. The LED display will show:
This will be displayed for 3 seconds. You can select the split voice by turning the Data
Control knob or reference to voice selection(P10-P11) in 3 seconds. After 3seconds, it will
change to show the currently main voice.
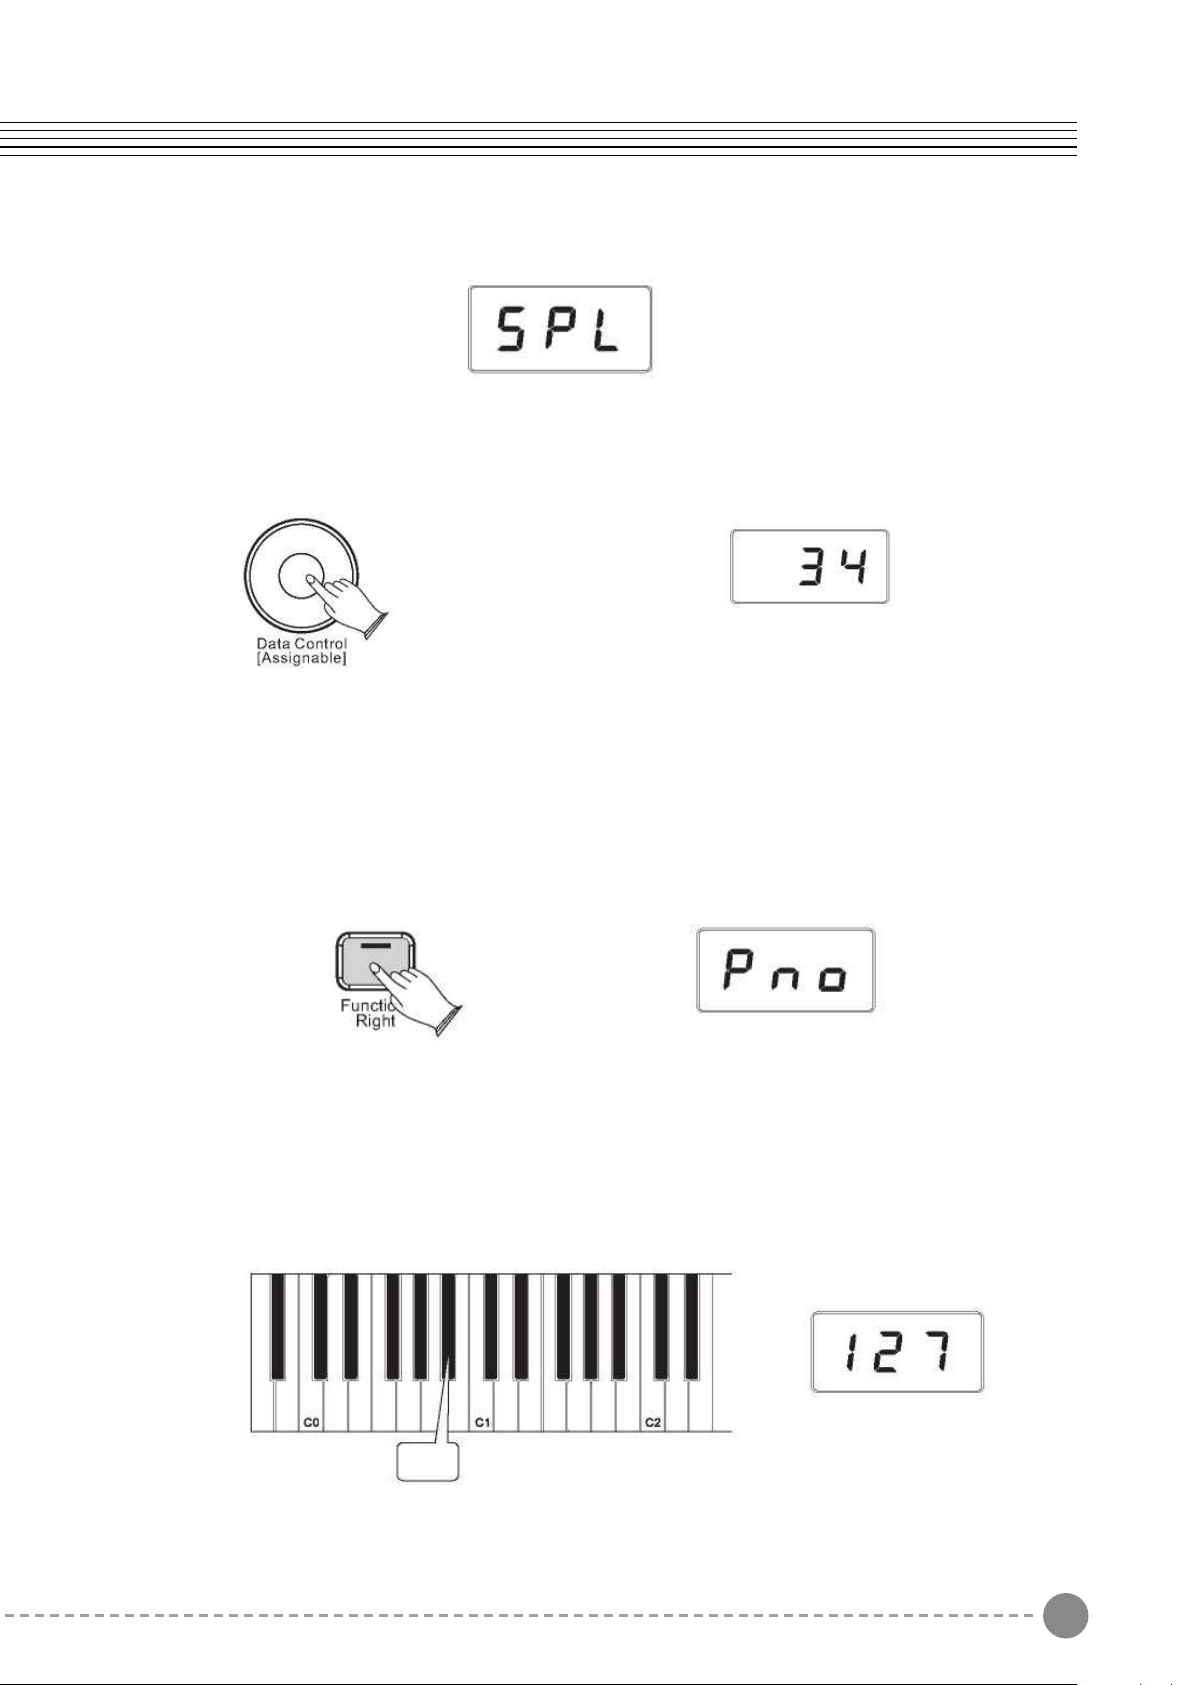
Change the Split Point
Press and hold on the [Function/Right] button.
The LED display will show “SPL” for 3 seconds, then you can turn the Data
Control knob or play any of keys on the keyboard to select the Split Point
3 seconds, after 3 seconds the LED will display the currently selected voice
The LED will show the value you selected. Range: 00-87.
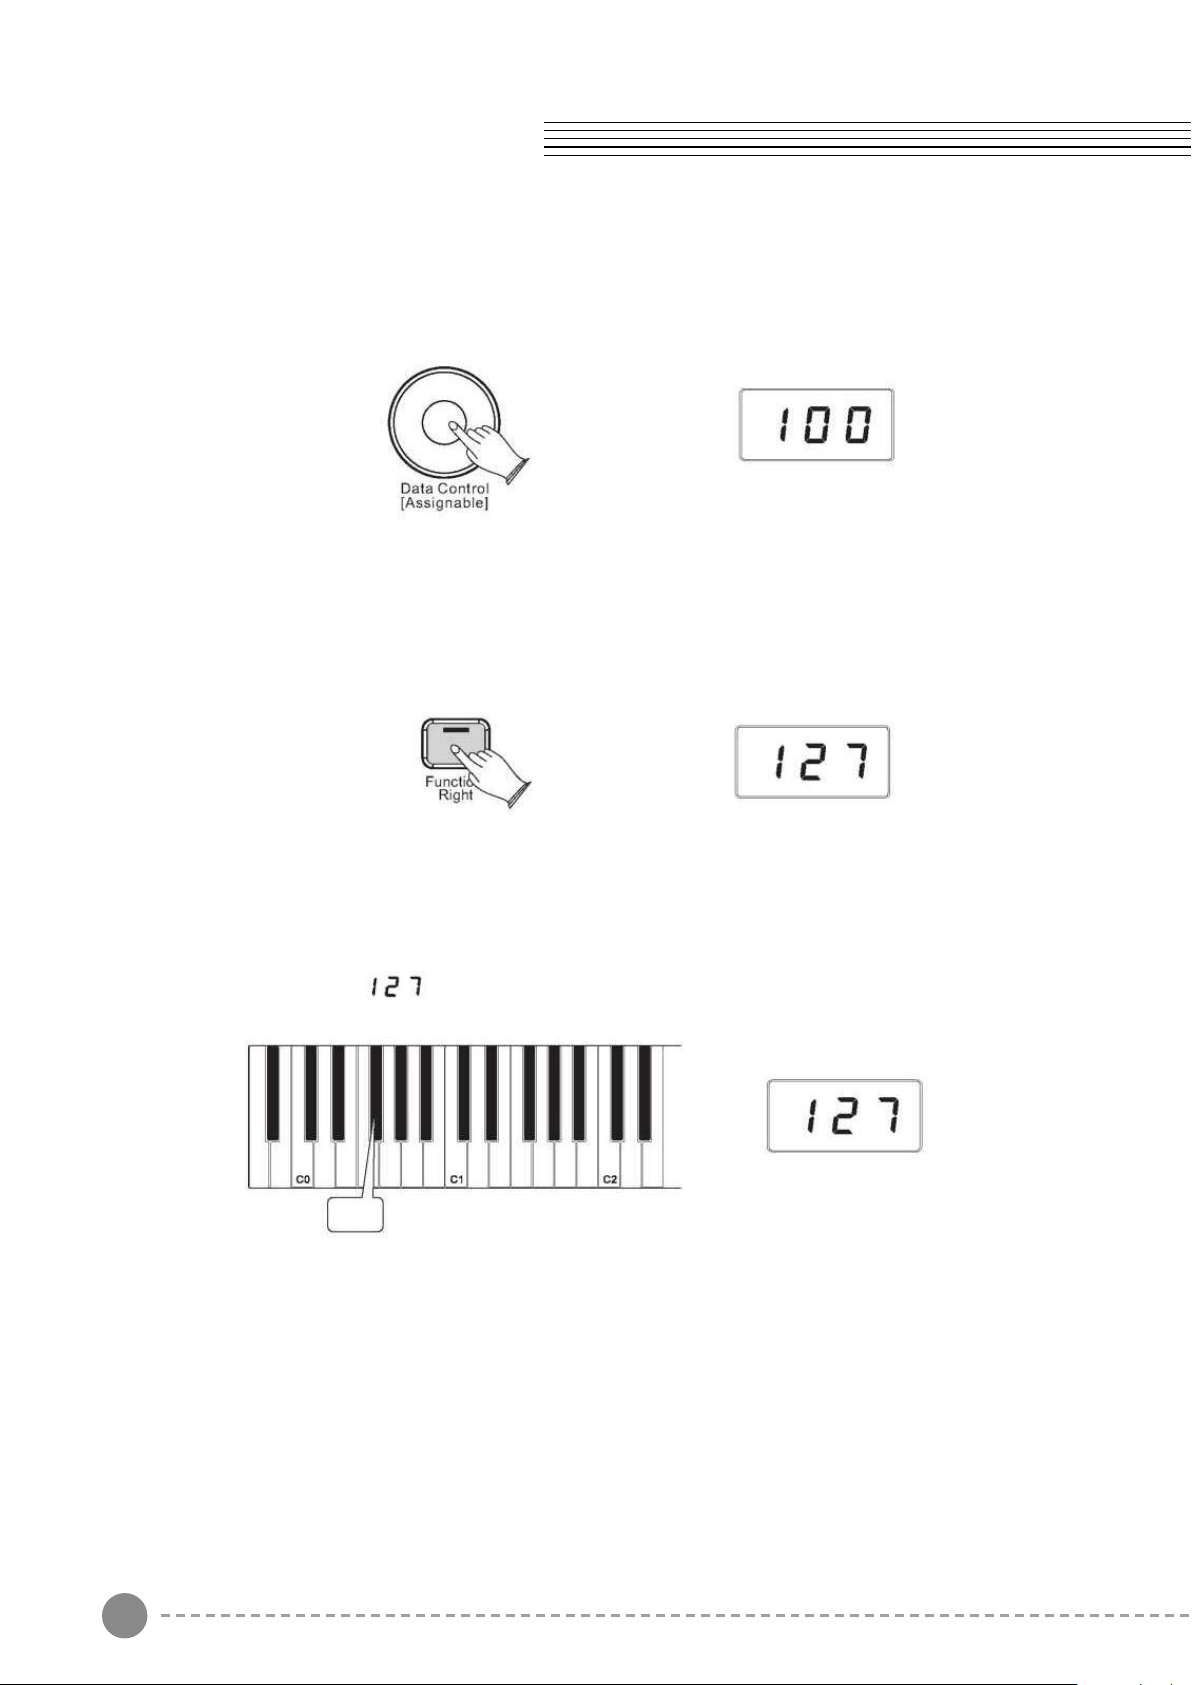
To Independently Control Volume Levels of Left Hand and Right Hand Voices:
1 .Left Hand Voice Volume:
Press the [Function/Right] button to enter Edit Mode.
Press the Bb0 key to assign the Data Control knob to control the Split Voice (Left
Hand Voice) volume.
Voice/Function
Bb-1
Bb0
15 16
Split Mode
In SPLIT mode, your keyboard will be split into two sections which means different voices
can be played with the left and right hands at the same time.
Use Split Mode
Press the [Function/Right] button to enter Edit Mode.
Press the Bb-1 key to enter Split Mode. The LED display will show:
This will be displayed for 3 seconds. You can select the split voice by turning the Data
Control knob or reference to voice selection(P10-P11) in 3 seconds. After 3seconds, it will
change to show the currently main voice.
Change the Split Point
Press and hold on the [Function/Right] button.
The LED display will show “SPL” for 3 seconds, then you can turn the Data
Control knob or play any of keys on the keyboard to select the Split Point
3 seconds, after 3 seconds the LED will display the currently selected voice
The LED will show the value you selected. Range: 00-87.
To Independently Control Volume Levels of Left Hand and Right Hand Voices:
1 .Left Hand Voice Volume:
Press the [Function/Right] button to enter Edit Mode.
Press the Bb0 key to assign the Data Control knob to control the Split Voice (Left
Hand Voice) volume.
Voice/Function
Bb-1
Bb0
17 18
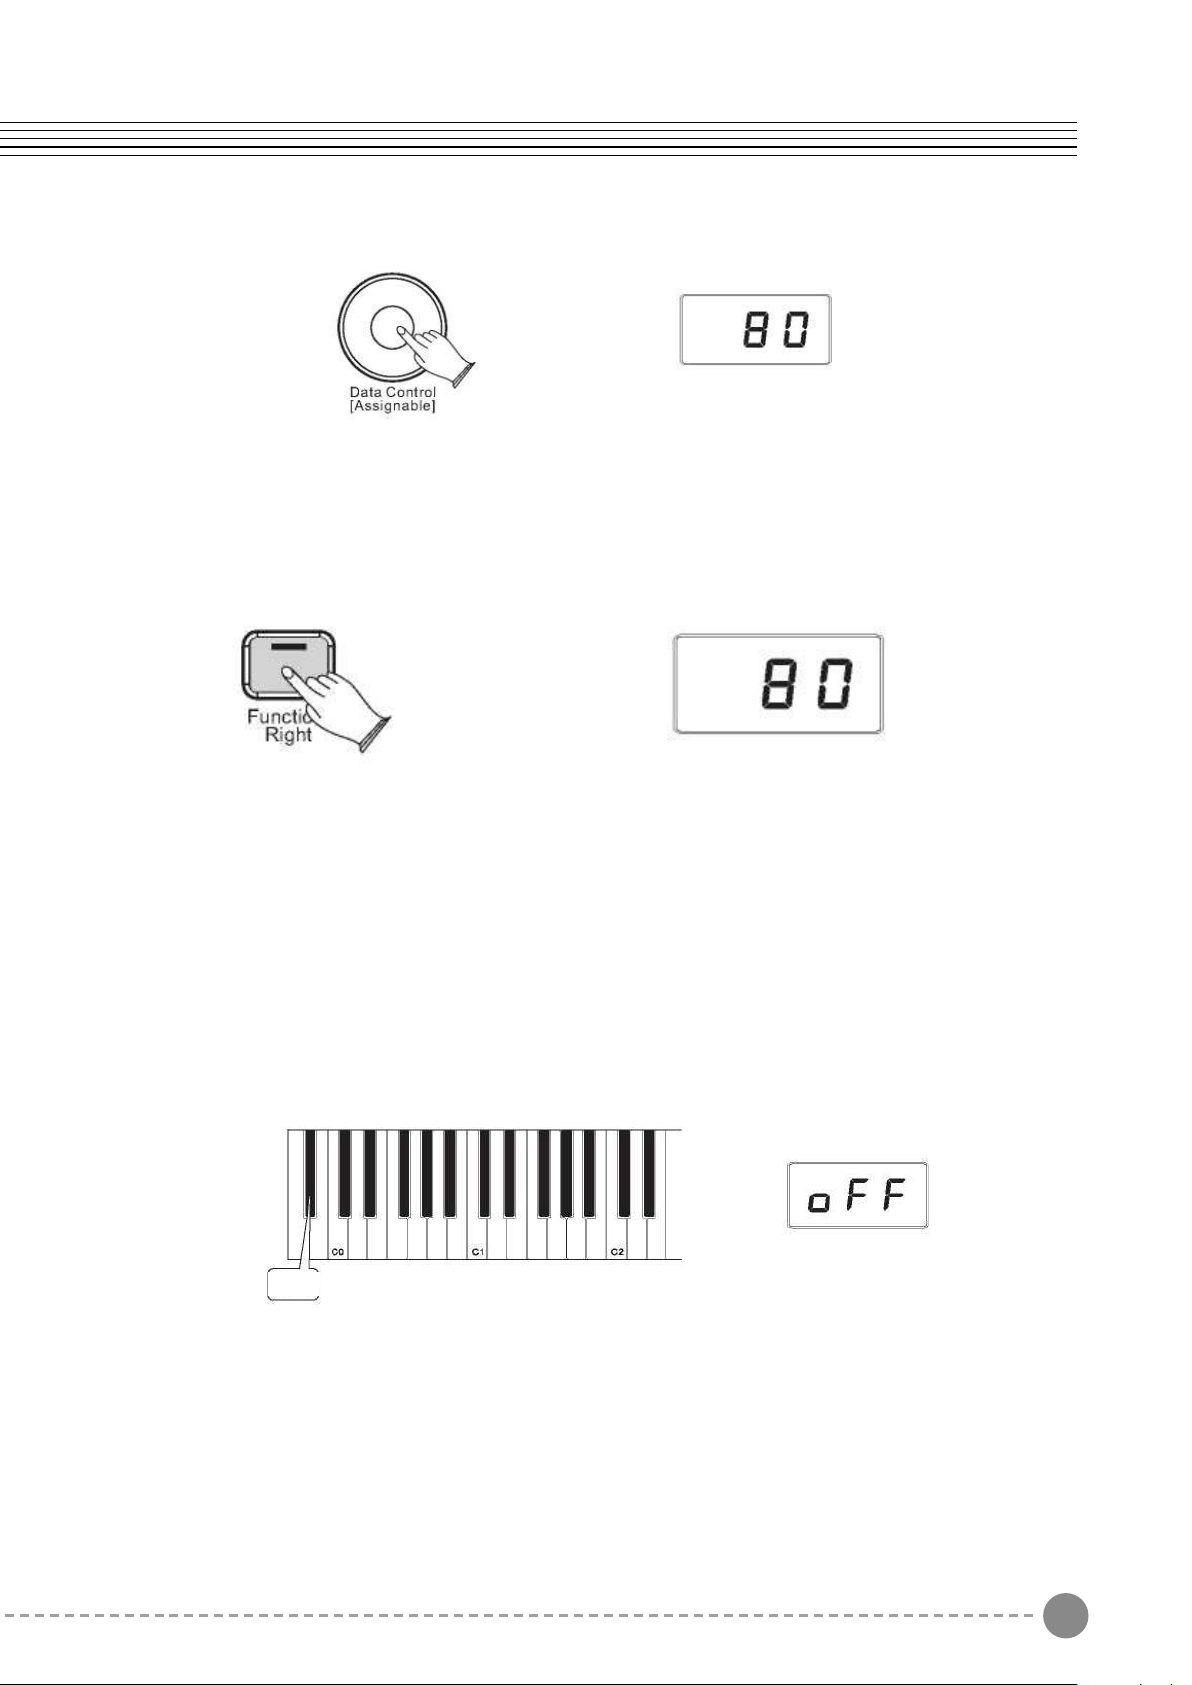
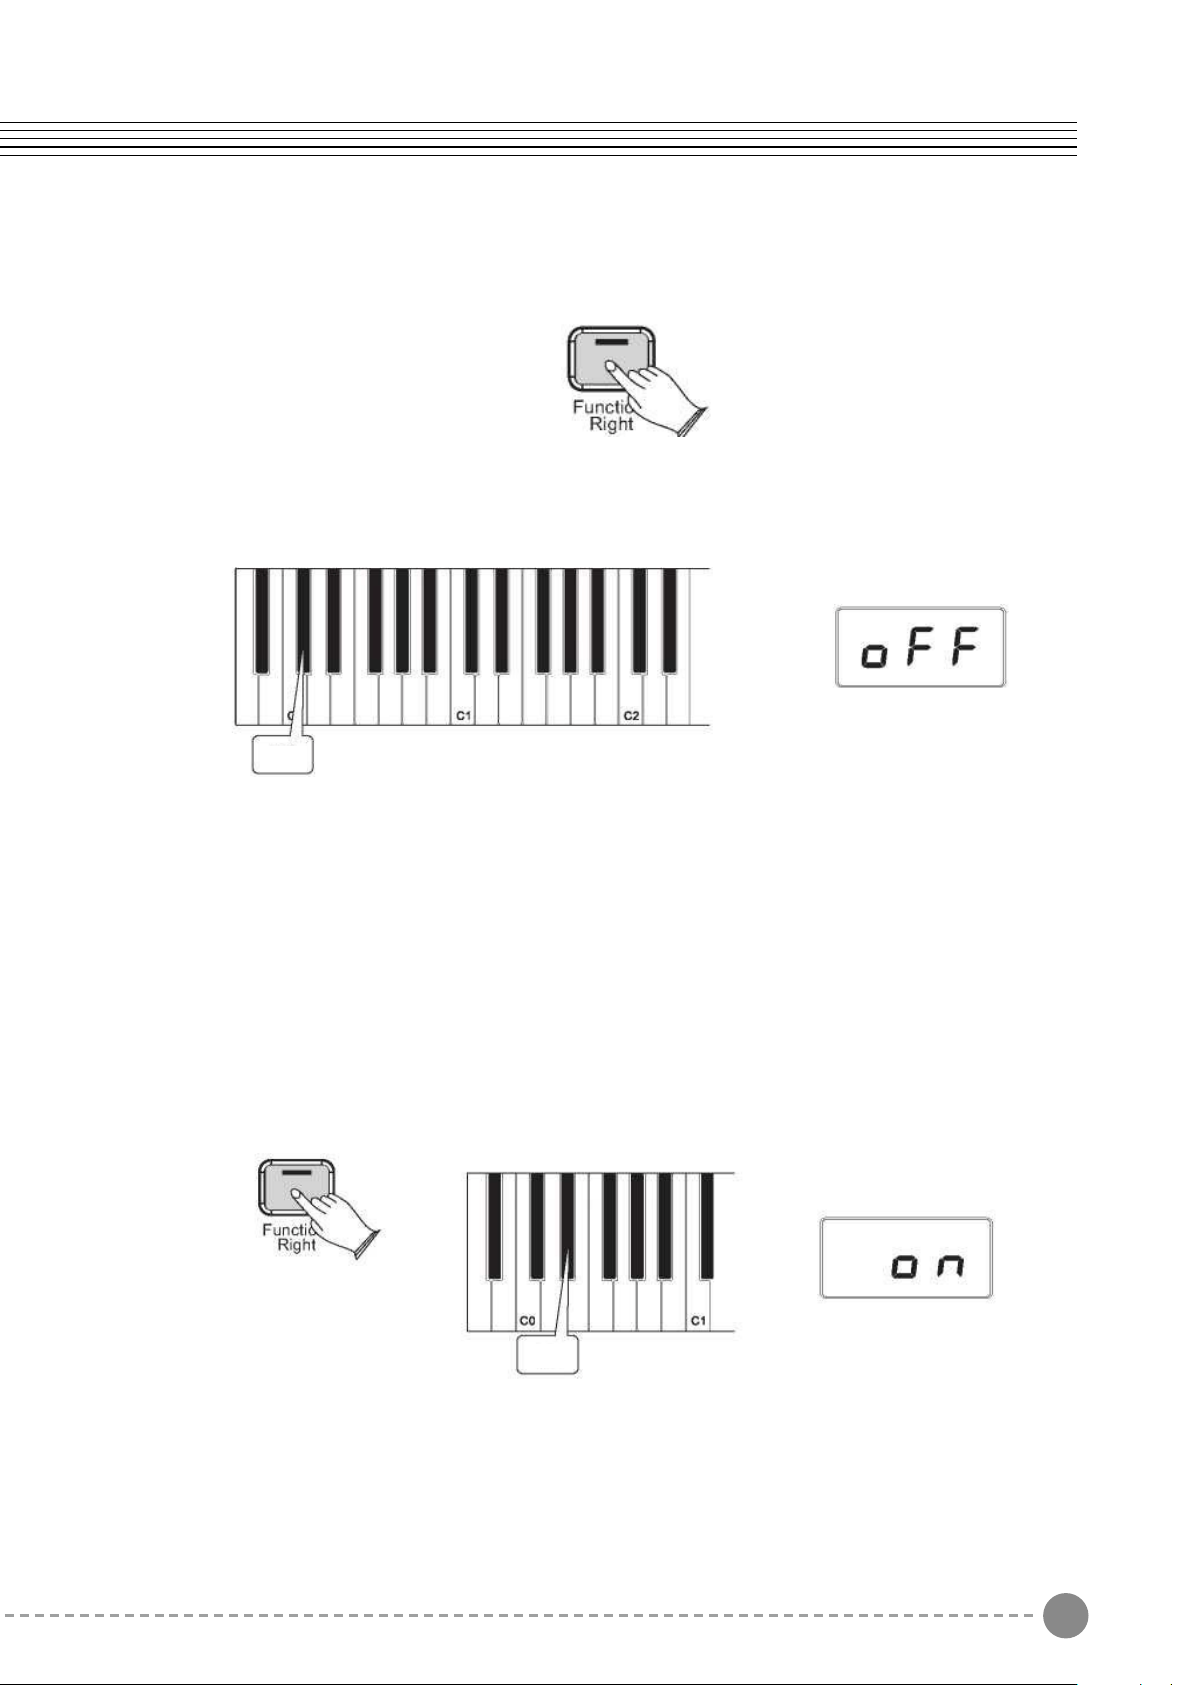
To turn off Split Mode:
Press the [Function/Right] button.
Press the Split Mode key Bb-1 to turn off Split Mode.
The display will show “off” for 3 seconds.
Then the LED display will return to showing the name of the currently selected Voice.
In Layer Mode, this piano will play two voices simultaneously on each key.
To use Layer Mode:
Press the [Function/Right] button to enter Edit Mode
Voice/Function
Use the Data Control knob to select a Split Voice volume level between 0 (minimum) and
127 (maximum). You can play as you do this to hear the volume change.
2.Right Hand Voice Volume:
Press the [Function/Right]] button to enter Edit Mode
Press the F#0 key to assign the Data Control knob to control the Right Hand Voice volume.
The LED display will show:
Use the [Data Control] knob to select a Right Hand Voice volume level between 0 (minimum)
and 127 (maximum). You can play as you do this to hear the volume change.
F#0
Bb-1
17 18
To turn off Split Mode:
Press the [Function/Right] button.
Press the Split Mode key Bb-1 to turn off Split Mode.
The display will show “off” for 3 seconds.
Then the LED display will return to showing the name of the currently selected Voice.
In Layer Mode, this piano will play two voices simultaneously on each key.
To use Layer Mode:
Press the [Function/Right] button to enter Edit Mode
Voice/Function
Use the Data Control knob to select a Split Voice volume level between 0 (minimum) and
127 (maximum). You can play as you do this to hear the volume change.
2.Right Hand Voice Volume:
Press the [Function/Right]] button to enter Edit Mode
Press the F#0 key to assign the Data Control knob to control the Right Hand Voice volume.
The LED display will show:
Use the [Data Control] knob to select a Right Hand Voice volume level between 0 (minimum)
and 127 (maximum). You can play as you do this to hear the volume change.
F#0
Bb-1
19 20
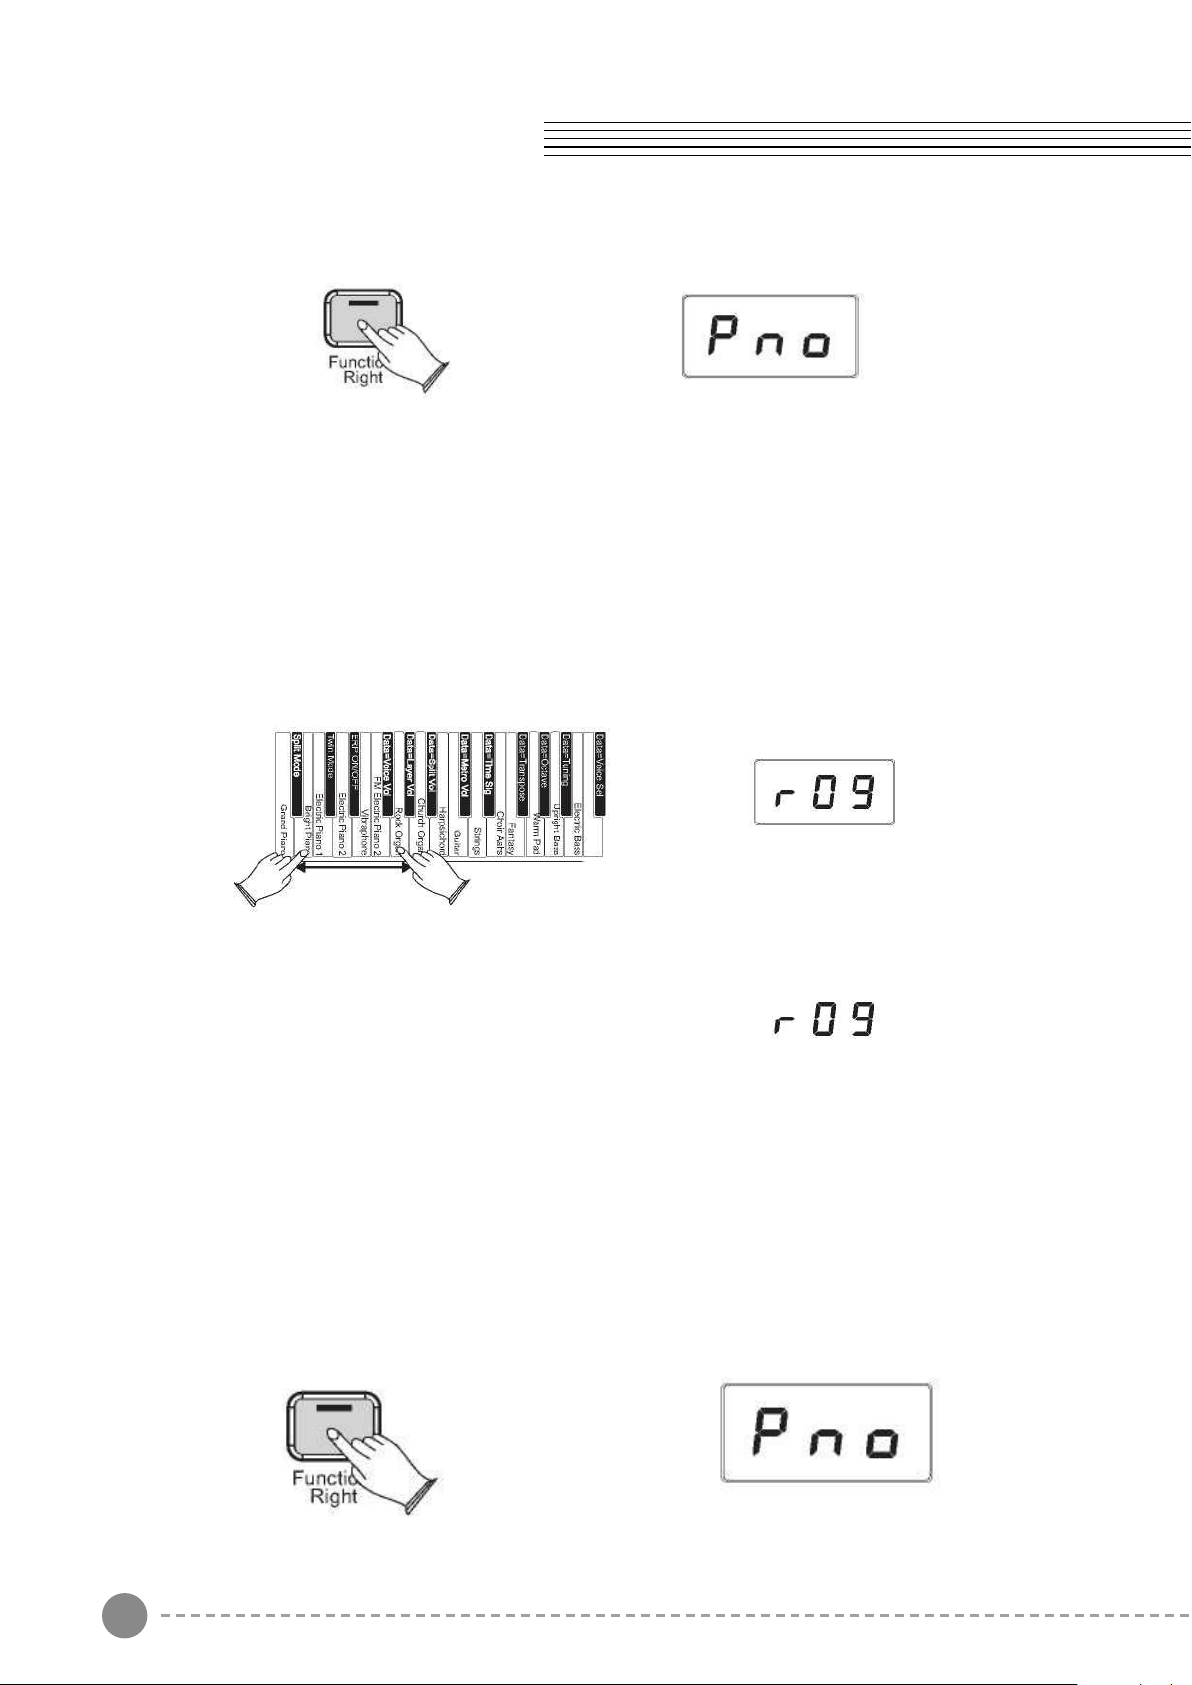
Press and hold down a Voice Select key (any white key in the lowest octave of the piano).
This will select the Main Voice. (See the section on Using the Voice Select Keys at the
beginning of the Edit Mode Functions section for more information on selecting voices in
this manner.)
While both keys are held down the display will show:
While continuing to hold the rst Voice Select key, press a second Voice Select key. This
will select the Layer Voice.
This piano is now in Layer Mode. Both the Main and Layer Voices will sound when keys
are pressed.(In the example illustration, Bright Piano is the Main Voice (because it is
selected rst), and Rock Organ is the Layer Voice (because it is selected second).
If the Data Control knob is used to change voices while in Layer Mode, it will aect the
main Voice only. The Layer Voice will stay the same until Layer Mode is turned o again.
Please note that polyphony may be reduced while Layer Mode is in use.
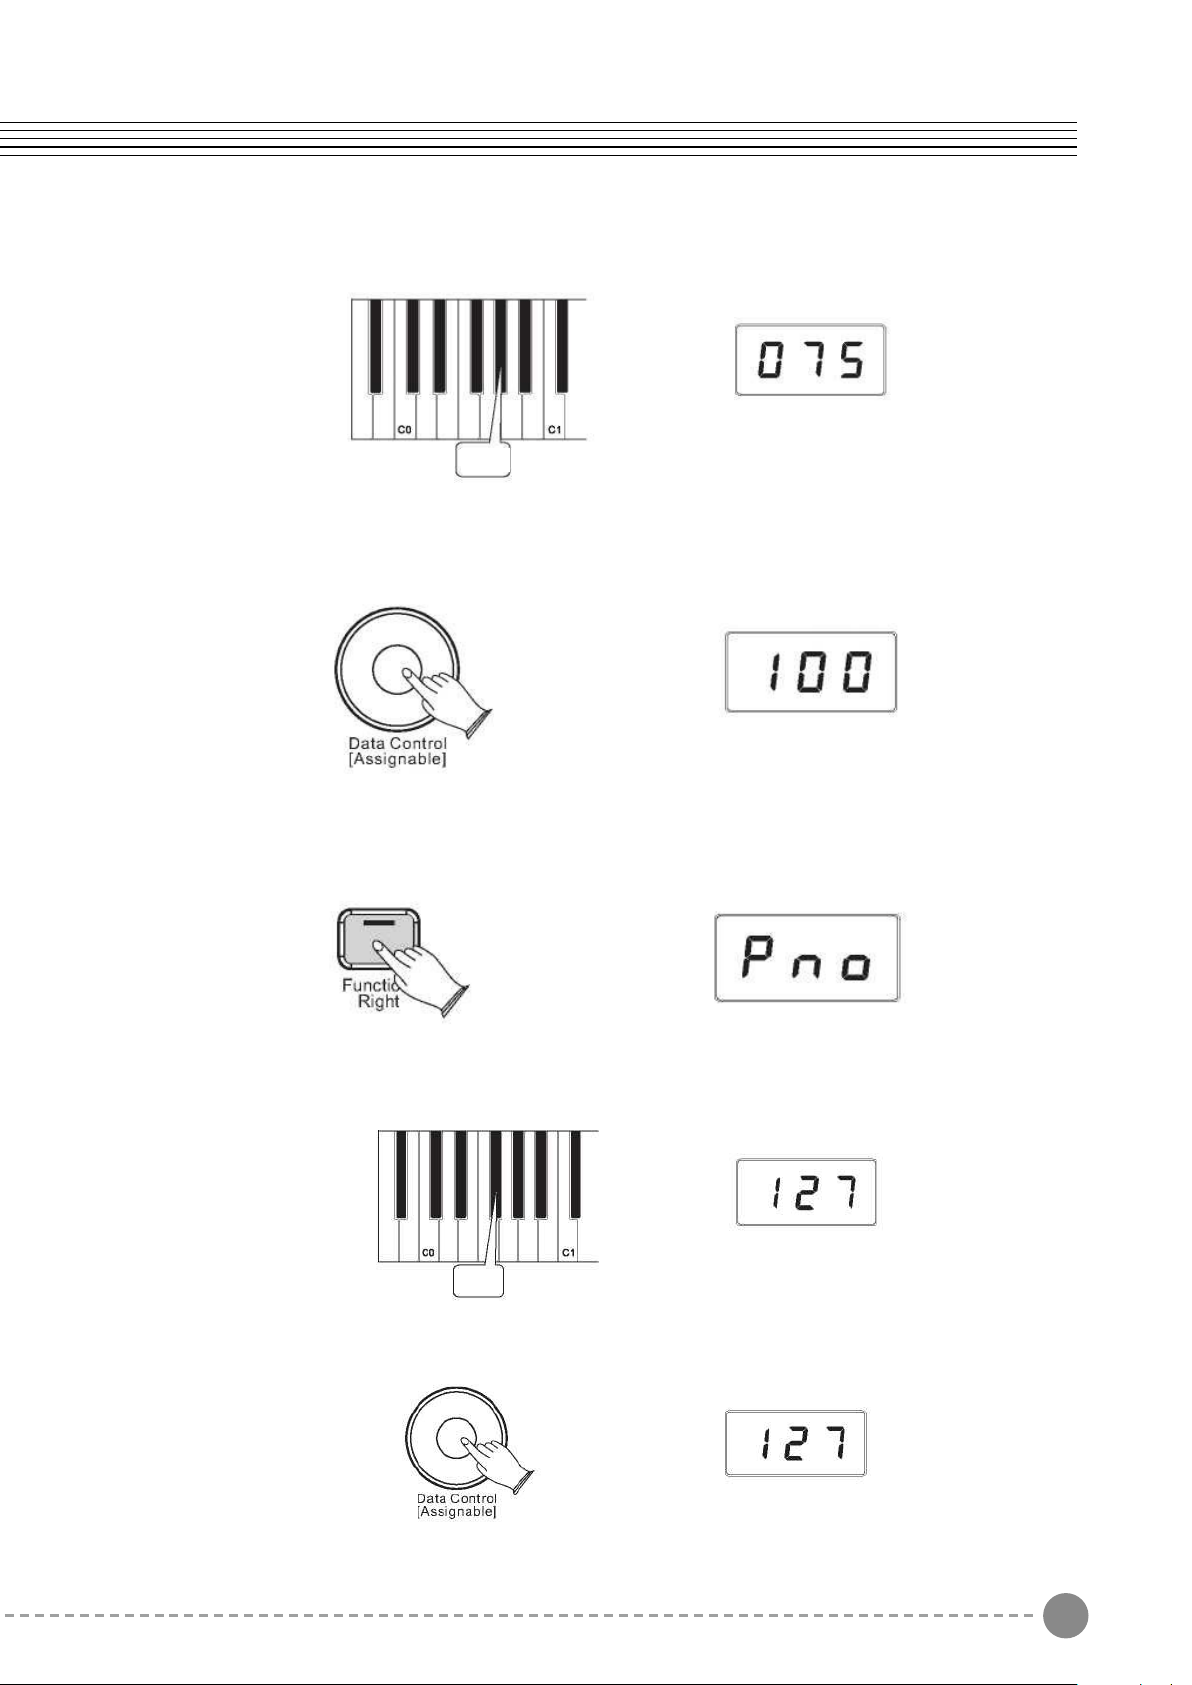
To Adjust the Volume of the Layer Voice:
Press the [Function/Right] button to enter Edit Mode
Press the Layer Volume key (Ab0).
Use the Data Control knob to select a Layer Voice volume level between 0 (minimum)
and 127 (maximum). You can play as you do this to hear the volume
change.
To Adjust the Volume of the Main Voice:
Press the [Function/Right] button to enter Edit Mode.
Press the Voice Volume key (F#0).
Use the Data Control knob to adjust the Voice volume.
Voice/Function
Ab0
F#0
19 20
Press and hold down a Voice Select key (any white key in the lowest octave of the piano).
This will select the Main Voice. (See the section on Using the Voice Select Keys at the
beginning of the Edit Mode Functions section for more information on selecting voices in
this manner.)
While both keys are held down the display will show:
While continuing to hold the rst Voice Select key, press a second Voice Select key. This
will select the Layer Voice.
This piano is now in Layer Mode. Both the Main and Layer Voices will sound when keys
are pressed.(In the example illustration, Bright Piano is the Main Voice (because it is
selected rst), and Rock Organ is the Layer Voice (because it is selected second).
If the Data Control knob is used to change voices while in Layer Mode, it will aect the
main Voice only. The Layer Voice will stay the same until Layer Mode is turned o again.
Please note that polyphony may be reduced while Layer Mode is in use.
To Adjust the Volume of the Layer Voice:
Press the [Function/Right] button to enter Edit Mode
Press the Layer Volume key (Ab0).
Use the Data Control knob to select a Layer Voice volume level between 0 (minimum)
and 127 (maximum). You can play as you do this to hear the volume
change.
To Adjust the Volume of the Main Voice:
Press the [Function/Right] button to enter Edit Mode.
Press the Voice Volume key (F#0).
Use the Data Control knob to adjust the Voice volume.
Voice/Function
Ab0
F#0
21 22
To Turn Off Layer Mode:
Press the [Function/Right] button to enter Edit Mode.
Select a single Voice by pressing a single Voice Select Key.
Twin Mode
In Twin mode, the keyboard will be separated into two play areas.
Use Twin Mode
Press the [Function/Right] button to enter Edit Mode.
Press the C#0 key to enter Twin Mode. The LED display will show:
Right: from C#3 to C7
Left: from A-1 to C3
Note
If Split Mode is engaged and Layer Mode is selected, the Layer Voice will only be
applied to the keys to the right of the split point. The Left Hand Voice will remain the
same as was specied for Split Mode
To turn off the Twin Mode:
Press the [Function/Right] button
Use the Data Control knob to select a Layer Voice volume level between 0 (minimum) and
127 (maximum). You can play as you do this to hear the volume change.
Your piano will switch off automatically in 30 minutes after no any operation on it. In this
case, press the [STANDBY/ON] button again to turn on the power.
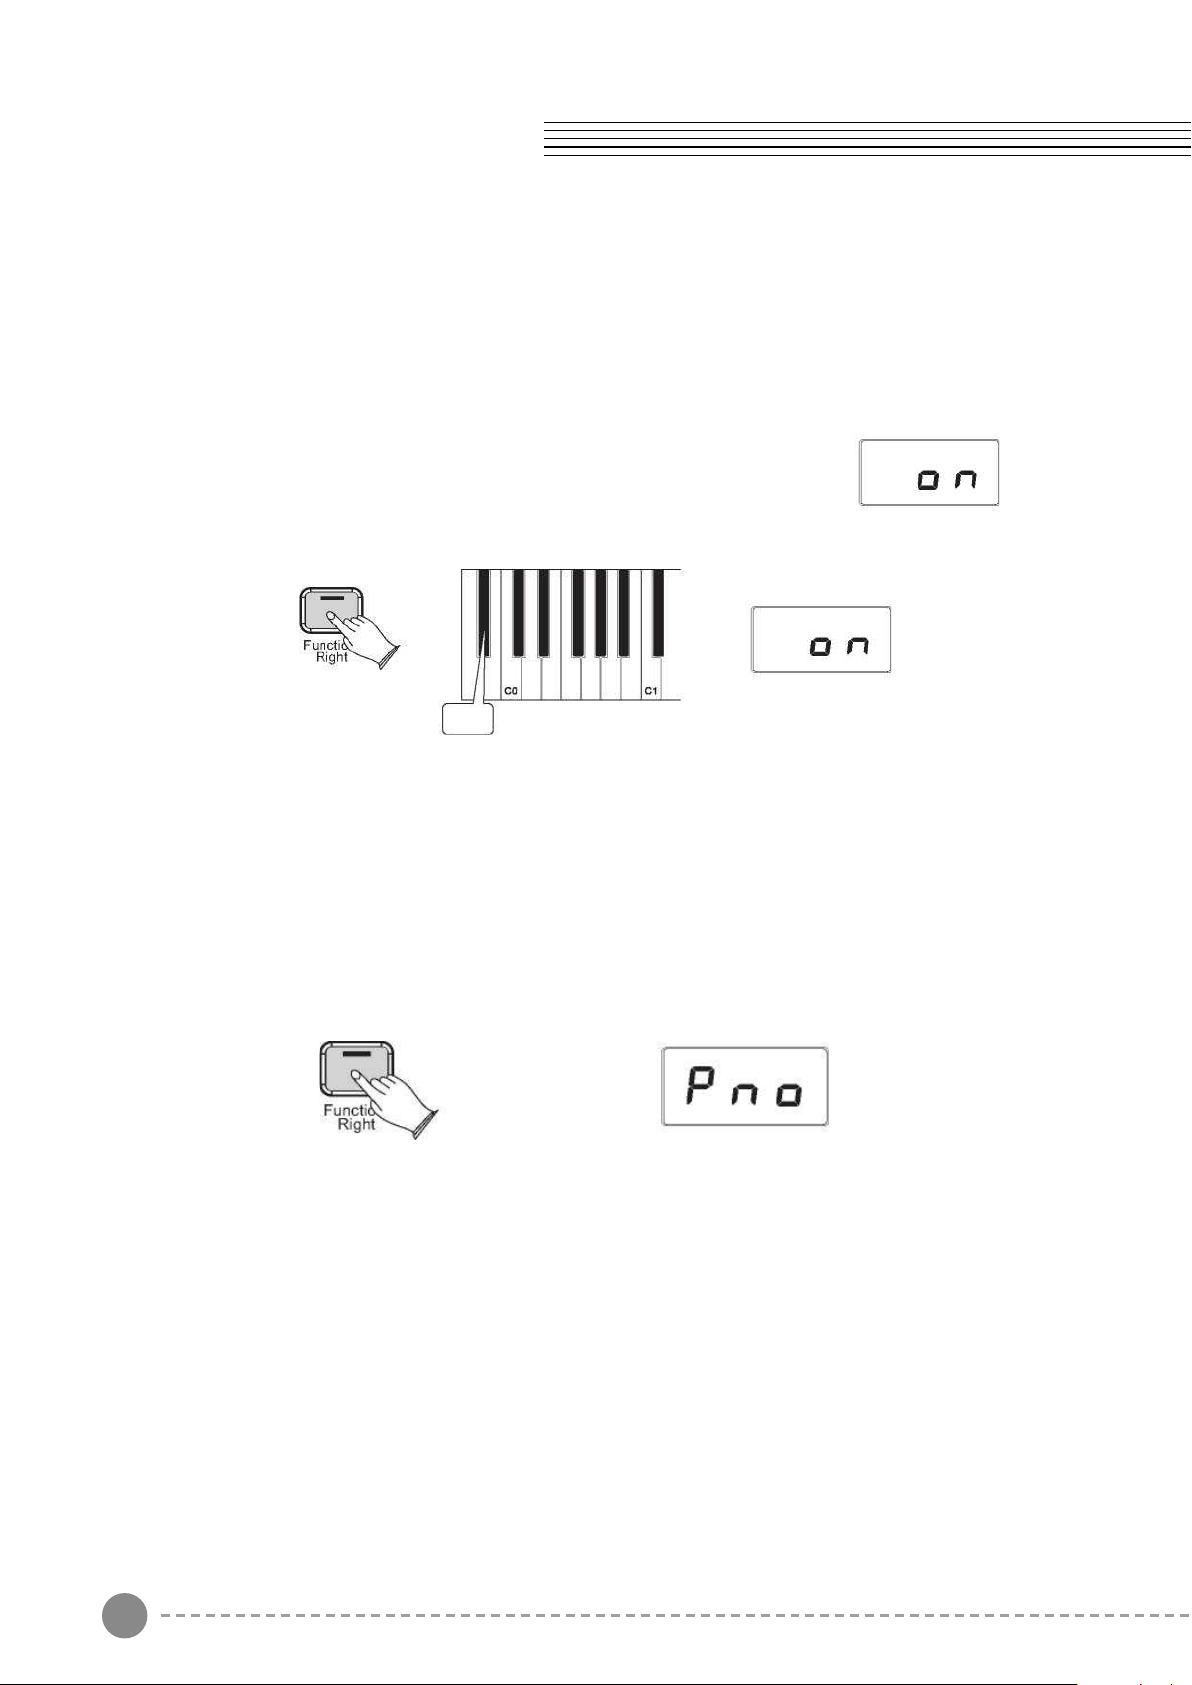
Use Erp On
Press the [Function/Right] button to enter Edit Mode.
Press the Eb0 key to enter the Erp On Mode. The LED display will show:
Voice/Function
C#0
Eb0
Bb-1
21 22
To Turn Off Layer Mode:
Press the [Function/Right] button to enter Edit Mode.
Select a single Voice by pressing a single Voice Select Key.
Twin Mode
In Twin mode, the keyboard will be separated into two play areas.
Use Twin Mode
Press the [Function/Right] button to enter Edit Mode.
Press the C#0 key to enter Twin Mode. The LED display will show:
Right: from C#3 to C7
Left: from A-1 to C3
Note
If Split Mode is engaged and Layer Mode is selected, the Layer Voice will only be
applied to the keys to the right of the split point. The Left Hand Voice will remain the
same as was specied for Split Mode
To turn off the Twin Mode:
Press the [Function/Right] button
Use the Data Control knob to select a Layer Voice volume level between 0 (minimum) and
127 (maximum). You can play as you do this to hear the volume change.
Your piano will switch off automatically in 30 minutes after no any operation on it. In this
case, press the [STANDBY/ON] button again to turn on the power.
Use Erp On
Press the [Function/Right] button to enter Edit Mode.
Press the Eb0 key to enter the Erp On Mode. The LED display will show:
Voice/Function
C#0
Eb0
Bb-1

23 24
To turn off the Twin Mode:
Press the [Function/Right] button
Press the Erp On/Off key (Bb0) to turn off the Erp Mode.
The display will show “off” for 3 seconds.
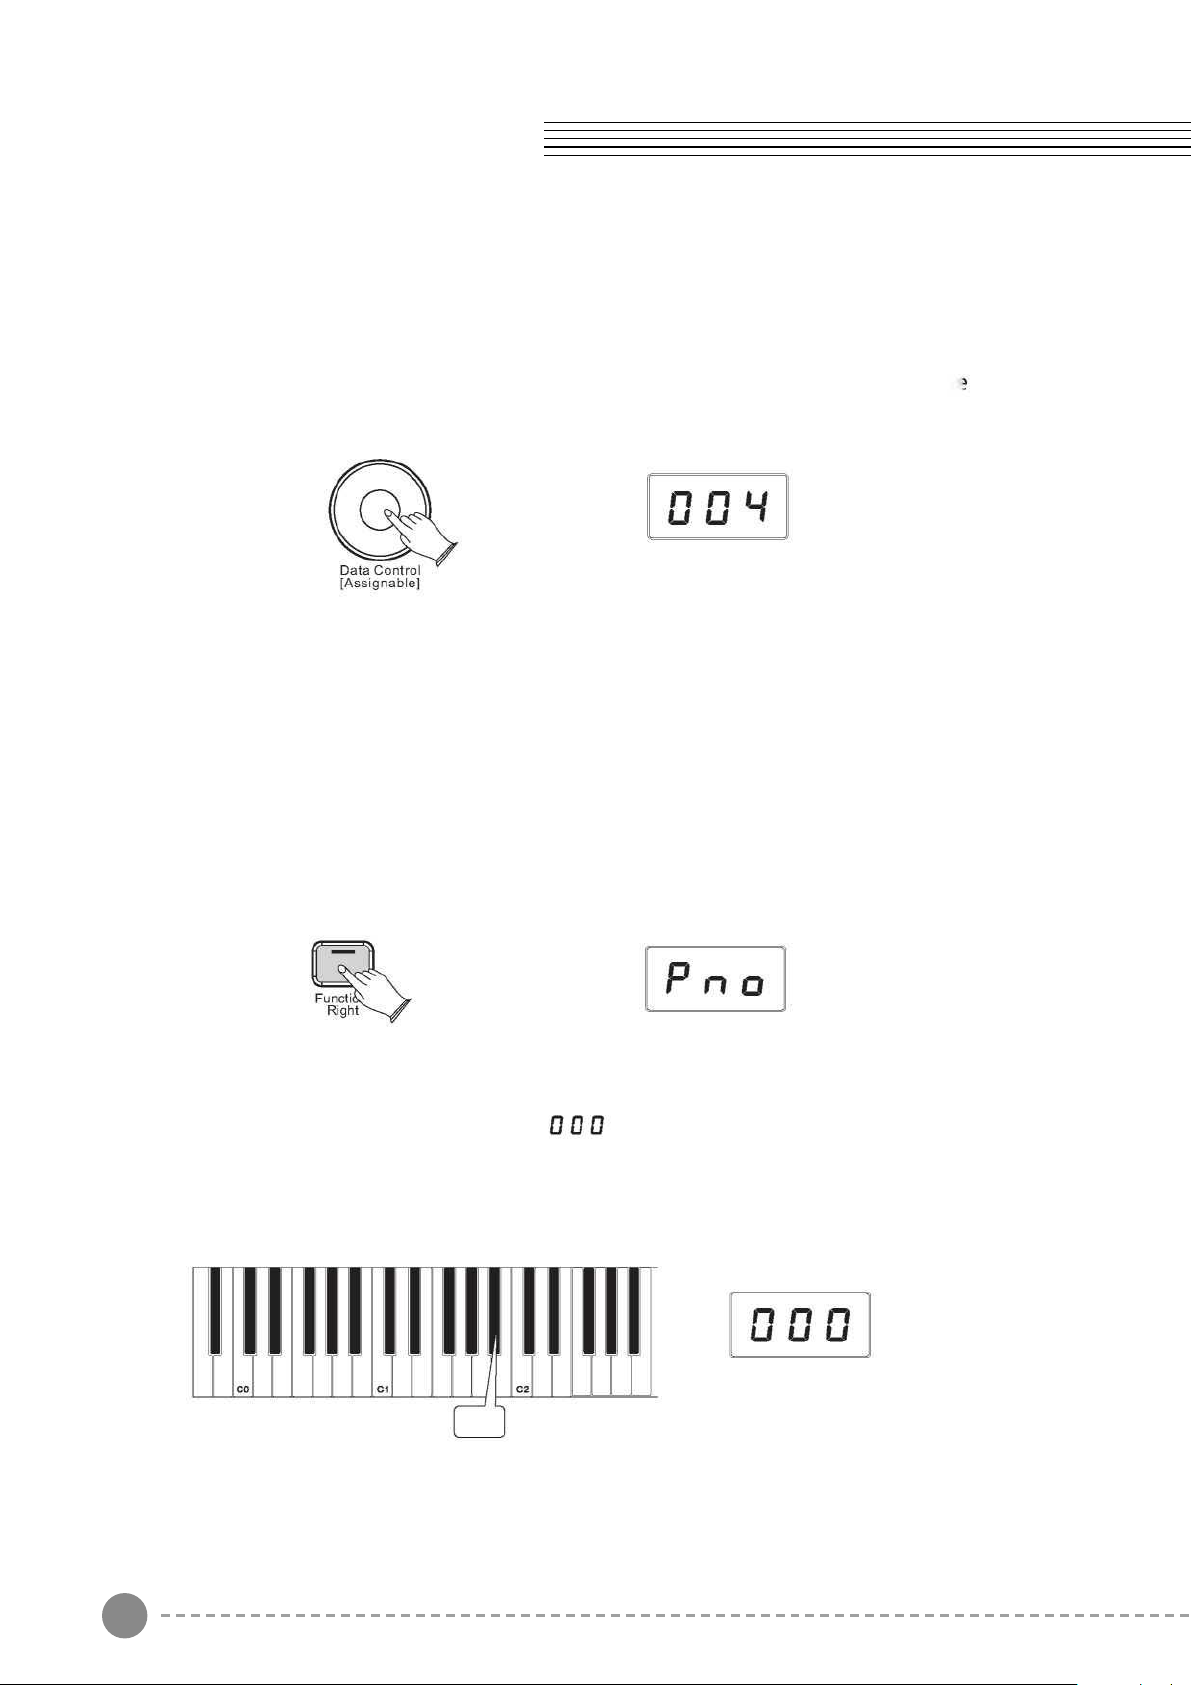
Octave
Pressing this key will set the Data Control knob to increase or decrease the octave setting.
Press the [Function/Right] button to enter Edit Mode.
Press the Octave Key (Ab1).
The LED display will momentarily show:
Voice/Function
Bb0
Use the Data Control knob to select the desired Octave.
Turning the Data Control knob clockwise will raise the keyboard's pitch in octave
increments, and turning it counter-clockwise will lower it in octave increments.
Value:-02~002.
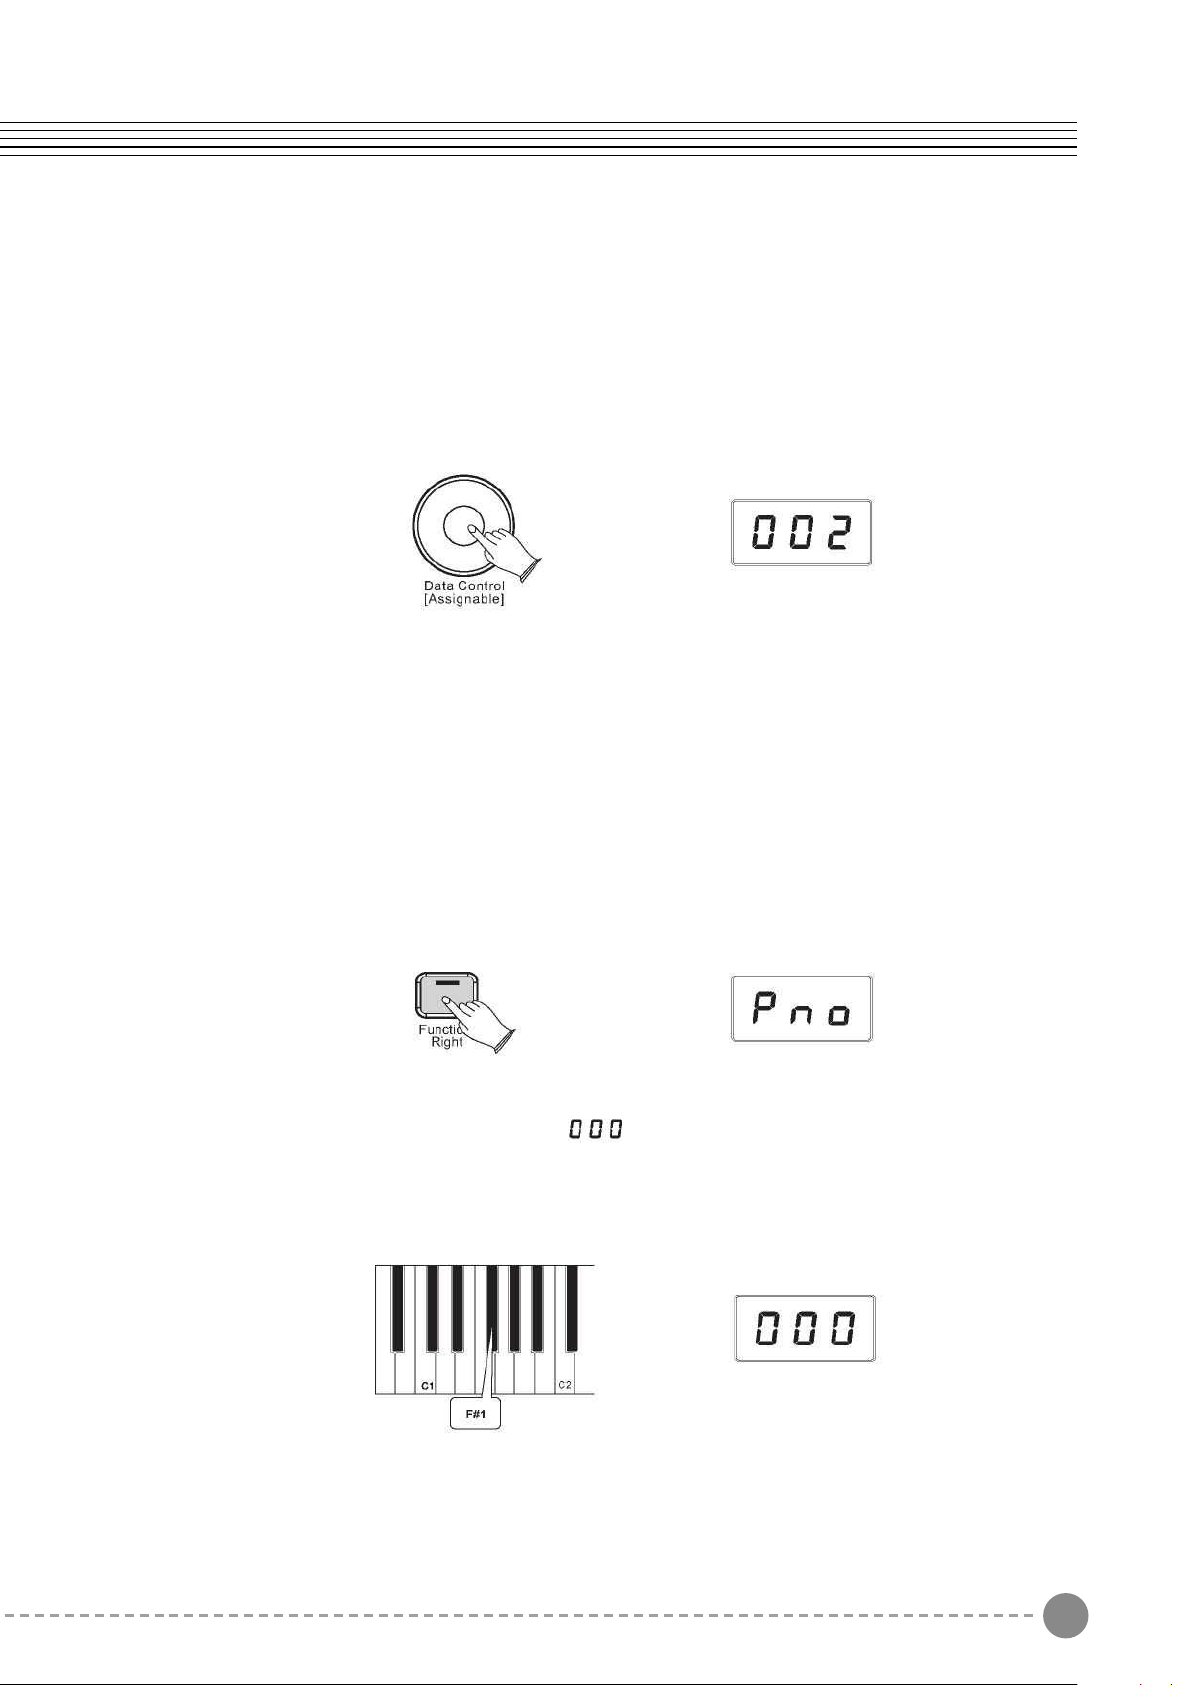
Transpose
Pressing this key will set the Data Control knob to increase or decrease the keyboard's
transpose value.
Press the [Function/Right] button to enter Edit Mode.
Press the Transpose key (F#1).
The LED display will momentarily show:
23 24
To turn off the Twin Mode:
Press the [Function/Right] button
Press the Erp On/Off key (Bb0) to turn off the Erp Mode.
The display will show “off” for 3 seconds.
Octave
Pressing this key will set the Data Control knob to increase or decrease the octave setting.
Press the [Function/Right] button to enter Edit Mode.
Press the Octave Key (Ab1).
The LED display will momentarily show:
Voice/Function
Bb0
Use the Data Control knob to select the desired Octave.
Turning the Data Control knob clockwise will raise the keyboard's pitch in octave
increments, and turning it counter-clockwise will lower it in octave increments.
Value:-02~002.
Transpose
Pressing this key will set the Data Control knob to increase or decrease the keyboard's
transpose value.
Press the [Function/Right] button to enter Edit Mode.
Press the Transpose key (F#1).
The LED display will momentarily show:
25 26
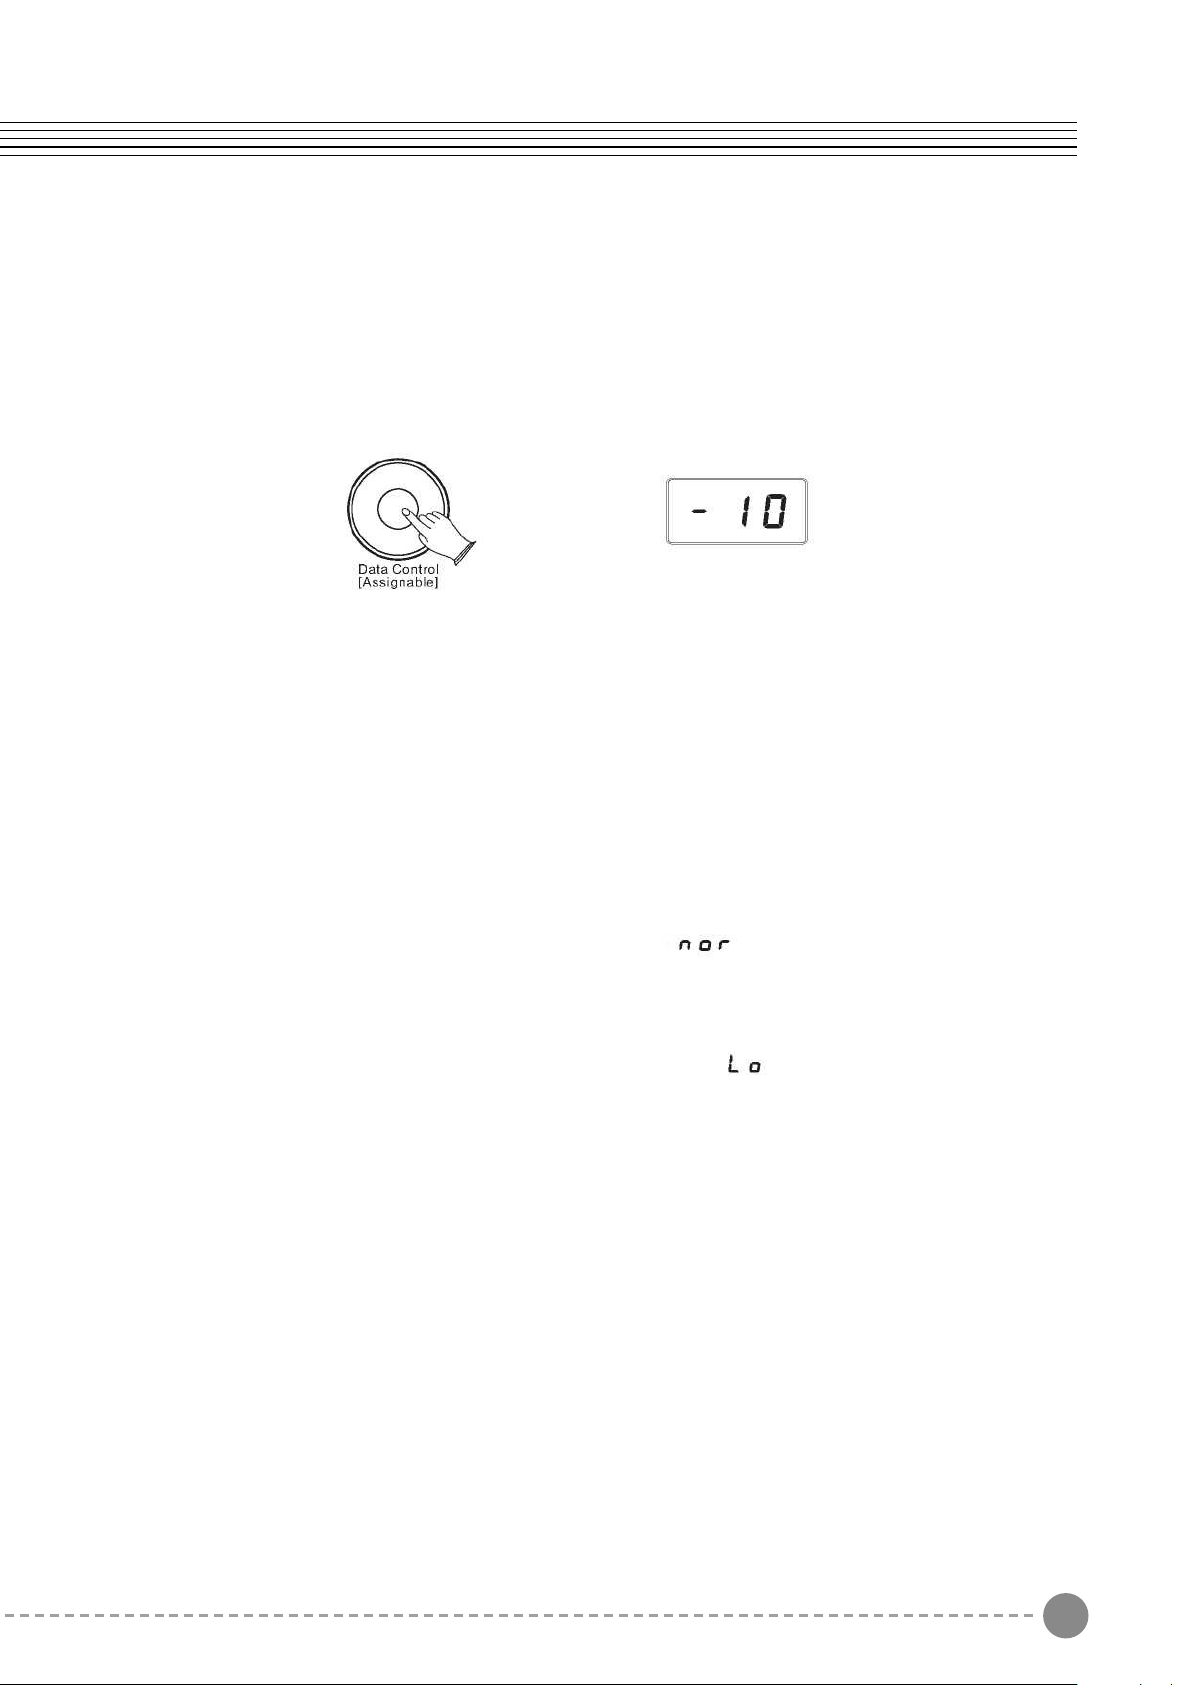
Use the Data Control knob to select the Master Tuning.
The LED display will show a positive, negative, or zero value between -64 and 063.
Of course, this piano never actually “goes out of tune,” but the Master Tuning feature can
be useful when you are playing along with another instrument or recording that may be
slightly above or below standard pitch.
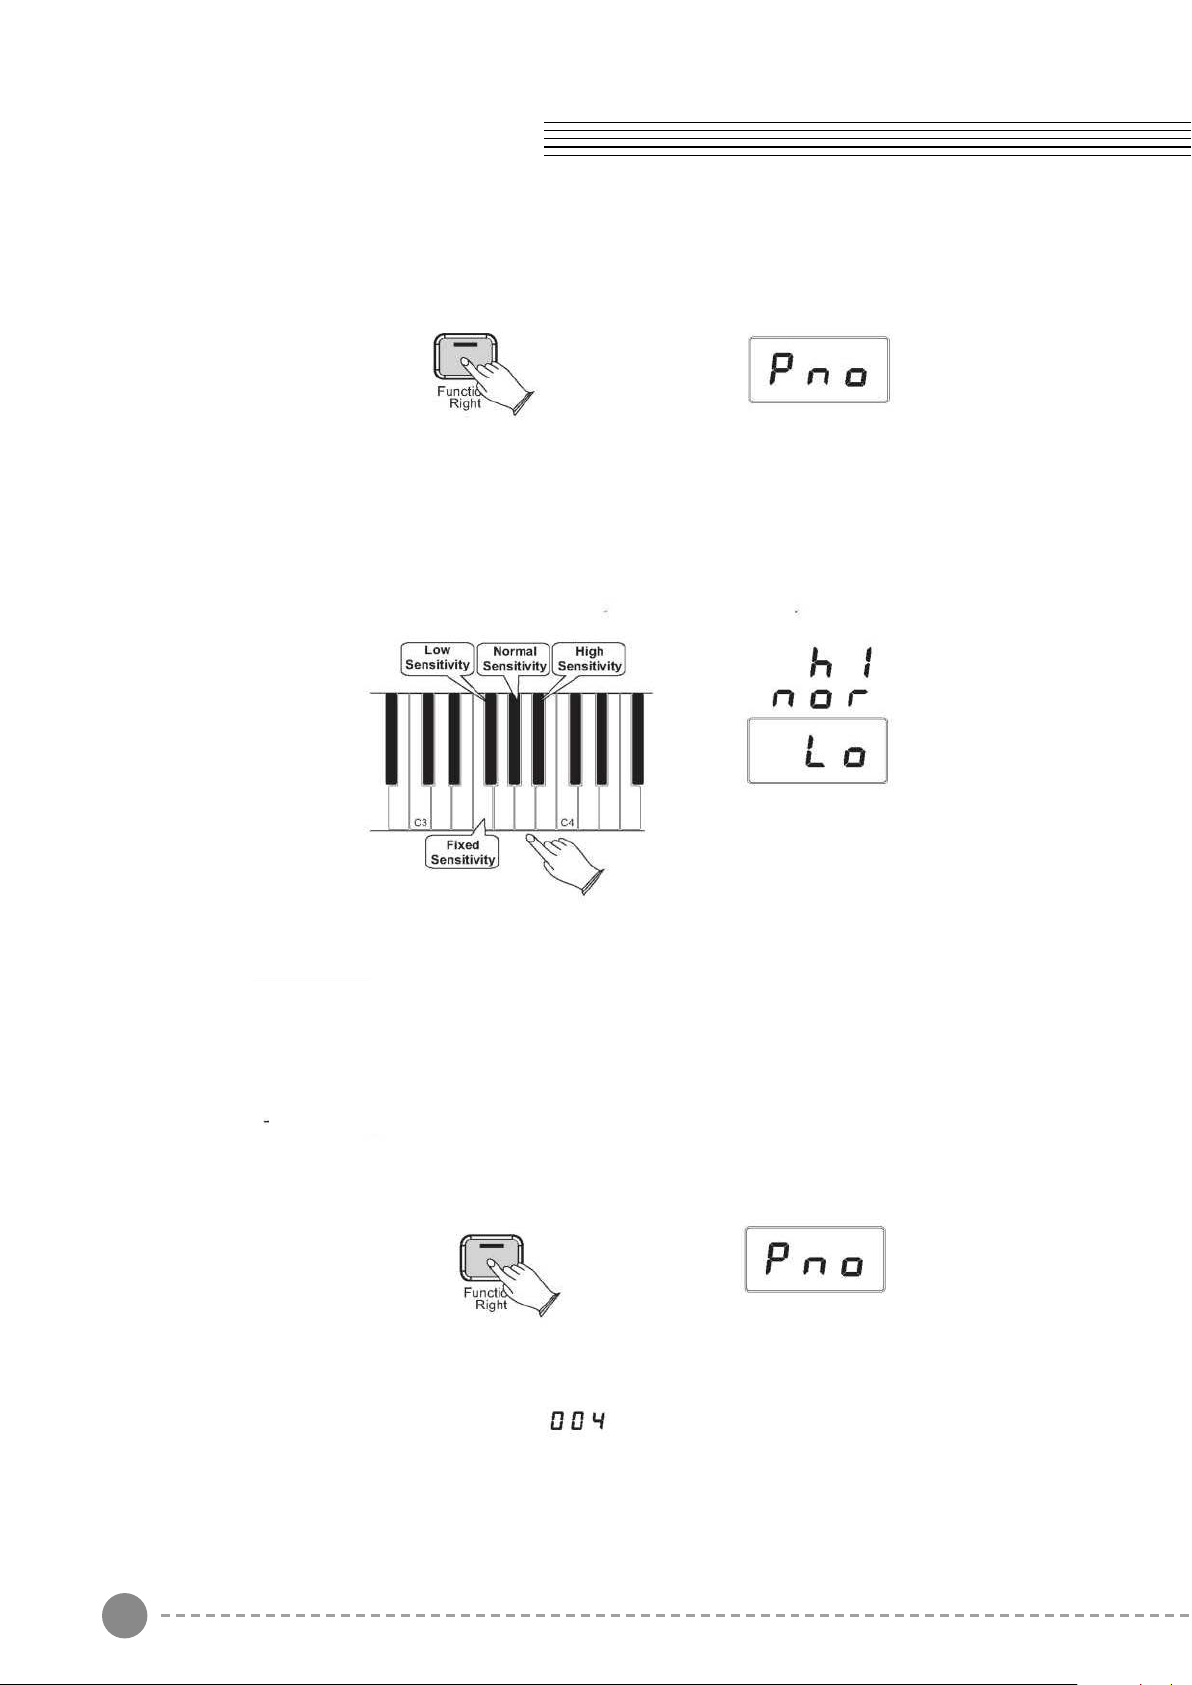
Touch
The Touch Select control, sometimes referred to as Velocity Curve, lets you decide how
the pressure with which you hit the keys determines the volume at which the notes play.
This piano provides you with four dierent keyboard sensitivity options
Normal (Ab3 key) is the default setting, and is designed to be useful for most players with
an “average” touch (i.e.: people who play with an average amount of
force). When selecting this option
Low (F#3 key) is a sensitivity setting that generates lower velocity values for the same
force. This setting is useful for playing more quietly, even if you have a
“heavy” touch. When selecting this option
High (Bb3) is a sensitivity setting that generates higher velocity values for the same force.
This setting is useful for playing more loudly, even if you have a naturally “light”
touch. When selecting this option explained further below), the LED display
Fixed (F3 key) is a setting that eectively disables sensitivity, meaning the keyboard will
generate a xed velocity value of 100 regardless of how hard or soft you
play. When selecting this option(explained further below), the LED display
shows:
Voice/Function
Use the Data Control knob to select the desired Octave.
Turning the Data Control knob clockwise will raise the keyboard's pitch in semitone
increments, and turning it counter-clockwise will lower it in semitone increments.
Value:-12~012.
Master Tuning
Pressing this key will set the Data Control knob to raise or lower ( “ne-tune” ) the Master
Tune setting of the piano.
Press the [Function/Right] button to enter Edit Mode.
Press the Master Tuning key (Bb1).
The LED display will momentarily show:
Bb1
25 26
Use the Data Control knob to select the Master Tuning.
The LED display will show a positive, negative, or zero value between -64 and 063.
Of course, this piano never actually “goes out of tune,” but the Master Tuning feature can
be useful when you are playing along with another instrument or recording that may be
slightly above or below standard pitch.
Touch
The Touch Select control, sometimes referred to as Velocity Curve, lets you decide how
the pressure with which you hit the keys determines the volume at which the notes play.
This piano provides you with four dierent keyboard sensitivity options
Normal (Ab3 key) is the default setting, and is designed to be useful for most players with
an “average” touch (i.e.: people who play with an average amount of
force). When selecting this option
Low (F#3 key) is a sensitivity setting that generates lower velocity values for the same
force. This setting is useful for playing more quietly, even if you have a
“heavy” touch. When selecting this option
High (Bb3) is a sensitivity setting that generates higher velocity values for the same force.
This setting is useful for playing more loudly, even if you have a naturally “light”
touch. When selecting this option explained further below), the LED display
Fixed (F3 key) is a setting that eectively disables sensitivity, meaning the keyboard will
generate a xed velocity value of 100 regardless of how hard or soft you
play. When selecting this option(explained further below), the LED display
shows:
Voice/Function
Use the Data Control knob to select the desired Octave.
Turning the Data Control knob clockwise will raise the keyboard's pitch in semitone
increments, and turning it counter-clockwise will lower it in semitone increments.
Value:-12~012.
Master Tuning
Pressing this key will set the Data Control knob to raise or lower ( “ne-tune” ) the Master
Tune setting of the piano.
Press the [Function/Right] button to enter Edit Mode.
Press the Master Tuning key (Bb1).
The LED display will momentarily show:
Bb1
27 28
To Set the Keyboard Sensitivity:
Press the [Function/Right] button to enter Edit Mode.
Press the desired Touch Select key (F3, F#3, Ab3, Bb3).
The LED display will show the selected Touch setting. Please note that these keys are in
the middle of the keyboard. If you need help locating them, please refer to the included
laminated Special Function Key chart.
Reverb
In Reverb mode, you can select a number of digital reverb effects that you can use for
extra depth and expressive power
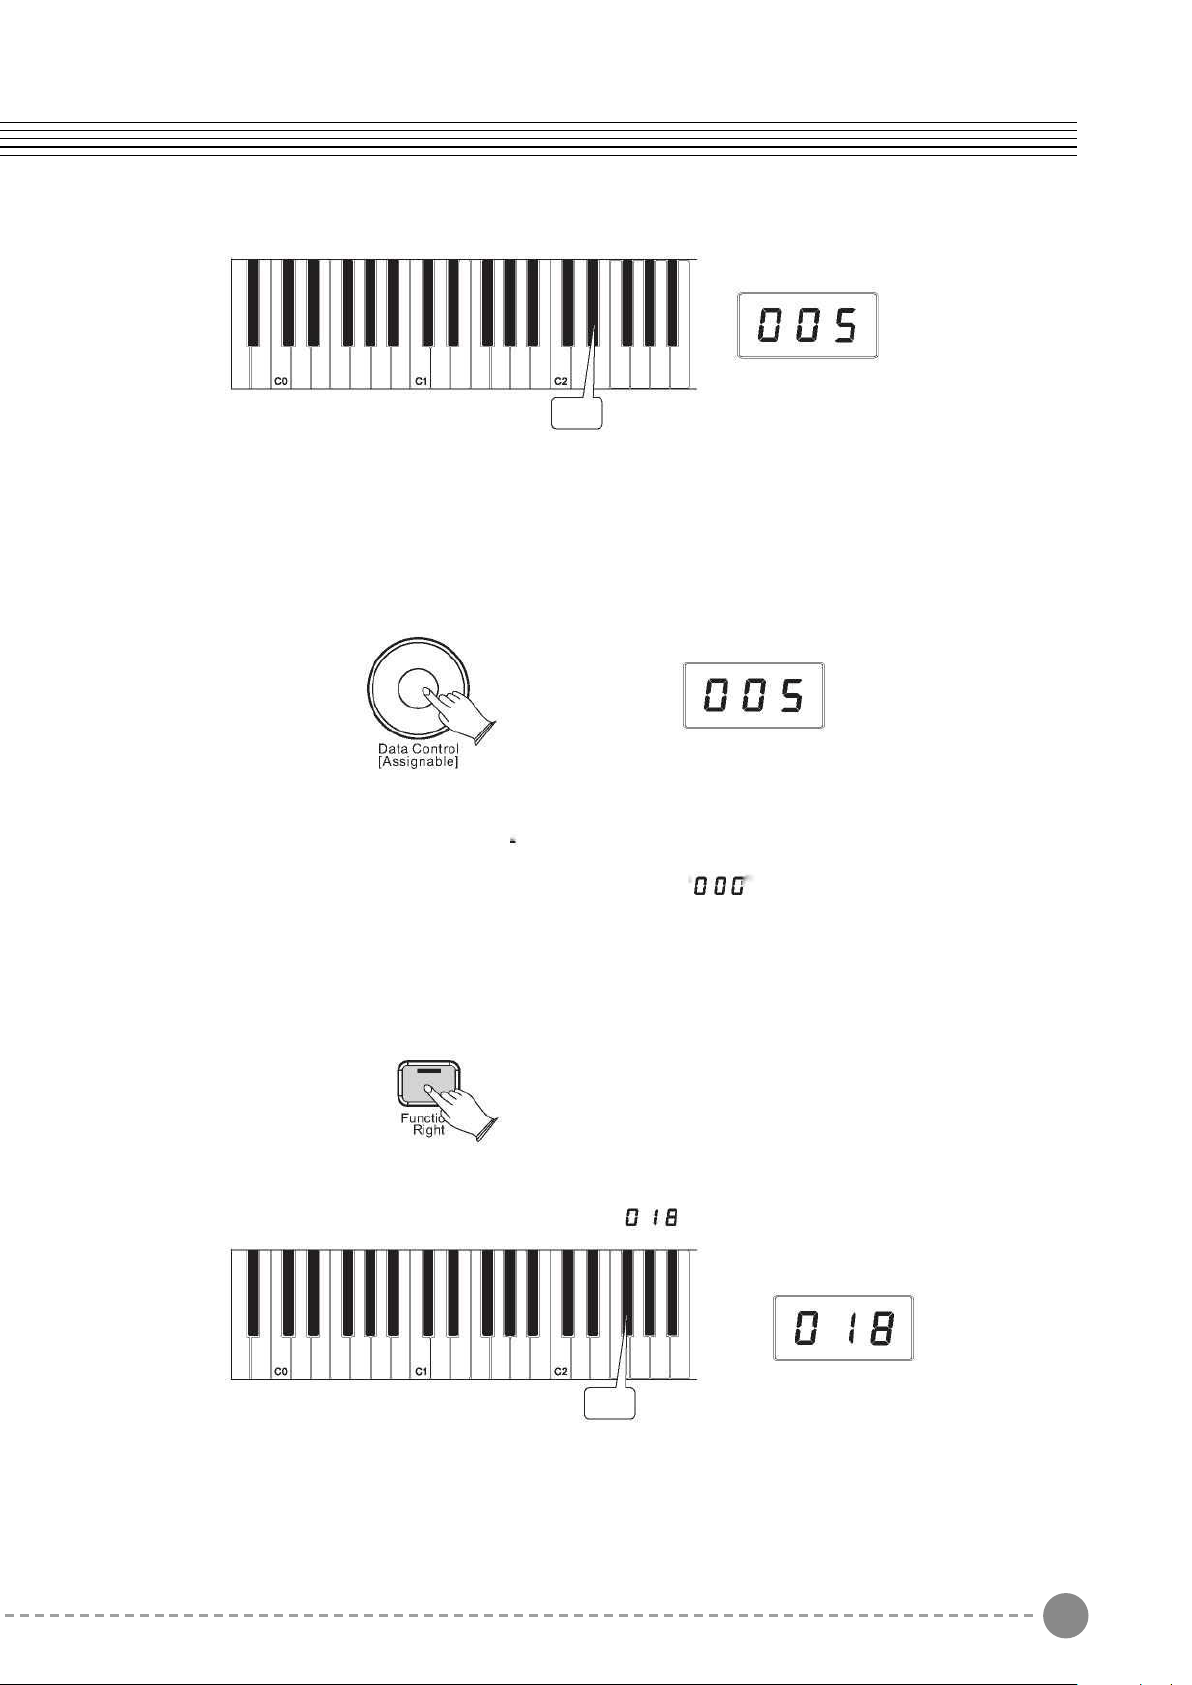
To Select Reverb Type:
Press the [Function/Right] button to enter Edit Mode.
Press the Reverb Type key (Eb2).
The LED display will momentarily show:
Voice/Function
Eb2
Use the Data Control knob to select the desired Reverb Type.
Turning the Data Control knob select the desired Reverb Type. Value:001-010( 001: Hall
1; 002: Hall 2; 003: Room 1; 004: Room 2; 005:Room 3; 006: Stage 1; 007: Stage 2; 008:
Plate; 009: Delay ; 010: Echo.(Default: 005)
To Turn Off the Reverb type:
Turn the Data Control knob until the LED show “ type. ” to turn off the Reverb
To Adjust the Reverb Level :
Press the [Function/Right] button.
Press the Reverb Level key (F#2).
The LED display will momentarily show:
F#2
27 28
To Set the Keyboard Sensitivity:
Press the [Function/Right] button to enter Edit Mode.
Press the desired Touch Select key (F3, F#3, Ab3, Bb3).
The LED display will show the selected Touch setting. Please note that these keys are in
the middle of the keyboard. If you need help locating them, please refer to the included
laminated Special Function Key chart.
Reverb
In Reverb mode, you can select a number of digital reverb effects that you can use for
extra depth and expressive power
To Select Reverb Type:
Press the [Function/Right] button to enter Edit Mode.
Press the Reverb Type key (Eb2).
The LED display will momentarily show:
Voice/Function
Eb2
Use the Data Control knob to select the desired Reverb Type.
Turning the Data Control knob select the desired Reverb Type. Value:001-010( 001: Hall
1; 002: Hall 2; 003: Room 1; 004: Room 2; 005:Room 3; 006: Stage 1; 007: Stage 2; 008:
Plate; 009: Delay ; 010: Echo.(Default: 005)
To Turn Off the Reverb type:
Turn the Data Control knob until the LED show “ type. ” to turn off the Reverb
To Adjust the Reverb Level :
Press the [Function/Right] button.
Press the Reverb Level key (F#2).
The LED display will momentarily show:
F#2
29 30
Turn the Data Controller knob to adjust the reverb level setting. The minimum setting is
000, and the maximum setting is 127.
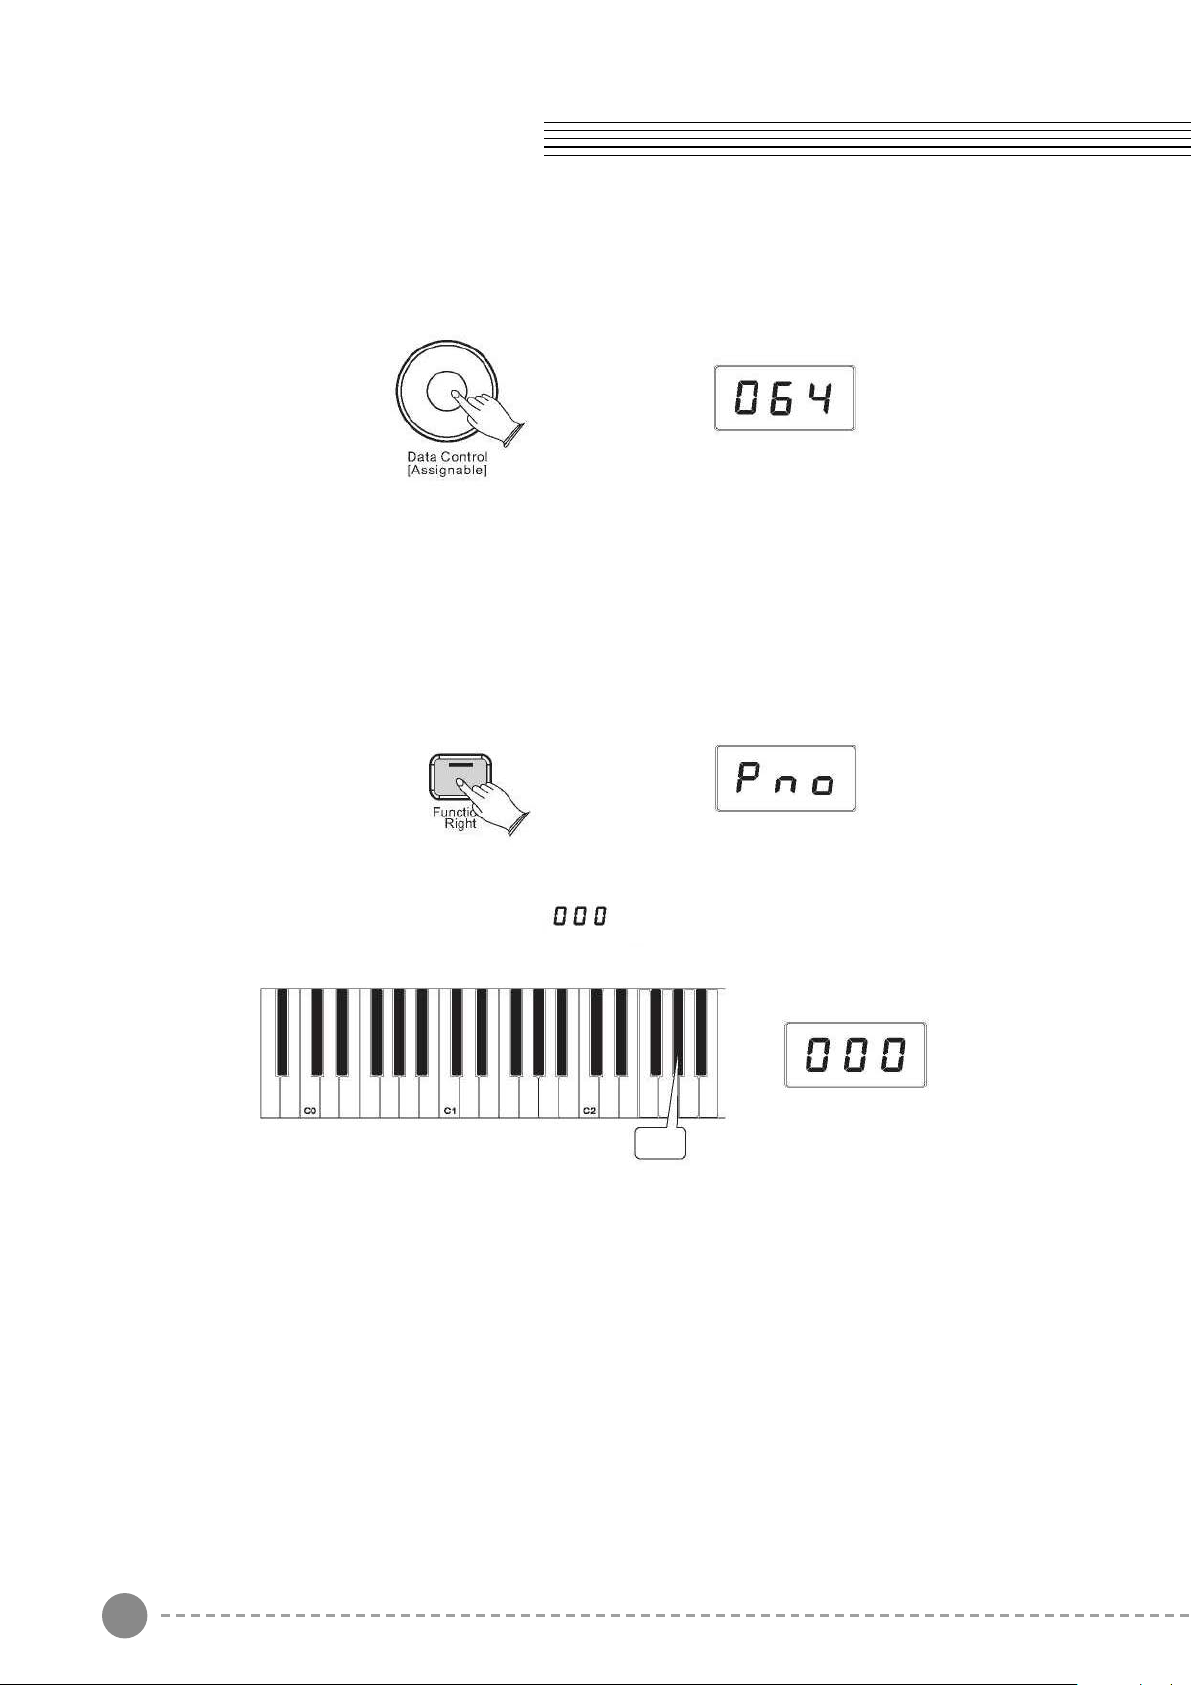
Chorus
To Select the Chorus Type:
Press the [Function/Right] button to enter Edit Mode.
Press the Chorus Type key (Ab2).
The LED display will momentarily show:
Use the Data Control knob to select the desired Chorus Type.
Turning the Data Control knob select the desired Chorus Type. Value:000-013( 000:
O; 001: Chorus 1; 002: Chorus 2; 003: Chorus 3; 004: Chorus 4; 005: Feedback; 006:
Flanger 1; 007: ShrtDelay ; 008 ShrtdlFb; 009: Flanger 2; 010: Flanger 3; 011 Celeste 1;
012:Celeste 2; 013:Celeste 3. (Default: 000)
To Turn Off the Chorus type:
Turn the Data Control knob until the LED show “ type. ” to turn off the Chorus
To Adjust the Chorus Level :
Press the [Function/Right] button.
Press the Chorus Level key (Bb2).
The LED display will momentarily show:
Turn the Data Controller knob to adjust the chorus level setting.
The minimum setting is 000, and the maximum setting is 127.
Voice/Function
Ab2
Bb2
29 30
Turn the Data Controller knob to adjust the reverb level setting. The minimum setting is
000, and the maximum setting is 127.
Chorus
To Select the Chorus Type:
Press the [Function/Right] button to enter Edit Mode.
Press the Chorus Type key (Ab2).
The LED display will momentarily show:
Use the Data Control knob to select the desired Chorus Type.
Turning the Data Control knob select the desired Chorus Type. Value:000-013( 000:
O; 001: Chorus 1; 002: Chorus 2; 003: Chorus 3; 004: Chorus 4; 005: Feedback; 006:
Flanger 1; 007: ShrtDelay ; 008 ShrtdlFb; 009: Flanger 2; 010: Flanger 3; 011 Celeste 1;
012:Celeste 2; 013:Celeste 3. (Default: 000)
To Turn Off the Chorus type:
Turn the Data Control knob until the LED show “ type. ” to turn off the Chorus
To Adjust the Chorus Level :
Press the [Function/Right] button.
Press the Chorus Level key (Bb2).
The LED display will momentarily show:
Turn the Data Controller knob to adjust the chorus level setting.
The minimum setting is 000, and the maximum setting is 127.
Voice/Function
Ab2
Bb2
31 32
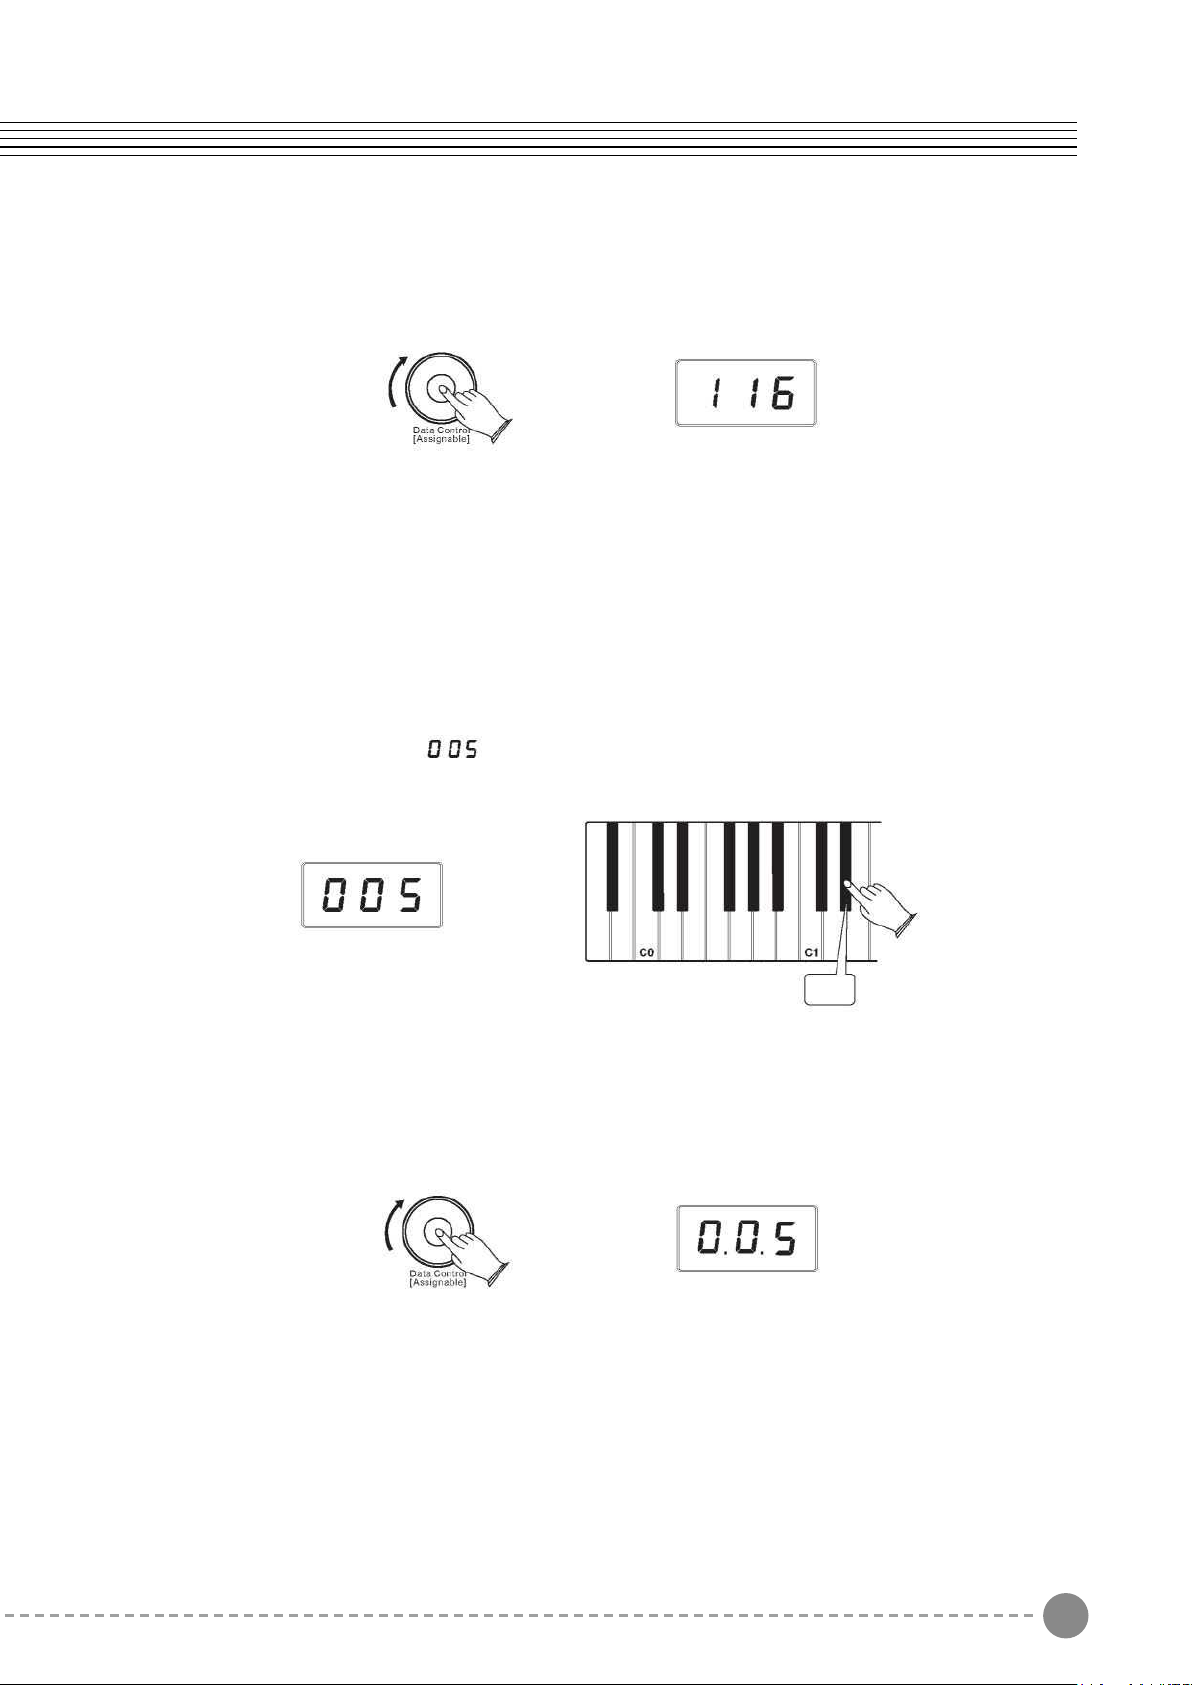
Turn the Data Control knob clockwise to increase the metronome volume, or counter-
clockwise to decrease the metronome volume. The metronome volume level will be
indicated as a value from 0-127 in the LED display window.
Time Signature
The metronome can support the following time signatures: 2/2,1/4, 2/4,3/4, 4/4, 5/4,
6/4,3/8,6/8, 7/8, 9/8, 12/8
Change the Metronome Time Signature
Press the Voice/Function button on the left hand panel.
Press the Eb1 key on the keyboard.
The display will show:
Turn the Data Control knob to step through the available time signatures.
The available time signatures will be shown on the LED display as they appear below:
0.0.1,0.0.2, 0.0.3, 0.0.4, 0.0.5, 0.0.6, 0.0.7, 0.0.8, 0.0.9, 0.1.0, 0.1.1,0.1.2
Voice/Function
Metronome
Our piano features a built-in metronome which can be used for practicing to a set tempo,
and is also helpful when recording tracks in the Song Recorder.
To Activate the Metronome:
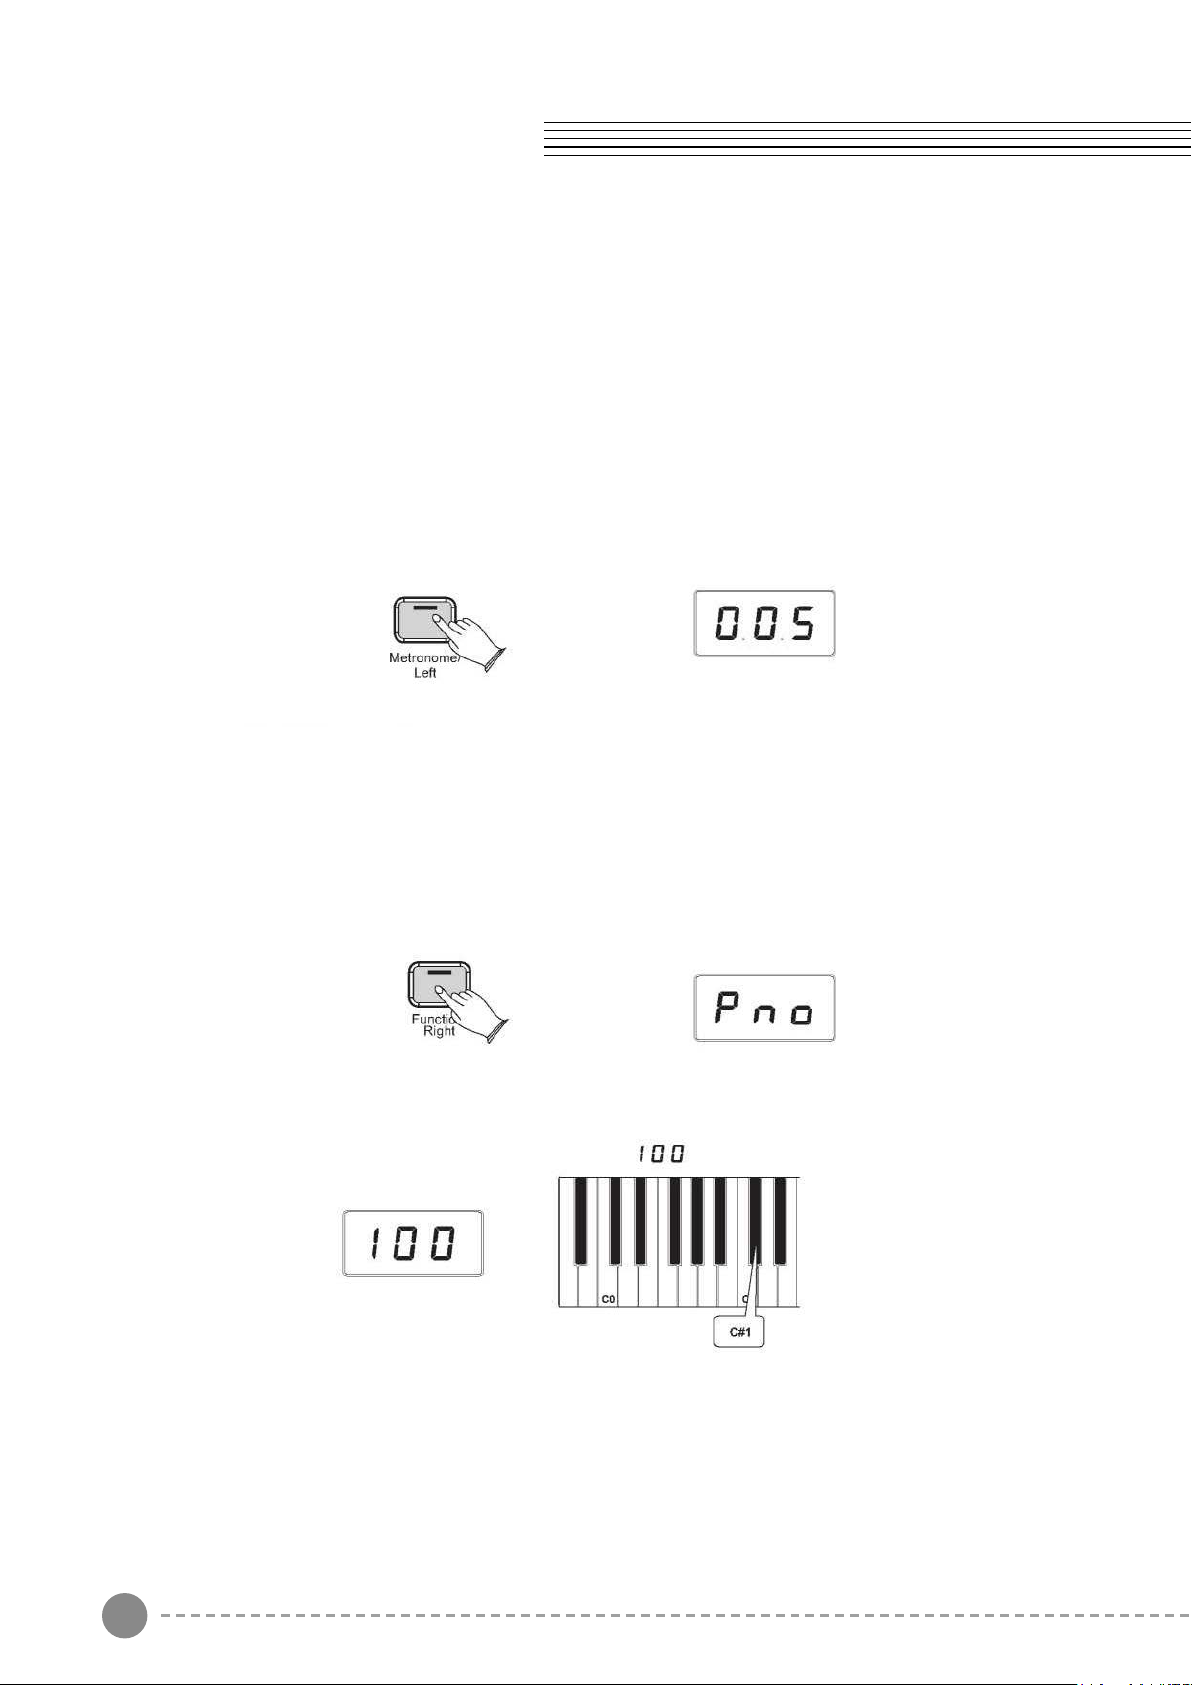
The metronome sound is alternately turned on and turned o by pressing [Metronome/Left]
button. The Metronome button's LED will also ash in time.
Metronome Volume
The metronome volume can be raised or lowered to a level that is comfortable for you.
Chang the Metronome's Volume
Press the [Function/Right] button on the left hand panel.
Press the Metronome Volume key (C#1) on the keyboard.
The LED display will momentarily show:
Eb1
31 32
Turn the Data Control knob clockwise to increase the metronome volume, or counter-
clockwise to decrease the metronome volume. The metronome volume level will be
indicated as a value from 0-127 in the LED display window.
Time Signature
The metronome can support the following time signatures: 2/2,1/4, 2/4,3/4, 4/4, 5/4,
6/4,3/8,6/8, 7/8, 9/8, 12/8
Change the Metronome Time Signature
Press the Voice/Function button on the left hand panel.
Press the Eb1 key on the keyboard.
The display will show:
Turn the Data Control knob to step through the available time signatures.
The available time signatures will be shown on the LED display as they appear below:
0.0.1,0.0.2, 0.0.3, 0.0.4, 0.0.5, 0.0.6, 0.0.7, 0.0.8, 0.0.9, 0.1.0, 0.1.1,0.1.2
Voice/Function
Metronome
Our piano features a built-in metronome which can be used for practicing to a set tempo,
and is also helpful when recording tracks in the Song Recorder.
To Activate the Metronome:
The metronome sound is alternately turned on and turned o by pressing [Metronome/Left]
button. The Metronome button's LED will also ash in time.
Metronome Volume
The metronome volume can be raised or lowered to a level that is comfortable for you.
Chang the Metronome's Volume
Press the [Function/Right] button on the left hand panel.
Press the Metronome Volume key (C#1) on the keyboard.
The LED display will momentarily show:
Eb1
33 34
Please note that time signature and Tempo cannot be changed while recording a song in
Song Record Mode.
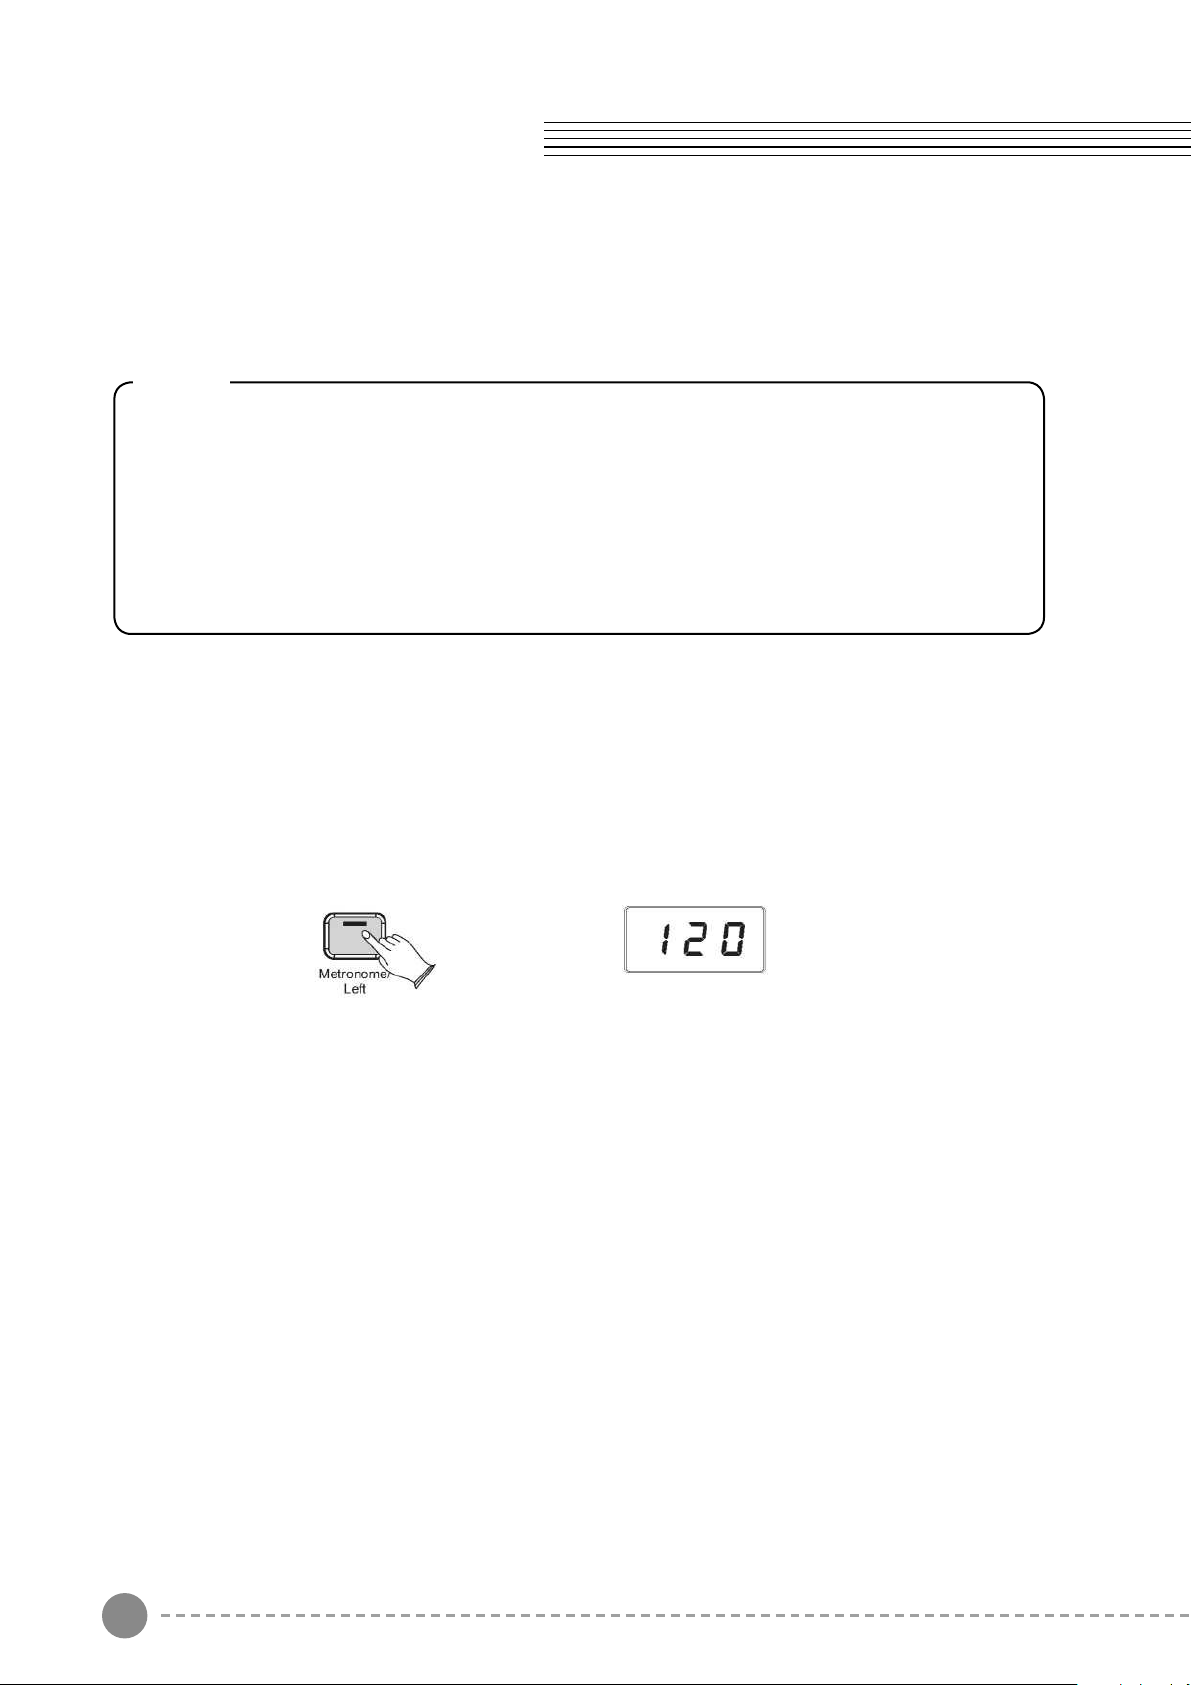
Tempo
Hold down the [Metronome/Left] button and the LED display will show “120” then you can
turn the Data Control knob to set the tempo. Range: 20~280.
Note
Now the Data Control knob is assigned to control time signature instead of
Voice Selection. To reassign the Data Control knob for Voice Selection, press
the Voice / Function button and then press the Eb2 key. (This procedure is
illustrated at the beginning of the “Edit Mode” section.) Also, keep in mind that
no matter how the Data Controller knob is assigned, you can always select
sounds (in Performance Mode) by holding down the Voice /Function button
while turning the Data Control knob.
Note
When Record Wait Mode is active, you can also start recording by pressing the
Demo/Learn button. In that case, the Song Recorder will record silence until you
start playing the keyboard.(The rst one measures are tempo only. It cannot record
any data.)
The Song Recorder built into the piano can record two individual tracks, allowing you to
record one part and then record a second complementary part while the first part is played
back.
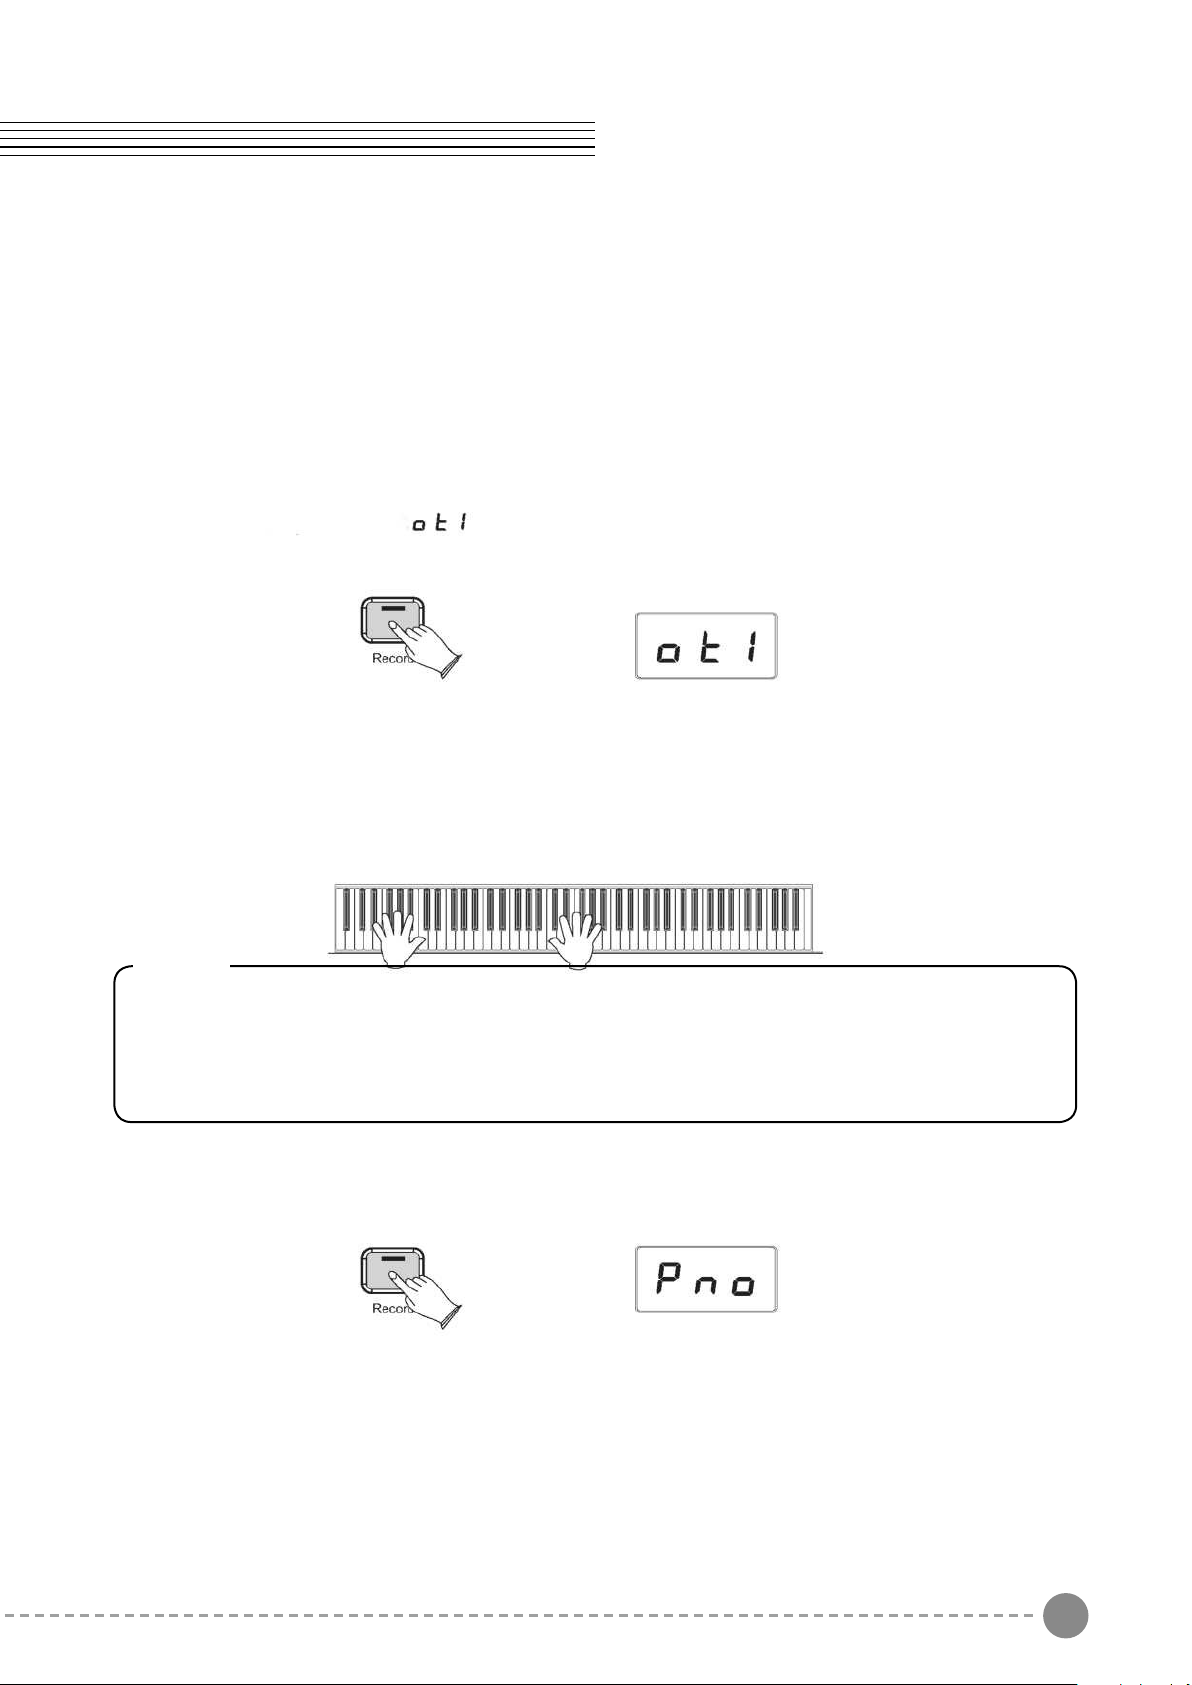
To Record a Track
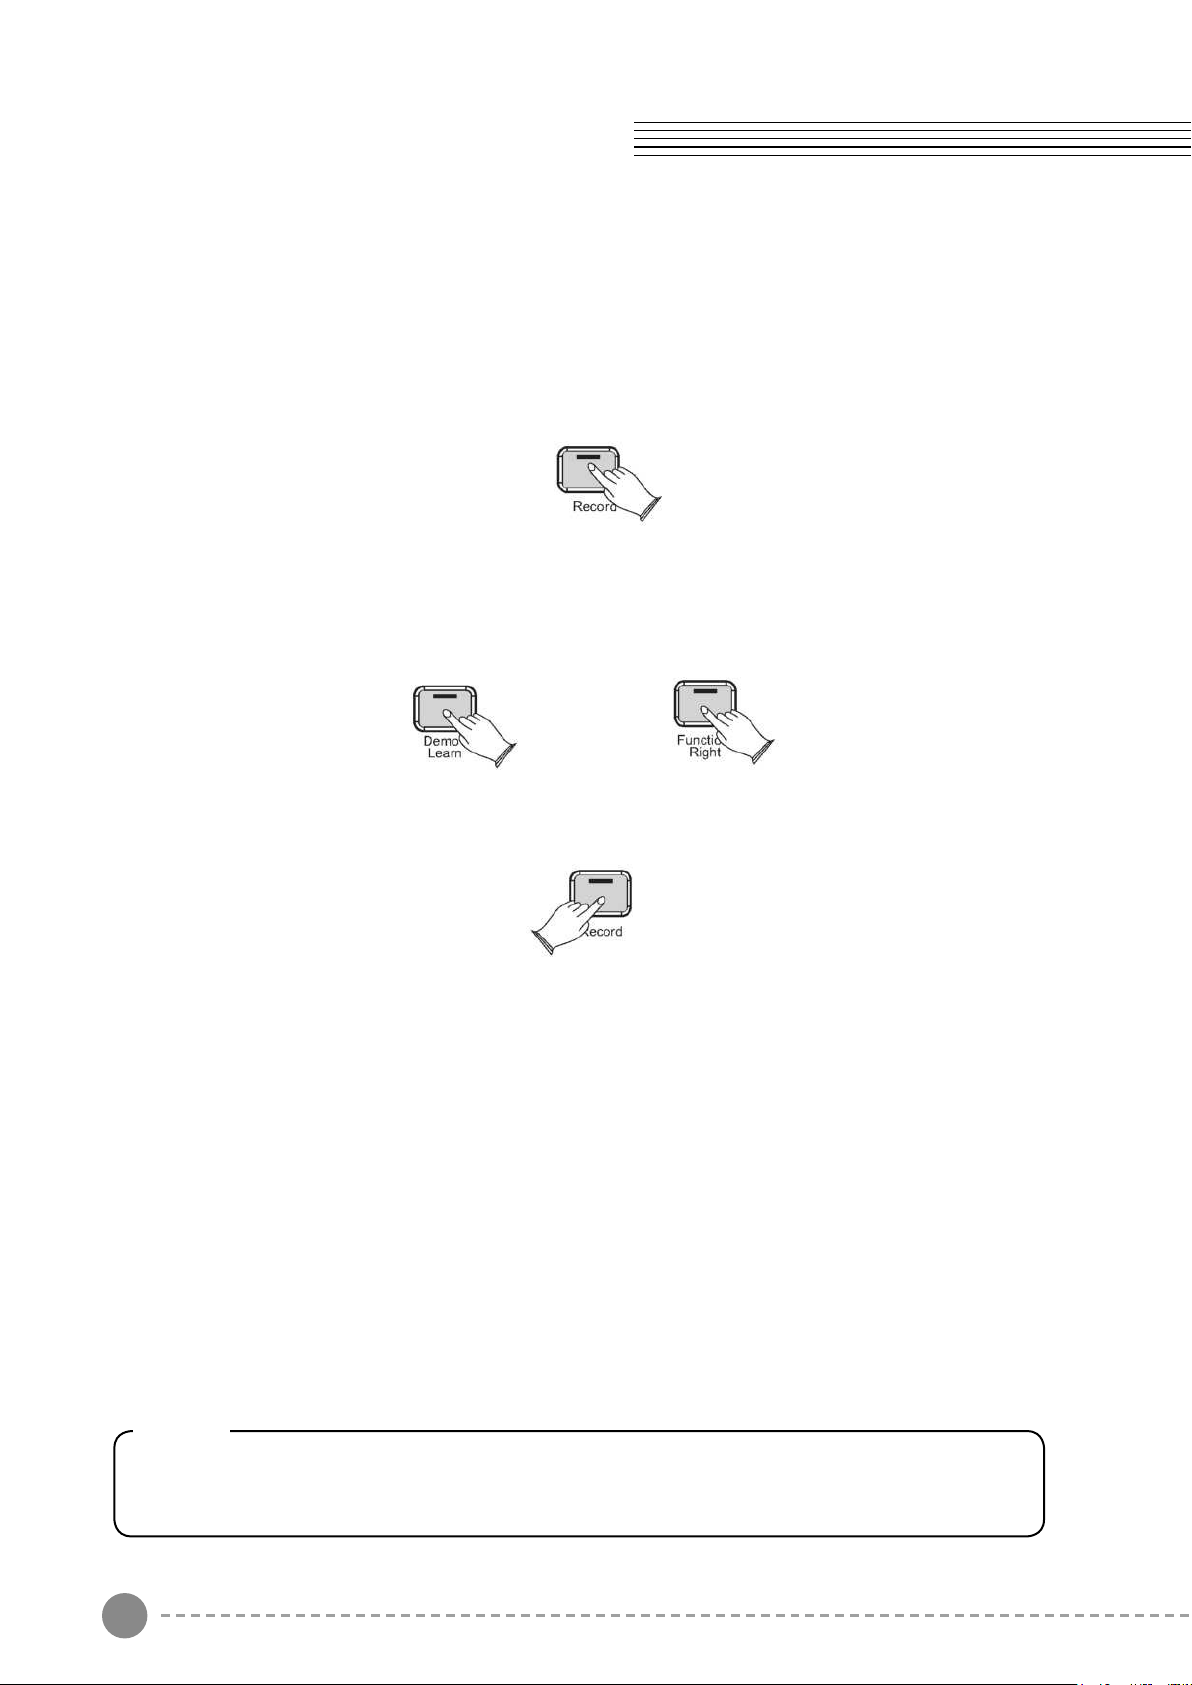
Press the [Record] button to enter Record Wait Mode. The Record button LED will light,
and the Demo/Learn button will ash.
The LED display will show:
This piano is now in Record Wait Mode.
To start recording, begin playing the keyboard. Recording starts automatically as soon as
you start playing.
Press the [Record] button again to stop the recording.
Voice/Function Song Recording
33 34
Please note that time signature and Tempo cannot be changed while recording a song in
Song Record Mode.
Tempo
Hold down the [Metronome/Left] button and the LED display will show “120” then you can
turn the Data Control knob to set the tempo. Range: 20~280.
Note
Now the Data Control knob is assigned to control time signature instead of
Voice Selection. To reassign the Data Control knob for Voice Selection, press
the Voice / Function button and then press the Eb2 key. (This procedure is
illustrated at the beginning of the “Edit Mode” section.) Also, keep in mind that
no matter how the Data Controller knob is assigned, you can always select
sounds (in Performance Mode) by holding down the Voice /Function button
while turning the Data Control knob.
Note
When Record Wait Mode is active, you can also start recording by pressing the
Demo/Learn button. In that case, the Song Recorder will record silence until you
start playing the keyboard.(The rst one measures are tempo only. It cannot record
any data.)
The Song Recorder built into the piano can record two individual tracks, allowing you to
record one part and then record a second complementary part while the first part is played
back.
To Record a Track
Press the [Record] button to enter Record Wait Mode. The Record button LED will light,
and the Demo/Learn button will ash.
The LED display will show:
This piano is now in Record Wait Mode.
To start recording, begin playing the keyboard. Recording starts automatically as soon as
you start playing.
Press the [Record] button again to stop the recording.
Voice/Function Song Recording
35 36
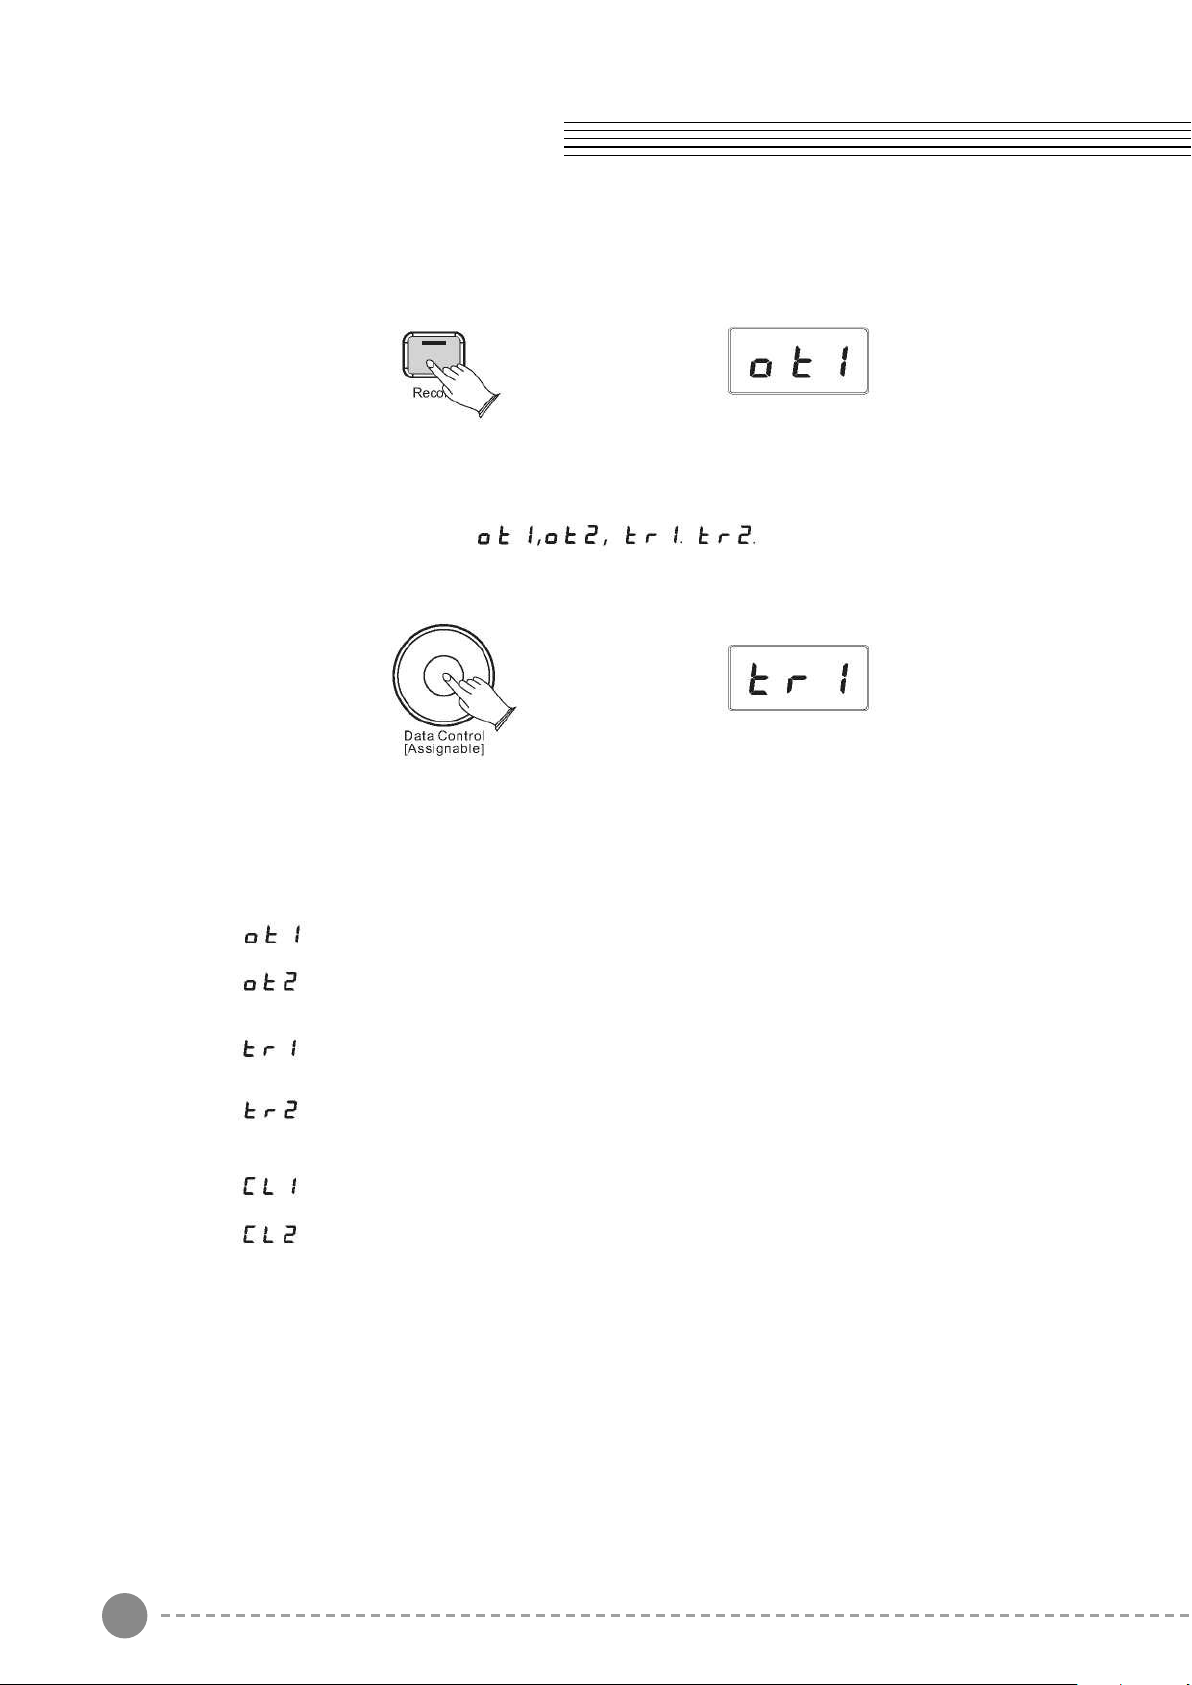
Manually Select a Track to Record:
Press the [Record] button to enter Record Wait Mode.
Turn the Data Control knob to select between Only Track 1, Only Track 2,Track 1, Track 2 .
The display will show
You will also see options for “Clear 1 ”(abbreviated “cl1 ”)and “Clear 2” (abbreviated “cl2” ),
which you can ignore for the moment. These will be discussed later in this section.
In this case, you can record the song in Track 1, if the Track 2 has data, it will not play.
In this case, you can record the song in Track 2, if the Track 1 has data, it will not play.
In this case, you can record the song in Track 1, if the Track 2has data, it will play automatically.
In this case, you can record the song in Track 2, if the Track 1 has data, it will play automatically.
In this case, you can clear the record data of Track 1.
In this case, you can clear the record data of Track 2.
When the LED display shows the track you wish to record to, you may begin playing
whenever you are ready, and recording will automatically begin as soon as you play the
rst note.
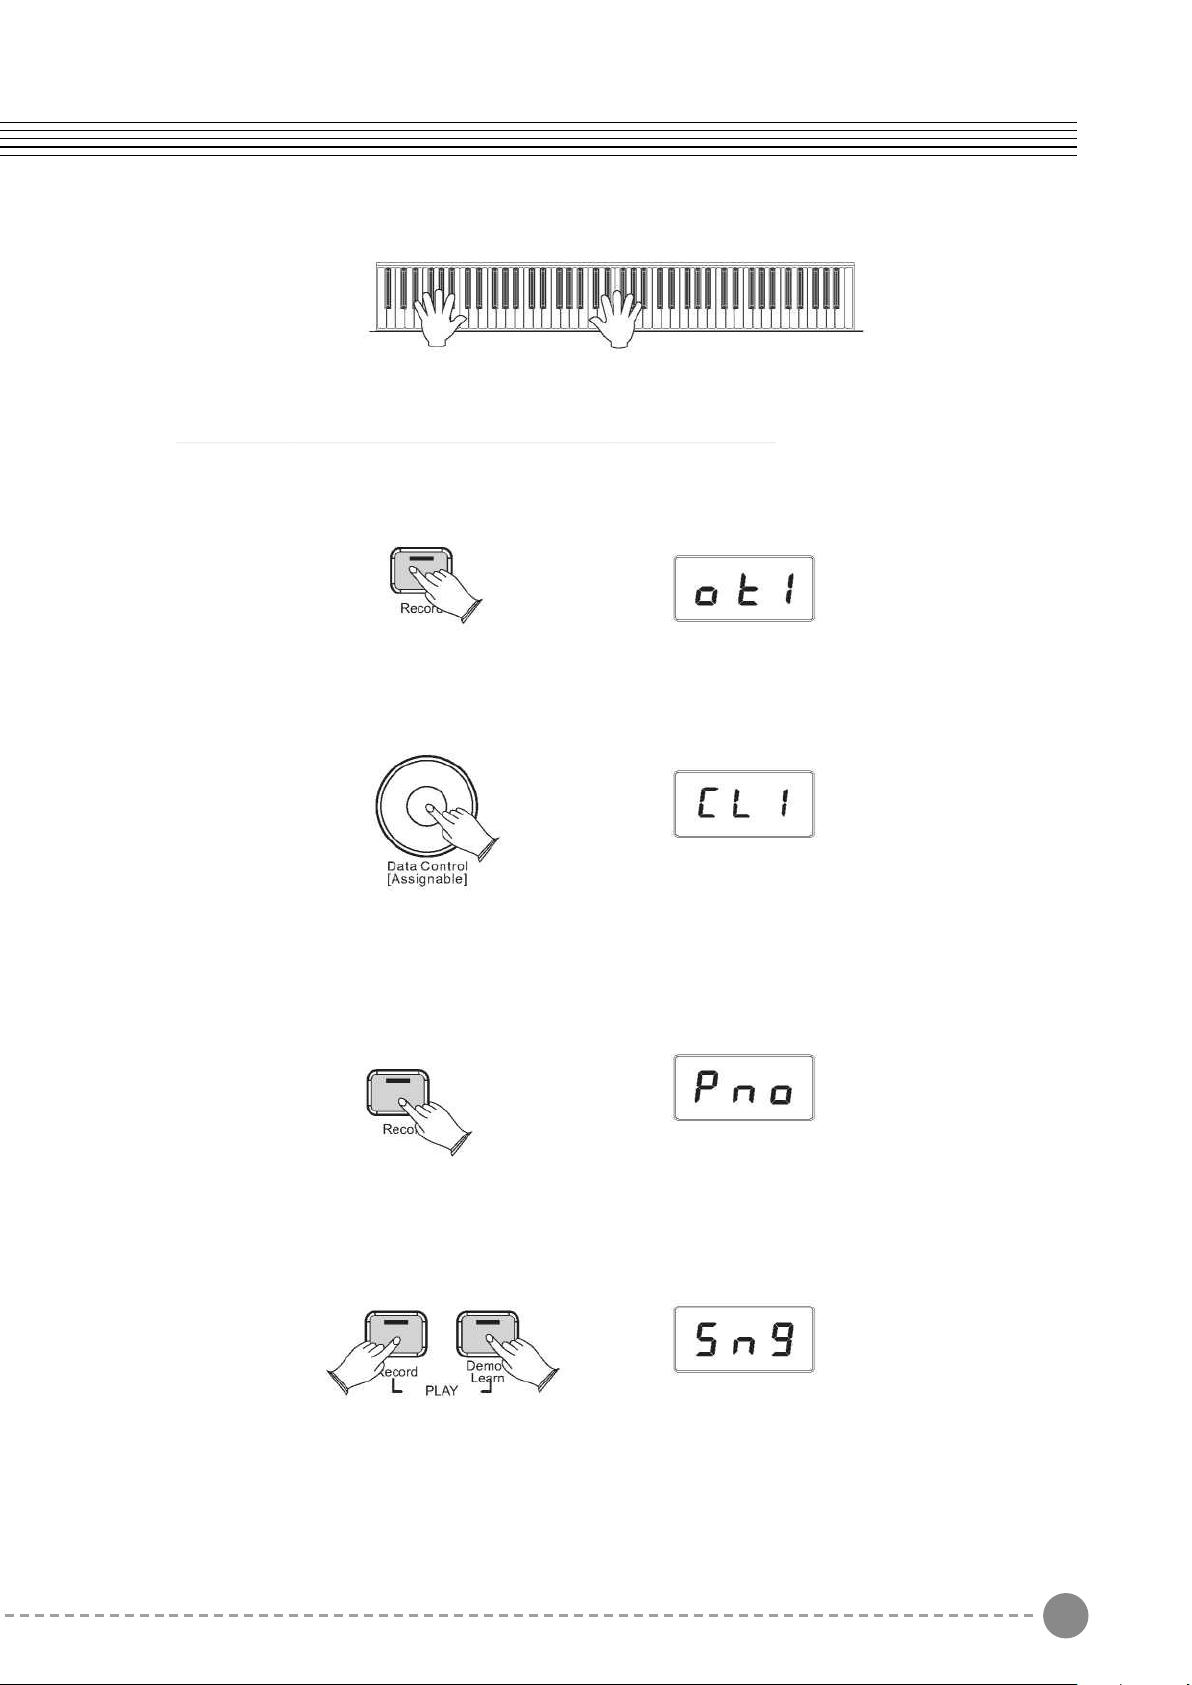
Clearing a Single Track in the Song Recorder:
Press the [Record] button enter Song Recording Mode.
Use the [Data Control] knob to select the track you wish to clear.
Press the [Record] button, the track will be erased, and this piano will be back in
Performance Mode.
The LED will then display the currently selected Voice
Playing Back Your Song Recorder Tracks:
Press the [Record] button and the [Demo/Learn] button at the same time to enter Song
Play Mode.
Song Recording
35 36
Manually Select a Track to Record:
Press the [Record] button to enter Record Wait Mode.
Turn the Data Control knob to select between Only Track 1, Only Track 2,Track 1, Track 2 .
The display will show
You will also see options for “Clear 1 ”(abbreviated “cl1 ”)and “Clear 2” (abbreviated “cl2” ),
which you can ignore for the moment. These will be discussed later in this section.
In this case, you can record the song in Track 1, if the Track 2 has data, it will not play.
In this case, you can record the song in Track 2, if the Track 1 has data, it will not play.
In this case, you can record the song in Track 1, if the Track 2has data, it will play automatically.
In this case, you can record the song in Track 2, if the Track 1 has data, it will play automatically.
In this case, you can clear the record data of Track 1.
In this case, you can clear the record data of Track 2.
When the LED display shows the track you wish to record to, you may begin playing
whenever you are ready, and recording will automatically begin as soon as you play the
rst note.
Clearing a Single Track in the Song Recorder:
Press the [Record] button enter Song Recording Mode.
Use the [Data Control] knob to select the track you wish to clear.
Press the [Record] button, the track will be erased, and this piano will be back in
Performance Mode.
The LED will then display the currently selected Voice
Playing Back Your Song Recorder Tracks:
Press the [Record] button and the [Demo/Learn] button at the same time to enter Song
Play Mode.
Song Recording
37 38
Note
If there is nothing recorded on either of the tracks (1 or 2), then the Song will not
play. Rather, the LED will show “Err” quickly, and this piano will exit Song Play Mode
and resume Performance Mode, with the LED display showing the currently selected
voice.
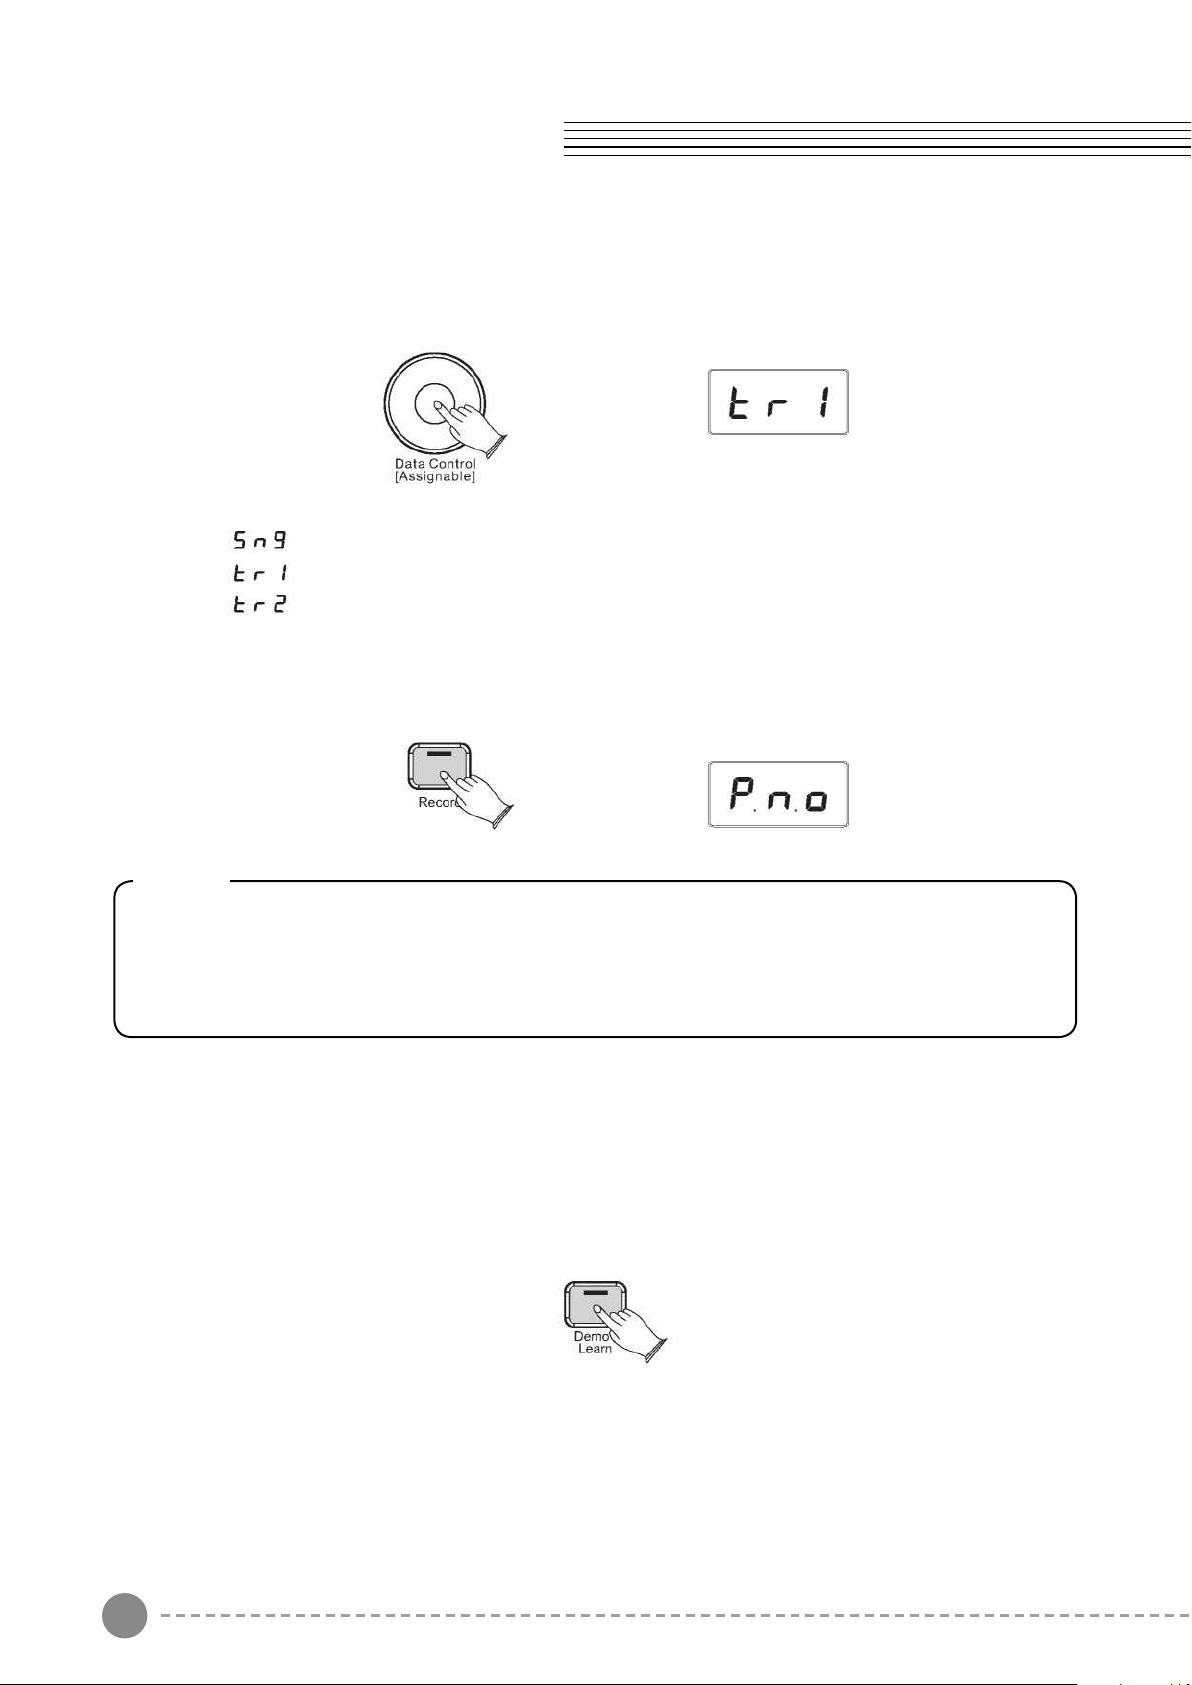
Use the [Data Control] knob to select one of the following:
Playback of both of the Song Recorder tracks simultaneously.
Playback of Song Recorder Track 1.
Playback of Song Recorder Track 2.
Press the [Demo/Learn] button to start playback.
While the Song is playing the LED display will show:
To Stop Playback and Exit Song Play Mode:
Press the [Demo/Learn] button. Song playback will stop, and this piano will exit Song Play
Mode and resume Performance Mode with the LED display showing the currently selected
voice.
Song Recording Learning Function
There are several songs built into this Piano for your musical enjoyment. These songs
have separate left and right-hand parts that can be turned on and off as required so you
can practice the corresponding part on the piano.
1. Selecting A Song
Press and hold down the [Demo/Learn] button to enter the Learning Mode. The song
number will appear on the LED display. Both Right and Left indicator are light.
Use the [Data Control] knob to select a song. Press the [Record] button to start playing the
song.
Selecting a song of song bank
Press and hold down the [Function/Right] button and then press the C#4 (Eb4,F#4,Ab4)
key to select the desired song bank. If you select the right song your instrument will
generate da sound, then you can use the Data Control knob to select desired song.
The Czerny bank includes 70learning songs, the Beyer bank includes 106 learning songs
and the School bank includes 275 learning songs.
37 38
Note
If there is nothing recorded on either of the tracks (1 or 2), then the Song will not
play. Rather, the LED will show “Err” quickly, and this piano will exit Song Play Mode
and resume Performance Mode, with the LED display showing the currently selected
voice.
Use the [Data Control] knob to select one of the following:
Playback of both of the Song Recorder tracks simultaneously.
Playback of Song Recorder Track 1.
Playback of Song Recorder Track 2.
Press the [Demo/Learn] button to start playback.
While the Song is playing the LED display will show:
To Stop Playback and Exit Song Play Mode:
Press the [Demo/Learn] button. Song playback will stop, and this piano will exit Song Play
Mode and resume Performance Mode with the LED display showing the currently selected
voice.
Song Recording Learning Function
There are several songs built into this Piano for your musical enjoyment. These songs
have separate left and right-hand parts that can be turned on and off as required so you
can practice the corresponding part on the piano.
1. Selecting A Song
Press and hold down the [Demo/Learn] button to enter the Learning Mode. The song
number will appear on the LED display. Both Right and Left indicator are light.
Use the [Data Control] knob to select a song. Press the [Record] button to start playing the
song.
Selecting a song of song bank
Press and hold down the [Function/Right] button and then press the C#4 (Eb4,F#4,Ab4)
key to select the desired song bank. If you select the right song your instrument will
generate da sound, then you can use the Data Control knob to select desired song.
The Czerny bank includes 70learning songs, the Beyer bank includes 106 learning songs
and the School bank includes 275 learning songs.
39 40
If you are an advanced MIDI user, this section will help you to access the MIDI controller
capabilities of the piano. If you already know that you need this specialized functionality,
then this section is for you. However, this information is not necessary in order to enjoy
playing the piano. A good rule to keep in mind is: If you don't know what a function
described in this section is, then you probably don't need it.
MIDI, or Musical Instrument Digital Interface, is the way most electronic keyboards
communicate with computers and with each other. Through a series of MIDI messages a
computer or keyboard can tell an instrument what note to play, how loud to play it, when to
stop playing it, and a host of other information.
The piano can send MIDI information to a computer or another MIDI-capab instrument, via
its MIDI or USB output.
Local On/O(C#3)
Turning the Local On/Off function to Off will disconnect the keyboard from the internal
sound engine of the piano. This means you can use the piano as a MIDI controller to
control other MIDI devices (or virtual instrument software running on your computer)
without playing the internal sounds of the piano. You may also nd other occasions (such
as when you are using MIDI sequencing software on your computer) where it is useful to
turn Local o.
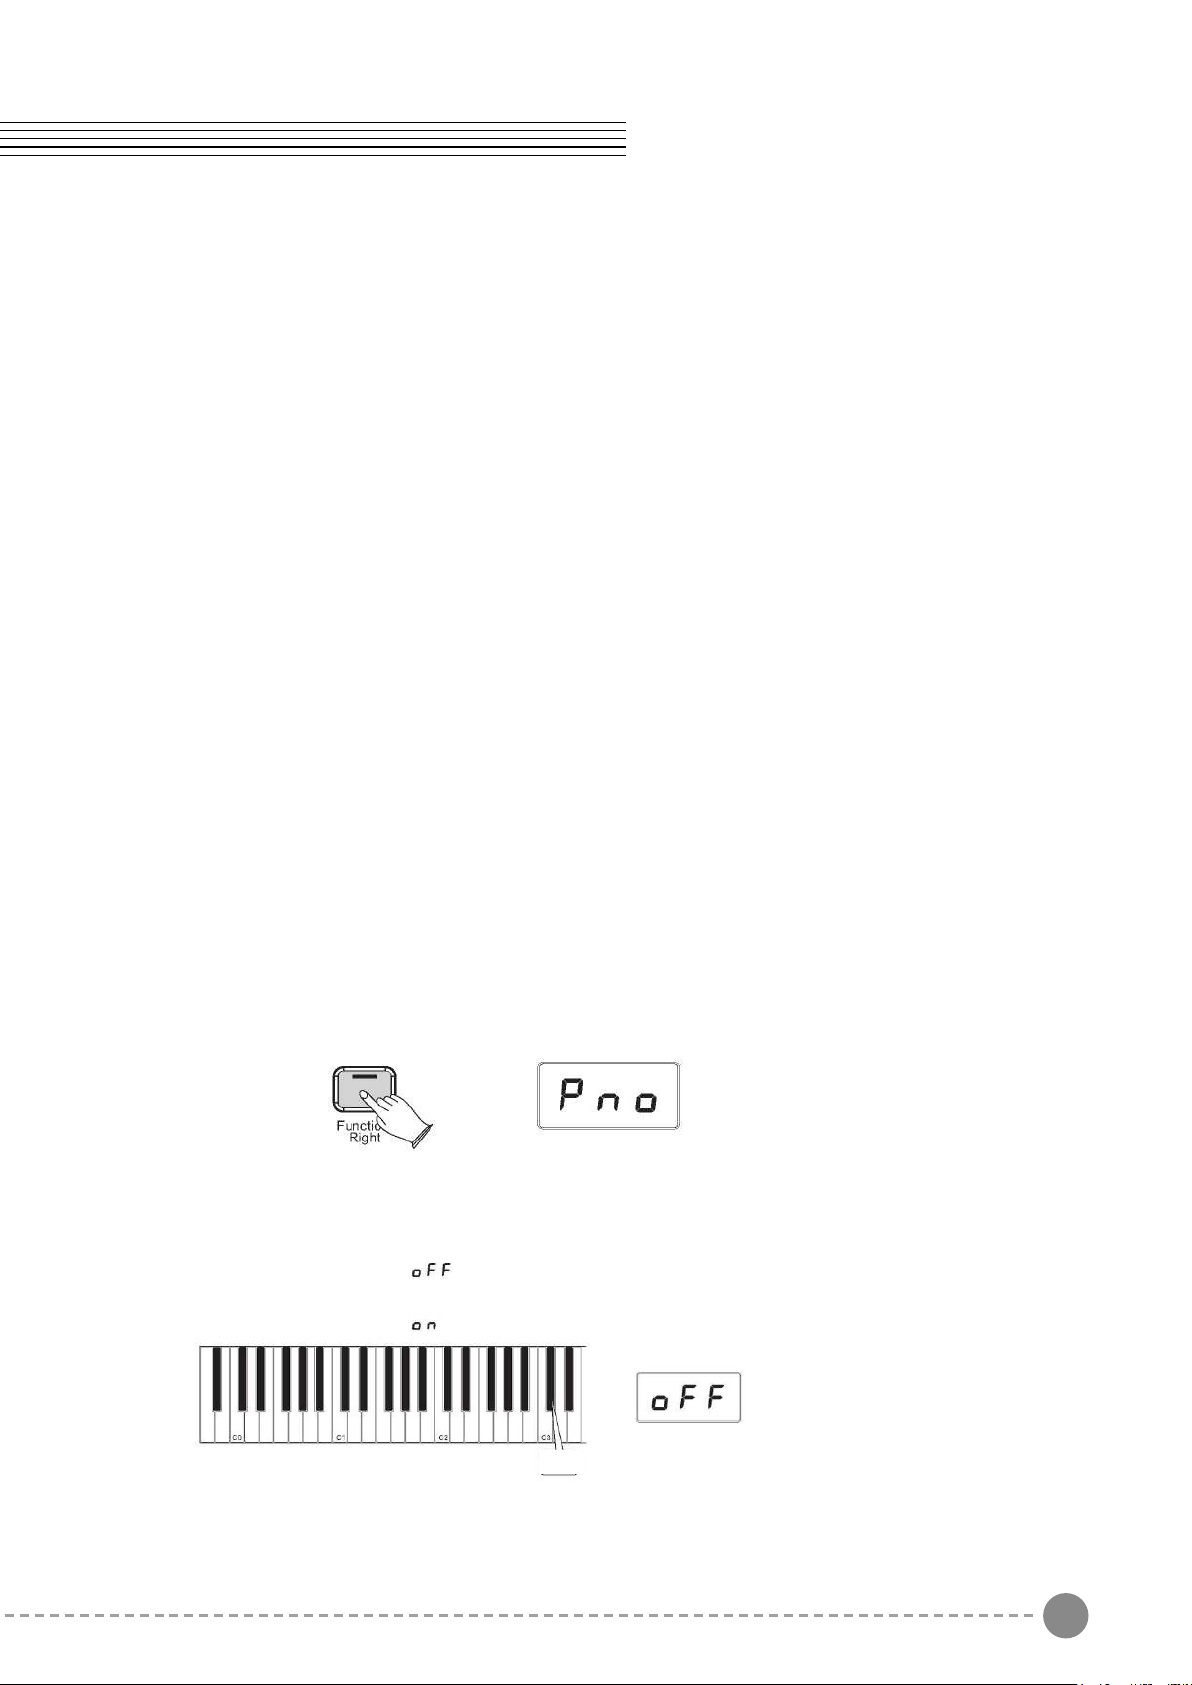
To turn Local On/O to O:
Press the [Function/Right] button to enter Function Mode
Press the Local On/O key (C#3)
The LED display will show:
To turn Local On/O back on, follow the above procedure again.
The LED display will show:
MIDI Function
2. Listening To The Entire Song
1) With the play along song mode engaged, press the [Record] button to hear both hand
parts playing the entire song.
2) Press the [Record] button again to stop. Otherwise, playback will stop automatically at
the end of the song.
3. Practicing The Right Hand Of The Selected Song
1) Press and hold down the [Demo/Learn] button to enter the Learning Mode. Both Right
and Left button are light. Press the [Function/Right] to mute the right hand part
2) Press the [Record] button. Then you will hear the song. You will only hear the left-hand
part.
3) Play the right-hand part of your selected song while the left-hand part plays.
4) Press the [Record] button again to stop. Otherwise, playback will stop automatically at
the end of the song.
4. Practicing The Left Hand Of The Selected Song
Follow steps 1-4 listed above, substituting the [Metronome/Left] button whenever the
[Function/Right] button is mentioned. You will hear the right-hand part of your selected
song. Play the left-hand part of your selected song while the right- hand part plays.
5. Turn o the Learning mode
Press the [Demo/Learn] again to turn o the learning mode.
Learning Function
Note
After you nish learning one song, your piano may automatically score 0~100
on your performance.
C#3
39 40
If you are an advanced MIDI user, this section will help you to access the MIDI controller
capabilities of the piano. If you already know that you need this specialized functionality,
then this section is for you. However, this information is not necessary in order to enjoy
playing the piano. A good rule to keep in mind is: If you don't know what a function
described in this section is, then you probably don't need it.
MIDI, or Musical Instrument Digital Interface, is the way most electronic keyboards
communicate with computers and with each other. Through a series of MIDI messages a
computer or keyboard can tell an instrument what note to play, how loud to play it, when to
stop playing it, and a host of other information.
The piano can send MIDI information to a computer or another MIDI-capab instrument, via
its MIDI or USB output.
Local On/O(C#3)
Turning the Local On/Off function to Off will disconnect the keyboard from the internal
sound engine of the piano. This means you can use the piano as a MIDI controller to
control other MIDI devices (or virtual instrument software running on your computer)
without playing the internal sounds of the piano. You may also nd other occasions (such
as when you are using MIDI sequencing software on your computer) where it is useful to
turn Local o.
To turn Local On/O to O:
Press the [Function/Right] button to enter Function Mode
Press the Local On/O key (C#3)
The LED display will show:
To turn Local On/O back on, follow the above procedure again.
The LED display will show:
MIDI Function
2. Listening To The Entire Song
1) With the play along song mode engaged, press the [Record] button to hear both hand
parts playing the entire song.
2) Press the [Record] button again to stop. Otherwise, playback will stop automatically at
the end of the song.
3. Practicing The Right Hand Of The Selected Song
1) Press and hold down the [Demo/Learn] button to enter the Learning Mode. Both Right
and Left button are light. Press the [Function/Right] to mute the right hand part
2) Press the [Record] button. Then you will hear the song. You will only hear the left-hand
part.
3) Play the right-hand part of your selected song while the left-hand part plays.
4) Press the [Record] button again to stop. Otherwise, playback will stop automatically at
the end of the song.
4. Practicing The Left Hand Of The Selected Song
Follow steps 1-4 listed above, substituting the [Metronome/Left] button whenever the
[Function/Right] button is mentioned. You will hear the right-hand part of your selected
song. Play the left-hand part of your selected song while the right- hand part plays.
5. Turn o the Learning mode
Press the [Demo/Learn] again to turn o the learning mode.
Learning Function
Note
After you nish learning one song, your piano may automatically score 0~100
on your performance.
C#3
41 42
Appendix
MIDI Implementation Chart
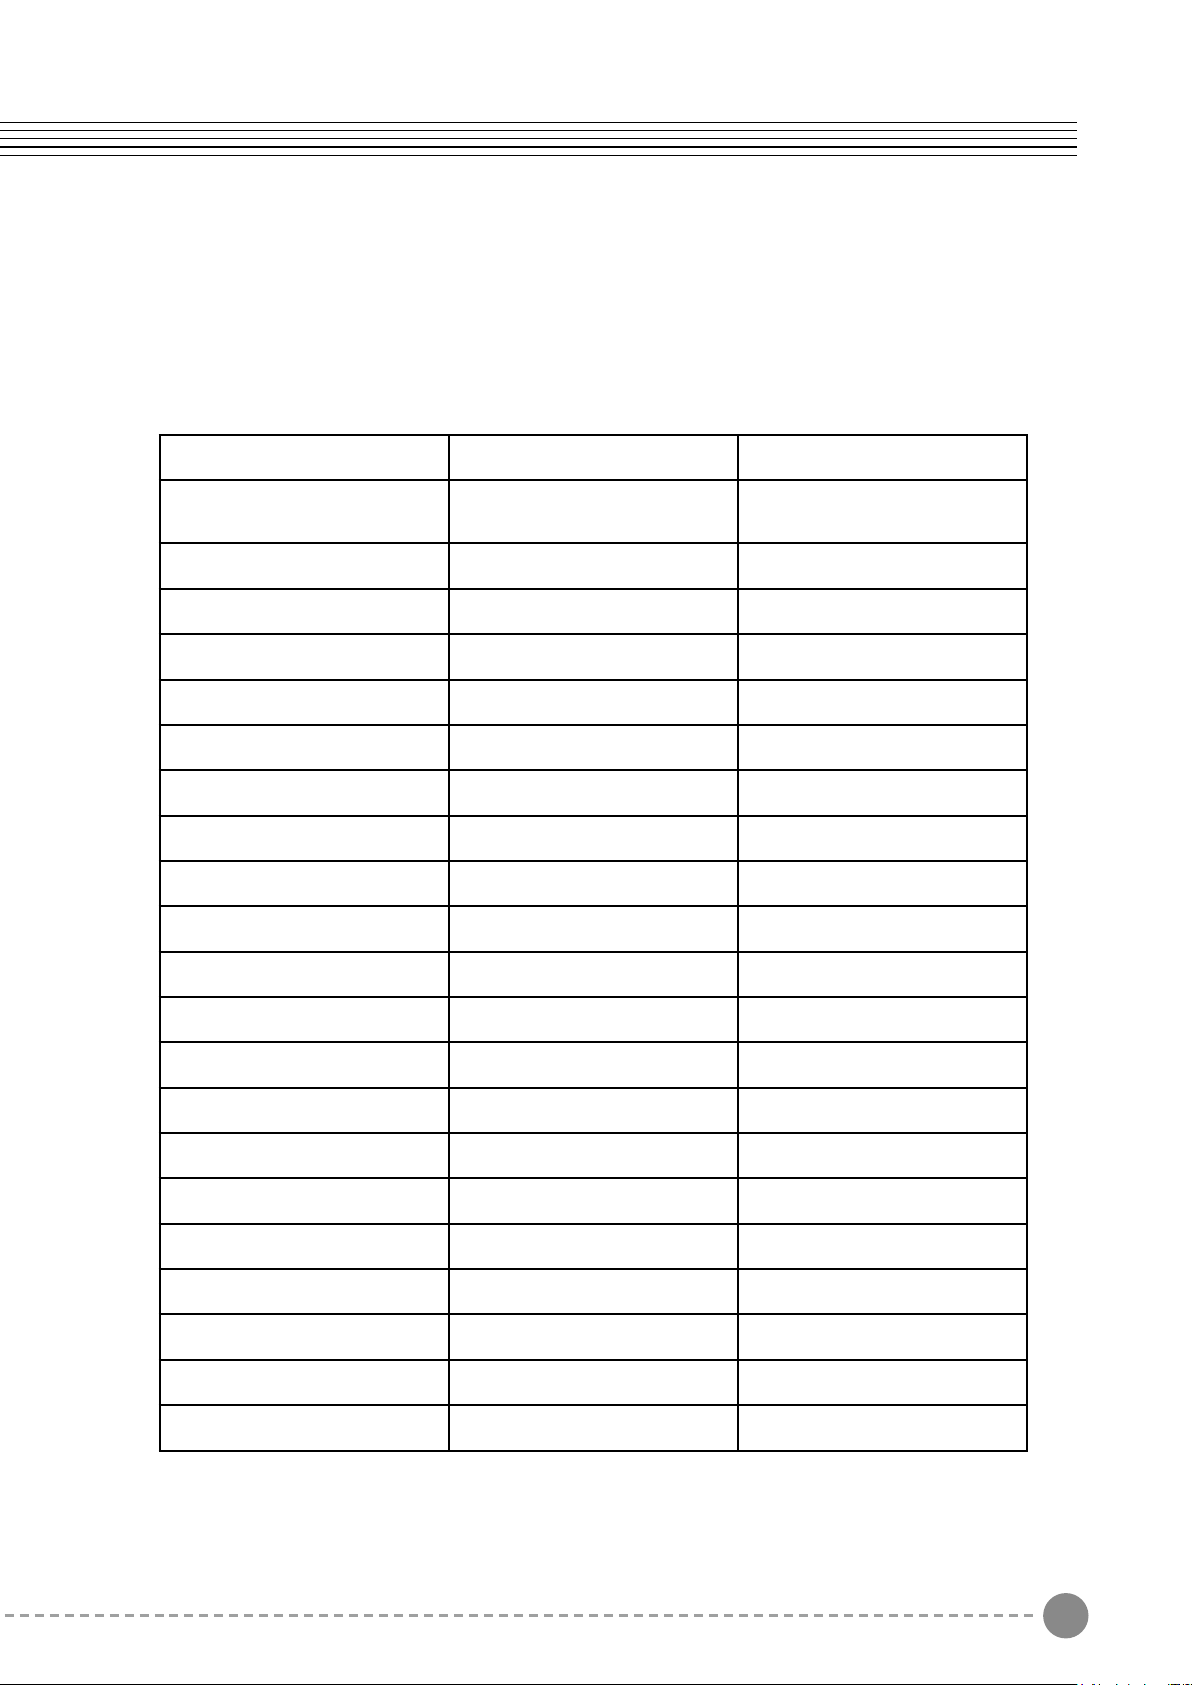
Model :OMNI ON,POLY Mode2:OMNI ON,MONO O: Yes
Mode3:OMNI OFF,POLY Mode4:OMNI OFF,MONO X: NO
Function Transmitted Recognized Remarks
Basic Default Channel
Changed
1-16
1-16
1-16
1-16
Mode Default
Messages
Altered
Mode
3 O
Mode 3
X
X
Note True voice Number 0~127 0~127
Velocity ON Note OFF
O
O
O
O
After Key's
Touch Touch Channel
X
X
X
X
Pitch Bend 0-127
0,1,5,6,7,10,11,
32,64,65,66,67,
80,81,91,93,100,
101,121
Program Change
True#
0-127 0-7
*8 sounds only
PGM=0-7
System Exclusive O O*
*The controller
will recognize and
respond to GM Device
inquiries.
Master Tune
supported. Master
Volume supported
System Song Position Pointer
Common Song Select Tune
Request
X
X
X
X
X
X
System Clock Real Time
Commands
X
X
X
X
Aux All Sounds O*
Messages Reset All
Controllers Local ON/OFF*
ALL Notes OFF Active
Sensing System Reset
O
O
O
O
X
X
O
O
O
O
O
O
Notes
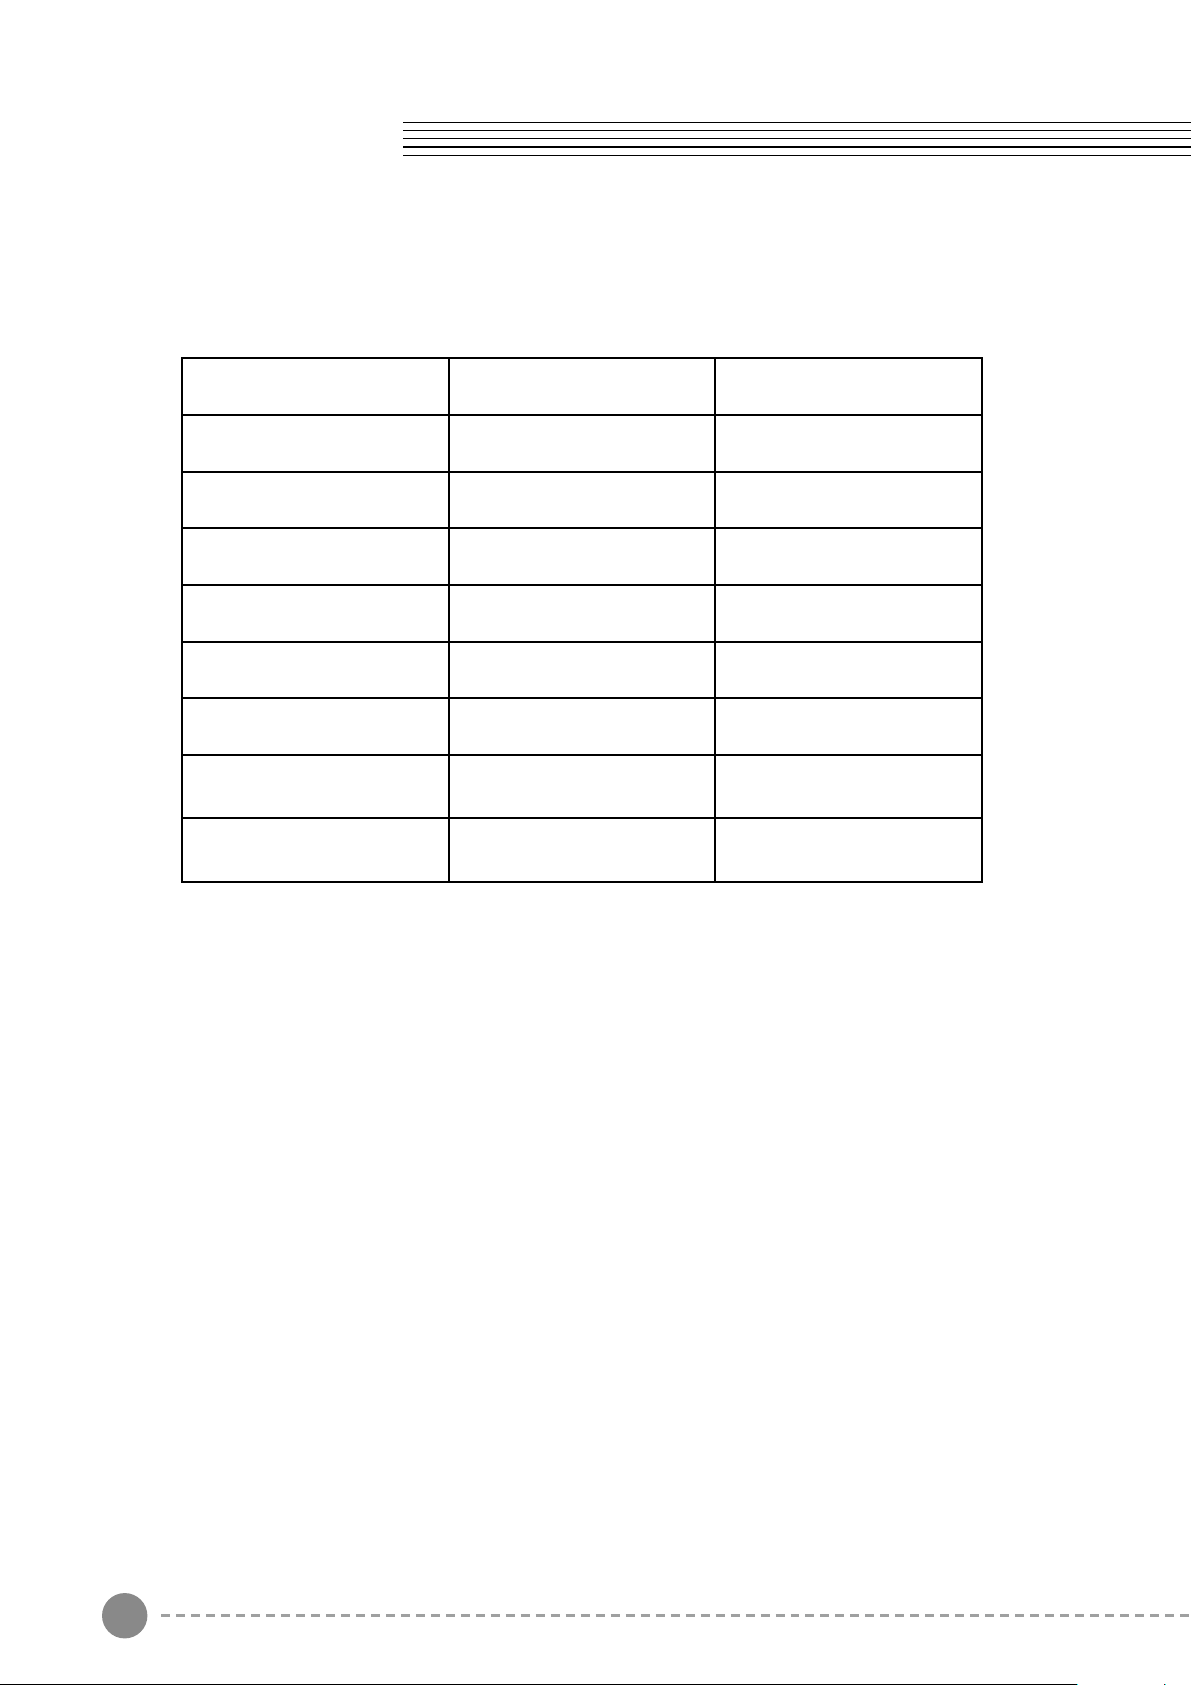
Defaults
- Default Settings
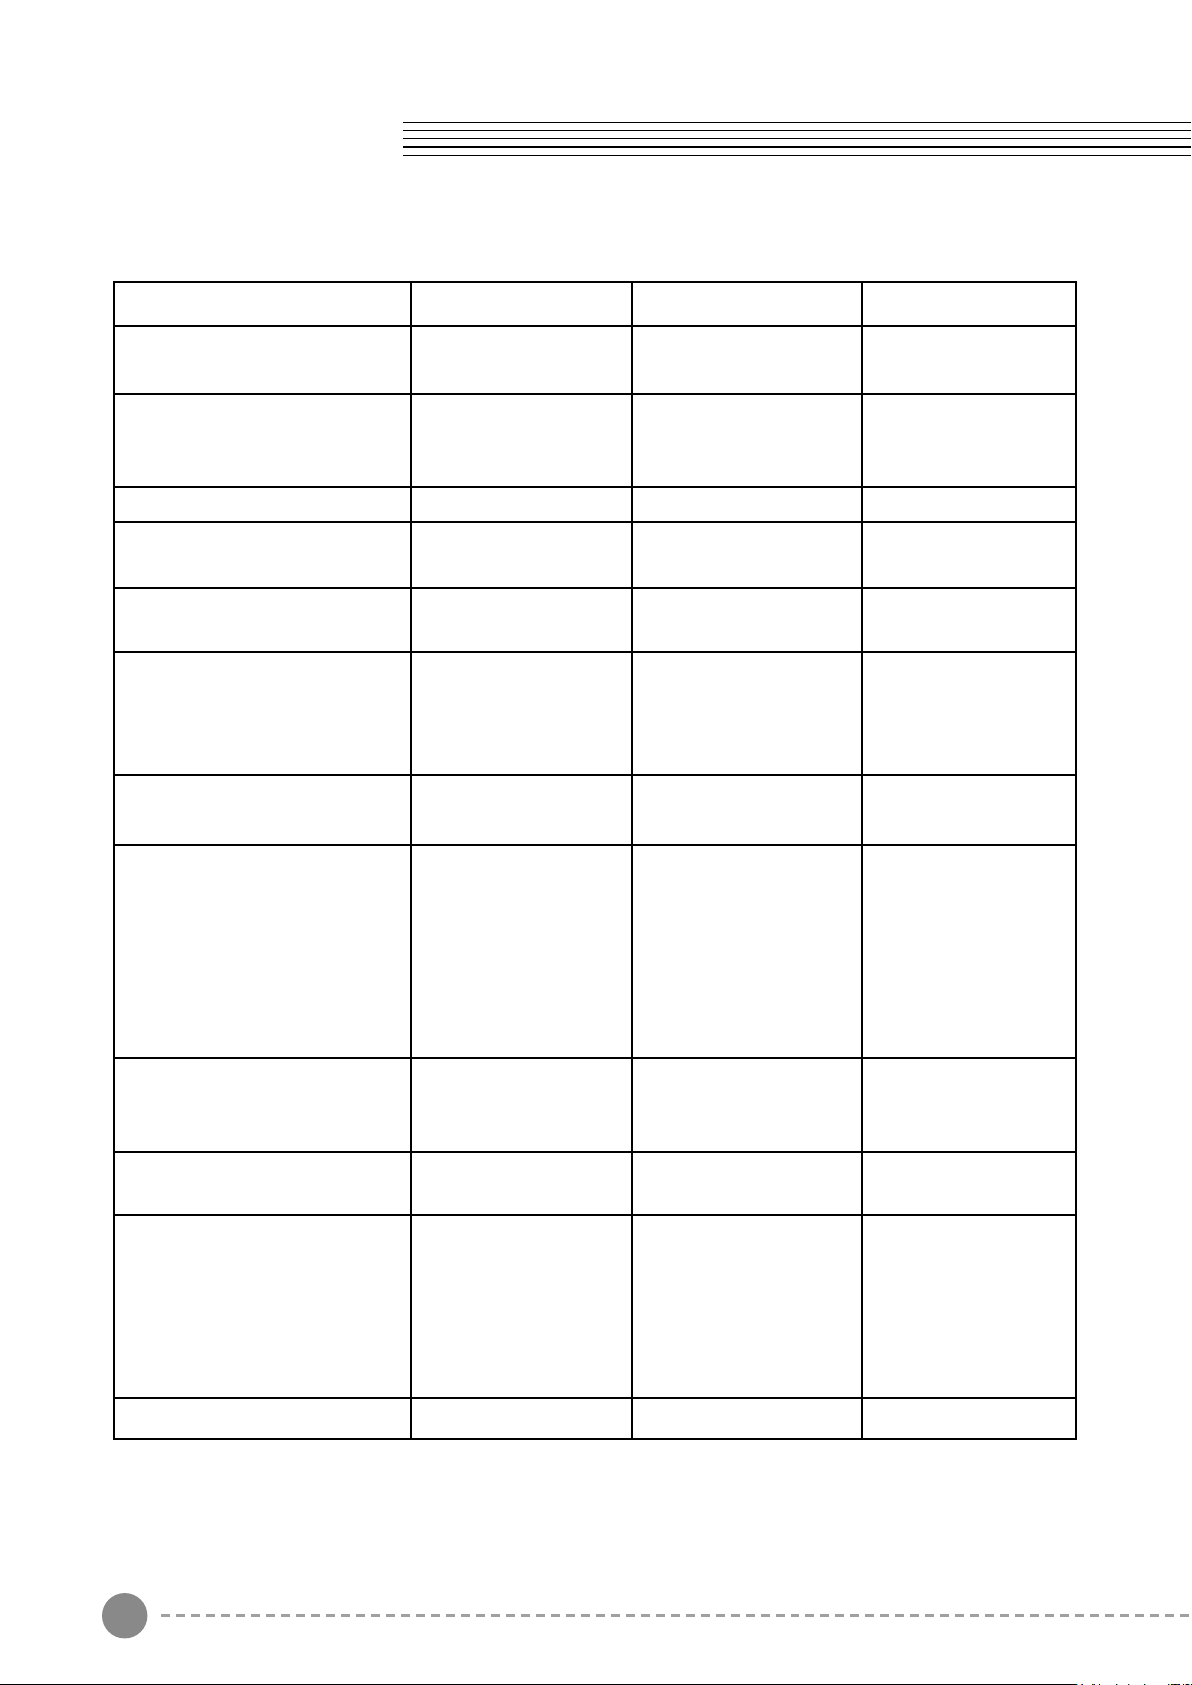
The table below shows the piano factory default settings and whether or not user changes
to these settings are retained after a power-cycle (turning the device o and on):
Parameter Factory Default Retained on Power-Down
Program Number & Voice
Selected
000 - Grand Piano No
Octave shift 0 No
Transpose 0 No
Local On No
Data Control Assignment Data = Voice Select No
Reverb On/O Reverb On Yes
Reverb Depth 18 Yes
Chorus On/O Chorus O Yes
Chorus Depth 36 Yes
Velocity Curve Selected “NORMAL” No
Split Point F#2 No
Voice Volume 127 Yes
Layer Volume 75 Yes
Split Volume 127 Yes
Metronome Volume 100 Yes
Master Tune 0 No
Tempo 120 No
Layer Mode Voice n/a n/a
Split Mode Voice 16 - Electric Bass No
Layer Mode On/O O No
Split Mode On/O O No
41 42
Appendix
MIDI Implementation Chart
Model :OMNI ON,POLY Mode2:OMNI ON,MONO O: Yes
Mode3:OMNI OFF,POLY Mode4:OMNI OFF,MONO X: NO
Function Transmitted Recognized Remarks
Basic Default Channel
Changed
1-16
1-16
1-16
1-16
Mode Default
Messages
Altered
Mode
3 O
Mode 3
X
X
Note True voice Number 0~127 0~127
Velocity ON Note OFF
O
O
O
O
After Key's
Touch Touch Channel
X
X
X
X
Pitch Bend 0-127
0,1,5,6,7,10,11,
32,64,65,66,67,
80,81,91,93,100,
101,121
Program Change
True#
0-127 0-7
*8 sounds only
PGM=0-7
System Exclusive O O*
*The controller
will recognize and
respond to GM Device
inquiries.
Master Tune
supported. Master
Volume supported
System Song Position Pointer
Common Song Select Tune
Request
X
X
X
X
X
X
System Clock Real Time
Commands
X
X
X
X
Aux All Sounds O*
Messages Reset All
Controllers Local ON/OFF*
ALL Notes OFF Active
Sensing System Reset
O
O
O
O
X
X
O
O
O
O
O
O
Notes
Defaults
- Default Settings
The table below shows the piano factory default settings and whether or not user changes
to these settings are retained after a power-cycle (turning the device o and on):
Parameter Factory Default Retained on Power-Down
Program Number & Voice
Selected
000 - Grand Piano No
Octave shift 0 No
Transpose 0 No
Local On No
Data Control Assignment Data = Voice Select No
Reverb On/O Reverb On Yes
Reverb Depth 18 Yes
Chorus On/O Chorus O Yes
Chorus Depth 36 Yes
Velocity Curve Selected “NORMAL” No
Split Point F#2 No
Voice Volume 127 Yes
Layer Volume 75 Yes
Split Volume 127 Yes
Metronome Volume 100 Yes
Master Tune 0 No
Tempo 120 No
Layer Mode Voice n/a n/a
Split Mode Voice 16 - Electric Bass No
Layer Mode On/O O No
Split Mode On/O O No
43 44
Additional Default Information
I.Defaults
1 tone = 100 cents, therefore -50 to +50 cents = -1 to +1 semi-tone.
Note this is shown in MIDI steps -64 to 63.
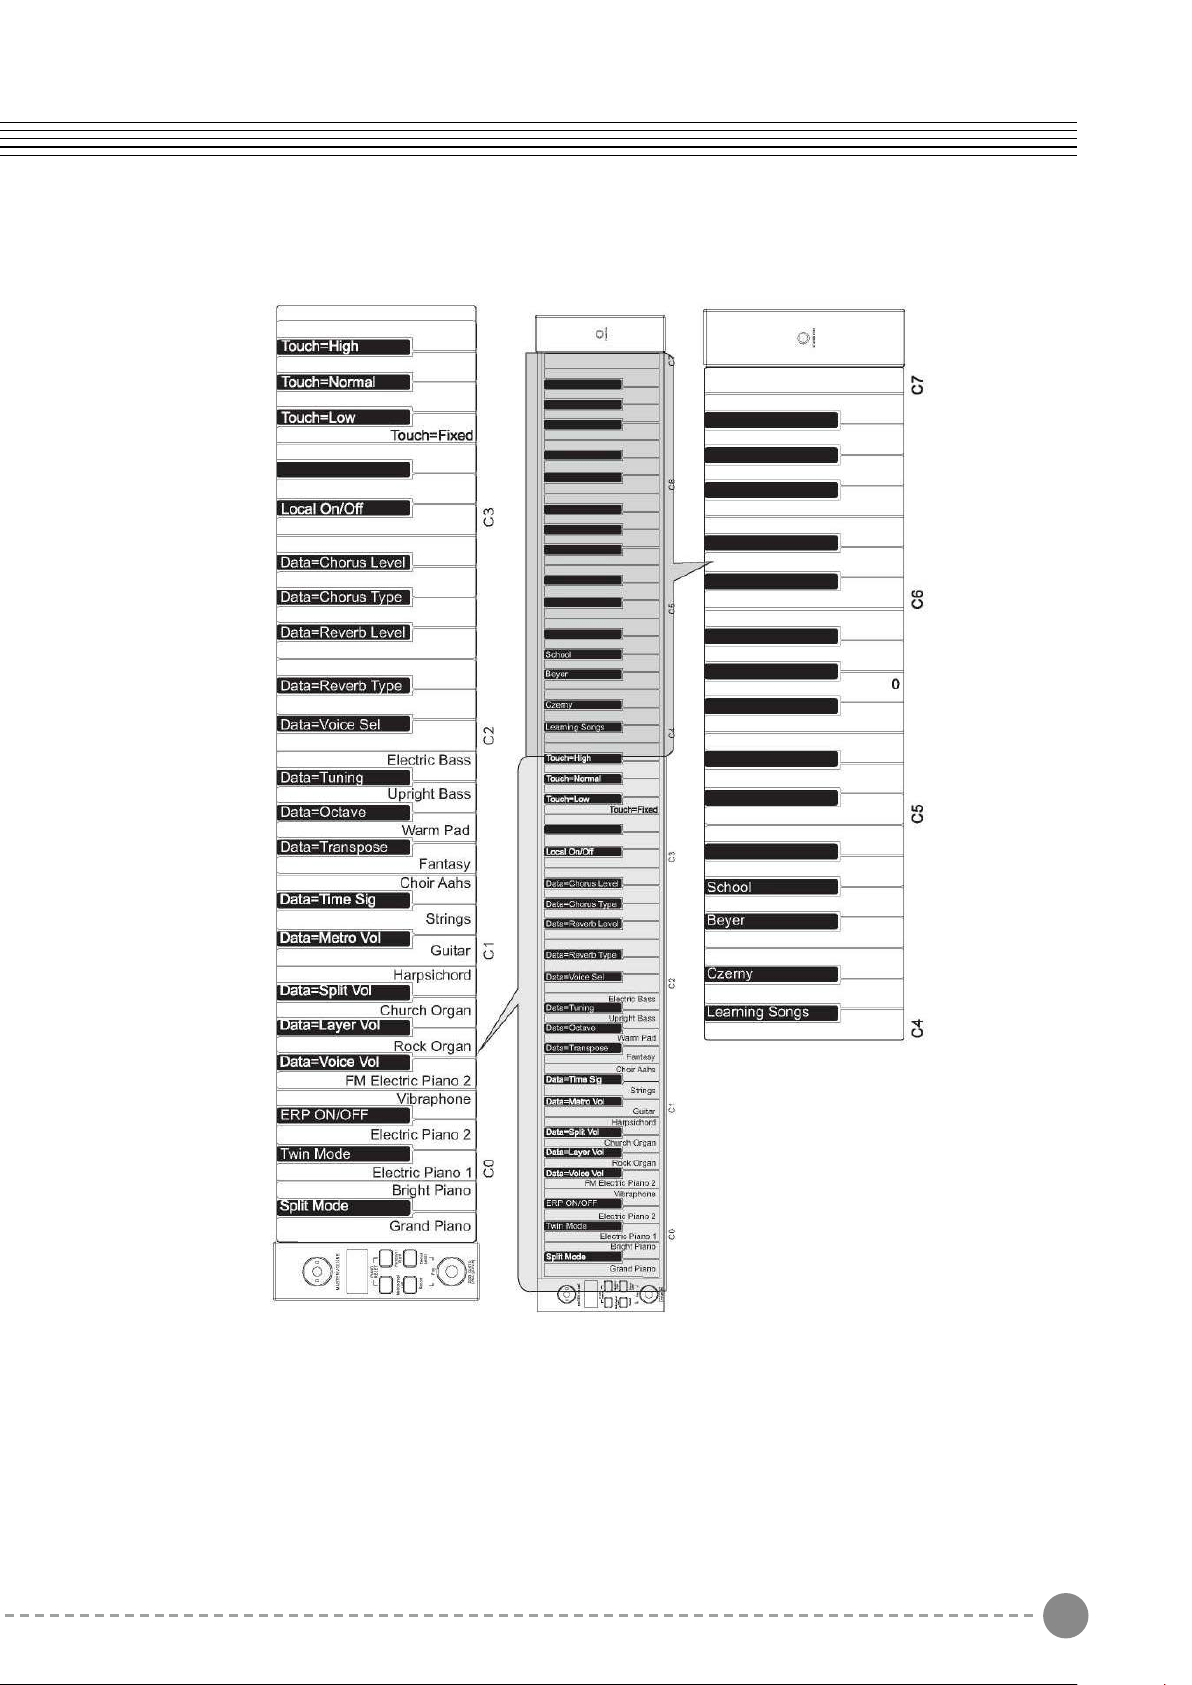
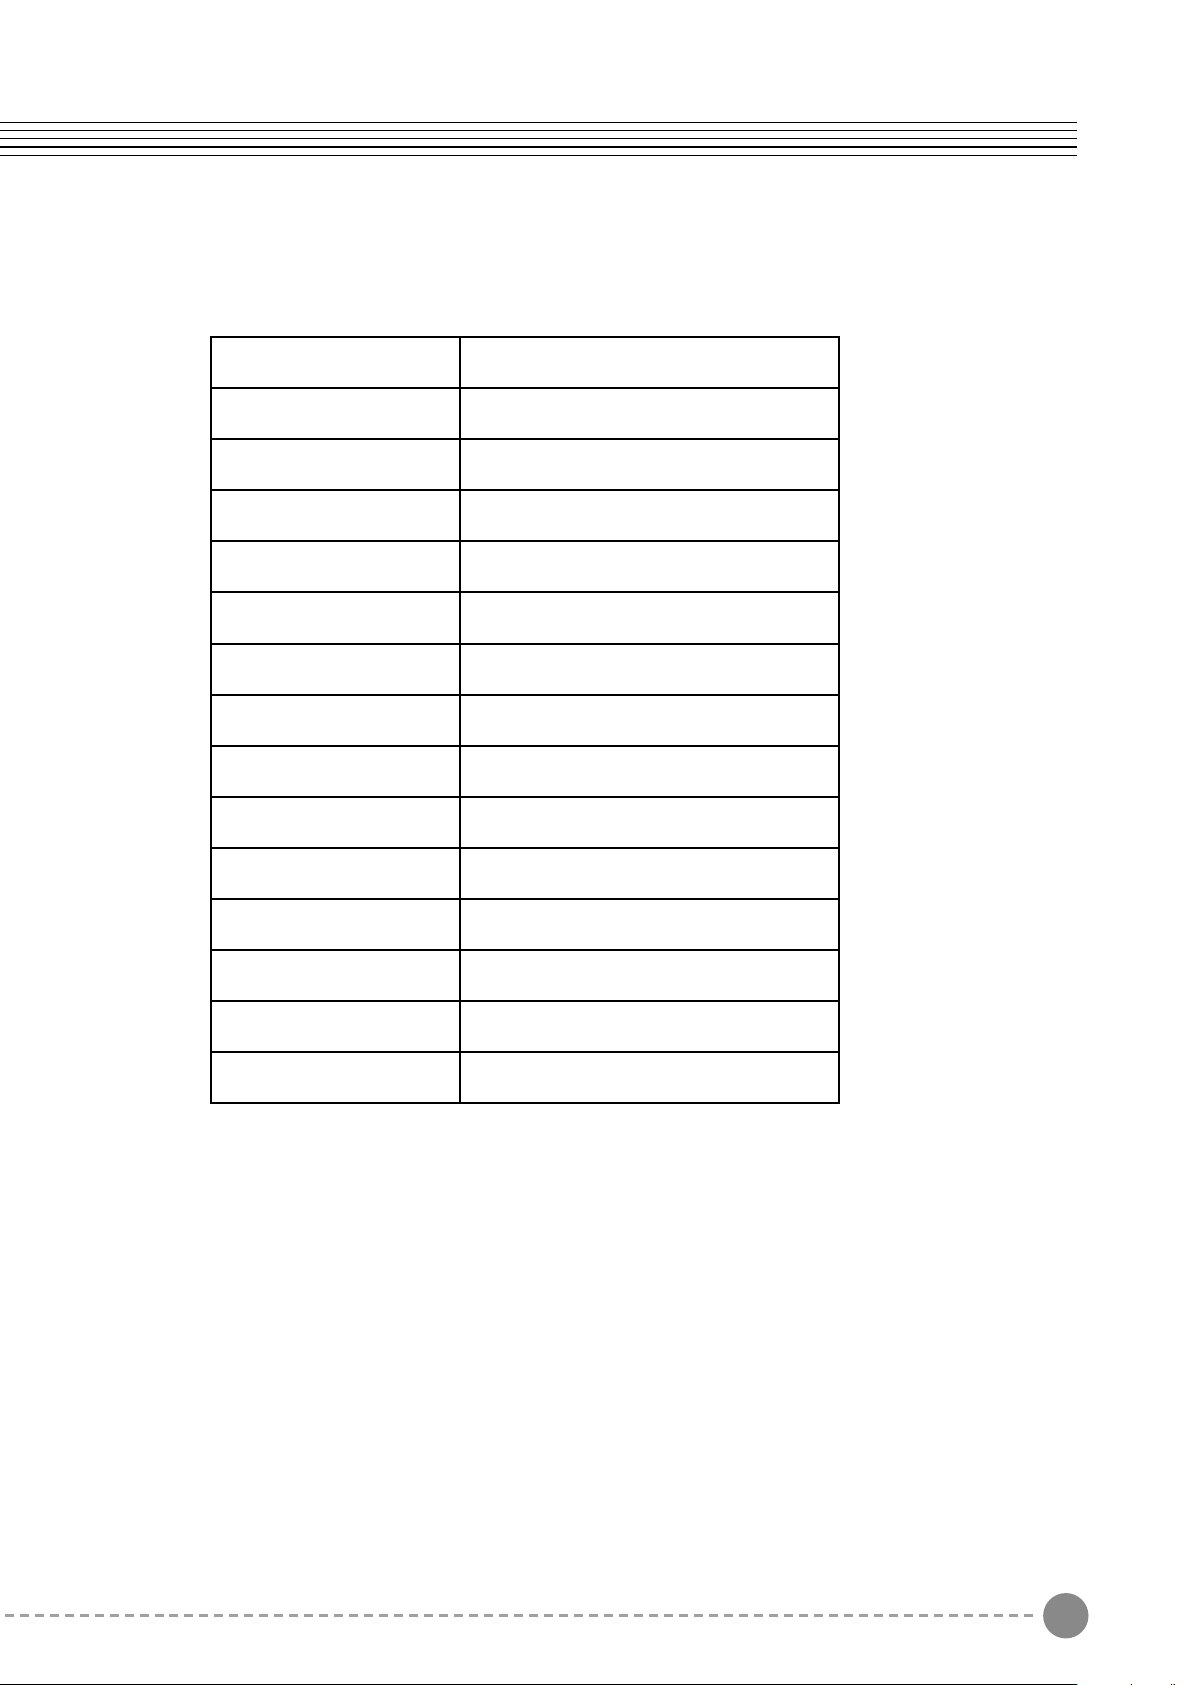
Advanced Functions Keyboard Chart
Appendix
Parameter Default Value Range
Octave Shift 0 -2 to +2
Transpose 0 -12 to +12
Voice Vol 127 0 to 127
Layer Vol 75 0 to 127
Split Vol 127 0 to 127
Metronome Vol 100 0 to 127
Voice Select 1 (Grand Piano)
1 to 16(display shows Voice
names)
Tuning 440 Hz (display shows “0”)
-64 (-50 cents) to 63 (+50
cents) in 128 MIDI steps
43 44
Additional Default Information
I.Defaults
1 tone = 100 cents, therefore -50 to +50 cents = -1 to +1 semi-tone.
Note this is shown in MIDI steps -64 to 63.
Advanced Functions Keyboard Chart
Appendix
Parameter Default Value Range
Octave Shift 0 -2 to +2
Transpose 0 -12 to +12
Voice Vol 127 0 to 127
Layer Vol 75 0 to 127
Split Vol 127 0 to 127
Metronome Vol 100 0 to 127
Voice Select 1 (Grand Piano)
1 to 16(display shows Voice
names)
Tuning 440 Hz (display shows “0”)
-64 (-50 cents) to 63 (+50
cents) in 128 MIDI steps

45 46
Appendix
Piano Reset in Detail
As soon as the Piano Reset function is activated (by pressing the [Metronome/Left] and
[Function/Right] buttons simultaneously and then press the STANDBY/ON button), the
device will perform the following functions:
1. Turn Local On
2. Assign Data Control to Voice Select
3. Set Volume levels for Main Voice, Split Voice and Layer Voice to defaults
4. Turn o Layer Mode and Split Mode
5. Set Transpose and Octave Shift both back to zero
6. Set the Reverb Depth back to the default value for the Default Voice
Specifications
Keyboard 88 Keys With Touch Sensitivity
Display LED Display
Voice 16
Polyphony 64
Voice Control Layer Layer, Touch, Trans, Split, Metro
Pedals Soft, Sostenuto, Sustain
Eect Reverb, Chorus
Demo Song 16
Song Re cording Record two individual tracks
Midi Transmit Settings, Local Control
Connectors MIDI Out, Pedal,
Speakers YD158-7/4Q 15W
Dimensions(W x D x H) 1490mm X 520mm X 415mm
Weight 44Kg
Supplied Accessories: User's Manual
10506417-V1.0

196, Bongsu-daero, Seo-gu,
Incheon, Korea