
Operator's Manual
CRRF[SM ®
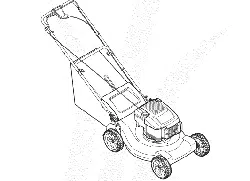
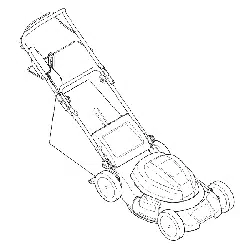
19=inch Electric
Rotary Mower
Model No. 247.370160
CAUTION: Before using
this product, read this
manual and follow all
safety rules and operating
instructions.
,, SAFETY
o ASSEMBLY
o OPERATION
o MAINTENANCE
o PARTS LIST
o ESPANOL R 24
o his symbol on the product's nameplatemeans it is listed by
LISTEDUNDERWRITERSLABORATORIESINC,
Sears, Roebuck and Co., Hoffman Estates, IL 60179, U.S.A.
Visit our web site: www.craftsman.com FORMNO.769-04643A
November17,2009
ServiceandMaintenance..............................................15
Off-SeasonStorage........................................................18
Troubleshooting..............................................................19
PartsList.........................................................................20
Espa_ol............................................................................24
ServiceNumbers.............................................BackCover
Craftsman TwoYear Limited Warranty
If this Craftsmanproductfailsdueto a defectin materialor workmanshipwithintwo years fromthe date of purchase,returnitto any Searsstore,
SearsServiceCenter,or otherCraftsmanoutletinthe UnitedStatesfor free repair.
Thiswarrantydoesnot include:
• Expendableitemswhich canwearout fromnormaluse withinthe warrantyperiod,suchas the grassbagandrotarymowerblade.
Repairsnecessarybecauseof operatorabuseor negligence,includingbentmotorshafts and the failureto operateor maintainthe
equipmentaccordingto all suppliedinstructions.
Thiswarrantyappliesforonly 90daysifthis productiseverusedfor commercialorrentalpurposes.
Thiswarrantyappliesonly whilethis productisused inthe UnitedStates.
Thiswarrantygivesyou specificlegalrights,andyou mayalsohaveotherrightswhich vary from stateto state.
Sears, Roebuck and Co., Hoffman Estates, IL 60179
Motor: 12Amperes
Model Number
SerM Number
Dateof Purchase
Recordthe modelnumber,serialnumber,
anddateof purchaseabove.
© Sears Brands,LLC 2
Thissymbolpointsout importantsafetyinstructions
which,if not followed,could endangerthe personal
safetyand/or propertyof yourselfandothers.Read
andfollowall instructionsin this manualbefore
attemptingto operatethismachine.Failureto complywith these
instructionsmayresultinpersonalinjury.Whenyou seethissymbol,
HEEDITSWARNING!
Your Responsibility: Restrictthe useof this powermachineto
personswho read,understand,andfollowthe warningsand instruc-
tionsinthis manualand on the machine.
Thismachinewasbuiltto be operatedaccordingtothe rulesfor
safeoperationinthis manual.As withanytype of powerequipment,
carelessnessorerroronthe part of the operatorcan resultin serious
injury.Thismachineis capableof amputatinghandsandfeetand
throwingobjects. Failureto observethefollowingsafetyinstructions
could resultin seriousinjuryor death.
Whenusingelectriclawnmowers,basicsafetyprecautionsshould
alwaysbe followedto reducethe risk of fire, electricshock,and
personalinjury.Thesebasicprecautionsincludethe following:
Double Insulated Lawn Mower
Doubleinsulationis a conceptinthe safetyof electriclawn mowers,whicheliminatesthe needfor the usualthree-wire
groundedpowercordand groundedpowersupplysystem.Whereverthereis electriccurrentin the mower,therearetwo
completesetsof insulationto protectthe user.All exposedmetalparts are isolatedfromthe internalmetal motorcompo-
nentswithprotectinginsulation.
Servicingof a lawnmowerwithdoubleinsulationrequiresextremecare andknowledgeof the systemandshouldbe
performedonly by aqualifiedservicetechnician.Forrepairservicewe suggestyou takethe lawnmowerto yournearest
authorizedservicedealer.Alwaysuseoriginal equipmentmanufacturer's(OEM)replacementpartswhenservicing.
CHILDREN
Tragicaccidentscanoccurif the operatoris notalert to the presence
of children.Childrenare oftenattractedto the mowerandthe mowing
activity.Theydo notunderstandthe dangers.Neverassumethat
childrenwill remainwhereyou lastsawthem.
• Keepchildrenout of the mowingareaand underwatchfulcare of
a responsibleadult otherthanthe operator.
Bealert andturn moweroff if a childentersthearea.
o
o
Beforeandwhile movingbackwards,lookbehindanddownfor
smallchildren.
• Use extremecarewhenapproachingblind corners,doorways,
shrubs,trees,or otherobjectsthat mayobscureyourvisionof a
childwho may run intothe mower.
Neverallowchildrenunder 14years of age to operatethis machine.
Children14and overshouldreadand understandthe instructionsand
safeoperationpracticesin this manualand on the machineandbe
trainedand supervisedby anadult.
OPERATION
General Operation:
• Readthisoperator'smanual carefullyin its entiretybefore
attemptingto assemblethismachine.Read,understand,and
followall instructionson the machineandin themanual(s) before
operation.Keepthis manualina safeplacefor futureand regular
referenceand for orderingreplacementparts.
• Be completelyfamiliarwiththe controlsandthe properuseof this
machinebeforeoperatingit.
• This machineis a precisionpiece of powerequipment,nota
plaything.Therefore,exerciseextremecautionat alltimes.This
machinehas beendesignedto performonejob: to mowgrass.
Donot use itfor anyotherpurpose.
• Neverallowchildrenunder14yearsof ageto operatethis
machine.Children14and overshouldreadand understandthe
instructionsandsafeoperationpracticesinthis manualand on
the machineand betrainedandsupervisedby an adult.
• Only responsibleindividualswho are familiarwith these rulesof
safeoperationshouldbe allowedto use this machine.
• Thoroughlyinspecttheareawheretheequipmentis to be used.
Removeall stones,sticks,wire, bones,toysand otherforeign
objectswhich couldbetrippedoveror pickedup and thrownby
the blade.Thrownobjectscan causeseriouspersonalinjury.
• Planyourmowingpatternto avoiddischargeof materialtoward
roads,sidewalks,bystandersand thelike.Also,avoiddischarg-
ing materialagainsta wallor obstructionwhichmaycause
dischargedmaterialto ricochetbacktowardthe operator.
• To helpavoidbladecontactora thrownobjectinjury,stayin
operatorzonebehind handlesandkeepchildren,bystanders,
helpersand pets at least 75 feet from mowerwhileit is in opera-
tion.Stop machineif anyoneentersarea.
• Alwayswear safetyglassesor safetygogglesduring operation
andwhile performingan adjustmentor repair to protectyoureyes.
Thrownobjectswhich ricochetcancauseseriousinjuryto the
eyes.
3

• Wearsturdy,rough-soledworkshoesandclose-fittingslacks
andshirts.Shirtsandpantsthatcoverthearmsand legsand
steel-toedshoesarerecommended.Neveroperatethismachine
in barefeet, sandals,slipperyorlight weight(e.g.canvas)shoes.
Do not puthandsor feetnearrotatingpartsor undercuttingdeck.
Contactwithbladecan amputatehandsandfeet.
A missingor damageddischargechutecan causebladecontact
orthrownobjectinjuries.
Manyinjuriesoccuras a resultof the mowerbeingpulledoverthe
footduringa fall causedby slippingor tripping.Donot holdonto
the mowerif youarefalling;releasethe handleimmediately.
• Neverpull the mowerbacktowardyouwhile youarewalking.If
youmust backthe mowerawayfroma wall or obstructionfirst
lookdownand behindto avoidtrippingand thenfollowthese
steps:
• Stepbackfrommowerto fullyextendyour arms.
• Be sureyou are well balancedwith surefooting.
• Pull the mowerbackslowly,nomorethan halfwaytowardyou.
• Repeatthesestepsas needed.
• Do notoperatethemowerwhileunder the influenceof alcoholor
drugs.
• Stayalert -- Watchwhat youaredoing.Use commonsense.Do
not operatelawnmowerwhenyouare tired.
• Themotor/bladecontrolhandleis a safetydevice.Neverattempt
to bypassits operation.Doingso makesthe safetydevice
inoperativeand mayresult in personalinjury throughcontact
withthe rotatingblade.The motor/bladecontrolhandlemust
operateeasilyinbothdirectionsand automaticallyreturnto the
disengagedpositionwhenreleased.
• Neveroperatethe mowerin the rainor in dampor wetgrass.
Alwaysbesureof yourfooting. Aslip andfall cancause serious
personalinjury.If youfeel youarelosingyourfooting,releasethe
motor/bladecontrolhandleimmediatelyandthe bladewill stop
rotatingwithinthreeseconds.
• Mowonly indaylightor goodartificiallight.Walk,neverrun.
• Stopthe motor/bladewhencrossinggraveldrives,walksor roads.
• If theequipmentshouldstartto vibrateabnormally,stop the
engineandcheckimmediatelyfor the cause.Vibrationisgener-
ally awarningof trouble.
Shutthe motoroff and wait untilthe bladecomesto a complete
stopbeforeremovingthe grass catcheror uncloggingthe chute.
Thecuttingbladecontinuesto rotatefora few secondsafterthe
motoris shutoff. Neverplaceany partof the bodyin the blade
areauntilyouare surethe bladehas stoppedrotating.
• Neveroperatemowerwithoutpropertrail shield,discharge
chute,grasscatcher,motor/bladecontrol handleor other safety
protectivedevicesin placeandworking.Neveroperatemower
withdamagedsafetydevices.Failureto do so,can resultin
personalinjury.
GroundFaultCircuitInterrupter(GFCI)protectionshouldbe
providedon thecircuit(s)oroutlet(s)to be usedfor the lawn
mower.Receptaclesareavailablehavingbuilt-inGFCIprotection
and maybe usedforthis measureof safety.
To preventelectricshockuseonly with a UL listedextension
cord setsuitableforoutdooruse,suchas TypeSW-A,SOW-A,
STW-A,STOW-A,SJW-A,SJOW-A,SJTW-A,or SJTOW-A.
ExtensionCord--Make sureyour extensioncord setis in good
conditionandis heavyenoughto carrythe currentloadyourlawn
mowerwill draw.If in doubt, usethe nextheaviergaugecord.The
smallerthe gaugenumber,the heavierthe cord.Anundersized
cord willcause a drop in line voltageresultingin loss of powerand
overheating.
MINIMUMWIRESIZE FOREXTENSIONCORDS
FOR120VOLTAPPLIANCESUSING10- 12AMPS
Cord Length(ft.) 25 50 100 150
WireSize(AWG) 16 16 14 12
• To reducethe likelihoodof disconnectionof the extensioncord set
fromthe mower,besureto use the cordrestraintprovidedas well
as a modern,tightlyfittingextensioncord.
• To reducethe riskof electricshock,this lawnmowerhasa
polarizedplug(onebladeis widerthanthe other)and will require
the use of a polarizedextensioncord.Themowerplug will only
fit into thepolarizedextensioncordone way.Ifthe plug does not
fit fully intothe extensioncord, reversethe plug. Ifthe plug still
does notfit, obtaina correctpolarizedextensioncord. A polarized
extensioncordwill requirethe useof a polarizedwalloutlet.This
plugwill fit intothe polarizedoutletonly oneway.Ifthe plugdoes
notfit fullyintothe walloutlet,reversethe plug.If the plugstill
does notfit, contacta qualifiedelectricianto installthe proper
wall outlet.Do notchangetheequipmentplug,extensioncord
receptacle,or extensioncord pluginany way.
• If extensioncordis damagedin any mannerduringuse,discon-
nectextensioncordfrom housereceptaclebeforeunplugging
mower.
CircuitBreaker/Fuses--Themowershouldbe operatedon a 15
AMPor 20AMP circuit.If difficultyinstartingis experiencedwith
a standard15 AMPfuseorcircuitbreakeror the mower'sbuilt-in
overloadprotectionswitchfrequentlytrips, contactyournearest
authorizedservicedealer.Do not usea higherratedcircuit
breakeror fuse withoutconsultingyourpowercompany.
Donot abusethecord by pullingthe mowerbythe cord oryank-
ingit to disconnectit fromthe receptacle.Keepcord fromheat,
oil, andsharpedges.
Onlyusepartsandaccessoriesmadefor this machineby
manufacturer.Failureto do so can resultin personalinjury.
Ifsituationsoccur which are notcoveredinthis manual,use care
andgoodjudgment.ContactCustomerSupportfor assistanceor
the nameof the nearestservicedealer.
4
SRope Operation:
Slopesare a majorfactor relatedto slipandfall accidentswhichcan
resultinsevereinjury.Operationon slopes requiresextra caution.If
youfeel uneasyon a slope,do not mowit. Foryour safety,usethe
slopegaugeincludedas partof this manualto measureslopesbefore
operatingthis machineon a slopedor hillyarea. Ifthe slopeis greater
than 15degrees,donot mowit.
Do:
1. Mowacrossthe faceof slopes;neverup and down. Exercise
extremecautionwhenchangingdirectionon slopes.
2. Watchfor holes, ruts,rocks,hiddenobjects,or bumpswhichcan
causeyou to slipor trip. Tallgrasscan hideobstacles.
3. Alwaysbe sureof yourfooting.A slip and fallcan causeserious
personalinjury.If youfeel youare losingyour balance,release
the motor/bladecontrolhandleimmediately,andthe bladewill
stoprotatingwithinthree(3) seconds.
Do Not:
1. Do not mowneardrop-offs,ditchesorembankments,youcould
loseyourfootingor balance.
2. Do not mowslopesgreaterthan 15degreesas shownonthe
slopegauge.
3. Do not mowonwetgrass. Unstablefootingcouldcauseslipping.
SERVICE
• Whenservicingmower,use originalequipmentmanufacturer
(OEM) replacementpartslistedinthis manual."Useof parts
whichdonot meettheoriginalequipmentspecificationsmaylead
to improperperformanceandcompromisesafety!"
• Beforecleaning,repairing,or inspecting,makecertainthe blade
andall movingparts havestopped.Disconnectthe powercord
when notin useandto preventunintendedstarting.
• Followinstructionsfor lubricatingandchangingaccessories.
• Inspectlawn mowercord andextensioncordsperiodicallyand
replaceimmediately,if damaged.Lawnmowercord shouldbe
repairedby anauthorizedservicedealeronly.
• Keephandlesdry, cleanandfreefrom oil and grease.
• To reducea fire hazard,keepthe motorfreeof grass,leavesand
debrisbuild-up.
• Checkthe bladeand motormountingboltsat frequentintervals
for propertightness.Also,visuallyinspectbladefor damage
(e.g.,bent, cracked,andworn) Replacebladewiththe original
equipmentmanufacturer's(OEM)bladeonly, listedin thismanual.
• Maintainyourmowerwith care-- Keepmowerbladesharpand
cleanfor best and safest performance.Mowerbladesare sharp
andcan cut, wrapthe bladeor wearglovesanduseextra caution
when servicingthem.
• Keepall nuts, bolts,and screwstightto besurethe equipmentis
in safe workingcondition.
• Nevertamperwith safetydevices.Checktheir properoperation
regularly.
• After strikingaforeignobject,stopthe motoranddisconnect
the powercord.Thoroughlyinspectthe mowerfor anydamage.
Repairthe damagebeforeoperatingthe mower.
• Grass catchercomponents,dischargecover,andtrail shieldare
subjectto wearanddamagewhichcouldexposemovingpartsor
allowobjectsto be thrown.Forsafety protection,frequentlycheck
componentsand replaceimmediatelywithoriginalequipment
manufacturer's(OEM)partsonly,listedinthis manual.
• Whennot in use,storelawnmowerindoorsina dry area,locked-
up and/orout of the reachof children.
• Maintainor replacesafetyandinstructionallabels,as necessary.
• Accordingto the ConsumerProductsSafetyCommission(CPSC)
andthe U.S.EnvironmentalProtectionAgency(EPA),this product
has anAverage UsefulLifeof seven(7)years,or 140hoursof
operation.At the endof theAverage UsefulLifehavethe machine
inspectedannuallyby anauthorizedservicedealerto ensurethat
all mechanicaland safety systemsareworkingproperlyandnot
wornexcessively.Failureto do so can resultinaccidents,injuries
or death
SAVE THESE INSTRUCTIONS!
5

SAFETY SYMBOLS
Thispagedepictsand describessafetysymbolsthatmayappearonthis product. Read,understand,and follow all instructionson the machine
beforeattemptingto assembleandoperate.
A
• ®
READ THE OPERATOR'S MANUAL(S)
Read,understand,andfollowall instructionsin the manual(s)beforeattemptingto assembleand
operate.
DANGER m ROTATING BLADES
To reducethe riskof injury,keephandsand feet away.Donotoperateunlessdischargecoveror grass
catcheris in its properplace. If damaged,replaceimmediately.
DANGER m BYSTANDERS
Donot mowwhenchildrenor others are around.
DANGER = HAND/FOOT CUT
Keephandsand feetawayfromrotatingparts.
DANGER = THROWN DEBRIS
Removeobjectsthat can be thrownby the bladein anydirection.Wearsafetyglasses.
DANGER = SLOPES
Useextracautiononslopes.Do not mowslopesgreaterthan 15°.
WARNING= ELECTRICAL SHOCK
Donot operatethe mowerinthe rain.
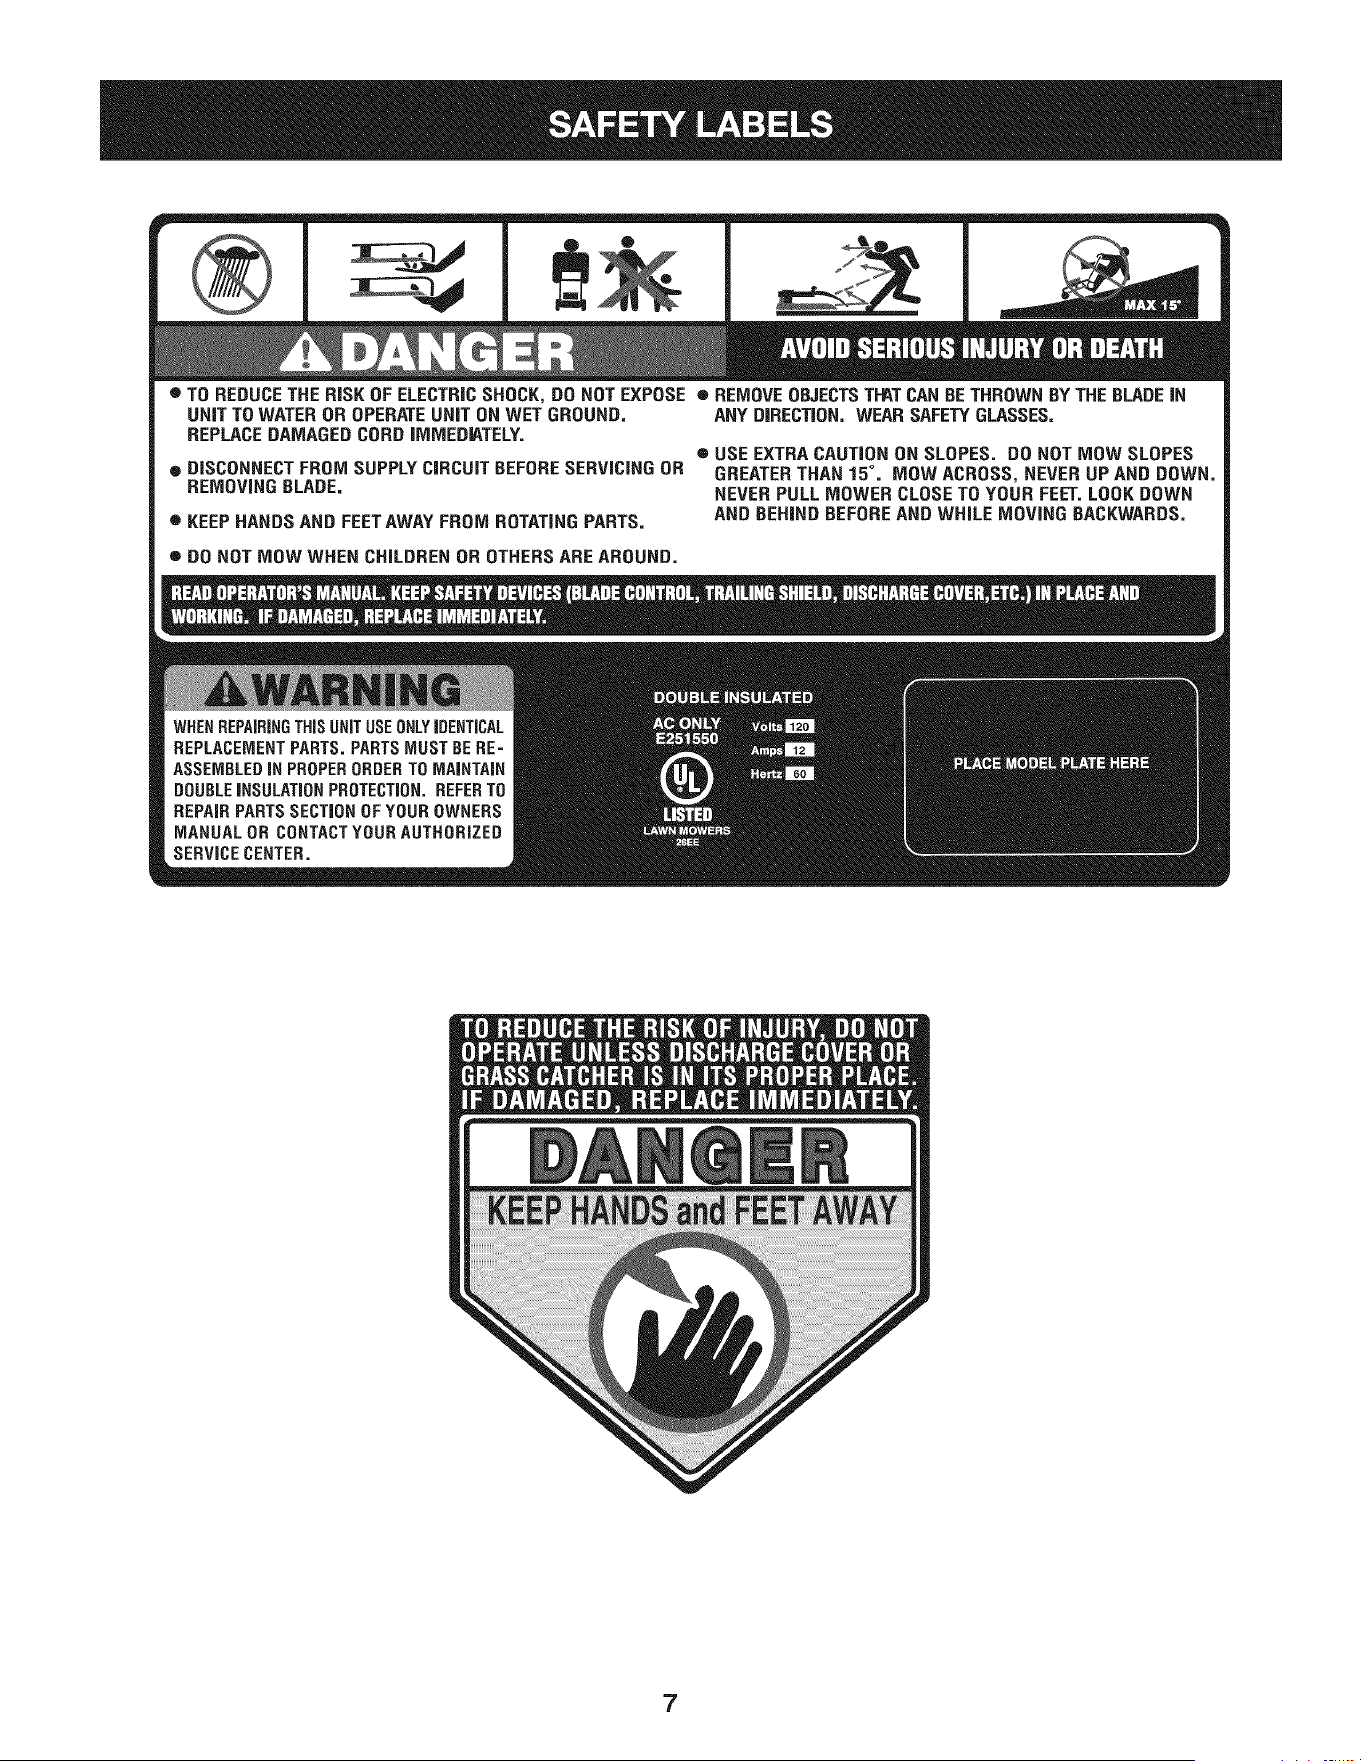
e TOREDUCETHE RiSKOF ELECTRICSHOCK,DONOT EXPOSE e REMOVEOBJECTSTI-_TCANBETHROWNBY THEBLADEiN
UNiT TOWATEROR OPERATEUNiT ON WET GROUND, ANY DiRECTiON,WEARSAFETYGLASSES,
REPLACEDAMAGEDCORDiMMEDiATELY.
e USE EXTRACAUTIONON SLOPES. DONOT MOW SLOPES
e DISCONNECTFROM SUPPLYCiRCUiTBEFORESERViCiNGOR GREATERTHAN15°. MOW ACROSS,NEVERUP AND DOWN,
REMOVINGBLADE, NEVERPULL MOWERCLOSETO YOURFEET.LOOKDOWN
e KEEPHANDSAND FEETAWAYFROM ROTATINGPARTS, AND BEHINDBEFOREAND WHILE MOVINGBACKWARDS,
e DO NOT MOW WHEN CHILDREN OR OTHERS ARE AROUND.
7
05
g3
O
._c
o
o
E
q3
O
"5
O
g3
o
o5
E
o
cb
o
m
Go
q3
E
CD
.£o
q3
O5
(D
O5
I
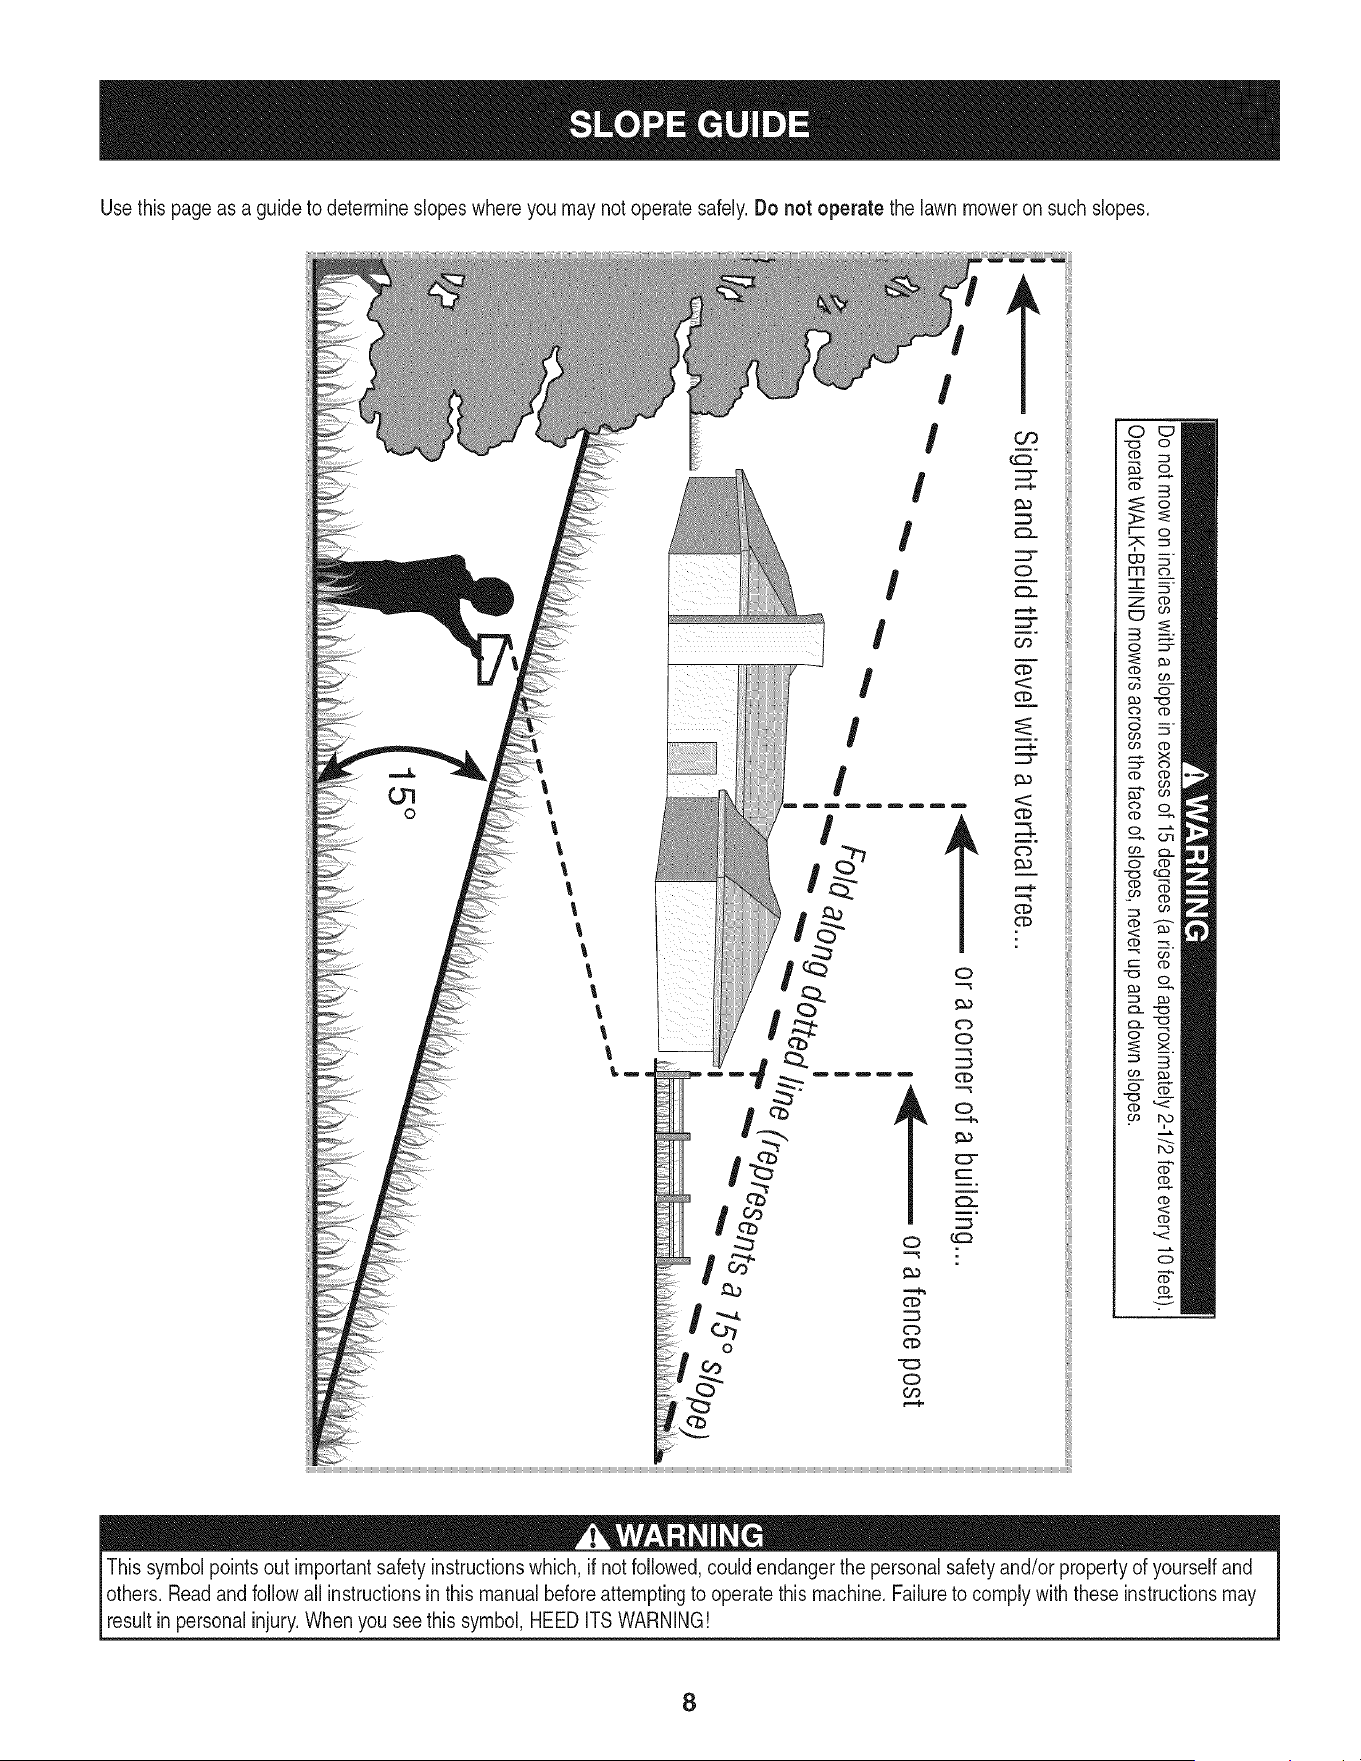
Do notmow on inclineswith a slopein excessof 15degrees(a riseof approximately2-1/2feet every 10feet).
OperateWALK-BEHINDmowersacrossthe face of slopes,neverup anddownslopes.
Sight and h01dthis levelwith a vertical tree...
or a fence post
15°
|
15°
¢0

This page left intentionallyblank.
9
NOTE:Standbehindthe moweras if youweregoingto operateit. Your
righthand correspondsto the rightside of the mower;yourleft hand
correspondsto the leftside of the mower.
LOOSE PARTS IN CARTON
Thefollowingitemsarepackagedloosein thecarton:
Operator'sManual,GrassCatcher
REMOVING THE UNIT FROM THE CARTON
1. Cutthe cornersof thecartonandlay the sidesflat on theground.
Removeallpackinginserts.
2. Movethe mowerand grasscatcherout of the carton.
3. Makecertain thecartonhas beencompletelyemptiedbefore
discardingit.
ASSEMBLING THE HANDLE
NOTE: Removeany packingmaterialwhichmaybe betweenupper
andlowerhandles.
1. Looseneach handknobfoundon the insideof the upperhandle.
2. Gentlylift andpivotthe upper handleintothe operatingposition
as shownin Figure1.Makecertainthe lowerhandleis seated
securelyintothe handlemountingbrackets.
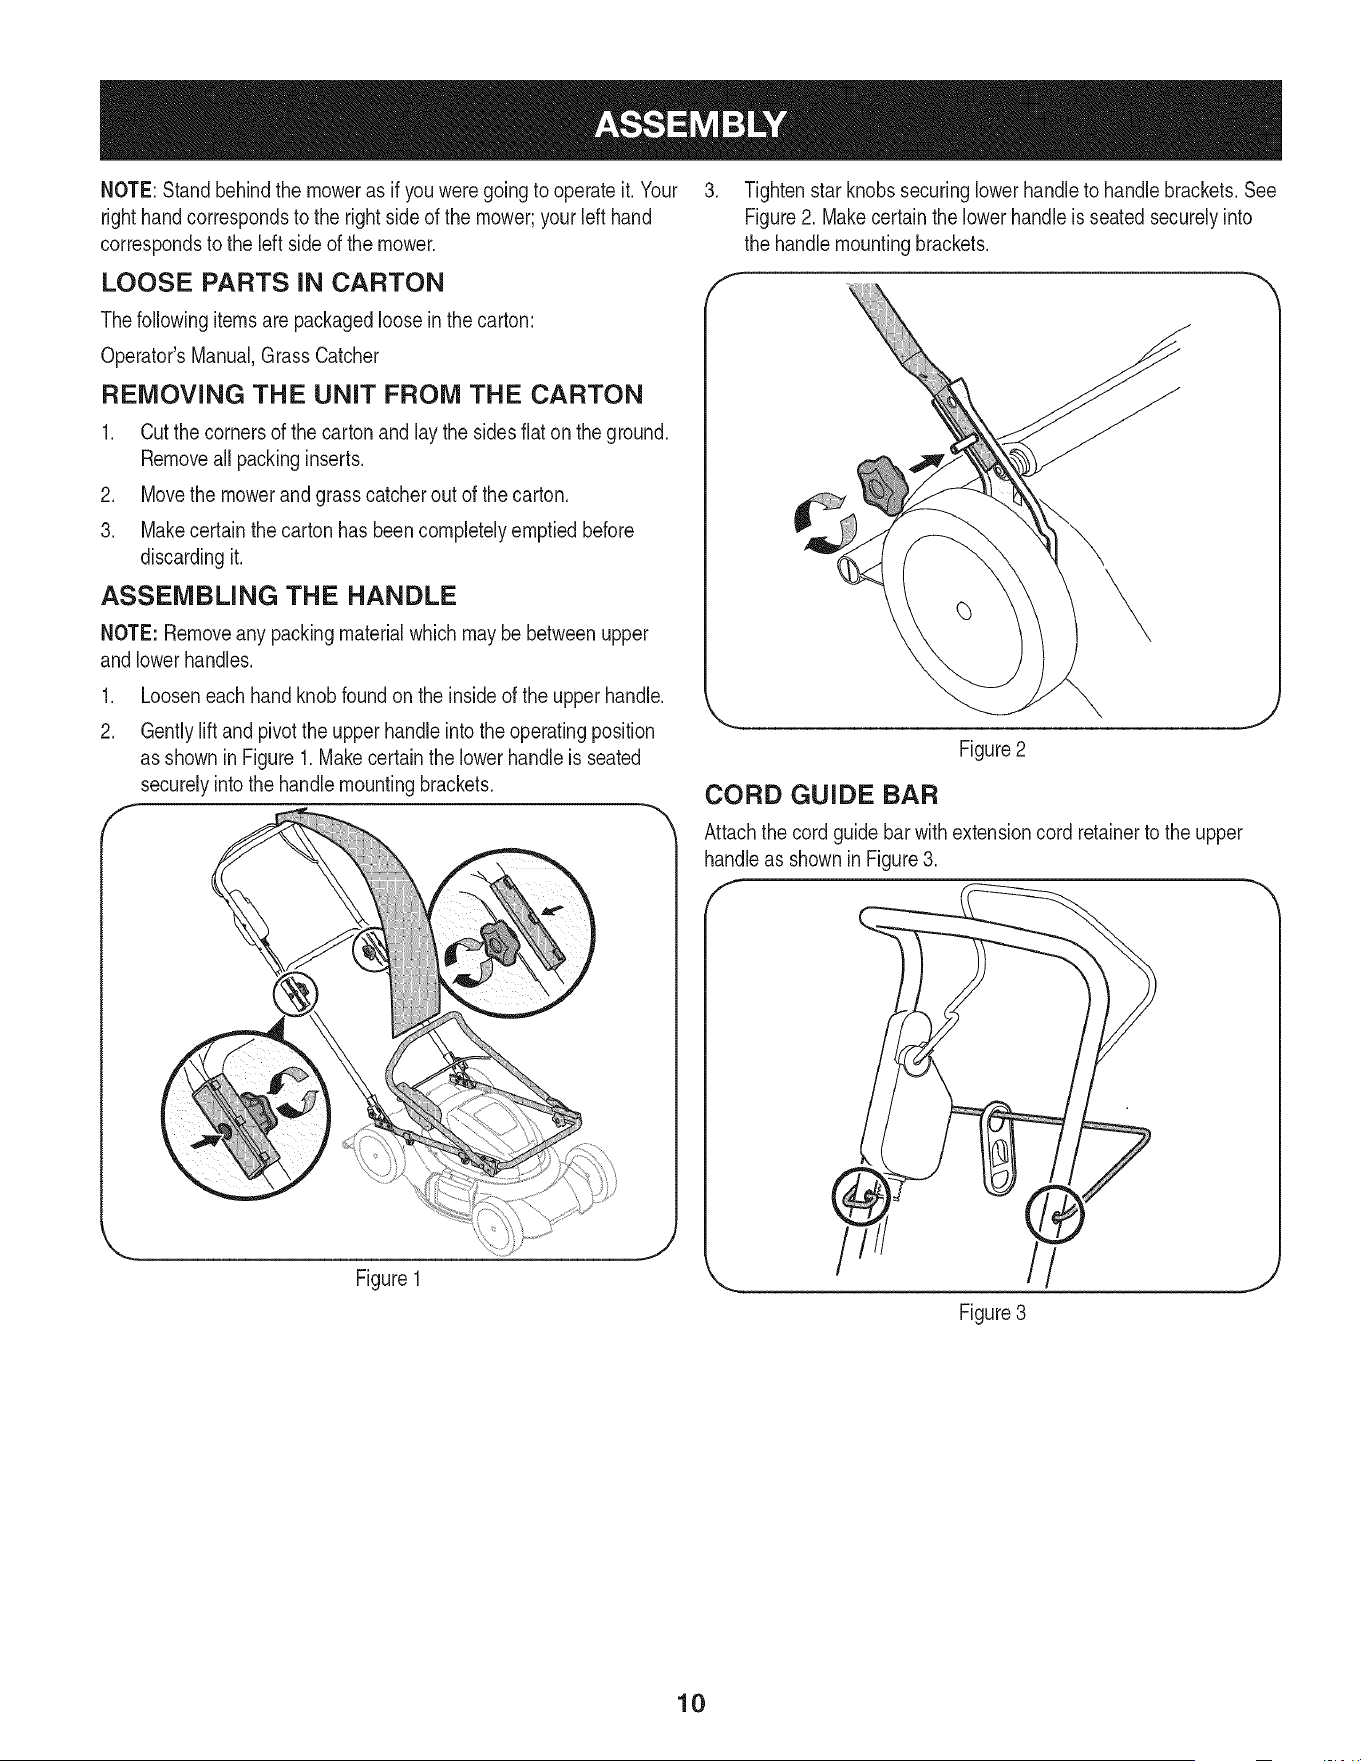
3. Tightenstar knobs securinglowerhandleto handlebrackets.See
Figure2. Makecertain the lowerhandleis seatedsecurelyinto
the handlemountingbrackets.
J
Figure2
CORD GUIDE BAR
Attachthe cordguidebarwithextensioncord retainerto the upper
handleas shownin Figure3.
f
Figure1
/
Figure3
10
NOTE: Donot plugyourextensioncord intothe powersourcerecep-
tacle(outlet)priorto routingit throughthe cord retainerandconnecting
theextensioncord to the mower'scord outletreceptacle.
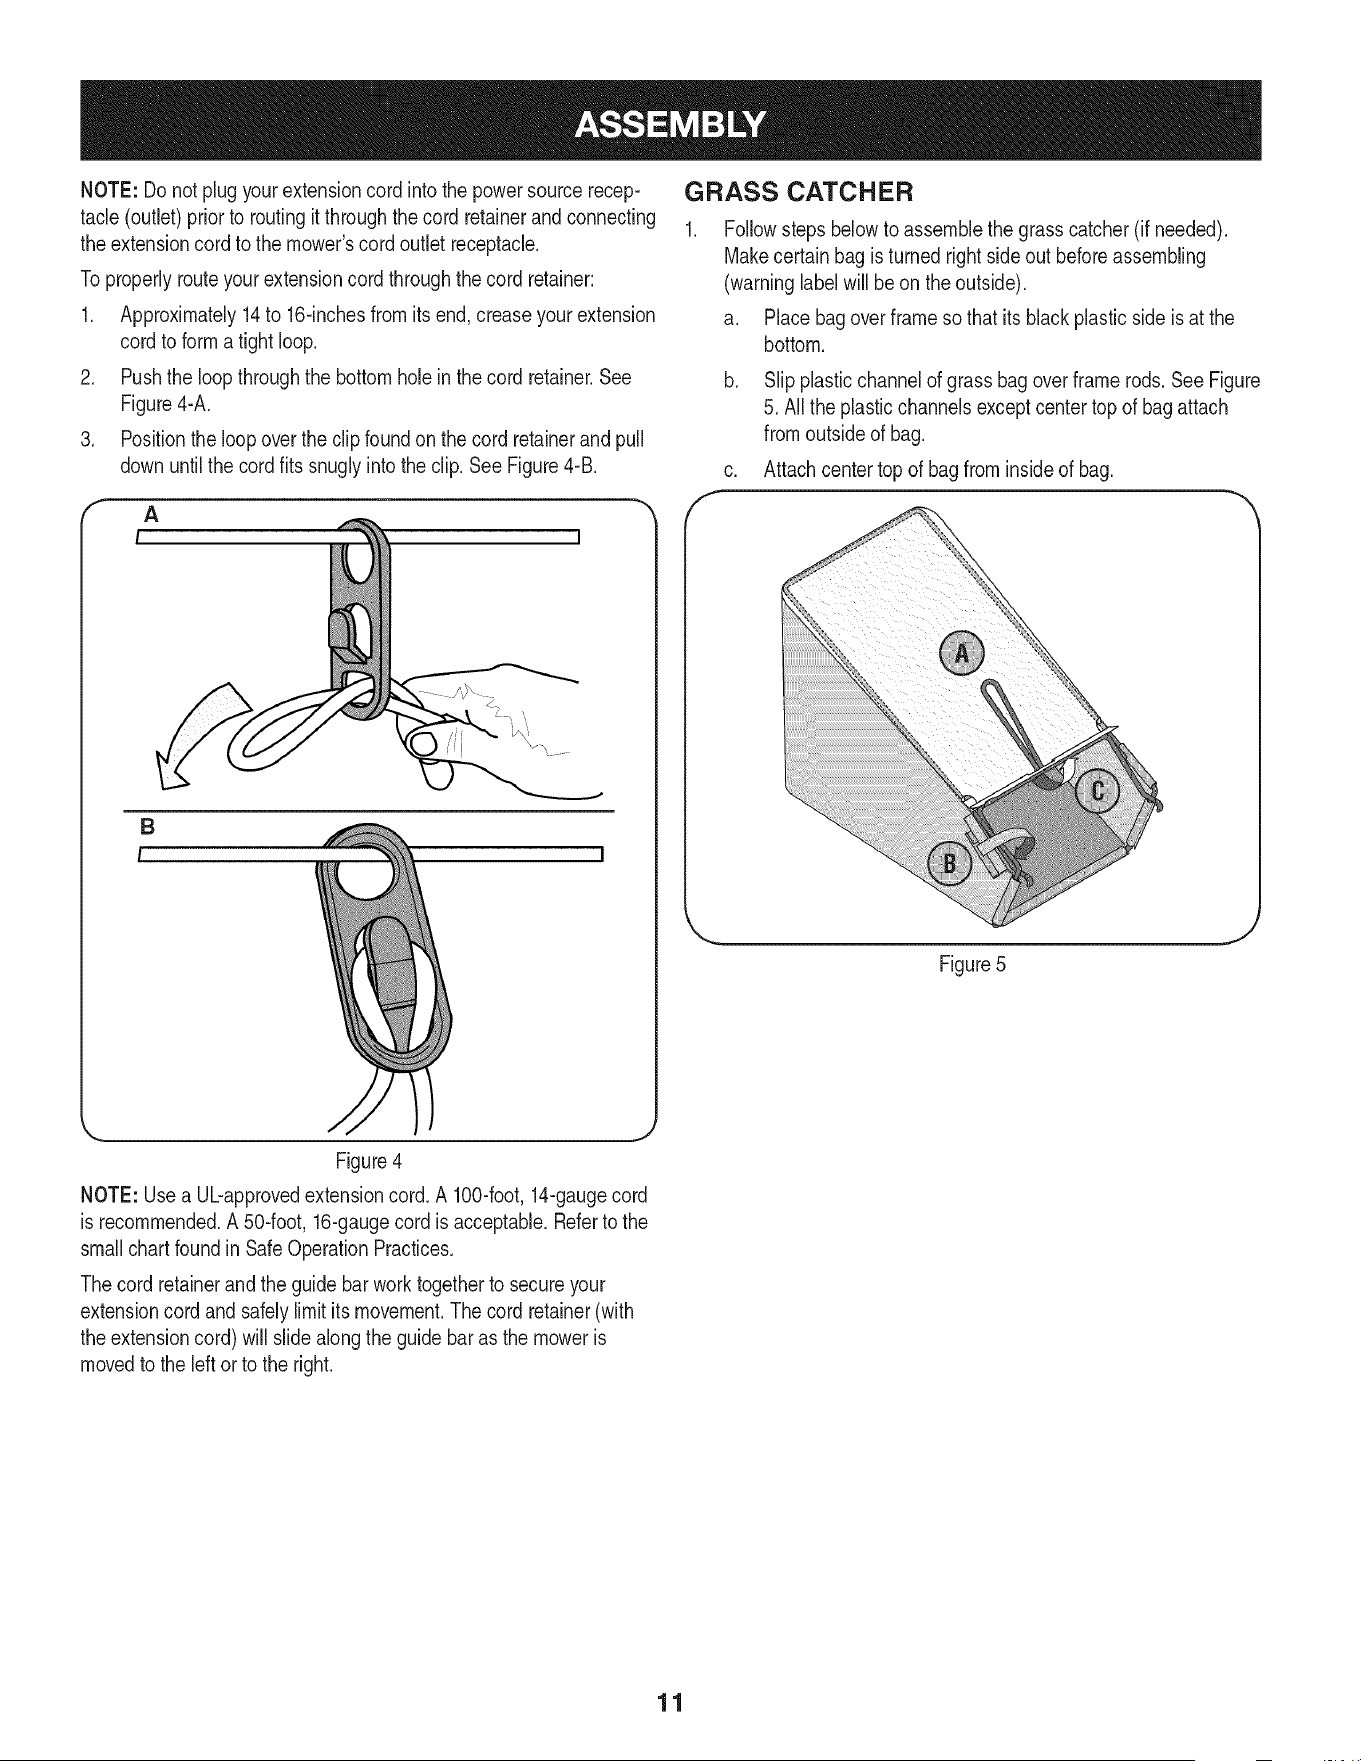
Toproperlyrouteyourextensioncordthroughthecord retainer:
1. Approximately14to 16-inchesfrom its end,creaseyourextension
cordto form a tight loop.
2. Pushthe loopthroughthe bottomholein the cord retainer.See
Figure4-A.
3. Positionthe loopoverthe clip foundon the cord retainerand pull
downuntilthe cordfits snuglyintothe clip. See Figure4-B.
A
B
GRASS CATCHER
Followstepsbelowto assemblethe grasscatcher(if needed).
Makecertainbagis turnedright sideout beforeassembling
(warninglabelwill be on theoutside).
a. Placebag overframesothat its black plasticsideis at the
bottom.
b. Slip plasticchannelof grassbagoverframe rods.See Figure
5. All the plasticchannelsexceptcentertopof bagattach
fromoutsideof bag.
c. Attachcentertop of bagfrominsideof bag.
Figure5
Figure4
NOTE: Usea Ubapprovedextensioncord.A 100-foot,14-gaugecord
is recommended.A50-foot, 16-gaugecord is acceptable.Referto the
smallchartfoundin SafeOperationPractices.
Thecord retainerand the guide bar worktogetherto secureyour
extensioncord andsafelylimit its movement.The cord retainer(with
theextensioncord) will slidealongthe guide baras the moweris
movedto the leftorto the right.
11
,
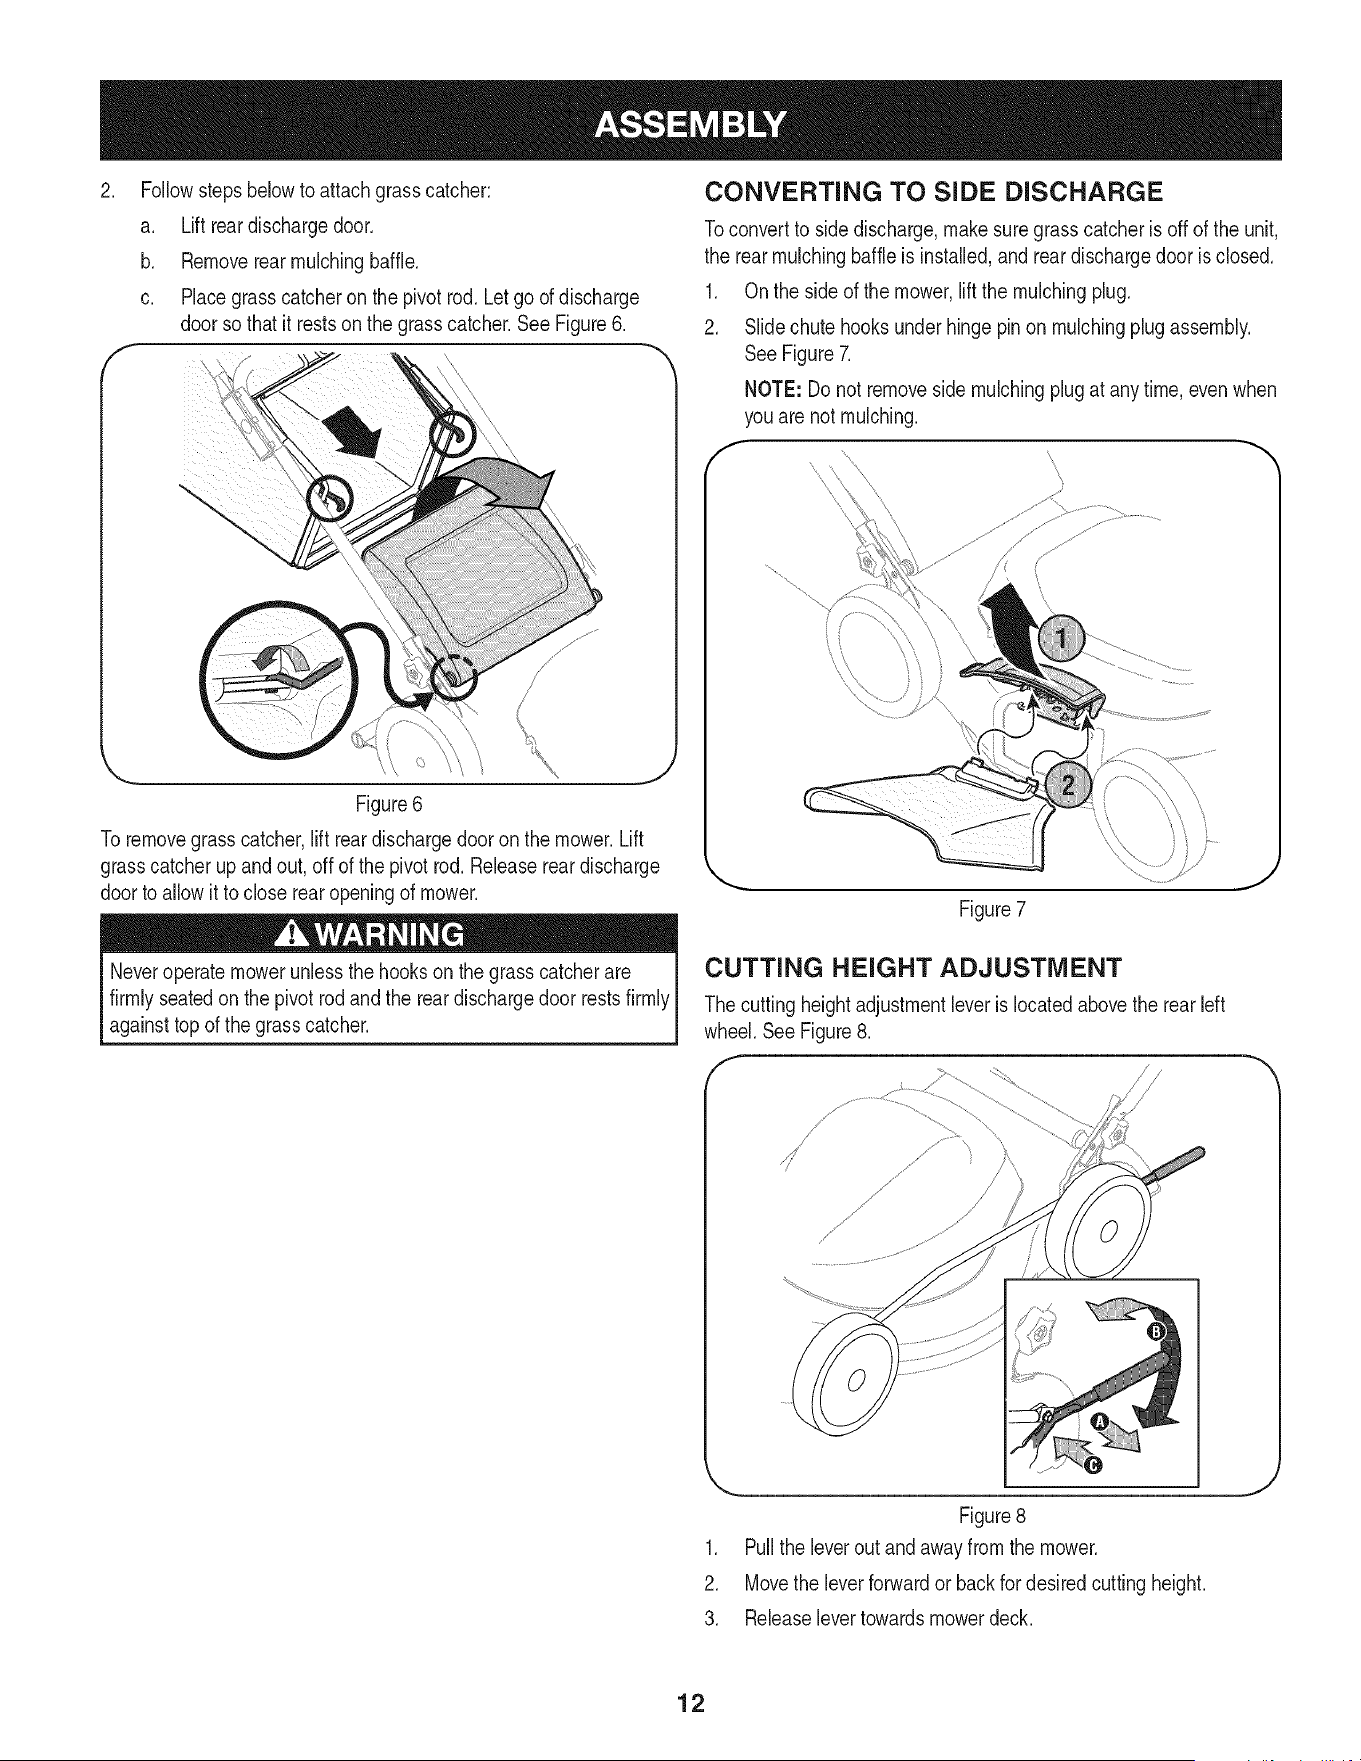
Followstepsbelowto attachgrass catcher:
a, Lift reardischargedoor,
b, Removerear mulchingbaffle,
Placegrasscatcheronthe pivotrod.Let go of discharge
doorsothat it restson the grasscatcher.See Figure6.
X zS _',,
"_'L'4 /
(
Figure6
Toremovegrasscatcher,lift rear dischargedooronthe mower.Lift
grasscatcherup and out, off of the pivot rod.Releasereardischarge
doorto allowit to closerearopeningof mower.
Neveroperatemowerunlessthe hookson the grasscatcherare
firmlyseatedon the pivot rod and the rear dischargedoorrestsfirmly
againsttop of thegrass catcher.
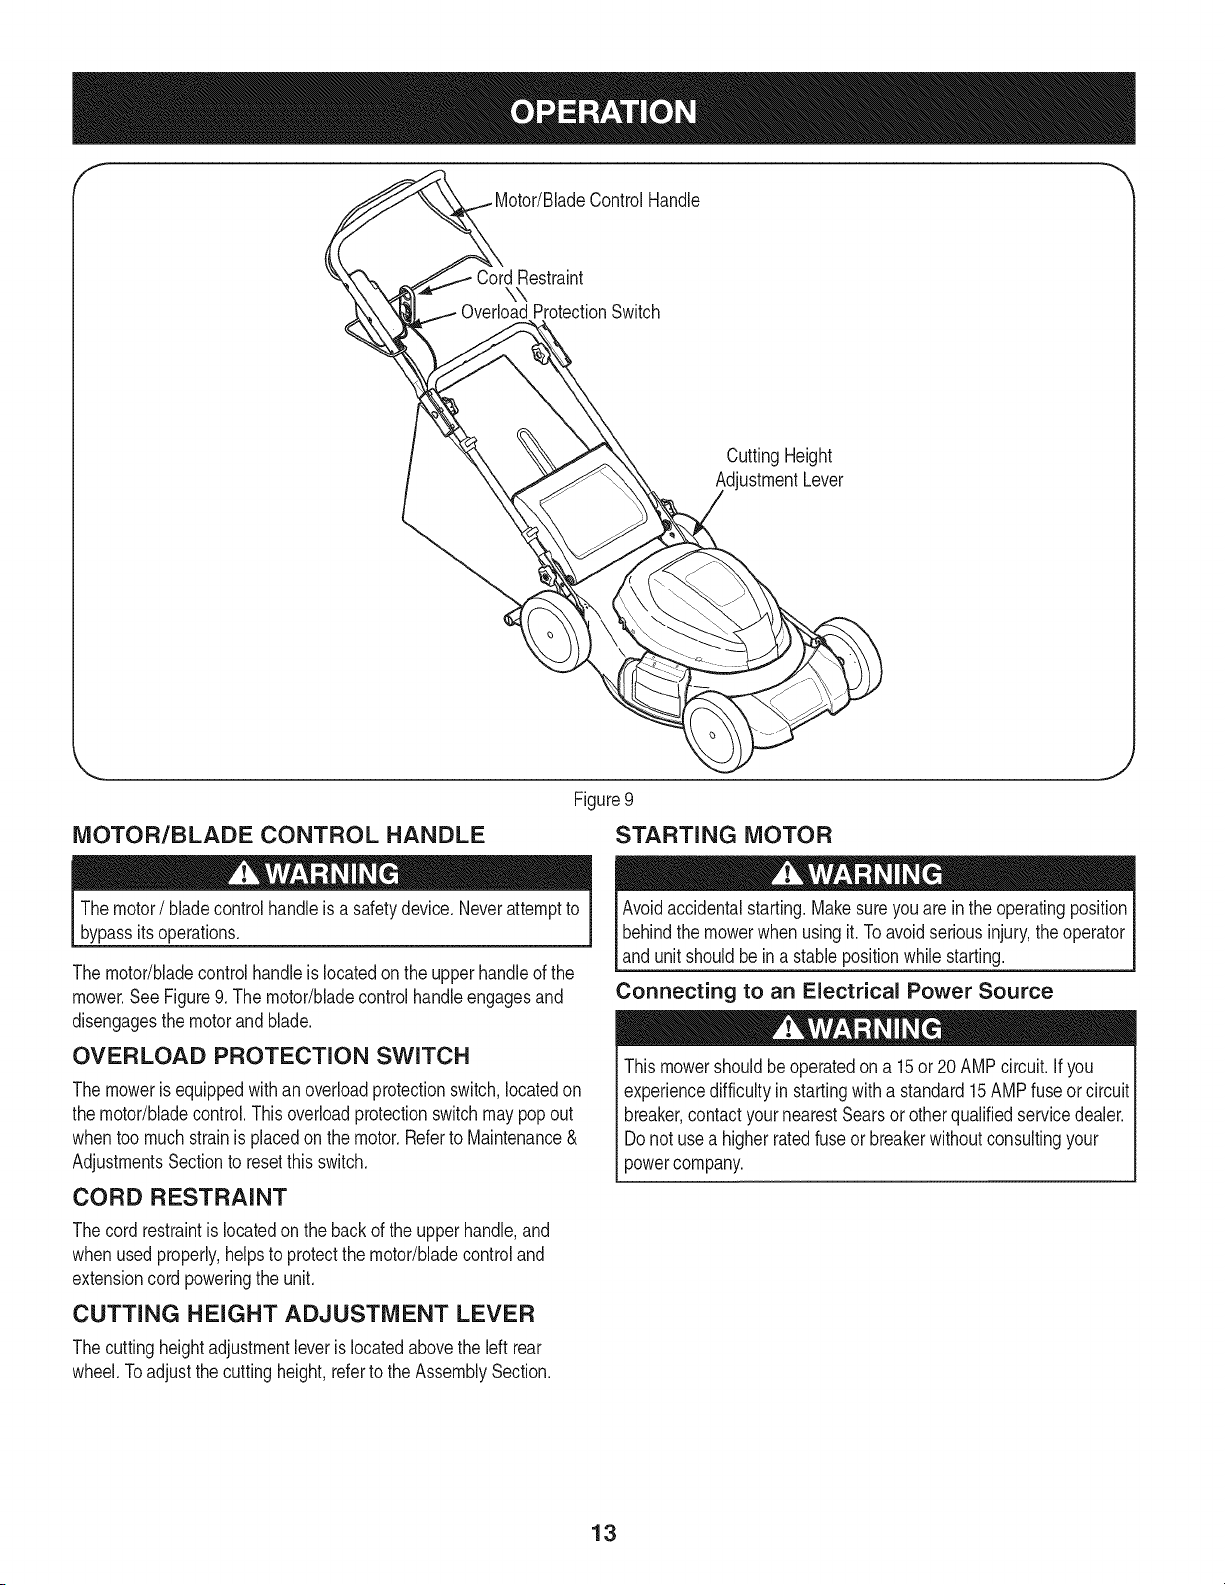
CONVERTING TO SIDE DISCHARGE
Toconvertto side discharge,makesuregrasscatcheris offof the unit,
the rearmulchingbaffleis installed,and reardischargedoor isclosed.
1. On the sideof the mower,lift the mulchingplug.
2. Slidechute hooksunder hingepinon mulchingplugassembly.
SeeFigure7.
NOTE:Do not removeside mulchingplugat anytime,evenwhen
you arenot mulching.
f ......
\
"\
\
Figure7
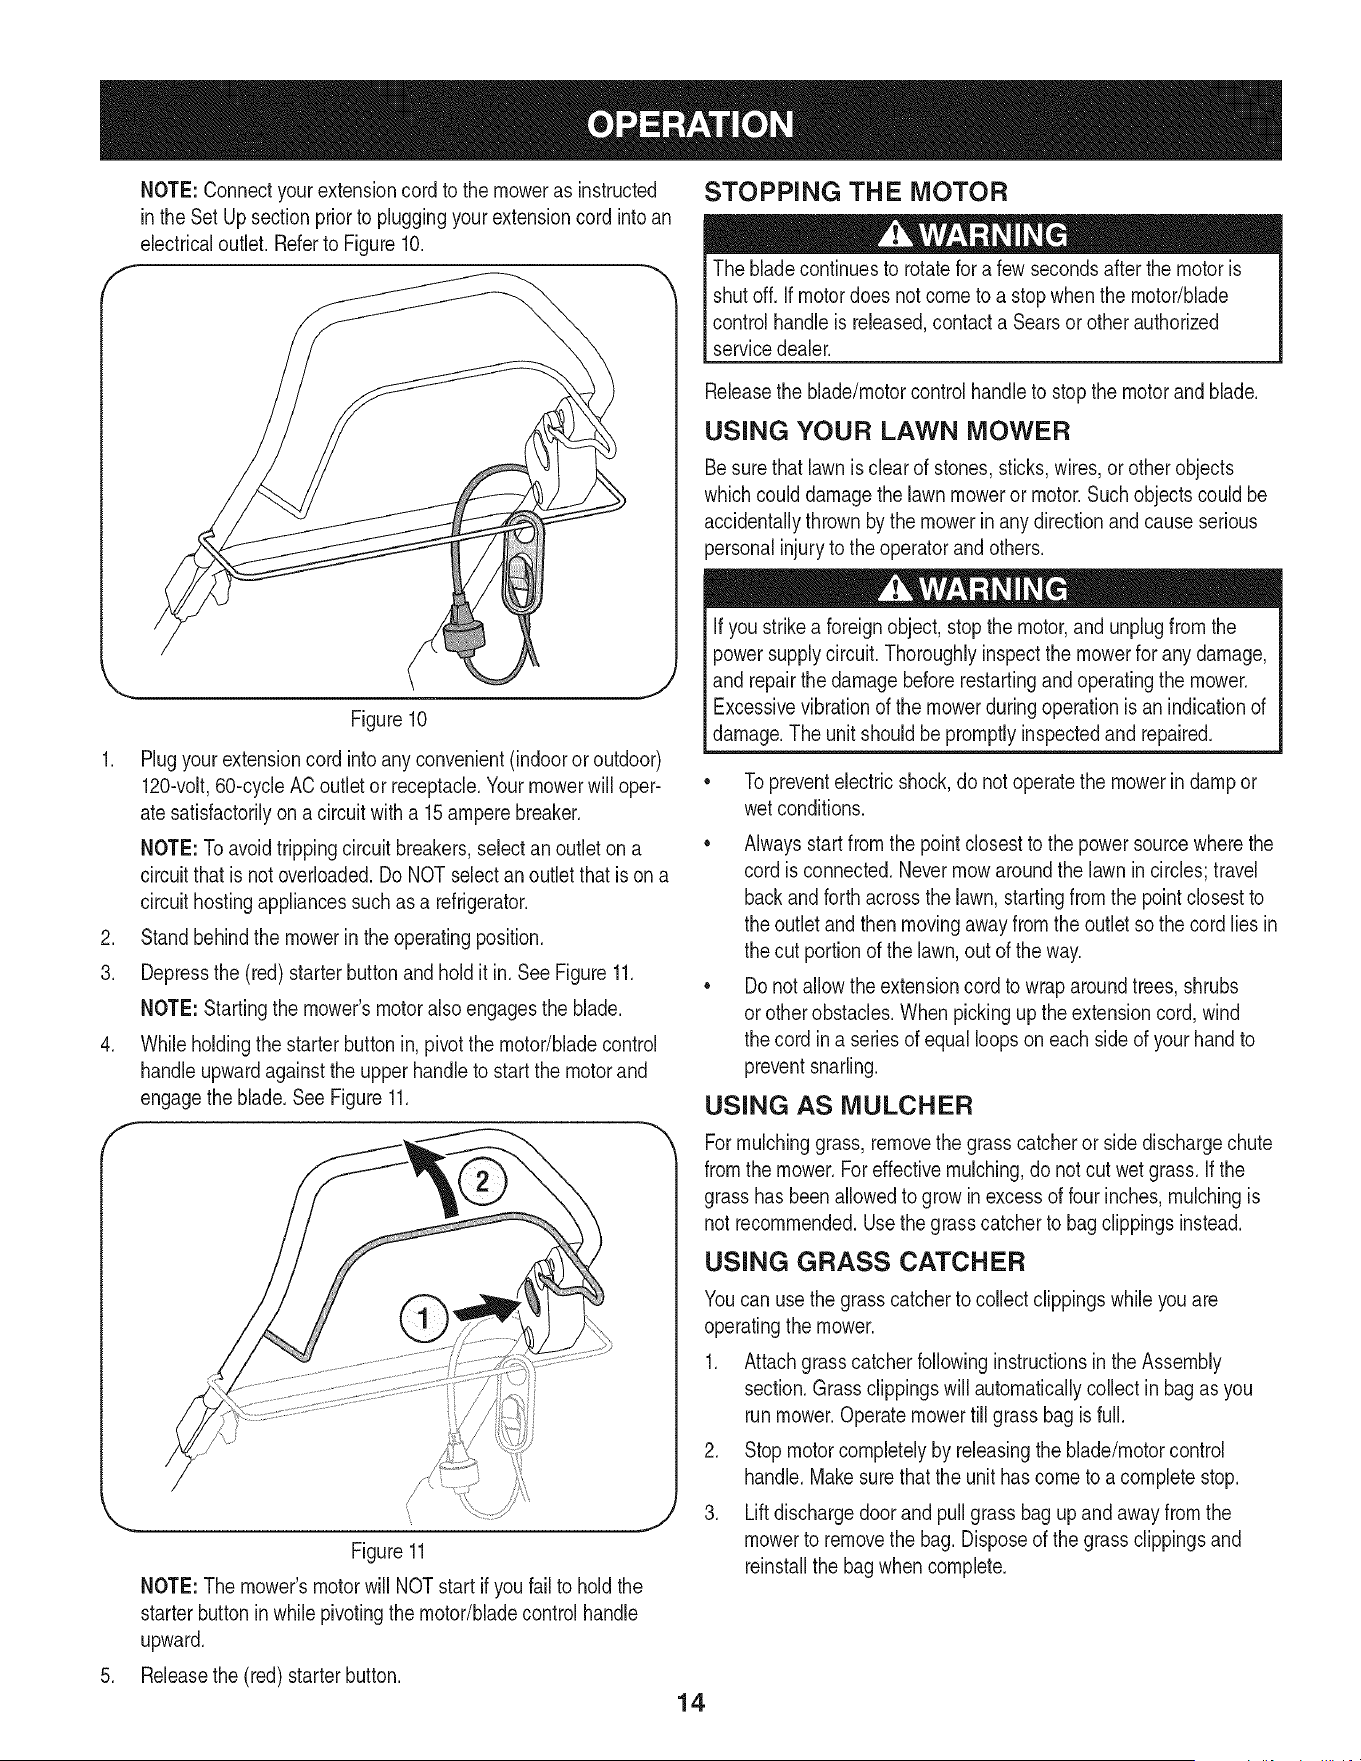
CUTTING HEIGHT ADJUSTMENT
The cuttingheightadjustmentleveris locatedabovethe rear left
wheel.SeeFigure8.
f
//
/
J
Figure8
1. Pullthe leverout and awayfrom the mower.
2. Movethe leverforwardor backfor desiredcuttingheight.
3. Releaselevertowardsmowerdeck.
12
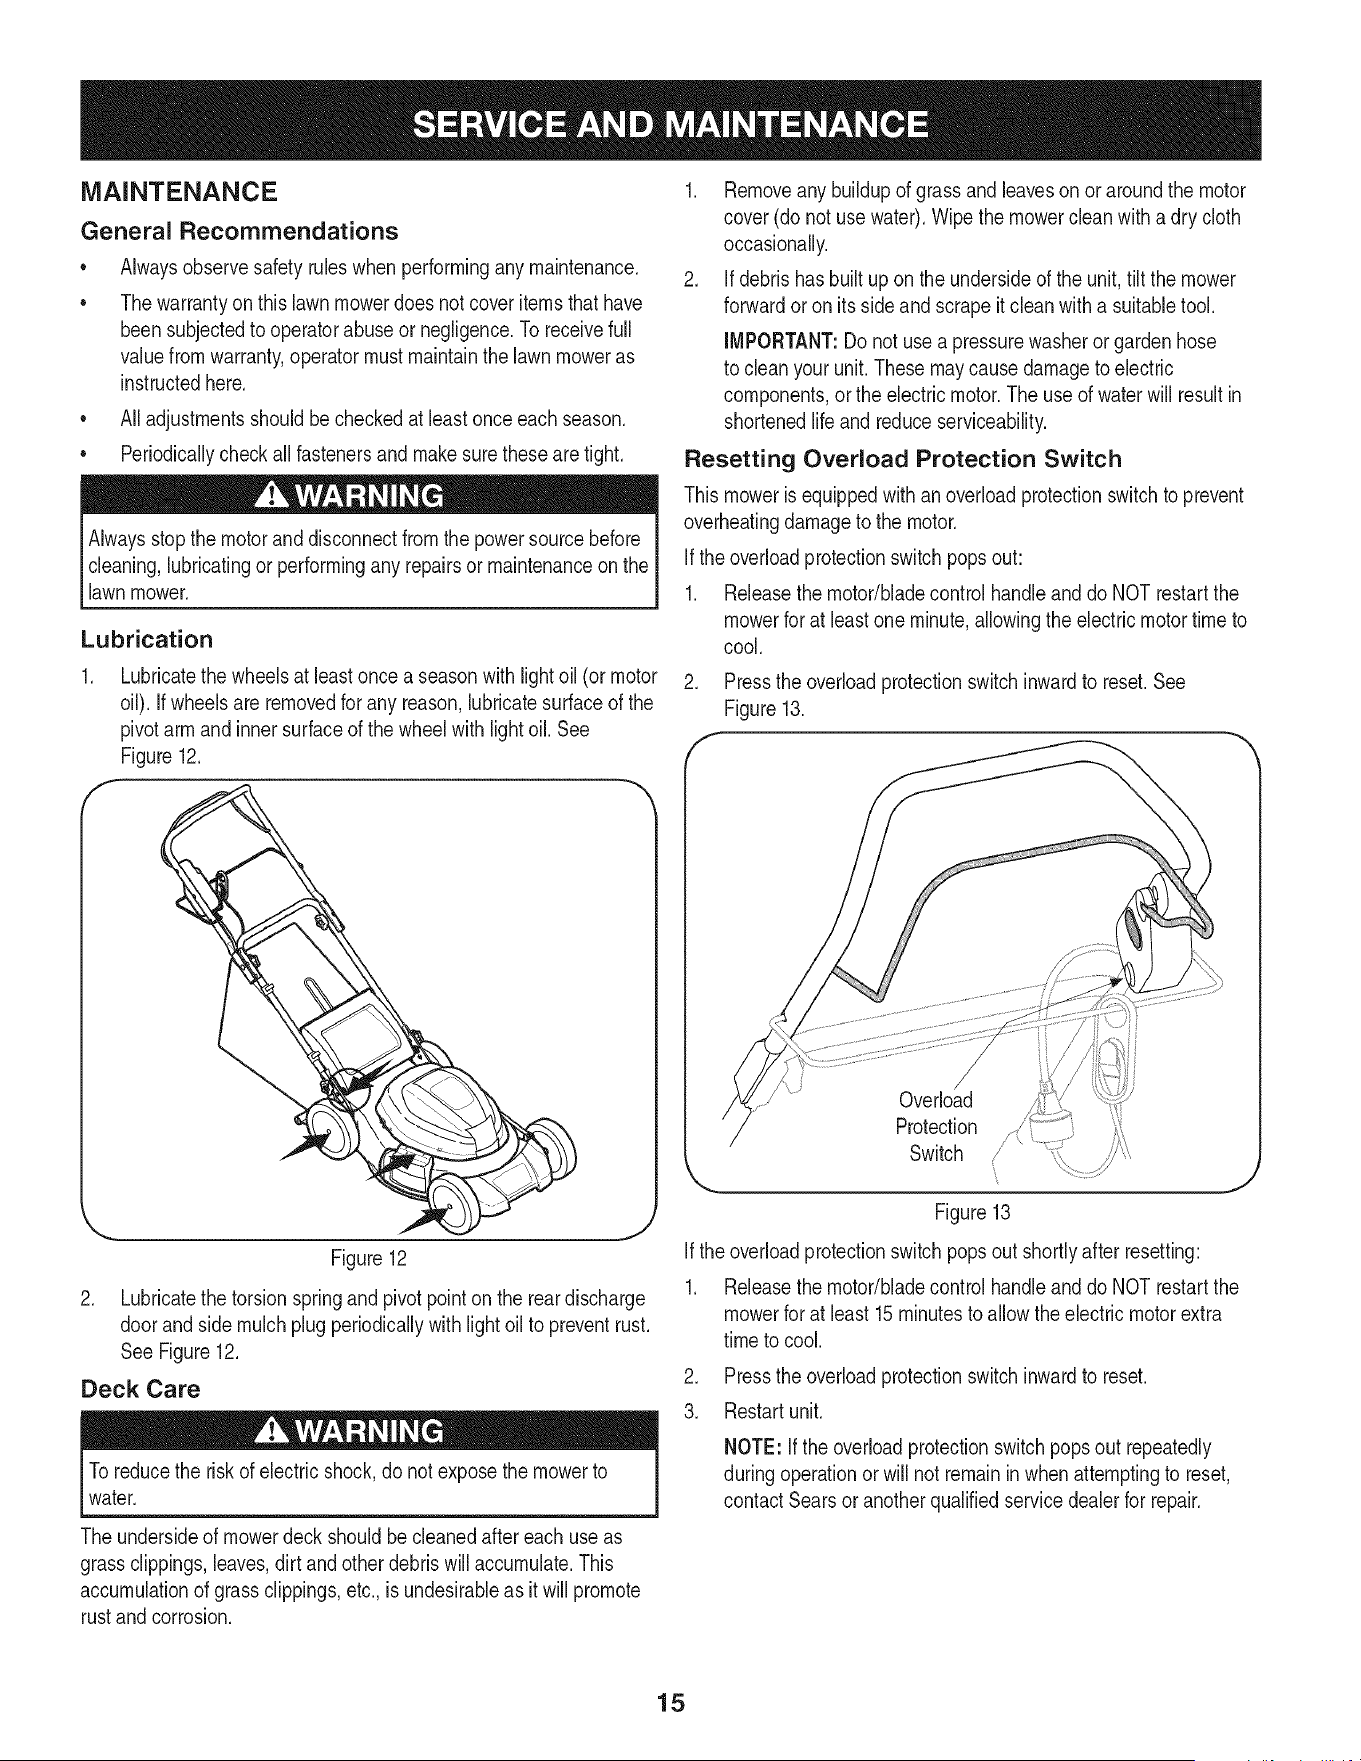
f
Motor/BladeControlHandle
CordRestraint
\\
OverloadProtectionSwitch
CuttingHeight
AdjustmentLever
MOTOR/BLADE CONTROL HANDLE
Themotor/ blade controlhandleis a safetydevice.Neverattemptto
bypassits operations.
The motor/bladecontrolhandleis locatedon the upperhandleof the
mower.SeeFigure9. The motor/bladecontrolhandleengagesand
disengagesthe motorand blade.
OVERLOAD PROTECTION SWITCH
The moweris equippedwithanoverloadprotectionswitch,locatedon
the motor/bladecontrol.Thisoverloadprotectionswitchmaypopout
whentoo muchstrain is placedon the motor.Referto Maintenance&
AdjustmentsSectionto resetthis switch.
CORD RESTRAINT
STARTING MOTOR
Avoidaccidentalstarting.Makesureyou are in the operatingposition
behindthe mowerwhen usingit.Toavoidseriousinjury,the operator
andunitshouldbe in a stablepositionwhile starting.
Connecting to an Electrical Power Source
This mowershouldbe operatedon a 15or 20 AMPcircuit.If you
experiencedifficultyin startingwitha standard15 AMPfuseorcircuit
breaker,contactyour nearestSearsor otherqualifiedservicedealer.
Donot use a higherratedfuseorbreakerwithoutconsultingyour
powercompany.
Thecord restraintis locatedonthe backof the upperhandle,and
whenusedproperly,helpsto protectthe motor/bladecontroland
extensioncord poweringthe unit.
CUTTING HEIGHT ADJUSTMENT LEVER
Thecuttingheightadjustmentleveris locatedabovethe left rear
wheel.Toadjustthe cuttingheight,referto the AssemblySection.
13
NOTE:Connectyour extensioncord to the moweras instructed
in theSet Up sectionpriorto pluggingyourextensioncordinto an
electricaloutlet.Referto Figure10.
f
Figure10
1. Plugyour extensioncord intoany convenient(indoororoutdoor)
120-volt,60-cycleAC outletor receptacle.Your mowerwill oper-
ate satisfactorilyon acircuitwith a 15amperebreaker.
NOTE:Toavoidtrippingcircuitbreakers,selectan outleton a
circuitthat is not overloaded.Do NOTselectan outletthat is on a
circuithostingappliancessuchasa refrigerator.
2. Standbehindthe mowerinthe operatingposition.
3. Depressthe (red) starterbuttonandholdit in. SeeFigure11.
NOTE:Startingthe mower'smotoralsoengagesthe blade.
4. Whileholdingthe starterbuttonin, pivotthe motor/bladecontrol
handleupwardagainstthe upperhandleto startthe motorand
engagethe blade.See Figure11.
f
_, ,J
Figure11
NOTE:The mower'smotorwill NOTstart if youfail to hold the
starterbuttonin whilepivotingthe motor/bladecontrol handle
upward.
5. Releasethe (red)starterbutton.
STOPPING THE MOTOR
The bladecontinuesto rotatefor a few secondsafter the motoris
shutoff. If motordoesnot cometo a stopwhenthe motor/blade
controlhandleis released,contacta Searsor other authorized
servicedealer.
Releasethe blade/motorcontrolhandleto stopthe motor and blade.
USING YOUR LAWN MOWER
Besurethat lawnis clearof stones,sticks,wires,orotherobjects
whichcoulddamagethe lawnmoweror motor.Suchobjectscould be
accidentallythrownby the mowerinany directionandcause serious
personalinjuryto theoperatorand others.
Ifyou strikea foreignobject,stopthemotor,and unplugfromthe
powersupplycircuit.Thoroughlyinspectthe mowerfor any damage,
and repairthedamagebeforerestartingandoperatingthe mower.
Excessivevibrationof the mowerduringoperationis an indicationof
damage.The unit shouldbe promptlyinspectedandrepaired.
To preventelectricshock,do notoperatethe mowerin dampor
wetconditions.
• Alwaysstartfrom the pointclosestto the powersourcewherethe
cord is connected.Nevermowaroundthe lawn incircles;travel
backandforthacrossthe lawn,startingfrom the pointclosestto
the outletandthenmovingawayfrom theoutletso the cordlies in
the cut portionof the lawn,out of the way.
• Donot allowthe extensioncord to wraparoundtrees,shrubs
or otherobstacles.When pickingupthe extensioncord,wind
the cord ina seriesof equalloopson eachsideof your handto
preventsnarling.
USING AS MULCHER
Formulchinggrass,removethe grasscatcheror sidedischargechute
fromthe mower.Foreffectivemulching,do not cutwetgrass. Ifthe
grasshas beenallowedto grow in excessof four inches,mulchingis
notrecommended.Usethe grass catcherto bagclippingsinstead.
USING GRASS CATCHER
Youcanuse the grasscatcherto collectclippingswhileyou are
operatingthe mower.
1. Attachgrass catcherfollowinginstructionsin the Assembly
section.Grass clippingswill automaticallycollect in bag as you
runmower.Operatemowertill grassbagis full.
2. Stopmotorcompletelyby releasingthe blade/motorcontrol
handle.Makesurethat the unit hascometo a completestop.
3. Lift dischargedoorandpullgrassbagupandawayfromthe
mowerto removethe bag.Disposeof the grassclippingsand
reinstallthe bagwhencomplete.
14
MAINTENANCE
General Recommendations
o
o
Alwaysobservesafetyruleswhenperformingany maintenance.
Thewarrantyon thislawnmowerdoesnot coveritemsthathave
beensubjectedto operatorabuseor negligence.To receivefull
valuefromwarranty,operatormustmaintainthe lawnmoweras
instructedhere.
• All adjustmentsshouldbecheckedat leastonceeach season.
• Periodicallycheckall fastenersand makesurethesearetight.
Alwaysstopthe motorand disconnectfromthe powersourcebefore
cleaning,lubricatingor performingany repairsor maintenanceon the
lawnmower.
Lubrication
Lubricatethe wheelsat leastoncea seasonwithlightoil (or motor
oil). If wheelsareremovedfor any reason,lubricatesurfaceof the
pivotarm andinnersurfaceof the wheelwithlightoil. See
Figure12.
Figure12
2. Lubricatethe torsionspringand pivot pointonthe reardischarge
doorandsidemulch plug periodicallywith lightoil to preventrust.
SeeFigure12.
Deck Care
Toreducethe riskof electricshock,do not exposethe mowerto
water.
The undersideof mowerdeckshouldbe cleanedafter each useas
grassclippings,leaves,dirt andotherdebriswill accumulate.This
accumulationof grassclippings,etc.,is undesirableas it will promote
rustandcorrosion.
1. Removeany buildupof grassandleavesonor aroundthe motor
cover(donot usewater).Wipethe mowercleanwitha dry cloth
occasionally.
2. If debrishas builtup on the undersideof the unit,tilt the mower
forwardor on its sideandscrapeit cleanwith a suitabletool.
IMPORTANT:Do not usea pressurewasheror gardenhose
to cleanyour unit.Thesemaycausedamageto electric
components,orthe electricmotor.The useof water will resultin
shortenedlifeand reduceserviceability.
Resetting Overload Protection Switch
Thismoweris equippedwithanoverloadprotectionswitchto prevent
overheatingdamageto the motor.
Ifthe overloadprotectionswitchpopsout:
1. Releasethe motor/bladecontrolhandleanddo NOT restartthe
mowerfor at leastoneminute,allowingthe electricmotortimeto
cool.
2. Pressthe overloadprotectionswitchinwardto reset.See
Figure13.
f-
/
Overload
Protection
Switch
Figure13
Ifthe overloadprotectionswitchpopsout shortlyafter resetting:
1. Releasethe motor/bladecontrolhandleanddo NOT restartthe
mowerfor at least15minutesto allowthe electricmotorextra
timeto cool.
2. Pressthe overloadprotectionswitchinwardto reset.
3. Restartunit.
NOTE: Ifthe overloadprotectionswitchpopsout repeatedly
duringoperationor will not remainin whenattemptingto reset,
contactSearsor anotherqualifiedservicedealerfor repair.
15
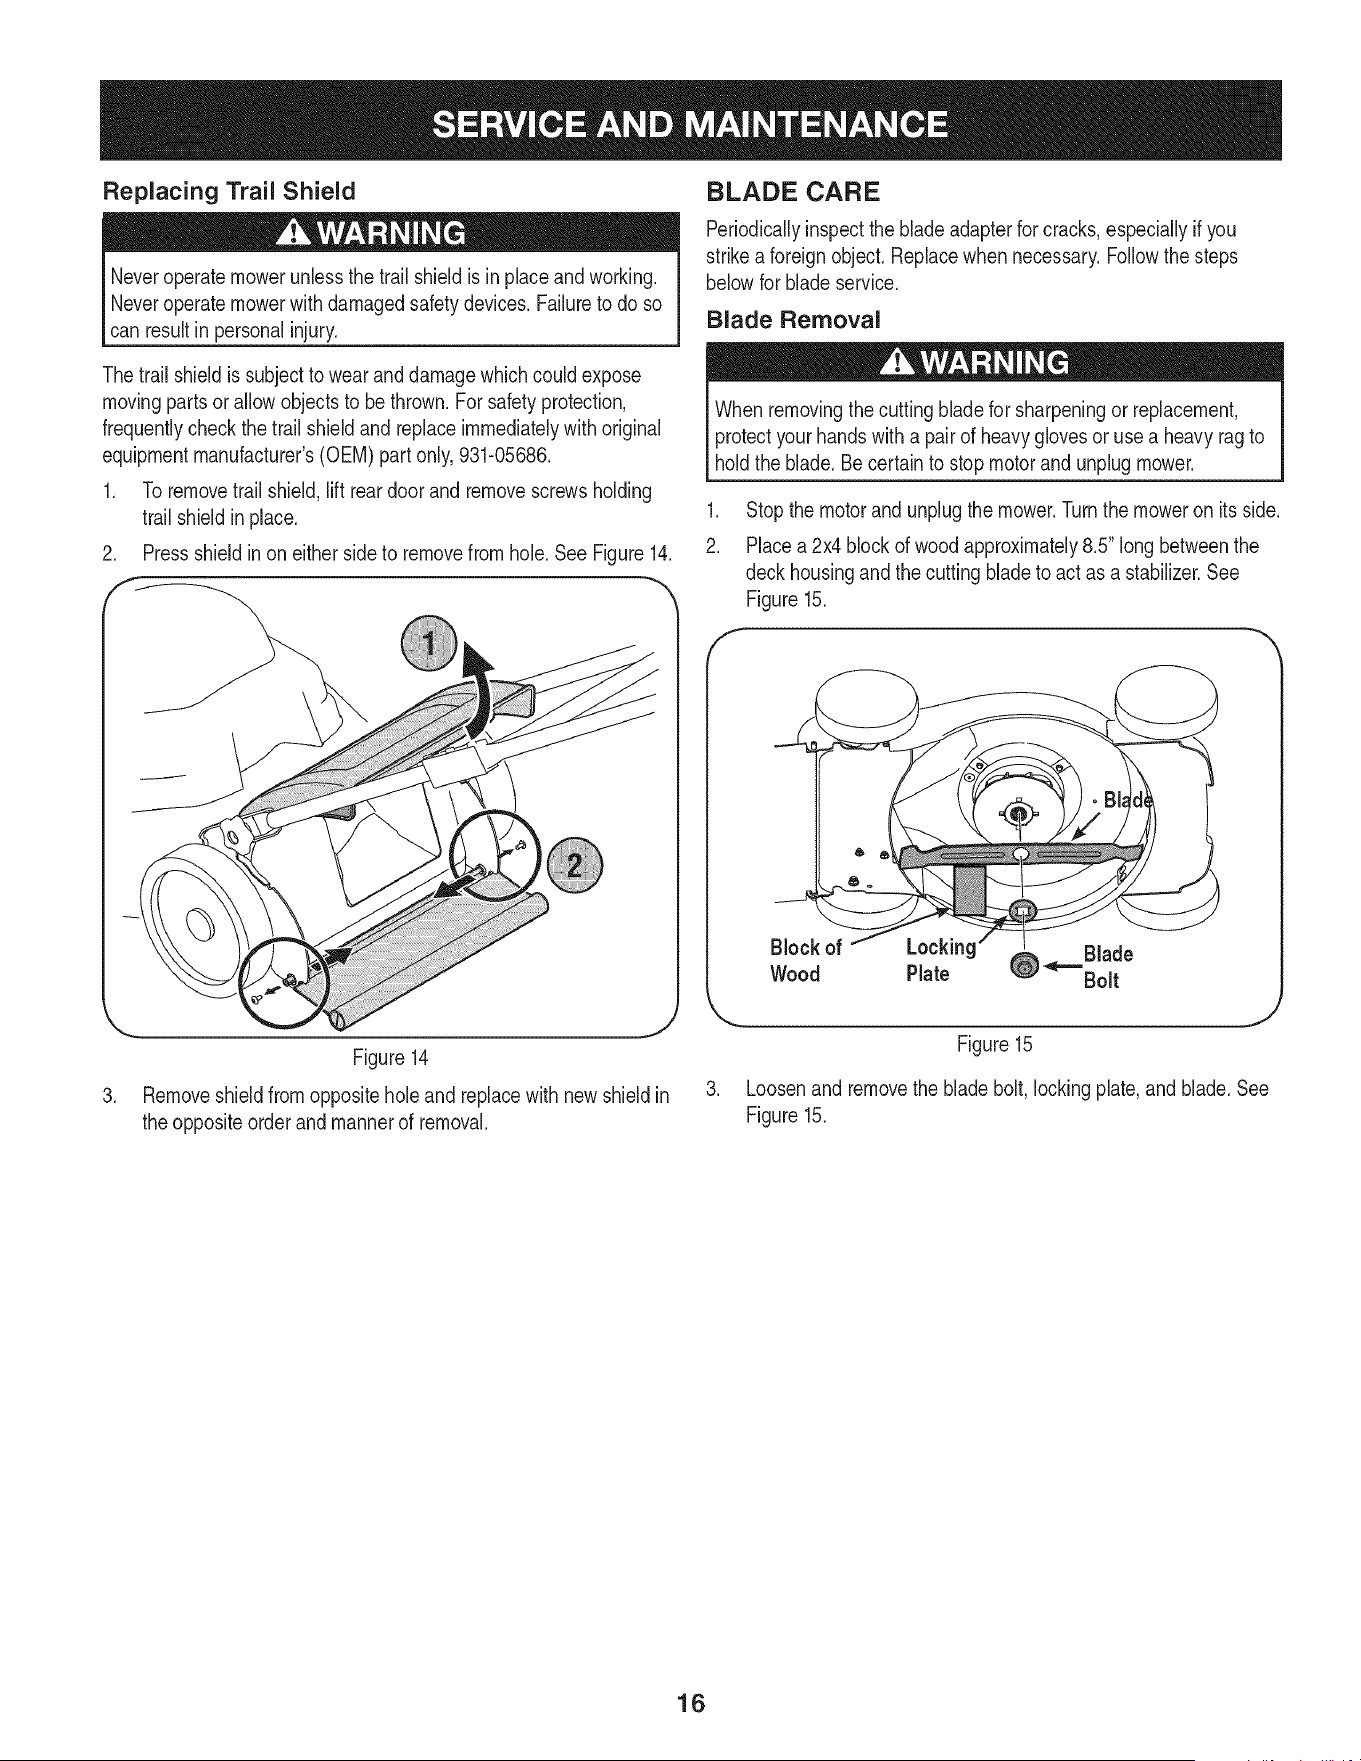
Replacing Trail Shield
Neveroperatemowerunlessthe trail shieldisinplaceand working.
Neveroperatemowerwith damagedsafetydevices.Failureto do so
can resultin personalinjury.
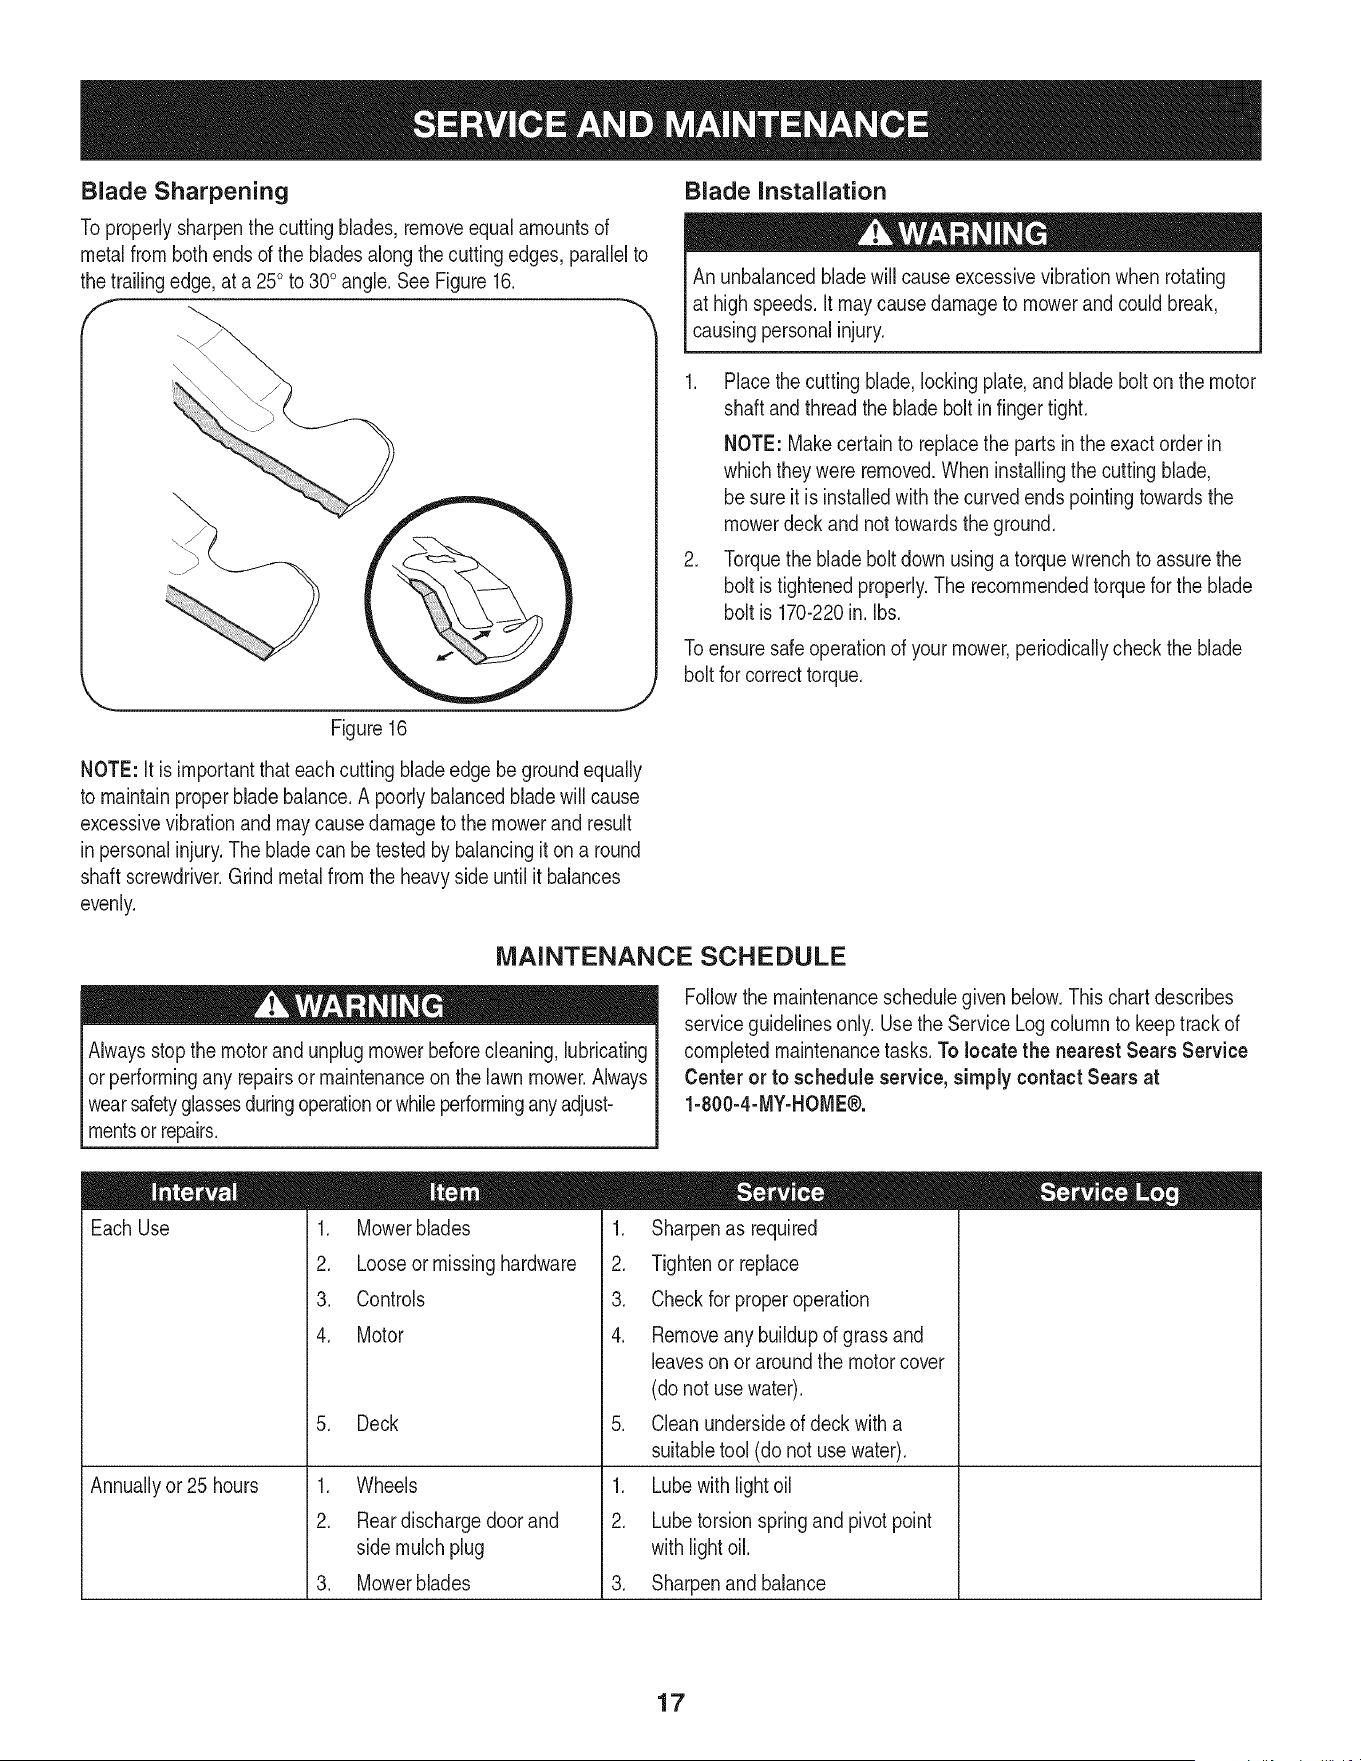
BLADE CARE
Periodicallyinspectthe bladeadapterfor cracks,especiallyif you
strikea foreignobject. Replacewhennecessary.Followthe steps
belowfor blade service.
Blade Removal
Thetrail shieldis subjectto wearanddamagewhichcouldexpose
movingpartsor allowobjectsto bethrown.Forsafetyprotection,
frequentlycheckthe trail shieldandreplaceimmediatelywithoriginal
equipmentmanufacturer's(OEM)part only,931-05686.
1. Toremovetrail shield,lift rear door and removescrewsholding
trailshieldin place.
2. Pressshieldin on eithersideto removefrom hole.SeeFigure14.
f
J
Figure14
Removeshieldfrom oppositehole and replacewith new shieldin
theoppositeorder and mannerof removal.
Whenremovingthe cuttingbladefor sharpeningor replacement,
protectyourhandswith a pairof heavyglovesor usea heavy ragto
holdthe blade.Be certainto stopmotor and unplugmower.
.
2.
f
Stopthe motorand unplugthe mower.Turnthe moweron its side.
Placea 2x4blockof woodapproximately8.5" longbetweenthe
deckhousingandthe cuttingbladeto act as a stabilizer.See
Figure15.
.
Figure15
,J
Loosenandremovethe bladebolt,lockingplate,andblade.See
Figure15.
16
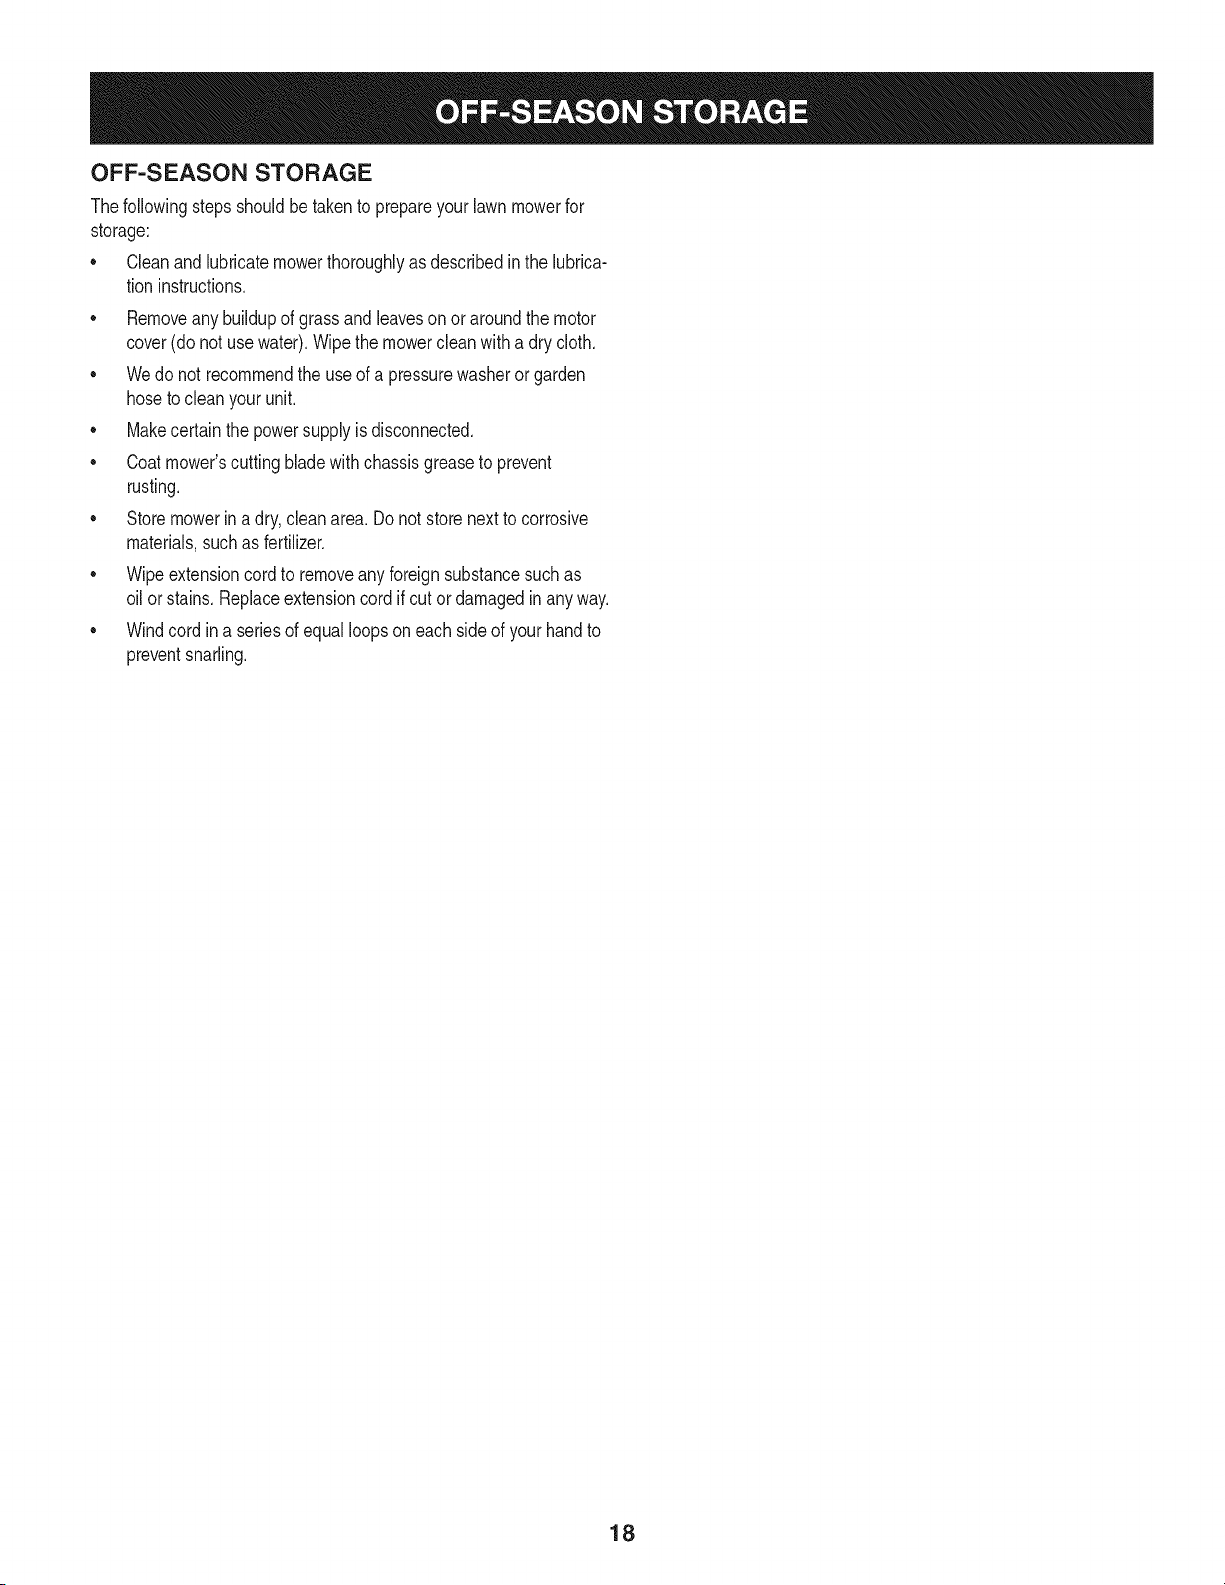
Blade Sharpening
Toproperlysharpenthe cuttingblades,removeequalamountsof
metalfrombothends d the bladesalongthecuttingedges, parallelto
thetrailingedge,at a 250to300angle.See Figure16.
Figure16
J
NOTE: Itis importantthateachcutting bladeedge be groundequally
to maintainproperbladebalance.Apoorlybalancedbladewillcause
excessivevibrationandmaycausedamageto the mowerand result
in personalinjury.The blade canbe testedbybalancingit on a round
shaftscrewdriver.Grind metalfrom the heavyside untilit balances
evenly.
Blade Installation
An unbalancedbladewill causeexcessivevibrationwhen rotating
at highspeeds.It maycausedamageto mowerand couldbreak,
causingpersonalinjury.
1. Placethe cuttingblade,lockingplate,and blade bolton the motor
shaft andthreadthe bladeboltin fingertight.
NOTE: Makecertainto replacethe partsinthe exactorderin
whichtheywere removed.Wheninstallingthe cuttingblade,
be sureit is installedwiththe curvedends pointingtowardsthe
mowerdeckandnot towardstheground.
2. Torquethe blade boltdownusinga torquewrenchto assurethe
bolt is tightenedproperly.The recommendedtorquefor the blade
bolt is 170-220in. Ibs.
Toensuresafeoperationof your mower,periodicallycheckthe blade
bolt for correcttorque.
MAINTENANCE SCHEDULE
Alwaysstopthe motorand unplug mowerbeforecleaning,lubricating
or performingany repairsor maintenanceonthe lawn mower.Always
wearsafetyglassesduringoperationorwhileperforminganyadjust-
mentsorrepairs.
Followthe maintenanceschedulegiven below.This chart describes
serviceguidelinesonly.Usethe ServiceLogcolumnto keeptrackof
completedmaintenancetasks.To locate the nearest Sears Service
Centeror to scheduleservice,simplycontactSearsat
1-800-4-MY-HOME®,
EachUse
Annuallyor 25 hours
1. Mowerblades
2. Looseormissinghardware
3. Controls
4. Motor
5. Deck
1. Wheels
2. Reardischargedoorand
side mulchplug
3. Mowerblades
1. Sharpenas required
2. Tightenor replace
3. Checkfor properoperation
4. Removeany buildupof grassand
leaveson or aroundthe motorcover
(donot usewater).
5. Cleanundersideof deckwitha
suitabletool (do notuse water).
1. Lubewith light oil
2. Lubetorsion springand pivot point
withlightoil.
3. Sharpenandbalance
17
OFF-SEASON STORAGE
Thefollowingstepsshouldbe takento prepareyourlawnmowerfor
storage:
• Cleanandlubricatemowerthoroughlyas describedin the lubrica-
tion instructions.
• Removeanybuildupof grassandleaveson or around themotor
cover(do notuse water).Wipethe mowercleanwith a dry cloth.
Wedo not recommendthe use of a pressurewasherorgarden
hoseto cleanyourunit.
Makecertainthepowersupplyis disconnected.
Coatmower'scuttingbladewith chassisgreaseto prevent
rusting.
Storemowerin a dry,cleanarea.Do not storenext to corrosive
materials,suchas fertilizer.
Wipeextensioncordto removeanyforeignsubstancesuchas
oilor stains.Replaceextensioncordif cut ordamagedin anyway.
Windcordin a seriesof equalloopsoneach sideof your handto
preventsnarling.
18
Alwaysstopthe motorandunplugmowerbeforecleaning,lubricatingor performingany repairsor maintenanceon the lawnmower.Alwayswear
safetyglassesduringoperationorwhileperforminganyadjustmentsorrepairs.
Motorfailsto start 1. Corddisconnectedfromthe motor/blade
control.
2. Motor/bladecontroldefective.
Circuitbreakeron the
mowertripping
3. Extensioncord notconnectedto the plug on
the mower.
4. Extensioncord notconnectedto a source
of power.
5. Overloadprotectionswitchonthe moweror
circuitbreakerinthe housereceptacletripped.
1. Toomuch workloadonthe mower.
2. Fuseblown;outlet overloaded.
1. Reconnectthe cord, keepingthe cord restraintcloseto
the motor/bladecontrol.
2. Takemowerto Searsorotherqualifiedservicedealerto
havemotor/bladecontrolreplacedwithoriginalequipment
manufacturer's(OEM)partonly,931-05686.
3. Connecttheextensioncordto theplugon the mower.
Mowercuttinggrass 1. Lawnroughor uneven.
unevenly
Mowernot mulching 1. Wetgrassclippingsstick to the undersideof 1. Wait till the grassdries beforemowing.
properly the deck.
Hardto push 1. Highgrassor cuttingheighttoo low. 1. Raisecuttingheight.
2. Rearof mowerhousingand bladedragging 2. Raisecuttingheight.
inheavygrass.
1. Bentmotorshaft. 1.
Mowervibratingat higher
speed
Corddisconnectsfre-
quently
2. Cuttingblade is unbalanced.
3. Bladeis loose.
1. Extensioncord is not properlyattachedto
the cord restraint.
2. Old,worn,or looseextensioncord.
1. Carriageboltsnot seatedin the handle
insulators.
Handlenot inposition
4. Connecttheextensioncordto a 110-120volt60 hertz
A.C. receptacle.
5. Resetthe overloadprotectionswitchfollowinginstructions
intheServiceAnd Maintenancesectionof this manual.
1. Raisethecutting height,resetthe circuitbreakeronthe
mower,takea smallerwidthof cut, andwalkslowly.
2. Connectto an outlet that is fusedfor 15amperes.Reset
the circuitbreakerand start the moweragain.
1. Movethewheelsto a highercuttingheightposition.
Stopthe motor,disconnectthe powersourceand
inspectfor damage.Repairbeforerestarting.Ifvibration
persists,takeit to a servicedealer.
2. Balancethe bladeby grindingeachcuttingedgeequally.
3. Tightenblade boltto 170-220in. Ibs.
1. Reconnectthe extensioncordto the cord restrainton
the guiderod.
2. Replaceextensioncord.
1. Adjustthe heightof the handleand makesurethat
the carriageboltsare seatedproperlyintothe handle
insulators.Tightenthe handknobs.
NEED MORE HELP?
You'll find the a_lswer and race ot_ _]_al_age_T_yl]o_T_e co_T_ -Io[ Ilee!
= Find this and all your other product manuals online,
Get answers from our team of home experts.
= Get a personalized maintenance plan for your home.
Find information and tools to help with home projects.
maHage_home
b_:oug_t _e ye_a hy Sears
19
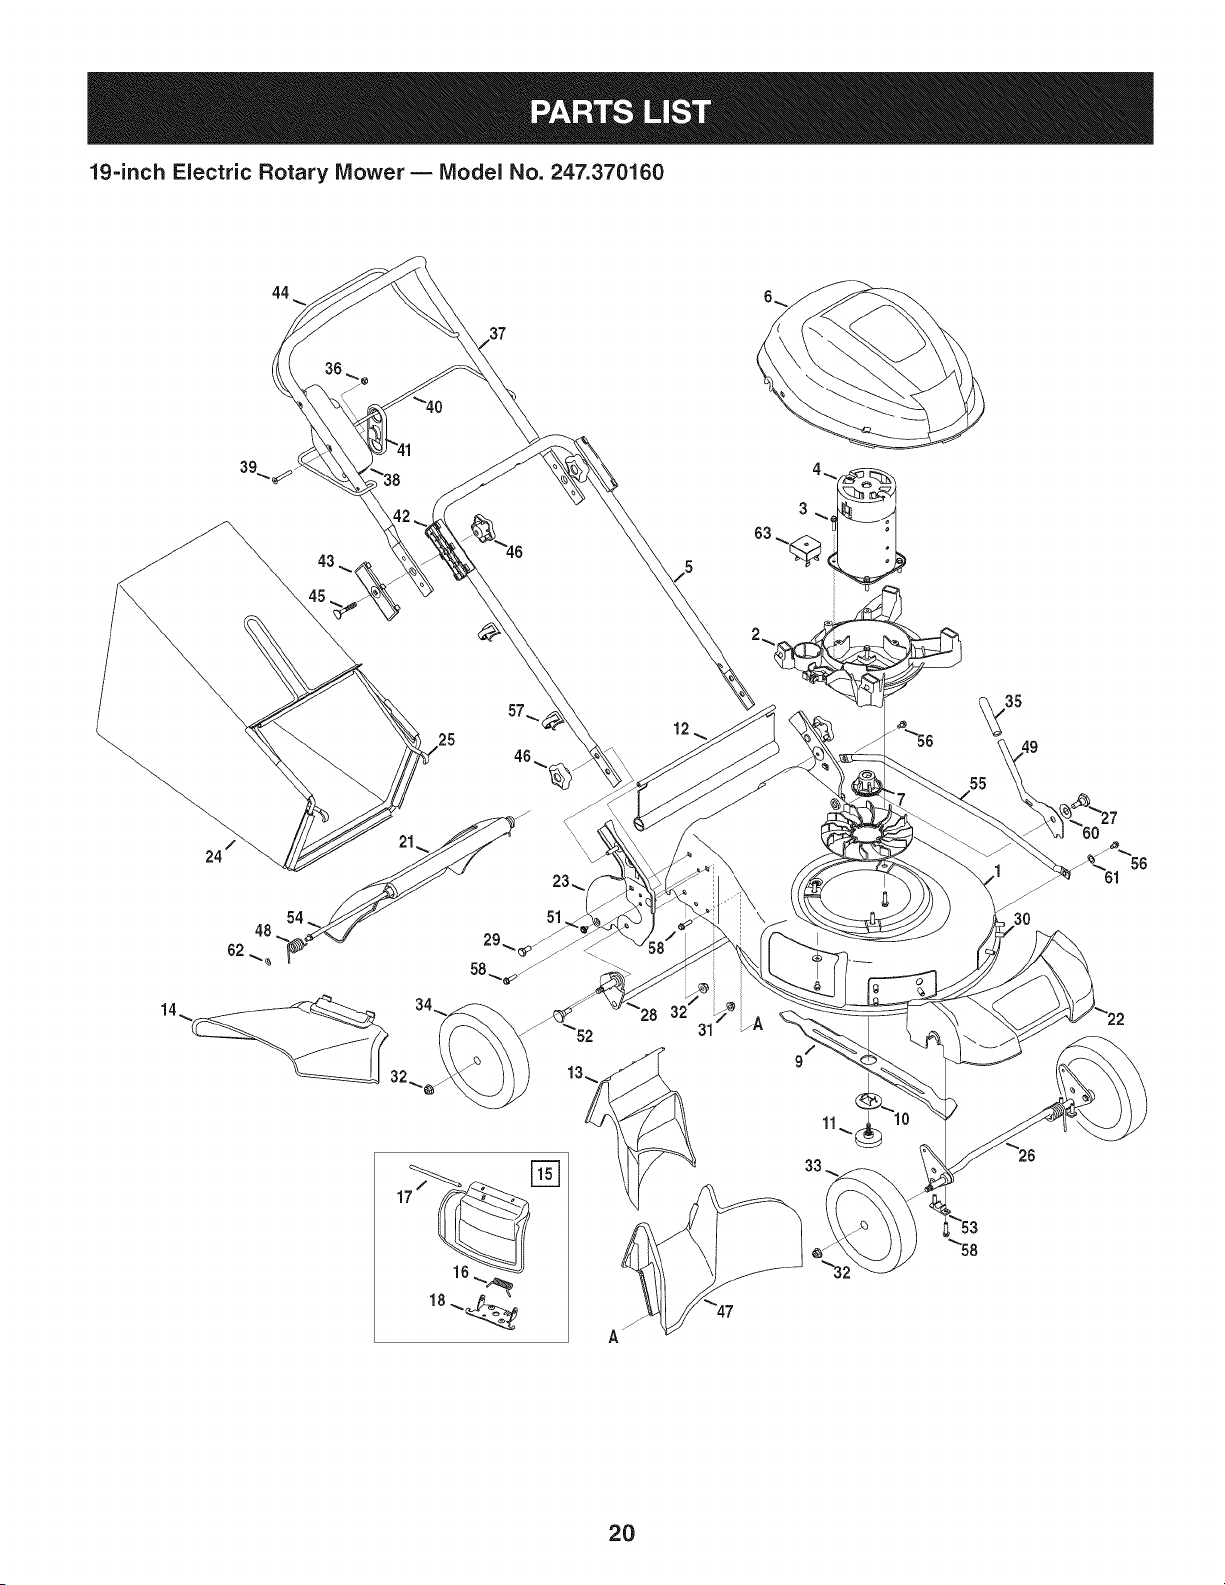
19=inch Electric Rotary Mower B Model No. 247.370160
44
\\
%
9 /
35
3O
2O
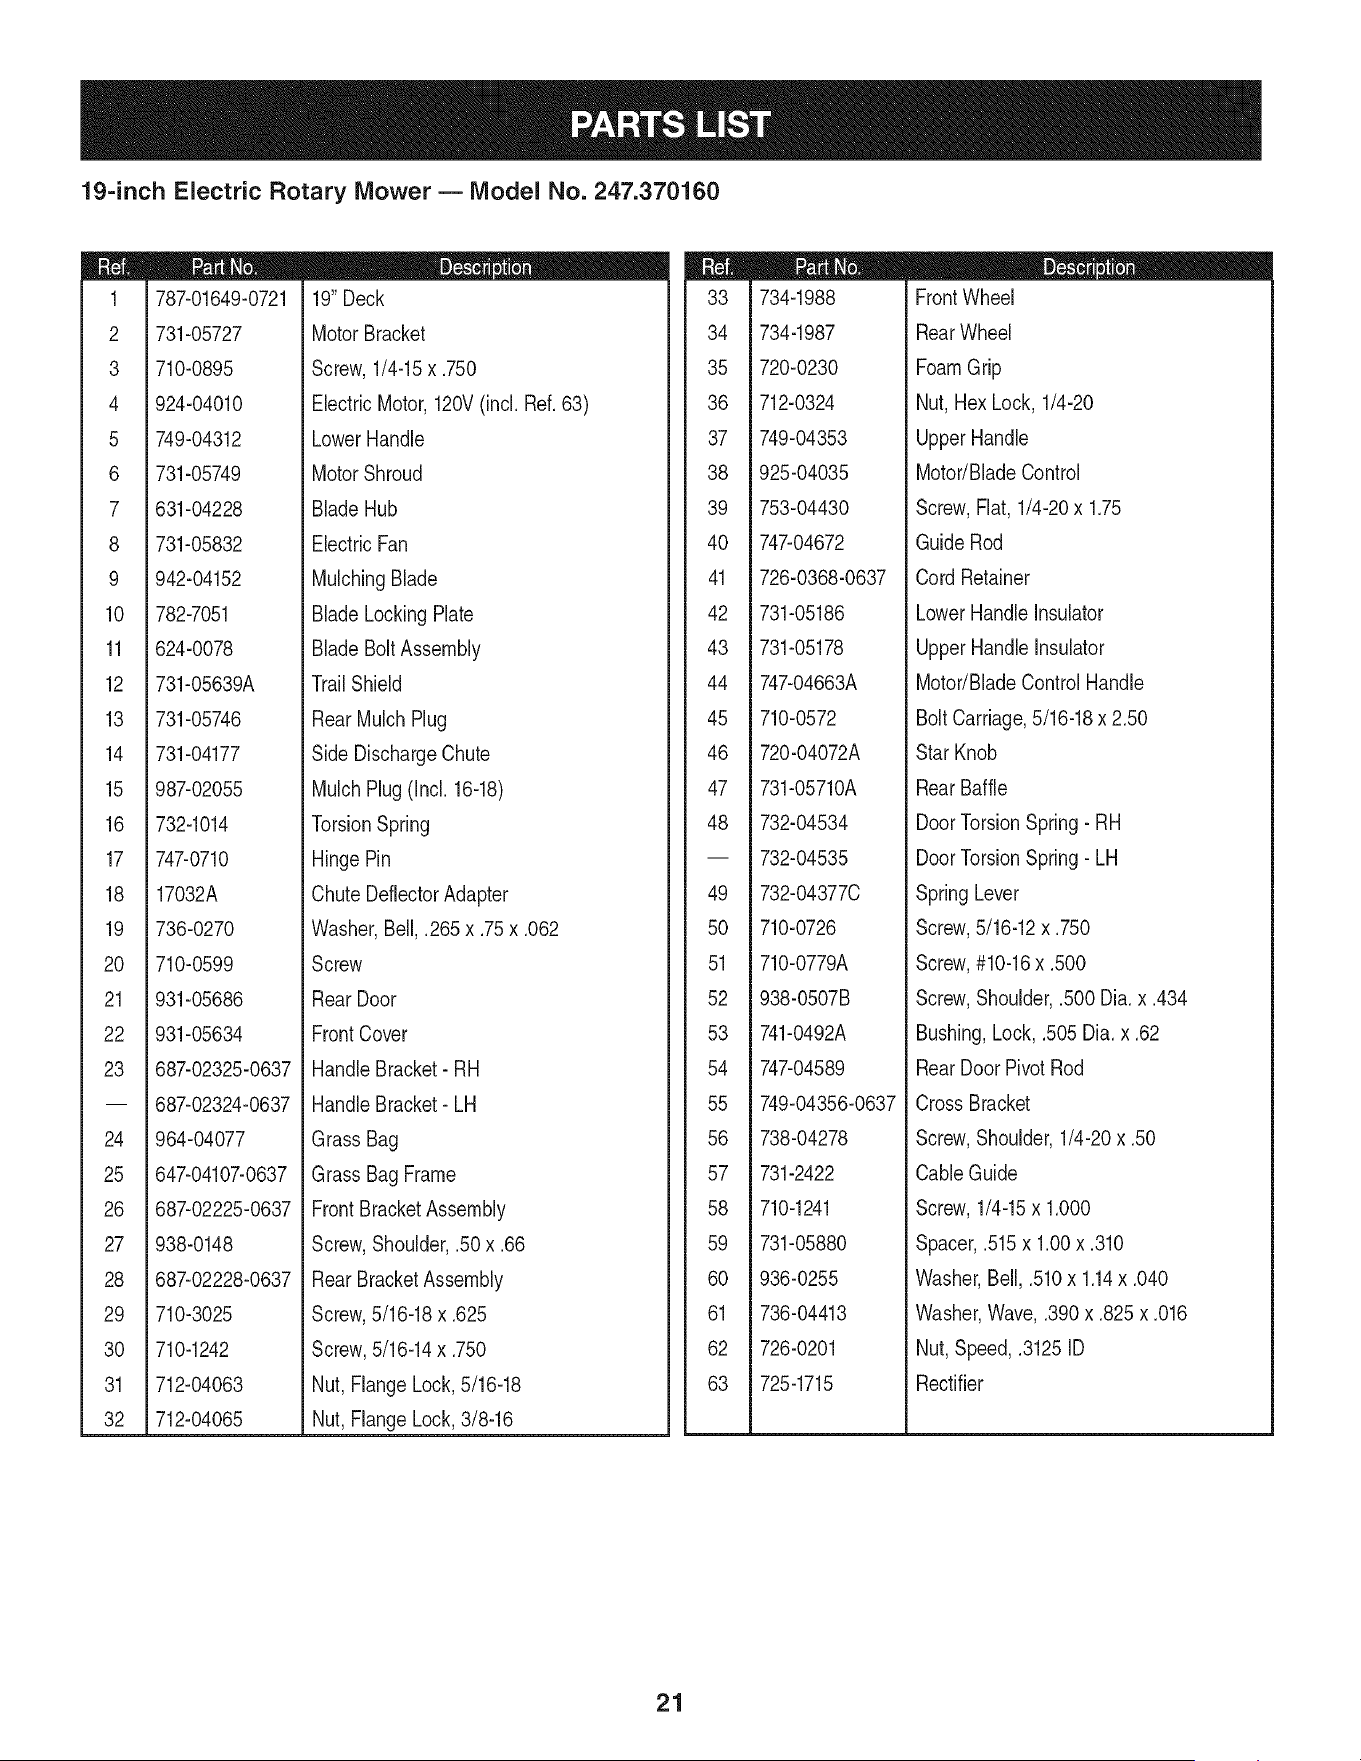
19-inch Electric Rotary Mower B Model No. 247.370160
m
1
2
3
4
5
6
7
8
9
10
11
12
13
14
15
16
17
18
19
2O
21
22
23
24
25
26
27
28
29
30
31
32
787-01649-0721
731-05727
710-0895
924-04010
749-04312
731-05749
631-04228
731-05832
942-04152
782-7051
624-0078
731-05639A
731-05746
731-04177
987-02055
732-1014
747-0710
17032A
736-0270
710-0599
931-05686
931-05634
687-02325-0637
687-02324-0637
964-04077
647-04107-0637
68_02225-0637
938-0148
68_02228-0637
710-3025
710-1242
712-04063
712-04065
m = O O
19"Deck
MotorBracket
Screw,1/4-15x .750
ElectricMotor,120V(incl. Ref.63)
LowerHandle
MotorShroud
BladeHub
ElectricFan
MulchingBlade
BladeLockingPlate
BladeBoltAssembly
TrailShield
RearMulch Plug
SideDischargeChute
MulchPlug(Incl. 16-18)
TorsionSpring
HingePin
ChuteDeflectorAdapter
Washer,Bell,.265x .75x .062
Screw
RearDoor
FrontCover
HandleBracket- RH
HandleBracket- LH
GrassBag
GrassBagFrame
FrontBracketAssembly
Screw,Shoulder,.50x .66
RearBracketAssembly
Screw,5/16-18x .625
Screw,5/16-14x .750
Nut, FlangeLock,5/16-18
Nut, FlangeLock,3/8-16
m
33
34
35
36
37
38
39
4O
41
42
43
44
45
46
47
48
49
50
51
52
53
54
55
56
57
58
59
60
61
62
63
734-1988
734-1987
720-0230
712-0324
749-04353
925-04035
753-04430
74_04672
726-0368-0637
731-05186
731-05178
747-04663A
710-0572
720-04072A
731-05710A
732-04534
732-04535
732-04377C
710-0726
710-0779A
938-0507B
741-0492A
747-04589
749-04356-0637
738-04278
731-2422
710-1241
731-05880
936-0255
736-04413
726-0201
725-1715
D = O O
FrontWheel
RearWheel
FoamGrip
Nut,Hex Lock,1/4-20
UpperHandle
Motor/BladeControl
Screw,Fiat,1/4-20x 1.75
GuideRod
CordRetainer
LowerHandleInsulator
UpperHandleInsulator
Motor/BladeControlHandle
BoltCarriage,5/16-18x 2.50
StarKnob
RearBaffle
DoorTorsionSpring- RH
DoorTorsionSpring- LH
SpringLever
Screw,5/16-12x .750
Screw,#10-16x .500
Screw,Shoulder,.500 Dia.x .434
Bushing,Lock,.505 Dia. x .62
RearDoorPivotRod
CrossBracket
Screw,Shoulder,1/4-20x .50
CableGuide
Screw,1/4-15x 1.000
Spacer,.515x 1.00x .310
Washer,Bell,.510x 1.14x .040
Washer,Wave,.390x .825x .016
Nut,Speed,.3125ID
Rectifier
21
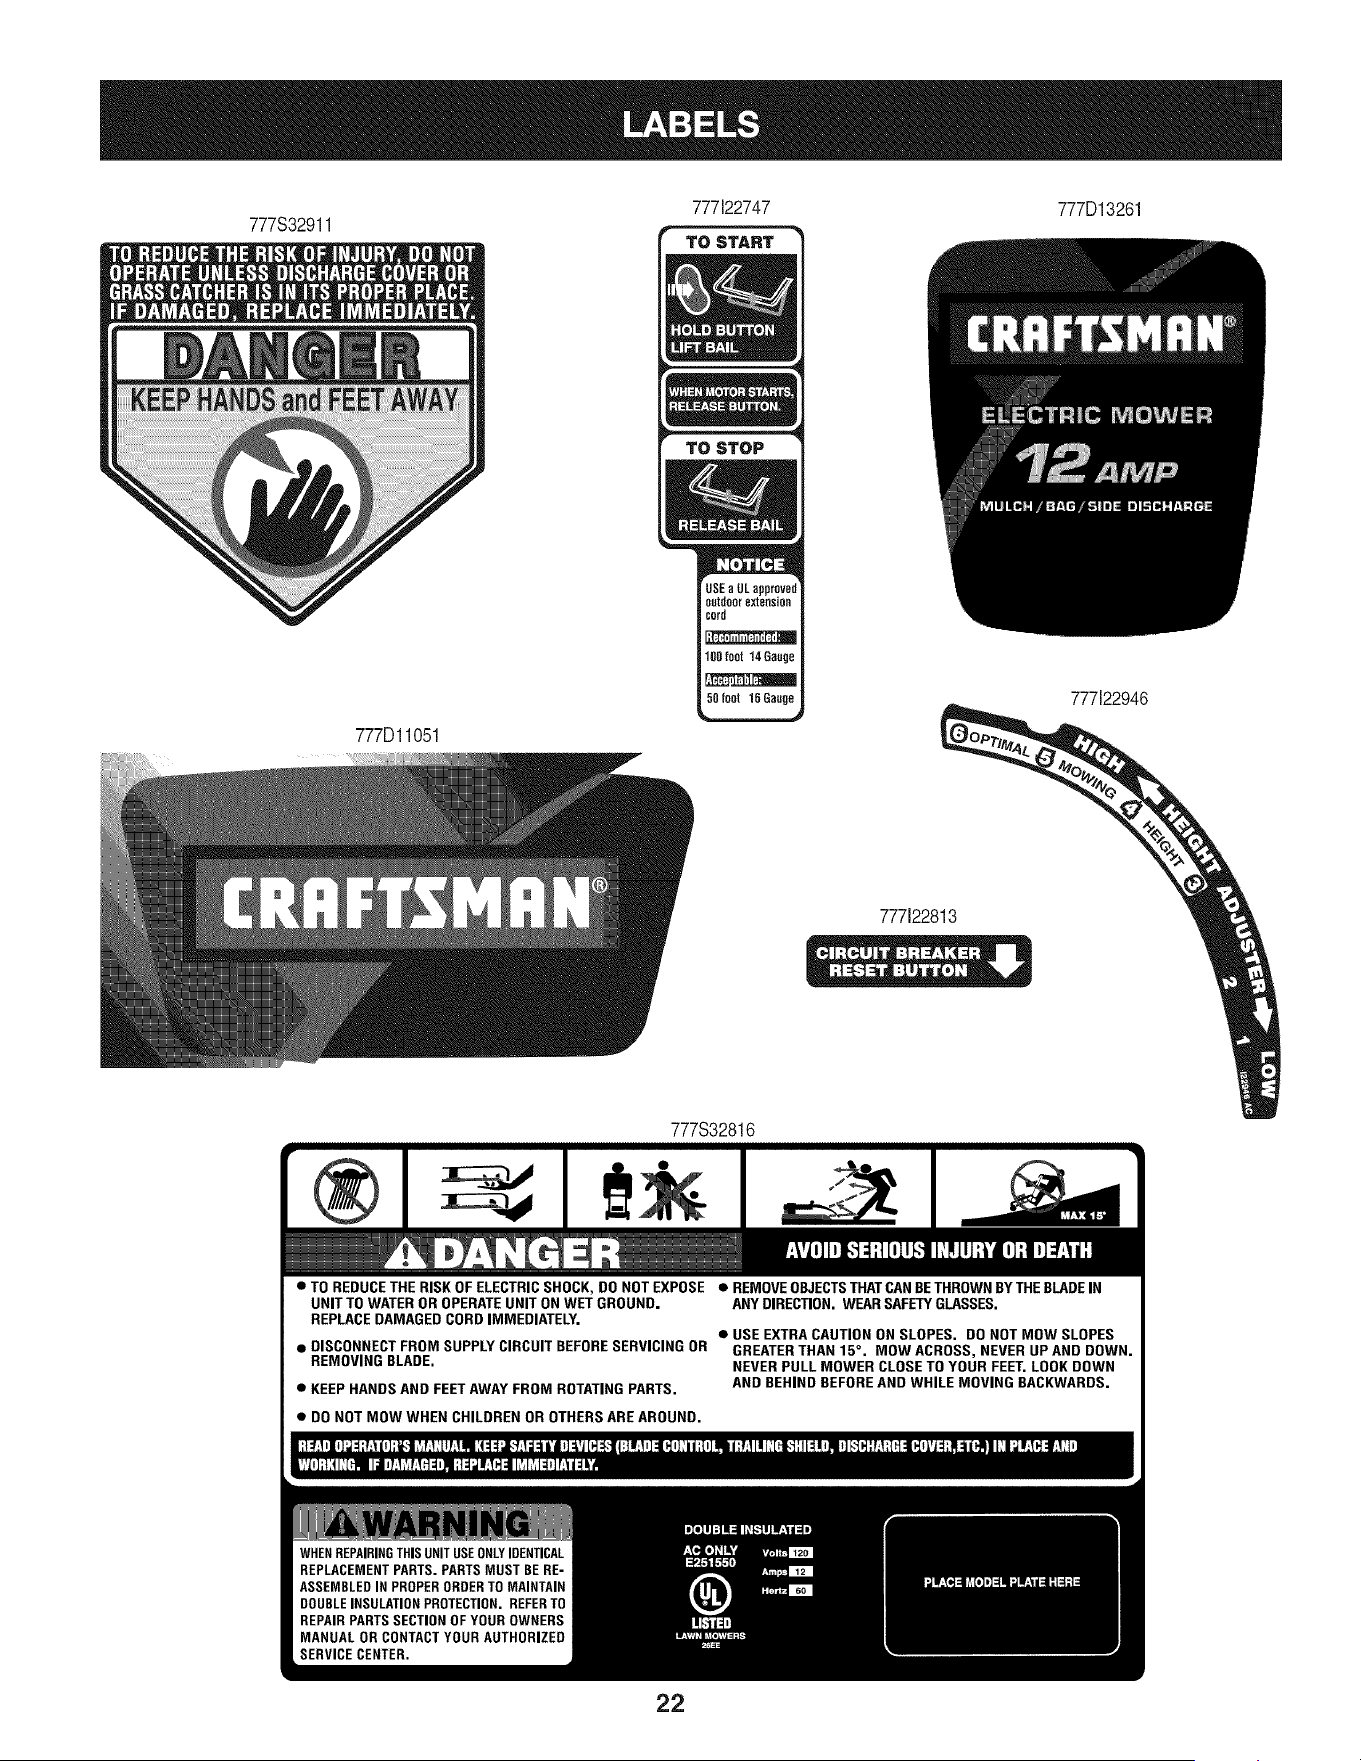
777S32911
777Dl1051
777122747
TO START
TO STOP
777D13261
777122946
777122813
777S32816
• TO REDUCETHE RISK OF ELECTRICSHOCK, DO NOT EXPOSE • REMOVEOBJECTSTHATCANBETHROWNBYTHE BLADEIN
UNIT TO WATER OR OPERATEUNIT ON WET GROUND. ANYDIRECTION. WEARSAFETYGLASSES.
REPLACEDAMAGED CORD IMMEDIATELY.
• USE EXTRA CAUTION ON SLOPES. DO NOT MOW SLOPES
• DISCONNECT FROM SUPPLY CIRCUIT BEFORESERVICING OR GREATER THAN 15°. MOW ACROSS, NEVER UP AND DOWN.
REMOVING BLADE. NEVER PULL MOWER CLOSETO YOUR FEET. LOOK DOWN
• KEEP HANDS AND FEET AWAY FROM ROTATING PARTS. AND BEHIND BEFOREAND WHILE MOVING BACKWARDS.
• DO NOT MOW WHEN CHILDREN OR OTHERS ARE AROUND.
SERVICE CENTER.
22

Congratulationsonmakinga smartpurchase.YournewCraftsman®
productis designedandmanufacturedforyears of dependableopera-
tion.But likeall products,itmay requirerepairfrom time to time.That's
whenhavinga RepairProtectionAgreementcan saveyou moneyand
aggravation.
Here'swhat the RepairProtectionAgreement*includes:
* Expert service by our 10,000professionalrepairspecialists
* Unlimited service and no charge for partsand labor on all
coveredrepairs
* Product replacement upto $1500if your coveredproductcan't be
fixed
* Discountof 10%from regularpriceof serviceand relatedinstalled
partsnotcoveredbythe agreement;also,10%off regularpriceof
preventivemaintenancecheck
* Fast help by phone- we call it RapidResolution- phonesupport
froma Sears representative.Thinkof us as a "talkingowner's
manual."
Onceyou purchasethe Agreement,a simplephonecall is all that it
takesfor youto scheduleservice.Youcan call anytimedayor night,or
schedulea serviceappointmentonline.
The RepairProtectionAgreementis a risk-freepurchase.If youcancel
for any reasonduringthe productwarrantyperiod,wewill provideafull
refund.Or,a proratedrefundanytimeafterthe productwarrantyperiod
expires.Purchaseyour RepairProtectionAgreementtoday!
Somelimitations and exclusions apply. For pricesand additional
informationin the U.S.A.call 1-800-827-6655.
*Coverage inCanadavarieson someitems. Forfull details call
Sears Canadaat 1-800-361-6665.
Sears installationService
ForSearsprofessionalinstallationof homeappliances,garagedoor
openers,waterheaters,andothermajorhomeitems,in the U.S.A.or
Canadacall 1-800-4-MY-HOME®.
23
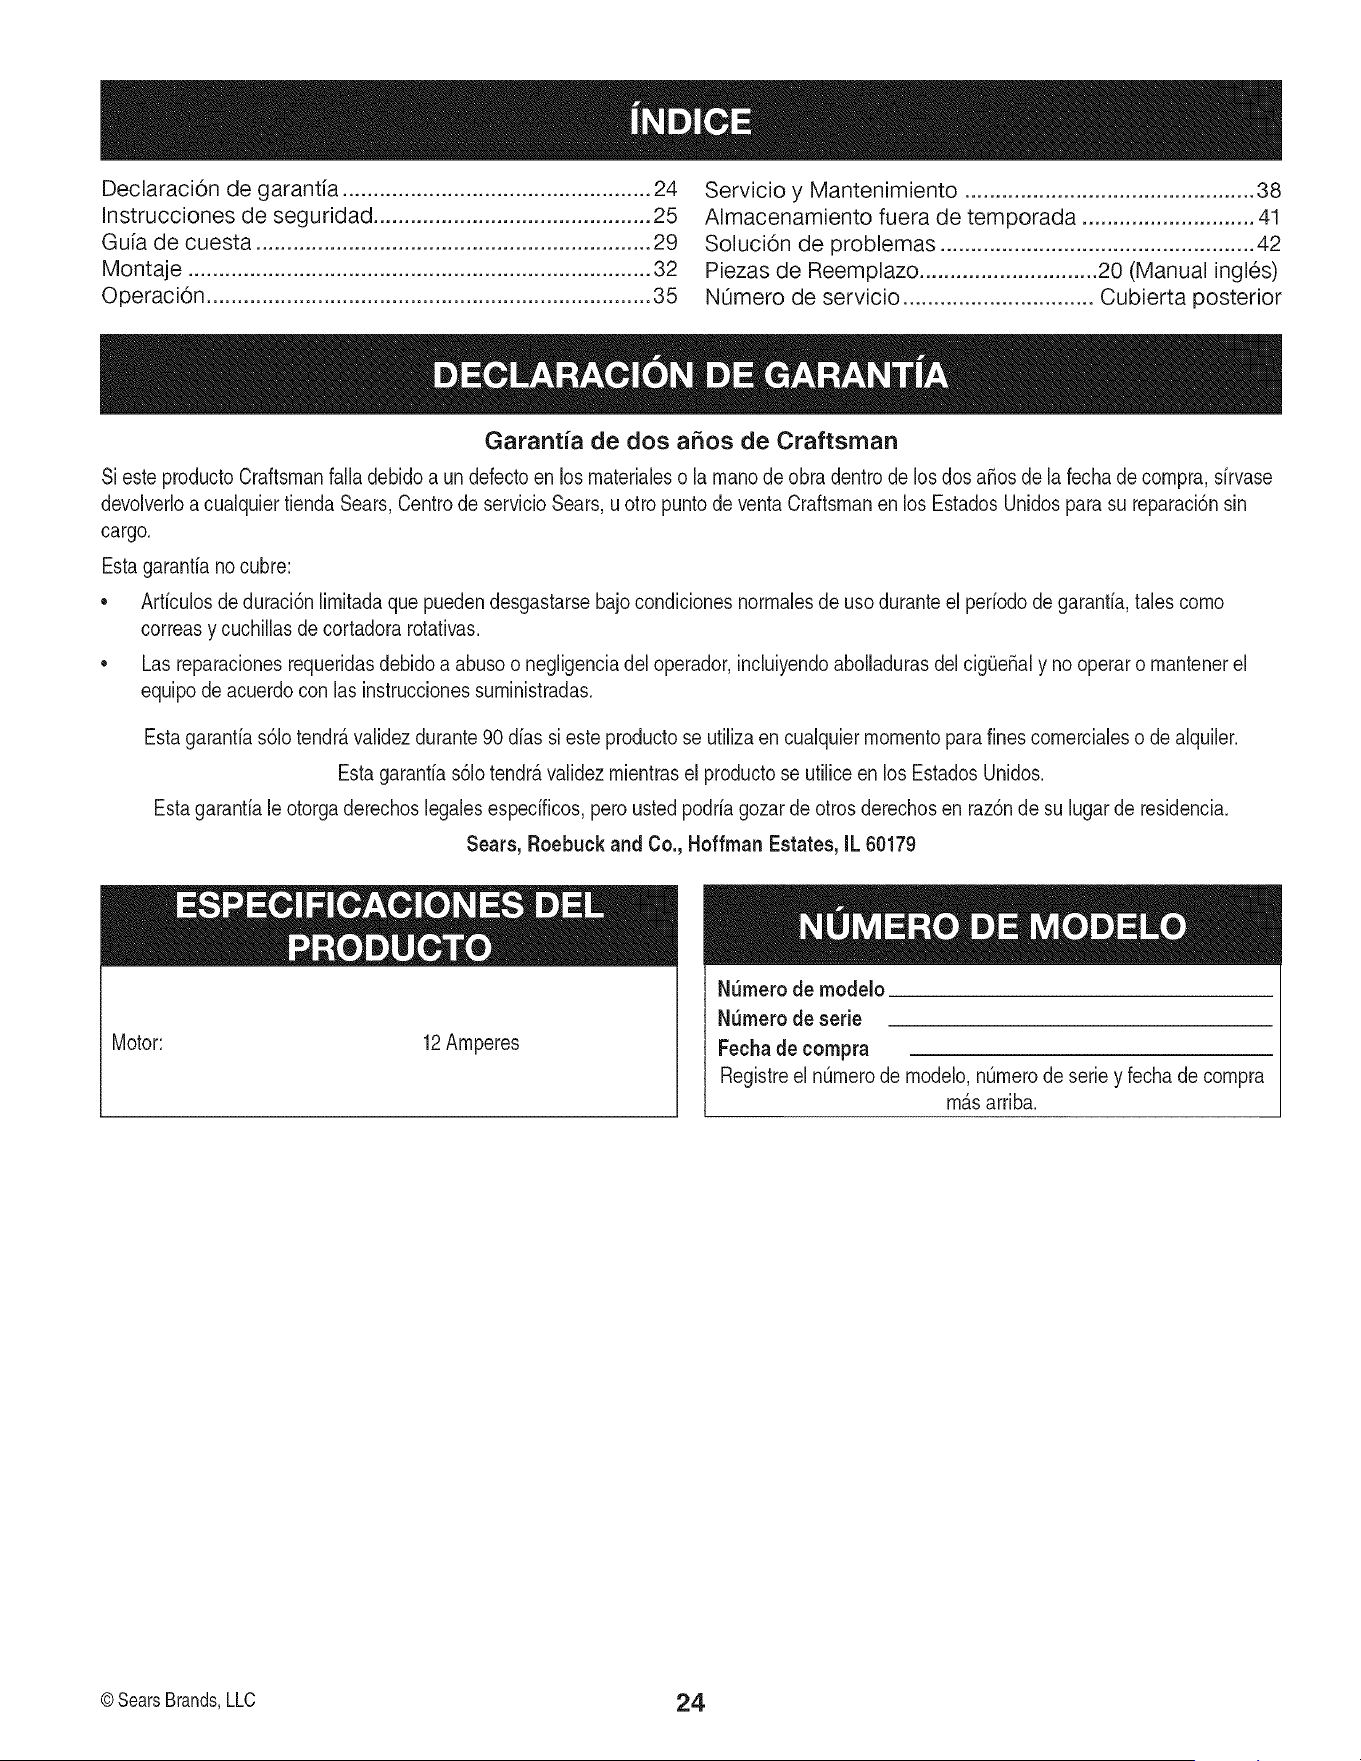
Declaraci6n de garantia .................................................. 24
Instrucciones de seguridad ............................................. 25
Guia de cuesta ................................................................ 29
Montaje ........................................................................... 32
Operaci6n ........................................................................ 35
Servicio y Mantenimiento ............................................... 38
Almacenamiento fuera de temporada ............................ 41
Soluci6n de problemas ................................................... 42
Piezas de Reemplazo ............................. 20 (Manual ingles)
NOmero de servicio ............................... Cubierta posterior
Garantia de dos ahos de Craftsman
Si este productoCraftsmanfalladebidoa un defectoen losrnaterialeso larnanodeobradentrode losdos aSosde la fecha de cornpra,sirvase
devolverloa cualquiertienda Sears,Centrode servicioSears,u otto puntodeventaCraftsmanen los EstadosUnidosparasu reparaci6nsin
cargo.
Estagarantiano cubre:
• Arficulosdeduraci6nlirnitadaquepuedendesgastarsebajocondicionesnorrnalesde uso duranteel periododegarantia,talescorno
correasy cuchillasde cortadorarotativas.
• Lasreparacionesrequeridasdebidoaabusoo negligenciadel operador,induiyendoabolladurasdelcig(JeSaly nooperaro rnantenerel
equipode acuerdocon las instruccionessurninistradas.
Estagarantias61otendr&validezdurante90 dias si esteproductose utilizaencualquierrnornentoparafinescornercialeso de alquiler.
Estagarantias61otendrAvalidezrnientrasel productose utiliceen los EstadosUnidos.
Estagarantiale otorgaderechoslegalesespecificos,peroustedpodriagozardeotrosderechosen raz6nde su lugar de residencia.
Sears,Roebuck and Co., Hoffman Estates,IL 60179
Motor: 12Amperes
N_rnerode rnodelo
N_rnerode serie
Fechade cornpra
Registreel nQrnerode rnodelo,nQrnerode seriey fechade cornpra
rn_sarriba.
© SearsBrands,LLC 24
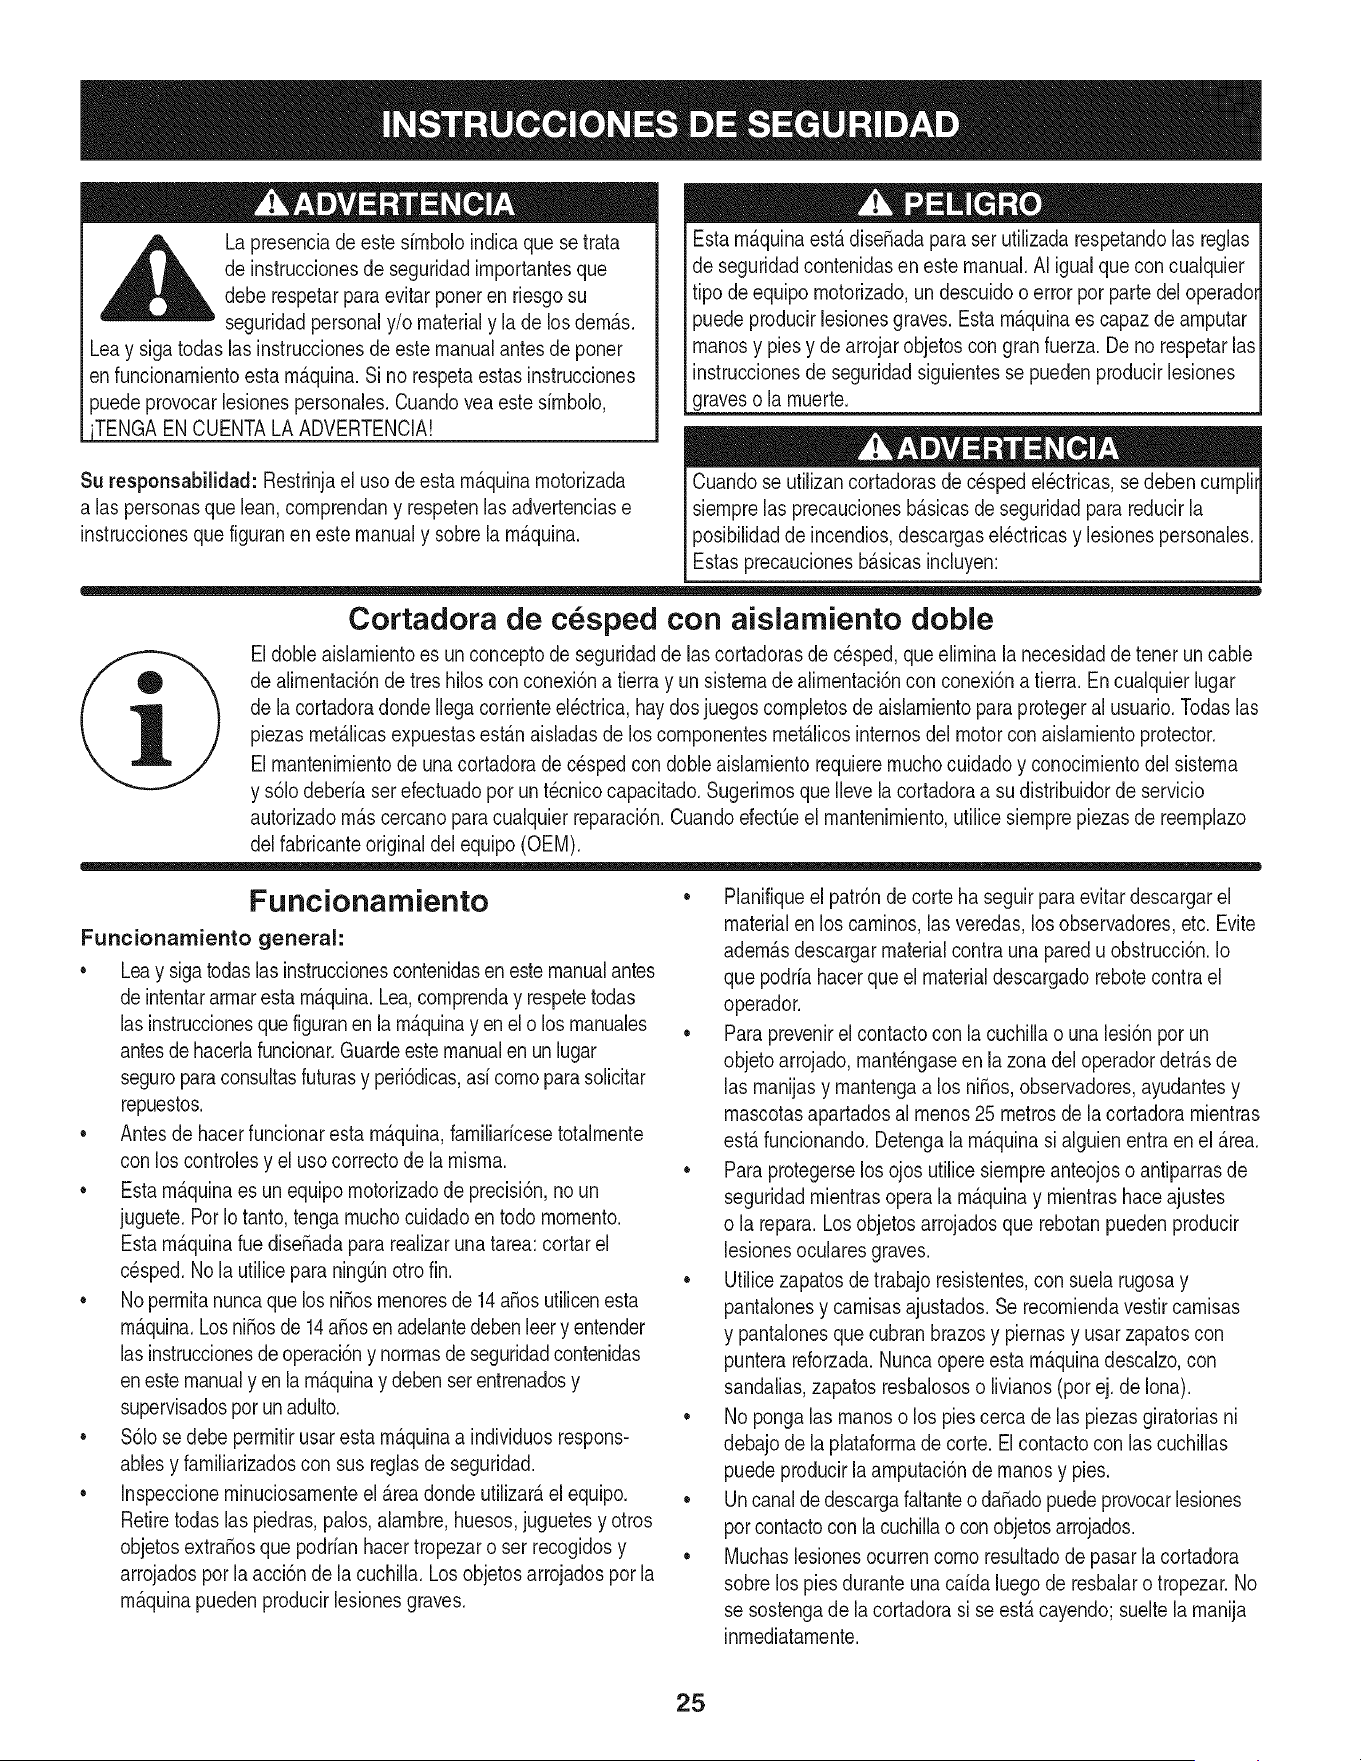
La presenciade este sfrnboloindicaque se trata
de instruccionesde seguridadirnportantesque
deberespetarpara evitarponer en riesgosu
seguridadpersonaly/omaterialy la de losdern_.s.
Leay siga todaslas instruccionesde este manualantes de poner
enfuncionarnientoestarn_.quina.Si no respetaestasinstrucciones
puedeprovocarlesionespersonales.Cuandovea este sirnbolo,
_JENTA LAADVERTENCIA!
Su responsabilidad:Restrinjael usodeesta rn_.quinarnotorizada
alas personasque lean,cornprendany respetenlas advertenciase
instruccionesquefiguranen este manualy sobrela rn_.quina.
Estarn_.quinaest,.dise_adaparaserutilizadarespetandolas reglas
de seguridadcontenidasen este manual.AI igualqueconcualquier
tipo deequipornotorizado,undescuidooerrorporparte deloperadol
puedeproducirlesionesgraves.Estarn_.quinaes capazdearnputar
rnanosy piesy de arrojarobjetoscongranfuerza.De no respetarlas
instruccionesde seguridadsiguientesse puedenproducirlesiones
graveso la rnuerte.
Cuandose utilizancortadorasde cespedel_ctricas,sedeben curnpli_
siernprelas precaucionesb_.sicasdeseguridadparareducirla
posibilidaddeincendios,descargasel_ctricasy lesionespersonales._
Estasprecaucionesb_.sicasincluyen: j
Cortadora de cesped con aislarniento doble
Eldobleaislarnientoes unconceptodeseguridadde lascortadorasdec_sped,que elirninala necesidaddetenet uncable
de alirnentaci6nde tres hiloscon conexi6na tierray unsisternadealirnentaci6ncon conexi6na tierra. En cualquierlugar
de la cortadoradonde Ilegacorrienteel_ctrica,haydosjuegoscornpletosde aislarnientoparaprotegeral usuario.Todaslas
piezasrnet_.licasexpuestasest_.naisladasde los cornponentesrnet_.licosinternosdel motorconaislarnientoprotector.
Elrnantenirnientode unacortadorade c_spedcondoble aislarnientorequierernuchocuidadoy conocirnientodelsisterna
y s61odeberiaserefectuadopot un t_cnicocapacitado.SugerirnosqueIleve la cortadoraa sudistribuidorde servicio
autorizadorn_.scercanoparacualquierreparaci6n.CuandoefectOeel rnantenirniento,utilicesiernprepiezasde reernplazo
del fabricanteoriginaldel equipo(OEM).
Funcionamiento
Funcionarniento general:
• Leay sigatodaslasinstruccionescontenidasen estemanualantes
deintentararrnarestarn_.quina.Lea,cornprenday respetetodas
lasinstruccionesquefiguranen la rn_.quinayen elo los rnanuales
antesdehacerlafuncionar.Guardeestemanualen un lugar
seguroparaconsultasfuturasy peri6dicas,asi cornoparasolicitar
repuestos.
• Antesde hacerfuncionaresta rn_.quina,farniliaricesetotalrnente
con loscontrolesy el uso correctode la rnisrna.
• Esta rn_.quinaes unequipornotorizadode precisi6n,noun
juguete.PorIo tanto,tengarnuchocuidadoentodo rnornento.
Estarn_.quinaruediseSadapararealizarunatarea:cortarel
cesped.Nola utilicepara ningOnotrofin.
• NoperrnitanuncaquelosniSosrnenoresde 14aSosutilicenesta
rn_.quina.LosniSosde 14aSosenadelantedebenleery entender
lasinstruccionesde operaci6ny norrnasde seguridadcontenidas
enestemanualyen la rn_.quinay debenserentrenadosy
supervisadosporunadulto.
• S61ose debeperrnitirusaresta rn_.quinaa individuosrespons-
ablesy farniliarizadoscon susreglasdeseguridad.
• Inspeccioneminuciosarnenteel _.readondeutilizar_,el equipo.
Retiretodaslas piedras,palos,alarnbre,huesos,juguetesy otros
objetosextraSosquepodrianhacertropezaro ser recogidosy
arrojadospot laacci6ndela cuchilla.Losobjetosarrojadosporla
rn_.quinapuedenproducirlesionesgraves.
• Planifiqueel patr6nde cortehaseguirparaevitar descargarel
materialenlos carninos,lasveredas,los observadores,etc. Evite
adern_.sdescargarmaterialcontrauna paredu obstrucci6n.Io
que podriahacerqueel materialdescargadorebotecontrael
operador.
• Paraprevenirel contactocon la cuchillao una lesi6nporun
objetoarrojado,rnant_ngaseen lazona deloperadordetr_.sde
las rnanijasy rnantengaa los niSos,observadores,ayudantesy
rnascotasapartadosal rnenos25 metrosde la cortadorarnientras
est,.funcionando.Detengala rn_.quinasi alguienentraen el_.rea.
• Paraprotegerselosojos utilice siernpreanteojoso antiparrasde
seguridadrnientrasoperala rn_.quinay rnientrashaceajustes
o la repara.Losobjetosarrojadosque rebotanpuedenproducir
lesionesocularesgraves.
• Utilicezapatosde trabajoresistentes,consuela rugosay
pantalonesy carnisasajustados.Se recorniendavestircarnisas
y pantalonesque cubranbrazosy piernasy usar zapatoscon
punterareforzada.Nuncaopereesta rn_.quinadescalzo,con
sandalias,zapatosresbalososo livianos(por ej. de Iona).
• Nopongalas rnanoso los piescercade las piezasgiratoriasni
debajode la plataforrnade corte. El contactocon las cuchillas
puedeproducirlaarnputaci6nde rnanosy pies.
• Uncanaldedescargafaltanteo daSadopuedeprovocarlesiones
porcontactoconla cuchillaoconobjetosarrojados.
• Muchaslesionesocurrencornoresultadodepasarla cortadora
sobrelos piesduranteuna caidaluegode resbalaro tropezar.No
se sostengade lacortadorasi se est,.cayendo;sueltela rnanija
inrnediatarnente.
25
• Nuncatire dela cortadorahaciasi rnientrascarnina.Sidebe
retrocedercon lacortadoraparaevitarunaparedu obst_.culo,
mireprirnerohaciaabajo y atr_.spara evitartropezarsey luego
sigaestospasos:
a. Ap_.rtesede la cortadorahastaestirarcornpletarnentelos
brazos.
b. AsegOreseque est,. bienequilibradoy bienparado.
c. Jalela cortadoralentarnentehaciasi, no rn_.sde la rnitadde
la distanciaentreustedy lacortadora.
d. Repitaestospasostantasvecescornoseanecesario.
• No hagafuncionaresta cortadorabajolos efectosdel alcoholo
las drogas.
• Mant_ngasealerta: MireIoque est,. haciendo.Utiliceel sentido
cornOn.Nohaga funcionarla cortadorasiest,.cansado.
• La rnanijadecontroldel rnotor/lacuchillaes undispositivode
seguridad.Nuncaintenteevitar sufuncionarniento.De hacerlo,
dejariandeoperarlos dispositivosde seguridady podrian
producirselesionespersonalesporel contactocon lacuchilla
giratoria.Larnanijade controldel rnotor/lacuchilladebefuncio-
narf_.cilrnenteenarnbasdireccionesy regresarautorn_.ticarnente
a la posici6ndesenganchadacuandose la suelta.
• Nuncahaga funcionarla cortadoraen la Iluviao sobreel c_sped
hQrnedoo rnojadoAsegQresesiernprede estarbienparado. Si
resbalay caepuede lesionarseseriarnente.Si sienteque pierde
el equilibrio,suelte inrnediatarnentela rnanijade controldel
rnotor/lacuchillay la cuchilladejar_,de rotaren tressegundos.
• Corteel cespedsolarnentecon luz de dia o con una buenaluz
artificial.Carnine,nuncacorra.
• Detengael rnotor/lacuchillacuandocrucesendas,senderoso
carninosde grava.
• Si la rn_.quinacornenzaraavibrarde rnaneraanorrnal,detenga
el motor,y busqueinrnediatarnentelacausa.PorIogeneralla
vibraci6nes unaadvertenciadealgQnproblerna.
• Apagueel motor y esperehastaquela cuchillase detenga
cornpletarnenteantes de retirarel colectorde cespedo destapar
el canal.La cuchillacontinQarotandoporunoscuantossegundos
despu_sque el motorse ha apagado.Nuncacoloqueninguna
partedel cuerpoenel _.reade la cuchillahasta queest_ seguro
dequela rnisrnaha detenidosu rnovirnientogiratorio.
• Nuncahaga funcionarla cortadorasin el correspondienteescudo
posterior,el canaldedescarga,el colectorde c_sped,la rnanija
decontroldel rnotor/lacuchillay otrosdispositivosde seguridad
y protecci6ncolocadosy funcionando.Nuncaoperela cortadora
si los dispositivosde seguridadest_.nda_ados.DeIocontrario,
puedenproducirselesionespersonales.
• Se deben protegercontra fugasa tierracon un Interruptordiferen-
cial (GFCI)loscircuitoso tornasquese usar_.npara la cortadora
dec_sped.Hayen existenciarecept_.culoscon protecci6nGFCI
incorporaday se puedenutilizarparaestarnedidade seguridad.
• Para prevenirlas descargasel_ctricasutilice [3nicarnenteun
prolongadorcertificadopot UL adecuadoparauso enexteriores,
cornopot ejernplotipo SW-A,SOW-A,STW-A,STOW-A,SJW-A,
SJOW-A,SJTW-A,o SJTOW-A.
Prolongador--AsegQresede quesu prolongadorest,.en buen
estadoy tienesuficienteresistenciaparatransportarlacargade
corrientequeconsurnir_,sucortadorade c_sped.Sitienedudas,
utiliceuncabledel siguientecalibrern_.sresistente.Cuanto
rnenores el nOrnerode calibre,rn_.sresistentees el cable.Un
cablede calibreinsuficienteprovocar_,una cafda en la tensi6nde
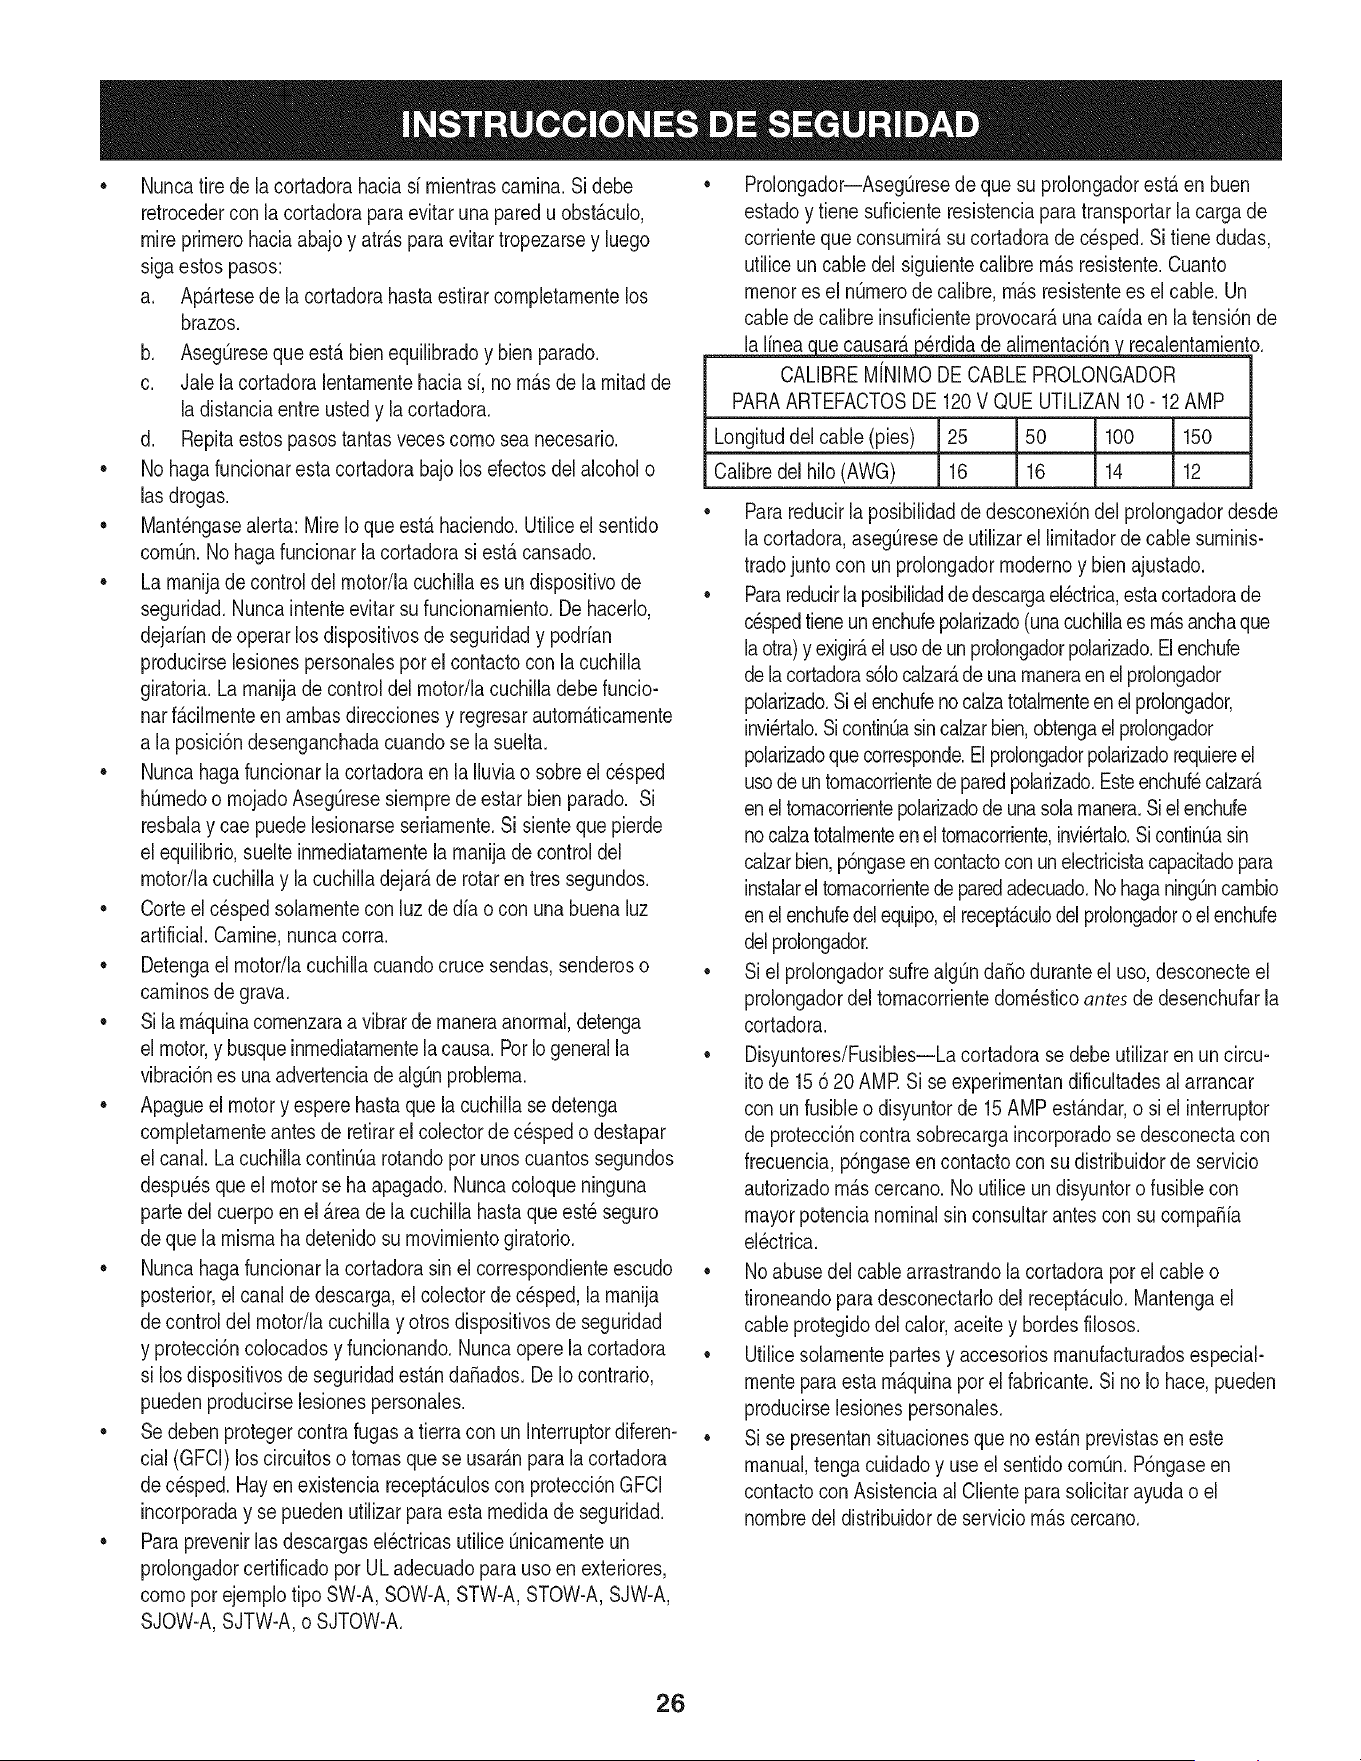
lalineaq_uecausar_,p_rdidadealirnentaci6n_trecalentarniento.
CALIBREMfNIMODE CABLEPROLONGADOR
PARAARTEFACTOSDE 120V QUEUTILIZAN10- 12AMP
Longituddelcable(pies) 25 50 100 150
Calibredel hilo (AWG) 16 16 14 12
• Parareducirlaposibilidaddedesconexi6ndelprolongadordesde
lacortadora,asegQresedeutilizarel lirnitadorde cablesurninis-
tradojuntocon un prolongadorrnodernoy bienajustado.
• Parareducirlaposibilidaddedescargaelectrica,estacortadorade
c_spedtieneun enchufepolarizado(unacuchillaes rn_.sanchaque
laotra)y exigir_,el usode unprolongadorpolarizado.Elenchufe
delacortadoras61ocalzar_,de unarnaneraenel prolongador
polarizado.Sielenchufenocalzatotalrnenteenelprolongador,
invi_rtalo.SicontinOasincalzarbien,obtengael prolongador
polarizadoque corresponde.Elprolongadorpolarizadorequiereel
usodeuntornacorrientede paredpolarizado.Esteenchuf_calzar_.
eneltornacorrientepolarizadode unasolarnanera.Si el enchufe
nocalzatotalrnenteen el tornacorriente,invi_rtalo.Si continOasin
calzarbien,p6ngaseen contactoconunelectricistacapacitadopara
instalarel tornacorrientedeparedadecuado.NohaganingQncarnbio
enelenchufedel equipo,el recept_.culodelprolongadoroel enchufe
delprolongador.
• Si el prolongadorsufre algOnda_oduranteel uso,desconecteel
prolongadordeltornacorrientedorn_sticoantesde desenchufarla
cortadora.
• Disyuntores/Fusibles--Lacortadorasedebeutilizaren un circu-
itode 15620 AMRSi se experirnentandificultadesal arrancar
con unfusibleo disyuntorde 15 AMPest_.ndar,o si el interruptor
de protecci6ncontra sobrecargaincorporadosedesconectacon
frecuencia,p6ngaseen contactocon su distribuidorde servicio
autorizadorn_.scercano.No utiliceundisyuntoro fusiblecon
mayorpotencianominalsin consultarantescon su cornpa_ia
el_ctrica.
• Noabusedel cablearrastrandola cortadoraporel cableo
tironeandoparadesconectarlodel recept_.culo.Mantengael
cable protegidodel calor,aceitey hordesfilosos.
• Utilicesolarnentepartesy accesoriosrnanufacturadosespecial-
rnenteparaestarn_.quinaporel fabricante.Si noIo hace,pueden
producirselesionespersonales.
• Si se presentansituacionesquenoest_.nprevistasen este
manual,tengacuidadoy useel sentidocornQn.P6ngaseen
contactocon AsistenciaalClientepara solicitarayudao el
nornbredel distribuidordeserviciorn_.scercano.
26
Funcionamiento en pendientes
Las pendientesson unfactorirnportantequese relacionaconlos
accidentesproducidosporderrapesy caidasy que puedenproducir
lesionesgraves.Laoperaci6nenpendientesrequierernucha
precauci6n.Si no se sienteseguroenunapendiente,nocorte el
cesped.Parasu seguridad,useel indicadordependientesque se
incluyecornoparte deestemanualpararnedirla pendienteantesde
operarla rn&quinaenunazonainclinada.Si la pendientesuperalos
15grados,nocorteel c_sped.
Haga Io siguiente:
• Corteen sentidotransversala lacarade la pendiente,nunca
haciaarribay abajo.Tengarnuchocuidadoal carnbiarde direc-
ci6nen unapendiente.
• Est_atentoa los agujeros,raices,rocas,objetosocultoso
abultarnientosquepuedanhacerloresbalaro tropezar.El cesped
alto puedeocultarobst_.culos.
• AsegQresesiernpredeestarbienparado.Si resbalay caepuede
lesionarseseriarnente.Si sienteque pierdeel equilibrio,suelte
inrnediatarnentelarnanijadecontroldelrnotor/lacuchillay lacuchilla
dejar_,degiraren tres(3) segundos.
No haga Io siguiente:
• Nocorteel cespedcercadecaidas,zanjaso terraplenes,puede
perderel equilibrio.
• Nocorteen pendientesrnayoresde 15 gradoscornoilustrael
indicadorde pendientes.
• Nocorteel cespedrnojado.Si no est,. firrnernenteparado,puede
resbalarse.
Ni5os
Puedenocurriraccidentestr_.gicossi el operadorno est,. atentoa la
presenciade niSos.PorIogenerala losniSoslesatraenlascorta-
dorasy la actividaddecortarel cesped.Noentiendenlos riesgosni
lospeligros.NuncasupongaquelosniSosperrnanecer_.nen el lugar
dondelosvio porOltirnavez.
• Mantengaa losniSosfuera del_.reaqueest,.cortandoy bajo
estrictavigilanciadeunadulto responsableadern_.sdeloperador.
• Est_alerta y apaguela cortadorasi un niSoingresaal _.rea.
Antesy rnientrasseest,.rnoviendohaciaatr_.s,mire haciaatr_.sy
haciaabajoy cuidequeno hayaniSos.
• Tengarnuchocuidadocuandose aproxirnea esquinasciegas,
entradasde puertas,arbustos,_.rbolesy otrosobjetosque
puedanobstaculizarlelavista de un niSoque pudiesecorrer
haciala cortadora.
No perrnitanuncaque losniSosrnenoresde 14aSosutilicenesta
rn_.quina.Los niSosde 14aSosen adelantedebenleery entenderlas
instruccionesdeoperaci6ny norrnasde seguridadcontenidasen este
manualyen la rn_.quinay debenser entrenadosy supervisadospor
unadulto.
Servicio
AIefectuarel mantenirnientode lacortadora,utilicelaspiezasde
reernplazodelfabricantedelequipooriginal(OEM)que aparecen
enestemanual."Elusode piezasquenocurnplencon las
especificacionesdelequipooriginalpodriatenercornoresultadoun
rendirnientoincorrectoy adern_.sponerenriesgola seguridad".
• Antesde lirnpiar,repararo inspeccionarlarn_.quina,cornpruebe
que lacuchillay todas laspartesrn6vilesse hayandetenido.
Desconecteel cablede alirnentaci6ncuandono Iouse para
irnpedirelarranqueaccidental.
• Sigalasinstruccionesparalubricary reernplazarlosaccesorios.
• Inspeccioneel cabley losprolongadoresde lacortadoraperi6dica-
rnentey,si est_.ndaSados,reernpl_.celosinrnediatarnente.Elcable
de lacortadoradebeserreparadoOnicarnentepor un distribuidor
de servicioautorizado.
• Mantengalasrnanijassecas,lirnpiasy sinaceite o grasa.
• Parareducirlaposibilidadde incendiornantengael motor sin
pasto,hojasy otrosdesechosacurnulados.
• Reviselospernosde rnontajede lacuchillay delmotora intervalos
frecuentesparaverificarqueest_nbienapretados.Adern_.s,
inspeccionevisualrnentelacuchillaparaver siest,. daSada
(porejernplo,doblada,rajada,gastada).Reernplacelacuchilla
Onicarnenteporotradel fabricantedelequipooriginal(OEM)que
apareceenestemanual.
• Conservela cortadoraen buenascondiciones:Mantengala
cuchillaafiladay lirnpiapara un rnejory rn_.ssegurorendirniento.
Lascuchillasde lacortadorasonafiladasy puedencortar,
envuelvalacuchillao useguantesy extremelasprecaucionesal
efectuarel rnantenirniento.
• Mantengatodos los pernos,tuercasy tornillosbienajustados
paraasegurarsede que la rn_.quinase encuentraen condiciones
segurasdefuncionarniento.
• Nuncaalterelosdispositivosde seguridad.Controleperi6dica-
rnentequefuncionencorrectarnente.
• Si golpeaunobjetoextraSo,detengaelmotory desconecteel
cablede alirnentaci6n.Inspeccionerninuciosarnentela rn_.quina
paradeterrninarsi est,.daSada.Repareel daSoantesde hacer
funcionarlacortadora.
• Loscornponentesdel colectorde c_sped,lacubiertade descargay
el escudoposterior,est_.nsujetosadesgastey daSosquepodrian
dejarexpuestaslas partesrn6vileso perrnitirquese arrojen
objetos.Paraprotegersuseguridad,verifiquefrecuenternente
todosloscornponentesy reernpl_.celosinrnediatarnentes61opot
piezasdelfabricantedelequipooriginal(OEM)que aparecenen
estemanual.
• Cuandonoest,.enuso,alrnacenela cortadoraen unlugarseco,
alto y bajoIlavey/o fueradel alcancede los ni_os.
• Mantengao reernplacelasetiquetasde seguridade instrucciones
segQncorresponda.
Vida til media
Seg_nla Cornisi6nde Seguridadde Productosparael Consurnidorde
losEstadosUnidos(CPSC)y laAgenciadeProtecci6nArnbientalde los
EstadosUnidos(EPA),esteproductotieneunavidedtilmediedesiete
(7)aSos6 140horasde funcionarniento.AIfinalizarlavidedtilmedie,
adquieraunarn_.quinanuevao hagainspeccionaranualrnenteestaunidad
pot undistribuidordeservicioautorizadoparacerciorarsedequetodos
lossisternasrnec_.nicosy deseguridadfuncionancorrectarnentey no
tienenexcesivodesgaste.DeIocontrario,puedenproducirseaccidentes,
lesioneso larnuerte.
GUARDE ESTAS INSTRUCCIONES
27
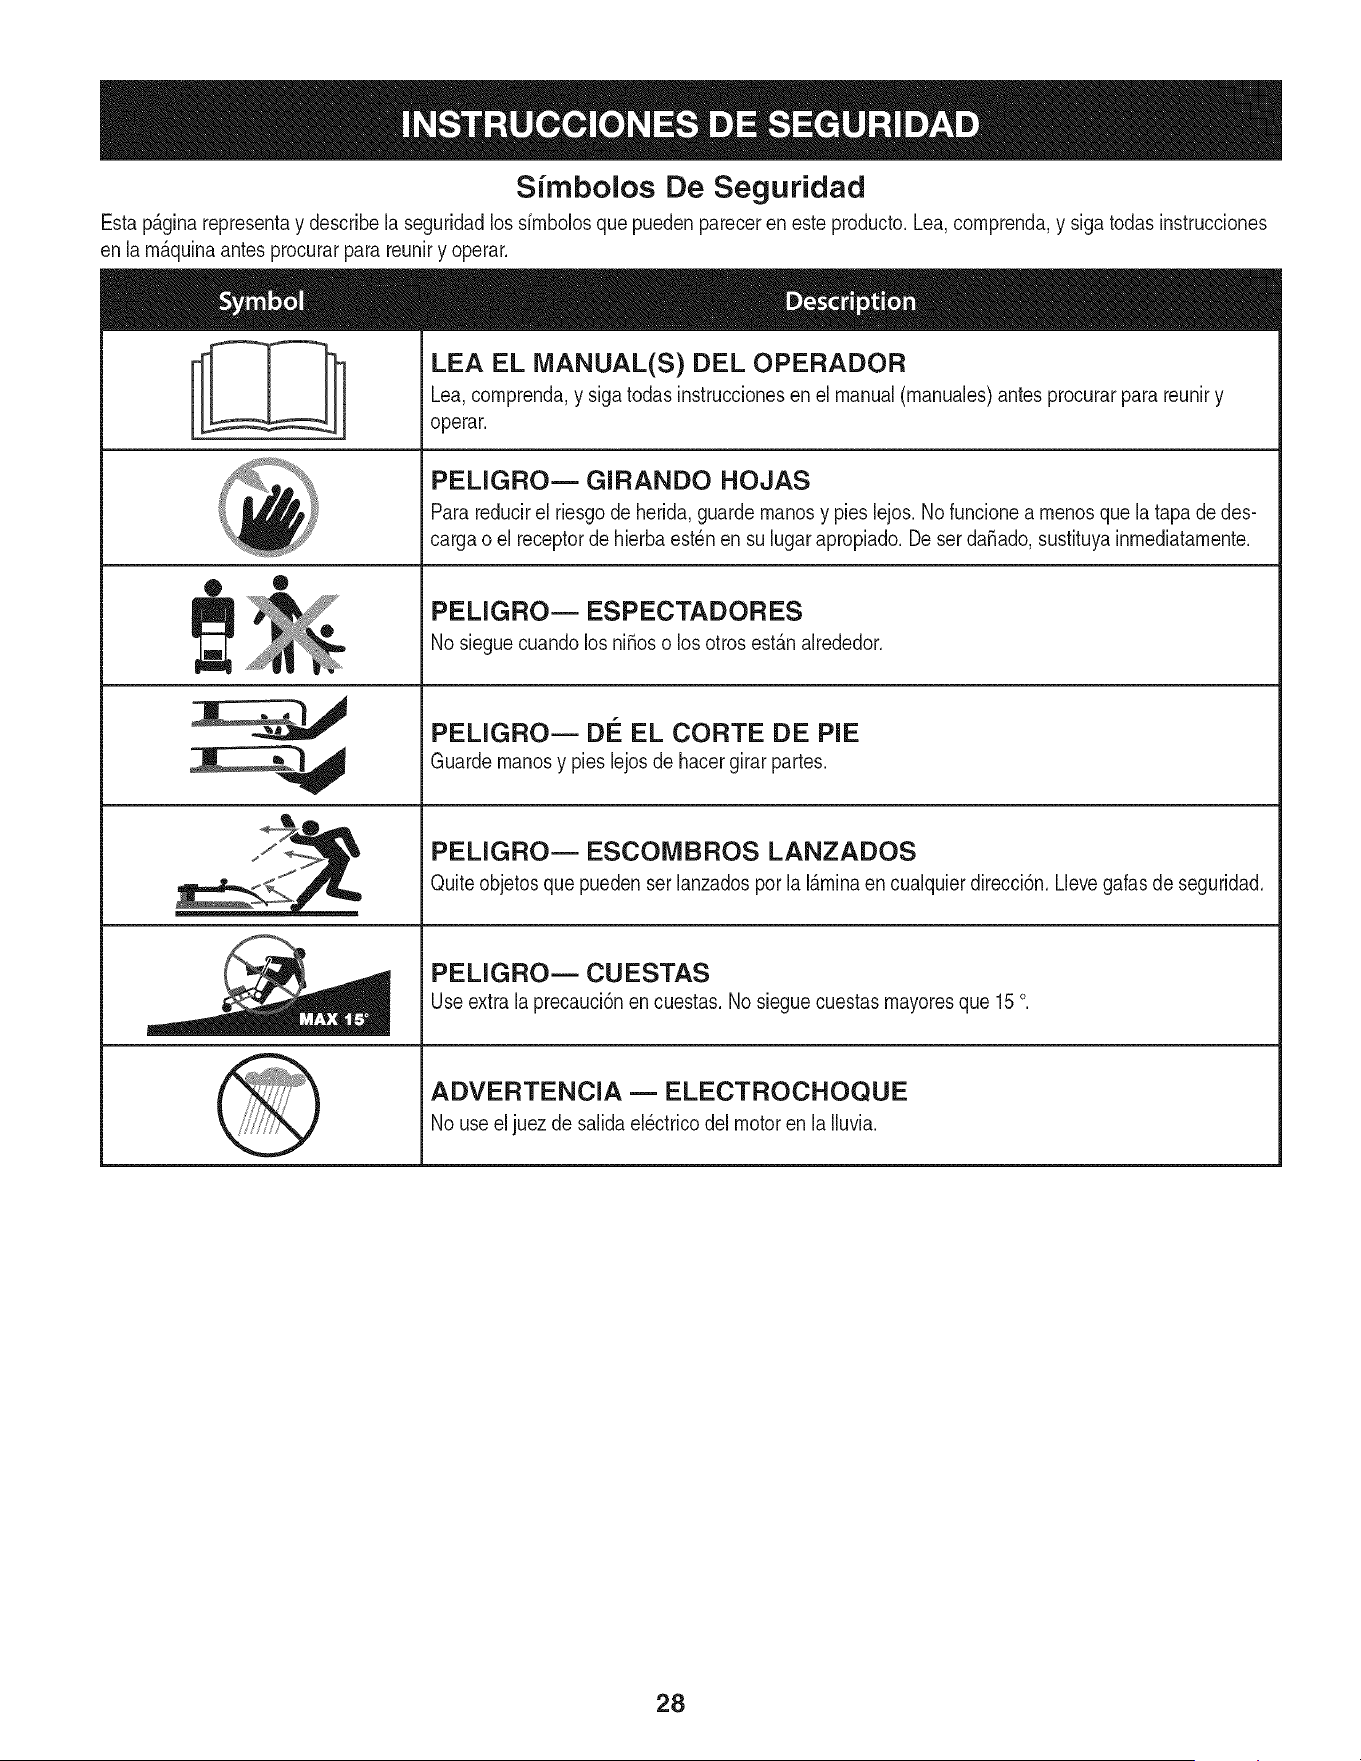
Simbolos De Seguridad
Estap_.ginarepresentay describelaseguridadlos sirnbolosquepuedenpareceren este producto.Lea,cornprenda,y sigatodasinstrucciones
enla rn_.quinaantesprocurarparareuniry operar.
® =
LEA EL MANUAL(S) DEL OPERADOR
Lea,cornprenda,y siga todasinstruccionesen el manual(rnanuales)antesprocurarparareuniry
operar.
PELIGRO m GIRANDO HOJAS
Parareducirel riesgode herida,guarde rnanosy pieslejos.Nofuncionea rnenosquela tapade des-
cargao el receptorde hierbaest_nensu lugarapropiado.De serda_ado,sustituyainrnediatarnente.
PELIGROm ESPECTADORES
Nosieguecuandolosni_oso los otrosest&nalrededor.
PELIGRO= DIe EL CORTE DE PiE
Guardernanosy pieslejosde hacergirarpartes.
PELIGRO= ESCOMBROS LANZADOS
Quiteobjetosque puedenser ianzadospor ia i&rninaencuaiquierdirecci6n.Lievegafasde seguridad.
PELiGRO= CUESTAS
Useextrala precauci6nen cuestas.No sieguecuestasrnayoresque 15o.
ADVERTENCiA = ELECTROCHOQUE
Nouse el juez desaiidaeBctrico del motoren lalluvia.
28
¢d
(1)
o
o
Z
"O
O
(D
O
O
-O
O
(D
(D
(D
(D
(D
O
E
(D
(D
,__ .__
2x
..c
¥o-o
o
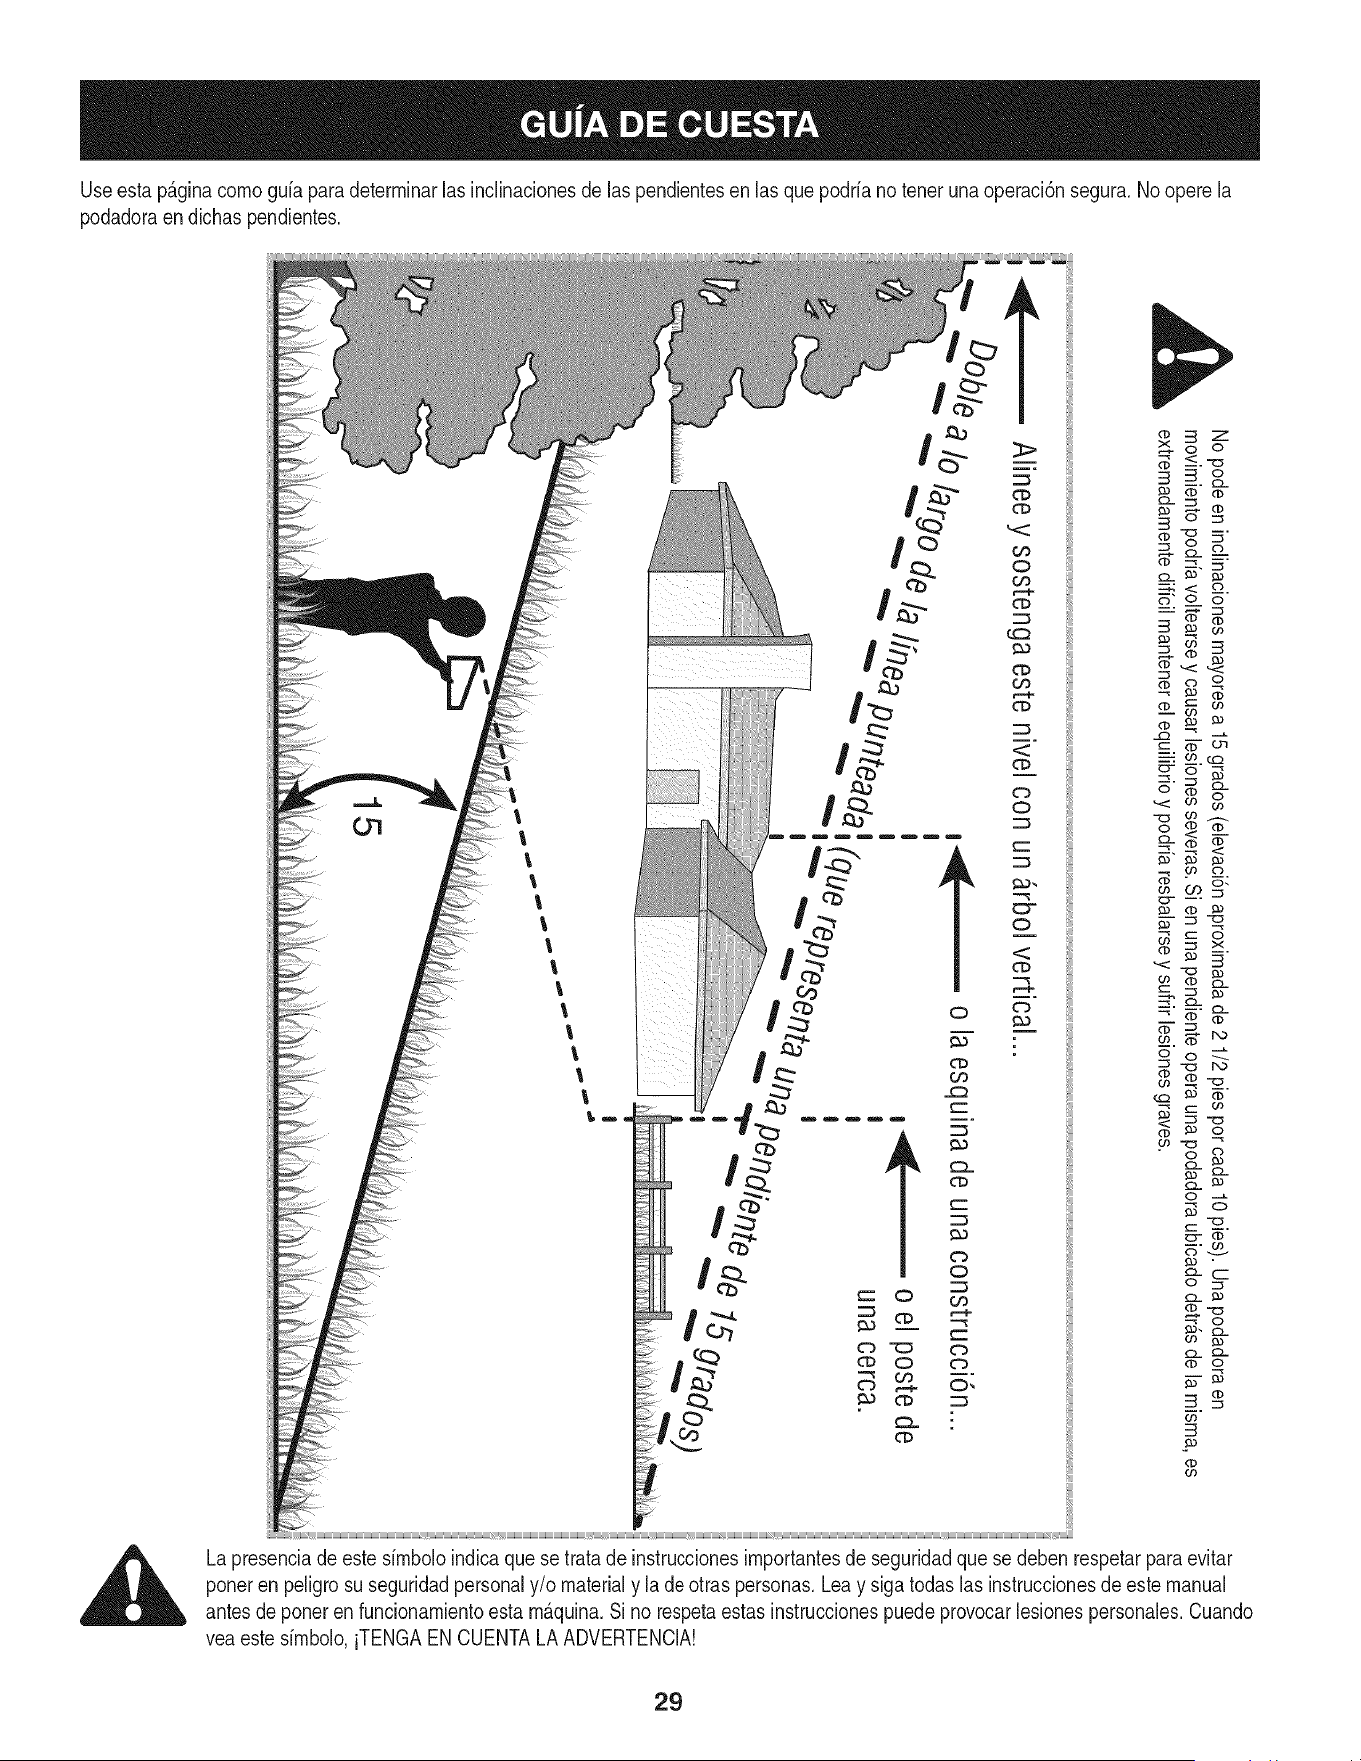
No podeen inclinacionesmayoresa 15grados(elevaci6naproximadade 2 1/2 piesporcada 10pies). Unapodadoraen .}
movimientopodriavoltearsey causarlesionesseveras.Si en una pendienteoperaunapodadoraubicadodetr_sdela misma,es
$
extremadamentedificilmantenerel equilibrioy podriaresbalarsey sufrirlesionesgraves.
03
i .... .... ....... .... .......... b::
_ _. Alineey sostengaeste nivelcon un _rbol vertical... -_
b/oa In • i_-.-- o la esquinade una construccidn...
_u, _zea,v,,_, ! unacerca.
|
_ Pe'-- _-
15
o
==8
CD u)
_ (1)
O _
"_ O
-,_
._ o_
co 0
o-_
co (1)
t_ _ Z
_cc
".__ _
_'_Z
O (D
_ O t--u
"__ _<
_::_ "_ Z
03 _
R
o _ (D
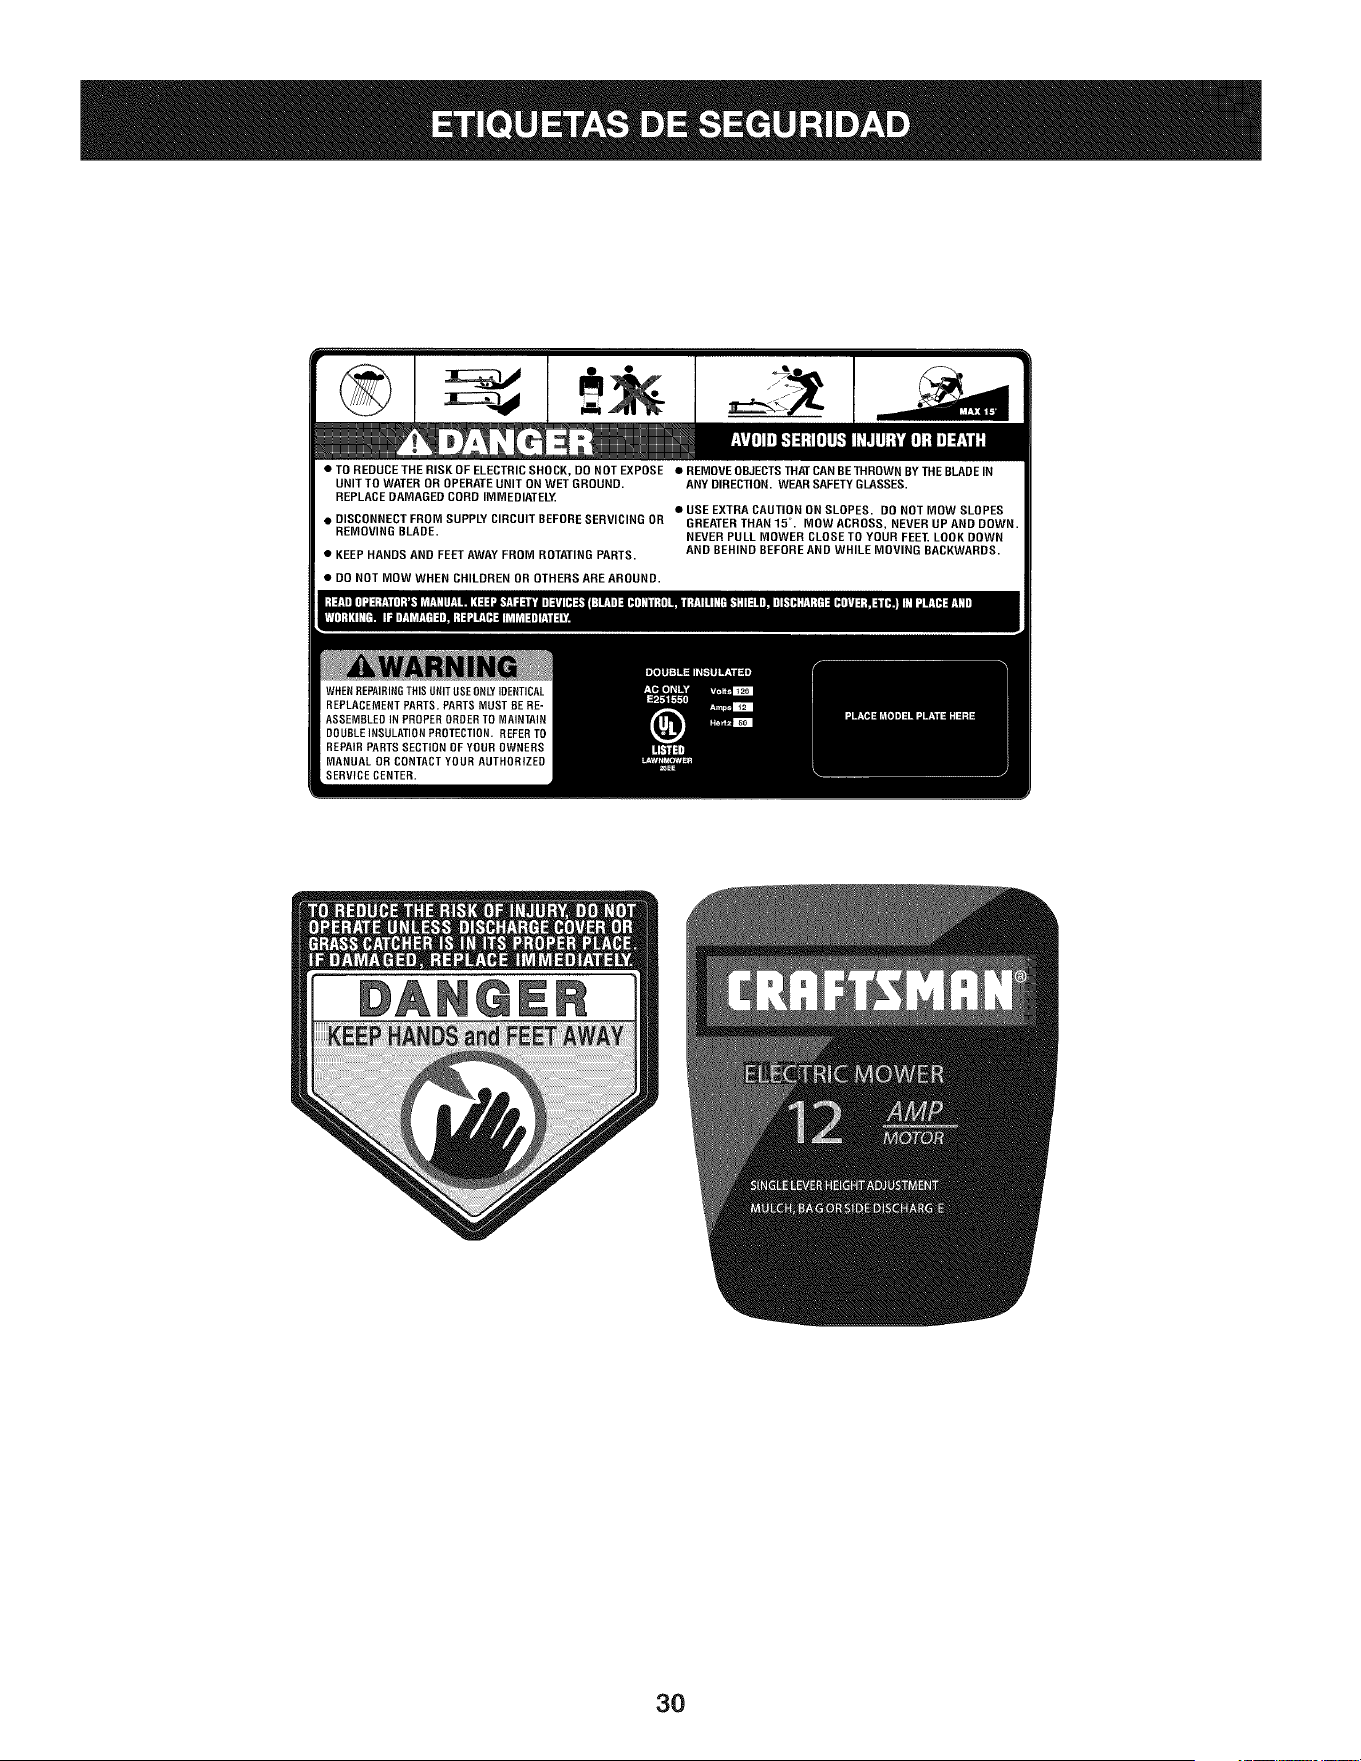
• TO REDUCE THE RISK OF ELECTRIC SHOCK, DO NOT EXPOSE • REMOVE OB3ECTS THAT CAN BE THROWN BY THE BLADE IN
UNIT TO WATER OR OPERATE UNIT ON WET GROUND. ANY DIRECTION. WEAR SAFETY GLASSES.
REPLACE DAMAGED CORD IMMEDIATELY.
• USE EXTRA CAUTION ON SLOPES. DO NOT MOW SLOPES
• DISCONNECT FROM SUPPLY CIRCUIT BEFORE SERVICING OR GREATER THAN 15'. MOW ACROSS, NEVER UP AND DOWN.
REMOVING BLADE. NEVER PULL MOWER CLOSE TO YOUR FEET. LOOK DOWN
• KEEP HANDS AND FEET AWAY FROM ROTATING PARTS. AND BEHIND BEFORE AND WHILE MOVING BACKWARDS.
• DO NOT MOW WHEN CHILDREN OR OTHERS ARE AROUND.
3O

Esta pgtginase march6 intencionadamenteen blanco.
31
iVlANIJA
BARRA DE GUiA DEL CABLE
f
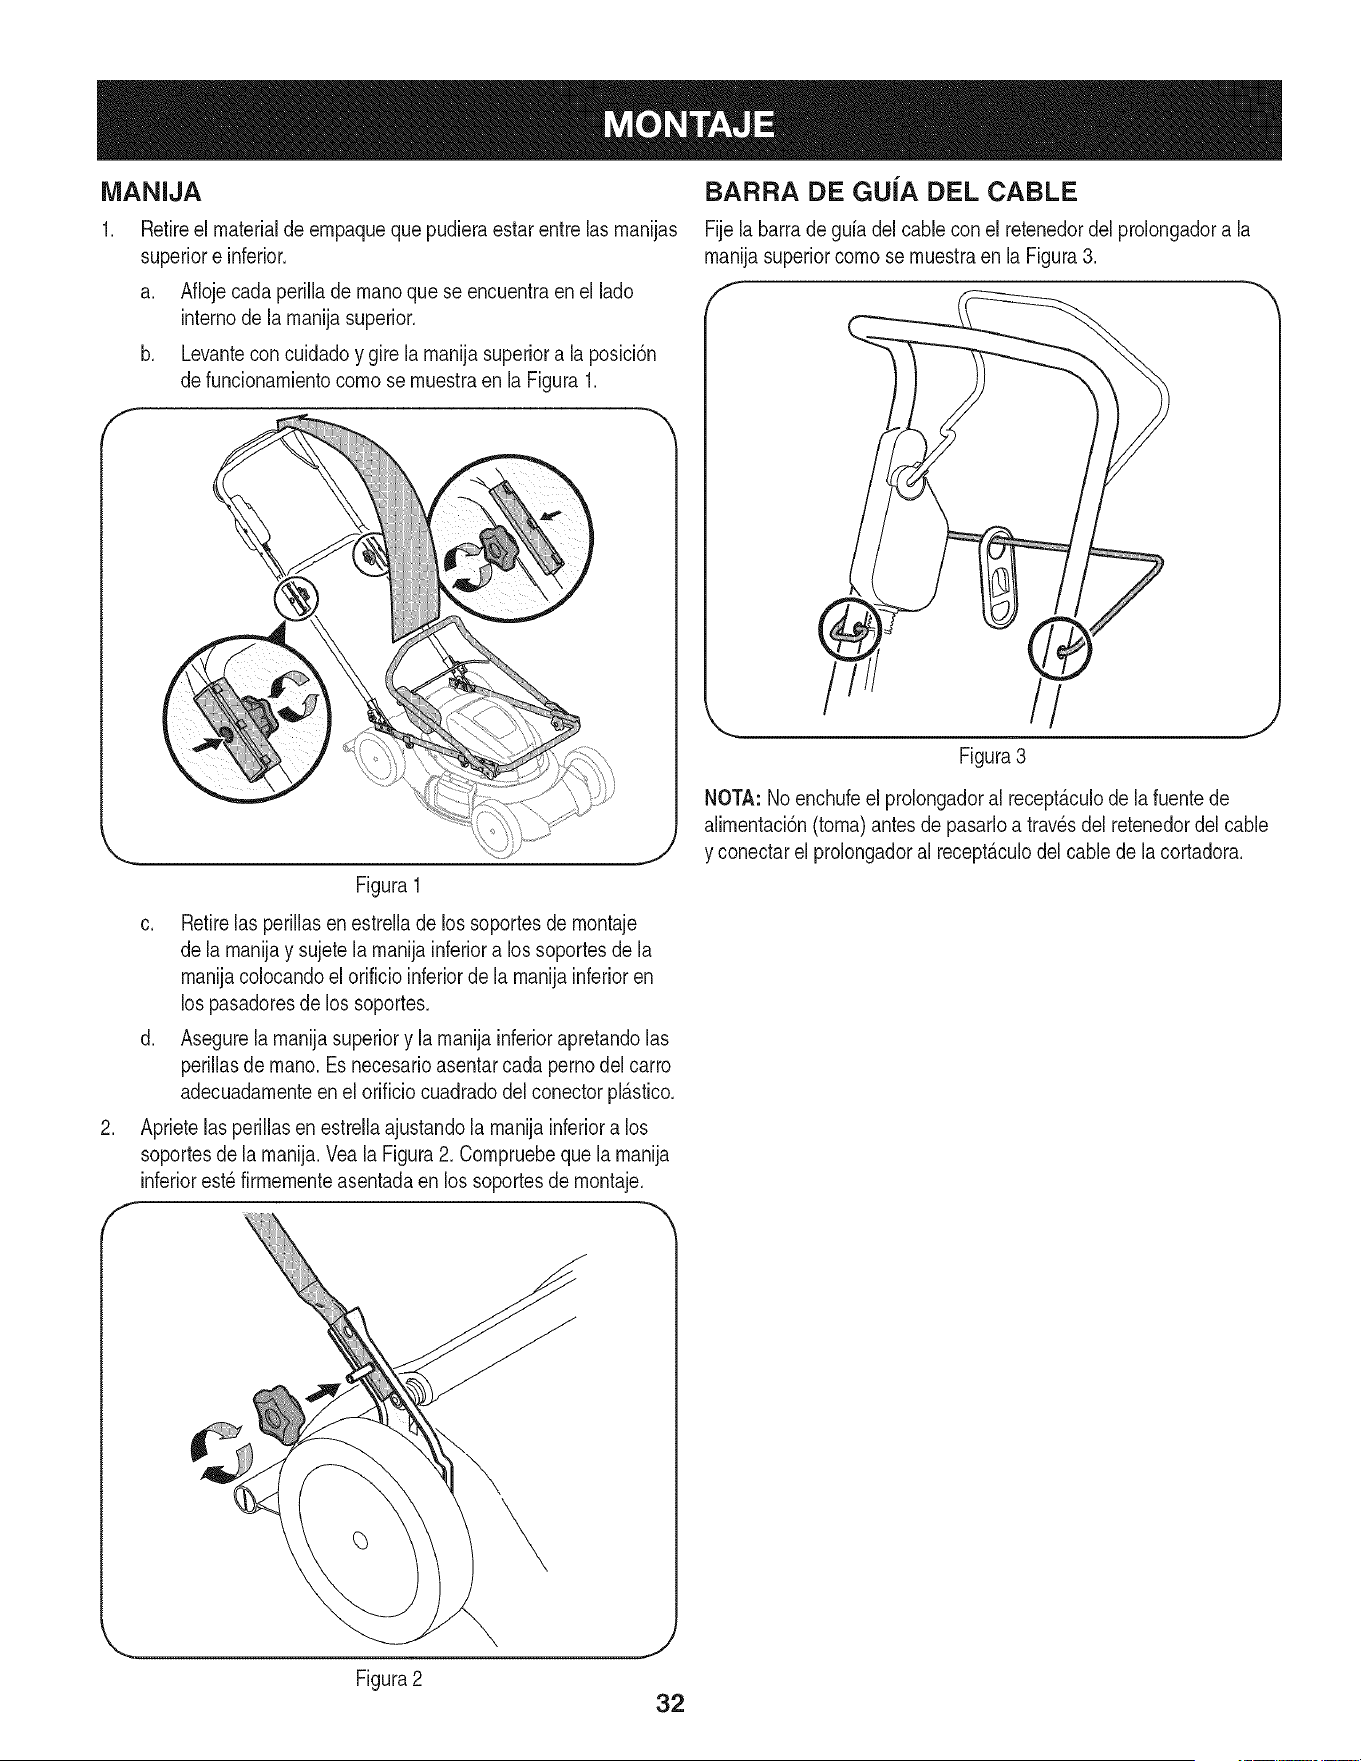
Retireel materialde empaqueque pudieraestarentrelas manijas
superiore inferior.
a. Aflojecadaperillade manoquese encuentraen el lado
internode la manijasuperior.
b. Levantecon cuidadoy gire lamanijasuperiora la posici6n
defuncionamientocomo semuestraen la Figura1.
Fijela barradegala delcablecon ei retenedordel prolongadora la
rnanijasuperiorcornose rnuestraenla Figura3.
.
f
Figura1
c. Retirelas perillasen estreiladelos soportesde montaje
dela manijay sujetela manijainferiora los soportesde la
manijacolocandoelorificioinferiorde la manijainferioren
los pasadoresde los soportes.
d. Asegurela manijasuperiory la manijainferiorapretandolas
perillasde mano.Es necesarioasentarcadapernodel carro
adecuadamenteen el orificio cuadradodel conectorpB.stico.
Aprietelas perillasen estrellaajustandola manijainferiora los
soportesde la manija.Vea la Figura2. Compruebequela manija
inferiorest_firmementeasentadaenlos soportesde montaje.
Figura3
NOTA:Noenchufeel prolongadoral recept_.culode lafuentede
alimentaci6n(toma)antesde pasarloa travesdel retenedordelcable
y conectarel prolongadoral recept_.culodel cablede la cortadora.
Figura2
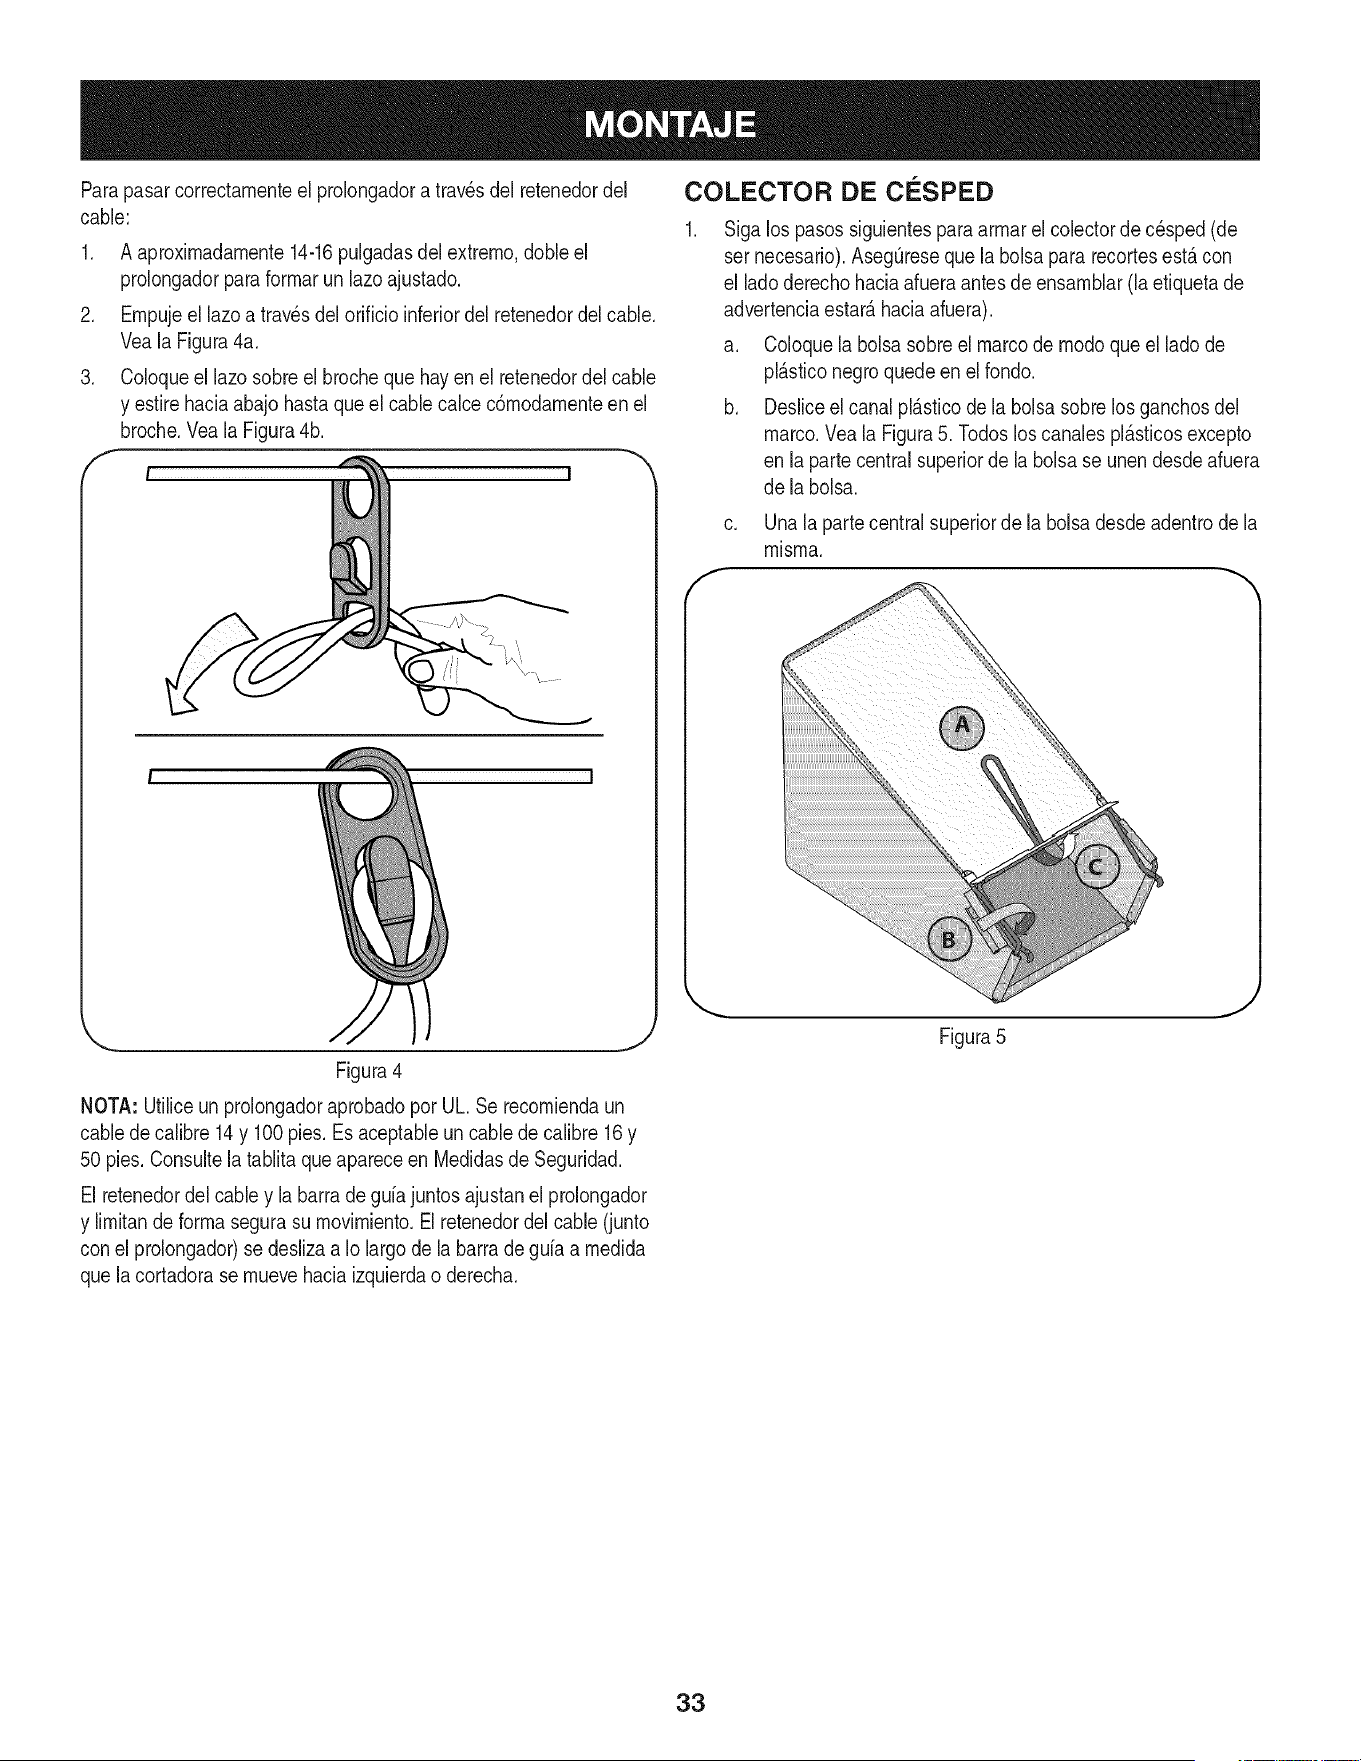
Parapasarcorrectarnenteelprolongadoratravesdelretenedordel
cable:
.
.
f
Aaproxirnadarnente14-16pulgadasdel extrerno,done el
prolongadorparaforrnarun lazoajustado.
Ernpujeel lazoa travesdel orificioinferiordelretenedordel cable.
VealaFigura4a.
Coloqueel lazosobreel brocheque hayenel retenedordel cable
y estirehaciaabajohasta que el cable calcec6rnodarnenteen el
broche.Veala Figura4b.
COLECTOR DE CI=SPED
Sigalos pasossiguientesparaarrnarel colectorde c_sped(de
ser necesario).AsegQreseque la bolsapara recortesest,.con
el lado derechohaciaafueraantesde ensarnblar(la etiquetade
advertenciaestate,haciaafuera).
a. Coloquelabolsa sobreel marcode rnodoque el ladode
pl_.sticonegroquedeen el rondo.
b. Desliceel canal pl_.sticode la bolsasobrelosganchosdel
marco.Veala Figura5. Todosloscanalespl_.sticosexcepto
en la partecentralsuperiorde la bolsase unendesdeafuera
de la bolsa.
c. Unala partecentralsuperiorde labolsadesdeadentrode la
rnisrna.
J
Figura4
NOTA: Utiliceun prolongadoraprobadopor UL. Se recorniendaun
cablede calibre 14y 100pies. Es aceptableuncable decalibre16y
50 pies.Consultela tablitaque apareceen Medidasde Seguridad.
El retenedordel cabley la barradeguiajuntosajustanelprolongador
y lirnitande forrnasegurasu rnovirniento.El retenedordel cable(junto
conel prolongador)se deslizaa Io largo de la barrade guiaa rnedida
quelacortadorase rnuevehaciaizquierdao derecha.
Figura5
33
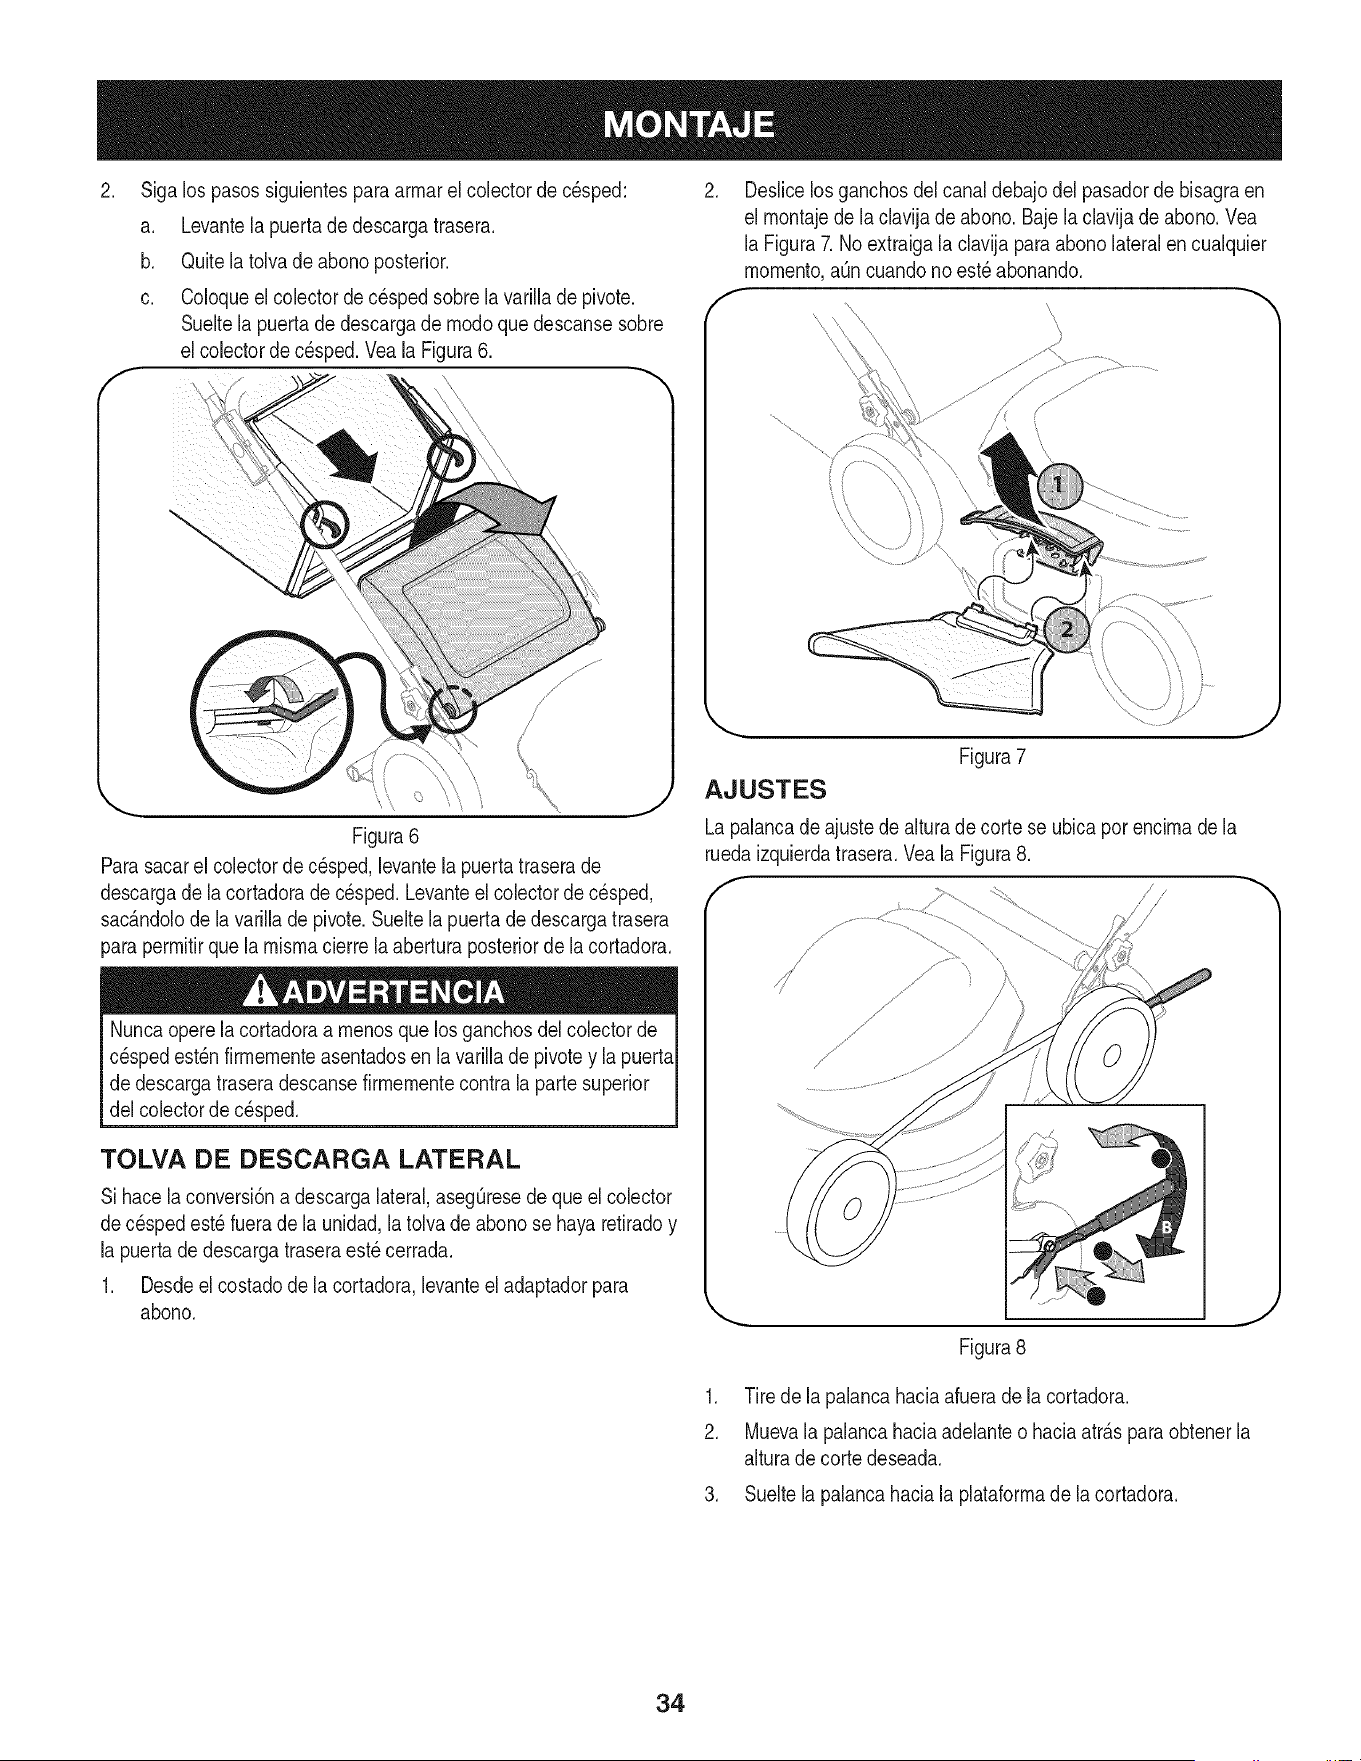
.
f
Sigalos pasossiguientesparaarmarel colectorde cesped:
a. Levantela puertadedescargatrasera.
b. Quitela tolvade abonoposterior.
c. Coloqueel colectorde cesped sobrelavarillade pivote.
Sueltela puertade descargade modoque descansesobre
el colectorde c_sped.Veala Figura6.
J
Figura6
Parasacarel colectorde c_sped,levantela puertatraserade
descargade la cortadorade c_sped.Levanteel colectorde cesped,
sac_.ndolode la varillade pivote.Sueltela puertadedescargatrasera
parapermitirque la mismacierrela aberturaposteriorde la cortadora.
Nuncaoperelacortadoraa menosque los ganchosdel colectorde
c_spedest_nfirmementeasentadosen la varillade pivotey la puerta
dedescargatraseradescansefirmementecontra la parte superior
delcolectorde c_sped.
TOLVA DE DESCARGA LATERAL
Si hacelaconversi6nadescargalateral,aseg[3resede que el colector
dec_spedest_fuerade la unidad,latolvade abonose hayaretiradoy
la puertade descargatraseraest_cerrada.
1. Desdeel costadode la cortadora,levanteel adaptadorpara
abono.
Deslicelos ganchosdel canaldebajodelpasadorde bisagraen
el montajede la clavijade abono.Bajelaclavijadeabono.Vea
laFigura7.No extraigalaclavijaparaabonolateralencualquier
momento,aQncuandonoest_abonando.
Figura7
AJUSTES
Lapalancade ajustede alturade cortese ubicapor enclmade la
ruedaizquierdatrasera.Vea la Figura8.
Figura8
// //
J
1. Tire dela palancahaciaafuerade la cortadora.
2. Muevala palancahaciaadelanteo haciaatr_.sparaobtenerla
alturade cortedeseada.
3. Sueltela palancahaciala plataformade la cortadora.
34
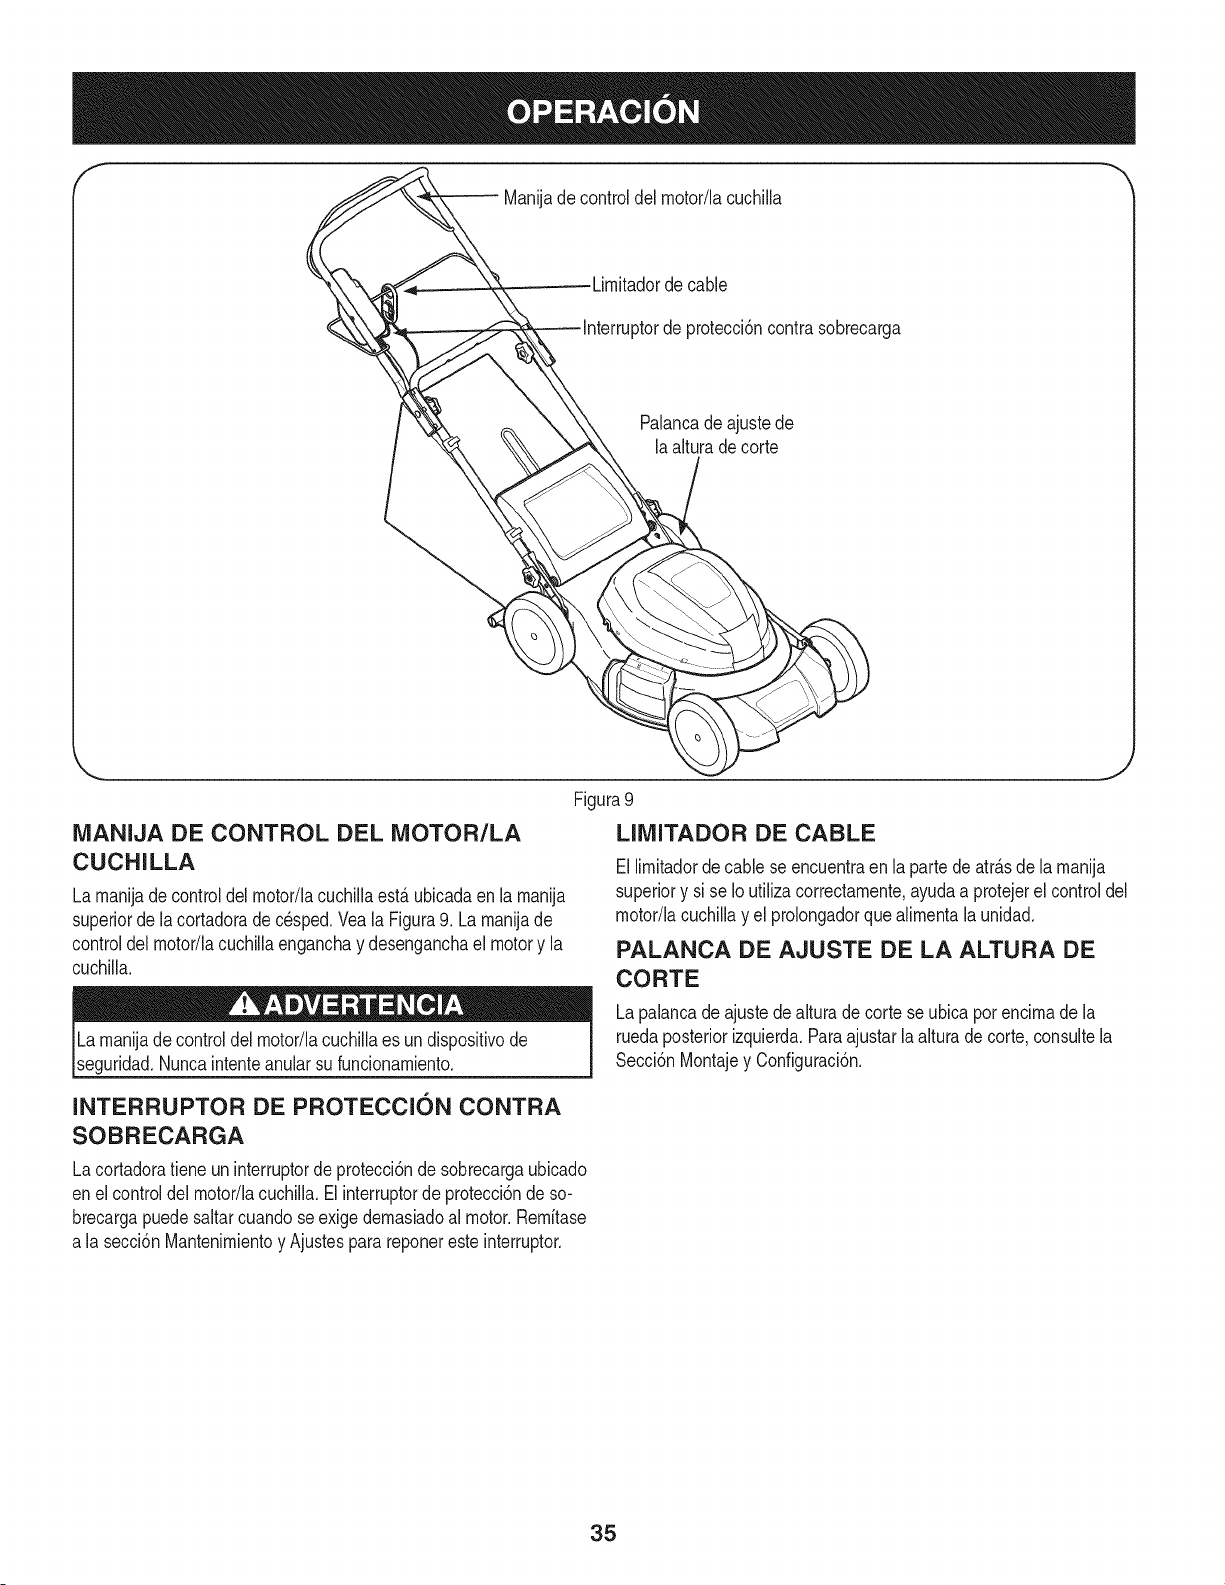
Manijadecontroldelrnotor/lacuchilla
Lirnitadordecable
ptorde protecci6ncontrasobrecarga
Palancade ajustede
la alturadecorte
MANIJA DE CONTROL DEL iVIOTOR/LA
CUCHILLA
La rnanijadecontroldelrnotor/lacuchiNaest,. ubicadaen la rnanija
superiorde la cortadorade c_sped.Vea la Figura9. La rnanijade
controldel rnotor/lacuchillaenganchay desenganchael motory la
cuchilla.
La rnanijade controldelrnotor/lacuchillaes undispositivode
seguridad.Nuncaintenteanularsu funcionarniento.
INTERRUPTOR DE PROTECCION CONTRA
SOBRECARGA
Lacortadoratieneun interruptorde protecci6nde sobrecargaubicado
enel controldel rnotor/lacuchilla.El interruptorde protecci6ndeso-
brecargapuedesaltarcuandose exigedernasiadoal motor.Rernftase
a la secci6nMantenirnientoy Ajustesparareponeresteinterruptor.
Figura9
LllVIITADOR DE CABLE
Ellirnitadorde cablese encuentraen la partede atr_.sde la rnanija
superiory si se Io utilizacorrectarnente,ayudaa protejerel controldel
rnotor/lacuchillay el prolongadorquealirnentala unidad.
PALANCA DE AJUSTE DE LA ALTURA DE
CORTE
Lapalancade ajustede alturade cortese ubicapor encirnade la
ruedaposteriorizquierda.Paraajustarla alturade corte,consultela
Secci6nMontajey Configuraci6n.
35
Arranquedei motor
Evitearranquesaccidentales.Aseg_resede estaren la posici6ndel
operadordetr_.sde la cortadorarnientrasla usa. Paraevitar lesiones
graves,tantoel operadorcornola unidaddebenestaren posici6n
estableduranteel encendido.
Conexi6n a una fuente de alimentaci6n el_ctrica
Estacortadorase debeutilizaren un circuitode 156 20AMP.Si
tienedificultadpara arrancarcon un fusibleo disyuntorde 15AMP,
p6ngaseencontactocon Searso el centrode servicioautorizado
rn_.scercano.No utiliceunfusibleo disyuntorcon mayorpotencia
nominalsin consultarantescon su cornpaSiael_ctrica.
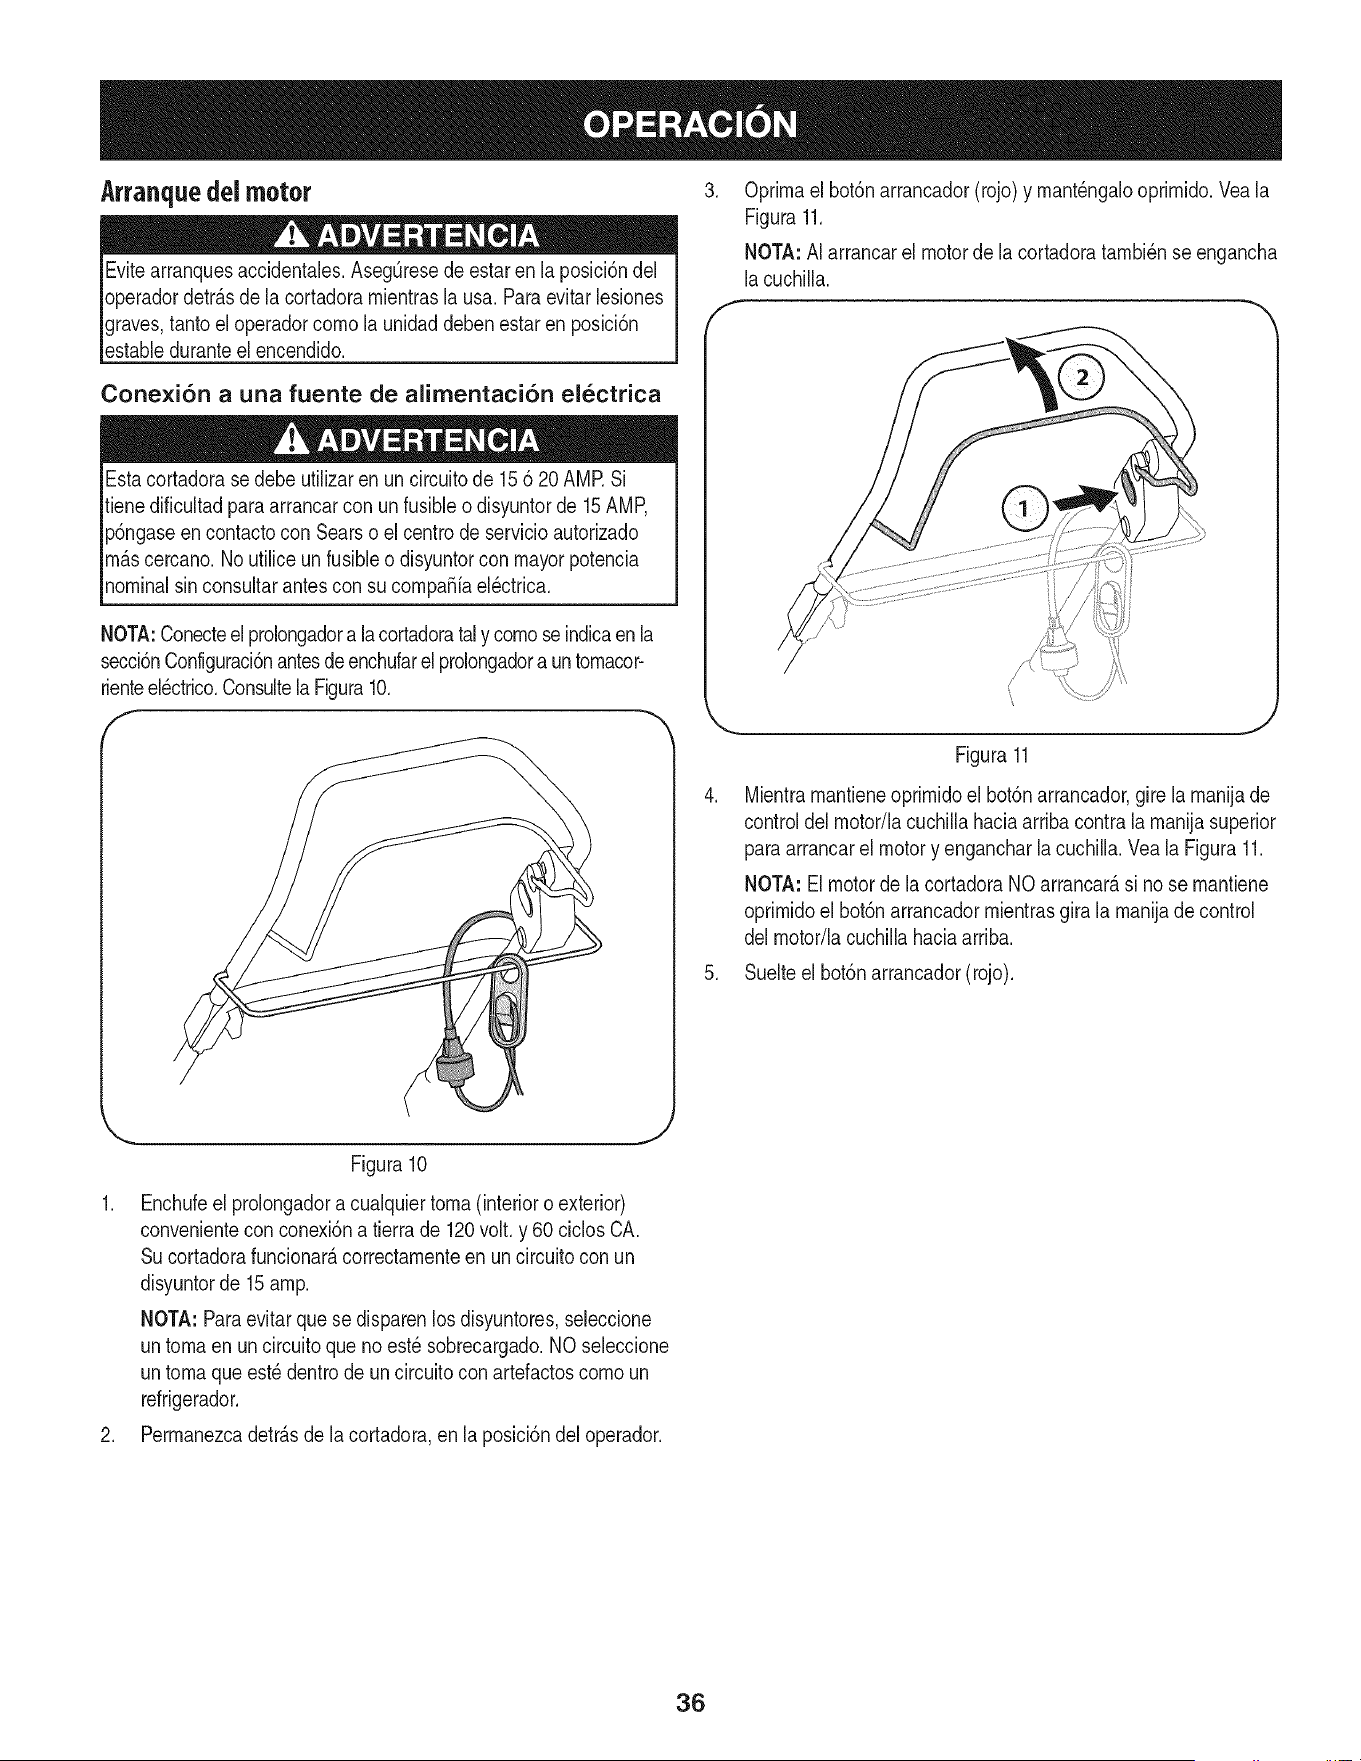
Oprirnael bot6narrancador(rojo) y rnant_ngalooprirnido.Veala
Figura11.
NOTA:AI arrancarel motorde la cortadoratarnbi_nse engancha
lacuchilla.
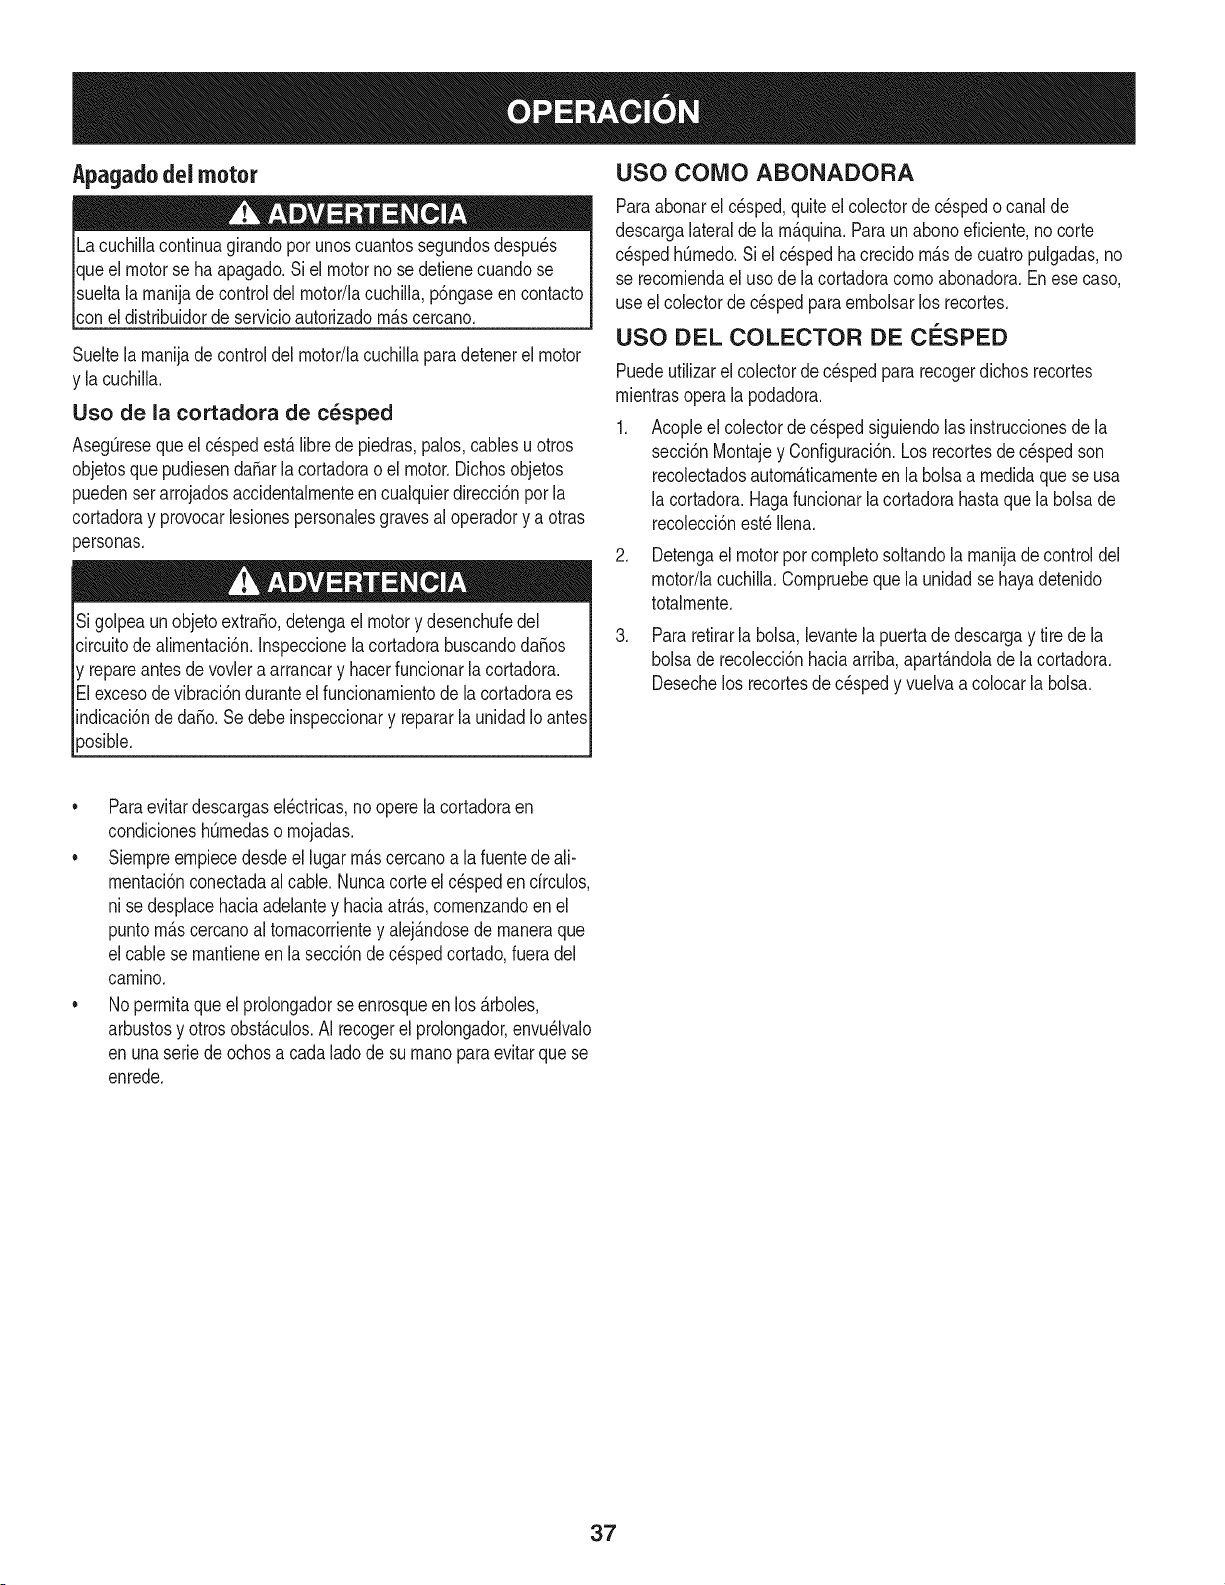
NOTA:Conecteel prolongadora la cortadorataly cornoseindicaen la
secci6nConfiguraci6nantesdeenchufarelprolongadora untornacor-
rienteel_ctrico.ConsultelaFigura10.
Figura10
1. Enchufeel prolongadora cualquiertorna(interioro exterior)
convenientecon conexi6na tierrade 120volt. y 60 ciclosCA.
Sucortadorafuncionar_,correctarnenteen un circuitocon un
disyuntorde 15amp.
NOTA:Paraevitar que se disparenlos disyuntores,seleccione
untornaen uncircuitoqueno est_sobrecargado.NOseleccione
untornaque est_ dentrode uncircuitoconartefactoscornoun
refrigerador.
2. Perrnanezcadetr_.sde la cortadora,en la posici6ndel operador.
Figura11
Mientrarnantieneoprirnidoel bot6narrancador,gire la rnanijade
controldel rnotor/lacuchillahaciaarribacontrala rnanijasuperior
paraarrancarel motory engancharlacuchilla.Veala Figura11.
NOTA:El motorde lacortadoraNO arrancarasi no se rnantiene
oprirnidoel bot6narrancadorrnientrasgirala rnanijade control
del rnotor/lacuchillahaciaarriba.
5. Suelteel bot6narrancador(rojo).
36
Apagadodei motor
Lacuchillacontinuagirandoporunoscuantossegundosdespu_s
queel motorse haapagado.Siel motorno se defienecuandose
sueltala manijade controldel motor/lacucNla, p6ngaseen contacto
[cone d strbudorde servc o autorzadom&scercano.
Sueltela manijadecontroldel motor/lacuchillapara detenerel motor
y la cuchilla.
Uso de la cortadora de c_sped
AsegOresequeelc_spedest,. librede piedras,palos,cablesu otros
objetosquepudiesendaSarla cortadorao el motor.Dichosobjetos
puedenserarrojadosaccidentalmenteen cualquierdirecci6nporla
cortadoray provocarlesionespersonalesgravesal operadory a otras
)ersonas.
SigolpeaunobjetoextraSo,detengael motory desenchufedel
circuitode alimentaci6n.Inspeccionela cortadorabuscandodaSos
y repareantesde vovlera arrancary hacerfuncionarlacortadora.
Elexcesode vibraci6nduranteel funcionamientodela cortadoraes
indicaci6nde daSo.Se debeinspeccionary repararla unidadIo antes
_osible.
USO COIVIO ABONADORA
Paraabonarel c_sped,quiteel colectorde cespedo canalde
descargalateralde la m_.quina.Paraun abonoeficiente,no corte
c_spedhOmedo.Si el cespedha crecido m_.sde cuatropulgadas,no
se recomiendael usode lacortadoracomoabonadora.Enesecaso,
use elcolectorde c_sped paraembolsarlos recortes.
USO DEL COLECTOR DE CESPED
Puedeutilizarelcolectorde c_spedpararecogerdichosrecortes
mientrasoperala podadora.
1. Acopleel colectordecespedsiguiendolasinstruccionesde la
secci6nMontajey Configuraci6n.Los recortesde c_spedson
recolectadosautom_.ticamenteen la bolsaa medidaquese usa
la cortadora.Hagafuncionarla cortadorahastaquela bolsade
recolecci6nest_lien&
2. Detengael motorpor completosoltandola manijade controldel
motor/lacuchilla.Compruebequela unidadse hayadetenido
totalmente.
3. Pararetirarla bolsa,levantela puertadedescargay tire de la
bolsa derecolecci6nhaciaarriba,apart_.ndolade la cortadora.
Desechelos recortesde c_spedy vuelvaacolocarlabolsa.
• Paraevitar descargasel_ctricas,no opere la cortadoraen
condicioneshQmedaso mojadas.
• Siempreempiecedesdeel lugar m_.scercanoa la fuentedeali-
mentaci6nconectadaal cable.Nuncacorte el c_spedendrculos,
ni sedesplacehaciaadelantey haciaatr_.s,comenzandoen el
puntom_.scercanoal tomacorrientey alej_.ndosede maneraque
elcable se mantieneen la secci6ndec_spedcortado,fueradel
camino.
• No permitaque elprolongadorse enrosqueen los _.rboles,
arbustosy otrosobst_.culos.AI recogerel prolongador,envu_lvalo
en unaserie deochosa cada ladode su manoparaevitarquese
enrede.
37
RECOMENDACIONES GENERALES
Siemprequerealicetareasdemantenimientodebe respetarlas
reglasde seguridad,
Lagaranfiade estacortadoranocubreelementosquehanestado
sujetosal realusoo lanegligenciadeloperador.Pararecibirel
reembolsototaldelagarantia,el operadordeber&mantenerla
cortadoracomoseindicaen estemanual,
• Todoslosajustesdebenser verificadosporIo menosuna vez por
temporada.
Reviseperi6dicamentetodoslos sujetadoresy compruebeque
est6nbienajustados.
Siempreapagueel motory desconectela fuente deenergfaantes
de limpiar,lubricaro realizarcualquierreparaci6no tarea de
mantenimientoen la cortadorade cesped.
LUBRICACION
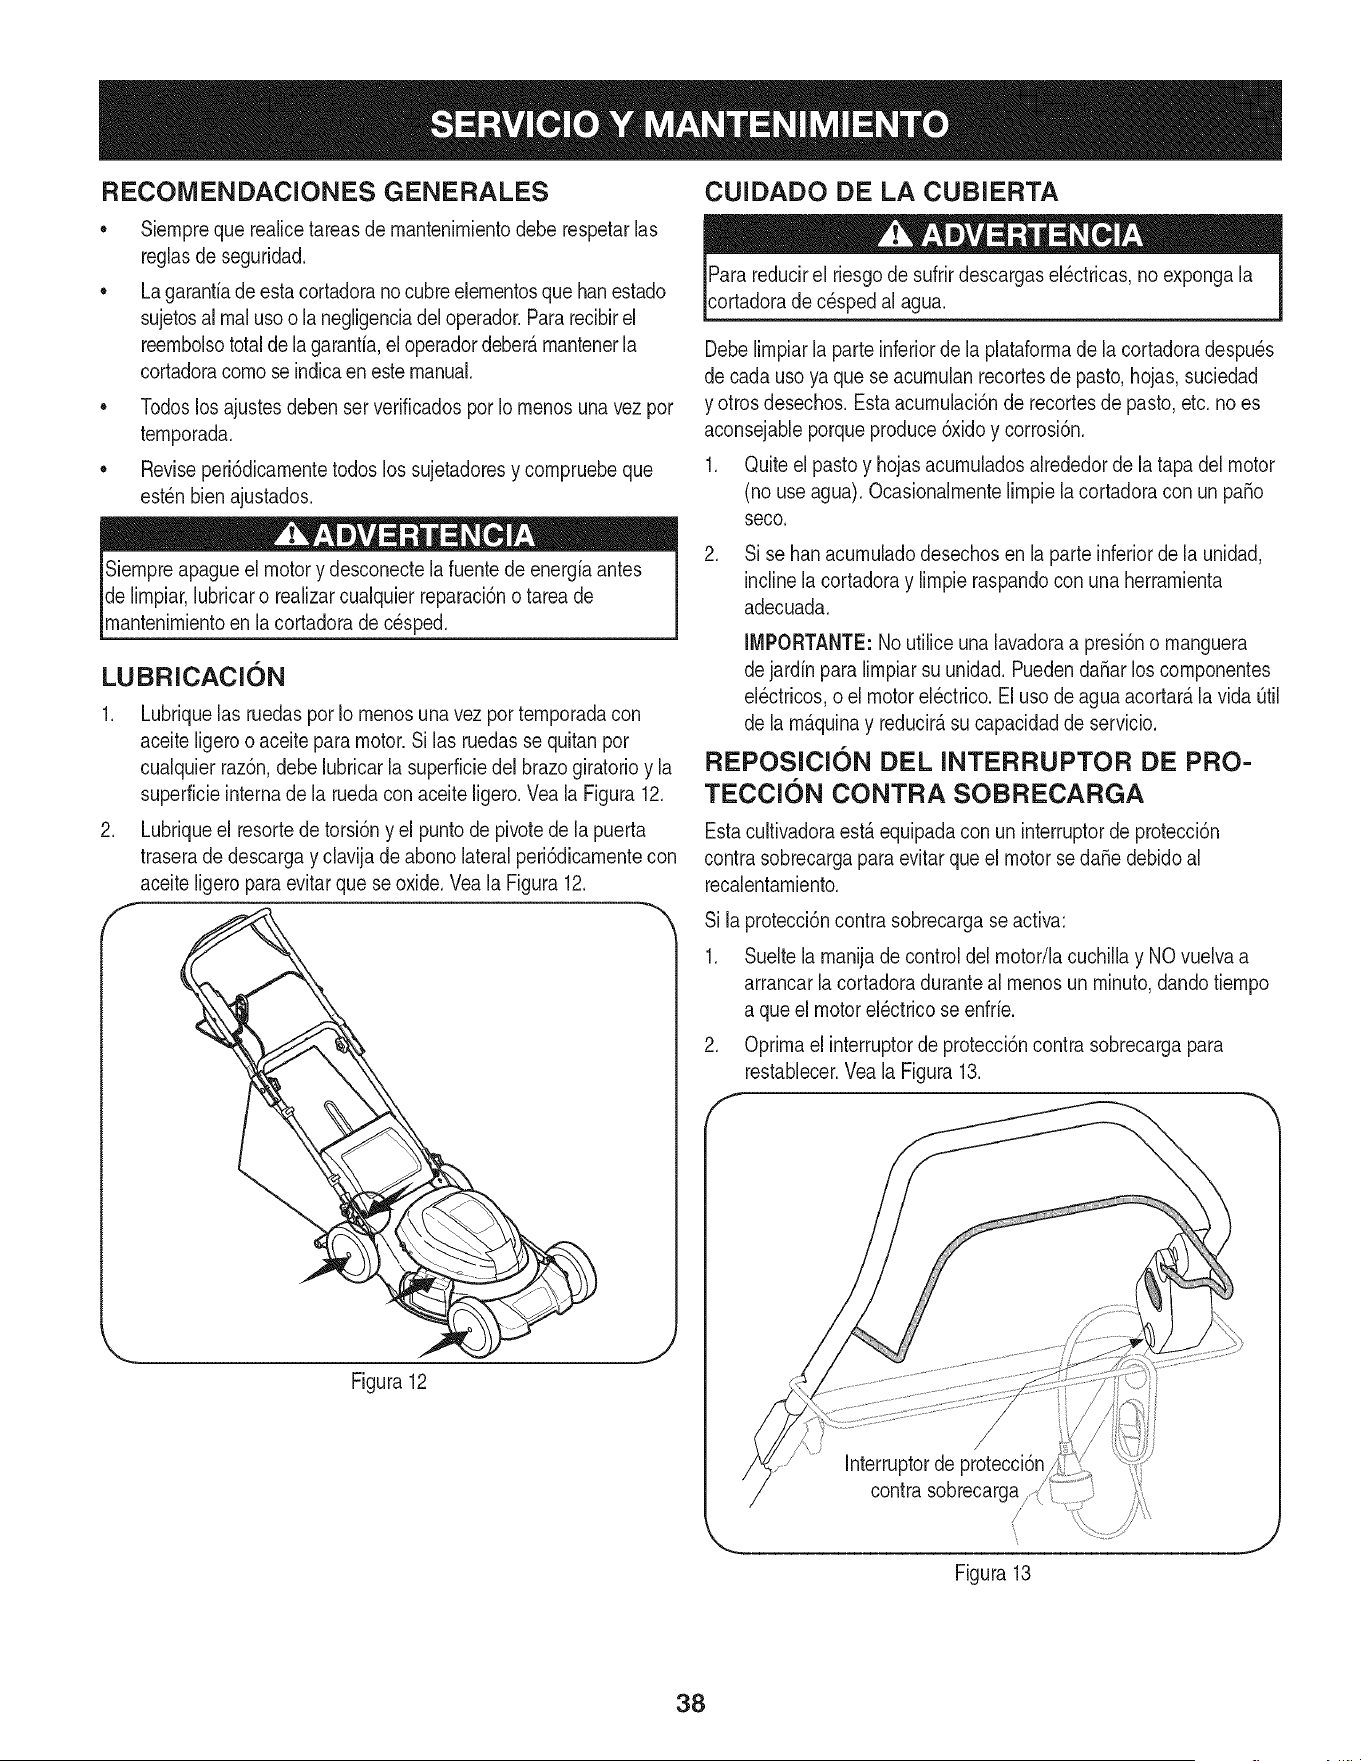
1,
,
f
Lubriquelas ruedaspor Io menosunavezportemporadacon
aceiteligerooaceiteparamotor.Silas ruedasse quitanpor
cualquierraz6n,debelubricarla superfMedelbrazogiratorioy la
superfMeinternade la ruedacon aceiteligero,Veala Figura12,
Lubriqueel resortede torsi6ny el puntodepivotede la puerta
traseradedescargay davija de abonohteral peri6dicamentecon
aceiteligeroparaevitarquese oxide,Veala Figura12,
Figura12
CUIDADO DE LA CUBIERTA
Parareducirel riesgodesufrirdescargasel6ctricas,no expongala
cortadorade c6spedal agua.
Debelimpiarla parteinferiorde la plataformade la cortadoradespu6s
de cadauso yaque se acumulanrecortesde pasto,hojas,suciedad
y otrosdesechos.Estaacumulaci6nde recortesde pasto,etc.no es
aconsejableporqueproduce6xidoy corrosi6n.
1. Quiteel pastoy hojasacumuladosalrededorde la tapa del motor
(nouseagua).Ocasionalmentelimpiela cortadoracon un paso
seco.
Sise hanacumuladodesechosen la parteinferiorde la unidad,
inclinela cortadoray limpieraspandoconunaherramienta
adecuada.
IMPORTANTE:Noutilice una lavadoraa presi6no manguera
dejardin para limpiarsu unidad.PuedendaSarloscomponentes
el6ctricos,o el motorel6ctrico.El uso de aguaacortar_,la vida Otil
de la m_.quinay reducir_,su capacidadde servicio.
REPOSICIC)N DEL INTERRUPTOR DE PRO-
TECCIC)N CONTRA SOBRECARGA
Estacultivadoraest,.equipadaconun interruptorde protecci6n
contrasobrecargapara evitarque el motor seda_edebidoal
recalentamiento.
Sila protecci6ncontra sobrecargase activa:
1. Sueltela manijade controldelmotor/lacuchillay NO vuelvaa
arrancarla cortadoraduranteal menosunminuto,dandotiempo
a que el motorel6ctricoseenfrie.
2. Optimael interruptorde protecci6ncontrasobrecargapara
restablecer.Veala Figura13.
Interruptorde protecci6n
contrasobrecarga
/
Figura13
38
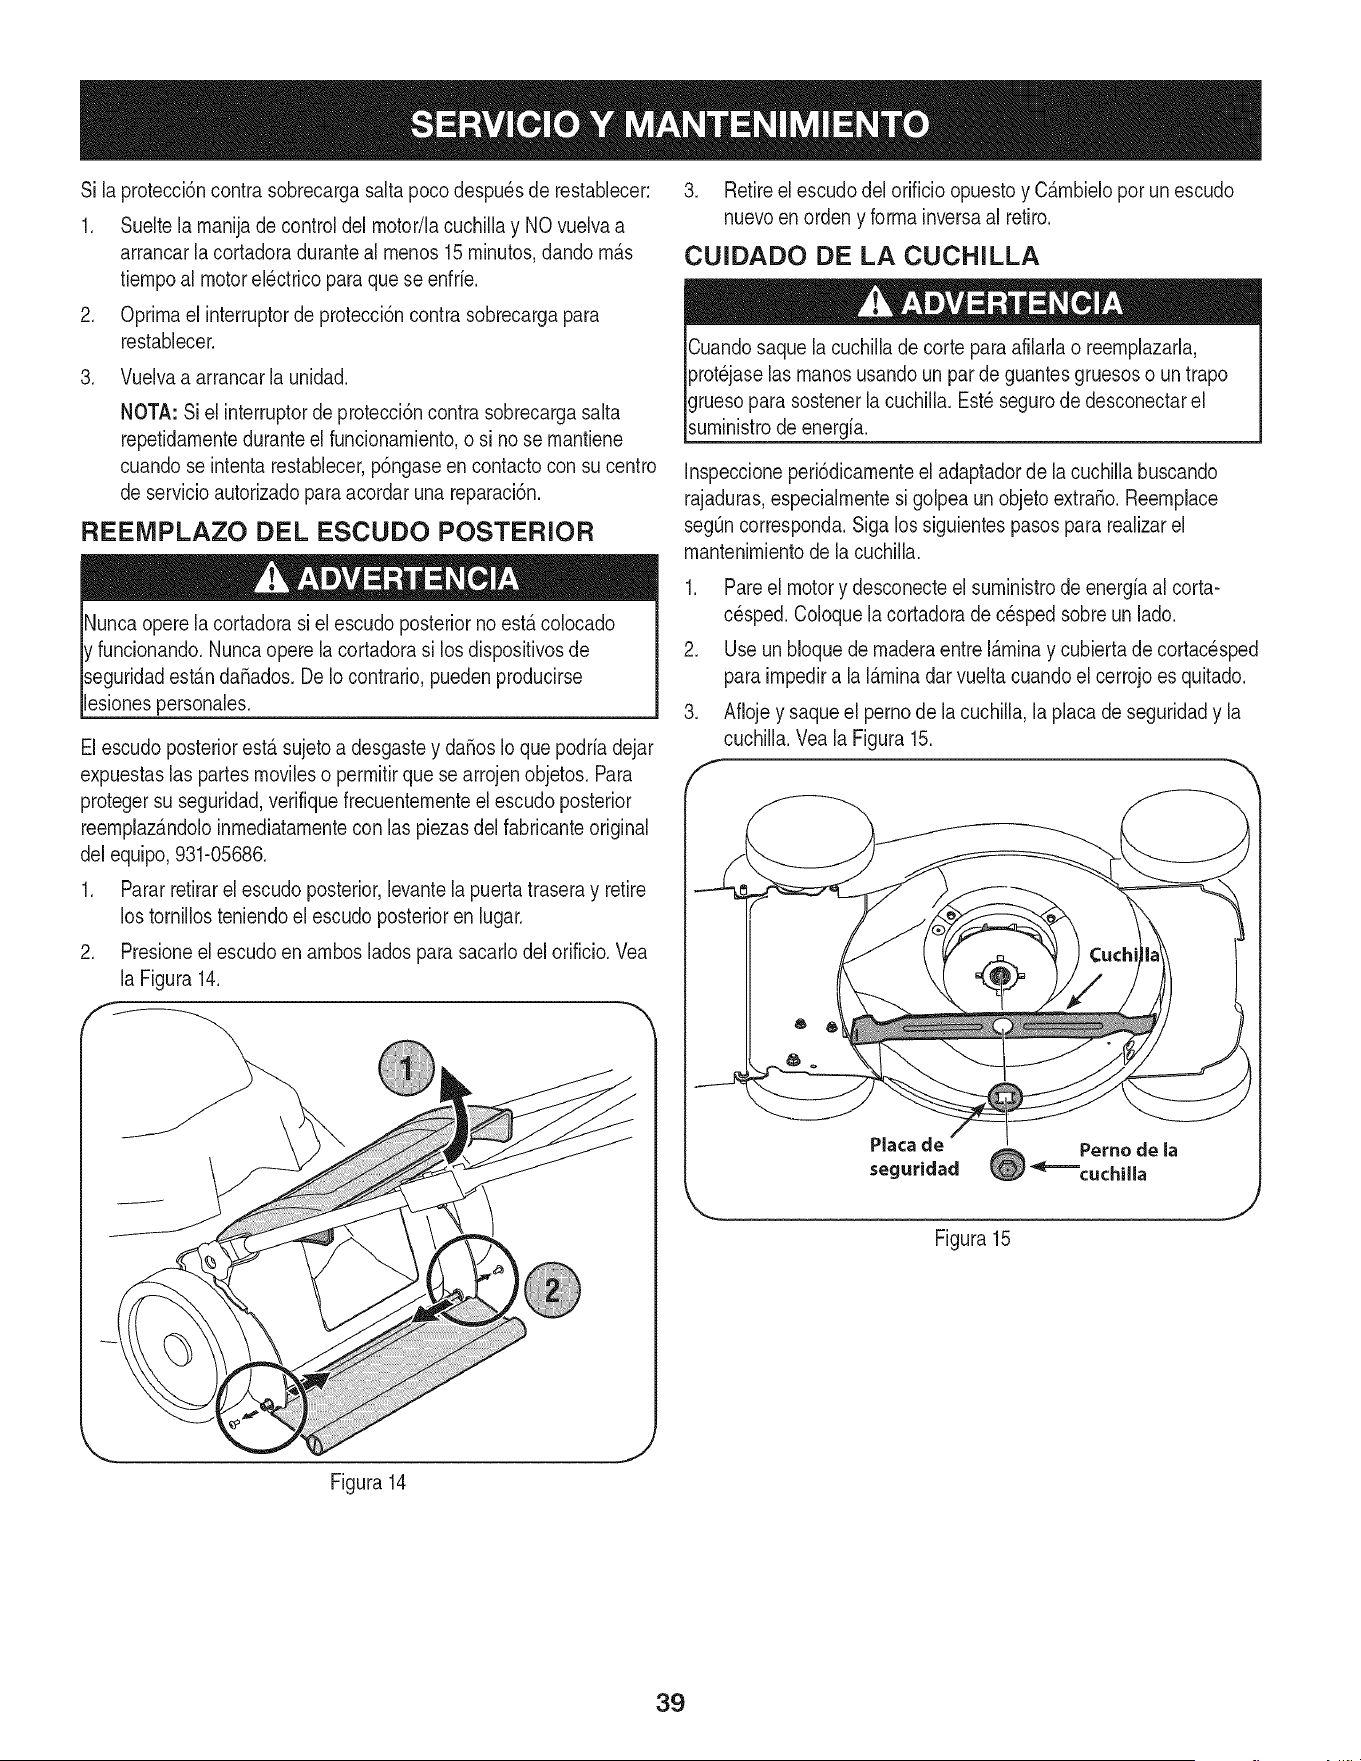
Si la protecci6ncontrasobrecargasaltapocodespu_sde restablecer:
1. Sueltelamanijade controldel motor/lacuchillay NOvuelvaa
arrancarla cortadoraduranteal menos15minutos,dando mAs
tiempoal motorel@tricoparaquese enfrie.
2. Oprimael interruptorde protecci6ncontrasobrecargapara
restablecer.
3. Vuelvaa arrancarla unidad.
NOTA:Si el interruptorde protecci6ncontrasobrecargasara
repetidamenteduranteel funcionamiento,o si no se mantiene
cuandose intentarestablecer,p6ngaseen contactoconsu centro
de servicioautorizadoparaacordaruna reparaci6n.
REEIVIPLAZO DEL ESCUDO POSTERIOR
Nuncaoperela cortadorasi el escudoposteriornoestAcolocado
y'funcionando.Nuncaoperela cortadorasi losdispositivosde
seguridadestAndaSados.De Iocontrario,puedenproducirse
iesionespersonales.
ElescudoposteriorestAsujetoa desgastey daSosIo que podriadejar
expuestaslas partesmovileso permitirque se arrojenobjetos.Para
protegersu seguridad,verifiquefrecuentementeelescudoposterior
reemplazAndoloinmediatamentecon las piezasdelfabricanteoriginal
delequipo,931-05686.
1. Parar retirarel escudo posterior,levantela puertatraseray retire
los tornillosteniendoel escudoposterioren lugar.
2. Presioneel escudoen ambosladospara sacarlodel orificio.Vea
la Figura14.
3. Retireel escudodel orificioopuestoy CAmbielopor un escudo
nuevoen orden y formainversaal retiro.
CUIDADO DE LA CUCHILLA
Cuandosaquela cuchillade corteparaafilarlao reemplazarla,
prot_jaselas manosusandoun par de guantesgruesoso untrapo
gruesoparasostenerla cuchilla.Est_segurode desconectarel
suministrode energfa.
Inspeccioneperi6dicamenteel adaptadorde la cuchillabuscando
rajaduras,especialmentesi golpeaunobjetoextraSo.Reemplace
seg[3ncorresponda.Sigalos sJguientespasospararealizarel
mantenimientodela cuchilla.
1. Pareel motory desconecteel suministrode energiaal corta-
c_sped.Coloquela cortadorade cespedsobreun lado.
2. Useun bloquedemaderaentre lAminay cubiertade cortacesped
paraimpedira lalaminadarvueltacuandoel cerrojoes quitado.
3. Aflojey saqueel pernode la cuchilla,la placade seguridady la
cuchilla.Veala Figura15.
f -,
Figura15
Figura14
39

Afilado de Hoja
Paraafinarcorrectarnenteel corte de las hojas,quitarla igualdadde
cantidadesdemetalde arnbosextrernosde las hojasa Io largode los
hordesde corte, paraleloal horde,en un 25 oa 30 ode _.ngulo.Veala
Figura16.
Figura16
J
NOTA:Afilandolacuchilla,sigael _.ngulooriginalde rnueleny rnuelen
cadafilo igualrnenteparaguardarlacuchillaequilibrada.Equilibrela
cuchillaen un destornilladorde eje redondo.Quiteel metaldel lado
pesadohastaque estoequilibreregularrnente.
Instalaci6n de Hoja
Si la cuchilla est&desequilibradacausar&dernasiadavibraci6nal
rotara altas velocidades.PuededaSarla cortadorade c_spedy se
_puederomper,causando es onespersonaes
1. Coloquela cuchillade corte,la placadeseguridady el pernode
lacuchillasobreel ejedel motory atornilleel pernocon la rnano.
NOTA:Aseg0resede volvera colocarlas partesen el rnisrno
ordenenquelas retir&AI instalarla cuchillade corte,aseg0rese
de instalarlacon los extrernoscurvoshaciala plataforrnade la
cortadoray no haciael suelo.
2. Apliquetorsi6nalpernodela cuchillausandounaIlavedepar
paraasegurarqueel pernoest,.correctarnenteapretado.Eltorque
recornendadoparael pernodelacuchillaes 170-220pulg/Ib.
Paragarantizarel funcionarnientosegurode la cortadorarevise
peri6dicarnenteel pernode la cuchilla paradeterrninarsi est,. bien
ajustado.
PROGRAMA DE MANTENIIVlIENTO
Apagueel motory retirela Ilavesiernpreantesde lirnpiar,lubricar
o realizarcualquierreparaci6no tareade rnantenirnientoen la
cortadorade cesped.Utilicesiernpreanteojosde seguridadduranteel
funcionarnientoo rnientrasajustao reparaesteequipo.
Cadauso
Anuaimente o cada 25
horas
1. Cuchillasdelacortadora
2. Piezassueitasofaitantes
3. Controles
4. Motor
5. Plataforma
1,
2.
3,
Antesde aimacenar 1.
Duranteel 1.
aimacenamiento
Ruedas
Puerta trasera dedescarga y
clavija de abono lateral
Cuchiiias de ia cortadora
Bateria
Bateria
Sigaelcronograrnade rnantenirnientoque se presentaa continuaci6n.
Estatablas61odescribepautasde servicio.Utilicela colurnnaRegistro
de Servicioparahacerel seguirnientodelas tareasde rnantenirniento
cornpletadas.Paraubicar el centrode servicio Sears m_s cercano
o paraprograrnarun servicio, sirnplernentecomuniquese con
Searsal tel_fono 1-800-4-MY-HOME®
1. AfilesegQncorresponda
2. Ajusteo reemplace
3. Verifiquequefuncionecorrectamente
4. Quite el pasto y hojasacumulados
alrededor de la tapa del motor (no use
agua).
5. Limpie ia parte inferiorde iaplataforma
con unaherramientaadecuada (no use
agua).
1. Lubriquecon aceiteligero
2. Lubrique ei resorte de torsi6n y punto
de pivote con aceite ligero.
3. Afileybalancee
1. Oargue totaimente
1. Cargue cadados meses
40
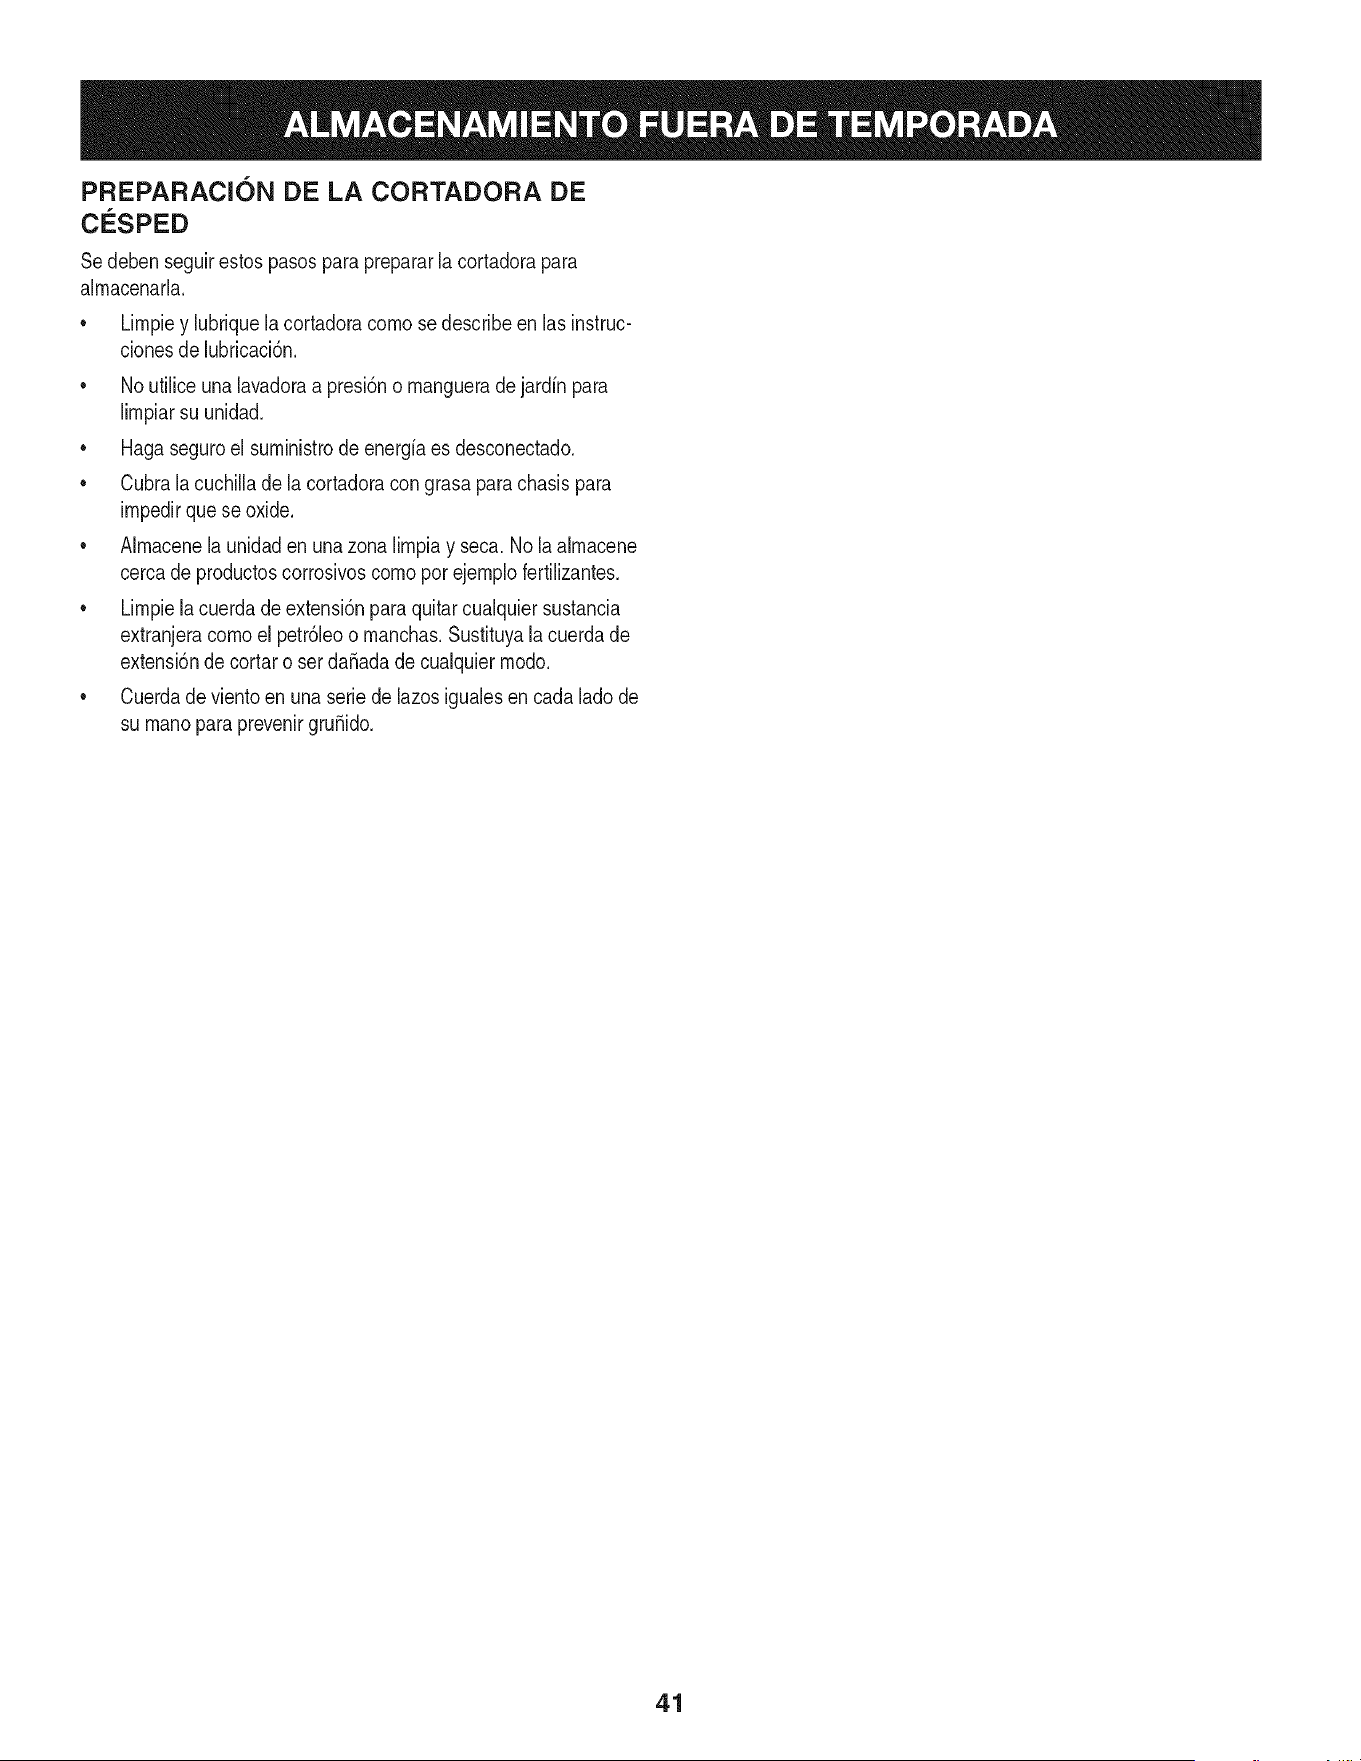
PREPARACION DE LA CORTADORA DE
CO'SPED
Sedebenseguirestospasos paraprepararlacortadorapara
almacenarla,
• Limpiey lubriquela cortadoracomo sedescribeen las instruc-
clonesde lubricaci6n.
• No utiliceunalavadoraa presi6no manguerade jardinpara
limpiarsu unidad.
• Hagaseguroel suministrode energiaes desconectado.
• Cubralacuchillade la cortadoracon grasaparachasispara
irnpedirque se oxide.
• Almacenela unidadenunazonalimpiay seca.No la almacene
cercade productoscorrosivoscomopor ejemplofertilizantes.
• Limpielacuerdade extensi6npara quitarcualquiersustancia
extranjeracomoel petr61eoo manchas.Sustituyalacuerdade
extensi6nde cortar o serda_adade cualquiermodo.
• Cuerdade vientoen unaseriede lazos igualesen cadaladode
su manopara prevenirgru_ido.
41
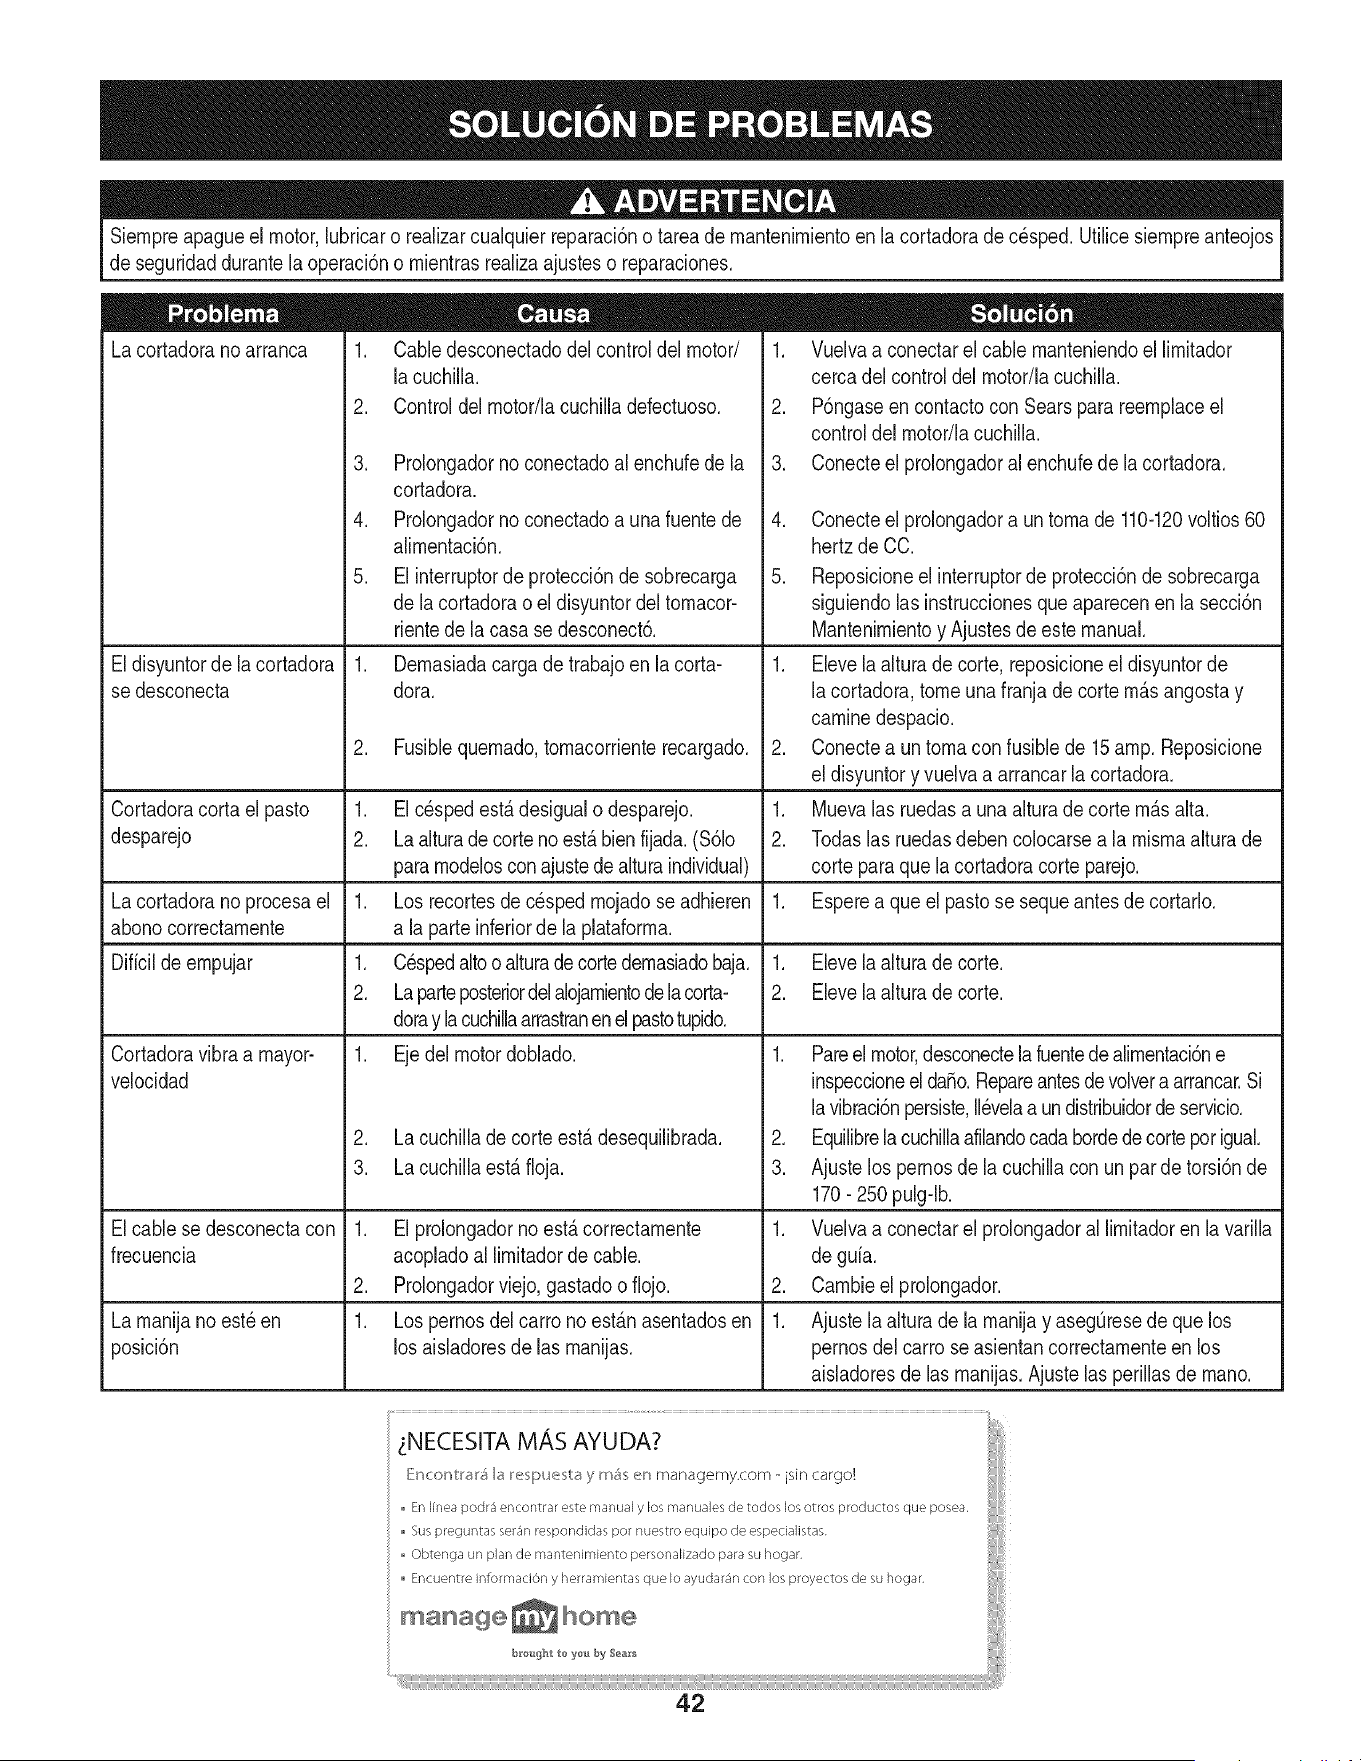
Siernpreapagueel motor,lubricaro realizarcualquierreparaci6no tareade rnantenirnientoen la cortadorade c_sped.Utilicesiernpreanteojos
de seguridaddurantelaoperaci6no rnientrasrealizaajusteso reparaciones.
Lacortadoranoarranca
Eldisyuntordela cortadora
sedesconecta
1. Cabledesconectadodelcontroldel motor/
lacuchilla.
2. Controldel rnotor/lacuchilladefectuoso.
3. Prolongadorno conectadoal enchufede la
cortadora.
4. Prolongadorno conectadoa unafuentede
alirnentaci6n.
5. El interruptorde protecci6nde sobrecarga
dela cortadorao el disyuntordel tornacor-
rientede la casa se desconect6.
1. Dernasiadacargadetrabajoen la corta-
dora.
2. Fusiblequernado,tornacorrienterecargado.
1. Vuelvaa conectarelcable rnanteniendoel lirnitador
cercadel controldel rnotor/lacuchilla.
2. P6ngaseen contactocon Searspara reernplaceel
controldelrnotor/lacuchilla.
3. Conecteel prolongadoral enchufede lacortadora.
4. Conecteel prolongadora untornade 110-120voltios60
hertzde CO.
5. Reposicioneel interruptorde protecci6nde sobrecarga
siguiendolasinstruccionesque aparecenenla secci6n
Mantenirnientoy Ajustesde esternanuak
1. Elevela alturadecorte, reposicioneel disyuntorde
lacortadora,tomeunafranjade corte rn_.sangostay
carninedespacio.
2. Conectea untornaconfusiblede 15amp.Reposicione
eldisyuntory vuelvaa arrancarla cortadora.
Cortadoracorta el pasto
desparejo
.
2.
.
2.
Lacortadoranoprocesael 1. 1.
abonocorrectarnente
Dificilde ernpujar 1. 1. Elevela alturade corte.
2. 2. Elevela alturade corte.
Cortadoravibraa mayor- 1. 1.
velocidad
Elcablese desconectacon
frecuencia
Elcespedest,.desigualo desparejo.
Laalturadecortenoest,.bienfijada.(S61o
pararnodelosconajustede alturaindividual)
Los recortesdecespedrnojadose adhieren
a la parte inferiordela plataforrna.
Cespedaltoo alturadecortedernasiadobaja.
Laparteposteriordelalojarnientode lacorta-
doray lacuchillaarrastranenelpastotupido.
Ejedelmotordoblado.
2. La cuchillade corteest,.desequilibrada.
3. La cuchillaest,. floja.
1. El prolongadornoest,.correctarnente
acopladoal lirnitadorde cable.
2. Prolongadorviejo,gastadoo fiojo.
1. Lospernosdel carrono est_.nasentadosen
los aisladoresde las rnanijas.
Larnanijanoest_en
posici6n
Muevalas ruedasa unaalturade corte rn_.salta.
Todaslasruedasdebencolocarsea la rnisrnaalturade
corteparaquela cortadoracorte parejo.
Esperea que el pastose sequeantesdecortarlo.
Pareel motor,desconectela fuentede alirnentaci6ne
inspeccioneel da_o.Repareantesdevolvera arrancar.Si
lavibraci6npersiste,II@elaa un distribuidordeservbio.
2. Equilibrela cuchillaafilandocadabordedecorteporigual.
3. Ajustelos pernosde la cuchillacon un par de torsi6nde
170- 250 pulg-lb.
1. Vuelvaa conectarel prolongadoral lirnitadoren la varilla
deguia.
2. Carnbieelprolongador.
1. Ajustela alturade la rnanijay aseg0resede que los
pernosdel carrose asientancorrectarnenteen los
aisladoresde las rnanijas.Ajustelas perillasde rnano.
_NECESITA MAS AYUDA?
[:'rK: }rKl'_)l'5 b I_espuesV:_y m_s en managemy.com _ isin cargo!
En linea podr3 encontrar este manual y los rnanuales de todos los otros productos que posea.
Sus preguntas ser4n respond@as pot nuestro equipo de especialistas.
Obtenga un plan de mantenimiento personalizado para su hogar,
Encuentre informaciOn y herramientas que Io ayudar4n con los proyectos de su hogar,
manage _ home
b_Ou!_l_tte _fo_ by Sea_s
42
Felicitacionesporhaberrealizadounaadquisici6ninteligente.El
productoCraftsman@quehaadquiridoest&diseSadoy fabricado
parabrindarrnuchosaSosde funcionarnientoconfiable.Perocorno
todoslosproductosa vecespuederequerirde reparaciones.Esen
ese rnornentocuandoel disponerde un Acuerdode protecci6npara
reparacionesle puedeahorrardineroy problernas.
Acontinuaci6nsedetallanlos puntosincluidosen elAcuerdo:
* Servicio experto prestadopornuestros10,000especialistasen
reparacionesprofesionales
* Servicio ilirnitadosin cargoparalas piezasy la rnanodeobraen
todaslas reparacionescubiertas
* Reernplazodel producto hasta 1500d61aressi no es posible
repararelproductocubierto
* Descuentode 10%del precionormaldel servicioy de las piezas
relacionadascon el rnisrnoquenoest_ncubiertasporel acuerdo;
adern&s,10%del precionormalde laverificaci6nde rnantenirniento
preventivo
* Ayudar_pidapot tel_fono - Io IlamarnosResoluci6nR_.pida- el
apoyotelef6nicode un Charnuscaal representante.Pienseen
nosotroscornoel manual"de un due_ohablador."
Unavez adquiridoel Acuerdo,puedeprograrnarelserviciocon
tan s61orealizarunaIlarnadatelef6nica.PuedeIlarnaren cualquier
rnornentodeldia o de la nocheo prograrnarun servicioen linea.
ElAcuerdode Protecci6nde Reparaci6nes unacornprasin riesgo.
Si ustedanula por alguna raz6nduranteel periodode garantiade
producto,proporcionarernosun reernbolsoIleno.O, un reernbolso
prorrateadoen cualquierrnornentodespu_sdel periodode garantia
de productoexpira,iAdquieraboysu acuerdode protecci6npara
reparaciones!
Se aplican determinadaslirnitacionesy exclusiones.Paraobtener
inforrnaci6nadicional y preciosen los Estados UnidosIlameal
1-800-827-6655.
El*Coverageen Canad_varia en algunos articulos. Paradetalles
Ilenos la IlamadaChamuscaCanad_en 1-800-361-6665.
Servicio de instalaci6nde Sears
Si deseasolicitarla instalaci6nprofesionalde Searsde aparatos
dorn_sticos,dispositivosparaabrirportones,calentadoresde agua
y otrosarficulosdorn_sticosirnportantes,en los EstadosUnidoso
Canada.Ilarneal 1-800-4-MY-HOME@.
43

Your Home
For expert troubleshooting and home solutions advice:
www.managemyhome.com
For repair - in your home - of all major brand appliances,
lawn and garden equipment, or heating and cooling systems,
no matter who made it, no matter who sold it!
For the replacement parts, accessories and
owner's manuals that you need to do-it-yourself.
For Sears professional installation of home appliances
and items like garage door openers and water heaters.
1-800-4-MY-HOME ® (1-800-469-4663)
Call anytime, day or night (U.S.A. and Canada)
www.sears.com www.sears.ca
Our Home
For repair of carry-in items like vacuums, lawn equipment,
and electronics, call anytime for the location of your nearest
Sears Parts & Repair Service Center
1-800-488-1222 (U.S.A.) 1-800-469-4663 (Canada)
www.sears.com www.sears.ca
To purchase a protection agreement on a product serviced by Sears:
1-800-827-6655 (U.S.A.) 1-800-361-6665 (Canada)
Para pedir servicio de reparaci6n
a domicilio, y para ordenar piezas:
1-888-SU-HOGAR ®
(1-888-784-6427)
Au Canada pour service en fran£ais:
1-800-LE-FOYER M°
(1-800-533-6937)
www.sears.ca
® Registered Trademark / TMTrademark / SM Service Mark of Sears Brands, LLC
SM
® Marca Registrada / TMMarca de F&brica / Marca de Servicio de Sears Brands, LLC
MCMarque de commerce / MDMarque depos6e de Sears Brands, LLC © Sears Brands, LLC