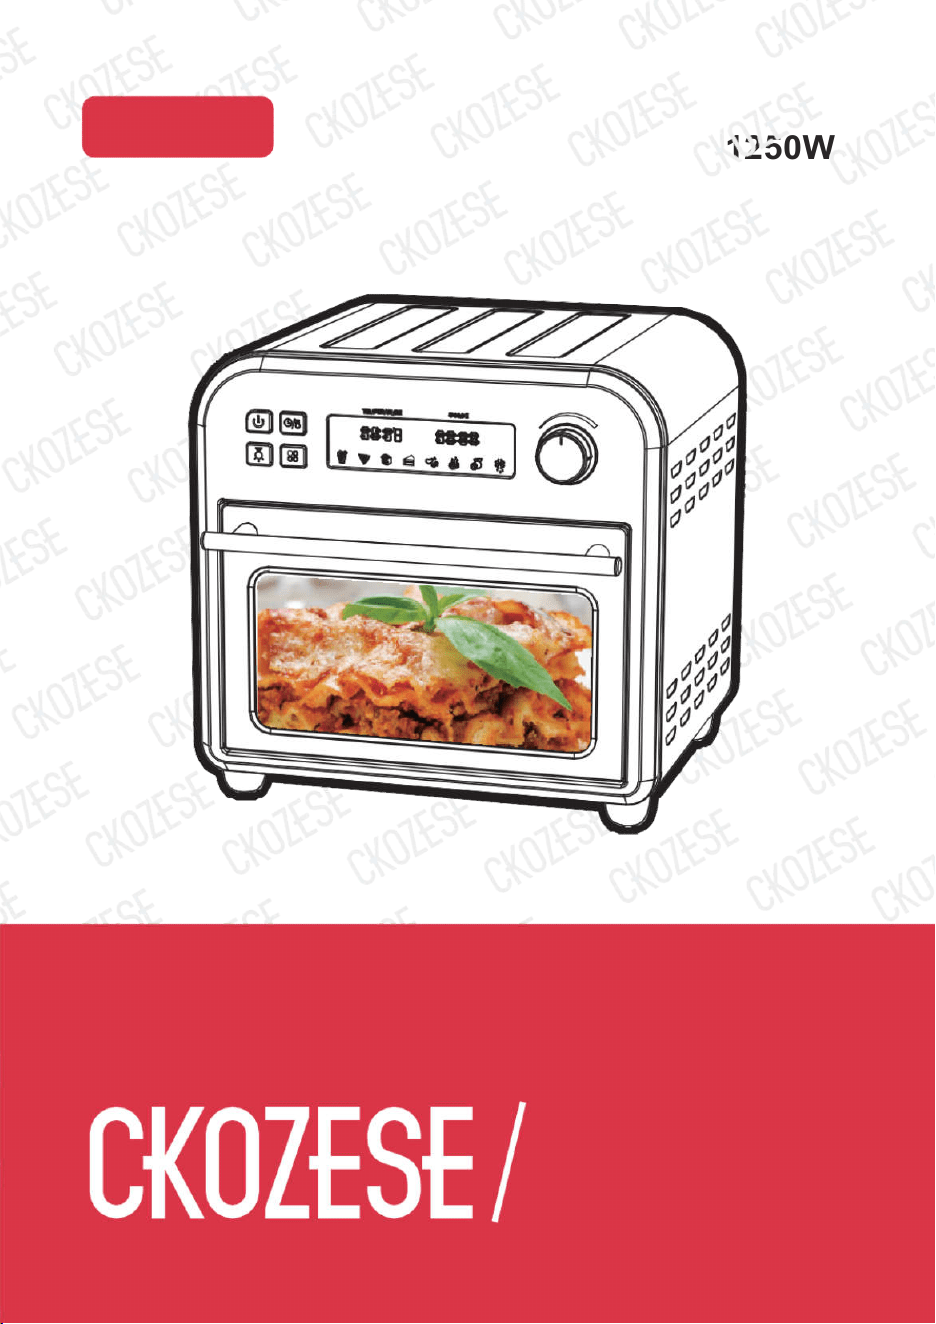
1250W
FM1053
120V 60Hz
Air Fryer Oven
Ver.1
INSTRUCTIONS
Air Fryer Oven


3 4
MARKETING STATEMENT IMPORTANT PRODUCT SAFEGUARDS
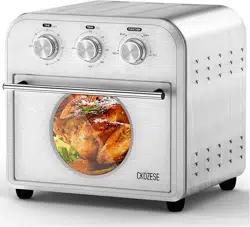
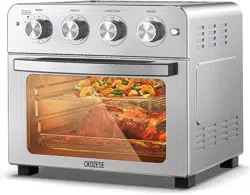
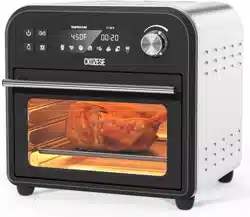
The brand new CKOZESE Air Fryer is a “multi-purpose” product to satisfy the needs of modern living. It is an
food preparation. It is an elegant stainless- steel countertop model with 1750W electrical power that covers a
wide-range of daily food preparation requirements. This model comes with a variety of accessory attachments
with a recipe booklet covering a wide range of delicious international cuisines that is easy to prepare at home.
CKOZESE Air Fryer “multifunctional” convection oven has 8 convenient presets including: Air Fry, Toast, Bake,
Broil, Roast, Pizza, Warm & Dehydrate functions. Many of the presets has already built-in time and temperature,
so all you have to do is push a button and turn a dial. However, for those who like
Staying healthy is a requirement of modern living. The ability to fry foods without oil needless to say is the idea
Z
of caloric intake from oil and its by-products.
function, temperature and timing to suit your cooking needs. All the accessory attachments for this appliance are
dishwasher safe and are easily cleaned.
So, stay with the trend of an essential lifestyle, of happiness and health! The CKOZESE Air Fryer will provide
you with good and a leisurely life of cooking in the kitchen!
When using electric appliances, basic safety precautions should always be followed,
including the following:
5. Unplug the appliance from outlet when not in use and before cleaning. Allow appliance to cool before putting
draperies, walls and the like when the appliance is in operation. Do not store any item on top of the
19. Do not store any materials, other than manufacturer’s recommended accessories in this oven when not in
21.
Do not cover crumbs tray or any other part of the oven with metal foil. This will cause overheating of the
22.
Caution: To ensure continued protection against risk of electric shock, connect appliance to properly
Z
prepared.
Z
3 4
MARKETING STATEMENT IMPORTANT PRODUCT SAFEGUARDS
The brand new CKOZESE Air Fryer is a “multi-purpose” product to satisfy the needs of modern living. It is an
food preparation. It is an elegant stainless- steel countertop model with 1750W electrical power that covers a
wide-range of daily food preparation requirements. This model comes with a variety of accessory attachments
with a recipe booklet covering a wide range of delicious international cuisines that is easy to prepare at home.
CKOZESE Air Fryer “multifunctional” convection oven has 8 convenient presets including: Air Fry, Toast, Bake,
Broil, Roast, Pizza, Warm & Dehydrate functions. Many of the presets has already built-in time and temperature,
so all you have to do is push a button and turn a dial. However, for those who like
Staying healthy is a requirement of modern living. The ability to fry foods without oil needless to say is the idea
Z
of caloric intake from oil and its by-products.
function, temperature and timing to suit your cooking needs. All the accessory attachments for this appliance are
dishwasher safe and are easily cleaned.
So, stay with the trend of an essential lifestyle, of happiness and health! The CKOZESE Air Fryer will provide
you with good and a leisurely life of cooking in the kitchen!
When using electric appliances, basic safety precautions should always be followed,
including the following:
5. Unplug the appliance from outlet when not in use and before cleaning. Allow appliance to cool before putting
draperies, walls and the like when the appliance is in operation. Do not store any item on top of the
19. Do not store any materials, other than manufacturer’s recommended accessories in this oven when not in
21.
Do not cover crumbs tray or any other part of the oven with metal foil. This will cause overheating of the
22.
Caution: To ensure continued protection against risk of electric shock, connect appliance to properly
Z
prepared.
Z
5 6
SHORT CORD INSTRUCTION
(DETACHABLE POWER-SUPPLY CORD)
NAME OF PARTS
1. A short power supply cord (or detachable power-supply cord) should be used to reduce the risk resulting from
becoming entangled in or tripping over a longer cord.
in their use.
of the appliance.
b. The cord should be arranged so that it will not drape over the countertop or tabletop where it could be pulled
by children or tripped over accidentally.
BEFORE USE FIRST TIME
1.
Remove all the accessories and packing materials before operating the oven.
2.
Wash the rack and pan in warm soapy water. Wipe inside of the oven with damp cloth or sponge. Blot dry
with paper towels to be sure the appliance is completely fry before using.
ON THE SAME CIRCUIT WITH ANOTHER APPLIANCE.
4.
Make sure the crumbs tray is properly installed before using the appliance.
5.
Before using the appliance, always place the crumbs tray underneath the bottom heating elements.
the “TIMER” to 15 minutes. NOW PUSH THE START/STOP button and let the unit run for the full 15 minutes.
NOTE: The oven may smoke during this process. This is normal for a new appliance, the smoke will not last
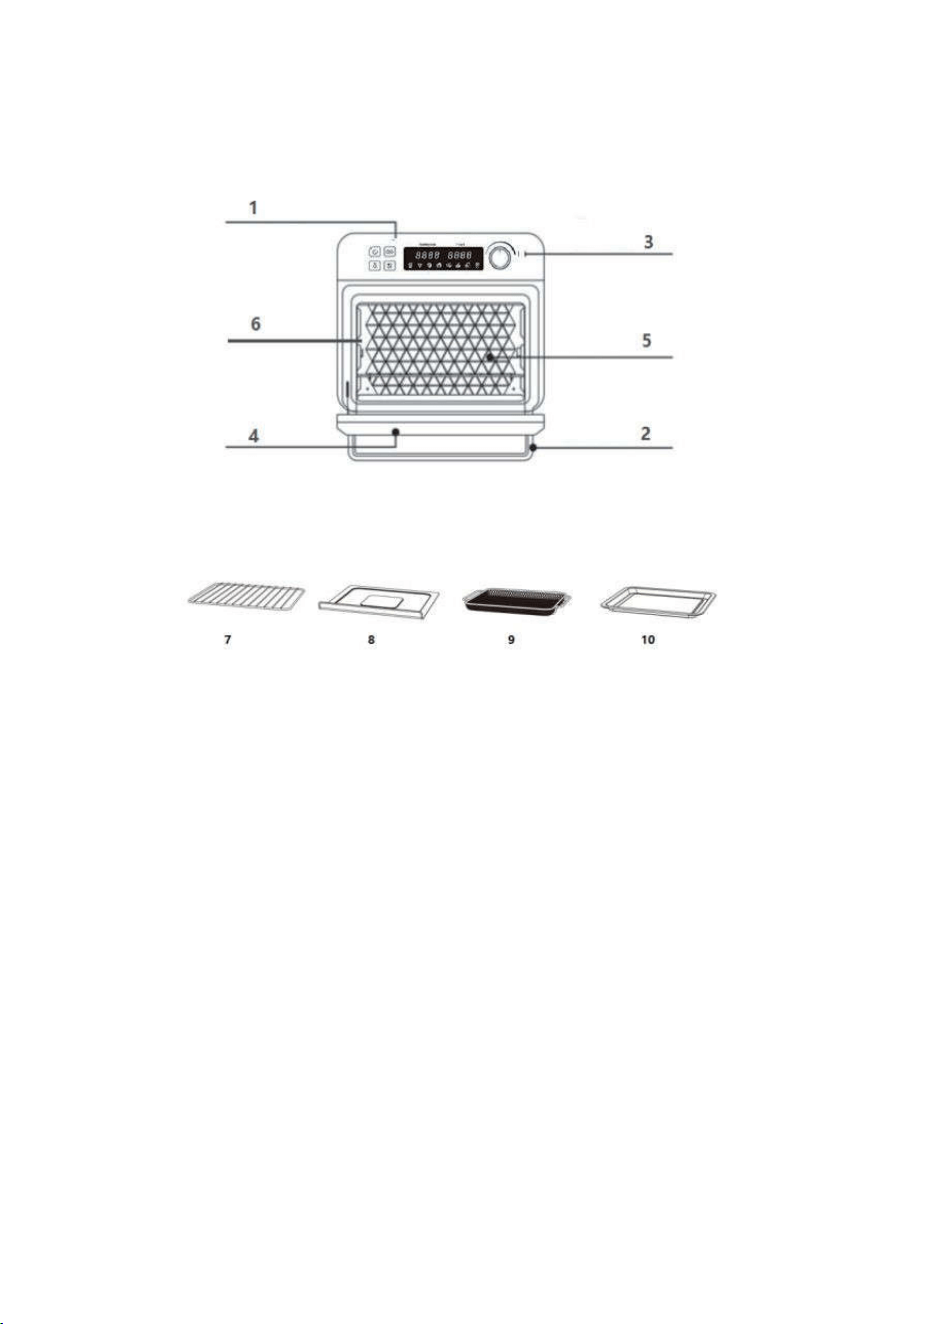
1. Control Panel
Super large LCD let the operation status clear to see, dial and buttons make the unit easy to use.
2. Door Handle
Handle designed to avoid hand scald.
3. Temperature/Time Knob
Temperature/Time adjustment.
4. Viewing Window
Viewing Window makes sure you can check the cooking process whenever you want.
5. Easy-Clean Interior
The galvanized interior is easy to clean after cooking.
SAVE THESE INSTRUCTIONS FOR FUTURE REFERANCE
5 6
SHORT CORD INSTRUCTION
(DETACHABLE POWER-SUPPLY CORD)
NAME OF PARTS
1. A short power supply cord (or detachable power-supply cord) should be used to reduce the risk resulting from
becoming entangled in or tripping over a longer cord.
in their use.
of the appliance.
b. The cord should be arranged so that it will not drape over the countertop or tabletop where it could be pulled
by children or tripped over accidentally.
BEFORE USE FIRST TIME
1.
Remove all the accessories and packing materials before operating the oven.
2.
Wash the rack and pan in warm soapy water. Wipe inside of the oven with damp cloth or sponge. Blot dry
with paper towels to be sure the appliance is completely fry before using.
ON THE SAME CIRCUIT WITH ANOTHER APPLIANCE.
4.
Make sure the crumbs tray is properly installed before using the appliance.
5.
Before using the appliance, always place the crumbs tray underneath the bottom heating elements.
the “TIMER” to 15 minutes. NOW PUSH THE START/STOP button and let the unit run for the full 15 minutes.
NOTE: The oven may smoke during this process. This is normal for a new appliance, the smoke will not last
1. Control Panel
Super large LCD let the operation status clear to see, dial and buttons make the unit easy to use.
2. Door Handle
Handle designed to avoid hand scald.
3. Temperature/Time Knob
Temperature/Time adjustment.
4. Viewing Window
Viewing Window makes sure you can check the cooking process whenever you want.
5. Easy-Clean Interior
The galvanized interior is easy to clean after cooking.
SAVE THESE INSTRUCTIONS FOR FUTURE REFERANCE
7 8
6. Rack Positions
A.
Position 1 is the bottom position and this is recommended when cooking larger foods (e.g., whole chicken).
.
HOW TO USE
GENERAL INSTRUCTIONS
CAUTION: THE OVEN SURFACES ARE HOT DURING AND AFTER USE
1.
Place the rack and grill tray in position that will accommodate the height of the food to be cooked.
7. Wire Rack
The rack for Bake, Pizza functions.
8. Crumb Tray
Don’t worry about cleaning the crumb in your oven, you could open the door and pull out the crumb tray easily
to clear it.
9. Air Fryer Basket
The basket for Air Fry, Broil or Dehydrate functions.
10. Baking/Drip Pan
The pan for Baking or Roasting, also use it with the Air Fryer Basket when Air Frying, Broiling or Dehydrating.
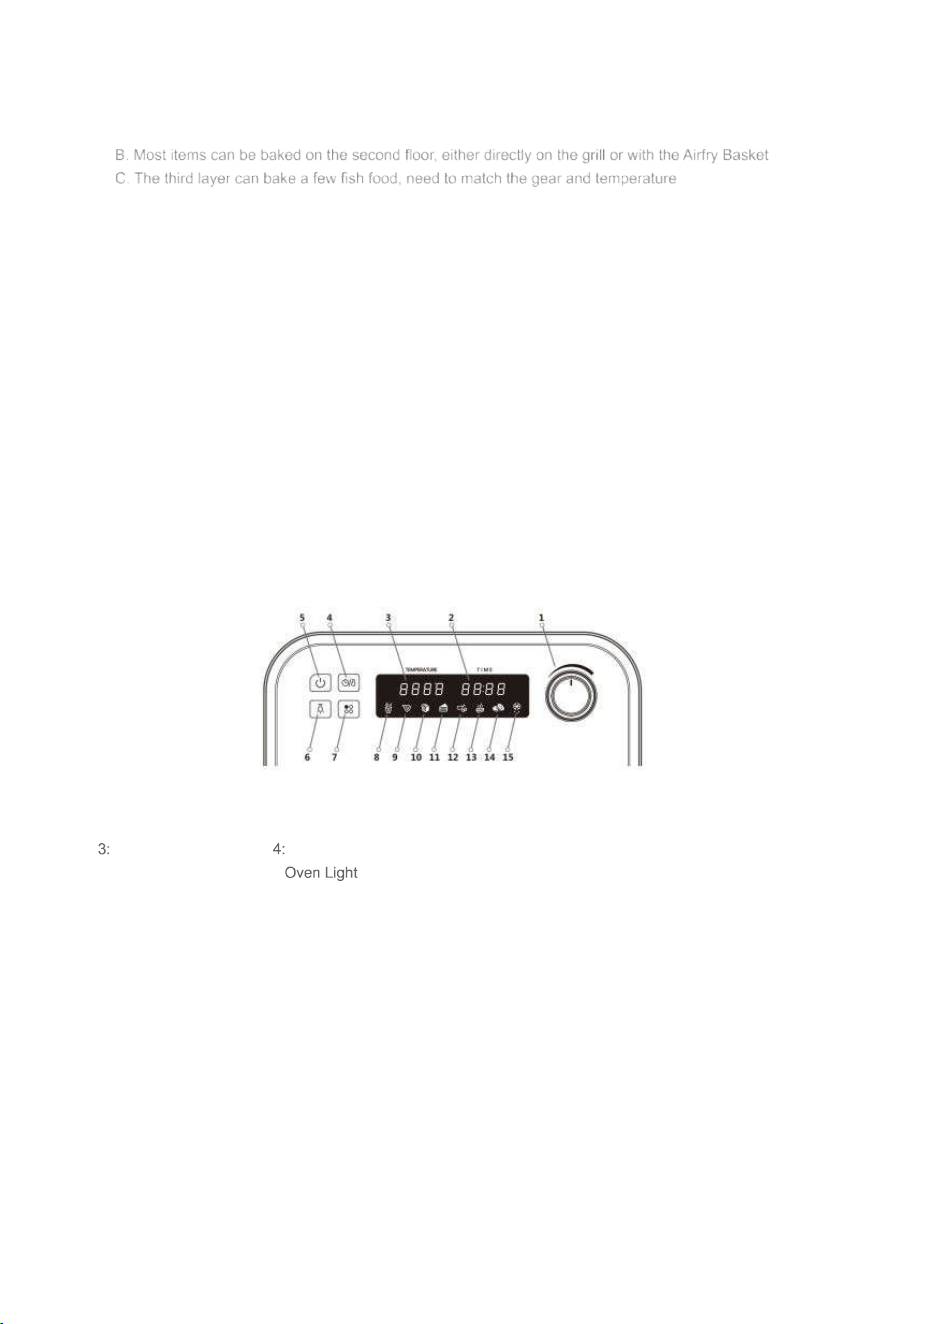
CONTROL PANEL
MENUS:
1:Temperature/Time knob 2:Time display
Temperature display Temperature/Time function selection
5:START/STOP 6:
7:Function 8:Air Fryer
9:Pizza 10:Toast
11:Bake 12:Roast
13:Broil 14:Dehydrate
15:Warm
NOTE:
The oven light will automatically turn off after being turned on for 30 seconds
the heating pipes below.
containers in the oven for cooking purposes.
7. Set the oven temperature as suggested by the recipe or as desired.
10. DO NOT unplug the power cord when the oven has not completed the cooking process. Make sure the
GENERAL INSTRUCTIONS
1.
When the appliance has been plugged in to the outlet and receiving power, the buzzer will ring once. And
after one second all the indicators should be on display
2.
After the appliance has power with all displays showing, if the appliance has not received information and
up, all you need is to push any button on the main panel.
including “AIR FRY”, “TOAST”, “BAKE”, “BROIL”, “ROAST”, “PIZZA”, “WARM”, and “DEHYDRATE”.
Now click the “Temperature/Time” icon then rotate “Temperature/Time” knob to choose time, temperature
each program has a default cooking time and temperature, you can skip the temperature/time adjustment.
4. During the process of cooking, click the “START/STOP” icon to stop the cooking process.
AIR FRY FUNCTION
1. Click the “FUNCTION” icon to select “
AIR FRY
”. The "
French fries
" icon on the screen will flash.
the “TIME/TEMP” icon again, then rotate the “Temperature/Time” knob to adjust the time (You can skip this
step and choose the default temperature and time).
START/STOP
4. After the cooking program is completed, the buzzer will ring and the screen will display "OFF".
It will automatically turn off after 30 seconds or unplug the power cord.
internal food temperature has been reached.
oven could be very “hot”.
.
7 8
6. Rack Positions
A.
Position 1 is the bottom position and this is recommended when cooking larger foods (e.g., whole chicken).
.
HOW TO USE
GENERAL INSTRUCTIONS
CAUTION: THE OVEN SURFACES ARE HOT DURING AND AFTER USE
1.
Place the rack and grill tray in position that will accommodate the height of the food to be cooked.
7. Wire Rack
The rack for Bake, Pizza functions.
8. Crumb Tray
Don’t worry about cleaning the crumb in your oven, you could open the door and pull out the crumb tray easily
to clear it.
9. Air Fryer Basket
The basket for Air Fry, Broil or Dehydrate functions.
10. Baking/Drip Pan
The pan for Baking or Roasting, also use it with the Air Fryer Basket when Air Frying, Broiling or Dehydrating.
CONTROL PANEL
MENUS:
1:Temperature/Time knob 2:Time display
Temperature display Temperature/Time function selection
5:START/STOP 6:
7:Function 8:Air Fryer
9:Pizza 10:Toast
11:Bake 12:Roast
13:Broil 14:Dehydrate
15:Warm
NOTE:
The oven light will automatically turn off after being turned on for 30 seconds
the heating pipes below.
containers in the oven for cooking purposes.
7. Set the oven temperature as suggested by the recipe or as desired.
10. DO NOT unplug the power cord when the oven has not completed the cooking process. Make sure the
GENERAL INSTRUCTIONS
1.
When the appliance has been plugged in to the outlet and receiving power, the buzzer will ring once. And
after one second all the indicators should be on display
2.
After the appliance has power with all displays showing, if the appliance has not received information and
up, all you need is to push any button on the main panel.
including “AIR FRY”, “TOAST”, “BAKE”, “BROIL”, “ROAST”, “PIZZA”, “WARM”, and “DEHYDRATE”.
Now click the “Temperature/Time” icon then rotate “Temperature/Time” knob to choose time, temperature
each program has a default cooking time and temperature, you can skip the temperature/time adjustment.
4. During the process of cooking, click the “START/STOP” icon to stop the cooking process.
AIR FRY FUNCTION
1. Click the “FUNCTION” icon to select “
AIR FRY
”. The "
French fries
" icon on the screen will flash.
the “TIME/TEMP” icon again, then rotate the “Temperature/Time” knob to adjust the time (You can skip this
step and choose the default temperature and time).
START/STOP
4. After the cooking program is completed, the buzzer will ring and the screen will display "OFF".
It will automatically turn off after 30 seconds or unplug the power cord.
internal food temperature has been reached.
oven could be very “hot”.
.
9
10
Vegetables Air fry Basket on Baking Pan
NOTE:
Please make sure you use the proper rack to place food for cooking in the appliance.
We recommend the following:
Fries Air fry Basket on Oven Rack
Wings Air fry Basket on Baking Pan
Nuggets Air fry Basket on Baking Pan
Seafood Air fry Basket on Baking
Pan Snacks Baking Pan
TOAST FUNCTION
1. Click the “FUNCTION” icon to select “
TOAST
”. The icon of the "
Toast
" on the screen will flash.
the “TIME/TEMP” icon again, then rotate the “Temperature/Time” knob to adjust the time (You can skip this
step and choose the default temperature and time).
START/STOP
4. After the cooking program is completed, the buzzer will ring and the screen will display "OFF".
It will automatically turn off after 30 seconds or unplug the power cord.
oven could be very “hot”.
NOTE:
We recommend you use the #7 Wire Rack to place the bread on for purpose of toasting.
BAKE FUNCTION
1. Click the “FUNCTION” icon to select “
BAKE
”.The "
Cake
" icon on the screen will flash.
the “TIME/TEMP” icon again, then rotate the “Temperature/Time” knob to adjust the time (You can skip this
step and choose the default temperature and time).
START/STOP
4.
After the cooking program is completed, the buzzer will ring and the screen will display "OFF".
It will automatically turn off after 30 seconds or unplug the power cord.
5.
Check internal food temperature with a food thermometer if desired to determine if ideal food temperature has
been reached.
BROIL FUNCTION
1. Click the “FUNCTION” icon to select “
BROIL
”.The "
Steak
" icon on the screen will flash.
the “TIME/TEMP” icon again, then rotate the “Temperature/Time” knob to adjust the time (You can skip this
step and choose the default temperature and time).
START/STOP
4.
After the cooking program is completed, the buzzer will ring and the screen will display "OFF".
It will automatically turn off after 30 seconds or unplug the power cord.
5.
Check internal food temperature with a food thermometer if desired to determine if ideal food temperature has
been reached.
ROAST FUNCTION
1. Click the “FUNCTION” icon to select “
ROAST
”.The "
Drumstick
" icon on the screen will flash.
the “TIME/TEMP” icon again, then rotate the “Temperature/Time” knob to adjust the time (You can skip this
step and choose the default temperature and time).
START/STOP
4.
After the cooking program is completed, the buzzer will ring and the screen will display "OFF".
It will automatically turn off after 30 seconds or unplug the power cord.
5.
Check internal food temperature with a food thermometer if desired to determine if ideal food temperature has
been reached.
PIZZA FUNCTION
1. Click the “FUNCTION” icon to select “
PIZZA
”.The "
Pizza
" icon on the screen will flash.
the “TIME/TEMP” icon again, then rotate the “Temperature/Time” knob to adjust the time (You can skip this
step and choose the default temperature and time).
START/STOP
4.
After the cooking program is completed, the buzzer will ring and the screen will display "OFF".
It will automatically turn off after 30 seconds or unplug the power cord.
5.
Check internal food temperature with a food thermometer if desired to determine if ideal food temperature has
been reached.
WARM FUNCTION
1. Click the “FUNCTION” icon to select “
WARM
”.The "
Snowflake
" icon on the screen will flash.
the “TIME/TEMP” icon again, then rotate the “Temperature/Time” knob to adjust the time (You can skip this
step and choose the default temperature and time).
START/STOP
AIR FRY FOOD RECOMMEND
11
12
4.
After the cooking program is completed, the buzzer will ring and the screen will display "OFF". It will
automatically turn off after 30 seconds or unplug the power cord.
5.
Check internal food temperature with a food thermometer if desired to determine if ideal food temperature has
been reached.
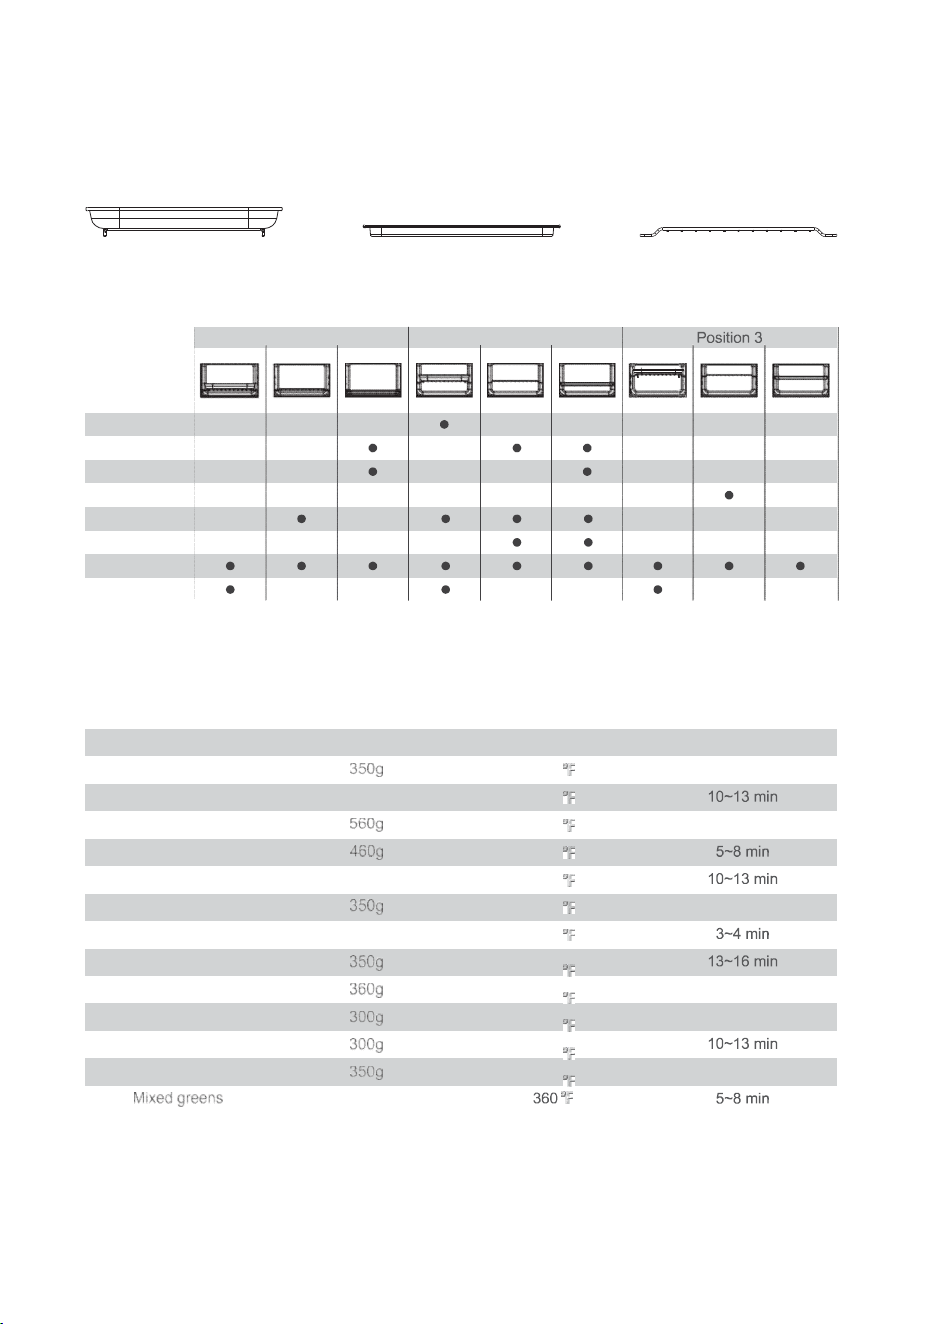
OVEN RACK AND PAN POSITION DIAGRAMS
Please refer to the chart below for suggested Oven Rack, Grill Tray, and AirFryer Basket positions.
DEHYDRATE FUNCTION
1.
Click the “FUNCTION” icon to select “
DEHYDEATE
”.The "
Orange
" icon on the screen will flash.
Air Fryer
Basket
Grill Tray Oven Rack
2.
Rotate the “SELECT” knob to select the temperature you want to dehydrate the food. The dehydrating
to dehydrate the food.
4.
Press the “START/STOP” button to start dehydrating, and the cooking time will begin to countdown. After the
cooking program is completed, the buzzer will ring and the screen will display "OFF". It will automatically turn
off after 30 seconds or unplug the power cord.
5.
Check internal food temperature with a food thermometer if desired to determine if ideal food temperature has
been reached.
SUGGESTED RACK / Tray / BASKET POSITIONS
AIRFRYER CHART
Food Recommended Amount Temperature Time
Frozen French fries 400 17~20 min
Chicken wings 500g 400
Chicken nuggets 400 17~20 min
Shrimp 400
Chilled Pollock 500g 400
The squid ring 400 11~14 min
Burritos 1 piece 400
The cod 400
Cod steak 400 14~17 min
Onion rings 400 11~14 min
Potato cheese sticks 400
Potatoes Angle 400 11~14 min
500g
Position 1 Position 2
Function
AirFry
Toast
Bake
Broil
Roast
Pizza
Warm
Dehydrate
11
12
4.
After the cooking program is completed, the buzzer will ring and the screen will display "OFF". It will
automatically turn off after 30 seconds or unplug the power cord.
5.
Check internal food temperature with a food thermometer if desired to determine if ideal food temperature has
been reached.
OVEN RACK AND PAN POSITION DIAGRAMS
Please refer to the chart below for suggested Oven Rack, Grill Tray, and AirFryer Basket positions.
DEHYDRATE FUNCTION
1.
Click the “FUNCTION” icon to select “
DEHYDEATE
”.The "
Orange
" icon on the screen will flash.
Air Fryer
Basket
Grill Tray Oven Rack
2.
Rotate the “SELECT” knob to select the temperature you want to dehydrate the food. The dehydrating
to dehydrate the food.
4.
Press the “START/STOP” button to start dehydrating, and the cooking time will begin to countdown. After the
cooking program is completed, the buzzer will ring and the screen will display "OFF". It will automatically turn
off after 30 seconds or unplug the power cord.
5.
Check internal food temperature with a food thermometer if desired to determine if ideal food temperature has
been reached.
SUGGESTED RACK / Tray / BASKET POSITIONS
AIRFRYER CHART
Food Recommended Amount Temperature Time
Frozen French fries 400 17~20 min
Chicken wings 500g 400
Chicken nuggets 400 17~20 min
Shrimp 400
Chilled Pollock 500g 400
The squid ring 400 11~14 min
Burritos 1 piece 400
The cod 400
Cod steak 400 14~17 min
Onion rings 400 11~14 min
Potato cheese sticks 400
Potatoes Angle 400 11~14 min
500g
Position 1 Position 2
Function
AirFry
Toast
Bake
Broil
Roast
Pizza
Warm
Dehydrate
13
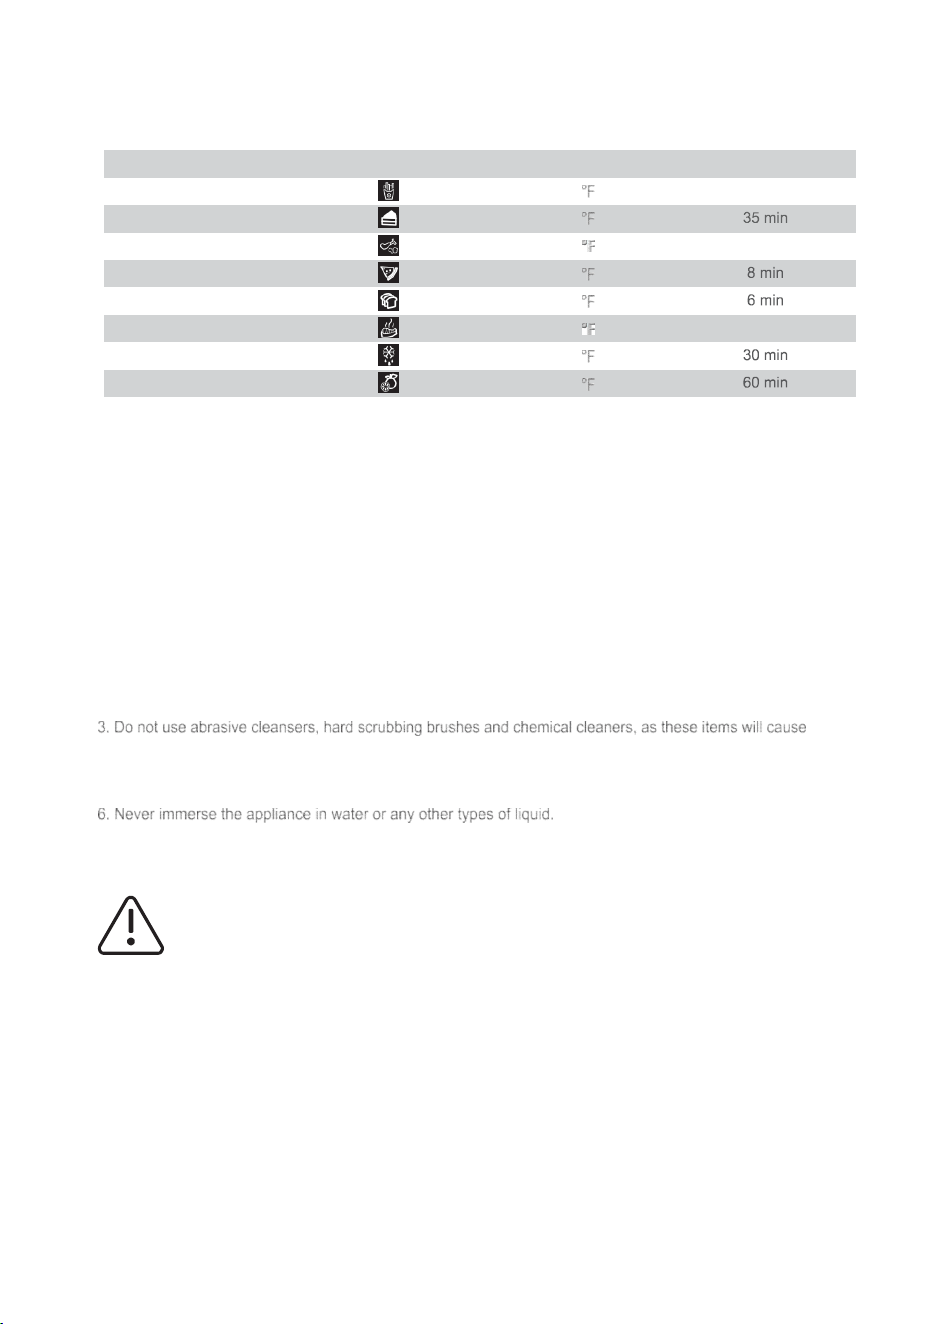
PRESET CHART
Preset Icon Temperature Time
Air Fry 450 15 min
Bake 350
Roast 450 20 min
Pizza 450
Toast 450
Broil 450 12 min
Warm 140
Dehydrate 140
CARE AND CLEANING
1.
Before cleaning, unplug the oven and allow the appliance to cool completely.
2.
Wash all the attachments with warm and mild kitchen detergent water, including the “rack” and the “grill tray”.
damage to the non-stick coating of the “grill tray”.
4.
Use a wet cloth to wipe the inside of the oven.
5.
To clean the door of the appliance with a wet cloth saturated with a mild kitchen detergent.
7. Any other type(s) of service the appliance shall be performed by an authorized service representative(s).
Warning: HOT SURFACES!
Manufacture Info:

1250W
FM1053
120V 60Hz
Air Fryer Oven
Ver.1
INSTRUCTIONS
Air Fryer Oven