SOLUTION B-FIX/B2-FIX+LUX
READ this Owner’s Manual carefully before rst use, and keep it for future reference.
LEA con cuidado este Manual del propietario antes de usar el producto por primera vez y guárdelo para uso futuro.
Owner’s Manual
Manual del propietario
ENES

Thank you for purchasing the CYBEX Solution B-Fix/B2-Fix+Lux High Back Booster Seat. We are proud to
bring this German engineered seat to North America. We hope the Solution B-Fix/B2-Fix+Lux will make your
child’s travel both safer and more pleasant, as well as making installation and use for you as simple and easy
as possible.
The Solution B-Fix/B2-Fix+Lux is the next generation of the award winning CYBEX booster seats. With greatly
improved protection in side impact and forward facing crashes, the Solution B-Fix/B2-Fix+Lux takes booster
safety to a new level.
Statistics show that over 75% of car seats are installed incorrectly!
Please read and follow these instructions to install this booster seat correctly, even if the installation and use
of this booster seat might seem simple and intuitive. The safety of your child depends on it! Although many
booster seats may be used without the backrest attached, the Solution B-Fix/B2-Fix+Lux should NEVER BE
USED WITHOUT THE BACKREST ATTACHED as it dramatically reduces the protection in a crash.
We recommend keeping your young child in a properly sized and installed car seat as long as possible before
making the switch to the Solution B-Fix/B2-Fix+Lux High Back Booster Seat.
No car seat can guarantee protection from injury in every situation, but proper use helps reduce the risk of death
or serious injury. If you have any questions or need assistance, please contact CYBEX at 1-877-242-5676.
Also, please remember to register your booster seat so we can contact you in the unlikely event of a recall.
Register online:
• In the United States, at http://register.cybex-online.com/us/carseats
• In Canada, at http://register.cybex-online.com/ca/carseats
Keep this Owner’s Manual for future reference by storing it in the pocket behind the Backrest pad. We
appreciate your purchase and invite you to visit our web site www.cybex-online.com to see other great CYBEX
products.
Before the rst use of this booster seat, please make sure you have followed all the steps in the Safety
Checklist found on pg. 31.
WELCOME TO THE CYBEX FAMILY.

EN
INDEX
SOLUTION B-FIX/B2-FIX+LUX FEATURES ................................................................................................ 3
REGISTRATION AND RECALL INFORMATION .......................................................................................... 4
BOOSTER SEAT OVERVIEW ....................................................................................................................5-6
WHEN TO PLACE YOUR CHILD IN A BOOSTER SEAT ............................................................................ 7
CHILD HEIGHT, WEIGHT, AND AGE REQUIREMENTS ............................................................................ 8
WARNINGS ................................................................................................................................................9-12
BOOSTER SEAT ASSEMBLY ...................................................................................................................... 13
VEHICLE SEAT LOCATION REQUIREMENTS ....................................................................................14-15
VEHICLE SEAT BELT REQUIREMENTS ................................................................................................... 16
VEHICLE LATCH/UAS REQUIREMENTS .................................................................................................. 17
INSTALLING WITH LATCH/UAS: SOLUTION B-FIX ONLY ...................................................................... 18
INSTALLING WITH RIGID LATCH/UAS: SOLUTION B2-FIX+LUX ONLY ............................................... 19
INSTALLING WITH SEAT BELT ONLY ....................................................................................................... 20
ADJUSTING THE SEAT FOR YOUR CHILD .............................................................................................. 21
USING THE THREE POSITION RECLINING HEADREST (SOLUTION B2-FIX+LUX ONLY) ............... 22
SECURING YOUR CHILD IN THE BOOSTER SEAT .......................................................................... 23-36
UNINSTALLING THE BOOSTER SEAT ..................................................................................................... 27
REMOVING AND REPLACING THE SEAT COVERS .......................................................................... 28-29
CARE AND CLEANING ................................................................................................................................ 30
SAFETY CHECKLIST ................................................................................................................................... 31
RESOURCES ................................................................................................................................................ 32
WARRANTY .............................................................................................................................................33-34

THREE POSITION
RECLINING HEADREST
D
E
E
P
S
A
F
E
T
Y
Z
O
N
E
3
The Solution B-Fix/B2-Fix+Lux brings all new technologies to the High Back Booster Seat category to enhance
the safety of your child in the event of a side impact collision.
LINEAR SIDE-IMPACT PROTECTION™ (L.S.P.)
The L.S.P. system allows the forces from a side impact collision to be reduced
gradually to help minimize injuries. The Head and Shoulder Protectors are made of
extra deep and thick energy absorbing EPS foam to create a deep Safety Zone™
around your child.
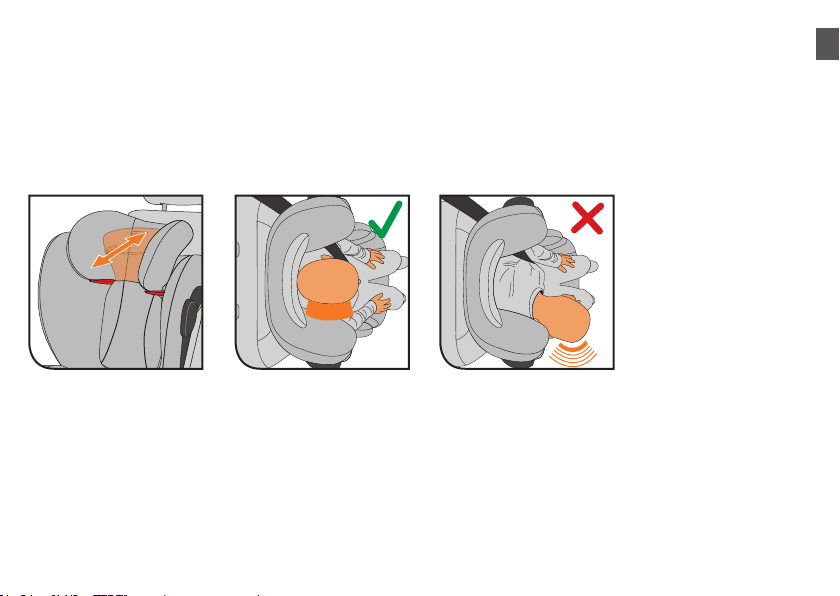
THREE POSITION RECLINING HEADREST (SOLUTION B2-FIX+LUX ONLY)
When a child sleeps, their head can fall forward. If your child slumps forward out
of position when asleep, there is an increased risk that your child will not be well
protected in the event of a collision. The Three Position Reclining Headrest on the
Solution B2-Fix+Lux helps avoid this by allowing your child’s head to recline and
remain protected in the Safety Zone of the Head Protectors.
Thanks to the Three Position Reclining Headrest, your child will be able to lean back and sleep comfortably
with their head inside the Safety Zone.
SOLUTION B-FIX/B2-FIX+LUX FEATURES
EN
4
REGISTRATION AND RECALL INFORMATION
Please complete the Registration Card that came
with your Child restraint and mail it immediately
or register online.
Child restraints could be recalled for safety reasons.
You must register this restraint to be reached in a
recall. Send your name, address, e-mail address
if available, and the restraint’s model number and
manufacturing date to:
Columbus Trading-Partners USA Inc.
Attn: ParentLink
1801 Commerce Drive
Piqua, Ohio 45356, USA
or call 1-877-242-5676 or register online at
http://register.cybex-online.com/us/carseats
For recall information, call the U.S. Government’s
Vehicle Safety Hotline at:
1-888-327-4236 (TTY: 1-800-424-9153),
or go to www.NHTSA.gov.
PUBLIC NOTICE FOR CANADIAN CUSTOMERS
To register your booster, return the registration card,
call 1-877-242-5676, or register online at
http://register.cybex-online.com/ca/carseats
For recall information, call Transport Canada at
1-800-333-0510 (1-613-993-9851 in Ottawa region)
or Goodbaby Canada Inc. at 1-877-242-5676.
CERTIFICATION
This restraint is certied for use only in passenger
and multi-purpose passenger motor vehicles, buses,
and trucks equipped with lap/shoulder belt systems.
THIS RESTRAINT IS NOT CERTIFIED
FOR AIRCRAFT USE as shoulder belts
are not available for proper use.
FEDERAL STANDARD NO. FMVSS213-
Child restraint Systems
This child restraint system conforms to all
applicable Federal Motor Vehicle Safety Standards.
CANADIAN REGULATORY NOTICE
This child restraint system meets all the applicable
requirements of Canadian Motor Vehicle Safety
Standard CMVSS 213.2.
Registration information may be found axed to
the underside of the Booster Base.

5
BOOSTER SEAT OVERVIEW
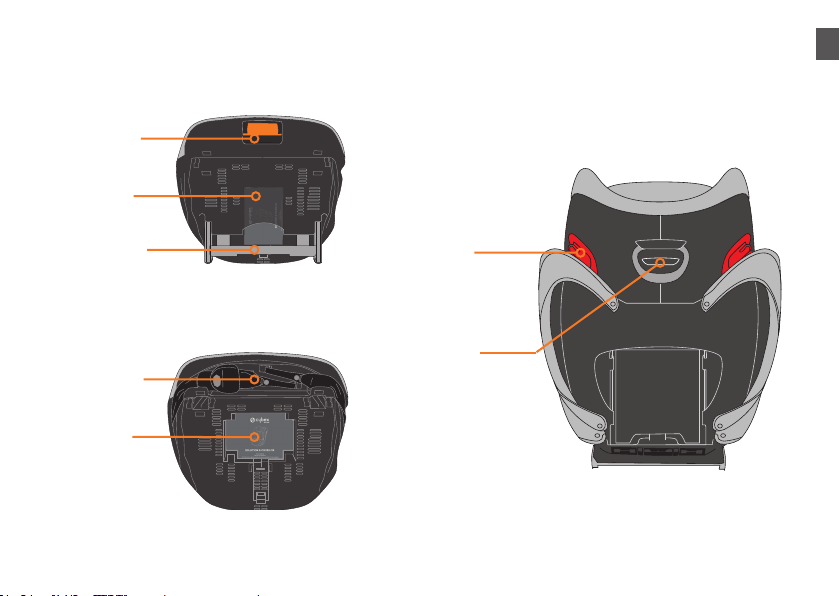
FRONT VIEW
q
w
e
r
t
u
q
Headrest (Solution B-Fix)
Three Position Recling Headrest
(Solution B2-Fix+Lux)
(see pg. 22)
w
L.S.P. (Solution B-Fix)
L.S.P. with Bolster
(Solution B2-Fix+Lux)
(see pg. 13)
e
Backrest
r
Armrest
t
Lower Belt Guide
y
Cup holder(s)*
u
Booster Base
* Quantity will vary.
y
EN
6
REAR VIEW
BOOSTER SEAT OVERVIEW
BOTTOM VIEW
SOLUTION B2-FIX+LUX
Rigid LATCH
Adjustment
Handle
User
Guide
LATCH
Storage
LATCH
Storage
User
Guide
SOLUTION B-FIX
Shoulder Belt
Guide
Headrest
Height
Adjustment
Handle

7
WHEN TO PLACE YOUR CHILD IN A BOOSTER SEAT
Booster seats raise the child up and help to position
the vehicle lap and shoulder belt correctly. When the
child is properly restrained in a booster seat, their
risk of injury in all types of crashes is reduced.
It is important for the
child to sit properly
within the vehicle seat
belts. When the vehicle
seat belt is buckled, the lap
belt must be positioned low
and snug at the child’s
hips A, and the shoulder
belt should lie across the
middle of the shoulder
B. If the child leans out or
moves the belt behind the
back or places it under the arm, it will not provide
the intended restraint.
There are a number of things to consider when
deciding whether the child is ready to sit in a booster
seat, including: the weight and height rating on their
current child seat, the child’s own weight and height,
their maturity, and the seating positions available in
your vehicle.
How is a booster seat used?
Using a booster seat is very similar to buckling
yourself into the vehicle:
• Read the instruction manuals for both the booster
seat and the vehicle before you start.
• Put the booster in the back seat in a location with
a lap and shoulder belt. Never use a booster with
only a lap belt, as this could cause serious injuries.
• After the child is in the booster, pull the lap and
shoulder belt across him/her and buckle it.
• Check that the shoulder belt lies across the middle
of the shoulder and that the lap belt is low on the
hips.
How can you tell if your child is ready to
transition to a booster seat?
You should consider using a booster seat if the
following conditions apply:
• The child is mature enough to sit in the booster seat
and not put the belts under their arm or behind their
back.
• The child is approaching the weight or height limit of
the child restraint they are currently using.
• Your vehicle does not have a tether anchorage
available, but does have a lap/shoulder seat belt in
the rear seat.
A
B
EN
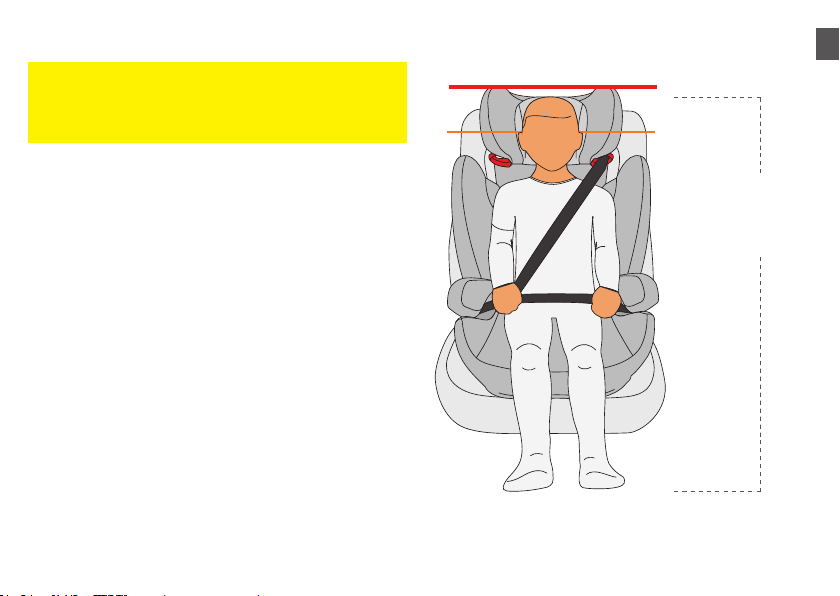
The tops of the child’s ears (Orange Line) are below
the top of the booster seat (Red Line).
When sitting in a booster seat, the shoulder belt
should lie across the middle of the shoulder and
snug across the midpoint of the child‘s chest.
The lap portion of the seat belt MUST be positioned
low and snug at the child's hips.
The lap and shoulder belts should lie snug, not
twisted, and with no slack.
8
CHILD HEIGHT, WEIGHT, AND AGE REQUIREMENTS
• USE ONLY with children who are 4 years
of age or older AND who weigh 18-54 kg
(40-120 lb) AND whose height is 96-152
cm (38-60 inches). Using this booster
seat with a child who does not meet ALL
of these requirements may increase the
risk of death or serious injury.
• Use this booster seat FORWARD
FACING ONLY.
18-54 kg
(40-120 lb)
AND
96-152 cm
(38-60 in)
WARNING!
DEATH or SERIOUS INJURY can occur
9
• YOUR CHILD’S SAFETY depends on
you correctly installing and using this
booster seat.
• READ and FOLLOW all booster seat
and vehicle instructions carefully. Failure
to follow these instructions and the
product labeling can result in DEATH
or SERIOUS INJURY of your child in a
sharp turn, sudden stop, or crash.
• DO NOT install or use this booster seat
until you have read and understand the
instructions in this manual and in your
vehicle Owner’s Manual. If there is a
conict between the two, the vehicle
Owner’s Manual must be followed unless
explicitly warned against in this manual.
• NEVER USE this booster seat with a
lap belt only, or with any motorized, door
mounted, or inatable vehicle belts. Your
child would not be properly restrained in
the event of a crash.
WARNING! DEATH or SERIOUS INJURY can occur
• DO NOT let others install or use this
booster seat unless they understand how
to correctly install and use it.
• KEEP this Owner’s Manual for future
reference by storing it in the Base of the
Booster Seat.
• NEVER USE the Booster Base without
the Backrest attached.
• NEVER TAKE your child out of the
booster seat to tend to his or her needs
while the vehicle is moving. Unrestrained
occupants are at a greatly increased risk
of DEATH or SERIOUS INJURY in a car
crash.
• NEVER TEND to your child’s needs
while driving. Driving while distracted is
the cause of many car crashes. Safely
stop your vehicle in order to tend to your
child.
• NEVER LEAVE children unattended in a
vehicle, even for a short period of time.
• The primary protection for occupants of
a vehicle in a collision is the structure of
EN
10
the vehicle itself; a booster seat and the
vehicle restraint system may not protect
a child from injury when a vehicle is
seriously impacted. Correctly used per
the instruction and labeling, this booster
seat will substantially improve the
chances for survival in most crashes.
• TOO MUCH RECLINE IN THE VEHICLE
SEAT BACK can result in improper seat
belt position. An improperly positioned
seat belt increases the risk of DEATH
or SERIOUS INJURY in a crash. Follow
your vehicle Owner’s Manual instructions
for proper seat back positioning.
• USE ONLY the vehicle’s lap and
shoulder belt system when restraining
your child in this booster seat.
• IMPROPER PLACEMENT of this
booster seat in a vehicle aects the
booster seat’s performance and can
result in DEATH or SERIOUS INJURY.
• ONLY PLACE this booster seat
WARNING! DEATH or SERIOUS INJURY can occur
FORWARD FACING in a vehicle
seating location allowed by the vehicle
manufacturer. Refer to your vehicle
Owner’s Manual for information about
vehicle seat belt systems, air bags, and
child restraint/booster seat installation to
determine allowable seating positions.
• Use this booster seat FORWARD
FACING ONLY.
• ACCORDING TO ACCIDENT
STATISTICS, children are safer when
properly restrained in rear vehicle seating
positions.
• DO NOT USE this booster seat in a
seating position with an airbag unless the
vehicle manufacturer specically allows
placement there. If an air bag inates, it
can hit your child with such a great force
that it may cause DEATH or SERIOUS
INJURY.
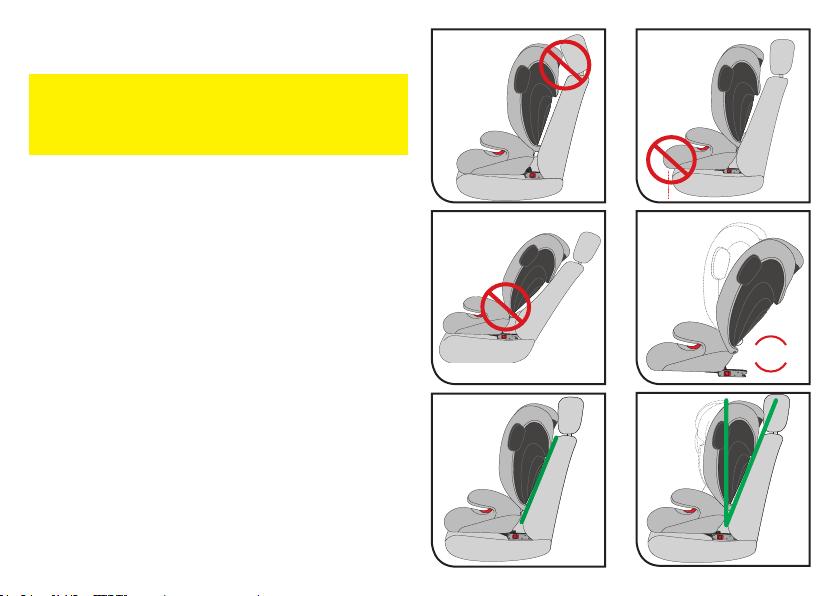
• The Backrest of this booster seat MUST
FIT FLAT against the vehicle seat back.
• Vehicle headrest MUST NOT
11
INTERFERE with the booster seat
Backrest. See the vehicle Owner’s
Manual for adjustment or possible
removal of vehicle headrest.
• NO PART of this booster seat should
hang over the front of the vehicle seat.
• NEVER USE a locking clip when
installing this booster seat.
• ALWAYS secure the Booster Seat with
the vehicle seat belt or lower anchors
when not occupied. An unsecured
Booster Seat can injure other occupants
in the event of a crash.
• DO NOT SECURE this booster seat to
the vehicle’s lower LATCH/UAS anchors
if the seat belt or seat belt buckle is not
easily accessible when the booster seat
is securely installed or if it negatively
impacts the positioning of the seat belt
over the child.
• NEVER LEAVE a vehicle seat with a
folding mechanism unlocked. In the
event of a sudden stop, a loose vehicle
WARNING! DEATH or SERIOUS INJURY can occur
seat back could prevent this booster
seat from protecting your child as well as
it should.
• DO NOT LEAVE loose objects (e.g.
books, bags, etc.) in a vehicle. In the
event of a sudden stop, loose objects
will become projectiles, potentially
causing serious injuries.
• DO NOT USE anything to raise this
booster seat o the vehicle seat.
• NEVER USE this booster seat in the
home, on aircraft, boats, low speed
vehicles (LSV), all-terrain vehicles (ATV),
golf carts, or any other non-certied
application.
• NEVER ALLOW children to play with
this booster seat.
• NEVER ALLOW children to play with
vehicle seat belts as they may create
an ENTANGLEMENT HAZARD for any
child that can reach the seat belt and
may wrap it around his or her neck.
• DO NOT USE this booster seat if it has

EN
12
been in a crash. There may be hidden
damage and it must be replaced. Your
insurance company may provide some
assistance replacing the booster seat.
• NEVER USE this booster seat if it
has been damaged in any way or has
missing parts.
• NEVER USE a cut, damaged, frayed, or
inoperable vehicle seat belt.
• DO NOT ATTEMPT to make repairs to
or otherwise modify or tamper with this
booster seat.
• NEVER USE this booster seat without
properly installed fabric covers.
• NEVER USE a second-hand booster
seat or a booster seat whose history you
do not know.
• DO NOT use cup holders to store cans
or hard cups. DO NOT place any cups
that contain hot liquids in cup holders.
• DO NOT USE accessories or parts
WARNING! DEATH or SERIOUS INJURY can occur
with this booster seat other than those
approved by CYBEX. Use of accessories
or parts from other manufacturers could
alter the performance of the booster
seat.
• DISCONTINUE USING this booster seat
when it is older than eight (8) years and
recycle it. The date of manufacture can
be found on a label axed to the bottom
of the Booster Base.
• This booster seat and the vehicle seat
belt can become very hot if left in the sun
and can burn your child’s skin. ALWAYS
TOUCH the surfaces of the parts before
putting your child in the booster seat.
GUIDE
e
13
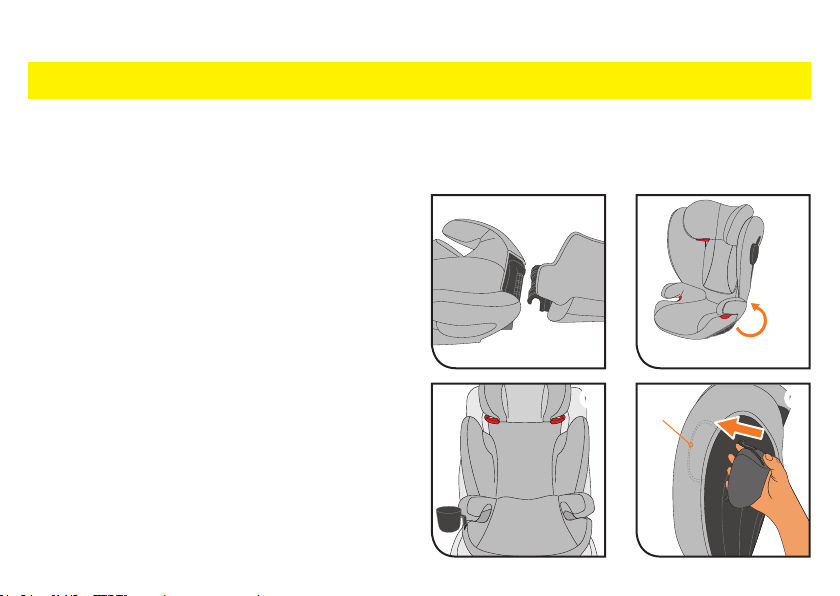
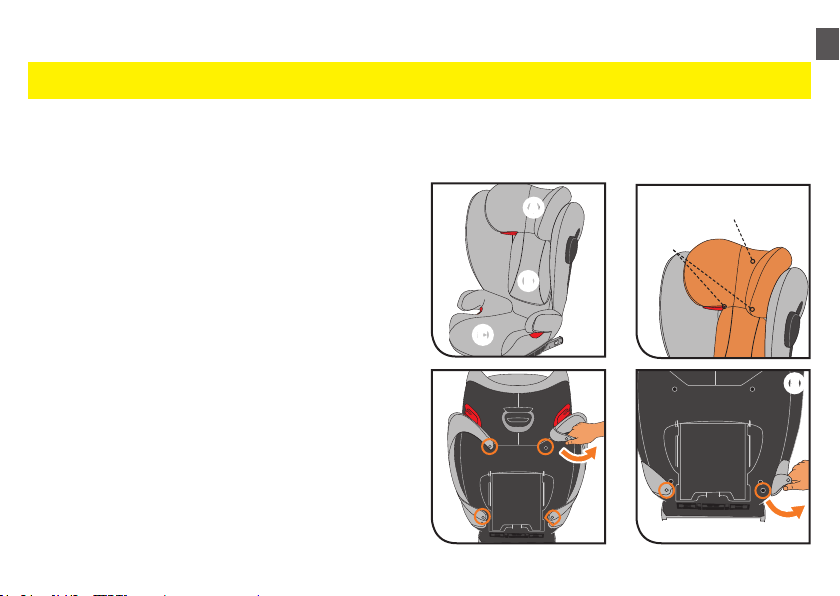
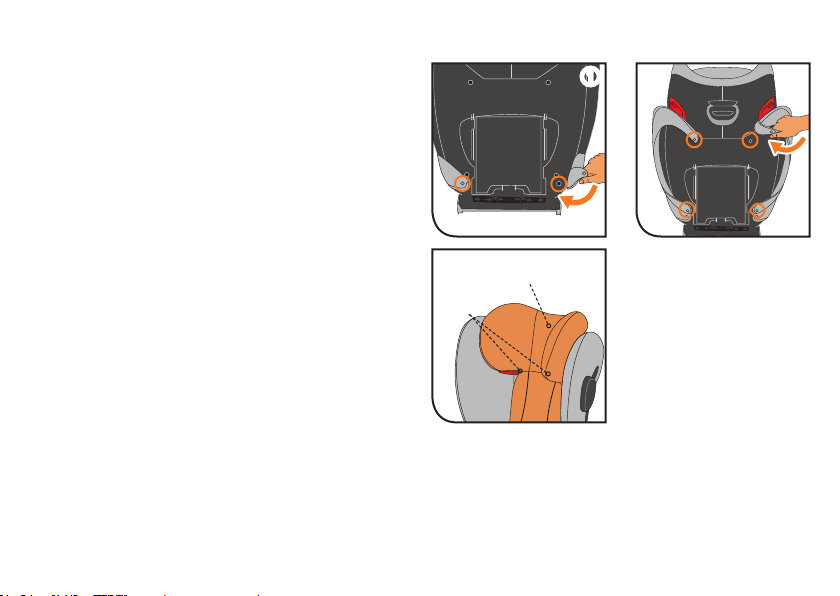
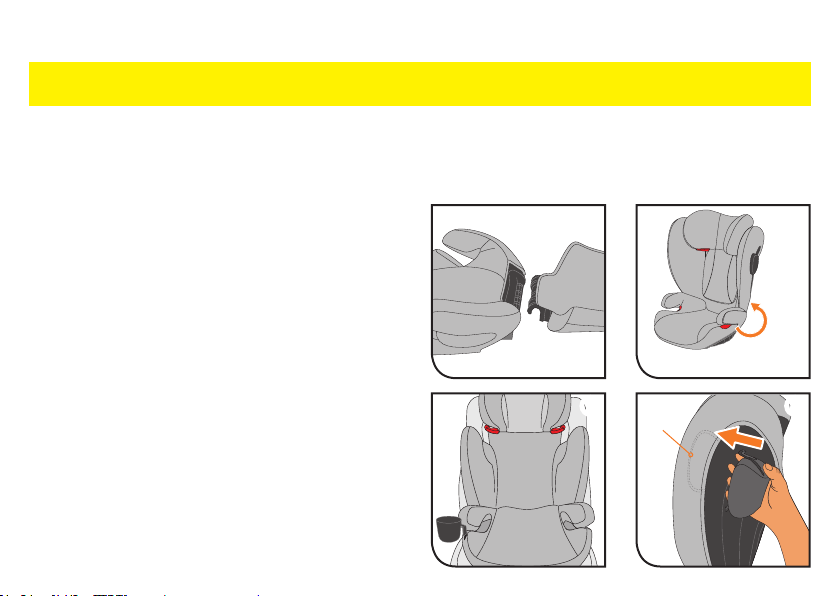
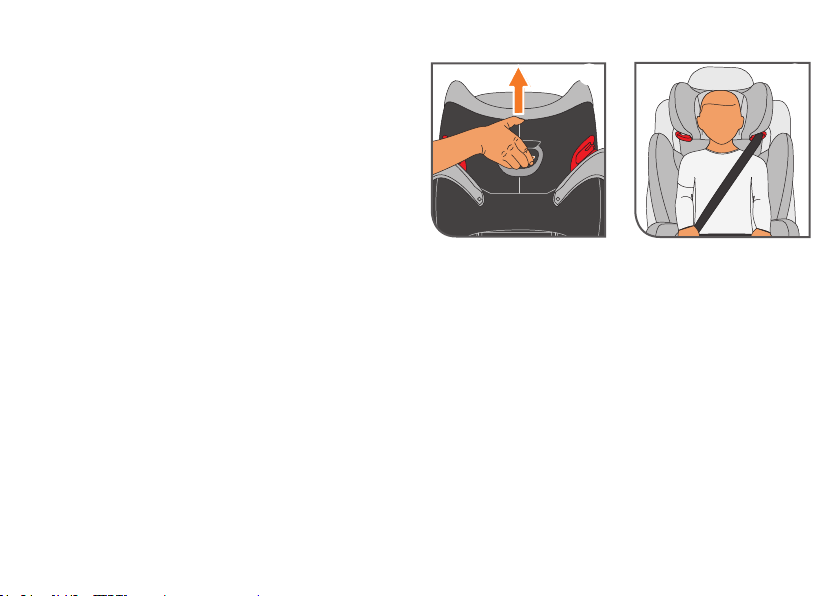
1. Connect the Backrest to the Booster Base.
2. Fold the Backrest up until it CLICKS into place.
3. Install cup holder(s) if used.
4. SOLUTION B2-FIX+LUX ONLY: Install L.S.P.
Bolster.
a. Line up one L.S.P. Bolster with the guide on
the corresponding side of the seat.
Note: L.S.P. guides are located under the
backrest cover on the sides of the seat.
b. Slide L.S.P. Bolster into position over top of
backrest cover until you hear and audible
CLICK. Repeat with other side.
BOOSTER SEAT ASSEMBLY
• NEVER USE the Booster Base without the Backrest attached.
• NEVER use this booster seat with the Backrest past the allowable adjustment range. An
audible CLICK will alert you when you have gone too far.
WARNING! DEATH or SERIOUS INJURY can occur
q w
r
EN
14
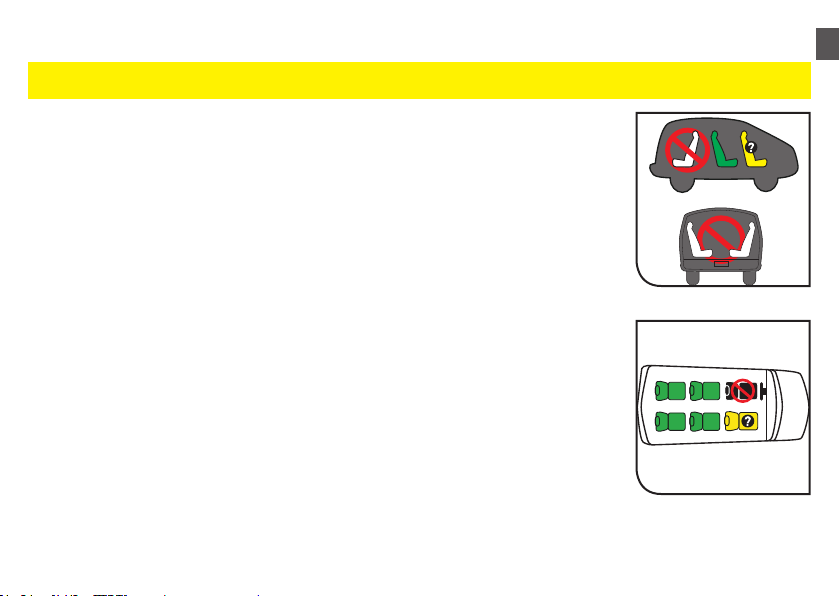
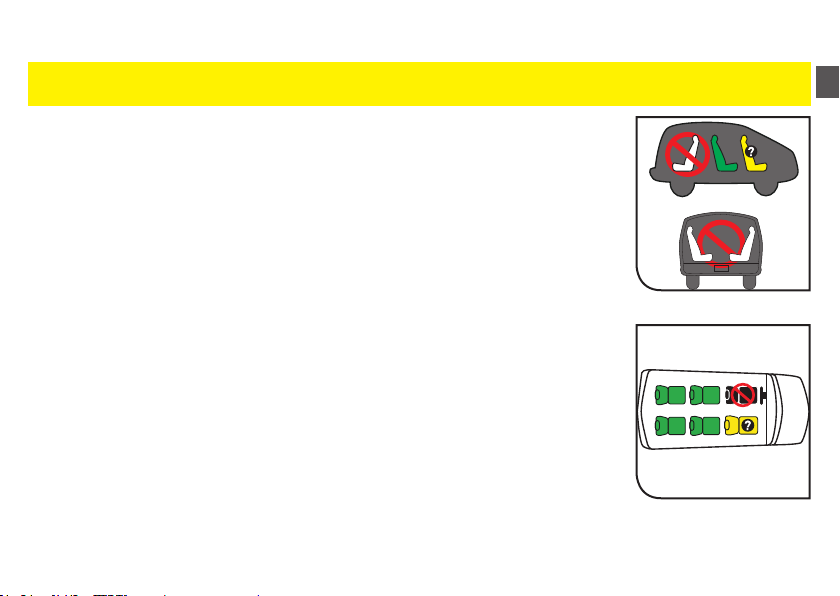
• ACCORDING TO ACCIDENT STATISTICS, children are safer
when properly restrained in rear vehicle seating positions.
• ONLY PLACE this booster seat FORWARD FACING in a
vehicle seating location allowed by the vehicle manufacturer.
Refer to your vehicle Owner’s Manual for information about
vehicle seat belt systems, air bags, and child restraint/booster
seat installation to determine allowable seating positions.
• Use this booster seat ONLY IN FORWARD FACING VEHICLE
SEATS.
VEHICLE SEAT LOCATION REQUIREMENTS
WARNING! DEATH or SERIOUS INJURY can occur

CLICK!
15
• Vehicle headrest MUST NOT
INTERFERE with the booster seat
Backrest. See the vehicle Owner’s
Manual for adjustment or possible
removal of vehicle headrest.
• NO PART of this booster seat should
hang over the front of the vehicle seat.
• NEVER ALLOW your child to use this
booster seat if the vehicle seat back is in
a reclined position.
• NEVER use this booster seat with the
Backrest past the allowable adjustment
range. An audible CLICK will alert you
when you have gone too far.
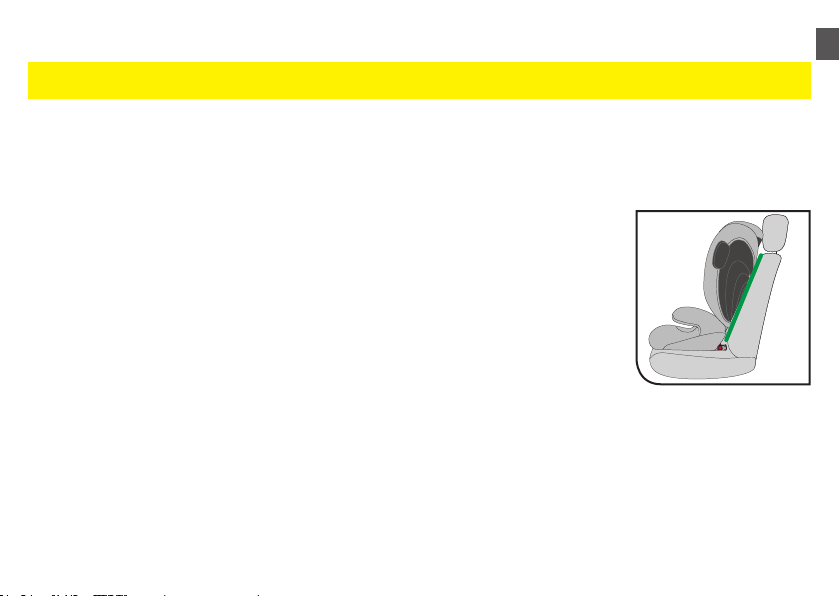
• The Backrest of this booster seat MUST
FIT FLAT against the vehicle seat back.
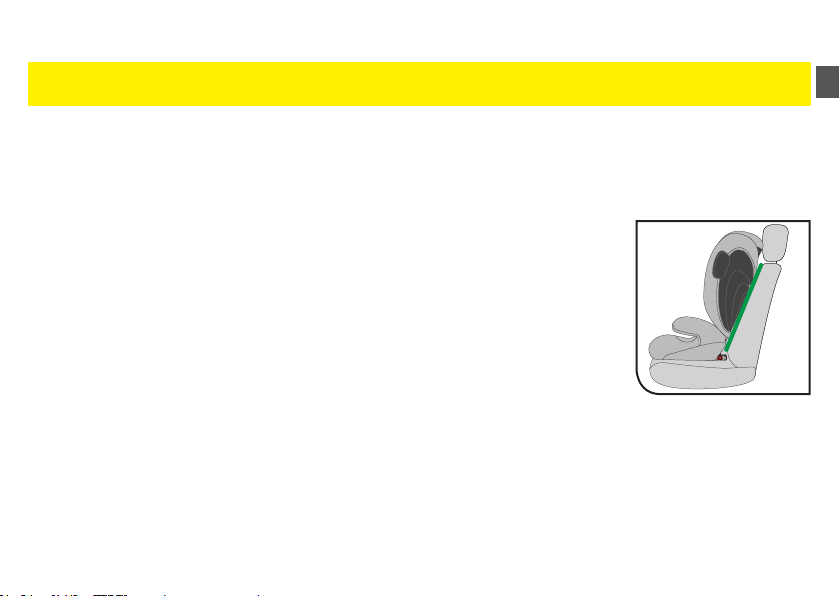
The Backrest will adjust to the vehicle seat
back through an allowable adjustment range of
approximately 15° as shown in green.
VEHICLE SEAT LOCATION REQUIREMENTS
WARNING!
DEATH or SERIOUS INJURY can occur
EN
16
VEHICLE SEAT BELT REQUIREMENTS
• USE ONLY the vehicle’s lap and shoulder belt system when restraining your child in
this booster seat.
• NEVER USE this booster seat with a lap belt only, or with any motorized, door
mounted, or inatable vehicle belts. Your child would not be properly restrained in the
event of a crash.
The design and operation of vehicle seat belt systems vary from vehicle to vehicle and from seating location
to seating location in the same vehicle. Refer to your vehicle Owner’s Manual for proper use, placement, and
adjustment of the vehicle’s lap and shoulder belts.
This booster seat may not t some vehicle seating positions.
Select a seat location allowed by your vehicle manufacturer that is equipped with a LAP AND SHOULDER
BELT system.
WARNING! DEATH or SERIOUS INJURY can occur
LATCH and UAS are acronyms for Lower Anchors and Tethers for CHildren (USA)
and Universal Anchorage System (Canada), and refer to a pair of xed Lower Anchors
(or bars) and a Top Tether anchor that are built into your vehicle, in vehicles built after
September 1, 2002.
Note: Your vehicle owner’s manual may also refer to this system as ISOFIX or Lower
Universal Anchorage System (LUAS).
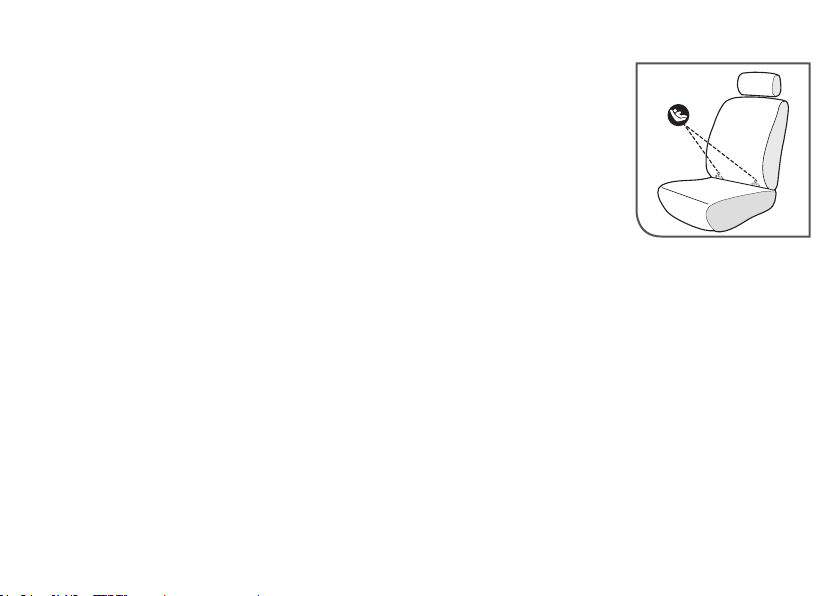
The lower LATCH/UAS anchors are located in the crease, or bight, between the
vehicle seat back and seat cushion, and if not visible, will typically be indicated by the
symbol. Top tether anchors are located in various places behind the rear vehicle seat.
Center installation in a non-standard LATCH/UAS position:
Center installation of this booster seat is permitted using inner Lower Anchor Bars from the outside seating
positions if:
1. your vehicle manual allows such installation; and
2. the inner Lower Anchor Bars from the outside seating positions are 28-51 cm (11-20 in.) apart.
LATCH/UAS typically oers an easier and more consistent installation. However, this booster seat can be safely
installed using either LATCH/UAS or vehicle belts and meets the requirements of Federal Safety Standard
FMVSS 213 and Canadian Safety Standard CMVSS 213.2 with either installation method. Either method is safe
for your child when installed correctly.
The LATCH/UAS system is intended to be used ONLY as described in these instructions. Serious injury or death
may result from misuse. Refer to your vehicle Owner’s Manual for lower anchor bar positions in your vehicle.
The Solution B-Fix/B2-Fix+Lux has been designed to attach to the lower anchors of this system using one of two
dierent styles of LATCH (see pgs. 18-19) and may also be used in seating positions without lower LATCH/UAS
anchors (see pg. 20).
17
VEHICLE LATCH/UAS REQUIREMENTS
EN
w
e r
18
1. Select a seat location allowed by your vehicle
manufacturer that is equipped with a LAP AND
SHOULDER BELT system. Locate the vehicle
lower LATCH/UAS anchors or the symbols
indicating their location (see pg. 17).
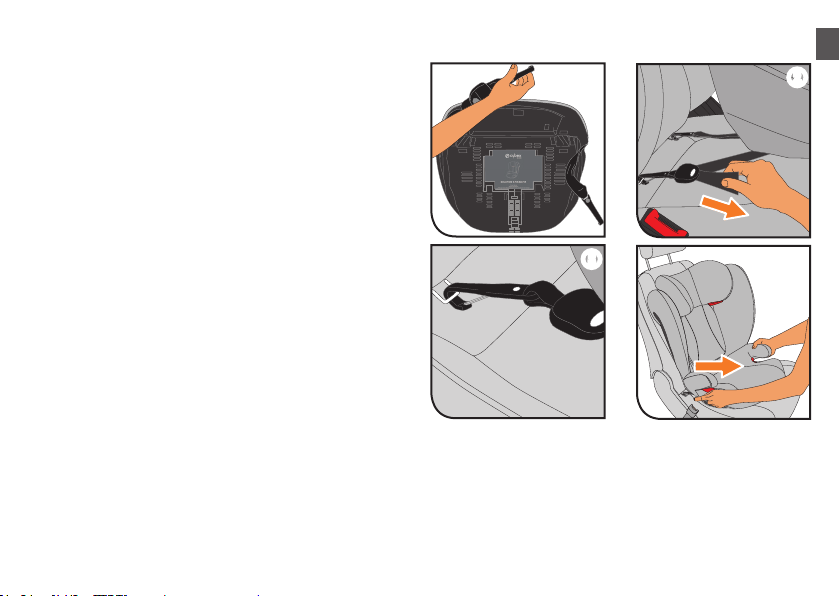
2. Remove the LATCH/UAS connectors from
their storage location under the Solution B-Fix
Booster Base q
and attach to the vehicle lower
LATCH/UAS anchor bars until they lock onto the
bars on both sides of the seat.
3. Using your full weight, push the booster seat
rmly into the vehicle seat while pulling the
Lower Anchor Strap on either side of the booster
seat to remove slack w. Do not overtighten.
Note: Make sure both lower anchor connectors
are facing downward as shown and the straps
are not twisted e.
4. Make sure that the booster seat is connected
safely by trying to pull it out on both sides r.
INSTALLING WITH LATCH/UAS: SOLUTION B-FIX ONLY
q

q
re
yt
w
19
INSTALLING WITH RIGID LATCH/UAS: SOLUTION
B2-FIX+LUX ONLY
1. Select a seat location allowed by your vehicle
manufacturer that is equipped with a LAP AND
SHOULDER BELT system. Locate the vehicle
lower LATCH/UAS anchors or the symbols
indicating their location (see pg. 17).
2. Place the booster on its side. While squeezing
the orange Rigid LATCH/UAS Adjustment
Handle located on the bottom of the Solution
B2-Fix+Lux Booster Base q, pull the Rigid
LATCH/UAS Connectors out until they stop.
Then rotate the Connectors 180° w.
3. Push the Rigid LATCH/UAS Connectors onto
the vehicle lower anchors e until you hear them
CLICK. The GREEN security bar will be visible
on the release button when the Rigid LATCH/
UAS Connectors are securely attached to the
lower anchors r.
4. While squeezing the Rigid LATCH/UAS
Adjustment Handle, push the booster until it
rests at against the vehicle seat back t.
5. Release the handle and the booster seat will
lock into place.
6. Make sure that the booster seat is connected
safely by trying to pull it out on both sides y.
EN
20
INSTALLING WITH SEAT BELT ONLY
• ACCORDING TO ACCIDENT STATISTICS, children are safer when properly
restrained in rear vehicle seating positions.
• NEVER USE the Booster Base without the Backrest attached.
• NEVER USE a locking clip when installing this booster seat.
1. Select a seat location allowed by your vehicle manufacturer that is equipped
with a LAP AND SHOULDER BELT system. Refer to pgs. 14-15 for Vehicle
Seat Location Requirements.
2. Ensure that the LATCH/UAS connectors are properly stored (see pg. 27).
3. Place the booster seat on the vehicle seat, making sure that the Backrest is in
full contact with the vehicle seat back and does not interfere with the vehicle’s
headrest.
WARNING! DEATH or SERIOUS INJURY can occur

21
After the Solution B-Fix/B2-Fix+Lux is properly
installed:
1. Squeeze the Headrest Height Adjustment
Handle and adjust the Headrest to its highest
position q.
2. Place your child in the booster seat, making
certain they are sitting up straight with their back
against the Backrest w.
3. Adjust the headrest so that the shoulder belt lies
across the middle of the shoulder and snug
across the midpoint of the child’s chest.
ADJUSTING THE SEAT FOR YOUR CHILD
wq
EN
22
The Three Position Reclining Headrest on the Solution B2-Fix+Lux is designed to help prevent your child’s
head from falling forward while asleep.
After adjusting the Backrest to the correct height for your child (pg. 21), select the headrest position that is
most comfortable for your child.
To adjust, lift up and move the headrest forward or backward to one of the three positions: upright, semi-
reclined, or fully reclined.
With some instruction and practice, a child can easily learn to adjust the Reclining Headrest by him or herself.
USING THE THREE POSITION RECLINING HEADREST (SOLUTION B2-FIX+LUX ONLY)
23
SECURING YOUR CHILD IN THE BOOSTER SEAT
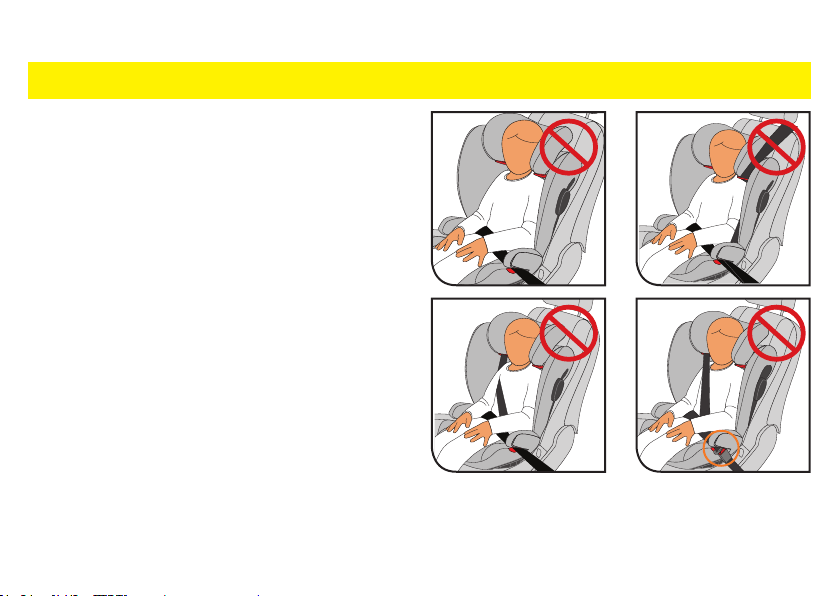
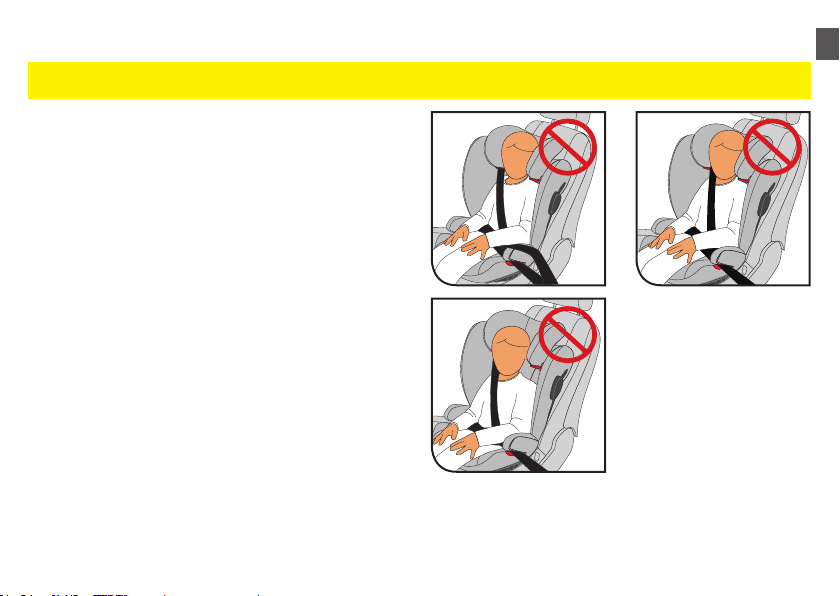
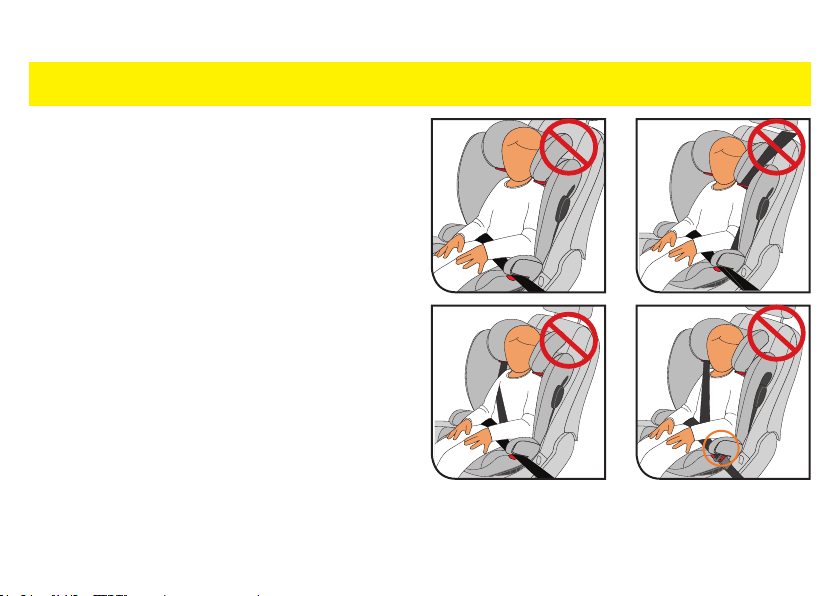
• NEVER USE WITH A LAP BELT ONLY.
• NEVER ALLOW your child to place the
shoulder belt behind his or her back.
• NEVER ALLOW your child to place the
shoulder belt under his or her armpit.
• NEVER ALLOW the seat belt buckle to
be located within the Lower Belt Guide.
Refer to the vehicle Owner’s Manual for
possible solutions.
Sometimes a longer buckle stalk will interfere with
proper belt routing. If this is the case, try a dierent
vehicle seat position.
• NEVER POSITION any part of the
WARNING! DEATH or SERIOUS INJURY can occur
EN
24
SECURING YOUR CHILD IN THE BOOSTER SEAT
vehicle seat belt over the top of the
armrests.
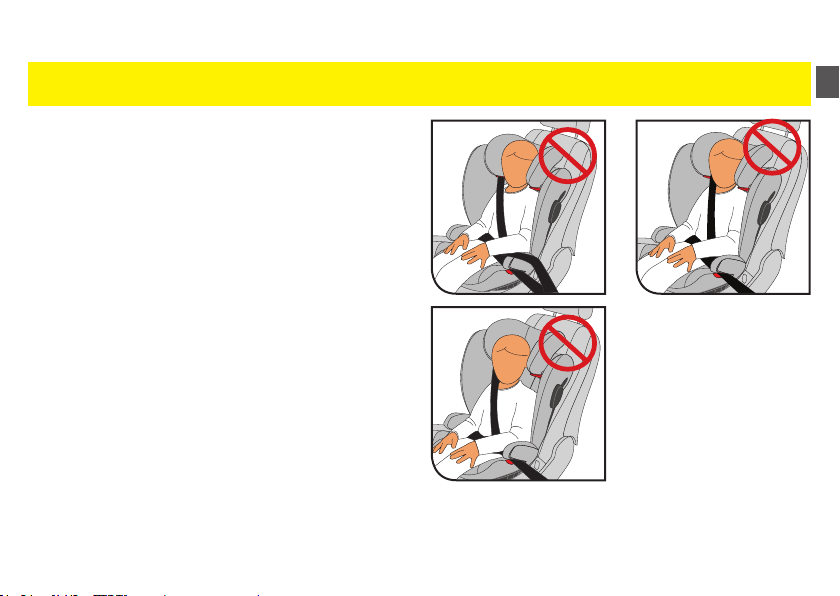
• NEVER USE with the shoulder belt in
contact with your child’s neck.
• NEVER ALLOW your child to slide down
in the booster seat. This could position
the lap belt across your child’s abdomen
and/or cause the shoulder belt to be in
contact with your child’s neck.
WARNING! DEATH or SERIOUS INJURY can occur

wq re
25
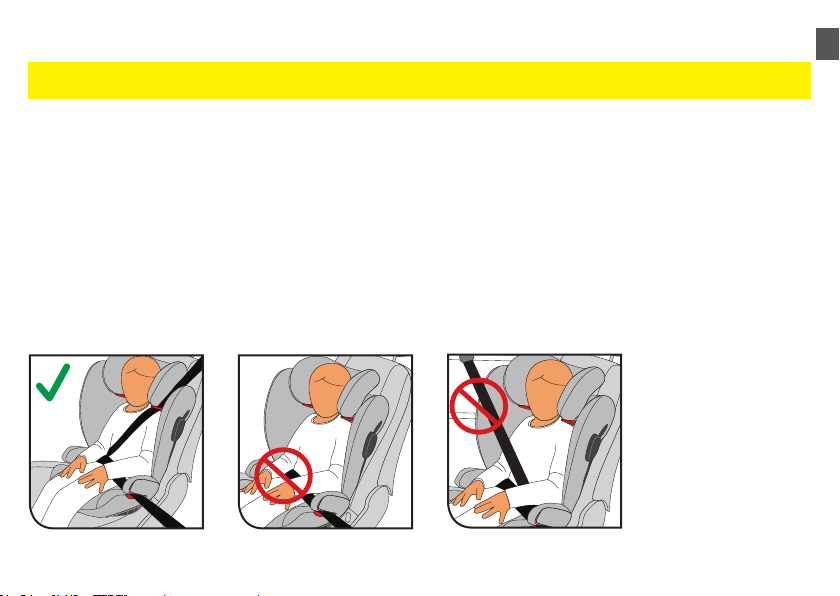
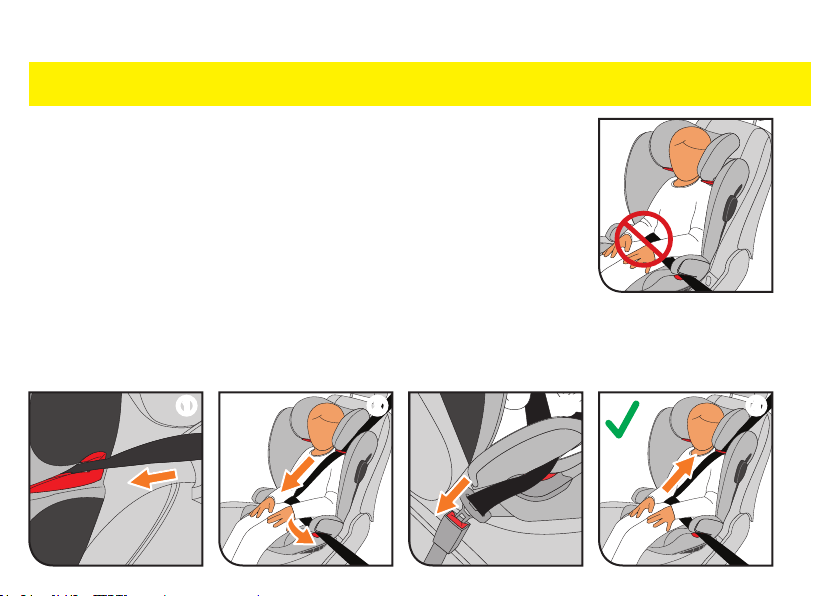
SECURING YOUR CHILD IN THE BOOSTER SEAT
NEVER USE this booster seat with a lap belt only, or with any
motorized, door mounted, or inatable vehicle belts. Your child
would not be properly restrained in the event of a crash.
WARNING! DEATH or SERIOUS INJURY can occur
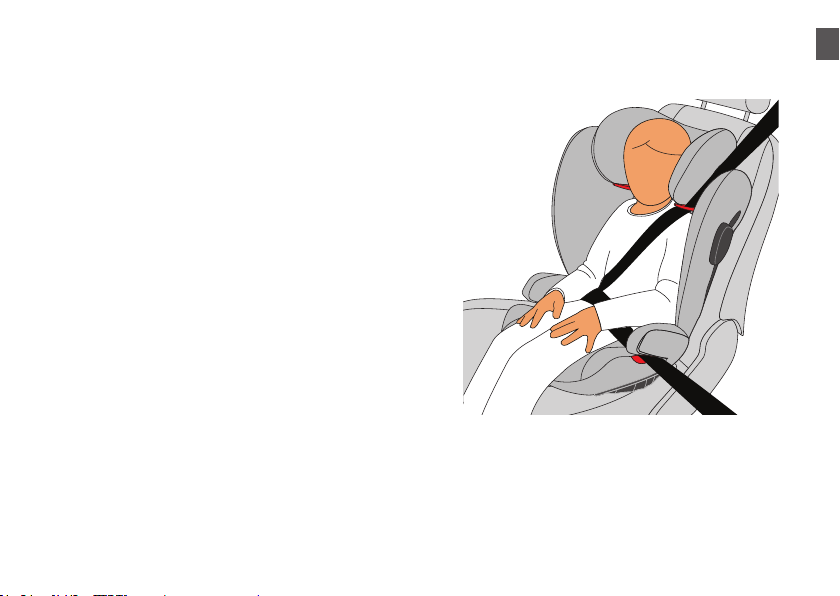
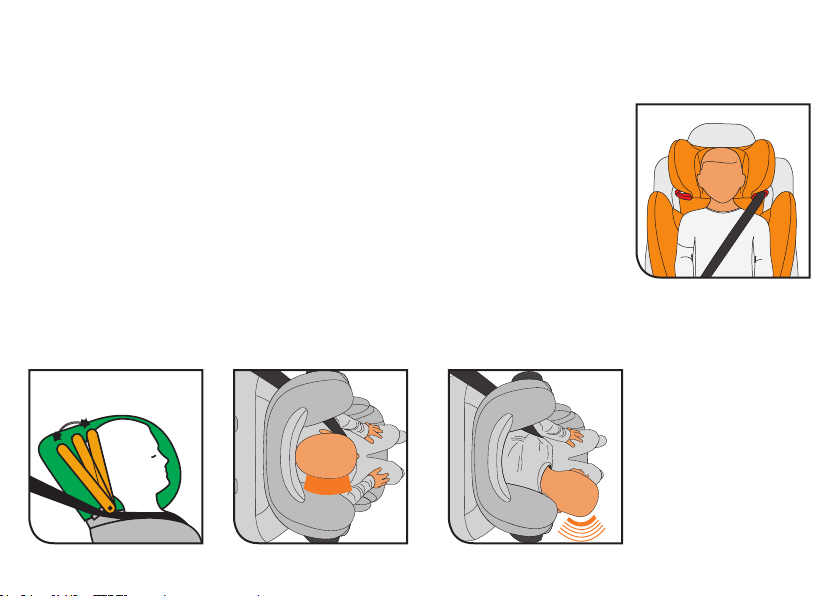
To properly secure your child in the booster seat:
1. Slip the shoulder belt between the Shoulder Pad and the Headrest and
route the belt inside the Belt Guide making sure it rests INSIDE the RED
area q.
2. Pull the shoulder belt down across your child’s chest while guiding the
lap belt underneath both armrests w.
3. Buckle the seat belt, making sure the shoulder belt passes underneath
the armrest on the buckle side e.
4. Pull up on the shoulder belt to remove any slack r.
EN
26
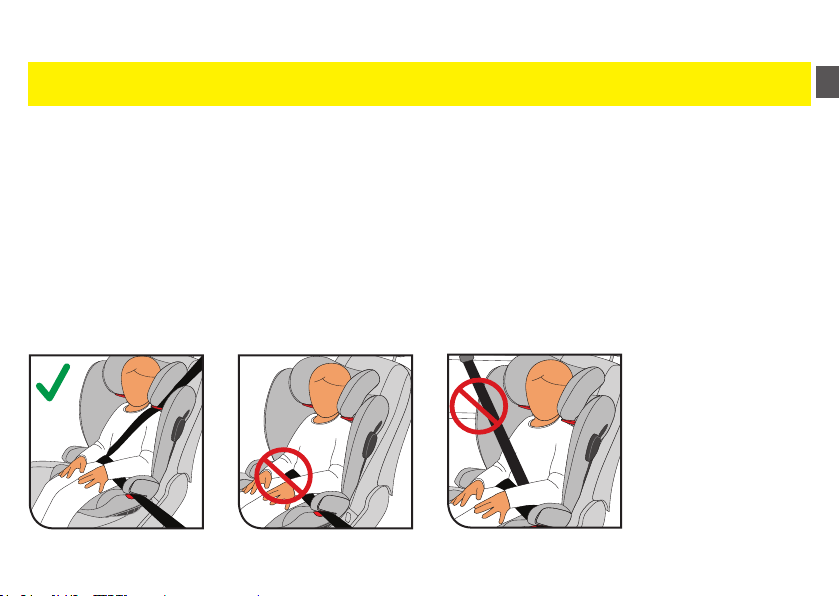
When your child sits properly in the booster seat:
• The lap portion of the seat belt must be positioned
low and snug on your child’s hips and NEVER
on your child’s abdomen.
• The shoulder belt should be threaded through the
belt guide and positioned across the mid-point of
your child’s chest and shoulder, and NEVER
in contact with your child’s neck. The shoulder
belt MUST LIE ACROSS THE MIDDLE OF THE
SHOULDER as shown.
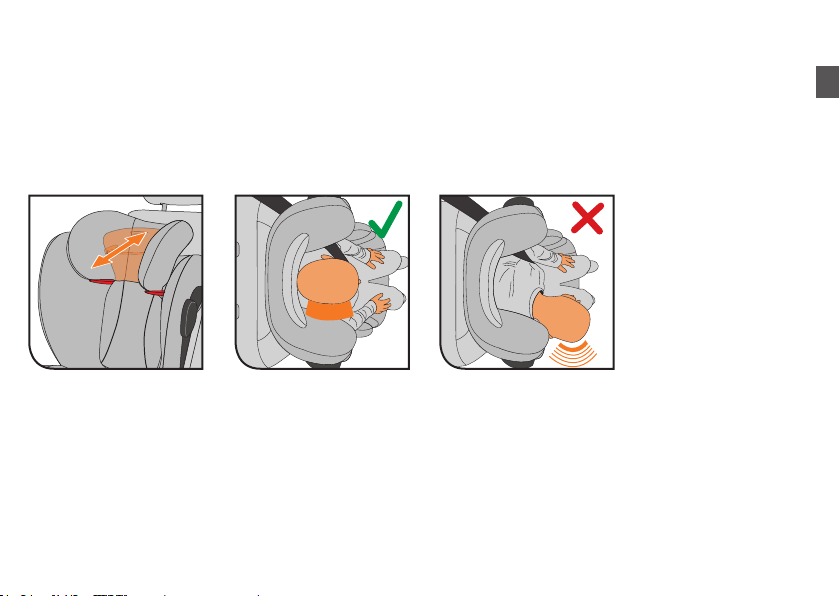
IMPORTANT: If the vehicle belt does not fall
across the middle of the shoulder, adjust the
Headrest to achieve proper belt t.
• BOTH the lap and shoulder belt must be
underneath the armrest on the side with the
buckle. Pull up on the shoulder belt to remove any
slack in the belts.
If you need to use a blanket in cold weather,
secure your child in the booster seat rst, and then
cover both child and booster seat with the blanket.
SECURING YOUR CHILD IN THE BOOSTER SEAT

w
q
r
e
t y
27
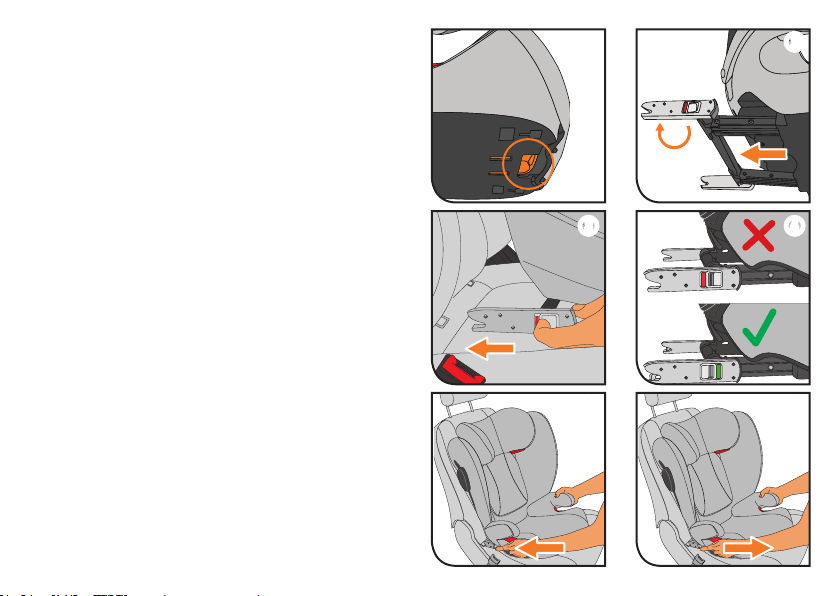
1. Unbuckle the vehicle belt. Remove the shoulder
belt from the guide by pressing down on the red
belt guide hook q.
2. Remove and store the LATCH/UAS Connectors.
a. For Solution B-Fix LATCH/UAS connectors,
press the tab on the LATCH hook and twist,
then remove the hook from the vehicle
anchor. Repeat for other side and store
connectors in the LATCH/UAS storage under
the front of the seat base w.
b. For Solution B2-Fix+Lux Rigid LATCH/UAS
connectors, squeeze the Rigid LATCH/UAS
Adjustment Handle and pull the booster seat
away from the vehicle seat e.
Release both Rigid LATCH/UAS Connectors
at the same time by pressing in while pulling
back on the release buttons, the pull the
connectors o the vehicle anchors r.
Rotate the Rigid LATCH/UAS Connectors
180°as shown t\.
While squeezing the Adjustment Handle, push
the LATCH/UAS Connectors into the booster
seat for storage y.
3. Remove the booster seat from the vehicle.
UNINSTALLING THE BOOSTER SEAT
EN
A
B
C
q
ew
B
A
28
• NEVER USE this booster seat without properly installed fabric covers.
• Do not damage, remove, or dispose of the foam Headrest Pads or Side Pads on this
booster.
REMOVING AND REPLACING THE SEAT COVERS
WARNING! DEATH or SERIOUS INJURY can occur
REMOVING THE SEAT COVERS
The seat is covered with three separate parts - the
Headrest Cover A, Backrest Cover B, and Seat
Pad C. To remove these parts, please follow the
instructions below.
Headrest Cover q: From the front of the seat,
remove the two elastics from the hooks at the top
of the shoulder belt guides A and pull the Headrest
Cover forward to remove.
Note: For Solution B2-Fix+Lux, you will also need
to unfasten the hook-and-loop connectors B at the
rear of the Three Position Reclining Headrest.
Backrest Cover w: Undo the four snaps on the rear
of the seat and pull the Backrest Cover o the seat
back.
Seat Pad e: Remove cup holder(s) if installed,
undo the two snaps at the rear of the seat base, and
remove the Seat Pad.
q w
e
B
A
29
REPLACING THE SEAT COVERS
Seat Pad q: Install the Seat Pad to the seat and
secure the two snaps at the rear of the seat base.
Install cup holder(s) if used.
Backrest Cover w: From the front of the seat, wrap
the Backrest Cover over the seat back and secure
the four snaps on the rear of the seat.
Headrest Cover e: Pull the Headrest Cover on over
the Headrest Pads, one side at a time, making sure
to support the base of the foam pad as you do, and
secure the two elastics from the hooks at the top of
the shoulder belt guides A.
Note: For Solution B2-Fix+Lux, you will also need
to unfasten the hook-and-loop connectors B at the
rear of the Three Position Reclining Headrest.
FABRIC COVERS
EN
30
SPOT CLEANING
Spot clean the fabric seat
covers as needed with a clean
cloth using mild detergent and
water.
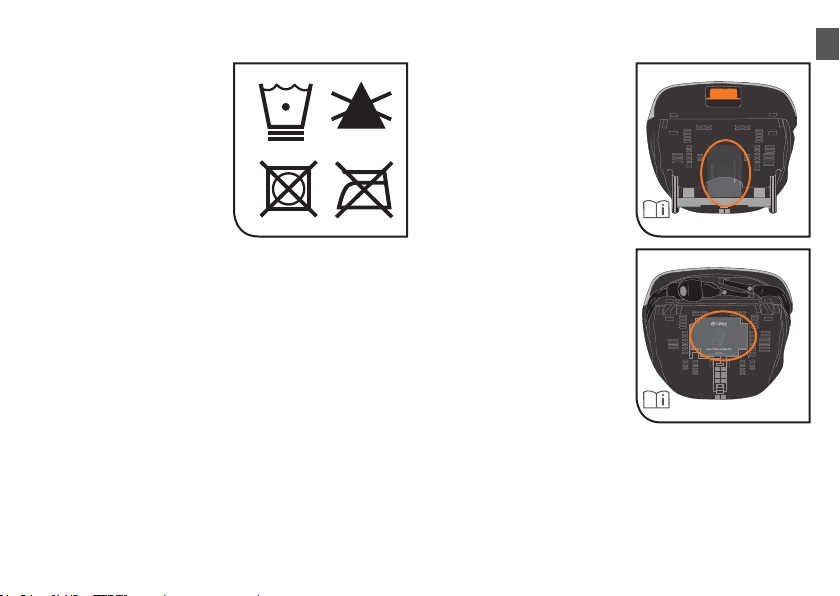
FABRIC SEAT COVERS
• Machine wash separately,
cold water, gentle cycle.
• Do not bleach
• Do not tumble dry
• Do not iron
• Do not dry clean
• Line dry
METAL AND PLASTIC PARTS
Wipe clean with mild detergent and cold water. Do not use
household cleaners or solvents.
REPLACEMENT SEAT COVERS
In the event you need to replace your seat covers, please
contact us in the US and Canada at 1-877-242-5676 to
purchase a new fabric set. Keep in mind that colors and
styles change each year, so your current color might not be
available.
CARE AND CLEANING
OWNER’S MANUAL
After carefully reading and
following these instructions,
store the User Guide in the
base of the Booster Seat as
shown.

31
■ Did you read and completely understand this Owner’s Manual and all labels found on this booster seat?
■ Is the booster seat completely assembled according to these instructions, with the Backrest attached to the Booster Base?
■ Is today’s date before the “Do Not Use After” date on your booster seat?
■ Is your child 4 years of age or older AND does he/she weigh 18-54 kg (40-120 pounds) AND stand 96-152 cm (38-60
inches) tall?
■ Is the booster seat forward-facing in a seating position with a lap and shoulder belt?
■ Is the Headrest positioned so the tops of the child’s ears are below the top of the booster seat back?
■ If using Solution B-Fix LATCH/UAS Connectors with the vehicle's lower LATCH/UAS anchors, are the LATCH Connectors
securely attached to the lower anchors?
■ If using Solution B2-Fix+Lux Rigid LATCH/UAS Connectors with the vehicle's lower LATCH/UAS anchors, are both green
safety bars showing on the Rigid LATCH Connectors?
■ Does the backrest t at against the vehicle seat back in an upright position?
■ Did you check for hot surfaces in sunny weather?
■ Is the Lap Belt under both arm rests?
■ Is the shoulder belt routed inside the RED Shoulder Belt Guide?
■ Does the shoulder belt lie across the middle of the shoulder and snug across the midpoint of the child‘s chest?
■ Does the lap belt lie low and snug on your child’s hips?
■ Are the lap and shoulder belts snug, not twisted, and with no slack?
If you answered YES to all of these questions, you are good to go, DRIVE SAFELY!
SAFETY CHECKLIST

EN
32
RESOURCES
IF YOU NEED HELP
Please contact our Customer Care Department, where
we have many Child Passenger Safety (CPS) Technicians
on sta, with any questions you may have concerning
installation, parts, maintenance, or warranty information.
When you contact us, please have the Model Number
and Manufactured on Date ready so that we may help you
eciently. This information can be found on the underside of
your Booster Base.
Please contact CYBEX Customer Care at 1-877-242-5676.
E-mail: [email protected]
Web: www.cybex-online.com
75% OF ALL CAR SEATS ARE INSTALLED
INCORRECTLY!
Installing your car seat correctly in your vehicle is extremely
important for your child’s safety. Make sure your car seat is
installed correctly by using one of the following resources:
In the United States:
www.nhtsa.gov/equipment/car-seats-and-booster-seats
In Canada:
www.tc.gc.ca/en/services/road/child-car-seat-safety.html
In the United States and Canada:
www.safekids.org
To nd an available CPS Technician in your area, go to
bit.ly/FindATech

33
IMPORTANT: Immediately register your Solution B-Fix/B2-Fix+Lux so we can contact you in the unlikely event of
a safety recall. Register online in the United States at http://register.cybex-online.com/us/carseats or in Canada
at http://register.cybex-online.com/ca/carseats, or mail in the separate registration card provided.
LIMITED WARRANTY
CYBEX warrants to the original consumer purchaser that this product will be free from defects in material and
workmanship for two (2) years from the date of original purchase (the “Warranty Period”). During the Warranty
Period, CYBEX, at its option, may repair or replace this product if it is found by the manufacturer to be defective
in material or workmanship. CYBEX reserves the right to discontinue or change parts, fabrics, models, or
products, or to substitute this product with a comparable model or product. To make a claim under this warranty,
please contact us at [email protected], call us at 1-877-242-5676, or write to us at:
CYBEX Warranty
Columbus Trading Partners USA, Inc.
1801 Commerce Drive
Piqua, Ohio 45356
An original receipt is required to validate your warranty, and shipping charges will be the responsibility of the
original consumer purchaser. To expedite the processing of any future warranty claims and to verify the original
date of purchase, please complete and mail the pre-addressed owner registration card within thirty (30) days
of purchase.
WARRANTY

EN
34
WARRANTY
WARRANTY LIMITATIONS
This warranty does not cover the eects of normal wear and tear or damages resulting from negligence,
modication, improper installation, accidents, misuse, or abuse of this product. It is expressly agreed that the
obligations of CYBEX and the original consumer purchaser’s remedies under the limited warranty contained
herein are exclusive and are strictly limited to the repair or replacement of the product. This limited warranty
is conditional upon strict compliance with the provisions of the Owner’s Manual. In no event will CYBEX or the
dealer selling this product be liable to you for any damages, including incidental or consequential damages,
arising out of the use or inability to use this product.
LIMITATION OF WARRANTIES AND STATE/PROVINCIAL LAW RIGHTS
The warranty and remedies as set forth above are exclusive and in lieu of all others, oral or written, express
or implied. To the extent permitted by applicable law, any implied warranties, including implied warranties of
merchantability and tness for a particular purpose, are hereby disclaimed. Some states/provinces do not allow
limitations as to how long an implied warranty lasts or the exclusion or limitation of incidental or consequential
damages, so the above limitations may not apply to you.
This warranty gives you specic legal rights, and you may have other rights, which vary from state/province to
state/province. Neither CYBEX nor the dealer selling this product has authorized any person to create for it any
other warranty, obligation, or liability in connection with this product.

Gracias por comprar el asiento elevador con respaldo alto Solution B-Fix/B2-Fix+Lux de CYBEX. Estamos orgullosos de
traer este asiento de ingeniería alemana a Norteamérica. Esperamos que Solution B-Fix/B2-Fix+Lux haga que los viajes de
su niño sean más seguros y agradables, así como que la instalación y el uso para usted tan simple y fácil como sea posible.
Solution B-Fix/B2-Fix+Lux es la próxima generación de los asientos elevadores premiados de CYBEX. Con una protección
muy mejorada en los impactos laterales y en los choques de frente, el modelo Solution B-Fix/B2-Fix+Lux lleva la seguridad
de los asientos elevadores a un nuevo nivel.
¡Las estadísticas muestran que más del 75% de los sistemas de sujeción se instalan incorrectamente!
Lea y siga cuidadosamente estas instrucciones para instalar este asiento elevador correctamente, incluso si la instalación
y el uso de este asiento elevador puedan parecer simples e intuitivas. ¡La seguridad de su niño depende de ello! Aunque
muchos asientos elevadores pueden utilizarse sin el respaldo, Solution B-Fix/B2-Fix+Lux NUNCA SE DEBE USAR SIN
EL RESPALDO ya que reduce drásticamente la protección en un accidente.
Recomendamos mantener a su niño pequeño en un asiento infantil para el automóvil de tamaño e instalación adecuados
tanto tiempo como sea posible antes de hacer el cambio al asiento elevador con respaldo alto Solution B-Fix/B2-Fix+Lux.
Ningún asiento para niño puede garantizar la protección contra lesiones en todos los casos, pero el uso adecuado ayuda a
reducir el riesgo de lesiones graves o la muerte. Si tiene preguntas o necesita ayuda, comuníquese con CYBEX al
1-877-242-5676.
Además, recuerde registrar su asiento elevador para que podamos contactarlo en el improbable caso de que se retire el
producto del mercado. Registre en línea:
• En los Estados Unidos: http://register.cybex-online.com/us/carseats
• En Canadá: http://register.cybex-online.com/ca/carseats
Guarde este manual del propietario como referencia futura guardándolo en el bolsillo detrás del acojinado del respaldo.
Agradecemos su compra y le invitamos a visitar nuestro sitio web www.cybex-online.com para ver otros grandes productos
de CYBEX.
Antes de usar por primera vez este asiento elevador, asegúrese de haber seguido todos los pasos de la lista de vericación
que se encuentra en la página 31.
BIENVENIDO A LA FAMILIA CYBEX.

ES
ÍNDICE
CARACTERÍSTICAS DEL SOLUTION B-FIX/B2-FIX+LUX ........................................................................ 3
REGISTRO E INFORMACIÓN SOBRE EL RETIRO DE PRODUCTOS DEL MERCADO ....................... 4
DESCRIPCIÓN GENERAL DEL ASIENTO ELEVADOR ..........................................................................5-6
CUÁNDO COLOCAR A SU NIÑO EN UN ASIENTO ELEVADOR .............................................................. 7
REQUISITOS DE ALTURA, PESO Y EDAD DEL NIÑO .............................................................................. 8
ADVERTENCIAS ....................................................................................................................................... 9-12
MONTAJE DEL ASIENTO ELEVADOR ....................................................................................................... 13
REQUISITOS DE LA UBICACIÓN DEL ASIENTO EN EL VEHÍCULO ...............................................14-15
REQUISITOS PARA EL CINTURÓN DE SEGURIDAD DEL VEHÍCULO ................................................ 16
REQUISITOS DEL LATCH/SAU DEL VEHÍCULO ..................................................................................... 17
INSTALACIÓN CON LATCH/SAU: SOLAMENTE SOLUTION B-FIX ....................................................... 18
INSTALACIÓN CON LATCH/SAU RÍGIDO: SOLAMENTE SOLUTION B2-FIX+LUX ............................. 19
INSTALACIÓN CON EL CINTURÓN DE SEGURIDAD SOLAMENTE .................................................... 20
AJUSTE DEL ASIENTO PARA SU NIÑO .................................................................................................... 21
USANDO LA CABECERA RECLINABLE DE TRES POSICIONES
(SOLAMENTE SOLUTION B2-FIX+LUX) ................................................................................................... 22
COMO ASEGURAR SU NIÑO EN EL ASIENTO ELEVADOR ............................................................. 23-36
DESINSTALACIÓN DEL ASIENTO ELEVADOR ....................................................................................... 27
COMO RETIRAR Y REEMPLAZAR LAS CUBIERTAS DEL ASIENTO ............................................... 28-29
CUIDADO Y LIMPIEZA ................................................................................................................................ 30
LISTA DE VERIFICACIÓN DE SEGURIDAD ............................................................................................. 31
RECURSOS .................................................................................................................................................. 32
GARANTÍA ...............................................................................................................................................33-34
3
CABECERA RECLINABLE
DE TRES POSICIONES
Z
O
N
A
D
E
A
L
T
A
S
E
G
U
R
I
D
A
D
Solution B-Fix/B2-Fix+Lux trae todas las nuevas tecnologías a la categoría de asientos elevadores con respaldo alto para
mejorar la seguridad de su niño en caso de una colisión de impacto lateral.
LINEAR SIDE-IMPACT PROTECTION™ (L.S.P.)
El sistema L.S.P. permite reducir gradualmente las fuerzas de una colisión con impacto lateral
para minimizar las lesiones. Los protectores de la cabeza y los hombros están hechos de
espuma EPS de absorción de energía extra profunda y gruesa para crear una Safety Zone™
(zona de alta seguridad) alrededor de su niño.
CABECERA RECLINABLE DE TRES POSICIONES
(SOLAMENTE SOLUTION B2-FIX+LUX)
Cuando un niño duerme, su cabeza puede caer hacia adelante. Si su niño se desploma hacia
adelante fuera de su posición cuando está dormido, existe un mayor riesgo de que no esté bien
protegido en caso de colisión. La cabecera reclinable de tres posiciones en el modelo Solution
B2-Fix+Lux ayuda a evitarlo permitiendo que la cabeza de su niño se recline y permanezca
protegida en la zona de seguridad de los protectores de cabeza.
Gracias a la cabecera reclinable de tres posiciones, su niño podrá reclinarse y dormir cómodamente con la cabeza dentro de
la zona de seguridad.
CARACTERÍSTICAS DEL SOLUTION B-FIX/B2-FIX+LUX
ES
4
REGISTRO E INFORMACIÓN SOBRE EL RETIRO DE PRODUCTOS DEL MERCADO
Por favor, complete la tarjeta de registro que vino con
su sistema de sujeción infantil y envíela por correo
inmediatamente o regístrese en línea.
Los sistemas de sujeción infantil pueden retirarse del
mercado por razones de seguridad. Debe registrar este
sistema de sujeción para recibir noticaciones en caso
de que se retire del mercado. Envíe su nombre, domicilio,
dirección de correo electrónico si está disponible, el
número de modelo y la fecha de fabricación del sistema de
sujeción a:
Columbus Trading-Partners USA Inc.
atención: ParentLink
1801 Commerce Drive
Piqua, Ohio 45356, USA
o llame al 1-877-242-5676, o registre el producto en línea en:
http://register.cybex-online.com/us/carseats
Para obtener información sobre órdenes de retiro de
producto del mercado, llame a la línea directa para el
consumidor del Departamento de Seguridad Vehicular del
Gobierno de los Estados Unidos al 1-888-327-4236
(TTY: 1-800-424-9153), o visite: www.NHTSA.gov.
AVISO PÚBLICO PARA CLIENTES CANADIENSES
Para registrar su asiento elevador, devuelva la tarjeta de
registro, llame al 1-877-242-5676, o regístrese en línea en
http://register.cybex-online.com/ca/carseats
Para obtener información sobre el retiro de productos del
mercado, llame a Transport Canada al1-800-333-0510
(1-613-993-9851 en la región de Ottawa) o llame a
Goodbaby Canada Inc. al 1-877-242-5676.
CERTIFICACIÓN
Este sistema de sujeción está certicado para su uso solo
en vehículos motorizados de pasajeros y de uso múltiple,
autobuses y camiones equipados con sistemas de cinturón
para regazo y hombro.
ESTE SISTEMA DE SUJECIÓN NO ESTÁ
CERTIFICADO PARA SU USO EN AVIONES
debido a que los cinturones de hombro no
están disponibles para el uso adecuado.
NORMA FEDERAL FMVSS213 -
Sistemas de sujeción infantil
Este sistema de retención infantil cumple con todas
las Normas federales de seguridad para vehículos
automotores aplicables.
AVISO NORMATIVO CANADIENSE
Este sistema de sujeción infantil cumple todos los
requisitos aplicables de la Norma Canadiense de
Seguridad para Vehículos Motorizados 213.2.
La información de registro se encuentra jada en la
parte inferior de la base del asiento elevador.
5
DESCRIPCIÓN GENERAL DEL ASIENTO ELEVADOR
VISTA DELANTERA
q
w
e
r
t
u
q
Cabecera (Solution B-Fix)
Cabecera reclinable de tres posiciones
(Solution B2-Fix+Lux)
(ver pág. 22)
w
L.S.P. (Solution B-Fix)
L.S.P. con apoyo
(Solution B2-Fix+Lux)
(ver pág. 13)
e
Respaldo
r
Descansabrazos
t
Guía del cinturón inferior
y
Portavasos*
u
Base del asiento elevador
* La cantidad puede variar.
y
ES
6
VISTA POSTERIOR
DESCRIPCIÓN GENERAL DEL ASIENTO ELEVADOR
VISTA INFERIOR
SOLUTION B2-FIX+LUX
Asa del ajuste
del sistema
LATCH rígido
Guía del
usuario
Almacenamiento
del sistema
LATCH
Almacenamiento
del sistema
LATCH
Guía del
usuario
SOLUTION B-FIX
Guía del cinturón
para hombro
Asa de ajuste
de la altura de
la cabecera
7
CUÁNDO COLOCAR A SU NIÑO EN UN ASIENTO ELEVADOR
Los asientos elevadores elevan al niño y ayudan a colocar
correctamente el cinturón para regazo y hombro del
vehículo. Cuando el niño está debidamente sujeto en un
asiento elevador, el riesgo de lesión en todos los tipos de
choques se reduce.
Es importante que el niño
quede correctamente
sentado con los cinturones
de seguridad del vehículo.
Cuando se abrocha el cinturón
de seguridad del vehículo,
el cinturón de regazo debe
colocarse por debajo y
ajustado a las caderas del
niño A, y el cinturón para
hombro debería cruzar la
parte media del hombro B.
Si el niño se inclina fuera del cinturón o lo mueve hacia la
espalda o lo pone debajo del hombro, no proporcionará la
sujeción deseada.
Hay varias cosas que debe tener en cuenta al decidir si
el niño está listo para sentarse en un asiento elevador
incluyendo: el peso y la altura designados de su asiento
infantil actual, el peso y la altura del niño, su madurez y los
asientos disponibles en su vehículo.
¿Cómo se usa el asiento elevador?
El asiento elevador requiere un procedimiento muy similar al
uso normal del cinturón de seguridad en el vehículo:
• Lea los manuales de instrucciones del asiento elevador y
del vehículo antes de empezar.
• Coloque el asiento elevador en un asiento trasero
equipado con cinturón para regazo y hombro. Nunca use
el asiento elevador solo con el cinturón para regazo,
ya que esto podría causar lesiones graves.
• Cuando el niño esté en el asiento elevador, jale y pase el
cinturón para regazo y hombro sobre el niño y abróchelo.
• Compruebe que el cinturón para el hombro pase por la
parte media del hombro y que el cinturón para regazo
descanse en la parte inferior de la cadera.
¿Cómo puede decidir si el niño está listo para la
transición a un asiento elevador?
Deberá considerar usar un asiento elevador si se aplican las
siguientes condiciones:
• El niño tiene la madurez suciente para sentarse en un
asiento elevador sin colocar los cinturones debajo de los
brazos o detrás en la espalda.
• El niño se acerca al límite de peso o altura del sistema de
sujeción infantil que usa actualmente.
• Su vehículo no dispone de un anclaje para las correas de
sujeción, pero sí de un cinturón de seguridad de regazo/
hombro en el asiento trasero.
A
B

ES
8
La parte superior de las orejas del niño (Línea naranja)
están por debajo de la parte superior del asiento elevador
(Línea roja).
Al sentarse en un asiento elevador, el cinturón para hombro
debería cruzar la parte media del hombro y se ajusta en el
punto medio del pecho del niño.
La parte del cinturón de seguridad que va en el regazo
DEBE ser colocado bajo y ajustado a las caderas del niño.
Los cinturones del regazo y hombro deben estar bien
ajustados, no estar torcidos y ni ojos.
REQUISITOS DE ALTURA, PESO Y EDAD DEL NIÑO
• UTILICE ÚNICAMENTE con niños de 4 años
o más Y que pesan 18-54 kg Y cuya altura
sea de 96-152 cm. El uso de este asiento
elevador con un niño que no cumpla TODOS
estos requisitos puede aumentar el riesgo de
muerte o de lesiones graves.
• Use este asiento elevador ORIENTADO
HACIA ADELANTE SOLAMENTE.
18-54 kg
Y
96-152 cm
¡ADVERTENCIA!
Pueden ocurrir LESIONES GRAVES o la MUERTE
9
• LA SEGURIDAD DE SU NIÑO depende de
que usted instale y use correctamente este
asiento elevador.
• LEA y SIGA todas las instrucciones de
los asientos elevadores y del vehículo
cuidadosamente. Si no se siguen estas
instrucciones y la etiqueta del producto
puede resultar en la MUERTE o LESIONES
GRAVES de su niño en un giro brusco, una
parada repentina o un choque.
• NO instale o utilice este asiento elevador
hasta que haya leído y comprendido las
instrucciones de este manual y del manual
del propietario del vehículo. Si la información
de los dos manuales no concuerda, se debe
seguir el Manual del Propietario del vehículo,
a menos que se advierta explícitamente en
este manual.
• NUNCA USE este asiento elevador con
un cinturón para regazo solamente, o con
cualquier cinturón motorizado, montado en
la puerta, o inflable del vehículo. Su niño no
estaría bien sujeto en caso de un accidente.
• NO deje que otros instalen o usen este
asiento elevador a menos que entiendan
cómo instalarlo y usarlo correctamente.
• MANTENGA este manual del propietario
para su referencia futura guardándolo en la
base del asiento elevador.
• NUNCA USE la base del asiento elevador
sin el respaldo.
• NUNCA SAQUE su niño fuera del asiento
elevador para atender sus necesidades
mientras el vehículo está en movimiento.
Los ocupantes que no estén sujetos corren
un riesgo mucho mayor de MUERTE
o LESIONES GRAVES en un choque
automovilístico.
• NUNCA ATIENDA las necesidades del niño
al conducir. Conducir distraído es la causa de
muchos accidentes de automóvil. Detenga
su vehículo de forma segura para atender a
su niño.
• NUNCA DEJE a los niños desatendidos en
un vehículo, ni siquiera por un corto período
de tiempo.
• La protección principal de los ocupantes de
un vehículo en una colisión es la estructura
del propio vehículo; un asiento elevador y el
sistema de sujeción para el vehículo pueden
Pueden ocurrir LESIONES
GRAVES o la MUERTE
¡ADVERTENCIA!
ES
10
no proteger a un niño de lesiones cuando
el vehículo sufre un impacto grave. Si se
utiliza correctamente según las instrucciones
y la etiqueta, este asiento elevador
mejorará sustancialmente las posibilidades
de supervivencia en la mayoría de los
accidentes.
• DEMASIADO RECLINADO EN EL
RESPALDO DEL ASIENTO DEL VEHÍCULO
puede resultar en una posición incorrecta
del cinturón de seguridad. Un cinturón de
seguridad mal colocado aumenta el riesgo
de MUERTE o LESIONES GRAVES en
un accidente. Siga las instrucciones del
manual del propietario de su vehículo para la
colocación correcta del respaldo del asiento.
• USE SOLAMENTE el sistema de cinturones
de seguridad de regazo y hombro del
vehículo cuando sujete a su niño en este
asiento elevador.
• LA COLOCACIÓN INADECUADA de este
asiento elevador en un vehículo afecta al
rendimiento del mismo y puede dar lugar a la
MUERTE o LESIONES GRAVES.
• COLOQUE SOLAMENTE este asiento
elevador ORIENTADO HACIA ADELANTE
en un lugar del asiento del vehículo permitido
por el fabricante del vehículo. Consulte el
manual del propietario de su vehículo para
obtener información sobre los sistemas
de cinturones de seguridad del vehículo,
las bolsas de aire y la instalación de los
sistemas de sujeción infantil/asientos
elevadores para determinar las posiciones
de asiento permitidas.
• Use este asiento elevador ORIENTADO
HACIA ADELANTE SOLAMENTE.
• SEGÚN LAS ESTADÍSTICAS DE
ACCIDENTES, los niños están más seguros
cuando están adecuadamente sujetos en un
asiento trasero del vehículo.
• NO USE este asiento elevador en un asiento
con bolsa de aire, a menos que el fabricante
del vehículo permita específicamente la
colocación allí. Si una bolsa de aire se infla,
puede golpear a su niño con una fuerza tan
grande que puede causarle la MUERTE o
LESIONES GRAVES.
Pueden ocurrir LESIONES
GRAVES o la MUERTE
¡ADVERTENCIA!

11
• El respaldo de este asiento elevador DEBE
AJUSTARSE DE MANERA PLANA contra
el respaldo del asiento del vehículo.
• La cabecera del asiento del vehículo
NO DEBE INTERFERIR con el respaldo
del asiento elevador. Vea el manual del
propietario del vehículo para el ajuste o la
posible retirada de la cabecera del asiento
del vehículo.
• NINGUNA PARTE de este asiento elevador
debe colgar sobre la parte delantera del
asiento del vehículo.
• NUNCA USE un clip de bloqueo al instalar
este asiento elevador.
• SIEMPRE asegure el asiento elevador con
el cinturón de seguridad del vehículo o con
los anclajes inferiores cuando no estén
ocupados. Un asiento elevador no asegurado
puede herir a otros ocupantes en caso de
accidente.
• NO ASEGURE este asiento elevador a
los anclajes inferiores del LATCH/SAU
del vehículo si el cinturón de seguridad
o la hebilla del mismo no son fácilmente
accesibles cuando el asiento elevador
está instalado de forma segura o si influye
negativamente en la colocación del cinturón
de seguridad sobre el niño.
• NUNCA DEJE un asiento de vehículo con un
mecanismo de plegado desbloqueado. En
caso de una parada repentina, un respaldo
suelto del asiento del vehículo podría impedir
que este asiento elevador proteja a su niño
tan bien como debería.
• NO DEJE objetos sueltos (por ejemplo,
libros, bolsas, etc.) en un vehículo. En caso
de una parada repentina, los objetos sueltos
se convertirán en proyectiles, lo que podría
causar lesiones graves.
• NO USE nada para elevar este asiento
elevador del asiento del vehículo.
• NUNCA USE este asiento elevador en el
hogar, en aviones, barcos, vehículos de
baja velocidad (LSV), vehículos todo terreno
(ATV), carritos de golf, o cualquier otra
aplicación no certificada.
• NUNCA PERMITA que los niños jueguen con
este asiento elevador.
• NUNCA PERMITA que los niños jueguen
con los cinturones de seguridad de los
vehículos ya que pueden crear un PELIGRO
Pueden ocurrir LESIONES
GRAVES o la MUERTE
¡ADVERTENCIA!

ES
12
DE ENREDO para cualquier niño que puede
alcanzar el cinturón de seguridad y puede
envolverlo alrededor de su cuello.
• NO USE este asiento elevador si ha estado
en un accidente. Puede haber daños ocultos
y debe ser reemplazado. Su compañía
de seguros puede proporcionarle alguna
asistencia para reemplazar el asiento
elevador.
• NUNCA USE este asiento elevador si se ha
dañado de alguna manera o le faltan piezas.
• NUNCA USE un cinturón de seguridad del
vehículo cortado, dañado, deteriorado o
inoperable.
• NO INTENTE hacer reparaciones o modificar
o manipular este asiento elevador
• NUNCA USE este asiento elevador sin las
cubiertas de tela debidamente instaladas.
• NUNCA USE un asiento elevador de
segunda mano o un asiento elevador cuya
historia no conozca.
• NO use portavasos para guardar latas
o vasos duros. NO coloque ningún vaso
que contenga líquidos calientes en los
portavasos.
• NO USE accesorios o partes de este asiento
elevador que no sean las aprobadas por
CYBEX. El uso de accesorios o partes de
otros fabricantes podría alterar el rendimiento
del asiente elevador.
• DISCONTINÚE EL USO de este asiento
elevador cuando sea mayor de ocho (8)
años y recíclelo. La fecha de fabricación
se encuentra en una etiqueta pegada en la
parte inferior de la base del asiento elevador.
• Este asiento elevador y el cinturón de
seguridad del vehículo pueden calentarse
mucho si se dejan al sol y pueden quemar
la piel del niño. SIEMPRE TOQUE las
superficies de las piezas antes de poner a su
niño en el asiento elevador.
Pueden ocurrir LESIONES
GRAVES o la MUERTE
¡ADVERTENCIA!
13
MONTAJE DEL ASIENTO ELEVADOR
• NUNCA USE la base del asiento elevador sin el respaldo.
• NEVER utilice este asiento elevador con el respaldo más allá del rango de ajuste permitido.
Un CLIC le avisará cuando haya ido demasiado lejos.
Pueden ocurrir LESIONES
GRAVES o la MUERTE
¡ADVERTENCIA!
GUÍA
e
1. Conecte el respaldo a la base del asiento elevador.
2. Doble el respaldo hasta que haga clic en su lugar.
3. Instale el o los portavasos si se utilizan.
4. SOLUTION B2-FIX+LUX SOLAMENTE: Instale el
apoyo L.S.P.
a. Alinee un apoyo L.S.P. con la guía en el lado
correspondiente del asiento.
Nota: Las guías L.S.P. se encuentran debajo de la
cubierta del respaldo a los lados del asiento.
b. Deslice el apoyo L.S.P. en posición sobre la cubierta
del respaldo hasta que escuche un CLIC. Repite con
el otro lado.
q w
r
ES
14
• SEGÚN LAS ESTADÍSTICAS DE ACCIDENTES, los niños están más
seguros cuando están adecuadamente sujetos en un asiento trasero del
vehículo.
• COLOQUE SOLAMENTE este asiento elevador ORIENTADO HACIA
ADELANTE en un lugar del asiento del vehículo permitido por el
fabricante del vehículo. Consulte el manual del propietario de su
vehículo para obtener información sobre los sistemas de cinturones
de seguridad del vehículo, las bolsas de aire y la instalación de los
sistemas de sujeción infantil/asientos elevadores para determinar las
posiciones de asiento permitidas.
• Use este asiento elevador SÓLO EN LOS ASIENTOS DE VEHÍCULO
ORIENTADOS HACIA ADELANTE.
REQUISITOS DE LA UBICACIÓN DEL ASIENTO EN EL VEHÍCULO
Pueden ocurrir LESIONES
GRAVES o la MUERTE
¡ADVERTENCIA!
15
¡CLIC!
• La cabecera del asiento del vehículo NO DEBE
INTERFERIR con el respaldo del asiento
elevador. Vea el manual del propietario del
vehículo para el ajuste o la posible retirada de la
cabecera del asiento del vehículo.
• NINGUNA PARTE de este asiento elevador
debe colgar sobre la parte delantera del asiento
del vehículo.
• NUNCA PERMITA que su niño use este asiento
elevador si el respaldo del asiento del vehículo
está en posición reclinada.
• NEVER utilice este asiento elevador con el
respaldo más allá del rango de ajuste permitido.
Un CLIC le avisará cuando haya ido demasiado
lejos.
• El respaldo de este asiento elevador DEBE
AJUSTARSE DE MANERA PLANA contra el
respaldo del asiento del vehículo.
• El respaldo se ajustará al respaldo del asiento
del vehículo a través de un rango de ajuste
permisible de aproximadamente 15° como se
muestra en verde.
REQUISITOS DE LA UBICACIÓN DEL
ASIENTO EN EL VEHÍCULO
¡ADVERTENCIA!
Pueden ocurrir LESIONES GRAVES o la MUERTE
ES
16
REQUISITOS PARA EL CINTURÓN DE SEGURIDAD DEL VEHÍCULO
• USE SOLAMENTE el sistema de cinturón para regazo y hombro del vehículo al sujetar su niño
en el asiento elevador.
• NUNCA USE este asiento elevador con un cinturón para regazo solamente, o con cualquier
cinturón motorizado, montado en la puerta, o inable del vehículo. Su niño no estaría bien
sujeto en caso de un accidente.
El diseño y el funcionamiento de los sistemas de cinturones de seguridad de los vehículos varían de un vehículo a otro
y de un lugar a otro de los asientos del mismo vehículo. Consulte el manual del propietario de su vehículo para el uso, la
colocación y el ajuste adecuados de los cinturones de regazo y hombro del vehículo.
Es posible que este asiento elevador no se ajuste a algunos asientos del vehículo.
Seleccione una ubicación de asiento permitida por el fabricante de su vehículo que esté equipada con un sistema de
CINTURÓN PARA REGAZO Y HOMBRO.
Pueden ocurrir LESIONES
GRAVES o la MUERTE
¡ADVERTENCIA!

17
LATCH y SAU son acrónimos de “anclajes inferiores y correas de sujeción para niños”
(Lower Anchors and Tethers for CHildren) (EE.UU.) y sistema de anclaje universal (Universal
Anchorage System) (Canadá) y se reere a un par de anclajes (o barras) inferiores jos y a un
anclaje de correa de sujeción superior integrados en vehículos fabricados después del 1 de
septiembre del 2002.
Nota: Es posible que el manual del propietario del vehículo se reera a este sistema como
ISOFIX o Lower Universal Anchorage System (LUAS) [Sistema de anclaje inferior universal].
Los anclajes del LATCH/SAU inferiores están ubicados en el pliegue o unión entre el respaldo
y el cojín del asiento del vehículo y, si no son visibles, generalmente están indicados con el
símbolo. Los anclajes de la correa de sujeción superior están ubicados en varios lugares detrás
del asiento posterior del vehículo.
Instalación central en una posición no estándar del LATCH/SAU:
Se permite la instalación central de este asiento elevador usando barras de anclaje inferior interiores desde los asientos
exteriores si:
1. el manual de su vehículo permite dicha instalación; y
2. las barras de anclaje inferior interiores desde los asientos exteriores tienen 28 a 51 cm de separación.
LATCH/SAU normalmente ofrece una instalación más fácil y consistente. Sin embargo, este asiento elevador se puede
instalar de forma segura usando tanto el sistema LATCH/SAU como los cinturones de seguridad y cumple los requisitos de
la norma federal de seguridad FMVSS 213 y la Norma de Seguridad Canadiense CMVSS 213.2 con cualquiera de los dos
métodos de instalación. Cualquiera de los métodos es seguro para el niño cuando el sistema se instala correctamente.
El sistema LATCH/SAU está destinado para ser utilizado SOLAMENTE como se describe en estas instrucciones. El uso
incorrecto puede ocasionar lesiones graves o la muerte. Consulte el manual del propietario del vehículo para ubicar las
posiciones de las barras de anclaje inferior en el vehículo.
Solution B-Fix/B2-Fix+Lux ha sido diseñado para jarse a los anclajes inferiores de este sistema utilizando uno de los dos
estilos diferentes de LATCH (ver págs. 18-19) y también puede utilizarse en posiciones de asiento sin los anclajes inferiores
del LATCH/SAU (ver pág. 20).
REQUISITOS DEL LATCH/SAU DEL VEHÍCULO

ES
18
w
e r
1. Seleccione una ubicación de asiento permitida por el
fabricante de su vehículo que esté equipada con un
sistema de CINTURÓN PARA REGAZO Y HOMBRO.
Localice los anclajes inferiores del LATCH/SAU del
vehículo o los símbolos que indican su ubicación
(véa la pág. 17).
2. Retire los conectores del LATCH/SAU de su lugar de
almacenamiento bajo la base del asiente elevador
Solution B-Fix q y je a las barras de anclaje del
LATCH/SAU inferiores del vehículo hasta que se
traben en las barras de ambos lados del asiento.
3. Utilizando todo su peso, empuje el asiento elevador
rmemente en el asiento del vehículo mientras tira de
la correa de anclaje inferior a cada lado del asiento
elevador para eliminar la holgura w. No apriete más de
lo necesario.
Nota: Asegúrese de que ambos conectores del anclaje
inferior estén orientados hacia abajo como se muestra
y que las correas no estén torcidas e.
4. Asegúrese de que el asiento elevador esté conectado
de forma segura tratando de sacarlo por ambos
lados r.
INSTALACIÓN CON LATCH/SAU: SOLAMENTE EL SOLUTION B2-FIX
q
19
q
re
yt
w
INSTALACIÓN CON EL LATCH/SAU RÍGIDO:
SOLAMENTE EL SOLUTION B2-FIX+LUX
1. Seleccione una ubicación de asiento permitida por el
fabricante de su vehículo que esté equipada con un
sistema de CINTURÓN PARA REGAZO Y HOMBRO.
Localice los anclajes inferiores del LATCH/SAU del
vehículo o los símbolos que indican su ubicación
(vea la pág. 17).
2. Coloque el asiento elevador de lado. Mientras aprieta
la manija naranja de ajuste del LATCH/SAU rígido
ubicado en la parte inferior de la base del asiento
elevador Solution B2-Fix+Lux q, tire de los conectores
del LATCH/SAU rígido hasta que se detengan. Luego
gire los conectores 180° w.
3. Empuje los conectores del LATCH/SAU rígidos en
los anclajes inferiores e del vehículo hasta que los
escuche hacer CLIC. La barra de seguridad VERDE
será visible en el botón de liberación cuando los
conectores del LATCH/SAU rígidos estén bien sujetos
a los anclajes inferiores s.
4. Mientras aprieta la manija de ajuste del LATCH/SAU
rígido, empuje el asiento elevador hasta que descanse
plano contra el respaldo del asiento del vehículo t.
5. Suelte la manija y el asiento elevador se bloqueará en
su lugar.
6. Asegúrese de que el asiento elevador esté conectado
de forma segura tratando de sacarlo por ambos
lados y.
ES
20
INSTALACIÓN CON EL CINTURÓN DE SEGURIDAD SOLAMENTE
• SEGÚN LAS ESTADÍSTICAS DE ACCIDENTES, los niños están más seguros cuando están
adecuadamente sujetos en un asiento trasero del vehículo.
• NUNCA USE la base del asiento elevador sin el respaldo.
• NUNCA USE un clip de bloqueo al instalar este asiento elevador.
1. Seleccione una ubicación de asiento permitida por el fabricante de su vehículo que esté
equipada con un sistema de CINTURÓN PARA REGAZO Y HOMBRO. Consulte las
páginas 14-15 para los requisitos de la ubicación del asiento en el vehículo.
2. Asegúrese de que los conectores del LATCH/SAU estén bien guardados (ver pág. 27).
3. Coloque el asiento elevador en el asiento del vehículo, asegurándose de que el respaldo
esté en pleno contacto con el respaldo del asiento del vehículo y no interera con la
cabecera del mismo.
Pueden ocurrir LESIONES
GRAVES o la MUERTE
¡ADVERTENCIA!
21
Después de que el Solution B-Fix/B2-Fix+Lux esté
correctamente instalado:
1. Apriete la manija de ajuste de altura de la cabecera y
ajuste la cabecera a su posición más alta q.
2. Ponga a su niño en el asiento elevador, asegurándose
de que esté sentado derecho con la espalda contra el
respaldo w.
3. Ajuste la cabecera para que el cinturón para hombro
pase por el medio del hombro y se ajuste en el punto
medio del pecho del niño.
AJUSTE DEL ASIENTO PARA SU NIÑO
wq
ES
22
La cabecera reclinable de tres posiciones del Solution B2-Fix+Lux está diseñada para ayudar a evitar que la cabeza de su
niño se caiga hacia adelante mientras duerme.
Después de ajustar el respaldo a la altura correcta para su niño (pág. 21), seleccione la posición de la cabecera que sea más
cómoda para su niño.
Para ajustar, levante y mueva la cabecera hacia adelante o hacia atrás a una de las tres posiciones: erguido, semi-reclinado o
totalmente reclinado.
Con un poco de instrucción y práctica, un niño puede aprender fácilmente a ajustar la cabecera reclinable por sí mismo.
COMO USAR LA CABECERA RECLINABLE DE TRES POSICIONES (SÓLO EL SOLUTION B2-FIX+LUX)
23
COMO ASEGURAR SU NIÑO EN EL ASIENTO ELEVADOR
• NUNCA USE SOLAMENTE CON EL
CINTURÓN PARA REGAZO.
• NUNCA PERMITA que el niño coloque el
cinturón para hombro detrás de su espalda.
• NUNCA PERMITA que su niño coloque el
cinturón para hombro bajo su axila.
• NUNCA PERMITA la hebilla del cinturón
de seguridad se ubique dentro de la guía
de cinturón inferior. Consulte el manual del
propietario del vehículo para soluciones
posibles.
A veces un tallo de hebilla más largo interferirá con el
recorrido del cinturón. Si este es el caso, intente una
posición diferente del asiento del vehículo.
Pueden ocurrir LESIONES
GRAVES o la MUERTE
¡ADVERTENCIA!
ES
24
COMO ASEGURAR SU NIÑO EN EL ASIENTO ELEVADOR
• NUNCA COLOQUE ninguna parte del
cinturón de seguridad del vehículo sobre la
parte superior de los descansabrazos.
• NUNCA USE el cinturón para hombro en
contacto con el cuello de su niño.
• NUNCA PERMITA a su niño que se deslice
en el asiento elevador. Esto podría colocar el
cinturón para regazo a través del abdomen
de su niño y/o causar que el cinturón para
hombro esté en contacto con el cuello de su
niño.
Pueden ocurrir LESIONES
GRAVES o la MUERTE
¡ADVERTENCIA!
25
wq re
COMO ASEGURAR SU NIÑO EN EL ASIENTO ELEVADOR
NUNCA USE este asiento elevador con un cinturón para regazo
solamente, o con cualquier cinturón motorizado, montado en la puerta,
o inable del vehículo. Su niño no estaría bien sujeto en caso de un
accidente.
Para asegurar apropiadamente a su niño en el asiento elevador:
1. Deslice el cinturón para hombro entre la hombrera y la cabecera y colóquelo
dentro de la guía del cinturón asegurándose de que descanse DENTRO del área
ROJA q.
2. Pase el cinturón para hombro por el pecho de su niño mientras pasa el cinturón
para regazo por debajo de los dos descansabrazos w.
3. Abroche el cinturón de seguridad, asegurándose de que el cinturón para hombro
pase por debajo del descansabrazos en el lado de la hebilla e.
4. Tire hacia arriba del cinturón para hombro para quitar cualquier holgura r.
Pueden ocurrir LESIONES
GRAVES o la MUERTE
¡ADVERTENCIA!
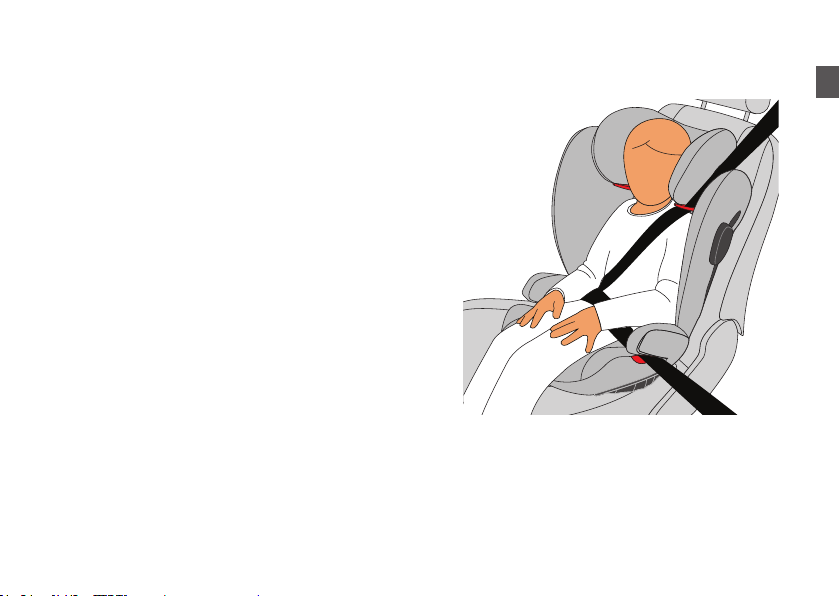
ES
26
Cuando su niño se sienta correctamente en el asiento elevador:
• La parte del cinturón de seguridad que va en el regazo debe
estar colocada por debajo y ajustada a las caderas del
niño y NUNCA en el abdomen de su niño.
• El cinturón para hombro debe pasar a través de la guía del
cinturón y colocarse en el punto medio del pecho y el
hombro de su niño, y NUNCA en contacto con el cuello
de su niño. El cinturón para hombro DEBE ESTAR EN EL
MEDIO DEL HOMBRO como se muestra.
IMPORTANTE: Si el cinturón del vehículo no pasa por el
medio del hombro, ajuste para lograr un ajuste adecuado del
cinturón.
• AMBOS, el cinturón para regazo y hombro deben estar por
debajo del descansabrazos en el lado con la hebilla. Tire
hacia arriba del cinturón para hombro para quitar cualquier
holgura en los cinturones.
Si necesita usar una manta en clima frío, asegure a su niño
en el asiento elevador primero y luego cubra al niño y al
asiento elevador con la manta.
COMO ASEGURAR SU NIÑO EN EL ASIENTO ELEVADOR

27
w
q
r
e
t y
1. Desabroche el cinturón del vehículo. Quite el cinturón
para hombro de la guía presionando el gancho rojo de
la guía del cinturón q.
2. Quite y guarde los conectores del LATCH/SAU.
a. Para los conectores del LATCH/SAU del Solution
B-Fix, presione la lengüeta del gancho LATCH y
gire, luego retire el gancho del anclaje del vehículo.
Repita para el otro lado y guarde los conectores en
el almacenamiento del LATCH/SAU debajo de la
parte delantera de la base del asiento w.
b. Para los conectores del LATCH/SAU rígidos del
Solution B2-Fix+Lux apriete la manija de ajuste de
LATCH/SAU rígido y tire del asiento elevador para
alejarlo del asiento del vehículo e.
Suelte los dos conectores del LATCH/SAU rígidos al
mismo tiempo presionando y tirando de los botones
de liberación, los conectores de los anclajes del
vehículo r.
Gire los conectores rígidos del LATCH/SAU 180°
como se muestra t\.
Mientras aprieta la manija de ajuste, empuje los
conectores del LATCH/SAU en el asiento elevador
para guardarlos y.
3. Retire el asiento elevador del vehículo.
DESINSTALACIÓN DEL ASIENTO ELEVADOR
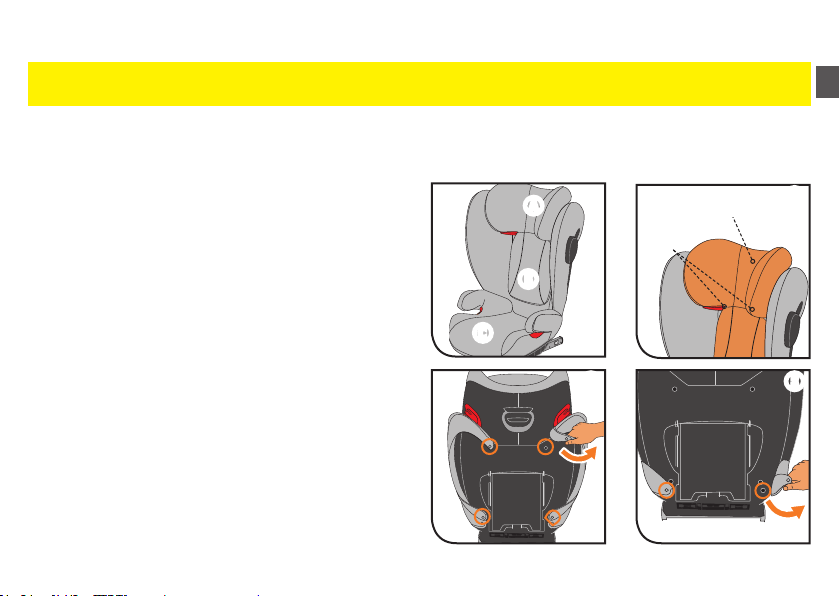
ES
28
A
B
C
q
ew
B
A
• NUNCA USE este asiento elevador sin las cubiertas de tela debidamente instaladas.
• No dañe, quite o deseche el acojinado de espuma de la cabecera o las almohadillas laterales
de este asiento elevador.
COMO RETIRAR Y REEMPLAZAR LAS CUBIERTAS DEL ASIENTO
CÓMO RETIRAR LAS CUBIERTAS DEL ASIENTO
El asiento está cubierto con tres partes separadas - la
cubierta de la cabecera A, la cubierta del respaldo B, y el
acojinado del asiento C. Para quitar estas partes, por favor
siga las instrucciones a continuación.
Cubierta de la cabecera q: Desde el frente del asiento,
retire los dos elásticos de los ganchos en la parte superior
de las guías del cinturón para hombro A y tire de la cubierta
de la cabecera hacia adelante para retirarla.
Nota: Para el Solution B2-Fix+Lux, también tendrá
que desconectar los conectores autoadherentes B
de la parte trasera de la cabecera reclinable de tres
posiciones.
Cubierta del respaldo w: Deshaga los cuatro broches de
presión en la parte trasera del asiento y tire de la cubierta del
respaldo del asiento.
Acojinado del asiento e: Retire el portavasos si está
instalado, deshaga los dos broches de presión de la parte
trasera de la base del asiento y retire el acojinado del
asiento.
Pueden ocurrir LESIONES
GRAVES o la MUERTE
¡ADVERTENCIA!

29
q w
e
B
A
REEMPLAZO DE LAS CUBIERTAS DEL ASIENTO
Acojinado del asiento q: Instale el acojinado del asiento y
asegure los dos broches en la parte trasera de la base del
asiento. Instale el o los portavasos si se utilizan.
Cubierta del respaldo w: Desde el frente del asiento,
envuelva la cubierta del respaldo del asiento y je los cuatro
broches en la parte trasera del asiento.
Cubierta de la cabecera e: Tire de la cubierta de la
cabecera sobre el acojinado de la cabecera, un lado a la
vez, asegurándose de apoyar la base del acojinado de
espuma como lo hace, y asegure los dos elásticos de los
ganchos en la parte superior de las guías del cinturón para
hombro A.
Nota: Para el Solution B2-Fix+Lux, también tendrá
que desconectar los conectores autoadherentes B
de la parte trasera de la cabecera reclinable de tres
posiciones.
CUBIERTAS DE TELA
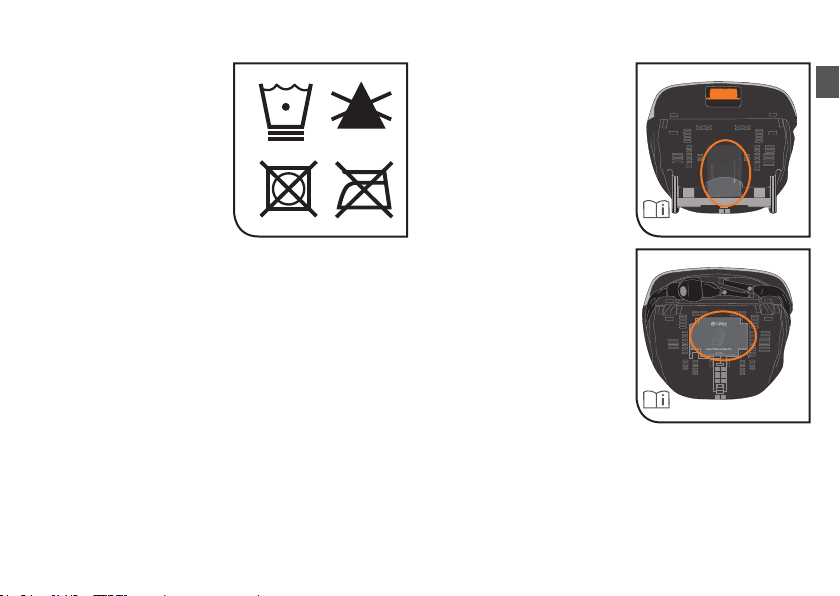
ES
30
LIMPIEZA DE MANCHAS
Limpie las cubiertas de tela del
asiento según sea necesario
con un paño limpio usando
detergente suave y agua.
CUBIERTAS DE
ASIENTO DE TELA
• Lavado a máquina por
separado, agua fría, ciclo
suave.
• No usar blanqueador
• No secar en la secadora
• No planchar
• No lavar en seco
• Secar en la tendedera
PIEZAS DE METAL Y PLÁSTICO
Use un paño para limpiar con jabón suave y agua fría. No
utilice limpiadores o disolventes domésticos.
CUBIERTAS DEL ASIENTO DE REPUESTO
En caso de que necesite reemplazar las cubiertas de su
asiento, por favor contáctenos en los EE.UU. y Canadá al
1-877-242-5676 para comprar un juego nuevo de telas.
Tenga en cuenta que los colores y estilos cambian cada año,
por lo que su color actual podría no estar disponible.
CUIDADO Y LIMPIEZA
MANUAL DEL PROPIETARIO
Después de leer
cuidadosamente y seguir
estas instrucciones, guarde la
Guía del Usuario en la base
del asiento elevador como se
muestra.

31
■ ¿Leyó y entendió completamente este Manual del Propietario y todas las etiquetas que se encuentran en este asiento
elevador?
■ ¿El asiento elevador está completamente ensamblado de acuerdo con estas instrucciones, con el respaldo unido a la base
del asiento elevador?
■ ¿La fecha de hoy es anterior a la fecha de "No usar después" en su asiento elevador?
■ ¿Su niño tiene 4 años O más y pesa 18-54 kg Y mide 96-152 cm de altura?
■ ¿El asiento elevador está orientado hacia adelante con un cinturón para regazo y hombro?
■ ¿La cabecera está posicionada de modo que la parte superior de las orejas del niño están por debajo de la parte
superior del respaldo del asiento elevador?
■ Si se utilizan los conectores del LATCH/SAU del Solution B-Fix con los anclajes inferiores del LATCH/SAU del vehículo,
¿están los conectores del LATCH bien sujetos a los anclajes inferiores?
■ Si se usan los conectores del LATCH/SAU del Solution del B2-Fix+Lux con los anclajes inferiores del LATCH/SAU del
vehículo, ¿se ven ambas barras de seguridad verdes en los conectores rígidos LATCH?
■ ¿El respaldo se ajusta de forma plana contra el respaldo del asiento del vehículo en posición vertical?
■ ¿Comprobó si hay supercies calientes en tiempo soleado?
■ ¿El cinturón para regazo está debajo de los dos descansabrazos?
■ ¿El cinturón para hombro está dentro de la Guía de cinturón para hombro ROJA?
■ ¿El cinturón para hombro se coloca en el medio del hombro y se ajusta en el punto medio del pecho del niño?
■ ¿El cinturón para regazo queda por debajo y ajustado a las caderas de su niño?
■ ¿Los cinturones del regazo y hombro están bien ajustados, no están torcidos y no están ojos?
Si respondió SÍ a todas estas preguntas, está listo para viajar, ¡CONDUZCA CON CUIDADO!
LISTA DE VERIFICACIÓN DE SEGURIDAD
ES
32
RECURSOS
SI NECESITA AYUDA
Comuníquese con nuestro Departamento de Atención al
Cliente, donde contamos con un amplio equipo de personal
técnico especializado en Seguridad de Pasajeros Infantiles
(CPS) para abordar cualquier pregunta que pueda tener
relacionada con la instalación, partes, mantenimiento o
información sobre la garantía.
Cuando se comunique con nosotros, tenga a mano el
número de modelo del producto y la fecha de fabricación
para que podamos ayudarlo ecazmente. Esta información
se puede encontrar en la parte inferior de la base del asiente
elevador.
Comuníquese con Atención al cliente de CYBEX al
1-877-242-5676.
Correo electrónico: [email protected]
Sitio web: www.cybex-online.com
¡EL 75 % DE LOS SISTEMAS DE SUJECIÓN SE
INSTALAN INCORRECTAMENTE!
Instalar el sistema de sujeción correctamente en el vehículo
es muy importante para la seguridad del niño. Asegúrese de
que el sistema de sujeción se instale correctamente usando
uno de los recursos siguientes:
En los Estados Unidos:
www.nhtsa.gov/equipment/car-seats-and-booster-seats
En Canadá:
www.tc.gc.ca/en/services/road/child-car-seat-safety.html
En los Estados Unidos y Canadá:
www.safekids.org
Para encontrar un técnico de CPS disponible en su área,
visite bit.ly/FindATech

33
IMPORTANTE: Registre de inmediato su Solution B-Fix/B2-Fix+Lux para que nos podamos comunicar
con usted en el caso poco probable de que se retire el producto del mercado por razones de seguridad.
Regístrese en línea en los Estados Unidos en http://register.cybex-online.com/us/carseats o en Canadá en
http://register.cybex-online.com/ca/carseats, o por correo con la tarjeta de registro separada que se proporciona.
GARANTÍA LIMITADA
CYBEX garantiza al comprador consumidor original que este producto estará libre de defectos de material y
mano de obra durante dos (2) años a partir de la fecha de compra original (el “Período de garantía”). Durante
el periodo de garantía, CYBEX, a su discreción, puede reparar o sustituir el producto si el fabricante determina
que tiene defectos de material o mano de obra. CYBEX se reserva el derecho de descontinuar o cambiar
partes, telas, modelos o productos, o de sustituir este producto con un modelo o producto comparable. Para
presentar una reclamación bajo esta garantía, comuníquese con nosotros en [email protected], llame
al 1-877-242-5676, o escriba a:
Garantía CYBEX
Columbus Trading Partners USA, Inc.
1801 Commerce Drive
Piqua, Ohio 45356
Se requiere el comprobante original de compra para validar su garantía y los gastos de envío serán
responsabilidad del comprador consumidor original. Para agilizar el procesamiento de cualquier reclamación
futura de la garantía y para vericar la fecha original de compra, llene debidamente y envíe por correo la tarjeta
de registro para el propietario con la dirección preimpresa en un plazo de treinta (30) días a partir de la fecha
de compra.
GARANTÍA

ES
34
GARANTÍA
LIMITACIONES DE LA GARANTÍA
Esta garantía no cubre los efectos del uso y desgaste normales o daños resultantes de la negligencia,
modicación, instalación inadecuada, accidentes, mal uso o abuso de este producto. Se acuerda expresamente
que las obligaciones de CYBEX y los remedios del comprador consumidor original en virtud de la garantía
limitada contenida en el presente documento son exclusivos y están estrictamente limitados a la reparación o
sustitución del producto. Esta garantía limitada está condicionada al estricto cumplimiento de lo dispuesto en
el Manual del propietario. Bajo ninguna circunstancia CYBEX o el distribuidor que vende este producto será
responsable legalmente ante usted de ningún daño, incluidos daños incidentales o consecuentes que surjan del
uso o incapacidad de usar este producto.
LIMITACIÓN DE GARANTÍAS Y DERECHOS LEGALES ESTATALES O PROVINCIALES
La garantía y los recursos especicados anteriormente son exclusivos y sustituyen a cualquier otro, ya sea
oral, escrito, expreso o implícito. En la medida que la ley vigente lo permita, por medio del presente se excluye
cualquier garantía implícita, incluidas garantías de comerciabilidad o idoneidad para un propósito determinado.
Algunos estados o provincias no permiten limitaciones sobre la duración de una garantía implícita o la exclusión
o limitación de daños incidentales o directos; por lo tanto, es posible que las limitaciones anteriores no se
apliquen en su caso.
Esta garantía le otorga derechos legales especícos y usted podría tener también otros derechos que pueden
variar de un estado a otro o de una provincia a otra. Ni CYBEX ni el distribuidor que vende este producto
autorizan a ninguna persona a crear ninguna otra garantía, obligación o responsabilidad legal en conexión con
este producto.
CY_171_7242_A0820
CYBEX Industrial Limited
Suite 1222, 12/F | Leighton Centre | 77 Leighton Road | Causeway Bay | Hong Kong
www.cybex-online.com
Distributed in the United States by Columbus Trading Partners USA Inc.
1801 Commerce Drive | Piqua, OH 45356 | USA
Distributed in Canada by Goodbaby Canada Inc.
2 Robert Speck Parkway, Suite 750 | Mississauga, ON L4Z 1H8| Canada
Tel: 1–877–242–5676 | e-mail: [email protected] | www.cybex-online.com
© 2020 CYBEX Industrial Limited. All rights reserved. Printed in China. This product and its components are subject to change without notice.
Patents pending.
CYBEX Industrial Limited
Suite 1222, 12/F | Leighton Centre | 77 Leighton Road | Causeway Bay | Hong Kong
www.cybex-online.com
Distribuido en los Estados Unidos por Columbus Trading Partners USA Inc.
1801 Commerce Drive | Piqua, OH 45356 | USA
Distribuido en Canadá por Goodbaby Canada Inc.
2 Robert Speck Parkway, Suite 750 | Mississauga, ON L4Z 1H8| Canada
Tel: 1–877–242–5676 | correo electrónico: [email protected] | www.cybex-online.com
© 2020 CYBEX Industrial Limited. Todos los derechos reservados. Impreso en China. Este producto y sus componentes están sujetos a cambios sin previo aviso.
Patentes pendientes.