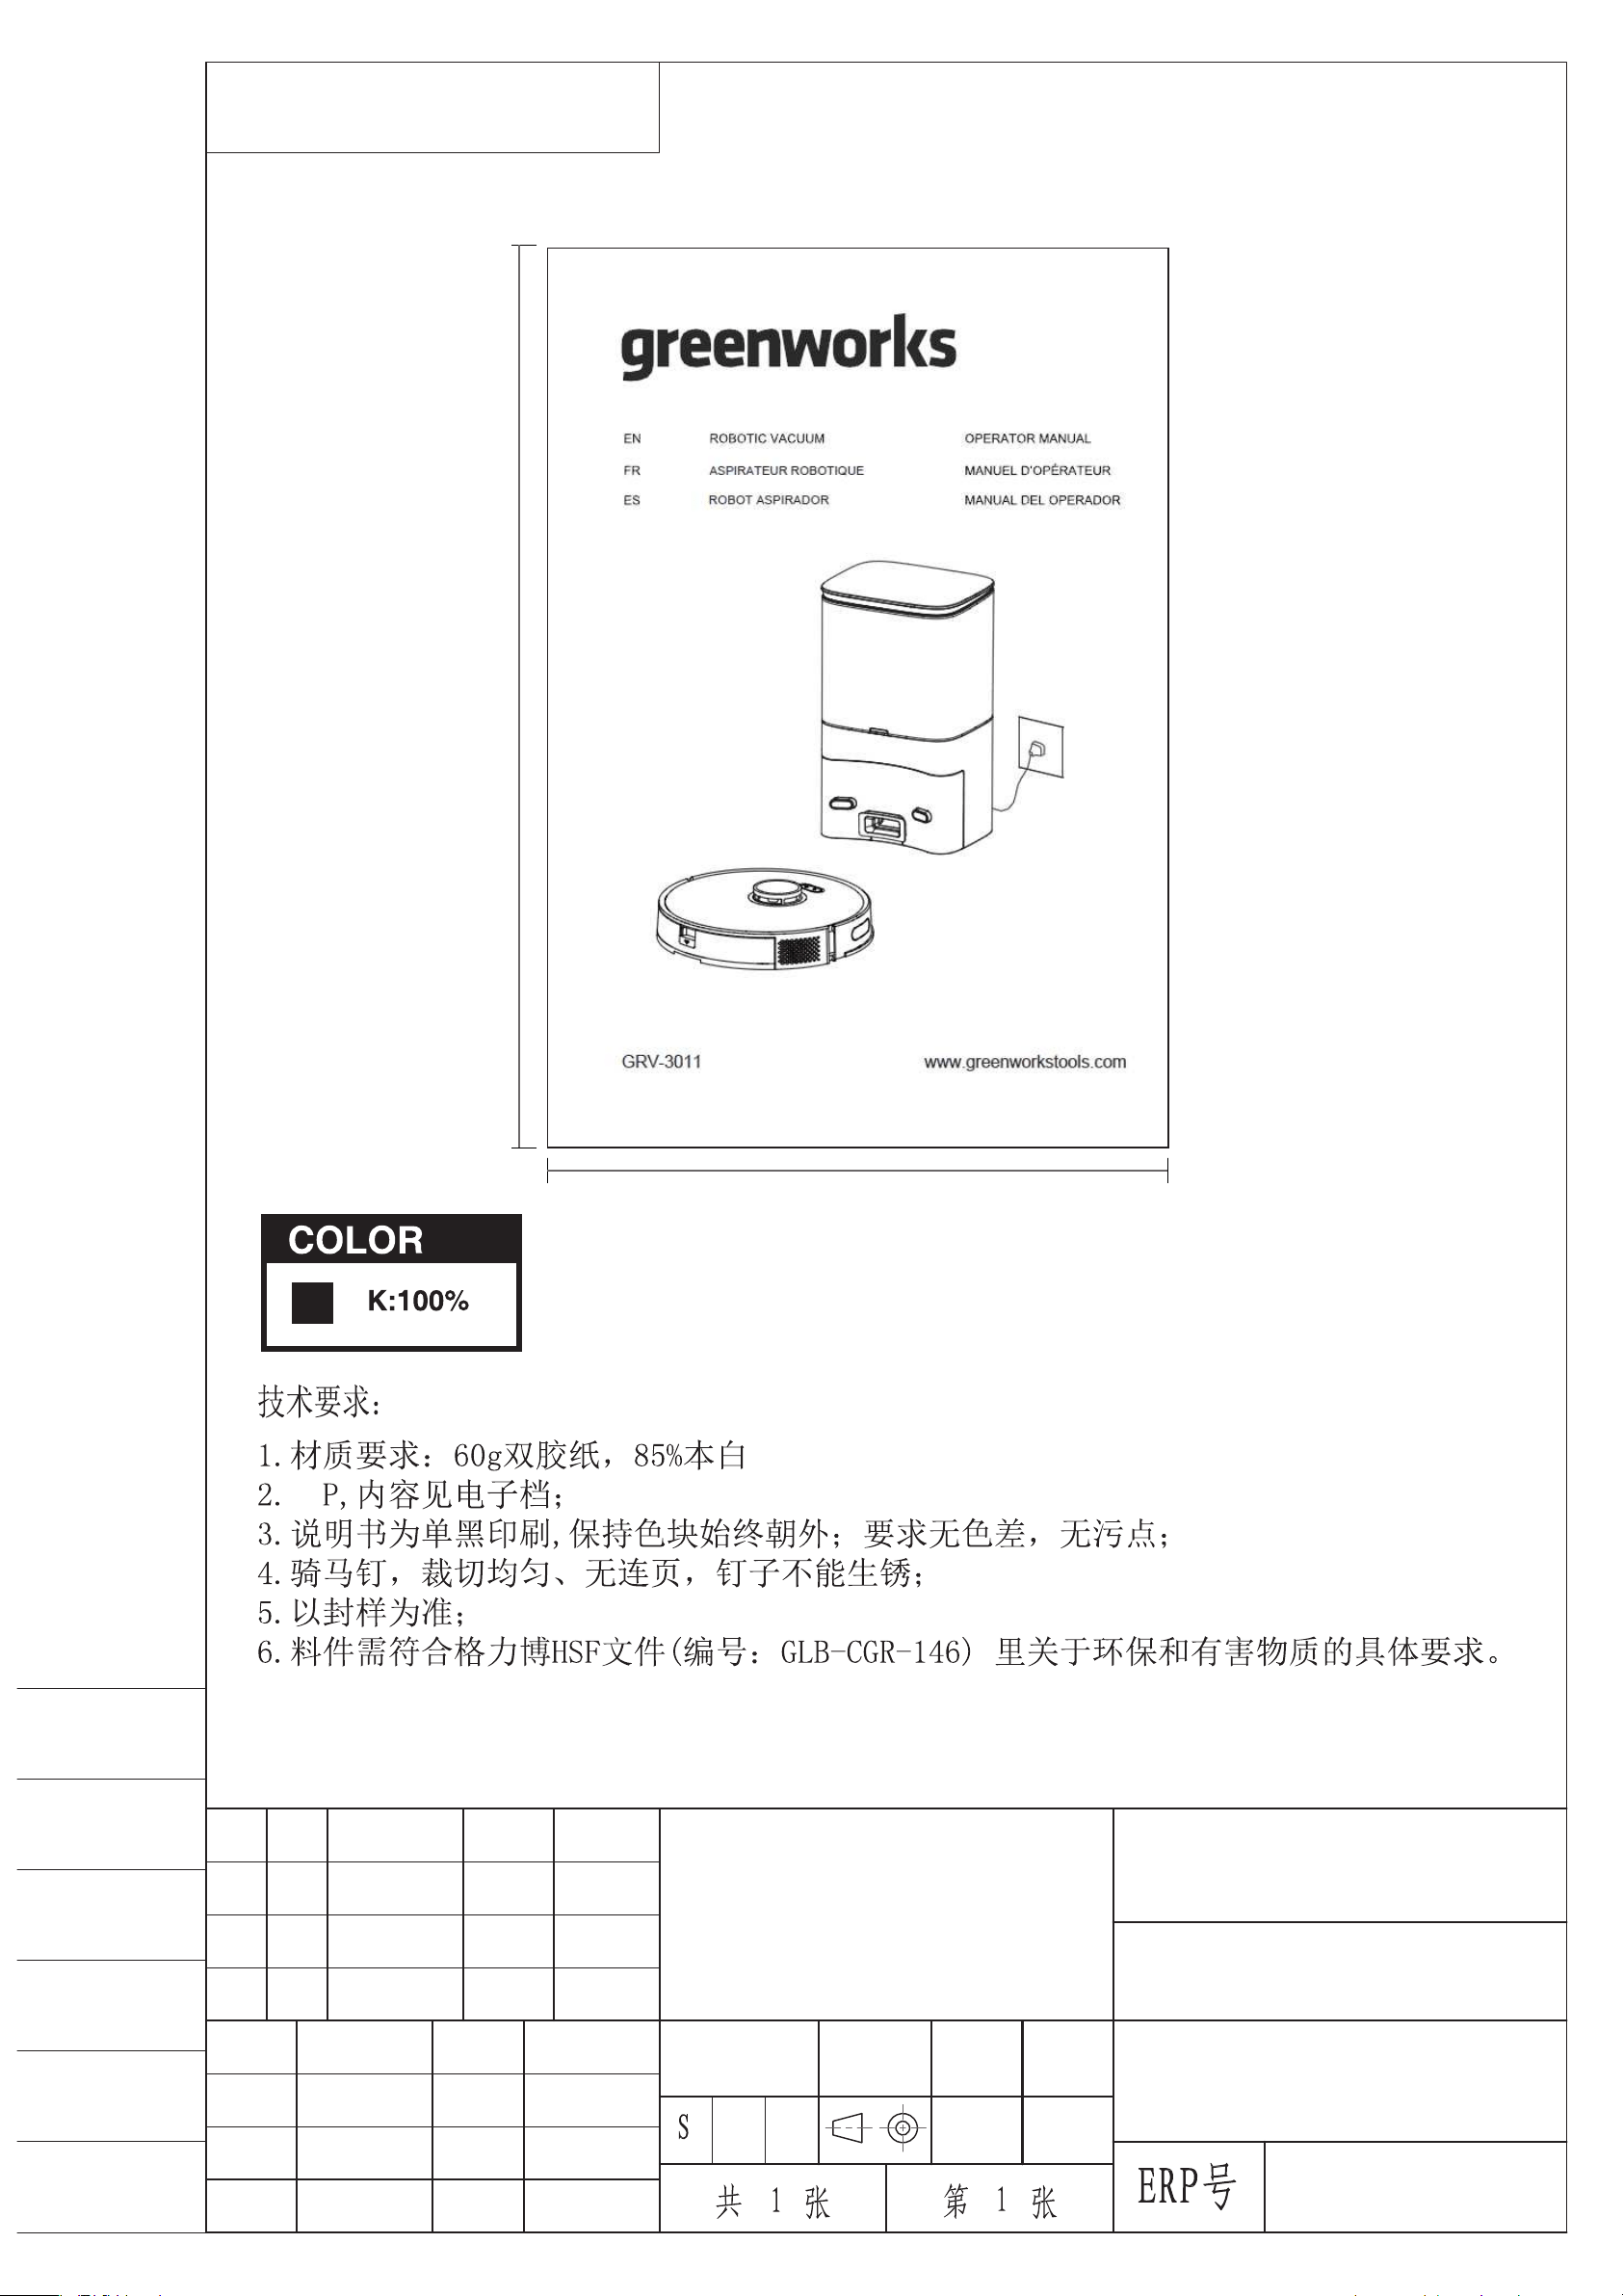
常州格力博集团
说明书
杨媛
徐心恺
周艳
王小妮
李海平
21.11.30
版本号
重要度等级
B
B
B A
日 期
工艺
审核
校对
设计
标记
处数
签名
日期
阶段标记
视角标记
重量 比例
批准
审定
标准化
日期
更改文件号
SCALE: A5
210mm
145mm
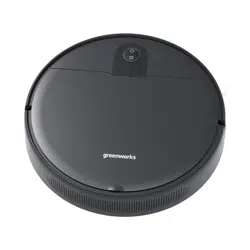
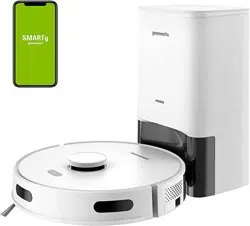
Robotic vacuum
GRV-3011
56
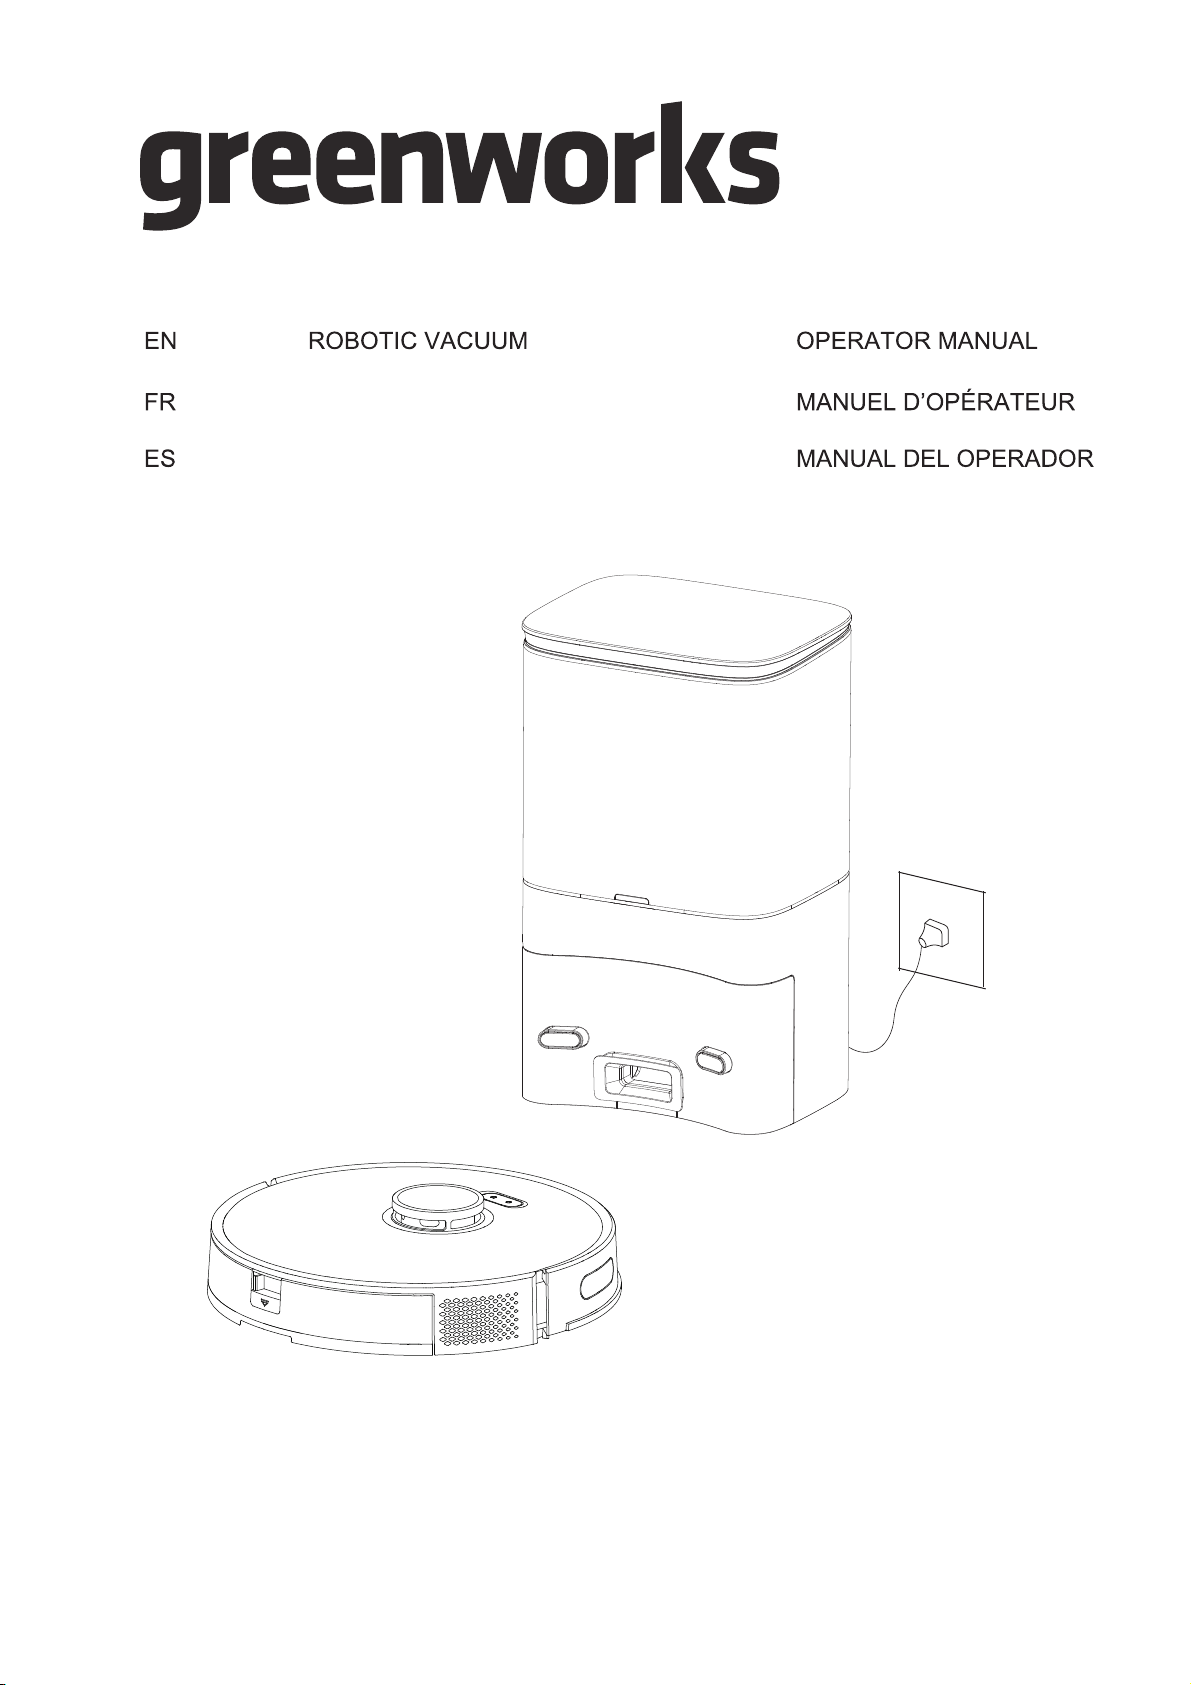
www.greenworkstools.comGRV-3011
ASPIRATEUR ROBOTIQUE
ROBOT ASPIRADOR


1 Safety Instructions............................ 4
2 Includes.............................................. 6
3 Description.........................................7
3.1 Basic Parameters................................................7
3.2 Vacuum.............................................................. 7
3.3 Dust collection dock.......................................... 8
3.4 Introduction of modules.....................................8
4 Installation....................................... 10
4.1 Collection dock/charging dock........................10
4.2 Prepare the vacuum......................................... 10
5 APP download and networking
operation...........................................11
5.1 Mobile Application..........................................11
5.2 Reset the network.............................................11
5.3 Add a device.................................................... 11
5.4 Wi-Fi connection failure..................................12
6 Operation......................................... 12
6.1 Start and stop the vacuum cleaner................... 12
6.2 Charging the vacuum cleaner.......................... 13
6.3 Reset the system.............................................. 13
6.4 Map management............................................ 13
6.5 Choose the cleaning mode...............................13
7 Maintenance.....................................14
7.1 Clean the dustbin............................................. 14
7.2 Clean the sensor...............................................14
7.3 Clean up the dust channel................................15
7.4 Replace the dust bag........................................15
8 Troubleshooting...............................16
9 Voice prompts.................................. 17
10 Warranty Card................................18
3
English
EN

1 SAFETY INSTRUCTIONS
Scope of use
• Read the user manual carefully, and use the product according to the instructions of the user manual to avoid damage due to
improper operation.
• The product can only be used indoors. The product is suitable for the following indoor floors: Wooden floors, ceramic tiles
and low pile carpets.
• Do not use the product in any hot, humid, flammable, explosive or corrosive environments.
• To prevent the product from falling accidentally, do not use this product in a suspended place without a protective fence,
which may result in personal injury and damage to the product.
Safety precautions
• This product can only use the adapter, batteries and charging dock or dust collection dock that are provided with this product.
The user cannot change the battery without authorization, otherwise the product may be damaged and warranty voided.
• If the main machine and accessories of this product are found to be damaged, please contact the service technicians
designated or authorized by Greenworks. Unauthorized persons and organizations are not permitted to service the
Greenworks robotic vacuum with voiding the existing warranty.
• Avoid the intake of water, oil and other liquids, which may damage the product.
• Do not use the product to suck in sharp objects (e.g. shattered glass and nails), which may damage the product.
• Remove fragile objects before use. Arrange scattered wires on the floor that may interrupt the normal operation of the
vacuum cleaner.
• The charging dock shall be placed against the wall and on a flat floor. When the product is working, removal of the charging
dock will affect the function of the product.
• Prevent clothing or any part of your body (hair, fingers, etc.) from getting caught in the brush or wheel of the robotic vacuum
cleaner. Failure to do so may result in personal injury.
• Unplug the product before maintenance. Do not touch the power plug or the product when your hands are wet, as this may
result in electrical shock.
• If the power cord is damaged, it must be replaced by the manufacturer, its service department or a similar professional to
avoid danger.
• Unplug the charging dock if it remains unused for a long time.
About child safety
• Children under the age of 8 are not allowed to use this product. Persons with physical, sensory or intellectual disabilities or
lack of relevant experience/knowledge cannot use the machine unless under supervision, operating instructions or awareness
of the danger.
• Children are not allowed to play with the machine or clean/repair the machine unless under supervision.
• Children are not allowed to play with the product's packaging bag for fear of suffocation.
About the batteries
1. Only the batteries provided by the manufacturer are applicable to the product.
2. The batteries shall be removed when the product is discarded.
3. Steps to take out the battery:
A. Be sure to turn off the power before taking out the battery;
B. Use a screwdriver to remove the bottom screws, and then remove the front bumper and middle shell;
C. Take out the motherboard and battery cover;
D. Unplug the connection line between the battery and the vacuum cleaner;
E. Remove the battery.
4. If you need to replace the battery of the vacuum cleaner, please contact our after-sales service department. If the wrong type
of battery is used for replacement, it may cause a safety accident.
5. Do not damage the battery during disassembly for fear of short circuit or battery leakage. In the event of battery leakage, be
careful not to let the liquid stick to your skin or clothing. You should wipe it off with a dry cloth immediately and send the
battery to a recycling station or designated maintenance point. Don’t throw it away randomly.
6. Please properly dispose of the old battery. The battery contains substances that are harmful to the environment if left
unattended. Please follow the local environmental protection regulations and dispose of it at the specified recycling site.
4
English
EN
Special rules
This device complies with Part 15 of the FCC Rules. Operation is subject to the following two conditions:
The following system is used in the operator manual to make it easier to understand:
• This device may not cause harmful interference.
• This device must accept any interference received, including interference that may cause undesired operation.
CAUTION: Changes or modifications not expressly approved by the party responsible for compliance could void the user’s
authority to operate the equipment.
This equipment has been tested and found to comply with the limits for a Class B digital device, pursuant to Part 15 of the FCC
Rules. These limits are designed to provide reasonable protection against harmful interference in a residential installation. This
equipment generates, uses and can radiate radio frequency energy, and if not installed and used in accordance with the
instructions, may cause harmful interference to radio or television reception, The reception can be determined by turning the
equipment off and on, the user is encouraged to try to correct the interference by one or more of the following measures:
• Reorient or relocate the receiving antenna.
• Increase the separation between the equipment and the receiver.
• Connect the equipment into an outlet on a circuit different from that to which the receiver is connected.
• Consult the dealer or an experienced radio/TV technician for help.
To satisfy FCC RF exposure requirements, a separation distance of 20cm or more should be maintained between the antenna of
this device and persons during device operation.
To ensure compliance, operations at closer than this distance is not recommended
Disclaimers
Under any of the following circumstances, the product will be excluded from the scope of free warranty, but paid repair can be
provided if warranted:
A. Damage due to the user’s failure to operate the product in strict accordance with Greenworks user manual or due to improper
storage;
B. The machine or parts have exceeded the free warranty period;
C. Damage due to disassembly by those other than the maintenance personnel of Greenworks or authorized by Greenworks;
D. A valid purchase voucher number cannot be provided;
E. The product model on the warranty card does not match that of the product to be repaired or is altered;
F. Damage caused by factors such as natural disasters;
G. Product failure or damage caused by unexpected factors or man-made causes (including operational errors, liquid ingress,
improper plugging/unplugging, scratching, handling, bumping, input of inappropriate voltage, etc.)
NOTE
Greenworks provides a warranty for the product in accordance with the “National New Regulations on Warranty”. For details,
please check the warranty card provided with the product.
5
English
EN
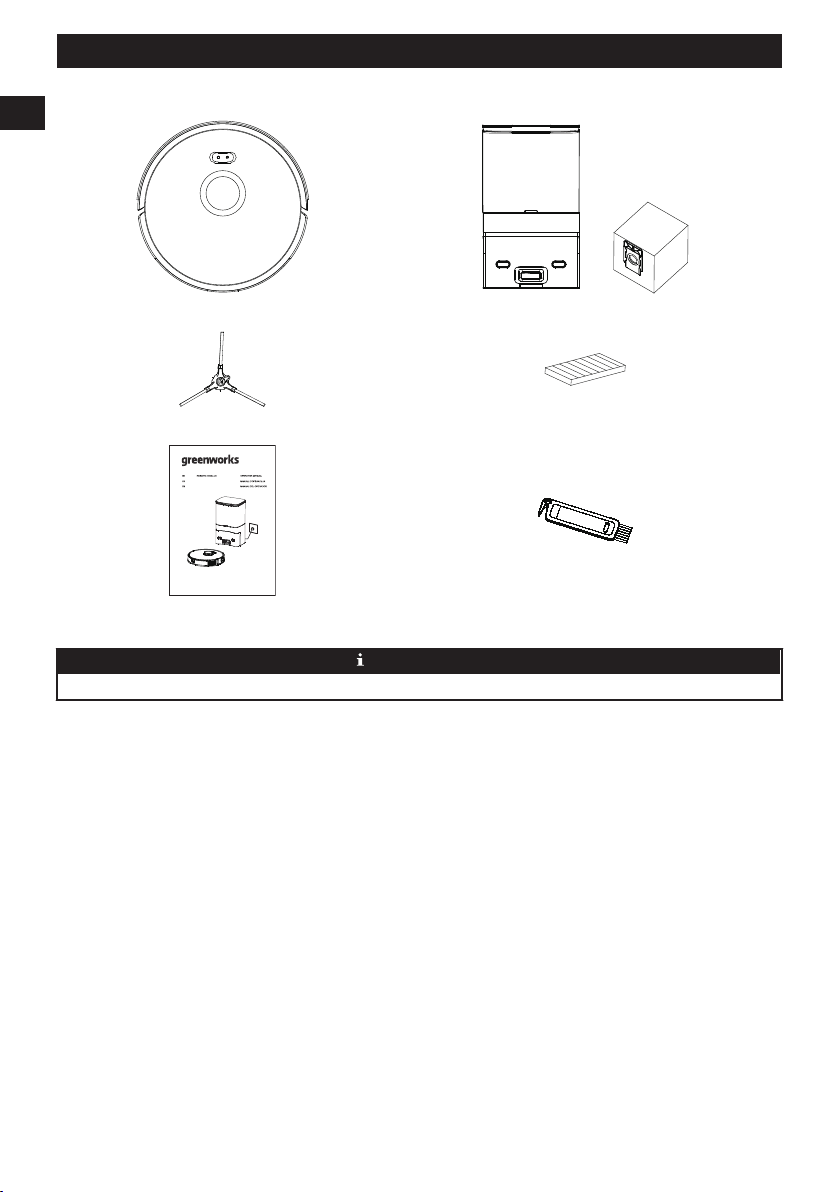
2 INCLUDES
(1) Vacuum (1) Dust collection dock + (1) extra dust bag
(1) Extra side brush (1) Replacement filter
www.greenworkstools.comGRV-3011
ASPIRATEUR ROBOTIQUE
ROBOT ASPIRADOR
(1) User manual (1) Cleaning brush
NOTE
A high-performance filter has already been installed in the vacuum.
6
English
EN
3 DESCRIPTION
3.1 BASIC PARAMETERS
Vacuum
Name Parameters
Dimensions 13.4" × 13.4" × 3.7"
Product Approx. 8.05 lbs
Battery Capacity 2600mAh
Voltage 14.4V
Rated 30W
Dust collection Dock
Name Parameters
Dimensions 8.7" × 7.1" × 15"
Rated 950W
Power 24V 1.5A MAX
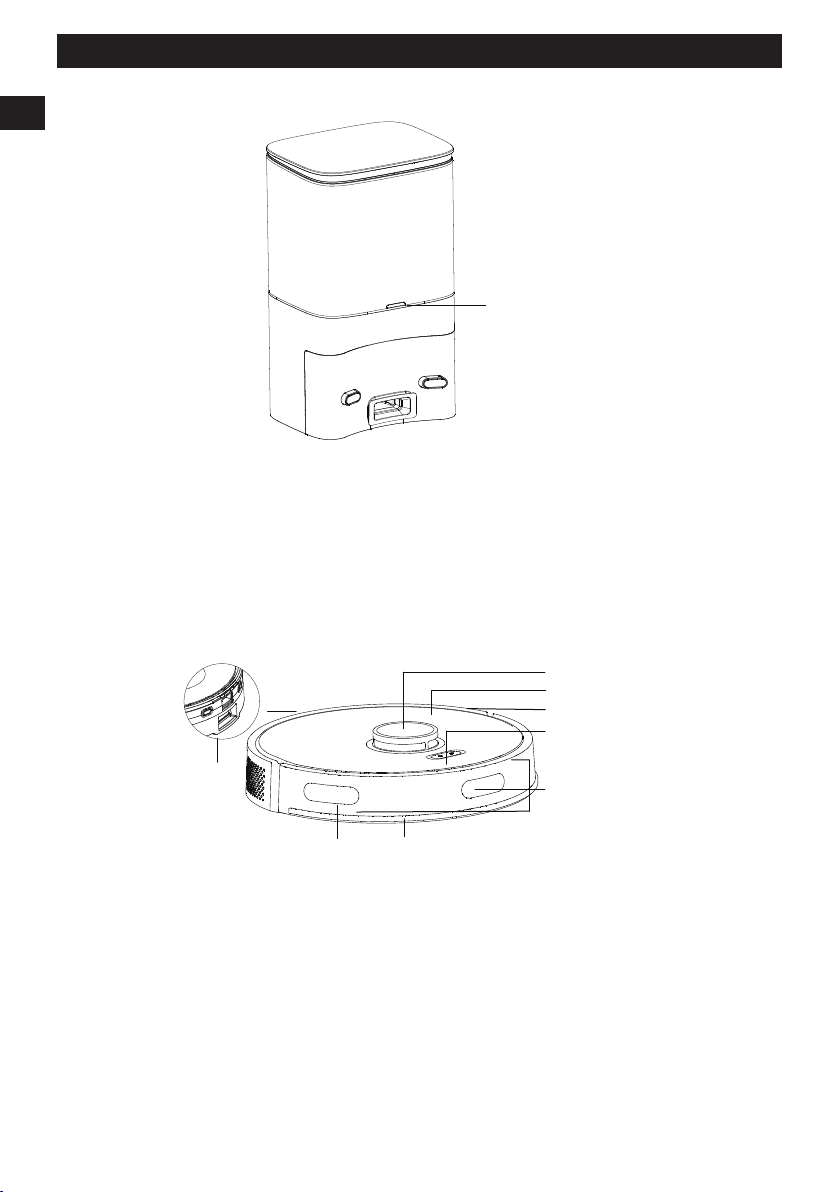
3.2 VACUUM
+
button.
Cleaning/On/Off button
Network configuration mode
Power Indicator
Cleaning On/Off button
• Press once: Start cleaning.
• Press twice: Start fixed-point cleaning.
• Press and hold for threee seconds: Turn on/off the machine.
*For the first use, toggle the main switch from O to I
Recharge button
• Press once: Return for recharge.
• Press and hold for 15 seconds: Restore factory settings.
+
Recharge button + Cleaning/On/Off button
• Press the two buttons at the same time and hold for three seconds: Network configuration mode
Power Indicator • Blue: Battery level≥20%
• Purple: Battery level < 20%
• Red: Fault or abnormality
7
English
EN
3.3 DUST COLLECTION DOCK
Indicator LED
Blue light on: Dust Collection Dock in standby.
Blue light off: The vaccum is correctly connected to the dust collection dock or the dust collection dock is sleeping.
Red light on: The dust bag is not in place.
Red light flashing: Abnormal status.
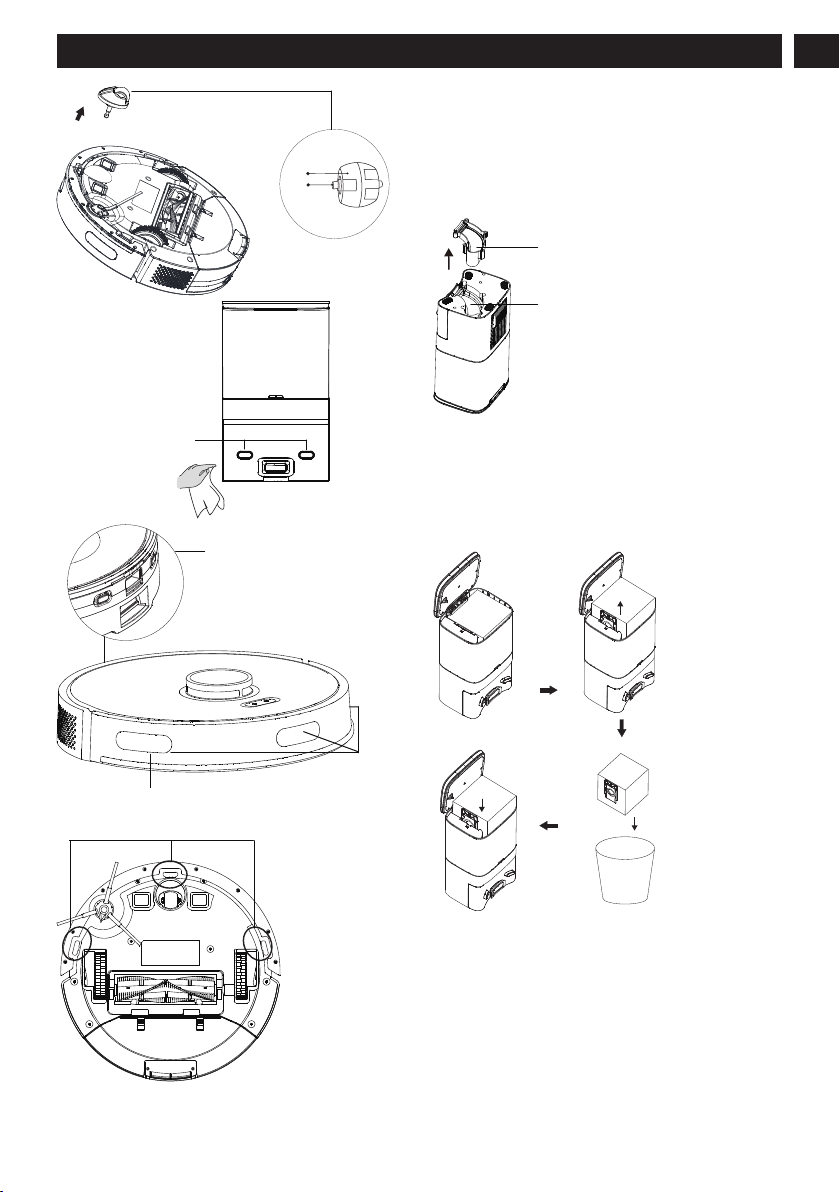
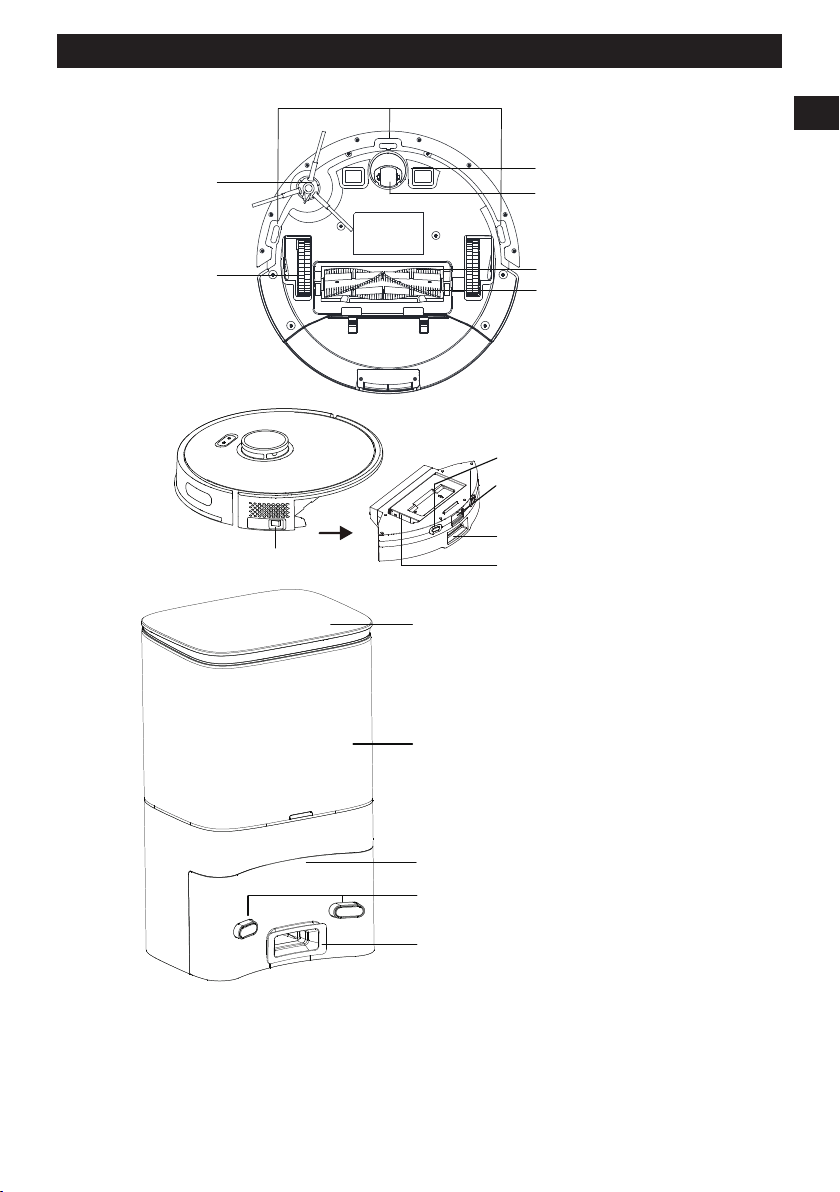
3.4 INTRODUCTION OF MODULES
Recharge
sensor
Wall sensor
Radar
Cover
Middle shell
Button
Front bumper
Recharge sensor
8
English
EN
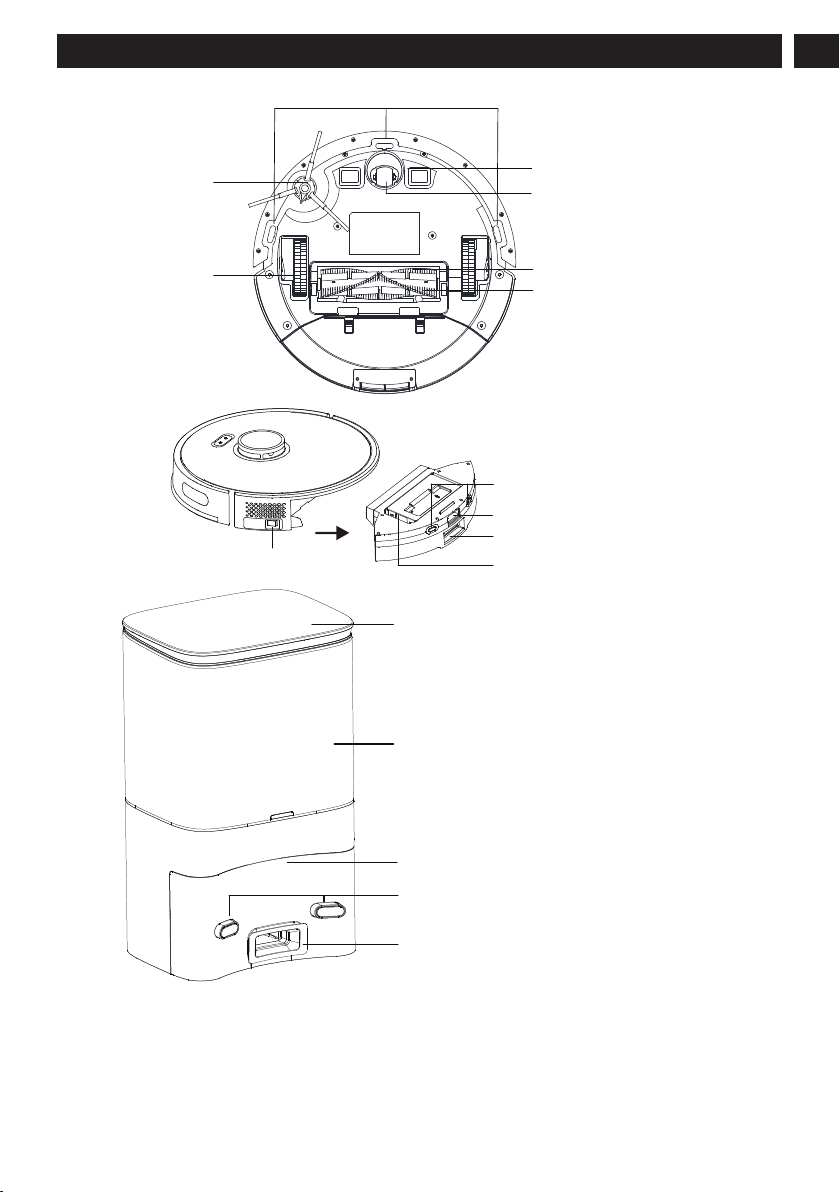
Anti-drop sensor
Side brush
Charging electrode
Universal wheel
Rolling brush
Rolling brush
protective cover
Wheel
Dust box release button
Filter opening
Dust collection port
Charging pole pieces
Main switch
Top cover
Open the top cover
Put in/take out the dust bag
Dust bag compartment
Charging and dust collection
induction zone
Charging pole piece
Dust suction port
The dust in the main machine
passes through the dust suction port
and is sucked into the dust bag.
9
English
EN

Dust box
Filter
Filter opening
Dust box opening
Fan filter
Dust bag
Dust bag handle
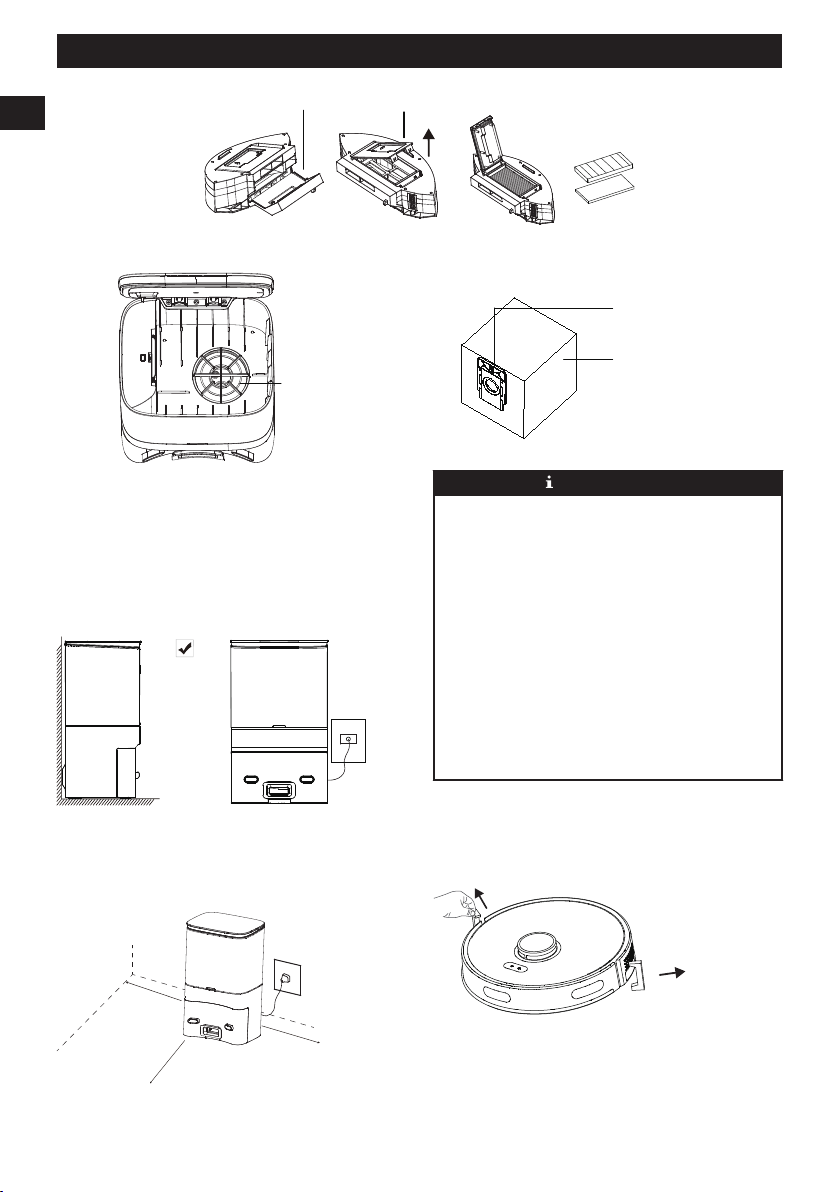
4 INSTALLATION
4.1 COLLECTION DOCK/CHARGING
DOCK
Install the dock
Place the dock against and perpendicular to the wall on a
level, hard floor, then insert the power plug into the socket.
Place the dock
Place the dock against and perpendicular to the wall on a
level, hard floor, without obstacles within 60" in front and 20"
on left and right.
19.7 in.
(0.5M
)
19.7 in.
(0.5M
)
59.1 in.
(1.5M)
NOTE
• Install the charging dock or the dust collection dock in a
position where the vacuum cleaner can easily reach. It
is advisable to place the charging dock or the dust
collection dock against the wall on a level, hard floor,
not on the carpet.
• Always keep the charging dock or the dust collection
dock powered on, otherwise the vacuum cleaner will
not automatically return.
• To ensure normal charging, please do not move the
charging dock or the dust collection dock frequently.
After the location of the vacuum cleaner is changed, the
main machine may regenerate a map due to failure to
relocate (for details, please refer to this
Manual>Instructions for Operation>Map Management).
4.2 PREPARE THE VACUUM
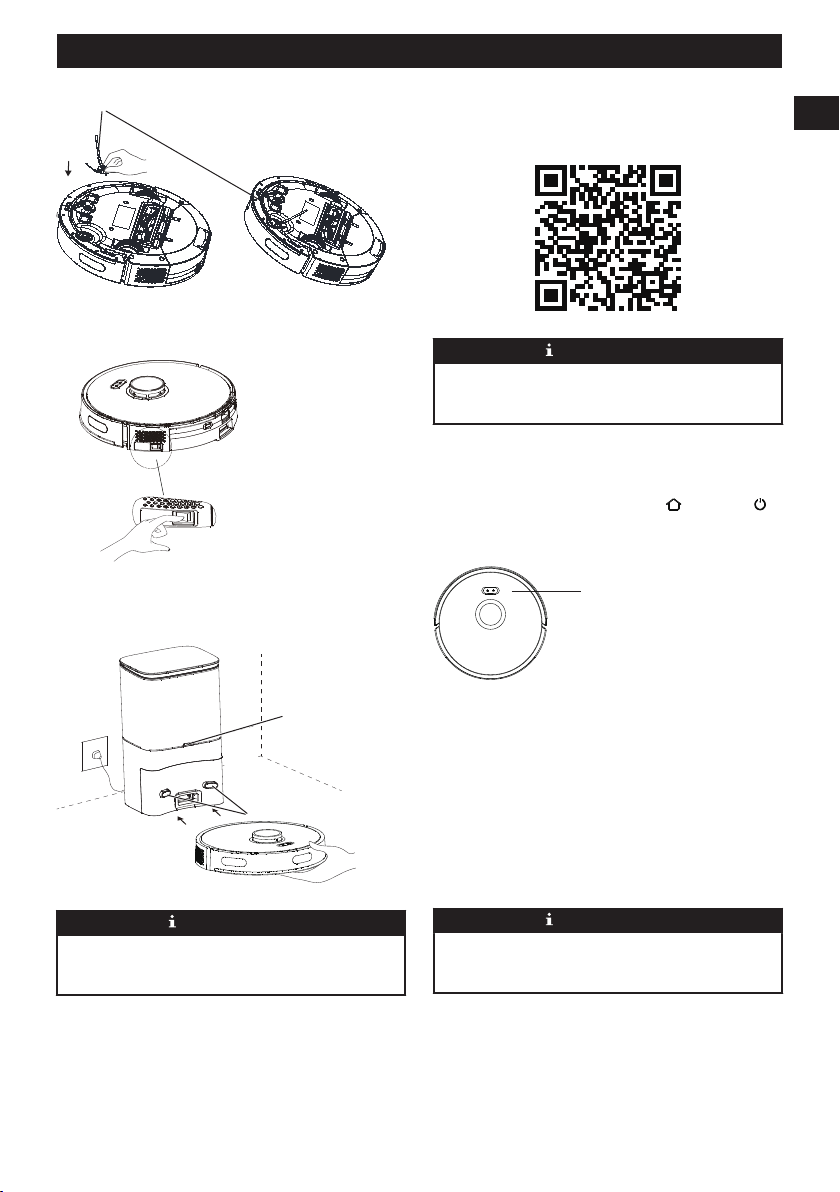
Remove the protective strip
Before use, remove the protective strips on both sides of the
front bumper.
Install the side brush
Side brush installation: align with the hole and press gently to
fix the side brush on the machine.
10
English
EN
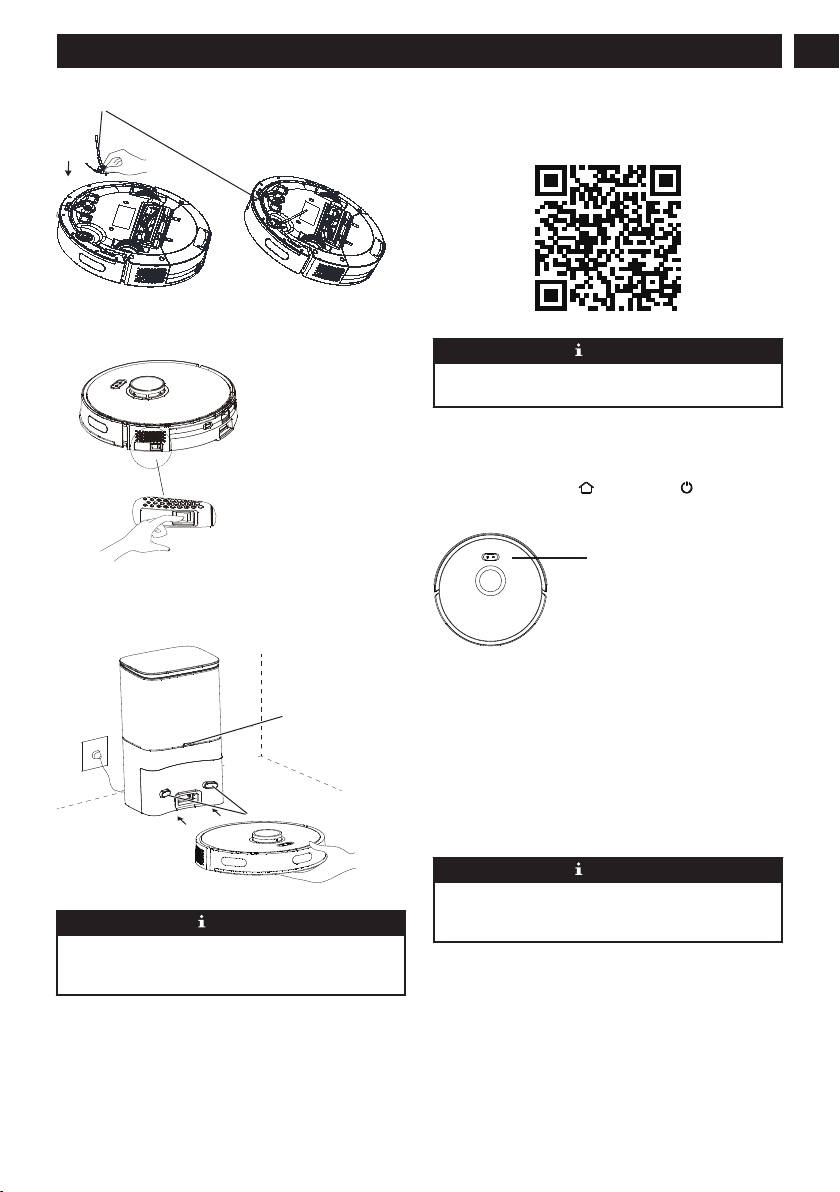
Side brush
Turn on and charge
• Flip the switch to "I" ,then fully charged (about 4
hours) .
• Manually place the vacuum cleaner on the dust collection
dock and align it with the charging port. When the blue
indicator of the charging dock flashes 3 times and then
goes out, the charging will begin.
Indicator
LED
NOTE
After the vacuum cleaner is connected with the dust
collection dock, the dust collection dock will start dust
collection.
5 APP DOWNLOAD AND
NETWORKING OPERATION
5.1 MOBILE APPLICATION
Scan the QR code and download and install the mobile
application.
NOTE
If the mobile phone cannot be connected to the robot, please
refer to “Product Use” – “Reset Wi-Fi”.
5.2 RESET THE NETWORK
Press and hold the button and the button at the same
time until a voice prompt is heared, then the indicator flashes
slowly in blue, and the machine enters the pairing status.
Indicator:
Indicator:
The blue light flashes slowly: Waiting for connection
The blue light flashes quickly: Connection to Wi-Fi in
progress
The blue light is normally on: Wi-Fi is connected
5.3 ADD A DEVICE
Open the app, create a new account, and follow the
instructions inside the APP.
NOTE
Before setting up Wi-Fi, please make sure that the vacuum
cleaner and the Wi-Fi network meet the following
requirements.
A. Vacuum:
• The battery level of the vacuum is greater than 20% or
the vacuum cleaner is placed on the charging dock.
B. Wi-Fi network:
• Use the correct wireless network password.
• Do not use a VPN (Virtual Private Network) or proxy
server.
11
English
EN

• The Wi-Fi router supports 802.11b/g/n and IPv4
protocols.
• The router frequency band is 2.4GHz, or use a dual-
frequency router that supports the 2.4GHz frequency
band. The vacuum cleaner does not support the 5GHz
frequency band.
• If the vacuum cleaner cannot be connected in the
2.4/5GHz dual-band Wi-Fi network, please switch to the
2.4GHz network for Wi-Fi settings. After the setting is
completed, the frequency band can be switched.
NOTE
Network security requirements:
Use WPA and WPA2 networks encrypted with TKIP, PSK,
AES/CCMP.
5.4 WI-FI CONNECTION FAILURE
If you cannot use your smart phone to control the vacuum ,
please try the following solutions. If the problem persists,
please contact our customer service staff in time. Hotline:
1-888-909-6757
Wi-Fi Sta-
tus
Cause Solution
The blue
light is nor-
mally on.
The vac-
uum is
connected
to the rout-
er, but can-
not be con-
nected to
the net-
work.
• Check whether the router is
connected to the network.
• Contact the network opera-
tor to find out whether there
are any network connection
problems.
The blue
light flashes
quickly.
The vac-
uum can-
not be con-
nected to
the wire-
less router.
• Check whether the network
name and password have
been changed.
• If necessary, reset the Wi-Fi
connection. Please refer to
the section “APP Download
and Networking Operation
> Reset the Network” in
this manual.
The blue
light flashes
slowly.
The Wi-Fi
connection
has been
reset or has
not been
set up be-
fore.
• Establish a Wi-Fi connec-
tion to the main machine.
Please refer to the section
“Using App to Control the
Main Machine” in this
manual.
• If necessary, reset the Wi-Fi
connection. Please refer to
the section “APP Download
and NetworkingOperation >
Reset the Network” in this
manual.
NOTE
• If other operations are triggered during the networking
process, the indicator light changes, and the device still
maintains the network configuration status.
• If the connection between the mobile phone and the
vacuum cleaner fails, you can reset the Wi-Fi again to
enter the network configuration mode and add it again.
• Due to version upgrades and renewals, please follow
the APP internal guide for actual operation.
6 OPERATION
6.1 START AND STOP THE VACUUM
CLEANER
On/Off
For the first use, toggle the main switch from O to I.
Press and hold the button for 3 seconds to turn on the
machine.
Press and hold the button
for 3 seconds to turn off the
machine.
If the vacuum cleaner fails to respond, toggle the main switch
from I to O to forcibly turn off the machine.
• Do not turn off the main switch directly during cleaning,
otherwise the data of the vacuum cleaner cannot be saved.
• If the main switch is in the O position, the vacuum
cleaner will automatically turn on when charged on the
charging dock, and will turn off when leaving the
charging dock.
• If it is not in use for a long time, please toggle the main
switch to O.
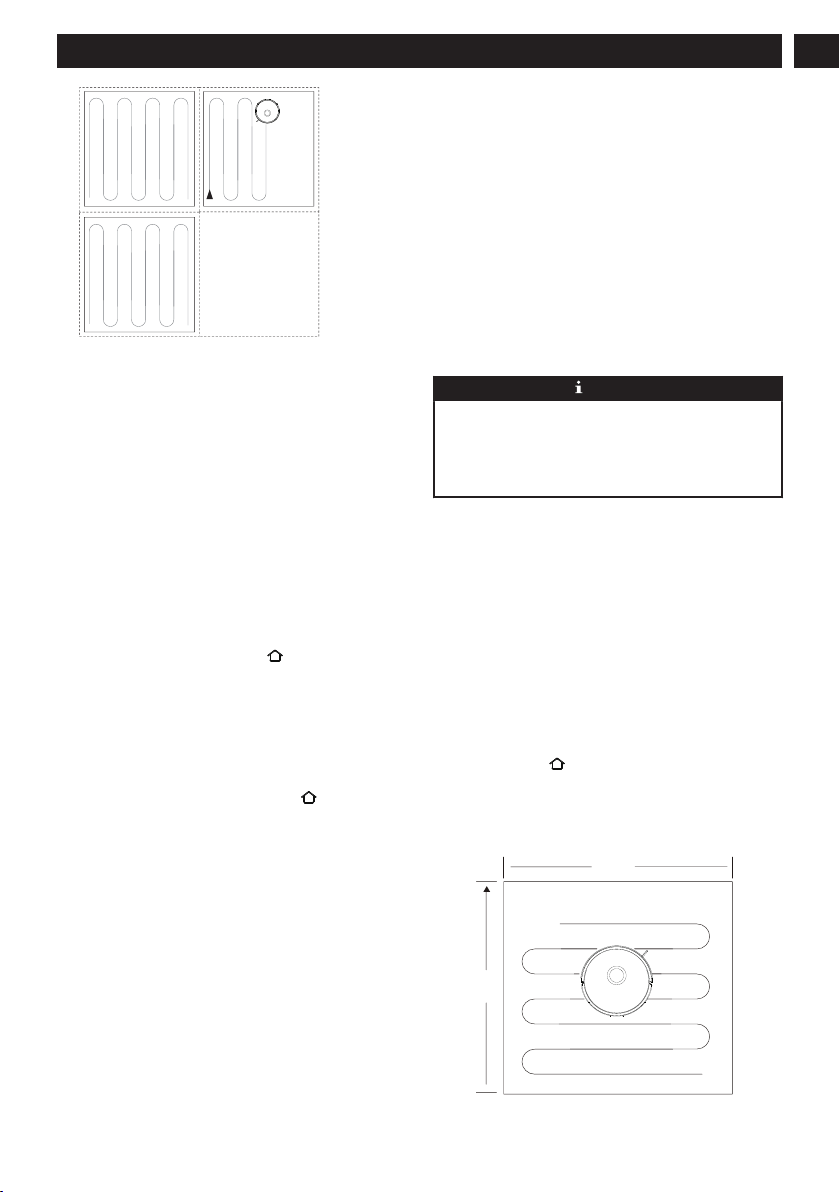
Start cleaning
Press the button
to start the automatic cleaning mode. After
starting, the vacuum cleaner will leave the charging dock,
automatically scan to generate a map, intelligently determine
its cleaning route, and divide the space into multiple zones.
The cleaning path will be planned along the wall, and then
cleaning will be conducted back and forth in a “bow” shape
to complete the cleaning of each zone one by one.
• If the battery level is too low, the cleaning cannot be
started. Please charge first and then start the cleaning.
• Before cleaning, all wires on the floor should be
organized to avoid power interruption or damage to items
caused by wire pulling during cleaning.
• In automatic cleaning mode, if the cleaning area is less
than 108 square feet (10 square meters), it will be cleaned
twice by default.
• Do not move the charging dock or dust collection dock
during cleaning, and make sure that the charging dock or
the dust collection dock is energized, otherwise the
vacuum cleaner may not be able to return for recharge.
12
English
EN
Pause
During the operation of the vacuum cleaner, press any button
to pause the operation.
Sleep
If it is inactive for 10 minutes, the vacuum cleaner will
automatically switch to the sleep mode.
The vacuum cleaner will automatically switch to the sleep
mode 10 minutes after fully charged.
6.2 CHARGING THE VACUUM
CLEANER
• Automatic recharge: After the cleaning task is
completed, it will automatically return for recharge.
• Manual recharge:
a. When paused, press the button
for automatic
recharge;
b. When the vacuum cleaner is stuck or cannot find the
charging dock, please manually put the vacuum cleaner
back on the dust collection dock for charging.
6.3 RESET THE SYSTEM
In standby mode, press and hold the button for 15 seconds
to reset the system.
After resetting the system, the vacuum cleaner will lose the
map and the original settings including the virtual borders.
6.4 MAP MANAGEMENT
A. Real-time drawing of room map
Real-time drawing of a room map can help you easily
understand the cleaning path and environment. After
cleaning, a map of the room will be generated. The map will
be updated in real time during each cleaning to ensure normal
navigation.
Generate a complete room map:
1. Open the door so that the vacuum cleaner generates a
map of each room;
2. Remove any objects that may block or jam the vacuum
cleaner;
3. After the map is generated, please do not move the
charging base or disconnect the power supply.
B. Repositioning and regeneration of a map
When the position of the vacuum cleaner is moved or the
surrounding environment changes significantly, the vacuum
cleaner will try to reposition and may regenerate a map to
match the surrounding environment. The details are as
follows:
1. If the repositioning is successful, the vacuum cleaner will
resume cleaning;
2. If the repositioning fails, the vacuum cleaner will
regenerate a map to ensure normal navigation for
cleaning.
NOTE
• Make sure that the vacuum cleaner starts cleaning every
time from the charging dock.
• During cleaning, do not move the vacuum cleaner
frequently. If it is moved, place the vacuum cleaner
back in its original position.
6.5 CHOOSE THE CLEANING MODE
Suction level selection (It is only supported with the
mobile App)
The cleaning intensity level can be selected according to the
needs in the APP:
• Quiet
• Standard
• Powerful
• Super
Fixed-point cleaning
Move the vacuum cleaner to the area that needs to be cleaned,
and press the button
twice. After the mode is activated, the
vacuum cleaner will clean a rectangular area of 59.1 in. ×
59.1 in. (1.5m × 1.5m) centered on itself.
• The vacuum cleaner cannot start the fixed-point cleaning
mode on the charging dock or the dust collection dock.
59.1 in.
(1.5 m)
59.1 in.
(1.5 m)
13
English
EN
Remote cleaning mode (It is only supported with the
mobile App)
• The manual remote control mode can be used in the APP
to control the vacuum cleaner to get to the area that needs
to be cleaned.
Zone cleaning mode (It is only supported with the mobile
App)
Use the mobile APP to set the zone cleaning, and the robotic
vacuum cleaner will clean one or more rooms checked on the
APP zoning map.
• After starting to clean, the vacuum cleaner may enter the
zone outside the selected zone, clear floor obstacles
around the selected zone. The zone selection cannot
ensure safe isolation;
• Zone cleaning can be started only after the vacuum
cleaner successfully creates a map.
Selected zone cleaning mode (It is only supported with the
mobile App)
Select the zone cleaning mode in the APP and set a cleaning
area. The vacuum cleaner will only clean this zone and return
to the charging dock after cleaning.
• Zone cleaning can be started only after the vacuum
cleaner successfully creates a map.
7 MAINTENANCE
7.1 CLEAN THE DUSTBIN
1. Empty the dust box. Put the dust box close to the trash
can, and tap the dust box gently to knock off excess dirt.
2. Take out the high-performance filter and clean the filter
with the supplied cleaning brush.
3. If necessary, rinse the dust box and filter assembly
thoroughly with water. (Note: The filter cannot be
cleaned with hot water or detergent.)
4. After rinsing, the dust box and filter assembly must be
thoroughly air-dried. (Note: Repeated rinsing will destroy
the high-performance filter material and make it
ineffective. Please clean it carefully.)
5. Reassemble the dust box, and filter assembly, and put
them back into the vacuum cleaner.
7.2 CLEAN THE SENSOR
Please clean the sensor regularly, and wipe off the dust on the
sensor with a soft dry cloth or cleaning brush.
14
English
EN
Wheel
Shaft
Charging electrode
Recharge
sensor
Wall sensor
Recharge
sensor
Anti-drop sensor
7.3 CLEAN UP THE DUST CHANNEL
After the replacement of the dust bag, if dust collection still
stops after a short period of time, and the red indicator of the
dust collection dock flashes, it is advisable to unplug the
power plug, reverse the dust collection dock, and check
whether the dust channel is blocked by foreign objects. If the
dust channel is blocked, refer to the figure.
Transparent cover of dust
Dust channel
7.4 REPLACE THE DUST BAG
When the dust bag is full, the indicator of the dust collection
dock will flash in red or there will be an APP notice. Please
replace the dust bag in time. When the dust bag is in normal
use, the blue light of the dust collection dock is normally on
or flashing.
15
English
EN
8 TROUBLESHOOTING
Error name Error performance and solution
Startup failure 1. The battery level is low. Please place the vacuum cleaner on the charging dock or the dust
dock and align with the charging pole pieces, toggle the switch on the left side of the vac-
uum cleaner to “I”, and the vacuum cleaner will start automatically (When it is completely
out of power, it needs to be charged for a while before automatic startup).
2. The ambient temperature is too low (below 32°F) or higher than (122°F) . Please use it
within the environmental temperature range of 32°F - 104°F.
3. Please confirm whether the switch on the left side of the vacuum cleaner is toggled to “I”.
Charging failure 1. Please remove the vacuum cleaner and check whether the indicator light of the charging
dock or dust collection dock is on, and make sure that both ends of the power adapter of
the charging dock are plugged in.
2. Poor contact. Please clean up the spring contacts on the charging dock and the charging
contacts on the vacuum cleaner.
3. Please confirm whether the switch on the left side of the vacuum cleaner is toggled to “I”.
Recharge failure 1. There are lots of obstacles near the charging dock or the dust collection dock. Please place
the charging dock or the dust collection dock in an open area.
2. The vacuum cleaner is far from the charging dock or the dust collection dock. Please place
the vacuum cleaner near the charging dock or the dust collection dock and try again.
Abnormal operation Shut down and restart.
Decreased cleaning ability or
dirt leakage
1. The dust box is full. Please clean the dust box.
2. The filter is clogged. Please clean or replace the filter.
3. The brush is entangled by foreign matter. So please clean the main brush.
Failure to connect to Wi-Fi 1. 1The Wi-Fi signal is poor. Please make sure the vacuum cleaner is in a good Wi-Fi signal
coverage area.
2. Wi-Fi connection is abnormal. Pease reset Wi-Fi and download the latest mobile APP and
try again.
3. The password is entered incorrectly.
4. The router is a 5G frequency band model, and this robotic cleaner only supports the 2.4G
frequency band.
Timed cleaning doesn’t work The battery level is low. Timed cleaning will be started when the remaining battery level is ≥
20%.
Whether the vacuum cleaner
consumes power when it is
placed on the charging dock
all the time
The power consumption is very low when the vacuum cleaner is placed on the charging dock
or the dust collection dock all the time, which helps to keep the battery in the best status of
performance.
Whether the machine needs to
be charged for 16 hours for the
first three times
Lithium battery has no memory effect when in use, and there is no need to wait when it is fully
charged.
16
English
EN
9 VOICE PROMPTS
When the machine fails, the red indicator on the machine will blink and relevant voice prompts will be heard. Follow the voice
prompts to resolve your problem.
Voice Prompts Solution
Error 1: Battery abnormal.
Please consult the instructions
or APP.
• Please open the battery compartment, check whether the battery is properly connected, and
try to restart the machine.
• The battery temperature is too high or too low. Please wait for the battery temperature to be
normal (2°~104°F) before use.
Error 2: Wheel module abnor-
mal. Please consult the in-
structions or APP.
• Please check whether any foreign matter is stuck in a wheel and try to restart the machine.
Error 3: Side brush module
abnormal. Please consult the
instructions or APP.
• Please check whether any foreign matter is stuck in a side brush and try to restart the ma-
chine.
Error 4: Fan abnormal. Please
consult the instructions or
APP.
• Please check whether any foreign matter is stuck in the fan and try to restart the machine.
• Please clean the dust box and filters and try to restart the machine.
Error 5: Rolling brush abnor-
mal. Please consult the in-
structions or APP.
• Please remove and clean it, its connections, its cover and the suction inlet. Please try to
restart the machine after cleaning.
Error 7: Laser sensor abnor-
mal. Please consult the in-
structions or APP.
• Please check the laser sensor for foreign matter and try to restart the machine after clean-
ing.
Error 9: The charging is ab-
normal. Please clean the
charging contact area.
• Please check whether the charging area is contaminated, and clean the charging pole
pieces.
• Please check whether the battery is installed correctly.
Error 10: The machine is ab-
normal. Please shut down and
restart.
• Please toggle the main switch to O first, then to I, and restart.
Error 12: The operation is ab-
normal. Please check whether
the rocker switch is turned on.
• Please turn on the main switch before operation.
17
English
EN
10 WARRANTY CARD
WARRANTY CARD II
Name
(II) Settlement
form of the war-
ranty provider
Address
Address
City/State/Zip
Product Model
Purchase Date
Invoice Number
Warranty Period
Product warranty description:
1. From the date of the user’s purchase of this product, the warranty period is one year for the vacuum,, and six months for the
adapter, rechargeable batteries and other accessories.
2. After receiving the product repair request, the after sales service staff will resolve the problem within 15 working days.
3. The user can learn about relevant technical problems by reading the user manual and/or the after sales service hotline to get
a clear solution. Hotline: 1-888-909-6757
4. When a performance failure occurs during the user’s normal use, manufacturer promises to provide the above warranty
services unless otherwise stipulated by the applicable laws, rules and regulations of the state.
5. During the warranty period, paid maintenance services will be provided under any of the following circumstances:
• Damage caused by man-made factors or irresistible natural phenomena;
• Failure or damage caused by improper operation by the user;
• Malfunction or damage due to the user’s disassembly or alteration without authorization.
WARRANTY CARD I
Name
(I) To be kept
by the user as
warranty certifi-
cate, which will
not be reissued
if lost
Address
Address
City/State/Zip
Product Model
Purchase Date
Invoice Number
Warranty Period
Date Repair Technician Maintenance Record
1.
2.
3.
4.
5.
18
English
EN

1 Consignes de sécurité...................... 20
2 Comprend........................................ 22
3 Description.......................................23
3.1 Paramètres de base...........................................23
3.2 Aspirateur........................................................ 23
3.3 Station de dépoussiérage................................. 24
3.4 Présentation des modules.................................24
4 Installation....................................... 26
4.1 Station de collecte/quai de chargement........... 26
4.2 Préparer l’aspirateur........................................ 26
5 Téléchargement de l’APP et
fonctionnement en réseau............... 27
5.1 Application mobile.......................................... 27
5.2 Réinitialisation du réseau.................................27
5.3 Ajoutez un appareil..........................................27
5.4 Échec de la connexion Wi-Fi...........................28
6 Utilisation.........................................28
6.1 Démarrer et arrêter l’aspirateur....................... 28
6.2 Chargement de l’aspirateur..............................29
6.3 Réinitialiser le système....................................29
6.4 Gestion de la carte........................................... 29
6.5 Choisissez le mode de nettoyage.....................29
7 Entretien...........................................30
7.1 Nettoyez la poubelle........................................ 30
7.2 Nettoyez le capteur.......................................... 31
7.3 Nettoyer le canal à poussière...........................31
7.4 Remplacer le sac à poussière...........................32
8 Dépannage........................................32
9 Invites vocales..................................34
10 Carte de garantie.............................35
19
Français
FR

1 CONSIGNES DE SÉCURITÉ
Portée de l’utilisation
• Lisez attentivement le manuel de l’utilisateur et utilisez le produit conformément aux instructions du manuel de l’utilisateur
pour éviter tout dommage dû à une mauvaise utilisation.
• Le produit ne peut être utilisé qu’à l’intérieur. Le produit est adapté aux sols intérieurs suivants : sols en bois, carreaux de
céramique et moquettes à poils ras.
• N’utilisez pas le produit dans un environnement chaud, humide, inflammable, explosif ou corrosif.
• Pour éviter que le produit ne tombe accidentellement, n’utilisez pas ce produit dans un endroit suspendu sans barrière de
protection, ce qui pourrait entraîner des blessures et endommager le produit.
Précautions de sécurité
• Ce produit ne peut utiliser que l’adaptateur, les batteries et la station de chargement ou la station de dépoussiérage qui sont
fournis avec ce produit. L’utilisateur ne peut pas changer la batterie sans autorisation, sous peine d’endommager le produit et
d’annuler la garantie.
• Si la machine principale et les accessoires de ce produit sont endommagés, veuillez contacter les techniciens de service
désignés ou autorisés par notre société. Les personnes et organisations non autorisées ne sont pas autorisées à réparer
l’aspirateur robot Greenworks, sous peine d’annuler la garantie existante.
• Évitez d’aspirer de l’eau, de l’huile ou d’autres liquides qui pourraient endommager l’appareil.
• N’utilisez pas le produit pour aspirer des objets tranchants (par exemple des éclats de verre ou des clous), ce qui pourrait
l’endommager.
• Retirez les objets fragiles avant utilisation. Disposez sur le sol des fils épars qui pourraient interrompre le fonctionnement
normal de l’aspirateur.
• La station de charge doit être placée contre le mur et sur un sol plat. Lorsque le produit fonctionne, le retrait de la station
d’accueil de charge affectera le fonctionnement du produit.
• Évitez que les vêtements ou toute partie de votre corps (cheveux, doigts, etc.) ne se prennent dans la brosse ou la roue de
l’aspirateur robot. Le non-respect de cette consigne peut entraîner des blessures corporelles.
• Débranchez le produit avant l’entretien. Ne touchez pas la fiche d'alimentation ou le produit lorsque vos mains sont
mouillées, car cela pourrait provoquer un choc électrique.
• Si le cordon d'alimentation est endommagé, il doit être remplacé par le fabricant, son service après-vente ou un professionnel
similaire pour éviter tout danger.
• Débranchez la station de charge si elle reste inutilisée pendant une longue période.
À propos de la sécurité des enfants
• Les enfants de moins de 8 ans ne sont pas autorisés à utiliser ce produit. Les personnes souffrant de handicaps physiques,
sensoriels ou intellectuels ou manquant d’expérience/connaissances pertinentes ne peuvent pas utiliser la machine, sauf sous
surveillance, avec des instructions d’utilisation ou en étant conscientes du danger.
• Les enfants ne sont pas autorisés à jouer avec la machine ou à la nettoyer/réparer, sauf sous surveillance.
• Les enfants ne sont pas autorisés à jouer avec le sac d’emballage du produit par crainte d’étouffement.
À propos des batteries
1. Seules les batteries fournies par le fabricant sont applicables au produit.
2. Les piles doivent être retirées lorsque le produit est mis au rebut.
3. Étapes à suivre pour retirer la batterie :
A. Assurez-vous de mettre l’appareil hors tension avant de retirer la batterie;
B. Utilisez un tournevis pour retirer les vis inférieures, puis retirez le pare-chocs avant et la coque centrale;
C. Retirez la carte mère et le couvercle de la batterie;
D. Débranchez la ligne de connexion entre la batterie et l’aspirateur;
E. Retirez la batterie.
4. Si vous avez besoin de remplacer la batterie de l’aspirateur, veuillez contacter notre service après-vente. Si un mauvais type
de batterie est utilisé pour le remplacement, cela peut provoquer un accident de sécurité.
5. N’endommagez pas la batterie lors du démontage par crainte d’un court-circuit ou d’une fuite de la batterie. En cas de fuite
de la batterie, veillez à ce que le liquide ne colle pas à votre peau ou à vos vêtements. Vous devez l’essuyer immédiatement
20
Français
FR

avec un chiffon sec et envoyer la batterie à une station de recyclage ou à un point d’entretien désigné. Ne la jetez pas au
hasard.
6. Veuillez vous débarrasser correctement de la batterie usagée. La batterie contient des substances dangereuses pour
l’environnement si elle est laissée sans surveillance. Veuillez respecter les réglementations locales en matière de protection
de l’environnement et la mettre au rebut dans le site de recyclage spécifié.
Règlement particulier
Cet appareil est conforme à la partie 15 des règles de la FCC. Le fonctionnement dépend des deux conditions suivantes :
Le système suivant est utilisé dans le manuel de l’opérateur afin de le rendre plus facile à comprendre :
• Cet appareil ne devrait pas causer d’interférence.
• Cet appareil doit accepter toute interférence reçue, y compris une interférence pouvant provoquer une opération non
souhaitée.
MISE EN GARDE Tout changement ou toute modification non expressément approuvée par la partie responsable de la
conformité pourrait annuler le droit de l’utilisateur d’utiliser l’équipement.
Cet appareil a été testé et jugé conforme aux limites des appareils numériques de classe B, en vertu des normes de la Partie 15 du
FCC. Ces limites sont conçues pour apporter une protection contre les brouillages préjudiciables dans un quartier résidentiel. Cet
appareil génère, utilise et émet une énergie de fréquence radio, et s’il n’est pas utilisé et utilisé conformément aux instructions, il
peut causer des brouillages préjudiciables avec la réception de la radio ou de la télévision. La réception peut être réglée en
allumant ou en éteignant l’appareil, nous invitons l’utilisateur à essayer de corriger l’interférence en effectuant les actions
suivantes :
• Réorientez ou déplacez l’antenne de réception.
• Augmentez la distance entre l’appareil et le récepteur.
• Branchez l’appareil dans une prise ou à un réseau différent de celui où le récepteur est branché.
• Consultez le vendeur ou un expert en installation radio/télé pour obtenir de l’aide.
Pour satisfaire aux exigences de la FCC en matière d’exposition aux radiofréquences, une distance de séparation de 20 cm ou
plus doit être maintenue entre l’antenne de cet appareil et les personnes pendant le fonctionnement de l’appareil.
Pour assurer la conformité, il n’est pas recommandé d’effectuer des opérations à une distance inférieure à cette distance
Avis de non-responsabilité
Dans l’une des circonstances suivantes, le produit sera exclu de la portée de la garantie gratuite, mais une réparation payante
pourra être fournie si elle est garantie :
A. Dommages dus à l'incapacité de l'utilisateur à utiliser le produit en stricte conformité avec Greenworks manuel d'utilisation ou
à un stockage inapproprié.
B. La machine ou les pièces ont dépassé la période de garantie gratuite.
C. Dommages dus au démontage par des personnes autres que le personnel de maintenance de Greenworks ou autorisé par notre
société.
D. Un numéro de bon d'achat valide ne peut pas être fourni.
E. Le modèle de produit sur la carte de garantie ne correspond pas à celui du produit à réparer ou est modifié.
F. Les dommages causés par des facteurs tels que les catastrophes naturelles.
G. Panne du produit ou dommage causé par des facteurs inattendus ou des causes artificielles (y compris des erreurs de
fonctionnement, une entrée de liquide, un branchement / débranchement incorrect, des rayures, une manipulation, des chocs, une
entrée de tension inappropriée, etc.)
REMARQUE
Greenworks fournit une garantie pour le produit conformément aux « Nouvelles réglementations nationales sur la garantie ».
Pour obtenir plus de détails, veuillez consulter la carte de garantie fournie avec le produit.
21
Français
FR
2 COMPREND
(1) Aspirateur (1) Station de dépoussiérage + (1) sac à poussière supplémentaire
(1) Brosse latérale supplémentaire (1) Filtre de remplacement
www.greenworkstools.comGRV-3011
ASPIRATEUR ROBOTIQUE
ROBOT ASPIRADOR
(1) Manuel de l’utilisateur (1) Brosse de nettoyage
REMARQUE
Un filtre haute performance a déjà été installé dans la aspirateur .
22
Français
FR

3 DESCRIPTION
3.1 PARAMÈTRES DE BASE
Aspirateur
Nom Paramètres
Dimensions 13,4 po × 13,4 po × 3,7 po
Produit Environ 8,05 lb
Capacité de la batterie 2600mAh
Voltage 14,4V
Valeur nominale 30W
Station de dépoussiérage
Nom Paramètres
Dimensions 8,7 po × 7,1 po × 15 po
Valeur nominale 950W
Puissance 24V 1,5A MAX
3.2 ASPIRATEUR
+
Bouton de recharge
Bouton de nettoyage/
marche/arrêt
Mode de configuration
du réseau
Indicateur d'alimentation
Bouton de nettoyage marche/arrêt
• Appuyer une fois : Démarrer le nettoyage.
• Appuyer deux fois : Lancer le nettoyage à point fixe.
• Maintenez la touche enfoncée pendant 3 secondes : Mettez la machine en marche/arrêt.
*Pour la première utilisation, basculez l’interrupteur principal d’O à I
Bouton Recharge
• Appuyez une fois : Retour pour recharge.
• Appuyez et maintenez enfoncé pendant 15 secondes : Rétablissement des paramètres d’usine.
+
Bouton de recharge + bouton de nettoyage/marche/arrêt
• Appuyez sur les deux boutons en même temps et maintenez-les enfoncés pendant 3 secondes :
Mode de configuration réseau
Indicateur d'alimen-
tation
• Bleu : Niveau de la batterie≥20 %
• Violet : Niveau de la batterie < 20 %
• Rouge : Défaut ou anomalie
23
Français
FR
3.3 STATION DE DÉPOUSSIÉRAGE
Indicateur
LED
Voyant bleu allumé : Station de collecte de poussière en veille.
Lumière bleue éteinte : L’aspirateur est correctement connecté au dock de collecte de poussière ou le dock de collecte de
poussière est en veille.
Lumière rouge allumée : Le sac à poussière n’est pas en place.
Lumière rouge clignotante : Statut anormal.
3.4 PRÉSENTATION DES MODULES
Capteur
de
recharge
Capteur mural
Radar
Couvercle
Coque centrale
Bouton
Pare-chocs avant
Capteur de
recharge
24
Français
FR
Capteur anti-chute
Brosse latérale
Électrode
de charge
Roue universelle
Brosse roulante
Housse de
protection de
la brosse roulante
Roue
Bouton de libération
de la boîte à poussière
Ouverture du filtre
Port de collecte
de poussière
Pièces du
pôle de charge
Interrupteur principal
Couvercle supérieur
Ouvrir le couvercle supérieur
Insérer/retirer le sac à poussière
Compartiment du sac à poussière
Zone de chargement et d’induction
de la poussière
Pièces du pôle de charge
Port d’aspiration des poussières
Les déchets de la machine principale
passent par l’orifice d’aspiration de la
poussière et sont as-pirés dans le sac
à poussière.
25
Français
FR
Boîte à poussière
Filtre
Ouverture du filtre Ouverture de la boîte
à poussière
Filtre du
ventilateur
Sac à poussière
Poignée du sac
à poussière
4 INSTALLATION
4.1 STATION DE COLLECTE/QUAI DE
CHARGEMENT
Installer la station
Placez la station contre et perpendiculairement au mur sur un
sol plat et dur, puis insérez la fiche d’alimentation dans la
prise.
Placez la station d’accueil
Placez la station d’accueil contre le mur et
perpendiculairement à celui-ci, sur un sol plat et dur, sans
obstacle, à moins de 60 po devant et 20 po à gauche et à
droite.
19.7 in.
(0.5M
)
19.7 in.
(0.5M
)
59.1 in.
(1.5M)
REMARQUE
• Installez la station de charge ou la station de
dépoussiérage à un endroit où l’aspirateur peut
facilement l’atteindre. Il est conseillé de placer la
station de charge ou la station de dépoussiérage contre
le mur, sur un sol plat et dur, et non sur le tapis.
• Gardez toujours la station de charge ou la station de
collecte de la poussière sous tension, sinon l’aspirateur
ne reviendra pas automatiquement.
• Pour garantir un chargement normal, ne déplacez pas
fréquemment la station de charge ou la station de
récupération de la poussière. Après avoir changé
l’emplacement de l’aspirateur, la machine principale
peut régénérer une carte en raison de l’échec de la
relocalisation (pour plus de détails, veuillez vous
reporter à ce manuel>Instructions d’utilisation>Gestion
de la carte).
4.2 PRÉPARER L’ASPIRATEUR
Retirez la bande de protection
Avant l’utilisation, retirez les bandes de protection des deux
côtés du pare-chocs avant.
Installez la brosse latérale
Installation de la brosse latérale : alignez-la avec le trou et
appuyez doucement pour fixer la brosse latérale sur la
machine.
26
Français
FR
Brosse latérale
Allumer et charger
• Basculez l'interrupteur sur "I", puis complètement chargé
(environ 4 heures).
• Placez manuellement l’aspirateur sur la station de
dépoussiérage et alignez-le avec le port de charge.
Lorsque le voyant bleu de la station de chargement
clignote 3 fois puis s’éteint, le chargement commence.
Indicateur
LED
REMARQUE
Une fois que l’aspirateur est connecté à la station de
collecte de la poussière, la station de collecte de la poussière
commence à collecter la poussière.
5 TÉLÉCHARGEMENT DE L’APP
ET FONCTIONNEMENT EN
RÉSEAU
5.1 APPLICATION MOBILE
Numérisez le code QR, et téléchargez et installez l'application
mobile.
REMARQUE
S’il est impossible de connecter le téléphone cellulaire au
robot, veuillez vous reporter à la section « Utilisation du
produit » – « Réinitialiser le Wi-Fi ».
5.2 RÉINITIALISATION DU RÉSEAU
Appuyez et maintenez enfoncé le bouton et le bouton
en même temps jusqu’à ce qu’un message vocal soit entendu,
puis l’indicateur clignote lentement en bleu, et la machine
entre dans l’état d’appariement.
Indicateur
Indicateur:
Le voyant bleu clignote lentement : en attente de connexion
Le voyant bleu clignote rapidement : Connexion au Wi-Fi en
cours
Le voyant bleu est normalement allumé : le Wi-Fi est
connecté
5.3 AJOUTEZ UN APPAREIL
Ouvrez l’application, créez un nouveau compte et suivez les
instructions de l’APP.
REMARQUE
Avant de configurer le Wi-Fi, veuillez vous assurer que
l’aspirateur et le réseau Wi-Fi répondent aux exigences
suivantes.
A. Aspirateur:
• Le niveau de batterie de l’aspirateur est supérieur à 20 %
ou l’aspirateur est placé sur la station de charge.
Réseau Wi-Fi :
27
Français
FR