www.greenworkstools.comGRV-5011
ASPIRATEUR ROBOTIQUE
ROBOT ASPIRADOR


1 Safety Instructions............................ 4
1.1 Instructions for use............................................ 4
1.2 Safety precautions..............................................4
1.3 About child safety..............................................5
1.4 About the batteries.............................................6
1.5 Scope of use of the product............................... 6
1.6 Disclaimers........................................................ 6
1.7 FCC STATEMENT............................................6
2 Product overview...............................8
2.1 Machine and its accessories...............................8
2.2 Machine and dust box......................................10
2.3 Machine and its sensors................................... 11
2.4 Mop module.....................................................12
2.5 Dust collecting and charging dock.................. 12
3 Installation....................................... 14
3.1 Assemble the dust collecting and charging
dock ................................................................ 14
3.2 Installation of Dust collecting and
charging dock ..................................................15
4 Operating Instructions....................16
4.1 Use of the machine.......................................... 16
4.2 Sweep modes................................................... 17
4.3 Select suction intensity (only in-app
operation supported)........................................ 18
4.4 Use of mop module..........................................18
4.5 Map management............................................ 20
4.6 System reset.....................................................20
5 Maintenance.....................................21
5.1 Clean dust box and water tank.........................21
5.2 Clean the main brush....................................... 22
5.3 Clean its side brushes...................................... 22
5.4 Clean caster......................................................22
5.5 Clean sensors and charging electrodes............ 22
5.6 Clean the mop module.....................................23
6 Common Faults............................... 23
6.1 Voice prompts.................................................. 23
6.2 Troubleshooting...............................................25
6.3 Faults in Wi-Fi connection.............................. 26
7 Technical Parameters......................27
8 IC warning....................................... 28
9 Warranty Card................................ 29
3
English
EN
1 SAFETY INSTRUCTIONS
1.1 INSTRUCTIONS FOR USE
Please review the following basic safety precautions before using the product:
• Read the user manual carefully and follow the instructions in the user manual when using the product.
• Keep the user manual for future reference.
• If you need to transfer the product to a third party, include the user manual with the product.
• Any operation not in conformity to the instructions in the user manual may result in serious personal injury or damage to the
product itself.
• This appliance is to only be used with the power supply provided.
1.2 SAFETY PRECAUTIONS
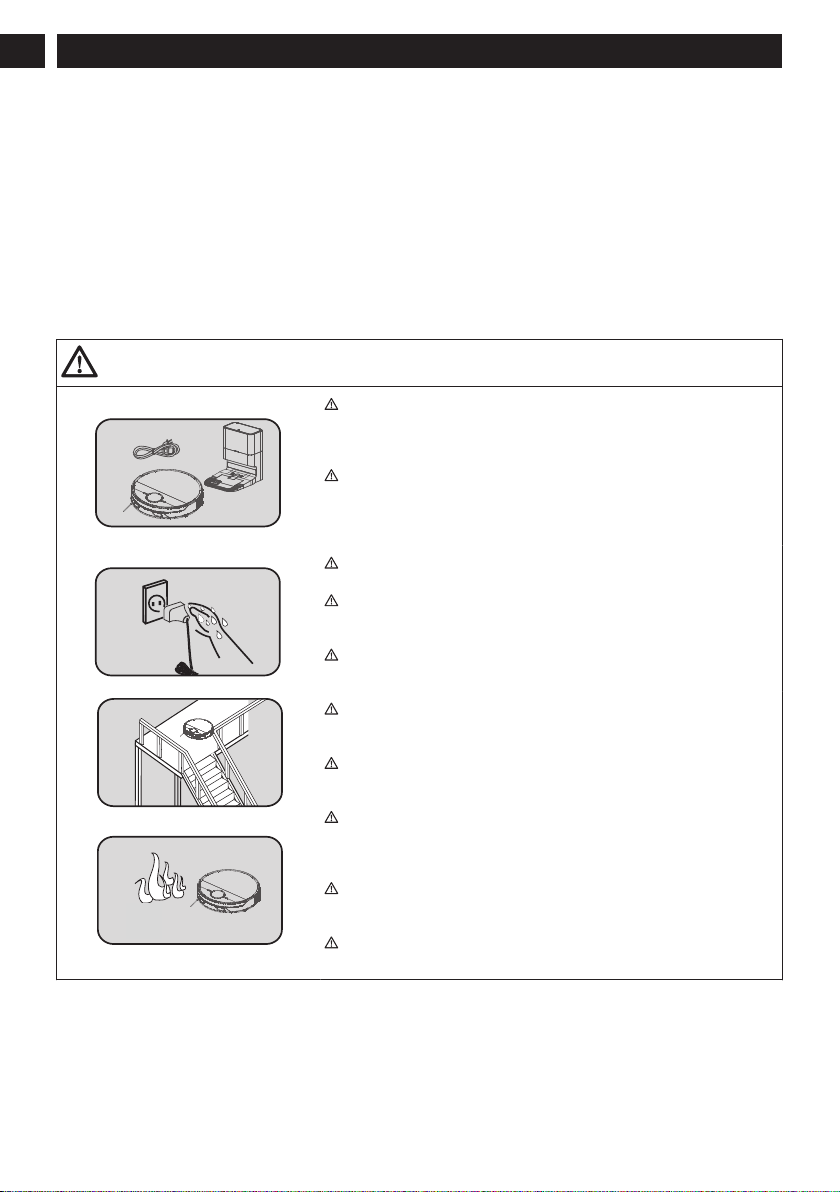
Warning
This product can only be used with the adapter, batteries and charging dock
provided with this product. Failure to do so may result in damage to the product,
electrical shock, or fire caused by high voltage.
Do not use this product if the appliance and/or accessories are found to be
damaged. Contact our service department. Except for the service technicians
designated or authorized by our company, no one may disassemble, repair or
modify this product.
Unplug the product before maintenance.
Do not touch the power plug or the product when your hands are wet, as this
may result in electrical shock.
If the power cord is damaged, it must be replaced by the manufacturer, its
service department or a similar professional.
To prevent the product from falling accidentally, do not use in a suspended
place without a protective fence, which may result in personal injury.
User should not attempt to replace the batteries. Contact the manufacturer for
battery replacement.
Prevent clothing or any part of your body (hair, fingers, etc.) from getting
caught in the brush or wheel of the vacuum cleaner. Failure to do so may result
in personal injury.
Do not place the product near fire or flammable, explosive or corrosive
materials.
If the user manual is missing, contact your local dealer or call the manufactur-
er’s service department to obtain an electronic user manual.
4
English
EN
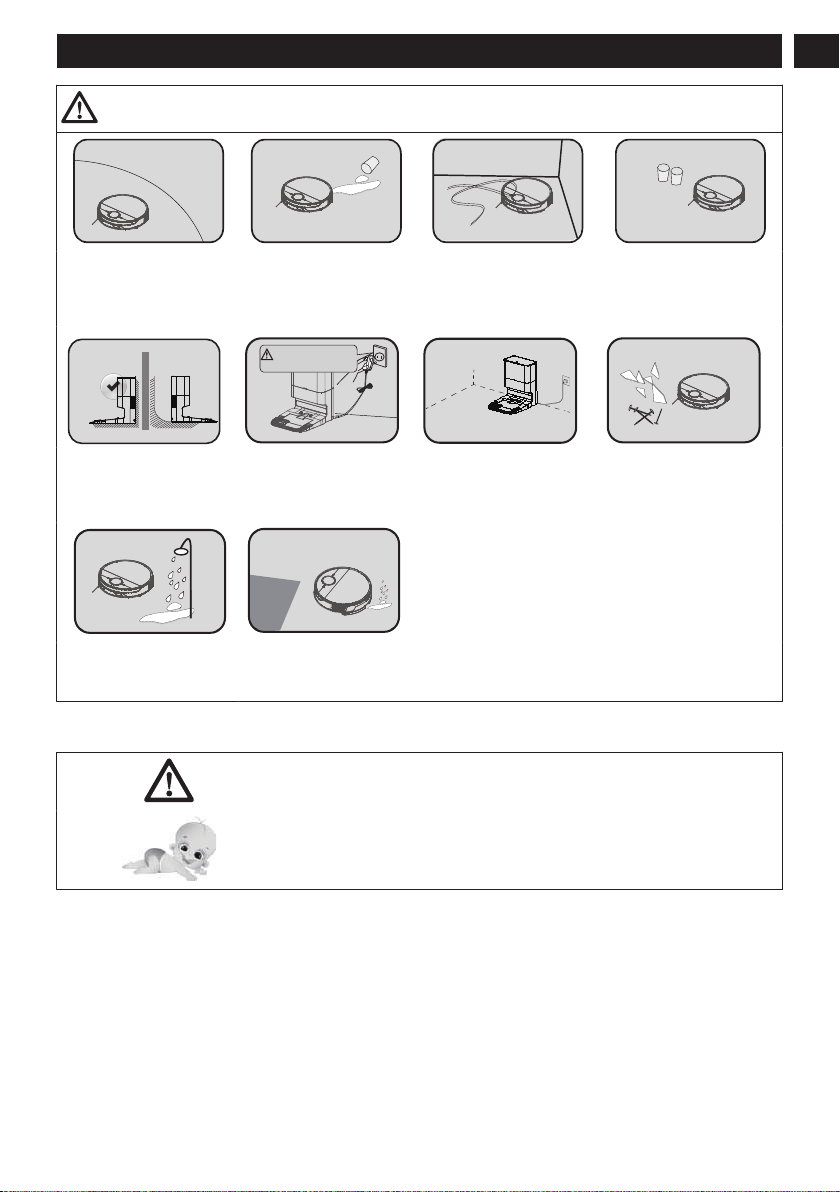
Caution
This product should only be
used indoors.
Prevent the suction of water,
oil or other liquids, which
may damage the vacuum
cleaner.
Remove scattered wires from
floor before use to avoid af-
fecting the normal operation
of the vacuum cleaner.
Remove fragile objects before
use.
The charging dock should be
placed on a flat floor by a wall
to ensure proper product func-
tionality.
Unplug charging dock when
unused for an extended period
of time.
When the product is working,
removal of the charging dock
will affect the normal recharg-
ing of the machine.
Do not use product to vacuum
sharp objects (e.g., shattered
glass, nails, etc.) to avoid dam-
age to the product.
Do not use product in a wet,
flammable, explosive or corro-
sive environment.
Do not use the mopping func-
tion on a carpet.
1.3 ABOUT CHILD SAFETY
• Keep away from children! This appliance should only be used by children aged
eight (8) and above and/or persons with reduced physical, sensory or mental capa-
bilities or lack of experience and knowledge if they have been provided supervision
and/or instructions concerning safe use of the appliance, and fully understand the
hazards involved.
• This is not a toy. Children should not play with the appliance.
• Children should not clean or do maintenance without supervision.
5
English
EN
High voltage danger! Be careful
of electric shock. Please dry
your hands before operation!

1.4 ABOUT THE BATTERIES
1. Only the batteries provided by the manufacturer are applicable to the product.
2. Before discarding the product, please remove the battery as follows:
• Use a screwdriver to loosen the screws of the side brush and the base decoration plate;
• Remove the base plate.;
• Take out the battery and unplug the connection cable between the battery and the vacuum.
3. Make sure that the product is powered off before removing the battery. Battery should be disposed of
properly.
4. Contact manufacturer’s service department for battery replacement.
5. Use of incorrect batteries may cause injury or accident.
6. If the batteries leak, prevent the contact of the liquid with the skin or clothing. Immediately wipe it with a
dry cloth and send it to the recycling station or designated maintenance point. Do not discard battery.
7. The batteries contain hazardous substances harmful to the environment. Battery should be disposed of
properly. Please follow the local environmental regulations and send them to the designated recycling site.
1.5 SCOPE OF USE OF THE PRODUCT
Scope of application The product is suitable for the following floors:
Wooden floor Ceramic tile Short-staple carpet
1.6 DISCLAIMERS
Manufacturer’s warranty will be null and void under any of the following circumstances:
• Damage due to the user’s failure to operate the product in strict accordance with our user manual, or due to improper
storage;
• The machine or parts have exceeded the free warranty period;
• Damage due to disassembly by those other than the manufacturer or maintenance personnel authorized by manufacturer.
• A valid purchase voucher number cannot be provided;
• The product model on the warranty card does not match the product to be repaired, or is altered in any way;
• Damage caused by uncontrollable factors such as natural disasters;
• Product failure or damage caused by unexpected factors or man-made causes (including operational errors, liquid ingress,
improper plugging/unplugging, scratching, handling, bumping, input of inappropriate voltage, etc.)
NOTE
Manufacturer provides a warranty for the product in accordance with the “National New Regulations on Warranty”. For details,
please check the warranty card provided with the product.
1.7 FCC STATEMENT
1. This device complies with Part 15 of the FCC Rules. Operation is subject to the following two conditions:
6
English
EN

(1) This device may not cause harmful interference,and
(2) This device must accept any interference received, including interference that may cause undesired operation.
2. Any changes or modifications not expressly approved by the party responsible for compliance could void the user's authority
to operate the equipment.
NOTE: This equipment has been tested and found to comply with the limits for a Class B digital device, pursuant to Part 15 of
the FCC Rules. These limits are designed to provide reasonable protection against harmful interference in a residential installation.
This equipment generates uses and can radiate radio frequency energy and, if not installed and used in accordance with the
instructions, may cause harmful interference to radio communications. However, there is no guarantee that interference will not
occur in a particular installation. If this equipment does cause harmful interference to radio or television reception, which can be
determined by turning the equipment off and on, the user is encouraged to try to correct the interference by one or more of the
following measures:
• Reorient or relocate the receiving antenna.
• Increase the separation between the equipment and receiver.
• Connect the equipment into an outlet on a circuit different from that to which the receiver is connected.
• Consult the dealer or an experienced radio/TV technician for help.
FCC Radiation Exposure Statement
This equipment complies with FCC radiation exposure limits set forth for an uncontrolled environment. This equipment should
be installed and operated with minimum distance 20cm between the radiator & your body.
7
English
EN
2 PRODUCT OVERVIEW
2.1 MACHINE AND ITS ACCESSORIES
TABLE 1: MACHINE
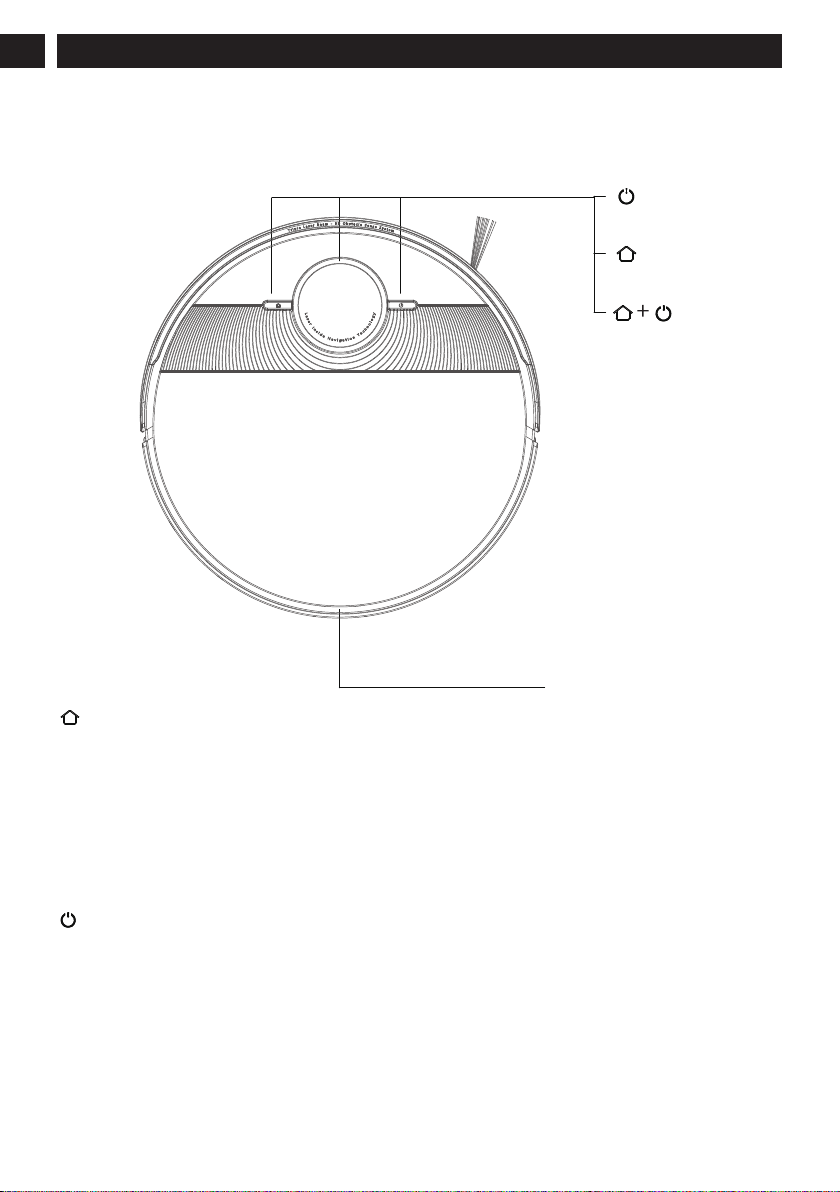
Flip port
Home Button
• Press to return to dock for charging. Press again to pause
• Press and hold for 3 seconds to start fixed-point cleaning
• In the charging state, press once to start dust collection
LED Status Indicator
• White: working state light. Battery level ≥20%
• Yellow: low battery state light. Battery level < 20%
• Red: Fault
Cleaning On/Off button
• Press and hold for 3 seconds to turn on or off (only when vacuum is not being charged).
• Press to start cleaning.
• Press to pause the task.
8
English
EN

+
Home button + on/off button
• Press and hold both buttons simultaneously for 3 seconds to reset Wi-Fi connection.
• Flashing: charging or starting in progress
• Fast flashing in red: fault state
TABLE 2: ACCESSORIES
Dust collecting and charging dock ×1 Bottom tray ×1 Power cord ×1
Tray Fastener ×2 Disposable dust bag ×1 Filter combination ×2
www.greenworkstools.comGRV-5011
ASPIRATEUR ROBOTIQUE
ROBOT ASPIRADOR
Mop holder ×1 Common mop ×1 User manual ×1
Side brush ×2
Note: A filter combination and battery have been installed in the vacuum cleaner; a disposable dust bag has been installed in the
dust collection charging stand ; the illustrations in this manual are for reference only, and the actual appearance is subject to the
actual product.
9
English
EN
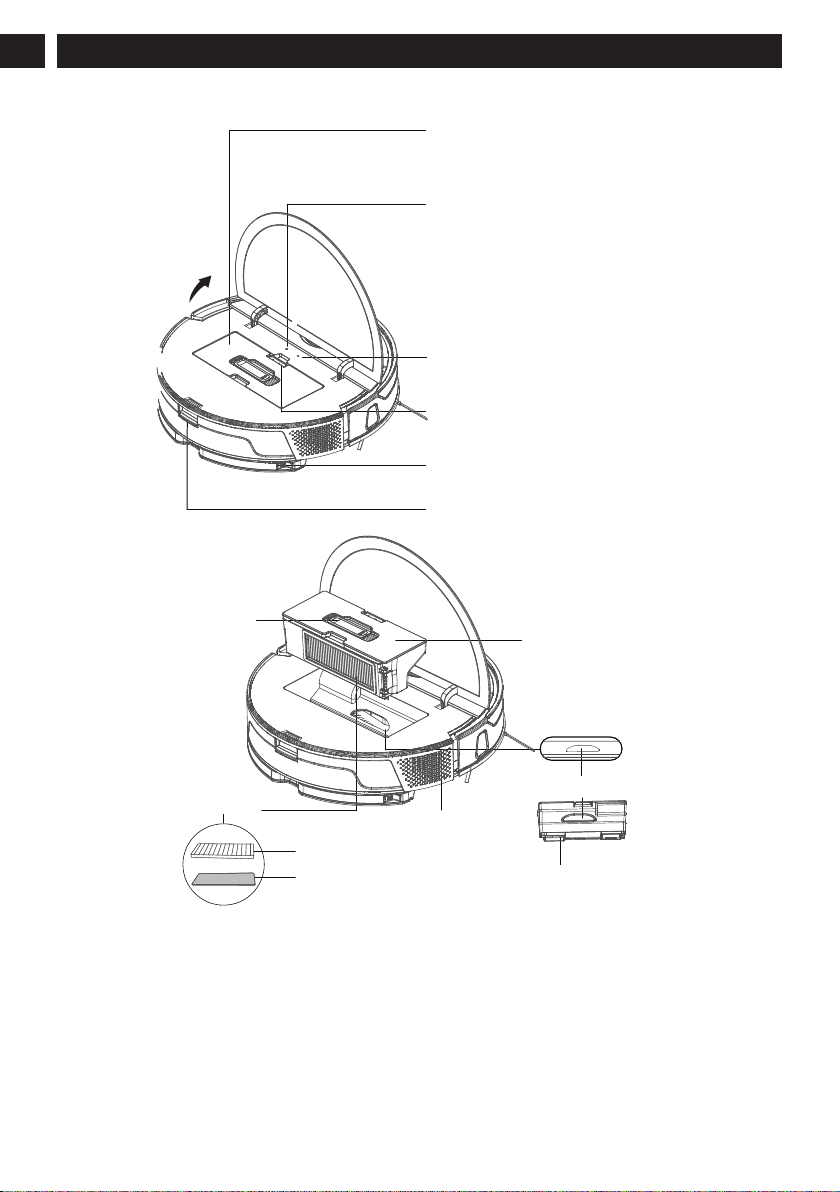
2.2 MACHINE AND DUST BOX
System reset button
Dust box
Button for taking out dust box
Button for taking out water tank
Button for removal of the mop holder
Wi-Fi indicator:
• Blinking slowly in white:
Wait for connection
• Blinking fast in white:
Being connected to Wi-Fi
• Normally on in white:
Wi-Fi connected
Dust box
Air outlet
Cleaning brush
Suction inlet
Filter
Foam filter
High-performance filter
Dust outlet at the bottom
of the dust box
10
English
EN
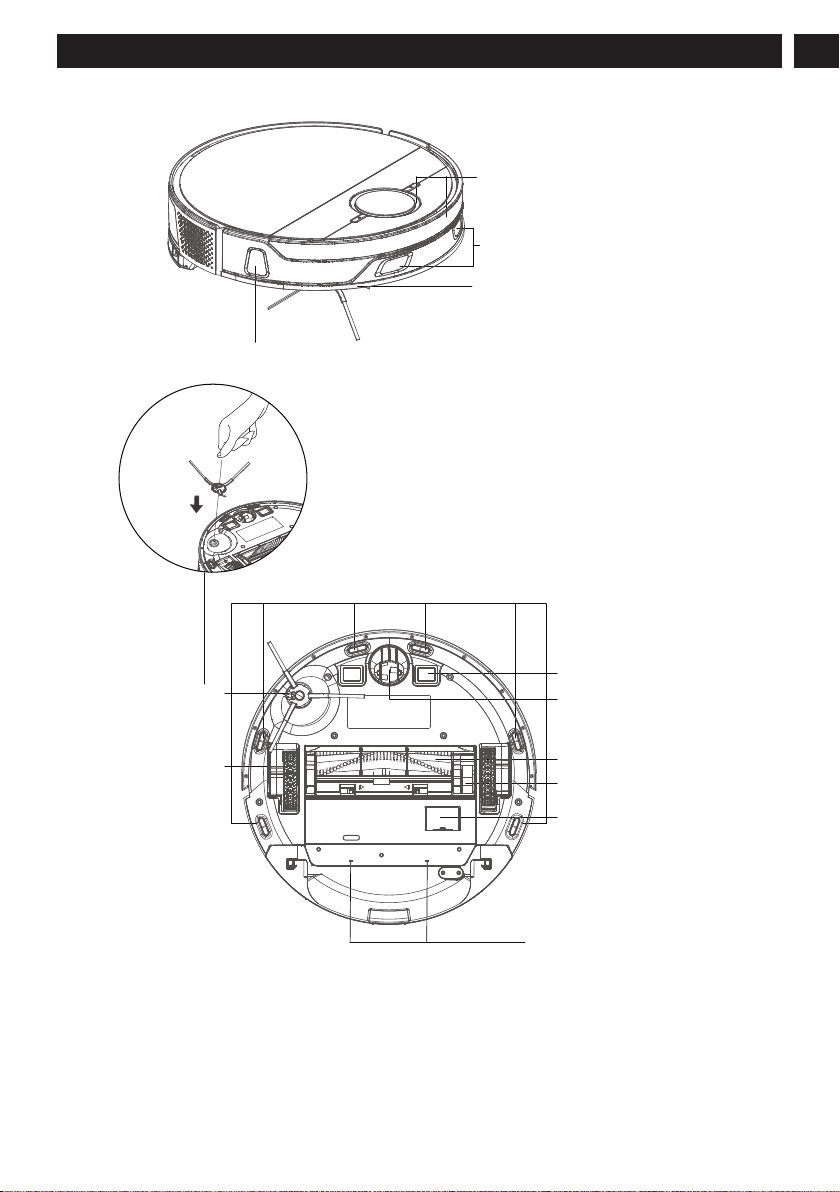
2.3 MACHINE AND ITS SENSORS
Collision buffer
Along-the-wall side sensor
Built-in TOF lidar
Front bumper laser sensor
for obstacle avoidance
Anti-drop sensor
Side brush
Charging electrode
Caster
Rolling brush
Rolling brush cover
Dust outlet at the bottom
Caster
Water outlet
11
English
EN
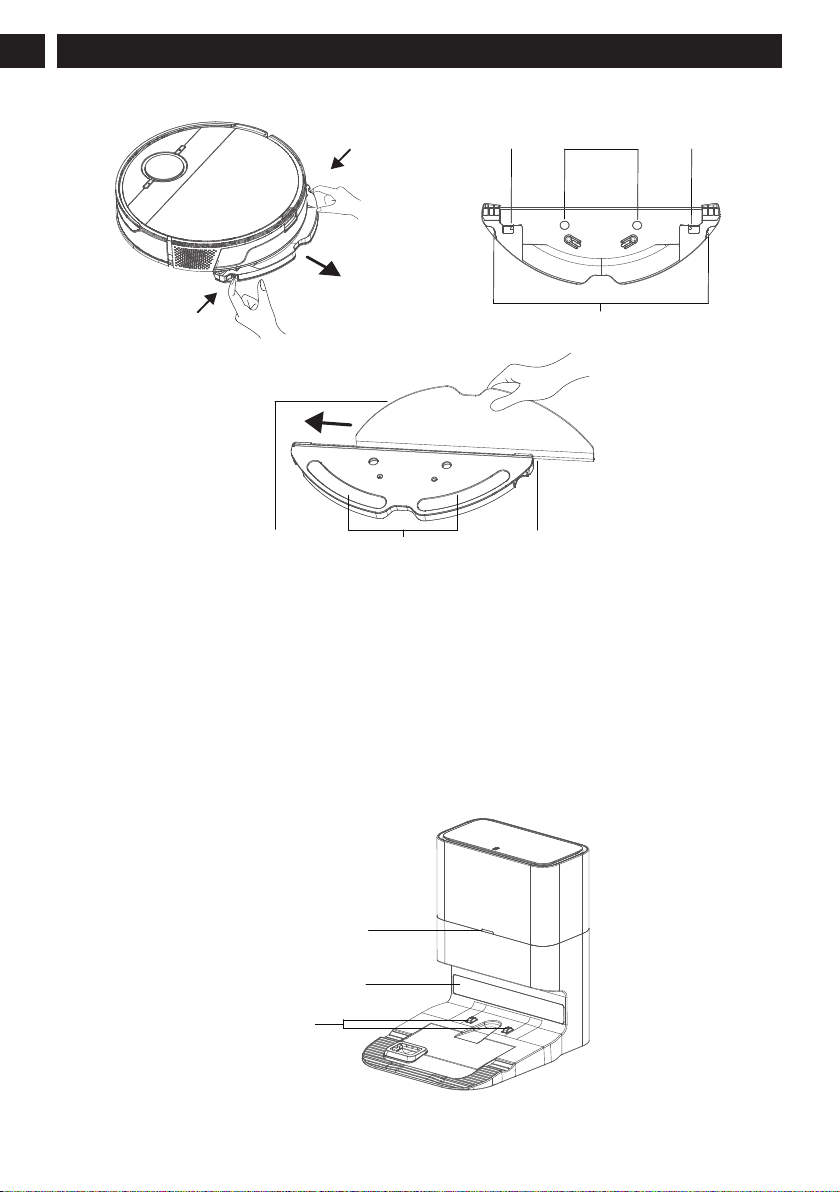
2.4 MOP MODULE
Water outlet
Removal button
BuckleBuckle
Washable
mopping cloth
Stick a mopping
cloth here
Slot
2.5 DUST COLLECTING AND CHARGING DOCK
Charging dock indicator
• Normally on in white: The charging dock has been connected to a power supply (when the machine is not connected to the
charging dock);
• White light off: The machine is correctly connected with the charging dock;
• White light flashing 3 times: When a relevant instruction is received;
• Red light normally on: The dust bag or the dust collecting and charging dock cover is not installed in place;
• Red light flashing 3 times: When a dust collection error or wrong operation occurs.
Charging
electrode
Infrared lens
State indicator
12
English
EN
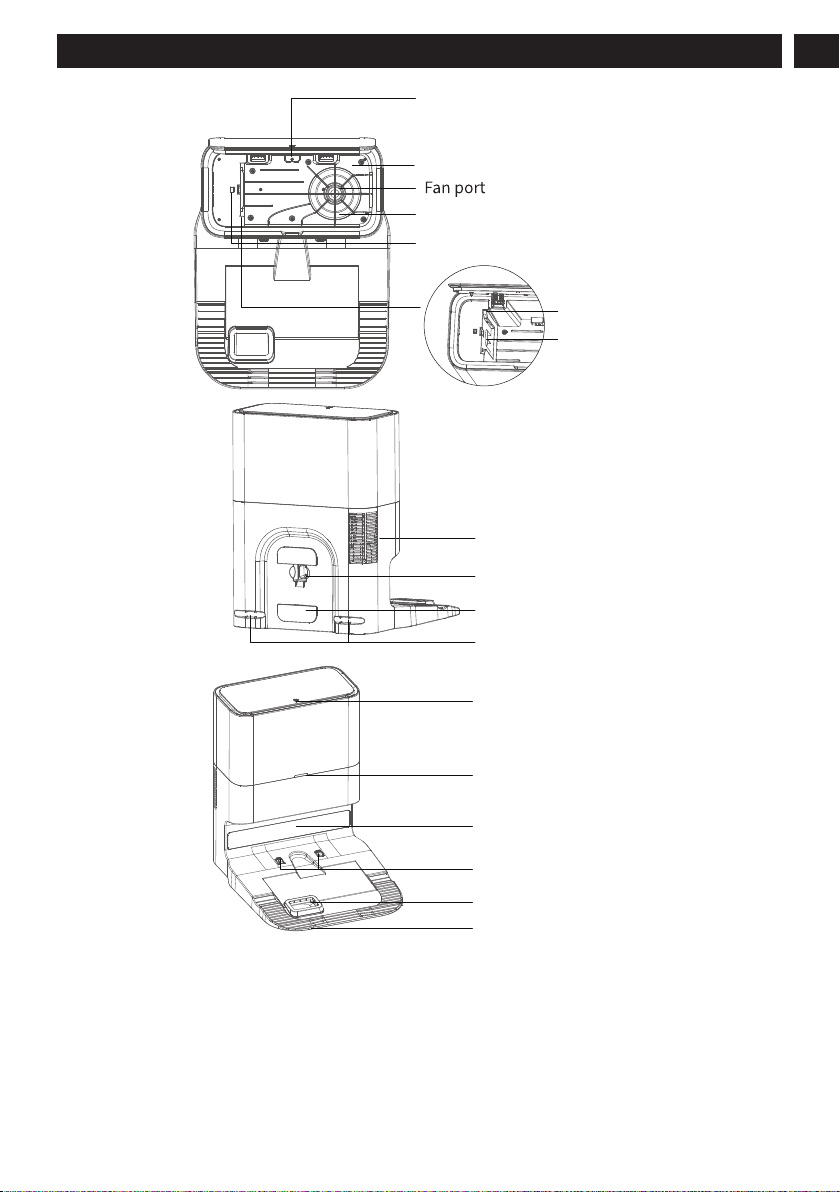
Filter (non-removable)
Flip cover closure sensor
Inner chamber for dust bag
Dust outlet
Dust bag slot
Air pressure sensor
(assisted detection of full
dust or blocked pipe)
Cable winding pile
Power outlet
Outlet slot
Air outlet
Dust collection port
Bottom tray
Flip cover
State indicator
Infrared lens
Charging pole pieces
13
English
EN
Bottom tray
(removable)
Non-slip
foot pad
Bottom tray
fixing buckle
Dust
collection
pipe
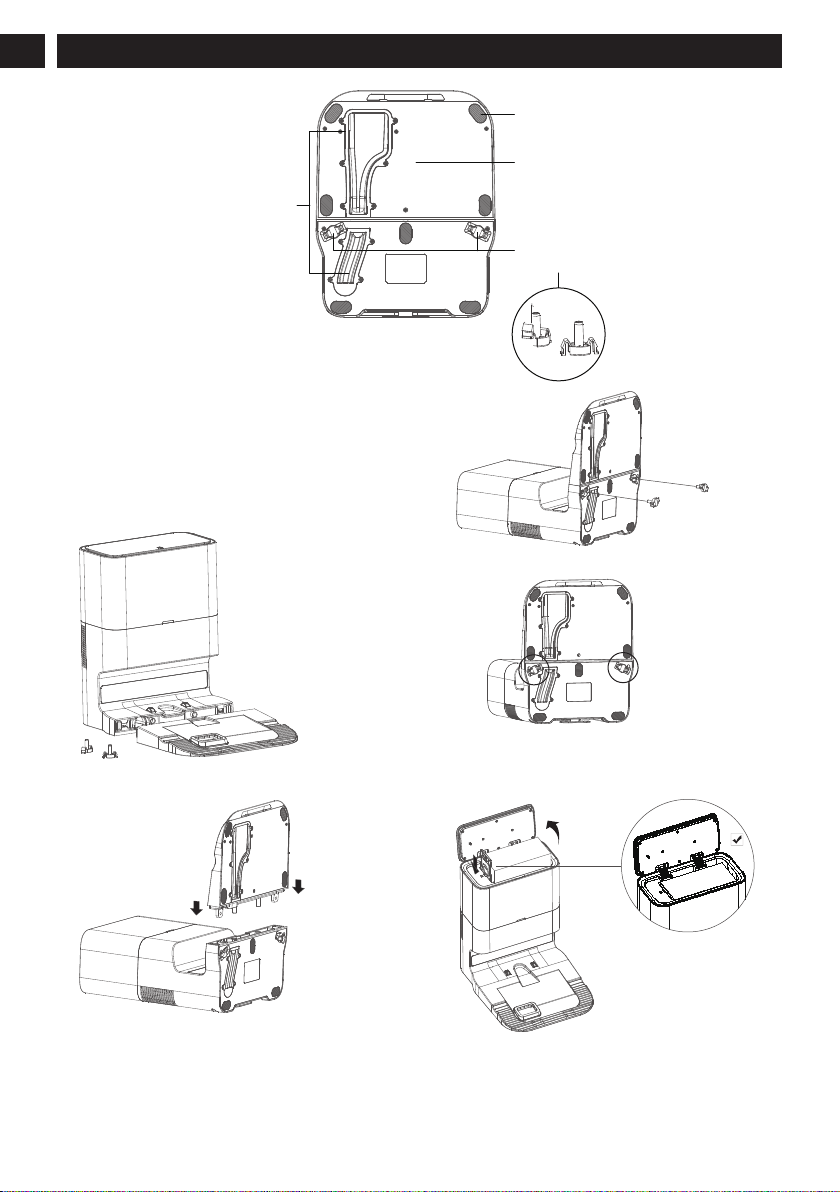
3 INSTALLATION
3.1 ASSEMBLE THE DUST
COLLECTING AND CHARGING
DOCK
1. Locate the dust collecting and charging dock, bottom tray,
and bottom tray fasteners;
2. Connect the dust collecting and charging dock with the
bottom tray, and ensure proper connection;
3. Insert the fasteners into the bottom tray and press until
they click to complete the assembly of the dust collecting
and charging dock;
4. Take out the dust bag and check whether the dust bag is
in good condition, open the cover, insert the dust bag into
the dust bag slot to the bottom, close the cover, and it can
be used after power on.
14
English
EN
NOTE
• If the dust bag is not installed or is not installed
properly, the red light of the dust collecting and
charging dock indicator is normally on, and the dust
collection operation cannot be started.
• Before using the dust bag, please be sure to check
whether the dust bag is damaged. If it is damaged, it
will cause damage to the fan of the dust collecting and
charging dock.
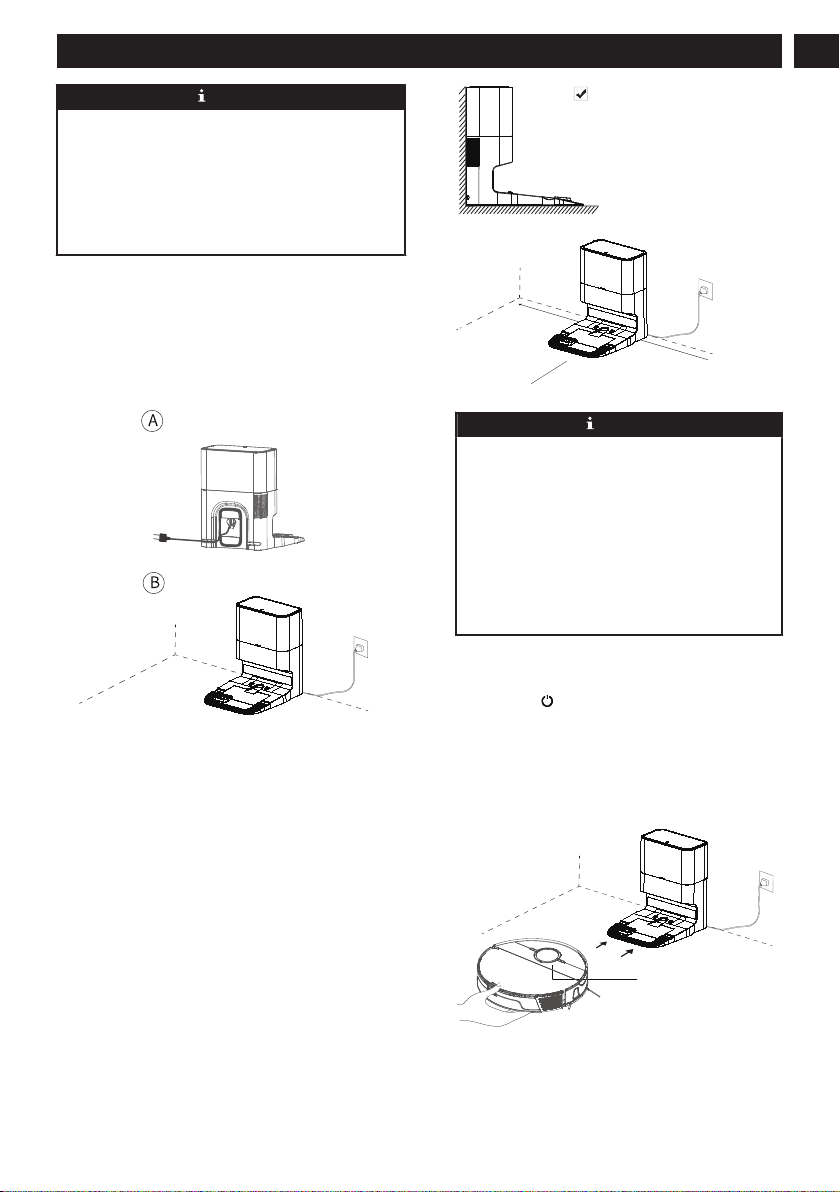
3.2 INSTALLATION OF DUST
COLLECTING AND CHARGING
DOCK
1. Connect the charging dock with the adapter. Prevent the
adapter wire from winding the machine during sweep.
Connect the adapter to the wall socket and keep the
power on.
2. Place the charging dock on a flat hard ground
perpendicular to a wall and keep it clear of obstacles
within 1.5 meters in front of it and within 0.5 meters on
its left and right.
19.7 in.
(0.5M)
19.7 in.
(0.5M
)
59.1 i
n.
(1.5M)
NOTE
• Install the charging dock at a location easily
accessible by the machine. It is recommended to
place the charging dock on a hard ground, instead
of a carpet, against a wall.
• Keep the charging dock powered, or the machine
will not automatically return.
• To ensure normal charging, do not move the
charging dock frequently. Once the machine
location is changed, the machine may regenerate
a map due to repositioning failure (for details, see
Operating Instructions > Map Management).
3. Startup and charging
Press and hold
on the machine for 3 seconds to turn
it on. Before use for the first time, the machine shall
be fully charged (about 4.5 hours) to ensure normal
operation.
• Place the machine on the charging dock and align it
with the charging port. When the white indicator on
the charging dock goes off, charging will begin.
LED indicator
The power indicator color indicates the battery level:
• White ≥20%
• Yellow red < 20%
15
English
EN

NOTE
• You may not be able to start the machine when the
battery is low. Please fully charge it and try again.
• To ensure the service life of the battery, please
charge and discharge at least once every six months.
• To enter the low power standby mode when the
machine is being charged, press and hold
and
for 20 seconds until the power status indicator
goes off. Wi-Fi will be disabled when this mode
is active. Press
to exit the low power standby
mode.
4. Install the app
① Download
Scan the QR code and download and install the mobile
application.
NOTE
If the mobile phone cannot be connected to the robot,
please refer to – “Reset Wi-Fi”.
② Reset Wi-Fi
A. Open the machine top cover to expose the Wi-Fi
indicator.
B. Press and hold
and simultaneously till the voice
prompts "reset Wi-Fi". Wait till the Wi-Fi indicator starts
blinking slowly in white, indicating that the robot vacuum
has entered the network configuration mode.
Wi-Fi indicator:
Wi-Fi indicator:
• Blinking slowly in white: Wait for connection
• Blinking fast in white: Being connected to Wi-Fi
• Normally on in white: Wi-Fi connected
③ Add devices
Open the app and create a new account, click the
"+" icon in the upper right corner of the page.
Perform network configuration operations according to
the internal instructions of the APP.
NOTE
• Only the 2.4GHz band, but not the 5GHz one, is
supported in the Wi-Fi connection.Please switch
to the 2.4GHz band if your Wi-Fi network is dual-
band and try again.
• If the connection between your phone and robot
vacuum fails, you can reset Wi-Fi again and add
it again after entering the network configuration
mode.
• As version upgrade and update may be made,
please follow internal guidelines in the app for
operation.
5.
Start sweep by operating it from the app or pressing
manually.
The machine automatically returns to the charging dock
for charging under the following conditions:
A. The machine has completed sweep;
B. Sweep has not been completed yet but the battery
power level is insufficient; Once the battery is charged to
80%, the machine will resume to complete the remaining
sweep work.
NOTE
Do not move the charging dock during sweep, and
make sure the charging dock is powered on, or the
machine may not be able to return for charging. If
automatic recharge fails, you shall manually connect it
to the charging dock.
4 OPERATING INSTRUCTIONS
4.1 USE OF THE MACHINE
A. Startup/shutdown
• When the machine is connected to the charging dock, it
will start automatically.
• If the machine is not connected to its charging dock, press
and hold
for 3 seconds to start it up. Wait until the
power status indicator turns white and is kept ON.
• If the machine is not connected to its charging dock, press
and hold
for 3 seconds to shut it down.
16
English
EN
B. Start sweep
•
Press to start the auto sweep mode. Once it is
started, the machine will leave the charging dock, scan
automatically to generate a map, intelligently determine
its sweep route, and divide the space into multiple areas.
The sweep route route will be planned along the wall to
sweep in straight lines back and forth to thoroughly clean
on area at a time.
NOTE
• If the battery level is too low to start sweep, please
charge it first.
• Before sweeping all wires on the ground should be
well organized or damage to articles may occur.
• In the auto sweep mode, by default the machine will
do sweeping twice if the sweep duration is shorter
than 10 minutes.
C. Pause
• When the robot vacuum is operating, press to pause.
Press again to resume sweep. During sweep, press once
to stop the current sweep and press twice to return to the
charging dock automatically.
D. Hibernation
•
When the robot vacuum is operating, press
to pause.
Press
again to resume sweep. During sweep, press
once to stop the current sweep and press twice to
return to the charging dock automatically.
E. Charging
• Auto recharge: After sweep, the white light of the
recharge button
will keep blinking and the machine
will automatically return to the charging dock for
charging.
• Manual recharge:
a. If it is paused, press
to recharge it automatically;
b. When the machine is stuck or cannot find the charging
dock, please manually return it to the charging dock for
charging.
F. Fault
• Please refer to the "Common Faults” section herein or
guidelines in the app for repair when any abnormality
occurs to your robot vacuum in operation and the power
indicator is blinking in red with voice prompts.
NOTE
• If it cannot be repaired after the above operations,
please contact our Service Department for consultation
or repair. Do not disassemble the machine by yourself.
G. Reset Wi-Fi
•
Press
and simultaneously for 3 seconds to reset
your Wi-Fi connection when your router has changed,
you've forgotten the password or your phone is unable to
connect to the machine normally for other reasons. The
Wi-Fi status indicator will be blinking slowly in white.
After the Wi-Fi connection is reset, there will be a voice
prompt. After that, you can reset the Wi-Fi connection as
instructed in this app.
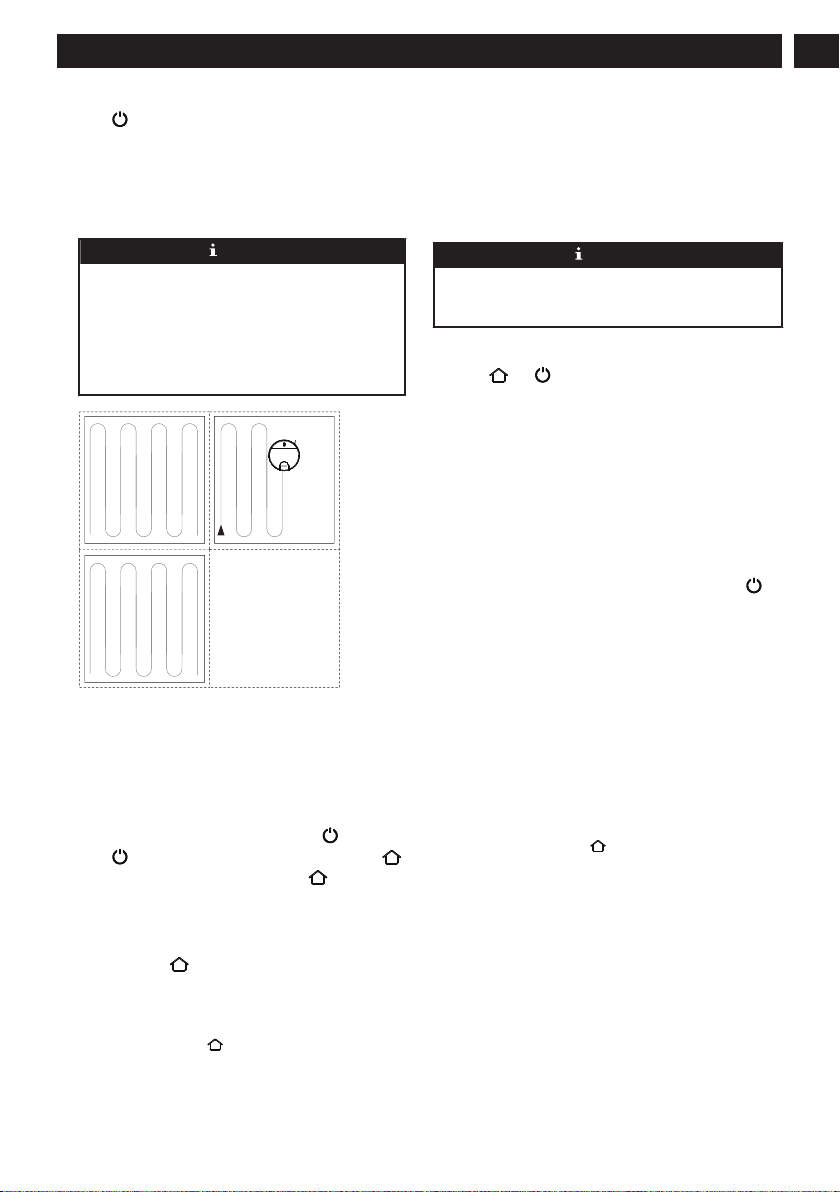
4.2 SWEEP MODES
A. Auto Sweep
•
Auto Sweep is the default mode after startup. Press
to start it. The machine will start off the charging dock,
automatically scan and plan the sweep map and path,
and sweep your rooms. After the task is complete, the
machine will return automatically for recharge. It is fast
and convenient.
B. Sweep at Fixed Point
• After the mode is enabled, the machine will sweep a
rectangular area of 1.5m X 1.5m centered on itself. This
mode is very useful if you have any area with much
dust or debris to clean. After such specific area has
been swept, the machine will automatically return to the
charging dock.
a. Manual startup: Move the machine to the area to be
cleaned, press and hold
for 3 seconds to start it up.
b. Startup using app: Open the app, select Pin n Go, and
follow the instructions.
17
English
EN
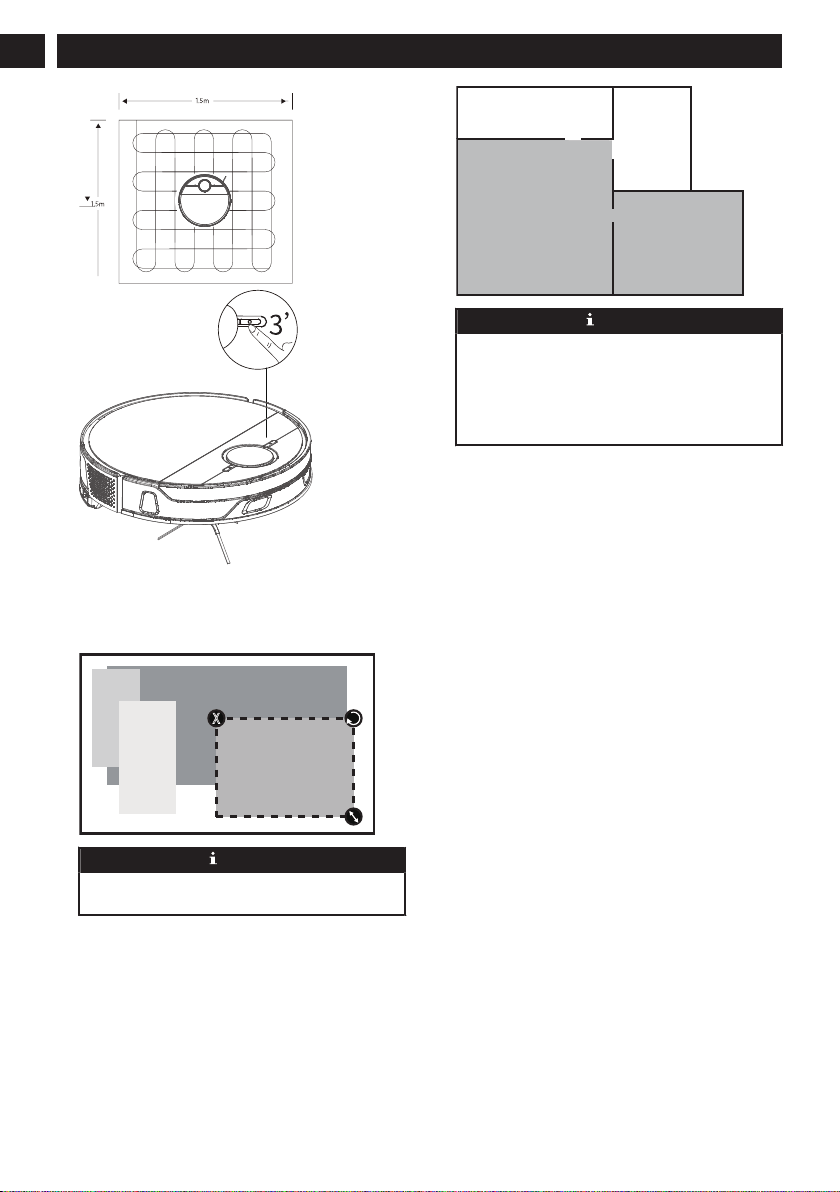
C. Area-specific Sweep (only in-app operation supported)
• Select Zone in the app and set a sweep area. The machine
will sweep this area only and return to the charging dock
after sweep.
;
NOTE
Area-specific Sweep can only be started after a map is
created.
D. Zone cleaning mode (It is only supported with the
mobile App)
• Use the mobile APP to set the zone cleaning, and the
robotic vacuum cleaner will clean one or more rooms
checked on the APP zoning map.
ĸ$
&
ĸ%
'
NOTE
• After starting to clean, the vacuum cleaner may
enter the zone outside the selected zone, clear
floor obstacles around the selected zone. The zone
selection cannot ensure safe isolation;
• Zone cleaning can be started only after the vacuum
cleaner successfully creates a map.
E. Remotely Controlled Sweep (only in-app operation
supported)
• Manual Remotely-Controlled Sweep is available in the
app to make the machine go to the area to be cleaned.
4.3 SELECT SUCTION INTENSITY
(ONLY IN-APP OPERATION
SUPPORTED)
Select an sweep intensity in this app as required:
• Floor mopping only
• Quiet
• Standard
• Power
• Max
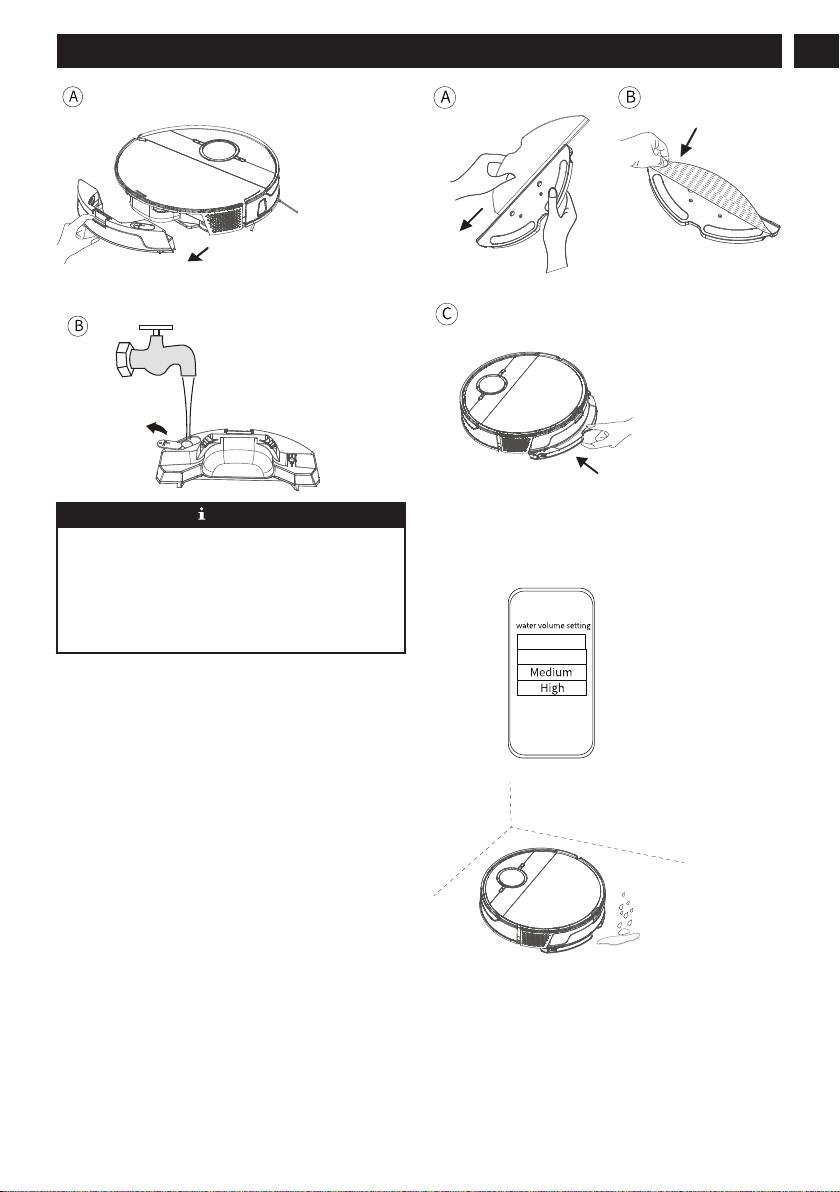
4.4 USE OF MOP MODULE
① Take out the water tank and add water.
18
English
EN
NOTE
If you want to use floor disinfectant or cleaning solution,
first fill the water tank with clean water, then pour in
an appropriate amount of disinfectant or cleaning solution
according to the dilution ratio, and shake evenly for dilution
before use, otherwise long-term use of high-concentration
cleaning solution will cause pipe blockage or corrosion of
the machine.
② Wet your mopping cloth before mopping, install the
mopping cloth on its holder, and then install the holder to
the machine bottom. (In order to ensure mopping results,
the machine's obstacle-crossing performance will be reduced
after the mopping cloth is put in.)
③ Select a sweep mode to start sweep, and select the amount
of mopping water (3 levels) in the app as necessary. (To
prevent the machine from wetting any of your carpets when
mopping your floor, it is recommended to place virtual wall
(for no mopping) around carpet areas using the app to protect
your carpets)
Dry mopping
LOW
④ When the machine returns to the charging dock after
completing its work, hold buckles on both sides by hand and
drag backward to remove the mop module.
19
English
EN
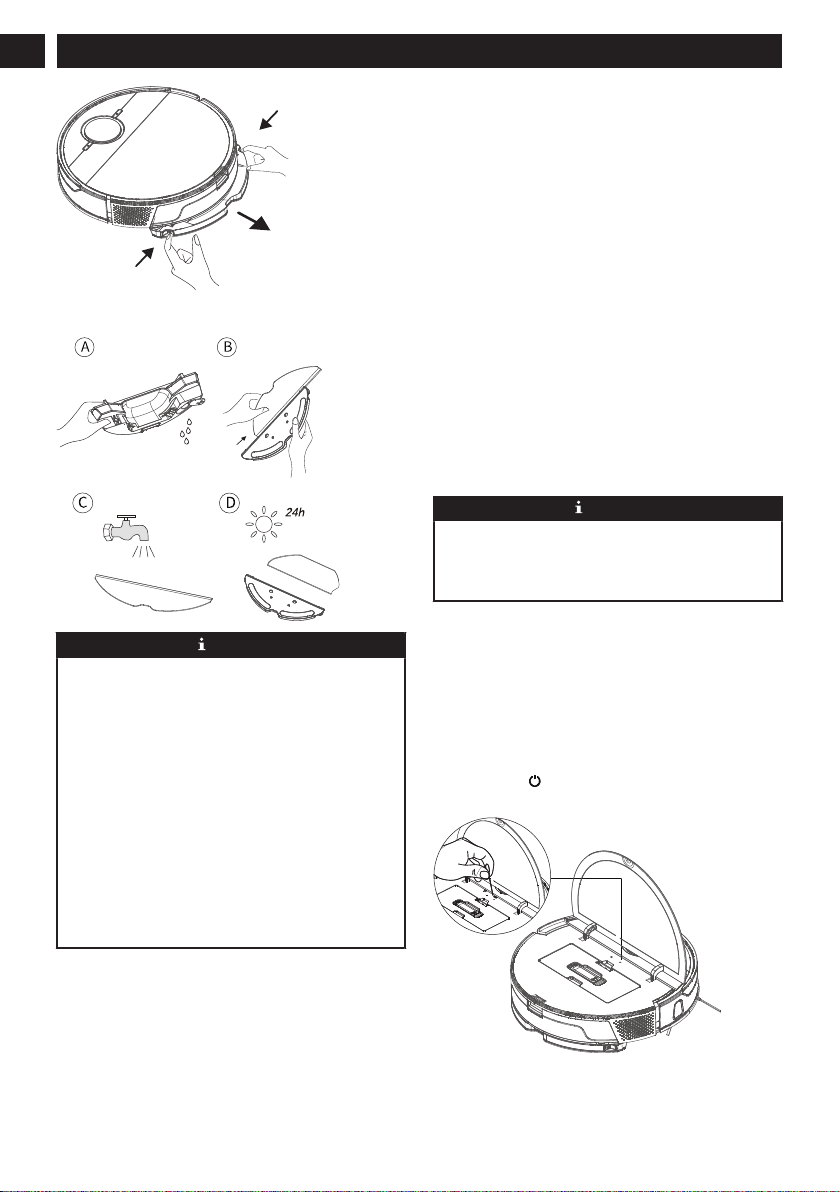
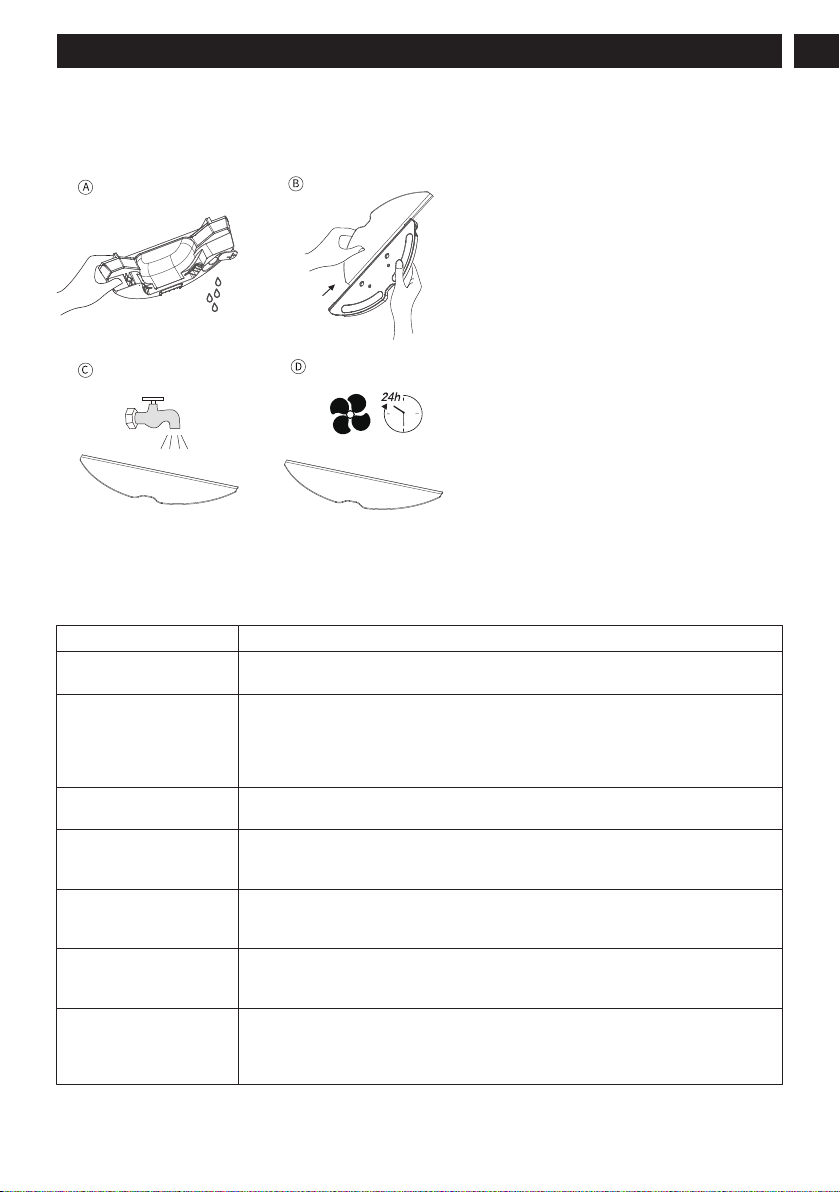
⑤ Empty the remaining water in the water tank. Wash the
mopping cloth to avoid mildew and odor.
NOTE
• Please do not use the mopping mode on any carpet.
• It is recommended to wash the mopping cloth after each
mopping.
• When the machine is being charged or idle, please
remove the mop module.
• In order to achieve better mopping results, it is
recommended to sweep your floor three times with the
machine before installing the mop module.
• To avoid damaging your wood floor, please make sure
to take out the mop module immediately after floor
mopping is complete. Or install the charging dock onto
the waterproof pad (optional).
• When mopping is paused or finished, the machine will
automatically cut off water. However, the mopping
cloth remains wet and should not be left in place for
too long but removed in time.
4.5 MAP MANAGEMENT
A. Map your rooms in real time
• Real-time mapping helps you easily understand the sweep
route and environment. After sweep, a floor plan of your
rooms will be generated. Maps will be updated in real
time during each sweep to ensure normal navigation.
Generate a complete floor plan of your rooms:
a. Open room doors so that the machine generates a map
of each room;
b. Remove any object that may block or jam the machine;
c. After generating maps, please do not disassemble or
move the charging dock;
B. Repositioning and map regeneration
• If the location of the machine/charging dock is adjusted
or the surrounding environment changes significantly, the
machine will try repositioning and may regenerate a map
to adapt to the surrounding environment. Details are as
follows:
a. If repositioning is successful, the machine will resume
sweep;
b. If repositioning fails, the machine will regenerate a
map to ensure normal navigation for new sweep;
c. If repositioning fails and virtual boundary information
(restricted area) is available in the original map, the
machine will not start a new sweep to avoid crossing any
restricted area.
NOTE
• Make sure that the machine always starts sweep from
the charging dock.
• Do not move the equipment frequently during sweep.
Otherwise, put the machineback to its home position.
4.6 SYSTEM RESET
• If the machine does not respond after pressing any button
thereon, it is an option to reset the system.
a. Ensure that the machine is not on the charging dock;
b. Press the reset button with a paper clip and the machine
will shut down automatically.
c. Connect the machine to the charging dock or press and
hold the key
for 3 seconds to turn it ON and system
reset will be completed.
20
English
EN
NOTE
• After resetting the system, the machine may lose maps
and original settings including the virtual boundary.
5 MAINTENANCE
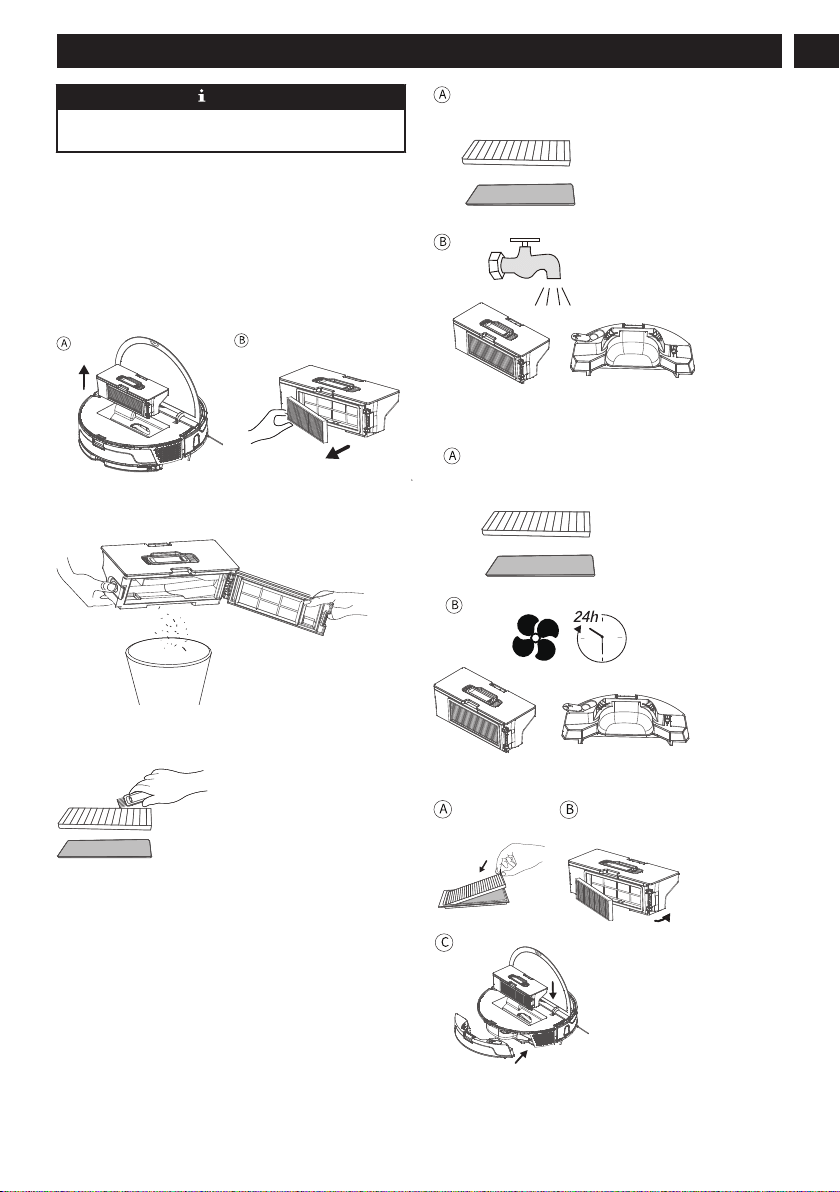
5.1 CLEAN DUST BOX AND WATER
TANK
A. Open the machine top cover and remove the dust box and
filters.
B. Empty the dust box into a trash can, tap lightly to insure all
dust and dirt is removed.
C. Disassemble the removed filter, remove the pre-filter, foam
filter and high-performance filter, and clean filters with a
cleaning brush.
D. Press the release button of dust box to separate the dust
box from the water tank.
E. Flush the water tank, dust box and filter module
thoroughly with water as necessary (Note: Filters shall not
be cleaned with hot water or detergent).
F. Reassemble the air-dried water tank, dust box and filter
module, and install them back into the machine.
21
English
EN
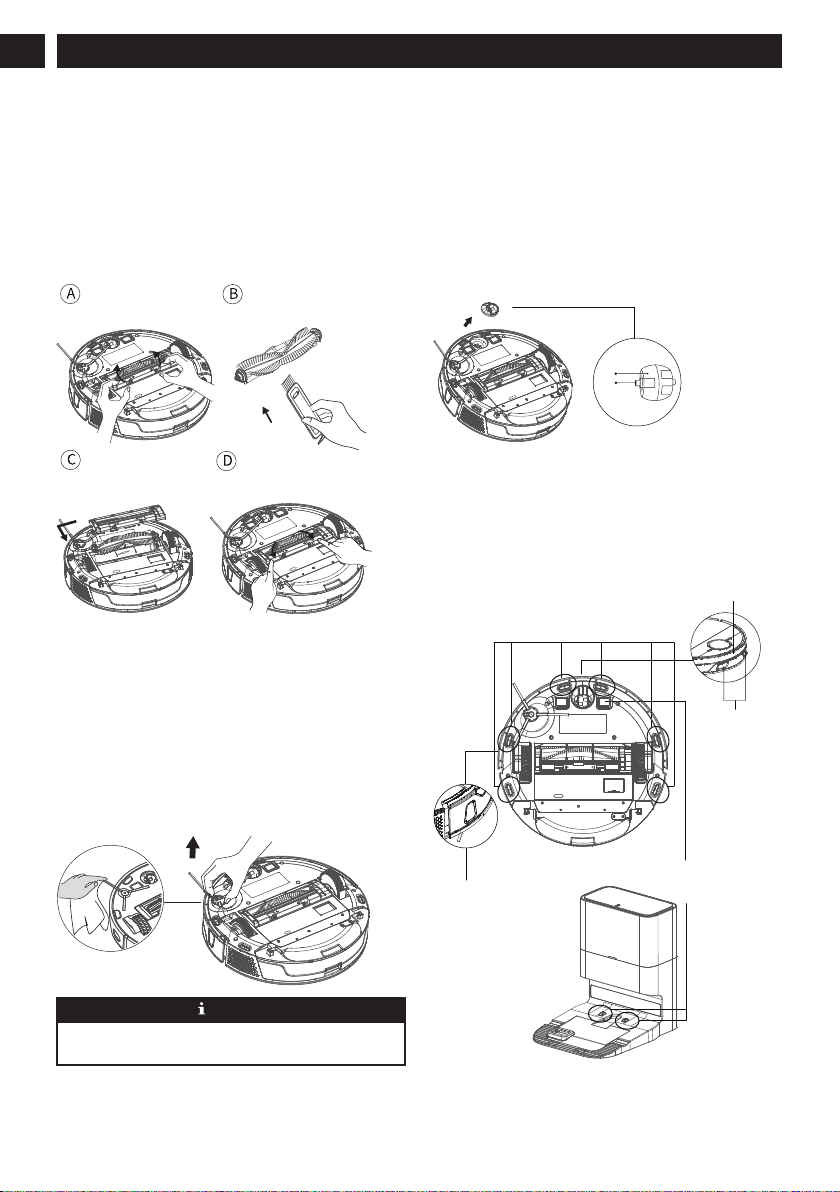
5.2 CLEAN THE MAIN BRUSH
A. As shown in the following figure, press down the buckle
to take out the protective cover, and take out the rolling brush
upwards.
B. Clean the rolling brush with cleaning tools included in the
accessories.
C. Put one end of rolling brush into the corresponding hole
first.
D. Press the brush cover and fix it with the buckle.
5.3 CLEAN ITS SIDE BRUSHES
Foreign matter such as hair can become tangled in the side
brush, be sure to clean it regularly.
A. Turn the vacuum over, hold it in place and pull the side
brush up to remove it.
B. Remove any hair or other debris, wipe with a damp cloth if
necessary.
C. Reinstall the side brush by aligning the square shaft with
the back of the brush, press down until it clicks.
NOTE
It is recommended to replace side brushes every 3-6 months
to ensure cleaning results.
5.4 CLEAN CASTER
Hair or dust particles tend to be entangled around casters.
Clean the them regularly or as needed.
A. Turn the vacuum over, hold it in place and pull up on the
caster. It may be necessary to use a tool such as a flat head
screw driver to pry the wheel out of place. Be careful not to
damage the caster.
B. Remove any hair or other debris, wipe with a damp cloth if
necessary.
C. Reinstall the caster by pressing it in place until it clicks.
Wheel
Shaft
5.5 CLEAN SENSORS AND
CHARGING ELECTRODES
In order to ensure optimum operating conditions, please clean
sensors and charging electrode regularly, and wipe dust off
them with a soft dry cloth or sweep brush.
Anti-drop sensor
Along-the-wall
side sensor
Built-in
TOF lidar
Front bumper
laser sensor
for obstacle
avoidance
Charging
electrode
22
English
EN
5.6 CLEAN THE MOP MODULE
It is recommended to empty the water accumulated in the
water tank, wash the mopping cloth with water, and air dry it
after using the mop module every time to avoid mildew.
6 COMMON FAULTS
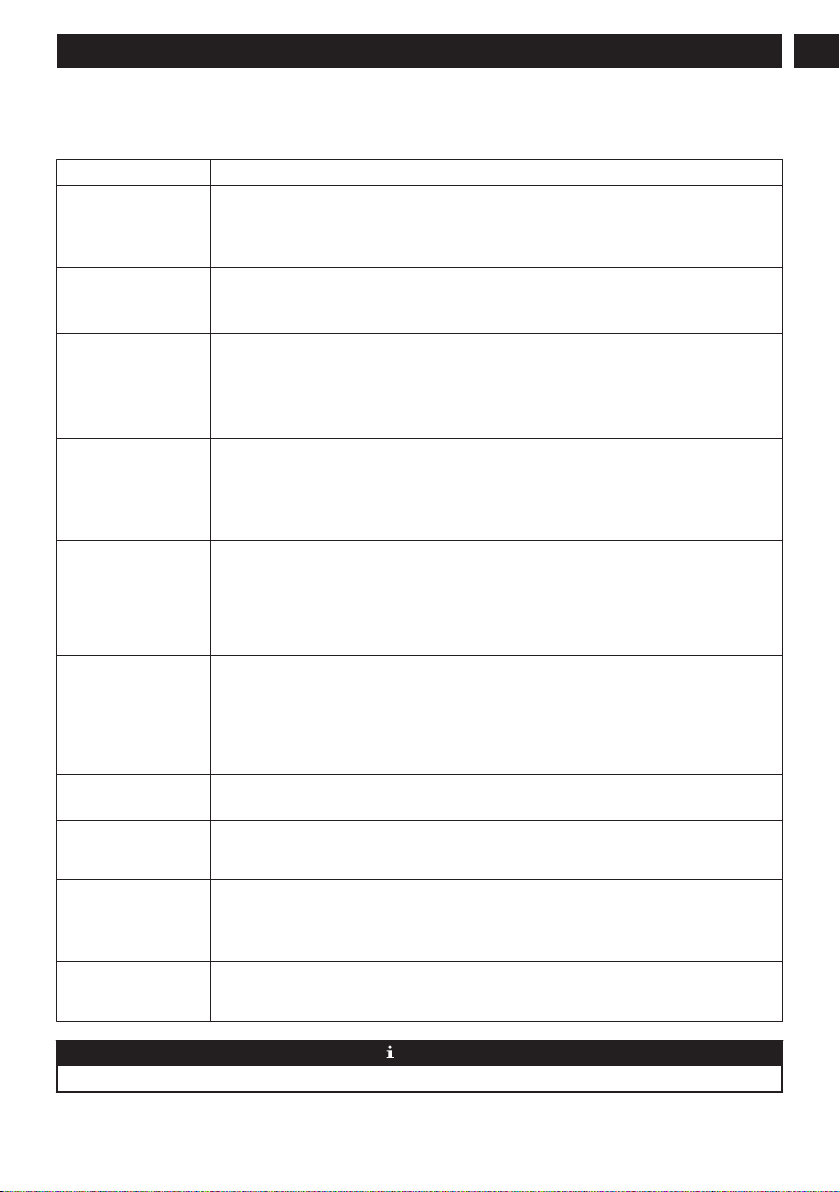
6.1 VOICE PROMPTS
When a fault is detected the LED Status Indicator will turn/flash red and there will be audible voice prompts. Follow the voice
prompt to help resolve the issue.
Voice Prompts Solution
Error 1: Front bumper is
stuck, please check.
• The front bumper is stuck: Please tap repeatedly to remove foreign matters. If there is no
foreign matter, please relocate it and then start it.
Error 2: A wheel is stuck.
Please check whether any for-
eign matter is stuck in the
wheel, or move it to near its
home position to start it.
• If any wheel is stuck, please check whether any foreign matter is stuck in the wheel, or
move it to near its home position to start it.
Error 3: A side brush is stuck,
please check.
• The side brush may be entangled with foreign matters. Please clean and restart it.
Error 4: The rolling brush
is stuck. Please remove and
clean it.
• The rolling brush may be entangled with foreign matters. Please remove and clean it, its
connections, its cover and the suction inlet.
Error 5: The machine is trap-
ped. Please clear obstacles
around.
• The machine may be suspended. Please relocate it and start. If the anti-drop sensor is too
dirty, it may also cause the fault. Please wipe the anti-drop sensor to eliminate the fault.
Error 7: A wheel is suspen-
ded. Please move it to near its
home position to start it.
• A wheel is suspended. Please move it to near its home position to start it.
Error 8: The power is too
low, and the system is about
to shut down automatically.
Please charge it.
• The power is too low, and the system is about to shut down automatically. Please charge it.
23
English
EN

Error 9: Virtual magnetic
stripe detected. Please relocate
it to start.
• The machine is too close to magnetic stripes in a virtual wall or strong magnetic field
during starting. Please relocate it to start.
Error 11: The recharge sensor
is blocked. Please wipe it.
• The recharge sensor is covered by dust. Please wipe it.
Error 12: The right alongwall
sensor is blocked. Please wipe
it.
• The right along-wall sensor is blocked. Please wipe it.
Error 13: The machine is til-
ted. Please put the machine on
the horizontal ground to start.
• The machine is tilted during startup. Please put the machine on the horizontal ground to
start.
Error 14: Please install the
dust box and filters back.
• Please install the dust box and filters back, and make sure that filters and the dust box are
installed in place. Then please restart the machine.
Error 17: Restricted area de-
tected. Please relocate it to
start.
• The machine is too close to a restricted area during starting. Please relocate it to start.
Error 18: The laser cover is
stuck. Please check.
• The pressure sensor for laser cover is pressed or stuck. Please relocate it to start.
Error 19: The laser sensor is
stuck or twisted, please check.
• The laser distance sensor is stuck by foreign matter. Please clear it.
Error 20: The laser sensor
may be blocked, please check.
• The laser distance sensor is blocked, please clear the blocking. Too spacious environment
and multi-reflection environment such as metal mirrors also affect the normal operation of
a laser distance sensor. Please relocate it to art.
Error S1: Battery abnormal.
Please consult the instructions
or APP.
• Please open the battery compartment, check whether the battery is properly connected, and
try to restart the machine.
• The battery temperature is too high or too low. Please wait for the battery temperature to be
normal (0℃~40℃ /32°F~104°F) before use.
• If the error persists, please contact our Service Department.
Error S2: Wheel module ab-
normal. Please consult the in-
structions or APP.
• Please check whether any foreign matter is stuck in a wheel and try to restart the machine.
• If the error persists, please contact our Service Department.
Error S3: Side brush module
abnormal. Please consult the
instructions or APP.
• Please check whether any foreign matter is stuck in a side brush and try to restart the
machine.
• If the error persists, please contact our Service Department.
Error S4: Fan abnormal.
Please consult the instructions
or APP.
• Please check whether any foreign matter is stuck in the fan and try to restart the machine.
• Please clean the dust box and filters and try to restart the machine.
• If the error persists, please contact our Service Department.
Error S5: Rolling brush ab-
normal. Please consult the in-
structions or APP.
• Please remove and clean it, its connections, its cover and the suction inlet. Please try to
restart the machine after cleaning.
• If the error persists, please contact our Service Department.
Error S6: Water pump abnor-
mal. Please consult the in-
structions or APP.
• Please clean the water tank, water pump connections on the tank and water pump connec-
tions on the machine, the water outlet at the machine bottom, and check the mop module.
Please try to restart the machine with all modules installed back after cleaning.
• If the error persists, please contact our Service Department.
Error S7: Laser sensor abnor-
mal. Please consult the in-
structions or APP.
• Please check the laser sensor for foreign matter and try to restart the machine after
cleaning.
• If the error persists, please contact our Service Department.
24
English
EN
6.2 TROUBLESHOOTING
When any abnormality occurs to the machine in operation, the power indicator will blink fast in red and voice prompt will be
provided. Please consult the following table for troubleshooting.
Fault Solution
Cannot start the machine • Make sure the machine is connected to power supply.
• Make sure the battery is fully charged.
• If the problem persists, please reset the machine (see the "Operating Instructions > System
Reset" section herein).
The machine suddenly
stops working.
• Check whether the machine is stuck or blocked by obstacles.
• Check whether the battery is too low.
• If the problem persists, please shut it down, wait for 3 seconds, and then restart it.
Cannot make a sweep
schedule
• Make sure the machine has been powered on.
• Set the time and schedule the time for automatic sweep with the app.
• Make sure the schedule time has been set correctly.
• Check whether the machine power is too low to start sweep.
• The machine will not start any scheduled sweep when the task is being performed.
Suction too weak • Check the suction inlet for any obstruction.
• Empty the dust box.
• Clean filters with water.
• Check whether filters are wet due to water or other liquids on the floor. Let filters dry naturally
thoroughly before use.
Cannot charge the ma-
chine
• Check whether the indicator on the charging dock is on (when the machine is not on the charg-
ing dock). If not, please contact our service center for repair or replacement of the charging
dock.
• Check whether the indicator on the charging dock is off and the indicator on the machine is
flashing during charging.
• Wipe dust off charging electrodes with dry cloth.
The machine cannot re-
turn to the charging dock.
• Clear the charging dock of objects within 0.5m on the left and right sides and within 1.5m
ahead.
• Make sure that the machine starts sweep from the charging dock without abnormal movement.
• When the machine is near the charging dock, it can return faster. But if the charging dock is
located far away, the machine will need more time to return. Please wait during its return.
• Clean charging electrodes.
The rolling brush does
not rotate
• Clean the rolling brush.
• Check whether the rolling brush and the brush cover are installed correctly.
Abnormal action or
sweep route of the ma-
chine
• Carefully clean the sensor with dry cloth.
• Restart the machine.
No water released during
mopping
• Make sure there is enough water in the water tank.
• Check whether the mop module is installed correctly. Upon correct installation, you will hear
related voice prompt.
• Check whether the water outlet is blocked.
The machine cannot con-
nect to your Wi-Fi net-
work.
• Ensure that your Wi-Fi router supports 2.4GHz and 802.11 b/g/n bands as this equipment does
not support 5GHz bands. For more details, For more details, please refer to the "Faults in Wi-Fi
Connection" section herein.
NOTE
Please contact our customer service promptly if any fault cannot be eliminated with the above measures.
25
English
EN
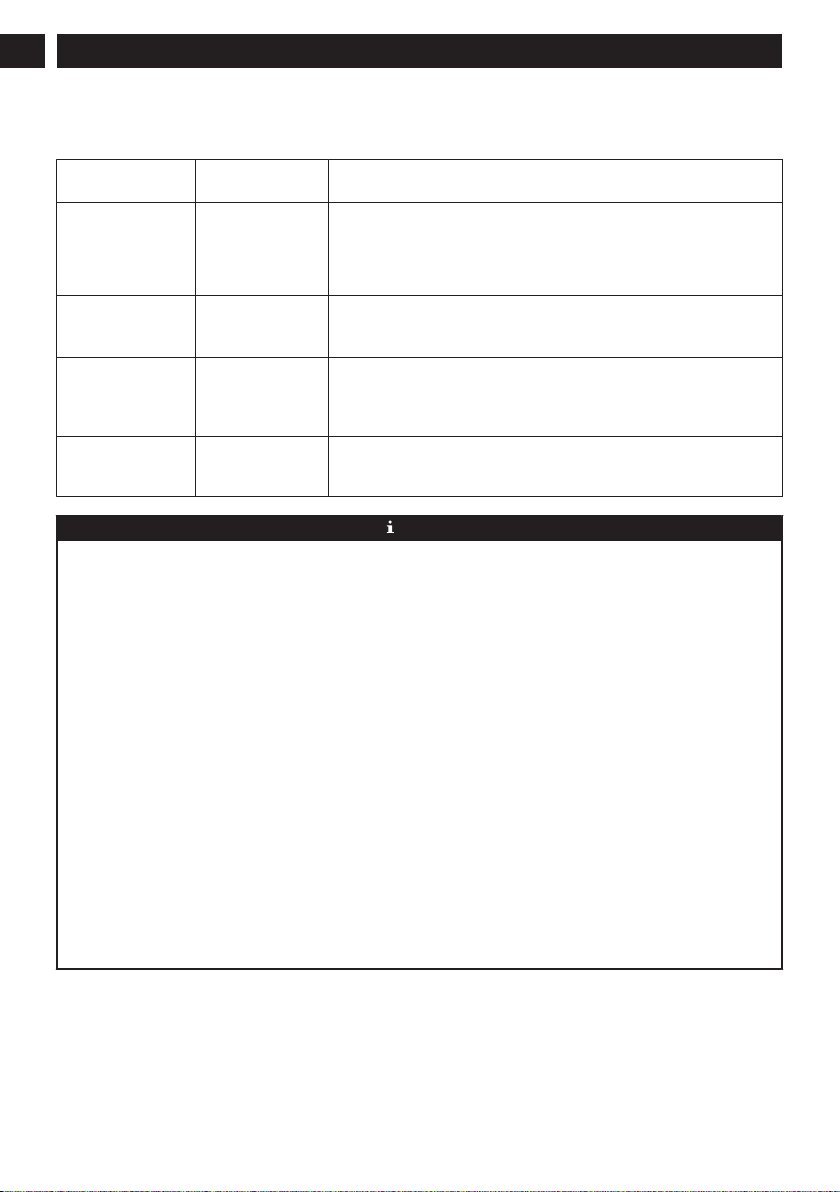
6.3 FAULTS IN WI-FI CONNECTION
If you fail to control the machine with your smartphone, please try the following solutions. If the problem persists, please contact
our customer service.
Wi-Fi Status Indica-
tor
Cause
Solution
White indicator nor-
mally on
The machine has
been connected to
the router, but can-
not connect to the
network.
• Check whether your router is connected to the network.
• Contact your network operator to find out if any network connection
problem exists.
Flashing rapidly in
white
The machine cannot
connect to your wire-
less router.
• Check whether the network name and password have changed.
• Reset Wi-Fi connections if necessary. Please refer to the "Operating In-
structions > Reset Wi-Fi Connection" section herein.
Flashing slowly in
white
Your Wi-Fi connec-
tion has been reset or
not yet set previously.
• Establish Wi-Fi connection with the machine. Please refer to the "Machine
Control with App" section in the manual.
• Reset Wi-Fi connections if necessary. Please refer to the "Operating In-
structions > Reset Wi-Fi Connection" section herein.
Off The machine is pow-
ered off. The machine
power is low.
• Make sure the machine has been powered on.
• Charge the machine with the charging dock.
NOTE
Before setting up Wi-Fi, ensure that the machine and your Wi-Fi network meet the following requirements.
Wi-Fi setup requirements:
A. Machine:
• Machine fully charged.
• Wi-Fi status indicator white and flashing slowly.
B. Wi-Fi network:
• Use the correct wireless network password.
• Do not use any VPN (Virtual Private Network) or proxy server.
• Your Wi-Fi router supports 802.11b/g/n and IPv4 protocols.
• The band of your router is 2.4GHz or use a dual-band router supporting 2.4GHz band. The machine does not support the
5GHz band.
• If the machine cannot connect in the 2.4/5GHz dual-band Wi-Fi network, please switch to the 2.4GHz network for Wi-Fi
settings. After setting is completed, you can switch it back.
• When connecting to a hidden network, be sure to enter the correct network name --- SSID (case sensitive) and connect to a
2.4GHz wireless network.
• When using a wireless extender/repeater, be sure that the network name (SSID) and password are the same as the main
network.
• Set the firewall and ports of Wi-Fi router to allow machine to connect with the app server.
Network security requirements:
• WPA and WPA2 networks encrypted with TKIP, PSK, AES/CCMP.
26
English
EN

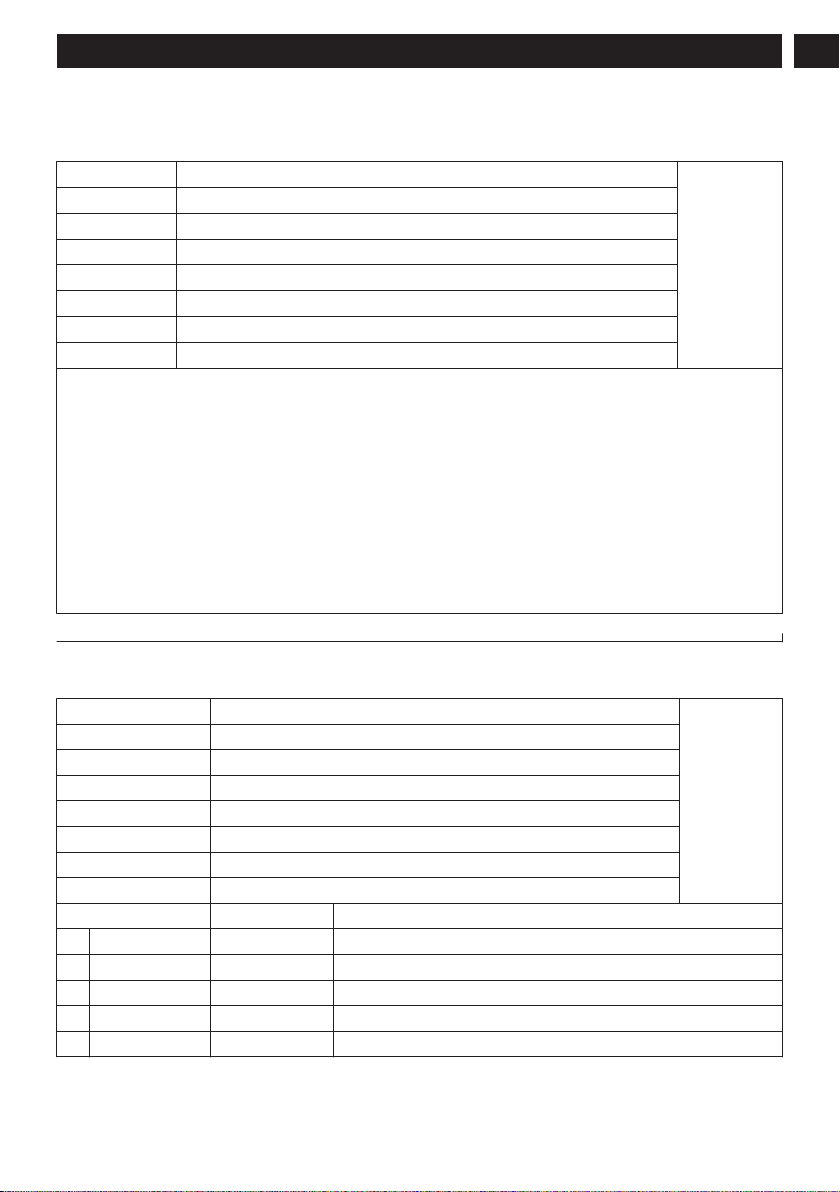
7 TECHNICAL PARAMETERS
Functional parameters of the main machine Functional parameters of accessories
Battery voltage 14.8V Rated input voltage 120V ~ 60Hz
Input Power Supply
24V 1.5A
Rated input current (charging
state)
0.6A
Power Consumption 50W Current (dust collection state) 9A
Battery Lithium battery Power (dust collection state) 950W
Battery capacity 5200mAh Rated output 24V 1.5A
Dust box capacity 0.45 L Dust bag volume 2.5 L
Water tank volume 0.35 L
Cleaning time >150 min
Manufacturer reserves the right to make any technical or design changes to the product due to continuous product improvement
needs.
27
English
EN

8 IC WARNING
This device contains licence-exempt transmitter(s)/receiver(s) that comply with Innovation, Science and Economic Development
Canada’s licence-exempt RSS(s). Operation is subject to the following two conditions:
(1) This device may not cause interference.
(2) This device must accept any interference, including interference that may cause undesired operation of the device.
RF warning statement:
This equipment complies with IC radiation exposure limits set forth for an uncontrolled environment. This equipment should be
installed and operated with minimum distance 20cm between the radiator & your body.
28
English
EN
9 WARRANTY CARD
WARRANTY CARD II
Name
(II) Settlement
form of the war-
ranty provider
Address
Address
City/State/Zip
Product Model
Purchase Date
Invoice Number
Warranty Period
Product warranty description:
1. From the date of the user’s purchase of this product, the warranty period is one year for the vacuum,, and six months for the
adapter, rechargeable batteries and other accessories.
2. After receiving the product repair request, the after sales service staff will resolve the problem within 15 working days.
3. The user can learn about relevant technical problems by reading the user manual and/or the after sales service hotline to get
a clear solution. Hotline: 1-888-909-6757
4. When a performance failure occurs during the user’s normal use, manufacturer promises to provide the above warranty
services unless otherwise stipulated by the applicable laws, rules and regulations of the state.
5. During the warranty period, paid maintenance services will be provided under any of the following circumstances:
• Damage caused by man-made factors or irresistible natural phenomena;
• Failure or damage caused by improper operation by the user;
• Malfunction or damage due to the user’s disassembly or alteration without authorization.
WARRANTY CARD I
Name
(I) To be kept
by the user as
warranty certifi-
cate, which will
not be reissued
if lost
Address
Address
City/State/Zip
Product Model
Purchase Date
Invoice Number
Warranty Period
Date Repair Technician Maintenance Record
1.
2.
3.
4.
5.
29
English
EN