GEAppliances
°_
:=
0
Safety Instruaions ...... 2-7
Operating ImIrua_ons
Alunfinum Foil ........... l2
Clock and Timer ......... 14
Oven ................ 10-20
Baldng and Roasting ..... 12
Broiling, Broiling Guide . .13
Oven Controls .......... l 0
Power Outag> ....... 11, 14
Preheating ............. 12
Self-Cleaning ......... 19, 20
Special Feaulies ...... 16, 17
Thermostat Adjusunent . .l 8
Timed Baking
and Roasting ........... 15
Surfi_ce Cooking ........ 8, 9
Care and Cleaning
Broiler Pan and Grid ...... 24
Burner Asseml)ly ...... 21,22
B/llIler Grams ............ 23
Control Panel and I_a_obs . .25
Cookmp Surface ......... 23
Door Removal ........... 24
Oven Bottom ............ 24
Oven Light Replacement . .26
()\'ell Vents .............. 25
Self-Cleaning ......... 19, 20
Shelves ................. 25
Storag> Drawer . ......... 25
Inslallation
Instructions .v _-_
Air Adjumnent ........... 36
Anti-Tip Device ....... 30, 37
Checking Burner Ignition . .35
Connecting tile Rang>
to Gas ............... 31-33
Dimensions and
Clearances .............. 29
Electrical Connections..34, 35
Lexeling the Rang> ....... 36
Location ................ 30
Troubleshooting
Tips ................ 38-41
Accessories . ..... Back Coxer
Write the model and serial
numbers here:
Model #
Serial #
You can find them on a label on
the front of the range behind the
storage drawer.
183D5580P135
JCBP35GXA
220V, 50Hz
49-85048 03-03 JR
IMPORTANTSAFETYINFORMATION.
READALLINSTRUCTIONSBEFOREUSING.
WARNING!
For your safe_ the information in this manual must be followed to minimize the risk of fire or explosion,
electric shock, or to prevent property damage, personal injury, or loss of life.
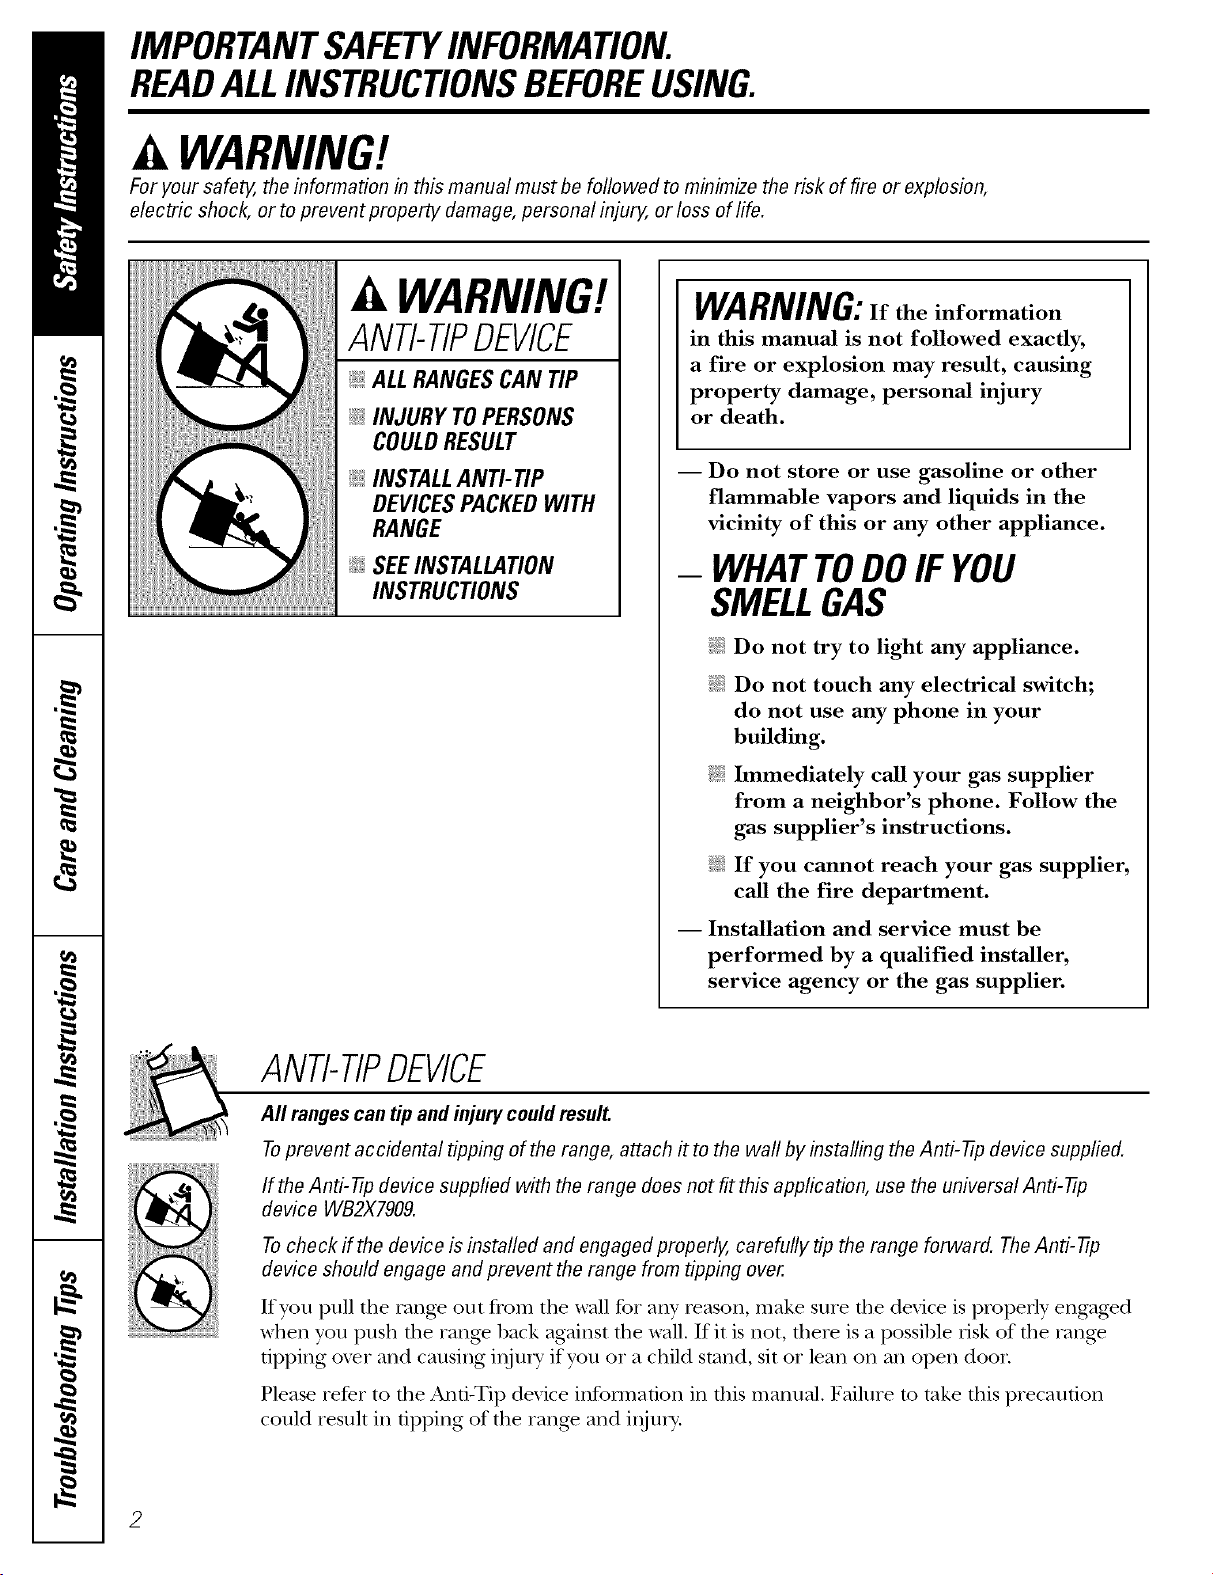
WARNING!
ANTI-TIPDEVICE
@ALL RANGESCAN TIP
_: INJURY TOPERSONS
COULDRESULT
@INSTALLAN_tiP
DEVICESPACKEDWITH
RANGE
INSTRUCTIONS
WARNING:If the information
in this manual is not followed exactly,
a fire or explosion may result, causing
property damage, personal injury
or death.
-- Do not store or use gasoline or other
flammable vapors and liquids in the
vicinity of this or any other appliance.
- WHATTODOIF YOU
SMELLGAS
@ Do not try to light any appliance.
Do not touch any electrical switch;
do not use any phone in your
building.
@ Immediately call your gas supplier
from a neighbor's phone. Follow the
gas supplier's instructions.
If you cannot reach your gas supplier,
call the fire department.
-- Installation and service must be
performed by a qualified installer,
service agency or the gas supplier.
ANTI-TIPDEVICE
All rangescan tip and injury could result.
Toprevent accidental tipping of the range, attach it to the wall by installing the Anti-tip device supplied.
If the Anti-tip device supplied with the range does not fit this application, use the universal Anti-tip
device WB2X7909.
Tocheck if the device is installed and engaged properly, carefully tip the range forward. TheAnti-tip
device should engage and prevent the range from tipping over.
If you pull the range out tiom tile wall for any reason, make sure die device is properly engag>d
when you push the range back against the wall. If it is not, there is a possible risk of the rang>
tipping ox>r and causing injm y if you or a child stand, sit or lean on an open door.
Please refer to the And-Tip device infollnafion in this manual. Failure to rake this precaution
could result in tipping of the rang_ and illjui>
WARNING!
IMPORTANTSAFETYNOTICE
The California Safe Drinking Water and ToxicEnforcement Act requires the Governor of California to
publish a list of substances known to the state to cause birth defects or other reproductive harm, and
requires businesses to warn customers of potential exposure to such substances.
Gasappliances can cause minor exposure to four of these substances, namely benzene, carbon
monoxide, formaldehyde and soot, caused primarily by the incomplete combustion of natural gas or
LP fuels. Properly adjusted burners, indicated by a bluish rather than a yeflow flame, will minimize
incomplete combustion. Exposure to these substances can be minimized by venting with an open
window or using a ventilation fan or hood.
SAFETYPRECAUTIONS
Have the instafler show you the location of the range gas shut-off valve and how to shut it off if necessary.
E_,:Ha_ your rang_ installed and properly E_,:Plug your range into a 990:\_1t grounded
grounded by a qualified installer, in
accordance with the Installation Insuucdons.
Any adjustment and service should be
performed only by qualified gas rang_
installers or service technicians.
_:;11Do not attempt to repair or replace any
part of your range unless it is specifically
recommended in this manua], All other
service should be refened to a qua]ified
technician,
outlet only, If in doubt about the grounding
of the home electrical sysmm, it is your
personal responsibility and oblig'afion to
have an ungrounded outlet _eplaced with
a properly grounded outlet.
3
IMPORTANTSAFETYINFORMATION.
READALLINSTRUCTIONSBEFOREUSING.
SAFETYPRECAUTIONS
_2_Locate the rang_ out of kitchen traffic path
and out of drafw locations to prex.ent poor
air cixvulafion.
_{_:Be sure all packaging materials are remox.ed
flom the range befbre operating it to
prevent fire or smoke damag.e should the
packaging material ignite.
;_i:':Be sure your range is correctly adjusted by
a qualified service technician or installer
WARNING: xeseadjnstment mnst
be made by a qualified service teclmician
ira accordance with the manu/_acmrer's
instructions and all codes and xequixements
of the authocitv having jurisdiction. Failure
m follow these instructions could xesult ira
serious injm T or I)ropergv damage.
_{::After prolonged use of a range, high floor
mmperatures m W result and many floor
cox.ering_ will not withstand this kind of use.
Nex.er install flae rang.e oxer vinyl tile or
linoleum that cannot wiflastand such type
of use. Nex.er install it dixecflv ox.er inmrior
kitchen carpeting.
q_{::Do not leax.e children alone or unatmnded
where a rang_ is hot or in operation. They
could be seriously burned.
;f; Do not allow anyone m climb, stand or hang
on the ox.en doox, storage drawex, wamfing
drawer or cookmp. They could damage the
rang.e and ex.en tip it ox.er, causing severe
personal ir_m%
CAUTION: mmsofinmres,,o
children should not be stored in cabinets
above a rang_ or on tim backsplash of a
rang_---xhildren climbing on the rang.e
m reach items could be seriously injured.
;;; Fox your safety, never use your appliance
fox wanning or heating the room.
_;;Nex,er wear loose fitting or hanging garments
while using the appliance. Be careflfl when
reaching fox items stored iracabinets over the
rang_. Flammable mamcial could be ignimd
if 1)rought in contact with flame or hot ox.en
snrP,tces and m W cause sex.exe l)nrras.
_i:,:Do not store flammable mamrials ira an
oven, a range smrag.e drawex, a wanning
drawer or near a cookmp.
_:;Do not store or use combustible materials,
gasoline or other flammable vapors and
liquids in rixe vicinity of this or any oflxer
appliance.
_{::Do not let cooking gxease or other
flammable matecials accumulam ira or
near the rang_.
_;):,iDo not use wamr on grease fires. Nex.er pick
up a flaming pan. Turn the controls off2
Smother a flaming pan on a surface burner
by cox.ering the pan completely with a
well-fitting lid, cookie sheet or fiat uay.
Use a multi-puq)ose dry chemical or
foam-type fire extinguisher
Flaming grease outside a pan can be put
out by cox.exJng it with baMng soda ox;
if available, 1)y using a mnld-pnrpose dry
chemical or foam-type fire extinguishen
Flame ira the oven can be smothered
completely by closing the ox.en door or
drawer and mining flxe conuol to off" or 1)v
using a mulf-puq)ose dU chemical or foam-
type fire extinguisher
;;; i,et the 1)umer grams and oflaer surfaces
cool before ranching them or leaving flxem
where childi.en can x.each them.
_{_;Never block the x.ents (air openings) of the
rang.e. They provide tim air inlet and outlet
that are necessa U for flxe rang_ to operam
I)ioperly with conect combustion. 'Air
opening_ are locamd at the rear of the
cooktop, at the top and 1)ottom of the oven
doox, and at the 1)ottom of rixe rang.e under
rixe storag_ drawen
_{_;Large scrawhes or impacts to glass doors can
lead to 1)roken or shattex.ed glass.
4
WARNING!
SURFACEBURNERS
Use proper pan size--avoid pans that are unstable or easily tipped. Select cookware having flat bottoms
large enough to cover burner grates. Toavoid spillovers, make sure cookware is large enough to contain
the food properly. This will both save cleaning time and prevent hazardous accumulations of food, since
heavy spattering or spillovers lefl on range can ignite. Usepans with handles that can be easily grasped
and remain cool
_t{;;Always use the LITE position when igniting
fl_e top burners and make sure the humers
hm_ ignited.
;_i:,:Nex_r leave fl_e surface burners unattended
at high flame settings. Boilox_rs cause
smoking and greasy spillox_rs that may
catch on fire.
q]{_;Adjust tile top burner flame size so it
does not exmnd hevond tile edg_ of the
cookwaie. Excessive flame is hazardous.
;_i:,:Use only d U pot holders--moist or damp
pot holders on hot surfaces may result in
1)tn_ls from smam. Do not let pot holders
come near open flames when lifting
cookware. Do not use a towel or other
hulky cloth in place of a pot holden
;_i:':_4]len using glass cookware, make sine it
is designed for toi>of-rang> cooking.
;_i:,:To minimize the possihility of hums,
ignition of flammable materials and spillag>,
turn cookware handles toward the side oi
hack of fl)e rang> without extending ox>r
adjacent hni_lers.
_{;_Careflllly watch fbods heing flied at a hiOi
flame setting.
_i_Always heat fi_t slowl> and watch as it heats.
_{;_Do not leme any imms on the cookmp. Tile
hot air from tile xent m W ignim flammable
imms and will increase pressure in closed
containers, which may cause fllem m hnrst.
;f; If a comhinafion of oils or Pats will be used in
flTing, stir mg>ther hefote heating or as fats
meh slowly
_{;_Use a deep fat thermomemr whenexer
possihle to pre_ent oveflleadng fl_theyond
the smoking point.
;fi:,iUse fl_e least possible amount of fat for
effective shallow or deep-fat flTing. Filling
the pan too fllll of Pat can cause spillox>rs
when food is added.
:fi:,:'_&'hei1flaming foods are under d_e hood,
Um_ the fan off. Tile fan, if operating, may
spread the flames.
_::Do not use a wok on the cooking surface
if the wok has a ronnd metal ring that is
placed ox_i tile burner gxam m support
the wok. This ring act,s as a heat trap,
which m W damag_ tile humer grate, and
hurner head. Also, it m W cause fl_e burner
to work impiopefl> This may cause a
carhon monoxide lexel aboxe that
allowed hy cnlTent standards, resulting
in a heahh hazard.
_i:,iFoods for flTing should be as dU as possible.
Frost on flozen foods or moisture on flesh
foods can cause hot fat to hnbble up and
ox>i tile sides of tile pan.
_:_Never tW to move a pan of hot fat, especially
a deep fat flTer Wait until the fat is cool.
_::Do not leaxe plastic imms on tile cooktop--
flley m W meh if left too close m file xent.
;_;Kee I) all plastics aw W flom the surface
hnrners.
;_i:,:To ax_id the possibility of a burn, always he
certain that tile controls tbr all burners are
at the OFF position and all grates are cool
hefore attempting to remo\_ fllem.
;fi:,iIf rang> is located near a windo_, do not
hang long curtains that could hlow ox_r the
surface burners and create a fire hazard.
q_{_:If you smell gas, turn off tile gas to tile range
and call a qualified service technician. Nex>i
use an open flame to locam a leak.
_):Alwws turn the surface burner conuols off
hefore removing cookware.
;_i:,:Do not lift tile cookmp. I,ifting the cookmp
can lead m damag> and improper operation
of tile rang_.
IMPORTANTSAFETYINFORMATION.
READALLINSTRUCTIONSBEFOREUSING.
COOKMEATANDPOULTRYTHOROUGHLY...
Cook meat and poultry thoroughly--meat to at leastan INTERNALtemperature of 16001:and poultry to
at least an INTERNAL temperature of 180°ECooking to these temperatures usually protects against
foodbome illness.
OVEN
Stand away from the range when opening the door of a hot oven. Thehot air and steam that escape
can cause bums to hands, face and eyes.
_i:,_Do not use dm oven for a storage area.
Imms stored in tile oxen can ignim.
_i:':Kee I) tile oven flee flom glease buildup.
_i:,iPlace the oxen shehes in tile desired
position while tile oxen is cool.
_i:,iPulling out the shelf m the stop-lock is a
comenience in lifting heaxy' foods. It is also
a p_ecaufion agvdnst bm_s flom touching
hot surfaces of file door or oxen walls. Tile
lowest position is not designed to slide.
;_?:':Do not heat unopened food containers.
Pressure could build up and tile container
could burst, causing an i*_nlEv.
_i:,:Nexer use ahlminum foil m line tile oxen
bottom. Improper use of foil could start
a fire and iesult in hi01 carbon monoxide.
_7_:_Do not use aluminum foil an_vhere in tile
oven except as desclibed in d)is manual.
Misuse could result in a fire hazard or
damage m tile range.
_{:;When using cooking or roasdng bag:s in the
oxen, follow tile manu£_culrer's directions.
_i:,:Do not use your oxen to dU newspapers.
If oxerheated, they can catch fire.
_i:,:Use only glass cool<ware that is
iecommended for use in gv_soxens.
_i:,:Always remoxe tile broiler pan from range
as soon as you finish broiling. Giease left in
the pan can catch fire if oxen is used without
removing tile grease from the broiler pan.
_fi:,iWhen broiling, if meat is mo close m fl)e
flame, file fi_tm W ignim. Trim excess fat to
plexent excessive flaiemps.
_{:_Make sine tile broiler pan is in place
coi_ecfly m reduce file possibility of
giease fires.
_:_If you shou]d haxe a grease fire in the broiler
pan, press tile CLEAR/'OFFpad, and kee I)
file oven door closed to contain file until
it burns out,
_i:,iFor safety and proper cooking performance,
always bake and broil with tile oxen door
closed.
vvvvw.GEAppliances.com
SELF-CLEANINGOVEN
E:,:Be sure to wipe off excess spillag_ be%re
self-cleaning operation.
_:;Before self-cleaning the oven, remo_
tile shelx_s, broiler pan, grid and other
cookware.
E:,:Do not clean file door gasket. Tile door
gasket is essential for a g_od seal. Care
should be taken not to rub, damag_ or
mow tile gasket.
_{:;Clean only parts lismd in this Owner's
Manual.
_i:,:ff tile self-<'leaning mode n/alflmctions,
tnFfl tile oxen off and disconnect tile power
supply. Haxe it serviced by a qualified
technician.
E:,:Do not use oxen cleaners. No commercial
oxen cleaner or oxen liner of aW kind
should be used in or around any part of
tile oxen. Residue flom oxen cleaners will
damage the inside of tile oxen when tile
self-dean cycle is used.
READANDFOLLOWTHISSAFETYINFORMATIONCAREFULLY.
SAVETHESEINSTRUCTIONS
Usingthegas surfaceburners.
Throughout this manual, features and appearance may vary from your model.
Before Lighting a Gas Burner
iJi::Drip pans are supplied with your range;
thex should be used at all times.
iJi::Make sure all burneis are ill place.
}NMake stlre all grates (m the range are
properl) placed before using any burnei:
After Lighting a Gas Burner
iJi::Do not operate the burner tin" an
extended period of time without
cookware on the grate. The finish on
the grate ma,v chip without cookware
to absorb the heat.
::Ji::Be sure tile burneis and grates are cool
before you place your hand, a pot holdei;
cleaning cloths or other mamrials
(Ill th elll.
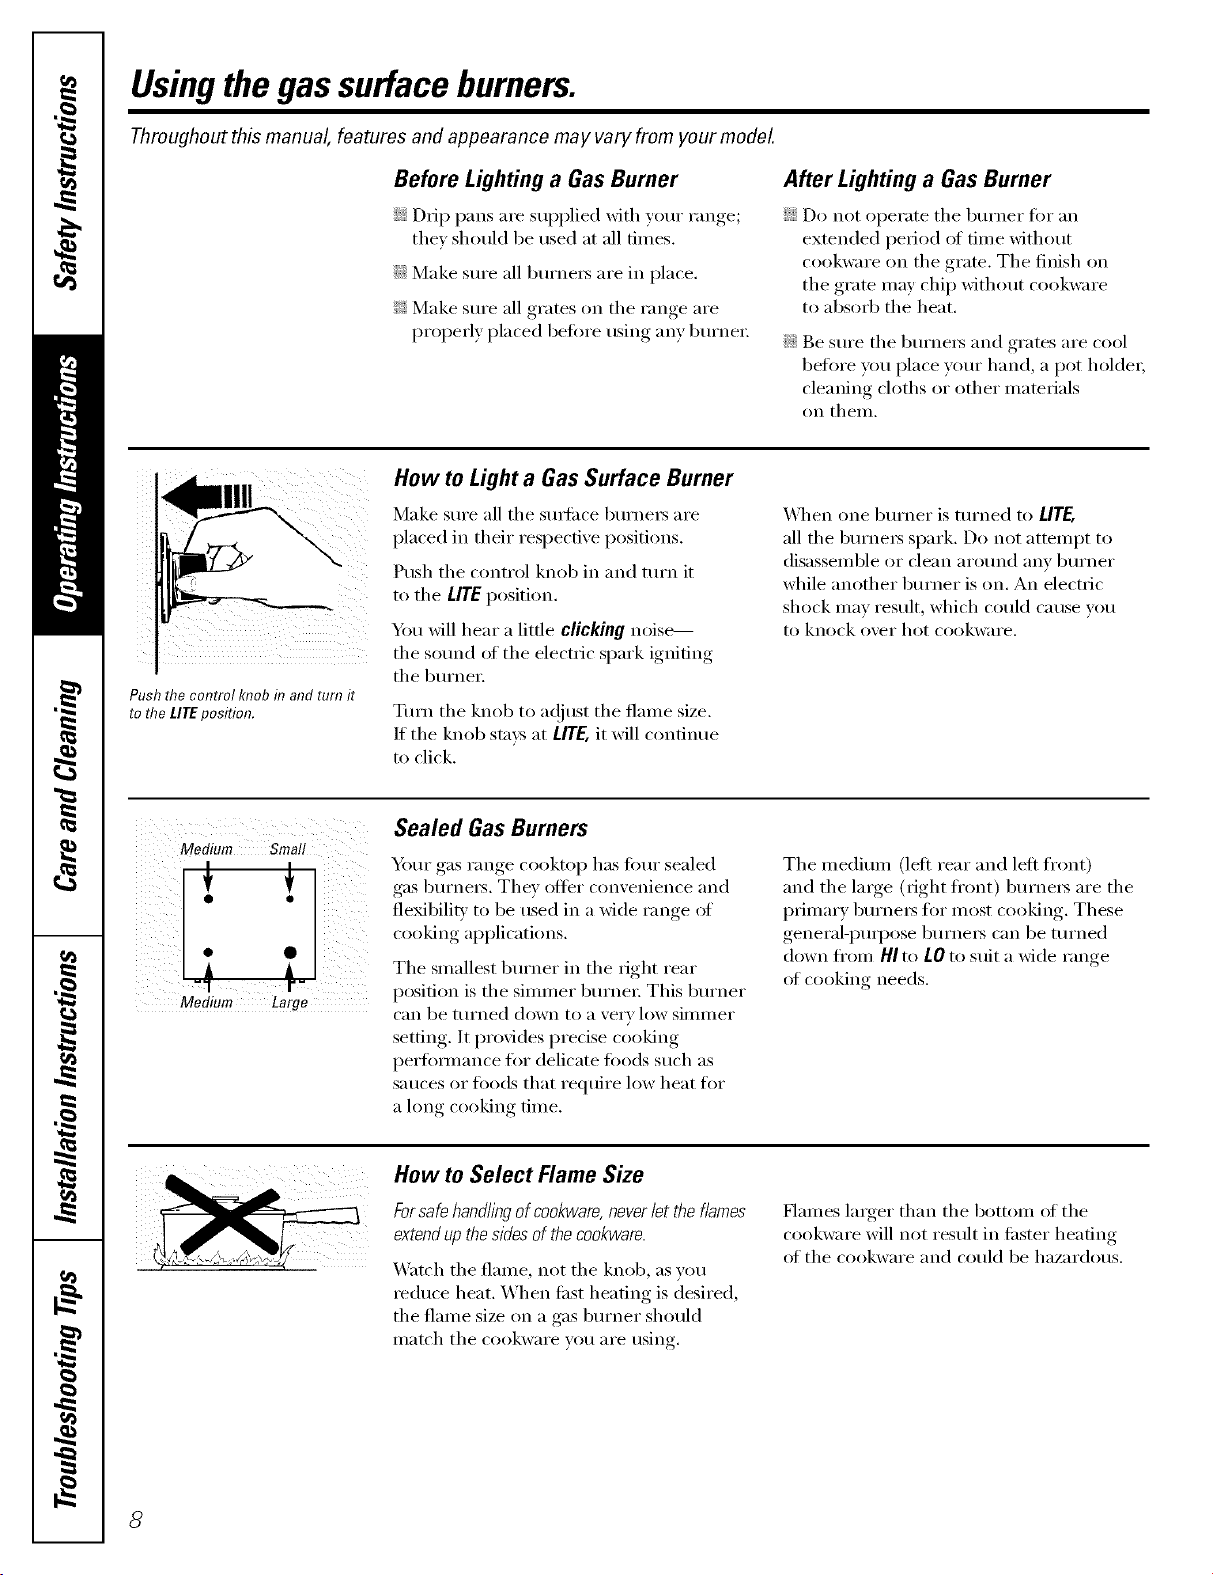
Push the control knob in and turn it
to the LITEposition.
How to Light a Gas Surface Burner
Make sure all tile surii_ce burnei_ are
placed ill their respectixe positions.
Push tile control knob ill and turn it
to tile L/TE position.
Y)u will hear a little clicking noise---
tile sound of tile electric si)ark igniting,,
tile burnei;
Turn tile knob to a({itlSt tile flame size.
If the knob stm_ at UTE, it will continue
to click.
_]/en one burner is turned to UTE,
all the burnei_ spark. Do not attempt to
disassemble or clean around any burner
while another burner is on. An electric
shock may result, which could cause you
to knock over hot cookware.
Medium Small
Medium Large
Sealed Gas Burners
Your gas range cookto I) has Ibm" sealed
gas burnei_. They otter convenience and
fleMbilitv to be used ill a wide range of
cooking applications.
The smallest burner ill the fight rear
position is tile simmer burnei; This burner
can be tllrned down to a very low SilllI//er
setting. It provides predse cooking
perfimnance ti)r delicate foods such as
sauces or t0ods that require low heat tot
a long cooking time.
Tile mediun/ (left rear and left fl'ont)
and tile laIge (right fl'ont) burnei_ are tile
primal y burnei_ fi)r most cooking. These
general-pull)ose burnei_ can be turned
down fl'()m HI to LO to suit a wide range
ot cooking needs.
How to Select Name Size
Forsafe handlingof cookware, neverlet the flames
extend upthe sides of the cookware.
_'at('h tile flame, not tile knob, as you
Ie(luce heat. When first heating is desired,
tile flame size on a gas burner should
match the cookware you are using.
Iqames larger than tile bottonl of tile
cookware will not result ill tipster heating
of tile cookware and could be hazardous.
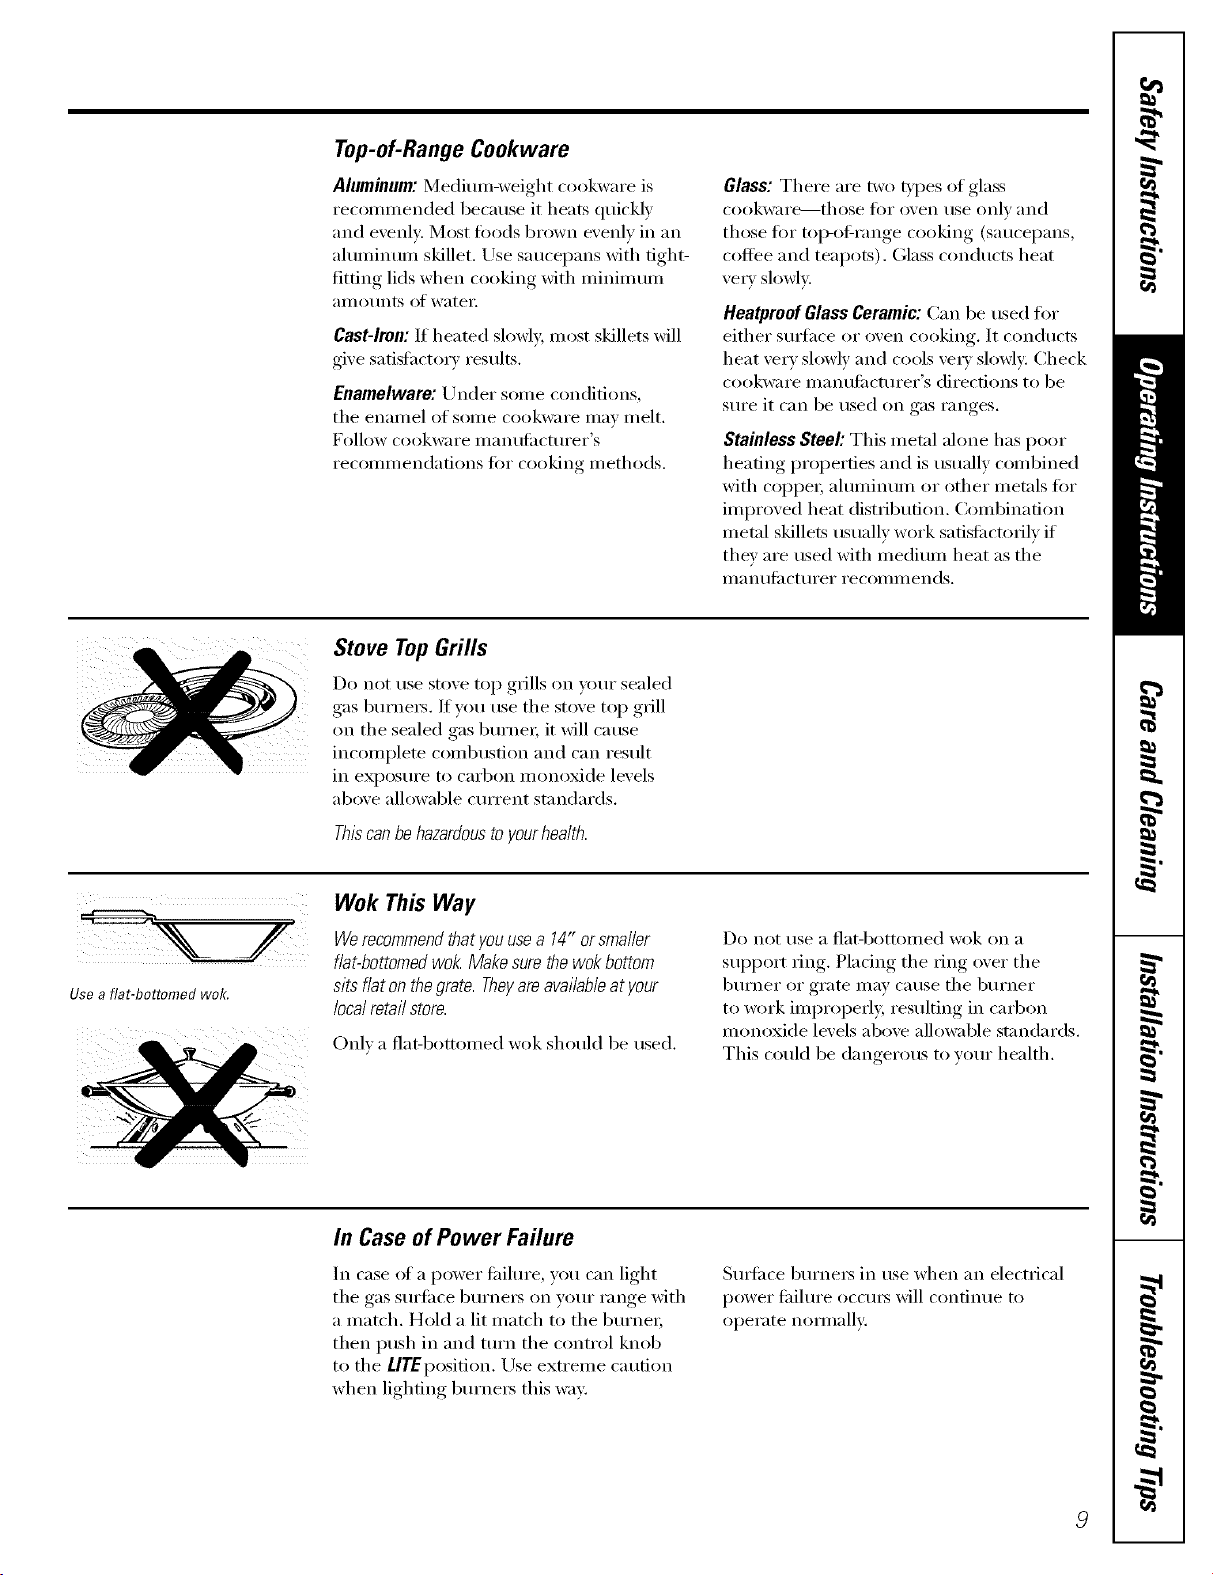
Top-of-Range Cookware
Aluminum: Mediun/-weight cookware is
recommended because it heats quickly
and evenlv. Most toods brown evenly in an
aluminum skillet. Use saucepans with tight-
fitting lids when cooking with minimmn
}lIllO/lntN 0][ watex:
Cast-Iron: If heated slowly, most skillets will
give satistactorv results.
Enamelware: Under some conditions,
tile exlaxllel of SOille cookw;ix'e ill}iv x/xelt.
Follow cookwax'e Xll_lXl/liilCtlxrer's
recommendations fin" cooking methods.
Glass: There are two types of glass
cookwax'e--those tot ovexl tlse only and
those for u_i>of-range cooking (saucepans,
coffee and teapots). Glass conducts heat
vexwslowly
Heatproof Glass Ceramic: Can be used fiw
either suxthce or oven cooking. It conducts
heat vex'}'slowly and cools vex_ slowly: Check
cookware illant/lilCttlrer's directions to be
sure it can be used on gas ranges.
Stainless Steel: This metal alone has poor
heating properties and is usually combined
with coppex; aluminum or other metals fin"
improved heat distribution. Combination
metal skillets usually work satisfi_ctorilv if
they are used with medium heat as the
IIla n/llil ct ill'el" recolI/IIlends,
Stove Top Grills
Do not use stove top grills on your sealed
gas burnex_. If you use tile stove top grill
on tile sealed gas burnex; it will cause
incomplete combustion and can result
ill expos/ire to C_lrbon ii/onoxide levels
above allowable cmTent standards.
Thbcanbehazardoustoyourhealth.
Use a flat-bottomed wok.
Wok This Way
Werecommendthatyouusea 14"orsmaller
flat-bottomedwol_Makesurethewokbottom
sitsflatonthegrate.Theyareavailableatyour
localretailstore.
Onl) a fiat-bottomed wok should be used.
Do not rise a flat-bottollled wok Oil _1
support ring. Pladng tile ring over tile
burner or grate may cause tile burner
to work improperl> resulting in carbon
monoxide levels above allowable standards.
This could be dangerous to your health.
In Case of Power Failure
In case _ff a power fifilure, you can light
tile gas sm'fi_ce burnex_ on wmr range with
a match. Hold a lit match to tile burnex;
then push in and ttlrn tile control knob
to tile LlTEposition. Use extreme caution
when lighting bm'nex_ this way.
Smti_ce bm'nex_ in use when an electxical
power fifilm'e occm_ will continue to
operate noli/lallv;,
Usingthe ovencontrols.
Throughout this manual, features and appearance may vary from your model
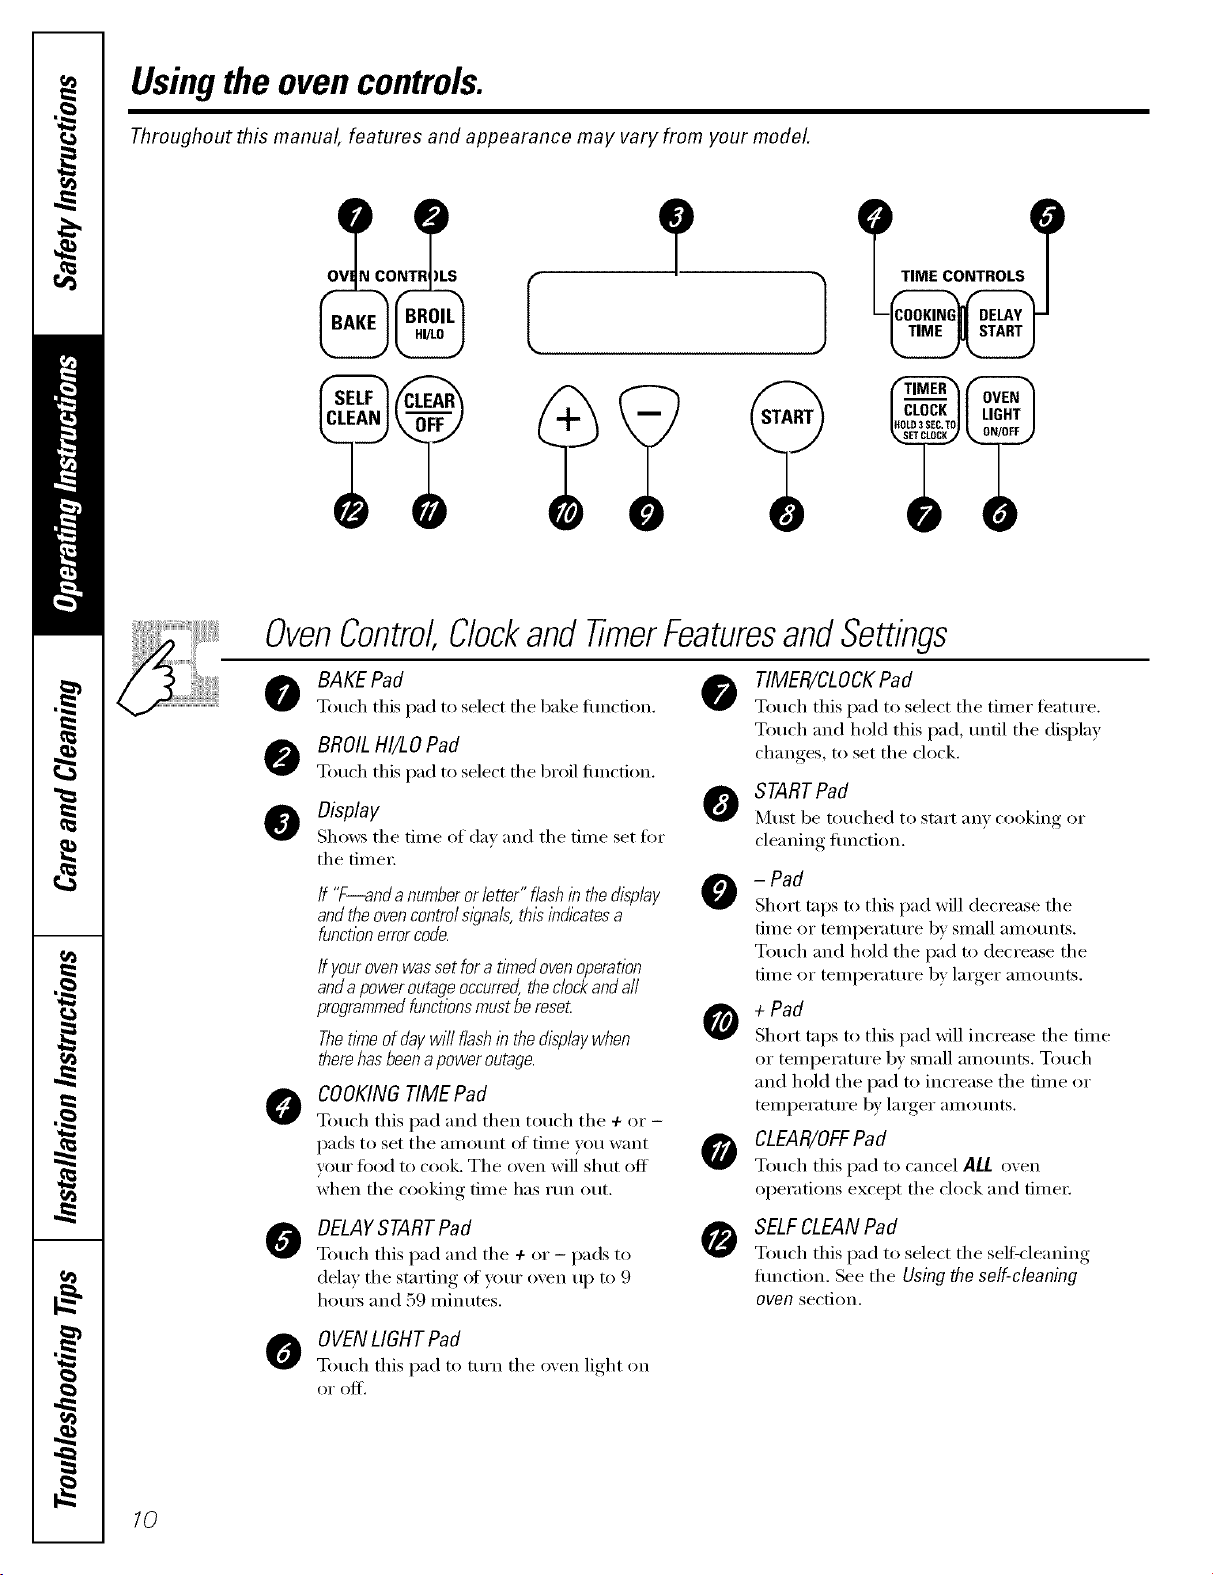
OvenControlClockandTimerFeaturesandSettings
BAKE Pad @
Touch this pad to select tile bake flmcfion.
BROIL HI/LO Pad
Touch this pad to select die broil function.
Display
Shm_s tile time of (la_ and tile time set fi:,r
tile time_:
O
If "F---andanumberorletter"flashin thedisplay
andtheovencontrolsl)na& thisindicatesa
functionerrorcode.
If yourovenwassetfora timedovenoperation
andapoweroutageoccurred,theclockandall
programmedfunctionsmustbereset
ThetlYneofdaywill flashb thedisplaywhen
therehasbeena poweroutage.
COOKINGTIMEPad
Touch this pad and then touch tile + or -
pads to set tile amount of time you want
your toed to cook. The oven will shut off
when the cooking time has mn out.
TIMER/CLOCKPad
Touch this pad to select tile tinier teatuI'e.
Touch and hold this pad, tmtil tile display
changes, to set the clock.
STARTPad
Must be touched to start an) cooking or
cleanim, fimction.
- Pad
Short taps to this pad will decrease tile
time or temperature by small amounts.
Touch and hold the pad to decrease the
time or temperature by linger alnounts.
+ Pad
Short taps to this pad will increase the time
or temperature by small amounts. Touch
and hold the pad to increase the time or
teml)erature b)' linger alnounts.
CLEAR/OFFPad
Touch this pad to cancel ALL o'_en
operations except the clock and fime_:
0
DELAYSTARTPad
Touch this pad and tile + or - pads to
delay tile starting of your oven up to 9
hom_ and 59 minums.
0
SELFCLEANPad
Touch this pad to select tile selfkleaning
flmction. See tile Using the self-cleaning
oven section.
OVENLIGHTPad
Touch this pad to mrn tile oven light on
0I" OIC[.
10
Usingthe oven.
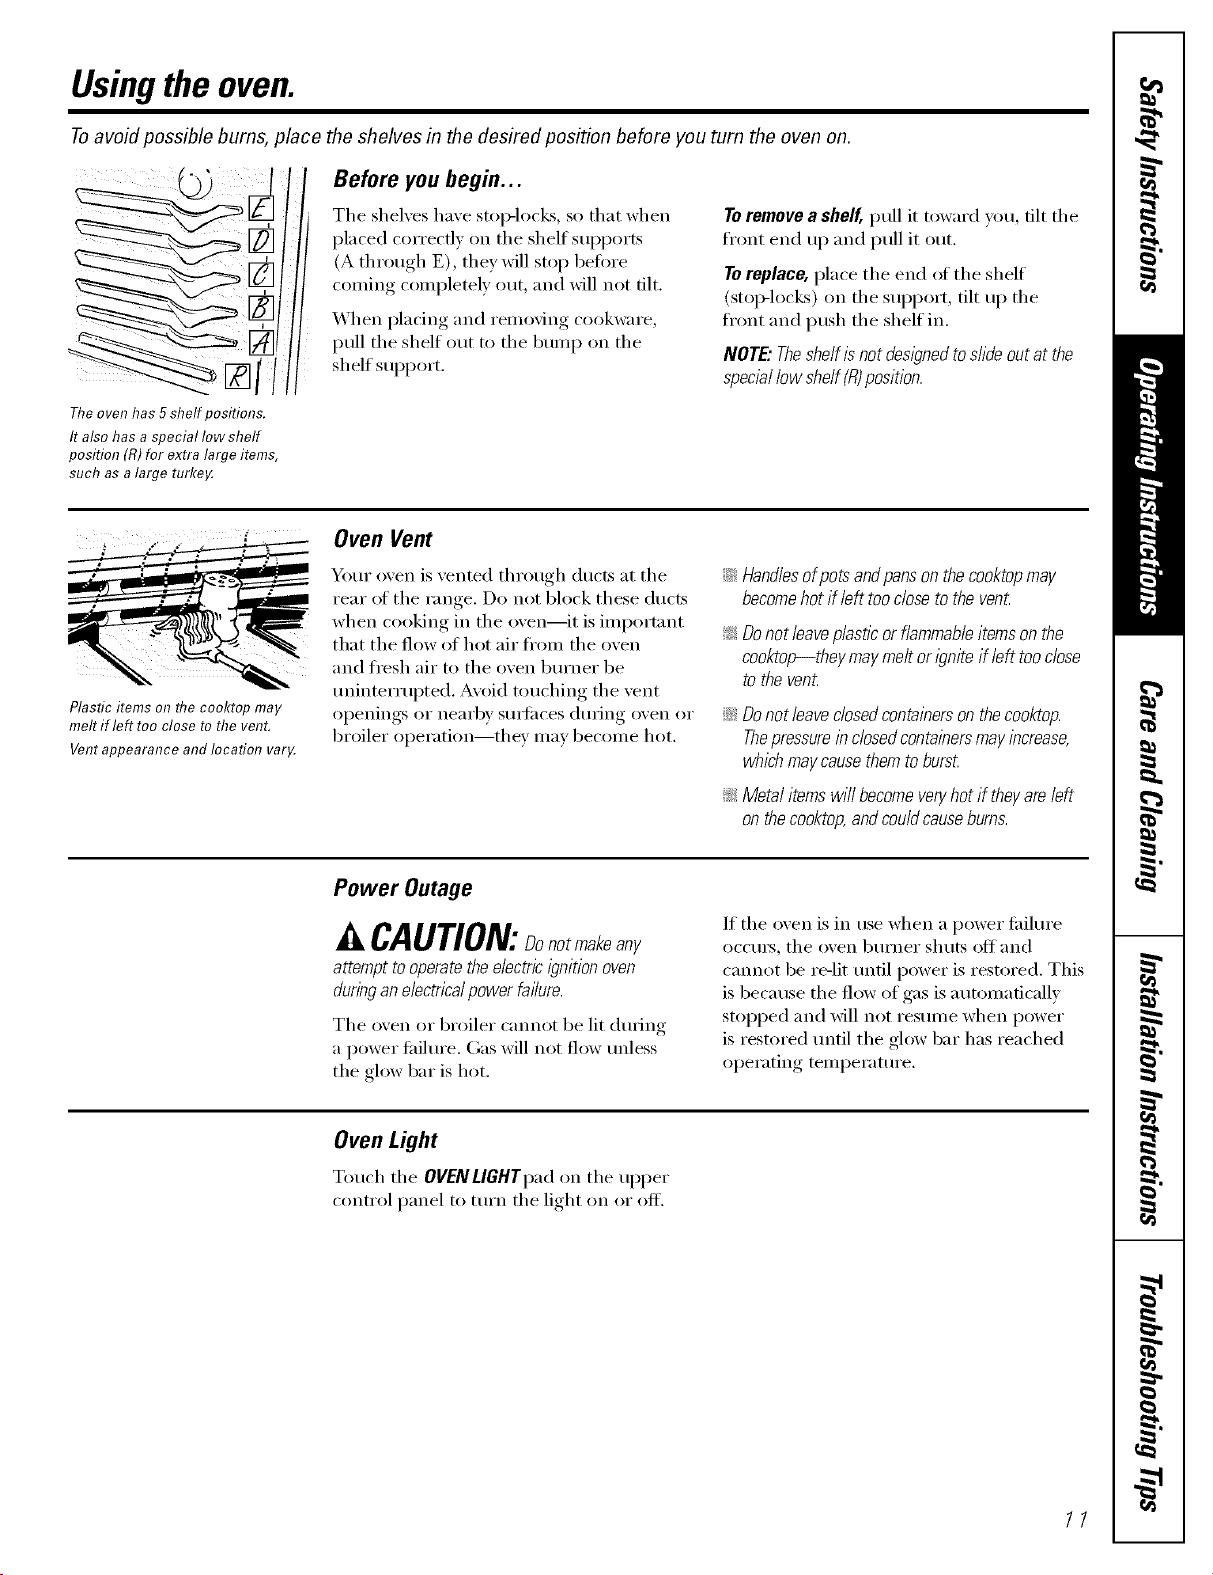
Toavoid possible bums, place the shelves in the desired position before you turn the oven on.
Ttieoven has 5shelf positions.
It also has a special low shelf
Before you begin...
The shelves have stop-locks, so that when
placed correctly oil the shelf supports
(A through E), they will stop betore
coming complemly otlt, }lllcl will not flit.
When placing and removing cookware,
pull the shelf out to the bump on the
shelf supi)ort.
Toremove a shelf, pull it toward you, flit the
front end up and pull it out.
Toreplace, place the end of the shelf
(stop-locks) on the SUl)l)O_t, tilt up the
fl'ont and push the shelf in.
NOTE: Theshelf is not designedtoslide out at the
speciallow shelf (R)position.
position (R)for extra large items,
such as a large turke_
Plastic items on ttie cooktop may
melt if left too close to ttie vent.
Ventappearance and location var_
Oven Vent
Your (wen is vented through ducts at the
rear of the range. Do not bh)ck these ducts
when cooking in the oven--it is important
that tile flow of hot air fl'om the oven
and flesh air to the oven burner be
tminterrul)ted. Avoid touching the vent
openings or nearby Stli]ilces during oven or
broiler operation--they may become hot.
::Ji::Handlesofpotsandpansonthecooktopmay
becomehotif left toodosetotheven£
_: Donot leave plastic or flammableitems on the
cookto/>-they maymelt or ignite if left too dose
to the venL
::Ji::Donotleaveclosedcontainersonthecooktop.
Thepressurelbc/osedcontainersmayincrease,
whichmaycausethemtoburs_
_: Metalitemswi//becomeveryhotif theyareleft
onthecooktop,andcouldcauseburns.
Power Outage
CAUTION:Donotmakeany
attempt tooperate the electric ignition oven
during an electricalpower failure.
The oven or broiler (-mmot be lit (hwing
a power fifilm'e. Gas will not flow tmless
the glow bar is hot.
If tile oven is in use when a power fifilm'e
occm_, the oven burner shuts off and
cmmot be re-lit tmfil power is restored. This
is because the flow of gas is automatically
stopped and will not resmne when power
is restored until the glow bar has reached
operating temperatm'e.
Oven Light
Touch the OVENLIGHTpad on the upper
control panel to mrn the light on or off.
11
Usingthe oven.
If your model has a door latch, do not lock the oven door with the latch during baking or roasting.
Thelatch is used for self-cleaning only.
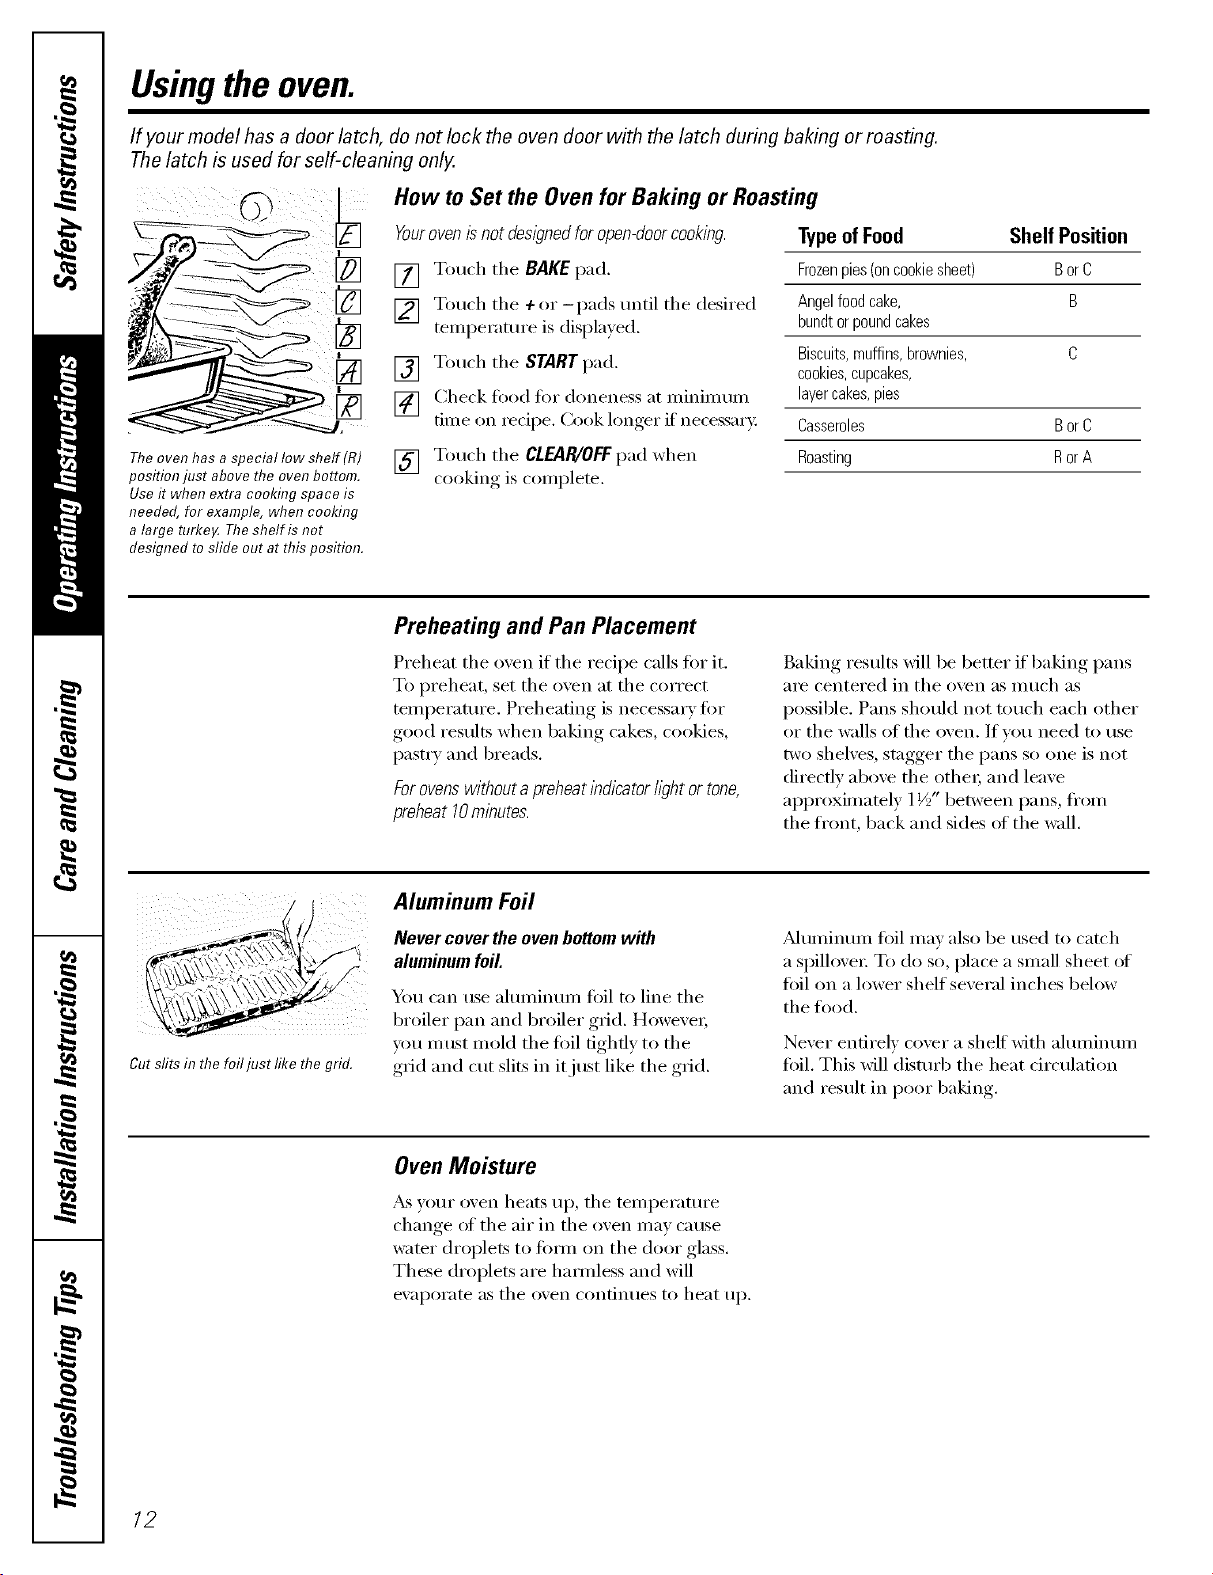
How to Set the Oven for Baking or Roasting
Yourovenis not designedfor open-doorcooking.
[] Touch the BAKEpad.
[] Touch tile ÷ or-pads until tile desired
temperature is displa)ed.
[] Touch tile START pad.
[] Check fi_od fi)r aloneness at minimum
time on recii)e, Cook longer, if necessar_ ,
Typeof Food Shelf Position
Frozenpies(oncookiesheet) BorC
Angelfoodcake, B
bundtorpoundcakes
Biscuits,muffins,brownies, C
cookies,cupcakes,
layercakes,pies
Casseroles BorC
Roasting RorATheoven has a special low shelf(R)
position just above the oven bottom.
Useit when extra cooking space is
needed, for example, when cooking
a large turke_ The shelf is not
designed toslide out at this position.
[] Touch tile CLEAR/OFFpad when
cooking is complete.
Preheating and Pan Placement
Preheat tile oven if tile recipe calls fi)r it.
To preheat, set tile oven at tile correct
temperature. Preheating is necessmw tot
good results when baking cakes, cookies,
past_ T and breads.
Forovens without a preheatindtcator/l_lhtor tone,
preheat 10minutes.
Baking results will be better if baking pans
aI'e centei'ed in tile oven as Illtlch as
possible. Pans should not touch each other
or the wails of the oven. If you need to use
two shelves, stagger the pans so one is not
directly above the other; and leave
approximately 1½" between pans, fl'om
the front, back and sides ot the wall.
Cutslitsin the foiljust likethegrid.
Aluminum Foil
Never cover the oven bottom with
aluminum foil
You can use almnimm/ foil to line tile
broiler pan and broiler grid. Howexe_,
you must rooM tile fi)il tightly to tile
grid and cut slits in it just like the ,Tid
_Muminmn fi)il may also be used to catch
a spillove_: To do so, place a small sheet of
fifil on a lower shelf several inches below
the tood.
Never entirely cover a shelf with ahmfinmn
fifil. This will disturb the heat circulation
and result in poor baking.
Oven Moisture
_s w>ur {wen heats up, tile temperatm'e
change of the air in the oven may cause
water droplets to titan on tile door glass.
These droplets are hamfless and will
evaporate as tile oven continues to heat up.
12
If your model has a door latch, do not lock the oven door with the latch during broiling.
Thelatch is used for self-cleaning only.
How to Set the Oven for Broiling
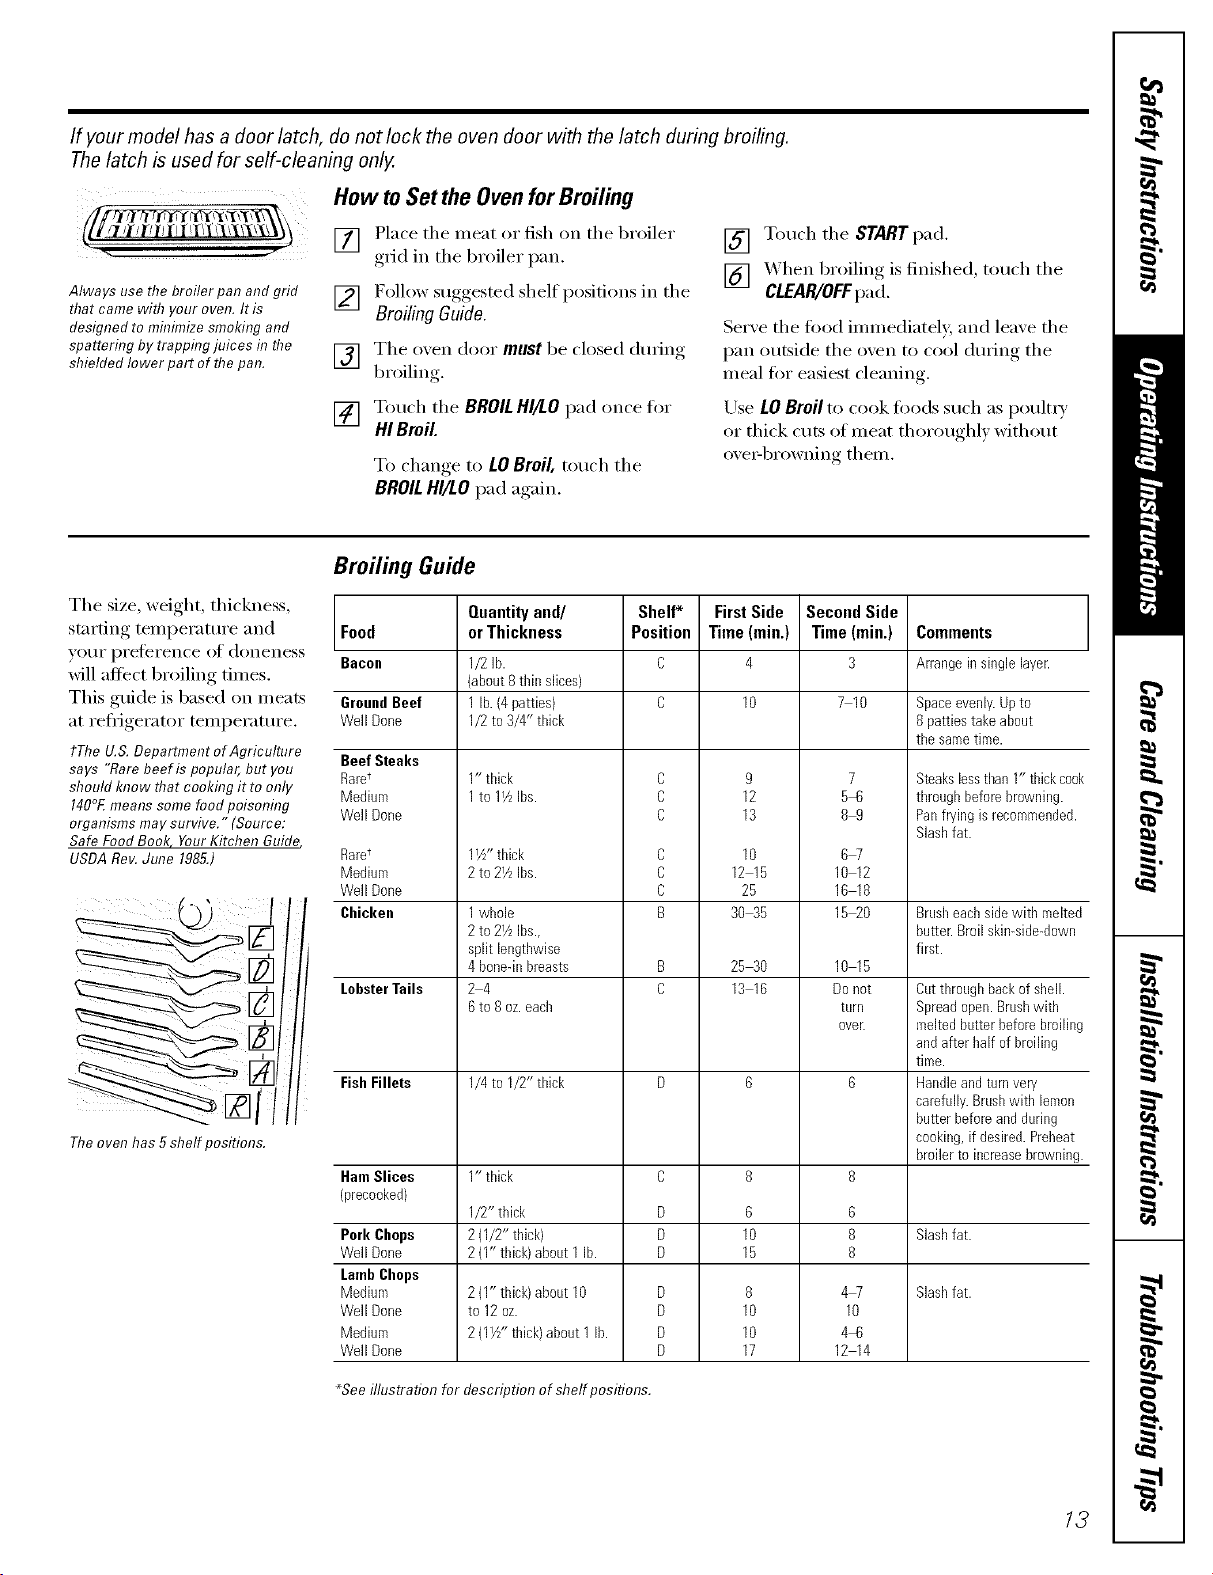
Always use the broiler pan and grid
that came with your oven. It is
designed to mflfimizesmoldng and
spatterflTgby trappflTgjuices f17the
shielded lower part of thepan.
[] Place the meat or fish on the broiler
grid in the broiler pan,
[] Follow suggested shelf positions in the
Broiling Guide.
[] The o_en door must be closed during
broiling
[] Touch the STARTpad.
[] _,_hen broiling is finished, touch the
CLEAR/OFFpad.
Ser_e the food immediately and lea_e the
pan outside the o',en to cool (lucino_ the
meal fiw easiest cleaning.
[]
Touch the BROILHI/LOpad once for
HI Broil
To change,to LOBroil, touch the
BROILHI/LOpad again.
Use LO Broil to cook fi)ods such as poultxy
or thick cuts of meat thoroughl) without
ox e>browning them.
Broiling Guide
The size, weight, thickness,
starting, temi)erattu'e and Food
your preference ot doneness Bacon
will affect broiling times.
This guide is based on meats GroundBeef
at refligerator temperature. Well Done
tThe U.& Department of Agriculture Beef Steaks
says "Rarebeef is popular, but you RarU
should know that cooking it to only Medium
140°Emeans some food poisonflTg Well Done
organisms may survive." (Source:
Safe FoodBook YourKitchen Guide
USDARev. June 1985.)
Theoven has 5shelf positions.
RaFU
Medium
Well Done
Cbicken
LobsterTails
FishFillets
HamSlices
3recooked}
Pork Chops
Well Done
LambChops
Mediurn
Well Done
Mediurn
Well Done
Quantityand/
orThickness
1/2lb.
(about8tbin slices)
1lb. (4 patties)
1/2to 3/4" tlfick
1" thick
1to 11/LIbs.
1V/' tldck
2 to 21/LIbs.
1whole
2 to 21/zIbs.,
split lengtbwise
4 bone-inbreasts
24
6to 8oz.eacb
1/4to I/2" thick
1" thick
1/2" tbick
2 (1/2" thick}
2 (I" tldck)about1lb.
2 (1"thick)about 10
to 12oz.
2 (IW' thick}about1lb.
Shelf*
Position
C
C
C
C
C
C
B
D
D
D
D
D
D
D
First Side
Time (rain.)
4
9
12
13
10
12 15
25
30_B
25 30
13 16
6
10
15
8
10
10
17
SecondSide
Time(rain.)
3
7 10
7
B_S
89
6W
10 12
16 18
1B_O
10 15
Donot
turn
oveL
6
8
8
4W
10
4_8
12 14
Comments
Arrangein single layer.
Space evenly. Up to
8 patties take about
the same time.
Steakslessthan1" thickcook
throughbeforebrowning.
Panfrying isrecommended.
Slashfat.
Brusheacbsidewith melted
butter.Broilskimsidedown
first.
Cutthroughbackofshell.
Spreadopen.Brushwith
meltedbutterbeforebroiling
andafter half of broiling
time.
Handleandturnvery
carefully.Brushwith lemon
butterbeforeandduring
cooking,if desired.Preheat
broilerto increasebrowning.
Slashfat.
Slashfat.
*See illustration for description of shelf positions.
13
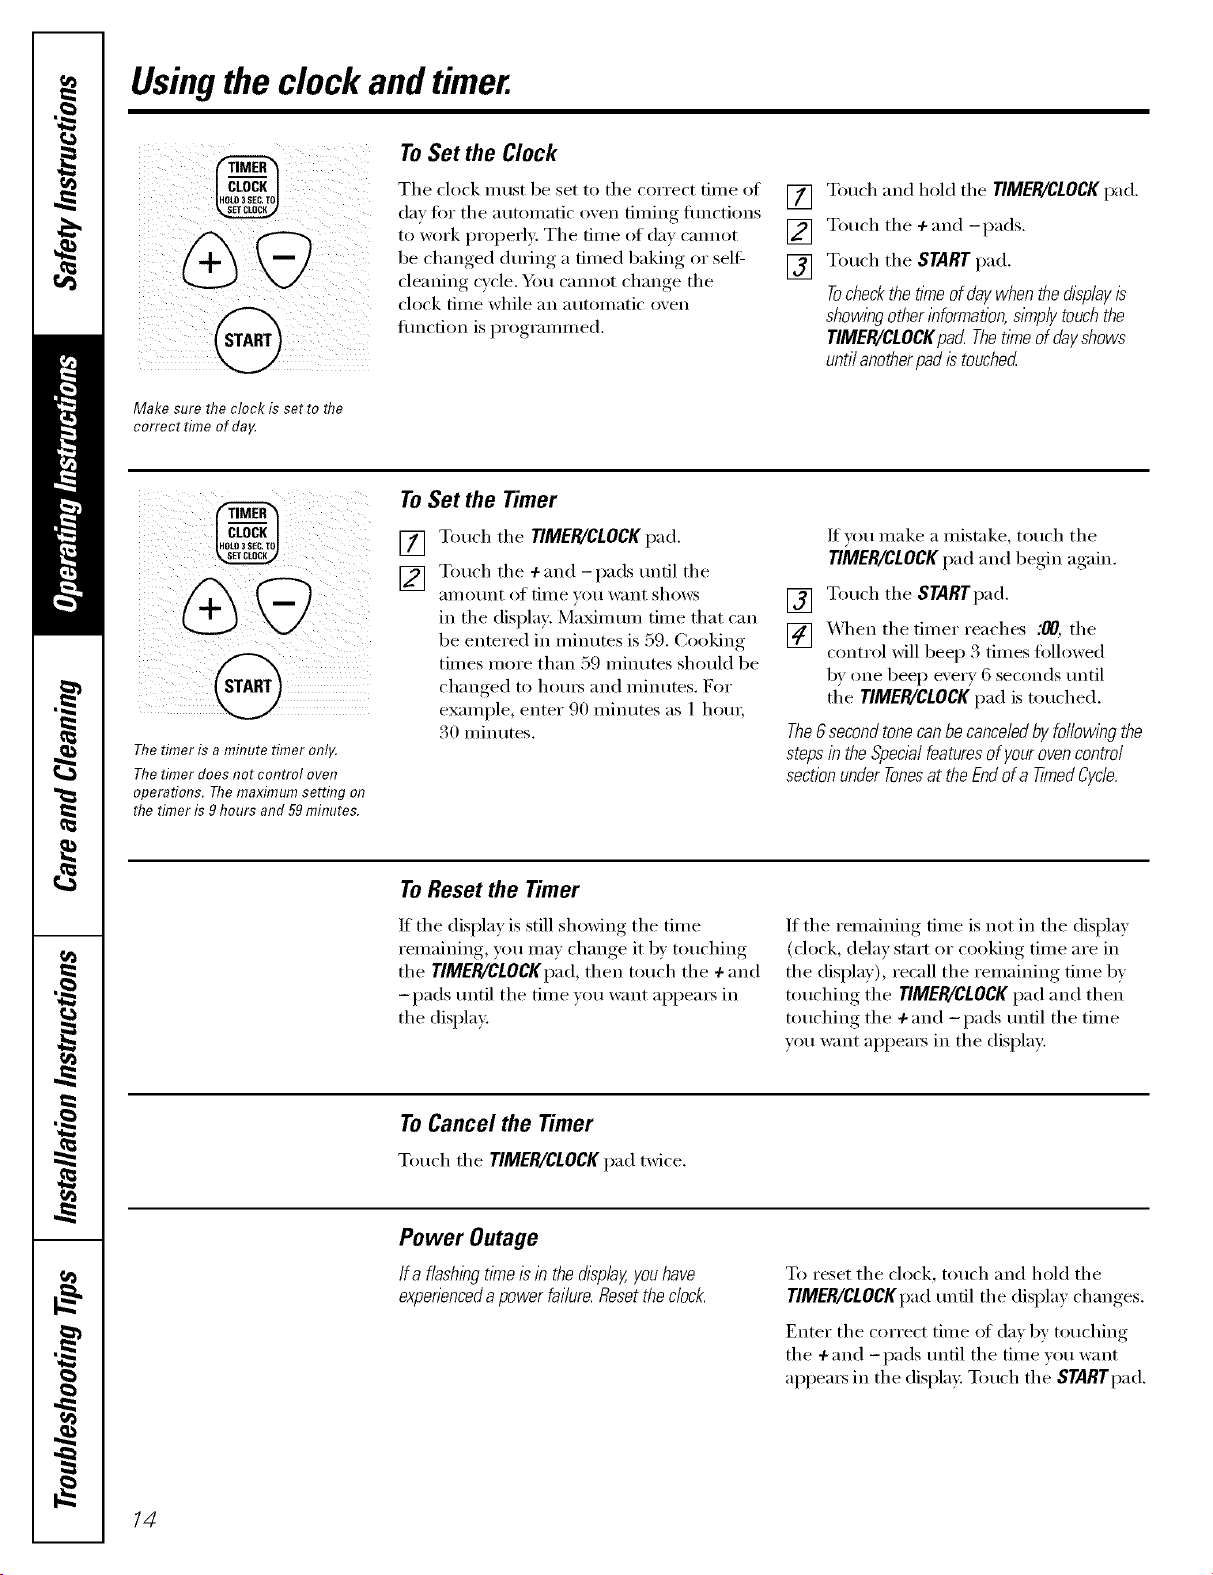
Usingthe clock andtimer.
Make sure the clock is set to the
correct time of da_
ToSet the Clock
Tile clock must be set to tile correct time ot
day fiw tile autonmtic o;en tinting flmctions
to work proi)erly. Tile time of day cmmot
be changed dtwing a timed baking or self:
cleaning cycle. _am cannot change the
clock time while an automatic oven
flmcfion is programmed.
[] Touch and hold tile TIMER/CLOCKpad.
[] Touch tile 4-and -pads.
[] Touch tile STARTpad.
Tocheckthetimeofdaywhenthedisplayis
showingotherinformation,simplytouchthe
TIMER/CLOCKpad Thetimeofdayshows
untilanotherpadistouched
Thetimer is a mflTutetimer only.
Thetimer does not control oven
operations. Themaximum setting on
the timer is 9hours and 59minutes.
ToSet the Timer
[] Touch tile TIMER/CLOCK pad.
[] Touch tile +and - pads tmtil tile
_lI/XO/xnt of tinle }()Ix V(_lIlt sho_vs
in tile display. Maim txm time that can
be entered in minutes is 59. Cooking
times more than 59 minums should be
changed to hom_ and minums. Fox"
example, enter 90 minutes as 1 horn;
30 mimxtes.
If you make a mistake touch tile
TIMER/CLOCK pad and begin again.
[] Touch tile STARTpad.
[] _._q/en tile timer reaches :00, tile
control will beep 3 times fi)llowed
by one beep every 6 seconds txntil
tile TIMER/CLOCKpad is touched.
TheGsecondtonecanbecanceledbyfollowingthe
stepsin theSpecblfeaturesofyourovencontrol
sectionunderTonesattheEndofa TimedCycle.
To Reset the Timer
If tile display is still showing tile time
remaining, you may change it 1)ytouching
tile TIMER/CLOCKpad,then touch tile 4-and
-pads tmtil tile time vou want al)l)eax_ in
the display.
If tile remaining time is not in tile display
(clock, delay start or cooking time are in
the display), recall the remaining time bv
touching tile TIMER/CLOCKpad and then
touching tile ÷ and - pads tmtil tile time
you want al)l)eax_ in tile display:
ToCancel the Timer
Touch the TIMER/CLOCKpad twice.
Power Outage
Ifa flashingt/_neisin thedisplay,youhave
expenenceda powerfailure.Resettheclock.
To reset tile clock, touch and hold tile
TIMER/CLOCKpad until tile display changes.
Enter tile correct time of day by touching
tile ÷ and -pads tmtil tile time vou want
al)l)eax_ in tile displa}: Touch tile STARTpad.
14
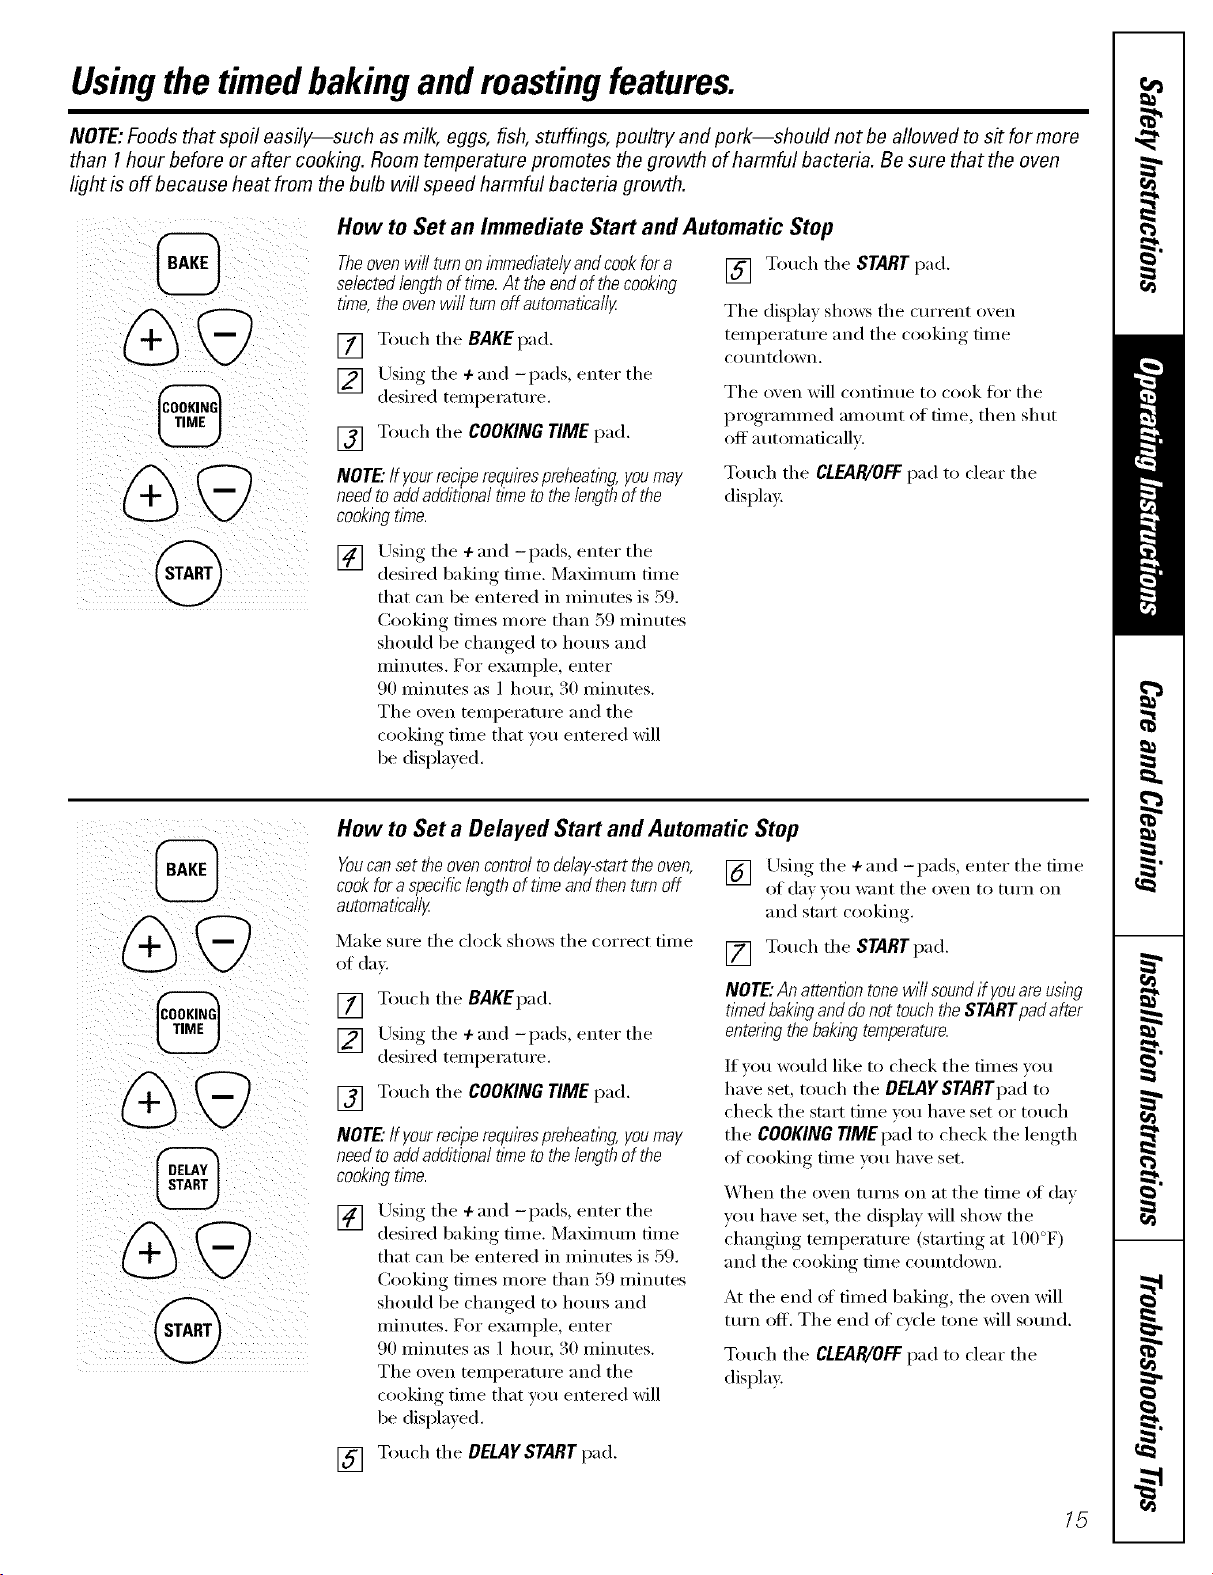
Usingthe timedbakingand mastingfeatures.
NOTE:Foods that spoil easily--such as milk, eggs, fish, stuffings, poultry and pork--should not be allowed to s# for more
than 1hour before or after cooking. Room temperature promotes the growth of harmful bacteria. Be sure that the oven
light is off because heat from the bulb will speed harmful bacteria growth.
How to Set an Immediate Start and Automatic Stop
Theoven wi// turn on/Ynmedlatelyandcook fora
selectedlength of time. At theendof the cooklbg
tlYne,the ovenwill turn off automaticallg
[] Touch the BAKEpad.
[] Using the + and -pads, enter the
desired temperature.
[] Touch the COOKING TIME pad.
[] Touch the STARTpad.
Tile displa) shows tile cmTent oven
temi)erature and tile cooking, time
co/intdown.
Tile oven will continue to cook fin" tile
programmed amount of time, then shut
off a utomaficallv,
NOTE."If yourreciperequirespreheating, youmay
needto add additional time to the lengthof the
cooklbgtime.
Touch tile CLEAR/OFF pad to clear tile
display,
[]
Using tile + and -pads, enter tile
desired baking time. Maxim um time
that can be entered in minutes is 59.
Cooking times more than 59 minutes
should be changed to houi_ and
minutes. For example, enter
90 minutes as 1 hem; 30 minutes.
Tile oven temperature and tile
cooking time that you entered will
be displayed.
How to Set a Delayed Start and Automatic Stop
Youcanset the ovencontrol todelay-start the oven,
cookfora specificlengthof time andthen turnoff
automaticallF
Make sure tile clock shows tile correct time
of day.
[] Touch tile BAKEpad.
[] Using the +and -pads, enter the
desired temperature.
[] Touch tile COOKING TIME pad.
NOTE."If yourreciperequirespreheat/bg,youmay
needto add additional time to the lengthof the
cookingtime.
[] /Jsing the + and -pads, enter the
desired baking time. Maximum time
that can be entered in minutes is 59.
Cooking times more than 59 minutes
should be changed to houi_ and
minutes. For example, enter
90 minutes as 1 hem; 30 minutes.
The oven temperature and tile
cooking time that you entered will
be displayed.
[] Llsing the + and -P ads' enter the time
of (1}1_ VO/I want tile o_,en to tlII'n on
and start cooking
[] Touch tile STARTpad.
NOTE."An attention tone will soundif youareusing
tlYnedbakinganddo not touchthe START pad after
entering the baklbgtemperature.
If you w_uld like to check tile times you
have set, touch tile DELAYSTARTpadto
check tile start time you have set or touch
tile COOKINGTIMEpad to check tile length
of cooking time you have set.
When tile (wen turns on at tile time (ff day
you have set, tile display will show tile
changing temperature (starting at 100°F)
and tile cooking time countdown.
At tile end of timed baking, tile oven will
turn off. Tile end of c_cle tone will sound.
Touch tile CLEAR/OFFpad to clear tile
display.
[] Touch tile DELAYSTARTpad.
15
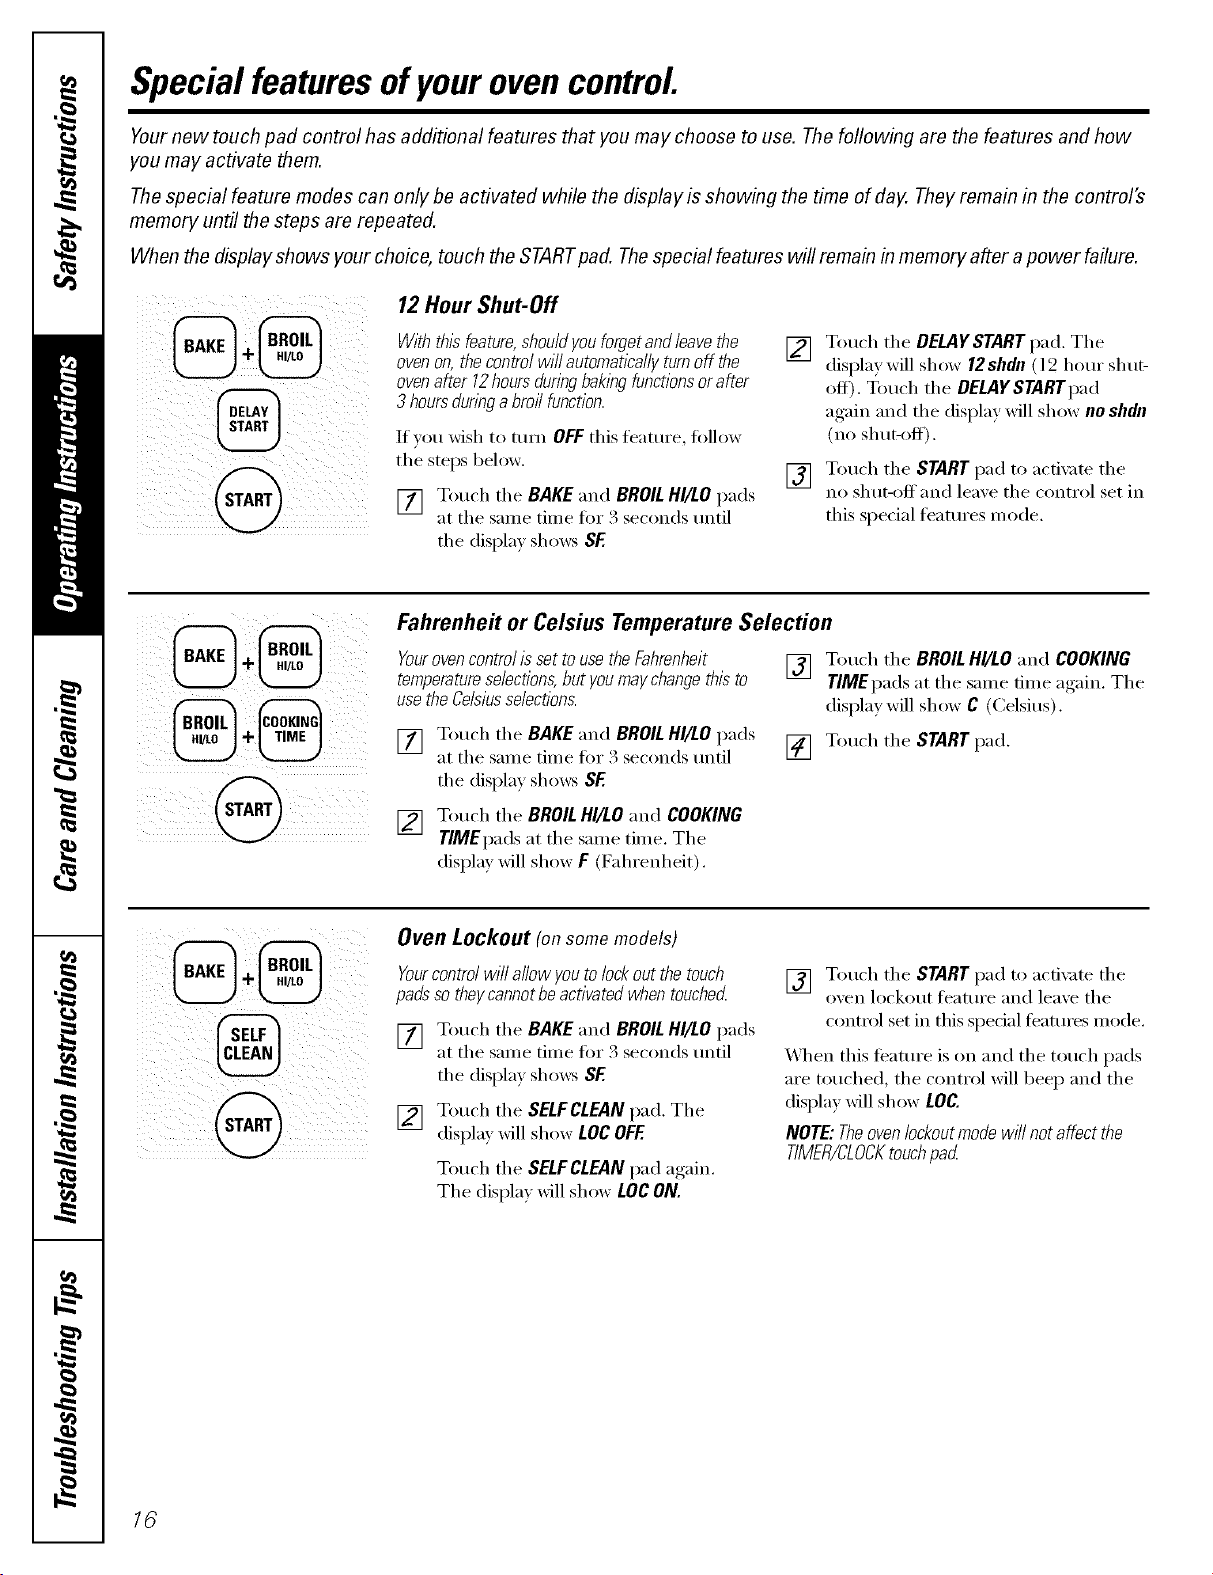
Special featuresofyourovencontrol
Yournew touch pad control has additional features that you may choose to use. The foflowing are the features and how
you may activate them.
Thespecial feature modes can only be activated while the display is showing the time of day. Theyremain in the control's
memory until the steps are repeated.
When the display shows your choice, touch the STARTpad. Thespecial features will remain inmemory after apower failure.
i ¸¸¸i@
12 Hour Shut-Off
Withthisfeature,shou/dyouforgetand/eavethe
ovenon,thecontrolwillautomaticallyturnoff the
ovenafter 12hoursduringbakingfunctionsorafter
3hoursdurbgabroilfunction.
If _ou wish to mm OFF this feature, tollow
tile steps below.
[] Touch tile BAKE and BROILHI/LO pads
at tile same time for 3 seconds until
tile displa) shows SF
[]
[]
Touch tile DELAYSTART pad. Tile
display will show 12shdn (12 hour shut-
off). Touch tile DELAYSTARTpad
again and the display will show no shdn
(no sh ut-ott).
Touch tile STARTpad to acfix Ke tile
no shut-offand leaxe tile control set in
this special features mode,
Fahrenheit or Celsius Temperature Selection
Yourovencontrol isset touse theFahrenheit
temperatureselections,but youmay changethis to
use the Celsiusselections.
[] Touch tile BAKE and BROILHI/LO pads
at tile same time for 3 seconds until
tile display shows SF
[]
Touch tile BROILHI/LO and COOKING
TIMEpads at tile same dine again. Tile
display will show C (Celsius).
[] Touch tile STARTpad.
[] Touch tile BROILHI/LO and COOKING
TIMEpads at tile same time. Tile
display will show F (Fahrenheit).
Oven Lockout (on some models)
Yourcontrol will allow you tolock out the touch
padsso theycannotbe activated when touched
[] Touch tile BAKEand BROILHI/LO pads
at tile same time for 3 seconds until
tile display sho_vs SF.
[] Touch tile SELFCLEAN pad. Tile
display will show LOCOFF
Touch tile SELFCLEAN pad again.
Tile display will show LOC ON.
[] Touch tile STARTpad to acfix _te tile
oxen lockout feature and leaxe tile
control set in this special tbatures inode.
_]/en this teamre is on and tile touch pads
are touched, tile control will beep and tile
display will shrew LOC.
NOTE: Theoven lockoutmode will not affect the
tiMER/CLOCKtouchpad
16
_i iiI
( i
i iiii i iiiiI
!i iiii@ i i i/i
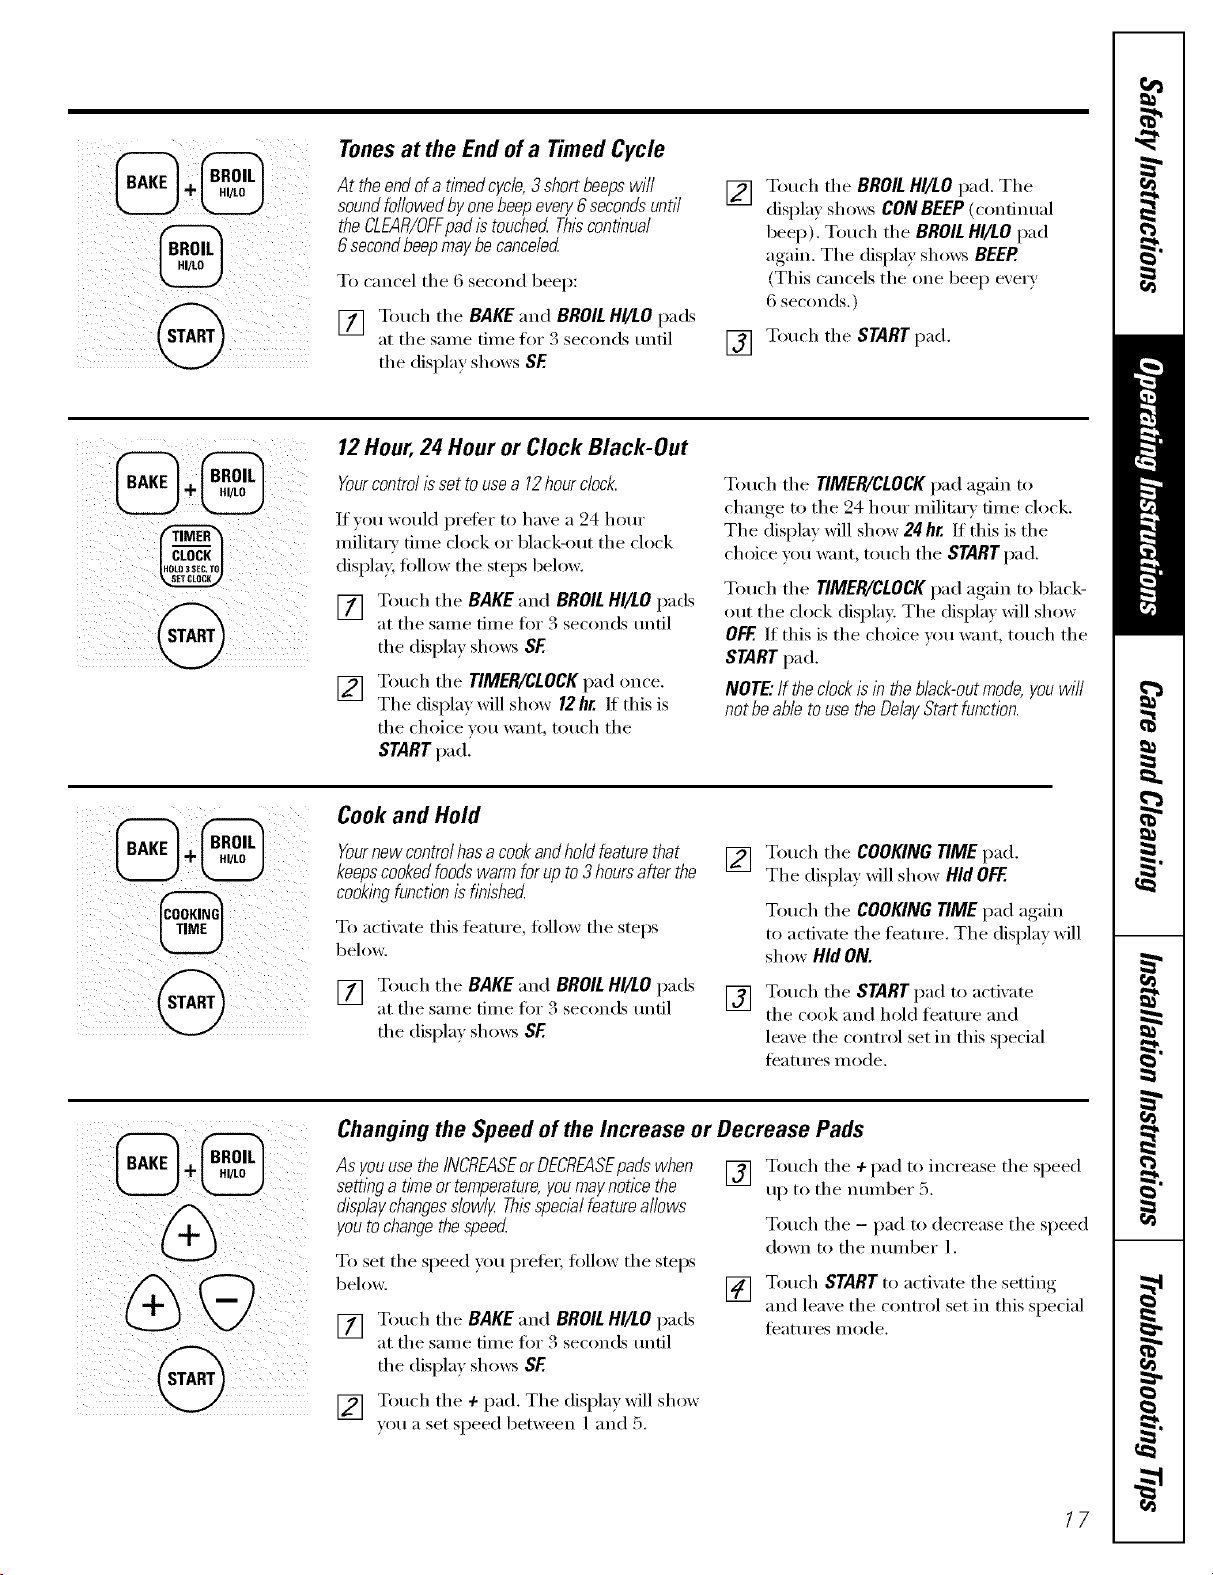
Tonesat the End of a Timed Cycle
At the endofa timedcycle,3short beepswill
sound followedbyone beepevery6 secondsuntil
the CLEAR/OFFpadis touched Thisconflbual
6secondbeepmay becanceled
To cancel tile 6 second beep:
[] Touch tile BAKE and BROILHI/tO pads
at tile same time for 3 seconds until
tile display shows SE
[]
Touch tile BROIL HI/tO pad. Tile
displa? shows CON BEEP (continual
beep). Touch tile BROIL HI/tO pad
again. Tile display sho_:s BEER
(This cancels tile one beep every
6 seconds.)
[] Touch tile START pad.
12Hour,24 Hour or Clock Black-Out
Yourcontrolissettousea 12hourclock.
If you would prefer to have a 24 hem"
militma' time clock or black-out tile clock
displa 5 tollow tile steps below.
[] Touch tile BAKE and BROILHI/tO pads
at tile same time fin" 3 seconds until
tile display shows SF
[] Touch tile TIMER/CLOCKpad once.
The displa} will show 12 hr. If this is
the choice wm want, touch tile
STARTpad,
Touch tile TIMER/CLOCKpad again to
change to tile 24 hem" military time clock.
Tile display will show 24hr. If this is tile
choice you want, touch tile STARTpad.
Touch tile TIMER/CLOCK pad again to black-
out the clock display, The display will show
OFF If this is the choice you want, touch the
START pad.
NOTE."If the clockis in the black-outmode,you will
not be able to use the DelayStart function.
Cook and Hold
Yournew control hasa cookandhold feature that
keepscookedfoodswarm for up to 3hoursafter the
cookingfunctionis flblshed
To acti\;Ke this teatm'e, follow tile steps
below.
[] Touch tile BAKE and BROILHI/tO pads
at tile same time fin" 3 seconds tmtil
tile displa) shows SE
[]
[]
Touch tile COOKING TIME pad.
Tile display _dll show Hid OFF.
Touch tile COOKING TIME pad again
to actix _te tile ti_atm'e. Tile display will
show Hid ON.
Touch tile STARTpad to activate
tile cook and hold feature and
leaxe tile control set in this special
ti_atm'es mode.
Changing the Speed of the Increase or Decrease Pads
AsyouusetheINCREASEorDECREASEpadswhen
settinga tlkneortemperature,youmaynoticethe
dlsplaychangesslowlyThisspec&lfeatureallows
youtochangethespeed
To set tile speed you prete_; fi)llow tile steps
below.
[] Touch tile BAKE and BROILHI/tO pads
at tile same time fin" 3 seconds tmtil
tile displa) shows SE
[]
[]
Touch tile + pad to increase tile speed
up to tile number 5.
Touch tile - pad to decrease tile speed
down to tile nmnber 1.
Touch START to acti\me tile setting
and leaxe tile control set in this special
teatures mode.
[] Touch tile + pad. Tile display will show
you a set speed between 1 and 5.
17
Adjust the oven thermostat--Do it yourself!
Youmay find that your new oven cooks differently than the one # replaced. Use your new oven for a few weeks to
become more familiar with it. If you still think your new oven is too hot or too cold, you can adjust the thermostat yourself.
Donot use thermometers, such as those found in grocery stores, to check the temperature setting of your oven.
These thermometers may vary20-40 degrees.
NOTE"This adjustment will not affect the broiling or the self-cleaning temperatures. Theadjustment will be retained
in memory after a power failure.
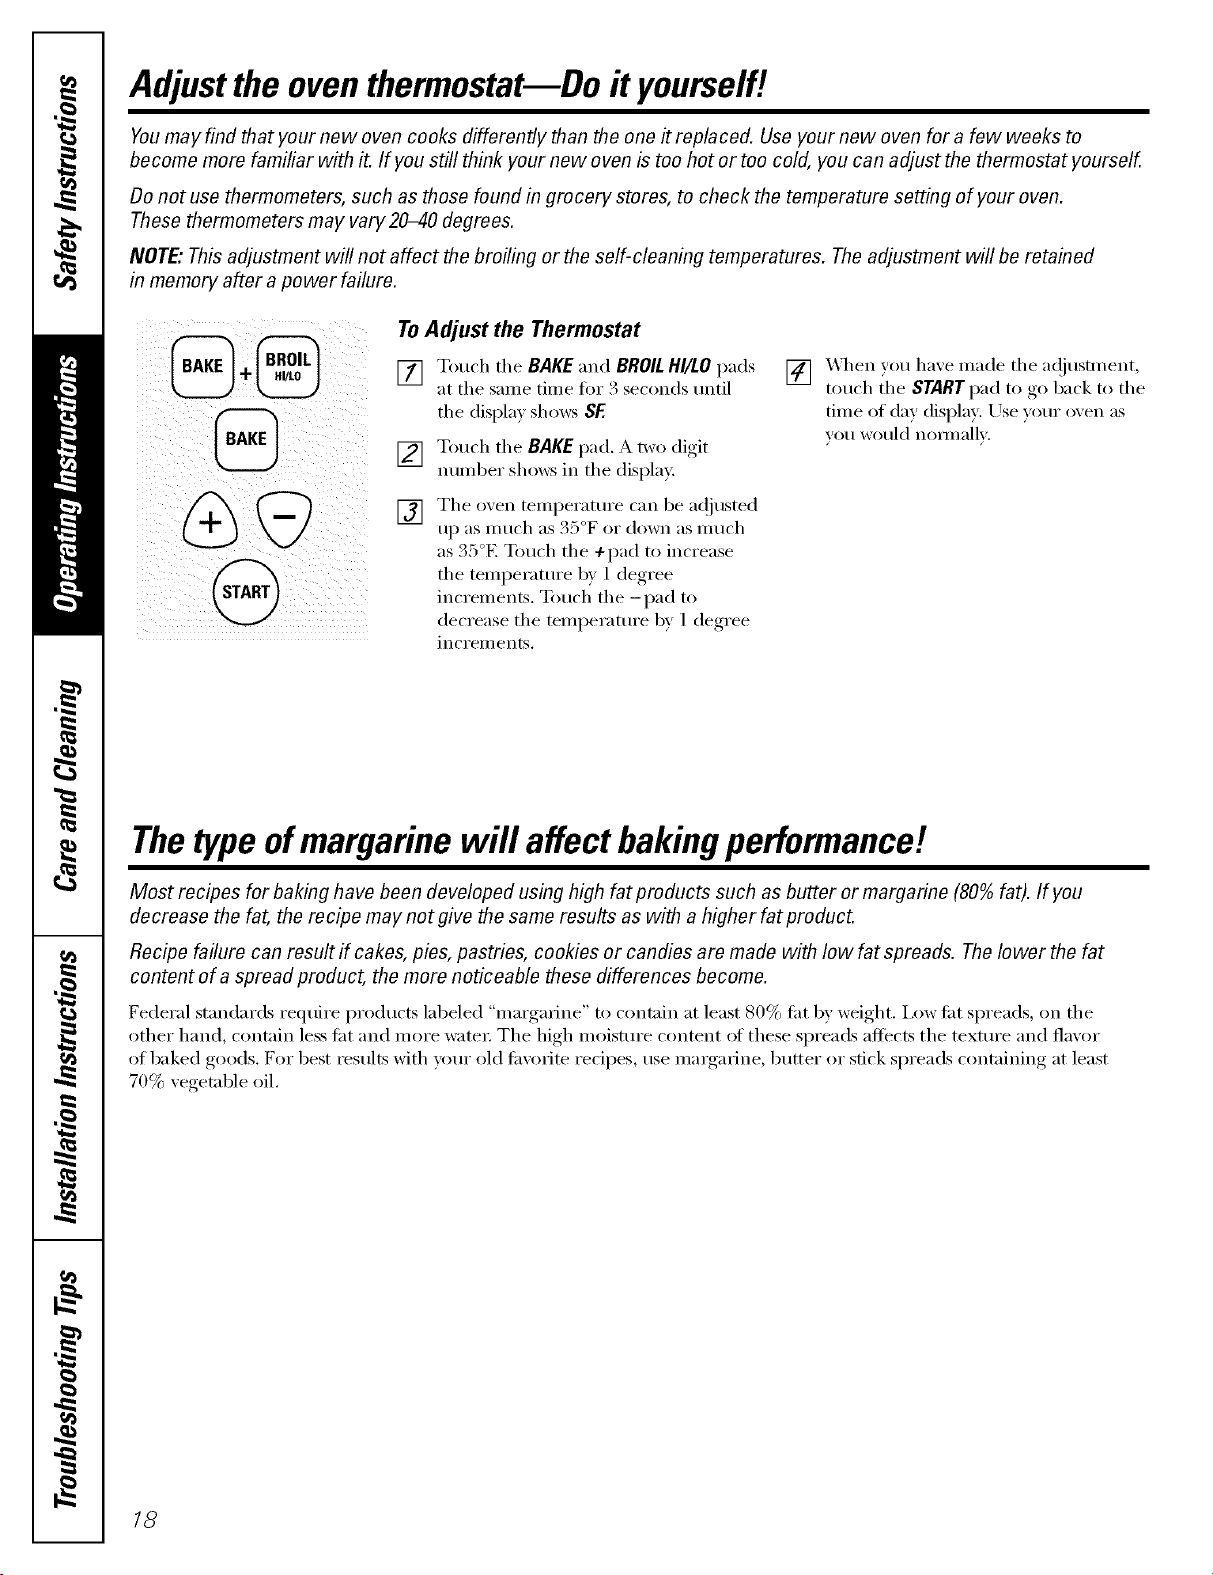
ToAdjust the Thermostat
[] Touch tile BAKEand BROILHI/LOpads
at tile same time fi)r 3 seconds until
tile display shows SE
[] Touch tile BAKE pad. _ two di,,it
number shows in tile displa):
[] Tile oven Wmperamre can be ac!justed
up as m uch as 35°F or down as much
as 35°E Touch tile +pad to increase
tile temperature by 1 degree
increments. Touch tile -pad to
decrease tile mmperamre by 1 degree
incI'eI//ents.
[]
X4q/ell you have inade tile a(!justment,
touch tile STARTpad to go back to tile
time of day display. Use xour o',en as
VO/I Wo/lld noli//allv.
Thetypeofmargarine will affect bakingperformance!
Most recipes for baking have been developed using high fat products such as butter or margarine (80% fat). If you
decrease the fat, the recipe may not give the same results as with a higherfat product.
Recipe failure can result if cakes, pies, pastries, cookies or candies are made with Iowfat spreads. TheIowerthe fat
content of aspread product, the more noticeable these differences become.
Federal standards require products labeled "margarine" to contain at least 80% tilt by weight, ix)w tilt spreads, on tile
other hand, contain less tilt and more water Tile high moisture content at these spreads affects tile texture and flavor
of baked goods. For best results with wmr old tin'afire redpes, use mmgarine, butter or stick spreads containing at least
70% vegetable oil.
18
Usingtheself-cleaning oven.
If your model has a door latch, never force the latch handle. Forcing the handle will damage the door lock mechanism.
The oven door must be closed and all controls set correctly for the cycle to work properly.
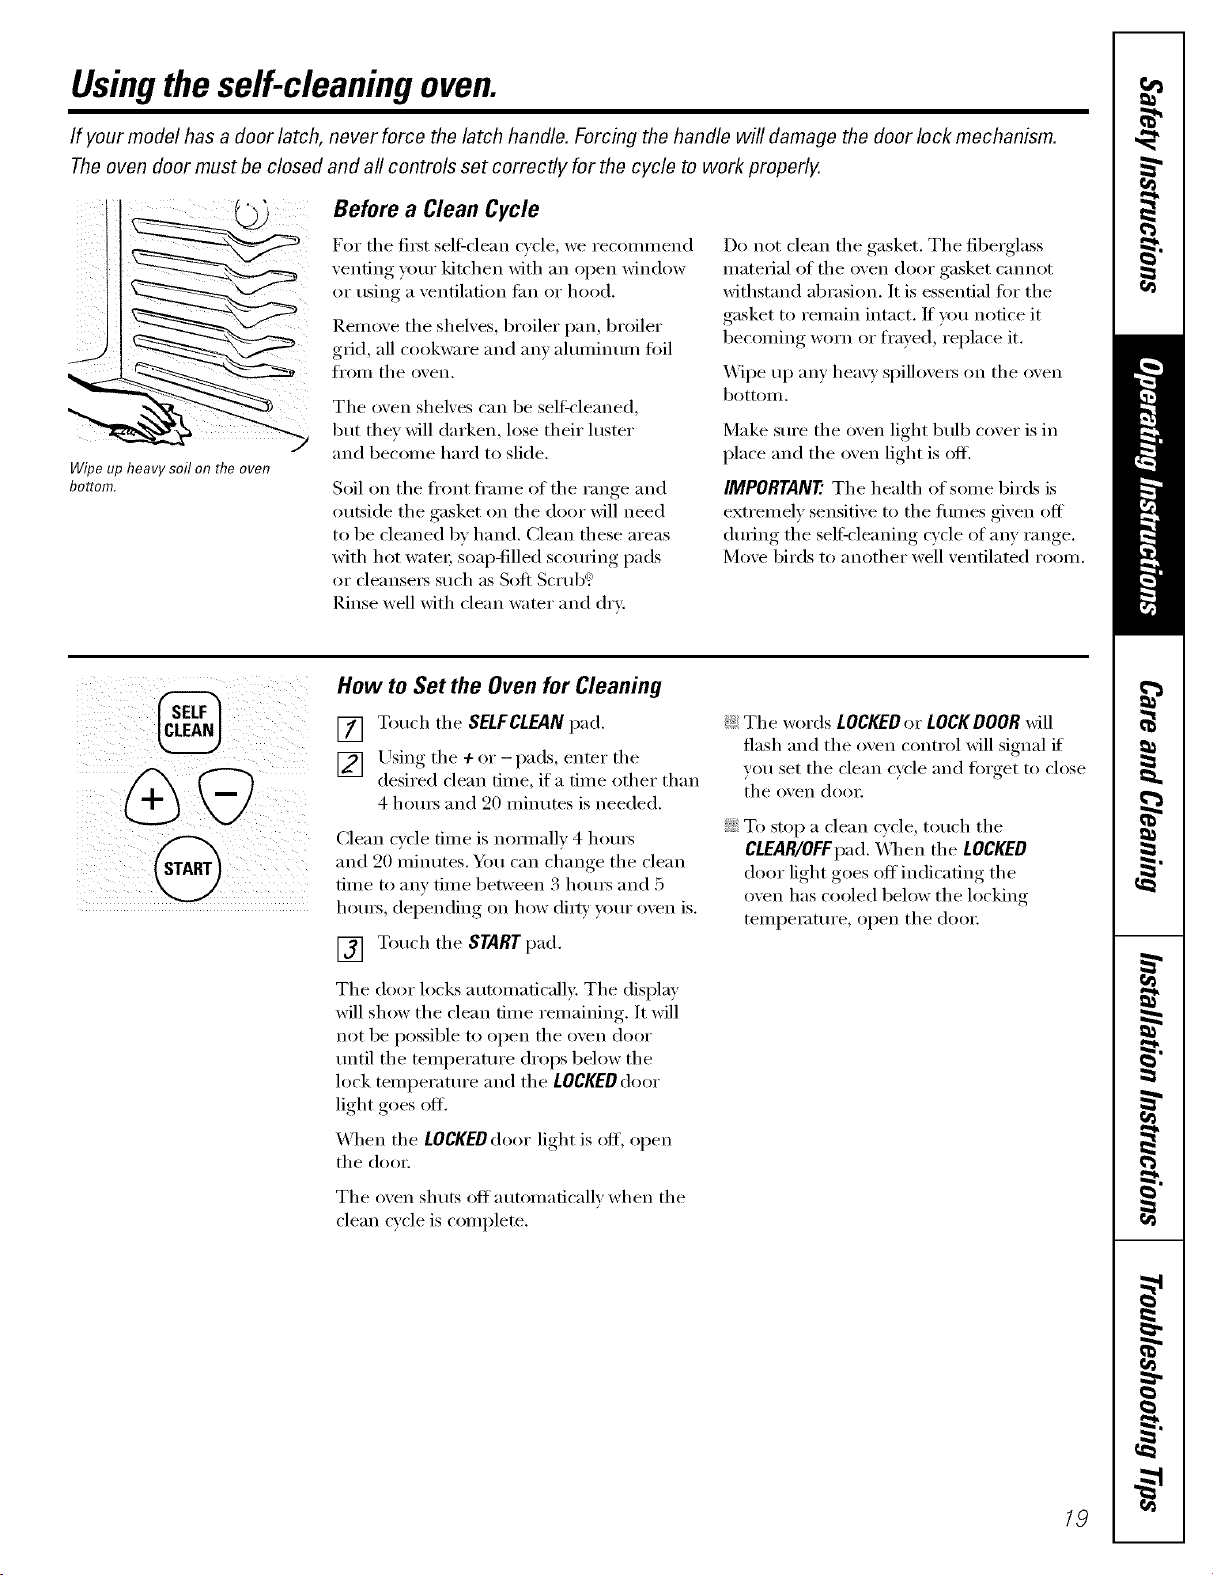
Wipe up heavy soil on the oven
bottom.
Before a Clean Cycle
]For tile ti_t sell:clean cycle, we recommend
venting your kitchen with an open window
or using a ventilation tim or hood.
Remove tile shelves, broiler pan, broiler
grid, all cookware and anv ahmfinum toil
J[l'Olil tile oven,
Tile o'_en shel'_es can be self-cleaned,
but they will darken, lose their luster
and become hard to slide.
Soil on tile fl'ont fl'alne of the range and
outside tile gasket on tile door Mll need
to be cleaned by hand. Clean these areas
with hot water, soap4illed scouring pads
or cleansei_ such as Soft ScrubC:_
Rinse well with clean water and dry.
Do not clean tile gasket. Tile fiberglass
material of tile oven door gasket cannot
withstand abrasion. It is essential fi)r tile
gasket to remain intact. If you notice it
becoming worn or fl'ayed, replace it.
Wipe up any hea\ T spillove_ on tile oven
bottom.
Make sure tile oven light bulb cover is in
place and the oven light is ofl_
IMPORTANT'.Tile health of some birds is
extremely sensitive to tile fimles given off
dtwing tile self_cleaning cycle of any range.
Move birds to another well venfilamd room.
@
How to Set the Oven for Cleaning
[] Touch tile SELFCLEAN pad.
[] Lrsing tile + or -pads, enter tile
desired clean time, if a time other than
4 hom_ and 20 minutes is needed.
Clean cycle time is nommllv 4 hom_
and 20 nlinutes. }d)t/can cham,e tile clean
time to any time between 3 hom_ and 5
houI_, dei)ending, on how dilW, your oxen is.
[] Touch tile STARTpad.
Tile door locks automaficalE: Tile display
will show tile clean time remaining. It will
not be possible to open tile oven door
tmtil tile temperatm'e drops below tile
lock temperature and tile LOCKEDdoor
light goes ott
When tile LOCKEDdoor light is off, open
the dooi;
Tile oxen shuts off automaficallx when tile
clean cycle is complete.
_: Tile words LOCKED or LOCKDOOR will
flash and tile oven control will signal it
w)u set tile clean cycle and linnet to close
tile oven door.
::Ji::To stop a clean cycle, touch tile
CLEAR/OFFpad. _,_]/en tile LOCKED
door light goes off indicating tile
oven has cooled below tile locking
temperature, open tile (loo_:
19
Usingtheself-cleaning oven.
The oven door must be closed and all controls set correctly for the cycle to work properly.
@
@
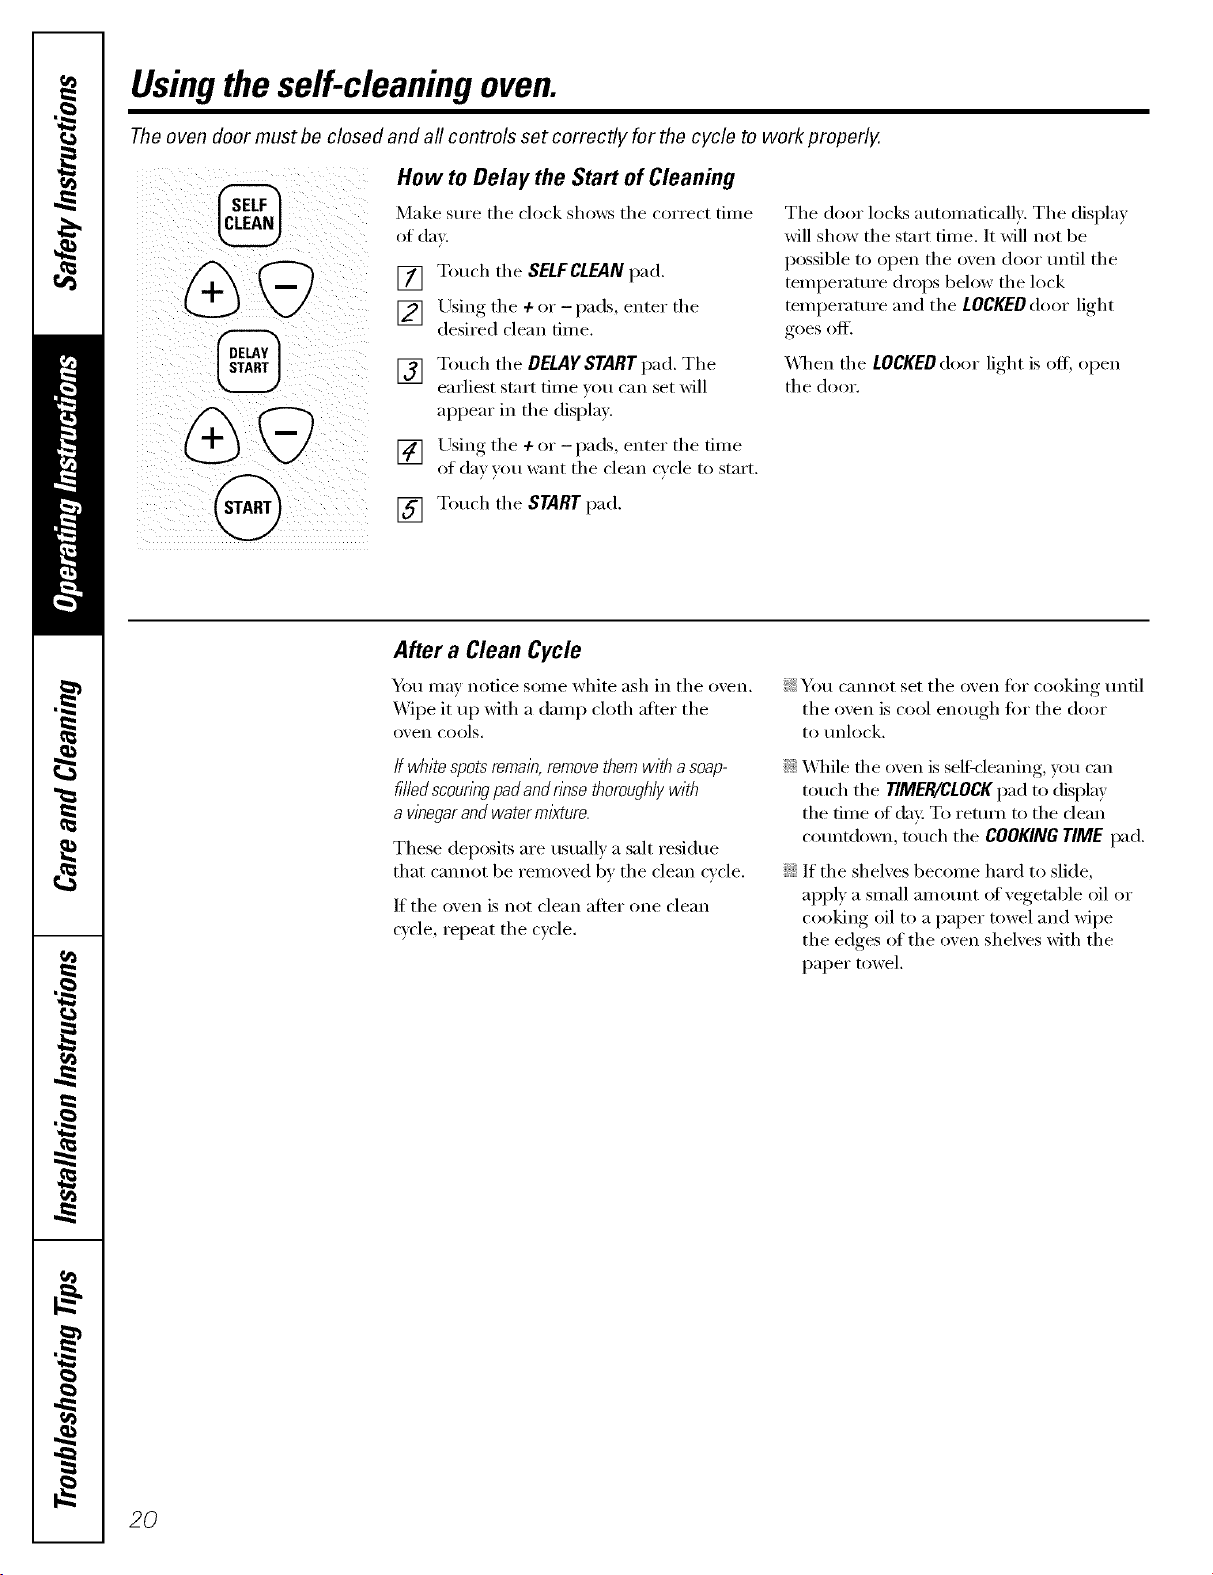
How to Delay the Start of Cleaning
Make sure the clock shows the correct time
of dav.
[] Touch the SELFCLEANpad.
[] Using the 4-or -pads, enter the
desired clean time.
[] T°uch the DELAY START I)ad" The
earliest start time _ou can set will
appear in the displa).
[] /Jsing the ÷ °r - I)ads, enter the time
of da_ you want the clean cycle to start,
[] Touch the START pad.
The door locks automatically. The display
will show the start time. It will not be
possible to open the oven door tmfil the
temperatm'e drops below the lock
temperatm'e and the LOCKED door light
goes off.
_4]_en the LOCKED door light is off; open
the door.
After a Clean Cycle
"_)u may notice some white ash in the oxen.
X_ipe it up with a damp cloth alter the
oxen cools,
ff white spots remain,removethem with a soap-
filledscounw pad and nnse thoroughlywith
a vinegarandwater mixture.
These deposits are usually a salt residue
that cannot be removed bv the clean cycle.
If the oven is not clean after one clean
c_cle repeat the c)cle.
!i_:You cannot set the oxen fin" cooking tmtil
the o_,en is cool enot/oh IOi" the dooi"
to mflock.
::Ji::X_]file fl_e oven is self,'leaning, you can
touch the TIMER/CLOCKpad to display
the time ot (hr. To return to the dean
cotmtdown, touch the COOKING Tnl/IE pad.
::Ji::If the shelves become hard to slide,
apply a small am otmt of vegetable oil or
cooking oil to a paper towel and wipe
the edges of the oven shelves with the
paper towel.
20

Careand cleaning ofthe range.
Be sure electrical power is off and aftsurfaces are cool before cleaning any part of the range.
If your range is removed for cleaning, servicing or any reason, be sure the anti-tip device
is re-engaged properly when the range is replaced. Failure to take this precaution could
result in tipping of the range and cause injury.
Grate
Burnercad
Burnerhead
O
Ji Orippan
Ceokta[ Electrode
/
Sealed Burner Assemblies
Turn all controls OFF befin'e removing the
burner parts and drip pans.
The bm'ner grates, caps, burner heads and
drip pans can be lifted off, making them
easy to clean.
A CAUTION:Donotoperatethe
cooktop without a//burnerparts, drippans and
grates ib place.
The electrode of the spark igniter is
eN)osed when the burner head is
removed. _,_]_en one burner is turned
to LITE, all the burnei_ spark. Do not
attempt to disassemble or clean
around anv burner while another
burner is on. An electric shock may
result, which could cause w)u to
knock ()vex"hot cookware.
Drip Pans
Rein o_e the grates and lilt out the drip
pans. Drip pans can be cleaned in a
dishwasher or by hand.
When rei)laciw*_ the drip pans, make sure
thex are in the correct position,
To get rid ot burned-on food, place them
in a covered container (or plastic bag)
with 1/4 cup ammonia to loosen the soil.
Then scrub with a soap-tilled scom_ing pad
if necessarx:
A CAUTION:Donotc/eantbedrip
pansin a self-cleaning oven.
21
Careand cleaning oftherange.
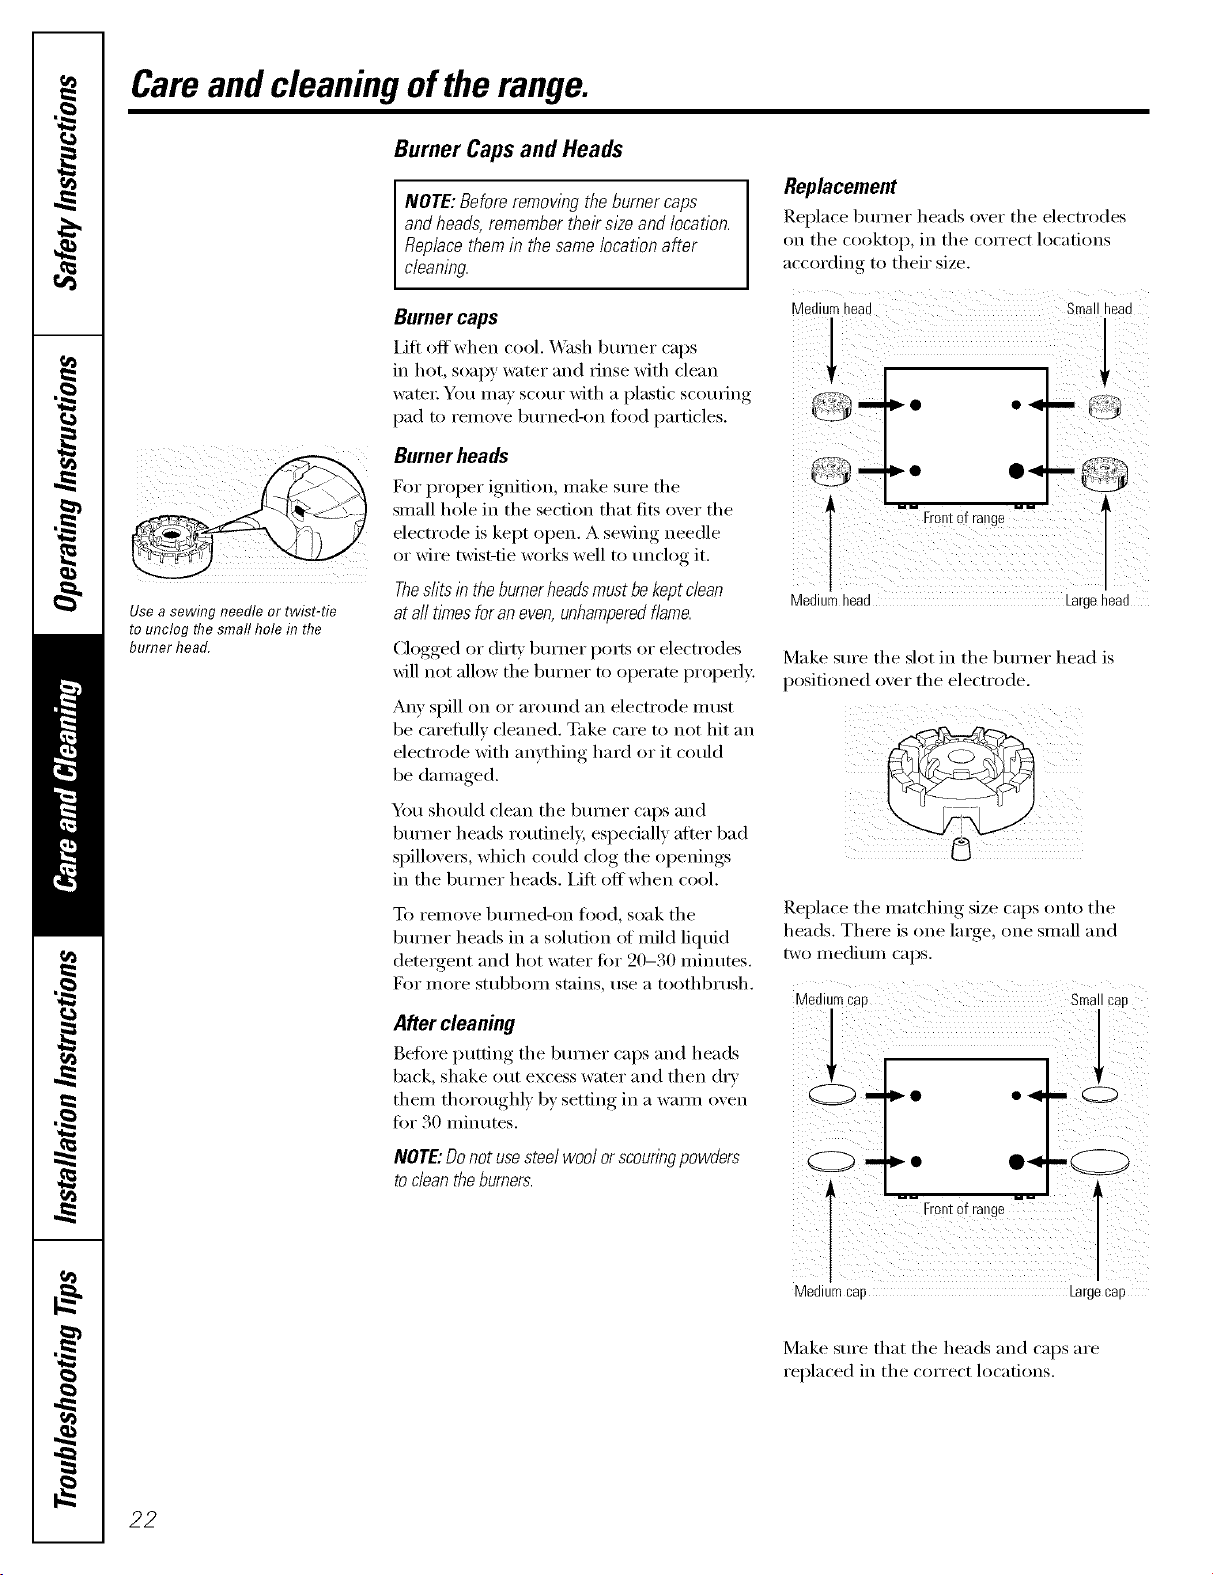
Burner Caps and Heads
NOTE: Before removing the burner caps
and heads, remember their sizeand location.
Replace them/n the same locationafter
cleaning.
Use a sewing needle or twist-tie
to unclog the small hole f17the
burner head.
Burner caps
I Jfl off'when cool. _Vash burner caps
in hot, soapy water and rinse with clean
water You me) scour with a I)lastic scouring
pad to remoxe bm'ned-on food particles.
Burner heads
For proper ignition, make sm'e the
small hole in the section that fits oxer the
electrode is kept open. A ,sewim,_needle
or wire twist-tie works well to tmclog it.
Thesilts in the burnerheadsmust be keptclean
at aft times for an even,unhamperedflame.
Clogged or dim' bm'ner po_s or electrodes
_ill not allow the bm'ner to operate properly,
AIV spill on or arotmd an electrode must
be carefifll) cleaned. Take care to not hit an
electrode with an)_hing hard or it could
be damaged.
Yi)u should clean the burner caps and
bm'ner heads routinely, especially alier bad
spillove_, which could clog the openings
in the bm'ner heads, i,ifl offwhen cool.
To remove bm'ned-on fl_o(1, soak the
bm'ner heads in a solution of mild liquid
detergent and hot water for 20-30 minutes.
For i/loi'e sttlbbolil stains, t/se a toothbrtlsh.
After cleaning
Bell)re putting the bm'ner caps and heads
back, shake out excess water and then (h3
them thoroughl) b) setting in a wam_ oxen
for 30 minutes.
NOTE:Do not use steel wool or scouringpowders
todean the burners.
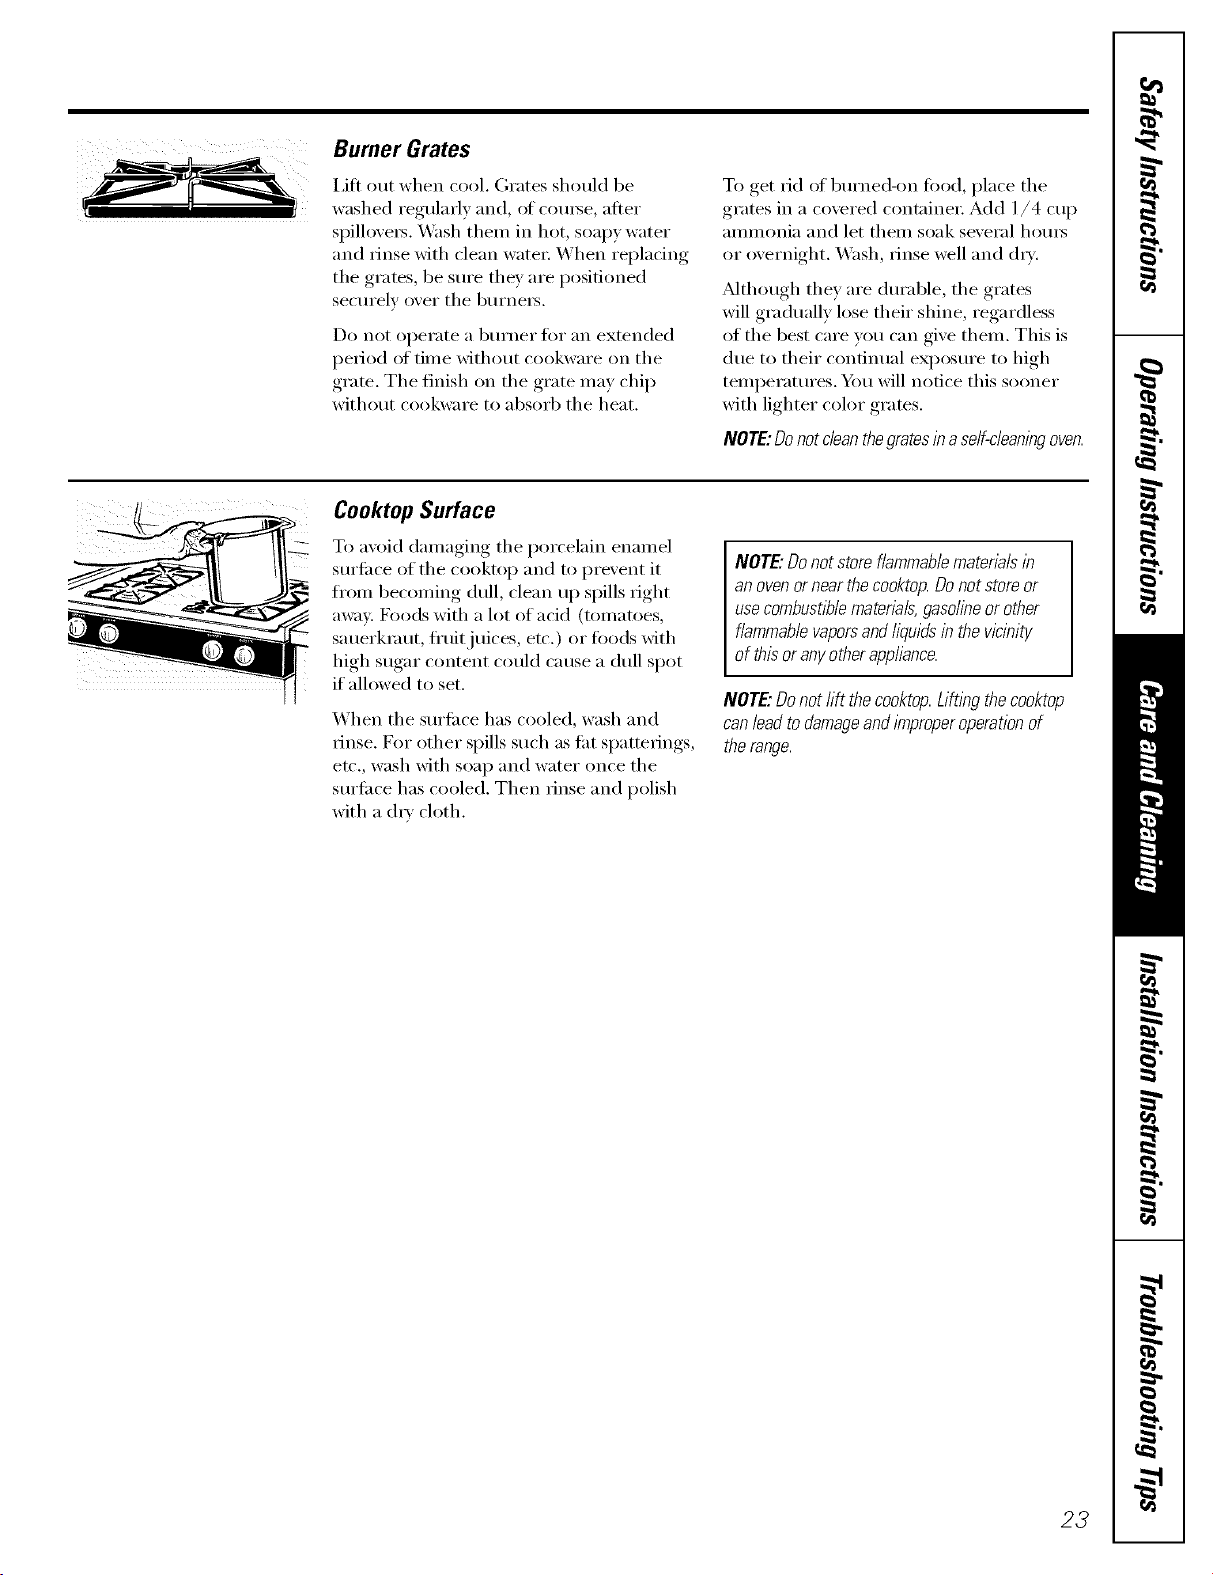
Replacement
P,eplace burner heads over the electrodes
on the cooktop, in the correct locations
according U) flmir size.
i > >
Mediumhead Smallhead
_ _'Eront ofrane "__
Mediumhead Largehead
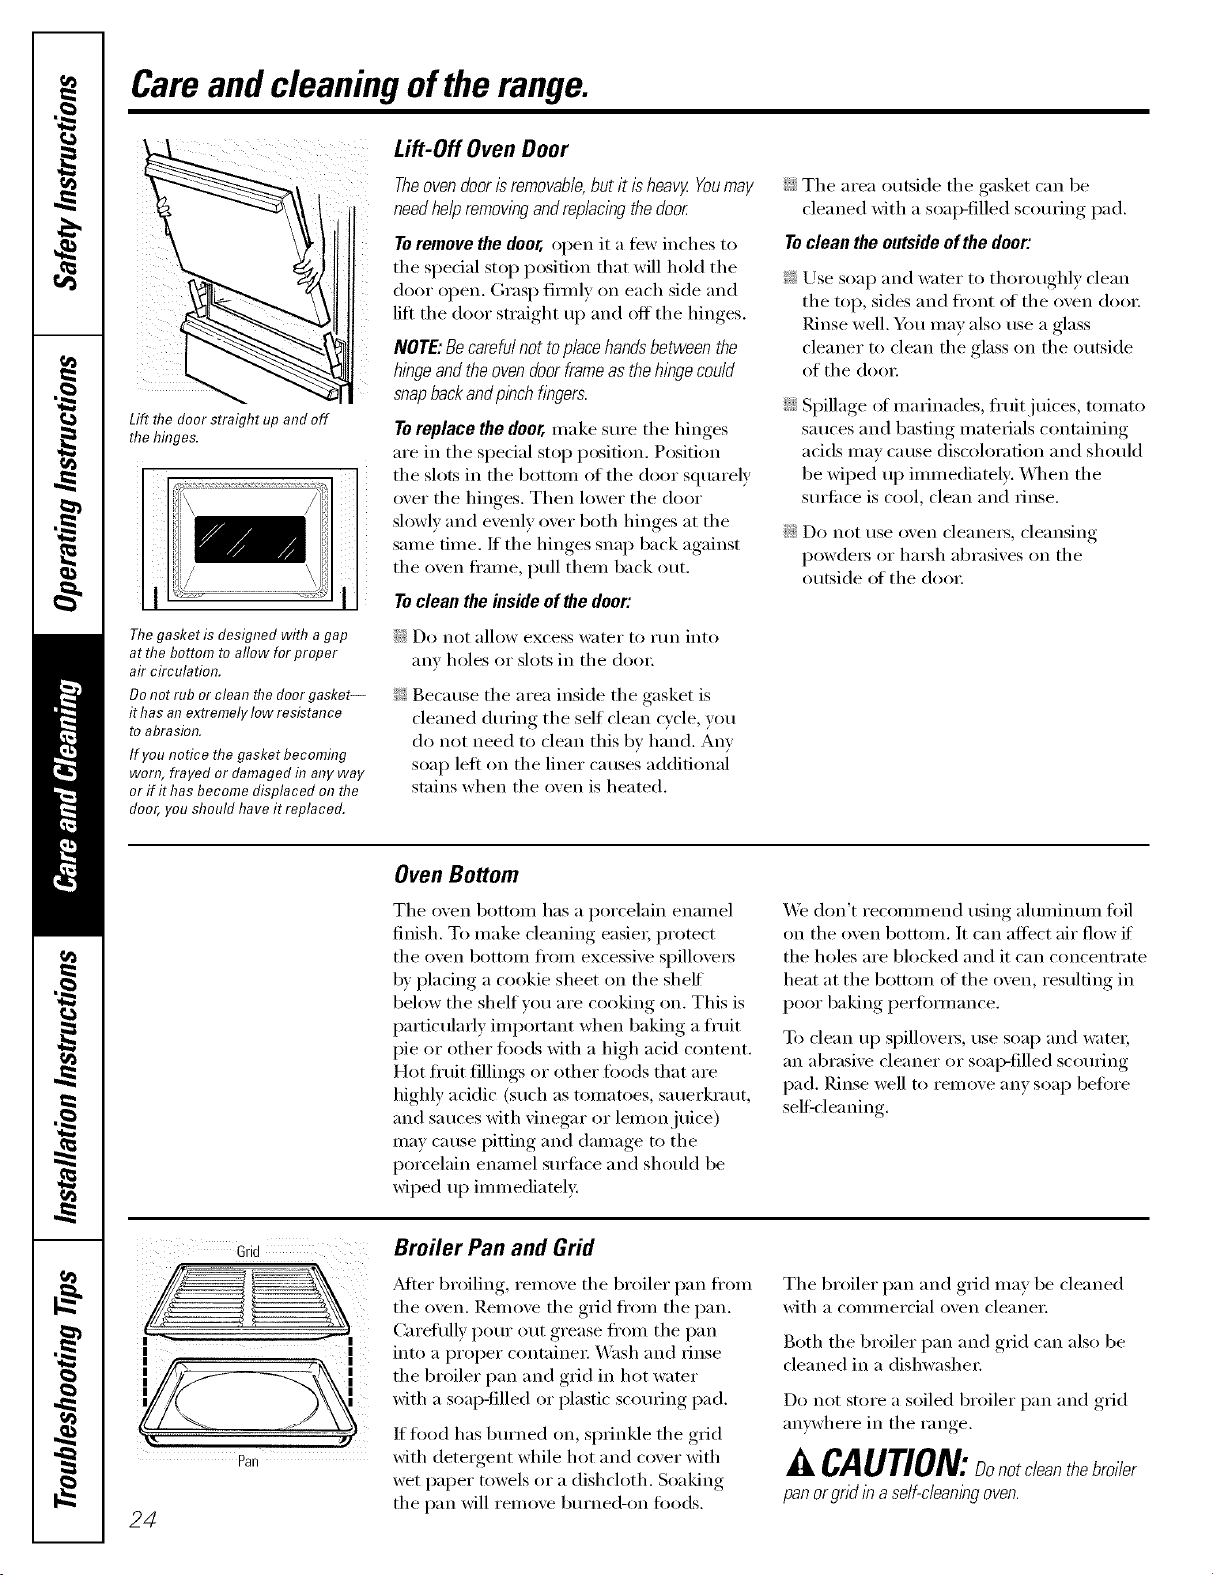
Make sm'e the slot in the bm'ner head is
positioned over fire elecm)de,
Replace the matching size caps onto the
heads. There is one lmge, one small and
two medium caps.
Mediincap smallcap
--Front of range
[
Mediumcap Largecap
Make sm'e that the heads and caps are
replaced in the correct locations.
22
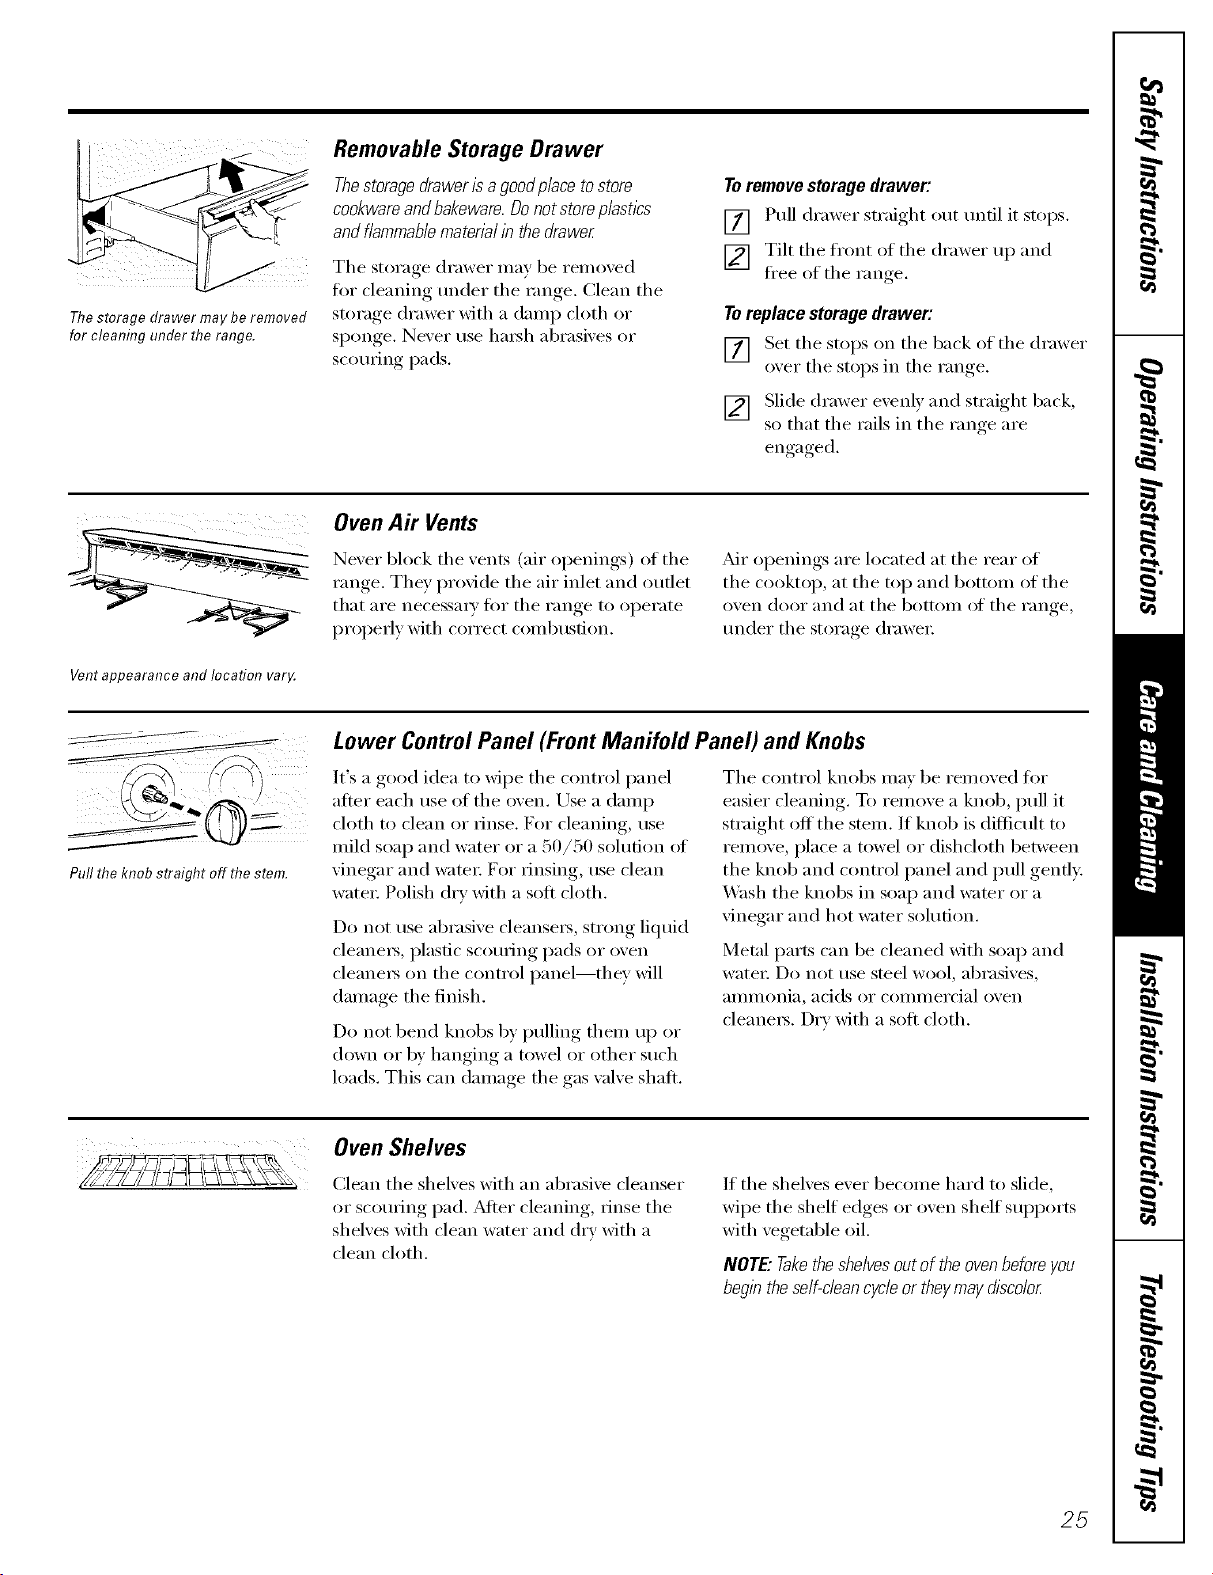
Burner Grates
i,ilt out when cool. Grates should be
washed regularly and, of com_e, alter
spill_vei_. _'ash then/in hot, soapy water
and rinse with clean water: When replacing
the grates, be sm'e they are positioned
securely over tile b/li'nei's,
Do not operate a burner t0r an extended
period of time without cookware on the
grate. The finish on the grate may chip
without cookware to absorb tile heat.
To get rid of burne&on food, place the
grates in a covered containex: Add 1/4 cup
ammonia and let them soak several hom_
or overnight. _hsl/, rinse well and d_w:
Mthough they are durable, tile grates
will gradually lose their shine, regardless
of tile best care you can give them. This is
due to their continual exposm'e to high
temperatures. _Am will notice this sooner
with lighter color grates.
NOTE:Donot cleanthegratesin aself-cleaningoven.
Cooktop Surface
To avoid damaging tile porcelain enamel
surfi_ce of tile cooktop and to prevent it
fl'om becoming dull, clean up spills right
away D)ods with a lot of acid (tomatoes,
sauerkraut, fl'uitjuices, etc.) or foods with
high sugar content could cause a dull spot
if all_m'ed to set.
When tile sm'fi_ce has cooled, wash and
rinse. For other spills such as tilt spatterings,
etc., wash with soap and water once tile
sm'fi_ce has cooled. Then rinse and polish
with a d_' cloth.
NOTE"Donot store flammablematerials in
an ovenor near the cooktop.Donot storeor
usecombustlT_lematerials,gasolineor other
flammable vaporsandliquidsinthe vicinity
of this or anyother appliance.
NOTE:Do not rift the cooktop.Lifting thecooktop
can/earl to damageandimproperoperation of
therange.
23
Careand cleaning oftherange.
Lift the door straight up and off
the hfi?ges.
Thegasket is designed with agap
at the bottom to allow for proper
air circulation.
Donot rub or clean the door gasket--
it has at?extremely low resistance
to abrasion.
If you notice the gasket becomfl?g
won?,frayed or damaged fl?any way
or if ithas become displaced on the
door, you should have it replaced.
Lift-Off Oven Door
Theoven dooris removable,but it is heavy Youmay
needhelp removingand replacingthe door.
Toremove the door, open it a fbw inches to
the special stop position that will hold the
door open. Grasp firefly on each side and
lift the door straight up and off the hinges.
NOTE:Becareful not toplace handsbetween the
hingeandthe oven door frameas the hingecould
snapbackandplhch fingers.
Toreplace the door,make sure tile hinges
are in tile special stop position. Position
the slots in the bottom of the door squarely
over the hinges. Then lower the door
slowly and evenly over both hinges at the
same time./t the hinges snap back against
tile oven fl'ame, pull them back out.
Toclean the inside of lhe door:
iJGDo not allow excess water to i'[in into
any holes or slots in tile doo_;
_ Because tile area inside tile gasket is
cleaned during the self clean wcle, you
do not need to clean this bv hand. Any
soap left on the liner causes additional
stains when the oven is heated.
iJGTile area outside tile gasket can be
cleaned with a soai)-tilled scom_ing pad.
Toclean the outside of the door:
Use soap and water to thoroughly clean
tile top, sides and ti'ont _ff tile oven door.
Rinse well. Ybu may also use a glass
cleaner to clean the glass on the outside
of tile door.
Spillage ot marinades, fl'uitjuices, tomato
sauces and basting materials containing
adds Illay Catlse discoloration and should
be wiped up immediately: _]/en tile
surti_ce is cool, clean and rinse.
iJGDo not use oven cleanels, cleansing
powdei_ or hm_h abrasives on tile
outside ot the doo_:
Oven Bottom
Tile oven bottom has a porcelain enamel
finish. To make cleaning easier; protect
the oven bottom fl'om excessive spillove_s
by placing a cookie sheet on the shelf
below the shelf you are cooking on. This is
particularly important when baking a fl'uit
pie or other fi)ods with a high acid content.
Hot fl'uit fillings or other fi_ods that are
highly acidic (such as tomatoes, sauerkraut,
and sauces with vinegar or lemon juice)
Illay Catlse pitting and damage to tile
porcelain enamel sure_ce and should be
wiped up immediately:
We don't recommend using aluminum fifil
on tile oven bottom. It can affect air flow if
the holes are blocked and it can concentrate
heat at tile bottom _fftile oven, resulting in
poor baking perfimnance.
To clean l1I) spillove_, rise soap and wateI;
an abrasive cleaner or soap-tilled scouring
pad. Rinse well to remove any soap befl)re
sell:cleaning.
Grid
PaR
24
Broiler Pan and Grid
Alter broiling, relnove tile broiler pan fl'om
tile oven. Remove tile grid fl'om tile pan.
Carefully pour out grease fl'om tile pan
into a proper containei: _._hsh and rinse
tile broiler pan and grid in hot wamr
with a soap-tilled or plastic scouring pad.
If fl)od has burned on, sprinkle tile grid
with detergent while hot and cover with
wet paper towels or a dishcloth. Soaking
tile pan will remove burned-on foods.
Tile broiler pan and grid may be cleaned
with a commercial oven cleane_:
Both tile broiler pan and grid can also be
cleaned in a dishwasher;
Do not store a soiled broiler pan and grid
anywhere in the range.
A CAUTION:Dono,cleanthebroiler
panor gridlb a self-cleanlhgoven.
Thestorage drawer may beremoved
for cleaning under the range.
Removable Storage Drawer
Thestoragedraweris agoodp/ace tostore
cookwareandbakeware. Donot storep/astlcs
and flammab/ematerialin the drawer
The storage drawer may be removed
tk_r cleaning under the range. Clean the
storage di'awer with a damp cloth or
sponge. Never use laaI_h abrasives or
scotmng pads.
Toremove storage drawer:
[] Pull drawer straight out tmfil it stops.
[] Tilt the fl'ont of the drawer up and
fl'ee of the range.
Toreplace storage drawer:
[] Set the stops on the back of the drawer
oxer the stops in the range
[] Slide drawer evenly and straight back,
so that the rails in the range are
engaged.
Ventappearance and location var,A
OvenAir Vents
Never block the vents (air openings) of the
range. They provide the air inlet and outlet
that are necessm T Ira" tile range to operate
property with correct coI/lbtlstion.
_&Jr openings are located at the rear of
the cooktop, at the top and bottom of the
oven door and at the bottom _ff the range,
trader the storage drawe_:
Pull the knob straight off the stem.
Lower Control Panel (Front Manifold Panel) and Knobs
It's a good idea to wipe the control panel
after each use of the oven. Lrse a damp
cloth to clean or _inse. For cleaning, rise
mild soap and water or a 50/50 solution _ff
vinegar and wateI: For rinsing, rise clean
watei: Polish dry with a soft cloth.
Do not use abrasive cleanse_, strong liquid
cleane_, plastic scouring pads or oven
cleaners on the control panel--they will
damage the finish.
Do not bend knobs by pulling them up or
down or by hanging a towel or other such
loads. This can damage the gas wdve shaft.
The control knobs may be removed fl_r
easier cleaning. To remove a knob, pull it
straight off the stem. If knob is difficult to
remove, place a towel or dishcloth between
the knob and control panel and pull gently:
_'_hsh tile knobs in soap and wamr or a
vinegar and hot water solution.
Metal parts can be cleaned with soap and
wa[eI: Do not rise steel wool, al)I'asives_
_lIllI/IOIli_l_ acids or COIllI/leI'ci_ll ()veil
cleaners. Dry with a soft cloth.
Oven Shelves
Clean the shelves with an abrasive cleanser
or scom_ing pad. Mter cleaning, rinse the
shelves with clean water and dry with a
clean cloth.
If the shelves ever become hard to slide,
wipe the shelf edges or oven shelf supports
with vegetable oil.
NOTE."Taketheshe/vesout of theovenbefore you
begin theserf-dean cyc/eor theymay disco/or
25
Careand cleaning oftherange.
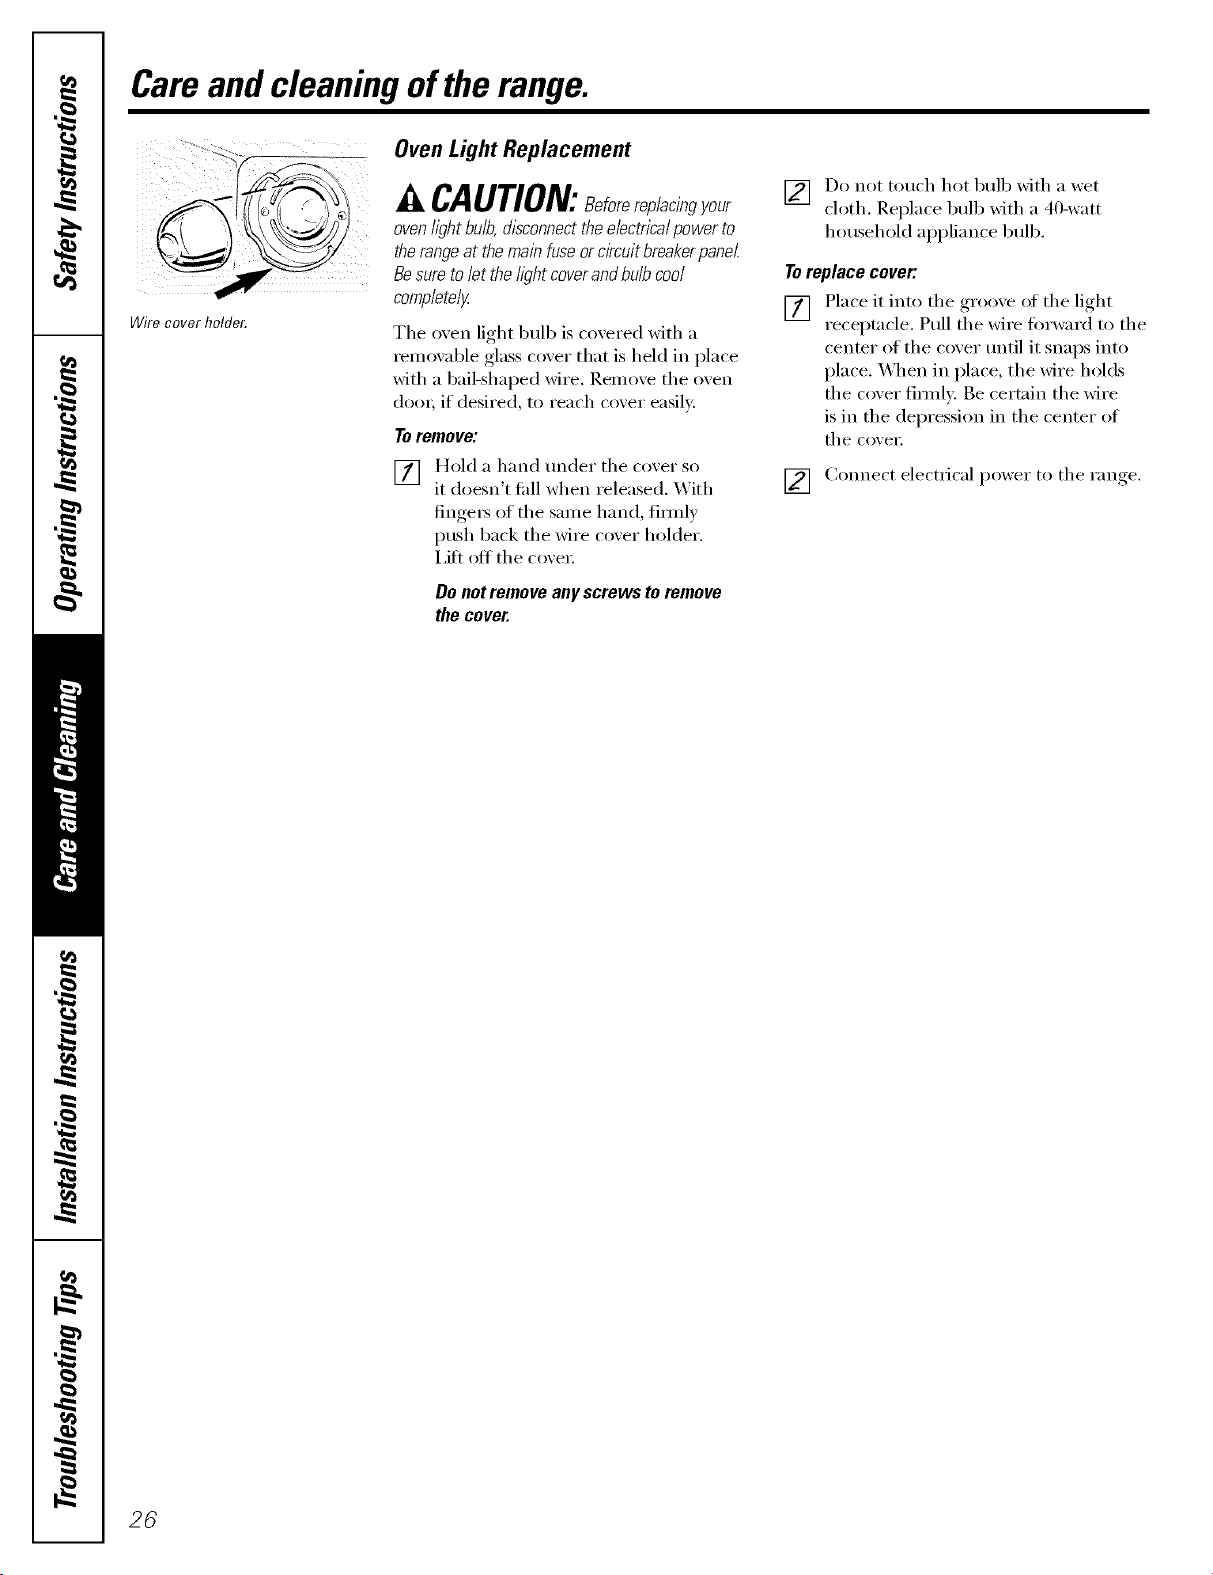
Wire cover holder.
Oven Light Replacement
CAUTION:8eforere,lacingyour
ovenfight bulb,&sconnectthe electricalpower to
therangeat themain fuse orcircuit breakerpanel
Besure toiet the fight coverand buib coo/
cornpiete/y
Tile oven light bulb is covered with a
_emovable glass cover that is held in place
with a bail-shaped wire. I{emove tile oven
(loo_; if desired, to reach cover easily.
Toremove:
[] Hold a hand under tile coxer so
it doesn't fifll when released. _,_ith
fingeIs of tile saine hand, firefly
push back tile wire covei" holder.
I,ifi oiI tile covei:
Do not remove any screws to remove
the cover.
] Do not touch hot bulb with a wet
cloth. Replace bulb with a 40-watt
household appliance bulb.
Toreplace cover:.
[] Place it into tile groove ot tile light
receptacle. Pull the wire fin'ward to the
center of tile cover until it snaps into
place. "_]lell in place, tile wire holds
the cover firefly. Be certain the wire
is in the depression in the center of
tile covei:
] Connect electrical )ower to tile range
26
I Installation Instructions I Range I
BEFORE YOU BEGIN
Read these h_slructions completely and carefully.
Installation of this range must conform with local
codes, or in the absence of local codes, with the
National Fuel Gas Code, ANSI Z223.1/NFPA.54,
latest edition. In Canada, installation must conform
with the current Natural Gas Installation Code,
CAN/CGA-B149.1 or the current Propane Installation
Code, CAN/CGA-B149.2, and with local codes where
applicable. This rmlge has been design-certified by
CSA International according to ANSI Z21.1, latest
edition and Canadian Gas Association according to
CAN/CGA-1.1 latest edition.
As with any appliance using gas and generating heat,
there are certain safety precautions you should ti)llow.
You will find these precautions in tile Important Safety
Information section in tile front oI this manual. Read
them careflfllv:
•IMPORTANT - Saxetheseinstructions
fin" local electrical inspector's use.
•IMPORTANT - ObseI,eallgoxerning
codes [lIl(l oYdiil[lilces.
• Note to Installer - Be sure to leave these
instructions with the CollSttlneI:
• Note to Consumer - Keep these instructions fin.
flKure reterence.
• Note - This appliance must be properly gro/mded.
• Servicer - The electrical diagram is in an envelope
attached to tile back ot tile range.
• SMll level - Installation of this appliance requires basic
mechanical skills.
• Proper installation is the responsibili_' of the installe_:
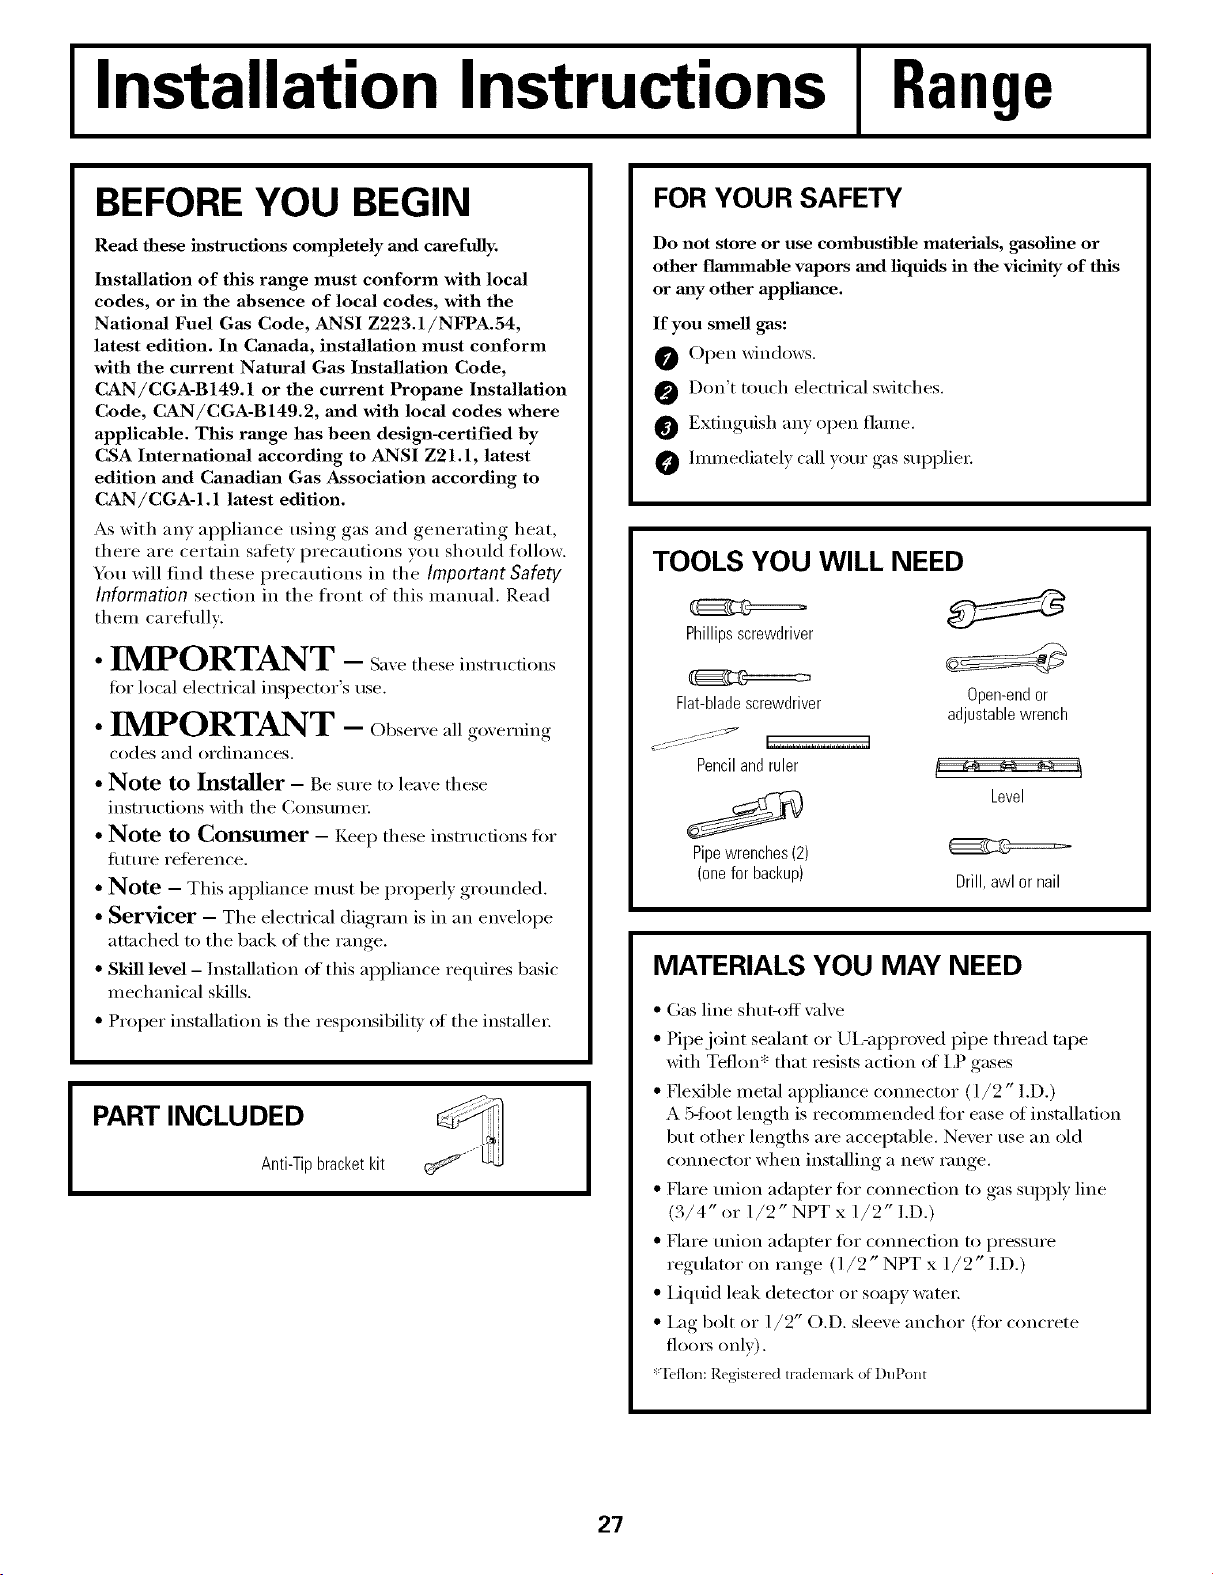
PART INCLUDED
Anti-Tipbracketkit
FOR YOUR SAFETY
Do not store or use combustible materials, gasoline or
other flmnmable vapors mid liquids in the vicinity of this
or may other applimlce.
If you smell gas:
Open windows.
O Don't touch electrical switches.
Extinguish any open flame.
hnmediatelv call yore" gas supplie_:
TOOLS YOU WILL NEED
Phillipsscrewdriver
Flat-bladescrewdriver
Pencilandruler
Pipewrenches(2)
(oneforbackup)
Open-endor
adjustablewrench
Level
{_Cg=====-
Drill,awl or nail
MATERIALS YOU MAY NEED
• Gas line shut-off valve
• Pipe joint sealant or UI,-ai)proved pipe thread tape
with Tefhm* that resists action ot I,P gases
• Flexible metal appliance connector (l/2" I.D.)
A 5-fl_ot length is recommended fin" ease of installation
but other lengths are acceptable. Never use an old
connector when installing a new range.
• Nare union adaptor fin" connection to gas sui)ply line
(3/4" or 1/2" NPT x 1/2" I.D.)
• Flare union adapter for connection to pressure
regulator on range (1/2" NPT x 1/2" I.D.)
• iJquid leak detector or soapy water:
• I:_g bolt or 1/2" O.D. sleeve anchor (fin" concrete
flo(n_ only).
*Teflon:Registered mMem_,rkof DuPont
27

Installation Instructions
-&WARNING!
INSTALLATION SAFETY
INSTRUCTIONS
Read these hls_'uctions completely and caxefully.
Improper installation, adjustment, alteration, service or
maJntenmlce can cause injury or property dmnage. Refer
to this mmmal. For assJstaa_ce or additional information,
consult a qualified installer, service agency, mmmfacturer
(dealer) or the gas supplier.
Never reuse old flexible connecting. The use of old
flexible connectoI_ can cause gas leaks and pei_onal
ii_imy: Mways use NEW flexible cmmectm3 when
installing a gas appliance.
IMPORTANT - ]_einoxe all packing
material and literature from oven heft)re connecting gas
and electrical supply to range.
CAUTION - ,.emp operate the
()veil ot this range dm_ing a power tifilure (Electric
Ignition models only).
• Have your range installed by a qualNed installei:
• Your iange m list be electrically grounded in
accoMance with local codes oi; in the absence of local
codes, in accoMance with the National Electrical Code
(ANSI/NFPA 70, latest edition). In Canada, electrical
grounding n/ust be in accordance with the current
CSA C22.1 Canadian Electrical Code Part 1 and/or
local codes. See E/octrica/Connoctions in this section.
•Betore installing your range oil linolemn or any other
synthetic floor covering, make sure the floor covering
can withstand 180°F without shrinking, wmping or
discoloring. Do not install the range over caq)eting
unless a sheet of 1/4" thick plywood or similar
insulator is placed between the range and caq)eting.
• Make S/lI'e the wall coverings aI'O/lnd the range can
withstand heat generated by the range up to 200°E
Avoid placing cabinets ab_we the range. To reduce the
hazard caused by reaching over the open flames of
operating burnei_, install a ventilation hood over tile
range that prL@cts fi)rward at least 5" beyond the front
of the cabinets.
The ventilating hood must be constructed of sheet
metal not less than 0.0122" thick. Install above the
cooktop Mth a clearance of not less than 1/4" between
the hood and the tmdeiside _ff the combustible
material or metal cabinet. Tile hood must be at least as
wide as the appliance and centered over the appliance.
Clearance between tile cooking sm_i_ce and the
ventilation hood surliace MUST NEVER BE LESS
THAN 24 INCI-_]S.
EXCEPTION: Installation ot a listed microwave oven or
coo!dng appliance over the cooktop shall conflmn to the
installation instructions packed with that appliance.
• If cabinets are placed above the range, allow a
mininmn/clearance of 30" between the cooking
stm'hce and the bottom of unprotected cabinets.
• If a 30" clearance between cooking surfl_ce and
overhead o)mbustible material or metal cabinets
cannot be maintained, protect the undei_ide ot the
cabinets above the cooktop with not less than 1/4"
insulating millboard covered with sheet metal not less
than 0,0122" thick, Clearance between the cooking
sm{hce and protected cabinets MUST NEVER BE
Lk2SS THAN 24 INCHES.
• The vertical distance fl'om the plane cff the cooking
sm_hce to the bottom of a(!iacent overhead cabinets
extending closer than 1" to the plane ot the range
sides must not be less than 18". (See the Oimonsions
and Cloarancos illustration in this section.)
• CAUTION - Itelns of interest to children
should not be stored in cabinets ab_we a range or oil
the backsplash of a range--<'hildren climbing oil the
range to reach items could be seriously ii_jured.
28
Installation Instructions
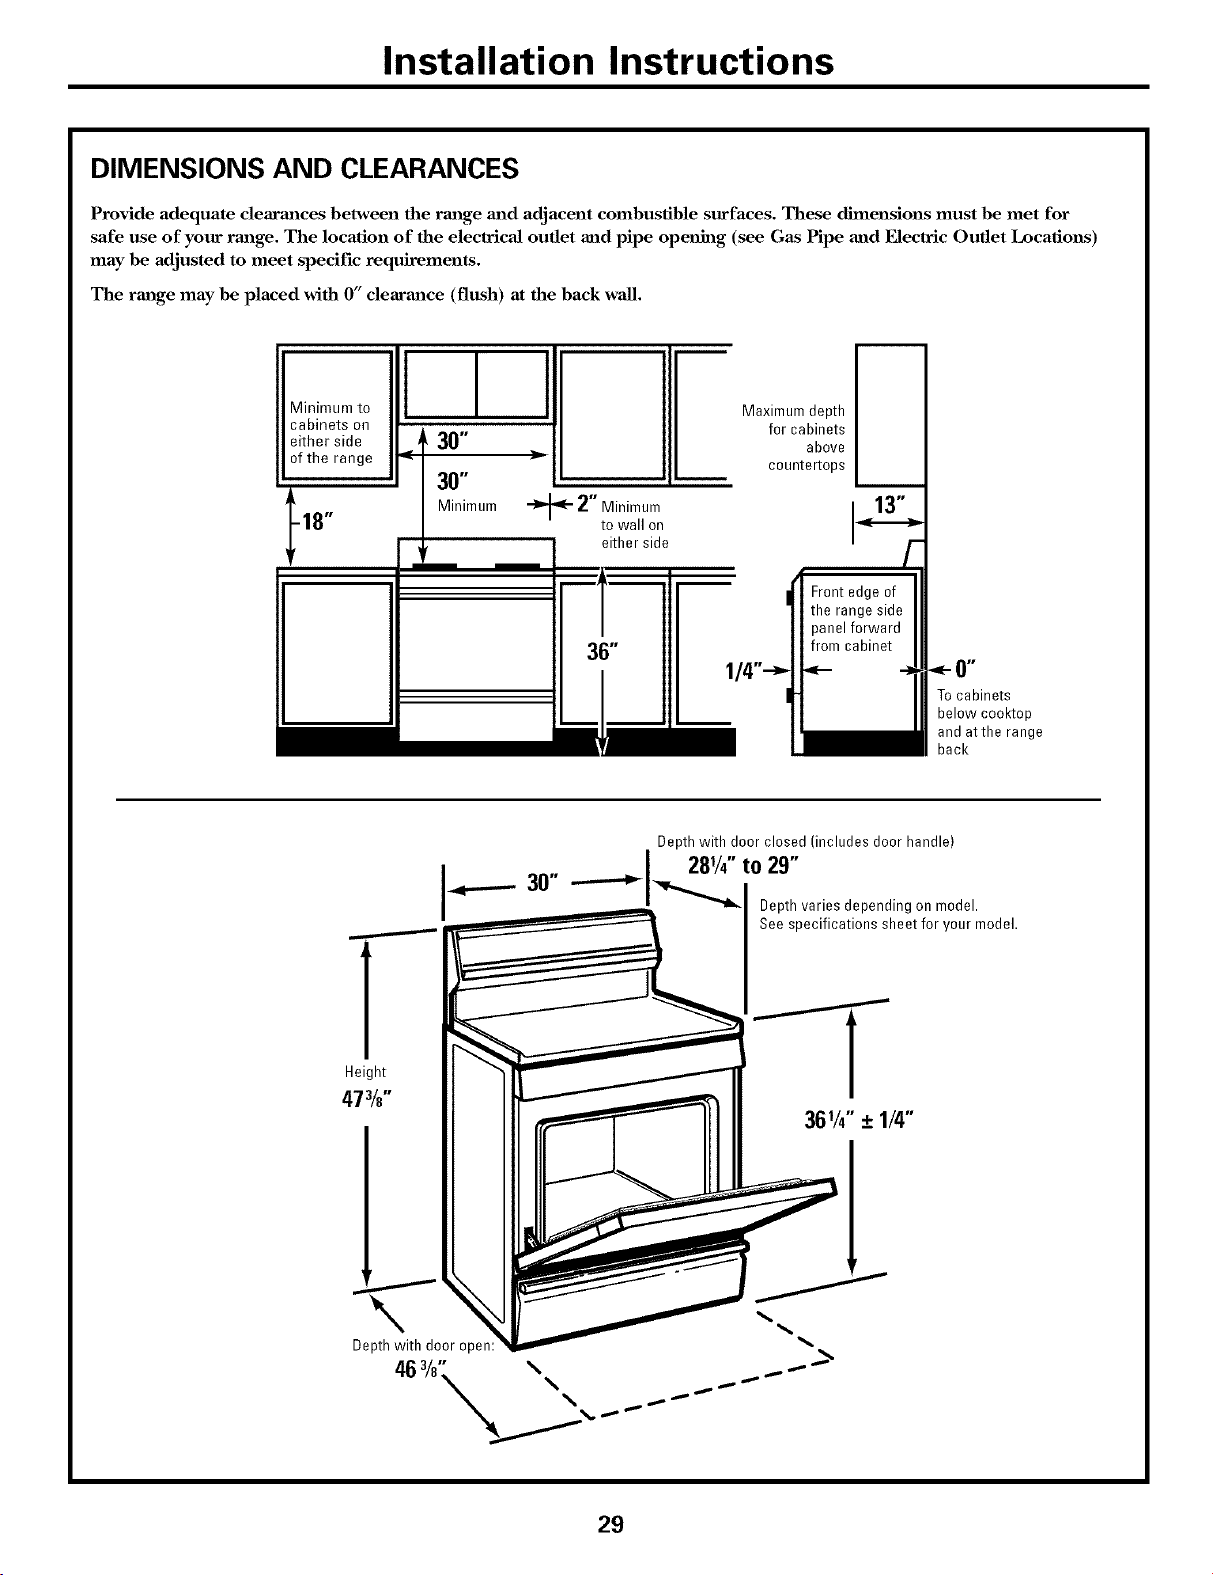
DIMENSIONS AND CLEARANCES
Provide adequate clearmaces between the rm_ge and adjacent combustible surfaces. These dimensions must be met for
safe use of your rm_ge. The location of the electrical outlet and pipe openh_g (see Gas Pipe and Electric Outlet Locations)
may be adjusted to meet specific requirements.
The rm_ge may be placed with 0" clearm_ce (flush) at the back wall.
Minimum to
cabinets on
either side
of the range
t _- 2" Minimum
18" to wall on
either side
1 I I
A30"
30"
Minimum
Maximum depth [
for cabinets
above
countertops
To cabinets
below cooktop
and atthe range
back
Depth with door closed (includes door handle)
Depthvaries depending on model.
See specifications sheet for your model.
Height
473/8"
29
Installation Instructions
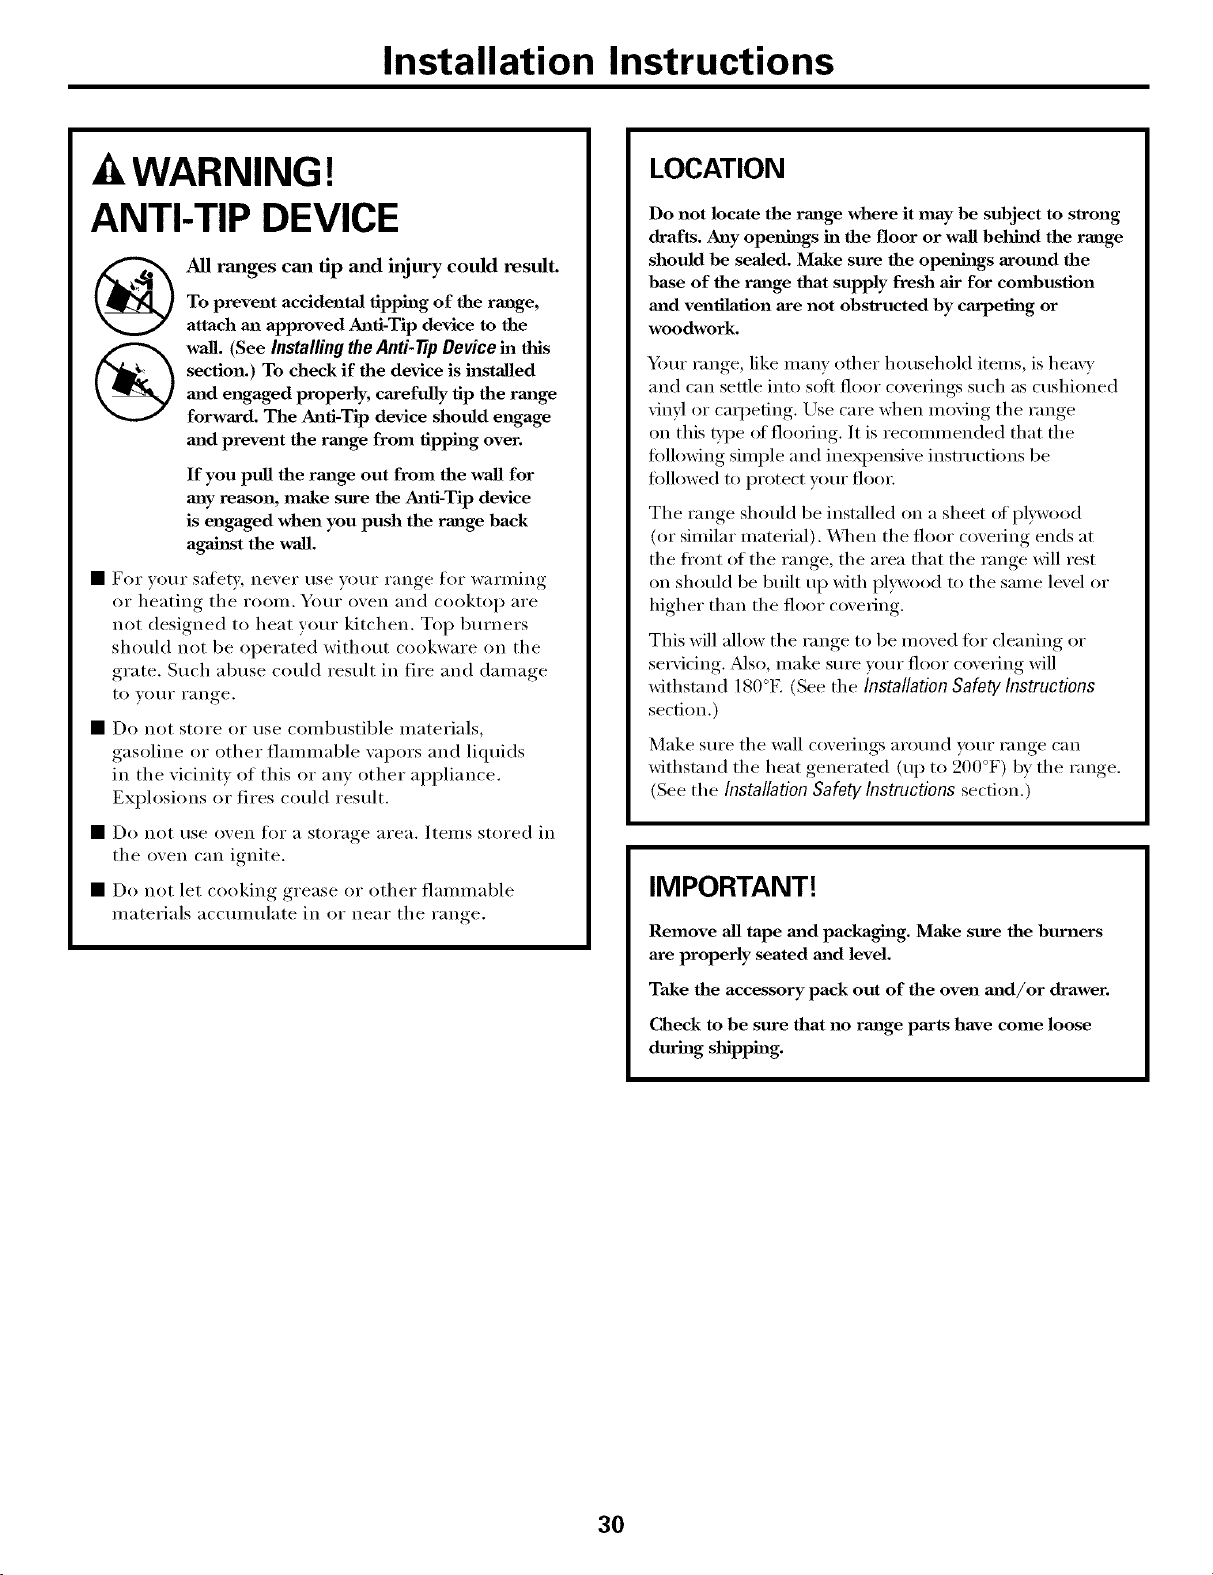
-&WARNING!
ANTI-TIP DEVICE
@
®
All ranges can tip and injury could result.
To prevent accideutaJ tipping of the rmage,
attach an approved AJafi-Tip device to the
wM1. (See Installing the Anti-tip Device ha this
section.) To check if the device is hastalled
mad engaged properly, carefully tip the rmage
forward. The kaati-Tip device should engage
mad prevent the rmage from tipping over.
If you pull the rmage out from the wall for
may reason, make sure the Anti-Tip device
is engaged when you push the range hack
against the wall.
• For your safet)', never use w)ur range for waruiing
or heating tile rooni. Your oven and cooktop are
not designed to heat your kitchen. Top burners
should not be operated without cookware oil the
grate. Such abuse could result in fire and daniage
1o vo/u" range,
• Do not store or use conlbustible ulaterials,
gasoline or other flauunable vapors and liquids
in the vicinity of this or any other ai)pliance.
Explosions or fires could result.
• Do not rise ()veil tor a storage ai'ea. ]teuls stored in
tile ()veil can ignite.
• Do not let cooking grease or other flauinlable
nlaterials accuululate in or near tile range.
LOCATION
Do not locate the range where it may be subject to strong
drafts. Any openings ha the floor or wall behind the rmage
should be sealed. Make sure the openhags around the
base of the rmage that supply fresh air for combustion
mad ventilation axe not obs_'ucted by carpeting or
woodwork.
Your range, like ulanv other household iteins, is hea\ T
and can settle into sott floor coverings such as cushioned
vinyl or cai])efing. Use care when inoving tile range
on this _'pe of flooring. It is recoumlended that tile
tollowing siinple and inexpensive instructions be
tollowed to protect your flooI:
Tile range should be installed on a sheet at plywood
(or siufilar inaterial). _'_]/eIl tile floor covering ends at
the fl'ont of the range, the area that the range will rest
on should be built up with plywood to tile sanle level or
higher than tile floor covering.
This will alh)w the range to be uloved fi)r cleaning or
seI'vicing. _Mso, ulake sure vour floor coveI_ing will
withstand 180°E (See the Installation Safety Instructions
section.)
Make sure tile wall c(wefings around your range can
withstand tile heat generated (up to 200°F) by tile range.
(See tile Installation Safety Instructions section.)
IMPORTANT!
Remove all tape mad packaghag. Make sure the burners
are properly seated mad level.
Take the accessory pack out of the oven mad/or drawer,
Check to be sure that no rmage parts have come loose
during shipphag.
30
Installation Instructions
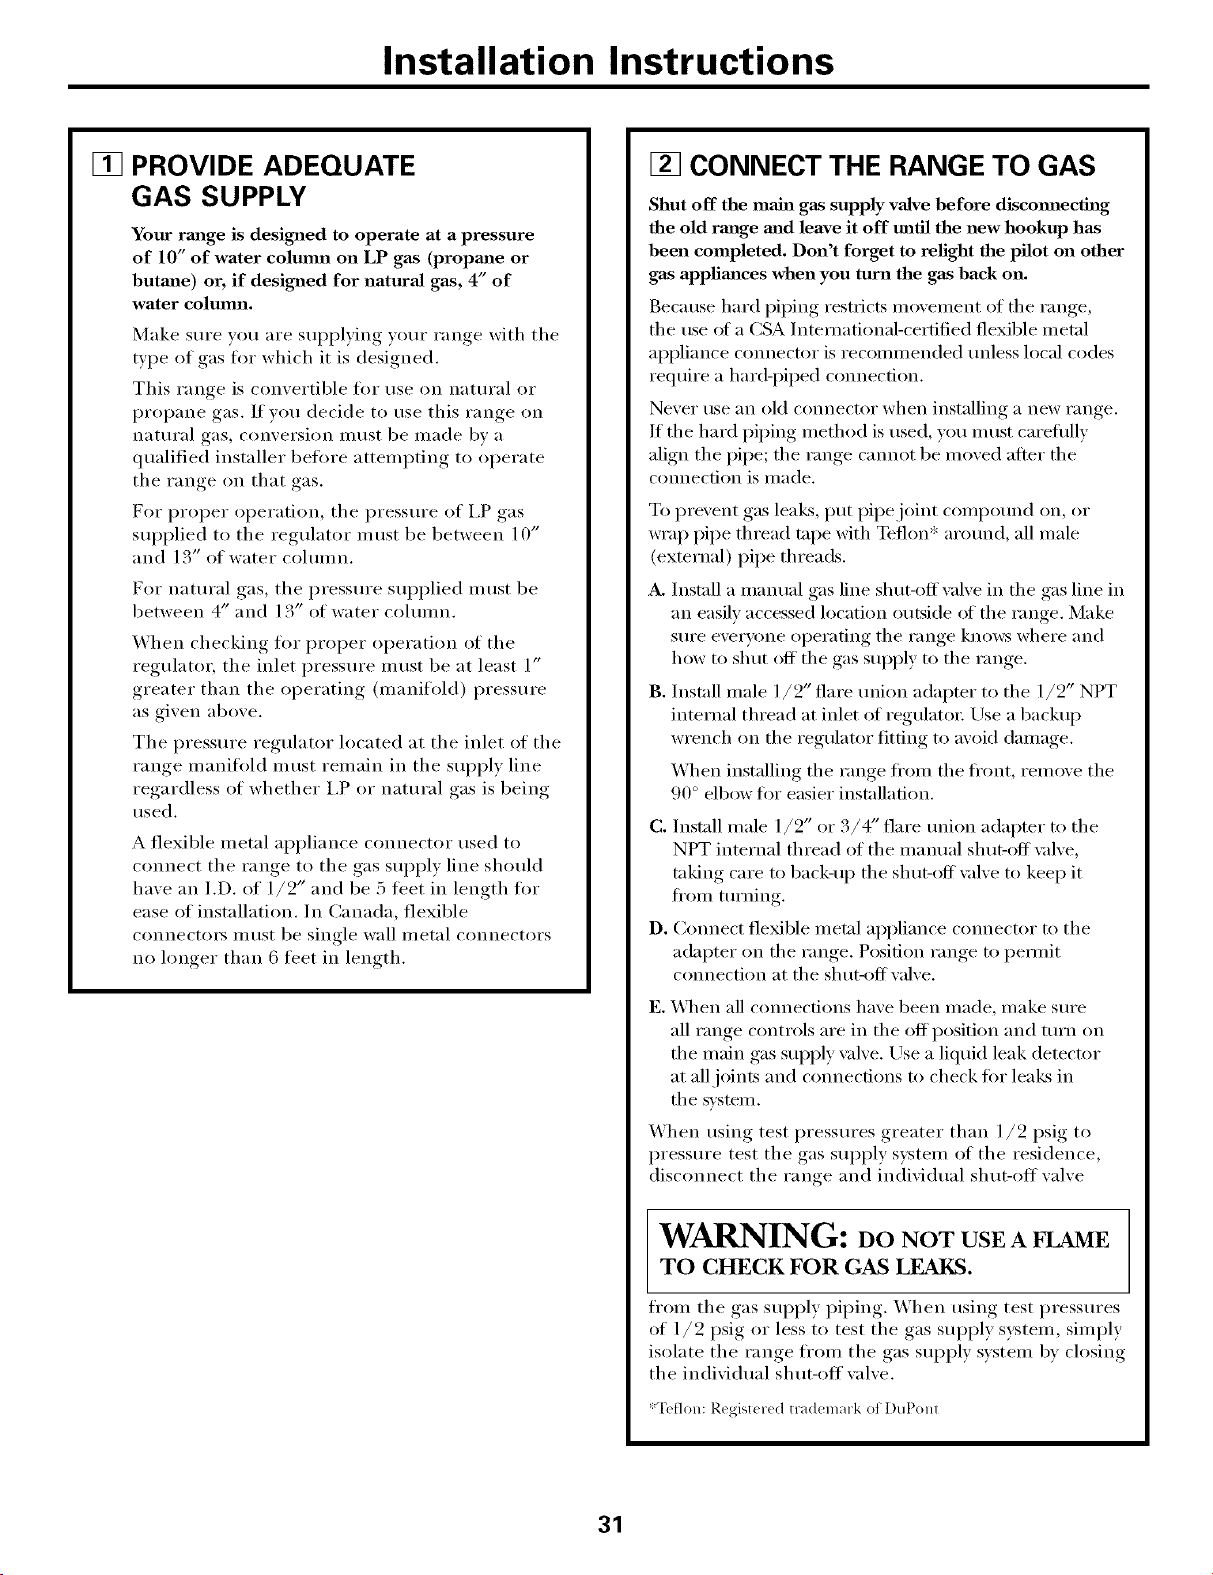
[] PROVIDE ADEQUATE
GAS SUPPLY
Your rmage is designed to operate at a pressure
of 10" of water column on LP gas (propane or
butmae) or, if designed for natural gas, 4" of
water column.
Make sure you are supplying your range with tile
type of gas tin" which it is designed.
This range is convertible fro" use on natural or
propane gas. If you decide to use this range on
II_lttII'_ll g_ls, convei'sion illtist be Ill}l(le bv }1
qualified installer before attempting to operate
tile range on that gas.
For proper operation, the pressure of I,P gas
supplied to tile regulator must be between 10"
and 13" of water colmnn.
For natural gas, the pressure supplied must be
between 4" and 13" of water colmnn.
When checking Ira" proper operation of the
regulatm; tile inlet pressure must be at least 1"
greater than tile operating (nmnifold) pressure
as given above.
Tile pressure regulator located at tile inlet of tile
range manifl_ld must remain in tile supply line
regardless of whether I,P or natmal gas is being
used,
A flexible metal appliance connector used to
connect the range to the gas supply line should
have an I.D. of 1/2" and be 5 fl_et in length Ira"
ease of installation. In Canada, flexible
connectoi_ must be single wall metal connectors
no longer than 6 feet in length.
[] CONNECT THE RANGE TO GAS
Shut off the main gas supply valve before discomaec_ag
the old rmage mad leave it off until the new hookup has
been completed. Don't forget to relight the pilot on other
gas applimaces when you tuna the gas back on.
Because hard piping restricts movement of tile range,
tile use of a CSA International-certified flexible metnl
appliance connector is recommended unless local codes
require a hard-i)iped connection.
Never use an old connector when installing a new range.
If tile hard piping method is used, you m ust carefllllv
align tile pipe; tile range cannot be moved after tile
connection is ii/[l(le.
To prevent gas leaks, put ifipejoint compound oil, or
wrap pipe thread tape with Teflon':: around, all male
(external) pipe threads.
A. Install a nlanual gas line shut-off wdve in the gas line in
an easily accessed location outside of the range. Make
sure everyone operating tile range knows where and
how to shut off tile gas supply to tile range.
B. Install male 1/2" flare union adapter to the 1/2" NPT
internal thread at inlet of regulatoi: Use a backup
wrench on the regulator fitting to avoid danmge.
When installing the range ti'om the fl'ont, remove the
90 ° elbow tot easier installation.
C. lnstnll male 1/2" or 3/4" flare ration adapter to tile
NPT internal thread of the manual shut-off \alve,
tnking care to back-up the shut-off \alve to kee I) it
fl'om turning.
D. Connect flexible metal appliance connector to tile
adapter on the range. Position range to pemfit
connection at the shin-off wdve.
E. When all connections have been made, make sure
all range controls are in the off position and turn oil
the main gas supply \alve. Use a liquid leak detector
at all joints and connections to check tor leaks in
the system.
When using test pressures greater than l/9 psig to
pressure test the gas supply s)_stem of the residence,
disconnect tile range and individual shut-off valve
WARNING: oo NOT USE A FLAME
TO CHECK FOR GAS LEAKS.
from tile gas supply piping. When using test pressures
of 1/2 psig or less to test tile gas supply s)'stem, simply
isolate tile range fl'om tile gas supply system by closing
tile individual shut-off valve.
*Teflon: Regist_ red trademark of DuPont
31
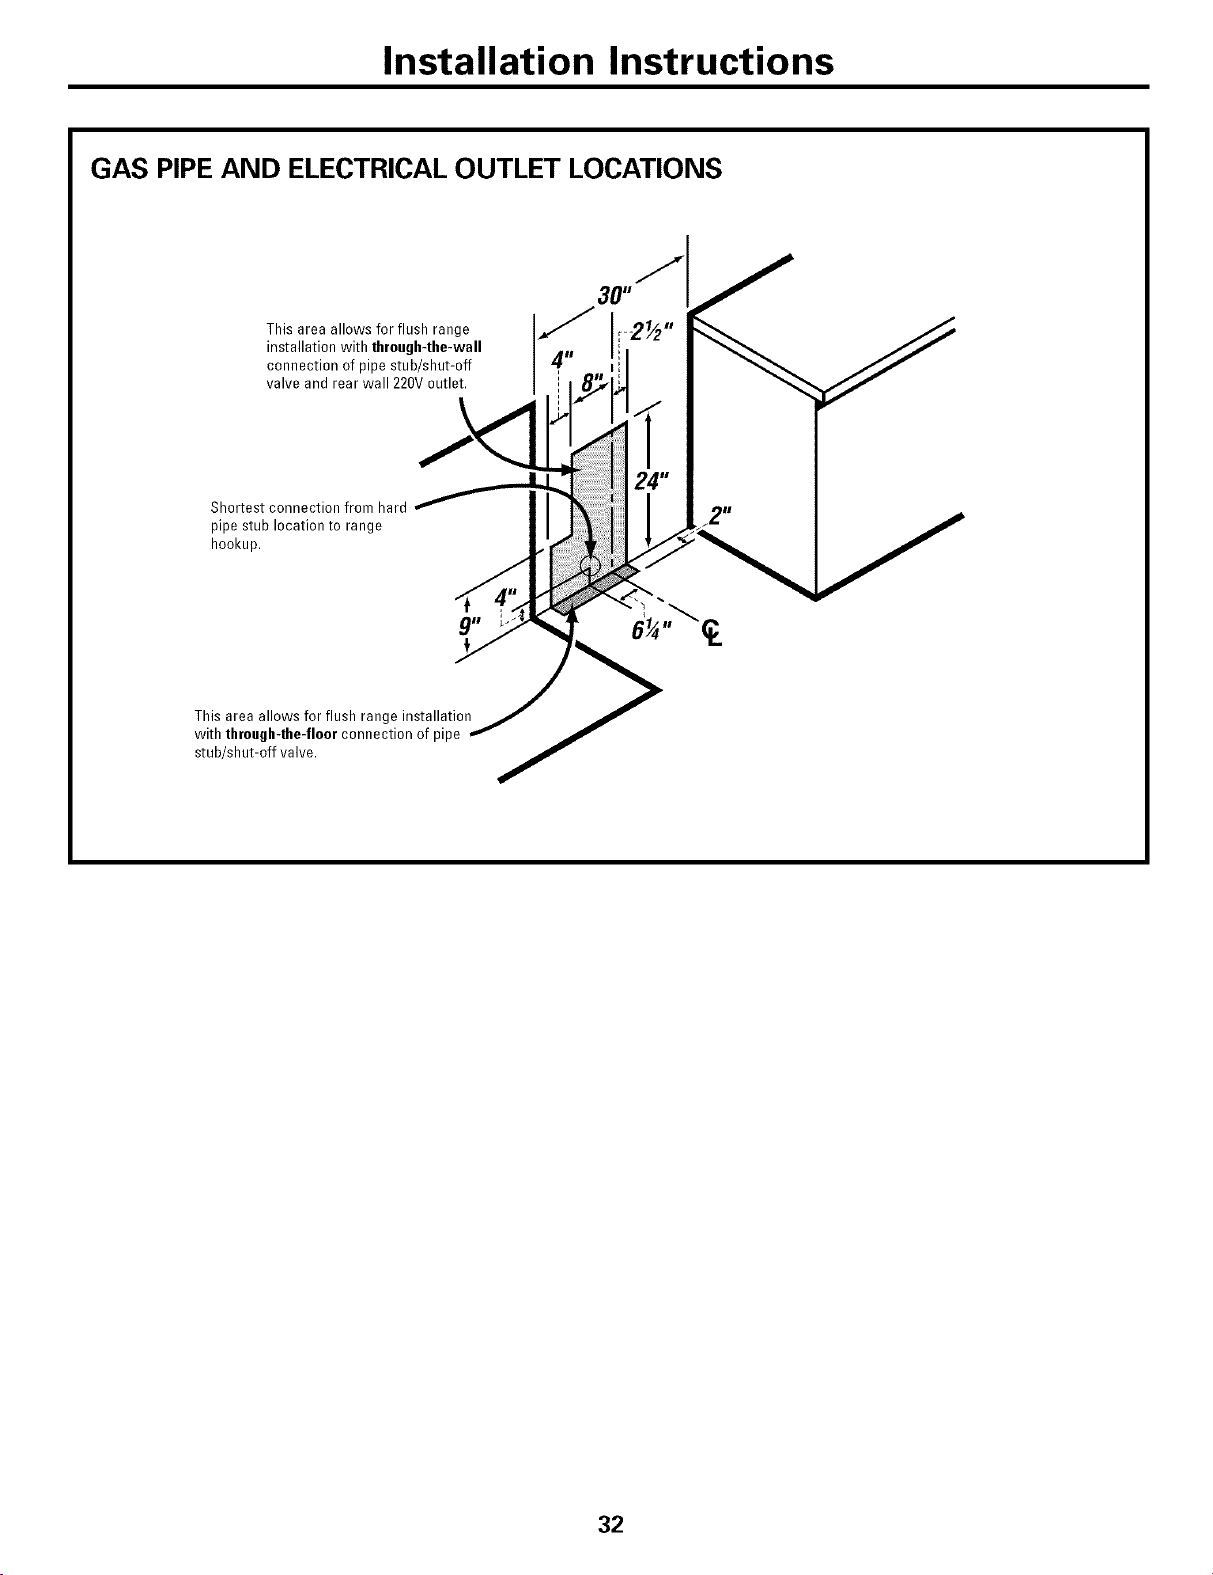
Installation Instructions
GAS PIPE AND ELECTRICAL OUTLET LOCATIONS
This area allows for flush range
installation with through4he-wall
connection of pipe stub/shut-off
valve and rear wall 220Voutlet.
\
Shortest connection from hard
pipe stub location to range
hookup.
This area allows for flush range installation
with tllrougll-the-floor connection of pipe
stub/shut-off valve.
32
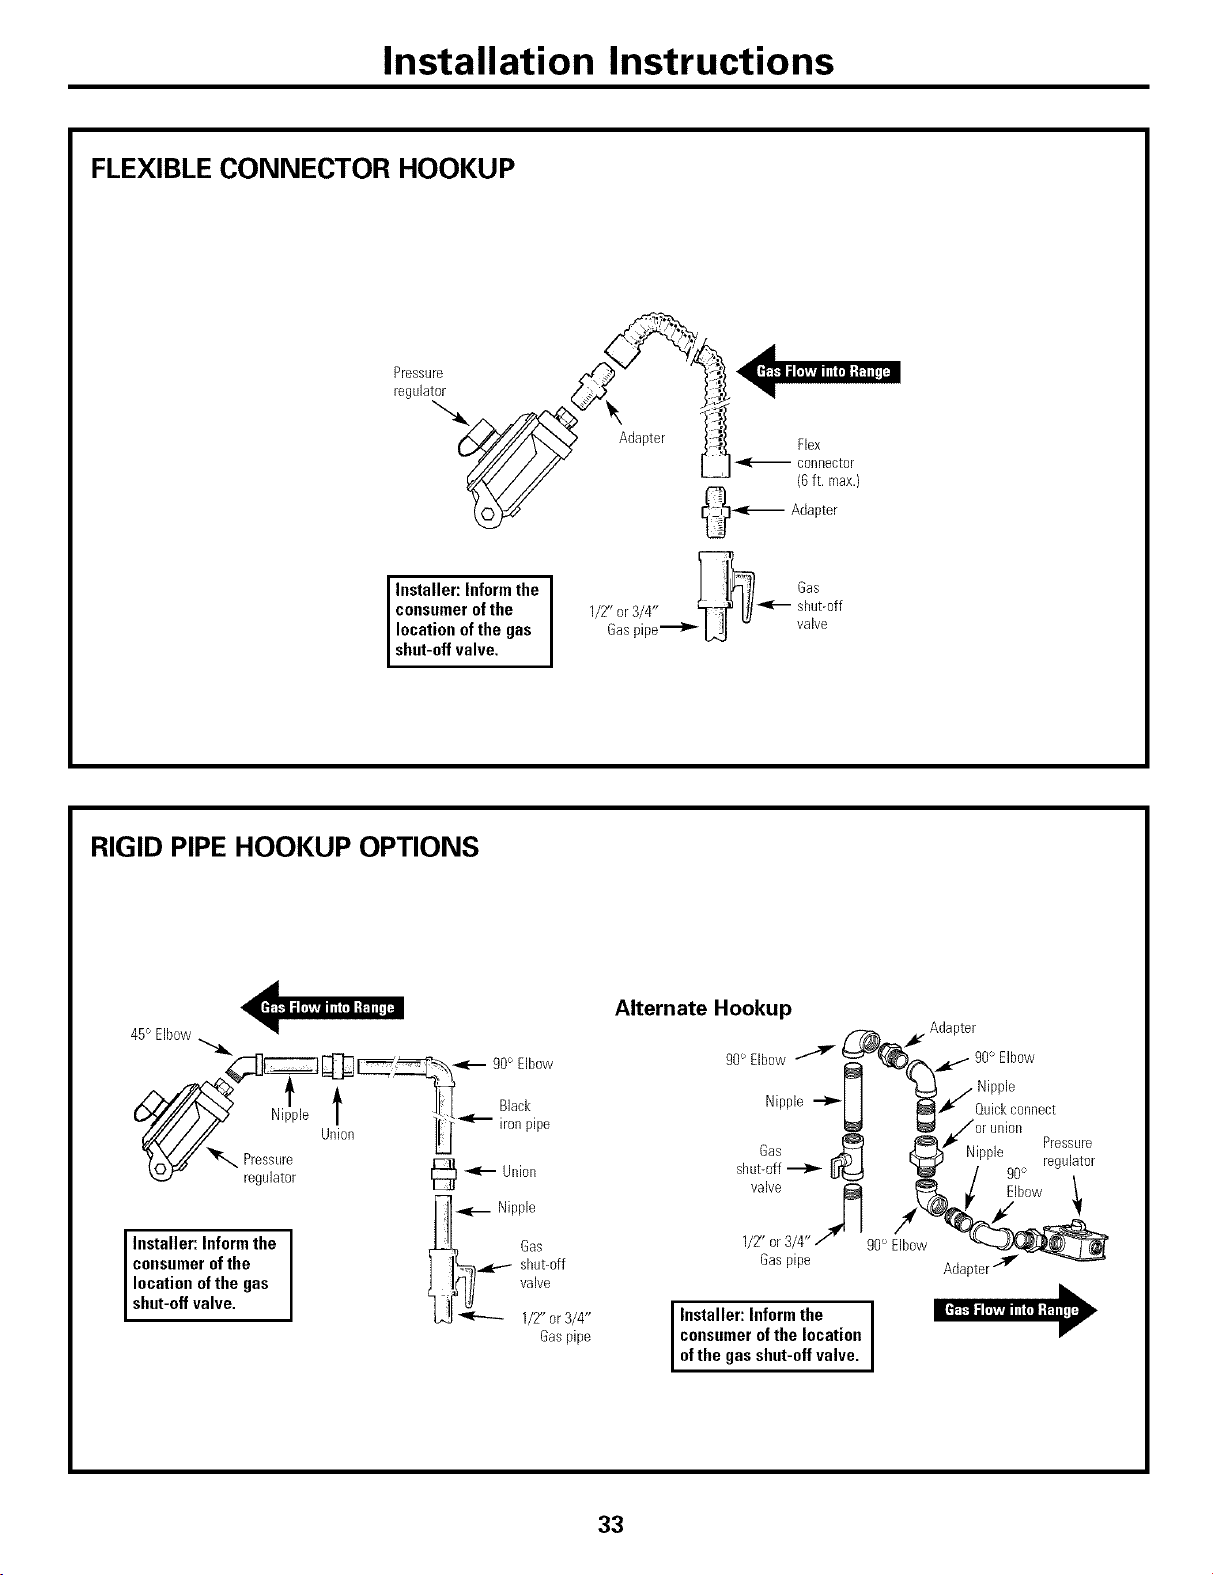
Installation Instructions
FLEXIBLE CONNECTOR HOOKUP
Pressure
regulator
Installer: Inform the
consumerofthe
locationofthe gas
shut-offva ve.
Adapter Flex
connector
(6ft. max.)
_(--- Adapter
Gas
1/2" or3/4" _-_ shut-off
Gaspipe_ [_J - valve
RIGID PIPE HOOKUP OPTIONS
45° Elbow
_'_4;2]_ _ __,--- gO° Elbow
regulator L_
_ _.... Nipple
Installer: Inform the I _ Gas
consumer of the I I [_ shut-off
location of the gas )[_]II valve
shut-off va ve.
q,lF_
b..[I_[----- 1/2"or 3/4"
Gaspipe
Alternate Hookup
_(_k..... Adapter
90° Elbow _ 90° Elbow
I I _ / Nipple
Nipple "-_'-I I _k/ Q • ,
I I 1_I UlCKconnect
I_ I@! ./or union
r, _ t_ _: ,,. Pressure
uas ,4_,--I 4. _ N_pple
shut-off _ _ k[_ 90c reguater
valve :_ Elbow !
I/Z' or 3/4" / 90° Elbow
Gaspipe Adapter
Installer: Inform the I
consumer of the location
I
of the gas shut-off va re.
33
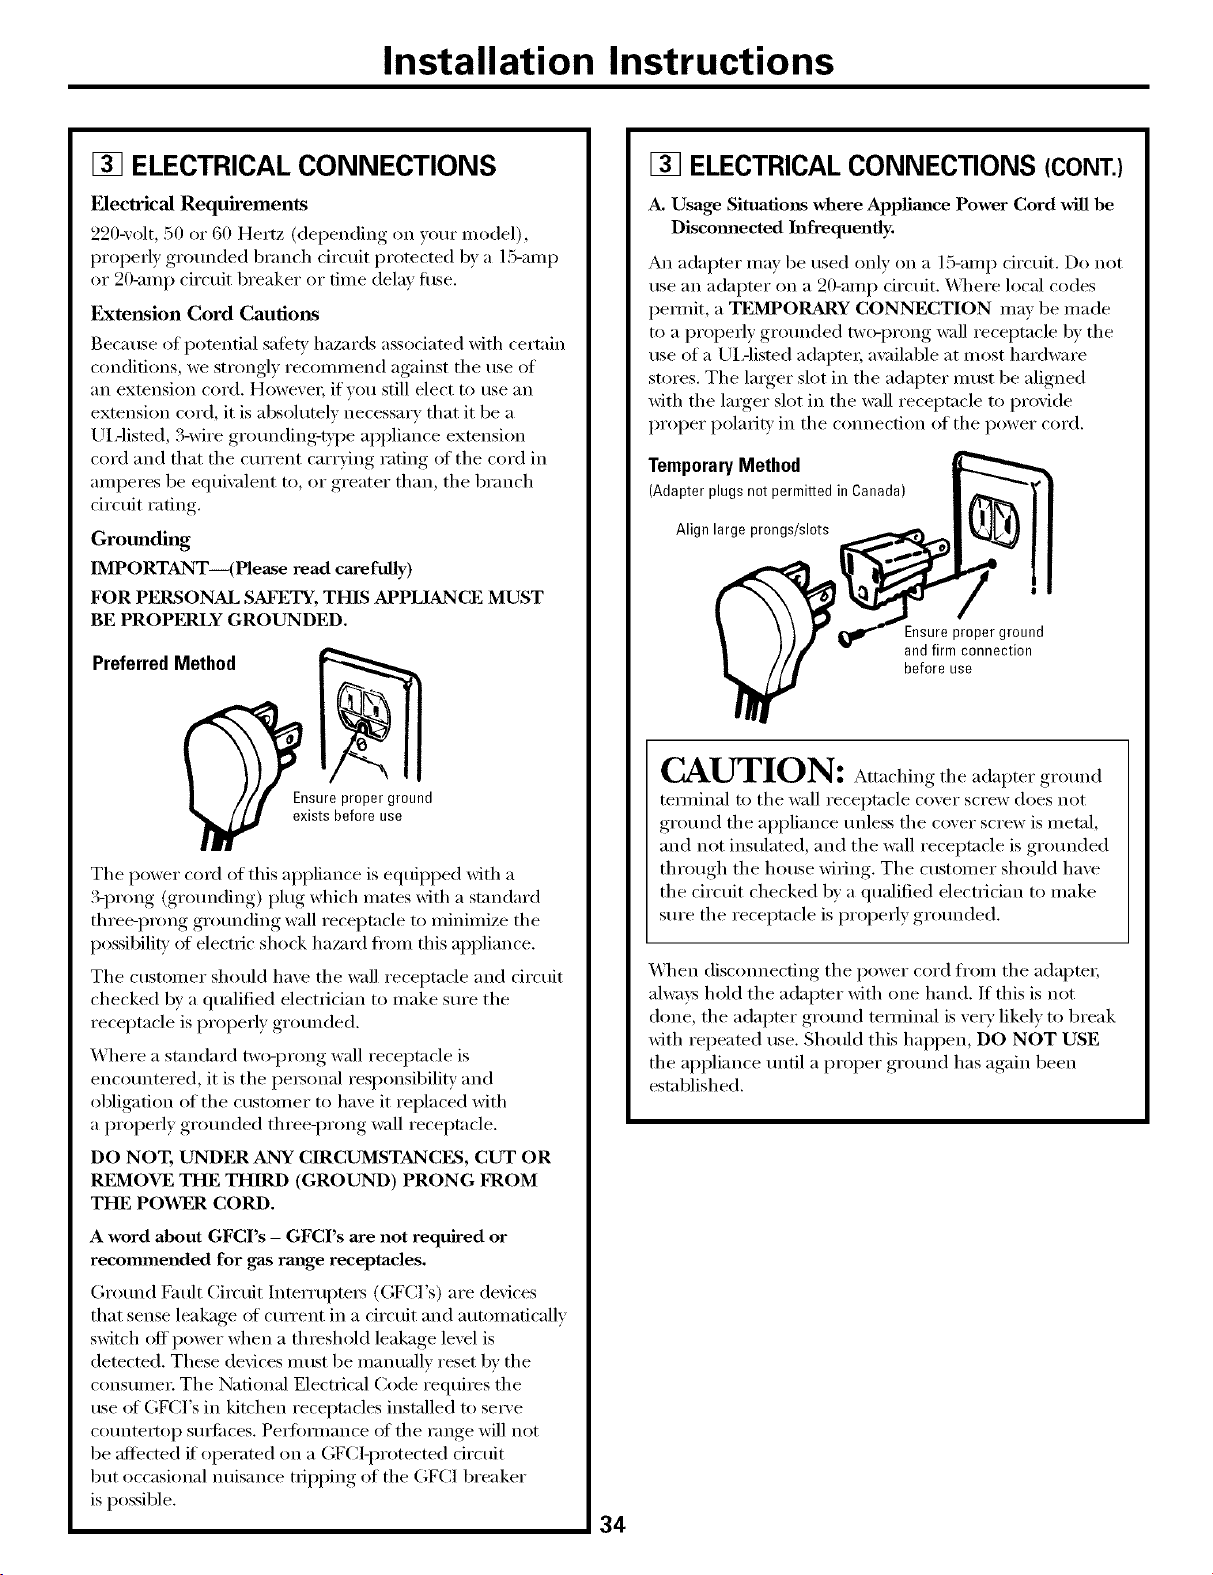
Installation Instructions
[] ELECTRICAL CONNECTIONS
Eleclrical Requirements
220wolt, 50 or 60 Hertz (depending on your model),
properly grounded branch circuit protected by a 15-amp
or 2()-amI) circuit breaker or time delay fllse.
Extension Cord Cautions
Because of potential satbW hazards associated with certain
conditions, we strongly reconlmend against the use of
an extension cord. However; if you still elect to use an
extension cord, it is absolutely necessary that it be a
UiAisted, 3-wire grounding-Q'l)e appliance extension
cord and that the current carrying rating of the cord in
amperes be equi\_dent to, or greater than, the branch
circuit rating.
Grounding
IMPORTANT (Please read caacefully)
FOR PERSONAL SAI_:'I'Y, THIS APPLIANCE MUST
BE PROPFI/LY GROUNDED.
Preferred Method
E_lsureproperground
existsbeforeuse
The power cord of this appliance is equipped with a
3-prong (grounding) i_lug which mates with a standard
three-prong grounding wall receptacle to minimize the
i)ossibiliQ ' of electric shock hazard fl'om this appliance.
The customer should have the wall receptacle and drcuit
checked by a qualified electfidan to make Stli'e the
receptacle is properly grounded.
Where a standard two-prong wall receptacle is
encountered, it is the personal responsibility and
obligation of the customer to have it replaced with
a propedy grounded three-prong wall receptacle.
DO NOT, UNDER ANY CIRCUMSTANCF£, CUT OR
REaMOVE THE THIRD (GROUND) PRONG I_IIOM
THE POWER CORD.
A word about GFCI's - GFCI's axe not required or
recommended for gas rmlge receptacles.
(;round Fault Circuit Interrul)te_ (GFCI's) are devices
that sense leakage ot current in a circuit and automatically
switch off power when a threshold leakage level is
detected. These devices must be manually reset by the
consulnei: The National Electrical Code requiles the
use of GFCI's in kitchen receptacles installed to se_a'e
countem_p surli_ces. Perlimnance ot the range will not
be affected if operated on a (;FCI-protected drcuit
but occasional nuisance till)ping of the GFCI breaker
is possible.
34
[] ELECTRICAL CONNECTIONS (CONT.)
A. Usage Situations where Applimlce Power Cord will be
Discommcted Infrequently,
An adapter may be used only on a 15-amp circuit. Do not
use an adapter on a 20-amp drcuit. _._]mre local codes
pe_nit, a TEMPORARY CONNECTION may be made
to a properly grounded two-prong wall receptacle b)' the
rise ofa UiAismd adapte_; a\_filable at most hardware
stores. The linger slot in the adapter must be aligned
with the larger slot in the wall receptacle to provide
proper polariS' in the connection of the power cord.
Temporary Method
(AdapterplugsnotpermittedinCanada)
Align large prongs/slots
Ensure proper ground
andfirm connection
before use
CAUTION: At ,chingthe g,-o.nd
tet_ninal to the wall receptacle cover screw does not
ground the appliance unless the cover screw is metal,
and not insulated, and the wall receptacle is grounded
through the house wiring. The customer should have
the circuit checked b)' a qualified electrician to make
sure the receptacle is properly grounded.
X,_q_endisconnecting the power cord fl'om the adapte_;
always hold the adapter with one hand. If this is not
done, the adapter ground temfinal is very likely to break
with repeated use. Should this hal)pen, DO NOT USE
the appliance until a proper ground has again been
established.
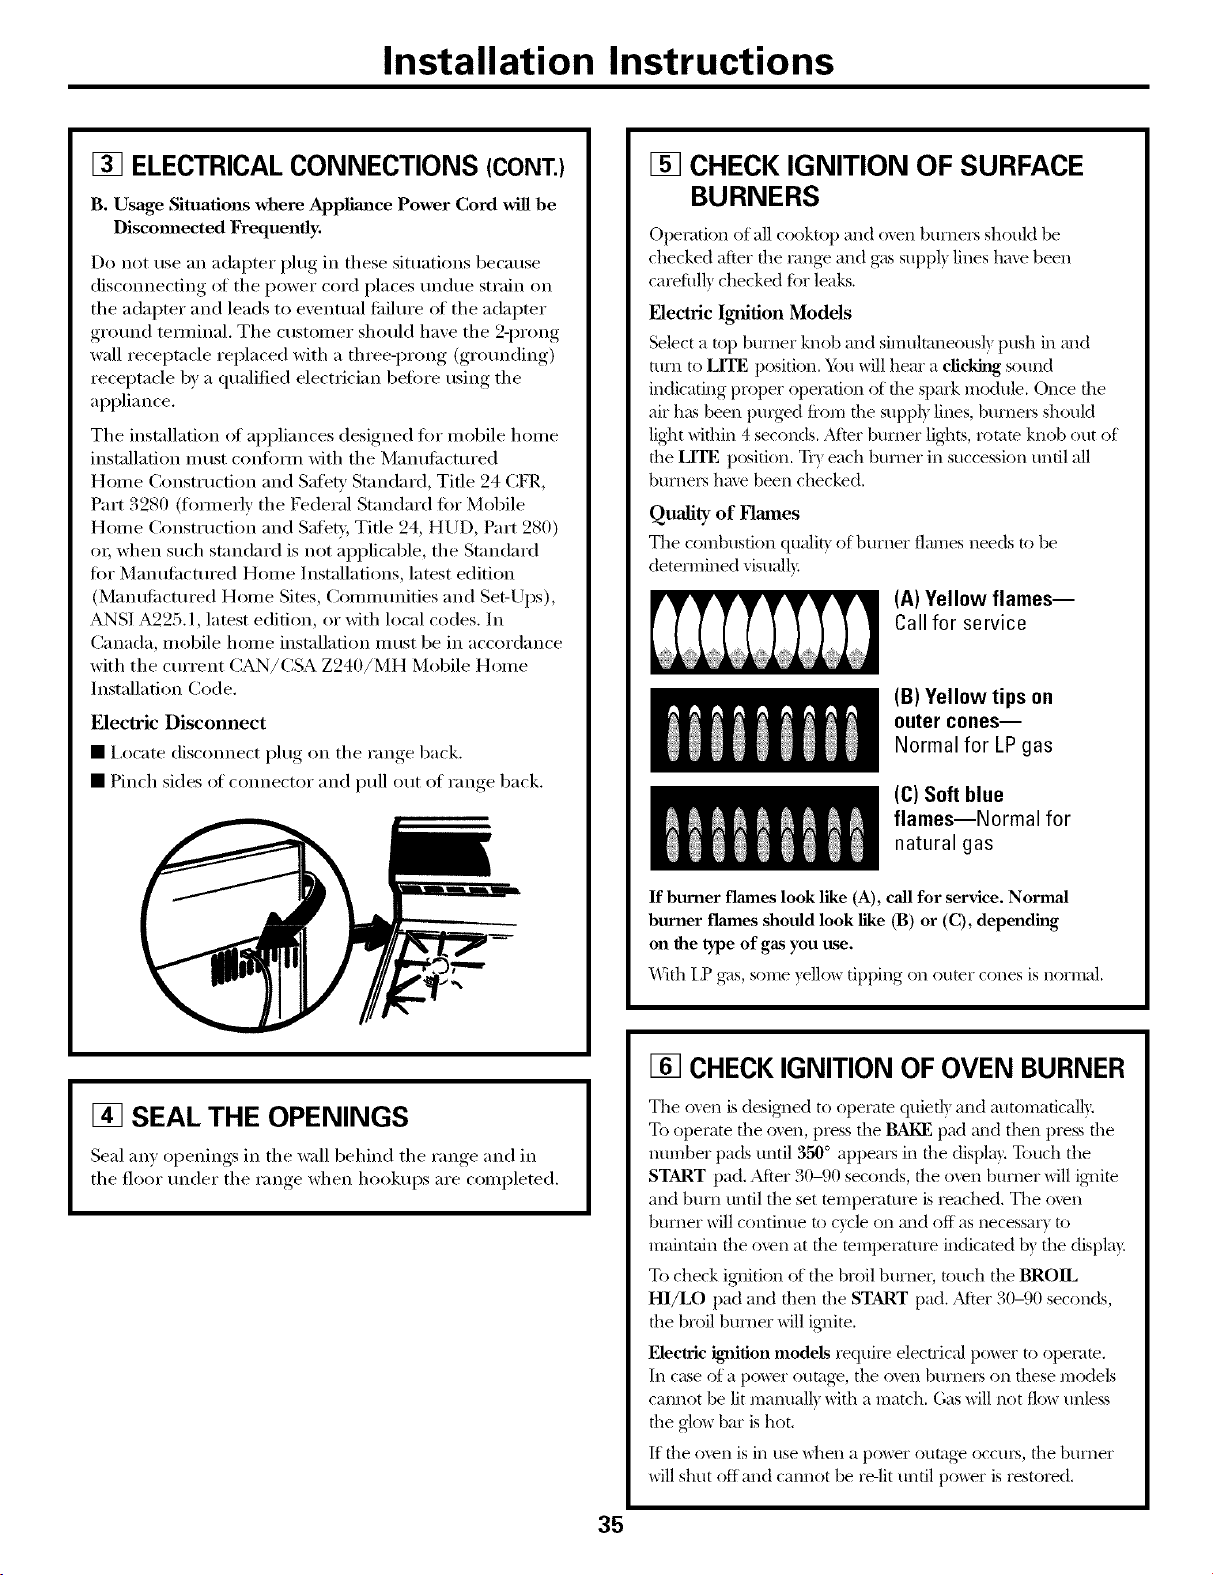
Installation Instructions
[] ELECTRICAL CONNECTIONS (CONT.)
B. Usage Situations where Applim_ce Power Cord will be
Discmmected Frequently.
Do not use an adapter plug in tl_ese situations because
disconnecting ot tl_e power cord places tin(hie strain on
tl_e adapter and leads to eventual tidlure of tl_e adaptor
ground temfinal. The customer should have the 2-prong
wall receptacle replaced with a d_ree-prong (grounding)
receptacle by a qualified electrician befin'e using the
appliance.
The installation ot appliances designed tot mobile home
installation Illtlst cont()ii/l with the Man/ltilCttlred
Home Construction and Safb_' Standard, Tide 24 CFR,
Part 3280 (fimnerly tile Federal Standard for Mobile
Home Construction and Satiety, Tide 24, HUD, Part 280)
oI; when such standard is not applicable, the Standard
fi)r Manuli_ctured Home Installations, latest edition
(Manuli_ctured Home Sites, Connnunities and Set-Ul)s),
ANSI A225.1, latest edition, or with local codes. In
Canada, mobile home installation must be ill accordance
with the current CAN/CSA Z_240/MH Mobile Home
Installation Code.
Electric Disconnect
• I,ocate disconnect plug on tile range back.
• Pinch sides ot connector and pull out of range back.
[] SEAL THE OPENINGS
Seal any openings ill the wall behind the range and ill
tile floor under tile range when hookups are completed.
[] CHECK IGNITION OF SURFACE
BURNERS
Operatkm of all cooktop and oxen burnei_ should be
checked after file range and gas suppl) lines hme been
carefidl_ checked fin" leaks.
F]ectric Ignition Models
Select a top burner knob and simultaneous]) push ill and
[(lrn [O LITE position. Y_u will hear a clicking sound
indicating proper ot)eiafion of the spark module. Once the
air has been purged fix)m the supp b lines, btu'nei_s should
lig_lt within 4 seconds. After burner lights, romm knob out of
the LrFE positkm. Tr_ each burner ii1 succession until all
burners hme been checked.
Quality of Flmnes
The combustion qualit\ of burner flames needs to be
determined _isua]h
(A) Yellow flames--
Call for service
(B) Yellow tips on
outer cones--
Normal for LP gas
(C) Soft blue
flames--Normal for
natural gas
If burner flames look like (A), call for service. Normal
burner flames should look like 0B) or (C), depending
on the type of gas you use.
With I P gas, some yello_ tipping on outer cones is normal.
[] CHECK IGNITION OF OVEN BURNER
The oxen is desig_led to ot)eram quietl) and m_tomafically.
To ot)erate the oxen, press the BAKE pad mitt then press the
number pads until 350 ° at)t)eai_s ill the displa): Touch the
START t)ad. After 30-90 seconds, the own burner will ig_fim
and burn until the set mmpeiature is reached. The oxvn
burner will continue to cycle on and off as necessar_ to
maintain file o_en at file temperature indicated b) the displa)
To check ignitkm of the broil burneI; touch the BROIL
HI/LO pad and then the START pad. After 30-90 seconds,
the broil burner will ig_fite.
Electric ignition models require electrical power to ot)eram.
Ill c_tse of a pt)wer oumge, the oxen burnei_ on these models
cannot be lit manuall_ with a match. Gas will not f](m unless
the g]o_ bar is hot.
If the oxen is ill use _tlen a t)ower oumge occm% the btlrner
will shut off and cannot be re-lit until power is restored.
35
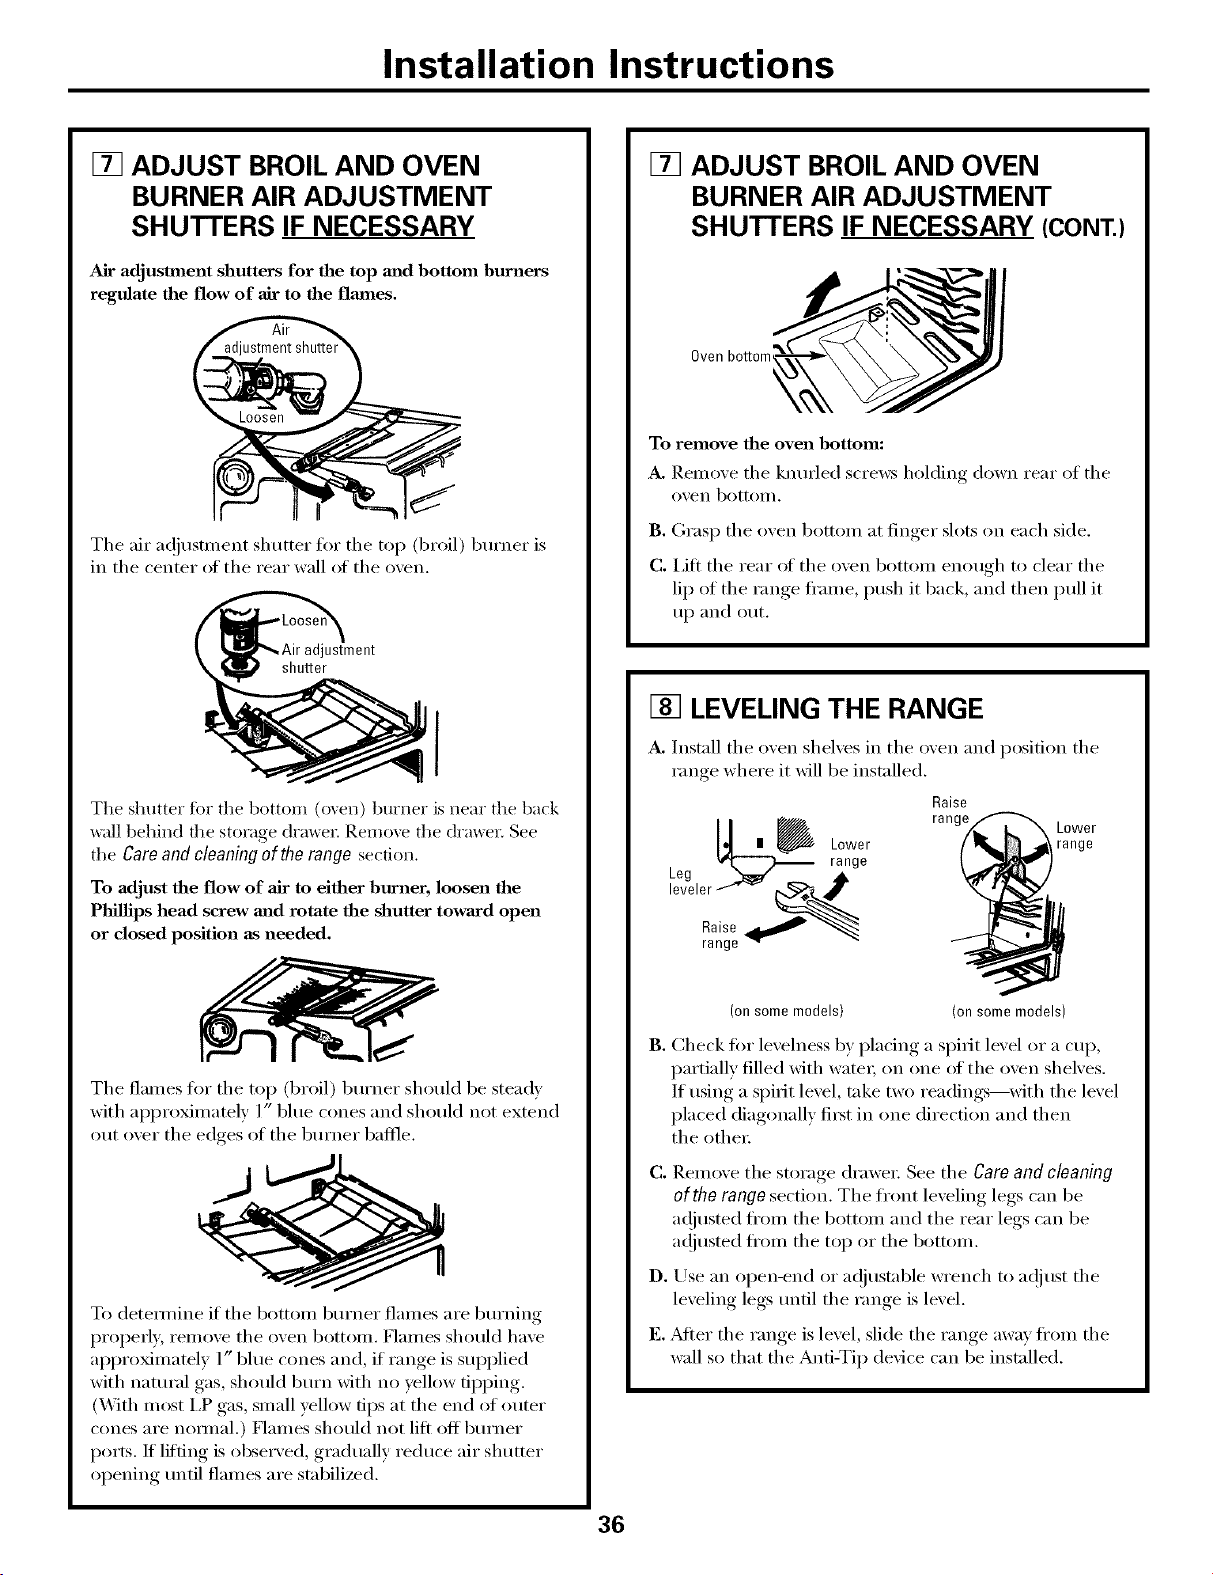
Installation Instructions
[] ADJUST BROIL AND OVEN
BURNER AIR ADJUSTMENT
SHUTTERS IF NECESSARY
Air adjustment shutters for the top m_d bottom burners
regulate the flow of air to the flmnes.
The air a(!justment shutter for the top (broil) burner is
in the center of the rear wall of the oxen.
adjustment
shuEer
The shutter tbr the bottom (oven) burner is near file back
wall behind the storage drawer Remove the drawer. See
the Care and cleaning of the range section.
To adjust the flow of air to either burner, loosen the
Phillips head screw and rotate the shutter toward open
or closed position as needed.
The flames fin" the top (broil) burner should be steady
with ai)proximately 1" blue cones and should not extend
out oxer the edges of the burner baffle.
To deteHnine if the bottom bm'ner flames are burning
i)roperly, relnove the oven bottom. Haines should have
approximately 1" blue cones and, if range is sui)plied
with natural gas, should burn with no yellow tipping.
(_'_]th most I,P gas, small yellow tips at the end of outer
cones are nomml.) Haines should not lilt off bm'ner
ports. If lifting is obse_wed, gradually reduce air shutter
opening until flames are stabilized.
[] ADJUST BROIL AND OVEN
BURNER AIR ADJUSTMENT
SHUTTERS IF NECESSARY (CONT.)
Oven bottom'_
To remove the oven bottom:
A, Remove the knurled screws holding down rear of the
oven bottoii/.
B. Grasp the oven bottom at finger slots on each side.
C. i,ifl the rear of the oven bottom enough to clear the
lip of the range fl'ame, push it back, and then pull it
up and out.
[] LEVELING THE RANGE
A. Install the oven shelves in the oven and position the
range where it will be installed.
Raise
[_m _ range Lower
Lower range
_ range
Leg _ ,A
leveler "_'_ _Q._
Raise
range - -
(on some models) (on some models)
B. Check fin" levelness by placing a spirit level or a cup,
partially filled with water; on one of the oven shelves.
If using a spirit level, take two readings--with the level
placed diagonally fi_t in one direction and then
the other:
C. Rem(we the storage drawer: See the Care and cleaning
of the range section. The fl'ont leveling legs can be
ac!justed fl'om the bottom and the rear legs can be
a(!justed fl'om the top or the bottom.
D. Use an open-end or a(!justable wrench to a(!just the
leveling legs until the range is level.
E. _Mter the range is level, slide the range away ti'om the
wall so that the Anti-Tip device can be installed.
36
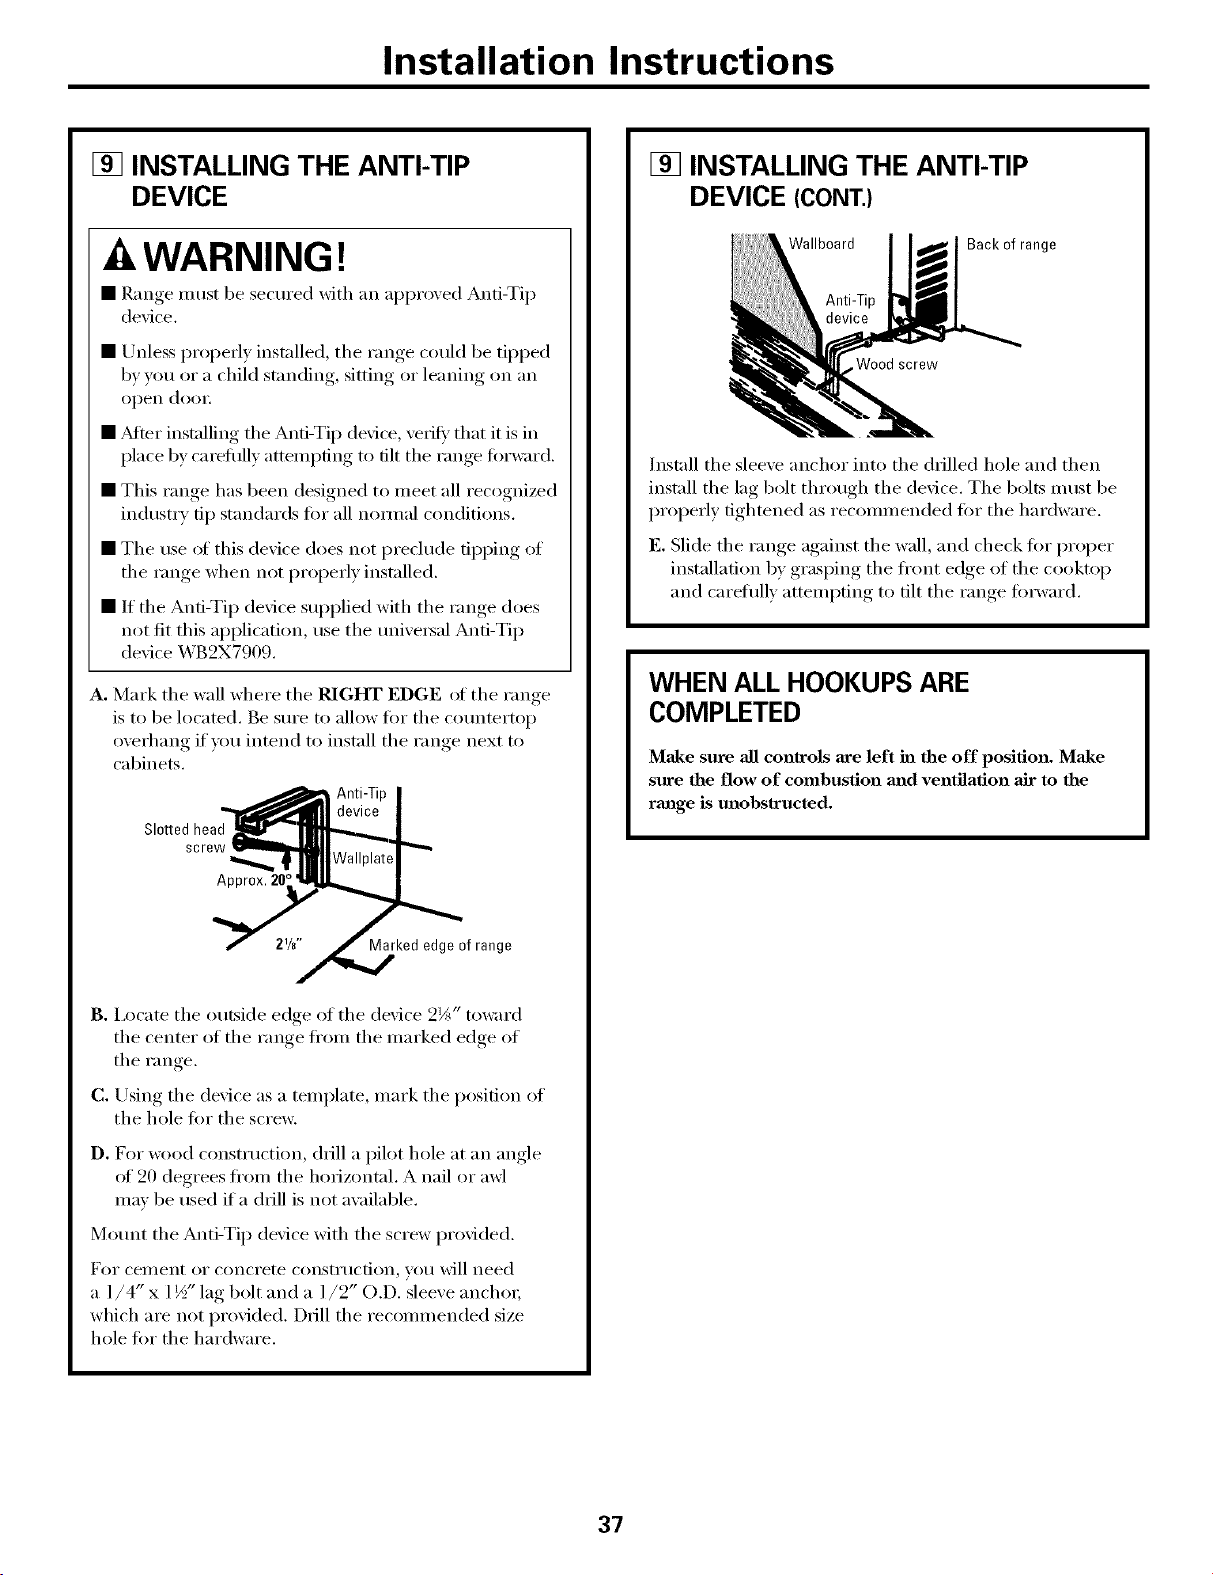
Installation Instructions
[] INSTALLING THE ANTI-TIP
DEVICE
A WARNING!
• Range must be secured xdth an approxed Anti-Ti I)
dexice.
• Unless propefl) installed, tile range could be tipped
b) you or a child standing, sitting or leaning on an
open dooi;
• _Mier installing tile Anti-Ti I) dex@e, xefifk' that it is in
place by careflfll)attempting to tilt tile range forward.
• This range has been desioned to meet all recognized
industry tip standards fi)r all nom/al conditions.
• The use of this dexice does not preclude tipping of
the range, when not I)r°I)erl_, installed.
• If the Ami-Tip device supplied with the range does
not fit this application, use the mlixe_al Ami-Tip
dexice _ B9X7909.
A. Mark tile wall where tile RIGHT EDGE (ff tile range
is to be located. Be sm'e to allow tot tile comltertop
overhang if you intend to install the range next to
cabinets.
SIo_ed head
screw
Approx. 28
Marked edge of range
B. I,ocate tile outside edge of tile device 2_" toward
the center of the range fl'om the marked edge of
the range.
C. Using tile device as a template, mark tile position of
the hole fi_r the screw,
D. For wood construction, drill a pilot hole at an an,de
of 20 degrees fl'om tile horizontal. A nail or awl
max be used if a drill is not axailable.
Motmt tile Anti-Tip device with tile screw provided.
FoI" celnent OI" conci'ete consti'tlction, VOtl will need
a ]/4" x ] ½" lag bolt and a ]/2" O.D. sleeve anchor;
which are not provided. Drill tile recommended size
hole for tile hardware.
[] INSTALLING THE ANTI-TIP
DEVICE (CONT.)
Wallboard
Wood screw
Back of range
Install tile sleeve anchor into tile drilled hole and then
install tile lag bolt through tile device. Tile bolts must be
prol)erly tightened as recommended tot tile hardware.
E. Slide the range against the wall, and check fi_r proper
installation by grasping tile fl'ont edge of tile cooktop
and carefully attempting to flit tile range forward.
WHEN ALL HOOKUPS ARE
COMPLETED
Make sure all controls axe left in the off position. Make
sure the flow of combustion and ventilation air to the
rmlge is unobstructed,
37
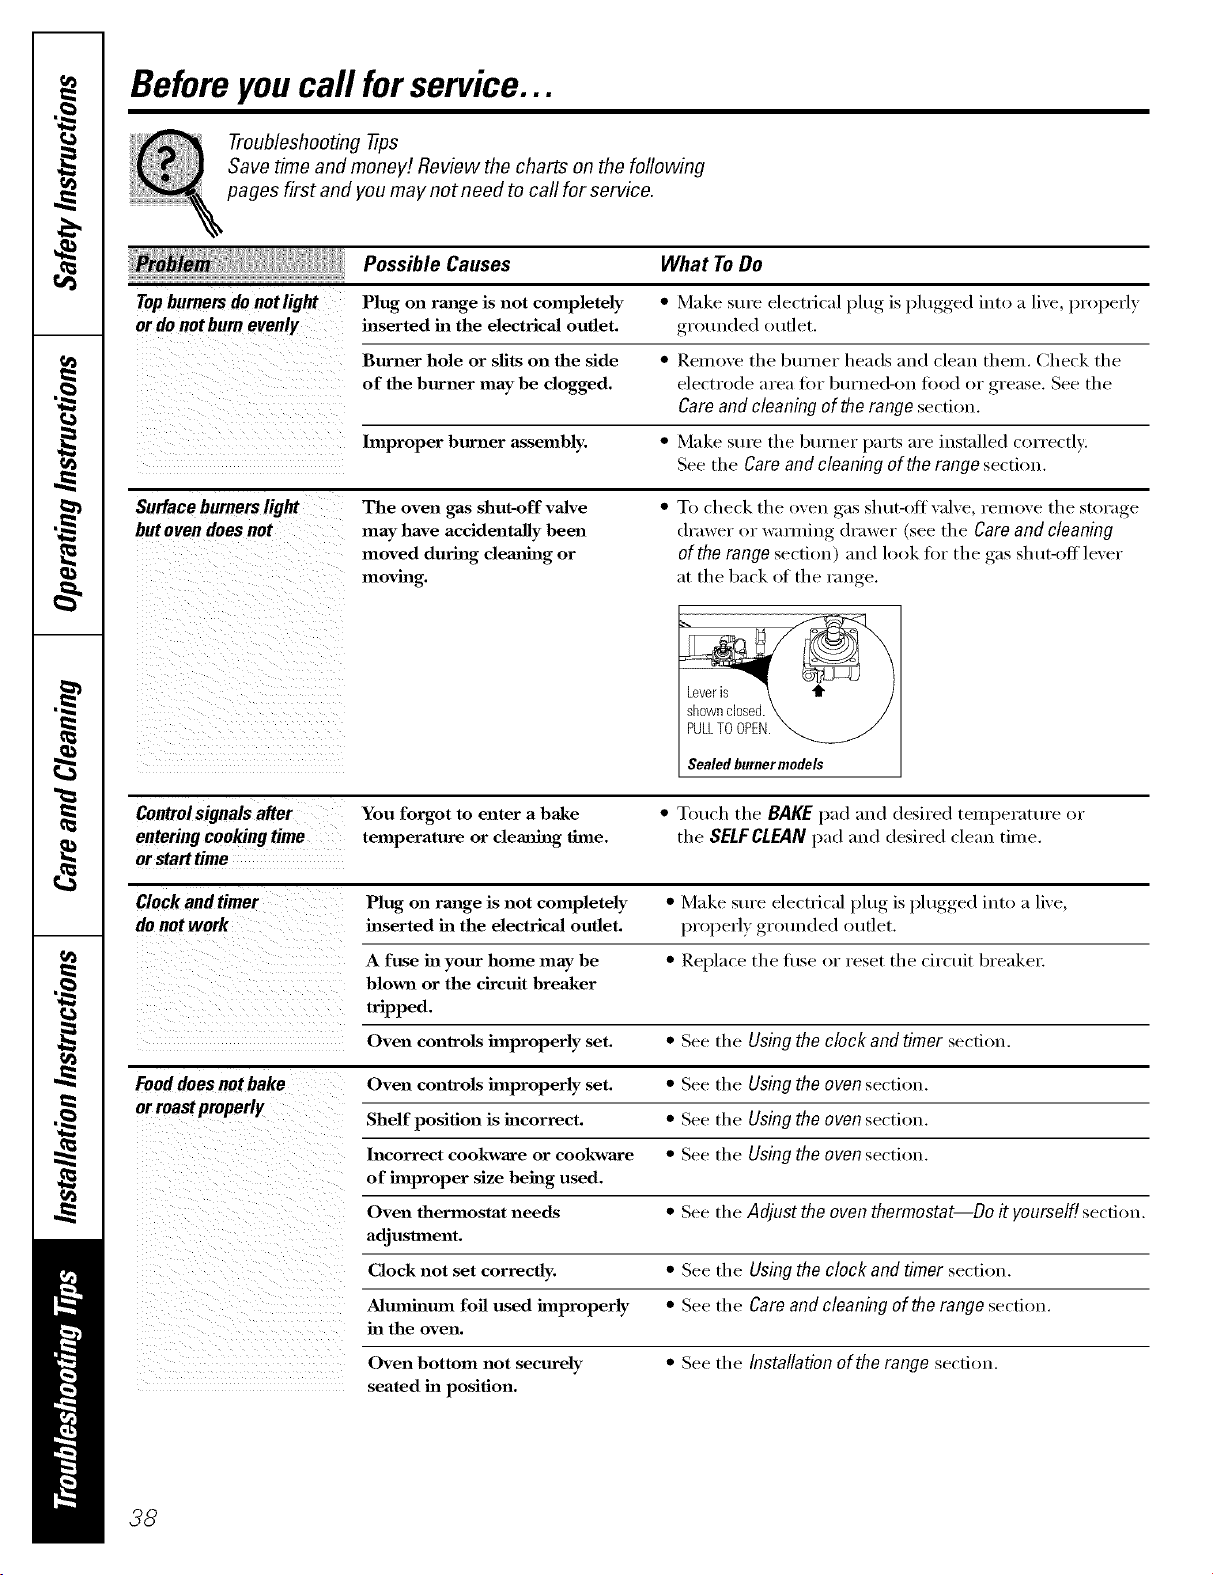
Beforeyoucall forservice...
Troubleshooting tips
Save time and money! Review the charts on the following
pages first and you may not need to call for service.
Possible Causes What To Do
Topburnersdonotlight
ordonotbumevenly
Plug on rmlge is not completely
inserted in the electrical outlet.
• Make sure electrical plug is plugged into a live, properly
grounded outlet.
Burner hole or silts on the side • Remove the btu'ner heads and clean them. Check the
of the burner may be clogged, electrode area fi)r burned-on ti_od or grease. See the
Care and cleaning of the range section.
hnproper burner assembly. • Make stu'e the btu'ner parts are installed (orrectlv:
See the Care and clean&g of the range section.
Surface burners light
but ovendoes not
The oven gas shut-off valve
may have accidentally been
moved during clemlhag or
movhag.
• To check the oven gas shut-nit valve, rein(we the storage
drawer or wamfing drawer (see the Care and cleaning
oftherange section) and look for the gas shut-off' lever
at the back _ff the range.
ii
Leveris
sl_0wnclosed
PULLTOOPEN.
Sealed burner models
Controlsignals after You forgot to enter a bake • Touch the BAKE p;Id ;rod desired teml_er;ittu'e or
entering cooking time temperature or cleaning time. the SELFCLEAN I);l(_l;rod desired clean time.
or start time
Clock and timer Plug on range is not completely • Make stlre electrical l)lug, is l)lugged,, into a live,
do not work inserted in the electrical outlet, l)rol)erl} grotmded outlet.
A fuse ha your home may be • Rel)l:lce the fl/se or reset the circtfit breaker:
blown or the circuit breaker
tripped.
Oven con_'ols improperly set. • See the Using the clock and timer section.
Fooddoes not bake Oven controls hnproperly set. • See the Using the oven section.
or roastproperly
Shelf position is incorrect. • See the Using the oven secti(>u.
Incorrect cookware or cookware • See the Using the oven section.
of hnproper size being used.
Oven thermostat needs • See the Adjust the oven thermostat--Do it yourself!section.
adjustment.
Clock not set correctly. • See the Using the clock and timer section.
Aluminum foil used improperly • See the Care and cleaning of the range section.
ha the oven.
Oven bottom not securely • See the Installation of the range secti(>n.
seated ha position.
38
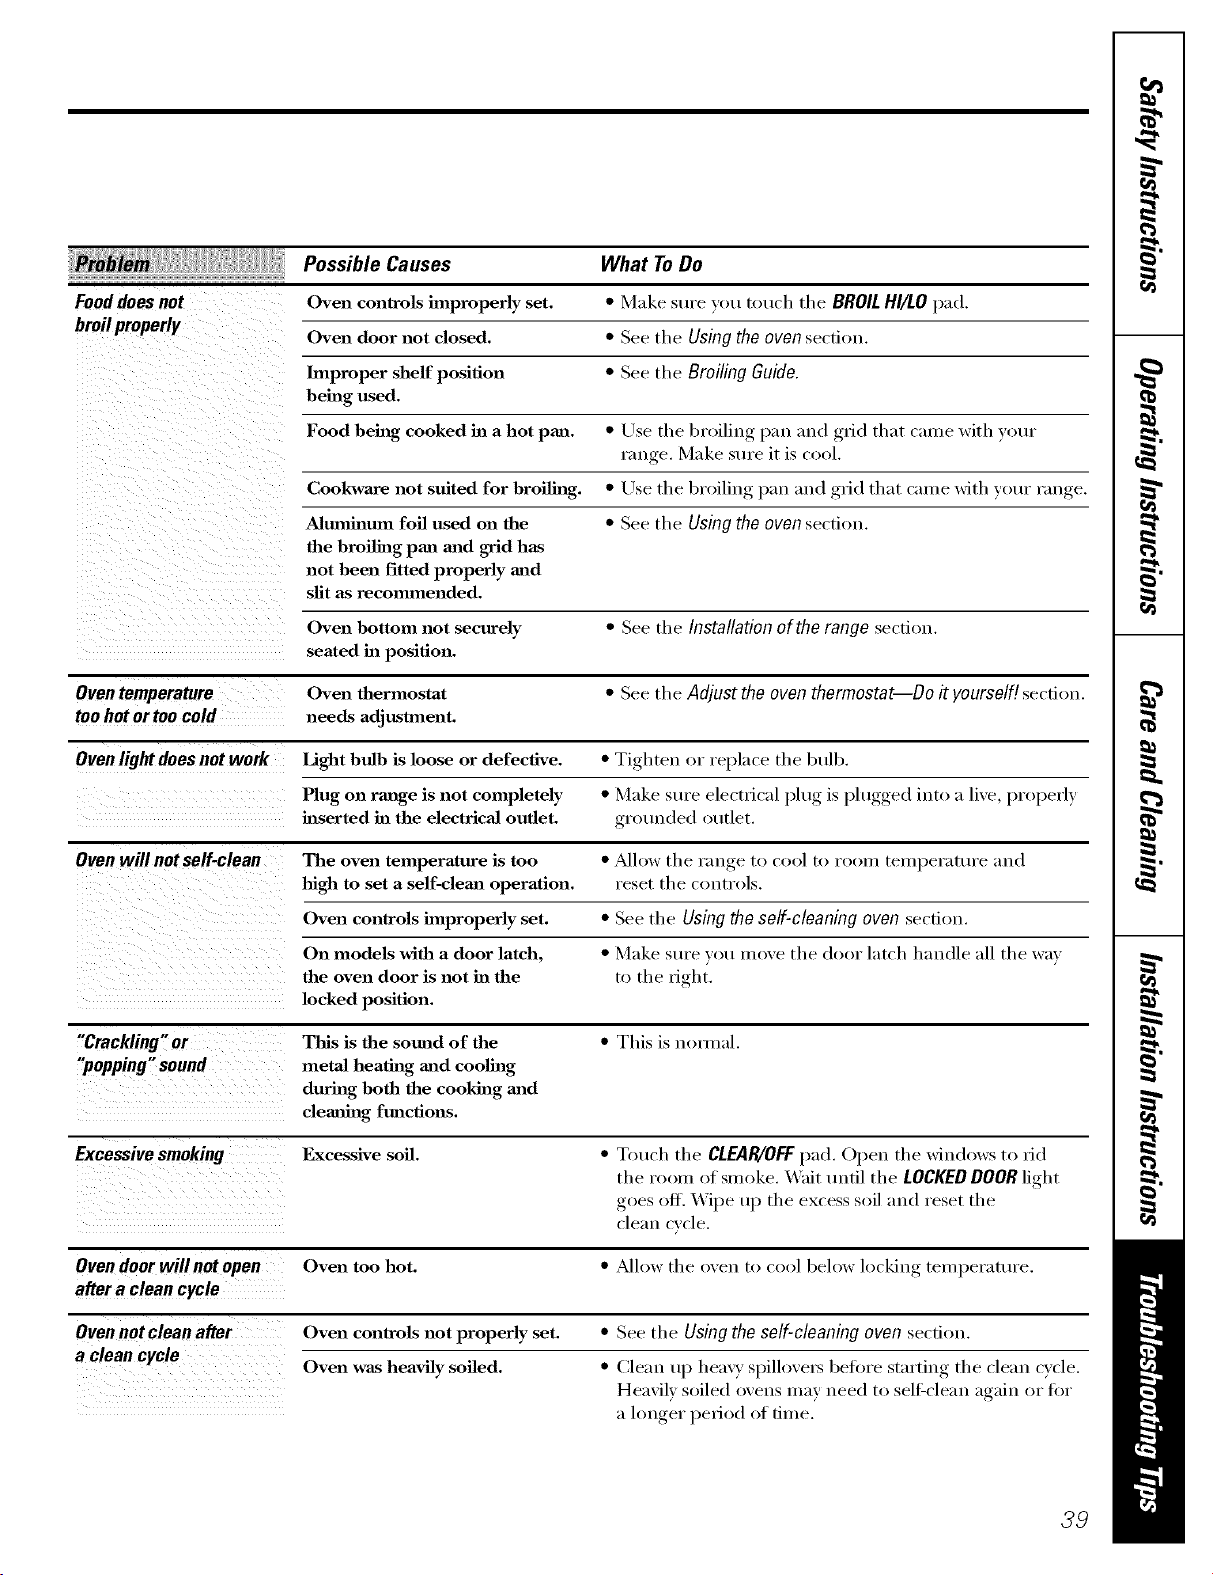
Possible Causes What To Do
Food does not Oven controls improperly set. * Make sure you touch the BROIL HI/LO pad.
broil properly
Oven door not closed. * See the Using the oven section.
Improper shelf position * See the Broiling Guide.
being used.
Food being cooked in a hot pan. * Use the broiling pan and glicl that came with w_ur
range. Make sure it is cool.
CookwaJce not suited for broiling. * Use the broiling pan and grid that came with your range.
Alumhmm foil used on the * See the Using the oven section.
the broiling pan mad grid has
not been fitted properly mad
silt as recommended.
oven bottom not securely * See the Installation of the range section.
seated in position.
Oven temperature oven thermostat * See the Adjust the oven thermostat--Do it yourself! se('don.
toohot or too cold needs adjustment.
Oven light does not work Light bulb is loose or defective. * Tighten or replace the btflb.
Plug on range is not completely * Make sure electrical plt/g ix plt/gged into a live, properly
inserted in the electrical outlet, grounded outlet.
Oven will notself-clean The oven temperature is too * ?dlow the range to cool to room teml)erature and
high to set a self-clean operation, l'eset the ¢olltl'()ls.
Oven controls improperly set. * See the Using the self-cleaning oven secfi_>n.
On models with a door latch, * Make sure you i/love the door latch handle all the way
the oven door is not ha the to the right.
locked position.
"Crackling"or This is the sound of the * This ix nollnal.
"popping" sound metal heating mad cooling
during both the cooking mad
cleaning functions.
Excessive smoking Excessive soil. * Tourh the CLEAR/OFFpad. Open the windows to rid
the room ot smoke. _ait until the LOCKEDDOORlight
goes ofl_ _\]pe tq) the excess soil and reset the
clean cycle.
Oven door willnot open Oven too hot. * ?dh)w the oven to cool below locking temperature.
after a clean cycle
Oven not clean after Oven controls not properly set. * See the Using the self-cleaning oven section.
a clean cycle
Oven WaS heavily soiled. * (]lean tip hea\)' spillo\'el_ before starting the clean cycle.
Heavily soiled ovens may need to sell=clean again or for
a longer period of time.
39
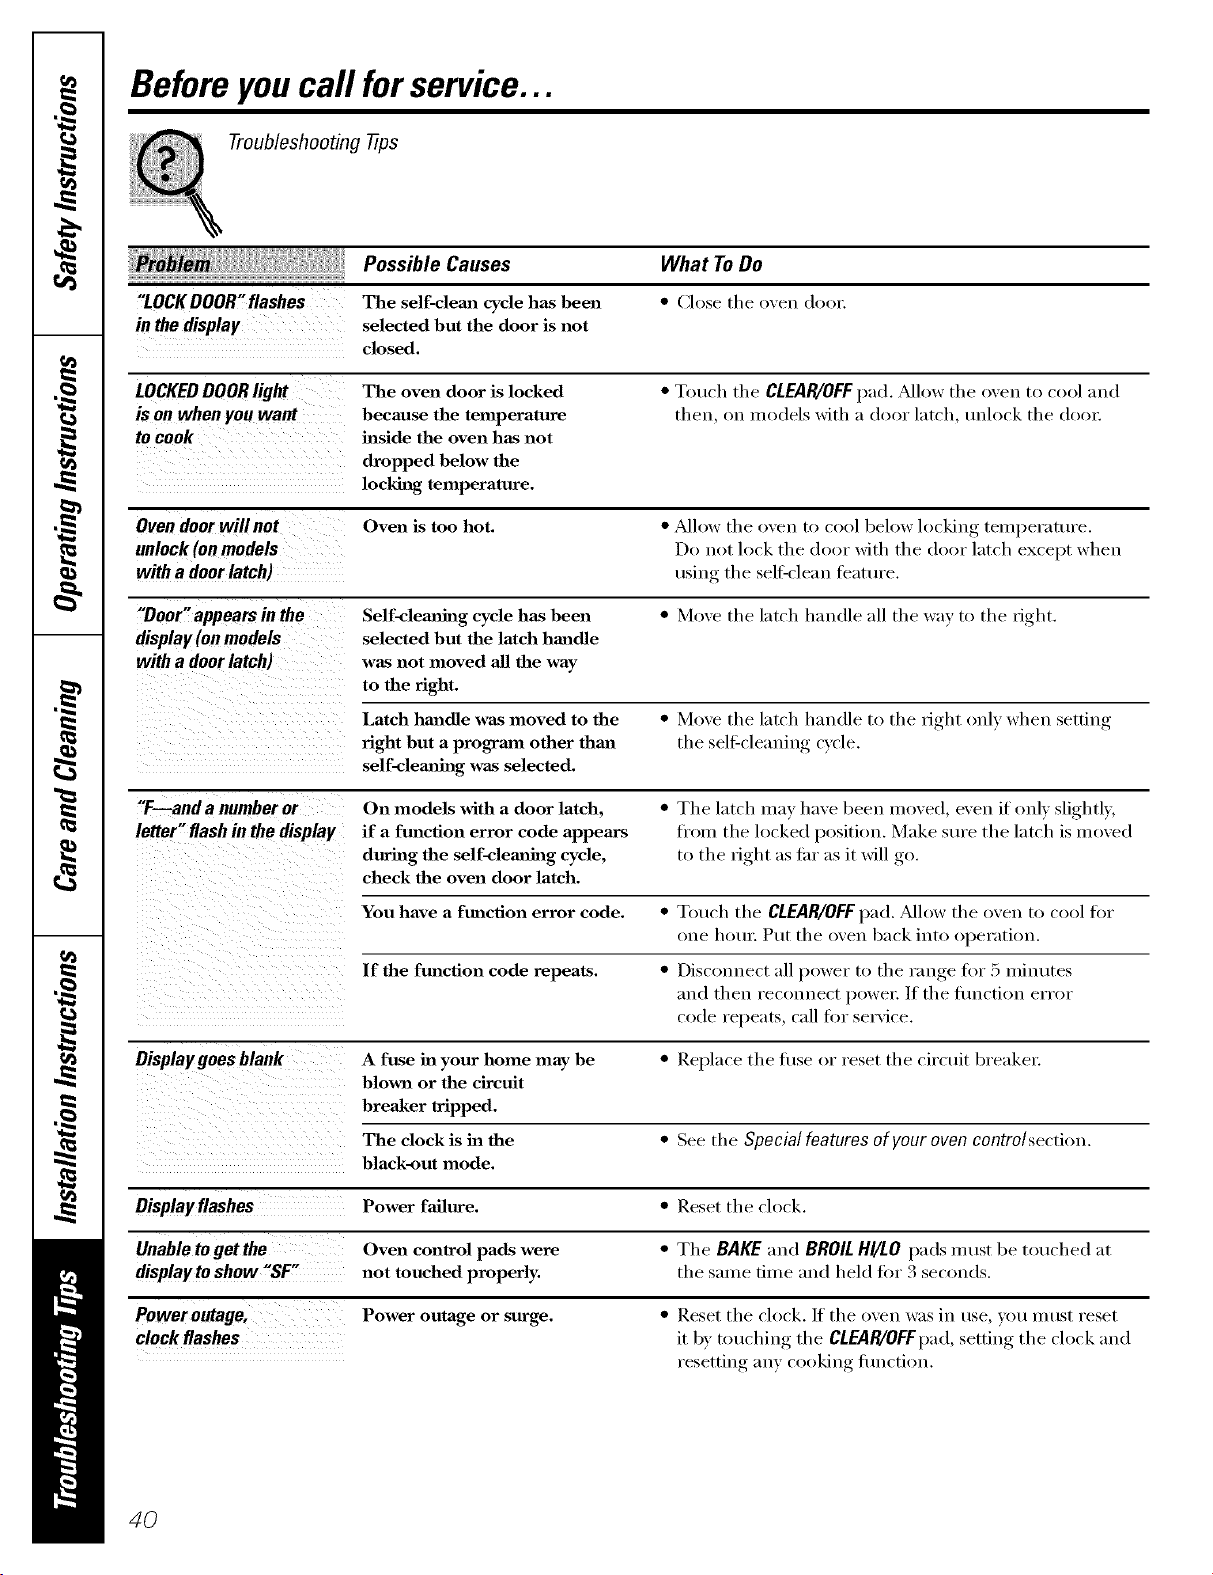
Beforeyoucall forservice...
Troubleshooting -tips
i!i iii!ili iillli!liii}iiii i iiiiii'iiili iiill
"LOCKDOOR" f/ashes
in the display
LOCKEDDOORlight
is on when you want
to cook
Possible Causes
The self-cleaJa cycle has been
selected but the door is not
closed.
The oven door is locked
because the temperature
inside the oven has not
dropped below the
locking temperature.
What To Do
• Close the oxen doo_:
• Touch the CLEAR/OFFpad. _Mlow the oven to cool and
then, on models with a door latch, unlock the do(n:
Oven door will not Oven is too hot. • _Mlow the oven to cool below locking temperature.
unlock (onmodels Do not lock the door with the door latch except when
with a door latch) usiuo the sell:cleau feature.
"Door"appears in the Self-clemahag cycle has been • Move the latch handle all the way to the right.
display (on models selected but the latch handle
with a door latch) was not moved all the way
to the fight.
Latch handle was moved to the • Move tile latch handle to the right only when ,setfiw,
fight but a progrmn other than the sell=cleaning cycle.
self-clemthag was selected.
"T--and a number or On models whh a door latch, • The latch may have been moved, even if only slightly,
letter"flash in the display if a function error code appears fi'om the h)cked position. Make st,re the latch ix moved
during the self-clemahag cycle, to the right as fin"as it will _o
check the oven door latch.
You have a function error code. • Touch the CLEAR/OFFpad. _dlow the oven to cool for
()lie heliX: Put the oveu back lute operatiou.
If the function code repeats. • Discouue(t all power to the range for 5 minutes
;lud then l'ecouuect po\vel: If the hluctiou elTOl"
code repeats, call for service.
Oisplaygoes blank A fuse ha your home may be • Replace the fllse or reset the circuit breaker:
blm_a or the circuit
breaker tripped.
The clock is ha the • See the Special features of your oven controlsectiou.
black-out mode.
Display flashes Power failure. • Reset the ch)ck.
Unable to get the Oven control pads were • The BAKE and BROILH!/LO pads must be touched at
displayto show "SF" not touched properly, the same time and held fin" 3 seconds.
Power outage, Power outage or surge. • Reset the clock./f tile oven was in use, you must reset
clock flashes it by touching the CLEAR/OFFpad, ,settiu*_the clock and
resetting any cooking flmctiou.
4O
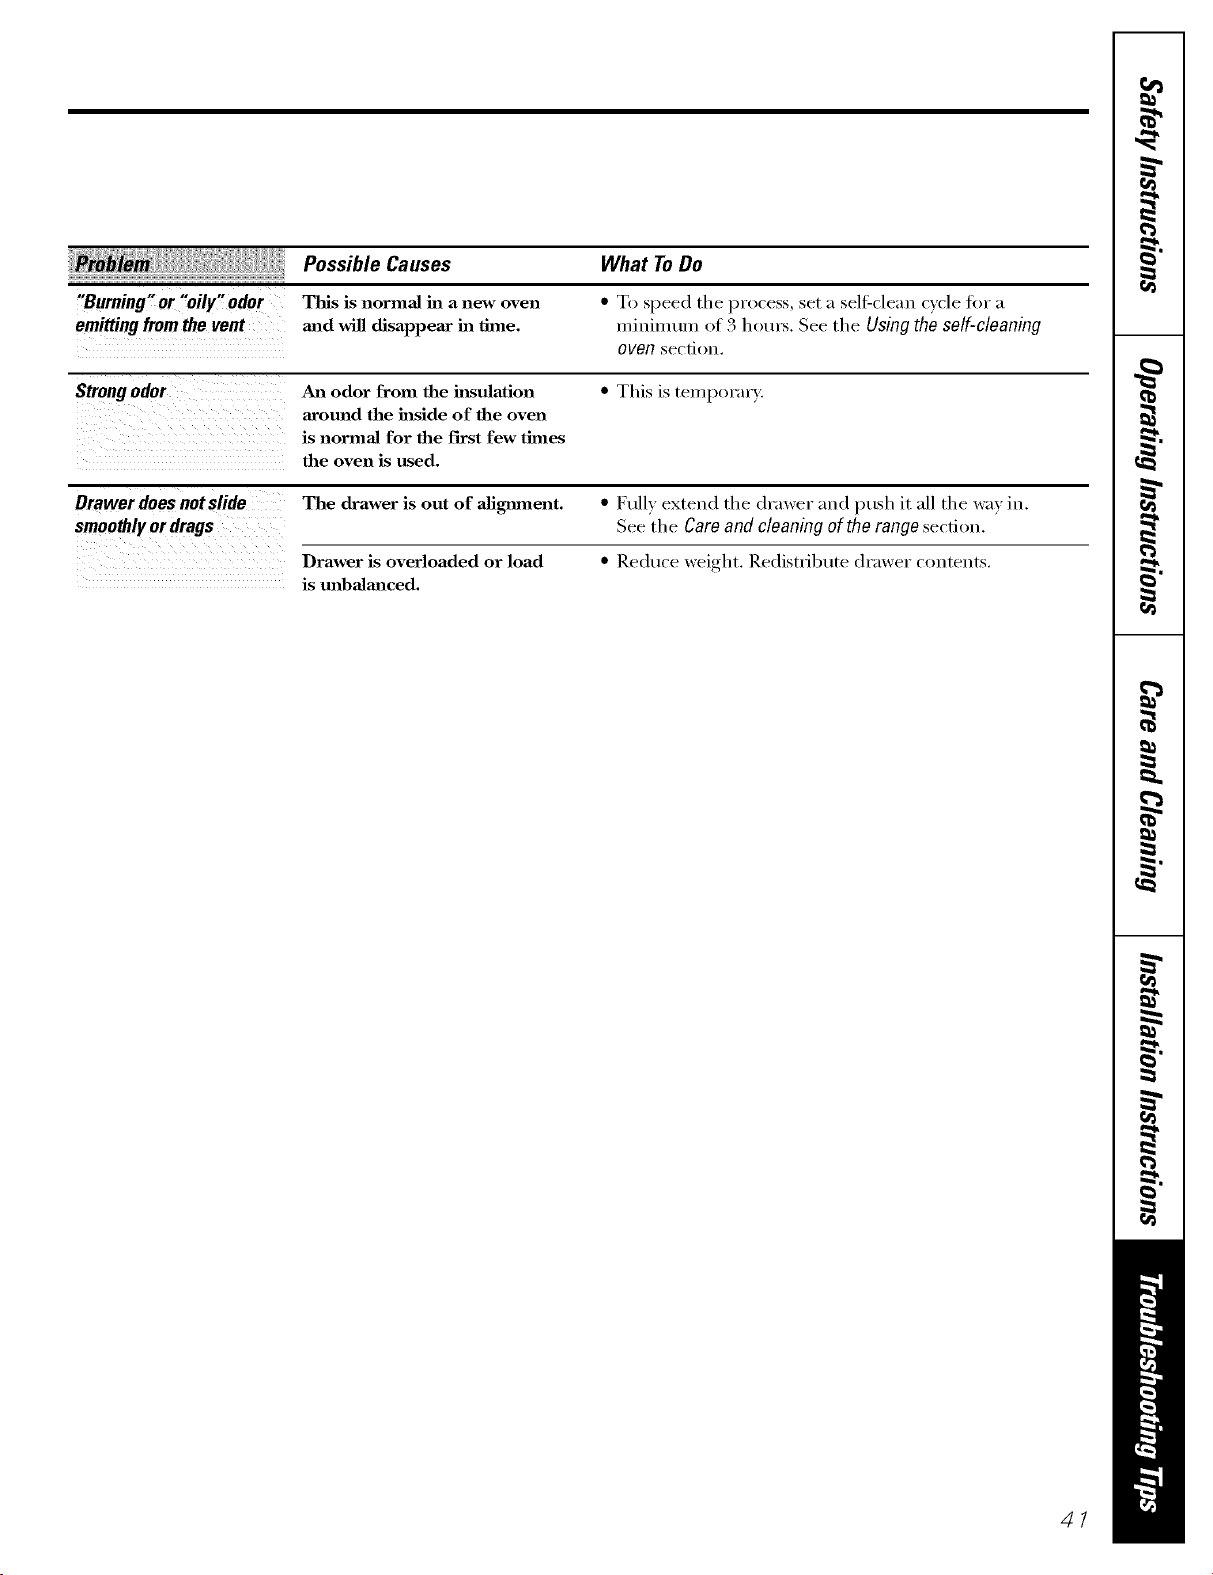
"Burning"or "oily"odor
emitting from the vent
Possible Causes
This is normal in a new oven
mad will disappear in lime.
What To Do
• To speed tile process, set a sell_clean cycle tot a
mininmm of 3 hom_. See tile Using the self-cleaning
oven sect.ion.
Strong odor An odor from the hasulation • This is temllorm T.
around the inside of the oven
is normal for the first few times
the oven is used.
Drawer does not slide The drawer is out of aligmnent. • Fully exten(1 the drawer and push it all the way in,
smoothlyor drags Sue tile Care and cleaning of the range section.
Drawer is overloaded or load • Reduce weight. Redistribute (h'mver contents.
is unbalanced.
4/
m
_ Notes_
€_
--o
_m8
€_
r_
Immb
m
m
--o
m_
42
Notes.
I
m
w
w
I
m
w
43
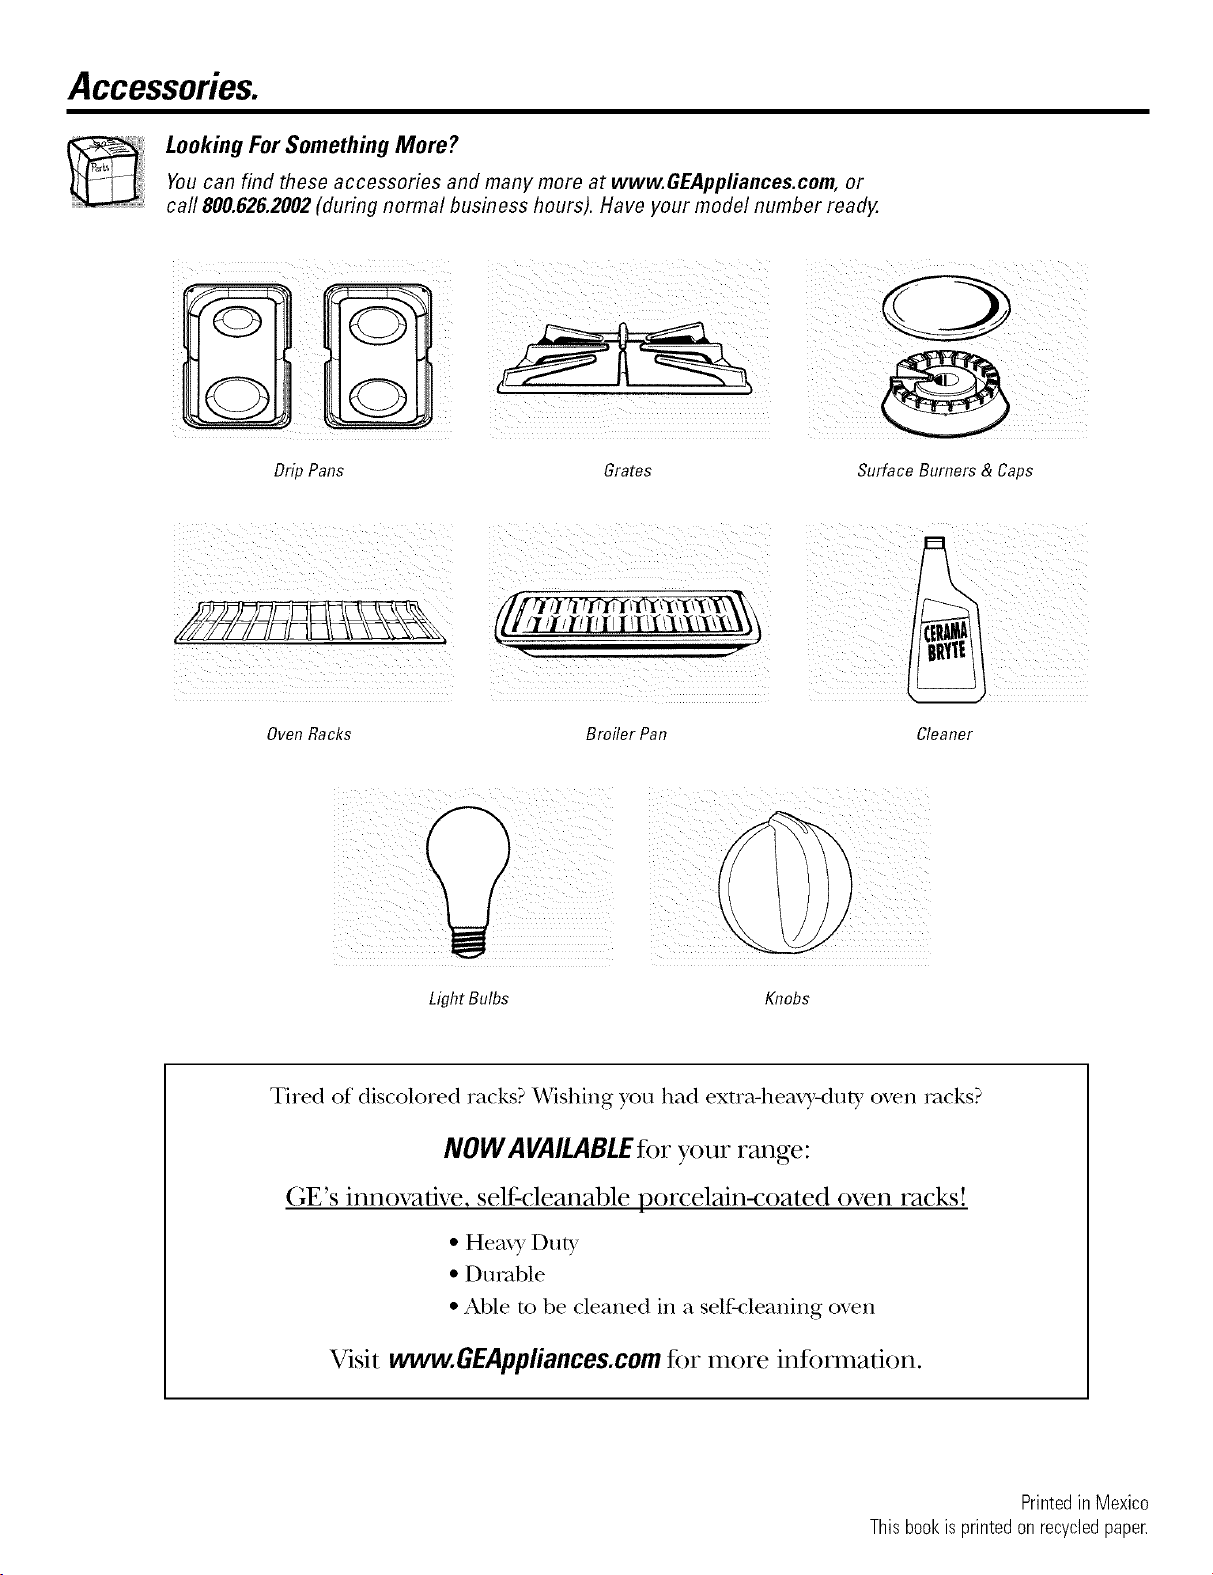
Accessories.
Looking ForSomething More?
Youcan find these accessories and manymore at www.GEAppliances.com,or
carl800.626.2002(duringnormal business hours).Have your modelnumber ready.
Drip Pans Grates Surface Burners & Caps
Oven Racks BroHerPan Cleaner
Light Bulbs Knobs
Tired of discolored racks? Wishing you had extra-hea_T-dub_ oven rocks?
NOW AVAILABLEfor your range:
(;E's innovative, self-cleanable porcelain-coated oven racks!
• Heax T Duty
• Durable
• Able m be cleaned in a self-cleaning oven
Visit www.GEAppliances.com for more information.
Printedin Mexico
Thisbookisprintedon recycledpaper.

