
UserGuide
ThinkPadEdgeE440andE540

Notes:Beforeusingthisinformationandtheproductitsupports,besuretoreadandunderstandthe
following:
•Safety,Warranty,andSetupGuide
•RegulatoryNotice
•“Importantsafetyinformation”onpagevi
•AppendixD“Notices”onpage163
TheSafety,Warranty,andSetupGuideandtheRegulatoryNoticehavebeenuploadedtotheWebsite.To
refertothem,gotohttp://www.lenovo.com/ThinkPadUserGuidesandclickUserGuides&Manuals,then
followtheinstructionsonthescreen.
FirstEdition(September2013)
©CopyrightLenovo2013.
LIMITEDANDRESTRICTEDRIGHTSNOTICE:IfdataorsoftwareisdeliveredpursuantaGeneralServicesAdministration
“GSA”contract,use,reproduction,ordisclosureissubjecttorestrictionssetforthinContractNo.GS-35F-05925.

Contents
Readthisrst..............v
Importantsafetyinformation..........vi
Conditionsthatrequireimmediateaction..vii
Safetyguidelines............vii
Chapter1.Productoverview......1
Locatingcomputercontrols,connectors,and
indicators..................1
Frontview................1
Right-sideview..............5
Left-sideview..............6
Bottomview...............9
Rearview...............10
Statusindicators............10
Locatingimportantproductinformation.....12
Machinetypeandmodellabel.......12
FCCIDandICCerticationnumberlabel..12
CerticateofAuthenticitylabel......13
GenuineMicrosoftlabel.........14
Features.................14
Specications...............15
Operatingenvironment...........16
Lenovoprograms.............17
AccessingLenovoprogramsontheWindows
7operatingsystem...........17
AccessingLenovoprogramsontheWindows
8operatingsystem...........18
Lenovoprogramsoverview........19
Chapter2.Usingyourcomputer...23
Registeringyourcomputer..........23
Frequentlyaskedquestions.........23
Usingthemulti-touchscreen.........25
Specialkeys...............27
ThinkPadEdgeE440specialkeys.....27
ThinkPadEdgeE540specialkeys.....29
UsingtheThinkPadpointingdevice......31
Powermanagement............32
Checkingthebatterystatus........33
Usingtheacpoweradapter........33
Chargingthebattery..........34
Maximizingthebatterylife........34
Managingthepowerplans........34
Power-savingmodes..........34
Handlingthebattery...........36
Connectingtothenetwork..........37
Ethernetconnections..........37
Wirelessconnections..........37
Presentationsandmultimedia.........40
Changingdisplaysettings........41
Usinganexternalmonitor........41
Usingaprojector............42
Usingdualdisplays...........42
Usingaudiofeatures............43
Usingthecamera.............44
Usingtheopticaldrive...........44
Usingaashmediacard...........44
Insertingaashmediacard........45
Removingaashmediacard.......45
Chapter3.Youandyourcomputer..47
Accessibilityandcomfort..........47
Ergonomicinformation..........47
Comfort...............48
Accessibilityinformation.........48
Travelingwithyourcomputer.........49
Traveltips...............49
Travelaccessories...........49
Chapter4.Security..........51
Attachingamechanicallock.........51
Usingpasswords..............51
Typingpasswords...........51
Power-onpassword...........51
Supervisorpassword..........52
Harddiskpasswords..........54
Harddisksecurity.............55
Usingthengerprintreader..........56
Noticeondeletingdatafromyourharddiskdrive
orsolid-statedrive.............58
Usingrewalls...............59
Protectingdataagainstviruses........59
Chapter5.Recoveryoverview....61
RecoveryoverviewfortheWindows7operating
system..................61
Creatingandusingarecoverymedia....61
Performingbackupandrecoveryoperations.62
UsingtheRescueandRecoveryworkspace.63
Creatingandusingarescuemedium....64
Reinstallingpreinstalledprogramsanddevice
drivers................65
Solvingrecoveryproblems........65
RecoveryoverviewfortheWindows8operating
system..................66
©CopyrightLenovo2013
i

Refreshingyourcomputer........66
Resettingyourcomputertothefactorydefault
settings................66
Usingtheadvancedstartupoptions....67
RecoveringyouroperatingsystemifWindows
8failstostart.............67
Creatingandusingrecoverymedia.....67
Chapter6.Replacingdevices.....69
Staticelectricityprevention..........69
Replacingthebattery............69
ReplacingtheSIMcard...........71
Replacingthekeyboard...........72
ThinkPadEdgeE440..........72
ThinkPadEdgeE540..........79
Replacingtheharddiskdriveorsolid-statedrive.85
Replacingtheopticaldrive..........88
ThinkPadEdgeE440..........88
ThinkPadEdgeE540..........90
ReplacingawirelessLANcard........92
ReplacingawirelessWANcard........95
Replacingamemorymodule.........97
Replacingthebackupbattery.........100
Chapter7.Enhancingyour
computer..............103
FindingThinkPadoptions..........103
ThinkPadOneLinkDock...........103
Chapter8.Advanced
conguration............105
Installinganewoperatingsystem.......105
InstallingtheWindows7operatingsystem..105
InstallingtheWindows8operatingsystem..106
Installingdevicedrivers...........107
UsingtheThinkPadSetupprogram......107
Mainmenu..............108
Congmenu..............108
DateandTimemenu..........112
Securitymenu.............112
Startupmenu.............117
Restartmenu.............119
UpdatingyoursystemUEFIBIOS.....119
Chapter9.Preventingproblems..121
Generaltipsforpreventingproblems......121
Makingsuredevicedriversarecurrent.....122
Takingcareofyourcomputer.........123
Cleaningthecoverofyourcomputer....124
Chapter10.Troubleshooting
computerproblems.........127
Diagnosingproblems............127
Troubleshooting..............127
Computerstopsresponding.......127
Spillsonthekeyboard..........128
Errormessages............128
Errorswithoutmessages.........130
Beeperrors..............131
Memorymoduleproblems........132
Networkingproblems..........132
Problemswiththekeyboardandotherpointing
devices................134
Problemswiththedisplayandmultimedia
devices................135
Fingerprintreaderproblems........140
Batteryandpowerproblems.......140
Problemswithdrivesandotherstorage
devices................143
Asoftwareproblem...........144
Problemswithportsandconnectors....145
Chapter11.Gettingsupport....147
BeforeyoucontactLenovo..........147
Gettinghelpandservice...........148
Usingdiagnosticprograms........148
LenovoSupportWebsite.........148
CallingLenovo.............148
Purchasingadditionalservices........149
AppendixA.Regulatory
information.............151
Wirelessrelatedinformation.........151
LocationoftheUltraConnectwireless
antennas...............152
Locatingwirelessregulatorynotices....153
Exportclassicationnotice..........153
Electronicemissionnotices..........153
FederalCommunicationsCommission
DeclarationofConformity........153
IndustryCanadaClassBemissioncompliance
statement...............154
EuropeanUnion-Compliancetothe
ElectromagneticCompatibilityDirective...154
GermanClassBcompliancestatement...154
KoreaClassBcompliancestatement....155
JapanVCCIClassBcompliancestatement..155
Japancompliancestatementforproducts
whichconnecttothepowermainswith
ratedcurrentlessthanorequalto20Aper
phase................155
Lenovoproductserviceinformationfor
Taiwan................155
iiUserGuide

AppendixB.WEEEandrecycling
statements.............157
ImportantWEEEinformation.........157
Japanrecyclingstatements.........157
RecyclinginformationforBrazil........158
BatteryrecyclinginformationfortheEuropean
Union..................158
BatteryrecyclinginformationforTaiwan.....159
BatteryrecyclinginformationfortheUnitedStates
andCanada................159
RecyclinginformationforChina........159
AppendixC.ENERGYSTARmodel
information.............161
AppendixD.Notices.........163
Trademarks................164
AppendixE.RestrictionofHazardous
SubstancesDirective(RoHS)....165
EuropeanUnionRoHS...........165
ChinaRoHS................165
IndiaRoHS................165
TurkishRoHS...............165
UkraineRoHS...............166
AppendixF .Eurasiancompliance
mark.................167
©CopyrightLenovo2013
iii

ivUserGuide
Readthisrst
Besuretofollowtheimportanttipsgivenheretogetthemostuseandenjoymentoutofyourcomputer.
Failuretodosomightleadtodiscomfortorinjury,orcauseyourcomputertofail.
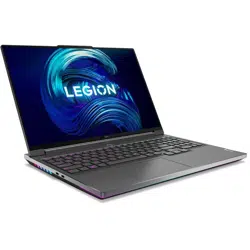
Protectyourselffromtheheatthatyourcomputergenerates.
Whenyourcomputeristurnedonorthebatteryischarging,thebase,thepalm
rest,andsomeotherpartsmaybecomehot.Thetemperaturetheyreach
dependsontheamountofsystemactivityandthelevelofchargeinthebattery.
Extendedcontactwithyourbody,eventhroughclothing,couldcause
discomfortorevenaskinburn.
•Avoidkeepingyourhands,yourlap,oranyotherpartofyourbodyin
contactwithahotsectionofthecomputerforanyextendedtime.
•Periodicallytakehandsfromusingthekeyboardbyliftingyourhandsfrom
thepalmrest.
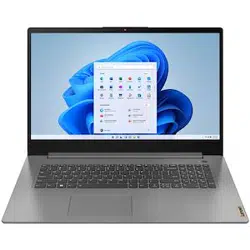
Protectyourselffromtheheatgeneratedbytheacpoweradapter.
Whentheacpoweradapterisconnectedtoanelectricaloutletandyour
computer,itgeneratesheat.
Extendedcontactwithyourbody,eventhroughclothing,maycauseaskin
burn.
•Donotplacetheacpoweradapterincontactwithanypartofyourbody
whileitisinuse.
•Neveruseittowarmyourbody.
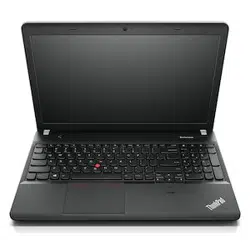
Preventyourcomputerfromgettingwet.
Toavoidspillsandthedangerofelectricalshock,keepliquidsawayfromyour
computer.
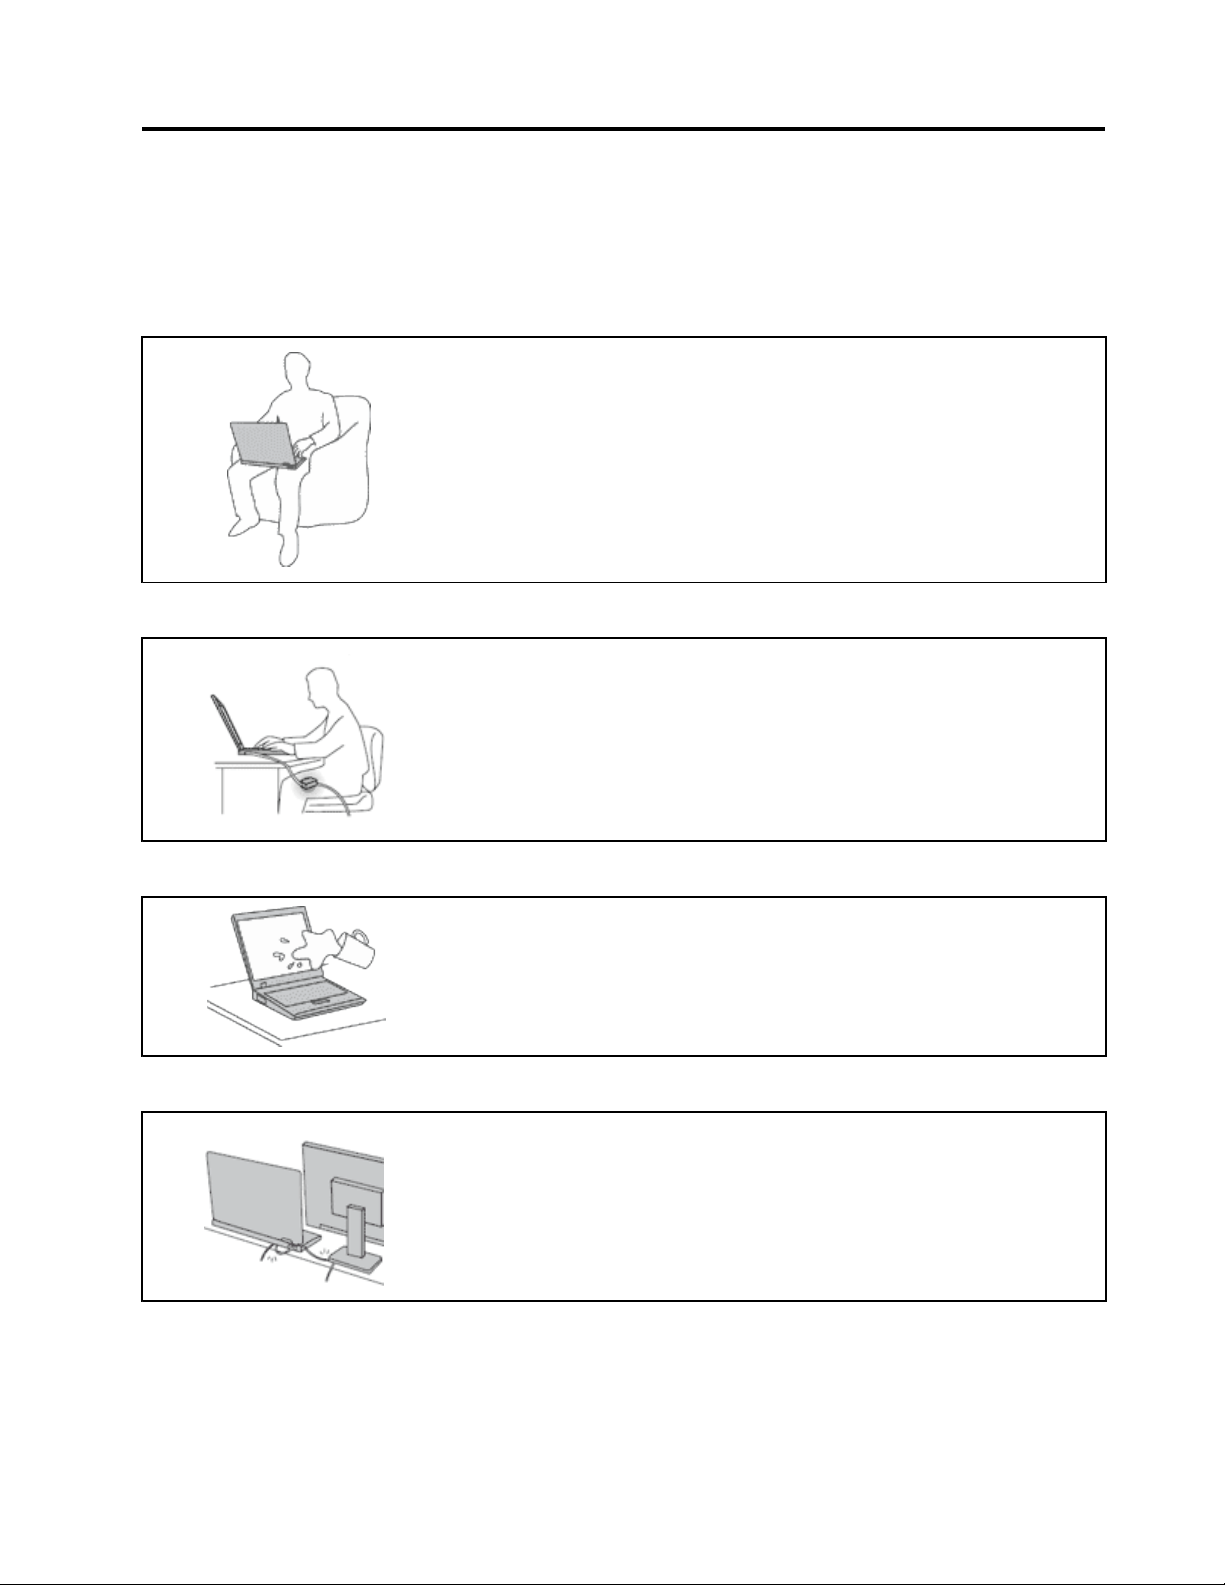
Protectthecablesfrombeingdamaged.
Applyingstrongforcetocablesmaydamageorbreakthem.
Routecommunicationlines,orthecablesofanacpoweradapter,amouse,a
keyboard,aprinter,oranyotherelectronicdevice,sothattheycannotbewalked
on,trippedover,pinchedbyyourcomputerorotherobjects,orinanyway
subjectedtotreatmentthatcouldinterferewiththeoperationofyourcomputer.
©CopyrightLenovo2013
v
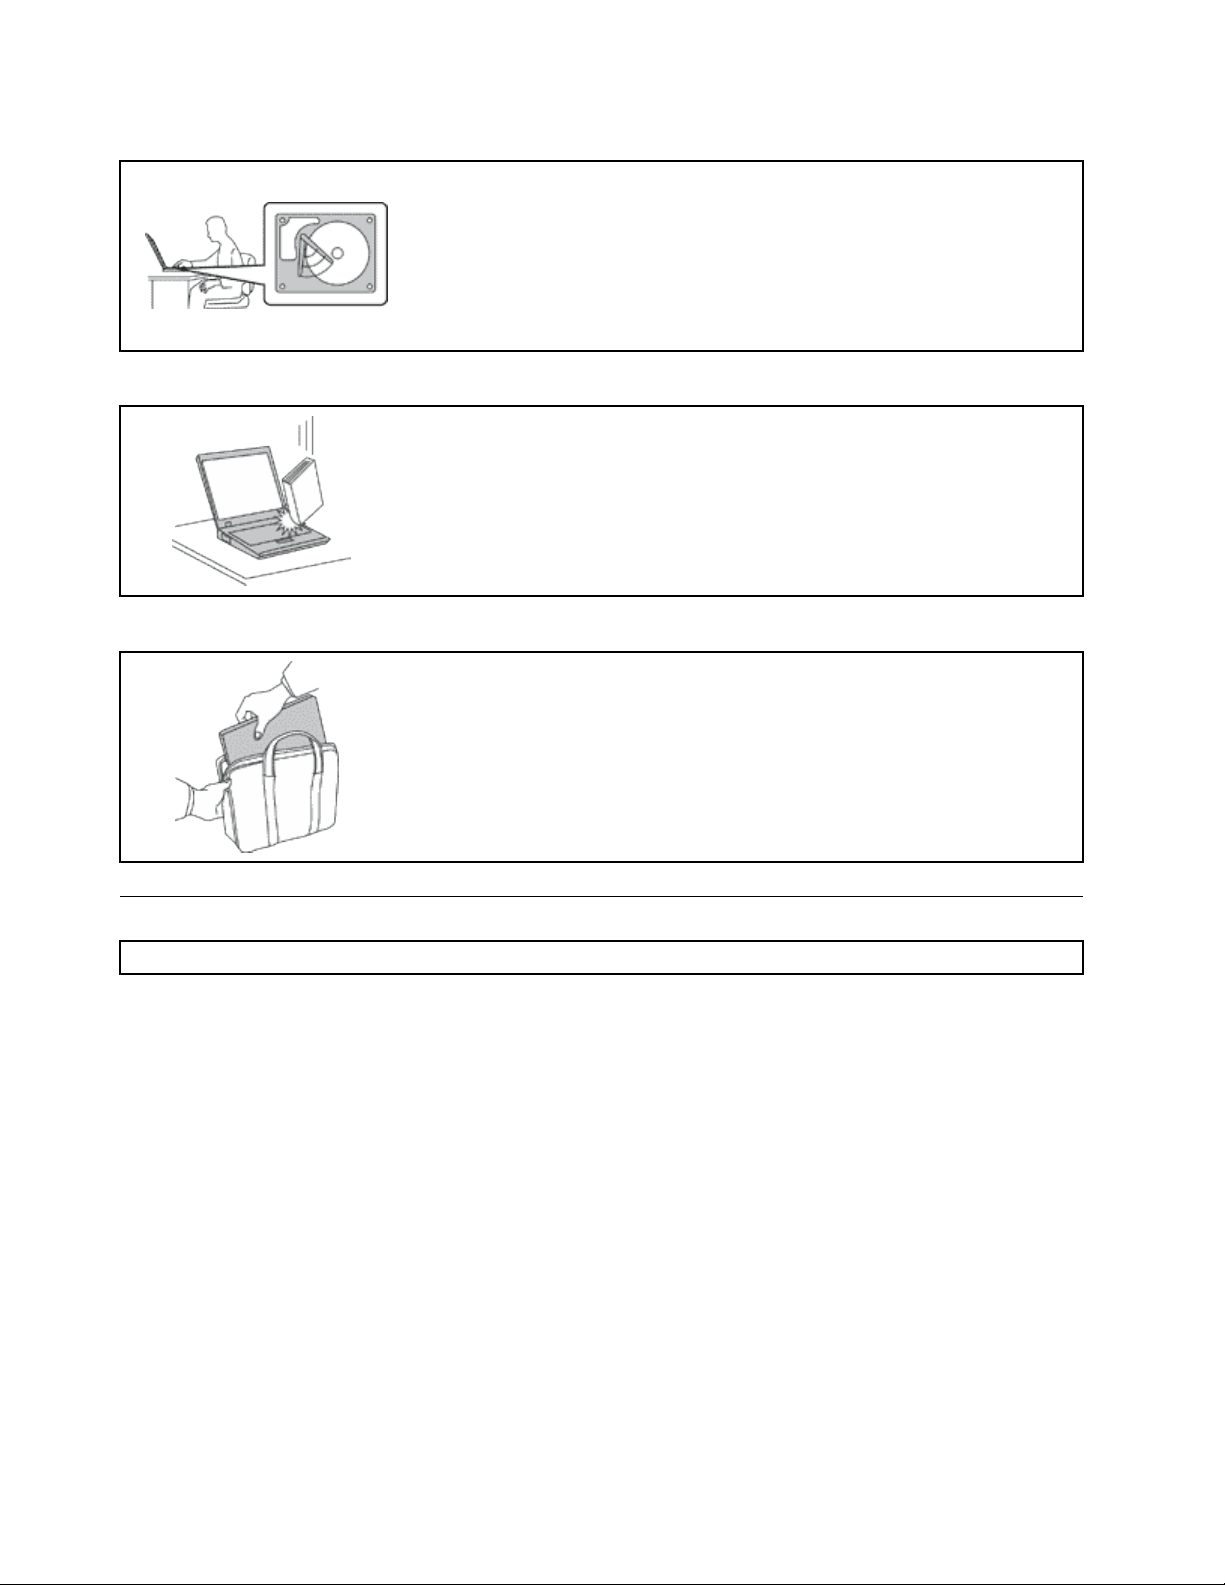
Protectyourcomputeranddatawhenmovingit.
Beforemovingacomputerequippedwithaharddiskdrive,dooneofthe
following,andmakesurethatthepowerswitchisofforisblinking:
•Turnitoff.
•Putitinsleepmode.
•Putitinhibernationmode.
Thiswillhelptopreventdamagetothecomputer,andpossiblelossofdata.
Handleyourcomputergently.
Donotdrop,bump,scratch,twist,hit,vibrate,push,orplaceheavyobjectson
yourcomputer,display,orexternaldevices.
Carryyourcomputercarefully.
•Useaqualitycarryingcasethatprovidesadequatecushioningandprotection.
•Donotpackyourcomputerinatightlypackedsuitcaseorbag.
•Beforeputtingyourcomputerinacarryingcase,makesurethatitisoff,insleep
mode,orinhibernationmode.Donotputacomputerinacarryingcasewhileit
isturnedon.
Importantsafetyinformation
Note:Readtheimportantsafetyinformationrst.
Thisinformationcanhelpyousafelyuseyournotebookcomputer.Followandretainallinformationincluded
withyourcomputer.Theinformationinthisdocumentdoesnotalterthetermsofyourpurchaseagreement
ortheLenovo
®
LimitedWarranty.Formoreinformation,see“WarrantyInformation”intheSafety,Warranty,
andSetupGuidethatcomeswithyourcomputer.
Customersafetyisimportant.Ourproductsaredevelopedtobesafeandeffective.However,personal
computersareelectronicdevices.Powercords,poweradapters,andotherfeaturescancreatepotential
safetyrisksthatcanresultinphysicalinjuryorpropertydamage,especiallyifmisused.Toreducethese
risks,followtheinstructionsincludedwithyourproduct,observeallwarningsontheproductandinthe
operatinginstructions,andreviewtheinformationincludedinthisdocumentcarefully.Bycarefullyfollowing
theinformationcontainedinthisdocumentandprovidedwithyourproduct,youcanhelpprotectyourself
fromhazardsandcreateasafercomputerworkenvironment.
Note:Thisinformationincludesreferencestopoweradaptersandbatteries.Inadditiontonotebook
computers,someproducts(suchasspeakersandmonitors)shipwithexternalpoweradapters.Ifyouhave
suchaproduct,thisinformationappliestoyourproduct.Inaddition,computerproductscontainacoin-sized
internalbatterythatprovidespowertothesystemclockevenwhenthecomputerisunplugged,sothe
batterysafetyinformationappliestoallcomputerproducts.
viUserGuide

Conditionsthatrequireimmediateaction
Productscanbecomedamagedduetomisuseorneglect.Someproductdamageisseriousenough
thattheproductshouldnotbeusedagainuntilithasbeeninspectedand,ifnecessary,repairedby
anauthorizedservicer.
Aswithanyelectronicdevice,paycloseattentiontotheproductwhenitisturnedon.Onveryrare
occasions,youmightnoticeanodororseeapuffofsmokeorsparksventfromyourproduct.Oryou
mighthearsoundslikepopping,crackingorhissing.Theseconditionsmightmerelymeanthatan
internalelectroniccomponenthasfailedinasafeandcontrolledmanner.Or,theymightindicate
apotentialsafetyissue.However,donottakerisksorattempttodiagnosethesituationyourself.
ContacttheCustomerSupportCenterforfurtherguidance.ForalistofServiceandSupportphone
numbers,seethefollowingWebsite:
http://www.lenovo.com/support/phone
Frequentlyinspectyourcomputeranditscomponentsfordamageorwearorsignsofdanger.Ifyou
haveanyquestionabouttheconditionofacomponent,donotusetheproduct.ContacttheCustomer
SupportCenterortheproductmanufacturerforinstructionsonhowtoinspecttheproductand
haveitrepaired,ifnecessary.
Intheunlikelyeventthatyounoticeanyofthefollowingconditions,orifyouhaveanysafetyconcerns
withyourproduct,stopusingtheproductandunplugitfromthepowersourceandtelecommunication
linesuntilyoucanspeaktotheCustomerSupportCenterforfurtherguidance.
•Powercords,plugs,poweradapters,extensioncords,surgeprotectors,orpowersuppliesthatare
cracked,broken,ordamaged.
•Signsofoverheating,smoke,sparks,orre.
•Damagetoabattery(suchascracks,dents,orcreases),dischargefromabattery,orabuildupofforeign
substancesonthebattery.
•Acracking,hissingorpoppingsound,orstrongodorthatcomesfromtheproduct.
•Signsthatliquidhasbeenspilledoranobjecthasfallenontothecomputerproduct,thepowercordor
poweradapter.
•Thecomputerproduct,powercord,orpoweradapterhasbeenexposedtowater.
•Theproducthasbeendroppedordamagedinanyway.
•Theproductdoesnotoperatenormallywhenyoufollowtheoperatinginstructions.
Note:Ifyounoticetheseconditionswithaproduct(suchasanextensioncord)thatisnotmanufacturedfor
orbyLenovo,stopusingthatproductuntilyoucancontacttheproductmanufacturerforfurtherinstructions,
oruntilyougetasuitablereplacement.
Safetyguidelines
Alwaysobservethefollowingprecautionstoreducetheriskofinjuryandpropertydamage.
Serviceandupgrades
DonotattempttoserviceaproductyourselfunlessinstructedtodosobytheCustomerSupportCenteror
yourdocumentation.OnlyuseaServiceProviderwhoisapprovedtorepairyourparticularproduct.
Note:Somecomputerpartscanbeupgradedorreplacedbythecustomer.Upgradestypicallyare
referredtoasoptions.ReplacementpartsapprovedforcustomerinstallationarereferredtoasCustomer
ReplaceableUnits,orCRUs.Lenovoprovidesdocumentationwithinstructionswhenitisappropriatefor
customerstoinstalloptionsorreplaceCRUs.Youmustcloselyfollowallinstructionswheninstallingor
replacingparts.TheOffstateofapowerindicatordoesnotnecessarilymeanthatvoltagelevelsinsidea
productarezero.Beforeyouremovethecoversfromaproductequippedwithapowercord,alwaysmake
©CopyrightLenovo2013
vii
surethatthepoweristurnedoffandthattheproductisunpluggedfromanypowersource.Ifyouhave
anyquestionsorconcerns,contacttheCustomerSupportCenter.
Althoughtherearenomovingpartsinyourcomputerafterthepowercordhasbeendisconnected,the
followingwarningsarerequiredforyoursafety.
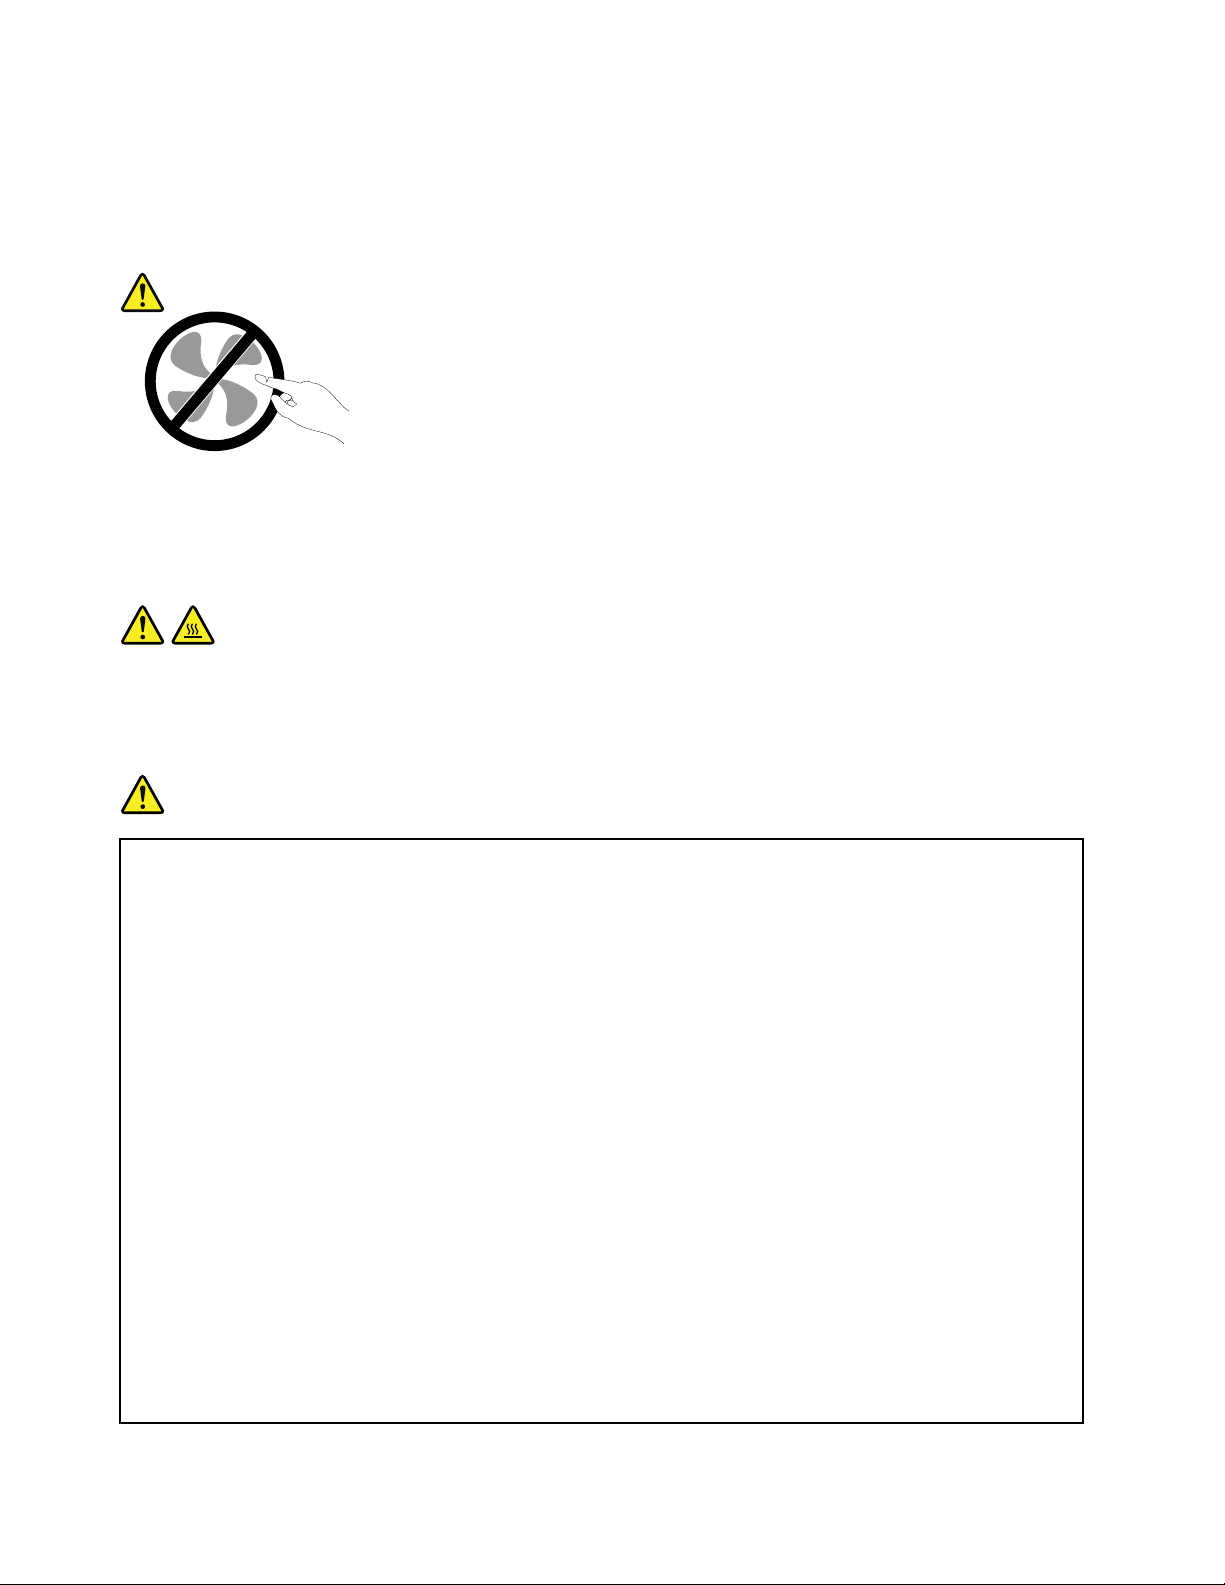
CAUTION:
Hazardousmovingparts.Keepngersandotherbodypartsaway.
CAUTION:
BeforereplacinganyCRUs,turnoffthecomputerandwaitthreetoveminutestoletthecomputer
coolbeforeopeningthecover.
Powercordsandpoweradapters
DANGER
Useonlythepowercordsandpoweradapterssuppliedbytheproductmanufacturer.
Thepowercordsshallbesafetyapproved.ForGermany,itshallbeH05VV-F,3G,0.75mm
2
,or
better.Forothercountries,thesuitabletypesshallbeusedaccordingly.
Neverwrapapowercordaroundapoweradapterorotherobject.Doingsocanstressthecordin
waysthatcancausethecordtofray,crack,orcrimp.Thiscanpresentasafetyhazard.
Alwaysroutepowercordssothattheywillnotbewalkedon,trippedover,orpinchedbyobjects.
Protectpowercordsandpoweradaptersfromliquids.Forinstance,donotleaveyourpowercord
orpoweradapternearsinks,tubs,toilets,oronoorsthatarecleanedwithliquidcleansers.
Liquidscancauseashortcircuit,particularlyifthepowercordorpoweradapterhasbeenstressed
bymisuse.Liquidsalsocancausegradualcorrosionofpowercordterminalsand/ortheconnector
terminalsonapoweradapter,whichcaneventuallyresultinoverheating.
Alwaysconnectpowercordsandsignalcablesinthecorrectorderandensurethatallpowercord
connectorsaresecurelyandcompletelypluggedintoreceptacles.
Donotuseanypoweradapterthatshowscorrosionattheacinputpinsorshowssignsof
overheating(suchasdeformedplastic)attheacinputpinsoranywhereonthepoweradapter.
Donotuseanypowercordswheretheelectricalcontactsoneitherendshowsignsofcorrosionor
overheatingorwherethepowercordappearstohavebeendamagedinanyway.
viiiUserGuide
Extensioncordsandrelateddevices
Ensurethatextensioncords,surgeprotectors,uninterruptiblepowersupplies,andpowerstripsthatyouuse
areratedtohandletheelectricalrequirementsoftheproduct.Neveroverloadthesedevices.Ifpowerstrips
areused,theloadshouldnotexceedthepowerstripinputrating.Consultanelectricianformoreinformation
ifyouhavequestionsaboutpowerloads,powerrequirements,andinputratings.
Plugsandoutlets
DANGER
Ifareceptacle(poweroutlet)thatyouintendtousewithyourcomputerequipmentappearstobe
damagedorcorroded,donotusetheoutletuntilitisreplacedbyaqualiedelectrician.
Donotbendormodifytheplug.Iftheplugisdamaged,contactthemanufacturertoobtain
areplacement.
Donotshareanelectricaloutletwithotherhomeorcommercialappliancesthatdrawlargeamounts
ofelectricity;otherwise,unstablevoltagemightdamageyourcomputer,data,orattacheddevices.
Someproductsareequippedwithathree-prongedplug.Thisplugtsonlyintoagrounded
electricaloutlet.Thisisasafetyfeature.Donotdefeatthissafetyfeaturebytryingtoinsertitinto
anon-groundedoutlet.Ifyoucannotinserttheplugintotheoutlet,contactanelectricianforan
approvedoutletadapterortoreplacetheoutletwithonethatenablesthissafetyfeature.Never
overloadanelectricaloutlet.Theoverallsystemloadshouldnotexceed80percentofthebranch
circuitrating.Consultanelectricianformoreinformationifyouhavequestionsaboutpowerloads
andbranchcircuitratings.
Besurethatthepoweroutletyouareusingisproperlywired,easilyaccessible,andlocatedclose
totheequipment.Donotfullyextendpowercordsinawaythatwillstressthecords.
Besurethatthepoweroutletprovidesthecorrectvoltageandcurrentfortheproductyouare
installing.
Carefullyconnectanddisconnecttheequipmentfromtheelectricaloutlet.
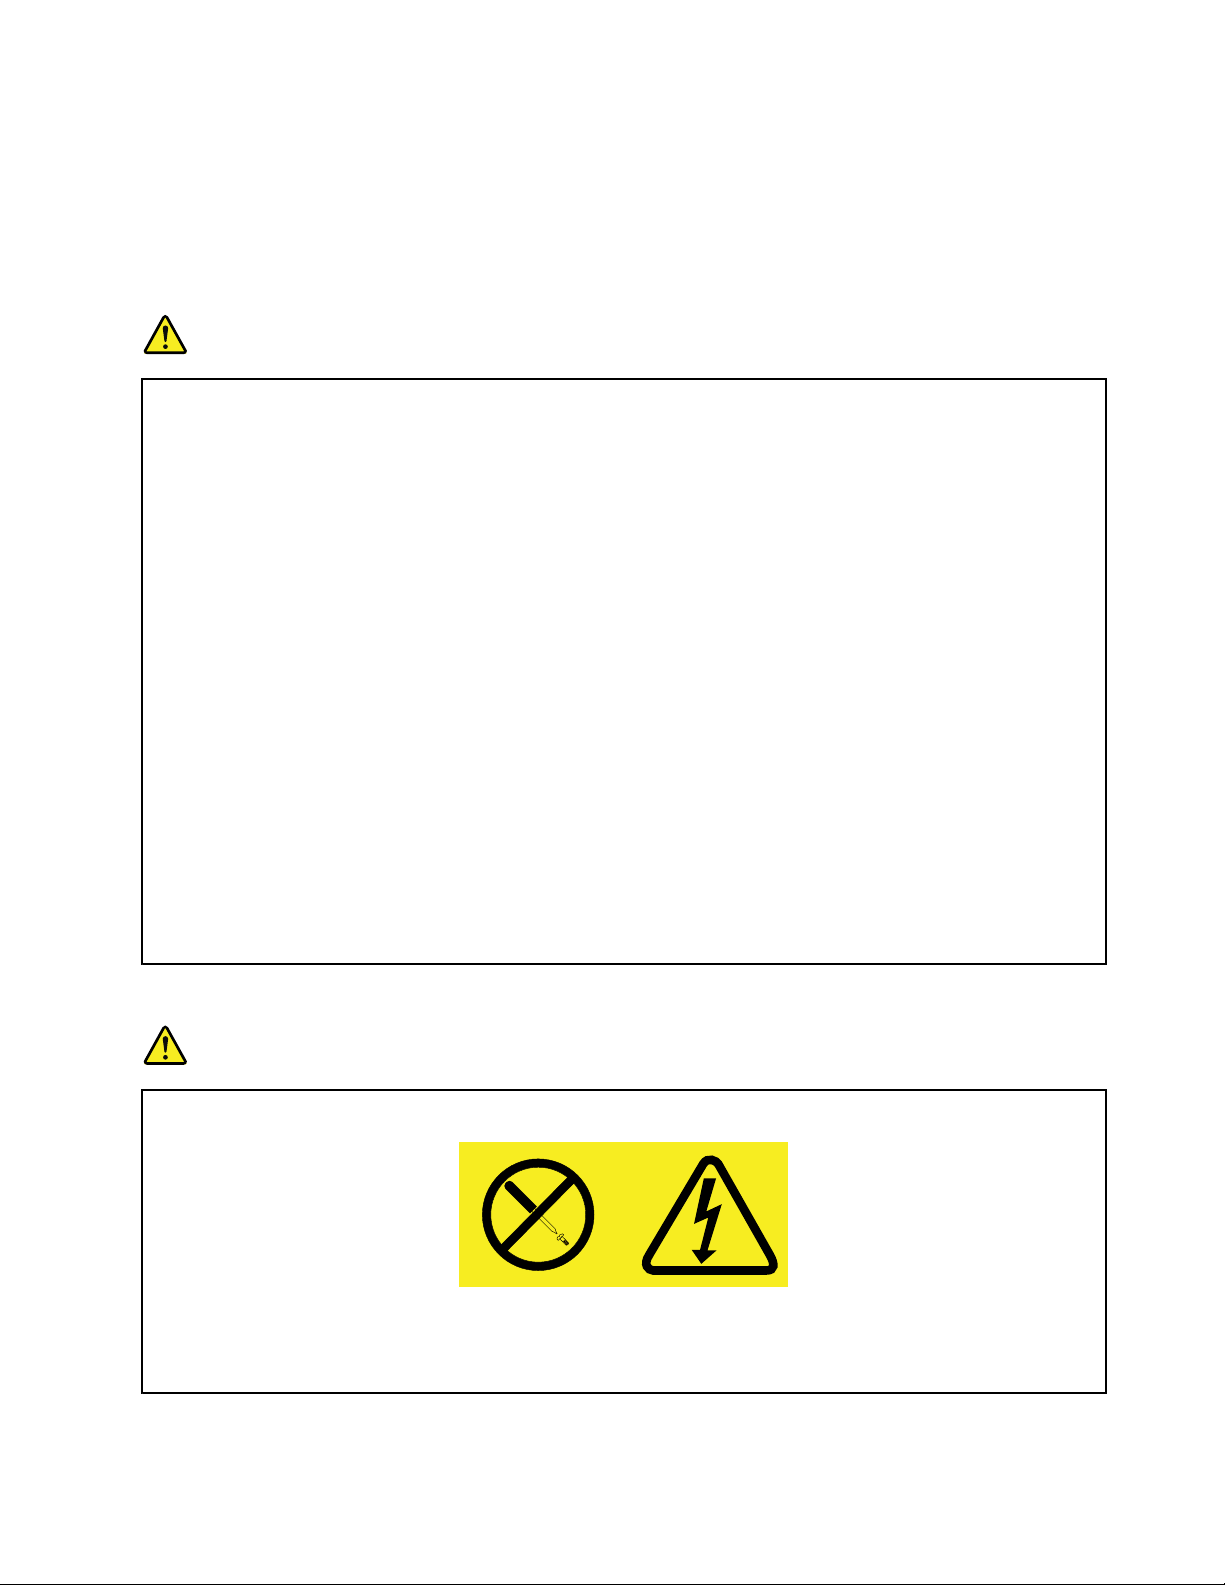
Powersupplystatement
DANGER
Neverremovethecoveronapowersupplyoranypartthathasthefollowinglabelattached.
Hazardousvoltage,current,andenergylevelsarepresentinsideanycomponentthathasthislabel
attached.Therearenoserviceablepartsinsidethesecomponents.Ifyoususpectaproblemwith
oneoftheseparts,contactaservicetechnician.
©CopyrightLenovo2013
ix

Externaldevices
CAUTION:
DonotconnectordisconnectanyexternaldevicecablesotherthanUSBand1394cableswhilethe
computerpowerison;otherwise,youmightdamageyourcomputer.T oavoidpossibledamageto
attacheddevices,waitatleastvesecondsafterthecomputerisshutdowntodisconnectexternal
devices.
Generalbatterynotice
DANGER
PersonalcomputersmanufacturedbyLenovocontainacoincellbatterytoprovidepowerto
thesystemclock.Inaddition,manymobileproducts,suchasnotebookcomputers,utilizea
rechargeablebatterypacktoprovidesystempowerwheninportablemode.Batteriessuppliedby
Lenovoforusewithyourproducthavebeentestedforcompatibilityandshouldonlybereplaced
withapprovedparts.
Neverattempttoopenorserviceanybattery.Donotcrush,puncture,orincineratebatteriesor
shortcircuitthemetalcontacts.Donotexposethebatterytowaterorotherliquids.Onlyrecharge
thebatterypackstrictlyaccordingtoinstructionsincludedintheproductdocumentation.
Batteryabuseormishandlingcancausethebatterytooverheat,whichcancausegassesorame
to“vent”fromthebatterypackorcoincell.Ifyourbatteryisdamaged,orifyounoticeany
dischargefromyourbatteryorthebuildupofforeignmaterialsonthebatteryleads,stopusingthe
batteryandobtainareplacementfromthebatterymanufacturer.
Batteriescandegradewhentheyareleftunusedforlongperiodsoftime.Forsomerechargeable
batteries(particularlyLithiumIonbatteries),leavingabatteryunusedinadischargedstatecould
increasetheriskofabatteryshortcircuit,whichcouldshortenthelifeofthebatteryandalsocan
poseasafetyhazard.DonotletrechargeableLithium-Ionbatteriescompletelydischargeorstore
thesebatteriesinadischargedstate.
Rechargeablebatterynotice
DANGER
Donotattempttodisassembleormodifythebatterypack.Attemptingtodosocancausean
explosion,orliquidleakagefromthebatterypack.Abatterypackotherthantheonespeciedby
Lenovo,oradisassembledormodiedbatterypackisnotcoveredbythewarranty.
Iftherechargeablebatterypackisincorrectlyreplaced,thereisdangerofanexplosion.Thebattery
packcontainsasmallamountofharmfulsubstances.Toavoidpossibleinjury:
•ReplaceonlywithabatteryofthetyperecommendedbyLenovo.
•Keepthebatterypackawayfromre.
•Donotexposeittowaterorrain.
•Donotattempttodisassembleit.
•Donotshort-circuitit.
•Keepitawayfromchildren.
•Donotdropthebatterypack.
Donotputthebatterypackintrashthatisdisposedofinlandlls.Whendisposingofthebattery,
complywithlocalordinancesorregulations.
xUserGuide

Thebatterypackshouldbestoredatroomtemperature,chargedtoapproximately30to50%
ofcapacity.Werecommendthatbatterypackbechargedaboutonceperyeartoprevent
overdischarge.
Lithiumcoincellbatterynotice
DANGER
Dangerofexplosionifbatteryisincorrectlyreplaced.
Whenreplacingthelithiumcoincellbattery,useonlythesameoranequivalenttypethatis
recommendedbythemanufacturer.Thebatterycontainslithiumandcanexplodeifnotproperly
used,handled,ordisposedof.
Donot:
•Throworimmerseintowater
•Heattomorethan100°C(212°F)
•Repairordisassemble
Disposeofthebatteryasrequiredbylocalordinancesorregulations.
ThefollowingstatementappliestousersinthestateofCalifornia,U.S.A.
CaliforniaPerchlorateInformation:
Productscontainingmanganesedioxidelithiumcoincellbatteriesmaycontainperchlorate.
PerchlorateMaterial-specialhandlingmayapply,See
www.dtsc.ca.gov/hazardouswaste/perchlorate
Heatandproductventilation
DANGER
Computers,acpoweradapters,andmanyaccessoriescangenerateheatwhenturnedonandwhen
batteriesarecharging.Notebookcomputerscangenerateasignicantamountofheatduetotheir
compactsize.Alwaysfollowthesebasicprecautions:
•Whenyourcomputeristurnedonorthebatteryischarging,thebase,thepalmrest,andsome
otherpartsmaybecomehot.Avoidkeepingyourhands,yourlap,oranyotherpartofyour
bodyincontactwithahotsectionofthecomputerforanyextendedlengthoftime.Whenyou
usethekeyboard,avoidkeepingyourpalmsonthepalmrestforaprolongedperiodoftime.
Yourcomputergeneratessomeheatduringnormaloperation.Theamountofheatdependson
theamountofsystemactivityandthebatterychargelevel.Extendedcontactwithyourbody,
eventhroughclothing,couldcausediscomfortorevenaskinburn.Periodicallytakebreaks
fromusingthekeyboardbyliftingyourhandsfromthepalmrest;andbecarefulnottouse
thekeyboardforanyextendedlengthoftime.
•Donotoperateyourcomputerorchargethebatterynearammablematerialsorinexplosive
environments.
©CopyrightLenovo2013
xi

•Ventilationslots,fansand/orheatsinksareprovidedwiththeproductforsafety,comfort,and
reliableoperation.Thesefeaturesmightinadvertentlybecomeblockedbyplacingtheproducton
abed,sofa,carpet,orotherexiblesurface.Neverblock,cover,ordisablethesefeatures.
•Whentheacpoweradapterisconnectedtoanelectricaloutletandyourcomputer,itgenerates
heat.Donotplacetheadapterincontactwithanypartofyourbodywhileusingit.Neverusethe
acpoweradaptertowarmyourbody.Extendedcontactwithyourbody,eventhroughclothing,
maycauseaskinburn.
Foryoursafety,alwaysfollowthesebasicprecautionswithyourcomputer:
•Keepthecoverclosedwheneverthecomputerispluggedin.
•Regularlyinspecttheoutsideofthecomputerfordustaccumulation.
•Removedustfromventsandanyperforationsinthebezel.Morefrequentcleaningsmightbe
requiredforcomputersindustyorhigh-trafcareas.
•Donotrestrictorblockanyventilationopenings.
•Donotoperateyourcomputerinsidefurniture,asthismightincreasetheriskofoverheating.
•Airowtemperaturesintothecomputershouldnotexceed35°C(95°F).
Electricalcurrentsafetyinformation
DANGER
Electriccurrentfrompower,telephone,andcommunicationcablesishazardous.
Toavoidashockhazard:
•Donotuseyourcomputerduringalightningstorm.
•Donotconnectordisconnectanycablesorperforminstallation,maintenance,orreconguration
ofthisproductduringanelectricalstorm.
•Connectallpowercordstoaproperlywiredandgroundedelectricaloutlet.
•Connecttoproperlywiredoutletsanyequipmentthatwillbeattachedtothisproduct.
•Wheneverpossible,useonehandonlytoconnectordisconnectsignalcables.
•Neverturnonanyequipmentwhenthereisevidenceofre,water,orstructuraldamage.
•Disconnecttheattachedpowercords,batterypack,andallthecablesbeforeyouopenthe
devicecovers,unlessinstructedotherwiseintheinstallationandcongurationprocedures.
•Donotuseyourcomputeruntilallinternalpartsenclosuresarefastenedintoplace.Neveruse
thecomputerwheninternalpartsandcircuitsareexposed.
xiiUserGuide

DANGER
Connectanddisconnectcablesasdescribedinthefollowingprocedureswheninstalling,moving,
oropeningcoversonthisproductorattacheddevices.
Toconnect:
1.TurneverythingOFF.
2.First,attachallcablestodevices.
3.Attachsignalcablestoconnectors.
4.Attachpowercordstooutlets.
5.TurndevicesON.
Todisconnect:
1.TurneverythingOFF.
2.First,removepowercordsfromoutlets.
3.Removesignalcablesfromconnectors.
4.Removeallcablesfromdevices.
Thepowercordmustbedisconnectedfromthewalloutletorreceptaclebeforeinstallingallother
electricalcablesconnectedtothecomputer.
Thepowercordmaybereconnectedtothewalloutletorreceptacleonlyafterallotherelectrical
cableshavebeenconnectedtothecomputer.
Lasercompliancestatement
CAUTION:
Whenlaserproducts(suchasCD-ROMs,DVDdrives,beropticdevices,ortransmitters)are
installed,notethefollowing:
•Donotremovethecovers.Removingthecoversofthelaserproductcouldresultinexposureto
hazardouslaserradiation.Therearenoserviceablepartsinsidethedevice.
•Useofcontrolsoradjustmentsorperformanceofproceduresotherthanthosespeciedherein
mightresultinhazardousradiationexposure.
DANGER
SomelaserproductscontainanembeddedClass3AorClass3Blaserdiode.Notethefollowing.
Laserradiationwhenopen.Donotstareintothebeam,donotviewdirectlywithoptical
instruments,andavoiddirectexposuretothebeam.
Liquidcrystaldisplay(LCD)notice
CAUTION:
TheLCDismadeofglass,androughhandlingordroppingthecomputercancausetheLCDtobreak.
IftheLCDbreaksandtheinternaluidgetsintoyoureyesoronyourhands,immediatelywashthe
affectedareaswithwaterforatleast15minutes;ifanysymptomsarepresentafterwashing,get
medicalcare.
Note:Forproductswithmercury-containinguorescentlamps(forexample,non-LED),theuorescentlamp
intheliquidcrystaldisplay(LCD)containsmercury;disposeofaccordingtolocal,state,orfederallaws.
Usingheadphonesorearphones
Ifyourcomputerhasbothaheadphoneconnectorandanaudio-outconnector,alwaysusetheheadphone
connectorforheadphones(alsocalledaheadset)orearphones.
©CopyrightLenovo2013
xiii

CAUTION:
Excessivesoundpressurefromearphonesandheadphonescancausehearingloss.Adjustmentof
theequalizertomaximumincreasestheearphoneandheadphoneoutputvoltageandthesound
pressurelevel.Therefore,toprotectyourhearing,adjusttheequalizertoanappropriatelevel.
Excessiveuseofheadphonesorearphonesforalongperiodoftimeathighvolumecanbedangerousifthe
outputoftheheadphoneorearphoneconnectorsdonotcomplywithspecicationsofEN50332-2.The
headphoneoutputconnectorofyourcomputercomplieswithEN50332-2Subclause7.Thisspecication
limitsthecomputer’smaximumwidebandtrueRMSoutputvoltageto150mV.Tohelpprotectagainst
hearingloss,ensurethattheheadphonesorearphonesyouusealsocomplywithEN50332-2(Clause7
limits)forawidebandcharacteristicvoltageof75mV.UsingheadphonesthatdonotcomplywithEN
50332-2canbedangerousduetoexcessivesoundpressurelevels.
IfyourLenovocomputercamewithheadphonesorearphonesinthepackage,asaset,thecombinationof
theheadphonesorearphonesandthecomputeralreadycomplieswiththespecicationsofEN50332-1.
Ifdifferentheadphonesorearphonesareused,ensurethattheycomplywithEN50332-1(Clause6.5
LimitationValues).UsingheadphonesthatdonotcomplywithEN50332-1canbedangerousdueto
excessivesoundpressurelevels.
Additionalsafetyinformation
DANGER
Plasticbagscanbedangerous.Keepplasticbagsawayfrombabiesandchildrentoavoiddanger
ofsuffocation.
Noticefortabletpersonalcomputerusers
SafetynoticeforusersinAustralia
DANGER
Donotconnectphonelinewhileusingtabletmode.
NoticeforusersintheU.S.A.
Manypersonalcomputerproductsandaccessoriescontaincords,cablesorwires,suchaspowercordsor
cordstoconnecttheaccessorytoapersonalcomputer.Ifthisproducthassuchacord,cableorwire,then
thefollowingwarningapplies:
WARNING:Handlingthecordonthisproductorcordsassociatedwithaccessoriessoldwiththisproduct
willexposeyoutolead,achemicalknowntotheStateofCaliforniatocausecancer,andbirthdefectsor
otherreproductiveharm.Washhandsafterhandling.
Savetheseinstructions.
xivUserGuide

Chapter1.Productoverview
Thischapterprovidesinformationaboutconnectorlocations,importantproductlabels,computerfeatures,
specications,operatingenvironment,andpreinstalledprograms.
Thischaptercontainsthefollowingtopics:
•“Locatingcomputercontrols,connectors,andindicators”onpage1
•“Locatingimportantproductinformation”onpage12
•“Features”onpage14
•“Specications”onpage15
•“Operatingenvironment”onpage16
•“Lenovoprograms”onpage17
Locatingcomputercontrols,connectors,andindicators
Thissectionintroducesthecomputerhardwarefeaturestogiveyouthebasicinformationyouneedto
startusingthecomputer.
Frontview
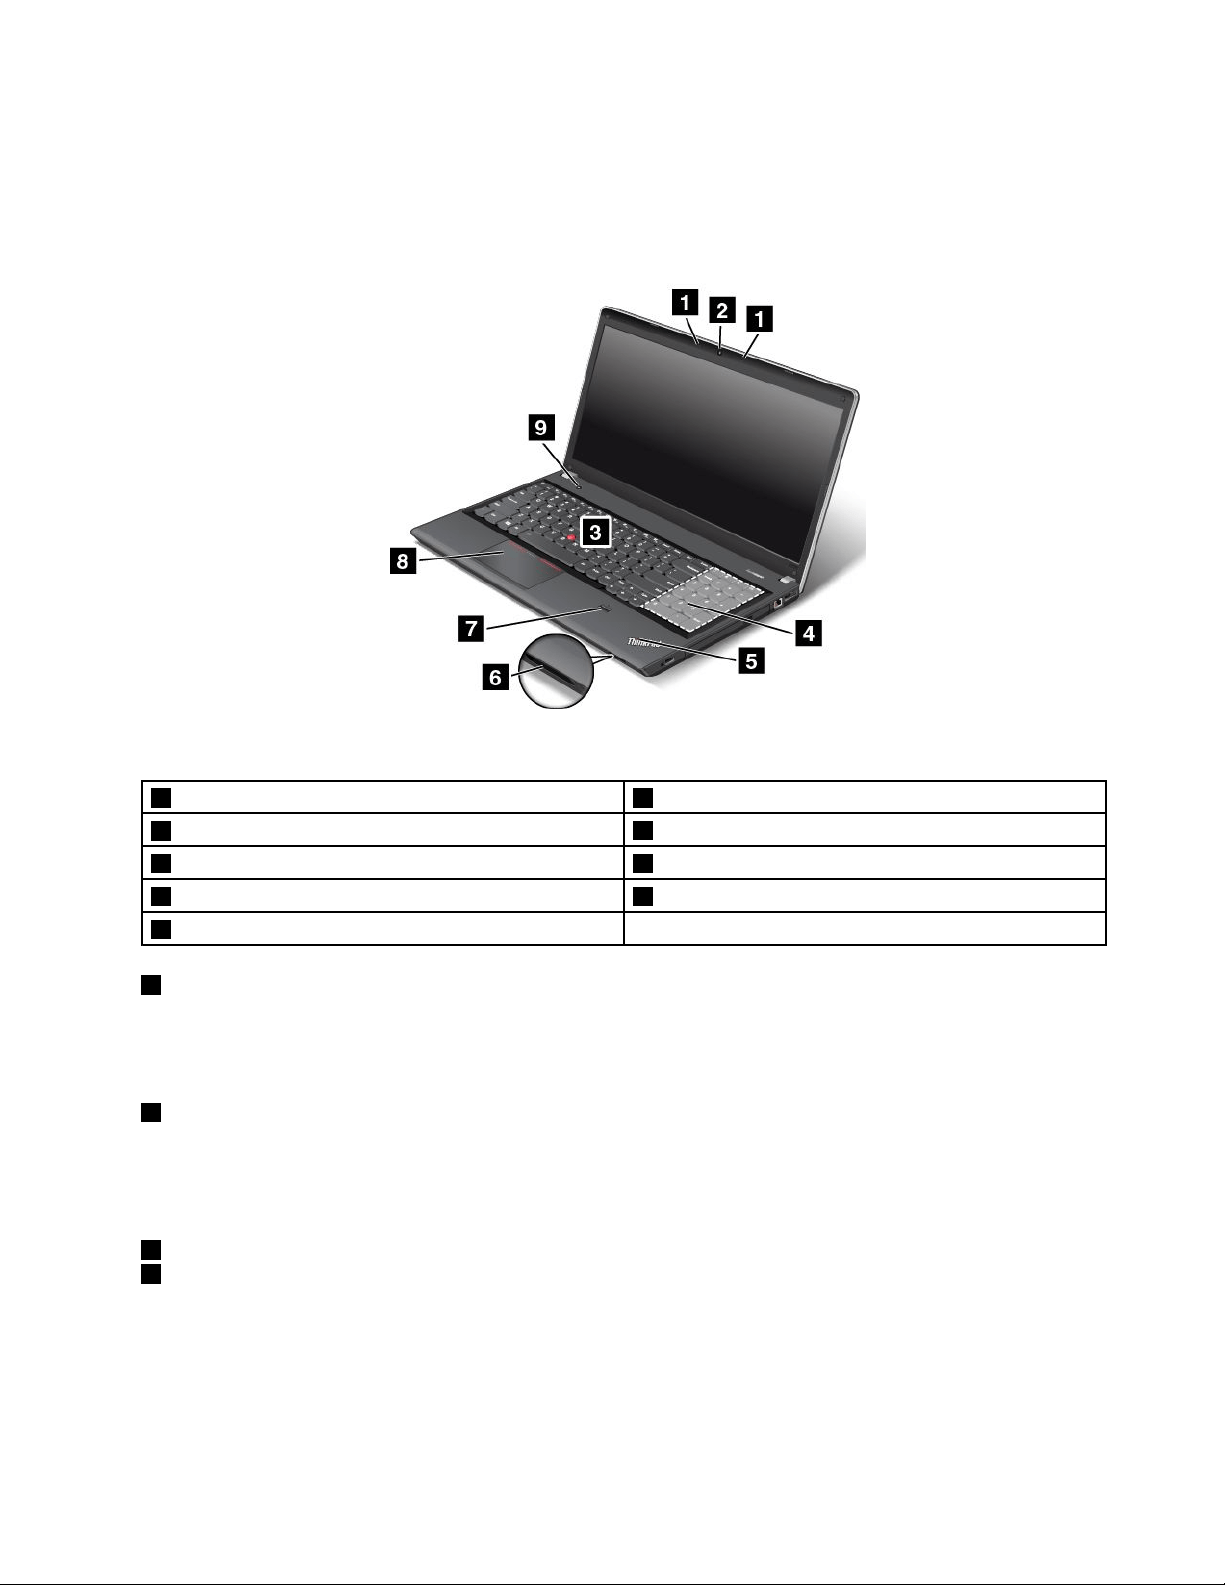
ThinkPadEdgeE440frontview
Figure1.ThinkPadEdgeE440frontview
1Microphones5Mediacardreaderslot
2Camera
6Fingerprintreader
©CopyrightLenovo2013
1

3TrackPoint
®
pointingstick7ThinkPad
®
trackpad
4Systemstatusindicator
8Powerbutton
1Microphones
Thebuilt-inmicrophonescapturesoundandvoicewhenusedwithaprogramcapableofhandlingaudio.
Dependingonyourmodel,yourcomputermightcomewithonemicrophone.
2Camera
Somemodelshaveanintegratedcamera.Usethecameratotakepicturesorholdavideoconference.
Fordetails,see“Usingthecamera”onpage44.
ThinkPadpointingdevice
3TrackPointpointingstick
7ThinkPadtrackpad
ThekeyboardcontainstheThinkPadpointingdevice.Pointing,selecting,anddraggingareallpartofasingle
processthatyoucanperformwithoutmovingyourngersfromatypingposition.Formoreinformation,see
“UsingtheThinkPadpointingdevice”onpage31.
4Systemstatusindicator
TheilluminateddotontheThinkPadlogofunctionsasasystemstatusindicator.Forthedetailedinformation
abouttheindicator,see“Statusindicators”onpage10.
5Mediacardreaderslot
Yourcomputerhasamediacardreaderslot.Insertyourashmediacardintothisslottoreadthedataon
thecard.Formoreinformationaboutthesupportedcards,see“Usingaashmediacard”onpage44
.
6Fingerprintreader
Somemodelshaveangerprintreader.Fingerprintauthenticationtechnologyprovidesasimpleandsecure
useraccessbyassociatingyourngerprintwithapassword.Formoreinformationaboutthengerprint
reader,see“Usingthengerprintreader”onpage56
.
8Powerbutton
Usethepowerbuttontoturnonthecomputer.
Toturnoffthecomputer,usetheStartmenushutdownoptionontheMicrosoft
®
Windows
®
7operating
system.FortheWindows8operatingsystem,movethecursortothetop-rightorbottom-rightcornerofthe
screentobringupthecharms.ThenclickSettings➙Power➙Shutdown.
Ifyourcomputerstopsrespondingandyoucannotturnitoff,pressandholdthepowerbuttonforfour
secondsormore.Ifthecomputerstillisnotresponding,removetheacpoweradapterorthesupported
ThinkPadOneLinkDockandthebatterytoresetthecomputer.
Youalsocanprogramthepowerbuttonsothatbypressingthepowerbuttonyoucanshutdownthe
computerorputitintosleeporhibernationmode.Toachievethis,youneedtochangeyourpowerplan
settings.Toaccesspowerplansettings,dothefollowing:
•FortheMicrosoftWindows7operatingsystem:OpenthePowerManagerprogramandthenclickPower
PlanorAdvanced➙PowerPlan.ForinstructionsonhowtostartthePowerManagerprogram,see
“AccessingLenovoprogramsontheWindows7operatingsystem”onpage17
.
2UserGuide
•FortheMicrosoftWindows8operatingsystem:ClickthebatterystatusiconintheWindowsnotication
areaandclickMorepoweroptions.ThenclickChoosewhatthepowerbuttonsdo.
ThinkPadEdgeE540frontview
Figure2.ThinkPadEdgeE540frontview
1Microphones6Mediacardreaderslot
2Camera
7Fingerprintreader
3TrackPointpointingstick8ThinkPadtrackpad
4Numerickeypad9Powerbutton
5Systemstatusindicator
1Microphones
Thebuilt-inmicrophonescapturesoundandvoicewhenusedwithaprogramcapableofhandlingaudio.
Dependingonyourmodel,yourcomputermightcomewithonemicrophone.
2Camera
Somemodelshaveanintegratedcamera.Usethecameratotakepicturesorholdavideoconference.
Fordetails,see“Usingthecamera”onpage44.
ThinkPadpointingdevice
3TrackPointpointingstick
8ThinkPadtrackpad
ThekeyboardcontainstheThinkPadpointingdevice.Pointing,selecting,anddraggingareallpartofasingle
processthatyoucanperformwithoutmovingyourngersfromatypingposition.Formoreinformation,see
“UsingtheThinkPadpointingdevice”onpage31
.
Chapter1.Productoverview3

4Numerickeypad
Yourcomputerhasanumerickeypadthatcanbeusedtoquicklyinputnumbers.
5Systemstatusindicator
TheilluminatedThinkPadlogoonthepalmrestfunctionsasasystemstatusindicator.Forthedetailed
informationaboutthelocationandmeaningoftheindicator,see“Statusindicators”onpage10
.
6Mediacardreaderslot
Yourcomputermighthaveamediacardreaderslot.Insertyourashmediacardintothisslottoreadthedata
onthecard.Formoreinformationaboutthesupportedcards,see“Usingaashmediacard”onpage44.
6Fingerprintreader
Somemodelshaveangerprintreader.Fingerprintauthenticationtechnologyprovidesasimpleandsecure
useraccessbyassociatingyourngerprintwithapassword.Formoreinformationaboutthengerprint
reader,see“Usingthengerprintreader”onpage56.
9Powerbutton
Usethepowerbuttontoturnonthecomputer.
Toturnoffthecomputer,usetheStartmenushutdownoptionontheMicrosoft
®
Windows
®
7operating
system.FortheWindows8operatingsystem,movethecursortothetop-rightorbottom-rightcornerofthe
screentobringupthecharms.ThenclickSettings➙Power➙Shutdown.
Ifyourcomputerstopsrespondingandyoucannotturnitoff,pressandholdthepowerbuttonforfour
secondsormore.Ifthecomputerstillisnotresponding,removetheacpoweradapterorthesupported
ThinkPadOneLinkDockandthebatterytoresetthecomputer.
Youalsocanprogramthepowerbuttonsothatbypressingthepowerbuttonyoucanshutdownthe
computerorputitintosleeporhibernationmode.Toachievethis,youneedtochangeyourpowerplan
settings.Toaccesspowerplansettings,dothefollowing:
•FortheMicrosoftWindows7operatingsystem:OpenthePowerManagerprogramandthenclickPower
PlanorAdvanced➙PowerPlan.ForinstructionsonhowtostartthePowerManagerprogram,see
“AccessingLenovoprogramsontheWindows7operatingsystem”onpage17
.
•FortheMicrosoftWindows8operatingsystem:ClickthebatterystatusiconintheWindowsnotication
areaandclickMorepoweroptions.ThenclickChoosewhatthepowerbuttonsdo.
4UserGuide
Right-sideview
Note:Yourcomputerkeyboardmightlookdifferentfromthefollowingillustration.
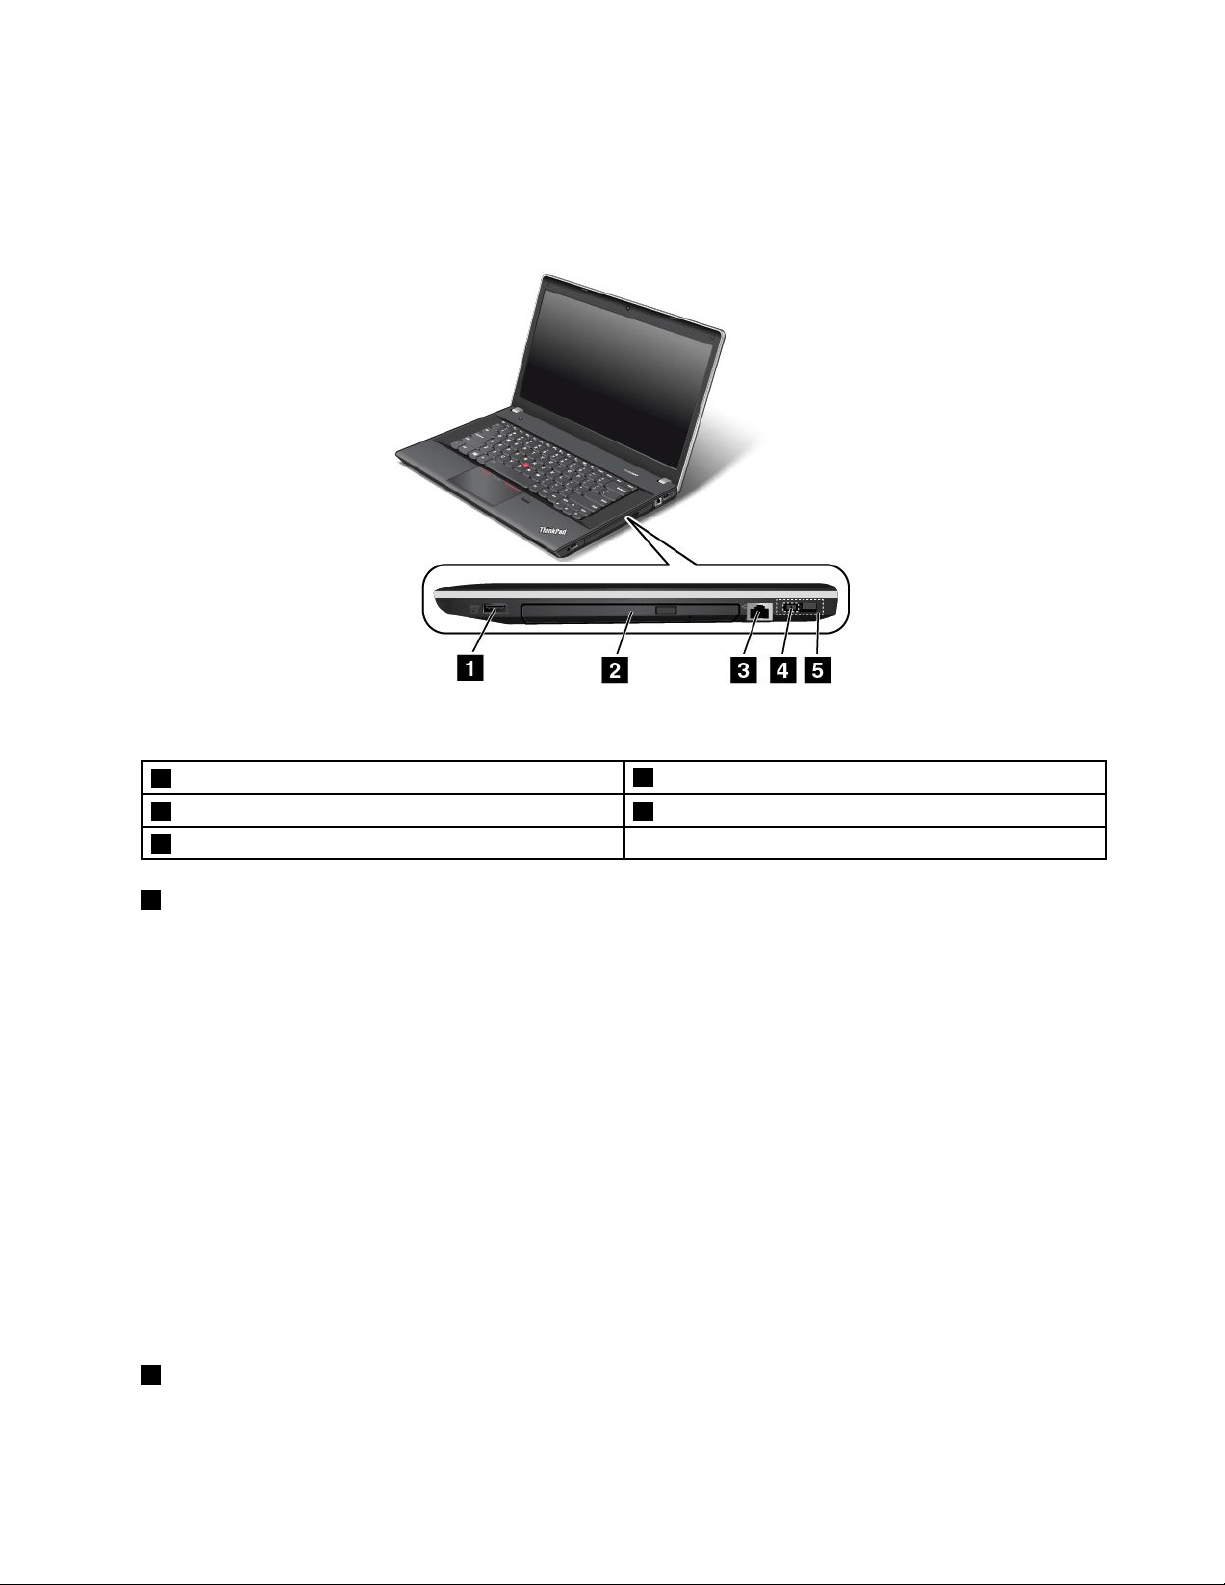
Figure3.ThinkPadEdgeE440andE540right-sideview
1AlwaysOnUSBconnector
4acpowerconnector
2Opticaldrive5LenovoOneLinkconnector
3Ethernetconnector
1AlwaysOnUSBconnector
Bydefault,theAlwaysOnUniversalSerialBus(USB)connectorenablesyoutochargesomemobiledigital
devicesandsmartphonesinthefollowingsituations:
•Whenyourcomputerisonorinsleepmode
•Whenyourcomputerisinhibernationmodeoristurnedoff,butconnectedtoacpower
Ifyouwanttochargethesedeviceswhenyourcomputerisinhibernationmodeoristurnedoff,andthe
computerisnotconnectedtoacpower,dothefollowing:
•ForWindows7:OpenthePowerManagerprogramandclickGlobalPowerSettingsorclickAdvanced
➙GlobalPowerSettings.ThenselecttheEnableUSBchargefromthecomputerbatteryevenwhen
thecomputerisoffcheckbox,andclickOKorApply.
•ForWindows8:PresstheWindowskeytogototheStartscreen.ClickLenovoSettings➙Power.Then
selecttheEnableUSBchargefromthecomputerbatteryevenwhenthecomputerisoffcheck
boxunderAlwaysonUSB.
Note:WhenyouattachaUSBcabletothisUSBconnector,ensurethattheUSBmarkisfacingupward.
Otherwisetheconnectormightbedamaged.
2Opticaldrive
Usetheopticaldrivetoreadorburnopticaldiscs.
Chapter1.Productoverview5
3Ethernetconnector
Connectthecomputertoalocalareanetwork(LAN)withtheEthernetconnector.
DANGER
Toavoidtheriskofelectricalshock,donotconnectthetelephonecabletotheEthernetconnector.
YoucanonlyconnectanEthernetcabletothisconnector.
TheEthernetconnectorhastwoindicatorsthatshowthestatusofthenetworkconnection.Whenthe
upper-leftindicatorissolidgreen,itindicatesthatthecomputerconnectstoaLANandasessionwiththe
networkisavailable.Whentheupper-rightindicatorblinksyellow,itindicatesthatdataisbeingtransmitted.
Note:IfyouconnectthecomputertoasupportedThinkPadOneLinkDock,usetheEthernetconnectoron
thedocktoconnecttoaLAN,nottheoneonthecomputer.
4acpowerconnector
5LenovoOneLinkconnector
Whentheacpoweradapterisconnectedtotheacpowerconnector,itprovidespowertothecomputer
andchargesthebattery.WhenasupportedThinkPadOneLinkDockisconnectedtotheLenovoOneLink
connector,itcannotonlyextendthecomputercapabilitiesbutalsoprovideacpowertothecomputer
andchargethebattery.
TousetheLenovoOneLinkconnector,youneedtoremovetheconnectorcoverfromtheLenovoOneLink
connectorrst.
Note:Ensurethatyoukeeptheconnectorcover.ReattachittotheLenovoOneLinkconnectorwhen
youarenotusingtheLenovoOneLinkconnector.
Left-sideview
ThinkPadEdgeE440left-sideview
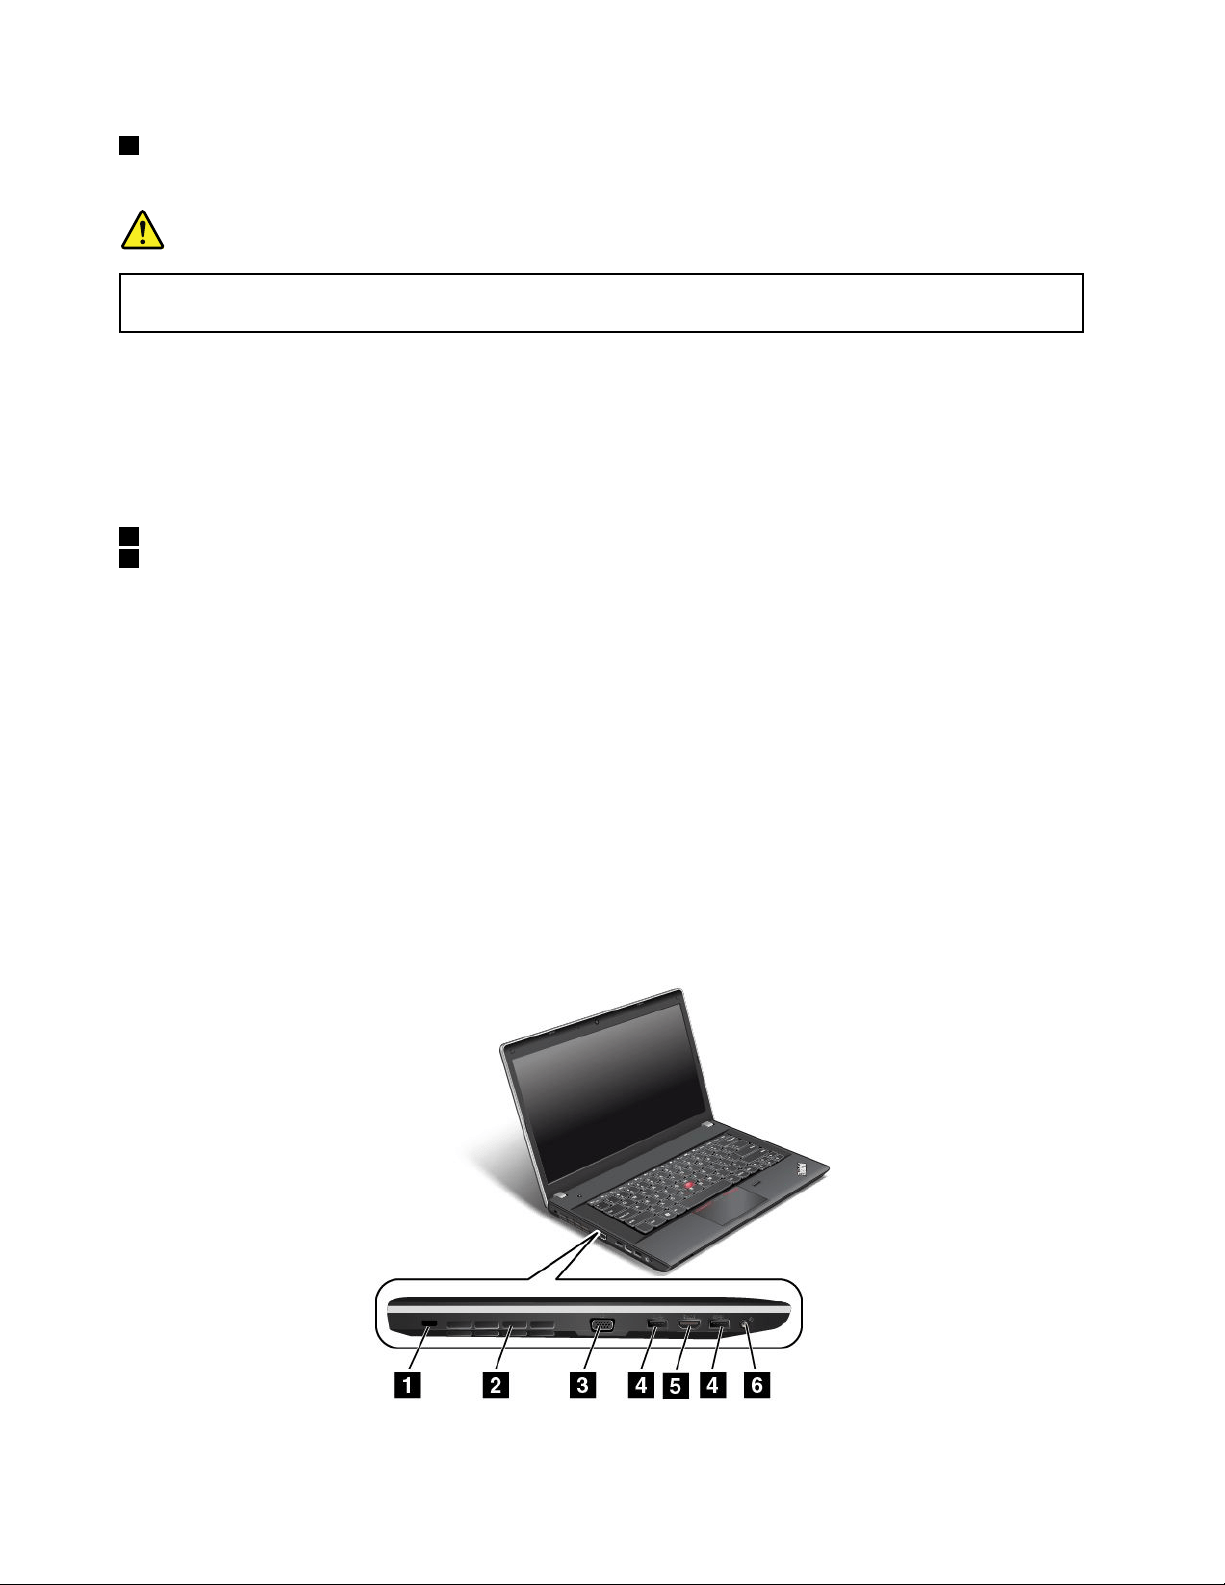
Figure4.ThinkPadEdgeE440left-sideview
6UserGuide

1Security-lockslot4USB3.0connectors
2Fanlouvers(left)
5HDMIconnector
3VGAconnector6Comboaudioconnector
1Security-lockslot
Purchaseasecuritycablelockthattsthissecurity-lockslottolockyourcomputertoastationaryobjectto
protectyourcomputerfromtheft.
2Fanlouvers(left)
Thefanlouversandtheinternalfanenableairtocirculateinthecomputertoensurepropercooling,
especiallythecoolingofthemicroprocessor.
Note:Toensureproperairow,donotplaceanyobstacleinfrontofthefanlouvers.
3VGAconnector
Usethevideographicsarray(VGA)connectortoconnectthecomputertoaVGA-compatiblevideodevice,
suchasaVGAmonitor.
Note:IfyouconnectthecomputertoasupportedThinkPadOneLinkDock,usetheVGAconnectoron
thedock,nottheoneonthecomputer.
4USB3.0connectors
TheUSB3.0connectorsareusedforconnectingUSB-compatibledevices,suchasaUSBprinteror
adigitalcamera.
Note:WhenyouattachaUSBcabletothisUSBconnector,ensurethattheUSBmarkisfacingupward.
Otherwisetheconnectormightbedamaged.
5HDMIconnector
Usethehigh-denitionmultimediainterface(HDMI)connectortoconnectthecomputertoa
HDMI-compatibleaudiodeviceorvideomonitor,suchasanhigh-denitiontelevision(HDTV).
Note:IfyouconnectthecomputertoasupportedThinkPadOneLinkDock,usetheHMDIconnectoron
thedock,nottheoneonthecomputer.
6Comboaudioconnector
Tolistentothesoundfromyourcomputer,connectaheadphoneoraheadsetthathasa3.5mm,4-pole
plugtothecomboaudioconnector.
Notes:
•Ifyouareusingaheadsetwithafunctionswitch,donotpressthisswitchwhileusingtheheadset.If
youpressit,theheadsetmicrophonewillbedisabled,andtheintegratedmicrophonesonthecomputer
willbeenabledinstead.
•Thecomboaudioconnectordoesnotsupportaconventionalmicrophone.Formoreinformation,see
“Usingaudiofeatures”onpage43
.
Chapter1.Productoverview7
ThinkPadEdgeE540left-sideview
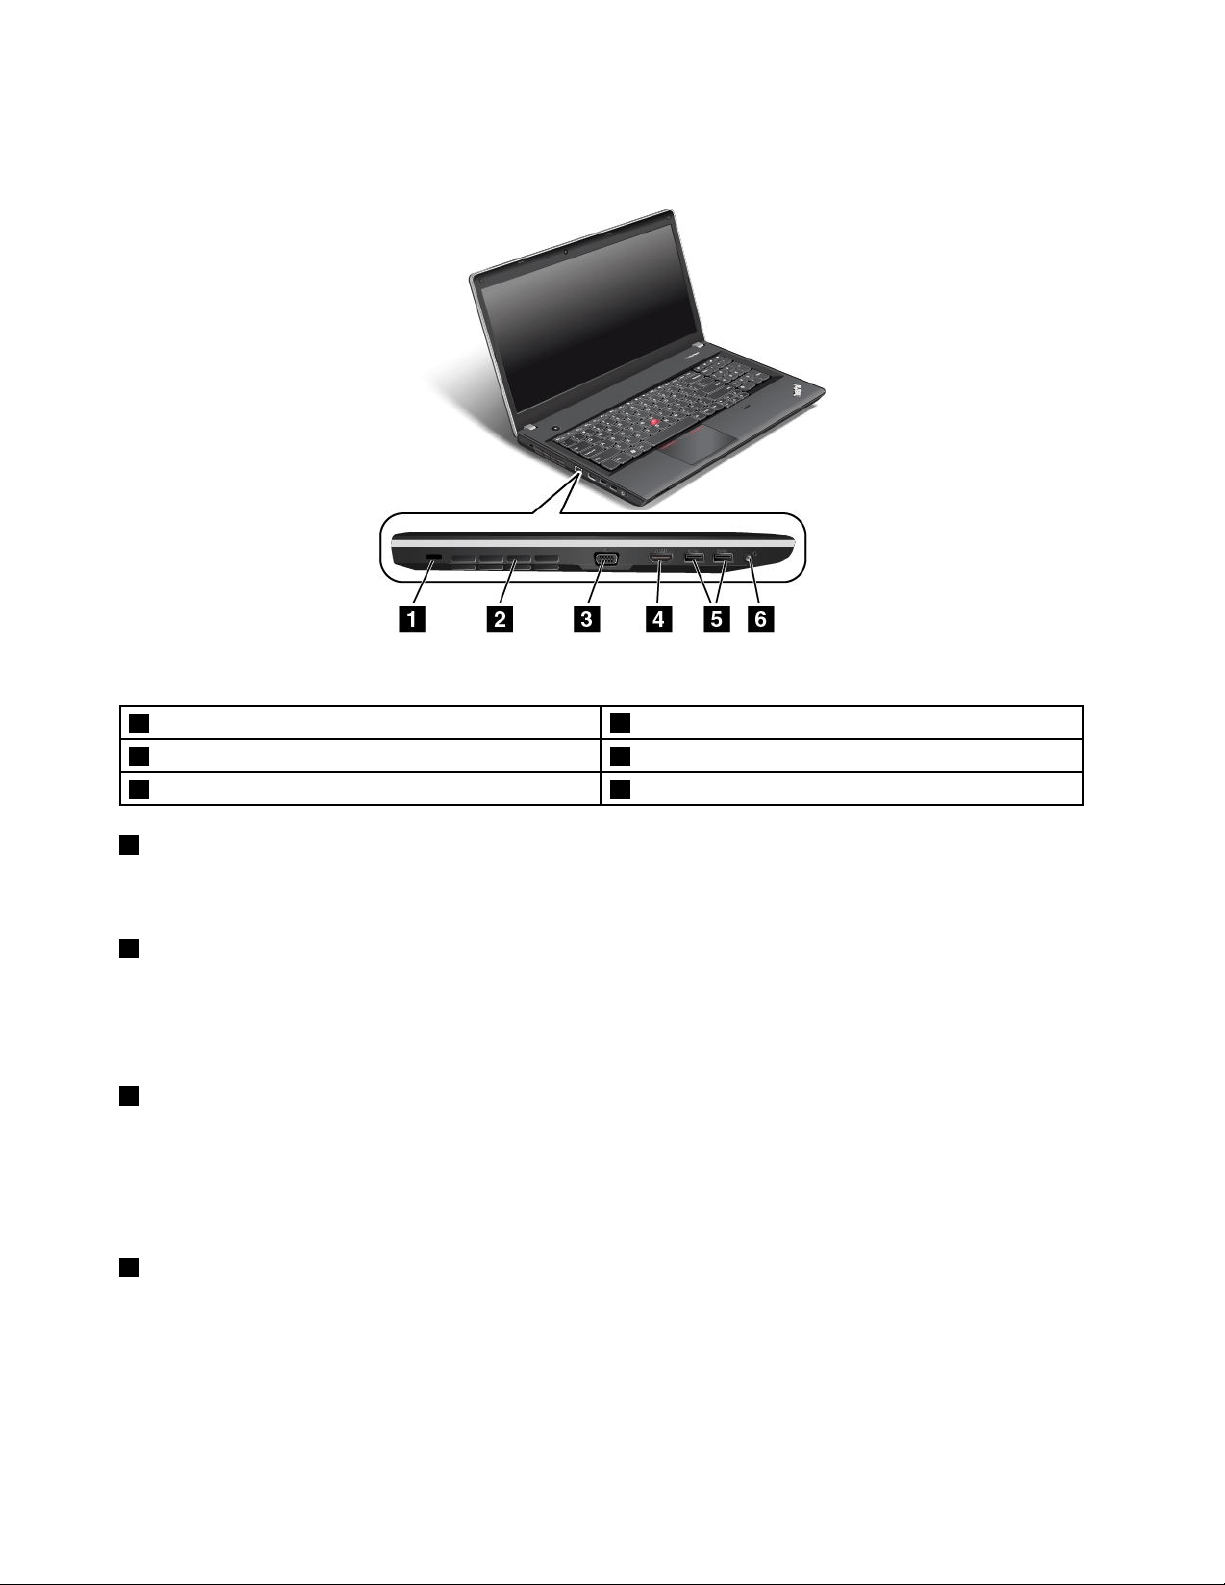
Figure5.ThinkPadEdgeE540left-sideview
1Security-lockslot
4HDMIconnector
2Fanlouvers(left)5USB3.0connectors
3VGAconnector6Comboaudioconnector
1Security-lockslot
Purchaseasecuritycablelockthattsthissecurity-lockslottolockyourcomputertoastationaryobjectto
protectyourcomputerfromtheft.
2Fanlouvers(left)
Thefanlouversandtheinternalfanenableairtocirculateinthecomputertoensurepropercooling,
especiallythecoolingofthemicroprocessor.
Note:Toensureproperairow,donotplaceanyobstacleinfrontofthefanlouvers.
3VGAconnector
Usethevideographicsarray(VGA)connectortoconnectthecomputertoaVGA-compatiblevideodevice,
suchasaVGAmonitor.
Note:IfyouconnectthecomputertoasupportedThinkPadOneLinkDock,usetheVGAconnectoron
thedock,nottheoneonthecomputer.
5HDMIconnector
Usethehigh-denitionmultimediainterface(HDMI)connectortoconnectthecomputertoa
HDMI-compatibleaudiodeviceorvideomonitor,suchasanhigh-denitiontelevision(HDTV).
Note:IfyouconnectthecomputertoasupportedThinkPadOneLinkDock,usetheHMDIconnectoron
thedock,nottheoneonthecomputer.
8UserGuide
5USB3.0connectors
TheUSB3.0connectorsareusedforconnectingUSB-compatibledevices,suchasaUSBprinteror
adigitalcamera.
Note:WhenyouattachaUSBcabletothisUSBconnector,ensurethattheUSBmarkisfacingupward.
Otherwisetheconnectormightbedamaged.
6Comboaudioconnector
Tolistentothesoundfromyourcomputer,connectaheadphoneoraheadsetthathasa3.5mm,4-pole
plugtothecomboaudioconnector.
Notes:
•Ifyouareusingaheadsetwithafunctionswitch,donotpressthisswitchwhileusingtheheadset.If
youpressit,theheadsetmicrophonewillbedisabled,andtheintegratedmicrophonesonthecomputer
willbeenabledinstead.
•Thecomboaudioconnectordoesnotsupportaconventionalmicrophone.Formoreinformation,see
“Usingaudiofeatures”onpage43
.
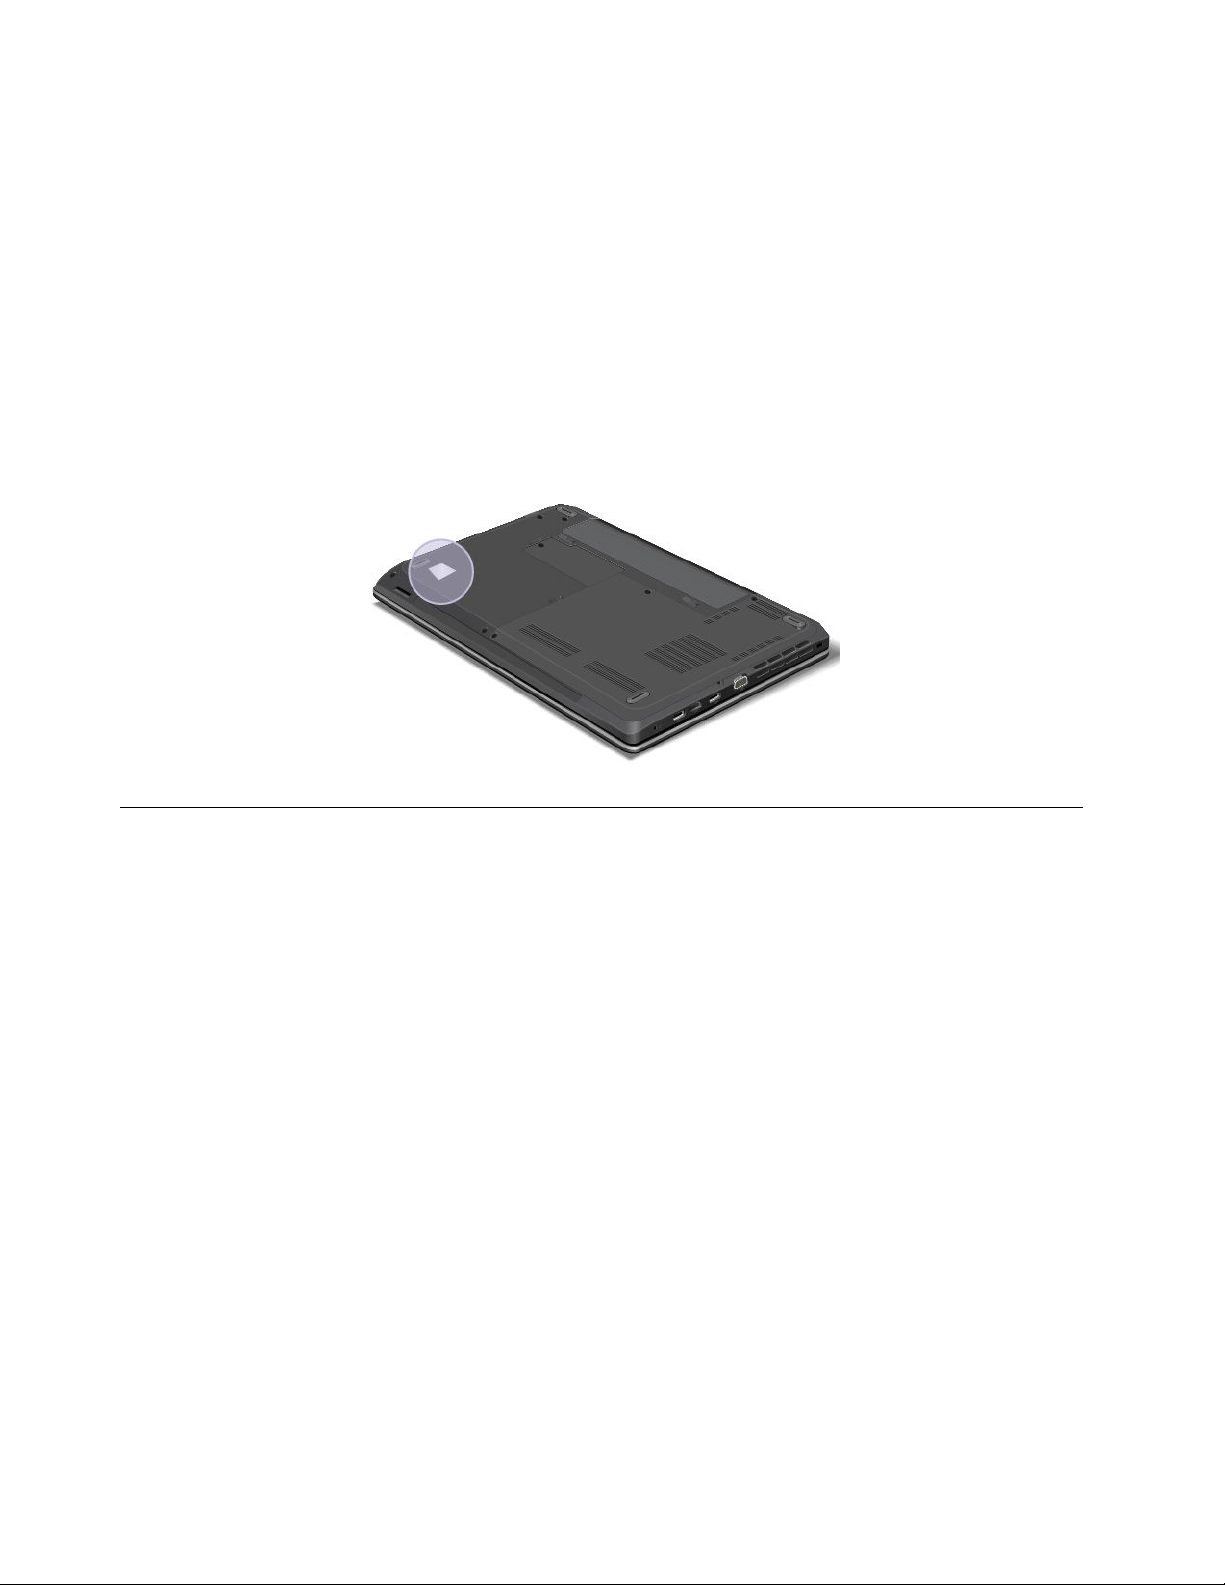
Bottomview
Note:Yourcomputerbottomviewmightlookslightlydifferentfromthefollowingillustration.
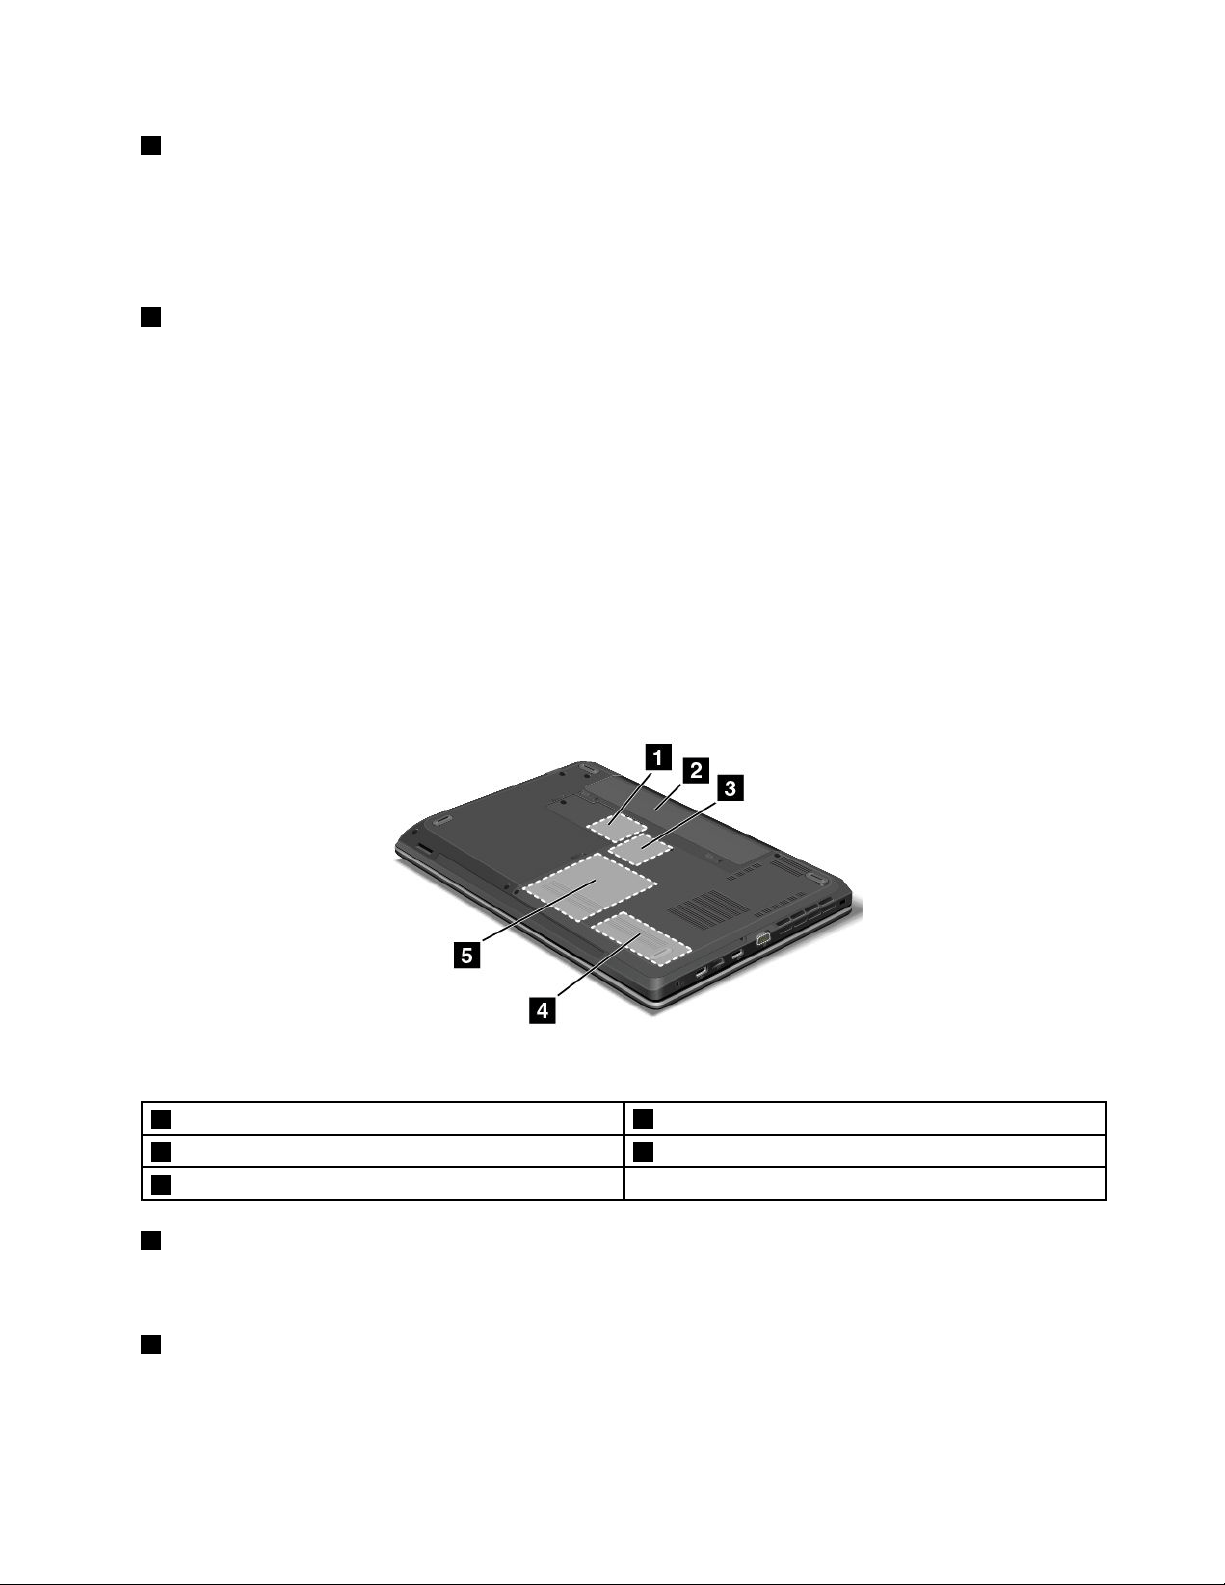
Figure6.ThinkPadEdgeE440andE540bottomview
1PCIExpressMiniCardslotforwirelessLANcard
4Memory-upgradeslot
2Battery5Harddiskdriveorsolid-statedrive
3SlotforwirelessWANcardorM.2solid-statedrive
1PCIExpressMiniCardslotforwirelessLANcard
YourcomputermighthaveawirelessLANcardinstalledinthePCIExpressMiniCardslotforyouto
establishwirelessLANconnections.
2Battery
Useyourcomputerwithbatterypowerwheneveracpowerisunavailable.
Chapter1.Productoverview9
YoucanusethePowerManagerprogramtoadjustyourpowersettingsasneeded.Fordetailedinformation,
seethehelpinformationsystemofthePowerManagerprogram.
3SlotforwirelessWANcardorM.2solid-statedrive
Yourcomputermighthaveawirelesswideareanetwork(WAN)cardinstalledinthisslotforyoutoestablish
wirelessWANconnections.
Forsomemodels,anM.2solid-statedrivemightbeinstalledfordatastorageinsteadofawirelessWANcard.
4Memory-upgradeslot
Youcanincreasetheamountofmemoryinyourcomputerbyinstallingamemorymoduleinthe
memory-upgradeslot.MemorymodulesareavailableasoptionsfromLenovo.
5Harddiskdriveorsolid-statedrive
Dependingonthemodel,thecomputermighthavealarge-capacity,customer-upgradableharddiskdrive
thatcanmeetvariousstoragedemands.
Somemodelshaveasolid-statedrivefordatastorage.Thesolid-statedrivemakesyourcomputerlight,
small,andfast.
Note:Thehiddenservicepartitionisthereasonwhythereislessfreespacethanexpectedonyourhard
diskdriveorsolid-statedrive.Thisreductionismorenoticeableonthesolid-statedrivebecauseofits
smallercapacity.
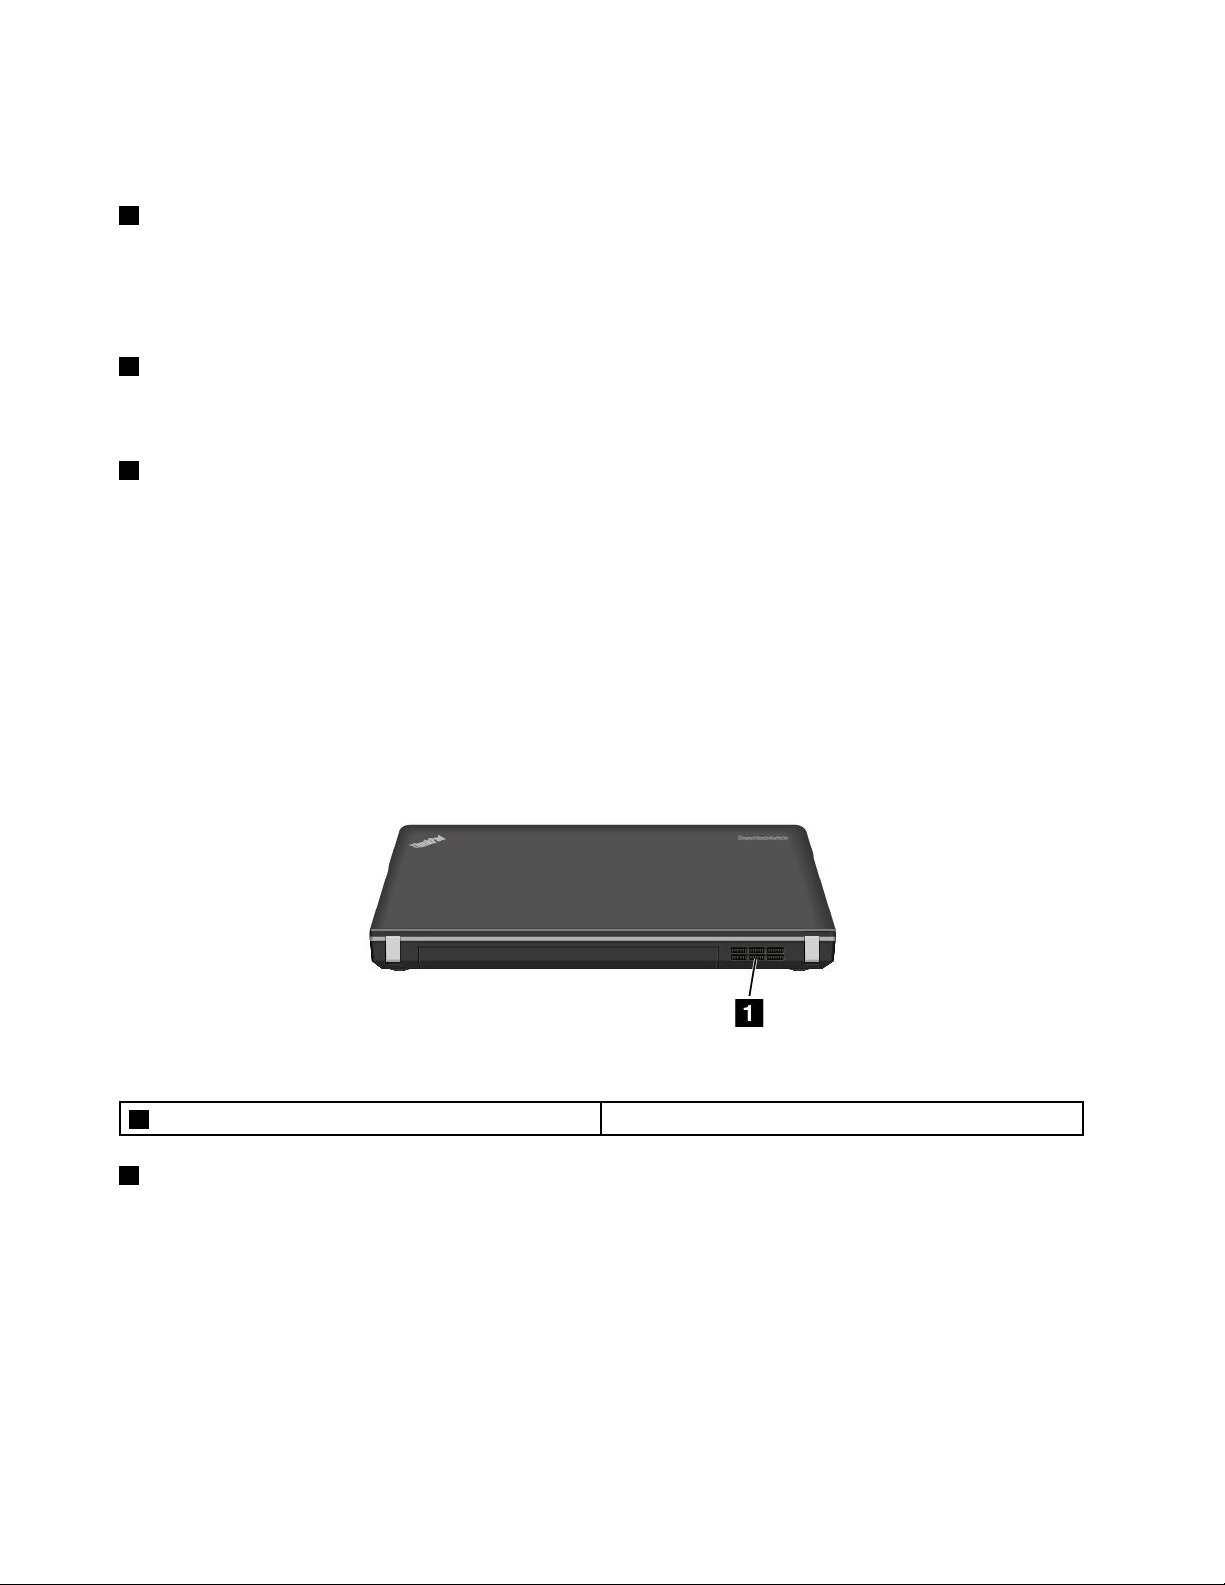
Rearview
Figure7.ThinkPadEdgeE440andE540rearview
1Fanlouvers(rear)
1Fanlouvers(rear)
Thefanlouversandtheinternalfanenableairtocirculateinthecomputertoensurepropercooling,
especiallythecoolingofthemicroprocessor.
Note:Toensureproperairow,donotplaceanyobstacleinfrontofthefanlouvers.
Statusindicators
Yourcomputerhasseveralstatusindicatorsshowingthestatusofyourcomputer.
Note:Yourcomputerkeyboardmightlookdifferentfromthefollowingillustration.
10UserGuide
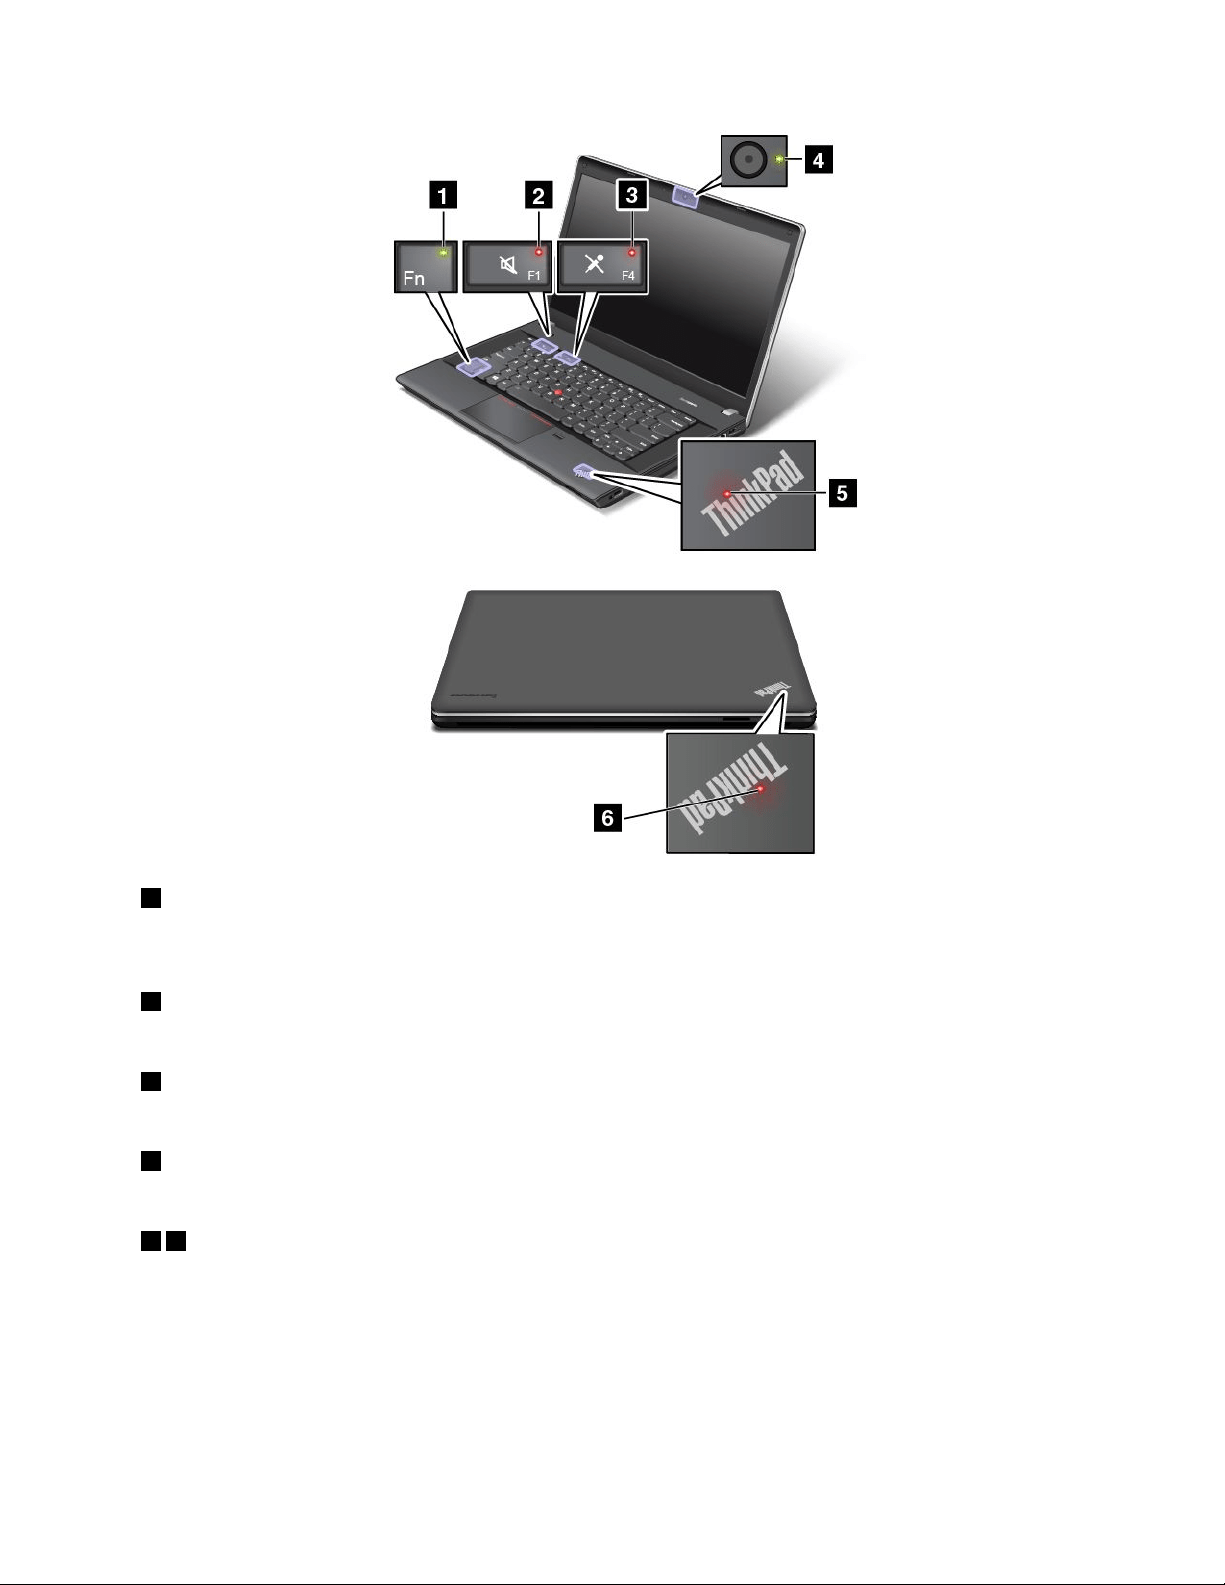
1FnLockindicator
TheFnLockindicatorshowsthestatusofFnLockfunction.Formoreinformation,see“Specialkeys”
onpage27.
2Speakermuteindicator
Whenthespeakermuteindicatorison,thespeakersaremuted.
3Microphonemuteindicator
Whenthemicrophonemuteindicatorison,themicrophonesaremuted.
4Camerastatusindicator
WhentheCamerastatusindicatorison,thecameraisinuse.
56Systemstatusindicators
TheilluminateddotsintheThinkPadlogoontheouterlidofyourcomputerandonthepalmrestshowthe
systemstatusofyourcomputer:
•Blinksforthreetimes:Thecomputerisinitiallyconnectedtothepower.
•On:Thecomputerison(innormalmode).
•Off:Thecomputerisofforinhibernationmode.
•Blinksfast:Thecomputerisenteringsleeporhibernationmode.
Chapter1.Productoverview11
•Blinksslowly:Thecomputerisinsleepmode.
Locatingimportantproductinformation
Thissectionprovidesinformationtohelpyoulocatethemachinetypeandmodellabel,theFCCIDandIC
Certicationlabel,theWindowsCerticateofAuthenticitylabel,andtheGenuineMicrosoftlabel.
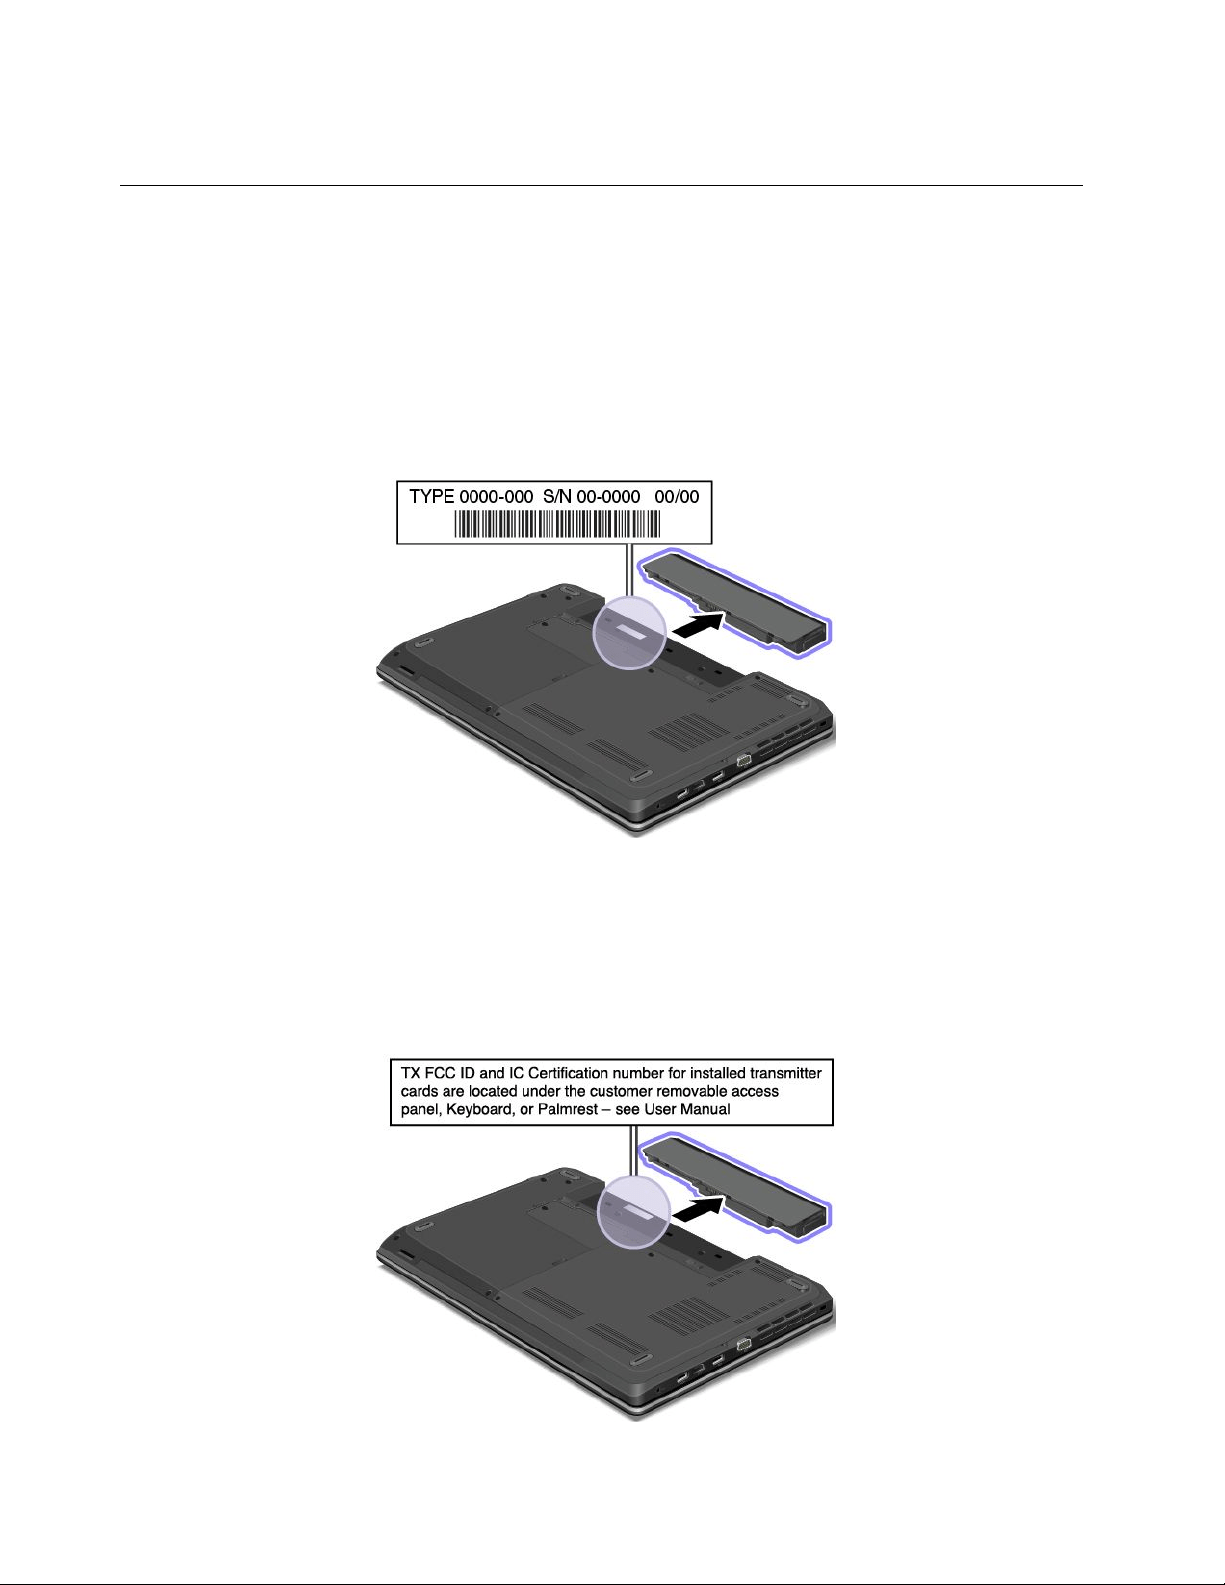
Machinetypeandmodellabel
Themachinetypeandmodellabelidentiesyourcomputer.WhenyoucontactLenovoforhelp,themachine
typeandmodelinformationhelpssupporttechnicianstoidentifyyourcomputerandprovidefasterservice.
Thefollowinggureshowsthelocationofthemachinetypeandmodelofyourcomputer:
FCCIDandICCerticationnumberlabel
ThereisnoFCCIDorICCerticationnumberforthewirelesscommunicationcardsshownontheenclosure
ofthecomputer.Onsomemodels,LenovoprovidesyoutheinformationaboutthelocationoftheFCCID
andICCerticationnumberlabelonthecomputerbackcoverassembly.
ThefollowinggureshowsthelocationoftheFCCIDandICCerticationnumberlabelofthecomputer.
12UserGuide
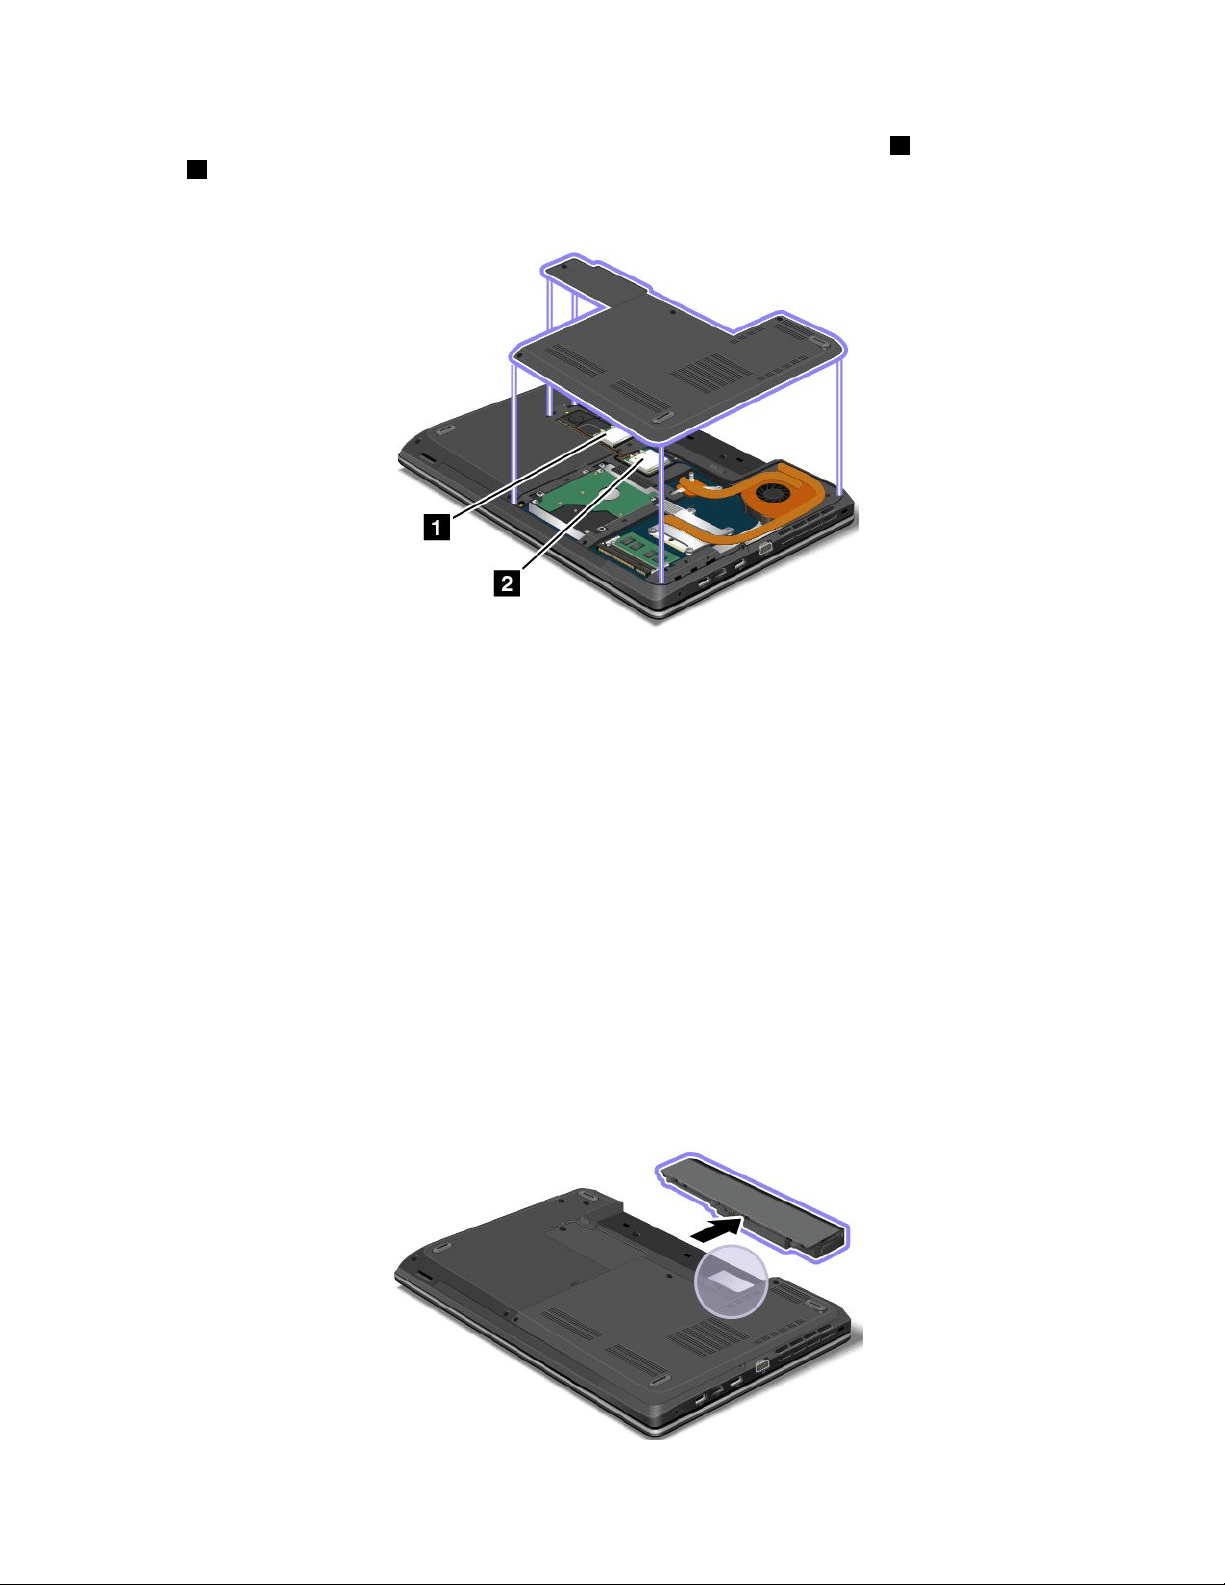
TheFCCIDandICCerticationnumberlabelsareafxedonthewirelessLANcard1andwirelessWAN
card2installedinthewirelesscommunicationcardslotsofthecomputer.
ThefollowinggureshowsthelocationoftheFCCIDandICCerticationnumberlabelsofyourcomputer.
ToremovethewirelessLANcardforrepairorreplacement,see“ReplacingawirelessLANcard”onpage92.
ToremovethewirelessWANcardforrepairorreplacement,see“ReplacingawirelessWANcard”onpage95.
Note:UseonlyLenovo-authorizedwirelesscommunicationcardsforthecomputer.Ifyouinstallan
unauthorizedwirelesscommunicationcardthatisnotapprovedforuseinyourcomputer,anerrormessage
willbedisplayedandthecomputerwillbeepwhenyouturnonthecomputer.
CerticateofAuthenticitylabel
TheCerticateofAuthenticitylabelisprovidedonmodelsthatarelicensedtouseaWindows7
operatingsystem.ThelicensedWindowsversionandproductkeyassociatedwiththecomputerareprinted
onthislabel.Recordthisinformationandkeepitinasafeplace.Youmightneedthesenumberstostart
yourcomputerorreinstalltheWindows7operatingsystem.Dependingonthemodel,theCerticateof
Authenticitylabelcanbeonthecomputercover,underthebattery,oronthepoweradapter.
FormoreinformationabouttheCerticateofAuthenticitylabel,goto:
http://www.microsoft.com/en-us/howtotell/Hardware.aspx
ThefollowinggureshowsthelocationoftheCerticateofAuthenticitylabelonthecomputercover:
Chapter1.Productoverview13
GenuineMicrosoftlabel
TheGenuineMicrosoftlabelisprovidedonmodelsthatarelicensedtouseaWindows8operatingsystem.
TheversionoftheWindows8operatingsystemisprintedonthelabel.Ifyourcomputermodelislicensedto
usetheWindows8Prooperatingsystem,thatlicensealsopermitsyoutousetheWindows7Professional
operatingsysteminplaceoftheWindows8Prooperatingsystemifyouprefer.Lenovocomputersthatare
licensedforusewithaWindows8operatingsystemareshippedwiththeWindows8licensekeydigitally
encodedintothecomputerhardware.Dependingonthecomputermodel,theGenuineMicrosoftlabelcan
beonthecomputercover,underthebattery,oronthepoweradapter.
FormoreinformationabouttheGenuineMicrosoftlabel,goto:
http://www.microsoft.com/en-us/howtotell/Hardware.aspx
ThefollowinggureshowsthelocationoftheGenuineMicrosoftlabelonthecomputercover:
Features
Thistopicliststhefeaturesofyourcomputer.
Toviewthesystempropertiesofyourcomputer,dothefollowing:
•ForWindows7:ClickStartandright-clickComputer.ThenclickProperties.
•ForWindows8:Movethecursortothetop-rightorbottom-rightcornerofthescreentobringupthe
charms.ThenclickSettings➙PCinfo.
Memory
•Doubledatarate3synchronousdynamicrandomaccessmemorymodules(DDR3SDRAM)
Storagedevice
•2.5-inchformfactor,7–mmor9.5–mmheightharddiskdrive
•2.5-inchformfactor,7–mmheightsolid-statedrive
•M.2solid-statedriveforcachingonly(onsomemodels)
Display
ThecolordisplayusestheThinFilmTransistor(TFT)technology.
•Size:
–ForE440models:14.0inches(355.6mm)
–ForE540models:15.6inches(396.2mm)
14UserGuide

•Resolution:
–LCD:
–ForE440models:Upto1366x768or1600x900,dependingonthemodel
–ForE540models:Upto1366x768or1920x1080,dependingonthemodel
–Externalmonitor:Upto2048x1536
•Brightnesscontrol
•Integratedcamera
•Microphones
Keyboard
•6-rowkeyboard
•ThinkPadpointingdevice(TrackPointpointingdeviceandThinkPadtrackpad)
•Fnkey
•Numerickeypad(onsomemodels)
Interface
•Externalmonitorconnectors(VGAconnectorandHDMIconnector)
•Comboaudioconnector
•TwoUSB3.0connectors
•OneAlwaysOnUSBconnector(USB2.0)
•RJ45Ethernetconnector
•4-in-1digitalmediacardreader
•LenovoOneLinkconnector
•acpowerconnector
Opticaldrive
•Multi-Burnerdrive
Wirelessfeatures
•IntegratedwirelessLAN
•IntegratedwirelessWAN(onsomemodels)
•IntegratedBluetooth
Securityfeatures
•Fingerprintreader(onsomemodels)
Specications
Thissectionliststhephysicalspecicationsforyourcomputer.
Size
•ForE440models:
–Width:344mm(13.54inches)
–Depth:239mm(9.41inches)
Chapter1.Productoverview15

–Height:26.3mm(1.04inches)
•ForE540models:
–Width:377mm(14.84inches)
–Depth:250mm(9.84inches)
–Height:26.6mm(1.05inches)
Heatoutput
•65W(222Btu/hr)maximumor90W(307Btu/hr)maximum(dependingonthemodel)
Powersource(acpoweradapter)
•Sine-waveinputat50to60Hz
•Inputratingoftheacpoweradapter:100to240Vac,50to60Hz
Batterypack
•Lithium-ion(Li-Ion)batterypack
Batterylife
•Forthepercentageoftheremainingbatterypower,checkthebatterystatusiconintheWindows
noticationarea.
Operatingenvironment
Thissectionprovidesinformationabouttheoperatingenvironmentofyourcomputer.
Environment:
•Maximumaltitudewithoutpressurization:3048m(10000ft)
•Temperature
–Ataltitudesupto2438m(8000ft)
–Operating:5.0°Cto35.0°C(41°Fto95°F)
–Storage:5.0°Cto43.0°C(41°Fto109°F)
–Ataltitudesabove2438m(8000ft)
–Maximumtemperaturewhenoperatingundertheunpressurizedcondition:31.3°C(88°F)
Note:Whenyouchargethebatterypack,itstemperaturemustbeatleast10°C(50°F).
•Relativehumidity:
–Operating:8%to80%
–Storage:5%to95%
Ifpossible,placeyourcomputerinawell-ventilatedanddryareawithoutdirectexposuretosunshine.
Attention:
•Keepelectricalappliancessuchasanelectricfan,radio,airconditioner,andmicrowaveovenawayfrom
thecomputer.Thestrongmagneticeldsgeneratedbytheseappliancescandamagethemonitorand
dataontheharddiskdrive.
•Donotplaceanybeveragesontopoforbesidethecomputerorotherattacheddevices.Ifliquidisspilled
onorinthecomputeroranattacheddevice,ashortcircuitorotherdamagemightoccur.
16UserGuide

•Donoteatorsmokeoveryourkeyboard.Particlesthatfallintoyourkeyboardcancausedamage.
Lenovoprograms
YourcomputercomeswithLenovoprogramstohelpyouworkmoreeasilyandsecurely.Theprograms
mightvarydependingonthepreinstalledWindowsoperatingsystem.
TolearnmoreabouttheprogramsandothercomputingsolutionsofferedbyLenovo,goto
http://www.lenovo.com/support.
AccessingLenovoprogramsontheWindows7operatingsystem
OntheWindows7operatingsystem,youcanaccessLenovoprogramsfromeithertheLenovo
ThinkVantage
®
ToolsprogramorfromControlPanel.
AccessingLenovoprogramsfromtheLenovoThinkVantageToolsprogram
ToaccessLenovoprogramsfromtheLenovoThinkVantageToolsprogram,clickStart➙AllPrograms➙
LenovoThinkVantageTools.Thendouble-clickaprogramicontoaccesstheprogram.
Note:IfaprogramiconisdimmedinthenavigationwindowoftheLenovoThinkVantageToolsprogram,it
indicatesthatyouneedtomanuallyinstalltheprogram.Tomanuallyinstalltheprogram,double-clickthe
programicon.Then,followtheinstructionsonthescreen.Whentheinstallationprocesscompletes,the
programiconwillbeactivated.
Thefollowingtableliststheprogramsandthecorrespondingiconnamesonthenavigationwindowofthe
LenovoThinkVantageToolsprogram.
Note:Dependingonthemodel,someoftheprogramsmightnotbeavailable.
Table1.ProgramsintheLenovoThinkVantageToolsprogram
ProgramIconname
AccessConnections™InternetConnection
ActiveProtectionSystem™
AirbagProtection
CommunicationsUtilityWebConferencing
LenovoSolutionCenterSystemHealthandDiagnostics
MobileBroadbandConnect3GMobileBroadband
RescueandRecovery
®
EnhancedBackupandRestore
PasswordManagerPasswordVault
PowerManager
PowerControls
RecoveryMediaFactoryRecoveryDisks
SimpleTapSimpleTap
SystemUpdate
UpdateandDrivers
AccessingLenovoprogramsfromControlPanel
ToaccessLenovoprogramsfromControlPanel,clickStart➙ControlPanel.Thendependingonthe
programyouwanttoaccess,clickthecorrespondingsectionandthenclickthecorrespondinggreentext.
Note:IfyoucannotndtheprogramyouneedinControlPanel,openthenavigationwindowoftheLenovo
ThinkVantageToolsprogramanddouble-clickthecorrespondingdimmedicontoinstalltheprogramyou
Chapter1.Productoverview17

need.Then,followtheinstructionsonthescreen.Whentheinstallationprocesscompletes,theprogram
iconwillbeactivated,andyoucanndtheprograminControlPanel.
ThefollowingtableliststheprogramsandthecorrespondingsectionsandgreentextsinControlPanel.
Note:Dependingonthemodel,someoftheprogramsmightnotbeavailable.
Table2.ProgramsinControlPanel
Program
ControlPanelsectionGreentextinControlPanel
AccessConnections
NetworkandInternet
Lenovo-InternetConnection
ActiveProtectionSystemSystemandSecurity
HardwareandSound
Lenovo-AirbagProtection
CommunicationsUtilityHardwareandSoundLenovo-WebConferencing
LenovoSolutionCenterSystemandSecurityLenovo-SystemHealthand
Diagnostics
MessageCenterPlus
Programs
MessagesfromLenovo
MobileBroadbandConnect
NetworkandInternet
Lenovo-3GMobileBroadband
RescueandRecovery
SystemandSecurity
Lenovo-EnhancedBackupand
Restore
PasswordManager
SystemandSecurity
UserAccountsandFamilySafety
Lenovo-PasswordVault
PowerManager
HardwareandSound
SystemandSecurity
Lenovo-PowerControls
RecoveryMedia
SystemandSecurity
Lenovo-FactoryRecoveryDisks
SimpleTap
Programs
Lenovo-SimpleTap
SystemUpdateSystemandSecurity
Lenovo-UpdateandDrivers
Note:Dependingonyourcomputermodel,someoftheprogramsmightnotbeavailable.
AccessingLenovoprogramsontheWindows8operatingsystem
IfyourcomputerispreinstalledwiththeWindows8operatingsystem,youcanaccessLenovoprogramsby
doingeitherofthefollowing:
•ClicktheLenovoQuickLaunchiconfromtheWindowsnoticationarea.Alistofprogramsisdisplayed.
Double-clickaLenovoprogramtolaunchit.Ifadesiredprogramisnotinthelist,clicktheplusicon+.
•PresstheWindowskeytogototheStartscreen.ClickaLenovoprogramtolaunchit.Ifyoucannotnd
theprogramyouneed,movethecursortothetop-rightorbottom-rightcornerofthescreentobringup
thecharms.ThenclicktheSearchcharmtosearchforthedesiredprogram.
YourcomputersupportsthefollowingLenovoprograms:
•ActiveProtectionSystem
•LenovoFingerprintManager
•LenovoCompanion
•LenovoCloudStorage
•LenovoMobileAccess
•LenovoQuickControl
18UserGuide

•LenovoQuickDisplay
•LenovoSettings
•LenovoSolutionCenter
•LenovoSupport
•LenovoThinkVantageTools
•PasswordManager
•SystemUpdate
Foranintroductiontoeachprogram,see“Lenovoprogramsoverview”onpage19
.
Lenovoprogramsoverview
ThistopicprovidesinformationaboutsomeLenovoprograms.
Note:Dependingonthemodel,someoftheprogramsmightnotbeavailable.
•AccessConnections
TheAccessConnectionsprogramisaconnectivityassistantprogramforcreatingandmanaginglocation
proles.EachlocationprolestoresallthenetworkandInternetcongurationsettingsneededfor
connectingtoanetworkinfrastructurefromaspeciclocationsuchasahomeoranofce.
Byswitchingbetweenlocationprolesasyoumoveyourcomputerfromplacetoplace,youcanquickly
andeasilyconnecttoanetworkwithnoneedtomanuallyrecongureyoursettingsandrestartthe
computereachtime.
•ActiveProtectionSystem
TheActiveProtectionSystemprogramprotectsyourharddiskdrivewhentheshocksensorinsideyour
computerdetectsaconditionthatcoulddamagethedrive,suchassystemtilt,excessivevibration,or
shock.Theharddiskdriveislessvulnerabletodamagewhenitisnotoperating.Thisisbecausewhen
theharddiskdriveisnotoperating,thesystemstopsitfromspinning,andmightalsomovetheread
andwriteheadsofthedrivetoareasthatdonotcontaindata.Assoonastheshocksensorsenses
thattheenvironmentisstableagain(minimalchangeinsystemtilt,vibration,orshock),itturnsonthe
harddiskdrive.
•ClientSecuritySolution
TheClientSecuritySolutionprogramprotectsyourcomputerbysecuringclientdataanddeecting
securitybreachattempts.Italsocanhelpmanageyourpasswords,recoveraforgottenpassword,
monitorsecuritysettingsonyourcomputer,andsuggesthowtoenhancethecomputersecurity.
•CommunicationsUtility
TheCommunicationsUtilityprogramenablesyoutoconguresettingsfortheintegratedcameraand
audiodevices.
•LenovoFingerprintManager
Ifyoursystemcomeswithangerprintreader,theLenovoFingerprintManagerprogramenablesyou
toenrollyourngerprintandassociateitwithyourWindowspassword.Asaresult,thengerprint
authenticationcanreplaceyourpasswordandenablesimpleandsecureuseraccess.
•LenovoCloudStorge
TheLenovoCloudStorageprogramenablesyoutouploadandstoreyourlocallestoaremoteLenovo
server.Youcanviewanddownloadthestoredlesatanytime.
•LenovoCompanion
ThroughtheLenovoCompanionprogram,youcangettheinformationabouttheaccessoriesforyour
computer,viewblogsandarticlesaboutyourcomputer,andcheckforotherrecommendedprograms.
Chapter1.Productoverview19

•LenovoMobileAccess
TheLenovoMobileAccessprogramenablesyoutomanageyourmobilebroadbandconnection.You
cancreateanaccount,addmoneytotheaccount,andpurchasemobilebroadbandsessionsusing
youraccount.
•LenovoQuickControl
TheLenovoQuickControlprogramenablesyoutocontrolyourcomputerremotelythroughyour
smartphone,suchascontrollingthecursor,changingprojectionsettings,andmanagingforeground
applicationsandwindows.
•LenovoQuickDisplay
TheLenovoQuickDisplayprogramenablesyoutoestablishaconnectionbetweenyourcomputeranda
Wi-Fidisplayprojector.Thisprovidesyouwithaquickandeasywaytomakepresentations.
•LenovoSettings
YoucanenhanceyourcomputingexperiencebyusingtheLenovoSettingsprogram.TheLenovoSettings
programenablesyoutoturnthecomputerintoaportablehotspot,congurecameraandaudiosettings,
optimizeyourpowersettings,andcreateandmanagemultiplenetworkproles.
•LenovoSolutionCenter
TheLenovoSolutionCenterprogramenablesyoutotroubleshootandresolvecomputerproblems.It
combinesdiagnostictests,systeminformationcollection,securitystatus,andsupportinformation,along
withhintsandtipsforoptimalsystemperformance.
•LenovoSupport
TheLenovoSupportprogramenablesyoutoregisteryourcomputerwithLenovo,checkthecomputer
healthconditionandbatterystatus,downloadandviewusermanuals,getthewarrantyinformationof
yourcomputer,andexplorehelpandsupportinformation.
•LenovoThinkVantageT ools
TheLenovoThinkVantageToolsprogramhelpsyouworkmoreeasilyandsecurelybyprovidingeasy
accesstovariousprogram,suchastheLenovoFingerprintManagerprogramandtheLenovoSolution
Centerprogram.
•MessageCenterPlus
TheMessageCenterPlusprogramautomaticallydisplaysmessagestoinformyouaboutimportantnotices
fromLenovo,suchasalertsonsystemupdatesandalertsonconditionsthatrequireyourattention.
•MobileBroadbandConnect
TheMobileBroadbandConnectprogramenablesyoutoconnectthecomputertothemobilebroadband
(3G)networkthroughasupportedwirelessWANcard.
•PasswordManager
ThePasswordManagerprogramautomaticallycapturesandllsinauthenticationinformationfor
WindowsprogramsandWebsites.
•PowerManager
ThePowerManagerprogramprovidesconvenient,exible,andcompletepowermanagementforthe
computer.Itenablesyoutoadjustyourcomputerpowersettingstoachievethebestbalancebetween
performanceandpowersaving.
•RecoveryMedia
TheRecoveryMediaprogramenablesyoutorestorethecontentsoftheharddiskdrivetothefactory
defaultsettings.
•RescueandRecovery
20UserGuide

TheRescueandRecoveryprogramisaone-buttonrecoveryandrestoresolution.Itincludesasetof
self-recoverytoolstohelpyoudiagnosecomputerproblems,gethelp,andrecoverfromsystemcrashes,
evenifyoucannotstarttheWindowsoperatingsystem.
•SimpleTap
TheSimpleTapprogramenablesyoutoquicklycustomizesomebasiccomputersettingssuchasmuting
thespeakers,adjustingthevolume,lockingthecomputeroperatingsystem,launchingaprogram,
openingaWebpage,openingale.YoualsocanusetheSimpleTapprogramtoaccesstheLenovoApp
Shop,fromwhichyoucandownloadvariousprogramsandcomputersoftware.
TostarttheSimpleTapprograminaquickway,clicktheredSimpleTaplaunchpointonthedesktop.
TheredlaunchpointisavailableonthedesktopafteryouhavelaunchedtheSimpleTapprogramfor
thersttime.
•SystemUpdate
TheSystemUpdateprogramenablesyoutokeepthesoftwareonthecomputerup-to-dateby
downloadingandinstallingsoftwarepackages,includingThinkVantageprograms,devicedrivers,UEFI
BIOSupdates,andotherthirdpartyprograms.
Chapter1.Productoverview21

22UserGuide

Chapter2.Usingyourcomputer
Thischapterprovidesinformationonusingsomeofthecomputercomponents.
Thischaptercontainsthefollowingtopics:
•“Registeringyourcomputer”onpage23
•“Frequentlyaskedquestions”onpage23
•“Specialkeys”onpage27
•“UsingtheThinkPadpointingdevice”onpage31
•“Powermanagement”onpage32
•“Connectingtothenetwork”onpage37
•“Presentationsandmultimedia”onpage40
•“Usingaudiofeatures”onpage43
•“Usingthecamera”onpage44
•“Usingtheopticaldrive”onpage44
•“Usingaashmediacard”onpage44
Registeringyourcomputer
Whenyouregisteryourcomputer,informationisenteredintoadatabase,whichenablesLenovotocontact
youincaseofarecallorothersevereproblem.Inaddition,somelocationsofferextendedprivilegesand
servicestoregisteredusers.
WhenyouregisteryourcomputerwithLenovo,youalsowillreceivethefollowingbenets:
•QuickerservicewhenyoucallLenovoforhelp
•Automaticnoticationoffreesoftwareandspecialpromotionaloffers
ToregisteryourcomputerwithLenovo,dooneofthefollowing:
•Gotohttp://www.lenovo.com/registerandfollowtheinstructionsonthescreentoregisteryourcomputer.
•ConnectyourcomputertotheInternetandregisteryourcomputerthroughapreinstalledregistration
program:
–ForWindows7:ThepreinstalledLenovoProductRegistrationprogramlaunchesautomaticallyafteryou
haveusedyourcomputerforatime.Followtheinstructionsonthescreentoregisteryourcomputer.
–ForWindows8:OpentheLenovoSupportprogram.ThenclickRegistrationandfollowtheinstructions
onthescreentoregisteryourcomputer.
Frequentlyaskedquestions
Thefollowingareafewtipsthatwillhelpyouoptimizetheuseofyourcomputer.
Toensurethatyoureceivethebestperformancefromyourcomputer,gotothefollowingWebpagetond
informationsuchasaidsfortroubleshootingandanswerstofrequentlyaskedquestions:
http://www.lenovo.com/support/faq
CanIgetmyuserguideinanotherlanguage?
©CopyrightLenovo2013
23

•Todownloadtheuserguideinanotherlanguage,gotohttp://www.lenovo.com/support.Thenfollow
theinstructionsonthescreen.
HowdoIusebatterypowermoreeffectivelywhenIamonthego?
•Toconservepower,ortosuspendoperationwithoutexitingprogramsorsavingles,see“Power-saving
modes”onpage34.
•Toachievethebestbalancebetweenperformanceandpowersaving,createandapplypowerplans.See
“Managingthepowerplans”onpage34
•Ifyourcomputerwillbeturnedoffforanextendedperiodoftime,youcanpreventbatterypower
fromdrainingbyremovingthebattery.Lookformoreinformationaboutusingthebatteryin“Power
management”onpage32
.
HowdoIsecurelydisposeofdatastoredontheharddiskdriveorsolid-statedrive?
•StudyChapter4“Security”onpage51sectiontondouthowyoucanprotectyourcomputerfrom
theftandunauthorizeduse.
•UsethePasswordManagerprogramtoprotectthedatastoredonyourcomputer.Fordetails,seethe
helpinformationsystemoftheprogram.
•Beforeyoudisposeofthedataontheharddiskdriveorsolid-statedrive,besuretoread“Noticeon
deletingdatafromyourharddiskdriveorsolid-statedrive”onpage58
.
HowdoIgetconnectedindifferentlocations?
•Totroubleshootawirelessnetworkingissue,goto:
http://www.lenovo.com/support/faq
•TakeadvantageofthenetworkingfeaturesprovidedbytheAccessConnectionsprogram(onthe
Windows7operatingsystem)orLocationAwarenessprograminLenovoSettings(ontheWindows8
operatingsystem).
•Tolearnmoreaboutusingthewirelessfeaturesofyourcomputer,referto“Wirelessconnections”on
page37
.
•Totravelmorecondently,besuretocheckthetipsin“Travelingwithyourcomputer”onpage49
.
•PressF8toenableordisablethewirelessfeatures.
HowdoIgivepresentationsorattachanexternalmonitoroften?
•Ensurethatyoufollowtheprocedurefor“Usinganexternalmonitor”onpage41.
•WiththeExtenddesktopfunction,youcandisplayoutputonboththecomputerdisplayandanexternal
monitor.
HowdoIattachorreplaceadevice?
•SeeChapter6“Replacingdevices”onpage69formoreinformationaboutreplacingthedevicesof
yourcomputer.
Ihavebeenusingthecomputerforsometimealready,anditisgettingslower.WhatshouldIdo?
•Followthe“Generaltipsforpreventingproblems”onpage121
.
•Diagnoseproblemsyourselfbyusingthepreinstalleddiagnosticsoftware.
•CheckforrecoverysolutionsinChapter5“Recoveryoverview”onpage61
.
Printthefollowingsectionsandkeepthemwithyourcomputerincaseyouareunabletoaccessthisonline
userguidewhennecessary.
•“Installinganewoperatingsystem”onpage105
24UserGuide
•“Computerstopsresponding”onpage127
•“Powerproblems”onpage141
Usingthemulti-touchscreen
Thistopicprovidesinstructionsonhowtousethemulti-touchscreenthatisavailableonsomemodels.
Tap
Taponthescreenwithyourngertiptolaunchanapplication,selectanitem,oropenamenu.
Pressandhold
Pressandholdanitemorablankareaonthescreenforafewsecondsuntilanactionoccurs.
Drag
Tapandholdyourngeronanitem,suchasanimageoranicononthescreen,thenpullitalongwithyour
ngertothedesiredlocation.
Swipeorslide
MoveyourngerhorizontallyonthescreentoscrollthroughWebpages,lists,picturethumbnails,andsoon.
Zoominorzoomout
Movetwongersclosertogetheronthescreentozoomout,ormovetwongersapartonthescreen
tozoomin.
Rotate
Puttwoormorengersonanitem,andthenrotateyourngers.Thisoperationenablesyoutorotatethe
selecteditemsinadirectionyoumoveyourngers.
Doubletap
Forsomeapplications,quicklytaptwiceonthescreentozoomin.Double-tapagaintozoomout.
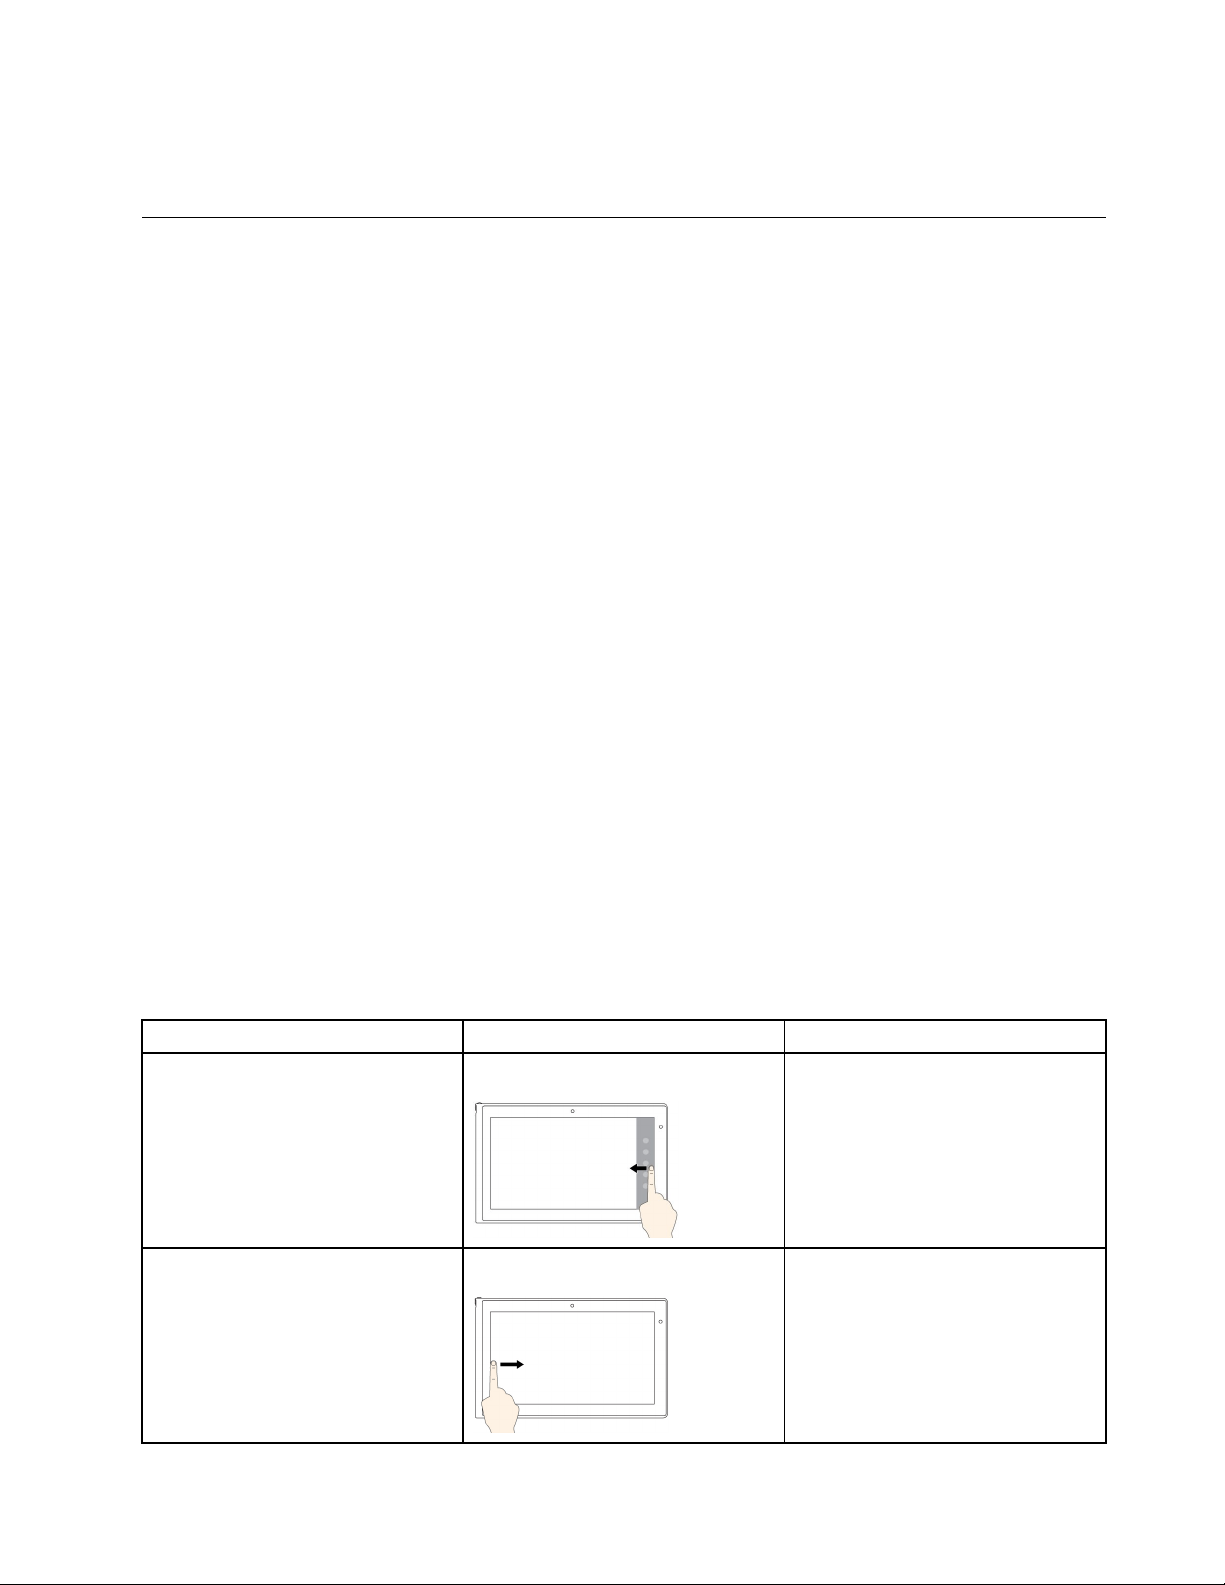
Windows8touchgesturesandmouseactions
ThefollowingtableliststhetouchgesturesandmouseactionssupportedbytheWindow8operatingsystem.
Tasks
Touchgestures(touchmodelsonly)
Mouseactions
Todisplaythecharmsthatcontain
systemcommands,suchasStart,
Settings,Search,Share,and
Devices
Swipeinfromtherightedge.
Movethepointertothelower-rightor
upper-rightcornerofyourscreen.
Todisplaytheopenapplicationsand
switchapplications
Swipeinfromtheleftedge.
Movethepointertotheupper-left
cornerofyourscreen,andthenclick.
Chapter2.Usingyourcomputer25
Tasks
Touchgestures(touchmodelsonly)
Mouseactions
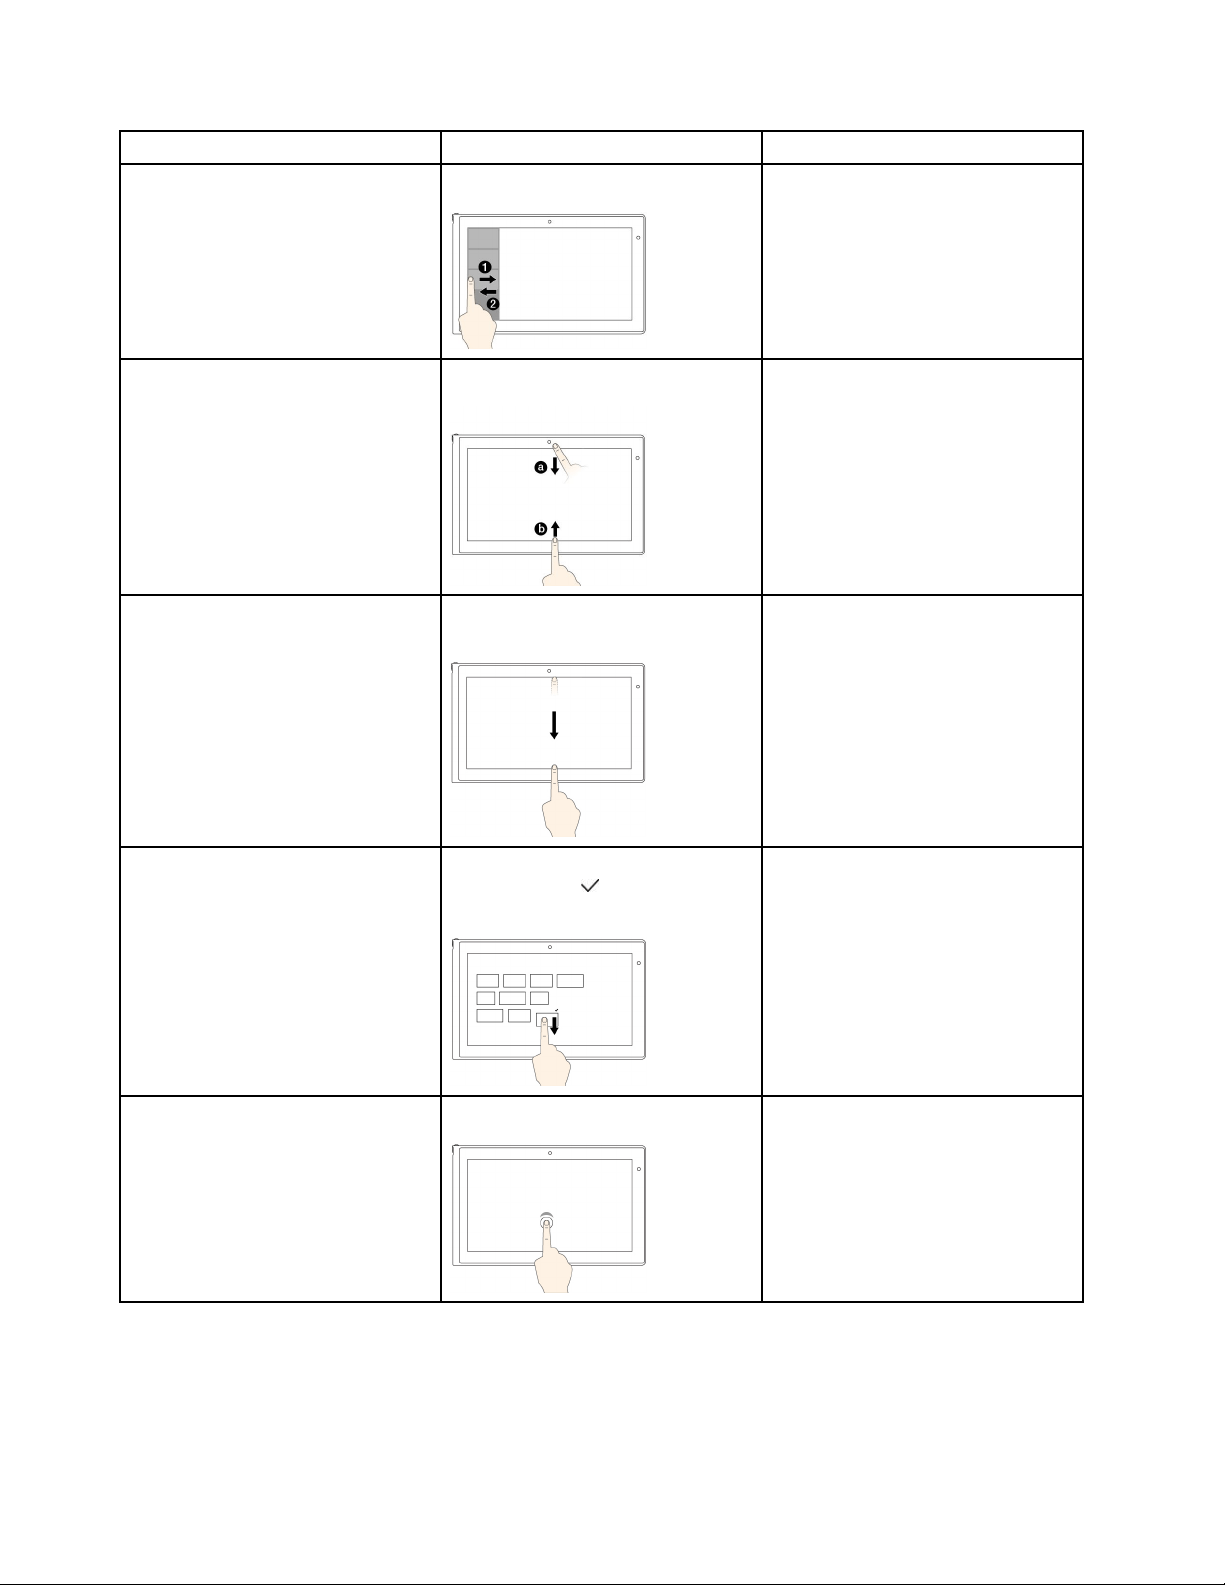
Toviewtherecentlyusedapplications
orselectanapplicationfromthelist
Swipeinandoutontheleftedge.
Movethepointertotheupper-left
cornerofyourscreen,andthenmove
itdownward.
Toviewallapplicationsonthe
Startscreenorviewtheapplication
commandsonanopenapplication,
suchasCopy,Save,andDelete,
dependingontheapplications
Swipeinfromthetoporbottomedge.
Right-clickablankareaonthe
Startscreenorright-clickanopen
application.
Toclosethecurrentapplication
Swipeinfromthetopedgetothe
bottom.
Clickthetopoftheapplication,and
thendragittothebottomofyour
screen.
Toenlargeorreducethesizeofan
icon,removeaniconfromtheStart
screen,orremoveanapplication
Movethedesiredicondownward
untilatickicon(
)isdisplayed,then
releaseyournger.
Right-clickthedesiredicon.
ToopenanapplicationontheStart
screenorperformanactiononan
openapplication,suchasCopy,
Save,andDelete,dependingonthe
application
Tap.
Click.
26UserGuide
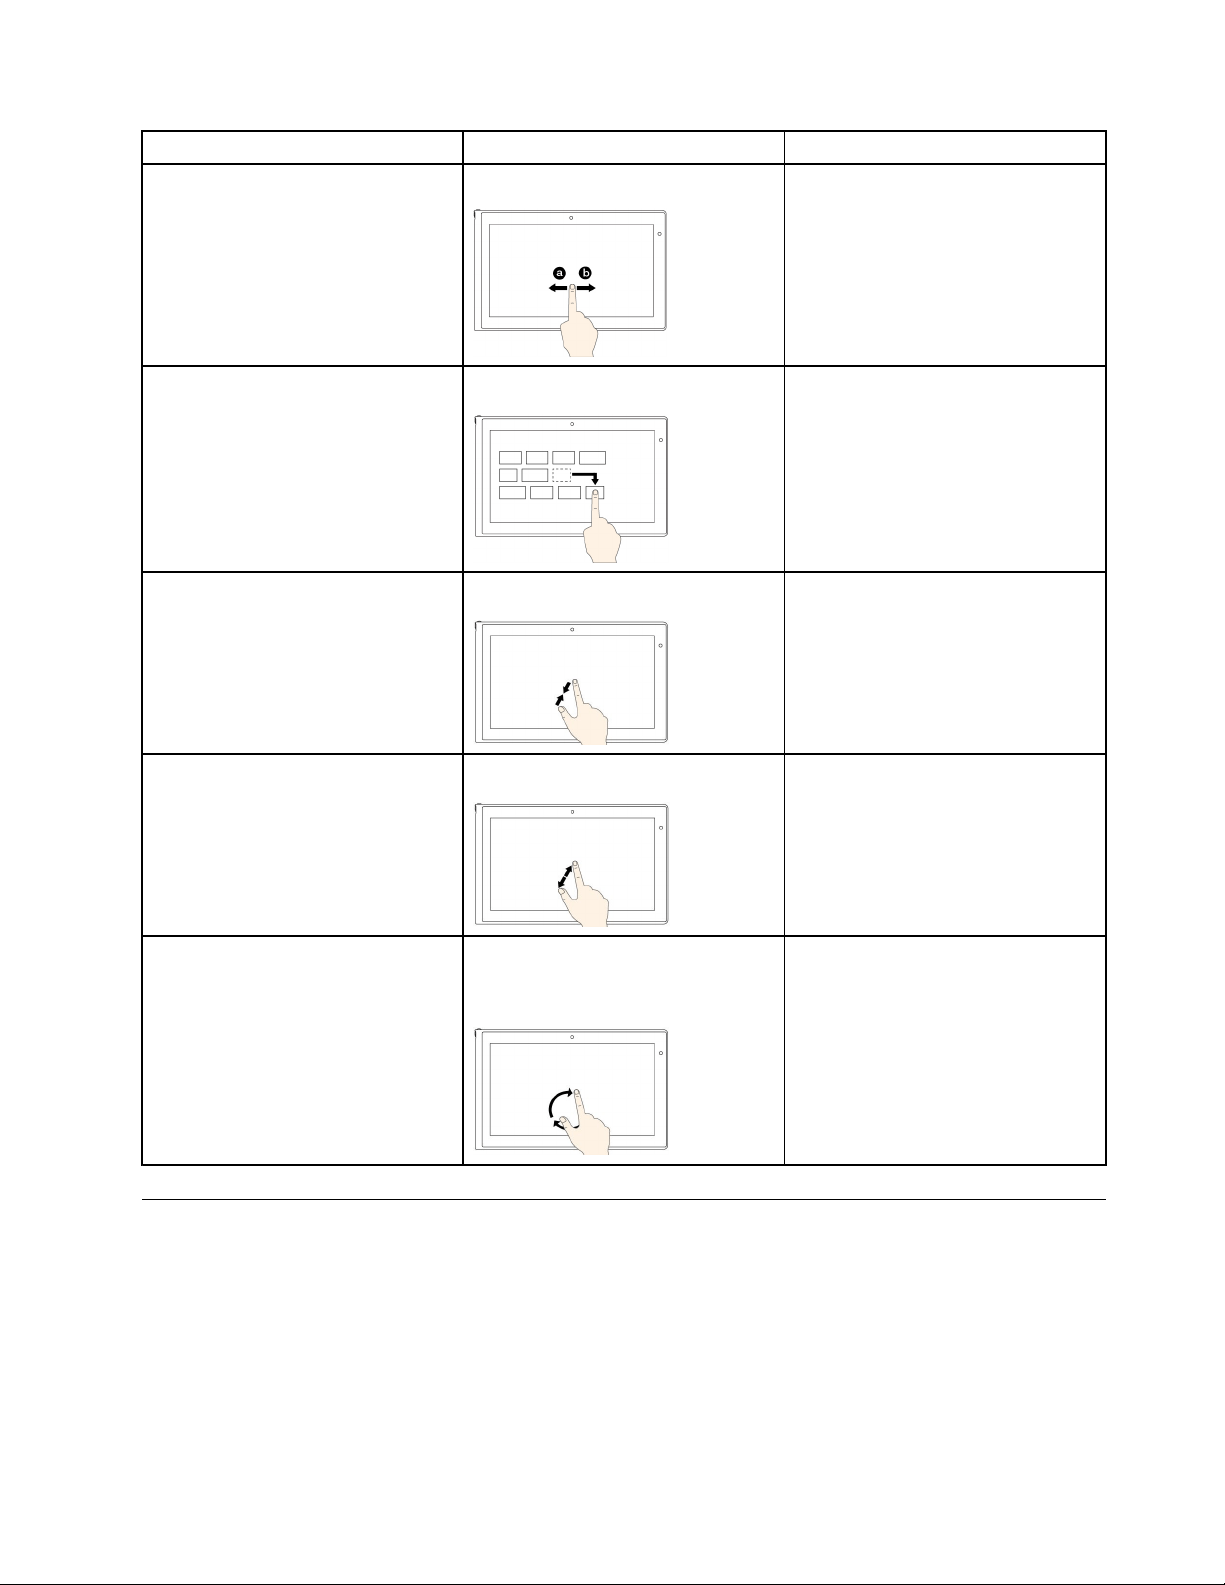
Tasks
Touchgestures(touchmodelsonly)
Mouseactions
Toscrollthroughitems,suchaslists,
pages,andphotos
Slide.Scrollthemousewheel,movethe
scrollbar,orclickthescrollarrow.
TomoveanobjectDraganitemtothedesiredlocation.
Click,hold,anddraganitem.
Tozoomout
Movetwongersclosertogether.
PresstheCtrlkeywhilescrollingthe
mousewheelbackward.
Tozoomin
Movetwongersfartherapart.
PresstheCtrlkeywhilescrollingthe
mousewheelforward.
Torotateanitem
Puttwoormorengersonan
item,andthenrotateyourngers
(supportedonlyonsomemodels).
Iftheapplicationsupportsrotation,
clicktherotationicon.
Specialkeys
Yourcomputerhasseveralspecialkeystohelpyouworkmoreeasilyandeffectively.
ThinkPadEdgeE440specialkeys
ThefollowinggureshowsthelocationsofmainspecialkeysforThinkPadEdgeE440.
Chapter2.Usingyourcomputer27

1Functionkeys
•+:PressFn+EsctoenableordisabletheFnLockfunction.
WhentheFnLockfunctionisdisabled:TheFnLockindicatorisoff(defaultmode).Toinitiatethe
specialfunctionofeachkey,pressthefunctionkeysdirectly.ToinputF1–F12,presstheFnkeyandthe
correspondingfunctionkey.
WhentheFnLockfunctionisenabled:TheFnLockindicatorturnson.ToinputF1–F12,pressthe
functionkeysdirectly.Toinitiatethespecialfunctionofeachkey,presstheFnkeyandthecorresponding
functionkey.
•
:Mutesorunmutesthespeakers.Whenthespeakersaremuted,thespeakermuteindicatorturnson.
Ifyoumutethesoundandturnoffyourcomputer,thesoundwillremainmutedwhenyouturnonyour
computeragain.Toturnonthesound,pressF1,F2,orF3.
•
:Decreasesthespeakervolume.
•
:Increasesthespeakervolume.
•:Mutesorunmutesthemicrophones.Whenthemicrophonesaremuted,themicrophonemute
indicatorturnson.
•:Darkensthedisplay.
•
:Brightensthedisplay.
Youcantemporarilychangethecomputerdisplaybrightnessbypressingthetwokeys.Tochangethe
defaultbrightnesslevel,right-clickthebatterystatusiconintheWindowsnoticationarea.Thenclick
Adjustscreenbrightnessandmakechangesasdesired.
•:Switchesthedisplayoutputlocationbetweenthecomputerdisplayandanexternalmonitor.For
moreinformation,referto“Presentationsandmultimedia”onpage40.
Note:Toswitchbetweenthecomputerdisplayandanexternalmonitor,theWindows+Pkeycombination
alsoisavailable.
•:Enablesordisablesthebuilt-inwirelessnetworkingfeatures.Formoreinformationonthewireless
features,referto“Wirelessconnections”onpage37.
28UserGuide
•:
ForWindows8:OpenstheSettingscharm.
ForWindows7:OpensControlPanel.
•:
ForWindows8:OpenstheSearchcharm.
ForWindows7:OpensWindowsSearch.
•:Viewstheprogramsthatyouhaveopened.
•
:
ForWindows8:Viewsalltheprograms.
ForWindows7:OpensComputer.
•Fn+B:HasthesamefunctionastheBreakkey.
•Fn+P:HasthesamefunctionasthePausekey.
•Fn+S:HasthesamefunctionastheSysRqkey.
•Fn+K:HasthesamefunctionastheScrLKkey.
2Windowskey
OntheWindows7operatingsystem,presstheWindowskeytoopentheStartmenu.OntheWindows8
operatingsystem,presstheWindowskeytoswitchbetweenthecurrentworkspaceandtheStartscreen.
ForinformationaboutusingtheWindowskeywithotherkeys,refertothehelpinformationsystemofthe
Windowsoperatingsystem.
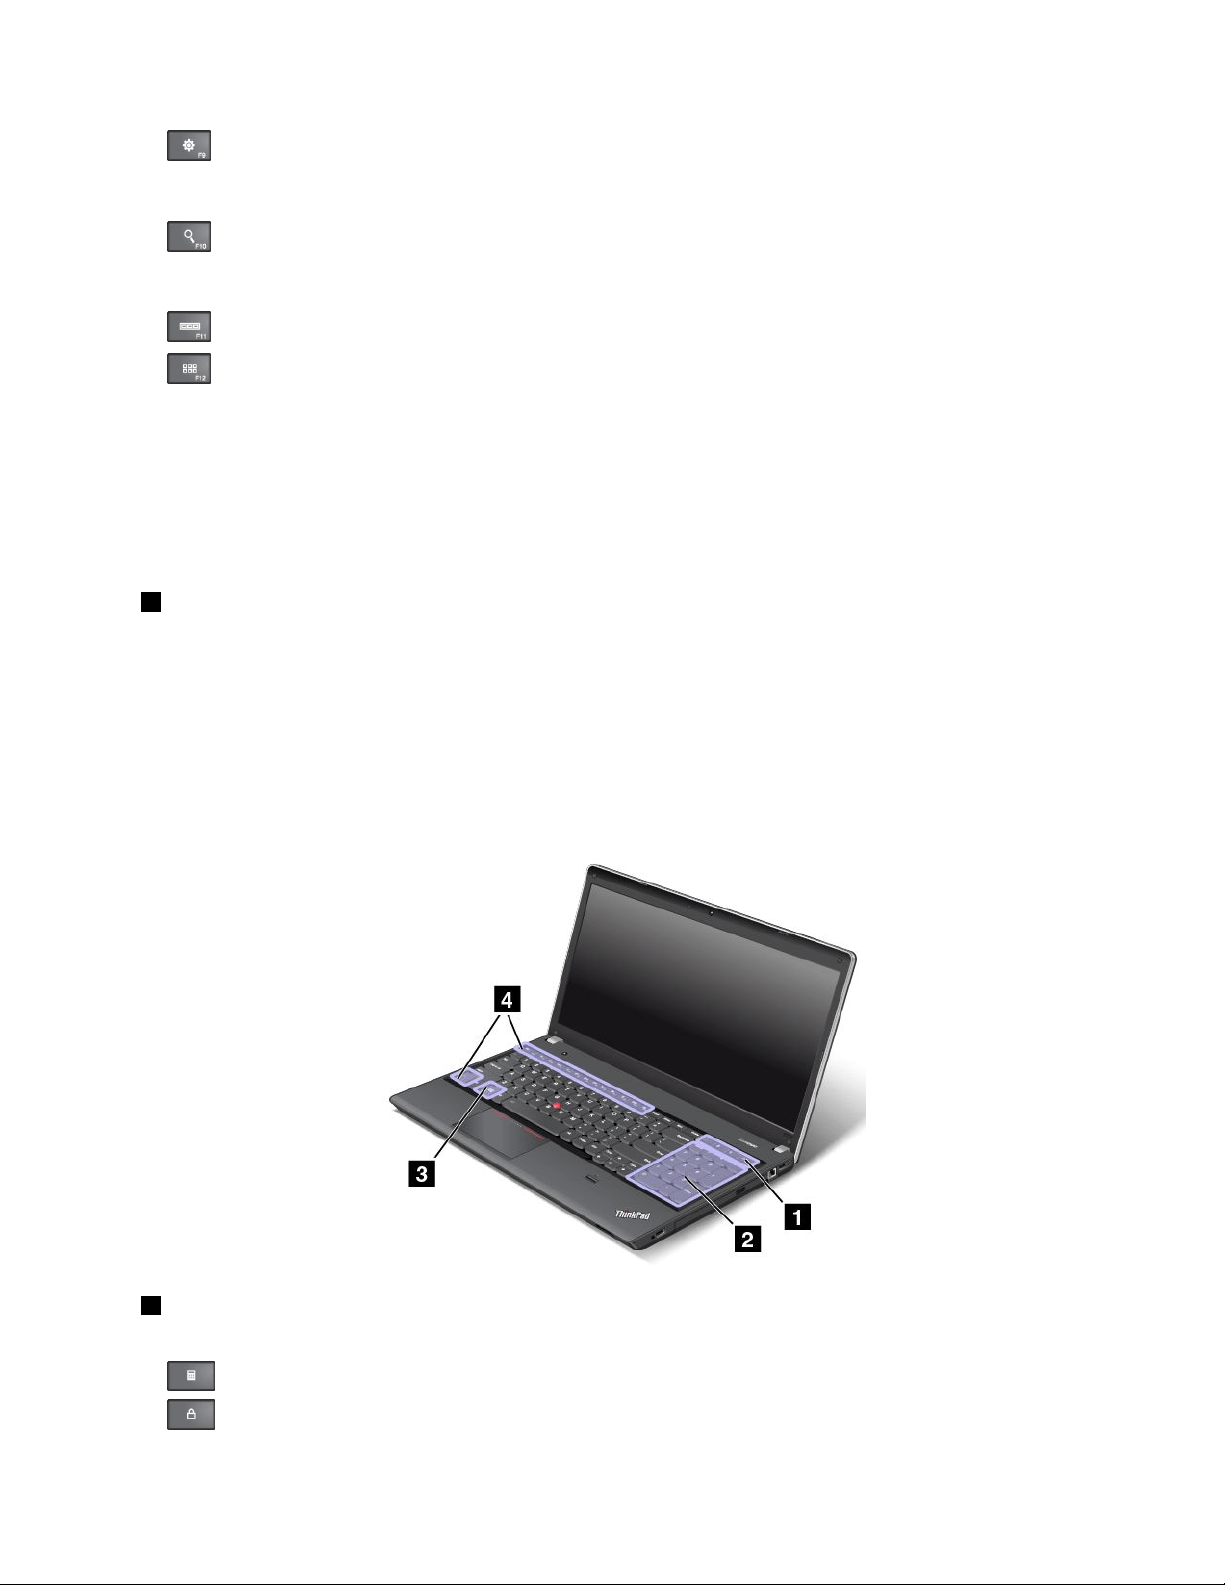
ThinkPadEdgeE540specialkeys
ThefollowinggureshowsthelocationsofmainspecialkeysforThinkPadEdgeE540.
1Additionalshortcutkeys
Yourcomputermighthavefouradditionalshortcutkeys:
•:Launchescalculator
•:Locksoperatingsystem
Chapter2.Usingyourcomputer29

•:Opensthedefaultbrowser
•
:OpensComputer
Note:Dependingonyourcomputermodel,theshortcutkeysmightnotbeavailable.
2Numerickeypad
Youcanusethisnumerickeypadtoinputnumbersquickly.
Note:Dependingonyourcomputermodel,thenumerickeypadmightnotbeavailable.
3Windowskey
OntheWindows7operatingsystem,presstheWindowskeytoopentheStartmenu.OntheWindows8
operatingsystem,presstheWindowskeytoswitchbetweenthecurrentworkspaceandtheStartscreen
ForinformationaboutusingtheWindowskeywithotherkeys,refertothehelpinformationsystemofthe
Windowsoperatingsystem.
4Functionkeys
•+:PressFn+EsctoenableordisabletheFnLockfunction.
WhentheFnLockfunctionisdisabled:TheFnLockindicatorisoff(defaultmode).Toinitiatethe
specialfunctionofeachkey,pressthefunctionkeysdirectly.ToinputF1–F12,presstheFnkeyandthe
correspondingfunctionkey.
WhentheFnLockfunctionisenabled:TheFnLockindicatorturnson.ToinputF1–F12,pressthe
functionkeysdirectly.Toinitiatethespecialfunctionofeachkey,presstheFnkeyandthecorresponding
functionkey.
•:Mutesorunmutesthespeakers.Whenthespeakersaremuted,thespeakermuteindicatorturnson.
Ifyoumutethesoundandturnoffyourcomputer,thesoundwillremainmutedwhenyouturnonyour
computeragain.Toturnonthesound,pressF1,F2,orF3.
•:Decreasesthespeakervolume.
•:Increasesthespeakervolume.
•:Mutesorunmutesthemicrophones.Whenthemicrophonesaremuted,themicrophonemute
indicatorturnson.
•:Darkensthedisplay.
•
:Brightensthedisplay.
Youcantemporarilychangethecomputerdisplaybrightnessbypressingthetwokeys.Tochangethe
defaultbrightnesslevel,right-clickthebatterystatusiconintheWindowsnoticationarea.Thenclick
Adjustscreenbrightnessandmakechangesasdesired.
•:Switchesthedisplayoutputlocationbetweenthecomputerdisplayandanexternalmonitor.For
moreinformation,referto“Presentationsandmultimedia”onpage40.
Note:Toswitchbetweenthecomputerdisplayandanexternalmonitor,theWindows+Pkeycombination
alsoisavailable.
•:Enablesordisablesthebuilt-inwirelessnetworkingfeatures.Formoreinformationonthewireless
features,referto“Wirelessconnections”onpage37
.
30UserGuide
•:
ForWindows8:OpenstheSettingscharm.
ForWindows7:OpensControlPanel.
•:
ForWindows8:OpenstheSearchcharm.
ForWindows7:OpensWindowsSearch.
•:Viewstheprogramsthatyouhaveopened.
•
:
ForWindows8:Viewsalltheprograms.
ForWindows7:OpensComputer.
•Fn+B:HasthesamefunctionastheBreakkey.
•Fn+P:HasthesamefunctionasthePausekey.
•Fn+S:HasthesamefunctionastheSysRqkey.
•Fn+K:HasthesamefunctionastheScrLKkey.
UsingtheThinkPadpointingdevice
TheThinkPadpointingdeviceconsistsoftheTrackPointpointingstick1andtheThinkPadtrackpad2.The
wholeThinkPadtrackpadisanactiveareasensitivetongermovement.Theleftclickzones3andright
clickzones
5workastheleftandrightmousebuttonsonaconventionalmouse.Thescrollzone4enables
youtoscrollWebpagesordocumentsinanydirection.
Note:Yourcomputerkeyboardmightlookslightlydifferentfromthefollowingillustration.
Chapter2.Usingyourcomputer31
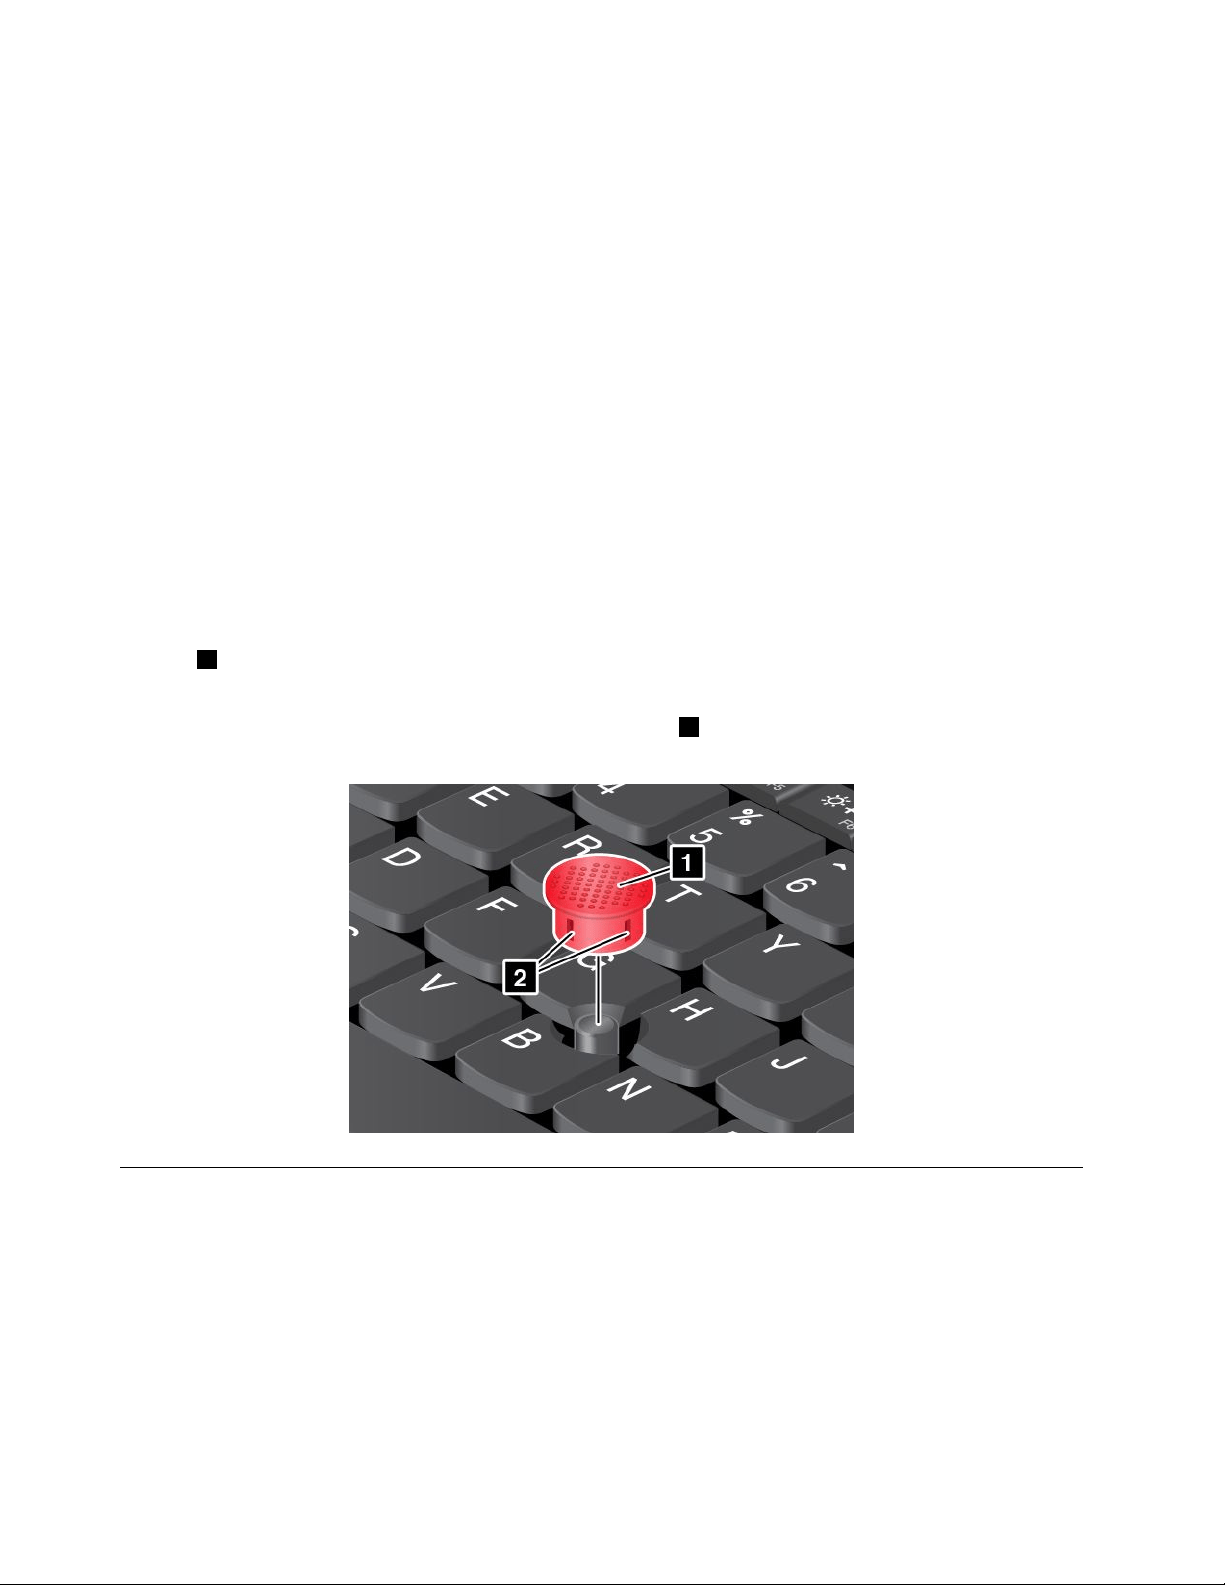
UsingtheTrackPointpointingstick
TousetheTrackPointpointingstick,applypressuretothenonslipcaponthepointingstickinanydirection
paralleltothekeyboard.Thenyoucanmovethecursor.Butthepointingstickitselfdoesnotmove.The
speedatwhichthecursormovesdependsonthepressureyouapplytothepointingstick.
UsingtheThinkPadtrackpad
TheThinkPadtrackpadofyourcomputersupportsmulti-touchwithwhichyoucanzoomin,zoomout,scroll,
orrotateonthescreenwhilebrowsingtheInternetorreadingoreditingadocument.
CustomizingtheThinkPadpointingdevice
YoucancustomizetheThinkPadpointingdevicetoachievetheextendedfunctionsoftheThinkPad
pointingdevice.
TocustomizetheThinkPadpointingdevice,dothefollowing:
1.GotoControlPanel.
2.ClickHardwareandSound➙Mouse➙ThinkPad.
3.Followtheinstructionsonthescreen.
Replacingthecap
Thecap1ontheendoftheTrackPointpointingstickisremovable.Afteryouusethecapforaperiod
oftime,youcanreplacethecapwithanewone.
Note:TheTrackPointcapusedinyourcomputerhasgrooves
2asshowninthefollowingillustration.
EnsurethatyoureplacetheTrackPointcapwithacorrectonethathassuchgrooves.
Powermanagement
Whenyouuseyourcomputerawayfromelectricaloutlets,youdependonbatterypowertokeepyour
computerrunning.Differentcomputercomponentsconsumepoweratdifferentrates.Themoreyouusethe
power-intensivecomponents,thefasteryouconsumebatterypower.
SpendmoretimeunpluggedwithThinkPadbatteries.Mobilityhasrevolutionizedbusinessbyenabling
youtotakeyourworkwhereveryougo.WithThinkPadbatteries,youwillbeabletoworklongerwithout
beingtiedtoanelectricaloutlet.
32UserGuide

Checkingthebatterystatus
ThebatterystatusiconintheWindowsnoticationareadisplaysthepercentageofbatterypowerremaining.
Therateatwhichyouusebatterypowerwilldeterminehowlongyoucanusethebatteryofyourcomputer
betweencharges.Becauseeachcomputeruserhasdifferenthabitsandneeds,itisdifculttopredicthow
longabatterychargewilllast.Therearetwomainfactors:
•Howmuchenergyisstoredinthebatterywhenyoubegintowork.
•Thewayyouuseyourcomputer:
–Howoftenyouaccesstheharddiskdriveorsolid-statedrive.
–Howbrightyoumakethecomputerdisplay.
–Howoftenyouusethewirelessfeatures.
Tocheckfordetailedbatterystatusinformation,dothefollowing:
•ForWindows7:OpenthePowerManagerprogramandclicktheBatterytab.
•ForWindows8:
–OpentheLenovoSupportprogramandclickBatteryHealth.
–OpentheLenovoSettingsprogramandclickPower.
EnablingthebatteryalarmontheWindows7operatingsystem
FortheWindows7operatingsystem,youcanprogramyourcomputersothatwhenthebatterypowerfalls
belowacertainlevel,threeeventsoccur:thealarmgoesoff,amessageisdisplayed,andtheLCDis
turnedoff.
Toenablethebatteryalarm,dothefollowing:
1.StartthePowerManagerprogram.
2.ClicktheGlobalPowerSettingstab.
3.ForLowbatteryalarmorCriticallylowbatteryalarm,setthepercentageofthepowerlevelandset
theaction.
Note:Ifyourcomputerenterssleeporhibernationmodewhenthebatteryislow,butthealarmmessage
hasnotyetbeendisplayed,themessagewillbedisplayedwhenthecomputerresumes.Toresumenormal
operation,whenthemessageisdisplayed,clickOK.
Usingtheacpoweradapter
Thepowertorunyourcomputercancomeeitherfromthelithium-ion(Li-ion)batterypackofyourcomputer,
orfromacpowerthroughtheacpoweradapter.Whileyouuseacpower,thebatterychargesautomatically.
Theacpoweradapterthatcomeswithyourcomputerhastwobasiccomponents:
•Thetransformerpackthatconvertsacpowerforusewiththecomputer.
•Thepowercordthatplugsintotheacoutletandintothetransformerpack.
Attention:Usinganimproperpowercordcouldcauseseveredamagetoyourcomputer.
Connectingtheacpoweradapter
Toconnecttheacpoweradapter,dothefollowing.
Note:Ensurethatyouperformtheactionsinthefollowingorder:
Chapter2.Usingyourcomputer33

1.Connectthepowercordtoanelectricaloutlet.
2.Connectthepowercordtothetransformerpack.
3.Connecttheacpoweradaptertotheacpowerconnectorofthecomputer.
Tipsonusingtheacpoweradapter
•Whentheacpoweradapterisnotinuse,disconnectitfromtheelectricaloutlet.
•Donotbindthepowercordtightlyaroundtheacpoweradaptertransformerpackwhenitisconnectedto
thetransformer.
•Beforeyouchargethebattery,makesurethatitstemperatureisatleast10°C(50°F).
•Youcanchargethebatterywhentheacpoweradapterisconnectedtothecomputerandthebatteryis
installed.Youneedtochargethebatteryinanyofthefollowingconditions:
–Anewbatteryisinstalled.
–Thepercentageofpowerremainingislow.
–Thebatteryhasnotbeenusedforalongtime.
Chargingthebattery
Whenyoundthatthepercentageofpowerremainingisloworwhenthepoweralarmalertsyouthatthe
remainingpowerislow,youneedtochargeyourbatteryorreplaceitwithachargedbattery.
Ifanacoutletisconvenient,plugtheacpoweradapterintoit,andtheninsertthejackintothecomputer.
Thebatterywillbefullychargedinaboutthreetosixhours.Thisisaffectedbythebatterysizeandthe
physicalenvironment.Youcancheckthebatterychargingstatusatanytimethroughthebatterystatus
iconintheWindowsnoticationarea.
Note:Tomaximizethelifeofthebattery,thecomputerdoesnotstartrechargingthebatteryiftheremaining
powerisgreaterthan95%.
Maximizingthebatterylife
Tomaximizethelifeofthebattery,dothefollowing:
•Usethebatteryuntilthechargeiscompletelydepleted.
•Rechargethebatterycompletelybeforeusingit.Youcanseewhetherthebatteryisfullychargedfromthe
batterystatusiconintheWindowsnoticationarea.
•Alwaysusepowermanagementfeaturessuchaspower-savingmodes.
Managingthepowerplans
Toachievethebestbalancebetweenperformanceandpowersaving,adjustyourpowerplansettings.
Toaccesspowerplansettings,dothefollowing:
1.ForWindows7:StartthePowerManagerprogramandthenclickPowerPlanorAdvanced➙Power
Plan.
2.ForWindows8:GotoControlPanelandclickPowerOptions.
FormoreinformationaboutthePowerManagerprogram,refertothehelpinformationsystem.
Power-savingmodes
Thereareseveralmodesthatyoucanuseatanytimetoconservepower.Thissectionintroduceseach
modeandgivestipsontheeffectiveuseofbatterypower.
34UserGuide

•Screenblankmode(forWindows7only)
Thecomputerdisplayrequiresconsiderablebatterypower.Toturnoffthepowertothedisplayand
makethecomputerenterscreenblankmode,right-clickthebatterygaugeiconfromtheWindows
noticationareaandselectPoweroffdisplay.
•Sleepmode
Insleepmode,yourworkissavedtomemory,andthenthesolid-statedriveortheharddiskdriveandthe
computerdisplayareturnedoff.Whenyourcomputerwakesup,yourworkisrestoredwithinseconds.
Dependingonthemodel,yourcomputermightsupportthe30DayStandbyfunction.Whenthisfunction
isenabled,thecomputerconsumesevenlesspowerinsleepmodeandtakesonlysecondstoresume
normaloperationwhenyoupressthepowerbutton.Formoreinformationaboutthe30DayStandby
function,dothefollowing:
–ForWindows7:RefertothehelpinformationsystemofthePowerManagerprogram.Forinstructions
onhowtostartthePowerManagerprogram,see“AccessingLenovoprogramsontheWindows7
operatingsystem”onpage17
.
–ForWindows8:OpentheLenovoSettingsprogramandclickPower➙30DayStandby.
Toputyourcomputerintosleepmode,dothefollowing:
–ForWindows7:UsetheStartmenushutdownoption.
–ForWindows8:Movethecursortothetop-rightorbottom-rightcornerofthescreentobringupthe
charms.ThenclickSettings➙Power➙Sleep.
•Hibernationmode
Byusingthismode,youcanturnoffyourcomputercompletelywithoutsavinglesorexitingany
programsthatarerunning.Whenthecomputerentershibernationmode,allopenprograms,folders,and
lesaresavedtotheharddiskdriveorsolid-statedrive,andthenthecomputerturnsoff.
Ifyouputyourcomputerintohibernationmodewiththewake-upfunctiondisabled,thecomputerdoes
notconsumeanypower.Thewake-upfunctionisdisabledbydefault.Ifyouputyourcomputerinto
hibernationmodewiththewake-upfunctionenabled,thecomputerconsumesasmallamountofpower.
Toenablethewake-upfunction,dothefollowing:
1.GotoControlPanelandclickSystemandSecurity.
2.ClickAdministrativeT ools.
3.ClickTaskScheduler.Ifyouarepromptedforanadministratorpasswordorconrmation,typethe
passwordorprovideconrmation.
4.Fromtheleftpane,selectthetaskfolderforwhichyouwanttoenablethewake-upfunction.The
scheduledtasksaredisplayed.
5.Clickascheduledtask,andthenclicktheConditionstab.
6.UnderPower,selectthecheckboxforWakethecomputertorunthistask.
Toputthecomputerintohibernationmode,changeyourpowerplansettingsbydoingthefollowing:
–ForWindows7:StartthePowerManagerprogramandthenclickthePowerPlantab.Thenfollow
theinstructionsonthescreen.ForinstructionsonhowtostartthePowerManagerprogram,see
“AccessingLenovoprogramsontheWindows7operatingsystem”onpage17.
–ForWindows8:Right-clickthebatterystatusiconfromtheWindowsnoticationareaandclickPower
Options,clickChangeplansettingsthatisnexttoyourpowerplan.Thenfollowtheinstructionson
thescreen.
•Wirelessoff
Whenyouarenotusingthewirelessfeatures,suchasBluetoothorwirelessLAN,turnthemoff.This
willhelpconservepower.Toturnoffthewirelessfeatures,pressF8.
Chapter2.Usingyourcomputer35

Handlingthebattery
ThissystemsupportsonlybatteriesspeciallydesignedforthisspecicsystemandmanufacturedbyLenovo
oranauthorizedbuilder.Thesystemdoesnotsupportunauthorizedbatteriesorbatteriesdesignedforother
systems.Ifanunauthorizedbatteryorabatterydesignedforanothersystemisinstalled,thesystemwill
notcharge.
Attention:Lenovohasnoresponsibilityfortheperformanceorsafetyofunauthorizedbatteries,and
providesnowarrantiesforfailuresordamagearisingoutoftheiruse.
Note:Ifanunauthorizedbatteryisinstalled,thefollowingmessagewillbedisplayed:“Thebatteryinstalled
isnotsupportedbythissystemandwillnotcharge.PleasereplacethebatterywiththecorrectLenovo
batteryforthissystem.”
DANGER
Donotattempttodisassembleormodifythebatterypack.
Attemptingtodosocancauseanexplosion,orliquidleakagefromthebatterypack.
AbatterypackotherthantheonespeciedbyLenovo,oradisassembledormodiedbattery
packisnotcoveredbythewarranty.
DANGER
Iftherechargeablebatterypackisincorrectlyreplaced,thereisdangerofanexplosion.Thebattery
packcontainsasmallamountofharmfulsubstances.Toavoidpossibleinjury:
•ReplaceonlywithabatteryofthetyperecommendedbyLenovo.
•Keepthebatterypackawayfromre.
•Donotexposeittoexcessiveheat.
•Donotexposeittowaterorrain.
•Donotshort-circuitit.
•Storeitinacooldryplace.
•Keepitawayfromchildren.
Thebatterypackisaconsumablesupply.Ifyourbatterybeginstodischargetooquickly,replacethebattery
packwithanewoneofthetyperecommendedbyLenovo.Formoreinformationaboutreplacingthe
batterypack,contactyourCustomerSupportCenter.
DANGER
Donotdrop,crush,puncture,orsubjecttostrongforces.Batteryabuseormishandlingcancause
thebatterytooverheat,whichcancausegassesorameto“vent”fromthebatterypackorcoin
cell.Ifyourbatteryisdamaged,orifyounoticeanydischargefromyourbatteryorthebuildup
offoreignmaterialsonthebatteryleads,stopusingthebatteryandobtainareplacementfrom
thebatterymanufacturer.
36UserGuide
DANGER
Onlyrechargethebatterypackstrictlyaccordingtoinstructionsincludedintheproduct
documentation.
DANGER
Donotputthebatterypackintrashthatisdisposedofinlandlls.Whendisposingofthebattery,
complywithlocalordinancesorregulationsandyourcompany'ssafetystandards.
DANGER
Thereisadangerofanexplosionifthebackupbatteryisincorrectlyplaced.Thelithiumbattery
containslithiumandcanexplodeifitisnotproperlyhandled,ordisposedof.Replaceonlywitha
batteryofthesametype.T oavoidpossibleinjuryordeath,donot:(1)throworimmerseintowater,
(2)allowittoheattomorethan100°C(212°F),or(3)attempttorepairordisassembleit.Disposeof
itasrequiredbylocalordinancesorregulationsandyourcompany'ssafetystandards.
Connectingtothenetwork
YourcomputerhasoneormorenetworkcardsthatenableyoutoconnectyourcomputertotheInternet
andothernetworkconnections.
Ethernetconnections
Youcanconnectyourcomputertoalocalnetworkorabroadbandconnectionbyusingthebuilt-inEthernet
featureofthecomputer.
DANGER
YourcomputerhasanEthernetconnector.Toavoidtheriskofelectricalshock,donotconnect
thetelephonecabletotheEthernetconnector.
Wirelessconnections
Wirelessconnectionisthetransferofdatawithouttheuseofcablesbutbymeansofradiowavesonly.
Attention:
•Ifyouwanttousethewirelessfeaturesonanairplane,checkthewirelessserviceswiththeairlinebefore
boardingtheairplane.
•Iftherearerestrictionsontheuseofcomputerwirelessfeaturesonanairplane,youneedtodisablethe
wirelessfeaturesofyourcomputerbeforeboarding.
Dependingonthewirelessdevicesinstalledonyourcomputer,youmightbeabletousethefollowing
wirelessnetworks:
•WirelessLANconnection
•WirelessWANconnection
•Bluetoothconnection
Chapter2.Usingyourcomputer37

UsingthewirelessLANconnection
Awirelesslocalareanetwork(LAN)coversarelativelysmallgeographicarea,suchasanofcebuildingora
house.Devicesbasedonthe802.11standardscanconnecttothistypeofnetwork.
Yourcomputercomeswithabuilt-inwirelessnetworkcardandacongurationutilitytohelpyouestablish
wirelessconnectionsandmonitortheconnectionstatus.Thisenablesyoutostayconnectedtoyournetwork
whileyouareattheofce,inameetingroom,orathome,withnoneedforawiredconnection.
ToestablishawirelessLANconnection,dothefollowing:
ForWindows7:
1.PressF8andfollowtheinstructionsonthescreentoenablethewirelessfeature.
2.ClickthewirelessnetworkconnectionstatusiconintheWindowsnoticationarea.Alistofavailable
wirelessnetworksisdisplayed.
3.Double-clickanetworktoconnecttoit.Providerequiredinformationifneeded.
ForWindows8:
1.PressF8todisplaythelistofavailablewirelessnetworks.EnsurethattheAirplanemodeissettooff.
2.Double-clickanetworktoconnecttoit.Providerequiredinformationifneeded.
Ifyouneedtoconnecttodifferentwirelessnetworksindifferentlocations,usethefollowingsoftwareto
managemultiplenetworkprolessothatthecomputerautomaticallyconnectstoanavailablenetworkwhen
thelocationchanges:
•ForWindows7:UsetheAccessConnectionsprogram.Formoreinformation,see“AccessingLenovo
programsontheWindows7operatingsystem”onpage17.
•ForWindows8:OpentheLenovoSettingsprogramandclickLocationAwareness.Formoreinformation,
see“AccessingLenovoprogramsontheWindows8operatingsystem”onpage18.
TipsforusingthewirelessLANfeature
Toachievethebestconnection,usethefollowingguidelines:
•PlaceyourcomputersothatthereareasfewobstaclesaspossiblebetweenthewirelessLANaccess
pointandthecomputer.
•Openyourcomputerlidtoanangleofslightlymorethan90degrees.
•Ifyouusethewirelessfeature(the802.11standards)ofyourcomputersimultaneouslywithaBluetooth
option,thedatatransmissionspeedcanbedelayedandtheperformanceofthewirelessfeaturecanbe
degraded.
CheckingthewirelessLANconnectionstatus
YoucancheckthewirelessLANconnectionstatusthroughthewirelessnetworkconnectionstatusiconin
theWindowsnoticationarea.Themorebarsencompassed,thebetterthesignalis.
FortheWindows7operatingsystem,youalsocanchecktheAccessConnectionsgauge,theAccess
Connectionsstatusicon,ortheAccessConnectionswirelessstatusiconintheWindowsnoticationarea.
AccessConnectionsgaugestatus:
•
Powertothewirelessradioisoffornosignal.
•Powertothewirelessradioison.Thesignalstrengthofthewirelessconnectionispoor.To
improvesignalstrength,moveyourcomputerclosertothewirelessaccesspoint.
38UserGuide

•Powertothewirelessradioison.Thesignalstrengthofthewirelessconnection
ismarginal.
•Powertothewirelessradioison.Thesignalstrengthofthewirelessconnection
isexcellent.
AccessConnectionsiconstatus:
•Nolocationproleisactiveornoneexists.
•Currentlocationproleisdisconnected.
•Currentlocationproleisconnected.
Wirelessstatusiconstatus
•Powertothewirelessradioisoff.
•Powertothewirelessradioison.Noassociation.
•
Powertothewirelessradioison.Nosignal.
•Powertothewirelessradioison.Thesignalstrengthofthewirelessconnectionisexcellent.
•Powertothewirelessradioison.Thesignalstrengthofthewirelessconnectionismarginal.
•
Powertothewirelessradioison.Thesignalstrengthofthewirelessconnectionispoor.Toimprove
signalstrength,moveyourcomputerclosertothewirelessaccesspoint.
UsingthewirelessWANconnection
WirelessWideAreaNetwork(wirelessWAN)whichusescellularnetworksfordatatransmission,enables
youtoestablishwirelessconnectionsoverremotepublicorprivatenetworks.Theseconnectionscanbe
maintainedoveralargegeographicalarea,suchasacityoranentirecountry,byuseofmultipleantenna
sitesorsatellitesystemsmaintainedbywirelessserviceproviders.
SomeThinkPadnotebookcomputerscomewithabuilt-inwirelessWANcardintegratedwithsomewireless
WANtechnologies,suchas1xEV-DO,HSPA,3G,GPRS,orLTE.Byusingthebuilt-inwirelessWANcardand
thecongurationutilitythatcomeswithyourcomputer,youcanestablishwirelessWANconnectionsand
monitortheconnectionstatus.
Note:ThewirelessWANserviceisprovidedbyauthorizedserviceprovidersinsomecountries.
TipsforusingthewirelessWANfeature
Toachievethebestconnection,usethefollowingguidelines:
•Keepyourcomputerawayfromyourbody.
•Placeyourcomputeronaatsurfaceandopenyourcomputerlidtoanangleofslightlymorethan
90degrees.
•Placeyourcomputerawayfromconcreteorbrickwallsthatmightdampencellularsignals.
•Bestreceptionwillbeavailablenearwindowsandotherlocationswherecellularphonereceptionisthe
strongest.
CheckingthewirelessWANconnectionstatus
YoucancheckthewirelessWANconnectionstatusthroughthewirelessnetworkconnectionstatusiconin
theWindowsnoticationarea.Themorebarsencompassed,thebetterthesignalis.
FortheWindows7operatingsystem,youalsocanchecktheAccessConnectionsgauge,theAccess
Connectionsstatusicon,ortheAccessConnectionswirelessstatusiconintheWindowsnoticationarea.
Chapter2.Usingyourcomputer39

AccessConnectionsgaugestatus:
•Nosignal
•Weaksignal
•Mediumsignal
•
Strongsignal
AccessConnectionsiconstatus:
•
Nolocationproleisactiveornoneexists.
•Currentlocationproleisdisconnected.
•Currentlocationproleisconnected.
Wirelessstatusiconstatus:
•PowertotheWANradioisoff
•Noassociation
•Nosignal
•Weaksignal
•Mediumsignal
•Strongsignal
UsingBluetooth
Bluetoothcanconnectdevicesashortdistancefromoneanother,andiscommonlyusedforconnecting
peripheraldevicestoacomputer,transferringdatabetweenhand-helddevicesandapersonalcomputer,or
remotelycontrollingandcommunicatingwithdevicessuchasmobilephones.
Dependingonthemodel,yourcomputermightsupporttheBluetoothfeature.Totransferdatathrough
theBluetoothfeature,dothefollowing:
1.EnsurethattheBluetoothfeatureisenabled.IfyouareusingtheWindows8operatingsystem,the
integratedBluetoothfeatureisenabledbydefault.IfyouareusingtheWindows7operatingsystem,to
enabletheBluetoothfeature,pressF8thenfollowtheinstructionsonthescreen.
2.Right-clickthedatathatyouwanttosend.
3.SelectSendT o➙BluetoothDevices.
4.SelectaBluetoothdevice,andthenfollowtheinstructionsonthescreen.
Note:Ifyouusethewirelessfeature(the802.11standards)ofyourcomputersimultaneouslywitha
Bluetoothoption,thedatatransmissionspeedcanbedelayedandtheperformanceofthewirelessfeature
canbedegraded.
Formoreinformation,refertotheWindowshelpinformationsystemandtheBluetoothhelpinformation
system.
Presentationsandmultimedia
Youcanconnectyourcomputertoaprojectortogivepresentationsoryoucanconnectyourcomputer
toanexternalmonitortoexpandyourworkspace.
40UserGuide

Changingdisplaysettings
Youcanchangethedisplaysettings,suchasthedisplayresolution,fontsize,andsoon.
Tochangethedisplaysettings,dothefollowing:
1.GotoControlPanelandclickAppearanceandPersonalization.
2.ClickDisplayforfurtherconguration.
3.ClickApply.Thechangewilltakeeffectafteryoulogoff.
Usinganexternalmonitor
Yourcomputercansupportamaximumvideoresolutionofupto2048x1536,providedthattheexternal
monitoralsosupportsthatresolution.Formoreinformation,refertothemanualsprovidedwithyourmonitor.
Youcansetanyresolutionforeitherthecomputerdisplayortheexternalmonitor.Whenyouusebothatthe
sametime,theresolutionofbothisthesame.Ifyousetahigherresolutionforthecomputerdisplay,you
canseeonlypartofthescreenatatime.YoucanseeotherpartsbymovingtheimagewiththeTrackPoint
pointingdeviceoranotherpointingdevice.
Youcanmovethedisplayoutputtothecomputerdisplay,theexternalmonitor,orbothbychangingsettings
intheDisplaySettingswindow.
Connectinganexternalmonitor
Toconnectanexternalmonitor,dothefollowing:
1.Connecttheexternalmonitortotheexternalmonitorconnector(VGAconnectororHDMIconnector)of
yourcomputer.
2.Connecttheexternalmonitortoanelectricaloutlet.
3.Turnontheexternalmonitor.
4.ChangethedisplayoutputlocationbypressingF7.Thisenablesyoutoswitchamongviewingoutput
ontheexternalmonitor,thecomputermonitor,andbothmonitors.
Note:Ifyourcomputercannotdetecttheexternalmonitor,right-clickonthedesktop,thenselectScreen
resolution.ClicktheDetectbutton.
Settingthemonitortype
Tosettheexternalmonitortype,dothefollowing:
1.Connecttheexternalmonitortoyourcomputer,andthenconnectthemonitortoanelectricaloutlet.
2.Turnontheexternalmonitor.
3.Right-clickonthedesktop,andthenclickScreenresolution.
Note:Ifyourcomputercannotdetecttheexternalmonitor,clicktheDetectbutton.
4.SelecttheexternalmonitorandsetResolution.
5.ClickAdvancedSettings.
6.ClicktheMonitortab.Checkthemonitorinformationtoensurethatthemonitortypeiscorrect.Ifitis,
clickOKtoclosethewindow;otherwiseproceedwiththefollowingsteps.
7.Ifmorethantwomonitortypesaredisplayed,selectGenericPnPMonitororGenericNon-PnP
Monitor.
8.ClickProperties.Ifyouarepromptedforanadministratorpasswordorconrmation,typethepassword
orprovideconrmation.
9.ClicktheDrivertab.
Chapter2.Usingyourcomputer41

10.ClickUpdateDriver.
11.ClickBrowsemycomputerfordriversoftware,andthenclickLetmepickfromalistofdevice
driversonmycomputer.
12.CleartheShowcompatiblehardwarecheckbox.
13.Selectthecorrectmanufacturerandmodelfortheexternalmonitor.Ifyoucannotndyourmonitoron
thelist,stoptheinstallationofthisdriverandusethedrivershippedwithyourmonitor.
14.Afterupdatingthedriver,clickClose.
15.FortheWindows7operatingsystem,tochangethecolorsettings,right-clickonthedesktop,andclick
Screenresolution.ClickAdvancedSettings,selecttheMonitortab,andthensetColors.
16.ClickOK.
Considerationsforconnectinganexternalmonitor
•Wheninstallinganoperatingsystem,youmustinstallthedisplaydriverforyourmonitorthatissupplied
withthecomputer,andthemonitorINFlethatissuppliedwiththeexternalmonitor.
•Ifyousetaresolutionhigherthantheresolutionyouareusingonthecomputermonitor,andusean
externalmonitorthatdoesnotsupportthatresolution,takeadvantageofthevirtualscreenfunction,
whichenablesyoutodisplayonlyapartofthehigh-resolutionscreenimageyourcomputerproduces.
YoucanseeotherpartsoftheimagebymovingthescreenwiththeTrackPointpointingdeviceoranother
pointingdevice.
•Iftheexternalmonitoryouareusingisoutdated,theresolutionandtherefreshratemightbelimited.
Usingaprojector
Tomakepresentations,youcanconnectaprojectortoyourcomputerthroughtheVGAconnectoronyour
computer.
Note:Itmighttakeseveralsecondsbeforetheprojectordisplaystheimage.Ifyoudonotseeyourdesktop
displayedafter60seconds,pressF7toswitchamongdifferentdisplayoutputlocations.
Yourprojectormighthaveoneormoreaudio-inputconnectors.Toprojectsound,youneedtoattach
thecomboaudioconnectoronyourcomputertotheseconnectors,usinganaudiocable(commercially
available).
Usingdualdisplays
ThissectionintroducestheDuplicateandExtenddesktopfunctionsthatenableyoutodisplayoutputon
boththecomputerdisplayandanexternalmonitor.
UsingtheDuplicateorExtenddesktopfunction
WiththeDuplicatedesktopfunction,youcandisplaythesameoutputonboththecomputerdisplayand
anexternaldisplay.YoualsocandisplaydifferentdesktopimagesoneachmonitorwiththeExtend
desktopfunction.
YoucanusetheDuplicateorExtenddesktopfunctionwithoutchanginganysettings.Ifthefunctiondoes
notwork,refertothefollowingtopiconhowtoenabletheDuplicateorExtenddesktopfunction.
EnablingtheDuplicateorExtenddesktopfunction
ToenabletheDuplicateorExtenddesktopfunction,dothefollowing:
1.Connecttheexternalmonitortothemonitorconnector;thenconnecttheexternalmonitortoan
electricaloutlet.
2.Turnontheexternalmonitor.
42UserGuide

3.PressF7,thenselectDuplicateorExtend.
Tochangetheresolutionforeachmonitor,dothefollowing:
1.Right-clickonthedesktop,andclickScreenresolution.
2.ClicktheMonitor-1icon,whichisfortheprimarydisplay(thecomputerdisplaybydefault).
3.Settheresolutionfortheprimarydisplay.
4.ClicktheMonitor-2icon,whichisforthesecondarydisplay(theexternaldisplaybydefault).
5.Settheresolutionforthesecondarydisplay.
6.ClickAdvancedsettingsandsetupthecolorqualityontheMonitortab.
7.ClickOKtoapplythechanges.
ConsiderationsforusingtheExtenddesktopfunction
•IfyouwanttoshowDOSfull-screenwhileinExtenddesktopmode,onlytheprimarydisplayshows
DOS;theotherdisplayisblackedout.
•IfyourcomputerhastheIntel
®
graphicscard,youcandesignatetheprimarydisplaybydoingthefollowing:
1.PressCtrl+Alt+Fn+F12.TheIntelCUIwindowopens.
2.SelectExtendedDesktop.
3.Changethesettingtodesignatetheprimarydisplay.
•IfyourcomputerhastheAMD
®
graphicscard,youcandesignatetheprimarydisplaybydoingthe
following:
1.Right-clickonthedesktopandthenselectScreenresolution.
2.SelectExtendthesedisplaysinMultipleDisplays.
3.Changethesettingtodesignatetheprimarydisplay.
•WhenaprogramusingDirectDraworDirect3Disrunninginfull-screenmode,onlytheprimarydisplay
showstheoutput.
•YoucannotusethedisplayswitchingfunctioninExtenddesktopmode.
Usingaudiofeatures
Yourcomputerisequippedwiththefollowingitems:
•Built-inspeakers
•Built-inmicrophones
•Comboaudioconnector,3.5mm(0.14inch)indiameter
Yourcomputeralsohasanaudiochipthatenablesyoutoenjoyvariousmultimediaaudiofeatures,such
asthefollowing:
•CompliantwithHighDenitionAudio
•PlaybackofMIDIandMP3les
•RecordingandplaybackofPCMandWAVles
•Recordingfromvarioussoundsources,suchasaheadsetattached
Thefollowingtableshowswhichfunctionsoftheaudiodevicesattachedtotheconnectorsonyourcomputer
orthesupportedThinkPadOneLinkDockaresupported.
Chapter2.Usingyourcomputer43

Table3.Audiofeaturelist
JackHeadsetwitha3.5–mm,
4-poleplug
ConventionalheadphoneConventionalmicrophone
Comboaudioconnector
Headphoneand
microphonefunctions
supported
Headphonefunction
supported
Notsupported
Comboaudioconnector
ofthesupportedThinkPad
OneLinkDock
Headphoneand
microphonefunctions
supported
Headphonefunction
supported
Notsupported
Conguringforsoundrecording
Tocongurethemicrophoneforoptimalsoundrecording,usetheSmartAudioprogram.Tostartthe
program,gotoControlPanelandclickHardwareandSound➙SmartAudio.
Usingthecamera
Ifyourcomputerhasanintegratedcamera,youcanusethecameratopreviewyourvideoimageand
takeasnapshotofyourcurrentimage.
Tostartthecameraandcongurethecamerasettings,dothefollowing:
•ForWindows7:OpentheCommunicationUtilityprogram.
•ForWindows8:OpentheLenovoSettingsprogram,andclickCamera.
Whenthecameraisstarted,thecamerastatusindicatorturnson.
Youalsocanusetheintegratedcamerawithotherprogramsthatprovidefeaturessuchasphotographing,
videocapturing,andvideoconferencing.Tousetheintegratedcamerawithotherprograms,openoneofthe
programsandstartthephotographing,videocapturing,orvideoconferencingfunction.Then,thecamera
willstartautomaticallyandthecamerastatusindicatorturnsongreen.Formoreinformationaboutusingthe
camerawithaprogram,refertothedocumentationthatcamewiththeprogram.
Usingtheopticaldrive
Note:YourcomputeronlysupportstheMulti-Burnerdrive.
Multi-Burnerdrive
ThisdrivecanreadDVD-ROMdiscs,DVD-Rdiscs,DVD-RAMdiscs,DVD-RWdiscs,andalltypesofCDs,
suchasCD-ROMdiscs,CD-RWdiscs,CD-Rdiscs,andaudioCDs.Inaddition,itcanrecordonDVD-R
discs,DVD-RWdiscs,typeIIDVD-RAMdiscs,CD-RWstandardandhighspeeddiscs,andCD-Rdiscs.
Usingaashmediacard
Yourcomputerhasonemediacardreaderslot.
Themediacardreaderslotsupportsthefollowingfourtypesofcards:
•MultiMediaCard(MMC)
•SecureDigitaleXtended-Capacity(SDXC)card
•SecureDigital(SD)card
•SecureDigitalHigh-Capacity(SDHC)card
44UserGuide

Note:YourcomputerdoesnotsupporttheCPRMfeaturefortheSDcard.
Attention:Whiletransferringdatatoorfromaashmediacard,suchasanSDcard,donotputyour
computerintosleeporhibernationmodebeforethedatatransfercompletes;otherwise,yourdatacould
becomedamaged.
Insertingaashmediacard
Attention:Beforeyoustartinstallingaashmediacard,touchametaltableoragroundedmetalobject.
Thisactionreducesanystaticelectricityfromyourbody.
Toinsertaashmediacard,dothefollowing:
1.Locatetheappropriatetypeofslotforyourcard.See“Locatingcomputercontrols,connectors,and
indicators”onpage1.
2.Ensurethatthemetalcontactsarefacingdownandpointingtowardtothecardslot.
3.Pressthecardrmlyintothecardslot.
Iftheplug-and-playfeatureisnotenabled,dothefollowing:
1.GotoControlPanel.
2.ClickHardwareandSound.
3.ClickDeviceManager.Ifyouarepromptedforanadministratorpasswordorconrmation,typethe
passwordorprovideconrmation.
4.FromtheActionmenu,selectAddlegacyhardware.TheAddHardwareWizardstarts.
5.Followtheinstructionsonthescreen.
Removingaashmediacard
Attention:
•Stopalltheactivitiesinvolvingthecardbeforeremovingit.Otherwise,dataonthecardmightbe
damagedorlost.
•Donotremoveacardwhilethecomputerisinsleepmodeorhibernationmode.Otherwise,thesystem
mightnotrespondwhenyoutrytoresumeoperation.
Toremoveaashmediacard,dothefollowing:
1.ClickthetriangulariconintheWindowsnoticationareatoshowhiddenicons.
2.Right-clicktheSafelyRemoveHardwareandEjectMediaicon.
3.SelectthecorrespondingitemtoejectthecardfromtheWindowsoperatingsystem.
4.Pressthecardtoejectitfromyourcomputer.
5.Removethecardandstoreitsafelyforfutureuse.
Note:IfyoudonotremovethecardfromyourcomputerafteryouejectthecardfromtheWindowsoperating
system,thecardcannolongerbeaccessed.Toaccessthecard,youmustremoveitrst,theninsertitagain.
Chapter2.Usingyourcomputer45

46UserGuide
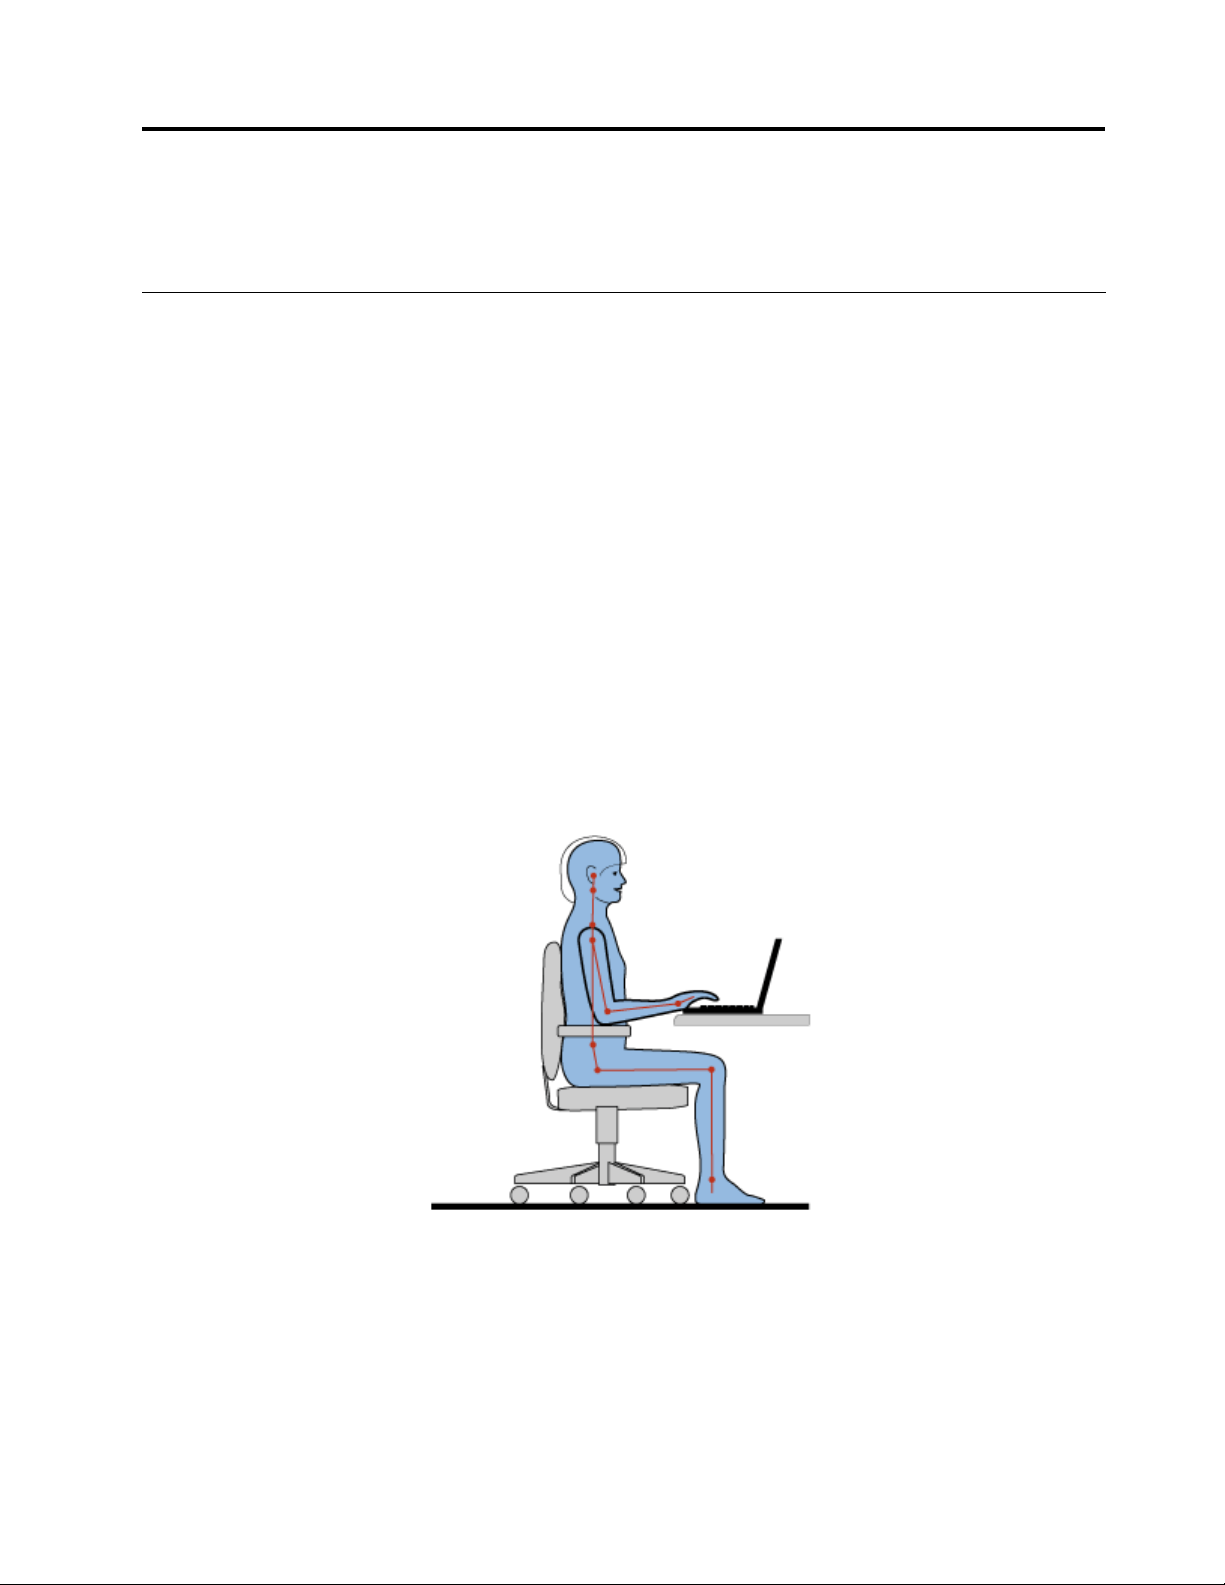
Chapter3.Youandyourcomputer
Thischapterprovidesinformationaboutaccessibility,comfort,andtravellingwithyourcomputer.
Accessibilityandcomfort
Goodergonomicpracticeisimportanttogetthemostfromyourpersonalcomputerandtoavoiddiscomfort.
Arrangeyourworkplaceandtheequipmentyouusetosuityourindividualneedsandthekindofwork
thatyouperform.Inaddition,usehealthyworkhabitstomaximizeyourperformanceandcomfortwhile
usingyourcomputer.
Thefollowingtopicsprovideinformationaboutarrangingyourworkarea,settingupyourcomputer
equipment,andestablishinghealthyworkhabits.
Lenovoiscommittedtoprovidingthelatestinformationandtechnologytoourcustomerswithdisabilities.
Refertoouraccessibilityinformationthatoutlinesoureffortsinthisarea.
Ergonomicinformation
Workinginthevirtualofcemightmeanadaptingtofrequentchangesinyourenvironment.Forexample,
adaptingtothesurroundinglightsources,properseating,andtheplacementofyourcomputerhardware,
canhelpyouimproveyourperformanceandachievegreatercomfort.
Thisexampleshowssomeoneinaconventionalsetting.Evenwhennotinsuchasetting,youcanfollow
manyofthesetips.Developgoodhabits,andtheywillserveyouwell.
Generalposture:Makeminormodicationsinyourworkingposturetodetertheonsetofdiscomfortcaused
bylongperiodsofworkinginthesameposition.Frequent,shortbreaksfromyourworkalsohelptoprevent
minordiscomfortassociatedwithyourworkingposture.
Display:Positionthedisplaytomaintainacomfortableviewingdistanceof510-760mm(20-30inches).
Avoidglareorreectionsonthedisplayfromoverheadlightingoroutsidesourcesoflight.Keepthedisplay
screencleanandsetthebrightnesstolevelsthatenableyoutoseethescreenclearly.PressF5orF6
toadjustdisplaybrightness.
©CopyrightLenovo2013
47

Headposition:Keepyourheadandneckinacomfortableandneutral(vertical,orupright)position.
Chair:Useachairthatgivesyougoodbacksupportandseatheightadjustment.Usechairadjustmentsto
bestsuityourdesiredposture.
Armandhandposition:Ifavailable,usechairarmrestsoranareaonyourworkingsurfacetoprovide
weightsupportforyourarms.Keepyourforearms,wrists,andhandsinarelaxedandneutral(horizontal)
position.Typewithasofttouchwithoutpoundingthekeys.
Legposition:Keepyourthighsparalleltotheoorandyourfeetatontheoororonafootrest.
Whatifyouaretraveling?
Itmightnotbepossibletoobservethebestergonomicpracticeswhenyouareusingyourcomputer
whileonthemoveorinacasualsetting.Regardlessofthesetting,trytoobserveasmanyofthetipsas
possible.Sittingproperlyandusingadequatelighting,forexample,willhelpyoumaintaindesirablelevels
ofcomfortandperformance.
Questionsaboutvision?
ThevisualdisplayscreensofThinkPadnotebookcomputersaredesignedtomeetthehigheststandards
andtoprovideyouwithclear,crispimagesandlarge,brightdisplaysthatareeasytosee,yeteasyonthe
eyes.Ofcourse,anyconcentratedandsustainedvisualactivitycanbetiring.Ifyouhavequestionsoneye
fatigueorvisualdiscomfort,consultavision-carespecialistforadvice.
Comfort
Observethefollowingguidelinestoachievegreatercomfortandimproveperformance.
Activesittingandrestbreaks:Thelongeryousitandworkwithyourcomputer,themoreimportantitisto
observeyourworkingposture.Follow“Ergonomicinformation”onpage47
andpractice“activesitting”to
avoiddiscomfortassociatedwithyourworkingpostures.Makingminorvoluntaryposturalchangesand
takingshortfrequentworkbreaksarethekeyingredientsforhealthycomputing.Yourcomputerislightand
mobile;youcaneasilyrepositionyourworkingsurfacetoaccommodatemanyposturemodications.
Workareasetupoptions:Familiarizeyourselfwithallofyourofcefurnituresothatyouknowhowtoadjust
yourworksurface,seat,andotherworktoolstoaccommodateyourpreferencesforcomfort.Ifyourwork
areaisnotinanofcesetting,besuretotakespecialnoteofemployingactivesittingandtakingworkbreaks.
ManyThinkPadproductsolutionsareavailabletohelpyoumodifyandexpandyourcomputertobestsuit
yourneeds.Youcanndsomeoftheseoptionsathttp://www.lenovo.com/accessories/services/index.html.
Exploreyouroptionsfordockingsolutionsandexternalproductsthatprovidetheadjustabilityandfeatures
thatyouwant.
Accessibilityinformation
Lenovoiscommittedtoprovidingpeoplewithdisabilitiesgreateraccesstoinformationandtechnology.
Asaresult,thefollowinginformationprovideswaystohelpusersthathavehearing,vision,andmobility
limitationsgetthemostoutoftheircomputerexperience.
Assistivetechnologiesenableuserstoaccessinformationinthemostappropriateway.Someofthese
technologiesarealreadyprovidedinyouroperatingsystem.Otherscanbepurchasedthroughproviders,or
accessedthroughtheWebsiteathttp://www.lenovo.com/healthycomputing.
48UserGuide

Assistivetechnologies
SomeaccessibilitytechnologiesareavailablethroughtheAccessibilityOptionsprogram.Depending
onyouroperatingsystem,thenumberofaccessibilityoptionsavailablevaries.Ingeneral,accessibility
optionsenhancethewayuserswithhearing,vision,ormobilitylimitationsnavigateandusetheircomputer.
Forexample,someusersmightnothavethenemotorskillsrequiredtouseamouseorselectkey
combinations.Otherusersmightrequirelargerfontsorhigh-contrastdisplaymodes.Insomecases,
magniersandbuilt-inspeechsynthesizersareavailable.Fordetailedinformationabouteachofthese
features,consulttheMicrosofthelpinformationsystem.
TousetheAccessibilityOptionsprogram,openControlPanelandclickEaseofAccess➙Easeof
AccessCenter.
Screenreadertechnologies
Screen-readertechnologiesareprimarilyfocusedonsoftwareprograminterfaces,helpinformationsystems,
andvariousonlinedocuments.However,inthecasewhereascreenreadercannotreaddocuments,the
documentmustrstgothroughaconversionprocess.OnesolutionconvertsAdobePDFlesintoaformat
thatisreadbythescreen-readerprograms.ThissolutionisaWeb-basedserviceprovidedbyAdobe
SystemsIncorporated.Throughhttp://access.adobe.com,AdobePDFdocumentscanbeconvertedto
HTMLorplaintextinmanylanguages.OneconversionoptionconvertsPDFdocumentsontheInternet.A
secondoptionenablesuserstosubmittheURLofanAdobePDFlethroughe-mailtoconvertittoHTMLor
ASCIItext.AdobePDFlesonalocalharddiskdrive,localCD-ROM,orLANalsocanbeconvertedby
attachingtheAdobePDFletoane-mailmessage.
Travelingwithyourcomputer
Thistopicprovidesinformationtohelpyouworkwithyourcomputerwhenyouaretravelling.
Traveltips
Usethefollowingtraveltipstotravelmorecondentlyandefcientlywithyourcomputer.
•Althoughitissafetoallowyourcomputertogothroughthex-raymachinesatairportsecuritystations,it
isimportanttokeepyoureyesonthecomputeratalltimestopreventtheft.
•Considerbringinganelectricaladapterforuseinanairplaneorautomobile.
•Ifyoucarryanacpoweradapter,detachtheaccordfromittoavoiddamagingthecord.
Traveltipsonairplanes
Ifyoucarryyourcomputerintoanairplane,takenoteofthefollowingtips:
•Ifyouintendtouseyourcomputerorwirelessservices(suchasInternetandBluetooth),checkwiththe
airlineforrestrictionsandavailabilityofservicesbeforeboardingtheairplane.Iftherearerestrictions
ontheuseofcomputerswithwirelessfeaturesontheairplane,youmustabidebythoserestrictions.If
necessary,disablewirelessfeaturesbeforeboarding.
•Becarefulabouttheseatinfrontofyouonairplanes.Angleyourcomputerdisplaysothatitdoesnotget
caughtwhenthepersoninfrontofyouleansback.
•Whentakingoff,remembertoturnoffyourcomputerorputitintohibernationmode.
Travelaccessories
Thefollowingisachecklistofitemstoconsiderpackingwhenyouaregoingtotravel:
•ThinkPadacpoweradapter
•ThinkPadAC/DCcomboadapter
Chapter3.Youandyourcomputer49

•Externalmouse,ifyouareaccustomedtousingone
•Ethernetcable
•Extrabattery,charged
•Aqualitycarryingcasethatprovidesadequatecushionandprotection
•Externalstoragedevice
Ifyouaretravelingtoanothercountry,youmightwanttoconsideranacpoweradapterforthecountryto
whichyouaretravelling.
Topurchasetravelaccessories,gotohttp://www.lenovo.com/accessories.
50UserGuide

Chapter4.Security
Thischapterprovidesinformationabouthowtoprotectyourcomputerfromtheftandunauthorizeduse.
•“Attachingamechanicallock”onpage51
•“Usingpasswords”onpage51
•“Harddisksecurity”onpage55
•“Usingthengerprintreader”onpage56
•“Noticeondeletingdatafromyourharddiskdriveorsolid-statedrive”onpage58
•“Usingrewalls”onpage59
•“Protectingdataagainstviruses”onpage59
Attachingamechanicallock
Youcanattachamechanicallocktoyourcomputer,tohelppreventitfrombeingremovedwithoutyour
permission.
Attachamechanicallocktothekeyholeofthecomputer;thensecurethechainonthelocktoastationary
object.Refertotheinstructionsshippedwiththemechanicallock.
Note:Youareresponsibleforevaluating,selecting,andimplementingthelockingdeviceandsecurity
feature.Lenovomakesnocomments,judgments,orwarrantiesaboutthefunction,quality,orperformance
ofthelockingdeviceandsecurityfeature.
Usingpasswords
Youcanhelppreventyourcomputerfromunauthorizedusebyusingpasswords.Onceyousetapassword,
apromptisdisplayedonthescreeneachtimeyouturnonthecomputer.Enteryourpasswordattheprompt.
Youcannotusethecomputerunlessyoutypethecorrectpassword.
Ifyouhavesetapower-onpassword,asupervisorpassword,oraharddiskpassword,itunlocks
automaticallywhenthecomputerresumesfromsleepmode.
Note:IfaWindowspasswordhasbeenset,youwillbepromptedtoenterit.
Typingpasswords
Whenthisiconisdisplayed,typeapower-onpasswordorasupervisorpassword.
Whenthisiconisdisplayed,typeauserharddiskpassword.Totypeamasterharddiskpassword,
pressF1.Whentheiconchangesto,typethemasterharddiskpassword
Note:Toreturntotheicon,pressF1again.
Power-onpassword
Youcansetapower-onpasswordtohelpprotectyourcomputeragainstunauthorizedaccess.
©CopyrightLenovo2013
51

Ifyousetapower-onpassword,thepasswordpromptisdisplayedonthescreenwheneveryouturnonthe
computer.Youmustenterthecorrectpasswordtostartusingthecomputer.
Setting,changing,orremovingapower-onpassword
Beforeyoustart,printtheseinstructions.
Toset,change,orremoveapower-onpassword,dothefollowing:
1.Turnoffyourcomputer.Waitforaboutveseconds,andthenturnonthecomputeragain.
2.Whenthelogoscreenisdisplayed,pressF1tostarttheThinkPadSetupprogram.
3.SelectSecurity➙Password➙Power-onPasswordbyusingthedirectionalkeys.
4.Dependingonyourneed,dooneofthefollowing:
•Tosetapassword,dothefollowing:
a.IntheEnterNewPasswordeld,typeadesiredpasswordandpressEnter.
b.IntheConrmNewPasswordeld,retypethepasswordandpressEnter.
•Tochangeapassword,dothefollowing:
a.IntheEnterCurrentPasswordeld,typethecurrentpower-onpasswordandpressEnter.
b.IntheEnterNewPasswordeld,typethenewpower-onpasswordandpressEnter;thenretype
thepasswordintheConrmNewPasswordeldandPressEnter.
•Toremoveapassword,dothefollowing:
a.IntheEnterCurrentPasswordeld,typethecurrentpower-onpasswordandpressEnter.
b.LeavetheEnterNewPasswordandConrmNewPasswordeldsblank.PressEntertwice.
5.ASetupNoticewindowisdisplayed.PressEntertocontinue.
6.PressFn+F10.ASetupConrmationwindowisdisplayed.SelectYestosavetheconguration
changesandexit.
Note:Youmightwanttorecordyourpasswordandstoreitinasafeplace.Otherwise,ifyouforgetthe
password,youhavetotakeyourcomputertoaLenovoreselleroramarketingrepresentativetohave
thepasswordcanceled.
Supervisorpassword
ThesupervisorpasswordprotectsthesysteminformationstoredintheThinkPadSetupprogram.Ifyouhave
setasupervisorpassword,noonecanchangethecongurationofthecomputerwithoutthepassword.It
providesthefollowingsecurityfeatures:
•Ifonlyasupervisorpasswordisset,apasswordpromptisdisplayedwhenyoutrytostarttheThinkPad
Setupprogram.UnauthorizeduserscannotaccesstheThinkPadSetupprogramwithoutthepassword.
•Thesystemadministratorcanusethesupervisorpasswordtoaccessacomputereveniftheuserofthat
computerhassetapower-onpassword.Thesupervisorpasswordoverridesthepower-onpassword.
•Ifbothasupervisorpasswordandapower-onpasswordareset,youcandothefollowingonlyifyou
havethesupervisorpassword:
–Changingordeletingthepower-onpassword
–Changingordeletingthesupervisorpassword
–Changingdateandtime
–Specifyingtheminimumlengthforpower-onpasswordandharddiskpassword
–Changingthesettingforthesecuritychip
–Erasingthengerprintdata
52UserGuide

–Enablingordisablingthefollowingfeatures:
–WakeonLANandFlashoverLAN
–LockUEFIBIOSSettings
–Passwordatunattendedboot
–BootDeviceListF12Option
–BootOrderLock
–FlashBIOSUpdatingbyEnd-Users
–Internalnetworkdevice
–Internalwirelessdevice
–InternalBluetoothdevice
–InternalNetworkOptionROM
–InternalwirelessWANdevice
–Securitymode
–Fingerprintreaderpriority
Notes:
•ThesystemadministratorcansetthesamesupervisorpasswordonmanyThinkPadnotebookcomputers
tomakeadministrationeasier.
•WhenLockUEFIBIOSSettingsoptionisenabled,allBIOSsettingscannotbechanged.Tochange
thesettings,asupervisorpasswordisrequired.
Setting,changing,orremovingasupervisorpassword
Beforeyoustart,printtheseinstructions.
Onlyasystemadministratorcanset,change,orremoveasupervisorpassword.Toset,change,orremovea
supervisorpassword,dothefollowing:
1.Turnoffyourcomputer.Waitforaboutveseconds,andthenturnonthecomputeragain.
2.Whenthelogoscreenisdisplayed,pressF1tostarttheThinkPadSetupprogram.
3.SelectSecurity➙Password➙SupervisorPasswordbyusingthedirectionalkeys.
4.Dependingonyourneeds,dooneofthefollowing:
•Tosetapassword,dothefollowing:
a.IntheEnterNewPasswordeld,typeadesiredpasswordandpressEnter.
b.IntheConrmNewPasswordeld,retypethepasswordandpressEnter.
•Tochangeapassword,dothefollowing:
a.IntheEnterCurrentPasswordeld,typethecurrentsupervisorpasswordandpressEnter.
b.IntheEnterNewPasswordeld,typethenewsupervisorpasswordandpressEnter;thenretype
thepasswordintheConrmNewPasswordeldandpressEnter.
•Toremoveapassword,dothefollowing:
a.IntheEnterCurrentPasswordeld,typethecurrentsupervisorpasswordandpressEnter.
b.LeavetheEnterNewPasswordandConrmNewPasswordeldsblank.PressEntertwice.
5.ASetupNoticewindowisdisplayed.PressEntertocontinue.
6.PressFn+F10.ASetupConrmationwindowisdisplayed.SelectYestosavetheconguration
changesandexit.
Chapter4.Security53

Note:Youmightwanttorecordyourpasswordandstoreitinasafeplace.Thenexttimeyouopenthe
ThinkPadSetupprogram,youwillbepromptedtotypeyoursupervisorpasswordtoproceed.Ifyouforget
yoursupervisorpassword,Lenovocannotresetyourpassword.YoumusttakeyourcomputertoaLenovo
reselleroraLenovomarketingrepresentativetohavethesystemboardreplaced.Proofofpurchaseis
required,andafeewillbechargedforpartsandservice.
Harddiskpasswords
Thefollowingtwotypesofharddiskpasswordscanhelpprotecttheinformationstoredontheharddiskdrive:
•Userharddiskpassword
Ifauserharddiskpasswordhasbeenset,butnomasterharddiskpasswordhasbeen,theusermust
entertheuserharddiskpasswordtoaccesslesandapplicationsontheharddiskdrive.
•Masterharddiskpassword
Themasterharddiskpasswordalsorequiresauserharddiskpassword.Themasterharddiskpassword
isusuallysetandusedbyasystemadministrator.Itenablestheadministratortoaccessanyharddisk
driveinasystemlikeamasterkey.Theadministratorsetsthemasterpassword;thenassignauser
passwordforeachcomputerinthenetwork.Theusercanthenchangetheuserpasswordasdesired,but
theadministratorstillcangetaccessbyusingthemasterpassword.
Whenamasterharddiskpasswordisset,onlytheadministratorcanremovetheuserharddiskpassword.
Settingaharddiskpassword
Beforeyoustart,printtheseinstructions.
Tosetaharddiskpassword,dothefollowing:
1.Turnoffyourcomputer.Waitforaboutveseconds,andthenturnonthecomputeragain.
2.Whenthelogoscreenisdisplayed,pressF1tostarttheThinkPadSetupprogram.
3.SelectSecurity➙Password➙Harddisk1Passwordbyusingthedirectionalkeys.
4.Apasswordwindowisdisplayed.YouarepromptedtoselectUserorUser+Master.SelectUserif
youwanttosetonlyoneharddiskpassword.SelectUser+Masterifyouwanttosetauserharddisk
passwordandamasterharddiskpassword,forexampleifyouareanadministratororasupervisor.
•IfyouselectUser,dothefollowing:
a.Whenawindowfortypingthenewpasswordopens,typeyournewpasswordintheEnterNew
PasswordeldandpressEnter.
b.IntheConrmNewPasswordeld,retypethepasswordyoujustenteredandpressEnter.
•IfyouselectUser+Master,dothefollowing:
a.First,setauserharddiskpassword.Whenamessagewindowpromptsyoutosettheuserhard
diskpassword,pressEntertocontinue.TypeyournewuserharddiskpasswordintheEnter
NewPasswordeldandpressEnter.RetypethepasswordintheConrmNewPassword
eldandpressEnter.
b.Then,setamasterharddiskpassword.Whenamessagewindowpromptsyoutosetthemaster
harddiskpassword.PressEntertocontinue.Typeyournewmasterharddiskpasswordinthe
EnterNewPasswordeldandpressEnter.RetypethepasswordintheConrmNewPassword
eldandpressEnter.
5.ASetupNoticewindowisdisplayed.PressEntertocontinue.
6.PressFn+F10.ASetupConrmationwindowisdisplayed.SelectYestosavetheconguration
changesandexit.
Thenexttimeyouturnonyourcomputer,typetheuserormasterharddiskpasswordtostartyourcomputer
andaccesstheoperatingsystem.
54UserGuide

Changingorremovingaharddiskpassword
Tochangeorremovetheharddiskpassword,dothefollowing:
•IfyouareinUser+Masterharddiskmode,youcanselecteitherUserHDPorMasterHDPtochange
thepassword,dependingonyourneeds.
–IfyouselectUserHDPmode,followthefollowingstepstochangetheuserharddiskpassword:
1.TypethecurrentuserharddiskpasswordintheEnterCurrentPasswordeldandpressEnter.
2.TypethenewpasswordintheEnterNewPasswordeldandpressEnter;thenretypethe
passwordintheConrmNewPasswordeldandpressEnter.
3.ASetupNoticewindowisdisplayed.PressEnteragaintocontinue.Theuserharddiskpassword
ischanged.
Note:TheharddiskpasswordcannotberemovedinUserHDPmode.
–IfyouselectMasterHDPmode,followthefollowingstepstochangethemasterharddiskpassword:
1.TypethecurrentmasterharddiskpasswordintheEnterCurrentPasswordeldandpressEnter.
2.TypethenewmasterharddiskpasswordintheEnterNewPasswordeldandpressEnter;then
retypethenewpasswordyoujustenteredintheConrmNewPasswordeldandpressEnter.
3.ASetupNoticewindowisdisplayed.PressEntertocontinue.Themasterharddiskpasswordis
changed.
Note:IfyouleavetheEnterNewPasswordandConrmNewPasswordeldsblankandpressEnter
twice,boththeuserandmasterharddiskpasswordsareremoved.
•IfyouareinUserharddiskmode,followthefollowingstepstochangetheuserharddiskpassword:
1.Followsteps1through7in“Settingaharddiskpassword”onpage54,typingyourpasswordtoget
accesstotheThinkPadSetupprogram.
2.TypethecurrentuserharddiskpasswordintheEnterCurrentPasswordeldandpressEnter.
3.TypethenewpasswordintheEnterNewPasswordeldandpressEnter;thenretypethenew
passwordintheConrmNewPasswordeldandpressEnter.
4.ASetupNoticewindowisdisplayed.PressEnteragaintocontinue.Theuserharddiskpasswordis
changed.
Note:IfyouleavetheEnterNewPasswordandConrmNewPasswordeldsblankandpressEnter
twice,theuserharddiskpasswordisremoved.
Tipsonusingtheharddiskpasswords
•YoucansettheminimumlengthofaharddiskpasswordthroughtheSecuritymenu.
•Ifyousetaharddiskpasswordofoversevencharacters,theharddiskdrivecanbeusedonlywitha
computerthatcanrecognizeaharddiskpasswordofoversevencharacters.Ifyoutheninstallthe
harddiskdriveinacomputerthatcannotrecognizeaharddiskpasswordthatcontainsmorethan
sevencharacters,youcannotaccessthedrive.
•Recordyourpasswordandstoreitinasafeplace.Ifyouforgettheuserharddiskpassword,orbothuser
andmasterharddiskpasswords,Lenovocannotresetyourpasswordsorrecoverdatafromtheharddisk
drive.YoumusttakeyourcomputertoaLenovoreselleroramarketingrepresentativetohavethehard
diskdrivereplaced.Proofofpurchaseisrequired,andafeewillbechargedforpartsandservice.
Harddisksecurity
Toprotectpasswordsfromunauthorizedsecurityattacks,refertothefollowingtipstomaximizesecurity:
Chapter4.Security55

•Setapower-onpasswordaswellasaharddiskpasswordforyourinternalsolid-statedriveorharddisk
drive.Refertotheproceduresin“Power-onpassword”onpage51and“Harddiskpasswords”onpage
54.Forsecurity,alongerpasswordisrecommended.
•IfaDiskEncryptionharddiskdriveoraDiskEncryptionsolid-statedriveisinstalledinyourcomputer,
besuretoprotectthecontentsofyourcomputermemoryfromunauthorizedaccessbyuseofdrive
encryptionsoftware.
•Beforeyoudisposeof,sell,orhandoveryourcomputer,deletethedatastoredonit.Formoreinformation,
referto“Noticeondeletingdatafromyourharddiskdriveorsolid-statedrive”onpage58
.
TheharddiskdrivebuiltintoyourcomputercanbeprotectedbyUEFIBIOS.
DiskEncryptionharddiskdriveandEncryptionsolid-statedrive
SomemodelscontaintheDiskEncryptionharddiskdriveorEncryptionsolid-statedrive.Thisfeaturehelps
toprotectyourcomputeragainstsecurityattacksonmedia,NANDash,ordevicecontrollersbyuseofa
hardwareencryptionchip.Fortheefcientuseoftheencryptionfeature,setaharddiskpasswordforthe
internalstoragedevice.
Usingthengerprintreader
Dependingonthemodel,yourcomputermighthaveangerprintreader.Fingerprintauthenticationcan
replaceyourWindowspassword.Inthisway,youcanlogontoyourcomputersimplyandsecurely.To
enablengerprintauthentication,enrollyourngerprintsrst.
Enrollingyourngerprint
Toenrollyourngerprints,dothefollowing:
1.StarttheLenovoFingerprintManagerprogram.ForinstructionsonhowtostarttheFingerprintManager
Proprogram,see“Lenovoprograms”onpage17.
2.EntertheWindowspasswordasrequired.
3.Clicktheiconforthengerthatyouwanttoenroll,andconstantlyswipeyourcorrespondingnger
acrossthengerprintreaderuntiltheenrollmentcompletes.Formoreinformation,see“Swipingyour
ngeroverthengerprintreader”onpage57
.
4.ClickFinish.Yourngerprintisenrolledsuccessfully.
Note:Itisrecommendedthatyouenrollmorethanonengerprintincaseofanyinjuriestoyourngers.
56UserGuide
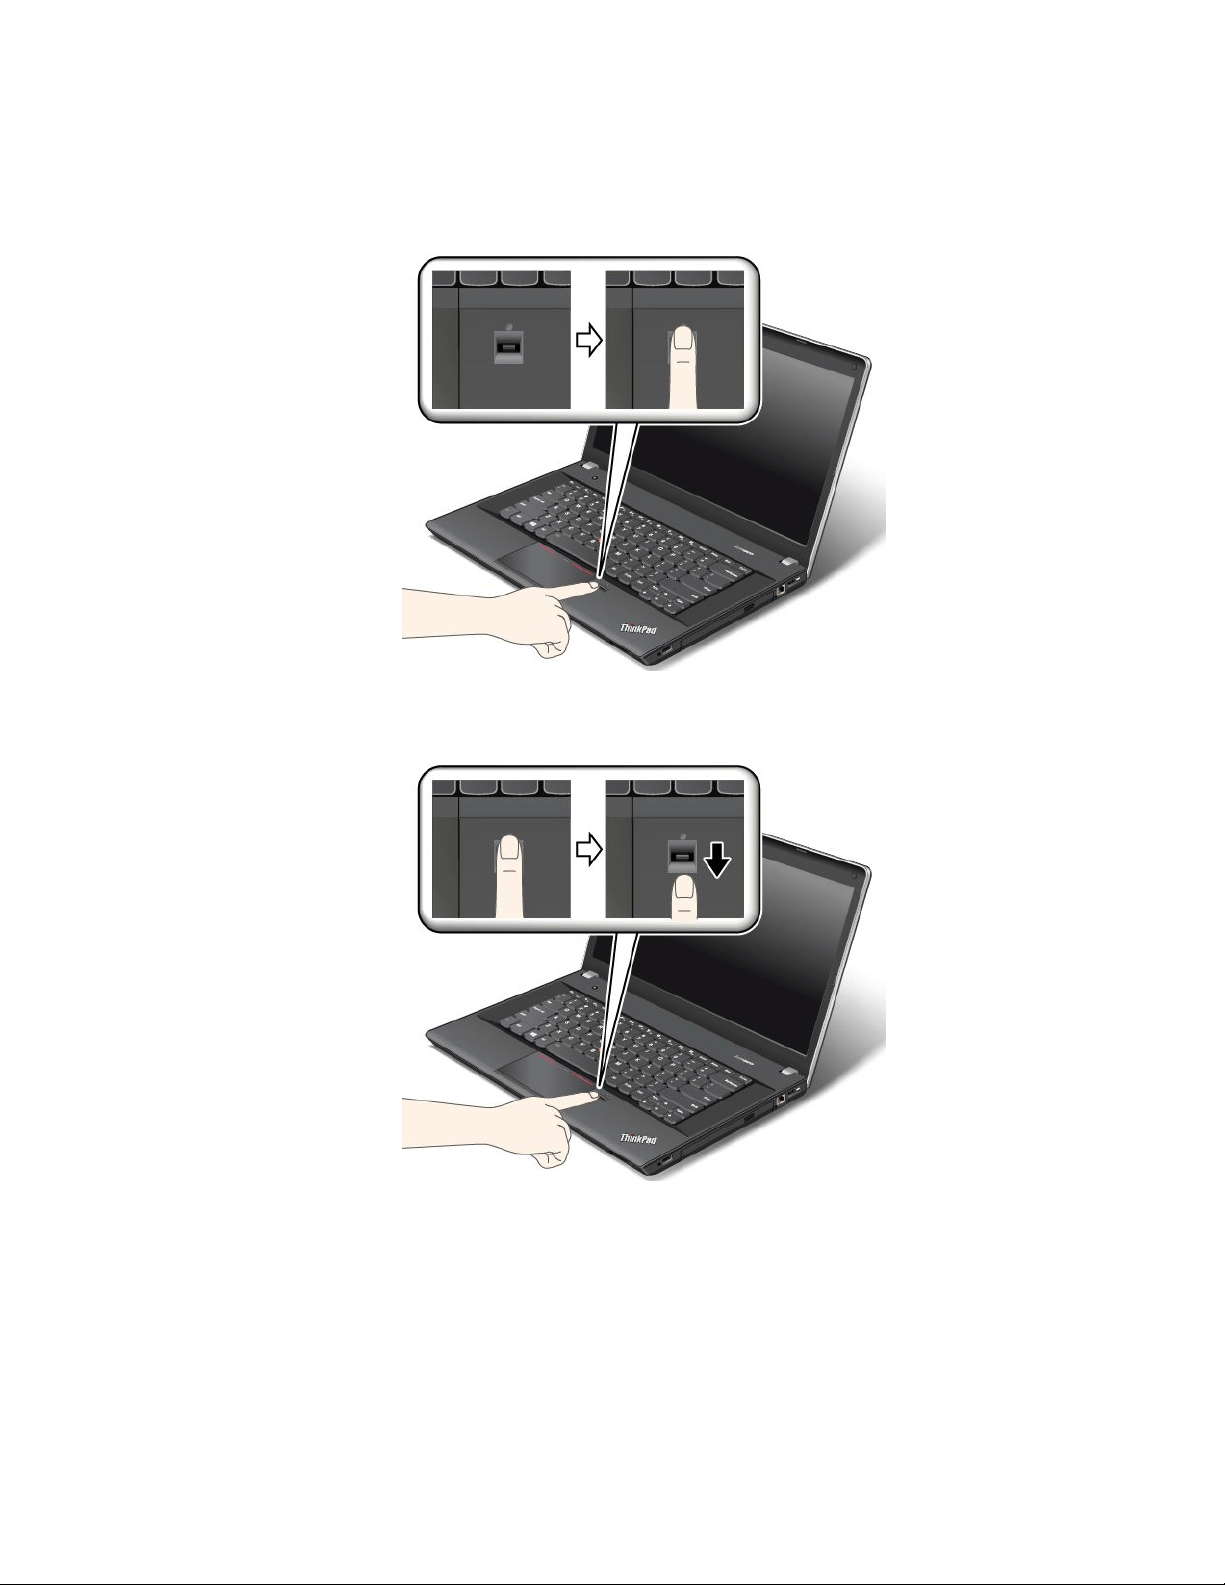
Swipingyourngeroverthengerprintreader
Toswipeyourngeroverthereader,dothefollowing:
1.Placethetopjointofyourngeronthesensor.
2.Applylightpressureandswipeyourngertowardyouacrossthethereaderinonesmoothmotion.
Donotliftyourngerwhenyouareswipingit.
Maintainingthengerprintreader
Thefollowingactionscoulddamagethengerprintreaderorcauseitnottoworkproperly:
•Scratchingthesurfaceofthereaderwithahard,pointedobject.
•Scrapingthesurfaceofthereaderwithyourngernailoranythinghard.
•Usingortouchingthereaderwithadirtynger.
Ifyounoticeanyofthefollowingconditions,gentlycleanthesurfaceofthereaderwithadry,soft,lint-free
cloth:
Chapter4.Security57

•Thesurfaceofthereaderisdirtyorstained.
•Thesurfaceofthereaderiswet.
•Thereaderoftenfailstoenrollorauthenticateyourngerprint.
Ifyourngerhasanyofthefollowingconditions,youmightnotbeabletoregisterorauthenticateit:
•Yourngeriswrinkled.
•Yourngerisrough,dry,orinjured.
•Yourngerisdry.
•Yourngerisstainedwithdirt,mud,oroil.
•Thesurfaceofyourngerisdifferentfromwhenyouenrolledyourngerprint.
•Yourngeriswet.
•Angerisusedthathasnotbeenenrolled.
Toimprovethesituation,trythefollowing:
•Cleanorwipeyourhandstoremoveanyexcessdirtormoisturefromthengers.
•Enrollanduseadifferentngerforauthentication.
•Ifyourhandsaredry,applylotiontothem.
Formoreinformationonhowtousethengerprintreader,refertothehelpsystemoftheLenovoFingerprint
Managerprogram.
Noticeondeletingdatafromyourharddiskdriveorsolid-statedrive
Someofthedatastoredontheharddiskdriveorsolid-statedrivemightbesensitive.Handingyour
computerovertosomeoneelsewithoutdeletingtheloadedsoftware,suchasoperatingsystemsand
applicationsoftware,mightevenviolatelicenseagreements.Besuretodeletedatastoredontheharddisk
driveorsolid-statedrivebeforeyoudisposeof,sell,orhandoveryourcomputer.
Youcanusethefollowingmethodstodeletedatafromtheharddiskdriveorsolid-statedrive:
•MovingthedatatotheRecycleBin,andthenemptytheRecycleBin.
•Deletingthedata.
•Formattingyourharddiskdriveorsolid-statedrive,usingthesoftwareforinitializingit.
•UsingtherecoveryprogramprovidedbyLenovotobringtheharddiskdriveorsolid-statedrivebackto
thefactorydefaultsettings.
Theseoperations,however,onlychangethelelocationofthedata;theydonotdeletethedataitself.In
otherwords,thedataretrievalprocessingisdisabledunderanoperatingsystemsuchasWindows.The
dataisstillthere,eventhoughitseemstobelost.Thus,itissometimespossibletoreadthedatabyuseof
specialsoftwarefordatarecovery.Thereisariskthatpeopleofbadfaithmightreadandmisusethecritical
dataonharddiskdrivesorsolid-statedrivesforunexpectedpurposes.
Topreventleakageofdata,itisimportantthatyoudeleteallthedatafromtheharddiskdrivewhenyou
disposeof,sell,orhandoveryourcomputer.Youcandestroythedataphysicallybysmashingtheharddisk
drivewithahammer,ormagneticallybymeansofstrongmagneticpower,thusmakingthedataunreadable.
Butitisrecommendedthatyouusethesoftware(payware)orservice(payservice)developedforthat
purpose.Theprocessmighttakeseveralhours.
Fordisposingofdataontheharddiskdriveorsolid-statedrive,LenovoprovidestheSecureDataDisposal
tool.Gotohttp://www.lenovo.com/supporttodownloadthetool.
58UserGuide

IfanEncryptionsolid-statedriveoraDiskEncryptionharddiskdriveissupportedandinstalledinyour
computer,youcanlogicallydisposeofallthedataonthedriveinashorttimebyerasingthecryptographic
key.Thedataencryptedwiththeoldkeyisnotphysicallyerasedbutremainsonthedrive;however,it
cannotbedecryptedwithouttheoldkey.ThisfeatureisenabledbyThinkPadSetupMenuExtensionUtility
andisavailableasamenuiteminThinkPadSetup.
Usingrewalls
Ifyoursystemispreinstalledwitharewallprogram,itprotectsagainstcomputerInternetsecuritythreats,
unauthorizedaccess,intrusions,andInternetattacks.Italsoprotectsyourprivacy.
Formoreinformationabouthowtousetherewallprogram,refertothehelpinformationsystemthat
comeswiththeprogram.
Protectingdataagainstviruses
Yourcomputerispreinstalledwithanantivirusprogramsoyoucandetectandeliminateviruses.The
antivirusprogramisdesignedtohelpyoudetectandeliminateviruses.
Lenovoprovidesafullversionofantivirussoftwareonyourcomputerwithafree30-daysubscription.After
30days,youmustrenewthelicensetocontinuereceivingtheantivirussoftwareupdates.
Formoreinformationabouthowtouseyourantivirussoftware,refertothehelpinformationsystemof
yourantivirussoftware.
Chapter4.Security59

60UserGuide

Chapter5.Recoveryoverview
ThischapterprovidesinformationabouttherecoverysolutionsprovidedbyLenovoontheWindows7
operatingsystemandthePushButtonResetprogramontheWindows8operatingsystem.
RecoveryoverviewfortheWindows7operatingsystem
ThissectionprovidesinformationabouttherecoverysolutionsprovidedbyLenovoontheWindows7
operatingsystem.
Notes:
•Thereareavarietyofmethodstochoosefromwhenconsideringhowtorecoverintheeventofasoftware-
orhardware-relatedproblem.Somemethodsvarydependingonthetypeofyouroperatingsystem.
•Theproductontherecoverymediamightbeusedonlyforthefollowingpurposes:
–Restoretheproductpreinstalledonyourcomputer
–Reinstalltheproduct
–ModifytheproductusingtheAdditionalFiles
Topreventpotentialperformancerisksorunexpectedbehaviorthatmightbecausedbythenewharddisk
drivetechnology,itisrecommendedthatyouuseoneofthefollowingsoftwareprogramsforbackup:
•ThinkVantageRescueandRecovery4.3orlater
•SymantecNortonGhostversion15orlater
TostarttheSymantecNortonGhostprogram,dothefollowing:
1.ClickStart➙Run.TheRunwindowopens.
2.Typecmdintheeld.ThenclickOK.
3.Typeghost-align=1mbandpressEnter.
•AcronisTrueImage2010orlater
•ParagonBackup&Recovery10Suitorlater,ParagonBackup&Recovery10Homeorlater
Creatingandusingarecoverymedia
Youcanuserecoverymediatorestoretheharddiskdrivetothefactorydefaultsettings.Recoverymedia
areusefulifyoutransferthecomputertoanotherarea,sellthecomputer,recyclethecomputer,orputthe
computerinanoperationalstateafterallothermethodsofrecoveryhavefailed.Asaprecautionarymeasure,
itisimportanttocreaterecoverymediaasearlyaspossible.
Note:Therecoveryoperationsyoucanperformusingrecoverymediavarydependingontheoperating
systemfromwhichtherecoverymediawerecreated.Therecoverymediamightcontainabootmedium
andadatamedium.YourMicrosoftWindowslicensepermitsyoutocreateonlyonedatamedium,soitis
importantthatyoustoretherecoverymediainasafeplaceafteryouhavemadethem.
Creatingrecoverymedia
Thissectionprovidesinstructionsonhowtocreaterecoverymedia.
Note:YoucancreaterecoverymediausingdiscsorexternalUSBstoragedevices.
Tocreaterecoverymedia,clickStart➙AllPrograms➙LenovoThinkVantageT ools➙FactoryRecovery
Disks.Then,followtheinstructionsonthescreen.
©CopyrightLenovo2013
61

Usingrecoverymedia
Thissectionprovidesinstructionsonhowtouserecoverymediaondifferentoperatingsystems.
•Youcanuserecoverymediatorestorethecomputertothefactorydefaultsettingsonly.Youcanuse
recoverymediatoputthecomputerinanoperationalstateafterallothermethodsofrecoveryhavefailed.
Attention:Whenyouuserecoverymediatorestorethecomputertothefactorydefaultsettings,allthe
lescurrentlyontheharddiskdrivewillbedeletedandreplacedbythefactorydefaultsettings.
Touserecoverymedia,dothefollowing:
1.Dependingonthetypeofyourrecoverymedia,connectthebootmedium(memorykeyorotherUSB
storagedevice)tothecomputer,orinsertthebootdiscintotheopticaldrive.
2.RepeatedlypressandreleasetheF12keywhenturningonthecomputer.WhentheBootMenu
windowopens,releasetheF12key.
3.SelectthedesiredstartupdeviceandpressEnter.Therestoreprocessbegins.
4.Followtheinstructionsonthescreentocompletetheoperation.
Notes:
1.Afterrestoringyourcomputertothefactorydefaultsettings,youmighthavetoreinstalldevicedrivers
forsomedevices.See“Reinstallingpreinstalledprogramsanddevicedrivers”onpage65
.
2.SomecomputerscomewithMicrosoftOfceorMicrosoftWorkspreinstalled.Ifyouneedtorecover
orreinstallyourMicrosoftOfceorMicrosoftWorksprograms,youmustusetheMicrosoftOfceCD
orMicrosoftWorksCD.ThesediscsareprovidedonlywithcomputerspreinstalledwithMicrosoft
OfceorMicrosoftWorks.
Performingbackupandrecoveryoperations
TheRescueandRecoveryprogramenablesyoutobackupallyourharddiskdrivecontentsincludingthe
operatingsystem,datales,softwareprograms,andpersonalsettings.Youcandesignatewherethe
RescueandRecoveryprogramstoresthebackup:
•Inaprotectedareaofyourharddiskdrive
•Onthesecondaryharddiskdriveifasecondaryharddiskdriveisinstalledinyourcomputer
•OnanattachedexternalUSBharddiskdrive
•Onanetworkdrive
•Onrecordablediscs(arecordableopticaldriveisrequiredforthisoption)
Afteryouhavebackedupthecontentsontheharddiskdrive,youcanrestorethecompletecontentsofthe
harddiskdrive,restoreonlytheselectedles,orrestoreonlytheWindowsoperatingsystemandapplications.
Performingabackupoperation
ThissectionprovidesinstructionsonhowtoperformabackupoperationusingtheRescueandRecovery
program.
1.FromtheWindowsdesktop,clickStart➙AllPrograms➙LenovoThinkVantageTools➙Enhanced
BackupandRestore.TheRescueandRecoveryprogramopens.
2.IntheRescueandRecoverymainwindow,clicktheLaunchadvancedRescueandRecoveryarrow.
3.ClickBackupyourharddriveandselectbackupoperationoptions.Then,followtheinstructionson
thescreentocompletethebackupoperation.
62UserGuide

Performingarecoveryoperation
ThissectionprovidesinstructionsonhowtoperformarecoveryoperationusingtheRescueandRecovery
program.
1.FromtheWindowsdesktop,clickStart➙AllPrograms➙LenovoThinkVantageTools➙Enhanced
BackupandRestore.TheRescueandRecoveryprogramopens.
2.IntheRescueandRecoveryprogrammainwindow,clicktheLaunchadvancedRescueandRecovery
arrow.
3.ClicktheRestoreyoursystemfromabackupicon.
4.Followtheinstructionsonthescreentocompletetherecoveryoperation.
FormoreinformationaboutperformingarecoveryoperationfromtheRescueandRecoveryworkspace,see
“UsingtheRescueandRecoveryworkspace”onpage63.
UsingtheRescueandRecoveryworkspace
TheRescueandRecoveryworkspaceresidesinaprotected,hiddenareaofyourharddiskdrivethat
operatesindependentlyfromtheWindowsoperatingsystem.Thisenablesyoutoperformrecovery
operationsevenifyoucannotstarttheWindowsoperatingsystem.Youcanperformthefollowingrecovery
operationsfromtheRescueandRecoveryworkspace:
•Rescuelesfromyourharddiskdriveorfromabackup
TheRescueandRecoveryworkspaceenablesyoutolocatelesonyourharddiskdriveandtransfer
themtoanetworkdriveorotherrecordablemedia,suchasaUSBdeviceoradisc.Thissolutionis
availableevenifyoudidnotbackupyourlesorifchangesweremadetothelessinceyourlastbackup
operation.YoualsocanrescueindividuallesfromaRescueandRecoverybackuplocatedonyourlocal
harddiskdrive,aUSBdevice,oranetworkdrive.
•RestoreyourharddiskdrivefromaRescueandRecoverybackup
IfyouhavebackedupyourharddiskdriveusingtheRescueandRecoveryprogram,youcanrestorethe
harddiskdrivefromaRescueandRecoverybackup,evenifyoucannotstarttheWindowsoperating
system.
•Restoreyourharddiskdrivetothefactorydefaultsettings
TheRescueandRecoveryworkspaceenablesyoutorestorethecompletecontentsofyourharddiskdrive
tothefactorydefaultsettings.Ifyouhavemultiplepartitionsonyourharddiskdrive,youhavetheoption
torestorethefactorydefaultsettingstotheC:partitionandleavetheotherpartitionsintact.Becausethe
RescueandRecoveryworkspaceoperatesindependentlyfromtheWindowsoperatingsystem,youcan
restorethefactorydefaultsettingsevenifyoucannotstarttheWindowsoperatingsystem.
Attention:IfyourestoretheharddiskdrivefromaRescueandRecoverybackuporrestoretheharddisk
drivetothefactorydefaultsettings,alllesontheprimaryharddiskdrivepartition(usuallydriveC:)willbe
deletedintherecoveryprocess.Ifpossible,makecopiesofimportantles.Ifyouareunabletostartthe
Windowsoperatingsystem,youcanusetherescuelesfeatureoftheRescueandRecoveryworkspaceto
copylesfromyourharddiskdrivetoothermedia.
TostarttheRescueandRecoveryworkspace,dothefollowing:
1.Makesurethatthecomputeristurnedoff.
2.RepeatedlypressandreleasetheF11keywhenturningonthecomputer.Whenyouhearbeepsor
seealogoscreen,releasetheF11key.
3.IfyouhavesetaRescueandRecoverypassword,typeyourpasswordwhenprompted.TheRescue
andRecoveryworkspaceopensafterashortdelay.
Note:IftheRescueandRecoveryworkspacefailstoopen,see“Solvingrecoveryproblems”onpage65
.
Chapter5.Recoveryoverview63

4.Dooneofthefollowing:
•Torescuelesfromyourharddiskdriveorfromabackup,clickRescuelesandfollowthe
instructionsonthescreen.
•TorestoreyourharddiskdrivefromaRescueandRecoverybackuportorestoreyourharddiskdrive
tothefactorydefaultsettings,clickRestoreyoursystemandfollowtheinstructionsonthescreen.
FormoreinformationaboutthefeaturesoftheRescueandRecoveryworkspace,clickHelp.
Notes:
1.Afterrestoringyourharddiskdrivetothefactorydefaultsettings,youmighthavetoreinstalldevice
driversforsomedevices.See“Reinstallingpreinstalledprogramsanddevicedrivers”onpage65.
2.SomecomputerscomewithMicrosoftOfceorMicrosoftWorkspreinstalled.Ifyouneedtorecover
orreinstallyourMicrosoftOfceorMicrosoftWorksprograms,youmustusetheMicrosoftOfceCD
orMicrosoftWorksCD.ThesediscsareprovidedonlywithcomputerspreinstalledwithMicrosoft
OfceorMicrosoftWorks.
Creatingandusingarescuemedium
Witharescuemedium,suchasadiscoraUSBharddiskdrive,youcanrecoverthecomputerfromfailures
thatpreventyoufromgainingaccesstotheRescueandRecoveryworkspaceonyourharddiskdrive.
Notes:
1.Therecoveryoperationsyoucanperformusingarescuemediumvarydependingontheoperating
system.
2.Therescuedisccanbestartedinalltypesofopticaldrives.
Creatingarescuemedium
Thissectionprovidesinstructionsonhowtocreatearescuemedium.
1.FromtheWindowsdesktop,clickStart➙AllPrograms➙LenovoThinkVantageTools➙Enhanced
BackupandRestore.TheRescueandRecoveryprogramopens.
2.IntheRescueandRecoverymainwindow,clicktheLaunchadvancedRescueandRecoveryarrow.
3.ClicktheCreateRescueMediaicon.TheCreateRescueandRecoveryMediawindowopens.
4.IntheRescueMediaarea,selectthetypeoftherescuemediumyouwanttocreate.Youcancreatea
rescuemediumusingadisc,aUSBharddiskdrive,orasecondaryinternalharddiskdrive.
5.ClickOKandfollowtheinstructionsonthescreentocreatearescuemedium.
Usingarescuemedium
Thissectionprovidesinstructionsonhowtousetherescuemediumyouhavecreated.
•Ifyouhavecreatedarescuemediumusingadisc,usethefollowinginstructionstousetherescuemedium:
1.Turnoffyourcomputer.
2.RepeatedlypressandreleasetheF12keywhenturningonthecomputer.WhentheBootMenu
windowopens,releasetheF12key.
3.IntheBootMenuwindow,selectthedesiredopticaldriveastherstbootdevice.Then,insertthe
rescuediscintotheopticaldriveandpressEnter.Therescuemediumstarts.
•IfyouhavecreatedarescuemediumusingaUSBharddiskdrive,usethefollowinginstructionsto
usetherescuemedium:
1.AttachtheUSBharddiskdrivetooneoftheUSBconnectorsonyourcomputer.
2.RepeatedlypressandreleasetheF12keywhenturningonthecomputer.WhentheBootMenu
windowopens,releasetheF12key.
64UserGuide

3.IntheBootMenuwindow,selecttheUSBharddiskdriveastherstbootdeviceandpressEnter.
Therescuemediumstarts.
Whentherescuemediumstarts,theRescueandRecoveryworkspaceopens.Thehelpinformationfor
eachfeatureisavailablefromtheRescueandRecoveryworkspace.Followtheinstructionstocomplete
therecoveryprocess.
Reinstallingpreinstalledprogramsanddevicedrivers
Yourcomputerhasprovisionsthatenableyoutoreinstallselectedfactory-installedprogramsanddevice
drivers.
Reinstallingpreinstalledprograms
Toreinstallsomepreinstalledapplicationprograms,dothefollowing:
1.Turnonyourcomputer.
2.GototheC:\SWTOOLSdirectory.
3.OpentheAPPSfolder.Thefoldercontainsseveralsubfoldersnamedforthevariouspreinstalled
applications.
4.Openthesubfolderfortheapplicationyouwanttoreinstall.
5.Double-clickSetup,andthenfollowtheon-screenstepstoreinstalltheapplication.
Reinstallingpreinstalleddevicedrivers
Attention:Whenyoureinstalldevicedrivers,youarechangingthecurrentcongurationofyourcomputer.
Reinstalldevicedriversonlywhenitisnecessarytocorrectaproblemwithyourcomputer.
Toreinstalladevicedriverforafactory-installeddevice,dothefollowing:
1.Turnonyourcomputer.
2.GototheC:\SWTOOLSdirectory.
3.OpentheDRIVERSfolder.Thefoldercontainsseveralsubfoldersnamedforthevariousdevices
installedinyourcomputer(forexample,AUDIOandVIDEO).
4.Openthesubfolderforthedevice.
5.Reinstallthedevicedriverbyoneofthefollowingmethods:
•Inthesubfolderforthedevice,lookforatextle(alewiththeextension.txt).Thetextlecontains
informationonhowtoreinstallthatdevicedriver.
•Ifthesubfolderforthedevicecontainsaleofsetupinformation(alewiththeextension.inf),you
canusetheAddNewHardwareprogram(intheWindowsControlPanel)toreinstallthedevicedriver.
Notalldevicedriverscanbereinstalledbyuseofthisprogram.IntheAddNewHardwareprogram,
whenpromptedforthedevicedriveryouwanttoinstall,clickHaveDiskandBrowse.Thenselect
thedevicedriverlefromthedevicesubfolder.
•Inthesubfolderforthedevice,lookfortheexecutablele(alewiththeextension.exe).Double-click
thele,andfollowtheinstructionsonthescreen.
Attention:Ifyouneedupdateddevicedriversforyourcomputer,donotdownloadthemfromtheWindows
UpdateWebsite.ObtainthemfromLenovo.Formoreinformation,see“Makingsuredevicedriversare
current”onpage122
.
Solvingrecoveryproblems
IfyouareunabletoaccesstheRescueandRecoveryworkspaceortheWindowsenvironment,doone
ofthefollowing:
Chapter5.Recoveryoverview65

•UsearescuemediumtostarttheRescueandRecoveryworkspace.See“Creatingandusingarescue
medium”onpage64.
•Userecoverymediaifallothermethodsofrecoveryhavefailedandyouneedtorestoretheharddisk
drivetothefactorydefaultsettings.See“Creatingandusingarecoverymedia”onpage61.
Note:IfyouareunabletoaccesstheRescueandRecoveryworkspaceortheWindowsenvironment
fromarescuemediumorrecoverymedia,youmightnothavetherescuedevice(aninternalharddisk
drive,adisc,aUSBharddiskdrive,orotherexternaldevices)setastherstbootdeviceinthestartup
devicesequence.Youmustrstmakesurethatyourrescuedeviceissetastherstbootdeviceinthe
startupdevicesequenceintheThinkPadSetupprogram.Fordetailedinformationonhowtotemporarilyor
permanentlychangethestartupdevicesequence,see“Startupmenu”onpage117.
Itisimportanttocreatearescuemediumandasetofrecoverymediaasearlyaspossibleandstorethem
inasafeplaceforfutureuse.
RecoveryoverviewfortheWindows8operatingsystem
ThissectionprovidesinformationabouttherecoverysolutionsfortheWindows8operatingsystem.
AWindowsrecoveryimageispreinstalledintherecoverypartitiononyourcomputer.TheWindowsrecovery
imageenablesyoutorefreshyourcomputer,orresetyourcomputertothefactorydefaultsettings.
YoucancreaterecoverymediaasbackupsorreplacementfortheWindowsrecoveryimage.Withthe
recoverymedia,youcantroubleshootandxtheproblemsonyourcomputerevenifyoucannotstartthe
Windows8operatingsystem.Itisrecommendedthatyoucreaterecoverymediaasearlyaspossible.For
moreinformation,see“Creatingandusingrecoverymedia”onpage67.
Refreshingyourcomputer
Ifyourcomputerdoesnotperformwellandtheproblemmightbecausedbyarecentlyinstalledprogram,
youcanrefreshyourcomputerwithoutlosingyourpersonallesorchangingyoursettings.
Attention:Ifyourefreshyourcomputer,theprogramsthatcamewithyourcomputerandtheprogramsthat
youinstalledfromWindowsStorewillbereinstalled,butallotherprogramswillberemoved.
Torefreshyourcomputer,dothefollowing:
1.Moveyourcursortothetop-rightorbottom-rightcornerofthescreentodisplaythecharms.Click
Settings➙ChangePCsettings➙General.
2.IntheRefreshyourPCwithoutaffectingyourlessection,clickGetstarted.
3.Followtheinstructionsonthescreentorefreshyourcomputer.
Resettingyourcomputertothefactorydefaultsettings
Ifyouwanttorecycleyourcomputerorjuststartover,youcanresetyourcomputertothefactorydefault
settings.Resettingthecomputerwillreinstalltheoperatingsystem,reinstallalltheprogramsthatcamewith
yourcomputer,andresetallthesettingstothefactorydefaultsettings.
Attention:Ifyouresetthecomputertothefactorydefaultsettings,allyourpersonallesandsettingswillbe
deleted.Toavoiddataloss,makeabackupcopyofallthedatathatyouwanttokeep.
Toresetyourcomputertothefactorydefaultsettings,dothefollowing:
1.Moveyourcursortothetop-rightorbottom-rightcornerofthescreentodisplaythecharms.Click
Settings➙ChangePCsettings➙General.
66UserGuide

2.IntheRemoveeverythingandreinstallWindowssection,clickGetstarted.ThenclickNextto
conrmtheoperation.
3.Dependingonyourneeds,dooneofthefollowing:
•Toperformaquickformat,clickJustremovemylestostarttheprocess.Theprocesswilltake
severalminutes.
•Toperformacompleteformat,clickFullycleanthedrivetostarttheprocess.Theprocesswill
takeseveralhours.
4.Followtheinstructionsonthescreentoresetyourcomputertothefactorydefaultsettings.
Usingtheadvancedstartupoptions
Withtheadvancedstartupoptions,youcanchangethermwaresettingsofthecomputer,changethe
startupsettingsoftheWindowsoperatingsystem,startthecomputerfromanexternaldevice,orrestorethe
Windowsoperatingsystemfromasystemimage.
Tousetheadvancedstartupoptions,dothefollowing:
1.Moveyourcursortothetop-rightorbottom-rightcornerofthescreentodisplaythecharms.Click
Settings➙ChangePCsettings➙General.
2.IntheAdvancedstartupsection,clickRestartnow➙Troubleshoot➙Advancedoptions.
3.Selectadesiredstartupoption,thenfollowtheinstructionsonthescreen.
RecoveringyouroperatingsystemifWindows8failstostart
TheWindowsrecoveryenvironmentonyourcomputeriscapableofoperatingindependentlyfromthe
Windows8operatingsystem.Thisenablesyoutorecoverorrepairtheoperatingsystemevenifthe
Windows8operatingsystemfailstostart.
Aftertwoconsecutivefailedbootattempts,theWindowsrecoveryenvironmentstartsautomatically.Then
youcanchooserepairandrecoveryoptionsbyfollowingtheinstructionsonthescreen.
Note:Ensurethatyourcomputerisconnectedtoacpowerduringtherecoveryprocess.
Creatingandusingrecoverymedia
YoucancreaterecoverymediaasbackupsfortheWindowsrecoveryenvironmentandtheWindows
recoveryimage.Ifyoucannotstartthecomputer,youcanuserecoverymediatotroubleshootandxthe
problemsonyourcomputer.
Itisrecommendedthatyoucreaterecoverymediaasearlyaspossible.Onceyoucreaterecoverymedia,
keeptheminasafeplaceanddonotusethemtostoreotherdata.
Creatingrecoverymedia
Tocreaterecoverymedia,youneedaUSBdrivewithatleast8GBofstorage.TherequiredUSBcapacity
dependsonthesizeoftherecoveryimage.
Attention:CreatingrecoverymediawilldeleteanythingstoredontheUSBdrive.Toavoiddataloss,makea
backupcopyofallthedatathatyouwanttokeep.
Tocreaterecoverymedia,dothefollowing:
Note:Ensurethatyourcomputerisconnectedtoacpower.
1.Moveyourcursortothetop-rightorbottom-rightcornerofthescreentodisplaythecharms,and
clickSearch.
Chapter5.Recoveryoverview67

2.TyperecoveryintheSearcheldandclickSettings.ThenclickCreatearecoverydrive.
3.ClickYesintheUserAccountControlwindowtoallowtheRecoveryMediaCreatorprogramtostart.
4.EnsurethatyouselecttheCopytherecoverypartitionfromthePCtotherecoverydrive.option.
ThenclickNext.
Important:IfyoucleartheCopytherecoverypartitionfromthePCtotherecoverydrive.option,
youwillcreaterecoverymediawithouttherecoverypartitioncontent.Youstillcanstartthecomputer
fromtherecoverymedia,butyoumightbeunabletorecoveryourcomputeriftherecoverypartitionon
yourcomputerisdamaged.
5.ConnectaproperUSBdrivethenclickNext.
6.ClickCreateintheRecoveryDrivewindow.Thecreationoftherecoverymediastarts.
7.Whenthecreationoftherecoverymedianishes,dooneofthefollowing:
•Tokeeptherecoverypartitiononyourcomputer,clickFinish.
•Todeletetherecoverypartitiononyourcomputer,clickDeletetherecoverypartition.
Attention:Ifyoudeletetherecoverypartitiononyourcomputer,dokeeptherecoverymediaina
safeplace.TheWindowsrecoveryimagewillnotbestoredinyourcomputeranymore,andyouwill
needtherecoverymediatorefreshorresetyourcomputer.
8.RemovetheUSBdrive.Therecoverymediaarecreatedsuccessfully.
Usingrecoverymedia
Ifyoucannotstartyourcomputer,orifyoucannotstarttheWindowsrecoveryimageonyourcomputer,use
recoverymediatorecoveryourcomputer.
Touserecoverymedia,dothefollowing:
Note:Ensurethatyourcomputerisconnectedtoacpower.
1.Turnonorrestartthecomputer.BeforetheWindowsoperatingsystemstarts,repeatedlypresstheF12
key.TheBootMenuwindowopens.
2.Selecttherecoverydriveasthebootdevice.
3.Selectapreferredlanguageandthenselectapreferredkeyboardlayout.
4.ClickTroubleshoottodisplaytheoptionalrecoverysolutions.
5.Selectacorrespondingrecoverysolutionaccordingtoyoursituation.Forexample,selectResetyour
PCifyouwanttoresetyourcomputertothefactorydefaultsettings.
FormoreinformationabouttherecoverysolutionsprovidedbytheWindows8operatingsystem,goto:
http://go.microsoft.com/fwlink/?LinkID=263800
68UserGuide

Chapter6.Replacingdevices
Thischapterprovidesinstructionsonhowtoinstallorreplacehardwareforyourcomputer.
•“Staticelectricityprevention”onpage69
•“Replacingthebattery”onpage69
•“ReplacingtheSIMcard”onpage71
•“Replacingthekeyboard”onpage72
•“Replacingtheharddiskdriveorsolid-statedrive”onpage85
•“Replacingtheopticaldrive”onpage88
•“ReplacingawirelessLANcard”onpage92
•“ReplacingawirelessWANcard”onpage95
•“Replacingamemorymodule”onpage97
•“Replacingthebackupbattery”onpage100
Staticelectricityprevention
Staticelectricity,althoughharmlesstoyou,canseriouslydamagecomputercomponentsandoptions.
Improperhandlingofstatic-sensitivepartscancausedamagetothepart.Whenyouunpackanoptionor
aCRU,donotopenthestatic-protectivepackagethatcontainsthepartuntiltheinstructionsdirectyou
toinstallthepart.
WhenyouhandleoptionsorCRUs,orperformanyworkinsidethecomputer,takethefollowingprecautions
toavoidstatic-electricitydamage:
•Limityourmovement.Movementcancausestaticelectricitytobuilduparoundyou.
•Alwayshandlecomponentscarefully.Handleadapters,memorymodules,andothercircuitboardsbythe
edges.Nevertouchexposedcircuitry.
•Preventothersfromtouchingcomponents.
•Whenyouinstallastatic-sensitiveoptionorCRU,touchthestatic-protectivepackagethatcontainsthe
parttoametalexpansion-slotcoverorotherunpaintedmetalsurfaceonthecomputerforatleasttwo
seconds.Thisreducesstaticelectricityinthepackageandyourbody.
•Whenpossible,removethestatic-sensitivepartfromthestatic-protectivepackageandinstallthepart
withoutsettingitdown.Whenthisisnotpossible,placethestatic-protectivepackageonasmooth,
levelsurfaceandplacethepartonthepackage.
•Donotplacethepartonthecomputercoverorothermetalsurface.
Replacingthebattery
Beforeyoustart,printtheseinstructions.
ThissystemsupportsonlybatteriesspeciallydesignedforthisspecicsystemandmanufacturedbyLenovo
oranauthorizedbuilder.Thesystemdoesnotsupportunauthorizedbatteriesorbatteriesdesignedforother
systems.Ifanunauthorizedbatteryorabatterydesignedforanothersystemisinstalled,thesystemwill
notcharge.
Attention:Lenovohasnoresponsibilityfortheperformanceorsafetyofunauthorizedbatteries,and
providesnowarrantiesforfailuresordamagearisingoutoftheiruse.
©CopyrightLenovo2013
69
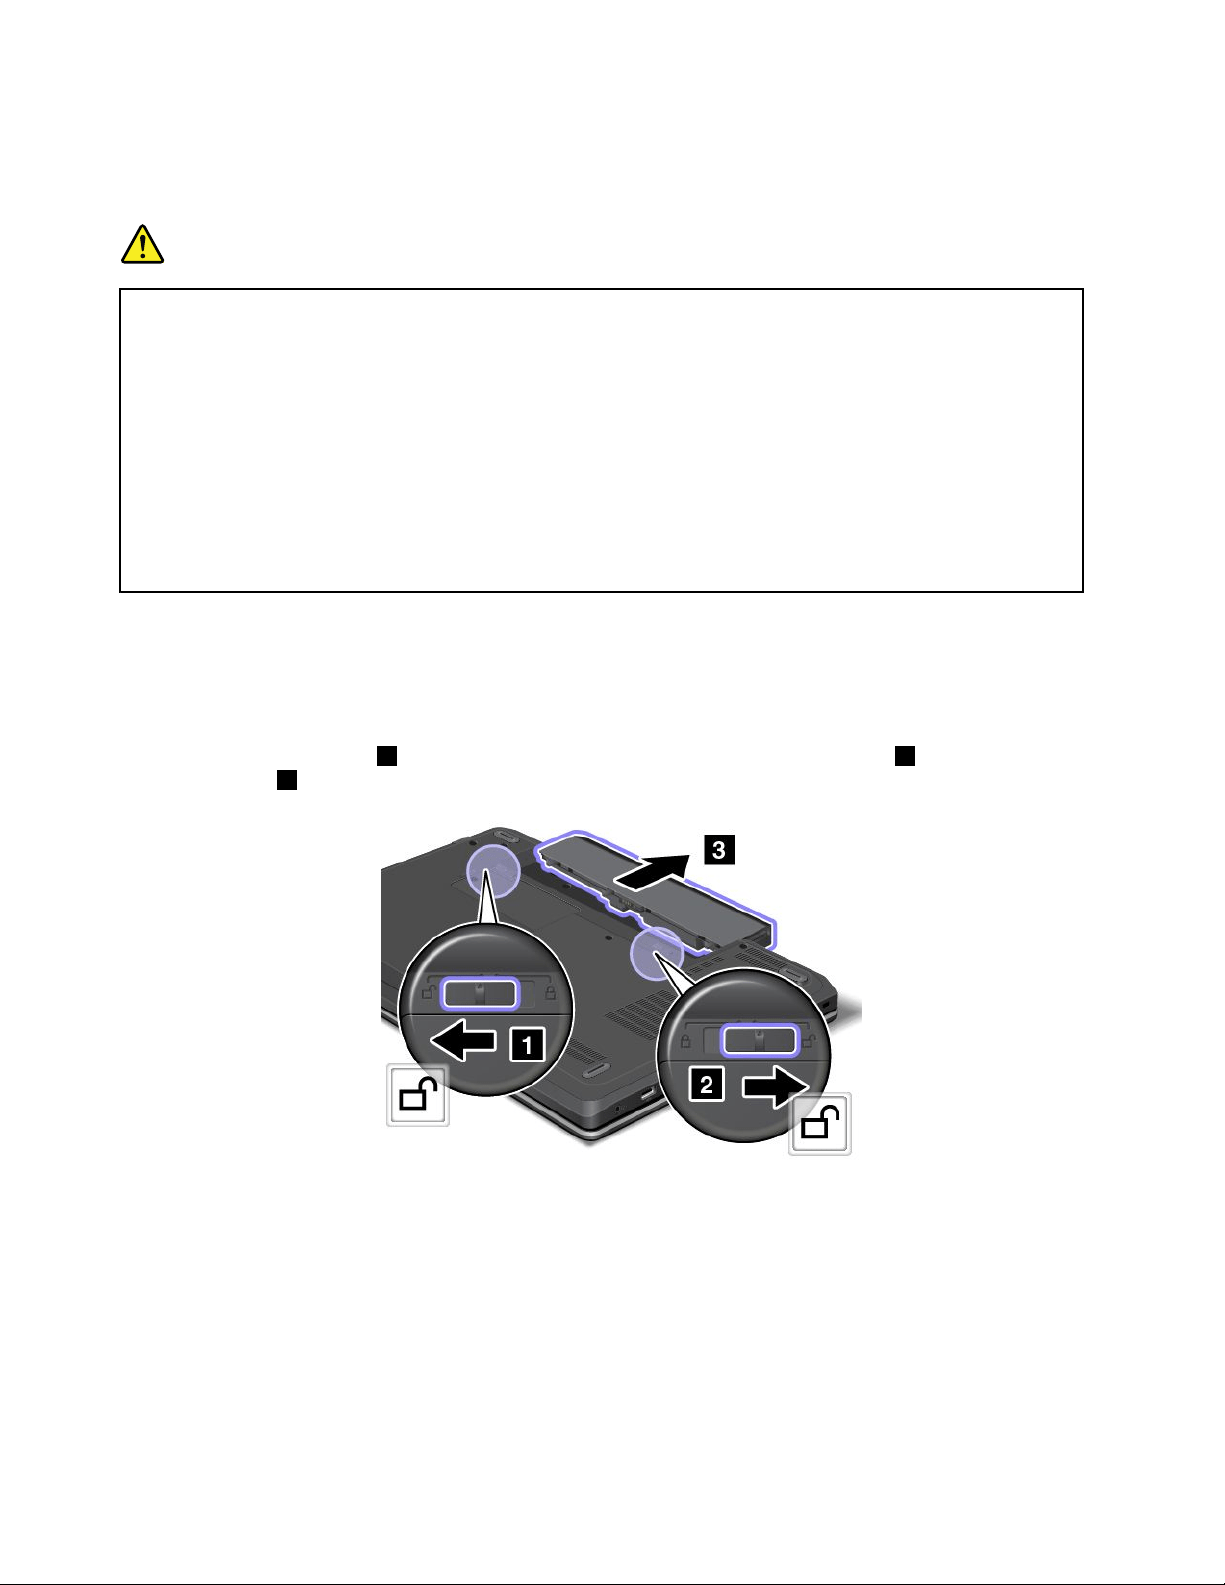
Note:Ifanunauthorizedbatteryisinstalled,thefollowingmessagewillbedisplayed:“Thebatteryinstalled
isnotsupportedbythissystemandwillnotcharge.PleasereplacethebatterywiththecorrectLenovo
batteryforthissystem.”
DANGER
Iftherechargeablebatterypackisincorrectlyreplaced,thereisdangerofanexplosion.Thebattery
packcontainsasmallamountofharmfulsubstances.Toavoidpossibleinjury:
•ReplaceonlywithabatteryofthetyperecommendedbyLenovo.
•Keepthebatterypackawayfromre.
•Donotexposeittoexcessiveheat.
•Donotexposeittowaterorrain.
•Donotshort-circuitit.
•Donotdrop,crush,puncture,orsubjecttostrongforces.Batteryabuseormishandlingcan
causethebatterytooverheat,whichcancausegassesorameto“vent”fromthebattery
packorcoincell.
Toreplacethebattery,dothefollowing:
1.Turnoffthecomputer,orenterhibernationmode.Thendisconnecttheacpoweradapterandallcables
fromthecomputer.
2.Closethecomputerdisplay,andturnthecomputerover.
3.Unlockthebatterylatch1.Holdingthebatterylockleverintheunlockedposition2,andremovethe
batterypack3.
70UserGuide
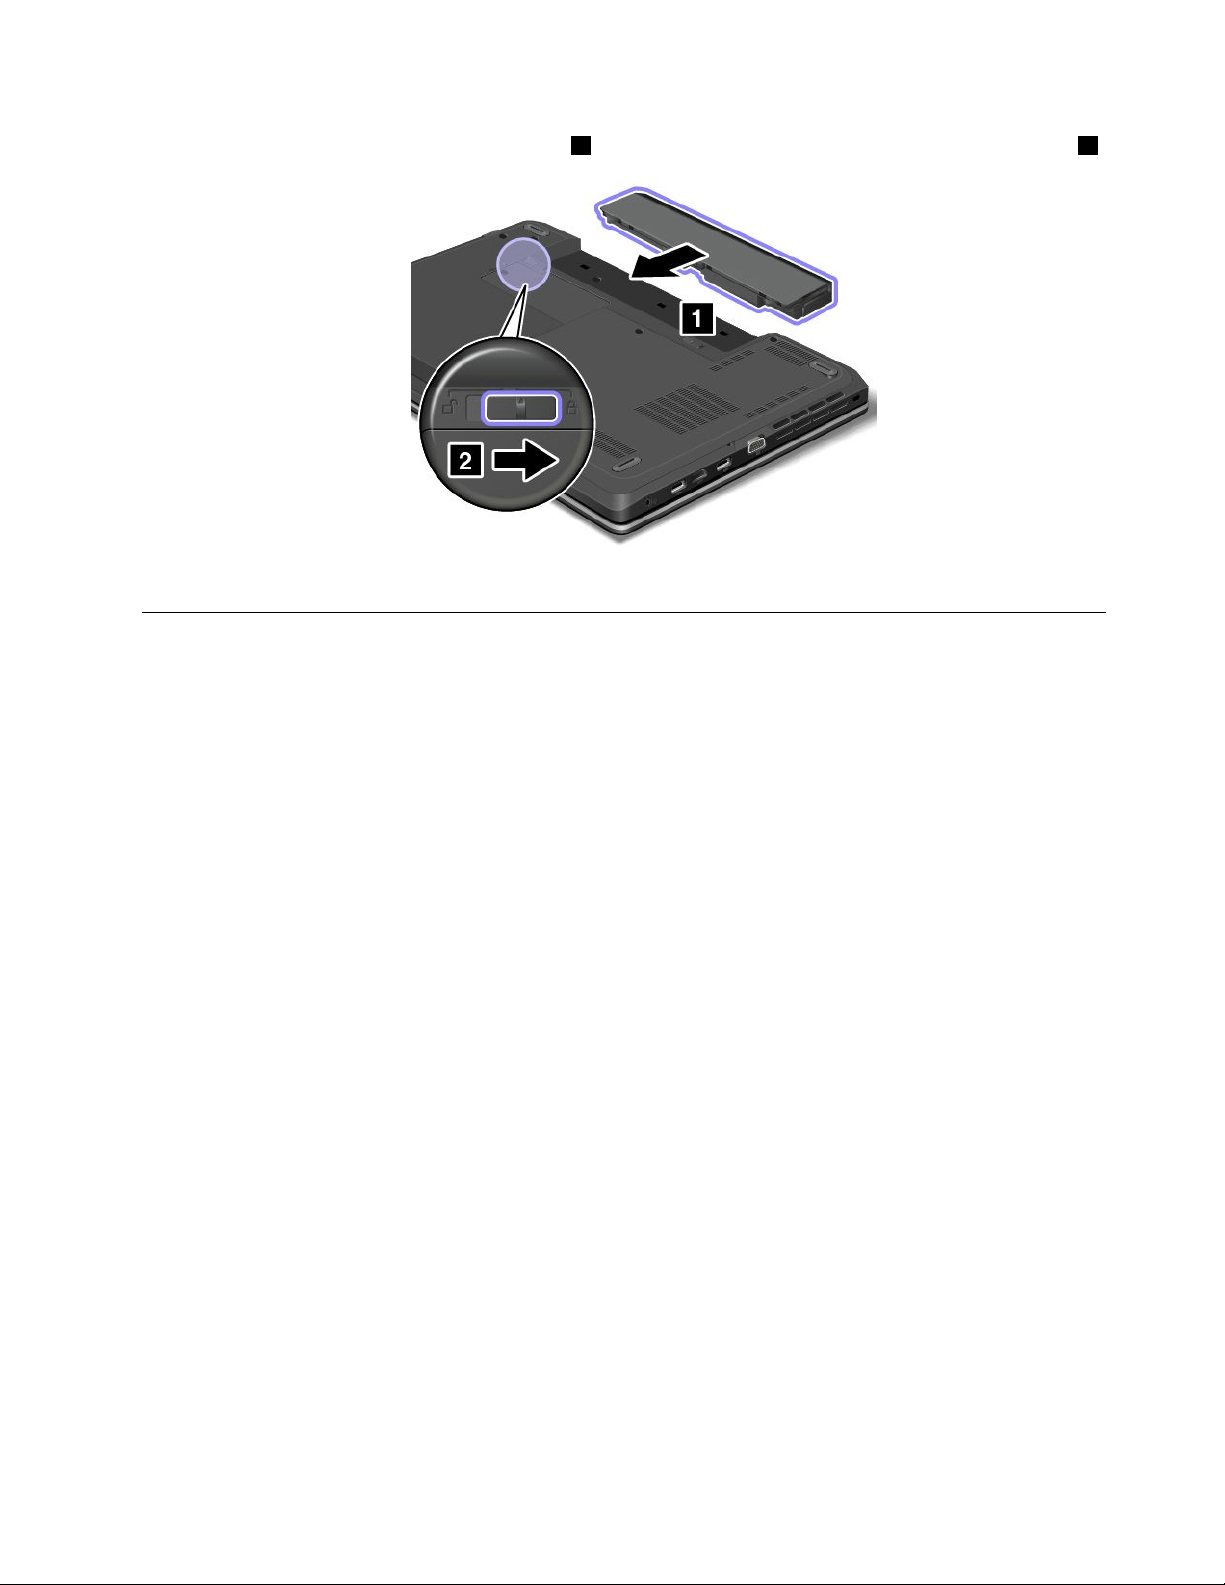
4.Insertanewbatteryuntilitclicksintoplace1,andthenslidethebatterylatchtothelockedposition2.
5.Turnthecomputeroveragain.Connecttheacpoweradapterandallcables.
ReplacingtheSIMcard
Beforeyoustart,printtheseinstructions.
IfyourcomputerisequippedwithaSIMcardslot,yourcomputermightrequireaSIMcardtoestablish
wirelessWANconnections.Dependingonthecountryofdelivery,youmightneedtopurchaseaSIM
cardoraSIMcardmightalreadybeinstalledinyourcomputerorispartoftheshippingcontentsthat
comewithyourcomputer.
IfyoundaSIMcardincludedintheshippingcontents,adummycardisinstalledintheSIMcardslot.
Note:TheSIMcardisidentiedbytheICchipmountedononesideofthecard.
ToreplacetheSIMcard,dothefollowing:
1.Turnoffthecomputer;thendisconnecttheacpoweradapterandallcablesfromthecomputer.Wait
threetoveminutestoletthecomputercool.
2.Closethecomputerdisplay,andturnitover.
3.Removethebattery.See“Replacingthebattery”onpage69.
Chapter6.Replacingdevices71
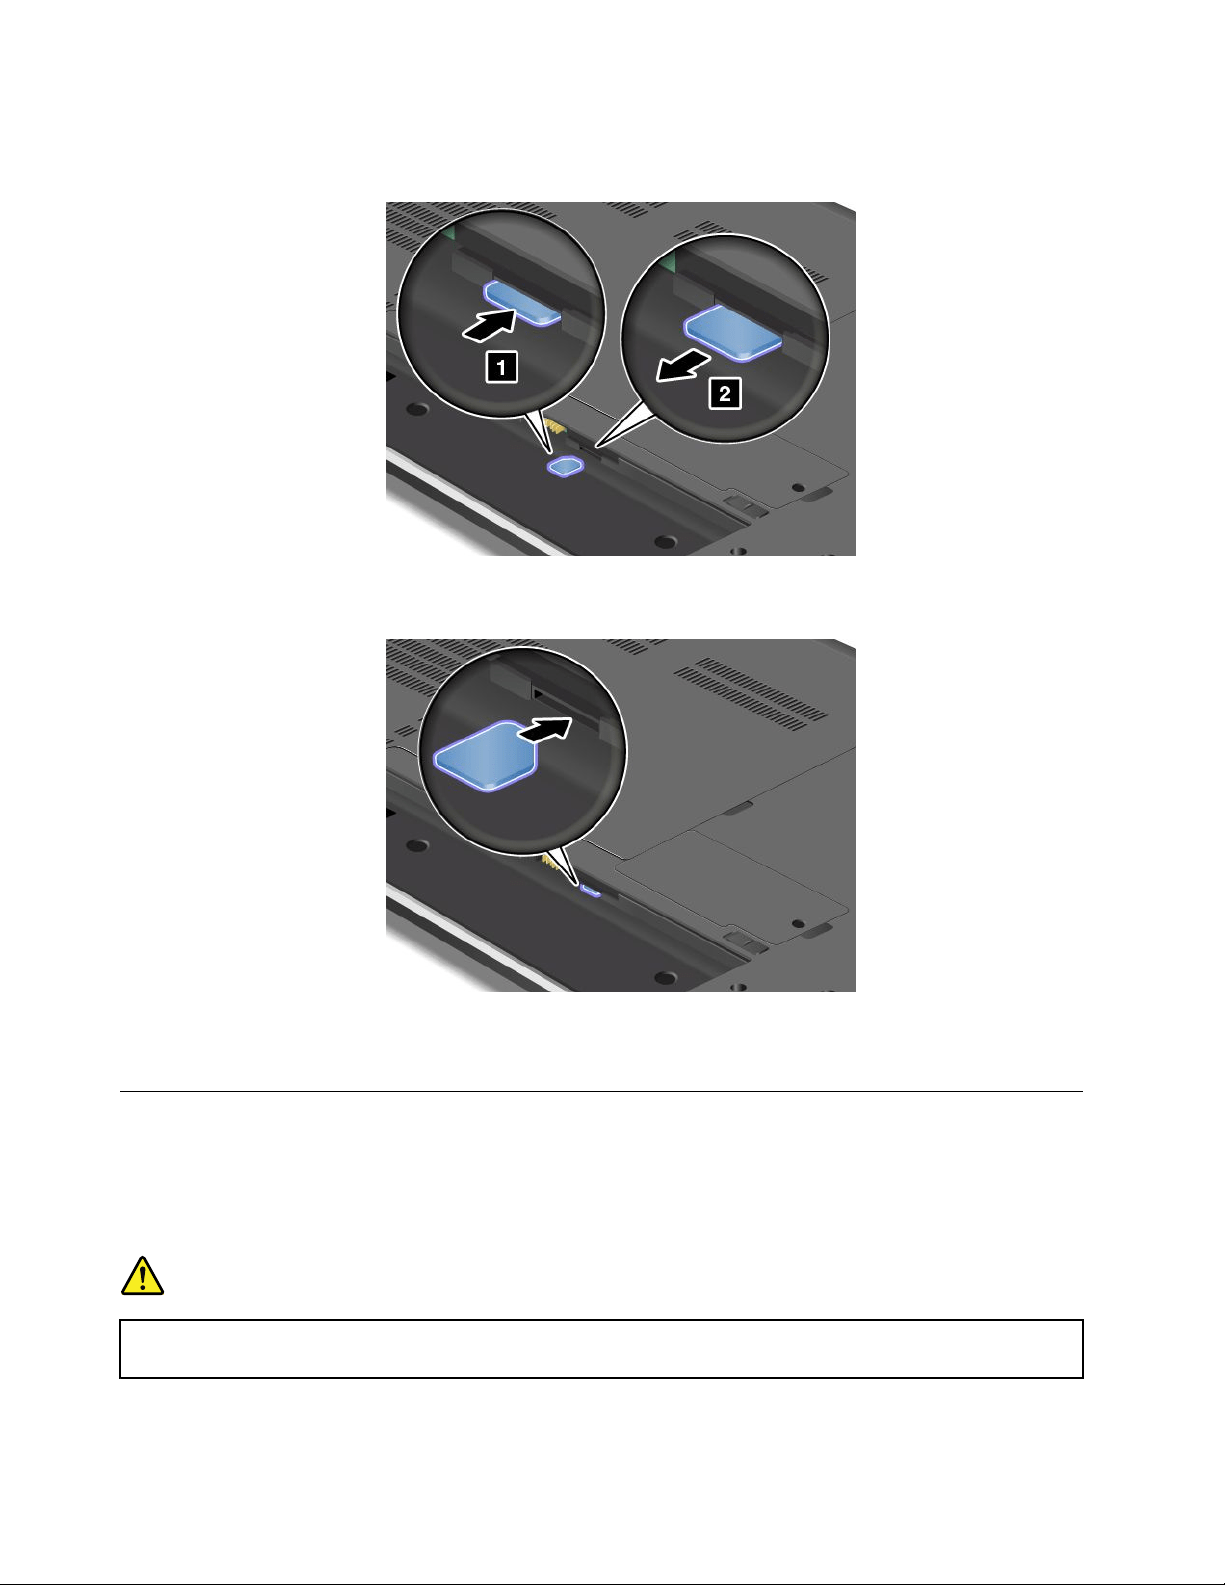
4.LocatetheSIMcardslotinsidethebatterycompartment.Gentlypushthecardtoremoveitfromthe
computer.
5.Holdthenewcardwiththemetalcontactfacingupwardandgoingintotheslotrst.Then,insert
thecardrmlyintotheslotuntilyouhearaclick.
6.Reinstallthebattery.See“Replacingthebattery”onpage69.
7.Turnthecomputeroveragain.Connecttheacpoweradapterandallcables.
Replacingthekeyboard
ThinkPadEdgeE440
Beforeyoustart,printtheseinstructions.
DANGER
Duringelectricalstorms,donotconnectthecabletoordisconnectitfromthetelephoneoutlet
onthewall.
72UserGuide
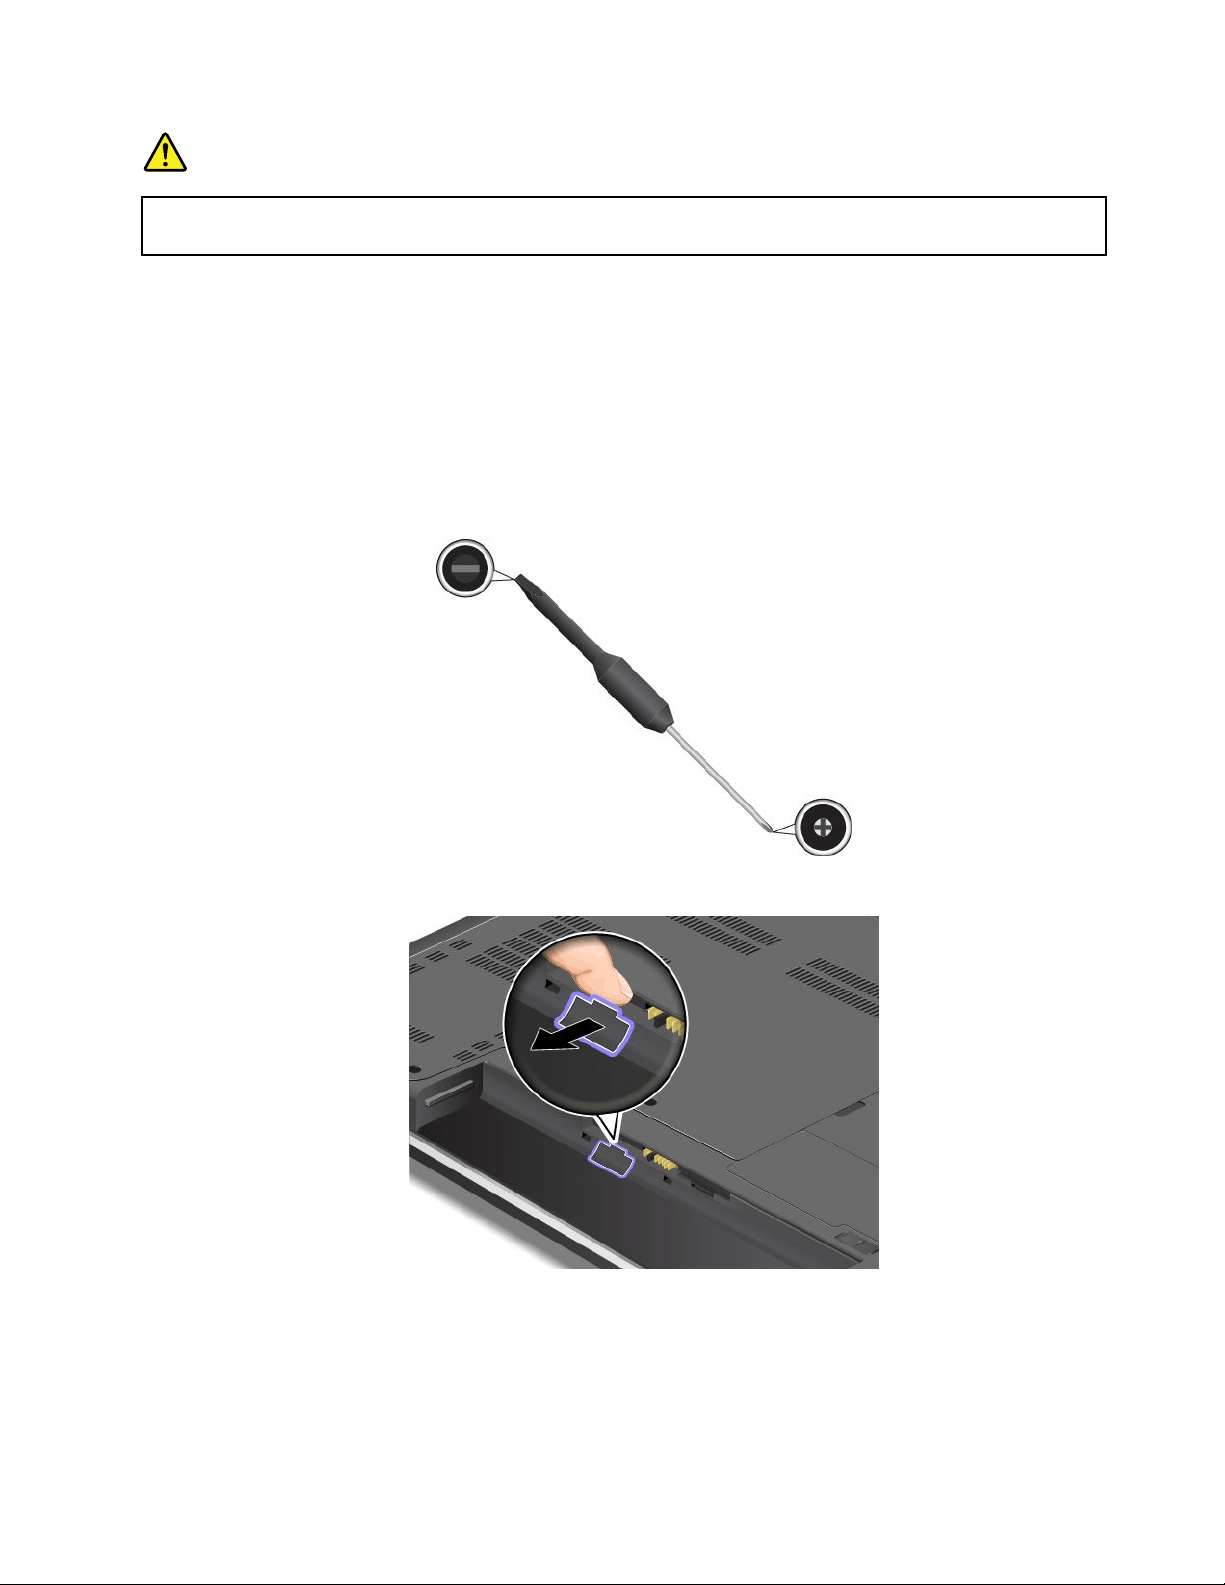
DANGER
Electriccurrentfrompower,telephone,andcommunicationcablesishazardous.Toavoidshock
hazard,disconnectthecablesbeforeopeningthecoverofthisslot.
Removingthekeyboard
Toremovethekeyboard,dothefollowing:
1.Turnoffthecomputerandthendisconnecttheacpoweradapterandallcablesfromthecomputer.Wait
threetoveminutestoletthecomputercool.
2.Closethecomputerdisplayandturnthecomputerover.
3.Removethebattery.See“Replacingthebattery”onpage69.
4.Findthekeyboardmulti-toolintheshippingpackageofthenewkeyboard.Thefollowingillustration
showsakeyboardmulti-tool.
5.Unlockthekeyboardframe.
Chapter6.Replacingdevices73
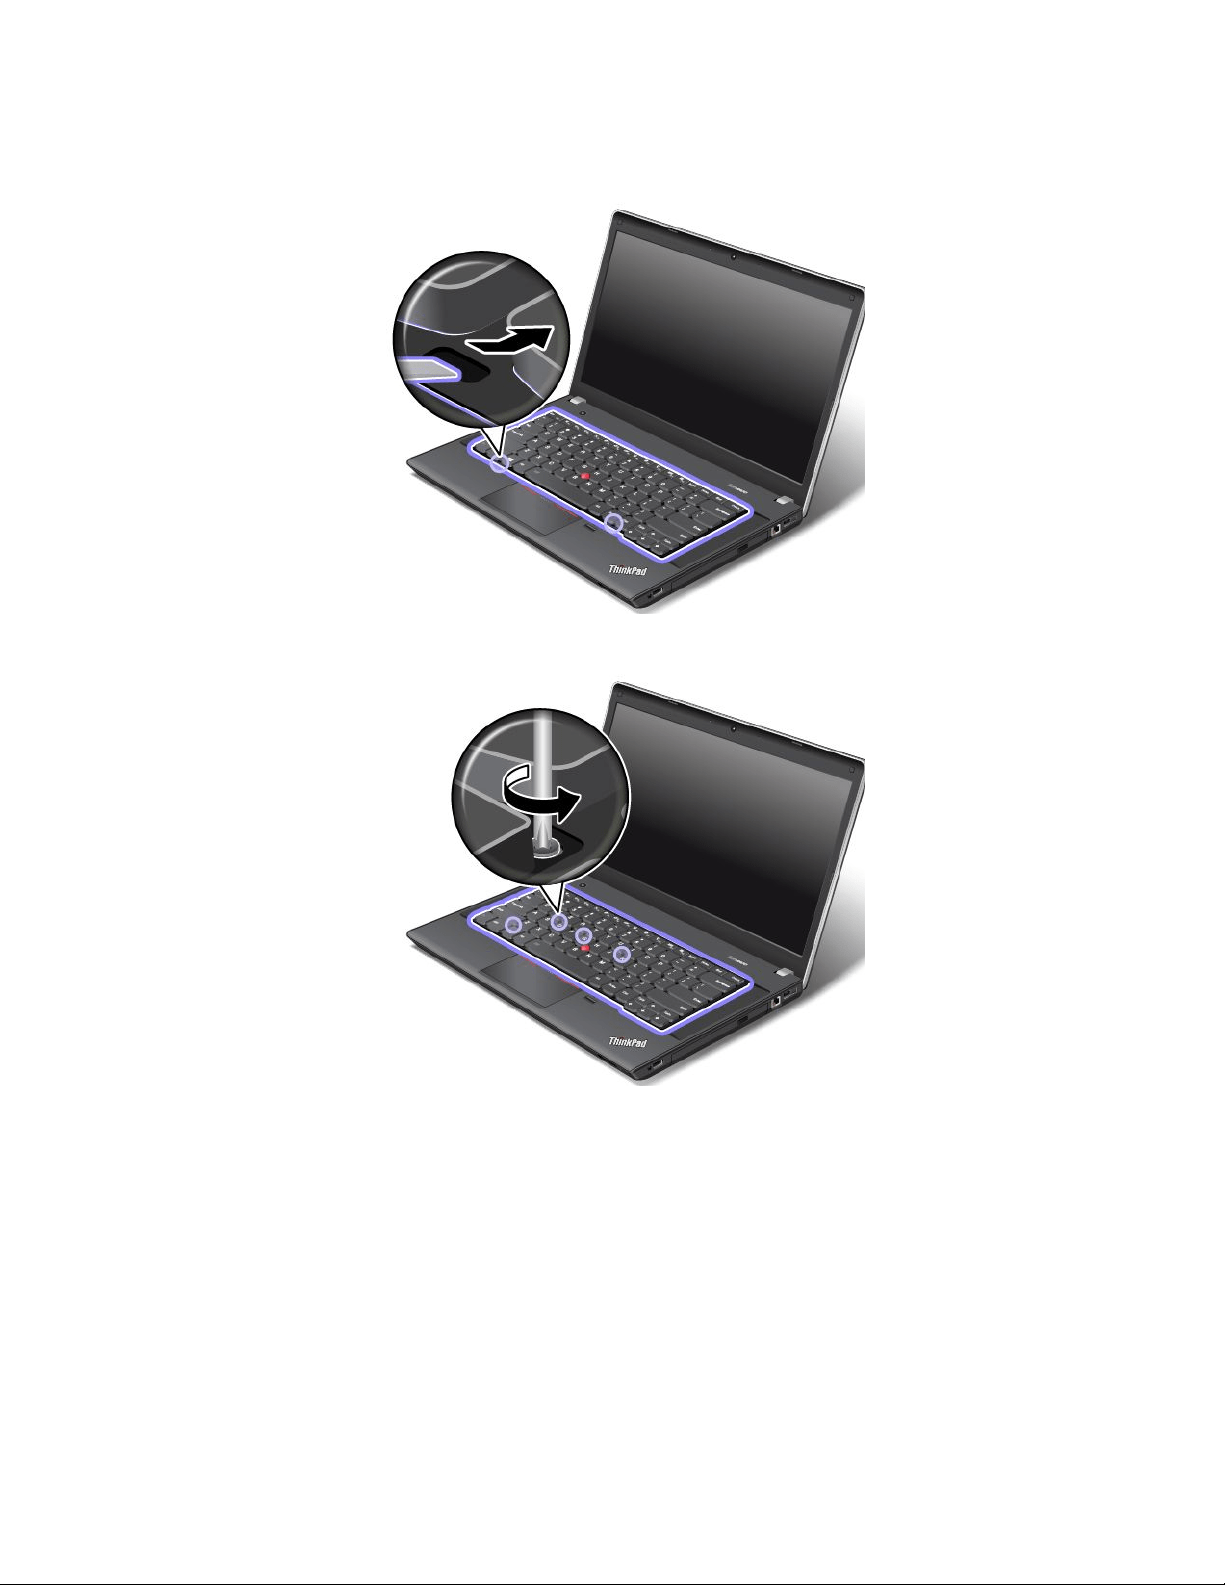
6.Torevealthescrewheadsbeneaththekeyboardframe,slidethekeyboardframeforwardby2.5mm
(0.1inch)withthekeyboardmulti-tool.
7.Loosenthescrewsthatsecurethekeyboardwiththekeyboardmulti-tool.
74UserGuide
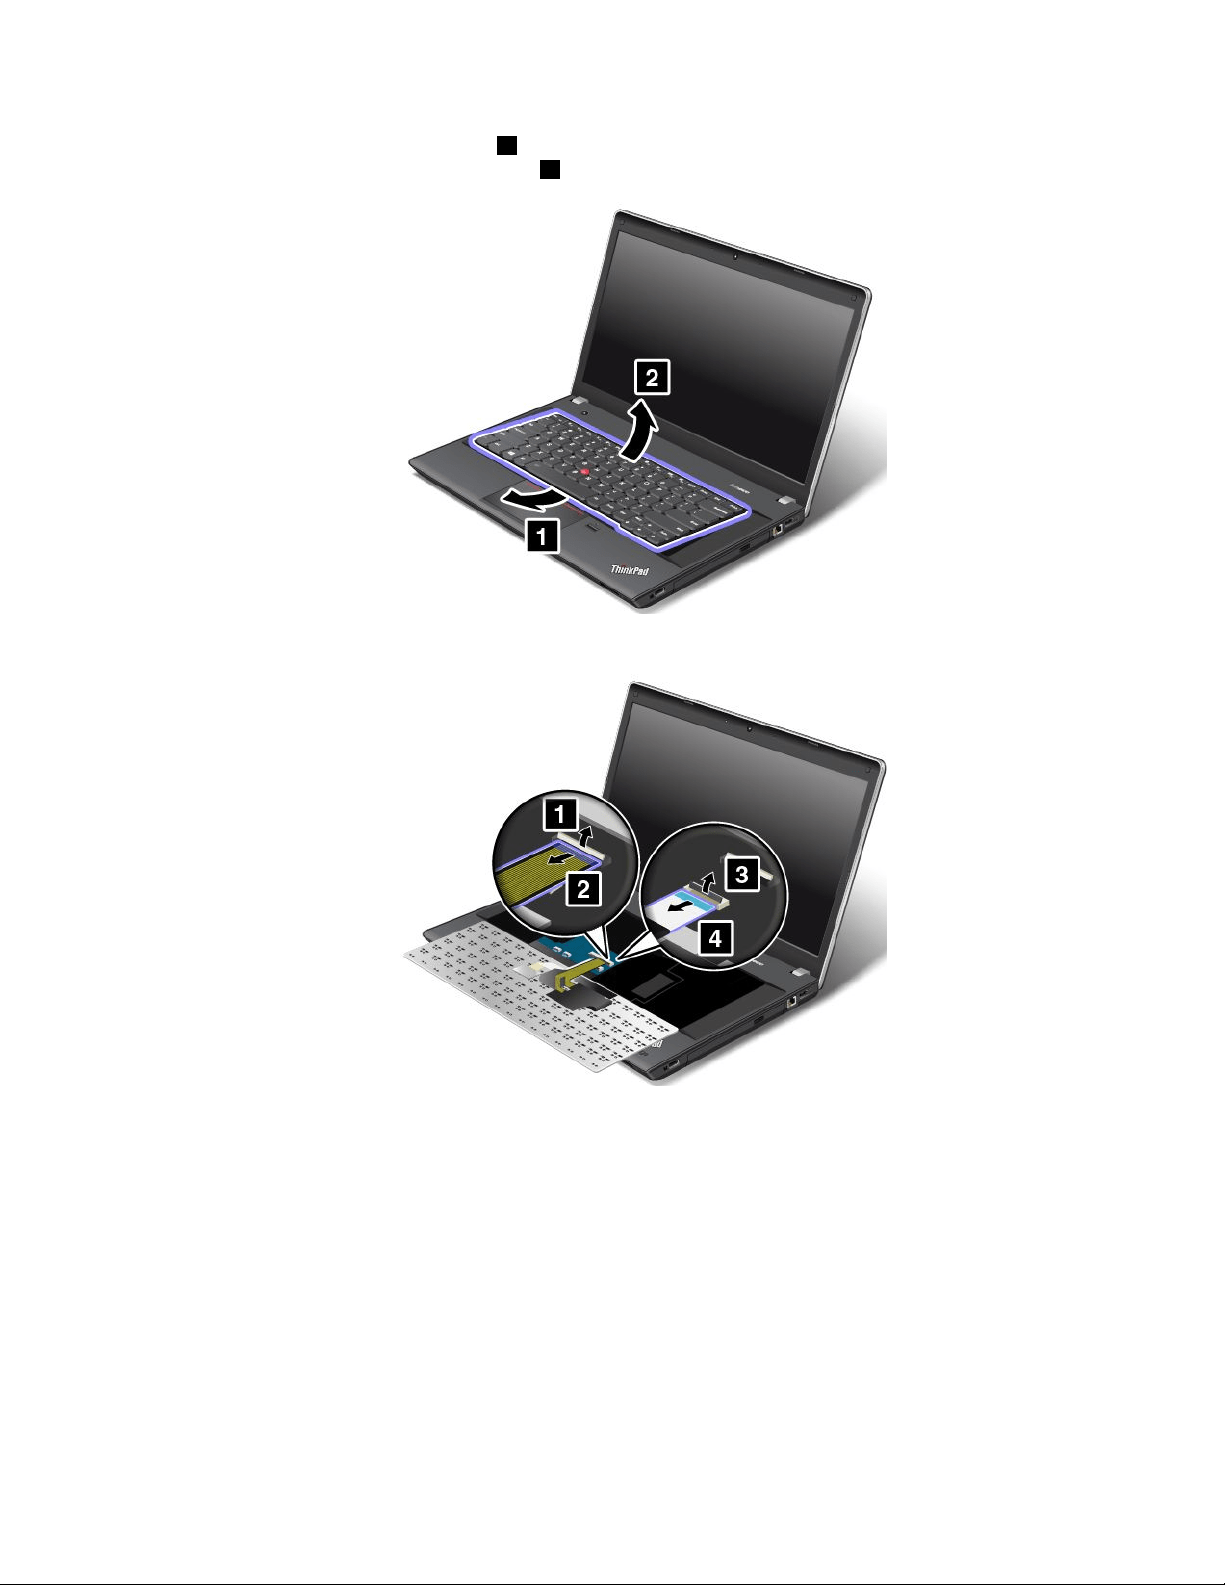
8.Pivotthekeyboardslightlyupward1untilyoucanseetheconnectorsonthebottomsideofthe
keyboard.Thenturnoverthekeyboard2.
9.Gentlyputthekeyboardonthepalmrestanddetachtheconnectors.Thenremovethekeyboard.
Installingthekeyboard
Toinstallthekeyboard,dothefollowing:
Chapter6.Replacingdevices75
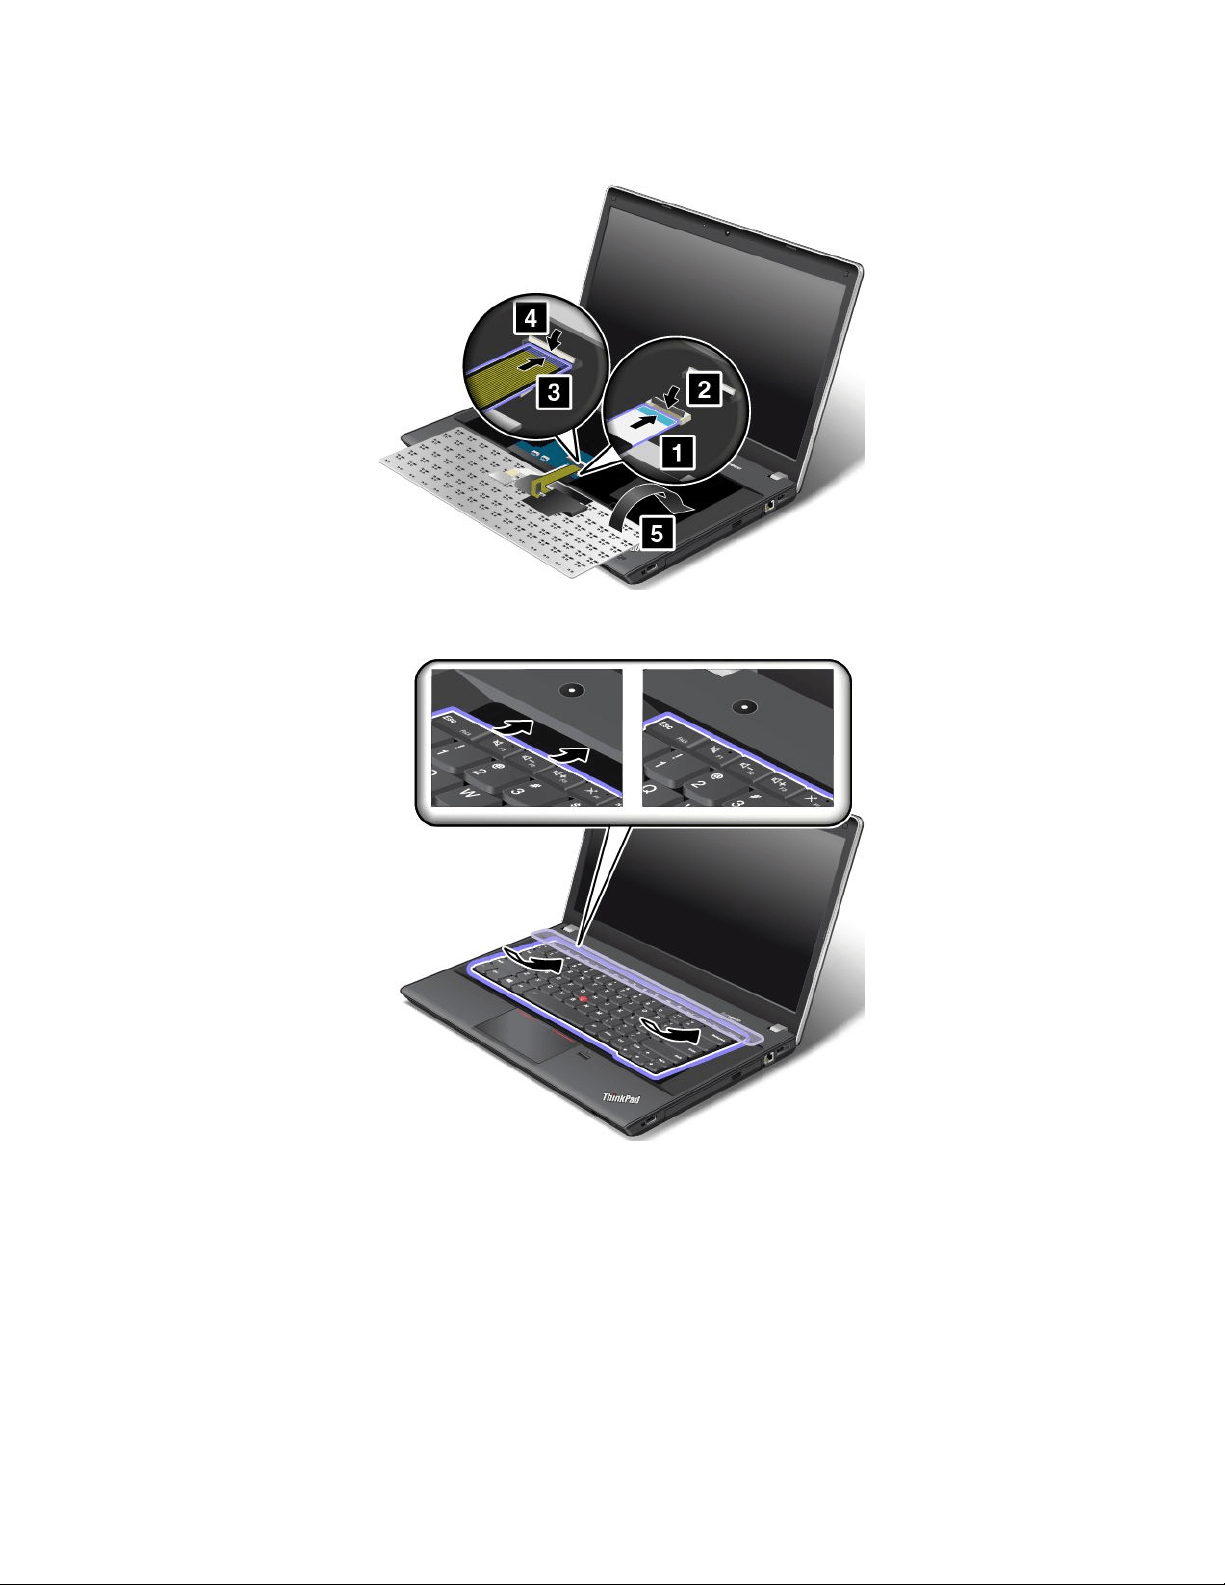
1.Attachtheconnectorsandthenturnoverthekeyboard.
2.Insertthekeyboardintothespaceundertheframeofthekeyboardbezelasshown.
76UserGuide
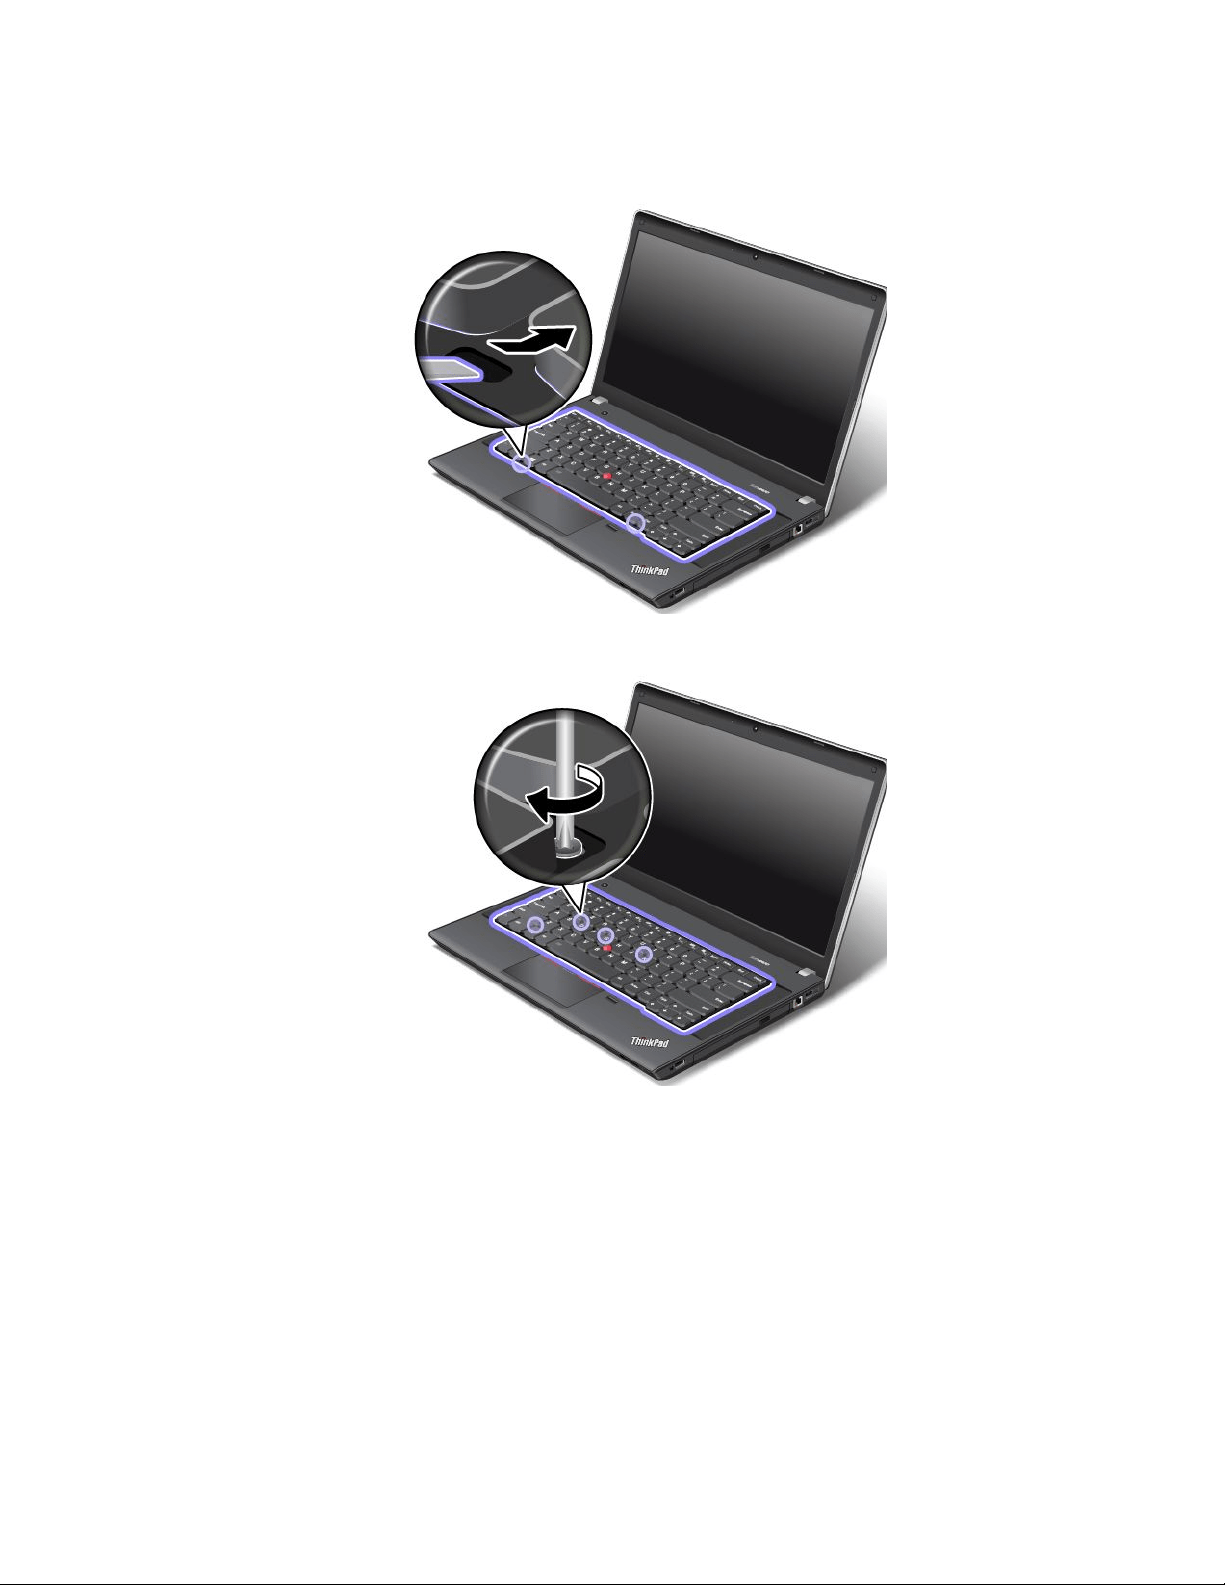
3.Revealthescrewheadsbyslidingthekeyboardframeforwardwiththekeyboardmulti-tool.Ensure
thatthescrewheadsareexposedcompletely.
4.Tightenthescrewswiththekeyboardmulti-tooltosecurethekeyboardinplace.
Chapter6.Replacingdevices77
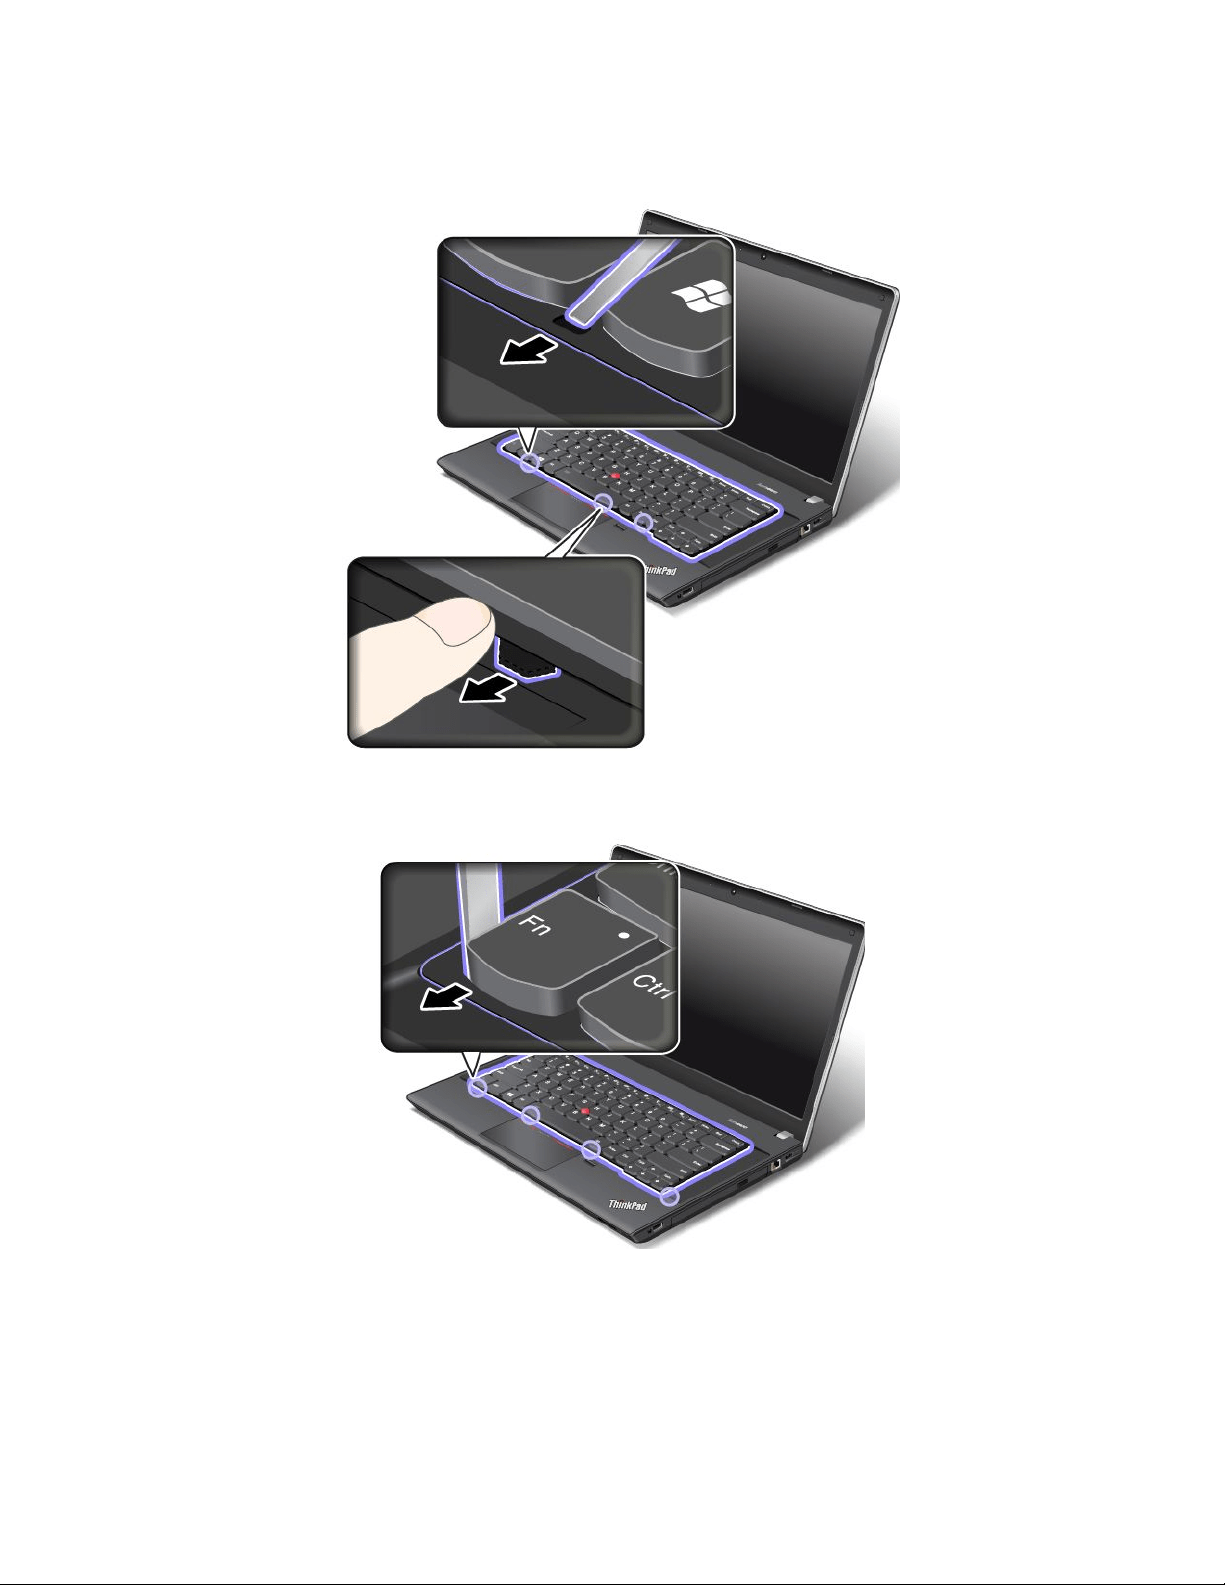
5.Slidethekeyboardframebackwardby2.5mm(0.1inch)withthekeyboardmulti-tool.Hidethelatches
ofthekeyboardframeunderthekeyboardbezelbypushingthelatcheswithyourngerasshown.
6.Adjustthekeyboardframeinplacewiththekeyboardmulti-toolandensurethatallthelatchesare
securedunderthekeyboardbezel.
78UserGuide
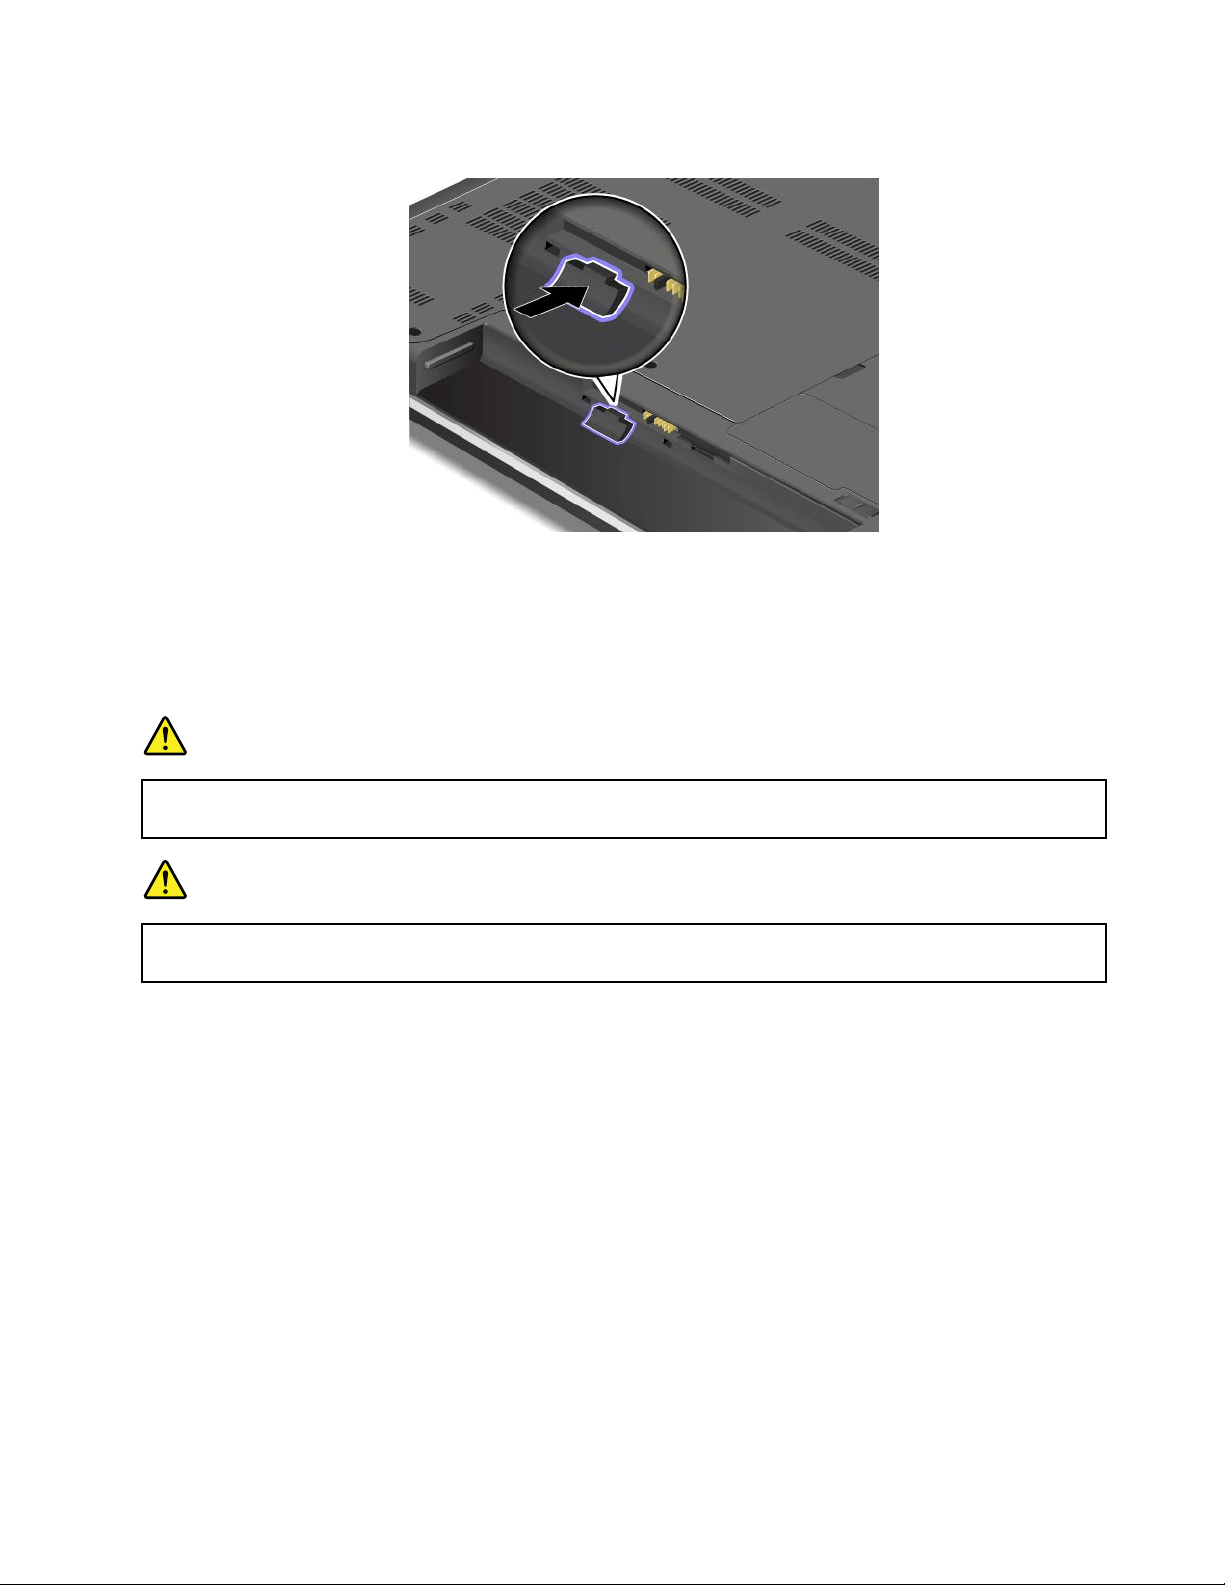
7.Turnthecomputeroverandlockthekeyboardframe.
8.Reinstallthebattery.See“Replacingthebattery”onpage69.
9.Turnthecomputeroveragain.Connecttheacpoweradapterandallcables.
ThinkPadEdgeE540
Beforeyoustart,printtheseinstructions.
DANGER
Duringelectricalstorms,donotconnectthecabletoordisconnectitfromthetelephoneoutlet
onthewall.
DANGER
Electriccurrentfrompower,telephone,andcommunicationcablesishazardous.Toavoidshock
hazard,disconnectthecablesbeforeopeningthecoverofthisslot.
Removingthekeyboard
Toremovethekeyboard,dothefollowing:
1.Turnoffthecomputerandthendisconnecttheacpoweradapterandallcablesfromthecomputer.Wait
threetoveminutestoletthecomputercool.
2.Closethecomputerdisplayandturnthecomputerover.
3.Removethebattery.See“Replacingthebattery”onpage69.
Chapter6.Replacingdevices79
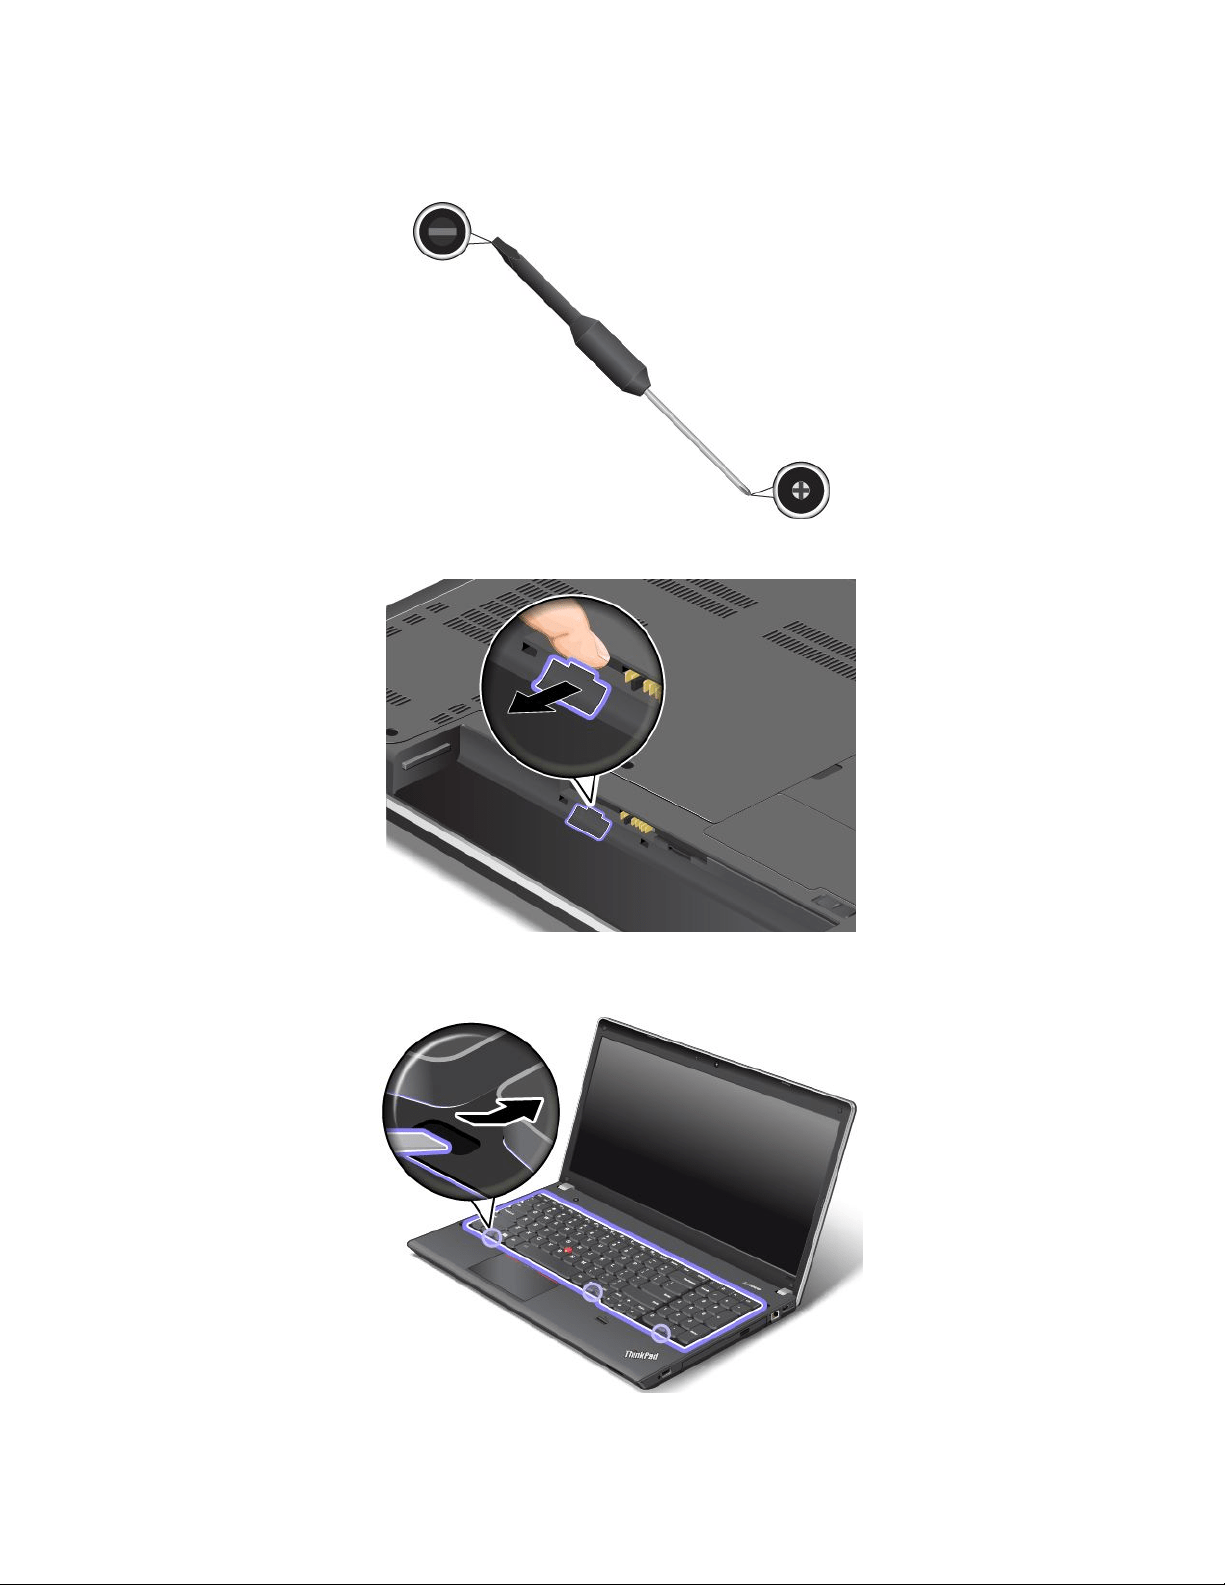
4.Findthekeyboardmulti-toolintheshippingpackageofthenewkeyboard.Thefollowingillustration
showsakeyboardmulti-tool.
5.Unlockthekeyboardframe.
6.Torevealthescrewheadsbeneaththekeyboardframe,slidethekeyboardframeforwardby2.5mm
(0.1inch)withthekeyboardmulti-tool.
80UserGuide
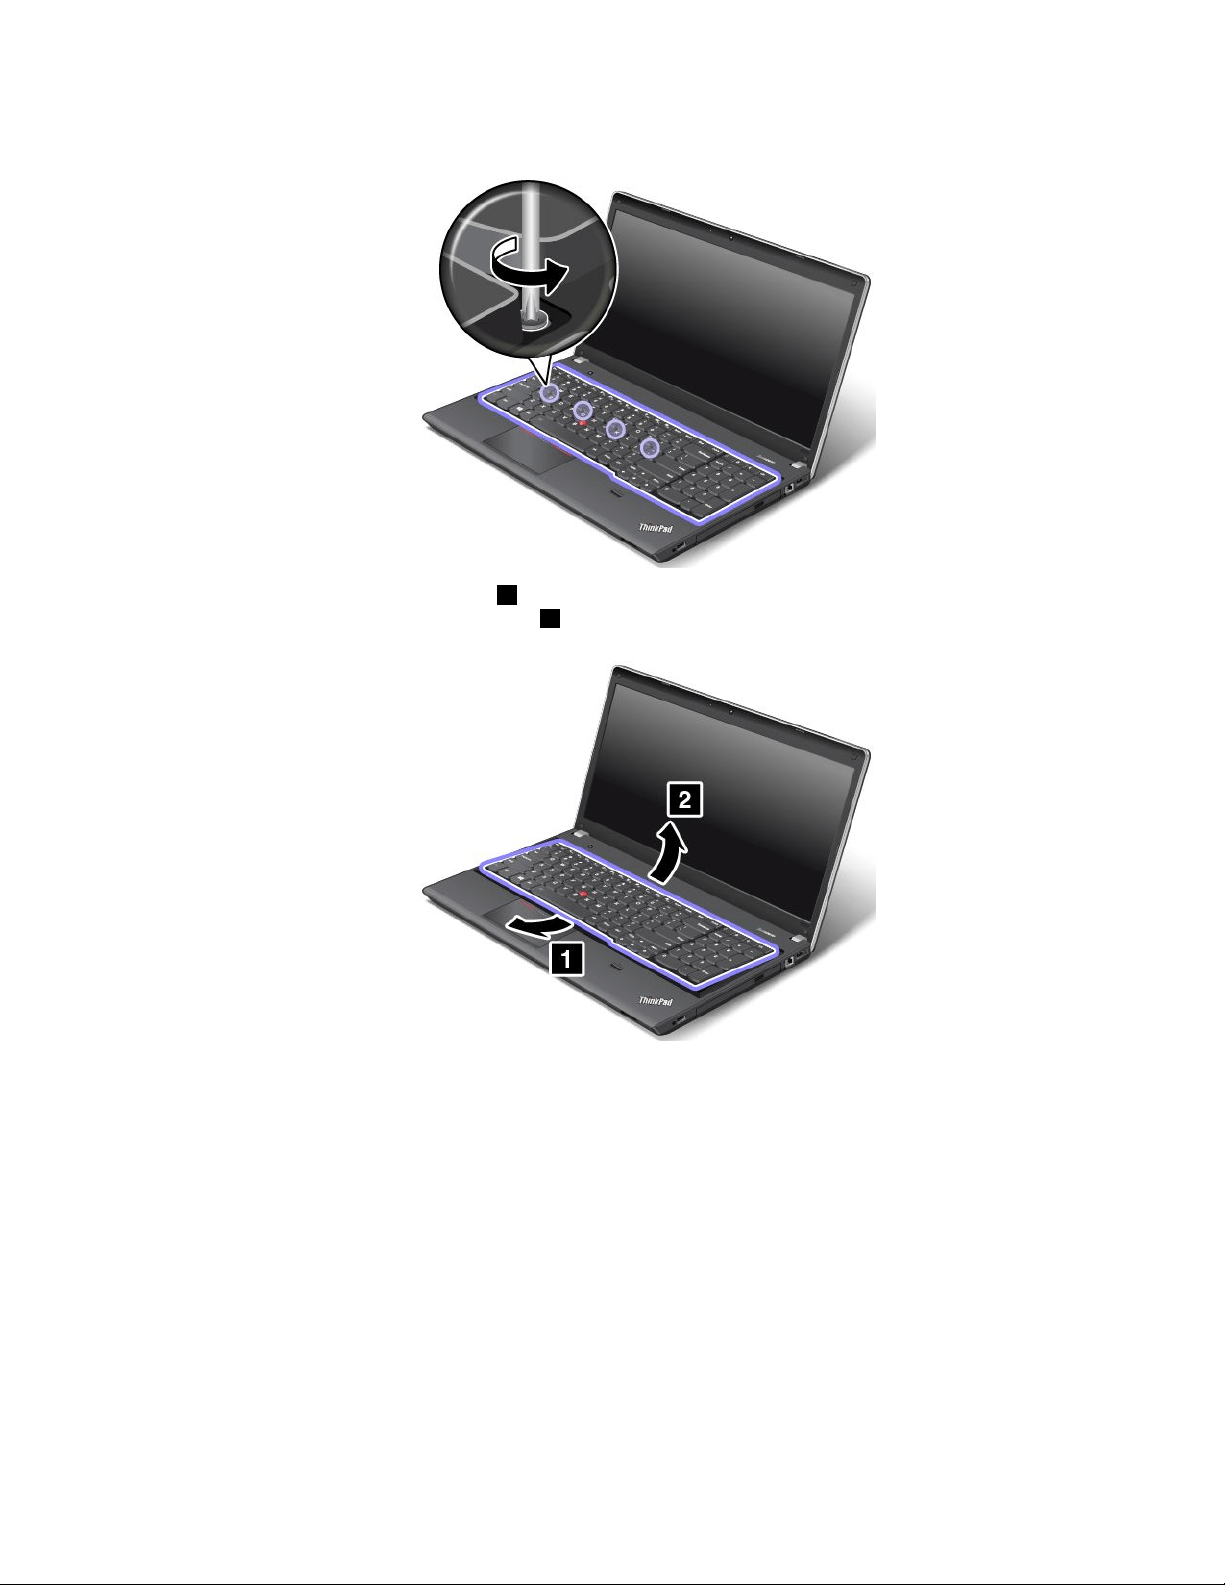
7.Loosenthescrewsthatsecurethekeyboardwiththekeyboardmulti-tool.
8.Pivotthekeyboardslightlyupward1untilyoucanseetheconnectorsonthebottomsideofthe
keyboard.Thenturnoverthekeyboard
2.
Chapter6.Replacingdevices81
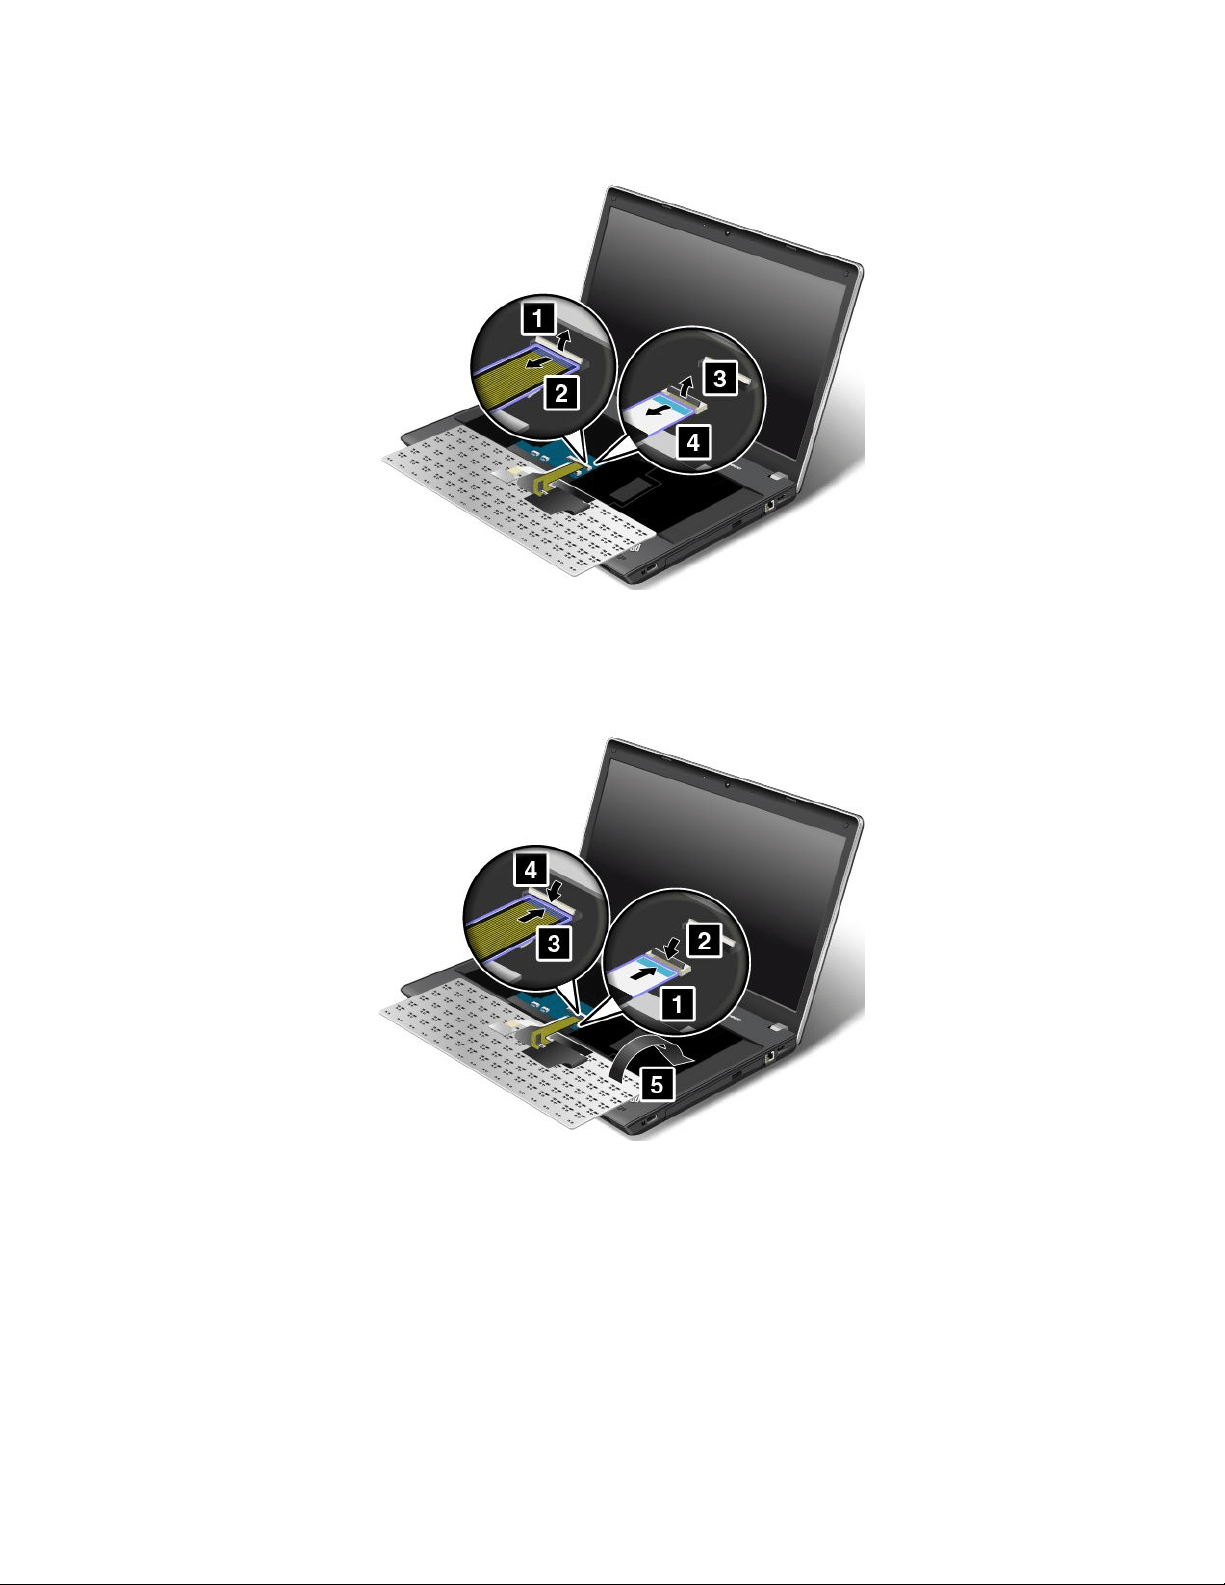
9.Gentlyputthekeyboardonthepalmrestanddetachtheconnectors.Thenremovethekeyboard.
Installingthekeyboard
Toinstallthekeyboard,dothefollowing:
1.Attachtheconnectorsandthenturnoverthekeyboard.
82UserGuide
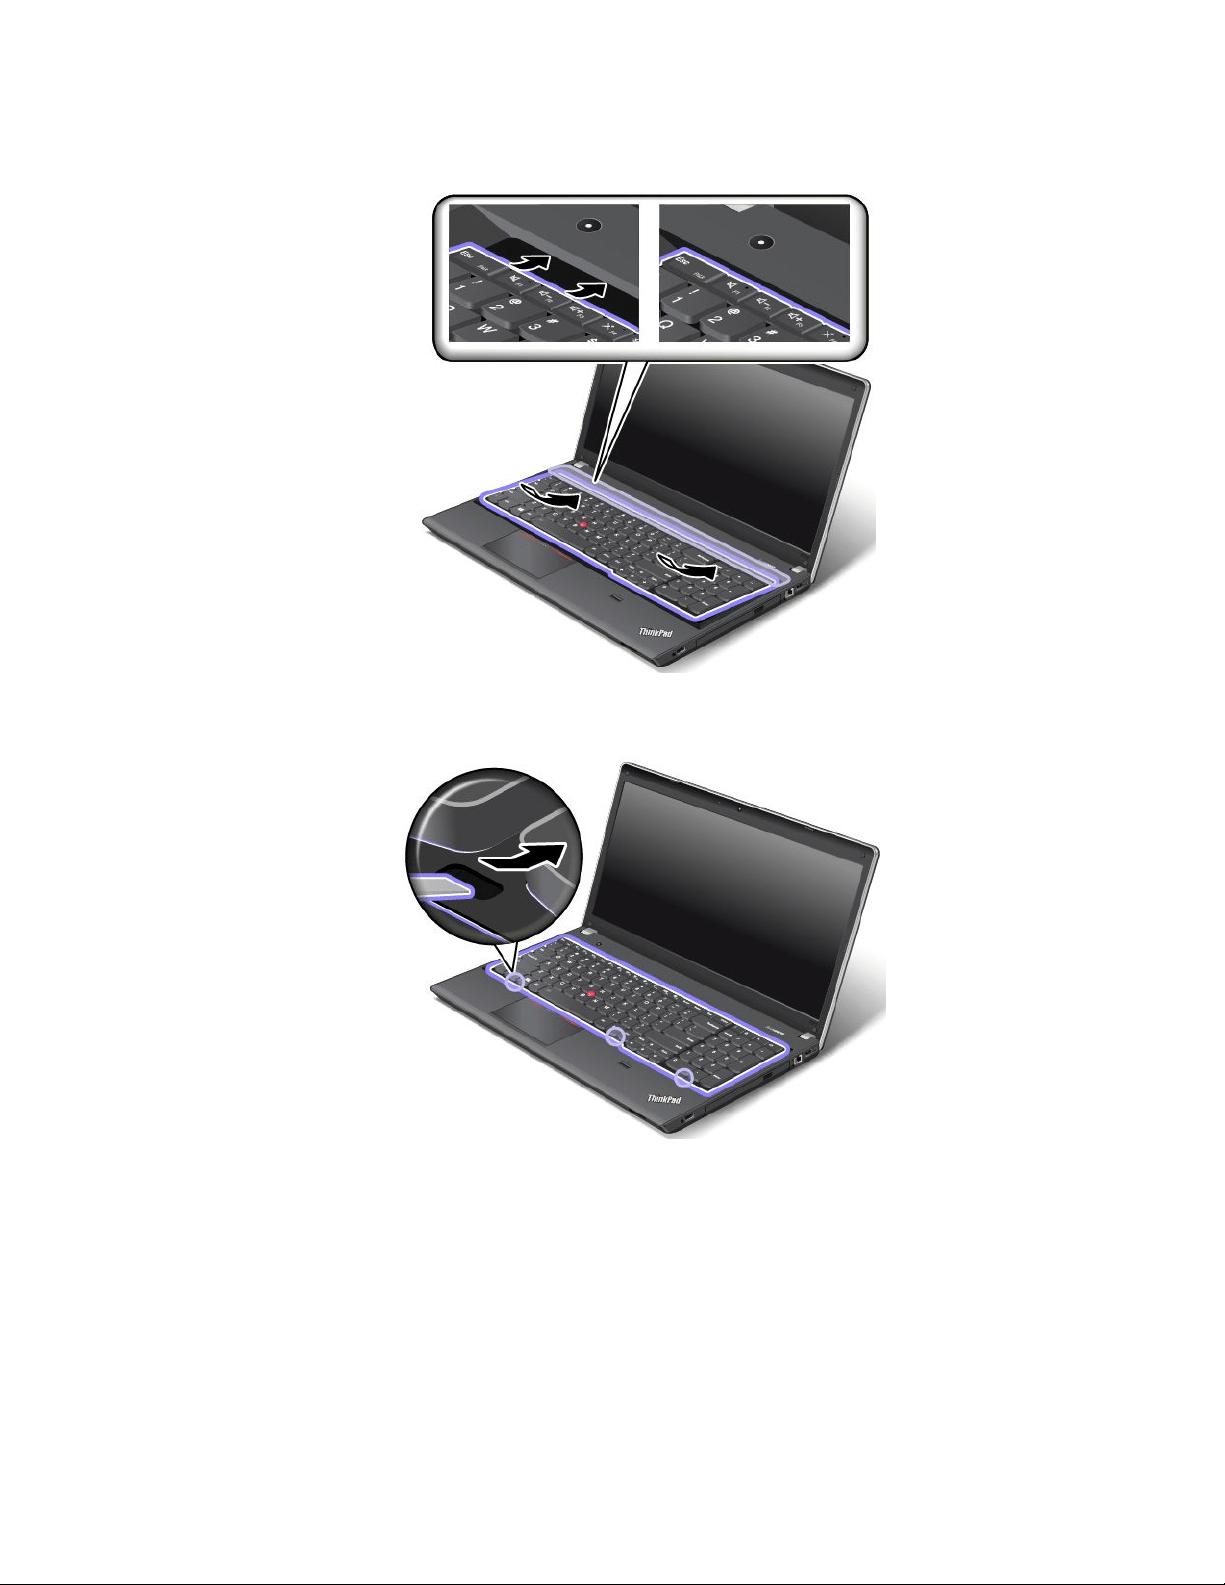
2.Insertthekeyboardintothespaceundertheframeofthekeyboardbezelasshown.
3.Revealthescrewheadsbyslidingthekeyboardframeforwardwiththekeyboardmulti-tool.Ensure
thatthescrewheadsareexposedcompletely.
Chapter6.Replacingdevices83
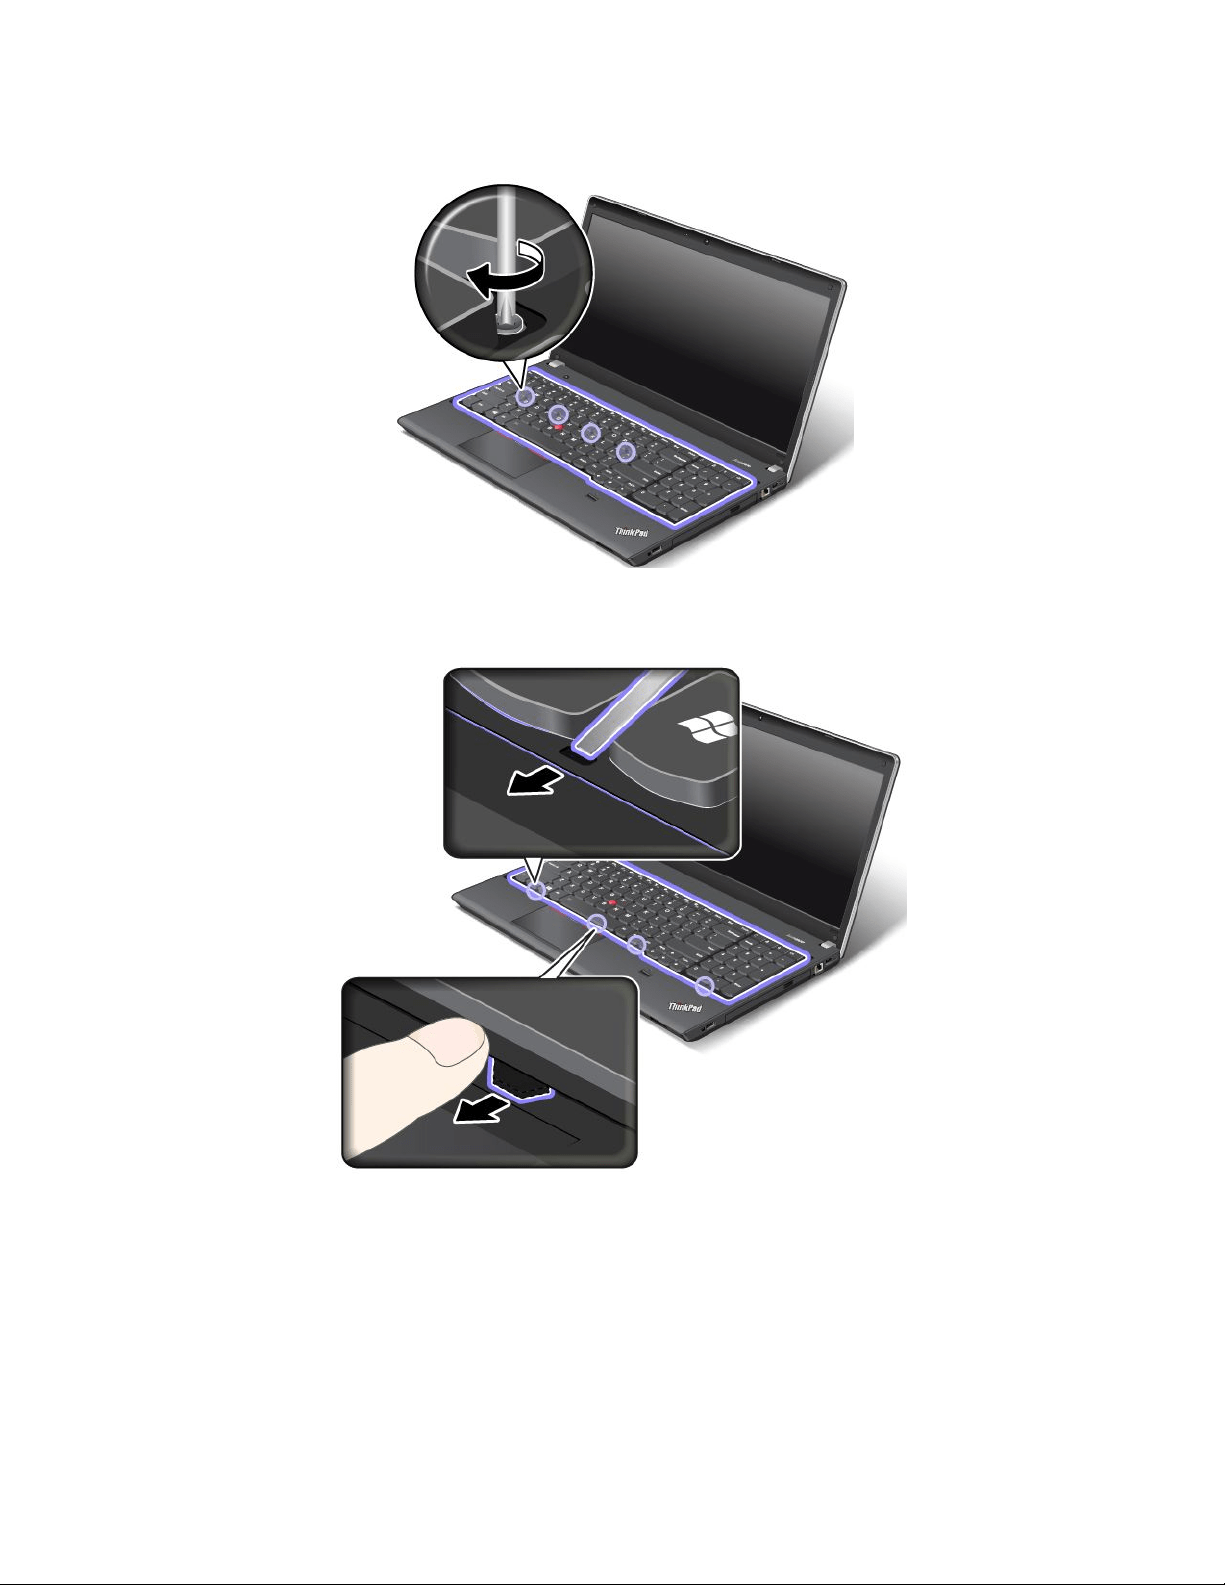
4.Tightenthescrewswiththekeyboardmulti-tooltosecurethekeyboardinplace.
5.Slidethekeyboardframebackwardby2.5mm(0.1inch)withthekeyboardmulti-tool.Hidethelatches
ofthekeyboardframeunderthekeyboardbezelbypushingthelatcheswithyourngerasshown.
84UserGuide
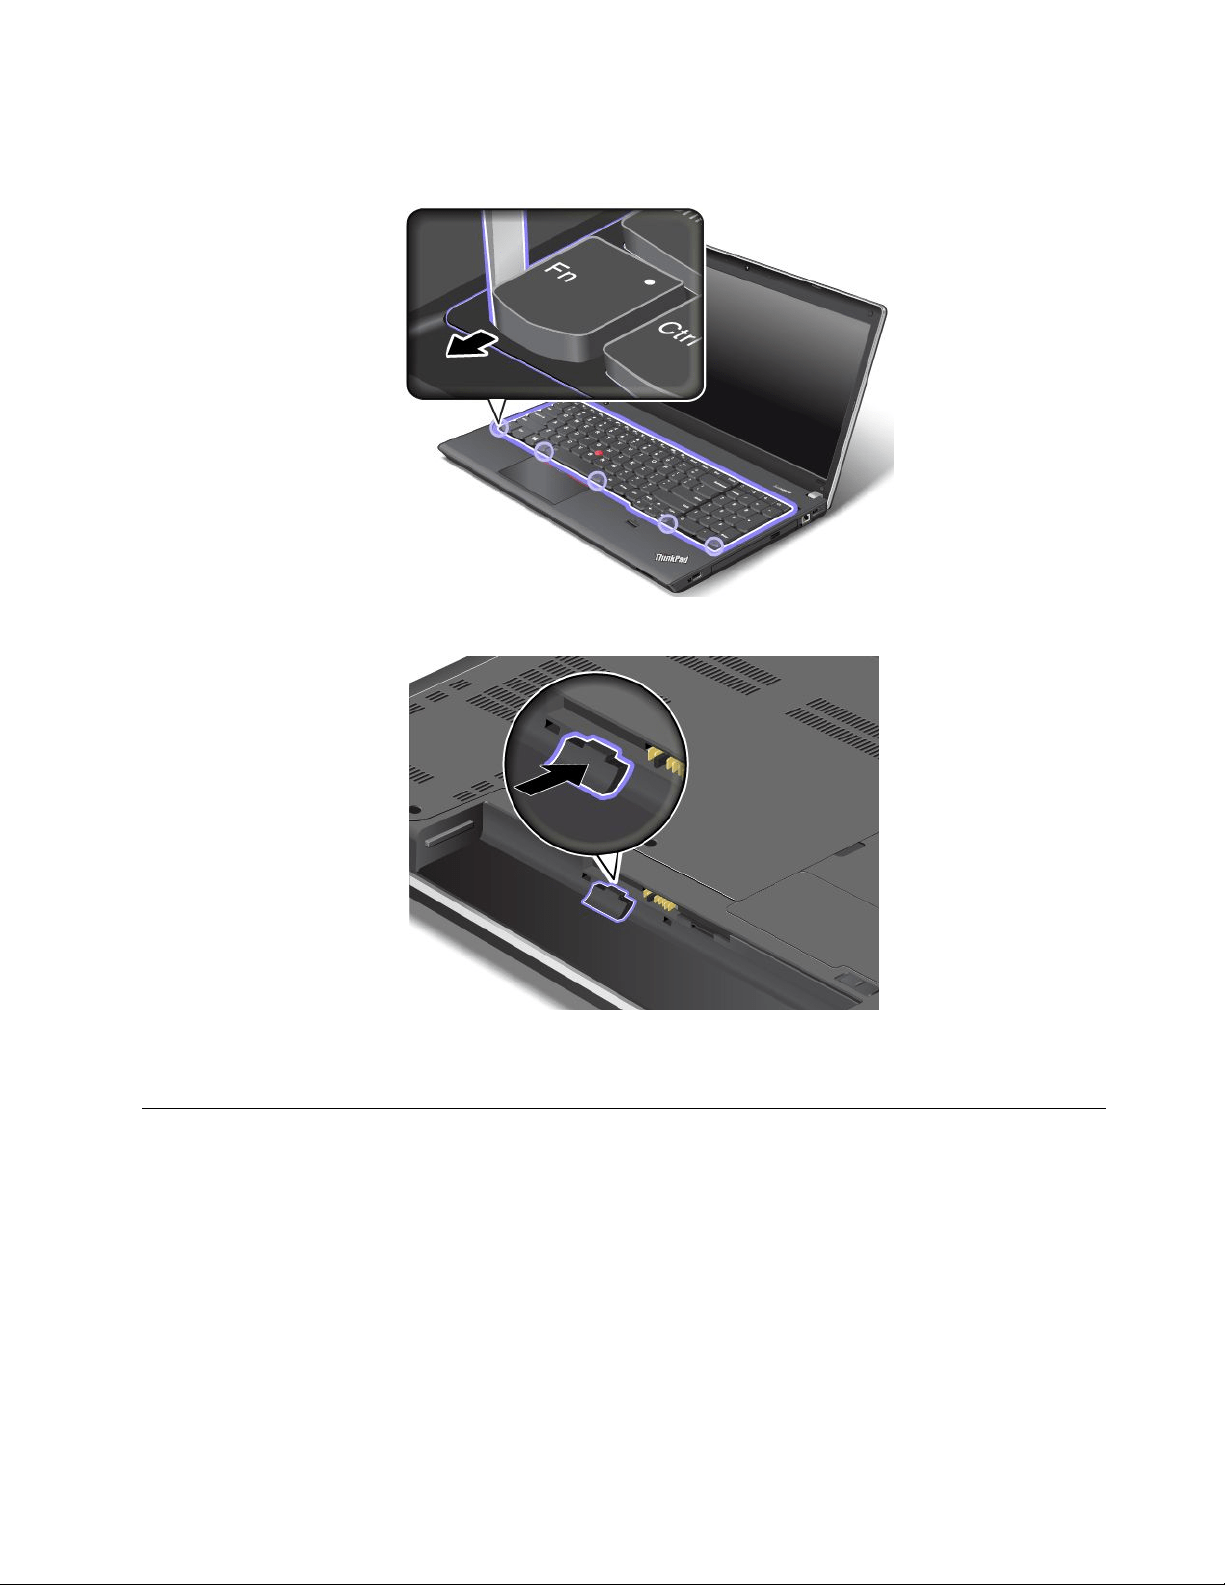
6.Adjustthekeyboardframeinplacewiththekeyboardmulti-toolandensurethatallthelatchesare
securedunderthekeyboardbezel.
7.Turnthecomputeroverandlockthekeyboardframe.
8.Reinstallthebattery.See“Replacingthebattery”onpage69.
9.Turnthecomputeroveragain.Connecttheacpoweradapterandallcables.
Replacingtheharddiskdriveorsolid-statedrive
Beforeyoustart,printtheseinstructions.
Attention:Theharddiskdriveorsolid-statedriveisverysensitive.Incorrecthandlingcancausedamage
andpermanentlossofdata.Observethefollowingguidelines:
•Replacetheharddiskdriveorsolid-statedriveonlyifyouupgradeitorhaveitrepaired.Theconnectors
andslotoftheharddiskdriveorsolid-statedrivearenotdesignedforfrequentchanges,ordrive
swapping.
•Donotdropthedriveorsubjectittophysicalshocks.Putthedriveonamaterial,suchassoftcloth,that
absorbsanyphysicalshocks.
•Donotapplypressuretothecoverofthedrive.
•Donottouchtheconnector.
Chapter6.Replacingdevices85
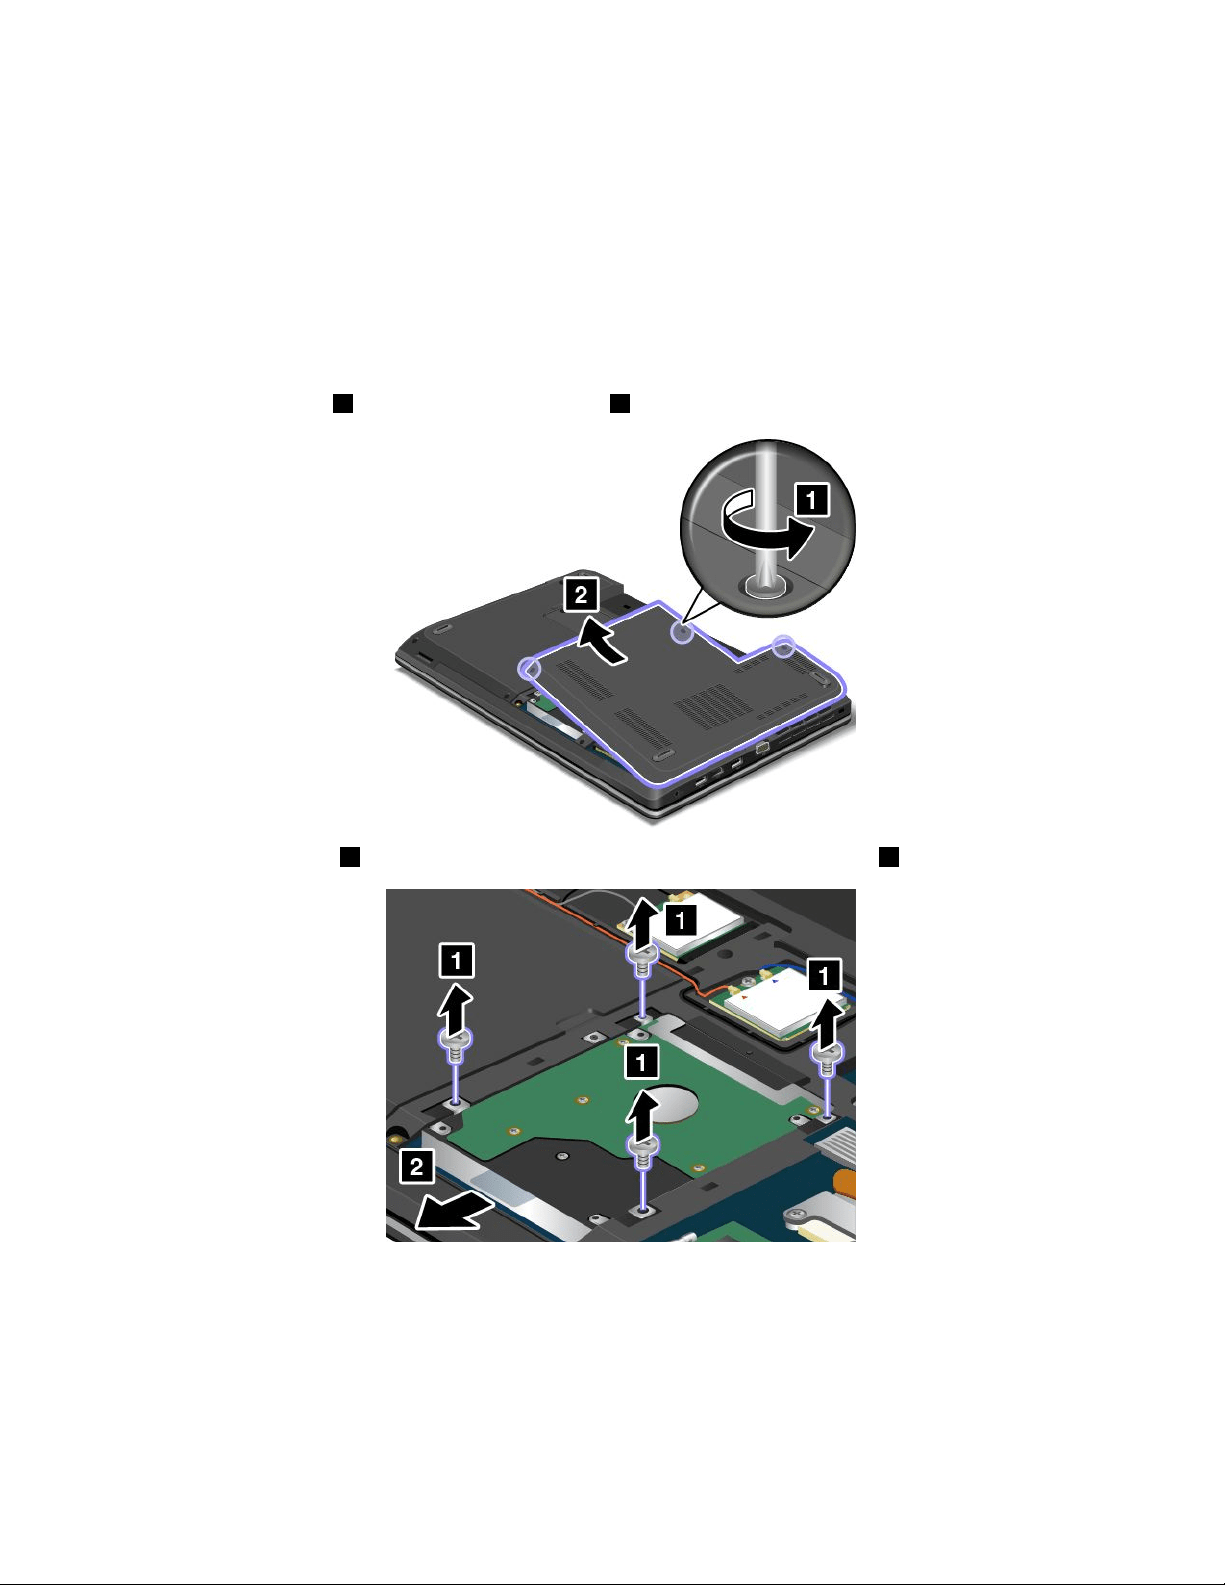
•Beforeremovingtheharddiskdriveorsolid-statedrive,makeabackupcopyofalltheinformation
onit,andthenturnoffthecomputer.
•Neverremovethedrivewhilethecomputerisoperating,insleepmode,orinhibernationmode.
Toreplacetheharddiskdriveorsolid-statedrive,dothefollowing:
1.Turnoffthecomputer;thendisconnecttheacpoweradapterandallcablesfromthecomputer.Wait
threetoveminutestoletthecomputercool.
2.Closethecomputerdisplay,andturnthecomputerover.
3.Removethebattery.See“Replacingthebattery”onpage69.
4.Loosenthescrews1,andthenremovethecover2.
5.Removethescrews1,andthenslideouttheharddiskdriveorsolid-statedrive2.
86UserGuide

6.Liftthetabtoremovetheharddiskdriveorsolid-statedriveoutofthecomputer.
7.Placethenewharddiskdriveorsolid-statedriveintothedrivebay.
8.Slidetheharddiskdriveorsolid-statedrivermlyintotheconnector1,andthenreinstallthescrews2.
Chapter6.Replacingdevices87
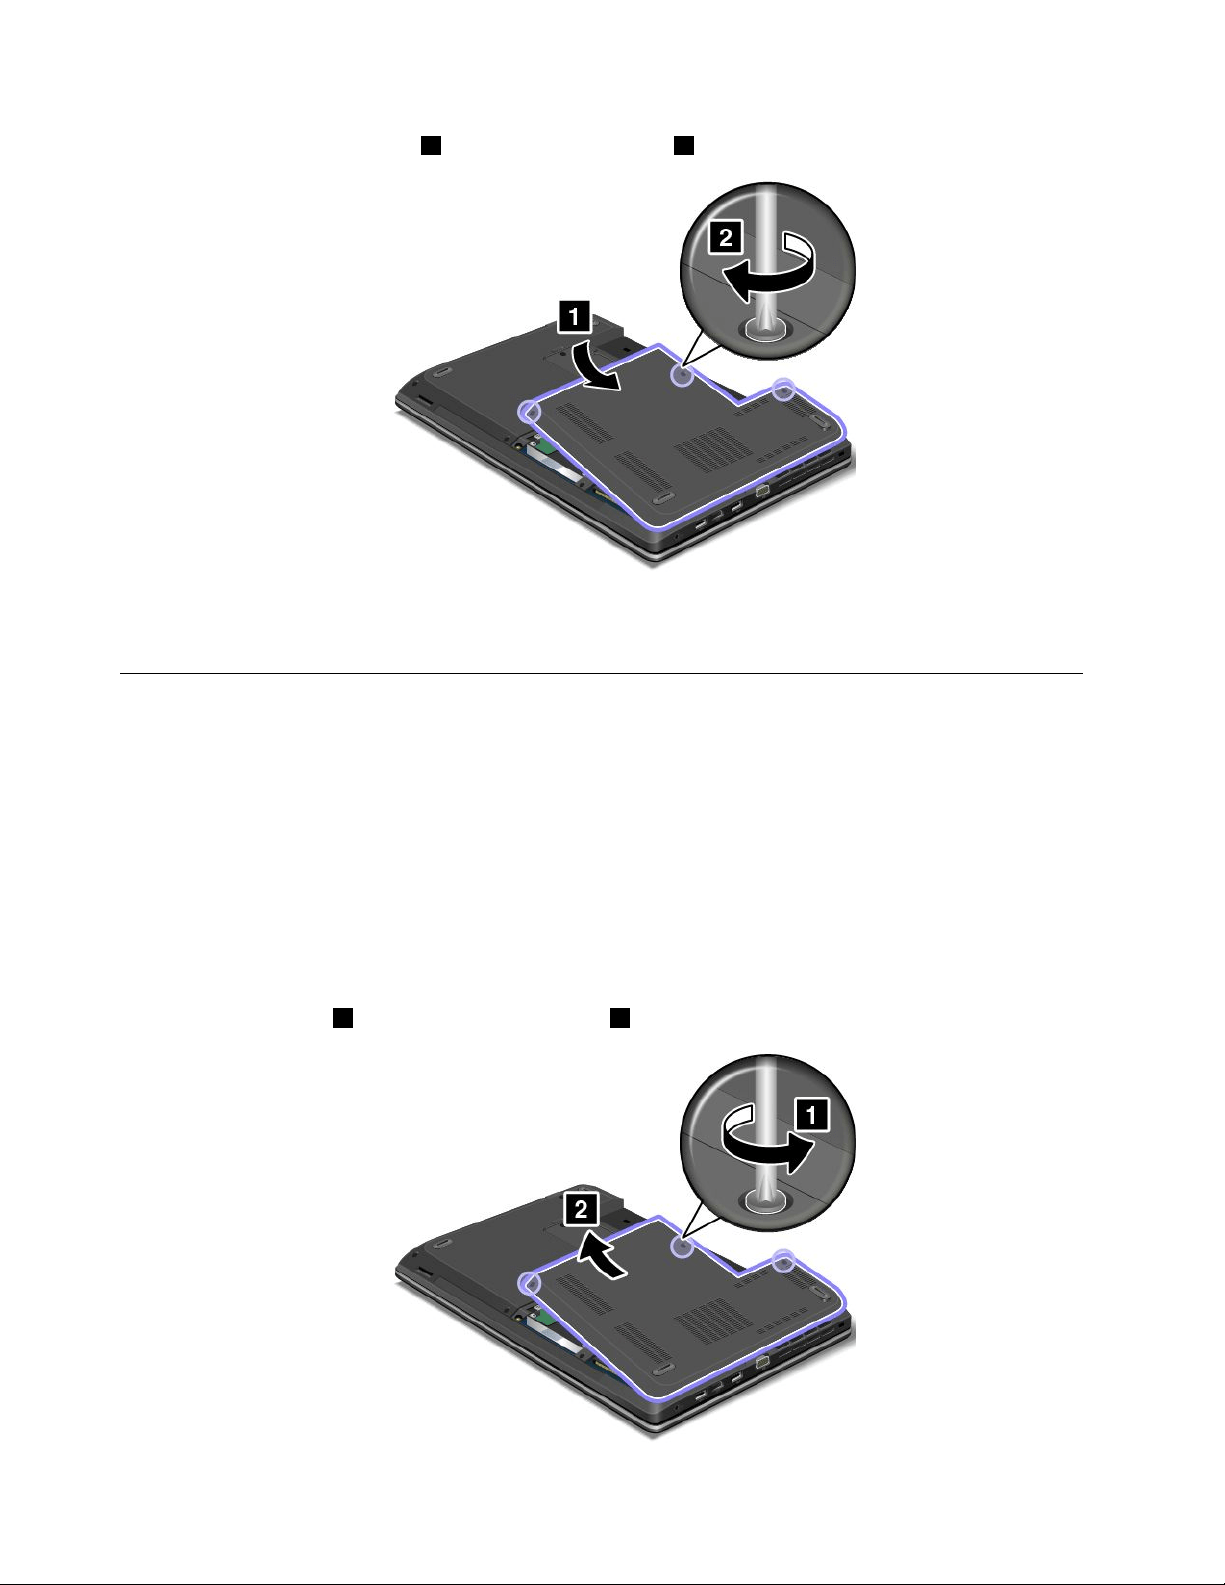
9.Reinstallthecomputercover1.Thentightenthescrews2.
10.Reinstallthebattery.See“Replacingthebattery”onpage69.
11.Turnthecomputeroveragain.Connecttheacpoweradapterandallcables.
Replacingtheopticaldrive
ThinkPadEdgeE440
Beforeyoustart,printtheseinstructions.
Anopticaldriveispreinstalledintheopticaldrivebay.Ifitneedstoberepaired,removeitbydoingthe
following:
1.Turnoffthecomputer;thendisconnecttheacpoweradapterandallcablesfromthecomputer.Wait
threetoveminutestoletthecomputercool.
2.Removethebattery.See“Replacingthebattery”onpage69.
3.Closethecomputerdisplay,andturnthecomputerover.
4.Loosenthescrews1,andthenremovethecover2.
88UserGuide
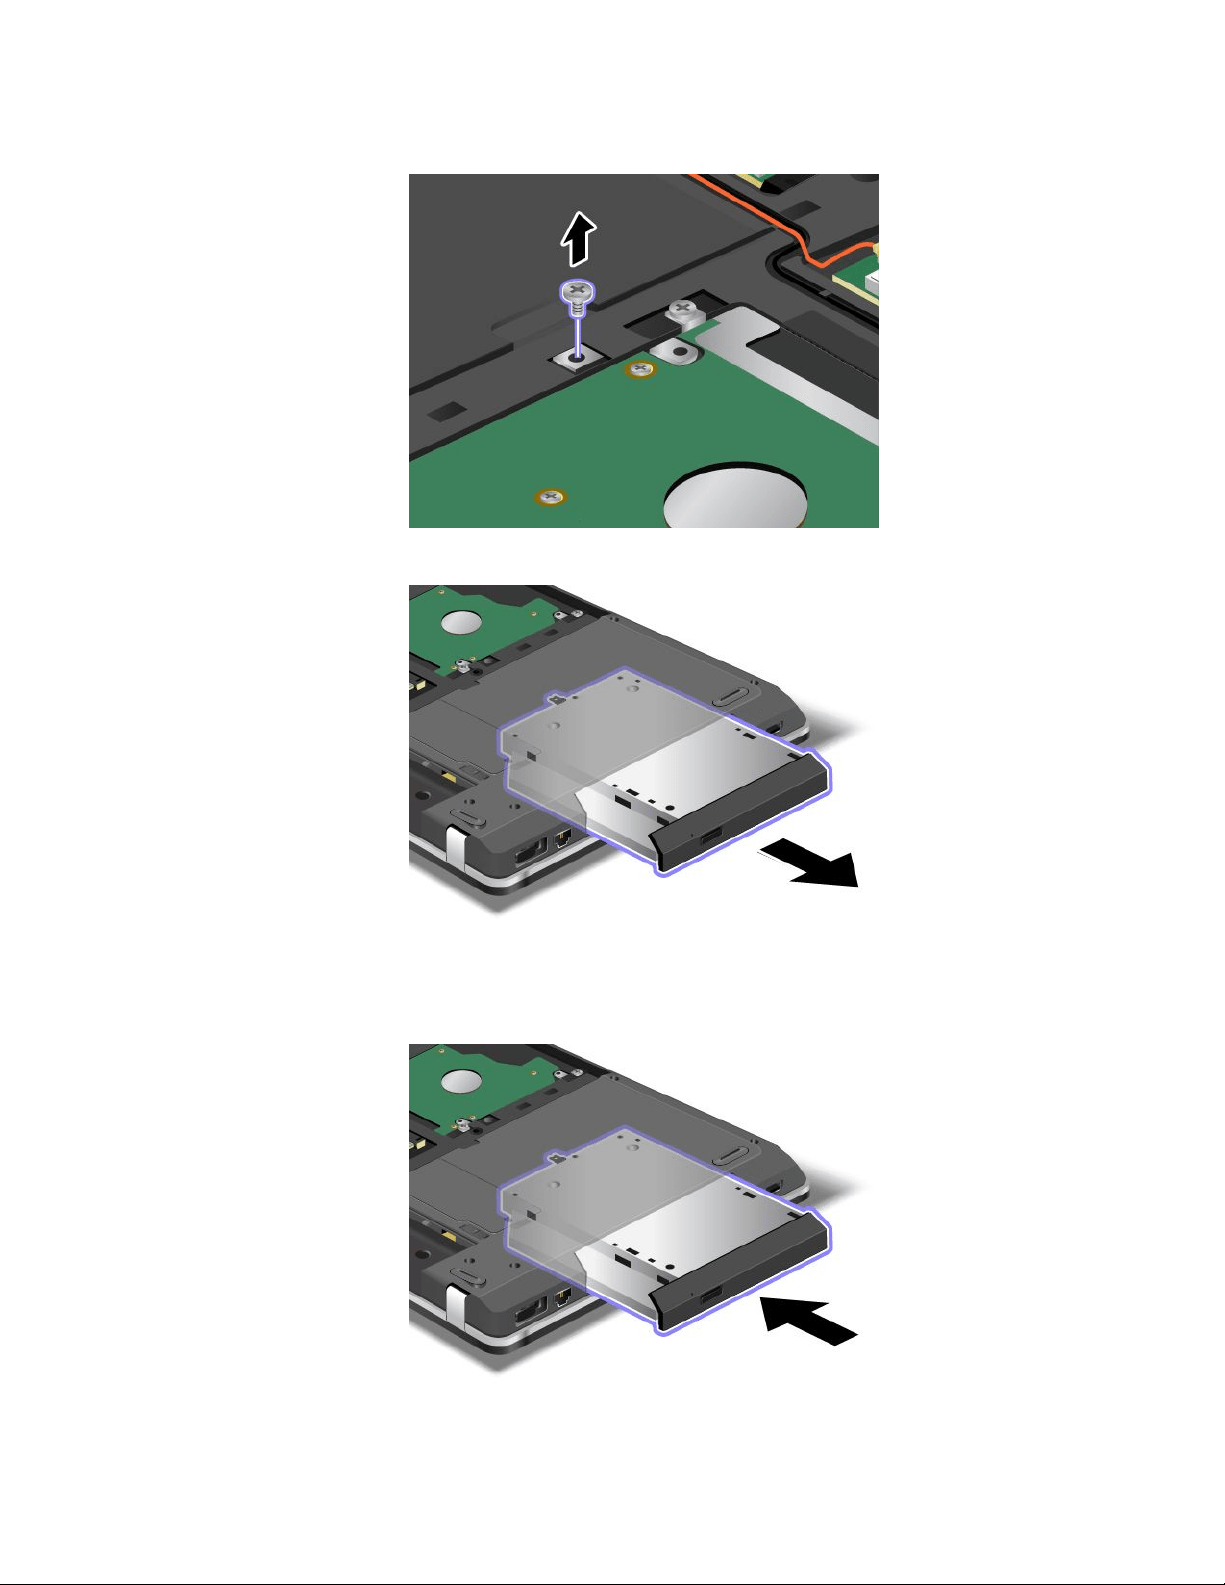
5.Removethescrew.
6.Pullouttheopticaldrive.
Toinstallarepairedopticaldriveoranewone,dothefollowing:
1.Inserttheopticaldriveintotheopticaldrivebay,andthenpressitrmlyintotheconnector.
Chapter6.Replacingdevices89
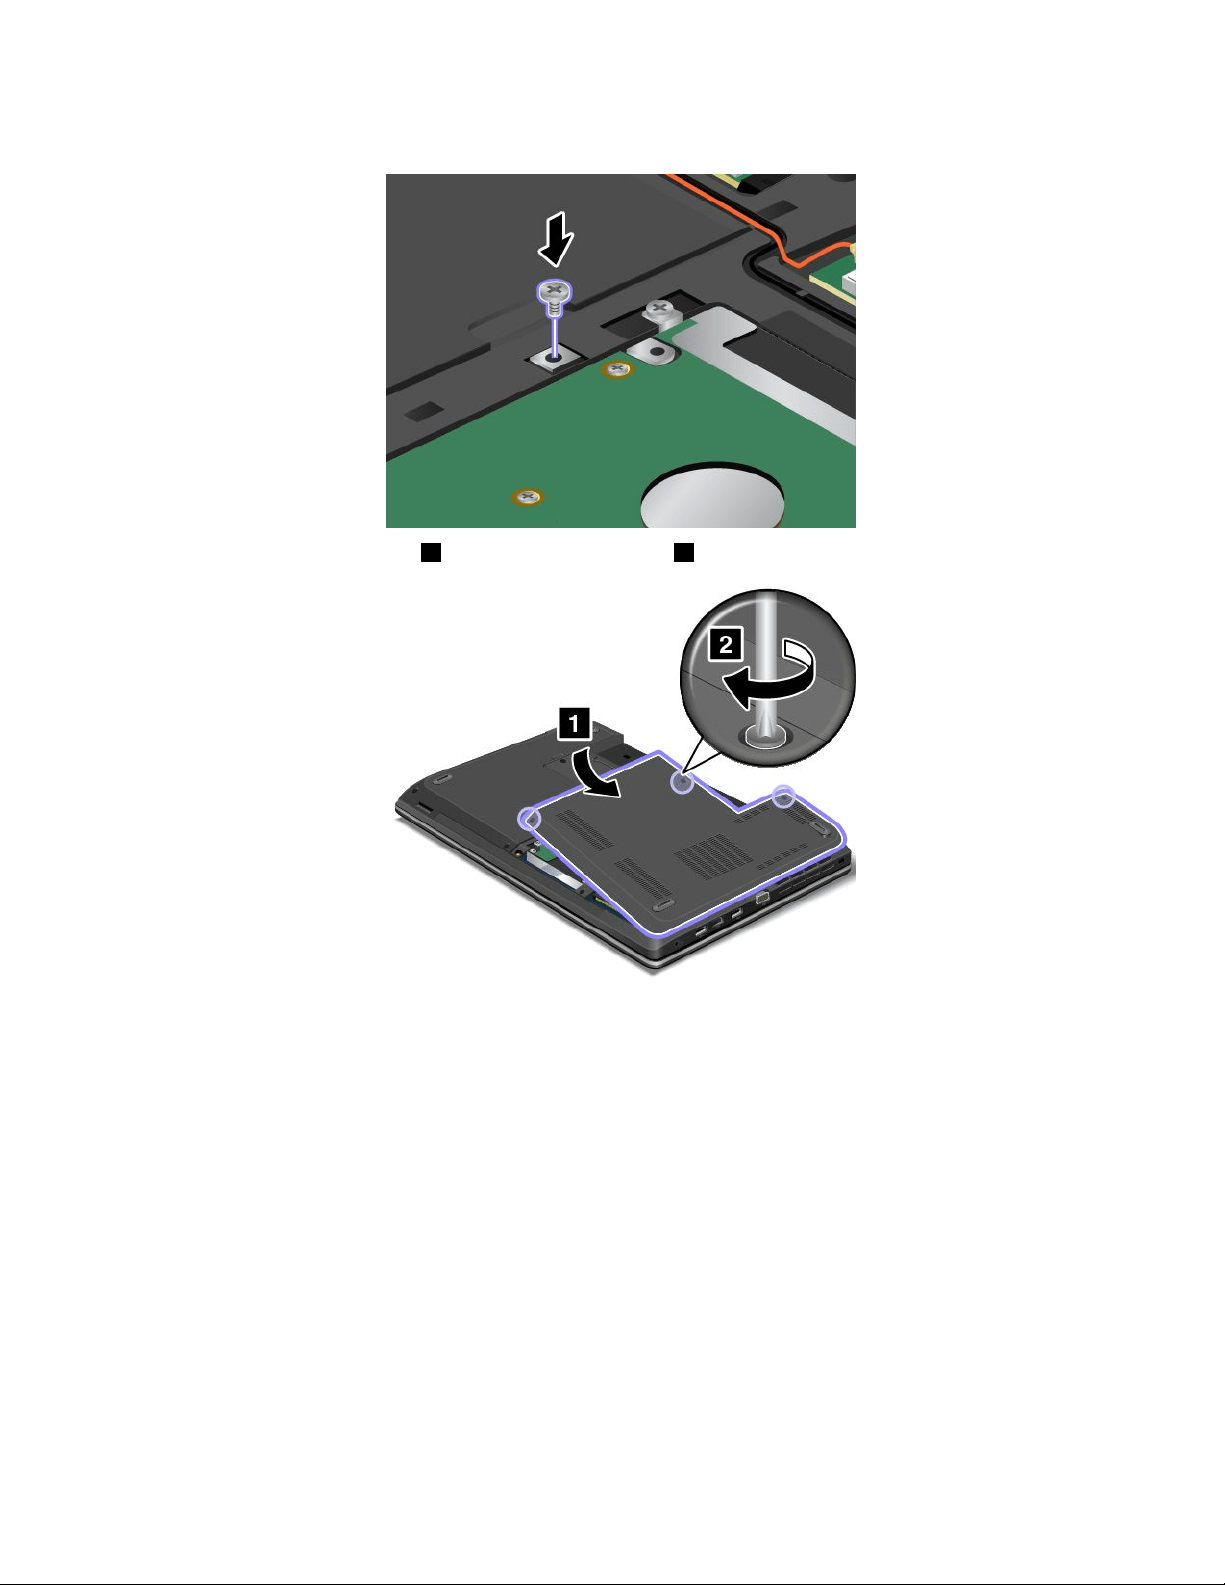
2.Reinstallthescrew.
3.Reinstallthecomputercover1.Thentightenthescrews2.
4.Reinstallthebattery.See“Replacingthebattery”onpage69.
5.Turnthecomputeroveragain.Connecttheacpoweradapterandallcables.
ThinkPadEdgeE540
Beforeyoustart,printtheseinstructions.
Anopticaldriveispreinstalledintheopticaldrivebay.Ifitneedstoberepaired,removeitbydoingthe
following:
1.Turnoffthecomputer;thendisconnecttheacpoweradapterandallcablesfromthecomputer.Wait
threetoveminutestoletthecomputercool.
2.Removethebattery.See“Replacingthebattery”onpage69.
3.Closethecomputerdisplay,andturnthecomputerover.
90UserGuide
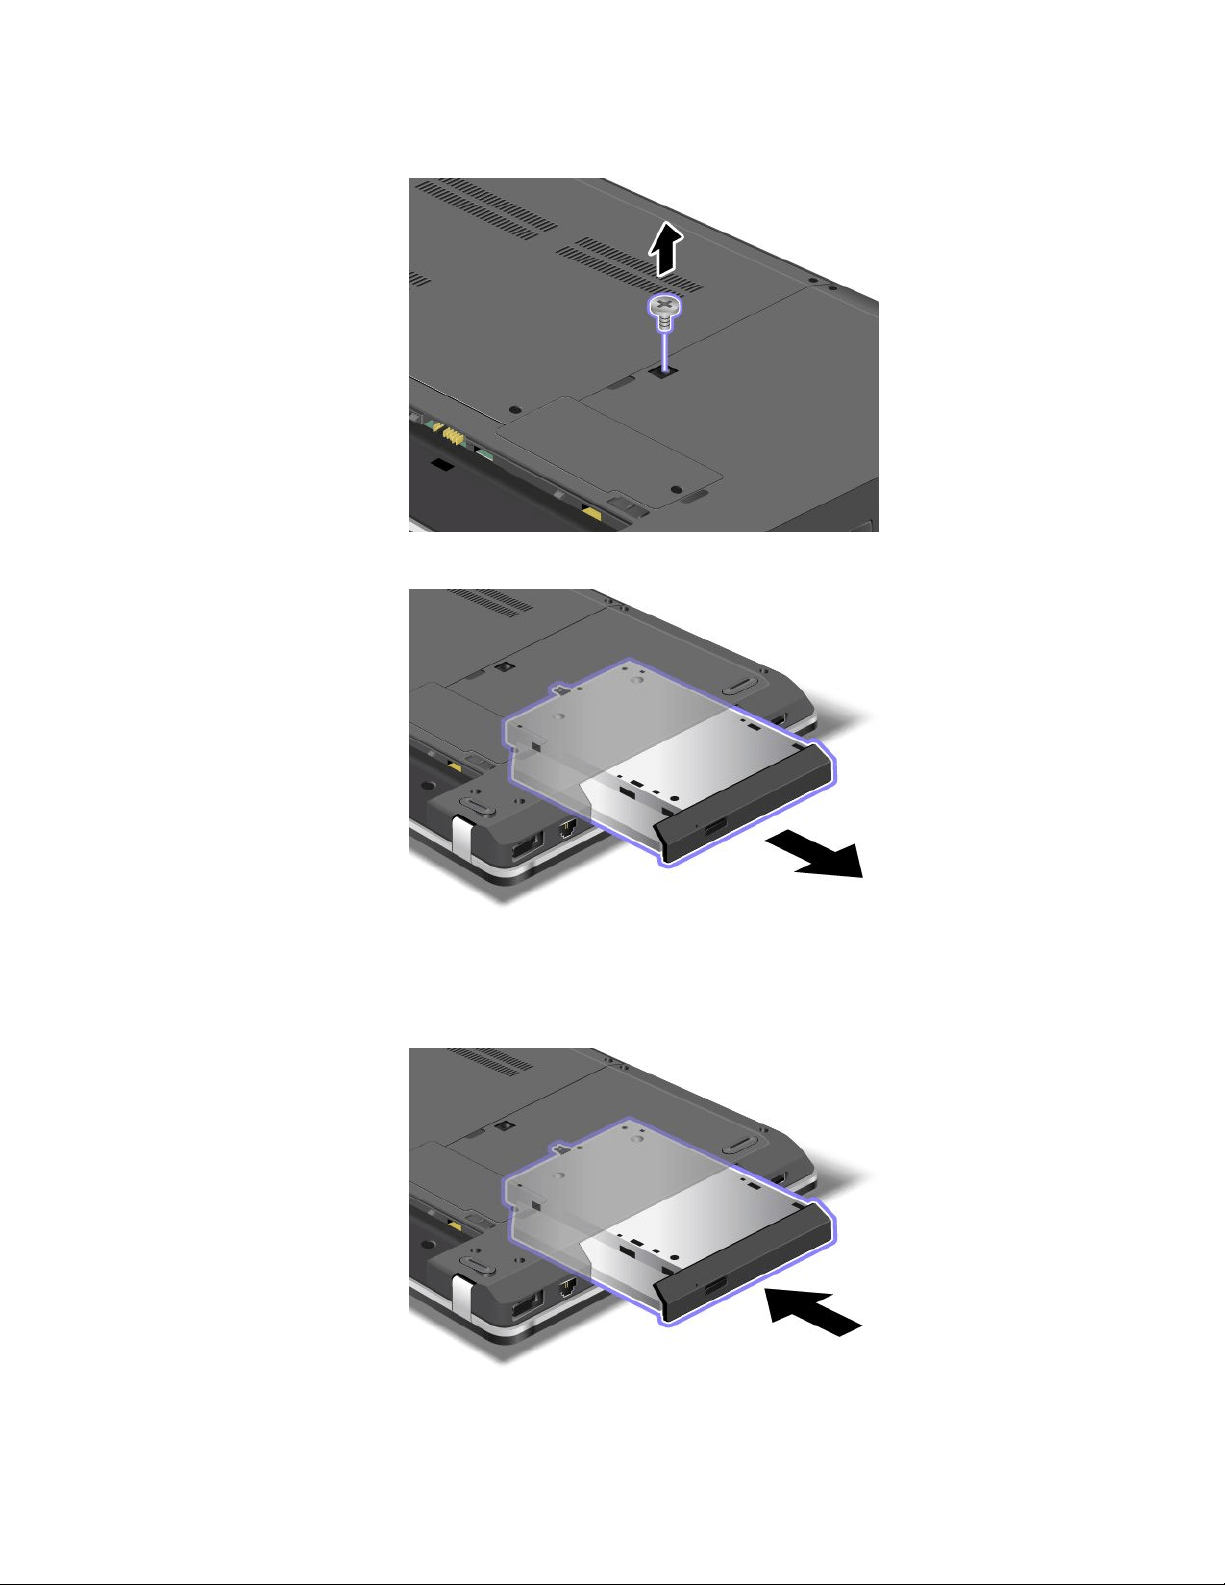
4.Loosenthescrewthatsecurestheopticaldriveandremoveit.
5.Pullouttheopticaldrive.
Toinstallarepairedopticaldriveoranewone,dothefollowing:
1.Inserttheopticaldriveintotheopticaldrivebay,andthenpressitrmlyintotheconnector.
Chapter6.Replacingdevices91
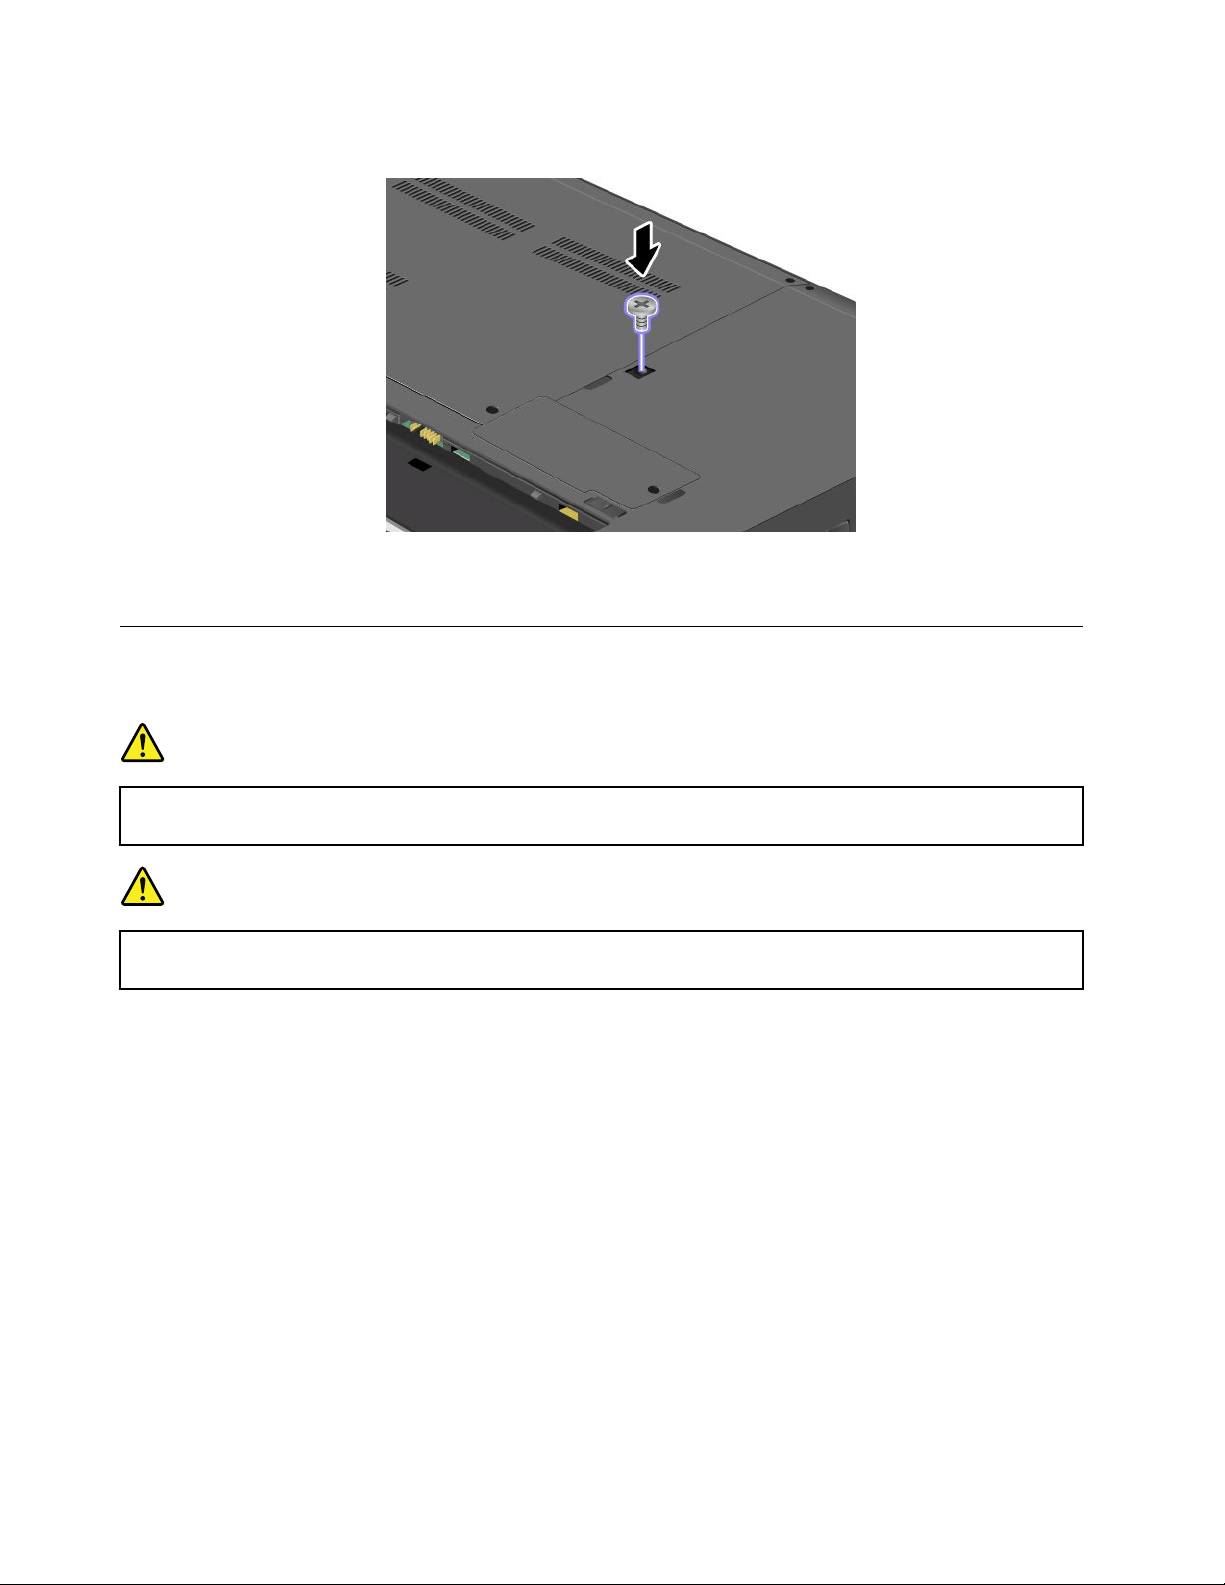
2.Reinstallthescrewandtightenit.
3.Reinstallthebattery.See“Replacingthebattery”onpage69.
4.Turnthecomputeroveragain.Connecttheacpoweradapterandallcables.
ReplacingawirelessLANcard
Beforeyoustart,printtheseinstructions.
DANGER
Duringelectricalstorms,donotconnectthecabletoordisconnectitfromthetelephoneoutlet
onthewall.
DANGER
Electriccurrentfrompower,telephone,andcommunicationcablesishazardous.Toavoidshock
hazard,disconnectthecablesbeforeopeningthecoverofthisslot.
Attention:BeforeyoustartinstallingawirelessLANcard,touchametaltableoragroundedmetalobject.
Thisactionreducesanystaticelectricityfromyourbody.Thestaticelectricitycoulddamagethecard.
ToreplacethewirelessLANcard,dothefollowing:
1.Turnoffthecomputer;thendisconnecttheacpoweradapterandallcablesfromthecomputer.Wait
threetoveminutestoletthecomputercool.
2.Closethecomputerdisplay,andturnthecomputerover.
3.Removethebattery.See“Replacingthebattery”onpage69.
92UserGuide
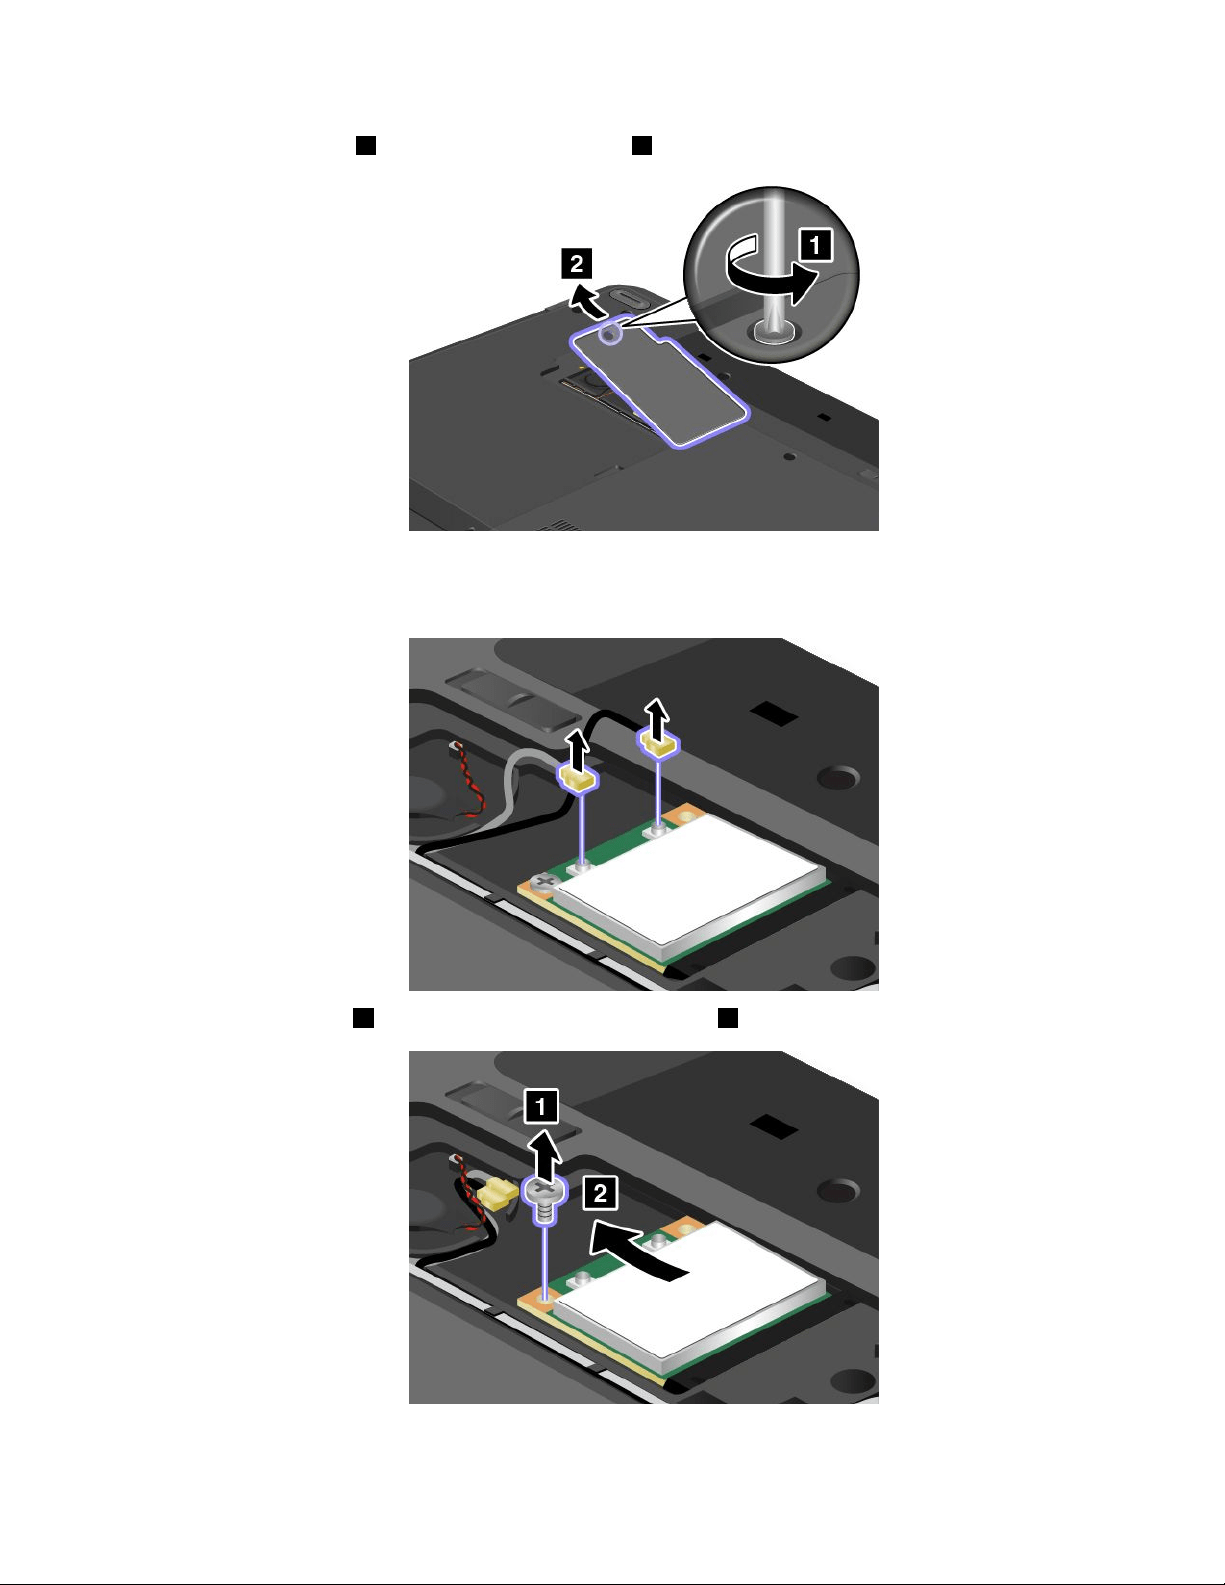
4.Loosenthescrews1,andthenremovethecover2.
5.Ifatoolisprovidedwiththenewcardtohelpyoudisconnectcables,usethetooltodisconnectthe
cablesfromtheoldcard.Ifnosuchatoolisprovided,holdthecableconnectorwithyourngersand
gentlydisconnecteachcablefromtheoldcard.
6.Removethescrew1.Thecardpopsup.Removethecard2.
Chapter6.Replacingdevices93

7.Alignthecontactedgeofthenewcardwiththecorrespondingsocket1.Pivotthecarduntilyoucan
snapitintoplace.Securethecardwiththescrew2.
8.Connecttheantennacablestothenewcardasshowninthedrawing.
9.Reinstallthecomputercover1.Thentightenthescrews2.
10.Reinstallthebattery.See“Replacingthebattery”onpage69.
11.Turnthecomputeroveragain.Connecttheacpoweradapterandallcables.
94UserGuide

ReplacingawirelessWANcard
Beforeyoustart,printtheseinstructions.
PrerequisitesforreplacingorinstallingthewirelessWANcard
DANGER
Duringelectricalstorms,donotconnectthecabletoordisconnectitfromthetelephoneoutlet
onthewall.
DANGER
Electriccurrentfrompower,telephone,andcommunicationcablesishazardous.Toavoidshock
hazard,disconnectthecablesbeforeopeningthecoverofthisslot.
Attention:BeforeyoustartinstallingawirelessWANcard,touchametaltableoragroundedmetalobject.
Thisactionreducesanystaticelectricityfromyourbody.Thestaticelectricitycoulddamagethecard.
YourcomputermightbeequippedwithawirelessWANcard.ToreplacethewirelessWANcard,doing
thefollowing:
1.Turnoffthecomputer;thendisconnecttheacpoweradapterandallcablesfromthecomputer.Wait
threetoveminutestoletthecomputercool.
2.Closethecomputerdisplay,andturnthecomputerover.
3.Removethebattery.See“Replacingthebattery”onpage69.
4.Loosenthescrew1,andthenremovethecover2.
Chapter6.Replacingdevices95
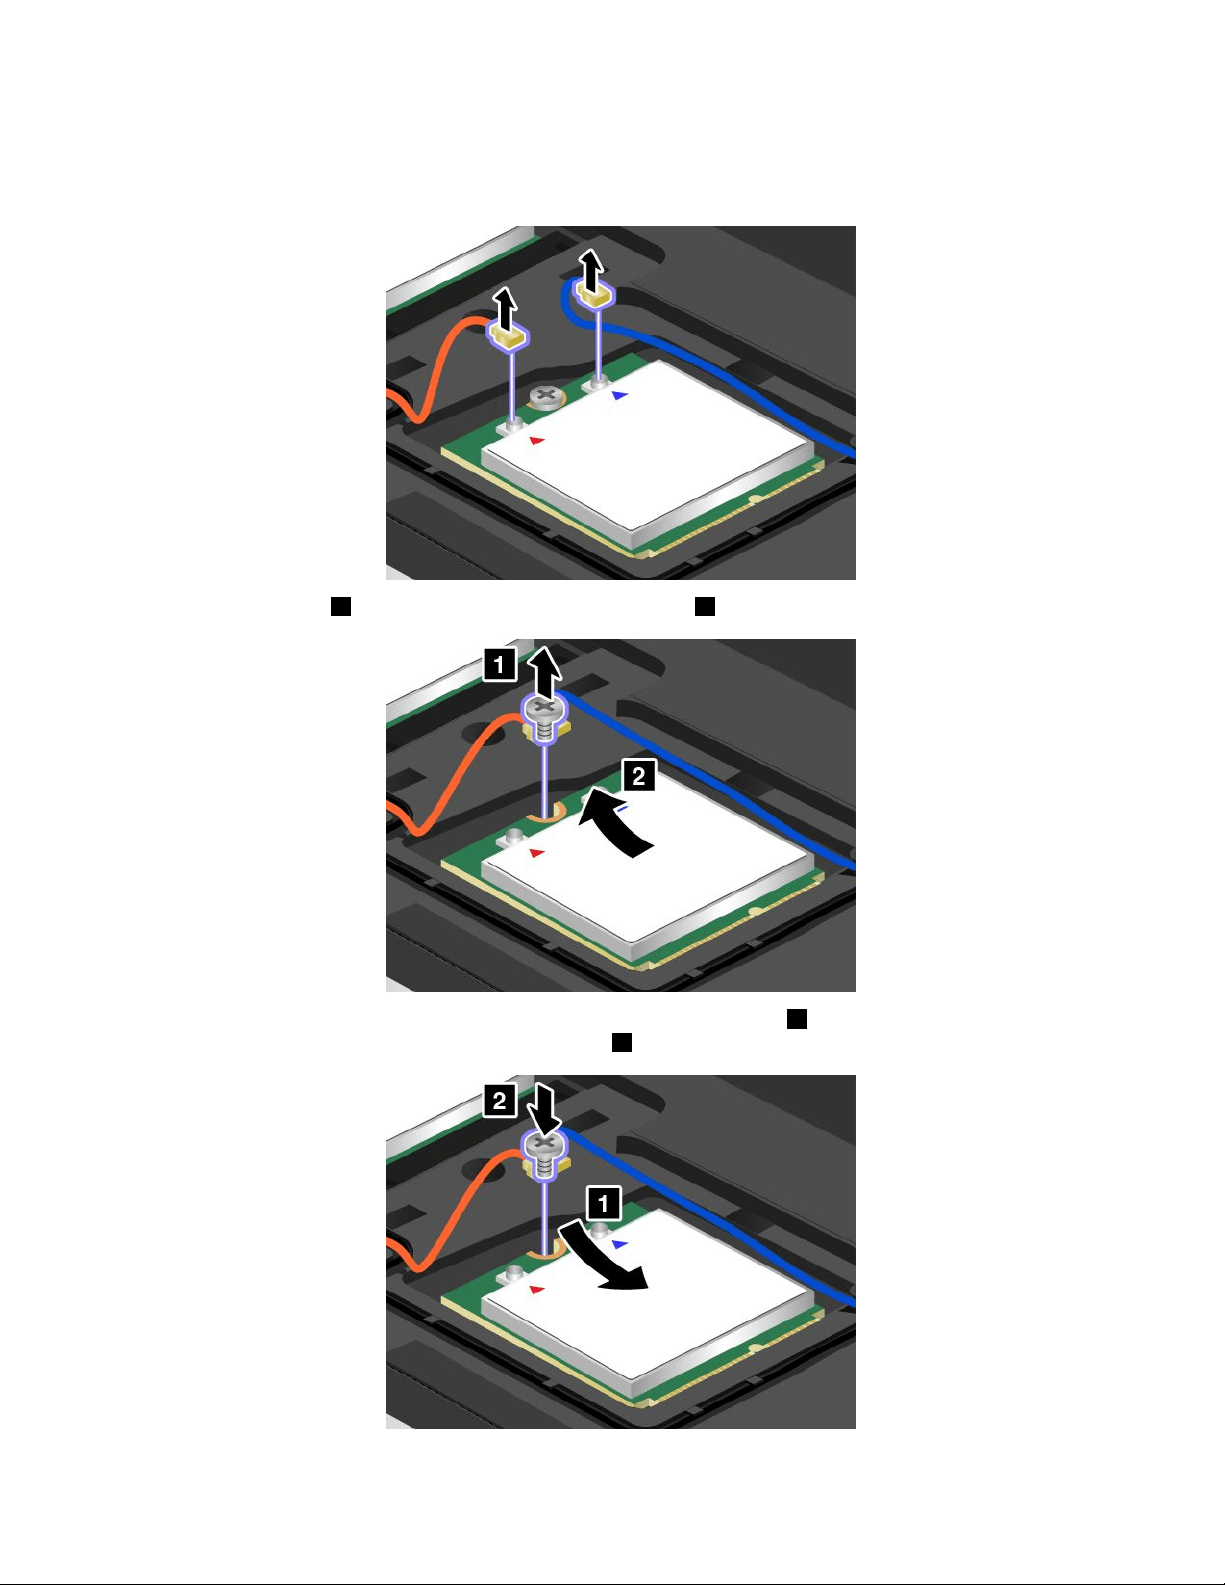
5.Ifatoolisprovidedwiththenewcardtohelpyoudisconnectcables,usethetooltodisconnectthe
cablesfromtheoldcard.Ifnosuchatoolisprovided,holdthecableconnectorwithyourngersand
gentlydisconnecteachcablefromtheoldcard.
6.Removethescrew1.Thecardpopsup.Removethecard2.
7.Alignthecontactedgeofthenewcardwiththecorrespondingsocket1.Pivotthecarduntilyoucan
snapitintoplace.Securethecardwiththescrew2.
96UserGuide
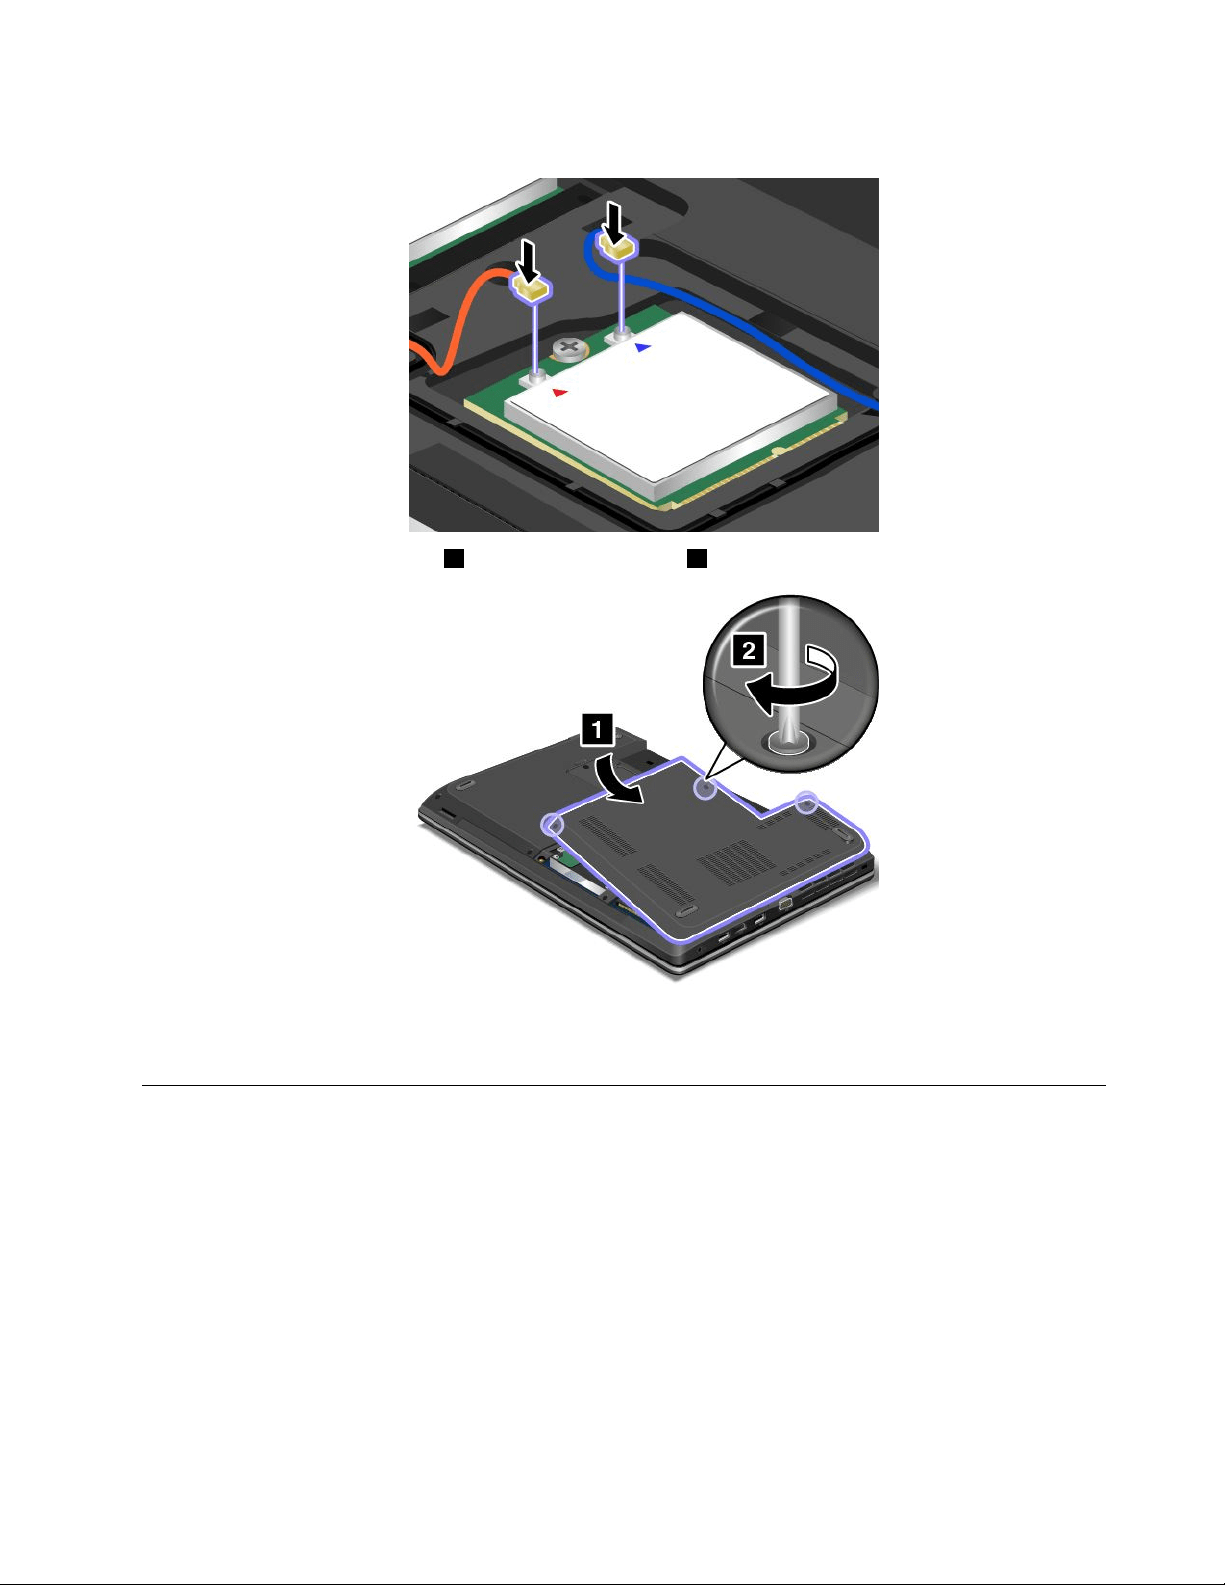
8.Connecttheantennacablestothenewcardasshowninthedrawing.
9.Reinstallthecomputercover1.Thentightenthescrew2.
10.Reinstallthebattery.See“Replacingthebattery”onpage69.
11.Turnthecomputeroveragain.Connecttheacpoweradapterandallcables.
Replacingamemorymodule
Beforeyoustart,printtheseinstructions.
Increasingmemorycapacityisaneffectivewaytomakeprogramsrunfaster.Toreplaceoraddamemory
module,readthefollowingprerequisites,andthentheinstructions.
Whenreplacingamemorymodule,besuretofollowtheprecautions.
Note:Theoperatingspeedofthememorymodulehasdependencyonthesystemconguration.Insome
conditions,thememorymoduleinyourcomputermightnotbeabletooperateatthemaximumspeed.
Attention:Beforeyoustartinstallingamemorymodule,touchametaltableoragroundedmetalobject.This
actionreducesanystaticelectricityfromyourbody.Thestaticelectricitycoulddamagethememorymodule.
Chapter6.Replacingdevices97
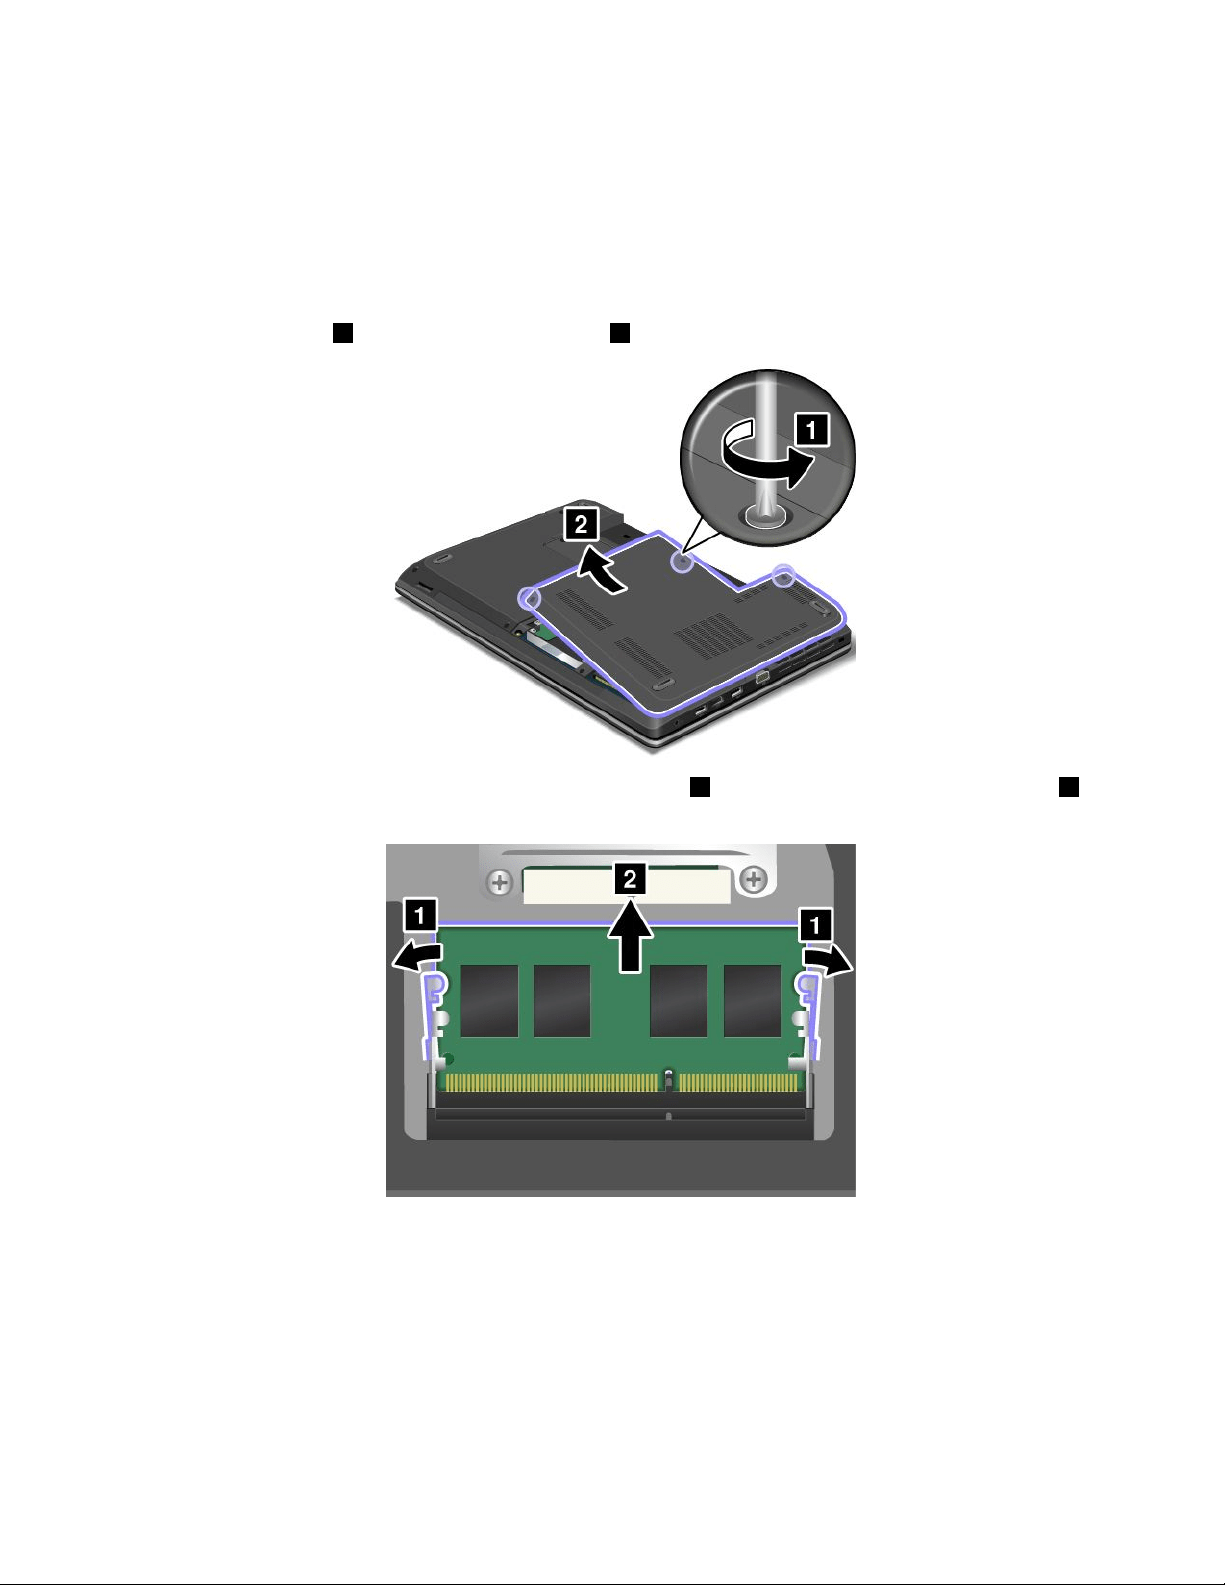
Replacingamemorymodule
Toreplaceamemorymodule,dothefollowing:
1.Turnoffthecomputer;thendisconnecttheacpoweradapterandallcablesfromthecomputer.Wait
threetoveminutestoletthecomputercool.
2.Closethecomputerdisplay,andturnitover.
3.Removethebattery.See“Replacingthebattery”onpage69.
4.Loosenthescrews1,andthenremovethecover2.
5.Openthelatchesonbothsidesoftheslotatthesametime1,andthenremovethememorymodule2.
Savetheremovedmemorymoduleforfutureuse.
98UserGuide
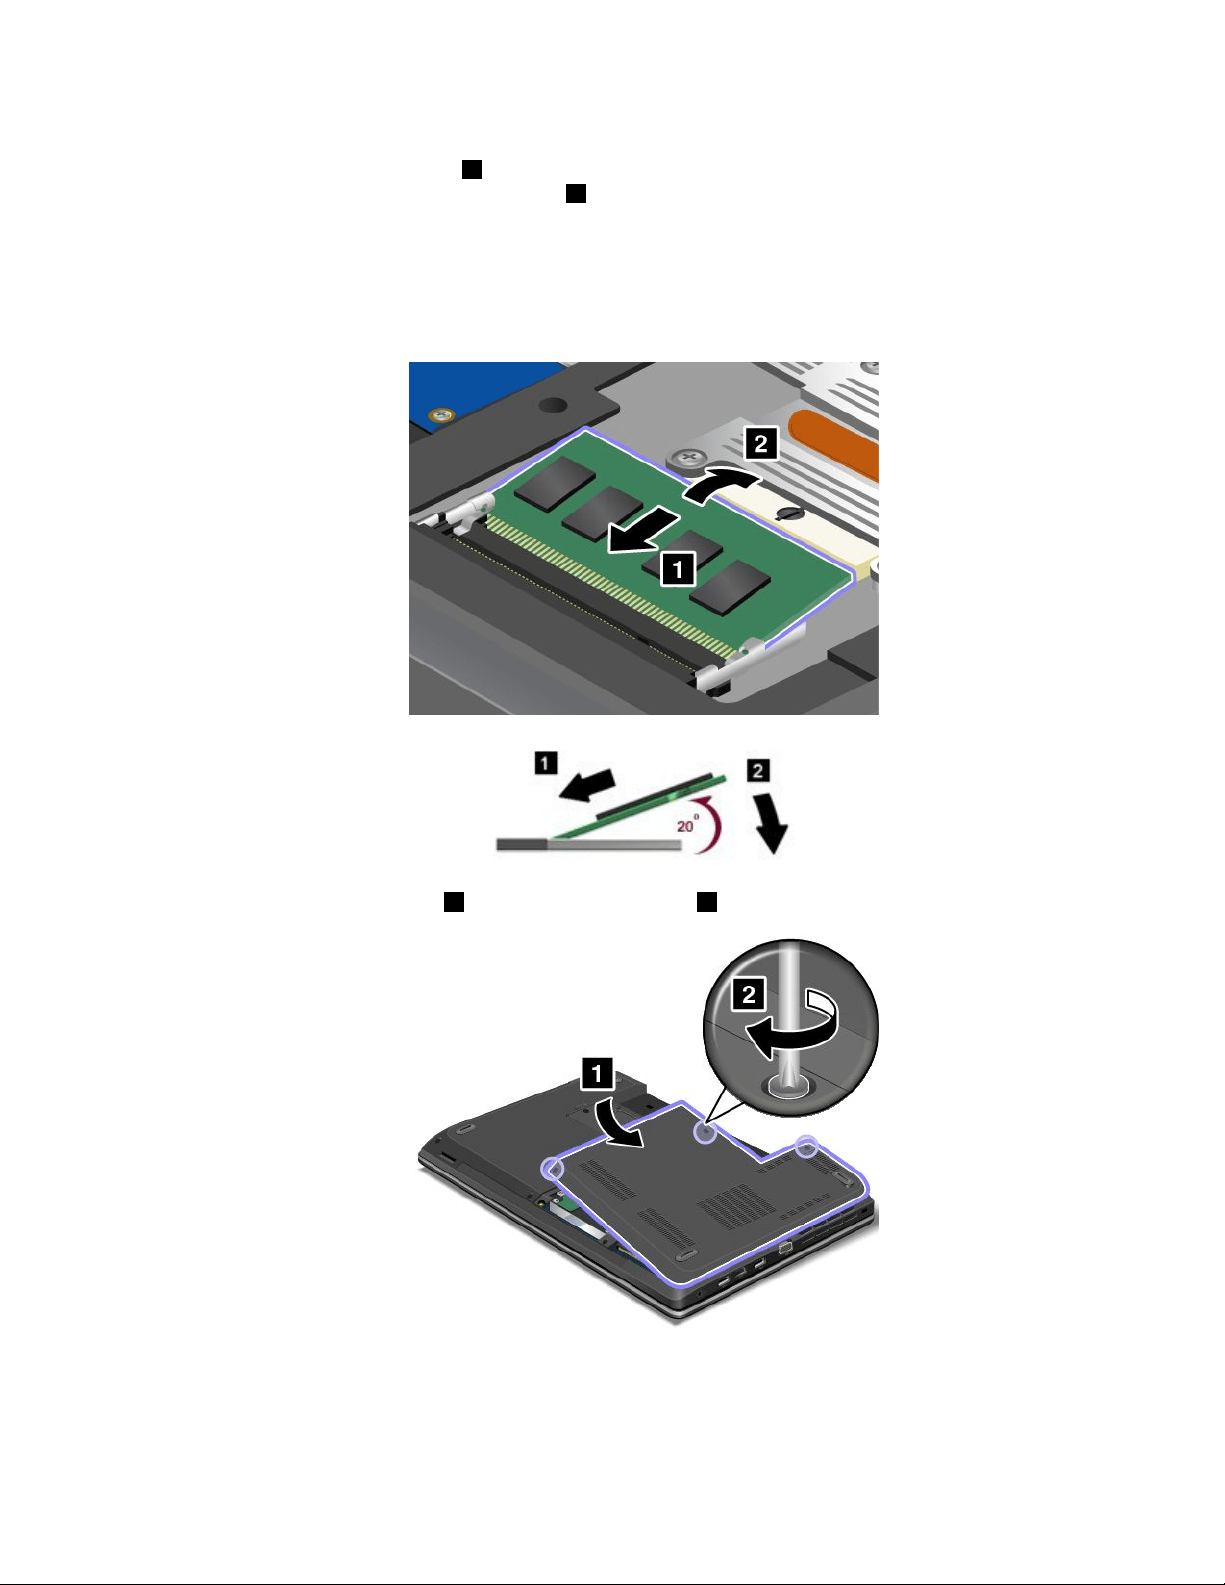
6.Placethenotchedendofthenewmemorymoduletowardthecontactedgesideofthememoryslot,
andinsertthememorymodule1intotheslotatanangleofabout20degrees.Pivotthememory
moduledownwarduntilitsnapsintoplace2.Ensurethatthememorymoduleisrmlyinstalledin
theslotandcannotbemovedeasily.
Attention:Donottouchthecontactedgeofthememorymodule.Otherwisethememorymodule
mightbedamaged.
Note:Ifyouinstallamemorymoduleinonlyoneofthetwomemoryslots,installitinthebottomslot.
7.Reinstallthecomputercover1.Thentightenthescrews2.
8.Reinstallthebattery.See“Replacingthebattery”onpage69.
9.Turnthecomputeroveragain.Connecttheacpoweradapterandallcables.
Chapter6.Replacingdevices99
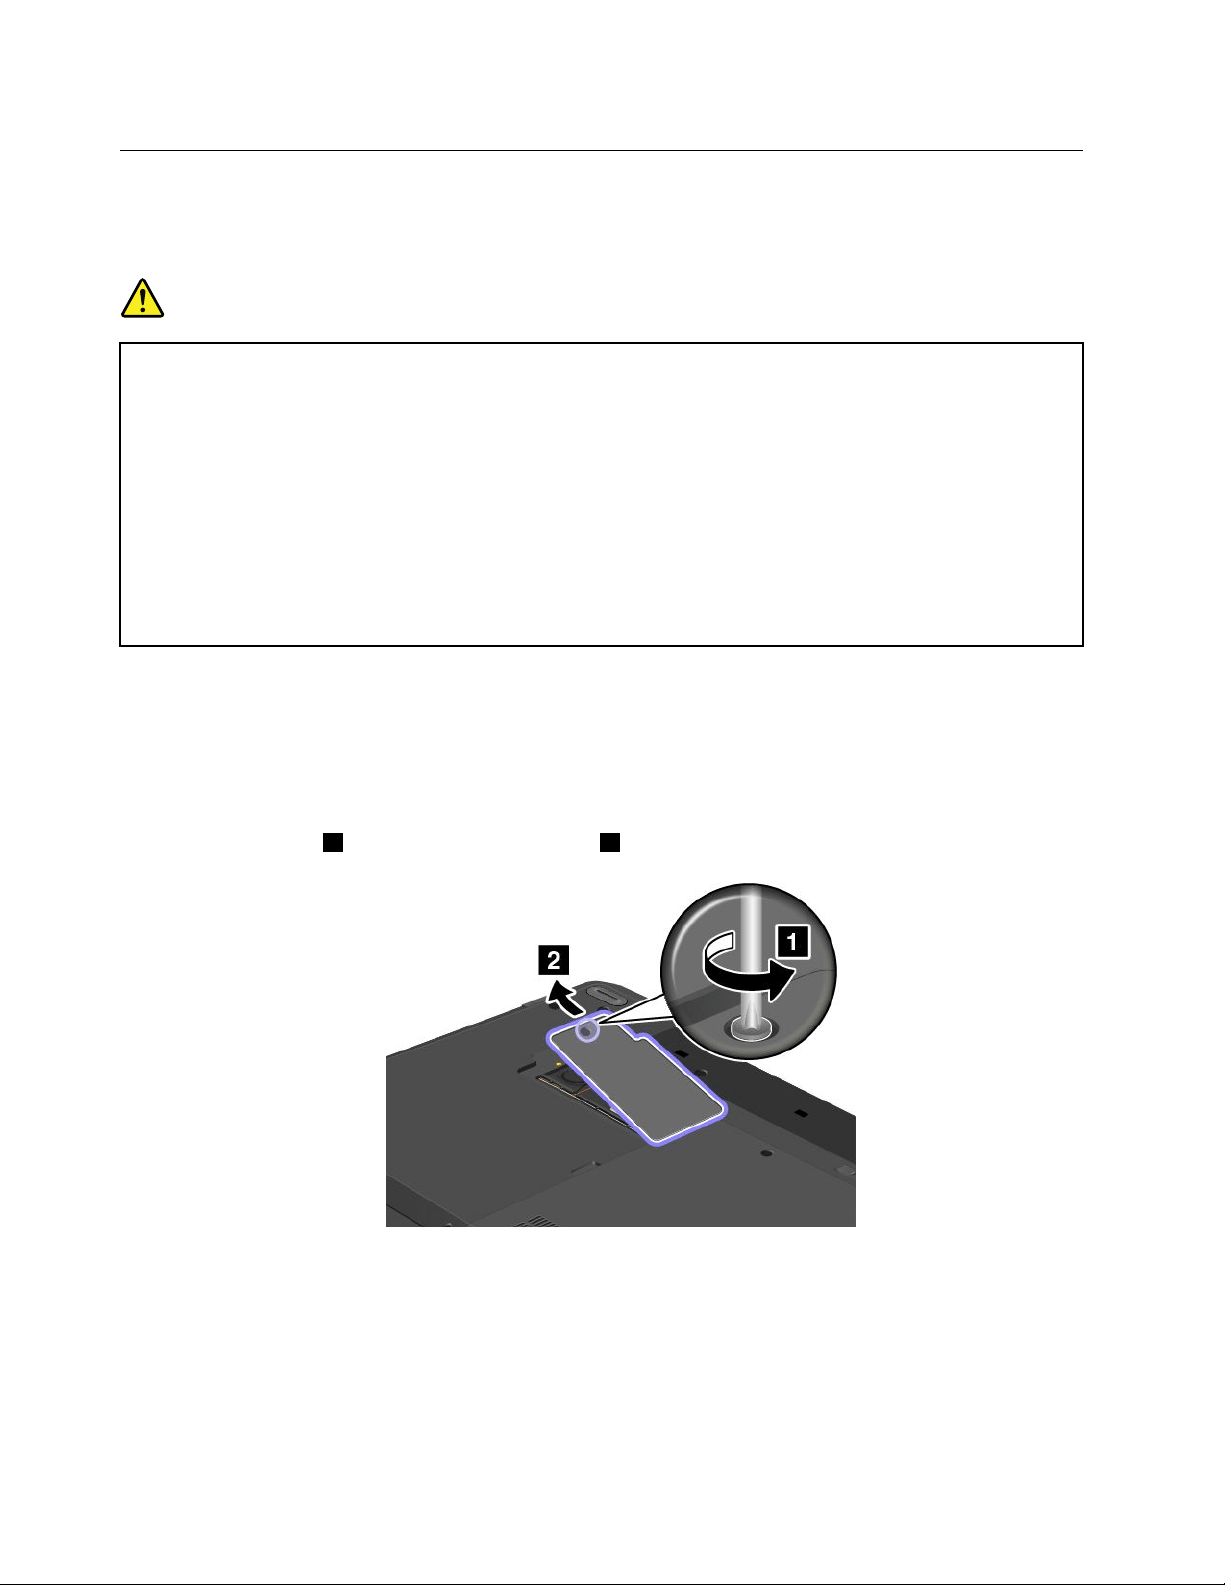
Replacingthebackupbattery
Beforeyoustart,printtheseinstructions.
Prerequisitesfortheprocedure
DANGER
Ifthebackupbatteryisincorrectlyreplaced,thereisdangerofanexplosion.Thebackupbattery
containsasmallamountofharmfulsubstances.Toavoidpossibleinjury:
•ReplaceonlywithabatteryofthetyperecommendedbyLenovo.
•Keepthebatterypackawayfromre.
•Donotexposeittoexcessiveheat.
•Donotexposeittowaterorrain.
•Donotshort-circuitit.
•Donotdrop,crush,puncture,orsubjecttostrongforces.Batteryabuseormishandlingcan
causethebatterytooverheat,whichcancausegassesorameto“vent”fromthebattery
packorcoincell.
Toreplacethebackupbattery,dothefollowing:
1.Turnoffthecomputer;thendisconnecttheacpoweradapterandallcablesfromthecomputer.Wait
threetoveminutestoletthecomputercool.
2.Closethecomputerdisplay,andturnthecomputerover.
3.Removethebattery.See“Replacingthebattery”onpage69.
4.Loosenthescrew1,andthenremovethecover2.
100UserGuide
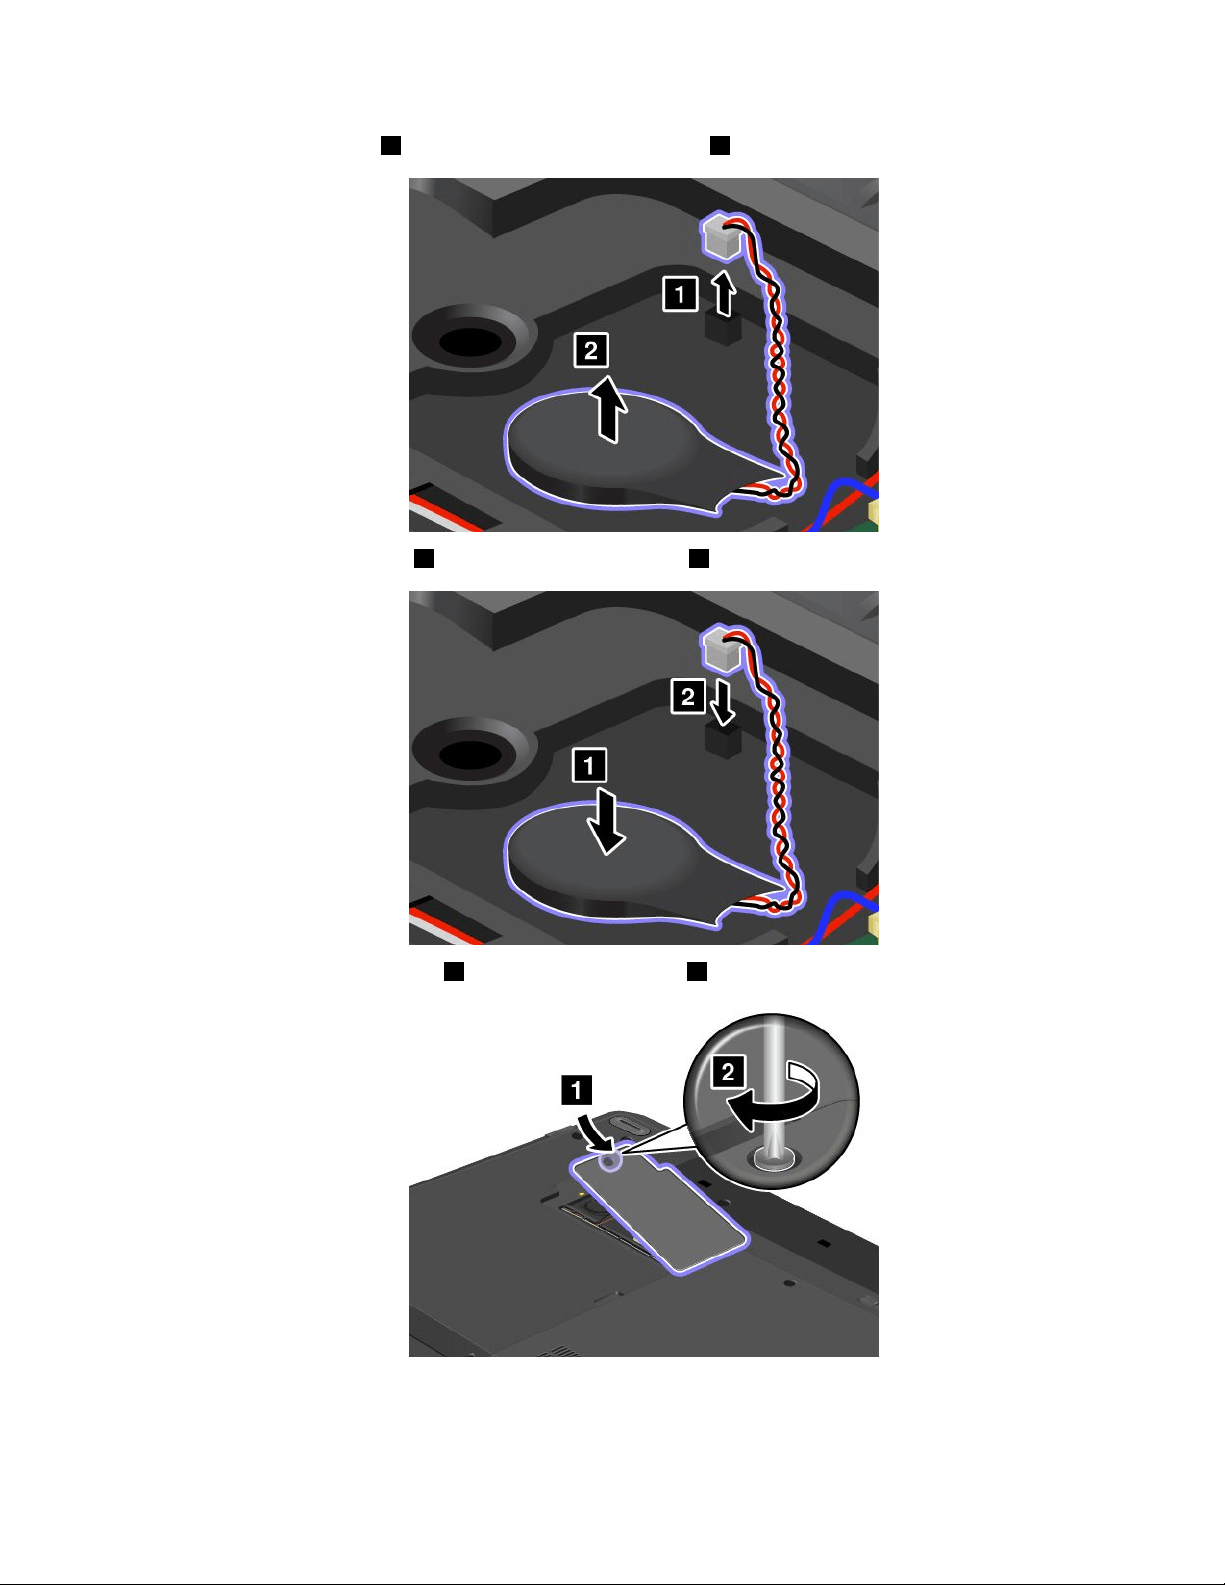

102UserGuide
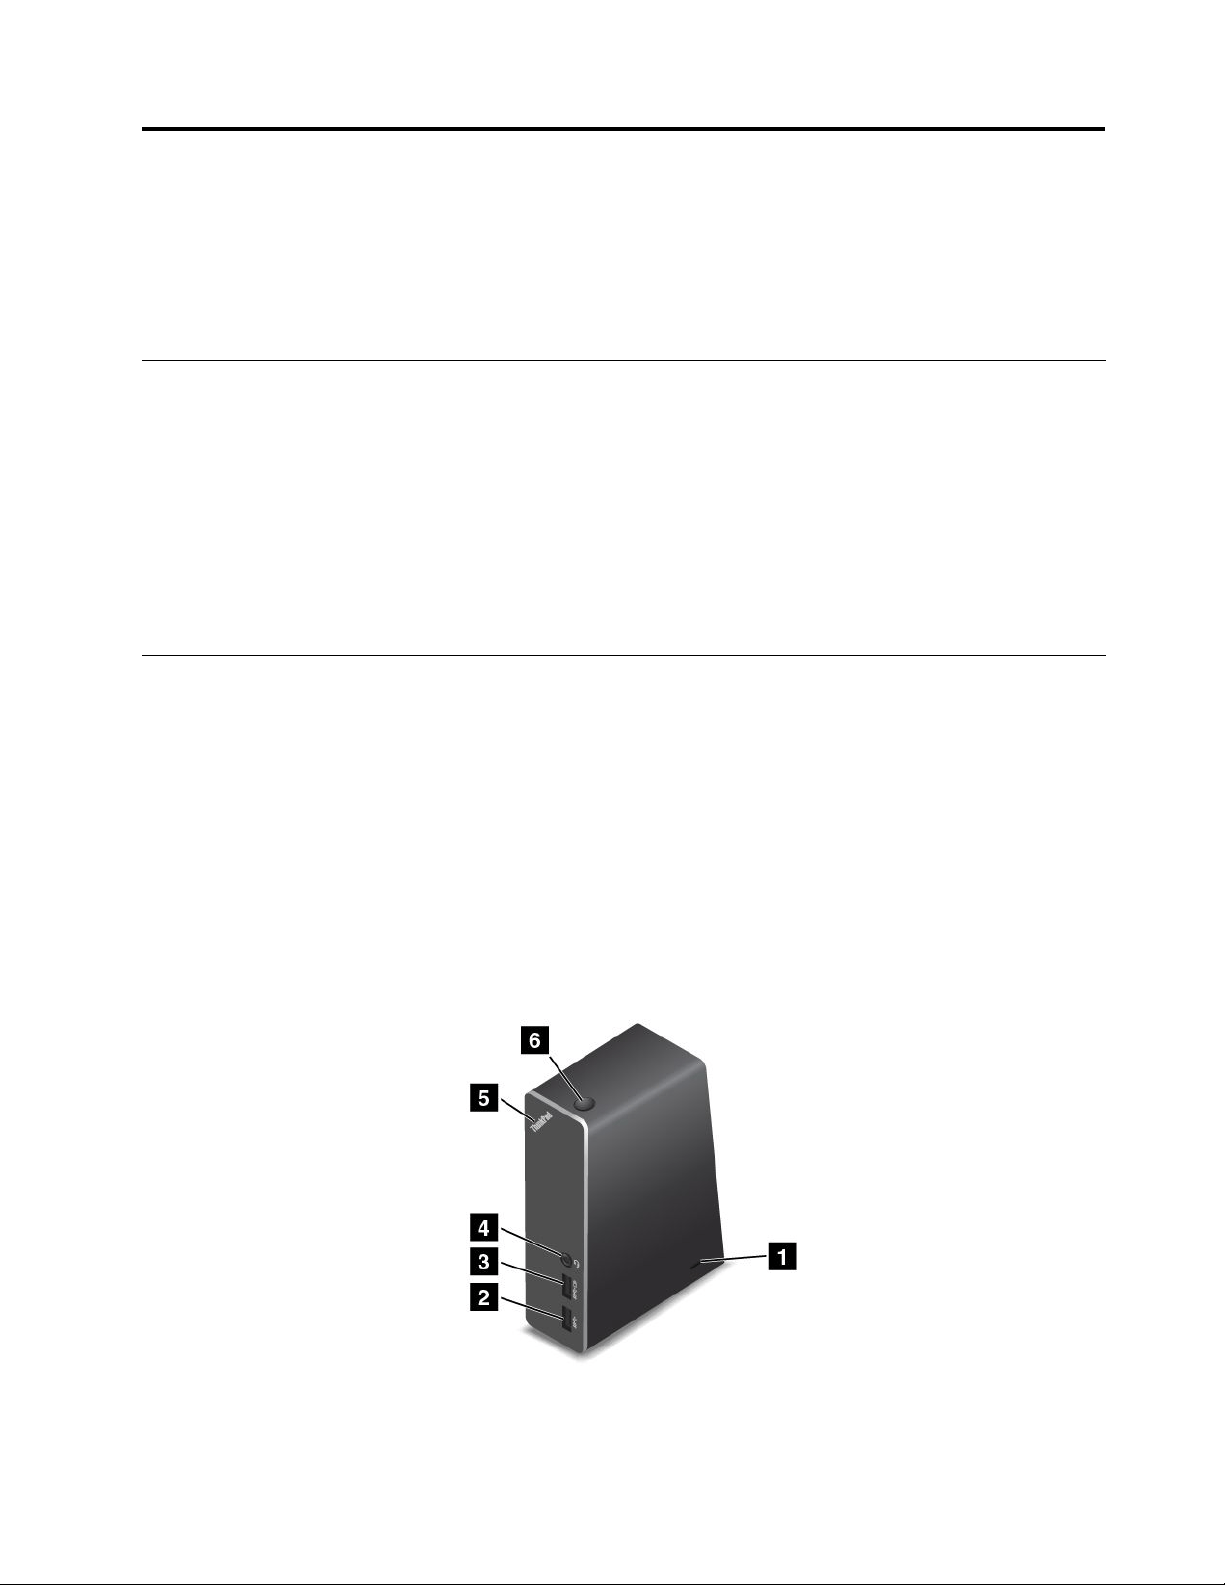
Chapter7.Enhancingyourcomputer
Thischapterprovidesinstructionsonhowtousehardwaredevicestoexpandyourcomputercapabilities.
•“FindingThinkPadoptions”onpage103
•“ThinkPadOneLinkDock”onpage103
FindingThinkPadoptions
Ifyouwanttoexpandthecapabilitiesofyourcomputer,Lenovohasanumberofhardwareaccessories
andupgradestomeetyourneeds.Optionsincludememorymodules,storagedevices,networkcards,port
replicators,batteries,poweradapters,printers,scanners,keyboards,mice,andmore.
YoucanshopatLenovo24hoursaday,7daysaweekdirectlyovertheWorldWideWeb.Allyouneedisan
Internetconnectionandacreditcard.
ToshopatLenovo,goto:
http://www.lenovo.com/accessories/services/index.html
ThinkPadOneLinkDock
Dependingonthemodel,yourcomputermightsupporttheThinkPadOneLinkDock(hereafterreferredtoas
thedock).Attachyourcomputertothedocktoexpandtheworkingcapability.
Thistopicprovidesbasicinformationaboutthedock.Fordetailedinformationaboutusingthedock,refer
tothedocumentationthatcomeswiththedock.
Notes:
•Dependingonthemodel,yourdockmightlookslightlydifferentfromtheillustrationsinthistopic.
•IfyouattachyourcomputertothedockanduseanEthernetconnectororanHDMIconnector,usethe
EthernetconnectorortheHDMIconnectoronthedock,nottheoneonthecomputer.
Frontview
©CopyrightLenovo2013
103
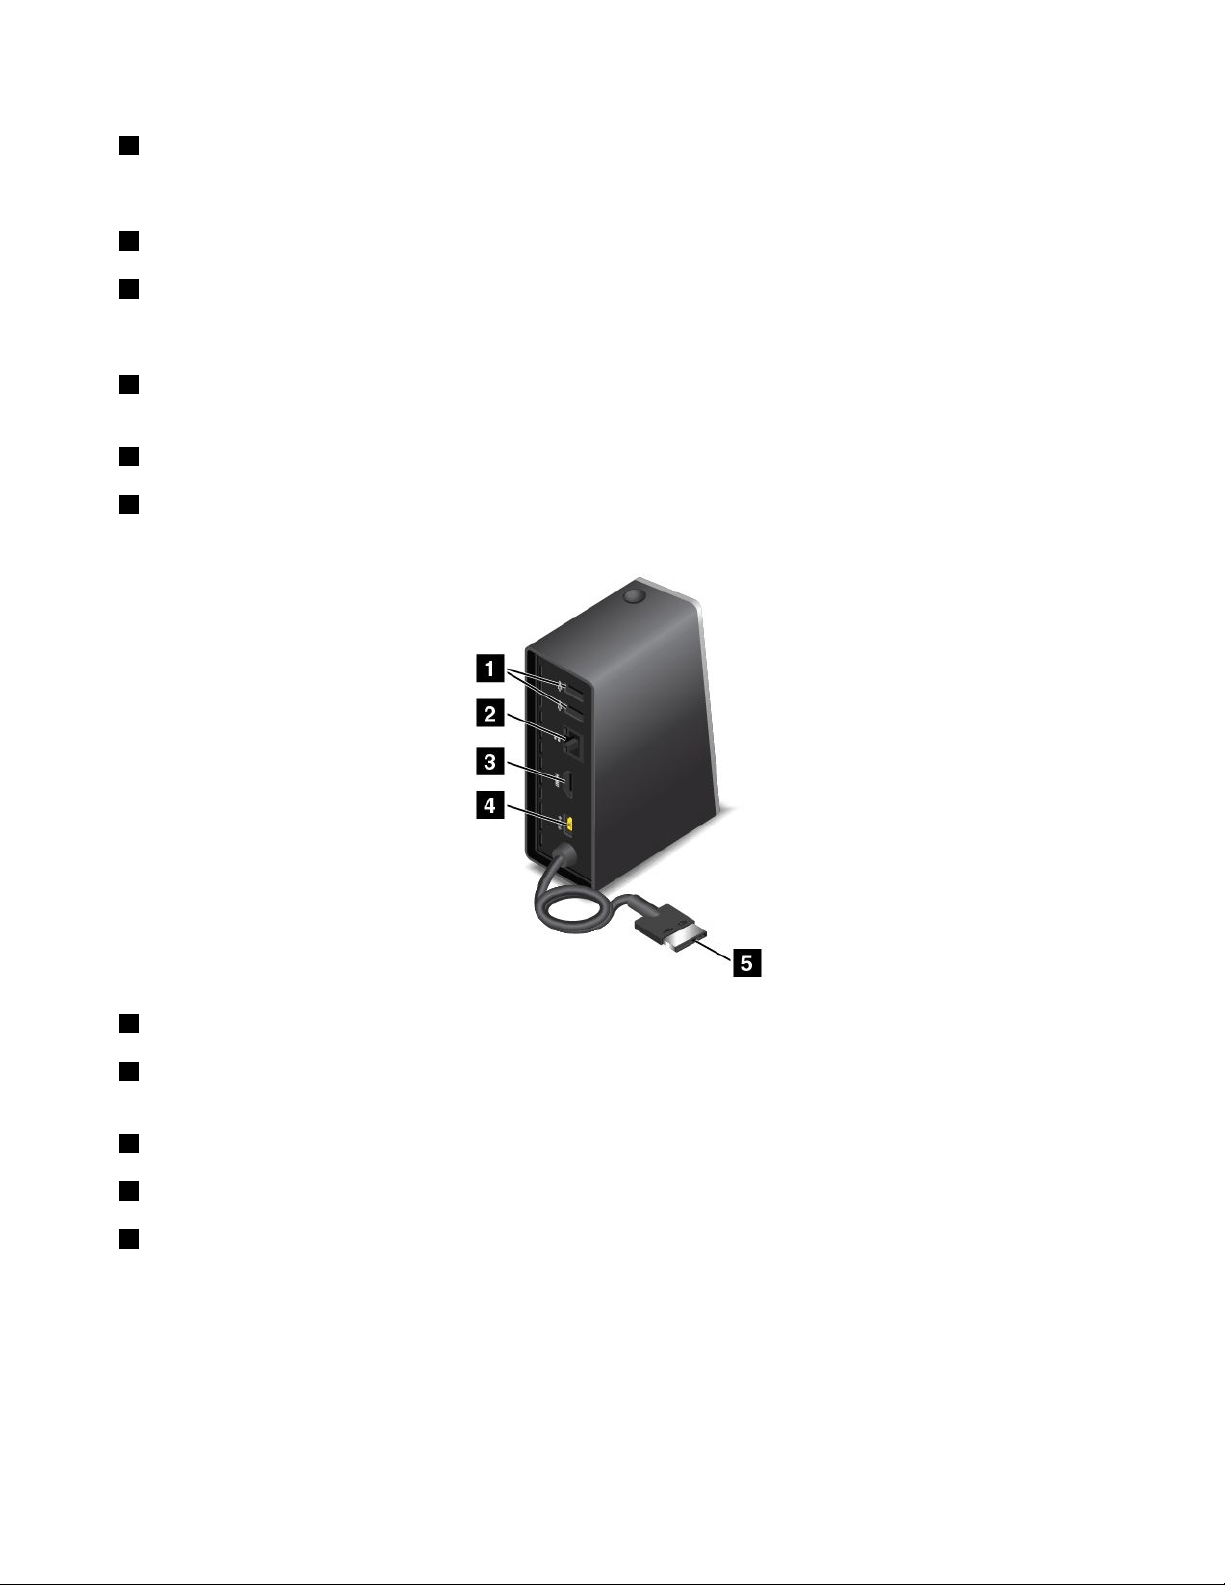
1Security-lockslot:Toprotectyourdockfromtheft,youcanpurchaseasecuritycablelock,suchas
aKensington-stylecablelock,thattsthissecurity-lockslottolockyourdocktoadesk,table,orother
non-permanentxture.
2USB3.0connector:UsedtoconnectdevicesthatarecompatiblewithUSB3.0.
3AlwaysOnUSBconnector:Bydefault,theAlwaysOnUSBconnectorenablesyoutochargesome
mobiledigitaldevicesandsmartphoneswhenyourcomputerisinsleeporhibernationmode.Formore
information,refertothedocumentationthatcomeswiththedock.
4Comboaudioconnector:Usedtoconnectheadphonesoraheadsetthathasa3.5-mm(0.14-inch),
4-poleplug.
5Powerindicator:TheilluminatedThinkPadlogoonthedockfunctionsasapowerindicatorforthedock.
6Powerbutton:Pressthepowerbuttontoturnonorturnoffthedock.
Rearview
1USB2.0connector:UsedtoconnectdevicesthatarecompatiblewithUSB2.0.
2Ethernetconnector:UsedtoconnectthedocktoanEthernetLAN.Theindicatorsonthisconnector
havethesamefunctionastheonesonthecomputer.
3HDMIconnector:UsedtoconnectadigitalaudiodeviceorvideomonitorthatiscompatiblewithHDMI.
4Powerconnector:Usedtoconnecttheacpoweradapter.
5LenovoOneLinkconnector:ConnecttheLenovoOneLinkconnectortothecomputer.
104UserGuide

Chapter8.Advancedconguration
Thischapterprovidesthefollowinginformationtohelpyoucongurethecomputer:
•“Installinganewoperatingsystem”onpage105
•“Installingdevicedrivers”onpage107
•“UsingtheThinkPadSetupprogram”onpage107
Installinganewoperatingsystem
Insomesituations,youmightneedtoinstallanewoperatingsystem.Thistopicprovidesinstructionson
howtoinstallanewoperatingsystem.
InstallingtheWindows7operatingsystem
Beforeyoustart,printtheseinstructions.
Attention:
•Theprocessofinstallinganewoperatingsystemdeletesallthedataonyourharddiskdriveorsolid-state
drive,includingthedatathatwerestoredinahiddenfolder.
•IfyourcomputerisequippedwithbothaharddiskdriveandanM.2solid-statedrive,donotusethe
M.2solid-statedriveasabootabledevice.TheM.2solid-statedriveisusedfor“cache”functionandto
supporttheIntelRapidStartTechnology.
ToinstalltheWindows7operatingsystem,dothefollowing:
1.CopyallthesubdirectoriesandlesintheC:\SWTOOLSdirectorytoaremovablestoragedevice.
•ThesupplementlesfortheWindows7operatingsystemareintheC:\SWTOOLS\OSFIXESdirectory.
•ThedevicedriversareintheC:\SWTOOLS\DRIVERSdirectory.
•ThepreinstalledprogramsareintheC:\SWTOOLS\APPSdirectory.
2.StarttheThinkPadSetupprogram.See“UsingtheThinkPadSetupprogram”onpage107.
3.SelectStartup➙UEFI/LegacyBoot.Thendooneofthefollowing:
•ToinstalltheWindows7(32-bit)operatingsystem,selectLegacyOnlyorBoth.
•ToinstalltheWindows7(64-bit)operatingsysteminLegacymode,selectLegacyOnly.
•ToinstalltheWindows7(64-bit)operatingsysteminUEFImode,selectUEFIOnly.
4.PresstheFn+F10keytoexittheThinkPadSetupprogram.
5.InserttheWindows7operatingsysteminstallationDVDintotheopticaldrive,andrestartthecomputer.
6.RestoretheC:\SWTOOLSdirectorythatyoubackedupbeforeinstallingtheWindows7operatingsystem.
7.Installthedevicedrivers.See“Installingdevicedrivers”onpage107.
8.InstalltheWindows7xmodules.YoucanndtheWindows7xmodulesintheC:\SWTOOLS\OSFIXES\
directory.Formoreinformation,gototheMicrosoftKnowledgeBasehomepageat:
http://support.microsoft.com/
9.Installtheregistrypatches,forexampletheEnablingWakeonLANfromStandbyforENERGYSTAR
patch.Todownloadandinstalltheregistrypatches,gototheLenovoSupportWebsiteat:
http://www.lenovo.com/support
©CopyrightLenovo2013
105

Note:Afterinstallingtheoperatingsystem,donotchangetheinitialUEFI/LegacyBootsettinginthe
ThinkPadSetupprogram.Otherwisetheoperatingsystemwillnotstartcorrectly.
WhenyouinstalltheWindows7operatingsystem,youmightneedoneofthefollowingcountryorregion
codes:
CountryorregionCodeCountryorregionCode
ChinaSC
NetherlandsNL
DenmarkDKNorway
NO
FinlandFI
SpainSP
FranceFR
SwedenSV
GermanyGR
TaiwanandHongKong
TC
ItalyIT
UnitedStatesUS
JapanJP
InstallingtheWindows8operatingsystem
Beforeyoustart,printtheseinstructions.
Attention:
•Theprocessofinstallinganewoperatingsystemdeletesallthedataonyourharddiskdriveorsolid-state
drive,includingthedatathatwerestoredinahiddenfolder.
•IfyourcomputerisequippedwithbothaharddiskdriveandanM.2solid-statedrive,donotusethe
M.2solid-statedriveasabootabledevice.TheM.2solid-statedriveisusedfor“cache”functionandto
supporttheIntelRapidStartTechnology.
ToinstalltheWindows8operatingsystem,dothefollowing:
1.StarttheThinkPadSetupprogram.See“UsingtheThinkPadSetupprogram”onpage107.
2.SelectStartup➙BoottodisplaytheBootPriorityOrdersubmenu.
3.SelectthedrivethatcontainstheWindows8operatingsysteminstallationprogram,forexampleUSB
HDD.
4.PresstheFn+F10keytoexittheThinkPadSetupprogram.
5.ConnectthedrivethatcontainstheWindows8operatingsysteminstallationprogramtothecomputer,
andrestartthecomputer.
6.InstalltheWindows8xmodules.GototheMicrosoftKnowledgeBasehomepageat
http://support.microsoft.com/.Typethenumberofthexmoduleinthesearcheld,thenclickSearch.
7.Installtheregistrypatches,forexampletheEnablingWakeonLANfromStandbyforENERGYSTAR
patch.Todownloadandinstalltheregistrypatches,gototheLenovoSupportWebsiteat:
http://www.lenovo.com/support
8.Installthedevicedrivers.See“Installingdevicedrivers”onpage107.
Note:Afterinstallingtheoperatingsystem,donotchangetheinitialUEFI/LegacyBootsettinginthe
ThinkPadSetupprogram.Otherwise,theoperatingsystemwillnotstartcorrectly.
WhenyouinstalltheWindows8operatingsystem,youmightneedoneofthefollowingcountryorregion
codes:
106UserGuide

CountryorregionCodeCountryorregionCode
ChinaSC
NetherlandsNL
DenmarkDKNorway
NO
FinlandFI
SpainSP
FranceFR
SwedenSV
GermanyGR
TaiwanandHongKong
TC
ItalyIT
UnitedStatesUS
JapanJP
Installingdevicedrivers
Devicedriveristheprogramthatoperatesaparticularhardwaredeviceofthecomputer.Ifadevicedoes
notperformwelloryouinstallanewdevice,youneedtoinstallorupdatethecorrespondingdevicedriver.
Forexample,ifyouusetheWindows7operatingsystem,tousetheUSB3.0connector,youneedto
downloadandinstalltheUSB3.0driver.
Todownloadthelatestdevicedrivers,dothefollowing:
1.Gotohttp://www.lenovo.com/ThinkPadDrivers.
2.Selectyourproductnametoviewallthedevicedriversforyourcomputer.
3.Selectthedevicedriversyouthatyouneed,andfollowtheinstructionsonthescreen.
Attention:DonotdownloadthedevicedriversfromtheWindowsUpdateWeb.Alwaysdownloadthedevice
driversfrom:
http://www.lenovo.com/ThinkPadDrivers
IfyouusetheWindows7operatingsystem,youalsocanndthedevicedriversintheC:\SWTOOLS\DRIVERS
directoryonyourharddiskdriveorsolid-statedrive.Formoreinformation,see“Reinstallingpreinstalled
programsanddevicedrivers”onpage65.
UsingtheThinkPadSetupprogram
TheThinkPadSetupprogramenablesyoutoselectvarioussetupcongurationsforyourcomputerthrough
conguringtheBIOS.
ToconguretheBIOSofyourcomputer,dothefollowing:
1.Turnonthecomputer.WhentheThinkPadlogoisdisplayed,pressF1.TheThinkPadSetupprogram
starts.
Ifyouarerequiredtoenterthesupervisorpassword,enterthecorrectpassword.Youalsocanpress
EntertoskipthepasswordpromptandstarttheThinkPadSetupprogram.Ifyoudonotenterthe
password,youcannotchangethecongurationsthatareprotectedbythesupervisorpassword.For
moreinformation,referto“Usingpasswords”onpage51.
2.Usethecursorkeystoselectatab;orusethecursorkeystolocateanitemandpressEntertoselectit.
Thenasubmenuisdisplayed.
Note:Somemenuitemsaredisplayedonlyifthecomputersupportsthecorrespondingfeatures.
3.Setthevalueofanitembydoingoneofthefollowing:
•PresstheFn+F6keytochangetoahighervalue.
•PresstheFn+F5keytochangetoalowervalue.
Chapter8.Advancedconguration107

Note:Defaultvaluesareinboldface.
4.Tochangeothercongurations,presstheEsckeytoexitthesubmenuandreturntotheparentmenu.
5.Whenyoucompletetheconguration,presstheFn+F10keytosaveandexit.Youalsocanselectthe
RestarttabintheThinkPadSetupmenu,andrestartyourcomputerwithoneoftheprovidedoptions.
Note:YoucanpresstheFn+F9keytorestoretothedefaultsettings.
Mainmenu
WhenyouentertheThinkPadSetupprogram,youwillrstseetheMainmenuasfollows:
•UEFIBIOSVersion
•UEFIBIOSDate(Year-Month-Day)
•EmbeddedControllerVersion
•MEFirmwareVersion
•MachineTypeModel
•System-unitserialnumber
•Systemboardserialnumber
•AssetT ag
•CPUType
•CPUSpeed
•Installedmemory
•UUID
•MACaddress(InternalLAN)
•PreinstalledOSLicense
•UEFISecureBoot
Congmenu
Tochangethecongurationofyourcomputer,selecttheCongtabfromtheThinkPadSetupmenu.
ThefollowingtableliststheCongmenuitems.
Attention:Thedefaultcongurationsarealreadyoptimizedforyou.Improperchangeofthecongurations
mightcauseunexpectedresults.
Table4.Congmenuitems
Menuitem
SubmenuitemSelectionComments
WakeOnLAN
•Disabled
•ACOnly
•ACandBattery
Enablethecomputerto
poweronwhentheEthernet
controllerreceivesamagic
packet(aspecialnetwork
message).
IfyouselectACOnly,Wake
onLANisenabledonly
whentheacpoweradapter
isattached.
IfyouselectACand
Battery,WakeonLANis
Network
108UserGuide

Table4.Congmenuitems(continued)
Menuitem
SubmenuitemSelectionComments
enabledwithanypower
sources.
Notes:
•Themagicpackettype
WakeonLANrequires
acpower.
•TheWakeonLAN
functiondoesnot
workwhenaharddisk
passwordisset.
EthernetLANOptionROM
(forUEFIOnlybootmode
orBothwithUEFIrst)
•Disabled
•Enabled
LoadstheEthernetLAN
OptionROMtoenable
startupfromanintegrated
networkdevice.
WirelessLANRadio
•On
•Off
IfyouselectOn,theinternal
wirelessradioisturnedon.
IfyouselectOff,theinternal
wirelessradioisturnedoff.
UEFIIPv4NetworkStack
(forUEFIOnlybootmode
orBothwithUEFIrst)
•Disabled
•Enabled
EnableordisableInternet
ProtocolVersion4(IPv4)
networkstackfortheUEFI
environment.
UEFIIPv6NetworkStack
(forUEFIOnlybootmode
orBothwithUEFIrst)
•Disabled
•Enabled
EnableordisableInternet
ProtocolVersion6(IPv6)
networkstackforUEFI
environment.
UEFIPXEBootPriority
(forBothwithUEFIrst
bootmode,andIPv6
andIPv4stacksareboth
enabled.)
•IPv6First
•IPv4First
Selectnetworkstack
priorityforUEFIPXEboot.
USBUEFIBIOSSupport
•Disabled
•Enabled
Enablesordisablesboot
supportforUSBstorage
devices.
AlwaysOnUSB
•Disabled
•Enabled
IfyouselectDisabled,
theexternalUSBdevices
cannotbechargedthrough
USBconnectors.
AlwaysOnUSBChargein
offmode
•Disabled
•Enabled
IfyouselectEnabled,the
AlwaysOnUSBconnector
enablesyoutocharge
somemobiledigitaldevices
andsmartphoneswhen
thecomputerispowered
offontheconditionthat
theacpoweradapteris
connected.
USB
USB3.0Mode
•Disabled
•Enabled
SettheUSB3.0controller
modefortheportsshared
betweenUSB2.0andUSB
3.0controllers.
Chapter8.Advancedconguration109

Table4.Congmenuitems(continued)
Menuitem
SubmenuitemSelectionComments
•Auto
IfyouselectAuto,itenables
youtoconnectandroute
appropriateUSB3.0or
USB2.0connectors.
IfyouselectEnabled,it
enablesUSB3.0mode
andallowsUSB3.0tobe
supportedintheoperating
system.
IfyouselectDisabled,it
disablesandhidestheUSB
3.0controller,andUSB3.0
connectorswillworkas
USB2.0connectors.
Keyboard/MouseFnandCtrlKeyswap
•Disabled
•Enabled
IfyouselectEnabled,the
FnkeyworksastheCtrl
key,andtheCtrlkeyworks
astheFnkey.
Note:EvenwhenEnabled
isselected,youneedto
presstheFnkeytoresume
thecomputerfromsleep
modetonormaloperation.
BootDisplayDevice
•ThinkPadLCD
•Analog(VGA)
•HDMI
•DisplayonDock
Selectthedisplaydevice
thatistobeactivatedat
boottime.Thisselection
iseffectiveforboottime,
passwordprompt,and
ThinkPadSetup.
GraphicsDevice•SwitchableGraphics
•IntegratedGraphics
TheIntegratedGraphics
modeprovideslonger
batterylife,whilethe
SwitchableGraphicsmode
enhancesperformance.
Display
OSDetectionforSwitchable
Graphics
•Disabled
•Enabled
IfyouselectEnabled,the
systemUEFIautomatically
switchesthegraphics
devicesettingtoSwitchable
Graphicsmodeifthe
operatingsystemsupports
thisfeature,andto
IntegratedGraphicsmodeif
theoperatingsystemdoes
notsupportthisfeature.
110UserGuide

Table4.Congmenuitems(continued)
Menuitem
SubmenuitemSelectionComments
IntelSpeedStep
®
technology
•Disabled
•Enabled
SelectthemodeofIntel
SpeedSteptechnologyat
runtime.
•Maximum
Performance:Always
highestspeed
•BatteryOptimized:
Alwayslowestspeed
•Disabled:Noruntime
support,lowestspeed
Note:Thissub-menuisnot
supportedinmodelswith
anAMDCPU.
CPUPowerManagement
•Disabled
•Enabled
Enableordisablethe
power-savingfeaturethat
stopsthemicroprocessor
clockautomaticallywhen
therearenocomputer
activities.Normally,itisnot
necessarytochangethe
setting.
Power
Intel(R)RapidStart
Technology
•Disabled
•Enabled
Enterafter:
•Immediately
•1minute
•2minutes
•5minutes
•10minutes
•15minutes
•30minutes
•1hour
•2hours
•3hours
Tousethisfeature,aspecial
partitiononthesolid-state
driveisrequired.
Whenenabled,the
computerentersalower
powerstateafterthe
speciedtimeinsleep
state.Andittakesonly
secondstoresumenormal
operation.
PasswordBeep•Disabled
•Enabled
Enablethisoptiontohave
abeepsoundwhenthe
systemiswaitingfora
power-on,harddisk,or
supervisorpassword.
Differentbeepswillsound
whentheenteredpassword
matchesordoesnotmatch
theconguredpassword.
BeepandAlarm
KeyboardBeep•Disabled
•Enabled
Enablethisoptionto
haveabeepsound
whenunmanageablekey
combinationarepressed.
Chapter8.Advancedconguration111

Table4.Congmenuitems(continued)
Menuitem
SubmenuitemSelectionComments
SerialATA(SATA)SATAControllerMode
Option
•Compatibility
•AHCI
SelectsSATAcontroller
operationmode.Ifyou
selectCompatibilitymode,
SATAcontrolleroperatesin
compatibilitymode.
CoreMulti-Processing
•Disabled
•Enabled
Enableordisableadditional
executioncoreunitswithin
amicroprocessor
Note:Ifyouareusinga
computerwithasingle-core
processor,thisitemisnot
available.
CPU
IntelHyper-Threading
Technology
•Disabled
•Enabled
Enableordisableadditional
logicalprocessorswithina
processorcore.
Note:Thissub-menuisnot
supportedinmodelswith
anAMDCPU.
DateandTimemenu
Tochangethedateortimeofyourcomputer,selecttheDate/TimetabfromtheThinkPadSetupmenu.
Thendothefollowing:
1.UsethecursorkeystoselectSystemDateorSystemTime.
2.Typeadateortime.
Securitymenu
Tochangethesecuritysettingsofyourcomputer,selecttheSecuritytabfromtheThinkPadSetupmenu.
ThefollowingtableliststheSecuritymenuitems.Defaultvaluesareinboldface.
Attention:Thedefaultcongurationsarealreadyoptimizedforyou.Improperchangeofthecongurations
mightcauseunexpectedresults.
Table5.Securitymenuitems
Menuitem
SubmenuitemSelectionComments
SupervisorPassword
•Disabled
•Enabled
Referto“Supervisor
password”onpage52
.
LockUEFIBIOSSettings
•Disabled
•Enabled
Enableordisablethe
functionthatprotects
itemsinThinkPadSetup
frombeingchangedbya
userwhodoesnothave
thesupervisorpassword.
Bydefault,thisissetto
Disabled.Ifyousetthe
supervisorpasswordand
enablethisfunction,no
onebutyoucanchange
Password
112UserGuide

Table5.Securitymenuitems(continued)
Menuitem
SubmenuitemSelectionComments
itemsintheThinkPadSetup
program.
SetMinimumLength
•Disabled
•Passwordlengthoptions
Specifyaminimumlength
forthepower-onpassword
andharddiskpassword.
Bydefault,thisissetto
Disabled.Ifyousetthe
supervisorpasswordand
specifyaminimumlength
forpasswords,noonebut
youcanchangethelength.
Passwordatunattended
boot
•Disabled
•Enabled
Ifyouselectandenable
Passwordatunattended
boot,apasswordprompt
isdisplayedwhenthe
computeristurnedon,
fromeitherapower-off
stateorhibernationstate.
IfyouselectDisabled,
nopasswordpromptis
displayed;thecomputer
goesaheadandloads
theoperatingsystem.
Topreventunauthorized
access,settheuser
authenticationonthe
operatingsystem.
Passwordatrestart•Disabled
•Enabled
Ifyouselectandenable
Passwordatrestart,
apasswordpromptis
displayedwhenyourestart
thecomputer.Ifyouselect
Disabled,nopassword
promptisdisplayed;the
computergoesaheadand
loadstheoperatingsystem.
Topreventunauthorized
access,settheuser
authenticationonthe
operatingsystem.
Power-OnPassword
•Disabled
•Enabled
Referto“Power-on
password”onpage51.
HardDisk1Password•Disabled
•Enabled
Referto“Harddisk
passwords”onpage
54
.
Chapter8.Advancedconguration113

Table5.Securitymenuitems(continued)
Menuitem
SubmenuitemSelectionComments
SecurityChip
•Active
•Inactive
•Disabled
IfyouselectActive,the
securitychipisfunctional.
IfyouselectInactive,the
SecurityChipoptionis
visible,butthesecurity
chipisnotfunctional.If
youselectDisabled,the
SecurityChipoptionis
hiddenandthesecurity
chipisnotfunctional.
SecurityReportingOptions
•Disabled
•Enabled
Enableordisablethe
followingSecurity
ReportingOptions:
•CMOSReporting:
CMOSdata
•NVRAMReporting:
NVRAMdata
•SMBIOSReporting:
SMBIOSdata
ClearSecurityChip
•Enter
Cleartheencryptionkey.
Note:Thisitemisdisplayed
onlyifyouhaveselected
ActivefortheSecurity
Chipoption.
PhysicalPresencefor
Provisioning
•Disabled
•Enabled
Thisoptionenablesor
disablestheconrmation
messagewhenyouchange
thesettingsofthesecurity
chip.
SecurityChip
PhysicalPresenceforClear
•Disabled
•Enabled
Thisoptionenablesor
disablestheconrmation
messagewhenyouclear
thesecuritychip.
FlashBIOSUpdatingby
End-Users
•Disabled
•Enabled
IfyouselectEnabled,
alluserscanupdatethe
UEFIBIOS.Ifyouselect
Disabled,onlytheperson
whoknowsthesupervisor
passwordcanupdatethe
UEFIBIOS.
UEFIBIOSUpdateOption
SecureRollBackPrevention
•Disabled
•Enabled
IfyouselectDisabled,you
canashtheolderversion
UEFIBIOS.
114UserGuide

Table5.Securitymenuitems(continued)
Menuitem
SubmenuitemSelectionComments
MemoryProtectionExecutionPrevention•Disabled
•Enabled
Somecomputerviruses
andwormscausememory
bufferstooverowby
runningcodewhereonly
dataisallowed.Ifthe
DataExecutionPrevention
featurecanbeusedwith
youroperatingsystem,then
byselectingEnabledyou
canprotectyourcomputer
againstattacksbysuch
virusesandworms.Ifafter
choosingEnabledyound
thataprogramdoesnotrun
correctly,selectDisabled
andresetthesetting.
IntelVirtualization
Technology
•Disabled
•Enabled
IfyouselectEnabled,a
VirtualMachineMonitor
(VMM)canutilizethe
additionalhardware
capabilitiesprovidedby
VirtualizationTechnology.
Virtualization
IntelVT-dFeature•Disabled
•Enabled
IntelVT-disIntel
VirtualizationTechnology
forDirectedI/O.When
enabled,aVMMcanutilize
theplatforminfrastructure
forI/Ovirtualization.
Note:Thissub-menuisnot
supportedinmodelswith
anAMDCPU.
EthernetLAN•Disabled
•Enabled
IfyouselectEnabled,you
canusetheEthernetLAN
device.
WirelessLAN•Disabled
•Enabled
IfyouselectEnabled,
youcanusewirelessLAN
devices.
WirelessWAN•Disabled
•Enabled
IfyouselectEnabled,you
canusewirelessWAN
devices.
Bluetooth•Disabled
•Enabled
IfyouselectEnabled,you
canuseBluetoothdevices.
USBPort
•Disabled
•Enabled
IfyouselectEnabled,you
canuseUSBconnectors.
OpticalDrive
•Disabled
•Enabled
IfyouselectEnabled,you
canusetheopticaldevice.
MemoryCardSlot
•Disabled
•Enabled
IfyouselectEnabled,you
canusethememorycard
slots.
I/OPortAccess
Chapter8.Advancedconguration115

Table5.Securitymenuitems(continued)
Menuitem
SubmenuitemSelectionComments
IntegratedCamera
•Disabled
•Enabled
IfyouselectEnabled,you
canusetheintegrated
camera.
Microphone•Disabled
•Enabled
IfyouselectEnabled,you
canusethemicrophones
(internal,external,or
line-in).
FingerprintReader•Disabled
•Enabled
IfyouselectEnabled,you
canusethengerprint
reader.
IntelATModuleActivation•Disabled
•Enabled
•PermanentlyDisabled
EnableordisabletheUEFI
BIOSinterfacetoactivate
theIntelATmodule,which
isanoptionalanti-theft
servicefromIntel.
Note:IfyousettheIntel
ATmoduleactivationto
PermanentlyDisabled,
youwillbeunabletoenable
thissettingagain.
Note:Thissub-menuisnot
supportedinmodelswith
anAMDCPU.
Anti-Theft
ComputraceModule
Activation
•Disabled
•Enabled
•PermanentlyDisabled
EnableordisabletheUEFI
BIOSinterfacetoactivate
thecomputracemodule.
Computraceisanoptional
monitoringservicefrom
AbsoluteSoftware.
Note:Ifyousetthe
Computracemodule
activationtoPermanently
Disabled,youwillbe
unabletoenablethis
settingagain.
SecureBoot
•Disabled
•Enabled
Enableordisablethe
UEFISecureBootfeature.
SelectEnabletoprevent
unauthorizedoperating
systemsfromrunningat
boottime.SelectDisabled
toallowanyoperating
systemstorunatboottime.
Windows8operating
systemrequiresthisfeature
tobeenabled.
PlatformMode
•SetupMode
•UserMode
Specifythesystem
operatingmode.
SecureBootMode•StandardMode
•CustomMode
Specifythesystem
operatingmode.
SecureBoot
116UserGuide

Table5.Securitymenuitems(continued)
Menuitem
SubmenuitemSelectionComments
ResettoSetupMode
•Yes
•No
Thisoptionisusedtoclear
thecurrentplatformkey
andputthesysteminto
SetupMode.Youcan
installyourownplatform
keyandcustomizethe
SecureBootsignature
databasesinSetupMode.
SecureBootmodewillbe
settoCustomMode.
RestoreFactorykeys•Yes
•No
Thisoptionisusedto
restoreallkeysand
certicatesinSecure
Bootdatabasestofactory
defaults.Anycustomized
SecureBootsettings
willbeerased,andthe
defaultplatformkeywillbe
re-establishedalongwith
theoriginalsignature
databasesincluding
certicateforWindows
8operatingsystem.
Startupmenu
Tochangethestartupsettingsofyourcomputer,selecttheStartuptabfromtheThinkPadSetupmenu.
Attention:
•Afteryouchangethestartupsequence,ensurethatyouselectacorrectdeviceduringacopy,asave,ora
formatoperation.Otherwiseyourdatamightbeerasedoroverwritten.
•IfyouareusingtheBitLockerdriveencryption,donotchangethestartupsequence.BitLockerdrive
encryptionlocksthecomputerfromstartingoncedetectsthechangeofstartupsequence.
Tochangethestartupsequencetemporarilysothatthecomputerstartsfromadesireddrive,dothefollowing:
1.Turnoffthecomputer.
2.Turnonthecomputer.WhentheThinkPadlogoisdisplayed,presstheF12key.
3.Selectthedevicethatyouwantthecomputertostartfrom.
Note:TheBootmenuwillbedisplayedifthecomputercannotstartfromanydevicesortheoperating
systemcannotbefound.
ThefollowingtableliststheStartupmenuitems.Defaultvaluesareinboldface.
Note:Someitemsaredisplayedonthemenuonlyifthecomputersupportsthecorrespondingfeatures.
Chapter8.Advancedconguration117

Table6.Startupmenuitems
Menuitem
SelectionComments
Boot
Selectthebootdevicewhenyou
pressthepowerbuttontoturnonthe
computer.
NetworkBoot
Selectthebootdevicewhenthe
computerwakesfromLAN.IfWake
OnLANisenabled,anetwork
administratorcanturnonallofthe
computersinaLANremotelybyuse
ofnetworkmanagementsoftware.
UEFI/LegacyBoot
•Both
•UEFIOnly
•LegacyOnly
UEFI/LegacyBootPriority
•UEFIFirst
•LegacyFirst
CSMSupport(forUEFIOnly)
•No
•Y es
Selectsystembootcapability.
•Both:Selectpriorityofboot
optionsbetweenUEFIandLegacy.
•UEFIOnly:Thecomputerwillstart
fromtheUEFI-enabledoperating
system.
•LegacyOnly:Thecomputerwill
bootfromanyoperatingsystem
otherthantheUEFI-enabledone.
Note:IfyouselectUEFIOnly,the
computercannotstartfromthe
bootabledevicesthatdonothavethe
UEFI-enabledoperatingsystem.
CompatibilitySupportModule(CSM)
isrequiredforstartingthelegacy
operatingsystem.IfyouselectUEFI
Only,CSMSupportisselectable.
ForBothorLegacyOnlymode,CSM
Supportisnotselectable.
BootMode
•Quick
•Diagnostics
ScreenduringthePOST:
•Quick:TheThinkPadLogoscreen
isdisplayed.
•Diagnostics:Testmessagesare
displayed.
Note:YoucanalsoenterDiagnostic
modebypressingEscduringPOST.
OptionKeyDisplay
•Disabled
•Enabled
IfyouselectDisabled,thenthe
message“Tointerruptnormalstartup,
pressEnter”isnotdisplayedduring
thePOST.
BootDeviceListF12Option
•Disabled
•Enabled
IfyouselectEnabled,theF12key
isrecognizedandtheBootMenu
windowisdisplayed.
BootOrderLock
•Disabled
•Enabled
IfyouselectDisabled,yourcomputer
willbootusingthedefaultpriority.If
youselectEnabled,yourcomputer
willbootusingthepriorityyouhave
customized.
118UserGuide

Restartmenu
ToexittheThinkPadSetupprogramandrestartthecomputer,selectRestartfromtheThinkPadSetupmenu.
Thefollowingsubmenuitemsaredisplayed:
•ExitSavingChanges:Savethechangesandrestartthecomputer.
•ExitDiscardingChanges:Discardthechangesandrestartthecomputer.
•LoadSetupDefaults:Restoretothefactorydefaultsettings.
Note:EnableOSOptimizedDefaultstomeettheWindows8certicationrequirements.Whenyou
changethissetting,someothersettingsarechangedautomatically,suchasCSMSupport,UEFI/Legacy
Boot,SecureBoot,andSecureRollBackPrevention.
•DiscardChanges:Discardthechanges.
•SaveChanges:Savethechanges.
UpdatingyoursystemUEFIBIOS
TheUEFIBIOSistherstprogramthatthecomputerrunswhenthecomputeristurnedon.TheUEFIBIOS
initializesthehardwarecomponents,andloadstheoperatingsystemandotherprograms.
YoucanupdatetheUEFIBIOSbystartingyourcomputerfromaashupdateopticaldiscoraashupdate
programrunningintheWindowsenvironment.Whenyouinstallanewprogram,adevicedriver,orhardware,
youmightbeinformedtoupdatetheUEFIBIOS.
ForinstructionsonhowtoupdatetheUEFIBIOS,goto:
http://www.lenovo.com/ThinkPadDrivers
Chapter8.Advancedconguration119

120UserGuide

Chapter9.Preventingproblems
AnimportantpartofowningaThinkPadnotebookcomputerismaintenance.Withpropercare,youcan
avoidcommonproblems.Thechapterprovidesinformationthatcanhelpyoukeepyourcomputerrunning
smoothly.
•“Generaltipsforpreventingproblems”onpage121
•“Makingsuredevicedriversarecurrent”onpage122
•“Takingcareofyourcomputer”onpage123
Generaltipsforpreventingproblems
•IfyourcomputerisequippedwithbothaharddiskdriveandanM.2solid-statedrive,youarenot
recommendedtousetheM.2solid-statedriveasabootabledevice.TheM.2solid-statedriveisdesigned
anddevelopedfor“cache”functionpurposeonly.IfyouusetheM.2solid-statedriveasabootable
device,itsreliabilityisnotguaranteed.
•Checkthecapacityofyourharddiskdrivefromtimetotime.Iftheharddiskdrivegetstoofull,the
Windowsoperatingsystemwillslowdownandmightproduceerrors.
Tochecktheharddiskdrivecapacity,dothefollowing:
–Windows7:ClickStart➙Computer.
–Windows8:OpentheFileExplorerandclickComputer.
•Emptyyourrecyclebinonaregularbasis.
•Usediskdefragmenttoolregularlyonyourharddiskdrivetoimprovedataseekandreadtimes.
•Tofreeupdiskspace,uninstallunusedapplicationprograms.
Note:Youalsomightwanttolookforprogramduplicationoroverlappingversions.
•CleanoutyourInbox,Sent,andTrashfoldersfromyoure-mailclientprogram.
•Backupyourdataatleastonceaweek.Ifcriticaldataispresent,itisagoodideatoperformadaily
backupoperation.Lenovohasmanybackupoptionsavailableforyourcomputer.Rewritableoptical
drivesareavailableformostmachinesandareeasilyinstalled.
•Schedulesystemrestoreoperationstotakeasystemsnapshotperiodically.Formoreinformationabout
systemrestore,seeChapter5“Recoveryoverview”onpage61
.
•UpdatedevicedriversandtheUEFIBIOSwhenneeded.
•Proleyourmachineathttp://www.lenovo.com/supporttokeepuptodatewithcurrentdriversand
revisions.
•Keepuptodatefordevicedriversonothernon-Lenovohardware.Youmightwanttoreadthedevice
driverinformationreleasenotespriortoupdatingforcompatibilityorknownissues.
•Keepalogbook.Entriesmightincludemajorhardwareorsoftwarechanges,driverupdates,minorissues
youhaveexperienced,andhowyouresolvedtheminorissues.
•Ifyoueverneedtorunarecoveryonyourcomputertoreturnthepreinstalledcontentsontothemachine,
thefollowingtipsmighthelpalongtheway:
–Removeallexternaldevicessuchastheprinter,keyboard,andsoon.
–Makesurethatyourbatteryischargedandyourcomputerhastheacpowerconnected.
–AccessThinkPadSetupandloadthedefaultsettings.
–Restartthecomputerandstarttherecoveryoperation.
©CopyrightLenovo2013
121

–Ifyourcomputerusesdiscsastherecoverymedia,donotremovethediscfromthedriveuntil
promptedtodoso.
•Forsuspectedharddiskdriveissues,referto“Diagnosingproblems”onpage127andrunadiagnostic
testforthedrivebeforeyoucalltheCustomerSupportCenter.Ifyourcomputerdoesnotstartup,
downloadthelestocreateabootableself-testmediumfromhttp://www.lenovo.com/hddtest.Runthe
testandrecordanymessagesorerrorcodes.Ifthetestreturnsanyfailingerrorcodesormessages,
calltheCustomerSupportCenterwiththecodesormessagesandthecomputerinfrontofyou.A
technicianwillassistyoufurther.
•Ifrequired,youcanndthecontactinformationabouttheCustomerSupportCenterforyourcountry
orregionathttp://www.lenovo.com/support/phone.WhencallingtheCustomerSupportCenter,make
surethatyouhaveyourmachinemodeltype,serialnumber,andthecomputerinfrontofyou.Also,ifthe
computerisproducingerrorcodes,itishelpfultohavetheerrorscreenonorthemessageswrittendown.
Makingsuredevicedriversarecurrent
Devicedriversareprogramsthatcontaininstructionsfortheoperatingsystemabouthowtooperateor
“drive”acertainpieceofhardware.Eachhardwarecomponentonyourcomputerhasitsownspecicdriver.
Ifyouaddanewcomponent,theoperatingsystemneedstobeinstructedonhowtooperatethatpiece
ofhardware.Afteryouinstallthedriver,theoperatingsystemcanrecognizethehardwarecomponent
andunderstandhowtouseit.
Note:Becausedriversareprograms,likeanyotherleonyourcomputer,theyaresusceptibletocorruption
andmightnotperformcorrectlyifcorruptionoccurs.
Itisnotalwaysnecessarytodownloadthelatestdrivers.However,youshoulddownloadthelatestdriver
foracomponentifyounoticepoorperformancefromthatcomponentorifyouaddedanewcomponent.
Thismighteliminatethedriverasthepotentialcauseofaproblem.
GettingthelatestdriversfromtheWebsite
YoucandownloadandinstallupdateddevicedriversfromtheLenovoWebsitebydoingthefollowing:
1.Gotohttp://www.lenovo.com/ThinkPadDrivers.
2.Selecttheentryforyourcomputerandthenfollowtheinstructionsonthescreentodownloadand
installnecessarysoftware.
GettingthelatestdriversusingSystemUpdate
TheSystemUpdateprogramhelpsyoukeepthesoftwareonyourcomputerup-to-date.Updatepackages
arestoredonLenovoserversandcanbedownloadedfromtheLenovoSupportWebsite.Updatepackages
cancontainapplications,devicedrivers,UEFIBIOSashes,orsoftwareupdates.WhentheSystemUpdate
programconnectstotheLenovoSupportWebsite,theSystemUpdateprogramautomaticallyrecognizes
themachinetypeandmodelofyourcomputer,theinstalledoperatingsystem,andthelanguageofthe
operatingsystemtodeterminewhatupdatesareavailableforyourcomputer.TheSystemUpdateprogram
thendisplaysalistofupdatepackagesandcategorizeseachupdateascritical,recommended,oroptionalto
helpyouunderstandtheimportance.Youhavecompletecontrolofwhichupdatestodownloadandinstall.
Afteryouselecttheupdatepackagesyouwant,theSystemUpdateprogramautomaticallydownloadsand
installstheupdateswithoutanyfurtherinterventionfromyou.
TheSystemUpdateprogramispreinstalledonyourcomputerandisreadytorun.Theonlyprerequisiteis
anactiveInternetconnection.Youcanstarttheprogrammanually,oryoucanusetheschedulefeature
toenabletheprogramtosearchforupdatesautomaticallyatspeciedintervals.Youalsocanpredene
scheduledupdatestosearchbyseverity(criticalupdates,criticalandrecommendedupdates,orallupdates)
sothelistyouchoosefromcontainsonlythoseupdatetypesthatareofinteresttoyou.
122UserGuide

FormoreinformationabouthowtousetheSystemUpdateprogram,refertothehelpinformationsystem
oftheprogram.
Takingcareofyourcomputer
Althoughyourcomputerisdesignedtofunctionreliablyinnormalworkenvironments,youneedtouse
commonsenseinhandlingit.Byfollowingtheimportanttipsinthistopic,youwillgetthemostuseand
enjoymentoutofyourcomputer.
Becarefulaboutwhereandhowyouwork
•Storepackingmaterialssafelyoutofthereachofchildrentopreventtheriskofsuffocationfromplastic
bags.
•Keepyourcomputerawayfrommagnets,activatedcellularphones,electricalappliances,orspeakers
(morethan13cmor5inches).
•Avoidsubjectingyourcomputertoextremetemperatures(below5°C/41°Forabove35°C/95°F).
•Someappliances,suchascertainportabledesktopfansorairpuriers,canproducenegativeions.Ifa
computerisclosetosuchanappliance,andisexposedforanextendedtimetoaircontainingnegative
ions,itmightbecomeelectrostaticallycharged.Suchachargemightbedischargedthroughyourhands
whenyoutouchthekeyboardorotherpartsofthecomputer,orthroughconnectorsonI/Odevices
connectedtoit.Eventhoughthiskindofelectrostaticdischarge(ESD)istheoppositeofadischargefrom
yourbodyorclothingtothecomputer,itposesthesameriskofacomputermalfunction.
Yourcomputerisdesignedandmanufacturedtominimizeanyeffectsofelectrostaticcharge.Anelectrostatic
chargeaboveacertainlimit,however,canincreasetheriskofESD.Therefore,whenusingthecomputer
closetoanappliancethatcanproducenegativeions,givespecialattentiontothefollowing:
•Avoiddirectlyexposingyourcomputertotheairfromanappliancethatcanproducenegativeions.
•Keepyourcomputerandperipheralsasfaraspossiblefromsuchanappliance.
•Whereverpossible,groundyourcomputertofacilitatesafeelectrostaticdischarge.
Note:Notallsuchappliancescauseasignicantelectrostaticcharge.
Begentlewithyourcomputer
•Avoidplacinganyobjects(includingpaper)betweenthedisplayandthekeyboardorthepalmrest.
•Yourcomputerdisplayisdesignedtobeopenedandusedatanangleslightlygreaterthan90degrees.
Donotopenthedisplaybeyond135degrees,asthismightdamagethecomputerhinge.
•Donotturnyourcomputeroverwhiletheacpoweradapterispluggedin.Thiscouldbreaktheadapter
plug.
Carryyourcomputerproperly
•Beforemovingyourcomputer,besuretoremoveanymedia,turnoffattacheddevices,anddisconnect
cordsandcables.
•Whenpickingupyouropencomputer,holditbythebottom.Donotpickuporholdyourcomputerby
thedisplay.
Handlestoragemediaanddrivesproperly
•Ifyourcomputercomeswithanopticaldrive,donottouchthesurfaceofadiscorthelensonthetray.
•WaituntilyouheartheCDorDVDclickintothecenterpivotofthedrivebeforeclosingthetray.
•Wheninstallingtheharddiskdrive,solid-statedrive,oropticaldrive,followtheinstructionsshippedwith
yourhardware,andapplypressureonlywhereneededonthedevice.
Chapter9.Preventingproblems123

•Afteryoureplacetheprimaryharddiskdriveorsolid-statedrive,reattachthecoverofthedriveslot.
•Whenreplacingtheharddiskdrive,reattachthecoverofthedriveslot.
•Storeyourexternalandremovableharddiskdriveoropticaldrivesintheappropriatecontainersor
packagingwhentheyarenotbeingused.
•Beforeyouinstallanyofthefollowingdevices,touchametaltableoragroundedmetalobject.Thisaction
reducesanystaticelectricityfromyourbody.Thestaticelectricitycoulddamagethedevice.
Note:Notalllisteddevicesareincludedinyourcomputer.
–Memorymodule
–Mini-PCIcard
–Memorycard,suchasanSDcard,SDHCcard,SDXCcard,andaMultiMediaCard
Thisactionreducesanystaticelectricityfromyourbody.Thestaticelectricitycoulddamagethedevice.
•Whentransferringdatatoorfromaashmediacard,suchasanSDcard,donotputyourcomputerin
sleeporhibernationmodebeforethedatatransferiscomplete.Todosomightcausedamagetoyour
data.
Takingcarewhensettingpasswords
•Rememberyourpasswords.Ifyouforgetasupervisororharddiskpassword,Lenovowillnotresetit,and
youmighthavetoreplaceyoursystemboard,harddiskdrive,orsolid-statedrive.
Takingcareofthengerprintreader
Thefollowingactionscoulddamagethengerprintreaderorcauseitnottoworkproperly:
•Scratchingthesurfaceofthengerprintreaderwithahard,pointedobject.
•Scrapingthesurfaceofthengerprintreaderwithyourngernailoranythinghard.
•Usingortouchingthengerprintreaderwithadirtynger.
Ifyounoticeanyofthefollowingconditions,gentlycleanthesurfaceofthengerprintreaderwithadry,
soft,lint-freecloth:
•Thesurfaceofthengerprintreaderisdirtyorstained.
•Thesurfaceofthengerprintreaderiswet.
•Thengerprintreaderoftenfailstoenrollorauthenticateyourngerprint.
Registeringyourcomputer
•RegisteryourThinkPadcomputerwithLenovoathttp://www.lenovo.com/register.Formoreinformation,
see“Registeringyourcomputer”onpage23.
Besurenottomodifyyourcomputer
•OnlyanauthorizedThinkPadrepairtechnicianshoulddisassembleandrepairyourcomputer.
•Donotmodifyortapethelatchestokeepthedisplayopenorclosed.
Cleaningthecoverofyourcomputer
Occasionallycleanyourcomputerbydoingthefollowing:
1.Prepareamixtureofagentlekitchen-usedetergent.Thedetergentmustnotcontainabrasivepowderor
strongchemicalssuchasacidoralkaline.Usevepartswatertoonepartdetergent.
2.Absorbthediluteddetergentintoasponge.
3.Squeezeexcessliquidfromthesponge.
124UserGuide

4.Wipethecoverwiththesponge,usingacircularmotionandtakingcarenottoletanyexcessliquiddrip.
5.Wipethesurfacetoremovethedetergent.
6.Rinsethespongewithcleanrunningwater.
7.Wipethecoverwiththecleansponge.
8.Wipethesurfaceagainwithadry,soft,lint-freecloth.
9.Waitforthesurfacetodrycompletelyandremoveanybersfromthecloth.
Cleaningyourcomputerkeyboard
Tocleanthecomputerkeyboard,dothefollowing:
1.Applysomeisopropylrubbingalcoholtoasoft,dust-freecloth.
Note:Avoidsprayingcleanerdirectlyontothekeyboard.
2.Wipeeachkeytopsurfacewiththecloth.Wipethekeysonebyone;ifyouwipeseveralkeysatatime,
theclothmighthookontoanadjacentkeyandpossiblydamageit.Makesurethatnoliquiddripsonto
orbetweenthekeys.
3.Allowtodry.
4.Toremoveanycrumbsordustfrombeneaththekeys,youcanuseacamerablowerwithabrush
orcoolairfromahairdryer.
Cleaningyourcomputerdisplay
Tocleanthecomputerdisplay,dothefollowing:
1.Gentlywipethedisplaywithadry,softlint-freecloth.Ifyouseeascratchlikemarkonyourdisplay,
itmightbeastaintransferredfromthekeyboardortheTrackPointpointingstickwhenthecoverwas
pressedfromtheoutside.
2.Wipeordustthestaingentlywithasoft,drycloth.
3.Ifthestainremains,moistenasoft,lint-freeclothwithwaterora50-50mixtureofisopropylalcoholand
waterthatdoesnotcontainimpurities.
Note:Avoidsprayingcleanerdirectlyontothekeyboard.
4.Wringoutasmuchoftheliquidasyoucan.
5.Wipethedisplayagain;donotletanyliquiddripintothecomputer.
6.Besuretodrythedisplaybeforeclosingit.
Chapter9.Preventingproblems125

126UserGuide

Chapter10.Troubleshootingcomputerproblems
Thischapterprovidesinformationonwhattodoifyouexperienceaproblemwithyourcomputer.
•“Diagnosingproblems”onpage127
•“Troubleshooting”onpage127
Diagnosingproblems
Ifyouexperienceproblemswithyourcomputer,usetheLenovoSolutionCenterprogramasastarting
pointforsolvingthem.
TheLenovoSolutionCenterprogramenablesyoutotroubleshootandresolvecomputerproblems.It
combinesdiagnostictests,systeminformationcollection,securitystatus,andsupportinformation,along
withhintsandtipsforoptimalsystemperformance.
Notes:
•TheLenovoSolutionCenterprogramalsoisavailablefordownloadedat:
http://www.lenovo.com/diags
•IfyouareusingotherWindowsoperatingsystemratherthanWindows7andWindows8,youcanndthe
latestinformationaboutdiagnosticsforyourcomputerat:
http://www.lenovo.com/diagnose
IfyourcomputerisinstalledwiththeWindows7operatingsystem,whenyouaresettingupyourcomputer,
theLenovoSolutionCenterprogrampromptsyoutocreaterecoverymedia.Youcanusetherecovery
mediatorestoretheharddiskdrivetothefactorydefaultstate.Formoreinformation,see“Creatingand
usingarecoverymedia”onpage61
.
ToruntheLenovoSolutionCenterprogram,see“AccessingLenovoprogramsontheWindows7operating
system”onpage17.
Foradditionalinformation,refertotheLenovoSolutionCenterhelpsystem.
Note:IfyouareunabletoisolateandrepairtheproblemyourselfafterrunningLenovoSolutionCenter
program,saveandprinttheloglescreatedbytheprogram.Youwillneedthelogleswhenyouspeaktoa
Lenovotechnicalsupportrepresentative.
Troubleshooting
Ifyourcomputerhasanerror,ittypicallydisplaysamessageoranerrorcode,ormakesabeepwhen
youturniton.Whenyouexperienceaproblem,refertothecorrespondingsectionsinthistopictotryto
solvetheproblembyyourself.
Computerstopsresponding
Printtheseinstructionsnowandkeepitwithyourcomputerforreferencelater.
Ifyourcomputeriscompletelyunresponsive(youcannotusetheThinkPadpointingdeviceorthekeyboard),
dothefollowing:
1.Pressandholdthepowerbuttonuntilthecomputerturnsoff.Afterthecomputeristurnedoff,restartby
pressingthepowerbutton.Ifthecomputerdoesnotturnon,continuewithstep2.
©CopyrightLenovo2013
127

Note:Donotremovethebatteryandtheacpoweradaptertoresetthecomputer.
2.Whilethecomputeristurnedoff,removeallpowersourcesfromthecomputer(batteryandtheacpower
adapter).Holddownthepowerbuttonfor10seconds.Plugintheacpoweradapterwhilekeepingthe
batteryoutofthecomputer.Ifthecomputerdoesnotturnbackon,continuewithstep3.
Note:OncethecomputerstartsupandenterstheWindowsenvironment,usethepropershutdown
proceduretoturnthecomputeroff.Oncethecomputerisoff,reattachthebatteryandrestartthe
computer.Ifthecomputerdoesnotstartwiththebatteryreattached,removethebatteryandagain
startwithstep2.Ifthecomputerstartswithacpowerbutdoesnotstartwhenthebatteryisattached,
calltheCustomerSupportCenterforsupport.
3.Whilethecomputerisoff,removeallsourcesofpower(batteryandtheacpoweradapter).Removeall
externaldevicesthatareattachedtoyourcomputer(keyboard,mouse,printer,scanner,andsoon).
Repeatstep2.Ifstep2isunsuccessful,continuewithstep4.
Note:Thefollowingstepsinvolveremovingstaticsensitivecomponentsfromyourcomputer.Makesure
thatyouareproperlygroundedandremoveallsourcesofpowerattachedtothecomputer.Ifyouare
uncomfortableorunsureaboutremovingcomponents,calltheCustomerSupportCenterforassistance.
4.Whilethecomputerisoff,removeallsourcesofpowerandexternalhardware.Removeanynon-original
memorymoduleaddedtoyourcomputer.Afterremovingtheextramemorymoduleandreinstallingthe
originalmemorymodule,repeatstep2.Ifthecomputerstilldoesnotturnon,consulttheusermanual
forothercustomer-replaceablecomponentsthatareattachedtoyourcomputer.
Ifthecomputerstilldoesnotstartup,calltheCustomerSupportCenterandaCustomerSupportSpecialist
willassistyou.
Spillsonthekeyboard
Withamobilecomputer,thereareincreasedchancesofspillingliquidsonthekeyboard.Becausemost
liquidsconductelectricity,liquidspilledonthekeyboardcouldcreatenumerousshortcircuits,potentially
causingirreparabledamagetoyourcomputer.
Ifyouspillsomethingonyourcomputer:
Attention:Besurethatnoliquidcreatesashortcircuitbetweenyouandtheacpoweradapter(ifinuse).
Althoughyoumightlosesomedataorworkbyturningoffthecomputerimmediately,leavingthecomputer
onmightmakeyourcomputerunusable.
1.Carefullyunplugtheacpoweradapterimmediately.
2.Turnoffthecomputerimmediately.Ifthecomputerdoesnotturnoff,removethebattery.Themore
quicklyyoustopthecurrentfrompassingthroughthecomputerthemorelikelyyouwillreducedamage
fromshortcircuits.
3.Waituntilyouarecertainthatalltheliquidisdrybeforeturningonyourcomputer.
Note:Ifyouwanttoreplaceyourkeyboard,youcanpurchaseanewone.
Errormessages
•Message:0177:BadSVPdata,stopPOSTtask.
Solution:ChecksumofthesupervisorpasswordintheEEPROMisnotcorrect.Thesystemboard
shouldbereplaced.Havethecomputerserviced.
•Message:0183:BadCRCofSecuritySettingsinEFIVariable.EnterThinkPadSetup.
128UserGuide

Solution:ChecksumoftheSecuritysettingsintheEFIVariableisnotcorrect.EnterThinkPadSetup
tochecksecuritysettings,PressF10andthenpressEntertorestartthesystem.Ifyoustillhavea
problem,havethecomputerserviced.
•Message:0187:EAIAdataaccesserror.
Solution:TheaccesstoEEPROMisfailed.Havethecomputerserviced.
•Message:0188:InvalidRFIDSerializationInformationArea.
Solution:TheEEPROMchecksumisnotcorrect(block#0and1).Thesystemboardshouldbereplaced,
andtheboxserialnumberneedstobereinstalled.Havethecomputerserviced.
•Message:0189:InvalidRFIDcongurationinformationarea.
Solution:TheEEPROMchecksumisnotcorrect(block#4and5).Thesystemboardshouldbereplaced,
andtheUUIDneedstobereinstalled.Havethecomputerserviced.
•Message:0190:Criticallow-batteryerror.
Solution:Thecomputerturnsoff,becausethebatteryislow.Connecttheacpoweradaptertothe
computerandchargethebattery,orreplacethebatterywithafullychargedone.
•Message:0191:SystemSecurity-Invalidremotechangerequested.
Solution:Thesystemcongurationchangehasfailed.Conrmtheoperationandtryagain.Toclearthe
error,entertheThinkPadSetupprogram.
•Message:0199:SystemSecurity-Securitypasswordretrycountexceeded.
Solution:Thismessageisdisplayedifyouenterawrongsupervisorpasswordmorethanthreetimes.
Conrmthesupervisorpasswordandtryagain.Tocleartheerror,entertheThinkPadSetupprogram.
•Message:0251:SystemCMOSchecksumbad.
Solution:ThesystemCMOSmighthavebeencorruptedbyaprogram.Thecomputerusesthedefault
settings.RunThinkPadSetuptorecongurethesettings.Ifyoustillseethesameerrorcode,have
thecomputerserviced.
•Message:0253:EFIVariableBlockDatawasdestroyed.
Solution:ThesystemEFIVariableBlockDatamighthavebeencorrupted.Thecomputerusesthe
defaultsettings.RunThinkPadSetuptorecongurethesettings.Ifyoustillseethesameerrorcode,
havethecomputerserviced.
•Message:0271:Realtimeclockerror.
Solution:Havethecomputerserviced.
•Message:1802:Unauthorizednetworkcardispluggedin.
Solution:Thenetworkcardisnotsupportedonthiscomputer.Removeit.
•Message:1820:Morethanoneexternalngerprintreadersareattached.
Solution:Poweroffandremoveallbutthereaderthatyousetupwithinyourmainoperatingsystem.
•Message:2000:ThinkVantageActiveProtectionsensordiagnosticsfailed.
Solution:ThinkVantageActiveProtectionsensorisnotworkingcorrectly.Havethecomputerserviced.
•Message:2100:DetectionerroronHDD0(MainHDD).
Chapter10.Troubleshootingcomputerproblems129

Solution:Theharddiskdriveisnotworking.Havetheharddiskdriveserviced.
•Message:2101:DetectionerroronHDD1(UltrabayHDD)).
Solution:Theharddiskdriveisnotworking.Havetheharddiskdriveserviced.
•Message:2102:DetectionerroronHDD2(MiniSATA).
Solution:TheMiniSATAdeviceisnotworking.HavetheMiniSATAdeviceserviced.
•Message:2110:ReaderroronHDD0(MainHDD).
Solution:Theharddiskdriveisnotworking.Havetheharddiskdriveserviced.
•Message:2111:ReaderroronHDD1(UltrabayHDD)
Solution:Theharddiskdriveisnotworking.Havetheharddiskdriveserviced.
•Message:2112:ReaderroronHDD2(MiniSATA)
Solution:TheMiniSATAdeviceisnotworking.HavetheMiniSATAdeviceserviced.
•Message:2200:MachineTypeandSerialNumberareinvalid.
Solution:MachineTypeandSerialNumberareinvalid.Havethecomputerserviced.
•Message:2201:MachineUUIDisinvalid.
Solution:MachineUUIDisinvalid.Havethecomputerserviced.
•Message:Fanerror
Solution:Coolingfanhasfailed.Shutdownthecomputerimmediatelyandhavethecomputerserviced.
•Message:Thermalsensingerror
Solution:Thethermalsensorisnotfunctioningcorrectly.Shutdownthecomputerimmediatelyand
havethecomputerserviced.
•Message:ThissystemdoesnotsupportbatteriesthatarenotgenuineLenovo-madeorauthorized.The
systemwillcontinuetoboot,butmaynotchargeunauthorizedbatteries.PresstheESCkeytocontinue.
Attention:Lenovohasnoresponsibilityfortheperformanceorsafetyofunauthorizedbatteries,and
providesnowarrantiesforfailuresordamagearisingoutoftheiruse.
Solution:ReplacethebatterywiththecorrectLenovobatteryforthiscomputer.Ifyoustillseethesame
errormessage,contactLenovoservicetohavethecomputerserviced.
•Message:Thebatteryinstalledisnotsupportedbythissystemandwillnotcharge.Pleasereplacethe
batterywiththecorrectLenovobatteryforthissystem.PresstheESCkeytocontinue.
Solution:ReplacethebatterywiththecorrectLenovobatteryforthiscomputer.Ifyoustillseethesame
errormessage,contactLenovoservicetohavethecomputerserviced.
Errorswithoutmessages
•Problem:MyscreenkeepsblankingwhenIdonotwantitto.
Solution:IfyoucomputerispreinstalledwiththeWindows7operatingsystem,youcandisableany
systemtimers,suchastheLCDturn-offtimerortheblanktimerbydoingthefollowing:
1.StartPowerManager.
2.ClickthePowerplantab,andthenselectMaximumPerformancefromthepredenedpowerplans.
130UserGuide

•Problem:WhenIturnonthecomputer,nothingisdisplayedonthescreenandthecomputerdoesnot
beepwhilestartingup.
Note:Ifyouarenotsurewhetheryouheardanybeeps,turnoffthecomputerbypressingandholdingthe
powerbuttonforfoursecondsormore.Thenturnonthecomputerandlistenagain.
Solution:Makesurethat:
–Thebatteryisinstalledcorrectly.
–Theacpoweradapterisconnectedtothecomputerandthepowercordispluggedintoaworking
electricaloutlet.
–Thecomputeristurnedon.(Pressthepowerbuttonagainforconrmation.)
–Thebrightnesslevelofthescreenisappropriatelyset.
Ifapower-onpasswordisset,pressanykeytodisplaythepromptforthepower-onpasswordand
thentypethecorrectpasswordandpressEnter.
Iftheseitemsarecorrectlyset,andthescreenremainsblank,havethecomputerserviced.
•Problem:WhenIturnonthecomputer,onlyawhitecursorisdisplayedonablankscreen.
Solution:Ifyouhavemodiedapartitiononyourharddiskdrivebyusingpartitionsoftware,information
aboutthatpartition,orthemasterbootrecordmighthavebeendestroyed.
1.Turnoffthecomputer,andthenturnitonagain.
2.Ifyoustillseeonlythecursoronthescreen,dothefollowing:
–Ifyouhaveusedthepartitionsoftware,examinethepartitionontheharddiskdrivebyusingthe
software,andrecoverthepartitionifrequired.
–Usetherecoverysolutionstorestorethesystemtothefactorydefaultstate.
Iftheproblempersists,havethecomputerserviced.
•Problem:Myscreengoesblankwhilethecomputerison.
Solution:Yourscreensaverorpowermanagementmighthavebeenenabled.Doeitherofthefollowing:
–TouchtheTrackPointpointingdeviceortheThinkPadtrackpad,orpressakeytoexitthescreensaver.
–Pressthepowerbuttontoresumethecomputerfromsleeporhibernationmode.
Beeperrors
Table7.Beeperrors
Problem
Solution
Oneshortbeep,pause,threeshortbeeps,pause,three
moreshortbeeps,andoneshortbeep
Makesurethatmemorymodulesareinstalledcorrectly.If
theyare,andyoustillhearthebeeps,havethecomputer
serviced.
Threeshortbeeps,pause,oneshortbeep,pause,one
moreshortbeep,andthreeshortbeeps
PCIresourceallocationfailure.Poweroffthecomputer
andremovethedevicefromtheExpressCardSlot.Ifthe
beepspersist,havethecomputerserviced.
Fiveshortbeeps,pause,Fiveshortbeeps,pause
TheSecurityChiphasaproblem.Havethecomputer
serviced.
Fourcyclesoffourshortbeeps
TheSecurityChiphasaproblem.Havethecomputer
serviced.
Chapter10.Troubleshootingcomputerproblems131

Table7.Beeperrors(continued)
Onelongandtwoshortbeeps
Thevideofunctionhasaproblem.Havethecomputer
serviced.
FiveshortbeepsThesystemboardhasaproblem.Havethecomputer
serviced.
Memorymoduleproblems
Printtheseinstructionsnowandkeepitwithyourcomputerforreferencelater.
Ifyourmemorymoduleisnotoperatingproperly,checkthefollowingitems:
1.Verifythatthememorymoduleisinstalledandseatedcorrectlyinyourcomputer.
Itmightbenecessarytoremovealladdedmemorymodulestotestthecomputerwithonlythe
factory-installedmemorymodules,andthenreinstallthememorymoduleoneatatimetoensure
aproperconnection.
2.Checkforerrormessagesduringstartup.
Followtheappropriatecorrectiveactionsforpower-onself-test(POST)errormessages.
3.VerifythatthelatestUEFIBIOSforyourmodelhasbeeninstalled.
4.Verifythepropermemorycongurationandcompatibilityincludingthemaximummemorysizeandthe
memoryspeed.
5.Rundiagnosticprograms.See“Diagnosingproblems”onpage127.
Networkingproblems
Thefollowingarethemostcommonnetworkingproblems:
Ethernetproblems
•Problem:Yourcomputercannotconnecttothenetwork.
Solution:Makesurethat:
–Thecableisinstalledcorrectly.
ThenetworkcablemustbesecurelyconnectedbothtotheEthernetconnectorofyourcomputerand
totheRJ45connectorofthehub.Themaximumallowabledistancefromthecomputertohubis
100meters.Ifthecableisconnectedandthedistanceiswithinacceptablelimitsbuttheproblem
persists,tryadifferentcable.
–Youareusingthecorrectdevicedriver.Toinstallthecorrectdriver,dothefollowing:
1.GotoControlPanelandclickHardwareandSound➙DeviceManager.Ifyouarepromptedfor
anadministratorpasswordorconrmation,typethepasswordorprovideconrmation.
2.Iftheexclamationmark!isdisplayednexttotheadapternameunderNetworkadapters,you
mightnotbeusingthecorrectdriverorthedrivermighthavebeendisabled.Toupdatethedriver,
right-clickthehighlightedadapter.
3.ClickUpdateDriverSoftware,andthenfollowtheinstructionsonthescreen.
–Theswitchportandtheadapterhavethesameduplexsetting.
Ifyouconguredtheadapterforfullduplex,makesurethattheswitchportalsoisconguredforfull
duplex.Settingwrongduplexmodecandegradeperformance,causedataloss,orresultinlost
connections.
–Youhaveinstalledallnetworkingsoftwarethatisnecessaryforyournetworkenvironment.
CheckwithyourLANadministratorforthenecessarynetworkingsoftware.
132UserGuide

•Problem:Theadapterstopsworkingfornoapparentreason.
Solution:Thenetworkdriverlesmightbecorruptormissing.Updatethedriverbyreferringtotheabove
solutionfortheproceduretomakesurethatthecorrectdevicedriverisinstalled.
•Problem:IfyourcomputerisaGigabitEthernetmodelandyouuseaspeedof1000Mbps,the
connectionfailsorerrorsoccur.
Solution:
–UseCategory5wiringandmakesurethatthenetworkcableissecurelyconnected.
–Connecttoa1000BASE-Thub/switch(not1000BASE-X).
•Problem:TheWakeonLANfeatureisnotworking.
Solution:
–MakesurethatWakeonLANisenabledinThinkPadSetup.
–Ifitis,checkwithyourLANadministratorforthenecessarysettings.
•Problem:IfyourcomputerisaGigabitEthernetmodel,itcannotconnecttothenetworkat1000Mbps.
Instead,itconnectsat100Mbps.
Solution:
–Tryanothercable.
–Makesurethatthelinkpartnerissettoauto-negotiate.
–Makesurethattheswitchis802.3ab-compliant(gigabitovercopper).
AwirelessLANproblem
Problem:Icannotconnecttothenetworkusingthebuilt-inwirelessnetworkcard.
Solution:Makesurethat:
•YourwirelessLANdriveristhelatestversion.
•Yourcomputeriswithinrangeofawirelessaccesspoint.
•Thewirelessradioisenabled.
Note:IfyouareusingtheWindows7operatingsystem,clickShowhiddeniconsontheWindows
noticationarea.TheAccessConnectionsiconisdisplayed.Formoreinformationabouttheicon,referto
theAccessConnectionshelpinformationsystem.
FortheWindows7operatingsystem,checktheNetworkName(SSID)andyourencryptioninformation.Use
theAccessConnectionsprogramtoverifythiscase-sensitiveinformation.
AwirelessWANproblem
Problem:AmessageisdisplayedindicatingthatanunauthorizedWANcardisinstalled.
Solution:TheWANcardisnotsupportedonthiscomputer.RemovetheWANcard.
Note:SomemodelsdonothaveawirelessWANcard.
Bluetoothproblems
Note:CheckyourconnectionanytimeandmakesurethatnootherBluetooth-enableddeviceissearchingfor
thedevicetowhichyouwanttoconnect.SimultaneoussearchingisnotallowedintheBluetoothconnection.
Chapter10.Troubleshootingcomputerproblems133

•Problem:SounddoesnotcomefromtheBluetoothheadset/headphonebutcomesfromthelocal
speakereventhoughtheBluetoothheadset/headphoneisconnectedusingaHeadsetproleorAVprole.
Solution:Dothefollowing:
1.Exittheapplicationthatusesthesounddevice(forexample,WindowsMediaPlayer).
2.GotoControlPanelandclickHardwareandSound➙Sound➙Playback.
3.IfyouareusingaHeadsetprole,selectBluetoothHands-freeAudioandclicktheSetDefault
button.IfyouareusinganAVprole,selectStereoAudioandclicktheSetDefaultbutton.
4.ClickOKtoclosetheSoundwindow.
•Problem:PIMitemssentfromtheWindows7operatingsystemscannotbereceivedcorrectlyintothe
addressbookofanyotherBluetooth-enableddevice.
Solution:TheWindows7operatingsystemsendsPIMitemsinXMLformat,butmostBluetooth-enabled
deviceshandlePIMitemsinvCardformat.IfanotherBluetooth-enableddevicecanreceivealethrough
Bluetooth,aPIMitemsentfromtheWindows7mightbesavedasalewiththeextension.contact.
Problemswiththekeyboardandotherpointingdevices
Thefollowingarethemostcommonproblemswithkeyboardsandotherpointingdevices.
ThinkPadpointingdeviceproblems
•Problem:Thepointerdriftswhenthecomputeristurnedonorafteritresumesnormaloperation.
Solution:ThepointermightdriftwhenyouarenotusingtheTrackPointpointingdeviceduringnormal
operation.ThisisanormalcharacteristicoftheTrackPointpointingdeviceandisnotadefect.Pointer
driftingmightoccurforseveralsecondsunderthefollowingconditions:
–Whenthecomputeristurnedon
–Whenthecomputerresumesnormaloperation
–WhentheTrackPointpointingdeviceiskeptpressedforalongtime
–Whenthetemperaturechanges
•Problem:TheTrackPointpointingdeviceorThinkPadtrackpaddoesnotwork.
Solution:MakesurethattheTrackPointpointingdeviceorThinkPadtrackpadisenabledintheThinkPad
pointingdevicesettingwindow.
Note:ToopentheThinkPadpointingdevicewindow,gotoControlPanelandclickHardwareand
Sound➙Mouse,andthenclicktheThinkPadtab.
Keyboardproblems
•Problem:Allorsomekeysonthekeyboarddonotwork.
Solution:Ifanexternalnumerickeypadisconnected:
1.Turnoffthecomputer.
2.Removetheexternalnumerickeypad.
3.Turnonthecomputerandtryusingthekeyboardagain.
Ifthekeyboardproblemisresolved,carefullyreconnecttheexternalnumerickeypadandtheexternal
keyboard.Makesurethatyouhaveseatedtheconnectorscorrectly.
Iftheproblempersists,makesurethatthecorrectdevicedriverisinstalledbydoingthefollowing:
1.OpenControlPanel.ChangetheviewofControlPanelfromCategorytoLargeiconsorSmallicons.
2.ClickKeyboard.
134UserGuide

3.SelecttheHardwaretab.IntheDevicePropertiespane,makesurethatyouseethismessage:
DeviceStatus:Thisdeviceisworkingproperly.
Ifkeysonthekeyboardstilldonotwork,havethecomputerserviced.
•Problem:Anumberisdisplayedwhenyoutypealetter.
Solution:Thenumericlockfunctionison.Todisableit,pressFn+NumLock.
•Problem:Allorsomekeysontheexternalnumerickeypaddonotwork.
Solution:Makesurethattheexternalnumerickeypadiscorrectlyconnectedtothecomputer.
Problemswiththedisplayandmultimediadevices
Thistopicincludesthemostcommonproblemswithdisplaysandmultimediadevices,includingthe
computerdisplay,theexternalmonitor,audiodevices,andtheopticaldrive.
Computerscreenproblems
•Problem:Thescreenisblank.
Solution:Dothefollowing:
–PressF7tobringuptheimage.
–Ifyouareusingtheacpoweradapter,orusingthebatteryandthebatterygaugeshowsthatthebattery
isnotdepleted,pressF6tomakethescreenbrighter.
–Ifyourcomputerisinsleepmode,pressFntoresumefromthesleepmode.
–Iftheproblempersists,followthesolutionforthefollowingproblem.
•Problem:Thescreenisunreadableordistorted.
Solution:Makesurethat:
–Thedisplaydevicedriverisinstalledcorrectly.
–Thescreenresolutionandcolorqualityarecorrectlyset.
–Themonitortypeiscorrect.
Tocheckthesesettings,dothefollowing:
1.Right-clickonthedesktop,andclickPersonalize.
2.ClickDisplayattheleft.
3.SelectChangedisplaysettings.Checkwhetherthescreenresolutioniscorrectlyset.
4.ClickAdvancedSettings.
5.ClicktheAdaptertab.Ensurethatthecorrectdevicedrivernameisshownintheadapterinformation
window.
Note:Thedevicedrivernamedependsonthevideochipthathasbeeninstalledonyourcomputer.
6.ClickthePropertiesbutton.Ifyouarepromptedforanadministratorpasswordorconrmation,type
thepasswordorprovideconrmation.ChecktheDevicestatusboxandmakesurethatthedevice
isworkingcorrectly.Ifnot,clicktheTroubleshootbuttonandfollowtheinstructionsonthescreen.
7.ClicktheMonitortab.Ensurethatthecorrectdevicedrivernameisshownintheadapterinformation
window.
Note:Thedevicedrivernamedependsonthevideochipthathasbeeninstalledonyourcomputer.
8.ClickthePropertiesbutton.Ifyouarepromptedforanadministratorpasswordorconrmation,type
thepasswordorprovideconrmation.ChecktheDevicestatusboxandmakesurethatthedevice
isworkingcorrectly.Ifnot,clicktheTroubleshootbuttonandfollowtheinstructionsonthescreen.
Chapter10.Troubleshootingcomputerproblems135

9.ClicktheColorManagementtab.Checkwhetherthecolorqualityiscorrectlyset,andensure
thattheotherinformationalsoiscorrect.Ifyouarepromptedforanadministratorpasswordor
conrmation,typethepasswordorprovideconrmation.ChecktheDevicestatusboxandensure
thatthedeviceisworkingcorrectly.Ifnot,clicktheTroubleshootbuttonandfollowtheinstructions
onthescreen.
•Problem:Incorrectcharactersaredisplayedonthescreen.
Solution:Didyouinstalltheoperatingsystemorprogramcorrectly?Iftheyareinstalledandcongured
correctly,havethecomputerserviced.
•Problem:Thescreenstaysonevenafteryouturnoffyourcomputer.
Solution:Pressandholdthepowerbuttonforfoursecondsormoretoturnoffyourcomputer;then
turnitonagain.
•Problem:Missing,discolored,orbrightdotsappearonthescreeneverytimeyouturnonyourcomputer.
Solution:ThisisanintrinsiccharacteristicoftheTFTtechnology.Yourcomputerdisplaycontains
multiplethin-lmtransistors(TFTs).Asmallnumberofmissing,discolored,orbrightdotsonthescreen
mightexistallthetime.
Externalmonitorproblems
•Problem:Theexternalmonitorisblank.
Solution:Tobringuptheimage,pressF7andselectthedesiredmonitor.Iftheproblempersists,do
thefollowing:
1.Connecttheexternalmonitortoanothercomputertomakesurethatitworks.
2.Reconnecttheexternalmonitortoyourcomputer.
3.Refertothemanualshippedwiththeexternalmonitortochecktheresolutionsandrefreshratesthat
aresupported.
–Iftheexternalmonitorsupportsthesameresolutionasthecomputerdisplayorahigherresolution,
viewoutputontheexternalmonitororonboththeexternalmonitorandthecomputerdisplay.
–Iftheexternalmonitorsupportsalowerresolutionthanthecomputerdisplay,viewoutputonthe
externalmonitoronly.(Ifyouviewoutputonboththecomputerdisplayandtheexternalmonitor,
theexternalmonitorscreenwillbeblankordistorted.)
•Problem:Youcannotsetahigherresolutionthanthepresentoneonyourexternalmonitor.
Solution:Makesurethatthemonitorinformationiscorrect.Dothefollowing:
1.Right-clickonthedesktop,andclickScreenresolution.
Note:Ifyourcomputercannotdetecttheexternalmonitor,clicktheDetectbutton.
2.Clicktheiconforthedesiredmonitor(theMonitor-2iconisfortheexternalmonitor).
3.ClickAdvancedSettings.
4.ClicktheAdaptertab.
5.Makesurethatthecorrectdevicedrivernameisshownintheadapterinformationwindow.
Note:Thedevicedrivernamedependsonthevideochipthathasbeeninstalledonyourcomputer.
6.ClickOK.
Iftheinformationisincorrect,reinstallthedevicedriver.
–Checkthemonitortypeand,ifnecessary,updatethedriverbydoingthefollowing:
136UserGuide

1.Connecttheexternalmonitortothemonitorconnector,andthenconnectthemonitortoan
electricaloutlet.
2.Turnontheexternalmonitorandthecomputer.
3.Right-clickonthedesktop,andclickScreenresolution.
Note:Ifyourcomputercannotdetecttheexternalmonitor,clicktheDetectbutton.
4.Clicktheiconforthedesiredmonitor(theMonitor-2iconisfortheexternalmonitor).
5.ClickAdvancedSettings.
6.ClicktheMonitortab.Checkthemonitorinformationwindowtomakesurethatthemonitortype
iscorrect.Ifitis,clickOKtoclosethewindow;otherwisedothefollowing.
7.Ifmorethanonemonitortypeisdisplayed,selectGenericPnPMonitororGenericNon-PnP
Monitor.
8.ClickProperties.Ifyouarepromptedforanadministratorpasswordorconrmation,typethe
passwordorprovideconrmation.
9.ClicktheDrivertab.
10.ClickUpdateDriver.
11.ClickBrowsemycomputerfordriversoftware,andthenclickLetmepickfromalistof
devicedriversonmycomputer.
12.CleartheShowcompatiblehardwarecheckbox.
13.Selectyourmonitormanufacturerandmodel.
14.Afterupdatingthedriver,clickClose.
15.SetResolution.
Note:Tochangethecolorsettings,selecttheMonitortab,thensetColors.
16.ClickOK.
•Problem:Thescreenisunreadableordistorted.
Solution:Makesurethat:
–Themonitorinformationiscorrectandtheappropriatemonitortypeisselected.Refertothesolution
totheaboveproblem.
–Makesurethatanappropriaterefreshrateisselectedbydoingthefollowing:
1.Connecttheexternalmonitortothemonitorconnector,andthenconnectthemonitortoan
electricaloutlet.
2.Turnontheexternalmonitorandthecomputer.
3.Right-clickonthedesktop,andclickScreenresolution.
Note:Ifyourcomputercannotdetecttheexternalmonitor,clicktheDetectbutton.
4.Clicktheiconforthedesiredmonitor(theMonitor-2iconisfortheexternalmonitor).
5.ClickAdvancedSettings.
6.ClicktheMonitortab.
7.Selectthecorrectscreenrefreshrate.
•Problem:Wrongcharactersaredisplayedonthescreen.
Solution:Didyoufollowthecorrectprocedurewheninstallingtheoperatingsystemorprogram?Ifyou
did,havetheexternalmonitorserviced.
Chapter10.Troubleshootingcomputerproblems137

•Problem:TheExtenddesktopfunctiondoesnotwork.
Solution:EnabletheExtenddesktopfunctionbydoingthefollowing:
1.Connecttheexternalmonitortothemonitorconnector,andthenconnectthemonitortoanelectrical
outlet.
2.Turnontheexternalmonitorandthecomputer.
3.Right-clickonthedesktop,andclickScreenresolution.
4.ClicktheMonitor-2icon.
5.SelectExtendthesedisplaysformultipledisplays.
6.ClicktheMonitor-1icon(fortheprimarydisplay,thecomputerdisplay).
7.Settheresolutionfortheprimarydisplay.
8.ClicktheMonitor-2icon(fortheexternalmonitor).
9.Setthescreenresolutionforthesecondarydisplay.
10.Settherelativepositionofeachmonitorbydraggingitsicon.Youcansetthemonitorsinanyrelative
position,buttheiconsmusttoucheachother.
11.ClickOKtoapplythechanges.
Note:Tochangethecolorsettings,right-clickonthedesktop,andclickScreenresolution.Click
AdvancedSettings,selecttheMonitortab,thensetColors.
•Problem:IfyouusetheExtenddesktopfunction,youcannotsetahigherresolutionorhigherrefresh
rateonthesecondarydisplay.
Solution:Changetheresolutionandthecolordepthtolowersettingsfortheprimarydisplay.Refer
tothesolutiontotheaboveproblem.
•Problem:Displayswitchingdoesnotwork.
Solution:IfyouusetheExtenddesktopfunction,disableit,andchangethedisplayoutputlocation.If
aDVDmovieoravideoclipisplaying,stoptheplayback,closetheprogram,andthenchangethe
displayoutputlocation.
•Problem:Thescreenpositionontheexternalmonitorisincorrectwhenthatmonitorissetforahigh
resolution.
Solution:Sometimes,whenyouuseahighresolutionsuchas1600x1200,theimageisshiftedtoleftor
rightonthescreen.Tocorrectthis,rstmakesurethatyourexternalmonitorsupportsthedisplaymode
(theresolutionandtherefreshrate)thatyouhaveset.Ifitdoesnot,setadisplaymodethatthemonitor
supports.Ifitdoessupportthedisplaymodeyouhaveset,gotothesetupmenuforthemonitoritself
andadjustthesettingsthere.Usuallytheexternalmonitorhasbuttonsforaccesstothesetupmenu.For
details,seethedocumentationthatcomeswiththemonitor.
Audioproblems
•Problem:WaveorMIDIsounddoesnotplaycorrectly.
Solution:Makesurethatthebuilt-inaudiodeviceisconguredcorrectly.
1.OpenControlPanel.
2.ClickHardwareandSound.
3.ClickDeviceManager.Ifyouarepromptedforanadministratorpasswordorconrmation,typethe
passwordorprovideconrmation.
4.Double-clickSound,videoandgamecontrollers.
5.Makesurethatthefollowingdeviceisenabledandconguredcorrectly:
138UserGuide

–ConexantCX20672SmartAudioHD
•Problem:Recordingsmadeusingthemicrophoneinputarenotloudenough.
Solution:MakesurethattheMicrophoneBoostfunctionisturnedonandsetbydoingthefollowing:
1.OpenControlPanel.
2.ClickHardwareandSound.
3.ClickSound.
4.ClicktheRecordingtabintheSoundwindow.
5.SelectMicrophone,andclickthePropertiesbutton.
6.ClicktheLevelstab,andmovetheMicrophoneBoostsliderupwards.
7.ClickOK.
Note:Fordetailsaboutcontrollingvolume,refertoyourWindowsonlinehelp.
•Problem:Avolumeorbalanceslidercannotbemoved.
Solution:Theslidermightbegrayedout.Thismeansthatitspositionisxedbythehardwareand
cannotbechanged.
•Problem:Thevolumeslidersdonotstayinplacewhensomeaudioprogramsareused.
Solution:Itisnormalforthesliderstochangepositionwhencertainsoundapplicationsareused.The
applicationsareawareofthesettingsintheVolumeMixerwindowandareallowedtochangethesettings
themselves.AnexampleistheWindowsMediaPlayer.Usuallytheprogramhasslidersavailableto
controlthesoundfromwithintheprogram.
•Problem:Thebalanceslidercannotcompletelymuteonechannel.
Solution:Thecontrolisdesignedtocompensateforminordifferencesinbalanceanddoesnot
completelymuteeitherchannel.
•Problem:ThereisnovolumecontrolforMIDIsoundintheVolumeMixerwindow.
Solution:Usethehardwarevolumecontrol.Thisisbecausethebuilt-insynthesizersoftwaredoes
notsupportthecontrol.
•Problem:ThesoundcannotbeturnedoffevenifyousettheMastervolumecontrolatminimum.
Solution:YoustillcanhearsomesoundeventhoughyouhavesettheMastervolumecontrolatminimum.
Toturnoffthesoundcompletely,gototheMastervolumecontrolandselectMutespeakers.
•Problem:Whenyouconnectaheadphonetoyourcomputerwhileplayingsound,aspeakerdoesnot
producesound.
Solution:Oncetheheadphoneisattached,thestreamingisautomaticallyredirectedtoit.Ifyouwant
tolistentosoundfromthespeakersagain,besuretosetthosespeakersasthedefaultdevice.The
procedureisasfollows:
1.OpenControlPanel.
2.ClickAllControlPanelItems.
3.ClicktheSmartAudioicon.TheSmartAudiowindowopens.
4.Lookattheplaybackdevices.Ifyouhaveattachedaheadphone,theheadphonewillbeautomatically
setasthedefaultdevice,andtheiconforthatheadphonewillbechecked.
5.Tosetadifferentdeviceasthedefault,double-clicktheiconforthosespeakers.Thaticonwill
nowhaveacheckmark.
Chapter10.Troubleshootingcomputerproblems139

6.PlayanysoundbyuseofamusicprogramsuchasWindowsMediaPlayer.Makesurethatsound
comesfromthespeakers.
Fordetails,refertothehelpinformationsystemforSmartAudio.
Fingerprintreaderproblems
•Problem:Thesurfaceofthereaderisdirty,stained,orwet.
Solution:Gentlycleanthesurfaceofthereaderwithadry,soft,lint-freecloth.
•Problem:Thereaderoftenfailstoenrollorauthenticateyourngerprint.
Solution:Ifthesurfaceofthereaderisdirty,stained,orwet,gentlycleanthesurfaceofthereader
withadry,soft,lint-freecloth.
Fortipsonhowtomaintainthengerprintreader,refertoMaintainingthengerprintreader.
Batteryandpowerproblems
Thistopiccontainsinstructionsontroubleshootingbatteryandpowerproblems.
Batteryproblems
•Problem:Thebatterypackcannotbefullychargedinthestandardchargetimewhenthecomputeris
poweredoff.
Solution:Thebatterypackmightbeover-discharged.Dothefollowing:
1.Turnoffthecomputer.
2.Makesurethattheover-dischargedbatterypackisinthecomputer.
3.Connecttheacpoweradaptertothecomputerandletitcharge.
Ifaquickchargerisavailable,useittochargetheover-dischargedbatterypack.
Ifthebatterypackcannotbefullychargedin24hours,useanewbatterypack.
•Problem:YourcomputershutsdownbeforethebatterystatusiconintheWindowsnoticationarea
showsempty,oryourcomputeroperatesafterthebatterystatusiconintheWindowsnoticationarea
showsempty.
Solution:Dischargeandrechargethebatterypack.
•Problem:Theoperatingtimeforafullychargedbatterypackisshort.
Solution:Dischargeandrechargethebatterypack.Ifyourbatteryoperatingtimeisstillshort,usea
newbatterypack.
•Problem:Thecomputerdoesnotoperatewithafullychargedbatterypack.
Solution:Thesurgeprotectorinthebatterypackmightbeactive.Turnoffthecomputerforoneminuteto
resettheprotector;thenturnonthecomputeragain.
•Problem:Thebatterypackcannotbecharged.
Solution:Youcannotchargethebatterywhenitistoohot.Ifthebatteryfeelshot,removeitfromthe
computerandallowittocooltoroomtemperature.Afteritcools,reinstallitandrechargethebattery.Ifit
stillcannotbecharged,haveitserviced.
Anacpoweradapterproblem
Problem:Theacpoweradapterisconnectedtothecomputerandtheworkingelectricaloutlet,butthe
poweradapter(powerplug)iconisnotdisplayedintheWindowsnoticationarea.
140UserGuide

Solution:Dothefollowing:
1.Makesurethattheconnectionoftheacpoweradapteriscorrect.Forinstructionsonconnectingtheac
poweradapter,seeSafety,Warranty,andSetupGuidethatcomeswithyourcomputer.
2.Iftheconnectionoftheacpoweradapteriscorrect,turnoffthecomputer,thendisconnecttheacpower
adapterandremovethemainbattery.
3.Reinstallthebatteryandreconnecttheacpoweradapter,thenturnonthecomputer.
4.IfthepoweradaptericonstillisnotdisplayedintheWindowsnoticationareaandthesystemstatus
indicatordoesnotblinkthreetimeswhenanacpowersourceisconnected,havetheacpoweradapter
andyourcomputerserviced.
Note:IfyouareusingtheWindows7operatingsystem,todisplaythepoweradapter(powerplug)icon,click
ShowhiddeniconsintheWindowsnoticationarea.
Powerproblems
Printtheseinstructionsnowandkeepitwithyourcomputerforreferencelater.
Ifyourcomputerisgettingnopoweratall,checkthefollowingitems:
1.Verifythepowerbutton.Thepowerbuttonhislitwheneverthecomputerison.
2.Checkallpowerconnections.Removeanypowerstripsandsurgeprotectorstoconnecttheacpower
adapterdirectlytotheacpoweroutlet.
3.Inspecttheacpoweradapter.Checkforanyphysicaldamage,andmakesurethatthepowercableis
rmlyattachedtotheadapterbrickandthecomputer.
4.Verifytheacpowersourceisworkingbyattachinganotherdevicetotheoutlet.
5.Removealldevicesandthentestforsystempowerwithminimaldevicesattached.
a.Disconnecttheacpoweradapterandallcablesfromthecomputer.
b.Closethecomputerdisplay,andturnthecomputerover.
c.Removethebattery.Referto“Replacingthebattery”onpage69.
d.Removethememorymodule.Referto“Replacingamemorymodule”onpage97.
e.RemovetheWirelessLANcardandWirelessWANcard.Referto“ReplacingawirelessLANcard”
onpage92
and“ReplacingawirelessWANcard”onpage95.
f.Removetheharddiskdrive.Referto“Replacingtheharddiskdriveorsolid-statedrive”onpage85.
g.Waitfor30seconds,andthenreinstallthememorymoduleandtheknowngoodbatteryortheac
poweradaptertotestthecomputerwithminimaldevicesattachedrst.
h.Reinstalleachdeviceoneatatimethatyouhaveremovedintheearliersteps.
Ifyourcomputerdoesnotrunonbatterypower,checkthefollowingitems:
1.Removeandreseatthebatterytomakesurethatitisproperlyconnected.Referto“Replacingthe
battery”onpage69
.
2.Swapbatterieswithanothersimilarmodel,ifavailable.
IfanothersimilarThinkPadmodelisavailable,thenverifythatthebatterypackworksintheother
computerandthatthebatterypackfortheothermodelworksinthiscomputer.
Apowerbuttonproblem
Problem:Thesystemdoesnotrespond,andyoucannotturnoffthecomputer.
Solution:Turnoffthecomputerbypressingandholdingthepowerbuttonfor4secondsormore.Ifthe
systemisstillnotreset,removetheacpoweradapterandthebattery.
Chapter10.Troubleshootingcomputerproblems141

Bootproblems
Printtheseinstructionsnowandkeepthemwithyourcomputerforreferencelater.
Ifyoureceiveanerrormessagebeforetheoperatingsystemloads,followtheappropriatecorrectiveactions
forPOSTerrormessages.
Ifyoureceiveanerrormessagewhiletheoperatingsystemisloadingthedesktopcongurationafterthe
POSTiscompleted,checkthefollowingitems:
1.GototheLenovoSupportWebsiteathttp://www.lenovo.com/supportandsearchfortheerrormessage.
2.GototheMicrosoftKnowledgeBasehomepageathttp://support.microsoft.com/andsearchforthe
errormessage.
Sleepandhibernationproblems
•Problem:Thecomputerenterssleepmodeunexpectedly.
Solution:Ifthemicroprocessoroverheats,thecomputerautomaticallyenterssleepmodetoallowthe
computertocoolandtoprotectthemicroprocessorandotherinternalcomponents.Checkthesettings
forsleepmode.
•Problem:Thecomputerenterssleepmode(thesystemstatusindicatorblinksslowlyimmediatelyafter
thepower-onself-test.
Solution:Makesurethat:
–Thebatteryischarged.
–Theoperatingtemperatureiswithintheacceptablerange.Referto“Operatingenvironment”onpage
16
.
Ifthebatteryischargedandthetemperatureiswithinrange,havethecomputerserviced.
•Problem:Acriticallow-batteryerroroccurs,andthecomputerimmediatelyturnsoff.
Solution:Thebatterypowerisgettinglow.Connecttheacpoweradaptertothecomputerandplugit
intoanelectricaloutlet,orreplacethebatterywithachargedone.
•Problem:ThecomputerdisplayremainsblankafteryoupressFntoreturnfromsleepmode.
Solution:Checkwhetheranexternalmonitorwasdisconnectedorturnedoffwhilethecomputerwas
insleepmode.Ifyoudisconnectedorturnedofftheexternalmonitor,connectitorturnitonbefore
resumingthecomputerfromthesleepmode.Whenresumingthecomputerfromthesleepmode
withoutattachingtheexternalmonitororturningiton,andthecomputerdisplayremainsblank,press
F7tobringupthecomputerdisplay.
•Problem:Thecomputerdoesnotreturnfromsleepmode,orthesystemstatusindicatorblinksslowly
andthecomputerdoesnotwork.
Solution:Ifthesystemdoesnotreturnfromsleepmode,itmighthaveenteredsleeporhibernationmode
automaticallybecausethebatteryisdepleted.Checkthesystemstatusindicator.
–Ifthesystemstatusindicatorblinksslowly,yourcomputerisinsleepmode.Connecttheacpower
adaptertothecomputer;thenpressFn.
–Ifthesystemstatusindicatorisoff,yourcomputerisinpower-offstateorhibernationmode.Connect
theacpoweradaptertothecomputer;thenpressthepowerbuttontoresumeoperation.
Ifthesystemstilldoesnotreturnfromsleepmode,yoursystemmightstoprespondingandyoumightnot
beabletoturnoffthecomputer.Inthiscase,youneedtoresetthecomputer.Ifyouhavenotsavedyour
data,itmightbelost.Toresetthecomputer,pressandholdthepowerbuttonfor4secondsormore.If
thesystemisstillnotreset,removetheacpoweradapterandthebattery.
142UserGuide

•Problem:Yourcomputerdoesnotentersleeporhibernationmode.
Solution:Checkwhetheranyoptionhasbeenselectedtodisableyourcomputerfromenteringsleep
orhibernationmode.
Ifyourcomputertriestoentersleepmodebuttherequestisrejected,thedeviceattachedtotheUSB
connectormighthavebeendisabled.Ifthisoccurs,doahot-unplug-and-plugoperationfortheUSB
device.
•Problem:Thebatterydischargesslightlywhilethecomputerisinhibernationmode.
Solution:Ifthewakeupfunctionisenabled,thecomputerconsumesasmallamountofpower.Thisisnot
adefect.Fordetails,referto“Power-savingmodes”onpage34.
Problemswithdrivesandotherstoragedevices
Thissectionincludesharddiskdriveproblems,solid-statedriveproblems,andopticaldriveproblems.
Harddiskdriveproblems
•Problem:Theharddiskdrivemakesarattlingnoiseintermittently.
Solution:Therattlingnoisemightbeheard:
–Whentheharddiskdrivebeginsornishesgettingaccesstodata.
–Whenyoucarrytheharddiskdrive.
–Whenyoucarryyourcomputer.
Thisisanormalcharacteristicofaharddiskdriveandisnotadefect.
•Problem:Theharddiskdrivedoesnotwork.
Solution:OntheBootmenuofThinkPadSetup,makesurethattheharddiskdriveisontheBootpriority
orderlist.IfitisontheExcludedfrombootorderlist,itisdisabled.Selecttheentryforitonthelistand
presstheShift+1key.ThismovestheentrytotheBootpriorityorderlist.
•Problem:Aftersettingaharddiskpasswordontheharddiskdriveofthecomputer,youmovedthedrive
toanothercomputer.Nowyoucannotunlocktheharddiskpassword.
Solution:Yourcomputersupportsanenhancedpasswordalgorithm.Computersolderthanyoursmight
notsupportsuchasecurityfunction.
Asolid-statedriveproblem
Problem:WhenyoucompresslesorfoldersbyuseofthedatacompressionfunctioninWindows,andthen
decompressthem,theprocessofwritingtoorreadingfromthelesorfoldersisslow.
Solution:ApplythediskdefragmentationtoolinWindowsforfasteraccesstothedata.
Opticaldriveproblems
•Problem:Theopticaldrive,suchasaCD,DVD,orCD-RWdrive,doesnotwork.
Solution:MakesurethatthecomputeristurnedonandaCD,DVD,orCD-RWisproperlyloadedonthe
centerpivotofthedrive.(Youshouldhearaclick.)
Makesurethatthedriveconnectorisrmlyconnectedtothecomputer.Ifyouuseanoptionthathasabay
forinstallingthedrive,makesurethattheoptionisrmlyconnectedtothecomputerandworksproperly.
Makesurethatthedrivetrayisrmlyclosed.
Makesurethatthedevicedriversarecorrectlyinstalled.
•Problem:YouhearanoisefromthedrivewhentheCD,DVD,orCD-RWdiscisspinning.
Chapter10.Troubleshootingcomputerproblems143

Solution:Ifthediscisnotcorrectlyloadedonthecenterpivotofthedrive,itmightrubagainstthedrive
coverandmakeanoise.Makesurethatthediscisloadedcorrectlyinthedrive.
•Problem:Thetraydoesnotopenevenifyoupresstheejectbutton.
Solution:Whenyourcomputerisnotturnedon,pressingtheejectbuttondoesnotcausethedrivetray
toopen.Makesurethatthecomputeristurnedonandthatthedriveconnectorisrmlyconnected
tothecomputer.
Ifthetraystilldoesnotopen,makesurethatthecomputerisrunning,andinserttheendofastraightened
paperclipintotheemergencyejecthole.Thetraywillopen.
•Problem:Anopticalmedium,suchasaCD,DVD,orCD-RWdisccannotberead.
Solution:MakesurethattheCD,DVD,orCD-RWdiscisnotdirty.Ifitis,cleanitwithacleanerkit.
TestanotherCD,DVD,orCD-RWdisc.Ifthecomputercanreadtheotherdisc,therstdiscmightbe
defective.
Makesurethatthediscisloadedonthecenterpivotofthedrivewiththelabelsideup.(Youshould
hearaclick.)
Makesurethatthediscisinoneofthefollowingformats:
–MusicCD
–CD-ROMorCD-ROMXA
–MultisessionphotoCD
–VideoCD
–DVD-ROM(DVD-video)
•Problem:ThecomputercannotplayaCD,orthesoundqualityisnotgood.
Solution:Ensurethatthediscmeetsthestandardsforyourcountry.Usually,adiscthatmeetsthelocal
standardsismarkedwithaCDlogoonthelabel.Ifyouuseadiscthatdoesnotmeetthesestandards,we
cannotguaranteethatitwillplay,orthat,ifitdoesplay,thesoundqualitywillbegood.
•Problem:TheHDDVDtabintheWinDVD8programisdimmedandIcannotuseit.
Solution:YourcomputerdoesnotsupportanHDDVDdrive.
Asoftwareproblem
Problem:Aapplicationdoesnotruncorrectly.
Solution:Makesurethattheproblemisnotbeingcausedbytheapplication.
Checkthatyourcomputerhastheminimumrequiredmemorytoruntheapplication.Refertothemanuals
suppliedwiththeapplication.
Checkthefollowing:
•Theapplicationisdesignedtooperatewithyouroperatingsystem.
•Otherapplicationsruncorrectlyonyourcomputer.
•Thenecessarydevicedriversareinstalled.
•Theapplicationworkswhenitisrunonsomeothercomputer.
Ifanerrormessageisdisplayedwhileyouareusingtheapplication,refertothemanualssuppliedwiththe
application.
144UserGuide

Iftheapplicationstilldoesnotruncorrectly,contactyourplaceofpurchaseoraservicerepresentative
forhelp.
Problemswithportsandconnectors
Thefollowingarethemostcommonproblemswithportsandconnectors.
AUSBproblem
Problem:AdeviceconnectedtotheUSBconnectordoesnotwork.
Solution:OpentheDeviceManagerwindow.MakesurethattheUSBdevicesetupiscorrect,andthatthe
assignmentofcomputerresourceandtheinstallationofthedevicedriverarecorrect.ToopentheDevice
Managerwindow,gotoControlPanelandclickHardwareandSound➙DeviceManager.Ifyouare
promptedforanadministratorpasswordorconrmation,typethepasswordorprovideconrmation.
Adockproblem
Problem:Thecomputerdoesnotstartwhenyoutrytoturniton,anddoesnotrespondwhenyoutryto
resumeoperation.
Solution:Makesurethat:
•TheThinkPadOneLinkDockisconnectedtopower.
•ThecomputeriscorrectlyconnectedtotheThinkPadOneLinkDock.
Chapter10.Troubleshootingcomputerproblems145

146UserGuide

Chapter11.Gettingsupport
ThischapterprovidesinformationaboutgettinghelpandsupportfromLenovo.
•“BeforeyoucontactLenovo”onpage147
•“Gettinghelpandservice”onpage148
•“Purchasingadditionalservices”onpage149
BeforeyoucontactLenovo
Often,youcansolveyourcomputerproblemsbyreferringtotheinformationintheexplanationsoferror
codes,runningdiagnosticprograms,orbyconsultingtheLenovoWebsite.
Registeringyourcomputer
IfyourcomputerisinstalledwiththeWindows7operatingsystem,registeryourcomputerwithLenovoat
http://www.lenovo.com/register.Formoreinformation,see“Registeringyourcomputer”onpage23.
IfyoursystemisinstalledwiththeWindows8operatingsystem,clickLenovoSupportfromtheStartscreen.
ClickRegistration.Thenfollowonscreeninstructions.
Downloadingsystemupdates
Downloadingupdatedsoftwaremightresolveproblemsyouexperiencewithyourcomputer.
Todownloadupdatedsoftware,gotothefollowingWebsiteandfollowtheinstructionsonthescreen:
http://www.lenovo.com/support
Recordinginformation
BeforeyoutalktoaLenovorepresentative,recordthefollowingimportantinformationaboutyourcomputer.
Recordingproblemsymptomsanddetails
Collecttheanswerstothequestionsbelowbeforeyoucallforhelp.Then,youwillbeabletogethelp
asquicklyaspossible.
•Whatistheproblem?Isitcontinuousorintermittent?
•Isthereanerrormessage?Whatistheerrorcode,ifany?
•Whatoperatingsystemareyouusing?Whichversion?
•Whichsoftwareprogramswererunningatthetimeoftheproblem?
•Cantheproblembereproduced?Ifso,how?
Recordingsysteminformation
Theserialnumberlabelisonthebottomofyourcomputer.Recordthemachinetypeandtheserialnumber.
•WhatisthenameofyourLenovoproduct?
•Whatisthemachinetype?
•Whatistheserialnumber?
©CopyrightLenovo2013
147

Gettinghelpandservice
Ifyouneedhelp,service,technicalassistance,orjustwantmoreinformationaboutLenovoproducts,you
willndawidevarietyofsourcesavailablefromLenovotoassistyou.Thissectioncontainsinformation
aboutwheretogoforadditionalinformationaboutLenovoandourproducts,whattodoifyouexperiencea
problemwithyourcomputer,andwhomtocallforserviceshoulditbenecessary.
Informationaboutyourcomputerandpreinstalledsoftware,ifany,isavailableinthedocumentationthat
comeswithyourcomputer.Thedocumentationincludesprintedbooks,onlinebooks,readmeles,andhelp
les.Inaddition,informationaboutLenovoproductsisavailableontheWorldWideWeb.
MicrosoftServicePacksarethelatestsoftwaresourceforWindowsproductupdates.Theyareavailable
throughWebdownload(connectionchargesmightapply)orthroughdisc.Formorespecicinformationand
links,gotohttp://www.microsoft.com.Lenovoofferstechnicalassistancewithinstallationof,orquestions
relatedto,ServicePacksforyourLenovo-preinstalledMicrosoftWindowsproduct.Forinformation,contact
theCustomerSupportCenter.
Usingdiagnosticprograms
Manycomputerproblemscanbesolvedwithoutoutsideassistance.Ifyouexperienceaproblemwithyour
computer,therstplacetostartisthetroubleshootinginformationinyourcomputerdocumentation.Ifyou
suspectasoftwareproblem,seethedocumentation,includingreadmelesandhelpinformationsystems,
thatcomeswiththeoperatingsystemorapplicationprogram.
ThinkPadnotebookcomputerscomewithasetofdiagnosticprogramsthatyoucanusetohelpyouidentify
hardwareproblems.See“Diagnosingproblems”onpage127forinstructionsonhowtousethediagnostic
programs.
Thetroubleshootinginformationorthediagnosticprogramsmighttellyouthatyouneedadditionalor
updateddevicedriversorothersoftware.Youcangetthelatesttechnicalinformationanddownloaddevice
driversandupdatesfromtheLenovoWebsiteathttp://www.lenovo.com/support.
LenovoSupportWebsite
TechnicalsupportinformationisavailableontheLenovoSupportWebsiteat:
http://www.lenovo.com/support
ThisWebsiteisupdatedwiththelatestsupportinformationsuchasthefollowing:
•Driversandsoftware
•Diagnosticsolutions
•Productandservicewarranty
•Productandpartsdetails
•Userguidesandmanuals
•Knowledgebaseandfrequentlyaskedquestions
CallingLenovo
Ifyouhavetriedtocorrecttheproblemyourselfandstillneedhelp,duringthewarrantyperiod,youcan
gethelpandinformationbytelephonethroughtheCustomerSupportCenter.Thefollowingservicesare
availableduringthewarrantyperiod:
•Problemdetermination-Trainedpersonnelareavailabletoassistyouwithdeterminingifyouhavea
hardwareproblemanddecidingwhatactionisnecessarytoxtheproblem.
148UserGuide

•Lenovohardwarerepair-IftheproblemisdeterminedtobecausedbyLenovohardwareunderwarranty,
trainedservicepersonnelareavailabletoprovidetheapplicablelevelofservice.
•Engineeringchangemanagement-Occasionally,theremightbechangesthatarerequiredafteraproduct
hasbeensold.Lenovooryourreseller,ifauthorizedbyLenovo,willmakeselectedEngineeringChanges
(ECs)thatapplytoyourhardwareavailable.
Thefollowingitemsarenotcovered:
•ReplacementoruseofpartsnotmanufacturedfororbyLenovoornonwarrantedparts
Note:Allwarrantedpartscontaina7-characteror10-characteridenticationintheformatFRUXXXXXXX
orFRUXXXXXXXXXX.
•Identicationofsoftwareproblemsources
•CongurationofUEFIBIOSaspartofaninstallationorupgrade
•Changes,modications,orupgradestodevicedrivers
•Installationandmaintenanceofnetworkoperatingsystems(NOS)
•Installationandmaintenanceofapplicationprograms
ForthetermsandconditionsoftheLenovoLimitedWarrantythatappliestoyourLenovohardwareproduct,
see“Warrantyinformation”intheSafety,Warranty,andSetupGuidethatcomeswithyourcomputer.
Ifpossible,benearyourcomputerwhenyoumakeyourcallincasethetechnicalassistancerepresentative
needstohelpyouresolveacomputerproblem.Ensurethatyouhavedownloadedthemostcurrentdrivers
andsystemupdates,rundiagnostics,andrecordedinformationbeforeyoucall.Whencallingfortechnical
assistance,havethefollowinginformationavailable:
•Machinetypeandmodel
•Serialnumbersofyourcomputer,monitor,andothercomponents,oryourproofofpurchase
•Descriptionoftheproblem
•Exactwordingofanyerrormessages
•Hardwareandsoftwarecongurationinformationforyoursystem
Telephonenumbers
ForalistoftheLenovoSupportphonenumbersforyourcountryorregion,goto
http://www.lenovo.com/support/phoneorrefertotheSafety,Warranty,andSetupGuidethatcomeswith
yourcomputer.
Note:Phonenumbersaresubjecttochangewithoutnotice.Thelatestphonenumbersareavailableat
http://www.lenovo.com/support/phone.Ifthenumberforyourcountryorregionisnotprovided,contact
yourLenovoresellerorLenovomarketingrepresentative.
Purchasingadditionalservices
Duringandafterthewarrantyperiod,youcanpurchaseadditionalservices,suchassupportforLenovo
andnon-Lenovohardware,operatingsystems,andapplicationprograms;networksetupandconguration
services;upgradedorextendedhardwarerepairservices;andcustominstallationsservices.Service
availabilityandservicenamemightvarybycountry.
Formoreinformationabouttheseservices,goto:
http://www.lenovo.com/accessories/services/index.html
Chapter11.Gettingsupport149

150UserGuide

AppendixA.Regulatoryinformation
Wirelessrelatedinformation
Wirelessinteroperability
WirelessLANPCIExpressMiniCardisdesignedtobeinteroperablewithanywirelessLANproductthat
isbasedonDirectSequenceSpreadSpectrum(DSSS),ComplementaryCodeKeying(CCK),and/or
OrthogonalFrequencyDivisionMultiplexing(OFDM)radiotechnology,andiscompliantto:
•The802.11b/gStandard,802.11a/b/gor802.11ndraft2.0onWirelessLANs,asdenedandapprovedby
theInstituteofElectricalandElectronicsEngineers.
•TheWirelessFidelity(WiFi)certicationasdenedbytheWi-FiAlliance.
ABluetoothdeviceisdesignedtobeinteroperablewithanyBluetoothproductsthatarecompliantto
BluetoothSpecication2.1+EDRasdenedbytheBluetoothSIG.Thefollowingprolesaresupported
byBluetoothdevices:
•AdvancedAudioDistributionProle(A2DP)
•Audio/VideoControlTransportProtocol(AVCTP)
•Audio/VideoDistributionTransportProtocol(AVDTP)
•A/VRemoteControlProle(AVRCP)
•BasicImagingProle(BIP)
•BasicPrintingProle(BPP)
•Dial-UpNetworkingProle(DUN)
•FileTransferProle(FTP)
•GenericAccessProle(GAP)
•GenericA/VDistributionProle(GAVDP)
•HardcopyCableReplacementProle(HCRP)
•HeadsetProle(HSP)
•Hands-FreeProle(HFP)
•HumanInterfaceDeviceProle(HID)
•MessageAccessProle(MAP)
•ObjectExchangeProtocol(OBEX)
•ObjectPushProle(OPP)
•PersonalAreaNetworkingProle(PAN)
•PhoneBookAccessProle(PBAP)
•ServiceDiscoveryProtocol(SDP)
•SynchronizationProle(SYNC)
•VideoDistributionProle(VDP)
•GenericAttributeProle(GATT)
•ProximityProle
•FindMeProle
©CopyrightLenovo2013
151
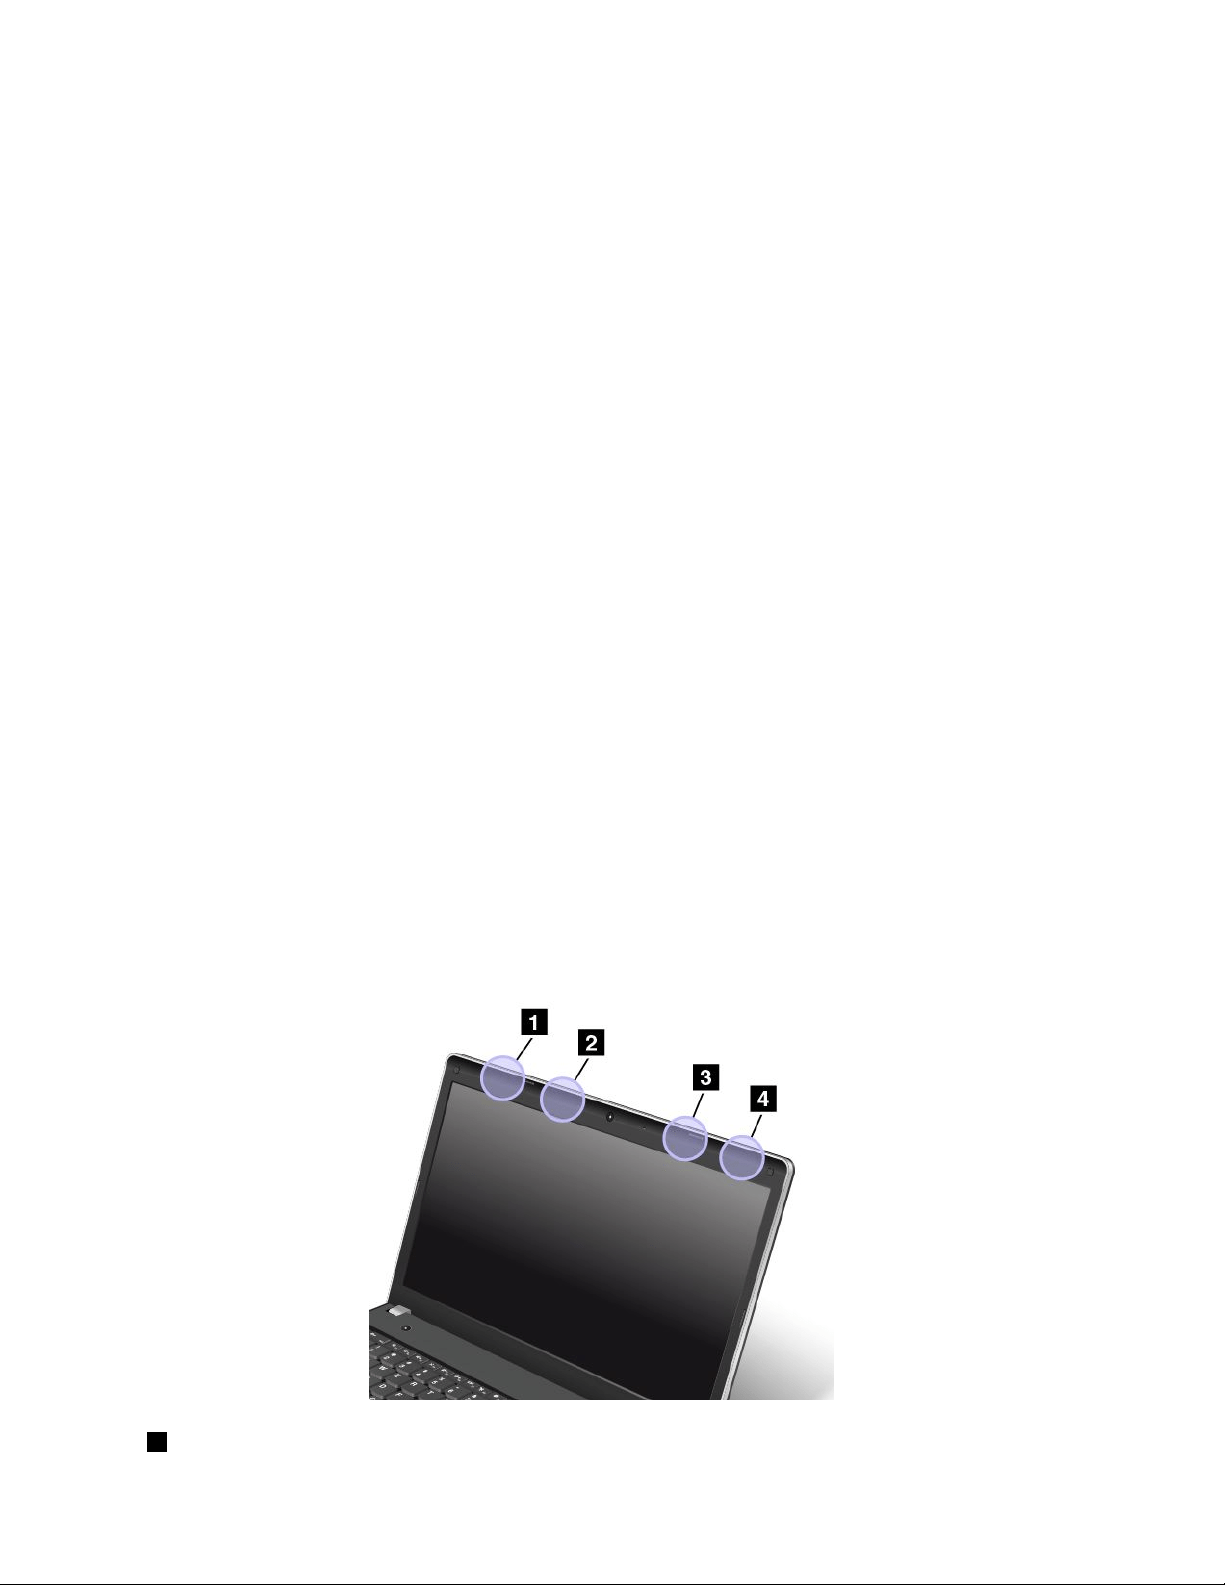
•ImmediateAlertProle
•BatteryStatusProle
Usageenvironmentandyourhealth
Integratedwirelesscardsemitradiofrequencyelectromagneticenergylikeotherradiodevices.However,the
levelofenergyemittedisfarmuchlessthantheelectromagneticenergyemittedbywirelessdeviceslike
forexamplemobilephones.
Duetothefactthatintegratedwirelesscardsoperatewithintheguidelinesfoundinradiofrequencysafety
standardsandrecommendations,Lenovobelievestheyaresafeforusebyconsumers.Thesestandardsand
recommendationsreecttheconsensusofthescienticcommunityandresultfromdeliberationsofpanels
andcommitteesofscientistswhocontinuallyreviewandinterprettheextensiveresearchliterature.
Insomesituationorenvironment,theuseofintegratedwirelesscardsmightberestrictedbytheproprietor
ofthebuildingorresponsiblerepresentativesoftheorganization.Thesesituationsandareasmightfor
exampleinclude:
•Usingtheintegratedwirelesscardsonboardofairplanes,inhospitalsornearpetrolstations,blasting
areas(withelectro-explosivedevices),medicalimplantsorbody-wornelectronicmedicaldevices,such
aspacemakers.
•Inanyotherenvironmentwheretheriskofinterferencetootherdevicesorservicesisperceivedor
identiedasharmful.
Ifyouareuncertainofthepolicythatappliestotheuseofwirelessdevicesinaspecicorganization(suchas
airportorhospital),youareencouragedtoaskforauthorizationtouseintegratedwirelesscardspriorto
turningonthecomputer.
LocationoftheUltraConnectwirelessantennas
ThinkPadnotebookcomputersfeatureanintegratedUltraConnect™wirelessantennasystembuiltintothe
displayforoptimalreception,enablingwirelesscommunicationwhereveryouare.
Therearetwotypesofantennalocations.Yourcomputercorrespondstooneofthefollowing:
Type1:Antennalocation
1WirelessLANantenna(auxiliary)
152UserGuide
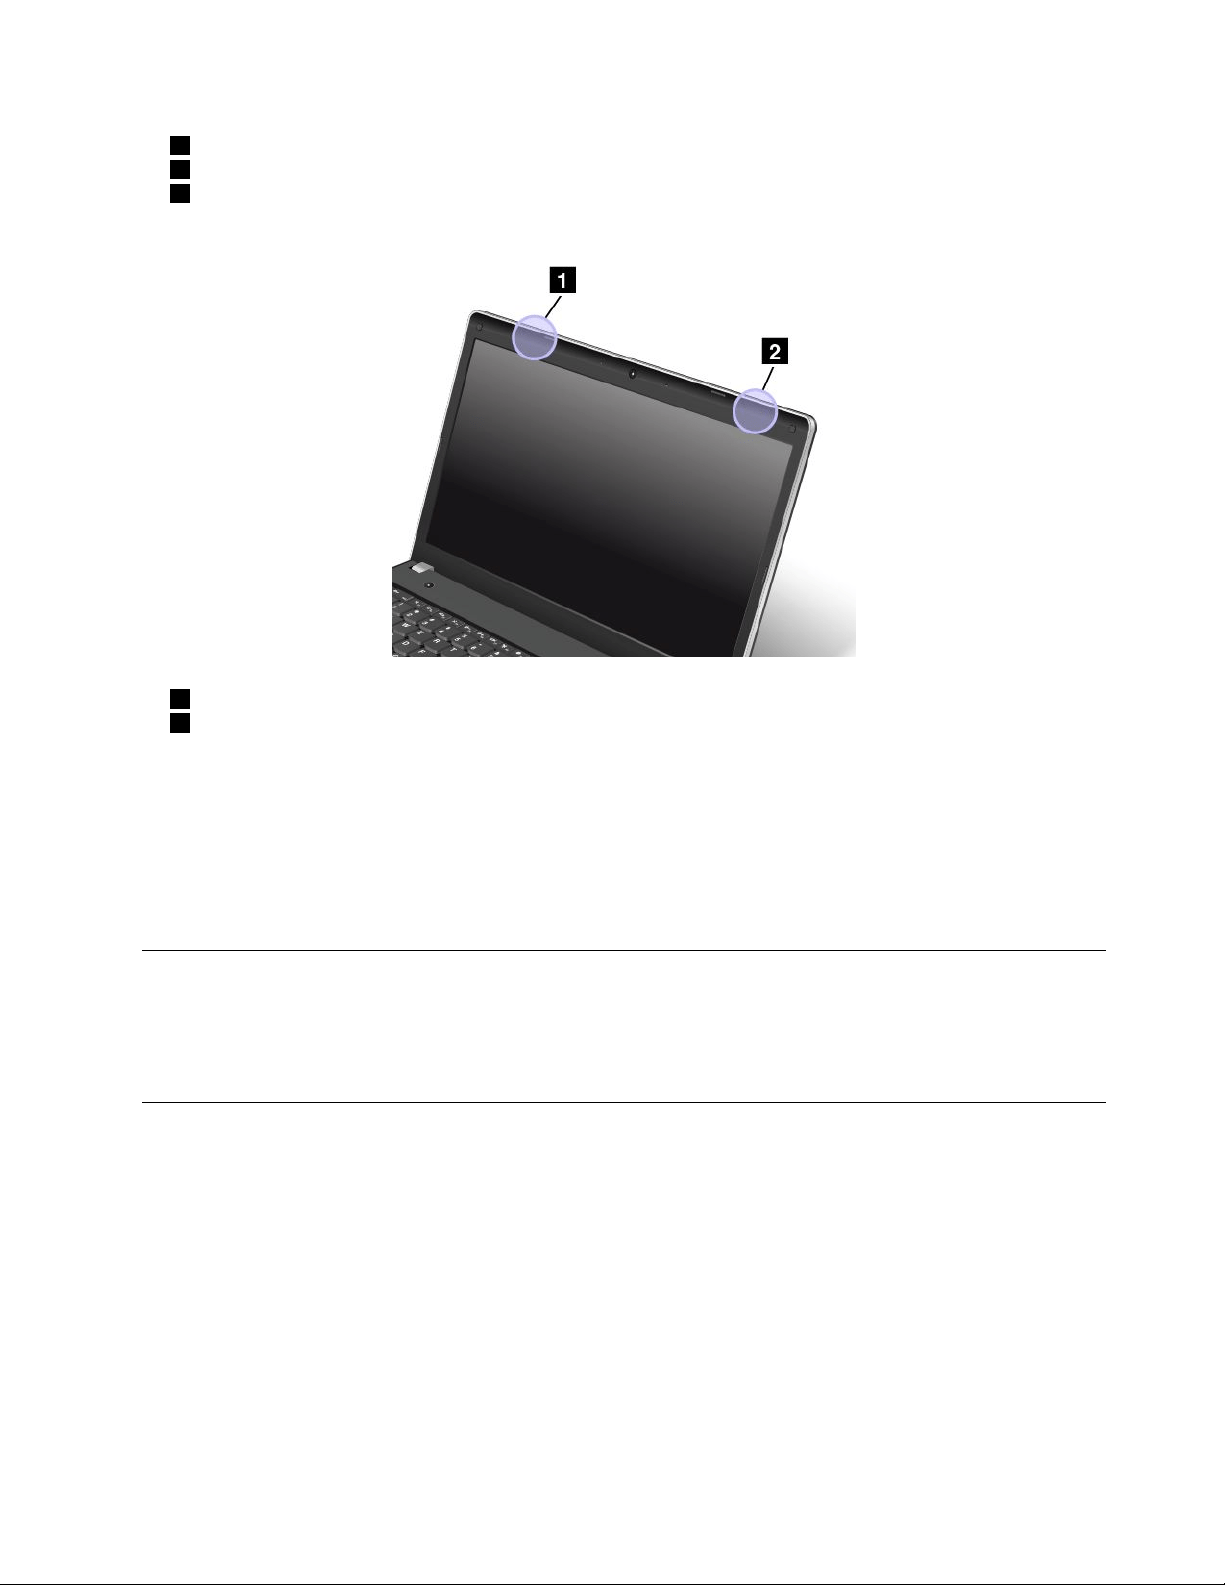
2WirelessWANantenna(auxiliary)
3WirelessWANantenna(main)
4WirelessLANantenna(main)
Type2:Antennalocation
1WirelessLANantenna(auxiliary)
2WirelessLANantenna(main)
Locatingwirelessregulatorynotices
Formoreinformationaboutthewirelessregulatorynotices,refertotheRegulatoryNoticeshippedwithyour
computer.
IfyourcomputerisshippedwithouttheRegulatoryNotice,youcannditontheWebsiteat:
http://www.lenovo.com/ThinkPadUserGuides
Exportclassicationnotice
ThisproductissubjecttotheUnitedStatesExportAdministrationRegulations(EAR)andhasanExport
ClassicationControlNumber(ECCN)of4A994.b.Itcanbere-exportedexcepttoanyoftheembargoed
countriesintheEARE1countrylist.
Electronicemissionnotices
ThefollowinginformationreferstotheThinkPadEdgeE440andE540,machinetype20C5and20C6.
FederalCommunicationsCommissionDeclarationofConformity
ThisequipmenthasbeentestedandfoundtocomplywiththelimitsforaClassBdigitaldevice,pursuant
toPart15oftheFCCRules.Theselimitsaredesignedtoprovidereasonableprotectionagainstharmful
interferenceinaresidentialinstallation.Thisequipmentgenerates,uses,andcanradiateradiofrequency
energyand,ifnotinstalledandusedinaccordancewiththeinstructions,maycauseharmfulinterference
toradiocommunications.However,thereisnoguaranteethatinterferencewillnotoccurinaparticular
installation.Ifthisequipmentdoescauseharmfulinterferencetoradioortelevisionreception,whichcanbe
determinedbyturningtheequipmentoffandon,theuserisencouragedtotrytocorrecttheinterferenceby
oneormoreofthefollowingmeasures:
AppendixA.Regulatoryinformation153

•Reorientorrelocatethereceivingantenna.
•Increasetheseparationbetweentheequipmentandreceiver.
•Connecttheequipmentintoanoutletonacircuitdifferentfromthattowhichthereceiverisconnected.
•Consultanauthorizeddealerorservicerepresentativeforhelp.
Lenovoisnotresponsibleforanyradioortelevisioninterferencecausedbyusingotherthanspeciedor
recommendedcablesandconnectorsorbyunauthorizedchangesormodicationstothisequipment.
Unauthorizedchangesormodicationscouldvoidtheuser'sauthoritytooperatetheequipment.
ThisdevicecomplieswithPart15oftheFCCRules.Operationissubjecttothefollowingtwoconditions:(1)
thisdevicemaynotcauseharmfulinterference,and(2)thisdevicemustacceptanyinterferencereceived,
includinginterferencethatmaycauseundesiredoperation.
ResponsibleParty:
Lenovo(UnitedStates)Incorporated
1009ThinkPlace-BuildingOne
Morrisville,NC27560
PhoneNumber:919-294-5900
IndustryCanadaClassBemissioncompliancestatement
ThisClassBdigitalapparatuscomplieswithCanadianICES-003.
CetappareilnumériquedelaclasseBestconformeàlanormeNMB-003duCanada.
EuropeanUnion-CompliancetotheElectromagneticCompatibility
Directive
ThisproductisinconformitywiththeprotectionrequirementsofEUCouncilDirective2004/108/EConthe
approximationofthelawsoftheMemberStatesrelatingtoelectromagneticcompatibility.Lenovocannot
acceptresponsibilityforanyfailuretosatisfytheprotectionrequirementsresultingfromanon-recommended
modicationoftheproduct,includingtheinstallationofoptioncardsfromothermanufacturers.
ThisproducthasbeentestedandfoundtocomplywiththelimitsforClassBInformationTechnology
EquipmentaccordingtoEuropeanStandardEN55022.ThelimitsforClassBequipmentwerederived
fortypicalresidentialenvironmentstoprovidereasonableprotectionagainstinterferencewithlicensed
communicationdevices.
EUcontact:Lenovo,Einsteinova21,85101Bratislava,Slovakia
GermanClassBcompliancestatement
DeutschsprachigerEUHinweis:
HinweisfürGerätederKlasseBEU-RichtliniezurElektromagnetischenVerträglichkeit
DiesesProduktentsprichtdenSchutzanforderungenderEU-Richtlinie2004/108/EG(früher89/336/EWG)zur
AngleichungderRechtsvorschriftenüberdieelektromagnetischeVerträglichkeitindenEU-Mitgliedsstaaten
undhältdieGrenzwertederEN55022KlasseBein.
154UserGuide
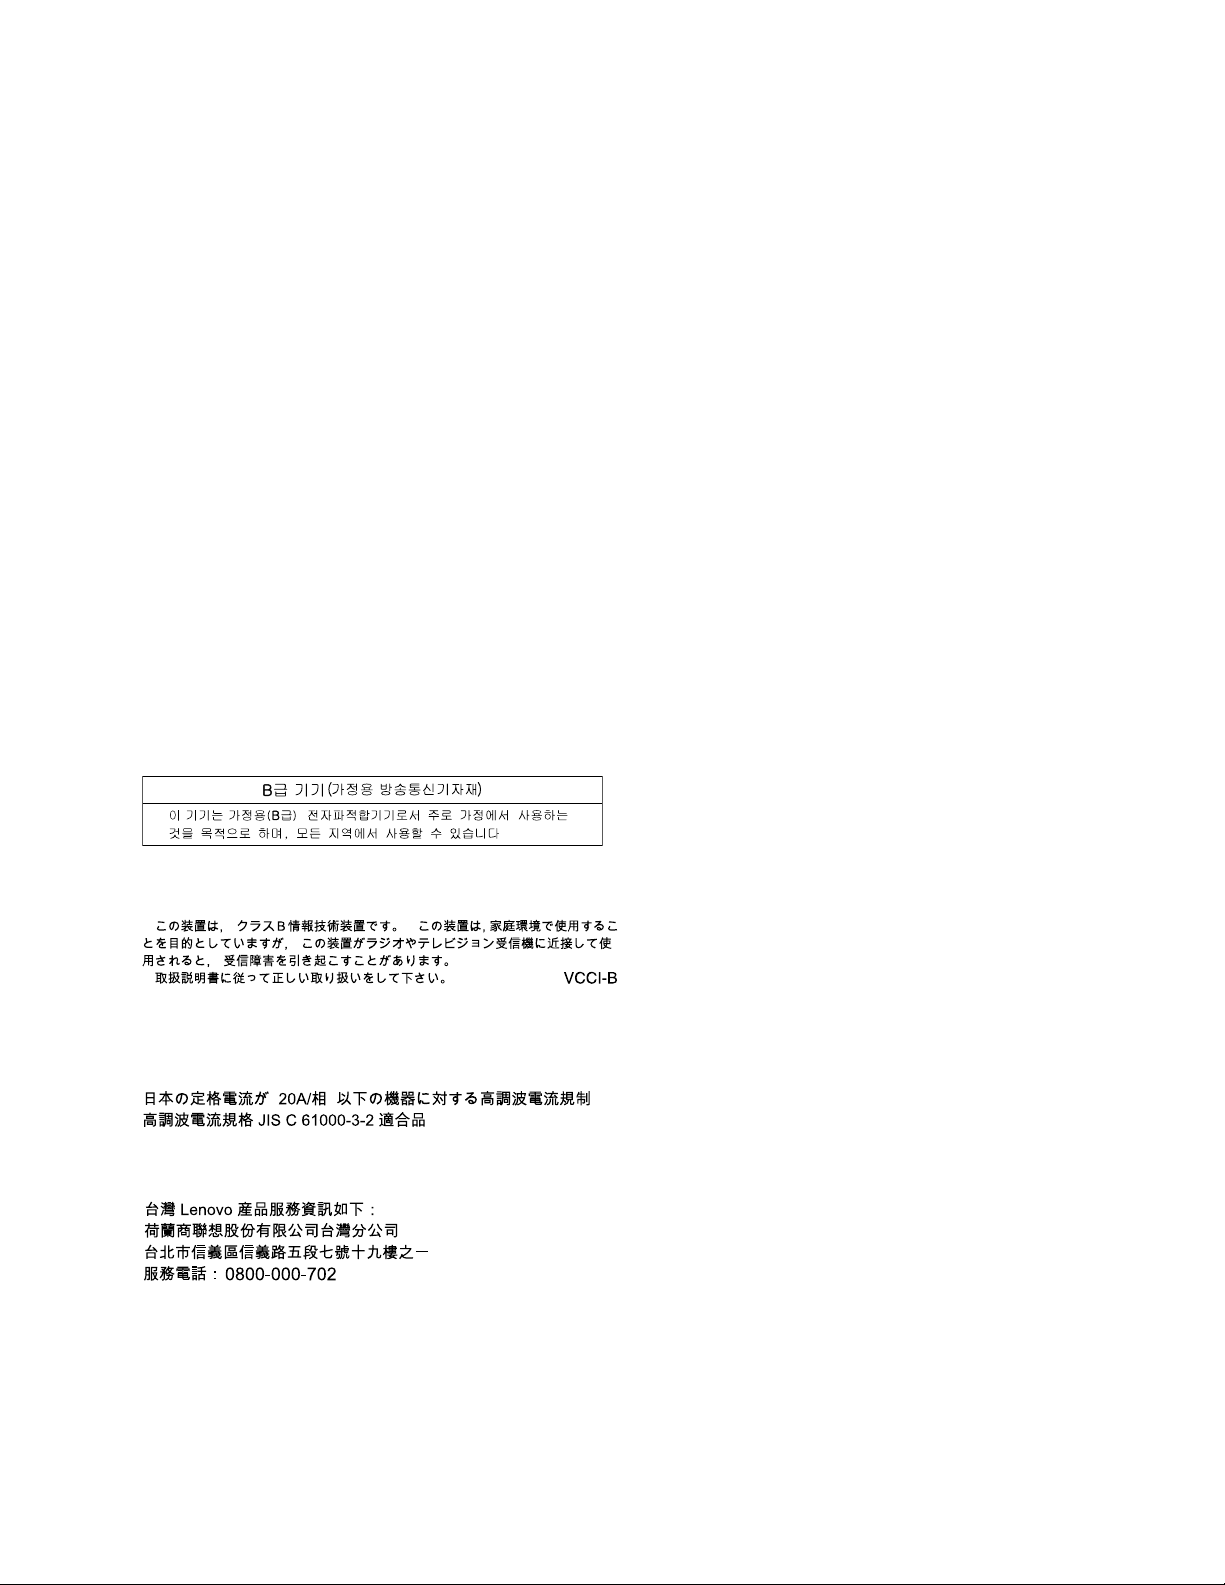
Umdiesessicherzustellen,sinddieGerätewieindenHandbüchernbeschriebenzuinstallierenundzu
betreiben.DesWeiterendürfenauchnurvonderLenovoempfohleneKabelangeschlossenwerden.
LenovoübernimmtkeineVerantwortungfürdieEinhaltungderSchutzanforderungen,wenndasProdukt
ohneZustimmungderLenovoverändertbzw.wennErweiterungskomponentenvonFremdherstellernohne
EmpfehlungderLenovogesteckt/eingebautwerden.
Deutschland:
EinhaltungdesGesetzesüberdieelektromagnetischeVerträglichkeitvonBetriebsmitteln
DiesesProduktentsprichtdem„GesetzüberdieelektromagnetischeVerträglichkeitvonBetriebsmitteln“
EMVG(früher„GesetzüberdieelektromagnetischeVerträglichkeitvonGeräten“).DiesistdieUmsetzungder
EU-Richtlinie2004/108/EG(früher89/336/EWG)inderBundesrepublikDeutschland.
ZulassungsbescheinigunglautdemDeutschenGesetzüberdieelektromagnetischeVerträglichkeit
vonBetriebsmitteln,EMVGvom20.Juli2007(früherGesetzüberdieelektromagnetische
VerträglichkeitvonGeräten),bzw.derEMVEGRichtlinie2004/108/EC(früher89/336/EWG),für
GerätederKlasseB.
DiesesGerätistberechtigt,inÜbereinstimmungmitdemDeutschenEMVGdasEG-Konformitätszeichen
-CE-zuführen.VerantwortlichfürdieKonformitätserklärungnachParagraf5desEMVGistdieLenovo
(Deutschland)GmbH,Gropiusplatz10,D-70563Stuttgart.
InformationeninHinsichtEMVGParagraf4Abs.(1)4:
DasGeräterfülltdieSchutzanforderungennachEN55024undEN55022KlasseB.
KoreaClassBcompliancestatement
JapanVCCIClassBcompliancestatement
Japancompliancestatementforproductswhichconnecttothepower
mainswithratedcurrentlessthanorequalto20Aperphase
LenovoproductserviceinformationforTaiwan
AppendixA.Regulatoryinformation155

156UserGuide

AppendixB.WEEEandrecyclingstatements
Lenovoencouragesownersofinformationtechnologyequipmenttoresponsiblyrecycletheirequipment
whenitisnolongerneeded.Lenovooffersavarietyofprogramsandservicestoassistequipmentownersin
recyclingtheirITproducts.InformationonproductrecyclingofferingscanbefoundonLenovo'sInternetsite
athttp://www.lenovo.com/social_responsibility/us/en/.
ImportantWEEEinformation
TheWEEEmarkingonLenovoproductsappliestocountrieswithWEEEande-wasteregulations(forexample,
EuropeanDirective2002/96/EC,IndiaE-WasteManagement&HandlingRules,2011).Appliancesare
labeledinaccordancewithlocalregulationsconcerningwasteelectricalandelectronicequipment(WEEE).
Theseregulationsdeterminetheframeworkforthereturnandrecyclingofusedappliancesasapplicable
withineachgeography.Thislabelisappliedtovariousproductstoindicatethattheproductisnottobe
thrownaway,butratherputintheestablishedcollectionsystemsforreclaimingtheseendoflifeproducts.
Usersofelectricalandelectronicequipment(EEE)withtheWEEEmarkingmustnotdisposeofendoflife
EEEasunsortedmunicipalwaste,butusethecollectionframeworkavailabletothemforthereturn,recycle,
andrecoveryofWEEEandtominimizeanypotentialeffectsofEEEontheenvironmentandhumanhealth
duetothepresenceofhazardoussubstances.ForadditionalWEEEinformationgoto:
http://www.lenovo.com/recycling
Japanrecyclingstatements
CollectingandrecyclingadisusedLenovocomputerormonitor
IfyouareacompanyemployeeandneedtodisposeofaLenovocomputerormonitorthatistheproperty
ofthecompany,youmustdosoinaccordancewiththeLawforPromotionofEffectiveUtilizationof
Resources.Computersandmonitorsarecategorizedasindustrialwasteandshouldbeproperlydisposed
ofbyanindustrialwastedisposalcontractorcertiedbyalocalgovernment.InaccordancewiththeLaw
forPromotionofEffectiveUtilizationofResources,LenovoJapanprovides,throughitsPCCollectingand
RecyclingServices,forthecollecting,reuse,andrecyclingofdisusedcomputersandmonitors.Fordetails,
visittheLenovoWebsiteathttp://www.lenovo.com/recycling/japan.
PursuanttotheLawforPromotionofEffectiveUtilizationofResources,thecollectingandrecyclingof
home-usedcomputersandmonitorsbythemanufacturerwasbegunonOctober1,2003.Thisservice
isprovidedfreeofchargeforhome-usedcomputerssoldafterOctober1,2003.Fordetails,goto
http://www.lenovo.com/recycling/japan.
©CopyrightLenovo2013
157

DisposingofLenovocomputercomponents
SomeLenovocomputerproductssoldinJapanmayhavecomponentsthatcontainheavymetalsorother
environmentalsensitivesubstances.Toproperlydisposeofdisusedcomponents,suchasaprintedcircuit
boardordrive,usethemethodsdescribedaboveforcollectingandrecyclingadisusedcomputerormonitor.
DisposingofdisusedlithiumbatteriesfromLenovocomputers
Abutton-shapedlithiumbatteryisinstalledinsideyourLenovocomputertoprovidepowertothecomputer
clockwhilethecomputerisoffordisconnectedfromthemainpowersource.Ifyouneedtoreplaceitwitha
newone,contactyourplaceofpurchaseorcontactLenovoforservice.Ifyouneedtodisposeofadisused
lithiumbattery,insulateitwithvinyltape,contactyourplaceofpurchaseoranindustrial-waste-disposal
operator,andfollowtheirinstructions.
Disposalofalithiumbatterymustcomplywithlocalordinancesandregulations.
DisposingofadisusedbatterypackfromLenovonotebookcomputers
YourLenovonotebookcomputerhasalithiumionbatterypackoranickelmetalhydridebatterypack.Ifyou
areacompanyemployeewhousesaLenovonotebookcomputerandneedtodisposeofabatterypack,
contacttheproperpersoninLenovosales,service,ormarketing,andfollowthatperson'sinstructions.You
alsocanrefertotheinstructionsathttp://www.lenovo.com/jp/ja/environment/recycle/battery/.
IfyouuseaLenovonotebookcomputerathomeandneedtodisposeofabatterypack,you
mustcomplywithlocalordinancesandregulations.Youalsocanrefertotheinstructionsat
http://www.lenovo.com/jp/ja/environment/recycle/battery/.
RecyclinginformationforBrazil
DeclaraçõesdeReciclagemnoBrasil
DescartedeumProdutoLenovoForadeUso
Equipamentoselétricoseeletrônicosnãodevemserdescartadosemlixocomum,masenviadosàpontosde
coleta,autorizadospelofabricantedoprodutoparaquesejamencaminhadoseprocessadosporempresas
especializadasnomanuseioderesíduosindustriais,devidamentecerticadaspelosorgãosambientais,de
acordocomalegislaçãolocal.
ALenovopossuiumcanalespecícoparaauxiliá-lonodescartedessesprodutos.Casovocêpossua
umprodutoLenovoemsituaçãodedescarte,ligueparaonossoSACouencaminheume-mailpara:
[email protected],informandoomodelo,númerodesérieecidade,amdeenviarmosasinstruções
paraocorretodescartedoseuprodutoLenovo.
BatteryrecyclinginformationfortheEuropeanUnion
158UserGuide
Notice:ThismarkappliesonlytocountrieswithintheEuropeanUnion(EU).
BatteriesorpackagingforbatteriesarelabeledinaccordancewithEuropeanDirective2006/66/EC
concerningbatteriesandaccumulatorsandwastebatteriesandaccumulators.TheDirectivedeterminesthe
frameworkforthereturnandrecyclingofusedbatteriesandaccumulatorsasapplicablethroughoutthe
EuropeanUnion.Thislabelisappliedtovariousbatteriestoindicatethatthebatteryisnottobethrown
away,butratherreclaimeduponendoflifeperthisDirective.
InaccordancewiththeEuropeanDirective2006/66/EC,batteriesandaccumulatorsarelabeledtoindicate
thattheyaretobecollectedseparatelyandrecycledatendoflife.Thelabelonthebatterymayalso
includeachemicalsymbolforthemetalconcernedinthebattery(Pbforlead,Hgformercury,andCdfor
cadmium).Usersofbatteriesandaccumulatorsmustnotdisposeofbatteriesandaccumulatorsasunsorted
municipalwaste,butusethecollectionframeworkavailabletocustomersforthereturn,recycling,and
treatmentofbatteriesandaccumulators.Customerparticipationisimportanttominimizeanypotential
effectsofbatteriesandaccumulatorsontheenvironmentandhumanhealthduetothepotentialpresenceof
hazardoussubstances.Forpropercollectionandtreatment,goto:
http://www.lenovo.com/lenovo/environment
BatteryrecyclinginformationforTaiwan
BatteryrecyclinginformationfortheUnitedStatesandCanada
RecyclinginformationforChina
AppendixB.WEEEandrecyclingstatements159

160UserGuide

AppendixC.ENERGYSTARmodelinformation
ENERGYSTAR
®
isajointprogramoftheU.S.EnvironmentalProtectionAgencyandtheU.S.Department
ofEnergyaimedatsavingmoneyandprotectingtheenvironmentthroughenergyefcientproductsand
practices.
LenovoisproudtoofferourcustomersproductswiththeENERGYSTARqualieddesignation.Lenovo
computersofthefollowingmachinetypes,iftheENERGYSTARmarkisafxed,havebeendesignedand
testedtoconformtotheENERGYSTARprogramrequirementsforcomputers.
20C5and20C6
ByusingENERGYSTARqualiedproductsandtakingadvantageofthepower-managementfeatures
ofyourcomputer,youcanhelpreducetheconsumptionofelectricity.Reducedelectricalconsumption
cancontributetopotentialnancialsavings,acleanerenvironment,andthereductionofgreenhousegas
emissions.
FormoreinformationaboutENERGYSTAR,goto:
http://www.energystar.gov
Lenovoencouragesyoutomakeefcientuseofenergyanintegralpartofyourday-to-dayoperations.To
helpinthisendeavor,Lenovohaspresetthefollowingpower-managementfeaturestotakeeffectwhenyour
computerhasbeeninactiveforaspeciedlengthoftime:
ByusingENERGYSTARqualiedproductsandtakingadvantageofthepower-managementfeatures
ofthecomputer,youcanhelpreducetheconsumptionofelectricity.Reducedelectricalconsumption
cancontributetopotentialnancialsavings,acleanerenvironment,andthereductionofgreenhousegas
emissions.
FormoreinformationaboutENERGYSTAR,goto:
http://www.energystar.gov
Lenovoencouragesyoutomakeefcientuseofenergyanintegralpartofyourday-to-dayoperations.To
helpinthisendeavor,Lenovohaspresetthefollowingpower-managementfeaturestotakeeffectwhenthe
computerhasbeeninactiveforaspeciedlengthoftime:
Powerplan:EnergySaver(settingswhenpluggedintoacpower)
•Turnoffthedisplay:After10minutes
•Putthecomputerintosleep:After20minutes
•Advancedpowersettings:
–Turnoffharddisks:After15minutes
–Hibernate:Never
©CopyrightLenovo2013
161

Toawakenthecomputerfromsleepmode,presstheFnkeyonyourkeyboard.Formoreinformationabout
thesesettings,seetheWindowsHelpandSupportinformationonthecomputer.
TheWakeonLANfunctionisenabledwhenyourLenovocomputerisshippedfromthefactory,andthe
settingremainsvalidevenwhenthecomputerisinsleepmode.IfyoudonotneedtohaveWakeonLAN
enabledwhilethecomputerisinsleepmode,youcanreducethepowerconsumptionandprolongthetime
insleepmode,bydisablingthesettingofWakeonLANforsleepmode.
TodisablethesettingofWakeonLANforsleepmode,dothefollowing:
1.ClickStart➙Controlpanel.
2.ClickHardwareandSound➙DeviceManager.
3.IntheDeviceManagerwindow,expandNetworkadapters.
4.Right-clickyournetworkadapterdevice,andclickProperties.
5.ClickthePowerManagementtab.
6.CleartheAllowthisdevicetowakethecomputercheckbox.
7.ClickOK.
162UserGuide

AppendixD.Notices
Lenovomaynotoffertheproducts,services,orfeaturesdiscussedinthisdocumentinallcountries.Consult
yourlocalLenovorepresentativeforinformationontheproductsandservicescurrentlyavailableinyour
area.AnyreferencetoaLenovoproduct,program,orserviceisnotintendedtostateorimplythatonlythat
Lenovoproduct,program,orservicemaybeused.Anyfunctionallyequivalentproduct,program,orservice
thatdoesnotinfringeanyLenovointellectualpropertyrightmaybeusedinstead.However,itistheuser's
responsibilitytoevaluateandverifytheoperationofanyotherproduct,program,orservice.
Lenovomayhavepatentsorpendingpatentprogramscoveringsubjectmatterdescribedinthisdocument.
Thefurnishingofthisdocumentdoesnotgiveyouanylicensetothesepatents.Youcansendlicense
inquiries,inwriting,to:
Lenovo(UnitedStates),Inc.
1009ThinkPlace-BuildingOne
Morrisville,NC27560
U.S.A.
Attention:LenovoDirectorofLicensing
LENOVOPROVIDESTHISPUBLICATION“ASIS”WITHOUTWARRANTYOFANYKIND,EITHEREXPRESS
ORIMPLIED,INCLUDING,BUTNOTLIMITEDTO,THEIMPLIEDWARRANTIESOFNON-INFRINGEMENT,
MERCHANTABILITYORFITNESSFORAPARTICULARPURPOSE.Somejurisdictionsdonotallow
disclaimerofexpressorimpliedwarrantiesincertaintransactions,therefore,thisstatementmaynotapply
toyou.
Thisinformationcouldincludetechnicalinaccuraciesortypographicalerrors.Changesareperiodically
madetotheinformationherein;thesechangeswillbeincorporatedinneweditionsofthepublication.
Lenovomaymakeimprovementsand/orchangesintheproduct(s)and/ortheapplication(s)describedinthis
publicationatanytimewithoutnotice.
Theproductsdescribedinthisdocumentarenotintendedforuseinimplantationorotherlifesupport
applicationswheremalfunctionmayresultininjuryordeathtopersons.Theinformationcontainedinthis
documentdoesnotaffectorchangeLenovoproductspecicationsorwarranties.Nothinginthisdocument
shalloperateasanexpressorimpliedlicenseorindemnityundertheintellectualpropertyrightsofLenovo
orthirdparties.Allinformationcontainedinthisdocumentwasobtainedinspecicenvironmentsandis
presentedasanillustration.Theresultobtainedinotheroperatingenvironmentsmayvary.
Lenovomayuseordistributeanyoftheinformationyousupplyinanywayitbelievesappropriatewithout
incurringanyobligationtoyou.
Anyreferencesinthispublicationtonon-LenovoWebsitesareprovidedforconvenienceonlyanddonotin
anymannerserveasanendorsementofthoseWebsites.ThematerialsatthoseWebsitesarenotpartof
thematerialsforthisLenovoproduct,anduseofthoseWebsitesisatyourownrisk.
Anyperformancedatacontainedhereinwasdeterminedinacontrolledenvironment.Therefore,theresult
obtainedinotheroperatingenvironmentsmayvarysignicantly.Somemeasurementsmayhavebeen
madeondevelopment-levelsystemsandthereisnoguaranteethatthesemeasurementswillbethesame
ongenerallyavailablesystems.Furthermore,somemeasurementsmayhavebeenestimatedthrough
extrapolation.Actualresultsmayvary.Usersofthisdocumentshouldverifytheapplicabledatafortheir
specicenvironment.
©CopyrightLenovo2013
163

Trademarks
ThefollowingtermsaretrademarksofLenovointheUnitedStates,othercountries,orboth:
Lenovo
AccessConnections
ActiveProtectionSystem
ThinkPad
ThinkVantage
TrackPoint
UltraConnect
IntelandIntelSpeedSteparetrademarksorregisteredtrademarksofIntelCorporationoritssubsidiariesin
theUnitedStatesandothercountries.
Microsoft,Windows,andBitLockeraretrademarksoftheMicrosoftgroupofcompanies.
AMDisatrademarkorregisteredtrademarkofAdvancedMicroDevices,Inc.
Othercompany,product,andservicenamesmaybetrademarksorservicemarksofothers.
164UserGuide
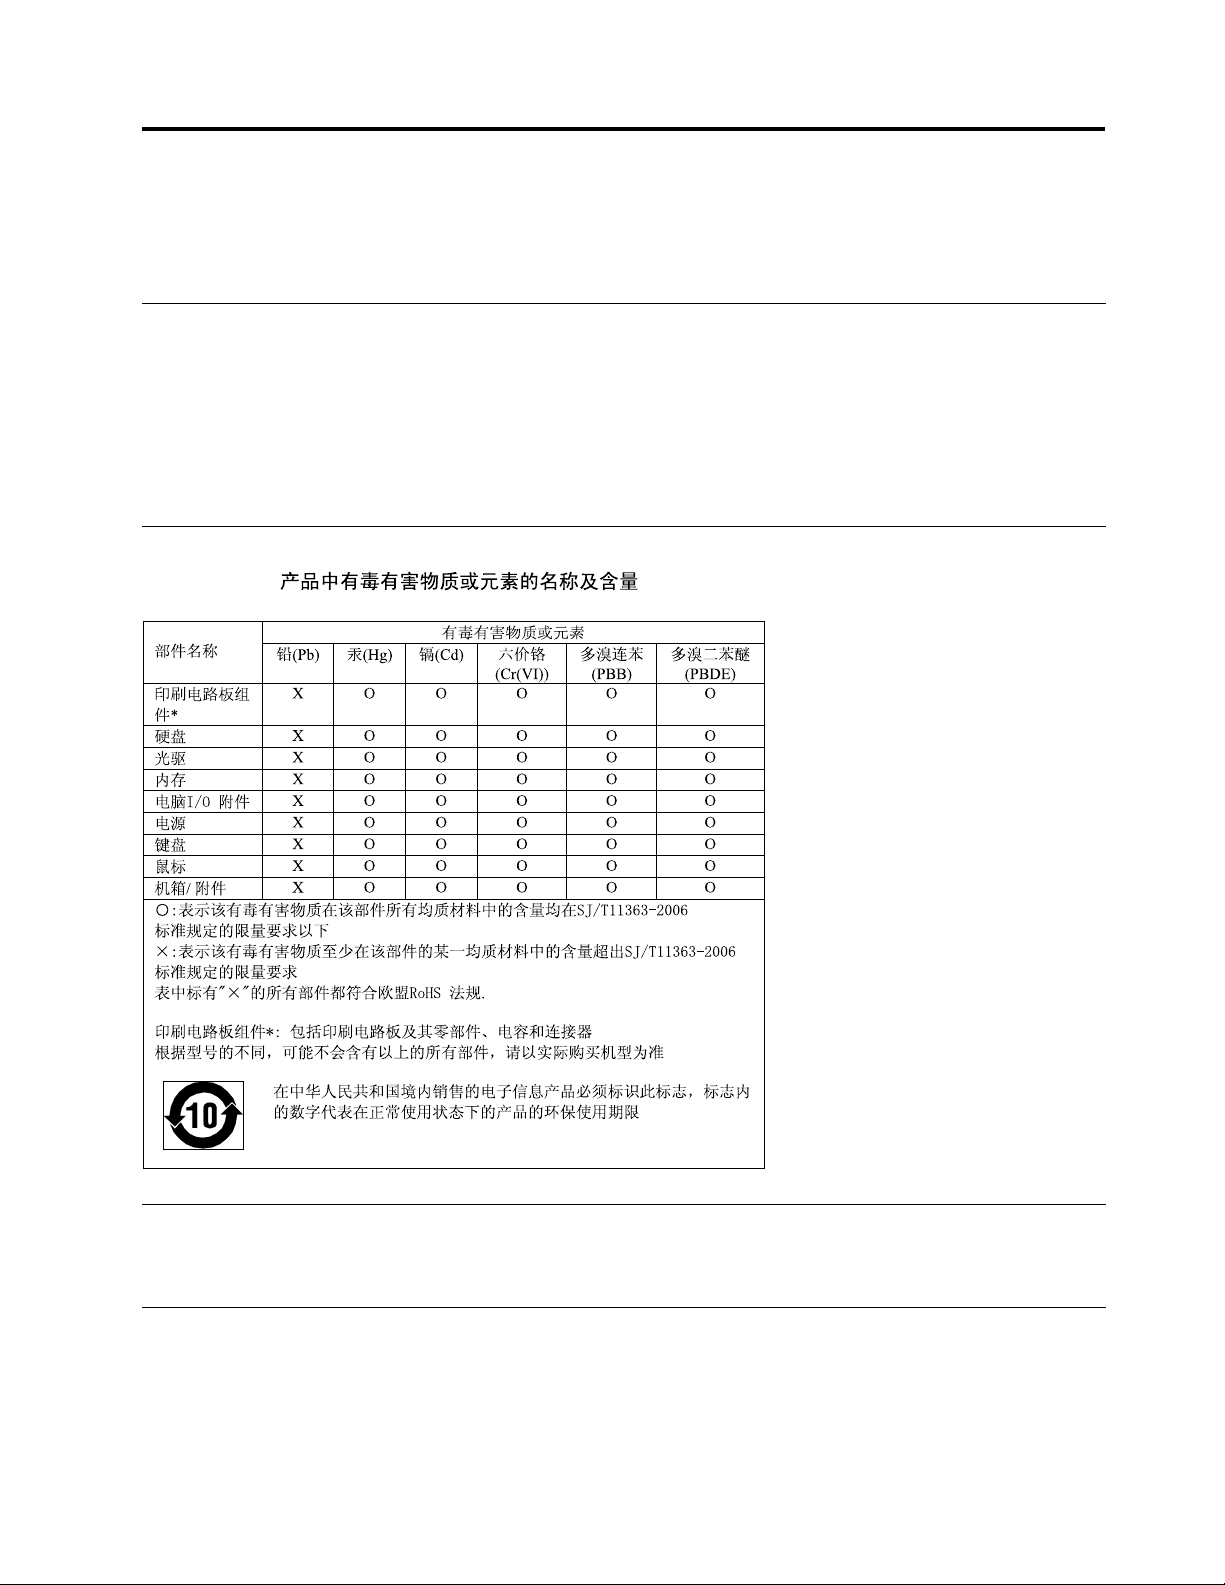
AppendixE.RestrictionofHazardousSubstancesDirective
(RoHS)
EuropeanUnionRoHS
LenovoproductssoldintheEuropeanUnion,onorafter3January2013meettherequirementsofDirective
2011/65/EUontherestrictionoftheuseofcertainhazardoussubstancesinelectricalandelectronic
equipment(“RoHSrecast”or“RoHS2”).
FormoreinformationaboutLenovoprogressonRoHS,goto:
http://www.lenovo.com/social_responsibility/us/en/RoHS_Communication.pdf
ChinaRoHS
IndiaRoHS
RoHScompliantasperE-Waste(Management&Handling)Rules,2011.
TurkishRoHS
TheLenovoproductmeetstherequirementsoftheRepublicofTurkeyDirectiveontheRestrictionoftheUse
ofCertainHazardousSubstancesinElectricalandElectronicEquipment(EEE).
©CopyrightLenovo2013
165

UkraineRoHS
166UserGuide

AppendixF.Eurasiancompliancemark
©CopyrightLenovo2013
167

168UserGuide