Mini Robotic Vacuum Cleaner

www.PyleUSA.com
2
3
4
4
5
6
7
8
8
8
9
9
12
13
TABLE OF CONTENTS
SAFETY INSTRUCTIONS
* BATTERY AND RECHARGING INSTRUCTIONS
PRODUCT FEATURES
MAIN BODY AND ACCESSORIES
BATTERY INSTALLATION AND REMOVAL
RECHARGING BATTERY
GENERAL OPERATION
* STARTING OPERATION
SIDE BRUSH INSTALLATON
CLEANING AND MAINTENANCE
*CLEANING DUST BIN
*CLEANING INTAKE
TROUBLESHOOTING

www.PyleUSA.com
3
SAFETY INSTRUCTIONS
Read the safety instructions before operating the Mini Robotic Vacuum
Cleaner and keep this manual handy for your
future reference. Observe
the basic safety rules to prevent any occurrence of fire, electric shock or
personal injury.
1. Do not operate the Mini Robotic Vacuum Cleaner outdoors.
2. Before starting to use the Mini Robotic Vacuum Cleaner, make sure the dust
bin filter is properly installed.
3. Do not use this product in wet or moist environments (any environment
with liquid), e.g. bathroom or laundry room.
4. Before you use the Mini Robotic Vacuum Cleaner, remove any loose
articles on the floor such as clothes, paper, loose cables, or extension cords.
Additionally, lift curtains and drapes off the floor to avoid any possible
accidents. If a loose cable is tangled with the Mini Robotic Vacuum
Cleaner, the cable may be dragged with the Mini Robotic Vacuum Cleaner
and could topple furniture or cause property damage.
5. Never stand or sit on the Mini Robotic Vacuum Cleaner. Use Caution when
operating the Mini Robotic Vacuum Cleaner around children or pets.
6. DO NOT let the Mini Robotic Vacuum Cleaner approach cigarettes,
lighters, matches or other flammable objects or combustible materials.
7. Never use the product to clean up combustible or highly volatile liquids
such as gasoline.
8. While the product is in operation, make sure all doors leading outside are
closed.
9. If the Mini Robotic Vacuum Cleaner malfunctions or is damaged by force,
do not operate regardless the cause. Call your local dealer for service
information.
10. Before charging, ensure that the adapter and outlet are properly
connected.
11. The Mini Robotic Vacuum Cleaner operates in temperatures from 32°F
to 104°F. Do not use this product in high-temperature environments or
under intense sunlight.
12. The appliance is not intended for children, people with reduced physical
sensory or mental capabilities, or those with a lack of experience and
knowledge. Proper supervision or instruction should be given to all users for
safety reasons.
13. Do not let children play with the appliance.
www.PyleUSA.com
4
BATTERY AND RECHARGING INSTRUCTIONS
1. The battery is rechargeable. Please use the voltage and current specified on
the packing. If you are not sure of the voltage and current of your house,
please contact the seller or local power company of a licensed electrician.
(Only use the battery pack provided by the manufacturer or specified by the
manufacturer, please check the polarity before installing the battery.
Battery voltage: 11.1V DC
Working current: 700-800mA
2. Only use the original battery and power adapter of the product for charging.
3. Charging adapter is for indoor use only.
4. Do not recharge the product if the battery cord or plug is damaged.
5. Never touch the charger, plug or cable with wet or damp hands.
6. Before cleaning the product, unplug the adapter, switch off the unit and
take out the battery.
7. Remove the battery when it is not in use for a long time.
8. Remove the battery from the product if disposing of the appliance
9. Switch off the Mini Robotic Vacuum Cleaner before removing the battery.
Recycle and dispose of the battery properly.
PRODUCT FEATURES
This revolutionary Mini Robotic Vacuum Cleaner is equipped with
functions suitable for cleaning floor surfaces such as wood, tile, and
linoleum. The Mini Robotic Vacuum Cleaner will automatically switch
between modes during its run cycle to ensure that every surface of the floor
is cleaned.
Random
Spiral
Along the wall
NOTE:
Take out or remove the packing foam from behind the
front bumper before using the Mini Robotic Vacuum
Cleaner.
www.PyleUSA.com
5
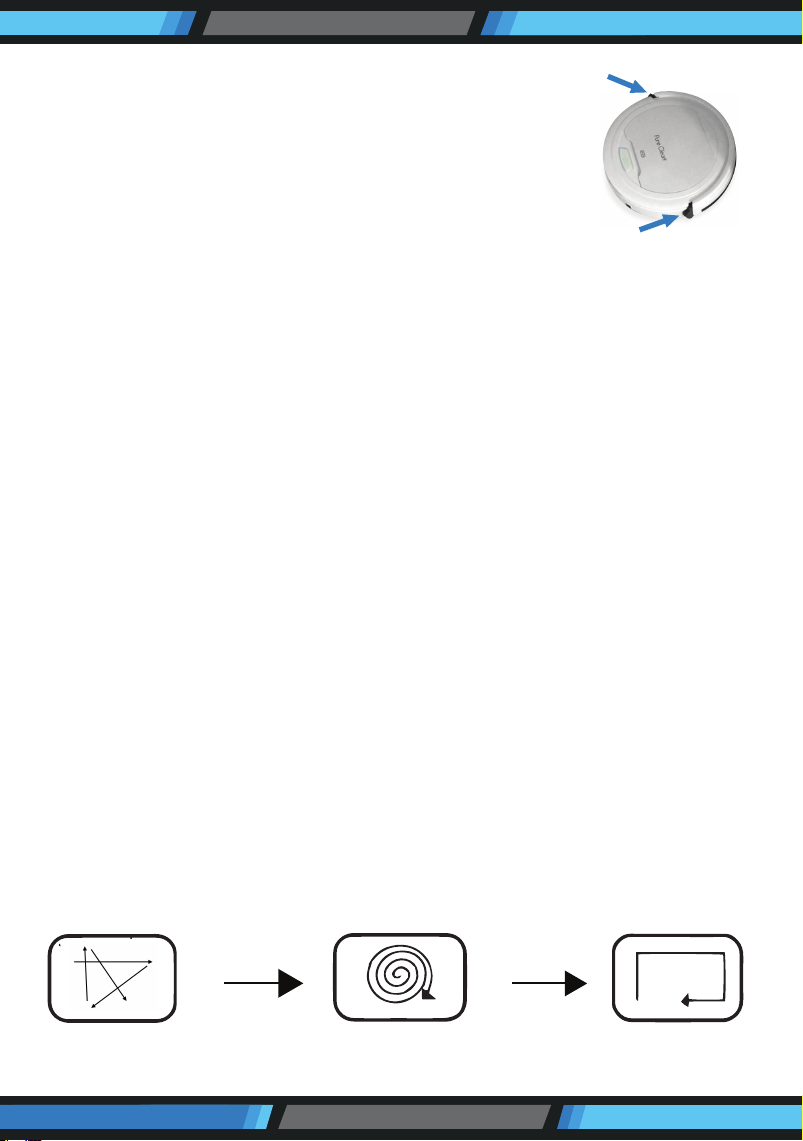
Main Body x 1 Rechargeable Battery x 1 Adapter x 1
Filter x 1 User Manual x 1 Side brush x 2
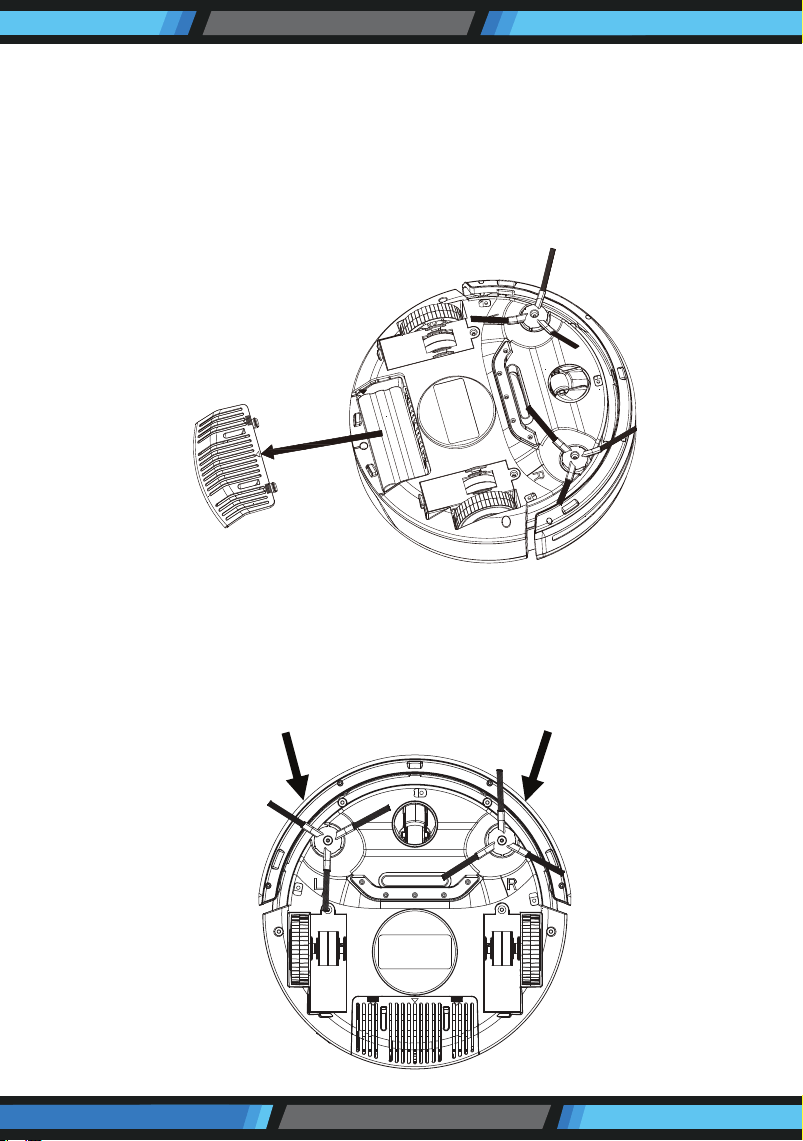
MAIN BODY AND ACCESSORIES
MAIN BODY AND ACCESSORIES
Bumper
Top Cover
Inner Dustbin
Switch ON/OFF

www.PyleUSA.com
6
BATTERY INSTALLATION AND REMOVAL
1. Before installin
g or removing the battery, disconnect the product from the
power source.
2. Open the battery cover.
3. Insert the battery into the battery cabinet and close the cover.
Make sure the cover clicks securely into its position.
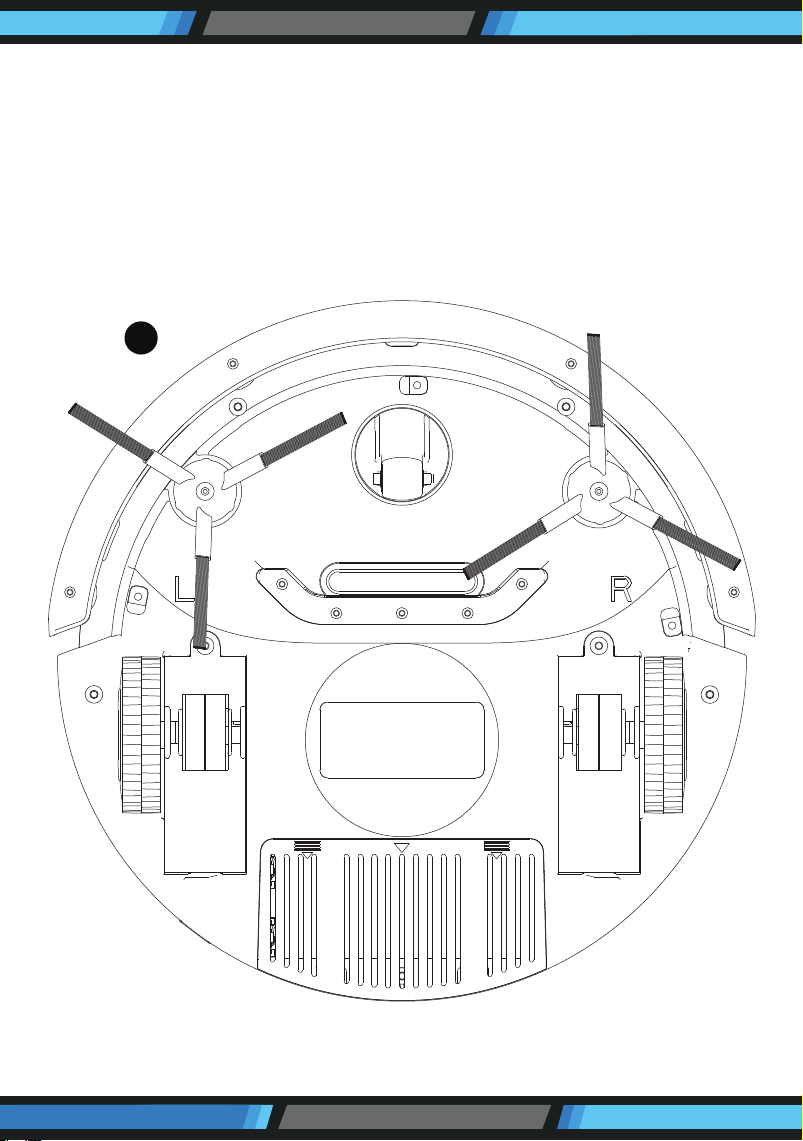
Front Wheel
Bumper
Anti Drop
Sensor
Side Brush
Vacuum
Intake
Wheel
Battery House
www.PyleUSA.com
7
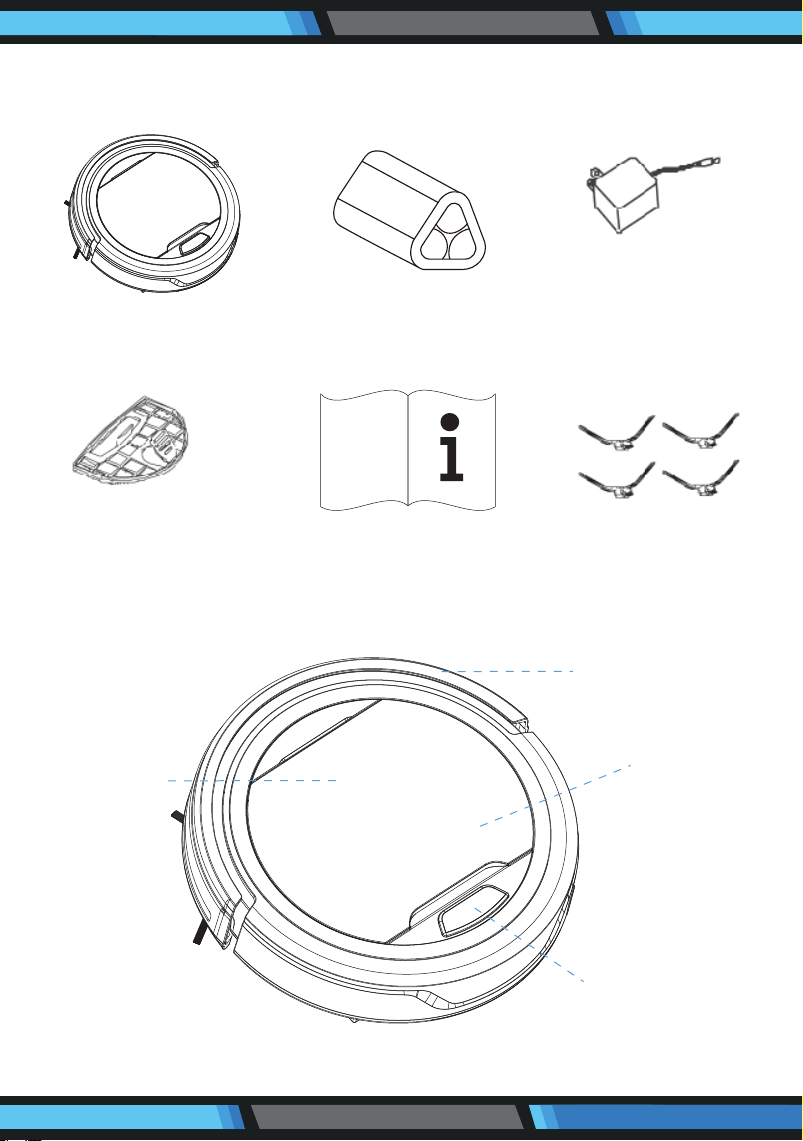
RECHARGING BATTERY
1. Before charging, make sure the battery is correctly installed.
2. To charge the product, connect the adapter output into the DC jack,
then plug the output into a wall outlet. A blue light will flash when
charging.
3. After it is fully charged, the indicator light will turn to a solid blue light.
4. When the product runs out of power, an LED indicator will turn red/
purple to signal that charging is needed.
5. To ensure the best performance and life span of the battery, please
charge the product for at least 3 hours continuously.
NOTE:
a. Charge the Mini Robotic Vacuum Cleaner for at least 8 hours before first
use.
b. When the battery is low, please charge as soon as possible.
c. If you are not using the robot for an extended period of time, please fully
charge the battery and remove it, then store it in a well ventilated and dry
place.
d. If the robot is unused for more than 3 months, please charge it for at least
8 hours before using again.
Adapter Plug
Adapter Plug Outlet
www.PyleUSA.com
8
GENERAL OPERATION
Starting Operation
1. Place the product in a room with a lot of free space, then power it on.
2. When the product runs out of power, the LED indicator in the illumination
ring will turn red and the product will stop working.
Note: *This product is not suitable for long-pile carpets.
SIDE BRUSH INST
ALLATION
Install the L side brush in the L slot and the R side brush in the R slot on the
bottom of the vacuum. Be sure that each side brush clicks into place. To
remove side brushes, pull firmly up.
www.PyleUSA.com
9
CLEANING AND MAINTENANCE
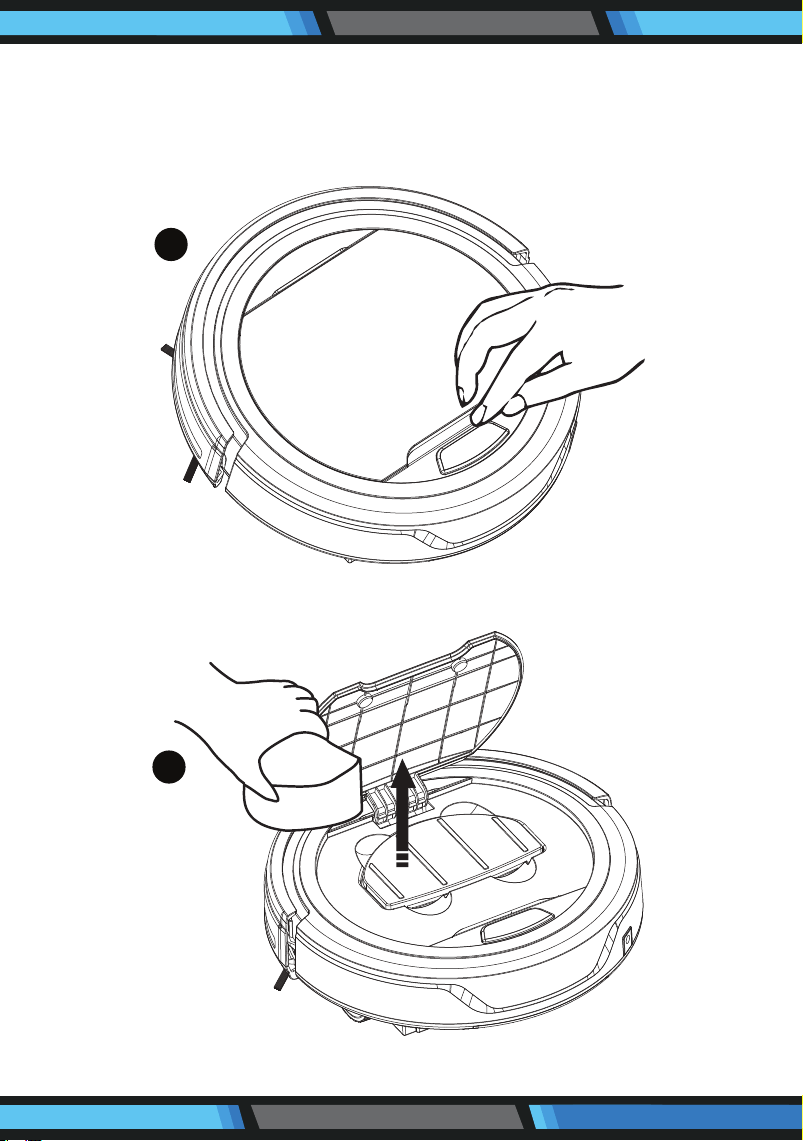
Cleaning Dust Bin
1. Open the upper cover by lifting the lid near the power on/o button
2. Put your nger into the dust bin groove and grip to take it out
1
2
www.PyleUSA.com
10
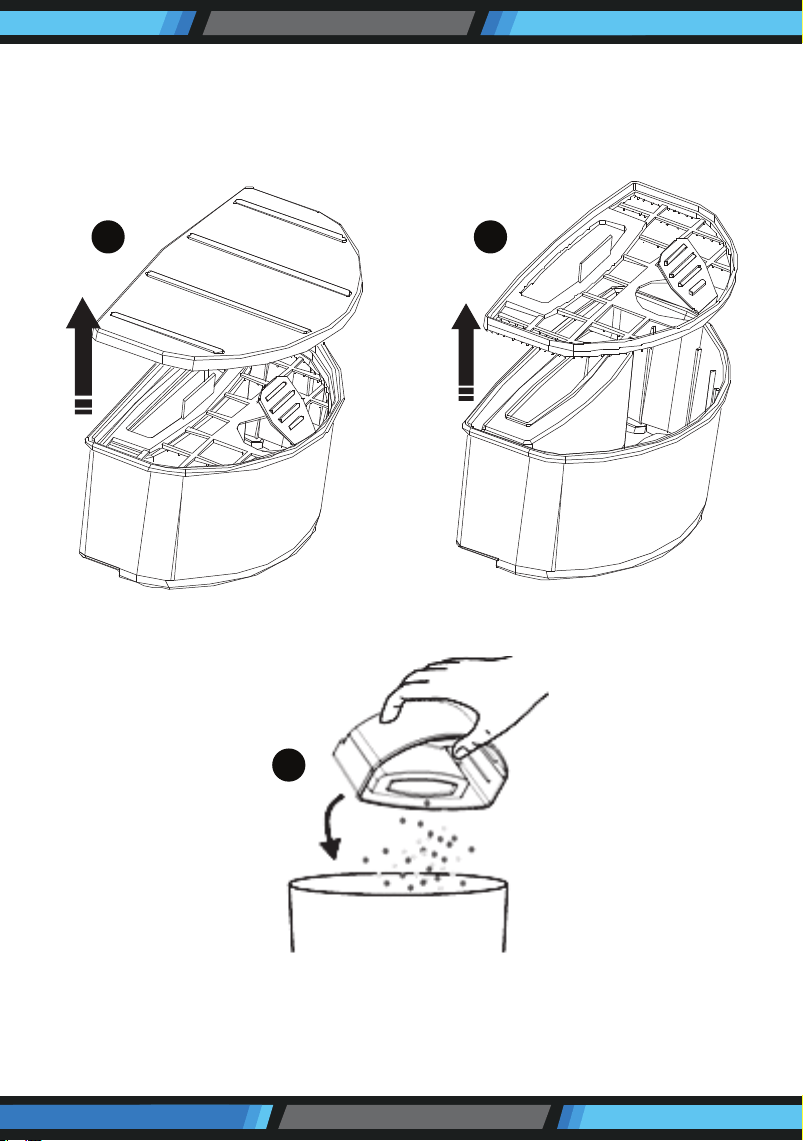
3. Open the lid of dust bin.
4. Take out the inner lter.
5. Empty the dirt in the dust bin.
3 4
5
www.PyleUSA.com
11
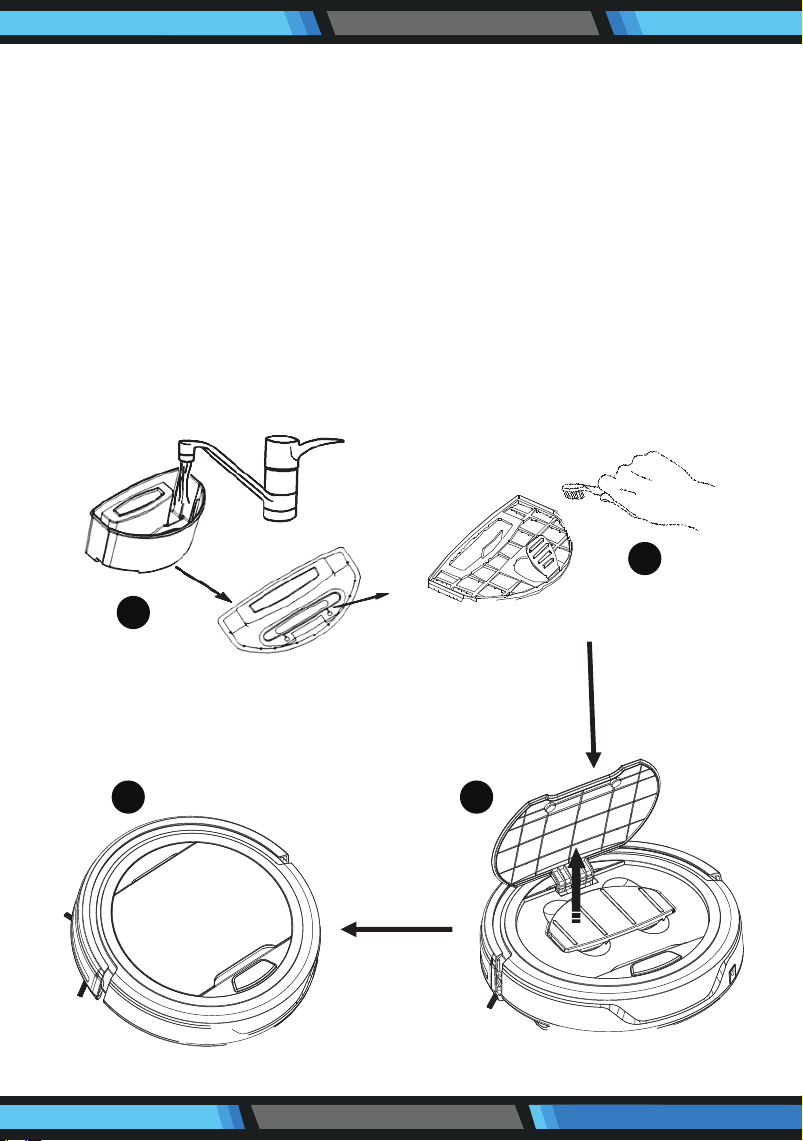
6. Rinse the dust bin with tap water. Do not wash it in washing machine, dish
washer or other machine.
7. Periodically clean the filter with a soft bristled brush.
8. Reinstall the filter and the dust bin lid
when fully dry.
9. Put the dust bin back into the vacuum.
NOTE:
Before putting back the dust bin, make sure the PE pad (function as non-return
valve) in the dust bin is well located. Recheck the lter also before operating
the product. Operating the product without lter might cause malfunction.
6
7
9 8
www.PyleUSA.com
12
Cleaning Intake
With use over time, dirt and dust may accumulate around the intake of
the product. For best cleaning results and efficiency, the intake should
be cleaned periodically.
1. Remove the external power source.
2. Clean the dirt and dust at the intake
10

www.PyleUSA.com
13
TROUBLESHOOTING
PROBLEM
POSSIBLE CAUSE SOLUTION
Red LED light stays
on after product is
powered on
Vacuum is on but
won’t collect dust
The blue LED light is
still flashing after 4
hours of charging
The side brushes are
crooked and not
sweeping well
The vacuum moves in
circles only and won't go
straight
1. Dustbin is full
2. The filter is not correctly
installed
1. The product is on dark
colored flooring
2. The anti-drop sensor
light is covered
1. The power supply may
have been cut off
during charging
2. The battery needs to be
reset
The side brush is worn from
use over time
One of the wheel
wires may be loose
1. Recharge the battery
2. Ensure that the
vacuum is on a flat
surface of the floor
1. Empty the dustbin
2. Reinstall the filter
1. Put the robot on light
colored flooring
2. Clean the anti-drop
sensor light
1. Be sure that the power
supply is fully
connected, then
recharge for 4 hours
2. Unplug the battery
from the device and
hold the power button
for 10 seconds, then
reconnect the battery.
1. Open the wheel
cover and connect the
loose wire properly
2. Send the robot to
seller for repair
The product is moving
backwards
1. The battery is low
2. The main body is
elevated from the floor
1. Pour hot water over
brushes to revert to
their original shape
2. Replace side brushes