Loading ...
Loading ...
Loading ...
-11-
REPLACEMENT PARTS:
Use only Genuine OEM replacement parts.
ASSEMBLY PROCEDURE FOR SEALS:
When repairing a tool, make sure the internal parts are clean and lubricated. Use Parker “O”-LUBE or equivalent
on all “O”-rings. Coat each “O”-ring with “O”-LUBE before assembling. Use a small amount of oil on all moving
surfaces and pivots. After reassembly add a few drops of BOSTITCH Air Tool Lubricant through the air line
fitting before testing.
AIR SUPPLY-PRESSURE AND VOLUME:
Air volume is as important as air pressure. The air volume supplied to the tool may be inadequate because of
undersize fittings and hoses, or from the effects of dirt and water in the system. Restricted air flow will prevent
the tool from receiving an adequate volume of air, even though the pressure reading is high. The results will be
slow operation, misfeeds or reduced driving power. Before evaluating tool problems for these symptoms, trace
the air supply from the tool to the supply source for restrictive connectors, swivel fittings, low points containing
water and anything else that would prevent full volume flow of air to the tool.
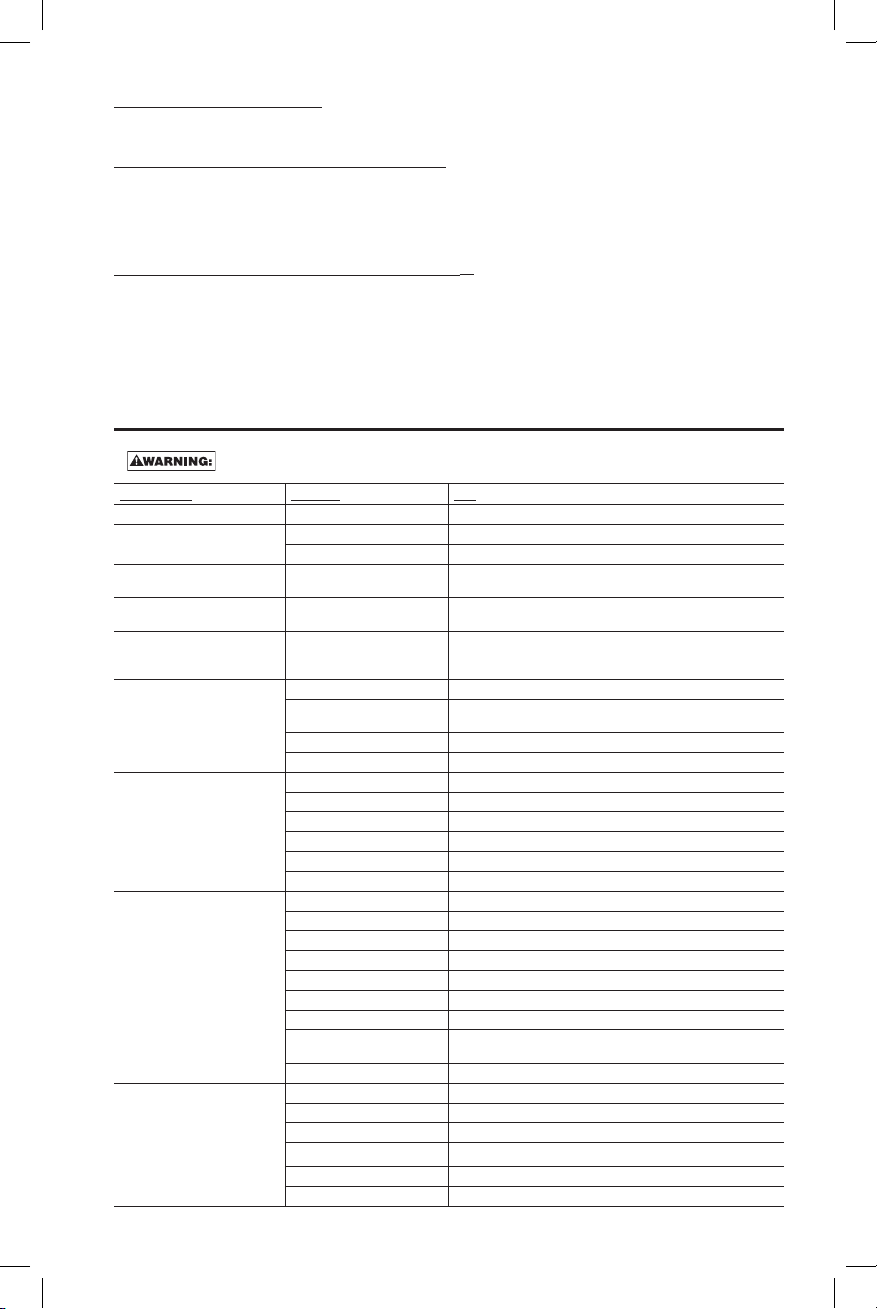
TROUBLE SHOOTING
To reduce the risk of serious personal injury, remove fasteners from magazine before
making any adjustments or servicing this tool.
SYMPTOM CAUSE FIX
Trigger valve housing leaks O-ring or valve stem failure Replace valve using Trigger Valve Kit
Top cap leaks air Loose cap screws Tighten cap screws using appropriate hex wrench
Damaged or worn gasket or o-ring Replace gasket/o-rings using Nailer O-Ring Repair Kit
Exhaust leaks Main seal or o-ring damaged,
debris in tool.
Replace gasket/o-rings using Framing Nailer O-Ring Repair Kit
Air leaks around nose when tool is
at rest. (Driver blade in up position.)
Damaged or worn o-rings Replace gasket/o-rings using Framing Nailer O-Ring Repair Kit
Air leaks around nose when tool is
in actuated position. (Driver blade in
down position.)
Damaged or worn bumper Replace bumper using: Frame Nailer Bumper Kit
Tool does not cycle in cold weather Tool not receiving air Check air supply
Valve may be frozen Warm up tool. Lubricate with BOSTITCH Pneumatic Tool Oil or winter
weight pneumatic oil containing ethylene glycol
Damaged or worn o-rings Replace gasket/o-rings using Framing Nailer O-Ring Repair Kit
Broken or damaged driver blade Replace driver blade
Lack of power; sluggish Low air pressure Check air supply
Lack of lubrication Lubricate tool using BOSTITCH pneumatic tool oil
Damaged or worn o-rings Replace gasket/o-rings using framing nailer o-ring repair kit
Exhaust port blocked or clogged Disconnect air, remove exhaust plate from top of tool, clean port
Depth adjustment set too shallowly Reset depth adjustment
Driver damaged or worn Replace driver blade
Skipping nails; intermittent feed Air restricted Check air supply and couplers
Lack of lubrication Lubricate tool using BOSTITCH pneumatic tool oil
Nosepiece screws loose Tighten nosepiece screws using appropriate hex wrench
Wrong size/angle fasteners Use only recommended fasteners
Dirty magazine Clean magazine track and nosepiece
Damaged/Worn magazine Replace magazine
Broken or damaged driver blade Replace driver blade
Trigger valve o-ring worn or
damaged
Replace valve using Trigger Valve Kit
Worn piston or feed system o-ring Replace O-ring using Framing Nailer O-Ring Repair Kit
Fasteners jam in tool Driver channel in nosepiece worn Replace nosepiece
Wrong size/ angle fasteners Use only recommended fasteners
Worn driver blade Replace driver blade
Nosepiece screws loose Tighten nosepiece screws using appropriate hex wrench
Nails not feeding properly Ensure nails are feeding properly through the magazine and into the nose
Nails not feeding properly Ensure canister platform is set to correct location for nail size being used
Loading ...
Loading ...
Loading ...