Model/Modelo:PWM6010M
Guarde éste manual para
operar y realizar mantenimiento
a esta lavadora.
LAVADORA SEMIAUTOMATICA
MANUAL DE INSTRUCCIONES
INSTRUCTION MANUAL
TWIN TUB WASHING MACHINE
This product is for domestic use only
Use & Care Manual
Important Safeguards
4
4
5
7
8
6
6
6
6
6
9
2
3
2
2
2
1
1
1
3
3
Name Of Parts
Introduction Of Control Panel
Washing Method
Rinsing Method
Spinning Method
Cabinet maintenance
Cleaning the lint filter
Operation when objects are
dropped into outside of the spin tub
Anti-freezing protection
Main Technical Parameters
Accessories
Change the position of the drain hose
Installation site
Notes
Others
Lay upper drain hose
Attention To Installation
Preparation Instructions
Weight reference of washing materials
Attention To Maintenance
CONTENTS
Laundry volume and detergent
dosage reference
Packing List
9
4
Soak Function
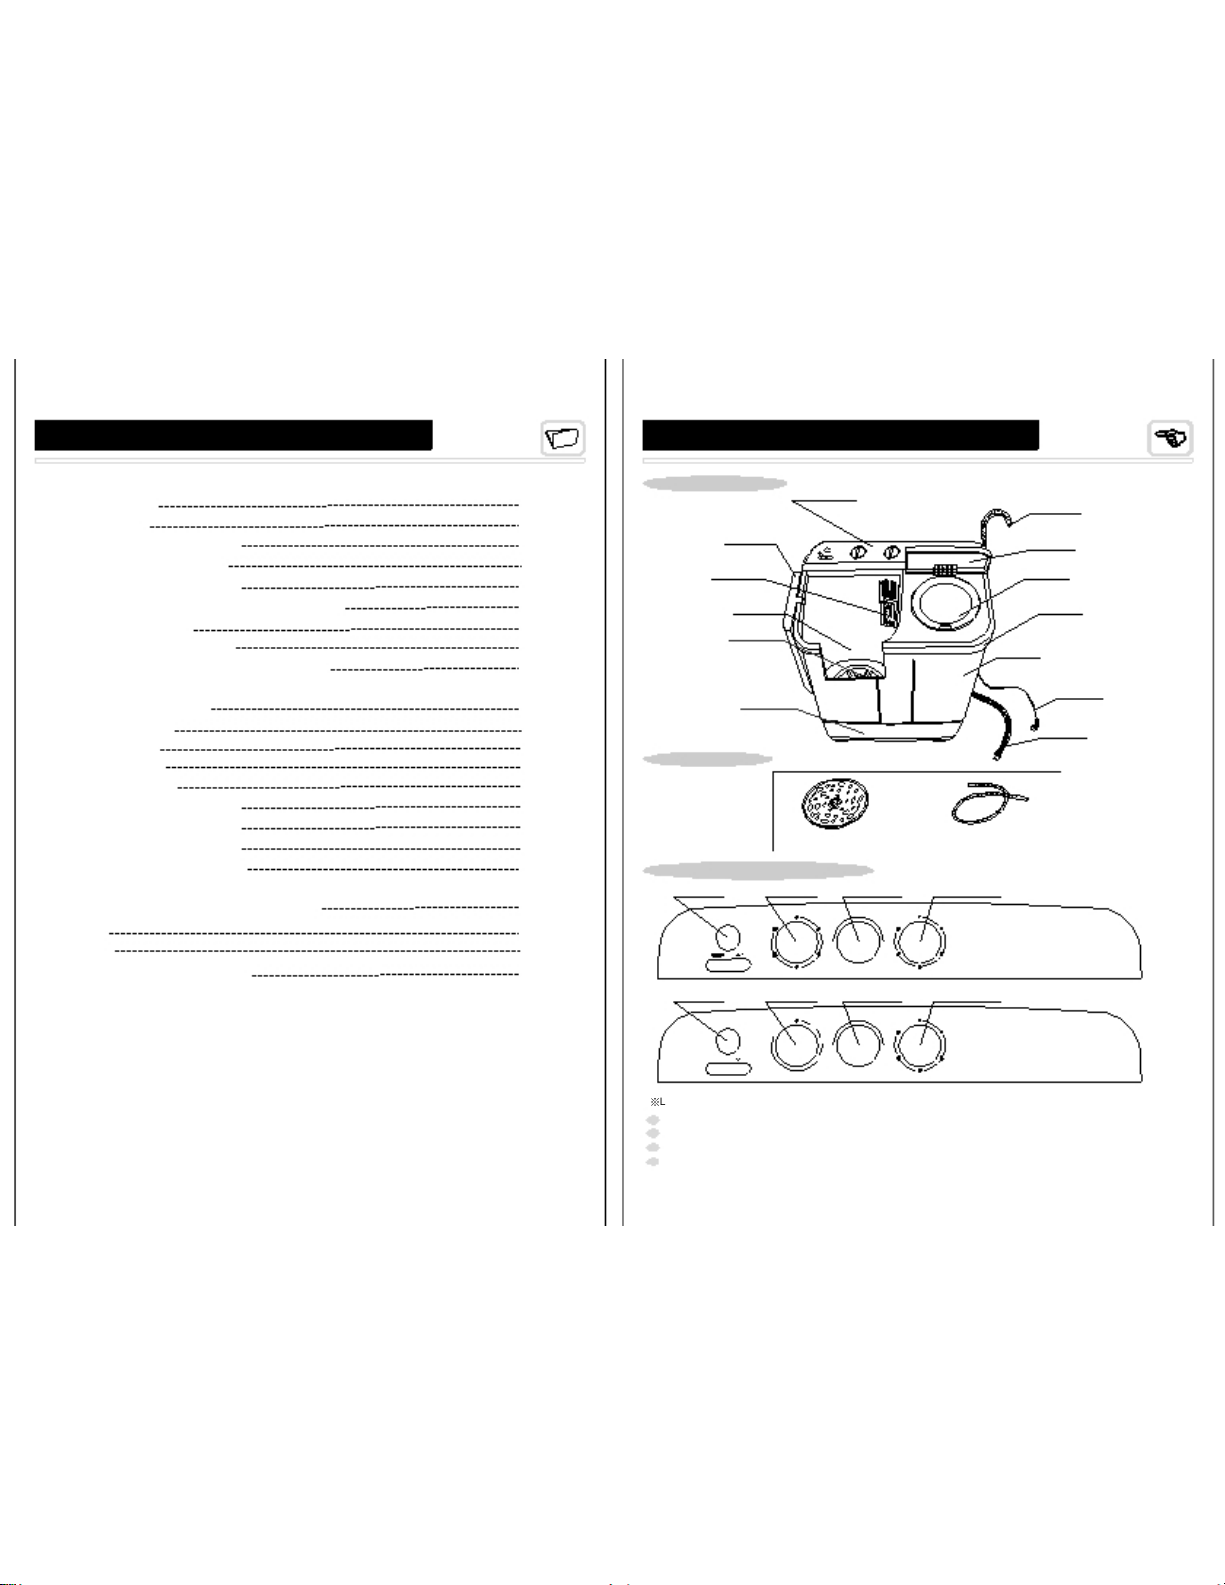
Accessories
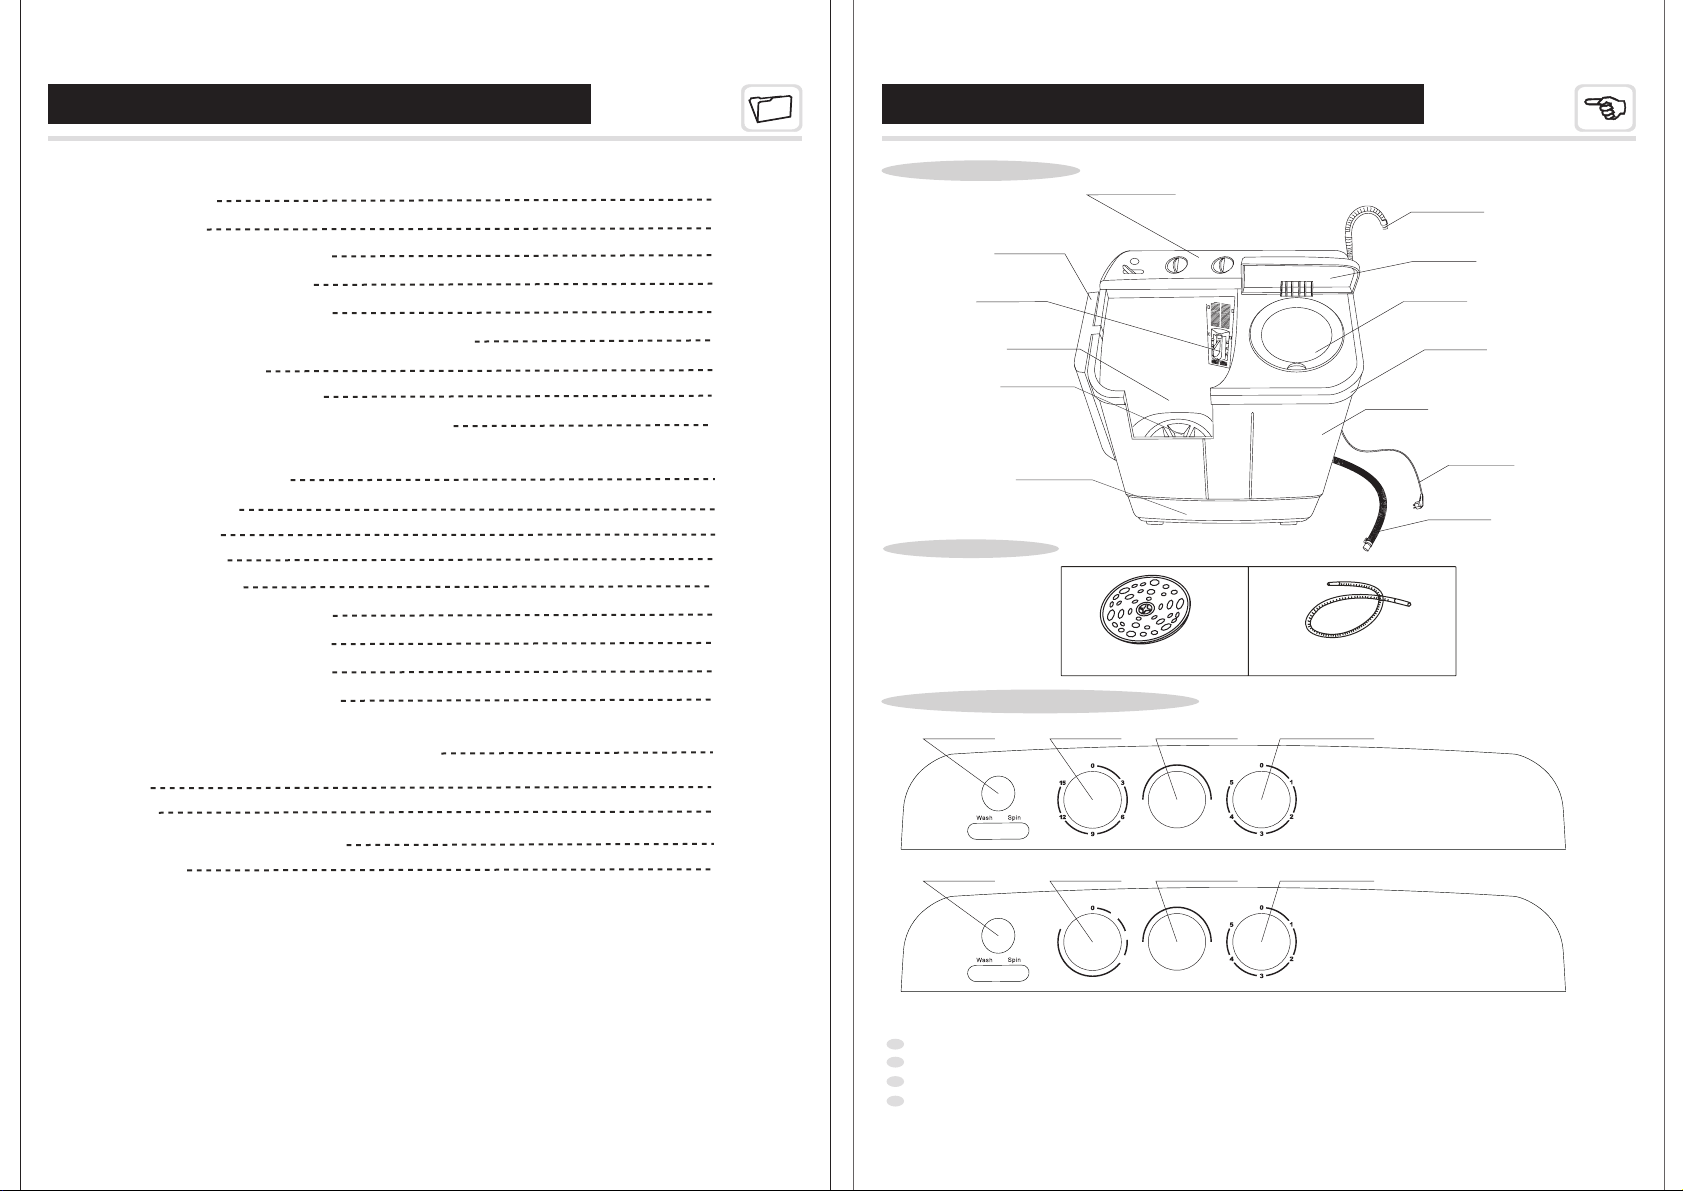
Name Of Parts
Structure Instruction
1
Inner spin cover
Water inlet hose
Introduction Of Control Panel
Water inlet: be used to inject water to wash tub or spin tub.
Wash timer: be used to select required washing time.
Spin timer: be used to select required spinning time.
Wash-Drain selector: For washing or rinsing, select “ Normal”or“ Heavy”.
For Draining ,select “Drain”.
※ he drawing above is for reference only, specific drawing is subject to actual models.T
Control panel
Wash cover
Lint filter
Pulsator
Base
Spin cover
Cabinet
Drain hose
Safety cover
Frame
(For lower drain only)
Drain hose
(For upper drain only)
wash tub
Power plug
Water inlet
Wash timer
Wash selector -Drain
Spin timer
Heavy
Drain
Normal
Wash-Drain Selector
Wash timer
Spin timer
Water inlet
Wash timer
Wash selector -Drain
Spin timer
Heavy
Drain
Normal
Wash-Drain Selector
Wash timer
Spin timer
Soak
35
15
10
5
2
3
Attention To Installation
Lay upper drain hose
FOR UPPER DRAIN SYSTEM ONLY
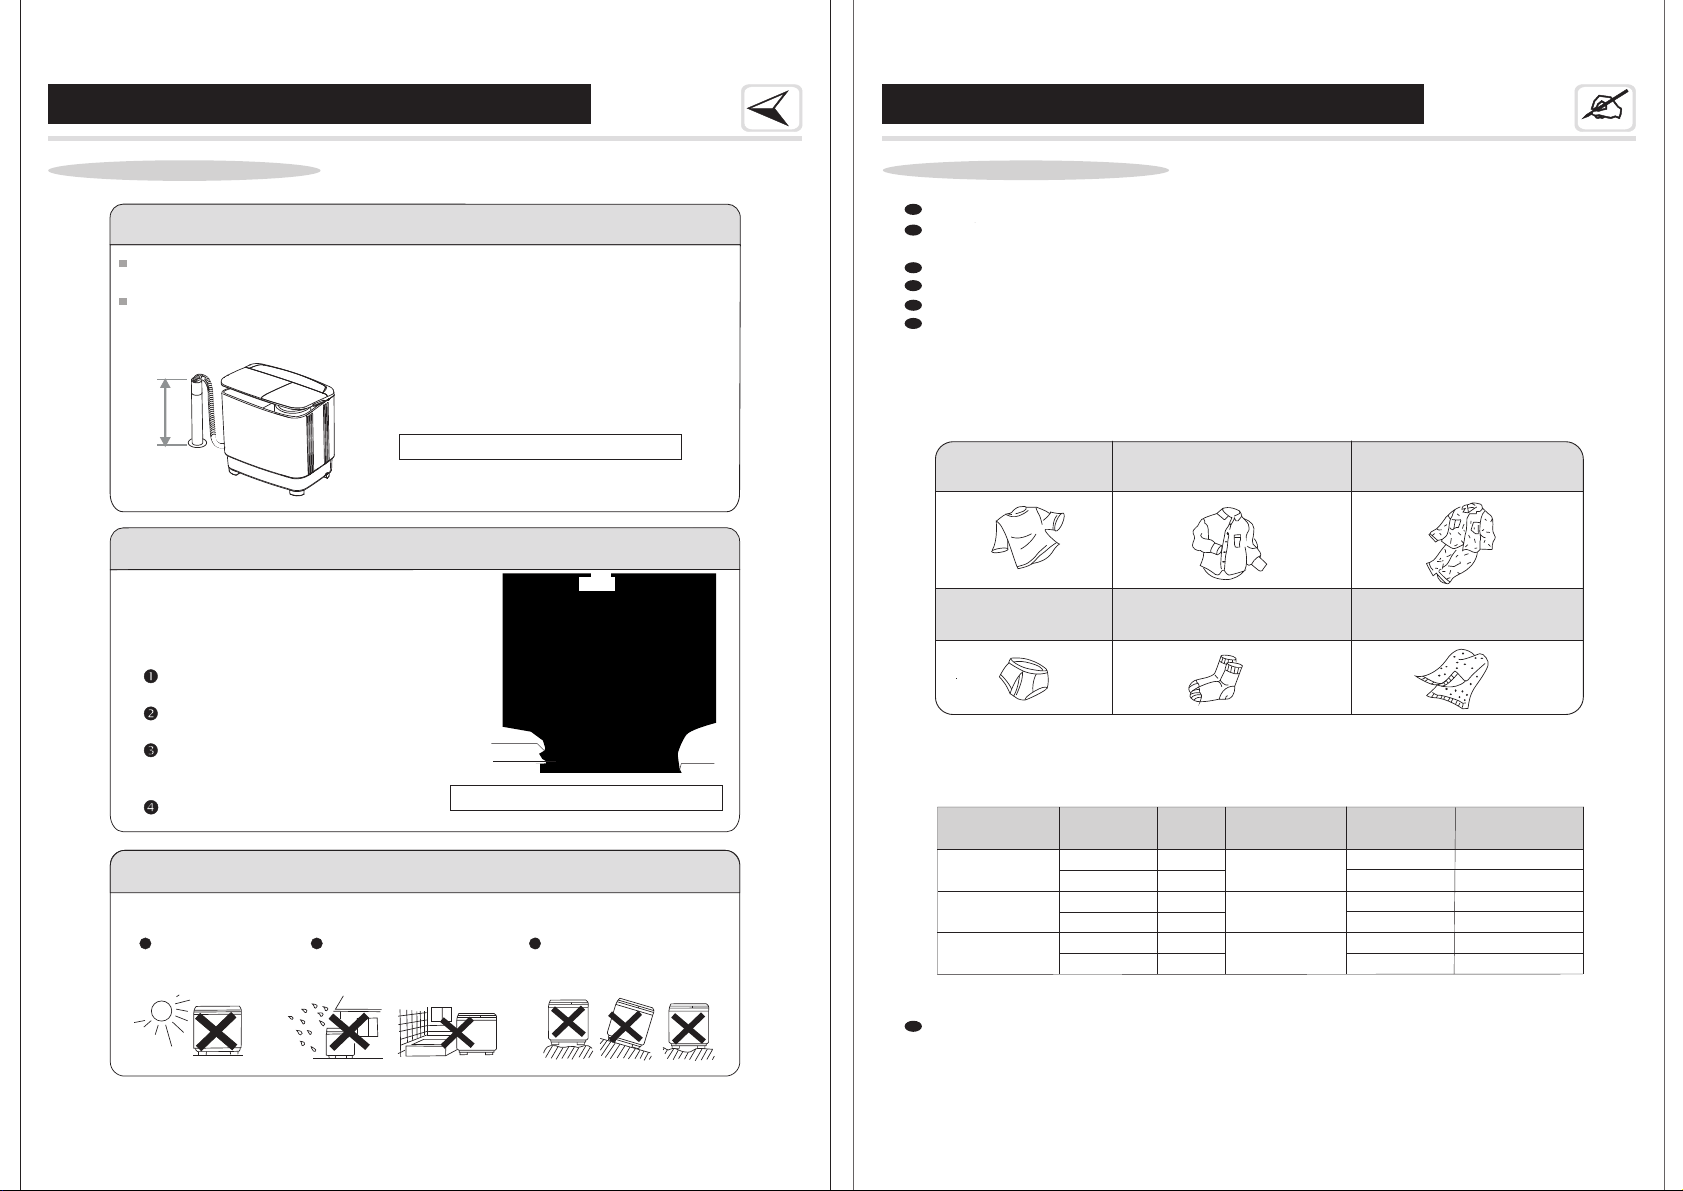
Needs a drain hose with minimum diameter 3 cm, and minimum carry away capacity of
40 liters per minute.
For upper drain system, the drain hose must be placed at least 86 cm(30 inches) from the
bottom of washer , but not higher than 100 cm.
of
86cm<H<100cm
Installation site
Change the position of the drain hose
FOR LOWER DRAIN SYSTEM ONLY
Front
Drain hose
Buckle
Blanket
Plug in power and connect the water inlet hose.
Lay down the lower drain hose and connect it to the sewer , or lay the upper drain hose to places as indicated
in page .
Check that there are no objects such as coins, hairpins, mud or sand in the pocket.
Strings should be knotted in advance to prevent entanglement.
Clothes can be classified for washing according to the texture, dirty
For small pieces (e.g., stockings) or fluffy clothes, put them into
2
degree and color.
a nylon net for washing.
T-shirt (cotton)
about 150 g
Shirt (blended)
about 200 g
Slipover (cotton)
about 500 g
Panties (cotton)
about 50 g
Socks (blended)
about 50 g
Scarf (cotton)
about 300 g
Preparation Instructions
Installation
Usage method
The dosage of washing detergent varies according to dirty degree and texture of laundries.
hose is located the spin side . According to the
installation site, the drain hose can also be installed
at the wash side of the machine . The method is
as follows:
The ex-factory installation position of the drain
at
Unplug the power cord and empty
water in the drain hose completely.
Spread a piece of soft cloth on the floor (e.g. a blanket)
and place the washing machine on it gently.
Take the drain hose out from the buckle
at the spin side, and put it into the buckle
at the wash side.
Hang up the drain hose kit.
in the following places:
In order to avoid electrical failure, discoloration and deformation, do not install the machine
Locations exposed to rain
or snow
Locations exposed
to direct sunlight
Locations with uneven
or unstable ground
Attachment :Laundry volume and detergent dosage reference
Attachment: Weight reference of washing materials
Fabric type
Cotton or linen
Laundry
capacity(kg)
Low
Synthetics,silk,
Delicate fabrics
High
Water flow
Normal
Heavy
Normal
Mid
Wash time
(minutes)
About 34
Detergent
amount(g)
About 44
About 44
About 54
About 44
About 54
High
Mid
Mid
Heavy soils
Water
level
0-2.5
2.5-3.5
0-3.5
3.5-6.0
3.5-6.0
0-3.5
3
3-5
7
7-10
10-35(soak 20)
10
4
5
Spinning Method
Inner
spin cover
Spin tub
Correct
Incorrect
Spin
cover
Safety
cover
Washing materials
Wire
Light clothes
(fiber/blended)
Knitwear (fiber)
Underwear
(cotton)
Slipover
(cotton/linen)
Toweling coverlet
(cotton)
About 50
seconds
About 1
minute
About 1~2
minutes
About 2~3
minutes
About 3~4
minutes
About 5
minutes
Usage method
Usage method
Washing Method
Rinsing Method
A. Spraying rinse (rinse in the spin tub)
Put the laundry into the spin tub after washing.
Turn on the water tap, choose to fill water into the spin tub for 3-4 minutes, and then turn off the water tap.
The above steps can be repeated.
Set the spin timer for 2-5 minutes for rinsing.
Note: If there is red rust in water, do not choose spraying rinse, for the rust is easy to adhere to laundries.
Ensure that do not fill water into spin tub when spinning.
To save time, water and energy, can do pre-spinning before rinsing.
1 to 5 minutes.
Put laundries which have already been dehydrated intothe wash tub.
After filling water to the desired level, turn off the water tap to save water.
Turn the “Wash-Drain selector” knob to the "Normal” or “Heavy”.
Set the “wash timer”to thedesired time (about 3-5 minutes)for rinsing.
After rinsing, put the washing materials into the spin tub to spin for
Drain out the rinsing water in the wash tub.
The above steps can be repeated.
Water level indicator
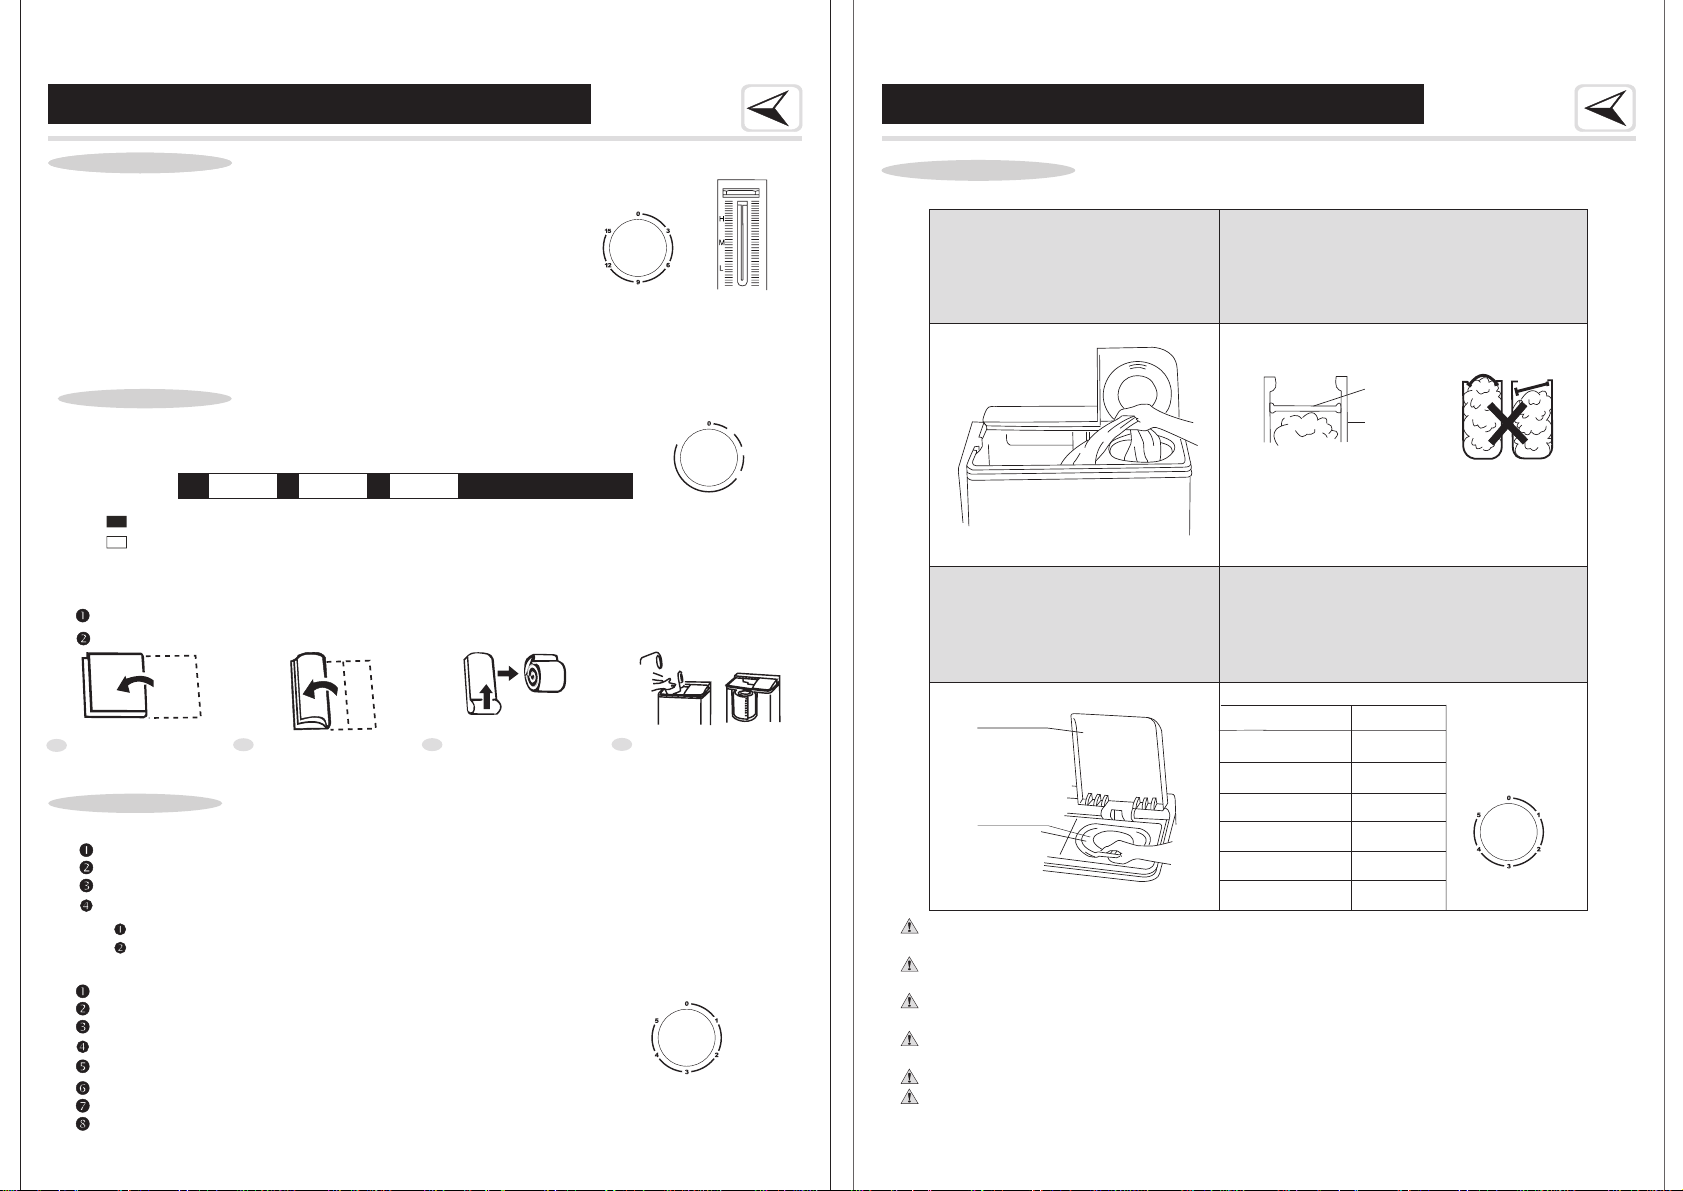
Fold in half along
the long edge
1/3 fold in the
same direction
Roll up the blanket
Put into the tub with
blanket edge facing down
Dilute detergent with water (below 50℃), then pour the solution into
Fold the blanket as shown in the figure, and into the wash tub.
adequate the wash tub.
put it
This machine can wash blended blanket (less than 3kg) marked with the "hand washing" label.
Washing method is as follows:
water to the wash tub
2.
1. Insert the inlet hose into the , and choose injectingwater water inlet mouth
.
Put the laundry into the wash tub, and add detergent into it.
When fill water to half of the desired water level, turn off the
water tap and let laundries soak in the solution for minutes,
then fill water to desired water level.
(For machines having soak function only )
Wash timer
Soak
35
15
10
5
Wash timer
Spin timer
Spin timer
1.Shake out the laundry and put
them into the spin tub.
2.Put the inner spin cover on .
Confirm the inner spin cover is placed
horizontally.
the laundry
3.Close the safety cover and the
spin cover.
4.Refer to the following table to select
spinning time.
Spin time
3. Set wash program “Normal” or “Heavy” as per amount and
texture of laundries.
4. Turn the wash timer knob to set wash time.
5. After washing, set the wash drain selector to “Drain” position for draining.
Work time
about 5 about 5 about 5
Total: 35 (mins)
about 1.5
about 1.5
about 2
Static time
Soak Function
For seriously stained clothes, Soak wash is useful to achieve better wash result.
15-35 minutes of the wash timer is for soak wash:(illustrate as follows)
6. Buzzer will alarm the completion of washing.(For machines having buzzer function only)
B. Common rinse (rinse in the wash tub)
35
15
(unit: )mins
The appliance can not be used by children or persons with reduced physical, sensory or mental capabilities, or
lack of experience and knowledge, unless they have been given supervision or instruction.
Please do not use other water inlet hoses, except for the water inlet hoses that are supplied as the accessories.
If need to replace the hose, please buy it from the local service center.
Please stop injecting water at the time of transfering water injection valve.(To avoid the water inlet hose washed
away by the supplied water, because the pressure of the water supply is very high).
the washing machine
is placed on a flat and stable floor ,and then adjust washing materials, distribute them evenly.
To do spinning and draining together, please spin for 1 minute before draining.
Do not wash or spin waterproof clothes or clothes that float easily to avoid abnormal vibration or damage to the
clothes.
If strong vibration occurs in time of spinning, open the spin cover immediately. Make sure that
控制面板图案
7
6
控制面板图案
After you use the washing machine, never forget to do the following two things:
Attention To Maintenance
Cabinet
Frame
Others
Maintenance
Cabinet maintenance
Cleaning the lint filter
After using the washing machine , wipe
the moisture and stain on it with a
piece of soft cloth. To avoid damage
to the surface , do not use corrosive or
volatile chemicals.
Anti-freezing protection
To prevent from freezing:
If the water is frozen, please take the following steps:
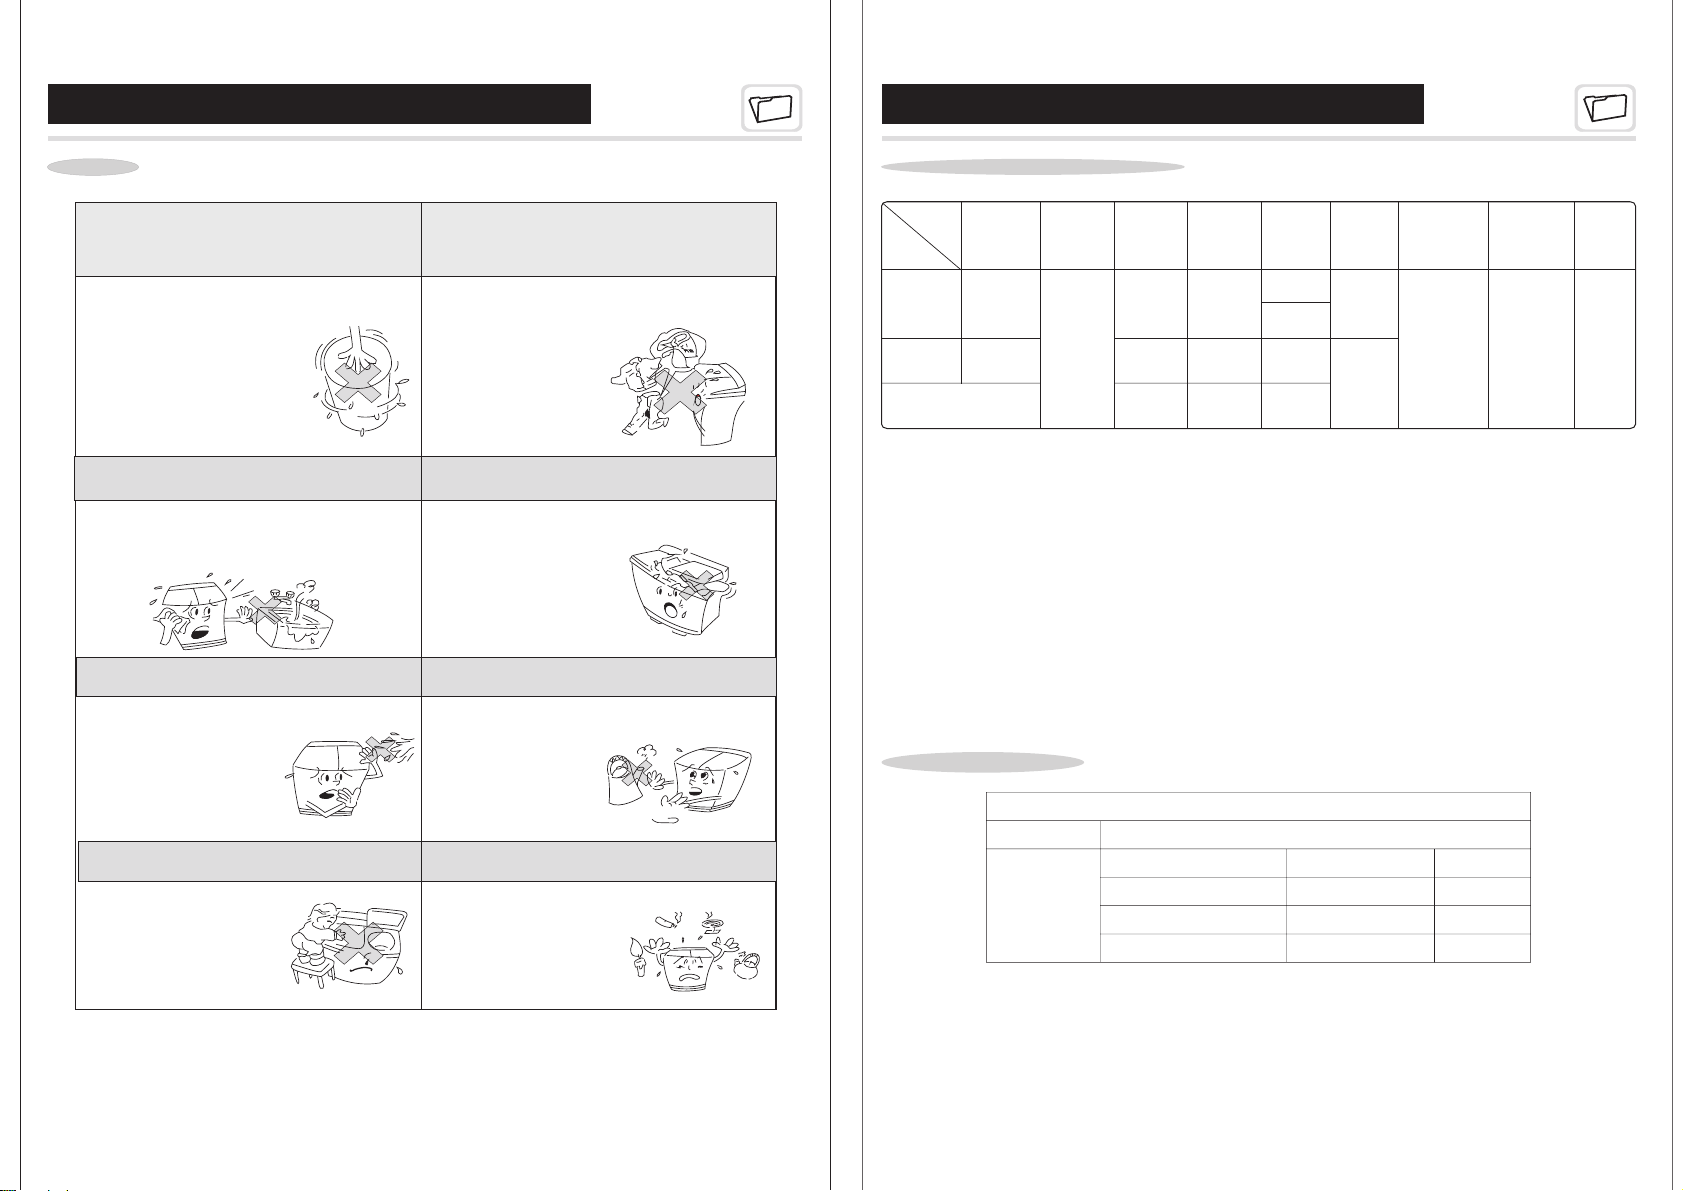
Notes
Symptom
Reason
The washing machine employs alternative current with rated voltage and frequency . When voltage fluctuates
between -10% and 10% of the rated voltage, the machine can work normally.
Connection mode of the power cord of this machine is Y-shaped connection. Users
or reconnect the wire by themselves. please contact the designated service center.
should not detach
If this part needs to be repaired,
Button head
1.Press the button head, and
pull the lint filter out.
Turn the filter net inside out, and rinse it
in water.
After inserting the claw, press the button
to insert it into place.
A sound of “ba” means proper installation.
Claw
hose completely.
Lay the drain hose and turn the drain selector knob to the "Drain”position to
empty the water in the tub.
Turn off the water tap, remove the water inlet hose and empty water in the water inlet
Keep about 2 liters of warm water below 50℃ in the wash tub for
about 10 minutes. and then lay the drain hose and turn the
wash drain selector knob to the "Drain”position to empty the water .
Fit the water inlet hose and turn on the water tap to
confirm water filling and draining work properly.
Put the water inlet hose into warm water of about 50℃.
Operation when objects are
dropped into the outside of the spin tub
Remove all screws on the frame with a screw driver.
Pull up the frame with both hands and turn it backwards.
Take out the clothes dropped into the outside of the spin tub.
Press the frame to reset and tighten screws.
2. Remove the water inlet hose.
1. Disconnect the power plug.
Be sure to use plug that is properly grounded.
The maximum gradient of the supporting surface for the washing machine should not exceed 2º.
Do not tear down electrical wires and components in the machine by yourself.
There are holes on the base for ventilation. These holes should not be blocked by foreign objects (carpets, etc.).
Never connect the grounding wire with the live wire, or it may lead to an electric shock.
If the power cord is damaged, it must be replaced by a qualified person to avoid a hazard.
After using, be sure to unplug the power plug.
If the following symptoms occur, please disconnect the power plug and perform the following
checks:
Check that the power supply is in good condition.
Check that the power plug is inserted properly.
Check that the wash timer knob or the spin timer knob is not
in the "0" position.
Check that the drain hose is not laid too high.
Check that the drain hose is not frozen.
Check that the drain hose is not blocked by foreign matter.
Check that there are no coins or any other foreign
objects dropped into the wash tub.
Check that the washing machine is placed on flat, stable floor.
Check that clothes are evenly distributed in the spin tub.
Check that there are no washing materials or foaming debris
dropped into the outside of the spin tub.
The washing
machine does
not work.
The drain hose
does not work.
There is abnormal
noise during washing.
There is abnormal
noise and violent
vibration during
spinning.
0thers
8
9
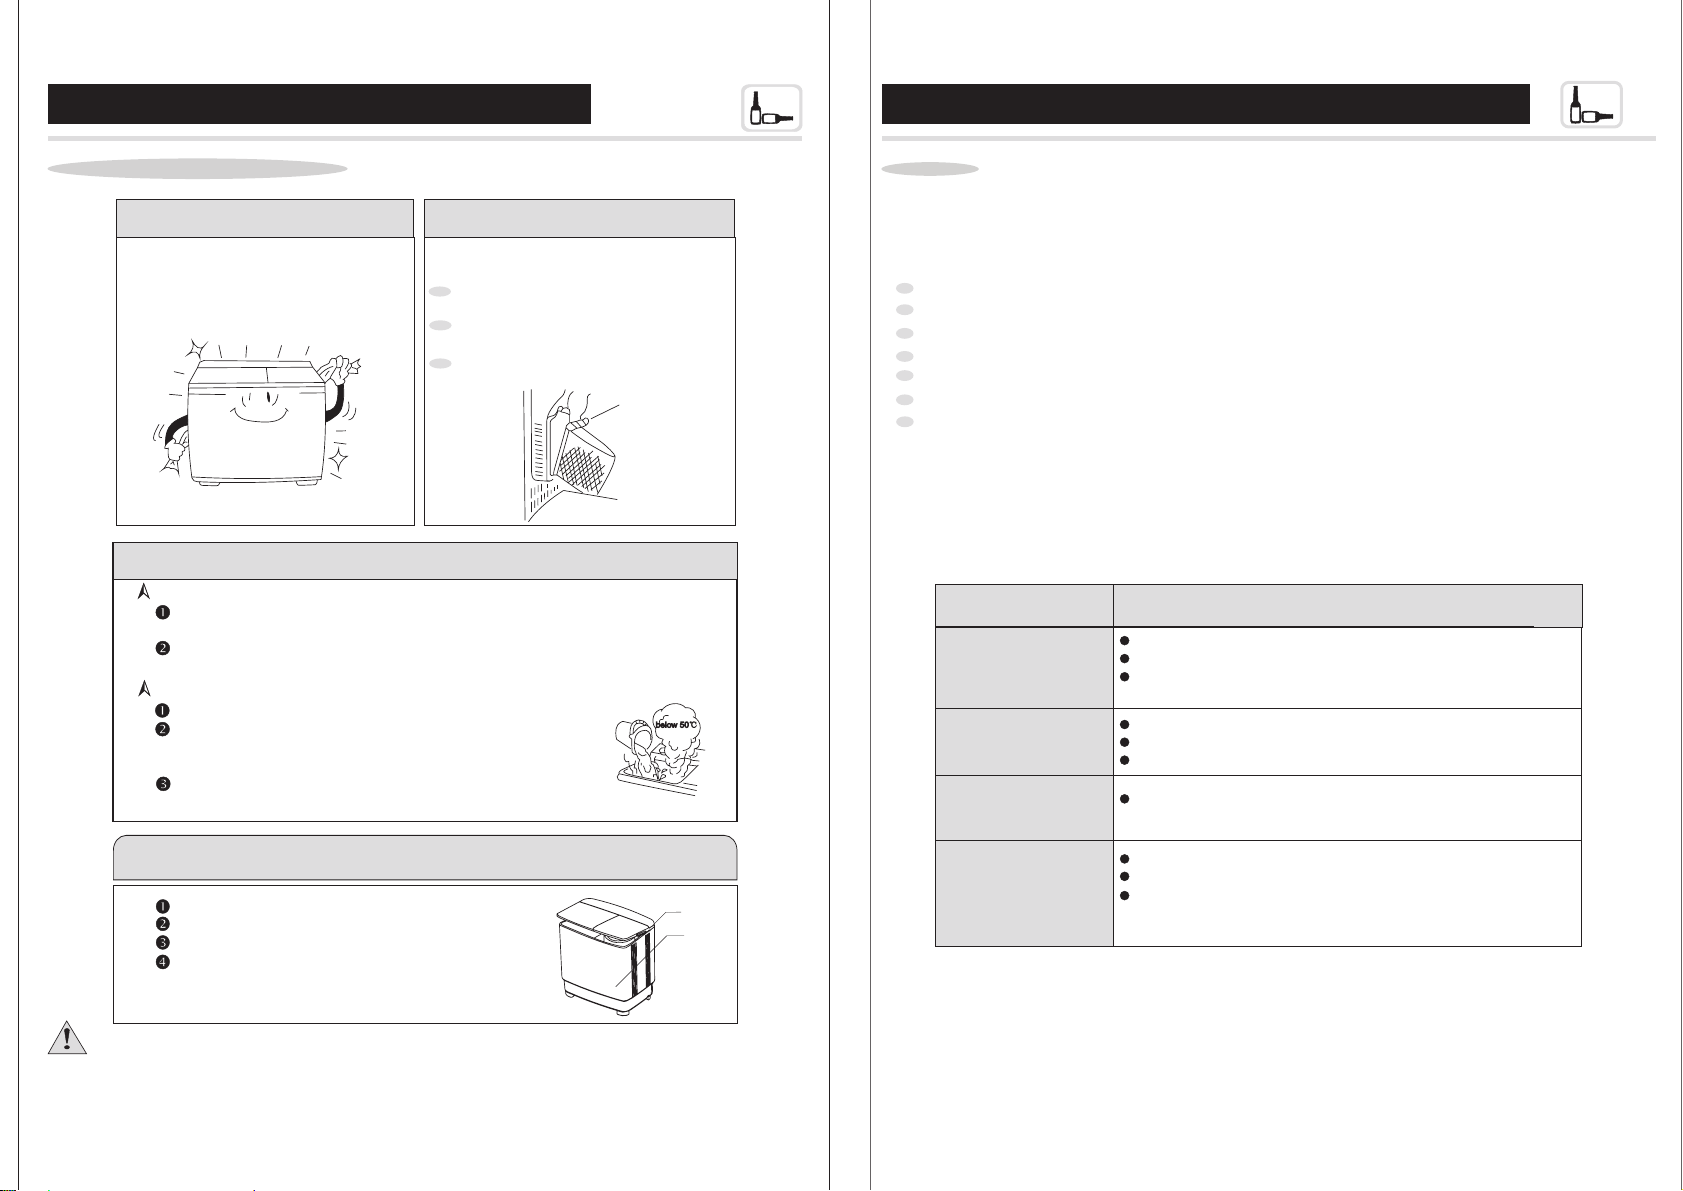
Be sure to comply with all the notes above.
Notes for scrubbing
Do not use warm water above 50℃
Do not let children play near the tub
Keep away from fire or heat source
Others
Keep the washing machine away from
fire or heat source such as heater,
cigarette, etc. to avoid fire
accident or plastic
deformation.
If the spin cover is opened in time of
spinning ,the washing machine
will arrest at once , which will
shorten its service life . So avoid
opening the spin cover during
spinning.Furthermore , do not
put hands into the wash tub
while the machine running,
for it is very dangerous.
Do not open the spin cover
in time of spinning
Which can not be washed
Do not wash clothes that
are stained with paint,
petrol or other volatile or
flammable substance.
Avoid dampness
Do not put the washing machine in extreme
damp place, for dampness may weaken
insulation of the machine, which may lead to
electric shocks or faults.
Do not forget to close
the inner spin cover
If laundries in the
spin tub are tossed out,
they are easily damaged.
In order to avoid damaging
electrical components , do
not scrub operation parts
of control panel with water.
This will prevent plastic
deformation and aging.
Main Technical Parameters
Parameters
for children falling into
the tubs.
It's very dangerous
PACKING LIST
Packing list
Quantity
Name
Quantity
1 Set of washing machine
Accessories
Water inlet hose
Instruction manual
1
1
1
Note
Inner spin cover
125W
320W
110V
60Hz
Parameter
Function
Wash
Spin
3.6kg
Input Power
(upper drain)
Input Power
(lower drain)
Pump
125W
320W
30W
Power
Supply
Capacity
(dry Clothes)
/
5 min.
Water
volume
Maximum
Time
/
/
6.0 kg
Maximum water
pressure permitted
in the water inlet
0.6Mpa
15 min.
3
(soak wash)
5 min.
H: 54L
M: 44L
L: 34L
Overall dimension
(L X W X H)
Net weight
735x430x845
(mm)
17.5kg
CONTENIDO Estructura de la lavadora
Nombre de las partes
Panel de contro
l
Nombre de las partes
Accesorios
Introducción al panel de control
Atención al instalar
Recostar la manguera de drenaje superior
Cambiar la manguera de posición
Lugar de instalación
Instrucciones de preparación
Referencia de peso de materiales a lavar
Volumen de ropas y dosificación
de detergente
Método de lavado
Función de remojo
Método de enjuague
Método de centrifugado
Mantenimiento
Mantenimiento del gabinete
Limpieza del filtro de pelusas
Protección contra congelamiento
Operación cuando se arrojan objetos por
fuera de la tina de centrifugado
Notas
Otros
Parámetros técnicos
Lista de empaque
1
1
1
2
2
2
2
3
3
Manguera de drenaje
(Drenaje superior solamente)
Tapa
Tapa
Filtro de pelus
as
Cubierta de seguridad
Tina de
lavado
Eje
Marco
Gabinete
Enchufe
3
4
4
4
5
6
6
6
6
Base
Manguera de drenaje
(Drenaje inferior
solamente)
Accesorio
s
Cubierta interior de centrifugado
Introducción al panel de control
Entrada de agua Tiempo de avado Selector de ciclo
Normal
Tiempo
de
lavado
Manguera de entrada de agua
Tiempo de centrifugado
Tiempo
de
centrifugado
6
7
8
9
9
Fuerte
Drenar
Selector de ciclo
Entrada de agua Tiempo de lavado
Tiempo
de
lavado
35
5
Selector de ciclo
Normal
Tiempo de centrifugado
Tiempo
de
centrifugado
10
Fuerte
Drena
r
Enjuague
15
Selector de ciclo
※
La imagen superior es para referencia únicamente. El panel puede ser diferente en cada modelo
Entrada de agua: se usa para agregar agua a la tina de lavado o centrifugado
Tiempo de lavado: se usa para escoger el tiempo de lavado
Tiempo de centrifugado: se usa para escoger el tiempo de centrifugado
Selector de ciclo: Para lavado o enjuagado, se selecciona “normal” o “fuerte”
Para centrifugado se selecciona “centrifugado”
1

Instalación
Atención al instalar
Recostar la manguera de drenaje superior
Se necesita una manguera de un diámetro mínimo de 3 centímetros y una capacidad de 40 litros por
minuto.
Para el sistema de drenaje superior, la manguera se debe poner a por lo menos 86 centímetros (30
pulgadas) de la parte inferior de la lavadora pero no más alto que 100 centímetros.
Método de uso
Instrucciones de preparación
Conecte el cable de electricidad y la manguera de entrada de agua.
Recueste la manguera inferior de drenaje y conecte al desagüe o recueste la manguera de drenaje superior como se indica en
la página 2.
Revise que no haya objetos como monedas, ganchos de cabello, lodo o arena en los bolsillos.
Las cuerdas se deben atar previamente para evitar enredos.
Las ropas se pueden clasificar dependiendo de su textura, grado de suciedad y color.
Piezas pequeñas (como medias de nylon) o ropas peludas, se pueden meter en una red de nylon para lavarlas.
Adjunto: Referencia de peso de los materiales a lavar
DRENAJE SUPERIOR UNICAMENTE
Franela
aprox 150 g
Camisa
aprox 200 g
Piyama
aprox 500 g
Cambiar la manguera de posición
La posición de la manguera al salir de fábrica es al lado de
centrifugado. Dependiendo de la instalación la manguera se puede
instalar del lado de lavado también. El método es el siguiente:
Desconecte el cable de corriente y vacíe el agua de la manguera
completamente.
Extienda un paño suave sobre el piso (ejemplo: cobija)
y ponga la lavadora sobre el suavemente.
Retire la manguera del gancho del lado de
centrifugado e instale el gancho en el lado de
lavado.
Cuelgue nuevamente la manguera.
Manguera
Gancho
Frente
Ropa interior
aprox 50 g
Calcetines
aprox 50 g
Bufanda
aprox 300 g
Adjunto: Volumen de ropas y dosificación de detergente
Cobija
DRENAJE INFERIOR SOLAMENTE
Lugar de instalación
Para prevenir daños eléctricos, decoloración o deformación, no instale la lavadora en los siguientes
sitios:
Lugares expuestos a
luz solar directa
Lugares expuestos a lluvia o
nieve
Lugares con superficies
inestables o disparejas
Tipo de tela
Sintética, seda
Telas delicadas
Algodón o lino
Ropa muy sucia
Capacidad de
lavado (kgs)
0-2.5
2.5-3.5
0-3.5
3.5-6.0
0-3.5
3.5-6.0
Nivel
agua
Bajo
Medio
Medio
Alto
Medio
Alto
Flujo de agua
Normal
Normal
Fuerte
Tiempo de
lavado (min)
3
3-5
7
7-10
10
10-35(remojo
20)
Cantidad
detergente (gr)
Alrededor de 34
Alrededor de 44
Alrededor de 44
Alrededor de 54
Alrededor de 44
Alrededor de 54
La dosificación de detergente varía de acuerdo a la suciedad y textura de las ropas.
2
3
86cm<H<
100cm

Método de uso
Método de lavado
1. Inserte la manguera de entrada de agua a la entrada en la lavadora y escoja agregar
agua a la tina de lavado.
2. Ponga las ropas en la tina de lavado y agregue detergente a ella. .
Llene agua hasta la mitad de la cantidad deseada de agua, cierre el grifo de agua y
deje que las ropas se remojen en la solución por varios minutos,
luego llene con agua hasta el nivel deseado.
3. Seleccione el programa de lavado “normal” o “fuerte” dependiendo de la cantidad y
textura de las ropas.
4. Gire el botón del tiempo de tiempo a la cantidad de tiempo deseada.
5. Después del lavado, gire el selector de ciclo a la posición de drenaje para drenar.
Método de uso
Método de centrifugado
Tiempo
de
lavado
1. Sacuda las ropas y póngalas en
la tina de centrifugado.
2. Ponga la cubierta interior de centrifugado
sobre la ropa. Revise que la cubierta este
puesta horizontalmente.
Indicador de nivel de
agua
6. Sonará una alarma al completar el ciclo de lavado (para lavadoras con alarma únicamente)
Función de remojo
(Para máquinas con función de remojo únicamente)
Cubierta interior de
centrifugado
Tina de
centrifugado
Para ropas muy manchadas, es muy útil remojarlas para alcanzar mejores resultados en el
lavado. Hay un tiempo de 15-35 minutos para el ciclo de remojo únicamente.
35
15
Total: 35 (mins)
aprox 2
Tiempo de trabajo
Tiempo de espera
aprox
5
aprox
5
aprox1.5
aprox
5
aprox 1.5
Tiempo
de
lavado
3
5
5
10
Soak
15
(unidad
minutos
)
Correcto
Incorrecto
Esta lavadora puede lavar cobijas (menos de 3 kilos) marcadas con etiqueta de “lavado a mano”.
El método de lavado es el siguiente:
Diluya el detergente con suficiente agua (menos de 50
℃
), y agregue la solución a la lavadora.
Doble la cobija como se muestra en la lavadora y agregue a la lavadora.
3. Cierre la tapa de seguridad y la
tapa de la tina de centrifugado.
4. Refiérase a la siguiente tabla para
seleccionar el tiempo de centrifugado
Tapa de
centrifugado
Doble por el lado
más largo
Método de enjuague
Doble 1/3 en la
misma dirección
Enrolle la cobija
Ponga la cobija en la tina
con
el extremo hacia abajo
Tapa de
seguridad
A. Enjuague con rocío (enjuague en la tina de centrifugado)
Ponga las ropas en la tina de centrifugado después de lavarlas.
Abra el grifo de agua y agregue agua a la tina de centrifugado por 3-4 minutos y luego cierre el grifo.
Programe el tiempo de centrifugado de 2 a 5 minutos para enjuagar.
Puede repetir los pasos mencionados arriba.
Nota: Si hay oxido rojo en el agua, no escoja el enjuague con rocío pues el oxido se puede adherir a las ropas.
Asegúrese de no agregar agua a la tina de centrifugado mientras está dando vueltas.
B. Enjuague normal (enjuague en la tina de lavado)
Para ahorrar tiempo, energía y agua, puede hacer un ciclo de centrifugado previo antes de enjuagar.
Spin timer
Ponga las ropas que se han centrifugado en la tina de lavado.
Después de llenar con agua hasta el nivel deseado, cierre el grifo de agua.
Gire el selector de ciclo "Normal" o "Fuerte".
Seleccione el tiempo deseado girando el tiempo de lavado (3-5 minutos) para enjuague.
Después de enjuagar, ponga las ropas en la tina de centrifugado de 1 a 5 minutos.
Drene el agua de la tina de lavado.
Puede repetir los pasos varias veces.
4
Materiales lavados
Alambre
Ropas ligeras
(fibra/mezclados
)
Tejidos (fibra)
Ropa interior
(algodón)
Piyama
(algodón/lino)
Toallas
(algodón)
Tiempo
Aprox 50
segundos
Aprox 1
minuto
Aprox 1
~
2
minutos
Aprox 2
~
3
minutos
Aprox 3
~
4
minutos
Aprox 5
minutos
Tiempo
de
centrifugado
El aparato no puede ser usado por niños o personas con capacidades físicas, sensoriales o mentales reducidas o con falta de
experiencia y conocimiento a no ser que se les de instrucciones o supervisión.
No use otras mangueras de agua excepto la manguera de entrada que se le suple como accesorio.
Si necesita reemplazar la manguera, contacte al centro de servicios local.
Deje de agregar agua en el momento que va a transferir la manguera de una tina a otra pues la presión del agua es alta.
Si ocurre una vibración fuerte al escurrir, abra la tapa inmediatamente. Asegúrese que la lavadora esta en un piso plano y estable,
luego reajuste las ropas y distribúyalas regularmente.
Para escurrir y drenar al mismo tiempo, por favor escurra un minuto antes de drenar
No lave o escurra ropas a prueba de agua que puedan flotar fácilmente para evitar vibraciones anormales o daños a las ropas.
5

Mantenimiento
Atención durante el mantenimiento
Mantenimiento del gabinete
Después de usar la lavadora, limpie la humedad
o manchas con un paño suave. Para evitar
daños a la superficie, no use químicos volátiles
o corrosivos
Otros
Notas
La lavadora usa corriente alterna con el voltaje y frecuencia marcados. Cuando el voltaje fluctúa entre -10% y 10% del voltaje marcado,
la lavadora puede operar normalmente.
El conector del cable de corriente es en forma de Y. Los usuarios no deben soltar o reconectar el cable por sí mismos. Si esta parte
necesita ser reparada, contacte el centro de servicios designado.
Después de usar, desconecte el cable de corriente.
Asegúrese que el enchufe tenga conexión a tierra.
El gradiente máximo de la superficie de soporte de la lavadora no puede exceder 2
º
.
No desbarate los cables eléctricos ni componentes de la maquina por usted mismo.
Hay orificios en la base para ventilación, no debe bloquear estos orificios con objetos extraños (alfombras, etc.)
Nunca conecte el cable de conexión a tierra con un cable con corriente, esto puede ocasionar una descarga eléctrica.
Si se daña el cable de corriente, debe ser reemplazado por una persona calificada para evitar riesgos.
Limpiando el filtro de pelusas
1. Presione el botón y tire el filtro de pelusas hacia
afuera.
Gire la malla del filtro al revés y enjuáguela con
agua
Después de insertar la pinza, presione el botón
para colocar en el sitio correcto.
Un sonido "ba" significa instalación correcta
Botón
Pinza
Protección contra congelamiento
Para prevenir el congelamiento:
Cierre el grifo de agua, remueva la manguera de entrada y vacíe el agua que se encuentra dentro
de la manguera completamente.
Recueste la manguera y gire el selector de drenaje hacia la opción drenaje para vaciar el agua en
la tina.
Si el agua está congelada, siga los siguientes pasos:
Ponga la manguera de agua en agua tibia de cerca de 50
℃
.
Ponga cerca de 2 litros de agua tibia bajo 50
℃
en la tina por cerca de
10 minutos, recueste la manguera de drenaje y gire el selector hacia drenaje
para vaciar el agua.
Ponga la manguera de entrada y abra el grifo de agua para confirmar que se llene correctamente
de agua y se drene.
Operación cuando se arrojan objetos por fuera de la tina de centrifugado
Remueva todos los tornillos del marco con un destornillador.
Tire del marco con ambas manos y voltéelo hacia atrás.
Saque las ropas que cayeron por fuera de la tina de centrifugado.
Presione el marco y apriete los tornillos.
Marco
Gabinete
Si alguno de estos síntomas ocurre, por favor desconecte el cable de corriente y realice las siguientes
pruebas:
Síntoma
La lavadora no funciona
La manguera de drenaje
no funciona
Hay ruido anormal
durante el lavado
Hay ruido anormal o
vibración violenta
durante el centrifugado
Razón
Revise que el cable de corriente esté en buenas condiciones
Revise que el cable de corriente esté bien conectado
Revise que el tiempo de lavado o de centrifugado no estén en la
posición "0"
Revise que la manguera de drenaje no esté muy apretada.
Revise que la manguera de drenaje no esté congelada
Revise que la manguera de drenaje no esté bloqueada por objetos
Revise que no haya objetos extraños como monedas en la tina de
lavado
Revise que la lavadora esté en una superficie estable y plana
Revise que las ropas estén distribuidas regularmente alrededor de la
tina de centrifugado.
Revise que no haya materiales de lavado o espumas en la parte exterior
de la tina de centrifugado.
Despué
s de usar la lavadora no olvide hacer estas dos cosas:
1. Desconecte el enchufe
2. Remueva la manguera de entrada.
案图板面制控
案图板面制控
6
7

Otros
Otros
No abra la cubierta de centrifugado
durante el proceso de centrifugado
Si la cubierta de centrifugado se abre
durante el centrifugado, la lavadora se detendrá de
repente lo cual reduce el tiempo de vida.
Evite abrir la cubierta durante el centrifugado.
No ponga sus manos dentro de la tina
de lavado durante el funcionamiento
de la máquina. Esto es muy
peligroso
Evite la humedad
No ponga la lavadora en un sitio muy húmedo pues la
humedad puede debilitar el aislamiento de la
máquina lo cual puede causar descargas eléctricas
o fallas.
Parámetros
Parámetros técnicos
Parámetro
Capacidad
(ropas secas)
Fuente
de
poder
Potencia de
entrada
(drenaje
inferior)
No debe ser lavado
Potencia de
entrada
(drenaje
superior)
Tiempo
máximo
Volumen de
agua
Presión máxima
de agua permitida
en la entrada de
agua
Dimensión general
(L X W X H)
Peso neto
Función
No debe lavar ropas
manchadas con pintura,
gasolina
u otras substancias
inflamables o volátiles.
6.0 kg
Lavado
110V
320W
320W
15 min.
35 min.
(enjuague
lavado)
H:
54L
M:
44L
L:
34L
0.6Mpa
735x430x845
(mm)
17.5kg
Centrifugado
3.6kg
60Hz
125W
125W
5 min.
/
Bomba
/
30W
/
No olvide cerrar la
cubierta de centrifugado
Si las ropas en la tina de centrifugado son
arrojadas afuera pueden dañarse
fácilmente.
Estregar la máquina
Para evitar daños a los componentes
eléctricos, no estriegue las partes
operacionales del panel de control
con agua.
No use agua tibia sobre los 50
℃
Esto para prevenir envejecimiento y deformación del
plástico.
LISTA DE EMPAQUE
Cantidad
No deje que los niños jueguen alrededor
Es muy peligroso que los niños caigan
dentro de la lavadora
Mantenga lejos del fuego o fuente de calor
Mantenga la lavadora lejos del fuego o fuente de calor
como calentador, cigarrillos, etc. para prevenir
accidentes o deformación del plástico.
Accesorios
Nombre
Manguera de entrada de agua
Manual de instrucciones
Cubierta interior de centrifugado
Lista de empaque
1 lavadora
Cantidad
1
1
1
Notas
Asegúrese de seguir las notas mencionadas
arriba
8
9