EVERSE 8
EVERSE8‑US, EVERSE8‑EU, EVERSE8‑W
en
User manual


EVERSE 8 Table of contents | en 3
Electro-Voice
User manual
2022-10 | 02 | F.01U.401.530
Table of contents
1
Safety4
1.1Important safety instructions4
1.2Battery and internal charger safety rules5
1.3Suspension8
1.4FCC information8
1.5Precautions9
1.6Certifications9
1.7Notices11
2
Description14
2.1Short information14
2.2System features15
2.3Quick setup15
3
Pairing the QuickSmart Mobile app17
4
Operation20
4.1Installation and charging of battery pack20
4.2Weatherization21
4.3Installation of weatherized input cover25
4.4Tripod or pole mount27
4.5Floor monitor & kickback30
5
Amplifier DSP32
5.1Amplifier DSP controls32
5.2System status33
5.3DSP controls34
5.3.1Loudspeaker DSP control menu35
6
Input & Mixer operation46
6.1INPUT DSP control menu46
7
Recommended configurations51
7.1Connecting with mobile device51
7.2Street musician performance52
7.3Bluetooth true wireless stereo (TWS)53
7.4Using as monitor54
8
Troubleshooting55
9
Technical data58
9.1Dimensions59
9.2Frequency response59
10
Appendices60
10.1Effects (FX) list60
4 en | Safety EVERSE 8
2022-10 | 02 | F.01U.401.530
User manual
Electro-Voice
1 Safety
1.1 Important safety instructions
WARNING: TO REDUCE THE RISK OF
FIRE OR ELECTRIC SHOCK, DO NOT
OVEREXPOSE THIS APPLIANCE TO RAIN
OR MOISTURE
AVIS: RISQUE DE CHOC ELECTRIQUE,
NE PAS OUVRIR.
WARNING: THE MAINS PLUG OR AC
INLET IS USED AS A DISCONNECT
DEVICE. THE DISCONNECT DEVICE
SHALL REMAIN READILY OPERABLE.
WARNING: CONNECT ONLY TO MAINS
SOCKET WITH PROTECTIVE EARTHING
CONNECTION.
WARNING: TO REDUCE THE RISK OF
ELECTRIC SHOCK, DO NOT REMOVE
COVER (OR BACK) AS THERE ARE NO
USER-SERVICABLE PARTS INSIDE.
REFER SERVICING TO QUALIFIED
PERSONNEL.
The lightning flash with arrowhead
symbol, within an equilateral triangle is
intended to alert the user to the
presence of uninsulated “dangerous
voltage” within the product’s enclosure
that may be sufficient magnitude to
constitute a risk of electric shock to
persons.
!
The exclamation point within an
equilateral triangle is intended to alert
the user to the presence of important
operating and maintenance (servicing)
instructions in the literature
accompanying the appliance.
The asterisk within an equilateral
triangle is intended to inform the user to
necessary installation or removal
instructions regarding equipment or
hardware use relating to the system.
1. Read these instructions.
2. Keep these instructions.
3. Heed all warnings.
4. Follow all instructions.
5. Do not use this apparatus near water other than explicitly called out in this manual.
6. Clean only with a dry cloth.
7. Do not block any ventilation openings. Install in accordance with the manufacturer's
instructions.
8. Do not install near any heat sources such as radiators, heat registers, stoves, or other
apparatus (including amplifiers) that produce heat.
9. Do not defeat the safety purpose of the polarized or grounding-type plug. A polarized plug
has two blades with one wider than the other. A grounding type plug has two blades and
a third grounding prong. The wide blade or the third prong is provided for your safety. If
the provided plug does not fit into your outlet, consult an electrician for replacement of
the obsolete outlet.
10. Protect the power cord from being walked on or pinched particularly at plugs,
convenience receptacles, and the point where they exit from the apparatus.
11. Only use attachments/accessories specified by the manufacturer.
12. Use only with the cart, stand, tripod, bracket, or table specified by the manufacturer, or
with the apparatus. When a cart is used, use caution when moving the cart/apparatus
combination to avoid injury from tip-over.
13. Unplug the apparatus during lightning storms or when unused for long periods of time.

EVERSE 8 Safety | en 5
Electro-Voice
User manual
2022-10 | 02 | F.01U.401.530
14. Refer all servicing to qualified service personnel. Servicing is required when the
apparatus has been damaged in any way, such as power-supply cord or plug is damaged,
liquid has been spilled or objects have fallen into the apparatus, the apparatus has been
exposed to rain or moisture, does not operate normally, or has been dropped.
15. No naked flame sources, such as lighted candles, should be placed on the apparatus.
16. To reduce the risk of fire or electric shock, do not expose this apparatus to rain or
moisture in any other method than the ones explicitly called out in this manual. The
apparatus should not be exposed to dripping or splashing without the included weather
cover or accessory rain cover, as covered in this manual. Objects filled with liquids, such
as vases should not be placed on apparatus.
17. Do not block any ventilation openings. Install in accordance with the manufacturer's
instructions.
18. Minimum 60 cm (2 ft) distances around the apparatus for sufficient ventilation.
19. The ventilation should not be impeded by covering the ventilation openings with items,
such as newspapers, table-cloths, curtains, etc.
20. To completely disconnect AC power from this apparatus, the power supply cord must be
unplugged.
21. Power cord options:
Mains plug
– Use a 3-pin mains plug that is registered with the Safety Authority.
– Use a 2-pin mains plug that is certified
1
to EN 50075/IEC 60083 Standard C5 (shown in
the Appendix S of Singapore Consumer Protection (Safety Requirements) Registration
Scheme Information).
Flexible cord
– Use a double insulated flexible cord that is certified
1
to the relevant IEC standards.
Appliance connector
– Use an appliance connector certified
1
to IEC 60320.
1
Certified by member of IECEE CB Scheme.
!
Warning!
Use of non-authorized accessories or attachments with this or any Electro-Voice product is at
your own discretion. Use of non-authorized accessories or attachments can result in product
malfunction, injury, or death.
The user assumes all liability and may result in the warranty being voided.
1.2 Battery and internal charger safety rules
1. SAVE THESE INSTRUCTIONS. This manual contains important safety and operating
instructions for Electro-Voice EVERSE loudspeaker.
2. Before using Electro-Voice EVERSE internal battery charger to re-charge the battery, read
all instructions and warning markings on (1) battery, (2) EVERSE loudspeaker.
3. To reduce the risk of injury, charge only Electro-Voice battery packs specified for use with
the EVERSE loudspeaker. Other types of batteries may burst causing personal injury and
damage.
4. Only charge the battery pack in temperatures above 0°C (+32°F) and below 35°C
(+95°F). Avoid charging battery in direct sunlight. Store the loudspeaker and the battery
pack in locations where temperatures will not exceed 45°C (113°F). This is important to
prevent serious damage to the battery cells.

6 en | Safety EVERSE 8
2022-10 | 02 | F.01U.401.530
User manual
Electro-Voice
5. Unless otherwise specified by Electro-Voice with the use of approved accessories, do not
recharge the battery in a damp or wet environment and do not expose the loudspeaker to
rain or snow while plugged in to mains power. Water entering battery charger may result
in electric shock or fire.
!
Caution!
Always use the supplied weather cover and/or Electro-Voice approved rain cover accessory in
wet environments.
6. Never submerge the battery pack, or the EVERSE loudspeaker in fluid of any kind or allow
fluid to enter them. Corrosive or conductive fluid (such as seawater or industrial chemical
or bleach containing products, etc.) can cause short circuit, which may result in fire,
personal injury and property damage.
7. Battery leakage may occur under extreme usage or temperature conditions. Avoid contact
with skin and eyes. The battery liquid is caustic and could cause chemical burns to
tissues. If liquid comes in contact with skin, wash quickly with soap and water. If the
liquid contacts your eyes, flush them with water for a minimum of 10minutes and seek
medical attention.
8. Place the EVERSE loudspeaker on flat nonflammable surfaces and away from flammable
materials when using or charging the battery pack. Carpeting and other heat insulating
surfaces block proper air circulation which may cause overheating of the charger and
battery pack. If smoke or melting of the loudspeaker or battery pack is observed, unplug
the loudspeaker immediately and do not use the battery pack or the loudspeaker. Contact
customer service immediately.
9. Make sure cord is located so that it will not be stepped on, tripped over, or otherwise
subjected to damage or stress. Damaged plug and cord may result in electric shock or
fire.
10. Disconnect the EVERSE loudspeaker by pulling the plug rather than the cord. Do not
operate the EVERSE loudspeaker with damaged cord or plug. Have them replaced
immediately. Damaged plug or cord may result in electric shock or fire.
11. Do not insert the battery pack in the EVERSE loudspeaker if the battery pack case is
cracked or visibly damaged. Using a damaged battery pack may result in electric shock or
fire.
12. Do not disassemble or operate the EVERSE loudspeaker if it has received a sharp blow,
been dropped or otherwise damaged in anyway. Incorrect reassembly or damage may
result in electric shock or fire.
13. Before each use, check the EVERSE loudspeaker, cable, plug and battery pack. Do not use
if damage is detected. Never open the battery pack yourself, take it to an Electro-Voice
Service Center, only using original replacement parts. Incorrect reassembly or using
damaged product may result in electric shock or fire.
14. Only use accessories or batteries recommended or sold by Electro-Voice. Using
attachments not recommended may result in electric shock or fire.
15. Unplug the EVERSE loudspeaker from outlet before storage, attempting any maintenance
or cleaning. Such preventive safety measures reduce the risk of electric shock or fire.
16. Replace battery pack if a substantial drop in operating time per charge is observed.
Battery pack may be nearing the end of its life.
EVERSE 8 Safety | en 7
Electro-Voice
User manual
2022-10 | 02 | F.01U.401.530
Battery care
!
Warning!
When batteries are not installed in a loudspeaker, keep them away from metal objects. For
example, to protect terminals from shorting DO NOT place batteries in a tool box or pocket
with nails, screws, keys, etc. Fire or injury may result.
DO NOT PUT BATTERIES INTO FIRE or expose to high heat. They may explode.
!
Warning!
Do not attempt to disassemble the battery or remove any component projecting from the
battery terminals. Fire or injury may result. Prior to disposal, protect exposed terminals with
heavy insulating tape to prevent shorting.
!
Warning!
Do not use the EVERSE loudspeaker in damp or wet environments without the proper
installation of the included weather cover or Electro-Voice approved rain cover in accordance
with the user manual.
Always ensure any device, cable, or instrument connected to the EVERSE loudspeaker is also
properly protected from moisture, properly grounded with ground fault circuit interrupt, and
used in accordance with their respective manufacturer’s directions.
i
Notice!
Electro-Voice battery packs
Use of battery packs not sold by Electro-Voice will void the warranty.
i
Notice!
Battery protection mode
The lithium-ion battery is protected against deep discharging by the “Battery protection
mode”. When the battery is empty, the EVERSE loudspeaker enters a battery protection
mode. The battery is supplied partially charged. Completely charge the battery before using
your loudspeaker for the first time. The lithium-ion battery can be charged at any time,
without reducing its service life. Interrupting the charging procedure does not damage the
battery.
i
Notice!
Battery disposal
Do not dispose batteries in household waste. Dispose of batteries only at suitable collection
points and, in the case of lithium batteries, cover the battery terminals with electrical tape or
other electrically insulating material. The lithium-ion battery must be collected, recycled or
disposed of in an environmentally sound manner.
!
Warning!
Air transport warning
Follow the airline transportation baggage regulation in use for the lithium-ion battery pack
device.
8 en | Safety EVERSE 8
2022-10 | 02 | F.01U.401.530
User manual
Electro-Voice
!
Warning!
Risk of explosion or burns
This device includes a lithium-ion battery pack. To reduce the risk of fire or burns, do not
attempt to open, disassemble, or service the battery pack. Do not crush, puncture, short
external contacts, or dispose of in fire or water. Only use the device in temperatures between
0°C (32°F) and 35°C (95°F). Recycle or dispose of properly.
1.3 Suspension
!
Warning!
Do not suspend this product in any other manner than explicitly described in this manual, or
Electro-Voice installation guides. Do NOT use handles to suspend the loudspeaker. Handles
on Electro-Voice loudspeakers are intended to only be used for temporary transport by
people. Items, such as fiber rope, wire rope, cables, or other types of materials cannot be
used to suspend loudspeaker from the handles.
1.4 FCC information
IMPORTANT: Do not modify this unit! Changes or modifications not expressly approved by the
manufacturer could void the user’s authority, granted by the FCC, to operate the equipment.
i
Notice!
This equipment has been tested and found to comply with the limits for a Class B digital
device, pursuant to Part 15 of the FCC Rules. These limits are designed to provide reasonable
protection against harmful interference in a residential installation. This equipment generates,
uses and can radiate radio frequency energy and, if not installed and used in accordance with
the instructions, may cause harmful interference to radio communications. However, there is
no guarantee interference will not occur in a particular installation.
If this equipment does cause harmful interference to radio or television reception or receive
audible interference from radio, television or communications equipment, which can be
determined by turning the equipment off and on. The user is encouraged to try to correct the
interference by one or more of the following measures:
– Reorient or relocate the receiving antenna.
– Increase the separation between the equipment and receiver.
– Connect the equipment into an outlet on a circuit different from that to which the
receiver is connected.
– Consult the dealer or an experienced radio/TV/communications equipment technician.
The device has been granted by FCC and IC, the FCC ID:ESVEVERSE and IC:1249A-EVERSE8.
Please take attention that changes or modification not expressly approved by the party
responsible for compliance could void the user’s authority to operate the equipment.
This equipment should be installed and operated with a minimum distance of 20cm between
the radiator and your body.
This device complies with Industry Canada license-exempt RSS standard(s). Operation is
subject to the following two conditions:
(1) this device may not cause interference, and
(2) this device must accept any interference, including interference that may cause undesired
operation of the device.
Le présent appareil est conforme aux CNR d'Industrie Canada applicables aux appareils
radioexempts de licence. L'exploitation est autorisée aux deux conditions suivantes :
(1) l'appareil ne doit pas produire de brouillage, et
EVERSE 8 Safety | en 9
Electro-Voice
User manual
2022-10 | 02 | F.01U.401.530
(2) l'utilisateur de l'appareil doit accepter tout brouillage radioélectrique subi, même si le
brouillage est susceptible d'en compromettre le fonctionnement.
Under Industry Canada regulations, this radio transmitter may only operate using an antenna
of a type and maximum (or lesser) gain approved for the transmitter by Industry Canada. To
reduce potential radio interference to other users, the antenna type and its gain should be so
chosen that the equivalent isotropically radiated power (e.i.r.p.) is not more than that
necessary for successful communication.
Conformément à la réglementation d'Industrie Canada, le présent émetteur radio peut
fonctionner avec une antenne d'un type et d'un gain maximal (ou inférieur) approuvé pour
l'émetteur par Industrie Canada. Dans le but de réduire les risques de brouillage
radioélectrique à l'intention des autres utilisateurs, il faut choisir le type d'antenne et son gain
de sorte que la puissance isotrope rayonnée équivalente (p.i.r.e.) ne dépasse pas l'intensité
nécessaire à l'établissement d'une communication satisfaisante.
For Europe:
Frequency band of operation 2400 to 2483.5MHz.
Maximum transmit power less than 20dBm EIRP.
1.5 Precautions
!
If an Electro-Voice loudspeaker is used outdoors on a sunny day, place the
loudspeaker in a shaded or covered area. The loudspeaker amplifiers have
protection circuits that temporarily shut the loudspeaker off when extremely high
temperatures are reached. This can happen on hot days when the loudspeaker is
in direct sunlight.
!
Do not use Electro-Voice loudspeakers in an environment where temperatures are
below 0°C (32°F) or exceed +35°C (95°F).
!
Electro-Voice loudspeakers are easily capable of generating sound pressure levels
sufficient to cause permanent hearing damage to anyone within normal coverage
distance. Caution should be taken to avoid prolonged exposure to sound pressure
levels exceeding 90dB.
!
Do not store EVERSE batteries in an environment where temperatures are below
-20°C (-4°F) or exceed 45°C (113°F).
1.6 Certifications
Brazil:
Após uma perturbação da rede elétrica, o EVERSE pode entrar em estado de segurança. Neste
caso, você deve desligar e ligar o dispositivo novamente.
Este equipamento não tem direito à proteção contra interferência prejudicial e não pode
causar interferência em sistemas devidamente autorizados.
Para mais informações, consulte o site da ANATEL: www.anatel.gov.br.
Cambodia:
TRC Identifier: RF-TA-2022-0373

10 en | Safety EVERSE 8
2022-10 | 02 | F.01U.401.530
User manual
Electro-Voice
Malaysia:
Pakistan:
Republic of Korea:
제품명: 앰프내장형 스피커
모델명: EVERSE 8
정격: 100-240Vac, 50-60Hz, 1000W
수입업체(상호)명: 로버트보쉬코리아(유)
제조자: Bosch Security Systems, LLC.
제조연월: 별도표기
제조국: 중국
A/S: 02-702-2846
해당 무선설비는 운용 중 전파혼신 가능성이 있음
해당 무선설비는 전파혼신 가능성이 있으므로 인명안전과 관련된 서비스는 할 수 없습니다.
EVERSE 8 Safety | en 11
Electro-Voice
User manual
2022-10 | 02 | F.01U.401.530
Thailand:
United Arab Emirates:
TDRA - UNITED ARAB Emirates
Dealer ID: DA45733/15
TA RTTE: ER10360/22
Model Name: EVERSE 8
Product Type: Bluetooth
1.7 Notices
Old electrical and electronic appliances
Electrical or electronic devices that are no longer serviceable must be collected separately and
sent for environmentally compatible recycling (in accordance with the European Waste
Electrical and Electronic Equipment Directive).
To dispose of old electrical or electronic devices, you should use the return and collection
systems put in place in the country concerned.
Copyright and disclaimer
All rights reserved. No part of this document may be reproduced or transmitted in any form by
any means, electronic, mechanical, photocopying, recording, or otherwise, without the prior
written permission of the publisher. For information on getting permission for reprints and
excerpts, contact Electro-Voice.
All content including specifications, data, and illustrations in this manual are subject to change
without prior notice.
i
Notice!
Bluetooth® is available in selected countries.
Contact your nearest Electro-Voice dealer or Electro-Voice distributor for more information.
The Bluetooth® word mark and logos are registered trademarks owned by Bluetooth SIG, Inc.
and any use of such marks by Bosch Security Systems, LLC is under license. Other trademarks
and trade names are those of their respective owners.
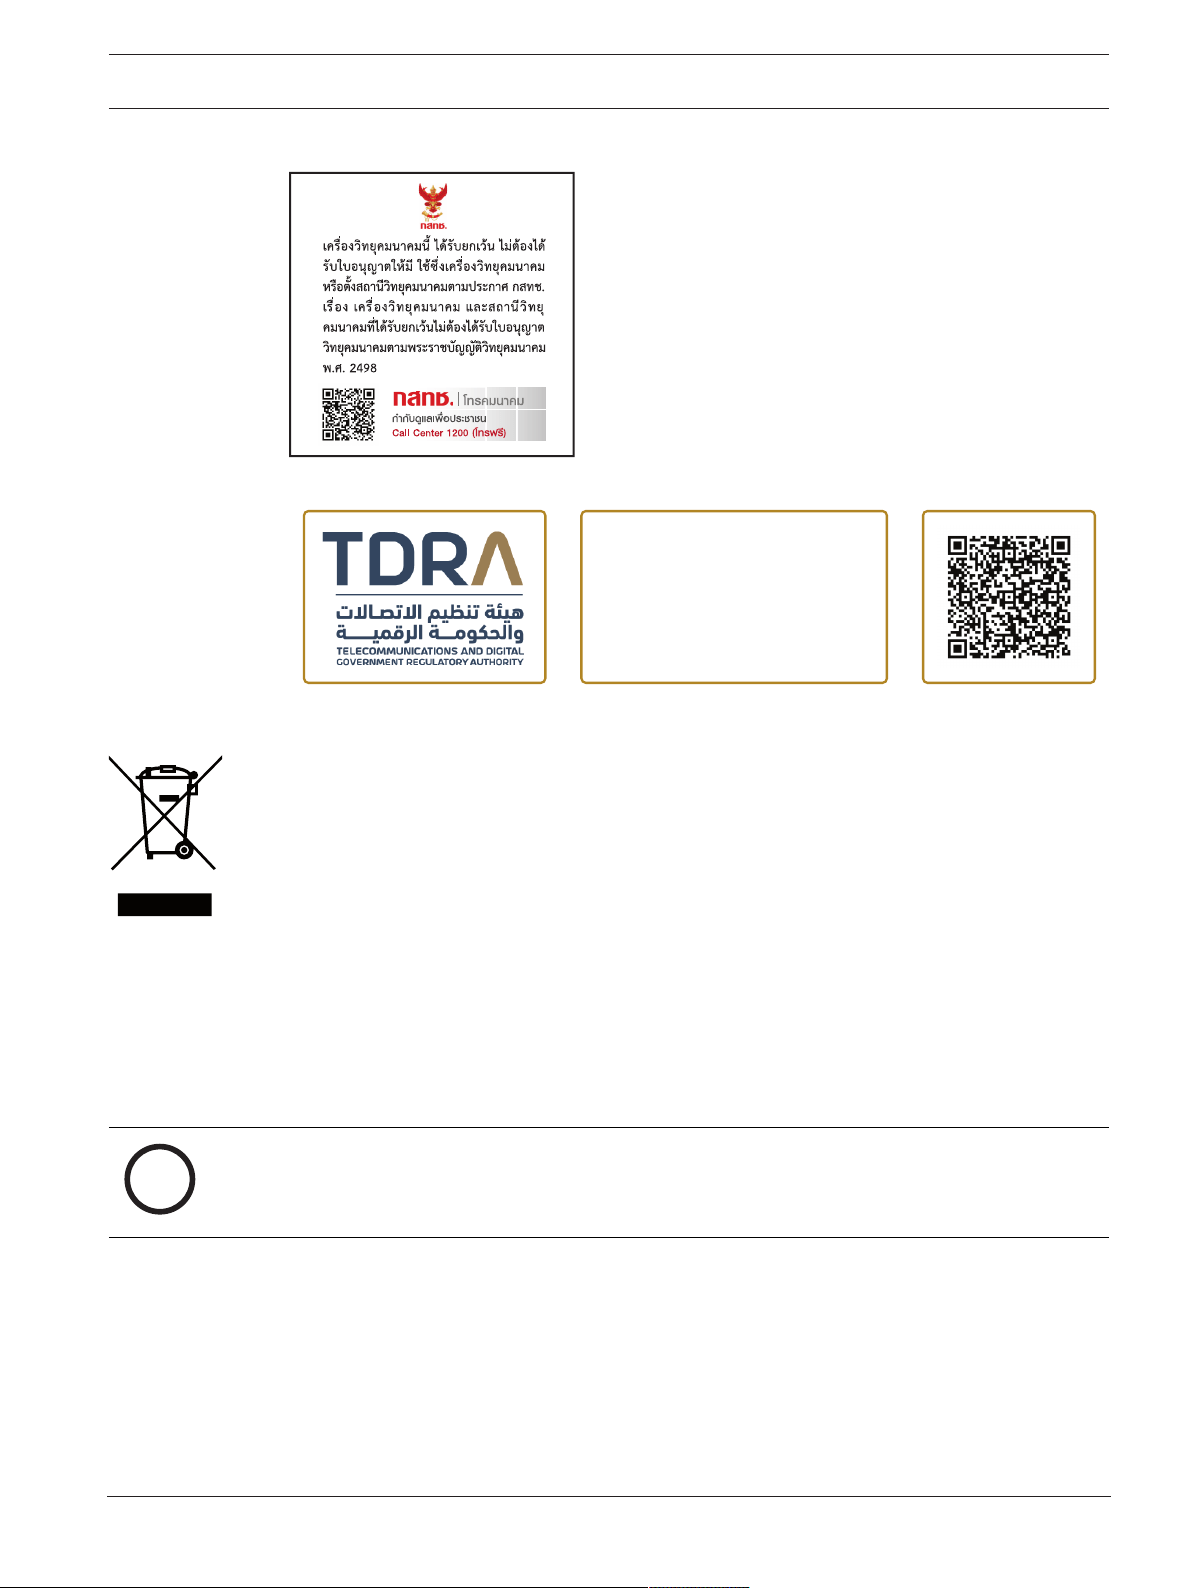
For use in China: CHINA ROHS DISCLOSURE TABLE
12 en | Safety EVERSE 8
2022-10 | 02 | F.01U.401.530
User manual
Electro-Voice
Importer and after-sales service
China
Bosch (Shanghai) Security Systems Ltd.
333 Fuquan Road North IBP
Changning District Shanghai
200335 P.R. China
博世(上海)安保系统有限公司
上海市长宁区虹桥临空经济园区,福泉北路333号
EU
Bosch Sicherheitssysteme GmbH
Robert-Bosch-Ring 5
85630 Grasbrunn
Germany

EVERSE 8 Safety | en 13
Electro-Voice
User manual
2022-10 | 02 | F.01U.401.530
Mexico
Robert Bosch de R.L de C.V.
Calle Robert Bosch No. Ext. 405
C.P.50071
Zona industrial Toluca
Mexico
Phone: +527222792300
UK
Robert Bosch Ltd.
Broadwater Park
North Orbital Road
Uxbridge UB9 5HJ
UK

14 en | Description EVERSE 8
2022-10 | 02 | F.01U.401.530
User manual
Electro-Voice
2 Description
Thank you for choosing an Electro-Voice powered loudspeaker system. Please take time to
consult the manual to understand all the features built into your Electro-Voice system and fully
utilize its performance capabilities.
The EVERSE 8 is a versatile, easy to use, compact, battery-powered loudspeaker system. It
provides professional level performance and is housed in a robust weatherized enclosure. The
EVERSE 8 provides real professional performance for musical performances, voice
reinforcement and audio playback. The EVERSE 8 takes advantage of decades of Electro-Voice
and Dynacord pro-audio and electronics expertise, along with new advancements in
technology, to provide truly portable and truly wireless audio.
The EVERSE 8 utilizes a 2-way configuration with an 8-inch woofer. It includes a hi-output,
titanium, ferro-fluid cooled tweeter, featuring a high-energy neodymium magnet for maximum
output and reduced weight. The tweeter is mounted to an Electro-Voice patented SST
constant directivity waveguide design, producing exceptionally high SPL with even 100°x100°
coverage and improved acoustic alignment and bass extension.
The rugged polypropylene enclosure features a weatherized input cover for the input section,
allowing the loudspeaker to meet IP43 rating (splash and light rain resistant) for use on
battery power and Bluetooth® streaming. The available accessory slipcover allows for
additional weather resistance and protection when needed.
The EVERSE 8 features Electro-Voice's QuickSmart DSP and is POWEREDBYDYNACORD,
featuring a built-in 4-channel digital mixer with FX, feedback suppression, and ducking
features. The loudspeaker features a custom designed, and fully optimized for audio use, high
capacity battery pack. The battery pack provides more than enough power to complete the
show, including a 12VDC accessory port to power RE3 or R300 wireless microphone systems.
The EVERSE 8 is available in both white and black.
2.1 Short information
The following table lists products in the EVERSE family, with CTN (Commercial Type Number)
and identifying product name DESCRIPTION.
CTN Description
EVERSE8-US 8" 2-way speaker battery black US
EVERSE8-EU 8" 2-way speaker battery black EU
EVERSE8-W 8" 2-way speaker battery white US&EU
EVERSE8-TRAY-B Tray for EVERSE 8, 12V DC cable black
EVERSE8-TRAY-W Tray for EVERSE 8, 12V DC cable white
EVERSE8-RAINCVR Rain resistant cover for EVERSE 8
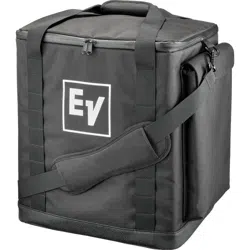
EVERSE8-TOTE Padded tote bag for EVERSE 8
EVERSE8-BAT-B Battery pack assembly, EVERSE8, black
EVERSE8-BAT-W Battery pack assembly, EVERSE8, white
EVERSE 8 Description | en 15
Electro-Voice
User manual
2022-10 | 02 | F.01U.401.530
2.2 System features
EVERSE8-US/EVERSE8-EU/EVERSE8-W
– Long run-time removable and replaceable battery pack
The EVERSE 8 battery pack will provide 6+ hours of constant music playback at maximum
output levels, or over 12+ hours at 95dB SPL average. The EVERSE 8 has integrated
power saving features to extend battery life when no signal is present. The 12V DC jack
on the EVERSE 8 loudspeaker can be used to power a wireless microphone receiver like
the Electro-Voice RE3 or R300.
– Real professional level output and Electro-Voice sound quality
The EVERSE 8 features an 8-inch woofer with SST port and a 1-inch titanium dome
tweeter which produces over 121dB SPL max, from 50Hz to 20kHz. The 100°x100°
wave guide ensures even coverage across all frequencies. Two additional monitor angles
(30° and 55°) ensure the right coverage and position for any situation.
– Easy to use with QuickSmart Mobile app and Electro-Voice's Intuitive User Interface
The EVERSE 8 features Electro-Voice's intuitive QuickSmart DSP with single encoder and
push key interface for simple and quick setup. EVERSE 8 can be paired via Bluetooth® to
a mobile device with the QuickSmart Mobile app installed to provide easy remote control
of all audio functions. The QuickSmart Mobile app allows pairing and grouping of up to
six loudspeakers, in any combination, including EVERSE 8 , ELX200 powered family, and
the EVOLVE family.
– High Quality Stereo Bluetooth® streaming
The EVERSE 8 features Bluetooth® streaming. Two EVERSE 8 loudspeakers can be paired
for true wireless stereo (TWS) streaming from a mobile device.
– POWERED BY DYNACORD with built-in digital 4-channel mixer
The EVERSE 8 features a built-in 4-channel mixer with FX, EQ, automatic feedback
suppression and ducking functions. The mixer includes two XLR/TRS combo jacks,
including 48V phantom power on INPUT1 (XLR) and Hi-Z compatibility on INPUT2
(TRS). The mixer also includes Stereo Bluetooth® and 3.5mm connections.
– Auto-Standby
The EVERSE 8 offers an automatic standby function after 15minutes without signal. This
extends the battery runtime in case the loudspeaker is not being used. The loudspeaker
can be re-activated to full operation by pressing a button on the panel or with the app.
2.3 Quick setup
Full-range loudspeaker
To set up the loudspeaker:
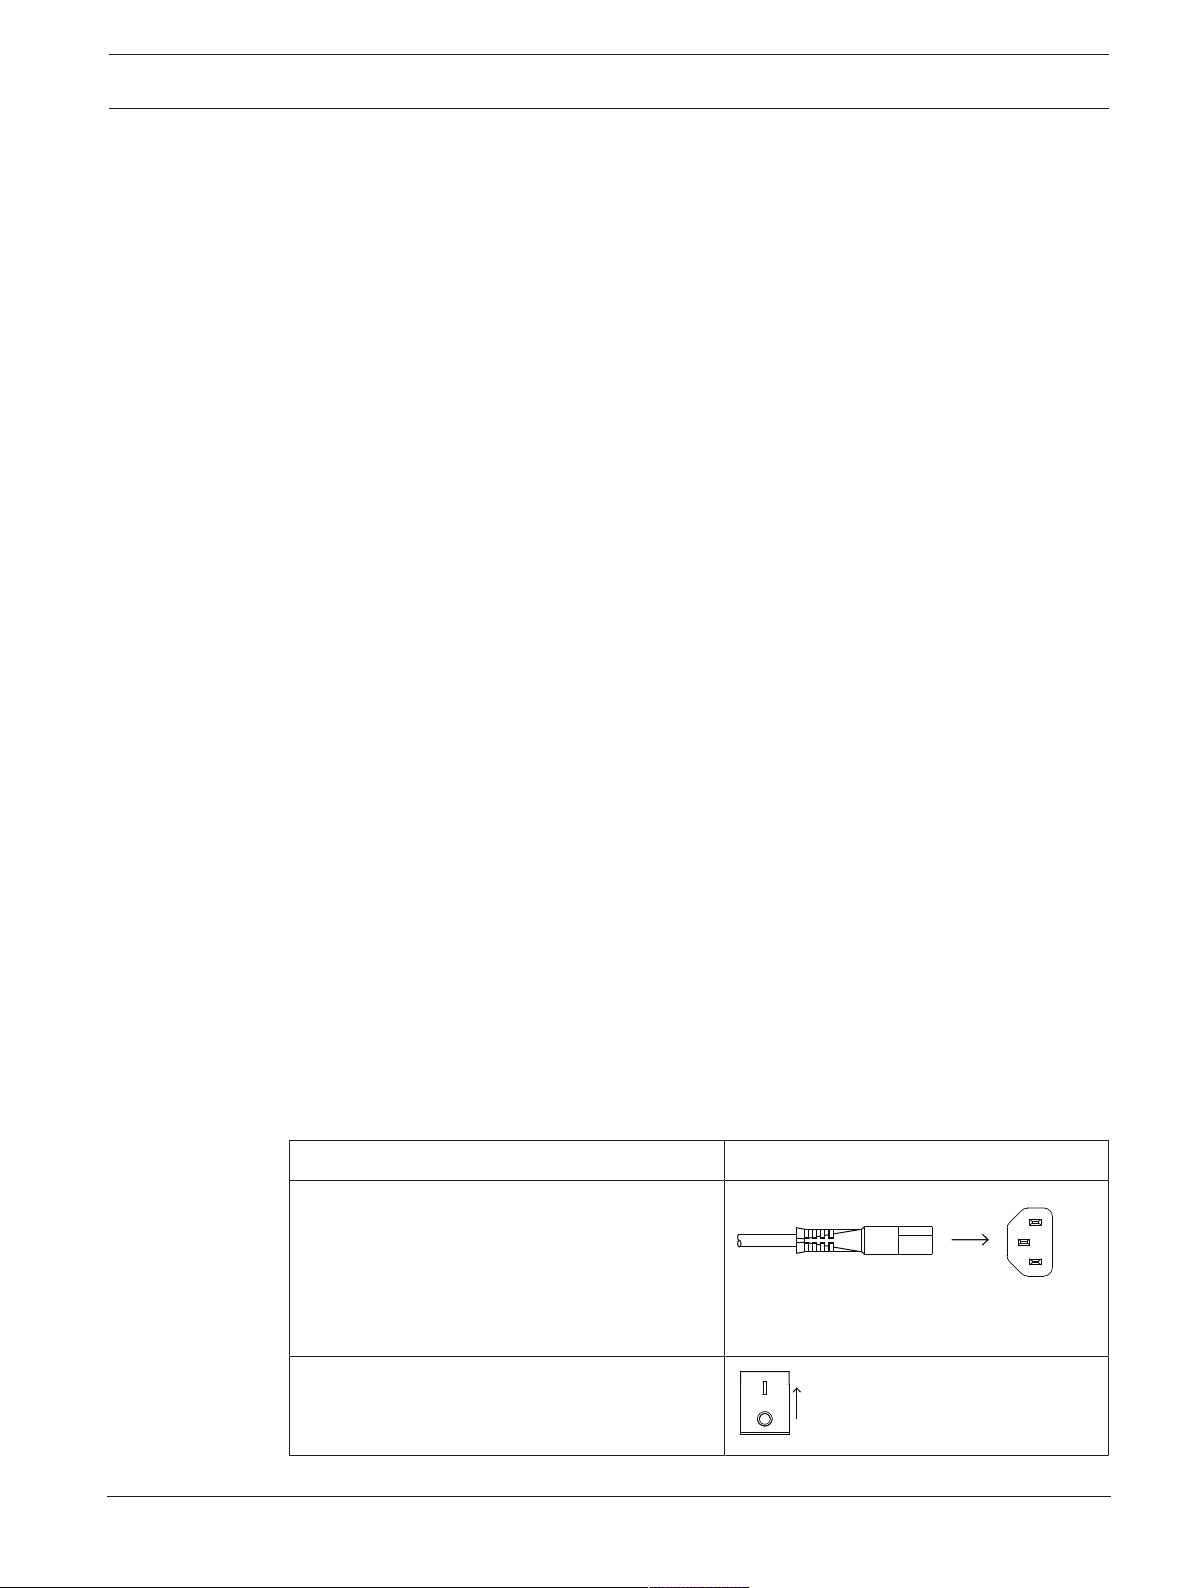
Step Illustration
1. Connect the AC power cord from a
grounded receptacle to the MAINS IN to
ensure the battery has sufficient charge.
Note: It is recommended to leave the
loudspeaker plugged in and charging for
24hours the first time it is used.
2. Switch power to ON.
ON
OFF
16 en | Description EVERSE 8
2022-10 | 02 | F.01U.401.530
User manual
Electro-Voice
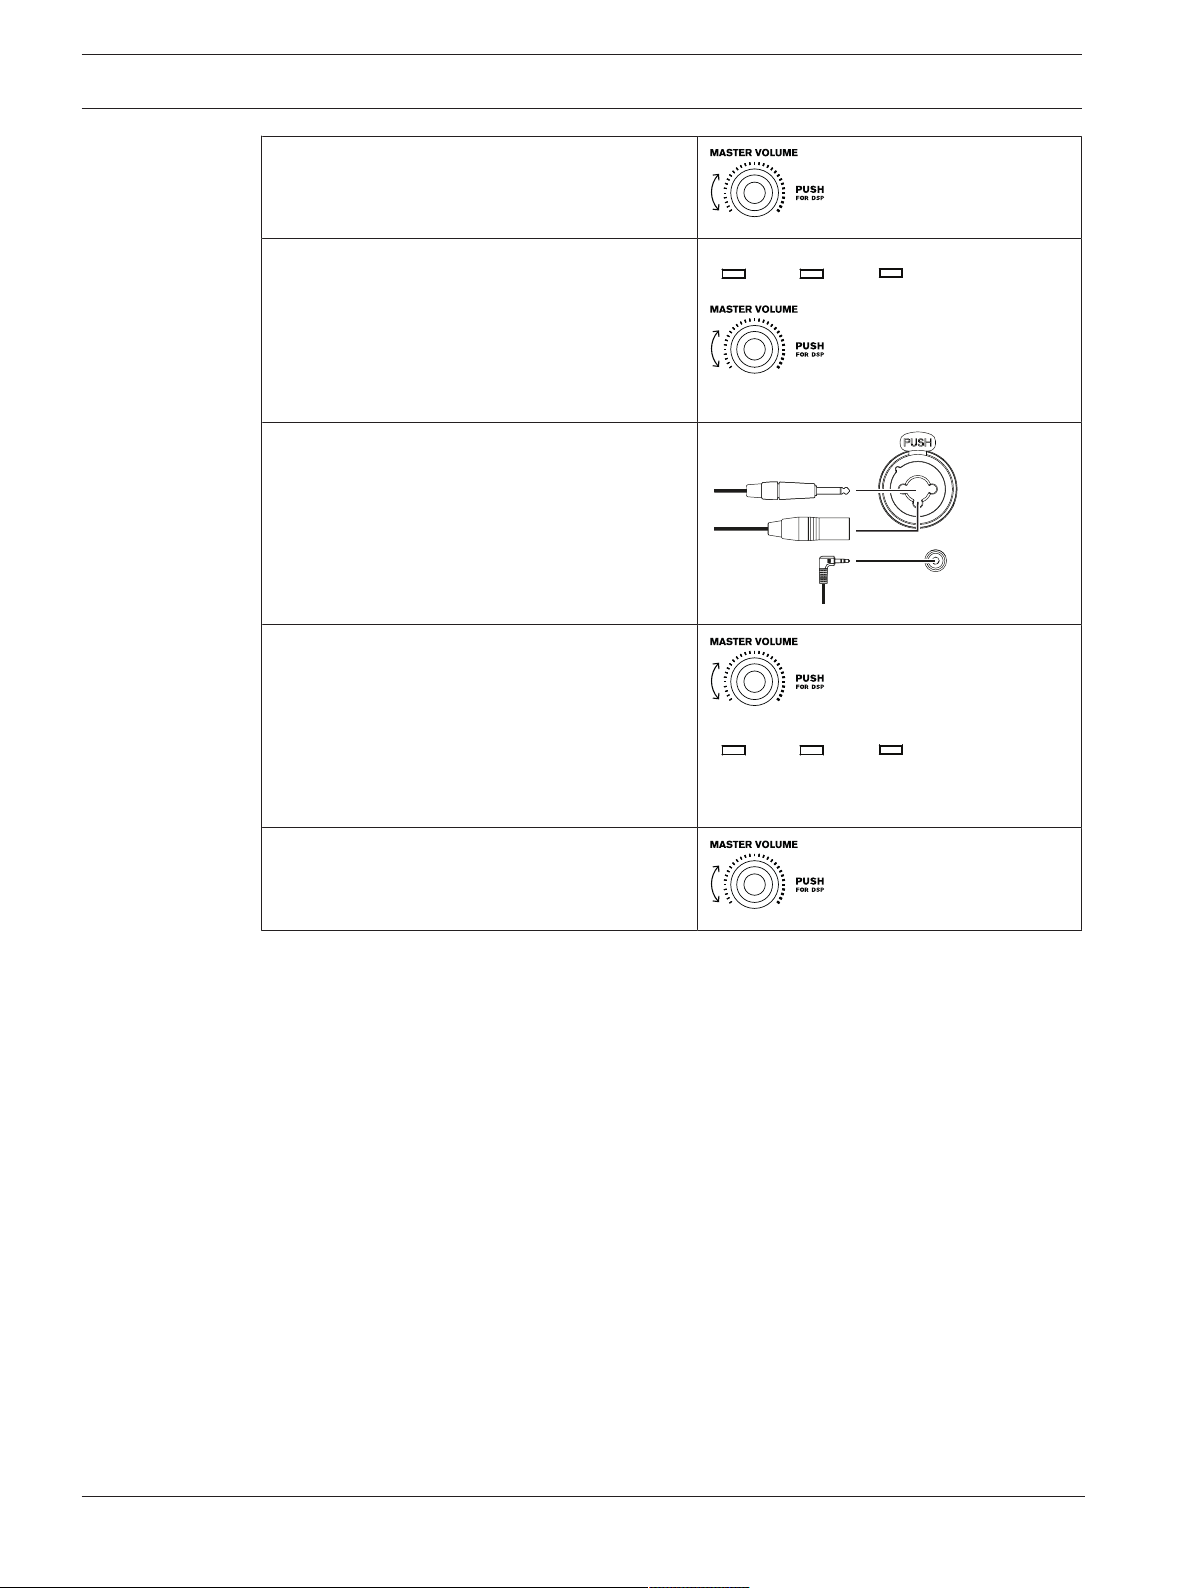
3. Adjust the MASTERVOL knob to 0dB.
4. Push the input selection soft key for
INPUT1 or INPUT2 if using an XLR or TRS
cable, or push the input selection soft key
for INPUT3/4 if using 3.5mm mini jack.
Use the MASTERVOL knob to adjust gain
to MUTE.
INPUT3/4
INPUT1 INPUT2
5. Connect an audio source using an XLR or
TRS cable to INPUT1, INPUT2, or a
3.5mm mini jack to INPUT3/4. Ensure
audio source is MUTE or at a low level
before making connection. After connection
is made, increase the source's output to a
reasonable level.
6. Adjust the INPUT LEVEL until the signal
peaks are just below maximum level or the
required output is achieved. If CLIP is
indicated, turn the level down until the
CLIP indication disappears.
Press the input selection soft key again to
exit the channel menu.
INPUT3/4
INPUT1 INPUT2
7. Adjust the MASTER VOL knob until you get
the required output from the loudspeaker.
EVERSE 8 Pairing the QuickSmart Mobile app | en 17
Electro-Voice
User manual
2022-10 | 02 | F.01U.401.530
3 Pairing the QuickSmart Mobile app
The EV QuickSmart Mobile app for tablets and smartphones is available for download from the
iTunes App Store and the Google Play Store.
i
Notice!
The EV QuickSmart Mobile app is designed to only find loudspeakers from Electro-Voice
featuring Bluetooth® control functionality.
The EV QuickSmart Mobile app will not display other types of Bluetooth® devices, e.g.
phones, laptops, tablets, or headsets.
Prior to pairing the EV QuickSmart Mobile app with Electro-Voice loudspeakers:
1. Ensure that Bluetooth® is enabled on the smartphone or tablet.
2. Ensure that pairing mode is enabled on the loudspeaker.
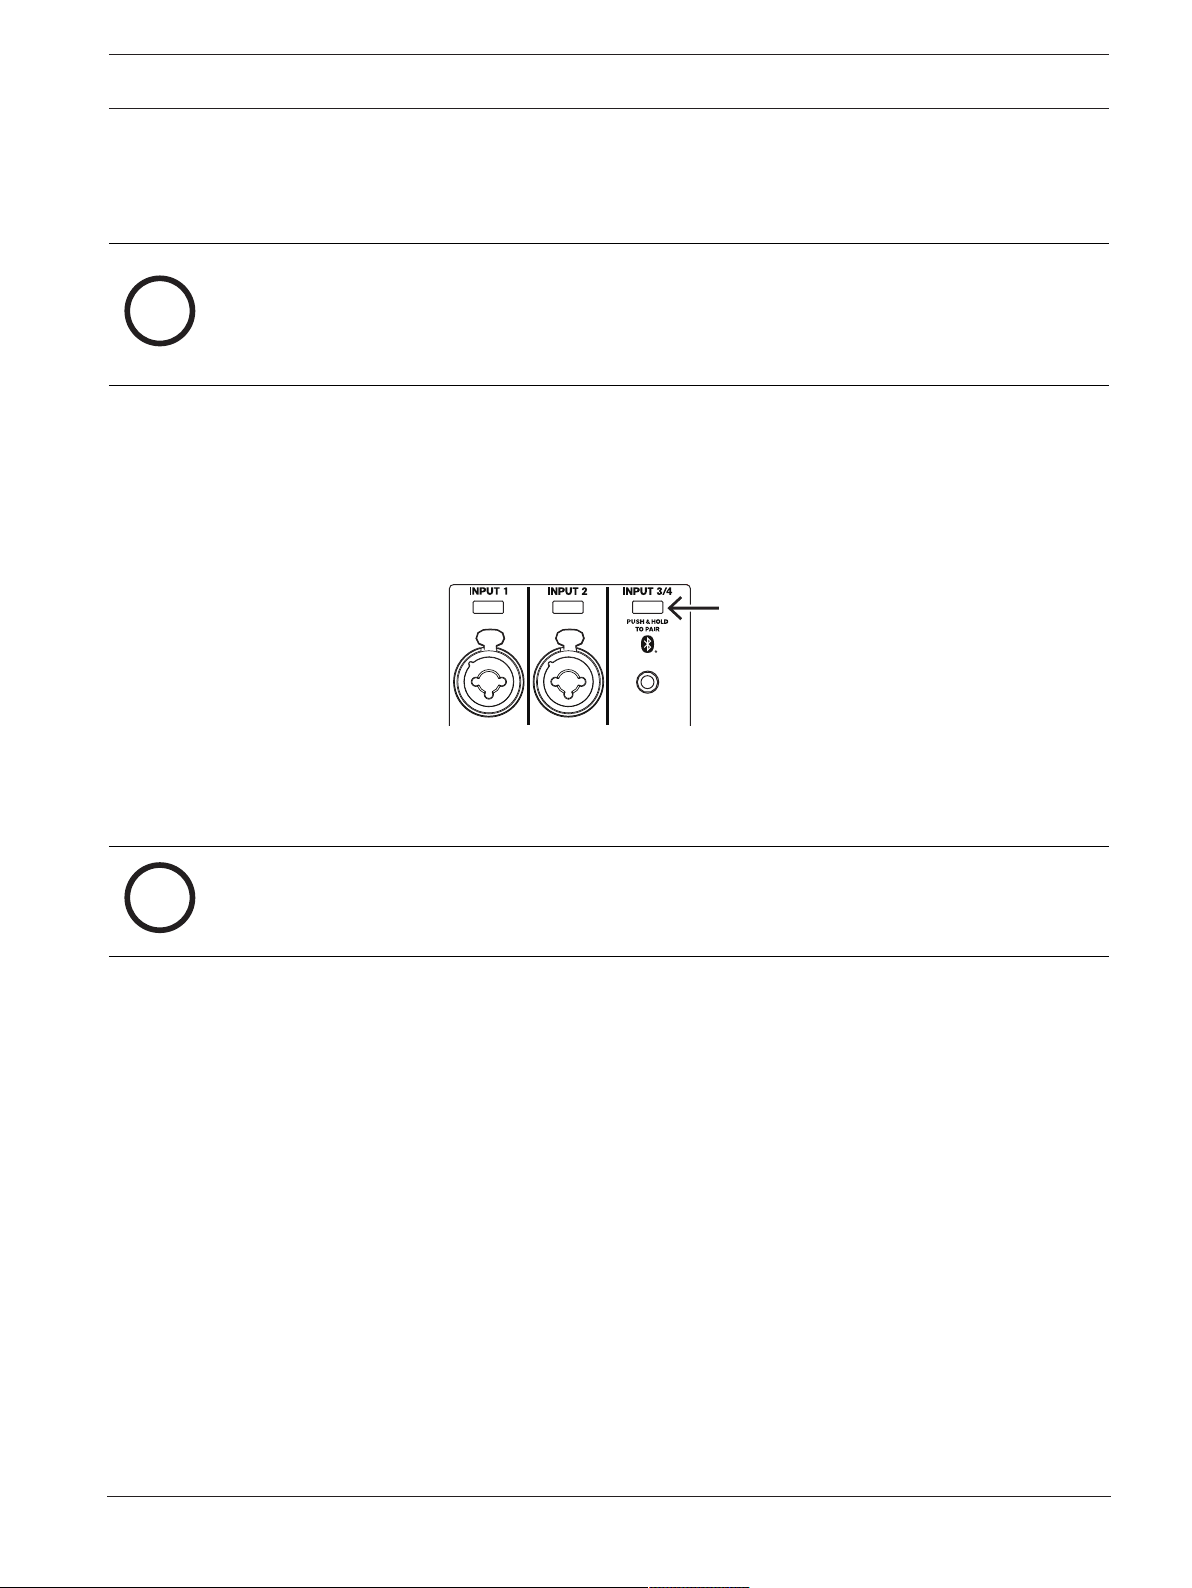
To place the loudspeaker in pairing mode for both control and streaming:
1. Press and hold INPUT3/4 until Pairing Mode On and the 4-digit ID is shown on the LCD.
Pairing mode can be enabled through the LCD menu for control and streaming separately.
2. Navigate to your mobile device's Bluetooth® settings menu, find the EVERSE loudspeaker
with the matching 4-digit ID and ensure you are paired to the loudspeaker.
This will pair the mobile device to the EVERSE loudspeaker for audio streaming.
3. Continue to the next step to pair for control.
i
Notice!
For Android devices ensure location services are allowed. Electro-Voice does not collect,
store, or track user location data or personal information.
18 en | Pairing the QuickSmart Mobile app EVERSE 8
2022-10 | 02 | F.01U.401.530
User manual
Electro-Voice
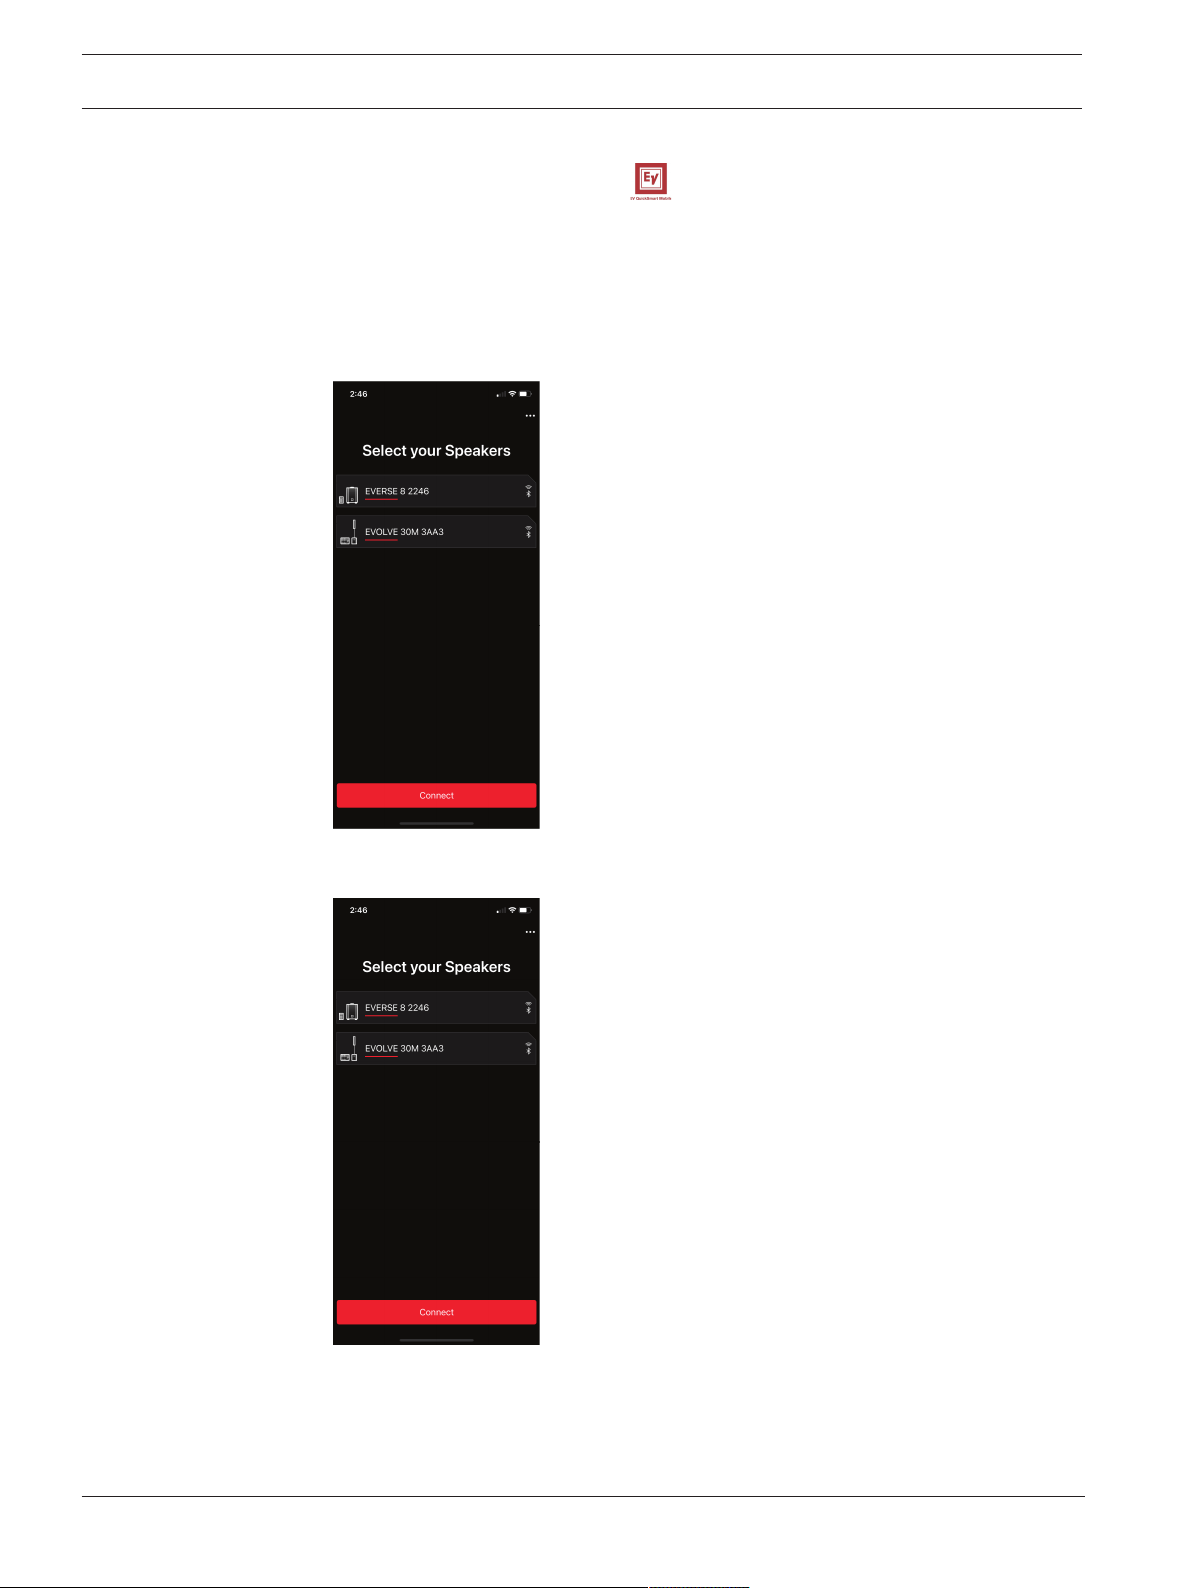
First time pairing
1. Open the EV QuickSmart Mobile app.
2. Select your Speakers is displayed on the screen.
The EV QuickSmart Mobile app is looking for available Bluetooth® enabled Electro-Voice
loudspeakers
.
The available loudspeakers are displayed on the screen.
3. Tap the loudspeaker you want to pair with the app.
The selected loudspeaker will have a line under it acknowledging it is selected.
4. Repeat the previous step until all of the required loudspeakers are selected.
5. Tap the CONNECT button.
6. The app connects with the required loudspeaker.
You will get a message from iOS/iPadOS/Android about pairing for each device which has
to be accepted.

EVERSE 8 Pairing the QuickSmart Mobile app | en 19
Electro-Voice
User manual
2022-10 | 02 | F.01U.401.530
7. Tap PAIR on the device to accept pairing to the loudspeakers.
The app can connect to up to six loudspeakers.
Bluethooth Pairing Request
Cancel Pair
“EVERSE 8 A5A5” would like to pair
with your iPhone.
Subsequent pairing
To pair additional loudspeakers with the EV QuickSmart Mobile app:
1. Tap the EV QuickSmart Mobile app icon.
2. Select your Speakers is displayed on the screen.
The EV QuickSmart Mobile app is looking for available Bluetooth® enabled Electro-Voice
loudspeakers
.
The available loudspeakers are displayed on the screen.
3. Tap the loudspeaker you want to pair with the app.
The selected loudspeaker will have a line under it acknowledging it is selected.
4. Repeat the previous step until all of the required loudspeakers are selected.
5. Tap the CONNECT button.
The app connects with the required loudspeaker.
The app can connect to up to six loudspeakers.
20 en | Operation EVERSE 8
2022-10 | 02 | F.01U.401.530
User manual
Electro-Voice
4 Operation
4.1 Installation and charging of battery pack
The EVERSE 8 comes pre-installed with a high capacity Li-Ion battery pack. Charge the battery
for 24hours before the first use to ensure maximum battery run time and life expectancy.
To charge the battery:
4 Plug the MAINSIN while the battery is installed in the EVERSE 8 .
After the first full charge, the expected battery charge times are as follows:
– 4hours or less with no signal and the power switched off.
– 6hours or less with the power switched on and audio playing at high output levels.
The LCD will display
while the battery is charging with the power switched off. The
LCD will display
when the battery has reached full charge.
i
Notice!
Battery self-discharge
All Li-Ion batteries experience self-discharge over extended periods (several months). If a
battery sits for an extended period without being charged, the battery may fully discharge. It
may take longer than normal to fully recharge. If this occurs, allow the battery to charge a full
24hours again before using.
Inspect your loudspeaker and battery monthly and recharge the battery. This will help
maintain the batteries run time and extend its useful life.
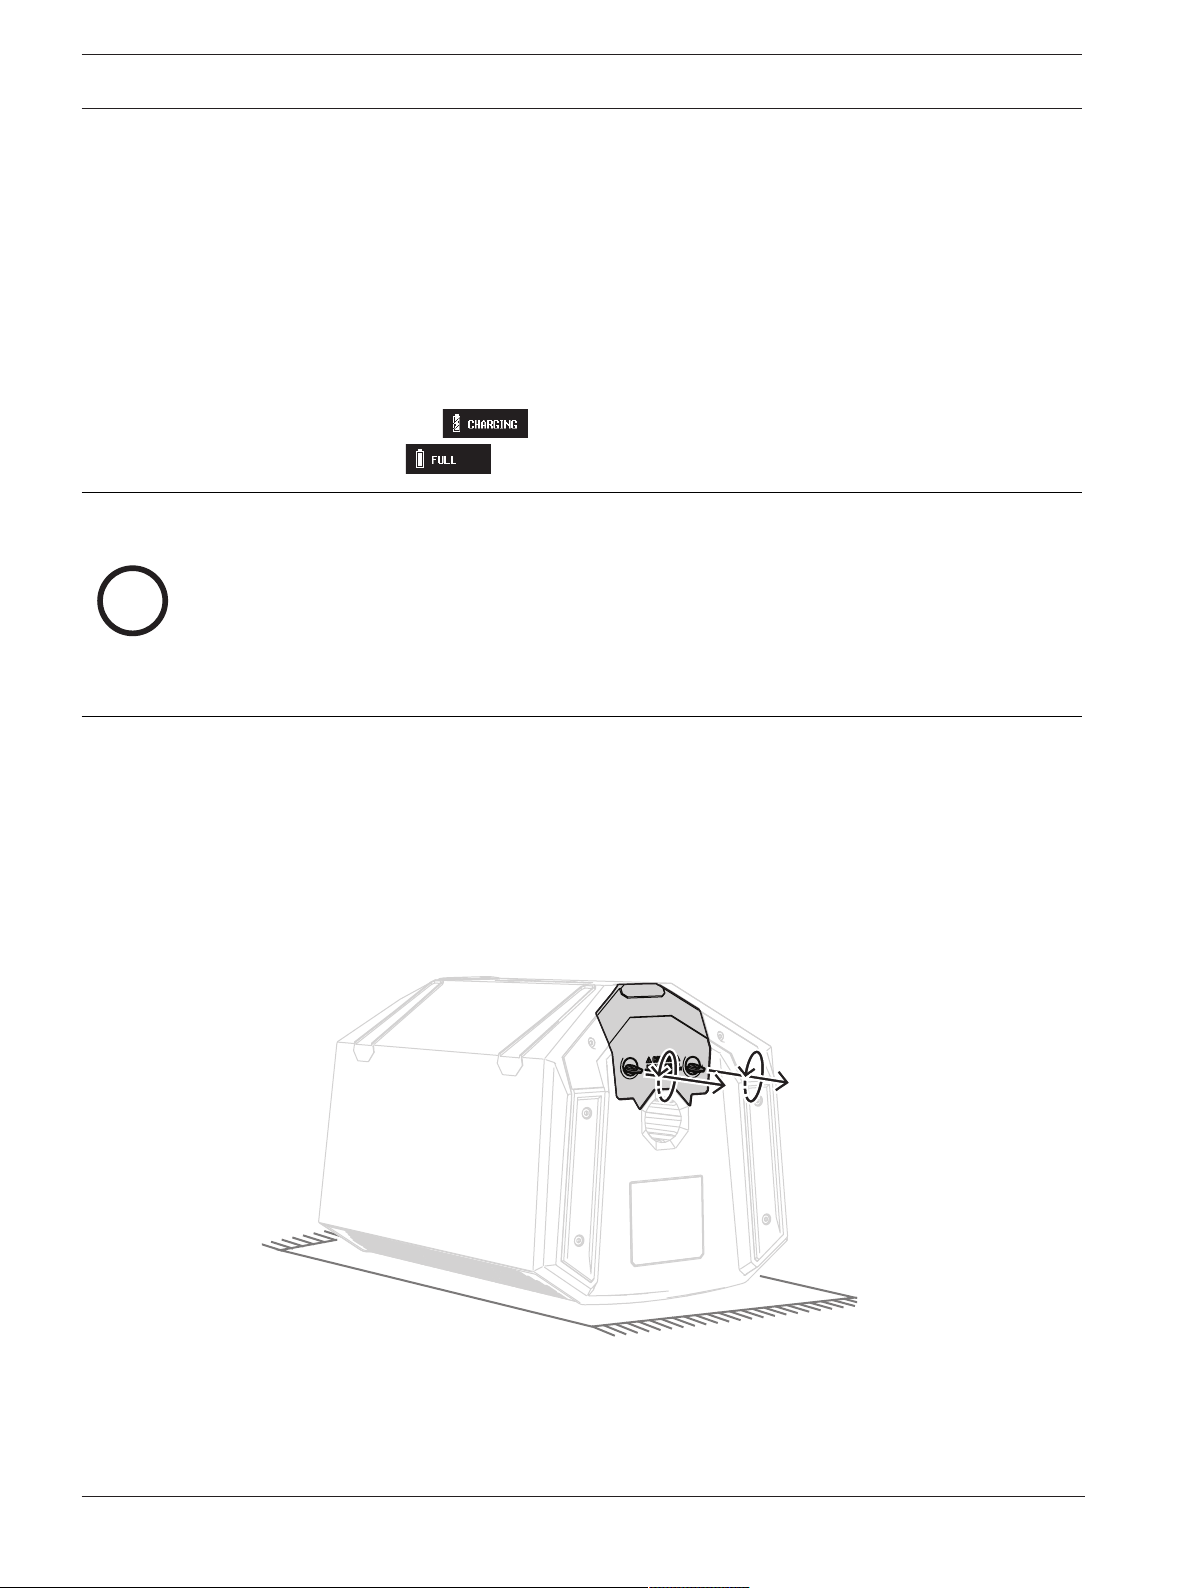
To remove and reinstall the battery for inspection or replacement:
1. Place the loudspeaker grille side down with the battery door facing you on a flat non-
scratching surface such as a workbench with a rubber mat.
2. Fully loosen the two finger tab screws by turning them counter-clockwise.
EVERSE 8 Operation | en 21
Electro-Voice
User manual
2022-10 | 02 | F.01U.401.530
3. Gently but firmly pull on the battery pack by the finger pull located on the back of the
battery door.
4. To reinstall the battery pack, follow the previous steps in reverse.
i
Notice!
Ensure that the battery door is fully seated before tightening the finger tab screws. Finger
tighten only until snug. Do not over tighten or use excessive torque. This may cause damage.
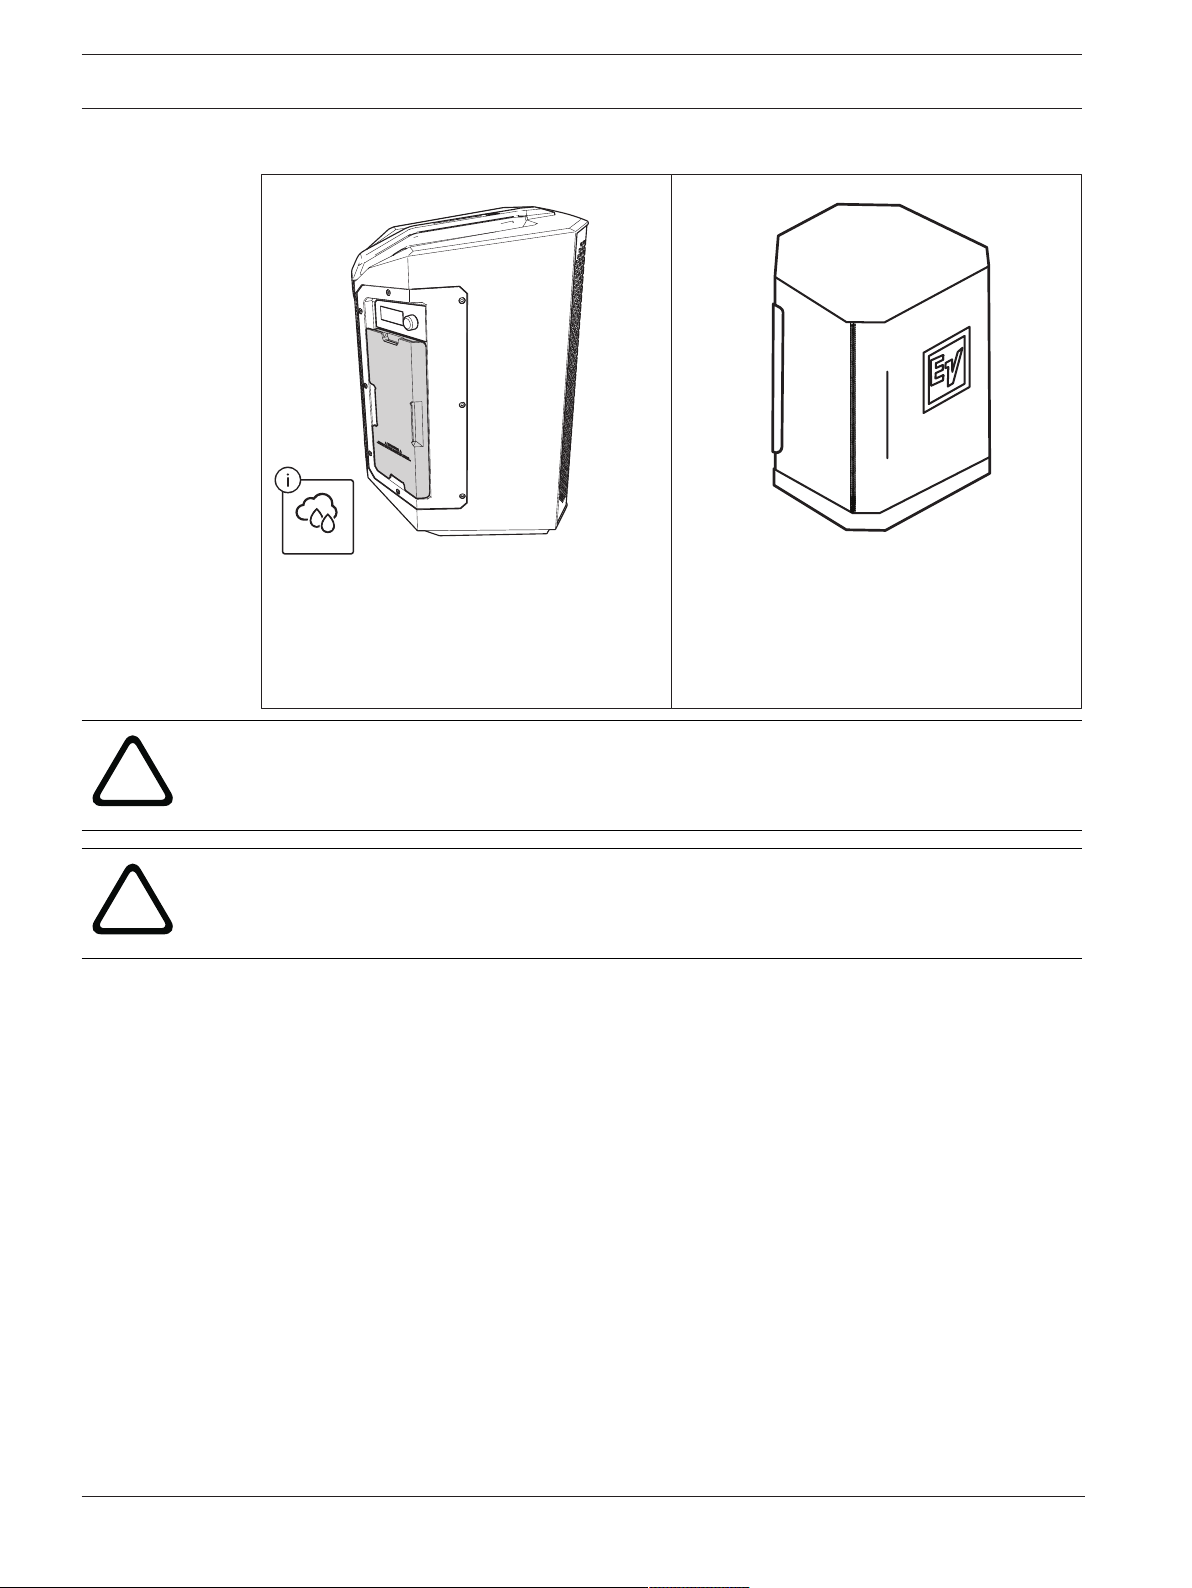
4.2 Weatherization
When the weatherized input cover is installed, the EVERSE 8 loudspeaker is designed to be
weather resistant to IP43 standards, but not waterproof. The weather resistance may be
reduced by damage, repair, improper disassembly, and regular wear and tear. Always inspect
the EVERSE 8 and accessories before and after every use. Allow the loudspeaker and
components to dry before storage or between uses.
The EVERSE 8 loudspeaker with weatherized input cover installed is intended only for
temporary use in wet or damp environments. The loudspeaker is not intended to be exposed
continuously to moisture over long periods of time. Do not expose to salt water or spray, do
not expose to chlorine or use in high chlorine environments.
22 en | Operation EVERSE 8
2022-10 | 02 | F.01U.401.530
User manual
Electro-Voice
To use the loudspeaker in wet and damp environments safely:
IP43
Use the weatherized input cover when on
battery power and when using Bluetooth®
streaming and control. Refer to
Installation of
weatherized input cover, page 25
.
Use the Electro-Voice approved accessory
rain resistant cover when on mains power, or
when any of the I/O connectors are needed.
Refer to the accessory user guide for proper
installation and use of rain resistant cover.
!
Warning!
Only use EVERSE products in the manner explicitly called out in this section. Failure to do so
may result in product failure or serious injury.
!
Warning!
Only use Electro-Voice approved accessories.
EVERSE 8 Operation | en 23
Electro-Voice
User manual
2022-10 | 02 | F.01U.401.530
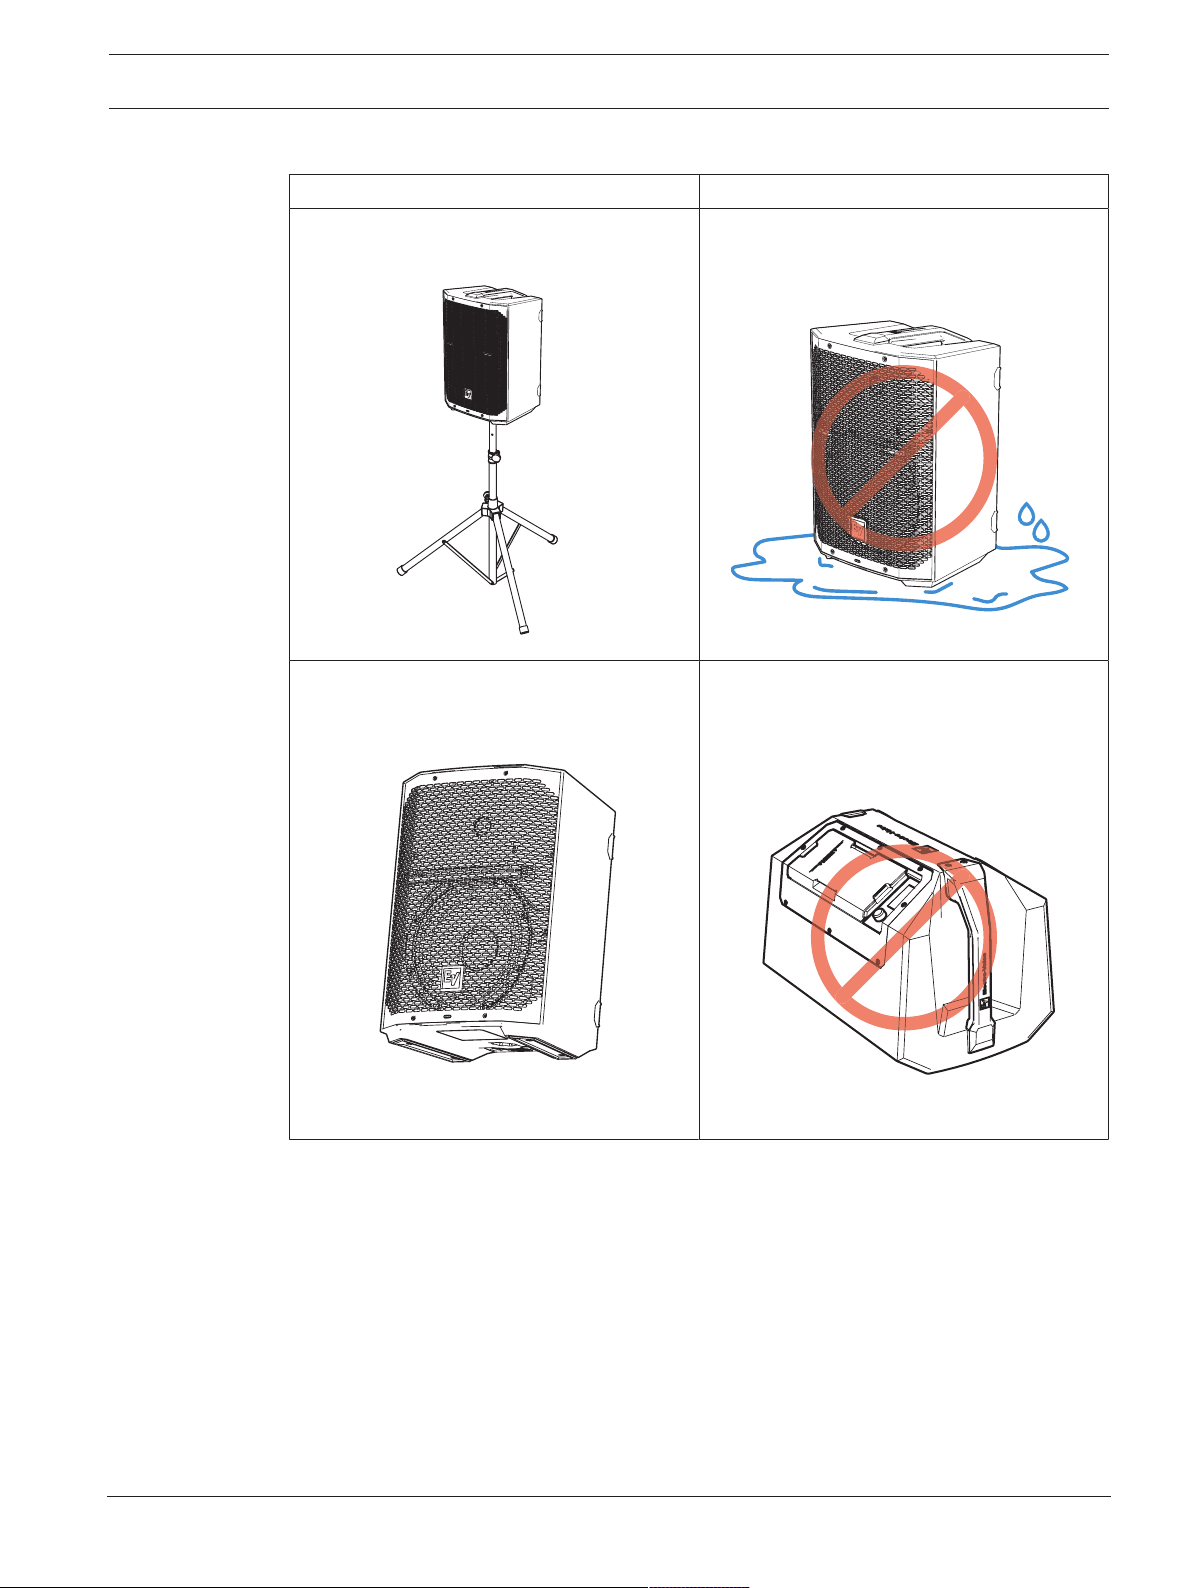
Using the loudspeaker in damp or wet environments
Correct Incorrect
Place the loudspeaker on an elevated, level,
stable surface, or on a tripod.
DO NOT place the loudspeaker in a puddle or
standing water.
Always orient the loudspeaker upright, in the
KICKBACK mode, or in the MONITOR mode.
DO NOT place or transport the loudspeaker
upside down, or on the amp panel side to
prevent water ingress.
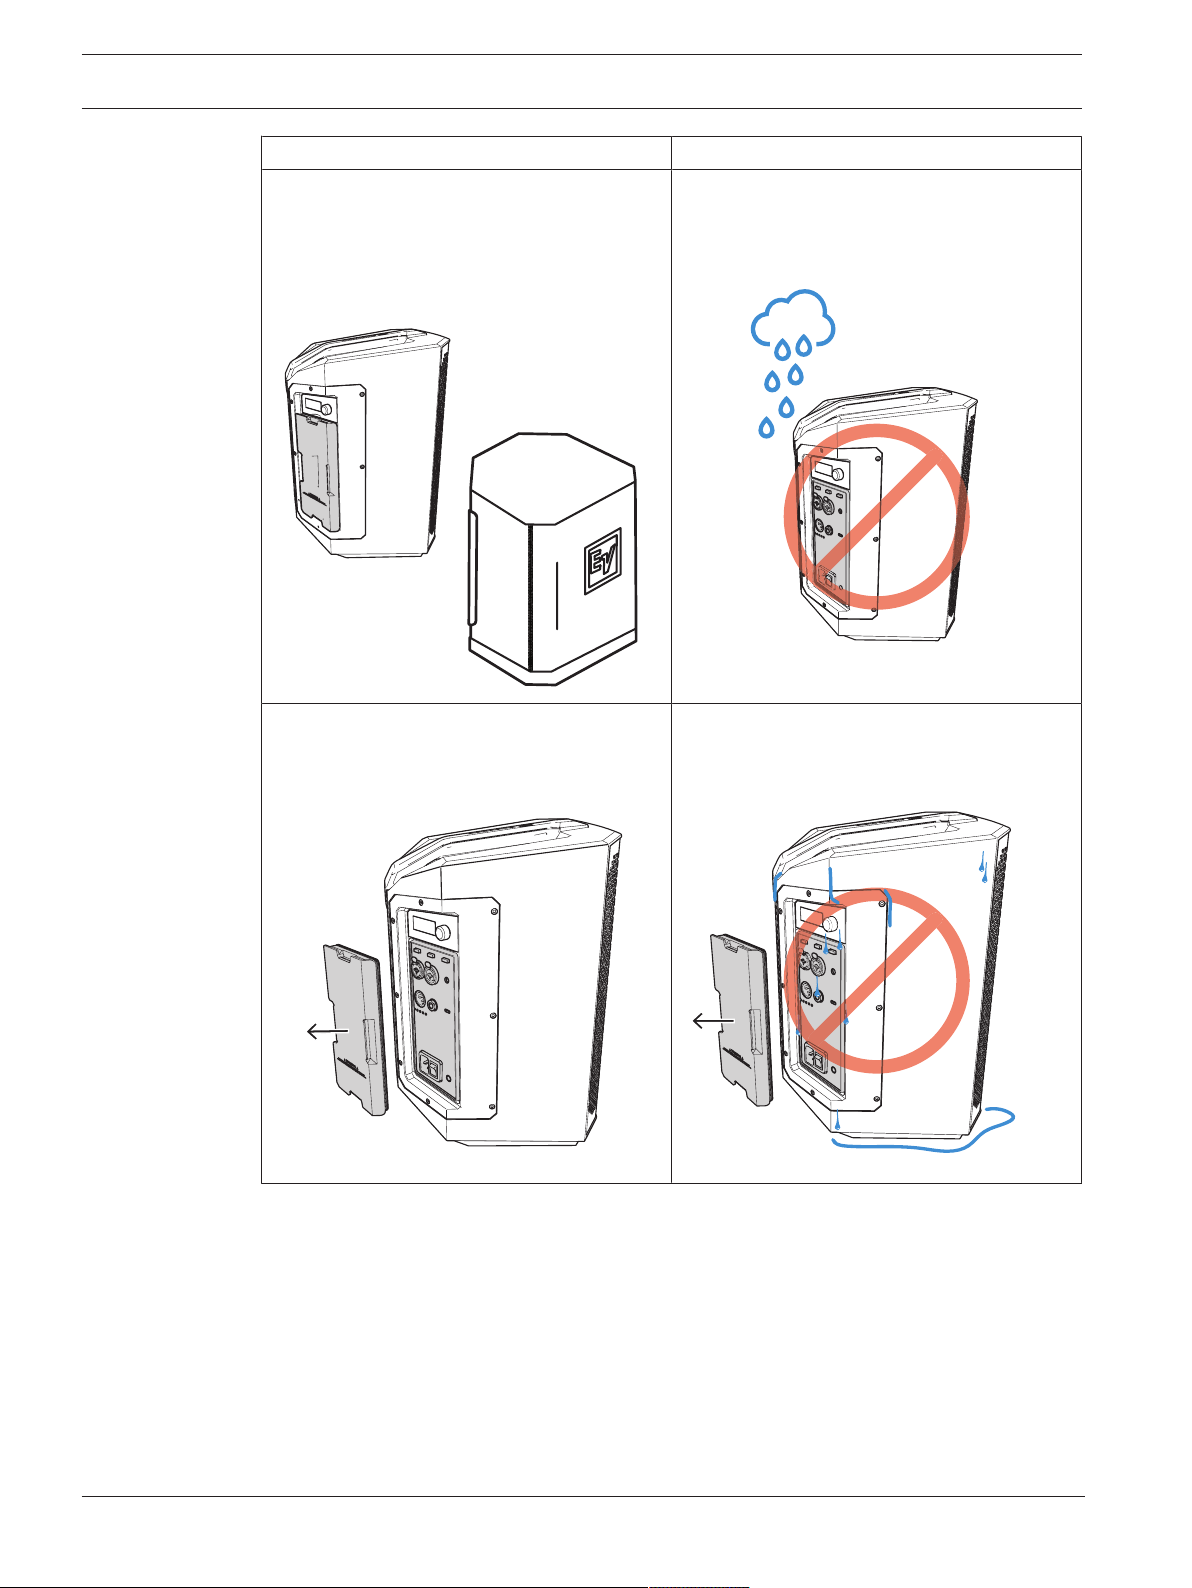
24 en | Operation EVERSE 8
2022-10 | 02 | F.01U.401.530
User manual
Electro-Voice
Correct Incorrect
Always use the supplied weatherized input
cover (refer to
Installation of weatherized
input cover, page 25
) or the Electro-Voice
approved accessory rain resistant cover in
wet or damp environments.
DO NOT use the EVERSE 8 loudspeaker in
damp or wet environments without the
weatherized input cover or the accessory rain
resistant cover.
Dry the product and the weatherized input
cover after use, prior to removing the
weatherized input cover.
DO NOT remove the weatherized input cover
while wet. If so, water may access the IO
panel.
EVERSE 8 Operation | en 25
Electro-Voice
User manual
2022-10 | 02 | F.01U.401.530
Correct Incorrect
Always ensure the battery is properly
installed when operating in a wet or damp
environment.
DO NOT use in wet or damp environments
when the battery is not installed. This may
result in moisture entering the battery bay.
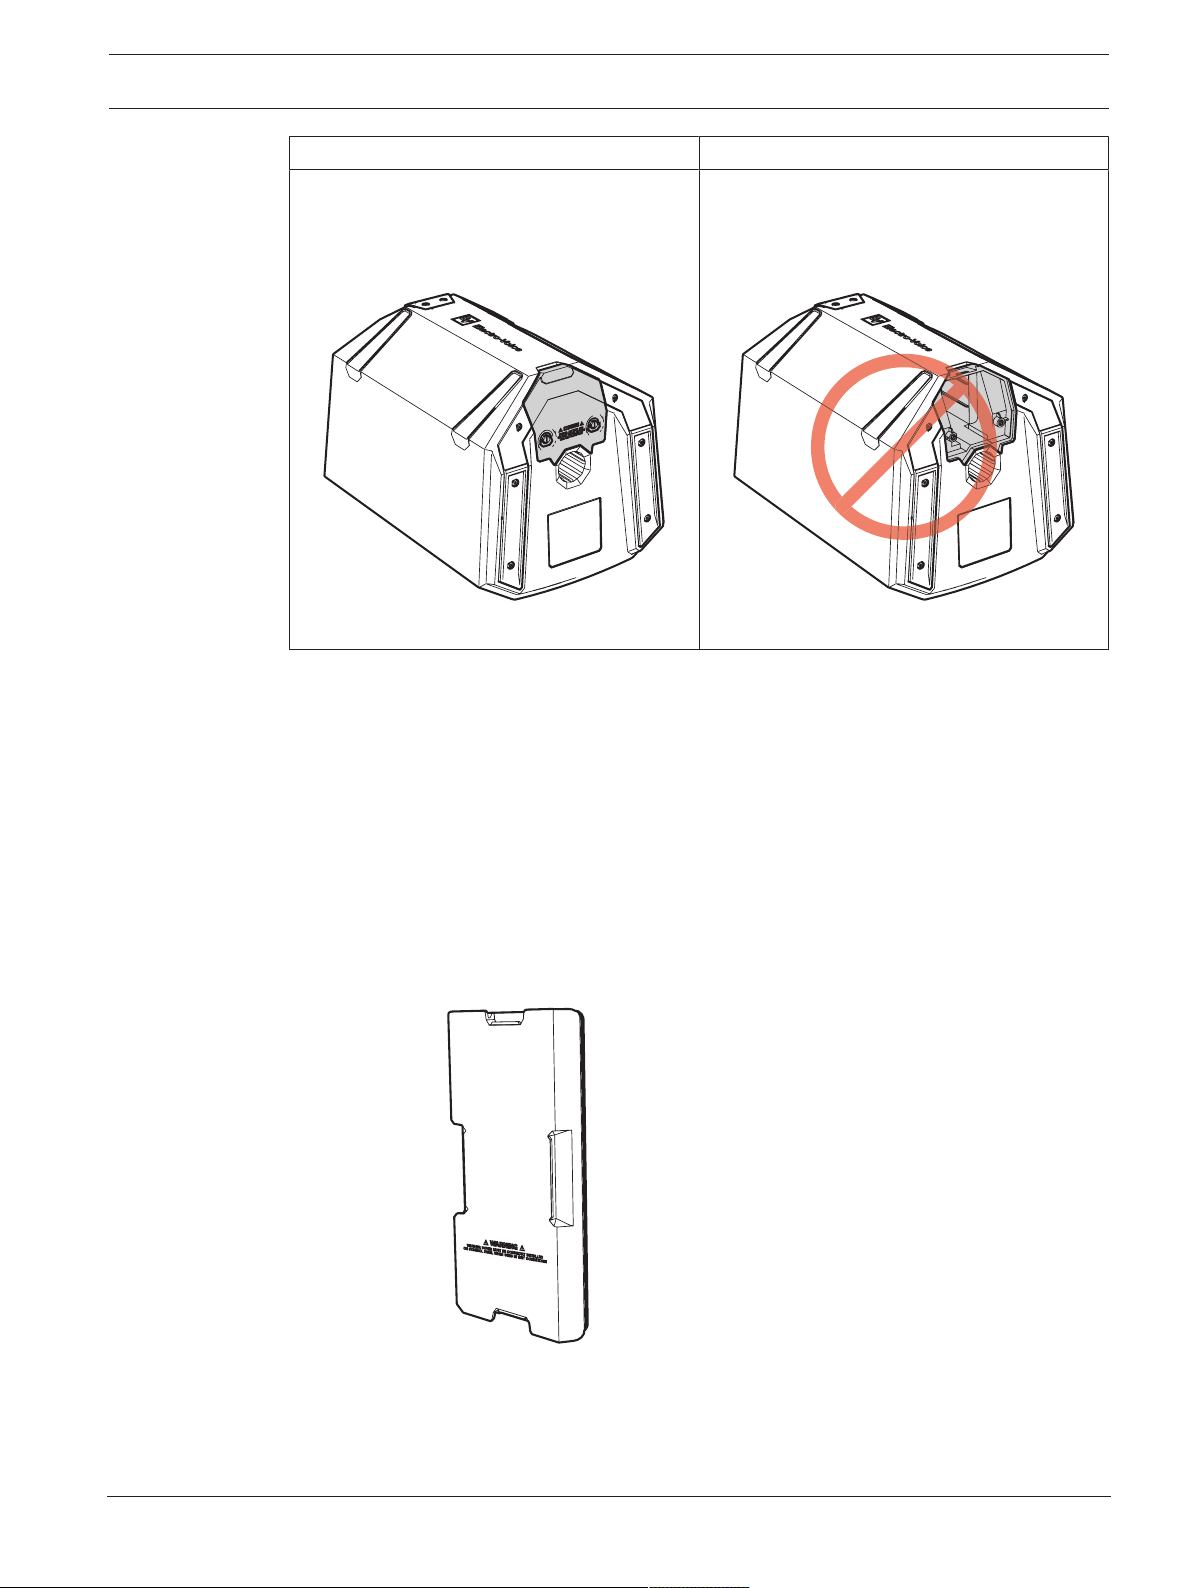
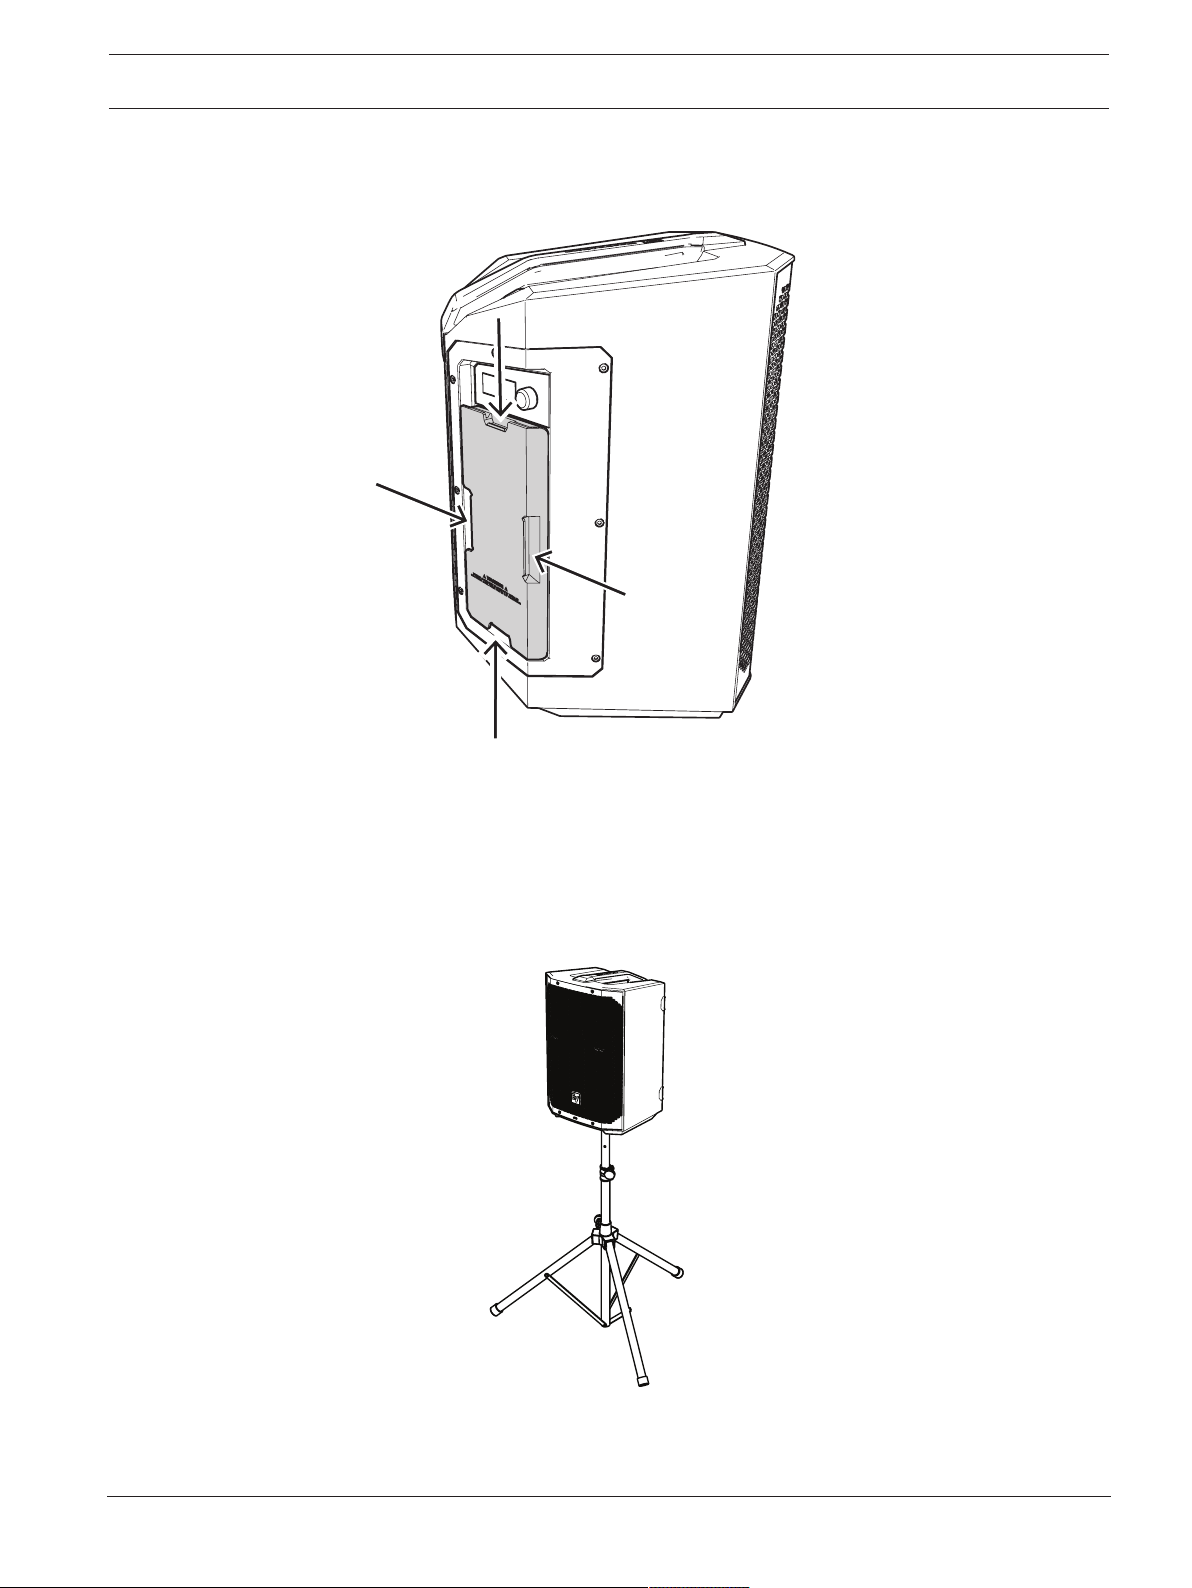
4.3 Installation of weatherized input cover
The weatherized input cover must be installed when the EVERSE 8 loudspeaker is intended to
be used in wet or damp conditions. When the weatherized input cover is installed, the EVERSE
8 loudspeaker will be water resistant to IP43 standards. The EVERSE 8 loudspeaker is able to
operate under battery power and Bluetooth® streaming for audio, and control with the
weatherized input cover installed.
To install the weatherized input cover:
1. Ensure that the weatherized input cover is fully intact, dry, clean and the gasket is in
good condition.
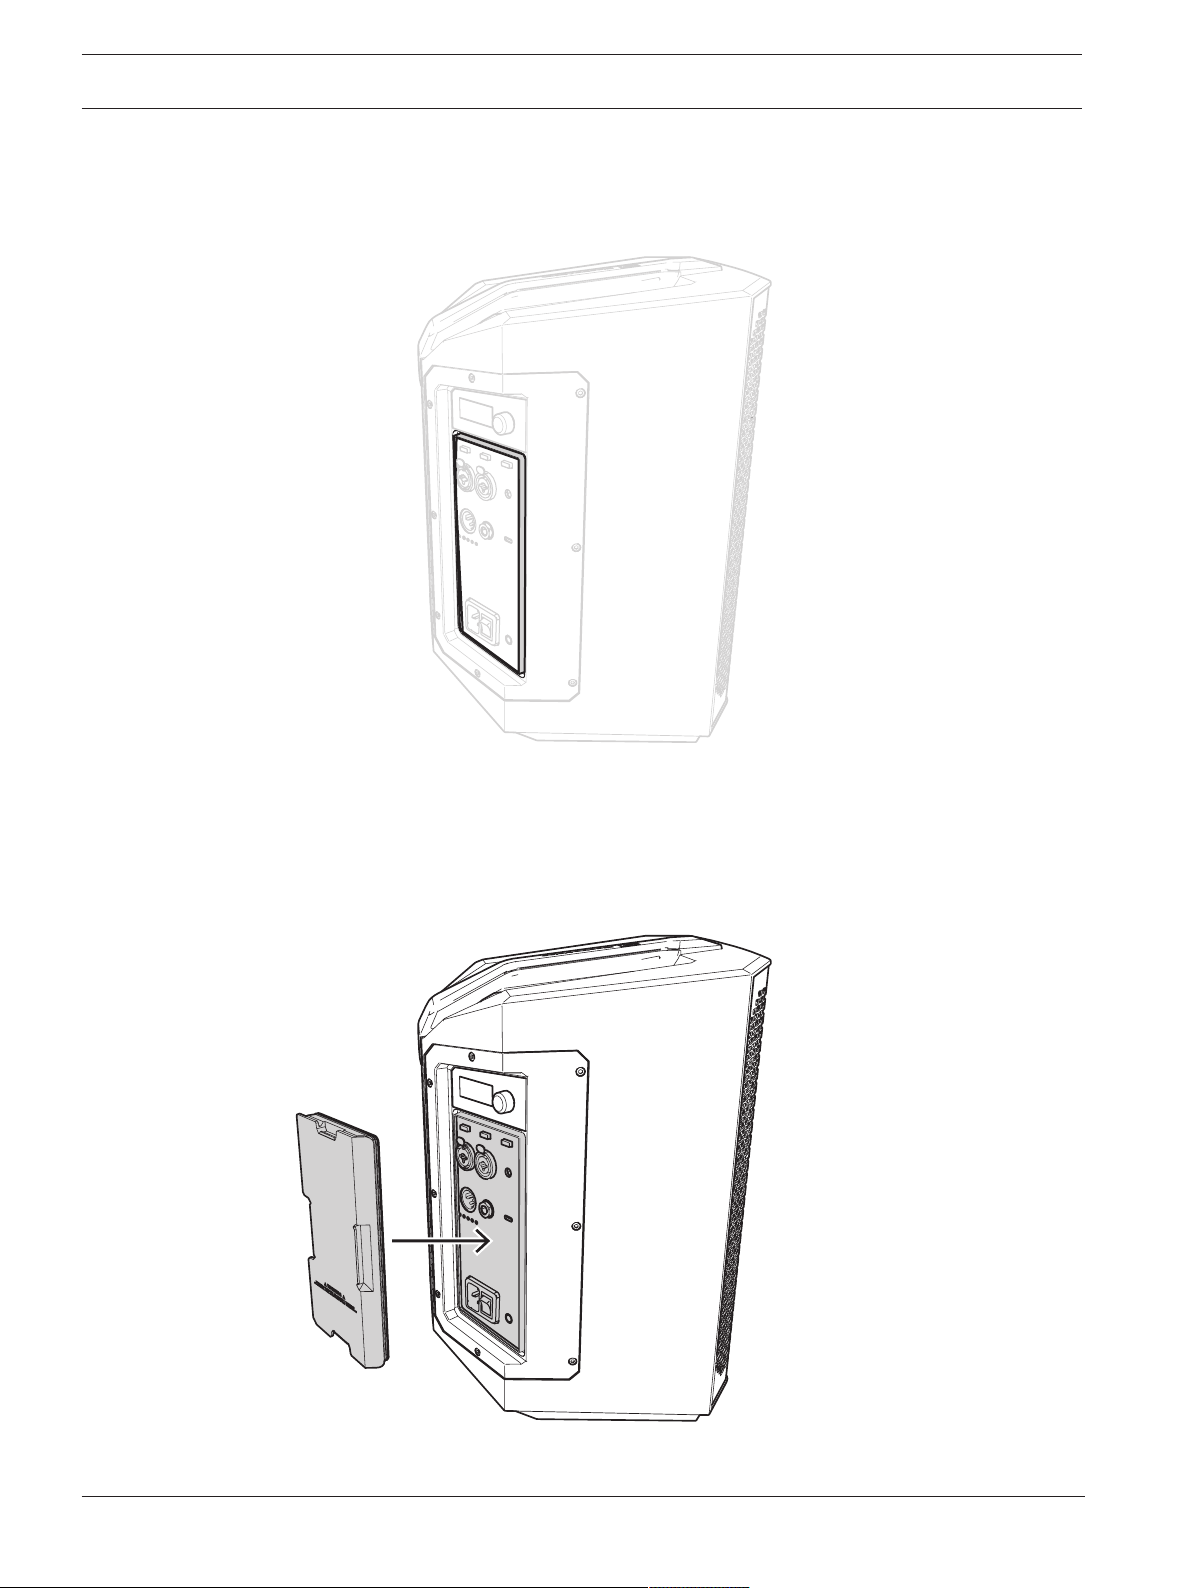
26 en | Operation EVERSE 8
2022-10 | 02 | F.01U.401.530
User manual
Electro-Voice
2. Ensure that the input panel on the EVERSE 8 loudspeaker is dry, clean, and the mating
channel around the input connectors is dry and free of any dust or debris that would
prevent a good seal.
3. Power on the loudspeaker.
4. Install the weatherized input cover by pressing it firmly in order to fully seat the gasket in
the mating channel on the amplifier input panel.
The weatherized input cover will be flush with the adjacent panels of the loudspeaker.
EVERSE 8 Operation | en 27
Electro-Voice
User manual
2022-10 | 02 | F.01U.401.530
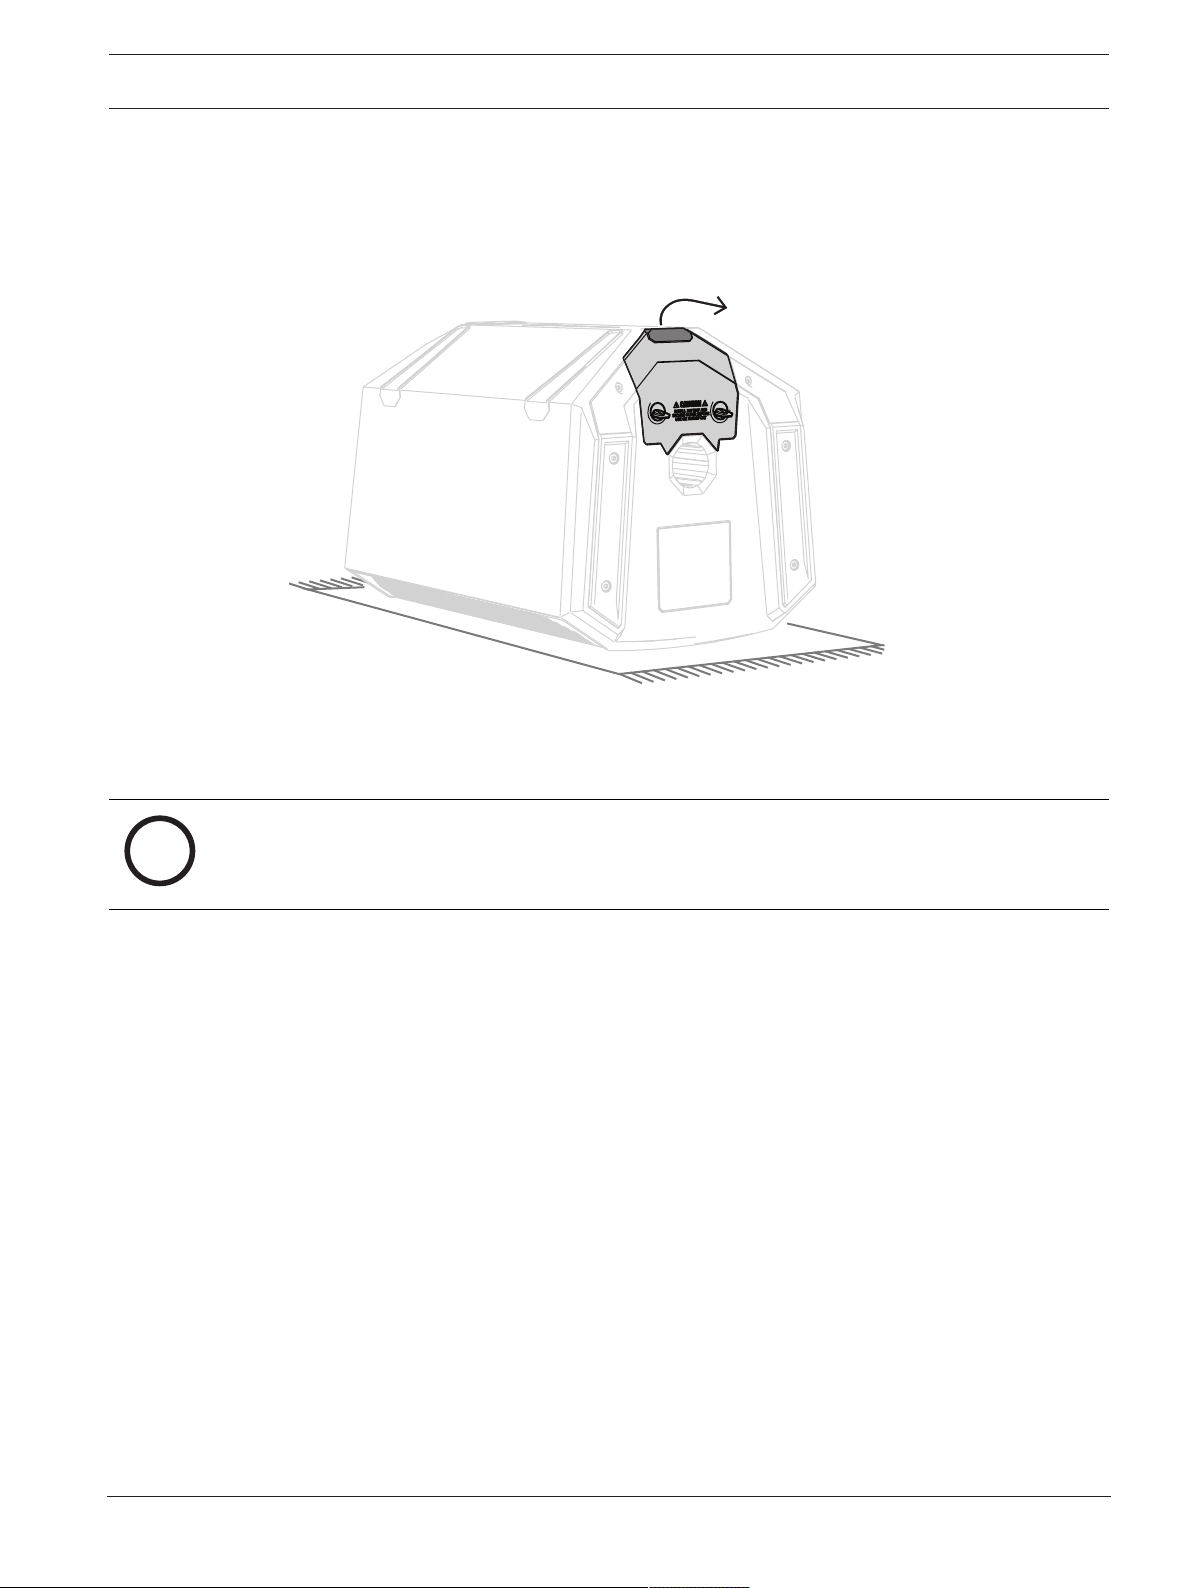
To remove the weatherized input cover:
4 Pull the cover carefully and evenly using the finger pull-tabs.
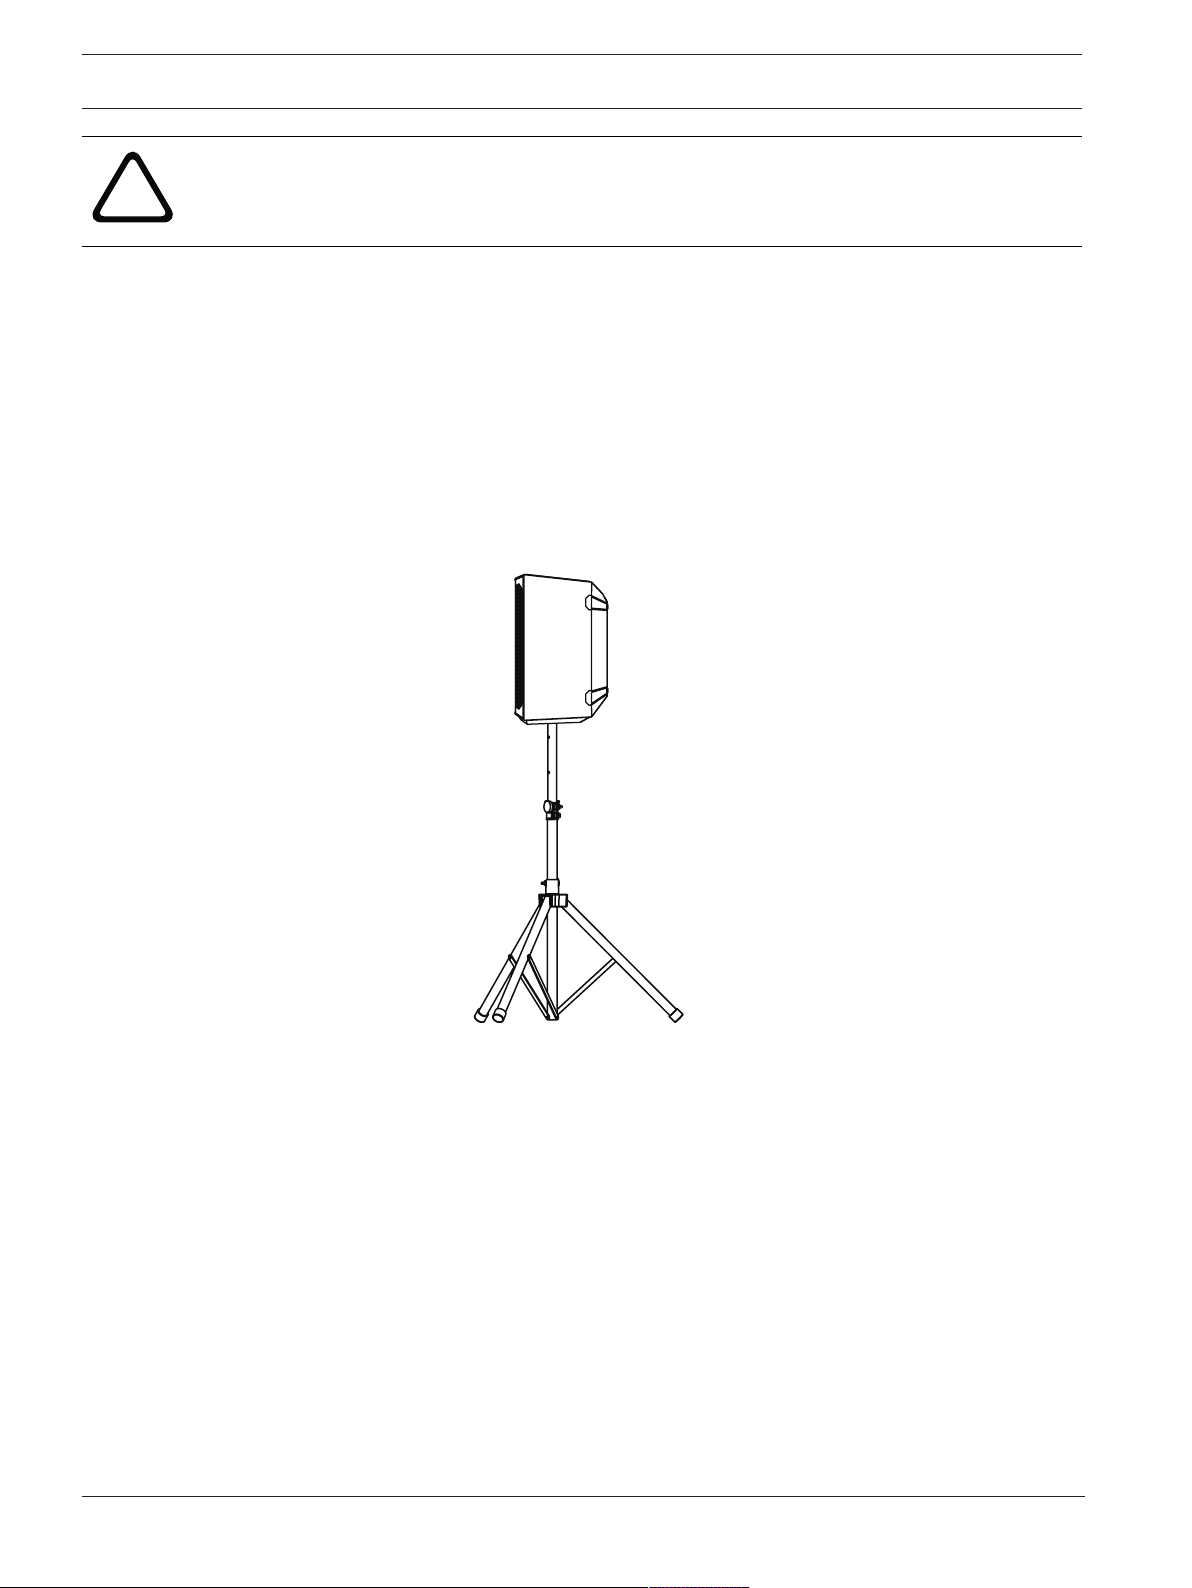
4.4 Tripod or pole mount
EVERSE 8 loudspeakers mount on a tripod stand or on a pole above a subwoofer.
Mounting a loudspeaker on a tripod stand
28 en | Operation EVERSE 8
2022-10 | 02 | F.01U.401.530
User manual
Electro-Voice
!
Caution!
Tripod is not evaluated for safety with this loudspeaker. Check the specifications of the tripod
stand to be certain it is capable of supporting the weight of the loudspeaker.
To mount a loudspeaker on a tripod stand:
1. Place the tripod stand on a level and stable surface.
1. Fully extend the legs on the tripod stand.
2. Do not compromise the tripod stand's structural integrity by trying to make the stand
taller.
3. Do not attempt to mount more than one loudspeaker on a stand designed for a single
loudspeaker.
1. Lift the loudspeaker using two hands.
2. Set the pole cup located on the bottom of the loudspeaker onto the pole.
Mounting a loudspeaker on a pole
To mount a loudspeaker on a pole:
1. Place the subwoofer on a level and stable surface.
2. Insert the M20 threaded pole into the combo pole cup on the top of the subwoofer.

EVERSE 8 Operation | en 29
Electro-Voice
User manual
2022-10 | 02 | F.01U.401.530
3. Turn the M20 threaded pole clockwise to secure the pole to the subwoofer.
4. Lift the loudspeaker using two hands.
5. Set the loudspeaker location to TRIPOD in the DSP control menu.
6. Select the corresponding LOW PASS setting for your subwoofer.
30 en | Operation EVERSE 8
2022-10 | 02 | F.01U.401.530
User manual
Electro-Voice
i
Notice!
Select LOCATION TRIPOD in menu or app for best sound.
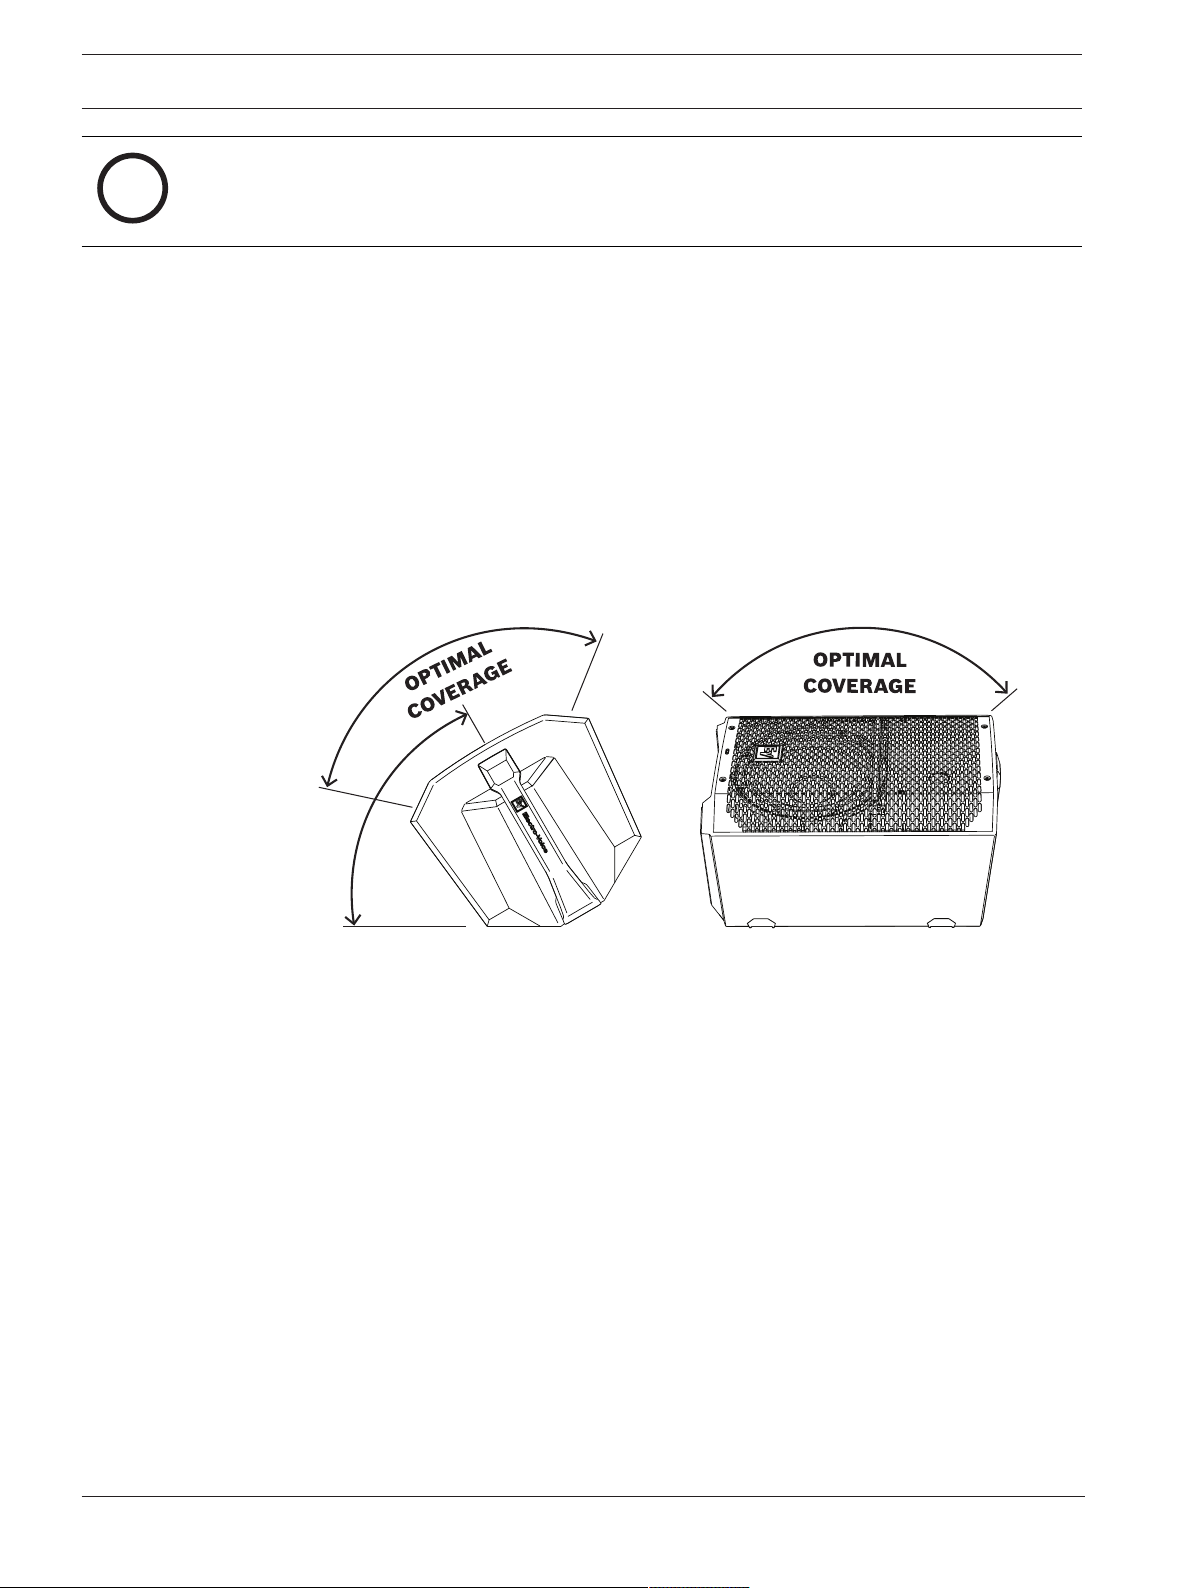
4.5 Floor monitor & kickback
EVERSE 8 loudspeakers may be used as a floor monitor or in kickback position by placing the
loudspeaker on one of the two integral monitor angles.
Setting up a loudspeaker as a floor monitor
To set up a loudspeaker as a floor monitor:
1. Place the loudspeaker on a level and stable surface.
2. Safely route cables to prevent injury to performers, production crew, and audience
members.
3. Set the loudspeaker location to MONITOR in the DSP control menu.
100º
55º
100º
Figure4.1: Optimum coverage in monitor position (side view left and front view right)
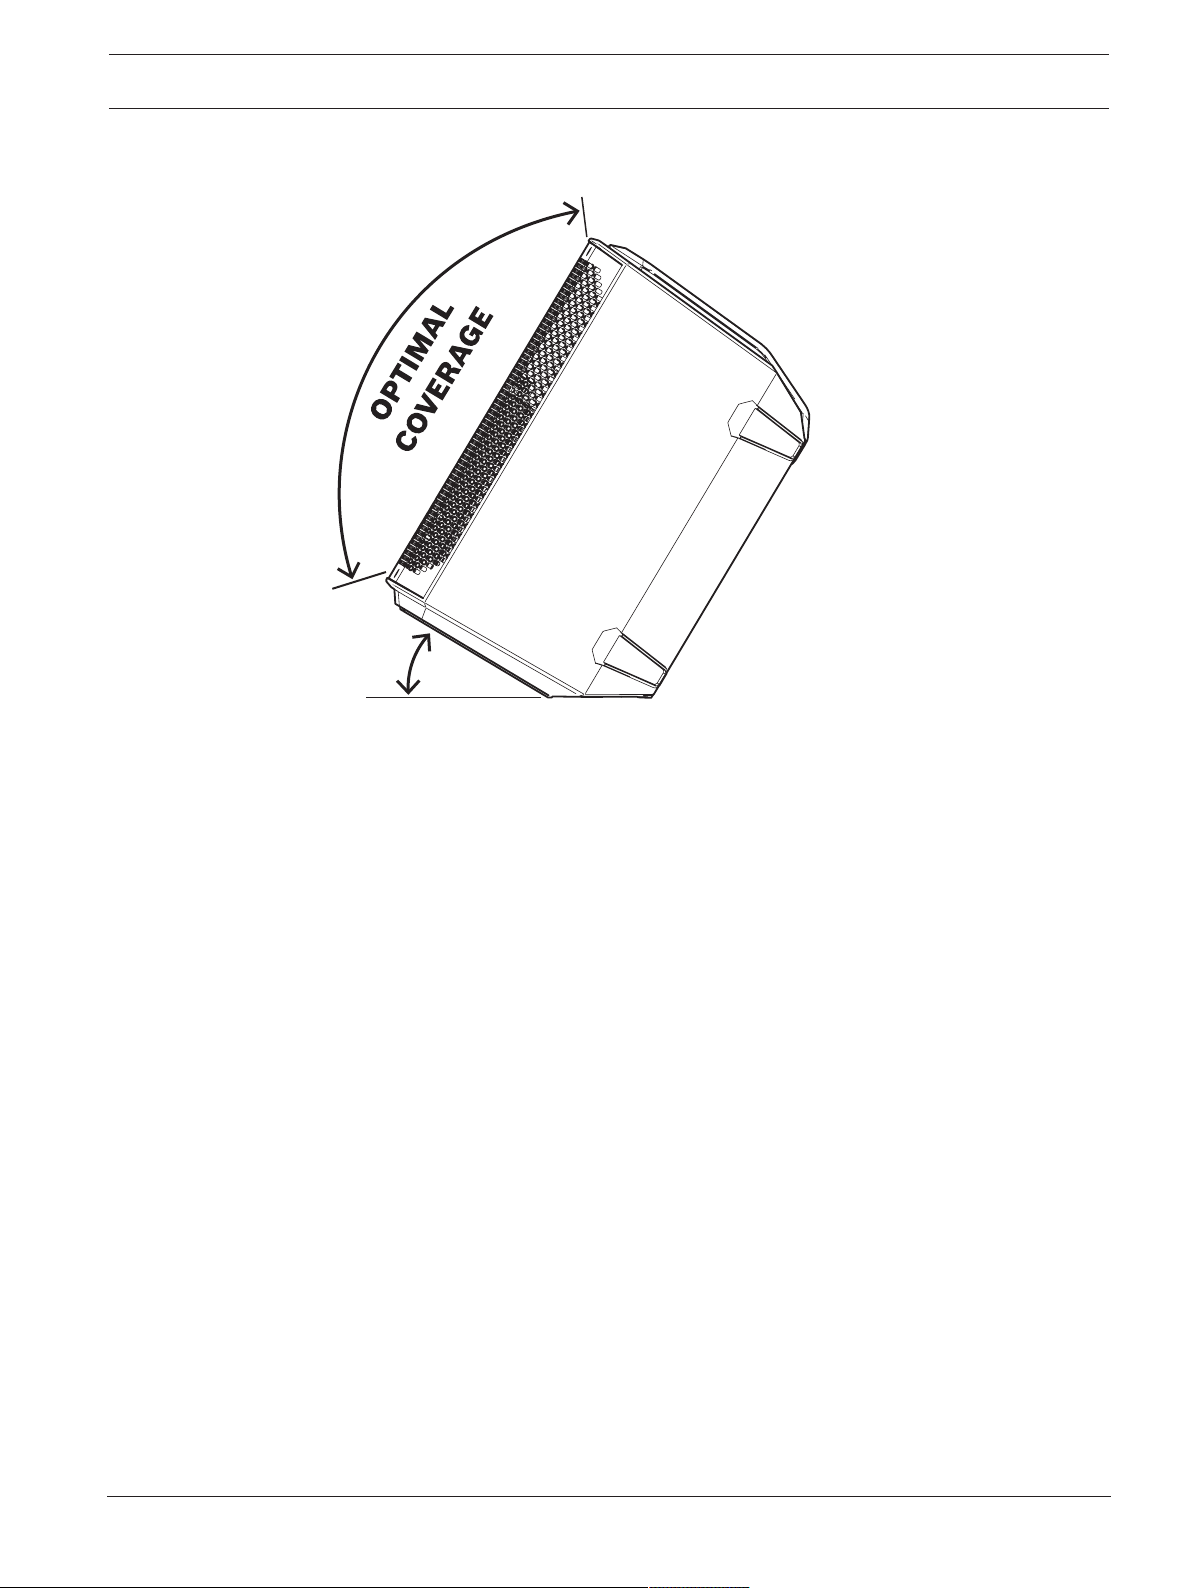
Setting up a loudspeaker in kickback position
To set up a loudspeaker in kickback position:
1. Place the loudspeaker on a level and stable surface.
2. Tilt the loudspeaker rearward to rest securely in the kickback position.
3. Safely route cables to prevent injury to performers, production crew, and audience
members.
EVERSE 8 Operation | en 31
Electro-Voice
User manual
2022-10 | 02 | F.01U.401.530
4. Set the loudspeaker location to KICKBACK in the DSP control menu.
30º
100
º
Figure4.2: Optimum coverage in kickback position.

32 en | Amplifier DSP EVERSE 8
2022-10 | 02 | F.01U.401.530
User manual
Electro-Voice
5 Amplifier DSP
5.1 Amplifier DSP controls
The amplifier has a combination of controls and connectors to ensure the most versatile
loudspeaker system.
Loudspeaker control and monitoring interface
These DSP control menu selections are available for the EVERSE 8 .
1
3
5
7
4
10
8
1
1
2
12
9
6
Figure5.1: Loudspeaker amplifier panel
1. LCD – DSP control and monitoring interface.
2. MASTER VOL - Adjusts the sound level and navigates DSP control menu.
DSP - Scroll through the menu and select the available choices. Push the MASTER VOL
knob to enter the DSP control menu.
3. Input selection soft keys - Press the soft key to select the input and access the DSP
control menu for the channel. Press the softkey a second time to deselect the channel
and return to the main DSP.
4. INPUT 1 - Balanced INPUT for the connection of signal sources like mixing consoles,
instruments, or microphones. Connections can be established using ¼-inch TRS or XLR
connectors. The XLR connector is selectable for 48V phantom power.
5. INPUT 2 - Balanced INPUT for the connection of input sources like mixing consoles, or
microphones via XLR connector or Hi-Z instrument connection via TRS.
6. INPUT 3/4 - Bluetooth® stereo INPUT for audio streaming or analog stereo INPUT via
3.5mm mini-jack.

EVERSE 8 Amplifier DSP | en 33
Electro-Voice
User manual
2022-10 | 02 | F.01U.401.530
7. MIX OUT - XLR output sends either the mix of all input signals or the stereo L or stereo R
signal to another loudspeaker or subwoofer.
8. FOOTSWITCH - ¼-inch TRS connector for connecting footswitch control to toggle FX on/
off.
9. Mobile device charging port - 5V 1.5A charging for mobile devices.
10. MAINS IN – AC connection is established via an IEC-connector.
11. POWER - Switch for power ON or OFF of the loudspeaker. The LCD screen lights up
when the power is turned ON, after approximately three seconds.
12. DC POWER JACK - 5.6mm DC power out, 12VDC 500mA for powering wireless
microphone receivers, such Electro-Voice RE3 or R300 wireless microphone receivers.
!
Warning!
The DC power jack is a power output. THIS IS NOT A CHARGING PORT. DO NOT connect a
DC power adapter or attempt to re-charge the EVERSE loudspeaker’s battery with this
connector. Doing so may cause damage to the loudspeaker and void of warranty.
5.2 System status
Normal
1
2
9
10
1
1
12
3
4
5
6
8
7
1. VOL - Indicates the master gain of the system in dB. The range is from -80dB to +10dB,
in 1dB increments.
2. INPUT1 - VU meter displays the signal level of INPUT1 into the amplifier INPUT1
connector. The display of P indicates 48V phantom power is switched on.
3. INPUT2 - VU meter displays the signal level of INPUT2 into the amplifier INPUT2
connector. The display of H indicates Hi-Z instrument connection is present on the
INPUT2 TRS connector.
4. INPUT3/4 - VU meter displays the signal level of INPUT3/4 into the amplifier from either
Bluetooth® streaming or 3.5mm mini jack connection.
5. MAIN - VU meter displays the signal level of the MAIN output.
6. DUCK - Ducking is activated on either or both INPUT1 and INPUT2.
7. AFS - Automatic feedback suppression is enabled.
8. BATTERY status - Indicates the battery level of the loudspeaker and if the battery is
charging (when MAINS is connected).
9. FUNCTION indicator - Indicates whether the system is in MIXER or BASIC mode.
10. Status display - Alternately shows the following:
1 - Indicates the selected preset number. There are five user-defined presets available.
E - Edited. Indicates the preset is not saved. When the preset is saved, the E is not
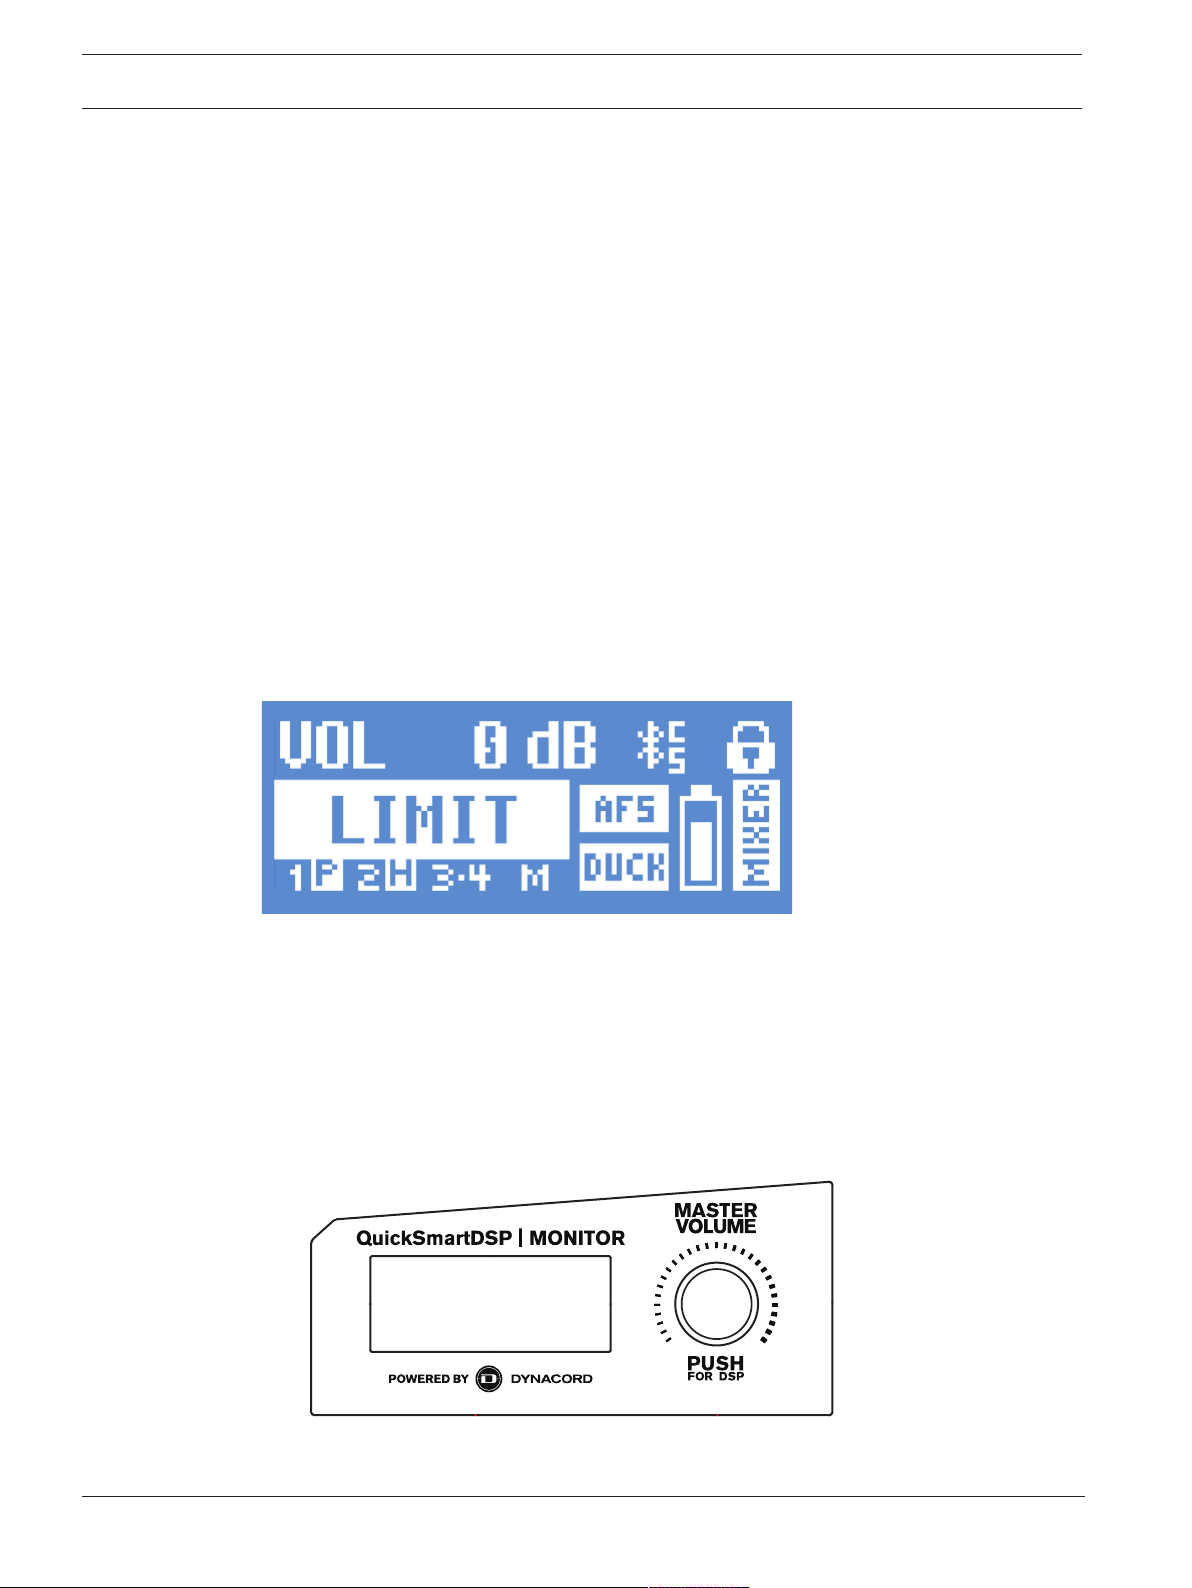
34 en | Amplifier DSP EVERSE 8
2022-10 | 02 | F.01U.401.530
User manual
Electro-Voice
displayed.
Lock status - Indicates that the LCD display and controls are locked. Press the MASTER
VOL or channel select soft key to unlock.
11. S - Audio streaming. The available options are:
OFF - DISABLED
FLASHING - PAIRING MODE (120s)
SOLID - CONNECTED
12. C - Control app. The available options are:
OFF - DISABLED
FLASHING - PAIRING MODE
SOLID - CONNECTED
System protection
System protection limiters indicate when a system is exceeding recommended usage by
indicating input CLIP or output LIMIT on the LCD display.
CLIP
CLIP indicates that the signal to the loudspeaker is too high, resulting in a clipped signal into
the loudspeaker.
If CLIP is shown:
4 Reduce the INPUT GAIN and/or the signal on the mixer or source equipment.
LIMIT
LIMIT protects the loudspeaker from short-term peaks and long-term overload, which can
cause distortion. When LIMIT is displayed on the screen, the limiter is active.
If the LIMIT indication is shown often or continuously:
4 Reduce the output volume (MASTER VOL). This is strongly recommended.
5.3 DSP controls
An integrated DSP control menu allows the user to select multiple DSP system settings on the
loudspeaker.

EVERSE 8 Amplifier DSP | en 35
Electro-Voice
User manual
2022-10 | 02 | F.01U.401.530
Accessing the DSP control menu
To access the DSP control menu:
1. Push the MASTER VOL knob.
The DSP control menu appears.
2. Using the MASTER VOL knob, scroll through the menu items.
3. Push the MASTER VOL knob to select the menu item you want to modify.
The focus moves to the parameters on the right side of the DSPcontrol menu.
4. Using the MASTER VOL knob, scroll through the parameters.
5. Push the MASTER VOL knob to confirm the selected parameter.
The setting is saved. The focus returns to the menu items on the left side of the
DSPcontrol menu.
6. Repeat steps 2 through 5 to modify additional DSP and system settings.
7. Select EXIT to return to the home screen.
5.3.1 Loudspeaker DSP control menu
The loudspeaker DSP control menu selections are available for the EVERSE loudspeakers.
DSP control menu for MIXER mode
VOLUME 0dB (Default)
MUTE, -80dB -
+10dB (1dB)
EXIT
FUNCTION MIXER (Default)
BASIC
MODE MUSIC (Default)
LIVE
SPEECH
CLUB
MAIN LEVEL 0dB (Default)
MUTE, -80dB -
+10dB (1dB)
LOCATION TRIPOD (Default)
KICKBACK
MONITOR
SUB OFF (Default)
100Hz
120Hz
150Hz
ELX200-12SP
ELX200-18SP

36 en | Amplifier DSP EVERSE 8
2022-10 | 02 | F.01U.401.530
User manual
Electro-Voice
EKX-15SP
EKX-18SP
TREBLE 0dB (Default)
-12dB - +6dB
MID 0dB (Default)
-12dB - +6dB
BASS 0dB (Default)
-12dB - +6dB
MAIN PEQ BACK
ENABLE ALL ON (Default)
OFF
RESET ALL NO (Default)
YES
PEQ # 1 (Default)
1 - 7
BYPASS OFF (Default)
ON
TYPE PEQ (Default)
LOW SHELF
HI SHELF
LOW PASS
HI PASS
Q
(PEQ only)
0.7 (Default)
0.5 - 10.0
FREQ 120Hz (Default)
50 - 20kHz
GAIN
(PEQ, LOW SHELF
and HI SHELF only)
0dB (Default)
-12dB - +6dB
RESET NO (Default)
YES
BACK
MAIN GEQ 63Hz 0dB (Default)
-12dB - +12dB
(1dB)

EVERSE 8 Amplifier DSP | en 37
Electro-Voice
User manual
2022-10 | 02 | F.01U.401.530
160Hz 0dB (Default)
400Hz -12dB - +12dB
(1dB)
1kHz 0dB (Default)
2.5kHz -12dB - +12dB
(1dB)
6kHz 0dB (Default)
12kHz -12 dB - +12dB
(1dB)
RESET RESET ALL BANDS?
YES/NO
BACK
FX 01 (Default)
00 to 30
FX Delay
(FX 20 only)
427ms (Default)
30ms - 550ms
FX ENABLE ON (Default)
OFF
AFS (automatic feedback suppression) OFF (Default)
ON
MIX OUT L+R (Default)
L
R
BLUETOOTH BACK
BLUETOOTH ON (Default)
OFF
ID (4-digit unique device number)
CONTROL PAIR
AUDIO PAIR
LINK SPEAKERS
LINK ROUTE L+R (Default)
L
R
BACK
LED ON (Default)

38 en | Amplifier DSP EVERSE 8
2022-10 | 02 | F.01U.401.530
User manual
Electro-Voice
OFF
LIMIT
DISPLAY BACK
LCD DIM ON (Default)
OFF
BRIGHT 5 (Default)
1 - 10
CONTRAST 5 (Default)
1 - 10
BACK
STORE BACK, 1, 2, 3, 4, 5,
BACK
RECALL BACK, 1, 2, 3, 4, 5, 6
(Default), BACK
STANDBY 15min (Default)
15min - 60min, OFF
RESET DEFAULT SETTINGS? NO (Default)
YES
ERASE USER
PRESETS?
NO (Default)
YES
INFO [FIRMWARE
VERSION]
©2021 Electro-Voice
EXIT
Table5.1: Loudspeaker DSP control menu MIXER mode
DSP control menu for BASIC mode
VOLUME 0dB (Default)
MUTE, -80dB -
+10dB (1dB)
EXIT
FUNCTION MIXER (Default)
BASIC
MODE MUSIC (Default)

EVERSE 8 Amplifier DSP | en 39
Electro-Voice
User manual
2022-10 | 02 | F.01U.401.530
LIVE
SPEECH
CLUB
LOCATION TRIPOD (Default)
KICKBACK
MONITOR
SUB OFF (Default)
100Hz
120Hz
150Hz
ELX200-12SP
ELX200-18SP
EKX-15SP
EKX-18SP
DELAY OFF (Default)
0.1m - 100.0m
TREBLE 0dB (Default)
-12dB - +6dB
MID 0dB (Default)
-12dB - +6dB
BASS 0dB (Default)
-12dB - +6dB
MIX OUT L+R (Default)
L
R
BLUETOOTH BACK
BLUETOOTH ON (Default)
OFF
ID (4-digit unique device number)
CONTROL PAIR
AUDIO PAIR
LINK SPEAKERS
BACK
LED ON (Default)

40 en | Amplifier DSP EVERSE 8
2022-10 | 02 | F.01U.401.530
User manual
Electro-Voice
OFF
LIMIT
DISPLAY BACK
LCD DIM ON (Default)
OFF
BRIGHT 5 (Default)
1 - 10
CONTRAST 5 (Default)
1 - 10
BACK
STORE BACK, 1, 2, 3, 4, 5,
BACK
RECALL BACK, 1, 2, 3, 4, 5, 6
(Default), BACK
STANDBY 15min (Default)
15min - 60min, OFF
RESET DEFAULT SETTINGS? NO (Default)
YES
ERASE USER
PRESETS?
NO (Default)
YES
INFO [FIRMWARE
VERSION]
©2021 Electro-Voice
EXIT
Table5.2: Loudspeaker DSP control menu BASIC mode
EXIT menu
The EXIT menu is used to return to the home screen.
i
Notice!
The display returns to the home screen after 30seconds of inactivity.
FUNCTION menu
The FUNCTION menu is used to configure between MIXER and BASIC functions:
– BASIC - provides input and output gain controls, 3-band EQ, and system delay for
simplified audio setups or used as satellite or R-channel stereo setup.
– MIXER - provides full access and control of the mixer.

EVERSE 8 Amplifier DSP | en 41
Electro-Voice
User manual
2022-10 | 02 | F.01U.401.530
MODE menu
The MODE menu is used to configure the type of sound the loudspeaker delivers.
Available options for this selection are: MUSIC, LIVE, SPEECH and CLUB.
– MUSIC - is used for recorded music playback and electronic dance music applications.
– LIVE – is used for live sound applications.
– SPEECH – is used for spoken word applications.
– CLUB – is used for recorded electronic music playback.
The default is MUSIC.
LOCATION menu
The LOCATION menu is used to optimize the loudspeaker for different boundaries.
Available options for this selection are: TRIPOD, KICKBACK, MONITOR.
– TRIPOD - is used when the loudspeaker is placed on a tripod stand or placed on a pole.
– KICKBACK - is used when the loudspeaker is placed on the angled rear kickback position.
This setting compensates for the amount of low frequency boost created by placing the
loudspeaker on a level and stable flat surface.
– MONITOR - is used when the loudspeaker is placed on the angled monitor panel in
monitor position. This setting compensates for the amount of low frequency boost
created by placing the loudspeaker on a level and stable flat surface.
The default is TRIPOD.
SUB menu
The SUB menu is used to select a high pass frequency for use with a subwoofer.
Available options for this selection are: OFF, 100Hz, 120Hz, 150Hz, ELX200-12SP,
ELX200-18SP, EKX-15SP and EKX-18SP. The 100Hz, 120Hz, and 150Hz choices are generic
high pass settings for use with other subwoofers. The ELX200-12SP, ELX200-18SP, EKX-15SP
and EKX-18SP settings are specifically optimized for subwoofers by including delay for best
summation.
The default is OFF.
TREBLE control
The TREBLE control is used to adjust the high frequency performance of the loudspeaker for
different applications or personal preference. The parameter controls a high shelving filter.
The default is 0dB.
MID control
The MID control is used to adjust the midrange frequency performance of the loudspeaker for
different applications or personal preference.
The default is 0dB.
BASS control
The BASS control is used to adjust the low frequency performance of the loudspeaker for
different applications or personal preference. The parameter controls a low shelving filter.
The default is 0dB.
MAIN PEQ menu
The MAIN PEQ is used to adjust the frequency response of the loudspeaker for different
applications or personal preference. There are seven equalization filters available.
The filter type is selectable between the following:
PEQ - Parametric Equalization Filters shape the sound using peak/dip bell shaped filters which
have three controls.
– Q - Quality Factor defines the bandwidth width of the filter. A lower Q provides a wider
bandwidth and a higher Q provides a narrower bandwidth.
– FREQ - selects the center frequency of the EQ filter.

42 en | Amplifier DSP EVERSE 8
2022-10 | 02 | F.01U.401.530
User manual
Electro-Voice
– GAIN - sets the amount of increase or reduction of the equalization filter.
LOW/HI SHELF - Shapes the sound using a shelving type filter that can be applied to the low
frequency or high frequency response using two controls:
– FREQ - sets the center frequency of the filter. For the LOW SHELF filter the GAIN of the
filter tapers off above the frequency selected. For the HIGH SHELF filter the GAIN of the
filter tapers off below the frequency selected.
– GAIN - sets the amount of increase or reduction of the signal below or above the FREQ
setting.
LOW/HI PASS - Pass band filters that shape the sound by only passing signal above or below
the selected frequency.
– FREQ - sets the corner frequency for the pass band filter. For HI PASS filters all
frequencies above the selection will be passed through. Frequencies below the setting
will be tapered off. For LOW PASS filters all frequencies below the selection will be
passed through. Frequencies above the selection will be tapered off.
MAIN GEQ menu
The MAIN GEQ menu is used to adjust the frequency response of the loudspeaker for
different applications or personal preference. There are seven different EQ filters available
centered at the following frequencies: 63, 160, 400, 1.0K, 2.5K, 6.0K & 12K Hz. The filter is
also independent of the MAIN GEQ setting if AUX OUT is set to MAIN MIX.
The range of each filter is -12dB to +12dB.
The default value for each filter is 0dB.
FX & FX ENABLE
The FX control is used to select the desired effect (e.g. reverb, chorus, delay, etc.) to apply to
the FX send. The FX send level is independently controlled in the INPUT1 and INPUT2 FX
control. The FXENABLE turns ON or OFF the effect globally. FXENABLE can be toggled with
a footswitch.
AFS (automatic feedback suppression)
The 12-band automatic feedback suppression (AFS) can be engaged to reduce unwanted
feedback frequencies when microphones or instruments with pickups are used. Feedback
occurs when sound from the loudspeaker enters the microphone or pickup and is amplified by
the loudspeaker and played back again. High levels or extended periods of feedback can
damage hearing and equipment.
Available options for this selection are OFF and ON.
Reducing feedback
To reduce feedback:
1. Set the loudspeaker and microphone or instrument according to your performance.
Follow appropriate microphone placement and use practices:
– Do not place the microphone directly in front of the loudspeaker. Refer to the user
manual of your microphone to know the pickup and rejection patterns of your
microphone.
– Avoid placing music stands, tablets, or other large flat objects near the microphone such
that they can cause audio reflections into the microphone.
– Use proper microphone technique when speaking, singing or placing by an instrument to
avoid using excessive input gain. For example, hold the microphone close to your mouth
when performing.
– Engage appropriate input channel PRESET for your application: LOWCUT80Hz,
LOWCUT120Hz, VOCALMIC, VOICEFILTER, SPEECH, ACOUSTICGUITAR, etc. Refer
to
INPUT DSP control menu, page 46
.

EVERSE 8 Amplifier DSP | en 43
Electro-Voice
User manual
2022-10 | 02 | F.01U.401.530
– Do not cup the microphone element with your hands while speaking or singing. Only hold
the microphone by the handle or body as per the microphone manufacturer's
recommendation.
2. Enable automatic feedback suppression (AFS) in the DSP control menu or FX section of
the QuickSmart Mobile app. This will enable AFS on INPUT1 and INPUT2.
3. Slowly turn up the output of the loudspeaker, and begin sound checking your microphone
or instrument.
4. As you hear feedback, allow a few seconds for the automatic feedback suppression (AFS)
to detect and to reduce the feedback.
5. Continue sound check until no additional feedback tones are generated.
MIX OUT menu
The MIX OUT menu is used to select which signal(s) should be output at MIX OUT and which
signal should be delivered by the loudspeaker.
– L+R - The left and right signals of all inputs are summed. The sum is output at MIX OUT
and is delivered by the loudspeaker (default).
– L - Only the panned left signal of all inputs is output at MIX OUT. The loudspeaker will
deliver only the right signal.
– R - Only the panned right signal of all inputs is output at MIX OUT. The loudspeaker will
deliver only the left signal.
BLUETOOTH menu
The BLUETOOTH menu is used to set the Bluetooth® functionality of the loudspeaker.
ON/OFF - The ON/OFF menu controls whether Bluetooth® functionality is enabled or disabled
on the loudspeaker.
CONTROL PAIR - The CONTROL PAIR menu is used to enable the QuickSmart Mobile app
wireless control and monitoring application. Available options for this selection are: ON or
OFF.
The default is OFF.
AUDIO PAIR - The AUDIO PAIR menu is used to stream audio from your Bluetooth® enabled
device to the loudspeaker system. Available options for this selection are: PAIRING, ON or
OFF.
The default is OFF.
LINKSPEAKERS
The LINKSPEAKERS function allows two EVERSE loudspeakers to be linked over Bluetooth®
in true wireless stereo.
To link two EVERSE loudspeakers:
1. Pair one of the EVERSE loudspeakers via Bluetooth® to a mobile device. Refer to
Pairing
the QuickSmart Mobile app, page 17
for pairing instructions.
2. In both EVERSE loudspeakers, navigate to the BLUETOOTH menu in the Main DSP menu.
3. In both EVERSE loudspeakers, select LINKSPEAKERS.
The LCD display will show LINKINGSPEAKERS... while establishing connection between
both EVERSE loudspeakers. When the connection is established, the menu will display
UNLINKSPEAKERS.
In the BLUETOOTH menu below the LINKING SPEAKERS, the stereo channel selection
will appear.
4. Select the appropriate stereo channel selection for each EVERSE loudspeaker: L+R
(mono), L, or R.
Note: This is stereo image from the audience's perspective, also known as House L & R.

44 en | Amplifier DSP EVERSE 8
2022-10 | 02 | F.01U.401.530
User manual
Electro-Voice
LED menu
The LED menu shows power on and indicates limit. Available options for this selection are:
ON, OFF or LIMIT.
– ON - turns the LED on when the power switch is set to ON and system is not in standby
mode.
– OFF - turns the LED off.
– LIMIT - turns the LED off under normal operation. The LED brief blinking indicates the
limiter is activating. Short-term blinking is not critical because the integrated limiter
keeps distortion under control. Constant lighting of the LED indicates the sound is
negatively affected. If the LED is constantly lit, check the rear LCD for more information.
Reducing the output volume is strongly recommended.
The default is ON.
LCD DIM menu
The LCD DIM menu is used to dim the display when the display is idle for 30 seconds.
Available options for this selection are: ON or OFF.
The default is ON.
BRIGHT menu
The BRIGHT menu is used to determine the brightness of the LCD.
The range is 1 (darkest) to 10 (brightest).
The default is 5.
CONTRAST menu
The CONTRAST menu is used to increase or decrease the visibility of the LCD screen based
on lighting conditions.
The range is 1 (less contrast) to 10 (more contrast).
The default is 5.
STORE menu
The STORE menu allows you to create up to five customized user settings. Available options
for this selection are: BACK, 1, 2, 3, 4, and 5.
i
Notice!
The customized user setting name can contain a combination of alphanumeric characters
including spaces. The alphanumeric character range is A to Z and 0-9.
The name field length is 12 characters.
Storing customized user settings
To store customized user settings:
1. From the DSP control menu, scroll to STORE.
2. Push the MASTER VOL knob to select STORE.
The STORE screen appears.
3. Push the MASTER VOL knob to select 1.
The Enter name for 1 screen appears.
4. Use the MASTER VOL knob to scroll through the characters.
The characters appear.
5. Push the MASTER VOL knob to select the required character.
6. Turn the MASTER VOL knob to move to the next character entry.
Continue selecting characters until the required name is entered.
7. Use the MASTER VOL knob to scroll to SAVE.
8. Push the MASTER VOL knob to select SAVE.
9. Repeat steps 3 through 8 to store additional customized user settings.

EVERSE 8 Amplifier DSP | en 45
Electro-Voice
User manual
2022-10 | 02 | F.01U.401.530
10. Select EXIT to return to the home screen.
RECALL menu
The RECALL menu allows you to retrieve up to five customized user settings. Available options
for this selection are: BACK, 1, 2, 3, 4, and 5. In addition, setting 6 is available to recall a
default setting. This setting cannot be used to store user settings.
Recalling customized user settings
To recall customized user settings:
1. From the DSP control menu, scroll to RECALL.
2. Push the MASTER VOL knob to select RECALL.
The RECALL screen appears.
3. Push the MASTER VOL knob to select 1.
The selected item is loaded.
4. After the preset is loaded, the menu will return to the home screen.
STANDBY menu
To extend battery life, the EVERSE loudspeaker will enter STANDBY mode after a set amount
of time. The STANDBY menu allows you to set the idle time (time with no audio or control
signal present) before the loudspeaker enters STANDBY mode.
To return to normal operation mode:
4 Apply an audio signal, BLE control signal via the QuickSmart Mobile app.
Or
4 Press any button on the loudspeaker.
RESET menu
The RESET menu is used to reset the loudspeaker to original factory settings. Available
options for this selection are: NO or YES.
Resetting the system
To reset the system to original factory settings:
4 From the DSP control menu, select RESET.
The DEFAULTSETTINGS? message appears.
4 Select YES.
The ERASE USER PRESETS? message appears.
4 Select YES.
i
Notice!
The RESET menu item is used to revert the loudspeaker to the original factory default
settings.
INFO menu
The INFO menu is used to display the firmware version.
Refer to
– Effects (FX) list, page 60

46 en | Input & Mixer operation EVERSE 8
2022-10 | 02 | F.01U.401.530
User manual
Electro-Voice
6 Input & Mixer operation
6.1 INPUT DSP control menu
The loudspeaker INPUT DSP control menu selections are available for the EVERSE
loudspeakers.
To control the mixer channels:
1. Press the input selection soft key to select the input channel.
The softkey will illuminate once selected.
2. Use the MASTER VOL knob to adjust the level.
3. Press the MASTER VOL knob to enter the input channel's DSP control menu.
4. Press the input selection soft key again to deselect the input channel for control.
The soft key will no longer be illuminated.
INPUT DSP control menu for MIXER mode
INPUTS 1 & 2
LEVEL 0dB (Default)
MUTE, -80dB - +42dB
EXIT
48V
(INPUT 1 only)
OFF (Default)
ON
PRESET FLAT (Default)
LOW CUT 80
LOW CUT 120
VOCAL MIC
VOICE FILTER
ND76 VOCAL
RE520
ND86 VOCAL
ND86 VOCAL
SPEECH
ACOUST GUITAR
ND66 A-GTR
ELECTRIC GUITAR
BASS GUITAR
PERCUSSION
LINE INPUT
COMP OFF (Default)
OFF, 1 - 100

EVERSE 8 Input & Mixer operation | en 47
Electro-Voice
User manual
2022-10 | 02 | F.01U.401.530
TREBLE 0dB (Default)
-12dB - +12dB
MID 0dB (Default)
-12dB - +12dB
BASS 0dB (Default)
-12dB - +12dB
FX 0dB (Default)
-80dB - +10dB
PAN C (Default)
10 L - 10 R
DUCKER OFF (Default)
OFF, -1 - -40
EXIT
Table6.3: INPUTS 1 & 2 DSP control menu MIXER mode
INPUT 3/4
LEVEL 0dB (Default)
MUTE, -80dB -
+42dB
EXIT
TREBLE 0dB (Default)
-12dB - +12dB
MID 0dB (Default)
-12dB - +12dB
BASS 0dB (Default)
-12dB - +12dB
BAL C (Default)
10 L - 10 R
BLUETOOTH BACK
BLUETOOTH ON (Default)
OFF
ID (4-digit unique device number)
CONTROL PAIR
AUDIO PAIR

48 en | Input & Mixer operation EVERSE 8
2022-10 | 02 | F.01U.401.530
User manual
Electro-Voice
LINK SPEAKERS
BACK
EXIT
Table6.4: INPUT 3/4 DSP control menu MIXER mode
INPUT DSP control menu for BASIC mode
INPUTS1 & 2
LEVEL 0dB (Default)
MUTE, -80dB - +42dB
EXIT
48V
(INPUT1 only)
OFF (Default)
ON
EXIT
Table6.5: INPUTS1 & 2 DSP control menu BASIC mode
INPUTS3/4
LEVEL 0dB (Default)
MUTE, -80dB -
+42dB
EXIT
BLUETOOTH BACK
BLUETOOTH ON (Default)
OFF
ID (4-digit unique device number)
CONTROLPAIR
AUDIOPAIR
LINKSPEAKERS
BACK
EXIT
Table6.6: INPUTS3/4 DSP control menu BASIC mode
Adjusting the incoming sound
Caution is advised when adjusting the incoming sound. Usually minor changes are sufficient to
produce the best results in the overall sound.
To adjust the incoming sound:
– Set all EQ controls to 0dB or FLAT.
– Avoid setting the EQ controls to extreme positions.
– Use natural reproduction as a starting point.

EVERSE 8 Input & Mixer operation | en 49
Electro-Voice
User manual
2022-10 | 02 | F.01U.401.530
– Rely on your musically trained ear.
INPUT LEVEL control
The INPUT LEVEL control adjusts the sensitivity of the incoming signals to the internal
operation level of the mixer.
To achieve a good signal input level:
1. Set the MASTER VOL to MUTE.
2. Press the input selection soft key and use the MASTER VOL to set the INPUT LEVEL to
MUTE.
3. Connect the sound source (microphone, instrument, etc) to the selected input.
4. Start the sound source at the highest volume level to be expected. Sing or speak as
loudly as possible directly (close up) into the microphone.
5. While playing the sound source or singing into the microphone:
– Increase the INPUT LEVEL by selecting the input channel using the input selection soft
key and using the MASTER VOL, so that during the loudest part, the CLIP does not show.
Press the input selection soft key again to deselect the input channel.
– Increase the MASTER VOL until you get the required output from the loudspeaker. This is
the basic channel setting.
If further adjustments to the EQ setting of the channel are necessary, perform these steps
again. Changes in the sound shaping section also have an influence on the overall level of the
channel.
48V (INPUT 1 only)
+48V DC phantom power is available on the XLR connector of INPUT1 only. Phantom power
can be used to power certain devices such as DI boxes and condenser microphones (non-
electret). Consult the user manual of your device before using. There is no phantom power on
the TRS connectors. Phantom power is switchable.
i
Notice!
Switch off phantom power (default) for sources which do not require phantom power such as
dynamic microphones and mixer outputs.
i
Notice!
Never connect a mobile device to INPUT1 with phantom power activated.
PRESET
The input PRESET adjusts the EQ and compressor settings to provide a starting point for
adjusting the sound for different input types.
COMP control
The COMP control controls the onboard compressor to adjust the input signal processing
during operation. Compressors are available on INPUT1 and INPUT2.
4 Use the COMP control to adjust the compressor threshold and the compression ratio
simultaneously.
Adjusting the COMP control from 0 to 100 will result in the following:
– The gain below the threshold will increase from 0dB to +6dB.
– The compression ratio will increase from 1:1 to 8:1.
– The compressor will reduce the dynamic range of the audio signal proportional to the
compressor setting.

50 en | Input & Mixer operation EVERSE 8
2022-10 | 02 | F.01U.401.530
User manual
Electro-Voice
Once the signal exceeds a certain threshold, the signal gets compressed. Major input level
changes result in minor output level changes. Narrowing the dynamic range often allows for
easier recording or mixing of the audio signal. It is recommended to start with low to
moderate levels of compression (25 - 40) and increase slowly if necessary.
TREBLE/MID/BASS controls
The EQ section of the input channel allows for a broad difference in the shaping of the
incoming audio signal within three frequency bands:
– TREBLE control - provides cymbals and vocals with more treble for a more transparent
sound.
– MID control - provides higher output and reduces acoustical feedback by lowering the
level.
– BASS control - adds more “punch” to the sound of a kick drum or adds “body” to the
vocals.
FX
The FX control is used to set the amount of effect you require on that channel. Using the FX
controls lets you easily assign an effect for musical instruments or vocals.
To determine the required level of effect:
1. Set the controls to minimum.
2. Increase the level individually and gradually until the required sound is achieved.
PAN
The PAN control adjusts the amount of the signal coming out of the stereo L or stereo R
loudspeaker in a stereo setup. The PAN is not engaged for mono (single loudspeaker) setups.
DUCKER
The DUCKER reduces the level of the signal(s) on the other inputs whenever a signal is
detected at the selected MIC/LINE input (INPUT 1 or INPUT 2). If no signal is detected at the
selected MIC/LINE input, the level of the signal(s) on the other inputs will return to the
previous set levels.
The DUCKER is useful to speak over background music:
– When signal is detected on the selected MIC input, the music on the other input channel
will be reduced.
– When signal is no longer detected on the selected MIC input, the music will return to the
previous level.
Engaging the DUCKER
To engage the ducker:
1. Select INPUT1 and/or INPUT2.
2. Adjust the DUCKER level to set the detection threshold for the selected input channel.
When signal is detected on the selected input, the signal on the other inputs will be
reduced by 12dB. Typical values are -10 to -20dB.
The table below describes the DUCKER operation logic. The DUCKER setting is the detection
threshold selected on INPUT1 and/or INPUT2. The ducked channels are the input signals
that are reduced by 12dB.
INPUT 1 INPUT 2 Reduced channels
DUCKER SETTING -1dB - -40dB OFF INPUTS 2 & 3/4
OFF -1dB - -40dB INPUTS 1 & 3/4
-1dB - -40dB -1dB - -40dB INPUT 3/4
OFF OFF NONE
EVERSE 8 Recommended configurations | en 51
Electro-Voice
User manual
2022-10 | 02 | F.01U.401.530
7 Recommended configurations
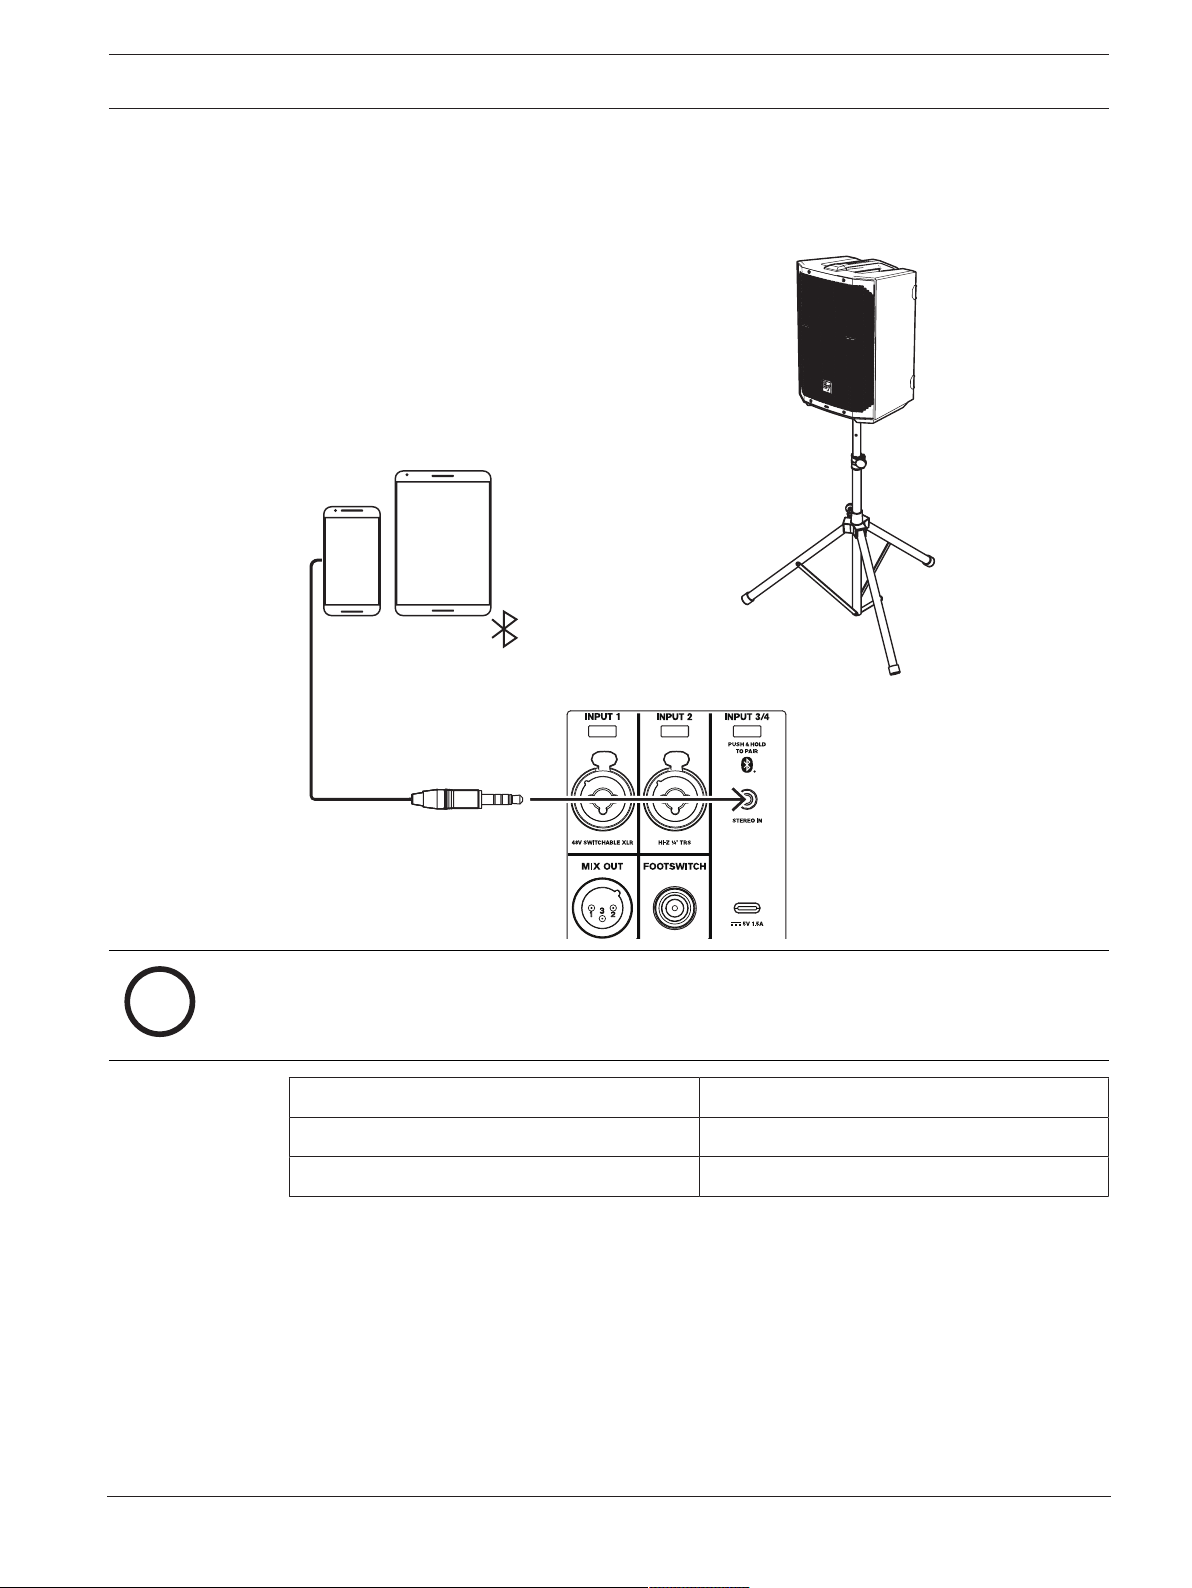
7.1 Connecting with mobile device
i
Notice!
The direction of the arrow indicates the signal path.
MODE MUSIC
LOCATION TRIPOD
SUB OFF
Table7.7: DSP settings loudspeaker on a tripod
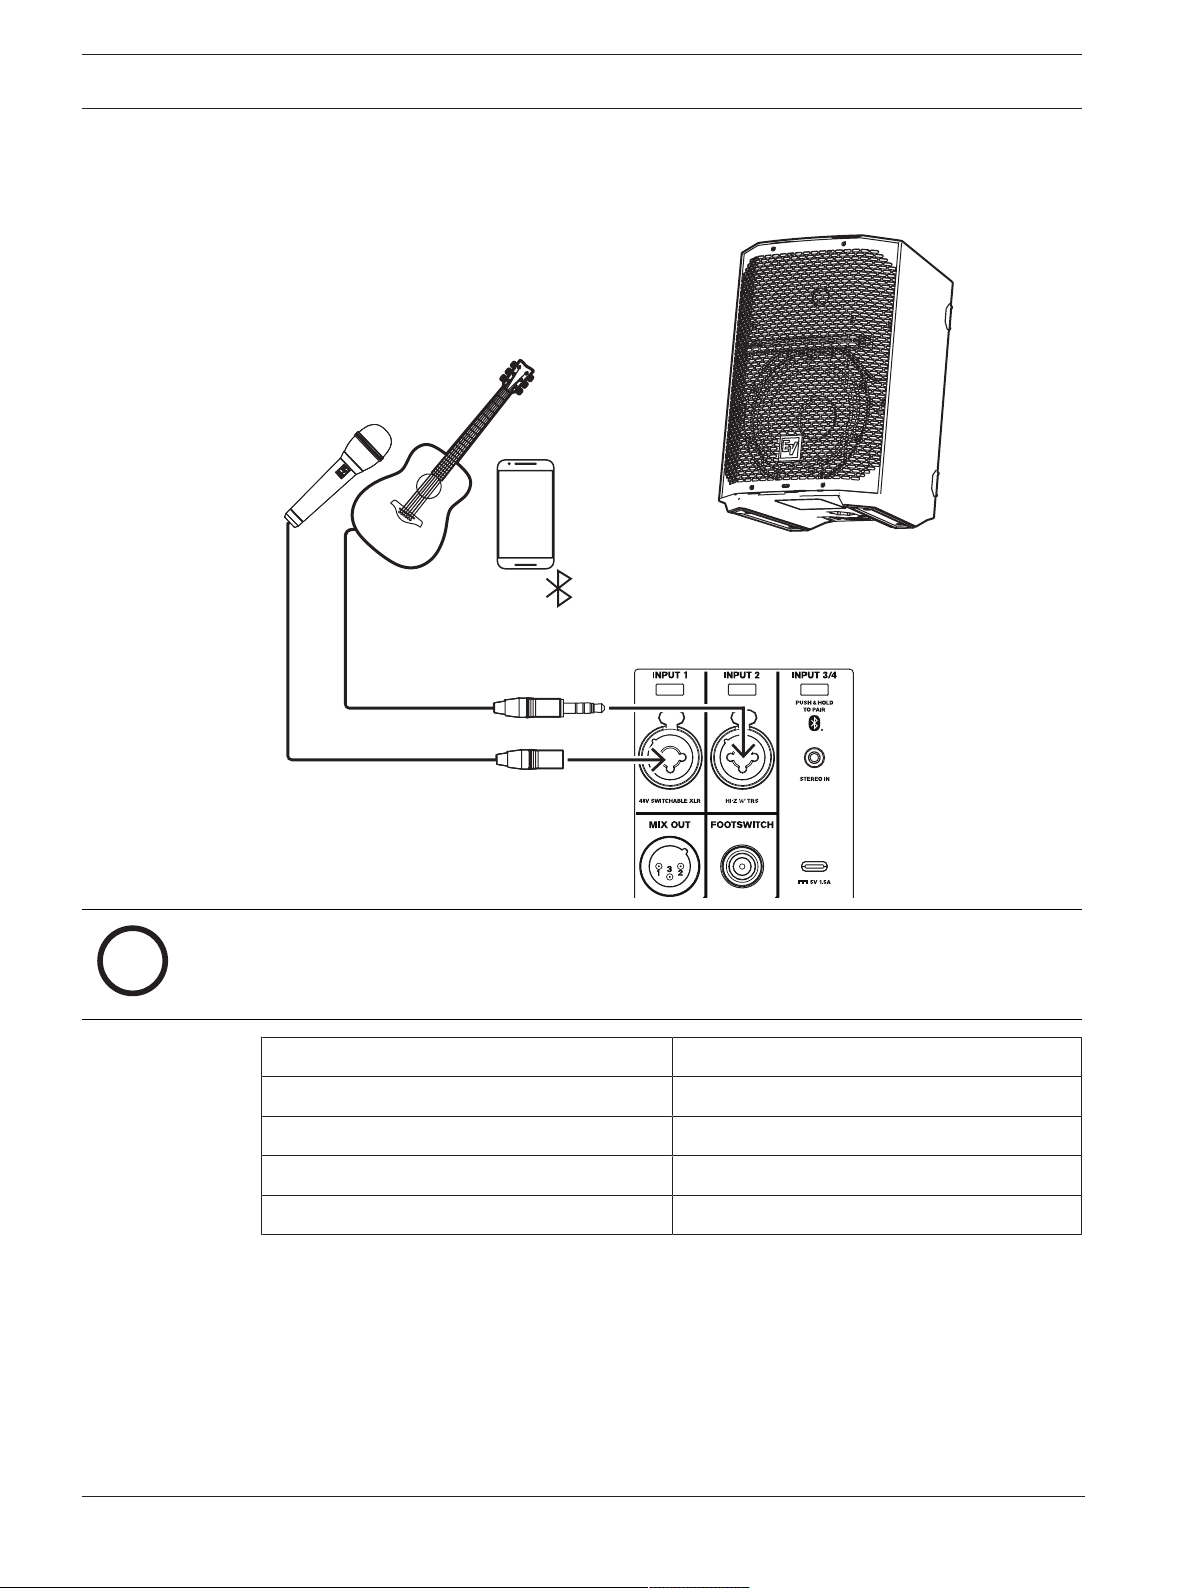
52 en | Recommended configurations EVERSE 8
2022-10 | 02 | F.01U.401.530
User manual
Electro-Voice
7.2 Street musician performance
i
Notice!
The direction of the arrow indicates the signal path.
MODE LIVE
LOCATION KICKBACK
SUB OFF
INPUT1 PRESET VOCAL MIC
INPUT2 PRESET ACOUSTIC GTR
Table7.8: DSP settings loudspeaker in kickback position
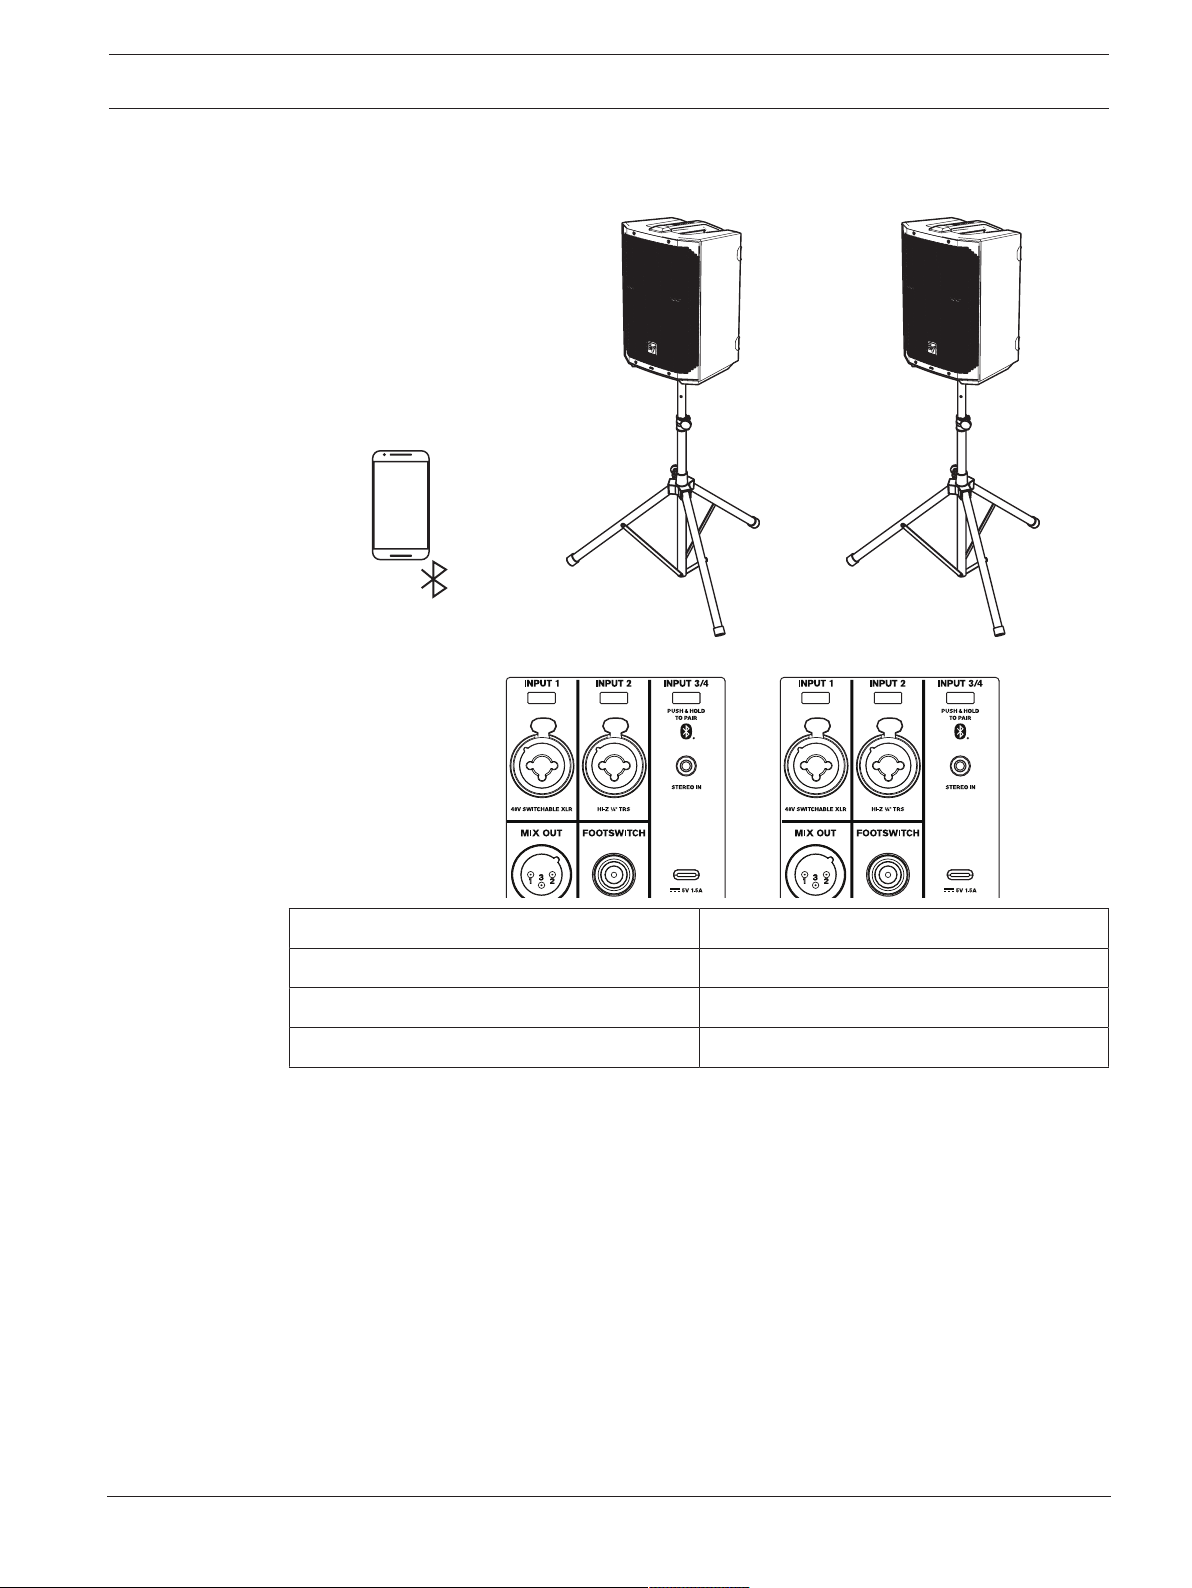
EVERSE 8 Recommended configurations | en 53
Electro-Voice
User manual
2022-10 | 02 | F.01U.401.530
7.3 Bluetooth true wireless stereo (TWS)
MODE MUSIC
LOCATION TRIPOD
SUB OFF
INPUT PRESET NONE
Table7.9: DSP settings loudspeaker on a tripod
To connect two loudspeakers via TWS:
1. Connect one of the loudspeakers to your streaming device via Bluetooth®.
2. Select LINK SPEAKERS in the BLUETOOTH control menu on both loudspeakers.
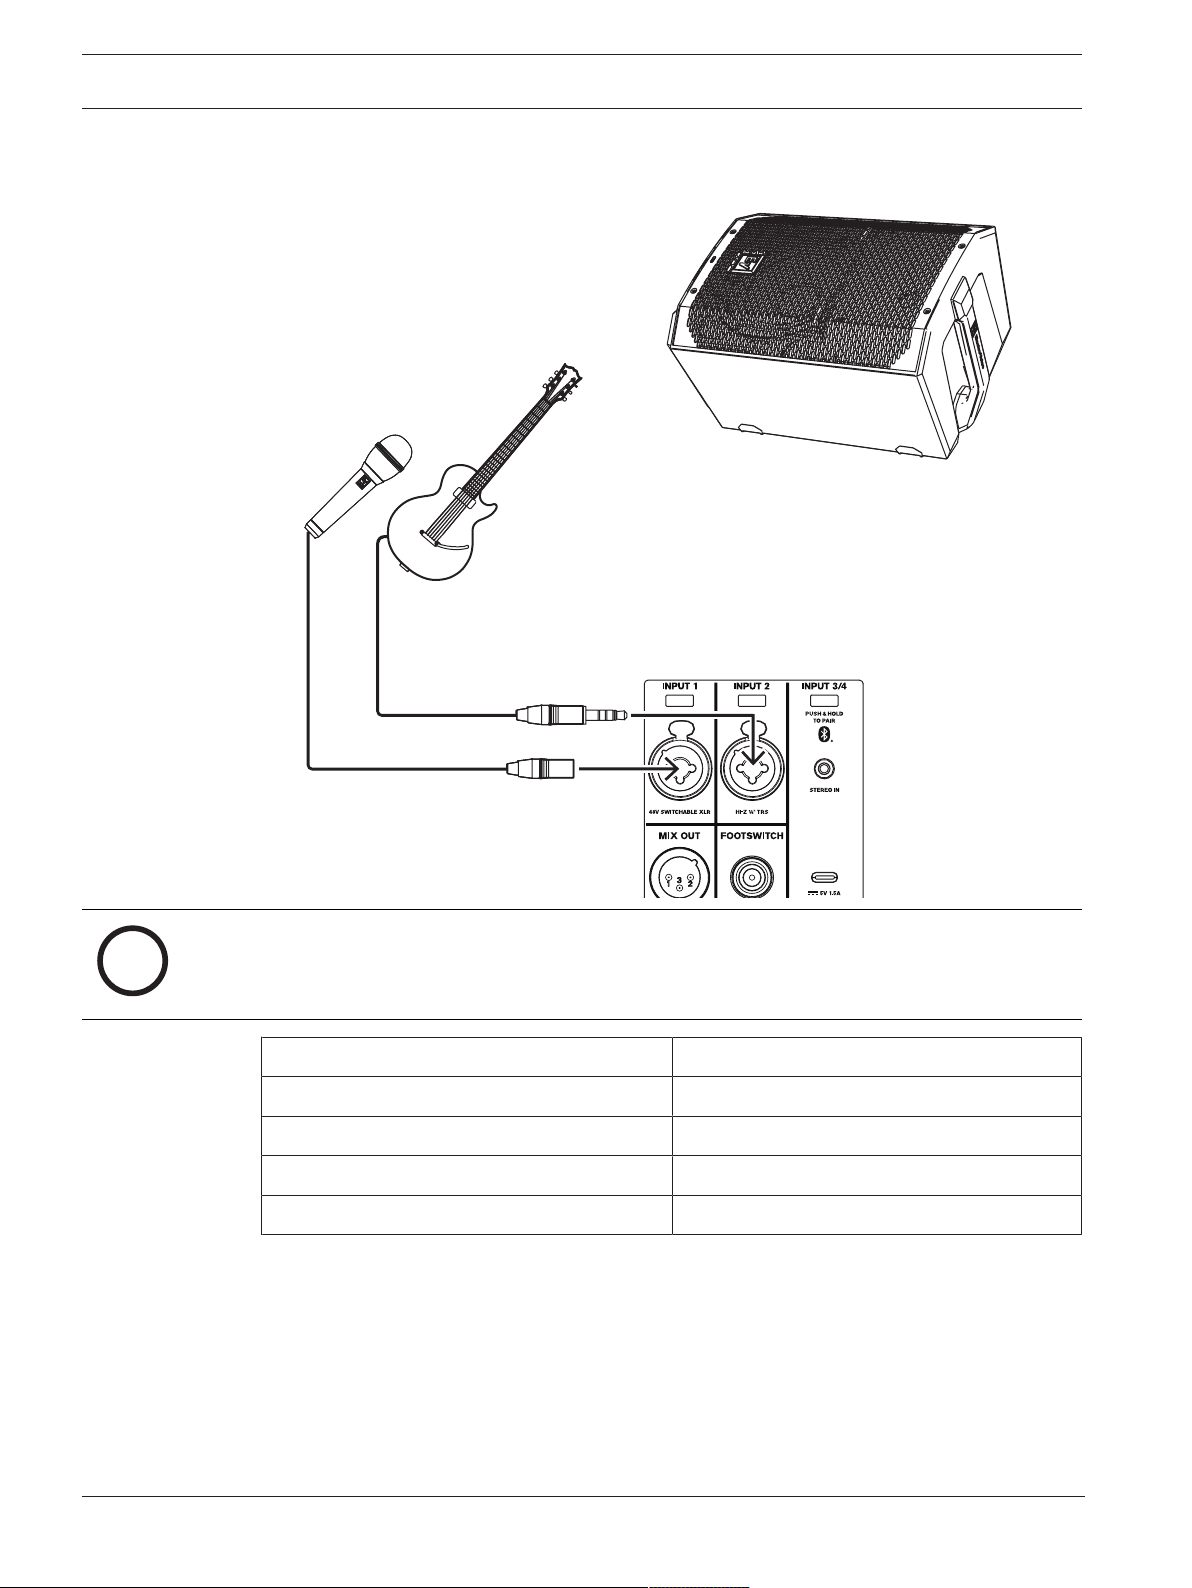
54 en | Recommended configurations EVERSE 8
2022-10 | 02 | F.01U.401.530
User manual
Electro-Voice
7.4 Using as monitor
i
Notice!
The direction of the arrow indicates the signal path.
MODE LIVE
LOCATION MONITOR
SUB OFF
INPUT 1 PRESET VOCAL MIC
INPUT 2 PRESET ELECTR GUIT
Table7.10: DSP settings loudspeakers as monitors

EVERSE 8 Troubleshooting | en 55
Electro-Voice
User manual
2022-10 | 02 | F.01U.401.530
8 Troubleshooting
Problem Possible Cause(s) Action
1. No sound Improper gain Verify all the sources are on. If the source is a condenser
microphone, make sure the mic is plugged into INPUT1
via XLR and phantom power is enabled in the menu.
Inspect the VU meters on LCD or in the app. If there is
signal present on the VU meters, increase the input and
gain controls to the required level. If there is no signal
present on the VU meters, then check the wiring.
Sources not
connected
Check all cables between the source and the
loudspeaker with a multimeter or cable tester. Replace
any suspect cables with a known good cable.
2. Poor Low-
Frequency
Response
With SUB menu
cross-over frequency
activated
If no subwoofers are used with the system, select the
OFF position.
SPEECH mode is
active
In the DSP control menu, change the MODE to MUSIC,
LIVE, or CLUB. Refer to
DSP controls, page 34
for more
details.
Input PRESET is not
set to FLAT
In the INPUT DSP control menu, change PRESET to
FLAT. Refer to
INPUT DSP control menu, page 46
for
more details.
EQ is active In the INPUT and DSP control menu, reset all EQs in the
low frequencies. Refer to
DSP controls, page 34
and
INPUT DSP control menu, page 46
for more details.
3. Intermittent output
such as cracking or
distortion
Faulty connection Check all connections at loudspeaker to ensure they are
all clean and tight. If the problem persists, check the
wiring. See problem 1.
4. Constant noise
such as buzzing,
hissing or humming
Defective source or
other electronic
device
If noise is present, but no program material is playing,
evaluate each component as necessary to isolate the
problem. Most likely there is a break in the signal path.
Poor system
grounding or ground
loop
Check and correct the system grounding, as required.
Input gain is not at a
microphone level.
Slowly increase the INPUTLEVEL to engage the
microphone pre-amp.
Mobile device is
connected via USB
and 3.5mm jack
simultaneously.
Some mobile devices, such as laptops and mobile
phones, may introduce ground loops if the loudspeaker is
charging the mobile device while simultaneously
connected via the 3.5mm audio input jack. Connect the
audio via Bluetooth®, or disconnect from the USB jack.

56 en | Troubleshooting EVERSE 8
2022-10 | 02 | F.01U.401.530
User manual
Electro-Voice
Problem Possible Cause(s) Action
5. No sound produced
with microphone
connected to
INPUT1 or INPUT2
Microphone requires
phantom power.
Use a dynamic microphone that does not require
phantom power. If using a microphone requiring
phantom power, connect it to INPUT1 via the XLR
connector and enable phantom power. Refer to
INPUT
DSP control menu, page 46
for more details.
Input gain is too low Slowly increase the input gain knob level to engage the
microphone pre-amp.
6. Sound is distorted,
front LED is OFF,
LCD screen LIMIT
is ON
Excessive
INPUTLEVEL
Reduce the INPUTLEVEL or loudspeaker level knobs to
prevent limit.
Incorrect gain
structure or source
input (mixing
console/preamp) is
overdriven
Verify level controls of the source are properly structured
by using the VU meter indicator on the LCD screen. If the
VU meter bar is solid or the system indicates LIMIT, the
input or source level is too high.
7. Microphone
produces acoustic
feedback when
INPUTLEVEL is
amplified
Automatic Feedback
Suppression is OFF
Enable Automatic Feedback Suppression in the DSP
Control menu. Refer to
DSP controls, page 34
for more
details.
Incorrect gain
structure
Reduce the microphone levels at the mixing console or
input source. If the microphone is connected directly to
the loudspeaker, reduce the INPUTLEVEL on the
loudspeaker. Positioning the microphone close to the
sound source increases gain-before-feedback. See
problem 6.
MODE is set to
MUSIC
Change the MODE to LIVE or SPEECH.
Microphone position
is too close to the
front of the
loudspeaker
Whenever possible setup the loudspeakers so the
microphone is behind them. If using the loudspeaker in a
monitor position, aim the loudspeaker to the back of the
microphone.
8. DSP control menu
is locked
The menu LOCK
function has been
turned on. A lock
symbol displays on
the LCD screen.
Press the MASTER VOL knob or input selection soft keys
to unlock.
9. QuickSmart Mobile
app does not
detect the
loudspeaker
Enable Bluetooth® Ensure Bluetooth® is enabled on the loudspeaker. For
Android: ensure location services are activated.
Remove loudspeaker from iOS/Android in device settings
(sometimes called “FORGET”).
Restart pairing.
Ensure phone/tablet has required OS version and latest
updates installed. Ensure the latest QuickSmart Mobile
App is installed. Ensure no other phone/tablet is
connected to the same loudspeaker.

EVERSE 8 Troubleshooting | en 57
Electro-Voice
User manual
2022-10 | 02 | F.01U.401.530
Problem Possible Cause(s) Action
10. No reaction of
loudspeaker to user
interaction or
power cycles
Unforseen internal
operation failure
Remove mains and battery, put battery back into
loudspeaker.
Or
Press and hold soft key for INPUT1 and INPUT2 for at
least 10seconds.
If these suggestions do not solve your problem, contact your nearest Electro-Voice dealer or Electro-Voice
distributor.

58 en | Technical data EVERSE 8
2022-10 | 02 | F.01U.401.530
User manual
Electro-Voice
9 Technical data
EVERSE8-EU 8” 2-way speaker and EVERSE8-US 8” 2-way speaker
Frequency response (-3 dB)
1
: 60 Hz to 20 kHz
Frequency range (-10 dB)
2
: 50 Hz to 20 kHz
Max. SPL
3
: 121 dB
Coverage angle (H x V): 100° x 100°
Amplifier rating: 400 W
LF transducer: 8 in. woofer - ferrite magnet
HF transducer: 1 in. titanium dome, neodymium magnet, ferro-
fluid cooled
Crossover frequency: 2.5 kHz
Connectors: 2 - XLR/TRS Combo
1 - 3.5mm Stereo
1 - Charge port
1 - TRS footswitch
1 - 12 V DC power output
Enclosure: Polypropylene
Grille material: Powder coated steel
USB charging: 1.5 A max., device-dependent
Color: Black & white
Dimensions (H x W x D): 400 mm x 275 mm x 272 mm
15.75 in. x 10.83 in. x 10.71 in.
Net weight: 7.6 kg
16.8 lb
Shipping weight: 11 kg
24.3 lb
Power consumption
4
: 100 - 240 V~, 50 - 60 Hz, 0.8 - 0.6 A
Battery capacity: 86.4 Wh
Battery run time (at max. output)
5
: 6+ hours
Battery run time (at moderate output)
6
: 12+ hours
1
Full space measurement using music DSP preset.
2
Half-space measurement.
3
Maximum SPL is measured at 1 m using broadband pink noise at maximum output.
4
Current rating is 1/8 power.
5
Maximum output before loudspeaker limit indication, with typical program material.
6
Moderate output is approximately 95 dB SPL, with typical program material.
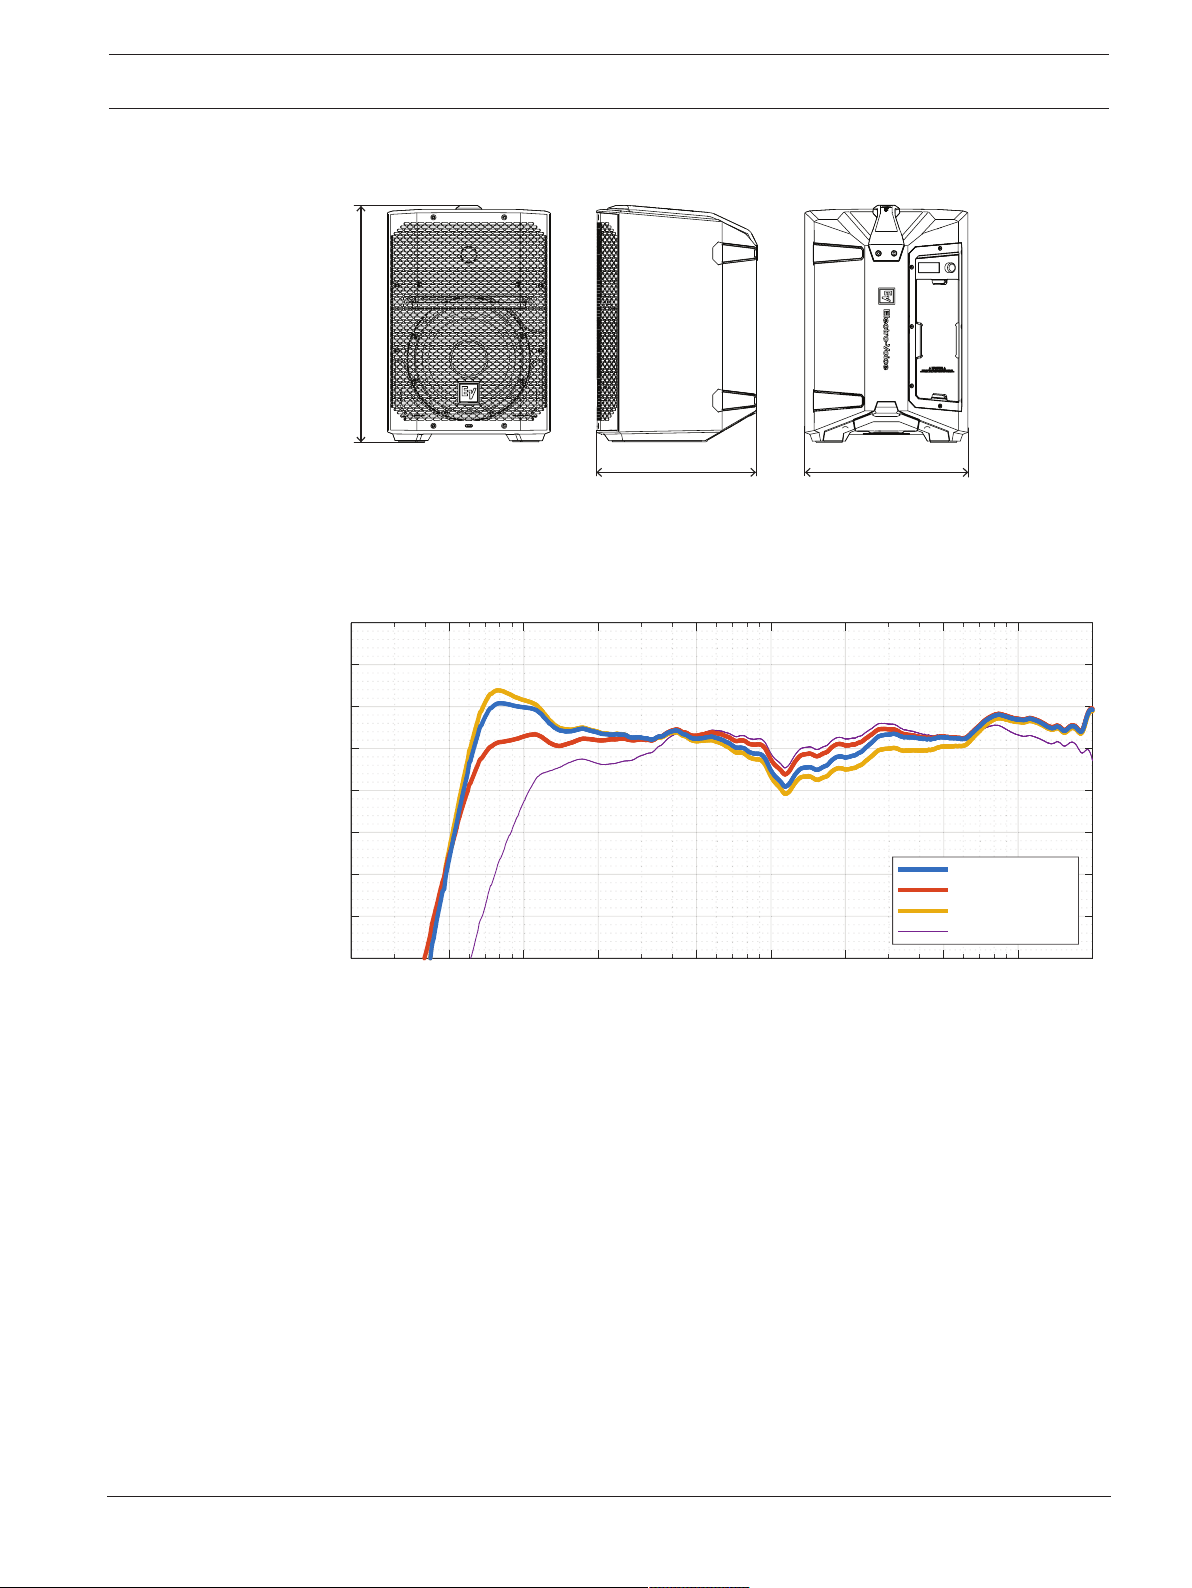
EVERSE 8 Technical data | en 59
Electro-Voice
User manual
2022-10 | 02 | F.01U.401.530
9.1 Dimensions
mm [in]
400
[15.73]
272 [10.71]
275 [10.82]
9.2 Frequency response
20 50 100 200 500 1k 2k 5k 10k 20k
Frequency (Hz)
70
75
80
85
90
95
100
105
110
Sound Pressure Level (dB)
Frequency Response
Everse8 - Music
Everse8 - Live
Everse8 - Club
Everse8 - Speech

60 en | Appendices EVERSE 8
2022-10 | 02 | F.01U.401.530
User manual
Electro-Voice
10 Appendices
10.1 Effects (FX) list
Number Name App Name LCD
0 OFF OFF
1 Echo+ReverbShort ECHO+REVERB S
2 Reverb Room REV ROOM
3 Reverb Concert Hall REV CONCERT
4 Reverb Large Hall REV HALL
5 Reverb Church REV CHURCH
6 Reverb Room Soft REV ROOM S
7 Reverb Concert Hall Soft REV CONCERT S
8 Reverb Large Hall Soft REV HALL S
9 Reverb Church Soft REV CHURCH S
10 Reverb Cathedral Soft REV CATHEDRAL S
11 Reverb Plate Medium PLATE MEDIUM
12 Reverb Plate Long PLATE LONG
13 Reverb Plate Medium Soft PLATE MEDIUM S
14 Reverb Plate Long Soft PLATE LONG S
15 Reverb+ChorusSlow REV+CHORUS SLOW
16 Reverb+ChorusMedium REV+CHORUS MEDIUM
17 Reverb+ChorusFast REV+CHORUS FAST
18 Delay Short DELAY SHORT
19 Delay Long DELAY LONG
20 Delay Tap DELAY TAP
21 Chorus Slow CHORUS SLOW
22 Chorus Medium CHORUS MEDIUM
23 Chorus Fast CHORUS FAST
24 Chorus+EchoSlow CHORUS+ECHO S
25 Chorus+EchoMedium CHORUS+ECHO M
26 Chorus+EchoFast CHORUS+ECHO F
27 SlapBack+EchoSlow SLAPBACK+ECHO S
28 SlapBack+EchoFast SLAPBACK+ECHO F
29 Doubling Narrow DOUBLING NARROW
30 Doubling Wide DOUBLING WIDE

EVERSE 8 Appendices | en 61
Electro-Voice
User manual
2022-10 | 02 | F.01U.401.530
Number Name App Name LCD
Note: Subject to change without notice

62 | Appendices EVERSE 8
2022-10 | 02 | F.01U.401.530
User manual
Electro-Voice


Bosch Sicherheitssysteme GmbH
Robert-Bosch-Ring 5
85630 Grasbrunn
Germany
www.boschsecurity.com
© Bosch Sicherheitssysteme
GmbH, 2022
Bosch Security Systems, LLC
12000 Portland Avenue South
Burnsville MN 55337
USA
www.electrovoice.com
© Bosch Security Systems,
LLC, 2022
202210181049
