
Congratulations and welcome to ownership of your Simple
Smoker™ with SmartChef™. You now own the easiest to use
and most intelligent smoker on the market. With the Simple
Smoker’s intuitive design and the SmartChef monitoring and
control capabilities, you’ll be a BBQ hero in no time, no matter
what your skill level.
We suggest you take a few moments to read the Product Guide
to gain a basic understanding of the Char-Boil SmartChef
app and the components of the smoker to ensure that you are
familiar with both its construction and operation before using.
We encourage you to check out our Char-Broil Community at
charbroil.com/community. Here you can view recipes, insider
tips and tricks, and sign up for our Char-Broil newsletter - de-
signed to make you a master of outdoor cooking.
Don’t forget to register your product at support.charbroil.com/
product-registgration to activate the warranty. You can also
mail the warranty card found on the last page of your Product
Manual, if you prefer.
HAPPY COOKING!
15.124440 SnapSmoker GG ENG 15102042.indd 3 7/20/15 11:36 AM

The Basics..........................................................................................................................1-2
Technical overview .....................................................................................................3-6
Char-Broil App.....................................................................................................................7
How to use your smoker .......................................................................................7-13
Cooking modes.............................................................................................9-10
Using the smoking basket...................................................................11-12
Using the smoker box............................................................................12-13
General Info.....................................................................................................................14
Troubleshooting.......................................................................................................15-17
Table of Contents:
15.124440 SnapSmoker GG ENG 15102042.indd 4 7/20/15 11:36 AM
1
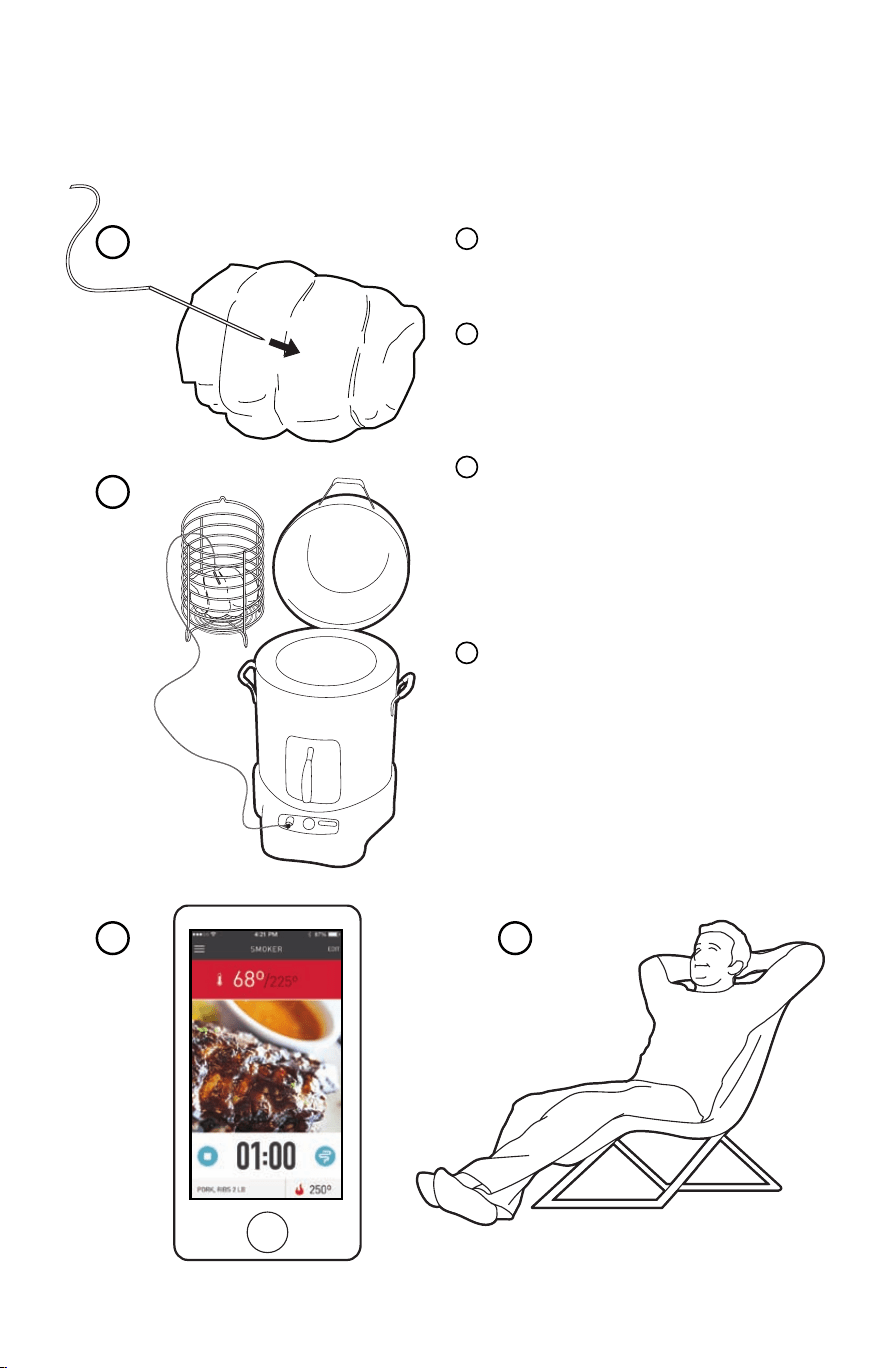
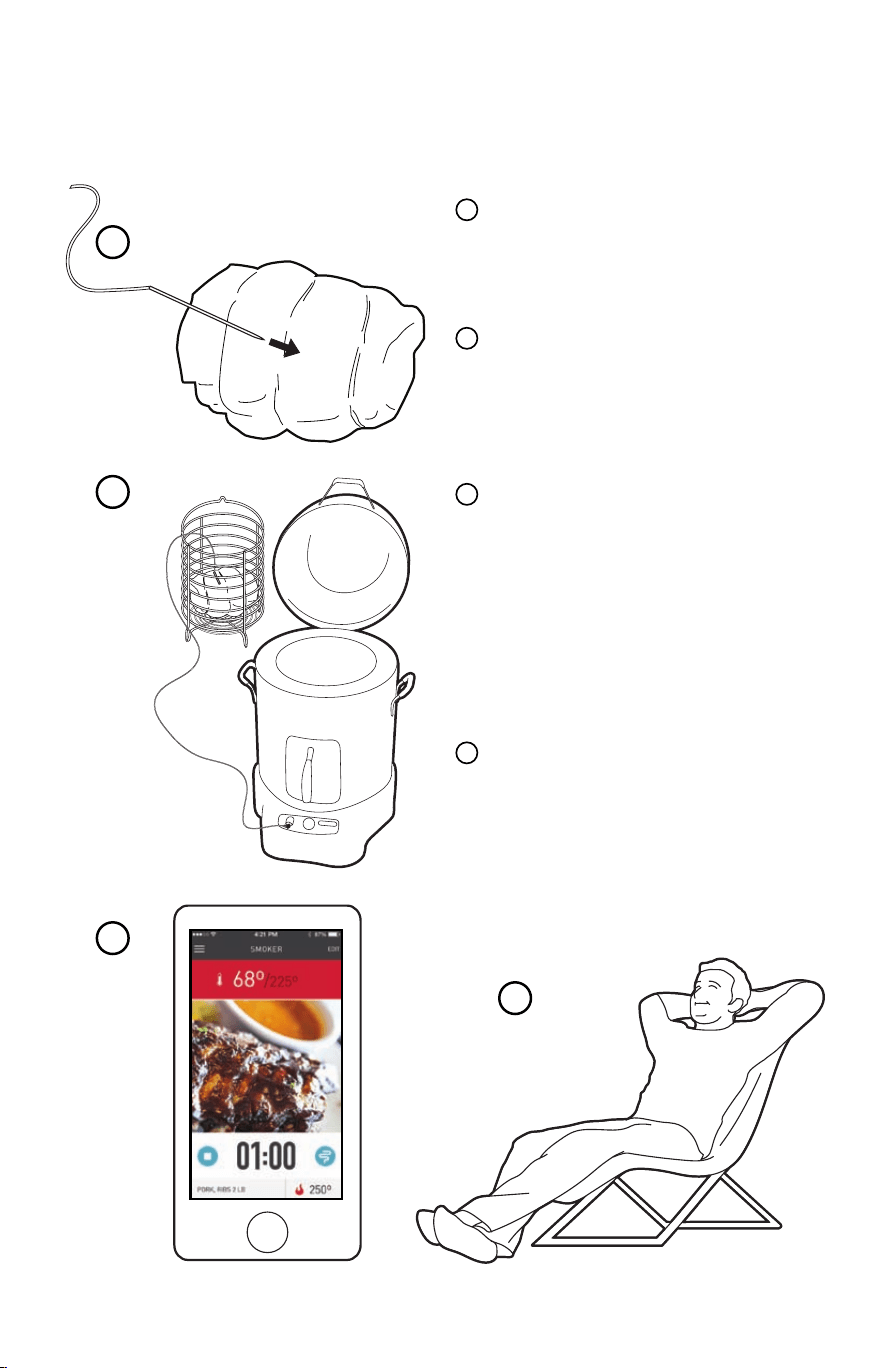
Basics on using your Simple Smoker...
Once your smoker is configured, using it is a snap.
1
2
3 4
1
2
3
4
Place the meat probe in the
center of your prepared meat.
Put the meat in the smoker,
add wood chips and connect
to the app.
With SmartChef, you know
exactly what’s happening in
your smoker, anytime from
anywhere, with updates on
your phone.
Focus on the party, the big
game or just relax worry-free -
SmartChef notifies you when
your meal is perfectly done
and ready to eat.
15.124440 SnapSmoker GG ENG 15102042.indd 1 7/20/15 11:36 AM
2
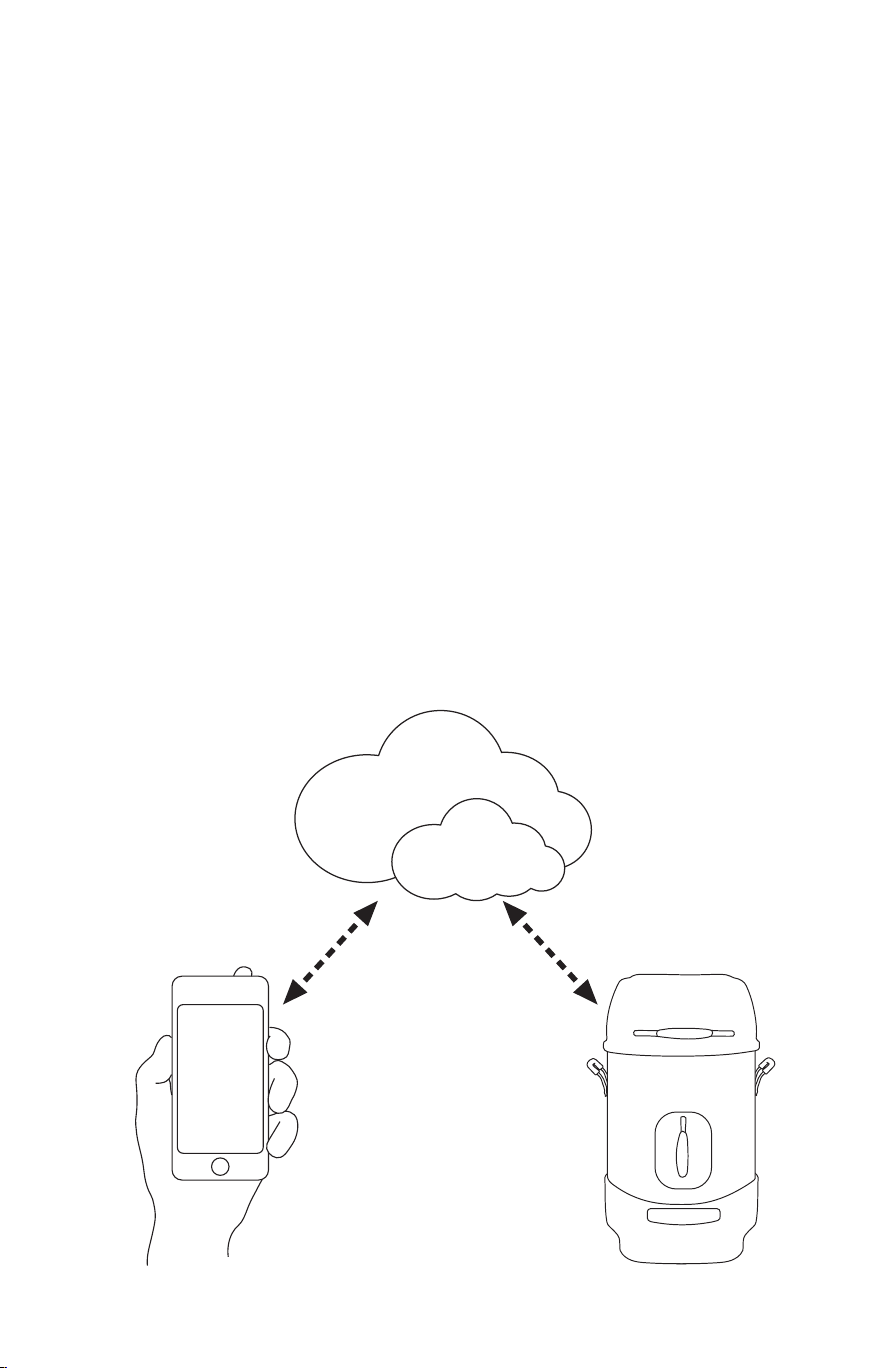
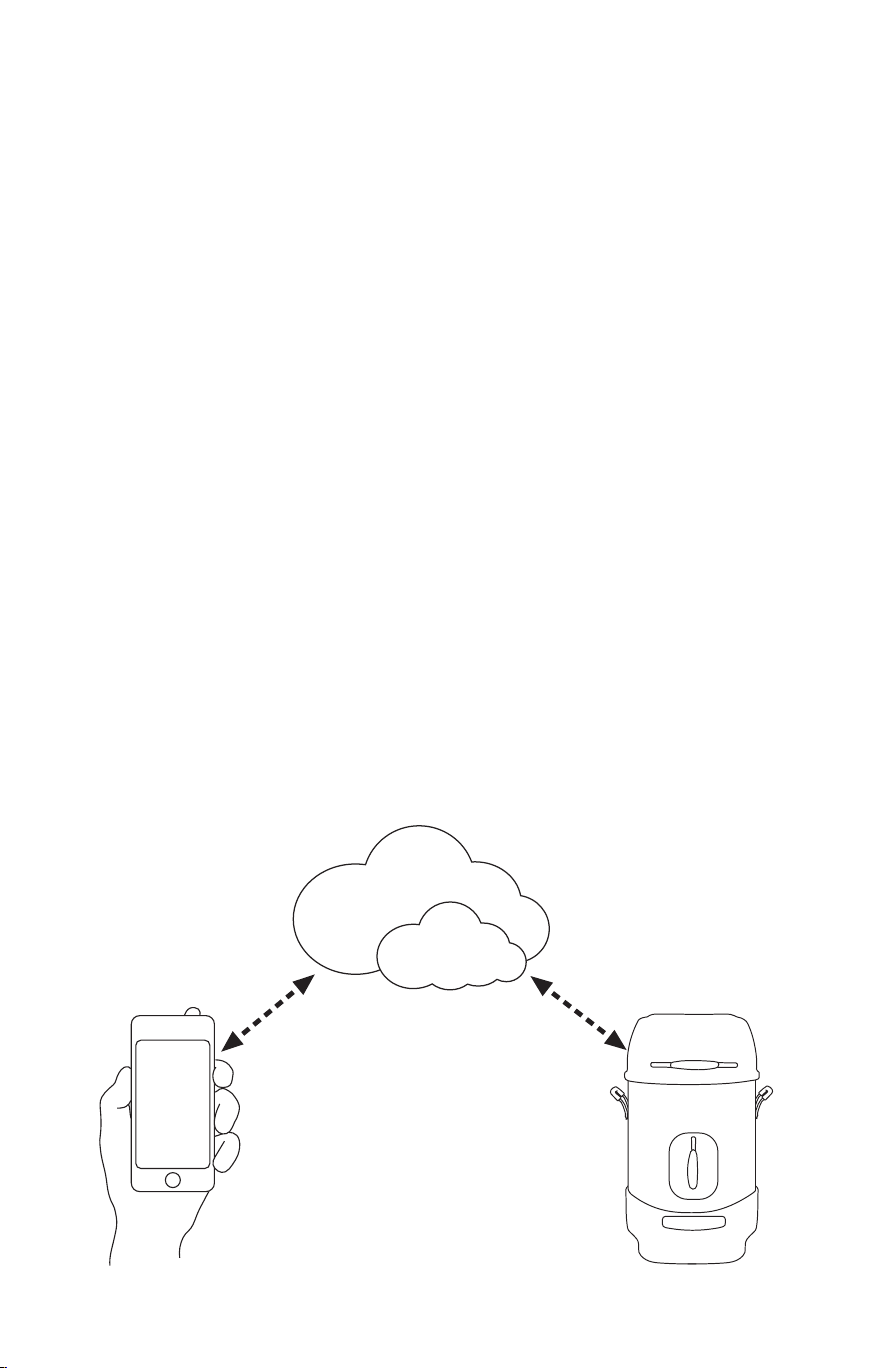
How It Works
Because your smoker is Wi-Fi enabled, you can send and receive
information to or from it anywhere you have an internet connection.
Basically this is how it works:
1. Your smart device sends information through the cloud to your
smoker.
2. Your smoker sends info back through the cloud to your smart
device so you can see your cooking status/progress from
anywhere.
Char-Broil’s SmartChef products use the DADO™ platform to
connect your grill/smoker to the internet. The DADO™ button is
used to establish a connection to your home Wi-Fi.
And because your smoker is connected to the internet, it can
incorporate important real time information (such as outside temp
in your area) into your estimated cook time for more accurate
information.
15.124440 SnapSmoker GG ENG 15102042.indd 2 7/20/15 11:36 AM

3
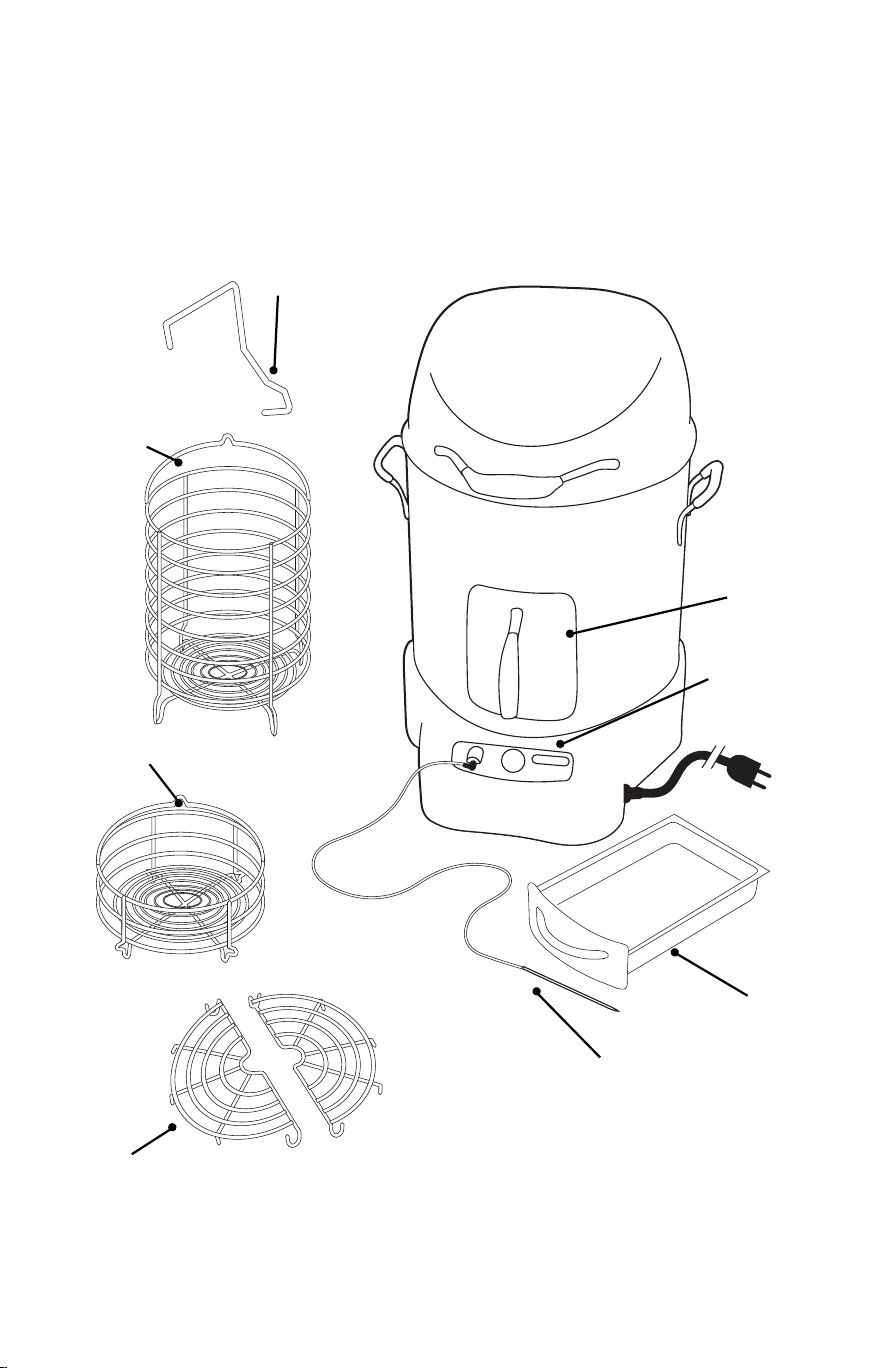
Smoker overview
Get familiar with the parts of your smoker.
Basket
Hook
Smoking
Basket
Half
Racks
Smoker
Box
Control
Panel
Meat
Probe
Grease
Tray
Power
Cord
Secondary
Basket
TECHNICAL OVERVIEW
15.124440 SnapSmoker GG ENG 15102042.indd 3 7/20/15 11:36 AM

4
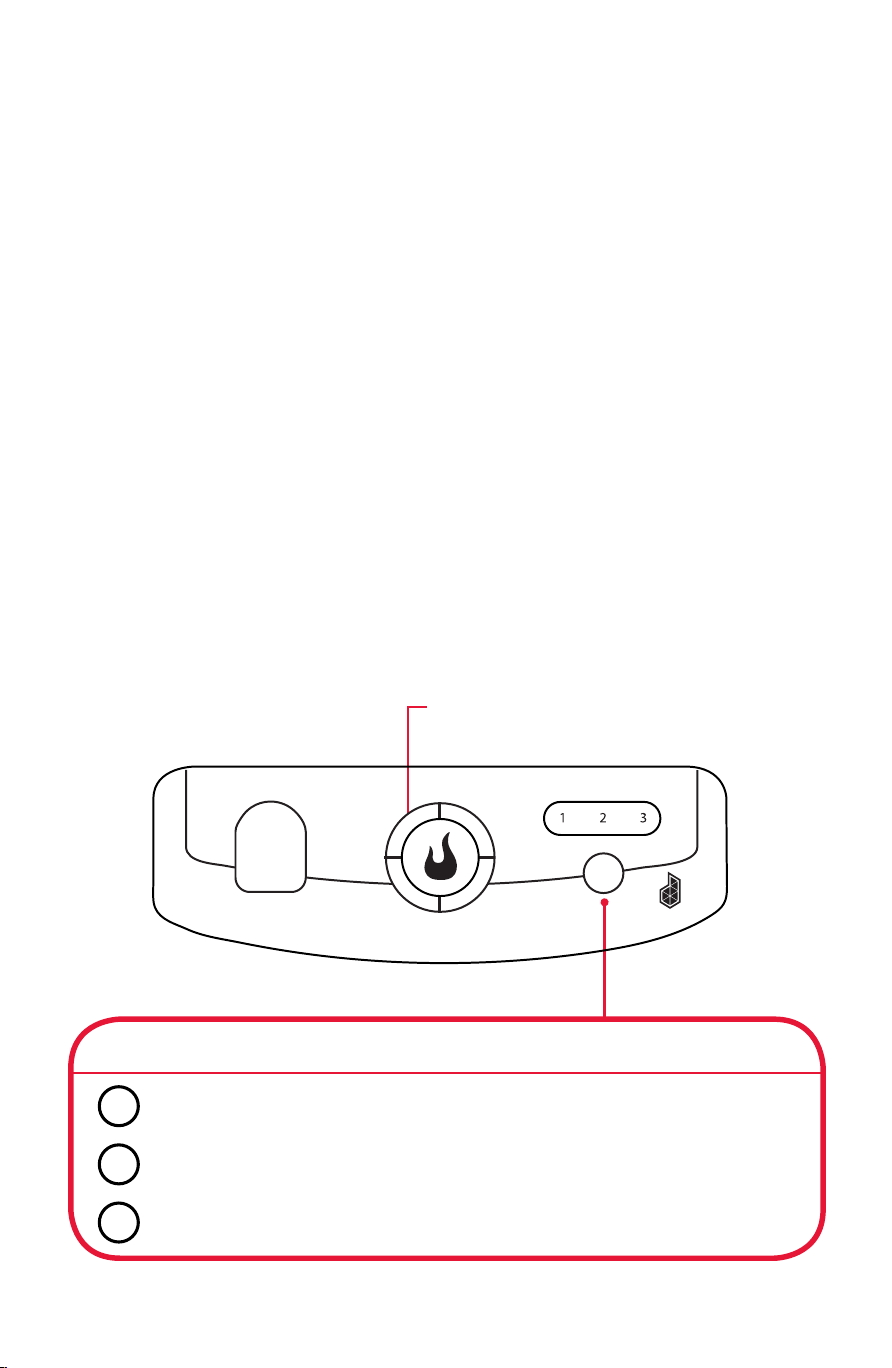
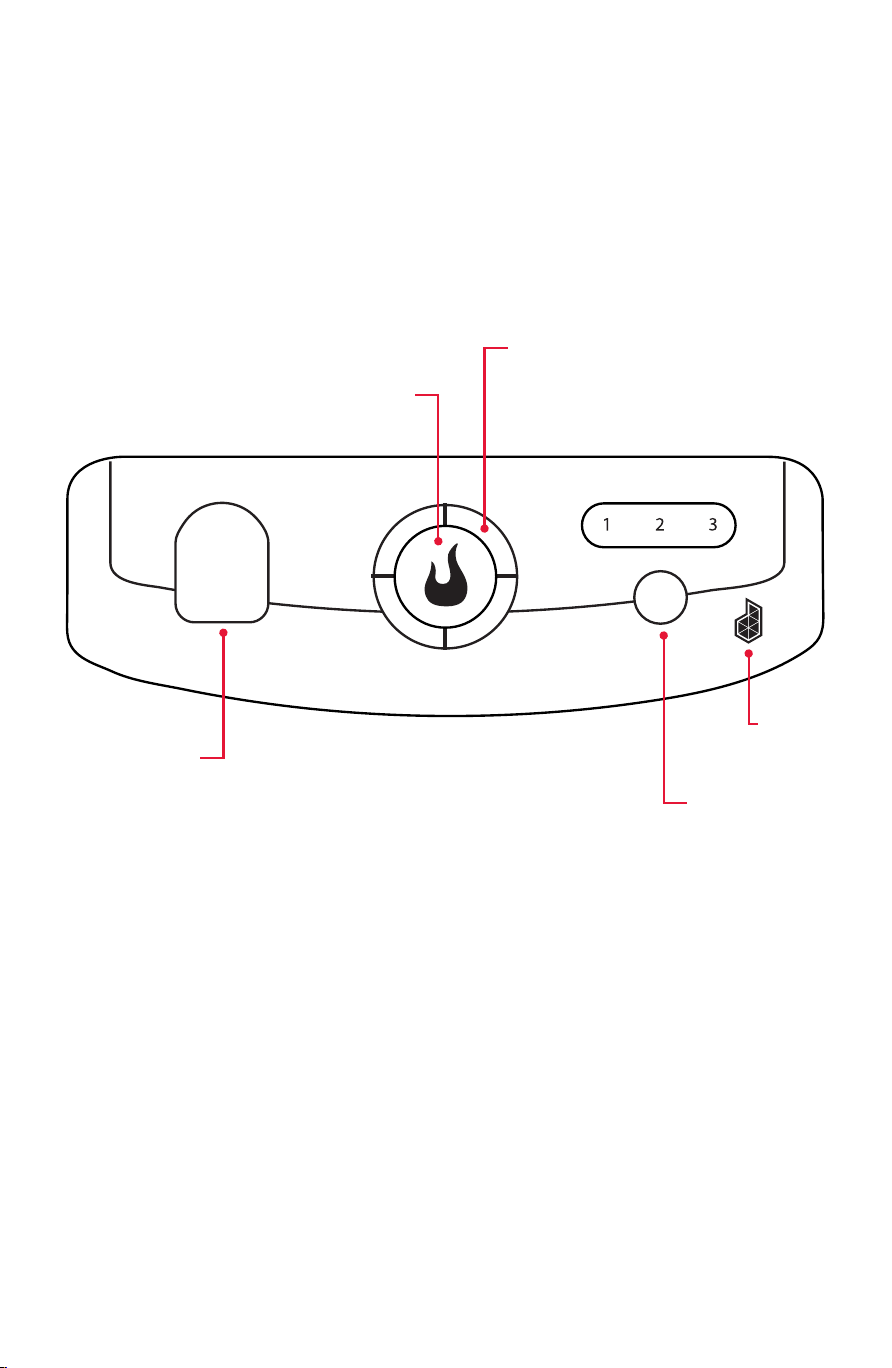
Control Panel
The Simple Smoker has a unique control panel designed
specifically to work with the Char-Broil app.
• Start/Stop button - initiates cook, once loaded from app
• Light ring - gives smoker status info to the user at a glance
(See light ring quick guide)
• Meat probe port - plug integrated probe into this port
• Presets - cycle through 3 pre-loaded, locally stored cook profiles
(see preset mode)
• DADO button - reset Wi-Fi broadcast/reset Wi-Fi credentials
Start/Stop
Light Ring
Meat Probe
DADO
Button
Presets
15.124440 SnapSmoker GG ENG 15102042.indd 4 7/20/15 11:36 AM

5
Light Ring Guick Guide
The light ring on your smoker well give you a wealth of knowledge
about the status of your cook:
READY/ON
Once the appliance is
online and ready to
accept a profile, the
light should be
SOLID GREEN.
This lets you know the
appliance is on and
ready.
ERROR
RED FLASHING
READY/ON
Once the appliance is online and
ready to accept a profile, the light
should be solid green.
This lets the user know the
appliance is on and ready.
READY/ON
Either after warming expires (15
min) or if the user removes food
from the bin the light should go
back to solid green.
COOKING
As a food starts cooking, the first
quadrant begins to flash orange.
This should continue through each
quadrant as the cook progresses. 1
flash then solid, 2 flash then
solid...
User can see that their food is
cooking and how far it is in the
process from a glance.
START COOKING
After a profile has been added to
the appliance the green light
should start flashing.
This should catch the user’s eye,
letting them know that something
needs to be done.
COOK IS DONE/WARMING
When cook is complete it should
change to a flashing orange ring.
This will again, grab the users
attention that an action needs to
be done.
CLEANING
Orange flashing propeller. Light up quadrants 2 & 4
(1 & 3 off), then quadrants 1 & 3 (2 & 4 off), repeat.
RUNNING CHIP BURN
Orange chasing. Light up quadrant 1 (2-4 off),
then quadrant 2 (1, 3-4 off) and so on.
ERROR
Red flashing.
START COOKING
After a profile has been
added to appliance the
green light should start
FLASHING.
This should catch your
eye, letting you know
that something needs
to be done.
COOKING
As food starts cooking,
the first quadrant
begins to FLASH
ORANGE. This should
continue through each
quadrant as the cook
progresses.
1 flash then solid,
2 flash then solid, etc.
You can see that your
food is cooking and
how far it is in the
process from a glance.
COOK IS DONE/WARMING
When cook is complete
it should change to a
FLASHING ORANGE
ring.
This will grab your
attention that an action
needs to be done.
READY/ON
Either after warming
expires (15 Min) or if
you remove food from
the bin the light should
go back to SOLID
GREEN.
READY/ON
Once the appliance is online and
ready to accept a profile, the light
should be solid green.
This lets the user know the
appliance is on and ready.
READY/ON
Either after warming expires (15
min) or if the user removes food
from the bin the light should go
back to solid green.
COOKING
As a food starts cooking, the first
quadrant begins to flash orange.
This should continue through each
quadrant as the cook progresses. 1
flash then solid, 2 flash then
solid...
User can see that their food is
cooking and how far it is in the
process from a glance.
START COOKING
After a profile has been added to
the appliance the green light
should start flashing.
This should catch the user’s eye,
letting them know that something
needs to be done.
COOK IS DONE/WARMING
When cook is complete it should
change to a flashing orange ring.
This will again, grab the users
attention that an action needs to
be done.
CLEANING
Orange flashing propeller. Light up quadrants 2 & 4
(1 & 3 off), then quadrants 1 & 3 (2 & 4 off), repeat.
RUNNING CHIP BURN
Orange chasing. Light up quadrant 1 (2-4 off),
then quadrant 2 (1, 3-4 off) and so on.
ERROR
Red flashing.
READY/ON
Once the appliance is online and
ready to accept a profile, the light
should be solid green.
This lets the user know the
appliance is on and ready.
READY/ON
Either after warming expires (15
min) or if the user removes food
from the bin the light should go
back to solid green.
COOKING
As a food starts cooking, the first
quadrant begins to flash orange.
This should continue through each
quadrant as the cook progresses. 1
flash then solid, 2 flash then
solid...
User can see that their food is
cooking and how far it is in the
process from a glance.
START COOKING
After a profile has been added to
the appliance the green light
should start flashing.
This should catch the user’s eye,
letting them know that something
needs to be done.
COOK IS DONE/WARMING
When cook is complete it should
change to a flashing orange ring.
This will again, grab the users
attention that an action needs to
be done.
CLEANING
Orange flashing propeller. Light up quadrants 2 & 4
(1 & 3 off), then quadrants 1 & 3 (2 & 4 off), repeat.
RUNNING CHIP BURN
Orange chasing. Light up quadrant 1 (2-4 off),
then quadrant 2 (1, 3-4 off) and so on.
ERROR
Red flashing.
Continued
15.124440 SnapSmoker GG ENG 15102042.indd 5 7/20/15 11:36 AM

6
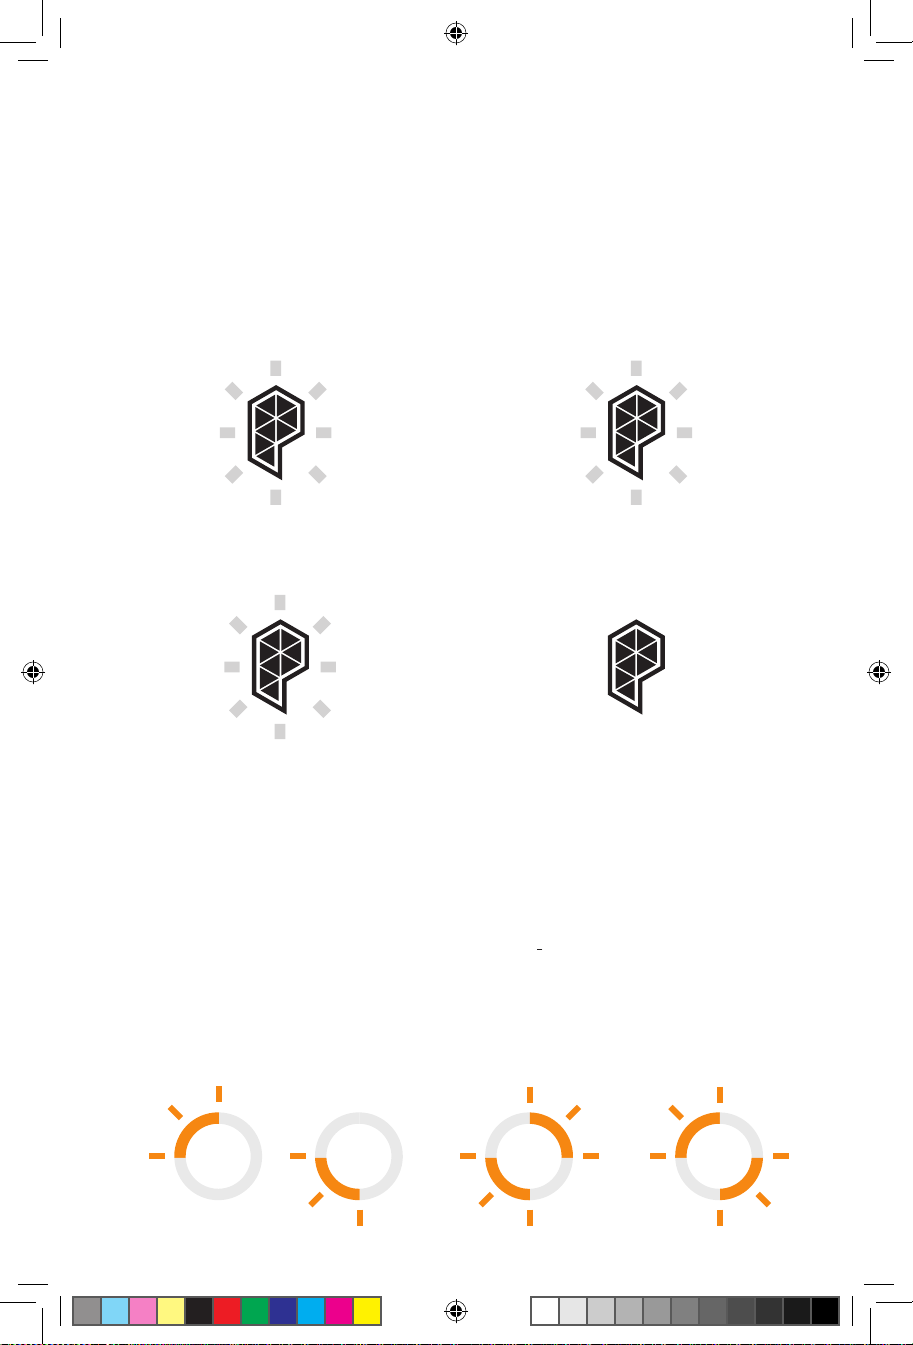
DADO Button/Light
The DADO light will inform you of the connection and functional
status of your smoker:
Here’s what the DADO button does:
OFF
Not connected to the
Internet.
ON/SOLID
Connected to the
Internet.
ON/BLINKING
(ONCE PER SECOND)
Either needs to be paired to the
home Wi-Fi network or (if that has
already happened) you need to
push the DADO button to try and
reconnect.
ON/BLINKING
(TWICE PER SECOND “RAPID”)
This should only happen when you
have initiated a firmware update
from the app. In this case the DADO
button needs to be pushed.
READY/ON
Once the appliance is online and
ready to accept a profile, the light
should be solid green.
This lets the user know the
appliance is on and ready.
READY/ON
Either after warming expires (15
min) or if the user removes food
from the bin the light should go
back to solid green.
COOKING
As a food starts cooking, the first
quadrant begins to flash orange.
This should continue through each
quadrant as the cook progresses. 1
flash then solid, 2 flash then
solid...
User can see that their food is
cooking and how far it is in the
process from a glance.
START COOKING
After a profile has been added to
the appliance the green light
should start flashing.
This should catch the user’s eye,
letting them know that something
needs to be done.
COOK IS DONE/WARMING
When cook is complete it should
change to a flashing orange ring.
This will again, grab the users
attention that an action needs to
be done.
CLEANING
Orange flashing propeller. Light up quadrants 2 & 4
(1 & 3 off), then quadrants 1 & 3 (2 & 4 off), repeat.
RUNNING CHIP BURN
Orange chasing. Light up quadrant 1 (2-4 off),
then quadrant 2 (1, 3-4 off) and so on.
ERROR
Red flashing.
CLEANING
ORANGE FLASHING propeller.
Light up quadrants 2 & 4 (1 & 3 off),
then quadrants 1 & 3 (2 & 4 off),
repeat.
RUNNING CHIP BURN
ORANGE CHASING. Light up
quadrant 1 (2-4 off), then quadrant
2 (1, 3-4 off) and so on.
READY/ON
Once the appliance is online and
ready to accept a profile, the light
should be solid green.
This lets the user know the
appliance is on and ready.
READY/ON
Either after warming expires (15
min) or if the user removes food
from the bin the light should go
back to solid green.
COOKING
As a food starts cooking, the first
quadrant begins to flash orange.
This should continue through each
quadrant as the cook progresses. 1
flash then solid, 2 flash then
solid...
User can see that their food is
cooking and how far it is in the
process from a glance.
START COOKING
After a profile has been added to
the appliance the green light
should start flashing.
This should catch the user’s eye,
letting them know that something
needs to be done.
COOK IS DONE/WARMING
When cook is complete it should
change to a flashing orange ring.
This will again, grab the users
attention that an action needs to
be done.
CLEANING
Orange flashing propeller. Light up quadrants 2 & 4
(1 & 3 off), then quadrants 1 & 3 (2 & 4 off), repeat.
RUNNING CHIP BURN
Orange chasing. Light up quadrant 1 (2-4 off),
then quadrant 2 (1, 3-4 off) and so on.
ERROR
Red flashing.
15.124440 SnapSmoker GG ENG 15102042.indd 6 7/20/15 11:36 AM

7
Using the Char-Broil App
The Char-Broil SmartChef tech uses an app on your smart device to
control your cook.
1. Download Char-Broil App
The first step will be logging onto the App Store℠ (Apple® product)
or Google Play™ (Android™ product) and download the Char-Broil
app to your device.
2. Congure Char-Broil App
1. Open app and create a user login.
2. Once you are logged in, you will be able to configure your
device for use.
3. Use Char-Broil App
The app will guide you through the rest of the process.
Before Your First Cook...
You will find that most of the product assembly has been completed
for you at the factory. Complete any remaining steps and reference
all safety and usage information found in the Product Guide.
Make certain that the holes in the cooking chamber are positioned
towards the front of the unit. This will align the holes in the cooking
chamber with the holes in the smoker box so that smoke flows
properly during use.
Just like grandma’s cast iron skillet, the stainless steel Cooking
Chamber must be seasoned prior to use. This is most important
as it will allow the cooking chamber to work properly. In addition,
it will make cleaning easier and inhibit rusting. Coat all interior
CHAR-BROIL APP
15.124440 SnapSmoker GG ENG 15102042.indd 7 7/20/15 11:36 AM

8
surfaces of the cooking chamber with vegetable oil. If you use a
vegetable spray, wipe down the cooking chamber after spraying to
ensure an even coat. Boot up the Char-Broil SmartChef app on your
smart device and run a cleaning cycle (found in the maintenance
section of the app), close the lid and allow it to heat until the
vegetable oil burns o and stops smoking. The shiny finish of the
stainless steel cooking chamber should now have a very dark brown
or bronze color.
You are now ready to cook. The more you use your Simple Smoker,
the better it will cook. The darker, more-seasoned, the cooking
chamber becomes the hotter and the more evenly it will cook. A
light coat of vegetable oil before each use will keep the surfaces
seasoned and help prevent any rusting – again, just like grandma’s
cast iron skillet.
On to the cooking!
This section will teach you how to cook with your new Simple
Smoker using SmartChef technology.
Cooking With SmartChef - The SmartChef system uses
changing meat temperature to attain real-time information about
your cook, which it then relays to you via the Char Broil app. The
app learns this temperature information through an integrated
meat probe that remains inside the meat throughout the cook. That
means it is important to properly place the meat probe to get as
accurate a reading as possible, which leads us to...
Good Meat Probe Etiquette:
• Insert the probe into the thickest part of the food - not touching
bone, fat or gristle before placing meat in the smoker. Once
the meat is in place you can connect the meat probe jack to the
smoker.
• After cooking, check the temperature in several places with the
probe and watch the reading on the status screen to make sure
the food is evenly heated.
15.124440 SnapSmoker GG ENG 15102042.indd 8 7/20/15 11:36 AM

9
• Make sure to clean your food thermometer with hot, soapy,
water before and after each use. Do not immerse or wash in the
dishwasher.
• Use only the included meat probe.
COOKING MODES
There are three dierent modes to cook in when using your
SmartChef smoker:
1. Guided - Follow a guided path to choose, prepare and cook a meal
2. Manual - Select custom parameters to run your cook
3. Presets - Preset cooks are preloaded into your smoker’s memory.
For details on using wood chips for smoke, see “using the smoker
box”.
1. Guided Cook- Use this mode if you’re new to smoking, want
a little guidance, or just don’t know exactly what you want to make.
When you choose this mode, you will be taken through a guided
process in which you will indicate specifics of your cook such as
type of meat, how it will be prepared, and weight of meat. Once the
app knows the details it will give you preparation instructions and
estimated cook time. Simply add the recipe to the smoker and hit
the start button on your smoker to get started.
2. Manual Cook- Use this mode if you know exactly how
you want to cook. Manual mode works by cooking to custom
parameters that you set for the smoker. These parameters include
target meat probe temperature, chamber temperature, and cook
time. This allows you to cook how you want, while giving you all
the monitoring and control capabilities unique to our SmartChef
system. Next, add your parameters to the smoker and hit the start
button on control panel to get the cook started.
15.124440 SnapSmoker GG ENG 15102042.indd 9 7/20/15 11:36 AM
10
3. Preset cooks- Use this mode if you want to quickly start a
cook or you don’t have access to a Wi-Fi network. Preset mode
works by using parameters that are preprogrammed into your
smoker. These cook profiles will cook to a specified internal meat
temp at a specified chamber temp. You will be able to monitor
progress via the light ring on your smoker’s control panel.
To use preset cooks:
1. Place meat probe into meat you want to cook
2. Put meat in smoking basket, then the basket into the easy
smoker, then plug the meat probe connector into the meat probe
port.
3. Push the preset button to cycle through your options. Stop
pushing when the number preset you want to run is lit up.
4. Push the start button to initiate the cooking process.
5. During the cook, pushing the preset button again will initiate
the wood chip smoke cycle. (See “using the smoke box”)
PRESET PARAMETERS:
Pulled Pork - Cook meat to 205 degrees @ 225 degrees
1
Beef Brisket - Cook meat to 200 degrees @ 225 degrees
2
Roasted Chicken/Turkey - Cook meat to 165 degrees @ 525 degrees
3
Monitor cook progress by
watching light ring
15.124440 SnapSmoker GG ENG 15102042.indd 10 7/20/15 11:36 AM

11
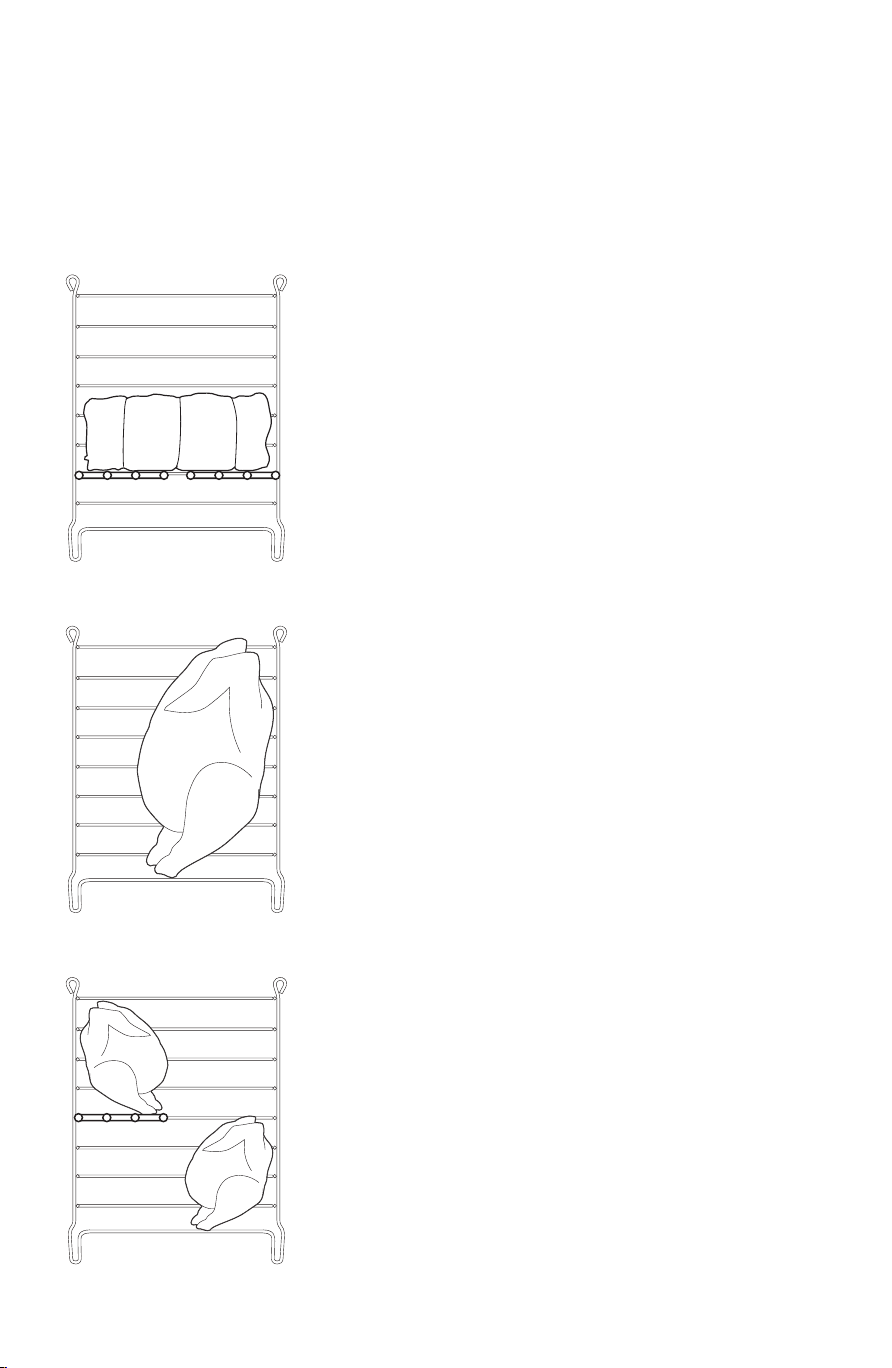
Using The Smoking Basket
No matter how you choose to cook or what you are cooking, always
use the basket to hold your meat. Half shelves are included to allow
various setups. See the below images for some configurations:
Large cuts of meat
For large cuts such as boston butts or
briskets, use the two half shelves to
form a full shelf, in order to raise the
meat to about the halfway point of the
smoker.
Large poultry
For turkeys or large chickens, remove
the tie that binds the legs and place
in the basket vertically. Opening the
legs will allow the bird to cook evenly
and maintain its position. Always
position breast at the top.
Small meat or poultry
When cooking smaller items use the
half shelves to stagger the pieces of
meat on each side of the basket. This
will ensure even cooking.
15.124440 SnapSmoker GG ENG 15102042.indd 11 7/20/15 11:36 AM
12
Tips on the basket...
• Allow a good 10-15 minutes for the basket to cool after it comes
out of the smoker. This will allow you to remove the meat from
the basket safely and easily.
• The secondary basket can be filled with side items such as
vegetables and stacked on the main smoking basket so that they
cook simultaneously.
• Always use the basket hook when removing basket from the
smoker.
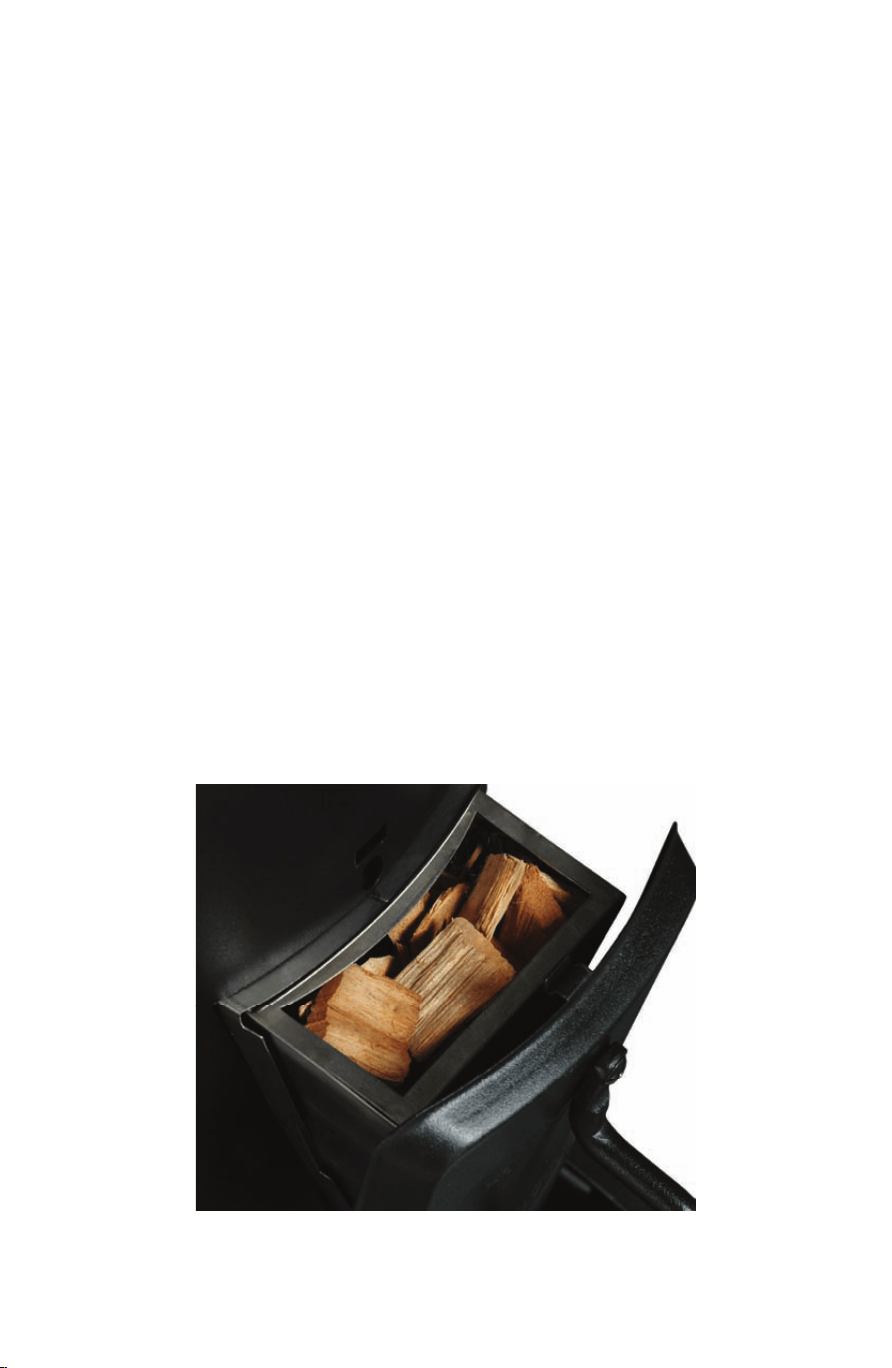
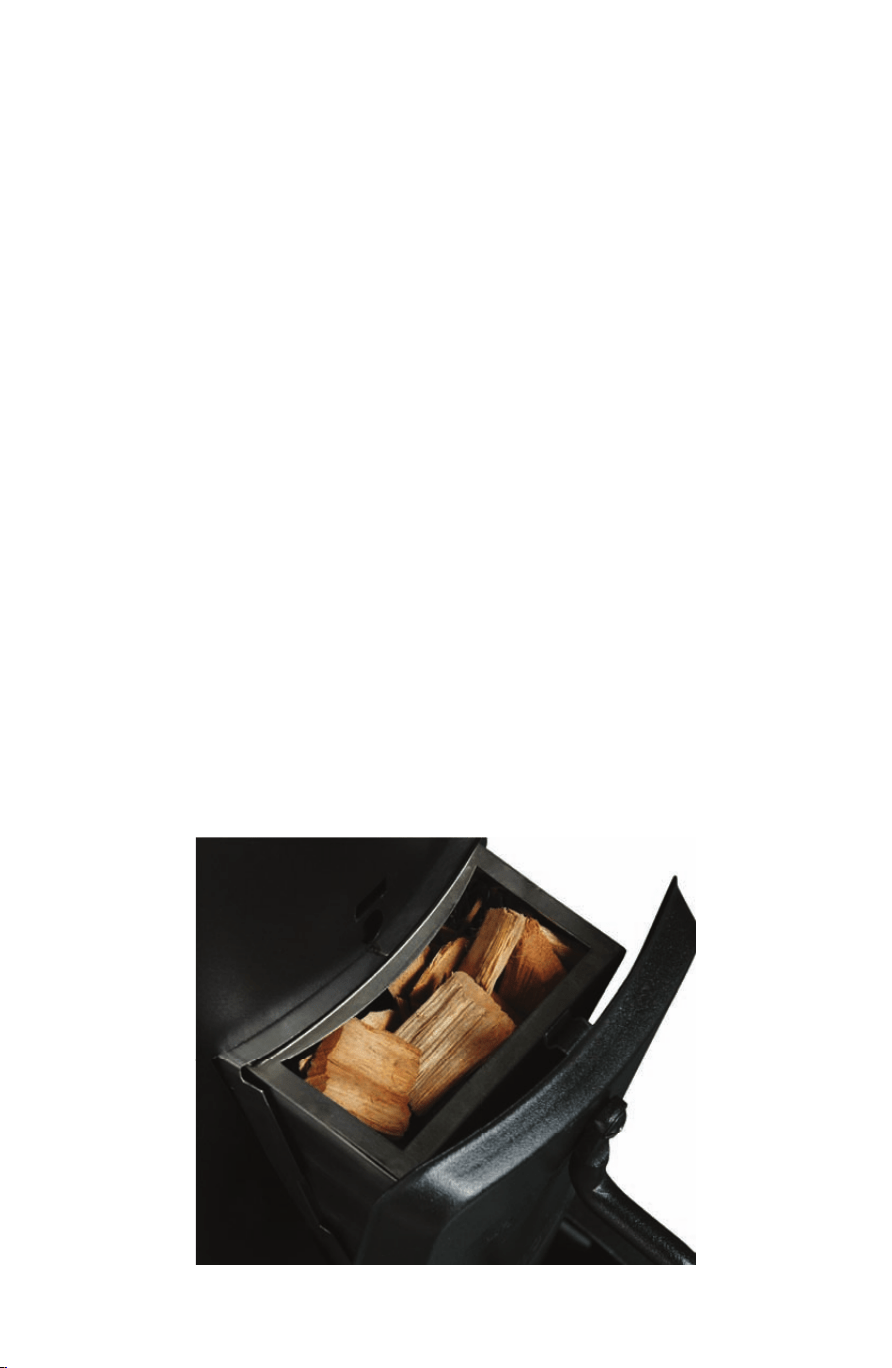
Using The Smoker Box:
The smoker box is what enables you to add delicious smoke flavor
to your foods. Your SmartChef app allows you to add wood chips
during the cook with its “add chips” function. Tapping the “add
chips” button will initiate a high temp cycle which will fire up your
chips and get the smoke going. The app will notify you when its
time to add more chips as they burn through. Filling the smoker
box yields about 45 minutes to an hour of smoke.
15.124440 SnapSmoker GG ENG 15102042.indd 12 7/20/15 11:36 AM
13
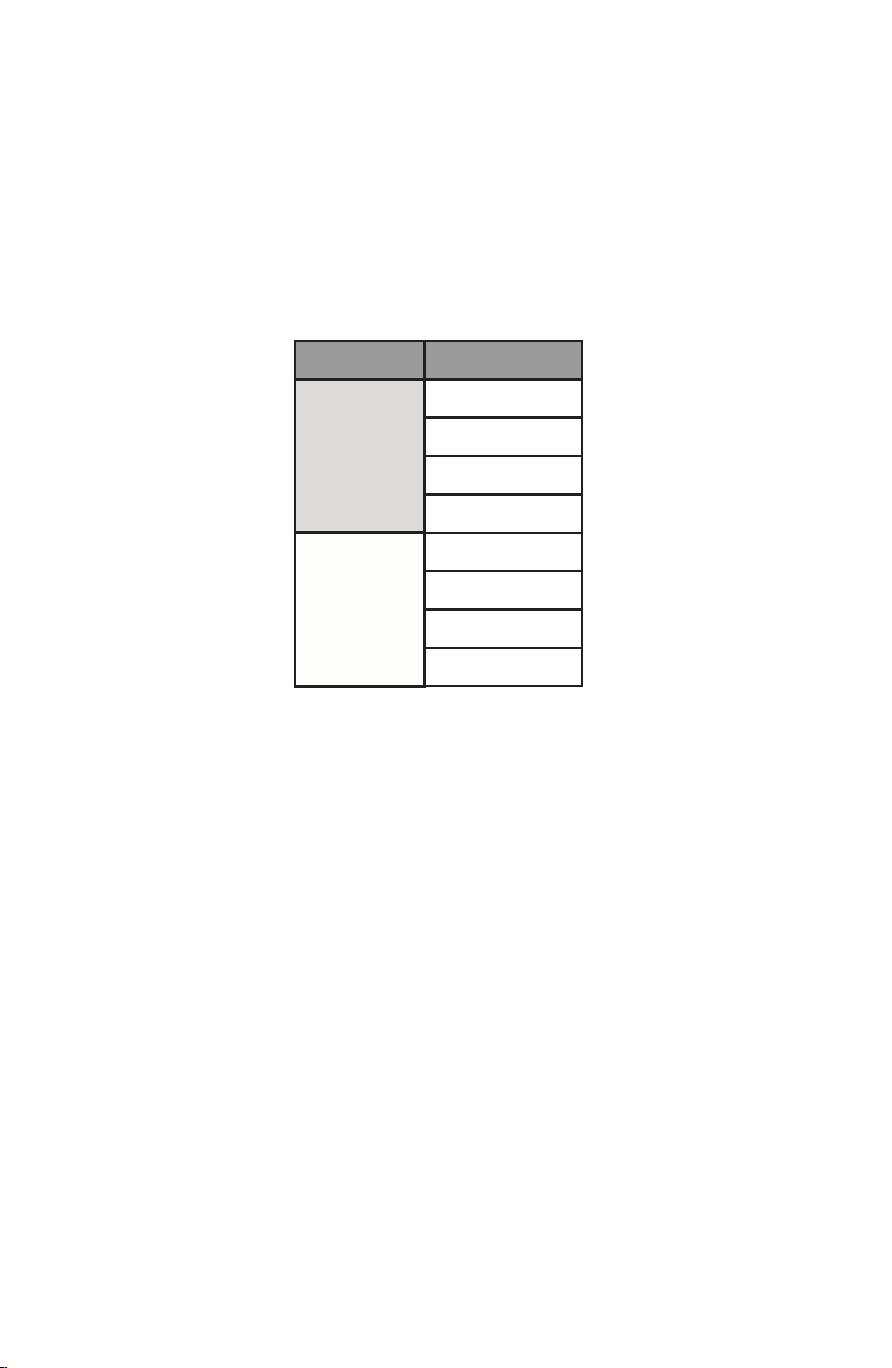
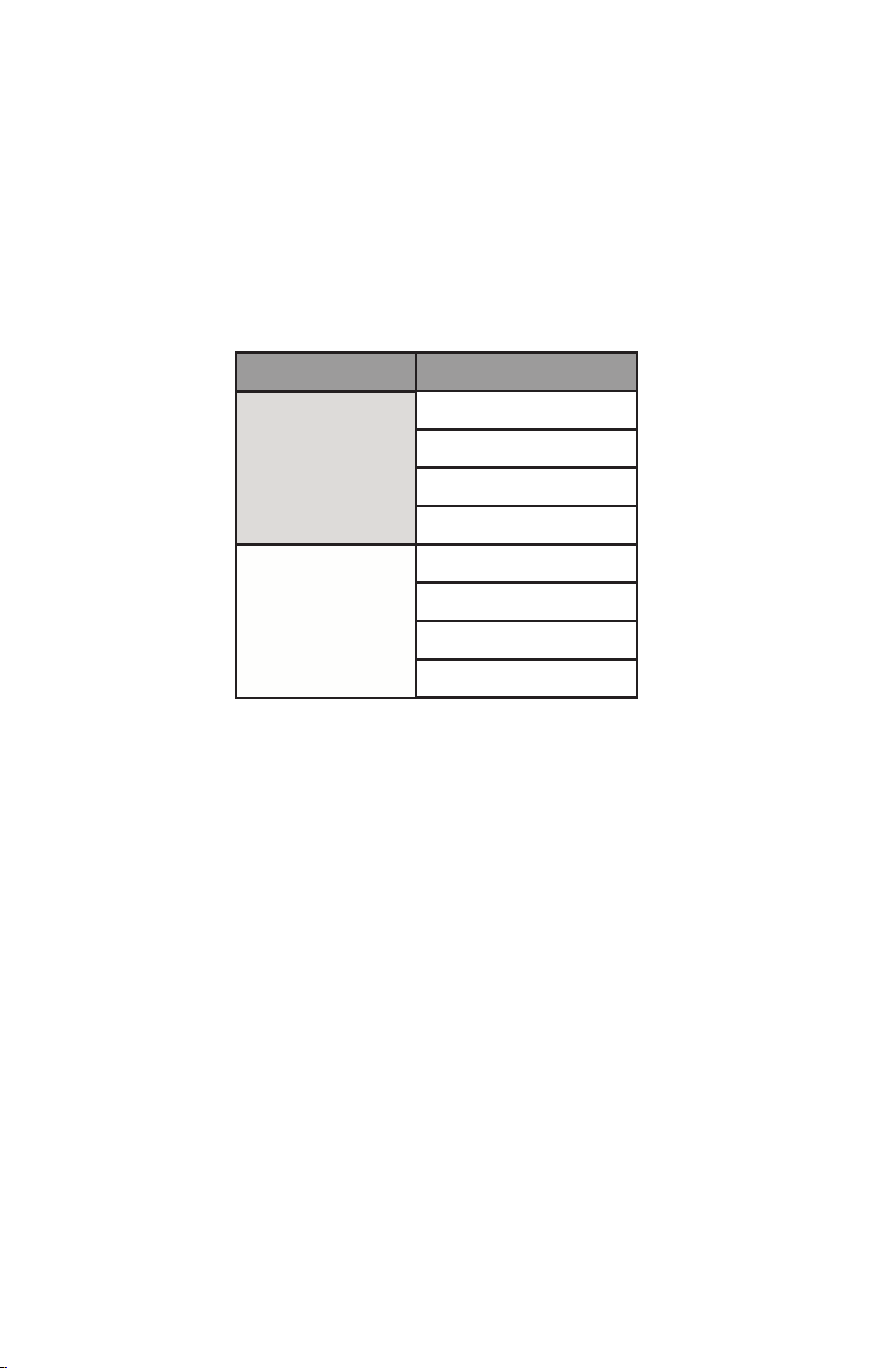
What Flavor Should I Use?
There are many wood chip types that result in dierent flavors.
Choosing a particular flavor may take some trial and error but the
chart below explains which woods will provide a more heavy, full
flavor and which will provide a more mild, light flavor. This is a
good starting point on your way to choosing your favorite flavors.
NOTE:
• You do not need to soak the wood chips in water before use.
Soaking the wood chips will not extend the smoking time; only
lengthen the time before they start to smoke.
• The smoker box is designed for wood chips or pellets only, do
not use wood chunks.
Wood Flavor
Hickory
Oak
Pecan
Mesquite
Alder
Maple
Apple
Cherry
Heavier
Lighter
15.124440 SnapSmoker GG ENG 15102042.indd 13 7/20/15 11:36 AM
14
For more info visit www.IsItDoneYet.gov
ENJOY YOUR SMOKER!
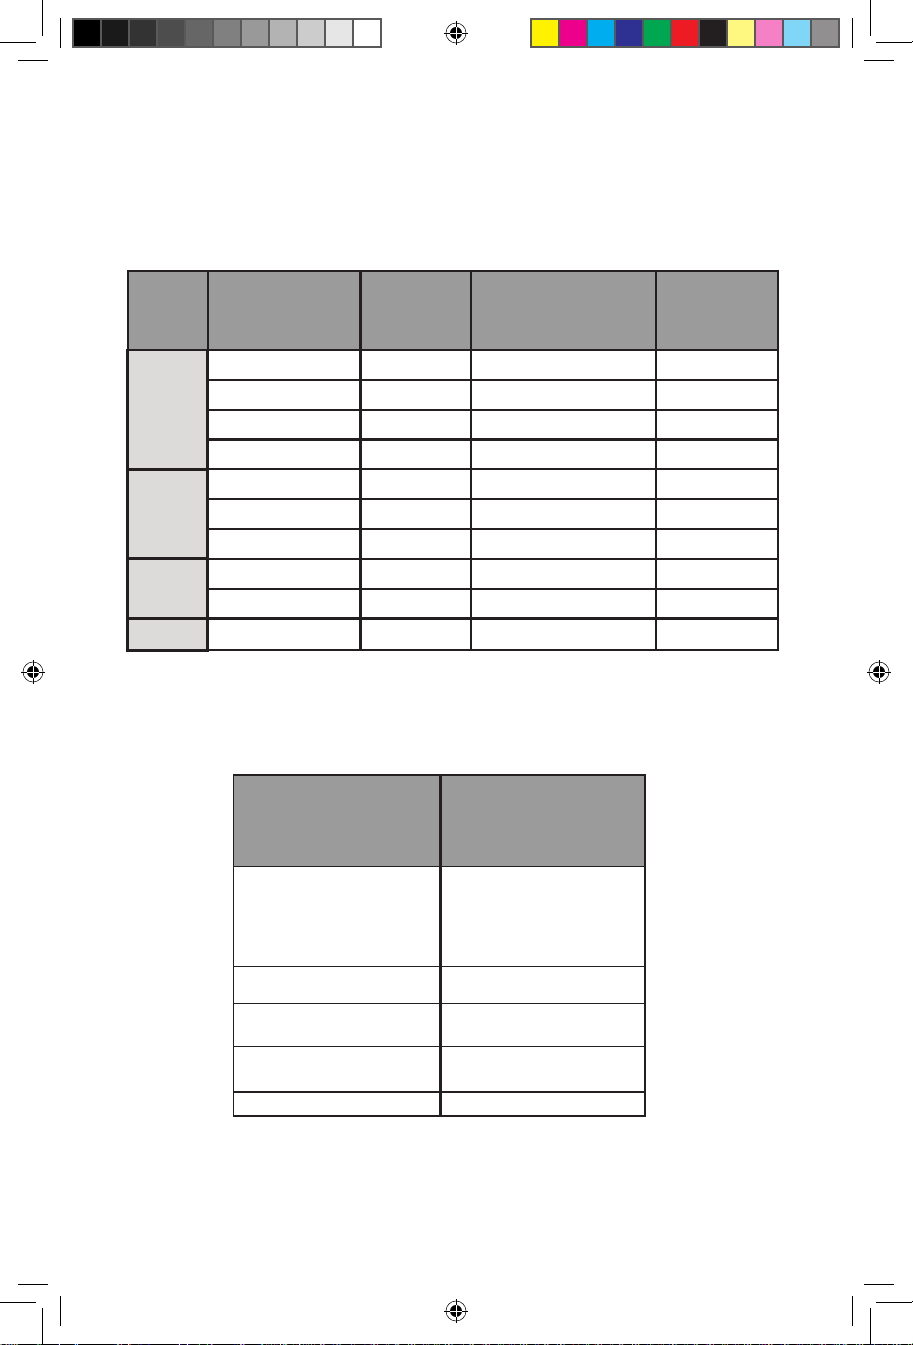
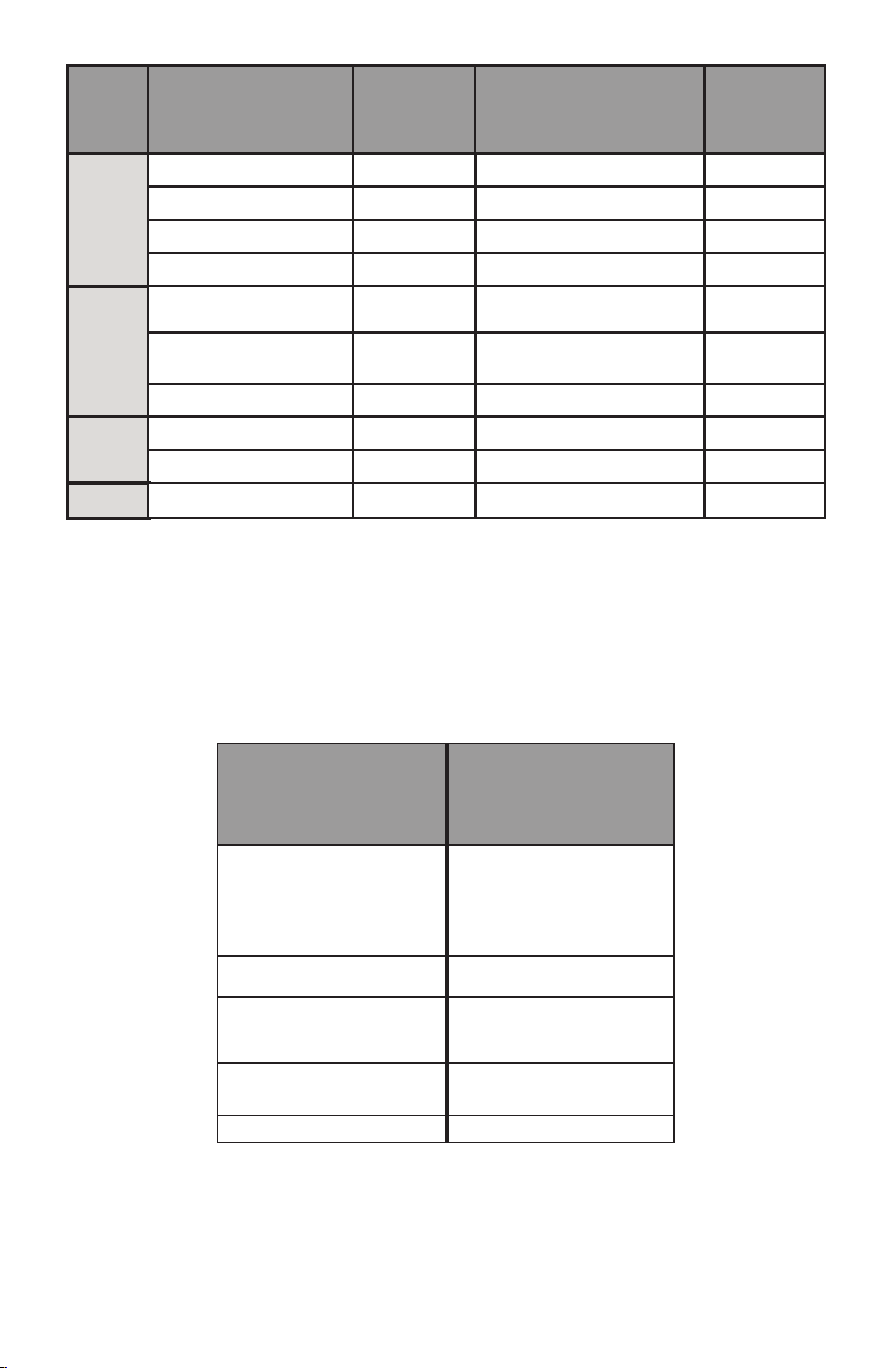
Remember, these are just estimates to help you plan by. Always
make sure you cook to the internal temperature listed in this chart:
GENERAL INFO
Lets get to the cooking! But first, here’s a quick guide to estimate
cooking times so you can better plan out your cooking:
Meat Meat Cut
Cooking
Temp
Estimated Cook
Time
Target
Temp
Pork
Beef
Poultry
Fish
Butt (Pulled)
Butt (Sliced)
Spare Ribs
Baby Back Ribs
Brisket (Pulled)
Brisket (Sliced)
Ribs
Chicken (Whole)
Turkey (Whole)
225 °F
225 °F
225 °F
225 °F
225 °F
225 °F
225 °F
250 °F
250 °F
225 °F
90-120 Mins Per Pound
90-120 Mins Per Pound
5-7 Hours (Total)
4-6 Hours (Total)
70-90 Mins Per Pound
70-90 Mins Per Pound
3-4 Hours (Total)
30-45 Mins Per Pound
30-45 Mins Per Pound
40-60 Mins Per Pound
205 °F
180 °F
190 °F
190 °F
200 °F
190 °F
175 °F
165 °F
165 °F
150 °F
Meat
USDA RECOMMENDED SAFE
MINIMUM
INTERNAL TEMPERATURES
Beef, Veal, Lamb
Steaks & Roast
(with a 3 minute rest)
145 °F
Fish
145 °F
Pork
(with a 3 minute rest)
145 °F
Beef, Veal, Lamb
Ground
160 °F
Turkey, Chicken & Duck
165 °F
15.124440 SnapSmoker GG ENG 15102042.indd 14 7/20/15 11:36 AM
15
TROUBLESHOOTING
This guide will help with general setup and connection issues.
Phase
Setup
Setup
Setup
Setup
Setup
Discovery
Problem Possible Cause Prevention/Solution
Unable to configure
new appliance-
D
ADO button is
not flashing
User waited longer
than 5 min
to attempt
configuration and
wireless radio
powered down
due to security
restrictions.
1. Press DADO
button to initiate
configuration mode,
confirm DADO button is
flashing
User waited longer
than 5 min
to attempt
configuration and
wireless radio
powered down
due to security
restrictions.
1. Restart appliance by
removing power
Unable to configure
new appliance-
D
ADO button is
not flashing
1. Go to the app store
and download/update
User may not have
the appropriate app
installed for the new
appliances
Unable to
communicate with
new appliance
during
configuration- DADO
Button is Flashing
1. Launch updated
application and initiate
configuration mode
by pressing the DADO
button-
D
ADO button
should be flashing
User may not have
the appropriate app
installed for the new
appliances
Unable to
communicate with
new appliance
during
configuration- DADO
Button is Flashing
1. Re-
ent
er the correct
password
2. User should verify
security settings
(WPA/WPA2)
User entered the
incorrect router
password and
attempt to
re-enter the correct
password
User sees
appliance, attempts
configuration and
receives incorrect
password error
1. Ensure phone and
appliance are on the
same Wi-Fi network
Phone is not on the
same network at the
appliance
First run, app does
not discover an
appliance that has
been previously
setup
15.124440 SnapSmoker GG ENG 15102042.indd 15 7/20/15 11:36 AM

16
Phase
Discovery
Problem Possible Cause Prevention/Solution
App does not
discover an
appliance that has
been previously
setup
App not
communicating
properly with the
cloud and appliance
1. Close app and restart
Discovery
App does not
discover an
appliance that has
been previously
setup
App not
communicating
properly with the
cloud and appliance
1. Power cycle the
appliance and wait for it
to reboot and connect
Discovery
App does not
discover an
appliance that has
been previously
setup
Appliance is still
connecting to the
Wi-Fi router
1. Wait for appliance
to complete connecting
with the Wi-
Fi r
outer.
2. Once user receives
a push notification that
appliance ready, they
may open the app and
start using
Discovery
When restarting the
app, the phone does
not connect to the
appliance
Phone and
appliance are not
on the same Wi-Fi
network
1. Check to ensure
appliance and phone
are on the same Wi-
Fi
netw
ork
Usage
Appliance looses
communication with
the Phone
During normal
usage, the user may
close the phone
or app. Once the
phone is open and
the app is running
it can take up to
30 seconds to
reconnect
1. Wait for phone
to reconnect to the
appliance
2. If after 30 seconds
and the appliance is not
communicating, restart
the app
Usage
User stops receiving
push notification
Cache full or
connection not
being made
1. Restart phone and
app typically fixes this
issue.
Usage
Appliance message
in app alerts
user that it is
disconnected
Appliance rebooting
or not properly
powered
1. Wait for appliance
to finish booting and
connecting to the Wi-Fi
network
15.124440 SnapSmoker GG ENG 15102042.indd 16 7/20/15 11:36 AM

17
For additional troubleshooting please refer to the Char-Broil
SmartChef app.
Phase Problem Possible Cause Prevention/Solution
Appliance message
in app alerts
user that it is
disconnected
Appliance rebooting
or not properly
powered
1. Check to ensure the
appliance is plugged in
and properly working
Usage
Appliance message
in app alerts
user that it is
disconnected
Appliance rebooting
or not properly
powered
1. Power cycle the
appliance, restart app,
and ensure you are
on the same Wi-Fi
network.
Usage
App attempts
connection to
appliance and
does not complete
connection (spinner)
Out of range or
connection not
established
1. Restart application
and attempt to connect
to existing appliance.
Usage
No connection No response during
connection
Power cycle the
appliance
General
No connection Other internet
devices connecting
but not Simple
Smoker
Power cycle the
appliance
General
No connection No response, not
completing scan
Power cycle the router/
modem. Call internet
provider if issue
persists.
General
AN 15.124440
Google Play is a trademark of Google Inc.
Apple, the Apple logo, iPhone, and iPod touch are trademarks of
Apple Inc., registered in the U.S. and other countries. App Store is a
service mark of Apple Inc.
15.124440 SnapSmoker GG ENG 15102042.indd 17 7/20/15 11:36 AM

Félicitations! Vous êtes désormais propriétaire d’un nouveau
fumoir Simple Smoker™ avec SmartChef™. Vous possédez
désormais l’un des fumoirs les plus intelligents et les plus
faciles à utiliser sur le marché. Grâce à la conception intuitive
du Simple Smoker et les capacités de surveillance et de
contrôle de SmartChef vous deviendrez la référence en
matière de grillades en un rien de temps, peu importe votre
niveau de compétence.
Nous vous conseillons de prendre quelques minutes pour
lire le guide d’utilisation du produit afin d’acquérir les
connaissances de base de l’application Char-Broil ainsi que
des composants du fumoir et de vous familiariser avec sa
structure et son fonctionnement avant de l’utiliser.
Il est important, avant toute chose, d’enregistrer votre gril pour
activer votre garantie et nous fournir toutes les informations
nécessaires afin que nous puissions mieux vous servir si
jamais vous aviez besoin de notre aide. Veuillez remplir la
carte d’enregistrement de garantie situéé à la derniére page
de votre guide de produit ou encore, économisez le prix d’un
timbre et visitez notre site à l’adresse support.charbroil.com/
product-registration pour enregistrer facilement et rapidement
votre gril.
Lorsque vous enregistrez votre garantie, abonnez-vous en
méme temps à notre bulletin électroniaque. Vous recevrez, au
fil des semaines, des conseils, des recettes et des idées pour
vos f
êtes. Vvous pourrez également vous inscrire à des ores
spéciales. Nous souhaitons que votre expérience Char-Broil
soit la meilleure qui soit - nous voulons une relation durable
avec nos clients.
BONNES GRILLADES!
15.124440 SnapSmoker GG FRE 15102042.indd 3 7/20/15 11:37 AM

Aperçu.................................................................................................................................1-2
Aperçu technique.........................................................................................................3-6
Application Char-Broil....................................................................................................7
Comment utiliser votre fumoir..........................................................................8-13
Modes de cuisson........................................................................................9-11
Utilisation du panier du fumoir..............................................................11
Utilisation de la boîte du fumoir ...................................................12-13
Renseignements généraux.................................................................................14-15
Dépannage..................................................................................................................16-18
Table des matières :
15.124440 SnapSmoker GG FRE 15102042.indd 4 7/20/15 11:37 AM
1
Les concepts de base concernant l’utilisation de votre
fumoir Simple Smoker...
Une fois votre fumoir configuré, son utilisation est très simple.
1
2
3
4
1
2
3
4
Insérez la sonde thermique
au centre de la viande
préparée.
Déposez la viande dans le
fumoir, , ajoutez des copeaux
de bois et connectez-vous à
l’application.
Grâce à la technologie
SmartChef, vous saurez
ce qui se passe dans votre
fumoir en tout temps et
de n’importe où en en
consultant les mises à jour
sur votre téléphone.
Concentrez-vous sur la fête,
le match important ou bien
détendez-vous sans soucis,
car SmartChef vous avertit
dès que votre repas est
parfaitement cuit et prêt à
être dégusté.
15.124440 SnapSmoker GG FRE 15102042.indd 1 7/20/15 11:37 AM
2
Fonctionnement
Puisque votre fumoir est muni d’une connexion Wi-Fi, vous
pouvez faire parvenir et recevoir des renseignements à partir de
l’appareil partout où vous disposez d’une connexion Internet. Le
fonctionnement est essentiellement le suivant :
1. Votre appareil intelligent fait parvenir des renseignements à
votre fumoir par le biais du nuage.
2. Votre fumoir communique à son tour des renseignements à
votre appareil intelligent par le biais du nuage de façon à ce que
vous puissiez surveiller l’état/la progression de la cuisson de
n’importe où.
Les produits SmartChef™ de Char-Broil utilisent la plateforme
DADO™ pour connecter votre gril/fumoir à Internet. Le bouton
DADO™ est utilisé pour établir une connexion avec votre réseau
domestique Wi-Fi.
Et étant donné que votre fumoir est branché à Internet, il est en
mesure d’intégrer à votre estimation de temps de cuisson des
renseignements importants et plus précis en temps réel (par
exemple la température extérieure dans votre région).
15.124440 SnapSmoker GG FRE 15102042.indd 2 7/20/15 11:37 AM
3
Aperçu du fumoir
Familiarisez-vous avec les pièces de votre fumoir.
Crochet du
panier
Panier
principal
du fumoir
Demi-
supports
Boîte du
fumoir
Panneau de
commande
Sonde
thermique
Plateau à
graisse
Cordon
d’alimentation
Panier
secondaire
APERÇU TECHNIQUE
15.124440 SnapSmoker GG FRE 15102042.indd 3 7/20/15 11:37 AM
4
Panneau de commande
Le fumoir Simple Smoker est muni d’un panneau de commande
unique et est conçu spécialement pour fonctionner avec
l’application Char-Broil.
• Bouton de démarrage/d’arrêt – démarrage de la cuisson une fois
le téléchargement eectué à partir de l’application
• Anneau lumineux – permet à l’utilisateur ou à l’utilisatrice de
jeter un coup d’œil rapide à la progression de la cuisson dans
le fumoir. (Référez-vous au guide de consultation rapide de
l’anneau lumineux)
• Le port de la sonde thermique – branchez la sonde intégrée à ce
port
• Préréglages – accès à trois cycles préchargés de profils de
cuisson emmagasinés localement (veuillez vous référer au
mode de préréglage)
• Bouton de DADO – réinitialiser la diusion/l’accréditation Wi-
Fi
Démarrage/
Arrêt
Anneau lumineux
Port de la sonde
thermique
Bouton
DADO
Préréglages
15.124440 SnapSmoker GG FRE 15102042.indd 4 7/20/15 11:37 AM

5
Guide de consultation rapide de l’anneau lumineux
L’anneau lumineux de votre fumoir représente une source
d’information importante pour vous en ce qui a trait au statut de
votre appareil de cuisson :
Continue
PRÊT/EN MARCHE
Une fois l’appareil
en ligne et prêt à
accepter un profil,
l’anneau lumineux
devrait passer au VERT
CONTINU.
Cela vous indique
que l’appareil est
en marche et prêt à
fonctionner.
Erreur
CLIGNOTE EN ROUGE
READY/ON
Once the appliance is online and
ready to accept a profile, the light
should be solid green.
This lets the user know the
appliance is on and ready.
READY/ON
Either after warming expires (15
min) or if the user removes food
from the bin the light should go
back to solid green.
COOKING
As a food starts cooking, the first
quadrant begins to flash orange.
This should continue through each
quadrant as the cook progresses. 1
flash then solid, 2 flash then
solid...
User can see that their food is
cooking and how far it is in the
process from a glance.
START COOKING
After a profile has been added to
the appliance the green light
should start flashing.
This should catch the user’s eye,
letting them know that something
needs to be done.
COOK IS DONE/WARMING
When cook is complete it should
change to a flashing orange ring.
This will again, grab the users
attention that an action needs to
be done.
CLEANING
Orange flashing propeller. Light up quadrants 2 & 4
(1 & 3 off), then quadrants 1 & 3 (2 & 4 off), repeat.
RUNNING CHIP BURN
Orange chasing. Light up quadrant 1 (2-4 off),
then quadrant 2 (1, 3-4 off) and so on.
ERROR
Red flashing.
COMMENCER LA CUISSON
Dès l’ajout d’un
profil à l’appareil,
l’anneau lumineux vert
devrait commencer à
CLIGNOTER.
Cela devrait attirer
votre attention et vous
indiquer qu’une action
est nécessaire.
CUISSON
Alors que la cuisson
des aliments
s’amorce, le premier
quadrant comment
à CLIGNOTER EN
ORANGE. Cela devrait
progresser vers
chaque quadrant au
cours de la cuisson. 1
clignotement et puis
une couleur continue,
2 clignotements et une
couleur continue.
Vous pouvez ainsi
observer d’un seul
coup d’œil la cuisson
de vos aliments ainsi
que sa progression.
CUISSON TERMINÉE/
RÉCHAUFFER
Une fois la cuisson
terminée, l’anneau
lumineux devrait
CLIGNOTER EN
ORANGE.
Cela attirera votre
attention une fois de
plus en vous indiquant
qu’une action est
nécessaire.
PRÊT/EN MARCHE
Une fois que l’appareil
a terminé de réchauffer
(15 min) ou si vous
retirez des aliments,
l’anneau lumineux
devrait à nouveau
passer au VERT
CONTINU.
READY/ON
Once the appliance is online and
ready to accept a profile, the light
should be solid green.
This lets the user know the
appliance is on and ready.
READY/ON
Either after warming expires (15
min) or if the user removes food
from the bin the light should go
back to solid green.
COOKING
As a food starts cooking, the first
quadrant begins to flash orange.
This should continue through each
quadrant as the cook progresses. 1
flash then solid, 2 flash then
solid...
User can see that their food is
cooking and how far it is in the
process from a glance.
START COOKING
After a profile has been added to
the appliance the green light
should start flashing.
This should catch the user’s eye,
letting them know that something
needs to be done.
COOK IS DONE/WARMING
When cook is complete it should
change to a flashing orange ring.
This will again, grab the users
attention that an action needs to
be done.
CLEANING
Orange flashing propeller. Light up quadrants 2 & 4
(1 & 3 off), then quadrants 1 & 3 (2 & 4 off), repeat.
RUNNING CHIP BURN
Orange chasing. Light up quadrant 1 (2-4 off),
then quadrant 2 (1, 3-4 off) and so on.
ERROR
Red flashing.
READY/ON
Once the appliance is online and
ready to accept a profile, the light
should be solid green.
This lets the user know the
appliance is on and ready.
READY/ON
Either after warming expires (15
min) or if the user removes food
from the bin the light should go
back to solid green.
COOKING
As a food starts cooking, the first
quadrant begins to flash orange.
This should continue through each
quadrant as the cook progresses. 1
flash then solid, 2 flash then
solid...
User can see that their food is
cooking and how far it is in the
process from a glance.
START COOKING
After a profile has been added to
the appliance the green light
should start flashing.
This should catch the user’s eye,
letting them know that something
needs to be done.
COOK IS DONE/WARMING
When cook is complete it should
change to a flashing orange ring.
This will again, grab the users
attention that an action needs to
be done.
CLEANING
Orange flashing propeller. Light up quadrants 2 & 4
(1 & 3 off), then quadrants 1 & 3 (2 & 4 off), repeat.
RUNNING CHIP BURN
Orange chasing. Light up quadrant 1 (2-4 off),
then quadrant 2 (1, 3-4 off) and so on.
ERROR
Red flashing.
15.124440 SnapSmoker GG FRE 15102042.indd 5 7/20/15 11:37 AM

6
Bouton DADO/voyant lumineux
Le voyant lumineux de DADO vous informe du statut de la connex-
ion et du fonctionnement de votre fumoir :
Les fonctions du bouton de DADO sont les suivantes :
ARRÊT
Aucune connexion à
Internet.
EN MARCHE/CONTINU
Connexion à Internet.
EN MARCHE/CLIGNOTE
(UNE FOIS PAR SECONDE)
Doit-être jumelé au réseau Wi-Fi
domestique ou (si cela s’est déjà
produit) l’utilisateur ou l’utilisatrice
doit appuyer sur le bouton DADO
pour tenter de se connecter à
nouveau.
EN MARCHE/CLIGNOTE
(DEUX FOIS PAR SECONDE « RAPIDE»)
Cela ne devrait se produire
que lorsque l’utilisateur ou
l’utilisatrice a lancé une mise à
jour microprogrammée à partir
de l’application. Auquel cas il est
nécessaire d’appuyer sur le bouton
DADO.
READY/ON
Once the appliance is online and
ready to accept a profile, the light
should be solid green.
This lets the user know the
appliance is on and ready.
READY/ON
Either after warming expires (15
min) or if the user removes food
from the bin the light should go
back to solid green.
COOKING
As a food starts cooking, the first
quadrant begins to flash orange.
This should continue through each
quadrant as the cook progresses. 1
flash then solid, 2 flash then
solid...
User can see that their food is
cooking and how far it is in the
process from a glance.
START COOKING
After a profile has been added to
the appliance the green light
should start flashing.
This should catch the user’s eye,
letting them know that something
needs to be done.
COOK IS DONE/WARMING
When cook is complete it should
change to a flashing orange ring.
This will again, grab the users
attention that an action needs to
be done.
CLEANING
Orange flashing propeller. Light up quadrants 2 & 4
(1 & 3 off), then quadrants 1 & 3 (2 & 4 off), repeat.
RUNNING CHIP BURN
Orange chasing. Light up quadrant 1 (2-4 off),
then quadrant 2 (1, 3-4 off) and so on.
ERROR
Red flashing.
NETTOYAGE
Hélice CLIGNOTANT EN ORANGE.
Quadrants lumineux 2 et 4 (1 et 3
éteints), et puis quadrants 1 et 3 (2
et 4 éteints), répétition.
GESTION DE LA COMBUSTION DES COPEAUX]
CIRCUIT LUMINEUX ORANGE.
Quadrant lumineux 1 (2-4 éteints),
puis par la suite quadrant 2 (1, 3-4
éteints) et ainsi de suite.
READY/ON
Once the appliance is online and
ready to accept a profile, the light
should be solid green.
This lets the user know the
appliance is on and ready.
READY/ON
Either after warming expires (15
min) or if the user removes food
from the bin the light should go
back to solid green.
COOKING
As a food starts cooking, the first
quadrant begins to flash orange.
This should continue through each
quadrant as the cook progresses. 1
flash then solid, 2 flash then
solid...
User can see that their food is
cooking and how far it is in the
process from a glance.
START COOKING
After a profile has been added to
the appliance the green light
should start flashing.
This should catch the user’s eye,
letting them know that something
needs to be done.
COOK IS DONE/WARMING
When cook is complete it should
change to a flashing orange ring.
This will again, grab the users
attention that an action needs to
be done.
CLEANING
Orange flashing propeller. Light up quadrants 2 & 4
(1 & 3 off), then quadrants 1 & 3 (2 & 4 off), repeat.
RUNNING CHIP BURN
Orange chasing. Light up quadrant 1 (2-4 off),
then quadrant 2 (1, 3-4 off) and so on.
ERROR
Red flashing.
15.124440 SnapSmoker GG FRE 15102042.indd 6 7/20/15 11:37 AM

7
Utilisation de l’application Char-Broil
La technologie SmartChef de Char-Broil utilise une application
installée sur votre appareil intelligent permettant de contrôler votre
appareil de cuisson.
1. Téléchargement de l’application Char-Broil
La première étape consiste à ouvrir une session dans l’App Store℠
(produits Apple®) ou dans la « Google Play™ » (produits Android™)
et à télécharger l’application Char-Broil sur votre appareil.
2. Conguration de l’application Char-Broil
1. Ouvrez l’application et créez un profil d’utilisateur.
2. Dès la connexion établie, vous pouvez configurer votre appareil
pour usage.
3. Utilisation de l’application Char-Broil
L’application vous guidera tout au long de la portion restante du
processus.
Avant de commencer à cuisiner...
Vous constaterez que l’assemblage du produit a été complété
principalement à l’usine. Veillez à compléter toute étape restante
en conformité avec les renseignements sur la sécurité et l’usage
de l’appareil se trouvant dans le guide d’utilisation du produit.
Assurez-vous que les trous de l’enceinte de cuisson se trouvent vers
l’avant de l’unité. De cette façon, les trous de l’enceinte de cuisson
s’alignent avec ceux de la boîte du fumoir, permettant ainsi à la
fumée de circuler adéquatement pendant l’usage.
Tout comme pour la poêle en fonte de grand-maman, l’enceinte
APPLICATION CHAR-BROIL
15.124440 SnapSmoker GG FRE 15102042.indd 7 7/20/15 11:37 AM

8
de cuisson en acier inoxydable requiert un apprêtage avant d’être
utilisée. Il s’agit d’une étape très importante puisqu’elle permet à
l’enceinte de cuisson de fonctionner adéquatement. En plus, cela
facilite le nettoyage et aide à prévenir la rouille. Enduisez d’huile
végétale toutes les surfaces intérieures de l’enceinte de cuisson. Si
vous utilisez une huile végétale en aérosol, essuyez l’enceinte de
cuisson après la vaporisation de manière à obtenir une application
uniforme. Démarrez l’application Char-Broil SmartChef sur votre
appareil intelligent, lancez un cycle de nettoyage (disponible dans
la section Entretien de l’application), fermez le couvercle et laissez
chauer jusqu’à ce que l’huile végétale brûle et cesse de dégager de
la fumée. À la suite de cela, l’apprêt brillant de l’enceinte de cuisson
en acier inoxydable arbore une couleur brun foncé ou bronze.
Vous voilà à présent en mesure de cuisiner. Plus vous utilisez
votre fumoir Simple Smoker, plus la cuisson sera d’une qualité
supérieure. Plus l’enceinte de cuisson est foncée en raison de
l’apprêtage, plus elle sera chaude et plus la cuisson sera uniforme.
Une légère couche d’huile végétale après chaque utilisation assure
un apprêtage adéquat des surfaces et aide à prévenir la rouille, tout
comme pour la poêle en fonte de grand-maman.
Passons maintenant à la cuisson!
Cette section vous enseignera comment cuisiner avec votre
nouveau fumoir SmartChef.
La cuisson avec SmartChef - Le système SmartChef fonctionne
en utilisant la variation de température de la viande de façon à
obtenir l’information en temps réel provenant de l’appareil de
cuisson, et cette information vous est par la suite communiquée
par le biais de l’application Char-Broil. L’application détecte cette
température à partir de la sonde thermique qui demeure insérée
dans la viande tout au long de la cuisson. Cela signifie qu’il est
important d’insérer la sonde thermique adéquatement de façon à
garantir une lecture aussi précise que possible, ce qui nous mène à...
15.124440 SnapSmoker GG FRE 15102042.indd 8 7/20/15 11:37 AM

9
L’usage adéquat de la sonde thermique :
• Insérez la sonde dans la partie la plus épaisse de la viande, sans
toucher à l’os, au gras ou au cartilage, avant de la déposer dans
le fumoir. Une fois la viande en place, vous pouvez alors relier le
connecteur femelle de la sonde thermique au fumoir.
• Après la cuisson, vérifiez la température à plusieurs endroits à
l’aide de la sonde et observez l’achage à l’écran afin de vous
assurer que la viande est cuite uniformément.
• Assurez-vous de nettoyer votre thermomètre de cuisson avec de
l’eau chaude savonneuse avant et après chaque usage. Veillez à
ne pas l’immerger ni à le mettre au lave-vaisselle.
• N’utilisez que la sonde thermique fournie.
MODES DE CUISSON
Il existe trois modes de cuisson diérents lorsque vous utilisez
votre fumoir SmartChef :
1. Guidé – suivez un processus prédéterminé, préparez et faites
cuire un repas
2. Manuel – sélectionnez des paramètres personnalisés pour faire
fonctionner votre appareil de cuisson
3. Préréglages – des cycles de cuisson préréglés sont préchargés sur
la mémoire de votre fumoir.
Pour en savoir plus concernant l’utilisation de copeaux de bois pour
le fumage, veuillez consulter « utilisation de la boîte du fumoir »
15.124440 SnapSmoker GG FRE 15102042.indd 9 7/20/15 11:37 AM

10
1. Cuisson guidée - Utilisez ce mode si vous fumez des aliments
pour la première fois, souhaitez plus de conseils ou si vous ne savez
pas tout à fait quoi préparer. En sélectionnant ce mode, on vous
guide tout au long du processus et vous devez préciser le cycle de
cuisson particulier désiré, comme le type et le poids de la viande
et le genre de préparation voulu. Dès que l’application intègre vos
choix, elle vous soumet des instructions de préparation et vous
indique également le temps de cuisson approximatif. Ajoutez
simplement la recette au fumoir et appuyer par la suite sur le
bouton de démarrage de votre fumoir pour commencer.
2. Cuisson manuelle - Utilisez ce mode si vous avez déterminé
exactement le type de cuisson voulu. Le mode manuel fonctionne
selon des paramètres de cuisson personnalisés pour l’appareil. Ces
paramètres comprennent la température cible enregistrée par la
sonde, la température de l’enceinte de cuisson ainsi que la durée de
cuisson. Cela vous permet de cuisiner comme vous le voulez tout
en bénéficiant des capacités de surveillance et de contrôle uniques
qu’ore le système SmartChef. Ajoutez par la suite vos paramètres
au fumoir et appuyer sur le bouton de démarrage qui se trouve sur
votre panneau de commande afin d’amorcer le cycle de cuisson.
3. Cycles de cuisson préréglables - Utilisez ce mode si vous
désirez démarrer un cycle de cuisson rapidement ou si vous n’avez
pas accès à un réseau Wi-Fi. Le mode de préréglage fonctionne
en utilisant des paramètres préprogrammés dans votre aumoir.
Ces profils de cuisson cuisent selon une température interne de la
viande et de l’enceinte de cuisson prédéterminées. Vous pouvez
surveiller la progression de la cuisson grâce à l’anneau lumineux
qui se trouve sur le panneau de commande de votre fumoir.
15.124440 SnapSmoker GG FRE 15102042.indd 10 7/20/15 11:37 AM
11
PARAMÈTRES PRÉRÉGLÉS :
Porc efloché – Cuire la viande pour atteindre 96 °C (205 °F)
à une temp. de 107 °C (225 °F)
1
Pointe de poitrine de bœuf – Cuire la viande pour atteindre
93 °C (200 °F) à une temp. de 107 °C (225 °F)
2
Poulet/dinde rôti(e) – Cuire la viande pour atteindre
74 °C (165 °F) à une temp. de 274 °C (525 °F)
3
Surveillez la progression du cycle de
cuisson en observant l’anneau lumineux
Utilisation des cycles de cuisson préréglés :
1. Insérez la sonde thermique dans le morceau de viande choisi.
2. Déposez la viande dans le panier du fumoir, puis déposez ce
dernier dans le fumoir Simple Smoker et, finalement, branchez
le connecteur de la sonde thermique au port de la sonde
thermique.
3. Appuyez sur le bouton de préréglage pour faire défiler vos
options. Cessez d’appuyer dès que le chire correspondant au
préréglage voulu s’illumine.
4. Appuyez sur le bouton de démarrage pour lancer le processus
de cuisson.
5. En appuyant à nouveau sur le bouton de préréglage pendant le
cycle de cuisson, cela a pour eet d’amorcer le cycle de fumage
des copeaux de bois. (Veuillez consulter « l’utilisation de la boîte
du fumoir »)
15.124440 SnapSmoker GG FRE 15102042.indd 11 7/20/15 11:37 AM
12
Utilisation du panier du fumoir
Peu importe la méthode de cuisson ou le type d’aliment que vous
faites cuire, utilisez toujours le panier pour y déposer votre viande.
Des demi-tablettes sont fournies pour permettre diverses combinai-
sons. Voir l’image ci-dessous pour des idées de configuration :
Grosses pièces de viande
En ce qui concerne les grosses pièces
de viande comme les épaules de porc
de palette ou les pointes de poitrine,
utilisez les deux demi-tablettes
pour n’en former qu’une de façon à
surélever la viande jusqu’à peu près au
milieu du fumoir.
Grosses pièces de volaille
Dans le cas de dindes ou de gros
poulets, retirez le lien qui rattache les
pattes de la volaille et positionnez-
la verticalement. En ouvrant les
jambes de la volaille, cela assure une
cuisson plus uniforme tout en aidant
à maintenir la position verticale.
Positionnez toujours la poitrine vers le
haut.
Petits morceaux de viande ou de
volaille
Lors de la cuisson de plus petits
morceaux, utilisez les demi-tablettes
de façon à y répartir les morceaux de
viande de chaque côté du panier. Cela
garantit une cuisson plus uniforme.
15.124440 SnapSmoker GG FRE 15102042.indd 12 7/20/15 11:37 AM
13
Conseils concernant le panier...
• LLaissez refroidir le panier au moins 10à15minutes lorsque
vous le sortez du fumoir. Cela vous permet de retirer facilement
la viande du panier de façon sécuritaire.
• Le second panier peut être utilisé pour des aliments
d’accompagnement tels que des légumes et il peut être placé
par-dessus le panier principal du fumoir pour une cuisson
simultanée.
• Utilisez toujours le crochet du panier lorsque vous retirez ce
dernier du fumoir.
Utilisation de la boîte du fumoir :
La boîte du fumoir vous permet d’agrémenter vos aliments de
saveurs fumées délicieuses. Votre fumoir avec SmartChef vous
permet d’ajouter des copeaux de bois au cours du cycle de cuisson
grâce à la fonction «ajout de copeaux». En appuyant sur le bouton
d’ajout de copeaux, un cycle de température élevée s’amorce et fait
chauer les copeaux qui dégagent alors de la fumée. L’application
vous indique lorsqu’il est temps d’ajouter plus de copeaux à ceux
qui se consument. La boîte du fumoir remplie dégagera de la fumée
pendant 45minutes à une heure.
15.124440 SnapSmoker GG FRE 15102042.indd 13 7/20/15 11:37 AM
14
Quelle saveur dois-je utiliser?
Il existe plusieurs sortes de copeaux de bois d’arômes diérents.
Le choix d’un arôme particulier implique des expériences parfois
réussies et parfois un peu moins, mais le tableau ci-dessous définit
quel type de bois dégage un arôme plus intense, plus complet et
lequel dégage un arôme plus léger. Il s’agit d’un excellent point de
départ pour vous aider à déterminer vos arômes favoris.
REMARQUE :
• Il n’est pas nécessaire de faire tremper les copeaux de bois dans
l’eau avant de les utiliser. Le trempage des copeaux de bois
n’améliore pas la durée de fumage, elle ne fait que prolonger
la période de temps avant qu’ils ne se mettent à dégager de la
fumée.
• La boîte du fumoir n’est conçue que pour les copeaux de bois et
les pastilles. N’utilisez pas de morceaux de bois.
RENSEIGNEMENTS GÉNÉRAUX
Passons à la cuisson! Mais tout d’abord, voici un guide de
consultation rapide qui vous permet d’estimer les temps de cuisson
pour vous permettre de planifier adéquatement la préparation de
votre repas :
Saveur de bois
Hickory
Chêne
Pacane
Prosopis
Aulne
Érable
Pomme
Cerisier
Intense
Léger
15.124440 SnapSmoker GG FRE 15102042.indd 14 7/20/15 11:37 AM
15
Pour en savoir plus, visitez www.IsItDoneYet.gov
PROFITEZ DE VOTRE FUMOIR!
N’oubliez pas qu’il ne s’agit que d’estimations pour vous aider à
mieux planifier. Assurez-vous que la cuisson de vos aliments est
toujours conforme aux températures internes apparaissant sur le
tableau suivant :
Viande Coupe de viande
Temp. de
cuisson
Estimé du temps de
cuisson
Temp. cible
Porc
Bœuf
Volaille
Poisson
Fesse (à l’effilochée)
Fesse (tranchée)
Côtes levées
Petites côtes levées de dos
Pointe de poitrine
(à l’effilochée)
Pointe de poitrine
(tranchée)
Côtes levées
Poulet (entier)
Dinde (entière)
107 °C (225 °F)
90 à 120 min par 0,45 kg (1 lb)
90 à 120 min par 0,45 kg (1 lb)
5 à 7 heures (total)
4 à 6 heures (total)
70 à 90 min par 0,45 kg (1 lb)
70 à 90 min par 0,45 kg (1 lb)
3 à 4 heures (total)
30 à 45 min par 0,45 kg (1 lb)
30 à 45 min par 0,45 kg (1 lb)
40 à 60 min par 0,45 kg (1 lb)
96 °C (205 °F)
107 °C (225 °F)
107 °C (225 °F)
107 °C (225 °F)
107 °C (225 °F)
107 °C (225 °F)
107 °C (225 °F)
121 °C (250 °F)
121 °C (250 °F)
107 °C (225 °F)
82 °C (180 °F)
88 °C (190 °F)
88 °C (190 °F)
93 °C (200 °F)
88 °C (190 °F)
79 °C (175 °F)
74 °C (165 °F)
74 °C (165 °F)
66 °C (150 °F)
Viande
TEMPÉRATURES INTERNES
MINIMALES considérées
sécuritaires selon le département
de l’Agriculture des États-Unis
(USDA)
Bœuf, veau, agneau,
steaks et rôtis
(laissez reposer 3 minutes)
63 °C (145 °F)
Poisson
63 °C (145 °F)
Porc
(laissez reposer 3 minutes)
63 °C (145 °F)
Bœuf, veau, agneau,
haché
71 °C (160 °F)
Dinde, poulet et canard
74 °C (165 °F)
15.124440 SnapSmoker GG FRE 15102042.indd 15 7/21/15 7:59 AM

16
DÉPANNAGE
Ce guide contient des renseignements concernant l’installation et
les problèmes de connexion.
Phase
Configu-
ration
Dét
ection
Problème
Cause possible
Prévention/solution
Incapable de
configurer le nouvel
appareil-
l
e bouton
DADO ne clignote
pas
L’utilisateur a
attendu plus de 5 min
avant d’essayer de
configurer l’appareil
et le réseau de
téléphone a été mis
hors tension en
raison de restrictions
liées à la sécurité.
1. Appuyez sur le bouton
de configuration DADO
pour amorcer le mode
de configuration,
assurez-vous que
le bouton DADO clignote
1. Redémarrez
l’appareil en cessant de
l’alimenter
Incapable de
configure le nouvel
appareil – le bouton
DADO ne clignote
pas
1. Visitez la boutique
d’applications
et téléchargez/procédez
à la mise à jour.
L’utilisateur peut ne
pas posséder
l’application
adéquate qui est
installée sur les
nouveaux appareils
Incapable d’établir la
communication avec
le nouvel appareil
au cours de la
configuration. Le
bouton DADO
clignote
1. Lancez l’application
mise à jour et
amorcez le mode
de configuration en
appuyant sur le bouton
DADO – le bouton DADO
devrait clignoter
L’utilisateur peut ne
pas posséder
l’application
adéquate qui est
installée sur les
nouveaux appareils
Incapable d’établir la
communication avec
le nouvel appareil
au cours de la
configuration.
Le bouton DADO
clignote
1. Saisissez à nouveau le
le bon mot de passe
2. L’utilisateur devrait
vérifier les paramètres de
sécurité (WPA/WPA2).
L’utilisateur a saisi
un mot de passe
erroné pour le
routeur et il tente de
saisir à nouveau le
bon mot de passe
L’utilisateur identifie
l’appareil, tente une
configuration et
reçoit un message
indiquant que le mot
de passe est erroné
1. Assurez-vous que le
téléphone et l’appareil
sont connectés au
même réseau Wi-Fi.
Le téléphone n’est
pas connecté au
même réseau que
l’appareil
Lors du premier
lancement,
l’application ne
détecte pas un
appareil configuré
précédemment
Configu
-
ration
L
’utilisateur a
attendu plus de 5 min
avant d’essayer de
configurer l’appareil
et le réseau de
téléphone a été mis
hors tension en
raison de restrictions
liées à la sécurité.
Configu
-
ration
Configu-
ration
Configu-
ration
15.124440 SnapSmoker GG FRE 15102042.indd 16 7/20/15 11:37 AM

17
Phase
Détection
Problème Cause possible Prévention/solution
L’application
ne détecte pas
d’appareil configuré
précédemment
L’application ne
communique pas
adéquatement
avec le le nuage et
l’appareil
1. Fermez l’application
et redémarrez-la
Détection
L’application ne
détecte pas
d’appareil configuré
précédemment
L’application ne
communique pas
adéquatement
avec le le nuage et
l’appareil
1. Redémarrez
l’appareil et attendez
qu’il soit relancé et
connecté
Détection
L’application
ne détecte pas
d’appareil configuré
précédemment
L’appareil se
connecte encore au
routeur Wi-Fi
1. Attendez que
l’appareil se connecte
complètement au
routeur Wi-Fi.
2. Dès que l’utilisateur
reçoit une notification
poussée indiquant que
l’appareil est prêt, il
est possible d’ouvrir
l’application et de
l’utiliser
Détection
Après avoir
redémarré
l’application, le
téléphone ne ne
se connecte pas à
l’appareil
Le téléphone et
l’appareil ne sont
pas liés au même
réseau Wi-Fi
1. Assurez-vous que
le téléphone et
l’appareil sont liés au
même réseau Wi-Fi
Utilisation
L’appareil perd
la communication
avec le téléphone
Au cours d’une
utilisation normale,
l’utilisateur peut
fermer le téléphone
ou l’application.
Lorsque le
téléphone est ouvert
et que l’application
est active, la
reconnexion peut
prendre jusqu’à 30
secondes
1. Attendez que
le téléphone se
reconnecte à l’appareil
2. Si après 30 secondes
l’appareil ne
communique
pas, redémarrez
l’application
Utilisation
L’utilisateur ne
reçoit plus de
notification de
poussée
Cache pleine ou la
connexion ne se fait
pas
1. Redémarrez
le téléphone et
l’application règle en
général le problème
Utilisation
Un message de
l’appareil s’affiche
dans l’application
et prévient
l’utilisateurqu’il est
déconnecté
Redémarrage
de l’appareil ou
alimentation
incorrecte
1. Attendez que
l’appareil termine le
redémarrage et se
connecte au réseau
Wi-Fi
15.124440 SnapSmoker GG FRE 15102042.indd 17 7/20/15 11:37 AM

18
Pour des informations de dépannage supplémentaires, veuillez
consulter l’application Char-Broil
Un message
provenant de
l’appareil s’affiche
dans l’application et
prévient l’utilisateur
qu’il est déconnecté
Redémarrage
de l’appareil ou
alimentation
incorrecte
1. Assurez-vous que
l’appareil est branché
et fonctionne
adéquatement
Utilisation
Un message
provenant de
l’appareil s’affiche
dans l’application et
prévient l’utilisateur
qu’il est déconnecté
Redémarrage
de l’appareil ou
alimentation
incorrecte
1. Redémarrez
l’appareil, redémarrez
l’application, et
assurez-vous d’être lié
au même réseau Wi-Fi
Utilisation
L’application tente
de se connecter à
l’appareil et ne
complète pas la
connexion (boucle
continue)
Hors de portée ou la
connexion n’est pas
établie
1. Redémarrez
l’application et tentez
une connexion à
l’appareil existant
Utilisation
Aucune connexion Aucune réponse
au cours de la
connexion
Redémarrez
l’appareil
Généralité
Aucune connexion D’autres appareils
se connectent à
Internet mais aucune
connexion du fumoir
Simple Smoker
Redémarrez
l’appareil
Généralité
Aucune connexion Aucune réponse,
balayage incomplet
Redémarrez le routeur/
modem. Communiquez
avec le fournisseur de
service Internet si le
problème persiste
Généralité
Phase Problème Cause possible Prévention/solution
Google Play est une marque déposée de Google Inc.
Apple, le logo d’Apple, iPhone et iPod touch sont des marques de
commerce d’Apple, Inc. déposées aux É.-U. et dans d’autres pays.
App Store est une marque de service d’Apple, Inc.
AN 15.124440
15.124440 SnapSmoker GG FRE 15102042.indd 18 7/20/15 11:37 AM