Loading ...
Loading ...
Loading ...
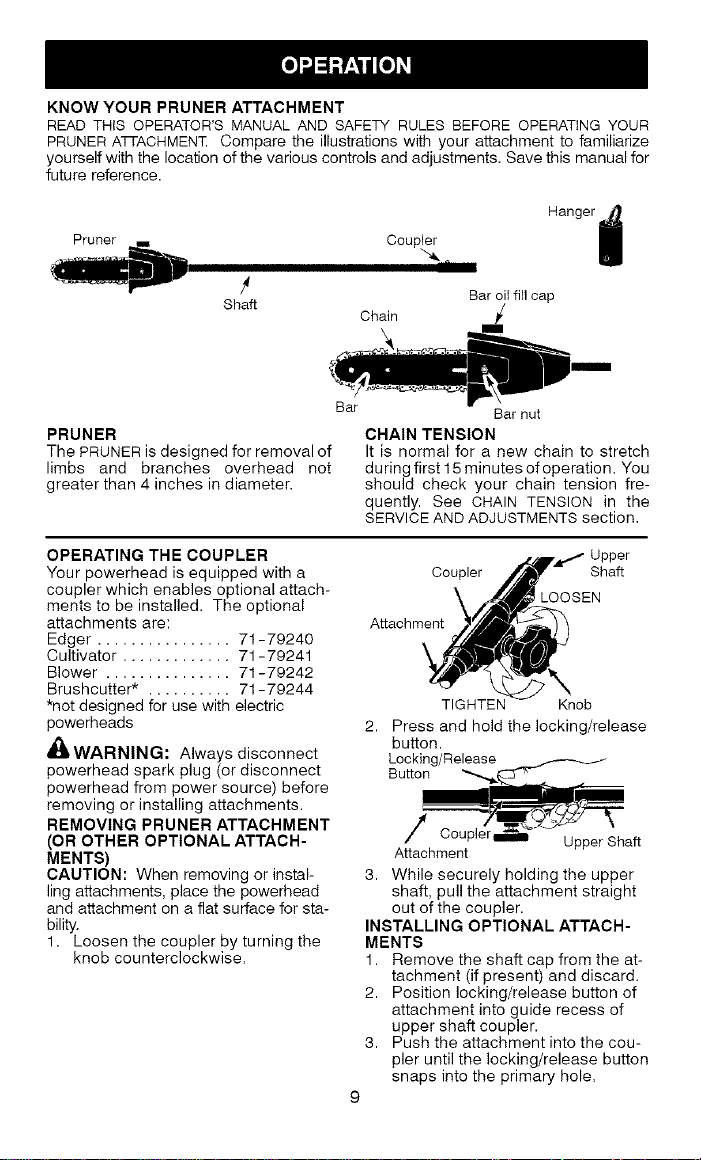
KNOW YOUR PRUNER ATTACHMENT
READ THiS OPERATOR'S MANUAL AND SAFETY RULES BEFORE OPERATING YOUR
PRUNER Aqq-ACHMENT Compare the illustrations with your attachment to familiarize
yourself with the location of the various controls and adjustments. Save this manual for
future reference.
Hanger
Pruner Coupler g
Bar oilfill cap
Shaft
Chain _/
Bar Bar nut
PRUNER CHAIN TENSION
The PRUNER is designed for removal of It is normal for a new chain to stretch
limbs and branches overhead not duringfirst15minutesofoperation. You
greater than 4 inches in diameter, should check your chain tension fre-
quently. See CHAIN TENSION in the
SERVICE AND ADJUSTMENTS section.
OPERATING THE COUPLER
Your powerhead is equipped with a
coupler which enables optional attach-
ments to be installed. The optional
attachments are:
Edger ................ 71-79240
Cultivator ............. 71-79241
Blower ............... 71-79242
Brushcutter* .......... 71-79244
*not designed for use with electric
powerheads
_WARNING: Always disconnect
powerhead spark plug (or disconnect
powerhead from power source) before
removing or installing attachments.
REMOVING PRUNER ATTACHMENT
(OR OTHER OPTIONAL ATTACH-
MENTS)
CAUTION: When removing or instal-
ling attachments, place the powerhead
and attachment on a flat surface for sta-
bility.
1. Loosen the coupler by turning the
knob counterclockwise.
Coupler Shaft
LOOSEN
Attachment
TIGHTEN Knob
2. Press and hold the locking/release
button.
Locking/Release
Button
/ c
cup er_ Upper Shaft
Attachment
3. While securely holding the upper
shaft, pull the attachment straight
out of the coupler.
INSTALLING OPTIONAL ATTACH-
MENTS
1. Remove the shaft cap from the at-
tachment (if present) and discard.
2. Position locking/release button of
attachment into guide recess of
upper shaft coupler.
3. Push the attachment into the cou-
pler until the locking/release button
snaps into the primary hole=
9
Loading ...
Loading ...
Loading ...