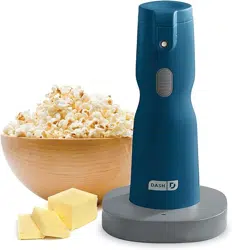
#DBD200
butter sprayeR
Instruction Manual | Recipe Guide
Setting Up Your Compact Centrifugal Juicer
r
e
c
i
p
e
s
i
n
s
i
d
e
!

2 ∙ page title
Important Safeguards .........................................4–5
Parts & Features ..................................................6–7
Setting Up Your Butter Sprayer .........................8–9
Using Your Butter Sprayer .............................. 10 -11
Understanding Your Indicator Lights .................12
Cleaning & Maintenance ................................ 14-15
Recipes ............................................................. 17-27
Customer Support ............................................... 30
Warranty ................................................................ 31
butter sprayer
t
h
e
d
a
s
h
t
e
a
m
!

∙ 5 ∙ ∙ 4 ∙
• Read all instructions.
• Remove all packaging and labels from appliance
prior to use.
• Make sure appliance is cleaned thoroughly
before using.
• To protect against electrical shock do not immerse
cord, plug, base or appliance in water or other
liquid.
• Do not use appliance for other than its intended
use. For household use only. Do not use outdoors.
• Close supervision is necessary when any
appliance is used by or near children.
• Unplug from outlet when not in use and before
cleaning. Allow to cool before putting on or
taking off parts.
• Do not operate this appliance with a damaged cord,
damaged plug, or after the appliance malfunctions
or is dropped or damaged in any manner. Return the
appliance to the nearest authorized service facility for
examination, repair or adjustment.
• Refrain from using attachments that are not
recommended by the appliance manufacturer,
as doing so can result in re, electric shock or
personal injury.
• Do not place appliance on or near a hot gas
burner, hot electric burner or in a heated oven.
• Extreme caution must be used when moving an
appliance containing hot oil or other hot liquids.
• Do not let the cord touch hot surfaces or hang
over the edges of tables or counters.
• CAUTION: The built-in rechargeable battery is
not replaceable. Do not remove or replace it, do
not throw in the trash or in a re. Do not dispose
of device in standard garbage disposal sites.
Dispose of device at available Battery Recycling
Sites after fully discharging battery. Not doing
so may violate disposal laws and regulations.
Please refer to local regulations for proper battery
disposal.
• For maintenance other than cleaning, please
contact StoreBound directly at 1-800-898-6970
from 9AM–9PM ET Monday–Friday or by email at
• StoreBound shall not accept liability for damages
caused by improper use of the appliance.
IMPORTANT SAFEGUARDS: PLEASE READ
AND SAVE THIS INSTRUCTION AND CARE
MANUAL.
When using electrical appliances, basic safety precautions should be followed, including:
IMPORTANT SAFEGUARDS
• Lisez toutes les instructions.
• Retirez tous les emballages et les étiquettes de
l’appareil avant de l’utiliser.
• Assurez-vous que l’appareil est bien nettoyé
avant de l’utiliser.
• Pour protéger contre les chocs électriques, ne
pas immerger le cordon, la che, la base ou tout
appareil dans de l’eau ou tout autre liquide.
• N’utilisez pas l’appareil pour un usage autre que
celui prévu.
• Pour usage domestique seulement.
Ne pas utiliser à l’extérieur.
• Une surveillance étroite est nécessaire quand
un appareil est utilisé par ou à proximité des
enfants.
• Débranchez la prise lorsque vous ne l’utilisez
pas et avant de la nettoyer. Laisser refroidir
avant de mettre ou de retirer des pièces.
• Ne faites pas fonctionner cet appareil avec un
cordon endommagé, une che endommagée
ou après un dysfonctionnement de l’appareil,
une chute ou un endommagement quelconque.
Renvoyez l’appareil au service de réparation
agréé le plus proche pour examen, réparation
ou réglage.
• Évitez d’utiliser des accessoires qui ne sont pas
recommandés par le fabricant de l’appareil,
car cela pourrait provoquer un incendie, une
électrocution ou des blessures.
• Ne placez pas l’appareil sur ou près d’un
brûleur à gaz chaud, d’un brûleur électrique
chaud ou dans un four chauffé.
• Ne laissez pas le cordon toucher des surfaces
chaudes ou suspendre les bords des tables ou
des comptoirs.
• Une extrême prudence doit être utilisée lors du
déplacement d’un appareil contenant de l’huile
chaude ou d’autres liquides chauds.
• Attention: La batterie rechargeable intégrée
n’est pas remplaçable. Ne pas l’enlever ou
le remplacer, ne pas jeter à la poubelle ou
au feu. Ne jetez pas l’appareil dans des sites
d’élimination des déchets standard. Éliminez
l’appareil sur les sites de recyclage de batterie
disponibles après avoir complètement
déchargé la batterie. Ne pas le faire
peut enfreindre les lois et les règlements
d’élimination. Veuillez vous référer aux
réglementations locales pour une élimination
appropriée de la batterie.
• Pour toute maintenance autre que le nettoyage,
veuillez contacter StoreBound directement au
1-800-898-6970 de 9h00 à 21h00 (heure locale)
du lundi au vendredi ou par e-mail à l’adresse
suppor[email protected].
• StoreBound décline toute responsabilité pour
les dommages causés par une utilisation
incorrecte
de l’appareil.
MESURES DE SÉCURITÉ IMPORTANTES: VEUILLEZ
LIRE ET CONSERVER CE MANUEL D’UTILISATION
Lors de l’utilisation d’appareils électriques, des précautions élémentaires de sécurité doivent être re-
spectées, notamment:
MESURES DE SÉCURITÉ IMPORTANTES

∙ 5 ∙ ∙ 4 ∙
• Read all instructions.
• Remove all packaging and labels from appliance
prior to use.
• Make sure appliance is cleaned thoroughly
before using.
• To protect against electrical shock do not immerse
cord, plug, base or appliance in water or other
liquid.
• Do not use appliance for other than its intended
use. For household use only. Do not use outdoors.
• Close supervision is necessary when any
appliance is used by or near children.
• Unplug from outlet when not in use and before
cleaning. Allow to cool before putting on or
taking off parts.
• Do not operate this appliance with a damaged cord,
damaged plug, or after the appliance malfunctions
or is dropped or damaged in any manner. Return the
appliance to the nearest authorized service facility for
examination, repair or adjustment.
• Refrain from using attachments that are not
recommended by the appliance manufacturer,
as doing so can result in re, electric shock or
personal injury.
• Do not place appliance on or near a hot gas
burner, hot electric burner or in a heated oven.
• Extreme caution must be used when moving an
appliance containing hot oil or other hot liquids.
• Do not let the cord touch hot surfaces or hang
over the edges of tables or counters.
• CAUTION: The built-in rechargeable battery is
not replaceable. Do not remove or replace it, do
not throw in the trash or in a re. Do not dispose
of device in standard garbage disposal sites.
Dispose of device at available Battery Recycling
Sites after fully discharging battery. Not doing
so may violate disposal laws and regulations.
Please refer to local regulations for proper battery
disposal.
• For maintenance other than cleaning, please
contact StoreBound directly at 1-800-898-6970
from 9AM–9PM ET Monday–Friday or by email at
suppor[email protected].
• StoreBound shall not accept liability for damages
caused by improper use of the appliance.
IMPORTANT SAFEGUARDS: PLEASE READ
AND SAVE THIS INSTRUCTION AND CARE
MANUAL.
When using electrical appliances, basic safety precautions should be followed, including:
IMPORTANT SAFEGUARDS
• Lisez toutes les instructions.
• Retirez tous les emballages et les étiquettes de
l’appareil avant de l’utiliser.
• Assurez-vous que l’appareil est bien nettoyé
avant de l’utiliser.
• Pour protéger contre les chocs électriques, ne
pas immerger le cordon, la che, la base ou tout
appareil dans de l’eau ou tout autre liquide.
• N’utilisez pas l’appareil pour un usage autre que
celui prévu.
• Pour usage domestique seulement.
Ne pas utiliser à l’extérieur.
• Une surveillance étroite est nécessaire quand
un appareil est utilisé par ou à proximité des
enfants.
• Débranchez la prise lorsque vous ne l’utilisez
pas et avant de la nettoyer. Laisser refroidir
avant de mettre ou de retirer des pièces.
• Ne faites pas fonctionner cet appareil avec un
cordon endommagé, une che endommagée
ou après un dysfonctionnement de l’appareil,
une chute ou un endommagement quelconque.
Renvoyez l’appareil au service de réparation
agréé le plus proche pour examen, réparation
ou réglage.
• Évitez d’utiliser des accessoires qui ne sont pas
recommandés par le fabricant de l’appareil,
car cela pourrait provoquer un incendie, une
électrocution ou des blessures.
• Ne placez pas l’appareil sur ou près d’un
brûleur à gaz chaud, d’un brûleur électrique
chaud ou dans un four chauffé.
• Ne laissez pas le cordon toucher des surfaces
chaudes ou suspendre les bords des tables ou
des comptoirs.
• Une extrême prudence doit être utilisée lors du
déplacement d’un appareil contenant de l’huile
chaude ou d’autres liquides chauds.
• Attention: La batterie rechargeable intégrée
n’est pas remplaçable. Ne pas l’enlever ou
le remplacer, ne pas jeter à la poubelle ou
au feu. Ne jetez pas l’appareil dans des sites
d’élimination des déchets standard. Éliminez
l’appareil sur les sites de recyclage de batterie
disponibles après avoir complètement
déchargé la batterie. Ne pas le faire
peut enfreindre les lois et les règlements
d’élimination. Veuillez vous référer aux
réglementations locales pour une élimination
appropriée de la batterie.
• Pour toute maintenance autre que le nettoyage,
veuillez contacter StoreBound directement au
1-800-898-6970 de 9h00 à 21h00 (heure locale)
du lundi au vendredi ou par e-mail à l’adresse
• StoreBound décline toute responsabilité pour
les dommages causés par une utilisation
incorrecte
de l’appareil.
MESURES DE SÉCURITÉ IMPORTANTES: VEUILLEZ
LIRE ET CONSERVER CE MANUEL D’UTILISATION
Lors de l’utilisation d’appareils électriques, des précautions élémentaires de sécurité doivent être re-
spectées, notamment:
MESURES DE SÉCURITÉ IMPORTANTES
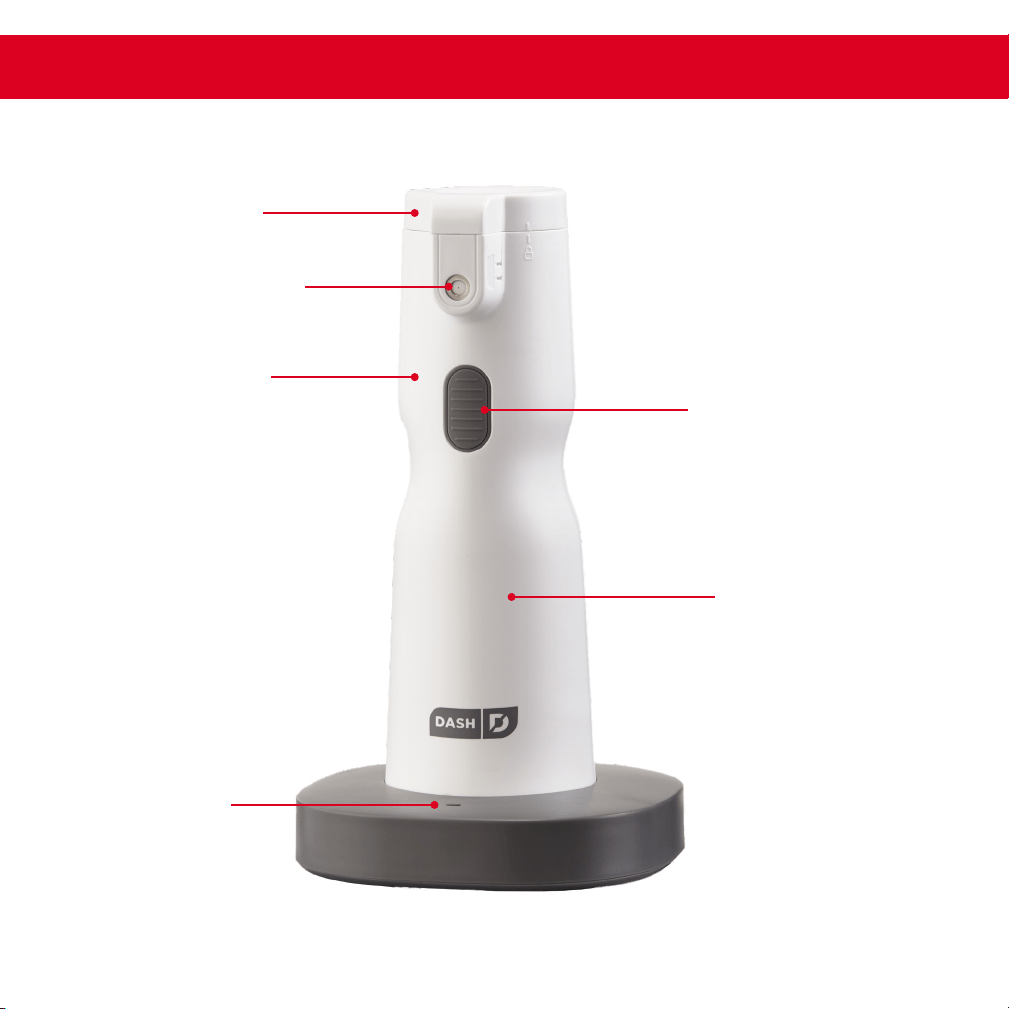
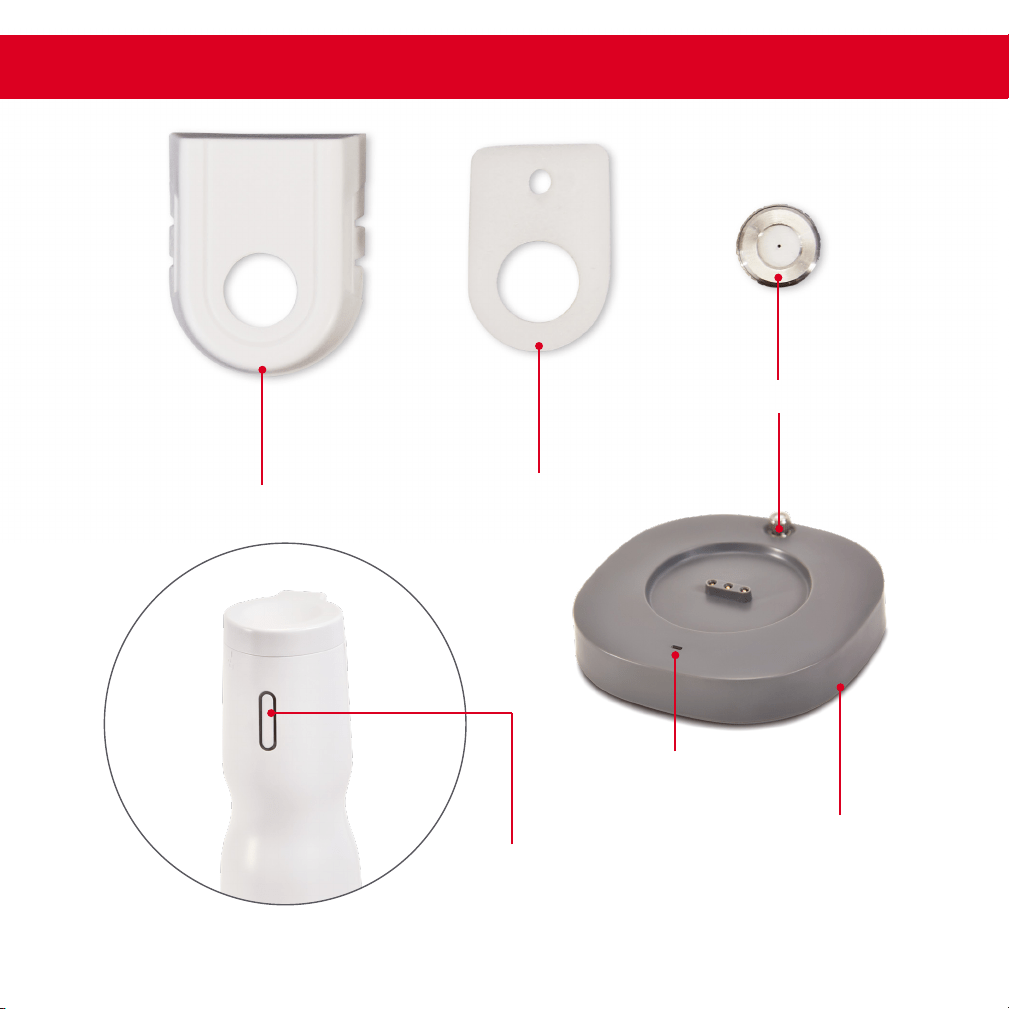
Power
Indicator
Light
Cap
Melting Chamber
(inside)
Spray Button
Main Body
Spray Nozzle
Charging/Melting
Indicator Light
Spare Spray Nozzle
Butter Sponge
Nozzle Cap
Power Indicator Light
Charging Base
∙ 6 ∙ ∙ 7 ∙
parts & Features parts & Features
Power
Indicator
Light
Cap
Melting Chamber
(inside)
Spray Button
Main Body
Spray Nozzle
Charging/Melting
Indicator Light
Spare Spray Nozzle
Butter Sponge
Nozzle Cap
Power Indicator Light
Charging Base
∙ 6 ∙ ∙ 7 ∙
parts & Features parts & Features
∙ 8 ∙
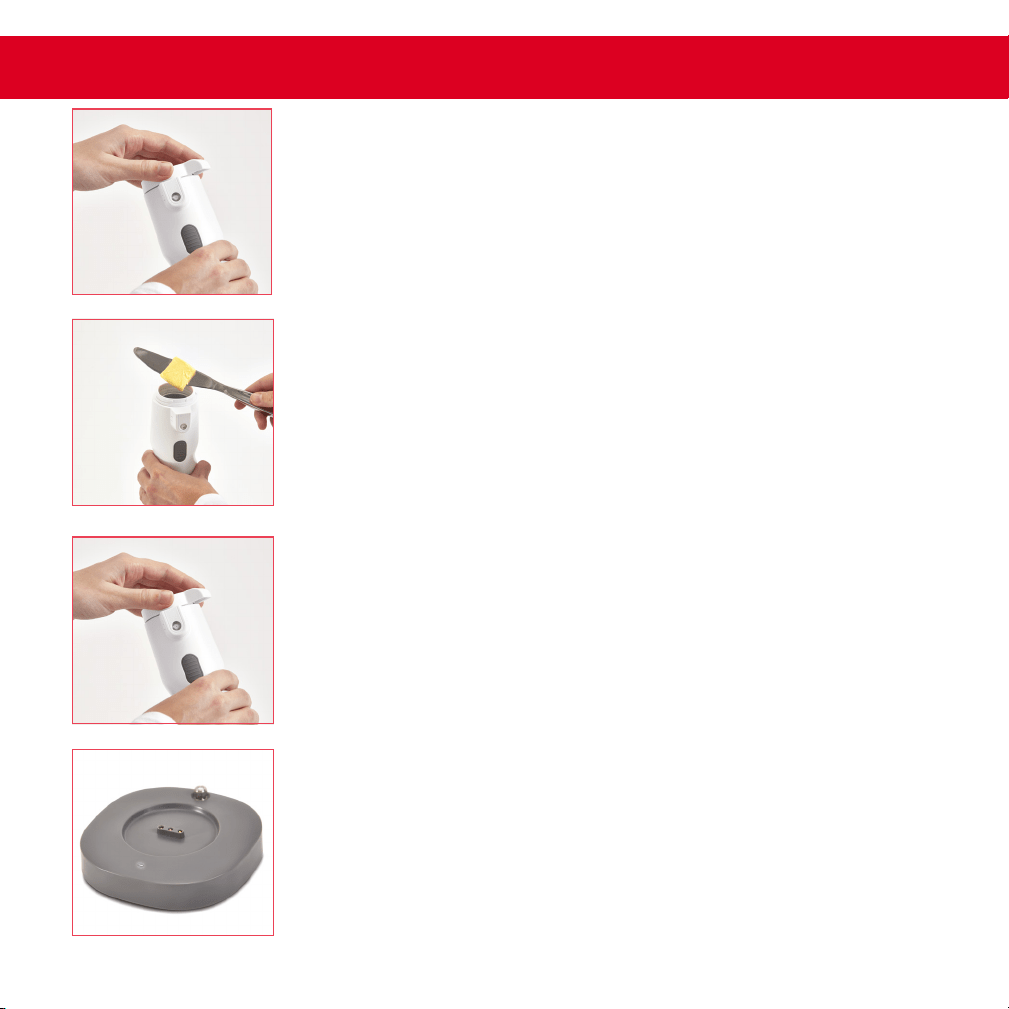
SETTING UP YOUR BUTTER SPRAYER SETTING UP YOUR BUTTER SPRAYER
Lock the Cap back onto the Main Body by turning it
clockwise and aligning the front tabs of the Cap and Main
Body.
Remove the Cap from the Main Body by unscrewing it
counterclockwise 90 degrees.
Place 1-8 tbsp of butter into the Melting Chamber. It is
recommended to only melt as much butter as will be
used. This will make cleaning and storing easier.
3
1
2
Plug the Charging Base into a wall socket. The Power
Indicator Light will illuminate blue.
4
Place your Butter Sprayer on the Charging Base to begin
charging and melting butter.
The Power Indicator Light on the Charging Base will
change to orange. The Charging/Melting Indicator
Light on the Butter Sprayer will illuminate orange.
This indicates that the Butter Sprayer is melting the
butter.
5
6
∙ 9 ∙
∙ 8 ∙
SETTING UP YOUR BUTTER SPRAYER SETTING UP YOUR BUTTER SPRAYER
Lock the Cap back onto the Main Body by turning it
clockwise and aligning the front tabs of the Cap and Main
Body.
Remove the Cap from the Main Body by unscrewing it
counterclockwise 90 degrees.
Place 1-8 tbsp of butter into the Melting Chamber. It is
recommended to only melt as much butter as will be
used. This will make cleaning and storing easier.
3
1
2
Plug the Charging Base into a wall socket. The Power
Indicator Light will illuminate blue.
4
Place your Butter Sprayer on the Charging Base to begin
charging and melting butter.
The Power Indicator Light on the Charging Base will
change to orange. The Charging/Melting Indicator
Light on the Butter Sprayer will illuminate orange.
This indicates that the Butter Sprayer is melting the
butter.
5
6
∙ 9 ∙
Note: Storing your Butter Sprayer in the refrigerator will keep your butter fresh for
longer. You do not need to replace the butter after every use. You only need to
replace the butter if the butter has spoiled.
Note: It is recommended to place the Butter Sprayer on the Charging Base for an
hour after first use. This will fully charge the Butter Sprayer for future use.
Your Butter Sprayer comes with an automatic safety shut-off feature that will activate
if the Butter Sprayer is left charging for more than an hour. This will turn the heating
element off and your butter will cool and harden.
∙ 10 ∙ ∙ 11 ∙
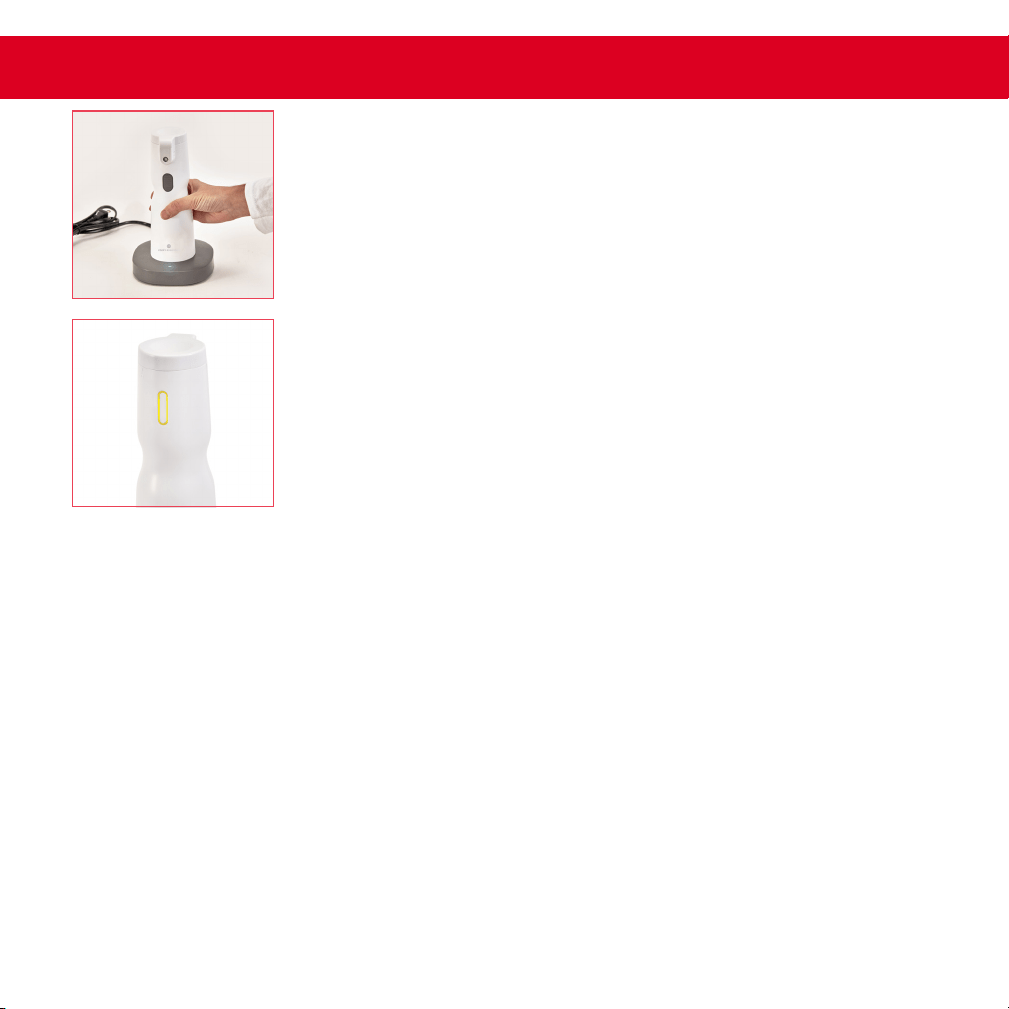
usING YOUR BUTTER SPRAYER usING YOUR BUTTER SPRAYER
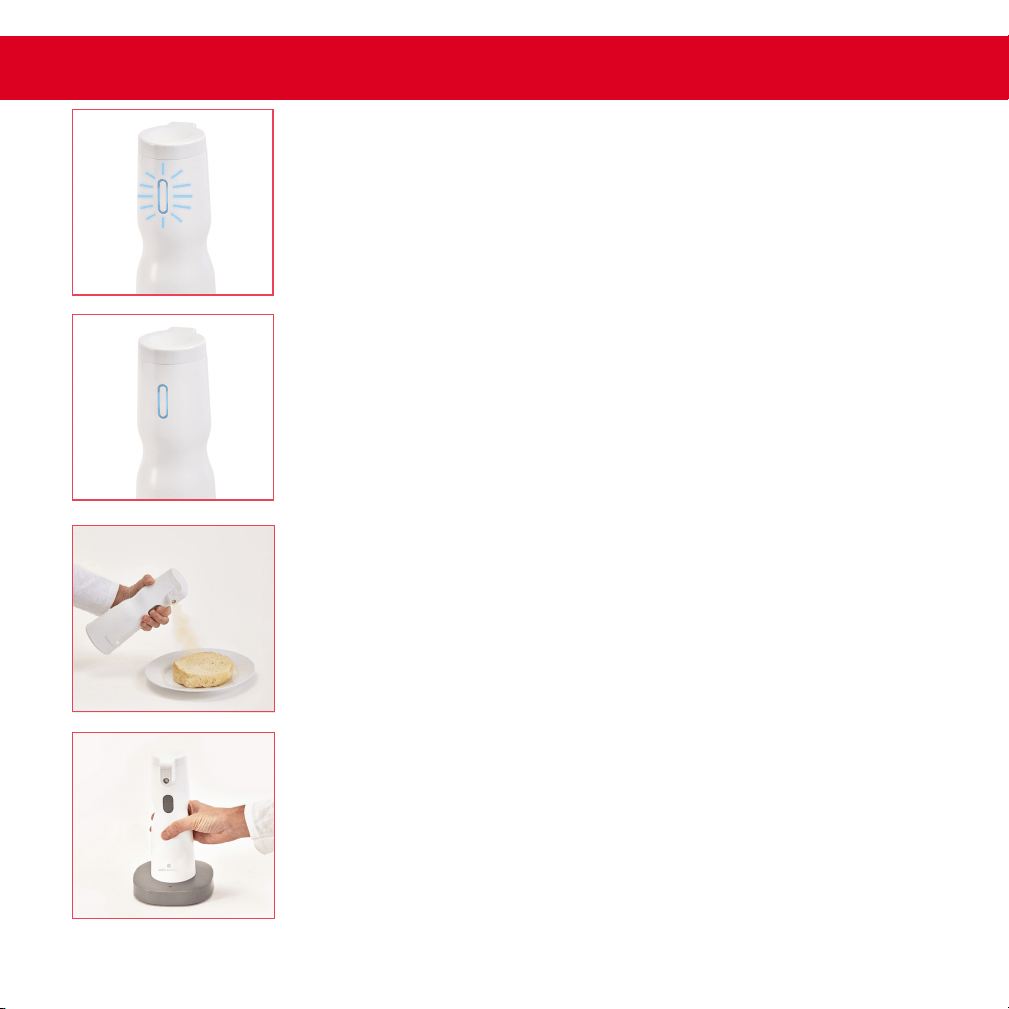
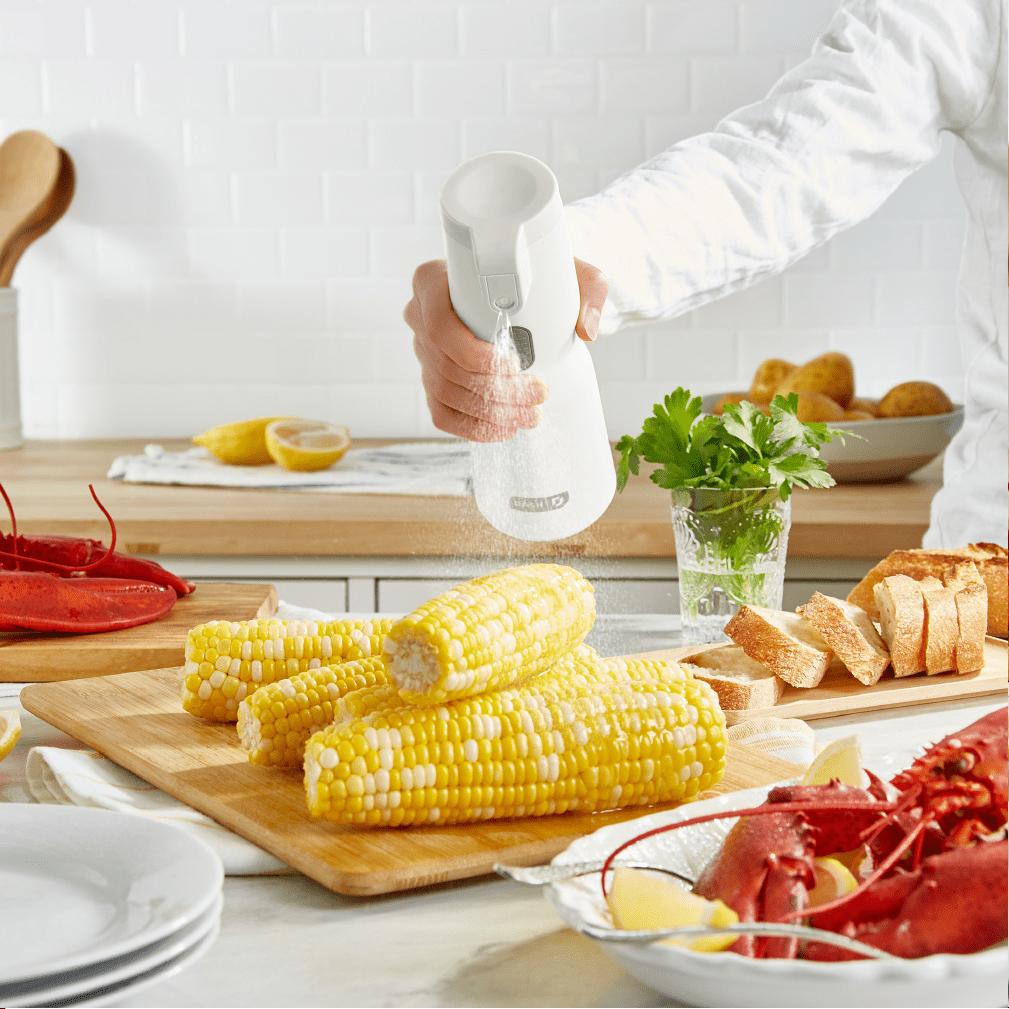
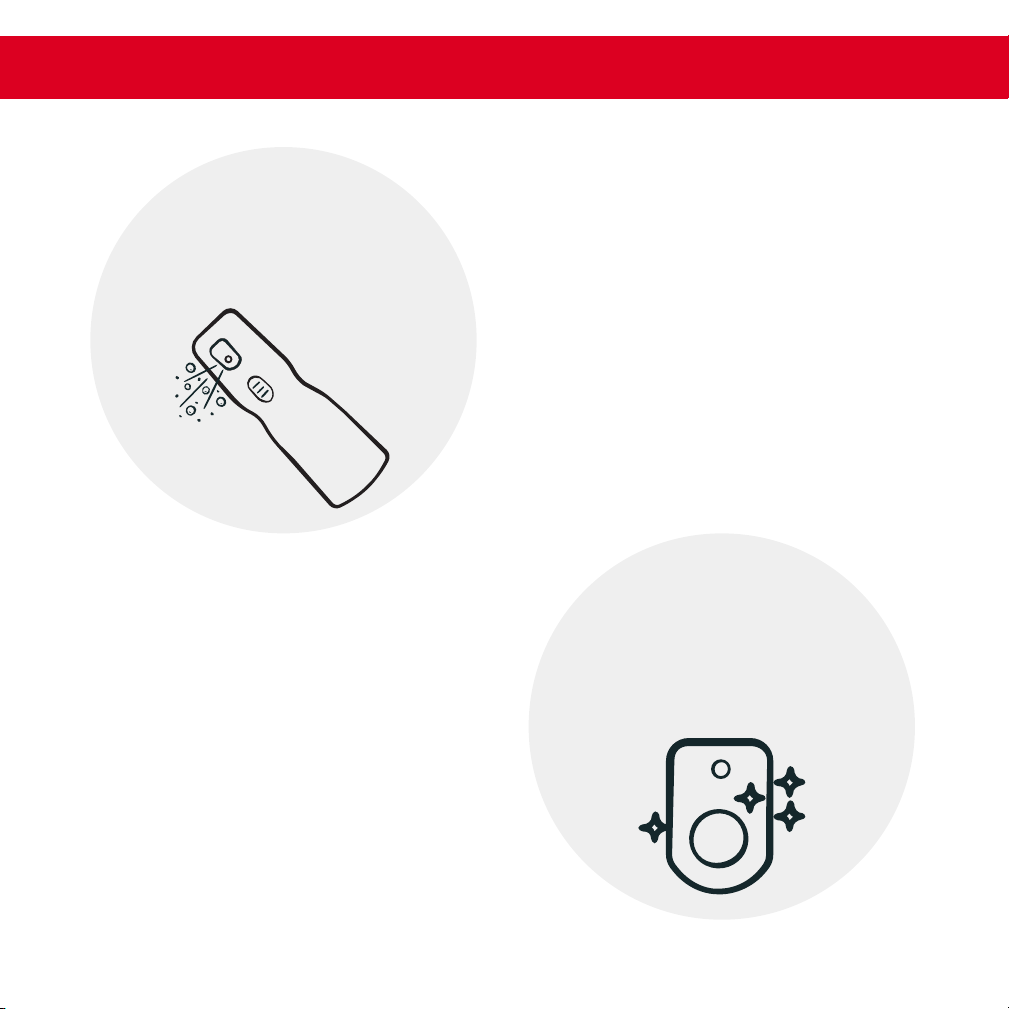
Point the Butter Sprayer’s Nozzle at the item you wish to
spray and press the Spray Button to release butter.
NOTE: DO NOT point the Butter Sprayer at face and eyes,
or at another person.
When the Charging/Melting Indicator Light begins
blinking blue, this indicates that your butter is partially
melted and the Butter Sprayer is ready to be used for
short spraying periods. IMPORTANT: It is recommended
to wait until your butter is fully melted as this will prevent
clogging of your Butter Sprayer.
When the Charging/Melting Indicator Light stops blinking
and is solid blue, your butter is fully melted and the Butter
Sprayer is ready for use.
3
1
2
When you have finished spraying, return the Butter
Sprayer to the Charging Base to charge. When the Butter
Sprayer is fully charged, store it in the refrigerator.
4

Note: Storing your Butter Sprayer in the refrigerator will keep your butter fresh for
longer. You do not need to replace the butter after every use. You only need to
replace the butter if the butter has spoiled.
Note: It is recommended to place the Butter Sprayer on the Charging Base for an
hour after first use. This will fully charge the Butter Sprayer for future use.
Your Butter Sprayer comes with an automatic safety shut-off feature that will activate
if the Butter Sprayer is left charging for more than an hour. This will turn the heating
element off and your butter will cool and harden.
∙ 10 ∙ ∙ 11 ∙
usING YOUR BUTTER SPRAYER usING YOUR BUTTER SPRAYER
Point the Butter Sprayer’s Nozzle at the item you wish to
spray and press the Spray Button to release butter.
NOTE: DO NOT point the Butter Sprayer at face and eyes,
or at another person.
When the Charging/Melting Indicator Light begins
blinking blue, this indicates that your butter is partially
melted and the Butter Sprayer is ready to be used for
short spraying periods. IMPORTANT: It is recommended
to wait until your butter is fully melted as this will prevent
clogging of your Butter Sprayer.
When the Charging/Melting Indicator Light stops blinking
and is solid blue, your butter is fully melted and the Butter
Sprayer is ready for use.
3
1
2
When you have finished spraying, return the Butter
Sprayer to the Charging Base to charge. When the Butter
Sprayer is fully charged, store it in the refrigerator.
4

Below are two charts to help you read the Charging Indicator Light and Melting Indicator Light.
∙ 12 ∙
Understanding Your Indicator Lights
POWER INDICATOR LIGHT (on Base of Butter Sprayer)
Butter Sprayer is
powered on.
Butter Sprayer is
connected to the Base.
CHARGING/MELTING INDICATOR LIGHT (on Body of Butter Sprayer)
Butter is melting and Butter Sprayer can be used
for short spraying periods.
Butter is completely melted and Butter Sprayer is ready for use.
Butter is starting to harden and needs to be heated.
Butter Sprayer is heating and butter is melting.
Low battery. Charge the Butter Sprayer.
Issue with battery. Stop use immediately and
contact customer service.
SOLID
BLINKING
KEY

∙ 14 ∙ ∙ 15 ∙
• Always unplug the appliance and allow it to cool completely before cleaning.
• The Butter Sprayer is NOT dishwasher safe.
• Never immerse the Power Cord or Charging Base in water or other liquids, or allow
moisture to contact these parts.
• To clean the exterior of the Butter Sprayer, wipe the Main Body with a damp cloth.
Never use rough, abrasive or poisonous cleaners.
• The Butter Sponge is included to prevent butter from dripping onto the sprayer.
Extra Sponges are included to replace your Butter Sponge as needed after
longterm use or before longterm storage.
• A replacement Spray Nozzle is included if your Spray Nozzle is damaged or lost. To
replace the Spray Nozzle, rst remove the Nozzle Cap and Butter Sponge. Unscrew
the Spray Nozzle from the Main Body, then unscrew the Spare Nozzle from the
Charging Base by turning counterclockwise. Screw the Spare Nozzle onto the Main
Body by turning clockwise.
Buer Sponge
Prevent Drips
by cleaning the
To prevent additional drips on the
front of the Butter Sprayer, it is
recommended to occasionally clean
the Butter Sponge. Remove the
Nozzle Cap and Butter Sponge, and
wash both with warm, soapy water.
Ensure that both are thoroughly
dried before replacing.
To clean the interior of the Butter
Sprayer, remove any excess butter
with a nylon, silicone or rubber utensil.
Once the Butter Sprayer is emptied,
place it on the Charging Base with
the power cord plugged in. When
the Indicator Light begins flashing
blue, remove the Butter Sprayer from
the Charging Base, fill with hot water
and spray into a sink. Repeat until the
interior chamber is clean.
clean the
interior with
Hot Water
CLEANING & MAINTENANCE CLEANING & MAINTENANCE

RECIPE
GUIDE
Follow us!
@bydash | recipes, videos & inspiration
@unprocessyourfood | veg & vegan-friendly meals
g
a
r
l
i
c
&
f
e
t
a
a
v
o
c
a
d
o
t
o
a
s
t
o
n
p
a
g
e
2
6
!

RECIPE
GUIDE
Follow us!
@bydash | recipes, videos & inspiration
@unprocessyourfood | veg & vegan-friendly meals
g
a
r
l
i
c
&
f
e
t
a
a
v
o
c
a
d
o
t
o
a
s
t
o
n
p
a
g
e
2
6
!

Ingredients:
1 tsp cinnamon
½ tsp allspice
pumpkin protein
pancakes
Directions:
1.
2.
3.
and nuts, if desired.
½ cup almond milk

Ingredients:
1 tsp cinnamon
½ tsp allspice
pumpkin protein
pancakes
Directions:
1.
2.
3.
and nuts, if desired.
½ cup almond milk

20
∙ 21 ∙
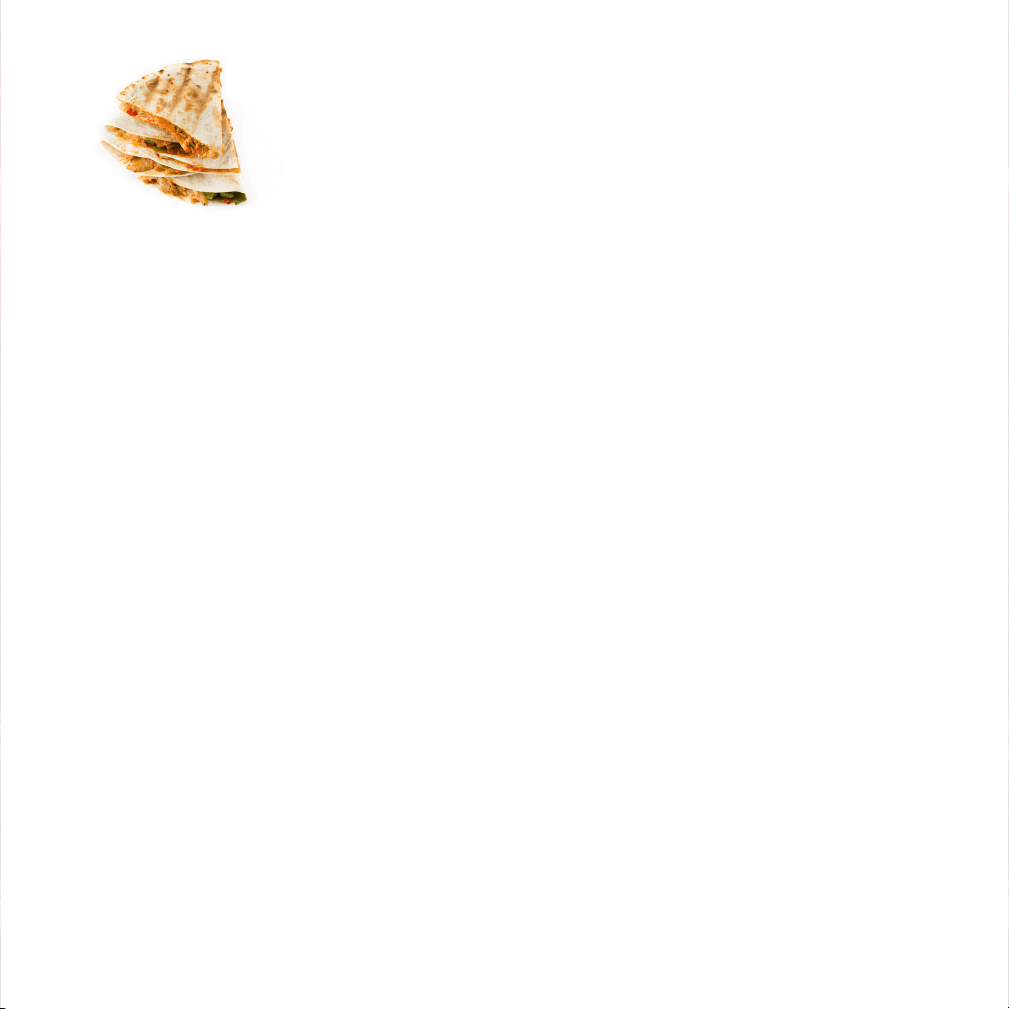
Directions:
1. In a pan or on a griddle, heat olive oil and sauté the spinach, salsa, garlic and
shredded chicken. Stir until all ingredients are tender.
2. Remove and set aside. Use tongs with a wet paper towel or damp cloth to carefully
remove excess liquid. Use the Butter Sprayer to lightly coat a tortilla before placing
it on the griddle or pan. Spread your desired amount of cheese on the tortilla then
add the chicken mixture and spread on top of the cheese. Place the other tortilla
on top.
3. Heat the tortilla for the next 2-5 minutes. Flip midway through to crisp evenly. Once
cheese is melted, remove the quesadilla with a spatula. Cut into pieces and garnish
with sour cream, if desired.
Ingredients:
1 tbsp olive oil
½ cup baby spinach
½ cup corn & bean salsa
½ garlic clove, minced
½ lb chicken, cooked and shredded
chicken
quesadilla
butter
2 whole wheat tortillas, medium
sized
1 cup Mexican-blend cheese,
shredded
sour cream (for garnish)
20
∙ 21 ∙
Directions:
1. In a pan or on a griddle, heat olive oil and sauté the spinach, salsa, garlic and
shredded chicken. Stir until all ingredients are tender.
2. Remove and set aside. Use tongs with a wet paper towel or damp cloth to carefully
remove excess liquid. Use the Butter Sprayer to lightly coat a tortilla before placing
it on the griddle or pan. Spread your desired amount of cheese on the tortilla then
add the chicken mixture and spread on top of the cheese. Place the other tortilla
on top.
3. Heat the tortilla for the next 2-5 minutes. Flip midway through to crisp evenly. Once
cheese is melted, remove the quesadilla with a spatula. Cut into pieces and garnish
with sour cream, if desired.
Ingredients:
1 tbsp olive oil
½ cup baby spinach
½ cup corn & bean salsa
½ garlic clove, minced
½ lb chicken, cooked and shredded
chicken
quesadilla
butter
2 whole wheat tortillas, medium
sized
1 cup Mexican-blend cheese,
shredded
sour cream (for garnish)

Ingredients:
sweet cinnamon
toast
Directions:
1.
2.
Directions:
1.
2.
done.
3.
Ingredients:
½ tsp cinnamon
¼ tsp cloves
¼ tsp allspice
banana bread
pancakes
Ingredients:
sweet cinnamon
toast
Directions:
1.
2.
Directions:
1.
2.
done.
3.
Ingredients:
½ tsp cinnamon
¼ tsp cloves
¼ tsp allspice
banana bread
pancakes

25
∙ 24 ∙
Ingredients:
2 tbsp almond our
1 tbsp nutritional yeast
1 tsp cinnamon
¼ tsp sea salt
2 tbsp maple syrup
1 tsp vanilla extract
1 cup almond milk
2 slices of bread
butter
eggless
french toast
Directions:
1. Whisk together the almond our, nutritional yeast, cinnamon and sea salt.
Add the maple syrup, vanilla and almond milk and mix until well combined.
2. Soak each slice of bread in mixture and cook over medium heat in a greased
skillet. Cook until golden brown and hot.
3. Spray slices with Butter Sprayer and serve with maple syrup and fresh fruit.

C
h
e
f
T
i
p
!
Use the Dash Mini
Wafe Maker with
¼ cup batter!
∙ 26 ∙ ∙ 27 ∙
Ingredients:
2 slices rustic whole wheat or health bread
1 avocado
1 tbsp extra virgin olive oil
¼ tsp salt
1 tsp roasted garlic
2 tbsp feta cheese
butter
garlic & feta
avocado toast
Directions:
1. Toast the bread. Mash the avocado with the oil, salt and roasted garlic.
2. Spray the bread with Butter Sprayer and spread avocado mix generously on top of
the two pieces of bread. Top with feta.
Ingredients:
1 cup oat our
1 tbsp ground ax seed
2 tsp baking powder
pinch of salt
pinch of nutmeg
workout
waffles
Directions:
1. Combine the dry ingredients using a mixer. Combine the wet ingredients in a
separate bowl.
2. Add the wet ingredients to the dry ingredients and mix just until combined. Make
wafes in a wafe maker.
3. Spray wafes with Butter Sprayer and drizzle with syrup.
1 tbsp maple syrup
1 egg
1 cup Greek yogurt
1 tsp vanilla extract
butter

PAGE TITLE
NOTES
∙ 28 ∙
Notes
∙ 29 ∙

PAGE TITLE
NOTES
∙ 28 ∙
Notes
∙ 29 ∙
STOREBOUND, LLC – 1 YEAR LIMITED WARRANTY
Your StoreBound product is warranted to be free from defects in material and workmanship for a period
of one (1) year from the date of the original purchase when utilized for normal and intended household
use. Should any defect covered by the terms of the limited warranty be discovered within one (1) year,
StoreBound, LLC will repair or replace the defective part. To process a warranty claim, contact Customer
Support at 1-800-898-6970 for further assistance and instruction. A Customer Support agent will assist you
by troubleshooting minor problems. If troubleshooting fails to x the problem, a return authorization will
be issued. Proof of purchase indicating the date and place of purchase, as well as the unit’s model number
and serial number is required and should accompany the return. You must also include your full name,
shipping address, and telephone number. We are unable to ship returns to a PO box. StoreBound will not
be responsible for delays or unprocessed claims resulting from a purchaser’s failure to provide any or all of
the necessary information. Freight costs must be prepaid by the purchaser.
There are no express warranties except as listed above.
Warranty is voided if used outside of the 50 states of the United States, the District of Columbia or the
10 provinces of Canada. Warranty is voided if used with an electric adapter/converter or used with any
voltage plug other than 120V.
REPAIR OR REPLACEMENT AS PROVIDED UNDER THIS WARRANTY IS THE EXCLUSIVE REMEDY OF
THE CUSTOMER. STOREBOUND SHALL NOT BE LIABLE FOR ANY INCIDENTAL OR CONSEQUENTIAL
DAMAGES OR FOR BREACH OF ANY EXPRESS OR IMPLIED WARRANTY ON THIS PRODUCT EXCEPT
TO THE EXTENT REQUIRED BY APPLICABLE LAW. ANY IMPLIED WARRANTY OF MERCHANTABILITY
OR FITNESS FOR A PARTICULAR PURPOSE ON THIS PRODUCT IS LIMITED IN DURATION TO THE
DURATION OF THIS WARRANTY.
Some states do not allow the exclusion or limitation of incidental or consequential damages, or limitations
on how long an implied warranty lasts. Therefore, the above exclusions or limitations may not apply to
you. This warranty gives you specic legal rights and you may also have other rights, which vary from state
to state.
Refurbished items or items not purchased through an authorized retailer are not eligible for warranty
claims.
REPAIRS
DANGER! Risk of electric shock! The Dash Butter Sprayer is an electrical appliance.
Do not attempt to repair the appliance yourself under any circumstances.
Contact Customer Support regarding repairs to the appliance.
TECHNICAL SPECIFICATIONS
Voltage 120V ~ 60Hz
Power Rating 50W
Stock#: DBD200_20210504_v11
∙ 30 ∙ ∙ 31 ∙
6am
–
6pm
Our customer support teams in the US and Canada are at
your service Monday - Friday during the times below.
Contact us at 1 (800) 898-6970 or suppor[email protected]
Dash values quality and workmanship and stands behind this
product with our Feel Good Guarantee
™
. To learn more about our
commitment to quality, visit bydash.com/feelgood.
7am
–
7pm
8am
–
8pm
9am
–
9pm
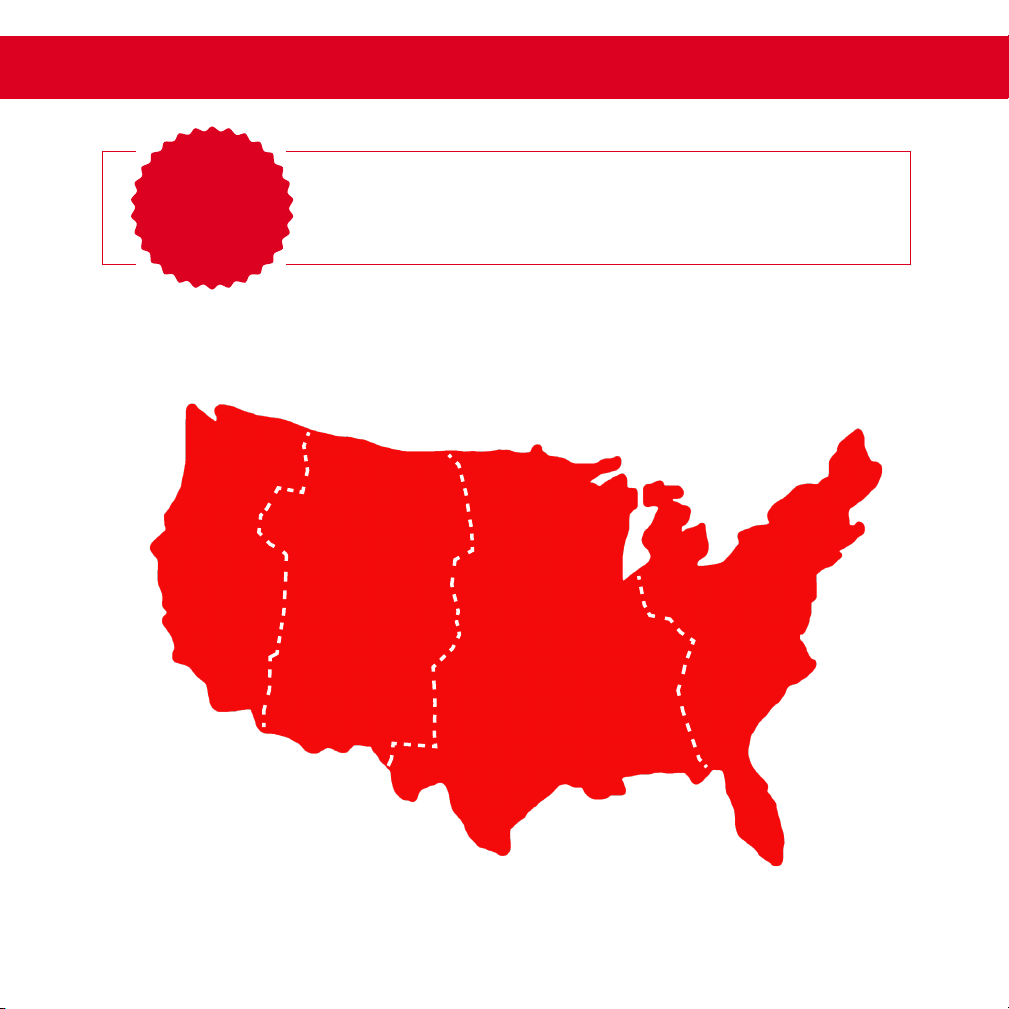
Hey Hawaii! You can reach our customer service team from 3AM to 3PM.
And also, Alaska, feel free to reach out from 5AM to 5PM.
feel good
guarantee
™
CUSTOMER SUPPORT warranty

STOREBOUND, LLC – 1 YEAR LIMITED WARRANTY
Your StoreBound product is warranted to be free from defects in material and workmanship for a period
of one (1) year from the date of the original purchase when utilized for normal and intended household
use. Should any defect covered by the terms of the limited warranty be discovered within one (1) year,
StoreBound, LLC will repair or replace the defective part. To process a warranty claim, contact Customer
Support at 1-800-898-6970 for further assistance and instruction. A Customer Support agent will assist you
by troubleshooting minor problems. If troubleshooting fails to x the problem, a return authorization will
be issued. Proof of purchase indicating the date and place of purchase, as well as the unit’s model number
and serial number is required and should accompany the return. You must also include your full name,
shipping address, and telephone number. We are unable to ship returns to a PO box. StoreBound will not
be responsible for delays or unprocessed claims resulting from a purchaser’s failure to provide any or all of
the necessary information. Freight costs must be prepaid by the purchaser.
Send all inquiries to [email protected].
There are no express warranties except as listed above.
Warranty is voided if used outside of the 50 states of the United States, the District of Columbia or the
10 provinces of Canada. Warranty is voided if used with an electric adapter/converter or used with any
voltage plug other than 120V.
REPAIR OR REPLACEMENT AS PROVIDED UNDER THIS WARRANTY IS THE EXCLUSIVE REMEDY OF
THE CUSTOMER. STOREBOUND SHALL NOT BE LIABLE FOR ANY INCIDENTAL OR CONSEQUENTIAL
DAMAGES OR FOR BREACH OF ANY EXPRESS OR IMPLIED WARRANTY ON THIS PRODUCT EXCEPT
TO THE EXTENT REQUIRED BY APPLICABLE LAW. ANY IMPLIED WARRANTY OF MERCHANTABILITY
OR FITNESS FOR A PARTICULAR PURPOSE ON THIS PRODUCT IS LIMITED IN DURATION TO THE
DURATION OF THIS WARRANTY.
Some states do not allow the exclusion or limitation of incidental or consequential damages, or limitations
on how long an implied warranty lasts. Therefore, the above exclusions or limitations may not apply to
you. This warranty gives you specic legal rights and you may also have other rights, which vary from state
to state.
Refurbished items or items not purchased through an authorized retailer are not eligible for warranty
claims.
REPAIRS
DANGER! Risk of electric shock! The Dash Butter Sprayer is an electrical appliance.
Do not attempt to repair the appliance yourself under any circumstances.
Contact Customer Support regarding repairs to the appliance.
TECHNICAL SPECIFICATIONS
Voltage 120V ~ 60Hz
Power Rating 50W
Stock#: DBD200_20210504_v11
∙ 30 ∙ ∙ 31 ∙
6am
–
6pm
Our customer support teams in the US and Canada are at
your service Monday - Friday during the times below.
Dash values quality and workmanship and stands behind this
product with our Feel Good Guarantee
™
. To learn more about our
commitment to quality, visit bydash.com/feelgood.
7am
–
7pm
8am
–
8pm
9am
–
9pm
Hey Hawaii! You can reach our customer service team from 3AM to 3PM.
And also, Alaska, feel free to reach out from 5AM to 5PM.
feel good
guarantee
™
CUSTOMER SUPPORT warranty

1-800-898-6970 | @bydash | bydash.com
