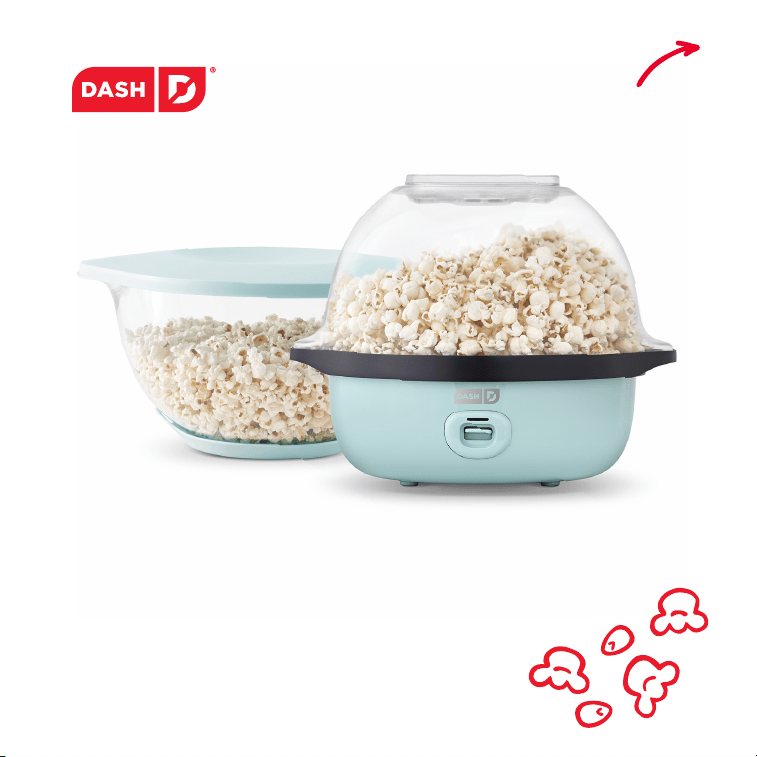
Deluxe
SmartStore
™
Stirring
POPCORN MAKER
Instruction Manual | Recipe Guide
#DSSP355
r
e
c
i
p
e
s
i
n
s
i
d
e
!
Important Safeguards ....................................................................4-7
Parts & Features ..............................................................................8-9
Using Your Popcorn Maker ...................................................... 10-15
Cleaning & Maintenance ............................................................... 16
Storing the Popcorn Maker ............................................................ 17
Recipes ....................................................................................... 19-35
Notes.... ...................................................................................... 36-37
Customer Support .......................................................................... 38
Warranty ........................................................................................... 39
Deluxe
SmartStore
™
Stirring
Popcorn Maker
t
h
e
d
a
s
h
t
e
a
m
!

∙ 4 ∙ ∙ 5 ∙
• Read all instructions carefully.
• Do not touch the power cord or
plug with wet hands
• This product is only suitable for
in-home use. Do not use it for other
purposes, including outdoors or
commercial use.
• Do not submerge the base or any
electric parts in liquid.
• Please keep this product out of
reach of children.
• Do not put the product in high
temperature environments, close
to strong magnets, ammable
materials including gas, etc. in
order to avoid re accidents.
• Do not pull, bend, or compress the
power cord with heavy objects to
avoid accidents such as electric
shock or re.
• After turning the power on, do
not attempt to disassemble the
Popcorn Maker. Do not put spoons
or other utensils into the popcorn
maker.
• Do not ip the Popcorn Maker
without oven gloves.
• Do not attempt to disassemble
or repair the popcorn maker by
yourself. Do not use parts created
by a third party manufacturer in the
Popcorn Maker.
• When using electrical appliances,
basic safety precautions should
always be followed, including the
following:
• Do not touch hot surfaces. Use
oven gloves when handling hot
surfaces.
• To protect against electric shock do
not immerse cord or plug in water
or other liquids.
• Unplug from outlet when not in use
and before cleaning. Allow to cool
before putting on or taking off parts,
and before cleaning the appliance.
• Do not operate any appliance with
a damaged cord or plug or after
the appliance malfunctions. Return
appliance to the nearest authorized
service facility for examination,
repair or adjustment.
• Do not place on or near a hot gas or
electric burner, or in a heated oven.
• Do not plug in power cord when not
in use.
IMPORTANT SAFEGUARDS IMPORTANT SAFEGUARDS
IMPORTANT SAFEGUARDS: PLEASE
READ AND SAVE THIS INSTRUCTION
AND CARE MANUAL.
IMPORTANT SAFEGUARDS:
PLEASE READ AND SAVE THIS
INSTRUCTION AND CARE MANUAL.
When using electrical appliances, basic safety precautions should be followed, including:

∙ 6 ∙ ∙ 7 ∙
garanties importantes garanties importantes
• Lisez attentivement toutes les
instructions.
• Ne touchez pas le cordon
d’alimentation ou la che avec
nos mains
• Ce produit ne convient qu’à
une utilisation à domicile. Ne
l’utilisez pas à d’autres ns, y
compris à l’extérieur ou à des ns
commerciales.
• Ne plongez pas la base ni aucune
pièce électrique dans du liquide.
• Veuillez garder ce produit hors de
portée des enfants.
• Ne placez pas le produit dans
des environnements à haute
température, à proximité
d’aimants puissants, de matériaux
inammables, notamment de
gaz, etc. an d’éviter les accidents
d’incendie.
• Ne tirez pas, ne pliez pas ou
ne comprimez pas le cordon
d’alimentation avec des objets
lourds pour éviter des accidents
tels qu’un choc électrique ou
un incendie.
• Après avoir mis l’appareil sous
tension, n’essayez pas de démonter
le Popcorn Maker. Ne mettez pas
de cuillères ou d’autres ustensiles
dans la machine à pop-corn.
• Ne retournez pas la machine à pop-
corn sans gants de cuisine.
• N’essayez pas de démonter ou de
réparer vous-même la machine à
pop-corn. N’utilisez pas de pièces
créées par un fabricant tiers dans le
Popcorn Maker.
• Lors de l’utilisation d’appareils
électriques, des précautions de
sécurité de base doivent toujours
être suivies, notamment les
suivantes:
• Ne touchez pas les surfaces
chaudes. Utilisez des gants de
cuisine lorsque vous manipulez
des surfaces chaudes.
• Pour vous protéger contre les
chocs électriques, n’immergez
pas le cordon, les ches dans
l’eau ou d’autres liquides.
• Débranchez-le de la prise
lorsqu’il n’est pas utilisé et
avant de le nettoyer. Laisser
refroidir avant d’installer ou de
retirer des pièces et avant de
nettoyer l’appareil.
• N’utilisez aucun appareil
dont le cordon ou la che
est endommagé ou après un
dysfonctionnement de l’appareil.
Retournez l’appareil au centre de
service agréé le plus proche pour
examen, réparation ou réglage.
• Ne pas placer sur ou près d’un
brûleur à gaz ou électrique
chaud, ni dans un four chauffé.
• Ne branchez pas l’alimentation
utilisé.
GARANTIES IMPORTANTES:
VEUILLEZ LIRE ET CONSERVER CE
MODE D’EMPLOI ET D’ENTRETIEN
GARANTIES IMPORTANTES:
VEUILLEZ LIRE ET CONSERVER CE
MODE D’EMPLOI ET D’ENTRETIEN
L’utilisation d’appareils électriques nécessite de prendre des mesures de
sécurité de base, y compris:
∙ 8 ∙ ∙ 9 ∙
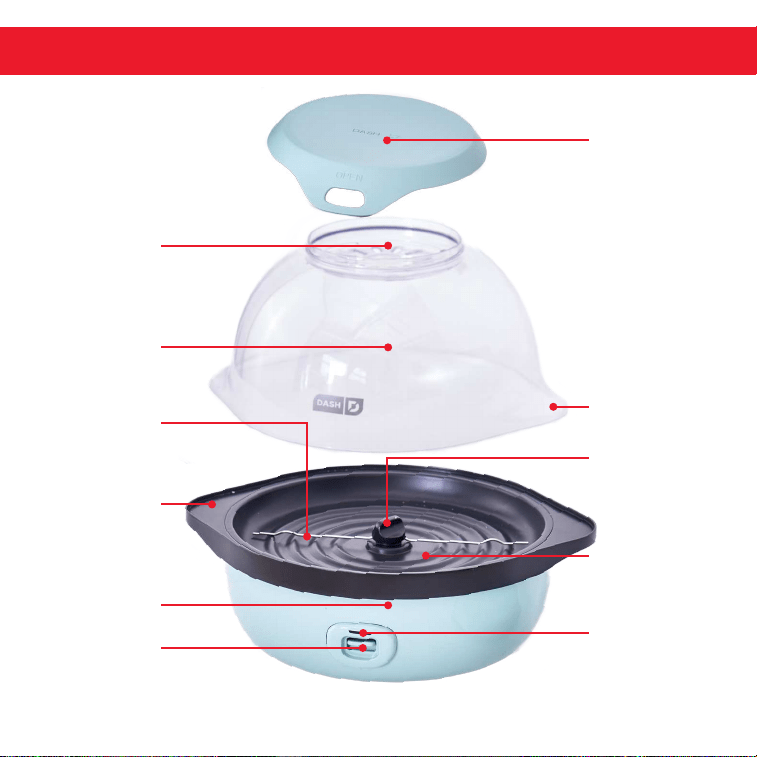
Measuring
Cup
Steam
Vent /
Butter
Melter
On/Off
Button
Stirring
Bar
Bowl
Base
PARTS & FEATURES Parts & Features
Base
Handle
Bowl
Handle
Indicator
Light
Rotary
Knob
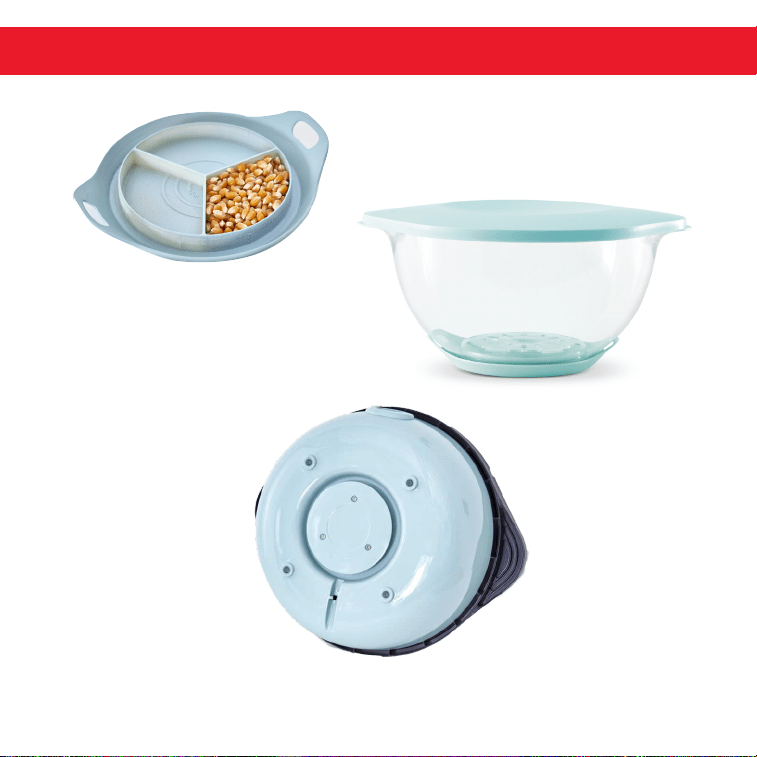
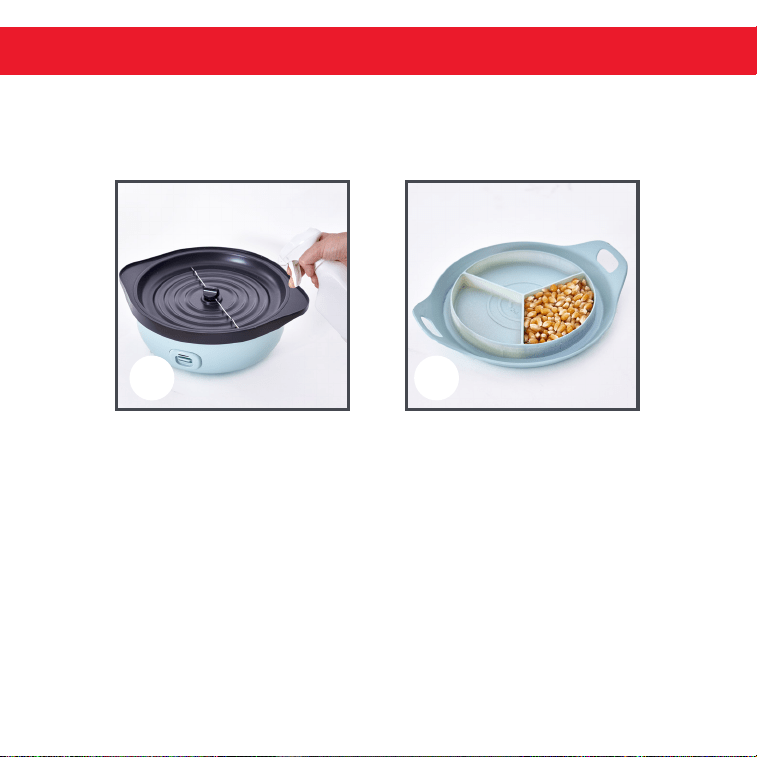
Measuring Cup
Each part of the Measuring
Cup holds ¼ cup of
kernels.
Cord Storage
Nonstick
Cooking
Surface
Storage Lid (attached to Bowl)
∙ 8 ∙ ∙ 9 ∙
Measuring
Cup
Steam
Vent /
Butter
Melter
On/Off
Button
Stirring
Bar
Bowl
Base
PARTS & FEATURES Parts & Features
Base
Handle
Bowl
Handle
Indicator
Light
Rotary
Knob
Measuring Cup
Each part of the Measuring
Cup holds ¼ cup of
kernels.
Cord Storage
Nonstick
Cooking
Surface
Storage Lid (attached to Bowl)

∙ 10 ∙ ∙ 11 ∙
USING YOUR DASH popcorn MAKER
USING YOUR DASH popcorn MAKER
BEFORE FIRST USE
Clean the Lid and Measuring Cup with a non-abrasive sponge, towel or
cloth before using. Turn the Rotary Knob counterclockwise to remove the
stirring arm from the Rotary Knob.
Wipe Stirring Bar and Cooking Surface with a non-abrasive sponge, towel
or cloth. Install the Stirring Bar, make sure the Stirring Bar aligns with the
Rotary Knob, and tighten the Rotary Knob clockwise to secure.
NOTE: If using an extension cord, the marked rating of the cord should
be at least as great as the electrical rating of the Popcorn Maker. Use a
grounded 3-wire cord for grounded appliances.
Place the Popcorn Maker on a level surface and plug it in.
Place a small amount of vegetable oil on the Cooking Surface
according to chart on page 10 (photo A). Measure corn kernels in the
included Measuring Cup
(photo B).
1
2
Cups of
popcorn
Amount
of oil
AMount of
popcorn
kernEls
Amount of
butter
8 1 tbsp ¼ cup 1 tbsp
16 2 tbsp ½ cup 2 tbsp
24 3 tbsp ¾ cup 3 tbsp
A
B
∙ 12 ∙ ∙ 13 ∙
USING YOUR DASH popcorn MAKER
USING YOUR DASH popcorn MAKER
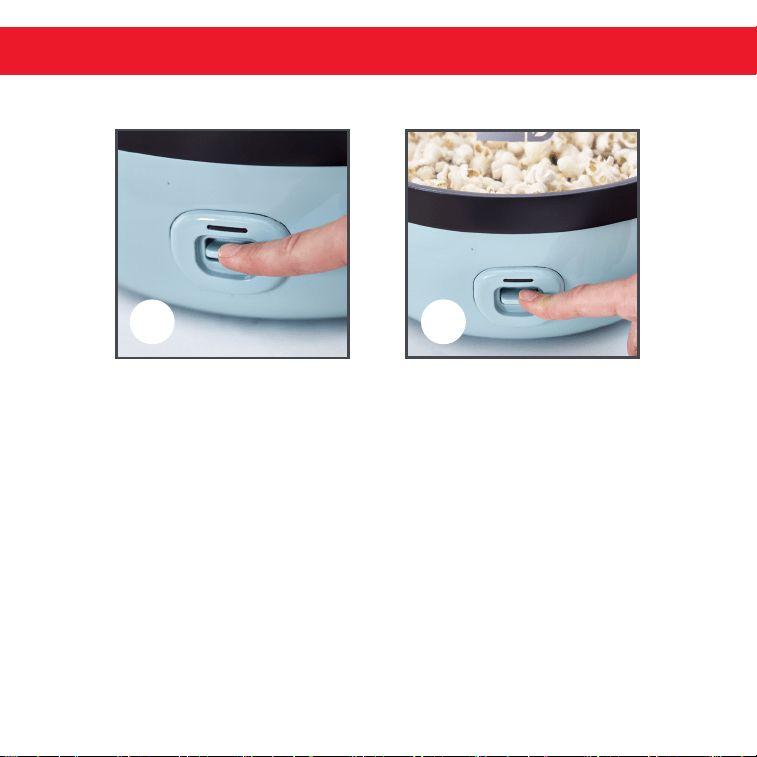
Press the Power Switch down to start cooking (photo E). Depending
on the amount of popcorn and size of kernels, it may take 3-4 minutes
for the popcorn to begin popping.
Once popping has slowed to one kernel every three seconds or
longer, turn the Power Switch up to turn off the appliance and unplug
the Popcorn Maker
(photo F).
5
6
E
F
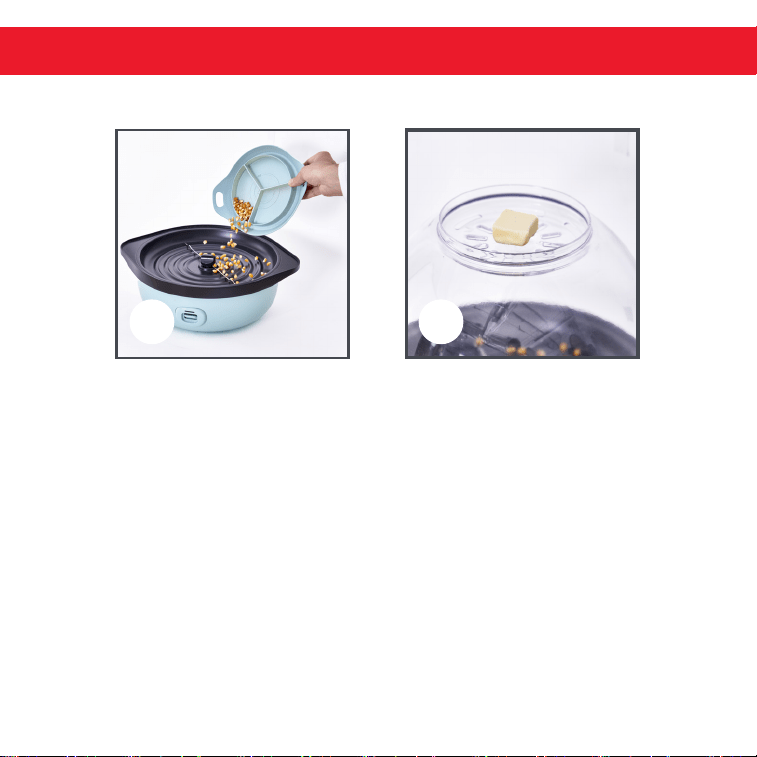
Add kernels to the Cooking Surface (photo C). Add the clear Bowl to
the Base of the Popcorn Maker. NOTE: DO NOT attach the Measuring
Cup to the top of the Popcorn Maker, as the Steam Vents must remain
open during cooking.
For additional buttery avor, add pat of butter to the top of the Bowl
(where the Steam Vents are located) to heat while cooking (photo D).
It is recommended to use 1 tbsp butter per ¼ cup popcorn.
4
3
C D
∙ 12 ∙ ∙ 13 ∙
USING YOUR DASH popcorn MAKER
USING YOUR DASH popcorn MAKER
Press the Power Switch down to start cooking (photo E). Depending
on the amount of popcorn and size of kernels, it may take 3-4 minutes
for the popcorn to begin popping.
Once popping has slowed to one kernel every three seconds or
longer, turn the Power Switch up to turn off the appliance and unplug
the Popcorn Maker
(photo F).
5
6
E
F
Add kernels to the Cooking Surface (photo C). Add the clear Bowl to
the Base of the Popcorn Maker. NOTE: DO NOT attach the Measuring
Cup to the top of the Popcorn Maker, as the Steam Vents must remain
open during cooking.
For additional buttery avor, add pat of butter to the top of the Bowl
(where the Steam Vents are located) to heat while cooking (photo D).
It is recommended to use 1 tbsp butter per ¼ cup popcorn.
4
3
C D
∙ 14 ∙ ∙ 15 ∙
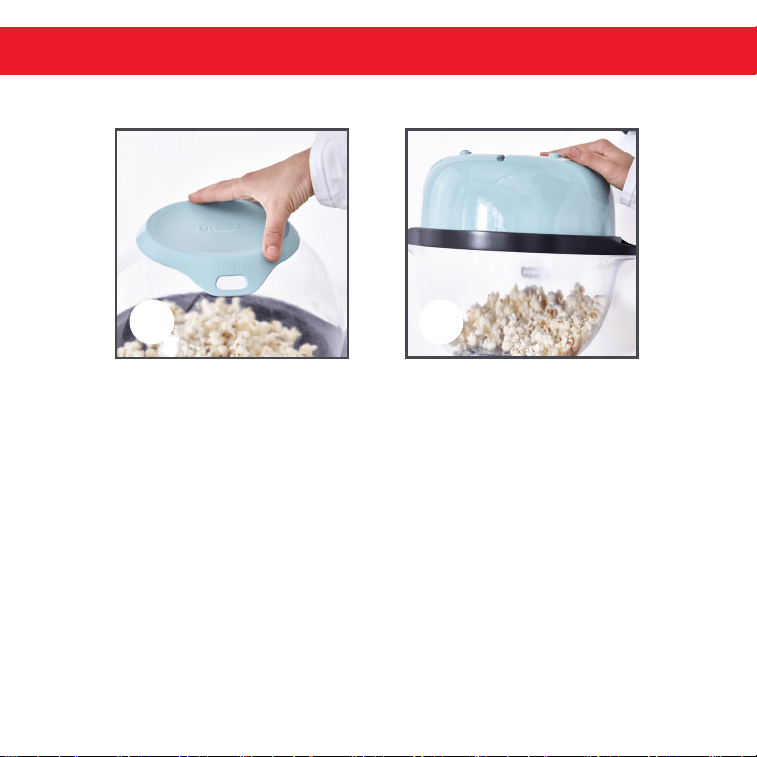
Remove the Base and serve (photo I). Be sure to open the Popcorn
Maker so the steam escapes away from you, as steam will be hot.
Use oven gloves or a towel.
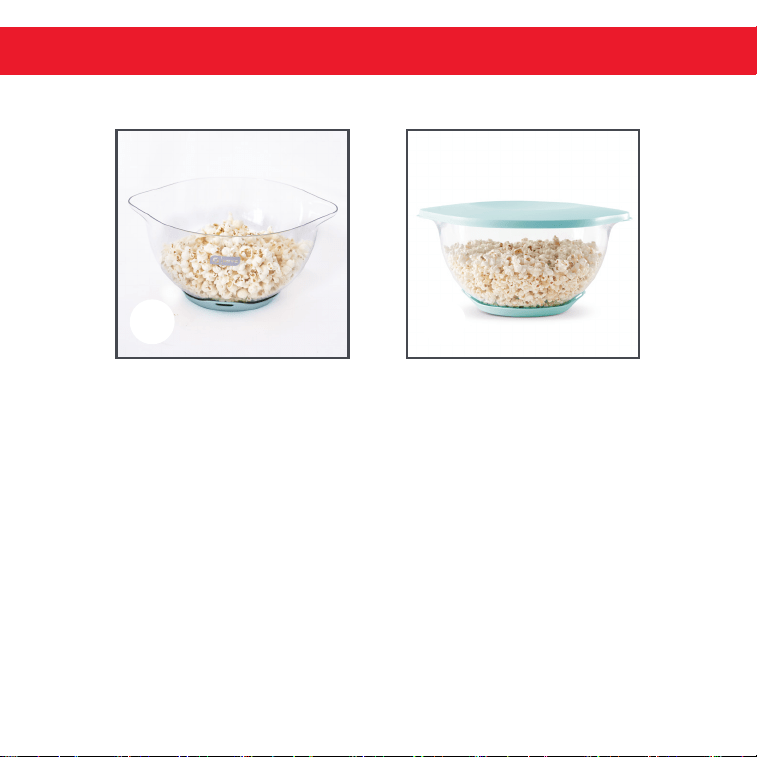
Add the Lid to the top of the Bowl to save and store leftovers
for later!
9
I
Add the Measuring Cup to the top of the Bowl (photo G). It should t
securely into place. Unplug the Popcorn Maker.
Hold together the Bowl Handle and the Base Handle and ip the
popcorn maker over. You can also hold by the Measuring Cup and the
Base of the Popcorn Maker
(photo H).
NOTE: DO NOT directly grab the clear Bowl or the Cooking Surface,
as both will be hot after cooking. Use oven mitts if desired for
additional safety!
7
8
G H
USING YOUR DASH popcorn MAKER USING YOUR DASH popcorn MAKER
NOTE: Please wait approximately 10-12 minutes before using the Popcorn
Maker again, otherwise it will overheat.
TIP: If kernels are not popping as much as desired, try soaking the rest of
them in water for 10 minutes to add moisture. If popcorn kernels are old
and completely dry, they won't pop. This can also result in ufer popcorn!
J
10
∙ 14 ∙ ∙ 15 ∙
Remove the Base and serve (photo I). Be sure to open the Popcorn
Maker so the steam escapes away from you, as steam will be hot.
Use oven gloves or a towel.
Add the Lid to the top of the Bowl to save and store leftovers
for later!
9
I
Add the Measuring Cup to the top of the Bowl (photo G). It should t
securely into place. Unplug the Popcorn Maker.
Hold together the Bowl Handle and the Base Handle and ip the
popcorn maker over. You can also hold by the Measuring Cup and the
Base of the Popcorn Maker
(photo H).
NOTE: DO NOT directly grab the clear Bowl or the Cooking Surface,
as both will be hot after cooking. Use oven mitts if desired for
additional safety!
7
8
G H
USING YOUR DASH popcorn MAKER USING YOUR DASH popcorn MAKER
NOTE: Please wait approximately 10-12 minutes before using the Popcorn
Maker again, otherwise it will overheat.
TIP: If kernels are not popping as much as desired, try soaking the rest of
them in water for 10 minutes to add moisture. If popcorn kernels are old
and completely dry, they won't pop. This can also result in ufer popcorn!
J
10
∙ 16 ∙ ∙ 17 ∙
Storing the Popcorn Makercleaning & maintenance
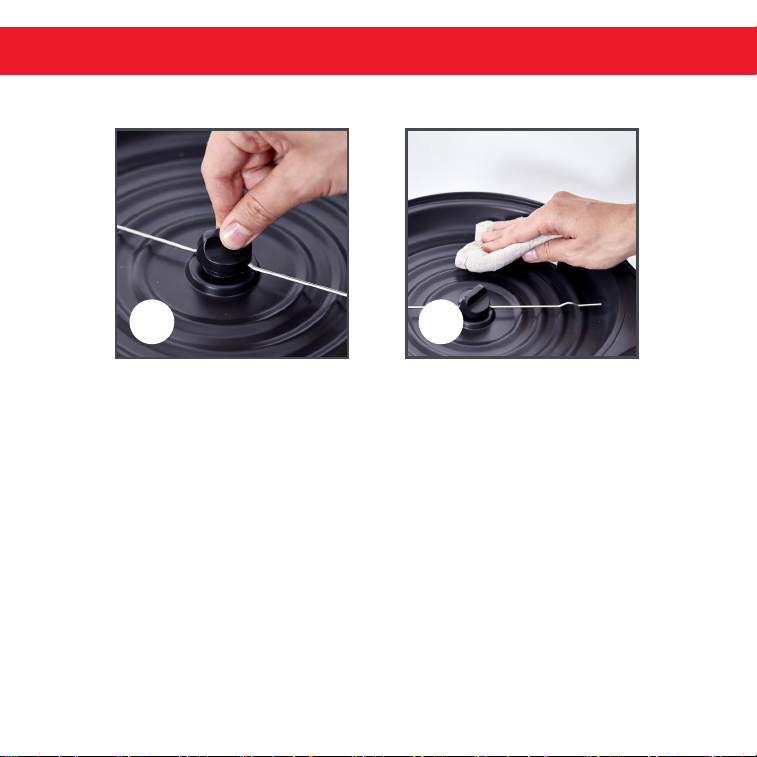
Be sure to allow the Popcorn Maker to cool before cleaning. Remove
the Stirring Bar from the Base by unscrewing the Rotary Knob
(photo A). Use a damp, frictionless sponge or damp cloth to clean the
Base and the Stirring Bar before reattaching (photo B).
Wash the Bowl and Measuring Cup in warm soapy water with no
abrasive or sponge. The Bowl and Measuring Cup are top-rack
dishwasher safe.
4
3
A B
Rinse thoroughly and dry with a soft towel.
DO NOT submerge the Base into water or other solutions.
1
2
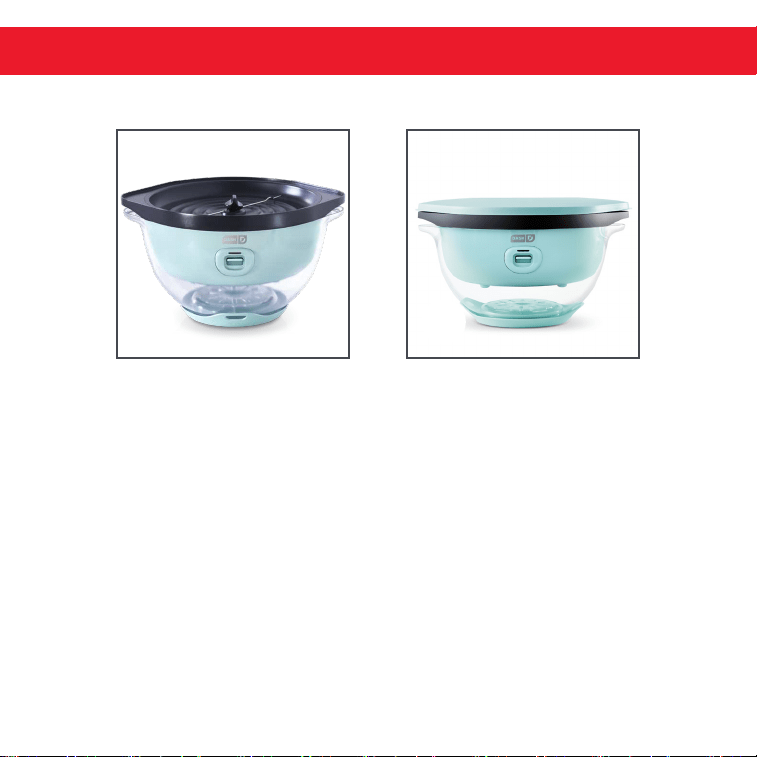
Ensure that the Popcorn Maker is clean and dry before storing.
To store the Popcorn Maker, wrap the cord around the Cord Storage
on the underside of the Base.
Attach the Measuring Cup to the clear Bowl and Nest the Base
inside the Bowl (photo A).
Place Lid on top of the stacked Base and Bowl (photo B).
Store in a dry place.
A
1
2
3
4
5
B
∙ 16 ∙ ∙ 17 ∙
Storing the Popcorn Makercleaning & maintenance
Be sure to allow the Popcorn Maker to cool before cleaning. Remove
the Stirring Bar from the Base by unscrewing the Rotary Knob
(photo A). Use a damp, frictionless sponge or damp cloth to clean the
Base and the Stirring Bar before reattaching (photo B).
Wash the Bowl and Measuring Cup in warm soapy water with no
abrasive or sponge. The Bowl and Measuring Cup are top-rack
dishwasher safe.
4
3
A B
Rinse thoroughly and dry with a soft towel.
DO NOT submerge the Base into water or other solutions.
1
2
Ensure that the Popcorn Maker is clean and dry before storing.
To store the Popcorn Maker, wrap the cord around the Cord Storage
on the underside of the Base.
Attach the Measuring Cup to the clear Bowl and Nest the Base
inside the Bowl (photo A).
Place Lid on top of the stacked Base and Bowl (photo B).
Store in a dry place.
A
1
2
3
4
5
B
RECIPE
GUIDE
Follow us!
@bydash
|
recipes, videos, & inspiration
@unprocessyourfood
|
veg & vegan-friendly meals

RECIPE
GUIDE
Follow us!
@bydash
|
recipes, videos, & inspiration
@unprocessyourfood
|
veg & vegan-friendly meals
∙ 20 ∙
½ cup (1 stick) good quality
unsalted butter
2
/3 cup popcorn kernels
2 tbsp canola oil
2 tbsp unsalted butter, thinly sliced
and softened
2 tsp ne sea salt
Best
Buttered POPCORN
Directions:
1. For claried butter, in a small saucepan, melt the cup butter over low heat until
white foam rises to the top. Skim off the foam. Let the butter sit for 10 minutes.
Pour or spoon off the clear yellow fat, leaving behind all the water and any
remaining solids. This makes about
1
/3 cup claried butter.
2. Place the popcorn kernels into the Base of the Deluxe SmartStore
TM
Stirring
Popcorn Maker. Drizzle the on the oil. Set the Bowl in place. Arrange the softened
butter on the Butter Melter. Plug in the machine. When the corn has popped,
click the Bowl in place. Flip the machine.
3. Pour cup of the claried butter over the popcorn and toss to coat it. Sprinkle
on the salt and toss. Serve warm.
Ingredients:
Makes 4 servings
recipes ∙ 21

∙ 22 ∙ ∙ 23 ∙
½ cup popcorn kernels
1 packed cup (6 ounces) light brown
sugar
½ cup (1 stick) unsalted butter
1
/3 cup light corn syrup
2 tbsp condensed milk
¼ tsp vanilla extract
Sea salt
Butter
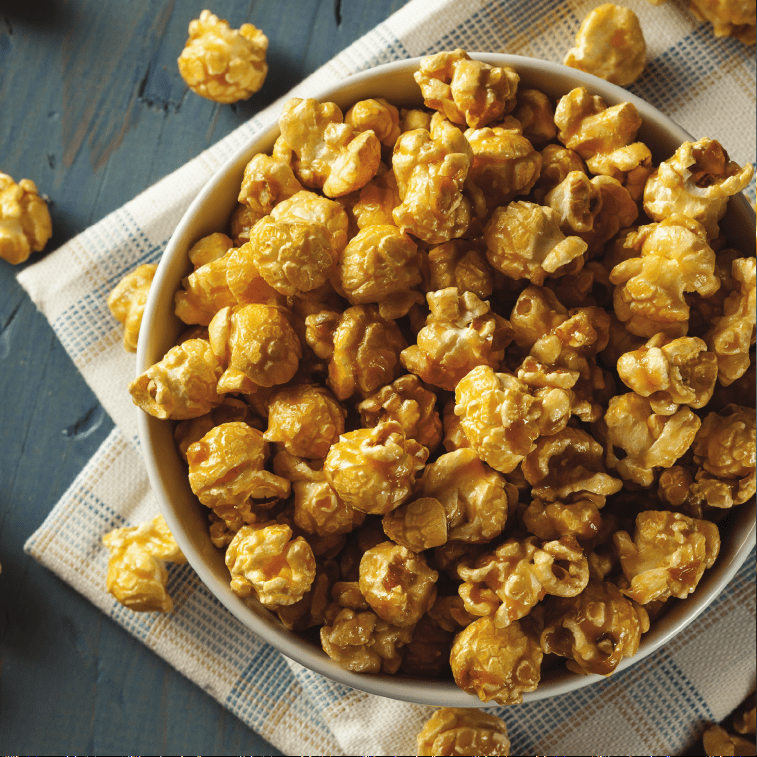
Perfect
caramel corn
Directions:
1.
Pop popcorn kernels using the Deluxe SmartStore
TM
Stirring Popcorn Maker.
2. Place the popcorn in a very large kitchen bowl or pot. (Do not use the Bowl of the
Deluxe SmartStore
TM
Stirring Popcorn Maker)
3. Line a large baking sheet with baking parchment and set aside. Coat a heatproof
Ingredients:
NOTE
: Working with boiling sugar requires great caution. Wear protective oven
gloves. For safety’s sake, make sure the cat, the dog and young children cannot
come into the kitchen while the caramel is cooking.
Makes 4 servings
spatula with cooking spray. If making crisp caramel corn, heat the oven to 300°F.
4. In a medium saucepan, combine the sugar, butter, and corn syrup, and over
medium-high heat bring to a boil, stirring constantly with a wooden spoon.
Add the condensed milk and stir just to combine. Reduce the heat to medium
and boil without stirring until the mixture registers 240-245°F on a candy
thermometer (see note for alternative method), about 4 minutes. Off the heat,
add the vanilla, and 1/
8
tsp salt, standing back as the mixture will splatter.
5. Working VERY CAREFULLY, pour the hot caramel over the popcorn. Stir, digging
the caramel up from the bottom for 2 minutes, until all the corn is evenly coated.
Take care while stirring not to let the hot mixture touch your hand. Turn the
coated popcorn onto the prepared baking sheet and spread it in an even layer.
6. For chewy, slightly sticky caramel corn, cool popcorn for 2 to 4 hours. For crisp
caramel popcorn, bake the popcorn mixture for 20 minutes. Stir, respread the
popcorn, and return to the oven for 20 minutes. Set the baking sheet on a wire
rack and cool completely. The popcorn will crisp as it cools.
7. Crisp Perfect Caramel Corn keeps for 2 days. The chewy kind is best the day it
is made.
8. Alternative method to measure temperature of the caramel: Fill a small bowl
with ice water. Drizzle a small amount of the caramel into the cold water. When it
forms a sticky ball, it has reached 240°F.

∙ 22 ∙ ∙ 23 ∙
½ cup popcorn kernels
1 packed cup (6 ounces) light brown
sugar
½ cup (1 stick) unsalted butter
1
/3 cup light corn syrup
2 tbsp condensed milk
¼ tsp vanilla extract
Sea salt
Butter
Perfect
caramel corn
Directions:
1.
Pop popcorn kernels using the Deluxe SmartStore
TM
Stirring Popcorn Maker.
2. Place the popcorn in a very large kitchen bowl or pot. (Do not use the Bowl of the
Deluxe SmartStore
TM
Stirring Popcorn Maker)
3. Line a large baking sheet with baking parchment and set aside. Coat a heatproof
Ingredients:
NOTE
: Working with boiling sugar requires great caution. Wear protective oven
gloves. For safety’s sake, make sure the cat, the dog and young children cannot
come into the kitchen while the caramel is cooking.
Makes 4 servings
spatula with cooking spray. If making crisp caramel corn, heat the oven to 300°F.
4. In a medium saucepan, combine the sugar, butter, and corn syrup, and over
medium-high heat bring to a boil, stirring constantly with a wooden spoon.
Add the condensed milk and stir just to combine. Reduce the heat to medium
and boil without stirring until the mixture registers 240-245°F on a candy
thermometer (see note for alternative method), about 4 minutes. Off the heat,
add the vanilla, and 1/
8
tsp salt, standing back as the mixture will splatter.
5. Working VERY CAREFULLY, pour the hot caramel over the popcorn. Stir, digging
the caramel up from the bottom for 2 minutes, until all the corn is evenly coated.
Take care while stirring not to let the hot mixture touch your hand. Turn the
coated popcorn onto the prepared baking sheet and spread it in an even layer.
6. For chewy, slightly sticky caramel corn, cool popcorn for 2 to 4 hours. For crisp
caramel popcorn, bake the popcorn mixture for 20 minutes. Stir, respread the
popcorn, and return to the oven for 20 minutes. Set the baking sheet on a wire
rack and cool completely. The popcorn will crisp as it cools.
7. Crisp Perfect Caramel Corn keeps for 2 days. The chewy kind is best the day it
is made.
8. Alternative method to measure temperature of the caramel: Fill a small bowl
with ice water. Drizzle a small amount of the caramel into the cold water. When it
forms a sticky ball, it has reached 240°F.

∙ 24 ∙
¼ cup popcorn kernels
Butter
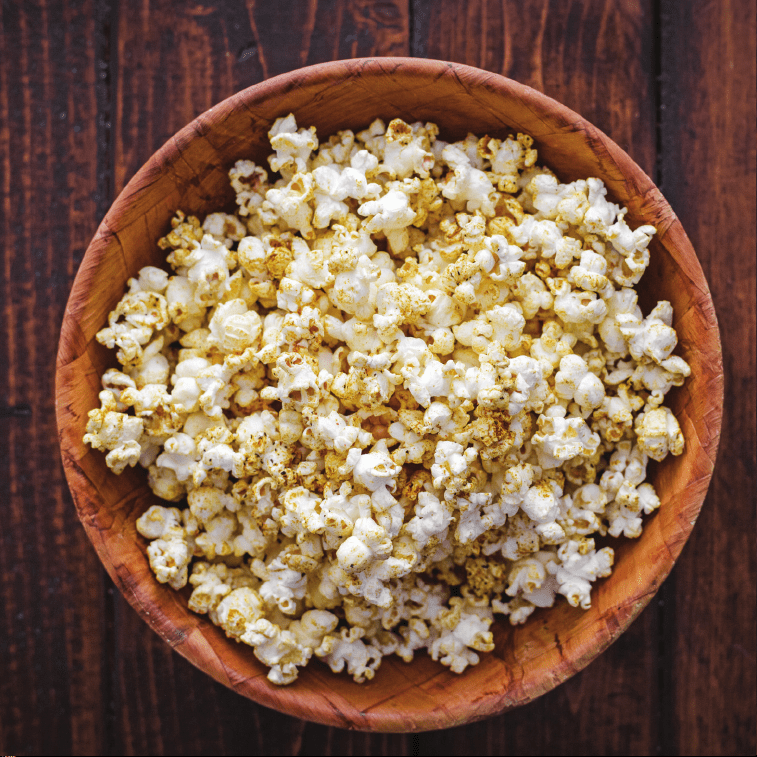
½ cup white cheddar cheese
powder
Pinch of red chili powder
¼ cup snipped chives, optional
white cheddar
POPCORN
Directions:
1. Pop popcorn kernels in the Deluxe SmartStore
TM
Stirring Popcorn Maker.
2. In the Bowl of the Popcorn Maker, sprinkle the cheddar cheese powder and
chili powder over the popcorn. Cover with the Lid and shake to mix until
the cheese coats the popcorn evenly. If using, sprinkle the chives over the
cheese-coated popcorn before serving.
3. White Cheddar Popcorn will keep in an airtight container at room
temperature for 2 days.
Ingredients:
Makes 4 servings
∙ 24 ∙
¼ cup popcorn kernels
Butter
½ cup white cheddar cheese
powder
Pinch of red chili powder
¼ cup snipped chives, optional
white cheddar
POPCORN
Directions:
1. Pop popcorn kernels in the Deluxe SmartStore
TM
Stirring Popcorn Maker.
2. In the Bowl of the Popcorn Maker, sprinkle the cheddar cheese powder and
chili powder over the popcorn. Cover with the Lid and shake to mix until
the cheese coats the popcorn evenly. If using, sprinkle the chives over the
cheese-coated popcorn before serving.
3. White Cheddar Popcorn will keep in an airtight container at room
temperature for 2 days.
Ingredients:
Makes 4 servings

∙ 26 ∙ ∙ 27 ∙
¼ cup popcorn kernels
butter and salt, to taste
1½ cups mini marshmallows
1¼ cups pretzel sticks in 1-inch
pieces
1 cup M&M candy
¾ cup raisins
½ cup chocolate chips
Movie Munchies
POPCORN
Directions:
1. Pop popcorn kernels in the Deluxe SmartStore
TM
Stirring Popcorn Maker. Add
butter and salt, to taste.
2. In a large bowl, combine all the ingredients. Movie Munches Popcorn keeps in an
airtight container at room temperature for 3 days.
Ingredients:
Makes 4 servings
1 tbsp popcorn kernels
1½ cups oat ring cereal
1
/3 cup dried cranberries
¼ cup golden raisins
¼ cup dry-roasted almonds,
halved crosswise
1
/3 cup chopped dried pineapple
¼ cup roasted pumpkin seeds
2 tbsp dry-roasted sunflower
seeds
Popcorn
Trail Mix
Directions:
1. Pop popcorn kernels in the Deluxe SmartStore
TM
Stirring Popcorn Maker.
2. In a large bowl, combine all the ingredients.
3. Popcorn Trail Mix keeps in an airtight at room temperature container for 3 days.
Ingredients:
Makes 4 servings

∙ 28 ∙ ∙ 29 ∙
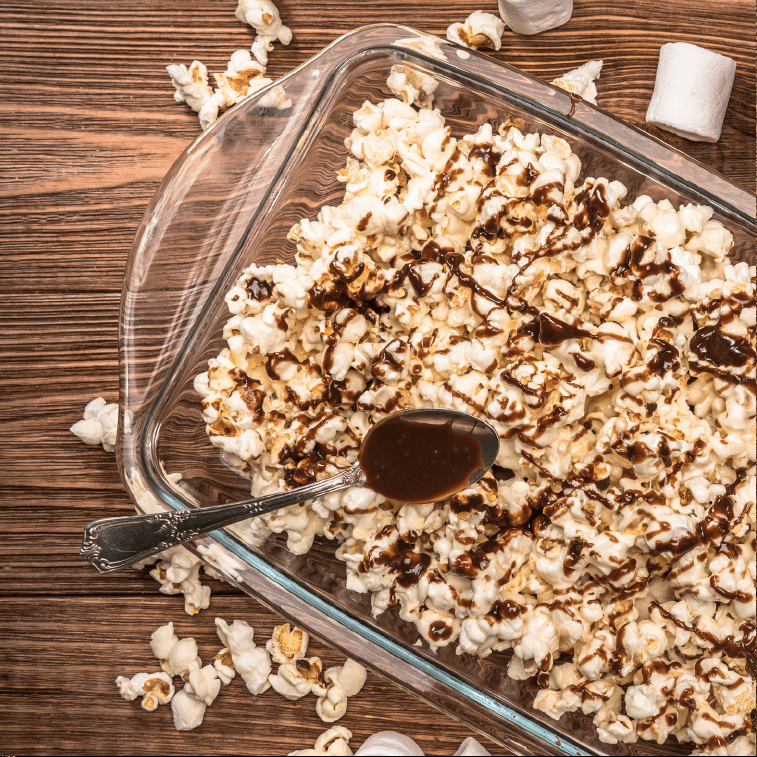
4 tbsp (½ stick) unsalted butter
6 cups mini marshmallows, divided
¼ cup popcorn kernels
1 cup lightly salted dry roasted peanuts
1 cup chocolate chips
Rocky Road
POPCORN
Directions:
1. Pop popcorn kernels in the Deluxe SmartStore
TM
Stirring Popcorn Maker.
2. Line a large baking sheet with baking parchment and set aside. Coat a heatproof
exible spatula and two tablespoons with cooking spray. Set them aside.
3. In a large oven pot, melt the butter over medium heat. As soon as the butter melts,
add 4 cups marshmallows. When the marshmallows are almost melted, take the pot
off the heat. Add the popcorn and mix to coat it thoroughly. Add the peanuts and
mix to distribute them evenly. Mix in the remaining 2 cups marshmallows. When the
mixture has cooled slightly but is still pliable, mix in the chocolate chips.
4. Using the two spoons, scoop up enough popcorn mixture to make a 3-inch mound
on the lined baking sheet. Repeat, making 19 more mound, using your hands when
the mixture is cool enough to handle. Press each mound rmly together.
5. Refrigerate Rocky Road Popcorn until rm, 1 to 2 hours. Serve chilled.
6. Rocky Road Popcorn will keep, covered in the refrigerator for 3 days.
Ingredients:
Makes 20 3-inch pieces
∙ 28 ∙ ∙ 29 ∙
4 tbsp (½ stick) unsalted butter
6 cups mini marshmallows, divided
¼ cup popcorn kernels
1 cup lightly salted dry roasted peanuts
1 cup chocolate chips
Rocky Road
POPCORN
Directions:
1. Pop popcorn kernels in the Deluxe SmartStore
TM
Stirring Popcorn Maker.
2. Line a large baking sheet with baking parchment and set aside. Coat a heatproof
exible spatula and two tablespoons with cooking spray. Set them aside.
3. In a large oven pot, melt the butter over medium heat. As soon as the butter melts,
add 4 cups marshmallows. When the marshmallows are almost melted, take the pot
off the heat. Add the popcorn and mix to coat it thoroughly. Add the peanuts and
mix to distribute them evenly. Mix in the remaining 2 cups marshmallows. When the
mixture has cooled slightly but is still pliable, mix in the chocolate chips.
4. Using the two spoons, scoop up enough popcorn mixture to make a 3-inch mound
on the lined baking sheet. Repeat, making 19 more mound, using your hands when
the mixture is cool enough to handle. Press each mound rmly together.
5. Refrigerate Rocky Road Popcorn until rm, 1 to 2 hours. Serve chilled.
6. Rocky Road Popcorn will keep, covered in the refrigerator for 3 days.
Ingredients:
Makes 20 3-inch pieces
¾ cup grated Parmesan cheese
½ cup crumbled crisp bacon
(about 6 strips)
Salt and ground black pepper,
optional
Parmesan Bacon
POPCORN
Directions:
1. Pop popcorn in the Deluxe SmartStore
TM
Stirring Popcorn Maker.
2. In a small bowl, combine the cheese and bacon. Set aside while making
the popcorn in the Popcorn Maker.
3. In the Bowl of the Popcorn Maker, add the Parmesan bacon mixture to the warm
popcorn. Cover with the Lid and toss until the kernels are lightly coated with the
cheese and the bacon gets distributed; some bacon will stay in the bottom of the
bowl. If desired, season with salt and pepper to taste.
4. To get all the bacon, dig deep when eating Parmesan Bacon Popcorn.
5. Parmesan Bacon Popcorn is best eaten shortly after you make it.
Ingredients:
Makes 4 to 6 servings
½ cup popcorn kernels
2 tbsp unsalted butter
3 tbsp Buffalo wing sauce (see note)
Hot sauce, optional
½ ounce Ranch Dressing or Dip Mix
1 tsp white cheddar cheese powder
(optional)
Buffalo Ranch
POPCORN
Directions:
1. Pop popcorn kernels and place in the clear Bowl of the Deluxe SmartStore
TM
Stirring Popcorn Maker.
2. In a small bowl, melt the butter in a microwave, or use a small pot over
medium heat.
3. Whisk in the Buffalo wing sauce until combined with butter. Add hot sauce to
spatula, mix until the popcorn is evenly coated.
4. Sprinkle the Ranch Dressing Mix and white cheddar cheese powder over the
popcorn and mix to combine. Serve immediately.
5. Note: Check the ingredients on Ranch Dressing or Dip Mix. Some brands
contain MSG.
Ingredients:
Makes 4 servings

∙ 32 ∙ ∙ 33 ∙
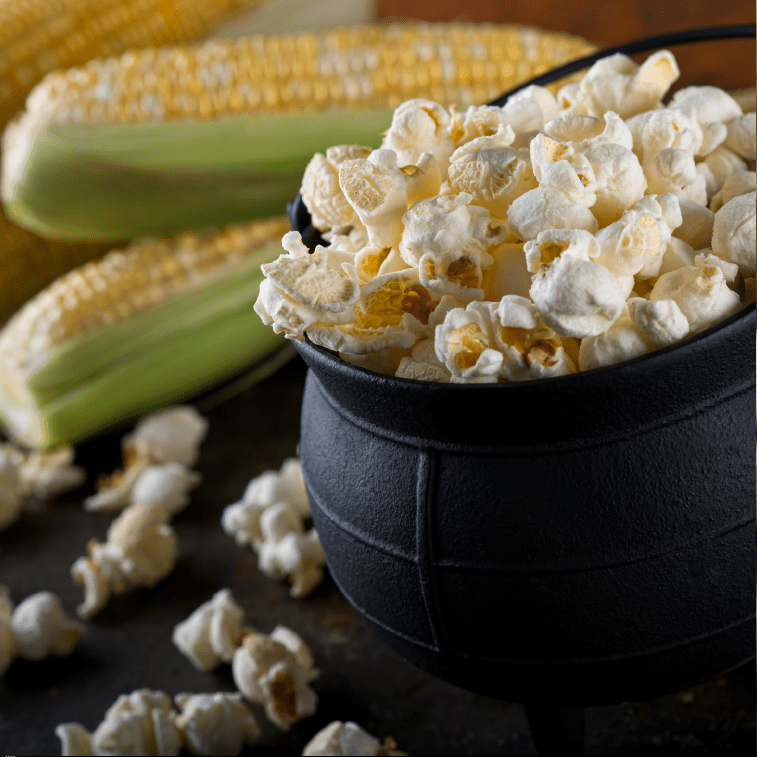
½ cup popcorn kernels
2 tbsp canola oil
1½ tbsp granulated white sugar
Fine sea salt
Kettle
CORN
Directions:
1. Place the popcorn kernels into the base of the Deluxe SmartStore
TM
Stirring
Popcorn Maker. Drizzle the oil over the kernels. Sprinkle on the sugar.
2. Pop ½ cup popcorn using the Deluxe SmartStore
TM
Stirring Popcorn Maker. As
soon as popping slows to 2 to 3 seconds, unplug the Popcorn Maker and ip it
to move the corn into the Bowl.
3. Season the popcorn to taste with salt.
4. Kettle Corn is best enjoyed the day it is made.
5. The popcorn will burn if more sugar is added or the batch made is smaller or
larger. To make more servings, repeat the recipe.
Ingredients:
Makes 2 servings
∙ 32 ∙ ∙ 33 ∙
½ cup popcorn kernels
2 tbsp canola oil
1½ tbsp granulated white sugar
Fine sea salt
Kettle
CORN
Directions:
1. Place the popcorn kernels into the base of the Deluxe SmartStore
TM
Stirring
Popcorn Maker. Drizzle the oil over the kernels. Sprinkle on the sugar.
2. Pop ½ cup popcorn using the Deluxe SmartStore
TM
Stirring Popcorn Maker. As
soon as popping slows to 2 to 3 seconds, unplug the Popcorn Maker and ip it
to move the corn into the Bowl.
3. Season the popcorn to taste with salt.
4. Kettle Corn is best enjoyed the day it is made.
5. The popcorn will burn if more sugar is added or the batch made is smaller or
larger. To make more servings, repeat the recipe.
Ingredients:
Makes 2 servings
∙ 34 ∙ ∙ 35 ∙
½ cup popcorn kernels
2 cups pecans, broken lengthwise in half
1 cup salted dry-roasted almonds
1 cup walnuts, broken into large pieces
2 cups (12 ounces) light brown sugar
¾ cup (1½ sticks) unsalted butter
½ cup light corn syrup
1 tsp vanilla extract
¼ tsp baking soda
¼ tsp sea salt
Nutty, Sweet & Salty
POPCORN Crunch
Directions:
1.
Pop the popcorn kernels in the Deluxe SmartStore
TM
Stirring Popcorn Maker.
2. Preheat the oven to 300°F. Line a large baking sheet with baking parchment and
set aside. Coat a heatproof spatula with cooking spray.
Ingredients:
Makes 12 servings
NOTE: Working with boiling sugar requires great caution. Wear protective oven
gloves. For safety’s sake, make sure the cat, the dog and young children cannot
come into the kitchen while the caramel is cooking.
3. Place the popcorn in a very large mixing bowl or large pot. Sprinkle the nuts over
the popcorn.
4. In a medium saucepan, combine the sugar, butter, and corn syrup. Bring
the mixture to a boil over medium-high heat, using a wooden spoon to stir
constantly. Reduce the heat to medium and boil without stirring until the mixture
registers 250°F on a candy thermometer (see note for alternative method). Off
the heat, add the vanilla, baking soda, and salt, standing back as the mixture will
splatter and foam.
5. Working VERY CAREFULLY, pour the hot caramel over the popcorn. Stir, digging
the caramel up from the bottom, until all the corn and nuts are evenly coated.
Take care while stirring not to let the hot mixture touch your hand. Turn the
coated popcorn mixture onto the prepared baking sheet and spread it in an
even layer.
6. Bake the popcorn mixture for 15 minutes. Stir, respread, and return to the oven
for 15 minutes, or until the coated popcorn is the color of caramel candy. If
darker caramel with more bitter avor is desired, after stirring, bake for 25 to
30 minutes.
7. Set the baking sheet on a wire rack. The caramel will harden and crisp as it cools.
When Nutty, Sweet & Salty Popcorn Crunch has cooled completely, break it up
completely or into chunks.
8. Nutty, Sweet & Salty Popcorn Crunch will keep in an airtight container at room
temperature for 5 days.

∙ 36 ∙ ∙ 37 ∙
NOTES Notes

∙ 36 ∙ ∙ 37 ∙
NOTES Notes

∙ 38 ∙ ∙ 39 ∙
STOREBOUND, LLC – 1 YEAR LIMITED WARRANTY
Your StoreBound product is warranted to be free from defects in material and workmanship for a period of
one (1) year from the date of the original purchase when utilized for normal and intended household use.
Should any defect covered by the terms of the limited warranty be discovered within one (1) year, StoreBound,
LLC will repair or replace the defective part. To process a warranty claim, contact Customer Support at
1-800-898-6970 for further assistance and instruction. A Customer Support agent will assist you by
troubleshooting minor problems. If troubleshooting fails to x the problem, a return authorization will be
issued. Proof of purchase indicating the date and place of purchase is required and should accompany the
return. You must also include your full name, shipping address, and telephone number. We are unable to
ship returns to a PO box. StoreBound will not be responsible for delays or unprocessed claims resulting
from a purchaser’s failure to provide any or all of the necessary information. Freight costs must be prepaid
by the purchaser.
There are no express warranties except as listed above.
REPAIR OR REPLACEMENT AS PROVIDED UNDER THIS WARRANTY IS THE EXCLUSIVE REMEDY OF
THE CUSTOMER. STOREBOUND SHALL NOT BE LIABLE FOR ANY INCIDENTAL OR CONSEQUENTIAL
DAMAGES OR FOR BREACH OF ANY EXPRESS OR IMPLIED WARRANTY ON THIS PRODUCT EXCEPT
TO THE EXTENT REQUIRED BY APPLICABLE LAW. ANY IMPLIED WARRANTY OF MERCHANTABILITY
OR FITNESS FOR A PARTICULAR PURPOSE ON THIS PRODUCT IS LIMITED IN DURATION TO THE
DURATION OF THIS WARRANTY.
Some states do not allow the exclusion or limitation of incidental or consequential damages, or
limitations on how long an implied warranty lasts. Therefore, the above exclusions or limitations may
not apply to you. This warranty gives you specic legal rights and you may also have other rights, which
vary from state to state.
Refurbished items or items not purchased through an authorized retailer are not eligible for warranty claims.
REPAIRS
DANGER! Risk of electric shock! The Dash Deluxe SmartStore
™
Stirring Popcorn Maker is an electrical
appliance.
Do not attempt to repair the appliance yourself under any circumstances.
Contact Customer Support regarding repairs to the appliance.
TECHNICAL SPECIFICATIONS
Voltage 120V ~ 60Hz
Power Rating 850W
Stock#: DSSP355_20201013_v5
Customer Support Warranty
Hey Hawaii! You can reach our customer service team from 3AM to 3PM.
And also, Alaska, feel free to reach out from 5AM to 5PM.
6am
–
6pm
Our customer support teams in the US and Canada are at
your service Monday - Friday during the times below.
Contact us at 1 (800) 898-6970 or suppor[email protected]
Dash values quality and workmanship and stands behind this
product with our Feel Good Guarantee
™
. To learn more about
our commitment to quality, visit bydash.com/feelgood.
7am
–
7pm
8am
–
8pm
9am
–
9pm
feel good
guarantee
™

∙ 38 ∙ ∙ 39 ∙
STOREBOUND, LLC – 1 YEAR LIMITED WARRANTY
Your StoreBound product is warranted to be free from defects in material and workmanship for a period of
one (1) year from the date of the original purchase when utilized for normal and intended household use.
Should any defect covered by the terms of the limited warranty be discovered within one (1) year, StoreBound,
LLC will repair or replace the defective part. To process a warranty claim, contact Customer Support at
1-800-898-6970 for further assistance and instruction. A Customer Support agent will assist you by
troubleshooting minor problems. If troubleshooting fails to x the problem, a return authorization will be
issued. Proof of purchase indicating the date and place of purchase is required and should accompany the
return. You must also include your full name, shipping address, and telephone number. We are unable to
ship returns to a PO box. StoreBound will not be responsible for delays or unprocessed claims resulting
from a purchaser’s failure to provide any or all of the necessary information. Freight costs must be prepaid
by the purchaser.
Send all inquiries to [email protected].
There are no express warranties except as listed above.
REPAIR OR REPLACEMENT AS PROVIDED UNDER THIS WARRANTY IS THE EXCLUSIVE REMEDY OF
THE CUSTOMER. STOREBOUND SHALL NOT BE LIABLE FOR ANY INCIDENTAL OR CONSEQUENTIAL
DAMAGES OR FOR BREACH OF ANY EXPRESS OR IMPLIED WARRANTY ON THIS PRODUCT EXCEPT
TO THE EXTENT REQUIRED BY APPLICABLE LAW. ANY IMPLIED WARRANTY OF MERCHANTABILITY
OR FITNESS FOR A PARTICULAR PURPOSE ON THIS PRODUCT IS LIMITED IN DURATION TO THE
DURATION OF THIS WARRANTY.
Some states do not allow the exclusion or limitation of incidental or consequential damages, or
limitations on how long an implied warranty lasts. Therefore, the above exclusions or limitations may
not apply to you. This warranty gives you specic legal rights and you may also have other rights, which
vary from state to state.
Refurbished items or items not purchased through an authorized retailer are not eligible for warranty claims.
REPAIRS
DANGER! Risk of electric shock! The Dash Deluxe SmartStore
™
Stirring Popcorn Maker is an electrical
appliance.
Do not attempt to repair the appliance yourself under any circumstances.
Contact Customer Support regarding repairs to the appliance.
TECHNICAL SPECIFICATIONS
Voltage 120V ~ 60Hz
Power Rating 850W
Stock#: DSSP355_20201013_v5
Customer Support Warranty
Hey Hawaii! You can reach our customer service team from 3AM to 3PM.
And also, Alaska, feel free to reach out from 5AM to 5PM.
6am
–
6pm
Our customer support teams in the US and Canada are at
your service Monday - Friday during the times below.
Dash values quality and workmanship and stands behind this
product with our Feel Good Guarantee
™
. To learn more about
our commitment to quality, visit bydash.com/feelgood.
7am
–
7pm
8am
–
8pm
9am
–
9pm
feel good
guarantee
™

1-800-898-6970 | @bydash | bydash.com