Loading ...
Loading ...
Loading ...

- 20 -
NOTICE
THIS ARTICLE MEETS OR EXCEEDS
ALL REQUIREMENTS COVERED IN
ASTM F833 STANDARD AND LATEST
REVISIONS.
The images referring to the textile details may
differ from the collection purchased.
For more information, consult our website:
www.pegperego.com
CHASSIS:
INSTRUCTIONS
1 OPENING: Before opening the frame, if present,
remove (without using blades) all die-cut
cardboard.
WARNING:
_ DO NOT PULL OR FORCE THE FASTENER BEYOND
ITS LIMIT.
_ DO NOT USE THE FASTENER AS A HANDLE BAR
FOR TRANSPORT OR TO CARRY WEIGHTS.
DO NOT HANG BAGS OR OTHER ACCESSORIES
ON THIS ELEMENT.
Press the side fastener downwards, grip the upper
ends of the handle bar and rotate them towards
you until the chassis has opened completely
(fig_a). Opened chassis (fig_b). The chassis is
opened correctly when you hear a click, which
corresponds to the handle bar frame attaching -
please look at the picture.
2 FITTING THE WHEELS: slot the rear wheel
crosspiece onto the uprights (fig_a), ensuring
that it is facing the right way, then attach the
rear wheels until they click into place (fig_b) . To
assemble the front wheels, fit them into the slots
until they lock into place (fig_c).
3 FITTING THE HANDLE BAR: insert the handlebar
into the frame (fig_a) as shown in the picture. For
the attachment to be complete, press the two
buttons on the side of the handle bar (fig_b) and
press the handle bar until you hear it click (fig_c).
4 BASKET ASSEMBLY: to facilitate basket assembly,
pull the tab outwards and lift as shown in the
figure (fig_a).
Slip the basket flap into the slot along the front
bar of the chassis (Fig_b).
5 Fasten the basket eyelets to the buttons on each
side of the frame.
6 To complete the basket attachment procedure
for the front part, you are required to insert the
supplied tie (fig_1) as follows:
position it between the basket and buttons,
as shown (fig_2) and use your finger to push
downwards, so as to complete the attachment
procedure (fig_3).
Repeat the same procedure for the other side of
the basket.
7 Attaching the rear part of the basket.
Remove the card from the rear bar.
Fasten the upper basket eyelet to the button on
each side of the frame (Fig_a).
Fasten the basket’s two lower eyelets to the two
buttons on the rear bar of the frame (Fig_b).
8 Basket fastened correctly (fig_g).
Lastly, re-position the footrest, pressing inward with
your hand as shown in the figure (fig_h).
It is possible to increase the basket capacity by
pulling the tab outwards (fig_i).
WARNING! If you do not hook the basket on
correctly, as shown, the basket will be unable to
support the weight of loads placed in it.
9 FIXED OR SWIVELLING FRONT WHEELS: to lock
the front wheels, rotate the lever anticlockwise
onto the locked padlock (fig_a), to release
the wheels - turn the lever clockwise to the
unlocked padlock (fig_b). On difficult terrain, we
recommend using fixed wheels.
10 BRAKE: press the lever down to apply the brake
and lock the frame. Do the opposite to release
the brake.
11 ADJUSTABLE HANDLE BAR: to adjust the height
of the handlebar, pull the levers towards you
(fig_a) and move the handle bar until it clicks
(fig_b). The handle bar can be adjusted in
several positions.
12 FOLDING: lock the front wheels into fixed
position (fig_a), put the handle bar to its lowest
position (fig b). Rotate the safety lever to the
left (fig_c) and pull the frame’s internal handle
towards you (fig_d). Lift the handle until the frame
is completely folded (fig_e).
13 To fold correctly, make sure the side hook is
engaged (fig_a). When folded, the chassis will
stand upright (fig_b).
14 TRANSPORT: the stroller can be conveniently
carried (with the front wheels in fixed position)
using the central handle bar.
15 All the wheels can be removed to reduce
dimensions further. To remove the back wheels:
pull the lever downwards and remove the
wheel as illustrated (fig_a). To remove the front
wheels: press the tab as shown and remove the
wheels (fig_b).
T-MATIC SYSTEM
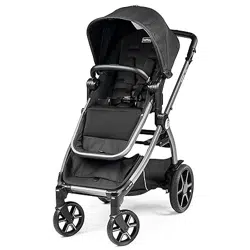
16 T-Matic System is the quick, practical system
that allows you to attach to the Ypsi Chassis:
- Ypsi Seat
- Primo Viaggio 4•35 Nido, Primo Viaggio 4•35 car
Seat (with Primo Viaggio LINKS adapters).
Position them on the T-matic System and press
on the product with both hands until they lock
into place.
Check that the child transport element is
properly attached.
SERIAL NUMBERS
17 Ypsi Chassis, has the information on the
product’s production date on the lower part of
the frame.
_ Product name, production date and serial
number of the chassis. This information is
essential in the event of a claim.
CLEANING AND
MAINTENANCE
Cleaning must only be carried out by adults.
PRODUCT MAINTENANCE: protect from the
weather: water, rain, or snow; prolonged and
continuous exposure to bright sunlight may
give rise to colour changes of various different
materials; store this product in a dry place.
Loading ...
Loading ...
Loading ...
