EasyPilot RTF
Thanks for purchasing the Easypilot. Designed in California, assembled in China.
Disclaimer
Please read the disclaimer carefully before using this product. By using this product,
you hereby agree to this disclaimer and signify that you have read them carefully and
completely. This product is not suitable for people under the age of 14.
Please read the instruction manual and warnings carefully. Before every flight, make
sure the battery is fully charged and power connections are secure. DO NOT fly
around crowds, children, animals or objects. EMAX ACCEPTS NO LIABILITY FOR
DAMAGE(S) OR INJURIES INCURRED DIRECTLY OR INDIRECTLY FROM THE
USE OF THIS PRODUCT.
Precautions
Please follow the instructions to assemble and to operate this product in a proper
way.
Pilots do not use this product if you have physical or mental illness, dizziness,
fatigued, or use while under the influence of alcohol or drugs.
Please fly in a safe area away from people.
Do not modify or use other parts and accessories not approved for the use of EMAX.
Do not use this product in harsh environments (such as winds, rain, lightning, snow,
etc.).
Do not use this product in a strong electromagnetic environment.
Support
Please visit emax-usa.com or emaxmodel.com for any updates or support needs.
Product specification
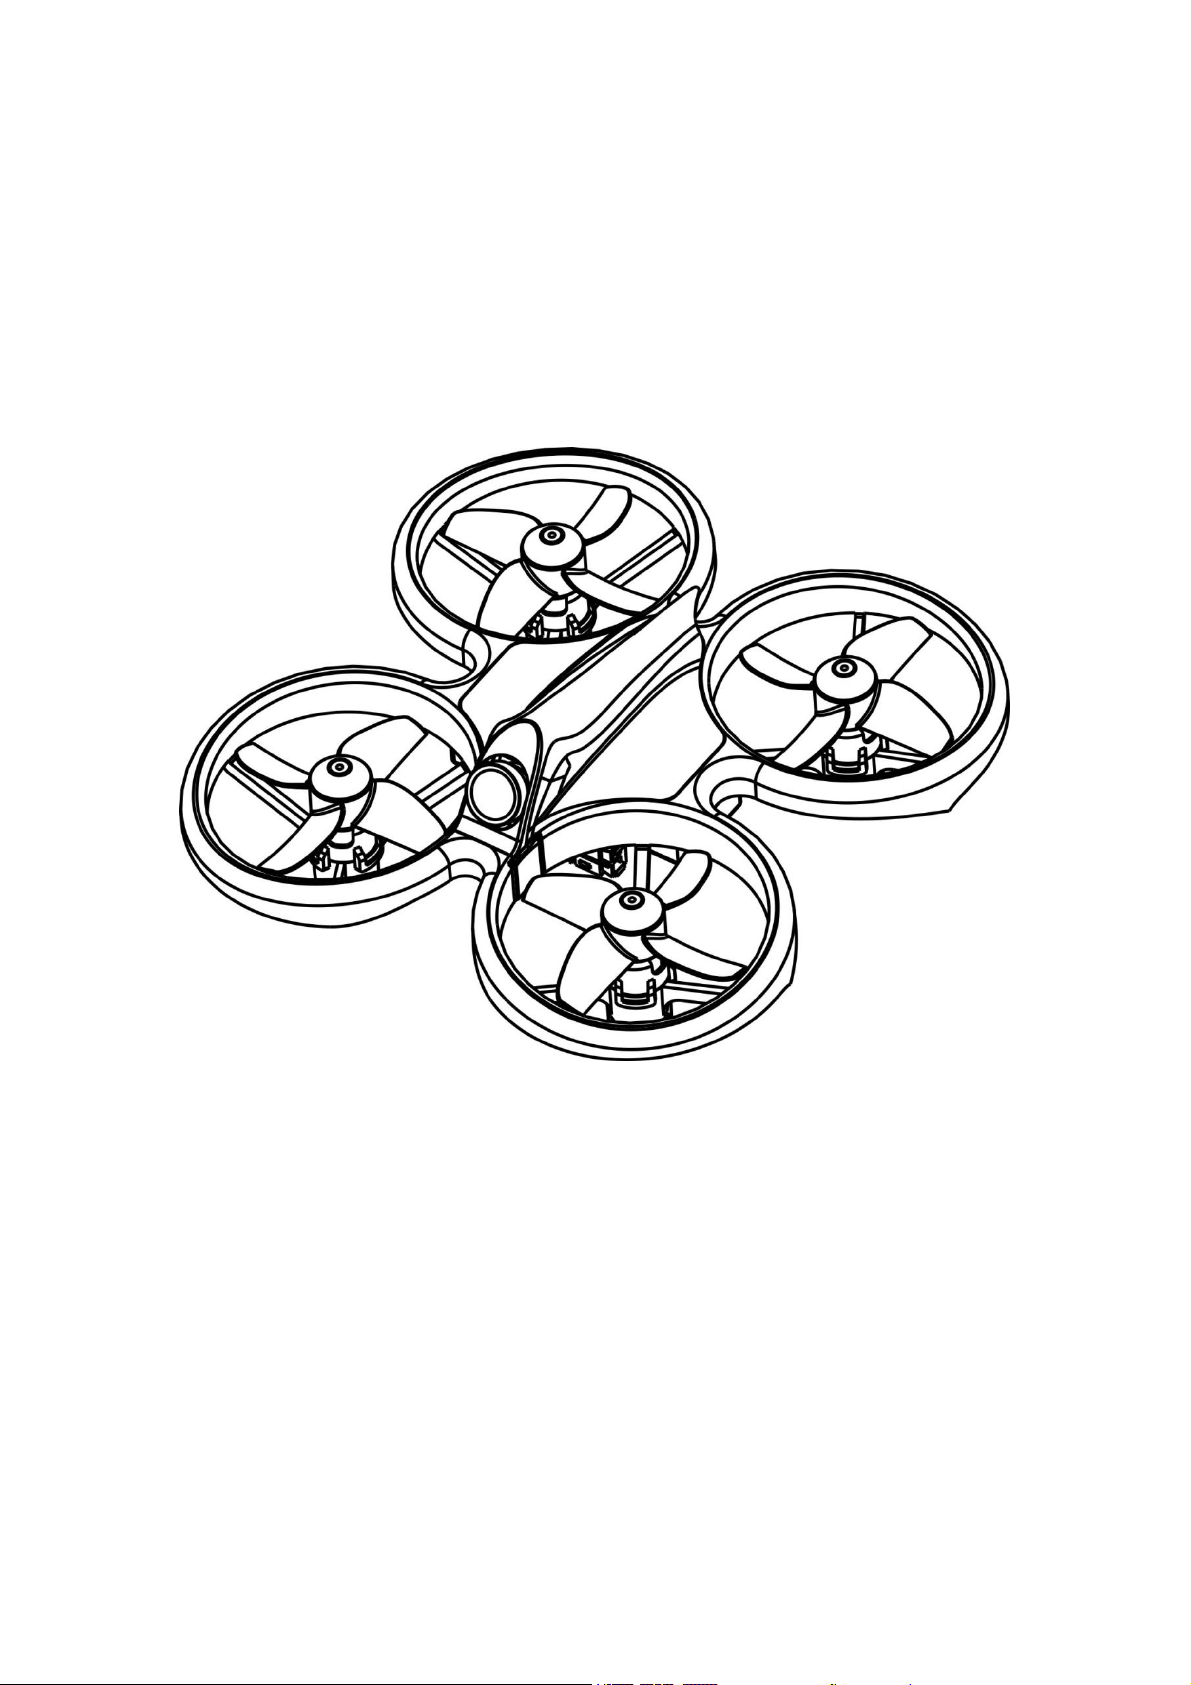
Easypilot
Parameter
Diagonal wheelbase (without paddles)
82.5mm
Maximum size of the aircraft (without antenna,
cable tie)
134mm
Aircraft weight (without battery)
35g
Motor
0816
Propeller
AVAN Tiny 40mm four-bladed paddle
Main Flight Controller
4 in one 3A ESC
EMAX 2.4G receiver
Camera
600TVL CMOS camera
Transmitter
25mW Adjustable frequency 37CH. Ham radio
license required for use in North America.
Battery
1 Cell 450 mAh HV lipo battery
Radio
Maximum appearance size
182*135*82(mm)
weight (without battery)
210g
Number of channels
6 Channels
Transmission frequency
2.4GHz ISM Band
(
2400MHz~2483.5MHz
)
Output Power
18dbm
Modulation
GFSK
battery
1 cell 18650 lipo battery
Goggle
Maximum appearance size
140×153×90(mm)
weight
390g
Resolution
480×272
battery
1 cell 18650 lipo battery
Product list
1. Easypilot ×1
2. Radio×1
3. Goggle×1
4. Instruction manual ×1
5. Emax 1s HV 450mAh×1
6. Charger×1
7. Extra Propeller Set (2x CW, 2x CCW)
8. Screwdriver×1
9. Goggle battery case × 1
10. USB cable × 1
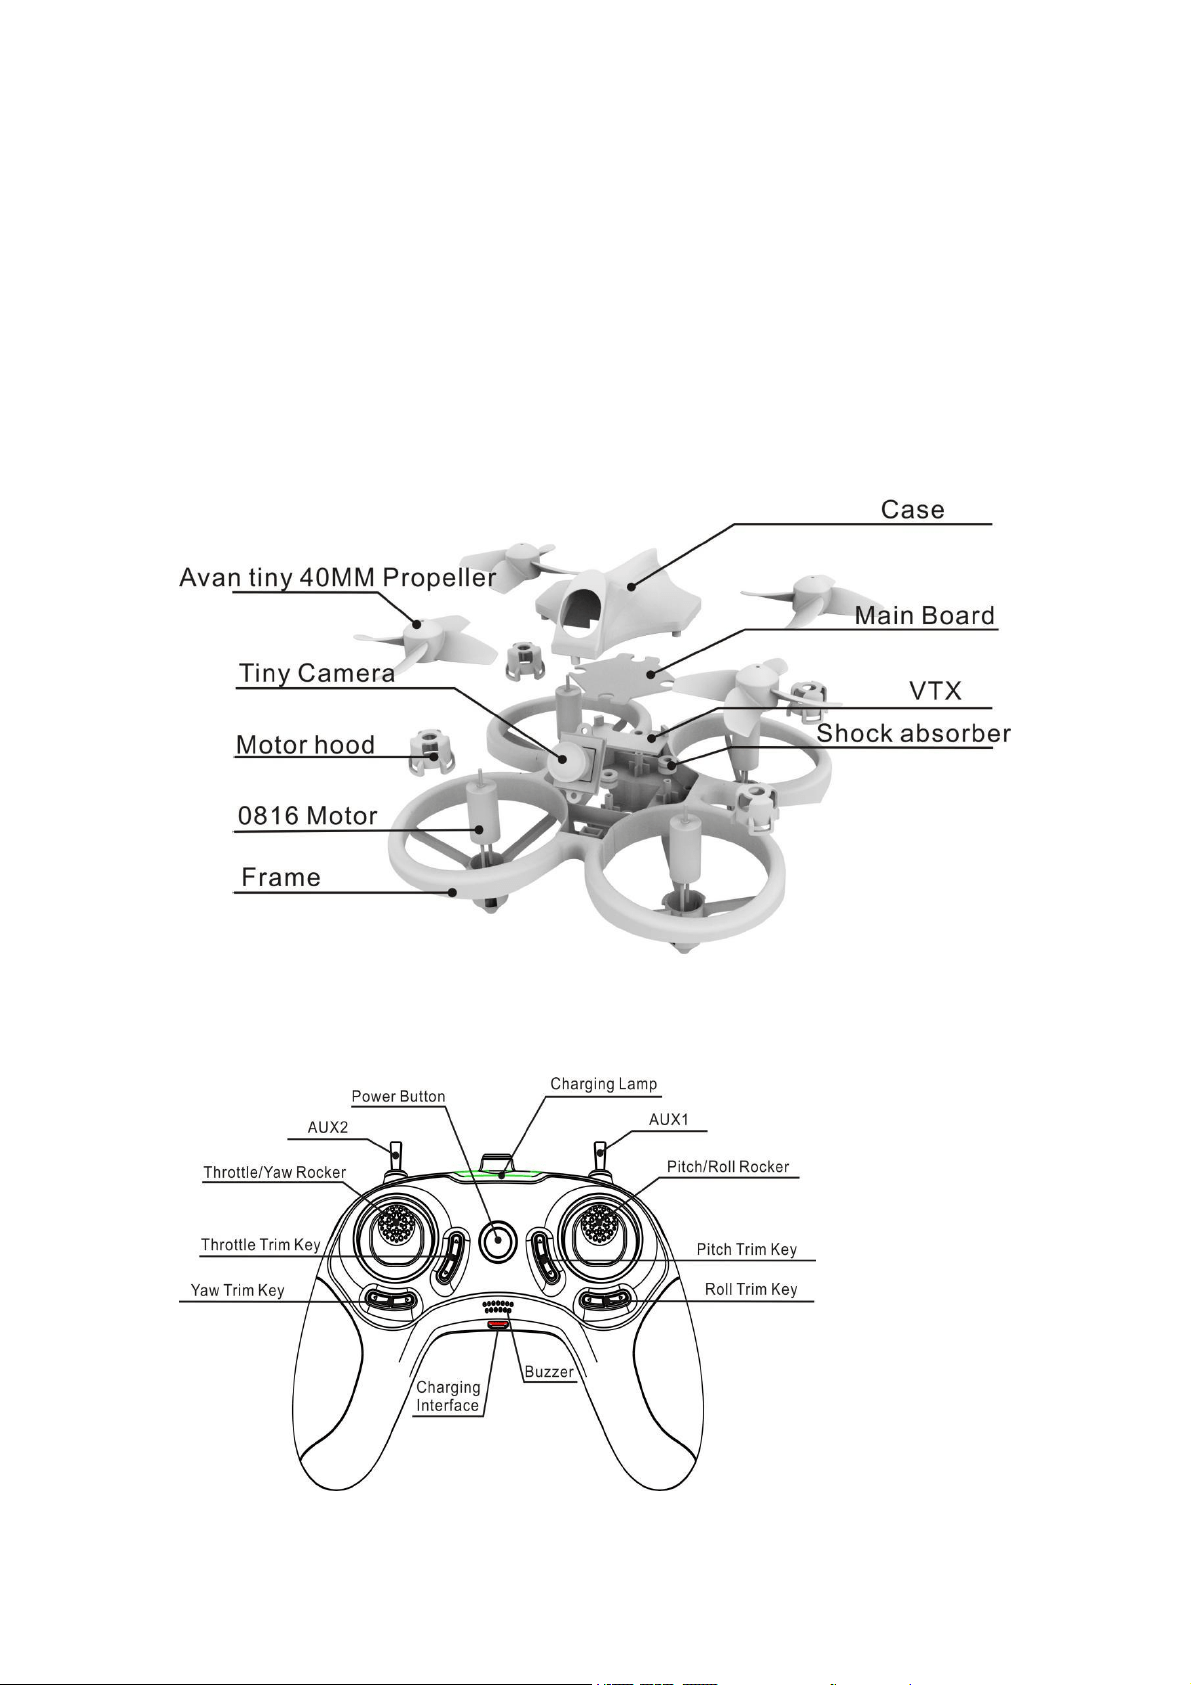
Easypilot Structure
Radio
Battery and Charging
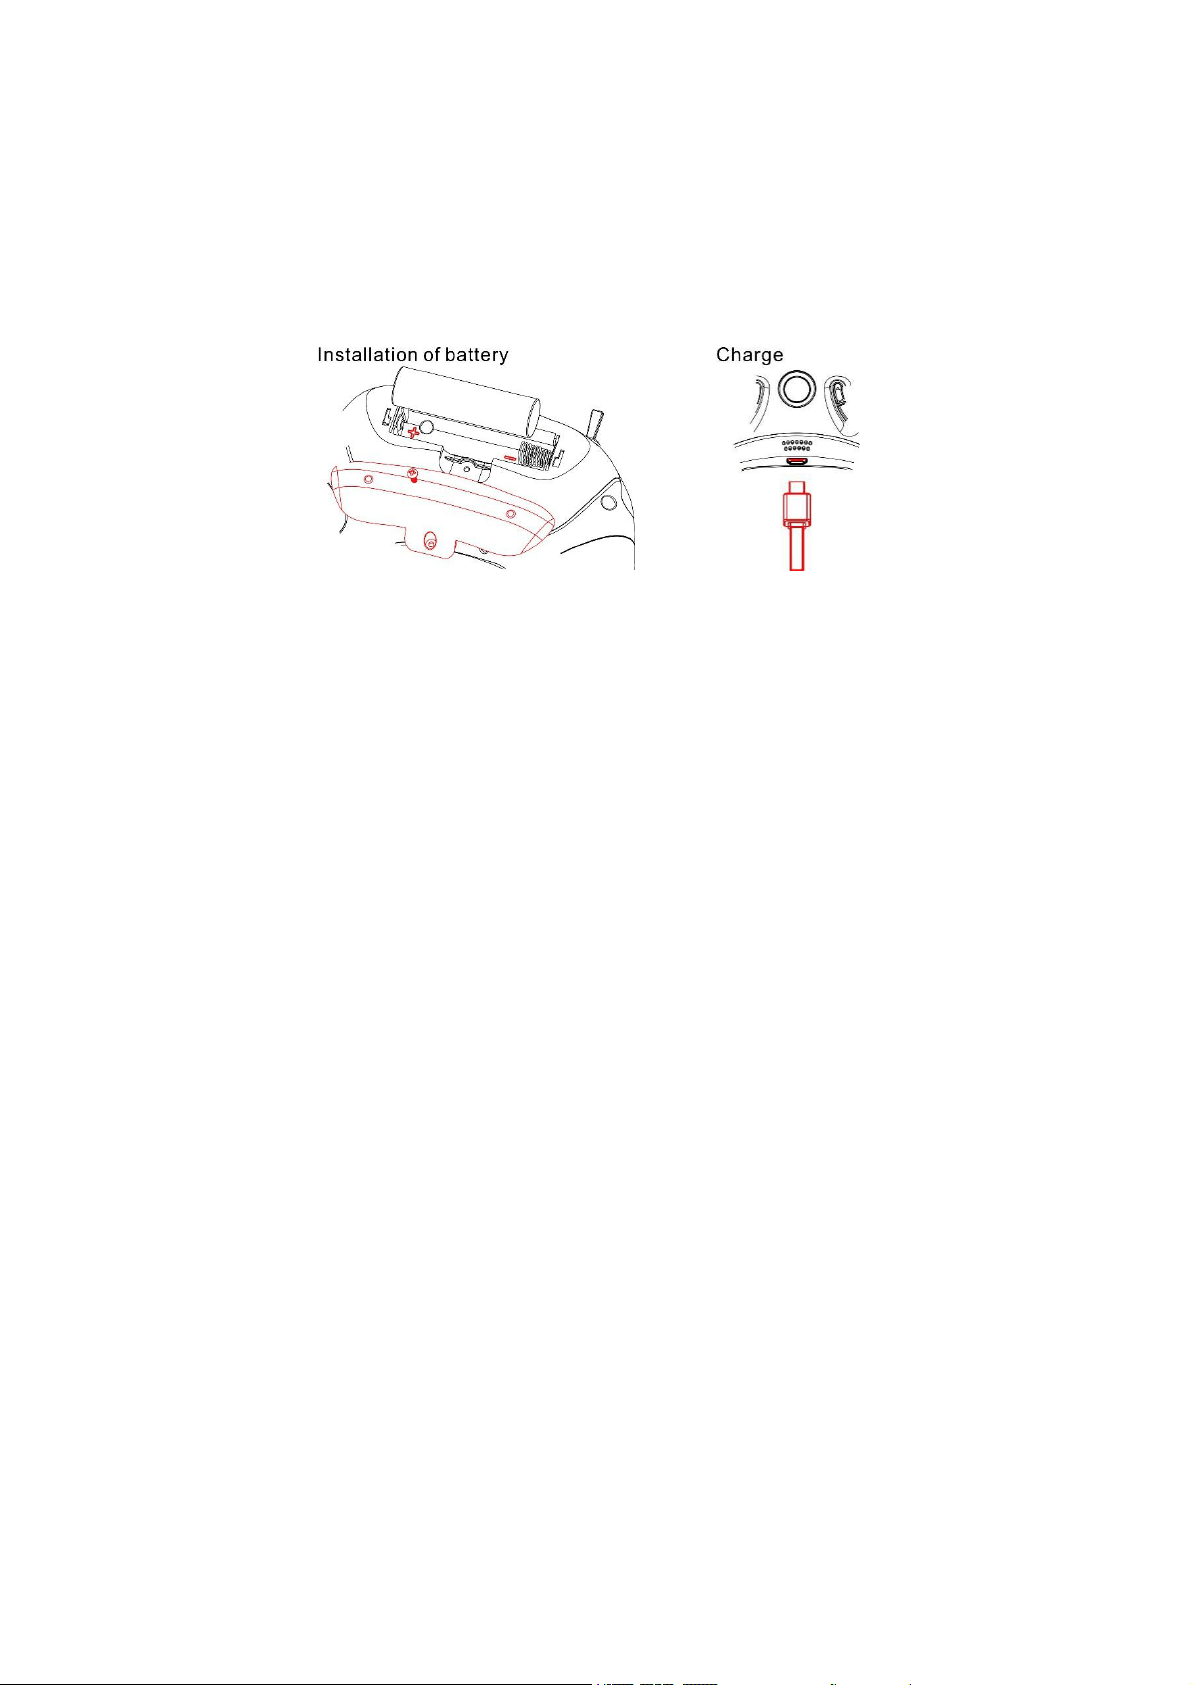
This is a 6 channel 2.4 GHz radio, The radio is powered with an 18650 battery. The
radio comes with the battery installed; however if a reinstall is needed make sure the
negative side is on the side touching the spring of the radio. The radio can be
charged with a micro usb cable attached right below the speaker and power button.
Operation
Power
Power on and off by holding the power button for 2 seconds. When the radio is
turned on, the green light is always on, indicating that the battery is fully charged.
When the red light is on, the battery voltage is lower than 3.5V. When the red light
flashes and the buzzer alarm indicates that the voltage is lower than 3.3V. Need to
charge the radio immediately.
Binding
The radio comes already bound to easypilot in the ready to fly kit. If binding is
necessary follow these steps:
1. Make sure the easypilot and radio are powered off.
2. Press and hold the radio throttle trim down and pitch trim down buttons on the
radio and turn easypilot on. When the green light flashes quickly then release
all buttons .
3. Bring the radio and the easypilot close and power on the easypilot then the
green light of the radio will steady light.
4. Power off the easypilot and power on again, the bind is completed.
Trim
There are trim buttons for each axis on each gimbal. Each trim adjustment will beep
the radio and a longer beep indicate the center trim. Adjust roll and pitch trim when
hovering to achieve a stable hover with no gimbal input.
Gimbal Calibration
The radio comes already pre-calibrated; however, recalibrating can help troubleshoot
some problems.
1. Make sure the radio are powered off.
2. Press and hold the yaw trim right and the roll trim left buttons . Then power on
the radio, when the radio red light flashes quickly then release all the
buttons.Do not touch any of the radio levers at this time.
3. After the red light flashes quickly 2S, the red light changes to a slowly flashing
state. At this time, manually shake the rocker to the maximum range, and
then cycle two times.
4. Click the power switch button, the green light is always on,at the same
time,the buzzer will beep, Then the gimbal calibration is completed.
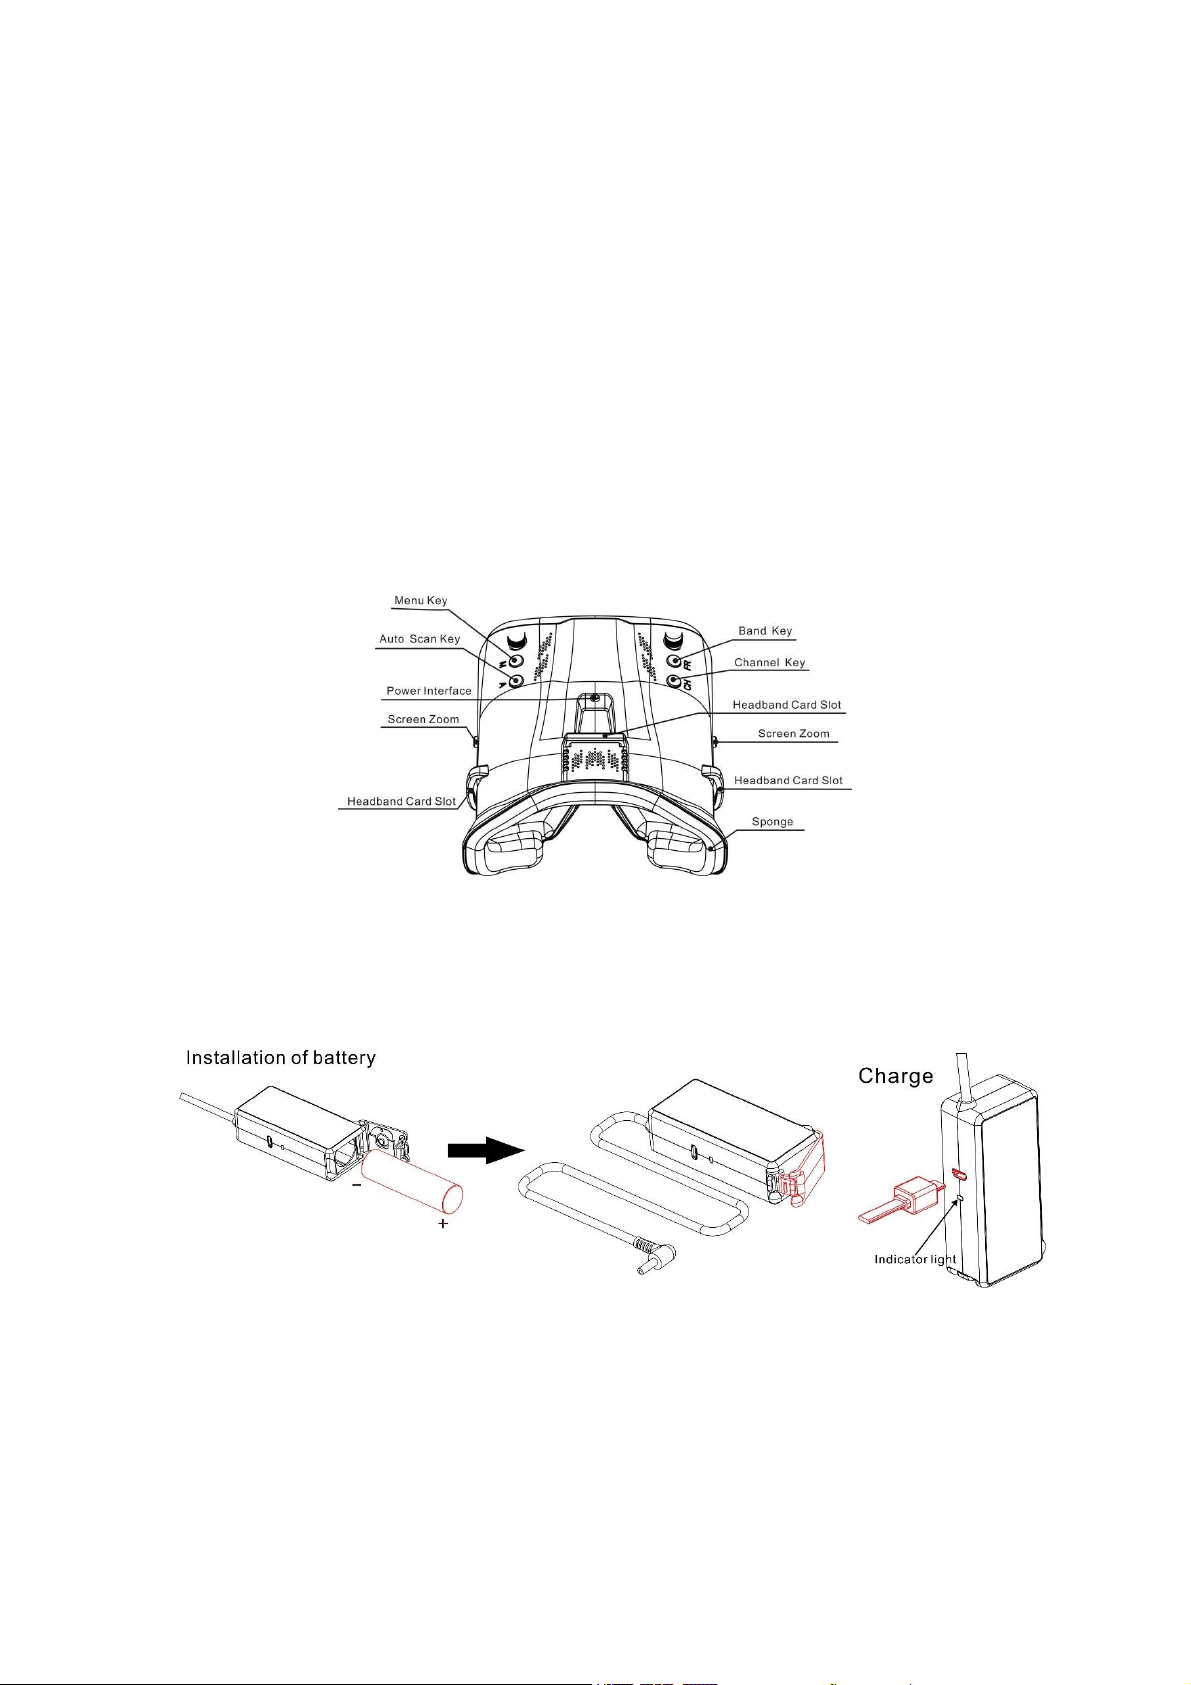
Goggles
Battery and Charging
The battery cartridge comes preinstalled with a 18650 battery. If a battery reinstall is
required please use caution making sure to install with the correct polarity. The
battery can be charged in the cartridge with a micro USB cable. When the battery is
charging the indicator light is green. The indicator light will turn red when charging is
complete.
Assembly
Minimal assembly is required for proper operation of the goggles. Follow the steps
below.
1. Attach the two supplied antennas by screwing them on to the SMA
connection point.
2. Place the battery cartridge in the sleeve on the backside of the head strap.
3. Feed the power lead through the loop on the top side of the head strap and
plug in the power lead to the port on the goggles. This will power the goggles.

4. Please remove antennas and power lead when traveling/storing the goggles.
Operation
Power
Power on the goggles by plugging in the power lead from the battery cartridge.
Power off by unplugging the power lead from the battery cartridge.
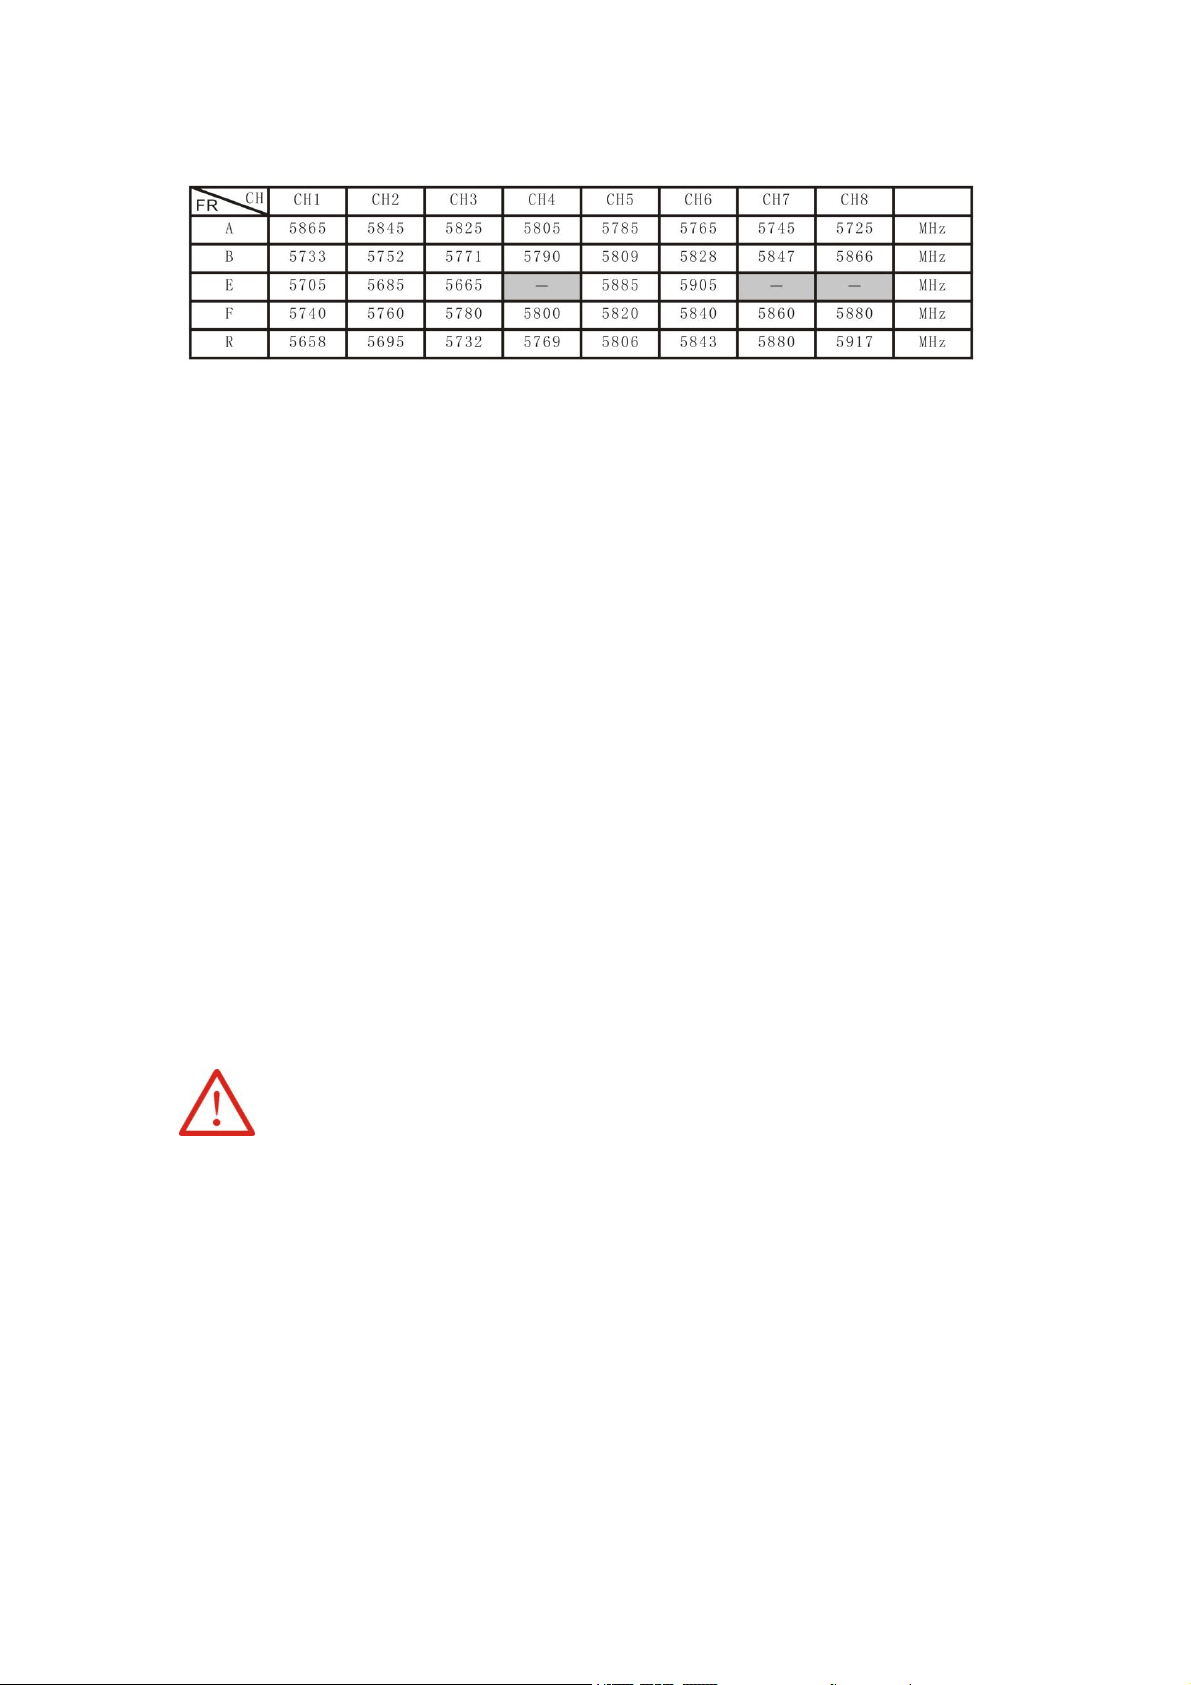
Video Channel Selection
There are 2 buttons (CH and FR) that can manually select the correct channel and
frequency band. The table below shows the channel and frequency band map with
the respective frequency number. This is the recommended way to change channels
to the correct frequency on easypilot. The CH button will cycle through the channel
number (1-8) while the FR button will cycle through the frequency band (A,B,E,F,R,H).
The frequency band and channel number will be shown in the upper left corner of
the screen when cycling through channels.
Tip: Make sure easypilot is powered on. When cycling through channels it will be
easier to spot the correct one with the video feed from easypilot.
Caution: Make sure the goggles are on the correct channel that easypilot is on.
Video Channel Auto Scanning
There is a scanning function on the goggles to aid in finding which channel easypilot
is on. First power on easypilot then press the “A” button to start the auto scan mode.
This mode will cycle through all channels and select the channel with the best video
reception. The frequency band and channel number will be shown in the upper left
corner of the screen when cycling through channels.
Caution: If using this feature with multiple easypilot (or other drones with a vtx)
powered on, autoscan may select the wrong drones channel. We recommend
manually selecting the correct channel to prevent mismatch errors.
Screen Adjustments
The menu button (“M”) will bring up a menu where you can adjust brightness,
contrast, saturation, and language. To cycle through menu options, press the menu
button again. With the current selection highlighted, adjustments can be made
pressing the “FR” button to increment and “CH” to decrement. The menu will close
automatically after 3 seconds if no input was detected.
Charger
Charge battery of Easypilot
1. Pull out the battery from the Easypilot.
2. Take out the battery charger, and insert the battery power port to the charger.
3. Connect the charger with the computer USB port. While charging, the LED will
light up; when fully charged, the LED will light off; when the battery take off, the
LED will flash.
4. Reconnect the battery to the Easypilot.
CAUTIONS WHEN CHARGING
1. When charging, please put this product on a dried or ventilated area and keep it far
away form heat source or explosive product.
2. When charging, please remove the batteries from the Easypilot. Then charging
process should be supervised by an adult so as not to cause an accident.
3. After flying, please do not charge the battery if the surface temperature is still not
cool. Otherwise it may cause a swollen battery or even a fire hazard.
4. A battery when not in use for a long time will lose its charge automatically.
Charging or discharging too often may reduce the life of the battery.
Flight
Always use caution when flying and operate in an open and controllable area. Please
learn the flight controls first before powering on the aircraft to fly.
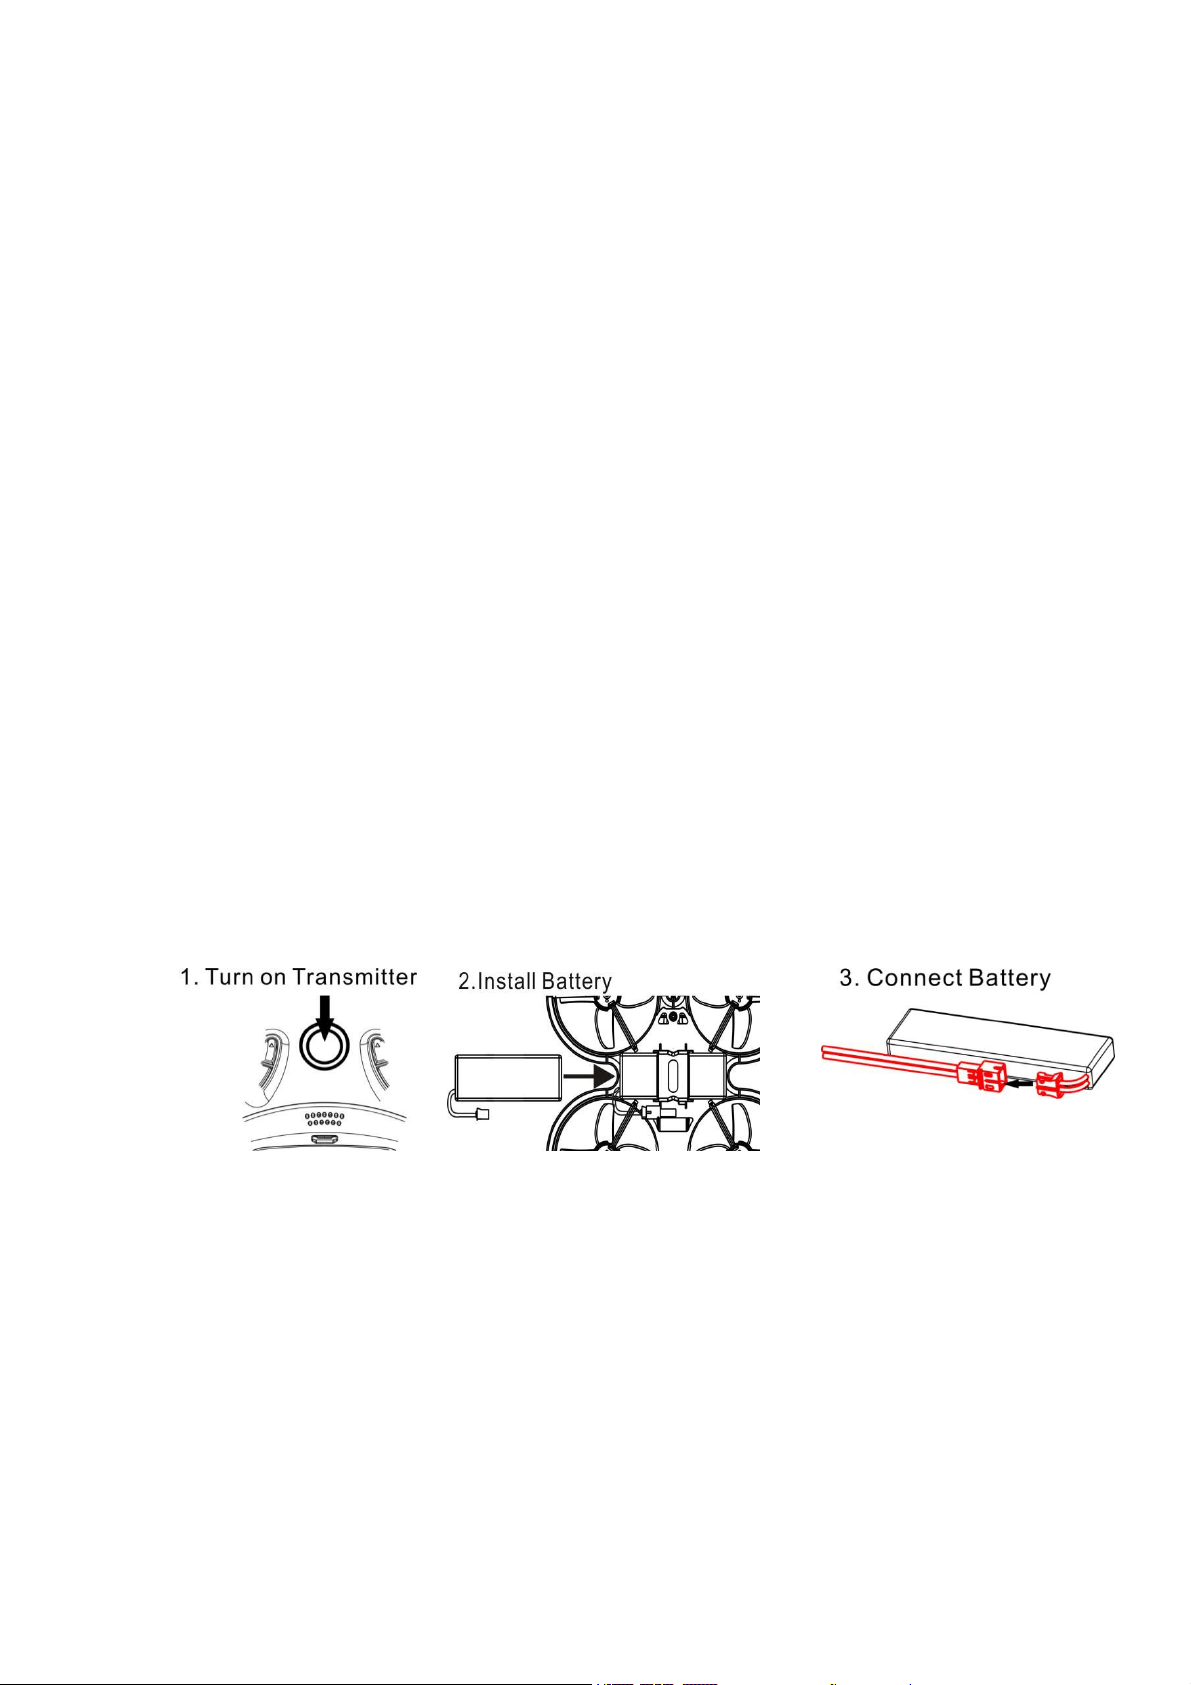
Fly Easypilot
Start by powering on your Radio and Goggles. Easypilot comes already bound to
your radio and on the right video channel matched with your goggles. Power on
easypilot by sliding the battery into the battery tray and plugging it in. Once the
battery is plugged in, set easypilot on a stable surface so it can calibrate. Calibration
takes a few seconds then easypilot is ready to fly. Easypilot can fly for 4 minutes on a
fully charged battery. The easypilot will landing when the battery reaches 3.3v.
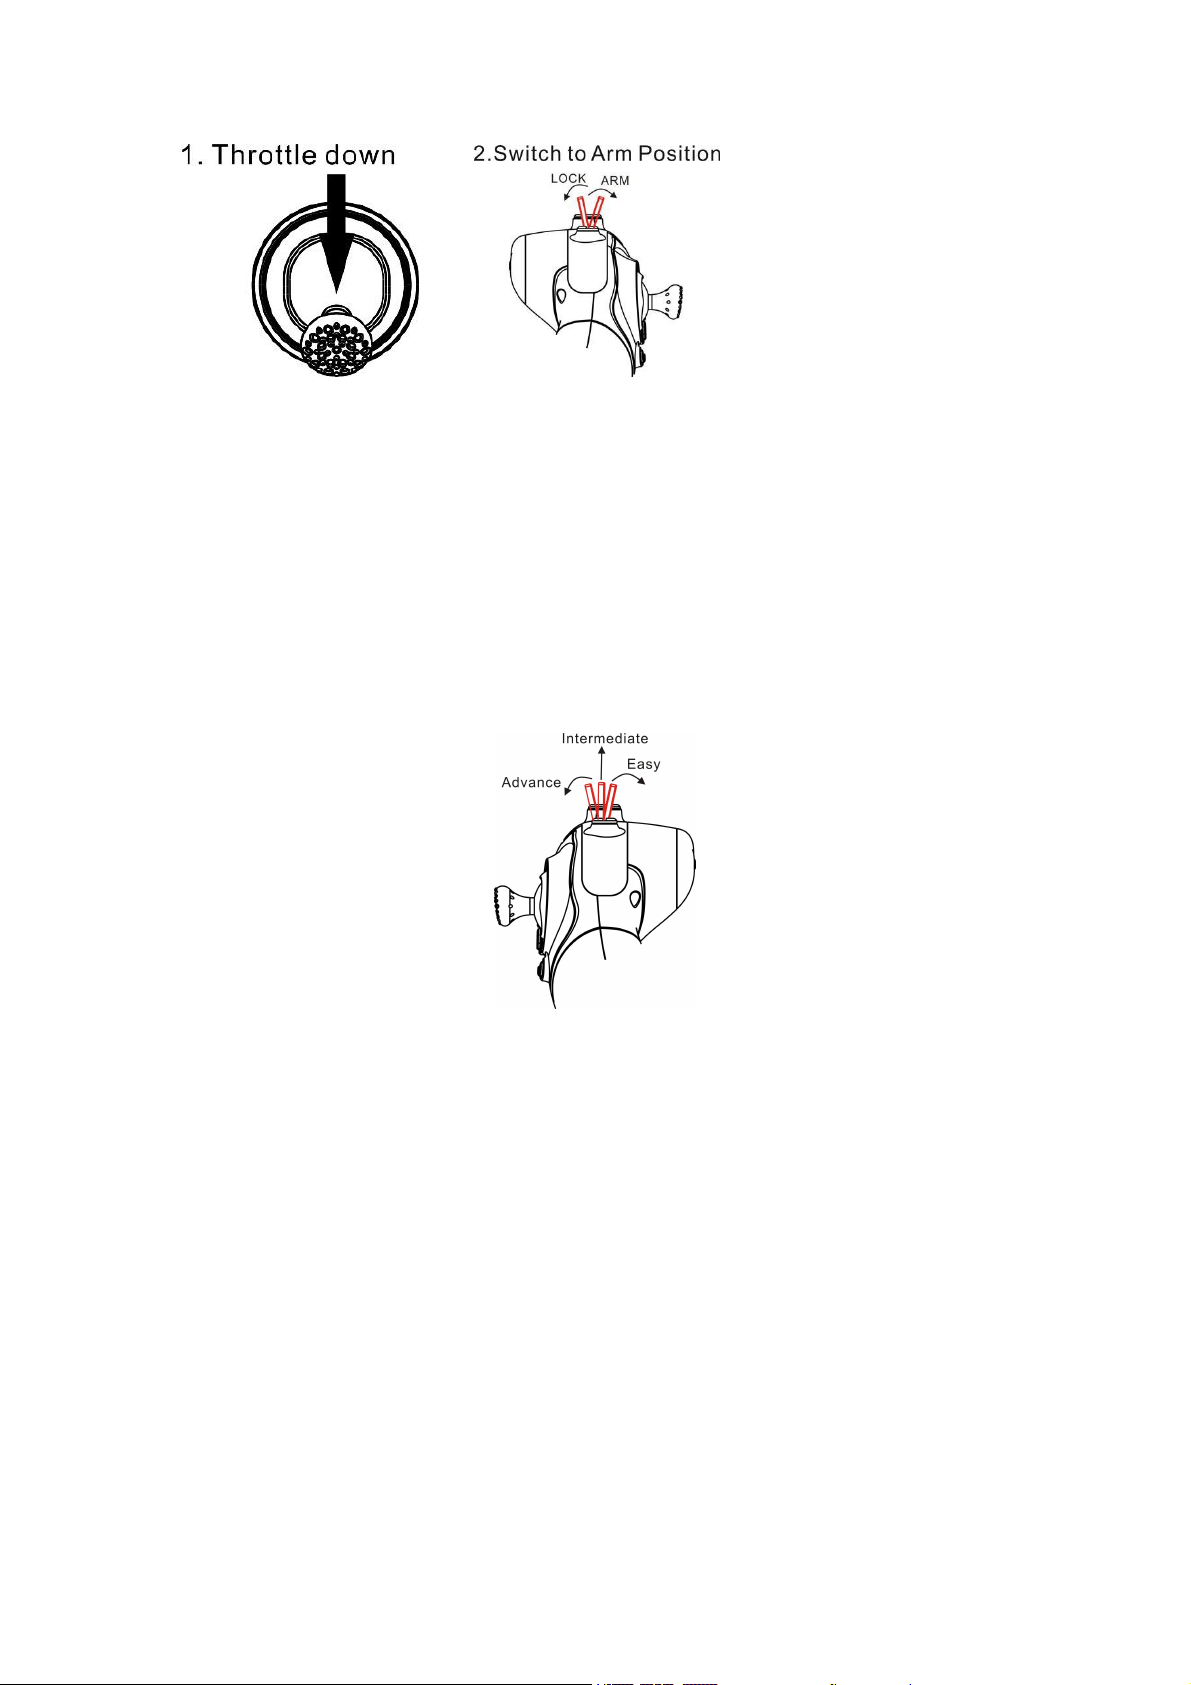
Arming
Arming refers to setting easypilot to a fly ready state. When easypilot is powered on
first it will not spin up the propellers until it is armed. Arm the aircraft by first moving
throttle to the bottom position. Then move the left switch of the radio to its top
position upwards.
In the event of a crash always disarm immediately. Failure to disarm in a timely
manner can damage easypilot.
Always disarm easypilot before handling it. Disarm easypilot by setting the arm
switch to its top position .
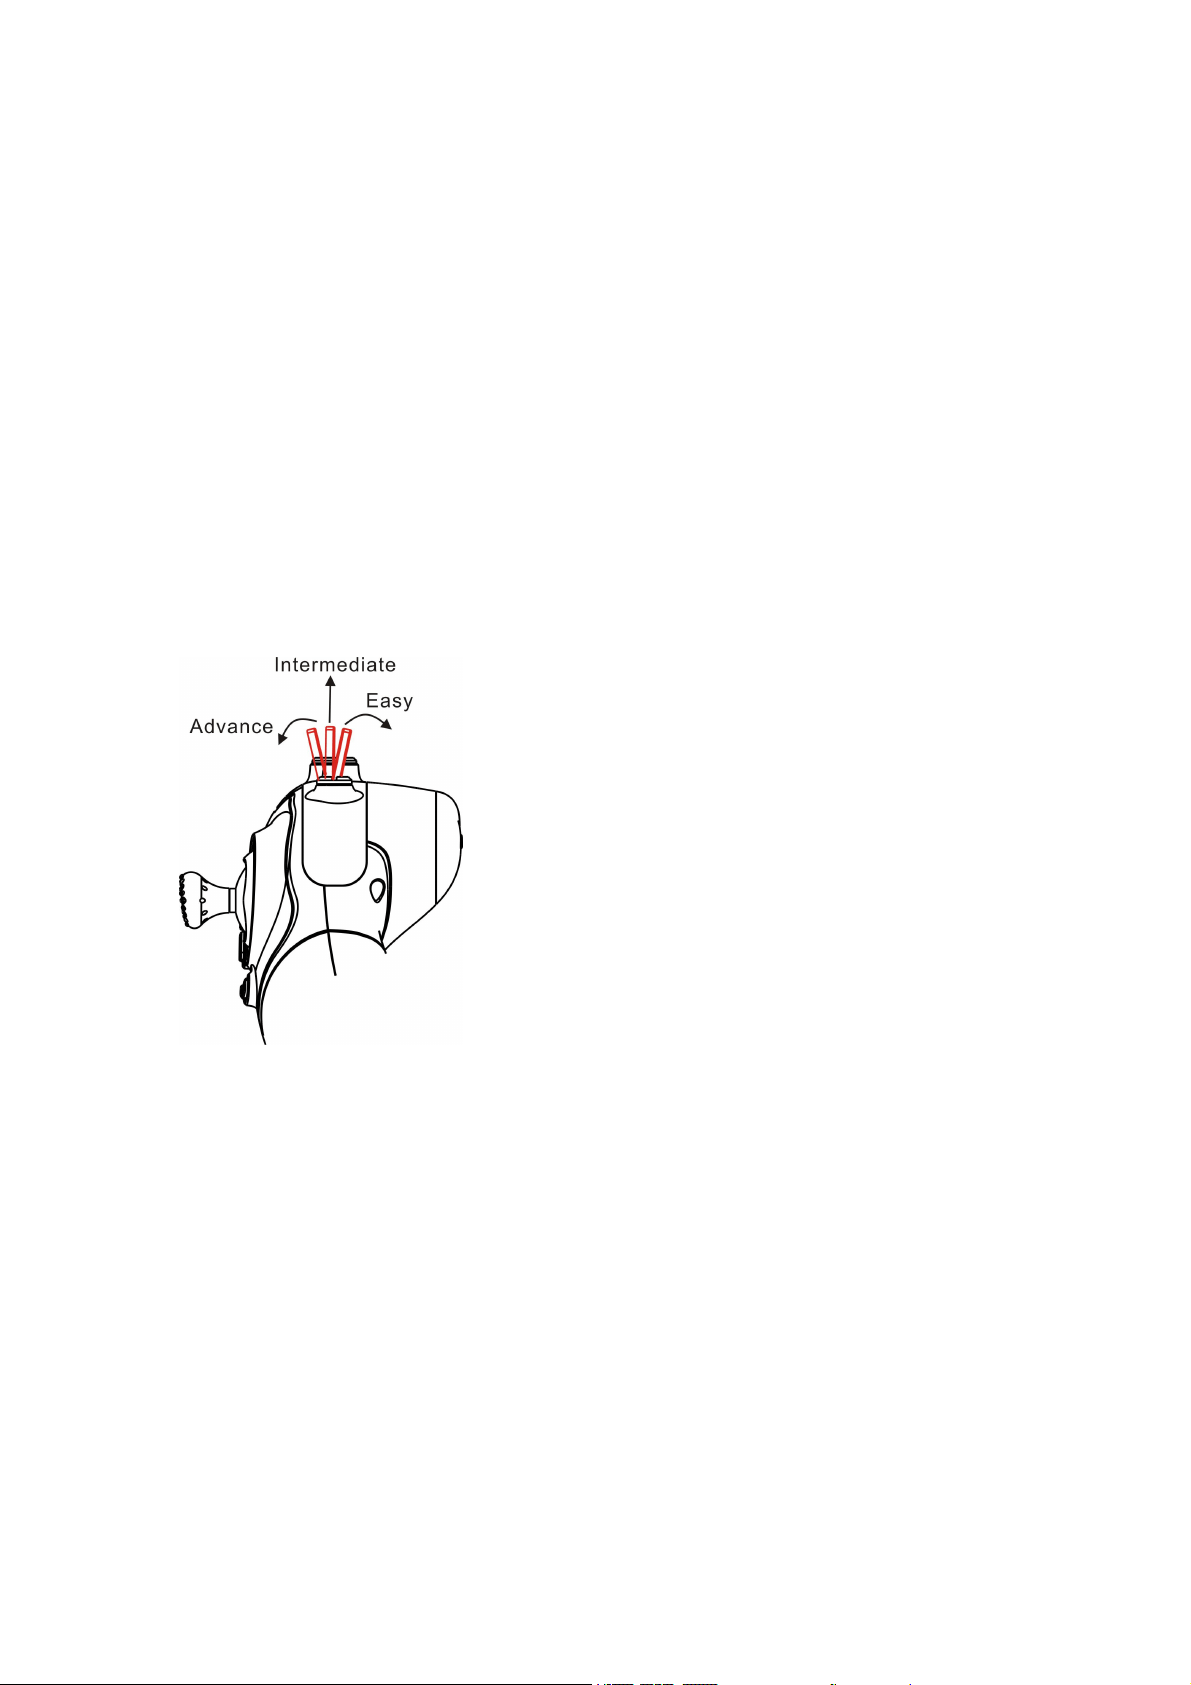
Flying Modes
The right switch on the radio controls the different flight modes of easypilot. There
are 3 modes: easy, intermediate, and advance. The switch in its first position
downward is easy mode, second position is intermediate, and third position is
advanced.
Easy Mode: While in this mode the internal barometer helps maintain the altitude of
the aircraft. When the throttle signal is pushed to the maximum, the easypilot will
increase the altitude at a fixed speed. When the throttle is pushed to the minimum,
the airplane will reduce the altitude at a fixed speed. The altitude of all other throttle
positions remains unchanged. This mode limits flight angle for a slow flight speed.
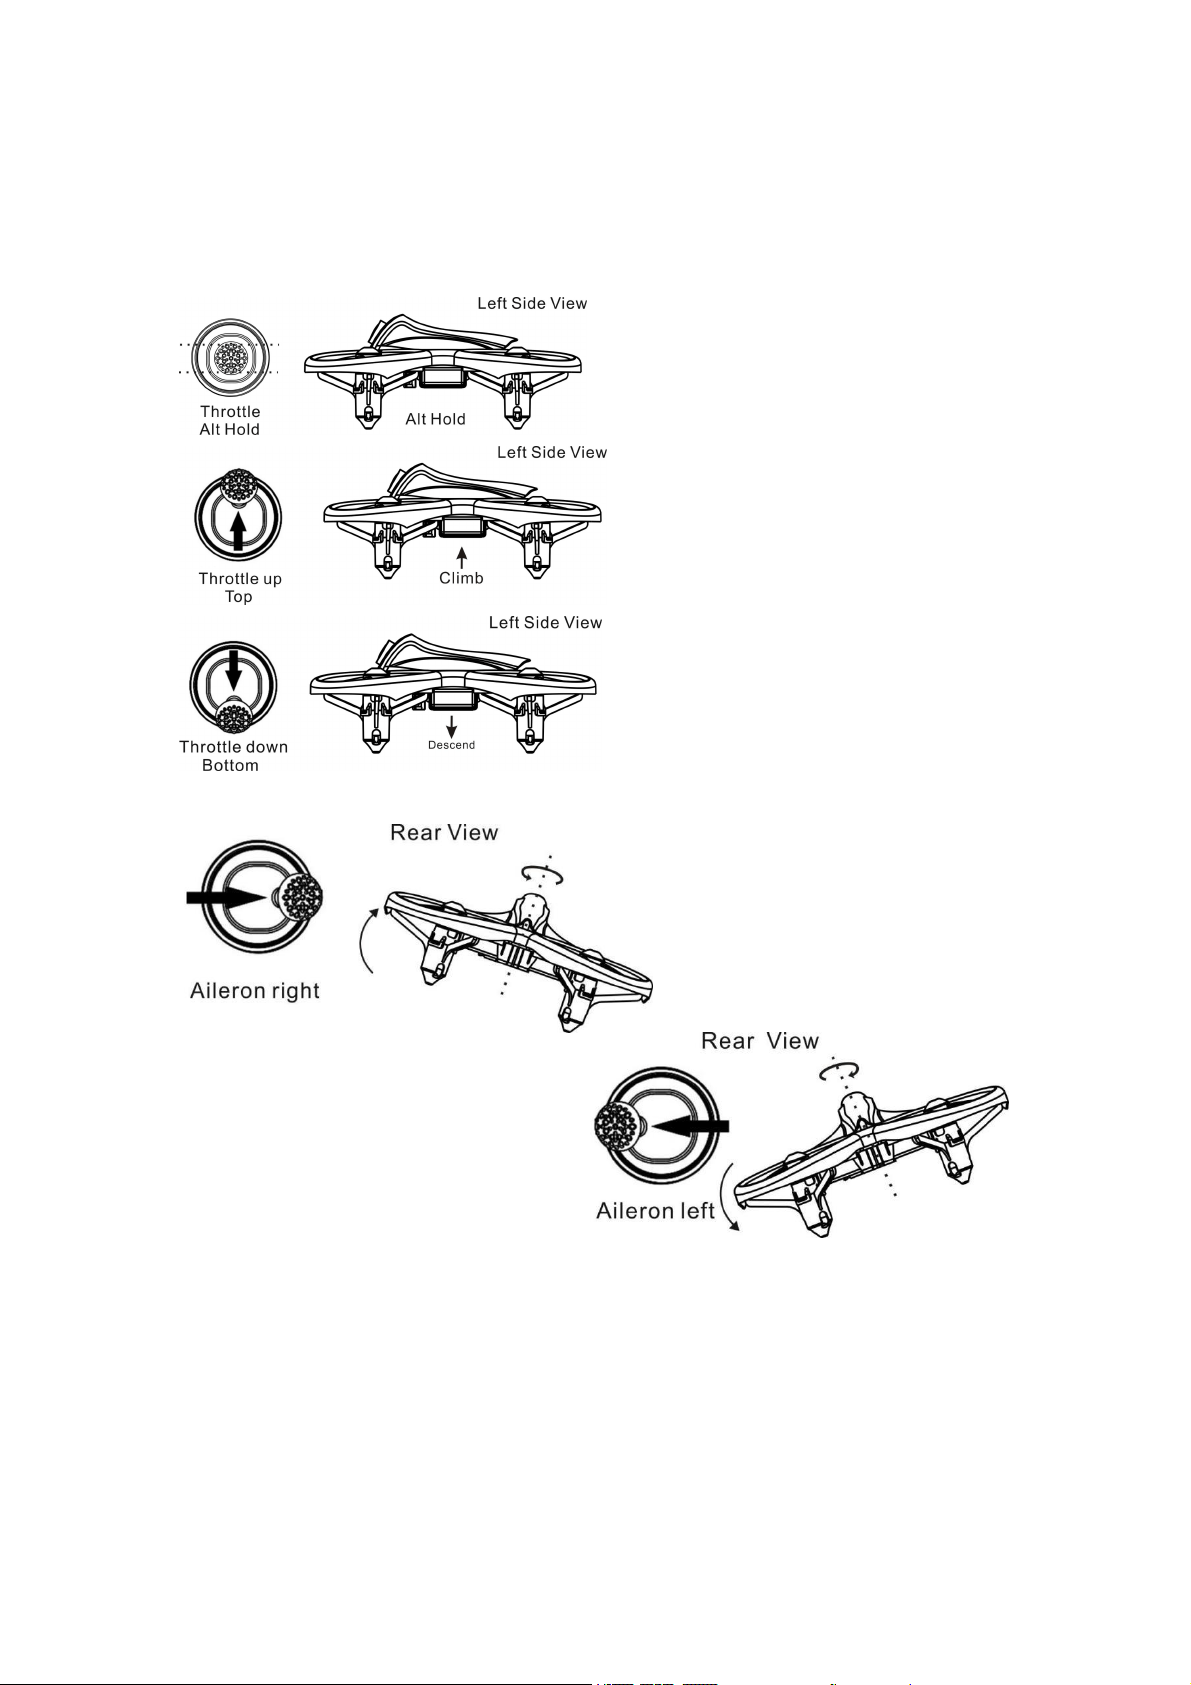
Radio Stick Controls(Easy Mode)
The left stick controls throttle of easypilot. The right stick controls pitch and yaw of
the aircraft.
Left Stick Diagram
Right Stick Diagram
Intermediate Mode: While in this mode the internal barometer helps maintain the
altitude of the aircraft. The gyroscope achieves the stability of the easypilot. This
mode has limited angle and a slow flight speed. In this mode yaw is independent
from roll stick and the easypilot like FPV quadcopter.
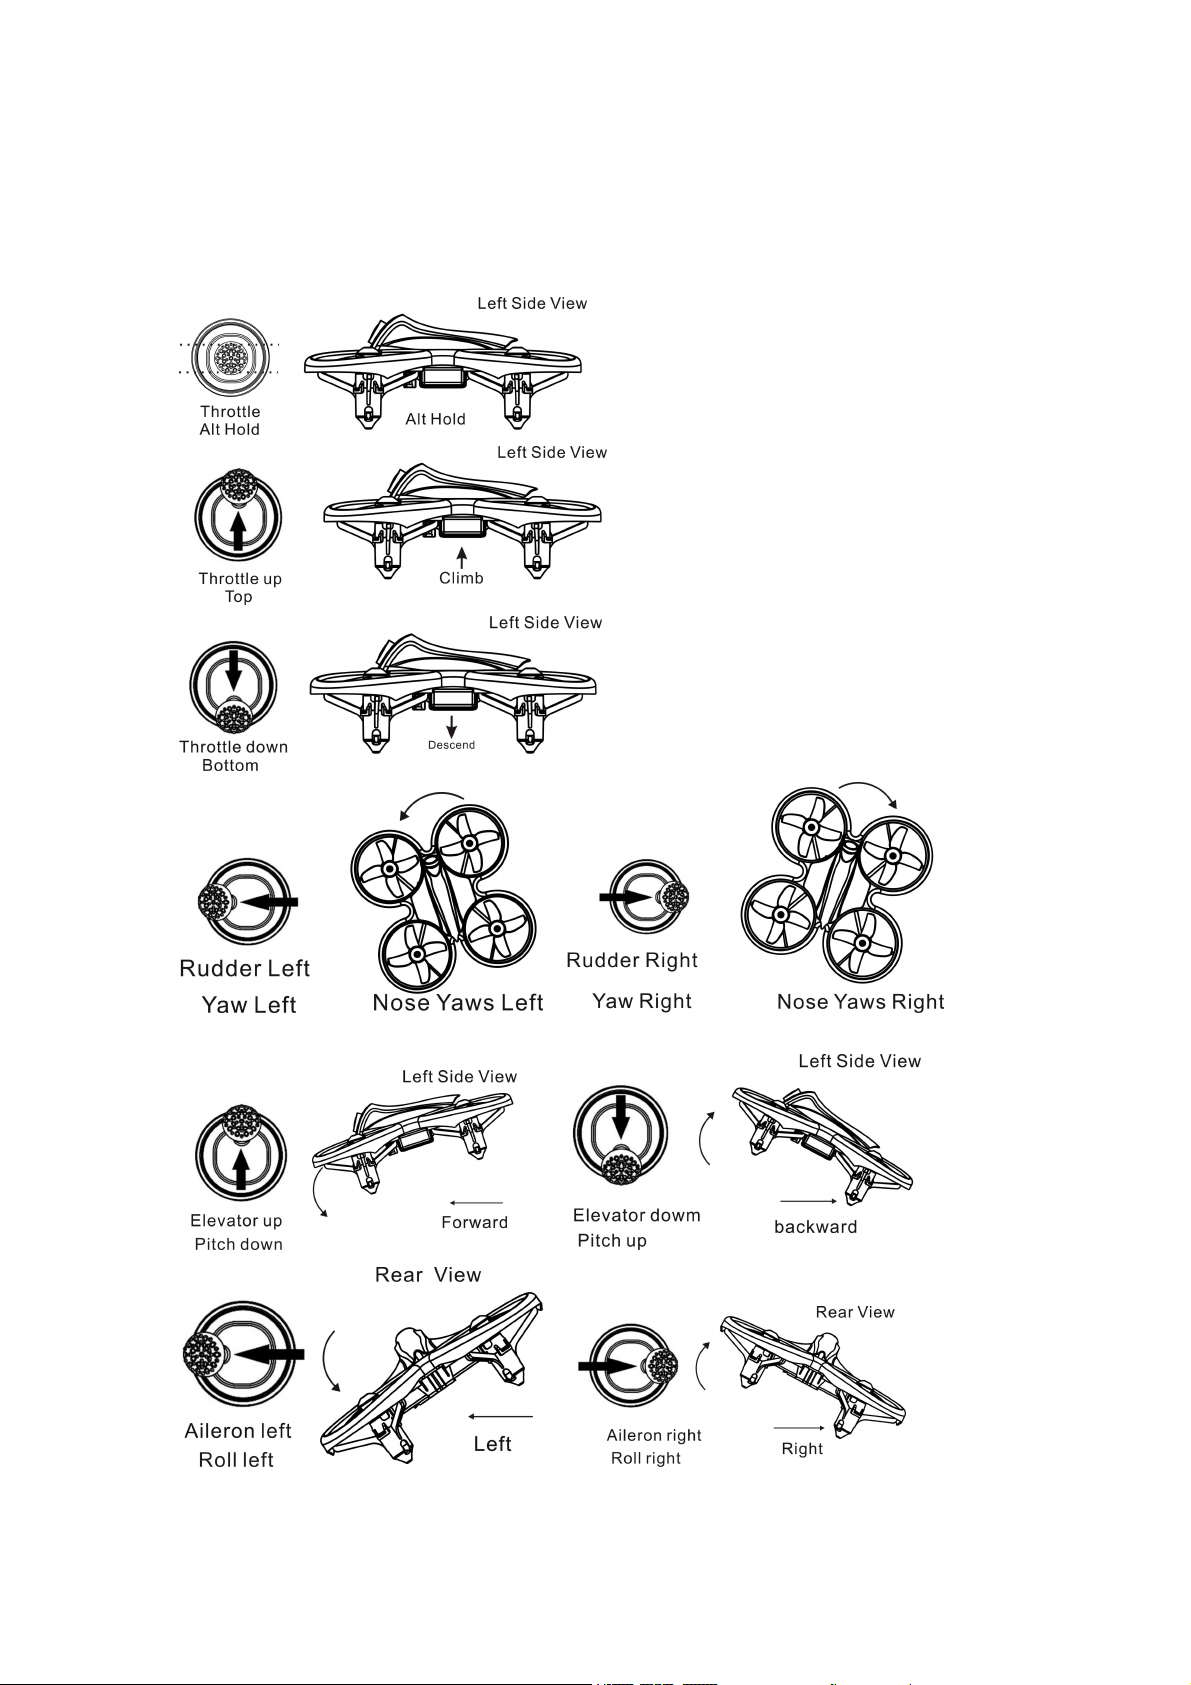
Radio Stick Controls(Intermediate Mode)
The left stick controls throttle and yaw direction of easypilot. The right stick controls
pitch and roll of the aircraft.
Left Stick Diagram
Right Stick Diagram
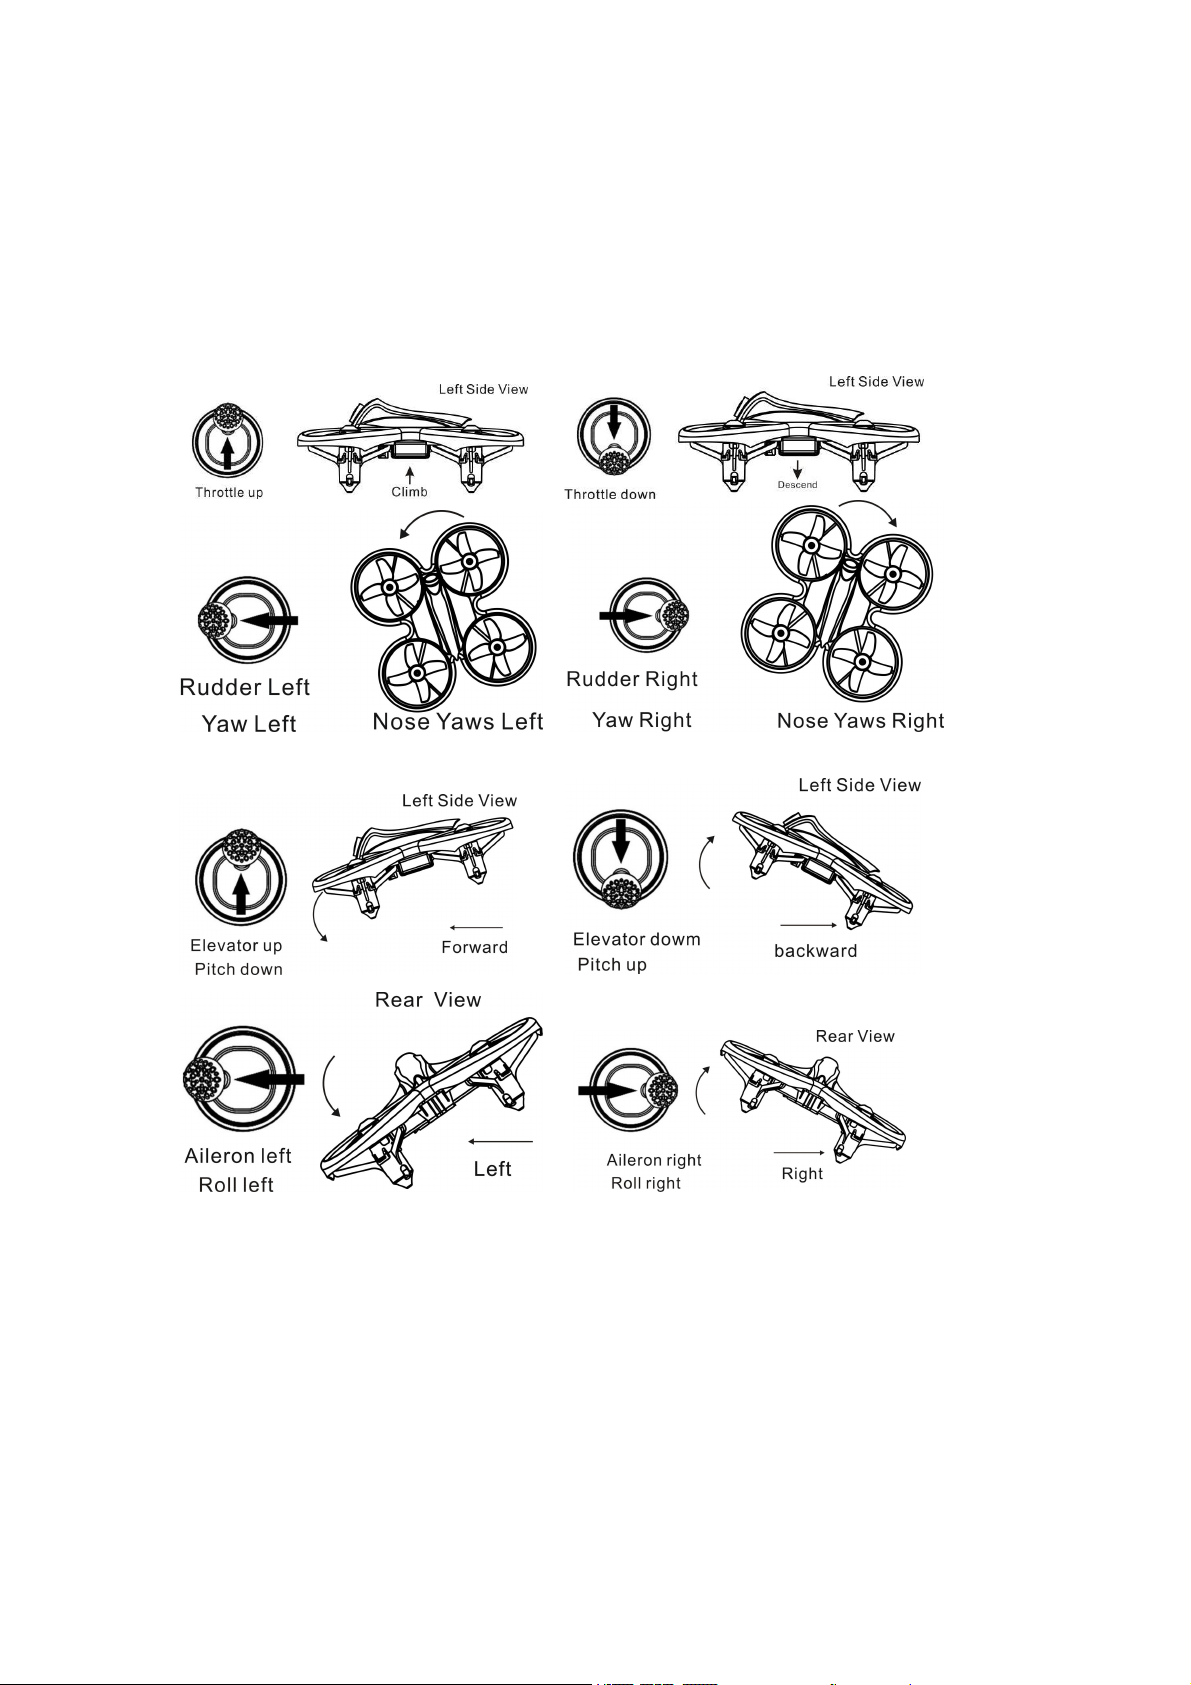
Advance Mode: This is the advanced flight control mode in which the barometer is not
used to maintain altitude to allow for more precise flying. The angle limit is increased to
allow faster movements.
Radio Stick Controls(Advance Mode)
The left stick controls throttle and yaw direction of easypilot. The right stick controls
pitch and roll of the aircraft.
Left Stick Diagram
Right Stick Diagram
Line of Sight Flying
To learn how to fly easypilot start by flying it line of sight (no goggles yet). Power on
easypilot and set it down in a cleared room. Arm easypilot then Control the throttle
according to different modes. Work on maintaining a constant altitude.
First Person View (FPV) Flying
Make sure easypilot and the goggles are on the same vtx channel and that you have
a clear area to fly around in. Apply the same principals learned when flying easypilot
line of sight except now work on flying in a forward direction while maintaining a
controlled constant altitude. It is easier to learn flying FPV by always moving in a
forward direction so always apply a slight amount of pitch using your right thumb stick.
You can steer easypilot like a car using yaw on the left thumb stick.
Tips: Easypilot can fly for a maximum of 4 minutes. When the battery reaches 3.3v,
Then the easypilot will be landing due to low voltage.
How to land your easypilot
Easy Mode&Intermediate Mode: Pull the throttle signal to the lowest throttle, the
product will slowly landing on the ground and motor will shut down finally.Finally arm
the easypilot.
Advance Mode: After playing, control the drone to the ground and keep the throttle at
the lowest position until the motor stop working. Finally arm the easypilot.
Gyro calibration
1. Power on the easypilot and radio,makesure the easypilot disarm .
2. Change the mode button from easy to advance 6 times,the green light of the
easypiot is trun always on.
3. Then we should wait 5 seconds,the green light of the easypiot is trun off.the
calibration is complete.
Easypilot VTX Settings
Vtx Schematic and Button Diagram

VTX Channel Settings with the Button
1. Normal display
All LEDs on the VTX are normally off until the button is pressed. To check band and
channel status click the button once quickly, and LED starts to indicate frequency
band and frequency channel. First indicate the frequency band and then indicate the
frequency channel. After all 2 rounds of LED display cycles, all LED will be off.
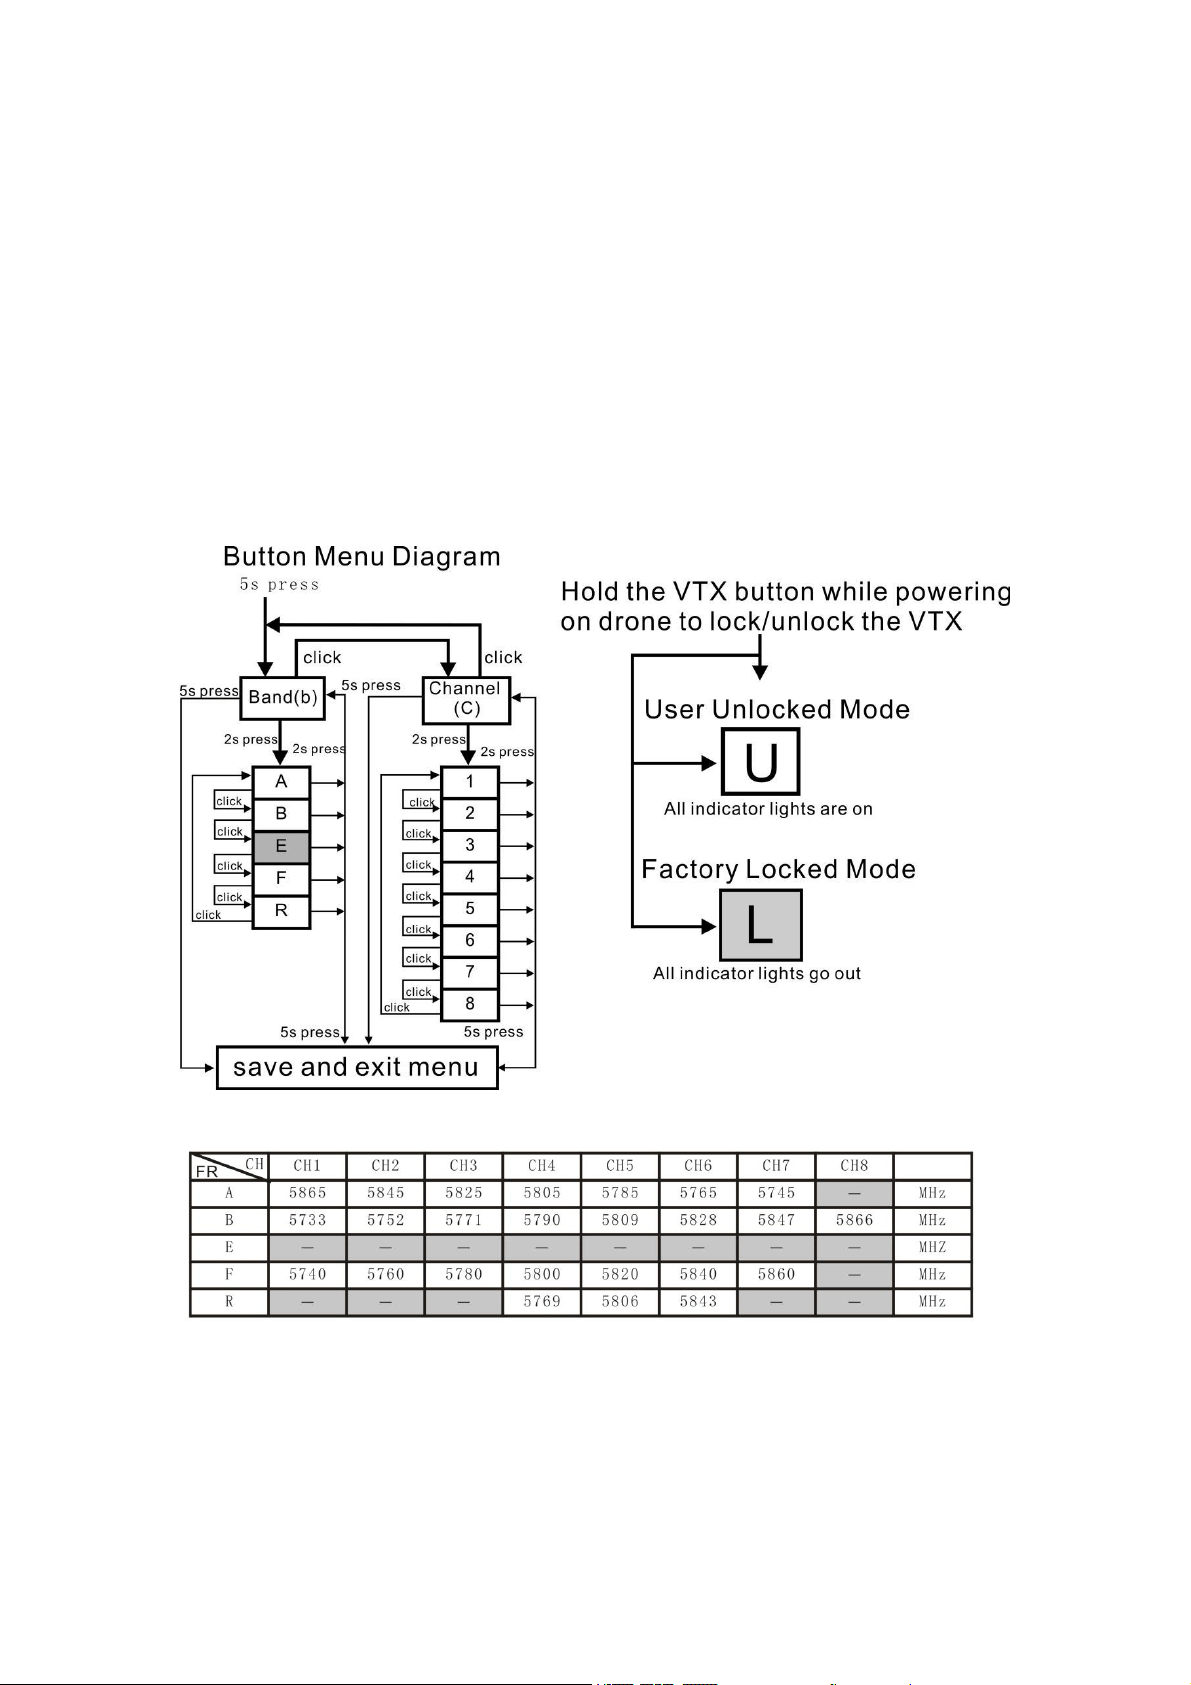
2. Menu Entry / Exit
(1)Press the button and hold for 5s to enter the menu. After entering the menu, ban
d LED lights up.
(2)Press the button and hold for 5s again to save parameters and exit the menu. Aft
er saving and exiting the menu, all LED goes out.
3.Enter/Exit Band / Channel option
(1) After entering menu, short click button to switch frequency group band / frequen
cy point, and the LED of the corresponding menu is lit.
(2) Press the button and hold for 2s to enter frequency group band / channel option.
(3) Press the button and hold for 2s again to exit frequency group band / channel op
tion and return to the menu.
4. Band / Channel parameter change
After entering frequency group band / channel option, short click button to change
the parameter.
Button Menu Diagram
Factory Locked Configuration (≤ 25mW Output)
FCC: Ham radio license required for use in North America.
EU/CE: Frequencies limited to prevent transmitting outside of designated CE
frequencies.
User Unlocked Configuration (Adjustable Output)
FCC: Ham radio license required for use in North America. E band Channels 4, 7,
and 8 limited to prevent transmitting outside of designated amateur radio frequencies.
Adjustable video output power only available on select models.
EU/CE: Do not use Use Unlocked Configuration.
* By purchasing this product, the user is agreeing that he/she understands these
responsibilities and will operate the equipment legally. EMAX cannot be held
responsible for a user’s actions purchasing and/or using this product in violation of
the governmental regulations.
Trouble shooting
1.When pushing the throttle signal does not improve the flying height or the flight in
the primary mode is not possible, it may be caused by low battery or battery
damage.
2.If the easypilot is still flying to one side dramatically or spinning while hovering.
Please switch off the power of both the easypilot and transmitter and then repeat
the pre-flying steps or please recalibrate the gyroscope. For the calibration method,
please refer to the gyroscope calibration.
Thank you for purchasing our product! Enjoy Flying Easypilot.
Warning
:
Please pay attention to your surroundings. Not Recommended for persons under 14
years of age.
Please check FAA guidelines and/or "Know before you Fly" be
fore using this product.
