Before using your new product, please read these instructions to prevent any damage.
INSTALLATION GUIDE
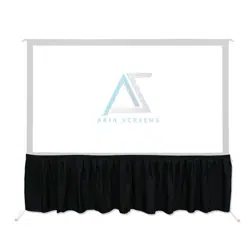
91" Projector Kit
NS-SCR79KIT

www.insigniaproducts.com
2
Contents
IMPORTANT SAFETY INSTRUCTIONS . . . . . . . . . . . . . . . . . . . . . . . . . . . . . . . . . . . . . . . . . . . . . . . . . . . . . . . . . . . . . . . . . . . 3
Features . . . . . . . . . . . . . . . . . . . . . . . . . . . . . . . . . . . . . . . . . . . . . . . . . . . . . . . . . . . . . . . . . . . . . . . . . . . . . . . . . . . . . . . . . . . . . . 3
Package contents . . . . . . . . . . . . . . . . . . . . . . . . . . . . . . . . . . . . . . . . . . . . . . . . . . . . . . . . . . . . . . . . . . . . . . . . . . . . . . . . . . . . . 3
Components . . . . . . . . . . . . . . . . . . . . . . . . . . . . . . . . . . . . . . . . . . . . . . . . . . . . . . . . . . . . . . . . . . . . . . . . . . . . . . . . . . . . . . . . . 4
Top . . . . . . . . . . . . . . . . . . . . . . . . . . . . . . . . . . . . . . . . . . . . . . . . . . . . . . . . . . . . . . . . . . . . . . . . . . . . . . . . . . . . . . . . . . . . . . . . . . . . . . . . . . . . . . 4
Back. . . . . . . . . . . . . . . . . . . . . . . . . . . . . . . . . . . . . . . . . . . . . . . . . . . . . . . . . . . . . . . . . . . . . . . . . . . . . . . . . . . . . . . . . . . . . . . . . . . . . . . . . . . . . . 5
Sides . . . . . . . . . . . . . . . . . . . . . . . . . . . . . . . . . . . . . . . . . . . . . . . . . . . . . . . . . . . . . . . . . . . . . . . . . . . . . . . . . . . . . . . . . . . . . . . . . . . . . . . . . . . . . 5
Remote control . . . . . . . . . . . . . . . . . . . . . . . . . . . . . . . . . . . . . . . . . . . . . . . . . . . . . . . . . . . . . . . . . . . . . . . . . . . . . . . . . . . . . . . . . . . . . . . . . . . 6
Setting up your projector kit . . . . . . . . . . . . . . . . . . . . . . . . . . . . . . . . . . . . . . . . . . . . . . . . . . . . . . . . . . . . . . . . . . . . . . . . . . 7
Connecting devices. . . . . . . . . . . . . . . . . . . . . . . . . . . . . . . . . . . . . . . . . . . . . . . . . . . . . . . . . . . . . . . . . . . . . . . . . . . . . . . . . . 11
Connecting an HDMI device. . . . . . . . . . . . . . . . . . . . . . . . . . . . . . . . . . . . . . . . . . . . . . . . . . . . . . . . . . . . . . . . . . . . . . . . . . . . . . . . . . . . . . 11
Connecting a USB device . . . . . . . . . . . . . . . . . . . . . . . . . . . . . . . . . . . . . . . . . . . . . . . . . . . . . . . . . . . . . . . . . . . . . . . . . . . . . . . . . . . . . . . . 11
Connecting an A/V device. . . . . . . . . . . . . . . . . . . . . . . . . . . . . . . . . . . . . . . . . . . . . . . . . . . . . . . . . . . . . . . . . . . . . . . . . . . . . . . . . . . . . . . . 12
Connecting headphones. . . . . . . . . . . . . . . . . . . . . . . . . . . . . . . . . . . . . . . . . . . . . . . . . . . . . . . . . . . . . . . . . . . . . . . . . . . . . . . . . . . . . . . . . 12
Connecting a speaker system . . . . . . . . . . . . . . . . . . . . . . . . . . . . . . . . . . . . . . . . . . . . . . . . . . . . . . . . . . . . . . . . . . . . . . . . . . . . . . . . . . . . 12
Connecting a Bluetooth speaker (wire connection) . . . . . . . . . . . . . . . . . . . . . . . . . . . . . . . . . . . . . . . . . . . . . . . . . . . . . . . . . . . . . . . 13
Connecting a VGA device . . . . . . . . . . . . . . . . . . . . . . . . . . . . . . . . . . . . . . . . . . . . . . . . . . . . . . . . . . . . . . . . . . . . . . . . . . . . . . . . . . . . . . . . 13
Connecting the power adapter. . . . . . . . . . . . . . . . . . . . . . . . . . . . . . . . . . . . . . . . . . . . . . . . . . . . . . . . . . . . . . . . . . . . . . . . . . . . . . . . . . . 13
Positioning your projector . . . . . . . . . . . . . . . . . . . . . . . . . . . . . . . . . . . . . . . . . . . . . . . . . . . . . . . . . . . . . . . . . . . . . . . . . . . 14
Using your projector . . . . . . . . . . . . . . . . . . . . . . . . . . . . . . . . . . . . . . . . . . . . . . . . . . . . . . . . . . . . . . . . . . . . . . . . . . . . . . . . . 14
Turning your projector on and off . . . . . . . . . . . . . . . . . . . . . . . . . . . . . . . . . . . . . . . . . . . . . . . . . . . . . . . . . . . . . . . . . . . . . . . . . . . . . . . . 14
Selecting the video source . . . . . . . . . . . . . . . . . . . . . . . . . . . . . . . . . . . . . . . . . . . . . . . . . . . . . . . . . . . . . . . . . . . . . . . . . . . . . . . . . . . . . . . 14
Adjusting the picture . . . . . . . . . . . . . . . . . . . . . . . . . . . . . . . . . . . . . . . . . . . . . . . . . . . . . . . . . . . . . . . . . . . . . . . . . . . . . . . . . . . . . . . . . . . . 16
Adjusting the contrast . . . . . . . . . . . . . . . . . . . . . . . . . . . . . . . . . . . . . . . . . . . . . . . . . . . . . . . . . . . . . . . . . . . . . . . . . . . . . . . . . . . . . . . . . . . 16
Adjusting the brightness . . . . . . . . . . . . . . . . . . . . . . . . . . . . . . . . . . . . . . . . . . . . . . . . . . . . . . . . . . . . . . . . . . . . . . . . . . . . . . . . . . . . . . . . . 16
Adjusting the tint . . . . . . . . . . . . . . . . . . . . . . . . . . . . . . . . . . . . . . . . . . . . . . . . . . . . . . . . . . . . . . . . . . . . . . . . . . . . . . . . . . . . . . . . . . . . . . . . 17
Adjusting the color temperature . . . . . . . . . . . . . . . . . . . . . . . . . . . . . . . . . . . . . . . . . . . . . . . . . . . . . . . . . . . . . . . . . . . . . . . . . . . . . . . . . 17
Selecting the aspect ratio . . . . . . . . . . . . . . . . . . . . . . . . . . . . . . . . . . . . . . . . . . . . . . . . . . . . . . . . . . . . . . . . . . . . . . . . . . . . . . . . . . . . . . . . 17
Adjusting the noise reduction . . . . . . . . . . . . . . . . . . . . . . . . . . . . . . . . . . . . . . . . . . . . . . . . . . . . . . . . . . . . . . . . . . . . . . . . . . . . . . . . . . . . 17
Adjusting the display size . . . . . . . . . . . . . . . . . . . . . . . . . . . . . . . . . . . . . . . . . . . . . . . . . . . . . . . . . . . . . . . . . . . . . . . . . . . . . . . . . . . . . . . . 18
Selecting the sound mode . . . . . . . . . . . . . . . . . . . . . . . . . . . . . . . . . . . . . . . . . . . . . . . . . . . . . . . . . . . . . . . . . . . . . . . . . . . . . . . . . . . . . . . 18
Adjusting the treble or bass . . . . . . . . . . . . . . . . . . . . . . . . . . . . . . . . . . . . . . . . . . . . . . . . . . . . . . . . . . . . . . . . . . . . . . . . . . . . . . . . . . . . . . 19
Adjusting the balance. . . . . . . . . . . . . . . . . . . . . . . . . . . . . . . . . . . . . . . . . . . . . . . . . . . . . . . . . . . . . . . . . . . . . . . . . . . . . . . . . . . . . . . . . . . . 19
Turning the Auto Volume control on or off . . . . . . . . . . . . . . . . . . . . . . . . . . . . . . . . . . . . . . . . . . . . . . . . . . . . . . . . . . . . . . . . . . . . . . . 19
Setting the sleep timer. . . . . . . . . . . . . . . . . . . . . . . . . . . . . . . . . . . . . . . . . . . . . . . . . . . . . . . . . . . . . . . . . . . . . . . . . . . . . . . . . . . . . . . . . . . 19
Selecting the OSD language . . . . . . . . . . . . . . . . . . . . . . . . . . . . . . . . . . . . . . . . . . . . . . . . . . . . . . . . . . . . . . . . . . . . . . . . . . . . . . . . . . . . . 20
Restoring factory defaults . . . . . . . . . . . . . . . . . . . . . . . . . . . . . . . . . . . . . . . . . . . . . . . . . . . . . . . . . . . . . . . . . . . . . . . . . . . . . . . . . . . . . . . . 20
Rotating the picture . . . . . . . . . . . . . . . . . . . . . . . . . . . . . . . . . . . . . . . . . . . . . . . . . . . . . . . . . . . . . . . . . . . . . . . . . . . . . . . . . . . . . . . . . . . . . 20
Updating the USB software . . . . . . . . . . . . . . . . . . . . . . . . . . . . . . . . . . . . . . . . . . . . . . . . . . . . . . . . . . . . . . . . . . . . . . . . . . . . . . . . . . . . . . 21
Specifications. . . . . . . . . . . . . . . . . . . . . . . . . . . . . . . . . . . . . . . . . . . . . . . . . . . . . . . . . . . . . . . . . . . . . . . . . . . . . . . . . . . . . . . . 21
Legal notices . . . . . . . . . . . . . . . . . . . . . . . . . . . . . . . . . . . . . . . . . . . . . . . . . . . . . . . . . . . . . . . . . . . . . . . . . . . . . . . . . . . . . . . . 22
ONE-YEAR LIMITED WARRANTY . . . . . . . . . . . . . . . . . . . . . . . . . . . . . . . . . . . . . . . . . . . . . . . . . . . . . . . . . . . . . . . . . . . . . . 23

www.insigniaproducts.com
3
NS-SCR79KIT
IMPORTANT SAFETY INSTRUCTIONS
READ AND FOLLOW ALL SAFETY INSTRUCTIONS.
WARNING: THIS IS NOT A TOY! THIS PRODUCT CONTAINS SMALL PARTS WHICH COULD CAUSE CHOKING IF SWALLOWED.
FOR INDOOR OR OUTDOOR USE WITH COVER. DO NOT EXPOSE THE PROJECTOR OR REMOTE CONTROL TO RAIN OR OTHER
WET CONDITIONS.
DO NOT REMOVE COVER. NO USER SERVICEABLE PARTS INSIDE. IF SERVICING IS NEEDED, SEND TO QUALIFIED SERVICE
PERSONNEL. PLEASE ADHERE TO THE FOLLOWING:
• Read Instructions - All safety and operating instructions should be read before the item is operated. Please adhere to
the instructions and warnings for your safety.
• Heat - The item should be situated away from heat sources such as radiators, hairdryers, heat registers, stoves, or other
appliances that produce heat.
• Power Sources - The item should be connected to a power supply only like the one that is provided with the item.
• Do not secure the wiring of the product with staples or nails, or place on sharp hooks or nails.
• Do not hang objects from cord.
• Do not close doors or windows on the product or product cords as this may damage the wire insulation.
• Unplug the product when leaving the house, retiring at night, or if left unattended.
• Damage Requiring Service – Refer all servicing to a qualified service personnel. Have a qualified service personnel
service this item when:
• The power-supply cord or plug has been damaged.
• Objects are loose inside and the unit no longer works.
• All troubleshooting techniques have been tried and the item will not work or has stopped working.
• The item has been dropped or the enclosure damaged.
• Do not leave the product outside after use.
• This product is intended for short term use throughout the year. It is not intended for permanent installation or use.
• To avoid risk of fire, burns, personal injury, and electrical shock, this item should not be played with or placed where
small children can reach it.
• Do not use this product for other than its intended use.
• Do not cover the product with cloth, paper, or any material not part of the product when in use.
SAVE THESE INSTRUCTIONS
Features
• Matte white screen with a 16:9 aspect ratio is ideal for both home and outdoor viewing
• Projector displays visuals up to 720p for high-definition visuals
• 180° viewing angle provides a large range of seating arrangements
• Portable speaker includes both Bluetooth and wired connection options
• Storage case protects your equipment from the elements
• Remote control lets you control your projector from up to 13 ft. (4 m)
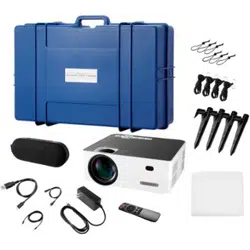
Package contents
Make sure that you have all the items to set up your projector kit:
•Projector (1)
• Power adapter for the projector (1)
• Remote control (1) with AAA alkaline batteries (2)
• Bluetooth speaker (1)
• USB cable for charging a Bluetooth speaker (1)
• Audio cable for a Bluetooth speaker (1)
•Screen (1)
•HDMI cable (1)
• 3.5mm AV cable
•Bungee cords (6)
•Stakes (4)
• Strings with hooks (4)
•Carrying case (1)
•A poles (4)
•B poles (2)
•C poles (2)
•D poles (1)
www.insigniaproducts.com
4
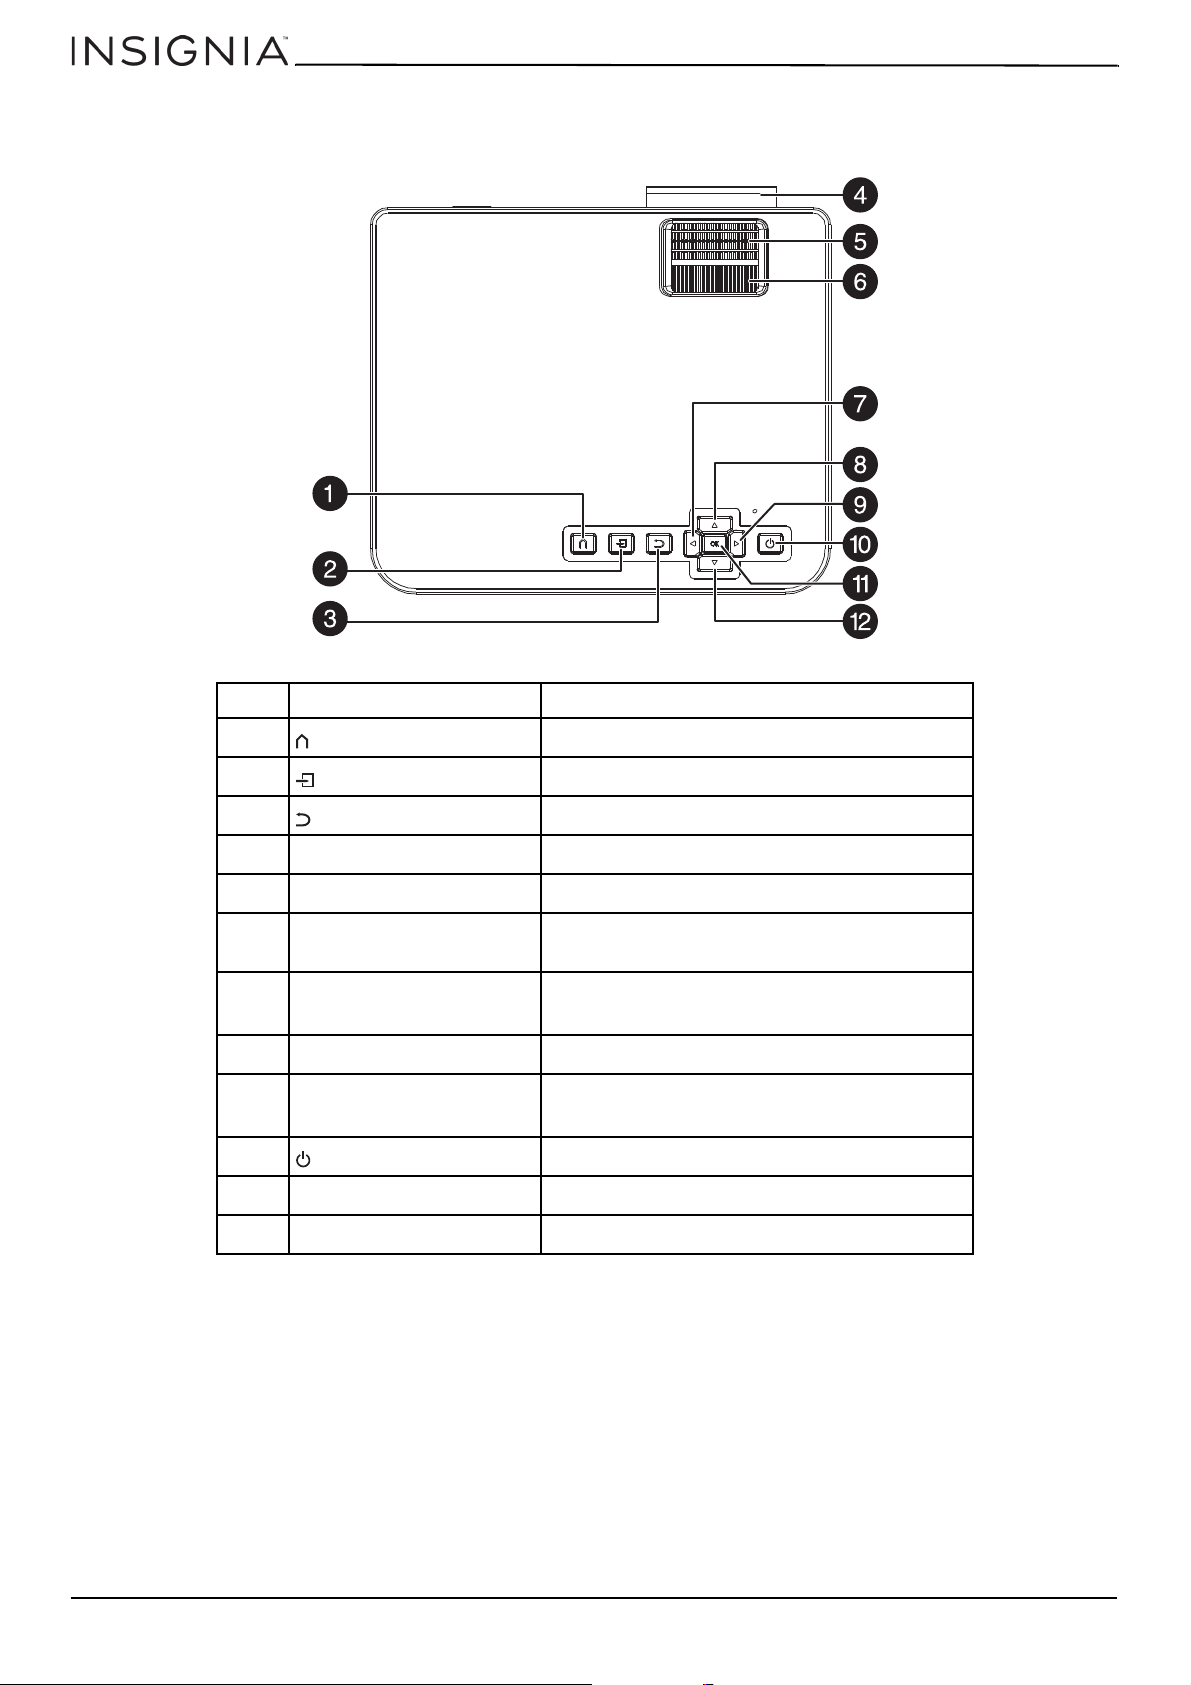
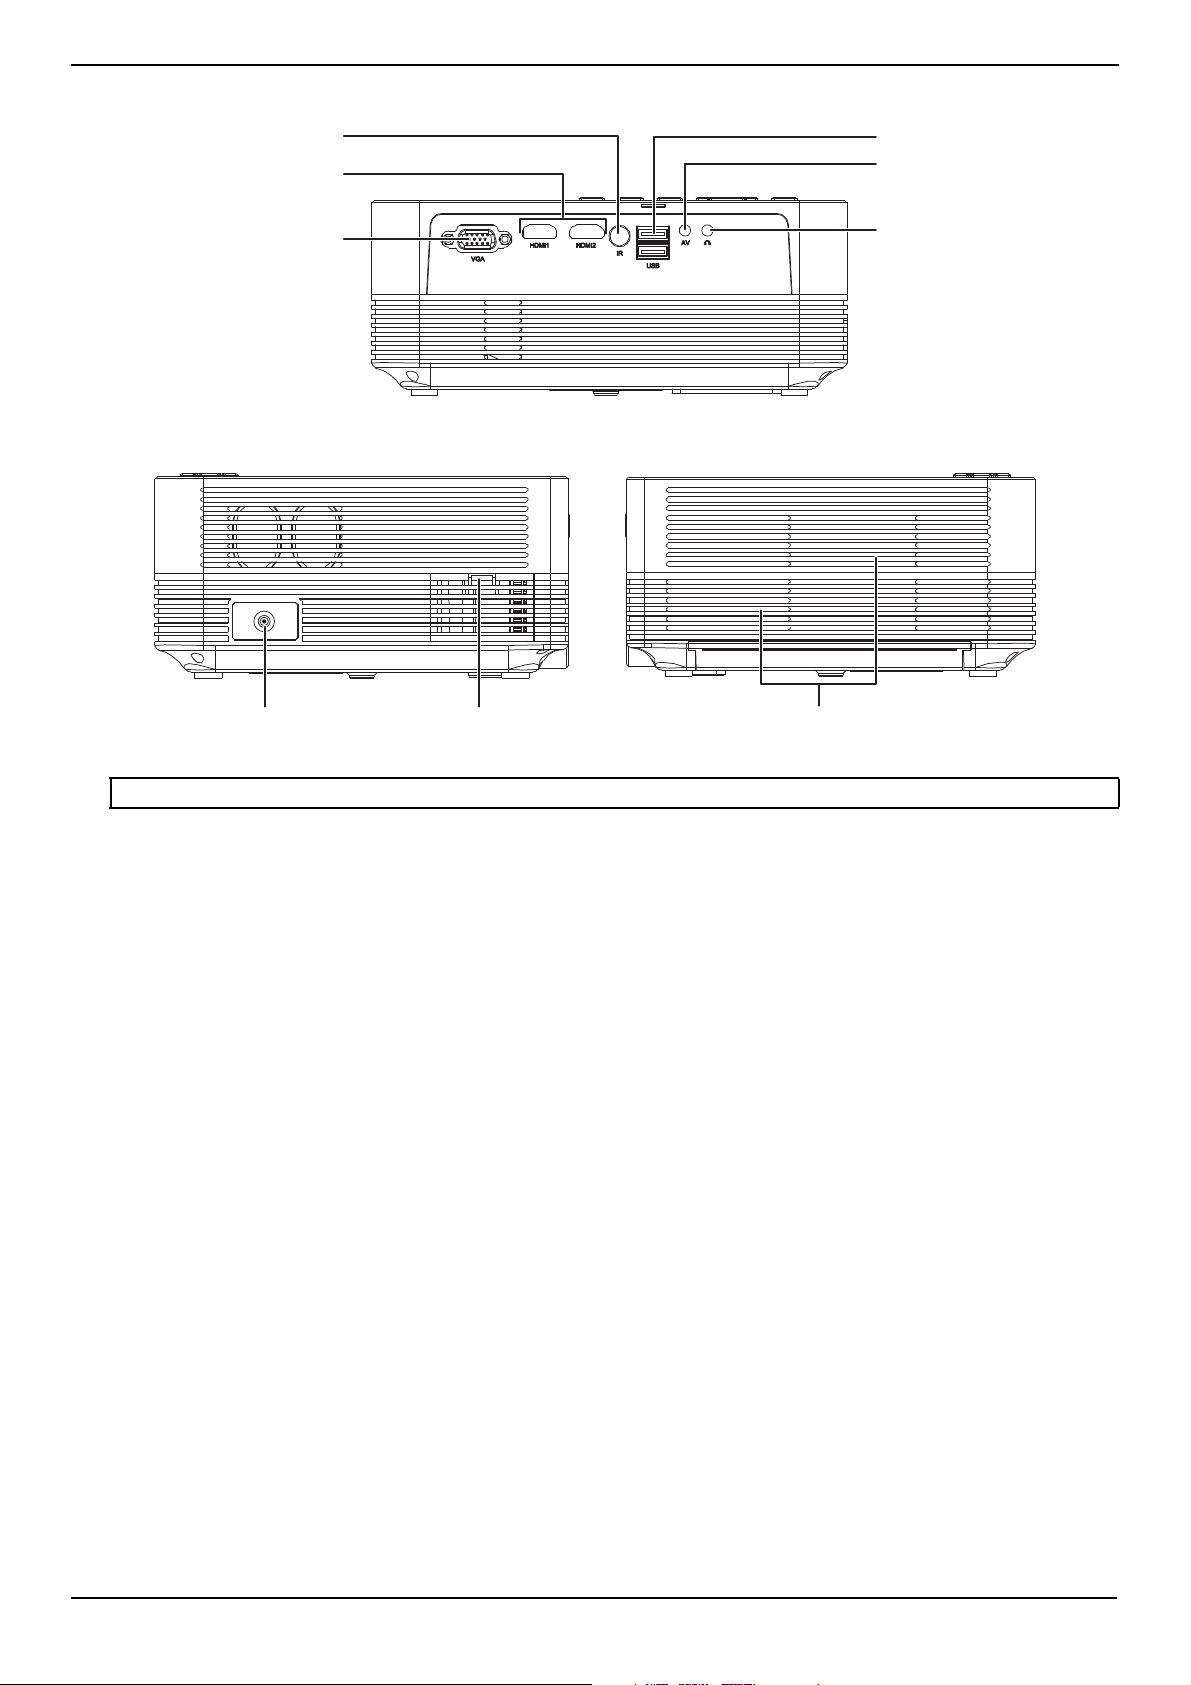
Components
Top
NO. COMPONENT DESCRIPTION
1 (menu) Press to open or close the menu.
2 (source) Press to select an external video device.
3 (return) Press to go back to the previous screen.
4 Lens Projects the image onto the screen.
5 Focus wheel Turn to focus the image on the screen.
6 Keystone wheel
Turn to adjust the vertical position of the image on
the screen by ± 15°.
7
(left)
Press to decrease the volume.
In menus, press to move left.
8 (up) In menus, press to move up.
9 (right)
Press to increase the volume.
In menus, press to move right.
10 (power) Press to turn your projector on or off.
11 OK Press to confirm menu selections.
12
(down) In menus, press to move down.
www.insigniaproducts.com
5
NS-SCR79KIT
Back
Sides
CAUTION: Do not block the vent openings. Your projector may overheat and be damaged.
VGA jack
HDMI jacks
Remote control sensor
USB ports
AV jack
Headset jack
Power jack Air inlet vent Air outlet vents
www.insigniaproducts.com
6
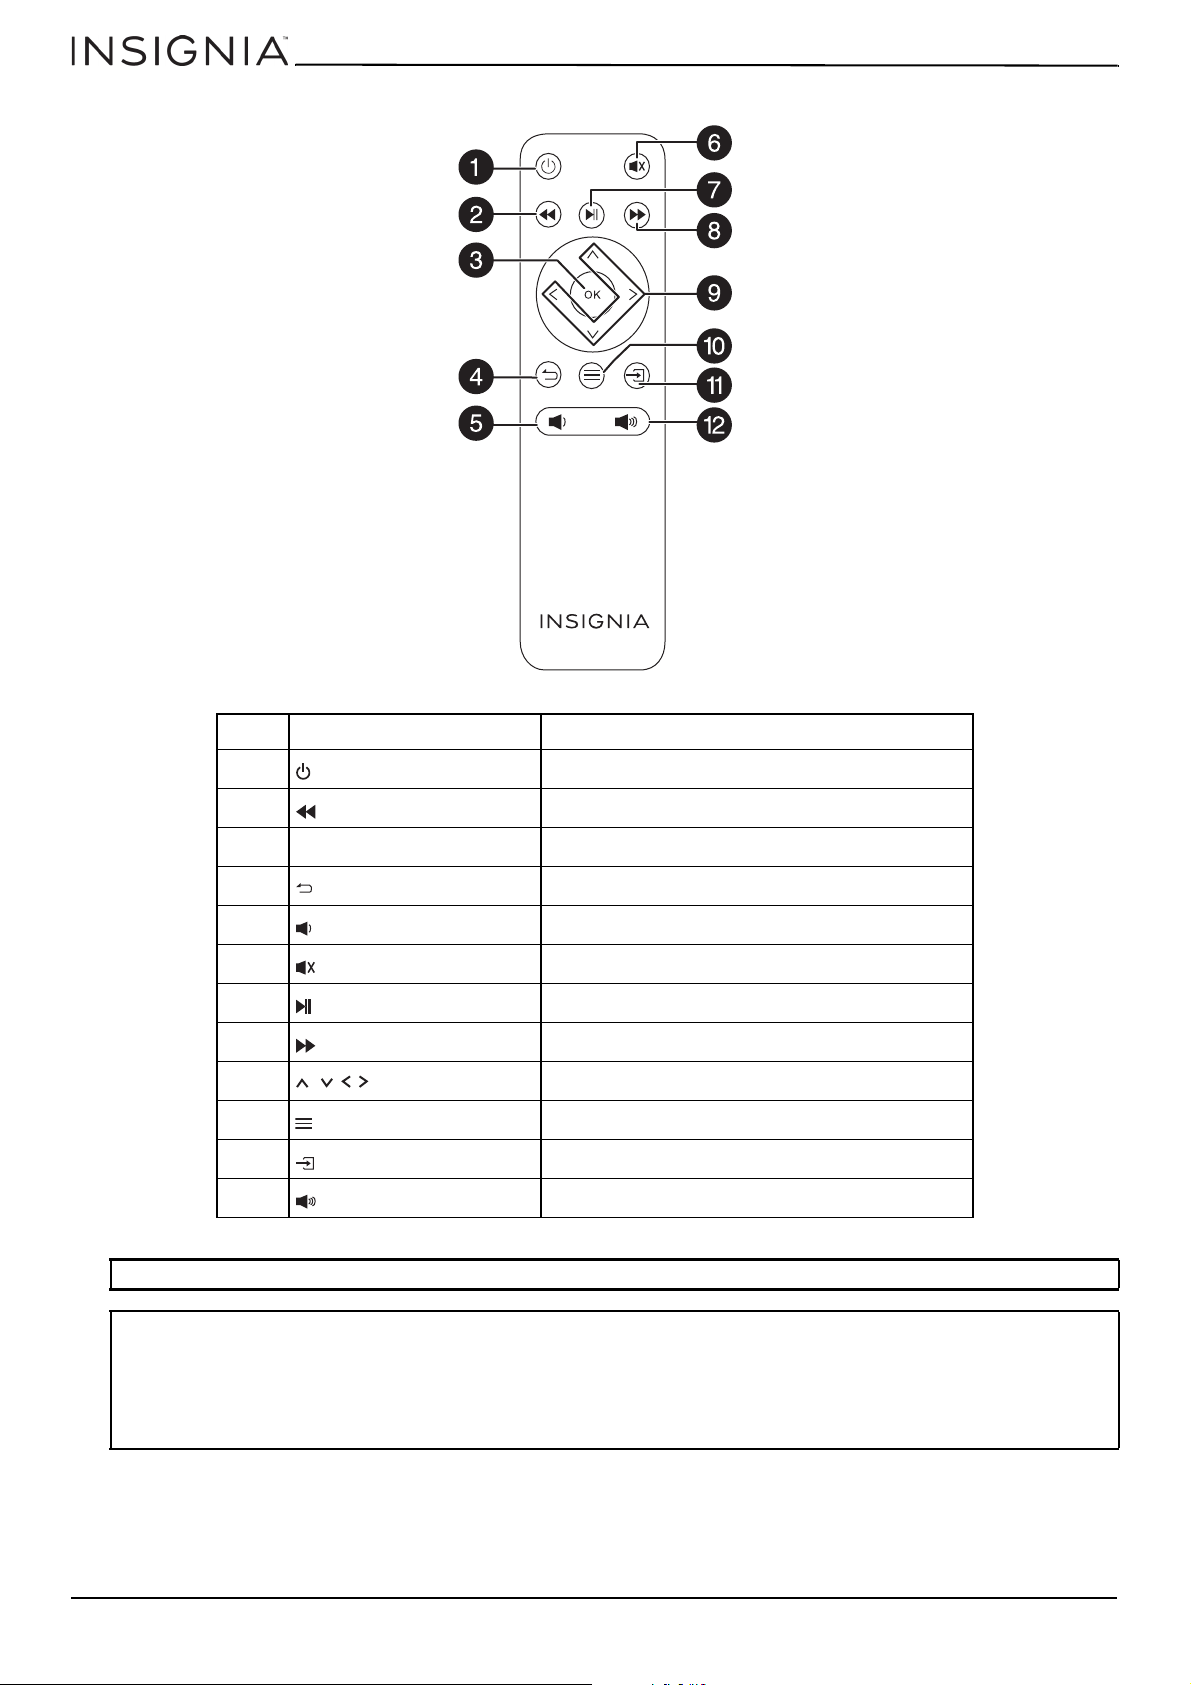
Remote control
NO. COMPONENT DESCRIPTION
1 (power) Press to turn your projector on and off.
2 (fast rewind) Press to fast rewind video from an external device.
3 OK Press to confirm menu selections.
4 (return) Press to go back to the previous screen.
5 (volume down) Press to decrease the volume.
6 (mute) Press to mute or unmute the sound.
7 (play/pause) Press to start or pause playback.
8 (fast forward) Press to fast forward video from an external device.
9 (arrows) Press to navigate in menus.
10 (menu) Press to open or close the menu.
11 (source) Press to select an external video device.
12 (volume up) Press to increase the volume.
CAUTION: Do not expose the remote to rain or other wet conditions.
Notes:
• Always point the remote at the remote sensor on the front or back of your projector.
• Make sure that there are no obstacles between the remote and the remote sensor.
• The remote works up to a distance of 13 ft. (4 m).
• Remove the batteries if you don't plan to use your projector for a long time.
• Replace the batteries with new batteries when the current batteries are exhausted.
• Store the remote in a cool and dry environment.
NS-6CR79KIT
www.insigniaproducts.com
7
NS-SCR79KIT
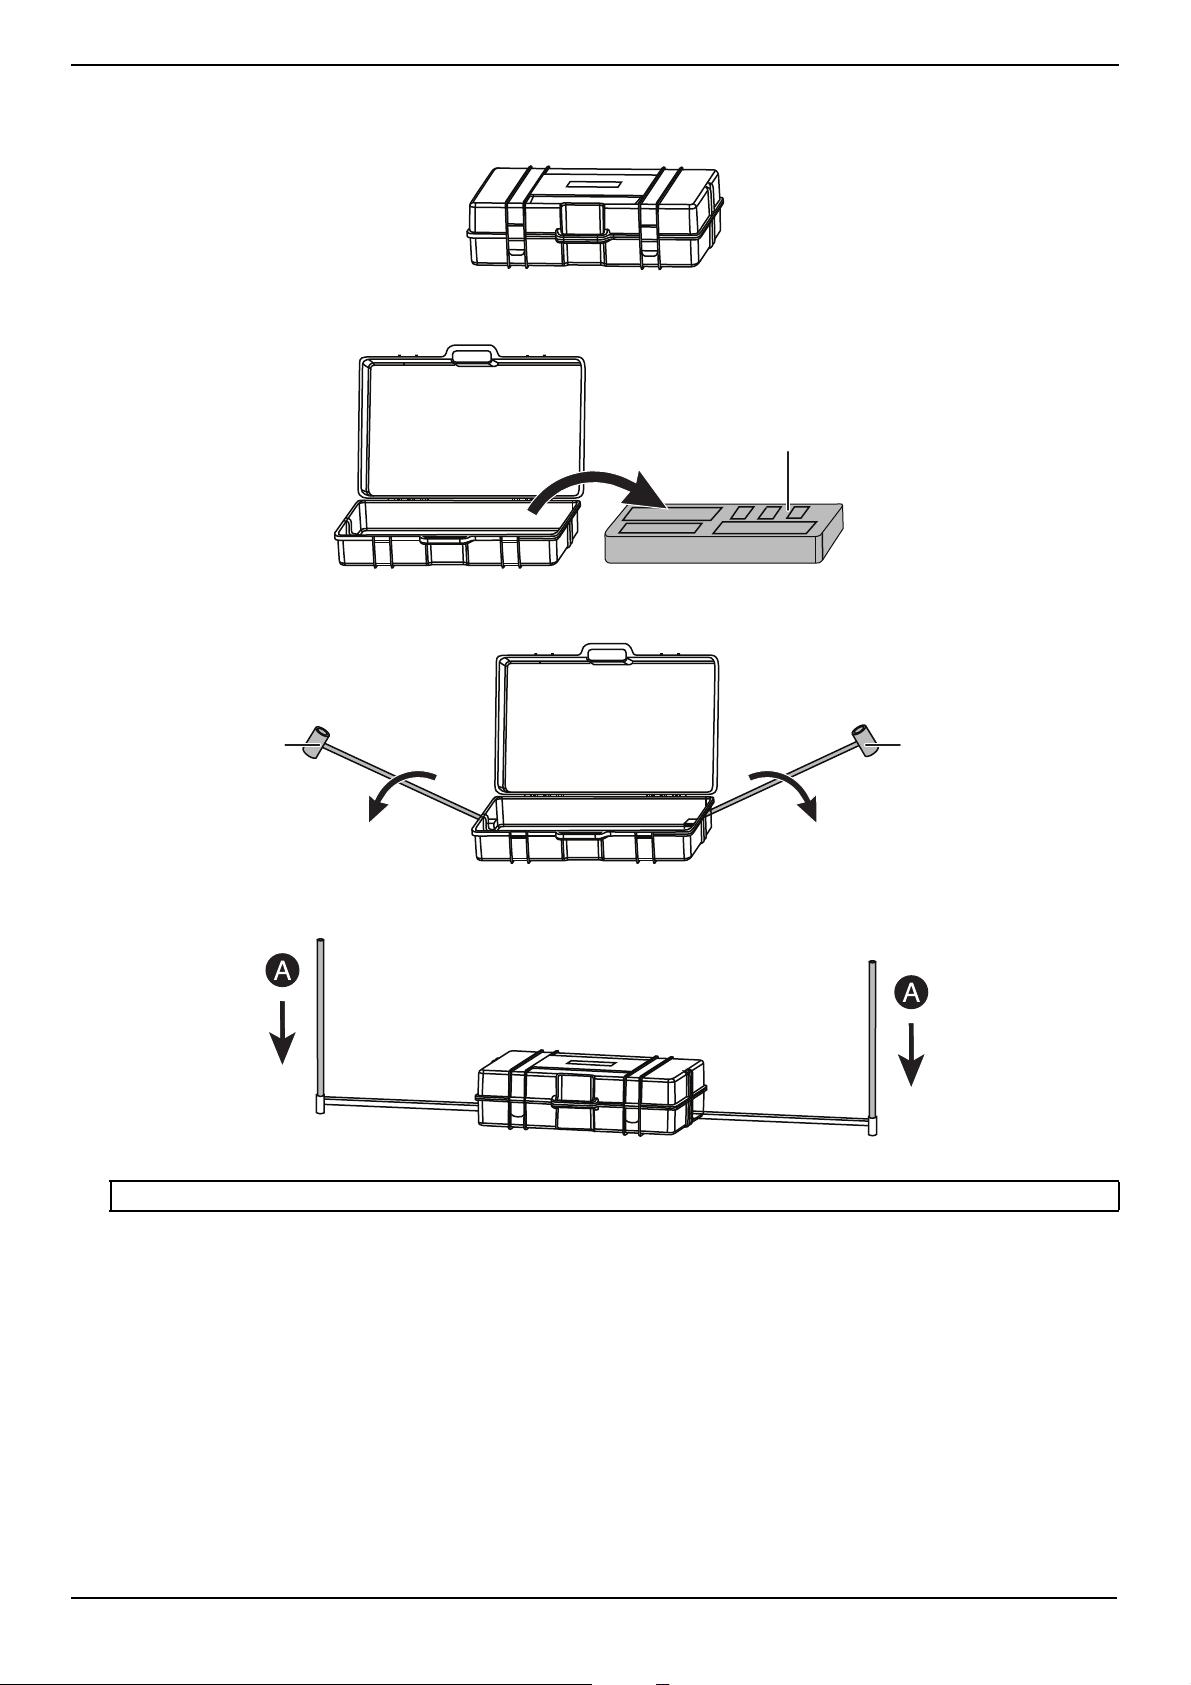
Setting up your projector kit
1 Place the carrying case on a flat surface with the logo facing upward.
2 Open the carrying case, then remove the foam packaging that holds all the parts.
3 Pull up the two bottom poles. These poles are hinged and permanently attached to the carrying case.
4 Insert one A pole into both ends of the bottom poles.
Note: The A, B, C, and D poles are labeled for easy identification.
Foam packaging
Bottom pole
Bottom pole
www.insigniaproducts.com
8
5 Insert a B pole into each A pole.
6 Insert an A pole into each B pole.
7 Insert a D pole into one C pole.
www.insigniaproducts.com
9
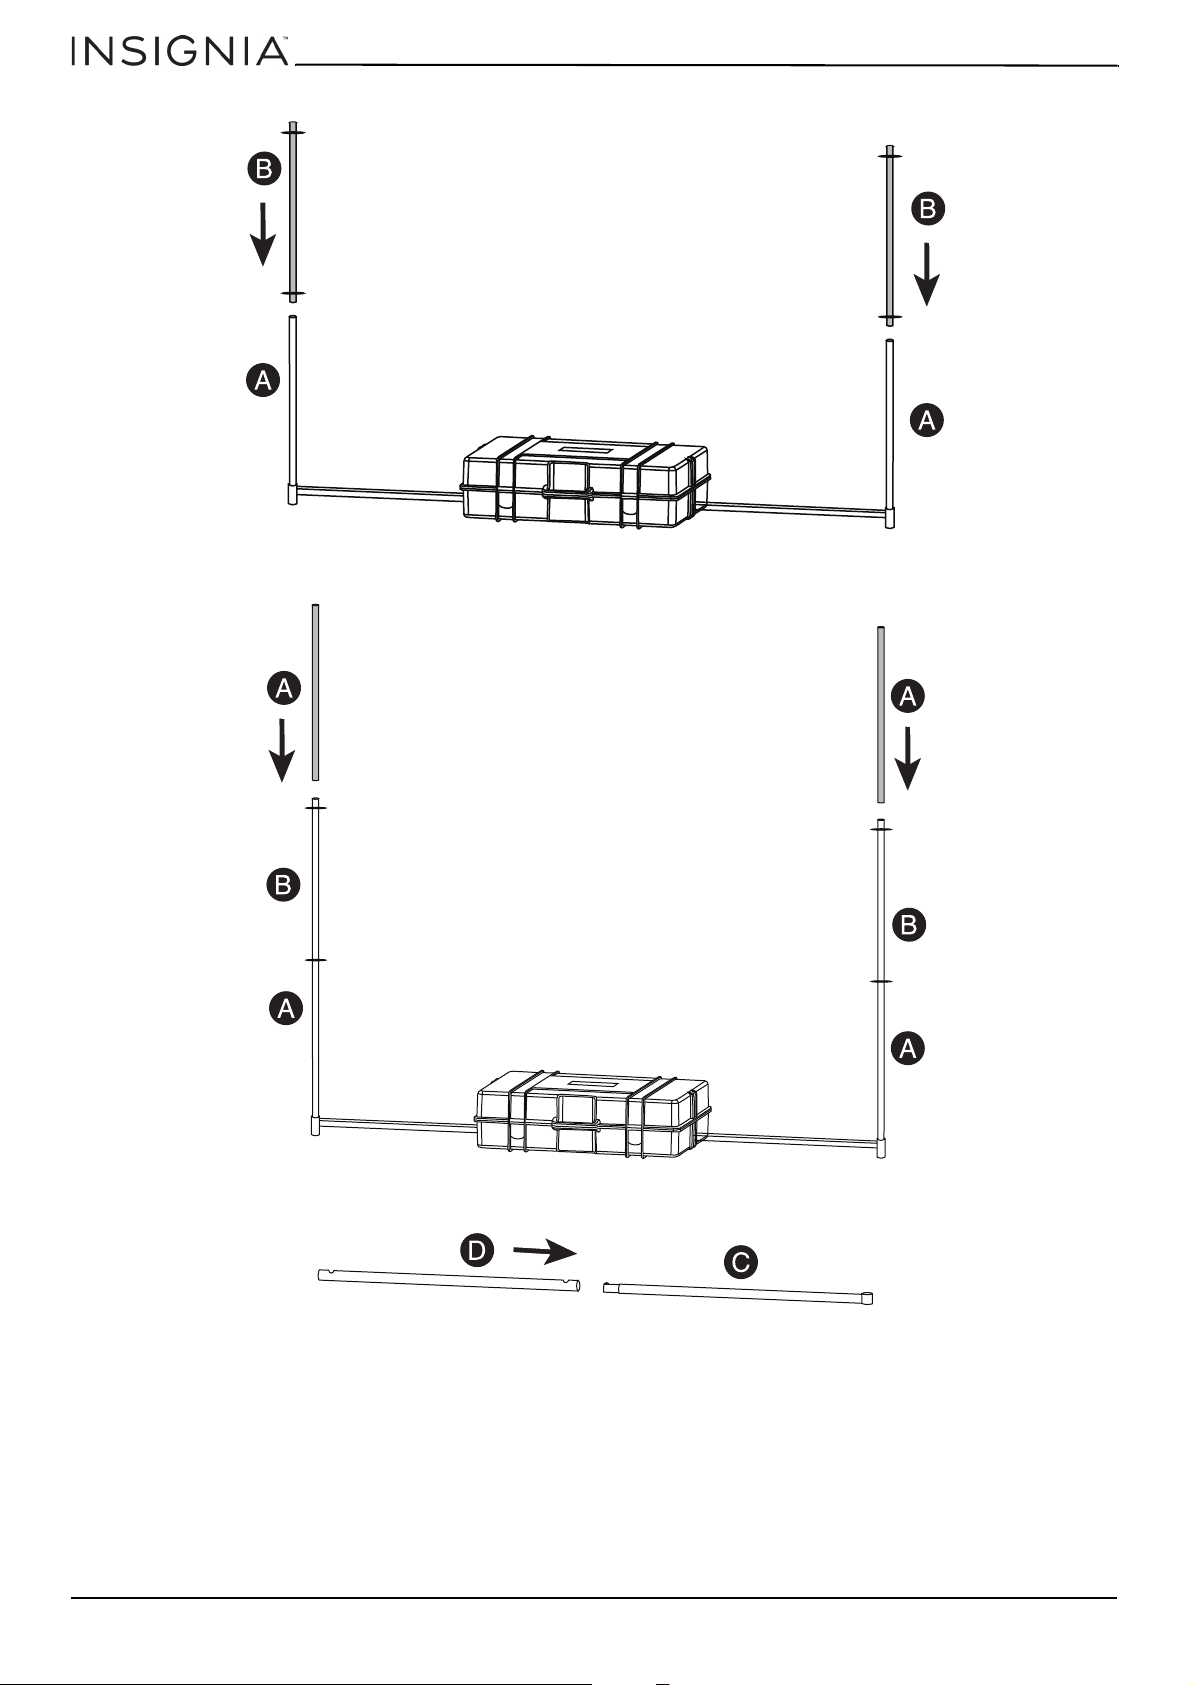
NS-SCR79KIT
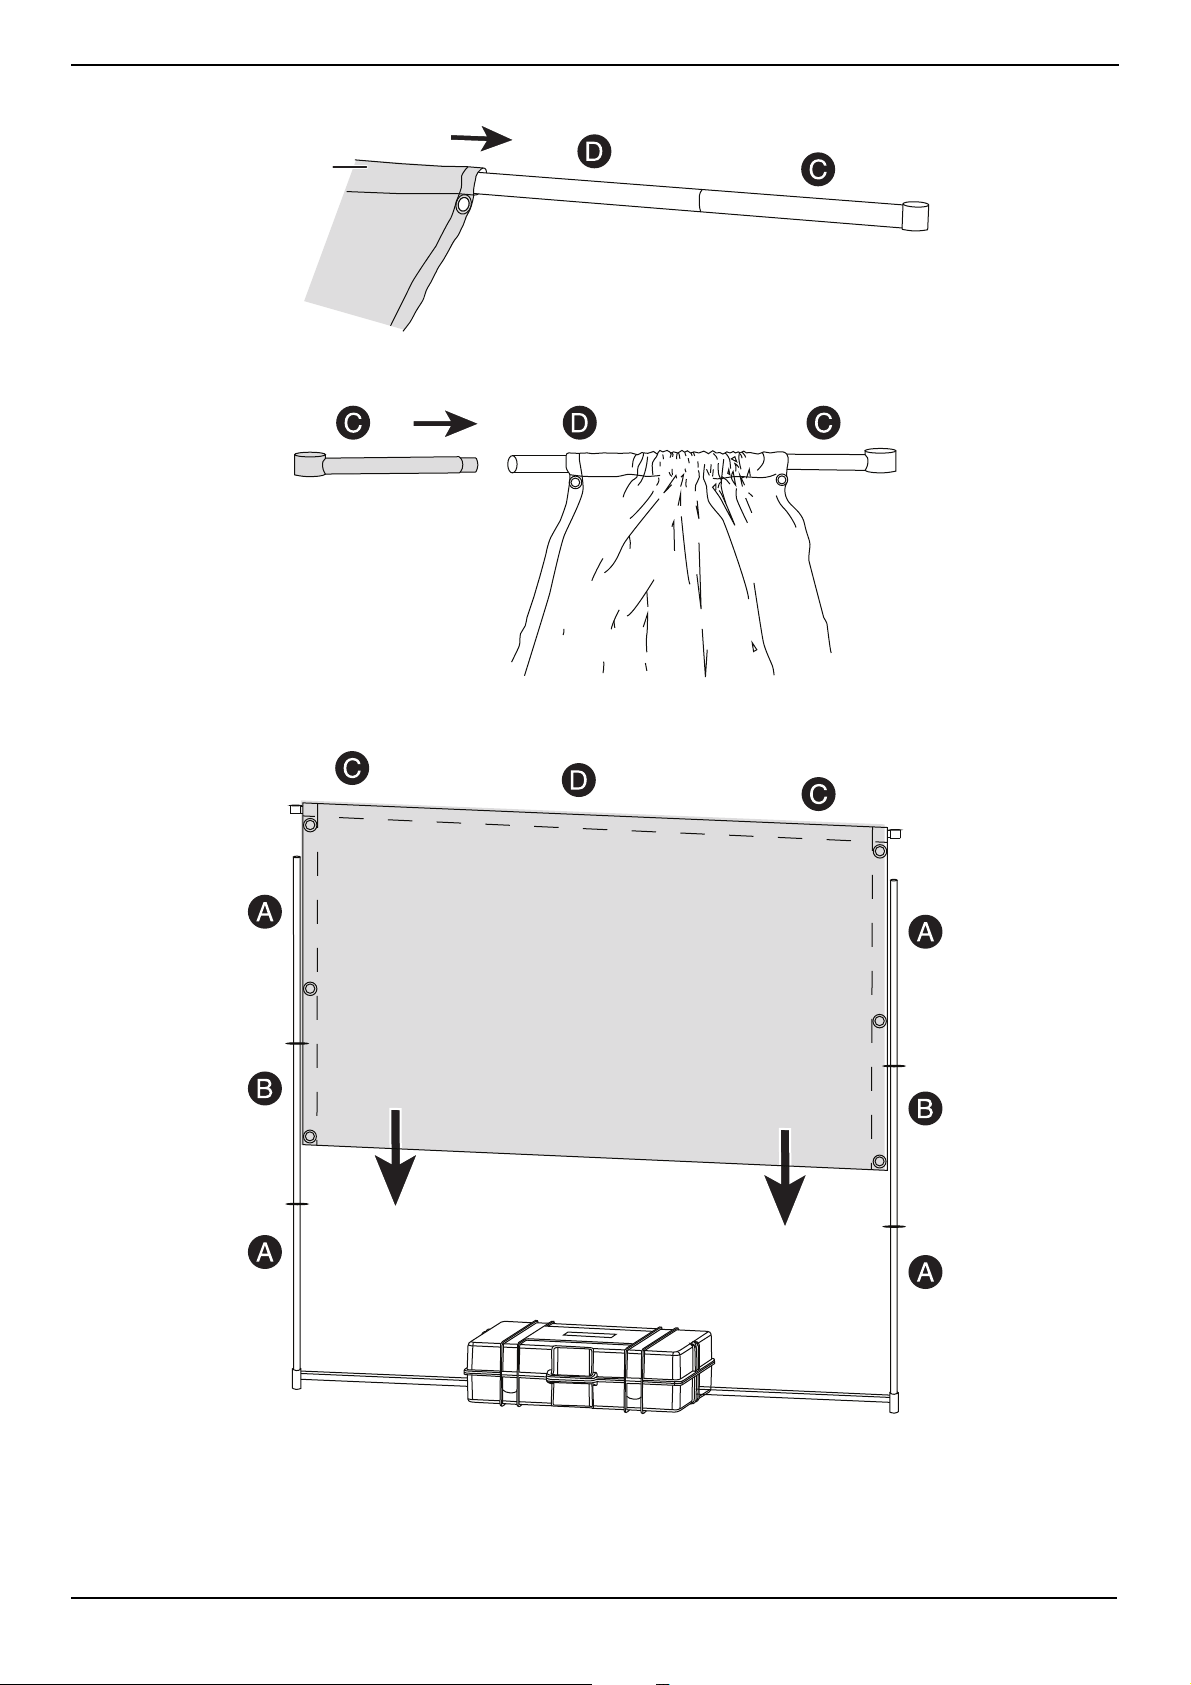
8 Slide the sleeve at the top of the screen over the D and C pole combination.
9 Insert the other C pole into the end of the D pole.
10 Slide the ends of the C poles onto the ends of the A poles.
Sleeve

www.insigniaproducts.com
10
11 To secure the screen to the poles, insert a bungee cord through the grommet on the screen, wrap it around the pole,
then insert the plastic ball through the loop on the cord. Attach the other five cords.
12 To secure the screen to the ground, attach the hook at one end of the string to the hole midway up the B poles. (We
recommend that you attach to the holes furthest up the pole.) Attach the hook at the other end of the string to the
ground stake. Repeat until all four strings are attached to the poles and stakes. Step firmly on the stakes to insert into
the ground. Make sure that the strings are taut and there is no slack.
Note: If you are using your projector on a solid surface (like concrete) or inside, you don’t need to do the next step.
CAUTION: Always take the weather into consideration when setting up. Take your projector and screen down under severe weather
conditions such as high winds or heavy rain. Take down and repack your projector and screen when not in use. Do not leave outside
for an extended amount of time.
B
A
Bungee cord
www.insigniaproducts.com
11
NS-SCR79KIT
Connecting devices
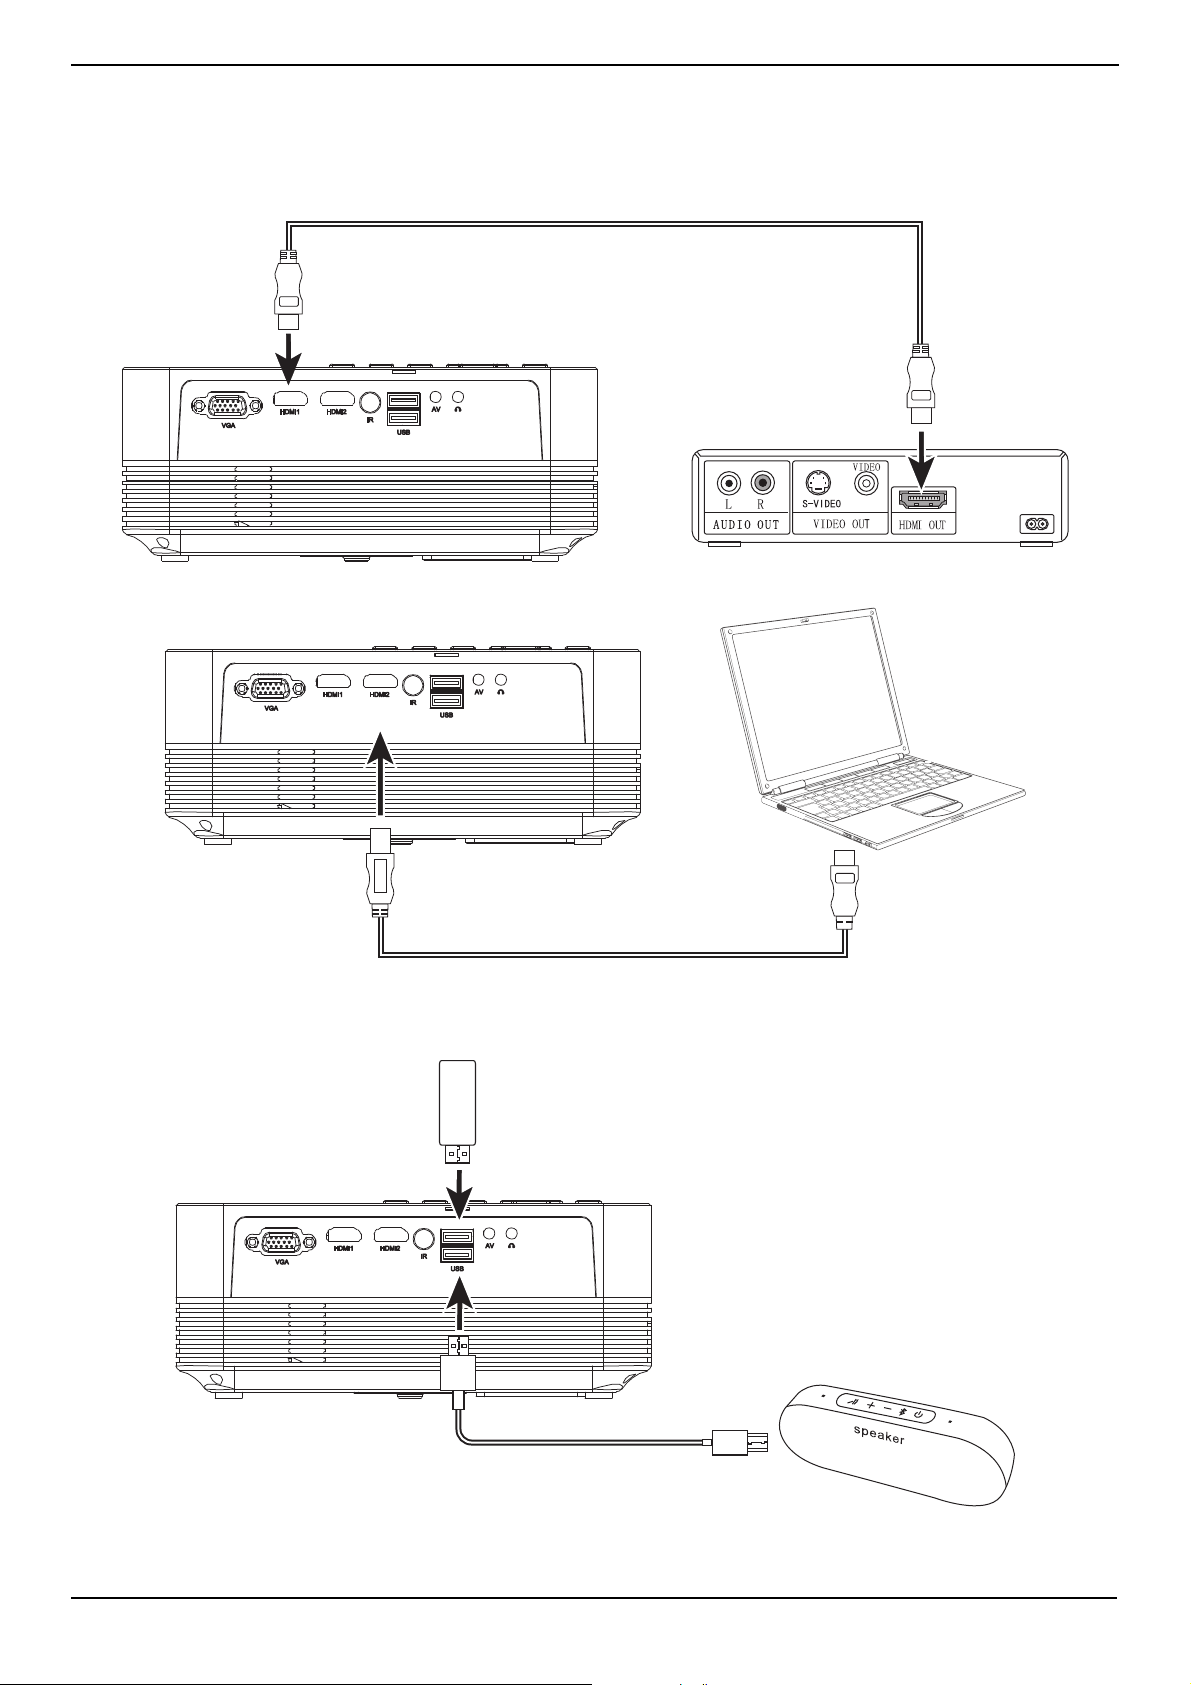
Connecting an HDMI device
• Plug the included HDMI cable into one of the HDMI jacks on the back of your projector and the HDMI OUT jack on your
HDMI device.
Connecting a USB device
• Connect your USB device to one of the USB ports on the back of your projector.
US
B
www.insigniaproducts.com
12
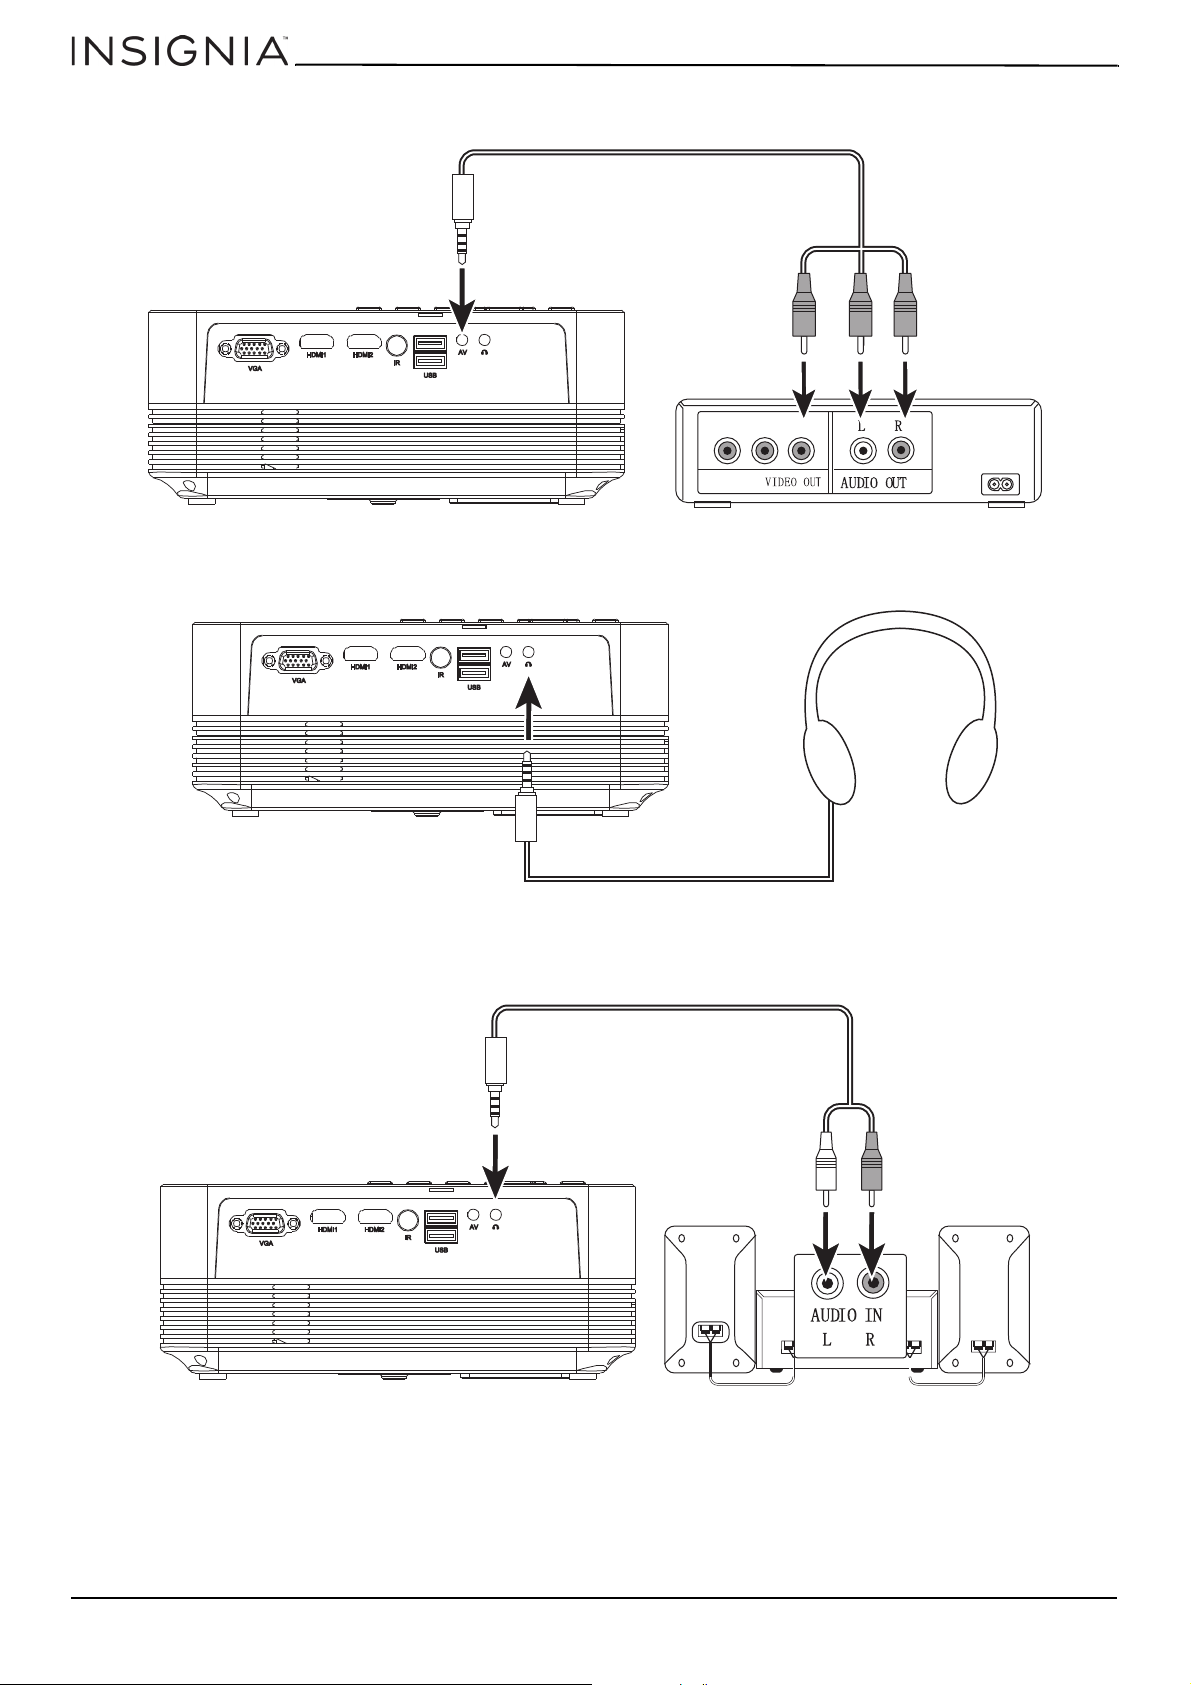
Connecting an A/V device
• Plug an A/V cable into the A/V jack on the back of your projector and into the A/V jacks on your device.
Connecting headphones
• Plug your headphones (not included) into the headphone jack on the back of your projector.
Connecting a speaker system
• Plug an audio cable (not included) into the headphone jack on the back of your projector and into the left and right
audio jacks on your speaker system.
www.insigniaproducts.com
13
NS-SCR79KIT
Connecting a Bluetooth speaker (wire connection)
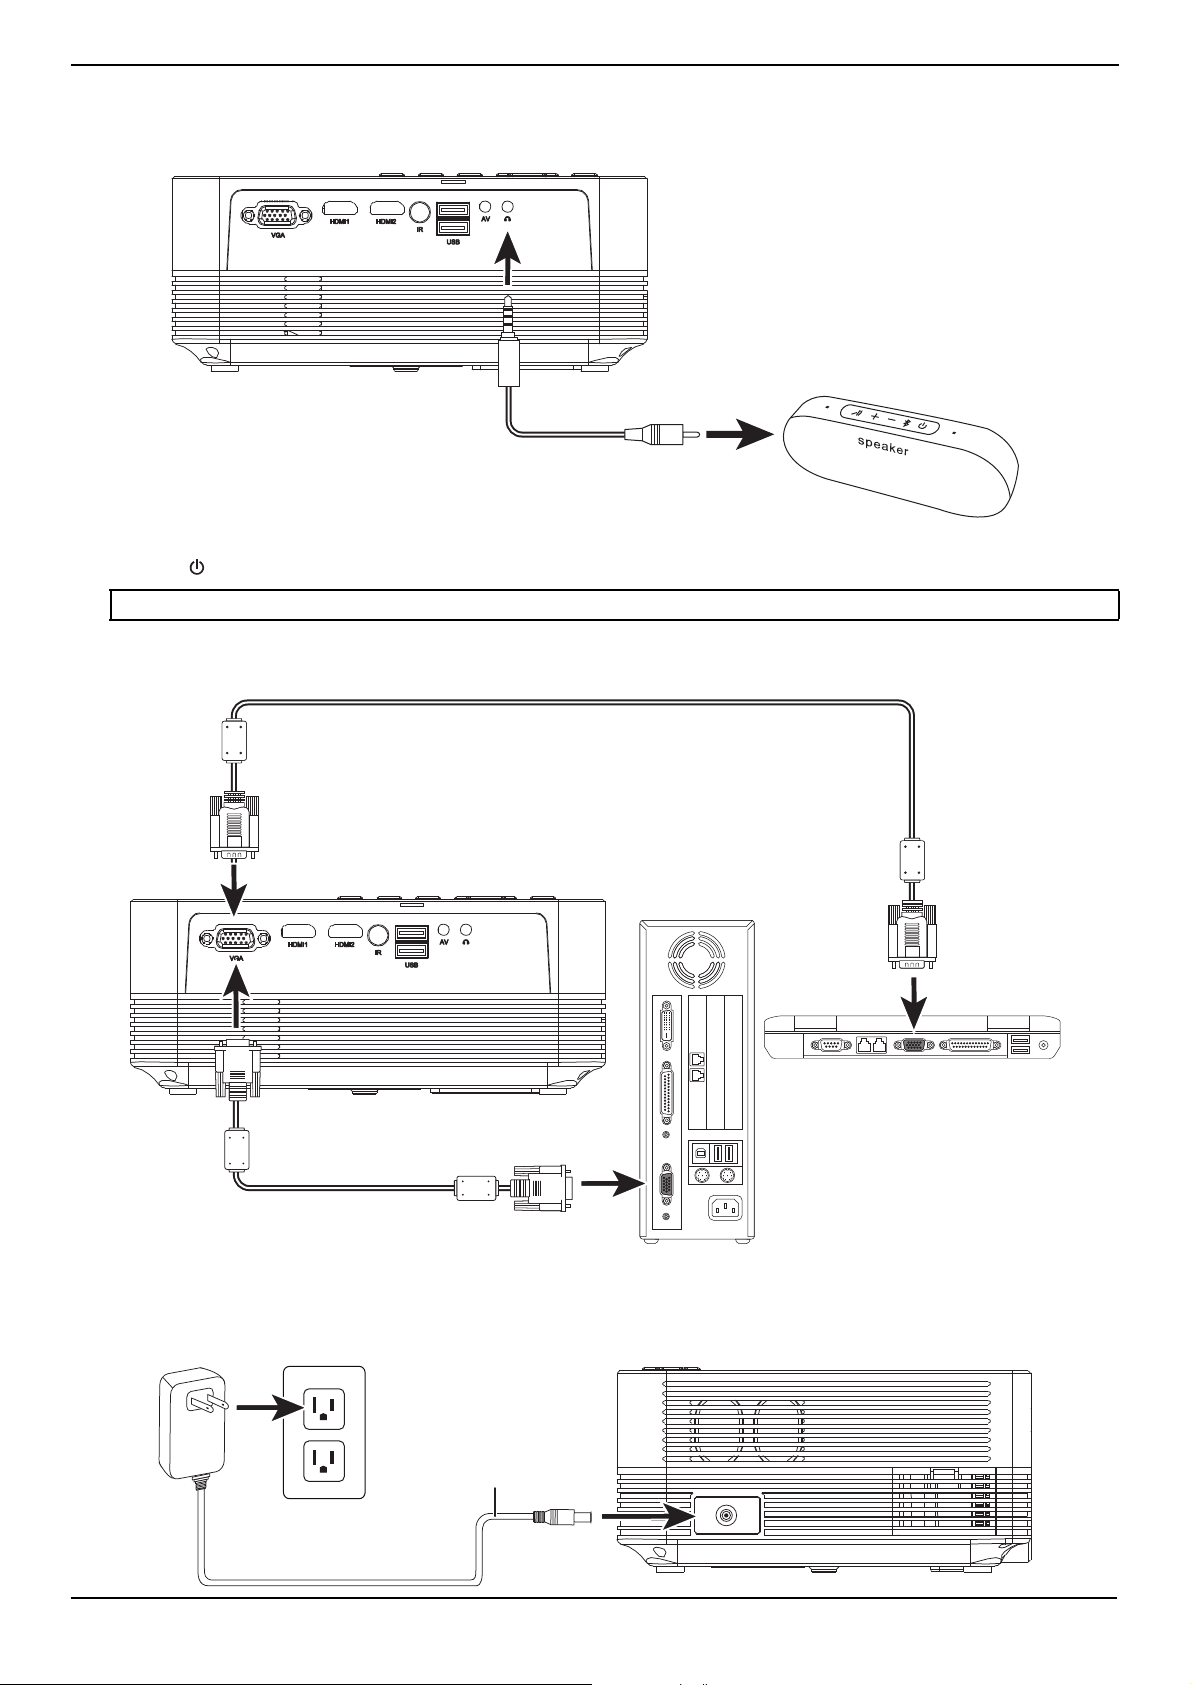
1 Connect the included audio cable to the headphone jack on the back of your projector and to the headphone jack on
the Bluetooth speaker.
2 Press (power) on the speaker to turn on the speaker.
Connecting a VGA device
• Plug the VGA cable (not included) into the VGA jack on your projector and into the VGA jack on your device.
Connecting the power adapter
• Plug the power adapter into the power jack on the side of your projector, then plug the other end into a power outlet
or an extension cord.
Note: You can use the included USB charging cable to charge a Bluetooth speaker.
Power adapter
www.insigniaproducts.com
14
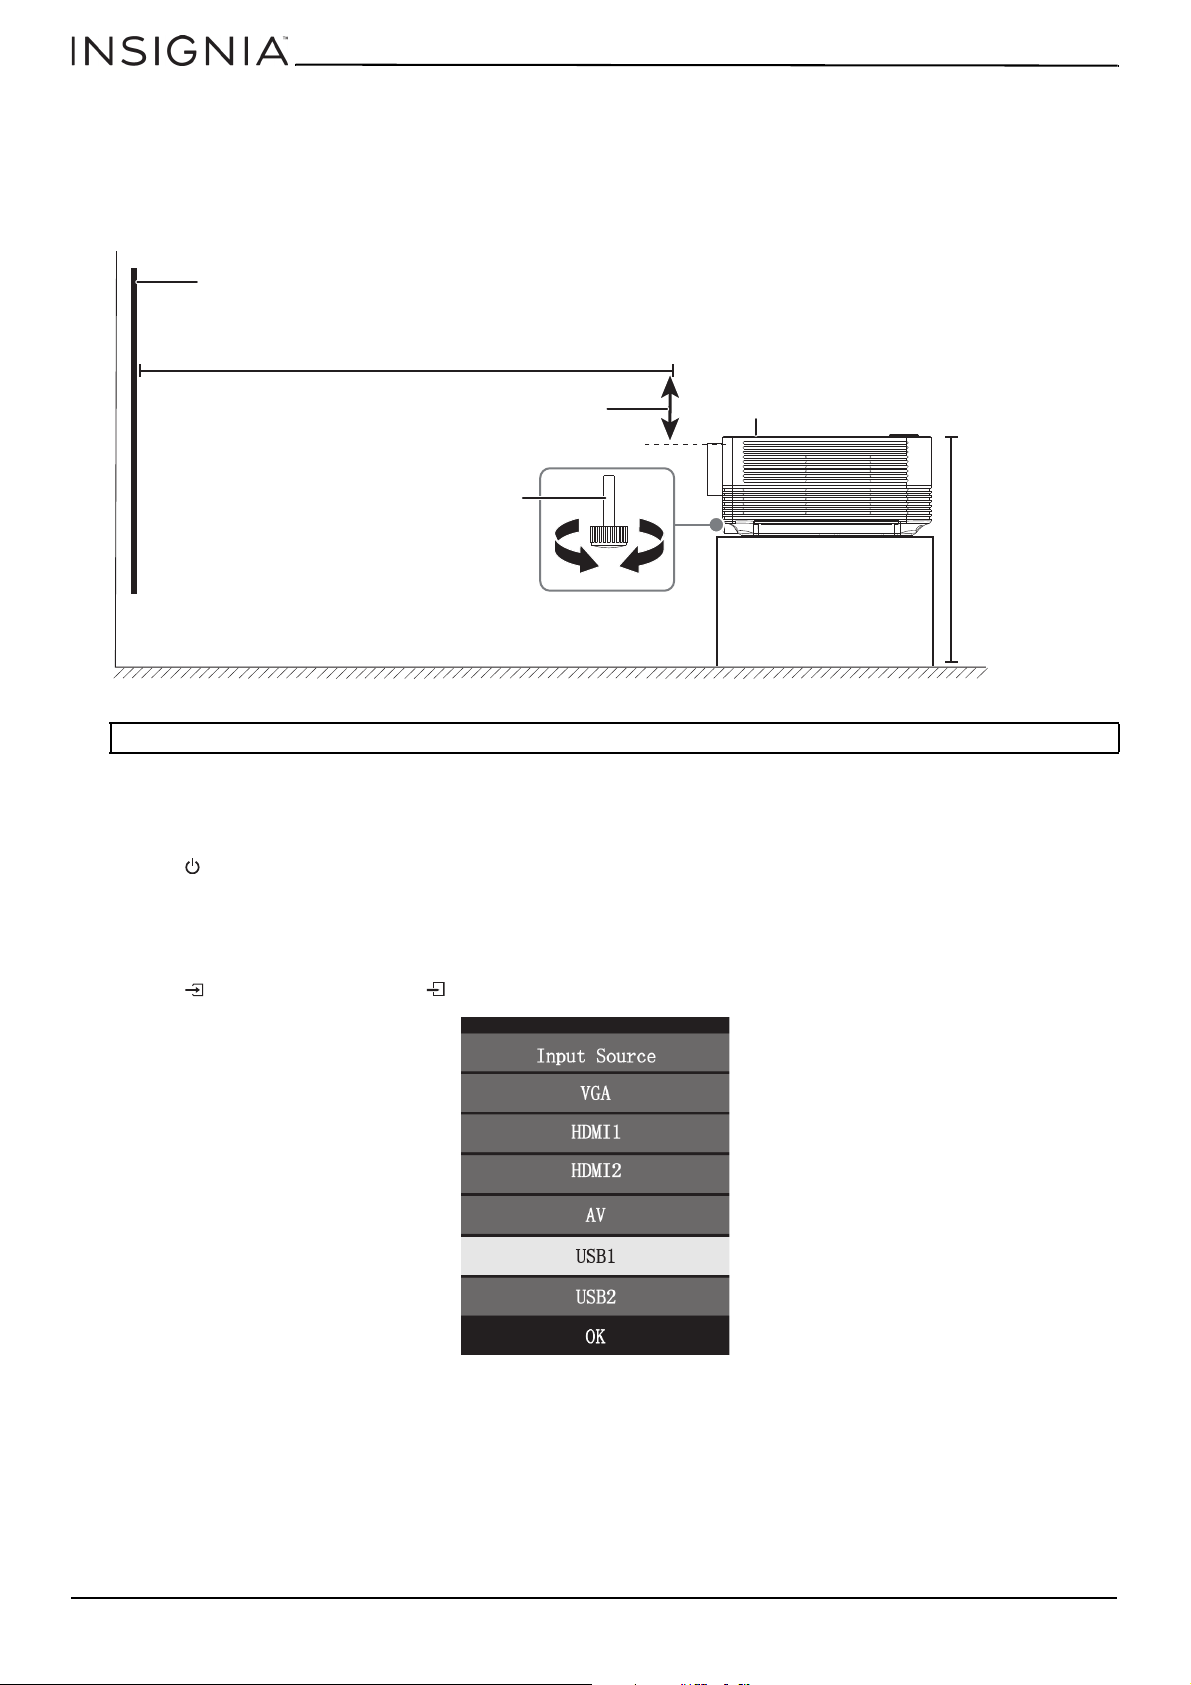
Positioning your projector
You can use your projector both indoors and outdoors (under a cover).
• Place your projector 8 ft. (2.5 m) from the screen and at a height of 4ft. (1.2 m) to use the full screen.
• Turn the keystone wheel on the front of your projector or the adjustment screw on the bottom of your projector to
adjust the projected image angle by ± 15 degrees.
• For best results, use your projector in a dark environment.
Using your projector
Turning your projector on and off
• Press (power) on the remote or on top of your projector to turn your projector on or off.
Selecting the video source
1 Make sure that the video device is connected to your projector.
2 Make sure that both your projector and video device are turned on.
3 Press (source) on the remote or (source) on the top of your projector. The Input Source list opens.
4 Press or to on the remote or projector to select the video source, then press OK. You can select VGA, HDMI1,
HDMI2, AV, USB1, or USB2.
Note: Your projector is not intended for either ceiling or wall mounting.
Screen
Vertical dimension
Keystone
wheel
Adjustment screw
8 ft. (2.5 m)
4 ft. (1.2 m)
www.insigniaproducts.com
15
NS-SCR79KIT
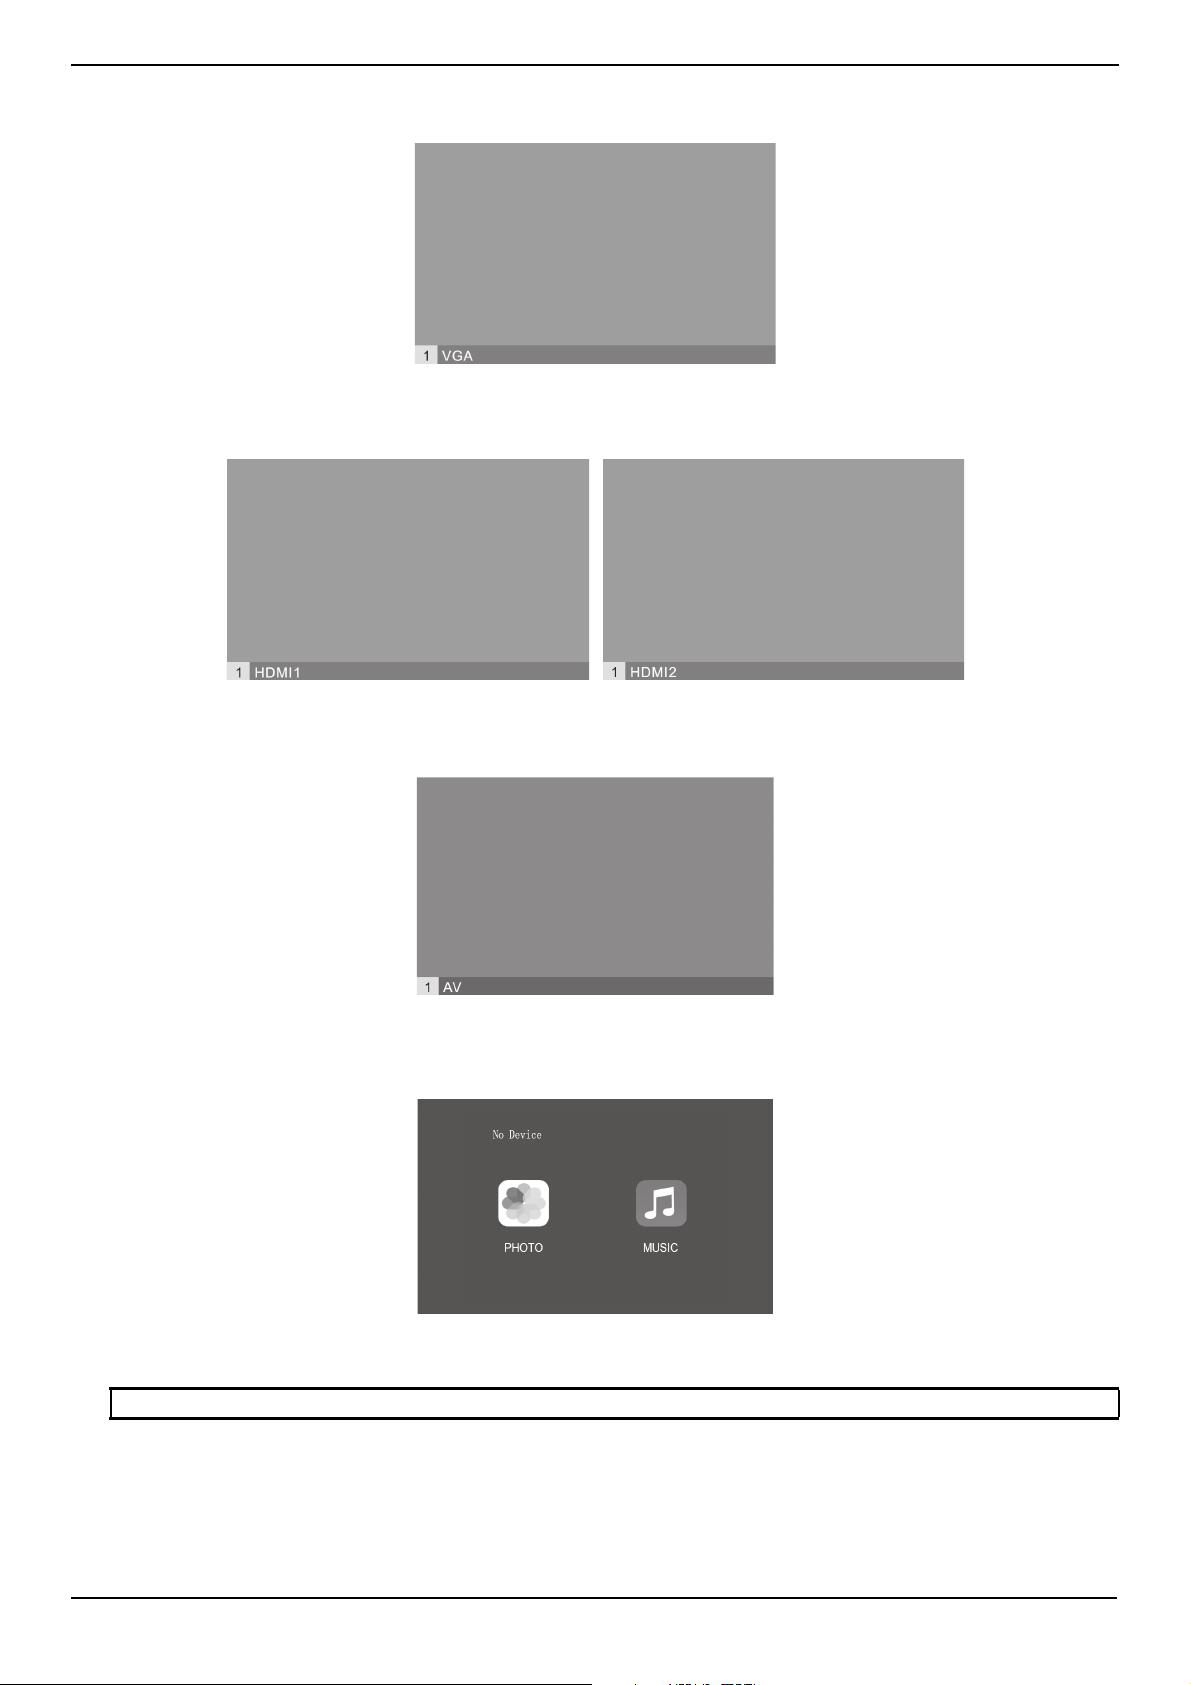
Selecting VGA
• Press or to select VGA, then press OK.
Selecting HDMI
• Press or to select HDMI1 or HDMI2, then press OK.
Selecting AV
• Press or to select AV, then press OK.
Selecting USB
1 Press or to select USB1 or USB2, then press OK.
2 Press or to select PHOTO to view JPG image files or MUSIC to listen to MP3 music files, then press OK.
Note: Your projector only plays JPG or MP3 files.
www.insigniaproducts.com
16
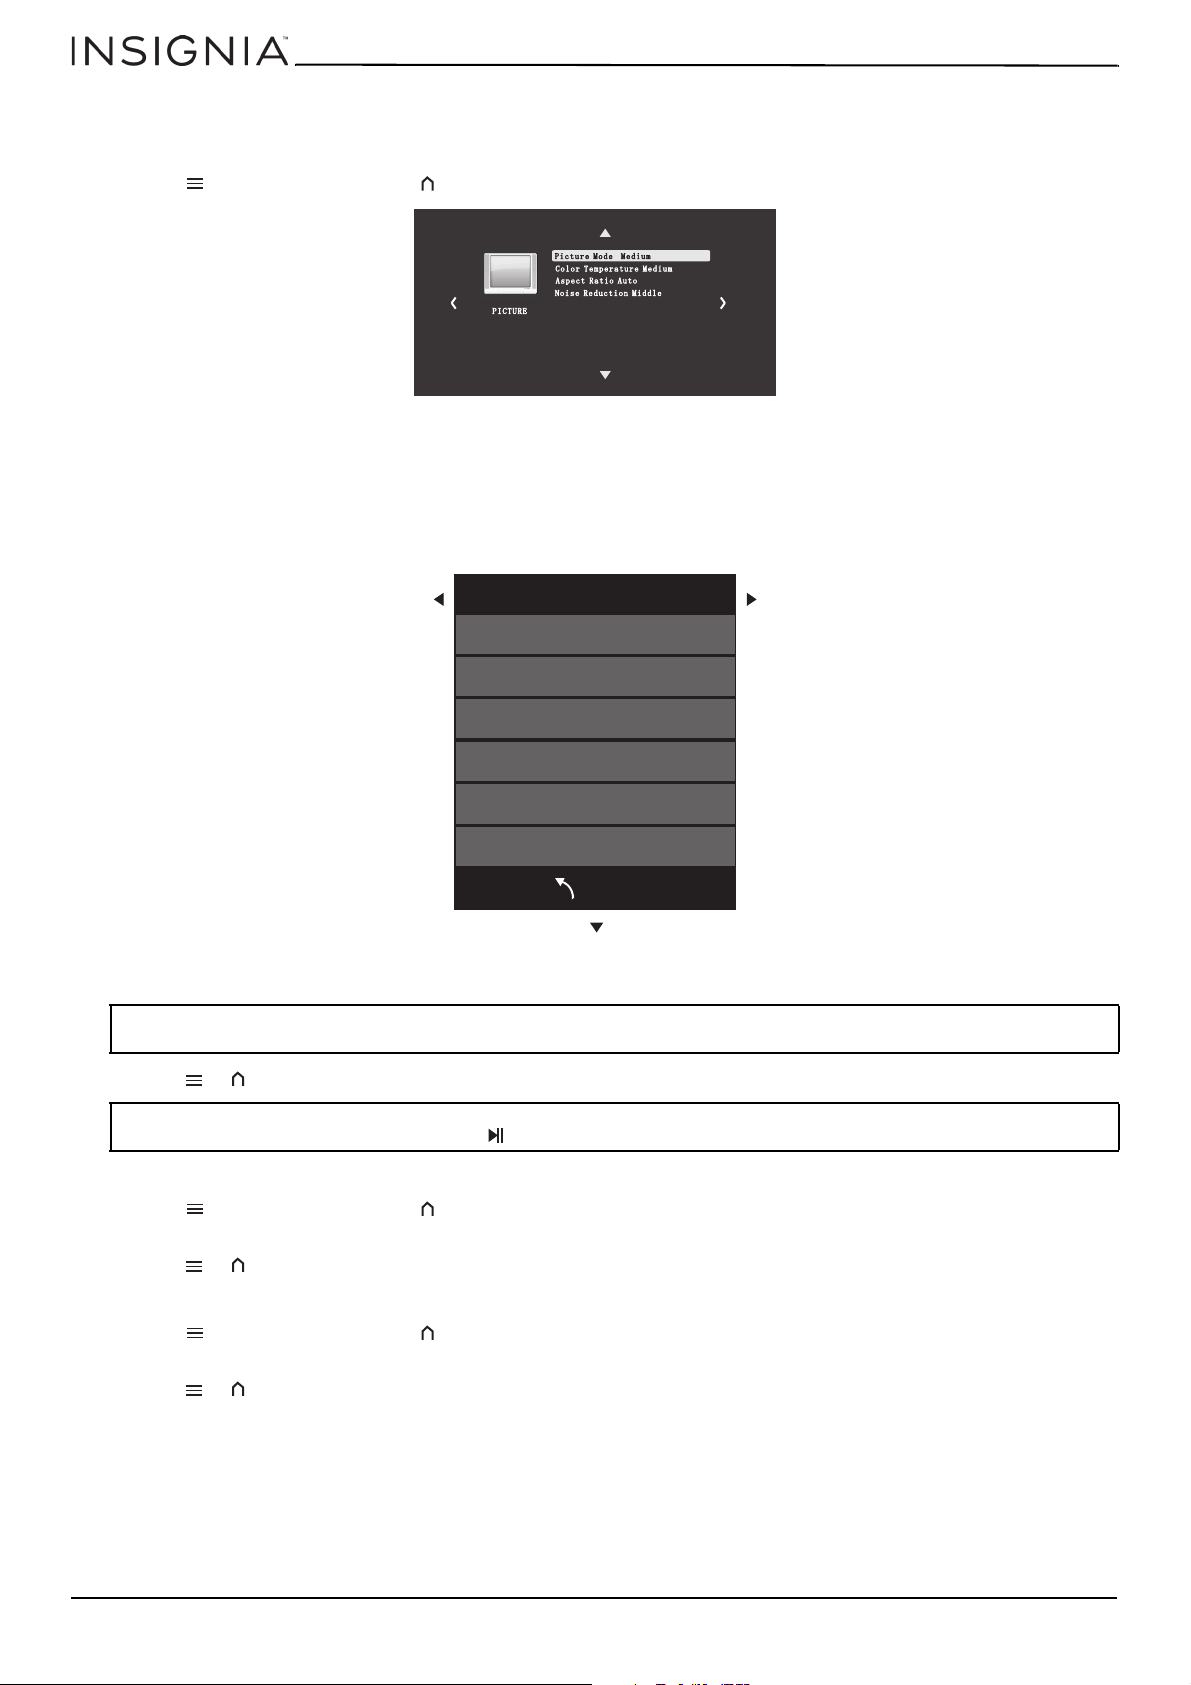
Adjusting the picture
1 Make sure that both your projector and video device are turned on.
2 Turn the focus wheel on the front of your projector to adjust the focus.
3 Press (menu) on the remote or (menu) on the top of your projector. The PICTURE menu opens.
4 Press
or to select Picture Mode, press or to select the picture mode, then press OK. You can select Soft, User,
Vivid, or Medium. The option menu that opens varies based on the picture mode you selected.
5 Press or to select an option, then press or to adjust the option.
If you selected Soft, Vivid, or Medium, you can’t adjust any options.
If you selected User, you can adjust Contrast, Brightness, Color, and Sharpness.
6 Press or to select a picture mode, then press OK. You can select Soft, User, Vivid, or Medium.
7 Press or to close the menu.
Adjusting the contrast
1 Press (menu) on the remote or (menu) on the top of your projector. The PICTURE menu opens.
2 Press or to select Contrast, then press or to adjust the contrast, then press OK.
3 Press or to close the menu.
Adjusting the brightness
1 Press (menu) on the remote or (menu) on the top of your projector. The PICTURE menu opens.
2 Press or to select Brightness, then press or to adjust the brightness, then press OK.
3 Press or to close the menu.
Note: To adjust the other picture options, you must set Picture Mode to User. The other picture modes are preset and can’t be
changed.
Note: If a movie or video stops after you adjust the brightness or contrast, plug a mouse (not included) into the USB port, then use the
mouse to press PLAY on the screen. Do not press (play/pause) on the remote.
Reduce Display size 100%
Picture Mode UserP i c t u r e M o d e U s e r
Contrast 50
Brightness 50
Color 50
Sharpness 50
Tint 50
BACK
www.insigniaproducts.com
17
NS-SCR79KIT
Adjusting the tint
1 Press (menu) on the remote or (menu) on the top of your projector. The PICTURE menu opens.
2 Press or to select Tint, then press or to adjust the tint, then press OK.
3 Press or to close the menu.
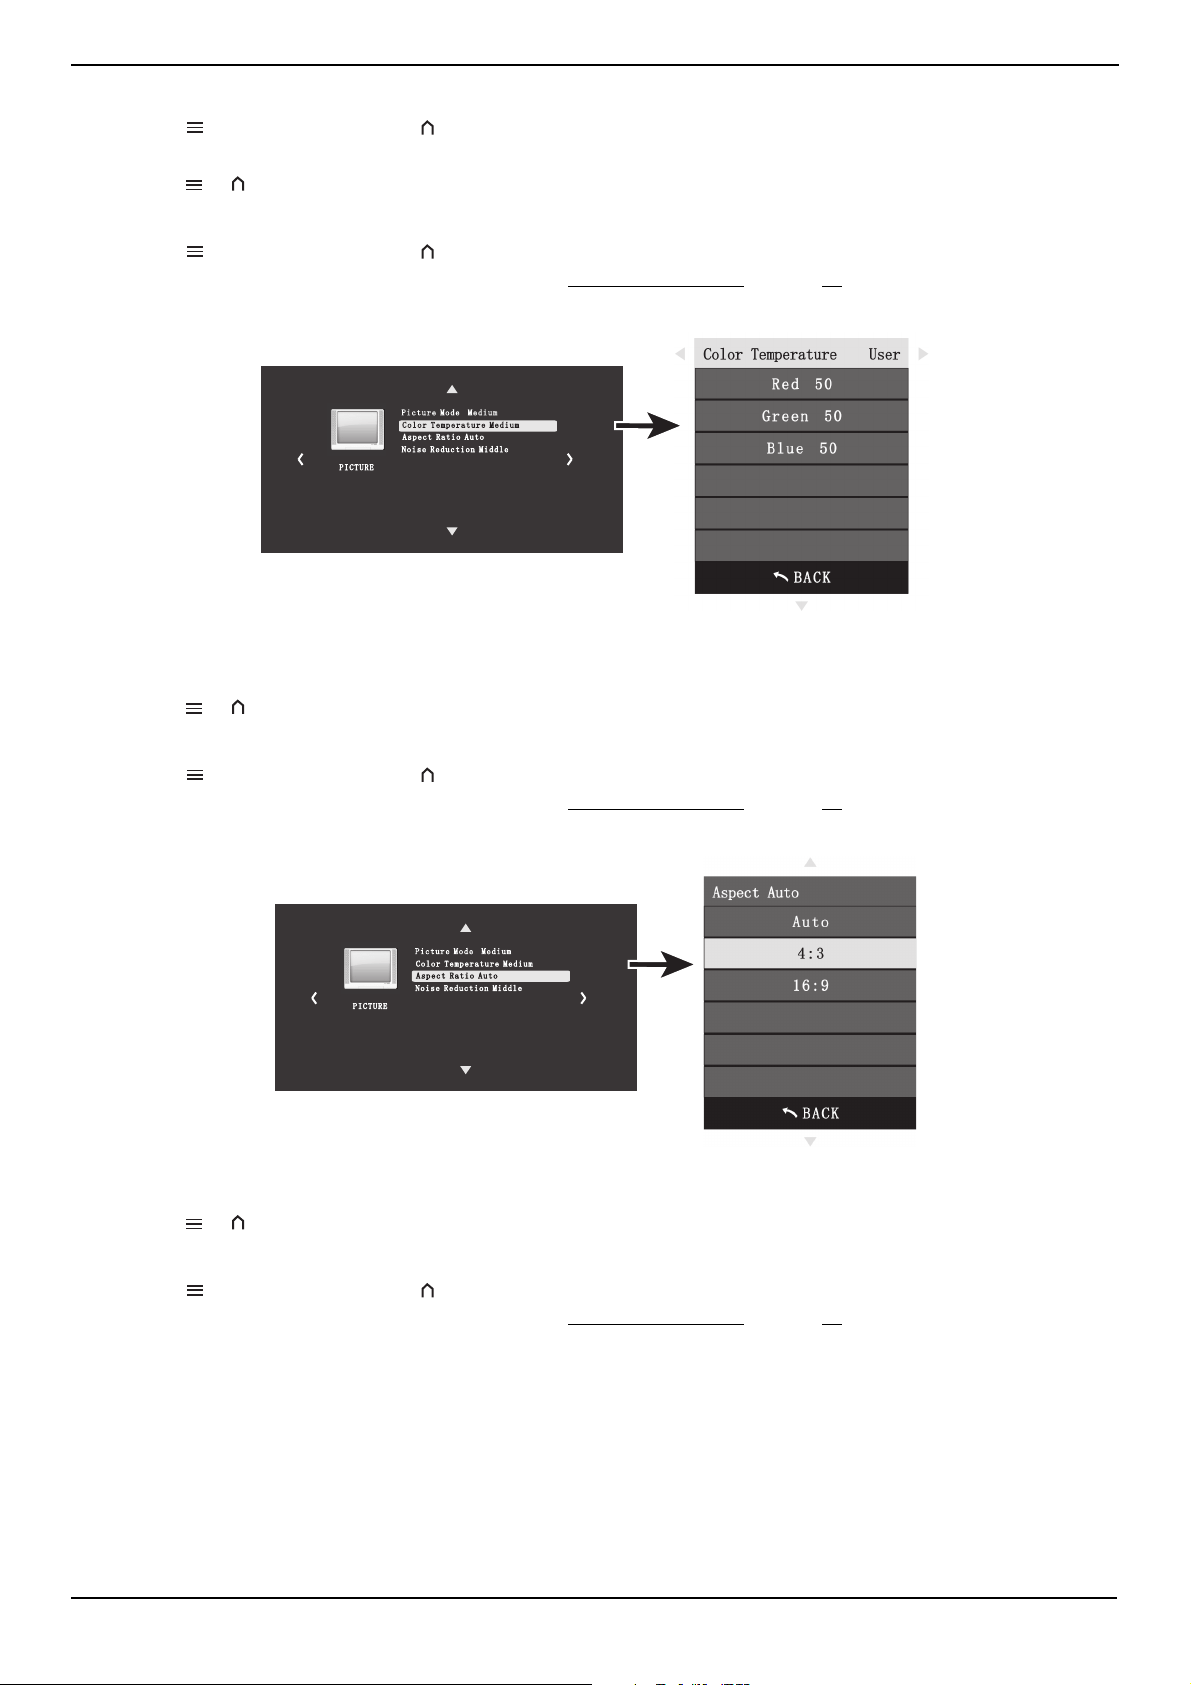
Adjusting the color temperature
1 Press (menu) on the remote or (menu) on the top of your projector. The PICTURE menu opens.
2 Make sure that the Picture Mode is set to User. See Adjusting the picture
on page 16.
3 Press or on the remote or projector to select Color Temperature, then press OK.
4 Press or to select a color to adjust, press or to adjust the color, then press OK. You can select Red, Green, or
Blue.
5 Press or to close the menu or press to return to the option list.
Selecting the aspect ratio
1 Press (menu) on the remote or (menu) on the top of your projector. The PICTURE menu opens.
2 Make sure that the Picture Mode is set to User. See Adjusting the picture
on page 16.
3 Press or to select Aspect Ratio, then press OK.
4 Press or to select an aspect ratio, then press OK.. You can select Auto, 4:3, or 16:9.
5 Press or to close the menu or press to return to the option list.
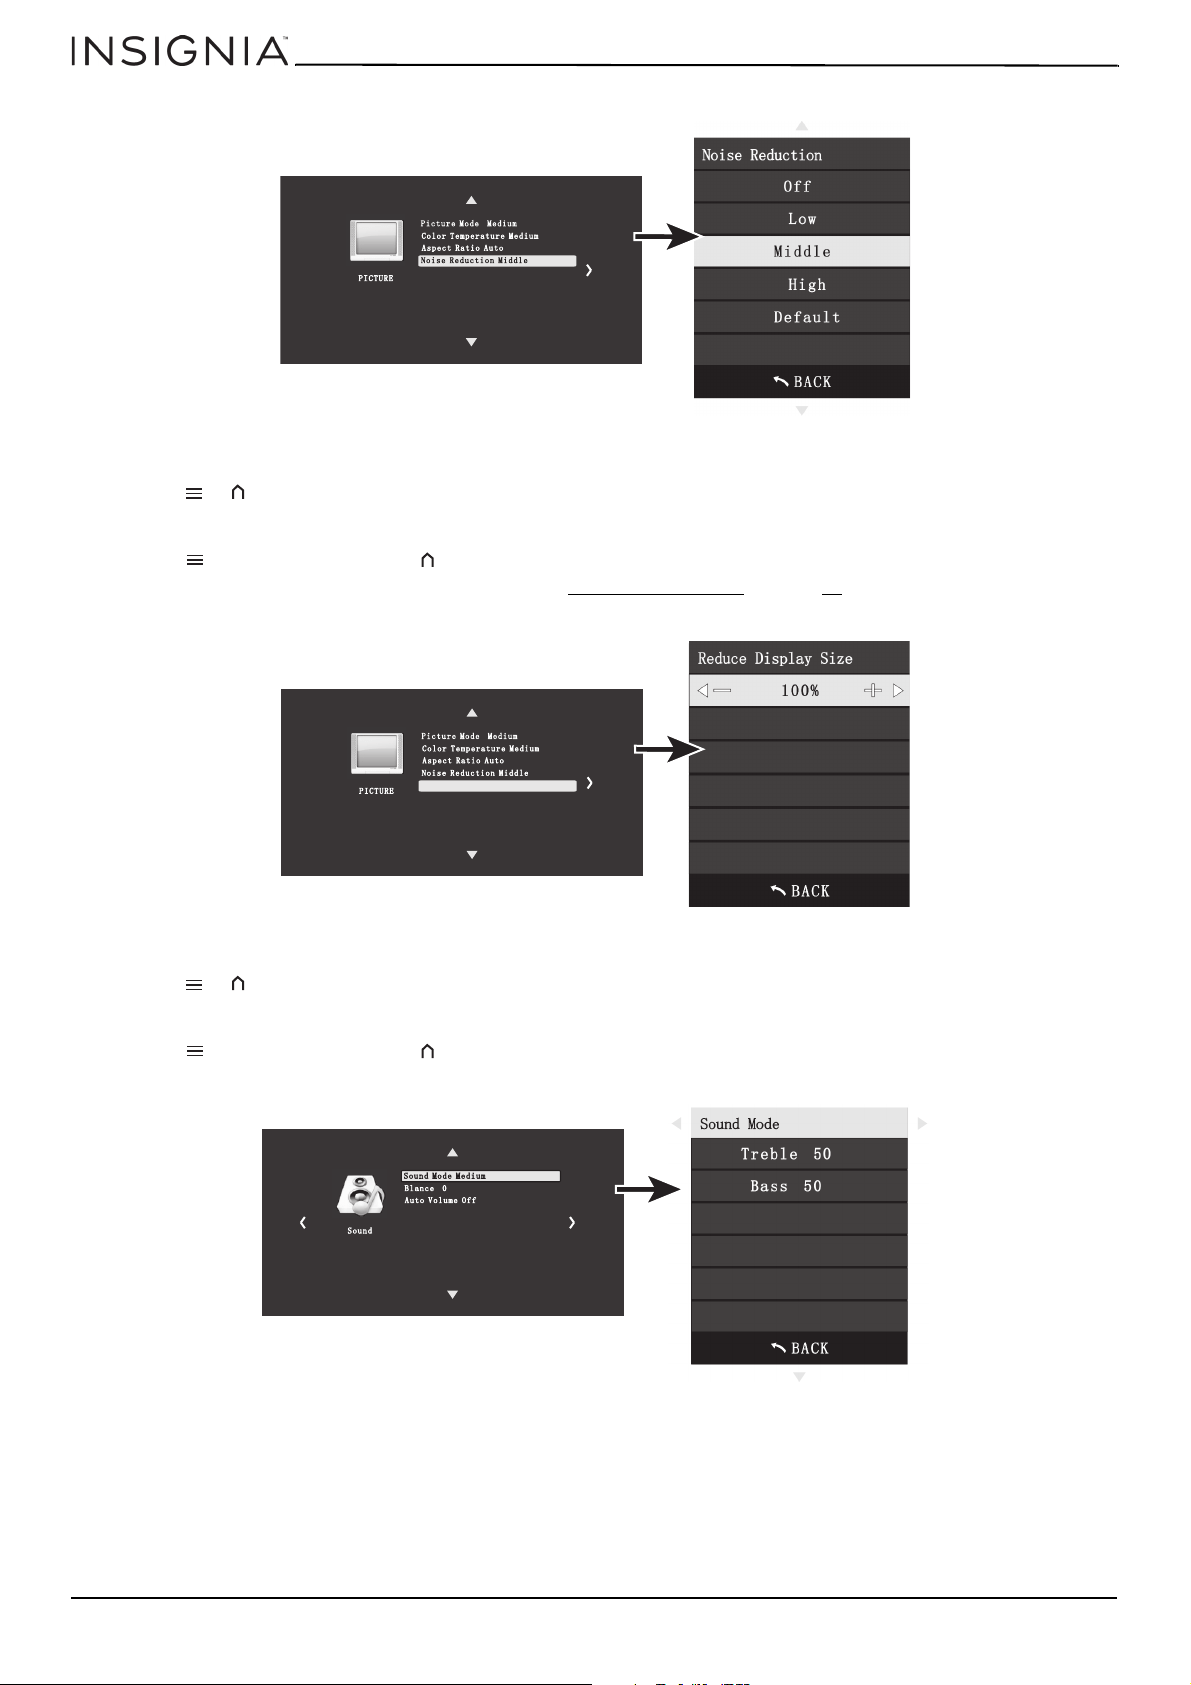
Adjusting the noise reduction
1 Press (menu) on the remote or (menu) on the top of your projector. The PICTURE menu opens.
2 Make sure that the Picture Mode is set to User. See Adjusting the picture
on page 16.
Reduce Display size 100%
Reduce Display size 100%
www.insigniaproducts.com
18
3 Press or to select Noise Reduction, then press OK.
4 Press
or to select a noise reduction option, then press OK.. You can select Off, Low, Middle, High, or Default.
5 Press or to close the menu or press to return to the option list.
Adjusting the display size
1 Press (menu) on the remote or (menu) on the top of your projector. The PICTURE menu opens.
2 Make sure that the Picture Mode is set to User. See Adjusting the picture
on page 16.
3 Press or to select Reduce Display, then press OK.
4 Press or to adjust the display size between 75% and 100%, then press OK
5 Press or to close the menu or press to return to the option list.
Selecting the sound mode
1 Press (menu) on the remote or (menu) on the top of your projector. The PICTURE menu opens.
2 Press or to select the Sound menu, then press OK.
3 Press or to select Sound Mode, press or u to select a sound mode, then press OK. The option menu that opens
varies based on the picture mode you selected.
If you selected Medium, Music, Movie, or Sports, your can’t adjust any options.
If you selected User, you can also adjust the Treble and Bass.
Reduce Display size 100%
Reduce Display size 100%
www.insigniaproducts.com
19
NS-SCR79KIT
4 Press or to close the menu or press to return to the option list.
Adjusting the treble or bass
1 Press (menu) on the remote or (menu) on the top of your projector. The PICTURE menu opens.
2 Press or to select Treble or Bass, press or to adjust the option, then press OK.
3 Press or to close the menu or press to return to the option list.
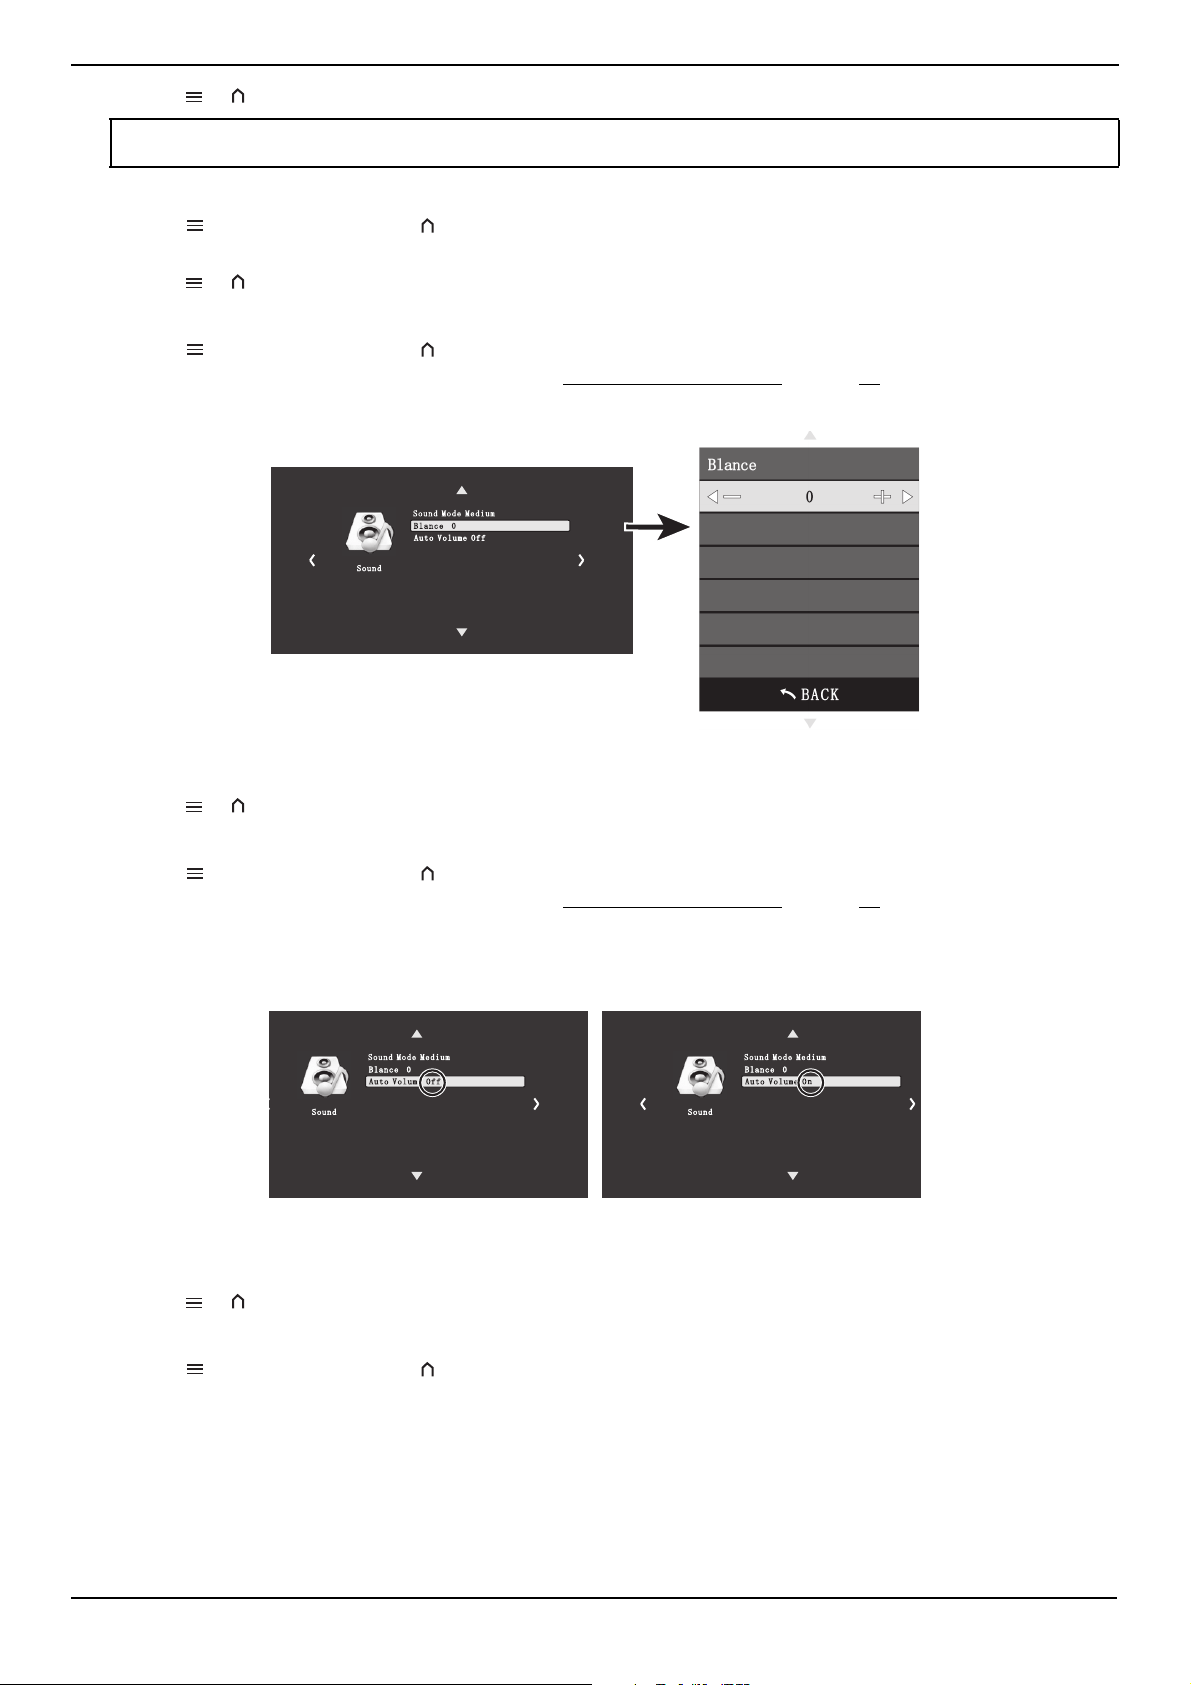
Adjusting the balance
1 Press (menu) on the remote or (menu) on the top of your projector. The PICTURE menu opens.
2 Make sure that the Sound Mode is set to User. See Selecting the sound mode on page 18.
3 Press or to select Balance, then press OK.
4 Press or to adjust the balance between 0 to 50, then press OK
5 Press or to close the menu or press to return to the option list.
Turning the Auto Volume control on or off
1 Press (menu) on the remote or (menu) on the top of your projector. The PICTURE menu opens.
2 Make sure that the Sound Mode is set to User. See Selecting the sound mode
on page 18.
3 Press or to select Auto Volume, then press OK to toggle between Off and On.
4 Press or to close the menu or press to return to the option list.
Setting the sleep timer
1 Press (menu) on the remote or (menu) on the top of your projector. The PICTURE menu opens.
2 Press or to select the TIME menu, then press OK.
Note: To adjust the other sound options, you must set Sound Mode to User. The other picture modes are preset and can’t be
changed.
www.insigniaproducts.com
20
3 Press or to select Sleep Timer, then press OK.
4 Press or to select the sleep timer time, then press OK. You can select Off, 5min, 10min, 15min, 20min, 30min,
40min, 50min, or 60min.
5 Press or to close the menu or press to return to the option list.
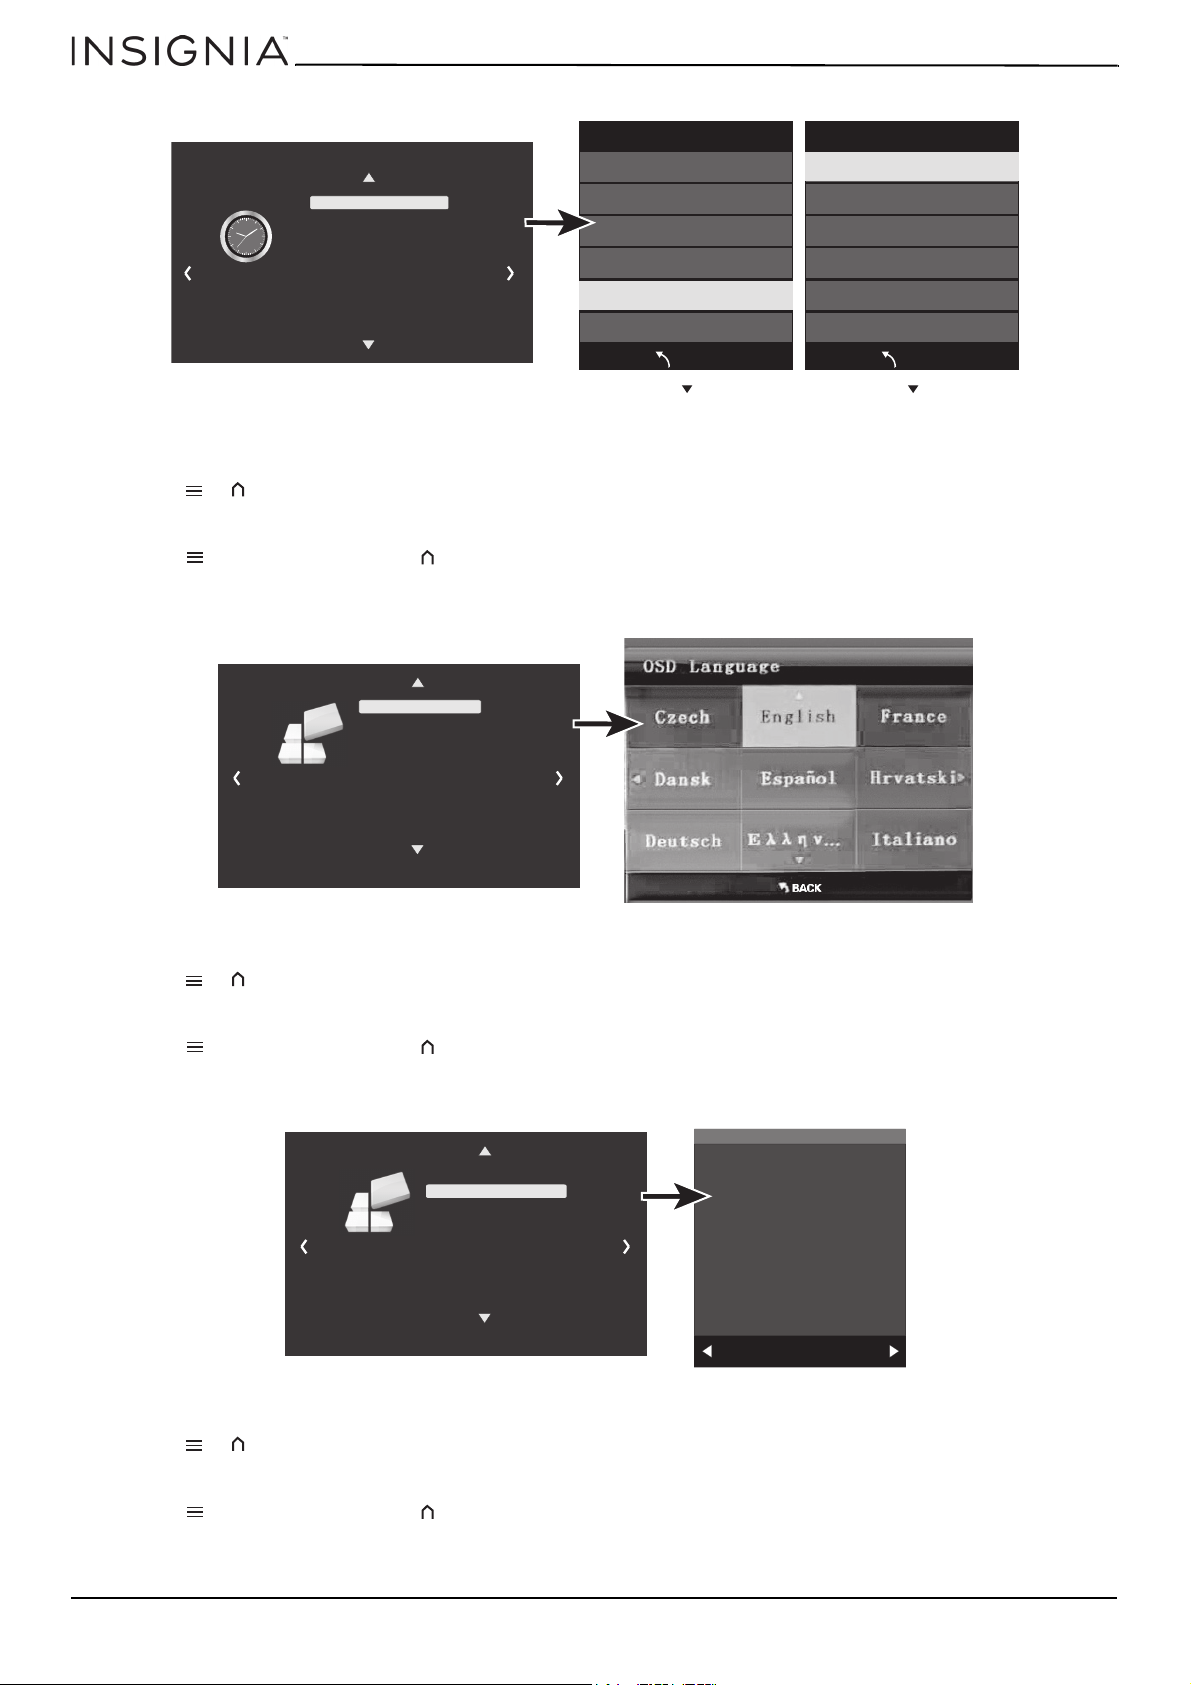
Selecting the OSD language
1 Press (menu) on the remote or (menu) on the top of your projector. The PICTURE menu opens.
2 Press or to select the OPTION menu, then press OK.
3 Press or to select OSD Language, then press OK.
4 Press the arrows to select the language you want, then press OK.
5 Press or to close the menu or press to return to the option list.
Restoring factory defaults
1 Press (menu) on the remote or (menu) on the top of your projector. The PICTURE menu opens.
2 Press or to select the OPTION menu.
3 Press or to select Restore Factory Default, then press OK.
4 Press or to select Ye s or No, then press OK.
5 Press or to close the menu or press to return to the option list.
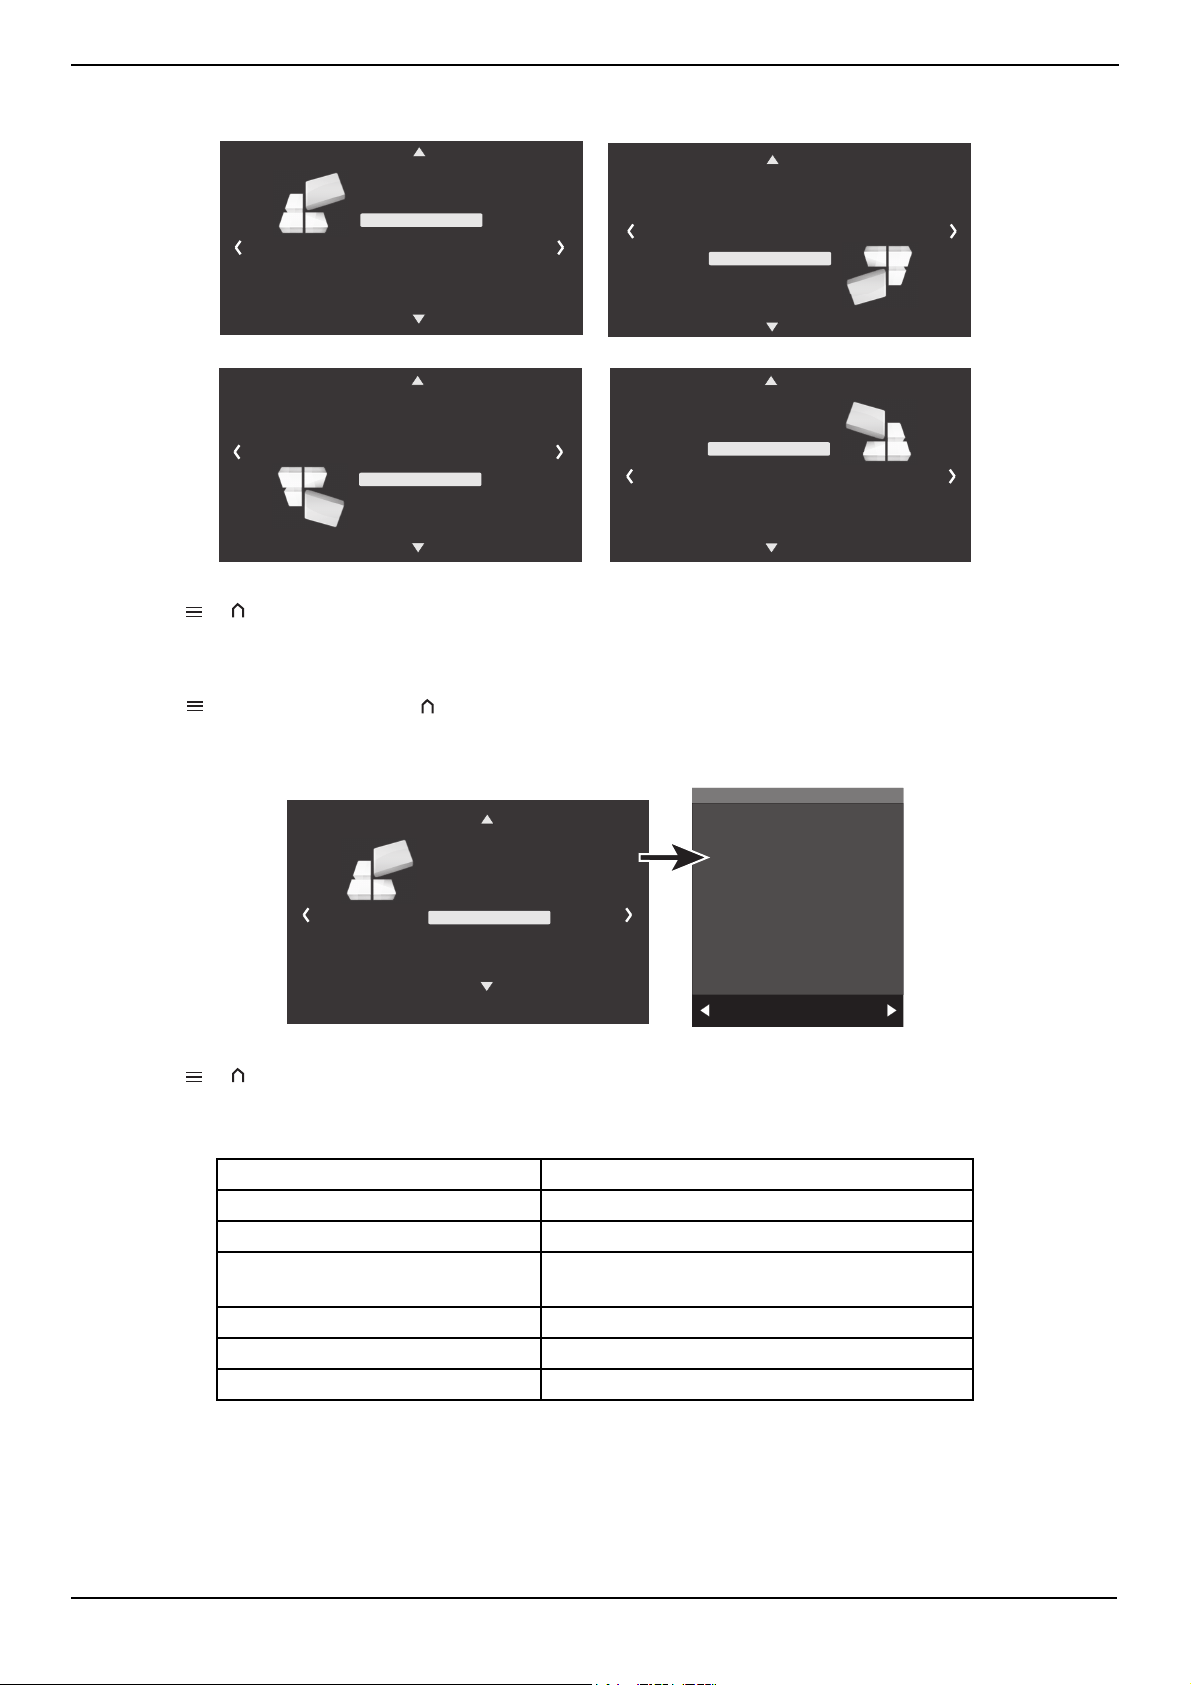
Rotating the picture
1 Press (menu) on the remote or (menu) on the top of your projector. The PICTURE menu opens.
2 Press or to select the OPTION menu.
Sleep TimerS l e e p T i m e r
Off
5min
10min
15min
30min
BACK
6OHHSWLPHU2II
7,0(
20min
Sleep TimerS l e e p T i m e r
50min
60min
BACK
40min
2626'
/DQJXDJ
/DQJXDJH (QJOLV(QJOLVK
5HVWRUHH)DFWRU\\'HIDXOW
+'0,&(&
+'0,&(&
5RWDWHH
26' 'XUDWLRQ 2II
6RIWZDUHH8SGDWH86%
237,21
2626'
/DQJXDJ/DQJXDJH(QJOLV(QJOLVK
55HHVVWWRRUUHH))DDFFWWRRUU\\''HHIIDDXXOOWW
+'0,&(&+'0,&(&
5RWDWHH
2266''''XXUUDDWWLLRRQQ22IIII
66RRIIWWZZDDUUHH88SSGGDDWWHH8866%%
237,21
$UH
\RX
VXUH"
<HV1R
www.insigniaproducts.com
21
NS-SCR79KIT
3 Press or to select Rotate, then press OK one or more times to select how you want the picture to rotate. You can
select Rotate 0, Rotate 1, Rotate 2, or Rotate 3.
4 Press or to close the menu or press
to return to the option list.
Updating the USB software
1 Insert a USB device into a USB port on your projector.
2 Press (menu) on the remote or (menu) on the top of your projector. The PICTURE menu opens.
3 Press or to select the OPTION menu.
4 Press or to select Software Update(USB), press to select Ye s or to select No, then press OK.
5 Press or to close the menu or press
to return to the option list.
Specifications
Projector dimensions (H × W × D) 2.8 ×9 × 4.5 in. (32.6 × 22.8 × 11.4 cm)
Total weight 20.3 lbs. (9.2 kg)
Screen diagonal 91 in. (231.1 cm)
Power requirements Adapter input: 100-240 V~50/60 Hz 1.5 A
Output: 19 V/3.4 A
Bluetooth 5.0
Viewing angle
180°
Screen material
Polyester
2626'
/DQJXDJ/DQJXDJH(QJOLV(QJOLVK
5HVWRUHH)DFWRU\\'HIDXOW
+'0,&(&
+'0,&(&
55RRWWDDWWHH
26'''XUDWLRQQ2II
6RIWZDUHH8SGDWH86%
237,21
2626'
/DQJXDJ/DQJXDJH(QJOLV(QJOLVK
5HVWRUHH)DFWRU\\'HIDXOW
+'0,&(&
+'0,&(&
55RRWWDDWWHH
26'''XUDWLRQQ2II
6RIWZDUHH8SGDWH86%
237,21
2626'
/DQJXDJ/DQJXDJH(QJOLV(QJOLVK
5HVWRUHH)DFWRU\\'HIDXOW
+'0,&(&
+'0,&(&
55RRWWDDWWHH
26'''XUDWLRQQ2II
6RIWZDUHH8SGDWH86%
237,21
2626'
/DQJXDJ/DQJXDJH(QJOLV(QJOLVK
5HVWRUHH)DFWRU\\'HIDXOW
+'0,&(&
+'0,&(&
55RRWWDDWWHH
26'''XUDWLRQQ2II
6RIWZDUHH8SGDWH86%
237,21
2626'
/DQJXDJ/DQJXDJH(QJOLV(QJOLVK
5HVWRUHH)DFWRU\\'HIDXOW
+'0,&(&
+'0,&(&
5RWDWHH
26'''XUDWLRQQ2II
66RRIIWWZZDDUUHH88SSGGDDWWHH8866%%
237,21
$UH\RXVXUH"
<HV1R

www.insigniaproducts.com
22
Legal notices
FCC ID
The FCC ID for the included Bluetooth speaker is HBONSSONIC20.
FCC statement
This device complies with Part 15 of the FCC Rules. Operation is subject to the following two conditions:
1) This device may not cause harmful interference, and
2) This device must accept any inference received, including interference that may cause undesired operation.
FCC Caution
Changes or modifications not expressly approved by the party responsible for compliance could void the user’s authority to operate this equipment.
Note: This equipment has been tested and found to comply with the limits for a Class B digital device, pursuant to Part 15 of the FCC Rules.
These limits are designed to provide reasonable protection against harmful interference in a residential installation. This equipment generates, uses, and can
radiate radio frequency energy and, if not installed and used in accordance with the instructions, maybe cause harmful interference to radio
communications.However, there is no guarantee that interference will not occur in a particular installation. If this equipment does cause harmful interference
to radio or television reception, which can be determined by turning the equipment off and on, the user is encouraged to try to correct the interference by one
or more of the following measures:
• Reorient or relocate the receiving antenna.
• Increase the separation between the equipment and receiver.
• Connect the equipment into an outlet on a circuit different from that to which the receiver is connected.
• Consult the dealer or an experienced radio/TV technician for help.
This equipment complies with FCC and Industry Canada radiation exposure limits set forth for an uncontrolled environment.
RG1 IEC 62471-5:2015

www.insigniaproducts.com
23
NS-SCR79KIT
ONE-YEAR LIMITED WARRANTY
Definitions:
The Distributor* of Insignia branded products warrants to you, the original purchaser of this new Insignia-branded product (“Product”), that the Product shall
be free of defects in the original manufacturer of the material or workmanship for a period of one (1) year from the date of your purchase of the Product
(“Warranty Period”).
For this warranty to apply, your Product must be purchased in the United States or Canada from a Best Buy branded retail store or online at www.bestbuy.com
or www.bestbuy.ca
and is packaged with this warranty statement.
How long does the coverage last?
The Warranty Period lasts for 1 year (365 days) from the date you purchased the Product. Your purchase date is printed on the receipt you received with the
Product.
What does this warranty cover?
During the Warranty Period, if the original manufacture of the material or workmanship of the Product is determined to be defective by an authorized Insignia
repair center or store personnel, Insignia will (at its sole option): (1) repair the Product with new or rebuilt parts; or (2) replace the Product at no charge with
new or rebuilt comparable products or parts. Products and parts replaced under this warranty become the property of Insignia and are not returned to you. If
service of Products or parts are required after the Warranty Period expires, you must pay all labor and parts charges. This warranty lasts as long as you own your
Insignia Product during the Warranty Period. Warranty coverage terminates if you sell or otherwise transfer the Product.
How to obtain warranty service?
If you purchased the Product at a Best Buy retail store location or from a Best Buy online website (www.bestbuy.com
or www.bestbuy.ca), please take your
original receipt and the Product to any Best Buy store. Make sure that you place the Product in its original packaging or packaging that provides the same
amount of protection as the original packaging.
To obtain warranty service, in the United States and Canada call 1-877-467-4289. Call agents may diagnose and correct the issue over the phone.
Where is the warranty valid?
This warranty is valid only in the United States and Canada at Best Buy branded retail stores or websites to the original purchaser of the product in the country
where the original purchase was made.
What does the warranty not cover?
This warranty does not cover:
REPAIR REPLACEMENT AS PROVIDED UNDER THIS WARRANTY IS YOUR EXCLUSIVE REMEDY FOR BREACH OF WARRANTY. INSIGNIA SHALL NOT BE LIABLE FOR
ANY INCIDENTAL OR CONSEQUENTIAL DAMAGES FOR THE BREACH OF ANY EXPRESS OR IMPLIED WARRANTY ON THIS PRODUCT, INCLUDING, BUT NOT
LIMITED TO, LOST DATA, LOSS OF USE OF YOUR PRODUCT, LOST BUSINESS OR LOST PROFITS. INSIGNIA PRODUCTS MAKES NO OTHER EXPRESS WARRANTIES
WITH RESPECT TO THE PRODUCT, ALL EXPRESS AND IMPLIED WARRANTIES FOR THE PRODUCT, INCLUDING BUT NOT LIMITED TO ANY IMPLIED WARRANTIES OF
AND CONDITIONS OF MERCHANTABILITY AND FITNESS FOR A PARTICULAR PURPOSE, ARE LIMITED IN DURATION TO THE WARRANTY PERIOD SET FORTH
ABOVE AND NO WARRANTIES, WHETHER EXPRESS OR IMPLIED, WILL APPLY AFTER THE WARRANTY PERIOD. SOME STATES, PROVINCES AND JURISDICTIONS DO
NOT ALLOW LIMITATIONS ON HOW LONG AN IMPLIED WARRANTY LASTS, SO THE ABOVE LIMITATION MAY NOT APPLY TO YOU. THIS WARRANTY GIVES YOU
SPECIFIC LEGAL RIGHTS, AND YOU MAY ALSO HAVE OTHER RIGHTS, WHICH VARY FROM STATE TO STATE OR PROVINCE TO PROVINCE.
Contact Insignia:
1-877-467-4289
www.insigniaproducts.com
INSIGNIA is a trademark of Best Buy and its affiliated companies.
*Distributed by Best Buy Purchasing, LLC
7601 Penn Ave South, Richfield, MN 55423 U.S.A.
©2021 Best Buy. All rights reserved.
• Food loss/spoilage due to failure of refrigerator or freezer
• Customer instruction/education
• Installation
•Set up adjustments
• Cosmetic damage
• Damage due to weather, lightning, and other acts of God, such as power
surges
•Accidental damage
•Misuse
•Abuse
•Negligence
• Commercial purposes/use, including but not limited to use in a place of
business or in communal areas of a multiple dwelling condominium or
apartment complex, or otherwise used in a place of other than a private
home.
• Modification of any part of the Product, including the antenna
• Display panel damaged by static (non-moving) images applied for
lengthy periods (burn-in).Damage due to incorrect operation or
maintenance
• Connection to an incorrect voltage or power supply
• Attempted repair by any person not authorized by Insignia to service
the Product
• Products sold “as is” or “with all faults”
• Consumable s, including but not limited to batteries (i.e. AA, AAA, C etc.)
• Products where the factory applied serial number has been altered or
removed
• Loss or Theft of this product or any part of the product
• Display panels containing up to three (3) pixel failures (dots that are
dark or incorrectly illuminated) grouped in an area smaller than one
tenth (1/10) of the display size or up to five (5) pixel failures throughout
the display. (Pixel based displays may contain a limited number of pixels
that may not function normally.)
• Failures or Damage caused by any contact including but not limited to
liquids, gels or pastes.

For product inquiries, please contact us with the information below:
1-877-467-4289
www.insigniaproducts.com
INSIGNIA is a trademark of Best Buy and its affiliated companies.
Distributed by Best Buy Purchasing, LLC
7601 Penn Ave South, Richfield, MN 55423 U.S.A.
©2021 Best Buy. All rights reserved.
V3 ENGLISH
21-0704