Loading ...
Loading ...
Loading ...
ninjakitchen.com
ninjakitchen.com
CLEANING & MAINTENANCE
DISHWASHER-SAFE PARTS:
Brew Basket, Permanent Filter, Ninja Pod Adapter,
Water Reservoir, Frother Whisk, Nozzle, and Ninja
Smart Scoop.
CLEANING THE FROTHER
Clean the Frother Whisk after each use. Hand-
wash thoroughly or wash in the dishwasher.
CLEANING THE WATER RESERVOIR
Empty the Water Reservoir and hand-wash
or place in dishwasher. For a better clean, we
recommend placing it in the bottom rack of the
dishwasher standing upright with the opening
facing downward.
CLEANING THE ADAPTER STORAGE BIN
Remove the Adapter Storage Bin from the unit and
the adapter inside. Hand-wash thoroughly with
warm soapy water.
CLEANING THE NINJA POD ADAPTER
If brewing pods, first remove the used pods from
the Ninja Pod Adapter. Then pinch the right tab of
the handle and lift straight up to remove from the
brew basket. Hand-wash the Ninja Pod Adapter
and brew basket with warm soapy water. To
ensure that the needle in the Ninja Pod Adapter
is free from any residual buildup, we recommend
using a flat wire or plastic clip, such as a paper
clip, to clean it out.
CLEANING AFTER BREW
CLEANING THE NOZZLE
Remove the nozzle by
pinching the sides and
pulling out of the coee
maker. Hand-wash
thoroughly or wash in
the dishwasher. We
recommend checking
and cleaning the
nozzle periodically to
ensure there is no built-
up residue from brewed
coee which may cause
overflow in the nozzle.
When reinstalling the
nozzle, ensure that the
nozzle is securely in place
on the coee maker.
CLEANING THE PERMANENT FILTER
If brewing grounds, allow the coee maker to cool.
First remove the Permanent Filter by pinching
both tabs of the Permanent Filter and brew
basket handle and lift up to prevent dripping,
then open the Permanent Filter lid back until it is
fixed in place to discard the used grounds. The
showerhead on the Permanent Filter can also
be removed by turning it counterclockwise and
pulling it o the lid. To reinstall the showerhead
back on the Permanent Filter lid, line up the
notches on the Permanent Filter lid with the
cutouts on the showerhead and turn clockwise.
Hand-wash the Permanent Filter, showerhead, and
brew basket with warm soapy water.
CLEANING & DESCALING YOUR BREWING SYSTEM
The Intelligent Clean Cycle Indicator will
automatically illuminate orange when a
cleaning cycle is recommended for the coee
maker. The coee maker will eventually need
to be cleaned with a clean cycle. The clean
cycle is used for descaling the coee maker
when calcium scale buildup is aecting the
performance of the coee maker and/or the
flavor of your coee.
NOTE: The clean cycle takes approximately
75 minutes.
BEFORE YOU BEGIN
You will need a large vessel that holds at least
56 oz. of water. We recommend using a 2 qt. or
larger mixing bowl or saucepan. If you are unsure
if you have a large enough vessel, fill the water
reservoir to the MAX line and pour it into the
desired vessel to ensure capacity.
TO CLEAN AND DESCALE YOUR NINJA
SINGLE-SERVE COFFEE MAKER:
1 Insert either the Permanent Filter or Ninja Pod
Adapter in the brew basket and close the lid.
Ensure there are no grounds or pods inside the
coee maker.
OR
2 Remove the Adjustable Cup Tray by lifting up
and out.
3 Place vessel beneath the nozzle.
NOTE: Ensure vessel can hold at least 56 oz.
(MAX line) of water.
4 Fill the water reservoir with 16 oz. of white
vinegar, then fill the rest of the reservoir with
water up to, but not exceeding, the MAX line.
5 Once the water reservoir is filled with white
vinegar and water mixture, press the CLEAN
button.
6 Press the BREW button to begin the cleaning
cycle. The clean cycle will take approximately
75 minutes. The coee maker will deliver a
small amount of cleaning solution to distribute
through the system. It will then pause, deliver
additional cleaning solution, and repeat this
process for 75 minutes. The extended pauses
allow for maximum cleaning and descaling.
IMPORTANT: Only use white vinegar OR descale
solution to product spec.
IMPORTANT: If you cancel the clean cycle
while it is running your coee maker will not be
properly descaled.
NOTE: To cancel the clean cycle, press the
Power button or CLEAN button once. The
coee maker will beep and stop brewing
through the cleaning mixture. Continue to
follow the instructions starting at Step 4.
7 Upon completion, the coee maker will beep
and the Clean Cycle Indicator will turn o.
8 Empty the vessel and clean the water reservoir
with warm, soapy water to remove any cleaning
solution that could aect the flavor of your
coee.
9 Place the vessel back beneath the nozzle and fill
the water reservoir with fresh water to the
24 oz. line.
10 Flush the system by running a water only
24 oz. Classic brew.
INTEGRATED FROTHER (NOT INCLUDED ON ALL MODELS)
INTEGRATED FROTHER
The Integrated Frother does not heat milk.
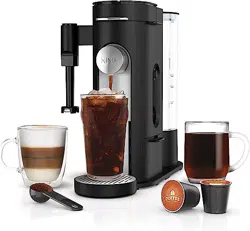
1 Add milk to your cup until it is about
1
/3 full.
• For cold froth, continue to Step 2.
• For hot froth, microwave for 45–60 seconds.
WARNING: To avoid contact with steam and hot
surfaces, DO NOT reach across top of coee
maker to froth.
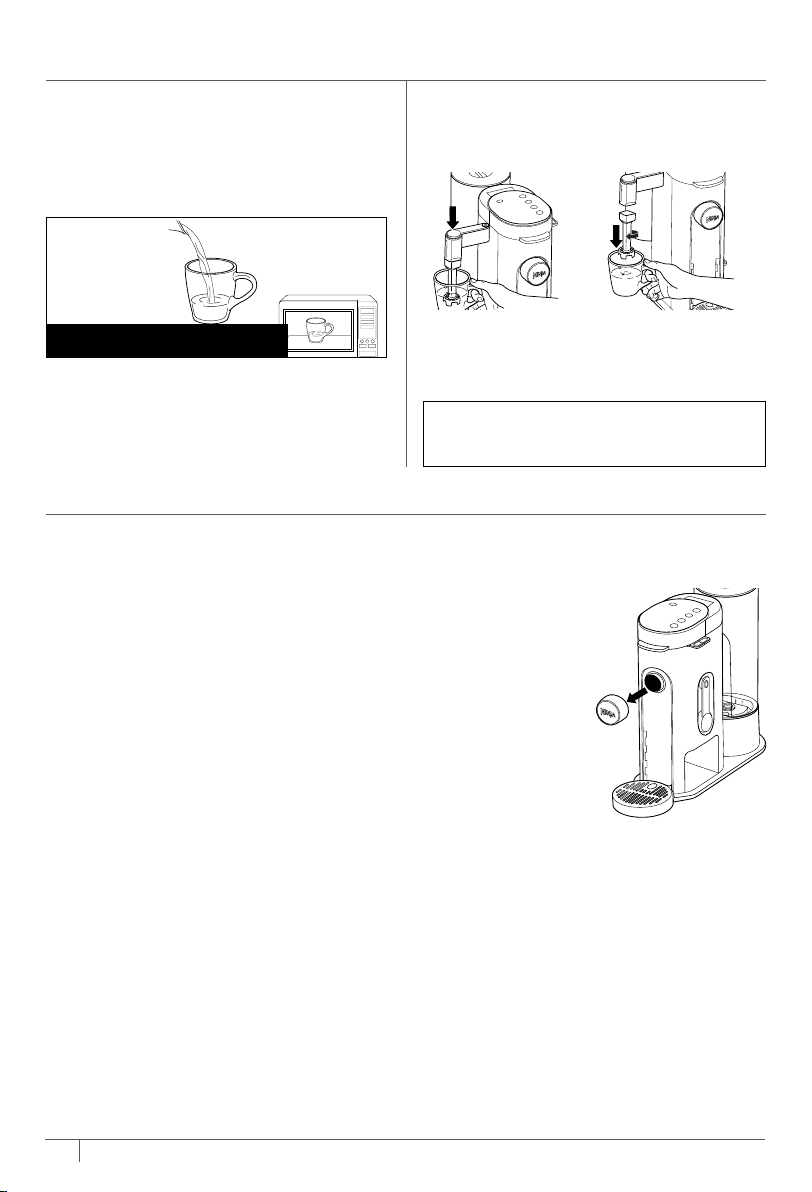
FOR HOT FROTH
2 Swing the arm of the frother toward the front
of the coee maker. Install the frother whisk by
twisting it to the right.
3 Hold the cup under the frother and submerge
the whisk just below the surface of the milk.
Press and hold the button on top of the frother
and froth for 30–45 seconds.
4 Remove the frother whisk by twisting it to the
left. Keep your cup below the whisk while you
carry it to your sink or dishwasher for easy
cleaning.
8 9
Loading ...
Loading ...
Loading ...