USER MANUAL
MANUEL DE L’UTILISATEUR
MSU16U6DBBC
Warning notices: Before using this product, please read this manual carefully and keep it for future reference.
The design and specifications are subject to change without prior notice for product improvement.
Consult with your dealer or manufacturer for details.
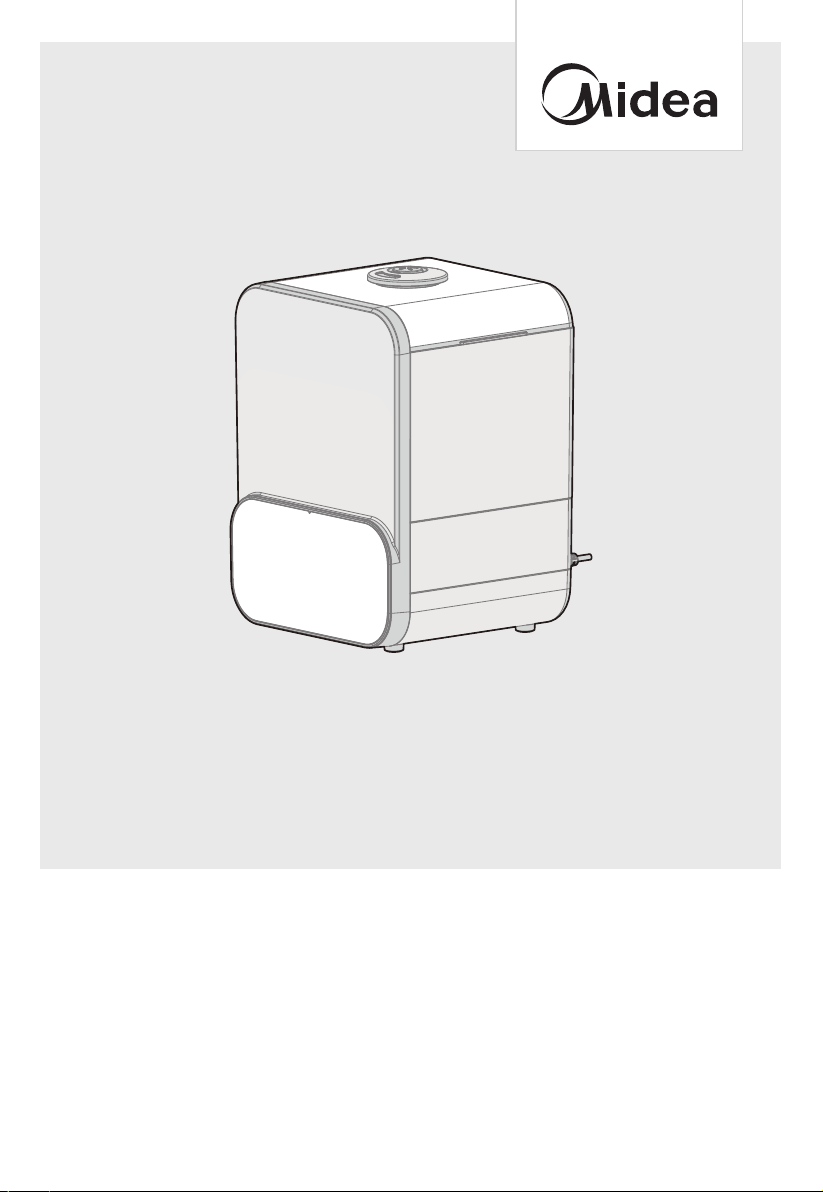
The diagram above is just for reference. Please take the appearance of the actual product as the standard.
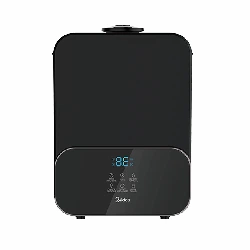
1.6 GALLON WARM AND COOL MIST
ULTRASONIC HUMIDIFIER
HUMIDIFICATEUR ULTRASONIQUE A VAPEUR
CHAUDE ET FROIDE DE 1,6 GALLON
Avertissements : Avant d'utiliser ce produit, merci de lire attentivement ce manuel et de le conserver pour
toute référence ultérieure. La conception et les spécifications sont susceptibles d'être modifiées sans
préavis afin d’améliorer le produit.
Consulter votre revendeur ou le fabricant pour plus de détails.
Le schéma ci-dessus n'est que pour référence. Merci de considérer l'apparence du produit réel comme la
norme.

THANK YOU LETTER
Thank you for choosing Midea! Before using your new Midea product, please read
this manual thoroughly to ensure that you know how to operate the features and
functions that your new appliance offers in a safe way.
01
CONTENTS
0
02
1
06
07
08
THANK YOU LETTER
SAFETY INSTRUCTIONS
SPECIFICATIONS
PRODUCT OVERVIEW
OPERATION INSTRUCTIONS
EN
1 7
1 6
1 5
1 3
CLEANING AND MAINTENANCE
TROUBLESHOOTING
TRADEMARKS, COPYRIGHTS AND LEGAL STATEMENT
DATA PROTECTION NOTICE
02
Danger
This symbol indicates that there are dangers to the life and health of
persons due to etremely ammable gas.
Warning of electrical voltage
This symbol indicates that there is a danger to life and health of
persons due to voltage.
Warning
The signal word indicates a hazard with a medium level of risk which, if
not avoided, may result in death or serious injury.
Caution
The signal word indicates a hazard with a low degree of risk which, if
not avoided, may result in minor or moderate injury.
Attention
The signal word indicates important information (e.g. damage to
property), but not danger.
Observe instructions
This symbol indicates that a service technician should only operate and
maintain this appliance in accordance with the operating instructions.
The following safety guidelines are intended to prevent unforeseen risks or damage from
unsafe or incorrect operation of the appliance. Please check the packaging and appliance
on arrival to make sure everything is intact to ensure safe operation. If you find any
damage, please contact the retailer or dealer. Please note modifications or alterations to
the appliance are not allowed for your safety concern. Unintended use may cause
hazards and loss of warranty claims.
Read these operating instructions carefully and attentively before using/commissioning the
unit and keep them in the immediate vicinity of the installation site or unit for later use!
Intended Use
Explanation of Symbols
SAFETY INSTRUCTIONS
EN

SAFETY WARNING
●
●
●
●
●
●
●
●
●
●
●
●
●
Always place the unit on a smooth, flat, lint-free,
non-metallic, waterproof and level surface and keep it
away from direct sunlight.
Always place the unit 2 feet (60 cm) above the floor, 12
inches (30 cm) away from the wall, other appliances or
wooden furniture.
Do not place the unit on carpet, towel or wood surface,
which will block the vent and may damage the unit.
To avoid electric shock, do not use wet hands to plug
and unplug the unit.
Do not start the unit when the water tank is empty.
Do not add any additives into the water tank that are
not produced or supervised by our company.
Do not put anything except water into the water tank.
Do not add water through the mist outlet.
While the humidifier is operating, do not touch the
water inside the unit or any parts submerged in water.
Do not cover or block the mist outlet, the mist outlet
should be kept clear at all times.
Do not replace the power cord without authorization
from an authorized representative.
Always ensure proper contact between the power cord
and outlet.
Never use this appliance on the same circuit as other
appliances.
03
SAFETY PRECAUTIONS
READ AND SAVE THESE
INSTRUCTIONS
EN

Do not place the appliance near a water source.
Do not disassemble, modify or repair internal parts
without authorization from an authorized
representative.
Do not climb or sit on the appliance.
Do not store appliance near or around flammable items,
explosive items or heat sources.
Do not directly flush the humidifier with water.
Always use the power button to turn off the humidifier
before unplugging the power cord.
Always use filtered or distilled water and do not use
hard water.
Please do not use a damaged or worn power cord; Do
not replace the power cord without authorization. If the
power cord is damaged, it must be replaced by the
manufacturer, its service department or professional
from similar department to avoid danger.
Power off and unplug the humidifier during
thunderstorms.
During an abnormal phenomenon (like a burnt smell),
power off the humidifier and unplug the power cord.
After a long period of no use, power off the humidifier
and unplug the power cord then, clean the water tank
according to the "Cleaning and Maintenance"
instructions.
To avoid bacterial growth, consistently change the
water in the water tank and base.
Before moving the appliance, always unplug the power
cord.
If the appliance is tilted when filled with water, be sure
to unplug the power cord immediately and send it for
inspection.
●
●
●
●
●
●
●
●
●
●
●
●
●
●
04
EN

●
●
●
●
●
The suitable ambient temperature for use of this
product: 5°C~40°C, relative humidity: <80% RH
(Please use pure water with temperature less than
40°C). A tolerance of ±10%RH is applied to the
accuracy of the inner humidity sensor. Each sensor has
its own variation in accuracy.Therefore, the
measurement results of different qualified sensors will
be different. Differences in measurement locations can
also cause measurement differences.
Do not run cord under carpeting.
Do not cover cord with throw rugs, runners or similar
coverings.
Do not route cord under furniture or appliances.
Arrange cord away from traffic area and where it will
not be tripped over.
●
●
Please note that any changes or modifications of this
product not expressly approved by the party
responsible for compliance could void the user’s
authority to operate the equipment.
If this equipment does cause harmful interference to
radio or television reception, which can be determined
by turning the equipment off and on, the user is
encouraged to try to correct the interference by one or
more of the following measures:
05
EN
-- Reorient or relocate the receiving antenna.
-- Increase the separation between the equipment and
receiver.
-- Connect the equipment into an outlet on a circuit di
erent from that to which the receiver is connected.
-- Consult the dealer or an experienced radio/TV
technician for help.

06
EN
SPECIFICATIONS
MSU16U6DBBCModel
Rated Frequency 60Hz
Rated Power 105W
Water Tank Capacity 1.6 gallon
Net Product Weight 5.07Ibs
Dimensions 9.25*8.07*12.80 inch
Rated Voltage 120V~
NOTE
The following are the design parameters of MSU16U6DBBC. The measured parameters are
subject to the product; The humidification amount will vary, depending on the tempera-
ture and humidity in the room.
The maximum humidification is 330mL/h.
07
EN
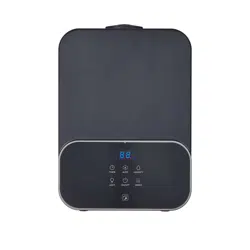
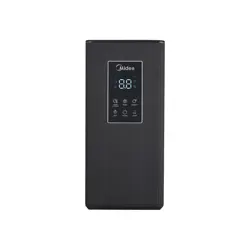
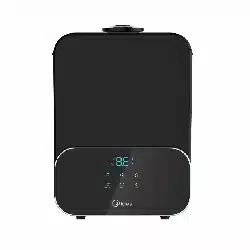
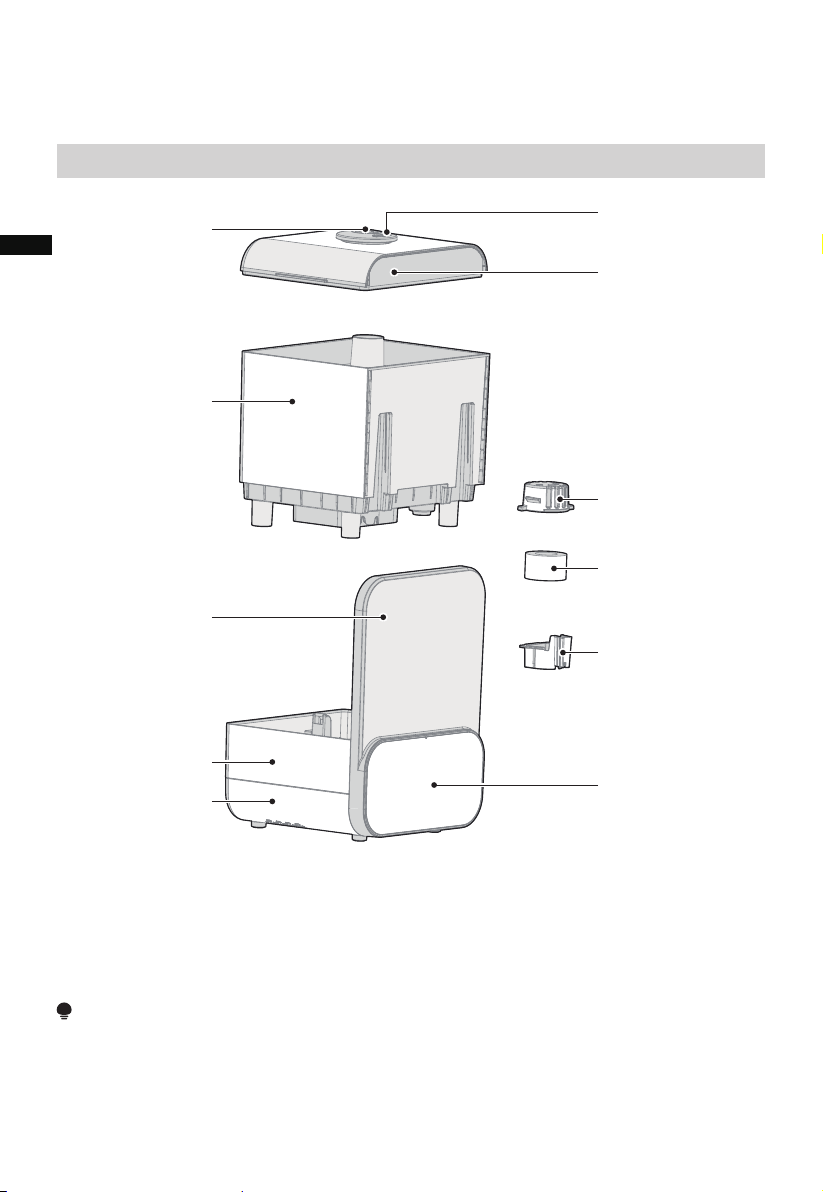
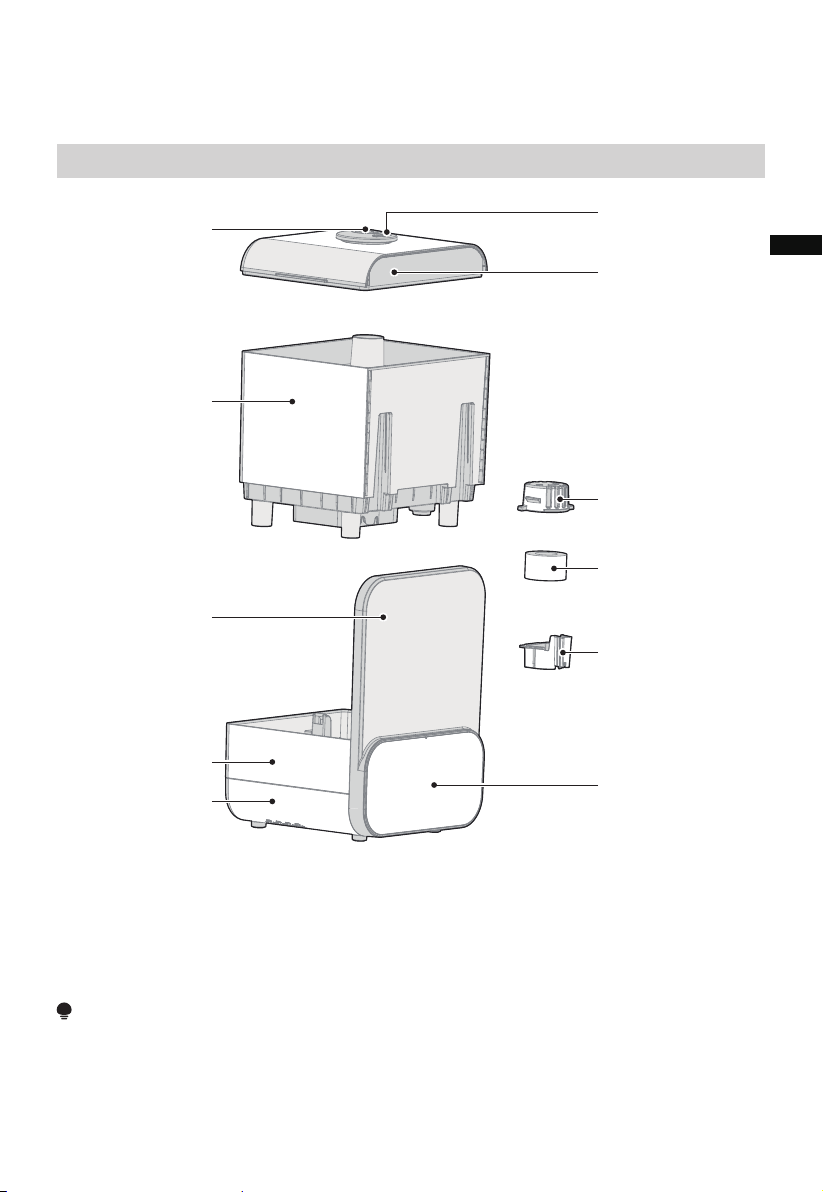
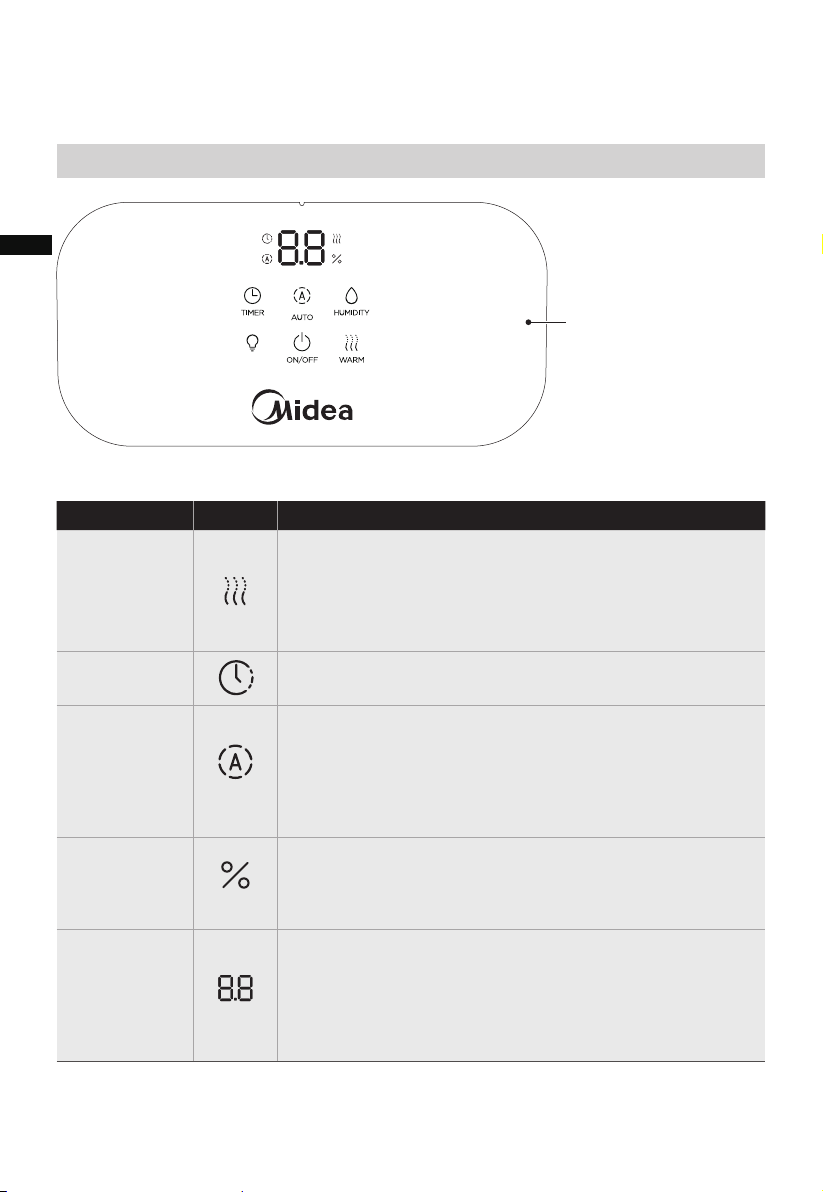
PRODUCT OVERVIEW
Component Name
NOTE
All the pictures in this manual are for explanation purpose only. Any discrepancy
between the real object and the illustration in the drawing shall defer to the real product.
This humidifier is pre-assembled in factory.
Essential Oil Tray
Water Tank
Front Panel
Shell
Base
Sponge Cap
Tank Lid
Display & Control
Panel
Mist Outlet
Sponge
Hot Plate Cover

08
EN
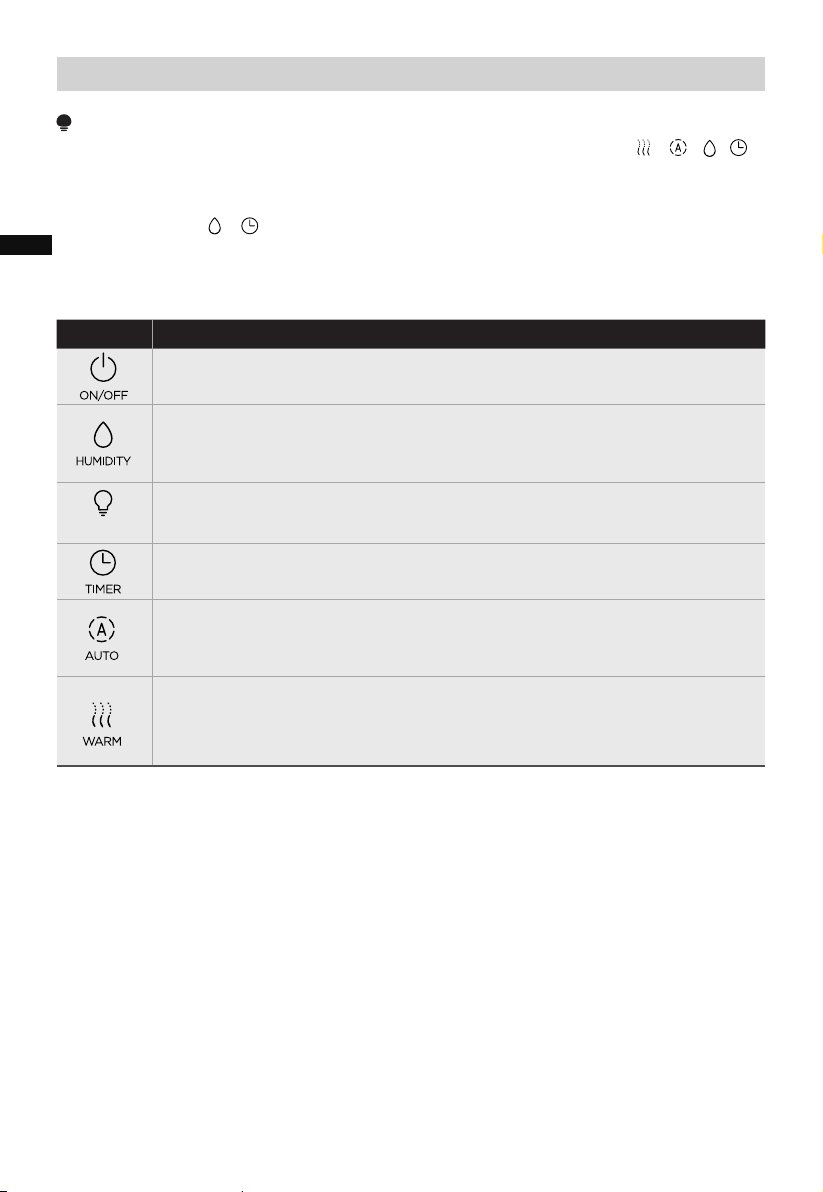
OPERATION INSTRUCTIONS
The current
environmental humidity
is displayed by default
Humidity value Unit:
%RH
• Displays the ambient humidity value and “- -”.
• Displays the off timer and “H”.
• Displays humidity level.
• Displays fault code, software version number.
• Displays the cleaning reminder mark “CL”.
• It is on when the device is turned on and a humidity
value is detected.
• In standby mode, it will be on for 60 seconds by default.
• It is off when the device is turned on and the AUTO
function is turned off.
• It is on when the device is turned on and the AUTO
function is turned on.
• In standby mode, it will be on for 60 seconds by default.
• It is on when the device is turned on and a shut- off
timer is set.
Icon Name Icon Status
WARM Light
AUTO Light
Timer
% Light
Double-8
Light
• Under power-on conditions, it will light up when the
WARM function is turned on, and turn off when the
WARM function is turned off.
• It flashes for cleaning reminder.
• In standby mode, it will be on for 60 seconds by default.
Description of Display
MINUTERIE HUMIDITÉ
GRADATEUR
MARCHE/ARRÊT
CHAUD
DIMMER
09
EN
Control Panel Operations
• When the unit is turned on and the constant humidity function is off,
press the button to turn on the ECO humidity function , Press it again to
turn off this function.
• Repeatedly tap to set a shut-off timer of 0, 1, 2, 4, or 8 hours.
• When the unit is turned on, press this button to turn on the warm mist
function, press it again to turn off the function.
• Repeatedly tap to cycle between light colors of red, green, blue,and
none.
Function description
• Tap to power on the humidifier and tap again to power off the
humidifier.
• Repeatedly tap to cycle between mist level 1, 2, and 3
DIMMER
NOTE
After power-on, when the product is in standby state, the display icon light “ + + + ”
will be on at the same time. If there is no operation within 60 seconds, the display will
enter the off-screen state.
After power on, you can turn on/off the screen-off function by pressing and holding the
key combination “ + ” for 3 seconds.
"--" indicates water is flowing from the tank to the base.
"P1" indicates shortage of the water,water needs to be added to the tank.
10
EN
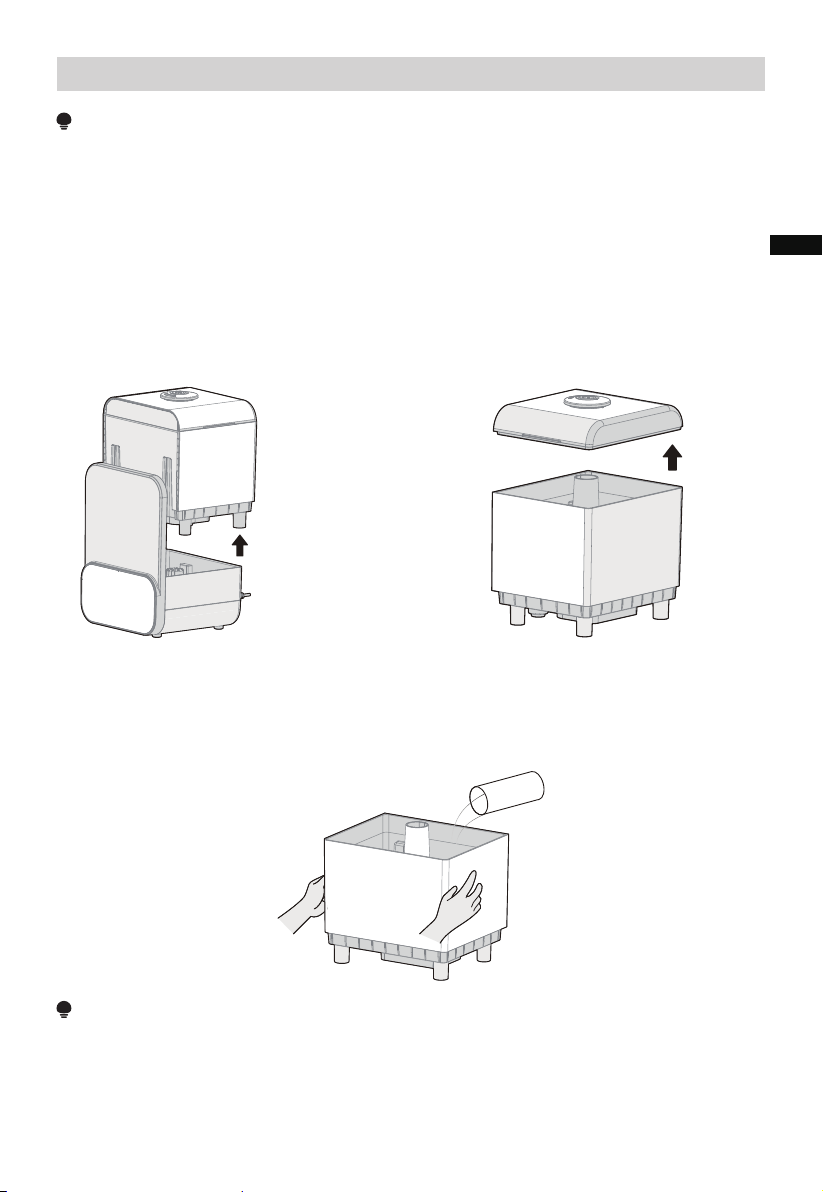
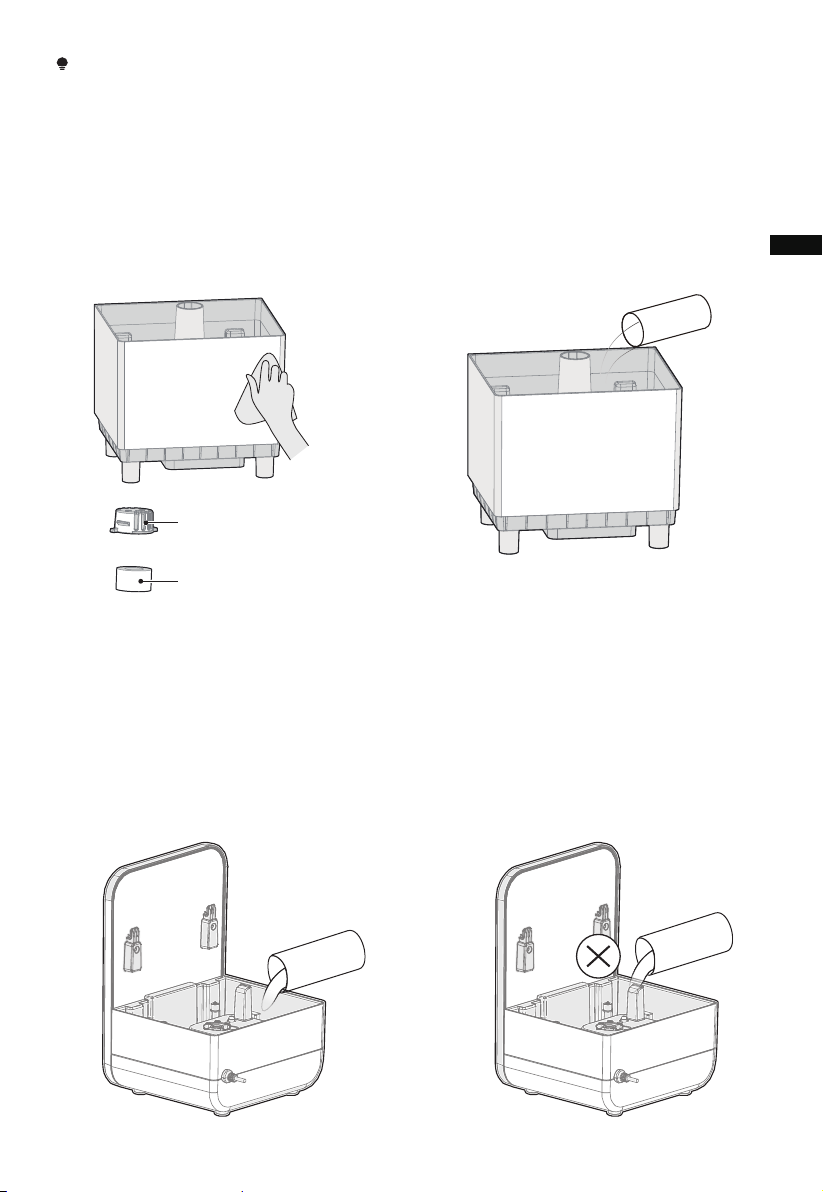
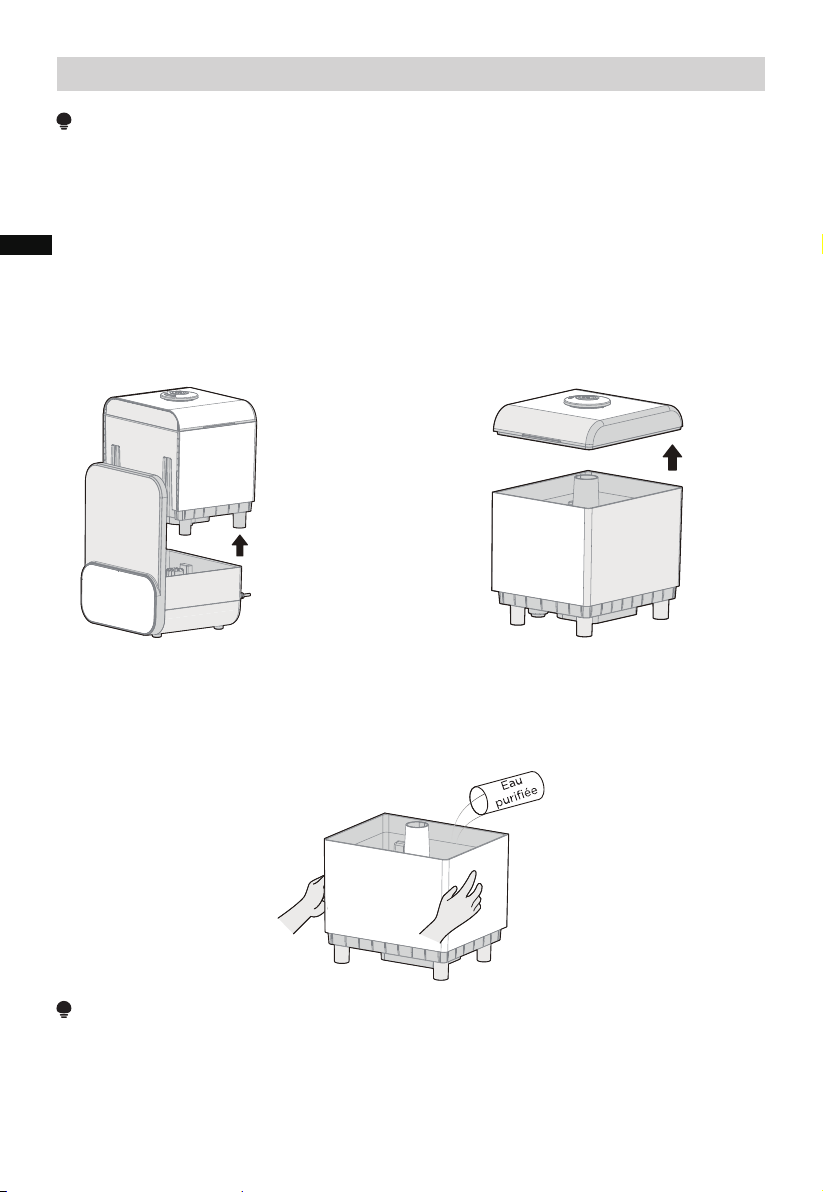
Water Filling (Two Methods)
Methods A
NOTE
• Please be sure to unplug the power cord before filling water.
• Never fill water tank exceed the MAX indication line(1.6Gal/6L ).
• Do not add water through the mist outlet.
• Never attempt to lift the water tank by the tank cover;
• Please do not add additives like essential oils, perfume, drugs, etc. to the water.
But you can add aroma liquid in the built in essential oil tray.
• Please use purified or distilledwater below 40°C.
1
Take out the water tank.
2
Remove the lid of the tank.
3
Pour cold/warm (no higher than
40°C
) distilled or filtered water into the water tank.
Purified
water
NOTE
• Make sure the tank lid is covered on the water tank properly after the water is filled in
the tank.
• When installing back to the lower shell, it is necessary to ensure that the two buckle
grooves on the water tank and the surface plate are in place.
11
EN
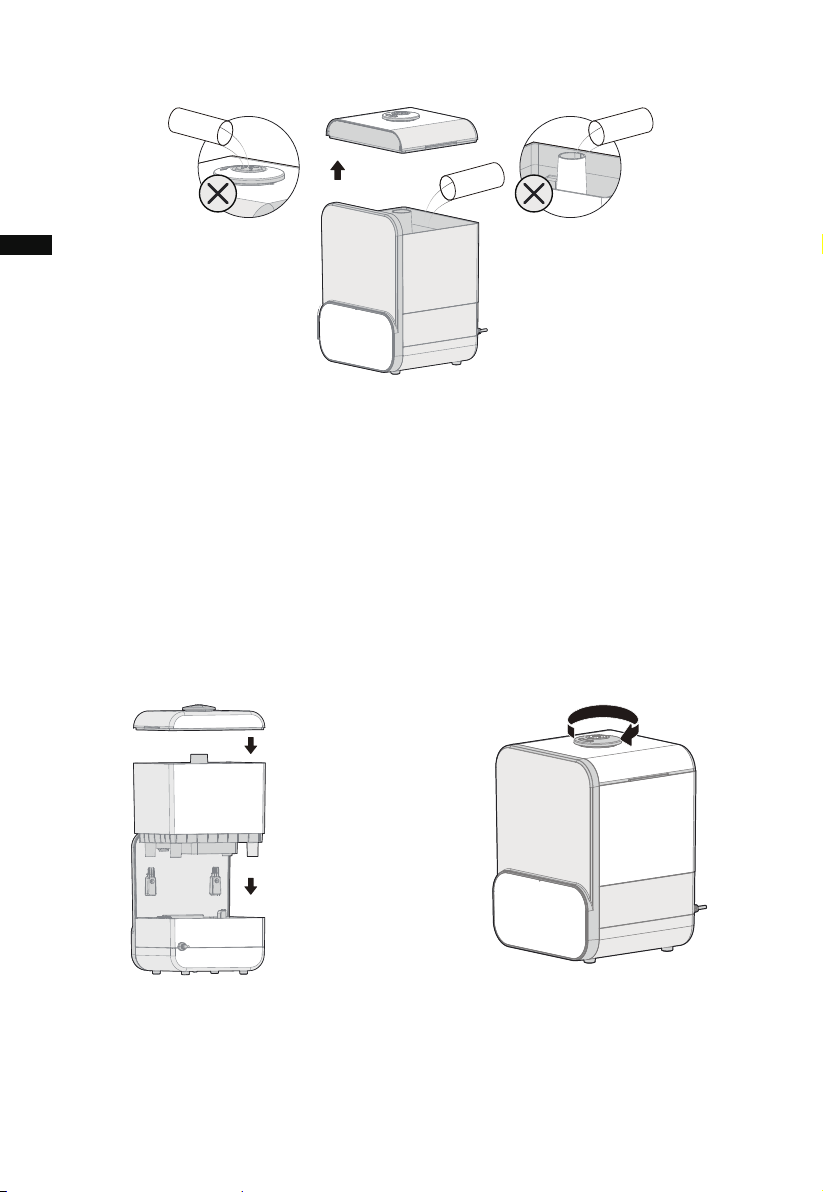
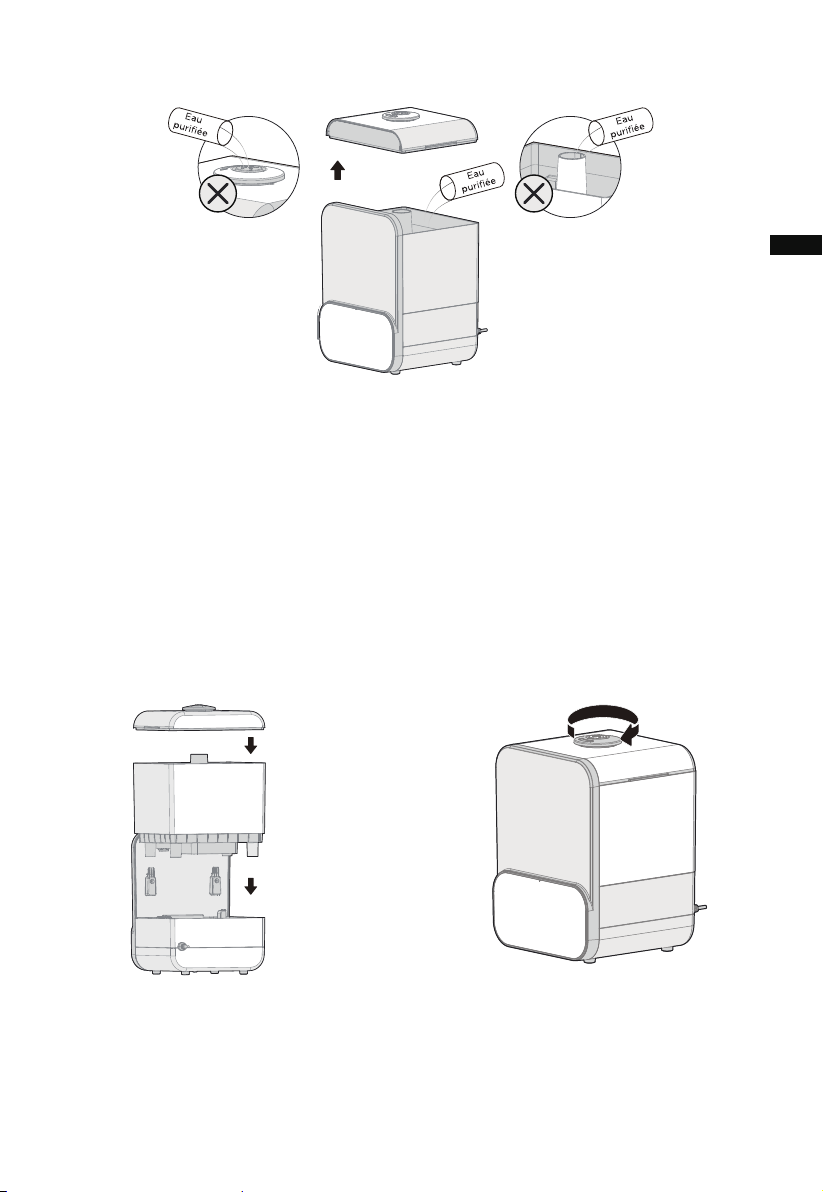
• With the water tank placed on the base, remove the lid of the tank and pour purified or
distilled water into the tank.
• Ensure that you do not exceed the maximum capacity of 1.6 gallon/6L.
Methods B
Purified
water
Purified
water
Purified
water
Do not fill the water
through the mist
outlet.
Do not fill the water
through the mist
chimney
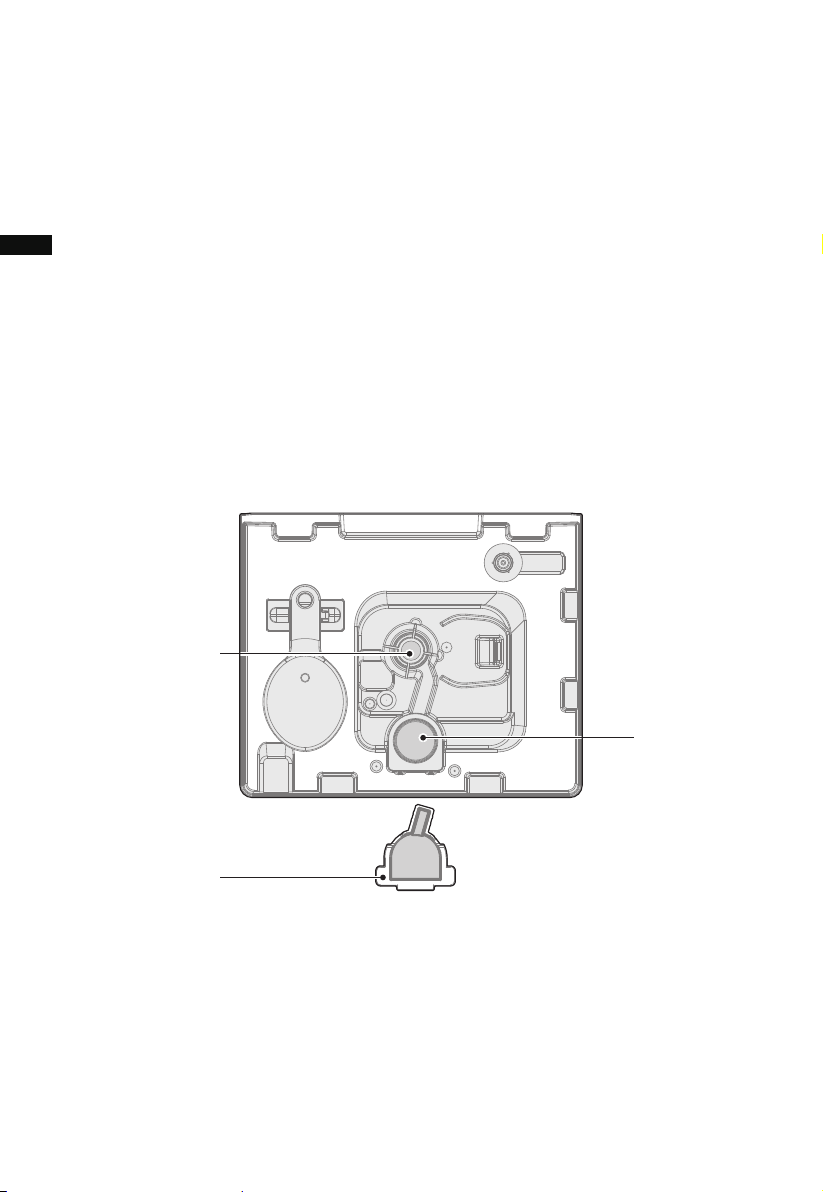
Installation of the Water Tank
• Make sure the base is placed on a
level surface. When placing the
water tank on the base, make sure to
slide the water tank slots onto the
hooks located on the front panel.
Ensure that the tank cover is aligned
and sits flush with the water tank
when placed correctly.
Mist Direction Adjustment
• The mist outlet can be rotated by 360°,
which can be adjusted according to
your own needs.
12
EN
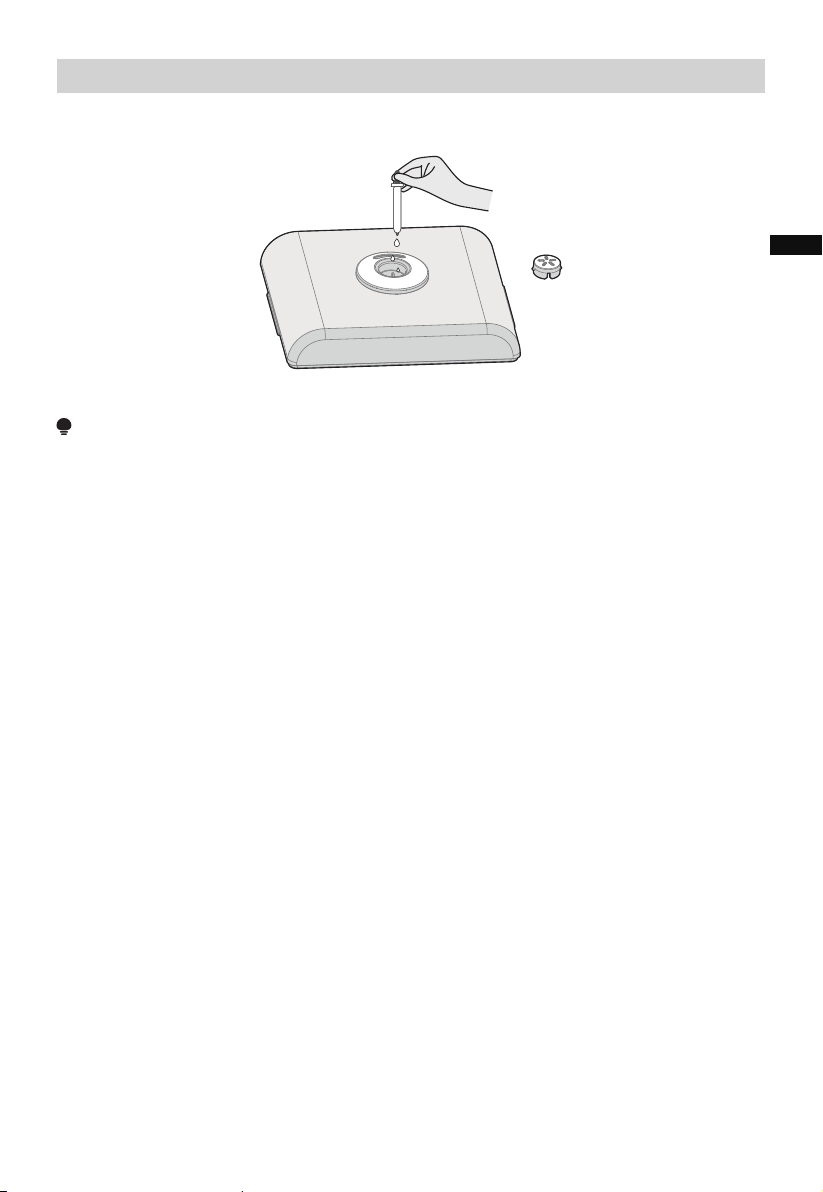
Essential Oil Tray Use
• Remove the essential oil tray cap, add a drop of essential oil in the tray and then put
back the cap and then cover it.
NOTE
When the device has run out of water it will enter the lack of water mode. Add water into
the water tank and the humidifier will resume working.
13
EN
CLEANING AND MAINTENANCE
• Please be sure to unplug the power cord before cleaning.
• Please be sure to remove scale and debris in the humidifier tank regularly and it is
recommended to clean it once every 3 days.
• Must clean scale and debris of heating plate and atomizing plate in sink regularly (336
hours in total).
1. Remove Water Tank Assembly.
2. Remove Hot Plate Cover (Pull up to remove it).
3. Mix cleaning solution (½ tablespoon white vinegar and 1 cup water).
4. Pour cleaning solution onto Atomizer and Hot Plate.
5. Wait for 30 minutes.
6. Pour cleaning solution into sink drain.
7. Pour 1 cup of water onto Atomizer and Hot Plate.
8. Pour water into a sink drain.
9. Re-install Hot Plate Cover (press into place).
10.Re-Install Water Tank Assembly.
11.Long Press “WARM” button for 3 seconds to reset the appliance.
• The product must be cleaned regularly to maintain good performance.
Hot plate
Atomization piece
Hot plate cover
14
EN
Filter Cover
Filter Sponge
Detergent
Detergent
Detergent
Water Tank Interior
Hot Plate And Atomizer
NOTE
Please be sure to unplug the power cord before cleaning.It is recommended to
clean scale and debris in the water tank and base at least every 3 days.
Rotate the filter cover clockwise and pull to remove. Then, remove the filter sponge
from the filter cover and rinse both with water. Do not forget to place the filter
sponge back in filter cover, place in the water tank and rotate counter-clockwise to
re-attach to the water tank.
Water Tank Exterior
Wipe the exterior with a
soft damp cloth and allow
to dry before use.
Use a mild detergent and water solution on
a soft cloth to scrub the interior of the
tank.Rinse the tank and dry thoroughly
before use.
When cleaning the lower shell, take out the gland first, and then add detergent or calen
water. Rinse after cleaning
Warning: Do not let water goes into the product when flushing, otherwise there is a risk
of electric shock.

15
EN
TROUBLESHOOTING
The appliances may encounters some errors and malfunctions, the following tables
contain possible causes and notes for resolving an error or malfunction.
Solut io n
Cause So lut io nPro b lem
The plug may not be fully
inserted.
Check whether the plug is
properly inserted into the
outlet.
●
The humidifier
does not work.
Mist has a bad
odor.
There is no water in the water
tank.
Add water to the tank.
●
The water tank is not in place. Make sure the tank is in place.
●
The water tank, or base is not
clean.
Refill clean water, or clean the
water tank and water tray.
●
Humidifier is
emitting a white
dust/residue.
Use tap water with a high
mineral content, aka “hard
water.”
Clean the tank and the base,
and use only demineralized or
distilled water.
●
The water tank
shows water
shortage, but is
filled with water;
the humidifier
does not work for
a long time.
Excessively tilting the unit at
an angle causes the water level
in the water tank to be judged
as low water level, so the unit
automatically starts protection
mode and stops.
Make sure the unit is put on a
flat and firm place, and kept
steady.
●
There is abnormal
noise.
The appliance is not in place,
tilted or unstable.
Make sure that the unit is
placed on a solid, flat surface.
●

16
EN
logo, word marks, trade name, trade dress and all versions there of are
trademarks, copyrights and other intellectual property rights, and all goodwill derived
valuable assets of Midea Group and/or its affiliates (“Midea”), to which Midea owns
from using any part of an Midea trademark. Use of Midea trademark for commercial
purposes without the prior written consent of Midea may constitute trademark
infringement or unfair competition in violation of relevant laws.
This manual is created by Midea and Midea reserves all copyrights thereof. No entity or
individual may use, duplicate, modify, distribute in whole or in part this manual, or
bundle or sell with other products without the prior written consent of Midea.
All the described functions and instructions were up to date at the time of printing this
manual. However, the actual product may vary due to improved functions and designs.
TRADEMARKS, COPYRIGHTS
AND LEGAL STATEMENT

17
EN
DATA PROTECTION NOTICE
For the provision of the services agreed with the customer,
we agree to comply without restriction with all stipulations of applicable data protection
law, in line with agreed countries within which services to the customer will be delivered,
as well as, where applicable, the EU General Data Protection Regulation (GDPR).
Generally, our data processing is to fulfil our obligation under contract with you and for
product safety reasons, to safeguard your rights in connection with warranty and
product registration questions. In some cases, but only if appropriate data protection is
ensured, personal data might be transferred to recipients located outside of the
European Economic Area.
Further information is provided by request. You can contact our Data Protection
Officer via [email protected]. To exercise your rights, such as your right to refrain
your personal data being processed for marketing purposes, please contact us via
[email protected]. To find further information, please follow the QR Code.

AVIS SUR LA PROTECTION DES DONNEES
MARQUES, DROITS D'AUTEUR ET MENTIONS LEGALES
CONSIGNES DE SECURITE
01
SPECIFICATIONS
VUE D’ENSEMBLE DU PRODUIT
INSTRUCTIONS DE FONCTIONNEMENT
NETTOYAGE ET ENTRETIEN
DEPANNAGE
LETTRE DE REMERCIEMENTS
LETTRE DE REMERCIEMENTS
SOMMAIRE
Merci d'avoir choisi Midea ! Avant d'utiliser votre nouveau produit Midea, merci
de lire attentivement ce manuel afin de vous assurer d’être à même d’utiliser les
caractéristiques et fonctions de votre nouvel appareil en toute sécurité.
-------------------------------------------
-------------------------------------------------
--------------------------------------------------------------------
---------------------------------------
------------------------
----------------------------------------------
----------------------------------------------------------------------------
-----------------
0
02
1
06
07
08
1 7
1 6
1 5
1 3
FR
Danger
Avertissement sur la tension électrique
Avertissement
Attention
Attention
Respecter les instructions
Usage prévu
Explication des symboles
CONSIGNES DE SECURITE
Les consignes de sécurité qui suivent ont pour but de prévenir les risques ou les
dommages imprévus résultant d'une utilisation dangereuse ou incorrecte de l'appareil.
Merci de vérifier l'emballage et l'appareil à réception afin de vous assurer que tout est
intact, cela afin de garantir un fonctionnement sûr. Si vous constatez des dommages,
merci de contacter le détaillant ou le revendeur. Merci de noter que les modifications ou
altérations de l'appareil ne sont pas autorisées pour votre sécurité. Une utilisation non
prévue peut entraîner des risques et la perte des droits à la garantie.
Ce symbole signale la présence d’un risque potentiellement mortel pour la vie et la
santé des personnes en raison de la présence d'un gaz extrêmement inflammable.
Ce symbole signale la présence d’un risque potentiellement mortel pour la vie et la
santé des personnes en raison de la tension.
Ce symbole signale un danger avec un niveau de risque intermédiaire qui, s'il n'est
pas évité, peut entraîner la mort ou des blessures graves.
Ce symbole signale un danger avec un faible degré de risque qui, s'il n'est pas évité,
peut entraîner des blessures mineures ou modérées.
Ce symbole signale une information importante (par exemple, un dommage
matériel), mais pas un danger.
Ce symbole signale qu'un technicien de service ne doit utiliser et entretenir cet
appareil que conformément aux instructions d'utilisation.
Lire attentivement ce mode d'emploi avant d'utiliser/mettre en service l'appareil et le
conserver à proximité immédiate du lieu d'installation ou de l'appareil pour une
utilisation ultérieure !
02
FR

03
PRECAUTIONS DE SECURITE
AVERTISSEMENT DE SECURITE
LIRE ET CONSERVER CES
INSTRUCTIONS
• Toujours placer l'appareil sur une surface lisse, plate,
non pelucheuse, non métallique, imperméable et plane,
et le conserver à l'écart de la lumière directe du soleil.
• Toujours placer l'appareil à 60 cm du sol et à 30 cm
du mur, d'autres appareils ou de meubles en bois.
• Ne pas placer l'appareil sur un tapis, une serviette ou
une surface en bois, car cela bloquerait l'évent et
pourrait endommager l'appareil.
• Afin d’éviter tout risque d'électrocution, ne pas utiliser
de mains mouillées pour brancher et débrancher
l'appareil.
• Ne pas démarrer l'appareil lorsque le réservoir d'eau
est vide.
• Ne pas ajouter dans le réservoir d'eau des additifs qui
ne sont pas produits ou contrôlés par notre société.
• Ne rien mettre d'autre que de l'eau dans le réservoir
d'eau.
• Ne pas ajouter d'eau par la sortie de brumisation.
• Lorsque l'humidificateur fonctionne, ne pas toucher
l'eau à l'intérieur de l'appareil ou les pièces immergées
dans l'eau.
• Ne pas couvrir ni obstruer la sortie de brumisation,
celle-ci doit rester dégagée en permanence.
• Ne pas remplacer le cordon d'alimentation sans l'au-
torisation d'un représentant agréé.
• Veiller toujours à ce que le cordon d'alimentation soit
bien en contact avec la prise de courant.
FR

04
• Ne jamais utiliser cet appareil sur le même circuit que
d'autres appareils.
• Ne pas placer l'appareil à proximité d'une source d'eau.
• Ne pas démonter, modifier ou réparer les pièces
internes sans l'autorisation d'un représentant agréé.
• Ne pas grimper ou s'asseoir sur l'appareil.
• Ne pas ranger l'appareil à proximité d'articles inflammables,
d'articles explosifs ou de sources de chaleur.
• Ne pas rincer directement l'humidificateur avec de l'eau.
• Toujours utiliser le bouton d'alimentation pour
éteindre l'humidificateur avant de débrancher le
cordon d'alimentation.
• Toujours utiliser de l'eau filtrée ou distillée, ne pas
utiliser d'eau dure.
• Ne pas utiliser un cordon d'alimentation endommagé
ou usé ; ne pas remplacer le cordon d'alimentation
sans autorisation. Si le cordon d'alimentation est
endommagé, il doit être remplacé par le fabricant, son
service après-vente ou un professionnel d'un service
similaire afin d'éviter tout danger.
• Eteindre et débrancher l'humidificateur en cas d'orage.
• Lors d'un phénomène anormal (comme une odeur de
brûlé), éteindre l'humidificateur et débrancher le
cordon d'alimentation.
• Après une longue période de non utilisation, éteindre
l'humidificateur et débrancher le cordon d'alimentation,
puis nettoyer le réservoir d'eau conformément aux
instructions "Nettoyage et Entretien".
• Afin d’éviter la prolifération des bactéries, changer
régulièrement l'eau du réservoir et de la base.
• Avant de déplacer l'appareil, débrancher toujours le
cordon d'alimentation.
• Si l'appareil est incliné lorsqu'il est rempli d'eau, veiller
à débrancher immédiatement le cordon d'alimentation
et à l'envoyer pour inspection.
FR

05
• La température ambiante appropriée pour l'utilisation
de ce produit : 5°C~40°C, humidité relative : <80% HR
(merci d’utiliser de l'eau pure dont la température est
inférieure à 40°C). Une tolérance de ±10%HR est
appliquée à la précision du capteur d'humidité interne.
Chaque capteur a sa propre variation de précision. Par
conséquent, les résultats des mesures effectuées par
différents capteurs qualifiés seront différents. Des
différences dans les lieux de mesure peuvent
également entraîner des différences de mesure.
• Ne pas faire passer le cordon sous la moquette.
• Ne pas recouvrir le cordon avec des tapis, des patins
ou des revêtements similaires.
• Ne pas faire passer le cordon sous les meubles ou les
appareils électroménagers.
• Placer le cordon loin des zones de circulation et à un
endroit où l'on ne risque pas de trébucher dessus.
• Merci de noter que tout changement ou modification de
ce produit non expressément approuvé par la partie
responsable de la conformité peut annuler l'autorité de
l'utilisateur à faire fonctionner l'équipement.
• Si cet équipement provoque des interférences nuisi-
bles à la réception de la radio ou de la télévision, ce
qui peut être déterminé en éteignant et en allumant
l'équipement, l'utilisateur est encouragé à essayer de
corriger les interférences en prenant une ou plusieurs
des mesures suivantes :
-- Réorienter ou déplacer l'antenne de réception.
-- Augmenter la distance entre l'équipement et le
récepteur.
-- Connecter l'équipement à une prise de courant sur un
circuit différent de celui auquel le récepteur est connecté.
-- Consulter le revendeur ou un technicien radio/TV
expérimenté pour obtenir de l'aide.
FR

06
SPECIFICATIONS
MSU16U6DBBCModèle
60Hz
105W
1,6 gallons
5,07Ibs
9,25*8,07*12,80 pouces
120V~
REMARQUE
Tension Nominale
Fréquence Nominale
Puissance Nominale
Capacité du Réservoir d'Eau
Poids Net du Produit
Dimensions
Voici les paramètres de conception du MSU16U6DBBC. Les paramètres mesurés
dépendent du produit. La quantité d'humidification varie en fonction de la température
et de l'humidité de la pièce.
L'humidification maximale est de 330 mL/h.
FR
07
VUE D’ENSEMBLE DU PRODUIT
Noms des Composants
REMARQUE
Coque
Base
Bouchon du
Eponge
Eponge
Bac à Huiles
Essentielles
Réservoir d'Eau
Panneau Avant
Sortie de Brumisa-
tion
Couvercle du
Réservoir
Couvercle de la
Plaque Chauffante
Panneau d'Affi-
chage et de
Commandes
Toutes les illustrations de ce manuel sont fournies à titre d'explication uniquement. Toute
divergence entre l'objet réel et l'illustration du dessin sera reportée sur le produit réel.
Cet humidificateur est préassemblé en usine.
FR
08
INSTRUCTIONS DE FONCTIONNEMENT
Nom Icône Icône Statut
Description de l'Affichage
L'humidité ambiante
actuelle est affichée
par défaut Unité de
valeur d'humidité :
%HR
Témoin CHAUD
Minuterie
Témoin AUTO
Témoin %
Témoin
Double 8
• Lors de la mise sous tension, il s'allume lorsque la
fonction CHAUD est activée et s'éteint lorsque la
fonction CHAUD est désactivée.
• Il clignote pour rappeler le nettoyage.
• En mode veille, il est activé par défaut pendant 60
secondes.
• Il s'allume lorsque l'appareil est mis en marche et qu'une
minuterie d'arrêt est réglée.
• Il est activé lorsque l'appareil est mis en marche et que la
fonction AUTO est désactivée.
• Il est activé lorsque l'appareil est mis en marche et que la
fonction AUTO est activée.
• En mode veille, il est activé par défaut pendant 60
secondes.
• Il s'allume lorsque l'appareil est mis en marche et qu'une
valeur d'humidité est détectée.
• En mode veille, il est activé par défaut pendant 60
secondes.
• Affiche la valeur de l'humidité ambiante et "- -".
• Affiche la minuterie d'arrêt et "H".
• Affiche le niveau d'humidité.
• Affiche le code d'erreur et le numéro de version du
logiciel.
• Affiche le marquage de rappel de nettoyage "CL".
FR
MINUTERIE HUMIDITÉ
GRADATEUR
MARCHE/ARRÊT
CHAUD
DIMMER

09
Control Panel Operations
Description de la fonction
Après la mise sous tension, lorsque le produit est en état de veille, le voyant de l'icône
de l'écran “ + + + ” s'allume en même temps. Si aucune opération n'est
effectuée dans les 60 secondes, l'écran s'éteint.
Après la mise sous tension, vous pouvez activer/désactiver la fonction d'extinction de
l'écran en appuyant sur la combinaison de touches “ + ” et en la maintenant
enfoncée pendant 3 secondes.
"--" indique que l'eau s'écoule du réservoir vers la base.
"P1" indique un manque d'eau, il faut ajouter de l'eau dans le réservoir.
REMARQUE
MARCHE/
ARRÊT
HUMIDITÉ
GRADATEUR
MINUTERIE
AUTO
CHAUD
• Appuyer pour mettre l'humidificateur en marche, appuyer à
nouveau pour l'éteindre.
• Appuyer de manière répétée pour alterner entre les niveaux de
brumisation 1, 2 et 3.
• Appuyer de manière répétée pour passer cycliquement d'une
couleur à l'autre (rouge, vert, bleu et aucune).
• Appuyer de manière répétée pour régler une minuterie d'arrêt de 0,
1, 2, 4 ou 8 heures.
• Lorsque l'appareil est en marche et que la fonction d'humidité constante
est désactivée, appuyer sur la touche pour activer la fonction d'humidité
ECO, appuyer à nouveau sur la touche pour désactiver cette fonction.
• Lorsque l'appareil est en marche, appuyer sur cette touche pour activer
la fonction de brumisation chaude, appuyer à nouveau pour désactiver
la fonction.
FR
10
Remplissage d’Eau (deux méthodes)
Méthodes A
REMARQUE
1
Retirer le réservoir d'eau.
2
Retirer le couvercle du réservoir.
3
REMARQUE
• Veiller à débrancher le cordon d'alimentation avant de remplir le réservoir d'eau.
• Ne jamais remplir le réservoir d'eau au-delà de la ligne d'indication MAX (1,6 Gal/6L).
• Ne pas ajouter d'eau par la sortie de brumisation.
• Ne jamais essayer de soulever le réservoir d'eau par le couvercle ;
• Ne pas ajouter d'additifs tels que des huiles essentielles, des parfums, des médica-
ments, etc. à l'eau. Vous pouvez cependant ajouter un liquide aromatique dans le bac
à huiles essentielles intégré.
• Merci d’utiliser de l'eau purifiée ou distillée en dessous de 40°C.
Verser de l'eau distillée ou filtrée froide/tiède (pas plus de 40°C) dans le réservoir
d'eau.
• Vérifier que le couvercle du réservoir est correctement recouvert après que l'eau a été
versée dans le réservoir.
• Lors du remontage sur la coque inférieure, il est nécessaire de s'assurer que les deux
rainures de bouclage sur le réservoir d'eau et la plaque de surface sont en place.
FR
11
Methodes B
Installation du Réservoir d'Eau Réglage de la Direction de la Brume
Ne pas remplir
d'eau par la sortie
de brumisation.
• Veiller à ce que la base soit placée sur
une surface plane. Lorsque vous placer
le réservoir d'eau sur la base, veiller à
faire glisser les fentes du réservoir d'eau
sur les crochets situés sur le panneau
avant. Veiller à ce que le couvercle du
réservoir soit aligné et à ce qu'il soit au
même niveau que le réservoir d'eau
lorsqu'il est placé correctement.
• La sortie de brumisation peut être
tournée à 360°, ce qui permet de
l'ajuster en fonction de vos besoins.
Ne pas remplir
l'eau par la
cheminée de
brumisation.
• En ayant le réservoir d'eau placé sur la base, retirer le couvercle du réservoir et verser
de l'eau purifiée ou distillée dans le réservoir.
• Veiller à ne pas dépasser la capacité maximale de 1,6 gallon/6L.
FR

12
Utilisation du Plateau à Huiles Essentielles
REMARQUE
• Retirer le bouchon du plateau à huiles essentielles, ajouter une goutte d'huile
essentielle dans le plateau puis remettre le bouchon et le recouvrir.
FR
Lorsque l'appareil n'a plus d'eau, il passe en mode manque d'eau. Ajouter de l'eau
dans le réservoir et l'humidificateur se remettra à fonctionner.

13
NETTOYAGE ET ENTRETIEN
• Veiller à débrancher le cordon d'alimentation avant de procéder au nettoyage.
• Veiller à éliminer régulièrement le tartre et les débris dans le réservoir de l'humidifica-
teur ; il est recommandé de le nettoyer une fois tous les trois jours.
• Il faut nettoyer régulièrement le calcaire et les débris de la plaque chauffante et de la
plaque d'atomisation dans l'évier (336 heures au total).
1. Retirer le réservoir d'eau.
2. Retirer le Couvercle de la Plaque Chauffante (tirer vers le haut pour le retirer).
3. Mélanger la solution de nettoyage (½ cuillère à soupe de vinaigre blanc et 1 tasse
d'eau).
4. Verser la solution de nettoyage sur l'Atomiseur et la Plaque Chauffante.
5. Attendre 30 minutes.
6. Verser la solution de nettoyage dans l’évacuation de l'évier.
7. Verser une tasse d'eau sur l'atomiseur et la plaque chauffante.
8. Verser de l'eau dans le siphon de l’évier.
9. Réinstaller le couvercle de la plaque chauffante (appuyer pour le mettre en place).
10. Réinstaller le Réservoir d'Eau.
11. Appuyer longuement sur le bouton "WARM" pendant 3 secondes pour réinitialiser
l'appareil.
• L'appareil doit être nettoyé régulièrement pour conserver ses performances.
Pièce d'atomisa-
tion
Couvercle de
plaque chauffante
Plaque
chauffante
FR