Jp
使用説明書
En
User’s Manual
Fr
Manuel d’utilisation
Sc
ҋᅶᢪϷ
Es
Manual del usuario
Kr
사용설명서
NIKKOR Z 50mm f/1.2 S
Printed in Thailand
7MMA4264-02
U
Jp
使用説明書
En
User’s Manual
Fr
Manuel d’utilisation
ご使用の前に、この使用説明書をよくお読みの上、正しくお使いください。また、
カメラの説明書もご覧ください。
•
このレンズは、ニコン
Z マウントのミラーレスカメラ専用です。
•
カメラのファームウェアを最新版にバージョンアップしてお使いください。ファーム
ウェアが最新になっていない場合、レンズを正しく認識しなかったり、機能の一部が
使用できないことがあります。最新のファームウェアは、ニコンダウンロードセンター
からダウンロードできます。
https://downloadcenter.nikonimglib.com/
安全上のご注意
あなたや他の人々への危害や財産への損害を未然に防止するため、ご使用の前に「安全上の
ご注意」をよくお読みの上、正しくお使いください。
この説明書をお読みになった後は、いつでも参照できるように保管してください。
A
警告
「死亡または重傷を負うおそれがある内容」です。
A
注意
「軽傷を負うことや財産の損害が発生するおそれがある内容」です。
お守りいただく内容を、以下の図記号で区分しています。
F
は、してはいけない内容です。
C
は、実行しなければならない内容です。
A
警告
E
分解
禁止
分解、修理または改造をしない
落下などによる破損で内部が露出したら、露出部に触らない
感電やけがの原因になります。
C
実行
熱くなる、煙が出る、こげ臭いなどの異常時は、直ちにカメラの電源を取り
外す
放置すると、発火、やけどの原因になります。
F
禁止
水でぬらさない
ぬれた手で触らない
感電や発火の原因になります。
F
禁止
引火、爆発のおそれのある場所では使わない
プロパンガス、ガソリン、可燃性スプレーなどの引火性ガスや粉塵の発生す
る場所で使うと、爆発や火災の原因になります。
F
禁止
レンズで直接太陽や強い光を見ない
失明や視力障碍の原因になります。
F
禁止
幼児の手の届くところに置かない
故障やけがの原因になります。
小さな付属品を誤って飲み込むと、身体に悪影響を及ぼします。飲み込んだ
ら、すぐに医師の診断を受けてください。
G
禁止
高温環境や低温環境では、直接触らない
やけどや低温やけど、凍傷の原因になることがあります。
A
注意
F
禁止
レンズを太陽や強い光源に向けたままにしない
集光して、内部部品の破損や発火の原因になることがあります。逆光撮影では、
太陽を画角から十分にずらしてください。画角から太陽をわずかに外しても、
発火の原因になります。
F
禁止
夏場の車内や直射日光の当たる所など高温環境に放置しない
故障や発火の原因になります。
F
禁止
三脚などにカメラやレンズを取り付けたまま移動しない
故障やけがの原因になります。
レンズの使い方
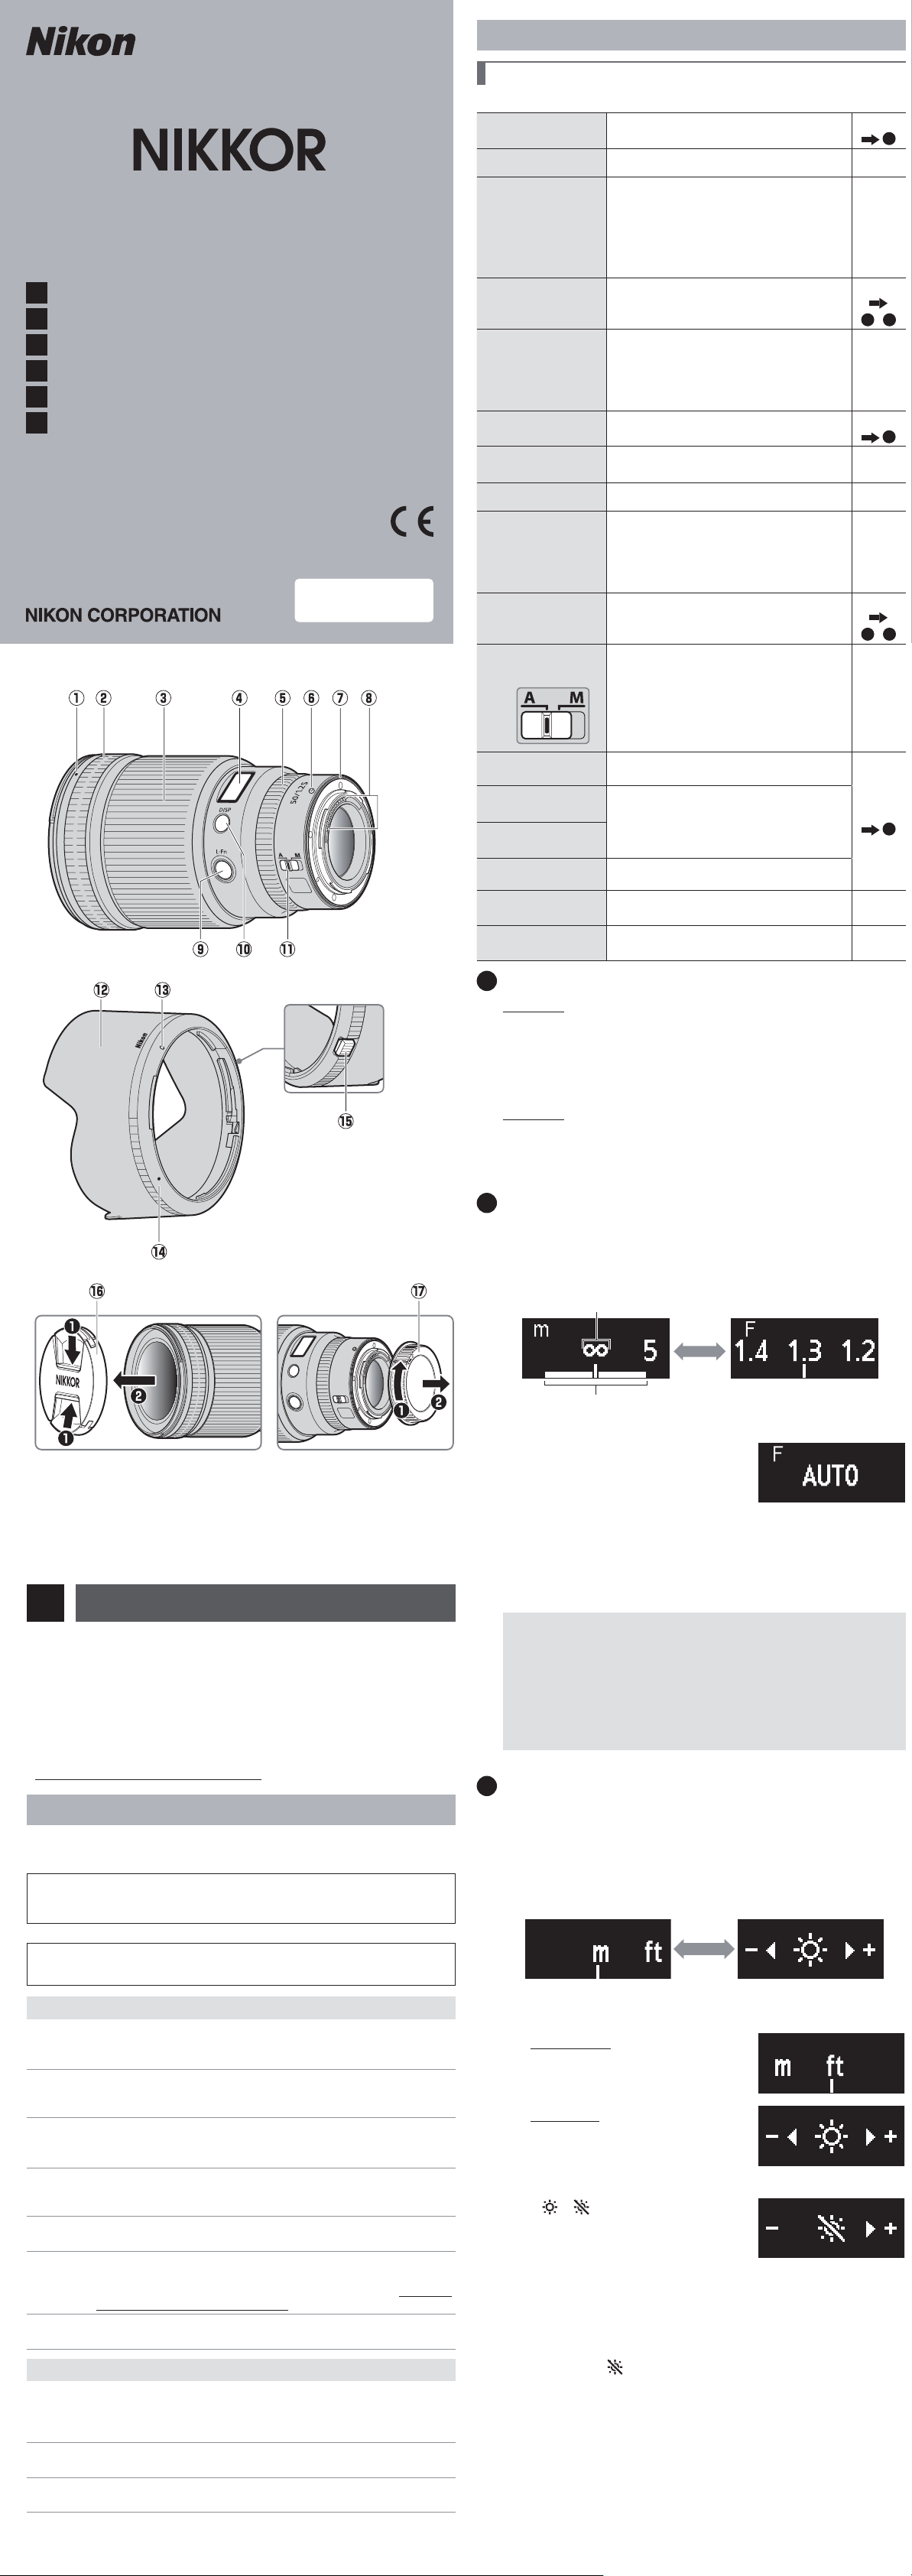
各部の名称と機能
左図で示されている各部の名称と機能は以下の通りです。
●
●
q
レンズフード
着脱指標
レンズにレンズフードを取り付けるときの指標
です。
詳しくは
D
●
w
すべり止めゴム
●
e
フォーカスリング
手動でピントを合わせるときに使用します。
•
オートフォーカス時に手動でピントを合わせて
撮影する場合は、シャッターボタンを半押しし
た状態でフォーカスリングを回してピントを合
わせてから、シャッターボタンをさらに押し込
みます。
●
r
レンズ情報パネル
撮影距離や被写界深度などの情報を表示します。
詳しくは
B
、
C
●
t
コントロールリング
このリングを回転させると、[絞り]や[露出補正]
などカメラで設定した機能を使用できます。詳
しくは、カメラの説明書に記載されている[カス
タムボタンの機能]または[カスタムボタンの
機能 ( 撮影 )]の説明をご覧ください。
●
y
レンズ着脱指標 カメラにレンズを取り付けるときの指標です。
詳しくは
A
●
u
レンズマウント
ゴムリング
●
i
CPU
信号接点 カメラとレンズの間で情報を伝達します。
●
o
L-Fn
ボタン
このボタンを押すと、カメラで設定した機能を
使用できます。詳しくは、カメラの説明書に記
載されている[カスタムボタンの機能]または[カ
スタムボタンの機能 ( 撮影 )]の説明をご覧くだ
さい。
●
!0
表示切り換えボタン
レンズ情報パネルの表示を切り換えたり、設
定を保存するときに使います。
詳しくは
B
、
C
●
!1
フォーカスモード
切り換えスイッチ
フォーカスモードを切り換えられます。
A
:オートフォーカスになります。
M
:マニュアルフォーカスになります。
•
カメラのフォーカスモードがマニュアルフォー
カスのときは、レンズで[
A
]を選んでいても
マニュアルフォーカスになります。
●
!2
レンズフード
画像に悪影響を及ぼす光線をカットします。
レンズ面の保護にも役立ちます。
詳しくは
D
●
!3
レンズフードセット
指標
レンズにレンズフードを取り付けるときの指標
です。
●
!4
レンズフード取り付
け指標
●
!5
レンズフードロック
解除ボタン
レンズフードを取り外すときに使用します。
●
!6
レンズキャップ
(フロントキャップ)
●
!7
レンズキャップ
(リアキャップ)
A
カメラへの取り付け方・取り外し方
取り付け方
z
カメラの電源を
OFF
にして、レンズのリアキャップとカメラのボ
ディーキャップを外す
x
カメラとレンズのレンズ着脱指標を合わせ、反時計回りにカチッ
と音がするまでレンズを回す
取り外し方
z
カメラの電源を
OFF
にする
x
レンズ取り外しボタンを押しながら、時計回りにレンズを回して
取り外す
B
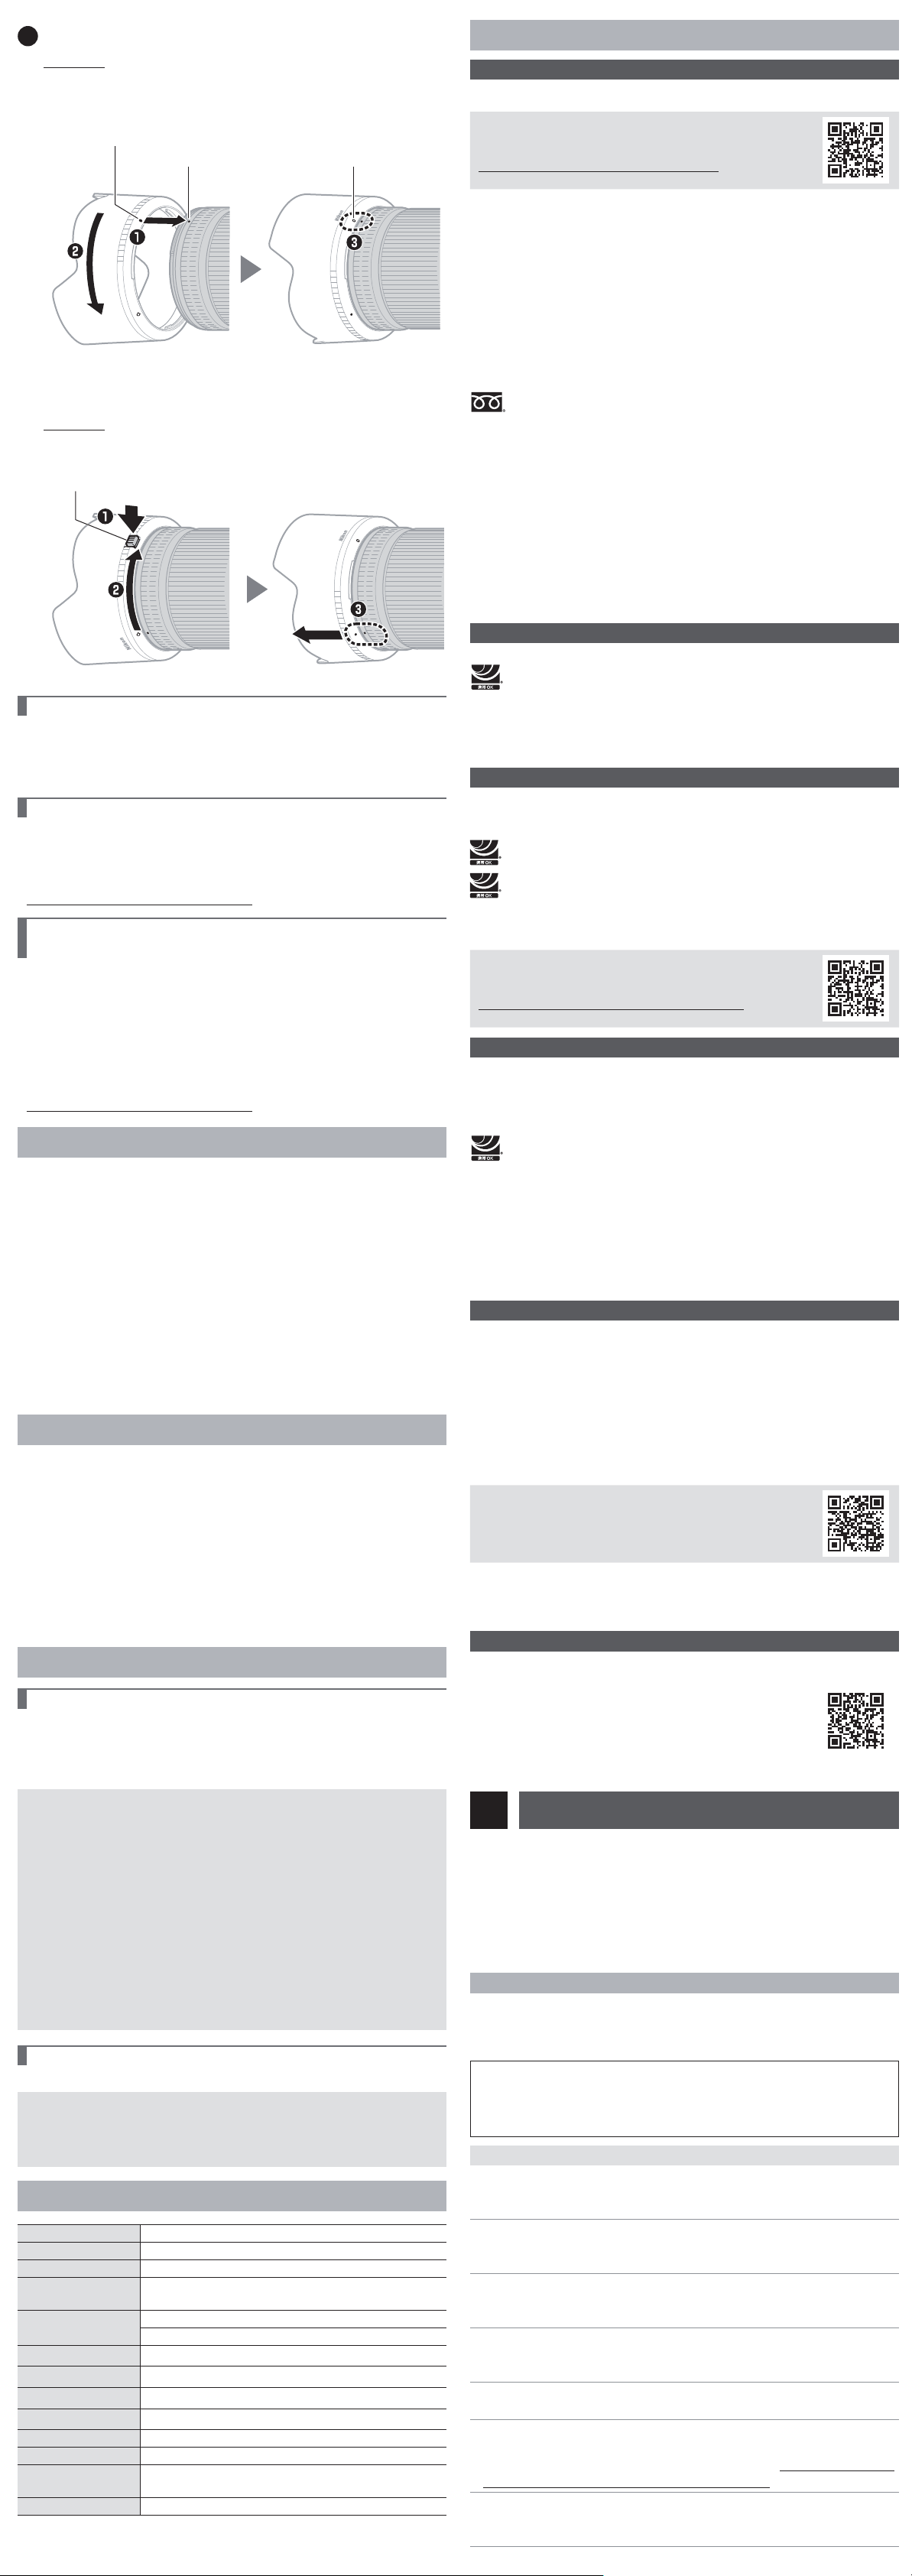
レンズ情報パネルの表示
このレンズをカメラに取り付けてカメラの電源を ON にすると、レンズ情報パ
ネルが点灯します。
•
レンズ情報パネルの表示は、レンズの表示切り換えボタンを押すたびに次のよ
うに切り換わります。
絞り値
※ 2
被写界深度
※ 1
撮影距離
※
1 被写界深度は、カメラの撮影モードが
A
または
M
の場合に表示されます。
※
2 絞り値は、カメラの撮影モードが
A
または
M
の
場合のみ表示されます。その他の撮影モードでは、
図のように表示されます。
•
フォーカスモード切り換えスイッチを切り換えると、選択したフォーカスモード
([
AF
]または[
MF
])が一瞬表示されます。
•
カメラの半押しタイマーがオフになったとき、またはレンズの操作を行わないま
ま約 10 秒経過したとき、レンズ情報パネルは消灯します。表示切り換えボタン
を押すと、レンズ情報パネルが再度点灯します。
A
レンズ情報パネルに表示される数値について
レンズ情報パネルに表示される撮影距離や被写界深度などの数値は、おおよその
目安です。
A
ボケ像が欠けて写る場合は
高速のシャッタースピードや開放付近の絞りで撮影すると、ボケ像が欠けて
写ることがあります。ボケ像の欠けが気になるときは、シャッタースピード
を遅くしたり、絞り値を大きくすると目立たなくなります。
C
レンズ情報パネルの設定
距離を表示するときの単位(
m
(メートル)または
ft
(フィート))や、レンズ情
報パネルの明るさを変更できます。
z
表示切り換えボタンを長押しして設定画面を表示する
•
距離単位または明るさの設定画面が表示されます。設定画面では、設定中の
項目が点滅します。
•
表示切り換えボタンを押すと、設定画面が切り換わります。
距離単位の設定画面 明るさの設定画面
x
コントロールリングを回して設定を変更する
距離単位の設定
-
コントロールリングを回して、
m
または
ft
を選びます。
明るさの設定
-
コントロールリングを
+(プラス)方向に
回すと表示が明るくなり、−(マイナス)
方向に回すと暗くなります。
-
設定できる明るさは 6 段階です。
-
が になるまでコントロールリング
を
−方向に回すと、レンズ情報パネルには
何も表示されなくなります。
•
表示切り換えボタンを押すと設定した内容が保存され、設定画面が切り換わ
ります。
•
レンズの操作を行わないまま約
5 秒経過すると、設定画面が終了します。そ
の場合、変更した内容は反映されません。
c
表示切り
換えボタンを長押しして設定画面を終了する
•
明るさの設定を
にしたときは、レンズ情報パネルに何も表示されなくなり
ます。再度表示切り換えボタンを長押しすると、レンズ情報パネルが点灯し
ます。
A
A
CAUTION
CAUTION
•
•
Do not leave the lens pointed at the sun or other strong light sources.
Do not leave the lens pointed at the sun or other strong light sources.
Light focused by the lens could cause fi re or damage to product’s internal parts. When
shooting backlit subjects, keep the sun well out of the frame. Sunlight focused into
the camera when the sun is close to the frame could cause fi re.
•
•
Do not leave the product where it will be exposed to extremely high temperatures,
Do not leave the product where it will be exposed to extremely high temperatures,
for an extended period such as in an enclosed automobile or in direct sunlight.
for an extended period such as in an enclosed automobile or in direct sunlight.
Failure to observe this precaution could result in fi re or product malfunction.
•
•
Do not transport cameras or lenses with tripods or similar accessories attached.
Do not transport cameras or lenses with tripods or similar accessories attached.
Failure to observe this precaution could result in injury or product malfunction.
Notices for Customers in the U.S.A.
Notices for Customers in the U.S.A.
This device complies with part 15 of the FCC Rules. Operation is subject to the following two
conditions: (1) this device may not cause harmful interference, and (2) this device must ac-
cept any interference received, including interference that may cause undesired operation.
Federal Communications Commission (FCC) Radio Frequency Interference Statement
Federal Communications Commission (FCC) Radio Frequency Interference Statement
This equipment has been tested and found to comply with the limits for a Class B digital
device, pursuant to Part 15 of the FCC rules. These limits are designed to provide reason-
able protection against harmful interference in a residential installation. This equipment
generates, uses, and can radiate radio frequency energy and, if not installed and used in
accordance with the instructions, may cause harmful interference to radio communica-
tions. However, there is no guarantee that interference will not occur in a particular instal-
lation. If this equipment does cause harmful interference to radio or television reception,
which can be determined by turning the equipment off and on, the user is encouraged to
try to correct the interference by one or more of the following measures:
• Reorient or relocate the receiving antenna.
• Increase the separation between the equipment and receiver.
• Connect the equipment into an outlet on a circuit diff erent from that to which the
receiver is connected.
• Consult the dealer or an experienced radio/television technician for help.
CAUTIONS
CAUTIONS
Modi cations
The FCC requires the user to be notifi ed that any changes or modifi cations made to
this device that are not expressly approved by Nikon Corporation may void the user’s
authority to operate the equipment.
Nikon Inc., 1300 Walt Whitman Road,
Melville, New York 11747-3064, U.S.A.
Tel.: 631-547-4200
Notice for Customers in Canada
Notice for Customers in Canada
CAN ICES-3 B / NMB-3 B
Using the Lens
Using the Lens
Parts of the Lens: Names and Functions
Parts of the Lens: Names and Functions
Refer to the diagram on the left edge of this sheet.
q
Lens hood mounting
mark
Use when attaching the lens hood.
See
D
w
Rubber grip
——
e
Focus ring
Use for manual focus.
• When focusing using autofocus, you can ad-
just focus manually by rotating the ring while
the shutter-release button is pressed halfway;
after focusing, press the shutter-release but-
ton the rest of the way down to shoot.
—
r
Lens info panel
View focus distance, depth of fi eld, and other
information.
See
B
,
C
t
Control ring
Rotate to adjust a setting such as [Aperture] or
[Exposure compensation] assigned using the cam-
era. For more information, see the description of
[Custom control assignment], [Custom controls], or
[Custom controls (shooting)] in the camera manual.
—
y
Lens mounting mark
Use when mounting the lens on the camera.
See
A
u
Rubber lens-mount
gasket
——
i
CPU contacts
Used to transfer data to and from the camera. —
o
L-Fn button
Press to perform a function assigned using the
camera. For more information, see the descrip-
tion of [Custom control assignment], [Custom
controls], or [Custom controls (shooting)] in
the camera manual.
—
!0
Display button
Save settings or choose the information
shown in the lens info panel.
See
B
,
C
!1
Focus-mode switch
Choose a focus mode.
• A: Autofocus
• M: Manual focus
Note that regardless of the setting chosen, fo-
cus must be adjusted manually when manual
focus mode is selected using camera controls.
—
!2
Lens hood
Lens hoods block stray light that would other-
wise cause fl are or ghosting. They also serve to
protect the lens.
See
D
!3
Lens hood lock mark
Use when attaching the lens hood.
!4
Lens hood alignment
mark
!5
Lens hood lock
release button
Use when removing the lens hood.
!6
Lens cap (front cap)
——
!7
Lens cap (rear cap)
——
A
Attachment and Removal
Attachment and Removal
Attaching the Lens
z
Turn the camera o , remove the body cap, and detach the rear lens cap.
x
Position the lens on the camera body, keeping the mounting mark
on the lens aligned with the mounting mark on the camera body,
and then rotate the lens counterclockwise until it clicks into place.
Removing the Lens
z
Turn the camera o .
x
Press and hold the lens release button while turning the lens clockwise.
B
The Lens Info Panel
The Lens Info Panel
The lens Info panel lights when the lens is attached to a camera and the camera is on.
• Press the lens display button to cycle the display as shown:
Aperture
Depth of eld
Focus distance
1 Depth of eld is displayed when the camera is in mode A or M.
2 Aperture is displayed only when the cam-
era is in mode A or M. The display for other
modes is shown in the illustration.
• The focus mode (AF or MF) is briefl y displayed when chosen using the focus-
mode switch.
• The panel turns off automatically when the camera standby timer expires or if no
lens operations are performed for about 10 seconds. Press the display button to
reactivate the display.
A
The Lens Info Panel
The focus distance, depth of eld, and other information displayed in the lens Info panel are approximations only.
A
Irregular Bokeh
With fast shutter speeds and/or wide apertures, you may notice irregularities in how bokeh is shaped. The
e ect can be mitigated by choosing slower shutter speeds and/or higher f-numbers.
C
Panel Options
Panel Options
Follow the steps below to choose the units for focus distance from meters (m) or
feet (ft) or adjust the brightness of the lens Info panel.
z Press and hold the display button to view settings.
• Unit or brightness selection options will be displayed. The currently selected
item will fl ash.
• Press the display button to toggle between displays.
Units Brightness
Before using this product, please read these instructions carefully. You will also need to
consult the camera manual.
• This lens is intended exclusively for use with mirrorless cameras featuring a Nikon Z mount.
• Update the camera fi rmware to the latest version. With earlier versions, the camera may fail
to detect the lens correctly and some features may not be available. The latest version of the
camera fi rmware can be downloaded from the Nikon Download Center at the URL below.
https://downloadcenter.nikonimglib.com/
For Your Safety
For Your Safety
To prevent damage to property or injury to yourself or to others, read “For Your Safety”
in its entirety before using this product.
Keep these safety instructions where all those who use this product will read them.
A WARNING: Failure to observe the precautions marked with this icon could
result in death or severe injury.
A CAUTION: Failure to observe the precautions marked with this icon could
result in injury or property damage.
A
A
WARNING
WARNING
•
•
Do not disassemble or modify this product.
Do not disassemble or modify this product.
Do not touch internal parts that become exposed as the result of a fall or other accident.
Do not touch internal parts that become exposed as the result of a fall or other accident.
Failure to observe these precautions could result in electric shock or other injury.
•
•
Should you notice any abnormalities such as the product producing smoke,
Should you notice any abnormalities such as the product producing smoke,
heat, or unusual odors, immediately disconnect the camera power source.
heat, or unusual odors, immediately disconnect the camera power source.
Continued operation could result in fi re, burns or other injury.
•
•
Keep dry.
Keep dry.
Do not handle with wet hands.
Do not handle with wet hands.
Failure to observe these precautions could result in fi re or electric shock.
•
•
Do not use this product in the presence of fl ammable dust or gas such as
Do not use this product in the presence of fl ammable dust or gas such as
propane, gasoline or aerosols.
propane, gasoline or aerosols.
Failure to observe this precaution could result in explosion or fi re.
•
•
Do not directly view the sun or other bright light source through the lens.
Do not directly view the sun or other bright light source through the lens.
Failure to observe this precaution could result in visual impairment.
•
•
Keep this product out of reach of children.
Keep this product out of reach of children.
Failure to observe this precaution could result in injury or product malfunction. In
addition, note that small parts constitute a choking hazard. Should a child swallow
any part of this product, seek immediate medical attention.
•
•
Do not handle with bare hands in locations exposed to extremely high or
Do not handle with bare hands in locations exposed to extremely high or
low temperatures.
low temperatures.
Failure to observe this precaution could result in burns or frostbite.
Avant d’utiliser ce produit, veuillez lire ces instructions attentivement. Vous devrez également consulter
le manuel de l’appareil photo.
• Cet objectif est destiné exclusivement aux appareils photo hybrides dotés d’une monture Nikon Z.
• Mettez à jour le fi rmware de l’appareil photo vers la dernière version. Avec les versions antérieures,
l’appareil photo risque de ne pas pouvoir détecter correctement l’objectif et certaines fonctionnalités
peuvent être indisponibles. La dernière version du fi rmware de l’appareil photo peut être téléchargée
depuis le Centre de téléchargement Nikon via l’URL ci-dessous.
https://downloadcenter.nikonimglib.com/
Pour votre sécurité
Pour votre sécurité
Afi n d’éviter de provoquer des dommages matériels ou de vous blesser ou de blesser un tiers, lisez
intégralement «Pour votre sécurité» avant d’utiliser ce produit.
Conservez ces consignes de sécurité dans un endroit facilement accessible à tous ceux qui pourraient
se servir de ce produit.
A AVERTISSEMENT: le non-respect des consignes indiquées par cette icône peut vous exposer à
un danger de mort ou à de graves blessures.
A ATTENTION: le non-respect des consignes indiquées par cette icône peut vous exposer à des
blessures ou provoquer des dommages matériels.
A
A
AVERTISSEMENT
AVERTISSEMENT
•
•
Ne démontez pas ou ne modifi ez pas ce produit.
Ne démontez pas ou ne modifi ez pas ce produit.
Ne touchez pas les composants internes qui sont exposés suite à une chute ou à un autre accident.
Ne touchez pas les composants internes qui sont exposés suite à une chute ou à un autre accident.
Le non-respect de ces consignes peut provoquer un choc électrique ou d’autres blessures.
•
•
Si vous observez des anomalies provenant du produit comme de la fumée, de la chaleur ou des
Si vous observez des anomalies provenant du produit comme de la fumée, de la chaleur ou des
odeurs inhabituelles, débranchez immédiatement la source d’alimentation de l’appareil photo.
odeurs inhabituelles, débranchez immédiatement la source d’alimentation de l’appareil photo.
Continuer d’utiliser le matériel risque de provoquer un incendie, des brûlures ou d’autres blessures.
•
•
Gardez votre matériel au sec.
Gardez votre matériel au sec.
Ne le manipulez pas avec les mains mouillées.
Ne le manipulez pas avec les mains mouillées.
Le non-respect de ces consignes de sécurité peut provoquer un incendie ou un choc électrique.
•
•
N’utilisez pas ce produit en présence de poussières ou de gaz infl ammables comme du
N’utilisez pas ce produit en présence de poussières ou de gaz infl ammables comme du
propane, de l’essence ou des aérosols.
propane, de l’essence ou des aérosols.
Le non-respect de cette consigne peut provoquer une explosion ou un incendie.
•
•
N’observez pas directement le soleil ou toute autre source lumineuse puissante à travers
N’observez pas directement le soleil ou toute autre source lumineuse puissante à travers
l’objectif.
l’objectif.
Le non-respect de cette consigne peut provoquer des troubles visuels.
•
•
Conservez ce produit hors de portée des enfants.
Conservez ce produit hors de portée des enfants.
Le non-respect de cette consigne peut provoquer des blessures ou le dysfonctionnement du produit. En
outre, notez que les petites pièces présentent un risque d’étouff ement. Si jamais un enfant avalait une pièce
de ce produit, consultez immédiatement un médecin.
•
•
Ne manipulez pas le matériel à mains nues dans des lieux exposés à des températures
Ne manipulez pas le matériel à mains nues dans des lieux exposés à des températures
extrêmement basses ou élevées.
extrêmement basses ou élevées.
Le non-respect de cette consigne peut provoquer des brûlures ou des engelures.
A
A
ATTENTION
ATTENTION
•
•
Ne pointez pas l’objectif en direction du soleil ou d’autres sources très lumineuses.
Ne pointez pas l’objectif en direction du soleil ou d’autres sources très lumineuses.
La lumière focalisée par l’objectif peut provoquer un incendie ou endommager les composants
internes du produit. Lorsque vous photographiez un sujet à contre-jour, veillez à garder toujours
le soleil à l’extérieur du cadre. Lorsque le soleil se trouve près du cadre, sa lumière risque de se
concentrer dans l’appareil photo et de provoquer un incendie.
•
•
Ne laissez pas le produit exposé à des températures excessivement chaudes pendant une période
Ne laissez pas le produit exposé à des températures excessivement chaudes pendant une période
prolongée, comme dans une voiture fermée ou en plein soleil.
prolongée, comme dans une voiture fermée ou en plein soleil.
Le non-respect de cette consigne peut provoquer un incendie ou le dysfonctionnement du produit.
•
•
Ne transportez pas les appareils photo ou les objectifs si des trépieds ou accessoires
Ne transportez pas les appareils photo ou les objectifs si des trépieds ou accessoires
similaires sont fi xés.
similaires sont fi xés.
Le non-respect de cette consigne peut provoquer des blessures ou le dysfonctionnement du produit.
Avis pour les clients au Canada
Avis pour les clients au Canada
CAN ICES-3 B / NMB-3 B
Utilisation de l’objectif
Utilisation de l’objectif
Descriptif de l’objectif: noms et fonctions
Descriptif de l’objectif: noms et fonctions
Reportez-vous aux fi gures situées à gauche.
q
Repère de montage du
parasoleil
Référez-vous à ce repère lorsque vous fi xez le parasoleil.
Voir
D
w
Grip en caoutchouc — —
e
Bague de mise au point
Utilisez cette bague pour faire le point manuellement.
• Lorsque vous utilisez l’autofocus, vous pouvez ajuster la
mise au point manuellement en tournant cette bague
tout en appuyant sur le déclencheur à mi-course; une fois
la mise au point eff ectuée, appuyez sur le déclencheur
jusqu’en fi n de course pour prendre la photo.
—
r
Écran d’informations sur
l’objectif
Affi chez la distance de mise au point, la profondeur de
champ et d’autres informations.
Voir
B
,
C
t
Bague de réglage
Tournez cette bague pour modifi er un réglage comme
l’[Ouverture] ou la [Correction d’exposition], attribué à l’aide
de l’appareil photo. Pour en savoir plus, reportez-vous à la
description de [Défi nition réglages perso.], [Commandes
personnalisées] ou [Commandes perso (prise de vue)] dans
le manuel de l’appareil photo.
—
y
Repère de montage de
l’objectif
Référez-vous à ce repère lorsque vous fi xez l’objectif sur
l’appareil photo.
Voir
A
u
Joint en caoutchouc de
la monture d’objectif
——
i
Contacts du
microprocesseur
Utilisés pour transférer les données depuis ou vers
l’appareil photo.
—
o
Commande L-Fn
Appuyez sur cette commande pour eff ectuer une fonction
attribuée à l’aide de l’appareil photo. Pour en savoir plus,
reportez-vous à la description de [Défi nition réglages
perso.], [Commandes personnalisées] ou [Commandes
perso (prise de vue)] dans le manuel de l’appareil photo.
—
!0
Commande d’affi chage
Enregistrez les réglages ou choisissez les informations
affi chées sur l’écran d’informations sur l’objectif.
Voir
B
,
C
!1
Commutateur du mode
de mise au point
Choisissez un mode de mise au point.
• A: autofocus
• M: mise au point manuelle
Notez qu’indépendamment du réglage choisi, vous
devez modifi er la mise au point manuellement lorsque
le mode de mise au point manuelle est sélectionné à
l’aide des commandes de l’appareil photo.
—
!2
Parasoleil
Le parasoleil bloque la lumière diff use pouvant
provoquer de la lumière parasite ou une image
fantôme. Il permet aussi de protéger l’objectif.
Voir
D
!3
Repère de verrouillage
du parasoleil
Référez-vous à ces repères vous fi xez le parasoleil.
!4
Repère d’alignement du
parasoleil
!5
Bouton de déverrouillage
du parasoleil
Utilisez ce bouton pour retirer le parasoleil.
!6
Bouchon d’objectif
(avant)
——
!7
Bouchon d’objectif
(arrière)
——
A
Fixation et retrait
Fixation et retrait
Fixation de l’objectif
z
Mettez l’appareil photo hors tension, retirez le bouchon du boîtier et détachez le
bouchon arrière de l’objectif.
x
Placez l’objectif sur le boîtier de l’appareil photo, en maintenant le repère de montage
de l’objectif aligné sur le repère de montage du boîtier de l’appareil photo, puis faites
pivoter l’objectif dans le sens inverse des aiguilles d’une montre jusqu’au déclic.
Retrait de l’objectif
z
Mettez l’appareil photo hors tension.
x
Maintenez appuyée la commande de déverrouillage de l’objectif tout en faisant
pivoter ce dernier dans le sens des aiguilles d’une montre.
B
Écran d’informations sur l’objectif
Écran d’informations sur l’objectif
L’écran d’informations sur l’objectif s’allume lorsque vous fi xez l’objectif sur un appareil photo et que
ce dernier est sous tension.
• Appuyez sur la commande d’affi chage de l’objectif pour parcourir l’affi chage de la façon
indiquée ci-dessous:
Ouverture
2
Profondeur de champ
1
Distance de mise au point
1 La profondeur de champ s’a che lorsque l’appareil photo est en mode A ou M.
2 L’ouverture s’a che uniquement lorsque l’appareil
photo est en mode A ou M. L’a chage des autres
modes est indiqué sur l’illustration.
• Le mode de mise au point (AF ou MF) s’affi che brièvement lors de sa sélection à l’aide du
commutateur du mode de mise au point.
• L’écran s’éteint automatiquement lorsque l’appareil photo entre en mode veille ou si vous
n’eff ectuez aucune opération avec l’objectif pendant 10 secondes environ. Appuyez sur la
commande d’affi chage pour activer à nouveau l’écran.
A
Écran d’informations sur l’objectif
La distance de mise au point, la profondeur de champ et les autres informations a chées sur l’écran d’informations sur
l’objectif ne sont que des approximations.
A
Bokeh irrégulier
Avec des vitesses d’obturation rapides et/ou de grandes ouvertures, il se peut que vous observiez des irrégularités dans le
rendu du bokeh ( ou d’arrière-plan). Vous pouvez atténuer cet e et en choisissant des vitesses d’obturation plus lentes et/ou
des ouvertures plus petites (valeurs f/ plus grandes).
C
Options de l’écran
Options de l’écran
Suivez les étapes ci-dessous pour choisir l’unité de la distance de mise au point, à savoir mètres (m)
ou pieds (ft), ou pour régler la luminosité de l’écran d’informations sur l’objectif.
z Maintenez appuyée la commande d’affi chage pour affi cher les réglages.
• Les options de sélection de l’unité ou de la luminosité s’affi chent. L’élément en cours de
sélection clignote.
• Appuyez sur la commande d’affi chage pour commuter entre les affi chages.
Unités Luminosité
x Choisissez un réglage à l’aide de la bague de réglage de l’objectif.
Unités
- Tournez la bague de réglage pour choisir entre
mètres (m) et pieds (ft).
Luminosité
- Tournez la bague de réglage dans le sens «+» (plus
clair) ou «−» (plus sombre).
- Vous avez le choix entre 6 niveaux de luminosité.
- Pour éteindre l’écran d’informations, tournez la
bague dans le sens «−» jusqu’à ce que l’icône
devienne
.
• Appuyez sur la commande d’affi chage pour enregistrer les modifi cations et changer
d’affi chage.
• Si vous n’eff ectuez aucune opération à l’aide des commandes de l’objectif pendant 5
secondes environ, les options disparaissent de l’écran. Toute modifi cation sera perdue.
c Maintenez appuyée la commande d’affi chage pour revenir à l’écran d’informations sur
l’objectif.
• Si vous choisissez le réglage de luminosité , l’écran d’informations sur l’objectif s’éteint.
Pour activer à nouveau l’écran, maintenez appuyée la commande d’affi chage.
D
Fixation et retrait du parasoleil
Fixation et retrait du parasoleil
Fixation du parasoleil
• Alignez le repère de montage du parasoleil sur le repère d’alignement du parasoleil (
q
), puis
tournez ce dernier (
w
) jusqu’à ce que le repère de montage s’aligne sur le repère de verrouillage
du parasoleil (
e
).
Repère de verrouillage du
parasoleil
Repère d’alignement du parasoleil
Repère de montage du parasoleil
• Si vous saisissez l’avant trop fermement, le parasoleil peut être diffi cile à fi xer ou à retirer. Lorsque
vous tournez le parasoleil, tenez-le près du repère d’alignement (
●
) situé sur sa base.
• Le parasoleil peut être retourné et monté sur l’objectif lorsqu’il n’est pas utilisé.
Retrait du parasoleil
• En maintenant appuyé le bouton de déverrouillage du parasoleil (
q
), tournez le parasoleil dans
le sens indiqué (
w
) et retirez-le de l’objectif (
e
).
Bouton de déverrouillage du parasoleil
• Il est possible d’eff ectuer la même procédure lorsque le parasoleil est retourné.
Lorsque l’objectif est fi xé
Lorsque l’objectif est fi xé
Le réglage de mise au point risque de changer si vous mettez l’appareil photo hors tension puis à
nouveau sous tension après avoir fait le point. Si vous avez fait le point sur un emplacement sélectionné
au préalable en attendant que votre sujet apparaisse, nous vous recommandons de ne pas mettre
l’appareil photo hors tension tant que vous n’avez pas pris la photo.
Appareils photo dotés d’illuminateurs d’assistance AF
Appareils photo dotés d’illuminateurs d’assistance AF
L’objectif ou le parasoleil risque de bloquer la lumière émise par l’illuminateur d’assistance AF de
l’appareil photo.
• Pour obtenir les dernières informations sur l’utilisation de l’objectif avec des appareils photo dotés
d’illuminateurs d’assistance AF intégrés, consultez le site ci-dessous.
https://downloadcenter.nikonimglib.com/
Utilisation de l’objectif avec des appareils photo équipés d’un fl ash intégré
Utilisation de l’objectif avec des appareils photo équipés d’un fl ash intégré
Des ombres seront visibles sur les photos si la lumière provenant du fl ash intégré est occultée par
l’objectif ou le parasoleil. Retirez le parasoleil avant la prise de vue. Notez cependant que selon la focale
de l’objectif et la distance au sujet, des ombres peuvent être visibles même si le parasoleil est retiré.
• Des ombres seront visibles sur les photos si cet objectif est fi xé sur un Z50.
• Pour obtenir les dernières informations sur les focales et les distances au sujet avec lesquelles aucune
ombre ne sera visible sur les photos prises avec un fl ash intégré, consultez le site ci-dessous.
https://downloadcenter.nikonimglib.com/
Précautions d’utilisation
Précautions d’utilisation
• Ne prenez pas, ni ne tenez l’objectif ou l’appareil photo uniquement par les bouchons ou par le parasoleil.
• Maintenez les contacts du microprocesseur propres.
• Si le joint en caoutchouc de la monture d’objectif est endommagé, cessez immédiatement l’utilisation
et confi ez l’objectif à un centre Nikon agréé pour le faire réparer.
• Remettez les bouchons en place lorsque vous n’utilisez pas l’objectif.
• Ne laissez pas l’objectif dans des endroits humides ou dans des lieux où il risque d’être exposé à l’humidité.
La formation de rouille sur les mécanismes internes peut provoquer des dommages irréparables.
• Ne laissez pas l’objectif à proximité d’un feu ou dans d’autres endroits extrêmement chauds. La chaleur
extrême peut endommager ou déformer l’extérieur en plastique renforcé.
• Les changements brusques de température peuvent être à l’origine d’une condensation préjudiciable à
l’intérieur et à l’extérieur de l’objectif. Avant de faire passer l’objectif d’un environnement chaud à froid ou vice
versa, rangez-le dans un sac ou dans une boîte en plastique pour ralentir le changement de température.
• Nous vous recommandons de ranger l’objectif dans son étui afi n de le protéger des rayures lors du transport.
Entretien de l’objectif
Entretien de l’objectif
• Normalement, enlever la poussière suffi t pour nettoyer les surfaces en verre de l’objectif.
• Les taches, les traces de doigt et autres taches d’huile peuvent être retirées de la surface de l’objectif
avec un tissu propre et doux en coton ou un chiff on optique (disponible auprès d’autres fabricants)
légèrement imbibé d’une petite quantité d’éthanol ou de nettoyant pour objectif. Essuyez délicatement
avec un mouvement circulaire à partir du centre vers l’extérieur, en prenant soin de ne pas laisser de
traces, ni de toucher le verre avec les doigts.
• N’utilisez jamais de solvants organiques comme un diluant à peinture ou du benzène pour nettoyer l’objectif.
• Les fi ltres neutres (NC, disponibles séparément) et autres accessoires similaires permettent de protéger la lentille avant.
• Ne rangez pas l’objectif avec des boules antimites de naphtaline ou de camphre ou à la lumière directe
du soleil. Si vous n’avez pas l’intention d’utiliser l’objectif avant longtemps, rangez-le dans un endroit
frais et sec pour éviter la moisissure et la rouille.
Accessoires
Accessoires
Accessoires fournis
Accessoires fournis
• Bouchon d’objectif LC-82B (avant)
• Bouchon d’objectif LF-N1 (arrière)
• Parasoleil HB-94
• Étui pour objectif CL-C2
D
Utilisation de l’étui pour objectif
• L’étui est destiné à protéger l’objectif des rayures et non des chutes ou autres chocs physiques.
• L’étui n’est pas résistant à l’eau.
• La matière utilisée dans cet étui peut se décolorer, déteindre, s’étirer, rétrécir ou changer de couleur en cas de frottement ou d’humidité.
• Retirez la poussière avec une brosse à poils doux.
• L’eau et les taches peuvent être retirées de la surface avec un chi on doux et sec. N’utilisez pas d’alcool, de benzène, de diluant ou
d’autres substances chimiques volatiles.
• Ne rangez pas l’étui dans des lieux exposés à la lumière directe du soleil, à des températures élevées ou à l’humidité.
• N’utilisez pas l’étui pour nettoyer le moniteur ou les lentilles.
• Veillez à ce que l’objectif ne tombe pas de l’étui lorsque vous le transportez.
Matière: polyester
Accessoires compatibles
Accessoires compatibles
Filtres à visser 82mm
D
Filtres
• N’utilisez qu’un seul ltre à la fois.
• Retirez le parasoleil avant de xer un ltre ou de faire pivoter un ltre polarisant circulaire.
Caractéristiques
Caractéristiques
Monture
Monture Monture Nikon Z
Focale
Focale 50 mm
Ouverture maximale
Ouverture maximale f/1.2
Construction optique
Construction optique
17 lentilles en 15 groupes (dont 2 lentilles en verre ED, 3 lentilles asphériques et des
lentilles béné ciant du Traitement nanocristal et du Traitement ARNEO)
Angle de champ
Angle de champ • Format FX: 47°
• Format DX: 31° 30’
Système de mise au point
Système de mise au point Système de mise au point interne
Distance minimale de mise au point
Distance minimale de mise au point 0,45 m à partir du plan focal
Rapport de reproduction maximal
Rapport de reproduction maximal 0,15×
Lamelles de diaphragme
Lamelles de diaphragme 9 (diaphragme circulaire)
Plage des ouvertures
Plage des ouvertures f/1.2 – 16
Diamètre de xation pour ltre
Diamètre de xation pour ltre 82 mm (P = 0,75 mm)
Dimensions
Dimensions Environ 89,5 mm de diamètre maximum × 150 mm (distance entre
l’extrémité de l’objectif et le plan d’appui de la monture d’objectif de l’appareil photo)
Poids
Poids Environ 1090g
Nikon se réserve le droit de modifi er à tout moment l’apparence, les caractéristiques et les performances de ce
produit sans avis préalable.
D
レンズフードの取り付け方・取り外し方
取り付け方
•
レンズフード着脱指標とレンズフード取り付け指標を合わせて(
q
)、レン
ズフードを矢印(
w
)の方向に回転させ、レンズフード着脱指標とレンズフー
ドセット指標を合わせてください(
e
)。
レンズフードセット指標
レンズフード取り付け指標
レンズフード着脱指標
•
レンズフード先端を強くつかむと着脱が困難になります。着脱の際は、レンズフー
ド取り付け指標(●)付近を持って回転させてください。
•
収納時はレンズフードを逆向きにしてレンズに取り付けられます。
取り外し方
•
レンズフードロック解除ボタンを押さえて(
q
)、レンズフードを矢印(
w
)の
方向に回転させ、取り外します(
e
)。
レンズフードロック解除ボタン
•
レンズフードが逆向きに取り付けられているときも、同様の手順で取り外します。
カメラにレンズを取り付けたときのご注意
ピント合わせを行った後に、カメラの電源を OFF にして再び ON にするとピント位置
が変わることがあります。ピントをあらかじめ合わせておいて被写体を待つ置きピン撮
影などでは、ピントを合わせてからシャッターをきるまでにカメラの電源を OFF にしな
いことをおすすめします。
カメラの
AF
補助光を使用するときのご注意
AF 補助光搭載のカメラの場合、AF 補助光がレンズやレンズフードでさえぎられる
ことがあります。
•
カメラの
AF 補助光を使って撮影するときの制限についての最新情報は、ニコンダウン
ロードセンターでご確認いただけます。
https://downloadcenter.nikonimglib.com/
内蔵フラッシュ搭載のカメラでフラッシュ撮影するとき
のご注意
内蔵フラッシュ搭載のカメラの場合、フラッシュの光がレンズやレンズフードでさえぎ
られると画像に影が写り込みます。レンズフードは取り外して撮影してください。
レンズフードを取り外しても、レンズの焦点距離と撮影距離によっては影が写り込みます。
•
このレンズを
Z 50 に取り付けると、フラッシュの光がレンズでさえぎられて影が写り
込みます。
•
内蔵フラッシュ搭載のカメラでフラッシュ撮影するときに影が写り込まずに撮影でき
る焦点距離と撮影距離についての最新情報は、ニコンダウンロードセンターでご確認
いただけます。
https://downloadcenter.nikonimglib.com/
取り扱い上のご注意
•
レンズキャップやレンズフードだけを持って、レンズやカメラを持ち運ばないでくださ
い。
•
CPU 信号接点は汚さないようにご注意ください。
•
レンズマウントゴムリングが破損した場合は、そのまま使用せず販売店またはニコン
サービス機関に修理を依頼してください。
•
レンズをカメラに装着していないときは、必ずレンズキャップを取り付けてください。
•
レンズを水にぬらしたり、湿気の多い場所に置かないでください。部品がサビつくな
どして故障の原因になりますのでご注意ください。
•
火の近くなど、極端に温度が高くなるところに置かないでください。外装に使用して
いる強化プラスチックが変形することがあります。
•
極端に温度差のある場所に急にレンズを持ち込むと、レンズ内外に水滴が生じ、故障の
原因となります。レンズをバッグやビニール袋などに入れて、周囲の温度になじませて
からお使いください。
•
レンズを傷から守るために、持ち運ぶときはレンズケースに入れることをおすすめします。
レンズのお手入れ
•
レンズ面を清掃する場合、通常はほこりを払う程度にしてください。
•
レンズ面に指紋など油分を含む汚れがついたときは、少量の無水アルコール(エタノー
ル)や市販のレンズクリーナーで湿らせた柔らかい清潔な木綿の布または市販のレン
ズクリーニングペーパーを使って、レンズの中心から外周へ渦巻き状に拭いてくださ
い。その場合、拭きムラや拭き残りがないように注意してください。
•
シンナーやベンジンなどの有機溶剤は絶対に使用しないでください。
•
レンズ表面の汚れや傷を防ぐには、別売のニュートラルカラー
NC フィルターなどの
使用をおすすめします。
•
レンズを保管するときは、直射日光のあたるところや防虫剤のあるところを避けてく
ださい。また、レンズを長期間使用しないときは、カビやサビを防ぐために、高温多
湿のところを避けて風通しのよい場所に保管してください。
アクセサリー
付属アクセサリー
•
レンズキャップ
LC-82B(フロントキャップ)
•
レンズキャップ
LF-N1(リアキャップ)
•
レンズフード
HB-94
•
レンズケース
CL-C2
D
レンズケースのお取り扱いについて
•
レンズケースはレンズを傷から守ることを目的としており、落下や衝撃からレンズ
を保護する機能はありません。
•
レンズケースに撥水機能はありません。
•
レンズケースは材質の特性上、雨や水などで濡れた場合や摩擦によって、色落ち、
変色、色移り、伸縮することがあります。
•
ほこりは柔らかいブラシで払い落としてください。
•
表面に付着した汚れや水分は、乾いた柔らかい布で拭き取ってください。アルコール、
ベンジン、シンナーなどの溶剤は使わないでください。
•
直射日光があたる場所や、温度、湿度の高い場所に放置しないでください。
•
レンズ面や液晶画面などを拭くクリーニングクロスとしては使用できません。
•
レンズを収納して持ち運ぶ際、レンズが転がり出ないようご注意ください。
レンズケースの素材:ポリエステル
使用できるアクセサリー
82 mm ネジ込み式フィルター
D
フィルターを使用する場合
•
フィルターは
1 枚で使用してください。
•
フィルターは、レンズフードを取り外してから装着してください。また、円偏光フィルター
の偏光効果の調節も、レンズフードを取り外した状態で行ってください。
仕様
マウント ニコン Z マウント
焦点距離
50 mm
最大口径比 1:1.2
レンズ構成
15 群 17 枚(ED レンズ 2 枚、非球面レンズ 3 枚、ナノク
リスタルコートあり、 アルネオコートあり)
画角
47°(
撮像範囲 FX
)
31°30′(撮像範囲 DX)
フォーカシング方式 IF(インターナルフォーカス)方式
最短撮影距離 撮像面から
0.45 m
最大撮影倍率 0.15 倍
絞り羽根枚数
9 枚(円形絞り)
絞りの範囲
f/1.2 16
アタッチメントサイズ 82 mm(P=0.75 mm)
寸法
約
89.5 mm(最大径)× 150 mm(レンズマウント基準
面からレンズ先端まで)
質量 約
1090 g
※製品の外観・仕様・性能は予告なく変更することがありますので、ご了承ください。
x Choose a setting using the lens control ring.
Units
- Rotate the control ring to choose from me-
ters (m) or feet (ft).
Brightness
- Rotate the control ring in the “+” (brighter)
or “−” (darker) direction.
- Choose from 6 levels of brightness.
- To turn the lens info panel off , rotate the
ring in the “−” direction until the icon
changes to
.
• Press the display button to save changes and toggle the display.
• If no operations are performed using lens controls for about 5 seconds,
panel options will clear from the display. Any changes will be lost.
c Press and hold the display button to return to the lens information display.
• Choosing
for brightness turns the lens info panel off . To turn the display
on again, press and hold the display button.
D
Attaching and Removing the Lens Hood
Attaching and Removing the Lens Hood
Attaching the Lens Hood
• Align the lens hood mounting mark with the lens hood alignment mark (
q
) and
then rotate the lens hood (
w
) until the mounting mark is aligned with the lens
hood lock mark (
e
).
Lens hood lock mark
Lens hood alignment mark
Lens hood mounting mark
• Gripping the front too tightly makes the lens hood diffi cult to attach or remove. When
rotating the lens hood, hold it near the lens hood alignment mark (
●
) on its base.
• T
he lens hood can be reversed and mounted on the lens when not in use.
Removing the Lens Hood
• Keeping the lens hood lock release button pressed (
q
), rotate the lens hood in
the direction shown (
w
) and remove it from the lens (
e
).
Lens hood lock release button
• The
same procedure can be used when the lens hood is reversed.
When the Lens Is Attached
When the Lens Is Attached
The focus position may change if you turn the camera off and then on again after fo-
cusing. If you have focused on a pre-selected location while waiting for your subject to
appear, we recommend that you do not turn the camera off until the picture is taken.
Cameras with AF-Assist Illuminators
Cameras with AF-Assist Illuminators
The lens or lens hood may block the light from the camera AF-assist illuminator.
• For the latest information on using the lens with cameras that have built-in AF-assist
illuminators, visit the site below.
https://downloadcenter.nikonimglib.com/
Using the Lens on Cameras with a Built-in Flash
Using the Lens on Cameras with a Built-in Flash
Shadows will be visible in photos where light from the built-in fl ash is obscured by the
lens or lens hood. Remove the lens hood before shooting. Note, however, that depend-
ing on lens focal length and the distance to the subject, shadows may appear even
when the lens hood is removed.
• Shadows will be visible in photos taken when this lens is mounted on a Z 50.
• For the latest information on focal lengths and subject distances at which shadows
will not appear in photos taken with a built-in fl ash, visit the site below.
https://downloadcenter.nikonimglib.com/
Precautions for Use
Precautions for Use
• Do not pick up or hold the lens or camera using only the lens caps or lens hood.
• Keep the CPU contacts clean.
• Should the rubber lens-mount gasket be damaged, cease use immediately and take
the lens to a Nikon-authorized service center for repair.
• Replace the lens caps when the lens is not in use.
• Do not leave the lens in humid locations or in locations in which it may be exposed to
moisture. Rusting of the internal mechanism can cause irreparable damage.
• Do not leave the lens next to open fl ames or in other extremely hot locations. Ex-
treme heat could damage or warp the reinforced plastic exterior.
• Rapid changes in temperature may cause damaging condensation inside and outside
the lens. Before taking the lens from a warm to a cold environment or vice versa, place
it in a bag or plastic case to slow the change in temperature.
• We recommend that you place the lens in its case to protect it from scratches during transport.
Lens Care
Lens Care
• Removing dust is normally suffi cient to clean the glass surfaces of the lens.
• Smudges, fi ngerprints, and other oily stains can be removed from the lens surface us-
ing a soft, clean cotton cloth or third-party lens cleaning tissue lightly dampened with
a small amount of ethanol or lens cleaner. Wipe gently from the center outwards in a
circular motion, taking care not to leave smears or touch the lens with your fi ngers.
• Never use organic solvents such as paint thinner or benzene to clean the lens.
• Neutral Color (NC) fi lters (available separately) and the like can be used to protect the
front lens element.
• Do not store with naphtha or camphor moth balls or in direct sunlight. If the lens will not
be used for an extended period, store it in a cool, dry location to prevent mold and rust.
Accessories
Accessories
Supplied Accessories
Supplied Accessories
• LC-82B Lens Cap (front cap)
• LF-N1 Lens Cap (rear cap)
• HB-94 Lens Hood
• CL-C2 Lens Case
D
Using the Lens Case
• The case is intended to protect the lens from scratches, not from falls or other physical shocks.
• The case is not water resistant.
• The material used in the case may fade, bleed, stretch, shrink, or change color when rubbed or wet.
• Remove dust with a soft brush.
• Water and stains can be removed from the surface with a soft, dry cloth. Do not use alcohol, benzene, thinner,
or other volatile chemicals.
• Do not store in locations exposed to direct sunlight or high temperatures or humidity.
• Do not use the case to clean the monitor or lens elements.
• Be careful that the lens does not fall from the case during transport.
Material: Polyester
Compatible Accessories
Compatible Accessories
82 mm screw-on fi lters
D
Filters
• Use only one lter at a time.
• Remove the lens hood before attaching lters or rotating circular polarizing lters.
Speci cations
Speci cations
Mount
Mount Nikon Z mount
Focal length
Focal length 50 mm
Maximum aperture
Maximum aperture
f/1.2
Lens construction
Lens construction 17 elements in 15 groups (including 2 ED elements, 3 aspherical elements,
and elements with Nano Crystal and ARNEO coats)
Angle of view
Angle of view • FX format: 47°
• DX format: 31°
30’
Focusing system
Focusing system Internal focusing system
Minimum focus
Minimum focus
distance
distance
0.45 m (1.48 ft) from focal plane
Maximum reproduc-
Maximum reproduc-
tion ratio
tion ratio
0.15×
Diaphragm blades
Diaphragm blades 9 (rounded diaphragm opening)
Aperture range
Aperture range f/1.2 – 16
Filter-attachment size
Filter-attachment size 82 mm (P = 0.75 mm)
Dimensions
Dimensions Approx. 89.5 mm/3.6 in. maximum diameter × 150 mm/6 in.
(distance to end of lens from camera lens mount ange)
Weight
Weight Approx. 1090 g (2 lb 6.5 oz )
Nikon reserves the right to change the appearance, specifi cations, and performance of this
product at any time and without prior notice.
サービスとサポート
修理サービスのご案内
■
インターネットでのお申込み
ニコンイメージングジャパン修理センターで承ります。
下記のホームページからお申込みいただけます。
https://www.nikon-image.com/support/repair/
•
ニコン
ピックアップサービスで発送する場合
梱包資材のお届け・修理品のお引き取り、修理後のお届け・集金までをニコン指定の配送
業者(ヤマト運輸)が一括して代行するサービスです。全国一律の料金にて承ります(大
きさや重さには制限があり、取り扱いできない製品もあります)。
•
ご自身で発送する場合
インターネットでお申込みいただいた後、お客様ご自身で修理品を梱包し、修理センター
まで発送してください。
株式会社ニコンイメージングジャパン修理センター
〒
230-0052 横浜市鶴見区生麦 2-2-26 修理センターナビダイヤル 0570-02-8200
※ 修理センターでは、宅配便、郵送をお受けします。ご来所の方の受付はしておりません。
■
お電話でのお申込み
お電話でのお申込みの場合は、ニコンピックアップサービスをご利用いただけます。
ニコン ピックアップサービス専用 フリーダイヤル(ヤマト運輸にて承ります)
0120-02-8155
営業時間:9:30 〜 18:00(土曜日、日曜日、祝日、年末年始、夏期休業などを除く毎日)
※
上記フリーダイヤルは、ニコン指定の配送業者(ヤマト運輸)にて承ります。修理内容に
関するお問い合わせにはお答えできません。修理内容に関するお問い合わせは修理センター
へお願いいたします。
■
サービスセンターでのお手続き
ニコンプラザのサービスセンター窓口でお見積り・受付をいたします。
D
修理品をお預けいただく場合のご注意
•
ボディーキャップやレンズキャップが付属している製品の場合は、製品保護のため、装着して
お預けください。
•
修理に必要と思われるもの以外の付属品は、ご自身で保管ください。
•
カメラなどの修理では、受付や修理の過程で撮影データをやむを得ず消去する場合があります。
大切なデータは必ずバックアップをお取りください。
修理に関するお問い合わせ先
株式会社ニコンイメージングジャパン修理センター
修理センター ナビダイヤル
0570-02-8200
営業時間:9:30 〜 18:00 (土曜日、日曜日、祝日、年末年始、夏期休業などを除く毎日)
•
ナビダイヤルをご利用いただけない場合は、ニコンカスタマーサポートセンター
(03) 6702-0577
におかけください。
•
最新情報につきましては、下記のホームページをご覧ください。
https://www.nikon-image.com/support/repair/
ニコンプラザについて
ニコンプラザは、ショールーム、サービスセンター、ギャラリーを統合したニコン映像製品
の総合情報拠点です。
※
ニコンプラザサービスセンターでは持ち込み修理の受け付けも行っています。
ニコンプラザショールーム ナビダイヤル
0570-02-8080
ニコンプラザサービスセンター ナビダイヤル
0570-02-8060
•
音声ガイダンスにしたがってご利用ください。
•
ナビダイヤルをご利用いただけない場合は、ニコンカスタマーサポートセンター
(03) 6702-0577
におかけください。
ニコンプラザの所在地、営業時間などについては、下記 URL を
ご覧ください。
https://www.nikon-image.com/support/showroom/
製品の使い方に関するお問い合わせ先
■
インターネットでのお問い合わせ
https://www.nikon-image.com/support/contact/
■
お電話でのお問い合わせ
ニコン カスタマーサポートセンター ナビダイヤル
0570-02-8000
営業時間:9:30 〜 18:00(土曜日、日曜日、祝日、年末年始、夏期休業などを除く毎日)
•
ナビダイヤルをご利用いただけない場合は、ニコンカスタマーサポートセンター
(03) 6702-0577 におかけください。
•
ファクシミリは、(
03) 5977-7499 にお送りください。
•
最新情報につきましては、下記のホームページをご覧ください。
https://www.nikon-image.com/support/contact/
お問い合わせ時のお願い
•
おわかりになる範囲で「製品名」、「製品番号」、「ご購入日」、問題が発生した場合は「手順」、「現象
(表示されたメッセージ)」、「発生頻度」などをご確認のうえ、お問い合わせください。
ニコンイメージング会員「製品登録」のご案内
ニコンでは製品を安全に、安心してご使用いただくため「製品登録」へのご協力をお願いしてお
ります。ご登録いただいた製品に関するファームアップ情報や重要なお知らせなどをメールでご
案内いたします。
■
製品登録方法
製品は、「ニコンイメージング会員」(無料)の「製品登録」ページからご登録いただけます。
ニコンイメージング会員登録および製品登録は以下ニコンホームページからお手続きください。
ニコンイメージング会員のご案内
https://www.nikon-image.com/enjoy/membership/about/
■
ニコンイメージング会員とは
登録製品に関するサポート情報・ニコン製品情報や、お得で便利な会員特
典
※
などフォトライフをよりお楽しみいただくための会員サービスです。
※ 特典は登録製品ごとに異なります。
ご注意
•
ご登録にはメールアドレスとインターネットに接続できる環境が必要です。
•
登録製品の製品番号(製品本体および保証書に記載)が必要です。
•
特典の内容は、予告なく変更される場合があります。あらかじめご了承ください。
ニコンイメージングサポートページのご案内
https://www.nikon-image.com/support/
最新の製品テクニカル情報や、ソフトウェアのアップデート情報をご覧いただ
けます。
製品をより有効にご利用いただくために、定期的なアクセスをお
すすめします。
Jp
使用説明書
En
User’s Manual
Fr
Manuel d’utilisation
Sc
ҋᅶᢪϷ
Es
Manual del usuario
Kr
사용설명서
NIKKOR Z 50mm f/1.2 S
Printed in Thailand
7MMA4264-02
U
Jp
使用説明書
En
User’s Manual
Fr
Manuel d’utilisation
ご使用の前に、この使用説明書をよくお読みの上、正しくお使いください。また、
カメラの説明書もご覧ください。
•
このレンズは、ニコン
Z マウントのミラーレスカメラ専用です。
•
カメラのファームウェアを最新版にバージョンアップしてお使いください。ファーム
ウェアが最新になっていない場合、レンズを正しく認識しなかったり、機能の一部が
使用できないことがあります。最新のファームウェアは、ニコンダウンロードセンター
からダウンロードできます。
https://downloadcenter.nikonimglib.com/
安全上のご注意
あなたや他の人々への危害や財産への損害を未然に防止するため、ご使用の前に「安全上の
ご注意」をよくお読みの上、正しくお使いください。
この説明書をお読みになった後は、いつでも参照できるように保管してください。
A
警告
「死亡または重傷を負うおそれがある内容」です。
A
注意
「軽傷を負うことや財産の損害が発生するおそれがある内容」です。
お守りいただく内容を、以下の図記号で区分しています。
F
は、してはいけない内容です。
C
は、実行しなければならない内容です。
A
警告
E
分解
禁止
分解、修理または改造をしない
落下などによる破損で内部が露出したら、露出部に触らない
感電やけがの原因になります。
C
実行
熱くなる、煙が出る、こげ臭いなどの異常時は、直ちにカメラの電源を取り
外す
放置すると、発火、やけどの原因になります。
F
禁止
水でぬらさない
ぬれた手で触らない
感電や発火の原因になります。
F
禁止
引火、爆発のおそれのある場所では使わない
プロパンガス、ガソリン、可燃性スプレーなどの引火性ガスや粉塵の発生す
る場所で使うと、爆発や火災の原因になります。
F
禁止
レンズで直接太陽や強い光を見ない
失明や視力障碍の原因になります。
F
禁止
幼児の手の届くところに置かない
故障やけがの原因になります。
小さな付属品を誤って飲み込むと、身体に悪影響を及ぼします。飲み込んだ
ら、すぐに医師の診断を受けてください。
G
禁止
高温環境や低温環境では、直接触らない
やけどや低温やけど、凍傷の原因になることがあります。
A
注意
F
禁止
レンズを太陽や強い光源に向けたままにしない
集光して、内部部品の破損や発火の原因になることがあります。逆光撮影では、
太陽を画角から十分にずらしてください。画角から太陽をわずかに外しても、
発火の原因になります。
F
禁止
夏場の車内や直射日光の当たる所など高温環境に放置しない
故障や発火の原因になります。
F
禁止
三脚などにカメラやレンズを取り付けたまま移動しない
故障やけがの原因になります。
レンズの使い方
各部の名称と機能
左図で示されている各部の名称と機能は以下の通りです。
●
●
q
レンズフード
着脱指標
レンズにレンズフードを取り付けるときの指標
です。
詳しくは
D
●
w
すべり止めゴム
●
e
フォーカスリング
手動でピントを合わせるときに使用します。
•
オートフォーカス時に手動でピントを合わせて
撮影する場合は、シャッターボタンを半押しし
た状態でフォーカスリングを回してピントを合
わせてから、シャッターボタンをさらに押し込
みます。
●
r
レンズ情報パネル
撮影距離や被写界深度などの情報を表示します。
詳しくは
B
、
C
●
t
コントロールリング
このリングを回転させると、[絞り]や[露出補正]
などカメラで設定した機能を使用できます。詳
しくは、カメラの説明書に記載されている[カス
タムボタンの機能]または[カスタムボタンの
機能 ( 撮影 )]の説明をご覧ください。
●
y
レンズ着脱指標 カメラにレンズを取り付けるときの指標です。
詳しくは
A
●
u
レンズマウント
ゴムリング
●
i
CPU
信号接点 カメラとレンズの間で情報を伝達します。
●
o
L-Fn
ボタン
このボタンを押すと、カメラで設定した機能を
使用できます。詳しくは、カメラの説明書に記
載されている[カスタムボタンの機能]または[カ
スタムボタンの機能 ( 撮影 )]の説明をご覧くだ
さい。
●
!0
表示切り換えボタン
レンズ情報パネルの表示を切り換えたり、設
定を保存するときに使います。
詳しくは
B
、
C
●
!1
フォーカスモード
切り換えスイッチ
フォーカスモードを切り換えられます。
A
:オートフォーカスになります。
M
:マニュアルフォーカスになります。
•
カメラのフォーカスモードがマニュアルフォー
カスのときは、レンズで[
A
]を選んでいても
マニュアルフォーカスになります。
●
!2
レンズフード
画像に悪影響を及ぼす光線をカットします。
レンズ面の保護にも役立ちます。
詳しくは
D
●
!3
レンズフードセット
指標
レンズにレンズフードを取り付けるときの指標
です。
●
!4
レンズフード取り付
け指標
●
!5
レンズフードロック
解除ボタン
レンズフードを取り外すときに使用します。
●
!6
レンズキャップ
(フロントキャップ)
●
!7
レンズキャップ
(リアキャップ)
A
カメラへの取り付け方・取り外し方
取り付け方
z
カメラの電源を
OFF
にして、レンズのリアキャップとカメラのボ
ディーキャップを外す
x
カメラとレンズのレンズ着脱指標を合わせ、反時計回りにカチッ
と音がするまでレンズを回す
取り外し方
z
カメラの電源を
OFF
にする
x
レンズ取り外しボタンを押しながら、時計回りにレンズを回して
取り外す
B
レンズ情報パネルの表示
このレンズをカメラに取り付けてカメラの電源を ON にすると、レンズ情報パ
ネルが点灯します。
•
レンズ情報パネルの表示は、レンズの表示切り換えボタンを押すたびに次のよ
うに切り換わります。
絞り値
※ 2
被写界深度
※ 1
撮影距離
※
1 被写界深度は、カメラの撮影モードが
A
または
M
の場合に表示されます。
※
2 絞り値は、カメラの撮影モードが
A
または
M
の
場合のみ表示されます。その他の撮影モードでは、
図のように表示されます。
•
フォーカスモード切り換えスイッチを切り換えると、選択したフォーカスモード
([
AF
]または[
MF
])が一瞬表示されます。
•
カメラの半押しタイマーがオフになったとき、またはレンズの操作を行わないま
ま約 10 秒経過したとき、レンズ情報パネルは消灯します。表示切り換えボタン
を押すと、レンズ情報パネルが再度点灯します。
A
レンズ情報パネルに表示される数値について
レンズ情報パネルに表示される撮影距離や被写界深度などの数値は、おおよその
目安です。
A
ボケ像が欠けて写る場合は
高速のシャッタースピードや開放付近の絞りで撮影すると、ボケ像が欠けて
写ることがあります。ボケ像の欠けが気になるときは、シャッタースピード
を遅くしたり、絞り値を大きくすると目立たなくなります。
C
レンズ情報パネルの設定
距離を表示するときの単位(
m
(メートル)または
ft
(フィート))や、レンズ情
報パネルの明るさを変更できます。
z
表示切り換えボタンを長押しして設定画面を表示する
•
距離単位または明るさの設定画面が表示されます。設定画面では、設定中の
項目が点滅します。
•
表示切り換えボタンを押すと、設定画面が切り換わります。
距離単位の設定画面 明るさの設定画面
x
コントロールリングを回して設定を変更する
距離単位の設定
-
コントロールリングを回して、
m
または
ft
を選びます。
明るさの設定
-
コントロールリングを
+(プラス)方向に
回すと表示が明るくなり、−(マイナス)
方向に回すと暗くなります。
-
設定できる明るさは 6 段階です。
-
が になるまでコントロールリング
を
−方向に回すと、レンズ情報パネルには
何も表示されなくなります。
•
表示切り換えボタンを押すと設定した内容が保存され、設定画面が切り換わ
ります。
•
レンズの操作を行わないまま約
5 秒経過すると、設定画面が終了します。そ
の場合、変更した内容は反映されません。
c
表示切り
換えボタンを長押しして設定画面を終了する
•
明るさの設定を
にしたときは、レンズ情報パネルに何も表示されなくなり
ます。再度表示切り換えボタンを長押しすると、レンズ情報パネルが点灯し
ます。
A
A
CAUTION
CAUTION
•
•
Do not leave the lens pointed at the sun or other strong light sources.
Do not leave the lens pointed at the sun or other strong light sources.
Light focused by the lens could cause fi re or damage to product’s internal parts. When
shooting backlit subjects, keep the sun well out of the frame. Sunlight focused into
the camera when the sun is close to the frame could cause fi re.
•
•
Do not leave the product where it will be exposed to extremely high temperatures,
Do not leave the product where it will be exposed to extremely high temperatures,
for an extended period such as in an enclosed automobile or in direct sunlight.
for an extended period such as in an enclosed automobile or in direct sunlight.
Failure to observe this precaution could result in fi re or product malfunction.
•
•
Do not transport cameras or lenses with tripods or similar accessories attached.
Do not transport cameras or lenses with tripods or similar accessories attached.
Failure to observe this precaution could result in injury or product malfunction.
Notices for Customers in the U.S.A.
Notices for Customers in the U.S.A.
This device complies with part 15 of the FCC Rules. Operation is subject to the following two
conditions: (1) this device may not cause harmful interference, and (2) this device must ac-
cept any interference received, including interference that may cause undesired operation.
Federal Communications Commission (FCC) Radio Frequency Interference Statement
Federal Communications Commission (FCC) Radio Frequency Interference Statement
This equipment has been tested and found to comply with the limits for a Class B digital
device, pursuant to Part 15 of the FCC rules. These limits are designed to provide reason-
able protection against harmful interference in a residential installation. This equipment
generates, uses, and can radiate radio frequency energy and, if not installed and used in
accordance with the instructions, may cause harmful interference to radio communica-
tions. However, there is no guarantee that interference will not occur in a particular instal-
lation. If this equipment does cause harmful interference to radio or television reception,
which can be determined by turning the equipment off and on, the user is encouraged to
try to correct the interference by one or more of the following measures:
• Reorient or relocate the receiving antenna.
• Increase the separation between the equipment and receiver.
• Connect the equipment into an outlet on a circuit diff erent from that to which the
receiver is connected.
• Consult the dealer or an experienced radio/television technician for help.
CAUTIONS
CAUTIONS
Modi cations
The FCC requires the user to be notifi ed that any changes or modifi cations made to
this device that are not expressly approved by Nikon Corporation may void the user’s
authority to operate the equipment.
Nikon Inc., 1300 Walt Whitman Road,
Melville, New York 11747-3064, U.S.A.
Tel.: 631-547-4200
Notice for Customers in Canada
Notice for Customers in Canada
CAN ICES-3 B / NMB-3 B
Using the Lens
Using the Lens
Parts of the Lens: Names and Functions
Parts of the Lens: Names and Functions
Refer to the diagram on the left edge of this sheet.
q
Lens hood mounting
mark
Use when attaching the lens hood.
See
D
w
Rubber grip
——
e
Focus ring
Use for manual focus.
• When focusing using autofocus, you can ad-
just focus manually by rotating the ring while
the shutter-release button is pressed halfway;
after focusing, press the shutter-release but-
ton the rest of the way down to shoot.
—
r
Lens info panel
View focus distance, depth of fi eld, and other
information.
See
B
,
C
t
Control ring
Rotate to adjust a setting such as [Aperture] or
[Exposure compensation] assigned using the cam-
era. For more information, see the description of
[Custom control assignment], [Custom controls], or
[Custom controls (shooting)] in the camera manual.
—
y
Lens mounting mark
Use when mounting the lens on the camera.
See
A
u
Rubber lens-mount
gasket
——
i
CPU contacts
Used to transfer data to and from the camera. —
o
L-Fn button
Press to perform a function assigned using the
camera. For more information, see the descrip-
tion of [Custom control assignment], [Custom
controls], or [Custom controls (shooting)] in
the camera manual.
—
!0
Display button
Save settings or choose the information
shown in the lens info panel.
See
B
,
C
!1
Focus-mode switch
Choose a focus mode.
• A: Autofocus
• M: Manual focus
Note that regardless of the setting chosen, fo-
cus must be adjusted manually when manual
focus mode is selected using camera controls.
—
!2
Lens hood
Lens hoods block stray light that would other-
wise cause fl are or ghosting. They also serve to
protect the lens.
See
D
!3
Lens hood lock mark
Use when attaching the lens hood.
!4
Lens hood alignment
mark
!5
Lens hood lock
release button
Use when removing the lens hood.
!6
Lens cap (front cap)
——
!7
Lens cap (rear cap)
——
A
Attachment and Removal
Attachment and Removal
Attaching the Lens
z
Turn the camera o , remove the body cap, and detach the rear lens cap.
x
Position the lens on the camera body, keeping the mounting mark
on the lens aligned with the mounting mark on the camera body,
and then rotate the lens counterclockwise until it clicks into place.
Removing the Lens
z
Turn the camera o .
x
Press and hold the lens release button while turning the lens clockwise.
B
The Lens Info Panel
The Lens Info Panel
The lens Info panel lights when the lens is attached to a camera and the camera is on.
• Press the lens display button to cycle the display as shown:
Aperture
Depth of eld
Focus distance
1 Depth of eld is displayed when the camera is in mode A or M.
2 Aperture is displayed only when the cam-
era is in mode A or M. The display for other
modes is shown in the illustration.
• The focus mode (AF or MF) is briefl y displayed when chosen using the focus-
mode switch.
• The panel turns off automatically when the camera standby timer expires or if no
lens operations are performed for about 10 seconds. Press the display button to
reactivate the display.
A
The Lens Info Panel
The focus distance, depth of eld, and other information displayed in the lens Info panel are approximations only.
A
Irregular Bokeh
With fast shutter speeds and/or wide apertures, you may notice irregularities in how bokeh is shaped. The
e ect can be mitigated by choosing slower shutter speeds and/or higher f-numbers.
C
Panel Options
Panel Options
Follow the steps below to choose the units for focus distance from meters (m) or
feet (ft) or adjust the brightness of the lens Info panel.
z Press and hold the display button to view settings.
• Unit or brightness selection options will be displayed. The currently selected
item will fl ash.
• Press the display button to toggle between displays.
Units Brightness
Before using this product, please read these instructions carefully. You will also need to
consult the camera manual.
• This lens is intended exclusively for use with mirrorless cameras featuring a Nikon Z mount.
• Update the camera fi rmware to the latest version. With earlier versions, the camera may fail
to detect the lens correctly and some features may not be available. The latest version of the
camera fi rmware can be downloaded from the Nikon Download Center at the URL below.
https://downloadcenter.nikonimglib.com/
For Your Safety
For Your Safety
To prevent damage to property or injury to yourself or to others, read “For Your Safety”
in its entirety before using this product.
Keep these safety instructions where all those who use this product will read them.
A WARNING: Failure to observe the precautions marked with this icon could
result in death or severe injury.
A CAUTION: Failure to observe the precautions marked with this icon could
result in injury or property damage.
A
A
WARNING
WARNING
•
•
Do not disassemble or modify this product.
Do not disassemble or modify this product.
Do not touch internal parts that become exposed as the result of a fall or other accident.
Do not touch internal parts that become exposed as the result of a fall or other accident.
Failure to observe these precautions could result in electric shock or other injury.
•
•
Should you notice any abnormalities such as the product producing smoke,
Should you notice any abnormalities such as the product producing smoke,
heat, or unusual odors, immediately disconnect the camera power source.
heat, or unusual odors, immediately disconnect the camera power source.
Continued operation could result in fi re, burns or other injury.
•
•
Keep dry.
Keep dry.
Do not handle with wet hands.
Do not handle with wet hands.
Failure to observe these precautions could result in fi re or electric shock.
•
•
Do not use this product in the presence of fl ammable dust or gas such as
Do not use this product in the presence of fl ammable dust or gas such as
propane, gasoline or aerosols.
propane, gasoline or aerosols.
Failure to observe this precaution could result in explosion or fi re.
•
•
Do not directly view the sun or other bright light source through the lens.
Do not directly view the sun or other bright light source through the lens.
Failure to observe this precaution could result in visual impairment.
•
•
Keep this product out of reach of children.
Keep this product out of reach of children.
Failure to observe this precaution could result in injury or product malfunction. In
addition, note that small parts constitute a choking hazard. Should a child swallow
any part of this product, seek immediate medical attention.
•
•
Do not handle with bare hands in locations exposed to extremely high or
Do not handle with bare hands in locations exposed to extremely high or
low temperatures.
low temperatures.
Failure to observe this precaution could result in burns or frostbite.
Avant d’utiliser ce produit, veuillez lire ces instructions attentivement. Vous devrez également consulter
le manuel de l’appareil photo.
• Cet objectif est destiné exclusivement aux appareils photo hybrides dotés d’une monture Nikon Z.
• Mettez à jour le fi rmware de l’appareil photo vers la dernière version. Avec les versions antérieures,
l’appareil photo risque de ne pas pouvoir détecter correctement l’objectif et certaines fonctionnalités
peuvent être indisponibles. La dernière version du fi rmware de l’appareil photo peut être téléchargée
depuis le Centre de téléchargement Nikon via l’URL ci-dessous.
https://downloadcenter.nikonimglib.com/
Pour votre sécurité
Pour votre sécurité
Afi n d’éviter de provoquer des dommages matériels ou de vous blesser ou de blesser un tiers, lisez
intégralement «Pour votre sécurité» avant d’utiliser ce produit.
Conservez ces consignes de sécurité dans un endroit facilement accessible à tous ceux qui pourraient
se servir de ce produit.
A AVERTISSEMENT: le non-respect des consignes indiquées par cette icône peut vous exposer à
un danger de mort ou à de graves blessures.
A ATTENTION: le non-respect des consignes indiquées par cette icône peut vous exposer à des
blessures ou provoquer des dommages matériels.
A
A
AVERTISSEMENT
AVERTISSEMENT
•
•
Ne démontez pas ou ne modifi ez pas ce produit.
Ne démontez pas ou ne modifi ez pas ce produit.
Ne touchez pas les composants internes qui sont exposés suite à une chute ou à un autre accident.
Ne touchez pas les composants internes qui sont exposés suite à une chute ou à un autre accident.
Le non-respect de ces consignes peut provoquer un choc électrique ou d’autres blessures.
•
•
Si vous observez des anomalies provenant du produit comme de la fumée, de la chaleur ou des
Si vous observez des anomalies provenant du produit comme de la fumée, de la chaleur ou des
odeurs inhabituelles, débranchez immédiatement la source d’alimentation de l’appareil photo.
odeurs inhabituelles, débranchez immédiatement la source d’alimentation de l’appareil photo.
Continuer d’utiliser le matériel risque de provoquer un incendie, des brûlures ou d’autres blessures.
•
•
Gardez votre matériel au sec.
Gardez votre matériel au sec.
Ne le manipulez pas avec les mains mouillées.
Ne le manipulez pas avec les mains mouillées.
Le non-respect de ces consignes de sécurité peut provoquer un incendie ou un choc électrique.
•
•
N’utilisez pas ce produit en présence de poussières ou de gaz infl ammables comme du
N’utilisez pas ce produit en présence de poussières ou de gaz infl ammables comme du
propane, de l’essence ou des aérosols.
propane, de l’essence ou des aérosols.
Le non-respect de cette consigne peut provoquer une explosion ou un incendie.
•
•
N’observez pas directement le soleil ou toute autre source lumineuse puissante à travers
N’observez pas directement le soleil ou toute autre source lumineuse puissante à travers
l’objectif.
l’objectif.
Le non-respect de cette consigne peut provoquer des troubles visuels.
•
•
Conservez ce produit hors de portée des enfants.
Conservez ce produit hors de portée des enfants.
Le non-respect de cette consigne peut provoquer des blessures ou le dysfonctionnement du produit. En
outre, notez que les petites pièces présentent un risque d’étouff ement. Si jamais un enfant avalait une pièce
de ce produit, consultez immédiatement un médecin.
•
•
Ne manipulez pas le matériel à mains nues dans des lieux exposés à des températures
Ne manipulez pas le matériel à mains nues dans des lieux exposés à des températures
extrêmement basses ou élevées.
extrêmement basses ou élevées.
Le non-respect de cette consigne peut provoquer des brûlures ou des engelures.
A
A
ATTENTION
ATTENTION
•
•
Ne pointez pas l’objectif en direction du soleil ou d’autres sources très lumineuses.
Ne pointez pas l’objectif en direction du soleil ou d’autres sources très lumineuses.
La lumière focalisée par l’objectif peut provoquer un incendie ou endommager les composants
internes du produit. Lorsque vous photographiez un sujet à contre-jour, veillez à garder toujours
le soleil à l’extérieur du cadre. Lorsque le soleil se trouve près du cadre, sa lumière risque de se
concentrer dans l’appareil photo et de provoquer un incendie.
•
•
Ne laissez pas le produit exposé à des températures excessivement chaudes pendant une période
Ne laissez pas le produit exposé à des températures excessivement chaudes pendant une période
prolongée, comme dans une voiture fermée ou en plein soleil.
prolongée, comme dans une voiture fermée ou en plein soleil.
Le non-respect de cette consigne peut provoquer un incendie ou le dysfonctionnement du produit.
•
•
Ne transportez pas les appareils photo ou les objectifs si des trépieds ou accessoires
Ne transportez pas les appareils photo ou les objectifs si des trépieds ou accessoires
similaires sont fi xés.
similaires sont fi xés.
Le non-respect de cette consigne peut provoquer des blessures ou le dysfonctionnement du produit.
Avis pour les clients au Canada
Avis pour les clients au Canada
CAN ICES-3 B / NMB-3 B
Utilisation de l’objectif
Utilisation de l’objectif
Descriptif de l’objectif: noms et fonctions
Descriptif de l’objectif: noms et fonctions
Reportez-vous aux fi gures situées à gauche.
q
Repère de montage du
parasoleil
Référez-vous à ce repère lorsque vous fi xez le parasoleil.
Voir
D
w
Grip en caoutchouc — —
e
Bague de mise au point
Utilisez cette bague pour faire le point manuellement.
• Lorsque vous utilisez l’autofocus, vous pouvez ajuster la
mise au point manuellement en tournant cette bague
tout en appuyant sur le déclencheur à mi-course; une fois
la mise au point eff ectuée, appuyez sur le déclencheur
jusqu’en fi n de course pour prendre la photo.
—
r
Écran d’informations sur
l’objectif
Affi chez la distance de mise au point, la profondeur de
champ et d’autres informations.
Voir
B
,
C
t
Bague de réglage
Tournez cette bague pour modifi er un réglage comme
l’[Ouverture] ou la [Correction d’exposition], attribué à l’aide
de l’appareil photo. Pour en savoir plus, reportez-vous à la
description de [Défi nition réglages perso.], [Commandes
personnalisées] ou [Commandes perso (prise de vue)] dans
le manuel de l’appareil photo.
—
y
Repère de montage de
l’objectif
Référez-vous à ce repère lorsque vous fi xez l’objectif sur
l’appareil photo.
Voir
A
u
Joint en caoutchouc de
la monture d’objectif
——
i
Contacts du
microprocesseur
Utilisés pour transférer les données depuis ou vers
l’appareil photo.
—
o
Commande L-Fn
Appuyez sur cette commande pour eff ectuer une fonction
attribuée à l’aide de l’appareil photo. Pour en savoir plus,
reportez-vous à la description de [Défi nition réglages
perso.], [Commandes personnalisées] ou [Commandes
perso (prise de vue)] dans le manuel de l’appareil photo.
—
!0
Commande d’affi chage
Enregistrez les réglages ou choisissez les informations
affi chées sur l’écran d’informations sur l’objectif.
Voir
B
,
C
!1
Commutateur du mode
de mise au point
Choisissez un mode de mise au point.
• A: autofocus
• M: mise au point manuelle
Notez qu’indépendamment du réglage choisi, vous
devez modifi er la mise au point manuellement lorsque
le mode de mise au point manuelle est sélectionné à
l’aide des commandes de l’appareil photo.
—
!2
Parasoleil
Le parasoleil bloque la lumière diff use pouvant
provoquer de la lumière parasite ou une image
fantôme. Il permet aussi de protéger l’objectif.
Voir
D
!3
Repère de verrouillage
du parasoleil
Référez-vous à ces repères vous fi xez le parasoleil.
!4
Repère d’alignement du
parasoleil
!5
Bouton de déverrouillage
du parasoleil
Utilisez ce bouton pour retirer le parasoleil.
!6
Bouchon d’objectif
(avant)
——
!7
Bouchon d’objectif
(arrière)
——
A
Fixation et retrait
Fixation et retrait
Fixation de l’objectif
z
Mettez l’appareil photo hors tension, retirez le bouchon du boîtier et détachez le
bouchon arrière de l’objectif.
x
Placez l’objectif sur le boîtier de l’appareil photo, en maintenant le repère de montage
de l’objectif aligné sur le repère de montage du boîtier de l’appareil photo, puis faites
pivoter l’objectif dans le sens inverse des aiguilles d’une montre jusqu’au déclic.
Retrait de l’objectif
z
Mettez l’appareil photo hors tension.
x
Maintenez appuyée la commande de déverrouillage de l’objectif tout en faisant
pivoter ce dernier dans le sens des aiguilles d’une montre.
B
Écran d’informations sur l’objectif
Écran d’informations sur l’objectif
L’écran d’informations sur l’objectif s’allume lorsque vous fi xez l’objectif sur un appareil photo et que
ce dernier est sous tension.
• Appuyez sur la commande d’affi chage de l’objectif pour parcourir l’affi chage de la façon
indiquée ci-dessous:
Ouverture
2
Profondeur de champ
1
Distance de mise au point
1 La profondeur de champ s’a che lorsque l’appareil photo est en mode A ou M.
2 L’ouverture s’a che uniquement lorsque l’appareil
photo est en mode A ou M. L’a chage des autres
modes est indiqué sur l’illustration.
• Le mode de mise au point (AF ou MF) s’affi che brièvement lors de sa sélection à l’aide du
commutateur du mode de mise au point.
• L’écran s’éteint automatiquement lorsque l’appareil photo entre en mode veille ou si vous
n’eff ectuez aucune opération avec l’objectif pendant 10 secondes environ. Appuyez sur la
commande d’affi chage pour activer à nouveau l’écran.
A
Écran d’informations sur l’objectif
La distance de mise au point, la profondeur de champ et les autres informations a chées sur l’écran d’informations sur
l’objectif ne sont que des approximations.
A
Bokeh irrégulier
Avec des vitesses d’obturation rapides et/ou de grandes ouvertures, il se peut que vous observiez des irrégularités dans le
rendu du bokeh ( ou d’arrière-plan). Vous pouvez atténuer cet e et en choisissant des vitesses d’obturation plus lentes et/ou
des ouvertures plus petites (valeurs f/ plus grandes).
C
Options de l’écran
Options de l’écran
Suivez les étapes ci-dessous pour choisir l’unité de la distance de mise au point, à savoir mètres (m)
ou pieds (ft), ou pour régler la luminosité de l’écran d’informations sur l’objectif.
z Maintenez appuyée la commande d’affi chage pour affi cher les réglages.
• Les options de sélection de l’unité ou de la luminosité s’affi chent. L’élément en cours de
sélection clignote.
• Appuyez sur la commande d’affi chage pour commuter entre les affi chages.
Unités Luminosité
x Choisissez un réglage à l’aide de la bague de réglage de l’objectif.
Unités
- Tournez la bague de réglage pour choisir entre
mètres (m) et pieds (ft).
Luminosité
- Tournez la bague de réglage dans le sens «+» (plus
clair) ou «−» (plus sombre).
- Vous avez le choix entre 6 niveaux de luminosité.
- Pour éteindre l’écran d’informations, tournez la
bague dans le sens «−» jusqu’à ce que l’icône
devienne
.
• Appuyez sur la commande d’affi chage pour enregistrer les modifi cations et changer
d’affi chage.
• Si vous n’eff ectuez aucune opération à l’aide des commandes de l’objectif pendant 5
secondes environ, les options disparaissent de l’écran. Toute modifi cation sera perdue.
c Maintenez appuyée la commande d’affi chage pour revenir à l’écran d’informations sur
l’objectif.
• Si vous choisissez le réglage de luminosité , l’écran d’informations sur l’objectif s’éteint.
Pour activer à nouveau l’écran, maintenez appuyée la commande d’affi chage.
D
Fixation et retrait du parasoleil
Fixation et retrait du parasoleil
Fixation du parasoleil
• Alignez le repère de montage du parasoleil sur le repère d’alignement du parasoleil (
q
), puis
tournez ce dernier (
w
) jusqu’à ce que le repère de montage s’aligne sur le repère de verrouillage
du parasoleil (
e
).
Repère de verrouillage du
parasoleil
Repère d’alignement du parasoleil
Repère de montage du parasoleil
• Si vous saisissez l’avant trop fermement, le parasoleil peut être diffi cile à fi xer ou à retirer. Lorsque
vous tournez le parasoleil, tenez-le près du repère d’alignement (
●
) situé sur sa base.
• Le parasoleil peut être retourné et monté sur l’objectif lorsqu’il n’est pas utilisé.
Retrait du parasoleil
• En maintenant appuyé le bouton de déverrouillage du parasoleil (
q
), tournez le parasoleil dans
le sens indiqué (
w
) et retirez-le de l’objectif (
e
).
Bouton de déverrouillage du parasoleil
• Il est possible d’eff ectuer la même procédure lorsque le parasoleil est retourné.
Lorsque l’objectif est fi xé
Lorsque l’objectif est fi xé
Le réglage de mise au point risque de changer si vous mettez l’appareil photo hors tension puis à
nouveau sous tension après avoir fait le point. Si vous avez fait le point sur un emplacement sélectionné
au préalable en attendant que votre sujet apparaisse, nous vous recommandons de ne pas mettre
l’appareil photo hors tension tant que vous n’avez pas pris la photo.
Appareils photo dotés d’illuminateurs d’assistance AF
Appareils photo dotés d’illuminateurs d’assistance AF
L’objectif ou le parasoleil risque de bloquer la lumière émise par l’illuminateur d’assistance AF de
l’appareil photo.
• Pour obtenir les dernières informations sur l’utilisation de l’objectif avec des appareils photo dotés
d’illuminateurs d’assistance AF intégrés, consultez le site ci-dessous.
https://downloadcenter.nikonimglib.com/
Utilisation de l’objectif avec des appareils photo équipés d’un fl ash intégré
Utilisation de l’objectif avec des appareils photo équipés d’un fl ash intégré
Des ombres seront visibles sur les photos si la lumière provenant du fl ash intégré est occultée par
l’objectif ou le parasoleil. Retirez le parasoleil avant la prise de vue. Notez cependant que selon la focale
de l’objectif et la distance au sujet, des ombres peuvent être visibles même si le parasoleil est retiré.
• Des ombres seront visibles sur les photos si cet objectif est fi xé sur un Z50.
• Pour obtenir les dernières informations sur les focales et les distances au sujet avec lesquelles aucune
ombre ne sera visible sur les photos prises avec un fl ash intégré, consultez le site ci-dessous.
https://downloadcenter.nikonimglib.com/
Précautions d’utilisation
Précautions d’utilisation
• Ne prenez pas, ni ne tenez l’objectif ou l’appareil photo uniquement par les bouchons ou par le parasoleil.
• Maintenez les contacts du microprocesseur propres.
• Si le joint en caoutchouc de la monture d’objectif est endommagé, cessez immédiatement l’utilisation
et confi ez l’objectif à un centre Nikon agréé pour le faire réparer.
• Remettez les bouchons en place lorsque vous n’utilisez pas l’objectif.
• Ne laissez pas l’objectif dans des endroits humides ou dans des lieux où il risque d’être exposé à l’humidité.
La formation de rouille sur les mécanismes internes peut provoquer des dommages irréparables.
• Ne laissez pas l’objectif à proximité d’un feu ou dans d’autres endroits extrêmement chauds. La chaleur
extrême peut endommager ou déformer l’extérieur en plastique renforcé.
• Les changements brusques de température peuvent être à l’origine d’une condensation préjudiciable à
l’intérieur et à l’extérieur de l’objectif. Avant de faire passer l’objectif d’un environnement chaud à froid ou vice
versa, rangez-le dans un sac ou dans une boîte en plastique pour ralentir le changement de température.
• Nous vous recommandons de ranger l’objectif dans son étui afi n de le protéger des rayures lors du transport.
Entretien de l’objectif
Entretien de l’objectif
• Normalement, enlever la poussière suffi t pour nettoyer les surfaces en verre de l’objectif.
• Les taches, les traces de doigt et autres taches d’huile peuvent être retirées de la surface de l’objectif
avec un tissu propre et doux en coton ou un chiff on optique (disponible auprès d’autres fabricants)
légèrement imbibé d’une petite quantité d’éthanol ou de nettoyant pour objectif. Essuyez délicatement
avec un mouvement circulaire à partir du centre vers l’extérieur, en prenant soin de ne pas laisser de
traces, ni de toucher le verre avec les doigts.
• N’utilisez jamais de solvants organiques comme un diluant à peinture ou du benzène pour nettoyer l’objectif.
• Les fi ltres neutres (NC, disponibles séparément) et autres accessoires similaires permettent de protéger la lentille avant.
• Ne rangez pas l’objectif avec des boules antimites de naphtaline ou de camphre ou à la lumière directe
du soleil. Si vous n’avez pas l’intention d’utiliser l’objectif avant longtemps, rangez-le dans un endroit
frais et sec pour éviter la moisissure et la rouille.
Accessoires
Accessoires
Accessoires fournis
Accessoires fournis
• Bouchon d’objectif LC-82B (avant)
• Bouchon d’objectif LF-N1 (arrière)
• Parasoleil HB-94
• Étui pour objectif CL-C2
D
Utilisation de l’étui pour objectif
• L’étui est destiné à protéger l’objectif des rayures et non des chutes ou autres chocs physiques.
• L’étui n’est pas résistant à l’eau.
• La matière utilisée dans cet étui peut se décolorer, déteindre, s’étirer, rétrécir ou changer de couleur en cas de frottement ou d’humidité.
• Retirez la poussière avec une brosse à poils doux.
• L’eau et les taches peuvent être retirées de la surface avec un chi on doux et sec. N’utilisez pas d’alcool, de benzène, de diluant ou
d’autres substances chimiques volatiles.
• Ne rangez pas l’étui dans des lieux exposés à la lumière directe du soleil, à des températures élevées ou à l’humidité.
• N’utilisez pas l’étui pour nettoyer le moniteur ou les lentilles.
• Veillez à ce que l’objectif ne tombe pas de l’étui lorsque vous le transportez.
Matière: polyester
Accessoires compatibles
Accessoires compatibles
Filtres à visser 82mm
D
Filtres
• N’utilisez qu’un seul ltre à la fois.
• Retirez le parasoleil avant de xer un ltre ou de faire pivoter un ltre polarisant circulaire.
Caractéristiques
Caractéristiques
Monture
Monture Monture Nikon Z
Focale
Focale 50 mm
Ouverture maximale
Ouverture maximale f/1.2
Construction optique
Construction optique
17 lentilles en 15 groupes (dont 2 lentilles en verre ED, 3 lentilles asphériques et des
lentilles béné ciant du Traitement nanocristal et du Traitement ARNEO)
Angle de champ
Angle de champ • Format FX: 47°
• Format DX: 31° 30’
Système de mise au point
Système de mise au point Système de mise au point interne
Distance minimale de mise au point
Distance minimale de mise au point 0,45 m à partir du plan focal
Rapport de reproduction maximal
Rapport de reproduction maximal 0,15×
Lamelles de diaphragme
Lamelles de diaphragme 9 (diaphragme circulaire)
Plage des ouvertures
Plage des ouvertures f/1.2 – 16
Diamètre de xation pour ltre
Diamètre de xation pour ltre 82 mm (P = 0,75 mm)
Dimensions
Dimensions Environ 89,5 mm de diamètre maximum × 150 mm (distance entre
l’extrémité de l’objectif et le plan d’appui de la monture d’objectif de l’appareil photo)
Poids
Poids Environ 1090g
Nikon se réserve le droit de modifi er à tout moment l’apparence, les caractéristiques et les performances de ce
produit sans avis préalable.
D
レンズフードの取り付け方・取り外し方
取り付け方
•
レンズフード着脱指標とレンズフード取り付け指標を合わせて(
q
)、レン
ズフードを矢印(
w
)の方向に回転させ、レンズフード着脱指標とレンズフー
ドセット指標を合わせてください(
e
)。
レンズフードセット指標
レンズフード取り付け指標
レンズフード着脱指標
•
レンズフード先端を強くつかむと着脱が困難になります。着脱の際は、レンズフー
ド取り付け指標(●)付近を持って回転させてください。
•
収納時はレンズフードを逆向きにしてレンズに取り付けられます。
取り外し方
•
レンズフードロック解除ボタンを押さえて(
q
)、レンズフードを矢印(
w
)の
方向に回転させ、取り外します(
e
)。
レンズフードロック解除ボタン
•
レンズフードが逆向きに取り付けられているときも、同様の手順で取り外します。
カメラにレンズを取り付けたときのご注意
ピント合わせを行った後に、カメラの電源を OFF にして再び ON にするとピント位置
が変わることがあります。ピントをあらかじめ合わせておいて被写体を待つ置きピン撮
影などでは、ピントを合わせてからシャッターをきるまでにカメラの電源を OFF にしな
いことをおすすめします。
カメラの
AF
補助光を使用するときのご注意
AF 補助光搭載のカメラの場合、AF 補助光がレンズやレンズフードでさえぎられる
ことがあります。
•
カメラの
AF 補助光を使って撮影するときの制限についての最新情報は、ニコンダウン
ロードセンターでご確認いただけます。
https://downloadcenter.nikonimglib.com/
内蔵フラッシュ搭載のカメラでフラッシュ撮影するとき
のご注意
内蔵フラッシュ搭載のカメラの場合、フラッシュの光がレンズやレンズフードでさえぎ
られると画像に影が写り込みます。レンズフードは取り外して撮影してください。
レンズフードを取り外しても、レンズの焦点距離と撮影距離によっては影が写り込みます。
•
このレンズを
Z 50 に取り付けると、フラッシュの光がレンズでさえぎられて影が写り
込みます。
•
内蔵フラッシュ搭載のカメラでフラッシュ撮影するときに影が写り込まずに撮影でき
る焦点距離と撮影距離についての最新情報は、ニコンダウンロードセンターでご確認
いただけます。
https://downloadcenter.nikonimglib.com/
取り扱い上のご注意
•
レンズキャップやレンズフードだけを持って、レンズやカメラを持ち運ばないでくださ
い。
•
CPU 信号接点は汚さないようにご注意ください。
•
レンズマウントゴムリングが破損した場合は、そのまま使用せず販売店またはニコン
サービス機関に修理を依頼してください。
•
レンズをカメラに装着していないときは、必ずレンズキャップを取り付けてください。
•
レンズを水にぬらしたり、湿気の多い場所に置かないでください。部品がサビつくな
どして故障の原因になりますのでご注意ください。
•
火の近くなど、極端に温度が高くなるところに置かないでください。外装に使用して
いる強化プラスチックが変形することがあります。
•
極端に温度差のある場所に急にレンズを持ち込むと、レンズ内外に水滴が生じ、故障の
原因となります。レンズをバッグやビニール袋などに入れて、周囲の温度になじませて
からお使いください。
•
レンズを傷から守るために、持ち運ぶときはレンズケースに入れることをおすすめします。
レンズのお手入れ
•
レンズ面を清掃する場合、通常はほこりを払う程度にしてください。
•
レンズ面に指紋など油分を含む汚れがついたときは、少量の無水アルコール(エタノー
ル)や市販のレンズクリーナーで湿らせた柔らかい清潔な木綿の布または市販のレン
ズクリーニングペーパーを使って、レンズの中心から外周へ渦巻き状に拭いてくださ
い。その場合、拭きムラや拭き残りがないように注意してください。
•
シンナーやベンジンなどの有機溶剤は絶対に使用しないでください。
•
レンズ表面の汚れや傷を防ぐには、別売のニュートラルカラー
NC フィルターなどの
使用をおすすめします。
•
レンズを保管するときは、直射日光のあたるところや防虫剤のあるところを避けてく
ださい。また、レンズを長期間使用しないときは、カビやサビを防ぐために、高温多
湿のところを避けて風通しのよい場所に保管してください。
アクセサリー
付属アクセサリー
•
レンズキャップ
LC-82B(フロントキャップ)
•
レンズキャップ
LF-N1(リアキャップ)
•
レンズフード
HB-94
•
レンズケース
CL-C2
D
レンズケースのお取り扱いについて
•
レンズケースはレンズを傷から守ることを目的としており、落下や衝撃からレンズ
を保護する機能はありません。
•
レンズケースに撥水機能はありません。
•
レンズケースは材質の特性上、雨や水などで濡れた場合や摩擦によって、色落ち、
変色、色移り、伸縮することがあります。
•
ほこりは柔らかいブラシで払い落としてください。
•
表面に付着した汚れや水分は、乾いた柔らかい布で拭き取ってください。アルコール、
ベンジン、シンナーなどの溶剤は使わないでください。
•
直射日光があたる場所や、温度、湿度の高い場所に放置しないでください。
•
レンズ面や液晶画面などを拭くクリーニングクロスとしては使用できません。
•
レンズを収納して持ち運ぶ際、レンズが転がり出ないようご注意ください。
レンズケースの素材:ポリエステル
使用できるアクセサリー
82 mm ネジ込み式フィルター
D
フィルターを使用する場合
•
フィルターは
1 枚で使用してください。
•
フィルターは、レンズフードを取り外してから装着してください。また、円偏光フィルター
の偏光効果の調節も、レンズフードを取り外した状態で行ってください。
仕様
マウント ニコン Z マウント
焦点距離
50 mm
最大口径比 1:1.2
レンズ構成
15 群 17 枚(ED レンズ 2 枚、非球面レンズ 3 枚、ナノク
リスタルコートあり、 アルネオコートあり)
画角
47°(
撮像範囲 FX
)
31°30′(撮像範囲 DX)
フォーカシング方式 IF(インターナルフォーカス)方式
最短撮影距離 撮像面から
0.45 m
最大撮影倍率 0.15 倍
絞り羽根枚数
9 枚(円形絞り)
絞りの範囲
f/1.2 16
アタッチメントサイズ 82 mm(P=0.75 mm)
寸法
約
89.5 mm(最大径)× 150 mm(レンズマウント基準
面からレンズ先端まで)
質量 約
1090 g
※製品の外観・仕様・性能は予告なく変更することがありますので、ご了承ください。
x Choose a setting using the lens control ring.
Units
- Rotate the control ring to choose from me-
ters (m) or feet (ft).
Brightness
- Rotate the control ring in the “+” (brighter)
or “−” (darker) direction.
- Choose from 6 levels of brightness.
- To turn the lens info panel off , rotate the
ring in the “−” direction until the icon
changes to
.
• Press the display button to save changes and toggle the display.
• If no operations are performed using lens controls for about 5 seconds,
panel options will clear from the display. Any changes will be lost.
c Press and hold the display button to return to the lens information display.
• Choosing
for brightness turns the lens info panel off . To turn the display
on again, press and hold the display button.
D
Attaching and Removing the Lens Hood
Attaching and Removing the Lens Hood
Attaching the Lens Hood
• Align the lens hood mounting mark with the lens hood alignment mark (
q
) and
then rotate the lens hood (
w
) until the mounting mark is aligned with the lens
hood lock mark (
e
).
Lens hood lock mark
Lens hood alignment mark
Lens hood mounting mark
• Gripping the front too tightly makes the lens hood diffi cult to attach or remove. When
rotating the lens hood, hold it near the lens hood alignment mark (
●
) on its base.
• T
he lens hood can be reversed and mounted on the lens when not in use.
Removing the Lens Hood
• Keeping the lens hood lock release button pressed (
q
), rotate the lens hood in
the direction shown (
w
) and remove it from the lens (
e
).
Lens hood lock release button
• The
same procedure can be used when the lens hood is reversed.
When the Lens Is Attached
When the Lens Is Attached
The focus position may change if you turn the camera off and then on again after fo-
cusing. If you have focused on a pre-selected location while waiting for your subject to
appear, we recommend that you do not turn the camera off until the picture is taken.
Cameras with AF-Assist Illuminators
Cameras with AF-Assist Illuminators
The lens or lens hood may block the light from the camera AF-assist illuminator.
• For the latest information on using the lens with cameras that have built-in AF-assist
illuminators, visit the site below.
https://downloadcenter.nikonimglib.com/
Using the Lens on Cameras with a Built-in Flash
Using the Lens on Cameras with a Built-in Flash
Shadows will be visible in photos where light from the built-in fl ash is obscured by the
lens or lens hood. Remove the lens hood before shooting. Note, however, that depend-
ing on lens focal length and the distance to the subject, shadows may appear even
when the lens hood is removed.
• Shadows will be visible in photos taken when this lens is mounted on a Z 50.
• For the latest information on focal lengths and subject distances at which shadows
will not appear in photos taken with a built-in fl ash, visit the site below.
https://downloadcenter.nikonimglib.com/
Precautions for Use
Precautions for Use
• Do not pick up or hold the lens or camera using only the lens caps or lens hood.
• Keep the CPU contacts clean.
• Should the rubber lens-mount gasket be damaged, cease use immediately and take
the lens to a Nikon-authorized service center for repair.
• Replace the lens caps when the lens is not in use.
• Do not leave the lens in humid locations or in locations in which it may be exposed to
moisture. Rusting of the internal mechanism can cause irreparable damage.
• Do not leave the lens next to open fl ames or in other extremely hot locations. Ex-
treme heat could damage or warp the reinforced plastic exterior.
• Rapid changes in temperature may cause damaging condensation inside and outside
the lens. Before taking the lens from a warm to a cold environment or vice versa, place
it in a bag or plastic case to slow the change in temperature.
• We recommend that you place the lens in its case to protect it from scratches during transport.
Lens Care
Lens Care
• Removing dust is normally suffi cient to clean the glass surfaces of the lens.
• Smudges, fi ngerprints, and other oily stains can be removed from the lens surface us-
ing a soft, clean cotton cloth or third-party lens cleaning tissue lightly dampened with
a small amount of ethanol or lens cleaner. Wipe gently from the center outwards in a
circular motion, taking care not to leave smears or touch the lens with your fi ngers.
• Never use organic solvents such as paint thinner or benzene to clean the lens.
• Neutral Color (NC) fi lters (available separately) and the like can be used to protect the
front lens element.
• Do not store with naphtha or camphor moth balls or in direct sunlight. If the lens will not
be used for an extended period, store it in a cool, dry location to prevent mold and rust.
Accessories
Accessories
Supplied Accessories
Supplied Accessories
• LC-82B Lens Cap (front cap)
• LF-N1 Lens Cap (rear cap)
• HB-94 Lens Hood
• CL-C2 Lens Case
D
Using the Lens Case
• The case is intended to protect the lens from scratches, not from falls or other physical shocks.
• The case is not water resistant.
• The material used in the case may fade, bleed, stretch, shrink, or change color when rubbed or wet.
• Remove dust with a soft brush.
• Water and stains can be removed from the surface with a soft, dry cloth. Do not use alcohol, benzene, thinner,
or other volatile chemicals.
• Do not store in locations exposed to direct sunlight or high temperatures or humidity.
• Do not use the case to clean the monitor or lens elements.
• Be careful that the lens does not fall from the case during transport.
Material: Polyester
Compatible Accessories
Compatible Accessories
82 mm screw-on fi lters
D
Filters
• Use only one lter at a time.
• Remove the lens hood before attaching lters or rotating circular polarizing lters.
Speci cations
Speci cations
Mount
Mount Nikon Z mount
Focal length
Focal length 50 mm
Maximum aperture
Maximum aperture
f/1.2
Lens construction
Lens construction 17 elements in 15 groups (including 2 ED elements, 3 aspherical elements,
and elements with Nano Crystal and ARNEO coats)
Angle of view
Angle of view • FX format: 47°
• DX format: 31°
30’
Focusing system
Focusing system Internal focusing system
Minimum focus
Minimum focus
distance
distance
0.45 m (1.48 ft) from focal plane
Maximum reproduc-
Maximum reproduc-
tion ratio
tion ratio
0.15×
Diaphragm blades
Diaphragm blades 9 (rounded diaphragm opening)
Aperture range
Aperture range f/1.2 – 16
Filter-attachment size
Filter-attachment size 82 mm (P = 0.75 mm)
Dimensions
Dimensions Approx. 89.5 mm/3.6 in. maximum diameter × 150 mm/6 in.
(distance to end of lens from camera lens mount ange)
Weight
Weight Approx. 1090 g (2 lb 6.5 oz )
Nikon reserves the right to change the appearance, specifi cations, and performance of this
product at any time and without prior notice.
サービスとサポート
修理サービスのご案内
■
インターネットでのお申込み
ニコンイメージングジャパン修理センターで承ります。
下記のホームページからお申込みいただけます。
https://www.nikon-image.com/support/repair/
•
ニコン
ピックアップサービスで発送する場合
梱包資材のお届け・修理品のお引き取り、修理後のお届け・集金までをニコン指定の配送
業者(ヤマト運輸)が一括して代行するサービスです。全国一律の料金にて承ります(大
きさや重さには制限があり、取り扱いできない製品もあります)。
•
ご自身で発送する場合
インターネットでお申込みいただいた後、お客様ご自身で修理品を梱包し、修理センター
まで発送してください。
株式会社ニコンイメージングジャパン修理センター
〒
230-0052 横浜市鶴見区生麦 2-2-26 修理センターナビダイヤル 0570-02-8200
※ 修理センターでは、宅配便、郵送をお受けします。ご来所の方の受付はしておりません。
■
お電話でのお申込み
お電話でのお申込みの場合は、ニコンピックアップサービスをご利用いただけます。
ニコン ピックアップサービス専用 フリーダイヤル(ヤマト運輸にて承ります)
0120-02-8155
営業時間:9:30 〜 18:00(土曜日、日曜日、祝日、年末年始、夏期休業などを除く毎日)
※
上記フリーダイヤルは、ニコン指定の配送業者(ヤマト運輸)にて承ります。修理内容に
関するお問い合わせにはお答えできません。修理内容に関するお問い合わせは修理センター
へお願いいたします。
■
サービスセンターでのお手続き
ニコンプラザのサービスセンター窓口でお見積り・受付をいたします。
D
修理品をお預けいただく場合のご注意
•
ボディーキャップやレンズキャップが付属している製品の場合は、製品保護のため、装着して
お預けください。
•
修理に必要と思われるもの以外の付属品は、ご自身で保管ください。
•
カメラなどの修理では、受付や修理の過程で撮影データをやむを得ず消去する場合があります。
大切なデータは必ずバックアップをお取りください。
修理に関するお問い合わせ先
株式会社ニコンイメージングジャパン修理センター
修理センター ナビダイヤル
0570-02-8200
営業時間:9:30 〜 18:00 (土曜日、日曜日、祝日、年末年始、夏期休業などを除く毎日)
•
ナビダイヤルをご利用いただけない場合は、ニコンカスタマーサポートセンター
(03) 6702-0577
におかけください。
•
最新情報につきましては、下記のホームページをご覧ください。
https://www.nikon-image.com/support/repair/
ニコンプラザについて
ニコンプラザは、ショールーム、サービスセンター、ギャラリーを統合したニコン映像製品
の総合情報拠点です。
※
ニコンプラザサービスセンターでは持ち込み修理の受け付けも行っています。
ニコンプラザショールーム ナビダイヤル
0570-02-8080
ニコンプラザサービスセンター ナビダイヤル
0570-02-8060
•
音声ガイダンスにしたがってご利用ください。
•
ナビダイヤルをご利用いただけない場合は、ニコンカスタマーサポートセンター
(03) 6702-0577
におかけください。
ニコンプラザの所在地、営業時間などについては、下記 URL を
ご覧ください。
https://www.nikon-image.com/support/showroom/
製品の使い方に関するお問い合わせ先
■
インターネットでのお問い合わせ
https://www.nikon-image.com/support/contact/
■
お電話でのお問い合わせ
ニコン カスタマーサポートセンター ナビダイヤル
0570-02-8000
営業時間:9:30 〜 18:00(土曜日、日曜日、祝日、年末年始、夏期休業などを除く毎日)
•
ナビダイヤルをご利用いただけない場合は、ニコンカスタマーサポートセンター
(03) 6702-0577 におかけください。
•
ファクシミリは、(
03) 5977-7499 にお送りください。
•
最新情報につきましては、下記のホームページをご覧ください。
https://www.nikon-image.com/support/contact/
お問い合わせ時のお願い
•
おわかりになる範囲で「製品名」、「製品番号」、「ご購入日」、問題が発生した場合は「手順」、「現象
(表示されたメッセージ)」、「発生頻度」などをご確認のうえ、お問い合わせください。
ニコンイメージング会員「製品登録」のご案内
ニコンでは製品を安全に、安心してご使用いただくため「製品登録」へのご協力をお願いしてお
ります。ご登録いただいた製品に関するファームアップ情報や重要なお知らせなどをメールでご
案内いたします。
■
製品登録方法
製品は、「ニコンイメージング会員」(無料)の「製品登録」ページからご登録いただけます。
ニコンイメージング会員登録および製品登録は以下ニコンホームページからお手続きください。
ニコンイメージング会員のご案内
https://www.nikon-image.com/enjoy/membership/about/
■
ニコンイメージング会員とは
登録製品に関するサポート情報・ニコン製品情報や、お得で便利な会員特
典
※
などフォトライフをよりお楽しみいただくための会員サービスです。
※ 特典は登録製品ごとに異なります。
ご注意
•
ご登録にはメールアドレスとインターネットに接続できる環境が必要です。
•
登録製品の製品番号(製品本体および保証書に記載)が必要です。
•
特典の内容は、予告なく変更される場合があります。あらかじめご了承ください。
ニコンイメージングサポートページのご案内
https://www.nikon-image.com/support/
最新の製品テクニカル情報や、ソフトウェアのアップデート情報をご覧いただ
けます。
製品をより有効にご利用いただくために、定期的なアクセスをお
すすめします。
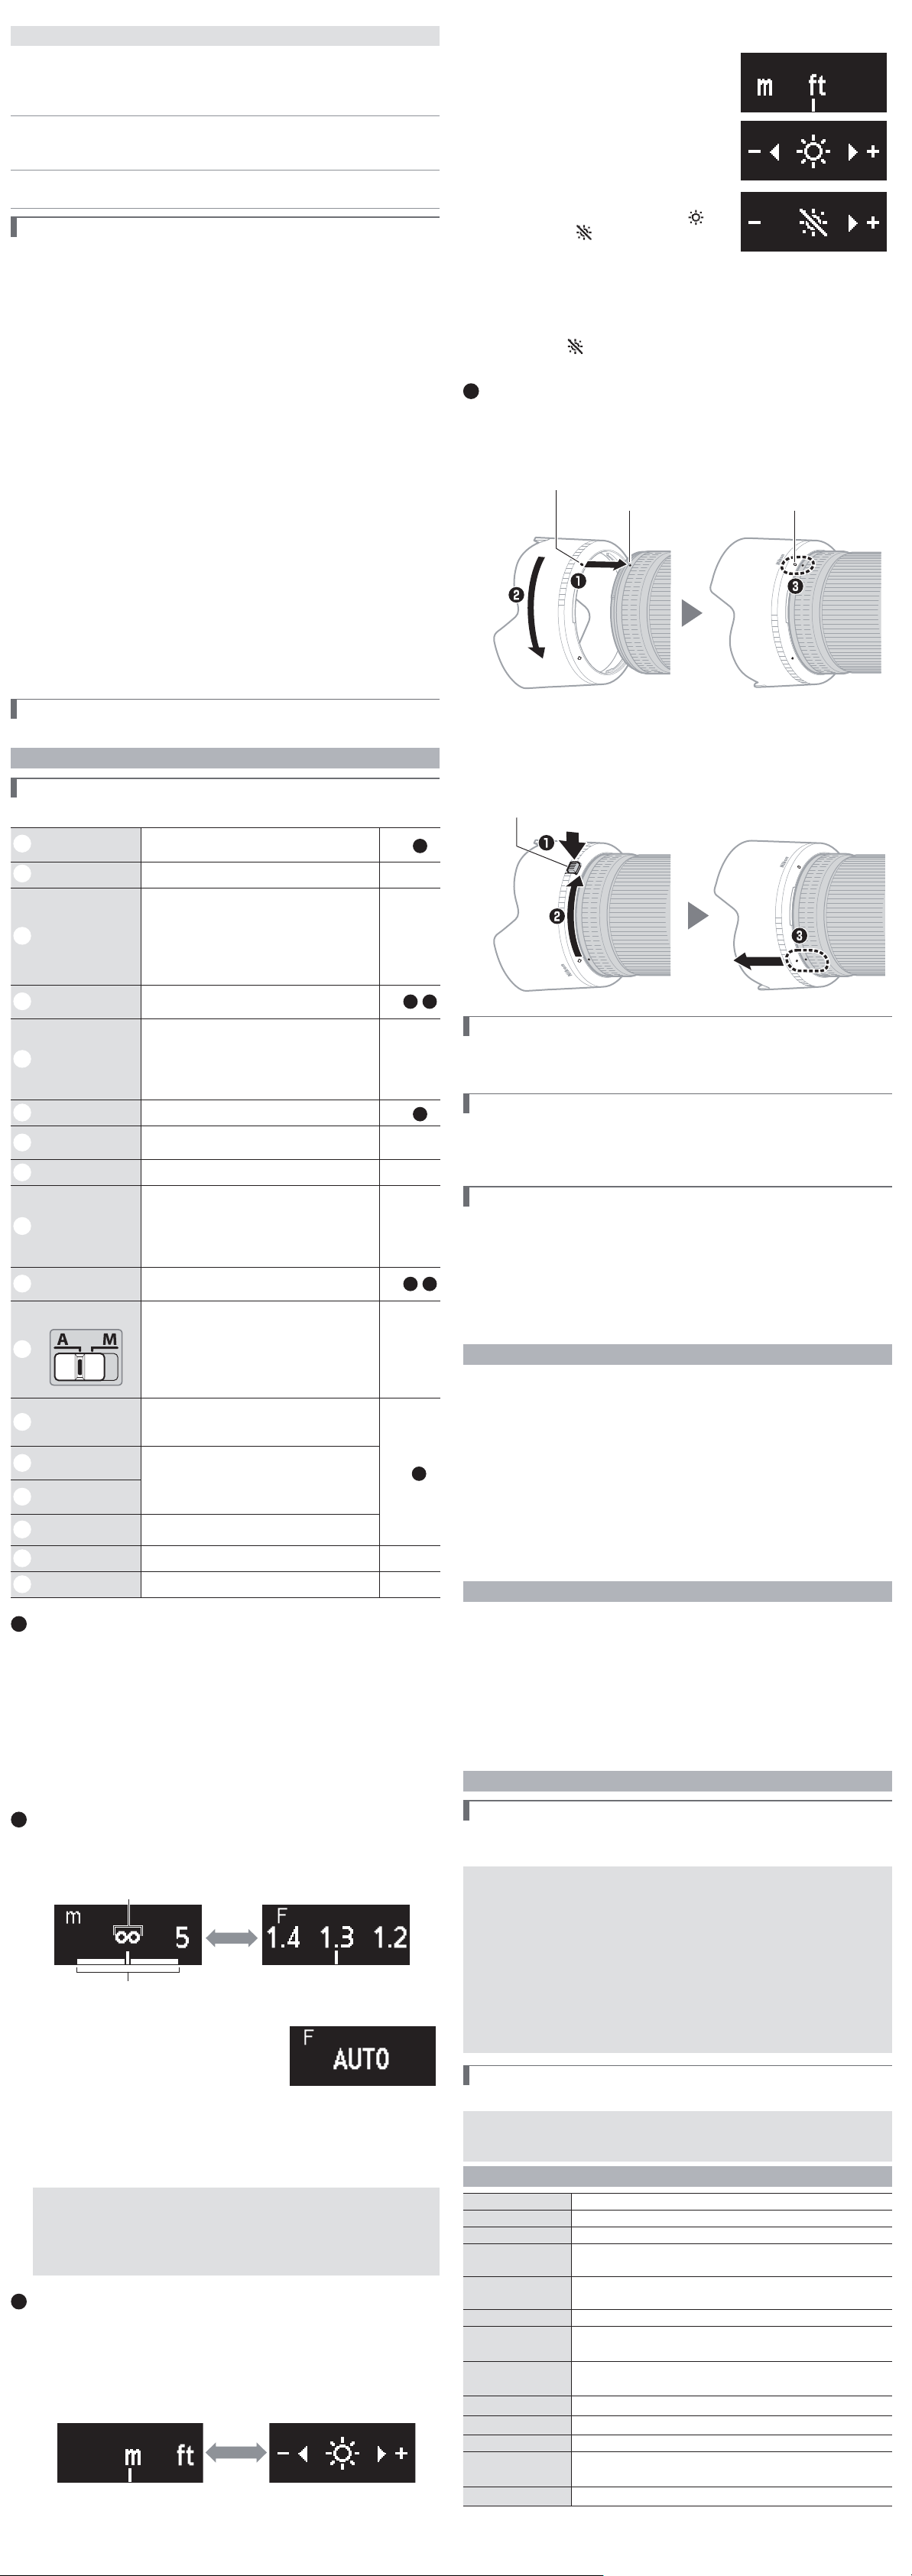
Jp
使用説明書
En
User’s Manual
Fr
Manuel d’utilisation
Sc
ҋᅶᢪϷ
Es
Manual del usuario
Kr
사용설명서
NIKKOR Z 50mm f/1.2 S
Printed in Thailand
7MMA4264-02
U
Jp
使用説明書
En
User’s Manual
Fr
Manuel d’utilisation
ご使用の前に、この使用説明書をよくお読みの上、正しくお使いください。また、
カメラの説明書もご覧ください。
•
このレンズは、ニコン
Z マウントのミラーレスカメラ専用です。
•
カメラのファームウェアを最新版にバージョンアップしてお使いください。ファーム
ウェアが最新になっていない場合、レンズを正しく認識しなかったり、機能の一部が
使用できないことがあります。最新のファームウェアは、ニコンダウンロードセンター
からダウンロードできます。
https://downloadcenter.nikonimglib.com/
安全上のご注意
あなたや他の人々への危害や財産への損害を未然に防止するため、ご使用の前に「安全上の
ご注意」をよくお読みの上、正しくお使いください。
この説明書をお読みになった後は、いつでも参照できるように保管してください。
A
警告
「死亡または重傷を負うおそれがある内容」です。
A
注意
「軽傷を負うことや財産の損害が発生するおそれがある内容」です。
お守りいただく内容を、以下の図記号で区分しています。
F
は、してはいけない内容です。
C
は、実行しなければならない内容です。
A
警告
E
分解
禁止
分解、修理または改造をしない
落下などによる破損で内部が露出したら、露出部に触らない
感電やけがの原因になります。
C
実行
熱くなる、煙が出る、こげ臭いなどの異常時は、直ちにカメラの電源を取り
外す
放置すると、発火、やけどの原因になります。
F
禁止
水でぬらさない
ぬれた手で触らない
感電や発火の原因になります。
F
禁止
引火、爆発のおそれのある場所では使わない
プロパンガス、ガソリン、可燃性スプレーなどの引火性ガスや粉塵の発生す
る場所で使うと、爆発や火災の原因になります。
F
禁止
レンズで直接太陽や強い光を見ない
失明や視力障碍の原因になります。
F
禁止
幼児の手の届くところに置かない
故障やけがの原因になります。
小さな付属品を誤って飲み込むと、身体に悪影響を及ぼします。飲み込んだ
ら、すぐに医師の診断を受けてください。
G
禁止
高温環境や低温環境では、直接触らない
やけどや低温やけど、凍傷の原因になることがあります。
A
注意
F
禁止
レンズを太陽や強い光源に向けたままにしない
集光して、内部部品の破損や発火の原因になることがあります。逆光撮影では、
太陽を画角から十分にずらしてください。画角から太陽をわずかに外しても、
発火の原因になります。
F
禁止
夏場の車内や直射日光の当たる所など高温環境に放置しない
故障や発火の原因になります。
F
禁止
三脚などにカメラやレンズを取り付けたまま移動しない
故障やけがの原因になります。
レンズの使い方
各部の名称と機能
左図で示されている各部の名称と機能は以下の通りです。
●
●
q
レンズフード
着脱指標
レンズにレンズフードを取り付けるときの指標
です。
詳しくは
D
●
w
すべり止めゴム
●
e
フォーカスリング
手動でピントを合わせるときに使用します。
•
オートフォーカス時に手動でピントを合わせて
撮影する場合は、シャッターボタンを半押しし
た状態でフォーカスリングを回してピントを合
わせてから、シャッターボタンをさらに押し込
みます。
●
r
レンズ情報パネル
撮影距離や被写界深度などの情報を表示します。
詳しくは
B
、
C
●
t
コントロールリング
このリングを回転させると、[絞り]や[露出補正]
などカメラで設定した機能を使用できます。詳
しくは、カメラの説明書に記載されている[カス
タムボタンの機能]または[カスタムボタンの
機能 ( 撮影 )]の説明をご覧ください。
●
y
レンズ着脱指標 カメラにレンズを取り付けるときの指標です。
詳しくは
A
●
u
レンズマウント
ゴムリング
●
i
CPU
信号接点 カメラとレンズの間で情報を伝達します。
●
o
L-Fn
ボタン
このボタンを押すと、カメラで設定した機能を
使用できます。詳しくは、カメラの説明書に記
載されている[カスタムボタンの機能]または[カ
スタムボタンの機能 ( 撮影 )]の説明をご覧くだ
さい。
●
!0
表示切り換えボタン
レンズ情報パネルの表示を切り換えたり、設
定を保存するときに使います。
詳しくは
B
、
C
●
!1
フォーカスモード
切り換えスイッチ
フォーカスモードを切り換えられます。
A
:オートフォーカスになります。
M
:マニュアルフォーカスになります。
•
カメラのフォーカスモードがマニュアルフォー
カスのときは、レンズで[
A
]を選んでいても
マニュアルフォーカスになります。
●
!2
レンズフード
画像に悪影響を及ぼす光線をカットします。
レンズ面の保護にも役立ちます。
詳しくは
D
●
!3
レンズフードセット
指標
レンズにレンズフードを取り付けるときの指標
です。
●
!4
レンズフード取り付
け指標
●
!5
レンズフードロック
解除ボタン
レンズフードを取り外すときに使用します。
●
!6
レンズキャップ
(フロントキャップ)
●
!7
レンズキャップ
(リアキャップ)
A
カメラへの取り付け方・取り外し方
取り付け方
z
カメラの電源を
OFF
にして、レンズのリアキャップとカメラのボ
ディーキャップを外す
x
カメラとレンズのレンズ着脱指標を合わせ、反時計回りにカチッ
と音がするまでレンズを回す
取り外し方
z
カメラの電源を
OFF
にする
x
レンズ取り外しボタンを押しながら、時計回りにレンズを回して
取り外す
B
レンズ情報パネルの表示
このレンズをカメラに取り付けてカメラの電源を ON にすると、レンズ情報パ
ネルが点灯します。
•
レンズ情報パネルの表示は、レンズの表示切り換えボタンを押すたびに次のよ
うに切り換わります。
絞り値
※ 2
被写界深度
※ 1
撮影距離
※
1 被写界深度は、カメラの撮影モードが
A
または
M
の場合に表示されます。
※
2 絞り値は、カメラの撮影モードが
A
または
M
の
場合のみ表示されます。その他の撮影モードでは、
図のように表示されます。
•
フォーカスモード切り換えスイッチを切り換えると、選択したフォーカスモード
([
AF
]または[
MF
])が一瞬表示されます。
•
カメラの半押しタイマーがオフになったとき、またはレンズの操作を行わないま
ま約 10 秒経過したとき、レンズ情報パネルは消灯します。表示切り換えボタン
を押すと、レンズ情報パネルが再度点灯します。
A
レンズ情報パネルに表示される数値について
レンズ情報パネルに表示される撮影距離や被写界深度などの数値は、おおよその
目安です。
A
ボケ像が欠けて写る場合は
高速のシャッタースピードや開放付近の絞りで撮影すると、ボケ像が欠けて
写ることがあります。ボケ像の欠けが気になるときは、シャッタースピード
を遅くしたり、絞り値を大きくすると目立たなくなります。
C
レンズ情報パネルの設定
距離を表示するときの単位(
m
(メートル)または
ft
(フィート))や、レンズ情
報パネルの明るさを変更できます。
z
表示切り換えボタンを長押しして設定画面を表示する
•
距離単位または明るさの設定画面が表示されます。設定画面では、設定中の
項目が点滅します。
•
表示切り換えボタンを押すと、設定画面が切り換わります。
距離単位の設定画面 明るさの設定画面
x
コントロールリングを回して設定を変更する
距離単位の設定
-
コントロールリングを回して、
m
または
ft
を選びます。
明るさの設定
-
コントロールリングを
+(プラス)方向に
回すと表示が明るくなり、−(マイナス)
方向に回すと暗くなります。
-
設定できる明るさは 6 段階です。
-
が になるまでコントロールリング
を
−方向に回すと、レンズ情報パネルには
何も表示されなくなります。
•
表示切り換えボタンを押すと設定した内容が保存され、設定画面が切り換わ
ります。
•
レンズの操作を行わないまま約
5 秒経過すると、設定画面が終了します。そ
の場合、変更した内容は反映されません。
c
表示切り
換えボタンを長押しして設定画面を終了する
•
明るさの設定を
にしたときは、レンズ情報パネルに何も表示されなくなり
ます。再度表示切り換えボタンを長押しすると、レンズ情報パネルが点灯し
ます。
A
A
CAUTION
CAUTION
•
•
Do not leave the lens pointed at the sun or other strong light sources.
Do not leave the lens pointed at the sun or other strong light sources.
Light focused by the lens could cause fi re or damage to product’s internal parts. When
shooting backlit subjects, keep the sun well out of the frame. Sunlight focused into
the camera when the sun is close to the frame could cause fi re.
•
•
Do not leave the product where it will be exposed to extremely high temperatures,
Do not leave the product where it will be exposed to extremely high temperatures,
for an extended period such as in an enclosed automobile or in direct sunlight.
for an extended period such as in an enclosed automobile or in direct sunlight.
Failure to observe this precaution could result in fi re or product malfunction.
•
•
Do not transport cameras or lenses with tripods or similar accessories attached.
Do not transport cameras or lenses with tripods or similar accessories attached.
Failure to observe this precaution could result in injury or product malfunction.
Notices for Customers in the U.S.A.
Notices for Customers in the U.S.A.
This device complies with part 15 of the FCC Rules. Operation is subject to the following two
conditions: (1) this device may not cause harmful interference, and (2) this device must ac-
cept any interference received, including interference that may cause undesired operation.
Federal Communications Commission (FCC) Radio Frequency Interference Statement
Federal Communications Commission (FCC) Radio Frequency Interference Statement
This equipment has been tested and found to comply with the limits for a Class B digital
device, pursuant to Part 15 of the FCC rules. These limits are designed to provide reason-
able protection against harmful interference in a residential installation. This equipment
generates, uses, and can radiate radio frequency energy and, if not installed and used in
accordance with the instructions, may cause harmful interference to radio communica-
tions. However, there is no guarantee that interference will not occur in a particular instal-
lation. If this equipment does cause harmful interference to radio or television reception,
which can be determined by turning the equipment off and on, the user is encouraged to
try to correct the interference by one or more of the following measures:
• Reorient or relocate the receiving antenna.
• Increase the separation between the equipment and receiver.
• Connect the equipment into an outlet on a circuit diff erent from that to which the
receiver is connected.
• Consult the dealer or an experienced radio/television technician for help.
CAUTIONS
CAUTIONS
Modi cations
The FCC requires the user to be notifi ed that any changes or modifi cations made to
this device that are not expressly approved by Nikon Corporation may void the user’s
authority to operate the equipment.
Nikon Inc., 1300 Walt Whitman Road,
Melville, New York 11747-3064, U.S.A.
Tel.: 631-547-4200
Notice for Customers in Canada
Notice for Customers in Canada
CAN ICES-3 B / NMB-3 B
Using the Lens
Using the Lens
Parts of the Lens: Names and Functions
Parts of the Lens: Names and Functions
Refer to the diagram on the left edge of this sheet.
q
Lens hood mounting
mark
Use when attaching the lens hood.
See
D
w
Rubber grip
——
e
Focus ring
Use for manual focus.
• When focusing using autofocus, you can ad-
just focus manually by rotating the ring while
the shutter-release button is pressed halfway;
after focusing, press the shutter-release but-
ton the rest of the way down to shoot.
—
r
Lens info panel
View focus distance, depth of fi eld, and other
information.
See
B
,
C
t
Control ring
Rotate to adjust a setting such as [Aperture] or
[Exposure compensation] assigned using the cam-
era. For more information, see the description of
[Custom control assignment], [Custom controls], or
[Custom controls (shooting)] in the camera manual.
—
y
Lens mounting mark
Use when mounting the lens on the camera.
See
A
u
Rubber lens-mount
gasket
——
i
CPU contacts
Used to transfer data to and from the camera. —
o
L-Fn button
Press to perform a function assigned using the
camera. For more information, see the descrip-
tion of [Custom control assignment], [Custom
controls], or [Custom controls (shooting)] in
the camera manual.
—
!0
Display button
Save settings or choose the information
shown in the lens info panel.
See
B
,
C
!1
Focus-mode switch
Choose a focus mode.
• A: Autofocus
• M: Manual focus
Note that regardless of the setting chosen, fo-
cus must be adjusted manually when manual
focus mode is selected using camera controls.
—
!2
Lens hood
Lens hoods block stray light that would other-
wise cause fl are or ghosting. They also serve to
protect the lens.
See
D
!3
Lens hood lock mark
Use when attaching the lens hood.
!4
Lens hood alignment
mark
!5
Lens hood lock
release button
Use when removing the lens hood.
!6
Lens cap (front cap)
——
!7
Lens cap (rear cap)
——
A
Attachment and Removal
Attachment and Removal
Attaching the Lens
z
Turn the camera o , remove the body cap, and detach the rear lens cap.
x
Position the lens on the camera body, keeping the mounting mark
on the lens aligned with the mounting mark on the camera body,
and then rotate the lens counterclockwise until it clicks into place.
Removing the Lens
z
Turn the camera o .
x
Press and hold the lens release button while turning the lens clockwise.
B
The Lens Info Panel
The Lens Info Panel
The lens Info panel lights when the lens is attached to a camera and the camera is on.
• Press the lens display button to cycle the display as shown:
Aperture
Depth of eld
Focus distance
1 Depth of eld is displayed when the camera is in mode A or M.
2 Aperture is displayed only when the cam-
era is in mode A or M. The display for other
modes is shown in the illustration.
• The focus mode (AF or MF) is briefl y displayed when chosen using the focus-
mode switch.
• The panel turns off automatically when the camera standby timer expires or if no
lens operations are performed for about 10 seconds. Press the display button to
reactivate the display.
A
The Lens Info Panel
The focus distance, depth of eld, and other information displayed in the lens Info panel are approximations only.
A
Irregular Bokeh
With fast shutter speeds and/or wide apertures, you may notice irregularities in how bokeh is shaped. The
e ect can be mitigated by choosing slower shutter speeds and/or higher f-numbers.
C
Panel Options
Panel Options
Follow the steps below to choose the units for focus distance from meters (m) or
feet (ft) or adjust the brightness of the lens Info panel.
z Press and hold the display button to view settings.
• Unit or brightness selection options will be displayed. The currently selected
item will fl ash.
• Press the display button to toggle between displays.
Units Brightness
Before using this product, please read these instructions carefully. You will also need to
consult the camera manual.
• This lens is intended exclusively for use with mirrorless cameras featuring a Nikon Z mount.
• Update the camera fi rmware to the latest version. With earlier versions, the camera may fail
to detect the lens correctly and some features may not be available. The latest version of the
camera fi rmware can be downloaded from the Nikon Download Center at the URL below.
https://downloadcenter.nikonimglib.com/
For Your Safety
For Your Safety
To prevent damage to property or injury to yourself or to others, read “For Your Safety”
in its entirety before using this product.
Keep these safety instructions where all those who use this product will read them.
A WARNING: Failure to observe the precautions marked with this icon could
result in death or severe injury.
A CAUTION: Failure to observe the precautions marked with this icon could
result in injury or property damage.
A
A
WARNING
WARNING
•
•
Do not disassemble or modify this product.
Do not disassemble or modify this product.
Do not touch internal parts that become exposed as the result of a fall or other accident.
Do not touch internal parts that become exposed as the result of a fall or other accident.
Failure to observe these precautions could result in electric shock or other injury.
•
•
Should you notice any abnormalities such as the product producing smoke,
Should you notice any abnormalities such as the product producing smoke,
heat, or unusual odors, immediately disconnect the camera power source.
heat, or unusual odors, immediately disconnect the camera power source.
Continued operation could result in fi re, burns or other injury.
•
•
Keep dry.
Keep dry.
Do not handle with wet hands.
Do not handle with wet hands.
Failure to observe these precautions could result in fi re or electric shock.
•
•
Do not use this product in the presence of fl ammable dust or gas such as
Do not use this product in the presence of fl ammable dust or gas such as
propane, gasoline or aerosols.
propane, gasoline or aerosols.
Failure to observe this precaution could result in explosion or fi re.
•
•
Do not directly view the sun or other bright light source through the lens.
Do not directly view the sun or other bright light source through the lens.
Failure to observe this precaution could result in visual impairment.
•
•
Keep this product out of reach of children.
Keep this product out of reach of children.
Failure to observe this precaution could result in injury or product malfunction. In
addition, note that small parts constitute a choking hazard. Should a child swallow
any part of this product, seek immediate medical attention.
•
•
Do not handle with bare hands in locations exposed to extremely high or
Do not handle with bare hands in locations exposed to extremely high or
low temperatures.
low temperatures.
Failure to observe this precaution could result in burns or frostbite.
Avant d’utiliser ce produit, veuillez lire ces instructions attentivement. Vous devrez également consulter
le manuel de l’appareil photo.
• Cet objectif est destiné exclusivement aux appareils photo hybrides dotés d’une monture Nikon Z.
• Mettez à jour le fi rmware de l’appareil photo vers la dernière version. Avec les versions antérieures,
l’appareil photo risque de ne pas pouvoir détecter correctement l’objectif et certaines fonctionnalités
peuvent être indisponibles. La dernière version du fi rmware de l’appareil photo peut être téléchargée
depuis le Centre de téléchargement Nikon via l’URL ci-dessous.
https://downloadcenter.nikonimglib.com/
Pour votre sécurité
Pour votre sécurité
Afi n d’éviter de provoquer des dommages matériels ou de vous blesser ou de blesser un tiers, lisez
intégralement «Pour votre sécurité» avant d’utiliser ce produit.
Conservez ces consignes de sécurité dans un endroit facilement accessible à tous ceux qui pourraient
se servir de ce produit.
A AVERTISSEMENT: le non-respect des consignes indiquées par cette icône peut vous exposer à
un danger de mort ou à de graves blessures.
A ATTENTION: le non-respect des consignes indiquées par cette icône peut vous exposer à des
blessures ou provoquer des dommages matériels.
A
A
AVERTISSEMENT
AVERTISSEMENT
•
•
Ne démontez pas ou ne modifi ez pas ce produit.
Ne démontez pas ou ne modifi ez pas ce produit.
Ne touchez pas les composants internes qui sont exposés suite à une chute ou à un autre accident.
Ne touchez pas les composants internes qui sont exposés suite à une chute ou à un autre accident.
Le non-respect de ces consignes peut provoquer un choc électrique ou d’autres blessures.
•
•
Si vous observez des anomalies provenant du produit comme de la fumée, de la chaleur ou des
Si vous observez des anomalies provenant du produit comme de la fumée, de la chaleur ou des
odeurs inhabituelles, débranchez immédiatement la source d’alimentation de l’appareil photo.
odeurs inhabituelles, débranchez immédiatement la source d’alimentation de l’appareil photo.
Continuer d’utiliser le matériel risque de provoquer un incendie, des brûlures ou d’autres blessures.
•
•
Gardez votre matériel au sec.
Gardez votre matériel au sec.
Ne le manipulez pas avec les mains mouillées.
Ne le manipulez pas avec les mains mouillées.
Le non-respect de ces consignes de sécurité peut provoquer un incendie ou un choc électrique.
•
•
N’utilisez pas ce produit en présence de poussières ou de gaz infl ammables comme du
N’utilisez pas ce produit en présence de poussières ou de gaz infl ammables comme du
propane, de l’essence ou des aérosols.
propane, de l’essence ou des aérosols.
Le non-respect de cette consigne peut provoquer une explosion ou un incendie.
•
•
N’observez pas directement le soleil ou toute autre source lumineuse puissante à travers
N’observez pas directement le soleil ou toute autre source lumineuse puissante à travers
l’objectif.
l’objectif.
Le non-respect de cette consigne peut provoquer des troubles visuels.
•
•
Conservez ce produit hors de portée des enfants.
Conservez ce produit hors de portée des enfants.
Le non-respect de cette consigne peut provoquer des blessures ou le dysfonctionnement du produit. En
outre, notez que les petites pièces présentent un risque d’étouff ement. Si jamais un enfant avalait une pièce
de ce produit, consultez immédiatement un médecin.
•
•
Ne manipulez pas le matériel à mains nues dans des lieux exposés à des températures
Ne manipulez pas le matériel à mains nues dans des lieux exposés à des températures
extrêmement basses ou élevées.
extrêmement basses ou élevées.
Le non-respect de cette consigne peut provoquer des brûlures ou des engelures.
A
A
ATTENTION
ATTENTION
•
•
Ne pointez pas l’objectif en direction du soleil ou d’autres sources très lumineuses.
Ne pointez pas l’objectif en direction du soleil ou d’autres sources très lumineuses.
La lumière focalisée par l’objectif peut provoquer un incendie ou endommager les composants
internes du produit. Lorsque vous photographiez un sujet à contre-jour, veillez à garder toujours
le soleil à l’extérieur du cadre. Lorsque le soleil se trouve près du cadre, sa lumière risque de se
concentrer dans l’appareil photo et de provoquer un incendie.
•
•
Ne laissez pas le produit exposé à des températures excessivement chaudes pendant une période
Ne laissez pas le produit exposé à des températures excessivement chaudes pendant une période
prolongée, comme dans une voiture fermée ou en plein soleil.
prolongée, comme dans une voiture fermée ou en plein soleil.
Le non-respect de cette consigne peut provoquer un incendie ou le dysfonctionnement du produit.
•
•
Ne transportez pas les appareils photo ou les objectifs si des trépieds ou accessoires
Ne transportez pas les appareils photo ou les objectifs si des trépieds ou accessoires
similaires sont fi xés.
similaires sont fi xés.
Le non-respect de cette consigne peut provoquer des blessures ou le dysfonctionnement du produit.
Avis pour les clients au Canada
Avis pour les clients au Canada
CAN ICES-3 B / NMB-3 B
Utilisation de l’objectif
Utilisation de l’objectif
Descriptif de l’objectif: noms et fonctions
Descriptif de l’objectif: noms et fonctions
Reportez-vous aux fi gures situées à gauche.
q
Repère de montage du
parasoleil
Référez-vous à ce repère lorsque vous fi xez le parasoleil.
Voir
D
w
Grip en caoutchouc — —
e
Bague de mise au point
Utilisez cette bague pour faire le point manuellement.
• Lorsque vous utilisez l’autofocus, vous pouvez ajuster la
mise au point manuellement en tournant cette bague
tout en appuyant sur le déclencheur à mi-course; une fois
la mise au point eff ectuée, appuyez sur le déclencheur
jusqu’en fi n de course pour prendre la photo.
—
r
Écran d’informations sur
l’objectif
Affi chez la distance de mise au point, la profondeur de
champ et d’autres informations.
Voir
B
,
C
t
Bague de réglage
Tournez cette bague pour modifi er un réglage comme
l’[Ouverture] ou la [Correction d’exposition], attribué à l’aide
de l’appareil photo. Pour en savoir plus, reportez-vous à la
description de [Défi nition réglages perso.], [Commandes
personnalisées] ou [Commandes perso (prise de vue)] dans
le manuel de l’appareil photo.
—
y
Repère de montage de
l’objectif
Référez-vous à ce repère lorsque vous fi xez l’objectif sur
l’appareil photo.
Voir
A
u
Joint en caoutchouc de
la monture d’objectif
——
i
Contacts du
microprocesseur
Utilisés pour transférer les données depuis ou vers
l’appareil photo.
—
o
Commande L-Fn
Appuyez sur cette commande pour eff ectuer une fonction
attribuée à l’aide de l’appareil photo. Pour en savoir plus,
reportez-vous à la description de [Défi nition réglages
perso.], [Commandes personnalisées] ou [Commandes
perso (prise de vue)] dans le manuel de l’appareil photo.
—
!0
Commande d’affi chage
Enregistrez les réglages ou choisissez les informations
affi chées sur l’écran d’informations sur l’objectif.
Voir
B
,
C
!1
Commutateur du mode
de mise au point
Choisissez un mode de mise au point.
• A: autofocus
• M: mise au point manuelle
Notez qu’indépendamment du réglage choisi, vous
devez modifi er la mise au point manuellement lorsque
le mode de mise au point manuelle est sélectionné à
l’aide des commandes de l’appareil photo.
—
!2
Parasoleil
Le parasoleil bloque la lumière diff use pouvant
provoquer de la lumière parasite ou une image
fantôme. Il permet aussi de protéger l’objectif.
Voir
D
!3
Repère de verrouillage
du parasoleil
Référez-vous à ces repères vous fi xez le parasoleil.
!4
Repère d’alignement du
parasoleil
!5
Bouton de déverrouillage
du parasoleil
Utilisez ce bouton pour retirer le parasoleil.
!6
Bouchon d’objectif
(avant)
——
!7
Bouchon d’objectif
(arrière)
——
A
Fixation et retrait
Fixation et retrait
Fixation de l’objectif
z
Mettez l’appareil photo hors tension, retirez le bouchon du boîtier et détachez le
bouchon arrière de l’objectif.
x
Placez l’objectif sur le boîtier de l’appareil photo, en maintenant le repère de montage
de l’objectif aligné sur le repère de montage du boîtier de l’appareil photo, puis faites
pivoter l’objectif dans le sens inverse des aiguilles d’une montre jusqu’au déclic.
Retrait de l’objectif
z
Mettez l’appareil photo hors tension.
x
Maintenez appuyée la commande de déverrouillage de l’objectif tout en faisant
pivoter ce dernier dans le sens des aiguilles d’une montre.
B
Écran d’informations sur l’objectif
Écran d’informations sur l’objectif
L’écran d’informations sur l’objectif s’allume lorsque vous fi xez l’objectif sur un appareil photo et que
ce dernier est sous tension.
• Appuyez sur la commande d’affi chage de l’objectif pour parcourir l’affi chage de la façon
indiquée ci-dessous:
Ouverture
2
Profondeur de champ
1
Distance de mise au point
1 La profondeur de champ s’a che lorsque l’appareil photo est en mode A ou M.
2 L’ouverture s’a che uniquement lorsque l’appareil
photo est en mode A ou M. L’a chage des autres
modes est indiqué sur l’illustration.
• Le mode de mise au point (AF ou MF) s’affi che brièvement lors de sa sélection à l’aide du
commutateur du mode de mise au point.
• L’écran s’éteint automatiquement lorsque l’appareil photo entre en mode veille ou si vous
n’eff ectuez aucune opération avec l’objectif pendant 10 secondes environ. Appuyez sur la
commande d’affi chage pour activer à nouveau l’écran.
A
Écran d’informations sur l’objectif
La distance de mise au point, la profondeur de champ et les autres informations a chées sur l’écran d’informations sur
l’objectif ne sont que des approximations.
A
Bokeh irrégulier
Avec des vitesses d’obturation rapides et/ou de grandes ouvertures, il se peut que vous observiez des irrégularités dans le
rendu du bokeh ( ou d’arrière-plan). Vous pouvez atténuer cet e et en choisissant des vitesses d’obturation plus lentes et/ou
des ouvertures plus petites (valeurs f/ plus grandes).
C
Options de l’écran
Options de l’écran
Suivez les étapes ci-dessous pour choisir l’unité de la distance de mise au point, à savoir mètres (m)
ou pieds (ft), ou pour régler la luminosité de l’écran d’informations sur l’objectif.
z Maintenez appuyée la commande d’affi chage pour affi cher les réglages.
• Les options de sélection de l’unité ou de la luminosité s’affi chent. L’élément en cours de
sélection clignote.
• Appuyez sur la commande d’affi chage pour commuter entre les affi chages.
Unités Luminosité
x Choisissez un réglage à l’aide de la bague de réglage de l’objectif.
Unités
- Tournez la bague de réglage pour choisir entre
mètres (m) et pieds (ft).
Luminosité
- Tournez la bague de réglage dans le sens «+» (plus
clair) ou «−» (plus sombre).
- Vous avez le choix entre 6 niveaux de luminosité.
- Pour éteindre l’écran d’informations, tournez la
bague dans le sens «−» jusqu’à ce que l’icône
devienne
.
• Appuyez sur la commande d’affi chage pour enregistrer les modifi cations et changer
d’affi chage.
• Si vous n’eff ectuez aucune opération à l’aide des commandes de l’objectif pendant 5
secondes environ, les options disparaissent de l’écran. Toute modifi cation sera perdue.
c Maintenez appuyée la commande d’affi chage pour revenir à l’écran d’informations sur
l’objectif.
• Si vous choisissez le réglage de luminosité , l’écran d’informations sur l’objectif s’éteint.
Pour activer à nouveau l’écran, maintenez appuyée la commande d’affi chage.
D
Fixation et retrait du parasoleil
Fixation et retrait du parasoleil
Fixation du parasoleil
• Alignez le repère de montage du parasoleil sur le repère d’alignement du parasoleil (
q
), puis
tournez ce dernier (
w
) jusqu’à ce que le repère de montage s’aligne sur le repère de verrouillage
du parasoleil (
e
).
Repère de verrouillage du
parasoleil
Repère d’alignement du parasoleil
Repère de montage du parasoleil
• Si vous saisissez l’avant trop fermement, le parasoleil peut être diffi cile à fi xer ou à retirer. Lorsque
vous tournez le parasoleil, tenez-le près du repère d’alignement (
●
) situé sur sa base.
• Le parasoleil peut être retourné et monté sur l’objectif lorsqu’il n’est pas utilisé.
Retrait du parasoleil
• En maintenant appuyé le bouton de déverrouillage du parasoleil (
q
), tournez le parasoleil dans
le sens indiqué (
w
) et retirez-le de l’objectif (
e
).
Bouton de déverrouillage du parasoleil
• Il est possible d’eff ectuer la même procédure lorsque le parasoleil est retourné.
Lorsque l’objectif est fi xé
Lorsque l’objectif est fi xé
Le réglage de mise au point risque de changer si vous mettez l’appareil photo hors tension puis à
nouveau sous tension après avoir fait le point. Si vous avez fait le point sur un emplacement sélectionné
au préalable en attendant que votre sujet apparaisse, nous vous recommandons de ne pas mettre
l’appareil photo hors tension tant que vous n’avez pas pris la photo.
Appareils photo dotés d’illuminateurs d’assistance AF
Appareils photo dotés d’illuminateurs d’assistance AF
L’objectif ou le parasoleil risque de bloquer la lumière émise par l’illuminateur d’assistance AF de
l’appareil photo.
• Pour obtenir les dernières informations sur l’utilisation de l’objectif avec des appareils photo dotés
d’illuminateurs d’assistance AF intégrés, consultez le site ci-dessous.
https://downloadcenter.nikonimglib.com/
Utilisation de l’objectif avec des appareils photo équipés d’un fl ash intégré
Utilisation de l’objectif avec des appareils photo équipés d’un fl ash intégré
Des ombres seront visibles sur les photos si la lumière provenant du fl ash intégré est occultée par
l’objectif ou le parasoleil. Retirez le parasoleil avant la prise de vue. Notez cependant que selon la focale
de l’objectif et la distance au sujet, des ombres peuvent être visibles même si le parasoleil est retiré.
• Des ombres seront visibles sur les photos si cet objectif est fi xé sur un Z50.
• Pour obtenir les dernières informations sur les focales et les distances au sujet avec lesquelles aucune
ombre ne sera visible sur les photos prises avec un fl ash intégré, consultez le site ci-dessous.
https://downloadcenter.nikonimglib.com/
Précautions d’utilisation
Précautions d’utilisation
• Ne prenez pas, ni ne tenez l’objectif ou l’appareil photo uniquement par les bouchons ou par le parasoleil.
• Maintenez les contacts du microprocesseur propres.
• Si le joint en caoutchouc de la monture d’objectif est endommagé, cessez immédiatement l’utilisation
et confi ez l’objectif à un centre Nikon agréé pour le faire réparer.
• Remettez les bouchons en place lorsque vous n’utilisez pas l’objectif.
• Ne laissez pas l’objectif dans des endroits humides ou dans des lieux où il risque d’être exposé à l’humidité.
La formation de rouille sur les mécanismes internes peut provoquer des dommages irréparables.
• Ne laissez pas l’objectif à proximité d’un feu ou dans d’autres endroits extrêmement chauds. La chaleur
extrême peut endommager ou déformer l’extérieur en plastique renforcé.
• Les changements brusques de température peuvent être à l’origine d’une condensation préjudiciable à
l’intérieur et à l’extérieur de l’objectif. Avant de faire passer l’objectif d’un environnement chaud à froid ou vice
versa, rangez-le dans un sac ou dans une boîte en plastique pour ralentir le changement de température.
• Nous vous recommandons de ranger l’objectif dans son étui afi n de le protéger des rayures lors du transport.
Entretien de l’objectif
Entretien de l’objectif
• Normalement, enlever la poussière suffi t pour nettoyer les surfaces en verre de l’objectif.
• Les taches, les traces de doigt et autres taches d’huile peuvent être retirées de la surface de l’objectif
avec un tissu propre et doux en coton ou un chiff on optique (disponible auprès d’autres fabricants)
légèrement imbibé d’une petite quantité d’éthanol ou de nettoyant pour objectif. Essuyez délicatement
avec un mouvement circulaire à partir du centre vers l’extérieur, en prenant soin de ne pas laisser de
traces, ni de toucher le verre avec les doigts.
• N’utilisez jamais de solvants organiques comme un diluant à peinture ou du benzène pour nettoyer l’objectif.
• Les fi ltres neutres (NC, disponibles séparément) et autres accessoires similaires permettent de protéger la lentille avant.
• Ne rangez pas l’objectif avec des boules antimites de naphtaline ou de camphre ou à la lumière directe
du soleil. Si vous n’avez pas l’intention d’utiliser l’objectif avant longtemps, rangez-le dans un endroit
frais et sec pour éviter la moisissure et la rouille.
Accessoires
Accessoires
Accessoires fournis
Accessoires fournis
• Bouchon d’objectif LC-82B (avant)
• Bouchon d’objectif LF-N1 (arrière)
• Parasoleil HB-94
• Étui pour objectif CL-C2
D
Utilisation de l’étui pour objectif
• L’étui est destiné à protéger l’objectif des rayures et non des chutes ou autres chocs physiques.
• L’étui n’est pas résistant à l’eau.
• La matière utilisée dans cet étui peut se décolorer, déteindre, s’étirer, rétrécir ou changer de couleur en cas de frottement ou d’humidité.
• Retirez la poussière avec une brosse à poils doux.
• L’eau et les taches peuvent être retirées de la surface avec un chi on doux et sec. N’utilisez pas d’alcool, de benzène, de diluant ou
d’autres substances chimiques volatiles.
• Ne rangez pas l’étui dans des lieux exposés à la lumière directe du soleil, à des températures élevées ou à l’humidité.
• N’utilisez pas l’étui pour nettoyer le moniteur ou les lentilles.
• Veillez à ce que l’objectif ne tombe pas de l’étui lorsque vous le transportez.
Matière: polyester
Accessoires compatibles
Accessoires compatibles
Filtres à visser 82mm
D
Filtres
• N’utilisez qu’un seul ltre à la fois.
• Retirez le parasoleil avant de xer un ltre ou de faire pivoter un ltre polarisant circulaire.
Caractéristiques
Caractéristiques
Monture
Monture Monture Nikon Z
Focale
Focale 50 mm
Ouverture maximale
Ouverture maximale f/1.2
Construction optique
Construction optique
17 lentilles en 15 groupes (dont 2 lentilles en verre ED, 3 lentilles asphériques et des
lentilles béné ciant du Traitement nanocristal et du Traitement ARNEO)
Angle de champ
Angle de champ • Format FX: 47°
• Format DX: 31° 30’
Système de mise au point
Système de mise au point Système de mise au point interne
Distance minimale de mise au point
Distance minimale de mise au point 0,45 m à partir du plan focal
Rapport de reproduction maximal
Rapport de reproduction maximal 0,15×
Lamelles de diaphragme
Lamelles de diaphragme 9 (diaphragme circulaire)
Plage des ouvertures
Plage des ouvertures f/1.2 – 16
Diamètre de xation pour ltre
Diamètre de xation pour ltre 82 mm (P = 0,75 mm)
Dimensions
Dimensions Environ 89,5 mm de diamètre maximum × 150 mm (distance entre
l’extrémité de l’objectif et le plan d’appui de la monture d’objectif de l’appareil photo)
Poids
Poids Environ 1090g
Nikon se réserve le droit de modifi er à tout moment l’apparence, les caractéristiques et les performances de ce
produit sans avis préalable.
D
レンズフードの取り付け方・取り外し方
取り付け方
•
レンズフード着脱指標とレンズフード取り付け指標を合わせて(
q
)、レン
ズフードを矢印(
w
)の方向に回転させ、レンズフード着脱指標とレンズフー
ドセット指標を合わせてください(
e
)。
レンズフードセット指標
レンズフード取り付け指標
レンズフード着脱指標
•
レンズフード先端を強くつかむと着脱が困難になります。着脱の際は、レンズフー
ド取り付け指標(●)付近を持って回転させてください。
•
収納時はレンズフードを逆向きにしてレンズに取り付けられます。
取り外し方
•
レンズフードロック解除ボタンを押さえて(
q
)、レンズフードを矢印(
w
)の
方向に回転させ、取り外します(
e
)。
レンズフードロック解除ボタン
•
レンズフードが逆向きに取り付けられているときも、同様の手順で取り外します。
カメラにレンズを取り付けたときのご注意
ピント合わせを行った後に、カメラの電源を OFF にして再び ON にするとピント位置
が変わることがあります。ピントをあらかじめ合わせておいて被写体を待つ置きピン撮
影などでは、ピントを合わせてからシャッターをきるまでにカメラの電源を OFF にしな
いことをおすすめします。
カメラの
AF
補助光を使用するときのご注意
AF 補助光搭載のカメラの場合、AF 補助光がレンズやレンズフードでさえぎられる
ことがあります。
•
カメラの
AF 補助光を使って撮影するときの制限についての最新情報は、ニコンダウン
ロードセンターでご確認いただけます。
https://downloadcenter.nikonimglib.com/
内蔵フラッシュ搭載のカメラでフラッシュ撮影するとき
のご注意
内蔵フラッシュ搭載のカメラの場合、フラッシュの光がレンズやレンズフードでさえぎ
られると画像に影が写り込みます。レンズフードは取り外して撮影してください。
レンズフードを取り外しても、レンズの焦点距離と撮影距離によっては影が写り込みます。
•
このレンズを
Z 50 に取り付けると、フラッシュの光がレンズでさえぎられて影が写り
込みます。
•
内蔵フラッシュ搭載のカメラでフラッシュ撮影するときに影が写り込まずに撮影でき
る焦点距離と撮影距離についての最新情報は、ニコンダウンロードセンターでご確認
いただけます。
https://downloadcenter.nikonimglib.com/
取り扱い上のご注意
•
レンズキャップやレンズフードだけを持って、レンズやカメラを持ち運ばないでくださ
い。
•
CPU 信号接点は汚さないようにご注意ください。
•
レンズマウントゴムリングが破損した場合は、そのまま使用せず販売店またはニコン
サービス機関に修理を依頼してください。
•
レンズをカメラに装着していないときは、必ずレンズキャップを取り付けてください。
•
レンズを水にぬらしたり、湿気の多い場所に置かないでください。部品がサビつくな
どして故障の原因になりますのでご注意ください。
•
火の近くなど、極端に温度が高くなるところに置かないでください。外装に使用して
いる強化プラスチックが変形することがあります。
•
極端に温度差のある場所に急にレンズを持ち込むと、レンズ内外に水滴が生じ、故障の
原因となります。レンズをバッグやビニール袋などに入れて、周囲の温度になじませて
からお使いください。
•
レンズを傷から守るために、持ち運ぶときはレンズケースに入れることをおすすめします。
レンズのお手入れ
•
レンズ面を清掃する場合、通常はほこりを払う程度にしてください。
•
レンズ面に指紋など油分を含む汚れがついたときは、少量の無水アルコール(エタノー
ル)や市販のレンズクリーナーで湿らせた柔らかい清潔な木綿の布または市販のレン
ズクリーニングペーパーを使って、レンズの中心から外周へ渦巻き状に拭いてくださ
い。その場合、拭きムラや拭き残りがないように注意してください。
•
シンナーやベンジンなどの有機溶剤は絶対に使用しないでください。
•
レンズ表面の汚れや傷を防ぐには、別売のニュートラルカラー
NC フィルターなどの
使用をおすすめします。
•
レンズを保管するときは、直射日光のあたるところや防虫剤のあるところを避けてく
ださい。また、レンズを長期間使用しないときは、カビやサビを防ぐために、高温多
湿のところを避けて風通しのよい場所に保管してください。
アクセサリー
付属アクセサリー
•
レンズキャップ
LC-82B(フロントキャップ)
•
レンズキャップ
LF-N1(リアキャップ)
•
レンズフード
HB-94
•
レンズケース
CL-C2
D
レンズケースのお取り扱いについて
•
レンズケースはレンズを傷から守ることを目的としており、落下や衝撃からレンズ
を保護する機能はありません。
•
レンズケースに撥水機能はありません。
•
レンズケースは材質の特性上、雨や水などで濡れた場合や摩擦によって、色落ち、
変色、色移り、伸縮することがあります。
•
ほこりは柔らかいブラシで払い落としてください。
•
表面に付着した汚れや水分は、乾いた柔らかい布で拭き取ってください。アルコール、
ベンジン、シンナーなどの溶剤は使わないでください。
•
直射日光があたる場所や、温度、湿度の高い場所に放置しないでください。
•
レンズ面や液晶画面などを拭くクリーニングクロスとしては使用できません。
•
レンズを収納して持ち運ぶ際、レンズが転がり出ないようご注意ください。
レンズケースの素材:ポリエステル
使用できるアクセサリー
82 mm ネジ込み式フィルター
D
フィルターを使用する場合
•
フィルターは
1 枚で使用してください。
•
フィルターは、レンズフードを取り外してから装着してください。また、円偏光フィルター
の偏光効果の調節も、レンズフードを取り外した状態で行ってください。
仕様
マウント ニコン Z マウント
焦点距離
50 mm
最大口径比 1:1.2
レンズ構成
15 群 17 枚(ED レンズ 2 枚、非球面レンズ 3 枚、ナノク
リスタルコートあり、 アルネオコートあり)
画角
47°(
撮像範囲 FX
)
31°30′(撮像範囲 DX)
フォーカシング方式 IF(インターナルフォーカス)方式
最短撮影距離 撮像面から
0.45 m
最大撮影倍率 0.15 倍
絞り羽根枚数
9 枚(円形絞り)
絞りの範囲
f/1.2 16
アタッチメントサイズ 82 mm(P=0.75 mm)
寸法
約
89.5 mm(最大径)× 150 mm(レンズマウント基準
面からレンズ先端まで)
質量 約
1090 g
※製品の外観・仕様・性能は予告なく変更することがありますので、ご了承ください。
x Choose a setting using the lens control ring.
Units
- Rotate the control ring to choose from me-
ters (m) or feet (ft).
Brightness
- Rotate the control ring in the “+” (brighter)
or “−” (darker) direction.
- Choose from 6 levels of brightness.
- To turn the lens info panel off , rotate the
ring in the “−” direction until the icon
changes to
.
• Press the display button to save changes and toggle the display.
• If no operations are performed using lens controls for about 5 seconds,
panel options will clear from the display. Any changes will be lost.
c Press and hold the display button to return to the lens information display.
• Choosing
for brightness turns the lens info panel off . To turn the display
on again, press and hold the display button.
D
Attaching and Removing the Lens Hood
Attaching and Removing the Lens Hood
Attaching the Lens Hood
• Align the lens hood mounting mark with the lens hood alignment mark (
q
) and
then rotate the lens hood (
w
) until the mounting mark is aligned with the lens
hood lock mark (
e
).
Lens hood lock mark
Lens hood alignment mark
Lens hood mounting mark
• Gripping the front too tightly makes the lens hood diffi cult to attach or remove. When
rotating the lens hood, hold it near the lens hood alignment mark (
●
) on its base.
• T
he lens hood can be reversed and mounted on the lens when not in use.
Removing the Lens Hood
• Keeping the lens hood lock release button pressed (
q
), rotate the lens hood in
the direction shown (
w
) and remove it from the lens (
e
).
Lens hood lock release button
• The
same procedure can be used when the lens hood is reversed.
When the Lens Is Attached
When the Lens Is Attached
The focus position may change if you turn the camera off and then on again after fo-
cusing. If you have focused on a pre-selected location while waiting for your subject to
appear, we recommend that you do not turn the camera off until the picture is taken.
Cameras with AF-Assist Illuminators
Cameras with AF-Assist Illuminators
The lens or lens hood may block the light from the camera AF-assist illuminator.
• For the latest information on using the lens with cameras that have built-in AF-assist
illuminators, visit the site below.
https://downloadcenter.nikonimglib.com/
Using the Lens on Cameras with a Built-in Flash
Using the Lens on Cameras with a Built-in Flash
Shadows will be visible in photos where light from the built-in fl ash is obscured by the
lens or lens hood. Remove the lens hood before shooting. Note, however, that depend-
ing on lens focal length and the distance to the subject, shadows may appear even
when the lens hood is removed.
• Shadows will be visible in photos taken when this lens is mounted on a Z 50.
• For the latest information on focal lengths and subject distances at which shadows
will not appear in photos taken with a built-in fl ash, visit the site below.
https://downloadcenter.nikonimglib.com/
Precautions for Use
Precautions for Use
• Do not pick up or hold the lens or camera using only the lens caps or lens hood.
• Keep the CPU contacts clean.
• Should the rubber lens-mount gasket be damaged, cease use immediately and take
the lens to a Nikon-authorized service center for repair.
• Replace the lens caps when the lens is not in use.
• Do not leave the lens in humid locations or in locations in which it may be exposed to
moisture. Rusting of the internal mechanism can cause irreparable damage.
• Do not leave the lens next to open fl ames or in other extremely hot locations. Ex-
treme heat could damage or warp the reinforced plastic exterior.
• Rapid changes in temperature may cause damaging condensation inside and outside
the lens. Before taking the lens from a warm to a cold environment or vice versa, place
it in a bag or plastic case to slow the change in temperature.
• We recommend that you place the lens in its case to protect it from scratches during transport.
Lens Care
Lens Care
• Removing dust is normally suffi cient to clean the glass surfaces of the lens.
• Smudges, fi ngerprints, and other oily stains can be removed from the lens surface us-
ing a soft, clean cotton cloth or third-party lens cleaning tissue lightly dampened with
a small amount of ethanol or lens cleaner. Wipe gently from the center outwards in a
circular motion, taking care not to leave smears or touch the lens with your fi ngers.
• Never use organic solvents such as paint thinner or benzene to clean the lens.
• Neutral Color (NC) fi lters (available separately) and the like can be used to protect the
front lens element.
• Do not store with naphtha or camphor moth balls or in direct sunlight. If the lens will not
be used for an extended period, store it in a cool, dry location to prevent mold and rust.
Accessories
Accessories
Supplied Accessories
Supplied Accessories
• LC-82B Lens Cap (front cap)
• LF-N1 Lens Cap (rear cap)
• HB-94 Lens Hood
• CL-C2 Lens Case
D
Using the Lens Case
• The case is intended to protect the lens from scratches, not from falls or other physical shocks.
• The case is not water resistant.
• The material used in the case may fade, bleed, stretch, shrink, or change color when rubbed or wet.
• Remove dust with a soft brush.
• Water and stains can be removed from the surface with a soft, dry cloth. Do not use alcohol, benzene, thinner,
or other volatile chemicals.
• Do not store in locations exposed to direct sunlight or high temperatures or humidity.
• Do not use the case to clean the monitor or lens elements.
• Be careful that the lens does not fall from the case during transport.
Material: Polyester
Compatible Accessories
Compatible Accessories
82 mm screw-on fi lters
D
Filters
• Use only one lter at a time.
• Remove the lens hood before attaching lters or rotating circular polarizing lters.
Speci cations
Speci cations
Mount
Mount Nikon Z mount
Focal length
Focal length 50 mm
Maximum aperture
Maximum aperture
f/1.2
Lens construction
Lens construction 17 elements in 15 groups (including 2 ED elements, 3 aspherical elements,
and elements with Nano Crystal and ARNEO coats)
Angle of view
Angle of view • FX format: 47°
• DX format: 31°
30’
Focusing system
Focusing system Internal focusing system
Minimum focus
Minimum focus
distance
distance
0.45 m (1.48 ft) from focal plane
Maximum reproduc-
Maximum reproduc-
tion ratio
tion ratio
0.15×
Diaphragm blades
Diaphragm blades 9 (rounded diaphragm opening)
Aperture range
Aperture range f/1.2 – 16
Filter-attachment size
Filter-attachment size 82 mm (P = 0.75 mm)
Dimensions
Dimensions Approx. 89.5 mm/3.6 in. maximum diameter × 150 mm/6 in.
(distance to end of lens from camera lens mount ange)
Weight
Weight Approx. 1090 g (2 lb 6.5 oz )
Nikon reserves the right to change the appearance, specifi cations, and performance of this
product at any time and without prior notice.
サービスとサポート
修理サービスのご案内
■
インターネットでのお申込み
ニコンイメージングジャパン修理センターで承ります。
下記のホームページからお申込みいただけます。
https://www.nikon-image.com/support/repair/
•
ニコン
ピックアップサービスで発送する場合
梱包資材のお届け・修理品のお引き取り、修理後のお届け・集金までをニコン指定の配送
業者(ヤマト運輸)が一括して代行するサービスです。全国一律の料金にて承ります(大
きさや重さには制限があり、取り扱いできない製品もあります)。
•
ご自身で発送する場合
インターネットでお申込みいただいた後、お客様ご自身で修理品を梱包し、修理センター
まで発送してください。
株式会社ニコンイメージングジャパン修理センター
〒
230-0052 横浜市鶴見区生麦 2-2-26 修理センターナビダイヤル 0570-02-8200
※ 修理センターでは、宅配便、郵送をお受けします。ご来所の方の受付はしておりません。
■
お電話でのお申込み
お電話でのお申込みの場合は、ニコンピックアップサービスをご利用いただけます。
ニコン ピックアップサービス専用 フリーダイヤル(ヤマト運輸にて承ります)
0120-02-8155
営業時間:9:30 〜 18:00(土曜日、日曜日、祝日、年末年始、夏期休業などを除く毎日)
※
上記フリーダイヤルは、ニコン指定の配送業者(ヤマト運輸)にて承ります。修理内容に
関するお問い合わせにはお答えできません。修理内容に関するお問い合わせは修理センター
へお願いいたします。
■
サービスセンターでのお手続き
ニコンプラザのサービスセンター窓口でお見積り・受付をいたします。
D
修理品をお預けいただく場合のご注意
•
ボディーキャップやレンズキャップが付属している製品の場合は、製品保護のため、装着して
お預けください。
•
修理に必要と思われるもの以外の付属品は、ご自身で保管ください。
•
カメラなどの修理では、受付や修理の過程で撮影データをやむを得ず消去する場合があります。
大切なデータは必ずバックアップをお取りください。
修理に関するお問い合わせ先
株式会社ニコンイメージングジャパン修理センター
修理センター ナビダイヤル
0570-02-8200
営業時間:9:30 〜 18:00 (土曜日、日曜日、祝日、年末年始、夏期休業などを除く毎日)
•
ナビダイヤルをご利用いただけない場合は、ニコンカスタマーサポートセンター
(03) 6702-0577
におかけください。
•
最新情報につきましては、下記のホームページをご覧ください。
https://www.nikon-image.com/support/repair/
ニコンプラザについて
ニコンプラザは、ショールーム、サービスセンター、ギャラリーを統合したニコン映像製品
の総合情報拠点です。
※
ニコンプラザサービスセンターでは持ち込み修理の受け付けも行っています。
ニコンプラザショールーム ナビダイヤル
0570-02-8080
ニコンプラザサービスセンター ナビダイヤル
0570-02-8060
•
音声ガイダンスにしたがってご利用ください。
•
ナビダイヤルをご利用いただけない場合は、ニコンカスタマーサポートセンター
(03) 6702-0577
におかけください。
ニコンプラザの所在地、営業時間などについては、下記 URL を
ご覧ください。
https://www.nikon-image.com/support/showroom/
製品の使い方に関するお問い合わせ先
■
インターネットでのお問い合わせ
https://www.nikon-image.com/support/contact/
■
お電話でのお問い合わせ
ニコン カスタマーサポートセンター ナビダイヤル
0570-02-8000
営業時間:9:30 〜 18:00(土曜日、日曜日、祝日、年末年始、夏期休業などを除く毎日)
•
ナビダイヤルをご利用いただけない場合は、ニコンカスタマーサポートセンター
(03) 6702-0577 におかけください。
•
ファクシミリは、(
03) 5977-7499 にお送りください。
•
最新情報につきましては、下記のホームページをご覧ください。
https://www.nikon-image.com/support/contact/
お問い合わせ時のお願い
•
おわかりになる範囲で「製品名」、「製品番号」、「ご購入日」、問題が発生した場合は「手順」、「現象
(表示されたメッセージ)」、「発生頻度」などをご確認のうえ、お問い合わせください。
ニコンイメージング会員「製品登録」のご案内
ニコンでは製品を安全に、安心してご使用いただくため「製品登録」へのご協力をお願いしてお
ります。ご登録いただいた製品に関するファームアップ情報や重要なお知らせなどをメールでご
案内いたします。
■
製品登録方法
製品は、「ニコンイメージング会員」(無料)の「製品登録」ページからご登録いただけます。
ニコンイメージング会員登録および製品登録は以下ニコンホームページからお手続きください。
ニコンイメージング会員のご案内
https://www.nikon-image.com/enjoy/membership/about/
■
ニコンイメージング会員とは
登録製品に関するサポート情報・ニコン製品情報や、お得で便利な会員特
典
※
などフォトライフをよりお楽しみいただくための会員サービスです。
※ 特典は登録製品ごとに異なります。
ご注意
•
ご登録にはメールアドレスとインターネットに接続できる環境が必要です。
•
登録製品の製品番号(製品本体および保証書に記載)が必要です。
•
特典の内容は、予告なく変更される場合があります。あらかじめご了承ください。
ニコンイメージングサポートページのご案内
https://www.nikon-image.com/support/
最新の製品テクニカル情報や、ソフトウェアのアップデート情報をご覧いただ
けます。
製品をより有効にご利用いただくために、定期的なアクセスをお
すすめします。
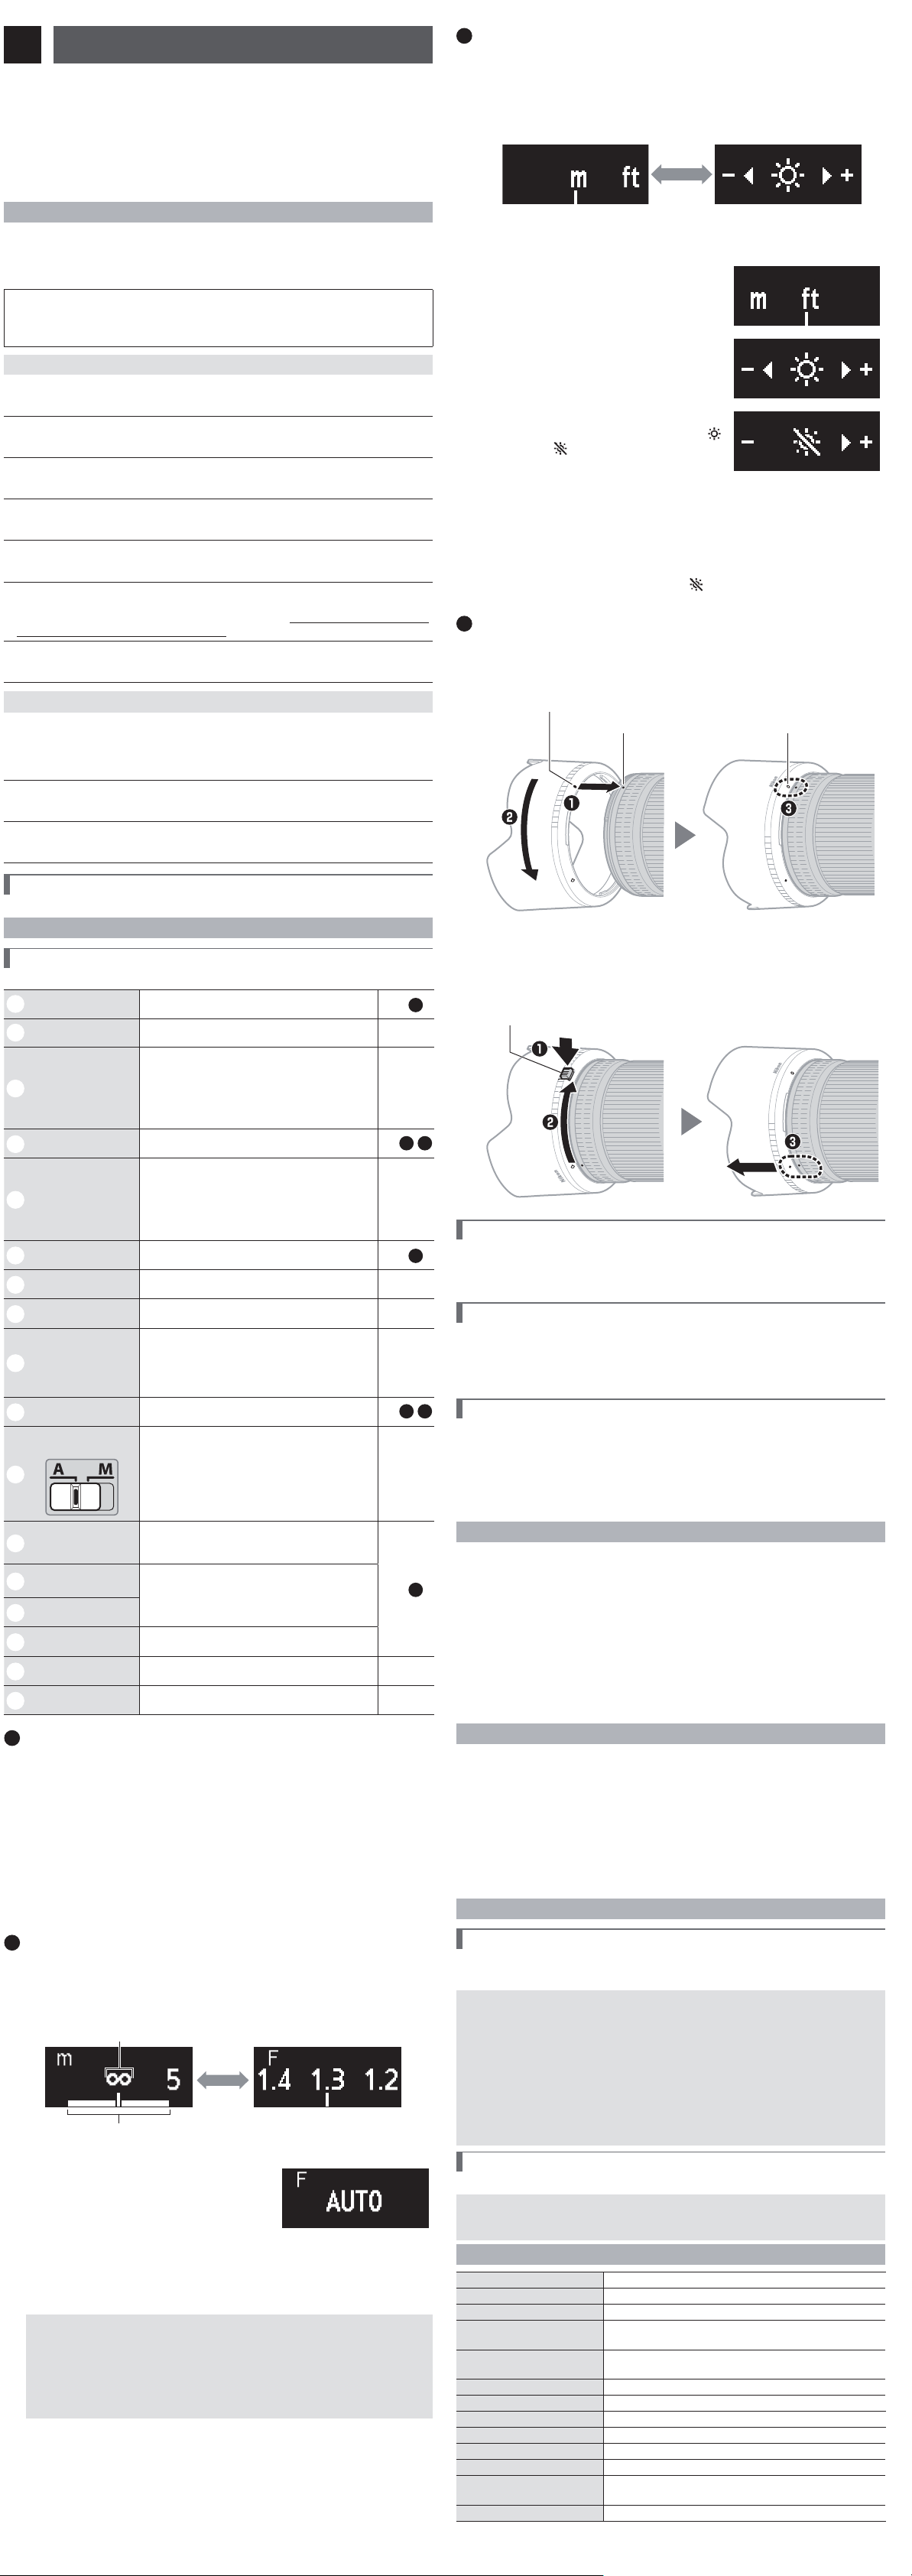
Jp
使用説明書
En
User’s Manual
Fr
Manuel d’utilisation
Sc
ҋᅶᢪϷ
Es
Manual del usuario
Kr
사용설명서
NIKKOR Z 50mm f/1.2 S
Printed in Thailand
7MMA4264-02
U
Jp
使用説明書
En
User’s Manual
Fr
Manuel d’utilisation
ご使用の前に、この使用説明書をよくお読みの上、正しくお使いください。また、
カメラの説明書もご覧ください。
•
このレンズは、ニコン
Z マウントのミラーレスカメラ専用です。
•
カメラのファームウェアを最新版にバージョンアップしてお使いください。ファーム
ウェアが最新になっていない場合、レンズを正しく認識しなかったり、機能の一部が
使用できないことがあります。最新のファームウェアは、ニコンダウンロードセンター
からダウンロードできます。
https://downloadcenter.nikonimglib.com/
安全上のご注意
あなたや他の人々への危害や財産への損害を未然に防止するため、ご使用の前に「安全上の
ご注意」をよくお読みの上、正しくお使いください。
この説明書をお読みになった後は、いつでも参照できるように保管してください。
A
警告
「死亡または重傷を負うおそれがある内容」です。
A
注意
「軽傷を負うことや財産の損害が発生するおそれがある内容」です。
お守りいただく内容を、以下の図記号で区分しています。
F
は、してはいけない内容です。
C
は、実行しなければならない内容です。
A
警告
E
分解
禁止
分解、修理または改造をしない
落下などによる破損で内部が露出したら、露出部に触らない
感電やけがの原因になります。
C
実行
熱くなる、煙が出る、こげ臭いなどの異常時は、直ちにカメラの電源を取り
外す
放置すると、発火、やけどの原因になります。
F
禁止
水でぬらさない
ぬれた手で触らない
感電や発火の原因になります。
F
禁止
引火、爆発のおそれのある場所では使わない
プロパンガス、ガソリン、可燃性スプレーなどの引火性ガスや粉塵の発生す
る場所で使うと、爆発や火災の原因になります。
F
禁止
レンズで直接太陽や強い光を見ない
失明や視力障碍の原因になります。
F
禁止
幼児の手の届くところに置かない
故障やけがの原因になります。
小さな付属品を誤って飲み込むと、身体に悪影響を及ぼします。飲み込んだ
ら、すぐに医師の診断を受けてください。
G
禁止
高温環境や低温環境では、直接触らない
やけどや低温やけど、凍傷の原因になることがあります。
A
注意
F
禁止
レンズを太陽や強い光源に向けたままにしない
集光して、内部部品の破損や発火の原因になることがあります。逆光撮影では、
太陽を画角から十分にずらしてください。画角から太陽をわずかに外しても、
発火の原因になります。
F
禁止
夏場の車内や直射日光の当たる所など高温環境に放置しない
故障や発火の原因になります。
F
禁止
三脚などにカメラやレンズを取り付けたまま移動しない
故障やけがの原因になります。
レンズの使い方
各部の名称と機能
左図で示されている各部の名称と機能は以下の通りです。
●
●
q
レンズフード
着脱指標
レンズにレンズフードを取り付けるときの指標
です。
詳しくは
D
●
w
すべり止めゴム
●
e
フォーカスリング
手動でピントを合わせるときに使用します。
•
オートフォーカス時に手動でピントを合わせて
撮影する場合は、シャッターボタンを半押しし
た状態でフォーカスリングを回してピントを合
わせてから、シャッターボタンをさらに押し込
みます。
●
r
レンズ情報パネル
撮影距離や被写界深度などの情報を表示します。
詳しくは
B
、
C
●
t
コントロールリング
このリングを回転させると、[絞り]や[露出補正]
などカメラで設定した機能を使用できます。詳
しくは、カメラの説明書に記載されている[カス
タムボタンの機能]または[カスタムボタンの
機能 ( 撮影 )]の説明をご覧ください。
●
y
レンズ着脱指標 カメラにレンズを取り付けるときの指標です。
詳しくは
A
●
u
レンズマウント
ゴムリング
●
i
CPU
信号接点 カメラとレンズの間で情報を伝達します。
●
o
L-Fn
ボタン
このボタンを押すと、カメラで設定した機能を
使用できます。詳しくは、カメラの説明書に記
載されている[カスタムボタンの機能]または[カ
スタムボタンの機能 ( 撮影 )]の説明をご覧くだ
さい。
●
!0
表示切り換えボタン
レンズ情報パネルの表示を切り換えたり、設
定を保存するときに使います。
詳しくは
B
、
C
●
!1
フォーカスモード
切り換えスイッチ
フォーカスモードを切り換えられます。
A
:オートフォーカスになります。
M
:マニュアルフォーカスになります。
•
カメラのフォーカスモードがマニュアルフォー
カスのときは、レンズで[
A
]を選んでいても
マニュアルフォーカスになります。
●
!2
レンズフード
画像に悪影響を及ぼす光線をカットします。
レンズ面の保護にも役立ちます。
詳しくは
D
●
!3
レンズフードセット
指標
レンズにレンズフードを取り付けるときの指標
です。
●
!4
レンズフード取り付
け指標
●
!5
レンズフードロック
解除ボタン
レンズフードを取り外すときに使用します。
●
!6
レンズキャップ
(フロントキャップ)
●
!7
レンズキャップ
(リアキャップ)
A
カメラへの取り付け方・取り外し方
取り付け方
z
カメラの電源を
OFF
にして、レンズのリアキャップとカメラのボ
ディーキャップを外す
x
カメラとレンズのレンズ着脱指標を合わせ、反時計回りにカチッ
と音がするまでレンズを回す
取り外し方
z
カメラの電源を
OFF
にする
x
レンズ取り外しボタンを押しながら、時計回りにレンズを回して
取り外す
B
レンズ情報パネルの表示
このレンズをカメラに取り付けてカメラの電源を ON にすると、レンズ情報パ
ネルが点灯します。
•
レンズ情報パネルの表示は、レンズの表示切り換えボタンを押すたびに次のよ
うに切り換わります。
絞り値
※ 2
被写界深度
※ 1
撮影距離
※
1 被写界深度は、カメラの撮影モードが
A
または
M
の場合に表示されます。
※
2 絞り値は、カメラの撮影モードが
A
または
M
の
場合のみ表示されます。その他の撮影モードでは、
図のように表示されます。
•
フォーカスモード切り換えスイッチを切り換えると、選択したフォーカスモード
([
AF
]または[
MF
])が一瞬表示されます。
•
カメラの半押しタイマーがオフになったとき、またはレンズの操作を行わないま
ま約 10 秒経過したとき、レンズ情報パネルは消灯します。表示切り換えボタン
を押すと、レンズ情報パネルが再度点灯します。
A
レンズ情報パネルに表示される数値について
レンズ情報パネルに表示される撮影距離や被写界深度などの数値は、おおよその
目安です。
A
ボケ像が欠けて写る場合は
高速のシャッタースピードや開放付近の絞りで撮影すると、ボケ像が欠けて
写ることがあります。ボケ像の欠けが気になるときは、シャッタースピード
を遅くしたり、絞り値を大きくすると目立たなくなります。
C
レンズ情報パネルの設定
距離を表示するときの単位(
m
(メートル)または
ft
(フィート))や、レンズ情
報パネルの明るさを変更できます。
z
表示切り換えボタンを長押しして設定画面を表示する
•
距離単位または明るさの設定画面が表示されます。設定画面では、設定中の
項目が点滅します。
•
表示切り換えボタンを押すと、設定画面が切り換わります。
距離単位の設定画面 明るさの設定画面
x
コントロールリングを回して設定を変更する
距離単位の設定
-
コントロールリングを回して、
m
または
ft
を選びます。
明るさの設定
-
コントロールリングを
+(プラス)方向に
回すと表示が明るくなり、−(マイナス)
方向に回すと暗くなります。
-
設定できる明るさは 6 段階です。
-
が になるまでコントロールリング
を
−方向に回すと、レンズ情報パネルには
何も表示されなくなります。
•
表示切り換えボタンを押すと設定した内容が保存され、設定画面が切り換わ
ります。
•
レンズの操作を行わないまま約
5 秒経過すると、設定画面が終了します。そ
の場合、変更した内容は反映されません。
c
表示切り
換えボタンを長押しして設定画面を終了する
•
明るさの設定を
にしたときは、レンズ情報パネルに何も表示されなくなり
ます。再度表示切り換えボタンを長押しすると、レンズ情報パネルが点灯し
ます。
A
A
CAUTION
CAUTION
•
•
Do not leave the lens pointed at the sun or other strong light sources.
Do not leave the lens pointed at the sun or other strong light sources.
Light focused by the lens could cause fi re or damage to product’s internal parts. When
shooting backlit subjects, keep the sun well out of the frame. Sunlight focused into
the camera when the sun is close to the frame could cause fi re.
•
•
Do not leave the product where it will be exposed to extremely high temperatures,
Do not leave the product where it will be exposed to extremely high temperatures,
for an extended period such as in an enclosed automobile or in direct sunlight.
for an extended period such as in an enclosed automobile or in direct sunlight.
Failure to observe this precaution could result in fi re or product malfunction.
•
•
Do not transport cameras or lenses with tripods or similar accessories attached.
Do not transport cameras or lenses with tripods or similar accessories attached.
Failure to observe this precaution could result in injury or product malfunction.
Notices for Customers in the U.S.A.
Notices for Customers in the U.S.A.
This device complies with part 15 of the FCC Rules. Operation is subject to the following two
conditions: (1) this device may not cause harmful interference, and (2) this device must ac-
cept any interference received, including interference that may cause undesired operation.
Federal Communications Commission (FCC) Radio Frequency Interference Statement
Federal Communications Commission (FCC) Radio Frequency Interference Statement
This equipment has been tested and found to comply with the limits for a Class B digital
device, pursuant to Part 15 of the FCC rules. These limits are designed to provide reason-
able protection against harmful interference in a residential installation. This equipment
generates, uses, and can radiate radio frequency energy and, if not installed and used in
accordance with the instructions, may cause harmful interference to radio communica-
tions. However, there is no guarantee that interference will not occur in a particular instal-
lation. If this equipment does cause harmful interference to radio or television reception,
which can be determined by turning the equipment off and on, the user is encouraged to
try to correct the interference by one or more of the following measures:
• Reorient or relocate the receiving antenna.
• Increase the separation between the equipment and receiver.
• Connect the equipment into an outlet on a circuit diff erent from that to which the
receiver is connected.
• Consult the dealer or an experienced radio/television technician for help.
CAUTIONS
CAUTIONS
Modi cations
The FCC requires the user to be notifi ed that any changes or modifi cations made to
this device that are not expressly approved by Nikon Corporation may void the user’s
authority to operate the equipment.
Nikon Inc., 1300 Walt Whitman Road,
Melville, New York 11747-3064, U.S.A.
Tel.: 631-547-4200
Notice for Customers in Canada
Notice for Customers in Canada
CAN ICES-3 B / NMB-3 B
Using the Lens
Using the Lens
Parts of the Lens: Names and Functions
Parts of the Lens: Names and Functions
Refer to the diagram on the left edge of this sheet.
q
Lens hood mounting
mark
Use when attaching the lens hood.
See
D
w
Rubber grip
——
e
Focus ring
Use for manual focus.
• When focusing using autofocus, you can ad-
just focus manually by rotating the ring while
the shutter-release button is pressed halfway;
after focusing, press the shutter-release but-
ton the rest of the way down to shoot.
—
r
Lens info panel
View focus distance, depth of fi eld, and other
information.
See
B
,
C
t
Control ring
Rotate to adjust a setting such as [Aperture] or
[Exposure compensation] assigned using the cam-
era. For more information, see the description of
[Custom control assignment], [Custom controls], or
[Custom controls (shooting)] in the camera manual.
—
y
Lens mounting mark
Use when mounting the lens on the camera.
See
A
u
Rubber lens-mount
gasket
——
i
CPU contacts
Used to transfer data to and from the camera. —
o
L-Fn button
Press to perform a function assigned using the
camera. For more information, see the descrip-
tion of [Custom control assignment], [Custom
controls], or [Custom controls (shooting)] in
the camera manual.
—
!0
Display button
Save settings or choose the information
shown in the lens info panel.
See
B
,
C
!1
Focus-mode switch
Choose a focus mode.
• A: Autofocus
• M: Manual focus
Note that regardless of the setting chosen, fo-
cus must be adjusted manually when manual
focus mode is selected using camera controls.
—
!2
Lens hood
Lens hoods block stray light that would other-
wise cause fl are or ghosting. They also serve to
protect the lens.
See
D
!3
Lens hood lock mark
Use when attaching the lens hood.
!4
Lens hood alignment
mark
!5
Lens hood lock
release button
Use when removing the lens hood.
!6
Lens cap (front cap)
——
!7
Lens cap (rear cap)
——
A
Attachment and Removal
Attachment and Removal
Attaching the Lens
z
Turn the camera o , remove the body cap, and detach the rear lens cap.
x
Position the lens on the camera body, keeping the mounting mark
on the lens aligned with the mounting mark on the camera body,
and then rotate the lens counterclockwise until it clicks into place.
Removing the Lens
z
Turn the camera o .
x
Press and hold the lens release button while turning the lens clockwise.
B
The Lens Info Panel
The Lens Info Panel
The lens Info panel lights when the lens is attached to a camera and the camera is on.
• Press the lens display button to cycle the display as shown:
Aperture
Depth of eld
Focus distance
1 Depth of eld is displayed when the camera is in mode A or M.
2 Aperture is displayed only when the cam-
era is in mode A or M. The display for other
modes is shown in the illustration.
• The focus mode (AF or MF) is briefl y displayed when chosen using the focus-
mode switch.
• The panel turns off automatically when the camera standby timer expires or if no
lens operations are performed for about 10 seconds. Press the display button to
reactivate the display.
A
The Lens Info Panel
The focus distance, depth of eld, and other information displayed in the lens Info panel are approximations only.
A
Irregular Bokeh
With fast shutter speeds and/or wide apertures, you may notice irregularities in how bokeh is shaped. The
e ect can be mitigated by choosing slower shutter speeds and/or higher f-numbers.
C
Panel Options
Panel Options
Follow the steps below to choose the units for focus distance from meters (m) or
feet (ft) or adjust the brightness of the lens Info panel.
z Press and hold the display button to view settings.
• Unit or brightness selection options will be displayed. The currently selected
item will fl ash.
• Press the display button to toggle between displays.
Units Brightness
Before using this product, please read these instructions carefully. You will also need to
consult the camera manual.
• This lens is intended exclusively for use with mirrorless cameras featuring a Nikon Z mount.
• Update the camera fi rmware to the latest version. With earlier versions, the camera may fail
to detect the lens correctly and some features may not be available. The latest version of the
camera fi rmware can be downloaded from the Nikon Download Center at the URL below.
https://downloadcenter.nikonimglib.com/
For Your Safety
For Your Safety
To prevent damage to property or injury to yourself or to others, read “For Your Safety”
in its entirety before using this product.
Keep these safety instructions where all those who use this product will read them.
A WARNING: Failure to observe the precautions marked with this icon could
result in death or severe injury.
A CAUTION: Failure to observe the precautions marked with this icon could
result in injury or property damage.
A
A
WARNING
WARNING
•
•
Do not disassemble or modify this product.
Do not disassemble or modify this product.
Do not touch internal parts that become exposed as the result of a fall or other accident.
Do not touch internal parts that become exposed as the result of a fall or other accident.
Failure to observe these precautions could result in electric shock or other injury.
•
•
Should you notice any abnormalities such as the product producing smoke,
Should you notice any abnormalities such as the product producing smoke,
heat, or unusual odors, immediately disconnect the camera power source.
heat, or unusual odors, immediately disconnect the camera power source.
Continued operation could result in fi re, burns or other injury.
•
•
Keep dry.
Keep dry.
Do not handle with wet hands.
Do not handle with wet hands.
Failure to observe these precautions could result in fi re or electric shock.
•
•
Do not use this product in the presence of fl ammable dust or gas such as
Do not use this product in the presence of fl ammable dust or gas such as
propane, gasoline or aerosols.
propane, gasoline or aerosols.
Failure to observe this precaution could result in explosion or fi re.
•
•
Do not directly view the sun or other bright light source through the lens.
Do not directly view the sun or other bright light source through the lens.
Failure to observe this precaution could result in visual impairment.
•
•
Keep this product out of reach of children.
Keep this product out of reach of children.
Failure to observe this precaution could result in injury or product malfunction. In
addition, note that small parts constitute a choking hazard. Should a child swallow
any part of this product, seek immediate medical attention.
•
•
Do not handle with bare hands in locations exposed to extremely high or
Do not handle with bare hands in locations exposed to extremely high or
low temperatures.
low temperatures.
Failure to observe this precaution could result in burns or frostbite.
Avant d’utiliser ce produit, veuillez lire ces instructions attentivement. Vous devrez également consulter
le manuel de l’appareil photo.
• Cet objectif est destiné exclusivement aux appareils photo hybrides dotés d’une monture Nikon Z.
• Mettez à jour le fi rmware de l’appareil photo vers la dernière version. Avec les versions antérieures,
l’appareil photo risque de ne pas pouvoir détecter correctement l’objectif et certaines fonctionnalités
peuvent être indisponibles. La dernière version du fi rmware de l’appareil photo peut être téléchargée
depuis le Centre de téléchargement Nikon via l’URL ci-dessous.
https://downloadcenter.nikonimglib.com/
Pour votre sécurité
Pour votre sécurité
Afi n d’éviter de provoquer des dommages matériels ou de vous blesser ou de blesser un tiers, lisez
intégralement «Pour votre sécurité» avant d’utiliser ce produit.
Conservez ces consignes de sécurité dans un endroit facilement accessible à tous ceux qui pourraient
se servir de ce produit.
A AVERTISSEMENT: le non-respect des consignes indiquées par cette icône peut vous exposer à
un danger de mort ou à de graves blessures.
A ATTENTION: le non-respect des consignes indiquées par cette icône peut vous exposer à des
blessures ou provoquer des dommages matériels.
A
A
AVERTISSEMENT
AVERTISSEMENT
•
•
Ne démontez pas ou ne modifi ez pas ce produit.
Ne démontez pas ou ne modifi ez pas ce produit.
Ne touchez pas les composants internes qui sont exposés suite à une chute ou à un autre accident.
Ne touchez pas les composants internes qui sont exposés suite à une chute ou à un autre accident.
Le non-respect de ces consignes peut provoquer un choc électrique ou d’autres blessures.
•
•
Si vous observez des anomalies provenant du produit comme de la fumée, de la chaleur ou des
Si vous observez des anomalies provenant du produit comme de la fumée, de la chaleur ou des
odeurs inhabituelles, débranchez immédiatement la source d’alimentation de l’appareil photo.
odeurs inhabituelles, débranchez immédiatement la source d’alimentation de l’appareil photo.
Continuer d’utiliser le matériel risque de provoquer un incendie, des brûlures ou d’autres blessures.
•
•
Gardez votre matériel au sec.
Gardez votre matériel au sec.
Ne le manipulez pas avec les mains mouillées.
Ne le manipulez pas avec les mains mouillées.
Le non-respect de ces consignes de sécurité peut provoquer un incendie ou un choc électrique.
•
•
N’utilisez pas ce produit en présence de poussières ou de gaz infl ammables comme du
N’utilisez pas ce produit en présence de poussières ou de gaz infl ammables comme du
propane, de l’essence ou des aérosols.
propane, de l’essence ou des aérosols.
Le non-respect de cette consigne peut provoquer une explosion ou un incendie.
•
•
N’observez pas directement le soleil ou toute autre source lumineuse puissante à travers
N’observez pas directement le soleil ou toute autre source lumineuse puissante à travers
l’objectif.
l’objectif.
Le non-respect de cette consigne peut provoquer des troubles visuels.
•
•
Conservez ce produit hors de portée des enfants.
Conservez ce produit hors de portée des enfants.
Le non-respect de cette consigne peut provoquer des blessures ou le dysfonctionnement du produit. En
outre, notez que les petites pièces présentent un risque d’étouff ement. Si jamais un enfant avalait une pièce
de ce produit, consultez immédiatement un médecin.
•
•
Ne manipulez pas le matériel à mains nues dans des lieux exposés à des températures
Ne manipulez pas le matériel à mains nues dans des lieux exposés à des températures
extrêmement basses ou élevées.
extrêmement basses ou élevées.
Le non-respect de cette consigne peut provoquer des brûlures ou des engelures.
A
A
ATTENTION
ATTENTION
•
•
Ne pointez pas l’objectif en direction du soleil ou d’autres sources très lumineuses.
Ne pointez pas l’objectif en direction du soleil ou d’autres sources très lumineuses.
La lumière focalisée par l’objectif peut provoquer un incendie ou endommager les composants
internes du produit. Lorsque vous photographiez un sujet à contre-jour, veillez à garder toujours
le soleil à l’extérieur du cadre. Lorsque le soleil se trouve près du cadre, sa lumière risque de se
concentrer dans l’appareil photo et de provoquer un incendie.
•
•
Ne laissez pas le produit exposé à des températures excessivement chaudes pendant une période
Ne laissez pas le produit exposé à des températures excessivement chaudes pendant une période
prolongée, comme dans une voiture fermée ou en plein soleil.
prolongée, comme dans une voiture fermée ou en plein soleil.
Le non-respect de cette consigne peut provoquer un incendie ou le dysfonctionnement du produit.
•
•
Ne transportez pas les appareils photo ou les objectifs si des trépieds ou accessoires
Ne transportez pas les appareils photo ou les objectifs si des trépieds ou accessoires
similaires sont fi xés.
similaires sont fi xés.
Le non-respect de cette consigne peut provoquer des blessures ou le dysfonctionnement du produit.
Avis pour les clients au Canada
Avis pour les clients au Canada
CAN ICES-3 B / NMB-3 B
Utilisation de l’objectif
Utilisation de l’objectif
Descriptif de l’objectif: noms et fonctions
Descriptif de l’objectif: noms et fonctions
Reportez-vous aux fi gures situées à gauche.
q
Repère de montage du
parasoleil
Référez-vous à ce repère lorsque vous fi xez le parasoleil.
Voir
D
w
Grip en caoutchouc — —
e
Bague de mise au point
Utilisez cette bague pour faire le point manuellement.
• Lorsque vous utilisez l’autofocus, vous pouvez ajuster la
mise au point manuellement en tournant cette bague
tout en appuyant sur le déclencheur à mi-course; une fois
la mise au point eff ectuée, appuyez sur le déclencheur
jusqu’en fi n de course pour prendre la photo.
—
r
Écran d’informations sur
l’objectif
Affi chez la distance de mise au point, la profondeur de
champ et d’autres informations.
Voir
B
,
C
t
Bague de réglage
Tournez cette bague pour modifi er un réglage comme
l’[Ouverture] ou la [Correction d’exposition], attribué à l’aide
de l’appareil photo. Pour en savoir plus, reportez-vous à la
description de [Défi nition réglages perso.], [Commandes
personnalisées] ou [Commandes perso (prise de vue)] dans
le manuel de l’appareil photo.
—
y
Repère de montage de
l’objectif
Référez-vous à ce repère lorsque vous fi xez l’objectif sur
l’appareil photo.
Voir
A
u
Joint en caoutchouc de
la monture d’objectif
——
i
Contacts du
microprocesseur
Utilisés pour transférer les données depuis ou vers
l’appareil photo.
—
o
Commande L-Fn
Appuyez sur cette commande pour eff ectuer une fonction
attribuée à l’aide de l’appareil photo. Pour en savoir plus,
reportez-vous à la description de [Défi nition réglages
perso.], [Commandes personnalisées] ou [Commandes
perso (prise de vue)] dans le manuel de l’appareil photo.
—
!0
Commande d’affi chage
Enregistrez les réglages ou choisissez les informations
affi chées sur l’écran d’informations sur l’objectif.
Voir
B
,
C
!1
Commutateur du mode
de mise au point
Choisissez un mode de mise au point.
• A: autofocus
• M: mise au point manuelle
Notez qu’indépendamment du réglage choisi, vous
devez modifi er la mise au point manuellement lorsque
le mode de mise au point manuelle est sélectionné à
l’aide des commandes de l’appareil photo.
—
!2
Parasoleil
Le parasoleil bloque la lumière diff use pouvant
provoquer de la lumière parasite ou une image
fantôme. Il permet aussi de protéger l’objectif.
Voir
D
!3
Repère de verrouillage
du parasoleil
Référez-vous à ces repères vous fi xez le parasoleil.
!4
Repère d’alignement du
parasoleil
!5
Bouton de déverrouillage
du parasoleil
Utilisez ce bouton pour retirer le parasoleil.
!6
Bouchon d’objectif
(avant)
——
!7
Bouchon d’objectif
(arrière)
——
A
Fixation et retrait
Fixation et retrait
Fixation de l’objectif
z
Mettez l’appareil photo hors tension, retirez le bouchon du boîtier et détachez le
bouchon arrière de l’objectif.
x
Placez l’objectif sur le boîtier de l’appareil photo, en maintenant le repère de montage
de l’objectif aligné sur le repère de montage du boîtier de l’appareil photo, puis faites
pivoter l’objectif dans le sens inverse des aiguilles d’une montre jusqu’au déclic.
Retrait de l’objectif
z
Mettez l’appareil photo hors tension.
x
Maintenez appuyée la commande de déverrouillage de l’objectif tout en faisant
pivoter ce dernier dans le sens des aiguilles d’une montre.
B
Écran d’informations sur l’objectif
Écran d’informations sur l’objectif
L’écran d’informations sur l’objectif s’allume lorsque vous fi xez l’objectif sur un appareil photo et que
ce dernier est sous tension.
• Appuyez sur la commande d’affi chage de l’objectif pour parcourir l’affi chage de la façon
indiquée ci-dessous:
Ouverture
2
Profondeur de champ
1
Distance de mise au point
1 La profondeur de champ s’a che lorsque l’appareil photo est en mode A ou M.
2 L’ouverture s’a che uniquement lorsque l’appareil
photo est en mode A ou M. L’a chage des autres
modes est indiqué sur l’illustration.
• Le mode de mise au point (AF ou MF) s’affi che brièvement lors de sa sélection à l’aide du
commutateur du mode de mise au point.
• L’écran s’éteint automatiquement lorsque l’appareil photo entre en mode veille ou si vous
n’eff ectuez aucune opération avec l’objectif pendant 10 secondes environ. Appuyez sur la
commande d’affi chage pour activer à nouveau l’écran.
A
Écran d’informations sur l’objectif
La distance de mise au point, la profondeur de champ et les autres informations a chées sur l’écran d’informations sur
l’objectif ne sont que des approximations.
A
Bokeh irrégulier
Avec des vitesses d’obturation rapides et/ou de grandes ouvertures, il se peut que vous observiez des irrégularités dans le
rendu du bokeh ( ou d’arrière-plan). Vous pouvez atténuer cet e et en choisissant des vitesses d’obturation plus lentes et/ou
des ouvertures plus petites (valeurs f/ plus grandes).
C
Options de l’écran
Options de l’écran
Suivez les étapes ci-dessous pour choisir l’unité de la distance de mise au point, à savoir mètres (m)
ou pieds (ft), ou pour régler la luminosité de l’écran d’informations sur l’objectif.
z Maintenez appuyée la commande d’affi chage pour affi cher les réglages.
• Les options de sélection de l’unité ou de la luminosité s’affi chent. L’élément en cours de
sélection clignote.
• Appuyez sur la commande d’affi chage pour commuter entre les affi chages.
Unités Luminosité
x Choisissez un réglage à l’aide de la bague de réglage de l’objectif.
Unités
- Tournez la bague de réglage pour choisir entre
mètres (m) et pieds (ft).
Luminosité
- Tournez la bague de réglage dans le sens «+» (plus
clair) ou «−» (plus sombre).
- Vous avez le choix entre 6 niveaux de luminosité.
- Pour éteindre l’écran d’informations, tournez la
bague dans le sens «−» jusqu’à ce que l’icône
devienne
.
• Appuyez sur la commande d’affi chage pour enregistrer les modifi cations et changer
d’affi chage.
• Si vous n’eff ectuez aucune opération à l’aide des commandes de l’objectif pendant 5
secondes environ, les options disparaissent de l’écran. Toute modifi cation sera perdue.
c Maintenez appuyée la commande d’affi chage pour revenir à l’écran d’informations sur
l’objectif.
• Si vous choisissez le réglage de luminosité , l’écran d’informations sur l’objectif s’éteint.
Pour activer à nouveau l’écran, maintenez appuyée la commande d’affi chage.
D
Fixation et retrait du parasoleil
Fixation et retrait du parasoleil
Fixation du parasoleil
• Alignez le repère de montage du parasoleil sur le repère d’alignement du parasoleil (
q
), puis
tournez ce dernier (
w
) jusqu’à ce que le repère de montage s’aligne sur le repère de verrouillage
du parasoleil (
e
).
Repère de verrouillage du
parasoleil
Repère d’alignement du parasoleil
Repère de montage du parasoleil
• Si vous saisissez l’avant trop fermement, le parasoleil peut être diffi cile à fi xer ou à retirer. Lorsque
vous tournez le parasoleil, tenez-le près du repère d’alignement (
●
) situé sur sa base.
• Le parasoleil peut être retourné et monté sur l’objectif lorsqu’il n’est pas utilisé.
Retrait du parasoleil
• En maintenant appuyé le bouton de déverrouillage du parasoleil (
q
), tournez le parasoleil dans
le sens indiqué (
w
) et retirez-le de l’objectif (
e
).
Bouton de déverrouillage du parasoleil
• Il est possible d’eff ectuer la même procédure lorsque le parasoleil est retourné.
Lorsque l’objectif est fi xé
Lorsque l’objectif est fi xé
Le réglage de mise au point risque de changer si vous mettez l’appareil photo hors tension puis à
nouveau sous tension après avoir fait le point. Si vous avez fait le point sur un emplacement sélectionné
au préalable en attendant que votre sujet apparaisse, nous vous recommandons de ne pas mettre
l’appareil photo hors tension tant que vous n’avez pas pris la photo.
Appareils photo dotés d’illuminateurs d’assistance AF
Appareils photo dotés d’illuminateurs d’assistance AF
L’objectif ou le parasoleil risque de bloquer la lumière émise par l’illuminateur d’assistance AF de
l’appareil photo.
• Pour obtenir les dernières informations sur l’utilisation de l’objectif avec des appareils photo dotés
d’illuminateurs d’assistance AF intégrés, consultez le site ci-dessous.
https://downloadcenter.nikonimglib.com/
Utilisation de l’objectif avec des appareils photo équipés d’un fl ash intégré
Utilisation de l’objectif avec des appareils photo équipés d’un fl ash intégré
Des ombres seront visibles sur les photos si la lumière provenant du fl ash intégré est occultée par
l’objectif ou le parasoleil. Retirez le parasoleil avant la prise de vue. Notez cependant que selon la focale
de l’objectif et la distance au sujet, des ombres peuvent être visibles même si le parasoleil est retiré.
• Des ombres seront visibles sur les photos si cet objectif est fi xé sur un Z50.
• Pour obtenir les dernières informations sur les focales et les distances au sujet avec lesquelles aucune
ombre ne sera visible sur les photos prises avec un fl ash intégré, consultez le site ci-dessous.
https://downloadcenter.nikonimglib.com/
Précautions d’utilisation
Précautions d’utilisation
• Ne prenez pas, ni ne tenez l’objectif ou l’appareil photo uniquement par les bouchons ou par le parasoleil.
• Maintenez les contacts du microprocesseur propres.
• Si le joint en caoutchouc de la monture d’objectif est endommagé, cessez immédiatement l’utilisation
et confi ez l’objectif à un centre Nikon agréé pour le faire réparer.
• Remettez les bouchons en place lorsque vous n’utilisez pas l’objectif.
• Ne laissez pas l’objectif dans des endroits humides ou dans des lieux où il risque d’être exposé à l’humidité.
La formation de rouille sur les mécanismes internes peut provoquer des dommages irréparables.
• Ne laissez pas l’objectif à proximité d’un feu ou dans d’autres endroits extrêmement chauds. La chaleur
extrême peut endommager ou déformer l’extérieur en plastique renforcé.
• Les changements brusques de température peuvent être à l’origine d’une condensation préjudiciable à
l’intérieur et à l’extérieur de l’objectif. Avant de faire passer l’objectif d’un environnement chaud à froid ou vice
versa, rangez-le dans un sac ou dans une boîte en plastique pour ralentir le changement de température.
• Nous vous recommandons de ranger l’objectif dans son étui afi n de le protéger des rayures lors du transport.
Entretien de l’objectif
Entretien de l’objectif
• Normalement, enlever la poussière suffi t pour nettoyer les surfaces en verre de l’objectif.
• Les taches, les traces de doigt et autres taches d’huile peuvent être retirées de la surface de l’objectif
avec un tissu propre et doux en coton ou un chiff on optique (disponible auprès d’autres fabricants)
légèrement imbibé d’une petite quantité d’éthanol ou de nettoyant pour objectif. Essuyez délicatement
avec un mouvement circulaire à partir du centre vers l’extérieur, en prenant soin de ne pas laisser de
traces, ni de toucher le verre avec les doigts.
• N’utilisez jamais de solvants organiques comme un diluant à peinture ou du benzène pour nettoyer l’objectif.
• Les fi ltres neutres (NC, disponibles séparément) et autres accessoires similaires permettent de protéger la lentille avant.
• Ne rangez pas l’objectif avec des boules antimites de naphtaline ou de camphre ou à la lumière directe
du soleil. Si vous n’avez pas l’intention d’utiliser l’objectif avant longtemps, rangez-le dans un endroit
frais et sec pour éviter la moisissure et la rouille.
Accessoires
Accessoires
Accessoires fournis
Accessoires fournis
• Bouchon d’objectif LC-82B (avant)
• Bouchon d’objectif LF-N1 (arrière)
• Parasoleil HB-94
• Étui pour objectif CL-C2
D
Utilisation de l’étui pour objectif
• L’étui est destiné à protéger l’objectif des rayures et non des chutes ou autres chocs physiques.
• L’étui n’est pas résistant à l’eau.
• La matière utilisée dans cet étui peut se décolorer, déteindre, s’étirer, rétrécir ou changer de couleur en cas de frottement ou d’humidité.
• Retirez la poussière avec une brosse à poils doux.
• L’eau et les taches peuvent être retirées de la surface avec un chi on doux et sec. N’utilisez pas d’alcool, de benzène, de diluant ou
d’autres substances chimiques volatiles.
• Ne rangez pas l’étui dans des lieux exposés à la lumière directe du soleil, à des températures élevées ou à l’humidité.
• N’utilisez pas l’étui pour nettoyer le moniteur ou les lentilles.
• Veillez à ce que l’objectif ne tombe pas de l’étui lorsque vous le transportez.
Matière: polyester
Accessoires compatibles
Accessoires compatibles
Filtres à visser 82mm
D
Filtres
• N’utilisez qu’un seul ltre à la fois.
• Retirez le parasoleil avant de xer un ltre ou de faire pivoter un ltre polarisant circulaire.
Caractéristiques
Caractéristiques
Monture
Monture Monture Nikon Z
Focale
Focale 50 mm
Ouverture maximale
Ouverture maximale f/1.2
Construction optique
Construction optique
17 lentilles en 15 groupes (dont 2 lentilles en verre ED, 3 lentilles asphériques et des
lentilles béné ciant du Traitement nanocristal et du Traitement ARNEO)
Angle de champ
Angle de champ • Format FX: 47°
• Format DX: 31° 30’
Système de mise au point
Système de mise au point Système de mise au point interne
Distance minimale de mise au point
Distance minimale de mise au point 0,45 m à partir du plan focal
Rapport de reproduction maximal
Rapport de reproduction maximal 0,15×
Lamelles de diaphragme
Lamelles de diaphragme 9 (diaphragme circulaire)
Plage des ouvertures
Plage des ouvertures f/1.2 – 16
Diamètre de xation pour ltre
Diamètre de xation pour ltre 82 mm (P = 0,75 mm)
Dimensions
Dimensions Environ 89,5 mm de diamètre maximum × 150 mm (distance entre
l’extrémité de l’objectif et le plan d’appui de la monture d’objectif de l’appareil photo)
Poids
Poids Environ 1090g
Nikon se réserve le droit de modifi er à tout moment l’apparence, les caractéristiques et les performances de ce
produit sans avis préalable.
D
レンズフードの取り付け方・取り外し方
取り付け方
•
レンズフード着脱指標とレンズフード取り付け指標を合わせて(
q
)、レン
ズフードを矢印(
w
)の方向に回転させ、レンズフード着脱指標とレンズフー
ドセット指標を合わせてください(
e
)。
レンズフードセット指標
レンズフード取り付け指標
レンズフード着脱指標
•
レンズフード先端を強くつかむと着脱が困難になります。着脱の際は、レンズフー
ド取り付け指標(●)付近を持って回転させてください。
•
収納時はレンズフードを逆向きにしてレンズに取り付けられます。
取り外し方
•
レンズフードロック解除ボタンを押さえて(
q
)、レンズフードを矢印(
w
)の
方向に回転させ、取り外します(
e
)。
レンズフードロック解除ボタン
•
レンズフードが逆向きに取り付けられているときも、同様の手順で取り外します。
カメラにレンズを取り付けたときのご注意
ピント合わせを行った後に、カメラの電源を OFF にして再び ON にするとピント位置
が変わることがあります。ピントをあらかじめ合わせておいて被写体を待つ置きピン撮
影などでは、ピントを合わせてからシャッターをきるまでにカメラの電源を OFF にしな
いことをおすすめします。
カメラの
AF
補助光を使用するときのご注意
AF 補助光搭載のカメラの場合、AF 補助光がレンズやレンズフードでさえぎられる
ことがあります。
•
カメラの
AF 補助光を使って撮影するときの制限についての最新情報は、ニコンダウン
ロードセンターでご確認いただけます。
https://downloadcenter.nikonimglib.com/
内蔵フラッシュ搭載のカメラでフラッシュ撮影するとき
のご注意
内蔵フラッシュ搭載のカメラの場合、フラッシュの光がレンズやレンズフードでさえぎ
られると画像に影が写り込みます。レンズフードは取り外して撮影してください。
レンズフードを取り外しても、レンズの焦点距離と撮影距離によっては影が写り込みます。
•
このレンズを
Z 50 に取り付けると、フラッシュの光がレンズでさえぎられて影が写り
込みます。
•
内蔵フラッシュ搭載のカメラでフラッシュ撮影するときに影が写り込まずに撮影でき
る焦点距離と撮影距離についての最新情報は、ニコンダウンロードセンターでご確認
いただけます。
https://downloadcenter.nikonimglib.com/
取り扱い上のご注意
•
レンズキャップやレンズフードだけを持って、レンズやカメラを持ち運ばないでくださ
い。
•
CPU 信号接点は汚さないようにご注意ください。
•
レンズマウントゴムリングが破損した場合は、そのまま使用せず販売店またはニコン
サービス機関に修理を依頼してください。
•
レンズをカメラに装着していないときは、必ずレンズキャップを取り付けてください。
•
レンズを水にぬらしたり、湿気の多い場所に置かないでください。部品がサビつくな
どして故障の原因になりますのでご注意ください。
•
火の近くなど、極端に温度が高くなるところに置かないでください。外装に使用して
いる強化プラスチックが変形することがあります。
•
極端に温度差のある場所に急にレンズを持ち込むと、レンズ内外に水滴が生じ、故障の
原因となります。レンズをバッグやビニール袋などに入れて、周囲の温度になじませて
からお使いください。
•
レンズを傷から守るために、持ち運ぶときはレンズケースに入れることをおすすめします。
レンズのお手入れ
•
レンズ面を清掃する場合、通常はほこりを払う程度にしてください。
•
レンズ面に指紋など油分を含む汚れがついたときは、少量の無水アルコール(エタノー
ル)や市販のレンズクリーナーで湿らせた柔らかい清潔な木綿の布または市販のレン
ズクリーニングペーパーを使って、レンズの中心から外周へ渦巻き状に拭いてくださ
い。その場合、拭きムラや拭き残りがないように注意してください。
•
シンナーやベンジンなどの有機溶剤は絶対に使用しないでください。
•
レンズ表面の汚れや傷を防ぐには、別売のニュートラルカラー
NC フィルターなどの
使用をおすすめします。
•
レンズを保管するときは、直射日光のあたるところや防虫剤のあるところを避けてく
ださい。また、レンズを長期間使用しないときは、カビやサビを防ぐために、高温多
湿のところを避けて風通しのよい場所に保管してください。
アクセサリー
付属アクセサリー
•
レンズキャップ
LC-82B(フロントキャップ)
•
レンズキャップ
LF-N1(リアキャップ)
•
レンズフード
HB-94
•
レンズケース
CL-C2
D
レンズケースのお取り扱いについて
•
レンズケースはレンズを傷から守ることを目的としており、落下や衝撃からレンズ
を保護する機能はありません。
•
レンズケースに撥水機能はありません。
•
レンズケースは材質の特性上、雨や水などで濡れた場合や摩擦によって、色落ち、
変色、色移り、伸縮することがあります。
•
ほこりは柔らかいブラシで払い落としてください。
•
表面に付着した汚れや水分は、乾いた柔らかい布で拭き取ってください。アルコール、
ベンジン、シンナーなどの溶剤は使わないでください。
•
直射日光があたる場所や、温度、湿度の高い場所に放置しないでください。
•
レンズ面や液晶画面などを拭くクリーニングクロスとしては使用できません。
•
レンズを収納して持ち運ぶ際、レンズが転がり出ないようご注意ください。
レンズケースの素材:ポリエステル
使用できるアクセサリー
82 mm ネジ込み式フィルター
D
フィルターを使用する場合
•
フィルターは
1 枚で使用してください。
•
フィルターは、レンズフードを取り外してから装着してください。また、円偏光フィルター
の偏光効果の調節も、レンズフードを取り外した状態で行ってください。
仕様
マウント ニコン Z マウント
焦点距離
50 mm
最大口径比 1:1.2
レンズ構成
15 群 17 枚(ED レンズ 2 枚、非球面レンズ 3 枚、ナノク
リスタルコートあり、 アルネオコートあり)
画角
47°(
撮像範囲 FX
)
31°30′(撮像範囲 DX)
フォーカシング方式 IF(インターナルフォーカス)方式
最短撮影距離 撮像面から
0.45 m
最大撮影倍率 0.15 倍
絞り羽根枚数
9 枚(円形絞り)
絞りの範囲
f/1.2 16
アタッチメントサイズ 82 mm(P=0.75 mm)
寸法
約
89.5 mm(最大径)× 150 mm(レンズマウント基準
面からレンズ先端まで)
質量 約
1090 g
※製品の外観・仕様・性能は予告なく変更することがありますので、ご了承ください。
x Choose a setting using the lens control ring.
Units
- Rotate the control ring to choose from me-
ters (m) or feet (ft).
Brightness
- Rotate the control ring in the “+” (brighter)
or “−” (darker) direction.
- Choose from 6 levels of brightness.
- To turn the lens info panel off , rotate the
ring in the “−” direction until the icon
changes to
.
• Press the display button to save changes and toggle the display.
• If no operations are performed using lens controls for about 5 seconds,
panel options will clear from the display. Any changes will be lost.
c Press and hold the display button to return to the lens information display.
• Choosing
for brightness turns the lens info panel off . To turn the display
on again, press and hold the display button.
D
Attaching and Removing the Lens Hood
Attaching and Removing the Lens Hood
Attaching the Lens Hood
• Align the lens hood mounting mark with the lens hood alignment mark (
q
) and
then rotate the lens hood (
w
) until the mounting mark is aligned with the lens
hood lock mark (
e
).
Lens hood lock mark
Lens hood alignment mark
Lens hood mounting mark
• Gripping the front too tightly makes the lens hood diffi cult to attach or remove. When
rotating the lens hood, hold it near the lens hood alignment mark (
●
) on its base.
• T
he lens hood can be reversed and mounted on the lens when not in use.
Removing the Lens Hood
• Keeping the lens hood lock release button pressed (
q
), rotate the lens hood in
the direction shown (
w
) and remove it from the lens (
e
).
Lens hood lock release button
• The
same procedure can be used when the lens hood is reversed.
When the Lens Is Attached
When the Lens Is Attached
The focus position may change if you turn the camera off and then on again after fo-
cusing. If you have focused on a pre-selected location while waiting for your subject to
appear, we recommend that you do not turn the camera off until the picture is taken.
Cameras with AF-Assist Illuminators
Cameras with AF-Assist Illuminators
The lens or lens hood may block the light from the camera AF-assist illuminator.
• For the latest information on using the lens with cameras that have built-in AF-assist
illuminators, visit the site below.
https://downloadcenter.nikonimglib.com/
Using the Lens on Cameras with a Built-in Flash
Using the Lens on Cameras with a Built-in Flash
Shadows will be visible in photos where light from the built-in fl ash is obscured by the
lens or lens hood. Remove the lens hood before shooting. Note, however, that depend-
ing on lens focal length and the distance to the subject, shadows may appear even
when the lens hood is removed.
• Shadows will be visible in photos taken when this lens is mounted on a Z 50.
• For the latest information on focal lengths and subject distances at which shadows
will not appear in photos taken with a built-in fl ash, visit the site below.
https://downloadcenter.nikonimglib.com/
Precautions for Use
Precautions for Use
• Do not pick up or hold the lens or camera using only the lens caps or lens hood.
• Keep the CPU contacts clean.
• Should the rubber lens-mount gasket be damaged, cease use immediately and take
the lens to a Nikon-authorized service center for repair.
• Replace the lens caps when the lens is not in use.
• Do not leave the lens in humid locations or in locations in which it may be exposed to
moisture. Rusting of the internal mechanism can cause irreparable damage.
• Do not leave the lens next to open fl ames or in other extremely hot locations. Ex-
treme heat could damage or warp the reinforced plastic exterior.
• Rapid changes in temperature may cause damaging condensation inside and outside
the lens. Before taking the lens from a warm to a cold environment or vice versa, place
it in a bag or plastic case to slow the change in temperature.
• We recommend that you place the lens in its case to protect it from scratches during transport.
Lens Care
Lens Care
• Removing dust is normally suffi cient to clean the glass surfaces of the lens.
• Smudges, fi ngerprints, and other oily stains can be removed from the lens surface us-
ing a soft, clean cotton cloth or third-party lens cleaning tissue lightly dampened with
a small amount of ethanol or lens cleaner. Wipe gently from the center outwards in a
circular motion, taking care not to leave smears or touch the lens with your fi ngers.
• Never use organic solvents such as paint thinner or benzene to clean the lens.
• Neutral Color (NC) fi lters (available separately) and the like can be used to protect the
front lens element.
• Do not store with naphtha or camphor moth balls or in direct sunlight. If the lens will not
be used for an extended period, store it in a cool, dry location to prevent mold and rust.
Accessories
Accessories
Supplied Accessories
Supplied Accessories
• LC-82B Lens Cap (front cap)
• LF-N1 Lens Cap (rear cap)
• HB-94 Lens Hood
• CL-C2 Lens Case
D
Using the Lens Case
• The case is intended to protect the lens from scratches, not from falls or other physical shocks.
• The case is not water resistant.
• The material used in the case may fade, bleed, stretch, shrink, or change color when rubbed or wet.
• Remove dust with a soft brush.
• Water and stains can be removed from the surface with a soft, dry cloth. Do not use alcohol, benzene, thinner,
or other volatile chemicals.
• Do not store in locations exposed to direct sunlight or high temperatures or humidity.
• Do not use the case to clean the monitor or lens elements.
• Be careful that the lens does not fall from the case during transport.
Material: Polyester
Compatible Accessories
Compatible Accessories
82 mm screw-on fi lters
D
Filters
• Use only one lter at a time.
• Remove the lens hood before attaching lters or rotating circular polarizing lters.
Speci cations
Speci cations
Mount
Mount Nikon Z mount
Focal length
Focal length 50 mm
Maximum aperture
Maximum aperture
f/1.2
Lens construction
Lens construction 17 elements in 15 groups (including 2 ED elements, 3 aspherical elements,
and elements with Nano Crystal and ARNEO coats)
Angle of view
Angle of view • FX format: 47°
• DX format: 31°
30’
Focusing system
Focusing system Internal focusing system
Minimum focus
Minimum focus
distance
distance
0.45 m (1.48 ft) from focal plane
Maximum reproduc-
Maximum reproduc-
tion ratio
tion ratio
0.15×
Diaphragm blades
Diaphragm blades 9 (rounded diaphragm opening)
Aperture range
Aperture range f/1.2 – 16
Filter-attachment size
Filter-attachment size 82 mm (P = 0.75 mm)
Dimensions
Dimensions Approx. 89.5 mm/3.6 in. maximum diameter × 150 mm/6 in.
(distance to end of lens from camera lens mount ange)
Weight
Weight Approx. 1090 g (2 lb 6.5 oz )
Nikon reserves the right to change the appearance, specifi cations, and performance of this
product at any time and without prior notice.
サービスとサポート
修理サービスのご案内
■
インターネットでのお申込み
ニコンイメージングジャパン修理センターで承ります。
下記のホームページからお申込みいただけます。
https://www.nikon-image.com/support/repair/
•
ニコン
ピックアップサービスで発送する場合
梱包資材のお届け・修理品のお引き取り、修理後のお届け・集金までをニコン指定の配送
業者(ヤマト運輸)が一括して代行するサービスです。全国一律の料金にて承ります(大
きさや重さには制限があり、取り扱いできない製品もあります)。
•
ご自身で発送する場合
インターネットでお申込みいただいた後、お客様ご自身で修理品を梱包し、修理センター
まで発送してください。
株式会社ニコンイメージングジャパン修理センター
〒
230-0052 横浜市鶴見区生麦 2-2-26 修理センターナビダイヤル 0570-02-8200
※ 修理センターでは、宅配便、郵送をお受けします。ご来所の方の受付はしておりません。
■
お電話でのお申込み
お電話でのお申込みの場合は、ニコンピックアップサービスをご利用いただけます。
ニコン ピックアップサービス専用 フリーダイヤル(ヤマト運輸にて承ります)
0120-02-8155
営業時間:9:30 〜 18:00(土曜日、日曜日、祝日、年末年始、夏期休業などを除く毎日)
※
上記フリーダイヤルは、ニコン指定の配送業者(ヤマト運輸)にて承ります。修理内容に
関するお問い合わせにはお答えできません。修理内容に関するお問い合わせは修理センター
へお願いいたします。
■
サービスセンターでのお手続き
ニコンプラザのサービスセンター窓口でお見積り・受付をいたします。
D
修理品をお預けいただく場合のご注意
•
ボディーキャップやレンズキャップが付属している製品の場合は、製品保護のため、装着して
お預けください。
•
修理に必要と思われるもの以外の付属品は、ご自身で保管ください。
•
カメラなどの修理では、受付や修理の過程で撮影データをやむを得ず消去する場合があります。
大切なデータは必ずバックアップをお取りください。
修理に関するお問い合わせ先
株式会社ニコンイメージングジャパン修理センター
修理センター ナビダイヤル
0570-02-8200
営業時間:9:30 〜 18:00 (土曜日、日曜日、祝日、年末年始、夏期休業などを除く毎日)
•
ナビダイヤルをご利用いただけない場合は、ニコンカスタマーサポートセンター
(03) 6702-0577
におかけください。
•
最新情報につきましては、下記のホームページをご覧ください。
https://www.nikon-image.com/support/repair/
ニコンプラザについて
ニコンプラザは、ショールーム、サービスセンター、ギャラリーを統合したニコン映像製品
の総合情報拠点です。
※
ニコンプラザサービスセンターでは持ち込み修理の受け付けも行っています。
ニコンプラザショールーム ナビダイヤル
0570-02-8080
ニコンプラザサービスセンター ナビダイヤル
0570-02-8060
•
音声ガイダンスにしたがってご利用ください。
•
ナビダイヤルをご利用いただけない場合は、ニコンカスタマーサポートセンター
(03) 6702-0577
におかけください。
ニコンプラザの所在地、営業時間などについては、下記 URL を
ご覧ください。
https://www.nikon-image.com/support/showroom/
製品の使い方に関するお問い合わせ先
■
インターネットでのお問い合わせ
https://www.nikon-image.com/support/contact/
■
お電話でのお問い合わせ
ニコン カスタマーサポートセンター ナビダイヤル
0570-02-8000
営業時間:9:30 〜 18:00(土曜日、日曜日、祝日、年末年始、夏期休業などを除く毎日)
•
ナビダイヤルをご利用いただけない場合は、ニコンカスタマーサポートセンター
(03) 6702-0577 におかけください。
•
ファクシミリは、(
03) 5977-7499 にお送りください。
•
最新情報につきましては、下記のホームページをご覧ください。
https://www.nikon-image.com/support/contact/
お問い合わせ時のお願い
•
おわかりになる範囲で「製品名」、「製品番号」、「ご購入日」、問題が発生した場合は「手順」、「現象
(表示されたメッセージ)」、「発生頻度」などをご確認のうえ、お問い合わせください。
ニコンイメージング会員「製品登録」のご案内
ニコンでは製品を安全に、安心してご使用いただくため「製品登録」へのご協力をお願いしてお
ります。ご登録いただいた製品に関するファームアップ情報や重要なお知らせなどをメールでご
案内いたします。
■
製品登録方法
製品は、「ニコンイメージング会員」(無料)の「製品登録」ページからご登録いただけます。
ニコンイメージング会員登録および製品登録は以下ニコンホームページからお手続きください。
ニコンイメージング会員のご案内
https://www.nikon-image.com/enjoy/membership/about/
■
ニコンイメージング会員とは
登録製品に関するサポート情報・ニコン製品情報や、お得で便利な会員特
典
※
などフォトライフをよりお楽しみいただくための会員サービスです。
※ 特典は登録製品ごとに異なります。
ご注意
•
ご登録にはメールアドレスとインターネットに接続できる環境が必要です。
•
登録製品の製品番号(製品本体および保証書に記載)が必要です。
•
特典の内容は、予告なく変更される場合があります。あらかじめご了承ください。
ニコンイメージングサポートページのご案内
https://www.nikon-image.com/support/
最新の製品テクニカル情報や、ソフトウェアのアップデート情報をご覧いただ
けます。
製品をより有効にご利用いただくために、定期的なアクセスをお
すすめします。
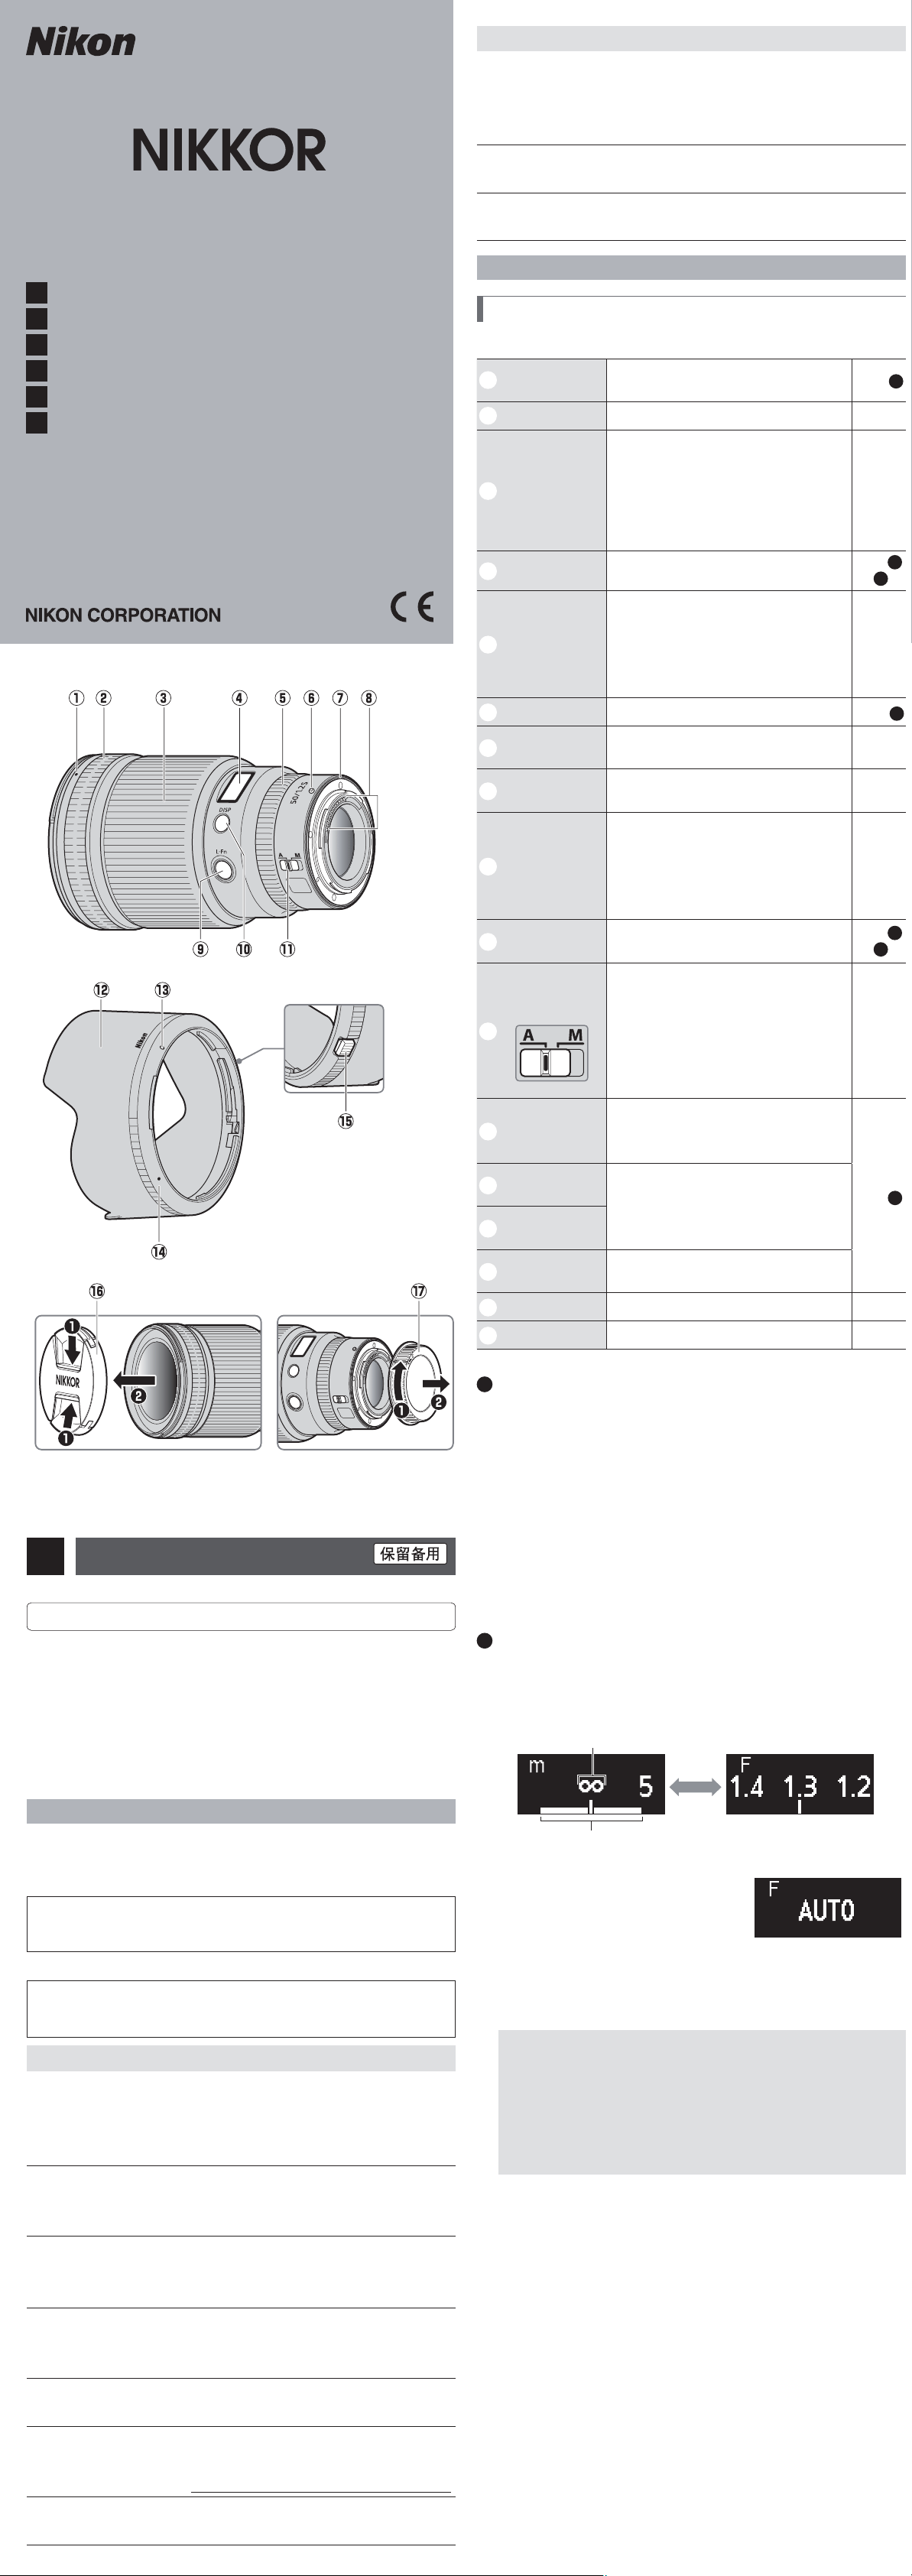
ДڳϔണႪᤌሇٍጣؠ٢
ඓ
ඓ
᪇хٍጣ
᪇хٍጣ
ണႪᤌ
ണႪᤌ
ᬢ
ᬢ
(Pb)
(Pb)
ໄ
ໄ
(Hg)
(Hg)
ᮘ
ᮘ
(Cd)
(Cd)
ԛцᭃ
ԛцᭃ
(Cr (VI))
(Cr (VI))
࠰࿁ᔌᘪ
࠰࿁ᔌᘪ
(PBB)
(PBB)
࠰࿁Ёᘪ
࠰࿁Ёᘪ
(PBDE)
(PBDE)
ࠤ
{{{{{{
സԈх
×
{{{{{
ԍࣣԈх
{{{{{{
ᆀ࣒Ԉх
×
{{{{{
ല៨ඨҗ௳
SJ/T
11364
ሇᠸࣽᒁցˊ
{
:
៨ዥᢜണႪᤌޗᢜ᪇хണަᤌൃಥϔሇ٢ަޗ
GB/T
26572
ᠸࣽሇᰊᠳຸмλˊ
:
៨ዥᢜണႪᤌᖭޗᢜ᪇хሇൺδަᤌൃಥϔሇ٢ᥑՠ
GB/T
26572
ᠸࣽሇᰊᠳຸˊѫƥмᄕണሇഴോхᠳҋၯሮ
സሮԟДڳࣶԘν٢ണκᨕണႪᤌ൚ϛޅᰯƥৰςκᨕДڳׇ٢ޗˏԟЃᆀພᆀ࣒ᡷࠩϔႯࣽണႪᤌҋᅶᰊցெл
2011
/
65
/EU
ːሇᣬԏᘲއϥԬˊ
©
2020 Nikon Corporation
Sc
ҋᅶᢪϷ
ҋᅶДڳ֏аᐷᯛᢱലҋᅶᢪϷˊ
ޗҋᅶലДڳ֏ƥаᐷᯛᢱലҋᅶᢪϷˊૣᨄ᱇ᠳඇᯛၯሮ
സᢪϷˊ
•
ലᮨ࠽ρҖണ
Z
ײحሇ߉תᆀሮസҋᅶˊ
•
ၯሮസފхഛಱᖭഡಱႝലˊҋᅶഛೇഭႝലƥၯሮസ
ظᕜುՋኵқ༻ᮨ࠽ςൺЌ֧ᕜظᕜುҋᅶˊၯሮസފх
ሇഡಱႝലظЭмλ
URL
ϔሇλϔᨆλˊ
https://downloadcenter.nikonimglib.com/
ࣴԘቹ
ࣴԘቹ
ϛᲒૣୈвОᨲୄОᦳћୈᤆД௬࠼ƥޗҋᅶ֏аᐷᯛ
ᢱǼࣴԘቹǽƥৰмኵሇಲҋᅶˊ
ޗᯛᢱϥَܐұᎫലҋᅶᢪϷƥмҤᰡඇᯛˊ
A
ᡚٴ
៨ዥǼണظᕜᨲୄОٽЏୈᤄћሇԬǽˊ
A
༉ଐ
៨ዥǼണظᕜᨲୄОٽᤄћୈᤆД௬࠼ሇԬǽˊ
ലᗩҋᅶмλތዥڔؿᩓࣳሇԬѸмթᏚˊ
F
៨ዥνԇᡲᨆሇϛ
ˊ
C
៨ዥᨆሇϛ
ˊ
A
ᡚٴ
E
ጂ
ஜᡊ
ժׅᖪஜᡊˉһᄮୈಅ᠆ˊ
ДڳᅽЃᥥᚽᎋؑݿᓨኞ௬ҋԬ᪇᱘ƥժׅ
ᡌዉ᱘᪇թˊ
ٞմᖮᡌᆀୈاћˊ
C
୭
ؤᄕДڳبၔˉԱ၌ୈؤՠၢڇᎋয়ƥ፞ֆ
ժಯၯሮസᆀྶˊ
ᘧಇчνᎫƥᖮ᥎ဟୈၒћˊ
F
ጂ
ժׅҋДڳາཱུྰˊ
ժׅᅶྰୡᡌዉДڳˊ
ٞմᖮᡌᆀୈ᥎ဟˊ
F
ጂ
ժׅޗണظᕜ᥎ဟˉႍှሇޡҋᅶˊ
ᘧޗണφၖພˉ໑ˉظႄપܢ᱆ᎋႄપພѱˉ
ᏝሇޡҋᅶДڳƥᖮႍှୈဟဨˊ
F
ጂ
ժׅᨦ᧼ᮨ࠽ርఉᠷሷ࠷ୈԢвԍˊ
ٞմᖮ࠼ୈᠺᠽ௬ћˊ
F
ጂ
ժׅޗࢬ৴ԅѦୡظؠϥࠨᨆұᎫˊ
ٞմᖮಉᰧୈاћˊᘧᢥٙᐷ᪇хƥѕᦳ
ѱᨲୄћˊηδଐٙԗحϔƥ፞ఉاכᅴᢂᆢˊ
G
ጂ
ޗᴱྛᄔࠏୈѭྛᄔࠏϔƥժׅርఉఉᡌДڳˊ
ٞմظᕜᖮၒћˉѭྛၒћୈՆћˊ
A
༉ଐ
F
ጂ
ժׅᮨ࠽࠷ୈԍˊ
ٞմണظᕜᔎԍƥҋԬ᪇᱃хኞ௬ୈᖮ᥎ဟˊᨆ
ᔽԍేƥҋ࠷ԊթӝጌᠺᡅˊᘧЦҋ࠷
ጬӝጌᠺᡅƥϴظᕜᖮ᥎ဟˊ
F
ጂ
ժׅಇᒳЃࠫ࠶ᯄሇᦹԬୈርԍλᎋᴱྛᄔࠏϔˊ
ٞմᖮಉᰧୈ᥎ဟˊ
F
ጂ
ժׅጥ֬ࣴ᠆ണၯሮസୈᮨ࠽ሇιᕫ൳ˊ
ٞմᖮಉᰧୈاћˊ
ҋᅶᮨ࠽
ҋᅶᮨ࠽
ᮨ࠽᪇хƳٍጣڔ֧ᕜ
ᮨ࠽᪇хƳٍጣڔ֧ᕜ
؝ᯛലᲃᱤস᧵ሇތ៨ˊ
q
ᮨ࠽ᩑԍᒱࣴ
᠆ඓᡫ
ࣴ᠆ᮨ࠽ᩑԍᒱҋᅶˊ
؝ᯛ
D
w
เᕘୡ൸
—
Ǹ
e
ၢᄔ
ᅶЃୡ֬ၢˊ
•
ҋᅶᖪ֬ၢᨆၢƥૣظ
ᨭ᧼ᦾၢᄔৰٌפைઉᯀ
ಇைᬋୡ֬ᢹಜၢ ƴၢَƥ
ࣶԘைλઉᯀಇைᬋظᨆ
ేˊ
Ǹ
r
ᮨ࠽Ҵૉᱤ൙
ඇሷၢᥭጌˉ྄ڔԢвҴૉˊ
؝ᯛ
B
,
C
t
ఊցᄔ
ᦾظᢹಜҋᅶၯሮസெࣽሇ
[
ԍ
ޑ
]
ୈ
[
കԍ៧ӧ
]
ᎋᡷࣽˊണԟᢝ
ᐷҴૉƥ؝ᯛၯሮസᢪϷϔ
[
ᖪ
ࣽϤఊց֧ᕜ
]
ˉ
[
ᖪࣽϤఊց
]
ୈ
[
ᖪࣽϤఊցơేƢ
]
ሇሮԟᢪˊ
Ǹ
y
ᮨ࠽ࣴ᠆ඓᡫ
ᮨ࠽ࣴ᠆ᖭၯሮസҋᅶˊ
؝ᯛ
A
u
ᮨ࠽ײحเᕘߖ
ޑ
ǸǸ
i
CPU
ఉဿ
ᅶЃಚ௳љᖭၯሮസୈЭၯሮ
സϔљಚ௳ˊ
Ǹ
o
L-Fn
ைᬋ
ைλظ୭ҋᅶၯሮസெࣽሇ֧
ᕜˊണԟᢝᐷҴૉƥ؝ᯛၯሮസ
ᢪϷϔ
[
ᖪࣽϤఊց֧ᕜ
]
ˉ
[
ᖪࣽ
Ϥఊց
]
ୈ
[
ᖪࣽϤఊցơేƢ
]
ሇሮԟᢪˊ
Ǹ
!0
೪ዥைᬋ
ұࣘᡷࣽୈᨢஶᮨ࠽Ҵૉᱤ൙ϔ
ዥሇҴૉˊ
؝ᯛ
B
,
C
!1
ၢาժ௮
ݥ
ᨢஶၢาˊ
• A
:
ᖪ֬ၢ
• M
:
ୡ֬ၢ
༉ଐƥುᡴᨢஶϽѲጕᡷࣽƥ
ҋᅶၯሮസఊցᨢஶϽୡ֬ၢา
ƥၢୡ֬ᨆᢹಜˊ
Ǹ
!2
ᮨ࠽ᩑԍᒱ
ᮨ࠽ᩑԍᒱظظᕜᖮ഻ԍୈ
ᵃሇಖԍᐰˊ࣯рᨄظᅶЃұ
ᮨ࠽ˊ
؝ᯛ
D
!3
ᮨ࠽ᩑԍᒱ᭗
ࣽඓᡫ
ࣴ᠆ᮨ࠽ᩑԍᒱҋᅶˊ
!4
ᮨ࠽ᩑԍᒱ
Ḍඓᡫ
!5
ᮨ࠽ᩑԍᒱ᭗
ࣽᡊᰑைᬋ
ئλᮨ࠽ᩑԍᒱҋᅶˊ
!6
ᮨ࠽ሣơ֏ሣƢ
ǸǸ
!7
ᮨ࠽ሣơَሣƢ
ǸǸ
A
ࣴ᠆ξئλ
ࣴ᠆ξئλ
ࣴ᠆ᮨ࠽
z
ԟᯄၯሮസƥئλസᦳሣƥၦَئλᮨ࠽َሣˊ
x
ᮨ࠽κሇࣴ᠆ඓᡫξၯሮസസᦳκሇࣴ᠆ඓᡫḌƥٌ
ᮨ࠽ᒳЃၯሮസസᦳκƥၦَᨡᦾᮨ࠽ርᖭԢ
ײԗኵѬᒳؤՠڙܭࠣˊ
ئλᮨ࠽
z
ԟᯄၯሮസˊ
x
ைѮᮨ࠽ಇைᬋৰٌᲈᦾᮨ࠽ˊ
B
ᮨ࠽Ҵૉᱤ൙
ᮨ࠽Ҵૉᱤ൙
ᮨ࠽ࣴ᠆ЃၯሮസςၯሮസࠨЃ٦Ⴡઔƥᮨ࠽Ҵૉᱤ
൙ѕဿКˊ
•
ைλᮨ࠽೪ዥைᬋظλዥᄔ೪ዥ Ƴ
ԍޑ
2
྄
1
ၢᥭጌ
1
ၯሮസޗา
A
ୈ
M
λ೪ዥ྄ˊ
2
ЦၯሮസࠨЃา
A
ୈ
M
ԍޑୣ
ѕ೪ዥˊԢвาሇ೪ዥތዥˊ
•
ᨭ᧼ၢาժ௮ݥᨢஶϽၢาơ
AF
ୈ
MF
Ƣƥѕቾ
ഄ೪ዥၢาˊ
•
ၯሮസസࣽݥᯋᓯୈ࠵ᐛ
10
രᨆᮨ࠽౯Ѹ
ƥᱤ൙ѕᖪ֬ԟᯄˊைλ೪ዥைᬋظಱဌ༰೪ዥˊ
A
ᮨ࠽Ҵૉᱤ൙
ᮨ࠽Ҵૉᱤ൙ϔዥሇၢᥭጌˉ྄ڔԢвҴૉЦϛᨀѨӖˊ
A
νᠸմಖ
ҋᅶᴱᨱઉᯀڔ
/
ୈ࠵ԍޑƥૣظᕜѕ༉ଐտಖჁν
ᠸմˊᨭ᧼ᨢஶ᧔ѭሇઉᯀᨱڔ
/
ୈ᧔ᴱሇ
f
ӖظмՐ
ᨅጕڻˊ
C
ᱤ൙ᨢᲇ
ᱤ൙ᨢᲇ
ைၯмλᴞظЭᏘơ
m
Ƣୈᘫơ
ft
Ƣϔᨢஶၢᥭጌሇת
Ѭୈᓥᢹಜᮨ࠽Ҵૉᱤ൙ሇКˊ
z
ைѮ೪ዥைᬋඇሷᡷࣽˊ
•
২ϔ೪ዥתѬୈКᨢஶᨢᲇˊ֏ᨢᲇѕᯂ
၄ˊ
•
ைλ೪ዥைᬋظժ௮೪ዥˊ
תѬ К
x
ҋᅶᮨ࠽ఊցᄔᨢஶδϑᡷࣽˊ
תѬ
-
ᦾఊցᄔظЭᏘơ
m
Ƣୈᘫ
ơ
ft
Ƣϔᨆᨢஶˊ
К
-
ബǼ
+
ǽơഛКƢୈǼ
–
ǽơഛഊƢ
ಲّᦾఊցᄔˊ
-
ЭКሇ
6
ϑᐜռϔᨆᨢஶˊ
-
ᘧᠳԟᯄᮨ࠽Ҵૉᱤ൙ƥബǼ
–
ǽ
ಲّᦾఊցᄔርᖭ ތඓبϛ
ˊ
•
ைλ೪ዥைᬋظұࣘഛಅৰժ௮೪ዥˊ
•
ᘧ࠵ᐛ
5
രҋᅶᮨ࠽ఊց୭чѲ౯Ѹƥᱤ൙ᨢᲇ
Э೪ዥϔཔ࠼ˊണഛಅό࠼ˊ
c
ைѮ೪ዥைᬋᨂݽᮨ࠽Ҵૉᱤ൙ˊ
•
Кᨢϛ
ѕԟᯄᮨ࠽Ҵૉᱤ൙ˊᘧᠳ๐٦೪ዥƥ
ைѮ೪ዥைᬋˊ
D
ࣴ᠆ڔئλᮨ࠽ᩑԍᒱ
ࣴ᠆ڔئλᮨ࠽ᩑԍᒱ
ࣴ᠆ᮨ࠽ᩑԍᒱ
•
ᮨ࠽ᩑԍᒱࣴ᠆ඓᡫξᮨ࠽ᩑԍᒱḌඓᡫơ
q
ƢḌƥ
ၦَᦾᮨ࠽ᩑԍᒱơ
w
Ƣርᖭࣴ᠆ඓᡫξᮨ࠽ᩑԍᒱ᭗ࣽ
ඓᡫơ
e
ƢḌˊ
ᮨ࠽ᩑԍᒱ᭗ࣽඓᡫ
ᮨ࠽ᩑԍᒱḌඓᡫ
ᮨ࠽ᩑԍᒱࣴ᠆ඓᡫ
•
ᮨ࠽ᩑԍᒱ֏᪇త࠷ᐈѕҋԢᰯмࣴ᠆ୈئλˊᦾᮨ
࠽ᩑԍᒱƥޗԢ᪇ሇᮨ࠽ᩑԍᒱḌඓᡫơ˃Ƣᰁᨀ
ԢతѮˊ
•
νҋᅶƥظᮨ࠽ᩑԍᒱأᦾৰފࣽޗᮨ࠽κˊ
ئλᮨ࠽ᩑԍᒱ
•
ைѮᮨ࠽ᩑԍᒱ᭗ࣽᡊᰑைᬋơ
q
Ƣƥٌைၯތዥಲّ
ᦾᮨ࠽ᩑԍᒱơ
w
ƢƥၦَЭᮨ࠽Ԣئλơ
e
Ƣˊ
ᮨ࠽ᩑԍᒱ᭗ࣽᡊᰑைᬋ
•
ᮨ࠽ᩑԍᒱأᦾފࣽЃᮨ࠽ظмҋᅶሮٌᴞˊ
ࣴ᠆ᮨ࠽َ
ࣴ᠆ᮨ࠽َ
ᘧૣޗၢَԟᯄၯሮസৰಱ٦ƥၢѬᒳظᕜѕؤᅴಅ
بˊᘧૣޗᎋేᣳՠᄕഭᯋীၢЃᲒᨢѬᒳƥᡩૣޗ
ၯႜే֏νᠳԟᯄၯሮസˊ
AF
᧖֭ၯݥሇၯሮസ
AF
᧖֭ၯݥሇၯሮസ
ᮨ࠽ୈᮨ࠽ᩑԍᒱظᕜѕᩑൌᖪၯሮസ
AF
᧖֭ၯݥሇԍᐰˊ
•
ണԟޗണԬᒳ
AF
᧖֭ၯݥሇၯሮസκҋᅶᮨ࠽ሇഡಱҴ
ૉƥᡸᯅмλᒧ፠ˊ
https://downloadcenter.nikonimglib.com/
ޗࠩԬᒳᯂԍဢሇၯሮസκҋᅶᮨ࠽
ޗࠩԬᒳᯂԍဢሇၯሮസκҋᅶᮨ࠽
Ԭᒳᯂԍဢؤՠሇԍᐰᮨ࠽ୈᮨ࠽ᩑԍᒱᩑƥၯႜ
ϔѕՠᄕˊޗే֏ئλᮨ࠽ᩑԍᒱˊѫ༉ଐƥට
௳ᮨ࠽ၢᥭڔξేᣳϥᯋᥭጌሇνٌƥҋئλᮨ࠽ᩑԍᒱ
ϴظᕜѕՠᄕˊ
•
ᮨ࠽ࣴ᠆Ѓ
Z
50
ƥၯႜϔѕՠᄕˊ
•
ണԟҋᅶԬᒳᯂԍဢၯႜϔνѕՠᄕሇၢᥭڔే
ᣳᥭጌሇഡಱҴૉƥᡸᯅмλᒧ፠ˊ
https://downloadcenter.nikonimglib.com/
Sc
ҋᅶᢪϷ
Es
Manual del usuario
Kr
사용설명서
Jp
使用説明書
En
User’s Manual
Fr
Manuel d’utilisation
NIKKOR Z 50mm f/1.2 S
Kr
사용설명서
이 제품을 사용하기 전에 본 지침을 주의해서 읽으십시오. 카메라 설명서도 참조해야 합니다.
• 이 렌즈는 Nikon Z 마운트가 장착된 미러리스 카메라 전용입니다.
• 카메라 펌웨어를 최신 버전으로 업데이트하십시오. 이전 버전에서는 카메라가 렌즈를
올바르게 감지하지 못해 기능 일부를 사용하지 못하는 경우가 있었습니다. 아래 URL의
Nikon 다운로드 센터에서 최신 버전의 카메라 펌웨어를 다운로드할 수 있습니다.
https://downloadcenter.nikonimglib.com/
안전상의 주의
안전상의 주의
제품이 손상되거나 사용자나 타인이 상해를 입지 않도록 제품을 사용하기 전에 “안전상의 주의”에 나와
있는 모든 내용을 읽으십시오.
안전 지침은 모든 사용자가 읽을 수 있는 곳에 보관하십시오.
A 경고: 이 아이콘이 표시된 주의사항을 지키지 않을 경우 사망이나 심각한 상해를 입을 수
있습니다.
A 주의: 이 아이콘이 표시된 주의사항을 지키지 않을 경우 상해를 입거나 제품이 손상될 수
있습니다.
A
A
경고
경고
•
•
이 제품을 분해하거나 개조하지 마십시오.
이 제품을 분해하거나 개조하지 마십시오.
떨어뜨리거나 다른 사고로 인해 노출된 내부를 만지지 마십시오.
떨어뜨리거나 다른 사고로 인해 노출된 내부를 만지지 마십시오.
이 주의사항을 지키지 않으면 감전이나 다른 상해를 입을 수 있습니다.
•
•
제품에서 연기가 나거나 제품이 뜨겁거나 이상한 냄새가 나는 등 이상 징후가 발견되면
제품에서 연기가 나거나 제품이 뜨겁거나 이상한 냄새가 나는 등 이상 징후가 발견되면
카메라 전원을 즉시 분리하십시오.
카메라 전원을 즉시 분리하십시오.
계속 사용할 경우 화재가 발생하거나 화상 또는 다른 상해를 입을 수 있습니다.
•
•
건조한 곳에 보관하십시오.
건조한 곳에 보관하십시오.
젖은 손으로 만지지 마십시오.
젖은 손으로 만지지 마십시오.
이 주의사항을 지키지 않으면 화재가 발생하거나 감전될 수 있습니다.
•
•
프로판, 가솔린, 에어로졸과 같은 가연성 가스 또는 분진이 있을 경우에는 제품을 사용하지
프로판, 가솔린, 에어로졸과 같은 가연성 가스 또는 분진이 있을 경우에는 제품을 사용하지
마십시오.
마십시오.
이 주의사항을 지키지 않으면 폭발이나 화재가 발생할 수 있습니다.
•
•
렌즈를 통해 태양이나 다른 밝은 광원을 직접 쳐다보지 마십시오.
렌즈를 통해 태양이나 다른 밝은 광원을 직접 쳐다보지 마십시오.
이 주의사항을 지키지 않으면 시력이 손상될 수 있습니다.
•
•
어린이의 손이 닿지 않는 곳에 두십시오.
어린이의 손이 닿지 않는 곳에 두십시오.
이 주의사항을 지키지 않으면 상해를 입거나 제품이 고장 날 수 있습니다.
또한 작은 부품을 잘못 삼키면 질식될 위험이 있습니다. 어린이가 부품을 삼켰을 경우 즉시
응급 처치를 해야 합니다.
•
•
극고온이나 극저온 장소에서는 맨손으로 만지지 마십시오.
극고온이나 극저온 장소에서는 맨손으로 만지지 마십시오.
이 주의사항을 지키지 않으면 화상이나 동상을 입을 수 있습니다.
A
A
주의
주의
•
•
렌즈를 태양이나 다른 강한 광원을 향하게 두지 마십시오.
렌즈를 태양이나 다른 강한 광원을 향하게 두지 마십시오.
렌즈를 통해 초점에 모아진 빛으로 화재가 발생하거나 제품 내부가 손상될 수 있습니다. 역광을 받는
피사체를 촬영할 때는 태양을 프레임에서 충분히 멀리 떨어뜨려 두십시오. 태양이 프레임 가까이에 있을
경우 태양광이 카메라 내부에 초점을 형성해 화재가 발생할 수 있습니다.
•
•
밀폐된 자동차나 직사광선이 비치는 곳과 같이 온도가 매우 높은 장소에 장시간 제품을
밀폐된 자동차나 직사광선이 비치는 곳과 같이 온도가 매우 높은 장소에 장시간 제품을
노출하지 마십시오.
노출하지 마십시오.
이 주의사항을 지키지 않으면 화재가 발생하거나 제품이 고장 날 수 있습니다.
•
•
삼각대 또는 유사한 액세서리가 설치된 상태에서 카메라 또는 렌즈를 이동하지 마십시오.
삼각대 또는 유사한 액세서리가 설치된 상태에서 카메라 또는 렌즈를 이동하지 마십시오.
이 주의사항을 지키지 않으면 상해를 입거나 제품이 고장 날 수 있습니다.
렌즈 사용하기
렌즈 사용하기
렌즈의 부품: 이름 및 기능
렌즈의 부품: 이름 및 기능
이 시트의 왼쪽 가장자리에 있는 그림을 참조하십시오.
q
렌즈 후드 장착 마크 렌즈 후드를 부착할 때 사용합니다.
D
참조
w
고무 그립 ——
e
초점 링
수동 초점용으로 사용하십시오.
• 자동 초점을 사용하여 초점을 맞출 때 셔터 버튼을
반누름한 상태에서 링을 회전시키면 수동으로
초점을 조정할 수 있습니다. 초점을 조정한
후에는 셔터 버튼을 완전히 눌러 촬영합니다.
—
r
렌즈 정보 패널 초점 거리, 피사계 심도 및 기타 정보를 확인합니다.
B
,
C
참조
t
조절 링
카메라를 사용하여 할당된 [조리개] 또는 [노출
보정]과 같은 설정을 조정하려면 돌립니다. 자세한
내용은 카메라 설명서의 [사용자 정의 제어 설정], [
사용자 제어 설정] 또는 [사용자 제어 설정(촬영)]의
설명을 참조하십시오.
—
y
렌즈 장착 마크 렌즈를 카메라에 장착할 때 사용합니다.
A
참조
u
렌즈 장착 고무
가스켓
——
i
CPU 접촉부 카메라와 데이터를 주고 받는 데 사용됩니다. —
o
L-Fn 버튼
카메라를 사용하여 할당된 기능을 수행하려면
누릅니다. 자세한 내용은 카메라 설명서의 [사용자
정의 제어 설정], [사용자 제어 설정] 또는 [사용자
제어 설정(촬영)]의 설명을 참조하십시오.
—
!0
표시전환 버튼
설정을 저장하거나 렌즈 정보 표시에 표시된 정보를
선택합니다.
B
,
C
참조
!1
초점 모드 스위치
초점 모드를 선택하십시오.
• A: 자동 초점
• M: 수동 초점
선택한 설정에 관계없이 카메라 컨트롤을 사용하여
수동 초점 모드를 선택했다면 초점을 수동으로
조정해야 합니다.
—
!2
렌즈 후드
렌즈 후드는 플레어나 고스트 현상을 초래할 우려가 있는
미광을 차단합니다. 렌즈를 보호하는 역할도 합니다.
D
참조
!3
렌즈 후드 잠금 마크
렌즈 후드를 부착할 때 사용합니다.
!4
렌즈 후드 정렬 마크
!5
렌즈 후드 잠금 해제 버튼
렌즈 후드를 제거할 때 사용합니다.
!6
렌즈 캡 (앞캡) ——
!7
렌즈 캡 (뒷캡) ——
A
부착 및 제거
부착 및 제거
렌즈 장착
z
카메라의 전원을 끄고 바디 캡을 제거한 다음 렌즈 뒷 커버를 분리합니다.
x
렌즈의 장착 마크와 카메라 본체의 장착 마크가 일치되도록 카메라 본체에서의 렌즈
위치를 조정합니다. 그런 다음 렌즈가 딸깍 소리를 내며 제자리에 들어갈 때까지 시계
반대 방향으로 돌려줍니다.
렌즈 제거
z
카메라 전원을 끕니다.
x
렌즈 릴리즈 버튼을 계속 누른 상태로 렌즈를 시계 방향으로 돌립니다.
B
렌즈 정보 패널
렌즈 정보 패널
렌즈를 카메라에 연결하고 카메라를 켜면 렌즈 정보 패널이 켜집니다.
• 그림과 같이 렌즈 표시전환 버튼을 눌러 디스플레이를 순환합니다.
조리개
2
피사계 심도
1
초점 거리
1 카메라가
A
또는
M
모드에 있으면 피사계 심도가 표시됩니다.
2 조리개는 카메라가
A
또는
M
모드일 때만
표시됩니다. 다른 모드의 디스플레이가 그림에
표시됩니다.
• 초점 모드 스위치를 사용하도록 선택하면 초점 모드(AF 또는 MF)가 잠시 표시됩니다.
• 카메라 대기 타이머가 만료되거나 약 10초 동안 렌즈가 작동되지 않으면 패널이
자동으로 꺼집니다. 디스플레이를 다시 활성화하려면 표시전환 버튼을 누르십시오.
A
렌즈 정보 패널
렌즈 정보 패널에 표시된 초점 거리, 피사계 심도 및 기타 정보는 근사치일 뿐입니다.
A
불규칙 보케
고속 셔터 속도 및/또는 넓은 조리개를 사용하면 보케 형태의 불규칙성을 발견할 수
있습니다. 느린 셔터 속도 및/또는 높은 조리개 값을 선택하면 효과를 완화할 수 있습니다.
C
패널 옵션
패널 옵션
아래 단계를 따라 미터(m) 또는 피트(ft)에서 초점 거리 단위를 선택하거나 렌즈 정보 패널
밝기를 조정하십시오.
z
설정을 보려면 표시전환 버튼을 길게 누르십시오.
• 단위 또는 밝기 선택 옵션이 표시됩니다. 현재 선택된 항목이 깜박입니다.
• 디스플레이 사이를 전환하려면 표시전환 버튼을 누르십시오.
단위 밝기
x
렌즈 조절 링을 사용하여 설정을 선택하십시오.
단위
- 미터(m) 또는 피트(ft)에서 선택하려면 조절
링을 회전하십시오.
밝기
- “+”(밝게) 또는 “-”(어둡게) 방향으로 조절
링을 회전하십시오.
- 6 레벨의 밝기에서 선택하십시오.
- 렌즈 정보 패널을 끄려면 “-” 방향의 링이
아이콘에서
아이콘으로 변경될 때까지
회전하십시오.
• 변경 사항을 저장하고 디스플레이를 전환하려면 표시전환 버튼을 누르십시오.
• 렌즈 컨트롤을 사용하여 약 5초 동안 아무 작업도 수행하지 않으면
디스플레이에서 패널 옵션이 사라집니다. 모든 변경 사항이 손실됩니다.
c
렌즈 표시로 되돌아가려면 표시전환 버튼을 길게 누르십시오.
• 밝기에 대해
을 선택하면 렌즈 정보 패널이 꺼집니다. 디스플레이를 다시 켜려면
표시전환 버튼을 길게 누르십시오.
D
렌즈 후드 부착 및 제거
렌즈 후드 부착 및 제거
렌즈 후드 연결
• 렌즈 후드 장착 마크를 렌즈 후드 정렬 마크(
q
)에 맞춘 다음 장착 마크가 렌즈 후드 잠금
마크(
e
)와 정렬될 때까지 렌즈 후드(
w
)를 돌립니다.
렌즈 후드 잠금 마크
렌즈 후드 정렬 마크
렌즈 후드 장착 마크
• 전면을 너무 세게 잡으면 렌즈 후드를 부착하거나 제거하기가 어렵습니다. 렌즈 후드를
회전시킬 때는 베이스에서 렌즈 후드 정렬 마크(●) 주변을 잡으십시오.
• 사용하지 않을 때는 렌즈 후드를 뒤집어 렌즈에 장착할 수 있습니다.
렌즈 후드 분리
• 렌즈 후드 잠금 해제 버튼을 누른 상태에서(
q
) 렌즈 후드를 표시된 방향으로 돌리고
(
w
) 렌즈에서 제거합니다(
e
).
렌즈 후드 잠금 해제 버튼
• 렌즈 후드가 뒤집을 때 동일한 절차를 사용할 수 있습니다.
렌즈가 부착된 경우
렌즈가 부착된 경우
초점을 맞춘 후 카메라 를 껐다가 다시 켜면 초점 위치가 변경될 수 있습니다. 피사체가 나타나기를
기다리면서 미리 선택한 위치에 초점을 맞춰뒀다면 화상을 촬영하기 전까지는 카메라를 끄지
않는 것이 좋습니다.
AF 보조광이 장착된 카메라
AF 보조광이 장착된 카메라
렌즈 또는 렌즈 후드가 카메라 AF 보조광의 빛을 차단할 수 있습니다.
• AF 보조광이 내장된 카메라에서 렌즈를 사용하는 방법에 대한 최신 정보는 아래 사이트를
참조하십시오.
https://downloadcenter.nikonimglib.com/
내장 플래시가 장착된 카메라에서 렌즈 사용
내장 플래시가 장착된 카메라에서 렌즈 사용
내장 플래시의 빛이 렌즈 또는 렌즈 후드로 가려진 사진에는 그림자가 나타납니다. 촬영하기
전에 렌즈 후드를 제거하십시오. 그러나 렌즈 초점 거리와 피사체와의 거리에 따라 렌즈 후드를
제거하더라도 그림자가 나타날 수 있습니다.
• 이 렌즈를 Z 50에 장착하면 촬영한 사진에 그림자가 나타납니다.
• 내장 플래시로 촬영한 사진에 그림자가 나타나지 않는 초점 거리 및 피사체 거리에 대한 최신
정보는 아래 사이트를 참조하십시오.
https://downloadcenter.nikonimglib.com/
사용 시 주의사항
사용 시 주의사항
• 렌즈 캡이나 렌즈 후드만 사용하여 렌즈 또는 카메라를 들거나 잡지 마십시오.
• CPU 접촉부를 깨끗하게 유지하십시오.
• 렌즈 장착 고무 가스켓이 손상된 경우에는 즉시 사용을 중단하고 니콘 서비스 지정점에 렌즈
수리를 의뢰하여 주십시오.
• 렌즈를 사용하지 않을 때는 렌즈 캡을 닫으십시오.
• 습한 장소나 수분에 노출될 수 있는 곳에 렌즈를 두지 마십시오. 내부 장치에 녹이 슬면
복구가 불가능한 손상을 입을 수 있습니다.
• 렌즈를 불 옆이나 기타 매우 뜨거운 장소에 두지 마십시오. 열이 심하게 발생할 경우 강화
플라스틱 외관이 손상되거나 뒤틀릴 수 있습니다.
• 온도가 급격히 변하면 렌즈 내부와 외부에 결로 현상이 발생할 수 있습니다.
따뜻한 곳에서 추운 장소로 또는 그 반대로 렌즈를 옮기기 전에 가방이나 플라스틱 케이스에
넣어 온도 변화를 늦추십시오.
• 렌즈에 흠집이 생기지 않도록 렌즈를 케이스에 넣어 운반하는 것이 좋습니다.
렌즈 관리
렌즈 관리
• 일반적으로 렌즈의 유리면을 청소할 경우 먼지만 제거하면 됩니다.
• 얼룩, 지문 및 기타 유성 얼룩은 부드럽고 깨끗한 면직물 또는 소량의 에탄올이나 렌즈
클리너를 살짝 적신 타사 렌즈 청소용 티슈를 사용하여 렌즈 표면에서 제거할 수 있습니다.
손가락으로 렌즈를 만지지 않도록 주의하면서 스미어가 남지 않도록 중심에서 바깥쪽으로
부드럽게 닦아줍니다.
• 절대로 페인트 시너나 벤젠과 같은 유기용제를 사용하여 렌즈를 닦지 마십시오.
• 뉴트럴 컬러(NC) 필터(별매) 등을 사용하여 전면 렌즈를 보호합니다.
• 나프타나 캠퍼 제충제 또는 직사광선에 보관하지 마십시오. 렌즈를 장기간 사용하지 않을
경우 곰팡이와 녹을 방지하기 위해 서늘하고 건조한 곳에 보관하십시오.
액세서리
액세서리
제공되는 액세서리
제공되는 액세서리
• 렌즈 캡 LC-82B (앞캡)
• 렌즈 캡 LF-N1 (뒷캡)
• 렌즈 후드 HB-94
• 소프트 렌즈 케이스 CL-C2
D
소프트 렌즈 케이스 사용
• 이 케이스는 렌즈에 흠집이 나지 않도록 보호하기 위한 것으로 떨어뜨리거나 다른 물리적인
충격으로부터 보호하기 위한 용도는 아닙니다.
• 이 케이스는 방수가 되지 않습니다.
• 케이스에 사용된 재료는 문지르거나 젖은 상태일 때 색이 바래거나, 흘러내리거나,
늘어나거나, 수축되거나, 변색될 수 있습니다.
• 먼지는 부드러운 솔을 이용해 제거하십시오.
• 부드럽고 마른 천으로 표면에 묻은 물기나 얼룩을 닦아줍니다. 알코올, 벤젠, 시너 또는 기타
휘발성 화학 물질은 사용하지 마십시오.
• 직사광선이나 고온 다습한 장소에 보관하지 마십시오.
• 케이스를 사용하여 모니터 또는 렌즈 구성을 닦지 마십시오.
• 운반 중에 렌즈가 케이스에서 빠지지 않도록 주의하십시오.
소재: 폴리에스테르
호환 액세서리
호환 액세서리
82mm 스크류식 필터
D
필터
• 필터는 한 번에 한 개씩만 사용하십시오.
• 필터를 부착하거나 원편광 필터를 돌리려면 먼저 렌즈 후드를 제거하십시오.
사양
사양
마운트
마운트
Nikon Z 마운트
초점 거리
초점 거리 50mm
최대 조리개값
최대 조리개값 f/1.2
렌즈 구성
렌즈 구성 15
군
17
매(ED 렌즈 2매, 비구면 렌즈 3매, Nano Crystal 및 ARNEO
코트 렌즈 포함)
화각
화각 • FX 포맷: 47°
• DX 포맷: 31° 30’
포커싱 시스템
포커싱 시스템 IF 방식
최단 초점 거리
최단 초점 거리 초점면에서 0.45m
최대 촬영 배율
최대 촬영 배율 0.15×
조리개 날
조리개 날 9매(원형 조리개)
조리개 범위
조리개 범위 f/1.2 ~ 16
필터 부착 크기
필터 부착 크기 82mm(P = 0.75mm)
크기
크기
최대 직경 약
89.5
mm×150mm(카메라 렌즈 장착면에서 렌즈 끝까지의
거리)
무게
무게 약 1090g
Nikon은 언제든지 예고 없이 제품의 외관, 사양, 성능을 변경할 수 있습니다.
Es
Manual del usuario
Antes de utilizar este producto, lea atentamente estas instrucciones. También tendrá que consultar el manual de la cámara.
• Este objetivo ha sido diseñado exclusivamente para su uso con cámaras mirrorless con montura Z de Nikon.
• Actualice el fi rmware de la cámara a la versión más reciente. Con las versiones anteriores, es posible que la cámara
no detecte correctamente el objetivo y que algunas funciones no estén disponibles. La versión más reciente del
fi rmware de la cámara se puede descargar desde el Centro de descargas de Nikon en la siguiente URL.
https://downloadcenter.nikonimglib.com/
Por su seguridad
Por su seguridad
Para evitar daños materiales, sufrir lesiones o lesionar a terceros, lea completamente “Por su seguridad”
antes de usar este producto.
Guarde estas instrucciones de seguridad en un lugar en el que todos los que usen el producto puedan leerlas.
A ADVERTENCIA: No respetar las precauciones marcadas con este icono puede causar lesiones
graves o mortales.
A PRECAUCIÓN: No respetar las precauciones marcadas con este icono puede causar lesiones o
daños materiales.
A
A
ADVERTENCIA
ADVERTENCIA
•
•
No desmonte ni modifi que este producto.
No desmonte ni modifi que este producto.
No toque las piezas internas que puedan quedar expuestas como resultado de una caída
No toque las piezas internas que puedan quedar expuestas como resultado de una caída
u otro accidente.
u otro accidente.
No respetar estas precauciones puede causar descargas eléctricas u otras lesiones.
•
•
Si nota anomalías en el producto, como por ejemplo la emisión de humo, calor u olores inusuales,
Si nota anomalías en el producto, como por ejemplo la emisión de humo, calor u olores inusuales,
desconecte inmediatamente la fuente de alimentación de la cámara.
desconecte inmediatamente la fuente de alimentación de la cámara.
Continuar usando el producto podría causar incendios, quemaduras u otras lesiones.
•
•
Mantener seco.
Mantener seco.
No manipular con las manos mojadas.
No manipular con las manos mojadas.
No respetar estas precauciones puede causar incendios o descargas eléctricas.
•
•
No use este producto en presencia de polvo o gas infl amable, como por ejemplo propano,
No use este producto en presencia de polvo o gas infl amable, como por ejemplo propano,
gasolina o aerosoles.
gasolina o aerosoles.
No respetar esta precaución puede causar explosiones o incendios.
•
•
No mire directamente al sol o a otra fuente de luz brillante a través del objetivo.
No mire directamente al sol o a otra fuente de luz brillante a través del objetivo.
No respetar esta precaución puede causar discapacidad visual.
•
•
Mantenga este producto alejado de los niños.
Mantenga este producto alejado de los niños.
No respetar esta precaución puede causar lesiones o funcionamientos incorrectos del producto.
Además, tenga en cuenta que las piezas pequeñas pueden presentar riesgos de asfi xia. Si un niño
ingiere cualquier pieza de este producto, solicite asistencia médica inmediatamente.
•
•
No manipular con las manos descubiertas en zonas expuestas a temperaturas extremadamente altas o bajas.
No manipular con las manos descubiertas en zonas expuestas a temperaturas extremadamente altas o bajas.
No respetar esta precaución puede causar quemaduras o congelación.
A
A
PRECAUCIÓN
PRECAUCIÓN
•
•
No deje el objetivo apuntando hacia el sol ni hacia otras fuentes de luz intensa.
No deje el objetivo apuntando hacia el sol ni hacia otras fuentes de luz intensa.
La luz enfocada a través del objetivo puede causar incendios o dañar las piezas internas del
producto. Al disparar en condiciones de contraluz, mantenga el sol alejado del encuadre. La luz del
sol enfocada en la cámara cuando el sol está cerca del encuadre puede causar un incendio.
•
•
No deje el producto en zonas expuestas a temperaturas extremadamente altas durante largos períodos,
No deje el producto en zonas expuestas a temperaturas extremadamente altas durante largos períodos,
como por ejemplo, en el interior de un vehículo cerrado o en contacto directo con la luz del sol.
como por ejemplo, en el interior de un vehículo cerrado o en contacto directo con la luz del sol.
No respetar esta precaución puede causar incendios o funcionamientos incorrectos del producto.
•
•
No transporte cámaras u objetivos con trípodes o accesorios similares instalados.
No transporte cámaras u objetivos con trípodes o accesorios similares instalados.
No respetar esta precaución puede causar lesiones o funcionamientos incorrectos del producto.
Avisos para los clientes de EE.UU.
Avisos para los clientes de EE.UU.
Este dispositivo cumple con la parte 15 de las normas de la FCC. El funcionamiento está sujeto a las dos condiciones
siguientes: (1) este dispositivo no puede causar interferencias perjudiciales, y (2) este dispositivo debe aceptar
cualquier interferencia recibida, incluidas las interferencias que pudieran generar un funcionamiento no deseado.
Declaración sobre interferencias con radiofrecuencias de la Comisión Federal de
Declaración sobre interferencias con radiofrecuencias de la Comisión Federal de
Comunicaciones (FCC)
Comunicaciones (FCC)
Este equipo ha sido sometido a pruebas y se ha determinado que cumple con los límites para un dispositivo digital
clase B, de acuerdo con la sección 15 del Reglamento de la FCC. Estos límites han sido establecidos para ofrecer
una protección razonable contra interferencias perjudiciales en un entorno residencial. Este equipo genera, utiliza
y puede irradiar energía de radiofrecuencia, y de no ser instalado y utilizado de acuerdo con las instrucciones,
puede producir interferencias perjudiciales en las comunicaciones de radio. Sin embargo, no es posible garantizar
que en una determinada instalación no habrá interferencias. Si este equipo causa interferencias perjudiciales en
la recepción de radio o televisión, lo cual puede determinarse apagando y encendiendo el equipo, se aconseja al
usuario que intente corregir dichas interferencias tomando una o más de las medidas siguientes:
• Cambie la orientación o la ubicación de la antena receptora.
• Aumente la separación entre el equipo y el receptor.
• Conecte el equipo a una toma de un circuito distinto a aquél al que el receptor esté conectado.
• Consulte al proveedor o a un técnico de radio/televisión experimentado.
PRECAUCIONES
PRECAUCIONES
Modi caciones
La FCC exige que se le notifi que al usuario que la realización de cambios o modifi caciones en este
dispositivo no expresamente aprobados por Nikon Corporation puede invalidar el derecho del usuario
a utilizar el equipo.
Nikon Inc., 1300 Walt Whitman Road,
Melville, New York 11747-3064, U.S.A.
Tel.: 631-547-4200
Aviso para los Clientes de Canadá
Aviso para los Clientes de Canadá
CAN ICES-3 B / NMB-3 B
Uso del objetivo
Uso del objetivo
Partes del objetivo: Nombres y funciones
Partes del objetivo: Nombres y funciones
Consulte el diagrama que aparece en el margen izquierdo de esta página.
q
Marca de montaje del
parasol
Utilizar al instalar el parasol.
Consulte
D
w
Empuñadura de goma — —
e
Anillo de enfoque
Utilizar para el enfoque manual.
• Al enfocar con el autofoco, podrá ajustar el enfoque
manualmente girando el anillo mientras pulsa el
disparador hasta la mitad; después de enfocar, pulse el
disparador hasta el fondo para disparar.
—
r
Panel de información del
objetivo
Visualice la distancia de enfoque, la profundidad del
campo, así como otro tipo de información.
Consulte
B
,
C
t
Anillo de control
Gire para ajustar una confi guración tal como [Diafragmas]
o [Compensación exposición] asignada usando la cámara.
Para obtener más información, consulte la descripción de
[Asignación control personalizado], [Controles personalizados]
o [Controles pers. (disparo)] en el manual de la cámara.
—
y
Marca de montaje del
objetivo
Utilizar al montar el objetivo en la cámara.
Consulte
A
u
Junta de goma de
montaje del objetivo
——
i
Contactos de CPU Se utiliza para transferir datos a y desde la cámara. —
o
Botón L-Fn
Pulse para ejecutar una función asignada utilizando
la cámara. Para obtener más información, consulte la
descripción de [Asignación control personalizado],
[Controles personalizados] o [Controles pers. (disparo)] en
el manual de la cámara.
—
!0
Botón de visualización
Guarde la configuración o seleccione la información que
aparecerá en el panel de información del objetivo.
Consulte
B
,
C
!1
Interruptor de modo de
enfoque
Seleccione un modo de enfoque.
• A: Autofoco
• M: Enfoque manual
Tenga en cuenta que, independientemente de la opción
seleccionada, el enfoque debe ajustarse manualmente al seleccionar
el modo de enfoque manual usando los controles de la cámara.
—
!2
Parasol de objetivo
Los parasoles bloquean la luz directa que de otro modo
causaría destellos o efecto fantasma. También sirven para
proteger el objetivo.
Consulte
D
!3
Marca de bloqueo del
parasol
Utilizar al instalar el parasol.
!4
Marca de alineación del
parasol
!5
Botón de bloqueo del
parasol
Utilizar al extraer el parasol.
!6
Tapa del objetivo
(tapa frontal)
——
!7
Tapa del objetivo
(tapa posterior)
——
A
Instalación y desinstalación
Instalación y desinstalación
Instalación del objetivo
z
Apague la cámara, retire la tapa del cuerpo y extraiga la tapa trasera del objetivo.
x
Coloque el objetivo en el cuerpo de la cámara, manteniendo la marca de montaje
del objetivo alineada con la marca de montaje del cuerpo de la cámara y, a
continuación, gire el objetivo en sentido antihorario hasta que haga clic en su lugar.
Desinstalación del objetivo
z
Apague la cámara.
x
Mantenga pulsado el botón de liberación del objetivo mientras gira el objetivo en
sentido horario.
B
El panel de información del objetivo
El panel de información del objetivo
El panel de información del objetivo se ilumina al instalar un objetivo en la cámara y si la cámara
está encendida.
• Pulse el botón de visualización del objetivo para alternar la visualización tal y como se
muestra:
Diafragmas
2
Profundidad de campo
1
Distancia de enfoque
1 La profundidad de campo se muestra cuando la cámara está en el modo A o M.
2 Diafragmas se visualiza solamente cuando
la cámara se encuentra en el modo A o M. La
visualización para el resto de modos se indica en la
ilustración.
• El modo de enfoque (AF o MF) es visualizado brevemente al realizar la selección usando el
interruptor de modo de enfoque.
• El panel se apaga automáticamente cuando expire el temporizador de espera de la cámara o si
no usa el objetivo durante aproximadamente 10 segundos. Pulse el botón de visualización para
reactivar la pantalla.
A
El panel de información del objetivo
La distancia de enfoque, la profundidad del campo, así como otro tipo de información visualizada en el panel de información
del objetivo son solo referencias.
A
Bokeh irregular
Con velocidades de obturación rápidas y/o diafragmas grandes, es posible que note irregularidades en la forma del bokeh. El
efecto puede mitigarse eligiendo velocidades de obturación más lentas y/o números f más altos.
C
Opciones del panel
Opciones del panel
Siga los pasos indicados a continuación para seleccionar las unidades correspondientes a la distancia
de enfoque en metros (m) o pies (ft), o para ajustar el brillo del panel de información del objetivo.
z Mantenga pulsado el botón de visualización para ver los ajustes.
• Se visualizarán las opciones de selección de la unidad o el brillo. El elemento actualmente
seleccionado parpadea.
• Pulse el botón de visualización para alternar entre las pantallas.
Unidades Brillo
x Seleccione un ajuste usando el anillo de control del objetivo.
Unidades
- Gire el anillo de control para seleccionar entre
metros (m) o pies (ft).
Brillo
- Gire el anillo de control en la dirección “+” (más
brillante) o “−” (más oscuro).
- Seleccione entre 6 niveles de brillo.
- Para desactivar la pantalla de información del
objetivo, gire el anillo en la dirección “−” hasta que
el icono
cambie a .
• Pulse el botón de visualización para guardar los cambios y alternar la pantalla.
• Si no realiza ninguna operación usando los controles del objetivo durante
aproximadamente 5 segundos, las opciones del panel desaparecen de la pantalla. Los
cambios se perderán.
c
Mantenga pulsado el botón de visualización para volver a la pantalla de información del objetivo.
• Seleccionar para el brillo apaga el panel de información del objetivo. Para volver a
encender la pantalla, mantenga pulsado el botón de visualización.
D
Instalación y extracción del parasol
Instalación y extracción del parasol
Instalación del parasol
• Alinee la marca de montaje del parasol con la marca de alineación del parasol (
q
) y, a
continuación, gire el parasol (
w
) hasta que la marca de montaje quede alineada con la marca de
bloqueo del parasol (
e
).
Marca de bloqueo del parasol
Marca de alineación del parasol
Marca de montaje del parasol
• Agarrar la parte delantera demasiado fuerte difi cultará la colocación o extracción del parasol. Al
girar el parasol, sosténgalo cerca de la marca de alineación del parasol (
●
) en su base.
• El parasol se puede invertir y montar en el objetivo cuando no esté en uso.
Extracción del parasol
• Manteniendo pulsado el botón de bloqueo del parasol (
q
), gire el parasol en la dirección
indicada (
w
) y extráigalo del objetivo (
e
).
Botón de bloqueo del parasol
• Podrá utilizar el mismo procedimiento cuando el parasol esté invertido.
Cuando el objetivo está instalado
Cuando el objetivo está instalado
La posición del enfoque podría cambiar si apaga la cámara y luego vuelve a encenderla después de
enfocar. Si ha enfocado sobre una ubicación preseleccionada mientras espera que su sujeto aparezca, se
recomienda no apagar la cámara hasta capturar la imagen.
Cámaras con luces de ayuda de AF
Cámaras con luces de ayuda de AF
El objetivo o el parasol podrían bloquear la iluminación de la luz de ayuda de AF de la cámara.
• Para obtener la información más reciente sobre el uso del objetivo con cámaras con luces de ayuda de
AF integradas, visite el siguiente sitio web.
https://downloadcenter.nikonimglib.com/
Uso del objetivo en cámaras con fl ash incorporado
Uso del objetivo en cámaras con fl ash incorporado
Aparecerán sombras en las fotos en las que la luz proveniente del fl ash incorporado sea oscurecida por el
objetivo o el parasol. Retire el parasol antes de disparar. Sin embargo, tenga en cuenta que en función de
la distancia focal del objetivo y de la distancia hasta el sujeto, es posible que aparezcan sombras incluso
si se extrae el parasol del objetivo.
• Aparecerán sombras en las fotos realizadas al montar este objetivo en una cámara Z50.
• Para obtener la información más reciente sobre las distancias focales y las distancias al sujeto en las que
no aparecerán sombras en las fotos capturadas con un fl ash incorporado, visite el siguiente sitio web.
https://downloadcenter.nikonimglib.com/
Precauciones de uso
Precauciones de uso
• No levante ni sujete el objetivo o la cámara usando solo las tapas del objetivo o el parasol.
• Mantenga los contactos de CPU limpios.
• Si se daña la junta de goma de montaje del objetivo, deje de usarlo inmediatamente y lleve el objetivo
al servicio técnico autorizado de Nikon para repararlo.
• Vuelva a colocar las tapas del objetivo cuando no utilice el objetivo.
• No deje el objetivo en lugares con mucha humedad o en aquellos lugares en los que pueda estar
expuesto a la humedad. El óxido en los mecanismos internos puede producir daños irreparables.
• No deje el objetivo junto a llamas o en un lugar extremadamente caliente. El calor extremo podría
dañar o deformar el exterior del plástico reforzado.
• Los cambios rápidos de temperatura podrían provocar condensación dañina dentro y fuera del
objetivo. Antes de transportar el objetivo de un ambiente frío a otro caliente o viceversa, colóquelo en
una bolsa o estuche de plástico para atenuar el cambio de temperatura.
• Se recomienda colocar el objetivo en su funda para protegerlo de arañazos durante el transporte.
Cuidado del objetivo
Cuidado del objetivo
• Retirar el polvo es, por norma general, sufi ciente para limpiar las superfi cies de cristal del objetivo.
• Las manchas grasientas, las huellas dactilares y otras manchas pueden eliminarse de la superfi cie del
objetivo con un paño de algodón suave y limpio o con papel de para objetivos de terceros ligeramente
humedecido con una pequeña cantidad de etanol o limpiador de objetivo. Limpie con cuidado desde
el centro hacia el exterior con movimientos circulares, teniendo cuidado de no dejar manchas ni de
tocar el objetivo con los dedos.
• Nunca use solventes orgánicos como el disolvente de pintura o benceno para limpiar el objetivo.
• Los fi ltros de color neutro (NC) (disponibles por separado) y similares pueden usarse para proteger el
elemento del objetivo delantero.
• No guardar con bolas antipolilla de naftalina o de alcanfor o bajo la luz directa del sol. Si no va a utilizar
el objetivo durante un período prolongado de tiempo, guárdelo en un lugar fresco y seco para evitar
la formación de moho y corrosión.
Accesorios
Accesorios
Accesorios suministrados
Accesorios suministrados
• Tapa del objetivo LC-82B (tapa frontal)
• Tapa del objetivo LF-N1 (tapa posterior)
• Parasol HB-94
• Estuche para objetivo CL-C2
D
Uso del estuche para objetivo
• El estuche está diseñado para proteger el objetivo contra arañazos, no contra caídas u otros impactos físicos.
• El estuche no es resistente al agua.
• El material utilizado en el estuche puede desvanecerse, desteñir, estirar, encoger o cambiar de color al frotarlo o mojarlo.
• Limpie el polvo con un cepillo suave.
• El agua y las manchas pueden limpiarse de la super cie con un paño suave y seco. No utilice alcohol, benceno, diluyente ni ningún
otro producto químico volátil.
• No lo guarde en lugares expuestos a la luz directa del sol o a altas temperaturas o humedad.
• No use el estuche para limpiar la pantalla o los elementos del objetivo.
• Preste atención para evitar que el objetivo se caiga del estuche durante el transporte.
Material: Poliéster
Accesorios compatibles
Accesorios compatibles
Filtros con rosca de 82 mm
D
Filtros
• Utilice únicamente un ltro cada vez.
• Retire el parasol antes de colocar ltros o de girar los ltros polarizadores circulares.
ҋᅶ༉ଐЀᲇ
ҋᅶ༉ଐЀᲇ
•
᥎ୈతᮨ࠽ୈၯሮസƥժׅЦᮨ࠽ሣୈᮨ࠽ᩑԍᒱˊ
•
ұ
CPU
ఉဿྊ༚ˊ
•
ᘧᮨ࠽ײحเᕘߖޑ௬ޫƥ፞Ӡҋᅶৰᮨ࠽ᖭ
۩َദ֩ϔୈႯᐛᑢһᨆᑢһˊ
•
νҋᅶᮨ࠽ƥಱሣκᮨ࠽ሣˊ
•
ժׅᮨ࠽ᒳЃྰሇޞಲୈظᕜൽྰພሇޡˊԬ᪇᠆ᒳ
ᅴ᭞ᖮುݽሇ௬ޫˊ
•
ժׅᮨ࠽ᱢᨀဟୈᒳЃԢв᧼ၔሇޡˊ᧼ၔظᕜѕҋ
ࠅಥ៨ᱤا௬ୈبˊ
•
ྛሇፇبظᕜᖮᮨ࠽Ԭ᪇ᑄ᱘мᖮ௬ޫˊᮨ࠽Эྛഉ
ሇᄔࠏԗՅሇᄔࠏୈЭՅሇᄔࠏԗྛഉሇᄔࠏϥ֏ƥ
ԌԢᒳЃׇԬୈࠅಥሡϔмᑾڔྛሇبˊ
•
᧿᧢Дڳƥޗׇ᠆ᎵԬ᠆ԗᥙ࠲࠰ሇᑾՁൃಥƥмՐ
ơᩕ
ԏƢ
ᅽЃՁաᖮДڳ௬ޫˊ
ᮨ࠽ұԦ
ᮨ࠽ұԦ
•
δᗇ૮Ճλƥྊ༚ᮨ࠽ሇᄚᅒ៨ᱤؚᰑဣظˊ
•
ᮨ࠽៨ᱤሇဿˉெᐬڔԢвྍظҋᅶδޮ৭Չሇᧁොৈୈ
ᎁιಲᮨ࠽ྊ༚ᐫጬκᡲϰୈᮨ࠽ྊ༚ൌྊᰑˊ
мސڄ᧿֬ಲЭّ౸ஸƥ༉ଐνᠳᆎλྍƥϴν
ᠳᅶୡெᡌዉᮨႜˊ
•
ժׅҋᅶདྷಥጧୈᘪᎋണസ࿂ྊ༚ᮨ࠽ˊ
•
ϔપᗡơ
NC
Ƣ࿗ᮨơذᤑƢᎋظᅶЃұ֏᪇ᮨႜˊ
•
ժνظξኀᕥୈัᕥϙδ᥎ࣘಇƥϴνظࣘಇޗርԍλˊ
ᘧૣޗ᧔ᮿᯋԬνҋᅶᮨ࠽ƥԢࣘಇޗՍ৭ႉሇޞ
ಲмؤᱍڔᅴ᭞ˊ
х
х
ᰡᰁх
ᰡᰁх
•
ᮨ࠽ሣ
LC-
82
B
ơ֏ሣƢ
•
ᮨ࠽ሣ
LF-N
1
ơَሣƢ
•
ᮨ࠽ᩑԍᒱ
HB-
94
•
ᮨ࠽ׇৈ
CL-C
2
D
ҋᅶᮨ࠽ׇৈ
•
ᮨ࠽ׇৈೆޗұᮨ࠽ԏاվћƥᓨνұԢԏاݿᥥᚽ
ୈԢв၇ዉౠᨲୄሇڻˊ
•
ᮨ࠽ׇৈνາˊ
•
ᮨ࠽ׇৈᅶሇൃᤌޗ౸ୈྰظᕜѕᠧᗡˉᗡˉ
டᮿˉሓᒓୈبᗡˊ
•
ҋᅶᧁւؚᰑဣˊ
•
៨ᱤᰁሇາڔྍظҋᅶδޮ৭ሇᧁৈᨆྊᰑˊժׅҋ
ᅶ᪢ᏲˉᘪˉጧୈԢвؤપࣣႪᤌˊ
•
ժׅԢࣘಇޗԍርˉᴱྛୈᴱྰሇᄔࠏϔˊ
•
ժׅҋᅶᮨ࠽ׇৈྊ༚ᮨႜڔၯሮസ೪ዥˊ
•
ޗ᧿᧢᧼ጫϔƥ༉ଐνᠳᡥᮨ࠽Эᮨ࠽ׇৈϔՠˊ
ൃᤌ Ƴᔎᐙᑢ
ԧሇх
ԧሇх
82
mm
ԗ࿗ᮨ
D
࿗ᮨ
•
δ๐Цظҋᅶδϑ࿗ᮨˊ
•
ࣴ᠆࿗ᮨୈᦾސӝ࿗ᮨ֏ƥԌئλᮨ࠽ᩑԍᒱˊ
ഴᠸඨ
ഴᠸඨ
ײح
ײح
Z
ײح
ၢᥭ
ၢᥭ
50
mm
ഡ࠵ԍޑ
ഡ࠵ԍޑ
f/
1
.
2
ᮨ࠽ᑄ൛
ᮨ࠽ᑄ൛
15
ᐵ
17
ႜơׇஷ
2
ൣѭᗡಖ
ED
ᮨႜˉ
3
ൣᱡᄬ
ᱤᮨႜмؠᐧᏘᑄഀདྷڔஅأᴱྊདྷ
ሇᮨႜƢ
ᠺᡅ
ᠺᡅ
•
FX
ඨ Ƴ
47
ă
•
DX
ඨ Ƴ
31
ă
30
Ȁ
ၢᐄᑏ
ၢᐄᑏ
Ԭ᪇ၢᐄᑏ
ഡᨀၢᥭጌ
ഡᨀၢᥭጌ
ᐛ
0
.
45
m
ơᖭၢ৮ᱤƥണبၢѬᒳƢ
ഡ࠵ࠪցຈᄈ
ഡ࠵ࠪցຈᄈ
ᐛ
0
.
15
Ӄ
ԍޑؾႜ
ԍޑؾႜ
9
ႜơސԍޑࣕƢ
ԍޑᘲއ
ԍޑᘲއ
f/
1
.
2
–
16
࿗ᮨᰁх
࿗ᮨᰁх
82
mm
ơ
P =
0
.
75
mm
Ƣ
ᐛ
89
.
5
mm
ơഡ࠵ርƢĆ
150
mm
ơЭၯሮസ
ᮨ࠽ײح᧵ᒃտᮨ࠽റ፨ሇᥭጌƢ
ᐛ
1090
g
ԚـұᆎظᰡഛಅലДڳሇᠷˉഴᠸඨڔપᕜሇ഼ջˊ
Especi caciones
Especi caciones
Montura
Montura Montura Z de Nikon
Distancia focal
Distancia focal 50 mm
Diafragma máximo
Diafragma máximo f/1.2
Construcción de objetivo
Construcción de objetivo 17 elementos en 15 grupos (incluyendo 2 elementos ED, 3 elementos asféricos y
elementos con revestimientos de ARNEO y nanocristal)
Ángulo de visión
Ángulo de visión • Formato FX: 47°
• Formato DX: 31° 30’
Sistema de enfoque
Sistema de enfoque Sistema de enfoque interno
Distancia de enfoque mínima
Distancia de enfoque mínima 0,45 m (1,48 pies) desde el plano focal
Relación de reproducción
Relación de reproducción
máxima
máxima
0,15×
Cuchillas del diafragma
Cuchillas del diafragma 9 (apertura de diafragma redondeada)
Alcance de diafragma
Alcance de diafragma f/1.2 – 16
Tamaño de accesorio del ltro
Tamaño de accesorio del ltro 82 mm (P = 0,75 mm)
Dimensiones
Dimensiones Aprox. 89,5 mm/3,6 pulg. de diámetro máximo × 150 mm/6 pulg. (distancia
hasta el extremo del objetivo desde la pletina de montaje del objetivo de la cámara)
Peso
Peso Aprox. 1090 g (2 lb 6,5 oz)
Nikon se reserva el derecho de cambiar el aspecto, las especifi caciones y el rendimiento de este producto en
cualquier momento y sin previo aviso.
ᨆح۵ Ƴ
ӵоݥ᭖۩ơϔދƢണᰊԚـ
ơκཏেᛙᖪ
757
ؿಡϔ
12
ซ
01
-
07
ᩨᒁ Ƴ
200023
Ƣ
ୗಀϔദ֩ၔᐰ Ƴ
400
-
820
-
1665
ơڄδᖭڄೃ
9
:
00
–
18
:
00
ƥᰑ࠭λעёૉƢ
ࣻಲᒧ፠ Ƴ
https://www.nikon.com.cn/
ޗ༎ދւ
ՠႝೃഭ Ƴ
2020
৯
9
ഢ
1
ೃ
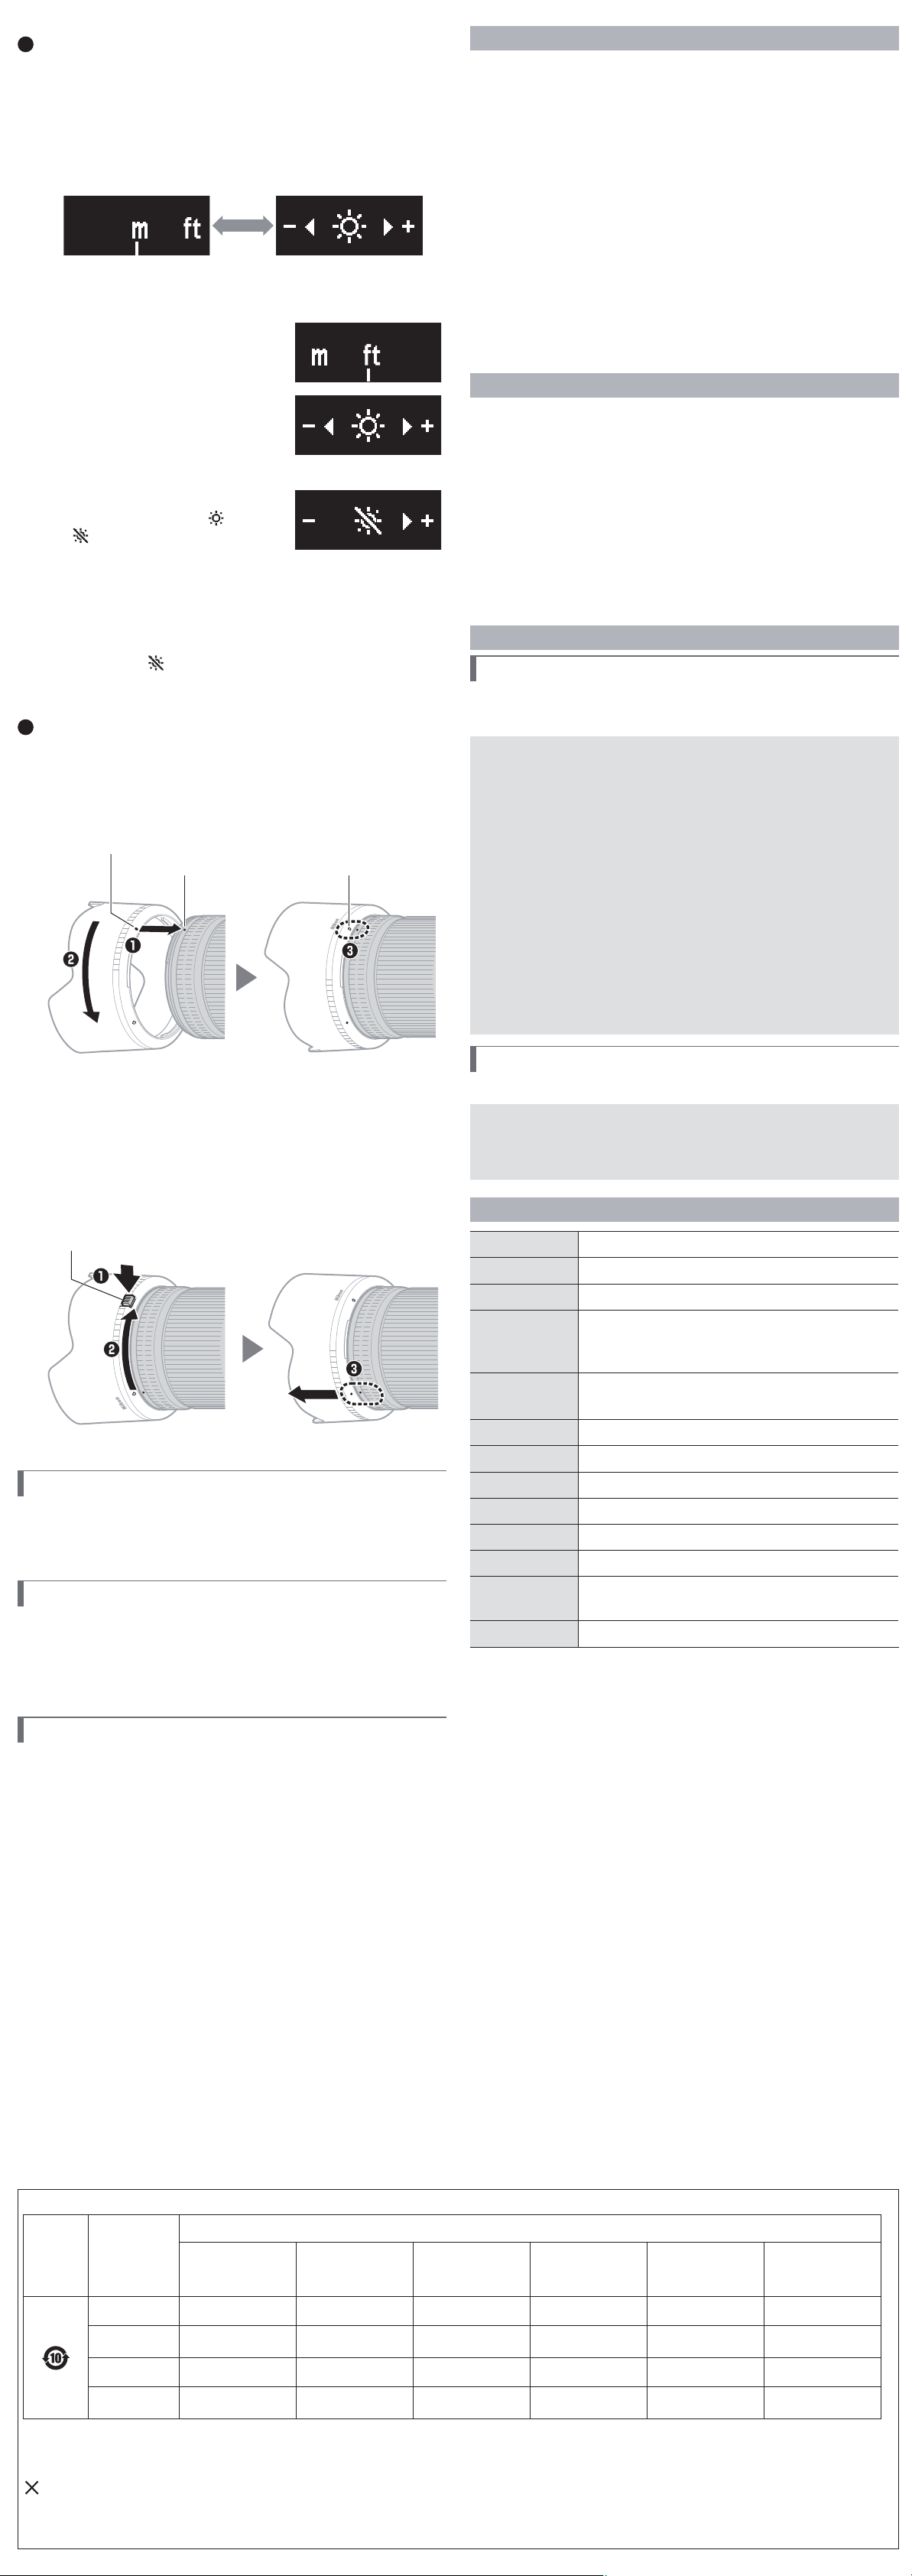
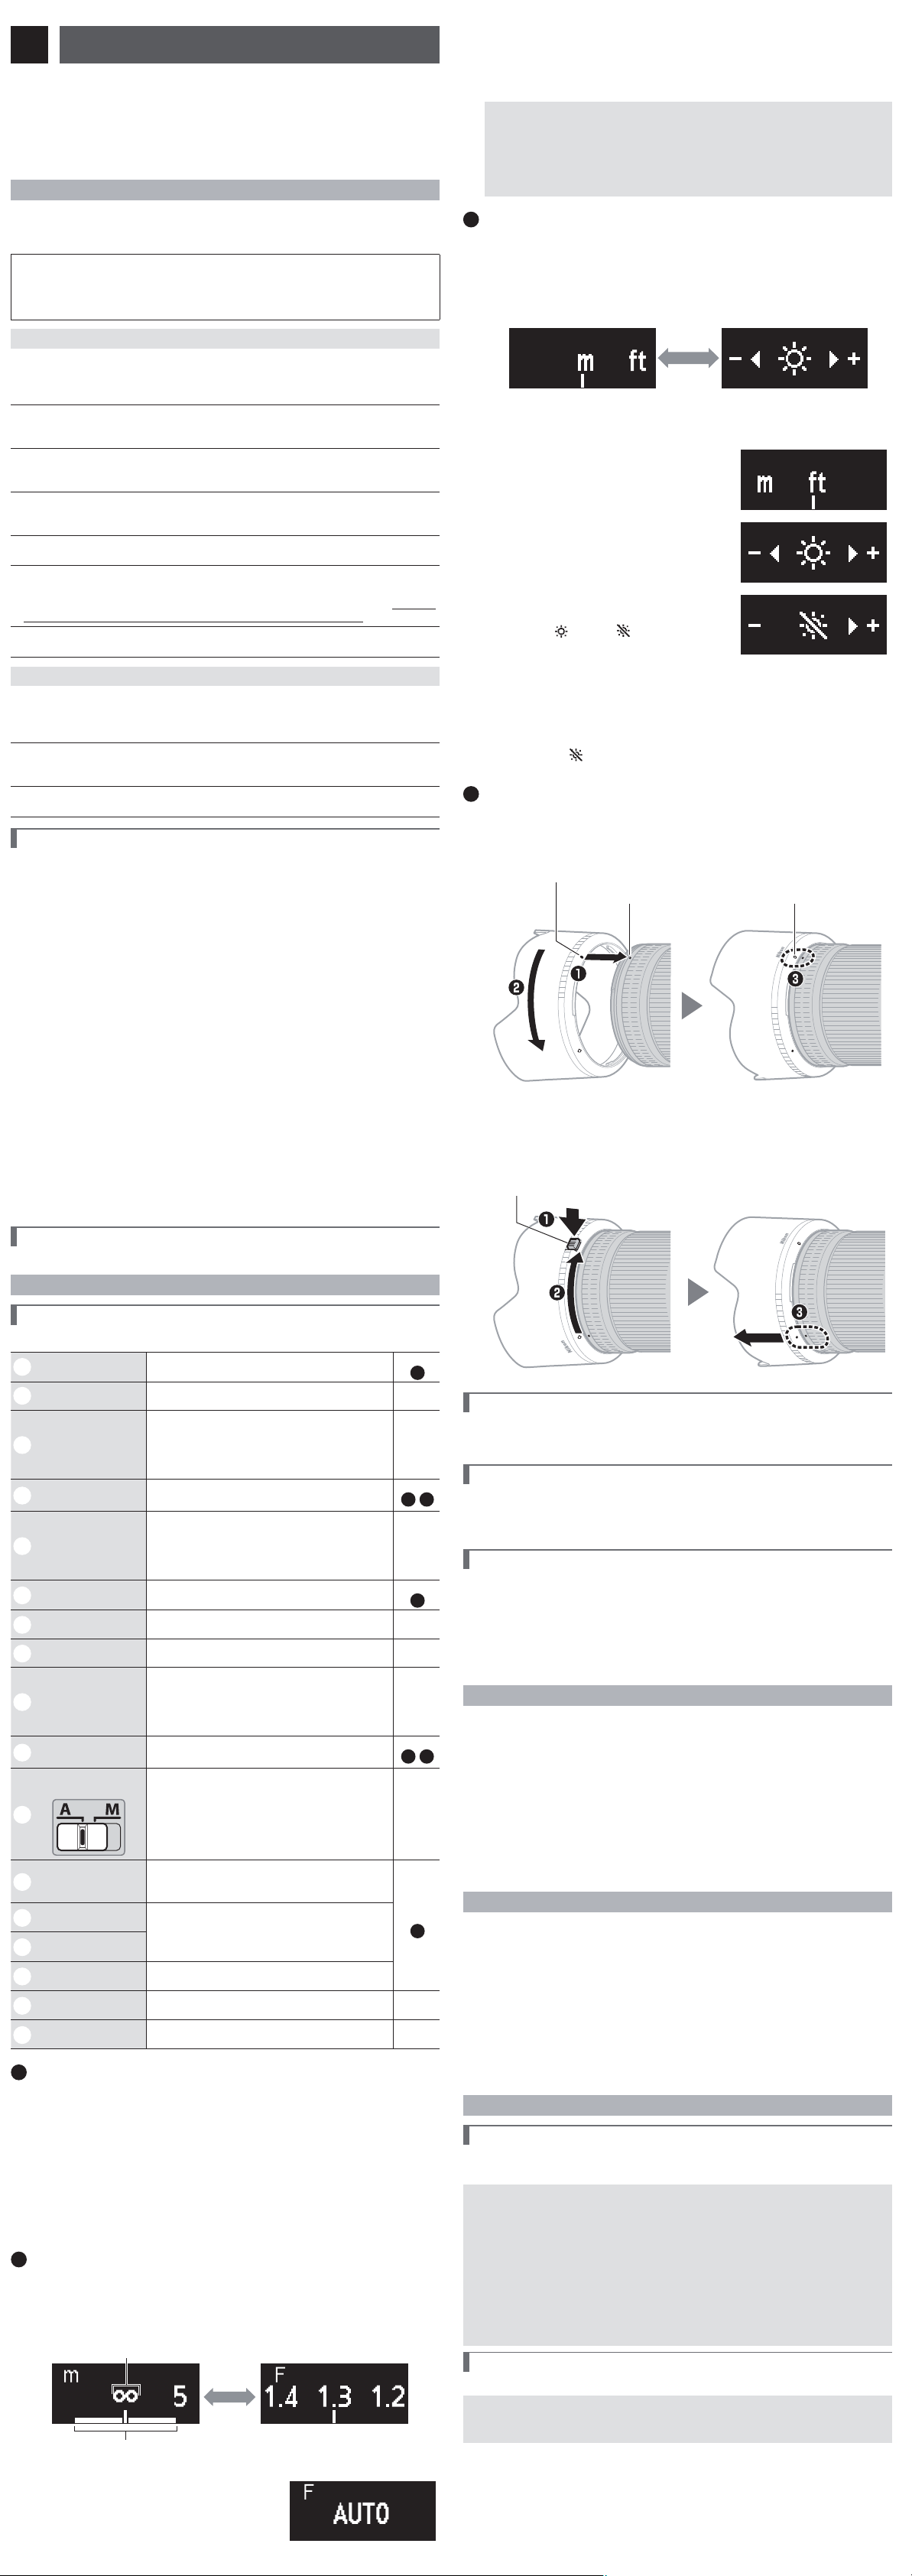
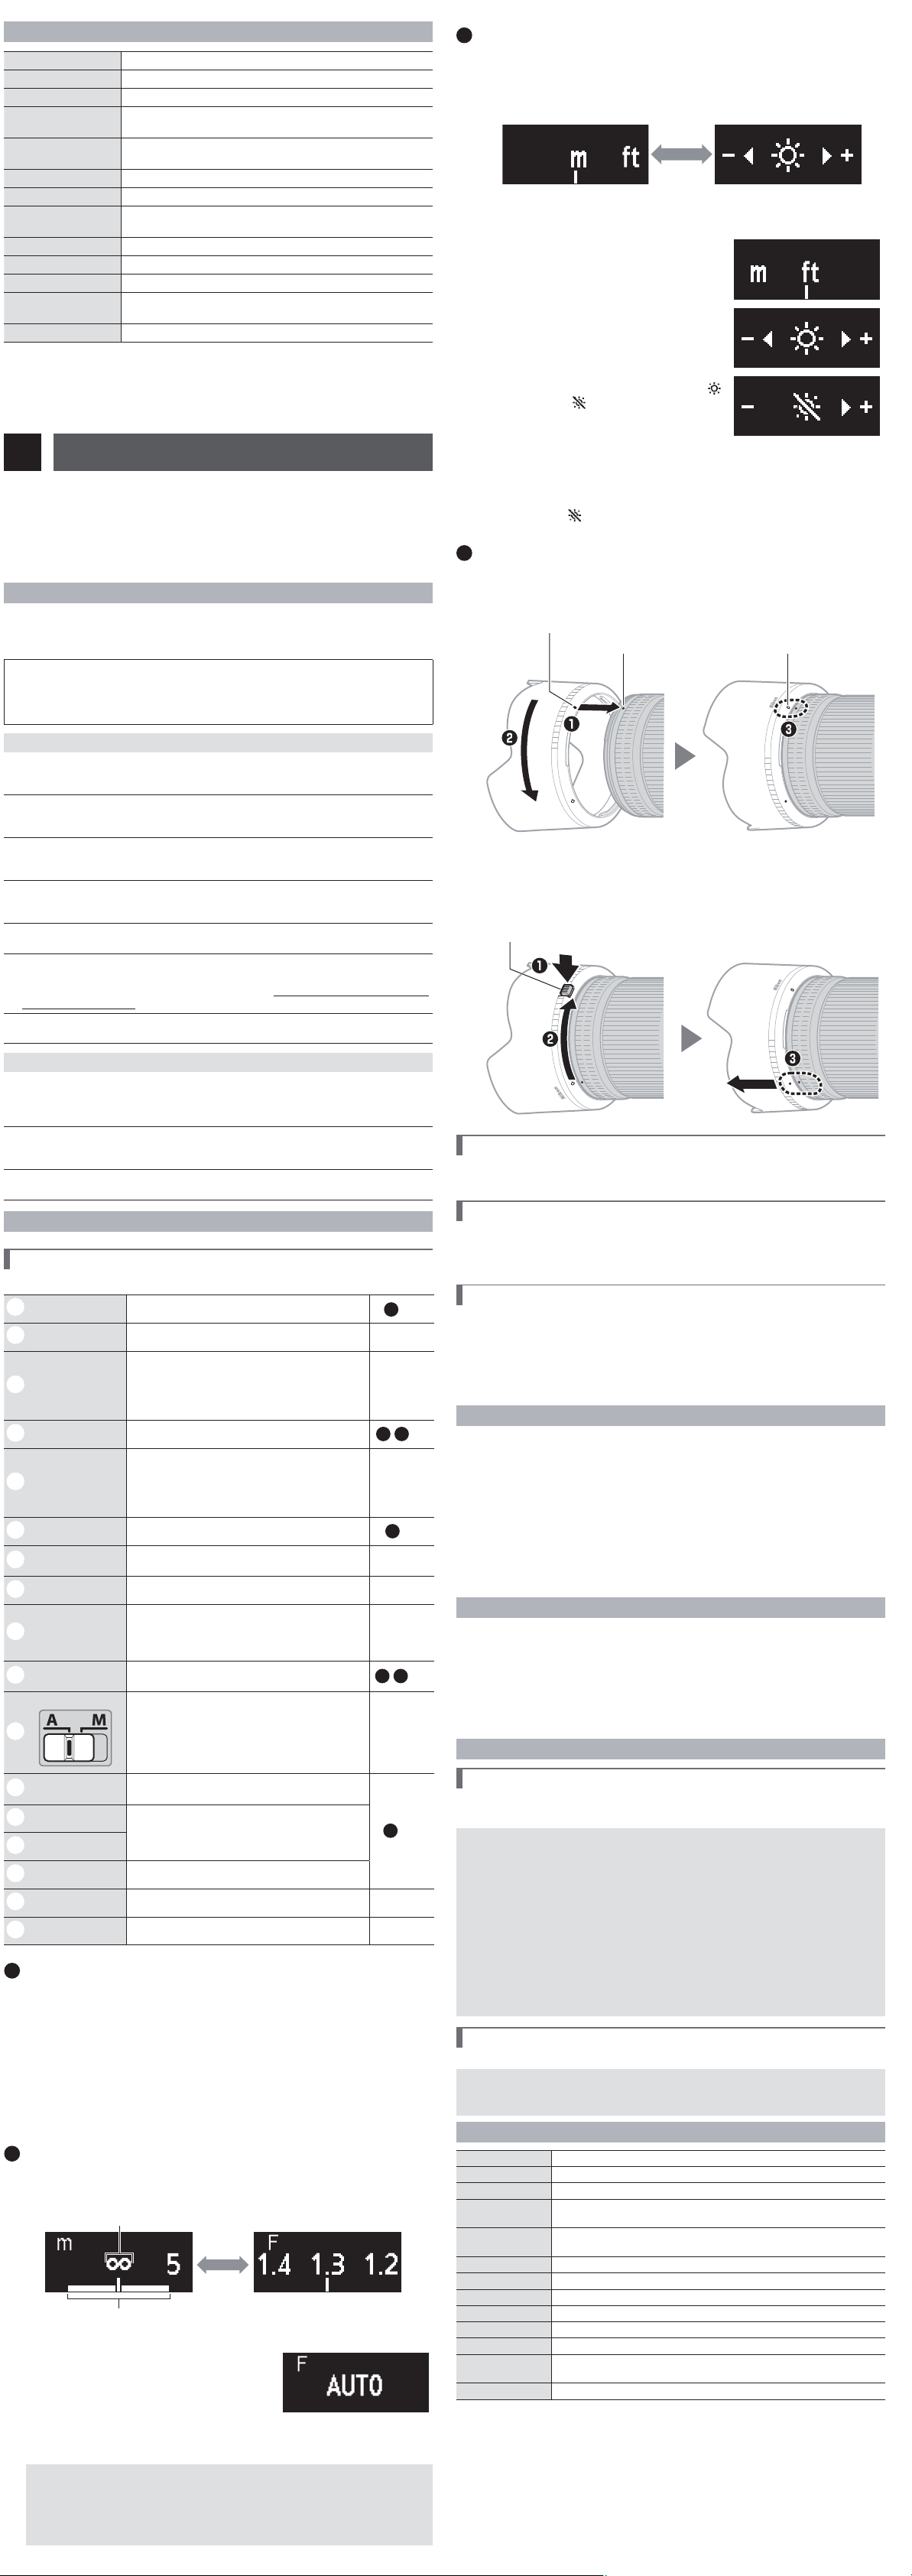