IMPORTANT MANUAL Do Not Throw Away_
8E/A/R8
Operator's
Manual
Model No.
358.799080
ASSISTANCE
1-800-235-5878
Jl HOURS(CS_ ' "°1
I I Mon.- Sat.7 a.m. - 7 p.m, J
II s_".-lo _m--,7 p-m- 1
|-I_ READ__THE__oP_E___TOR's
| I-- MANUAL ANDFOLLOWALL
| I WARNINGS AND SAFETY
| J INSTRUCTIONS, FAILURE
| J TO DO SO CAN RESULT IN
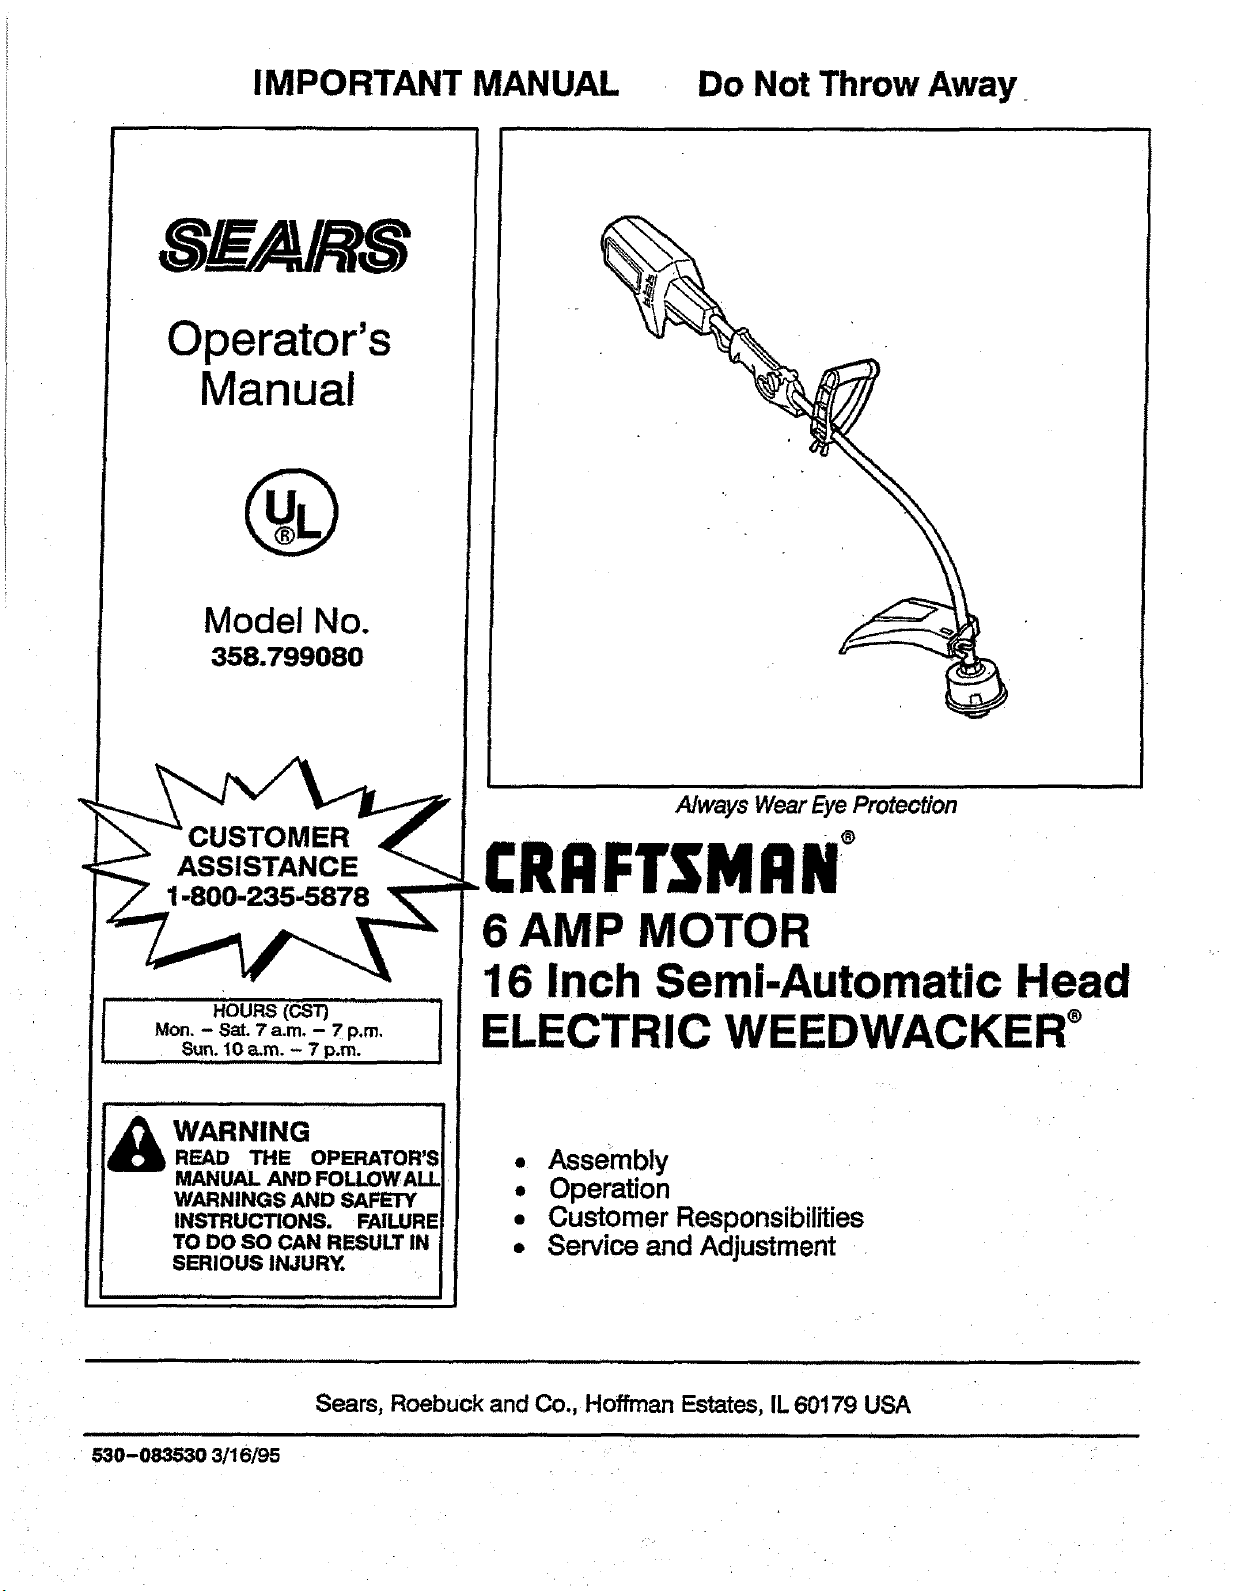
A/ways Wear Eye Protection
®
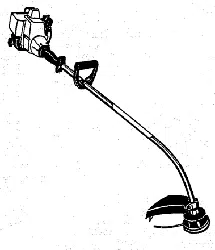
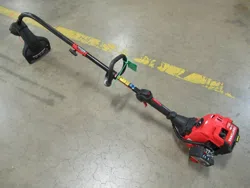
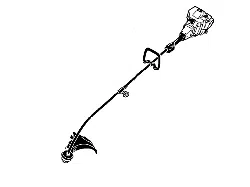
CRAFTSMAN
6 AMP MOTOR
16 Semi-Automatic Head
ELECTRIC WEEDWACKER ®
• Assembly
• Operation ...
• Customer Res.p.ons=bllities
° Service and Adjustment
,i i ,,,,,,,,,, ,,, i
530-083530 3/16/95
Seam, Roebuck and Co., Hoffman Estates, IL 60179 USA
i
SAFETY RULES
WARNING - WHEN USINGELECTRIC GARDENING APPLIANCES, BASIC SAFETY PRECAUTIONS
SHOULD ALWAYS BE FOLLOWEDTO REDUCE THE RISK OF FIRE, ELECTRIC SHOCK, AND
PERSONAL INJURY. READALL INSTRUCTIONS.
OPERATOR SAFETY ....
i ress properly. Always wear safetyglasses or similar eye
protection when operating, servicing, or performing mainte-
nanceonyourunit. (Safetygtassesareavailable,)Alwayswear
face mask or dust mask if operation is dusty.Always wear
heavy,long pants,long sleeves, boots,and gloves.Donot go
barefoot or wear sandals, short pants,or shortsleeves.
_ecure hair above shoulder length. Secureor removetoose
clothing and jewelry or clothing w_ loosely hanging ties,
straps, tassels, etc, They can be caught in movingparts.
Being fully covered helpsto protectyou from pieces oftoxic
plantsthrown by spinning line.
STAYALERT- - Donotoperate thisurdtwhenyou aretired,ill,
orunderthe influence ofaicehol,drugs,ormedication.Watch
what you are doing; use common sense.
• AVOID UNINTENTIONAL STARTINGOF THE UNIT--
Never carrythe unitwithyourfingaron the switch. Besurethe
switch is in the off position beforeconnecting the extension
cord.
• Restrictthe useof this unttto personswho read, unders_nd,
and followthe warningsand ins'mJc_onsinthismanuelandon
the unit.
ELECTRICAL SAFETY
* Useonlya t20A.C. voitagesupplyas shownonthe nsmsplate
ofthe unit.
. Avoid dangerous situations. Do notuse in the presence of
flammable liquidsorgases toavoidcreatingafire orexpiosion
and/or causing damage to unit.
• WARNING--TO REDUCE THE RISK OF ELECTRICAL
SHOCK--Do not use in damp or wet locations or around
swimming pools, hottubs,etc. Donotexposeto snow,rain,or
water to avoid the possibilityof etest_caishock.
* WARNING - -To reducethe riskofeIectrtcelshock, useexten-
sion cords specifically marked as suitable for outdoor
appliances havlng electrioai ratingnot lessthan the rating of
the unit. The cord must be marked withthe suffix=W-A" (in
Canada =W'). Usea.polarizedcord.Makesureyour extension
cord isin good condition.Replacedamaged cords.An under-
sizedextension cord willcause admp inline voltage resulting
in loss of power and overheating, ff in doubt, use the next
heaviergauge. The amailer the gaugenumber,theheavierthe
cord. (NOTE: Figure1 shows the correctsize tobe usedde-
pending on the cord length).
* DO NOTATTEMPTTO REPAIRUNIT- - Inspactthe insulation
and connectors on the unit and extensioncord before each
use. If there is any damage, do notuse untildamage is re-
paired by your Sears Service Center/DepL
* DO NOT ABUSE CORD. Never carrytheunitbythe extension
cord or yank the extension cord todisconnect the unit.
• Toreduce the possibility ofthe extensioncord disconnecting
from the unitduring operation, elipthe extension cord behind
the tab on the cord retorter as shownin Figure 2. Plug exten.
sioncord into the recessed plug onthehandle ofthe unit. Fig-
ure2.
. Donot usethe unitifthe switchdoesnottumthe unitonand off
properly. Repairs to the switch mustbe made by your Sears
Service Center/Dspt.
* Keeptheextension cord clear ofoperatorand obstacleSat all
times. Do not expcae cordsto heat'oil,water,orsharpedges.
• Avoldany bodycontact withanygroundedconductor,suchas
metal pipes or wire fences, to avoidthe possibilityof electric
shock.
• Ground Fault Circuit Interrupter (GFGI)protection shouldbe
provided on thecircuitoroutlattc beusedforthis unit. Recep-
tsciesare available havingbuilt-inGFCIprotectionand maybe
used for this measure of safety,
o TomducetheriskofalactrioaJshockthisequipmanthasapo-
larized plug. This piug will fit ina po_rized outletorextension
i
cord oniy one way. (onebl_leiswlder than the o_er), lfthe
plugdoes notfitfullyinthe outlet,reversethe plug. liltstilldoes
notfit' contaota quaiifiedelectriciantoinstallthe properoutlet.
Do not change the plug in any way.
UNIT SAFETY
• inspect entire unitbefore each use. Replace damaged parts.
Make sure althandles, guards, and fasteners areinplace and
securely fastened. A guard or other part that is damaged
should beproperlyrepaired orreplaced byyour Sears Service
Center.
i eplace trimmer head parts that are cracked, chipped, or
damaged before using the unit.
Use only .065" diameter genuine trimmer line.
(See =Accessories") Never use wire, rope, string etc.
Use only the specifiedtdmmer head, Make sure the semi-
automai_c head is properly installed and securelyfastened.
Disconnect unit from the power supply before changing
semi-automatic head.
• Use only recommended accessories as recommended. Use
of any other accessory may increase the risk ofinjury.
- Keep guards in place and in working order.
CUTTING SAFETY
• Inspect the area to be cut before each use. Remove objects
(rocks, broken glass, nails, wire, string, etc.) which can be
thrown or become entangled in the semi-automatio head.
• KEEP CHILDREN AWAY--Keep others including children,
animals, bystanders and helpersaminimum ors0feet (15 me-
ters) away. Stop the unitimmediately ifyou are approached.
Never allow children to operate the unit.
• Stop the unit and disconnect the power source when not in
use.
• DO NOT OVERREACH OR STAND ON UNSTABLE SUP-
PORT- -Keep firm footing and balance. Do not overreach,
• Keep the semi-automatic head below waist level.
• Do not raise handles above your waist. The semi-automatic
head can come dangerously close to your body.
• Keepall parts ofyour body away frem semi-automatic head
when unit is running.
• USE UNIT PROPERLY--Use only forjobs explained in this
manual. Do notforce the unit,it will do the job betterand with
le,_slikelihood ofa riskof injuryetthe rate forwhich itwas de-
signed.
• Use only in daylight or in good a,lffioial fight,
MAINTENANCE SAFETY
• Maintain unitaccording to recommended procedures. Keep
the cuffing line atthe proper length.
. Have all intemaiservice andmelntenarice notexplainedinthis
manual performed by your Sears Service Center/Dept.to
avoid creating a hazard and/or voiding your warranty. When
servicing use only identical replacement parts.
• DISCONNECT UNIT FROM THE POWER SUPPLYbeforeper-
forming maintenance.
• Never douse or squirt the unitwith water or any other liquid.
Clean unit and labels with a damp sponge. See "Storage,"
Keep handles dry,clean, and free from oil and grease.
• Keepthe airvents cleanandfree fromdebristo avoid overheat-
ingthe motor. Clean aftereach use. See =Spec_cations" for
locations.
TRANSPORTING AND STORAGE
• Hand carry the unit with the motor stopped.
• Allow the unit to coo] and se_Jre the unit before stodng or
transporting in avehicle.
• Store the unit so the line limiter cannot accidentally cause
injury.
• STORE UNiT INDOORS--Store unit unplugged in a high,
dry place out ofthe reach of children.
E
LOOK FOR THIS SYMBOL TO POINT OUT IMPORTANT SAFETY PRECAUTIONS. ]
IT MEANS - ATTENTION!!! BECOME ALERT!!! YOUR SAFETY !S INVOLVED.
I
-2-
SAFETY RULES
_b DANGER
THIS POWER UNIT CANBE DANGEROUS! THIS UNIT CAN CAUSE SERIOUS INJURY OR BLINDNESS TOTHE
OPERATOR AND OTHERS. WHEN USING AN ELECTRIC TRIMMER, THESE BASIC SAFETY PRECAUTIONS
MUST BE FOLLOWED TO REDUCE THE RISK OFINJURY,FIRE, AND ELECTRIC SHOCK. FAILURE TOFOLLOW
ALL INSTRUCTIONS CAN RESULT IN BIJNDNESS OR OTHER SERIOUS INJURY. THE OPERATOR IS
RESPONSIBLE FOR FOLLOWING THE WARNINGS AND INSTRUCTIONS IN THIS MANUALAND ON THE UNIT.
READ THE ENTIRE OPERATOR'S MANUAL BEFOREASSEMBUNG AND USING THIS UNto RESTRICT THE
USE OF THIS UNIT TO PERSONS WHO READ, UNDERSTAND, AND FOLLOW THE WARNINGS AND
INSTRUCTIONS IN THIS MANUAL AND ON THE UNIT. (SEE ADDITIONAL SAFETY INSTRUCTIONS
THROUGHOUT THIS MANUAL)
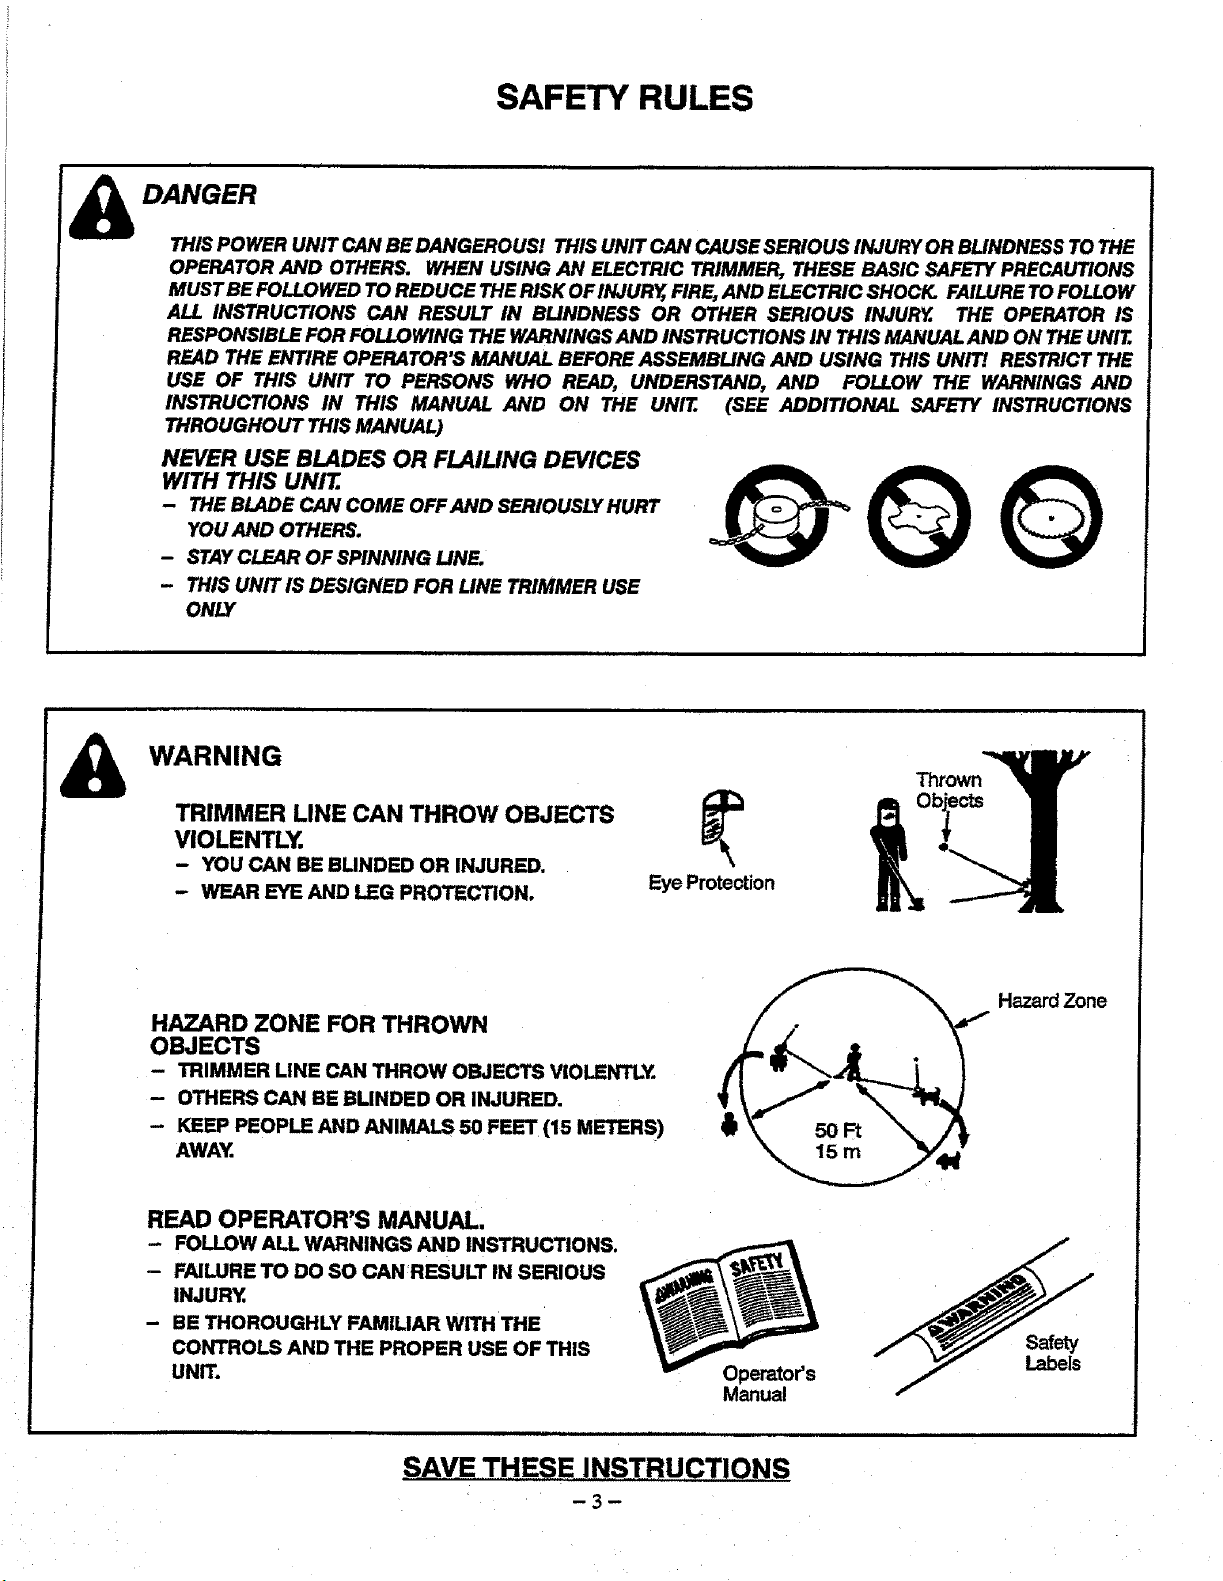
NEVER USE BLADES OR FLAILING DEVICES
WITH THIS UNrl:
- THE BLADE CAN COME OFFAND SERIOUSLYHURT
YOU AND OTHERS,
- STAYCLEAR OF SPINNING LINE.
- THIS UNIT IS DESIGNED FOR LINE TRIMMER USE
ONLY
OQQ
WARNING
TRIMMER LINE CAN THROW OBJECTS
VIOLENTLY.
- YOU CAN BE BLINDED OR INJURED.
- WEAR EYE AND LEG PROTECTION.
Eye Protection
ThrowR_
o?o I
HAZARD ZONE FOR THROWN
OBJECTS
- TRIMMER LINE CAN THROW OBJECTS VIOLENTLY.
- OTHERS CAN BE BLINDED OR INJURED.
- KEEP PEOPLE AND ANIMALS 50 FEET (15 METERS)
AWAY.
READ OPERATOR'S MANUAL,
- FOLLOW ALL WARNINGS AND INSTRUCTIONS.
- FAILURE TO DO SO CAN RESULT IN SERIOUS
INJURY.
- BE THOROUGHLY FAMILIAR WITH THE
CONTROLS AND THE PROPER USE OF THIS
UNIT.
f
Manual
Hazard Zone
Safety
Labels
SAVE THESE INSTRUCTIONS
-3-
CONGRATULATIONSon your purchaseof a Sears
CraftsmanE/eotricWeedwaoker.Ithasbeendesigned,
engineered and manufactured to give you the best
possible dependability and performance.
Should you experience any problems you cannot easily
remedy, please contact your nearest Sears Service
Center/Department. Sears has competent, well trained
technicians and the proper tools to service or repair this
unit.
Please read and retainthis manual. The instructionswill
enable you to assemble and maintain yourunitproperly.
Always observe the "SAFETY RULES."
358.799080
MODEL NUMBER:
SER/AL NUMBER/DATE CODE: .
DATE OF PURCHASE:
THE MODEL NUMBER WILL BE FOUND ONA DECAL
ATTACHED TO THE PRODUCT.
THE SERIAL NUMBER_ATE CODE WILL BEFOUND
ON THE UPPER PARTOF THE MOTOR HOUSING.
YOU SHOULD RECORD BOTH SERIAL NUMBER
/DATE CODE AND DATE OF PURCHASE AND KEEP
IN A SAFE PLACE FOR FUTURE REFERENCE.
PRODUCT SPECIFICATIONS
VOLTAGE:....... 120 Volts A.C.
AMPS ................. 6.0
CUTTING PATH ........ 16"
TRIMMER LINE: ........ 065" Di_ line
LINE FEED ............ Semi-Automatic Head
WEIGHT .............. 9.01.bs.
T
MANUFACTURED UNDER ONE OR MORE OFTHE FOLLOWING U.S.J
PATENTS: 4,4,90,910; 4,860,451; 4,926,557; DES._01,009. Other U.S.j
and foreign patents pending. !
J
CUSTOMER RESPONSIBILITIES
• Read and observe the safety rules.
• Follow a regular schedule in maintaining, caring for,
and usingyour uniL
• Followthe instructions under =Customer
Responsibilities=and "Storage" sectionsofthis Oper-
ator's Manual.
FULL ONE YEAR WARRANTY ON
CRAFTSMAN ELECTRIC WEEDWACKER ® LINE TRIMMER
if this Craftsman Electric Weedwaoker_ Une Trimmer fails to perform properly due to a detect in material or
workmanship within (1) one year from the date of purchase, Seats willrepair or replace it, free ofcharge.
This warranty does not cover the nylonline.
WARRANTY SERVICE IS AVAILABLE BY RETURNING THE CRAFTSMAN ELECTRIC WEEDWACKER® LINE
TRIMMER TOTHE NEAREST SEARS STORE IN THE UNITED STATES.
This warranty gives you specific legal rights,and you may also have other rights whioh vary from stateto state.
SEARS, ROEBUCKAND CO., D/817WA, HOFFMAN ESTATES, IL 60179
--4--
HI II1[1111 IIIIII IIIIIIIIIIIIIIIIIII IIIIIIIII II IIIIIIIIIIIIIIIIIIIIIIII I
TABLE OF CONTENTS
IIIIIII II I IIIIIIIIIIIII IIIII III II IIII I I IIIIII I I I I III IIIII III
Safety Rules ................................... 2
ProductSpecifications .......................... 4
Warranty .....................................4
Accessories ................................... 5
Assembly ..................................... 6
Operation ...................... ............... 8
Customer Responsibilities...................... 12
Serviceand Adjustments ....................... 13
Storage......................................13
TroubleShooting..............................14
RepairPaRs Ordering/Service.........Back Cover
I I I I I
INDEX
M UlIIIIIIIIIII III IIIIIIIIIII I II I II I
A
Accessories ................................... 5
Assembly ..................................... 6
C
Customer Assistance Hotline .......... Back Cover
Customer Responsibilities ...................... 12
H
Hardware Contents .............................6
K
Know YourWeedwacker ........................8
L
LineAdvancement ............................10
LineLimiter...................................10
LineReplacement .............................13
M
Maintenance Schedule ...................... 12
Model Number .............................. 4
O
Operation ........................... 8, 9, 10, 11
Ordering Repair Parts................ Back Cover
S
Safety Rules ................................ 2,3
Specifications ............................... 4
Storage .................................... 13
T
Trouble Shooting ............................ 14
W
Warranty .................................... 4
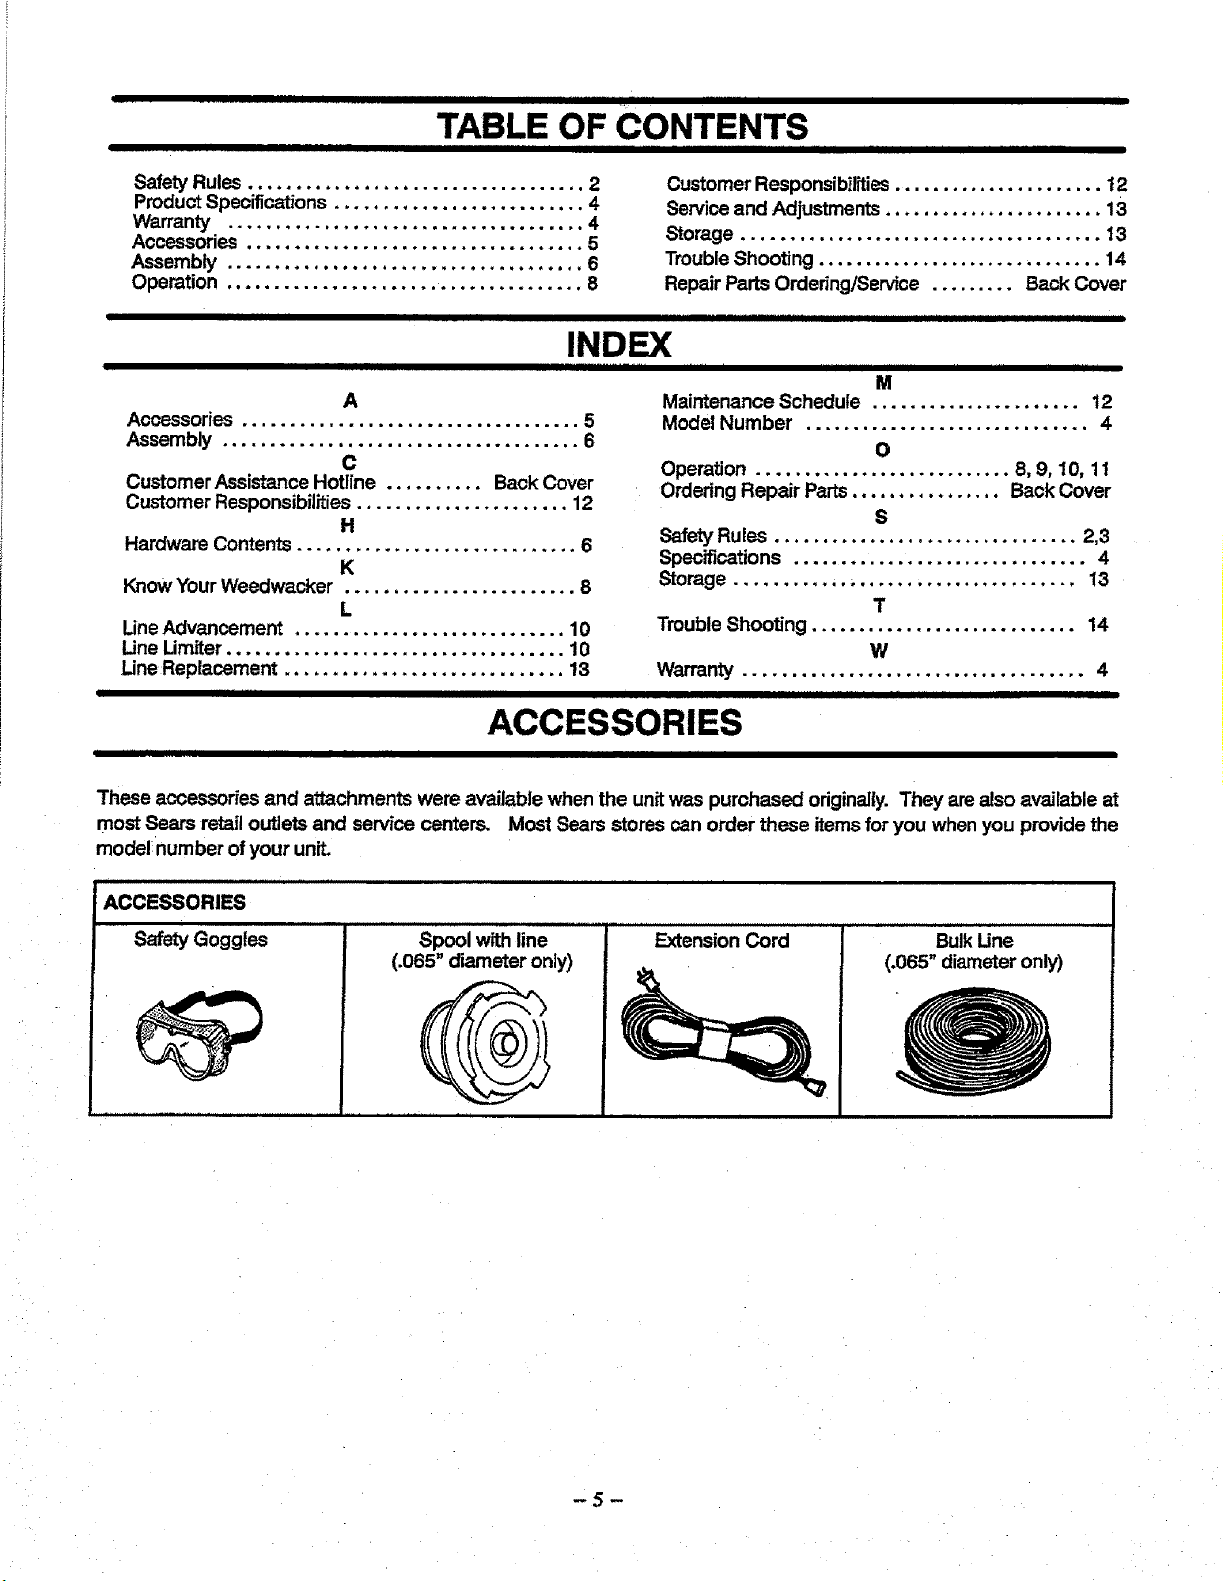
ACCESSORIES
I I I I II
These accessories and attachments were available when the unitwas purchased originally. They am also available at
most Sears retail outlets and service centers. Most Seam stores can order these itemsfor you when you providethe
model:number of your unit.
ACCESSORIES
Safety Goggles ......... Extension Cord BulkUne
(.065" diameter only)
., ,
Spool with line
(.065" diameter only)
-5-
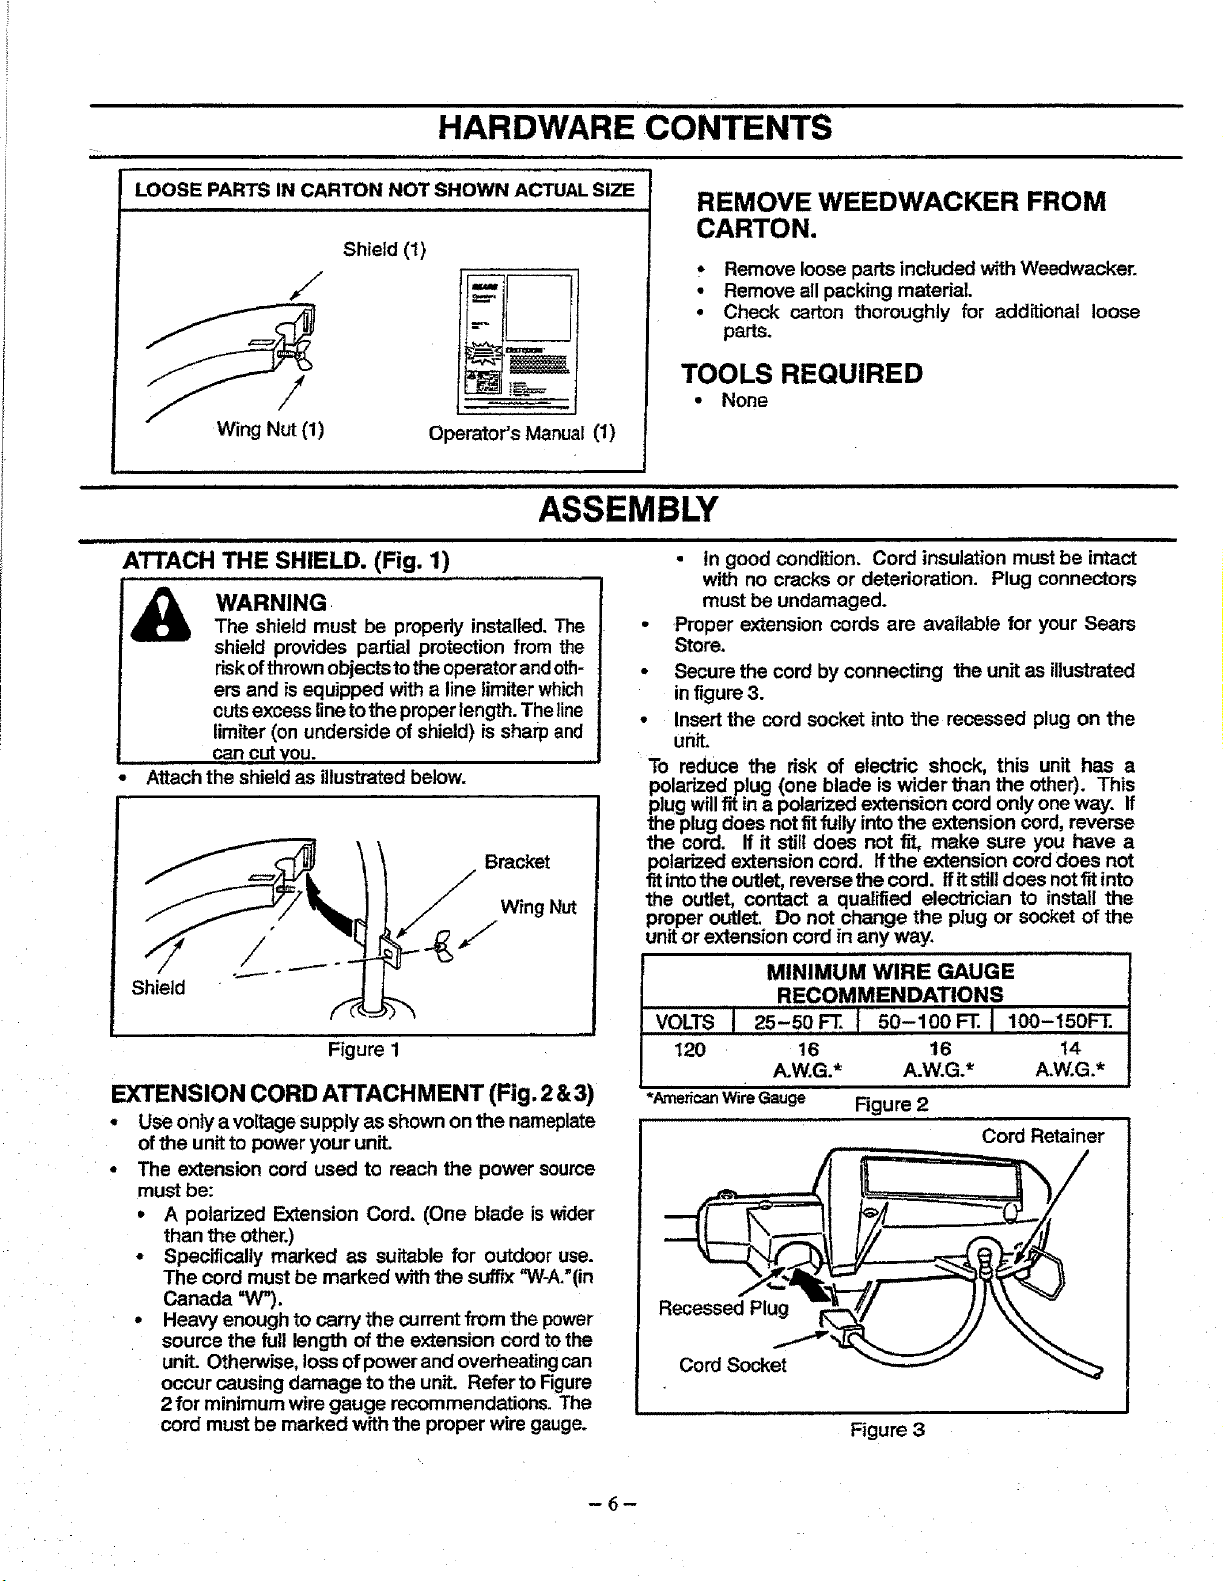
HARDWARE CONTENTS
LOOSE PARTS IN CARTON NOT SHOWN ACTUAL SiZE
,/
Wing Nut (1)
Shield (1)
Operator's Manual (1)
REMOVE WEEDWACKER FROM
CARTON.
, Remove looseparts included wfth Weedwacker.
• Remove all packing material
• Check carton thoroughly for additional loose
parts.
TOOLS REQUIRED
• None
ASSEMBLY
=
A'I-t'ACH THE SHIELD. (Fig. 1)
&
WARNING
The shield must be propedy installed. The
shield provides partial protection from the
riskofthrownobjectstotheoperator andoth-
ers and is equipped with a line limiterwhich
cutsexcess line tothe properlength. The line
limiter (on underside of shield) is sharp and
can cutyou.
Attachthe shield as illustrated below.
____ Bracket
Wing Nut
4J
Shield
Figure 1
EXTENSION CORD ATTACHMENT (Fig. 2 &3)
• Use only a voltage supply as shownon the nameplate
ofthe unitto power your unit.
• The extension cord used to reach the power source
mustbe:
• A poladzed Extension Cord. (One blade is wider
than the other.)
• Specifically marked as suitable for outdoor use.
The cord must be marked with the suffix %V-A.'(in
Canada "W").
• Heavy enough to carry the current from the power
source the full length of the extension cord tothe
unit. Otherwise, loss of powerand overheatingcan
occur causing damage to the unit. Refer to Figure
2 for minimum wire gauge recommendations. The
cord must be marked with the proper wire gauge.
= = ,= = ,,H,,,,
• In good condition. Cord insulation must be intact
with no cracks or deterioration. Plug connectors
must be undamaged.
• Proper extension cords are available for your Sears
Store.
• Secure the cord by connecting the unit as illustrated
infigure 3.
• Insertthe cord socket into the recessed plug on the
unit.
To reduce the risk of eie_ric shock, this unit has a
polarized plug (one blade is wider than the other). This
plug willfit ine polarized extension cord only one way. If
the plug does not fit fullyintothe extension cord, reverse
the cord. If it _ill does not fit, make sure you have a
polarized extension cord. ffthe extension corddoes not
fitinto the outlet, reversethe cord. If it stilldoes notfitinto
the outlet, contact a quatiiied electrician to install the
proper outlet. Do not change the plug or socket of the
unit or extension cord in any way.
MINIMUM WIRE GAUGE
RECOMMENDATIONS
VOLTSj 25-5o . I o-loo .1 loo-15o .
120 16 16 t4
A.W.G.* A.W.G.* A.W.G.*
*American Wire Gauge Figu re 2
i
Cord Retainer
Recessed Plug
Cord Socket
Figure 3
,===H i|==1 ,,,= =11 === i i i i IH =1
ASSEMBLY
,1111 i = , .,,,.,,.,,111 i i = ,m 1,,, 11 = ii i iii ,
CHECK LIST
• Check all fastenem. Make sure they are tight and
there are no loose parts.
• Checkthe position ofthe assisthandle and trigger
handle for operating comfort.
• Make sure your extension cord is marked with a
suffixof =W-A".{in Canada W'_).
• Makesure the semi-automatic head is properly as-
sembled and securely fastened.
-7-
, H ,,l=u H= H, i =
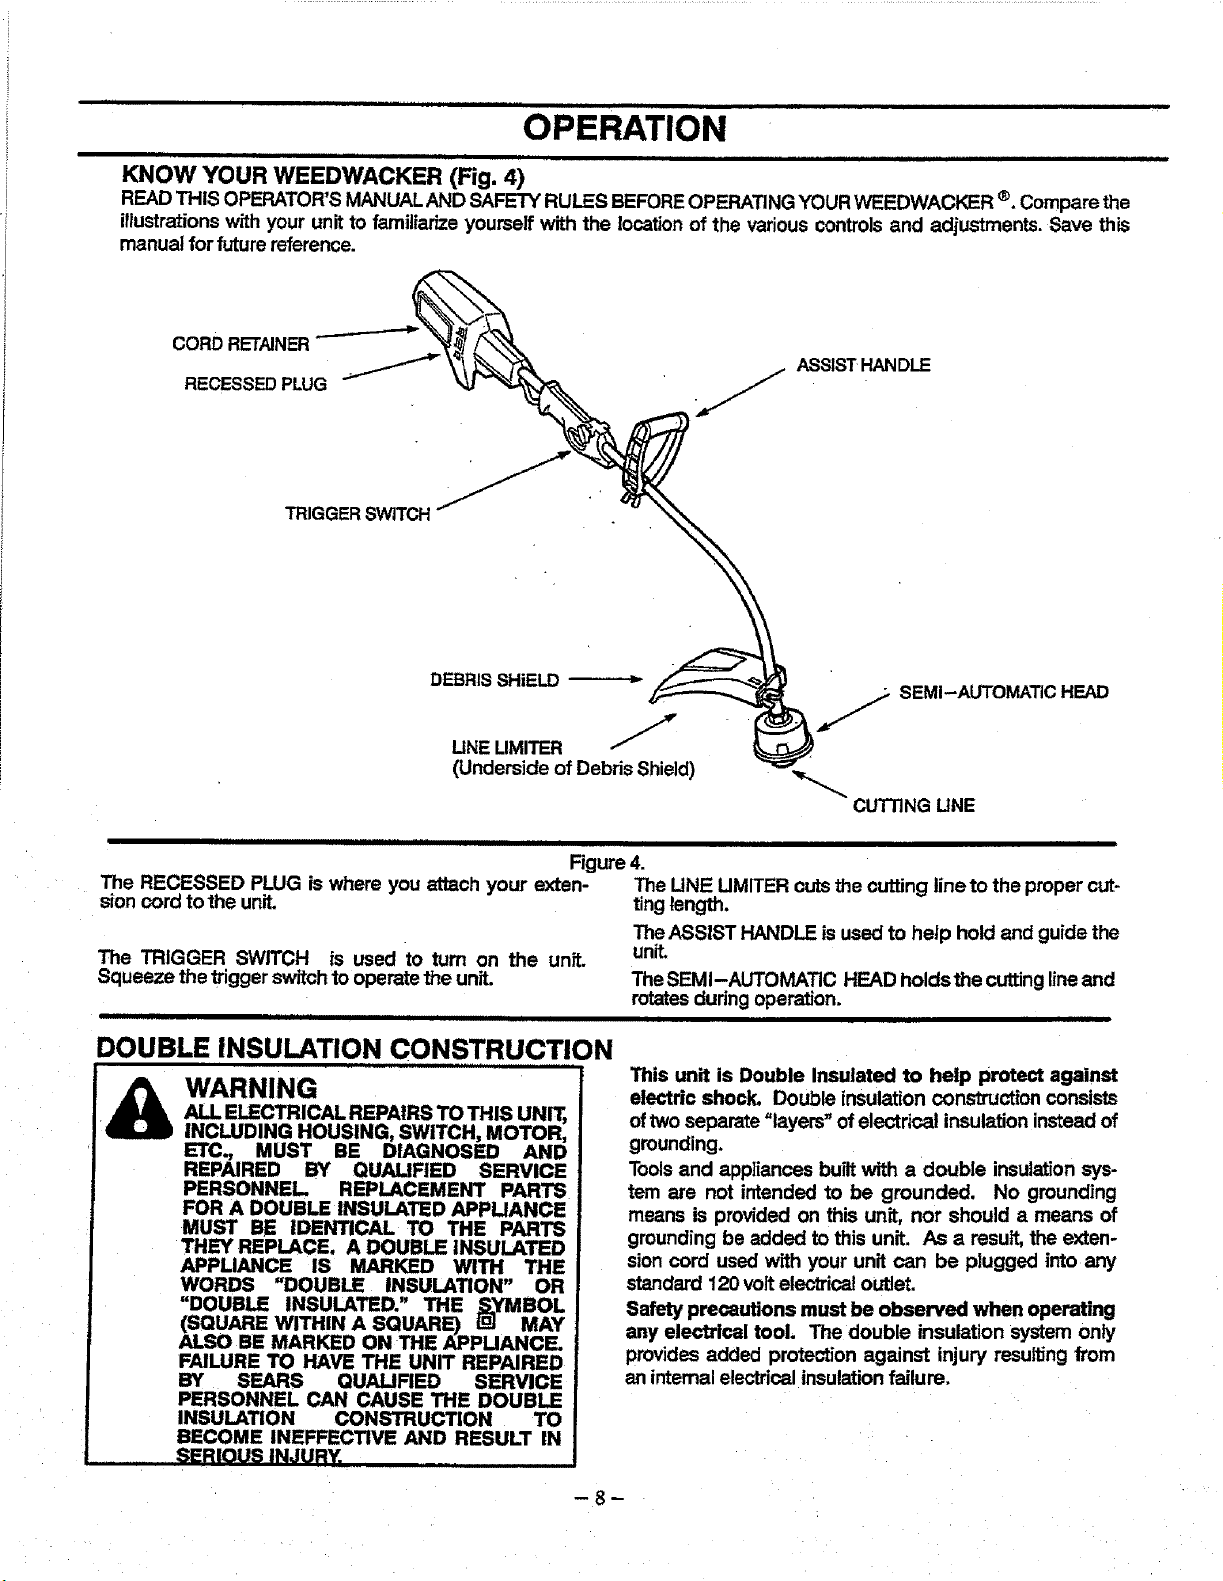
OPERATION
,,,,,,,.,, ..........
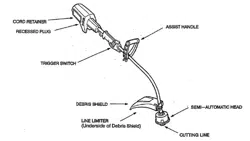
KNOW YOUR WEEDWACKER (Fig. 4)
READTHIS OPERATOR'S MANUALAND SAFETY RULES BEFOREOPERATINGYOUR WEEDWACKER ®. Compare the
iflustrationswith your unit to familiarize yourself with the location of the various controlsand adjustments. Save this
manuel for futurereference.
CORD RETAINER
RECESSED PLUG J
ASSISTHANDLE
TRIGGER SWITCH
DEBRIS SHIELD --
LINE LIMITER J
(Underside of Debris Shield)
• SEMI-AUTOMATIC HEAD
CUTTING UNE
ii i
The RECESSED PLUG is where you attach your exten-
sioncord to the unit.
The TRIGGER SWITCH is used to turn on the unit.
Squeeze the triggerswitch to operate the unit.
ii u i i L
Figure4.
The LINE UMITER cuts the cutting lineto the proper cut-
tinglength.
The ASSIST HANDLE is used to help hold and guide the
unit.
The SEMI -AUTOMATIC HEAD holds the cutting lineand
rotates duringoperation.
DOUBLE INSULATION CONSTRUCTION
WARNINGALL ELECTRICAL REPAIRS TO THIS UNIT,
INCLUDING HOUSING, SWITCH, MOTOR,
ETC., MUST BE DIAGNOSED AND
REPAIRED BY QUAUFIED SERVICE
PERSONNEL REPLACEMENT PARTS
FOR A DOUBLE INSULATED APPLIANCE
MUST BE IDENTICAL TO THE PARTS
THEY REPLACE. A DOUBLE INSULATED
APPLIANCE IS MARKED WITH THE
WORDS "DOUBLE INSULATION" OR
"DOUBLE INSULATED." THE _.YMBOL
(SQUARE WITHIN A SQUARE) igl MAY
ALSO BE MARKED ON THE APPUANCE.
FAILURE TO HAVE THE UNIT REPAIRED
BY SEARS QUALIFIED SERVICE
PERSONNEL CAN CAUSE THE DOUBLE
INSULATION CONSTRUCTION TO
BECOME INEFFECTIVE AND RESULT IN
SERIOUS INJURY.
This unit is Double Insulated to help protect against
electric shock. Double insulation construction consists
oftwo separate "layem" of electrical insulationinstead of
grounding.
Toolsand appliances built with a double insulationsys-
tem are not intended to be grounded. No grounding
means is provided on this unit, nor should a means of
grounding be added to this unit. As a result, the exten-
sion cord used with your unit can be plugged into any
standard 120 volt elec_ca! outlet.
Safety precautions must be observed when operating
any electrical tool. The double insulation system only
provides added protection against injury resu_ng from
an internalelectrical insulationfailure.
-8-
i i H ii i.ii i ,,i ii ,H,,HH I I I
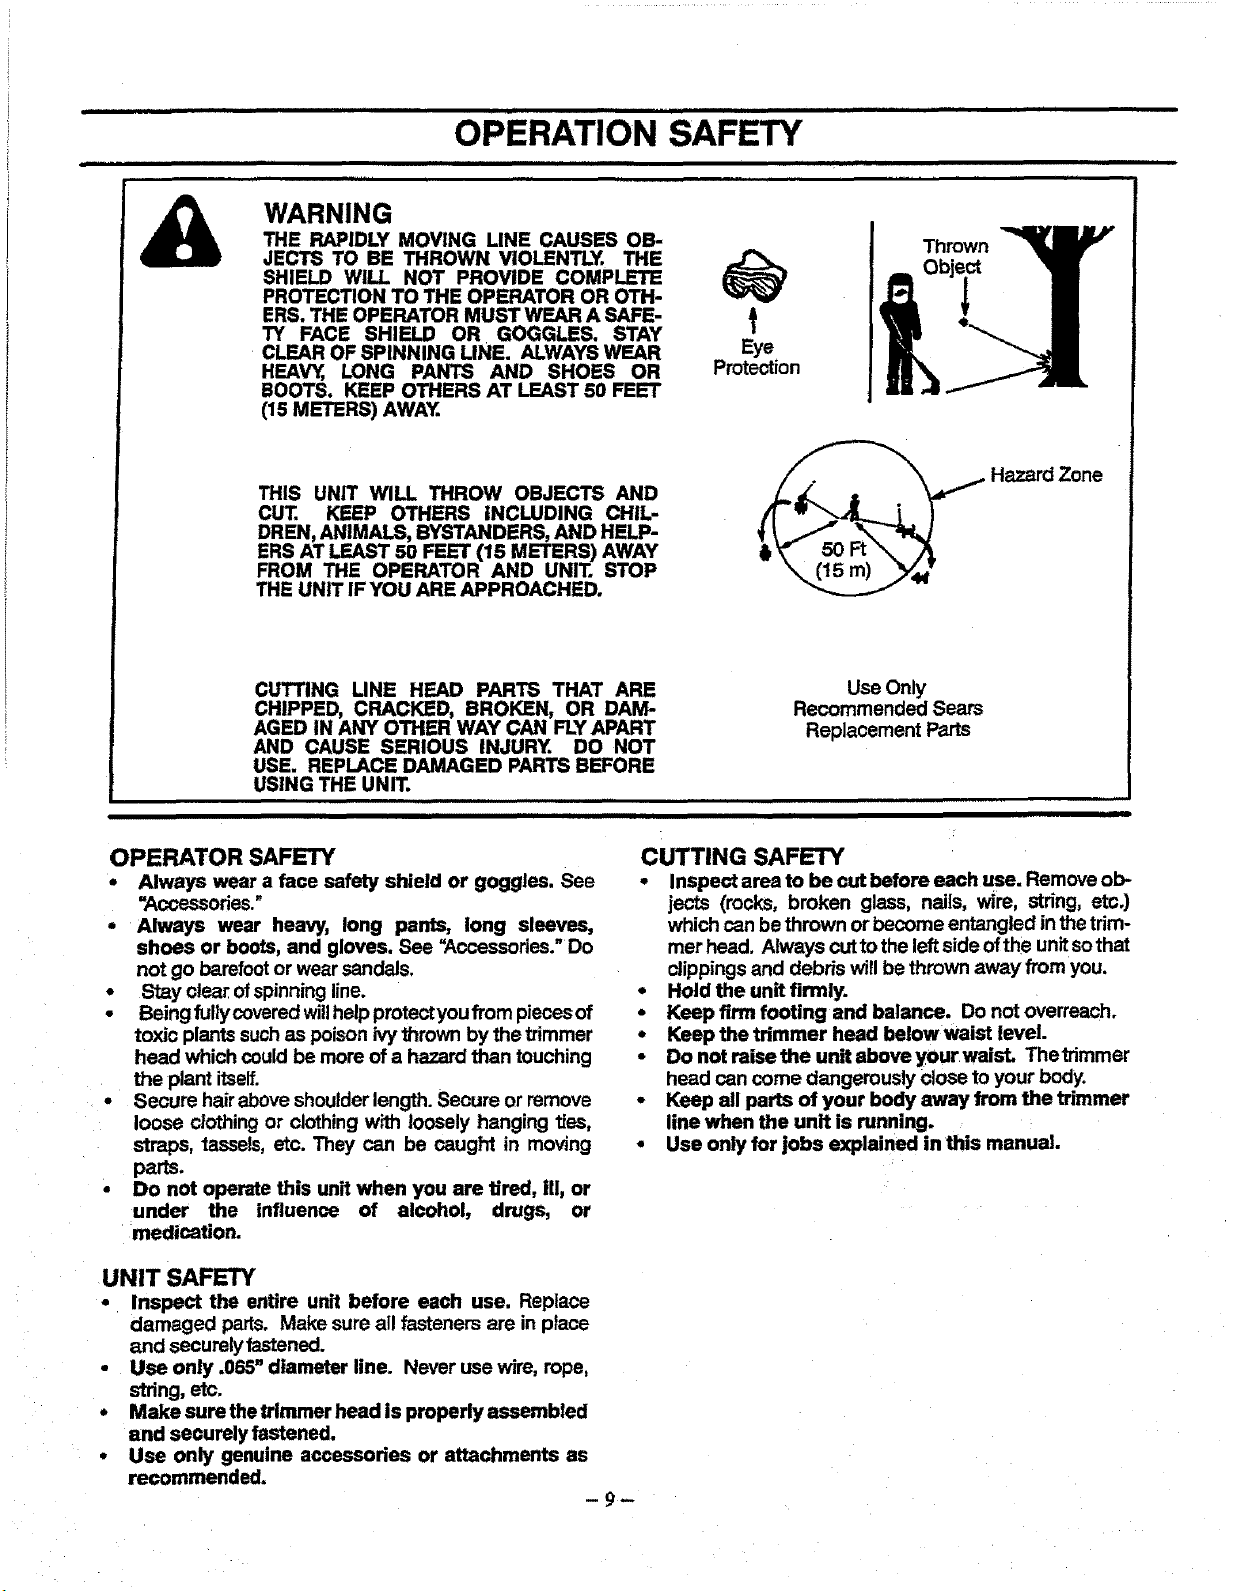
OPERATION SAFETY
,,,,,,,,, ,,,, ,,,, iii
&
WARNING
THE RAPIDLY MOVING LINE CAUSES OB-
JECTS TO BE THROWN VIOLENTLY. THE
SHIELD WILL NOT PROVIDE COMPLETE
PROTECTION TO THE OPERATOR OR OTH-
ERS. THE OPERATOR MUST WEAR A SAFE-
TY FACE SHIELD OR GOGGLES, STAY
CLEAR OF SPINNING LINE. ALWAYS WEAR
HEAV_, LONG PANTS AND SHOES OR
BOOTS. KEEP OTHERS AT LEAST 50 FEET
(15 METERS) AWAY.
THIS UNIT WILL THROW OBJECTS AND
CUT. KEEP OTHERS INCLUDING CHIL-
DREN, ANIMALS, BYSTANDERS, AND HELP-
ERS AT LEAST 50 FEET (15 METERS) AWAY
FROM THE OPERATOR AND UNIT. STOP
THE UNIT IF YOU ARE APPROACHED.
Eye
Protection
r Thrown
_ Object
t 51
_ Hazard Zone
CUTTING LINE HEAD PARTS THAT ARE
CHIPPED, CRACKED, BROKEN, OR DAM-
AGED IN ANY OTHER WAY CAN FLY APART
AND CAUSE SERIOUS INJURY. DO NOT
USE. REPLACE DAMAGED PARTS BEFORE
USING THE UNIT.
i ,Ill
iii iii iiiii ii ii iii
OPERATOR SAFETY
• Always wear a face safety shield or goggles. See
=Accessories."
• Always wear heavy, long pants, long sleeves,
shoes or boots, and gloves. See "Accessories." Do
not go barefootor wearsandals.
• Stay clear of spinningline.
• Being fullycovered willhelpprotectyoufrom piecesof
toxic plants suchas poisonivythrown by the trimmer
head which could be more of a hazard than touching
the plant itseff.
. Secure hairabove shoulderlength. Secure or remove
loose clothing or clothing with loosely hanging "des,
straps, tassels, etc. They can be caught in moving
parts.
• Do not operate this unit when you are fired, III, or
under the influence of alcohol, drugs, or
medication.
UNIT SAFETY
• Inspect the entire unit before each use. Replace
damaged parts. Make sure all fasteners are in place
and securelyfastened.
• Use only .065" diameter line. Never use wire, rope,
string, etc.
° Make sure the trimmer head is properly assembled
end securely fastened.
• Use only genuine accessories or attachments as
recommended.
Use Only
Recommended Sears
Replacement Parts
iii
CUTTING SAFETY
• Inspect area to be cut before each use. Remove ob-
jects (rocks, broken glass, nails, wire, stdng, etc.)
which can be thrown or become entangled inthetrim-
mer head. Always cutto the leftside ofthe unitsothat
clippingsand debds willbe thrown away from you.
• Hold the unit firmly.
• Keep firm footing and balance. Do not overreach.
° Keep the trimmer head below waist level.
• Do not raiee the unit above your waist. Thetdmmer
head can come dangerously close to your body.
• Keep all parts of your body away from the trimmer
line when the unit is running.
• Use only for jobs explained in this mnnuaL
= i = =,= = =
OPERATION
= ,=,,,,,,=i =,,::::::::::::::::::::::::::i i i
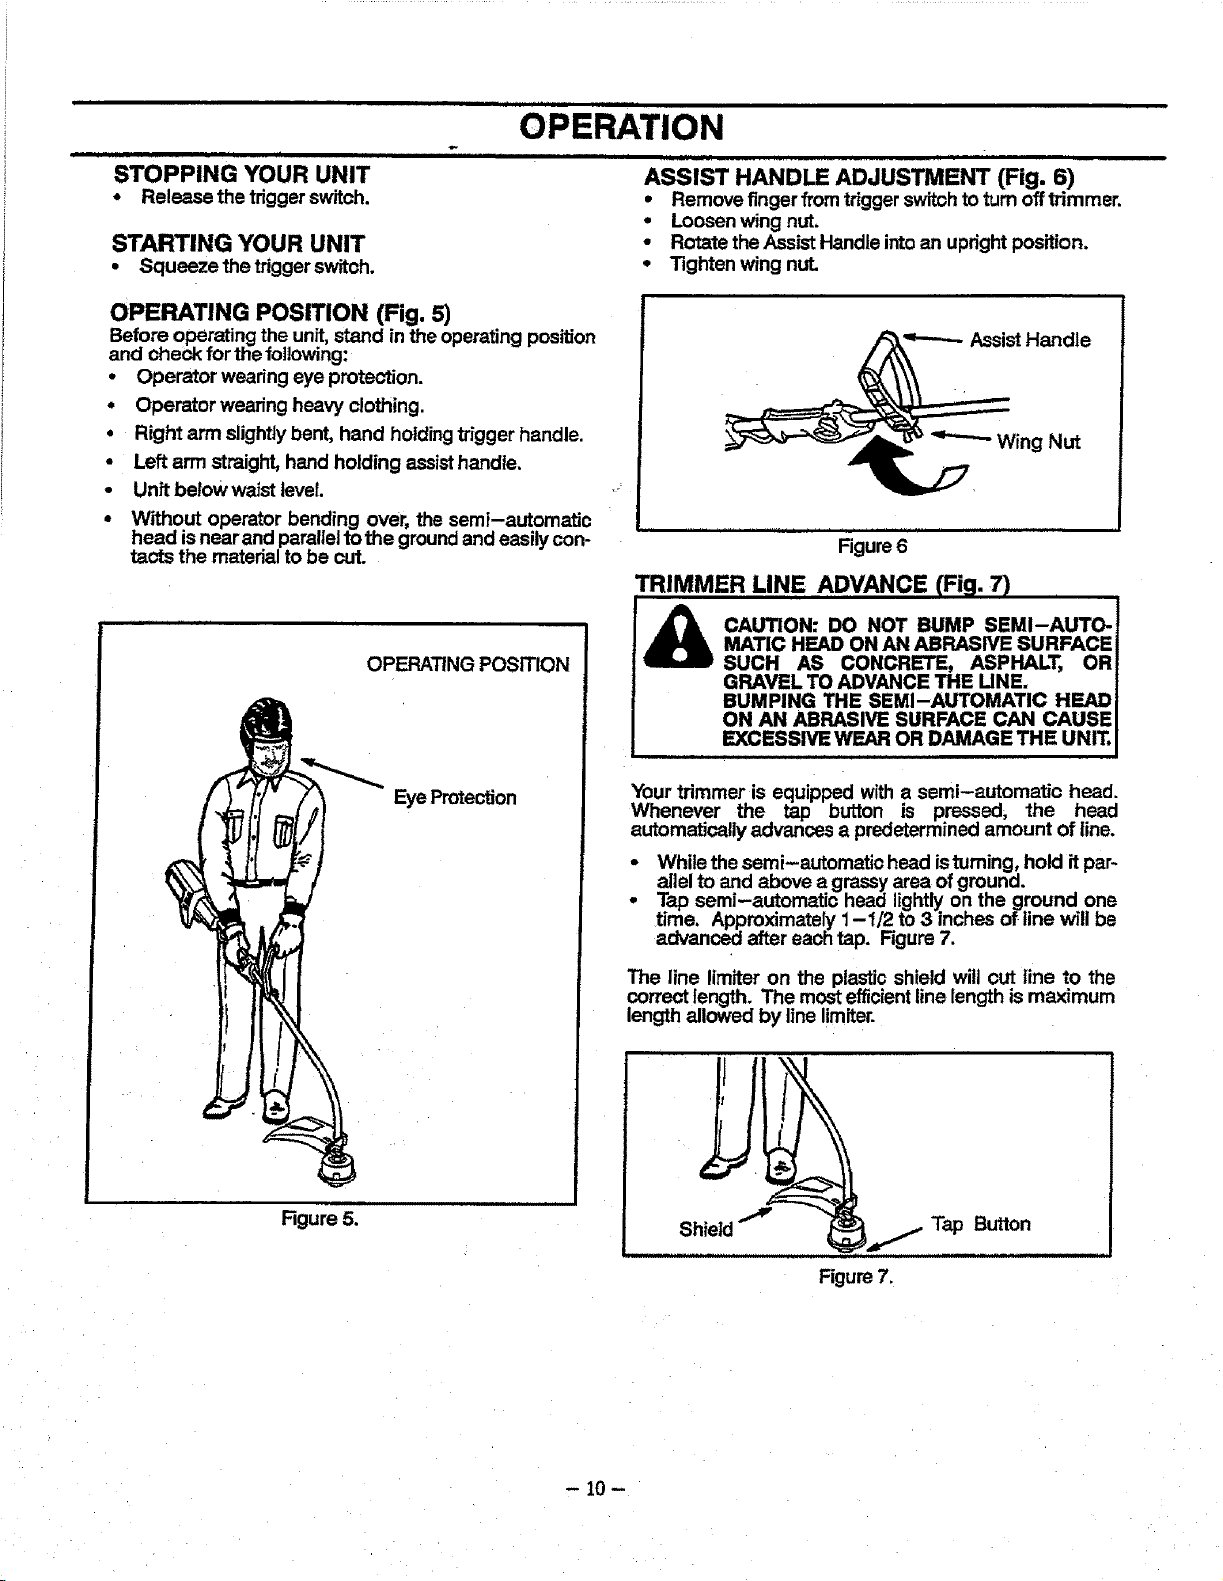
STOPPING YOUR UNIT ASSIST HANDLE ADJUSTMENT (Fig. 6)
* Release the triggerswitch. • Remove finger fromtriggerswitchto turnofftrimmer.
• Loosen wing nut.
• Rotate theAssistHandle intoan upright position.
• Tighten wing nut.
STARTING YOUR UNIT
• Squeeze the triggerswitch.
OPERATING POSITION (Fig. 5)
Before operating the unit, stand in the operating position
and check for the following:
• Operator weadng eye protection.
• Operator wearing heavy clothing.
• Right arm slightlybent, hand holdingtrigger handle.
• Left arm straight, hand holding assisthandle.
• Unft belowwaist level.
• Without operator bending over, the semi-automatic
head isnear and parallelto the groundand easily con-
tacts the rnatedal to be cut.
OPERATING POSITION
Eye Protection
Figure 5.
AssistHandle
Wing Nut
Figure6
TRIMMER LINE ADVANCE (Fig. 7)
_ AUTION: DO NOT BUMP SEMI-AUTO-
MATIC HEAD ON AN ABRASIVE SURFACE
SUCH AS CONCRETE, ASPHALT, OR
GRAVEL TO ADVANCE THE UNE.
BUMPING THE SEMI-AUTOMATIC HEAD
ON AN ABRASIVE SURFACE CAN CAUSE
EXCESSIVE WEAR OR DAMAGE THE UNIT.
Your trimmer is equipped with a semi-automatic head.
Whenever the tap button is pressed, the head
automatically advances a predetermined amount of line.
While thesemi-automatic head istuming, hold itpar-
allel to and above a grassy area of ground.
Tap semi-automatic head lightlyon the ground one
time. Approximately 1-1/2 to 3 inchesof line will be
advanced after each tap. Rgure 7.
The line limiter on the plasticshield will cut line to the
correct length. The most efficientline length is maximum
length allowed by linelimiter.
Figure7.
Tap Button
- 10 -
i, i i, i IIH,IH I, H
OPERATION
i i ,m i i ii H i,i, H ,ill ,,,
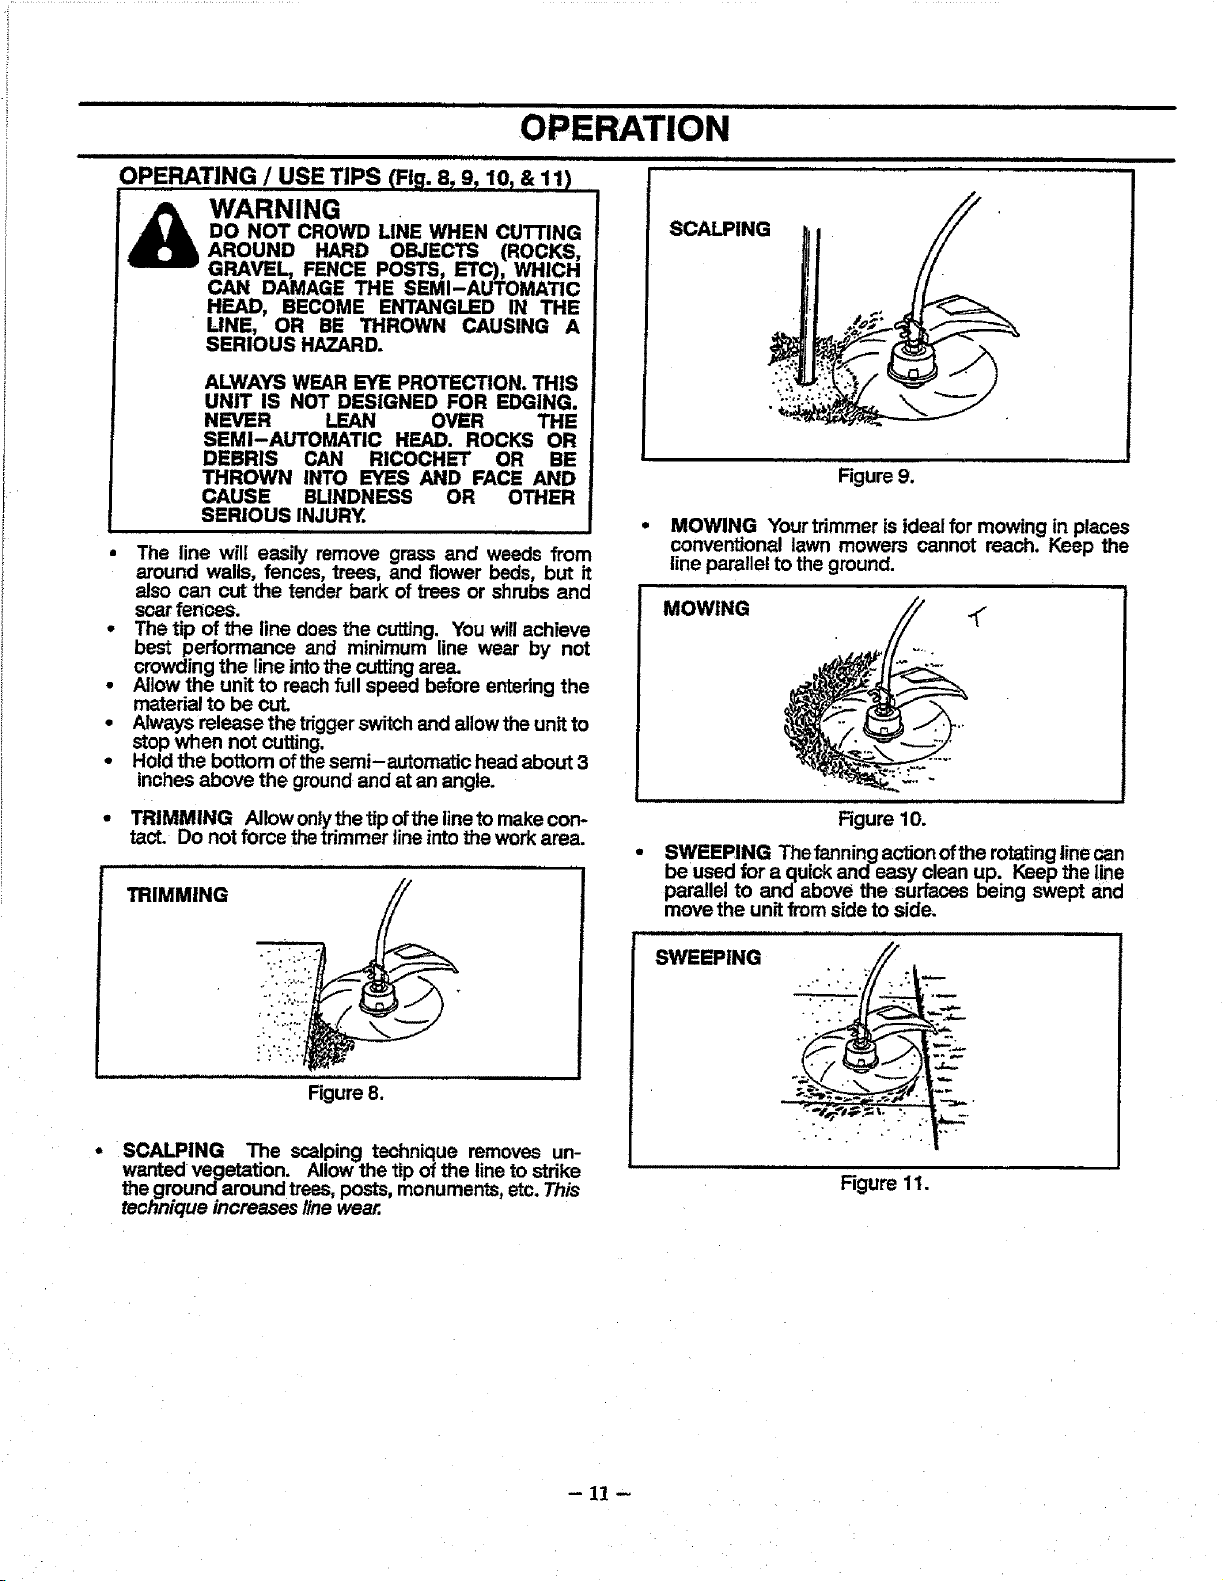
OPERATING / USE TIPS (Fig. 8_ 9_ 10_ & 11)
WARNING
DO NOT CROWD LINE WHEN CUTTING
AROUND HARD OBJECTS (ROCKS,
GRAVEL, FENCE POSTS, ETC), WHICH
CAN DAMAGE THE SEMI-AUTOMATIC
HEAD, BECOME ENTANGLED IN THE
LINE, OR BE THROWN CAUSING A
SERIOUS HAZARD.
ALWAYS WEAR EYE PROTECTION. THIS
UNIT IS NOT DESIGNED FOR EDGING.
NEVER LEAN OVER THE
SEMI-AUTOMATIC HEAD. ROCKS OR
DEBRIS CAN RICOCHET OR BE
THROWN INTO EYES AND FACE AND
CAUSE BLINDNESS OR OTHER
SERIOUS INJURY.
• The line wilt easily remove grass and weeds from
around wafts, fences, trees, and flower beds, but it
also can cut the tender bark of trees or shrubs and
scarfences.
i he tip of the line does the cutting. You willachieve
best performance and minimum line wear by not
crowding the lineintothe cutting area.
Allow the unitto reach fullspeed before enteringthe
material to be cut.
• Alwaysrelease the triggerswitchand allowtheunit to
stopwhen not cutting.
• Hold the bottom ofthesemi-automatic head about 3
inches above the groundand at an angle.
TRIMMING Allow onlythetip ofthe lineto make con-
tact. Do not force thetrimmer lineinto the work area.
TRIMMING
,ll i ,
Figure 8.
• SCALPING The scalping technique removes un-
wanted vegetation. Allow the tip of the lineto strike
the ground around trees,posts, monuments, etc. This
technique increases line wear.
SCALPING
Figure9.
MOWING Yourtrimmer is ideal for mowing in places
conventional lawn mowers cannot reach. Keep the
line parallel to the ground.
MOWING
i i
Figure 10.
SWEEPING The fanning action ofthe rotating line can
be used for a quick and easy clean up. Keep the line
parallel to and above the surfaces being swept and
movethe unit from side to side.
SWEEPING _.__5._
Figure 11.
- 11 --
=
CUSTOMER RESPONSIBILITIES
MAINTENANCE SCHEDULE
Fill in da_esas you complete regularservice.
ii
Check for damaged or worn parts.
Check for loose fasteners and parts.
,[i ,,,Him llJ I
Clean unit and labels
Before
Use
X
X
After
Use
X
ill ii illl
i ¸ i
Service Dates
ill ii ii
GENERAL RECOMMENDATIONS
The warranty on this unitdoes not cover itemsthat have
been subjected to operator abuse or negligence. To
receive full value from the warranty, the operator must
maintain unit as instructed inthis manual.
Some adjustments will need to be made periodically to
properly maintain your unit.
Alladjustments in the "Service and Adjustments_section
of this manual should be checked at least once each
season.
Followthe maintenance schedule inthis manual.
_b ARNINGHAVE CUTTING LINE HEAD PARTS THAT
ARE CRACKED, CHIPPED, OR DAMAGED
IN ANY OTHER WAY REPLACED BEFORE
USING THE UNIT,
BEFORE EACH USE
CHECK FOR DAMAGED/WORN PARTS
• Semi-Automatic Head - replace semi-automatic
head parts that are bent warped, cracked, or dam-
aged in any way.
CHECK FOR LOOSE FASTENERS!PARTS
• Semi-Automatic Head
• AssistHandle Wing Nut
• Shield Wing Nut
AFTER EACH USE
CLEAN UNIT AND LABELS
• Clean the unit using a damp clothwith a mild deter-
gent.
• Wipe offthe unitw_tha clean dry cloth.
Keep air vents freefrom debris at all times.
- 12-
i ,i ii i ,,,IHIII iiiiiiiii ii • i i ,11,,,111 Ul
• SERVICE AND ADJUSTMENTS
TAL i iiiiiiiii HHII,,,,HH,,,I, I
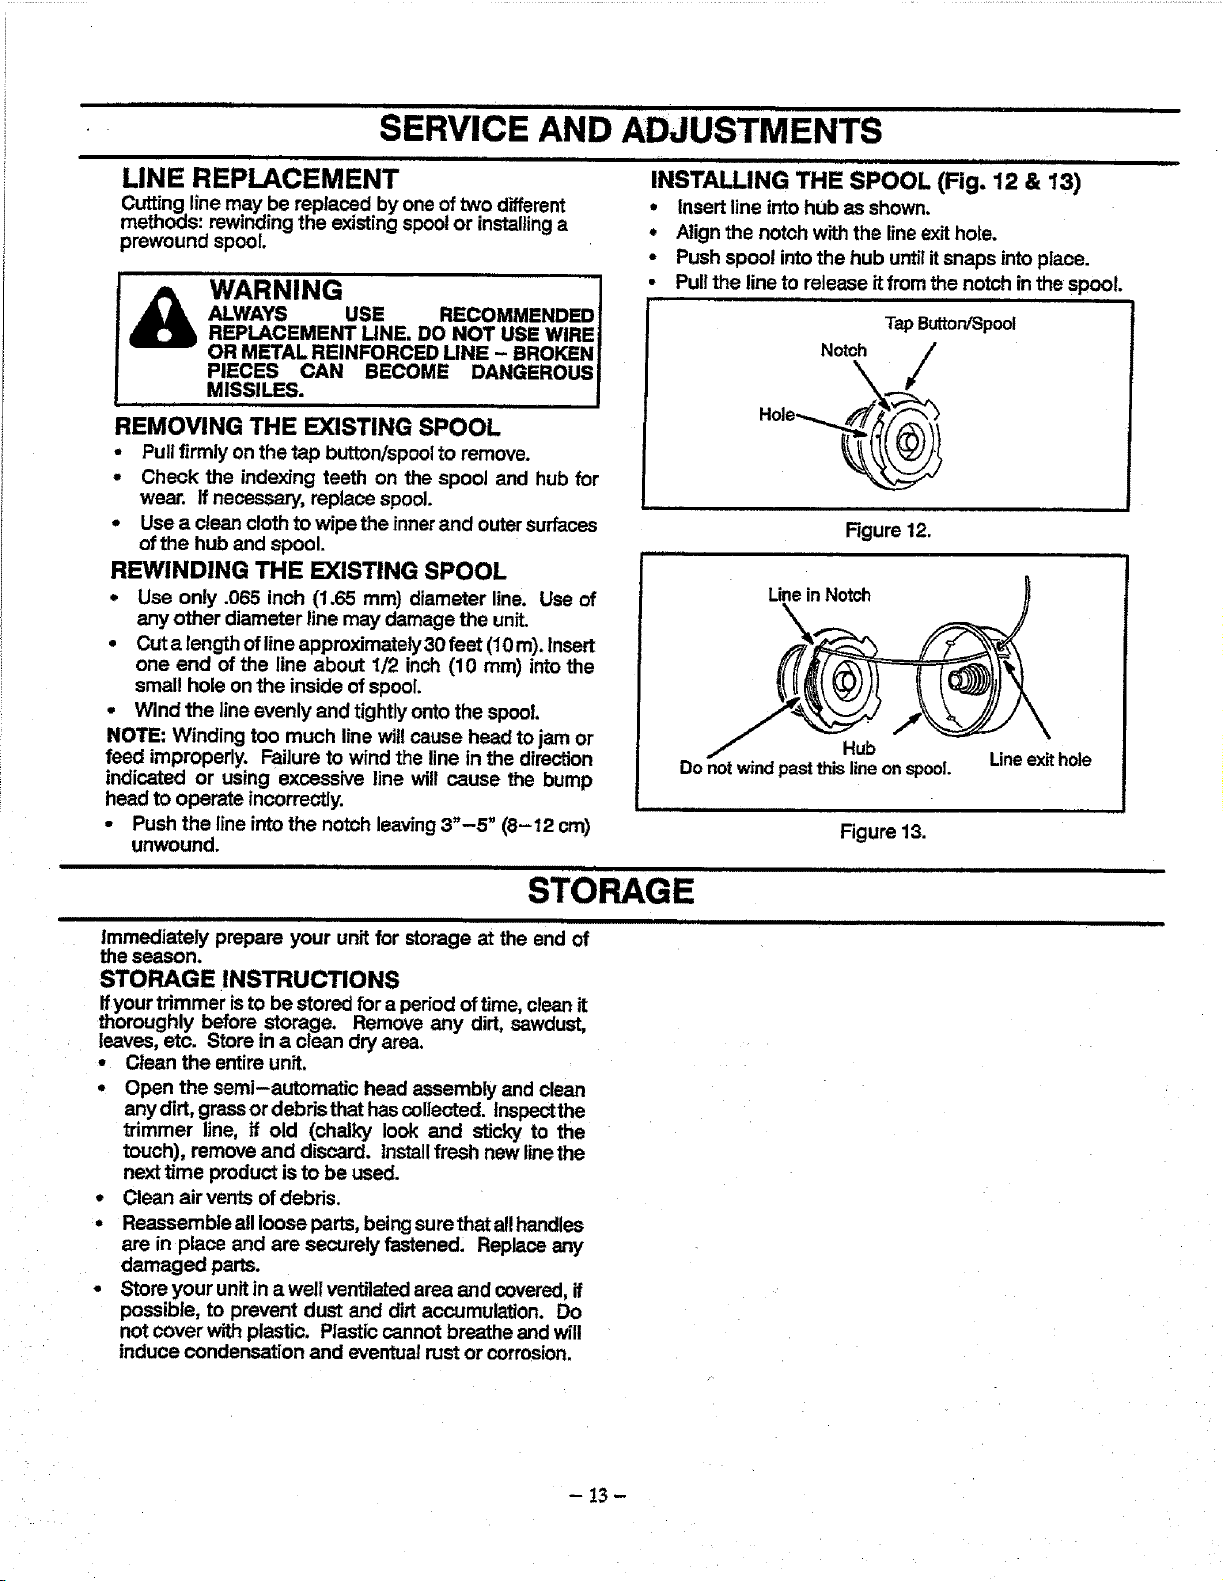
INS LING THE SPOOL (Fig. 12 & 13)
* Insert line into hub as shown.
* Alignthe notch with the lineexithole.
- Push spool intothe hub untilitsnaps intoplace.
• Pullthe line to release itfrom the notch inthe spool.
LINE REPLACEMENT
Cutting linemay be replaced by one of two different
methods: rewindingthe existing spoolor installinga
prewound spool.
WARNING I
ALWAYS USE RECOMMENDED I
REPLACEMENT LINE. DO NOT USE WIRE J
OR METAL REINFORCED LINE - BROKEN l
PIECES CAN BECOME DANGEROUS I
MISSILES. J
REMOVING THE EXISTING SPOOL
- Pullfirmly on the tap button/spoolto remove.
- Check the indexing teeth on the spool and hub for
wear. Ifnecessary, replace spool.
o Use a clean cloth to wipe the inner and outersurfaces
ofthe hub and spool.
REWINDING THE EXISTING SPOOL
• Use only .065 inch (1.65 ram) diameter line. Use of
any other diameter line may damage the unit.
• Cut a length of lineapproximately30 feet (10 m). Insert
one end of the line about 1/2 inch (10 ram) into the
small hole on the inside of spool.
• Wind the line evenly and tightlyonto the spoof.
NOTE: Winding too much line witl cause head to jam or
feed improperly. Failure to wind the line in the direction
indicated or using excessive line will cause the bump
head to operate incorrectly.
• Push the line into the notch leaving3"-5" (8-12 cm)
unwound.
STORAGE
ii
Immediately prepare your unit for storage at the end of
theseason.
STORAGE INSTRUCTIONS
Ifyour trimmer isto be stored for a period oftime, clean it
thoroughly before storage. Remove any dirt, sawdust,
leaves, etc. Store in a clean dry area.
• Clean the entire unit.
° Open the semi-automatic head assembly and clean
any dirt, grassor debristhat hascollected, tnspectthe
trimmer fine, ff old (chalky look and sticky to the
touch), remove and discard. Installfresh new linethe
next time product isto be used.
° Clean air vents ofdebris.
° Reassemble all loose parts,being surethatall handles
are in place and are securely fastened. Replace any
damaged parts.
° Store your unitin a well ventilated area and covered, if
possible, to prevent dust and dirtaccumulation. Do
not cover with plastic. Plastic cannot breathe and will
induce condensation and eventualrust or corrosion.
TapButtorJSpool
Notch /
Figure 12.
H
LineinNotch
Hub
Donotwindpastthislineonspool.
Lineexit hole
Figure 13.
i i L I I
- t3 -
..............................................................TROUBLESHOOTING POINTS
,,,,,,,, ,,,,,,,,,
TROUBLESHOOTING CHART
SYMPTOM CAUSE L_ ....
Semi-automatic
head stops under a
load or does not
turnwhen switch is
pressed.
, ,i.,
Linedoes not
advance or breaks
whilecutting.
.111111111 i
Linewelds
ontospool.
._e releases
continuously.
Une usage is
excessive.
HI" '11I'l'l I1'11"'11
Une pulis back
intohead.
1. Crowding trimmer lineagainst matedai
being cut.
2. Electricalfailure.
3. Thrown circuit breaker.
4. Debris wrapped at semi-automatic head.
5 None ofthe above.
1. Line improperly routed in semi-automatic
head.
2. Line improperly wound onto spool.
3. Linesize incorrect.
4. Too littlelineoutside semi-automatic
head.
5. Dirtaccumulated on cover.
i i w,
1. Linesize incorrect.
2. Incorrectspool.
3. Crowding line against material being cut.
1. Line improperly routed in semi-automatic
head.
2. Damaged spool.
3. Damaged hub.
1. Line improperly muted in semi-automatic
head.
2. Line size incorrect.
3. Crowding line against material being cut.
4. Spool teeth worn or damaged.
L im ill i i i
1. Toolittlellne outside semi-automatic
head.
2. Linesize incorrect.
i i i
ffsituationsoccur which are notcovered in thismanu&
REMEDY .......
1. Back trimmerhead away from grassbeing
cut; allowtip oflineto do the cutting.
2. Contact your SearsService Center/Dept.
3. Check breakerbox:
4. Remove debds.
5. Contact yourSears Service Center/Dept.
iiiiiiii ii i iiiii
1. Remove cover. Check line routing.
2. Rewind linetightlyand evenly.
3. Use onlycorrect diameter line. (See
"Specification Chart")
4, Remove cover. Pull4" of line to outside,
5. Clean cover.
1. Use onlycorrect diameter line. (See
uSpecification Chart")
2. Use properspool.
3. Cut withtip of !!ne,fully extended.
1. Remove cover. Check linerouting,
2. Replace spool
3. Contact yourSears Service Center/Dept.
1. Remove cover. Check linerouting.
2. Use only correct diameter line. (See
=Specification Chart')
3. Cut with tip ofline.
4. Replace spool.
1. Remove cover. Pull4" of lineto outside.
2. Use onlycorrect diameter line. (See
=Specification Chart")
use care and good judgement
ffyou need assistance, contact yourSearsServioe Center/Depar_ent or the
CUSTOMER ASSISTANCEHOTLINE at 1-800-235-5878.
- 14 -

SF_A/ $
Operator's
Manual
Model No.
35e.799o8o(18")
IF YOU NEED REPAIR
SERVICE OR PARTS:
REPAIR SERVICE
1-800-4-REPAIR
(1-800-473-7247)
ORDERING PARTS
1-800-FON-PART
1-800-366-7278
ASSISTANCE
1-800-235-5878
i HOURS (CST)
Mon.- Sat. 7 a.m. - 7 p.m.
Sun, 10 a.m. - 7 p.m,
CRRFTSMRN
6.0 AMP MOTOR
16 Inch Semi-Automatic Head
ELECTRIC WEEDWACKER _
Each ElectricWeedwacker ® hasitsown model number.The model
number for your unitwill be found on a decal attached tothe unit.
All parts listed herein may be ordered through Seam, Roebuck and
Co. Service Centers and most Retail Stores.
WHEN ORDERING REPAIR PARTS, ALWAYSGIVE THE FOLLOW-
ING INFORMATION
• PRODUCT - "ELECTRIC WEEDWACKER"
• MODEL NUMBER - 358.799080
• PARTNUMBER
• PARTDESCRIPTION
Your Sears merchandise has added value when you considerthat
Sears hasservice unitsnationwide staffedwithSearstrainedtechni-
cians.., professionaltechnicians specificallytrained on Searsprod-
ucts, having the parts, tools and the equipment to insurethat we
meet our pledge to you, we service what we sell.
Ifyou need assistance, contact your SEARS Service Center/Depart-
ment or the CUSTOMER ASSISTANCE HOTLINE 1-800-235-5878
Sears, Roebuck and Co., Hoffman Estates, IL 60179 USA
PRINTED IN U.S.A.