Installaon, Care and Use ofYour Lynx
Beverage Tower Kits
Lynx Beverage Kits
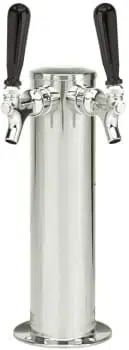
Model L24TWS Single Tower and L24TWD DoubleTower
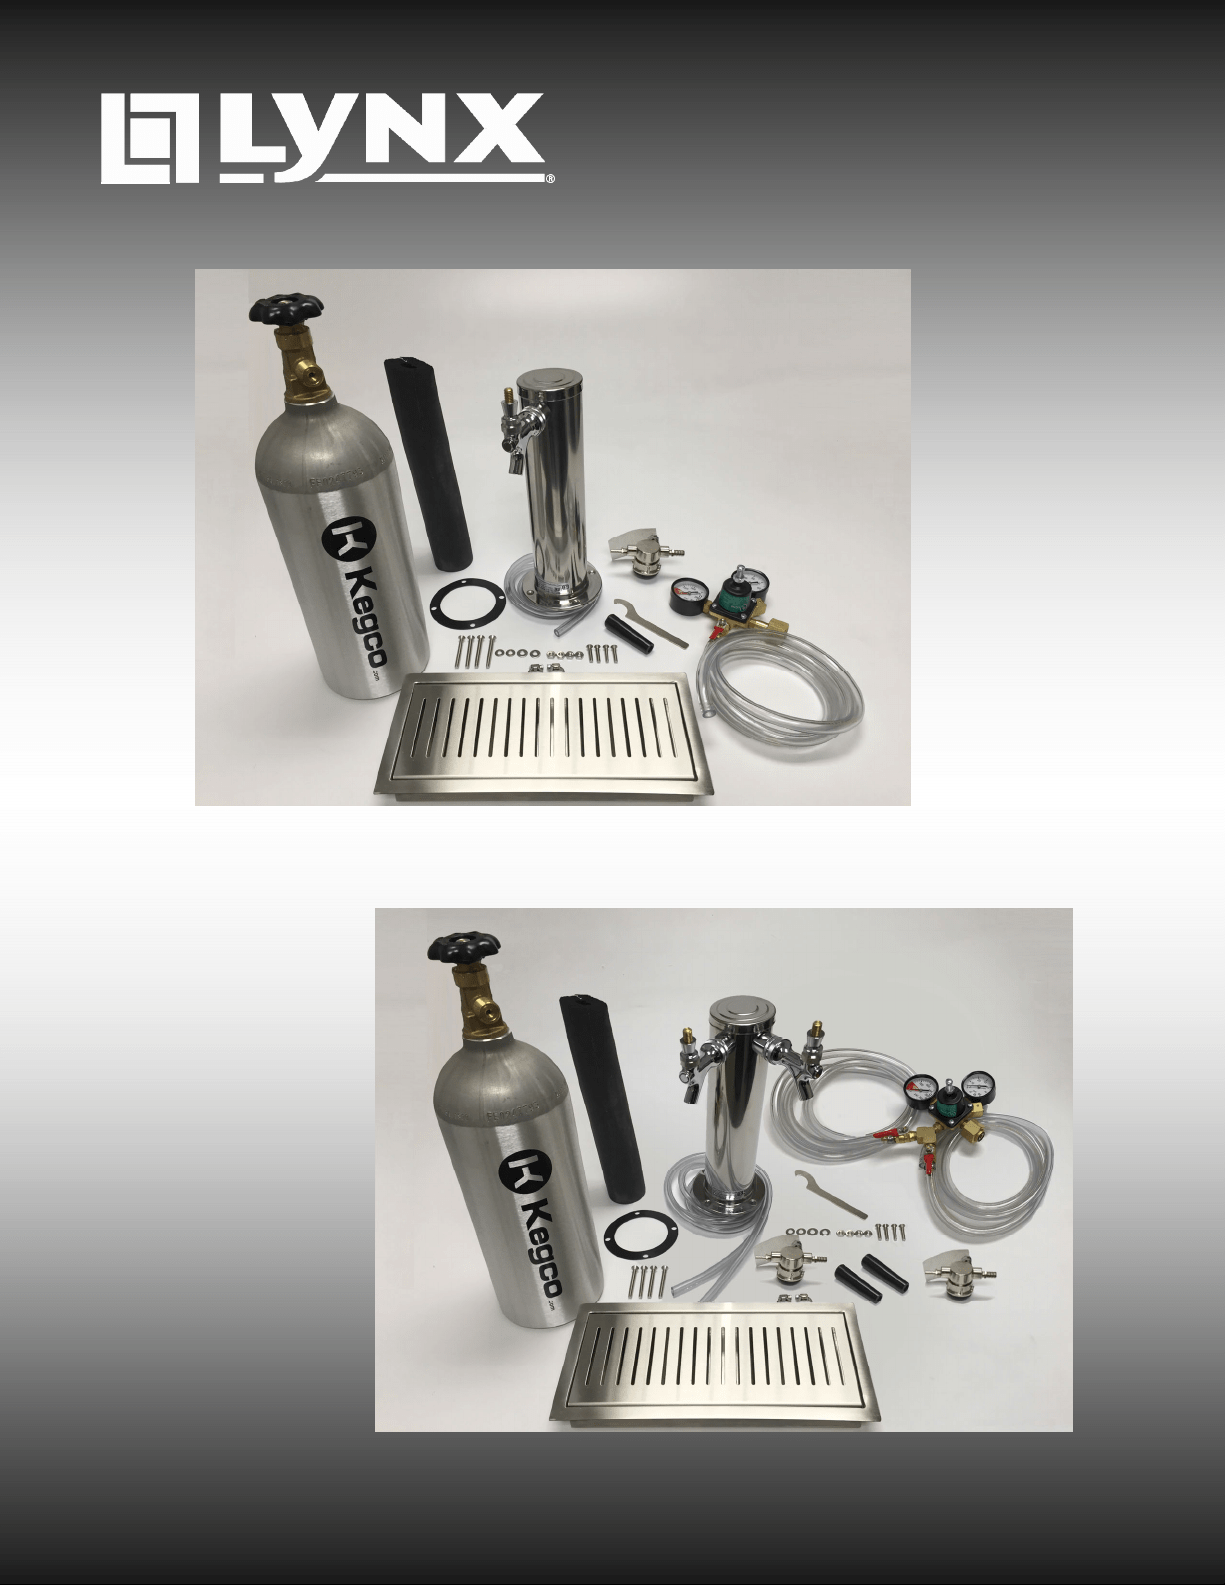
Beverage Tower Kit Components
L24TWS
L24TWD
Introducon:
Your Lynx Beverage Kits comes with all of the components necessary to install a keg tap and tray to an outdoor
islandortotheLynxmodelL24BForLM24BFoutdoorrefrigerators.
TheLynxmodelL24BFandLM24BFoutdoorrefrigeratorshavebeendesignedspecificallytoworkwiththeBeverage
Kits.
TheL24BFrefrigeratorcavityisdesignedtoaccommodatetwo1/6kegs,orallsinglestandardkegsizes excepta½
kegorlarger(notprovided),theCO
2
tankandrequiredconnecons.
The LM24BF refrigerator cavity is designed to accommodate all single standard keg sizes (not provided), the CO
2
tankandrequiredconnecons.
Pleasenoteinsomecasesyoumayneedtousesealinggumtosealaroundtheopeningatthetopoftherefrigerator.
Warning:
CO
2
cylinderscontainhighpressuregaswhichcanbehazardousifnothandledproperly.MakesureyouREADand
UNDERSTANDtheproceduresregardingtheCO
2
cylindersBEFOREinstallaon.
Safety First:
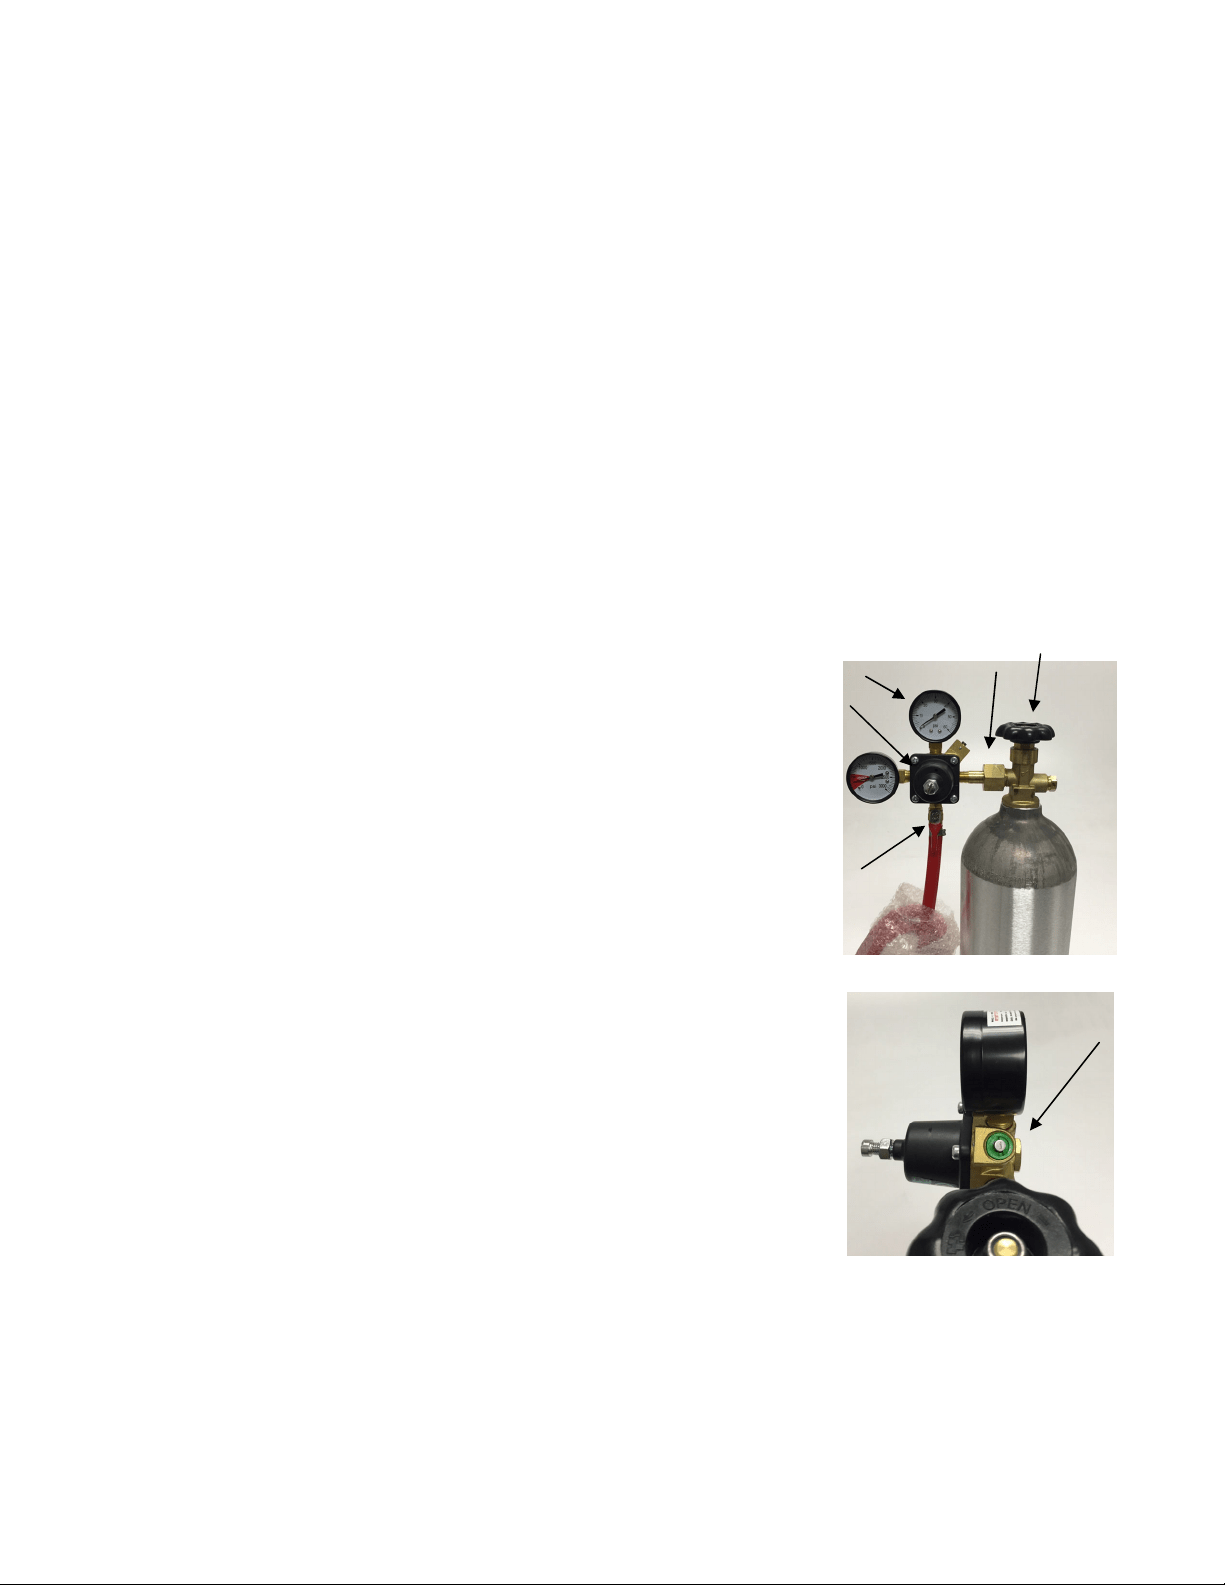
HowtoinstallaCO
2
RegulatororreplaceanEmptyCO
2
Cylinder
1. Toshutoffgaspressuretodispenseralwaysclosecylinder valve“A”
2. Shutoffoutletfing“C”ifregulatorisequippedwithone.
3. Backout(counterclockwis e) regulator adjusng screw“B”asfar out as it will
go.(Theregulatorisnowintheoff
posion).
4. Removeregulatorfromemptycylinderat“E”.
5. Removedustcapfromnewcylinderat“E”.Openandclosevalve“A”quicklyto
blowdustfromoutlet.
6. Withcylindervalve“A”inclosedposion,re‐aachregulatortocylindera“E”.
Useaplasc
orfiberCO
2
washertocoupleregulatortocylinder.
7. Openvalve“A”alltheway.(Thisisimportantbecausethiscylinder valveseals
intwoplaces).
8. Makecertainoutletisclosedat“C”.
9. Turn regulator adjusng screw “B” in (clockwise) unl required pressure is
reached“D”.
10. Openoutlet
valve“C”.
A CO
2
cylinder contains extremely high pressure regardless of size, and therefore
shouldbehandledwithcare!
C
B
D
E
A
CO
2
Safety
Device
CO
2
Regulator
Co2cylinderscontainhighpressuregaswhichcanbehazardousifnothandledproperly.Makesureyou
READandUNDERSTANDthefollowingproceduresforCO
2
cylindersBEFOREinstallaon.
1. ALWAYSconnecttheCO
2
cylindertoaregulator.Failuretodosocouldresultinanexplosionwithpossibledeathorinjury
whenthecylindervalveisopened.
2. NEVERconnecttheCO
2
cylinderdirectlytotheproductcontainer.Doingsowillresultinanexplosioncausingpossibledeath
orinjury.
3. ALWAYSfollowcorrectprocedureswhencylindersarechanged.
4. ALWAYSsecurethecylinderinanuprightposionwithachain.
5. NEVERdroporthrowaCO
2
cylinder.
6. ALWAYSkeepaCO
2
cylinderawayfromheat.Storeextracylindersinacoolplace(preferably70°F).Securelyfastenwitha
chaininanuprightposionwhenstoring.NEVERplacecylindersindirectsunlightorwheretemperaturecouldriseabove
130°F.
7. ALWAYSvenlateandleavetheareaimmediatelyifCO
2
gasleakagehasoccurred.NEVERenteraclosedareawhereleakage
mayhaveoccurredwithoutmakingcertainithasbeenvenlated.
8. ALWAYSchecktheD.O.T.testdateonthecylinderneckbeforeinstallaon.Ifoverfive(5)years.donouse,returncylinderto
gassupplier.
9.
NEVERconnectaproductcontainerunlesstherearetwo(2)safeesinthepressuresystem:
(a)oneatorontheCO
2
regulator
(b)oneatorontheproductcouplerorinthepressuregasline.
10.CO
2
Regulatorsaredelicateinstrumentsandshouldbecheckedconstantlyforcreeping,sluggishness,damagedgauges,orany
unusualbehavior.Ifanyofthesesymptomsoccurdisconnueuseimmediatelyandreturnregulatortosupplierormanufacturer.
WARNING
CO2 GAS CAN BE DANGEROUS
CAUTION: Failuretoconnecttheregulatorbyproperlyfollowingtheseinstruconsmay
resultinleaksexplosions,asphyxiaonandcauseseriouspersonalinjuryordeath.

Beverage Tower Kit Components
A. SingleorDoubleKegTower
B. LowProfileKegCoupler(DSystemforNorthAmericanBeers)
C. Regulator,DualGaugeCO
2
D. CO
2
GasCylinder
E. SpillTray
F. InsulangSleeve
G. Gasket
H. TapHandle
I. FaucetWrench
(Kitcontainsallhosesandfings,sleeveconnectors,bushingandinsulatorsleeves)
A
B
C
D
E
F
G
I
H
PartNo.
Descripon Qty PartNo. Descripon Qty
1
32413
33845
TowerAssemblySingleTap,or
TowerAssemblyDoubleTap
19 32404
CO
2
Cylinder,5Pounds,Alum
1
2
80411
BeverageCenterDeckAssembly
110
33029
33847
Regulator,SingleTap,CO2,or
RegulatorDoubleTap,CO2
1
3
32414
Tubing,7/8OD,x12
111 32403
KegCoupler,Domesc(StyleD)
1
4
32399
Insulaon,TowerArmaflex
112 33027
Hose,CO
2
toCoupler
1
5
32412
TowerBaseLevelingFeet
413 33028
HoseClamps,CO
2
2
6
33010
Base,SpillTrayInsert
114 33022
Hose,CouplertoTower
1
7
33011
Grate,SpillTrayInsert
115 33023
HoseClamps,Tower
1
8
33031
FaucetWrench
1
L24TWS Tower Kit ‐ Mounng your kit directly to an island.
1. Determinethelocaonoftherefrigeratorintheislandinstallaon.Itshouldbeposionednearlyflushtothefacesurfaceof
theislandforeasyaccessandalignmentwiththetower.Fortherefrigeratorcavityheightanddepth,pleaserefertothe
cutoutforyourindividual
model(L24BF/LM24BF).
2. Posiontherefrigeratorintheislandopeningattheexactposion.Openthedoorandmakeareferencemarkonthe
undersideofthecountertopatthefaceoftheopenrefrigerator.Thissurfacerepresentsthebestguideforlocangthehole
inthe
countertop.Eachrefrigeratordooriscustomsetatthefactoryforthebestseal.Thefaceofthecloseddoorvaries
slightlyfromunittounit.DONOTusethecloseddoorsurfaceasareference.
3. Removetherefrigeratorfromthecabinetwhiledrillingtheholesformounng.Using
thediagramattheboomofthispage
asaguide,markthecenterofa2”diameterholeanddrillthroughthecountertopforthebeverageline.
4. Locateanddrillthe4mounngholestosecurethekegtower.*Four#12
screwshavebeenprovided.A
¼”diameterholeissufficientforthesebolts.If
anothersecurementmethod(i.e.leadanchors)areused,followthe
manufacturersrecommendaons.
5. Aflushmountdriptrayisprovidedasanopon.Refertothediagrambelow
andcuttheopeningrequiredifthisoponis
tobeinstalled.
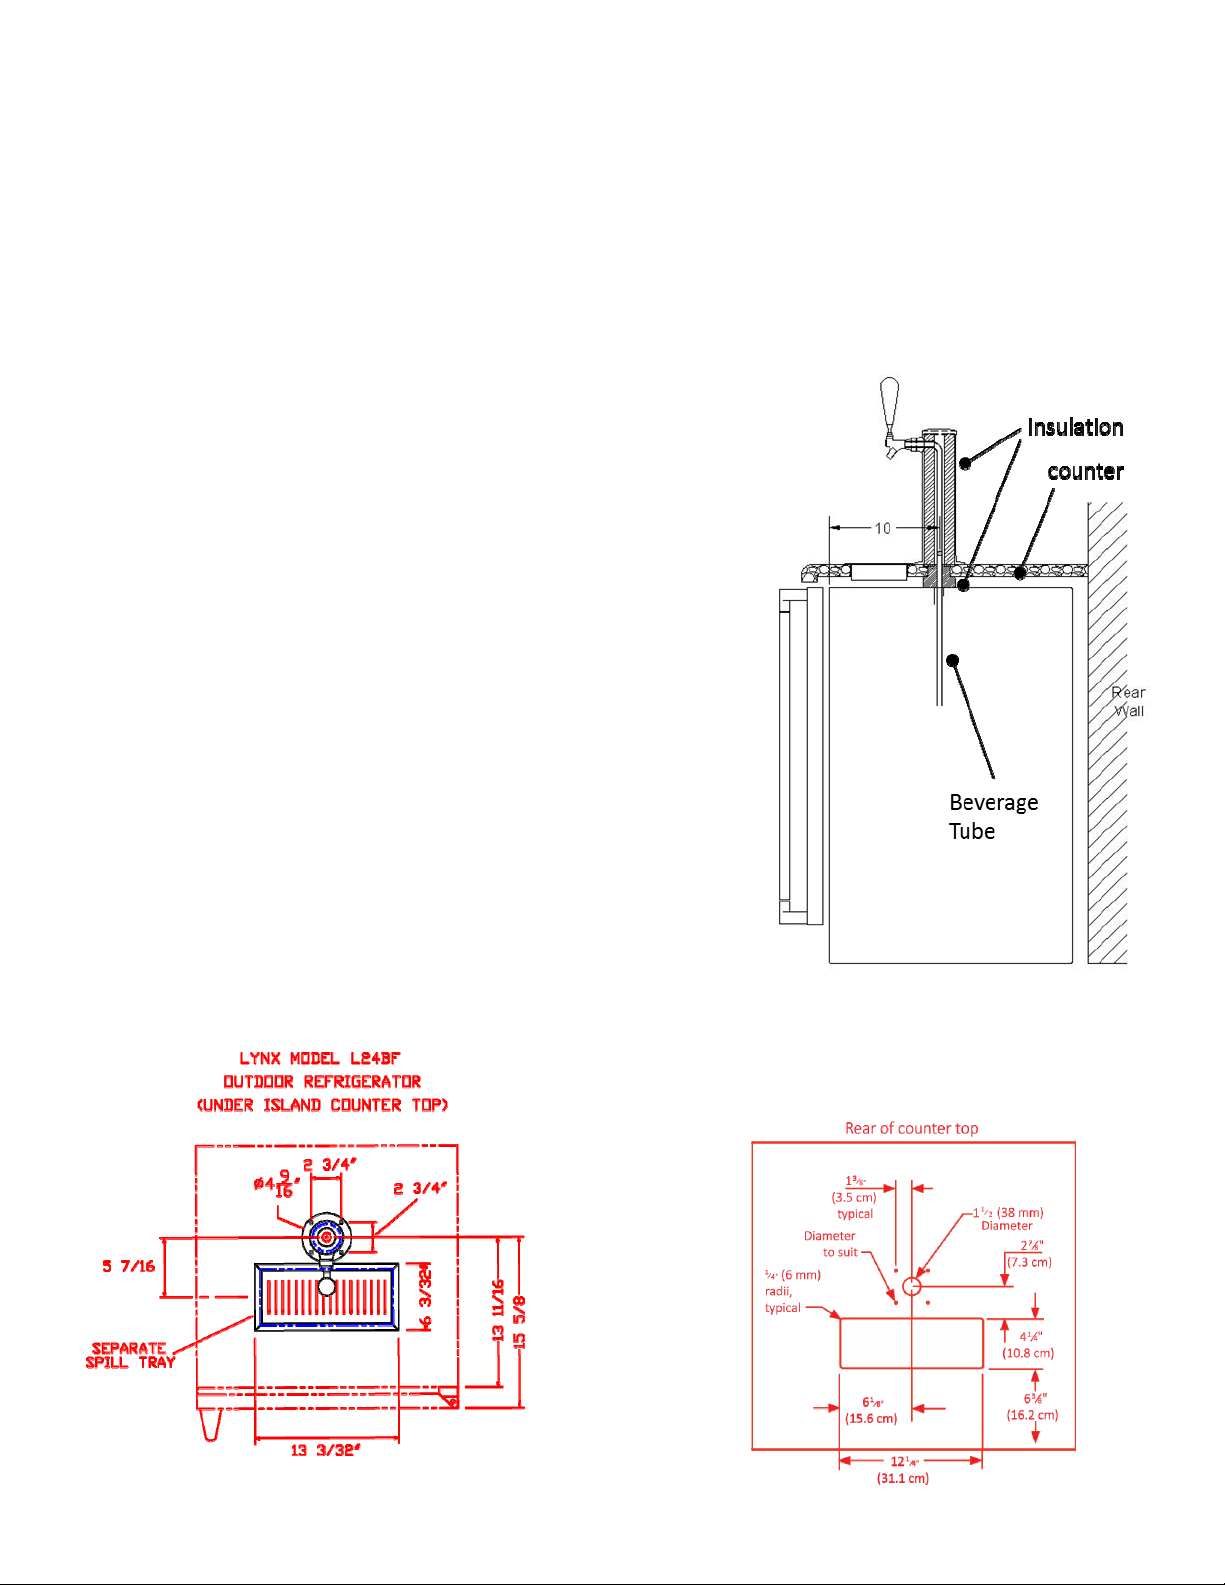
6. Preparethetowerassemblyforinstallaon.A14inchlengthofinsulang
foamhasbeenprovidedtoinstallinsidethetowerbase.Theinstallaonof
thisfoamiscricaltotheproperoperaonofthebeveragetowerkit.Failure
toproperlyinsulate
thetowerbasecouldcauseexcessivefoamandincorrect
temperaturecontrol.Insertthefoamaroundthebeveragelineandinsertit
intothebeveragetowerwithabout2”protrudingfromthebase.
7. Placethelargeflatrubbergask etovertheholeinthecountertop.
8. Feedthebeveragetube
intotheholeinthecountertop
9. Alignthegasketandsecurethetowertothecountertopwiththe4screws
provided.Fromtheundersideinsertthewashersandnuts.Tightenthe
screwscompletely.
10. Removetheblackplascplugfromthetopcenteroftherefrigerator.Keepin
asafeplaceforfutureuse.
11. Bringthebeveragetubeouttothefrontoftheopeningdesignedforthe
refrigerator.Begintoslidetherefrigeratorintotheopening.Beforethe
refrigeratorishalfwayintoposion,feedthebeveragetubethroughthehole
inthetop.Alternatelyslidethe
refrigeratorbackanddrawthetubeintothe
refrigeratortoremoveanykinksinthehose.Whenfinished,thehoseshould
alignliketheillustraonontheright.
12. Addthetapandhandlewiththewrenchprovided.
13. Insertthespilltrayintothecountertop.
*Beforedrillingmounngholes,
posionthetoweronthecounter
toptoensurepropertap
alignment.Holesmaybedrilled
outto½”toprovideaddional
adjustment.
LYNXMODELLM24BF
OUTDOORREFRIGERATOR
(UNDERISLANDCOUNTERTOP)
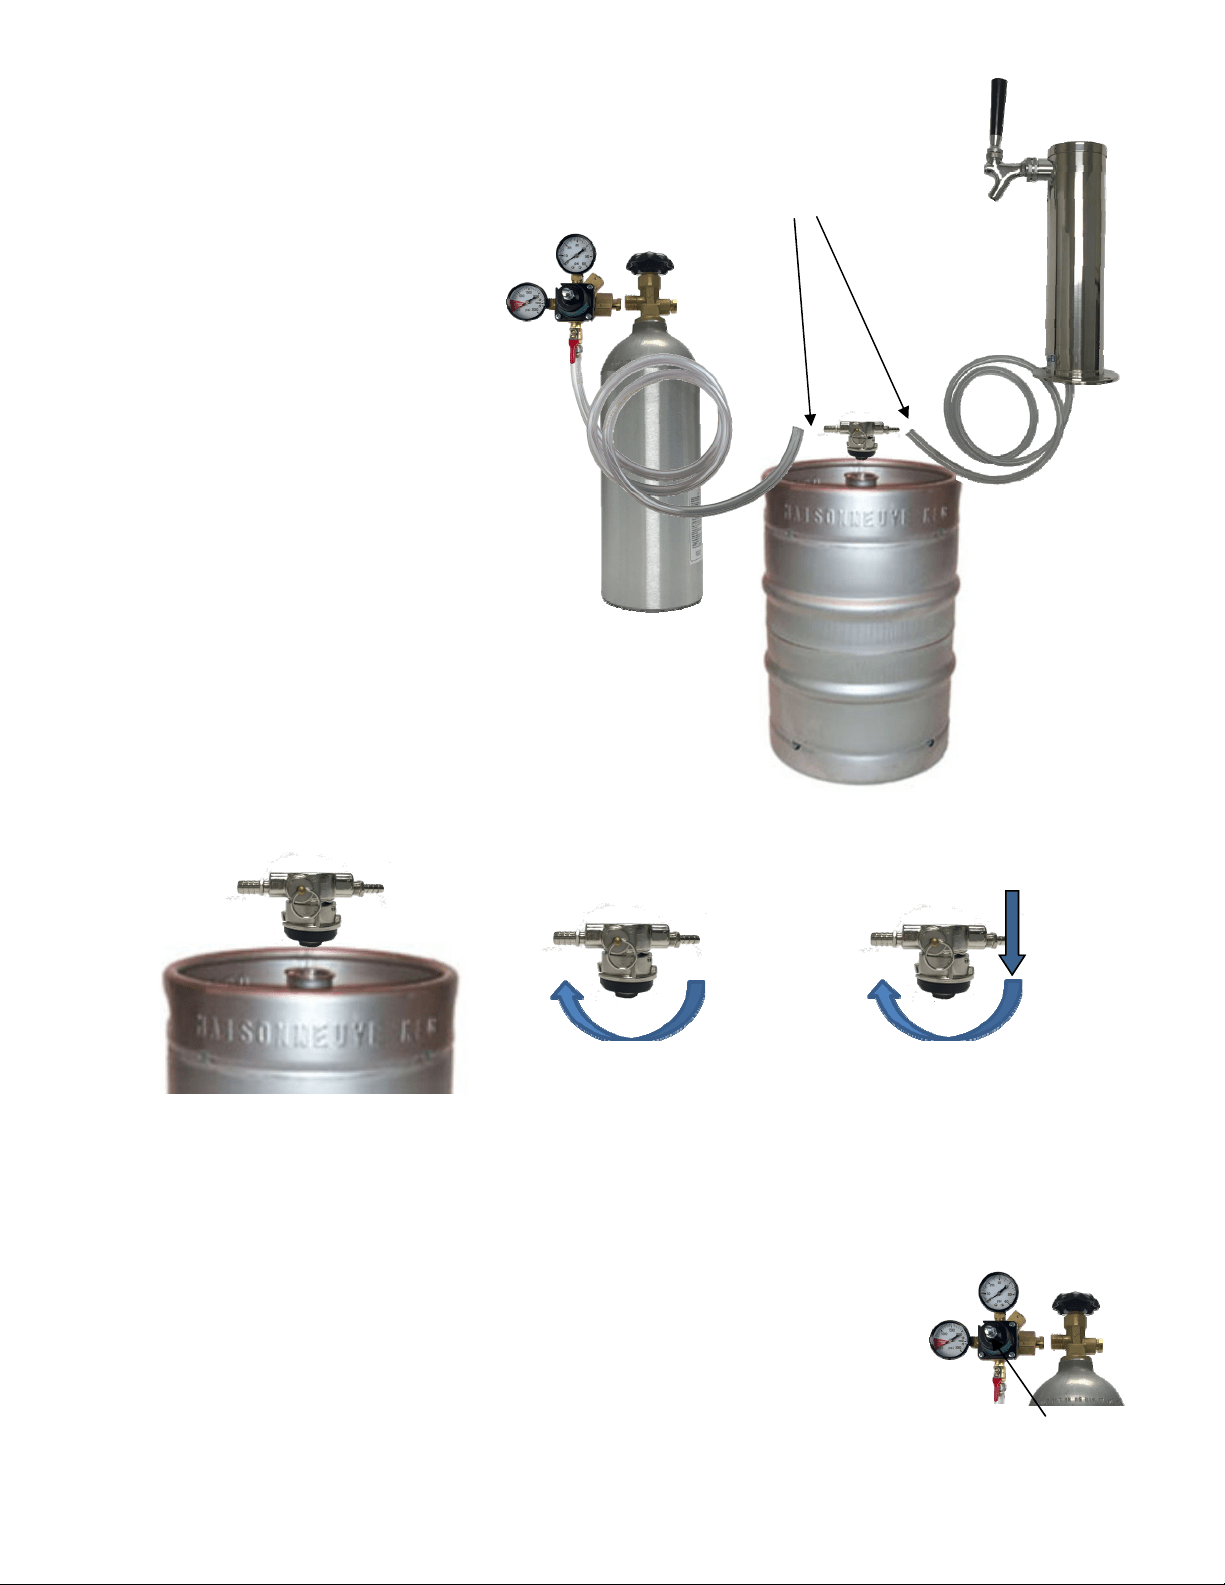
Connecng the Keg to the Beverage Tower.
1. Aach theclear hose from the beverage tower to
the barbed fingwith the hose clamp provided.
Insert the rubber washer provided into the
fing.
2. An elbow is included to provide addional
space above thekeg coupler. Secure the
elbow to the top outlet
of the keg coupler
withawasherbetween.Aachtheclearhose
fing, with washer, to the elbow. Use a
wrenchtoghtentheconnecons.
3. Thecoloredhoselineisinstalledontotheside
barbedfingofthekegcouplerandthe
barbedfingbelow
theCO
2
regulator.Press
thetubeontothefingsandsecurewiththe
twohoseclamps.Refertotheinstrucons
providedwiththeCO
2
tankbeforeaaching
thetanktotheregulator.
4. With the regulator and tank in the OFF posion,
aachtheregulatorsecurelytotheCO
2
tankwitha
wrench.
The Kit is Ready to Aach a Keg.
TheBeverageTowerKitisprovidedwithastandardDStylecoupler.
Thisstyleisappropriateformostdomescbeers.Addionalstylesare
availablefromrestaurantsupplyorbeveragecompanies.
BallValve
1. InserttheCO
2canisterintherearleshelfinsidetherefrigerator.
2. Placethebeerkeginsidetherefrigeratorandarrangeallhosessuchthatnonearepinched.
3. SlowlyopenthemainvalveontheCO
2canister.Checkforleaks.
4. Slowlyopentheregulatorballvalvetopressurizethekeg.
5. Togglethetaphandleonthetowertodispenseasmallamountofliquid.Thiswill“chargethe
system”.
6. AdjusttheT‐handleontheregulatortobetween8and14PSI.The
pressuresengwillvaryfor
beertypeandkegstyle.Refertothetroubleshoongguideandexperimentaontosetthepressure
accordingly.
7. Allowthesystemtorestforseveralhoursbeforeuse.Temperatureandpressurearecricalto
sasfactoryresults.
Operang the Beverage Tap:
Usesuppliedhose
clampshere
1.Alignluglocksoncouplerwithlug
housingintopofkeg;insertcoupler.
2.Turncoupler¼turn
clockwise;thecoupleris
nowsecuredtokeg.
3.Pushdownonthecoupler
andgiveanother¼turn,to
openbeerandCO
2
portsinkeg.
Thekegisnowtapped.
CO
2
TankLevel
MainValve
8‐14PSI
T‐Handle

When not in use:
WerecommendthattheCO
2canisterbeshutoffandtheballvalveclosediftheBeveragekitwillnotbeusedforanextended
periodofme.KeeptheCO
2tankinsidetherefrigeratorandallconneconsintact.
TheCO
2tankshouldbereplacedorrefilledwhentheCO2Tanklevelindicatorfallsintotheredindicatorzone(below300PSI).
CheckwithyourbeverageproviderforlocalsourcesofCO
2.
Storage:
ForseasonalstorageoftheBeverageKitwerecommendthattheCO
2tankbestoreduprightinacoolplace.TheTowerBasemay
bedisconnectedfromthekegcouplerandremovedfromtheislandinstallaon.Tohelppreventheatlossreplacetheblackplasc
capintothetopoftherefrigerator(seepage2step1).Thecap
maybeinstalledintothetoporfromtheinsideifmoreconvenient.
Sealallhosesandconnectorsinanairghtplascbagtoavoiddirtandinsectsduringstorage.Werecommendthatyouobtaina
cleaningkitandpurgethefluidlinesseasonally.Thesemaybeobtained
fromyourbeveragesupplieroronline.
Wild Beer Descripon
Beer,whendrawn,isallfoam,ortoomuchfoamand
notenoughliquidbeer.
Causes
Beerdrawnimproperly
Creepingregulator
Appliedpressureissettoohigh
Hotspotsinline
Useofnon‐insulatedbeerline
Beerrunsaretoolongforpropercooling
Tappedintoawarmkeg(Shouldbe34°‐38°
Coolermalfunconing
Kinks,dents,twistsorother
obstruconsinline
Faucets
inbad,dirtyorworncondion
Flat Beer Descripon
Foamyheaddisappearsquickly;
beerlacksusualzesulbreweryfreshflavor
Causes
Dirtyglasses(notbeerclean)
Sluggishregulator
Appliedpressureissettoolow
CO
2
isturnedoffatnight
Contaminatedairsource
(associatedwithcompressedair)
Moistureinairsystem
Beertoocold
Loosetaporventconnecons
Cloudy Beer Descripon
Whenbeeringlassappearshazy,notclear
Causes
Frozenornearlyfrozenbeer
Oldbeer
Beerthathasbeenunrefrigeratedfor
longperiodsofme
Dirtyglass
Dirtyfaucet
Unrefrigeratedfoodsplacedontopofcoldkeg
Contaminatedairsource
False Head Descripon
Largesoap‐likebubbles,headdissolvesveryquickly
Causes
Appliedpressurerequireddoesnotcorrespondto
beertemperature
Smallbeerlineintoalargefaucetshank
Beerlineswarmerthanbeerinkeg
Dryglasses
Improperpour
Unpalatable BeerDescripon
Off‐Taste
Causes
Dirtyoroldbeerlines
Dirtyfaucet
Contaminatedairsource,orunfiltered
Unsanitarybarcondions
LynxProfessionalGrills,Inc.
62201Hwy82West,Greenwood,MS38930
Phone:(888)289‐5969www.lynxgrills.com P/N33913Rev.E8/17

As product improvement is an ongoing process at Lynx, we reserve the right to change specifications and design without notice.
Part #33913, Rev. E 8/17
Thebestoutdoorkitchenproductscomefrom:
LynxGrills,Inc.
Formoreinformaon,pleasecall:
1‐888‐289‐5969 orvisitwww.lynxgrills.com
Emailusatservice@lynxgrills.com